

Page 1
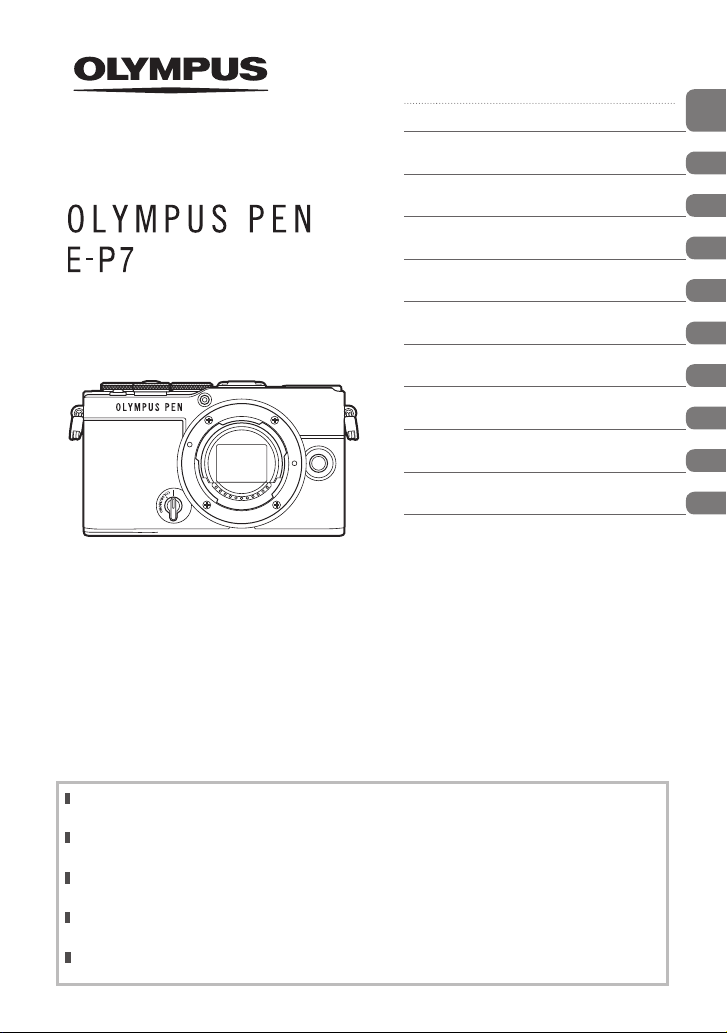
Table of Contents
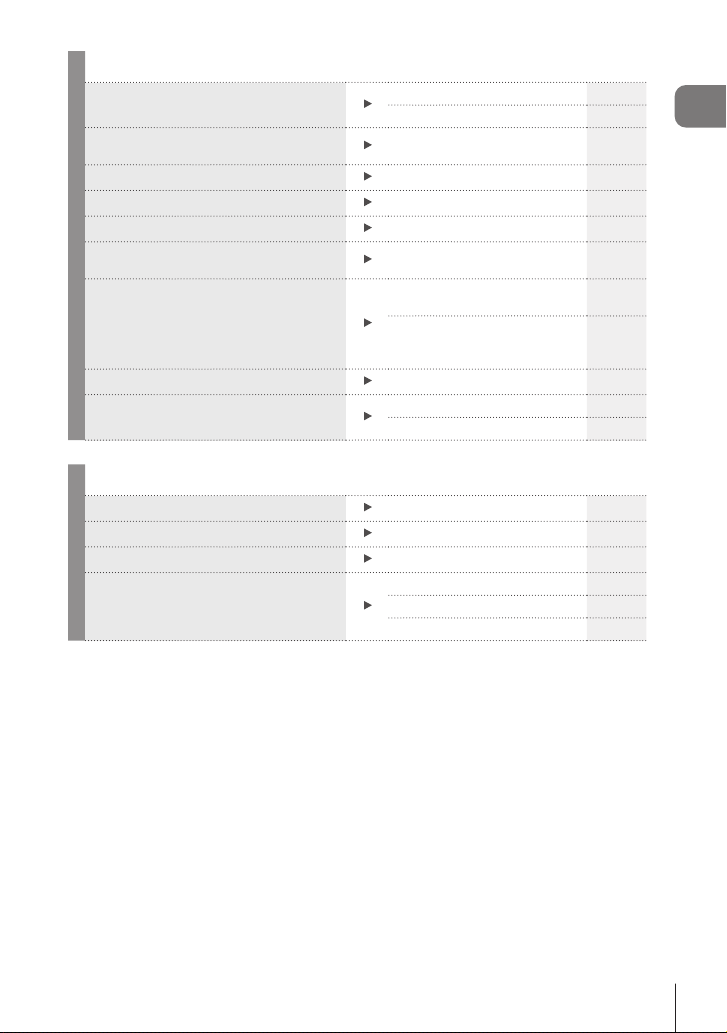
Quick task index
DIGITAL CAMERA
Instruction Manual
1. Preparation
2. Shooting
3. Playback
4. Menu functions
Connecting the camera to a
5.
smartphone
Connecting the camera to a
6.
computer
7. Cautions
8. Information
9. SAFETY PRECAUTIONS
Model No.: IM024
Thank you for purchasing our digital camer a. Before you star t to use you r new camera, please
read these instr uctio ns carefully to enjoy optimum performance and a longer servic e life.
Be sure you have read and understood the c ontents of “9. SA FETY PRECAUTIONS”, before using
this pro duct. Keep these instructions available for future reference.
We recommend that you take test shots to get accustomed to your camera before taking impor tant
photographs.
The screen and camera illustrat ions shown in this manual were produced during the deve lopment
stages and may dif fer from the actual product.
If ther e are additions and/or modifications of functi ons due to f irmware update for the camera, th e
contents will differ. For the latest information, please visit o ur website.
Page 2
Before You Begin
Read and Follow Safety Precautions
Before You Begin
To prevent incorrect operation resulting in re or other damage to property or harm to
yourself or to others, read “9. SAFETY PRECAUTIONS” (P. 191) in its entirety before
using the camera.
While using the camera, consult this manual to ensure safe and correct operation. Be
sure to keep the manual in a safe place once it is read.
Our company will not be held liable for violations of local regulations arising from use of
this product outside the country or region of purchase.
Wireless LAN and Bluetooth
The camera features built-in wireless LAN and Bluetooth®. Use of these features
outside the country or region of purchase may violate local wireless regulations; be
sure to check with local authorities before use. Our company will not be held liable for
the user’s failure to comply with local regulations.
Disable wireless LAN and Bluetooth
g “Disabling wireless LAN/Bluetooth®” (P. 163)
User Registration
Visit our website for information on registering your products.
Installing PC Software/Apps
Olympus Workspace
This computer application is used to download and view photos and movies recorded
with the camera. It can also be used to update the camera rmware. The software can be
downloaded from the website below. Be prepared to provide the camera serial number when
downloading the software.
https://support.olympus-imaging.com/owdownload/
OLYMPUS Image Share (OI.Share)
You can load images in the camera to a smartphone.
You can also operate the camera remotely and take pictures from a smartphone.
https://app.olympus-imaging.com/oishare/
®
®
in areas where their use is prohibited.
2
EN
Page 3
Product Manuals
In addition to the “Instruction Manual”, we also oer a “Camera Function Guide”.
Consult these manuals when using the product.
Table of Contents
Quick task index
1. Preparation
DIGITAL CAMERA
2. Shooting
3. Playback
4. Menu functions
Instruction Manual
5.
6.
7. Cautions
8. Information
9. SAFETY PRECAUTIONS
Thank you for purchasing our digital camera . Before you start to use y our new camera, pleas e
read these instructions carefully to enjoy optimum performance and a longer service life.
Be sure you have read and understood the contents of “ 9. SAFETY PRECAUT IONS”, before using
this product. Keep these instructions available for future reference.
We recommend that you take test shots to get accusto med to your camera befo re taking import ant
photographs.
The screen and camera illustrations show n in this manual were pro duced during the devel opment
stages and may differ from the actual product.
If there are additions and/or modificatio ns of functions due to fi rmware update for the c amera, the
contents will differ. For the latest information, please vis it our website.
Instruction Manual (this pdf)
A how-to guide to the camera and its features. The Instruction
Manual can be downloaded from our website or directly using the
Connecting the camera to a
smartphone
Connecting the camera to a
computer
“OLYMPUS Image Share” (OI.Share) smartphone app.
Model No.: IM024
Camera Function Guide
A function and setting guide that helps you use camera features to the full. It has been
optimized for display on mobile devices and can be viewed using OI.Share.
https://cs.olympus-imaging.jp/jp/support/cs/webmanual/index.html
Product Manuals
Indications used in this manual
The following symbols are used throughout this manual.
FGHI
g
Symbols designating the buttons (respectively the up, down, left, and right
arrow buttons) to press on the arrow pad (P. 13).
Notes and other supplementary information.
$
Tips and other helpful information for using the camera.
%
References to other pages in this manual.
EN
3
Page 4

Table of Contents
Table of Contents
Before You Begin 2
Product Manuals 3
Quick task index 9
Names of parts 12
Preparation 14
Unpacking the box contents .....14
Attaching the Strap ....................15
Inserting and Removing the
Battery and Card ........................16
Removing the battery ...............17
Removing the card ...................17
Charging the Battery ..................18
Attaching a lens to the
camera .........................................20
Removing Lenses .......................21
Turning the camera on ...............22
Initial setup .................................23
Camera displays unreadable/
not in the selected language .....25
Shooting 26
Information displays while
shooting ......................................26
Switching the information
display ......................................28
Choosing a shooting mode and
taking photos ..............................29
Types of shooting modes..........29
Taking high angle and low angle
shots ............................................31
Shooting with touch screen
operations ...................................32
Switching Displays with
the u (Shortcut) Button ...........33
Letting the camera choose
aperture and shutter speed
(Program mode) ..........................35
Choosing aperture
(Aperture Priority mode) ............37
Choosing shutter speed
(Shutter Priority mode) ..............39
Choosing aperture and shutter
speed (Manual mode) .................41
Long Exposures (Bulb/Time) ....42
Lighten Blending (Live
Composite Photography) ..........44
Shooting enhanced images
(Prole Control) ..........................46
Shooting enhanced monochrome
pictures (Monochrome Prole
Control) .....................................46
Shooting pictures with individual
colors adjusted
(Color Prole Control) ...............51
Letting the camera choose the
settings (AUTO mode) ...............54
Shooting in scene mode
(SCN mode) ................................56
Types of scene modes..............56
Shooting in advanced photo
mode (Z mode) ........................60
AP Mode Options .....................60
[Live Composite]: Live Composite
Photography .............................61
[Live Time]: Live Time
Photography .............................62
[Multiple Exposure]: Shooting
Multiple Exposures ...................63
[HDR]: Taking Composite Photos
with HDR ..................................64
[Silent s] Mode .......................65
4
EN
Page 5

Shooting a Panorama ...............66
[Keystone Compensation] ........67
[AE Bracketing]: Varying Exposure
over a Series of Shots ..............68
[Focus Bracketing]:
Varying Focus Distance over a
Series of Shots .........................69
Using art lters (ART mode) ......70
Types of art lters .....................72
Adjusting the degree of the art
lter eect (Fine-Tuning)...........73
Using [Partial Color]..................73
Recording movies in photo
shooting modes ..........................74
Recording movies
in movie mode ............................75
Movie Mode Options.................76
Recording Slow Motion
Movies .........................................77
Silencing Camera Sounds
While Shooting Movies ..............77
Taking Photos in Self-Portrait
Mode ............................................78
Using various settings ...............80
Buttons and dials ......................80
Controlling exposure
(Exposure F) ...........................81
Selecting the AF target mode
(AF Area) ..................................81
Setting the location of the focus
(AF target position) ...................82
Face priority AF/
Eye priority AF .......................... 82
Changing ISO sensitivity
(ISO) .........................................83
Using a ash
(Flash photography) .................84
Performing the sequential/
self-timer shooting ....................86
Self-Timer Options
(c Custom Self-timer) ............87
Shooting without the vibration
caused by shutter button
operations (Anti-Shock r) ......88
The Electronic Shutter
(Silent s) ................................88
Calling shooting options ...........89
Choosing a focus mode
(AF Mode).................................92
Choosing how the camera
measures brightness
(Metering) .................................93
Adjusting color
(WB (white balance)) ................94
Making ne adjustments to white
balance (WB Compensation)....96
Reducing camera shake
(Image Stabilizer) .....................96
Setting the image aspect ..........97
Photo File and Image Size
Options
(Still image quality, KK) ......98
Frame Size, Rate, and
Compression
(Movie quality, nK) ..............99
Adjusting ash output
(Flash intensity control) ..........103
Processing options
(Picture Mode) ........................103
Adjusting overall color
(Color Creator)........................105
Making ne adjustments to
sharpness (Sharpness) ..........106
Making ne adjustments to
contrast (Contrast) ..................106
Making ne adjustments to
saturation (Saturation) ............106
Adding a lm grain eect to the
Monochrome Prole
(Film Grain Eect) ..................107
Making ne adjustments to tone
(Gradation) .............................108
Applying lter eects to
monochrome pictures
(Color Filter)............................108
Table of Contents
EN
5
Page 6
Adjusting the tone of monochrome
pictures
(Monochrome Color)...............109
Table of Contents
Adjusting i-Enhance eects
(Eect) .................................... 110
Setting the color reproduction
format (Color Space) .............. 110
Changing the brightness
of highlights and shadows
(Highlight&Shadow Control) ... 111
Assigning functions to buttons
(Button Function) .................... 11 2
Zoom frame AF/Zoom AF
(Super Spot AF) ...................... 113
Choosing an Exposure Mode
(n Mode (Movie Exposure
Modes)) .................................. 11 5
Playback 116
Information display during
playback .................................... 116
Playback image information ... 116
Switching the information
display .................................... 11 7
Viewing photographs and
movies ....................................... 118
Finding Pictures Quickly
(Index and Calendar Playback)
................................................ 119
Zooming In
(Playback Zoom) .................... 11 9
Rotating Pictures (Rotate) ...... 119
Viewing Images as a Slideshow
(L) .........................................120
Watching movies ....................121
Protecting Pictures (0) .......121
Deleting Pictures (Erase)........121
Selecting Pictures for Sharing
(Share Order) .........................122
Cancelling all share orders
(Reset share Order)................122
Selecting Multiple Pictures
(0, Erase Selected, Share
Order Selected) ......................122
Creating a print order
(DPOF) ...................................123
Removing all or selected pictures
from the print order .................124
Adding Audio to Pictures
(R) ..........................................124
Audio Playback (Play 7) ........124
Scrolling Panoramas ..............125
Using the touch screen ............126
Single-frame playback ............126
Index/Calendar playback ........126
Selecting and protecting
images ....................................127
Viewing pictures in self-portrait
mode.......................................127
Menu functions 128
Basic menu operations ............128
Using Shooting Menu 1/
Shooting Menu 2 ......................129
Returning to default settings
(Reset) ....................................129
Processing options
(Picture Mode) ........................130
Digital Zoom
(Digital Tele-converter) ...........130
Improving Focus in Dark
Surroundings
(AF Illuminator) .......................130
Choosing a Zoom Speed
(K Elec. Zoom Speed) .........131
Recording multiple exposures in a
single image
(Multiple Exposure).................131
Shooting automatically with a
xed interval
(Intrvl. Sh./Time Lapse) ..........133
Setting anti-shock/silent shooting
(Anti-Shockr/Silents) ........135
6
EN
Page 7
Wireless remote control ash
photography (# RC Mode) ....135
Using the Video Menu ..............136
Using the Playback Menu ........137
Automatically Rotating PortraitOrientation Pictures for Playback
(R) ........................................137
Retouching Pictures (Edit) ......137
Combining Pictures
(Image Overlay) ......................141
Creating Movie Stills
(In-Movie Image Capture).......141
Trimming movies
(Movie Trimming) ....................142
Removing Protection from All
Pictures (Reset Protect) .........142
Using the setup menu ..............143
Formatting the card
(Card Setup) ...........................144
Deleting all images
(Card Setup) ...........................144
Choosing a language (W) ....144
Using the custom menus .........145
a AF/MF................................145
M Button/Dial.........................145
N Disp/8/PC ......................146
O Disp/8/PC .......................146
P Exp/ISO/BULB ..................147
Q Exp/ISO/BULB ..................147
b # Custom .........................148
W K/WB/Color ....................148
X Record...............................149
c K Utility ...........................150
AEL/AFL .................................151
Manual Focus Assist
(MF Assist)..............................151
Adding information displays....152
Viewing camera images on TV
(HDMI) ....................................153
Shutter speeds when the ash
res (# X-Sync./# Slow Limit)
................................................154
Combinations of JPEG image
sizes and compression rates
(K Set) .................................154
Connecting the camera to a
smartphone 155
Pairing the Camera and
Smartphone ..............................156
Wireless Connection Standby
Setting for When the Camera Is
On ..............................................157
Wireless Settings for When the
Camera Is O ............................158
Transferring images to a
smartphone ...............................159
Automatically uploading images
while the camera is o .............160
Automatically setting a share
order for photographs .............160
Shooting remotely with a
smartphone (Live View) ...........161
Shooting remotely with a
smartphone
(Remote Shutter) ......................161
Adding position information to
images .......................................162
Resetting wireless LAN/
Bluetooth
Changing the password ...........163
Disabling wireless LAN/
Bluetooth® .................................163
®
settings ..................162
Connecting the camera to a
computer 164
Copying pictures to a computer
...................................................164
Installing the PC software .......165
Table of Contents
EN
7
Page 8
Cautions 166
Batteries ....................................166
Table of Contents
Using your USB-AC adapter
abroad .......................................166
Usable cards .............................167
Interchangeable lenses ............167
MF Clutch Lenses .....................168
Compatible Flash Units ...........169
Wireless remote control ash
photography............................170
Other external ash units ........ 171
System chart .............................172
Information 174
Cleaning and storing the camera
...................................................174
Cleaning the camera ..............174
Storage ...................................174
Cleaning and checking the image
pickup device ..........................174
Pixel Mapping - Checking the
image processing functions ....175
Shooting tips and information
...................................................176
Error codes ...............................179
Defaults .....................................181
Record mode and le size/
number of storable still pictures
...................................................186
Specications ...........................188
SAFETY PRECAUTIONS 191
SAFETY PRECAUTIONS ..........191
Index 196
8
EN
Page 9
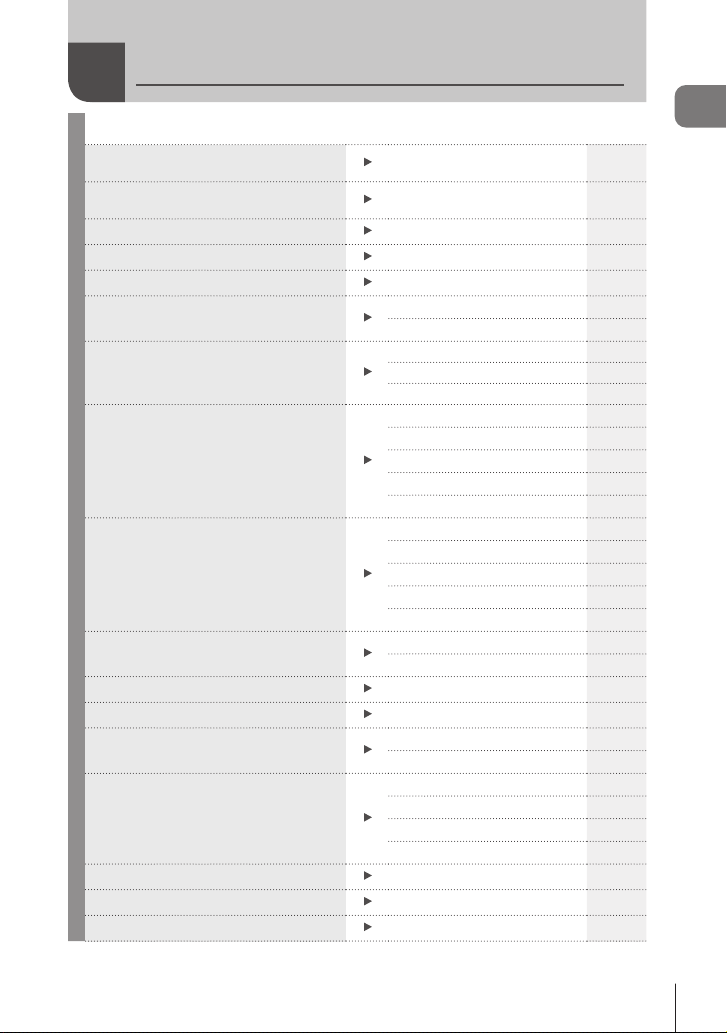
Quick task index
Shooting
Just shoot without making any dicult
settings
Shooting in the way you want without
needing to know technical terms
Taking self-portraits
Taking stylish pictures
Quickly matching settings to the scene
Taking pictures with a blurred
background
Shooting night views
Photographing reworks
Photographing light trails
Adjusting the brightness of highlights
and shadows
Taking photos with the ash
Taking photos without the ash
Reducing camera shake
Taking pictures of a subject against
backlight
Using the self-timer
Sequential shooting
Changing an aspect ratio
g
AUTO mode (B)
Live Guide 54
Self-portraits 78
Art lter 70
Scene mode (SCN) 56
Live Guide 54
Aperture priority shooting 37
Portrait + Nightscape (SCN) 56
Nightscape (SCN) 57
Hand-Held Starlight (SCN) 57
Fireworks (SCN) 57
Live Time (Z)
Live Composite (Z)
Live Composite (B) 44
Bulb/time photography (B) 42
Light Trails (SCN) 57
Live Time (Z)
Live Composite (Z)
Live Composite (B) 44
Bulb/time photography (B) 42
Live Guide 54
Exposure compensation 81
Flash photography 84
ISO sensitivity 83
Image Stabilizer 96
Self-timer 86
Flash photography 84
Backlight HDR (SCN) 58
Gradation (Picture Mode) 108
Spot metering 93
Self-timer 86
Sequential shooting 86
Aspect ratio 97
54
62
61
62
61
Quick task index
EN
9
Page 10
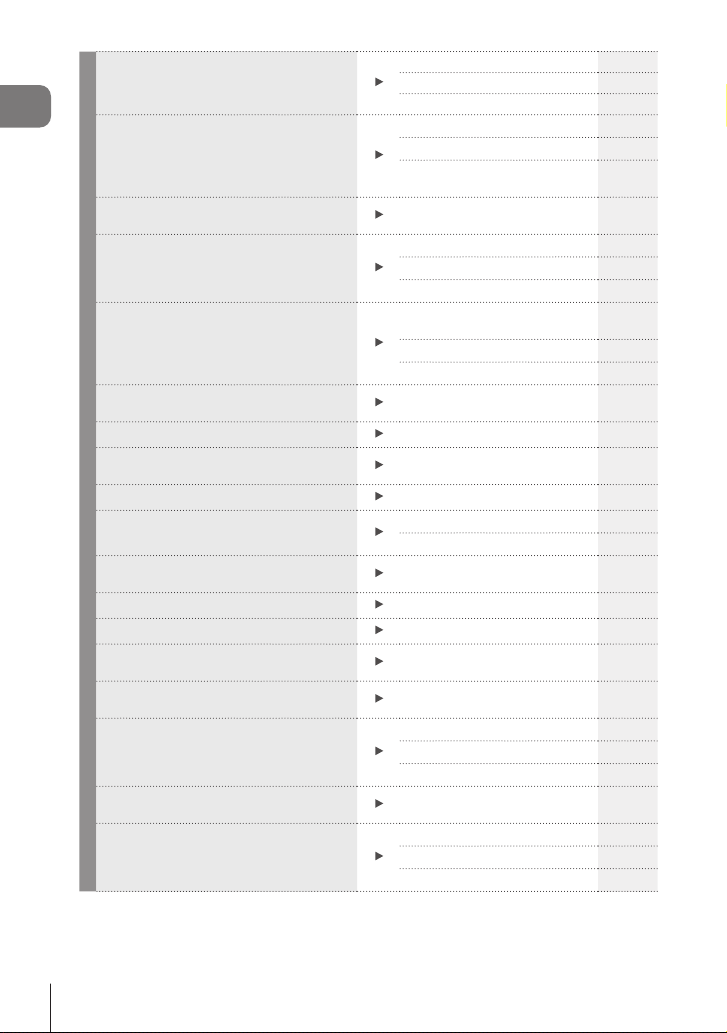
Changing photo coloring
Quick task index
Processing pictures to match the
subject/Taking monotone pictures
Enhancing images
Taking pictures that stop the subject in
motion or convey a sense of motion
When the camera will not focus on
your subject/Focusing on one area
Focusing on a small spot in the frame/
conrming focus before shooting
Keeping a moving subject in focus
Focusing on and shooting a moving
subject
Reducing image noise (mottling)
Optimizing the monitor/
adjusting monitor hue
Checking horizontal or vertical
orientation before shooting
Shooting with deliberate composition
Conserving battery power
Increasing the number of pictures that
can be taken
Using a remote control
Shooting without the shutter sound
Zooming in so your subject lls more
of the frame
Improving complexions
Live Guide 54
Picture Mode 103
White balance 94
Picture Mode 103
Art lter (ART) 70
Prole control
Prole control
Live Guide 54
Scene mode (SCN) 56
Shutter priority shooting 39
Tap AF (Using the touch
screen)
AF target position 82
Zoom frame AF/zoom AF 113
Zoom frame AF/zoom AF 113
C-AF+TR (AF tracking) 92
C-AF 92
Noise Reduct. 147
Live View Boost 146
Monitor brightness adjustment 143
Level gauge 28
Displayed Grid 146
Sleep 150
Still image quality mode 98
Shooting remotely with a
smartphone
Silent [♥] (SCN) 58
Silent [♥] (Z)
Silent [♥] (P/A/S/M/ART)
Digital Tele-converter 130
Portrait (Picture Mode) 104
e-Portrait (Picture Mode) 104
Scene mode (SCN) 56
46,
51
46,
51
32
161
65
88
10
EN
Page 11
Playback/Retouch
Viewing images on a TV
Viewing slideshows with background
music
Brightening shadows
Dealing with red-eye
Printing made easy
Viewing pictures on a smartphone
Uploading pictures to a smartphone
automatically
Adding location data to images
Retouching Pictures
g
HDMI 153
Playback on TV 153
Slideshow 120
Shadow Adj (JPEG Edit) 139
Redeye Fix (JPEG Edit) 139
Creating a print order 123
Transferring images to a
smartphone
Automatically uploading
images while the camera is o
Automatically setting a share
order for photographs (Auto
Share Order)
Adding location data to images 162
RAW Data Edit (Custom) 137
RAW Data Edit (ART BKT) 137
159
160
160
Quick task index
Camera Settings
Synchronizing the date and time
Restoring default settings
Changing the menu display language
Turning o the auto focus sound
g
Setting the date/time 23
Reset 129
W
8 (Beep sound)
Silent [♥] (SCN) 58
Silent [♥] (Z)
144
146
65
EN
11
Page 12
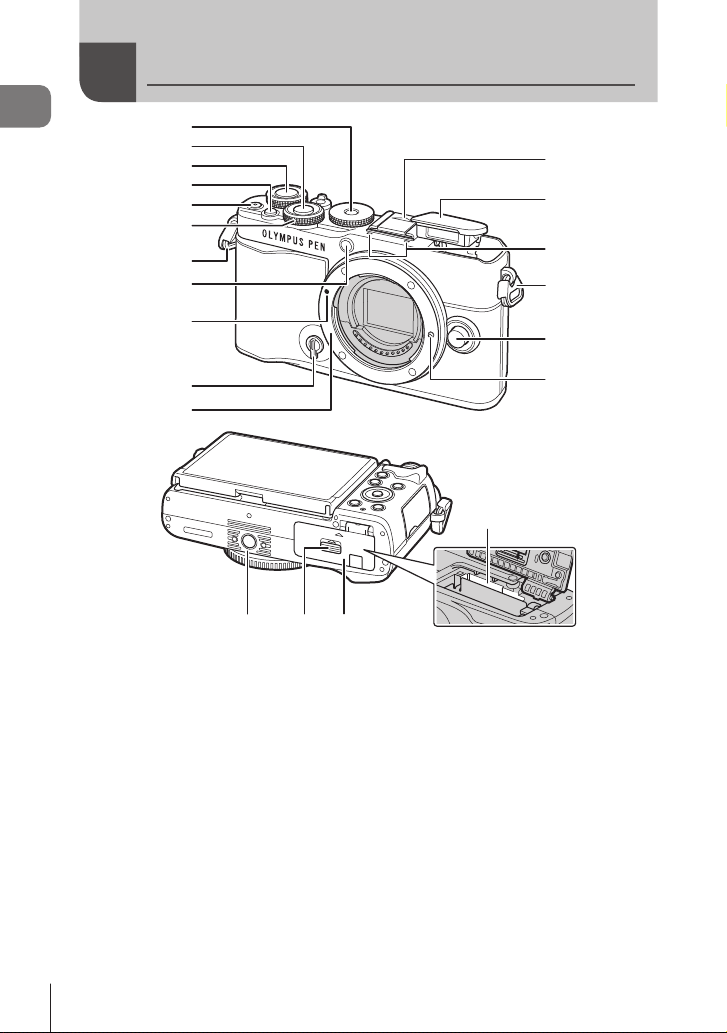
Names of parts
Names of parts
1
2
3
4
5
6
7
8
9
0
a
1 Mode dial ........................................P. 29
2 Shutter button .................................P. 30
3 Rear dial (o) .....................P. 35-41, 118
4 u (Shortcut) button .......................P. 33
5 R (Movie)/h button ............P. 74/P. 122
6 Front dial (r) ...............P. 35-41, 80, 84, 118
7 Strap eyelet.....................................P. 15
8 Self-timer lamp/AF illuminator
.............................................P. 86/P. 130
9 Lens attachment mark ....................P. 20
0 Prole control switch .................P. 46, 51
a Mount (Remove the body cap before
attaching the lens.)
b
c
d
7
e
f
g
hij
b Hot shoe cover
c Built-in ash ....................................P. 84
d Stereo microphone ...............P. 124, 136
e Lens release button ........................P. 21
f Lens lock pin
g Card slot .........................................P. 17
h Battery/card compartment cover
..................................................P. 16, 17
i Battery/card compartment lock
..................................................P. 16, 17
j Tripod socket
12
EN
Page 13
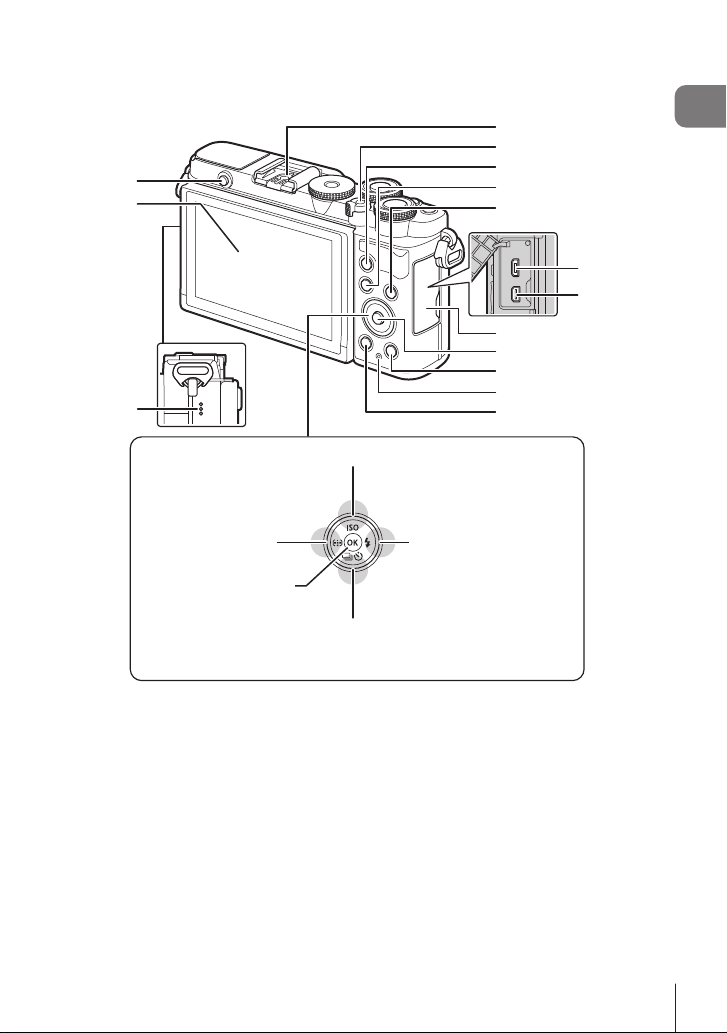
1
2
3
f
F (Up) / ISO button (P. 83)
4
5
6
7
8
a
b
c
d
e
Names of parts
9
0
N (AF target) button
1 Flash pop-up button ........................P. 84
2 Monitor (Touch screen)
............................P. 26, 32, 89, 116, 126
3 Speaker
4 Hot shoe .......................................P. 169
5 ON/OFF lever ................................P. 22
6 AEL/AFL button ..........P. 112, 113, 151
7 MENU button ...............................P. 128
8 INFO button ...................P. 28, 117, 152
* In this manual, the FGHI icons represent operations performed using the arrow pad.
H (Left) /
(P. 81)
Q button (P. 90, 118)
G (Down) / jY (Sequential shooting/Self-timer)
button (P. 86)
I (Right) /
# (Flash) button (P. 84)
9 Micro-USB connector....................P. 164
0 HDMI micro connector ..................P. 153
a Connector cover
b Q button ................................P. 91, 118
c q (Playback) button ....................P. 118
d CHARGE (battery charge) lamp ....P. 18
e D (Erase) button ..........................P. 121
f Arrow pad* .................P. 23, 81 – 86, 118
EN
13
Page 14
1
Preparation
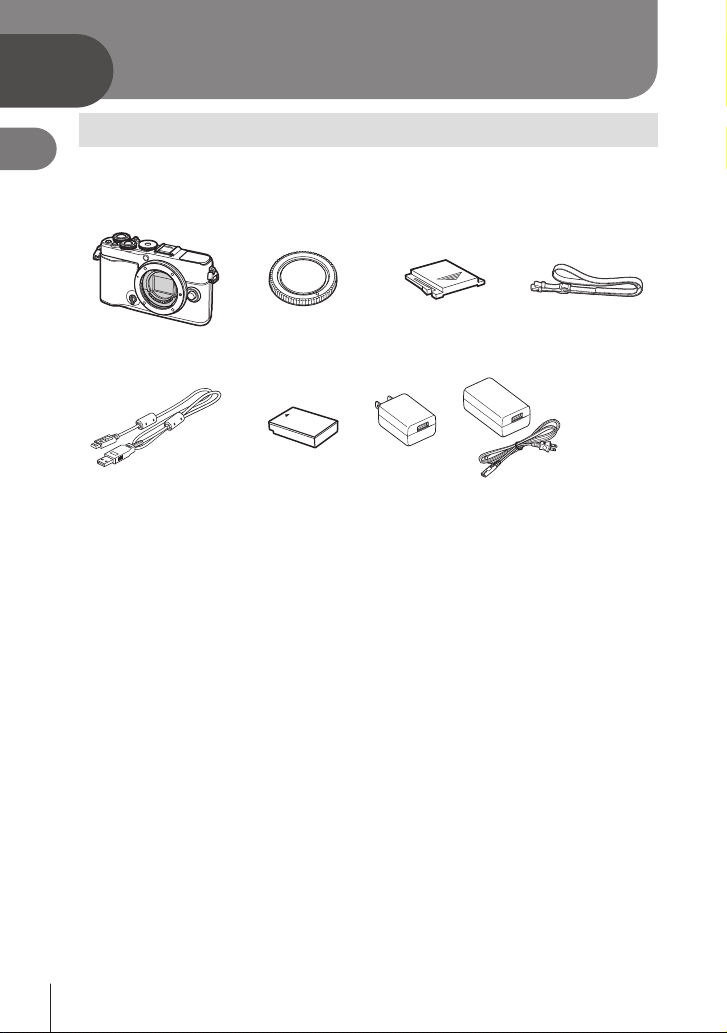
Unpacking the box contents
1
At purchase, the package contains the camera and the following accessories.
Preparation
If anything is missing or damaged, contact the dealer from whom you purchased the
camera.
Camera Body cap * Hot shoe cover * Strap
or
USB cable
CB-USB12
Basic Manual Warranty Card
* The body cap and hot shoe cover are already attached to or inserted into the camera.
14
EN
Lithium-ion battery
BLS-50
USB-AC adapter F-5AC
Page 15
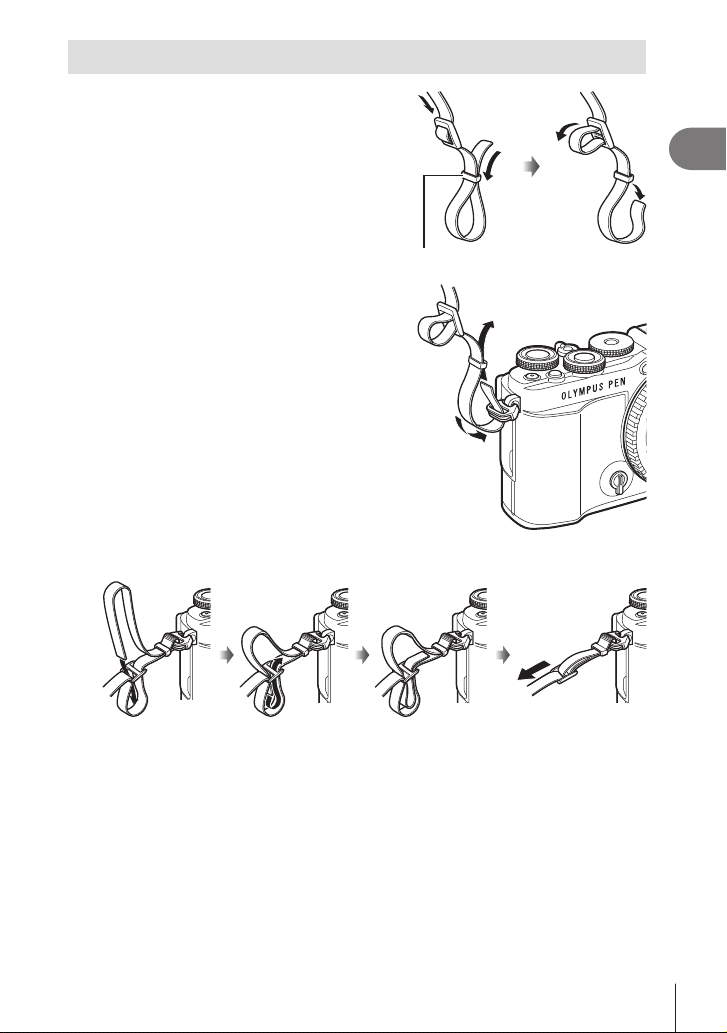
Attaching the Strap
Before attaching the strap, remove the end
1
from the keeper loop and loosen the strap
as shown.
Keeper loop
Pass the end of the strap through the strap
2
eyelet and back through the keeper loop.
Pass the end of the strap through the buckle and tighten as shown.
3
1
Preparation
• Attach the other end of the strap to the other eyelet.
• After attaching the strap, pull on it rmly to ensure that it will not come loose.
EN
15
Page 16
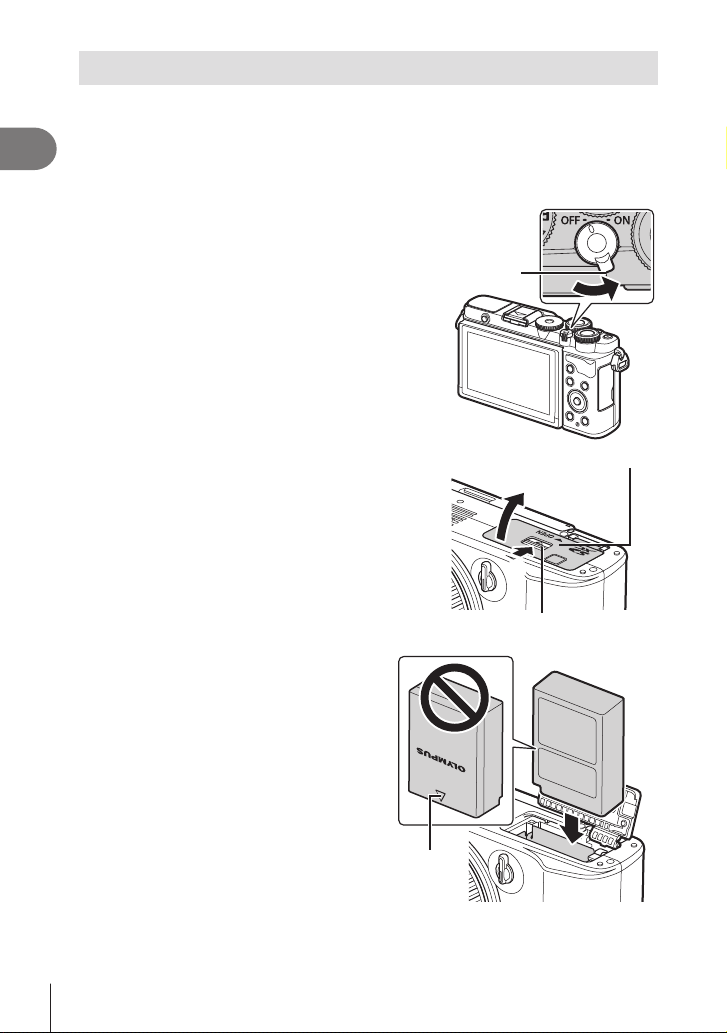
Inserting and Removing the Battery and Card
In this manual, all storage devices are referred to as “cards.”
The camera uses third-party SD, SDHC, or SDXC memory cards conforming to the SD
(Secure Digital) standard.
1
Cards must be formatted with this camera before rst use or after being used with
Preparation
other cameras or computers. g “Formatting the card (Card Setup)” (P. 144)
Conrm that the ON/OFF lever
1
is in the OFF position.
ON/OFF lever
Opening the battery/card
2
compartment cover.
Loading the battery.
3
• Use only BLS-50 batteries
(P. 14, 190).
Direction
indicating
mark
16
EN
Battery/card compartment cover
2
1
Battery/card compartment lock
Page 17
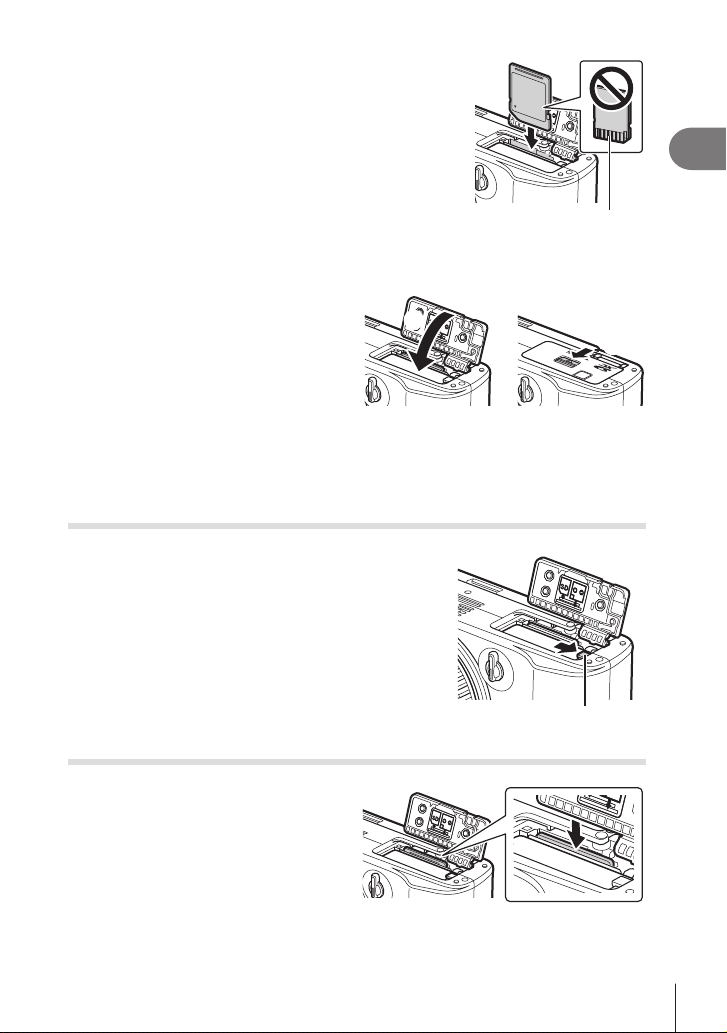
Loading the card.
4
• Slide the card in until it is locked into place.
g “Usable cards” (P. 167)
Terminal area
• Do not forcibly insert a damaged or deformed card. Doing so may damage the card
slot.
Closing the battery/card
5
compartment cover.
• Be sure the battery/card compartment
cover is closed before using the camera.
1
$
• It is recommended to set aside a backup battery for prolonged shooting in case the
battery in use drains.
• Also read “Batteries” (P. 166).
Removing the battery
Turn o the camera before opening or closing the battery/
card compartment cover. To remove the battery, rst push
the battery lock knob in the direction of the arrow and
then remove.
• Do not remove the battery while the card write
indicator is displayed (P. 26, 27).
• Contact an authorized distributor or service center
if you are unable to remove the battery. Do not use
force.
Battery lock knob
1
Preparation
2
Removing the card
Press the inserted card lightly and it will be
ejected. Pull out the card.
• Do not remove the battery while
the card write indicator is displayed
(P. 26, 27).
EN
17
Page 18
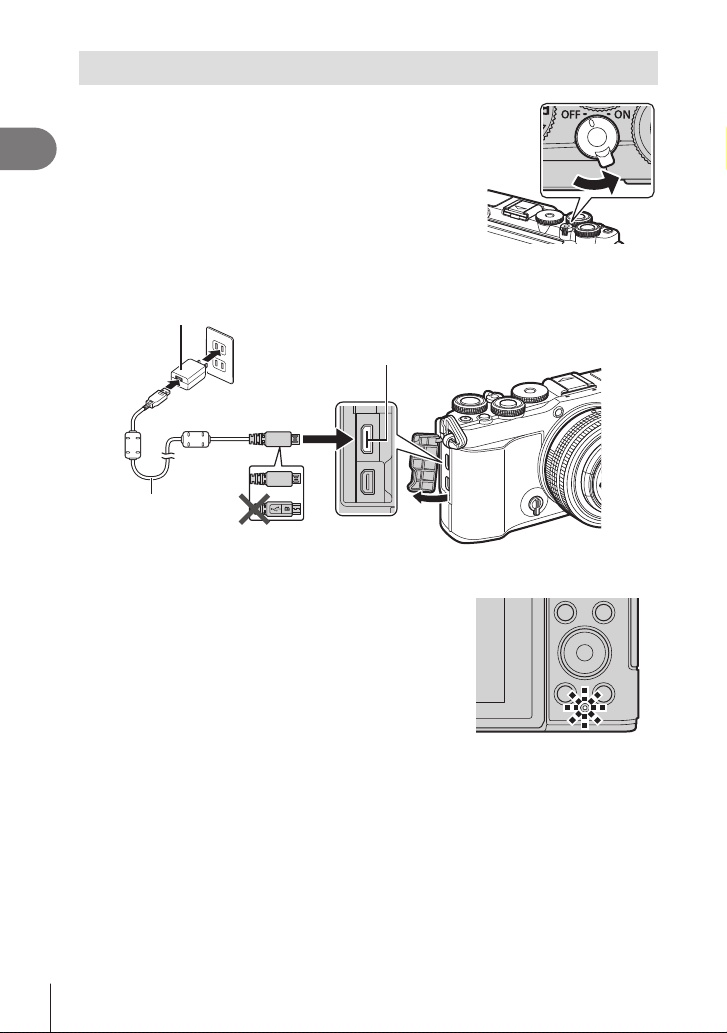
Charging the Battery
Conrm that the ON/OFF lever
1
is in the OFF position.
1
Preparation
Check that the battery is in the camera, and connect the USB cable and
2
USB-AC adapter.
USB-AC adapter (supplied)
2
AC outlet
Micro-USB connector
1
3
USB cable
(supplied)
• Never use cable other than the USB cable supplied or specied by our company
(P. 172). This may cause smoking or burning.
• The CHARGE lamp light during charging. Charging
takes about 4 hours. The lamp goes out as the
batteries reach full charge.
• Even if charging is in progress, it stops when the
camera is turned on.
• The USB-AC adapter cannot be used to charge the battery when the camera is on.
• If a charging error occurs, the CHARGE lamp will blink. Disconnect and reconnect the
USB cable.
• The USB-AC adapter can be used to charge the battery when the battery temperature is
between 0 and 40 °C (32 and 104 °F).
• A charger (BCS-5: sold separately) can be used to charge the battery.
%
• For safety reasons, charging may take longer, or the battery may not reach full charge,
when the battery is charged in a high-temperature environment.
• The batteries will not charge while the camera is o if pictures are being uploaded to a
smartphone via Wi-Fi (background auto upload). g “Automatically uploading images
while the camera is o” (P. 160)
18
EN
Page 19

$ The USB-AC Adapter
• Be sure to unplug the USB-AC adapter for cleaning. Leaving the USB-AC adapter
plugged in during cleaning could result in injury or electric shock.
1
Preparation
EN
19
Page 20
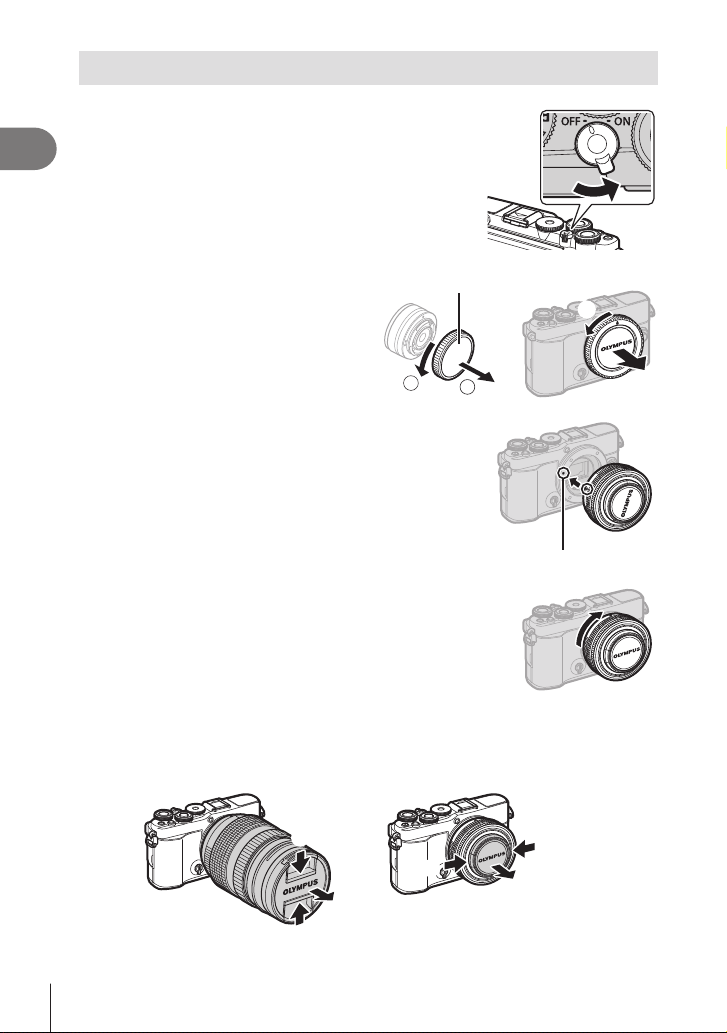
Attaching a lens to the camera
Conrm that the ON/OFF lever is in the
1
OFF position.
1
Preparation
Remove the rear cap of the lens
2
and the body cap of the camera.
Align the lens attachment mark (red) on
3
the camera with the alignment mark (red)
on the lens, then insert the lens into the
camera’s body.
Rotate the lens as shown until it clicks into
4
place.
• Do not press the lens release button.
• Do not touch internal portions of the camera.
Remove the front lens cap.
5
1
2
1
1
Rear cap
1
2
Lens attachment mark
1
2
1
2
20
EN
Page 21
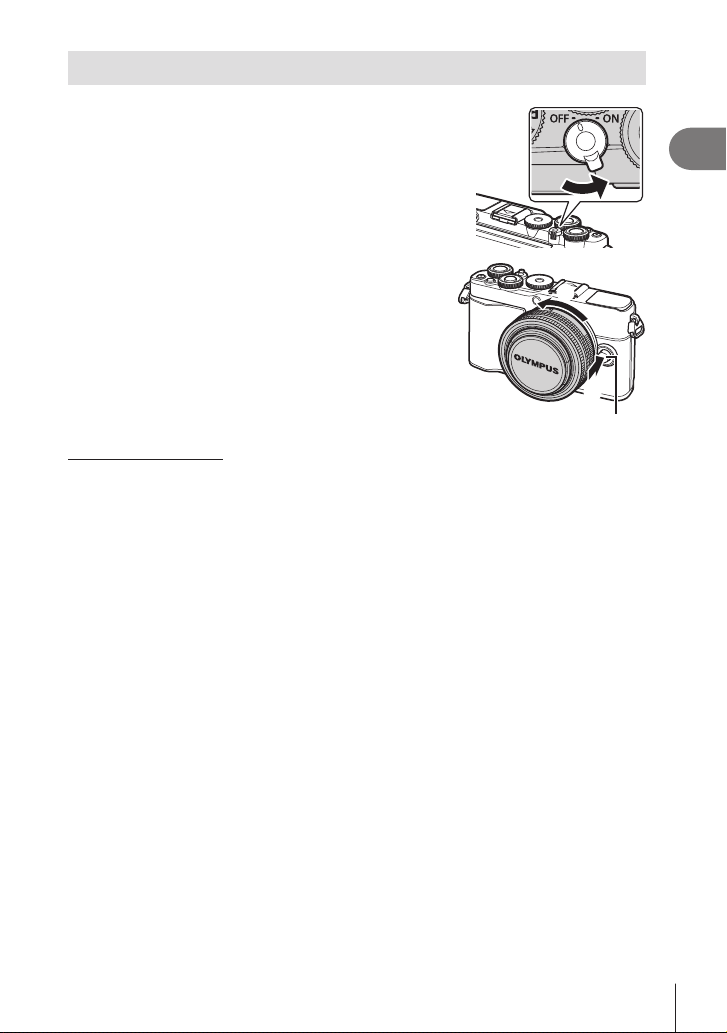
Removing Lenses
Conrm that the ON/OFF lever is in the
1
OFF position.
Hold the lens release button and rotate
2
the lens as shown.
Interchangeable lenses
Read “Interchangeable lenses” (P. 167).
1
Preparation
2
1
Lens release button
EN
21
Page 22
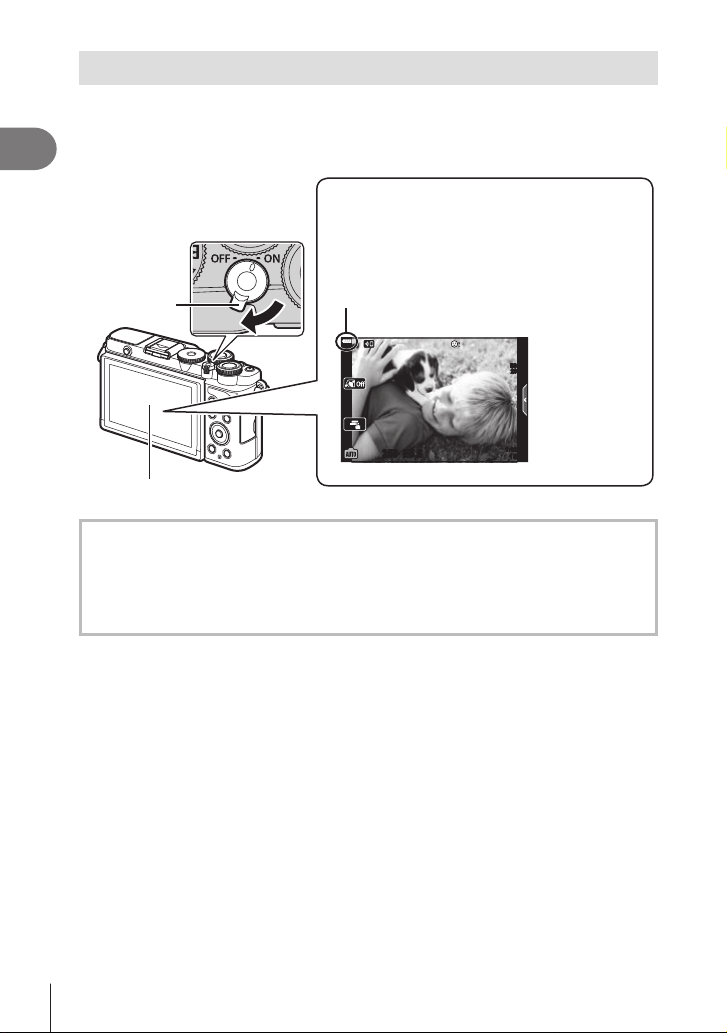
Turning the camera on
Set the ON/OFF lever to the ON position.
1
1
Preparation
ON/OFF lever
• When the camera is turned on, the monitor will turn on.
• To turn the camera o, return the lever to the OFF position.
Battery level
The battery level icon will be displayed.
j
(green): The camera is ready to shoot.
k
(green): The battery is not full.
l
(green): The battery is low.
m
(blinks red): Charge the battery.
ISO-A
200
250250 F5.6
Monitor
1:02:03
1023
Camera sleep operation
If no operations are performed for a minute, the camera enters “sleep” (stand-by) mode to
turn o the monitor and to cancel all actions. Pressing the shutter button reactivates the
camera. The camera will turn o automatically if left in sleep mode for 4 hours. Turn the
camera on again before use. You can choose how long the camera remains idle before
entering sleep mode. g [Sleep] (P. 150)
22
EN
Page 23
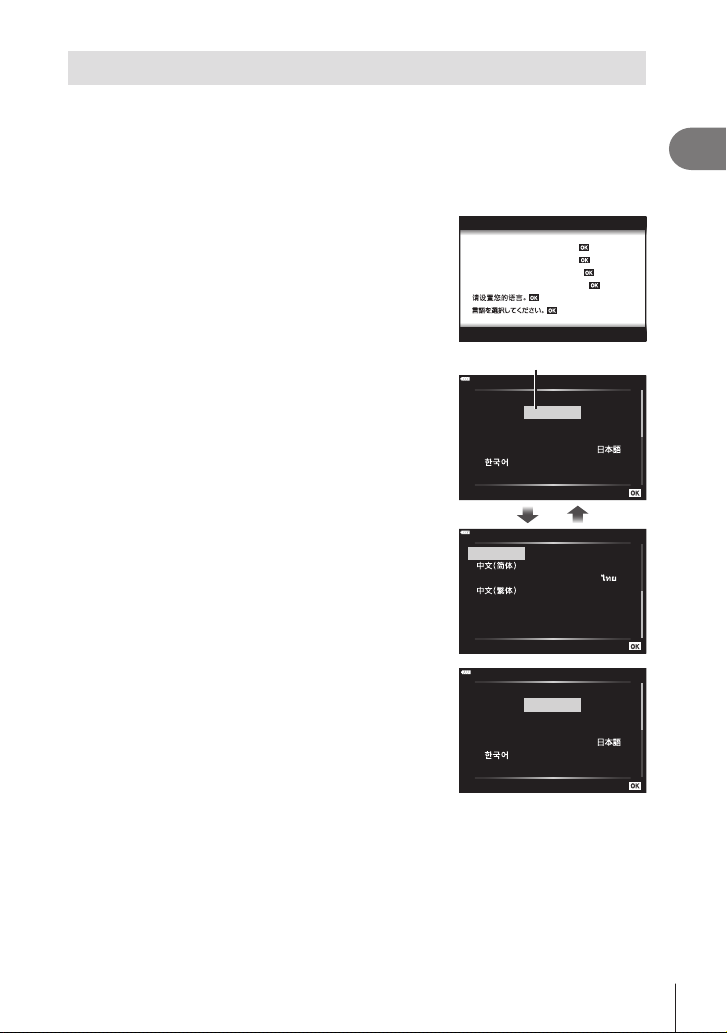
Initial setup
Set
W
Setare
W
Set
After turning the camera on for the rst time, perform the initial setup by choosing a
language and setting the camera clock.
• Date and time information is recorded on the card together with the images.
• The le name is also included with the date and time information. Be sure to set the
correct date and time before using the camera. Some functions cannot be used if the date
and time have not been set.
Press the Q button when the initial setup
1
dialog is displaying prompting you to choose a
language.
Please select your language.
Veuillez choisir votre langue.
Bitte wählen Sie Ihre Sprache.
Por favor, selecciona tu idioma.
1
Preparation
Hrvatski
Dansk
Eesti
Deutsch
Indonesia
Norsk
Romanian
Español
Viet Nam
Hrvatski
Dansk
Eesti
Deutsch
Indonesia
Norsk
Cursor
English
Ελληνικά
Italiano
Latviski
Русский
Slovensky
Svenska
Türkçe
English
Ελληνικά
Italiano
Latviski
W
Česky
Suomi
Polski
Česky
Suomi
Polski
Highlight the desired language using the front or
2
rear dial or FGHI.
• The language-selection dialog has two pages of
options. Use the front or rear dial or FGHI to
move the cursor between pages.
Press the Q button when the desired language
3
is highlighted.
• If you press the shutter button before pressing the
Q button, the camera will exit to shooting mode and
no language will be selected. You can perform the
initial setup by turning the camera o and then on
again to display the initial setup dialog and repeating
the process from Step 1.
• The language can be changed at any time from the e setup menu. g “Choosing a
language (W)” (P. 144)
Български
Nederlands
Français
Magyar
Lietuvių k.
Português(Pt)
Srpski
Slovenščina
Українська
Български
Nederlands
Français
Magyar
Lietuvių k.
Português(Pt)
23
EN
Page 24
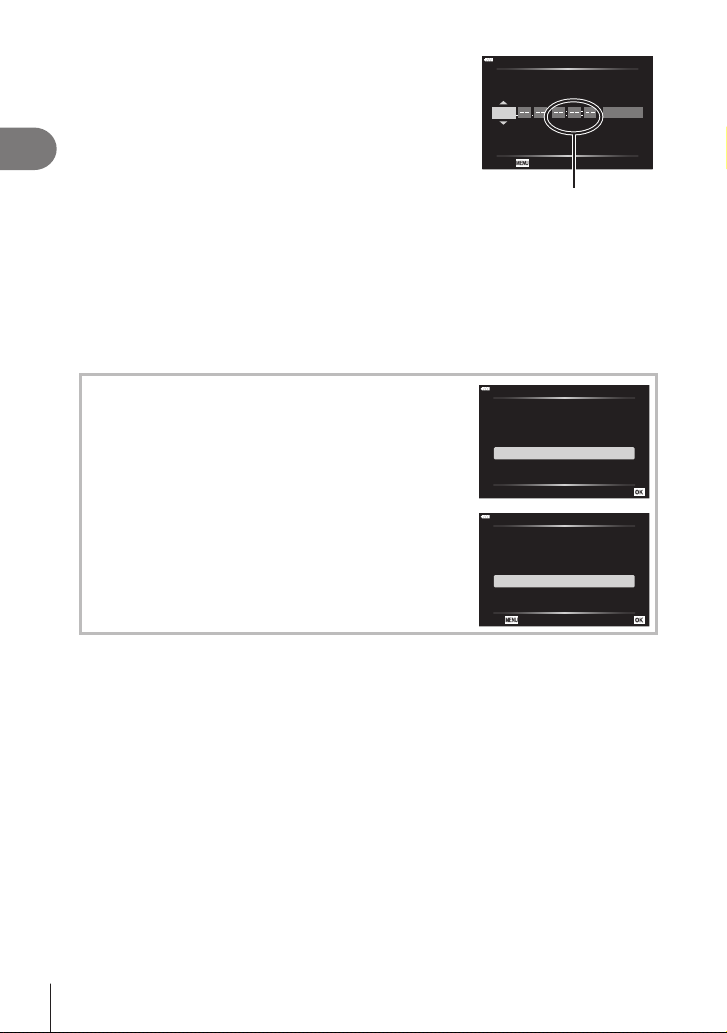
Set the date, time, and date format.
Set
Back Set
4
1
Preparation
• Use HI to highlight items.
• Use FG to change the highlighted item.
• The clock can be adjusted at any time from the
e setup menu. g [X] (P. 143)
Y M D Time
2021
Cancel
The time is displayed using
Complete the initial setup.
5
• Press the Q button to set the clock.
• If the battery is removed from the camera and the camera is left for a while, the date and
time may be reset to the factory default setting.
• If you are going to record movies, adjust the frame rate according to the video standard of
the country/region. g [Video Frame Rate] (P. 136)
X
Y/M/D
a 24-hour clock.
Turning the camera o
To turn the camera o, return the ON/OFF lever to the OFF
position. See page 158 for information on how to proceed
if the camera displays the dialog shown in the illustration.
Power-off Standby
Activate Wi-Fi/Bluetooth Power-off
Standby so images can be imported
while power is off?
Yes
No
Power-off Standby:On
Confirm whether or not to activate
Power-off Standby every time power
is turned off? This setting can be
changed from the menu anytime.
Confirm every time
Don't show this screen again
24
EN
Page 25
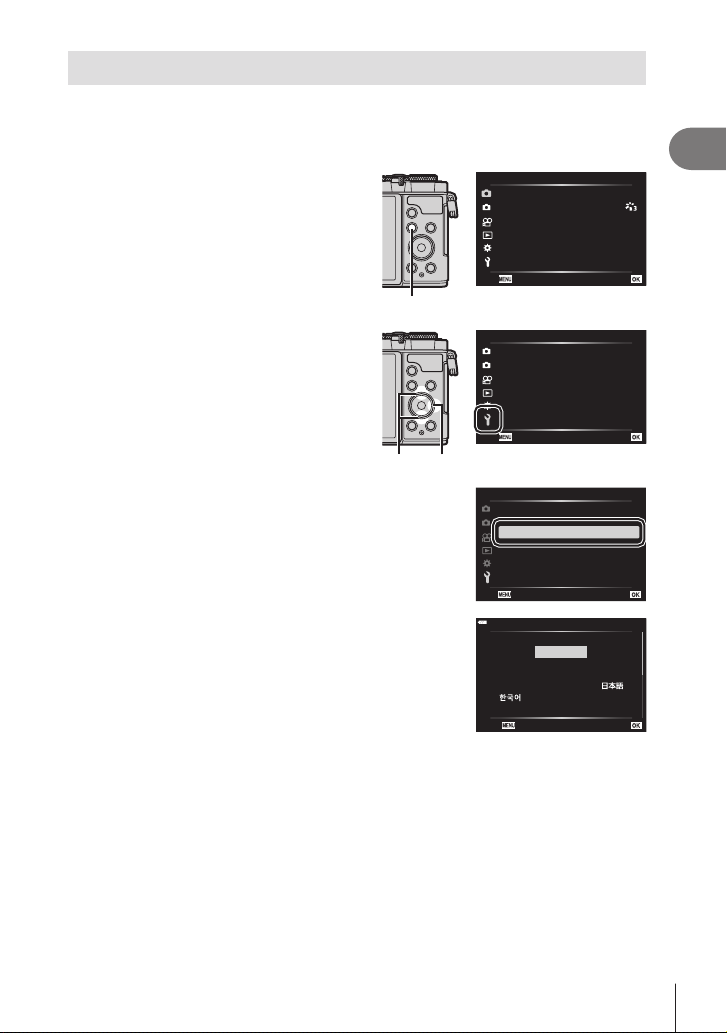
Camera displays unreadable/not in the selected language
เมนูถ่ายภาพ 1
กล ับ ตั�งค่า
เมนูตั�งค่า
กล ับ ตั�งค่า
W
If the camera displays are in an unfamiliar language or use characters you are unable
to read, you may have accidentally selected the wrong language in the languageselection dialog. Follow the steps below to change languages.
Press the MENU button to display
1
the menus.
Highlight the e Setup menu tab using
2
FG and press I.
Highlight [W] using FG and press I.
3
Highlight the desired language using FGHI
4
and press the Q button.
MENU button
FG
1
1
รีเ ซ็ต
โหมดภาพ
2
ดิจิทัลเทเลคอน
โหมดวัดแสง
ไฟช่วย AF เปิ ด
1
ตั�งค่าการ์ด
X
2
W
s
ดูภาพบันทึก
การตั�งค่า Wi-Fi/Bluetooth
เฟิร์มแวร์
I
1
ตั�งค่าการ์ด
X
2
W ไทย
s
ดูภาพบันทึก
การตั�งค่า Wi-Fi/Bluetooth
เฟิร์มแวร์
กล ับ ตั�งค่า
Hrvatski
Dansk
Eesti
Deutsch
Indonesia
Norsk
Back Set
เมนูตั�งค่า
Česky
English
Suomi
Ελληνικά
Italiano
Latviski
Polski
’--.--.-- --:--:--
j±0 k±0
0.5 วินาที
’--.--.-- --:--:--
j±0 k±0
0.5 วินาที
Български
Nederlands
Français
Magyar
Lietuvių k.
Português(Pt)
ไทย
ปิ ด
p
1
Preparation
EN
25
Page 26
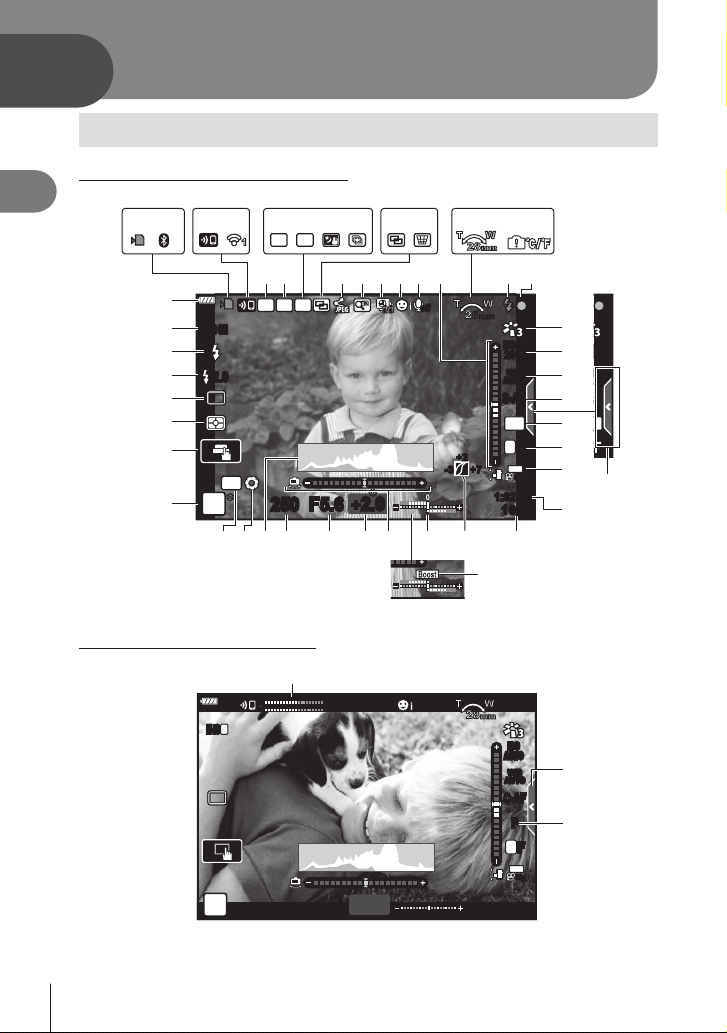
2
Shooting
Information displays while shooting
Monitor display during still photography
2
Shooting
Monitor display during movie mode
3 41 2 7 8 9 0 a b h i
K
S-IS ONS-IS ON
J
I
-
H
2.0
G
F
E
AEL
D
P
BKT
HDR
1
56 f g jdc
HDR
FP
RC
250250 F5.6
zC y x w vA u tB
+
2.0+2.0
28
mm
w
off
+2+2
ke
28
mm
+7+7-3-3
1:02:03
ISO-A
200
WB
AUTO
S-AF
4:3
L
F
4K
30p
1023
l
m
n
o
p
q
r
s
O
3
L
M
N
LRL
R
1
M-ISM-IS
n
26
EN
0.0
28
mm
1:02:03
ISO
AUTO
WB
AUTO
C-AF
P
L
F
4K
30p
O
P
Page 27

1 Card write indicator .........................P. 17
2 Bluetooth
.............................................P. 155 – 163
3 Wireless LAN connection starting up
.............................................P. 155 – 163
4 Wireless LAN connection status
.............................................P. 155 – 163
5 Super FP ash ..............................P. 169
6 RC mode.......................................P. 169
7 HDR ................................................P. 64
8 AE Bracketing .................................P. 68
Focus Bracketing ............................P. 69
9 Handheld Starlight ..........................P. 57
0 Multi Focus Shot .............................P. 59
a Multiple exposure....................P. 63, 131
b Keystone compensation .................P. 67
c Auto Share Order… ......................P. 160
d Digital Tele-converter ....................P. 130
e Time lapse shooting ......................P. 133
f Face priority/Eye priority .................P. 82
g Movie sound .................................P. 136
h Zoom operation direction/Focal length
i Internal temperature warning ........P. 179
j Flash ...............................................P. 84
(blinks: charging in progress, lights up:
charging completed)
k AF conrmation mark......................P. 30
l Picture mode.........................P. 103, 130
m ISO sensitivity .................................P. 83
n White balance .................................P. 94
o AF mode .........................................P. 92
®
connection status
p Aspect ratio .....................................P. 97
q Image quality (still images) .............P. 98
r Record mode (movies) ...................P. 99
s Available recording time ...............P. 187
t Number of storable still pictures ...P. 186
u Highlight & shadow control ........... P. 111
v Top: Flash intensity control ...........P. 103
Bottom: Exposure compensation ....P. 81
w Level gauge ....................................P. 28
x Exposure compensation value........P. 81
y Aperture value .........................P. 35 – 41
z Shutter speed ..........................P. 35 – 41
A Histogram .......................................P. 28
B Preview .........................................P. 112
C AE lock..................................P. 113, 151
D Shooting mode.........................P. 29 – 77
E Touch operation ..............................P. 32
F Metering mode ................................P. 93
G Sequential shooting/Self-timer ........P. 86
Silent shooting ................................P. 65
H Flash intensity control ...................P. 103
I Flash mode .....................................P. 84
J Image stabilizer...............................P. 96
K Battery level ....................................P. 22
L Live guide recall ..............................P. 54
M Live view boost .............................P. 146
N Recording level meter ...................P. 136
O Silent shooting tab ..........................P. 77
P Movie (exposure) mode ................P. 115
2
Shooting
EN
27
Page 28
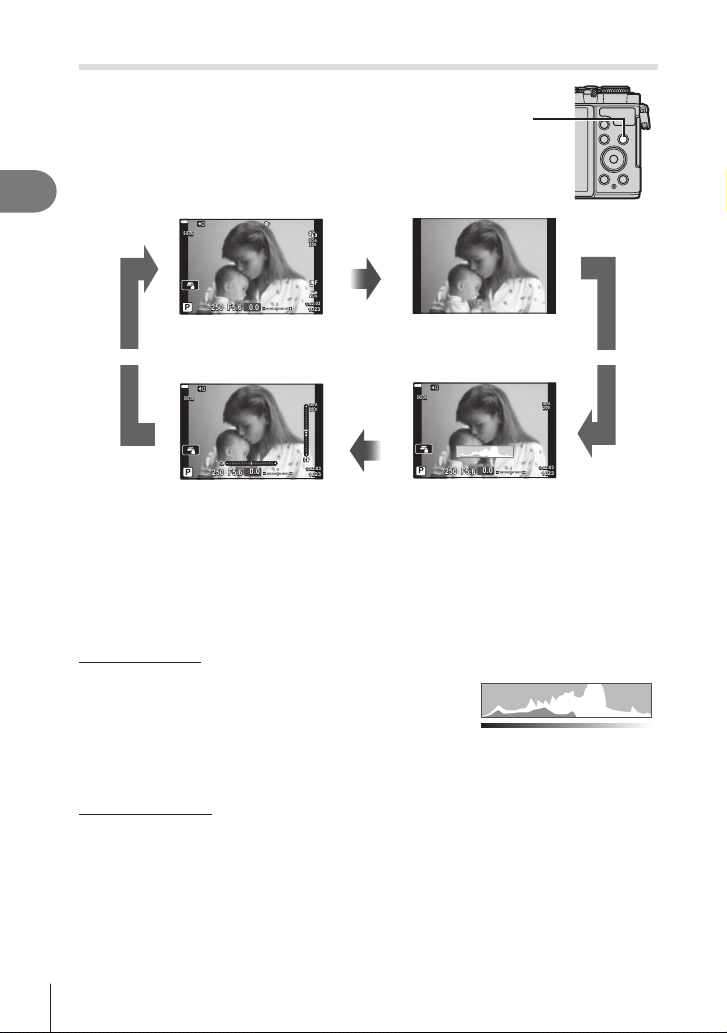
Switching the information display
250250 F5.6
P
S-IS ONS-IS ON
ISO-A
200
1023
1:02:03
0.0
250250 F5.6
P
S-IS ONS-IS ON
ISO-A
200
1023
1:02:03
0.0
250250 F5.6
P
S-IS ONS-IS ON
ISO-A
200
1023
1:02:03
0.0
L
F
4K
30p
You can switch the information displayed in
the monitor during shooting using the INFO
button.
2
Shooting
INFO button
INFOINFO
Basic Information*
INFOINFO
Image Only
INFOINFO
INFOINFO
Level Gauge display
(Custom2)
Histogram display
(Custom1)
* Not displayed in n mode (movie mode) unless recording is in progress.
• You can change Custom1 and Custom2 settings. g [G/Info Settings] > [LV-Info]
(P. 146)
• The information display screens can be switched in either direction by rotating the front
dial while pressing the INFO button.
Histogram display
A histogram showing the distribution of brightness
in the image is displayed. The horizontal axis
More
gives the brightness, the vertical axis the number
of pixels of each brightness in the image. During
shooting, overexposure is indicated in red,
underexposure in blue, and the range metered
Less
Dark Bright
using spot metering in green.
Level gauge display
The orientation of the camera is indicated. The “tilt” direction is indicated on the vertical bar
and the “horizon” direction on the horizontal bar. The camera is level and plumb when the
bars turn green.
• Use the indicators on the level gauge as a guide.
• Error in the display can be corrected via calibration (P. 150).
28
EN
Page 29
Choosing a shooting mode and taking photos
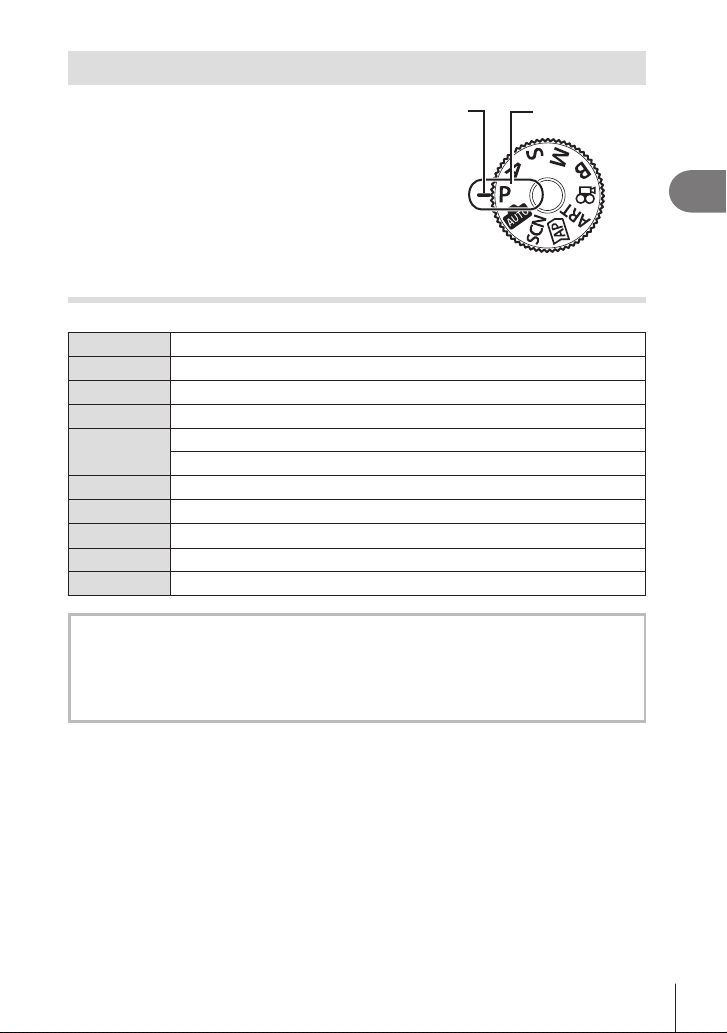
Use the mode dial to select the shooting mode,
Indicator Mode icon
and then shoot the image.
Types of shooting modes
For how to use the various shooting modes, see the following.
P
A
S
M
B
B
SCN Scene (P. 56)
Z
ART Art lter (P. 70)
n
Functions that cannot be selected from menus
Some items may not be selectable from the menus using FGHI.
• Items that cannot be set with the current shooting mode.
• Items that cannot be set because of an item that has already been set:
Settings such as picture mode are unavailable when the mode dial is rotated to B.
Program AE (P. 35)
Aperture-priority AE (P. 37)
Shutter-priority AE (P. 39)
Manual exposure (P. 41)
Bulb/time (P. 42)
Live composite (P. 44)
AUTO (P. 54)
Advanced photo (P.60)
Movie (P. 75)
2
Shooting
EN
29
Page 30
1
250250 F5.6
1023
2
Shooting
2
3
4
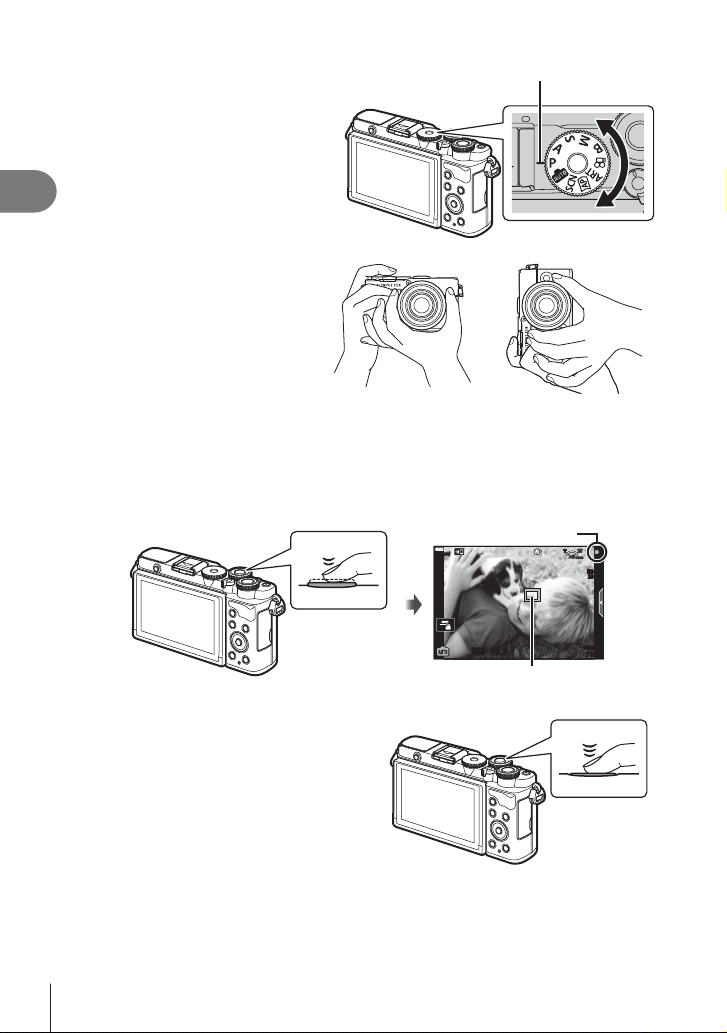
Rotate the mode dial to a mode.
Indicator
Frame the shot.
• Be careful that your ngers
or the camera strap do
not obstruct the lens or AF
illuminator.
Landscape position Portrait position
Adjust the focus.
• Display the subject in the center of the monitor, and lightly press the shutter button
down to the rst position (press the shutter button halfway).
The AF conrmation mark (() will be displayed, and a green frame (AF target) will
be displayed in the focus location.
AF conrmation mark
28
mm
ISO-A
200
Press the shutter
button halfway.
AF target
• If the AF conrmation mark blinks, the subject is not in focus (P. 176).
1:02:03
Release the shutter.
• Press the shutter button all the way
(fully).
• The camera will release the shutter
and take a picture.
• The shot image will be displayed on
the monitor.
Press the shutter
button all the way.
$
• You can focus and take pictures using touch controls. g “Shooting with touch screen
operations” (P. 32)
• To exit to shooting mode from menus or playback, press the shutter button halfway.
30
EN
Page 31
Taking high angle and low angle shots
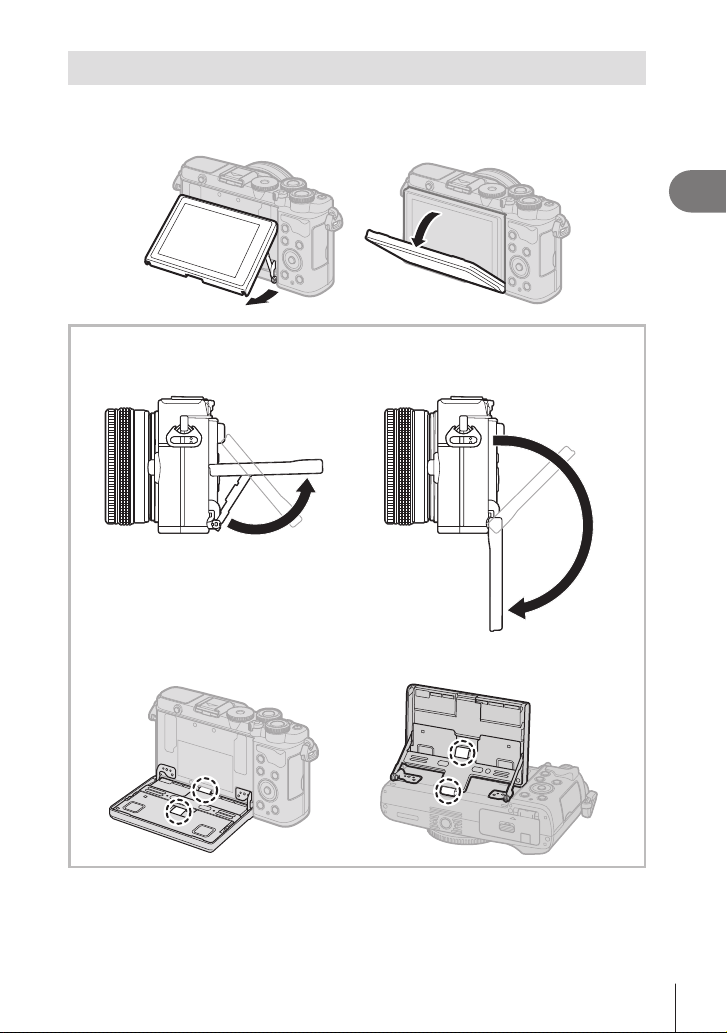
You can change the orientation and angle of the monitor.
Lower angle Upper angle
Rotating the Monitor: Cautions
• Rotate the monitor gently within the limits shown. Do not use force; failure to observe
this precaution could damage the connectors.
2
Shooting
• Do not touch the areas indicated in the illustration. Failure to observe this precaution
could damage the product or cause it to malfunction.
$
• Inverting the monitor allows you to take pictures of yourself while you preview the frame.
g “Taking Photos in Self-Portrait Mode” (P. 78)
EN
31
Page 32
Shooting with touch screen operations
250250 F5.6
ISO-A
200
1023
1:02:03
1414
1010
77
55
3x3x
Off
250250 F5.6
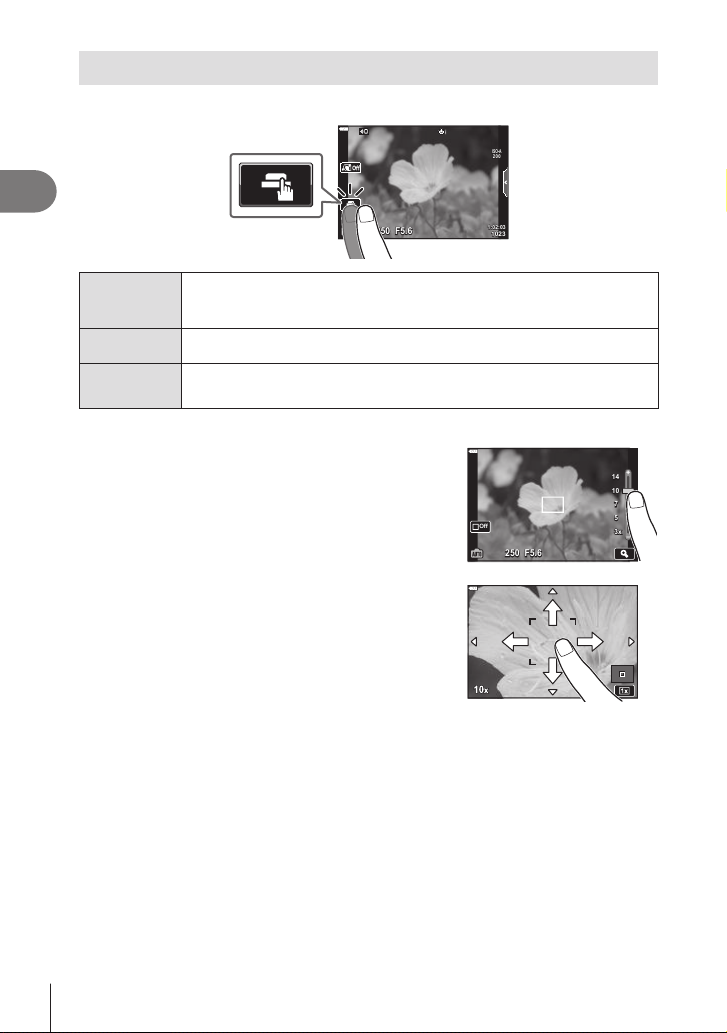
Tap d to cycle through touch screen settings.
2
Shooting
Tap a subject to focus and automatically release the shutter.
d
U
V
Previewing the subject (V)
Tap the subject in the display.
1
• An AF target will be displayed.
• Use the slider to choose the size of the frame.
• Tap S to turn o the display of the AF target.
Tap Y to zoom in at the frame position.
2
• Use your nger to scroll the display when the
• Tap Z to cancel the zoom display.
• You cannot resize or zoom in on the target in movie
This feature is not available in movie mode and during bulb, time, or
composite photography.
Touch screen operations are disabled.
Tap to display an AF target and focus on the subject in the selected area.
Photographs can be taken by pressing the shutter button.
picture is zoomed in.
mode.
• The situations in which touch screen operations are not available include the following.
One-touch WB, while buttons or dials are in use, etc.
• Do not touch the display with your ngernails or other sharp objects.
• Gloves or monitor covers may interfere with touch screen operation.
• You can disable the touch screen operation. g [Touchscreen Settings] (P. 150)
32
EN
Page 33
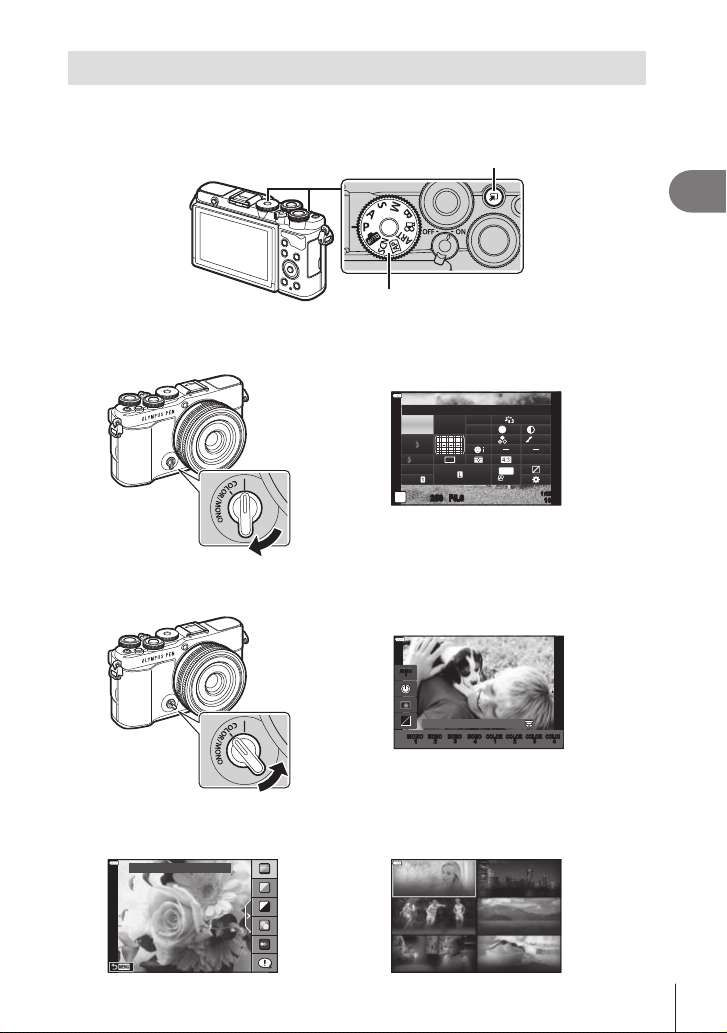
Switching Displays with the u (Shortcut) Button
250250 F5.6
P
1023
Indoors Close-ups
Press the u button to switch to each screen of the selected shooting mode between
shots.
u (Shortcut) button
Mode dial
P/A/S/M/B
• When the prole control switch is not in the COLOR/MONO position
LV super control panel (P. 89)
Recommended ISO
WB
ISO
Auto
Auto
± 0.0
S-IS On
M-IS
Prole control switch
• When the prole control switch is in the COLOR/MONO position
Prole Control (P. 46)
Natural
A ±
0
S
±
0±
G
±
S-AF
F
0
0
Normal
±
0
±
0
sRGB
4K
30p
1:02:03
2
Shooting
Prole control switch
B
Live guide (P. 54)
Change Color Saturation
MONO 1MONO
1
Monochrome Profile 1
MONO 1MONO
MONO 2MONO 2MONO 3MONO 3MONO 4MONO 4COLOR 1COLOR 1COLOR 2COLOR 2COLOR 3COLOR 3COLOR 4COLOR
1
SCN
Scene mode (P. 56)
People
Motion Scenery
Nightscapes
4
33
EN
Page 34
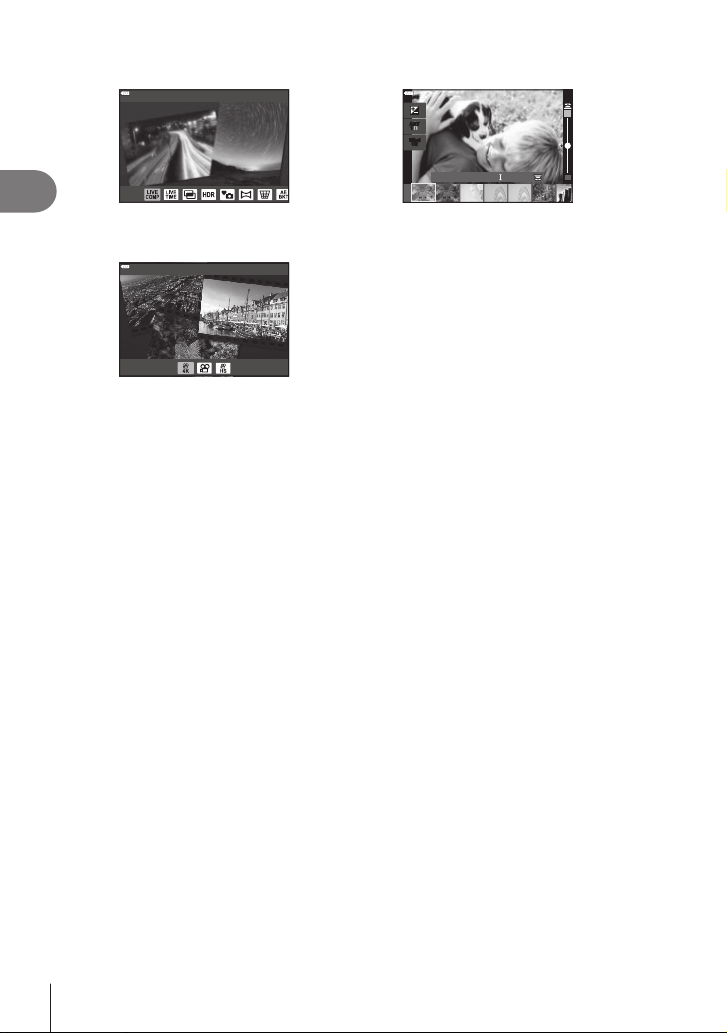
2
Live Composite
4K
Shooting
Z
Advanced photo mode (P. 60)
n
Movie mode (P. 75)
ART
Art lter mode (P. 70)
ART 1ART
1
Effect
Off
Pop Art
34
EN
Page 35
Letting the camera choose aperture and shutter speed
(Program mode)
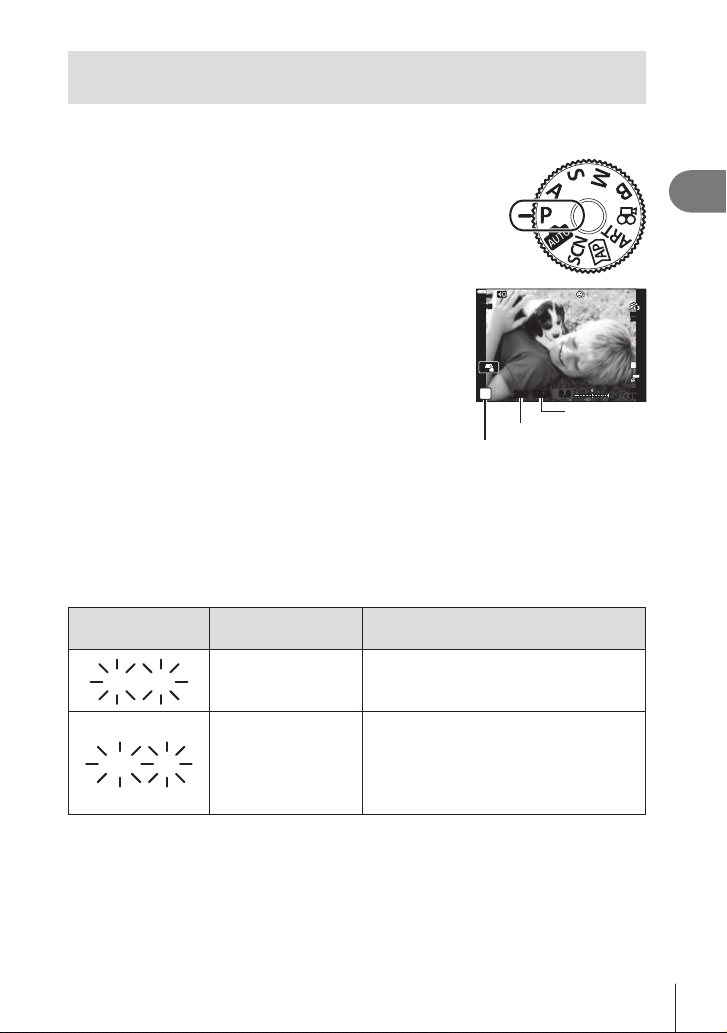
The camera chooses the optimal aperture and shutter speed according to subject
brightness.
Rotate the mode dial to P.
1
Focus and check the display.
2
• The shutter speed and aperture chosen by the camera
are displayed.
Take pictures.
3
• You can use the front dial to select exposure compensation.
• You can use the rear dial to select program shift.
• The shutter speed and aperture value displays will blink if the camera is unable to achieve
correct exposure.
The aperture value at the moment when its indication blinks varies with the lens type and
focal length of the lens.
When using a xed [ISO] setting, change the setting. g “Changing ISO sensitivity
(ISO)” (P. 83)
Warning display
example (blinking)
Status Action
S-IS ONS-IS ON
P
250250 F5.6
Shutter speed
Shooting mode
0.0
Aperture
1:02:03
ISO-A
200
L
F
4K
30p
1023
2
Shooting
60"60" F2.8F2.8
40004000
F22F22
The subject is too
dark.
The subject is too
bright.
Use the ash.
• The metered range of the camera is
exceeded. A commercially available ND
lter (for adjusting the amount of light) is
required.
• Take pictures in silent mode. g “The
Electronic Shutter (Silent s)” (P. 88)
EN
35
Page 36
%
250250 F5.6
P
1023
0.0
• You can choose processing options using the prole control. Rotate the prole control
switch to the COLOR/MONO position to display the prole control. When the prole
control is not display while the prole control switch is in the COLOR/MONO position,
press u button to display the control. g “Shooting enhanced images (Prole Control)”
(P. 46)
• You can choose the functions performed by the front and rear dials. g [Dial Function]
2
Shooting
(P. 145)
• You can choose whether the display reects the eects of exposure compensation or
maintains a constant brightness for ease of viewing. At default settings, the eects of
exposure settings are visible in the display. g [Live View Boost] (P. 146)
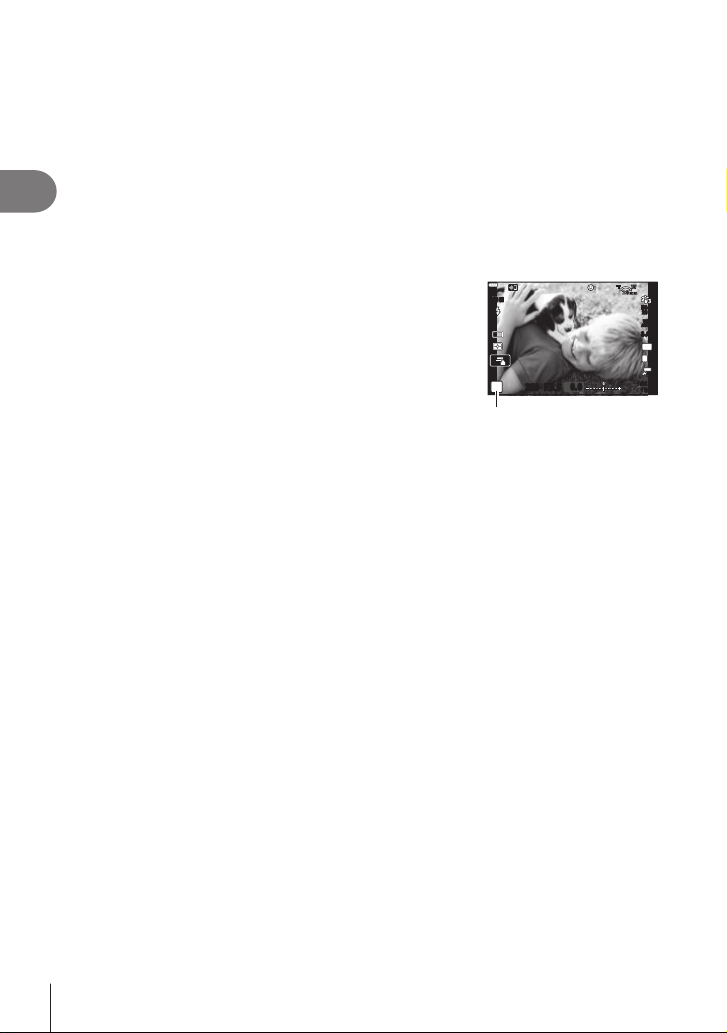
Program Shift
Without changing exposure, you can choose from dierent
combinations of aperture and shutter speed selected
S-IS ONS-IS ON
automatically by the camera. This is known as program
shift.
• Rotate the rear dial until the camera displays the desired
combination of aperture and shutter speed.
• The shooting mode indicator in the display changes from P
to
Ps while program shift is in eect. To end program shift,
rotate the rear dial in the opposite direction until Ps is no
s
Program shift
longer displayed.
28
mm
ISO-A
200
WB
AUTO
S-AF
4:3
L
F
4K
30p
1:02:03
36
EN
Page 37
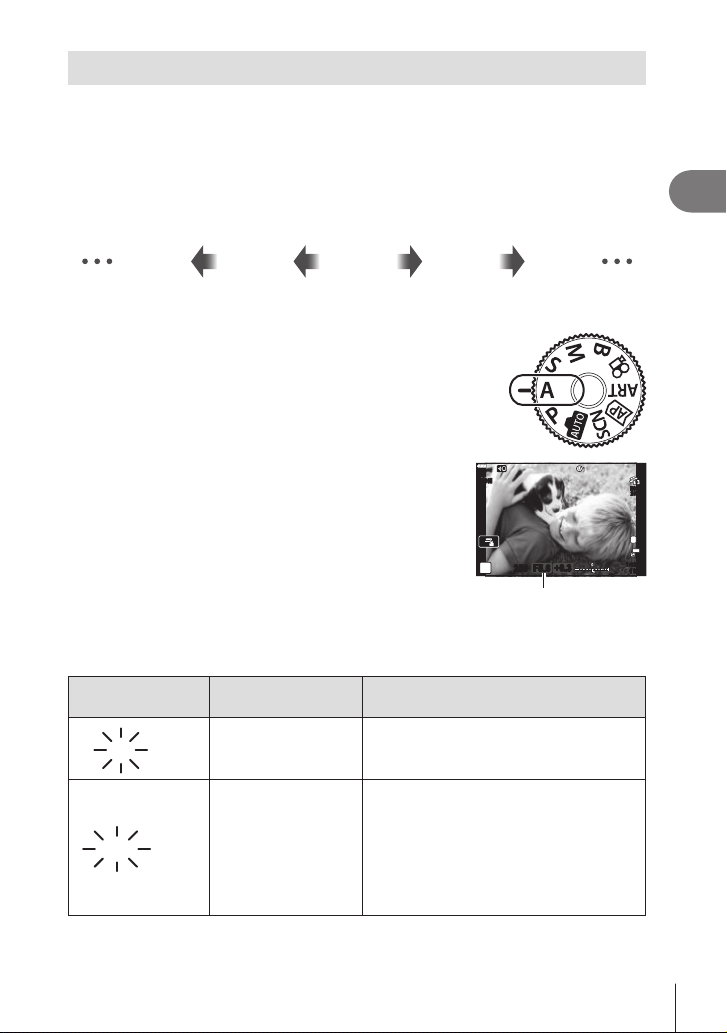
Choosing aperture (Aperture Priority mode)
In this mode, you choose the aperture (f/-number) and the camera automatically sets
the shutter speed for optimal exposure according to subject brightness. Lower aperture
values (larger apertures) reduce the depth of the area that appears to be in focus
(depth of eld), blurring the background. Higher aperture values (smaller apertures)
increase the depth of the area that appears to be in focus in front of and behind the
subject.
Lower aperture values… Higher aperture values…
F5.6F4.0F2.8 F8.0 F11
…reduce depth of eld and increase
blur.
Rotate the mode dial to A.
1
Choose an aperture.
2
• At default settings, aperture is selected by rotating the
rear dial.
• The shutter speed selected automatically by the camera
will appear in the display.
• You can use the front dial to select exposure
compensation.
Take pictures.
3
• The shutter speed display will blink if the camera is unable to achieve correct exposure.
When using a xed [ISO] setting, change the setting. g “Changing ISO sensitivity
(ISO)” (P. 83)
Warning display
example (blinking)
Status Action
…increase depth of eld.
S-IS ONS-IS ON
A
+0.3
250250 F5.6
Aperture value
1:02:03
ISO-A
200
L
1023
F
4K
30p
2
Shooting
60"60" F5.6F5.6
40004000 F5.6F5.6
The subject is
underexposed.
The subject is
overexposed.
Decrease the aperture value.
• Increase the aperture value.
• If the warning display does not disappear,
the metered range of the camera is
exceeded. A commercially available ND
lter (for adjusting the amount of light) is
required.
• Take pictures in silent mode. g “The
Electronic Shutter (Silent s)” (P. 88)
EN
37
Page 38

%
• You can choose processing options using the prole control. Rotate the prole control
switch to the COLOR/MONO position to display the prole control. When the prole
control is not display while the prole control switch is in the COLOR/MONO position,
press u button to display the control. g “Shooting enhanced images (Prole Control)”
(P. 46)
• You can choose the functions performed by the front and rear dials. g [Dial Function]
2
Shooting
(P. 145)
• You can choose whether the display reects the eects of exposure compensation or
maintains a constant brightness for ease of viewing. At default settings, the eects of
exposure settings are visible in the display. g [Live View Boost] (P. 146)
38
EN
Page 39
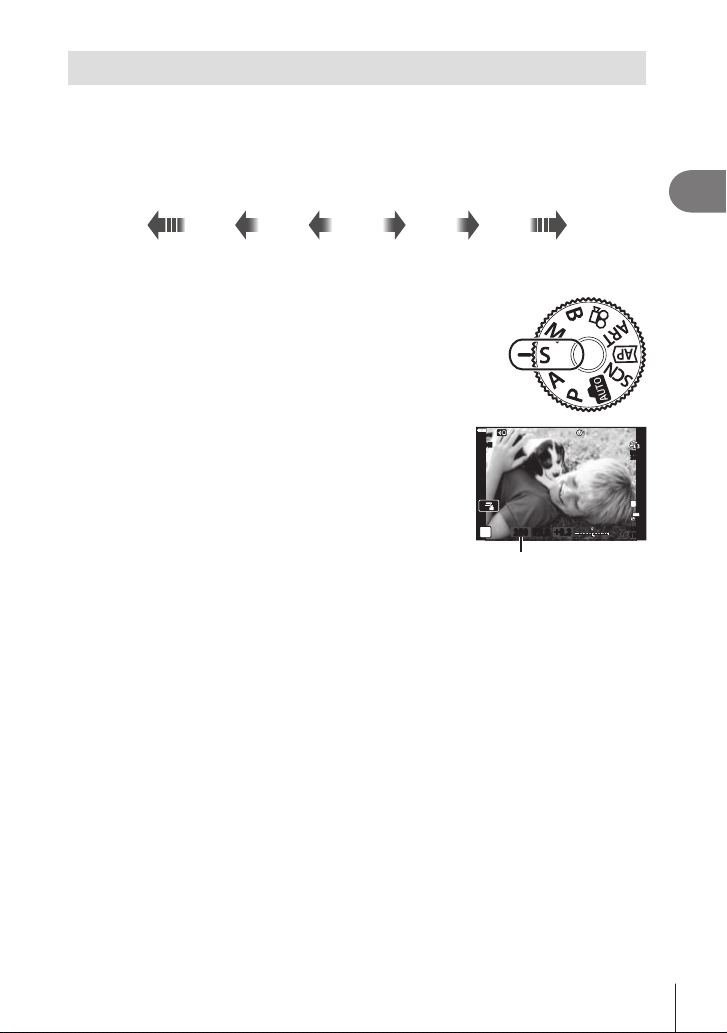
Choosing shutter speed (Shutter Priority mode)
In this mode, you choose the shutter speed and the camera automatically sets aperture
for optimal exposure according to subject brightness. Faster shutter speeds appear
to “freeze” fast-moving subjects. Slower shutter speeds add blur to moving objects,
lending them a sense of motion for a dynamic eect.
Slower shutter speeds… Faster shutter speeds…
125 250 400060301560”
…produce dynamic shots with a sense
of motion.
Rotate the mode dial to S.
1
Choose a shutter speed.
2
• At default settings, shutter speed is selected by rotating
the rear dial.
• Shutter speed can be set to values between 1/4000 and
60 s.
• Shutter speeds as fast as 1/16000 s are available in s
(silent) mode. g “The Electronic Shutter (Silent s)”
(P. 88)
• The aperture selected automatically by the camera will
appear in the display.
• You can use the front dial to select exposure
compensation.
Take pictures.
3
• The aperture value display will blink if the camera is unable to achieve correct exposure.
The aperture value at the moment when its indication blinks varies with the lens type and
focal length of the lens.
When using a xed [ISO] setting, change the setting. g “Changing ISO sensitivity
(ISO)” (P. 83)
…“freeze” the motion of fast-moving
S-IS ONS-IS ON
S
Shutter speed
250250 F5.6
subjects.
+0.3
1:02:03
ISO-A
200
L
4K
1023
F
30p
2
Shooting
EN
39
Page 40
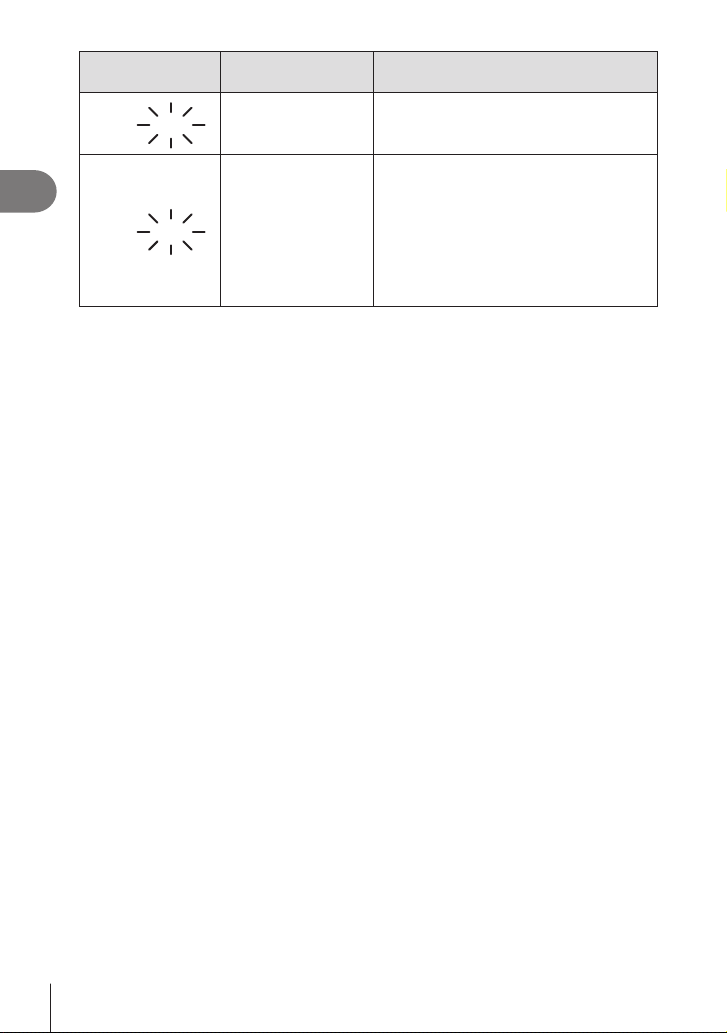
Warning display
example (blinking)
Status Action
2
Shooting
20002000 F2.8F2.8
125125 F22F22
The subject is
underexposed.
The subject is
overexposed.
Set the shutter speed slower.
• Choose a faster shutter speed. Shutter
speeds as fast as 1/16000 s are available
in silent mode. g “The Electronic
Shutter (Silent s)” (P. 88)
• If the warning display does not disappear,
the metered range of the camera is
exceeded. A commercially available ND
lter (for adjusting the amount of light) is
required.
%
• You can choose processing options using the prole control. Rotate the prole control
switch to the COLOR/MONO position to display the prole control. When the prole
control is not display while the prole control switch is in the COLOR/MONO position,
press u button to display the control. g “Shooting enhanced images (Prole Control)”
(P. 46)
• You can choose the functions performed by the front and rear dials. g [Dial Function]
(P. 145)
• You can choose whether the display reects the eects of exposure compensation or
maintains a constant brightness for ease of viewing. At default settings, the eects of
exposure settings are visible in the display. g [Live View Boost] (P. 146)
40
EN
Page 41
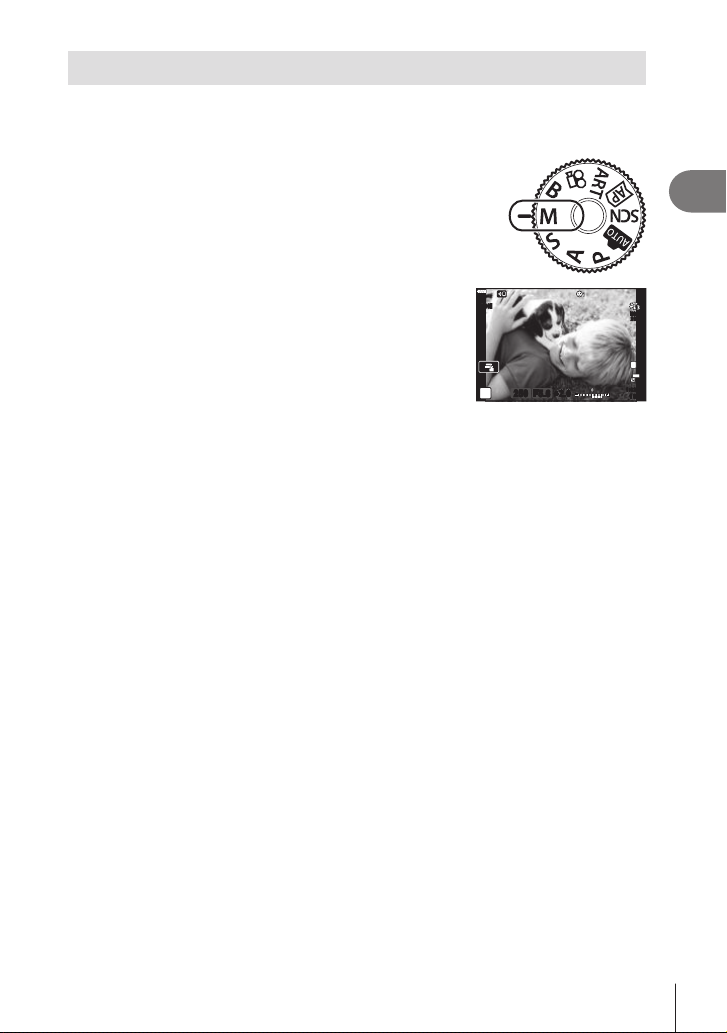
Choosing aperture and shutter speed (Manual mode)
250250 F5.6
M
2.0+2.0
1023
In this mode, you choose the aperture and shutter speed. You can adjust settings
according to your goals, for example by combining fast shutter speeds with small
apertures (high f/-numbers) for increased depth of eld.
Rotate the mode dial to M.
1
Adjust aperture and shutter speed.
2
• At default settings, aperture is selected with the front
S-IS ONS-IS ON
dial and shutter speed with the rear dial.
• The exposure determined by the aperture value and
shutter speed you have set and the dierence from
the suitable exposure measured by the camera are
displayed on the monitor.
+
• Shutter speed can be set to values between 1/4000 and
60 seconds.
• Shutter speeds as fast as 1/16000 s are available in s
(silent) mode. g “The Electronic Shutter (Silent s)”
(P. 88)
Take pictures.
3
%
• You can choose processing options using the prole control. Rotate the prole control
switch to the COLOR/MONO position to display the prole control. When the prole
control is not display while the prole control switch is in the COLOR/MONO position,
press u button to display the control. g “Shooting enhanced images (Prole Control)”
(P. 46)
• You can choose the functions performed by the front and rear dials. g [Dial Function]
(P. 145)
• The brightness of the image displayed in the monitor will change with changes in aperture
and shutter speed. You can x the brightness of the display so that you can keep the
subject in view while shooting. g [Live View Boost] (P. 146)
1:02:03
ISO-A
200
L
F
4K
30p
2
Shooting
41
EN
Page 42
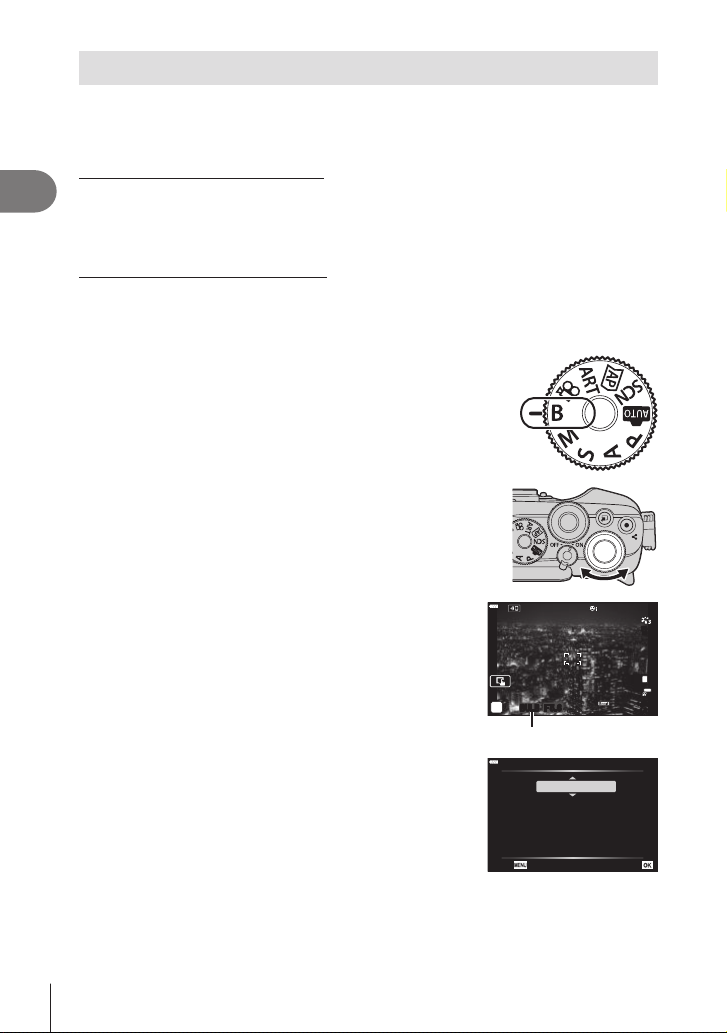
Long Exposures (Bulb/Time)
BULB
F5.6
1023
B
Live Bulb
Back Set
Leave the shutter open for a long exposure. You can preview the photo in live view
and end the exposure when the desired results have been achieved. Use when long
exposures are required, for example when photographing night scenes or reworks.
“Bulb” and “Live Bulb” Photography
The shutter remains open while the shutter button is pressed. Releasing the button ends the
2
exposure.
Shooting
• When live bulb photography is selected, you can choose how often the camera updates
the live view display during the exposure.
“Time” and “Live Time” Photography
The exposure begins when the shutter button is pressed all the way down. To end the
exposure, press the shutter button all the way down a second time.
• When live time photography is selected, you can choose how often the camera updates
the live view display during the exposure.
Rotate the mode dial to B.
1
Select [BULB]/[LIVE BULB] (bulb photography) or
2
[TIME]/[LIVE TIME] (time photography).
• At default settings, the selection is made with the rear
dial.
ISO-A
200
Press the MENU button.
3
• You will be prompted to choose the interval at which the
preview is updated.
Highlight an interval using FG.
4
42
EN
L
F
4K
30p
1:02:03
Bulb or time photography
Off
Display Count
ISO LOW ~
ISO 400 ~
ISO 800 ~
ISO 1600
24 times
19 times
14 times
9 times
Page 43
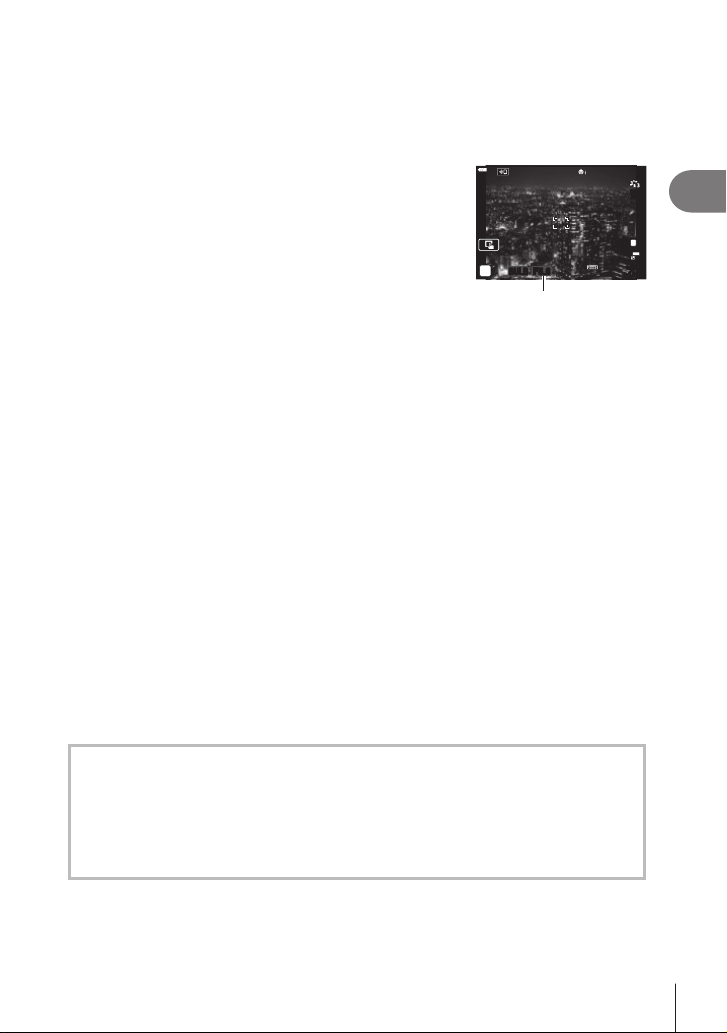
Press the Q button to select the highlighted option.
BULB
F5.6
1023
B
5
• The menus will be displayed.
Press the MENU button to exit the menus.
6
• If an option other than [O] is selected, [LIVE BULB] or [LIVE TIME] will appear in the
display.
Adjust aperture.
7
• At default settings, aperture can be adjusted using the
front dial.
Aperture
Take pictures.
8
• In bulb and live bulb modes, keep the shutter button pressed. The exposure ends
when the button is released.
• In time and live time modes, press the shutter button all the way down once to start
the exposure and again to end it.
• The exposure ends automatically when the time selected for [Bulb/Time Timer] is
reached. The default is [8 min]. The time can be changed. g [Bulb/Time Timer]
(P. 147)
• [Noise Reduct.] is applied after shooting. The display shows the time remaining until
the process is complete. You can choose the conditions under which noise reduction
is performed (P. 147).
• During live time photography, you can refresh the preview by pressing the shutter button
halfway.
• Some limitations apply to the choice of ISO sensitivity settings available.
• During shooting, there are limits on the settings for the following functions.
Sequential shooting, self-timer shooting, time lapse shooting, image stabilizer, multiple
*1*2
exposure
, etc.
*1 When an option other than [O] is selected for [Live Bulb] or [Live Time] (P. 147)
*2 When the prole control switch is in the COLOR/MONO position (P. 46)
• [K Image Stabilizer] (P. 96) turns o automatically.
• Depending on camera settings, the temperature, and the situation, you may notice noise
or bright spots in the monitor. These may sometimes appear in pictures even when [Noise
Reduct.] (P. 147) is enabled.
Noise in images
When shooting at slow shutter speeds, noise may appear in images. This phenomenon
occurs when the temperature rises in the image pickup device or image pickup device
internal drive circuit, causing current to be generated in those sections of the image pickup
device that are not normally exposed to light. This can also occur when shooting with a
high ISO setting in a high-temperature environment. To reduce this noise, the camera
activates the noise reduction function. g [Noise Reduct.] (P. 147)
1:02:03
ISO-A
200
L
F
4K
30p
2
Shooting
%
• During bulb/time photography, the brightness of the subject in the display is enhanced for
ease of viewing when lighting is poor. g [Live View Boost] (P. 146)
43
EN
Page 44
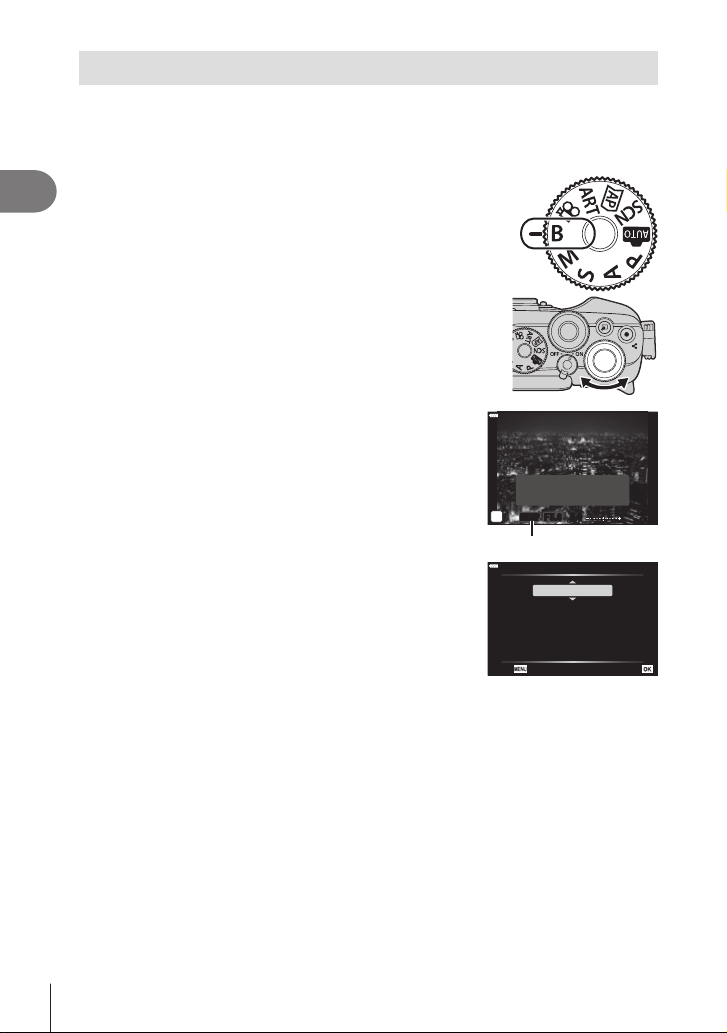
Lighten Blending (Live Composite Photography)
LIVECOMP
F5.6
1023
B
Composite Settings
Back Set
Leave the shutter open for a long exposure. You can view the light trails left by
reworks or stars and photograph them without changing the exposure of the
background. The camera combines multiple shots and records them as a single
photograph.
Rotate the mode dial to B.
1
2
Shooting
Select [LIVE COMP] (live composite photography).
2
• At default settings, the selection is made with the
rear dial.
Live composite photography
Press the MENU button.
3
• The [Composite Settings] menu will be displayed.
Press shutter button once
to prepare for composite
shooting.
Exposure time per image.
Exposure time and aperture
will determine your base exposure.
1sec
0
0.0
1:02:03
Highlight an exposure time using FG.
4
• Choose an exposure time of from 1/2 to 60 s.
Press the Q button to select the highlighted option.
5
• The menus will be displayed.
Press the MENU button repeatedly to exit the menus.
6
Adjust aperture.
7
• At default settings, aperture can be adjusted using the front dial.
44
EN
Page 45
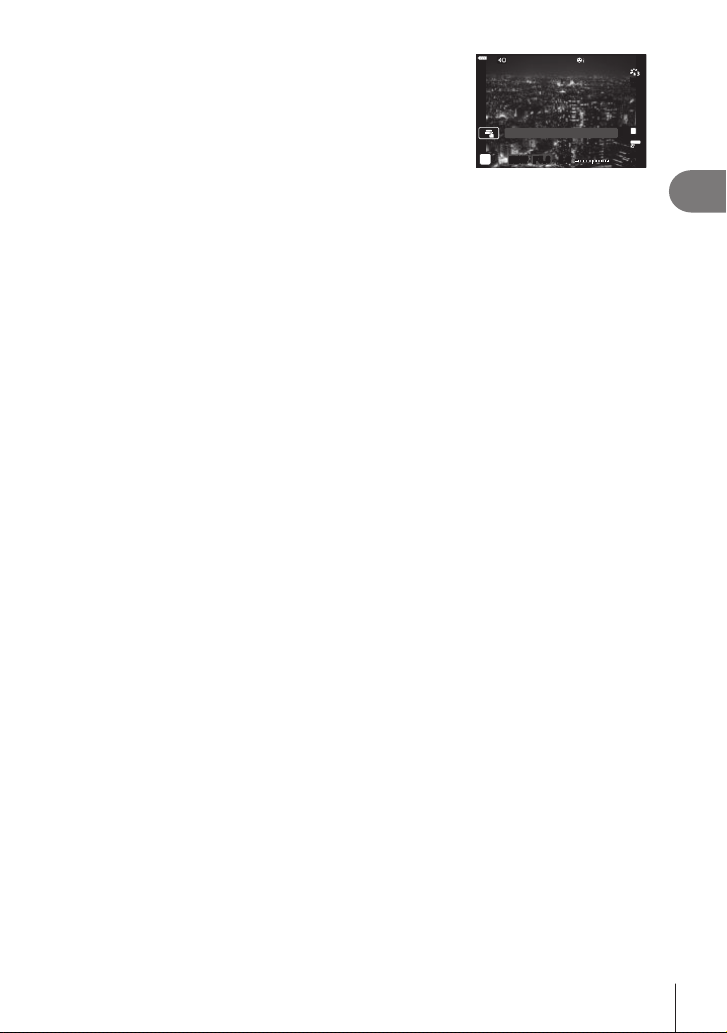
Press the shutter button all the way down to ready
LIVECOMP
F5.6
0.0
1023
B
8
the camera.
• The camera is ready to shoot when [Ready for
composite shooting] is displayed.
Press the shutter button to start shooting.
9
Ready for composite shooting
0
• Live composite photography will start. The display will be updated after each
exposure.
Press the shutter button again to end shooting.
10
• Live composite photography can continue for up to three hours. The maximum
recording time available varies with battery level and shooting conditions.
• Some limitations apply to the choice of ISO sensitivity settings available.
• To reduce blur caused by camera shake, x the camera securely to a tripod and use a
remote shutter release controlled via OI.Share (P. 161).
• During shooting, there are limits on the settings for the following functions.
Sequential shooting, self-timer shooting, time lapse shooting, image stabilizer, multiple
exposure, etc.
• [K Image Stabilizer] (P. 96) turns o automatically.
%
• The exposure time for each exposure made during live composite photography can be
chosen in advance using the menus. g G Custom Menu Q > [Composite Settings]
(P. 147)
1:02:03
ISO-A
200
L
F
4K
30p30
p
2
Shooting
45
EN
Page 46
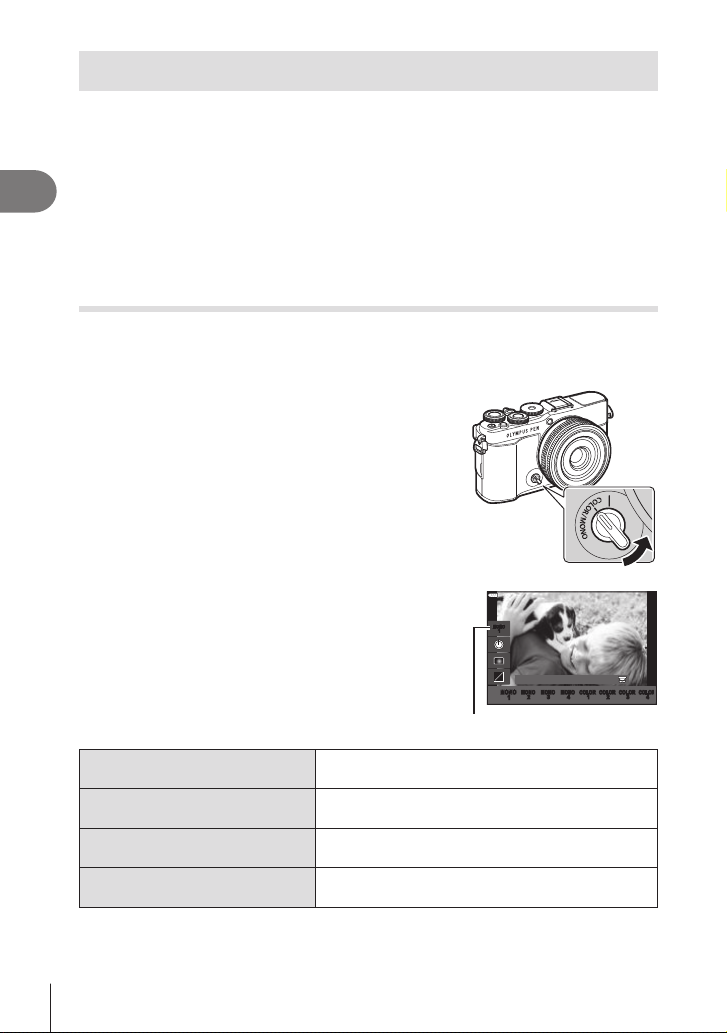
Shooting enhanced images (Prole Control)
Use the prole control switch to switch to prole control photography.
You can choose image enhancement options on the prole control screen.
• Prole control photography is available only when the mode dial is rotated to P, A, S, M,
or B.
• Some functions such as multiple exposures cannot be used with this function.
2
• If [RAW] is currently selected for image quality, image quality will automatically be set to
Shooting
RAW+JPEG.
• Touch controls can also be used.
Shooting enhanced monochrome pictures
(Monochrome Prole Control)
You can apply a color lter eect to monochrome pictures (Color Filter Eect), change
the amount of peripheral light (Shading), and adjust bright and dark areas of the picture
(Highlight&Shadow Control).
Rotate the prole control switch to
1
COLOR/MONO.
• The prole control screen will be displayed.
Choose a prole using FG and choose
2
one from [Mono1] to [Mono4] using HI.
• You can use the rear dials to select
[Mono1/2/3/4].
• The following are presets for [Mono1] to
[Mono4].
Prole
MONO 1MONO
1
Monochrome Profile 1
MONO 1MONO
MONO 2MONO 2MONO 3MONO 3MONO 4MONO 4COLOR 1COLOR 1COLOR 2COLOR 2COLOR 3COLOR 3COLOR 4COLOR
1
4
Mono1 Monochrome Prole 1
Mono2 Monochrome Prole 2
Mono3 Monochrome Prole 3
Mono4 Monochrome Prole 4
46
EN
A standard “Monochrome” preset with all settings reset
to their default values (±0)
A
preset that produces the eect of black-and-white
lm
A
preset that produces the eect of infrared black-
and-white lm
A
preset that reduces the contrast to make your
photo look soft
Page 47

Use FG to choose an option and adjust the settings (P. 48).
3
Press the Q button.
4
Shoot.
5
• To go back to the prole control screen, press the u button.
2
Shooting
EN
47
Page 48
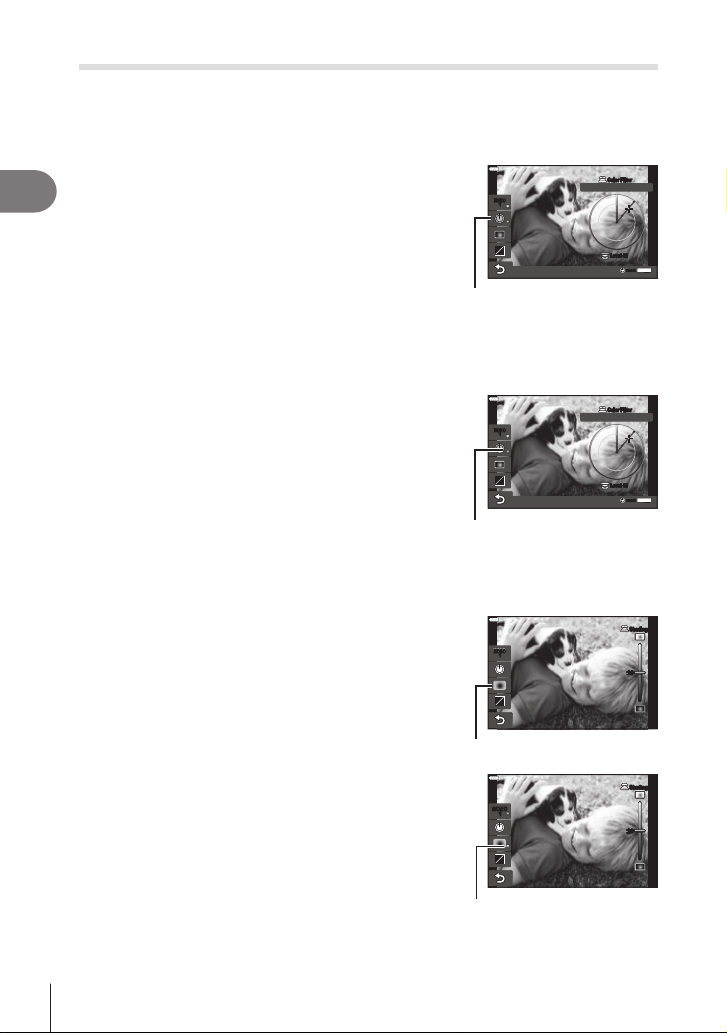
Image enhancement options for monochrome prole control
Color Filter Effect
You can apply a color lter eect to monochrome pictures, choosing from eight colors
and three intensity levels.
Choose Color Filter Eect using FG on the
1
2
Shooting
prole control screen.
• Press and hold the Q button to restore the default
color lter eect.
Choose the color of the lter using the front dial
2
and the intensity using the rear dial.
• When a setting is changed, “*” is displayed to the right
of the option icon.
• The settings are saved as the current prole ([Mono1]
to [Mono4]).
Shading Editor
You can adjust the peripheral illumination of pictures.
Choose Shading Editor using FG on the
1
prole control screen.
• Use the front dial to adjust shading.
• Press and hold the Q button to restore the default
shading setting.
• When a setting is changed, “*” is displayed to the right
of the option icon.
• The settings are saved as the current prole ([Mono1]
to [Mono4]).
MONO 1MONO
1
Color Filter Eect
MONO 1MONO
1
*
MONO 1MONO
1
Shading Editor
MONO 1MONO
1
Color FilterColor Filter
Yellow
Level +2Level +2
Color FilterColor Filter
Yellow
Level +2Level +2
ResetReset OK
ResetReset OK
±0±0
±0±0
ShadingShading
ShadingShading
Hold
Hold
OK
Hold
Hold
OK
*
48
EN
Page 49
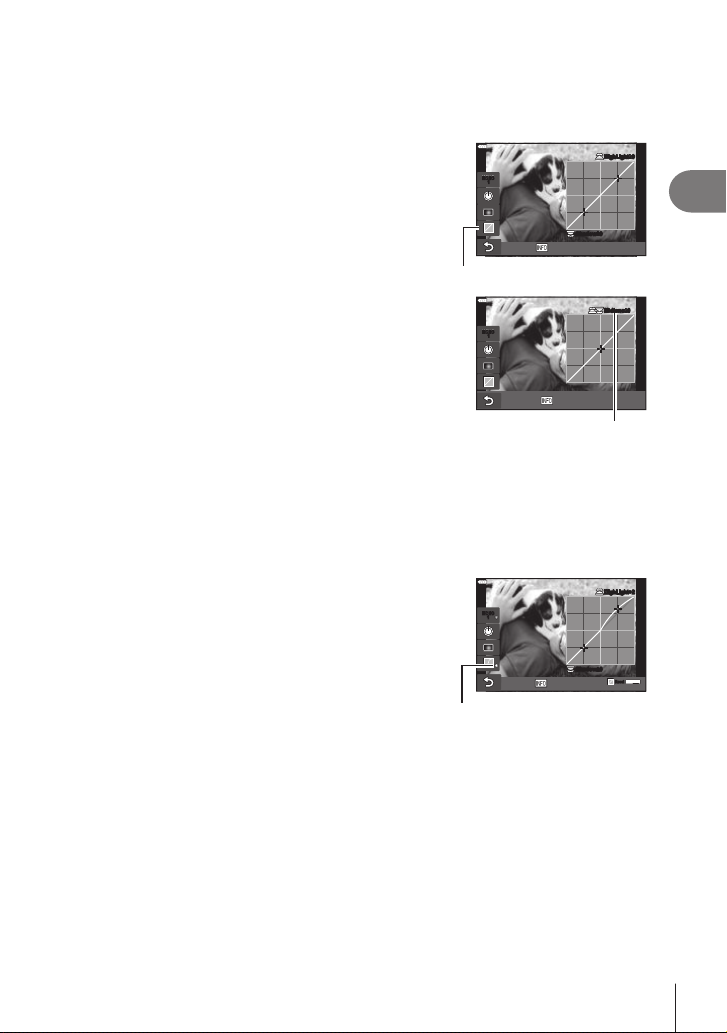
Highlight&Shadow Control
Adjust brightness separately for highlights, mid-tones, and shadows. You gain greater
control over exposure than you would with exposure compensation alone. You can
selectively make highlights darker or shadows brighter.
Choose Highlight&Shadow Control using FG
1
on the prole control screen.
• Press and hold the Q button to restore the default
MONO 1MONO
1
highlight&shadow.
Midtone
Shadow±0
Highlight&Shadow Control
Press the INFO button to choose the desired
2
tone range.
• The tone range changes each time the button is
MONO 1MONO
1
pressed.
Hi. & Sh.
Selected tone range
Rotate the dials to choose the desired setting.
3
• [Hi. & Sh.] (Highlight&Shadow) selected
Adjust highlights using the front dial and shadows
using the rear dial.
• [Midtone] selected
Use the front or rear dial.
• When a setting is changed, “*” is displayed to the right
of the option icon.
• The settings are saved as the current prole ([Mono1]
MONO1MONO
1
to [Mono4]).
Midtone
Shadow±0
*
%
• In addition to Color Filter/Shading/Highlight&Shadow, you can also adjust the granular
feeling, color, etc. of the image.
Film Grain Eect (P. 107)/Sharpness (P. 106)/ Monochrome Color (P. 109)/ Contrast
(P. 106)
HighLight
Midtone
HighLight+2
ResetReset OK
±0
±0
OK
Hold
Hold
2
Shooting
EN
49
Page 50

• When you choose a prole on the prole control screen
using FG and press and hold the Q button, the Color
Filter (P. 48)/Shading (P. 48)/Highlight&Shadow
(P. 49) settings for the selected prole ([Mono1/2/3/4])
reset to the default values. The following settings also
reset to the default values at the same time.
Film Grain Eect (P. 107)/Sharpness (P. 106)/
Monochrome Color (P. 109)/ Contrast (P. 106)
2
Shooting
MONO 1MONO
1
MONO 1MONO
MONO 2MONO 2MONO 3MONO 3MONO 4MONO 4COLOR 1COLOR 1COLOR 2COLOR 2COLOR 3COLOR 3COLOR 4COLOR
1
Prole
Monochrome Profile 1
ALLResetALLReset
OK
OK
Hold
Hold
4
50
EN
Page 51
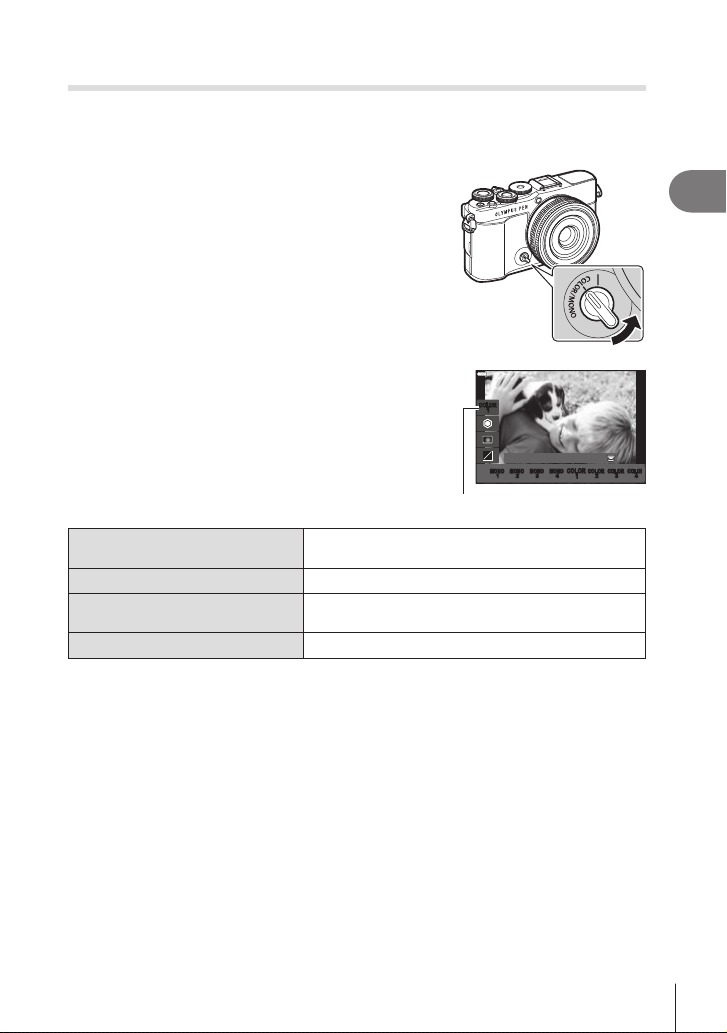
Shooting pictures with individual colors adjusted
(Color Prole Control)
You can adjust the saturation of each color (Saturation Level), change the amount
of peripheral light (Shading), and adjust bright and dark areas of the picture
(Highlight&Shadow Control).
Rotate the prole control switch to
1
COLOR/MONO.
• The prole control screen will be displayed.
Choose a prole using FG and choose
2
one from [Color1] to [Color4] using HI.
• You can use the rear dials to select
[Color1/2/3/4].
• The following are presets for [Color1] to
[Color4].
Prole
COLOR 1COLOR
1
MONO 1MONO 1MONO 2MONO 2MONO 3MONO 3MONO 4MONO
Color Profile 1
4
COLOR 1COLOR
COLOR 2COLOR 2COLOR 3COLOR 3COLOR 4COLOR
1
2
Shooting
4
Color 1 Color Prole 1
Color 2 Color Prole 2
Color 3 Color Prole 3
Color 4 Color Prole 4
Use FG to choose an option and adjust the settings (P. 52).
3
Press the Q button.
4
Shoot.
5
• To go back to the prole control screen, press the u button.
A standard “Natural” preset with all settings reset to
their default values (±0)
A
preset with deep, austere colors
A
preset that gives the eect of lm with highly
saturated, deep colors
A
preset with light and soft tones
EN
51
Page 52
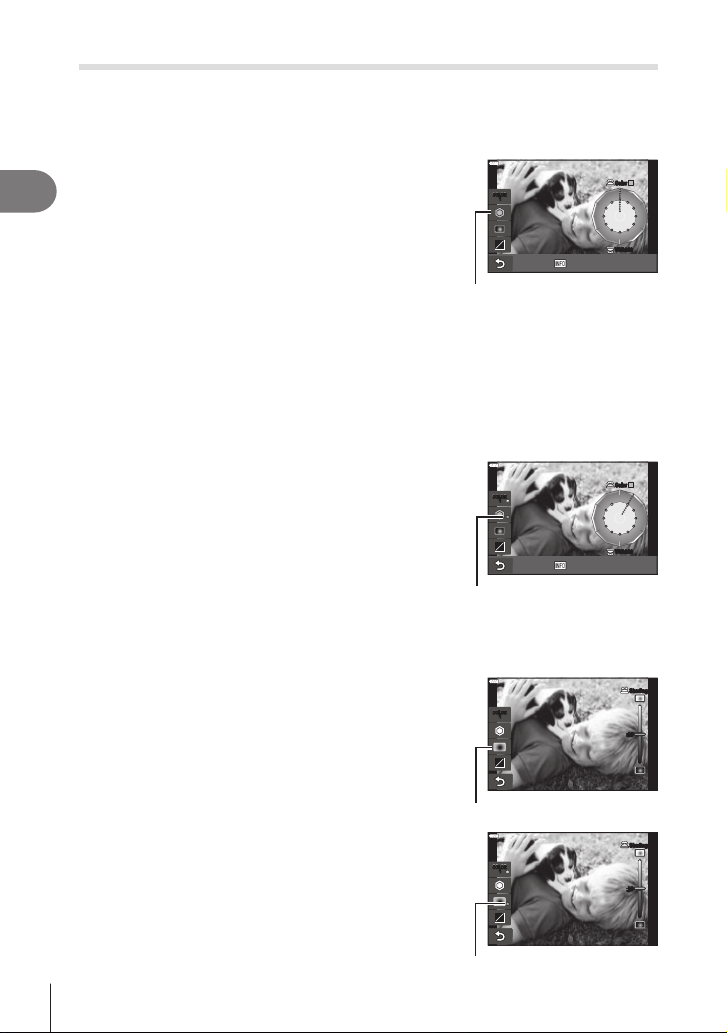
Image enhancement options for color prole control
Saturation Level
The saturation of twelve dierent colors can be adjusted by up to ±5 while checking the
eect on the screen.
Choose Saturation Level using FG on the
1
2
Shooting
prole control screen.
• Press and hold the Q button to restore the default
saturation level.
Set the hue using the front dial and the
2
saturation using the rear dial.
• Modications made with [Color All] displayed above
the Color Prole Control apply to all colors.
• To modify all colors simultaneously, press the
INFO button and rotate the rear dial to adjust the
saturation.
• When a setting is changed, “*” is displayed to the right
of the option icon.
• The settings are saved as the current prole ([Color1]
to [Color4]).
Shading Editor
You can adjust the peripheral illumination of pictures.
COLOR 1COLOR
1
All colors
Saturation Level
COLOR 1COLOR
1
All colors
*
ColorColor
ViVid ±0ViVid ±0
ColorColor
ViVid ±0ViVid ±0
Choose Shading Editor using FG on the
1
prole control screen.
• Use the front dial to adjust shading.
• Press and hold the Q button to restore the default
shading setting.
• When a setting is changed, “*” is displayed to the right
of the option icon.
• The settings are saved as the current prole ([Color1]
to [Color4]).
52
EN
COLOR 1COLOR
1
Shading Editor
COLOR 1COLOR
1
*
ShadingShading
±0±0
ShadingShading
±0±0
Page 53
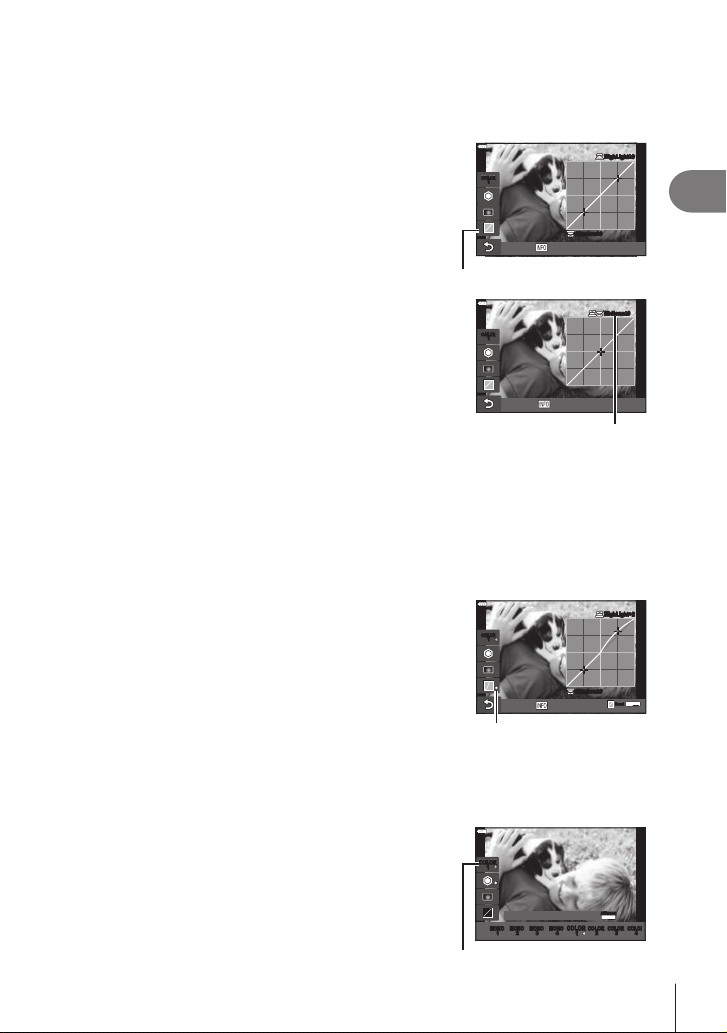
Highlight&Shadow Control
Adjust brightness separately for highlights, mid-tones, and shadows. You gain greater
control over exposure than you would with exposure compensation alone. You can
selectively make highlights darker or shadows brighter.
Choose Highlight&Shadow Control using FG
1
on the prole control screen.
• Press and hold the Q button to restore the default
COLOR 1COLOR
1
HighLight
highlight&shadow.
Midtone
Shadow±0
Highlight&Shadow Control
Press the INFO button to choose the desired
2
tone range.
• The tone range changes each time the button is
COLOR 1COLOR
1
Midtone
pressed.
Hi. & Sh.
Selected tone range
Rotate the dials to choose the desired setting.
3
• [Hi. & Sh.] (Highlight&Shadow) selected
Adjust highlights using the front dial and shadows
using the rear dial.
• [Midtone] selected
Use the front or rear dial.
• When a setting is changed, “*” is displayed to the right
of the option icon.
• The settings are saved as the current prole ([Color1]
COLOR 1COLOR
1
HighLight+2
to [Color4]).
Shadow±0
Midtone
ResetReset OK
*
%
• In addition to Color Prole/Shading/Highlight&Shadow, you can also adjust the sharpness
and/or contrast of the image.
Sharpness (P. 106)/Contrast (P. 106)
• When you choose a prole on the prole control screen
using FG and press and hold the Q button, the Color
Prole (P. 52)/Shading (P. 52)/Highlight&Shadow
(P. 53) settings for the selected prole ([Color1/2/3/4])
reset to the default values. The following settings also
reset to the default values at the same time.
Sharpness (P. 106)/Contrast (P. 106)
COLOR 1COLOR
1
MONO 1MONO 1MONO 2MONO 2MONO 3MONO 3MONO 4MONO
Color Profile 1
4
COLOR 1COLOR
COLOR 2COLOR 2COLOR 3COLOR 3COLOR 4COLOR
1
ALLResetALLReset
OK
OK
Hold
Hold
Prole
±0
±0
OK
Hold
Hold
4
EN
53
2
Shooting
Page 54
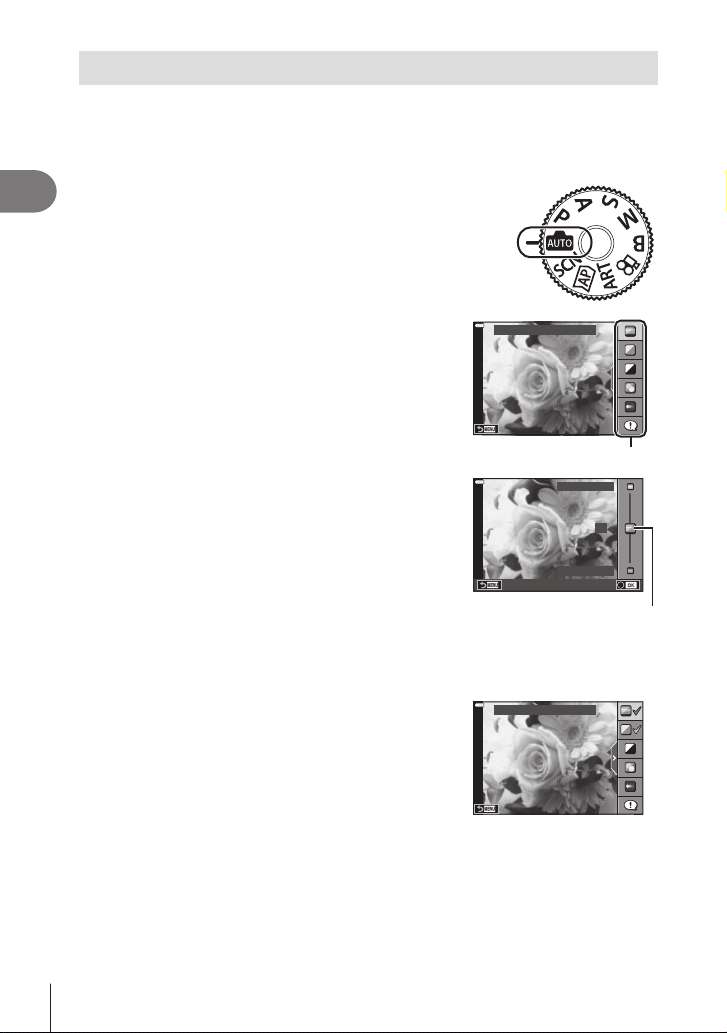
Letting the camera choose the settings (AUTO mode)
The camera adjusts settings to suit the scene; all you have to do is press the shutter
button.
Use live guides to easily adjust such parameters as color, brightness, and background
blurring.
2
Shooting
Set the mode dial to B.
1
• In auto mode, the camera automatically selects
the scene mode option appropriate to your subject
when you press the shutter button halfway. Once the
selection has been made, the B icon in the bottom
left corner of the display will be replaced by the icon
for the chosen scene.
To adjust shooting settings, display the live guide
2
by pressing the u button.
• Use FG to highlight an item in the live guide and
press Q to display a slider.
Use FG to position the slider and choose a
3
level.
• Press the Q button to save changes.
• To exit, press the MENU button.
• When [Shooting Tips] is selected, use FG to
highlight the item and press the Q button to display
the detail.
• The eect of the selected level is visible in the
display.
If [Blur Background] or [Express Motions] is selected,
the display will return to normal, but the selected
eect will be visible in the nal photograph.
To set multiple live guides, repeat Steps 2 and 3.
4
• A check is displayed on the guide item for live guides
that are already set.
• [Blur Background] and [Express Motions] cannot be
set at the same time.
Change Color Saturation
Change Color Saturation
Guide item
Clear & Vivid
0
Flat & Muted
Slider
54
EN
Page 55
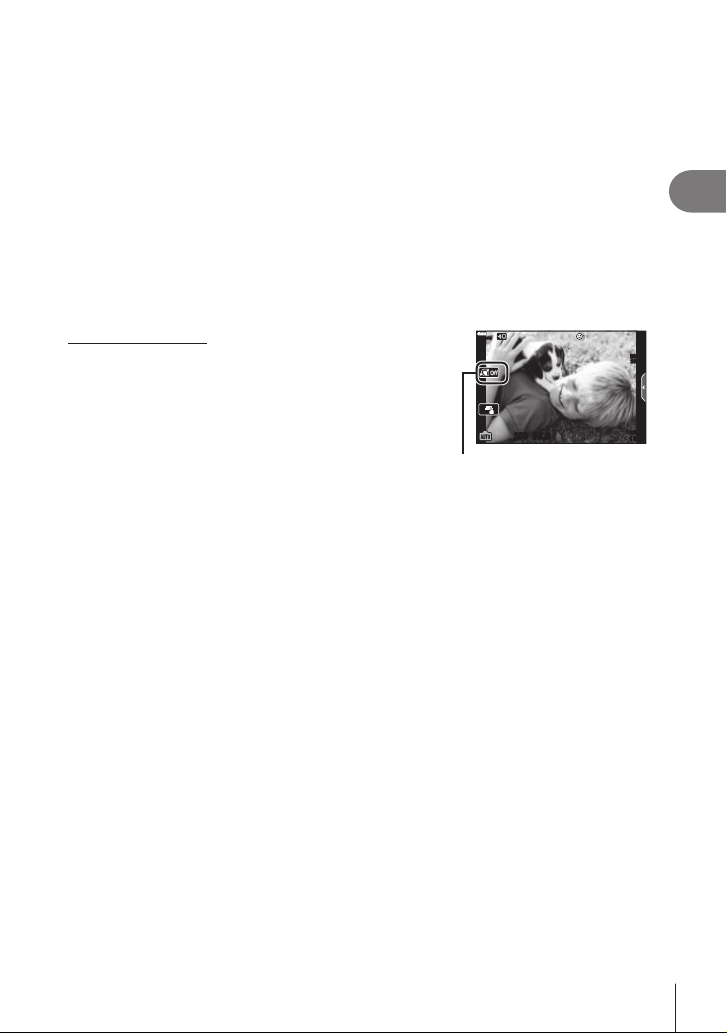
Shoot.
5
• To clear the live guides from the display, press the MENU button.
• If [RAW] is currently selected for image quality, image quality will automatically be set to
RAW+JPEG.
• Certain live guide settings are not applied to the RAW copy.
• Pictures may appear grainy at some live guide setting levels.
• Changes to live guide setting levels may not be visible in the monitor.
• Frame rates drop the closer the [Express Motions] slider is to [Blurred Motion].
• The ash cannot be used when a live guide is set.
• Choosing live guide settings that exceed the limits of the camera exposure meters may
result in pictures that are overexposed or underexposed.
$
• Touch controls can also be used.
One-Touch e-Portrait
To enable one-touch e-Portrait so that the camera
smooths the complexions of portrait subjects, tap the
A (one-touch e-Portrait) icon to turn it on (B).
g “Taking Photos in Self-Portrait Mode” (P. 78)
250250 F5.6
One-touch e-Portrait icon
1:02:03
1023
ISO-A
200
2
Shooting
EN
55
Page 56
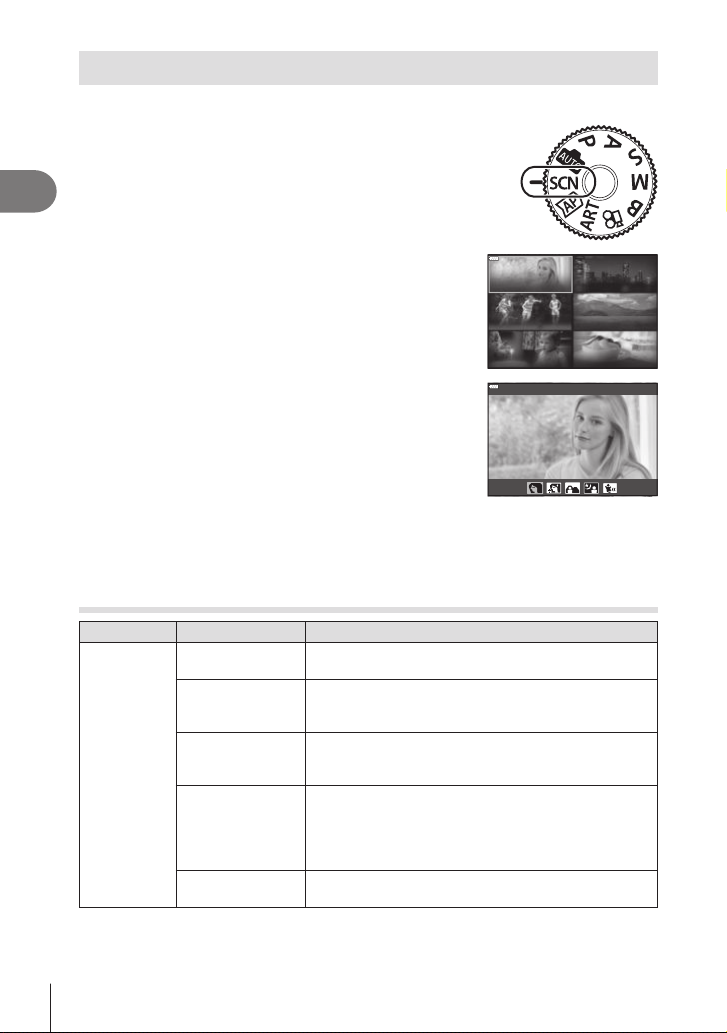
Shooting in scene mode (SCN mode)
Indoors Close-ups
Portrait
The camera automatically optimizes settings for the subject or scene.
Rotate the mode dial to SCN.
1
2
Shooting
Use FGHI to highlight a scene and press the
2
Q button.
Use HI to highlight a scene mode and press the
3
Q button.
• Press the u button to choose a dierent scene.
Shoot.
4
$
• Touch controls can also be used.
Types of scene modes
Subject type Scene mode Description
Suitable for portrait shooting.
Brings out skin texture.
Smooths out skin tones and texture.
The camera records two pictures: one with the eect
applied and one without.
Suitable for portrait shooting with a landscape in the
background.
Focuses from near to far.
Suitable for portrait shooting against a background of
night view.
Raise the ash (P. 84).
Use of a tripod and remote control via OI.Share is
recommended (P. 161).
Suitable for photographs of children and other active
subjects.
People
B
e
D
U
m
Portrait
e-Portrait
Portrait +
Landscape
Portrait +
Nightscape
Children
People
Motion Scenery
Nightscapes
56
EN
Page 57
Subject type Scene mode Description
Suitable for tripod shooting of night scenes.
Use of a tripod and remote control via OI.Share is
recommended (P. 161).
Suitable for portrait shooting against a background of
night view.
Raise the ash (P. 84).
Use of a tripod and remote control via OI.Share is
recommended (P. 161).
Suitable for shooting night scenes without a tripod.
Reduces blur when shooting low light/illuminated
scenes.
The camera makes eight exposures and combines
them into a single photograph.
Suitable for shooting reworks at night.
Use of a tripod and remote control via OI.Share is
recommended (P. 161).
The camera automatically shoots multiple images,
takes newly bright areas only, and composites them
into a single image.
With normal long exposure, an image of light trace such
as star trails with bright buildings tends to get too bright.
You can capture them without over exposure while
checking the progress.
Press the shutter button to start shooting, then view the
changing result in the monitor and press the shutter
button again to end shooting once the desired result is
achieved (maximum 3 hours).
Use of a tripod and remote control via OI.Share is
recommended (P. 161).
• For information on taking photos using this feature,
see “[Live Composite]: Live Composite Photography”
(P. 61), starting from Step 2.
• Advanced settings can be accessed via live
composite photography (dark and light eld
composite) in
Suitable for fast action shooting.
The camera will take photos while the shutter button is
pressed.
Suitable for photographs of children and other active
subjects.
Choose to blur the background behind moving objects.
The camera chooses the optimal shutter speed for
panning shots based on camera motion.
mode (P. 44).
B
Nightscapes
Motion
Nightscape
G
Portrait +
U
Nightscape
Handheld
H
Starlight
Fireworks
X
Light Trails
d
Sport
C
Children
m
Panning
J
2
Shooting
EN
57
Page 58
Subject type Scene mode Description
2
Shooting
Scenery
Indoors
Landscape
F
Sunset
`
Beach & Snow
g
Panorama
s
Backlight HDR
E
Candlelight
W
k Silent s
Portrait
B
e-Portrait
e
Children
m
Backlight HDR
E
Suitable for shooting landscapes.
Emphasizes sharpness and contrast.
Suitable for shooting the setting/rising sun.
Reproduces colors vividly.
Suitable for shooting snow-capped mountains,
landscapes, white sand beaches, etc.
Take panoramic photos with a wider angle of view than
other shots.
• For information on taking photos using this feature,
see “Shooting a Panorama” (P. 66), starting from
Step 3.
Suitable for high-contrast scenes. Each time the shutter
button is pressed, the camera takes four shots and
subsequently merges them into one, correctly exposed
image.
• For information on taking photos using this feature,
see “[HDR]: Taking Composite Photos with HDR”
(P. 64), starting from Step 3.
Suitable for shooting in candlelight.
Creates a soft atmosphere.
Disable camera sounds and lights in situations in which
they may be unwelcome.
• For information on taking photos using this feature,
see “[Silent s] Mode” (P. 65), starting from Step 2.
Suitable for portrait shooting.
Brings out skin texture.
Smooths out skin tones and texture.
The camera records two pictures: one with the eect
applied and one without.
Suitable for photographs of children and other active
subjects.
Suitable for high-contrast scenes. Each time the shutter
button is pressed, the camera takes four shots and
subsequently merges them into one, correctly exposed
image.
• For information on taking photos using this feature,
see “[HDR]: Taking Composite Photos with HDR”
(P. 64), starting from Step 3.
58
EN
Page 59

Subject type Scene mode Description
Macro Suitable for close-ups.
i
Nature Macro Suitable for vivid close-ups of owers or insects.
j
Documents
Close-ups
• To maximize the benets of the scene modes, some of the shooting function settings are
disabled.
• Some time may be needed to record pictures taken using [e-Portrait]. In addition, when
the image quality mode is [RAW], the image is recorded in RAW+JPEG.
• Movies cannot be recorded using [e-Portrait], [Handheld Starlight], [Panorama], or
[Backlight HDR].
• [Handheld Starlight] pictures taken with [RAW] selected for image quality will be recorded
in RAW+JPEG format, with the rst frame recorded as a RAW image and the nal
composite as a JPEG image.
• [Backlight HDR] records HDR-processed images in JPEG format. When the image quality
mode is set to [RAW], the image is recorded in RAW+JPEG.
• In [Panning], J is displayed during panning detection, and I is displayed when nothing
is detected.
• When using a lens with an image stabilizer switch in [Panning], turn the image stabilizer
switch o.
Sucient panning eects may not be obtained in bright conditions. Use a commercially
available ND lter to obtain eects more easily.
d
Multi Focus
t
Shot
Suitable for photos of timetables or other documents.
The camera heightens the contrast between the text
and background.
The camera takes eight photos, varying the focus
distance with each shot.
• For information on taking photos using this feature,
see “[Focus Bracketing]: Varying Focus Distance over
a Series of Shots” (P. 69), starting from Step 2.
2
Shooting
EN
59
Page 60
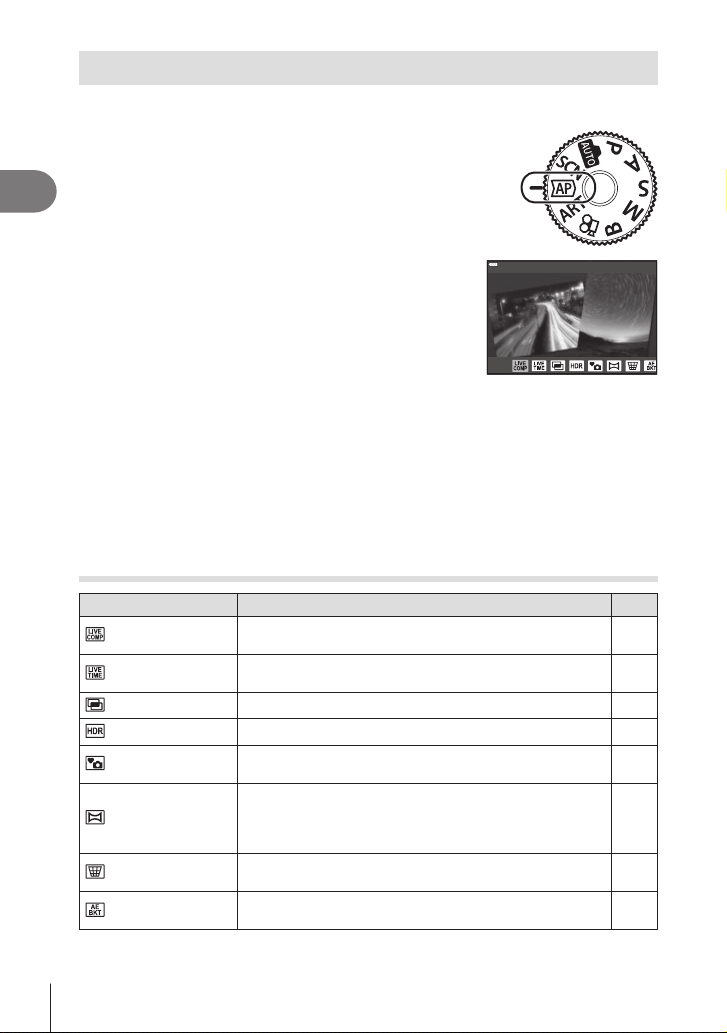
Shooting in advanced photo mode (Z mode)
Live Composite
Use for quick access to advanced shooting settings.
Rotate the mode dial to Z.
1
2
Shooting
Use HI to highlight an AP mode.
2
• Some modes oer additional options that can be
accessed using G.
Press the Q button to select the highlighted mode.
3
• Press the u button to choose a dierent mode. If additional options are displayed,
press F.
$
• In some modes, the front dial can be used for exposure compensation (P. 81) and the
rear dial for program shift (P. 36).
• Touch controls can also be used.
AP Mode Options
AP mode Description
Live Composite
Live Time
Multiple Exposure Combine two dierent images on top of one another. 63
HDR Capture details in both highlights and shadows. 64
Silent s
Panorama
Keystone
Compensation
AE Bracketing
Record light trails from stars and other objects while
keeping exposure constant overall.
Choose for photos of reworks and night scenery. Make
long time exposures at selected shutter speeds.
Disable camera sounds and lights in situations in which
they may be unwelcome.
Take a series of shots that are joined together to create
a wide-angle photo. Choose from two angles of view: a
wider angle than normal shots (z), or an even wider
angle (y).
Correct the eects of perspective in photos of buildings or
landscapes.
Each time the shutter button is pressed, the camera takes
a series of photos, varying exposure with each shot.
g
61
62
65
66
67
68
60
EN
Page 61
AP mode Description
Focus Bracketing
Each time the shutter button is pressed, the camera takes
a series of eight photos, varying the focus distance with
each shot.
g
69
[Live Composite]: Live Composite Photography
Create photos that record light trails from stars and other objects without changing the
brightness of the background; during shooting, the changing results can be viewed
in the monitor. You can adjust white balance or picture mode and other settings not
available with the SCN mode “Light Trails” option.
Highlight [Live Composite] on the AP-mode-selection screen (P. 60) and
1
press the Q button.
Press the shutter button halfway down to focus.
2
• To reduce blur caused by camera shake, x the camera securely to a tripod and use
a remote shutter release controlled via OI.Share (P. 161).
• If the focus indicator blinks, the camera is not in focus.
Press the shutter button all the way down to shoot.
3
• The camera congures the proper settings automatically and starts shooting.
• After pressing the shutter button, there is a time lag until shooting starts.
• The composite image will be displayed at regular intervals.
Press the shutter button again to stop shooting.
4
• View the changing result in the monitor and press the shutter button to end shooting
once the desired result is achieved.
• The recording length in one shooting is up to 3 hours.
$
• Advanced settings can be accessed via live composite photography (dark and light eld
composite) in B mode (P. 44).
2
Shooting
EN
61
Page 62

[Live Time]: Live Time Photography
Live Time
You can make long exposures without having to keep the shutter button pressed. The
changing result can be viewed in the monitor during shooting.
Highlight [Live Time] on the AP-mode-selection screen (P. 60).
1
Press G, use HI to choose the maximum
2
2
Shooting
exposure time, and press the Q button.
• The display refresh rate may change automatically
depending on the maximum exposure time selected.
• The shorter the maximum exposure time, the faster the
display refresh rate.
Press the shutter button halfway down to focus.
3
• To reduce blur caused by camera shake, x the camera securely to a tripod and use
a remote shutter release controlled via OI.Share (P. 161).
• If the focus indicator blinks, the camera is not in focus.
Press the shutter button all the way down to start live time photography.
4
• The camera adjusts settings automatically and begins shooting.
• The changing result can be viewed in the monitor.
Press the shutter button again to stop shooting.
5
• View the changing result in the monitor and press the shutter button to end shooting
once the desired result is achieved.
• Shooting ends automatically when the selected exposure time is reached.
2
min2min
$
• The long exposure (bulb/time) options in B mode oer more advanced settings (P. 42).
min1min4min
2
62
EN
Page 63

[Multiple Exposure]: Shooting Multiple Exposures
Combine two dierent images on top of one another.
Highlight [Multiple Exposure] on the AP-mode-selection screen (P. 60) and
1
press the Q button.
Press the shutter button halfway down to focus.
2
• If the focus indicator blinks, the camera is not in focus.
Press the shutter button all the way down for the rst shot.
3
• a is displayed in green if shooting starts.
• The image is shown superimposed on the monitor.
• Press D to delete the last shot.
Ta ke the second shot.
4
• Use the rst image as a guide to compose the second shot.
• The camera will not go to sleep while multiple exposure is in eect.
• Performing any of the following actions automatically deletes the second shot:
The camera is turned o; the q button is pressed; the MENU button is pressed; the
u button is pressed; the mode dial is rotated; the battery power runs out; or any cable
is connected to the camera
%
• For more information on creating image overlays: g “Combining Pictures (Image
Overlay)” (P. 141)
$
• Advanced settings can be used when you select [Multiple Exposure] in the P/A/S/M
mode while the prole control switch is not in the COLOR/MONO position.
g “Recording multiple exposures in a single image (Multiple Exposure)” (P. 131)
2
Shooting
EN
63
Page 64
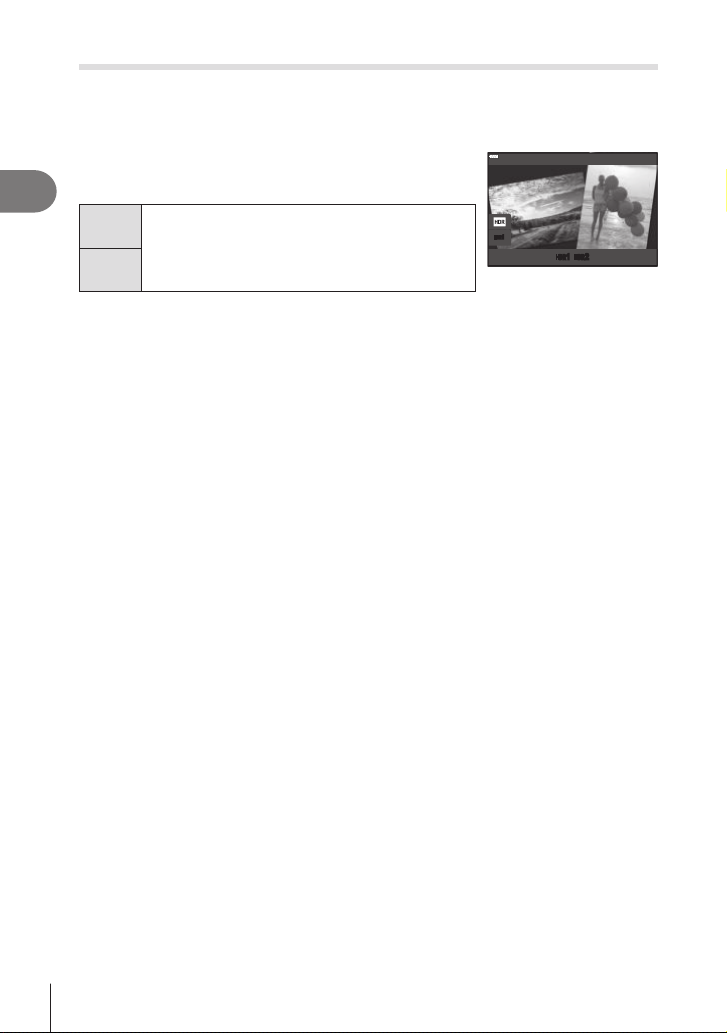
[HDR]: Taking Composite Photos with HDR
HDR
Capture details in both highlights and shadows. The camera varies exposure over a
series of four shots and combines them into a single image.
Highlight [HDR] on the AP-mode-selection screen (P. 60).
1
Press G, use HI to choose [HDR1] or [HDR2],
2
2
Shooting
and press the Q button.
Four shots are taken, each with a dierent
HDR1
exposure, and the shots are combined into one
HDR image inside the camera. HDR2 provides a
more impressive image than HDR1. ISO sensitivity
HDR2
is xed to 200.
Press the shutter button halfway down to focus.
3
• If the focus indicator blinks, the camera is not in focus.
Press the shutter button all the way down to start HDR photography.
4
• The camera automatically takes four shots when the shutter button is pressed.
• Noise may be more noticeable in photos taken in conditions associated with slow shutter
speeds.
• For best results, secure the camera by, for example, mounting it on a tripod.
• The image displayed on the monitor during shooting diers from the nal HDR picture.
• The HDR-processed image will be saved as a JPEG le. When the image quality mode is
set to [RAW], the image is recorded in RAW+JPEG.
• The picture mode is xed to [Natural] and the color space is xed to [sRGB].
1
HDR
HDR1HDR
2
64
EN
Page 65

[Silent s] Mode
Disable camera sounds and lights in situations in which they may be unwelcome.
Highlight [Silent s] on the AP-mode-selection screen (P. 60) and press
1
the Q button.
Press the shutter button halfway down to focus.
2
• If the focus indicator blinks, the camera is not in focus.
Press the shutter button all the way down to shoot.
3
• When the shutter is released, the monitor screen will go dark for a moment. No
shutter sound will be emitted.
• The desired results may not be achieved under ickering light sources such as uorescent
or LED lamps or if the subject moves abruptly during shooting.
• When [Silent s] is selected in the SCN or Z mode, the following measures are
undertaken to reduce the sound and light produced by the camera.
- Electronic shutter: Enabled
- 8: O
- AF Illuminator: O
- Flash mode: O
• Noise reduction is not available when [Silent s] is selected in the SCN or Z mode.
• Note that due to the electronic shutter, the subject may appear to be distorted in
photographs if camera moves quickly during shooting or when shooting fast-moving
subjects.
$
• Press G for sequential/self-timer photography (P. 86).
• Advanced settings can be used when you select Silent s photography (P. 88) in the
P/A/S/M/ART mode. g “Setting anti-shock/silent shooting (Anti-Shockr/Silents)”
(P. 135)
2
Shooting
EN
65
Page 66
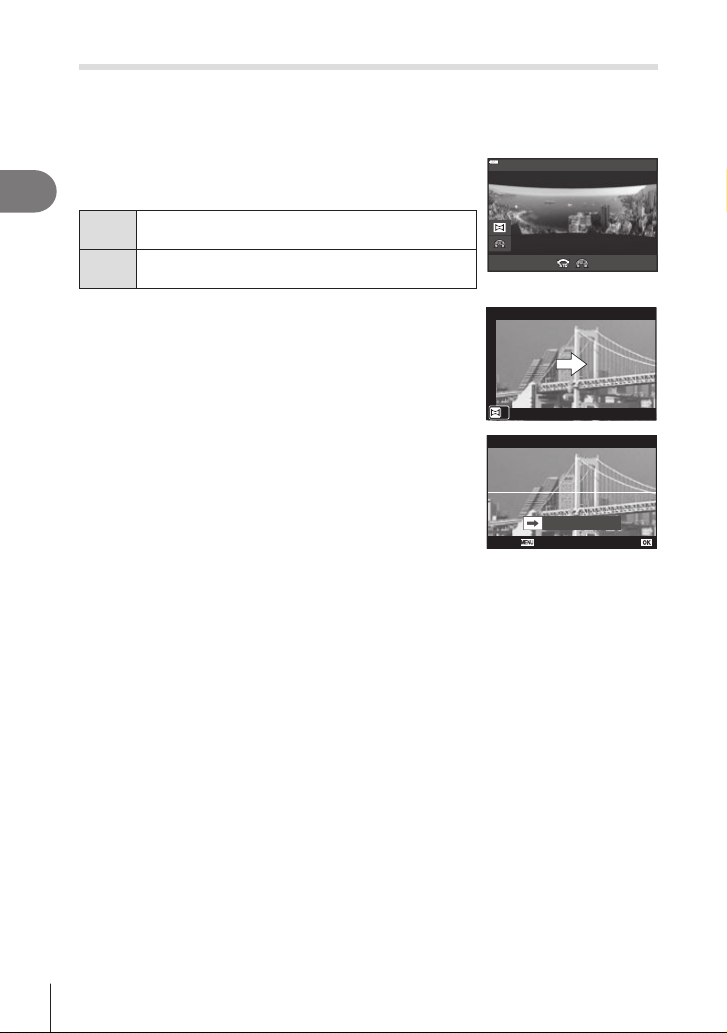
Shooting a Panorama
Panorama
Cancel Save
Pan the camera following an on-screen guide to create a single wide-angle (panorama)
photo.
Highlight [Panorama] on the AP-mode-selection screen (P. 60).
1
Press G, then use HI to highlight the desired
2
2
Shooting
panorama type and press the Q button.
Take panorama photos with a wider angle of view
z
than other shots.
Take panorama photos with a wider angle of view
y
than z.
Highlight a pan direction using FGHI and press
3
the Q button.
• You can also select the pan direction using the front and
rear dials.
Press the shutter button halfway to focus.
4
Press the shutter button the rest of the way down to
5
start shooting, and then pan the camera slowly in
the direction indicated by the arrow in the display.
• The arrow in the display moves as the camera is
panned.
• To cancel shooting and return to Step 3, press the
MENU button.
When the arrow in the display reaches the end of the progress bar, shooting
6
will end and the camera will create a panorama.
$
• Focus, exposure, and the like are xed at the values in eect at the start of shooting.
• Before the arrow reaches the end of the progress bar, you can press the Q button or
press the shutter button again to end shooting and record a panorama from the data
recorded to the current point.
• Shooting may be cancelled and an error displayed if:
the camera is panned too slowly or too quickly/the camera is panned diagonally/
the camera is panned in the opposite direction to the arrow in the display/the lens is
zoomed in or out/panning does not start within a set period
• Panorama photography may be unavailable with some lenses.
66
EN
Page 67
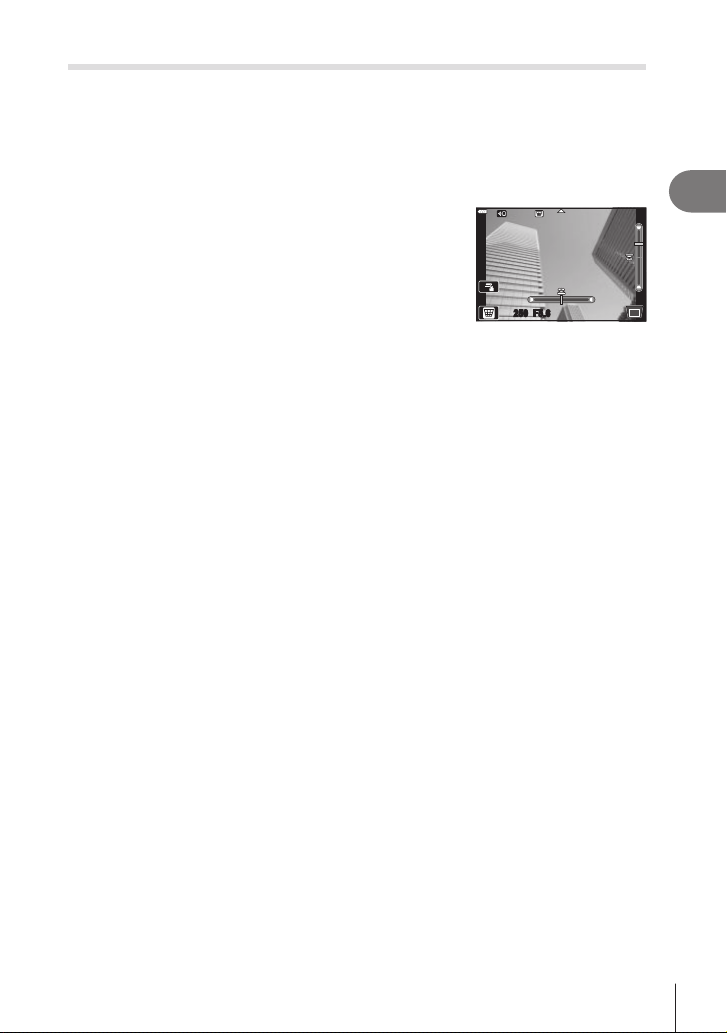
[Keystone Compensation]
250250 F5.6
Keystone distortion due to the inuence of lens focal length and proximity to the subject
can be corrected, or enhanced to exaggerate the eects of perspective. Keystone
compensation can be previewed in the monitor during shooting. The corrected image is
created from a smaller crop, slightly increasing the eective zoom ratio.
Highlight [Keystone Compensation] on the AP-mode-selection screen
1
(P. 60) and press the Q button.
Frame the shot and adjust keystone compensation
2
while viewing your subject in the display.
• Use the front and rear dials to choose the compensation
amount.
• Use FGHI to choose the area to be recorded.
Depending on the compensation amount, you may be
unable to choose the area recorded.
• Press and hold the Q button to cancel any changes.
• To adjust exposure compensation and other shooting options while keystone
compensation is in eect, press the INFO button to view a display other than
keystone compensation adjustment. To resume keystone compensation, press the
INFO button until keystone compensation adjustment is displayed.
Press the shutter button halfway down to focus.
3
• If the focus indicator blinks, the camera is not in focus.
Press the shutter button all the way down to shoot.
4
• As the compensation amount increases:
- The image will become coarser
- The zoom ratio of the crop will increase
- It will no longer be possible to reposition the crop in both the vertical and horizontal
displays
• Photos are recorded in RAW+JPEG format when [RAW] is selected for image quality.
• The desired results may not be obtained with converter lenses.
• Depending on the amount of correction, some AF targets may be outside the display area.
An icon (g, h, i or j) is displayed when the camera focuses on an AF target outside
the display area.
• If a focus distance is selected for [Image Stabilizer], the correction will be adjusted for
the selected focus distance. Except when using a Micro Four Thirds or Four Thirds lens,
choose a focal length using the [Image Stabilizer] option (P. 96).
2
Shooting
EN
67
Page 68
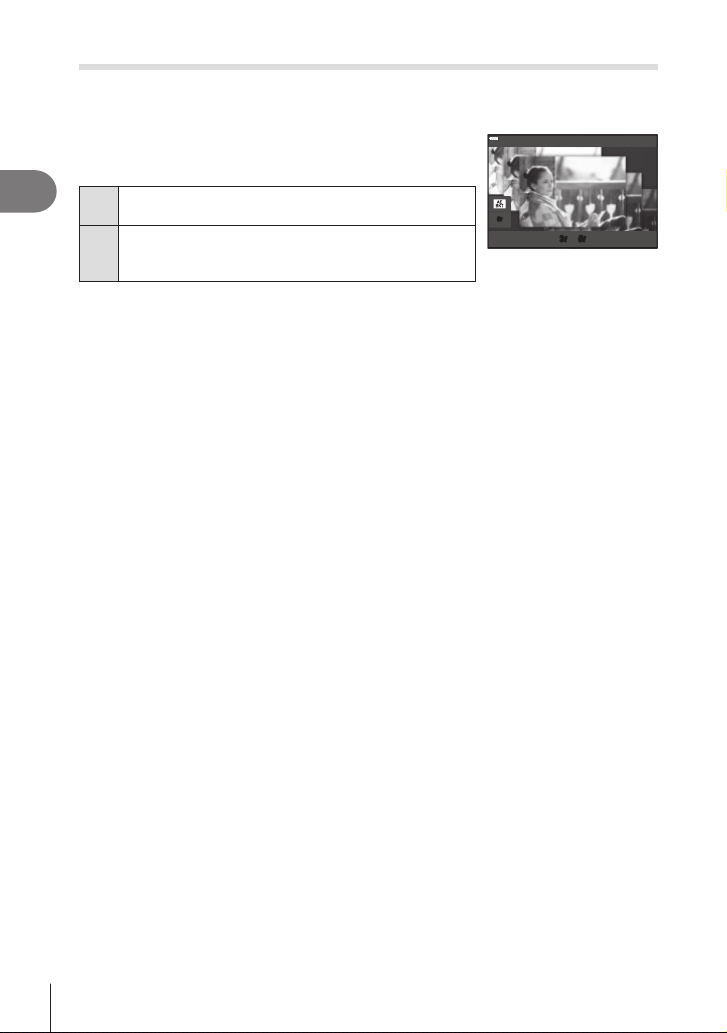
[AE Bracketing]: Varying Exposure over a Series of Shots
AE Bracketing
Take a series of photos, varying the exposure with each shot.
Highlight [AE Bracketing] on the AP-mode-selection screen (P. 60).
1
Press G, use HI to choose the number of shots,
2
and press the Q button.
2
Shooting
Take 3 shots, the rst at optimal exposure (±0.0 EV),
3f
the second at −1.0 EV, and the third at +1.0 EV.
Take 5 shots, the rst at optimal exposure (±0.0 EV),
5f
the second at −1.3 EV, the third at −0.7 EV, the fourth
at +0.7 EV, and the fth at +1.3 EV.
Press the shutter button halfway down to focus.
3
• If the focus indicator blinks, the camera is not in focus.
Press the shutter button all the way down to shoot.
4
• Take the set number of shots.
• The t indicator turns green during bracketing.
• The camera brackets the value currently selected for exposure compensation.
5
f
f
3f5
68
EN
Page 69
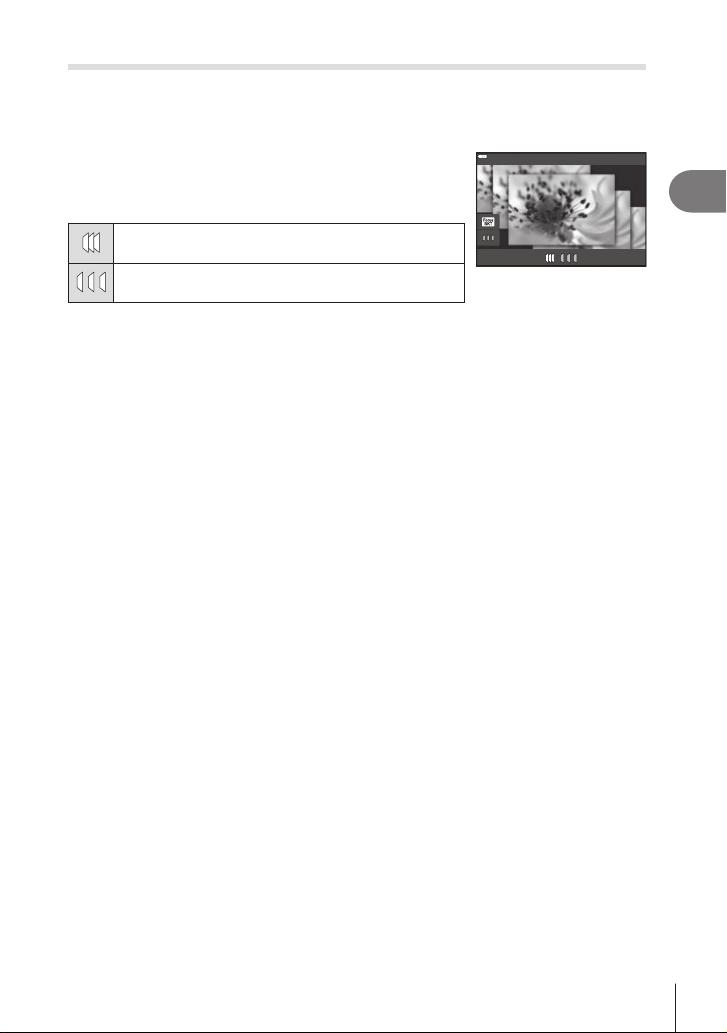
[Focus Bracketing]: Varying Focus Distance over a Series of Shots
Focus Bracketing
Each time the shutter button is pressed, the camera takes a series of eight photos,
varying the focus distance with each shot.
Highlight [Focus Bracketing] on the AP-mode-selection screen (P. 60).
1
Press G, use HI to choose the amount focus
2
distance changes with each shot, and press the Q
button.
The focus distance changes by a small amount with
each shot.
The focus distance changes by a large amount with
each shot.
Press the shutter button halfway down to focus.
3
• If the focus indicator blinks, the camera is not in focus.
Press the shutter button all the way down to shoot.
4
• The camera takes eight photos, varying the focus distance with each shot. The camera
will take pictures at, and at distances in front of and behind, the focus distance chosen
when the shutter button is pressed halfway.
• The t indicator turns green during bracketing.
• Focus bracketing ends if zoom is adjusted during shooting.
• Shooting ends when focus reaches ) (innity).
• Focus bracketing uses the electronic shutter.
• Focus bracketing is not available with lenses that have mounts conforming to the Four
Thirds or some Micro Four Thirds standards.
2
Shooting
EN
69
Page 70
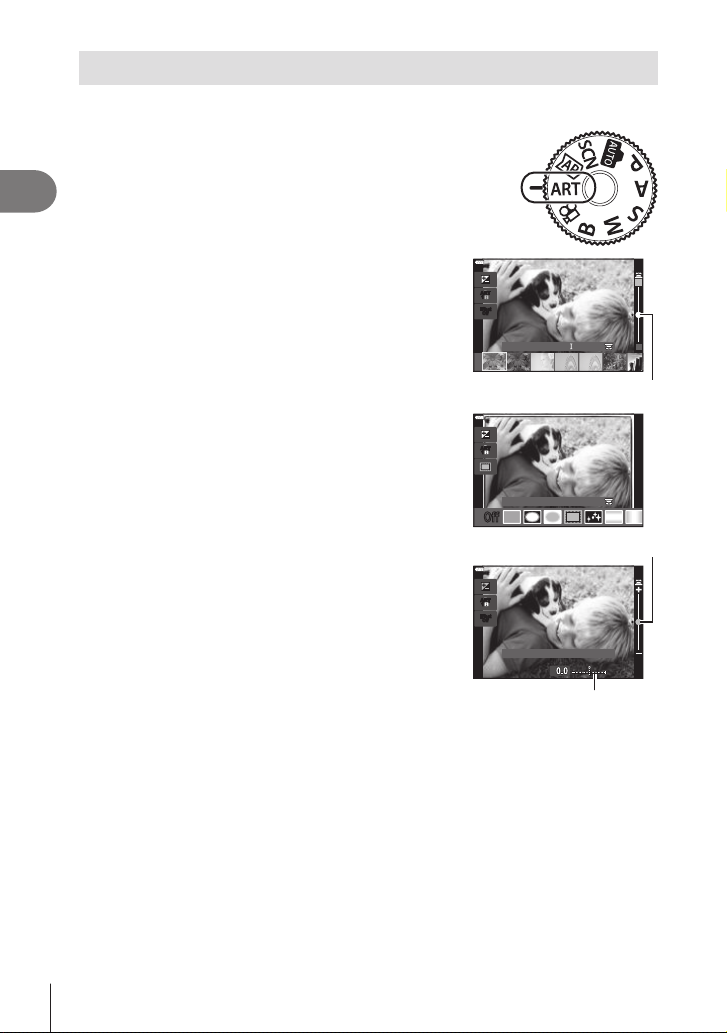
Using art lters (ART mode)
O
ff
Using art lters, you can easily have fun with artistic eects.
Rotate the mode dial to ART.
1
2
Shooting
Use HI to highlight a lter.
2
• The slider appears on the display when [Pop Art I/II],
[Soft Focus], [Pin Hole I/II/III], [Cross Process I/II] or
[Instant Film] is highlighted. Use the slider to adjust
the degree of the art lter eect (P. 73).
Press G, and highlight an eect using HI.
3
• The eects available vary with the selected lter (Soft
Focus Eect, Pin Hole Eect, White Edge Eect,
Frame Eect, Star Light Eect, Blur Eect, Shade
Eect, Color Filter, or Monochrome Color).
ART 1ART
1
Effect
Off
Pop Art
Slider
ART 1ART
1
Frame Effect
Press G to adjust exposure compensation.
4
Slider
• The slider will appear on the display.
• Rotate the front dial to adjust exposure compensation.
• Choose positive (“+”) values to make pictures
brighter, negative (“–”) values to make pictures darker.
Exposure can be adjusted by ±5.0 EV. During live
view, the brightness of the monitor will be adjusted to
a maximum of only ±3.0 EV. If the exposure exceeds
±3.0 EV, the exposure bar will begin ashing.
• To reset exposure compensation, press and hold the
Effect
ART 1ART
1
Off
Exposure/Brightness
0.00.0
Exposure bar
Q button.
Press the Q button.
5
Shoot.
6
• Press the u button to choose a dierent art lter. If eects are displayed, press F.
If [Exposure/Brightness] is displayed, press G.
70
EN
Page 71

$
• [Color Filter] (P. 108) and [Monochrome Color] (P. 109) options are available with some
art lters.
• After you press the Q button in Step 5, the front dial can be used for exposure
compensation (P. 81) and the rear dial for program shift (P. 36).
• Touch controls can also be used.
2
Shooting
EN
71
Page 72
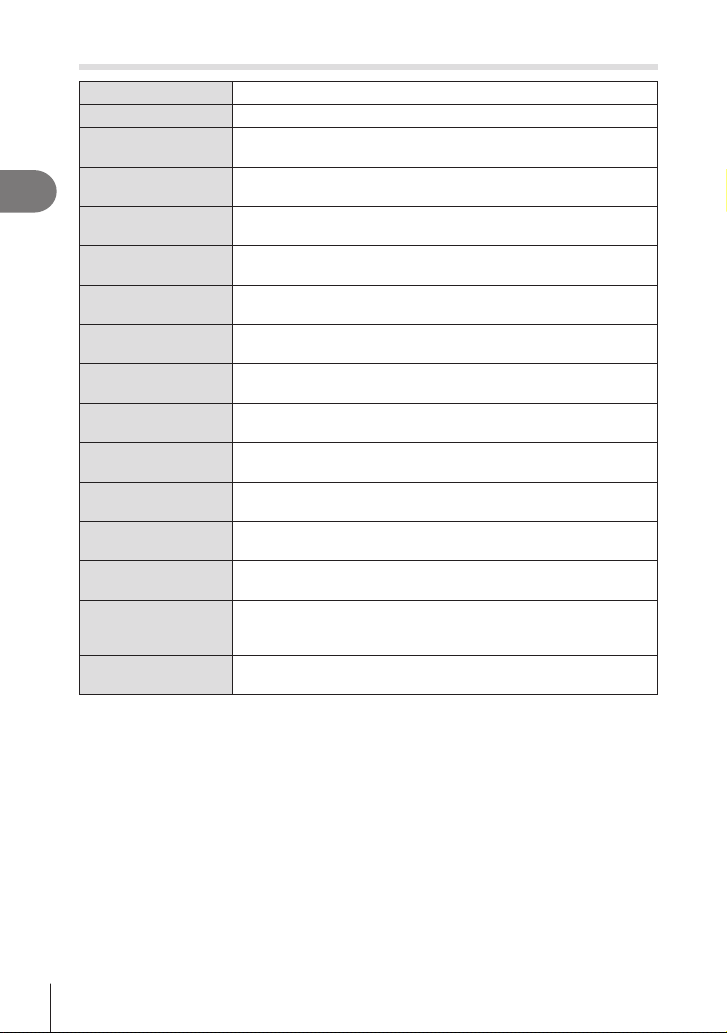
Types of art lters
Pop Art I/II Creates an image that emphasizes the beauty of color.
Soft Focus Creates an image that expresses a soft tone atmosphere.
Pale&Light Color I/II
Light Tone
2
Shooting
Grainy Film I/II
Pin Hole I/II/III
Diorama I/II
Cross Process I/II
Gentle Sepia
Dramatic Tone I/II
Key Line I/II
Watercolor I/II
Vintage I/II/III
Partial Color I/II/III
Bleach Bypass I/II
Instant Film
II and III are altered versions of the original (I).
• To maximize the benets of the art lters, some of the shooting function settings are
disabled.
• If [RAW] is currently selected for image quality (P. 98), image quality will automatically
be set to RAW+JPEG. The art lter will be applied to the JPEG copy only.
• Depending on the subject, tone transitions may be ragged, the eect may be less
noticeable, or the image may become more “grainy.”
• Some eects may not be visible during movie recording.
• Your choice of lters, eects, and movie quality when recording movies may aect
playback speed and smoothness.
Creates an image that expresses warm light by scattering overall
light and slightly overexposing the image.
Creates a high-quality image by softening both shadows and
highlights.
Creates an image that expresses the roughness of black and
white images.
Creates an image that looks as if it was taken using an old or toy
camera by dimming the image perimeter.
Creates a miniature-like image by emphasizing saturation and
contrast, and blurring unfocused areas.
Creates an image that expresses a surreal atmosphere. Cross
Process II creates an image that emphasizes magenta.
Creates a high-quality image by drawing out shadows and
softening the overall image.
Creates an image that emphasizes the dierence between
brightness and darkness by partially increasing contrast.
Creates an image that emphasizes edges and adds an illustrative
style.
Creates a soft, bright image by removing dark areas, blending
pale colors on a white canvas, and further softening contours.
Expresses an everyday shot in a nostalgic, vintage tone using
printed lm discoloration and fading.
Impressively expresses a subject by extracting colors you want to
emphasize and keeping everything else monotone.
The “bleach bypass” eect, which you may recognize from motion
pictures and the like, can be used to great eect in shots of
streetscapes or metal objects.
A contemporary take on the skin tones and shadow gradations
typical of lm.
72
EN
Page 73
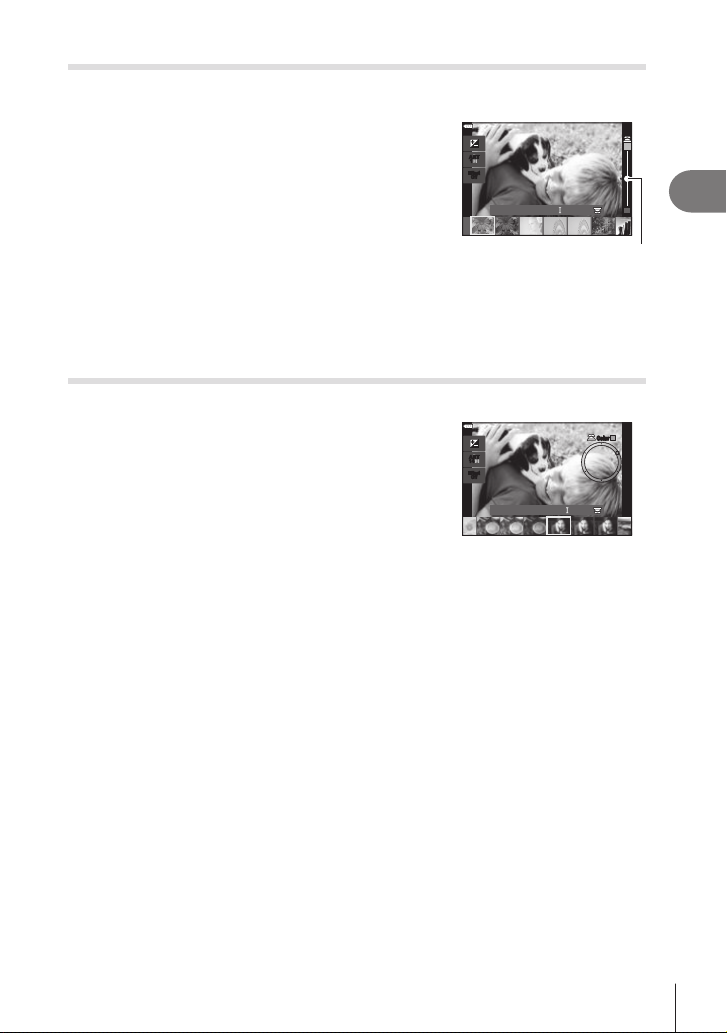
Adjusting the degree of the art lter eect (Fine-Tuning)
You can adjust the degree of the lter eect for Pop Art, Soft Focus, Pin Hole, Cross
Process, and Instant Film before taking pictures.
Select [Pop Art I/II], [Soft Focus], [Pin Hole I/II/
1
III], [Cross Process I/II], or [Instant Film] on the
art-lter-selection screen (P. 70).
• The slider will appear on the display.
• Rotate the front dial to ne-tune the art lter.
ART 1ART
1
Effect
Off
Pop Art
• Touch controls can also be used.
• The eect is visible in the display.
• To reset the lter eect, press and hold the Q button.
Press the Q button.
2
Shoot.
3
• Press the u button if you want to ne-tune the art lter again.
Using [Partial Color]
Record only selected hues in color.
Select [Partial Color I/II/III] in the art lter-
1
selection screen (P. 70).
• A color ring appears in the display.
Rotate the front dial to select a color.
2
• The eect is visible in the display.
• Touch controls can also be used.
Press the Q button.
3
Shoot.
4
• To choose a dierent color after shooting, press the u button.
ART
ART
14
14
Effect
Off
Partial Color
ColorColor
2
Shooting
Slider
EN
73
Page 74
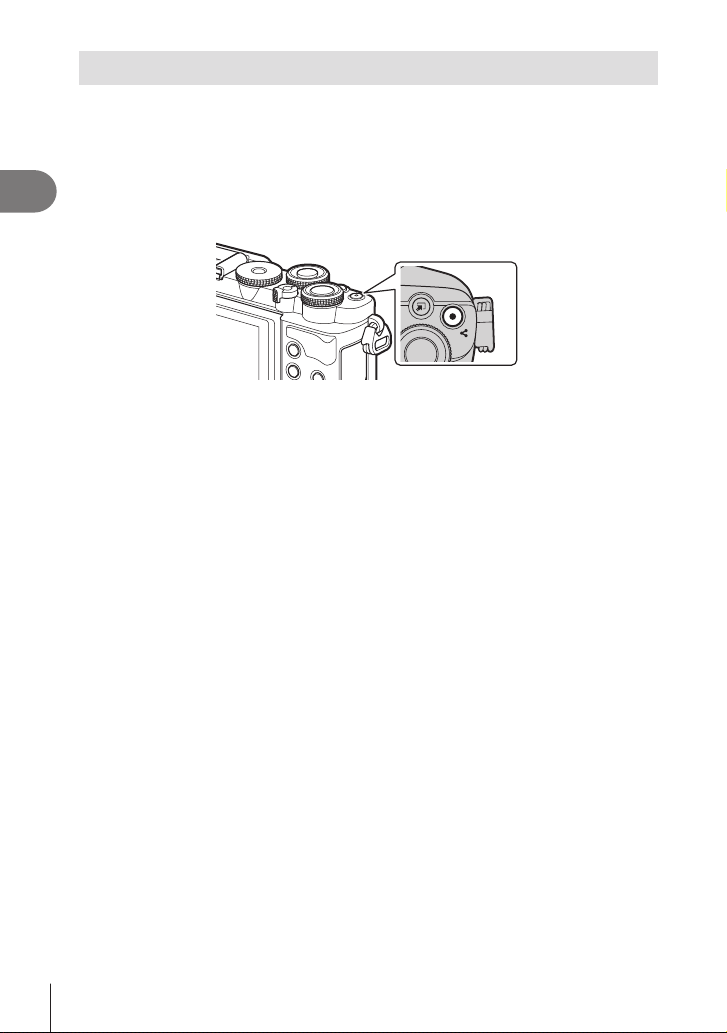
Recording movies in photo shooting modes
The R button can be used for movie recording even when the mode dial is not in the
n position.
• Be sure that [R REC] is assigned to the R button (P. 112).
Press the R button to begin recording.
1
2
Shooting
• Movie you are recording will be displayed on the monitor.
• You can change the focus location by tapping the screen while recording.
R button
Press the R button again to end recording.
2
• The sound of touch operations and button operations may be recorded.
• CMOS image sensors of the type used in the camera generate a so-called “rolling
shutter” eect that can cause distortion in pictures of moving objects. This distortion is
a phenomenon that occurs in pictures of fast-moving subjects or if the camera is moved
during shooting. It is particularly noticeable in pictures taken at long focal lengths.
• If the size of the movie le being recorded exceeds 4 GB, the le will be split
automatically. (Depending on shooting conditions, movies under 4 GB in size may be split
into multiple les.)
• When the camera is used continuously for extended periods, the temperature of the
image sensor will rise and noise and color splotches may be visible in the display.
Should this occur, turn the camera o and wait for it to cool. Noise and color splotches
are particularly likely to occur at high ISO sensitivities. If the temperature of the sensor
increases further, the camera will turn o automatically.
• The R button cannot be used to record movies in the following instances:
While shutter the button is pressed halfway; during bulb, time, composite, sequential or
time lapse photography; or when e-portrait, handheld starlight, panorama, or backlight
HDR is selected in SCN mode or keystone compensation, panorama, live time, multiple
exposure, or HDR is selected in Z mode
• When recording movies, use an SD card that supports an SD speed class of 10 or higher.
• A UHS-II or UHS-I card with a UHS speed class of 3 or better is required when:
a movie resolution of [4K] is selected in the [nK] menu
$
• Some settings, such as AF mode, can be set separately for movies and photographs.
g “Using the Video Menu” (P. 136)
74
EN
Page 75
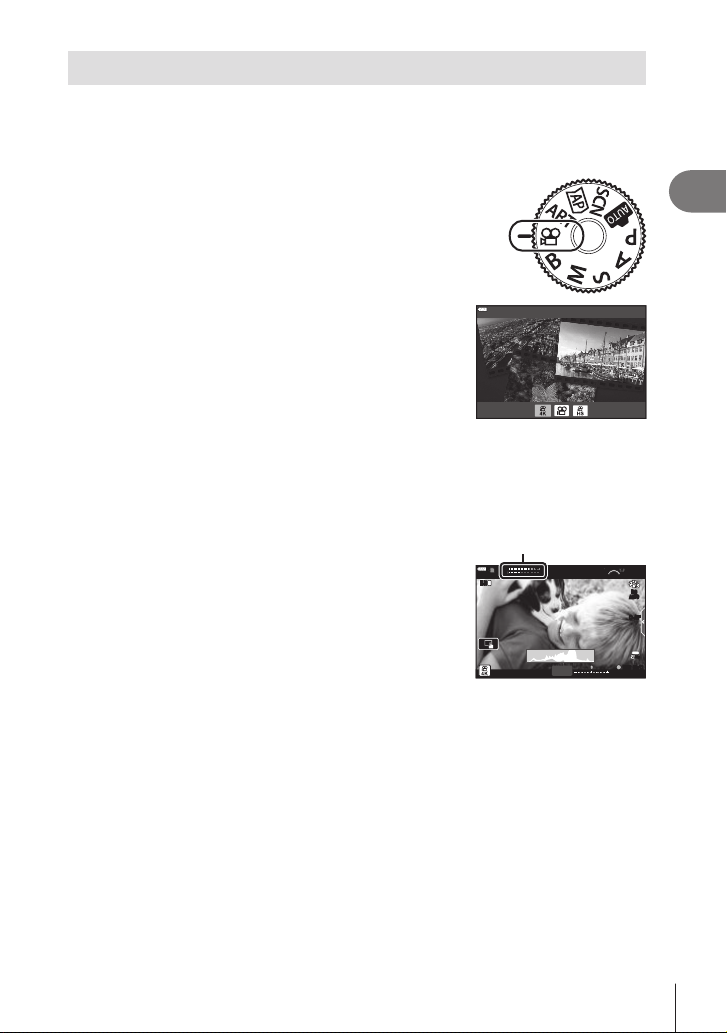
Recording movies in movie mode
4K
1:02:03
When the mode dial is rotated to n, movies can be recorded using functions such as
the slow-motion mode.
• Adjust aperture and shutter speed to suit your artistic intent. g “Choosing an Exposure
Mode (n Mode (Movie Exposure Modes))” (P. 115)
Rotate the mode dial to n.
1
Use HI to highlight movie mode (P. 76).
2
Press the Q button to select the highlighted mode.
3
• Press the u button to choose a dierent movie mode.
Press the R button to begin recording.
4
• Be sure that [R REC] is assigned to the R button (P. 112).
• Press the R button again to end recording.
• The sound level during recording is shown by the
recording level meter. The more the meter extends into
the red, the higher the recording level.
• The recording level can be adjusted from the n video
Recording level meter
LRL
R
1
M-ISM-IS
28
mm
menu. g [Recording Volume] (P. 136)
0.0
REC 00:12
• A beep does not sound when the camera focuses in movie mode.
$
• You can prevent the camera from recording operating sounds that occur due to camera
operations while shooting. g “Silencing Camera Sounds While Shooting Movies”
(P. 77)
• Touch controls can also be used.
ISO
AUTO
C-AF
4K
30p
2
Shooting
75
EN
Page 76
Movie Mode Options
Movie mode Description
4K Shoot 4K movies. ―
o
Standard Shoot standard movies. ―
n
High-speed Record slow-motion movies. Sound will not be recorded. 77
p
• The picture modes available vary with the movie mode.
2
• When recording movies, use an SD card that supports an SD speed class of 10 or higher.
Shooting
• Use UHS-II or UHS-I memory card with a UHS Speed Class of 3 when shooting in [4K] or
[High-speed] mode.
• Depending on the system, some computers may be unable to play movies recorded at
[4K]. See our website for information on the system requirements for viewing 4K movies
on a computer.
g
76
EN
Page 77
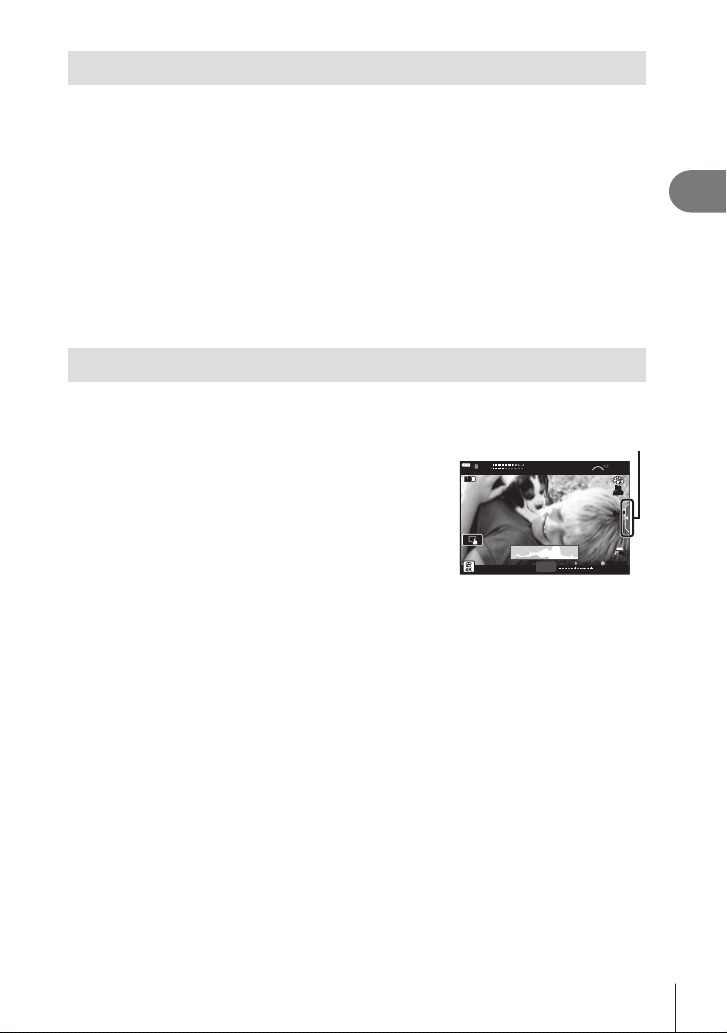
Recording Slow Motion Movies
1:02:03
Record slow-motion movies. Footage shot at 120 fps plays back at 30 fps; quality is
equivalent to [HD].
Highlight [High-speed] in the movie mode option (P. 76) and press the Q
1
button.
Press the R button to start shooting.
2
• Press the R button again to end shooting.
• Focus and exposure are xed at the start of recording.
• Recording can continue for up to 20 seconds.
• Sound will not be recorded.
Silencing Camera Sounds While Shooting Movies
You can prevent the camera from recording operating sounds that occur due to camera
operations while shooting.
Tap the silent shooting tab to display the function items.
After tapping an item, tap the displayed arrows to select
the settings.
• Electronic zoom*, recording volume, aperture, shutter
speed, exposure compensation, ISO sensitivity
* Only available with power zoom lenses
• The options available vary with the movie exposure
modes (P. 115).
• This option is not available in self-portrait mode (P. 78).
1
M-ISM-IS
Silent shooting tab
LRL
R
28
mm
ISO
AUTO
C-AF
4K
30p
0.0
REC 00:12
2
Shooting
EN
77
Page 78
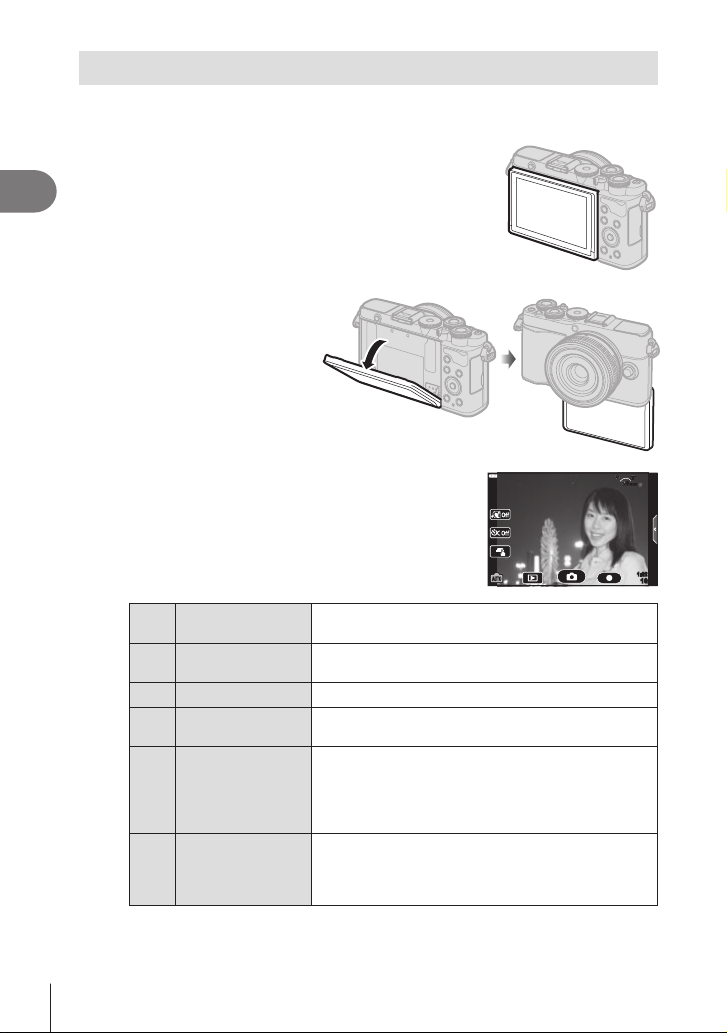
Taking Photos in Self-Portrait Mode
Inverting the monitor allows you to take pictures of yourself while you preview the
frame.
If the monitor is open, close it.
1
2
Shooting
Open the monitor downward.
2
• Read “Rotating the Monitor:
Cautions” (P. 31) before
moving the monitor.
• If a power zoom lens is attached, the camera
automatically switches to wide angle.
• The self portrait menu is displayed in the monitor.
• Dierent icons may be displayed depending on the
shooting mode.
Shutter Touch
C
Movie
R
Playback Tap to switch to playback mode (P. 127).
5
One-Touch
A
e-Portrait
One-Touch
D
Custom Self Timer
Brightness
adjustment
E
(Exposure
compensation)
78
EN
When the icon is touched, the shutter is released
about 1 second later.
When you touch this icon, movie recording will start.
To stop recording, press the (Q) icon.
Turning this on makes skin look smooth and
translucent.
Shoot 3 frames using the self timer. You can set
the number of times the shutter is released and the
interval between each release using Custom Self
Timer. g “Self-Timer Options (c Custom Selftimer)” (P. 87)
Touch [+] or [-] icon to adjust the brightness.
28
mm
1:02:03
1023
Page 79

Frame the shot.
3
• Be careful that your ngers or the camera strap do not obstruct the lens.
Touch C and shoot.
4
• You can also shoot by touching the subject displayed in the monitor, or by pressing
the shutter button.
• The shot image will be displayed on the monitor.
• Be careful not to drop the camera when using the touch screen with the camera held in
one hand.
2
Shooting
EN
79
Page 80
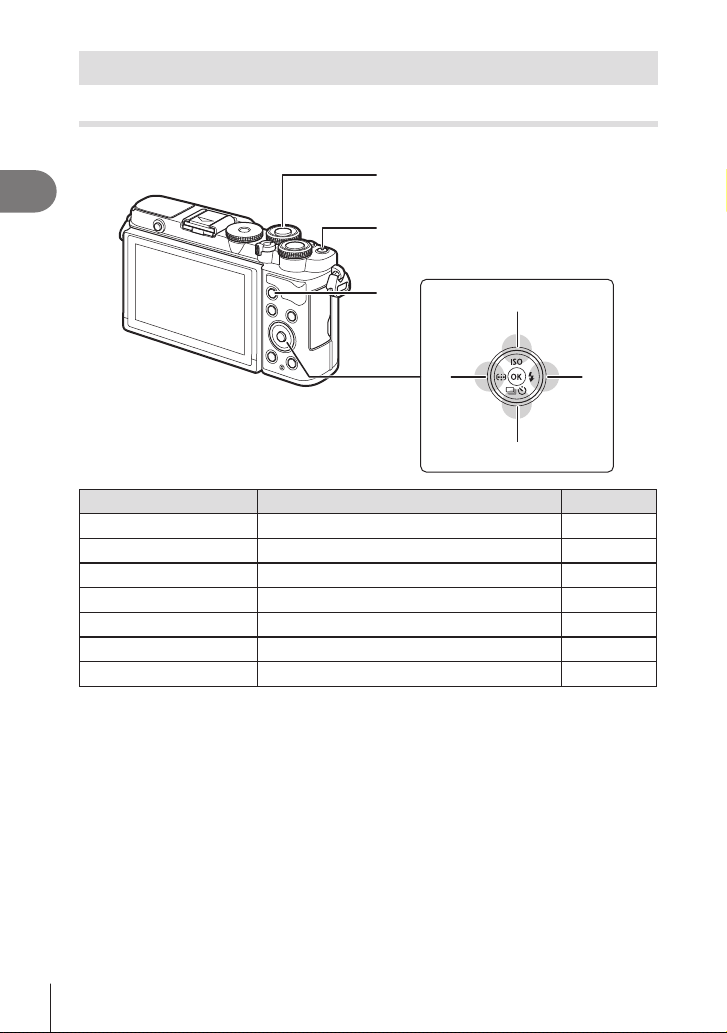
Using various settings
Buttons and dials
Frequently used photographic functions can be assigned to the buttons and dials.
1
2
Shooting
2
3
5
4 6
7
Button/dial Assigned function
Front dial Exposure compensation* 81
1
R button
2
AEL/AFL button AEL/AFL** 112, 151
3
N button (H)
4
ISO button (F)
5
# button (I)
6
jY button (G)
7
* You can choose the functions performed by the front and rear dials. g [Dial Function]
(P. 145)
**
Buttons can be assigned dierent roles. g “Assigning functions to buttons (Button
Function)” (P. 112)
Movie recording** 74
AF Area/AF target position 81, 82
ISO sensitivity 83
Flash modes 84
Sequential/self-timer shooting 86-88
g
80
EN
Page 81
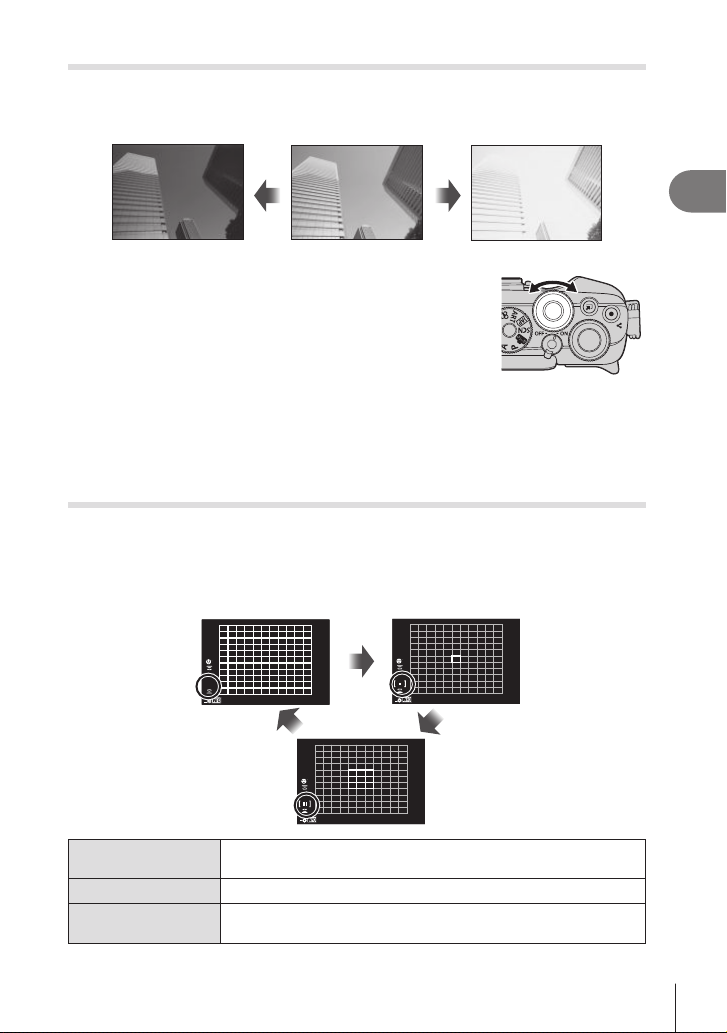
Controlling exposure (Exposure F)
The exposure selected automatically by the camera can be altered to suit your artistic
intent. Choose positive values to make pictures brighter, negative values to make them
darker. Exposure compensation can be adjusted by up to ±5.0 EV.
Negative (–) No compensation (0) Positive (+)
Rotate the front dial to adjust exposure
1
compensation.
• Exposure compensation is not available in B, M, B, or SCN mode or when Live Time or
panorama is selected in Z mode.
• The live view shows the eects of values not exceeding ±3.0 EV. If the exposure exceeds
±3.0 EV, the exposure bar will begin ashing.
• Movies can be corrected in a range up to ±3.0 EV.
Selecting the AF target mode (AF Area)
The frame showing the location of the focus point is referred to as the “AF target”. You
can change the size of the AF target. You can also select Face priority AF (P. 82).
Press the N (H) button to display the AF target.
1
Select [I (Single Target)] or [J (9-Target Group)] using the front dial.
2
2
Shooting
ii
o
ii
All Targets
o
Single Target
I
9-Target Group
J
• The single target mode is automatically applied in movie shooting if the group target mode
is set.
The camera automatically chooses from the full set of focus
targets.
You can choose a single AF target.
The camera automatically chooses from the targets in the selected
nine-target group.
ii
EN
81
Page 82
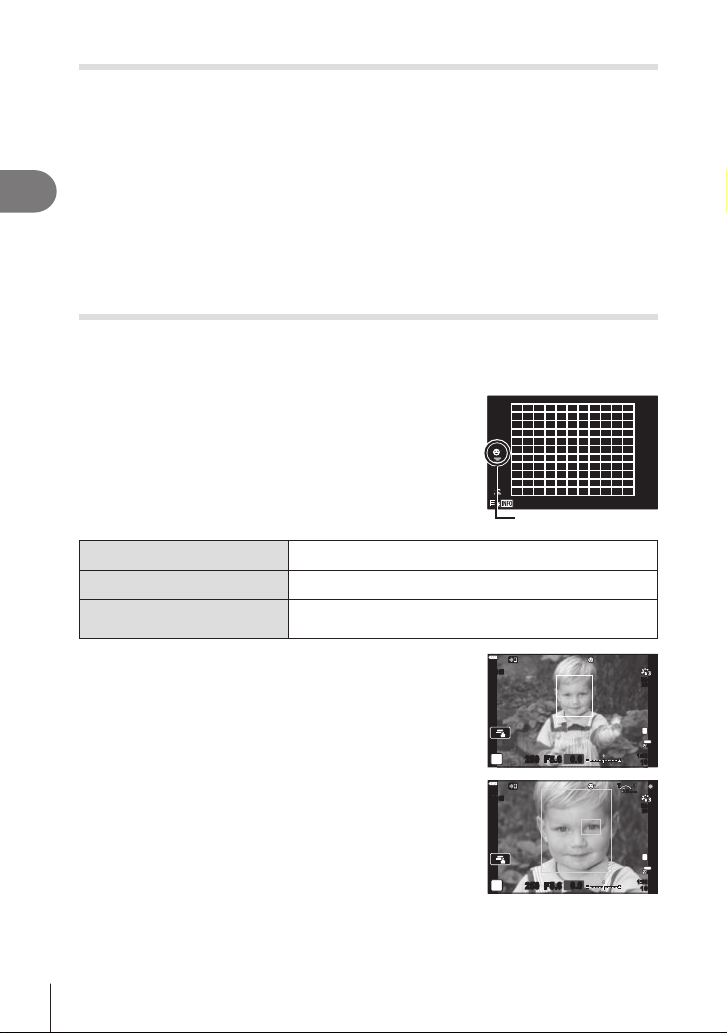
Setting the location of the focus (AF target position)
250250 F5.6
P
1023
0.0
You can position the target over your subject.
Press the N (H) button to display the AF target.
1
• If [o (All Targets)] is selected, select [I (Single Target)] or [J (9-Target Group)]
using the front dial.
Use FGHI to choose a focus area.
2
2
• The size and number of the AF targets changes with the aspect ratio (P. 97) and the
Shooting
option selected for [Digital Tele-converter] (P. 130).
$
• Touch controls can also be used.
Face priority AF/Eye priority AF
The camera automatically detects and focuses on the faces or eyes of portrait
subjects. When digital ESP metering is used, exposure will be weighted according to
the value metered for the face.
Press the N (H) button to display the AF target.
1
Select an option using the rear dial.
2
Face Priority On The camera detects and focuses on faces.
I
Face Priority O
N
Face & Eye Priority On
K
Face priority AF o.
The camera detects faces and focuses on the eye closest
to the camera.
ii
o
Selection method
Point the camera at your subject.
3
• If a face is detected, it will be indicated by a white
S-IS ONS-IS ON
ISO-A
200
frame.
Press the shutter button halfway to focus.
4
• When the camera focuses on the face in the white
frame, the frame will turn green.
• If the camera is able to detect the subject’s eyes, it
will display a green frame over the selected eye (eye
priority AF).
Press the shutter button the rest of the way down
5
to shoot.
S-IS ONS-IS ON
P
250250 F5.6
0.0
L
F
4K
30p
1:02:03
28
mm
ISO-A
200
L
F
4K
30p
1:02:03
1023
• Depending on the subject and the art lter setting, the camera may not be able to correctly
detect the face.
• When set to [p (Digital ESP metering)] (P. 93), metering is performed with priority
given to faces.
82
EN
Page 83
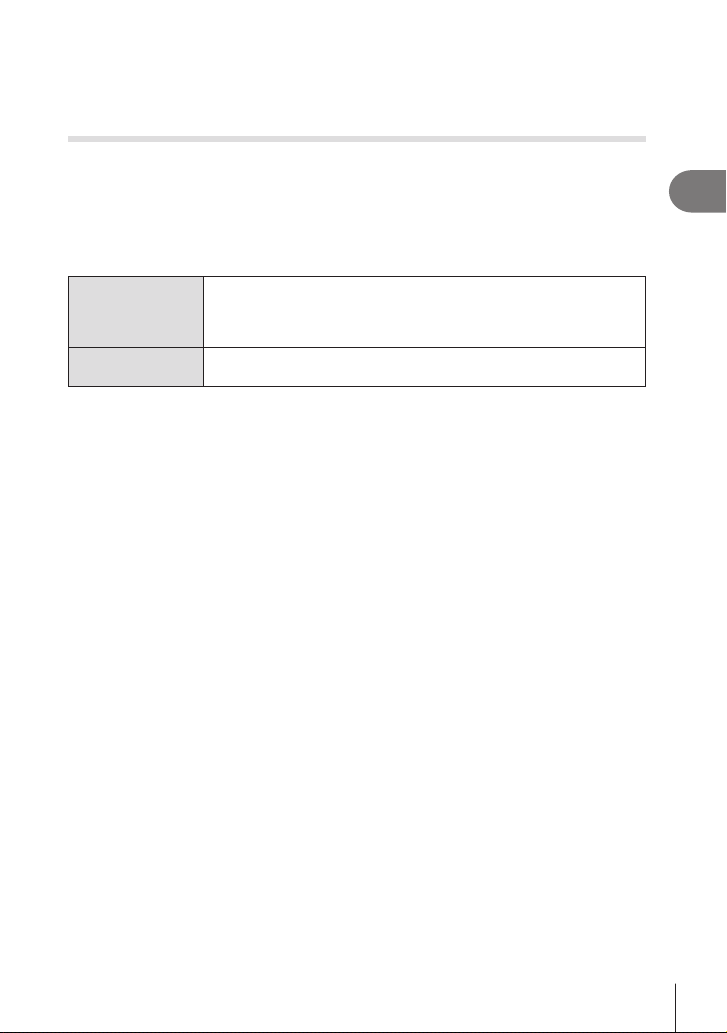
$
• Face priority is also available in [MF] (P. 92). Faces detected by the camera are
indicated by white frames.
Changing ISO sensitivity (ISO)
Select a value according to subject brightness. Higher values let you photograph
darker scenes but also increase image “noise” (mottling). Select [AUTO] to let the
camera adjust sensitivity according to lighting conditions.
Press the ISO (F) button.
1
Use HI to select an option.
2
Sensitivity is adjusted automatically according to shooting conditions.
AUTO
LOW, 200–25600
Use [ISO-Auto Set] (P. 147) in G Custom Menu P to choose the
maximum sensitivity selected by the camera and the shutter speed at
which auto sensitivity control takes eect.
Choose a value for ISO sensitivity. ISO 200 oers a good balance
between noise and dynamic range.
2
Shooting
EN
83
Page 84
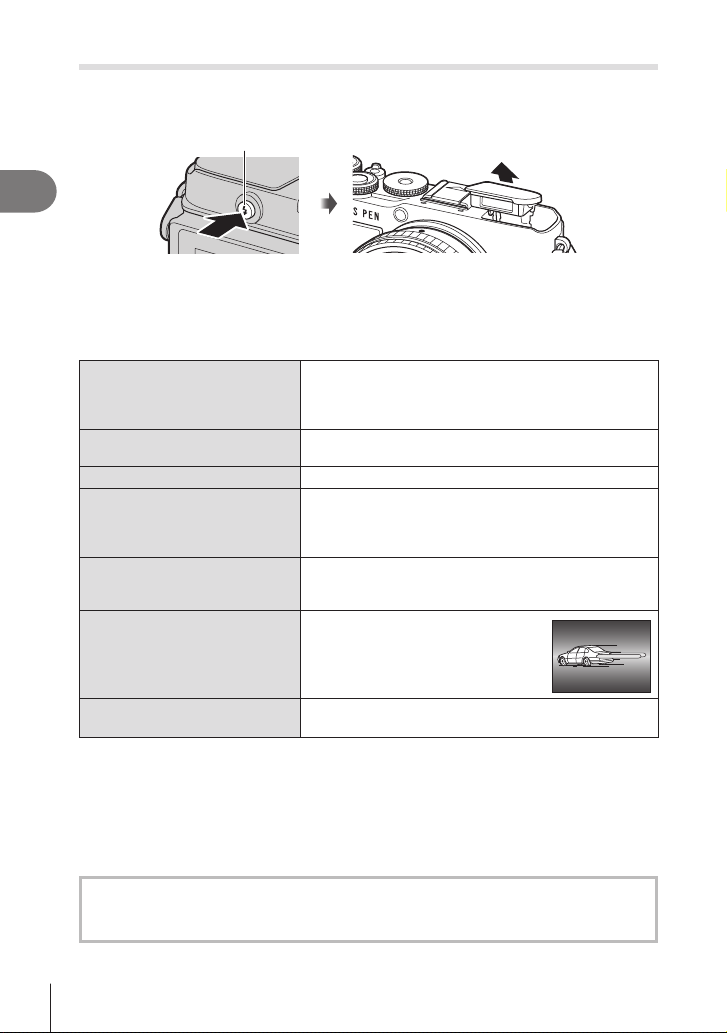
Using a ash (Flash photography)
The ash can be used for ash photography in a variety of shooting conditions.
Press the ash pop-up button to raise the ash.
1
Flash pop-up button
2
Shooting
Press the # (I) button.
2
Select an item using HI, and then press the Q button.
3
• The options available and the order in which they are displayed vary depending on
the shooting mode. g “Flash modes that can be set by shooting mode” (P. 85)
The ash res.
Fill In
#
Redeye
0
Flash O The ash does not re.
$
Red-Eye Slow
Slow synchronization
1
(1st curtain/Red-eye
reduction ash)
Slow
Slow synchronization
2
(1st curtain)
• Shutter speed can be set to values between that
selected for [#Slow Limit] (P. 148) and [#X-Sync.]
(P. 148) in G Custom Menu b.
The ash res so that the red-eye phenomenon is
reduced.
The slow synchronization is combined with the red-eye
reduction ash.
The ash res with slow shutter speeds to brighten
dimly-lit backgrounds.
Slow2
Slow synchronization
M
(2nd curtain)
3, 4
• In [0 (Redeye)], after the pre-ashes, it takes about 1 second before the shutter is
• [0 (Redeye)] may not work eectively under some shooting conditions.
• When the ash res, the shutter speed is set to 1/250 seconds or slower. When shooting a
• The ash sync speed for the silent mode (P. 88) is 1/20
84
EN
Manual Value
etc.
released. Do not move the camera until shooting is complete.
subject against a bright background with the ash, the background may be overexposed.
Optional Flash Units
When using optional ash units, be sure the built-in ash has been securely restored to its
housing.
The ash res immediately before the
shutter closes to create trails of light
behind moving light sources.
For users who prefer manual operation. Press the
INFO button and use FG to adjust ash output.
seconds
or less.
Page 85
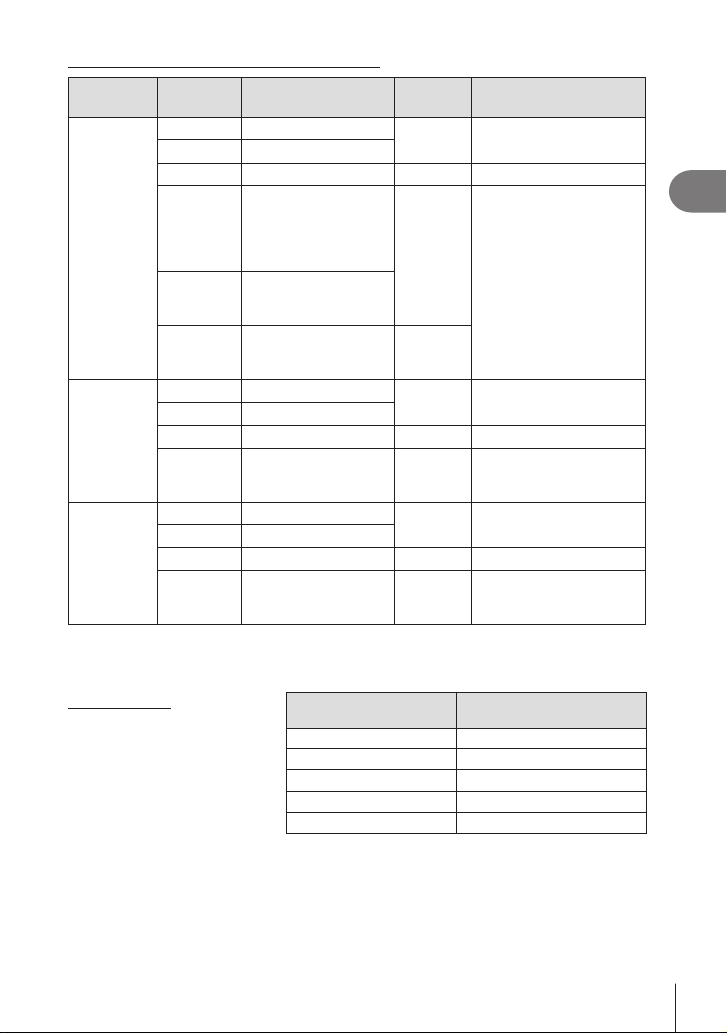
Flash modes that can be set by shooting mode
Shooting
mode
P/A
S/M
B
• Only # and $ can be set in B mode.
* 2nd-curtain sync is not available when [LIVE COMP] is selected (P. 44).
**
For the silent mode, the shutter speed is 1/20 seconds.
Minimum range
The lens may cast shadows over
objects close to the camera,
causing vignetting, or the ash
may be too bright even at
minimum output.
• External ash units can be used to prevent vignetting. To prevent photographs from being
overexposed, select A or M mode, and choose a high aperture value or reduce ISO
sensitivity.
Monitor Flash mode
#
0
$
1
2
M
#
0
$
M
#
0
*
$
M
Fill In
Redeye
Flash O — —
Red-Eye Slow
Slow synchronization
(1st curtain/
Red-eye reduction
ash)
Slow
Slow synchronization
(1st curtain)
Slow2
Slow synchronization
(2nd curtain)
Fill In
Redeye
Flash O — —
Slow2
Slow synchronization
(2nd curtain)
Fill In
Redeye
Flash O — —
Slow2
Slow synchronization
(2nd curtain)
17mm f1.8 0.25 m
25mm f1.8 0.25 m
45mm f1.8 0.5 m
ED 14-42mm f3.5-5.6 EZ 1 m
ED 40-150mm f4.0-5.6 0.9 m
Flash
timing
1st curtain 30 sec. – 1/250 sec.**
1st curtain
2nd
curtain
1st curtain 60 sec. – 1/250 sec.**
2nd
curtain
1st curtain —
2nd
curtain
Lens
Shutter speed limit
60 sec. – 1/250 sec.**
60 sec. – 1/250 sec.**
Approximate distance at
which vignetting occurs
—
2
Shooting
EN
85
Page 86
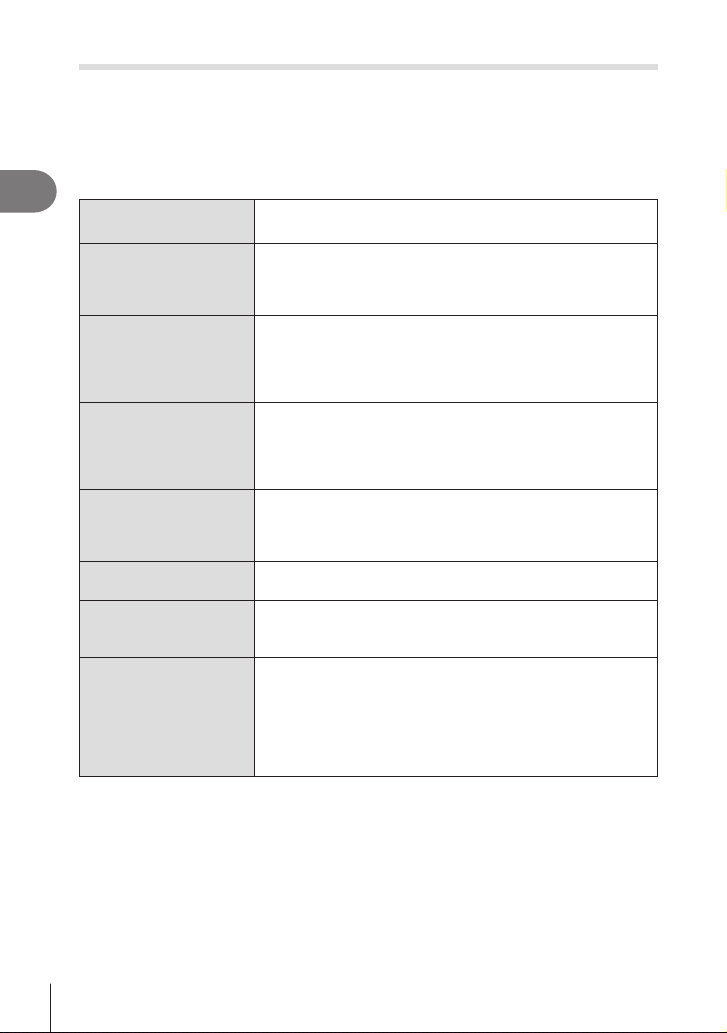
Performing the sequential/self-timer shooting
Adjust settings for burst or self-timer photography. Choose an option according to your
subject. Other options, including anti-shock and silent modes, are also available.
Press the jY (G) button.
1
Use HI to select an option.
2
2
Shooting
• Custom self-timer options can be viewed by pressing the INFO button (P. 87).
o
T
S
X
Z
c
tS
(sample
icon)
♥S
(sample
icon)
Single
Sequential High
Sequential Low
Y 12 sec
Y 2 sec
Custom
Self-Timer
Anti-Shock r
Silent s
Single-frame advance. The camera takes one photo each time
the shutter button is pressed all the way down.
The camera takes photos at up to about 8.7 fps while the
shutter button is held all the way down. Focus, exposure, and
white balance are locked at the values for the rst shot in each
series.
The camera takes photos at up to about 5 fps while the shutter
button is held all the way down. Focus and exposure conform
to the options selected for [K AF Mode] (P. 92) and [AEL/
AFL] (P. 151). If [C-AF] or [C-AF+TR] is selected for [K AF
Mode], the camera will focus before each shot.
The shutter is released 12 s after the shutter button is pressed
all the way down. The self-timer lamp will light for about 10 s
and then start to ash about 2 s before the shutter is released.
The camera focuses when the shutter button is pressed
halfway.
When the shutter button is pressed all the way down, the
self-timer lamp will start to ash and a photo will be taken after
about 2 seconds. The camera focuses when the shutter button
is pressed halfway.
Adjust self-timer settings, including the self-timer delay and the
number of shots taken when the timer expires (P. 87).
Reduce the slight blur caused by shutter motion. Available in
single-frame, sequential low, and custom self-timer modes
(P. 88).
Take pictures with the electronic shutter. Use for shutter
speeds faster than 1/4000 s or in settings where the sound of
the shutter would be unwelcome. Available in single-frame,
sequential low, sequential high, and Custom self-timer modes.
In ♥T mode, focus, exposure, and white balance are locked
at the values for the rst shot in each series. The ash sync
speed drops to 1/20 s (P. 88).
Press the Q button.
3
86
EN
Page 87
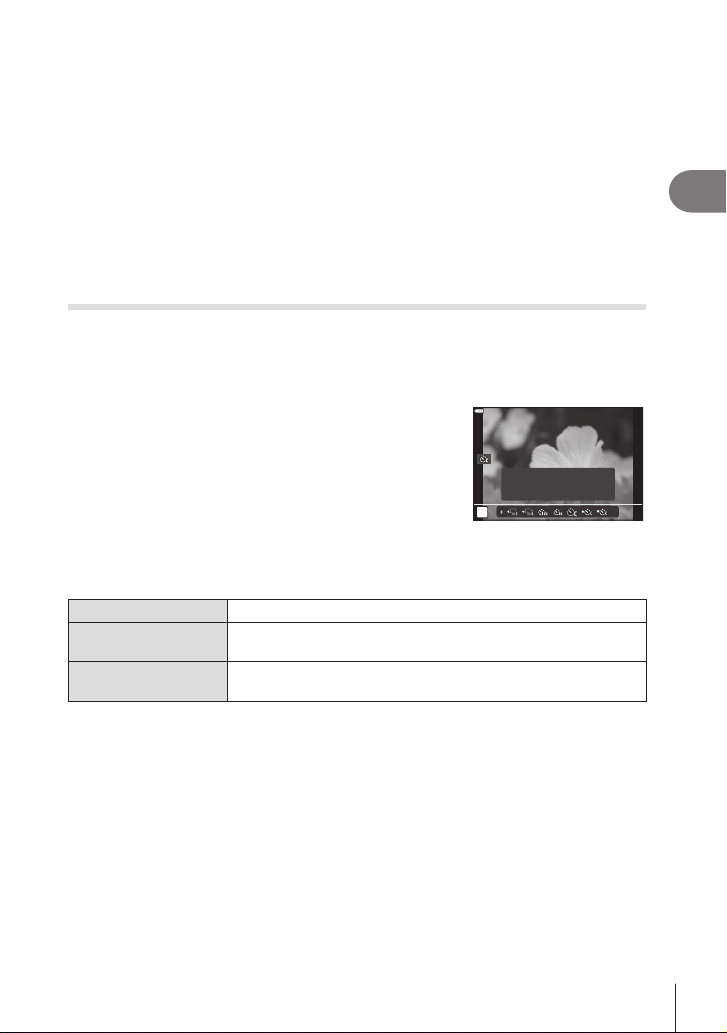
• Fix the camera securely on a tripod for self-timer shooting.
• If you stand in front of the camera to press the shutter button when using the self-timer,
the picture may be out of focus.
• When you are using S, tS or ♥S, live view is displayed. In T or ♥T, the display
shows the last photograph taken during the sequential shooting.
• The speed of sequential shooting varies depending on the lens you are using and the
focus of the zoom lens.
• During sequential shooting, if the battery level icon blinks due to low battery, the camera
stops shooting and starts saving the pictures you have taken on the card. The camera
may not save all of the pictures depending on how much battery power remains.
$
• To cancel the activated self-timer, press G.
Self-Timer Options (c Custom Self-timer)
Adjust self-timer settings, including the shutter release delay and the number of shots
taken when the timer expires.
Press the jY (G) button.
1
Highlight c (custom self-timer) using HI,
2
and then press the INFO button.
Settings
o
Y
1s ×3 0.5s
Custom Self-timer
P
Highlight items using HI, and then use
3
FG to choose an option.
Number of Frames Choose the number of shots taken when the timer expires.
Y Timer
Interval Length
Choose how long the camera waits to begin shooting after the
shutter button is pressed all the way down.
If the number of shots is 2 or more, choose the interval between
the shots taken when the timer expires.
2
Shooting
EN
87
Page 88

Shooting without the vibration caused by shutter button operations
(Anti-Shock r)
Reduce the slight blur caused by shutter motion.
Use this option when even slight camera motion can cause blur, for example during
macro or telephoto photography.
• The delay between the shutter button being pressed all the way down and the start
of shooting can be selected using [Anti-Shock r/Silent s] > [Anti-Shock r] in
2
Shooting
X Shooting Menu 2 (P. 135).
Press the jY (G) button.
1
Select one of the items marked ♦ using HI, and then press the Q button.
2
Take pictures.
3
• When the set time has elapsed, the shutter is released and the picture is taken.
The Electronic Shutter (Silent s)
Take pictures using the electronic shutter. Use for shutter speeds faster than 1/4000 s
or in settings where the sound of the shutter would be unwelcome. The electronic
shutter can be used in single-frame mode and custom self-timer modes and for
frame rates as high as about 15 fps in sequential shooting modes. This setting is only
available in P/A/S/M/ART modes.
• The ash sync speed is 1/20 s.
• The delay between the shutter button being pressed all the way down and the shutter
being released can be selected using [Anti-Shock r/Silent s] > [Silent s] in
X Shooting Menu 2 (P. 135).
• In [Silent s] mode, [8], [AF Illuminator], and [Flash Mode] are set to [Not Allow] by
default. You can enable each operation in [SilentsMode Settings].
Press the jY (G) button.
1
Highlight one of the options marked with ♥ using HI.
2
Press the Q button.
3
Take pictures.
4
• When the shutter is released, the monitor screen will go dark for a moment. No
shutter sound will be emitted.
• The desired results may not be achieved under ickering light sources such as uorescent
or LED lamps or if the subject moves abruptly during shooting.
• Note that due to the electronic shutter, the subject may appear to be distorted in
photographs if camera moves quickly during shooting or when shooting fast-moving
subjects.
88
EN
Page 89
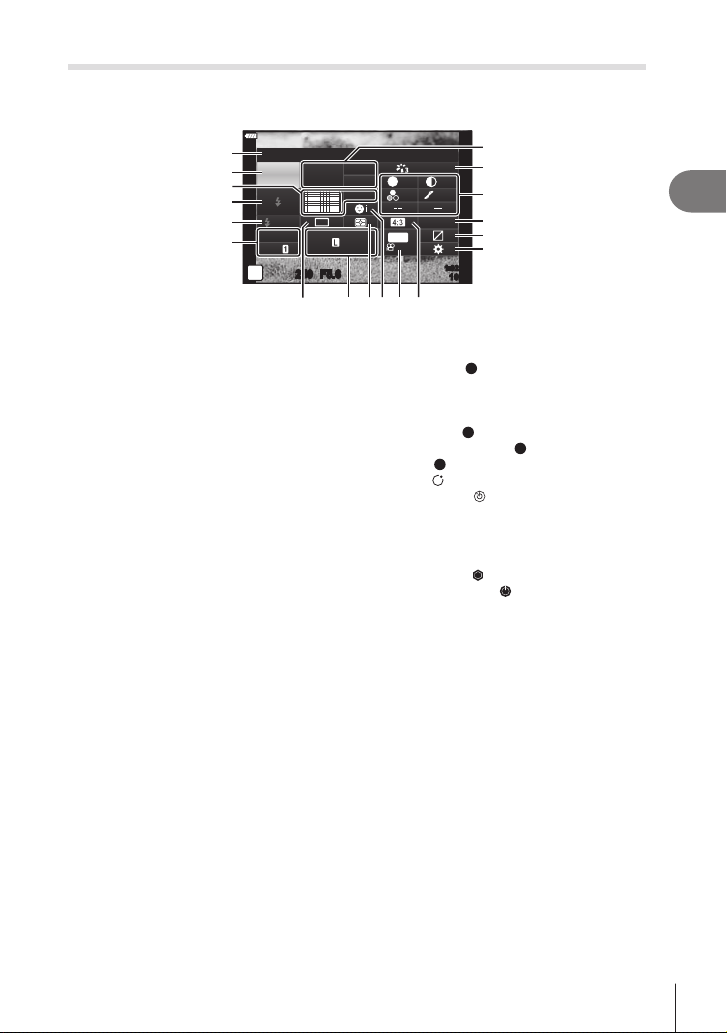
Calling shooting options
c
d
e
f
g
h
S
F
T
E
LV super control panel
The LV super control panel lists shooting settings and their current values.
1
Recommended ISO
WB
ISO
2
3
4
5
6
P
Auto
± 0.0
S-IS On
M-IS
Auto
250250 F5.6
Available settings
1 Currently selected option
2 ISO sensitivity .................................P. 83
3 K AF mode ...................................P. 92
AF target .........................................P. 81
4 Flash mode .....................................P. 84
5 Flash intensity control ...................P. 103
6 Image stabilizer...............................P. 96
7 Sequential shooting/Self-timer ........P. 86
8 KK .............................................P. 98
9 Metering mode ................................P. 93
0 Face priority ....................................P. 82
a nK..............................................P. 99
b Aspect ratio .....................................P. 97
c White balance .................................P. 94
White balance compensation..........P. 96
d Picture mode.................................P. 103
A ±
G
F
8 097
Natural
0
S
±
0±
±
4K
30p
a b
0
Normal
0
sRGB
1:02:03
1023
................................P. 106
0
±
S-AF
e Sharpness
Contrast u ...................................P. 106
Saturation t ................................P. 106
Gradation z.................................P. 108
Color lter
Monochrome color
Eect
Color
Color / Vivid
Eect*
Film Grain Eect*
Shading*
Fine-Tune*
Color / Vivid
ColorFilter/Level
.................................P. 108
........................................P. 110
*1 ........................................P. 73
3
............................................P. 70
4*5
3
....................P. 109
*2 ...........................P. 105
4
........................P. 107
...........................P. 48. P. 52
................................ ….P. 73
*5 ...............................P.52
*4 ........................P.48
f Color space...................................P. 110
g Highlight & shadow control ........... P. 111
h Button function assignment ..........P. 112
2
Shooting
*1 Displayed when Partial Color is selected.
*2 Displayed when Color Creator is selected.
*3 Displayed when Art Filter is selected.
*4 Displayed when Mono Prole is selected for the picture mode.
*5 Displayed when Color Prole is selected for the picture mode.
89
EN
Page 90
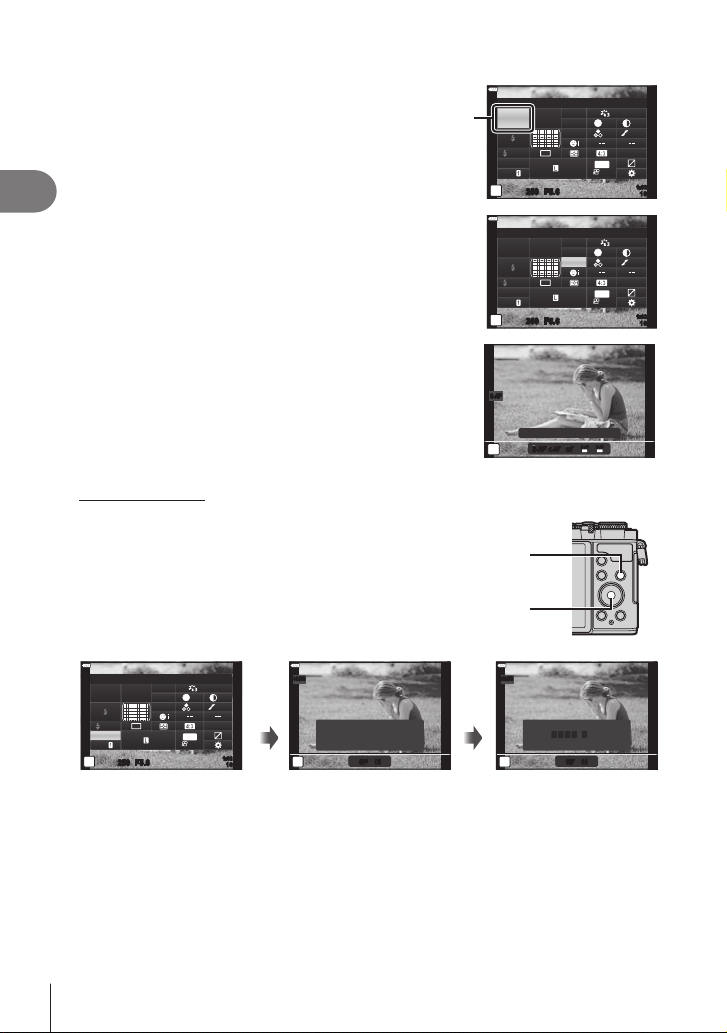
Using the LV Super Control Panel
1023
Press the Q button.
1
• The LV super control panel will be displayed.
When the mode dial is rotated to n, the LV
control (P. 91) is displayed.
• The last setting used will be highlighted.
2
Shooting
Highlight an item using FGHI, and then
2
press the Q button.
• You can also highlight items by tapping them
on the display.
Use HI to highlight an option, and then
3
press the Q button.
Additional Options
Pressing the Q button in Step 2 displays
options for the highlighted setting. In some
cases, additional options can be viewed by
pressing the INFO button.
Cursor
INFO button
Q button
Recommended ISO
ISO
Auto
± 0.0
S-IS On
M-IS
P
250250 F5.6
KAF Mode
ISO
Auto
± 0.0
S-IS On
M-IS
P
250250 F5.6
S-AFS-AF
P
S-AFS-AF
Auto
Auto
Natural
A ±
0
WB
S
±
0±
0
0
0
S-AFS-AFMFC-AFC-AF
0
Normal
±
0
±
0
sRGB
4K
30p
1:02:03
1023
Natural
S
0±
0
±
Normal
±
0
±
0
sRGB
4K
30p
1:02:03
TR
G
±
S-AF
F
A ±
WB
G
±
S-AF
F
Single AF
C-AFC-AF
MFMF
KImage Stabilizer
ISO
Auto
± 0.0
S-IS On
M-IS
P
250250 F5.6
Natural
A ±
0
WB
Auto
S
±
0±
G
±
S-AF
F
0
0
Normal
±
0
±
0
sRGB
4K
30p
1:02:03
1023
S-IS AUTO
Q
Focal Length
o
9mm
Still-I.S. On
P
OFFOFF ONONON
S-IS AUTO
INFO
P
[K Image Stabilizer]
• Touch controls can be used in place of the Q button. Lightly tap the desired setting twice
to display options.
90
EN
Still-I.S. On
OFFOFF ONONON
mm0.9000
Page 91
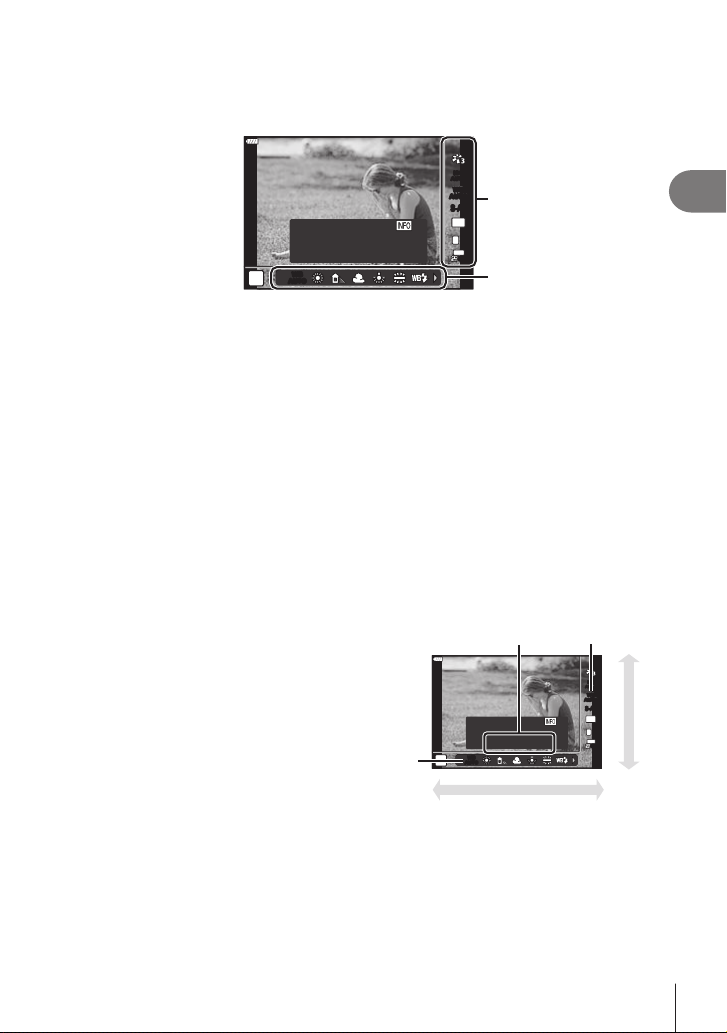
LV control
P
You can use LV control to select the shooting function while checking the eect on the
screen.
LV control screen
ISO
AUTO
WB
WB
AUTO
AUTO
Functions
S-AFS-AF
W Keep Warm Color
WB Auto
WB
AUTOWBAUTO
On
4:3
L
F
4K
30p
Settings
Available settings
Picture mode ......................................P. 103
ISO sensitivity .......................................P. 83
White balance .......................................P. 94
AF mode ...............................................P. 92
Aspect ratio*
1
........................................P. 97
KK ...................................................P. 98
nK ...................................................P. 99
Movie (exposure) mode*2 ...................P. 115
Scene mode*
Art lter mode*
3
.......................................P. 56
4
.....................................P. 70
*1 Not available in movie mode.
*2 Available in movie mode.
*3 Available in SCN mode.
*4 Available in ART mode.
Using the LV control
Press Q to display the LV control.
1
• To display the LV control when the mode dial is rotated to a position other than n,
choose the control in [K Control Settings] (P. 146).
• To hide the LV control, press Q again.
Use FG to highlight the desired
2
function and HI to highlight a
setting, and then press the Q
button.
• You can use the front and rear dials
to select a setting.
• The selected settings take eect
automatically if no operations are
performed for about 8 seconds.
Cursor
Displays the selected
function name
W Keep Warm Color
On
WB Auto
WB
P
AUTOWBAUTO
Cursor
ISO
AUTO
WB
WB
AUTO
AUTO
S-AFS-AF
4:3
L
F
4K
30p
F
G
or
o
HI or r
• Some items are not available in some shooting modes.
$
• For the default settings of each option, refer to “Defaults” (P. 181).
2
Shooting
91
EN
Page 92
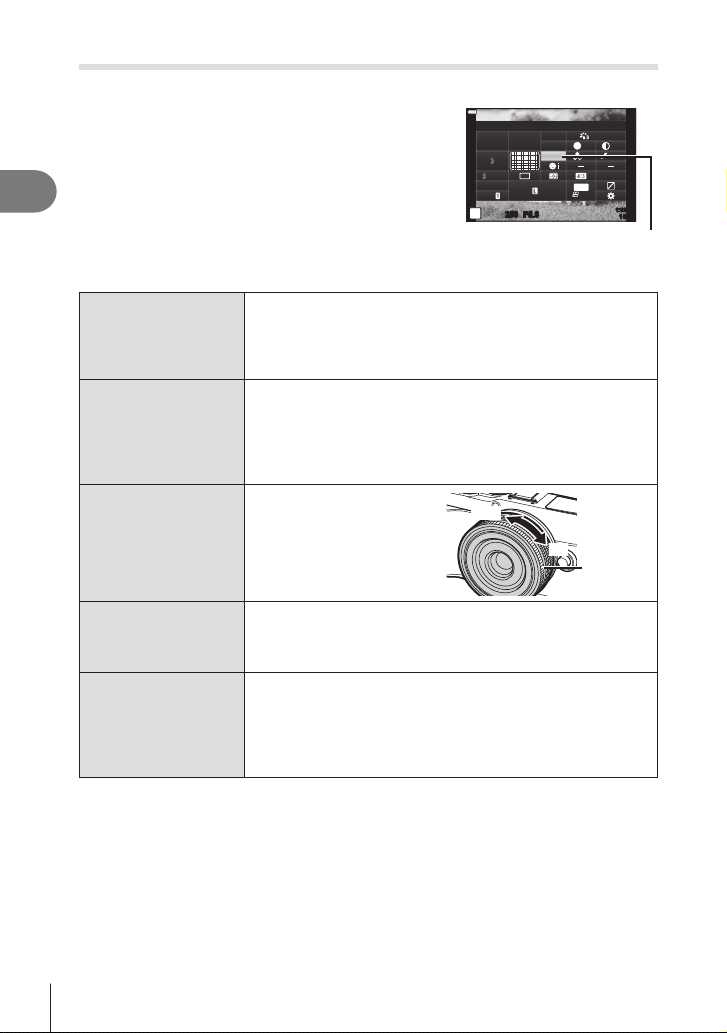
Choosing a focus mode (AF Mode)
You can select a focusing method (focus mode).
Press the Q button to display the LV super
1
2
2
Shooting
3
S-AF
(Single AF)
C-AF
(Continuous AF)
MF
(Manual focus)
control panel.
Use FGHI to highlight AF Mode, and then
press the Q button.
Highlight an option using HI, and then press the Q button.
The camera focuses once when the shutter button is pressed
halfway. When the focus is locked, a beep sounds, and the AF
conrmation mark and the AF target mark light up. This mode
is suitable for taking pictures of still subjects or subjects with
limited movement.
The camera repeats focusing while the shutter button remains
pressed halfway. When the subject is in focus, the AF
conrmation mark lights up on the monitor and the beep sounds
when the focus is locked at the rst time.
Even if the subject moves or you change the composition of the
picture, the camera continues trying to focus.
This function allows you
to manually focus on any
position by operating the
focus ring on the lens.
KAF Mode
ISO
Auto
± 0.0
S-IS On
M-IS
P
Near
WB
Auto
250250 F5.6
Natural
A ±
0
S
±
0±
G
±
S-AF
F
0
0
Normal
±
0
±
0
sRGB
4K
30p
1:02:03
1023
AF Mode
)
Focus ring
S-AF+MF
(Simultaneous use of
S-AF mode and MF
mode)
C-AF+TR
(AF tracking)
92
EN
After pressing the shutter button halfway to focus in [S-AF]
mode, you can turn the focus ring while you keep pressing the
shutter button halfway to ne-adjust focus manually.
Press the shutter button halfway to focus; the camera then
tracks and maintains focus on the current subject while the
shutter button is held in this position.
• The AF target is displayed in red if the camera can no longer
track the subject. Release the shutter button and then frame
the subject again and press the shutter button halfway.
Page 93
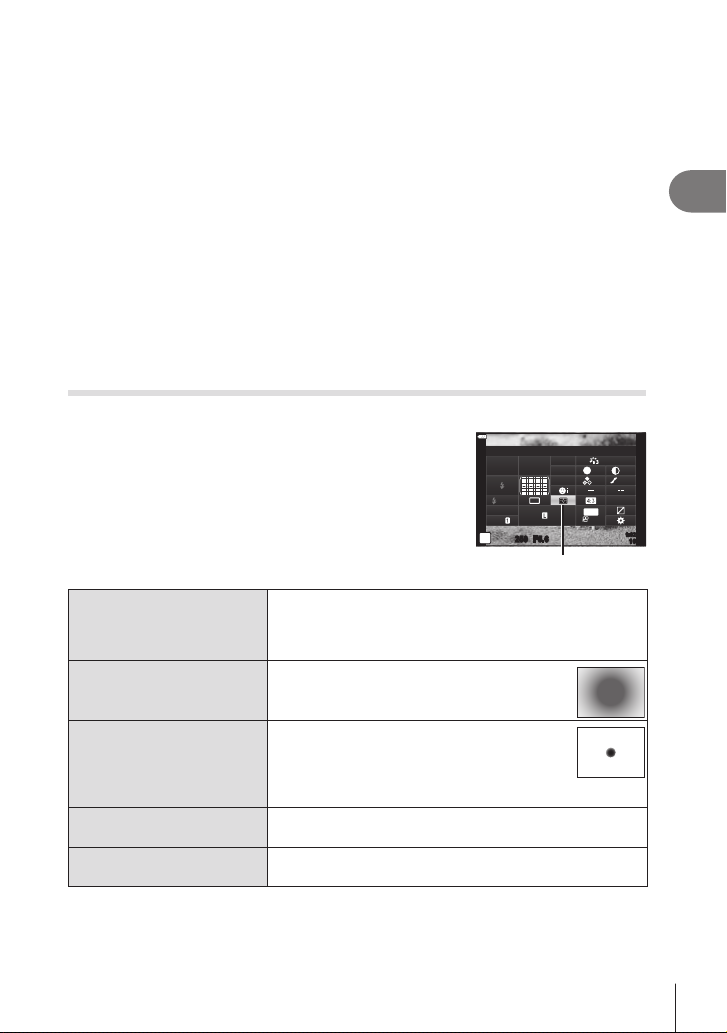
• The camera may be unable to focus if the subject is poorly lit, obscured by mist or smoke,
1023
or lacks contrast.
• AF mode is unavailable when a Four Thirds system lens is used.
• AF mode is unavailable when the lens MF focus clutch is set to MF.
• If [MF], [C-AF], or [C-AF+TR] is selected in P, A, S, M, B, n or ART mode, the shutter
can be released even when the camera is not focus.
• If [C-AF] or [C-AF+TR] is selected, keep the shutter button pressed halfway to let the
camera focus on the subject for a little while, and then press the shutter button all the way
down to shoot.
• If you operate the zoom during sequential shooting when [C-AF] or [C-AF+TR] is selected,
the focus may move o the subject.
• If shooting a fast-moving person in sequential shooting mode when [C-AF] is selected, it is
recommended that you select [NFace Priority O] (P. 82).
• If shooting a fast-moving subject in sequential shooting mode when [C-AF+TR] is
selected, the focus may move o the subject.
$
• The focus method can be chosen in the G custom menu. g “AEL/AFL” (P. 151)
Choosing how the camera measures brightness (Metering)
You can choose how the camera meters subject brightness.
Press the Q button to display the LV super control
1
panel.
Use FGHI to select [Metering], and then press
2
the Q button.
Highlight an option using HI, and then press the
3
Q button.
Meters exposure in 324 areas of the frame and optimizes
Digital ESP
p
metering
Center weighted
H
averaging metering
exposure for the current scene or portrait subject (if an
option other than [OFF] is selected for [I Face Priority]).
This mode is recommended for general use.
Provides the average metering between the
subject and the background lighting, placing
more weight on the subject at the center.
Meters a small area (about 2% of the frame)
with the camera pointed at the object you
I
Spot metering
wish to meter. Exposure will be adjusted
according to the brightness at the metered
point.
IHI
ISH
Spot metering
(highlight)
Spot metering
(shadow)
Increases spot metering exposure. Ensures bright subjects
appear bright.
Lowers spot metering exposure. Ensures dark subjects
appear dark.
P
Metering
ISO
Auto
± 0.0
S-IS On
M-IS
WB
Auto
250250 F5.6
Metering
Natural
A ±
0
S
±
0±
G
±
0
S-AF
F
0
Normal
±
0
sRGB
4K
30p
1:02:03
2
Shooting
93
EN
Page 94
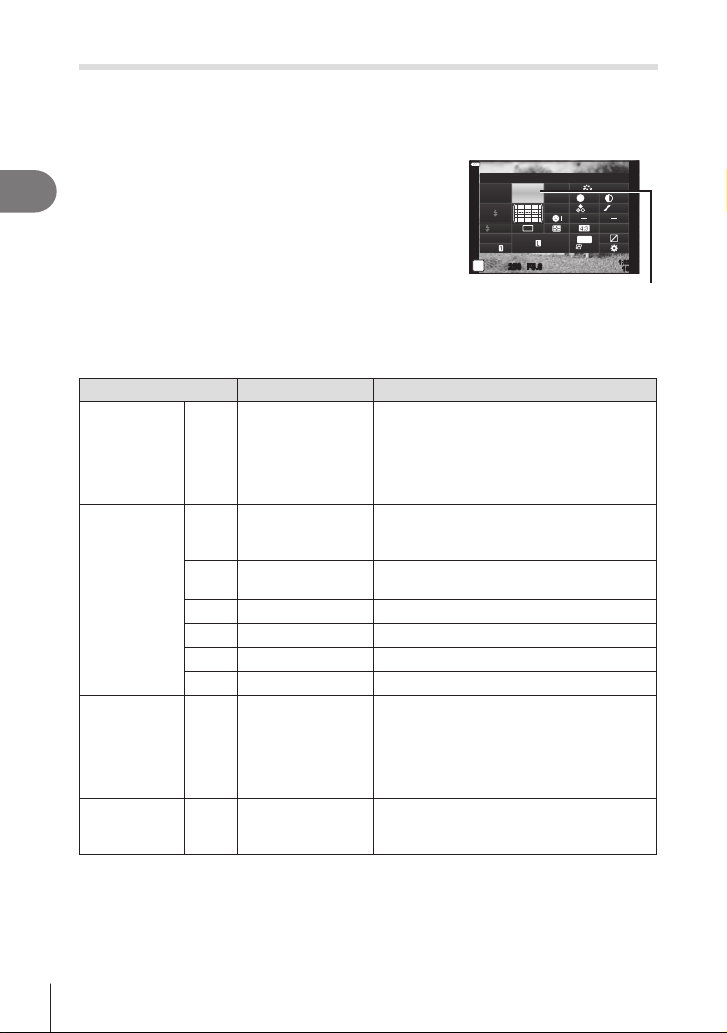
Adjusting color (WB (white balance))
250250 F5.6
P
1023
White balance (WB) ensures that white objects in images recorded by the camera
appear white. [AUTO] is suitable in most circumstances, but other values can be
selected according to the light source when [AUTO] fails to produce the desired results
or you wish to introduce a deliberate color cast into your images.
Press the Q button to display the LV super
1
2
Shooting
2
3
Auto white
balance
Preset white
balance
One-touch
white balance
Custom white
balance
control panel.
Use FGHI to highlight White Balance, and
then press the Q button.
Highlight an option using HI, and then press the Q button.
• One-touch white balance and custom white balance options can be viewed by
pressing the INFO button.
WB mode Color temperature Light conditions
Most normal scenes (scenes containing
objects that are white or close to white)
AUTO —
5
N
O
1
>
n
P/
Q/
W/
X
5300 K
7500 K
6000 K For shooting outdoors on a cloudy day
3000 K For shooting under a tungsten light
4000 K For shooting under a uorescent light
5500 K For ash shooting
Color temperature
set by one-touch
WB
CWB 2000 K – 14000 K
• This mode is recommended in most
situations.
• You can choose the white balance used
under incandescent lighting (P. 148).
For shooting outdoors on a clear day, or to
capture the reds in a sunset or the colors in
a reworks display
For shooting outdoors in the shadows on a
clear day
Situations in which you want to set white
balance for a specic subject
• Color temperature is set to a value
metered from a white object under the
lighting what will be used in the nal
photograph (P. 95).
Situations in which you can identify the
appropriate color temperature
• Choose a color temperature.
WB
Auto
S-IS On
M-IS
ISO
± 0.0
Auto
WB
A ±
0
G
±
0
S-AF
F
White Balance
Natural
S
0±
0
±
Normal
±
0
±
0
sRGB
4K
30p
1:02:03
94
EN
Page 95
One-touch white balance
Measure white balance by framing a piece of paper or other white object under the lighting
that will be used in the nal photograph. Use this option to ne-tune white balance when
you nd it hard to obtain the desired results with white balance compensation or preset white
balance options such as 5 (sunlight) or O (overcast).
The camera stores the metered value for quick recall as required.
Select [P], [Q], [W], or [X] (one-touch white balance 1, 2, 3, or 4), and
1
then press the INFO button.
Photograph a piece of colorless (white or gray) paper.
2
• Frame the paper so that it lls the display and no shadows fall it.
• The one-touch white balance screen appears.
Select [Yes], and then press the Q button.
3
• The new value is saved as a preset white balance option.
• The new value is stored until one-touch white balance is measured again. Turning the
power o does not erase the data.
W Keep Warm Color
Choose how the camera adjusts white balance for pictures taken using auto white
balance under incandescent lighting.
After selecting [AUTO], press the INFO button.
1
• [W Keep Warm Color] options will be displayed.
Highlight an option using FGHI, and then press the Q button.
2
Off
On
The camera suppresses the warm tones produced by
incandescent lighting.
The camera preserves the warm tones produced by
incandescent lighting.
2
Shooting
EN
95
Page 96
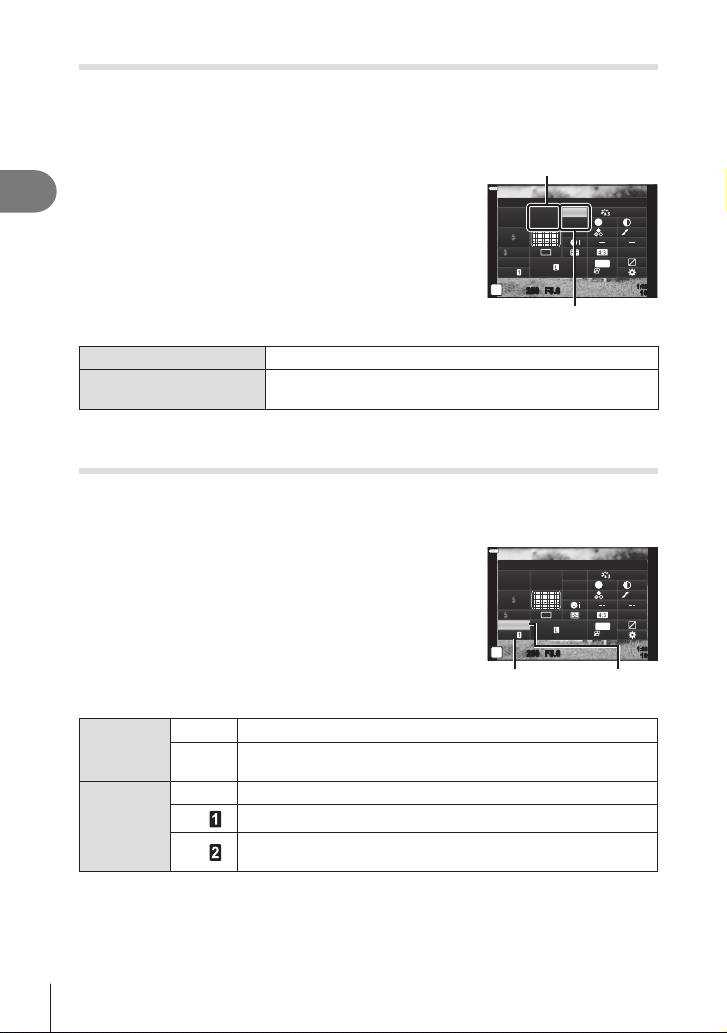
Making ne adjustments to white balance (WB Compensation)
1023
You can set and nely adjust the compensation values for both auto white balance and
preset white balance.
Before proceeding, choose a white balance option to which to make ne adjustments.
g “Adjusting color (WB (white balance))” (P. 94)
Press the Q button to display the LV super control
1
2
Shooting
panel.
Highlight white balance compensation using
2
FGHI, and then press the Q button.
Use HI to choose an axis.
3
Choose a value using FG, and then press the Q
4
button.
Auto x
ISO
Auto
± 0.0
S-IS On
M-IS
P
250250 F5.6
White balance compensation
A A (amber–blue) axis Positive values add a red cast, negative values a blue cast.
G (green–magenta)
G
axis
Positive values add a green cast, negative values a magenta
cast.
• Selecting [Reset] (basic) in Shooting Menu 1 does not reset the values selected.
Reducing camera shake (Image Stabilizer)
You can reduce the amount of camera shake that can occur when shooting in low light
situations or shooting with high magnication.
The image stabilizer starts when you press the shutter button halfway.
Press the Q button to display the LV super control
1
panel.
Use FGHI to select [Image Stabilizer], and then
2
press the Q button.
Highlight an option using HI, and then press the
3
Q button.
Still picture
(S-IS)
S-IS O Image stabilizer is o.
S-IS On
The camera detects the panning direction and applies the
appropriate image stabilization.
M-IS O Image stabilizer is o.
Movie
(M-IS)
M-IS
M-IS
The camera uses both sensor shift and electronic correction.
The camera uses sensor shift correction only.
Electronic correction is not used.
KImage Stabilizer
ISO
Auto
± 0.0
S-IS On
M-IS
P
250250 F5.6
n
Image
Stabilizer
WB
WB
Auto
WB
Auto
A ±
G
F
F
S-AF
A ±
G
S-AF
0
±
0
0
±
0
Natural
S
±
0±
±
0
±
0
sRGB
4K
30p
Natural
S
±
0±
±
0
±
0
sRGB
4K
30p
K
Image
Stabilizer
Normal
1:02:03
Normal
1:02:03
0
1023
0
96
EN
Page 97
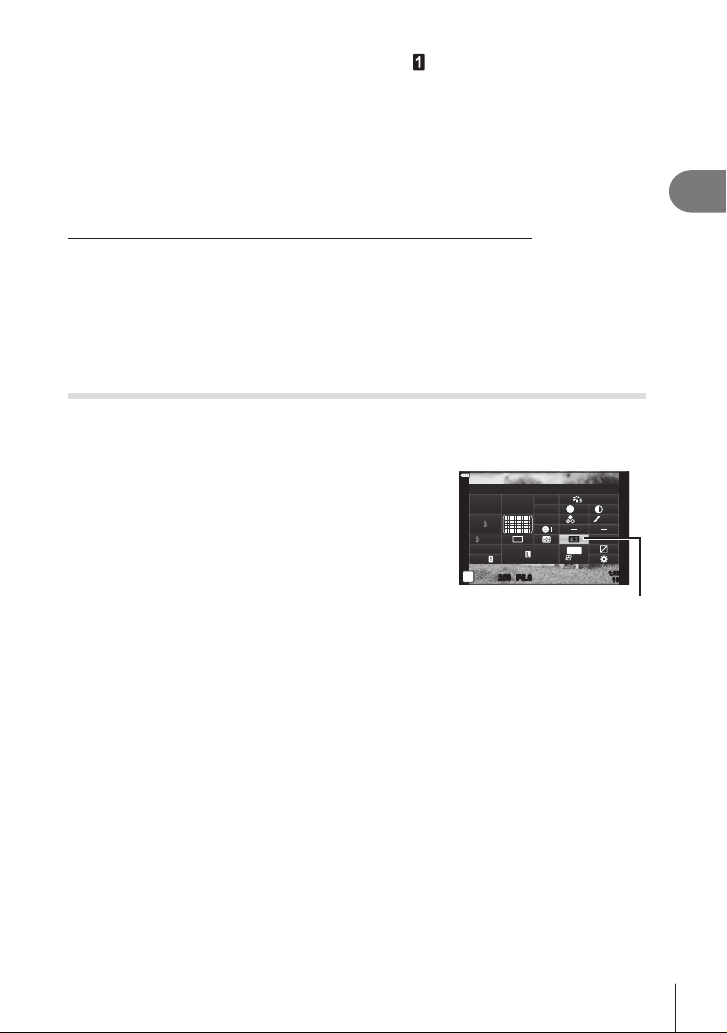
• The edges of the frame are cropped out when [M-IS ] is selected, reducing the area
P
1023
recorded.
• The image stabilizer cannot correct excessive camera shake or camera shake that occurs
when the shutter speed is set to the slowest speed. In these cases, it is recommended
that you use a tripod.
• When using a tripod, set [Image Stabilizer] to [S-IS O]/[M-IS O].
• When using a lens with an image stabilization function switch, priority is given to the lens
side setting.
• You may notice an operating sound or vibration when the image stabilizer is activated.
Using lenses other than Micro Four Thirds/Four Thirds System lenses
You can use focal length information to reduce camera shake when shooting with lenses that
are not Micro Four Thirds or Four Thirds system lenses.
• Press the INFO button while [Image Stabilizer] is selected, use FGHI to highlight a
focal length, and press the Q button.
• Choose a focal length between 0.1 mm and 1000.0 mm.
• Choose the value that matches the one printed on the lens.
• Selecting [Reset] (basic) in Shooting Menu 1 does not reset the focal length.
Setting the image aspect
Choose the ratio of width to height for pictures according to your intent or your goals
for printing or the like. In addition to the standard aspect (width-to-height) ratio of [4:3],
the camera oers settings of [16:9], [3:2], [1:1], and [3:4].
Press the Q button to display the LV super
1
control panel.
Use FGHI to highlight Image Aspect, and
2
then press the Q button.
Use HI to choose a value, and then press the
3
Q button.
• Image aspect can only be set for still images.
• JPEG images are recorded at the selected aspect ratio. RAW images are the same size
as the image sensor and are recorded at an aspect ratio of 4:3 with a tag indicating the
aspect ratio selected. A crop indicating the selected aspect ratio is displayed when images
are played back.
Aspect
ISO
Auto
± 0.0
S-IS On
M-IS
WB
Auto
250250 F5.6
A ±
0
G
±
0
S-AF
F
Natural
S
±
0±
0
Normal
±
0
±
0
sRGB
4K
30p
1:02:03
Image Aspect
2
Shooting
97
EN
Page 98
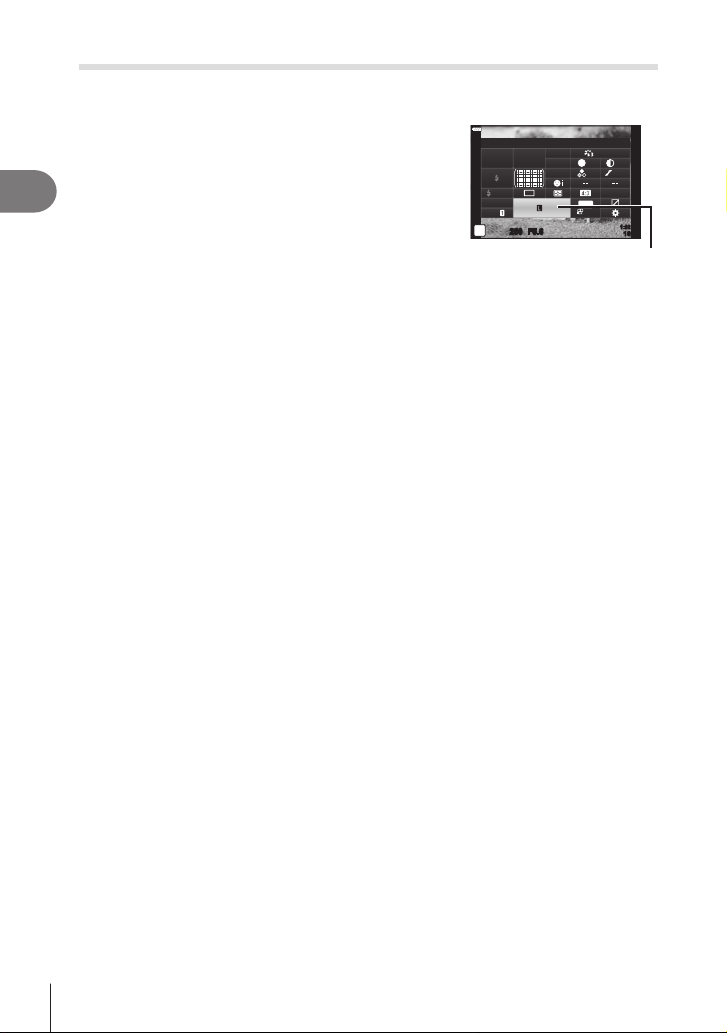
Photo File and Image Size Options (Still image quality, KK)
1023
You can set an image quality mode for still images. Select a quality suitable for the
application (such as for processing on PC, use on website etc.).
Press the Q button to display the LV super
1
2
2
Shooting
3
control panel.
Use FGHI to highlight still image quality,
and then press the Q button.
Highlight an option using HI, and then press the Q button.
P
KK
ISO
Auto
± 0.0
S-IS On
M-IS
WB
Auto
250250 F5.6
• Choose from JPEG (YSF, YF, YN, and XN) and RAW modes. Choose a
JPEG+RAW option to record both a JPEG and a RAW image with each shot. JPEG
modes combine image size (Y, X, and W) and compression ratio (SF, F, and N).
• When you want to select a combination other than YSF, YF, YN, and XN, change
the [K Set] (P. 148) settings in Custom Menu.
$
• RAW les store raw image data in an unprocessed state. Choose this format (extension
“.ORF”) for pictures that will later be enhanced.
- Cannot be viewed on other cameras
- Can be viewed on computers using Olympus Workspace Digital Photo Managing
software
- Can be saved in JPEG format using the [RAW Data Edit] (P. 137) retouch option in
the camera menus
Natural
A ±
0
S
±
0±
G
±
S-AF
F
0
0
Normal
±
0
±
0
sRGB
4K
30p
1:02:03
Still Image Quality
98
EN
Page 99
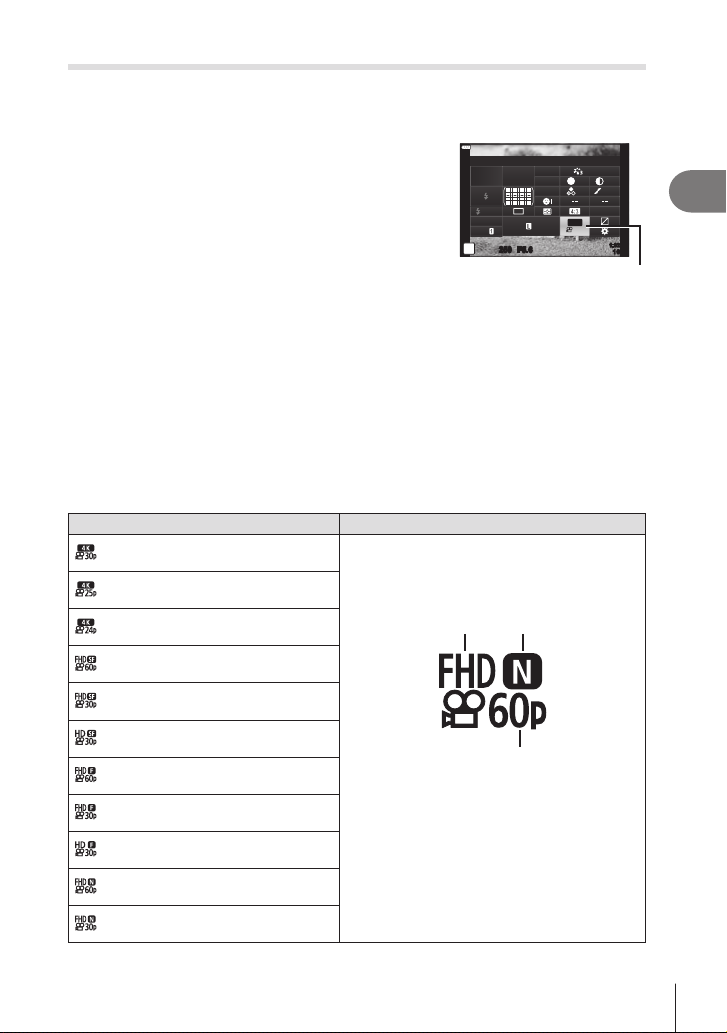
Frame Size, Rate, and Compression (Movie quality, nK)
P
1023
Choose the image quality options available for movie recording. When choosing an
option, consider how the movie will be used: for example, are you planning to process
it on a computer, or is it intended for upload to a website?
Press the Q button to display the LV super
1
control panel.
Use FGHI to highlight movie quality, and
2
then press the Q button.
Use HI to choose an option, and then press
3
the Q button.
Available Movie Quality Options
The options available for movie quality vary with the movie mode (P. 76) and the
options selected for [Video Frame Rate] and [Video Bit Rate] in the video menu
(P. 136).
• When shooting movies that will be viewed on a television, choose a frame rate that
matches the video standard used in the device, as otherwise the movie may not play back
smoothly. Video standards vary by country or region: some use NTSC, others PAL.
- When shooting for display on NTSC devices, choose 60p (30p)
- When shooting for display on PAL devices, choose 50p (25p)
The following options are available when the mode dial is rotated to a position
other than n:
Movie quality Movie quality components
3840×2160 30p
nK
ISO
Auto
± 0.0
S-IS On
M-IS
WB
Auto
250250 F5.6
A ±
0
G
±
0
S-AF
F
Natural
S
±
0±
0
Normal
±
0
±
0
sRGB
4K
30p
1:02:03
Movie Quality
2
Shooting
3840×2160 25p
Choose the desired combination of frame size,
bit rate, and frame rate.
3840×2160 24p
1 2
1920×1080 Super Fine 60p
1920×1080 Super Fine 30p
1280×720 Super Fine 30p
1920×1080 Fine 60p
1920×1080 Fine 30p
1280×720 Fine 30p
1 Frame size
4K : 3840×2160
FHD : 1920×1080
HD : 1280×720
2 Bit rate (compression ratio)*
SF (Super Fine), F (Fine), N (Normal)
3
1
3 Frame rate
1920×1080 Normal 60p
30p (60p), 25p (50p), 24p
1920×1080 Normal 30p
99
EN
Page 100
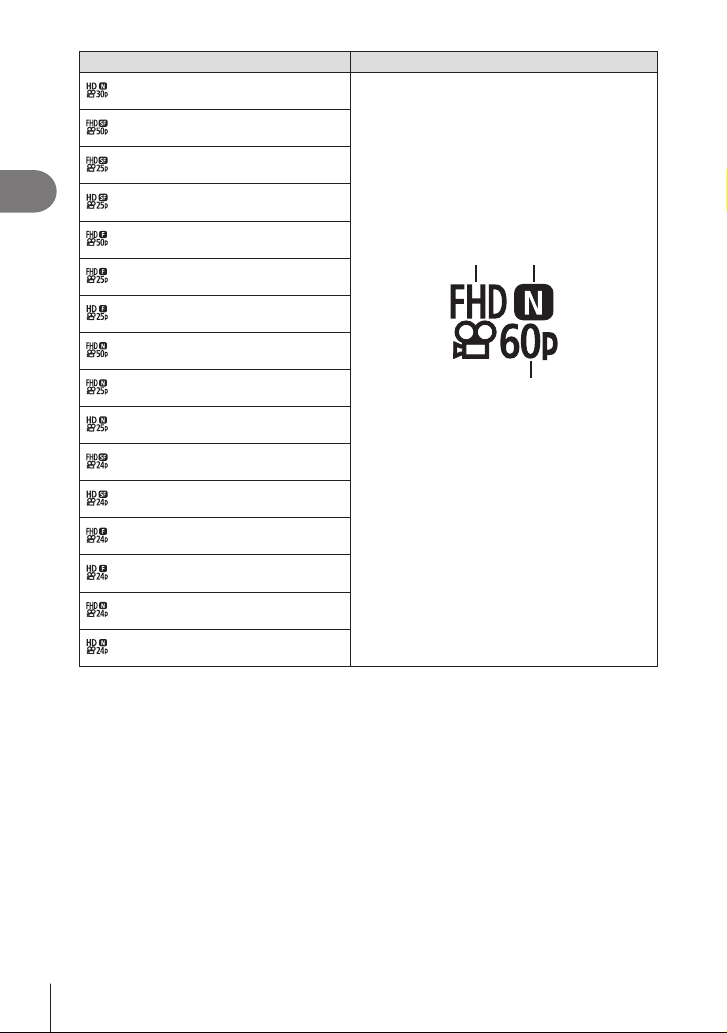
2
Shooting
Movie quality Movie quality components
1280×720 Normal 30p
1920×1080 Super Fine 50p
1920×1080 Super Fine 25p
1280×720 Super Fine 25p
Choose the desired combination of frame size,
1920×1080 Fine 50p
1920×1080 Fine 25p
1280×720 Fine 25p
1920×1080 Normal 50p
bit rate, and frame rate.
1 2
1920×1080 Normal 25p
1280×720 Normal 25p
1920×1080 Super Fine 24p
1280×720 Super Fine 24p
1920×1080 Fine 24p
1280×720 Fine 24p
1920×1080 Normal 24p
1280×720 Normal 24p
*1 The bit rate can not be changed when the frame size is [4K].
1 Frame size
4K : 3840×2160
FHD : 1920×1080
HD : 1280×720
2 Bit rate (compression ratio)*
SF (Super Fine), F (Fine), N (Normal)
3 Frame rate
30p (60p), 25p (50p), 24p
3
1
100
EN
 Loading...