

Page 1

DIGITAL CAMERA
Instruction Manual
Model No. : IM010
Thank you for purchasing an Olympus digital camera. Before you start to use your new camera,
please read these instructions carefully to enjoy optimum performance and a longer service life. Keep
this manual in a safe place for future reference.
We recommend that you take test shots to get accustomed to your camera before taking important
photographs.
The screen and camera illustrations shown in this manual were produced during the development
stages and may differ from the actual product.
If there are additions and/or modifi cations of functions due to fi rmware update for the camera, the
contents will differ. For the latest information, please visit the Olympus website.
Page 2

Product Manuals
In addition to the “Instruction Manual”, we also offer a “Camera Function Guide”.
Consult these manuals when using the product.
Instruction Manual (this pdf)
A how-to guide to the camera and its features. The Instruction
Manual can be downloaded from the OLYMPUS website
or directly using the “OLYMPUS Image Share” (OI.Share)
smartphone app.
Camera Function Guide
A function and setting guide that helps you use camera features to the full. It has
been optimized for display on mobile devices and can be viewed using OI.Share.
http://cs.olympus-imaging.jp/jp/support/cs/webmanual/index.html
Symbols Used in This Manual
The following symbols are used in this manual:
Tips and other helpful information for using the camera.
%
Notes and other supplementary information.
$
References to other pages in this manual.
g
2
EN
Page 3

Product Manuals P. 2
Table of Contents P. 4
Feature Index P. 16
Parts of the Camera P. 20
Package Contents P. 24
Before You Begin P. 25
1 Getting Ready
Read this chapter, together with the other relevant sections of this manual, when using the
camera to take photographs or fi lm movies.
2 Taking and Viewing Photographs
Read this chapter for information on using the camera to take photographs. This chapter also
covers the features you’ll use when shooting and viewing photos.
3 Shooting and Viewing Movies
Read this chapter for information on using the camera to record movies. This chapter also
covers the features needed to record movies and view them on the camera.
4 Customizing the Camera
Customize camera buttons and dials to suit your shooting style.
5 Using Field Sensor Data
Read this chapter for information on using the camera’s built-in sensors and GPS feature.
6 Connecting the Camera to External Devices
Connect the camera to external devices such as computers or displays using cables or via
wireless LAN.
7 Technical Notes
This chapter covers such topics as camera maintenance and provides a list of default
settings that you can refer to while using the camera.
8 SAFETY PRECAUTIONS
This chapter includes safety precautions for using your camera. Be sure to read them.
9 Index
P. 27
1
P. 51
2
P. 293
3
P. 453
4
P. 567
5
P. 581
6
P. 631
7
P. 663
8
P. 675
EN
9
3
Page 4

Table of Contents
Product Manuals ....................................................................................................2
Feature Index ........................................................................................................ 16
Parts of the Camera .............................................................................................20
Package Contents ................................................................................................ 24
Before You Begin .................................................................................................25
1 Getting Ready ................................................................................................ 27
Attaching the Strap .................................................................................. 28
Attaching Cable Protectors ......................................................................29
Removing the Eyecup ............................................................................. 30
Inserting and Removing Batteries ........................................................... 31
Batteries and Chargers .................................................................... 33
Using Y our Charger Abroad ............................................................. 33
Using External Power Sources ................................................................34
Connecting via USB .........................................................................34
Optional AC Adapters ...................................................................... 35
1-1 Inserting Memory Cards ................................................................................. 36
Using Two Memory Cards ................................................................ 37
Memory Cards .................................................................................37
Formatting Memory Cards (Card Setup) ......................................... 38
1-2 Attaching Lenses ............................................................................................ 39
Removing Lenses ............................................................................ 40
MF Clutch Lenses ...................................................................................41
Interchangeable Lenses .......................................................................... 42
1-3 Using the Monitor ............................................................................................ 43
1-4 Turning the Camera On .................................................................................. 44
Sleep Mode ......................................................................................44
1-5 Initial Setup ..................................................................................................... 45
What to Do If You Can’t Read the Display ............................................... 47
Correcting the Clock Using GPS ............................................................. 48
1-6 Focusing the Viewfi nder..................................................................................49
4
EN
Table of Contents
Page 5

2 Taking and Viewing Photographs ................................................................ 51
2-1 Basic Photography and Playback ................................................................... 52
Taking Photos .......................................................................................... 52
Holding the Camera ......................................................................... 52
Taking Photos with the Shutter Button ............................................. 53
Taking Photos with Touch Controls ..................................................54
Remote Photography ....................................................................... 55
Viewing Photographs ..............................................................................56
Choosing a Memory Card ................................................................ 57
Adjusting Volume ............................................................................. 58
Playback Using Touch Controls .......................................................58
2-2 Shooting Settings ............................................................................................ 59
Direct Buttons .......................................................................................... 60
The Super Control/LV Super Control Panel ............................................ 62
Using the Menus .....................................................................................66
Using Live Controls ................................................................................. 68
2-3 Card-Related Settings .................................................................................... 71
Storage Options (K Save Settings)....................................................... 72
Choosing a Card for Photos (K Save Slot) ........................................... 74
Storage Slot Selection ............................................................................. 75
Storage Folder Selection (Assign Save Folder) ...................................... 76
2-4 Image Quality and Size ................................................................................... 78
Photo File and Image Size Options (KK) .......................................... 78
Choosing Available Options (K Set) .....................................................81
Choosing Values for [X] and [W] Sizes (Pixel Count) ...................... 82
2-5 The Viewfi nder and Monitor Displays .............................................................83
Display Selection ..................................................................................... 83
Choosing the Information Displayed .......................................................84
Display Selection Options (EVF Auto Switch) ......................................... 85
The Shooting Display .............................................................................. 86
Optical Viewfi nder Simulation (S-OVF) ...................................................89
2-6 Photo Review (Rec View) ............................................................................... 90
2-7 Restoring Default Settings (Reset) ................................................................. 91
2-8 Choosing a Shooting Mode ............................................................................ 93
Letting the Camera Choose Aperture and Shutter Speed
: Program AE) ................................................................................... 94
(
P
Adjusting Settings in Mode
Program Shift ................................................................................... 95
...........................................................95
P
Table of Contents
EN
5
Page 6

Choosing an Aperture (A: Aperture-Priority AE) ...................................... 96
Adjusting Settings in Mode
Choosing a Shutter Speed (
Adjusting Settings in Mode
Choosing Aperture and Shutter Speed (M:
Adjusting Settings in Mode M ........................................................ 102
Using Exposure Compensation in Mode
Long Exposures (
Adjusting Focus During Exposures (Bulb/Time Focusing) ............. 107
Lighten Blending (B: Live Composite Photography) .................................. 108
Choosing the Shutter Speed (Composite Settings) ........................110
Saving Custom Settings to the Mode Dial
(C1/C2/C3/C4 Custom Modes) .........................................................111
Saving Settings (Assign to Custom Mode) .....................................111
Using Custom Modes (C1/C2/C3/C4) ..........................................112
2-9 Focus .............................................................................................................114
Focus Mode (K AF Mode)....................................................................115
Choosing an AF-Target Mode (AF Target Mode) ................................... 120
Choosing a Focus Target (AF Target Point) .......................................... 123
Custom AF Targets (t Target Mode Settings) ................................... 125
Lens MF Clutch (Manual Focus Clutch) ................................................ 127
Disabling the MF Clutch (MF Clutch) ............................................. 128
Focusing at a Preset Distance (Preset MF) ..........................................129
Face/Eye Priority AF .............................................................................. 133
Using Face/Eye Priority AF ............................................................135
Zoom Frame/Focus Zoom AF (Super Spot AF) ..................................... 136
Assigning [a] (Magnify) to a Control ............................................136
Using [a] (Magnify) ......................................................................137
Focus Zoom Options (LV Close Up Settings) ........................................ 139
Setting Focus and Exposure with the AEL/AFL Button
(K AEL/AFL) ..................................................................................... 141
Lens Focus Range (AF Limiter) ............................................................143
C-AF Tracking Sensitivity (K C-AF Sensitivity) ................................... 145
C-AF Lens Scanning (AF Scanner) ....................................................... 146
C-AF Starting Focus Target (K C-AF Center Start) ............................ 147
C-AF Center Target Priority (K C-AF Center Priority) .........................148
Tracking Focus on Selected Subjects (K Tracking Subject) ...............149
: Bulb/Time) ............................................................ 104
B
.......................................................... 97
A
: Shutter-Priority AE).................................98
S
.........................................................100
S
Manual Exposure) .................101
................................... 103
M
6
EN
Table of Contents
Page 7

2-10 Drive Mode (j/Y/i) ............................................................................... 151
Sequential Shooting/Self-Timer ............................................................. 151
Burst Shooting Options (jL Settings/jH Settings) ......................... 155
Self-Timer Options (c Custom Self-timer) .......................................... 157
Reducing Shutter Slap (Anti-Shock r) ................................................ 160
Adjusting Anti-Shock Settings ........................................................160
The Electronic Shutter (Silent s) ......................................................... 163
Long Exposure Noise Reduction (Noise Reduction s) ................ 166
Silent-Mode Options (Silent s Mode Settings) ............................ 167
Reducing Shutter Lag (Pro Capture Photography) ...............................168
Interval-Timer Photography (Intrvl. Sh./Time Lapse) ............................. 172
Burst Mode Image Stabilization (j Image Stabilization) .................... 174
Viewfi nder Display Rate (Frame Rate) .................................................. 175
2-11 Image Stabilization ....................................................................................... 176
Reducing Camera Blur (K Image Stabilizer)....................................... 176
Half-Press Image Stabilization (Half Way Rls With IS)..........................178
2-12 Metering and Exposure ................................................................................. 179
Adjusting Exposure (Exposure Compensation) ..................................... 180
Adjusting ISO Sensitivity (K ISO) .......................................................181
Options for [K ISO] > [AUTO] (K ISO-Auto Set) ..............................183
Shooting Mode and [K ISO] > [AUTO] (K ISO-Auto) ....................... 185
Exposure Metering (Metering) ............................................................... 186
Locking Exposure (AE Lock) ................................................................. 188
Reducing Flicker (Flicker Reduction) ....................................................190
Reducing Flicker in Live View (Anti-Flicker LV) ............................. 190
Reducing Flicker in Photographs (Anti-Flicker Shooting) ..............191
Reducing Flicker Under LED Lighting (K Flicker Scan) ...................... 193
High Dynamic Range (HDR) ................................................................. 195
Slowing the Shutter in Bright Light (Live ND Shooting) ......................... 197
Live View Exposure Preview (Live View Boost) .................................... 200
2-13 Color and Quality ..........................................................................................202
Adjusting Hue (K WB) ........................................................................ 202
Preserving Warm Colors (KW Keep Warm Color) .................... 205
Fine-Tuning White Balance (K White Balance Compensation) ... 206
Metering White Balance (One-Touch White Balance
P/Q/W/X) .................................................................................207
High-Resolution Photos (High Res Shot) ............................................. 210
High Res Shot Image Quality (KK) .......................................... 213
Table of Contents
EN
7
Page 8

Image Enhancement (Picture Mode) .................................................... 215
Choosing a Picture Mode .............................................................. 217
Creating Custom Picture Modes (K Custom Picture Mode) ......... 219
Adjusting Sharpness (Sharpness) .................................................220
Adjusting Contrast (Contrast) ........................................................ 221
Adjusting Vividness (Saturation) .................................................... 222
Adjusting Shading (Gradation) .......................................................223
Color Filters for Black-and-White Photography (Color Filter) ........ 224
Monochrome Tints (Monochrome Color) ....................................... 225
Adjusting i-Enhance Effects (Effect) ..............................................226
Choosing a Tone Curve (Highlight&Shadow Control) ....................227
Hue and Saturation (Color Creator) ............................................... 229
“Leave Color” Effects (Partial Color) .............................................. 231
Choosing a Color Space (Color Space) .........................................232
2-14 Effects ...........................................................................................................233
Aspect Ratio (Image Aspect) ................................................................ 233
Zoom (Digital Tele-converter) ...............................................................235
Varying Settings Little-by-Little over a Series of Shots (Bracketing) ..... 236
Increasing Depth of Field (Focus Stacking) .........................................243
Overlaying Pictures (Multiple Exposure) .............................................. 246
Keystone Effects/Enhancing Perspective (Keystone Comp.) ............... 248
Correcting Fisheye Distortion (Fisheye Compensation) ....................... 250
2-15 Flash Photography ........................................................................................ 252
Compatible Flash Units ......................................................................... 252
Choosing a Flash Mode (#Flash Mode) .............................................. 254
Adjusting Flash Output (x) ................................................................ 259
Choosing a Flash Sync Speed (#X-Sync.) .........................................260
Setting a Slow Shutter Speed Limit (#Slow Limit) ..............................261
Wireless Remote Flash Control ............................................................. 262
Third-Party Flash Units .................................................................. 264
2-16 Working with Saved Images ......................................................................... 265
Choosing the Information Displayed .....................................................265
The Playback Info Display ..................................................................... 266
Zooming In (Playback Zoom) ................................................................ 267
Finding Pictures Quickly (Index and Calendar Playback) .....................268
Rotating Pictures (Rotate) ..................................................................... 269
Protecting Pictures (0) ...................................................................... 270
Removing Protection from All Pictures (Reset Protect) ................. 271
8
EN
Table of Contents
Page 9

Copying Pictures Between Cards (Copy) .............................................. 272
Copying All Pictures (Copy All) ......................................................274
Deleting Pictures (Erase) ......................................................................275
Deleting All Pictures (All Erase) ............................................................. 276
Selecting Pictures for Sharing (Share Order) ........................................ 277
Removing Share Marking from All Pictures
(Reset Share Order) .................................................................... 278
Selecting Multiple Pictures
(0/Copy Select/Erase Selected/Share Order Selected) ................. 279
Adding Audio to Pictures (K) .................................................................281
Automatically Rotating Portrait-Orientation Pictures for Playback
(R) .................................................................................................... 283
Retouching Pictures (Edit) ..................................................................... 284
Retouching RAW Pictures (RAW Data Edit) ..................................284
Retouching JPEG Pictures (JPEG Edit) ........................................287
Combining Pictures (Image Overlay) ....................................................289
Selecting Pictures for Printing (< — DPOF) ......................................... 291
3 Shooting and Viewing Movies .................................................................... 293
3-1 Basic Recording and Playback ..................................................................... 294
An Introduction to Movie Recording ...................................................... 294
Recording Movies .................................................................................. 295
Holding the Camera ....................................................................... 295
Recording Movies with the Touch Screen ...................................... 295
Remote Photography ..................................................................... 297
Touch Screen Options ...................................................................298
Focus Zoom (V) ......................................................................... 298
Using the Viewfi nder ......................................................................299
Viewing Movies .....................................................................................300
Playback Volume ........................................................................... 301
Viewing Movies over 4 GB in Size ................................................. 301
Choosing a Memory Card .............................................................. 302
Playback Using Touch Controls .....................................................303
3-2 Shooting Settings .......................................................................................... 304
Direct Buttons ........................................................................................ 305
Touch Controls (Silent Controls) ............................................................ 306
The LV Super Control Panel .................................................................. 309
Using Live Controls ............................................................................... 312
Using the Menus ...................................................................................314
Table of Contents
EN
9
Page 10

3-3 Card-Related Settings .................................................................................. 316
Choosing a Card for Movies (n Save Slot) .........................................316
Storage Slot Selection ........................................................................... 318
Storage Folder Selection (Assign Save Folder) .................................... 319
3-4 Movie File Settings ....................................................................................... 321
Frame Size, Rate, and Compression (nK) ....................................... 321
Time Codes (Time Code Settings) ........................................................ 324
3-5 The Viewfi nder and Monitor Displays ...........................................................326
Choosing the Information Displayed .....................................................327
Display Selection Options (EVF Auto Switch) ....................................... 328
The Shooting Display ............................................................................ 329
Restoring Default Settings (Reset) ........................................................ 331
3-6 Movie Recording Options ............................................................................. 332
Choosing an Exposure Mode (n Mode) .............................................. 332
Letting the Camera Choose Aperture and Shutter Speed
: Program AE) .......................................................................... 334
(
P
Choosing an Aperture (
Choosing a Shutter Speed (
Choosing Aperture and Shutter Speed (
Filming High-Speed Movies (nK) ..................................................... 339
Filming Slow- or Fast-Motion Movies
(Slow- and Fast-Motion Movies) ......................................................... 342
3-7 Focus ............................................................................................................ 345
Focus Mode (n AF Mode) ................................................................... 345
Choosing an AF Target Mode (AF Target Mode) ................................... 349
Choosing a Focus Target (AF Target Point) .......................................... 352
Lens MF Clutch (Manual Focus Clutch) ................................................ 355
Disabling the MF Clutch (MF Clutch) ............................................. 356
Focusing at a Preset Distance (Preset MF) ..........................................357
Face Priority AF ..................................................................................... 360
Using Face Priority AF ................................................................... 361
C-AF Tracking Sensitivity (n C-AF Sensitivity) .................................... 362
C-AF Focus Speed (n C-AF Speed) ................................................... 363
Zoom Frame/Focus Zoom AF ............................................................... 364
3-8 Metering and Exposure ................................................................................. 367
Adjusting Exposure (Exposure Compensation) ..................................... 367
Adjusting ISO Sensitivity (n ISO) ........................................................ 369
Auto ISO Sensitivity Control (b ISO-Auto Set).................................. 372
Locking Exposure (AE Lock) ................................................................. 373
Reducing Flicker Under LED Lighting (n Flicker Scan) ......................374
: Aperture-Priority AE) ............................335
A
: Shutter-Priority AE) ....................... 336
S
: Manual Exposure) .....337
M
10
Table of Contents
EN
Page 11

3-9 Image Stabilization, Color, and Quality ......................................................... 376
Reducing Camera Blur (n Image Stabilizer) .......................................376
Image Stabilization Options (n IS Level) .............................................378
High ISO Noise Reduction Options (n Noise Filter) ............................ 379
Adjusting Hue (n WB) .........................................................................380
Preserving Warm Colors (nW Keep Warm Color) ............................ 383
White Balance Compensation (n White Balance Compensation) .......384
Fine-Tuning White Balance (n All x) ............................................... 385
Metering White Balance (One-Touch White Balance
P/Q/W/X) .................................................................................. 386
Image Enhancement (Picture Mode) .................................................... 388
Choosing a Picture Mode .............................................................. 390
Creating Custom Picture Modes (K Custom Picture Mode) ......... 392
Highlight&Shadow Control (n Picture Mode) ......................................393
Preview Options for Movie Picture Modes (a View Assist) ................ 395
Adjusting Sharpness (Sharpness) ......................................................... 396
Adjusting Contrast (Contrast) ................................................................ 397
Adjusting Vividness (Saturation) ...........................................................398
Adjusting Shading (Gradation) .............................................................. 399
Color Filters for Black-and-White Photography (Color Filter) ................ 400
Monochrome Tints (Monochrome Color) ............................................... 401
Adjusting i-Enhance Effects (Effect) ...................................................... 402
Choosing a Tone Curve (Highlight&Shadow Control) ........................... 403
Hue and Saturation (Color Creator) ......................................................405
“Leave Color” Effects (Partial Color) .....................................................407
3-10 Effects ...........................................................................................................408
Power Zoom (n Elec. Zoom Speed) ...................................................408
Adjusting Zoom During Filming (Movie H) .......................................... 409
Filming at a Higher Zoom Ratio (Digital Tele-converter) ........................411
3-11 Audio Recording ........................................................................................... 412
Sound Recording Options (Movie K) .................................................... 413
Using the Olympus LS-100 IC Recorder ............................................... 415
3-12 Customizing Camera Controls ...................................................................... 417
Assigning Roles to Buttons (n Button Function) .................................417
Choosing a Role for the Shutter Button (n Shutter Function) .............423
Assigning Roles to the Front and Rear Dials (n Dial Function) ..........424
Customizing the Fn Lever (n Fn Lever Function) ............................... 426
3-13 Display Settings ............................................................................................ 428
Viewing On-Screen Controls (n Control Settings)............................... 428
Shooting Indicators (n Info Settings) ...................................................429
Battery Level Display Options (8 Display Pattern) .......................... 431
Table of Contents
EN
11
Page 12

3-14 HDMI Devices ...............................................................................................432
HDMI Output (n HDMI Output) ........................................................... 432
External Monitor Display Options (HDMI) .............................................434
3-15 Working with Saved Movies .......................................................................... 436
Choosing the Information Displayed .....................................................436
The Movie Playback Info Display .......................................................... 437
Finding Movies Quickly (Index and Calendar Playback) ....................... 438
Protecting Movies (0) ........................................................................ 439
Removing Protection from All Pictures (Reset Protect) ................. 440
Copying Pictures Between Cards (Copy) .............................................. 441
Copying All Pictures (Copy All) .............................................................. 443
Deleting Pictures (Erase) ......................................................................444
Deleting All Pictures (All Erase) ............................................................. 445
Selecting Movies for Sharing (Share Order) .........................................446
Removing Share Marking from All Pictures
(Reset Share Order) .................................................................... 447
Selecting Multiple Pictures (0/Copy Select/Erase Selected/ Share
Order Selected) ..................................................................................448
Editing Movies (Movie Edit) ................................................................... 450
Trimming Movies (Movie Trimming) ............................................... 450
Creating Movie Stills (In-Movie Image Capture) ............................ 451
4 Customizing the Camera ............................................................................. 453
4-1 Basic Camera Settings (the e Setup Menu) ................................................. 454
Formatting Memory Cards and Deleting All Photos and Movies
(Card Setup) ....................................................................................... 454
Setting the Camera Clock (X Settings) ................................................ 455
Choosing a Language (W Language) ................................................455
Monitor Brightness and Hue (s) ........................................................ 456
Post-Shooting Display Time (Rec View) ................................................ 456
Wireless LAN Options (Wi-Fi/Bluetooth Settings) ................................. 457
Viewing the Firmware Version (Firmware) ............................................ 457
4-2 Custom Shooting Modes .............................................................................. 458
Saving Settings to the Mode Dial (Assign to Custom Mode) ................. 458
Using Custom Modes (C1/C2/C3/C4) ................................................. 460
4-3 Customizing Buttons and Dials ..................................................................... 462
Assigning Roles to Buttons (K Button Function)................................. 463
Multi-Function Button Options (Multi Function) ..................................... 470
Assigning Roles to the Front and Rear Dials (K Dial Function) .......... 473
Customizing the Fn Lever (K Fn Lever Function) .............................. 475
12
Table of Contents
EN
Page 13

4-4 “My Menu” ..................................................................................................... 477
Creating a Personalized Menu (My Menu) ............................................ 477
4-5 Customizing Camera Functions .................................................................... 480
Focus-Related Items (Custom Menus J, K, L, and I) .................. 480
Control-Related Items (Custom Menus J and K) .............................. 498
Release-Related Items (Custom Menus N and O) ............................ 505
Display-, Sound-, and Connection-Related Items
(Custom Menus P, Q, R, and S) ................................................. 513
Exposure-Related Items (Custom Menus T, U, and V) ................... 530
Flash-Related Items (Custom Menu W) ............................................... 539
Image Quality, White Balance, and Color-Related Items
(Custom Menu X) ............................................................................. 542
Storage- and Deletion-Related Items (Custom Menus Y and Z) ....... 547
Viewfi nder-Related Items (Custom Menu a) ....................................... 553
Other Custom Settings (Custom Menus b, c, and Q) ..................... 558
5 Using Field Sensor Data ............................................................................. 567
5-1 Notes on Field Sensors ................................................................................ 568
GPS: Precautions for Use ..................................................................... 568
Before Using GPS (A-GPS Data) .......................................................... 569
Updating the A-GPS Data Using a Smartphone ............................ 569
Updating the A-GPS Data Using a PC ........................................... 569
5-2 Using Field Sensors ...................................................................................... 570
Recording Location Data (Record GPS location) .................................. 570
Field Sensor Logs .................................................................................571
Logging Data (Field Sensor Logger) ..............................................571
Viewing Sensor Data (G/Info Settings) ...............................................574
Enabling Sensor Data Display ....................................................... 575
Sensor Data Display Options (Elevation/Temperature) ......................... 578
GPS Options (GPS Priority) .................................................................. 579
5-3 Disabling GPS .............................................................................................. 580
6 Connecting the Camera to External Devices ............................................581
6-1 Connection Types and Software ................................................................... 582
Precautions for Using Wi-Fi and Bluetooth
®
........................................ 583
6-2 Connecting to Smartphones via Wi-Fi .......................................................... 584
Installing Apps .......................................................................................585
Connecting to Smartphones (Wi-Fi/Bluetooth Settings) ........................ 586
Readying the Camera (Availability) ................................................ 586
Pairing the Camera and Smartphone ............................................587
Connecting When the Camera Is Off (Power-off Standby) ...................590
Table of Contents
EN
13
Page 14

Copying Pictures to Smartphones ......................................................... 592
Downloading Pictures Selected with OI.Share ..............................592
Auto Download .............................................................................. 594
Removing Share Marking (Reset Share Order) .............................595
Remote Photography Using a Smartphone ........................................... 596
Accessing Field Sensor Logs ................................................................ 597
Ending the Connection .......................................................................... 598
Ending the Current Connection .....................................................598
Disabling Wi-Fi/Bluetooth
®
........................................................... 598
6-3 Connecting to Computers via Wi-Fi .............................................................. 600
Installing Software ................................................................................. 601
Readying the Computer (Windows) ......................................................602
Pairing the Computer with the Camera (New Link) ............................... 603
Adjusting Wi-Fi Settings (T Wi-Fi Connect) ...................................... 605
Enabling Camera Wi-Fi (Wi-Fi/Bluetooth Settings) ........................606
Connecting via WPS (Connect by WPS) ....................................... 607
Connecting Manually (Manual Connections) ................................. 609
Choosing a Network from a List
(Connect from Access Point List) ................................................ 612
Uploading Pictures as They Are Taken ................................................. 614
Ending the Connection .......................................................................... 616
Ending the Current Connection .....................................................616
Disabling Wi-Fi/Bluetooth
®
........................................................... 617
6-4 Network Settings ........................................................................................... 618
Changing Passwords (Connection Password) ...................................... 618
Restoring Default Wi-Fi/Bluetooth
®
Settings (Reset Settings) ............. 619
6-5 Connecting to Computers via USB ............................................................... 620
Compatible Computers .......................................................................... 621
Installing Software ................................................................................. 621
Uploading Pictures as They Are Taken (0) ..................................... 622
Copying Pictures to the Computer (Storage) ........................................624
6-6 Powering the Camera via USB (USB Power Delivery) ................................. 625
6-7 Connecting to TVs or External Displays via HDMI........................................ 626
Viewing Pictures on a TV (HDMI) .......................................................... 627
HDMI Output .................................................................................. 627
Connecting the Camera to a TV ....................................................629
Using a TV Remote (HDMI Control) ...................................................... 630
14
Table of Contents
EN
Page 15

7 Technical Notes ............................................................................................ 631
7-1 Storage and Maintenance ............................................................................. 632
7-2 Troubleshooting ............................................................................................ 634
7-3 Warnings and Error Messages .....................................................................637
7-4 Default Settings ............................................................................................ 640
Live Controls/LV Super Control Panel ........................................... 640
The K Shooting Menus ...............................................................642
The n Video Menu ....................................................................... 643
The q Playback Menu ................................................................. 645
The e Setup Menu ......................................................................... 646
The G Custom Menus ................................................................... 647
7-5 Memory Card Capacity ................................................................................. 654
7-6 Specifi cations ................................................................................................656
7-7 System Chart ................................................................................................ 660
8 SAFETY PRECAUTIONS .............................................................................. 663
9 Index ............................................................................................................. 675
Table of Contents
EN
15
Page 16
Feature Index
Feature
Shooting Mode 93 – 110
Custom Mode 111, 460
Monitor Display 83, 326
Viewfi nder Display 83, 326
Direct Button Functions 60, 305
Live Controls 68, 312
LV Super Control Panel 62, 309
W Shooting Menu 1
Reset / Custom Modes
Picture Mode 215, 388
KK
Image Aspect 233
Digital T ele-converter 235, 411
j/Y/i (Drive Mode)
X Shooting Menu 2
Bracketing 236
HDR 195
Multiple Exposure 246
Keystone Comp. 248
Anti-Shock r/Silent s
High Res Shot 210
Live ND Shooting 197
n Video Menu
n Mode Settings
n Mode
n Flicker Scan
g
91, 111,
331, 458,
460
78, 82,
213, 543
151
160, 163
332
374
Feature
n Specifi cation Settings
nK
b ISO-Auto Set
n Noise Filter
n WB
n All x
nW Keep Warm Color
n Picture Mode
n AF/IS Settings
n AF Mode
n C-AF Speed
n C-AF Sensitivity
n Image Stabilizer
n IS Level
n Button/Dial/Lever
n Button Function
n Dial Function
n Fn Lever Function
n Shutter Function
n Elec. Zoom Speed
n Display Settings
n Control Settings
n Info Settings
Time Code Settings 324
8 Display Pattern
a View Assist
Movie K
n HDMI Output
321, 339
g
372
379
380
385
383
393
345
363
362
376
378
417
424
426
423
408
428
429
431
395
413
432
EN
Feature Index
16
Page 17

Feature
q Playback Menu
R
Edit 284
Print Order 291
Reset Protect 271, 440
Reset share Order 278, 447
Copy All 274, 443
TWi-Fi Connect
G Custom Menu
J AF/MF
K AF Mode
K AF+MF
K AEL/AFL
AF Scanner 146, 482
K C-AF Sensitivity
K C-AF Center Start
K C-AF Center Priority
K AF/MF
KNMode Settings
AF Area Pointer 486
AF T argeting Pad 486
N Set Home
N Select Screen
Settings
t Target Mode Settings
K Orientation Linked
N
L AF/MF
AF Limiter 143, 490
AF Illuminator 490
I Face Priority
K Tracking Subject
AF Focus Adj. 492
g
283
586
115
481
141
145, 483
147, 483
148, 484
485
487
488
125, 488
489
133, 360,
491
149, 491
Feature
I AF/MF
Preset MF distance
MF Assist 495
MF Clutch
Focus Ring 496
Bulb/Time Focusing 107, 497
Reset Lens 497
J Button/Dial/Lever
K Button Function
S Center Button
T Direction Key
K Dial Function
Dial Direction 500
K Fn Lever Function
Fn Lever/Power Lever 501
K Button/Dial/Lever
K Elec. Zoom Speed
C-LOCK Settings 503
N Release/j/Image Stabilizer
S-AF Release Priority 505
C-AF Release Priority 505
jL Settings
jH Settings
Flicker reduction 190, 509
O Release/j/Image Stabilizer
K Image Stabilizer
j Image Stabilization
Half Way Rls With IS 178, 511
Lens I.S. Priority 512
g
129, 357,
494
128, 356,
496
463
499
499
473, 500
475, 501
502
155, 506
155, 507
176, 510
174, 511
Feature Index
EN
17
Page 18

Feature
P Disp/8/PC
K Control Settings
G/Info Settings
Picture Mode Settings 520
j/Y Settings
Multi Function Settings 521
Q Disp/8/PC
Live View Boost 200, 521
Art LV Mode 522
Frame Rate 175, 522
LV Close Up Settings 139, 523
qa Default Setting
z Settings
R Disp/8/PC
Grid Settings 524
Peaking Settings 525
Histogram Settings 526
Mode Guide 526
Selfi e Assist 527
S Disp/8/PC
8
HDMI
USB Mode 529
T Exp/ISO/BULB/p
EV Step 530
ISO Step 530
K ISO-Auto Set
K ISO-Auto
K Noise Filter
K Low ISO Processing
Noise Reduct. 533
434, 528,
183, 531
185, 531
g
513
515
520
523
524
527
627
532
532
Feature
U Exp/ISO/BULB/p
Bulb/Time Timer 533
Bulb/Time Monitor 534
Live Bulb 534
Live Time 535
Composite Settings 110, 535
K Flicker Scan
V Exp/ISO/BULB/p
Metering 186, 536
AEL Metering 537
N Spot Metering
Exposure Shift 538
W #Custom
#X-Sync.
#Slow Limit
x+F
#+WB
#RC Mode
X K/WB/Color
K Set
Pixel Count 82, 543
Shading Comp. 543
K WB
K All x
KW Keep Warm Color
Color Space 232
g
536
537
260, 539
261, 539
540
540
541
81, 542
544
545
205
EN
Feature Index
18
Page 19

Feature
Y Record/Erase
Card Slot Settings 547
File Name 548
Edit Filename 548
dpi Settings 549
Copyright Settings 549
Lens Info Settings 550
Z Record/Erase
Quick Erase 551
RAW+JPEG Erase 551
Priority Set 552
a EVF
EVF Auto Switch
EVF Adjust 553
EVF Style 554
V Info Settings
EVF Grid Settings 556
V Half Way Level
S-OVF 89, 557
b K Utility
Pixel Mapping 558, 633
Press-and-hold Time 558
Level Adjust 559
Touchscreen Settings 559
Menu Recall 560
Fisheye Compensation 250, 560
g
85, 328,
553
555
556
Feature
c K Utility
Battery Settings 561
Backlit LCD 561
Sleep 562
Auto Power Off 562
Quick Sleep Mode 563
Q K Utility
Record GPS location 570
GPS Priority 564, 579
Elevation/Temperature 565, 578
Field Sensor Logger 565, 571
Certifi cation 566
e Setup Menu
Card Setup
X Settings
W
s
Rec View 90, 456
Wi-Fi/Bluetooth Settings
Firmware 457
My Menu 477
g
38, 276,
445, 454
455
455
456
457, 586,
607
Feature Index
EN
19
Page 20
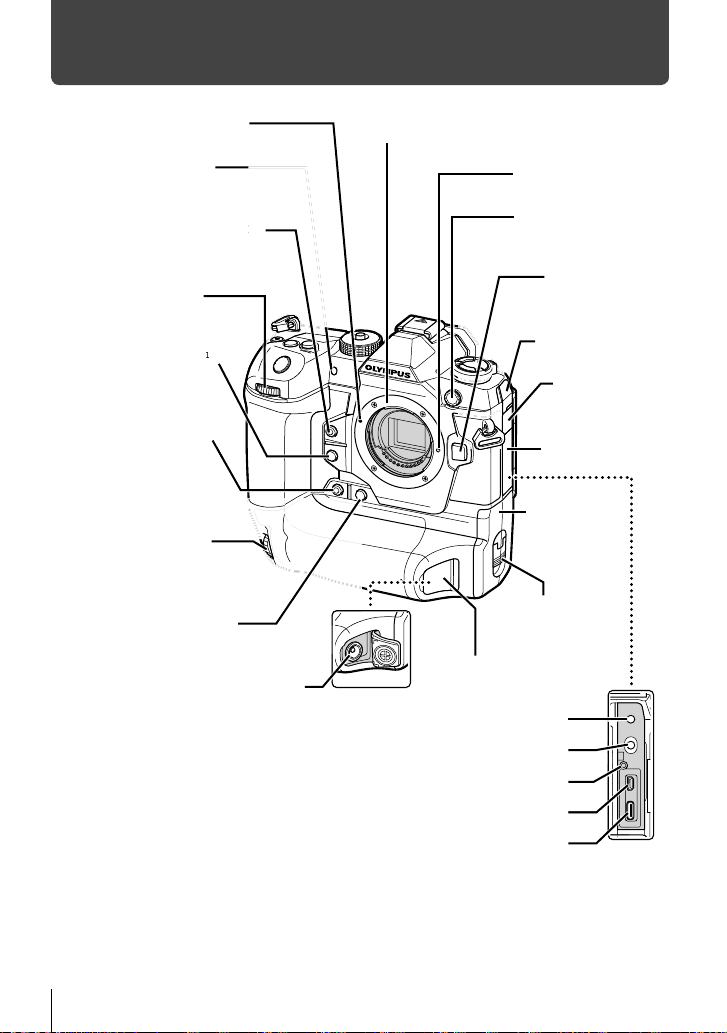
Parts of the Camera
M
c
1
Lens attachment mark (P. 39)
Self-timer lamp (P. 151)
AF illuminator (P. 490)
One-touch white balance button
1
(XY) *
(P. 207, 386)
button
Front dial (P. 94–101,
334–338)
Preview button (XZ) *
1
(P. 464, 524)
Vertical-use one-touch
white balance button
1*2
(P. 207, 386)
(YY) *
Vertical-use front dial *2
(P. 94–101, 334–338)
Vertical-use preview button
(YZ) *1*2 (P. 464, 524)
DC connector (P. 35)
Microphone jack (R) (ø3.5 mm stereo mini-jack) (P. 413)
Mount (remove body cap before attaching
lens)
Lens lock pin
External fl ash terminal
(P. 264)
Lens release
button (P. 39)
Microphone jack
cover
Headphone jack
cover
Connector cover
Battery
compartment
cover (P. 32)
Battery compartment
lock (P. 32)
DC connector cover
(P. 35)
Headphone jack (P) (ø3.5 mm stereo mini-jack)
Cable protector mount (P. 29)
HDMI connector (Type D) (P. 627)
USB connector (Type C) (P. 415, 603, 622, 625)
*1 Can be assigned other roles. g “Assigning Roles to Buttons (K Button Function)”
(P. 463), “Assigning Roles to Buttons (n Button Function)” (P. 417)
*2 Used when the camera is rotated 90° to shoot pictures in portrait (“tall”) orientation.
Performs the same function as the standard (landscape or “wide”) orientation equivalent.
20
Parts of the Camera
EN
Page 21
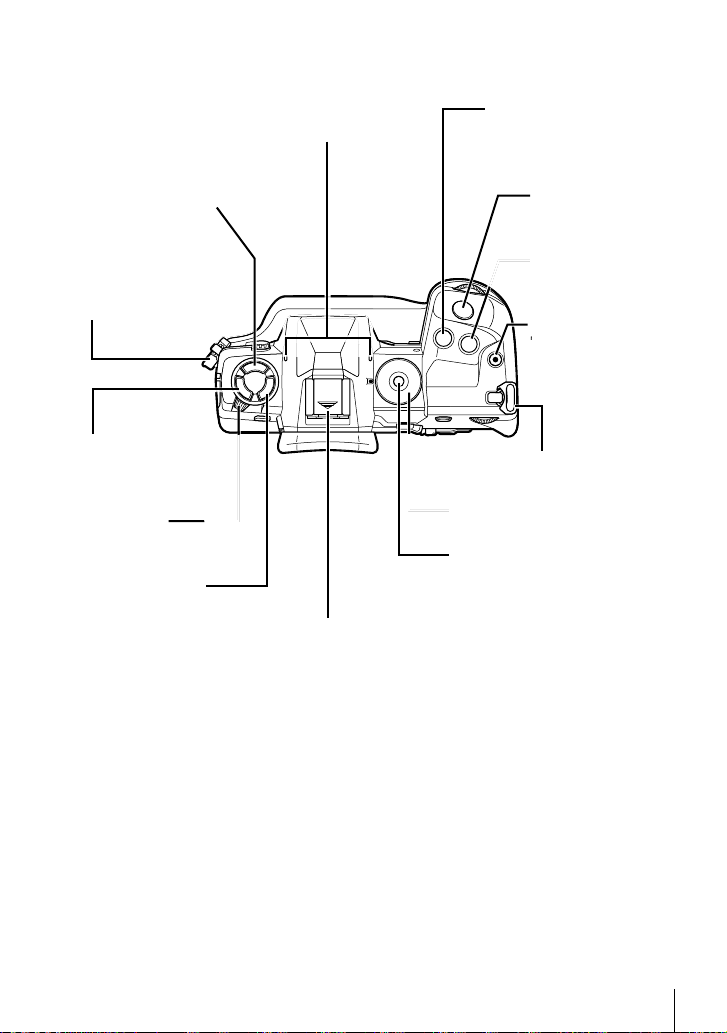
Stereo microphone (P. 412)
/
#jY (fl ash/sequential shooting/
self-timer) button (P. 151, 252)
Strap eyelet (P. 28)
AFp
(AF/metering
mode) button (P. 115,
186, 345)
ON/OFF lever
(P. 44)
BKT button (P. 236)
ring
. 115,
Hot shoe (hot shoe cover) (P. 256)
F (exposure
compensation) button *
(P. 180, 227, 367, 403)
Shutter button
(P. 53)
ISO button *
(P. 181, 369)
R (movie) /
H button * (P. 295 /
P. 279, 448)
Strap eyelet (P. 28)
Mode dial (P. 93, 294)
Mode dial lock (P. 93)
* Can be assigned other roles. g “Assigning Roles to Buttons (K Button Function)”
(P. 463), “Assigning Roles to Buttons (n Button Function)” (P. 417)
Parts of the Camera
EN
21
Page 22
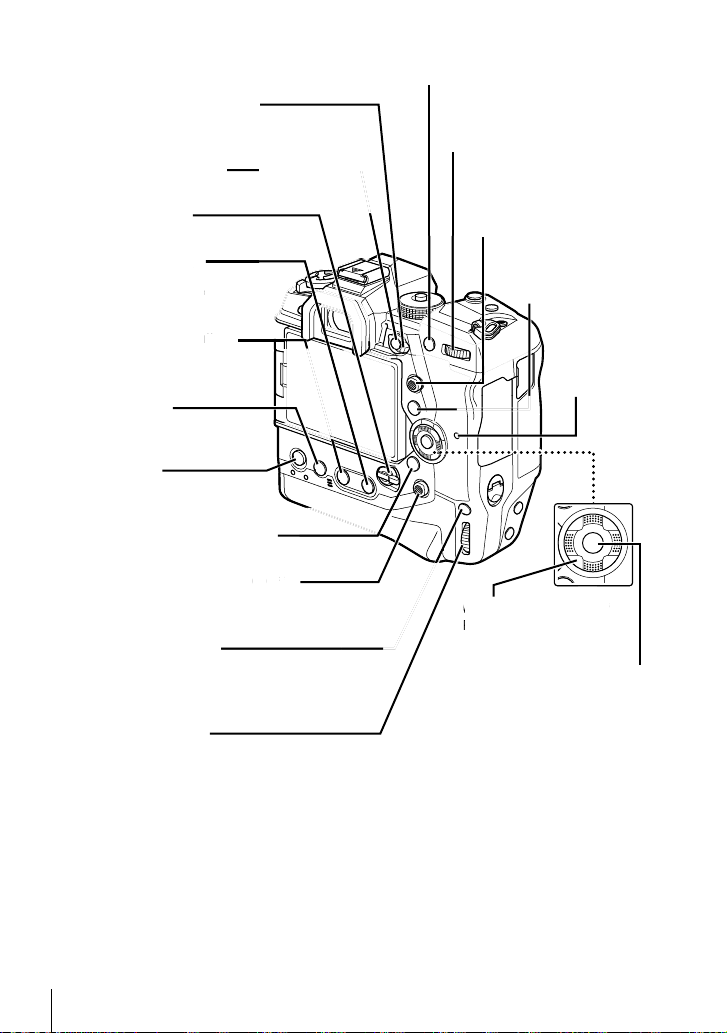
Fn lever (P. 94–102, 334–338,
)
*
3
/
)
PA(P (/) *
2
)
4
bu
426, 475)
1
Fn button *
(P. 417, 463)
Lock lever (P. 503)
AEL/AFL / 0 (protect) button *
(P. 141, 188, 373 / P. 270, 439)
Rear dial (P. 94–101,
334–338)
Multi selector (S/T) *
(P. 120, 123, 137, 349,
352, 410)
1
4
WB (white balance) /
h (share) button *
(P. 202, 380 / P. 277, 446)
1
4
INFO button (P. 84,
265, 436)
CARD (card select) button
(P. 75, 318)
Card access
lamp
(erase) button
(P. 275, 444)
MENU button
(P. 66, 314)
q (playback) button (P. 56, 300)
Vertical-use multi selector (S/T) *
(P. 120, 123, 137, 349, 352, 410)
6, 300
2, 410
2*4
4
3
Arrow pad (FGHI) *
(P. 56, 300)
Vertical-use AEL/AFL /
0 (protect) button *1*
(P. 141, 188, 373 / P. 270, 439)
Vertical-use rear dial *
2
0, 439
2
OK button (P. 56, 62, 66, 300)
(P. 94–101, 334–338)
*1 Can be assigned other roles. g “Assigning Roles to Buttons (K Button Function)”
(P. 463), “Assigning Roles to Buttons (n Button Function)” (P. 417)
*2 Used when the camera is rotated 90° to shoot pictures in portrait (“tall”) orientation.
Performs the same function as the standard (landscape or “wide”) orientation equivalent.
*3 The I and G positions on the arrow pad can be assigned other roles. g “Assigning
Roles to Buttons (K Button Function)” (P. 463), “Assigning Roles to Buttons (n Button
Function)” (P. 417)
*4 The multi selector is designed to be used in two ways. You can place a fi nger lightly on
the multi selector and pivot it in the desired direction (T). You can also press down on the
center of the multi selector much as you would a button (S).
EN
Parts of the Camera
22
Page 23
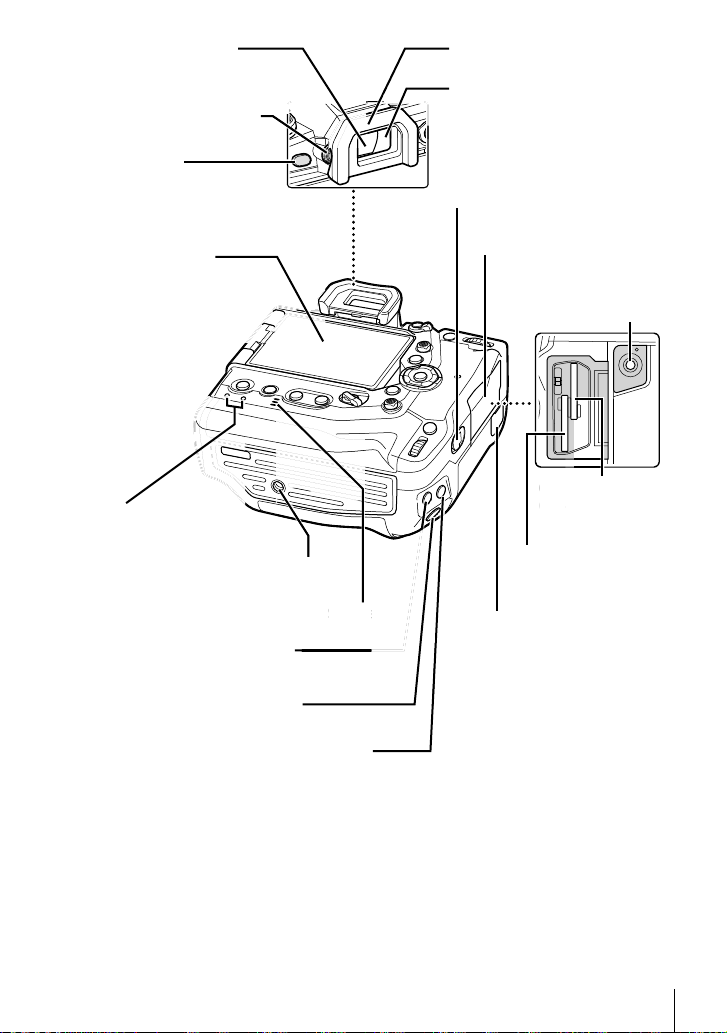
Diopter adjustment dial (P. 49)
)
d
S
e
t
r
Card
(P.
1
u (LV) button *
9
(P. 62, 86, 328)
Monitor (touch screen)
(P. 43, 54, 58, 83,
295, 303, 326)
CHARGE (battery charge)
lamp (P. 34)
Vertical-use ISO button (YK) *
(P. 181, 369)
1*2
Vertical-use shutter button *
(P. 53)
o
socke
Tripod socket
1*2
peak
Speaker
Eyecup (P. 30)Viewfi nder (P. 49, 83, 326)
Eye sensor
Card compartment cover lock
(P. 36)
Card compartment cover
(P. 36)
Remote cable terminal
(b) (P. 55, 297)
Card slot 1
3
(P. 36)
Card slot 2
(P. 36)
Remote cable terminal cover
(P. 55, 297)
Vertical-use F (exposure compensation) button
1*2
(YF) *
(P. 180, 227, 367, 403)
*1 Can be assigned other roles. g “Assigning Roles to Buttons (K Button Function)”
(P. 463), “Assigning Roles to Buttons (n Button Function)” (P. 417)
*2 Used when the camera is rotated 90° to shoot pictures in portrait (“tall”) orientation.
Performs the same function as the standard (landscape or “wide”) orientation equivalent.
Parts of the Camera
EN
23
Page 24

Package Contents
At purchase, the package contains the camera and the following accessories. Contact
your retailer should you discover anything damaged or missing.
Camera Body cap *
Battery cartridge *
1
BLH-1 rechargeable
lithium-ion battery *
1
EP-17 eyecup *
BCH-1 charger for
2
lithium-ion batteries *
CC-1 cable clip CP-1 cable protector CB-USB11 USB
1
2
Hot shoe cover *
Strap
cable
• Warranty Card
Basic Manual
*1 The body cap, eyecup, hot shoe cover, and battery cartridge ship attached to or inserted in
the camera.
*2 The camera comes with two rechargeable batteries and two battery chargers.
1
24
Package Contents
EN
Page 25

Before You Begin
Read and Follow Safety Precautions
To prevent incorrect operation resulting in fi re or other damage to property or harm
to yourself or to others, read “8 SAFETY PRECAUTIONS” (P. 663) in its entirety
before using the camera.
While using the camera, consult this manual to ensure safe and correct operation.
Be sure to keep the manual in a safe place once it is read.
Olympus will not be held liable for violations of local regulations arising from use of
this product outside the country or region of purchase.
• Use of these features outside the country or region of purchase may violate local wireless
regulations; be sure to check with local authorities before use. Olympus will not be held liable
for the user’s failure to comply with local regulations.
Wireless LAN, Bluetooth®, and GPS
The camera features built-in wireless LAN, Bluetooth
features outside the country or region of purchase may violate local wireless
regulations; be sure to check with local authorities before use. Olympus will not be
held liable for the user’s failure to comply with local regulations.
®
Disable wireless LAN, Bluetooth
, and GPS in areas where their use is prohibited.
g “5 Using Field Sensor Data” (P. 567), “6 Connecting the Camera to External
Devices” (P. 581)
User Registration
Visit the OLYMPUS website for information on registering your OLYMPUS products.
®
, and GPS. Use of these
Before You Begin
EN
25
Page 26

MEMO
26
EN
Page 27

1
Getting Ready
1
Read this chapter whether you are taking photographs or
fi lming movies.
EN
27
Page 28
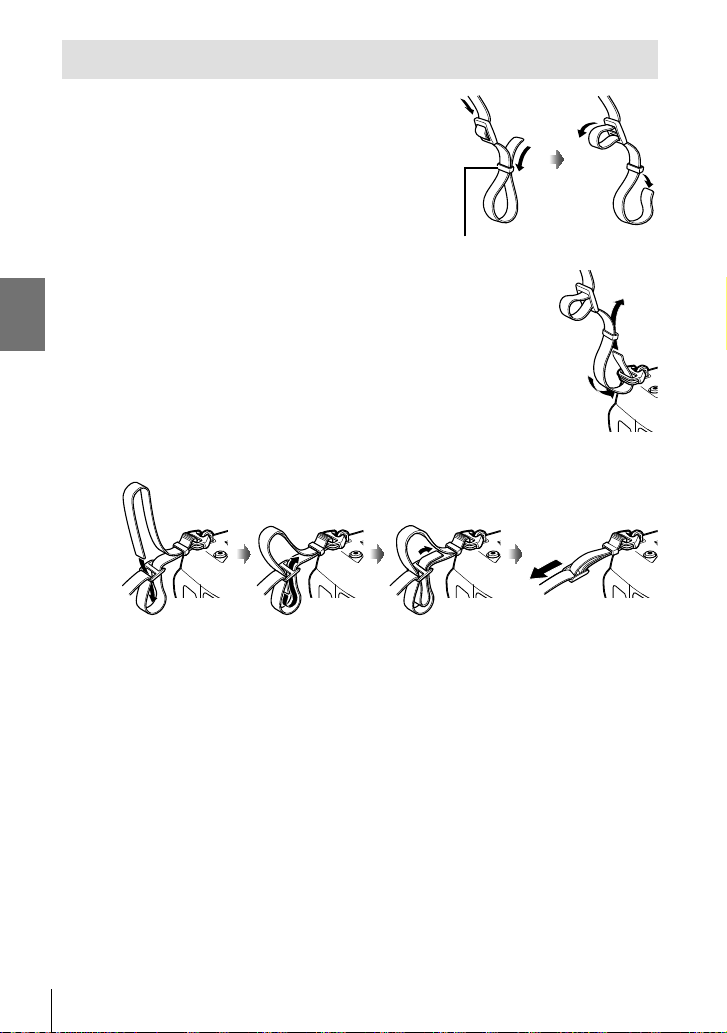
Attaching the Strap
1 Before attaching the strap, remove the end from
the keeper loop and loosen the strap as shown.
Keeper loop
2 Pass the end of the strap through the strap
eyelet and back through the keeper loop.
1
3 Pass the end of the strap through the buckle and tighten as shown.
• Attach the other end of the strap to the other eyelet.
• After attaching the strap, pull on it fi rmly to ensure that it will not come loose.
EN
28
Page 29

Attaching Cable Protectors
Attach the supplied cable protectors when connecting the supplied USB and HDMI
cables. This prevents accidental disconnection and damage to the connectors.
1 Mount the cable protector on the camera.
2 Tighten the screw.
3 Clip the cable clip to the cable and attach the clip to the strap.
• The clip attaches to the buckle.
1
2
1
29
EN
Page 30

Removing the Eyecup
The eyecup can be removed from the viewfi nder eyepiece as shown.
1 Push up where shown.
2 To re-attach the eyecup, slide it straight down
the rails.
1
EN
30
Page 31

Inserting and Removing Batteries
The camera can be used with up to two batteries at a time. It can also be used with
a single battery.
1 Charge the batteries.
Insert battery in direction shown (▲)
Battery charger
3
1
2
Charge lamp
Power cable
• Batteries charge in about 2 hours. Charge status is shown as follows:
Charge lamp Charge status
Flashes amber once per second
Flashes amber twice per second 50–79% charged
Flashes amber three times per second 80–99% charged
Lights green Charging complete
Flashes green fi ve times per second Charging error
• Unplug the charger when charging is complete.
• Batteries inserted in the camera will charge when the camera is powered by an
AC adapter or connecting to an external device via USB. g “Charging via USB”
(P. 34), “Optional AC Adapters” (P. 35), “6-6 Powering the Camera via USB (USB
Power Delivery)” (P. 625)
2
Confi rm that the camera is off.
Charging
ON/OFF lever
<50% charged
1
OutletRechargeable Li-ion battery
31
EN
Page 32

3
Unlatch the battery compartment cover and remove the battery cartridge.
1
2
3
4 Insert the batteries into the battery cartridge.
1
Bay 1
Bay 2
5 Insert the battery cartridge into the camera and latch the battery compartment
cover.
1
2
$
• We recommend that before using the camera for extended periods, you ready fully-charged
spare batteries to swap in when the current batteries are exhausted.
• See “Batteries and Chargers” (P. 33).
• The order in which the batteries are used when two batteries are inserted can be chosen in
the menus. g [Battery Settings] (P. 561)
EN
32
3
Page 33

Removing Batteries
To remove the batteries from the cartridge, slide them in
toward the connectors and then lift them out.
2
1
Batteries and Chargers
• The camera uses two Olympus rechargeable Li-ion batteries. Use only genuine Olympusbrand batteries.
• Camera power consumption varies widely with the conditions of use.
• The following lead to greatly increased power consumption even when no photographs are
taken or movies recorded:
- Keeping the shutter button pressed halfway for repeated autofocus operations
- Viewing pictures in the monitor for extended periods
- Using Wi-Fi, Bluetooth
- Leaving the camera connected to a computer
• The camera may turn off without warning when the batteries are exhausted.
• The batteries are not fully charged at purchase. Use a battery charger to charge batteries
before fi rst use.
• Remove the batteries before putting the camera into storage for periods of a month or more.
Leaving the batteries in the camera for extended periods shortens their lives, potentially
rendering them unusable.
• The supplied chargers take roughly two hours to charge the supplied batteries.
• Use only chargers specifi cally designated for use with the supplied batteries. Similarly, use
only batteries specifi cally designated for use with the supplied chargers.
• Incompatible batteries may explode (or rupture) during use.
• Follow the instructions in “SAFETY PRECAUTIONS” (P. 664) when preparing used
batteries for disposal.
®
, or GPS
1
Using Y our Charger Abroad
• The charger can be used in most home electrical sources within the range of 100 V to 240 V
AC (50/60 Hz) around the world. However, depending on the country or area you are in,
the AC wall outlet may be shaped differently and the charger may require a plug adapter to
match the wall outlet.
• Do not use commercially available travel adapters as the charger may malfunction.
EN
33
Page 34

Using External Power Sources
Connecting via USB
Batteries inserted in the camera will charge when the camera is connected to a
USB-AC adapter, computer, or other USB device via a USB cable. The batteries
charge only when the camera is off.
Devices that conform to the USB Power Delivery (USB PD) standard can also be
used to power the camera. g “6-6 Powering the Camera via USB (USB Power
Delivery)” (P. 625)
Charging via USB
1 Confi rm that the camera is off.
1
2 Connect the camera to the external device via USB.
• When attaching the USB cable, use the supplied cable
protector and cable clip to prevent damage to the
connectors. g “Attaching Cable Protectors” (P. 29)
• The CHARGE lamps light during charging. Charging
times vary with the output of the USB device. The lamps
each go out in turn as the batteries reach full charge.
• If only one battery is inserted, the camera will charge the
battery in whichever bay is occupied.
3 Charging ends when the camera is turned on.
• The batteries cannot be charged via USB when the camera is on.
• If a charging error occurs, the CHARGE lamps will blink. Disconnect and reconnect the USB
cable.
• USB charging is available when the battery temperature is between 0 and 40 °C.
%
• If connected to both an AC adapter and a USB device, the camera will receive power only
from the AC adapter.
• The supply of power ends when the batteries are charged. Disconnect and reconnect the
USB cable to resume charging.
• The batteries will not charge while the camera is off if pictures are being uploaded to a
smartphone via Wi-Fi (background auto upload). g “Connecting When the Camera Is Off
(Power-off Standby)” (P. 590)
EN
34
Page 35

Powering the Camera via USB
The camera can be powered using mobile batteries or similar devices connected via
USB. The devices must:
Standard: Conform to the USB Power Delivery (USB PD) standard
Output: Be rated for an output of 9 V 3 A, 15 V 2 A, or 15 V 3 A
For more information, see “6-6 Powering the Camera via USB (USB Power
Delivery)” (P. 625).
Optional AC Adapters
While inserted in the camera, batteries can be charged using an optional AC-5
AC adapter (on-board charging). The AC adapter can also be used to power the
camera. When powered by an AC adapter, the camera can be used even if no
batteries are inserted. Use only AC adapters designated for used with the camera.
The power cable supplied with the AC adapter is not to be used with other devices.
1 Confi rm that the camera is off.
2 Open the DC connector cover.
3 Connect the AC-5 by plugging the DC jack into the
camera DC connector.
1
• The batteries will charge while the camera is off.
• Securely close the DC connector cover when the AC adapter is not in use.
• If batteries are inserted in the camera, the CHARGE lamps light while the batteries charge.
The lamps each go out in turn as the batteries reach full charge.
• If only one battery is inserted, the camera will charge the battery in whichever bay is
occupied.
• Charging via AC adapter is available when the battery temperature is between 0 and 40 °C.
%
• The batteries will not charge while the camera is off if pictures are being uploaded to a
smartphone via Wi-Fi (background auto upload). g “Connecting When the Camera Is Off
(Power-off Standby)” (P. 590)
EN
35
Page 36

1-1
The camera uses third-party SD, SDHC, or SDXC memory cards conforming to the
SD (Secure Digital) standard. Read “Memory Cards” (P. 37) before use.
Inserting Memory Cards
1 Confi rm that the camera is off.
2 Rotate the card compartment cover lock as
1
shown (1, 2) and open the card compartment
cover (3).
• The camera has two card slots.
3 Slide the card in until it locks into place.
• Turn the camera off before inserting or removing
memory cards.
• Do not attempt to forcibly insert cards that are
damaged or deformed. Failure to observe this
precaution could result in damage to the slots.
4 Close the card compartment cover.
• Press the cover closed until it clicks into place.
• Be sure the cover is closed before using the
camera.
3
2
1
Card slot 1
Connectors
Card slot 2
• Format memory cards in the camera before fi rst use (P. 38).
36
1-1 Inserting Memory Cards
EN
Page 37

Removing Memory Cards
Press the card to eject it. The card can then be removed by
hand.
• Never remove batteries or memory cards while the card access lamp
is lit or the memory card access indicator (P. 86, 88, 329, 330)
is displayed.
Card access lamp
Using Two Memory Cards
When two memory cards are inserted, you can choose how each card is used
according to your goals. g [Card Slot Settings] (P. 547)
• Record only to a selected card
• Record to a selected card until it is full, then record to the second card
• Record pictures with different sizes or compression ratios to different cards
• Record copies of each picture to both cards
For information on card role selection, see “2-3 Card-Related Settings” (P. 71).
Memory Cards
This manual refers to storage devices as “memory cards”. The
camera uses third-party SD, SDHC, or SDXC memory cards
conforming to the SD (Secure Digital) standard. Visit the Olympus
website for the latest information.
• Use a memory card with a Speed Class of 10 or better when recording movies.
• Use a memory card with a UHS-II or UHS-I Speed Class of 3 or better when:
Recording movies with [4K] or [C4K] selected for [nK]/Recording movies with [A-I] (AllIntra) selected for the [nK] bit rate
g [nK] (P. 321)
• Some data remain when memory cards are formatted or pictures are deleted. To protect your
personal information when disposing of memory cards, destroy the card or take other steps
to render the data unrecoverable.
• SD memory cards are equipped with a write-protect switch. Data
cannot be written to the card when the switch is in the “LOCK” position.
Returning the switch to its original position allows data to again be
written to the card.
LOCK
1
1-1 Inserting Memory Cards
EN
37
Page 38

Formatting Memory Cards (Card Setup)
Use the camera to format newly-purchased memory cards or cards that have been
used in another camera, computer, or other device.
Formatting deletes all data from the card, protected pictures included. Confi rm that
the card does not contain important fi les before formatting.
When fi rst turned on, the camera will display a message prompting you to confi gure
basic settings; do not format the card until the initial setup process is complete.
g “1-5 Initial Setup” (P. 45)
1 Press the MENU button to display the menus.
• For information on using the menus, see “Using the
Menus” (P. 66).
2 In the e setup menu, highlight [Card Setup] and
1
press the OK button.
• If two memory cards are inserted, one in Slot 1 and the
other in Slot 2, [Select Card to Set Up] options will be
displayed. Highlight the desired slot and press the OK
button.
• If the card already contains data, a menu will be
displayed. Highlight [Format] and press the OK button.
3 Highlight [Yes] and press the OK button.
• The camera will format the card.
38
1-1 Inserting Memory Cards
EN
Page 39

1-2
1
Attaching Lenses
Confi rm that the camera is off.
2 Remove the rear lens cap and the camera body cap.
Rear lens cap
1
1
2
1
2
3 Align the (red) attachment mark on the
lens with the (red) attachment mark on the
camera body and insert the lens into the
camera lens mount.
4 Rotate the lens as shown until it clicks into
place.
Lens attachment mark
1-2 Attaching Lenses
EN
39
Page 40

5 Remove the front lens cap.
1
2
1
• Be careful not to press the lens release button while attaching the lens.
• Do not touch the camera’s internal parts.
Removing Lenses
1
1 Confi rm that the camera is off.
2 Hold the lens release button and rotate the lens
as shown.
1
1
2
Lens release button
2
1
40
1-2 Attaching Lenses
EN
Page 41

MF Clutch Lenses
The “MF clutch” (manual focus clutch) mechanism on MF clutch lenses can be used
to switch between auto and manual focus simply by repositioning the focus ring.
• Check the position of the MF clutch before shooting.
• Sliding the focus ring to the AF/MF position at the end of the lens selects autofocus, while
sliding it to the MF position closer to the camera body selects manual focus, regardless of
the focus mode chosen with the camera.
Focus ring
Focus distances visible
∞
5.6 8 11 16
2153mm
5.681116
0.5
∞
5.6 8 11 16
2153mm
5.681116
0.5
AF/MF MFAF/MF MF
• Selecting [MF] or [PreMF] for focus mode on the camera disables autofocus even when the
focus ring is in the AF/MF position.
1
1-2 Attaching Lenses
EN
41
Page 42

Interchangeable Lenses
The camera can be used with interchangeable lenses designated
exclusively for use with the “Micro Four Thirds” system, which can be
identifi ed by the presence of the M.ZUIKO DIGITAL trademark or the
logo shown at right.
Four Thirds and OM system lenses can also be used. An adapter
(available separately) is required.
• To prevent dust or other foreign matter entering the camera, keep the lens mount pointed
down when the lens or body cap is removed.
• Do not remove the body cap or exchange lenses in dusty locations.
• Do not point the lens at the sun while it is mounted on the camera. Sunlight focused through
the lens could cause product malfunction or fi re.
• Be careful not to lose the body cap or rear lens cap.
• To prevent dust entering the camera, attach the body cap when a lens is not in place.
1
Lens Compatibility
Lens Camera Compatible AF Metering
Micro Four Thirds system
lens
Four Thirds system lens
OM system lens No Yes *
*1 Not available during movie recording.
*2 Does not produce accurate results.
Micro Four Thirds
system camera
Yes Yes Yes
Mount adapter
required
Yes *
1
Yes
2
42
1-2 Attaching Lenses
EN
Page 43

1-3
Up to
Up to 90°
Up to
Rotate the monitor for ease of viewing. The angle of the monitor can be adjusted
according to conditions at the time of shooting.
• Gently rotate the monitor within its range of motion. Attempting to rotate the monitor
beyond the limits shown below could damage the connectors.
• The camera can be confi gured to display a mirror image of the view through the lens or
automatically zoom power zoom lenses all the way out when the monitor is rotated for self
portraits. g [Selfi e Assist] (P. 527)
Using the Monitor
Up to 180°
Up to 270°
Up to 90°
1
1-3 Using the Monitor
EN
43
Page 44

1-4
Turning the Camera On
Rotate the ON/OFF lever to ON.
• The camera will turn on and the monitor will light.
• To turn the camera off, rotate the lever to OFF.
ON/OFF lever Monitor
The Battery Level Display
The level of the current battery and the
number of the bay in which it is inserted are
shown in the display. The battery level is
shown in 10 increments. The indicator fl ashes
red when the level reaches 10%.
1
100
1
%
Current battery bay
Level of current battery
1
100
%
ISO-A
200
P
250 F5.6
0.0
S-IS AUTOS-IS AUTO
1:02:03
1023
YFYF
4K
p
30p30
• The camera may require additional time to power on when [On] (enabled) is selected for
[Wi-Fi/Bluetooth Settings] > [Power-off Standby]. g “Connecting When the Camera Is Off
(Power-off Standby)” (P. 590)
Sleep Mode
If no controls are used for a set period, the camera will automatically enter suspend
operation to reduce the drain on the batteries. This is referred to as “sleep mode”.
• When the camera enters sleep mode, the monitor will turn off and operation will be
suspended. Pressing the shutter or q button reactivates the camera.
• If no operations are performed for a set period after the camera enters sleep mode, the
camera will turn off automatically. The camera can be reactivated by turning it on again.
• The camera may require additional time to recover from sleep mode when [On] (enabled)
is selected for [Wi-Fi/Bluetooth Settings] > [Power-off Standby]. g “Connecting When the
Camera Is Off (Power-off Standby)” (P. 590)
• The delay before the camera goes to sleep or turns off automatically can be selected in the
G custom menu. At default settings, the camera will go to sleep after one minute and turn off
automatically after four hours. g [Sleep] (P. 562), [Auto Power Off] (P. 562)
44
1-4 Turning the Camera On
EN
Page 45

1-5
Initial Setup
When fi rst turned on, the camera will prompt you to pick a language and set the
clock.
• The current time and date are saved with each picture taken.
• File names include the current date. Be sure to set the clock before using the camera. Some
features are only available if the clock is set.
1
100
1 When the camera displays a setup
dialog prompting you to select a
language, press the OK button.
%
Please select your language.
Veuillez choisir votre langue.
Bitte wählen Sie Ihre Sprache.
Por favor, selecciona tu idioma.
2 Highlight the desired language using the arrow pad
(FGHI) or front or rear dial.
• The language-selection dialog has two pages of options.
Highlight the desired language using the FGHI
buttons or front or rear dial.
100
100
1
%
Hrvatski
Dansk
Eesti
Deutsch
Indonesia
ଛ˯ߪ
Norsk
1
%
Romanian
Ὶ㜴)䴭℀*
Español
Ὶ㜴)修℀*
Viet Nam
Cursor
ǼȜȜȘȞȚțȐ
Ɋɭɫɫɤɢɣ
Slovensky
Svenska
OK button
Arrow pad
W
ýHVN\
English
Suomi
Italiano
Latviski
Polski
Português(Pt)
W
Türkçe
Ȼɴɥɝɚɪɫɤɢ
Nederlands
Français
0DJ\DU
日本語
/LHWXYLǐN
Set
Srpski
6ORYHQãþLQD
ѳъѕ
ɍɤɪɚʀɧɫɶɤɚ
Setare
1
1-5 Initial Setup
EN
45
Page 46

3 After highlighting the desired language, press the
OK button.
• If you press the shutter button before pressing the OK
button, the camera will exit to shooting mode and no
language will be selected. The language selection dialog
can be displayed by turning the camera off and then
on again, after which you can repeat the process from
Step 1.
• The language can be changed at any time from the
e setup menu. g [W] (P. 455)
4 Choose the time and date.
• Highlight items using the HI buttons.
• Edit the highlighted item using the FG buttons.
• The clock can be adjusted at any time from the e setup
menu. g [X Settings] (P. 455)
1
• Press the OK button when settings are complete.
24 hour clock
5 Highlight a time zone using the FG buttons and
press the OK button.
• Press the INFO button to enable or disable daylight
saving time.
6 Press the OK button to set the clock.
• Leaving the camera with the batteries removed may cause the clock to be reset.
• Choose the frame rate as necessary before recording movies. g [nK] (P. 321)
%
• The clock can be automatically updated via GPS. g “Correcting the Clock Using GPS”
(P. 48)
46
1-5 Initial Setup
EN
Page 47

What to Do If You Can’t Read the Display
If you see unfamiliar characters or words in other languages, you may not have
selected the language you intended. Follow the steps below to choose another
language.
1
ѯєьѬщҕѥѕѓѥё1
100
1 Press the MENU button to view the
menus.
MENU button
%
іѨѯоѶшѱўєчдѦўьчѯѠк
1
1
ѱўєчѓѥё
2
K
K
ѝѤчѝҕњьѓѥё
чѧлѧъѤјѯъѯјзѠь
j/Y/i
дјѤэ шѤҖкзҕѥ
Y
F
4:3
юѧч
2 Highlight the e (setup) tab using
FG on the arrow pad and press
the OK button.
Arrow pad
OK button
3 Highlight [W] using the FG buttons and press
the OK button.
4 Highlight the desired language using the FGHI
buttons and press the OK button.
1
1-5 Initial Setup
EN
47
Page 48

Correcting the Clock Using GPS
GPS can be used to correct the clock. Time and date information acquired via
GPS are used to automatically correct the clock while the camera is on. The time
zone must be selected in advance using the [Time Zone] option. g “Choosing a
Language (W Language)” (P. 455)
1 Press the MENU button to view the
menus.
1
MENU button
2 Highlight the e (setup) tab using
FG on the arrow pad and press
the OK button.
OK button
3 Highlight [X Settings] using the FG buttons and
press the OK button.
4 Highlight [Auto Time Adjust] using the FG buttons
and press the OK button.
5 Highlight [On] using the FG buttons and press the
OK button.
Arrow pad
48
1-5 Initial Setup
EN
Page 49

1-6
At default settings, putting your eye to the viewfi nder automatically turns the display
on. Adjust viewfi nder diopter if the display is not in focus.
• Rotate the diopter adjustment dial until the display in the
viewfi nder is in focus.
• The viewfi nder may turn off while you adjust the angle of the
monitor.
• The camera can be confi gured not to switch automatically
between the monitor and viewfi nder displays. g [EVF Auto
Switch] (P. 553)
Focusing the Viewfi nder
1
1-6 Focusing the Viewfi nder
EN
49
Page 50

MEMO
50
EN
Page 51

2
Taking and Viewing Photographs
Read this chapter for information on using the camera to
take photographs. This chapter also covers the features
you’ll use when shooting and viewing photos.
2
EN
51
Page 52

2-1
Basic Photography and
Playback
Read this section for information on basic photography and playback that will get
you started using your camera right away. It also provides basic information on such
topics as using the touch screen and switching memory cards.
2
Taking Photos
Holding the Camera
Be careful that your fi ngers or other objects, such as the camera strap, do not
obstruct the lens or AF-assist illuminator.
Landscape (wide) orientation Portrait (tall) orientation
• To prevent unintended operation, you can lock camera controls using the lock lever. You can
choose which controls are locked. g [C-LOCK Settings] (P. 503)
52
K 2-1 Basic Photography and Playback
EN
Page 53

Taking Photos with the Shutter Button
Frame your subject in the viewfi nder and take photos with the shutter button.
Compose the shot to position the AF frame over your subject and focus before
shooting.
1 Focus.
• Press the shutter button a short distance to the fi rst stop (referred to as “pressing the
shutter button halfway”). The in-focus indicator (() will be displayed and the AF target
for the area in focus will light.
Press the shutter
button halfway In-focus indicator
1
100
%
ISO-A
200
P
250 F5.6
0.0
1:02:03
S-IS AUTOS-IS AUTO
1023
YFYF
4K
p
30p30
1
100
%
ISO-A
200
P
250 F5.6
T W
28mm
S-IS AUTOS-IS AUTO
YFYF
4K
p
30p30
0.0
1:02:03
1023
AF frame AF target
• If the camera is unable to focus, the in-focus indicator will fl ash.
• The AF frame varies with the option chosen for AF-target mode. AF-target mode
defaults to M (single target). The area covered by the AF target can be chosen in
the AF-target selection display (P. 120). The AF frame is not displayed when q (all
targets) is chosen for AF-target mode.
2 Take the picture.
• Starting from the halfway point, press the shutter button the rest of the way down
(“press the shutter button all the way down”).
• The shutter will be released and a photograph will be taken.
Pressing the Shutter Button Halfway or All the Way Down
The camera features a two-position shutter button. Pressing the button a short distance
to the fi rst position is referred to as “pressing the shutter button halfway”, while pressing it
further down to the second position is referred to as “pressing the shutter button all the way
down”.
Press halfway
Press all the way
down
2
%
• The photograph will be displayed for viewing in the monitor. You can disable the display of
pictures after shooting or choose how long they are displayed. g [Rec View] (P. 90).
• Press the q (playback) button to view photos as they are saved to the memory card after
shooting. You can check pictures even as the camera records large numbers of photos taken
during burst photography or the like. Some playback options are not available.
K 2-1 Basic Photography and Playback
EN
53
Page 54

Taking Photos with Touch Controls
Frame a shot in the monitor and touch your subject in the display to focus and
shoot. You can also use touch controls to position or zoom in on the AF target.
Touch Shutter Options
Tap T in the monitor to choose an option.
• The option selected changes each time you tap T.
Tap your subject to focus and take a picture.
T
Touch shutter disabled.
U
Tap to position the AF target and focus. You can
resize or position the AF frame with your fi ngers.
V
Press the shutter button to shoot.
Focus Zoom (V)
1 Tap your subject.
2
• An AF target is displayed.
• Adjust the size of the target using the slider.
• To hide the target, tap S.
2
After adjusting the size of the target with the slider,
tap Y to zoom the target in.
• While zoom is in effect, you can slide your fi nger to
scroll the display.
• To exit zoom, tap Z.
1
100
%
ISO-A
200
P
250 F5.6
1
100
%
Off
P
250 F5.6
S-IS AUTOS-IS AUTO
YFYF
4K
p
30p30
0.0
0.0
1:02:03
1023
S-IS AUTOS-IS AUTO
1414
1010
7
7
55
3x
3x
• Touch controls are not available in some circumstances, including:
- In the one-touch WB white balance metering display
- While camera buttons or dials are in use
• Do not touch the display with your fi ngernails or pointed objects.
• Touch controls may not function as expected if you are wearing gloves or the monitor is
covered with a protective sheet.
%
• Touch controls can be disabled. g [Touchscreen Settings] (P. 559)
54
K 2-1 Basic Photography and Playback
EN
Page 55

Remote Photography
You can use remote photography when photographing night scenes, during macro
photography, or in other situations in which you wish to avoid camera blur caused
by operating the shutter button. You can either use an optional RM-CB2 remote
cable or take pictures remotely via a wireless connection using the OI.Share
smartphone app.
Using a Remote Cable
Open the remote cable terminal cover and connect the remote cable.
Using OI.Share
You will need to confi gure the camera for connection to a smartphone. Install
OI.Share on your smartphone before proceeding. g “6-2 Connecting to
Smartphones via Wi-Fi” (P. 584)
2
K 2-1 Basic Photography and Playback
EN
55
Page 56

Viewing Photographs
View photographs stored on the memory cards.
1 Press the q button.
• The most recent picture will be displayed (single-frame
playback).
• Use the multi selector (T), front dial (k), or HI on
the arrow pad to view other pictures.
• To return to the shooting display, press the shutter button
halfway.
View previous picture View next picture
1
100
%
2019.04.01 12:30:00 15
Single-frame playback
Front dial
4:3
YFYF
100-0015
2
Multi selector
Arrow pad
q button
2 Rotate the rear dial (j) to cycle through the playback displays.
• Cycle through the displays as follows:
1
100
%
4:3
YFYF
2019.04.01 12:30:00 15
100-0015
Single-frame playback
S (center of multi selector) or OK
• To return to single-frame playback from the index playback display, press the multi
selector.
• To return to single-frame playback from the calendar playback display, press the OK
button.
• Use [G/Info Settings] (P. 515) > [G Settings] in G Custom Menu P to choose the
number of pictures shown in each page of the index playback display.
1
100
%
p
q
2019.04.01 12:30:00 20
Index playback
p
q
S (center of multi
selector)
1
2019.4
100
%
Sun Mon Tue Wed Thu Fri Sat
531 1 2 3 4
2 3 4130 2928
98765
Calendar playback
6
13121110987 13121110987
20191817161514
27262524232221
56
K 2-1 Basic Photography and Playback
EN
Page 57

3 Press the shutter button halfway to end playback and exit to the shooting
display.
%
• Press the q (playback) button to view photos as they are saved to the memory card after
shooting. You can check pictures even as the camera records large numbers of photos taken
during burst photography or the like. Some playback options are not available.
Choosing a Memory Card
If two memory cards are inserted, you can switch from viewing pictures on one card
to viewing pictures on the other while playback is in progress.
1
100
1 Press the q button to start playback.
%
4:3
YFYF
2019.04.01 12:30:00 15
100-0015
2 Hold the CARD (card select) button and
rotate the front or rear dial to choose a
card slot, and then release the CARD
button.
CARD button
• The number of the slot currently selected is shown in the
playback display.
+
1
100
%
2
4:3
YFYF
2019.04.01 12:30:00 15
100-0015
Current slot
• The camera automatically switches between the last photo on the fi rst memory card and the
fi rst photo on the second card.
%
• To choose the card selected for playback when the q button is pressed, use [Card Slot
Settings] (P. 547)
• You can also switch cards using the q button. Hold the q button and rotate the front or
rear dial to switch cards while playback is in progress.
K 2-1 Basic Photography and Playback
EN
57
Page 58

Adjusting Volume
Adjust playback volume for sound recorded with pictures.
You can also add audio to photos after shooting. g [K] (P. 281)
1
100
1 Press the q button to start playback.
%
2 Press F or G on the arrow pad.
• Press F to increase the volume, G to decrease.
Playback Using Touch Controls
Touch controls can be used to zoom in on and scroll pictures and to page through
pictures during playback.
Single-Frame Playbcak
2
1 Press the q button to start playback.
1
100
2 Touch the monitor and slide your fi nger left or
right.
• Flick left to view the next picture, right to view the
previous picture.
%
3 Tap the monitor again.
• A slider and a P icon will be displayed.
1
100
4 Drag the slider up or down.
• Drag the slider up to zoom in, down to zoom out.
%
5 When the picture is zoomed in, you can slide a
fi nger over the display to scroll.
• Lightly tap twice to zoom in on a selected location.
Repeat the process to zoom out.
• Touch controls are also available during index
playback. Swipe up or down to change pages.
58
K 2-1 Basic Photography and Playback
EN
Slider
Page 59

2-2
The camera offers many photography-related functions. Depending on how often you
use them, you can access settings via buttons, icons in the display, or menus that can
be used for detailed adjustments.
Direct buttons
LV super control panel/
super control panel
Live controls Adjust settings while viewing your subject in the display.
Menus Adjust settings from menus displayed in the monitor.
Shooting Settings
Method Description
Adjust settings directly using buttons, including those listed below.
Commonly-used functions are assigned to buttons for quick
access during viewfi nder photography.
• The AFp, WB, and #jY buttons
Choose from a list of settings showing current camera status. You
can also view current camera settings.
2
K 2-2 Shooting Settings
EN
59
Page 60

Direct Buttons
b
Frequently-used photographic functions are assigned to buttons. These are referred
to as “direct buttons”. Included are the buttons listed below, which can be used for
basic shooting settings.
The camera features buttons for shots framed in (“wide”) orientation and others
that make the camera easier to use when rotated to take pictures in portrait (“tall”)
orientation. Unless otherwise noted, either can be used.
3
1
2
4
5
1
2
2
6
9
0
a
Direct button Assigned function
Y button *
1
2
3
4
5
6
7
8
*
Z button
Fn button
AEL/AFL button
Arrow pad
*
F button
ISO button
WB button White balance 202
* ISO sensitivity 181
One-touch white balance 207, 386
Preview 464
N (AF-target selection)
* AEL/AFL 141, 188
N (AF-target selection)
Exposure compensation 180, 227
7
c
4
6
7
8
g
123
123
60
K 2-2 Shooting Settings
EN
Page 61

Direct button Assigned function
#jY button
9
AFp button
0
BKT button Bracketing 236
a
u (LV) button
b
R button
c
* Also assigned to a button for use when the camera is rotated to take shots in portrait (“tall”)
orientation. g “Parts of the Camera” (P. 20)
Flash/sequential shooting/self-timer 151
AF/metering mode 115, 186
Display (monitor/viewfi nder) selection 62, 83
Movie recording 294
g
1 Press the desired button.
• The camera will display options for the chosen function.
Options
2 Rotate the front or rear dial to select the desired
option.
• Additional options may be available for some functions.
In this case options can be displayed by pressing the
INFO button.
• You can also choose a setting by holding the button and
rotating the front or rear dial. Release the button to exit
the option list and return to the shooting display.
2
%
• To prevent unintended operation, you can lock camera controls using the lock lever. You can
choose which controls are locked. g [C-LOCK Settings] (P. 503)
• Buttons can be assigned different roles. g G Custom Menu J [K Button Function]
(P. 463)
K 2-2 Shooting Settings
EN
61
Page 62

The Super Control/LV Super Control Panel
The super control/LV super control panel lists shooting settings and their current
values. Use the LV super control panel when framing shots in the monitor (“live
view”), the super control panel when framing shots in the viewfi nder.
The instructions in this manual are for the LV super control panel.
• Pressing the u (LV) button during live view enables viewfi nder photography and displays
the LV super control panel in the monitor.
1
100
%
ISO-A
200
P
2
Live view photography Viewfi nder photography (monitor
250 F5.6
S-IS AUTOS-IS AUTO
YFYF
4K
p
30p30
1:02:03
0.0
1023
u
(LV button)
1
100
%
2019.04.01 12:30:00
ISO
Auto
#
±
S-IS Auto
M-IS
P
Natural
A ±
0
WB
Auto
S
±
0±
0
G
±
0
#
Normal
S-AF
±
0
±
0
0.0
o
p
sRGB
Y
F
4K
p
30p30
Y
F
1:02:03
0.0
250
F5.6
1023
turns off while viewfi nder is on)
LV Super Control Panel (Live View Photography)
To display the LV super control panel in the monitor, press the OK button during live
view.
1
100
%
ISO-A
200
P
250 F5.6
S-IS AUTOS-IS AUTO
OK
YFYF
4K
p
30p30
1:02:03
0.0
1023
Super Control Panel (Viewfi nder Photography)
When you frame subjects in the viewfi nder, the super LV control panel will be
displayed in the monitor at all times.
1
100
%
2019.04.01 12:30:00
ISO
Auto
#
#
±
0.0
S-IS Auto
M-IS
P
250
Auto
Natural
A ±
0
WB
S
±
0±
G
o
Y
F
Y
F
F5.6
0
±
0
S-AF
±
±
p
4K
30p30
0.0
OK
Normal
0
0
sRGB
p
1:02:03
1023
62
K 2-2 Shooting Settings
EN
Page 63

Using the Super Control/LV Super Control Panel
1 Press the OK button.
• If you press the button during live view, the LV super
control panel will be displayed in the monitor.
• The last setting used will be highlighted.
2 Rotate the rear dial or tap to select
a setting in display.
• The selected setting will be
highlighted.
• You can also highlight settings using
the multi selector or arrow pad
(FGHI).
3 Rotate the front dial to change the
highlighted setting.
4 Press the shutter button halfway to accept current
settings and exit the LV super control panel.
• If you are using the super control panel, the cursor will
vanish and setting will end.
Cursor
2
K 2-2 Shooting Settings
EN
63
Page 64

Additional Options
Pressing the OK button in Step 2 displays options for the
highlighted setting. In some cases, additional options can
be viewed by pressing the INFO button.
INFO button
OK INFO
[K Image Stabilizer]
• Touch controls can be used in place of the OK button. Lightly tap the desired setting twice to
display options.
2
OK button
64
K 2-2 Shooting Settings
EN
Page 65

Settings Available in the Super Control/LV Super Control Panel
1
2
3
4
5
6
7
8
1 Option currently selected
2 ISO sensitivity ................................. P. 181
3 K AF mode ....................................P. 115
AF-target mode ............................... P. 120
4 Flash mode ..................................... P. 254
5 Flash compensation........................ P. 259
Manual fl ash output ........................ P. 257
6 K image stabilization .................... P. 176
7 n image stabilization *
1
.................. P. 376
8 K storage options ........................... P. 72
9 Drive mode (sequential shooting/
self-timer) ........................................ P . 151
0 K image quality ..............................P. 78
a Metering mode ................................ P. 186
b I face priority ................................P. 133
c n image quality *
1
.................. P. 321, 339
cd
0ba9
f Picture mode................................... P. 215
g N Sharpness.................................. P. 220
u Contrast ..................................... P. 221
t Saturation .................................. P. 222
z T one gradation ........................... P. 223
x Color fi lter .................................. P. 224
y Tint ............................................. P. 225
3 Effect .......................................... P. 226
R Color *
c Color/Vivid *
5
Effect *
h Color space..................................... P. 232
i Highlight & shadow control ............. P. 227
j Control assignment ......................... P. 463
e
f
g
h
i
j
3
....................................... P . 231
4
............................... P . 229
............................................ P. 226
d Aspect ratio ..................................... P. 233
e K white balance ........................... P. 202
K white balance compensation .... P. 206
K color temperature *
2
.................. P . 202
*1 Settings indicated by a “n” (movie) icon are for movie recording. See “3 Shooting and
Viewing Movies” (P. 293).
*2 Displayed when CWB (custom white balance) is selected for K white balance.
*3 Displayed when “Partial Color” is selected.
*4 Displayed when “Color Creator” is selected.
*5 Displayed when an art fi lter is selected.
2
K 2-2 Shooting Settings
EN
65
Page 66

Using the Menus
Items not listed in the control panels can be found in the menus, including items for
adjusting shooting and playback settings and customizing the camera for ease of
use.
Tab name
Tab
Tab Tab name Description
Shooting Menu 1
W
Shooting Menu 2 Photography-related items. Adjust advanced photo settings.
X
2
Video Menu *
n
Playback Menu Playback- and retouch-related items.
q
Custom Menu Items for customizing the camera.
G
Setup Menu Items for setting the clock, choosing a language, and the like.
e
My Menu *
P
*1 The n video menu is for movie recording. See “3 Shooting and Viewing Movies” (P. 293).
*2 “My Menu” contains no items at shipment. Use “My Menu” to store and organize frequently-
used items from other menus. Select items for addition to “My Menu” from the camera
menus (P. 477).
2
Photography-related items. Ready the camera for shooting or
access basic photo settings.
Items related to movie recording. Adjust basic and custom
1
settings.
A customizable menu containing only items you select.
g “Creating a Personalized Menu (My Menu)” (P. 477)
Item (setting)
66
K 2-2 Shooting Settings
EN
Page 67

1 Press the MENU button to display the menus.
1
1
2
On-screen guides
Press the MENU button to exit to
the previous display
• Tool tips are displayed for roughly 2 seconds after an item is highlighted.
INFO button to view or hide tool tips.
Tool tip
Press the OK button to select the
highlighted item
Press the
2 Highlight a tab using FG on the arrow pad and press the OK button.
• Selecting the G custom menu tab displays group tabs.
Highlight a group tab using the FG buttons and press
the OK button to select.
Group tabs
3
Highlight an item using
options.
Item Current setting
the FG buttons
OK
and press the OK button to view
2
4 Highlight options using the FG buttons and press the OK button to select.
• Press the MENU button repeatedly to exit the menus.
• Depending on camera status and settings, some items may be unavailable. Items that are
not available are grayed out and cannot be selected.
• You can also navigate the menus using the multi selector or the front and rear dials in place
of the arrow pad.
K 2-2 Shooting Settings
EN
67
Page 68

Using Live Controls
Live controls are used to view and adjust settings
during live view. The effects of the selected
settings can be previewed in the live view display.
Live controls are hidden by default. They can be
accessed by enabling their display in the menus.
Viewing Live Controls
1 Press the MENU button to display the menus.
2 Highlight the G (custom menu) tab using FG on
the arrow pad and press the OK button.
2
3 Highlight the P (Disp/8/PC) tab using the FG
buttons and press the OK button.
4 Highlight [K Control Settings] using the FG
buttons and press the OK button.
1
100
%
Natural
P
JJ KK
S-IS AUTOS-IS AUTO
WB
AUTOWBAUTO
oo
4:3
Y
4K
F
p
30p30
5 Highlight [Live Control] using the FG buttons and
press the OK button.
• A check (v) will appear next to [Live Control].
• To exit the menus, press the MENU button repeatedly or
press the shutter button halfway.
68
K 2-2 Shooting Settings
EN
Page 69

6
Press the OK button during live view to display the LV super control panel.
1
100
%
ISO-A
200
P
250 F5.6
0.0
1:02:03
S-IS AUTOS-IS AUTO
1023
OK
YFYF
4K
p
30p30
7 Press the INFO button to switch to the live control display.
INFO
• Press the INFO button again to return to the LV super control panel.
Using Live Controls
1 Press the OK button to view live controls.
• To hide live controls, press the OK button again.
2 Highlight a setting using FG on the arrow pad,
then highlight an option using the HI buttons and
press the OK button to select.
• Settings can also be adjusted using the dials. Use the
rear dial to highlight a setting and the front dial to choose
an option.
• The highlighted option will be selected automatically if no
operations are performed for 8 seconds.
2
ESP
BCDE
Options
Settings
##
p
S-AFS-AF
ISO
AUTO
#
++
--
ii
1
100
%
p
p
P
K 2-2 Shooting Settings
EN
69
Page 70

Available Live Controls
1
100
%
P
Natural
JJ KK
S-IS AUTOS-IS AUTO
WB
AUTOWBAUTO
oo
4:3
Y
4K
30p30
Settings
F
p
Options
K image stabilization .......................... P. 176
Picture mode ........................................P. 215
K white balance .................................P. 202
Drive mode (sequential shooting/self-timer)
........................................................ P . 151
Aspect ratio........................................... P. 233
K image quality .................................... P. 78
Flash mode ........................................... P. 254
Flash compensation .............................P. 259
Metering mode...................................... P. 186
K AF mode ..........................................P. 115
K ISO sensitivity ................................ P. 181
I face priority ...................................... P. 133
K movie audio * .................................... P. 413
n image quality * .................................P. 321
2
* Available during movie recording. g “3 Shooting and Viewing Movies” (P. 293)
70
K 2-2 Shooting Settings
EN
Page 71

2-3
The camera can be used with up to two memory cards simultaneously. This section
describes memory-card–related settings.
The menus and control panels offer items choosing how fi les are saved when two
memory cards are inserted. For example, you can opt to save pictures of different
types to different cards or automatically switch to the other card when one card fi lls.
For information on the cards that can be used for still photography, see “Memory
Cards” (P. 37).
Card-Related Settings
2
K 2-3 Card-Related Settings
EN
71
Page 72

Storage Options (K Save Settings)
Choose how the camera stores pictures when two memory cards are inserted.
• This setting can be accessed via:
- The LV super control panel (P. 73) - The menus (P. 73)
• The option selected for image quality may change when you change settings or remove a
memory card and replace it with a card that has space available. Check image quality before
shooting.
Standard
y
Auto Switch
z
Dual
1
2
Independent 1
Dual
2
Independent 3
Dual Same 1
3
Dual Same 3
4
Pictures are recorded to the memory card in the slot selected for
[K Save Slot] (P. 74). Shooting ends when the card is full.
Pictures are recorded to the memory card in the slot selected for
[K Save Slot] (P. 74). Pictures will be recorded to the remaining
card when the card in the selected slot fi lls. This setting automatically
reverts to [Standard] when only one memory card is inserted.
Each picture is recorded twice, once in each of two different image
quality formats. Choose an image quality for each slot (P. 78).
Shooting ends when either card is full. Image quality is set separately
for each slot; after changing the option selected, check the current
image quality setting.
Each picture is recorded twice, once in each of two different image
quality formats. Choose an image quality for each slot (P. 78).
Recording continues to the card in the remaining slot when either
card fi lls. Image quality is set separately for each slot; after changing
the option selected, check the current image quality setting.
Each picture is recorded twice, once to each card, using the option
currently selected for image quality. Shooting ends when either card
is full. This setting automatically reverts to [Standard] when only one
memory card is inserted.
Each picture is recorded twice, once to each card, using the option
currently selected for image quality. Recording continues to the card
in the remaining slot when either card fi lls. This setting automatically
reverts to [Standard] when only one memory card is inserted.
72
K 2-3 Card-Related Settings
EN
Page 73

Access via the LV Super Control Panel
1 Highlight [K Save Settings] in the LV super control
panel.
2 Rotate the front dial to choose a setting.
K save settings
3 Press the shutter button halfway to exit the LV super
control panel.
• Image quality may change depending on the option
selected. Check image quality before shooting.
Menu Access
Choose a setting using [Card Slot Settings] (P. 547) >
[K Save Settings] in G Custom Menu Y.
MENU button G tab Y tab [Card Slot Settings] [K Save Settings] Press
I on the arrow pad to display options Use the FG buttons to choose an option
2
K 2-3 Card-Related Settings
EN
73
Page 74

Choosing a Card for Photos (K Save Slot)
Choose the memory card used to store photos when two memory cards are
inserted. Card selection is available when y (standard) or z (auto switch) is
selected for [K Save Settings].
• This setting can be accessed via:
- The LV super control panel - The menus
Access via the LV Super Control Panel
1 Highlight [K Save Settings] in the LV super control
panel and press the OK button.
• [Card Slot Settings] options will be displayed.
2
2 Highlight [K Save Slot] using FG on the arrow
pad and press the I button.
K save settings
3 Highlight an option using the rear dial or the FG
buttons.
Photos are recorded to the card in Slot 1.
[5]:
Photos are recorded to the card in Slot 2.
[4]:
4 Press the OK button to select the highlighted option.
5 Press the MENU button repeatedly to exit the
menus.
Menu Access
Choose a setting using [Card Slot Settings] (P. 547) >
[K Save Slot] in G Custom Menu Y.
• [K Save Settings] (P. 72) is available when [Standard] or
[Auto Switch] is selected.
MENU button G tab Y tab [Card Slot Settings] [K Save Slot] Press I on
the arrow pad to display options Use the FG buttons to choose an option
74
K 2-3 Card-Related Settings
EN
Page 75

Storage Slot Selection
If two memory cards are inserted with y (standard) or z (auto switch) selected
for [K Save Settings], the card used to store pictures can be selected using the
CARD (card select) button.
1 Press the CARD button.
• You will be prompted to choose a slot.
CARD button
2 Rotate the front or rear dial to choose the desired
slot.
Record pictures to the card in Slot 1.
[5]:
Record pictures to the card in Slot 2.
[4]:
2
3 Press the OK button to exit.
• The icon for the selected card will be displayed.
1
100
%
ISO-A
200
P
250 F5.6
0.0
K save settings
K 2-3 Card-Related Settings
1:02:03
S-IS AUTOS-IS AUTO
1023
YFYF
4K
p
30p30
75
EN
Page 76

Storage Folder Selection (Assign Save Folder)
Choose the folder in which subsequent pictures will be stored.
• This setting can be accessed via:
- The LV super control panel - The menus (P. 77)
New Folder Create a new folder as the destination for subsequent pictures.
Existing Folder Choose an existing folder.
• A new folder cannot be created if a folder with the same name exists on either memory card.
Access via the LV Super Control Panel
1 Highlight [K Save Settings] in the LV super control
panel and press the OK button.
• [Card Slot Settings] options will be displayed.
2
K save settings
2 Highlight [Assign Save Folder] using FG on the
arrow pad and press the I button.
3 Highlight [Assign] using the FG buttons and press
the OK button.
76
K 2-3 Card-Related Settings
EN
Page 77

4 Highlight an option using the FG buttons.
[New Folder]: Choose the desired folder number and
[Existing Folder]:
press the OK button.
Highlight an existing folder using the FG
buttons and press the OK button. The
camera will display the fi rst two photos and
the last photo in the selected folder.
5 Press the OK button to select the highlighted option.
6 Press the MENU button repeatedly to exit the
menus.
Menu Access
Choose a setting using [Card Slot Settings] (P. 547) >
[Assign Save Folder] in G Custom Menu Y.
MENU button G tab Y tab [Card Slot Settings] [Assign Save Folder] Press
I on the arrow pad to display options Use the FG buttons to choose an option
2
K 2-3 Card-Related Settings
EN
77
Page 78

2-4
Choose the compression ratio, fi le format, and size used when saving pictures. The
options available via the LV super control panel or live controls can be selected in
the menus.
Image Quality and Size
2
Photo File and Image Size Options (KK)
Choose image quality settings used when photos are saved. When choosing an
option, consider how the photos will be used: for example, are you planning to
process it on a computer, or is it intended for upload to a website?
• This setting can be accessed via:
- The LV super control panel
- The menus (P. 79)
- Live controls (P. 80)
Access via the LV Super Control Panel
1 In the LV super control panel, highlight the [KK]
option for Slot 1 (5) or Slot 2 (4).
• Choose the option used for each card when [Dual
Independent 1] or [Dual Independent 3] is selected
for [K Save Settings] (P. 72).
78
K 2-4 Image Quality and Size
EN
K image quality
Page 79

2 Rotate the front dial to choose an option.
• Choose from the following options. The image size/compression combinations
available can be selected in the menus. g G Custom Menu X > [K Set] (P. 81)
Option Image size Compression ratio File format
YSF
YF
YN
XN
RAW 5184 × 3888 Lossless compression ORF
RAW+JPEG RAW plus the JPEG option selected above
• When [Standard], [Dual Same 1], or [Dual Same 3], or [Auto Switch] is selected
for [Card Slot Settings] > [K Save Settings] (P. 547) in G Custom Menu Y, the
selected option applies to the cards in both slots 5 and 4.
• IF, JF, IF+RAW, and JF+RAW options are available when High Res Shot
(P. 210) is enabled.
• Selecting High Res Shot changes the image quality option selected; be sure to check
the image quality setting before shooting.
5184 × 3888 SuperFine (1/2.7) JPG
5184 × 3888 Fine (1/4) JPG
5184 × 3888 Normal (1/8) JPG
3200 × 2400 Normal (1/8) JPG
3 Press the shutter button halfway to exit the LV super control panel.
• The image quality option selected may change if you change the option chosen
for [K Save Settings] or remove a memory card and replace it with one that has
space available. In particular, image quality will require readjustment when [Dual
Independent 1] or [Dual Independent 3] is selected.
Menu Access
Select [KK] in W Shooting Menu 1.
2
MENU button W tab [KK] Press I on the arrow pad to display options Use
the FG buttons to choose an option
K 2-4 Image Quality and Size
EN
79
Page 80

Access via Live Controls
Highlight [KK] in the live controls and use HI on the
1
100
%
arrow pad to choose an option.
5184×3888
X
YFY
Y
F
N
P
• For information on displaying live controls, see “Using Live Controls” (P. 68).
• When [Dual Independent 1] or [Dual Independent 3] is selected for [Card Slot Settings] >
[K Save Settings], you can select the image quality used for pictures recorded to the
memory card in Slot 1.
$
• RAW images consist of unprocessed image data to which settings such as exposure
compensation and white balance have yet to be applied. They serve as raw data for images
that will be processed after shooting. RAW image fi les:
- Have the extension “.orf”
- Cannot be viewed on other cameras
2
- Can be viewed on computers using Olympus Workspace Digital Photo Managing
software
- Can be saved in JPEG format using the [RAW Data Edit] (P. 284) retouch option in the
camera menus
K image quality
S-IS AUTOS-IS AUTO
WB
AUTOWBAUTO
oo
4:3
YFY
F
4K
p
30p30
Y
Y
N
F
N
W
1023
N
+RAW
+RAW
80
K 2-4 Image Quality and Size
EN
Page 81

Choosing Available Options (K Set)
Choose the combinations of image size (measured in pixels) and compression
(“image quality”) available in the [KK] menu (P. 78).
1 Press the MENU button to display the menus.
2 Select G Custom Menu X (K/WB/Color).
3 Highlight [K Set] using FG on the arrow pad and
press the I button.
• Image size and compression ratio selection options will
be displayed.
4 Using the HI buttons, highlight the size (in pixels)
or compression ratio for the desired image quality
setting ([K1] – [K4]) and then use the FG
buttons to choose a value.
Image size (in pixels)
Compression ratio
• The following sizes and compression ratios are available. The sizes for [X] and [W]
images can be selected from a menu.
Image size (pixels) Compression ratio
Y (Large)
X (Medium)
W (Small)
5184 × 3888 SF (Super Fine) 1/2.7
3200 × 2400 F (Fine) 1/4
1280 × 960 N (Normal) 1/8
2
5 Press the OK button to accept the new values.
• G Custom Menu X will be displayed.
6 Press the MENU button repeatedly to exit the menus.
K 2-4 Image Quality and Size
EN
81
Page 82

Choosing Values for [X] and [W] Sizes (Pixel Count)
Choose the size, in pixels, of the [X] (Xiddle) and [W] (Wmall) [KK] options
(P. 78).
• The size, in pixels, of the [X] and [W] options can be selected from following:
Xiddle (medium)
Wmall (small)
3200×2400, 1920×1440
1280×960, 1024×768
1 Press the MENU button to display the menus.
2 Select G Custom Menu X (K/WB/Color).
3 Highlight [Pixel Count] using FG on the arrow pad
2
and press the I button.
4 Highlight [Xiddle] or [Wmall] using the FG buttons
and press the I button.
• Options will be displayed.
5 Choose a size using the HI buttons and press the
OK button.
• The size-selection dialog ([Xiddle] or [Wmall]) will be
displayed.
6 Press the OK button to accept the new values.
• G Custom Menu X will be displayed.
7 Press the MENU button repeatedly to exit the
menus.
82
K 2-4 Image Quality and Size
EN
Page 83

2-5
The Viewfi nder and Monitor
Displays
Display Selection
The camera uses an eye sensor to automatically switch between the monitor
and viewfi nder displays. The monitor live view display and viewfi nder also show
information on camera settings. Options are available for controlling display
switching and choosing the information shown.
Framing photos in the monitor Framing photos in the viewfi nder
Put your eye to
the viewfi nder
Monitor Viewfi nder
1
100
%
ISO-A
200
P
250 F5.6
Live view in monitor shooting display Putting your eye to the viewfi nder turns
S-IS AUTOS-IS AUTO
YFYF
4K
p
30p30
1:02:03
0.0
1023
1
P
250 F5.6
100
%
1:02:03
ISO-A
WB
0.0
1023
200
AUTO
the viewfi nder on. The monitor turns off
while the viewfi nder is on.
2
• Pressing the u (LV) button switches the display in the monitor from live view to the super
control panel. Putting your eye to viewfi nder turns the viewfi nder on. The monitor turns off.
1
100
u (LV) button
%
2019.04.01 12:30:00
ISO
Auto
Auto
#
#
±
0.0
S-IS Auto
M-IS
P
250
Natural
A ±
0
WB
S
±
0±
G
±
S-AF
o
p
Y
F
Y
F
0.0
F5.6
0
0
Normal
±
0
±
0
sRGB
4K
p
30p30
1:02:03
1023
Monitor
(super control panel)
%
• Display switching and viewfi nder display options are available in the menus. g [EVF Auto
Switch] (P. 553), [EVF Style] (P. 554)
K 2-5 The Viewfi nder and Monitor Displays
EN
83
Page 84

Choosing the Information Displayed
Press the INFO button.
• The information displayed changes each time the INFO button is pressed.
1
100
%
ISO-A
200
P
250 F5.6
S-IS AUTOS-IS AUTO
YFYF
4K
p
30p30
1:02:03
0.0
1023
Basic info
1
100
%
ISO-A
200
P
250 F5.6
S-IS AUTOS-IS AUTO
1:02:03
0.0
1023
Level gauge
(Custom Display 2)
• You can also hold the INFO button and rotate the front or rear dial to choose the information
2
displayed. The displays can be cycled in either direction.
%
• You can choose the items displayed in Custom Displays 1 and 2. You can also display data
from GPS and other sensors. Use G Custom Menu P > [G/Info Settings] (P. 515) >
[LV-Info] to choose items for display in live view, G Custom Menu a > [V Info Settings]
(P. 555) to choose items for display in the viewfi nder.
Histograms
Histograms graph the distribution of brightness
in an image. The horizontal axis shows
brightness, the vertical axis the number of
pixels. During shooting, pixels brighter than the
upper limit are shown in red, pixels darker than
the lower limit in blue, and pixels in the spot metering area in green.
You can choose the upper and lower limits. g [Histogram Settings] (P. 526)
INFO
INFO
1
100
%
Info hidden
1
100
%
ISO-A
200
P
0.0
250 F5.6
Histogram
(Custom Display 1)
INFOINFO
S-IS AUTOS-IS AUTO
1:02:03
1023
Many
Few
Dark Bright
INFO button
Highlights and Shadows
Highlights and shadows, defi ned according to the upper and lower limits for the
histogram display, are shown in red and blue. You can choose the upper and lower
limits. g [Histogram Settings] (P. 526)
The Level Gauge
The level gauge shows camera tilt. Pitch is shown by the vertical bar, roll by the
horizontal bar.
• The level gauge is intended as a guide only.
• Calibrate the gauge if you fi nd it is no longer truly plumb or level. g [Level Adjust]
(P. 559)
84
K 2-5 The Viewfi nder and Monitor Displays
EN
Page 85

Display Selection Options (EVF Auto Switch)
Adjust settings for switching between the monitor and viewfi nder displays.
Using the u (LV) Button
1 Press and hold the u button.
• The [EVF Auto Switch] menu will be displayed.
u button
2 Highlight an option using FG on the arrow pad and press the OK button.
[On]: The display switches to the viewfi nder when you put your eye to the viewfi nder and
to the monitor when you take your eye away. During live view, you can turn live view
on or off by pressing the u button.
[Off]:
Press the u button to switch back and forth between the monitor and viewfi nder.
Menu Access
Adjust settings using [EVF Auto Switch] in G Custom
Menu a (P. 553).
2
MENU button G tab a tab [EVF Auto Switch] Press I on the arrow pad to
display options Use the FG buttons to choose an option
K 2-5 The Viewfi nder and Monitor Displays
EN
85
Page 86

The Shooting Display
DCBAzEywvxFG
Camera menus can be used to choose the information shown in the monitor and
viewfi nder. g [G/Info Settings] (P. 515), [V Info Settings] (P. 555)
Monitor (Still Photography)
2341 90 abcd j k56
1
w1w
1
R
100
%
#
Q
p
P
S-AF
O
ISO-A
N
200
#
-
2.0
M
L
2
K
J
AEL
C1
I
H
P
1 Memory card access indicator .......... P. 37
2 Wireless LAN connection
status ...................................... P. 584, 600
3 Active Bluetooth
®
connection ........ P. 586
4 Active connection to computer (Wi-Fi)
........................................................ P . 600
5 Wireless LAN connection
........................................ P. 592, 596, 597
6 Pro Capture active .......................... P. 168
7 Super FP fl ash ................................P. 252
8 RC mode.........................................P. 252
9 Bracketing ....................................... P. 236
0 HDR ................................................ P. 195
a Multiple exposure............................P. 246
b Keystone compensation ................. P. 248
c Fisheye correction .......................... P. 250
d Live ND fi lter photography .............. P. 197
e High frame rate ............................... P. 175
f Digital teleconverter ........................ P. 235
HDR
BKT
78 ghi le
FP RC
BKT FLK
250 F5.6
+2.0
Ÿ
FPS
99
g Interval timer photography .............. P. 172
h Face/eye priority ............................. P. 133
i Flickerless photography .................. P. 190
j Zoom direction/focal length
k Internal temperature warning .......... P. 639
l Flash-ready indicator ...................... P. 252
m In-focus indicator .............................. P. 53
n K image stabilization .................... P. 176
o Picture mode...................................P. 215
p K white balance ...........................P. 202
q Drive mode (single-frame/sequential
r Aspect ratio ..................................... P. 233
s K image quality .............................. P. 78
t n image quality * ...........................P. 321
T W
ND8
1
28
A
T W
+2
+7-3
mm
mf
28
mm
S-IS AUTOS-IS AUTO
n
o
WB
AUTO
p
oo
q
4:3
r
YFYF
s
4K
p
30p30
t
u
1:02:03
1023
LVLV
(blinking: charging in progress;
steady: charging complete)
shooting/self-timer/vibration reduction/
silent photography/Pro Capture/
High Res Shot) ...............P. 151 – 170, 210
* Settings indicated by a “n” (movie) icon are for movie recording. See “3 Shooting and
Viewing Movies” (P. 293).
1:02:03
PC
86
K 2-5 The Viewfi nder and Monitor Displays
EN
Page 87

DCBAzEywvxFG
2341 90 abcd j k56
1
w1w
1
R
100
%
#
Q
p
P
S-AF
O
ISO-A
N
200
#
-
2.0
M
L
K
J
AEL
C1
I
H
P
HDR
BKT
78 ghi le
FP RC
BKT FLK
FPS
250 F5.6
+2.0
T W
ND8
1
Ÿ
99
28
A
T W
+2
+7-3
mm
mf
28
mm
S-IS AUTOS-IS AUTO
n
o
WB
AUTO
p
oo
q
4:3
r
YFYF
s
4K
p
30p30
1:02:03
1023
t
u
1:02:03
PC
2
LVLV
u Available recording time ................. P. 655
Number of exposures remaining..... P. 654
v
w Card slot settings
Top: n save slot ............................P. 316
Bottom: K save settings ................. P. 72
x Active connection to computer (USB) *
........................................................ P . 600
y Highlight & shadow control ............. P. 227
z Top: fl ash compensation ................. P. 259
Bottom: exposure compensation .... P. 180
A Level gauge ...................................... P. 84
B Exposure compensation value........P. 180
C Aperture value ..........................P. 94 – 102
D Shutter speed ...........................P. 94 – 102
E Histogram ......................................... P. 84
F Preview ........................................... P. 464
G Exposure lock ................................. P. 188
H Shooting mode..........................P. 93 – 110
I Custom mode ..................................P. 111
J Log status ....................................... P. 571
K GPS status...................................... P. 570
L Touch controls................................... P. 54
M Flash compensation........................ P. 259
N K ISO sensitivity ........................... P. 181
O K AF mode ....................................P. 115
P Metering mode ................................ P. 186
Q Flash mode ..................................... P. 254
R Battery level/bay number .................. P. 44
* Displayed only if a computer is currently selected in the [0] menu as the sole destination
for new pictures (P. 622).
• You can also display data from GPS and other sensors. g “5-2 Using Field Sensors”
(P. 570)
K 2-5 The Viewfi nder and Monitor Displays
EN
87
Page 88

Viewfi nder (Still Photography)
#
p
S-AF
MF
#
-
2.0
FP RC
BKT
1
T W
FLK
99
28
mm
S-IS AUTOS-IS AUTO
oo
4:3
YFYF
4K
30p
250 F5.6 +2.0
Sh-3 Mid+2 Hi+6
#
AEL
C1
1
P
100
%
1:02:03
WB
ISO-A
1023
AUTO
200
2345 6 7 8 9 0 a
100
#
AEL
C1
1
P
%
250 F5.6 +2.0
Sh-3 Mid+2 Hi+6
WB
AUTO
bghi j k
2
defc
1
w1w
+2.0
WB
AUTO
ISO-A
200
ISO-A
200
1:02:03
1023
1023
PC
l
m
no
• This is the default display style ([Style 2]). The display style can be selected using G Custom
Menu a > [EVF Style] (P. 554). To display the same information as appears in the monitor,
choose [Style 3] for [EVF Style].
1
OVF simulation *1 ......................... P . 89
2 Flash-ready indicator ...................... P. 252
(Blinks: fl ash charging; on: charging
complete)
3 In-focus indicator .............................. P. 53
4 Custom mode ..................................P. 111
5 Exposure lock ................................. P. 188
6 Shutter speed ...........................P. 94 – 102
7 Aperture value ..........................P. 94 – 102
8 Exposure compensation value........P. 180
9 Highlight & shadow control ............. P. 227
0 K white balance ...........................P. 202
a K ISO sensitivity ........................... P. 181
b Battery level/bay number .................. P. 44
c Memory card access indicator .......... P. 37
d Wireless LAN connection........P. 584, 600
e Active Bluetooth
f Active connection to computer (Wi-Fi)
........................................................ P . 600
g Shooting mode..........................P. 93 – 110
h Pro Capture active .......................... P. 168
i Preview ........................................... P. 464
j Top: fl ash compensation ................. P. 259
Bottom: exposure compensation .... P. 180
k Card slot settings
Top: n save slot ............................P. 316
Bottom: K save settings ................. P. 72
l Available recording time ................. P. 655
m Number of exposures remaining.....P. 654
n Level gauge *
o Active connection to computer (USB) *
........................................................ P . 600
®
connection ........ P. 586
2
................................. P . 556
*1 Displayed in the viewfi nder only . g [S-OVF] (P. 89)
*2 Displayed when the shutter button is pressed halfway. g [V Half Way Level] (P. 556)
*3 Displayed only if a computer is currently selected in the [0] menu as the sole destination
for new pictures (P. 622).
3
88
K 2-5 The Viewfi nder and Monitor Displays
EN
Page 89

Optical Viewfi nder Simulation (S-OVF)
Increase dynamic range of the viewfi nder display, increasing the amount of detail
visible in highlights and shadows in a manner similar to optical viewfi nders. Backlit
subjects and the like are easier to see.
• The effects of exposure, white balance, picture mode art fi lters, and other shooting settings
cannot be previewed while optical viewfi nder simulation is in effect.
1 Press the MENU button to display the menus.
2 Select G Custom Menu a (EVF).
3 Highlight [S-OVF] using FG on the arrow pad and
press the I button.
4 Highlight an option using the FG buttons.
[Off]: The effects of exposure and other settings are visible in the viewfi nder display .
Choose this option to preview the effects of settings during shooting.
[On]: Dynamic range is increased. The effects of exposure, white balance, and other
shooting settings are not visible in the display.
5 Press the OK button to select the highlighted option.
• G Custom Menu a will be displayed.
6 Press the MENU button repeatedly to exit the menus.
2
%
• This option can be assigned to a camera control using [K Button Function] in G Custom
Menu J. You can then turn optical viewfi nder simulation on or off at the touch of a button.
g G Custom Menu J [K Button Function] (P. 463)
K 2-5 The Viewfi nder and Monitor Displays
EN
89
Page 90

2-6
Pictures are displayed immediately after shooting. This gives you a chance to
quickly review the shot. You can choose how long pictures are displayed or disable
photo review altogether.
To end photo review and resume shooting at any time, press the shutter button
halfway. This item defaults to [Off].
0.3–20sec Choose how long photos are displayed.
Off
Auto q
Photo Review (Rec View)
Photo review disabled. The camera continues to display the view through
the lens after shooting.
Switch to playback after shooting. You can delete images and perform
other playback operations.
1 Press the MENU button to display the menus.
2 Highlight [Rec View] in the e setup menu and press
2
I on the arrow pad.
3 Highlight an option using the FG buttons.
4 Press the OK button to select the highlighted option.
• The e setup menu will be displayed.
5 Press the MENU button repeatedly to exit the
menus.
90
K 2-6 Photo Review (Rec View)
EN
Page 91

2-7
Restoring Default Settings
(Reset)
Reset the camera to factory default settings. You can opt to reset almost all settings
or only those directly related to photography.
Full Reset all settings with a few exceptions, such as the clock and language.
Basic Reset photography-related settings only.
• See “7-4 Default Settings” (P. 640) for information on the settings that are reset.
1 Press the MENU button to display the menus.
2 Highlight [Reset / Custom Modes] in W Shooting
Menu 1 and press I on the arrow pad.
3 Highlight [Reset] using the FG buttons and press
the I button.
4 Highlight an option using the FG buttons.
2
5 Press the OK button to select the highlighted option.
• The [Reset / Custom Modes] menu will be displayed.
6 Press the OK button in the [Reset / Custom Modes]
menu.
• The [Reset] menu will be displayed.
7 Highlight [Yes] using the FG buttons and press the
OK button.
• Settings will be reset.
K 2-7 Restoring Default Settings (Reset)
EN
91
Page 92

%
• Settings can be saved to a computer using Olympus Workspace. For more information, visit
the OLYMPUS website at the following URL:
https://support.olympus-imaging.com/owdownload/
2
92
K 2-7 Restoring Default Settings (Reset)
EN
Page 93

2-8
Choose a shooting mode according to your artistic intent. The shooting mode is
selected with the mode dial. Choose custom modes to save and recall shooting
settings as required.
Choosing a Shooting Mode
Shooting Modes
See the page numbers listed below for more information.
Program AE (P. 94)
P
Aperture-priority AE (P. 96)
A
Shutter-priority AE (P. 98)
S
M
n
C1
Manual exposure (P. 101)
Bulb/time (P. 104)
B
Live composite (P. 108)
Movie (P. 294)
–
C4 Custom (P. 111)
Selected mode
Index
Choosing a Shooting Mode
1 Press the mode dial lock to unlock the mode dial.
• The mode dial locks while the mode dial lock is depressed. Press the lock to lock or
unlock the dial.
2
2 Rotate the mode dial to choose a mode.
3 Press the mode dial lock to lock the dial.
K 2-8 Choosing a Shooting Mode
EN
93
Page 94

Letting the Camera Choose Aperture and Shutter
F2.8
60"
F22
8000
Speed (P: Program AE)
The camera chooses the optimal aperture and shutter speed according to subject
brightness.
1 Rotate the mode dial to
2 Focus and check the display.
• The shutter speed and aperture chosen by the camera
are displayed.
.
P
1
100
%
ISO-A
200
3 Take pictures.
2
Subject Too Dark or Too Bright
If the camera is unable to achieve optimal exposure, the shutter-speed and aperture
displays will fl ash as shown.
Display Problem/solution
Large aperture (low f/-number)/
slow shutter speed
F2.8
60"
Small aperture (high f/-number)/
fast shutter speed
8000
• If auto ISO sensitivity control is disabled, choose a value using [K ISO]. g “Adjusting
ISO Sensitivity (K ISO)” (P. 181)
• The aperture value shown when the displays fl ash varies with the lens and focal length.
F22
The subject is too dark.
• Use a fl ash.
Subject is too bright.
• The limits of the camera metering system have been
exceeded. Use a third-party ND (Neutral Density) fi lter
to reduce the amount of light entering the camera.
• Shutter speeds as fast as 1/32000 s are available in
s (silent) mode. g “2-10 Drive Mode (j/Y/i)”
(P. 151)
P
250 F5.6
Shutter speed
Shooting mode
0.0
Aperture
1:02:03
S-IS AUTOS-IS AUTO
1023
YFYF
4K
p
30p30
94
K 2-8 Choosing a Shooting Mode
EN
Page 95

Adjusting Settings in Mode
P
Use the front and rear dials to adjust the following
settings.
Front dial: Exposure compensation (P. 180)
Rear dial: Program shift
• Exposure compensation can also be adjusted using the F
button. Press the F button and rotate the front or rear dial.
%
• You can choose the functions performed by the front and rear dials. g G Custom Menu
J [K Dial Function] (P. 473)
• You can use the Fn lever to reverse the roles of the front and rear dials. The lever can also
be assigned other roles. g G Custom Menu J [K Fn Lever Function] (P. 475)
Program Shift
1
100
to
%
ISO-A
200
Ps
250 F5.6
Program shift
0.0
Without changing exposure, you can choose from
different combinations of aperture and shutter speed
selected automatically by the camera. This is known as
program shift.
• Rotate the rear dial until the camera displays the desired
combination of aperture and shutter speed.
• The shooting mode indicator in the display changes from
while program shift is in effect. To end program shift, rotate
Ps
the rear dial in the opposite direction until Ps is no longer
displayed.
%
• You can choose whether the display refl ects the effects of exposure compensation or
maintains a constant brightness for ease of viewing. At default settings, the effects of
exposure settings are visible in the display. g [Live View Boost] (P. 200)
P
1:02:03
S-IS AUTOS-IS AUTO
S-IS AUTOS-IS AUTO
1023
2
YFYF
4K
p
30p30
K 2-8 Choosing a Shooting Mode
EN
95
Page 96

Choosing an Aperture (A: Aperture-Priority AE)
In this mode, you choose the aperture (f/-number) and the camera automatically
sets the shutter speed for optimal exposure according to subject brightness. Lower
aperture values (larger apertures) reduce the depth of the area that appears to be
in focus (depth of fi eld), blurring the background. Higher aperture values (smaller
apertures) increase the depth of the area that appears to be in focus in front of and
behind the subject.
Lower aperture values… Higher aperture values…
F5.6F4.0F2.8 F8.0 F11
…reduce depth of fi eld and increase
blur.
1 Rotate the mode dial to
2
2 Choose an aperture.
• At default settings, aperture is selected by rotating the
rear dial.
• The shutter speed selected automatically by the camera
will appear in the display.
3 Take pictures.
…increase depth of fi eld.
.
A
YFYF
4K
p
30p30
0.0
Aperture value
96
K 2-8 Choosing a Shooting Mode
EN
Page 97

Subject Too Dark or Too Bright
60"
F5.6
8000
F5.6
If the camera is unable to achieve optimal exposure, the shutter-speed display will
fl ash as shown.
Display Problem/solution
Slow shutter speed
60"
F5.6
Fast shutter speed
8000
F5.6
• If auto ISO sensitivity control is disabled, choose a value using [K ISO]. g “Adjusting
ISO Sensitivity (K ISO)” (P. 181)
Underexposure.
• Choose a lower aperture value.
Overexposure.
• Choose a higher aperture value.
• If the subject is still overexposed at the higher value,
the limits of the camera metering system have been
exceeded. Use a third-party ND (Neutral Density) fi lter
to reduce the amount of light entering the camera.
• Shutter speeds as fast as 1/32000 s are available in
s (silent) mode. g “2-10 Drive Mode (j/Y/i)”
(P. 151)
2
Adjusting Settings in Mode
A
Use the front and rear dials to adjust the following
settings.
Front dial: Exposure compensation (P. 180)
Rear dial: Aperture
• Exposure compensation can also be adjusted using the F
button. Press the F button and rotate the front or rear dial.
%
• You can choose the functions performed by the front and rear dials. g G Custom Menu
J [K Dial Function] (P. 473)
• You can use the Fn lever to reverse the roles of the front and rear dials. The lever can also
be assigned other roles. g G Custom Menu J [K Fn Lever Function] (P. 475)
• You can choose whether the display refl ects the effects of exposure settings or maintains a
constant brightness for ease of viewing. At default settings, the effects of exposure settings
are visible in the display. g [Live View Boost] (P. 200)
• You can stop aperture down to the selected value and preview its effects. g G Custom
Menu J [K Button Function] (P. 464)
K 2-8 Choosing a Shooting Mode
EN
97
Page 98

Choosing a Shutter Speed (S: Shutter-Priority AE)
In this mode, you choose the shutter speed and the camera automatically sets
aperture for optimal exposure according to subject brightness. Faster shutter
speeds appear to “freeze” fast-moving subjects. Slower shutter speeds add blur to
moving objects, lending them a sense of motion for a dynamic effect.
Slower shutter speeds… Faster shutter speeds…
…produce dynamic shots with a sense
of motion.
1 Rotate the mode dial to
2
2 Choose a shutter speed.
• At default settings, shutter speed is selected by rotating
the rear dial.
• Shutter speed can be set to values between 1/8000 and
60 s.
• Shutter speeds as fast as 1/32000 s are available in s
(silent) mode. g [Silent s] (P. 163)
• The aperture selected automatically by the camera will
appear in the display.
3 Take pictures.
60301560”
125 250
8000
…“freeze” the motion of fast-moving
subjects.
.
S
1
100
%
ISO-A
200
S
250 F5.6
0.0
1:02:03
S-IS AUTOS-IS AUTO
S-IS AUTOS-IS AUTO
1023
YFYF
4K
p
30p30
Shutter speed
98
K 2-8 Choosing a Shooting Mode
EN
Page 99

Subject Too Dark or Too Bright
F2.8
2000
F22
125
If the camera is unable to achieve optimal exposure, the aperture display will fl ash
as shown.
Display Problem/solution
Low aperture value
125
F2.8
F22
2000
High aperture value
• If auto ISO sensitivity control is disabled, choose a value using [K ISO]. g “Adjusting
ISO Sensitivity (K ISO)” (P. 181)
• The aperture value shown when the display fl ashes varies with the lens and focal length.
Underexposure.
• Choose a slower shutter speed.
Overexposure.
• Choose a faster shutter speed.
• If the subject is still overexposed at the higher speed,
the limits of the camera metering system have been
exceeded. Use a third-party ND (Neutral Density) fi lter
to reduce the amount of light entering the camera.
• Shutter speeds as fast as 1/32000 s are available in
s (silent) mode. g “2-10 Drive Mode (j/Y/i)”
(P. 151)
2
K 2-8 Choosing a Shooting Mode
EN
99
Page 100

Adjusting Settings in Mode
S
Use the front and rear dials to adjust the following
settings.
Front dial: Exposure compensation (P. 180)
Rear dial: Shutter speed
• Exposure compensation can also be adjusted using the F
button. Press the F button and rotate the front or rear dial.
%
• You can choose the functions performed by the front and rear dials. g G Custom Menu
J [K Dial Function] (P. 473)
• You can use the Fn lever to reverse the roles of the front and rear dials. The lever can also
be assigned other roles. g G Custom Menu J [K Fn Lever Function] (P. 475)
• You can choose whether the display refl ects the effects of exposure settings or maintains a
constant brightness for ease of viewing. At default settings, the effects of exposure settings
are visible in the display. g [Live View Boost] (P. 200)
• To achieve the effect of a slow shutter in brightly-lit settings in which slow shutter speeds are
not otherwise available, use the live ND fi lter. g [Live ND Shooting] (P. 197)
2
• Depending on the shutter speed selected, you may notice banding in the display caused
by fl icker from fl uorescent or LED light sources. The camera can be confi gured to reduce
the effects of fl icker during live view or when pictures are taken. g [Flicker reduction]
(P. 190), [K Flicker Scan] (P. 193)
100
K 2-8 Choosing a Shooting Mode
EN
 Loading...