

Page 1
INSTRUCTIONS
Before using your camera, read this manual carefully to ensure
correct use .
PREPARATIONS
BASIC OPERATIONS
ADVANCED TECHNIQUES
CAMERA MAINTENANCE
Page 2
Thank you for purchasing an Olympus camera. Before
you start to use your new camera, please read these
instructions carefully to obtain optimum performance
and a longer service life from the unit.
KEEP THE BATTERIES A WAY FROM FIRE
NEVER T R Y TO DISASSEMBLE, RECHARGE
OR SHORT CIRCUIT BATTERIES.
NEVER ATTEMPT TO DISASSEMBLE THE
CAMERA; IT CONTAINS A HIGH-V O L TA G E
CIRCUIT.
IF THE INTERNAL PARTS OF THE CAMERA
ARE EXPOSED DUE TO DROPPING OR
DAMAGE, REMOVE THE BATTERIES
IMMEDIATELY TO PREVENT FURTHER
USAGE.
2
Page 3
• Before using your camera, read this manual carefully
to ensure correct use.
• We recommend that you take test shots to get
accustomed to your camera before taking important
photographs.
MAIN FEATURES
An easy-to-use fully automatic camera with a
leather-like touch.
Built-in 38mm - 105mm approx. 3X z oom lens.
Quartz date or time imprinting.
Weatherproof. Remote control (optional).
Versatile, easy-to-use functions include spot metering,
night scene mode, as well as various flash modes.
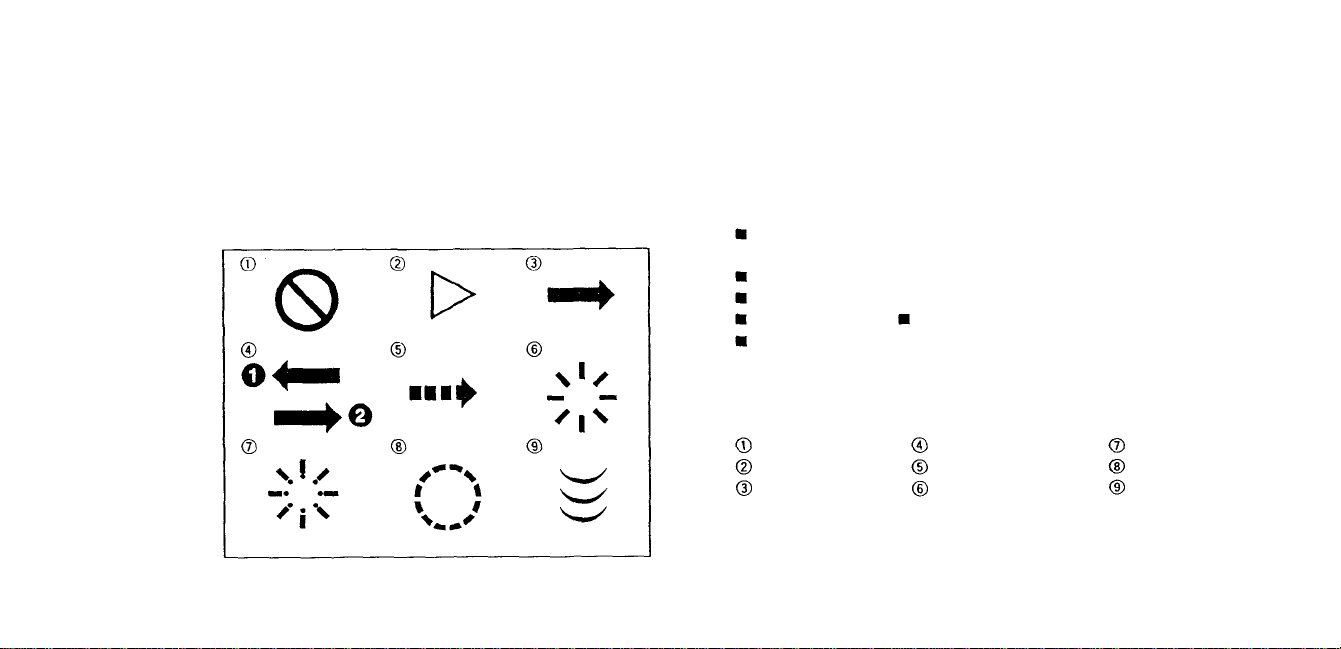
Symbols used in this manual:
Incorrect
Next operation
Manual operation
Operation order
Automatic operation
Indicator on
Indicator blinking
Attention
Depress halfway
Product shown in pictures and illustrations may be
3
slightly different from the actual unit.
Page 4

PREPARATIONS
Names
and
functions of parts
Viewfinder
Diopter adjustment ............................................................. 9
Using
Outline
Loading the battery ............................................................. 13
Checking the battery ........................................................... 14
Points to remember ............................................................ 15
display/LCD panel
the
strap
...................................................................
of
operations
..........................................................
...........................................
.............................................
6
8
10
9
BASIC OPERATIONS
4
Loading
Taking pictures ...................................................................
Using the focus lock
After
Unloading
the
film
Shooting
....................................................................
the
film
.................................................................
...........................................................
..............................................................
17
20
25
27
28
Page 5

ADVANCED TECHNIQUES
Using the flash modes
Auto (Auto Flash) ...............................................................
Auto-S
(Redeye-Reducing
OFF (Flash Override) ...........................................................
FILL-IN
Selftimer............................................................................. 37
Remote Control (optional)
Correcting the data
Printing
(Forced
Night Scene ...................................................................
Spot
.............................................................................
the
date
........................................................
Flash) ......................................
Activation)
.............................................................
and
................................................
..................................................
time
..................................................
29
31
32
33
34
35
36
38
40
42
CAMERA MAINTENANCE
5
Questions
Care
Caring for your weatherproof camera.................................. 47
Battery
Remote control (optional) handling
Troubleshooting
Specifications
and
and
answers
storage
......................................................
................................................................
handling .................................................................
..................................
...............................................................
..................................................................
43
44
49
51
52
. 59
Page 6
PREPARATIONS
6
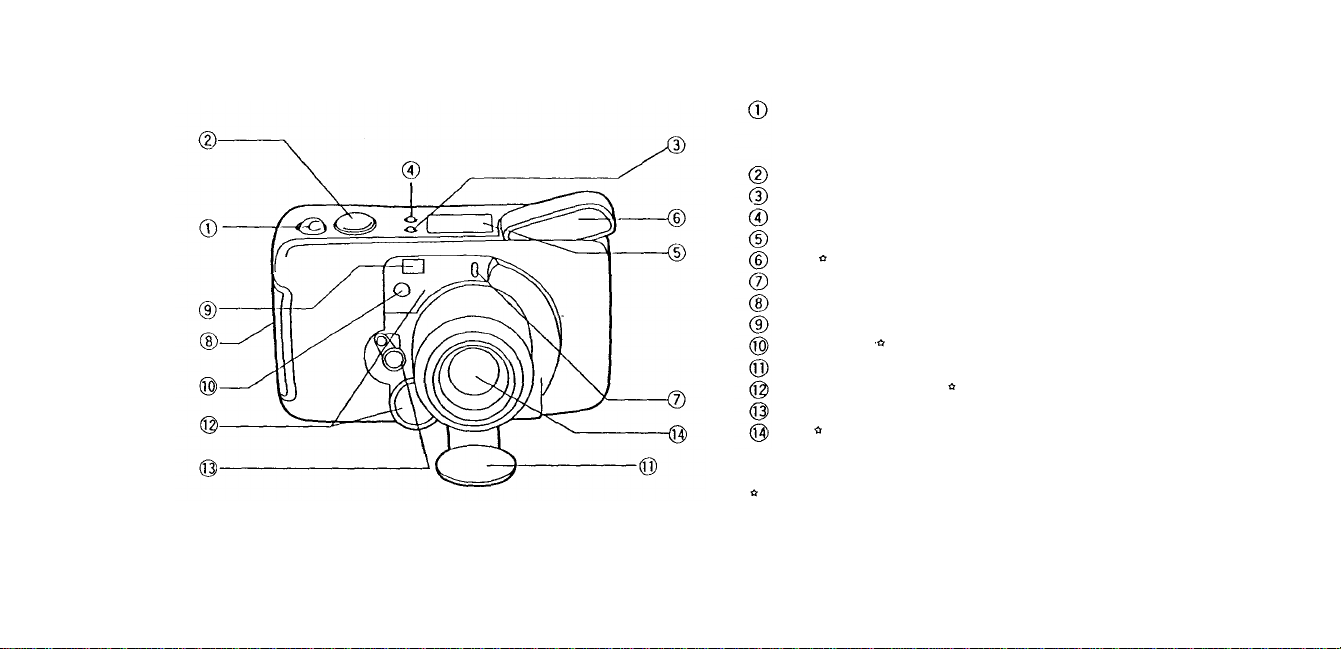
NAMES AND FUNCTIONS OF PARTS
Zoom le ve r (See p. 21.)
Zooms In — telephoto.
Zooms out — wide-angle.
Shutter release button (See p. 16.)
Selftimer/remote control button (See p. 37/38.)
Flash mode button (See p. 29.)
LCD panel (Date/time indicator ) (See p. 8.)
Flash
Selftimer indicator
Strap eyelet
Viewfinder
Light sensor
Lens barrier
Autofocus windows
Power switch
Lens
Do not soil as this can cause blurred pictures.
Wipe clean with a soft cloth.
Page 7
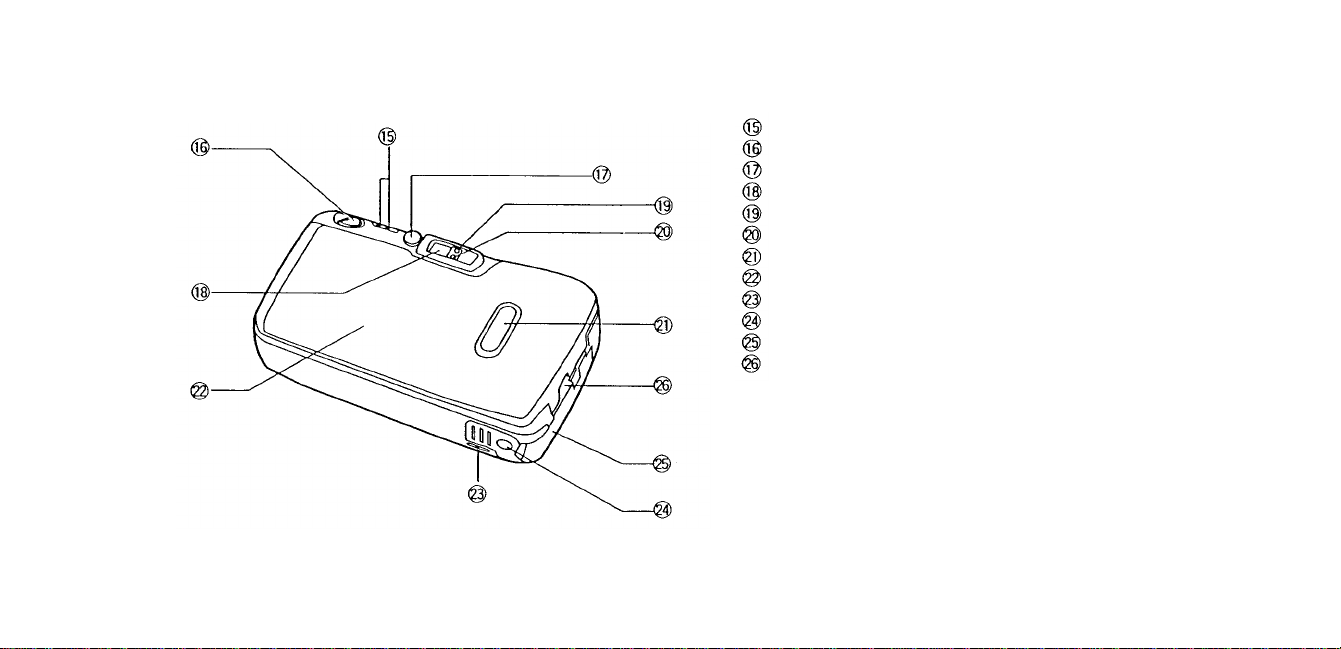
Quartzdate mode buttons (See p. 40.)
Panorama lever (See p. 29)
Diopter adjustment dial (See p. 9.)
Viewfinder (See p. 8.)
Orange lamp
Green lamp
Film window
Back cover
Mid-roll rewind button (See p. 28.)
Trip od socket
Battery compartment cover
Bac k cover release
7
Page 8
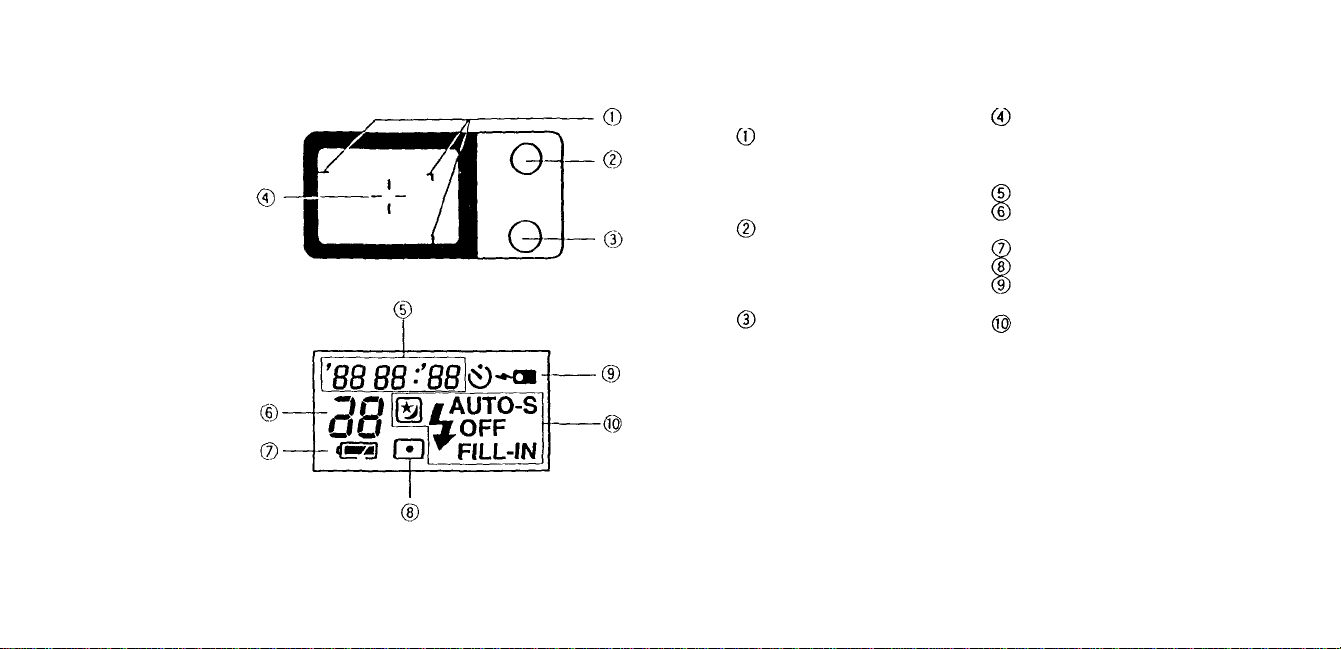
VIEWFINDER DISPLAY/LCD PANEL
Viewfinder Display
Close-up correction marks
At a close distance, your
subject must be
positioned within the
close-up correction marks.
Orange lamp
Lights when the flash is
ready to fire .
Blinks while the flash is
recharging.
Green lamp
Lights when the subject
is in focus.
Autofocus mark
Position your subject within
the autofocus mark.
LCD Panel
Date/time indicator
Exposure counter
(See
p.
Battery check (See p. 14.)
Sp ot ( S ee p . 36. )
Selftimer/remote control
(See p . 3 7 /3 8 . )
Flash modes (See p. 29.)
19.)
Blinks when the subject
is not in focus.
Note:
8
The LCD panel does not actually display all indication
simultaneously as shown.
Page 9
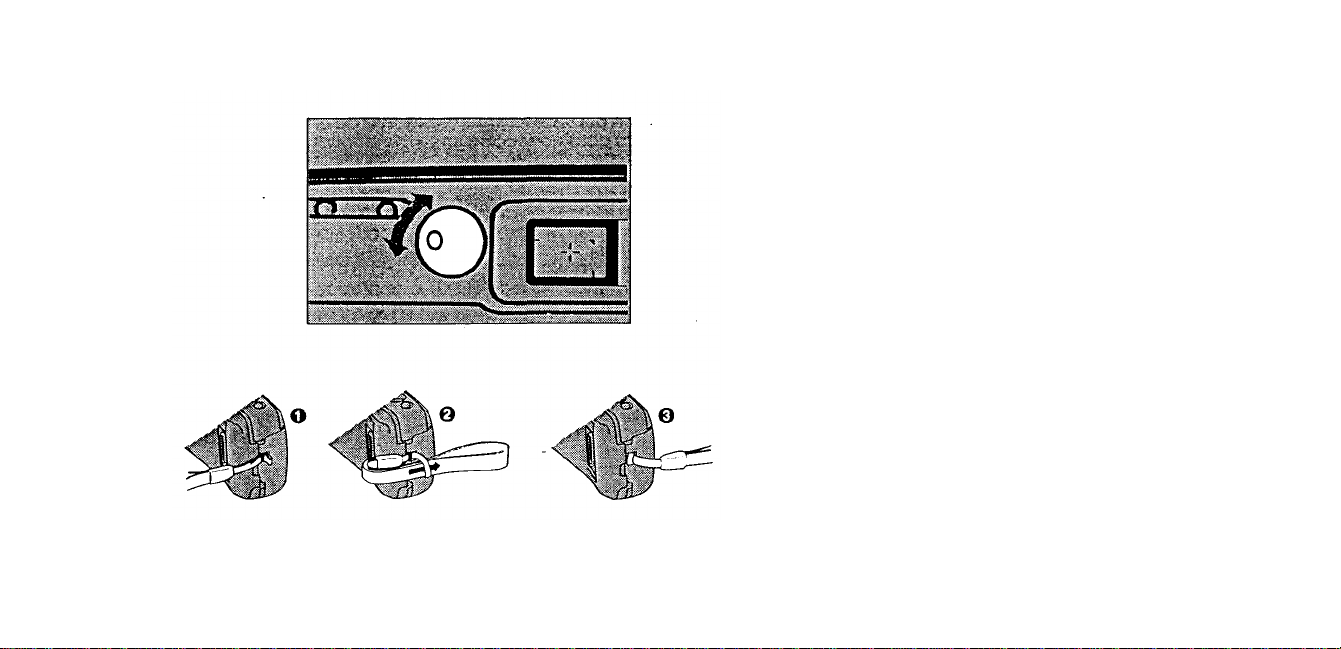
To Adjust the Viewfinder to Compensate for Near-and Far-sighted vision
DIOPTER ADJUSTMENT
Turn the diopter adjustmen t dial un ti l the
viewfinder display becomes clear.
Turn t o the right if you are far-sighted or to the left if you
are near-sighted.
USING THE STRAP
Attaching the strap.
9
Page 10
10
OUTLINE OF OPERATIONS
Basic Shooting Procedures
Loa d a batte ry (p. 13) .
1.
Open the back cover (p . 17).
2.
Load the fi l m (p. 17).
3.
(Use of ISO 400 film is recommended.)
Close the back cover. The fi lm
4.
automatically advances to the first
frame (p. 19).
Page 11
11
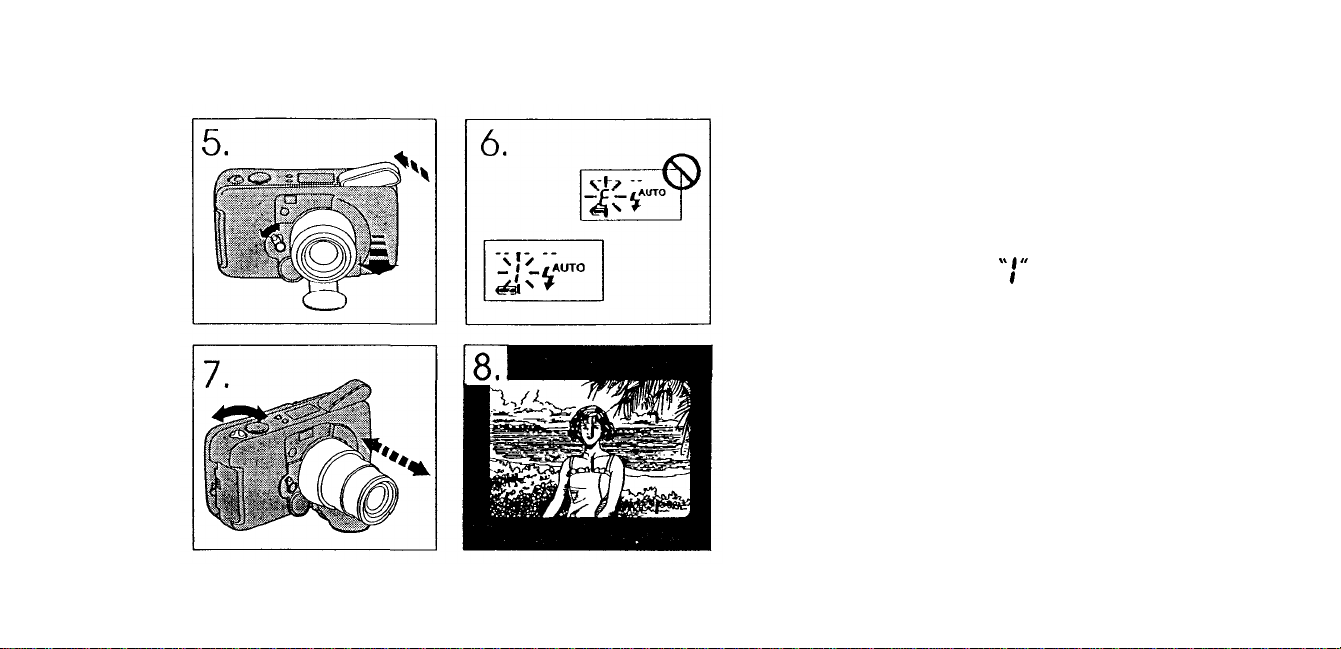
Turn the power switch ON (p. 19).
5.
The lens barrier will open automatically.
Make sure the exposure counter on the
6.
LCD panel reads (p. 19).
Press the zoom lever for telephoto or
7.
wide-angle photography (p . 21).
Place the autofocus mark on the
8.
subject you want to photograph (p. 22).
Page 12
12
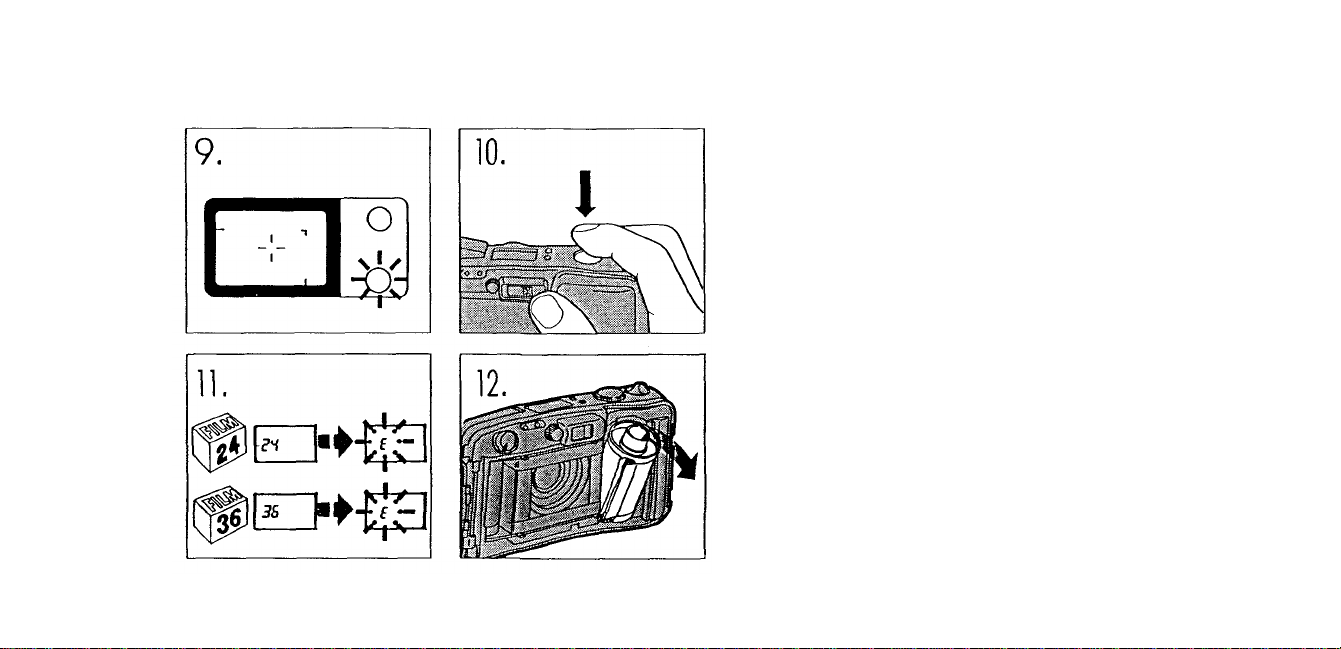
Depress the shutter release button halfway
9.
to make sure the green lamp lights ( p. 22).
Depress the shutter release button fully
10.
to take a picture (p . 23).
When the film reaches the end, it will
11.
automatically rewind (p. 28).
Open the back cover to remove the
12.
rewound film (p. 28).
Page 13
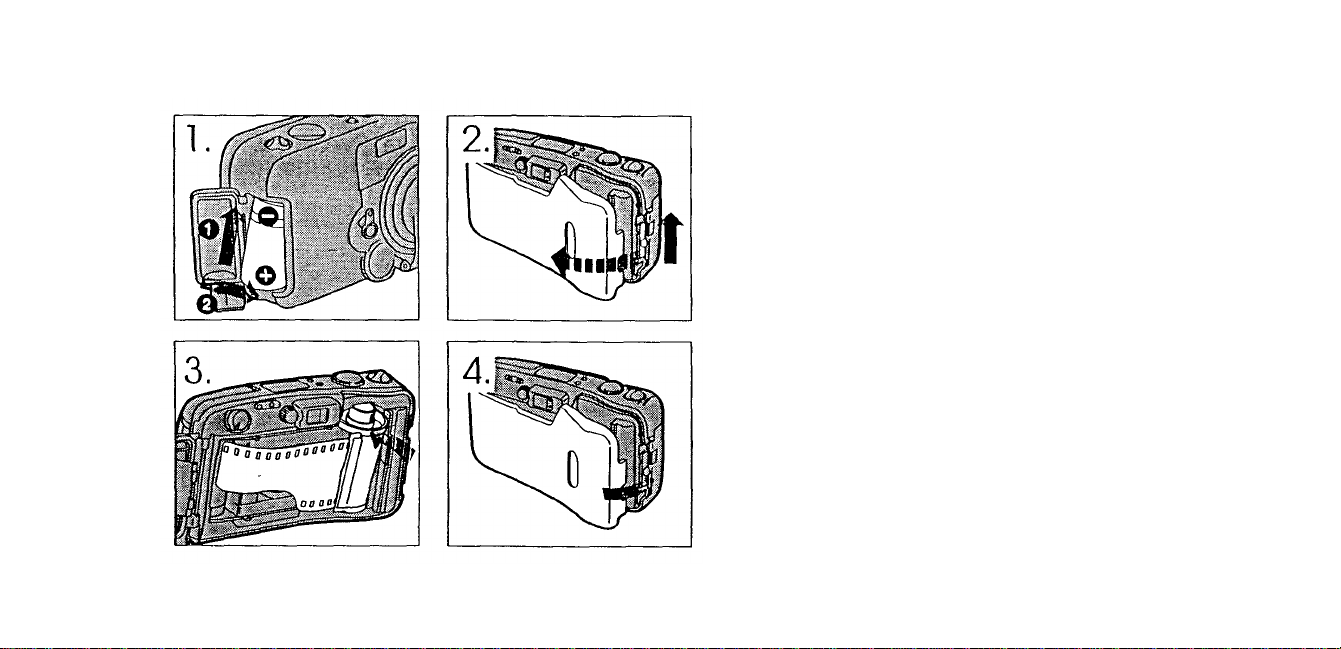
LOADING THE BATTERY
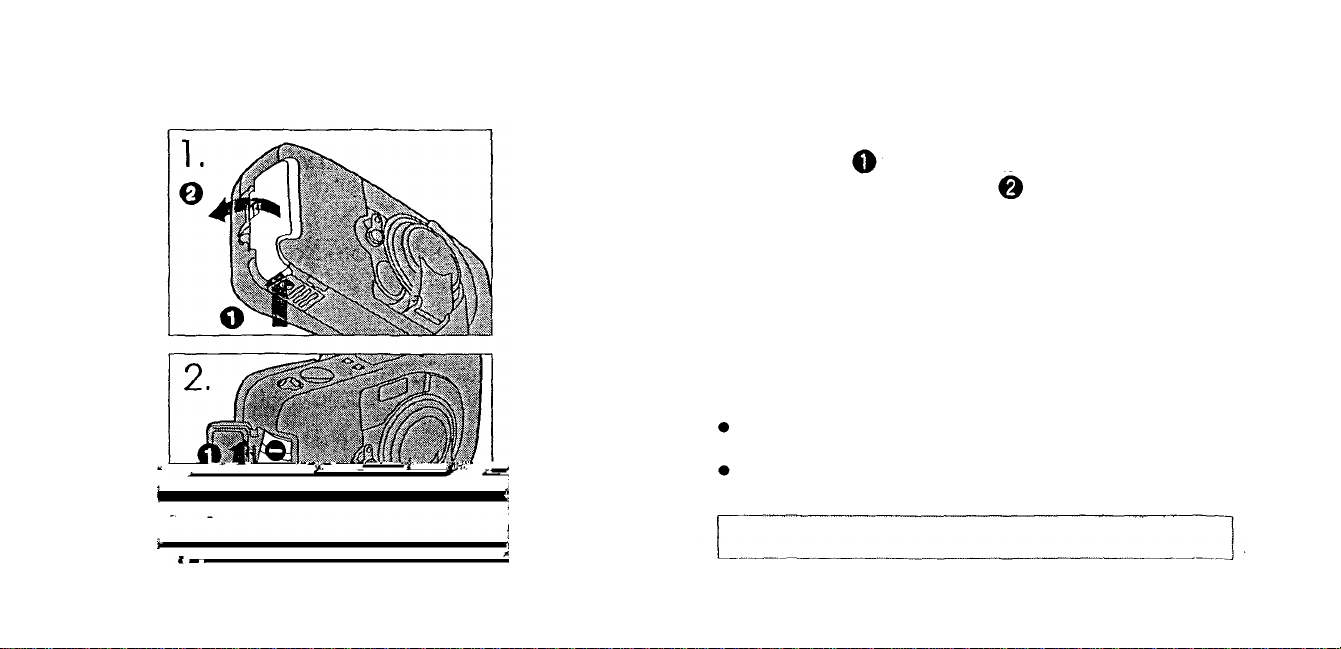
After turning the power switch OFF, push
1.
OPEN to open the battery
compartment cover .
Turn the power switch OFF and close the
lens barrier when replacing the batteries.
Insert the new battery correctly as
2.
shown and close the battery
compartment cover tightly.
Use a 3 V lithium battery (DL 123A, CR123A, or
equivalent.)
About 15 rolls of film can be used with one new battery.
(p. 43)
13
Read "Battery Handling" on page 49.
Page 14
CHECKING THE BATTERY
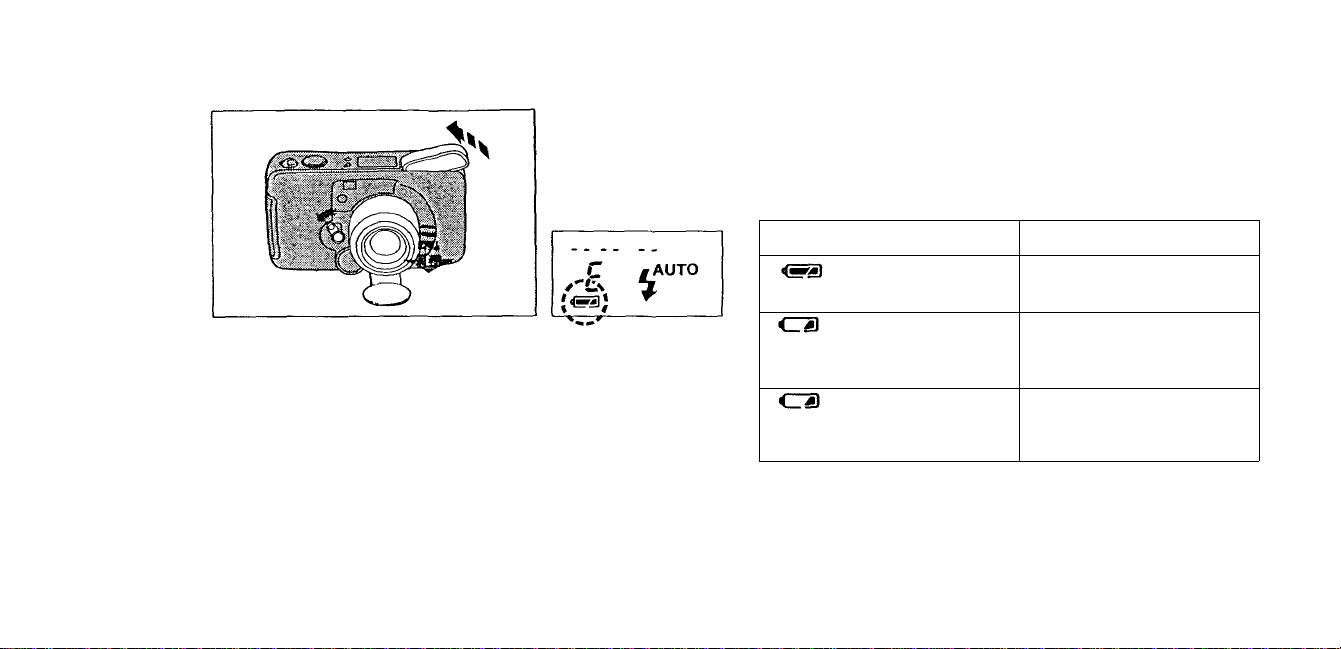
Turn the power switch ON. Check the
remaining battery power.
14
Display
lights (and turns off
automatically).
blinks and other
indicators on the LCD panel
are displayed normally.
blinks and other
indicators on the LCD panel
go
out.
Note: Keep spare battery on hand when going on a long trip
a wedding or when using the camera i n cold weather. Adjust
the data of the Quartzdate every time the battery is replaced.
Battery is OK.
You can shoot.
Battery power is low and
battery should be replaced
Battery is dead and should
be replaced immediately.
Meaning
Page 15
15
POINTS TO REMEMBER
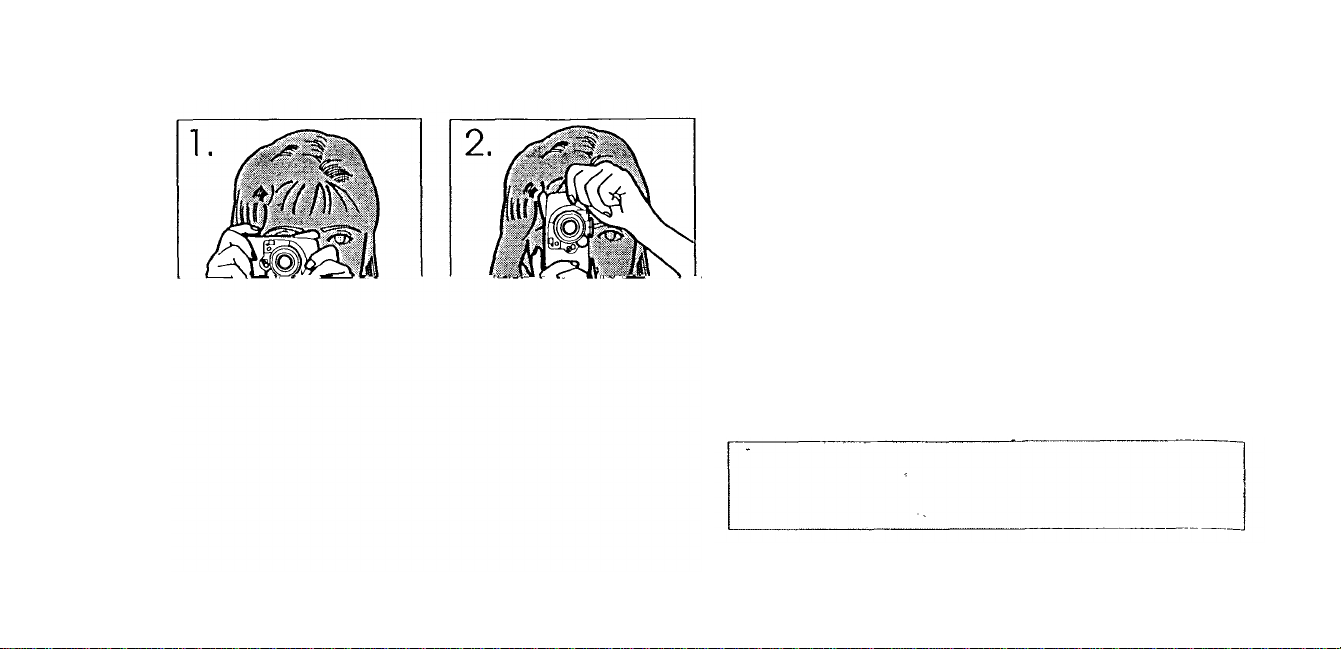
Hol d the Camera Correctly.
Correct.
1.
Hold the camera firmly with both hands
while keeping elbows at sides to prevent
the camera from shaking.
Correct.
2.
I n the vertical position, hold the camera
with its flash positioned at the to p.
Incorrect.
3.
Caution:
keep your fingers and the strap away from the lens, lens
barrier, autofocus windows and flash. (See p. 6)
Page 16
16
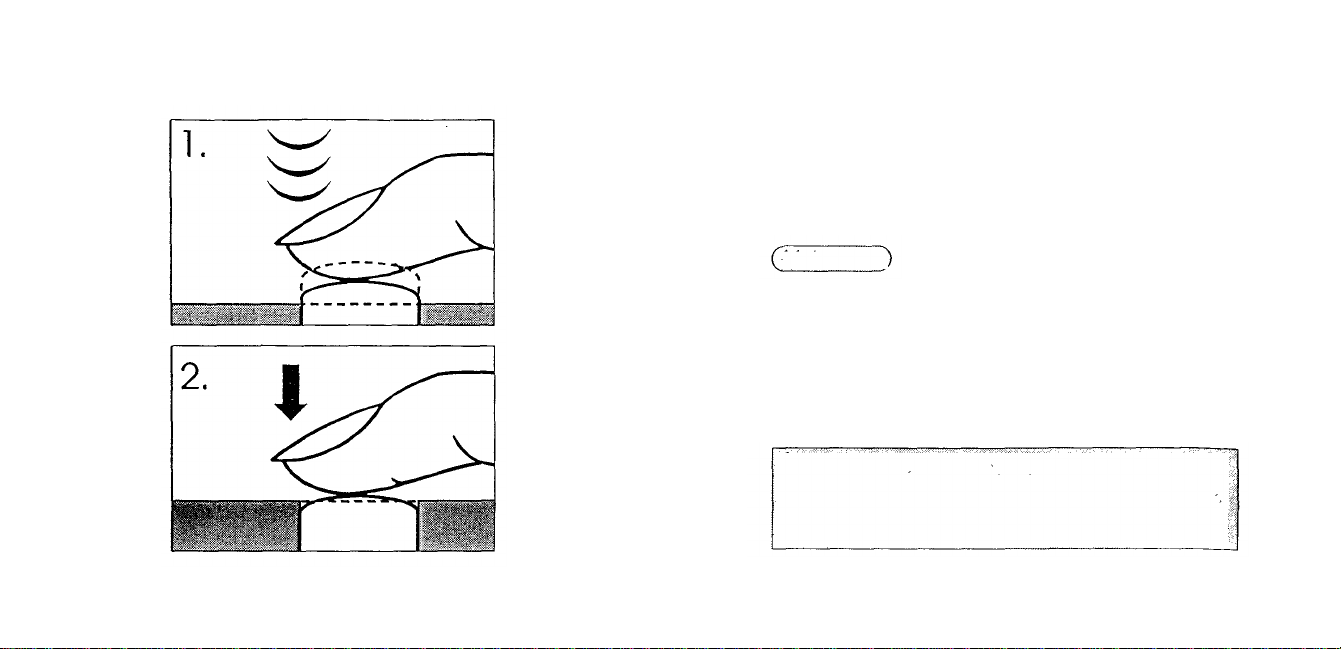
Proper Shutter Release.
Practice before loading the film.
Depress the shutter release button
1.
halfway to lock the focus.
Make sure.
The green lamp next to the viewfinder lights.
Depress the shutter release button fully
2.
to release the shutter and take the
picture.
Cautions:
• Press the shutter release button gently.
• Avoid shaking the camera when pressing the
shutter release button to prevent blurry pictures.
Page 17
OPERATIONS
BASIC
17
LOADING THE FILM
Slide the back cover releas e upward to
1.
open the back cover.
Do not touch the inside of the camera,
especially the lens. If there is dust or dirt on
the lens, remove it with a blower brush.
Insert the film cartridge, making sure
2.
the film is lying flat.
Note: Use of IS O 400 film is recommended.
When using non-DX-coded film, use ISO 100 film.
Page 18
18
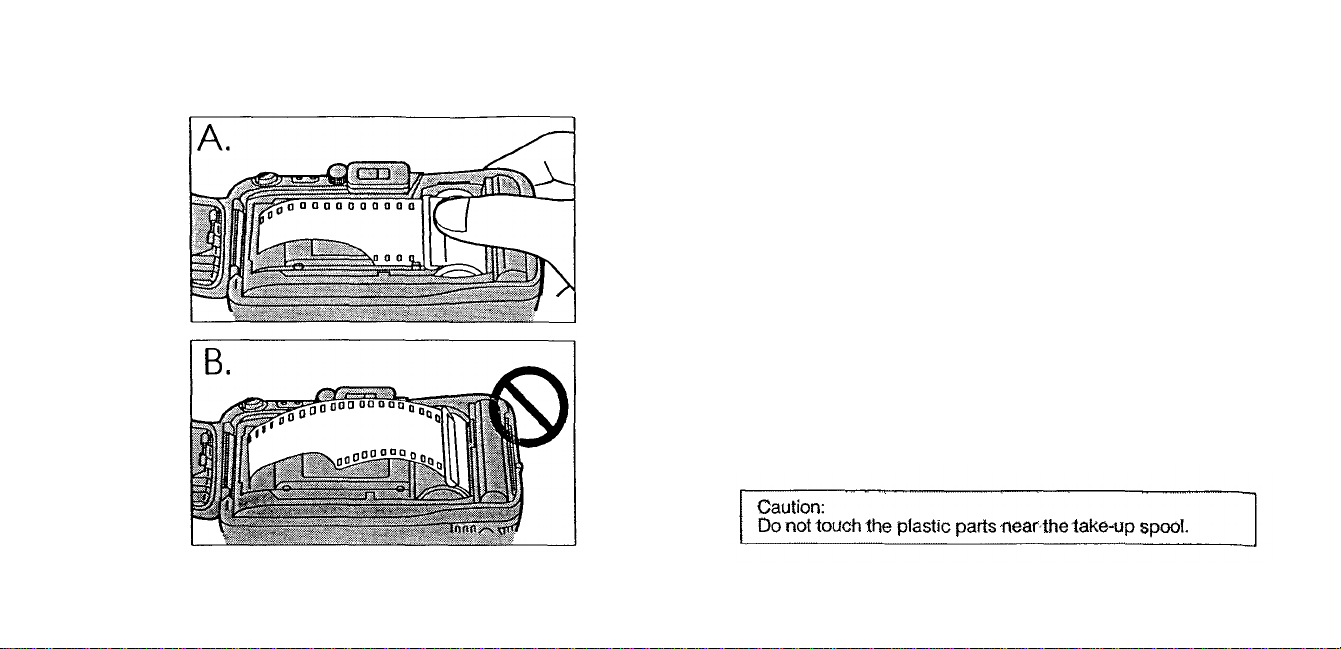
Correct.
A.
Make sure the film is lying flat before closing
the back cover.
Incorrect.
B.
If the film is not lying flat as shown, the film
may not
advance
to the
first
frame.
Page 19
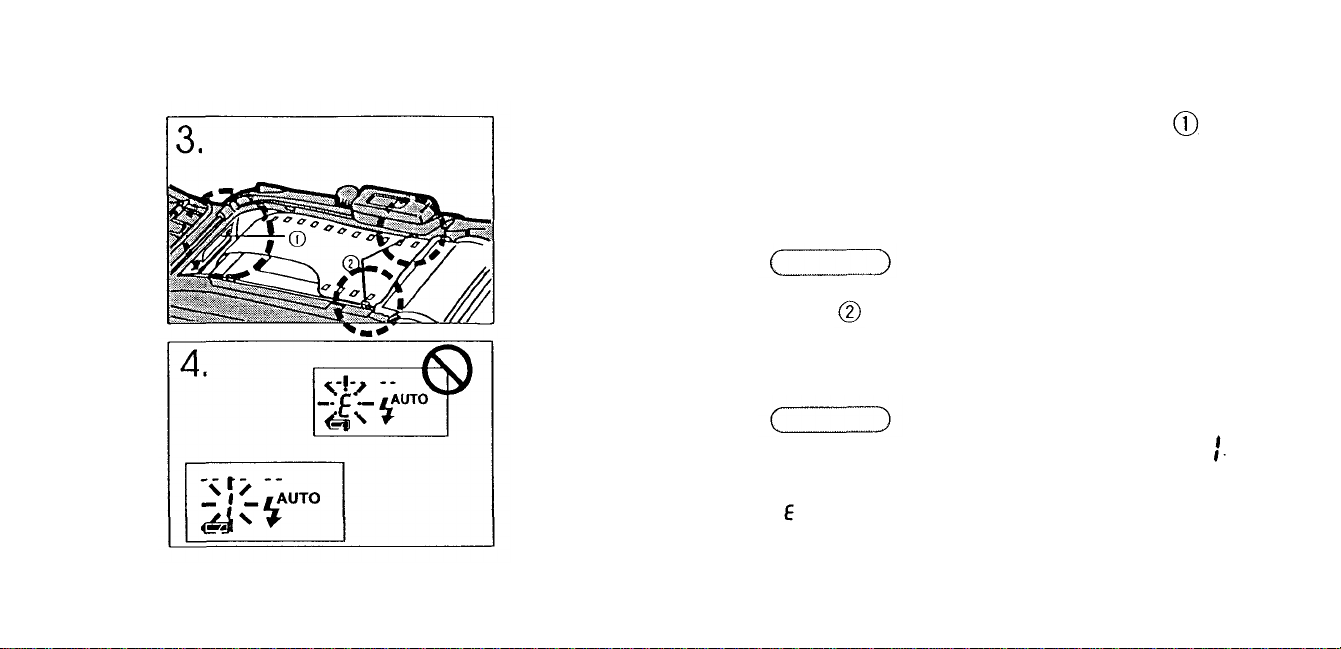
19
Align the film leader with the mark ,
3.
and close the back cover.
The
film
automatically
frame.
Make sure
The film does not overlap any of the positioning
guides shown on the left.
Turn the power switch ON.
4.
advances
Make sure
The exp os u re counter on the LCD panel reads
Note
:
If blinks in the exposure counter, as shown on the left,
the film is improperly loaded. Reload the film.
to the
first
Page 20
20
TAKING PICTURES
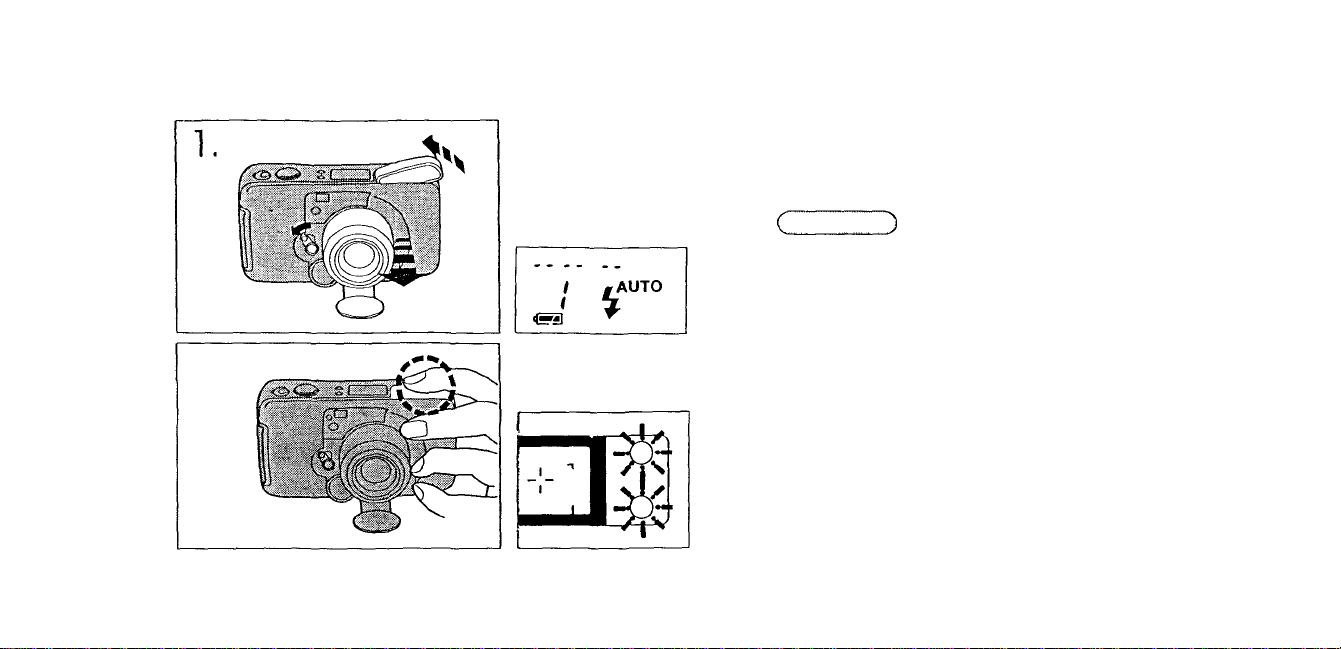
Turn the power switch ON.
1.
Make sure
The lens extends slightly, the flash pops up, and
the LCD panel activates.
When the flash is hel d down, the two
indicators next to the viewfinder blink.
The camera wil l not activate.
The display also goes out.
Release the flash to reactivate the
camera.
Page 21
21
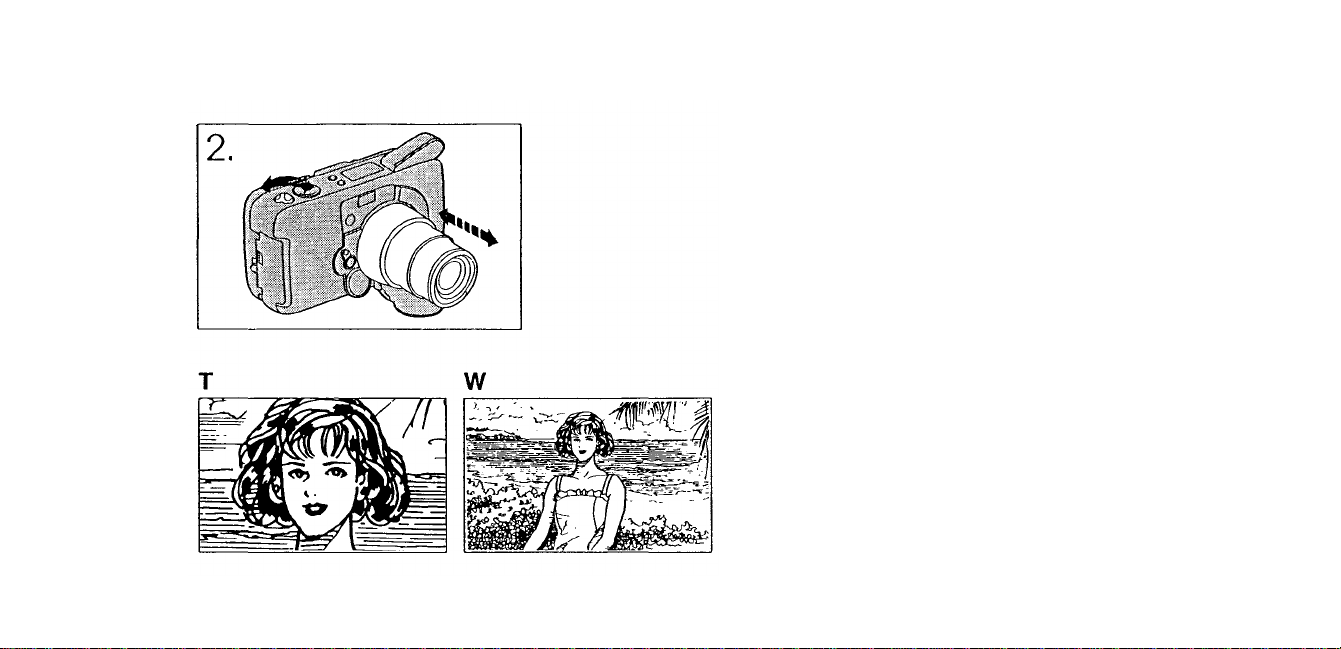
Aim the camera at your subject. Use
2.
the zoom lever for telephoto or wide
angle photography.
How to Use the Zoom Lever:
Telephoto:
Pull the lever to the "T" side t o zoom in.
Maximum telephoto focal length: 105 mm
Wide angle:
Push the lever to the "W" side to zoom out.
Maximum wide-angle focal length: 38 mm
Page 22
22
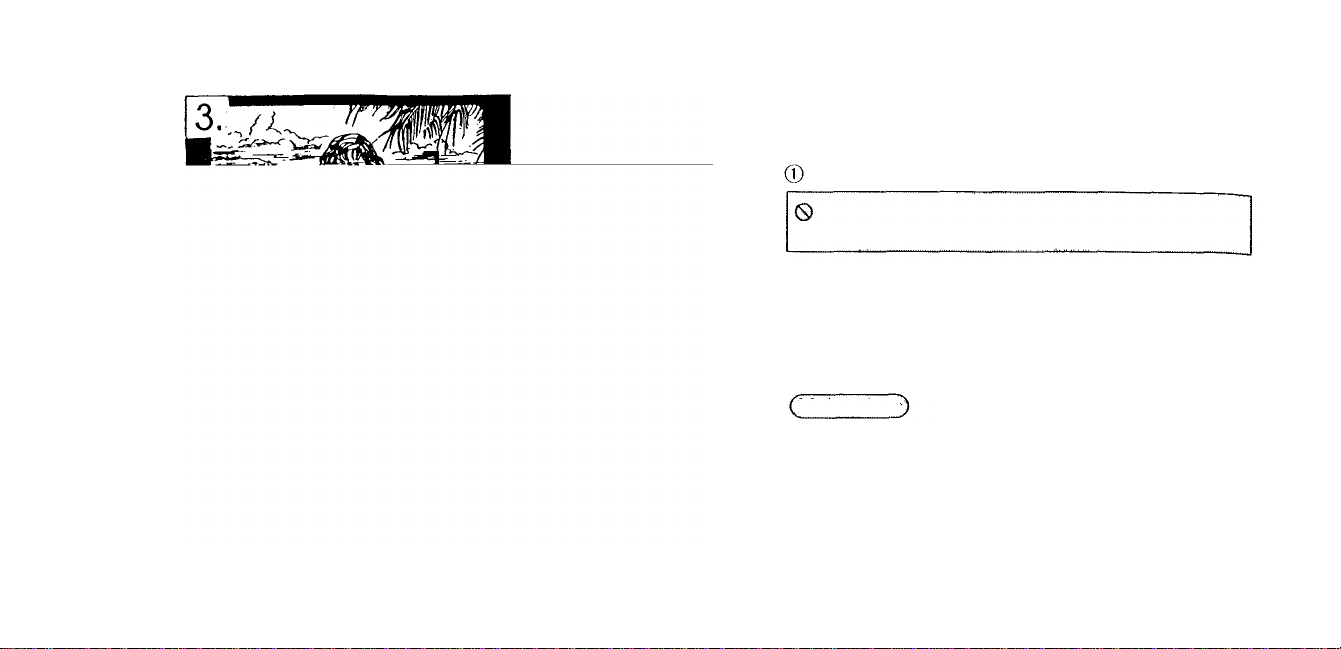
Position the autofocus mark on your
3.
subject.
Autofocus mark
Do not look directly at the sun through the
viewfinder.
Depress the shutter release button
4.
halfway to adjust the focus.
Make sure
Focus has been correctly adjusted and the green
lamp lights. Exposure also will be adjusted
automatically.
Page 23
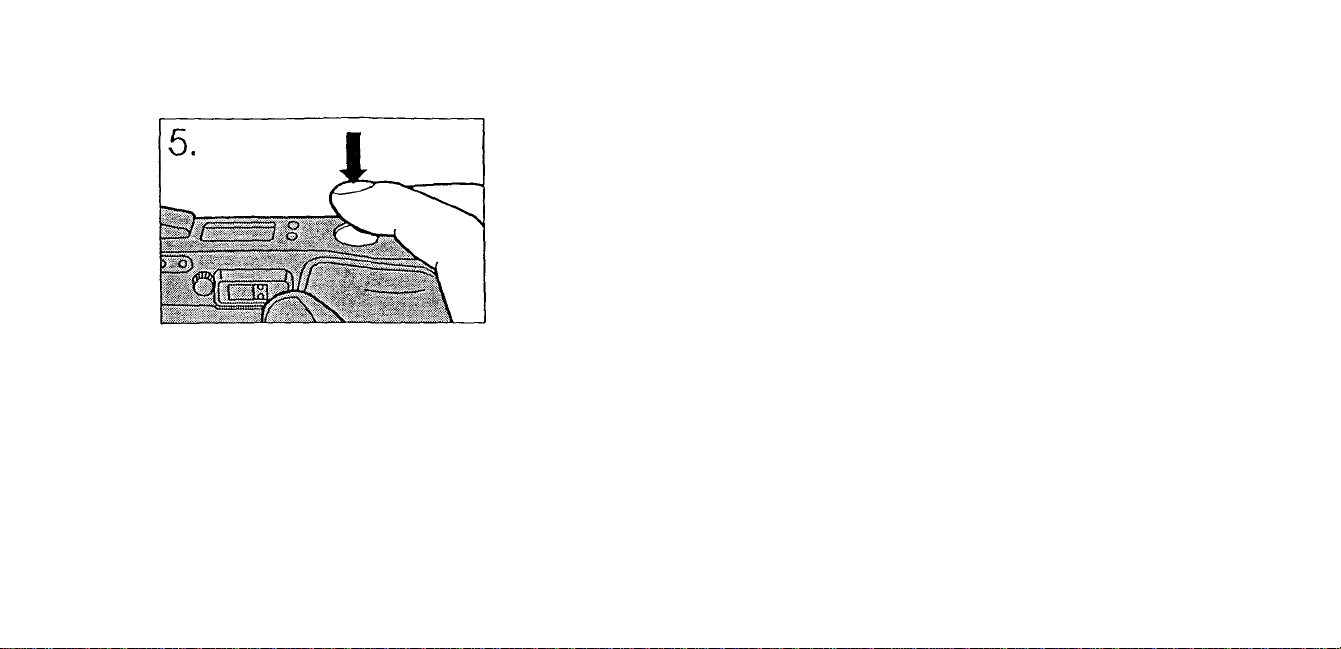
23
Depress the shutter release button fully
5.
to take the picture.
The film automatically advances to the next frame.
Page 24
24
Work ing Distance
The focus range of the camera is 0.6 m (2 ft)
to (infinity).
When the subject is closer than 0.6 m (2 ft), the
shutter will not release. (The green lamp blinks.)
When the subject is extremely close to the
camera, the subject will be out of focus
although the shutter releases.
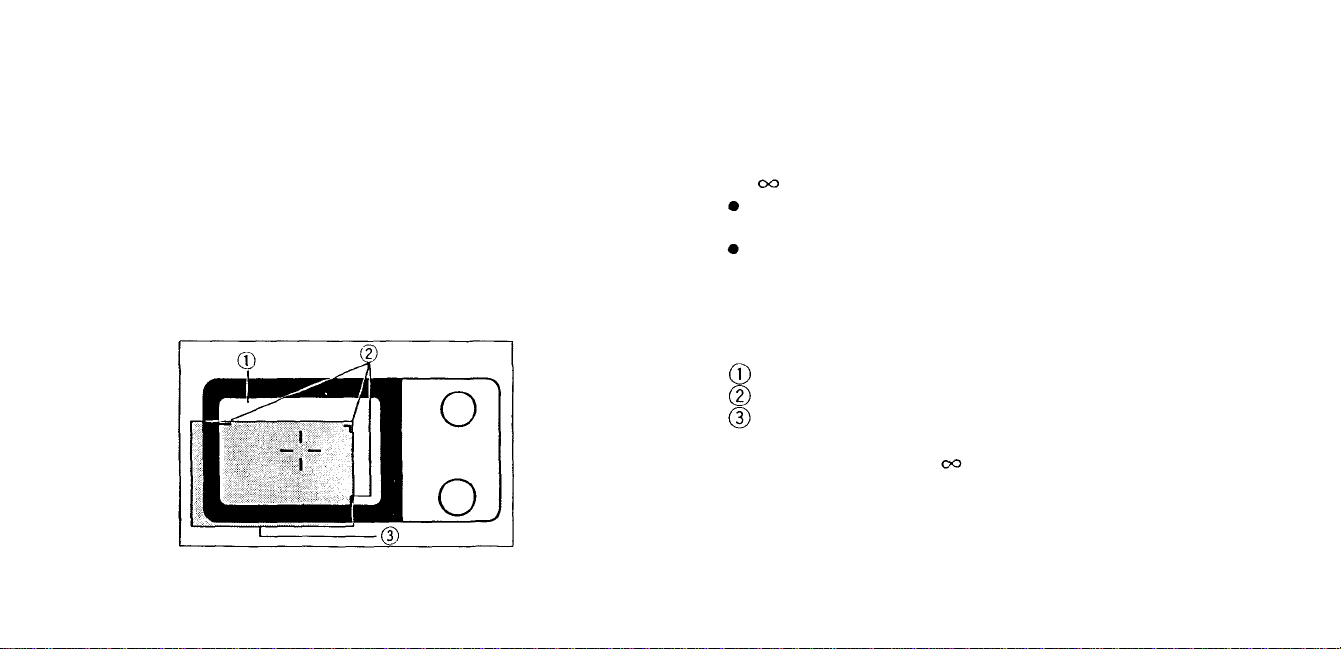
Close-up Correction
Picture frame
Close-up correction marks
Image area of picture at 0.6 m (2 ft)
The viewfinder's picture frame shows the area that can
be shot fo r subjects at . However, the picture area will
move lower in the viewfinder as you get closer to the
subject. At 0.6 m (2 ft), the shaded area is the actual
available image area. In this case, the subject should
be positioned below the close-up correction marks.
Page 25
25
USING THE FOCUS LOCK
To Avoid Taking Out-of-focus Pictures
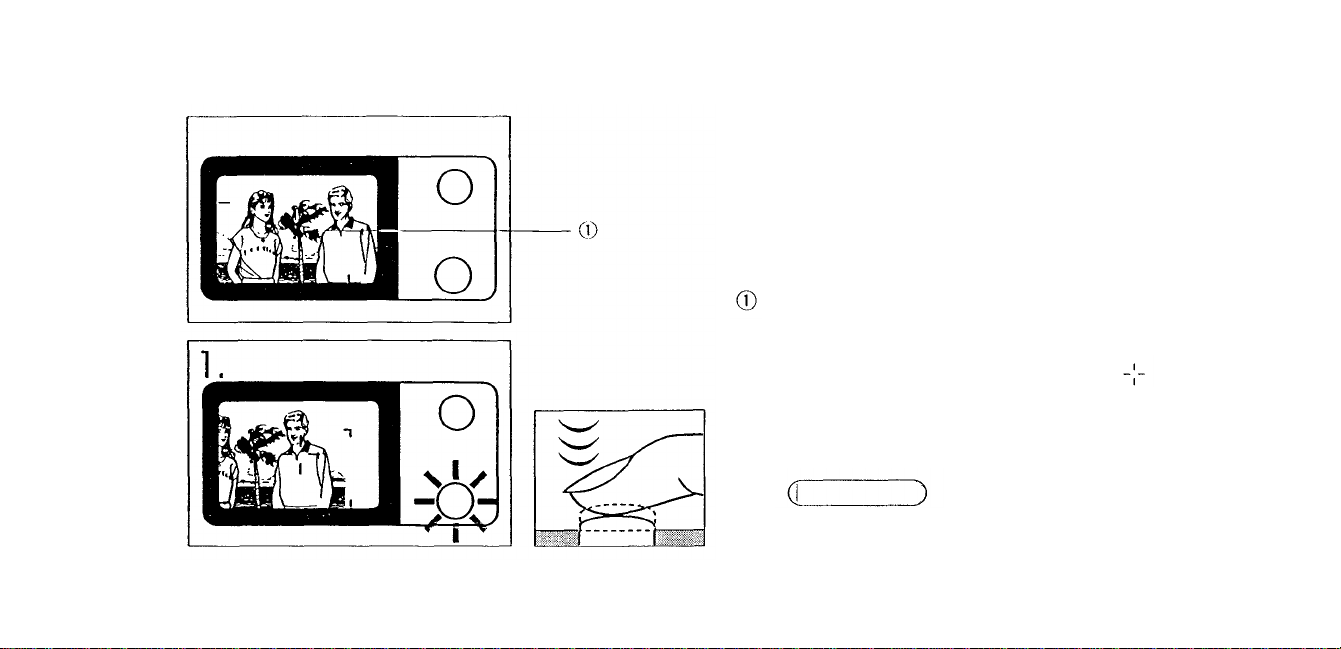
When the mai n subject is not within the
autofocus mark. Use the focus lock .
The autofocus mark must be positioned on the subject in
this case, the camera will focus on the background behind
the subjects and the subjects will be out of focus.
Autofocus mark
Position the autofocus mark on your
1.
subject and press the shutter release
button halfway.
Make sure
The green lamp lights.
Page 26
26
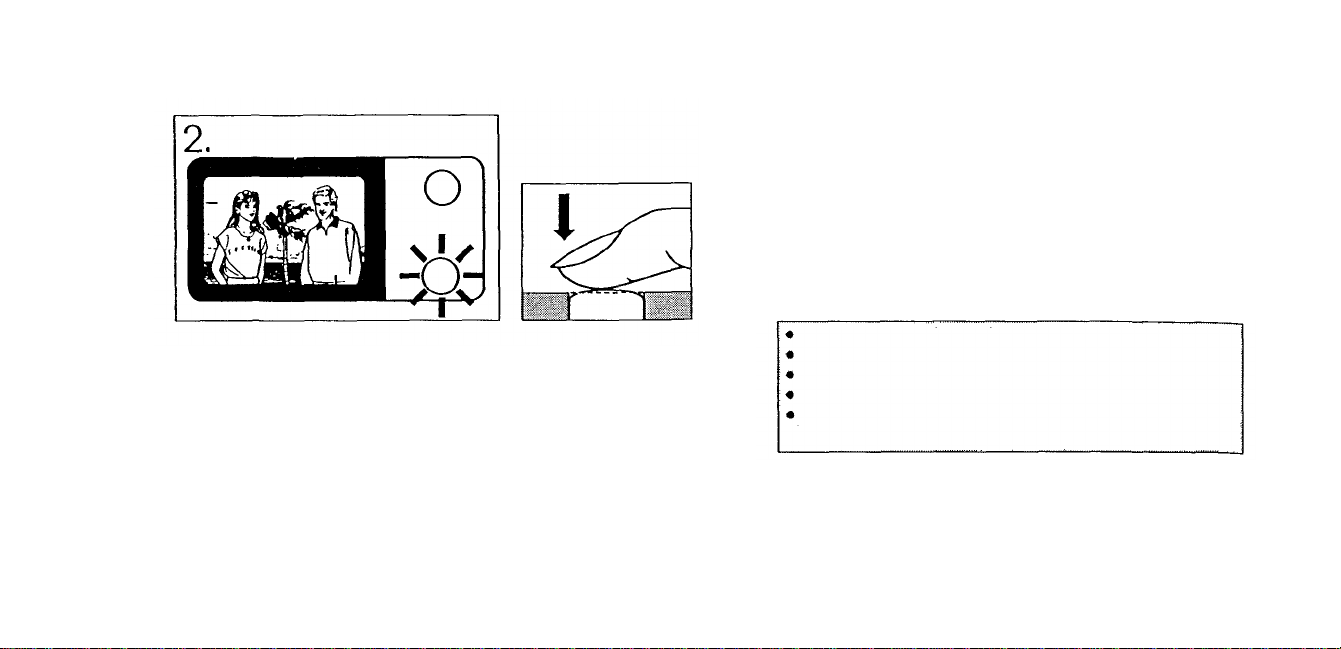
Reposition your subjects in the picture
2.
frame while keeping the shutter release
button depressed halfway. Then press
the shutter release button fully.
Difficult Autofocus Subjects
Glossy or reflective surfaces
Black objects
Subjects behind glass or wire mesh
Flames, smoke, etc.
Sunlight or excessively bright light within the picture
area
In such situation as the above, use the focus lock by
focusing on a different subject at a similar distance.
Then reposition the correct subject in the picture frame.
Page 27
27
AFTER SHOOTING
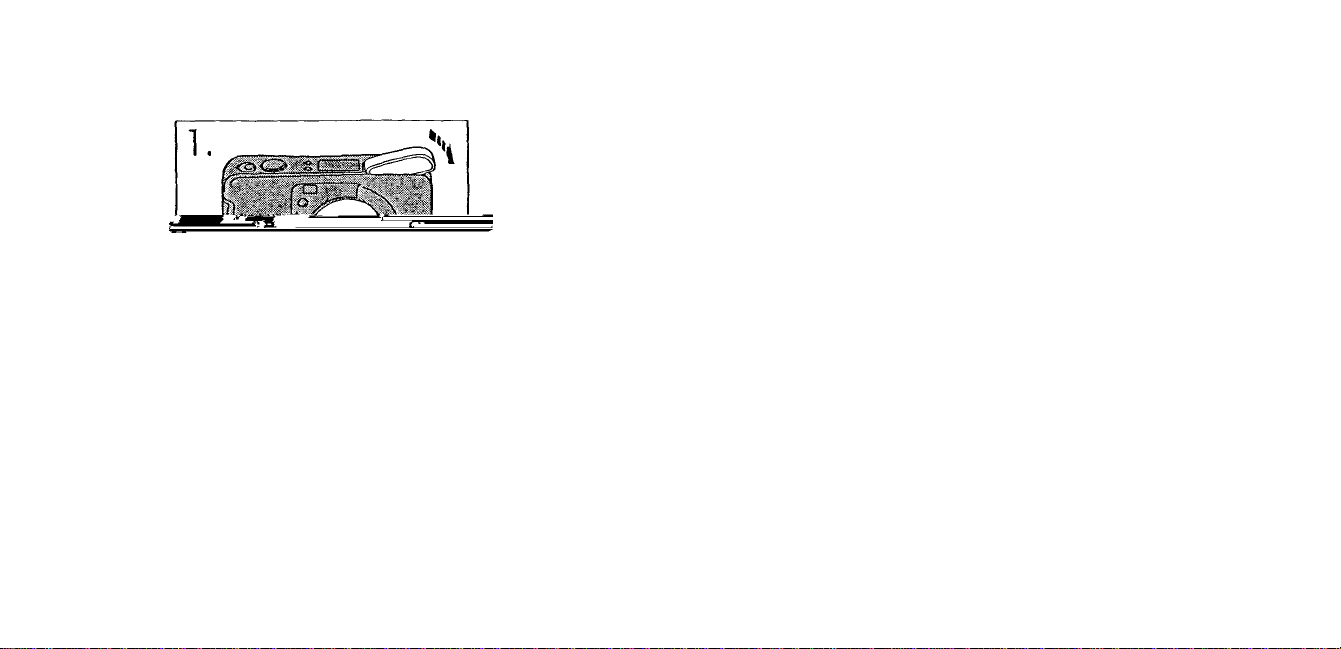
When the power switch is turned OFF,
1
.
the lens and flash will retract
automatically.
The display goes out.
Close the lens barrier.
2.
Page 28
28
UNLOADING THE FILM
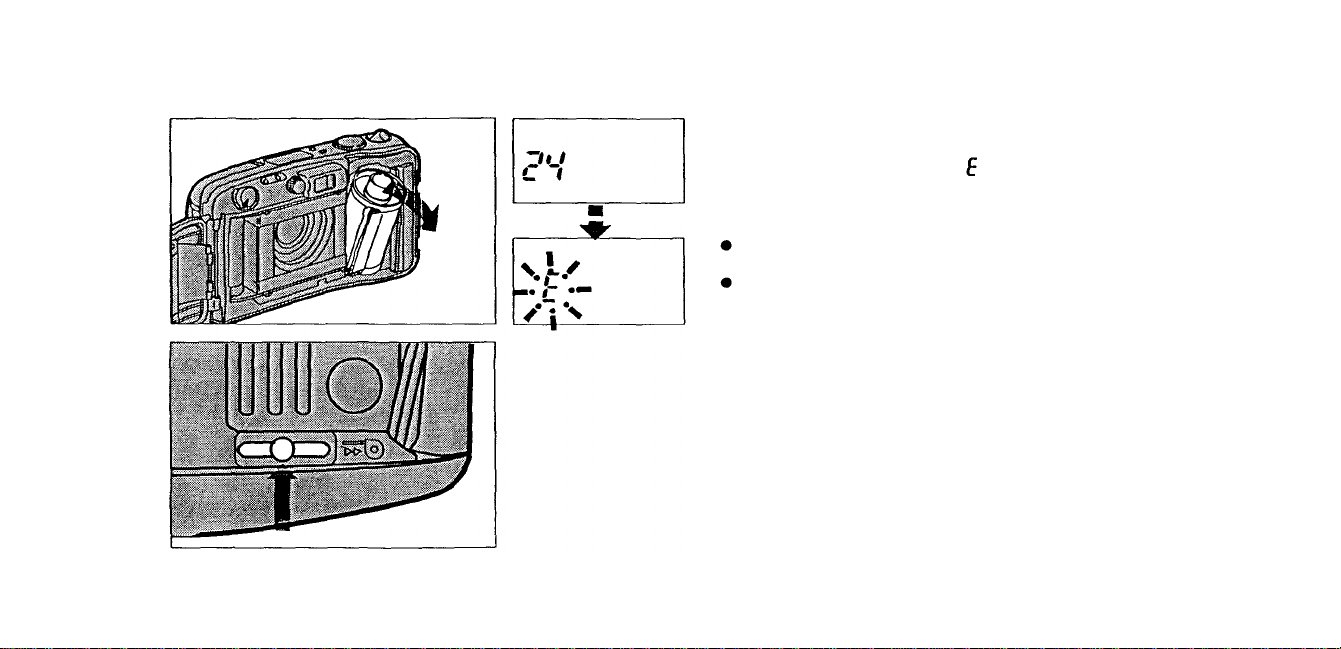
The camera automatically rewinds the film when
you reach the end of a roll.
After the motor stops and starts blinking on th e LCD
panel, open the back cover and remove the film.
Notes:
The number of exposures remaining decreases during
rewinding.
The final number of exposures may sometimes exceed the
number of exposures specified on the film.
Rewinding the film before the end of the roll
Press the mid-roll rewind button gently with your nail,
etc. Do not use an instrument with a sharp tip.
Page 29
USING THE FLASH MODES
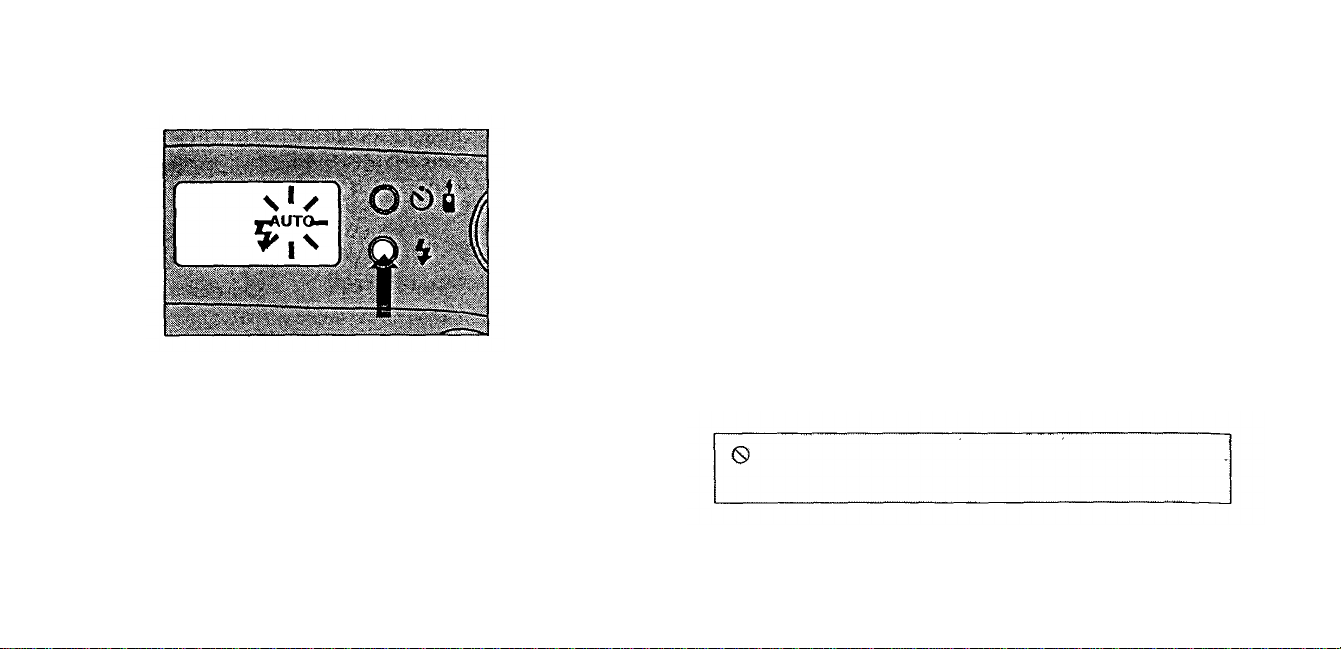
This
camera
has
five
flash
modes.
Select
the
flash mode according to your shooting
conditions and needs.
How to select the flash mode:
As you press the FLASH mode button, the mode
switches as shown on p. 30. The selected flash
mode is displayed on the LC D panel.
ADVANCED TECHNlQUES
29
Do not discharge flash too close to
eyes of people or animals.
Page 30
30
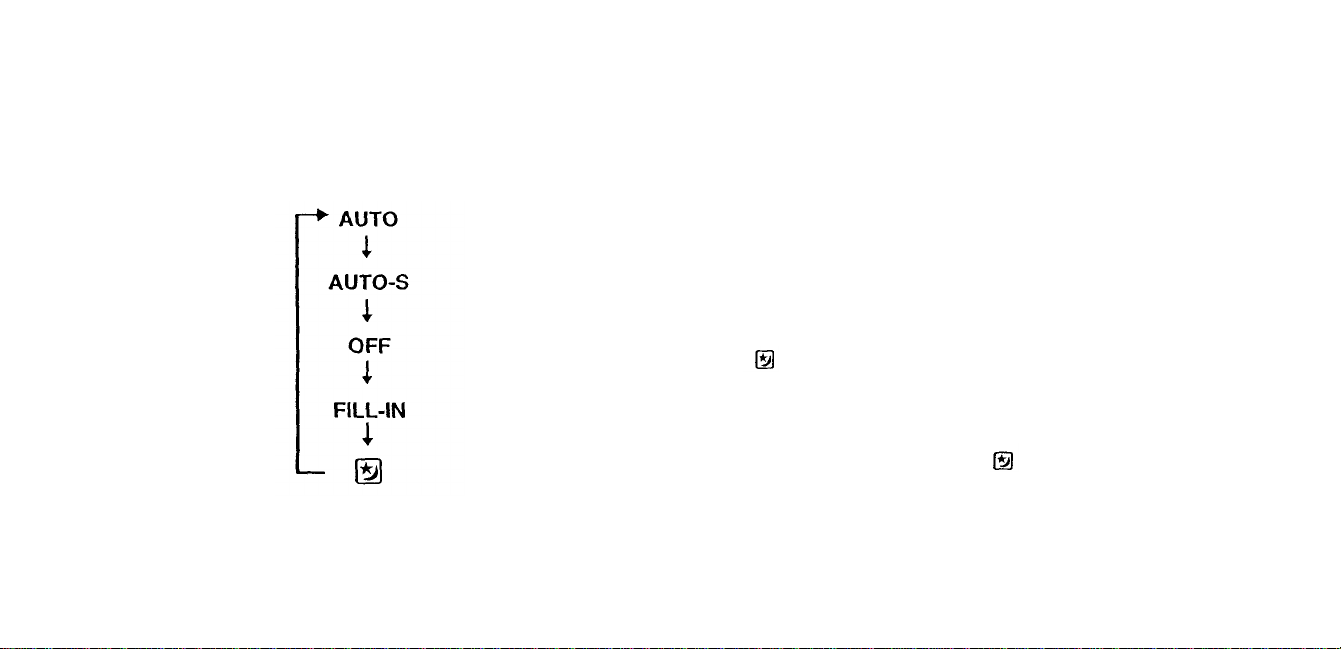
LCD Panel Display
AUTO mode:
Automatically fires in low-light and backlit conditions
(p. 31)
AUTO-S mode:
Significantly reduces the phenomenon of "red-eye"
(when a subject's eyes appear red in flash photos)
(p. 32)
OFF mode:
The flash does not fire. (p. 33)
FILL-IN mode:
Fires regardless of available light, (p. 34)
mode:
Lights the subject in the foreground with a
nightscene in the background. (p. 35)
Note:
In the Auto, Auto-S Flash, and modes, the flash strength is
•
automatically controlled to prevent pictures from being
overexposed even wh en the subjects are close.
Page 31
ISO
100
200
W (38 mm)
0.6~4.7 m (2~15.4 ft . )
0.6~6.6 m (2~21.7 ft.)
T (105 mm)
0.6~2.4 m (2~7.9 f t . )
0.6~3.3 m (2~10.8 ft.)
AUTO
(Auto Flash)
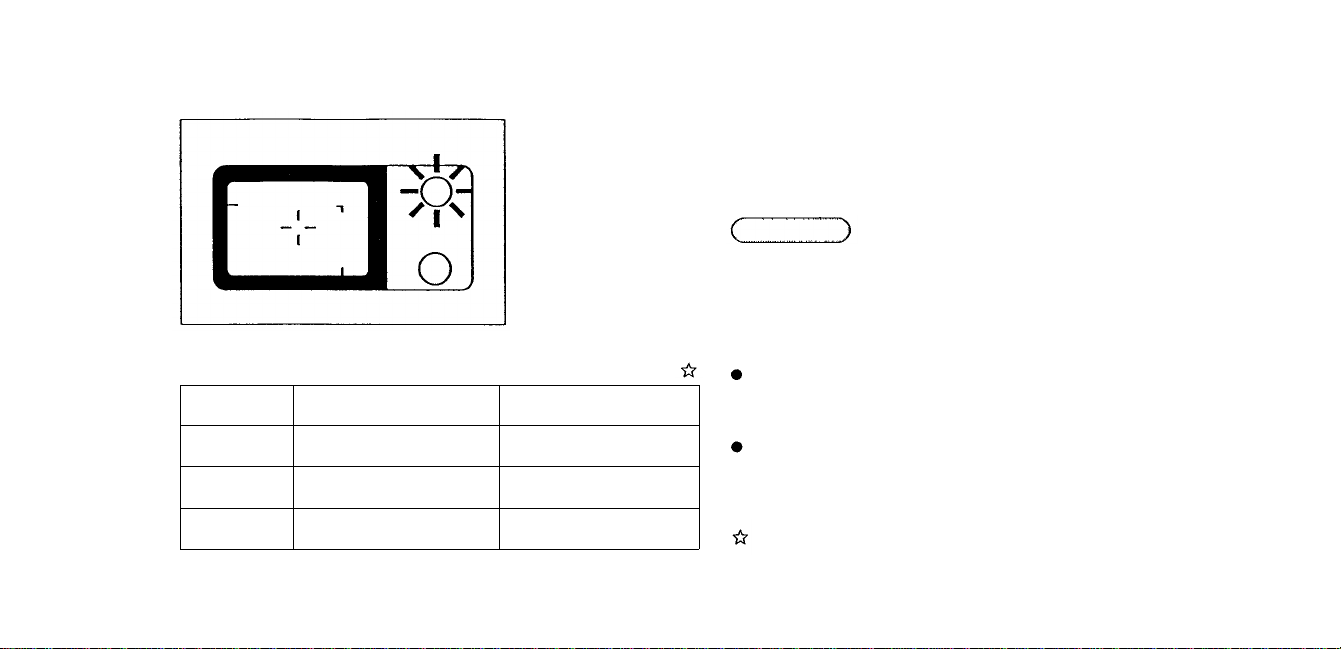
In the Auto Flash mode, th e flash will fire
automatically in low-light and backlit
conditions.
Make sure
The orange lamp in the upper right of the viewfinder
lights when the shutter release button is depressed
halfway.
Notes:
When the orange lam p is blinking, the flash is being recharged
and the shu tt er r e l ea s e button won't release. Release your
finger from the shutter release button, and wait for several
seconds.
Maximum distance is about 70% of the distance shown left when
using positive color fi lm .
31
400
0.6~9.4 m (2~30.8 f t. )
0.6~4.7 m (2~15.4 f t .)
Flash Working Range (with color negative film)
Page 32
AUTO-S
(R edey e Reducing Flash)
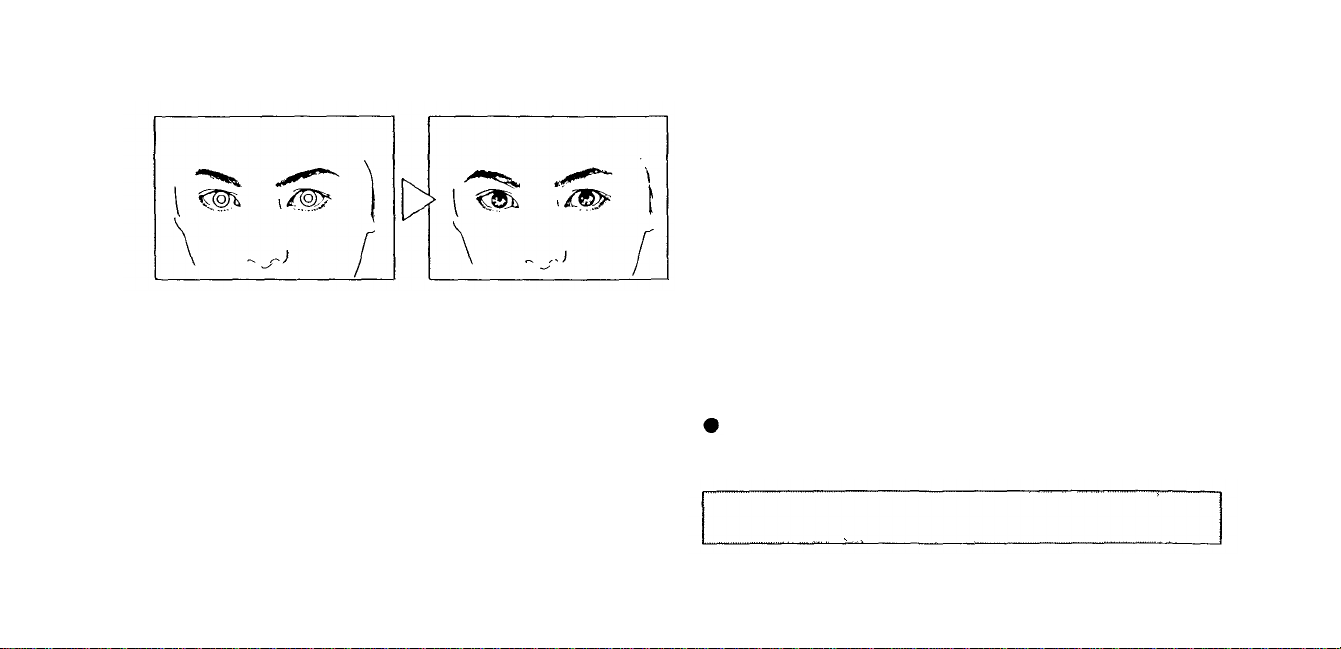
Significantly reduces the phenomenon of
"red-eye" (when a subject's eyes appear
red in flash photography).
In the Auto-S Flash mode, the camera will emit a series
of low-power pre-flashes before the regular flash. This
makes the subject's pupils contract, significantly
reducing red-eye. Except for the pre-flashes, this mode
is the same as the Auto Flash mode.
Redeye-Reduction may not be effe ct iv e when the
subject.
1. Is not looking at the flash from the right front.
2. Is not watching the pre-flashes.
3. Is too far from the camera.
Does not respond to the pre-flashes due to
particular individual characteristics.
32
IMPORTANT: Be sure to hold the camera still until the
shutter releases. It takes about one second.
Page 33

33
(Flash Override)
OFF
In the Flash-OFF mode, the flash does not
fire even in low-light conditions.
Use this mode in situations where flash photography is
not desired or is prohibited or in twilight or night
scenes.
Note: Since a slow shutter speed (down to 4 seconds) is
automatically selected in low-light situations when in the
Flash-OFF mode, the use of a tripod is recommended to
prevent blurred pictures caused by shaking the camera.
When the power swi tc h is turne d OFF, the mode will
return to the AUTO mode.
Page 34
34
FILL-IN
(Forced Activation)
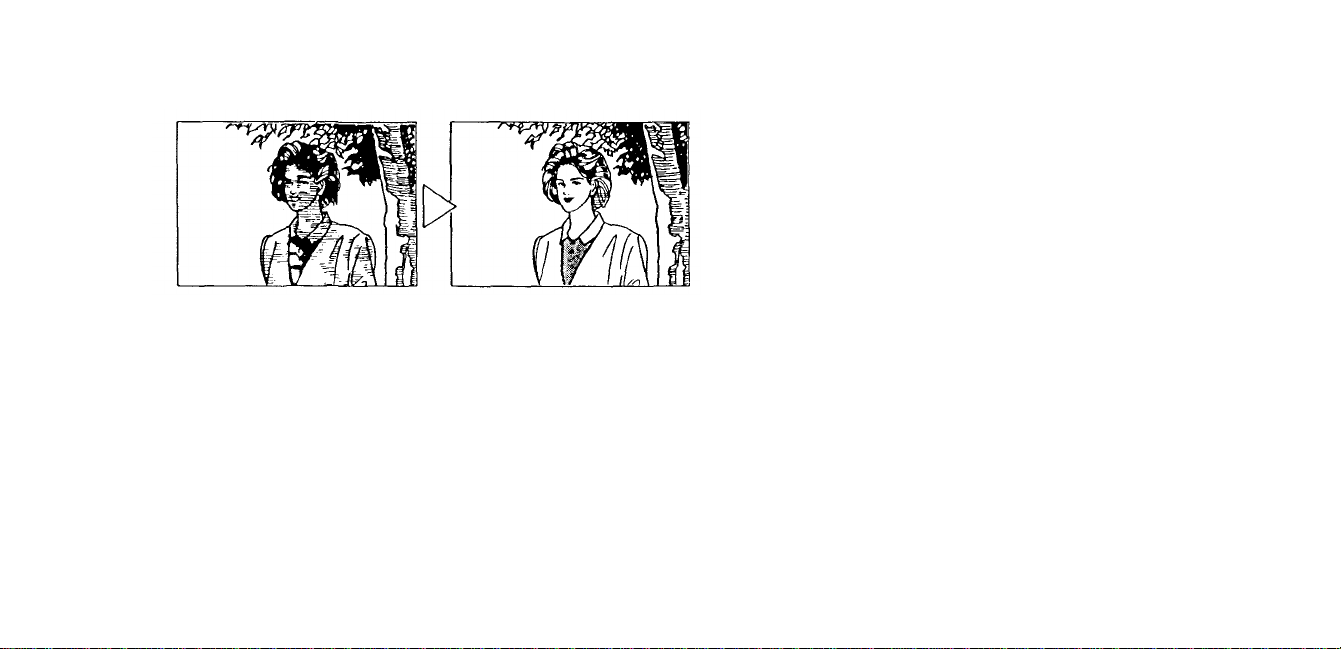
In the FILL-IN Flash mode, the flash fires
regardless of available light.
For example, this mode can be used to brighten up a
subject's shaded f a c e or under artificial lighting suc h
as back-lit, fluorescent light. Use this mode within the
flash working range (p. 31).
It may be hard to wor k under the excessively bright
light.
When the power switch is turned OFF, the mode will
return to the AUTO mode.
Page 35
35
NIGHT SCENE
To Capture a Night Scene Beautifully
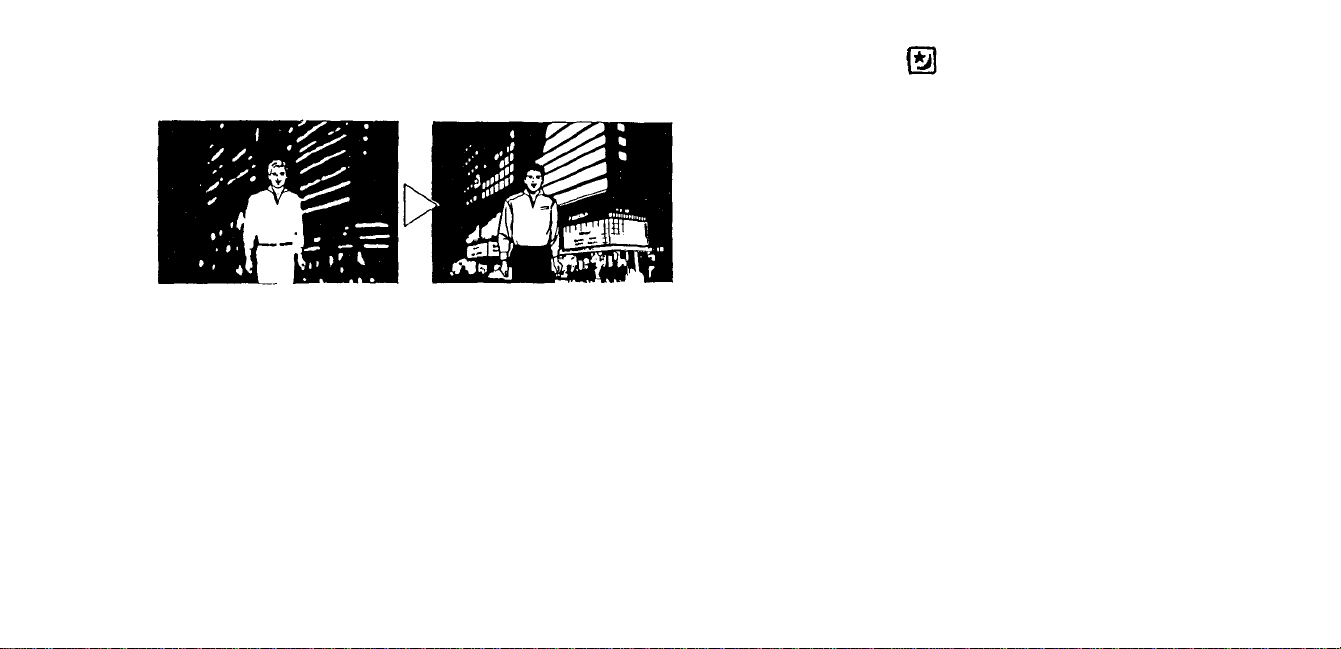
Use the Night-Scene Flash mode to properly
light subject i n the foreground while leaving
the background naturally lit.
Note: Since a slow shutter speed (down t o 4 seconds)
is automatically selected in low-light situations, use a
tripod to prevent blurred pictures caused by camera
shake.
Night-Scene mode cannot be used together with Spot
mode.
When the power switch is turned OFF, the mode will
return to the AUTO mode.
Page 36
36
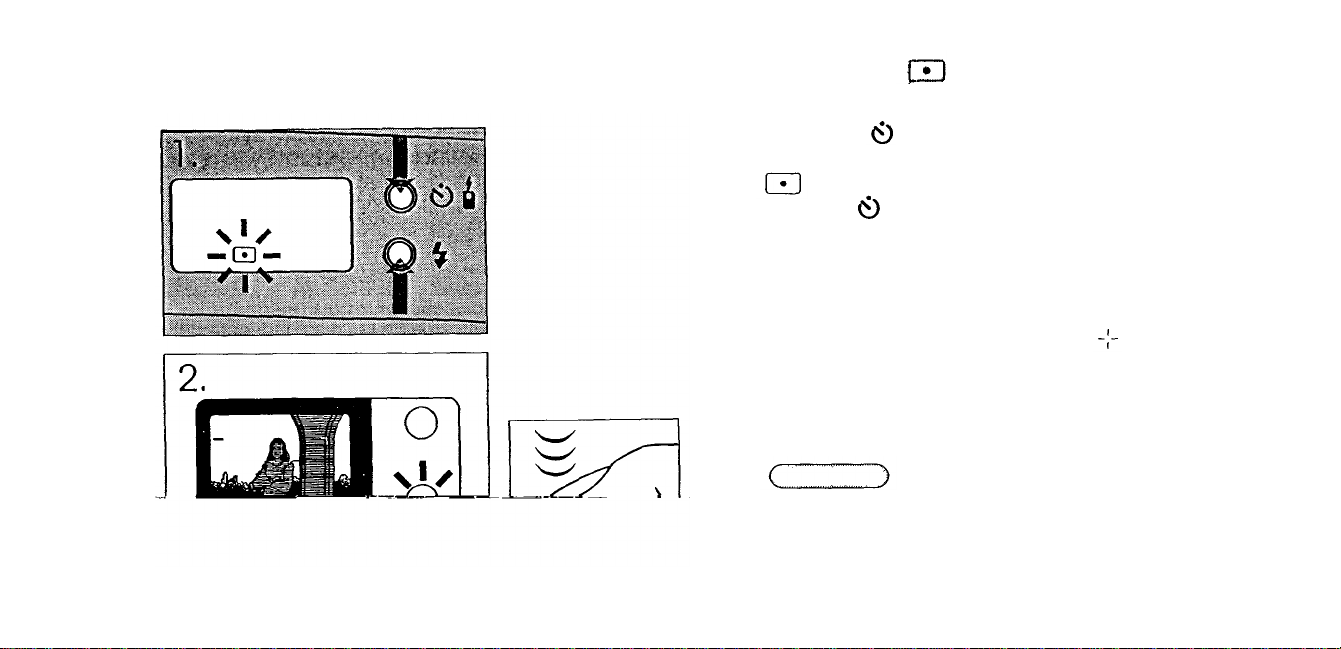
SPOT MODE
TO FOCUS AND SET THE EXPOSURE FOR A SELECTED AREA
Press
the
1.
mode button at the same time,
/REMOTE
is displayed on the LCD panel.
Press
the
/REMOTE
buttons at the same time or turn the power
switch OFF to cancel the Spot mode.
Position the autofocus mark on your
2.
subject, and press the shutter release
button halfway.
Make sure
The green lamp lights,
Th e exposure will be locked in the center of the
autofocus mark.
button
and the
and
flash
flash
mode
Page 37
37
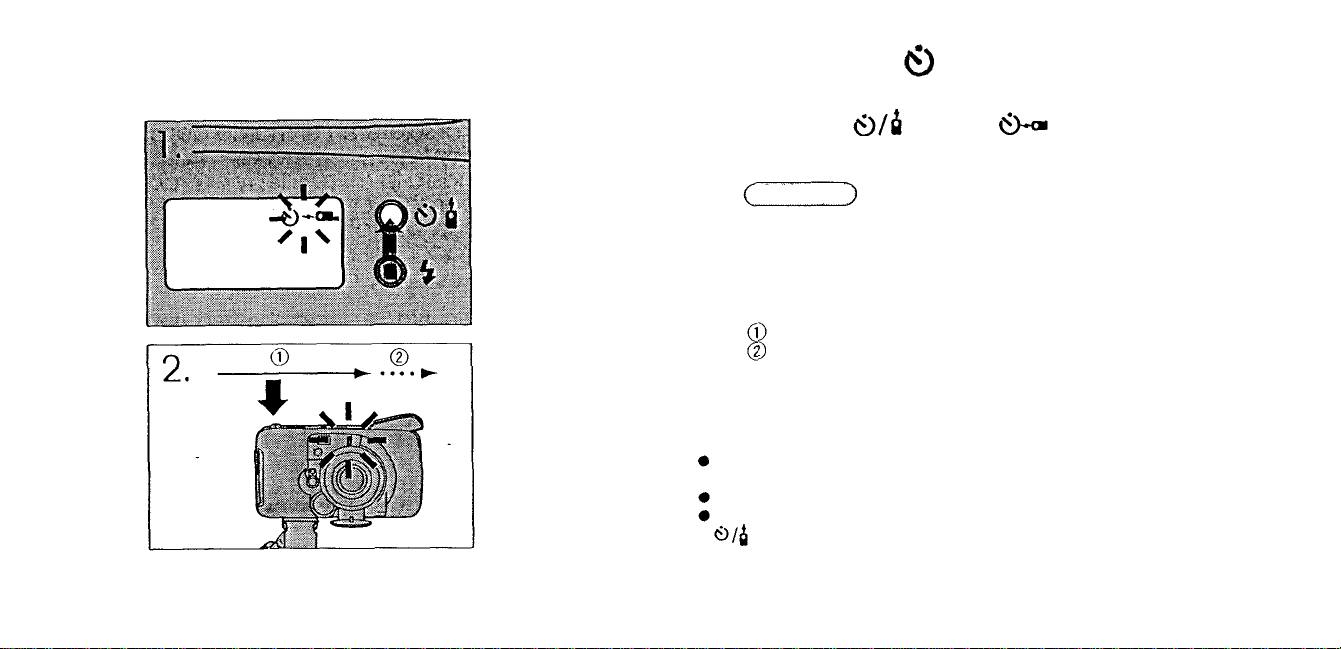
SELFTIMER
To Put Yourself In the Picture
Press
the
1.
on the LCD panel.
button.
Make sure
Use a tripod to hold the camera securely.
Aim at your subject, and press the
2.
shutter release button.
10 sec.: Selftimer indicator lights
2 sec.: Blinks
The shutter wi ll be released about 12 seconds
after the shutter release.
Notes:
The focus and exposure will be locked when the shutter
release button is depressed halfway.
The selftimer is disengaged when the shutter is released.
To cancel the selftimer after it has been activated, press the
button again.
is
displayed
Page 38
38
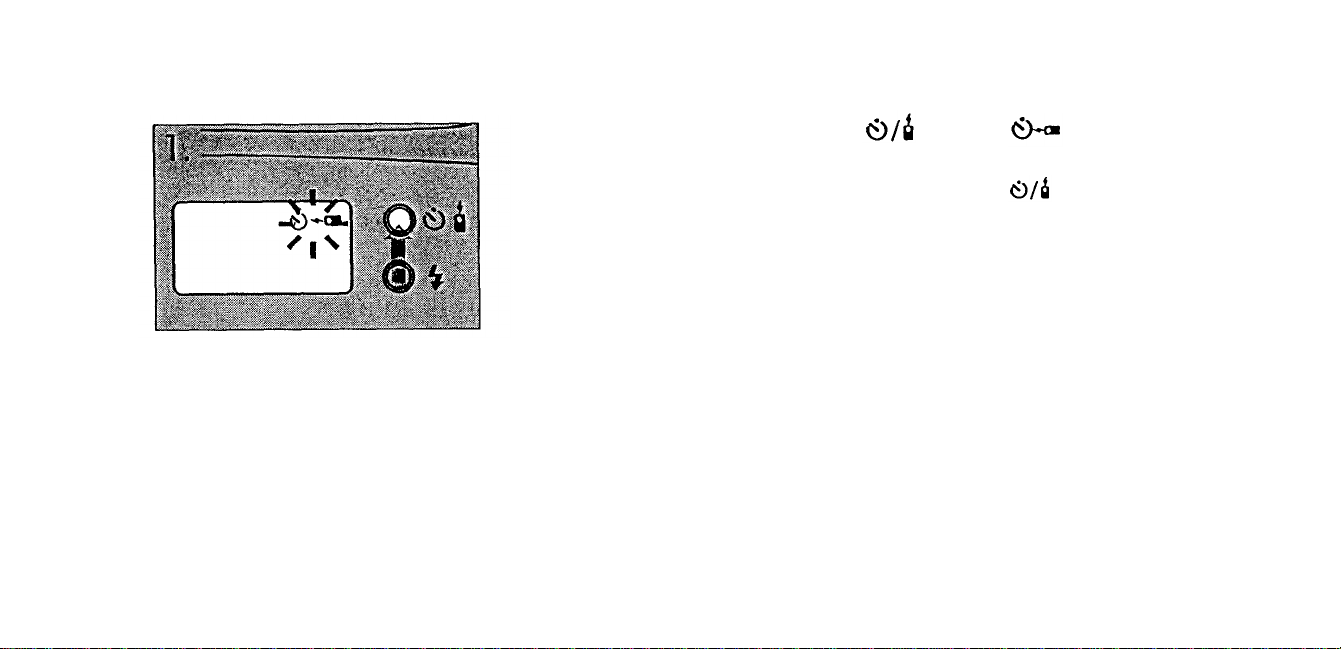
REMOTE CONTROL (optional)
The optional RC 200 Remote Control is required in the operation below
Press
the
1.
on the LCD panel.
After shooting, press the button again to
cancel the selftimer/remote control mo de.
Remote control operation is canceled
automatically when not in use for more than
about 20 minutes.
button.
is
displayed
Page 39
39
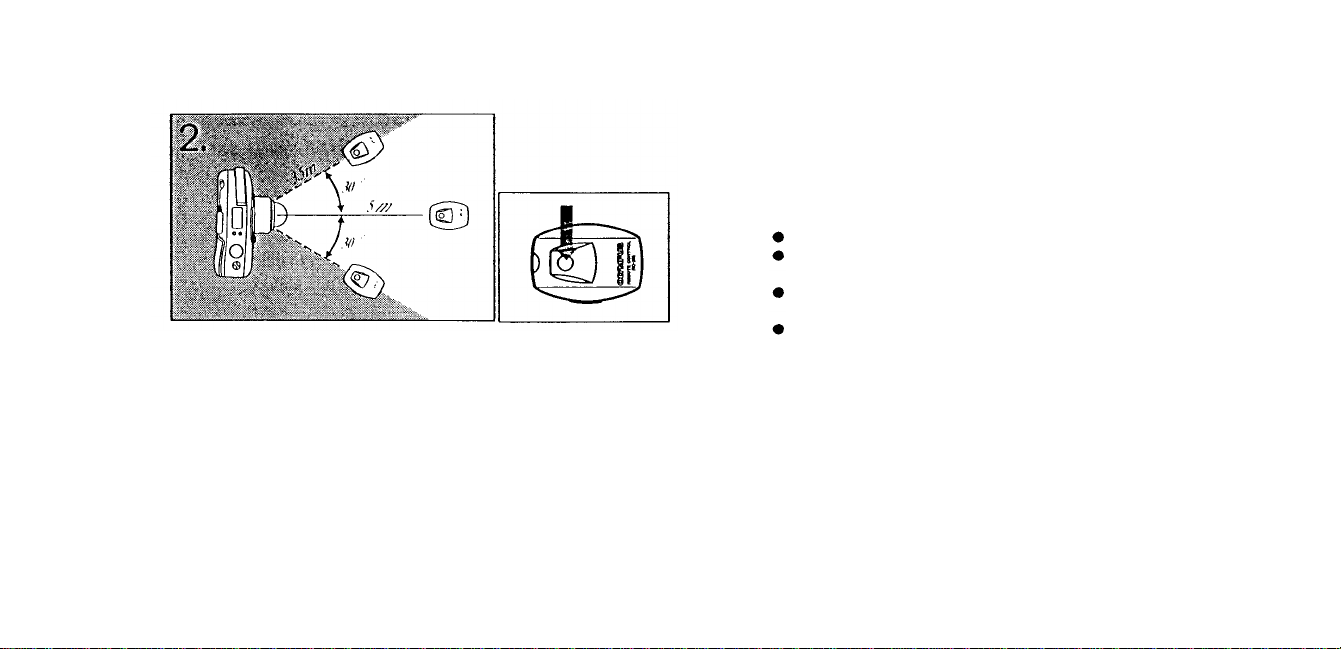
Aim the remote control at the camera,
2.
and press the button. The shutter will be
released after about 3 seconds.
Notes:
Use the remote control within the range shown at l e ft .
The camera will focus on the subject directly in front of
it.
The remote control may not work when the subject is
backlit. In this case, use the selftimer.
The remote control may not work when there is inverted
fluorescent light near the cam era .
Page 40
40
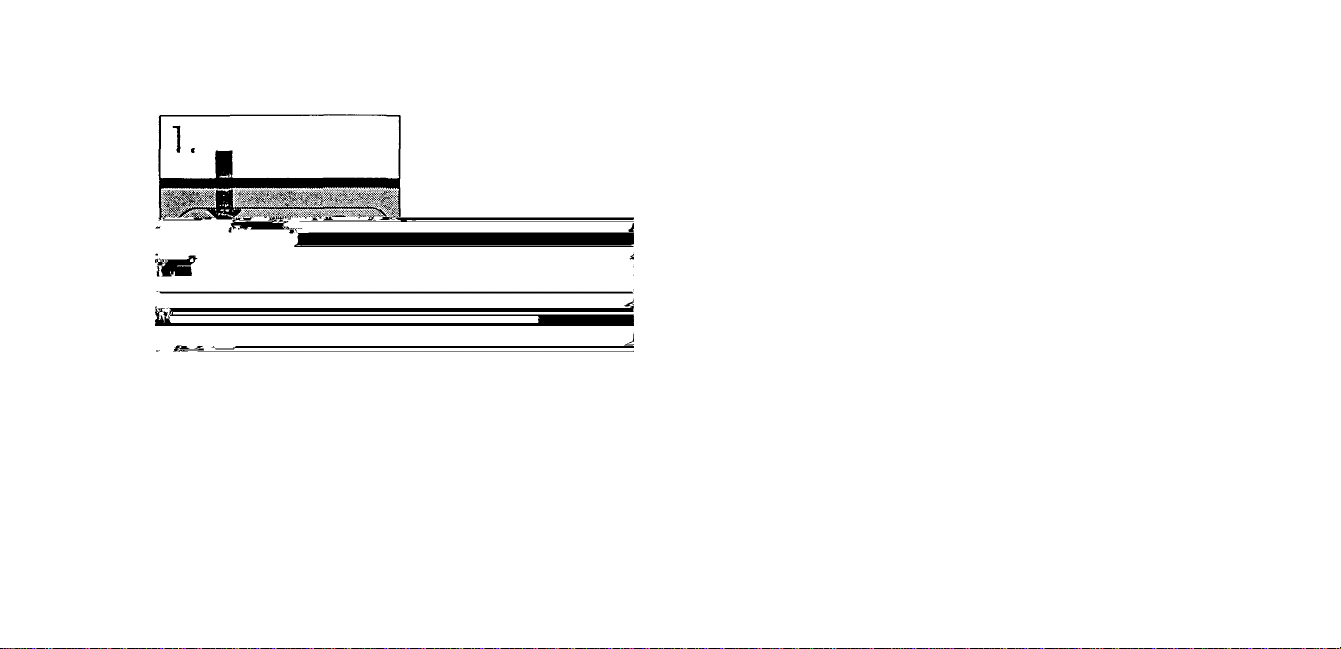
CORRECTING THE DATA
Press
the
the
MODE
SET
1.
or longer.
The year indication will start blinking.
Press
2.
If you press the button once, the number on the
display will advance by 1. And if you keep it
pressed, the numbers will run in rapid
succession.
button
button
for two
to
correct
seconds
the
year.
Page 41
41
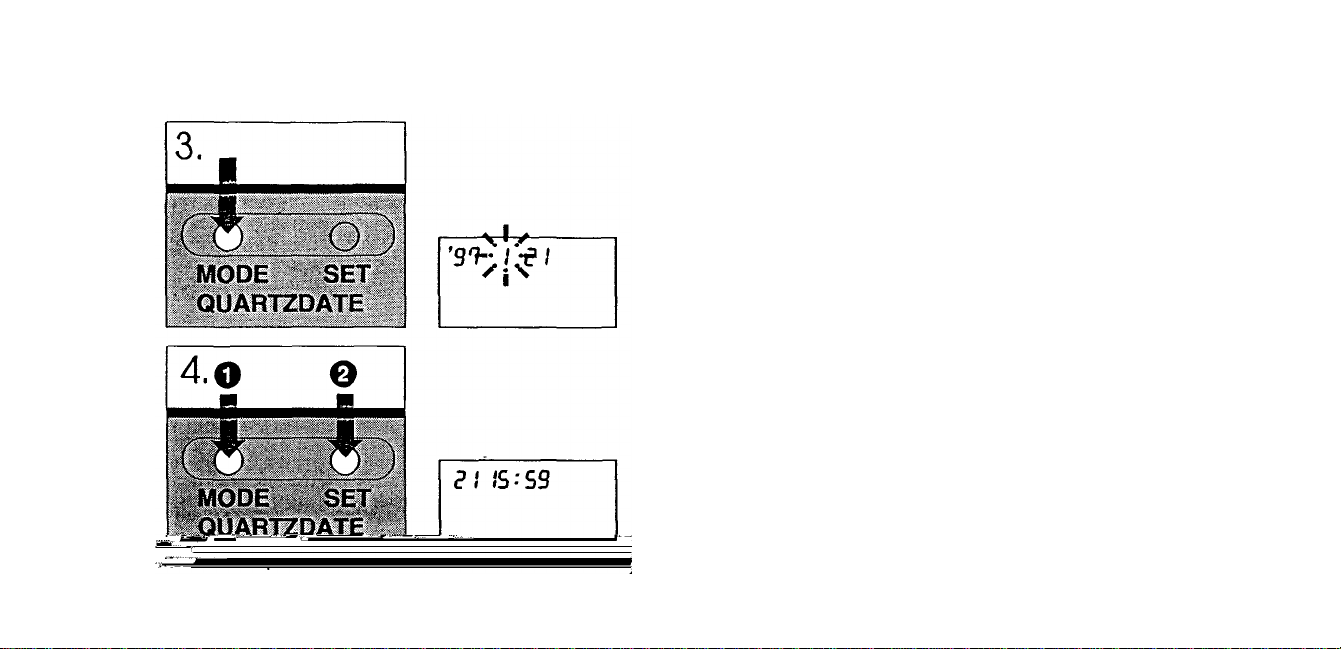
Press
the
3.
The month indication will start blinking.
Repeat steps 2 and 3 to set the hour
4.
and minutes.
Note: As you press the mode button, the blinking indication
changes in the order of year, month, day , hour, and minute. The
data correction will be finished when the mode button is pressed
again.
MODE
button
again.
Page 42
42
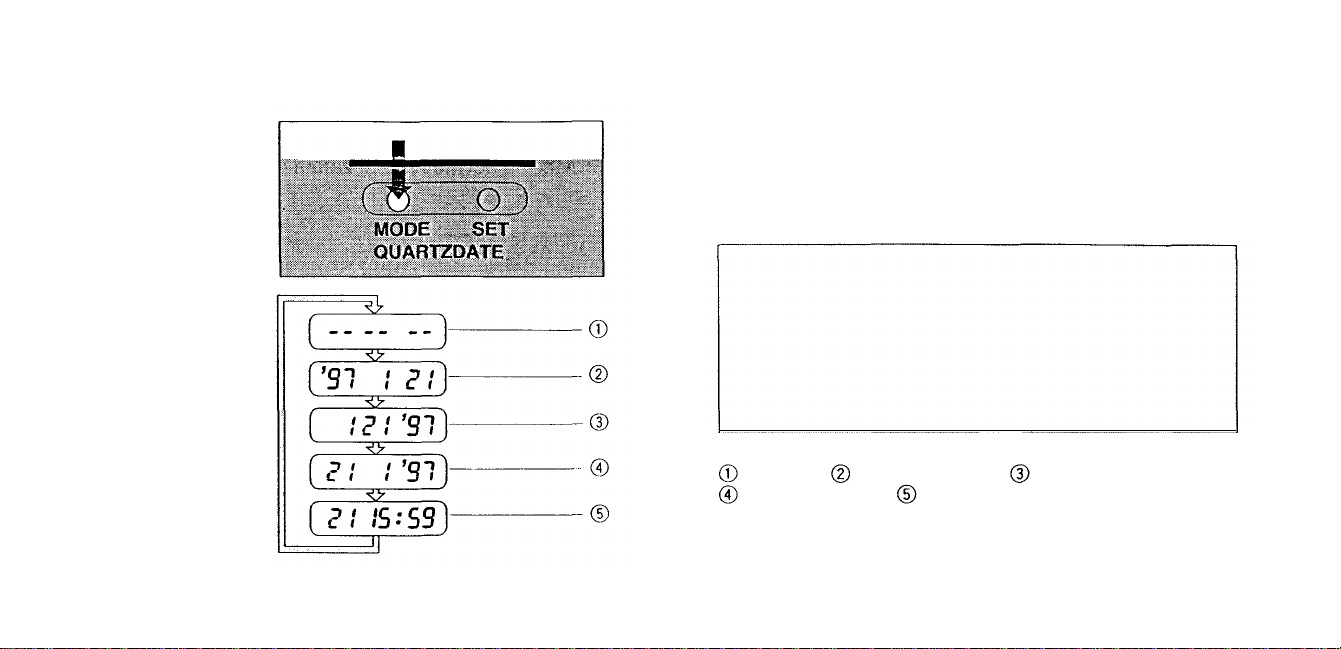
PRINTING THE DATE AND TIME
Choose the desired mode with the MODE
button.
The mode will switch in the described order by
pressing the MODE b u tton .
The quartzdate uses the sam e power source as the main
unit. Make sure to correct the data after t h e battery is
replaced.
The data is imprinted in the lower right of the picture. If
there is something whitish or tinged with orange where
the data is imprinted, the data may be difficult to read.
The data may not be imprinted correctly on the frame(s)
after the specified final exposure of the film.
No data Year-month-day Month-day-year
Day-month-year Day-hour-minute
Page 43

CAMERA MAINTENANCE
43
QUESTIONS AND ANSWERS
Q: How long will the battery last?
A: A new 3V lithium battery will last for roughly 15 rolls
of 24-exposure film on which the flash was used on
half of all the shots (determined under Olympus test
conditions). If you do not use the flash and zoom
very often, the battery will last much longer.
Q: Why does the flash get hot?
A: If the flash is used continuously, it may become hot.
If this happens, stop using the camera for a while.
Q: C an I u se infr ared film?
A: No, you cannot.
Q: How should I clean the lens?
A: Wipe the lens gently with lens cleaning tissue that
has been moistened with a small amount of lens
cleaning fluid.
Q: Can I moun t a filter or hood?
A: No, you cannot.
Q: What should I do when both the orange and green
lamps are blinking and the camera doesn't work?
A: Release your finger from the flash.
Page 44
CARE AND STORAGE
Do not leave camera in any place exposed
to excessive heat, humidity, or direct sunlight
—for example, in a car on (n)n5(a)-43( )-the5(a)-43( )-beach.5( )]TJ-0.031 Tc0012135 Tw 1266795 0 0 11.3218.8 200.96.64 Tm[4ooexp3(o)-3oh8(op3(o)-35( camero)-3t3(9-13(o)-35( )]TJ-30.031 Tc-0.0533 Tw 4955132 0 Tdformali29(n)-43r5( )]TJ-357276 Tc 0 T2..6795 0 0 11.321 373.190256.64 (naphthalene.ght)Tj-198431 Tc -7.0135 Tw 453795 0 0 11.321 373.143.19.92 TmI),)-f0(R)-3t3Ra6(5( camero)-35(61(get)4(sero)-35(15(weheato)-35( )]TJ-303031 Tc0010135 9.7697132 0 Tdwipe9(n)-4i) )-t9(n)-4)Dnn1717
Page 45
45
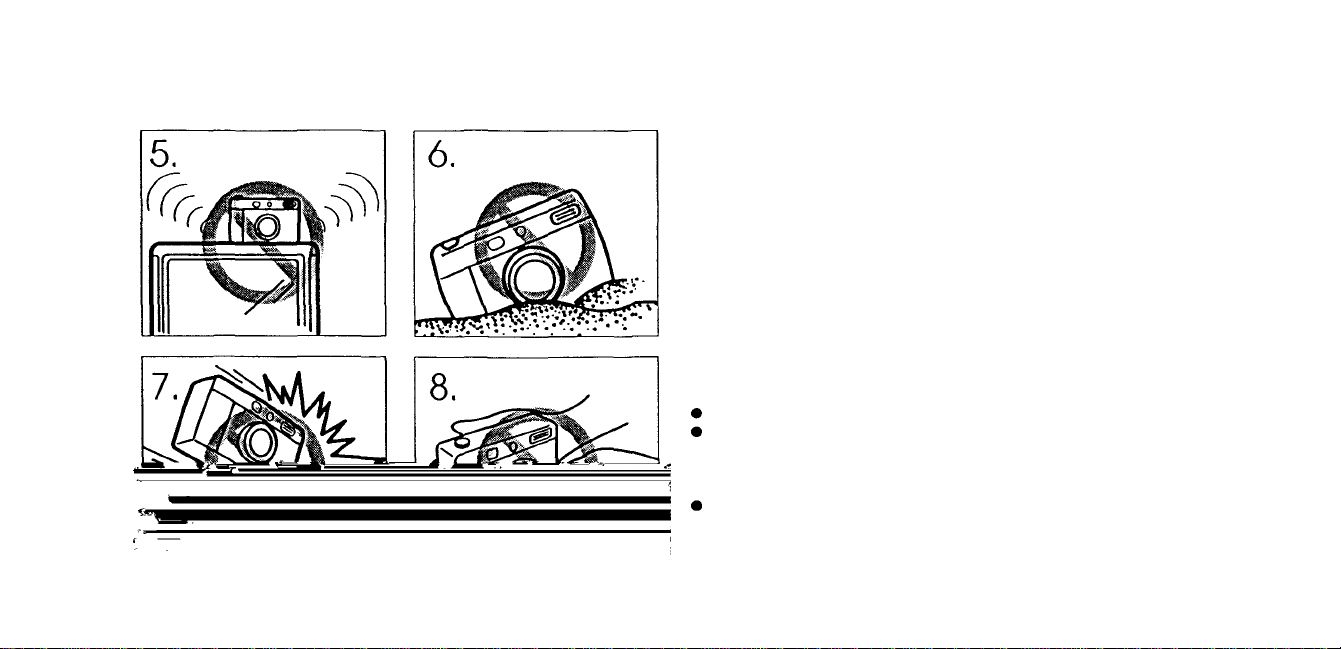
Do not leave the camera on or ne a r a
5.
television, refrigerator, or other appliance
with a magnetic field.
Do not expose the camera to dust or sand as
6.
this could cause serious damage.
Do not shake or shock the camera.
7.
Do not apply excessive force to the zo om
8.
lens.
Please keep the camera in a well-ventilated place.
Do not expose the camera to extreme heat (over 40°C/104°F)
or to extreme cold (below -10°C/14°F). Low temperatures,
even within this range, may sometimes cause deterioration in
battery performance, temporarily disabling the camera.
Some airport X-ray machines can damage the film in your
camera. Try to avoid passing your camera through these
machines. Give it to the security officer for manual
inspection.
Page 46

46
When transporting the camera from a cold place to a warm
place or in the event of a sudden temperature change, put
the camera into a plastic bag. This allows the camera's
temperature to change slowly. Once the camera has
adjusted to the new temperature, you can remove it from the
bag and use it.
Keep your hair, hands, strap etc. away from the autofocus
window, lens, AE sensor and flash .
Avoid leaving th e camera unused for long periods of time.
This can cause mold to grow on the camera as wel l as other
problems. Try t o press the shutter release button and check
the operation of camera before use.
This camera is controlled by a microcomputer. Problems with
the microcomputer can affect or stop camera operation. If
this happens, remove the batteries, then reload them and try
the camera again. Strong electrical fields can also interfere
with the operation o f this camera so try to avoid places or
objec ts that generate such fields.
This camera is not suitable for professional use or for use
under severe conditions.
Strongly rubbing th e leather parts with alcohol can remove
the color.
Page 47
47
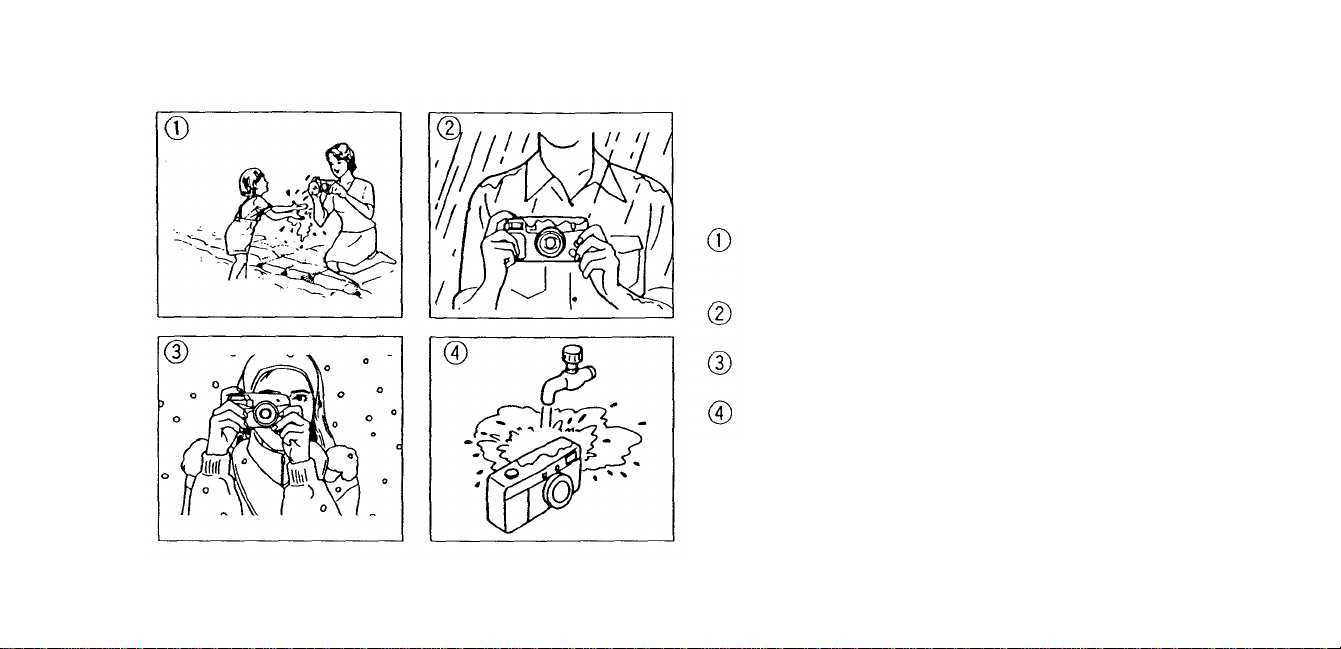
CARING FOR YOUR WEATHERPROOF CAMERA
This
camera
is
weatherproof;
however,
not designed for underwater use. Please
note the following warnings and us e the
camera correctly.
The camera can withstand splashing water
(e.g., seaside, swimming pool side, etc.)
The camera can be used in rain.
And in snow.
Do not wash the camera.
it is
Page 48
48
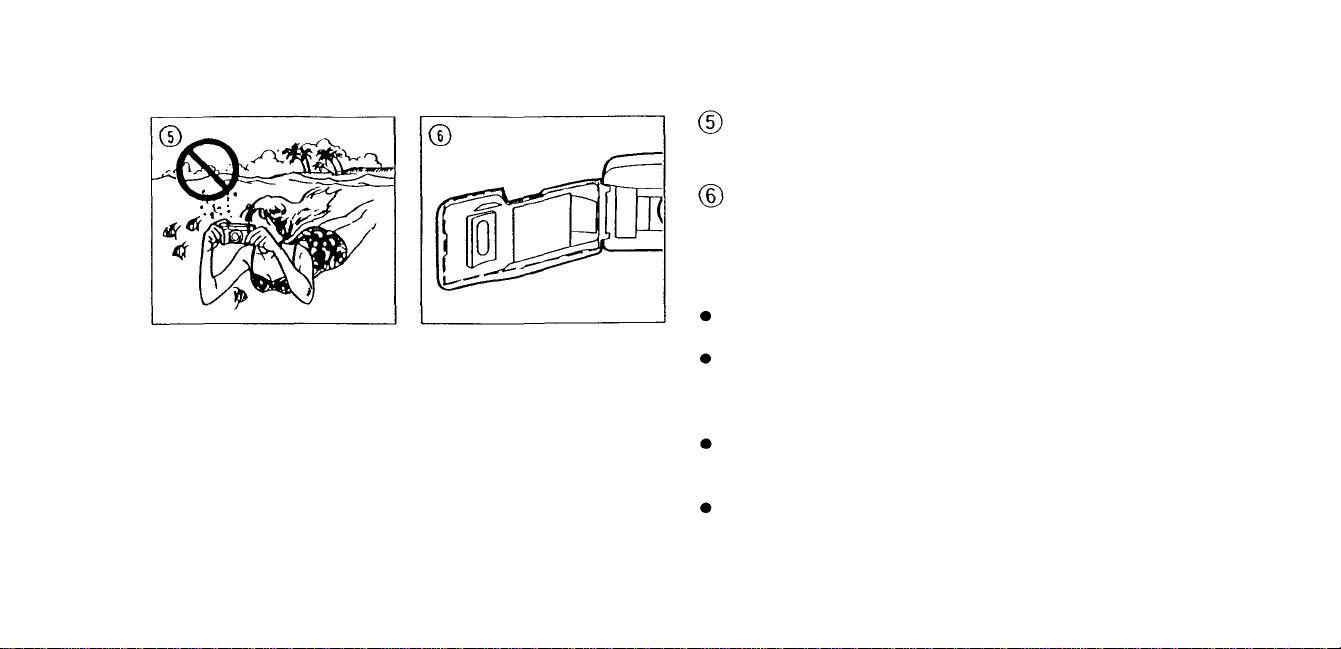
Do not submerge the camera or attempt to
take pictures underwater.
Rubber gaskets are located inside the rear
of the camera. Check the gaskets for wear
and carefully remove any sand and dust to
maintain a weatherproof seal.
If the camera has been splashed by water, etc., clean
the camera with a dry cloth as soon as possible.
Do not touch the rubber gasket on the battery
compartment cover or the rubber gasket on the
camera back with excessive force. Do not remove the
gaskets.
Gaskets should be replaced after approximately three
years, although they may require replacement earlier
than tha t depending on use and wear.
If the gaskets are damaged or need replacement,
contact your nearest Olympus service center.
Page 49

49
BATTERY HANDLING
NOTES
When the camera is not used for an
extended period of time, remove the battery.
Keep spare battery on hand when going on
a long trip or to a cold area.
Sweat, oil, and so on can prevent a battery's
terminals from making electrical contact. To
avoid this, wipe both terminals before
loading bat te ry.
Used batteries should be treated as general
waste in accordance with local government
regulations.
Page 50
50
WARNINGS
NEVER TRY TO DISASSEMBLE, RECHARGE, OR
SHORT CIRCUIT BATTERY. NEVER EXPOSE
BATTERY TO EXCESSIVE HEAT OR OPEN
FLAMES.
KEEP THE BATTERY OUT OF THE REACH OF
CHILDREN. IF A CHILD SWALLOWS A BATTERY,
CONTACT A DOCTOR IMMEDIATELY.
USE ONE 3V LITHIUM BATTERY (DL123A OR
CR123A). NEVER TRY TO DISASSEMBLE OR
MODIFY A NY BATTERY OR BATTERY PACK FOR
USE IN THIS CAMERA.
Page 51

51
REMOTE CONTROL (optional) HANDLING
Keep the remote control out of the reach of
children. If a child swallows the remote
control, contact a physician immediately.
Never try to disassemble the remote control.
Never expose the remote control to
excessive heat or open flame.
Page 52
52
TROUBLESHOOTING
OPERATING PROBLEMS
The camera does not work.
The power switch is not turned ON.
Turn the power switch ON. (p. 20)
The alignment of the battery terminals is not correct.
Reload the battery correctly. (p. 13)
The battery is exhausted.
Replace the battery with new one. (p . 14)
The battery is temporarily unable to function
because of cold.
Keep the camera warm while using i t.
The loaded film has been rewound.
Remove the film. (p. 28)
The film is incorrectly loaded.
Reload the film. (p. 17)
The flash is held wit h your finger.
Release your finger.
Page 53

53
The LCD display goes off suddenly.
If you don't use the camera, the LCD goes off aft e r
fou r and half minutes.
Turn the power switch OF F and then ON again or
operate the zoom lever to turn the LCD back on. In
additon, the power is turned OFF automatically after 4
hours. When the camera is not in use, try to keep the
power switch OFF .
The shutter release button doesn't r ele ase when the
remote control's shutter release button is pressed.
The remote control hasn't been used in the 20
minutes since the Selftimer/Remote Control mode
was engaged, causing the LC D panel to turn off.
Press the zoom lever. The LCD will light. Then
press the Selftimer/Remote button again.
Page 54

54
The green lamp bl i n k s , an d t h e shutter release button
will not release.
The camera is closer th a n 0. 6 m (2 ft) to the
subject.
Move the camera back to distance more than
0.6 m (2 ft) from the subject. (p. 24)
The orange lamp blinks, and the shutter release button
will not release.
The flash has not been recharged yet.
Remove your finger from the shutter release
button and wait for several seconds until th e flash
is recharged before shooting. (p. 31)
The flash does not fire, even in the dark.
The f lash mode is se t to OFF.
Set it to a mode other t h an OFF. (p. 29)
High sensitivity film is being u se d .
Set the flash mode to FILL-IN. (p . 2 9 )
Page 55
55
The viewfinder is out of focus.
Diopter dial is not adjusted.
Adjust the diopter dial until image is clear. (p. 9)
PROBLEMS WITH PRINTED PICTURES
The picture is out of focus.
The camera moved when the shutter release
button was pressed.
Hold the camera correctly and press the shutter
release button gently. (p. 15)
The subject was not within the viewfinder's
autofocus ma r k.
Position the subject in the center of the
autofocus mark, or use the focus lock. (p. 25)
The lens and autofocus windows we re dirty.
Clean the lens and autofocus windows.
Page 56
56
The autofocus window was blocked, such as by a
finger.
Hold the camera correctly, keeping you r fingers
clear of the autofocus windows. (p. 15)
The subject was closer than the minimum working
distance to the lens (0.6 m / 2 ft).
Shoot from more than 0.6 m (2 ft ) away from the
subject. (p. 24)
When using the selftimer, the shutter release
button was pressed while standing right in front of
the camera.
Do not stand in front of the camera. Press the
shutter release button while looking through the
viewfinder. (p. 37)
Page 57

57
The autofocus didn't work correctly. There are
some subjects that are difficult for the autofocus
to lock on. These include: glossy or reflective
surfaces, black objects, subjects behind glass or
wire mesh, flames and smoke, excessively bright
light within the picture area.
Focus on an object located at the same
distance as the subject, then return to the
subject and take the picture. (p. 26)
The picture is too dark.
The flash was blocked, (e.g. by a finger).
Hold the camera correctly, keeping your
fingers clear of the flash . (p. 15)
The subject was out of the working range o f the
flash.
Shoot within the flash working range. (p. 31)
The flash mode was set to OFF.
Check the flash mode before shooting. (p. 30)
Page 58
58
The data has not been printed (or looks faded).
The da ta m o d e wa s set to n o da ta ( —) .
Change the data mode to another setting.
(p. 42)
There is a bright color like white, orange, or yellow
in the area of the picture where the data is printed.
Avoid bright colors in the lower right corner of
your photo compositions. (p. 42)
The pict ure wa s taken w it h black-and-white film.
Do not use black-and-white fil m if you wan t to
print data on the pictures.
The camera's battery is low.
Replace with a new battery. (p. 13)
The color of a picture taken indoors is abnormal.
The color of the room lighting affected the picture.
Set the flash to FILL-IN mode.
Page 59

59
SPECIFICATIONS
Type: Full automatic 35 mm autofocus lens-shutter
camera with built-in 38 ~ 10 5 mm zoom lens.
Film format : 35 mm standard DX-coded film (24 x 36
mm)
Lens: Olympus lens 38~105 mm F4.5 ~ 8.9,
6 elements in 5 groups.
Shutter: Programmed electronic shutter.
Viewfinder: Real image zoom vie wfinder (with
autofocus mark, close-up correc tio n marks,
autofocus indicator and flash indicator).
Focusing: Active-type autofocus system. Focus lock
possible.
Focusing range: 0.6 m (2ft) ~ (infinity).
Exposure control: Programmed automatic exposure
control, 3-zone light metering, switchable to spot
metering. Auto exposure range: Wide-angle —
EV2.3 (F4.5, 4 sec.) to EV16 (F10.9, 1/500 sec.),
Telephoto — EV4.3 (F8.9, 4 sec.) to EV17 (F19.7,
1/350 sec.).
Page 60

60
Exposure counter: Progressive type wit h automatic
reset, displayed on LCD panel.
Selftimer: Electronic selftimer 12-sec. delay.
Remote control (optional): Infrared remote control unit
with 3-sec. delay.
Film speed range: Automatic setting with DX-coded
fil m wi th ISO 50, 100, 200, 400 , 800, 1600, 3200.
For non DX-coded film and film with less than
ISO 50, film spee d is se t to ISO 100.
Fil m loading: Automatic loading. ( Automatically
advances to first frame when back cove r is
closed.)
Film advance: Automatic film winding.
Film r e wi n d: Automatic film rewind (automatic rewind
activation at end of film, automatic r ewind stop).
Rewind possible at any point with Mid-roll rewind
button.
Page 61

61
Flash: Built-in flash. Recycling time: Approx. 0.5 ~ 7
sec. (at normal temperature with new battery).
Flash working range: Wide-angle — 0.6 ~ 4.7 m
(2 ~ 15.4 ft), Telephoto — 0.6 ~ 2.4 m (2 ~ 7.9 ft)
with ISO 100 color negative film: Wide-angle —
0.6 ~ 9.4 m (2 ~ 30.8 ft). Telephoto — 0.6 ~ 4.7
m (2 ~ 15.4 ft) with ISO 400 color negative film.
Flash modes: AUTO (Automatic fl ash activation in low-
light and backlight), AUTO-S (Redeye-Reducing,
otherwise same as Auto), OFF (No flash), FILL-IN
(Forced activation), (for night scene with
slowest shutter speed of 4 sec. Other functi ons
operate as the same as in Au t o mode.)
Battery check: Dis played on LC D panel.
Page 62

62
Weatherproof: IEC Standard publication 529.
Classification of degrees of protection provided by
enclosures. Degree of protection indicated by
the second characteristics numeral 4.
Shot description: Protected against splashing water.
Definition: Water splashed against the enclosure fr o m
any direction shall have no harmful e f fe c t.
Test for second numeral 4: The equipment is splayed
from all practical directions.
The water pressure is adjusted to give a delivery rate
op 10 lit./min. The test duration shall be 1 min.
2
per m
of calculated surface area of the
enclosure with a minimum duration of 5 min.
Power source: 3 V lithium battery (DL123A/CR123A)
Dimensions: 121(W) x 66 (H) x 46 (D) mm (4.8 x 2.6
x 1.8 in) (without protrusions).
Weight: 255 g (9.0 oz)(without battery)
Page 63

63
SPECIFICATIONS FOR DATE UNIT
Imprinting direction: Data imprinted on to fi lm f ro m lens
side.
Data coding: No data, year-month-day, month-day-
year, day-month-year and day-hour-minute.
External indica t i o n of data: Data display on LC D panel.
Film speed setting: Automatic film speed setting.
Automatic calendar system: Up to year 2030.
Power source: Ordinarily used with camera body.
SPECIFICATIONS ARE SUBJECT TO CHANGE
WITHOUT ANY NOTICE OR OBLIGATION ON THE
PART OF THE MANUFACTURER.
Page 64

OLYMPUS OPTICAL CO.,LTD.
San-Ei Building, 22-2, Nishi Shinjuku 1-chome, Shlnjuku-ku,Tokyo, Japan.Tel. 03-3340-2211
OLYMPUS AMERICA INC.
Two Corporate Center Drive, Melville, NY 11747-3157, U.S.A. Tel. 516-844-5000 /(800)622-6372
OLYMPUS OPTICAL CO.(EUROPA) GMBH.
(Premises/Goods delivery) Wendenstrasse 14-16,20097 Hamburg, Germany. Tel. 040-237730
(Letters) Postfach 10 49 08,20034 Ham burg, Germany.
OLYMPUS OPTICAL CO.(U.K.) LTD.
2-8 Honduras Street, London EC1YOTX, United Kingdom. Tel. 0171-253-2772
0197.10MM
 Loading...