

Page 1
DIGITAL CAMERA
FE-230/X-790
FE-240/X-795
Basic
Manual
ENGLISH 2
FRANÇAIS 28
ESPAÑOL 54
DEUTSCH 80
РУССКИЙ 106
Page 2

Table of Contents
Gather these items (box contents)................................................... 3
Attach the strap .....................................................................................3
Prepare the battery ............................................................................ 4
Turn the camera on............................................................................ 5
Set the date and time......................................................................... 6
About the date and time setting screen................................................. 6
Set the language ................................................................................ 8
Take a picture..................................................................................... 9
En
Review your pictures....................................................................... 10
Erase pictures ..................................................................................... 10
Basic operation................................................................................ 11
Shooting Mode Buttons ....................................................................... 11
Scene Modes ...................................................................................... 12
Macro Mode ........................................................................................ 12
Flash Modes........................................................................................ 13
Self-Timer............................................................................................ 13
Power Save Feature............................................................................ 13
Menus and settings ......................................................................... 14
Top Menu ............................................................................................14
Erase All Pictures ................................................................................ 14
Connecting the camera ................................................................... 15
Playback on a TV ................................................................................15
Direct Printing (PictBridge) .................................................................. 16
Transfer images ............................................................................... 17
OLYMPUS Master software............................................................. 19
Specifications .................................................................................. 20
Safety Precautions........................................................................... 22
Before using your camera, read this manual carefully to ensure correct use.
We recommend that you take test shots to get accustomed to your camera
before taking important photographs.
Please observe the safety precautions at the end of this manual.
The images on the LCD screen and illustrations of the camera used in this
manual may differ from the actual product. Unless otherwise specified, the
explanation about these illustrations is provided for FE-230/X-790.
2
Page 3

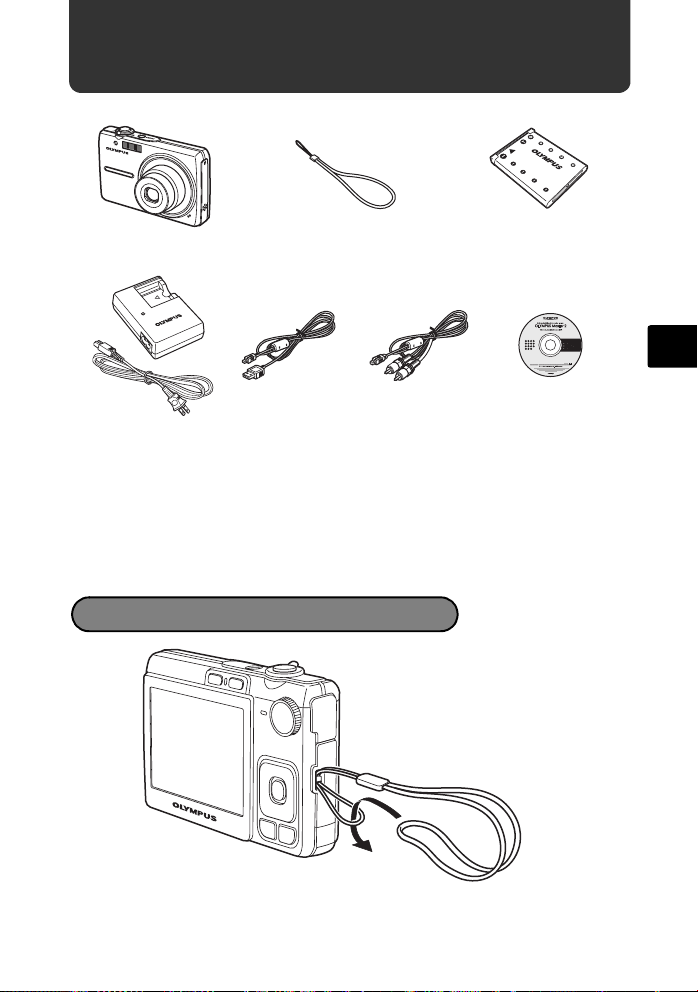
Gather these items (box contents)
Digital Camera Strap Lithium Ion Battery
Battery Charger
(LI-40C)
Items not shown: Advanced Manual (CD-ROM), Basic Manual (this manual),
and the Warranty Card. Contents may vary depending on purchase location.
USB Cable AV Cable OLYMPUS Master
(LI-42B)
CD-ROM
Attach the strap
En
Pull the strap tight so that it does not come loose.
3
Page 4
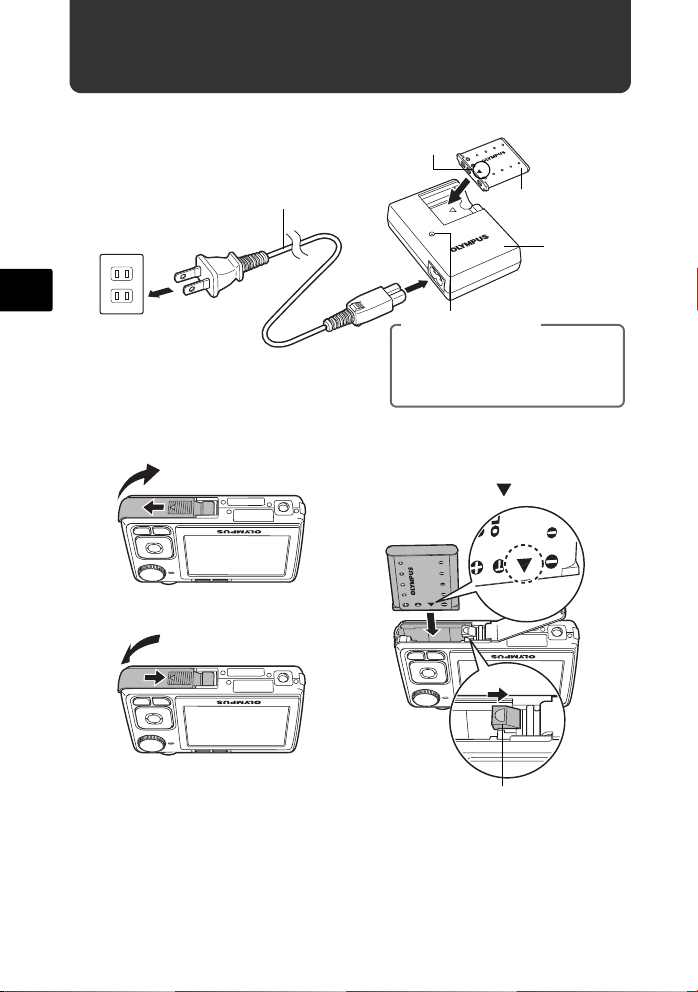
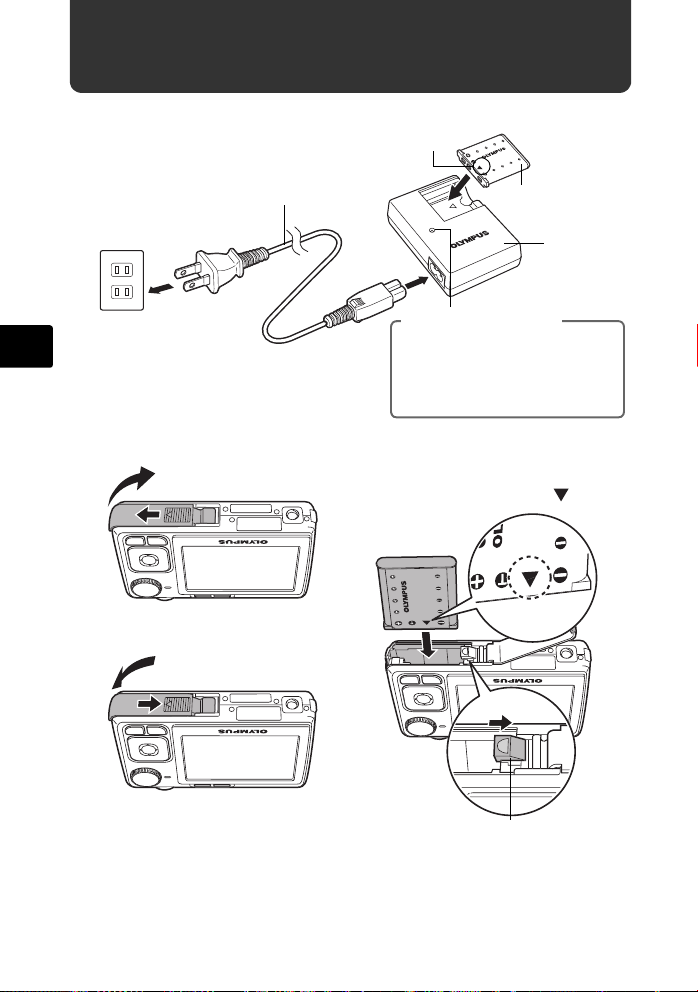
Prepare the battery
a. Charge the battery.
W
3
Power Cable
En
AC Wall
Outlet
Battery comes partially charged.
2
b. Insert the battery in the camera.
2
1
4
5
Lithium Ion
Battery
Battery
1
Charging Indicator
Red light on: Charging
Light off: Charging complete
(Charging time: Approx. 300
minutes)
Insert the battery in the direction
indicated by the mark.
3
Charger
To remove the battery, press the
battery lock knob in the direction
of the arrow.
With this camera, you can take pictures without inserting the optional
xD-Picture Card™ (hereinafter referred to as “the card”). For details
on inserting the card, please refer to the Advanced Manual.
Battery lock knob
4
Page 5
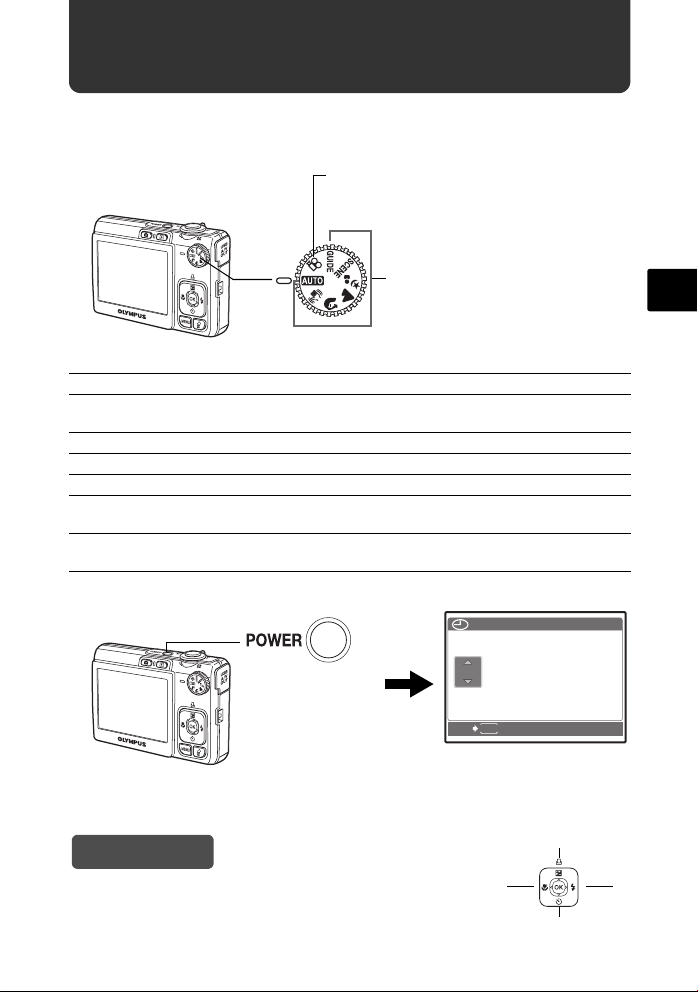
Turn the camera on
TIME
----
.--.-- --:--
Y / M /
This explains how to turn on the camera in shooting mode.
a. Set the mode dial to h.
When shooting movies
When shooting still
pictures
Still picture shooting modes
h For normal shooting.
h This function reduces the blur incurred by a moving subject or camera
B Suitable for taking pictures of people.
E Suitable for taking pictures of a landscape.
M Suitable for taking pictures of people at night.
f Select from 10 available scene modes (FE-240/X-795) or 13 available scene
R Use the shooting guide displayed on the screen to shoot pictures according
movement when taking pictures.
modes (FE-230/X-790), according to the shooting conditions.
to the situation.
b. Press the o button.
o button
To turn off the camera, press the o button once again.
Hint
The directions of the arrow pad is indicated with
ONXY in the supplied instruction manual.
TIME
DMY
----
.--.-- --:--
MENU
CANCEL
Y/M/
This screen is
displayed if the date
and time are not set.
O
N
En
D
YX
5
Page 6
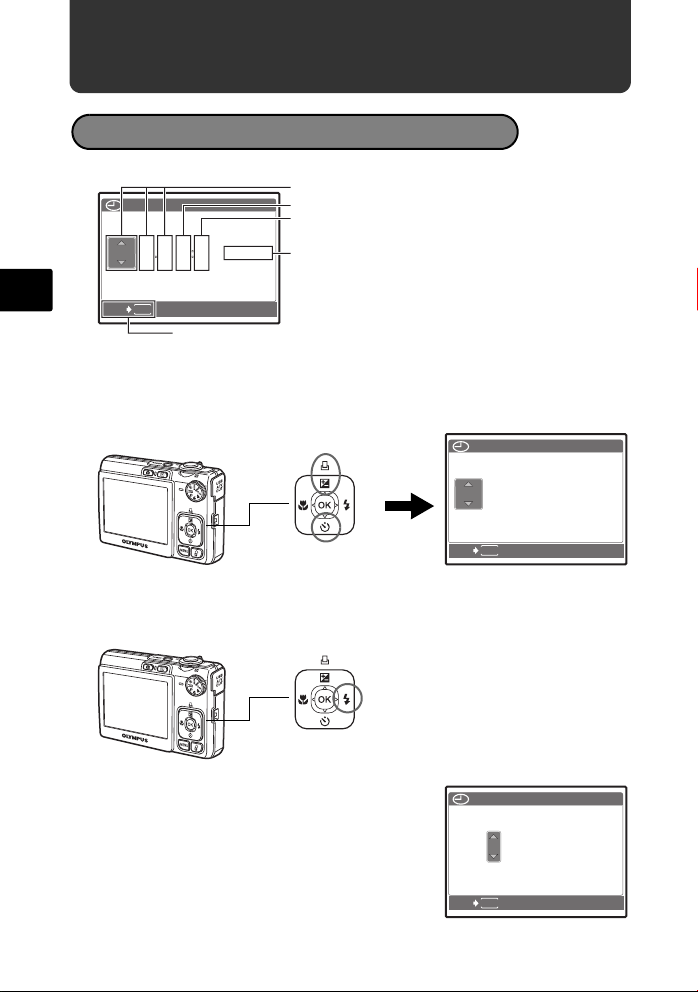
Set the date and time
TIME
----
.--.-- --:--
Y / M /
2007
.--.-- --:--
TIME
Y / M /
2007
.-- --:--
TIME
Y / M /
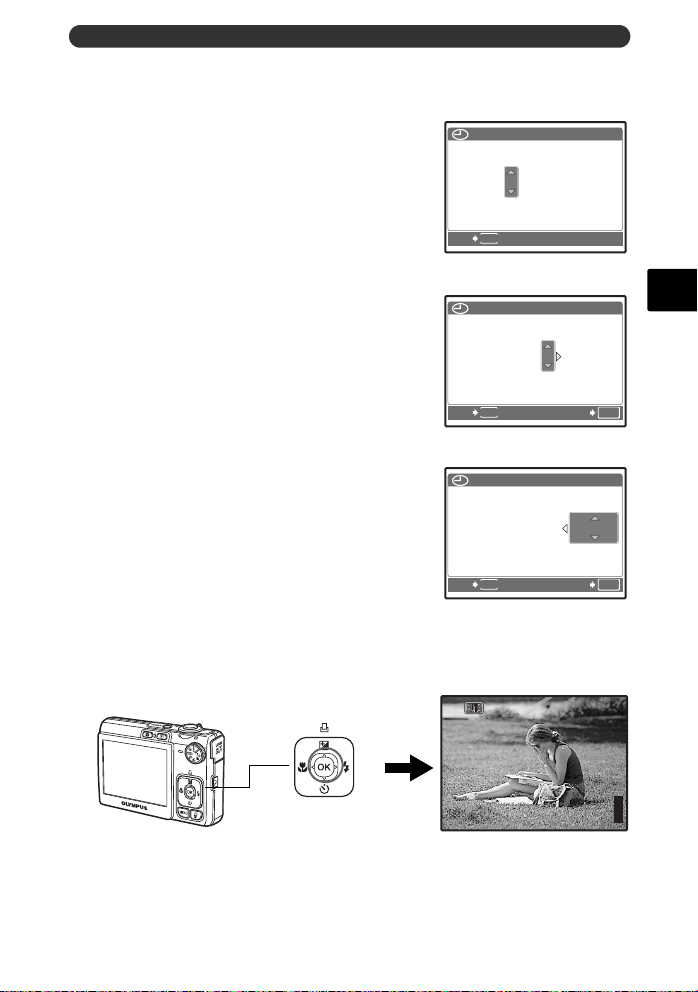
About the date and time setting screen
Y-M-D
Hour
Minute
D
Date formats (Y-M-D, M-D-Y, D-M-Y)
----
DMY
.--.-- --:--
TIME
Y/M/
En
MENU
CANCEL
Cancels the setting
a. Press the OF/< and NY buttons to select [Y].
• The first two digits of the year are fixed.
OF/< button
2007
.--.-- --:--
MENU
NY button
CANCEL
b. Press the Y# button.
Y# button
c. Press the OF/< and NY
buttons to select [M].
2007
.
0202.-- --:--
TIME
DMY
Y/M/
D
TIME
DMY
Y/M/
D
6
MENU
CANCEL
Page 7
d. Press the Y# button.
2007
--:--
TIME
Y / M /
2007
30
TIME
Y / M /
2007
30
TIME
Y / M /
IN
3072
2304
e. Press the OF/< and NY
buttons to select [D].
f. Press the Y# button.
g. Press the OF/< and NY
buttons to select the hours and
minutes.
• The time is displayed in the 24-hour format.
Set the date and time
TIME
DMY
TIME
1212:
Y/M/
Y/M/
30
2007
.
MENU
CANCEL
2007
.
0202.
0202.
1010 --:--
DMY
1010
D
En
D
h. Press the Y# button.
i. Press the OF/< and NY
buttons to select [Y/M/D].
j. After all settings have been set, press .
• For a more accurate setting, press when the time signal hits 00
seconds.
button
MENU
CANCEL
2007
.
MENU
CANCEL
HQHQ3072
0202.
DMY
1010
TIME
1212:
[ ]
×2304
OK
SET
D
Y/M/
30
OK
SET
[
]
IN
44
7
Page 8
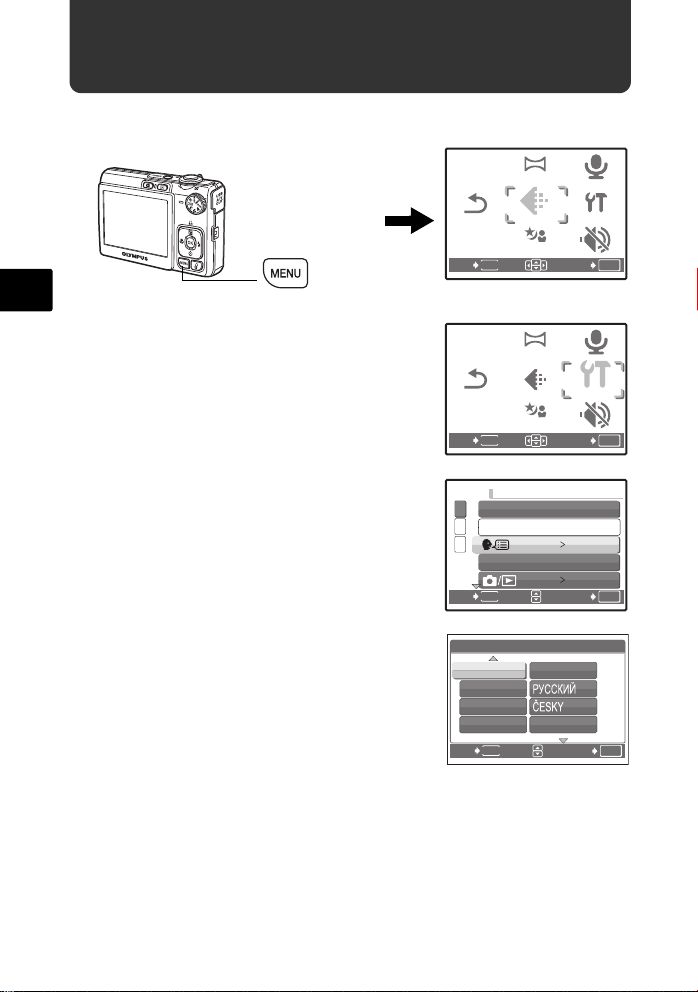
Set the language
RESET
PANORAMA
SILENT
MODE
SETUP
IMAGE
QUALITY
SCENE
PICTURE
+ SOUND
RESET
PANORAMA
SILENT
MODE
SETUP
IMAGE
QUALITY
SCENE
PICTURE
+ SOUND
SETUP
a. Press the m button to display the top menu.
m button
En
b. Press the Y# button to select
[SETUP], and press .
c. Press the OF/< and NY
buttons to select [W], and
press .
d. Press the arrow pad (ONXY)
to select a language, and press
.
• You can add other languages to your camera
with the provided OLYMPUS Master software.
Please refer to the Advanced Manual.
RESET
MENU
EXIT
RESET
MENU
EXIT
1
MEMORY FORMAT
2
BACKUP
3
PIXEL MAPPING
MENU
BACK
W
ENGLISH
FRANCAIS
DEUTSCH
ESPAÑOL
MENU
BACK
PANORAMA
IMAGE
IMAGE
QUALITY
QUALITY
SCENE
PANORAMA
IMAGE
IMAGE
QUALITY
QUALITY
SCENE
ITALIANO
NEDERLANDS
PICTURE
+ SOUND
SETUP
SETUP
SILENT
MODE
OK
SET
PICTURE
+ SOUND
SETUP
SETUP
SILENT
MODE
OK
SET
ENGLISH
NO
OK
SET
OK
SET
8
Page 9
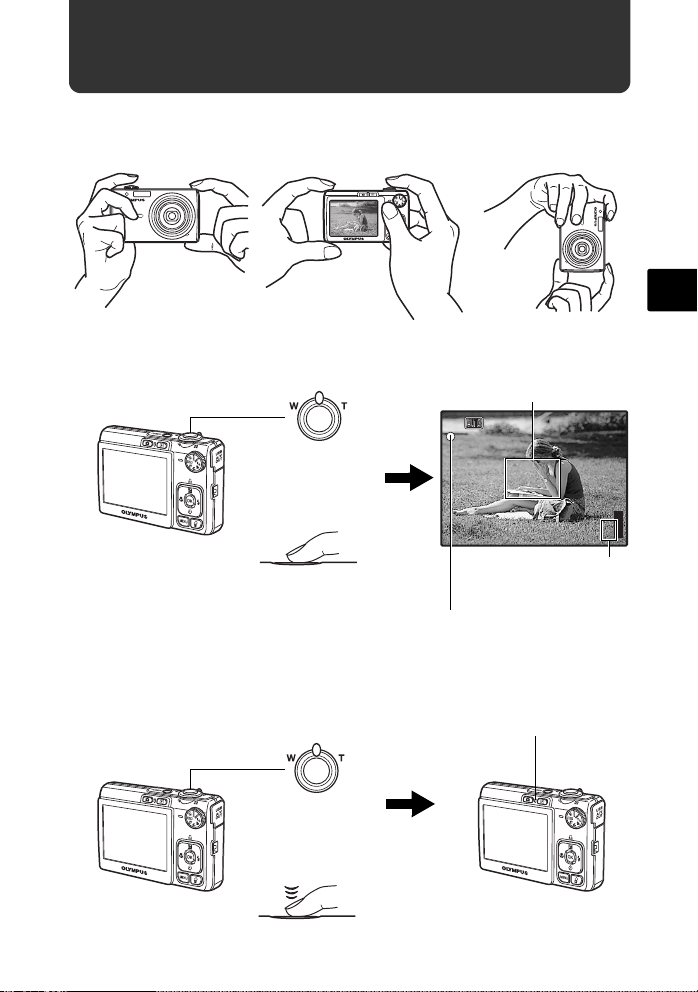
Take a picture
3072
2304
IN
a. Hold the camera.
Horizontal grip Vertical grip
En
b. Focus.
c. Shoot.
Shutter Button
(Press
Halfway)
Shutter Button
(Press
Completely)
Place this mark over
your subject.
[ ]
[
]
HQHQ3072
×2304
The number of pictures
that can be taken is
displayed.
The green lamp indicates the
focus and exposure are locked.
The card access lamp
blinks.
IN
44
9
Page 10
Review your pictures
12: 30
'0 7 .0 2.1 0
1 0 0 - 0 0 0 4
HQ
IN
30 7 2
23 0 4
0. 0
a. Press the q button.
q button
En
Arrow pad
[
]
IN
3072
HQ
×2304
0.0
Displays the next image
'07.02.10
100-0004
Displays the previous image
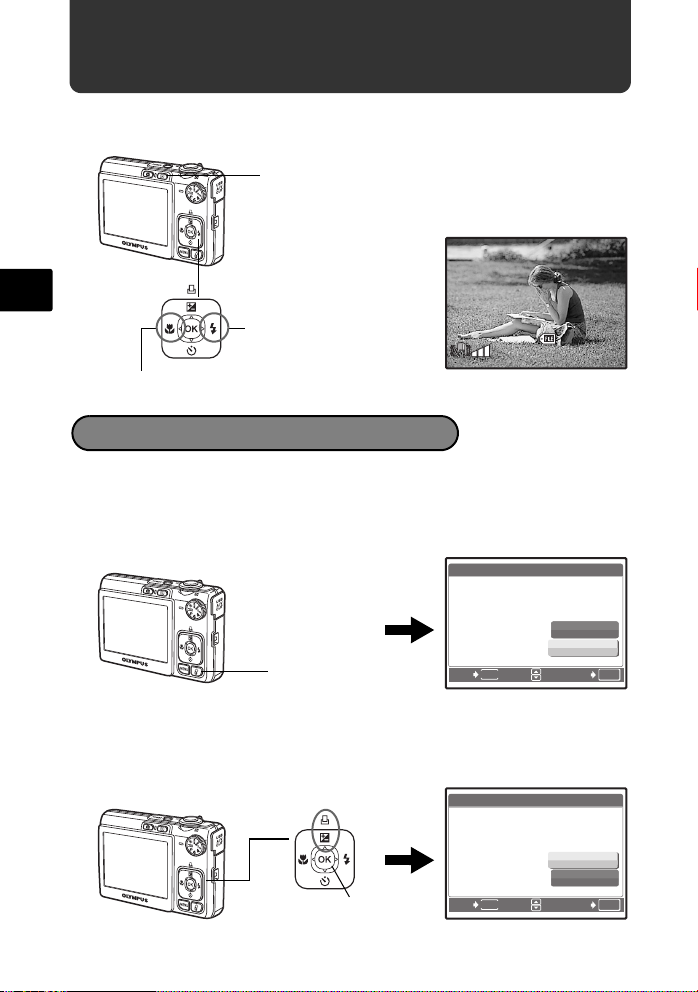
Erase pictures
a. Press the X& and Y# buttons to display the
picture you want to erase.
b. Press the S button.
ERASE
YES
NO
S button
BACK
MENU
c. Press the OF/< button, select [YES], and press
.
OF/< button
button
ERASE
MENU
BACK
YES
NO
SET
SET
12:30
[IN]
[IN]
OK
[IN]
OK
4
10
Page 11

Basic operation
Shooting Mode Buttons
While in shooting mode, use these buttons for quick access to some of the more
commonly used features.
1
2
5
6
3
4
1 K button (Shooting)
Selects the shooting mode.
2 q button (Playback)
Selects the playback mode.
3 m button
Displays the top menu.
4 S button (Erase)
Selects the picture you want to erase in playback mode.
5 Arrow pad (ONXY)
Selects scenes, playback pictures and menu items.
6 X& button (Macro Mode)
Enables macro or super macro mode for taking close-up pictures.
7 OF/< button (Exposure Compensation/Print)
While in shooting mode, press this button to adjust the exposure compensation
value, which affects picture brightness.
8 Y# button (Flash Mode)
Selects from 4 flash modes - AUTO, ! (Red-eye reduction), # (Fill-in flash), or
$ (Flash off).
9 button (OK)
Confirms settings.
0 NY button (Self-timer)
Sets the self-timer to take the shot approximately 12 seconds after the shutter
button is pressed.
7
8
9
0
11
En
Page 12
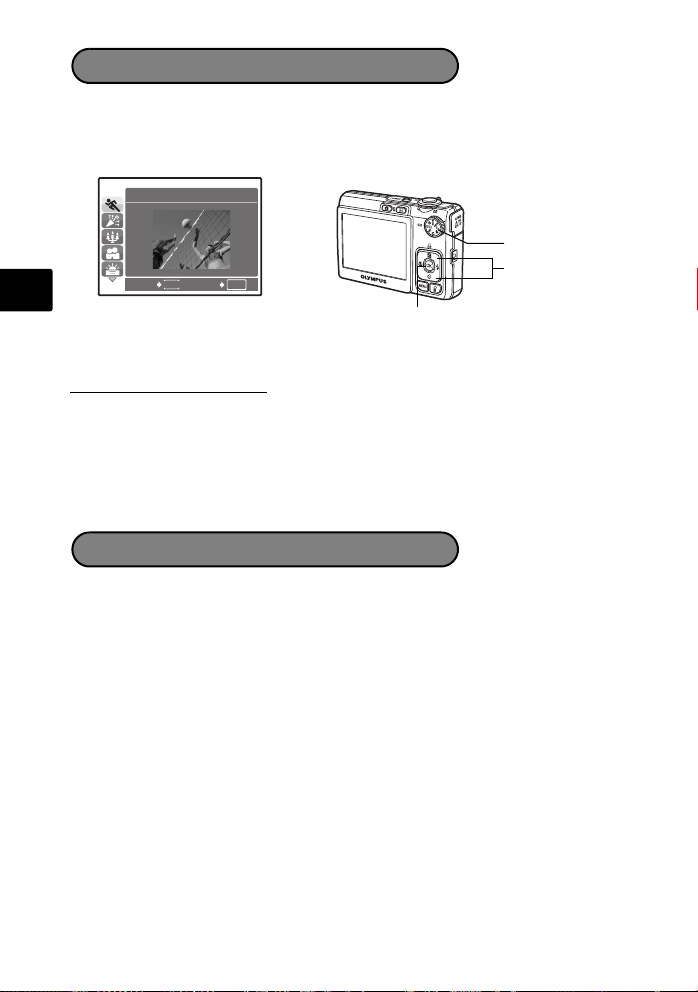
Scene Modes
This function allows you to switch the f (scene mode) according to the
subject.
1 Set the mode dial to f.
1
SPORT
Mode Dial
O/N
En
MENU
OK
SETBACK
button
2 Press O/N to select the scene modes and press .
Shooting Scene Modes
• j SPORT • N INDOOR • W CANDLE
• R
SELF PORTRAIT
• P BEHIND GLASS • V CUISINE • d DOCUMENTS
• i AUCTION • k
• H
UNDER WATER MACRO
*1 Available for the FE-230/X-790 only.
• S SUNSET • X FIREWORKS
UNDER WATER WIDE1*1• l
*1
UNDER WATER WIDE2
Macro Mode
& This mode lets you take pictures as close as 10 cm (3.9 in.) with FE-230/X-790,
20 cm (7.9 in.) with FE-240/X-795 to your subject. (at the widest angle)
% Use this mode to take pictures as close as 5 cm (2.0 in.) with FE-230/X-790,
3 cm (1.2 in.) with FE-240/X-795 to your subject. In % mode, the position of
the zoom lens is fixed.
1 Press the X& button repeatedly to select [&] or [%] and press .
*
1
12
Page 13
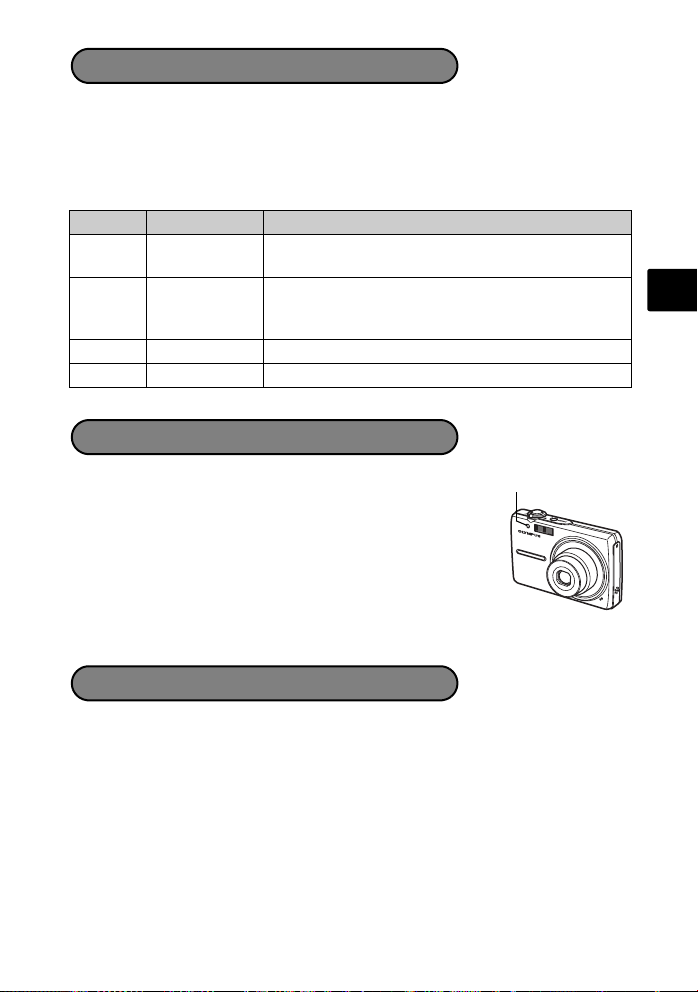
Flash Modes
1 Press the Y# button repeatedly to select the flash mode and press .
2 Press the shutter button halfway.
When the flash is set to fire, the # mark lights.
3 Press the shutter button completely to take the picture.
Icon Flash Mode Description
No
indication
Auto flash The flash fires automatically in low light or backlight
Red-eye
!
reduction flash
Fill-in flash The flash fires regardless of the available light.
#
$ Flash off The flash does not fire even in low light conditions.
conditions.
The red-eye reduction flash mode significantly reduces
this phenomenon by emitting pre-flashes before firing
the regular flash.
Self-Timer
En
1 Press the NY button to select [Y] and press .
Self-timer Lamp
2 Press the shutter button fully to take the picture.
The self-timer lamp lights for approximately 10 seconds after
the shutter button is pressed, then starts blinking. After blinking
for approximately 2 seconds, the picture is taken.
Power Save Feature
To save the battery power, the camera automatically enters sleep mode and
stops operating if not used for approximately 3 minutes. Operate the shutter
button or zoom lever to reactivate the camera.
If the camera is not operated for approximately 12 minutes after the camera
enters sleep mode, it automatically retracts the lens and turns off. To resume
operation, turn on the power again.
13
Page 14
Menus and settings
RESET
PANORAMA
SILENT
MODE
SETUP
IMAGE
QUALITY
SCENE
PICTURE
+ SOUND
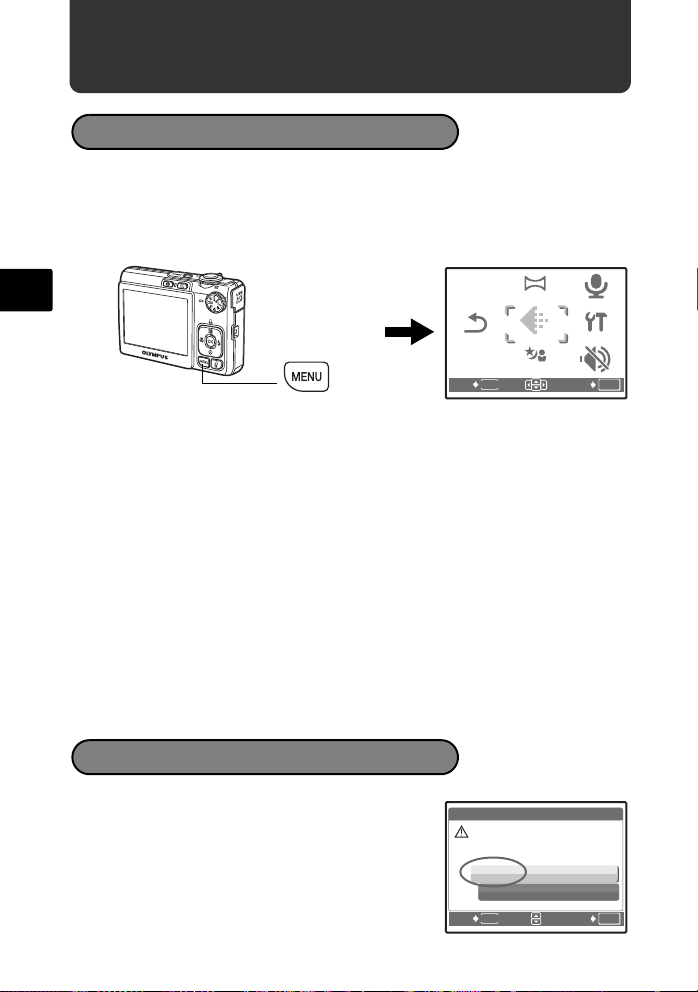
Top Menu
1 Press the m button to display the top menu on the monitor.
2 Use the arrow pad (ONXY) to select menu items.
Top menu in shooting
En
m button
IMAGE QUALITY
Sets image quality and resolution.
PANORAMA
Creates a panoramic picture.
RESET
Resets to the factory default settings.
SCENE
Select a scene according to the subject and shooting condition.
SILENT MODE
Mutes the operation sounds, warning sounds, shutter sound, etc… during
shooting and playback.
SETUP
Sets the date and time, language and other settings.
PICTURE+SOUND/MOVIE W/SOUND
Records sound during shooting.
RESET
EXIT
MENU
mode
PANORAMA
IMAGE
IMAGE
QUALITY
QUALITY
SCENE
PICTURE
+ SOUND
SETUP
SETUP
SILENT
MODE
OK
SET
Erase All Pictures
1 Press the m button to display the top menu
in playback mode.
2 Select [ERASE], [ALL ERASE], and press .
3 Select [YES], and press .
All the pictures are erased.
14
ALL ERASE
CAUTION ERASING ALL
YES
NO
MENU
BACK
SET
[IN][IN]
OK
Page 15
Connecting the camera
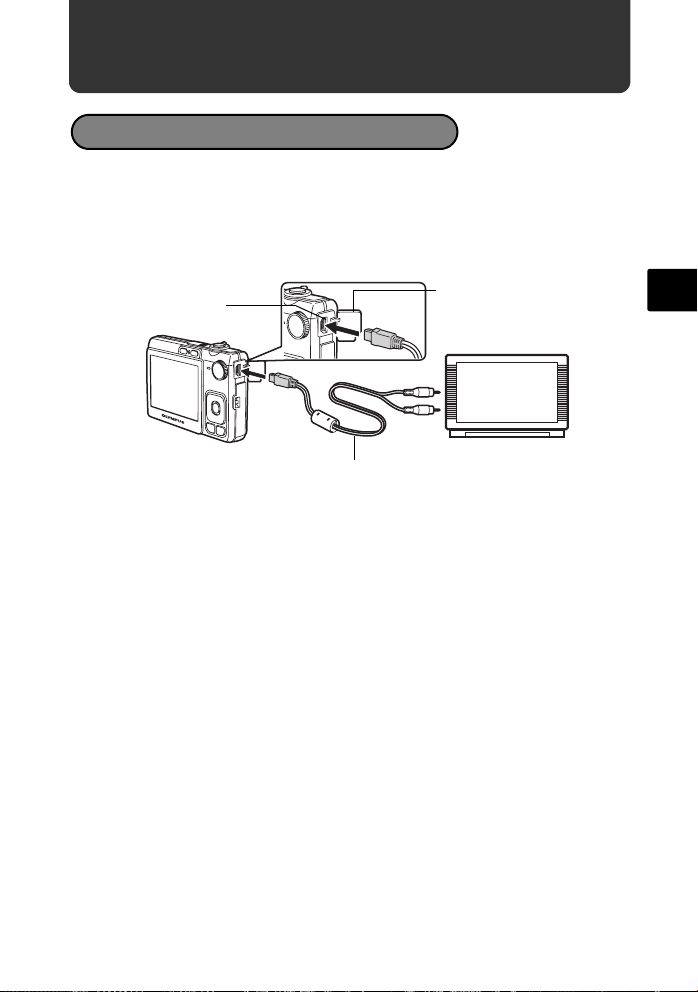
Playback on a TV
Use the AV cable provided with the camera to playback recorded images on your
TV. Both still pictures and movies can be played back.
1 Make sure that the TV and camera are turned off. Connect the multi-
connector on the camera to the video input terminal on the TV using the AV
cable.
Multi-connector
AV cable (provided)
2 Turn the TV on and set it to the video input mode.
For details on switching to video input, refer to your TV’s instruction manual.
3 Turn the camera on and press the q button to select the playback mode.
The last picture taken is displayed on the TV. Use the arrow pad (ONXY) to select
the picture you want to display.
Connector cover
Connect to the TV’s video
input (yellow) and audio
input (white) terminals.
En
15
Page 16
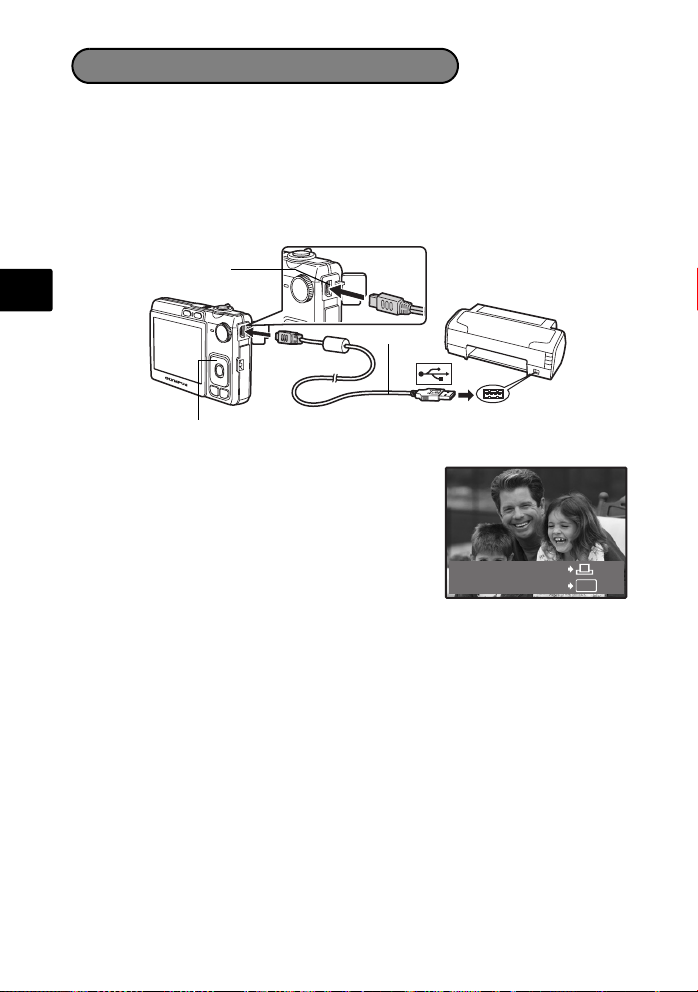
Direct Printing (PictBridge)
Using the provided USB cable, you may connect your camera directly to a
PictBridge compatible printer to make prints. You can print a picture with simple
operations.
1 In playback mode, display the picture you want to print out on the monitor.
2 Connect one end of the provided USB cable into the camera’s multi-
connector and the other end into the printer’s USB connector.
Multi-connector
En
USB cable
OF/< button
3 Press the OF/< button.
Printing starts.
When you are finished, disconnect the USB cable
from the camera with the picture selection screen
displayed.
EASY PRINT START
PC / CUSTOM PRINT
OK
16
Page 17
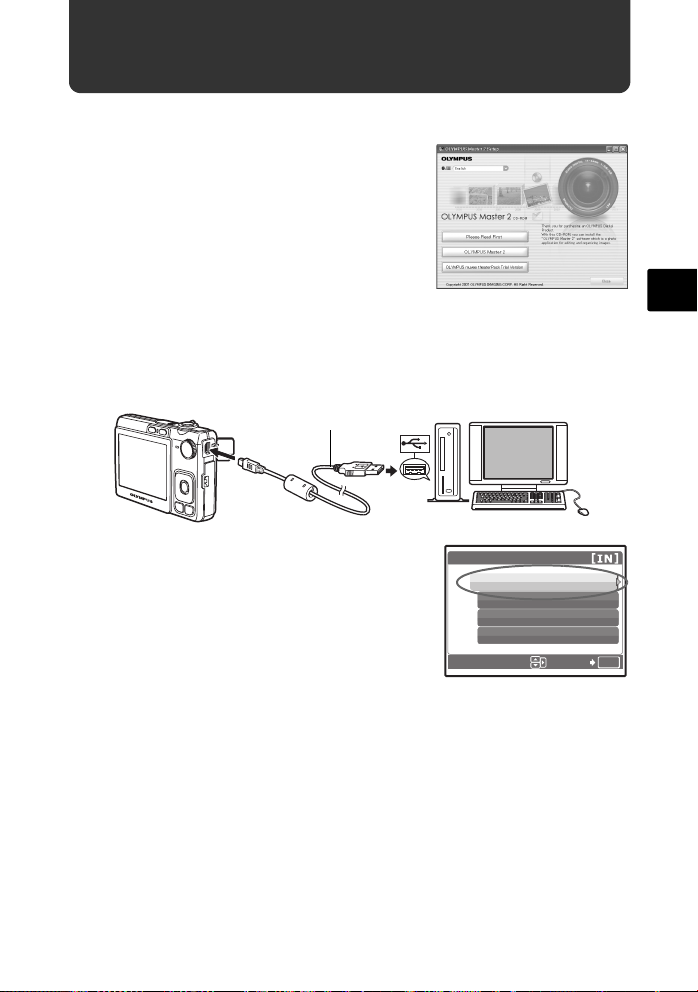
Transfer images
a. Install the software
1 Insert the OLYMPUS Master CD-ROM.
2 Windows: Click the “OLYMPUS Master 2”
button.
Macintosh: Double-click the “Setup” icon.
3 Simply follow the on-screen instructions.
b. Connect the camera to the computer
1 Connect the camera and computer using the USB cable (provided).
The monitor will turn on automatically.
USB cable
2
1
En
2 Select [PC] on the monitor, and press .
Your PC will now recognize your camera as a
removable storage drive.
USB
PC
EASY PRINT
CUSTOM PRINT
EXIT
SET
OK
17
Page 18

c. Transfer images to the computer
1 With the camera now connected, open OLYMPUS Master.
2 Click “Transfer Images” on the browse
window, and then click “From Camera” .
3 Simply follow the on-screen instructions.
En
Tips
• For more detailed information regarding camera setup and usage, please
refer to the camera’s “Advanced Manual” provided on CD-ROM.
• For additional assistance, refer to the “Help” file in the OLYMPUS Master
software.
18
Page 19
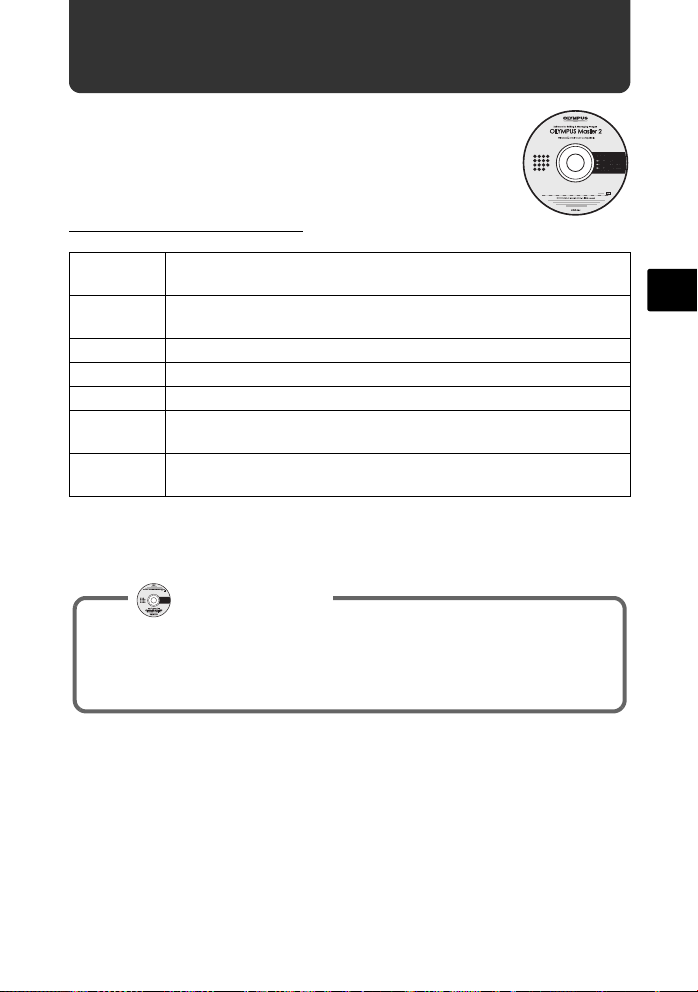
OLYMPUS Master software
OLYMPUS Master Software: Use this software to
download pictures from the camera, view, organize,
retouch, e-mail and print your digital pictures, movies and
more!
(System Requirements
OS Windows 2000 Professional/XP Home Edition/XP Professional/Vista
or Mac OS X (v10.3 or later)
CPU Pentium III 500 MHz/Power PC G3 500 MHz/Intel Core Solo/
Duo 1.5 GHz, or later
RAM 256 MB or more
Hard Disk 500 MB or more free space
Connection USB port/IEEE 1394 port
Monitor 1024 × 768 pixels resolution or more with minimum 65,536 colors
(Windows), 32,000 colors (Macintosh)
Other Internet Explorer 6 or later (Windows), Safari 1.0 or later,
QuickTime 6 or later (Macintosh)
For the latest support information, visit the Olympus website
(http://www.olympus.com/)
User Registration
Register your camera when you install OLYMPUS Master to activate your
warranty, receive notifications for software and camera firmware updates,
and more.
En
19
Page 20

Specifications
(Camera
Product type : Digital camera (for shooting and displaying)
Recording system
Still pictures : Digital recording, JPEG (in accordance with Design rule
Applicable
standards
En
Sound with still : Wave format
Movie : AVI Motion JPEG
Memory : Internal memory
Number of effective
pixels
Image pickup device : 1/2.5" CCD (primary color filter),
Lens : FE-230/X-790:
Photometric system : Digital ESP metering
Shutter speed : 4 to 1/2000 sec.
Shooting range : FE-230/X-790:
Monitor : 2.5" TFT color LCD display, 115,000 pixels
Outer connector : USB connector, A/V OUT jack (multi-connector)
Automatic calendar
system
Operating environment
Temperature : 0°C to 40°C (32°F to 104°F) (operation)/
Humidity : 30% to 90% (operation)/10% to 90% (storage)
Power supply : One Olympus lithium ion battery (LI-42B/LI-40B)
for Camera File system (DCF))
: Exif 2.2, Digital Print Order Format (DPOF), PRINT
Image Matching III, PictBridge
xD-Picture Card (16 MB – 2 GB) (Type H/M, Standard)
: 7,100,000 pixels
7,400,000 pixels (gross)
Olympus lens 6.3 to 18.9 mm, f3.1 to 5.9
(equivalent to 38 to 114 mm on a 35 mm camera)
FE-240/X-795:
Olympus lens 6.4 to 32 mm, f3.3 to 5.0
(equivalent to 38 to 190 mm on a 35 mm camera)
0.6 m (2.0 ft.) to ) (W), 1.0 m (3.2 ft) to ) (T) (normal)
0.1 m (0.3 ft.) to ) (W), 0.6 m (2.0 ft.) to ) (T) (macro mode)
0.05 m (0.2 ft.) (super macro mode)
FE-240/X-795:
0.7 m (2.3 ft.) to ) (normal)
0.2 m (0.7 ft.) to ) (W), 0.6 m (2.0 ft.) to ) (T) (macro mode)
0.03 m (0.1 ft.) (super macro mode)
: 2000 up to 2099
-20°C to 60°C (-4°F to 140°F) (storage)
20
Page 21

Dimensions : FE-230/X-790:
90.5 mm (W) × 55.0 mm (H) × 16.5 mm (D)
(3.6 × 2.2 × 0.6 in.)
(excluding protrusions)
FE-240/X-795:
93.5 mm (W) × 56.0 mm (H) × 20.0 mm (D)
(3.7 × 2.2 × 0.8 in.)
(excluding protrusions)
Weight : FE-230/X-790: 105 g (3.7 oz) without battery and card
FE-240/X-795: 115 g (4.0 oz) without battery and card
(Lithium ion battery (LI-42B)
Product type : Lithium ion rechargeable battery
Standard voltage : DC 3.7 V
Standard capacity : 740 mAh
Battery life : Approx. 300 full charges (varies on usage)
Operating environment
Temperature : 0°C to 40°C (32°F to 104°F) (charging)/
-10°C to 60°C (14°F to 140°F) (operation)/
-20°C to 35°C (-4°F to 95°F) (storage)
Dimensions : 31.5 × 39.5 × 6 mm (1.2 × 1.5 × 0.2 in.)
Weight : Approx. 15 g (0.5 oz)
(Battery charger (LI-40C)
Power requirements : AC 100 to 240 V (50 to 60 Hz)
3.2 VA (100 V) to 5.0 VA (240 V)
Output : DC 4.2 V, 200 mA
Charging time : Approx. 300 min.
Operating environment
Temperature : 0°C to 40°C (32°F to 104°F) (operation)/
-20°C to 60°C (-4°F to 140°F) (storage)
Dimensions : 62 × 23 × 90 mm (2.4 × 0.9 × 3.5 in.)
Weight : Approx. 65 g (2.3 oz)
En
Design and specifications subject to change without notice.
21
Page 22
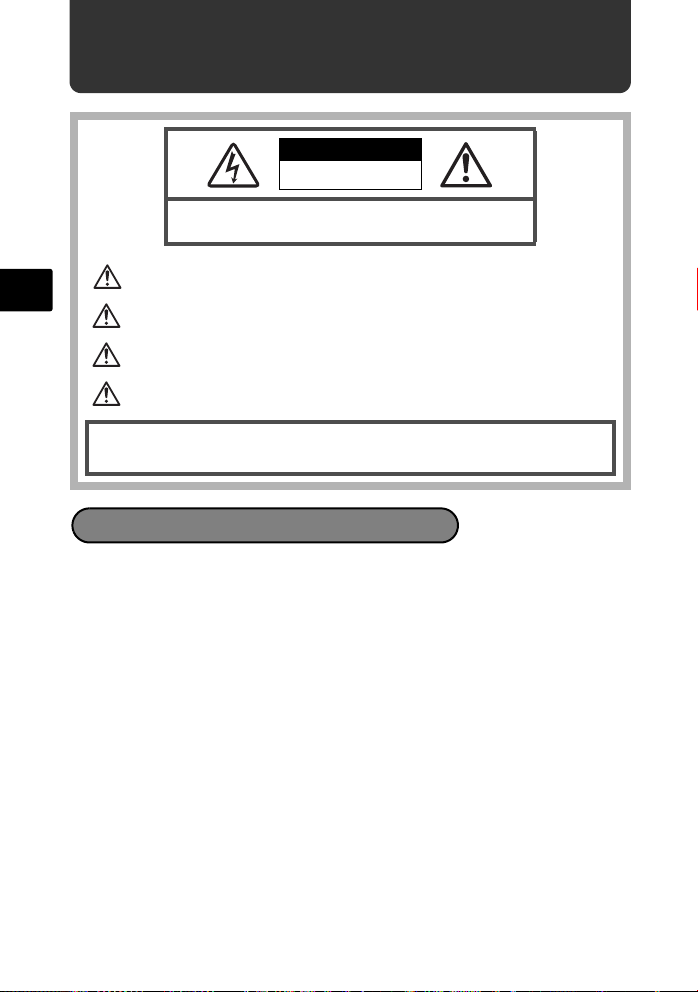
Safety Precautions
CAUTION
RISK OF ELECTRIC SHOCK
DO NOT OPEN
CAUTION: TO REDUCE THE RISK OF ELECTRICAL SHOCK, DO NOT
REMOVE COVER (OR BACK). NO USER-SERVICEABLE PARTS INSIDE.
REFER SERVICING TO QUALIFIED OLYMPUS SERVICE PERSONNEL.
An exclamation mark enclosed in a triangle alerts you to important operating and
En
DANGER
WARNING
CAUTION
WARNING!
TO AVOID THE RISK OF FIRE OR ELECTRICAL SHOCK, NEVER DISASSEMBLE, EXPOSE THIS PRODUCT
TO WATER OR OPERATE IN A HIGH HUMIDITY ENVIRONMENT.
General Precautions
Read All Instructions — Before you use the product, read all operating
instructions. Save all manuals and documentation for future reference.
Cleaning — Always unplug this product from the wall outlet before cleaning. Use
only a damp cloth for cleaning. Never use any type of liquid or aerosol cleaner,
or any type of organic solvent to clean this product.
Attachments — For your safety, and to avoid damaging the product, use only
accessories recommended by Olympus.
Water and Moisture — For precautions on products with weatherproof designs,
read the weatherproofing sections.
Location — To avoid damage to the product, mount the product securely on a
stable tripod, stand, or bracket.
Power Source — Connect this product only to the power source described on
the product label.
Foreign Objects — To avoid personal injury, never insert a metal object into the
product.
Heat — Never use or store this product near any heat source such as a radiator,
heat register, stove, or any type of equipment or appliance that generates
heat, including stereo amplifiers.
maintenance instructions in the documentation provided with the product.
If the product is used without observing the information given under this symbol, serious
injury or death may result.
If the product is used without observing the information given under this symbol, injury or
death may result.
If the product is used without observing the information given under this symbol, mino r
personal injury, damage to the equipment, or loss of valuable data may result.
22
Page 23

Handling the Camera
WARNING
( Do not use the camera near flammable or explosive gases.
( Do not use the flash on people (infants, small children, etc.) at
close range.
• You must be at least 1 m (3 ft.) away from the faces of your subjects. Firing
the flash too close to the subject’s eyes could cause a momentary loss of
vision.
• Keep young children and infants away from the camera.
• Always use and store the camera out of the reach of young children and
infants to prevent the following dangerous situations which could cause
serious injury:
• Becoming entangled in the camera strap, causing strangulation.
• Accidentally swallowing the battery, cards or other small parts.
• Accidentally firing the flash into their own eyes or those of another child.
• Accidentally being injured by the moving parts of the camera.
( Do not look at the sun or strong lights with the camera.
( Do not use or store the camera in dusty or humid places.
( Do not cover the flash with a hand while firing.
CAUTION
( Stop using the camera immediately if you notice any unusual
odors, noise, or smoke around it.
• Never remove the batteries with bare hands, which may cause a fire or
burn your hands.
( Never hold or operate the camera with wet hands.
( Do not leave the camera in places where it may be subject to
extremely high temperatures.
• Doing so may cause parts to deteriorate and, in some circumstances,
cause the camera to catch fire. Do not use the charger if it is covered (such
as a blanket). This could cause overheating, resulting in fire.
( Handle the camera with care to avoid getting a low-temperature
burn.
• When the camera contains metal parts, overheating can result in a lowtemperature burn. Pay attention to the following:
• When used for a long period, the camera will get hot. If you hold on to the
camera in this state, a low-temperature burn may be caused.
• In places subject to extremely cold temperatures, the temperature of the
camera’s body may be lower than the environmental temperature. If
possible, wear gloves when handling the camera in cold temperatures.
( Be careful with the strap.
• Be careful with the strap when you carry the camera. It could easily catch
on stray objects - and cause serious damage.
En
23
Page 24

Battery Handling Precautions
Follow these important guidelines to prevent batteries from leaking,
overheating, burning, exploding, or causing electrical shocks or burns.
DANGER
• The camera uses a lithium ion battery specified by Olympus. Charge the
battery with the specified charger. Do not use any other chargers.
• Never heat or incinerate batteries.
• Take precautions when carrying or storing batteries to prevent them from
coming into contact with any metal objects such as jewelry, pins, fasteners, etc.
En
• Never store batteries where they will be exposed to direct sunlight, or subjected
to high temperatures in a hot vehicle, near a heat source, etc.
• To prevent causing battery leaks or damaging their terminals, carefully follow
all instructions regarding the use of batteries. Never attempt to disassemble a
battery or modify it in any way, by soldering, etc.
• If battery fluid gets into your eyes, flush your eyes immediately with clear, cold
running water and seek medical attention immediately.
• Always store batteries out of the reach of small children. If a child accidentally
swallows a battery, seek medical attention immediately.
WARNING
• Keep batteries dry at all times.
• To prevent batteries from leaking, overheating, or causing a fire or explosion,
use only batteries recommended for use with this product.
• Insert the battery carefully as described in the operating instructions.
• If rechargeable batteries have not been recharged within the specified time,
stop charging them and do not use them.
• Do not use a battery if it is cracked or broken.
• If a battery leaks, becomes discolored or deformed, or becomes abnormal in
any other way during operation, stop using the camera.
• If a battery leaks fluid onto your clothing or skin, remove the clothing and flush
the affected area with clean, running cold water immediately. If the fluid burns
your skin, seek medical attention immediately.
• Never subject batteries to strong shocks or continuous vibration.
CAUTION
• Before loading, always inspect the battery carefully for leaks, discoloration,
warping, or any other abnormality.
• The battery may become hot during prolonged use. To avoid minor burns, do
not remove it immediately after using the camera.
• Always unload the battery from the camera before storing the camera for a long
period.
24
Page 25

For customers in Europe
“CE” mark indicates that this product complies with the European
requirements for safety, health, environment and customer protection. “CE”
mark cameras are intended for sales in Europe.
This symbol [crossed-out wheelie bin WEEE Annex IV] indicates separate
collection of waste electrical and electronic equipment in the EU countries.
Please do not throw the equipment into the domestic refuse.
Please use the return and collection systems available in your country for the
disposal of this product.
Use Only Dedicated Rechargeable Battery and Battery Charger
We strongly recommend that you use only the genuine Olympus dedicated
rechargeable battery and battery charger with this camera.
Using a non-genuine rechargeable battery and/or battery charger may result in
fire or personal injury due to leakage, heating, ignition or damage to the battery.
Olympus does not assume any liability for accidents or damage that may result
from the use of a battery and/or battery charger that are not genuine Olympus
accessories.
Trademarks
• IBM is a registered trademark of International Business Machines Corporation.
• Microsoft and Windows are registered trademarks of Microsoft Corporation.
• Macintosh is a trademark of Apple Computer Inc.
• xD-Picture Card™ is a trademark.
• All other company and product names are registered trademarks and/or
trademarks of their respective owners.
• The standards for camera file systems referred to in this manual are the
“Design Rule for Camera File System/DCF” standards stipulated by the Japan
Electronics and Information Technology Industries Association (JEITA).
En
25
Page 26

Provisions of warranty
1. If this product proves to be defective, although it has been used properly (in accordance with the
written Handling Care and Operating instructions supplied with it), during a period of two years
from the date of purchase from an authorized Olympus distributor within the business area of
Olympus Imaging Europa GmbH as stipulated on the website: http://www.olympus.com this
product will be repaired, or at Olympus’s option replaced, free of charge. To claim under this
warranty the customer must take the product and this Warranty Certificate before the end of the
two year warranty period to the dealer where the product was purchased or any other Olympus
service station within the business area of Olympus Imaging Europa GmbH as stipulated on the
website: http://www.olympus.com. During the one year period of the World Wide Warranty the
customer may turn the product in at any Olympus service station. Please notice that not in all
countries such Olympus service station exists.
2. The customer shall transport the product to the dealer or Olympus authorized service station at
his own risk and shall be responsible for any costs incurred in transporting the product.
3. This warranty does not cover the following and the customer will be required to pay repair
charge, even for defects occurring within the warranty period referred to above.
(a) Any defect that occurs due to mishandling (such as an operation performed that is not
En
mentioned in the Handling Care or other sections of the instructions, etc.)
(b) Any defect that occurs due to repair, modification, cleaning, etc. performed by anyone other
than Olympus or an Olympus authorized service station.
(c) Any defect or damage that occurs due to transport, a falI, shock, etc. after purchase of the
product.
(d) Any defect or damage that occurs due to fire, earthquake, flood damage, thunderbolt, other
natural disasters, environmental pollution and irregular voltage sources.
(e) Any defect that occurs due to careless or improper storage (such as keeping the product
under conditions of high temperature and humidity, near insect repellents such as
naphthalene or harmful drugs, etc.), improper maintenance, etc.
(f) Any defect that occurs due to exhausted batteries, etc.
(g) Any defect that occurs due to sand, mud, etc. entering the inside of the product casing.
(h) When this Warranty Certificate is not returned with the product.
(i) When any alterations whatsoever are made to the Warranty Certificate regarding the year,
month and date of purchase, the customer’s name, the dealer’s name, and the serial
number.
(j) When proof of purchase is not presented with this Warranty Certificate.
4. This Warranty applies to the product only; the Warranty does not apply to any other accessory
equipment, such as the case, strap, lens cap and batteries.
5. Olympus’s sole liability under this warranty shall be limited to repairing or replacing the product.
Any liability for indirect or consequential loss or damage of any kind incurred or suffered by the
customer due to a defect of the product, and in particular any loss or damage caused to any
lenses, films, other equipment or accessories used with the product or for any loss resulting from
a delay in repair or loss of data, is excluded. Compelling regulations by law remain unaffected
by this.
Notes regarding warranty maintenance
1. This warranty will only be valid if the Warranty Certificate is duly completed by Olympus or an
authorized dealer or other documents contain sufficient proof. Therefore, please make sure that
your name, the name of the dealer, the serial number and the year, month and date of purchase
are all completed or the original invoice or the sales receipt (indicating the dealer’s name, the
date of purchase and product type) is attached to this Warranty Certificate. Olympus reserves
the right to refuse free-of-charge service if neither Warranty Certificate is completed nor the
above document is attached or if the information contained in it is incomplete or illegible.
2. Since this Warranty Certificate will not be re-issued, keep it in a safe place.
* Please refer to the list on the website: http://www.olympus.com for the authorized international
Olympus service network.
Disclaimer of Warranty
Olympus makes no representations or warranties, either expressed or implied, by or concerning
any content of these written materials or software, and in no event shall be liable for any impelled
warranty purchase are all completed or the original invoice or the sales receipt of merchantability or
fitness for any particular purpose or for any consequential, incidental or indirect damages (including
but not limited to damages for loss of business profits, business interruption and loss of business
information) arising from the use of inability to use these written materials or software. Some states
do not allow the exclusion or limitation of liability for consequential or incidental damages, so the
above limitations may not apply to you.
26
Page 27

Memo
En
27
Page 28

Table des matières
Réunissez ces éléments (contenu de la boîte) ............................. 29
Attachez la courroie............................................................................. 29
Préparer la batterie.......................................................................... 30
Allumer l’appareil photo.................................................................. 31
Régler la date et l’heure .................................................................. 32
A propos de l’écran de réglage de la date et de l’heure...................... 32
Régler la langue............................................................................... 34
Prendre une photo........................................................................... 35
Vérifier les images........................................................................... 36
Fr
Effacer des photos ..............................................................................36
Fonctionnement de base................................................................. 37
Touches du mode prise de vue ...........................................................37
Modes de scène .................................................................................. 38
Mode gros plan....................................................................................38
Modes flash .........................................................................................39
Retardateur .........................................................................................39
Fonctionnalité d’économie d’énergie................................................... 39
Menus et réglages............................................................................ 40
Menu principal .....................................................................................40
Effacement de toutes les photos ......................................................... 40
Connexion de l’appareil photo ....................................................... 41
Affichage sur un téléviseur .................................................................. 41
Impression directe (PictBridge) ...........................................................42
Transfert d’images........................................................................... 43
Logiciel OLYMPUS Master.............................................................. 45
Caractéristiques............................................................................... 46
Précautions de sécurité .................................................................. 48
Avant d’utiliser votre appareil photo, lisez attentivement ce manuel pour
garantir une utilisation correcte.
Nous vous recommandons de prendre des photos-test pour vous habituer à
votre appareil avant de commencer à prendre de vraies photos.
Veillez à ce que les mesures de sécurité présentées à la fin de ce manuel soit
respectées.
Les images sur l’écran ACL et les illustrations de l’appareil photo figurant dans
ce manuel peuvent différer de celles du produit. Sauf indication contraire, les
explications relatives à ces illustrations sont fournies dans les guides relatifs
aux modèles FE-230/X-790.
28
Page 29
Réunissez ces éléments (contenu de la boîte)
Appareil photo
numérique
Chargeur de
batterie (LI-40C)
Eléments non illustrés : Manuel Avancé (CD-ROM), Manuel de Base
(présent manuel), carte de garantie. Le contenu est susceptible de varier en
fonction de l’endroit où l’appareil est acheté.
Câble USB Câble AV CD-ROM
Courroie Batterie au lithium-ion
(LI-42B)
OLYMPUS Master
Attachez la courroie
Fr
Tendez la courroie afin qu’elle ne soit pas relâchée.
29
Page 30
Préparer la batterie
a. Chargez la batterie.
W
3
Câble d’alimentation
1
Fr
Prise
secteur
2
Indicateur de charge
Allumé en rouge :
Chargement en cours
Éteint : Chargement terminé
(Durée de chargement :
Environ 300 minutes)
La batterie est livrée en partie chargée.
b. Insérez la batterie dans l’appareil photo.
2
4
1
5
Insérez la batterie dans le sens
indiqué par la symbole .
3
Batterie au
lithium-ion
Chargeur
de batterie
Bouton de verrouillage de la batterie
Pour retirer la batterie, appuyez sur le
bouton de verrouillage de la batterie
dans le sens indiqué par la flèche.
Avec cet appareil photo, vous pouvez prendre des photos sans insérer la
xD-Picture Card™ en option (appelée ci-après “la carte”). Pour plus
d’informations sur l’insertion de la carte, reportez-vous au Manuel Avancé.
30
Page 31

Allumer l’appareil photo
HEURE
----
.--.-- --:--
A / M / J
Cette rubrique vous explique comment allumer l’appareil en mode de prise de vue.
a. Amenez la molette mode sur h.
Lors de la prise de vidéo
Lors de la prise de vue
fixe
Modes de prise de vue d’images fixes
h Pour la prise de vue normale.
h Cette fonction réduit le flou dû à un mouvement du sujet ou un bougé de
B Idéal pour prendre des photos de personnes.
E Idéal pour prendre des photos de paysages.
M Idéal pour prendre des photos de personnes de nuit.
f Sélectionnez une scène parmi les 10 (FE-240/X-795) ou les 13
R Utilisez le guide de prise de vue affiché à l’écran pour prendre des photos
l’appareil lors de la prise de vue.
(FE-230/X-790) scènes disponibles selon les conditions de prise de vue.
en fonction de la situation.
b. Appuyez sur la touche o.
Touche o
Cet écran s’affiche si
Pour éteindre l’appareil photo, appuyez sur la touche o.
Conseil
Les directions de la molette de défilement sont indiquées
par les symboles ONXY dans le manuel d’instructions
fourni.
HEURE
JMA
----
.--.-- --:--
MENU
ANNULE
A/M/J
la date et l’heure de
sont pas réglées.
O
N
Fr
YX
31
Page 32

Régler la date et l’heure
----
.--.-- --:--
HEURE
A / M / J
2007
.--.-- --:--
HEURE
A / M / J
2007
.-- --:--
HEURE
A / M / J
A propos de l’écran de réglage de la date et de l’heure
A-M-J
Heure
HEURE
JMA
A/M/J
Annule les réglages
Fr
.--.-- --:--
----
MENU
ANNULE
a. Appuyez sur les touches OF/< et NY pour
sélectionner [A].
• Les deux premiers chiffres de l’année sont fixes.
b. Appuyez sur la touche Y#.
Minute
Formats de date (A-M-J, M-J-A, J-M-A)
Touche OF/<
2007
Touche NY
ANNULE
.--.-- --:--
MENU
HEURE
JMA
A/M/J
Touche Y#
c. Appuyez sur les touches OF/
< et NY pour sélectionner
[M].
32
2007
.
MENU
ANNULE
HEURE
JMA
0202.-- --:--
A/M/J
Page 33

d. Appuyez sur la touche Y#.
2007
--:--
HEURE
A / M / J
2007
30
HEURE
A / M / J
2007
30
HEURE
A / M / J
IN
3072
2304
e. Appuyez sur les touches OF/
< et NY pour sélectionner [J].
f. Appuyez sur la touche Y#.
g. Appuyez sur les touches OF/
< et NY pour sélectionner les
heures et les minutes.
• L’heure est affichée au format 24 heures.
Régler la date et l’heure
HEURE
JMA
HEURE
1212:
30
A/M/J
A/M/J
2007
.
MENU
ANNULE
2007
.
0202.
0202.
1010 --:--
JMA
1010
h. Appuyez sur la touche Y#.
i. Appuyez sur les touches OF/
< et NY pour sélectionner
[A/M/J].
j. Une fois que vous avez paramétré tous ces
réglages, appuyez sur
• Pour un réglage plus précis, appuyez sur lorsque l’horloge franchit 00
seconde.
.
Touche
MENU
ANNULE
2007
.
MENU
ANNULE
HQHQ3072
0202.
JMA
1010
HEURE
1212:
[ ]
×2304
30
CONF
A/M/J
CONF
OK
OK
[
]
IN
44
33Fr33
Page 34

Régler la langue
RE-
INITIALI.
PANORAMA
SILENCE
REGLAGE
QUALITE
D'IMAGE
SCENE
IMAGE +
SON
RE-
INITIALI.
PANORAMA
SILENCE
REGLAGE
QUALITE
D'IMAGE
SCENE
IMAGE +
SON
REGLAGE
a. Appuyez sur la touche m pour afficher le menu
principal.
PANORAMA
PANORAMA
QUALITE
RE-
QUALITE
Touche m
Fr
b. Appuyez sur la touche Y#
pour sélectionner [REGLAGE]
et appuyez sur .
c. Appuyez sur les touches OF/
< et NY pour sélectionner
[W], puis appuyez sur .
INITIALI.
QUITTE
INITIALI.
QUITTE
RETOUR
MENU
PANORAMA
PANORAMA
RE-
MENU
1
FORMATER
2
SAUVEGARDER
3
PIXEL MAPPING
MENU
D'IMAGE
D'IMAGE
SCENE
QUALITE
QUALITE
D'IMAGE
D'IMAGE
SCENE
IMAGE +
SON
REGLAGE
SILENCE
SILENCE
CONF
IMAGE +
SON
REGLAGE
SILENCE
SILENCE
CONF
FRANCAIS
NON
CONF
OK
OK
OK
d. Appuyez sur la molette de
défilement (ONXY) pour
sélectionner une langue, puis
appuyez sur .
• Vous pouvez ajouter d’autres langues à votre
appareil à l’aide du logiciel OLYMPUS Master
fourni. Reportez-vous au Manuel Avancé.
34
W
ENGLISH
FRANCAIS
DEUTSCH
ESPAÑOL
MENU
RETOUR
ITALIANO
NEDERLANDS
OK
CONF
Page 35

Prendre une photo
3072
2304
IN
a. Tenez l’appareil photo.
Tenue horizontale Tenue verticale
Fr
b. Effectuez la mise au point.
Déclencheur
(Appuyez
jusqu’à mi-course)
c. Prenez la photo.
Déclencheur
(Appuyez
complètement)
Placez cette marque
sur votre sujet.
[ ]
[
]
HQHQ3072
×2304
Le nombre de photos
pouvant être prises est
Le voyant vert indique que la mise au
point et l’exposition sont verrouillées.
affiché.
Voyant d’accès de carte.
IN
44
35
Page 36

Vérifier les images
12: 30
'0 7 .0 2.1 0
100-0004
HQ
IN
30 7 2
23 0 4
0. 0
a. Appuyez sur la touche q.
Touche q
Molette de
défilement
[
]
IN
3072
HQ
×2304
0.0
Affiche l’image suivante
'07.02.10
Fr
Affiche l’image précédente
Effacer des photos
a. Appuyez sur les touches X& et Y# pour afficher
l’image que vous voulez effacer.
b. Appuyez sur la touche S.
EFFACER
Touche S
RETOUR
MENU
c. Appuyez sur la touche OF/<, sélectionnez [OUI],
et appuyez sur .
Touche OF/<
Touche
EFFACER
MENU
RETOUR
12:30
100-0004
[IN]
OUI
NON
CONF
[IN]
OUI
NON
CONF
4
OK
OK
36
Page 37

Fonctionnement de base
Touches du mode prise de vue
Lorsque vous êtes en mode prise de vue, ces touches vous permettent
d’accéder rapidement à certaines des fonctions les plus utilisées.
1
2
7
8
9
0
3
5
6
4
1 Touche K (Prise de vue)
Sélectionne le mode de prise de vue.
2 Touche q (Affichage)
Sélectionne le mode d’affichage.
3 Touche m
Affiche le menu principal.
4 Touche S (Effacement)
Sélectionne l’image que vous voulez supprimer en mode d’affichage.
5 Molette de défilement (ONXY)
Sélectionne des scènes, des images affichées et des éléments de menu.
6 Touche X& (Mode gros plan)
Active le mode gros plan ou super gros plan pour la prise de photos rapprochées.
7 Touche OF/< (compensation d’exposition/impression)
En mode prise de vue, appuyez sur cette touche pour régler la valeur de
compensation d’exposition qui modifie la luminosité de la photo.
8 Touche Y# (Mode flash)
Sélectionne un des quatre modes de flash - AUTO, ! (Atténuant l’effet yeux
rouges), # (Flash d’appoint), ou $ (Flash désactivé).
9 Touche (OK)
Confirme les réglage.
0 Touche NY (Retardateur)
Sélectionne le retardateur pour retarder la prise de vue d’environ 12 secondes
une fois que le déclencheur a été enfoncé.
Fr
37
Page 38

Modes de scène
Cette fonction vous permet de sélectionner le mode f (scène) en fonction
du sujet.
1 Amenez la molette mode sur f.
1
SPORT
Molette mode
RETOUR
MENU
CONF
OK
O/N
Touche
Fr
2 Appuyez sur O/N pour sélectionner des modes de scène et appuyez sur .
Modes de scène de prise de vue
• j SPORT • N INTERIEUR • W BOUGIE
AUTO PORTRAIT
• R
• P VITRINE • V
• i ENCHÈRE •
•H SOUS-MARIN MACRO
*1 Uniquement disponible pour le FE-230/X-790.
• S
COUCHER DE SOLEIL
CUISINE • d DOCUMENTS
k
SOUS-MARIN LARGE1*1•l SOUS-MARIN LARGE2
*1
• X FEUX D’ARTIFICES
Mode gros plan
& Ce mode vous permet de prendre des photos à une distance de 10 cm (modèle
FE-230/X-790) ou de 20 cm (modèle FE-240/X-795). (avec le plus grand angle)
% Ce mode vous permet de prendre des photos à une distance de 5 cm (modèle
FE-230/X-790) ou de 3 cm (modèle FE-240/X-795). En mode %, la position du
zoom est fixe.
1 Appuyez plusieurs fois sur la touche X& pour sélectionner [&] ou [%] et
appuyez sur .
*1
38
Page 39

Modes flash
1 Appuyez plusieurs fois sur la touche Y# pour sélectionner le mode de flash
et appuyez sur .
2 Appuyez sur le déclencheur jusqu’à mi-course.
Lorsque le flash est réglé pour se déclencher, l’indication # s’allume.
3 Enfoncez complètement le déclencheur pour prendre la photo.
Icône Mode flash Description
Aucune
indication
Flash
automatique
Flash atténuant
!
l’effet “yeux
rouges”
Flash d’appoint Le flash se déclenche quelles que soient les conditions
#
Flash désactivé Le flash ne se déclenche pas, même dans des
$
Le flash se déclenche automatiquement lorsque
l’éclairage est faible ou à contre-jour.
Ce mode permet d’atténuer considérablement l’effet
“yeux rouges” en émettant une série de pré-éclairs
avant de déclencher le flash principal.
d’éclairage.
situations de faible éclairage.
Retardateur
Fr
1 Appuyez sur la touche NY pour sélectionner [Y] et
appuyez sur .
Voyant du
retardateur
2 Enfoncez complètement le déclencheur pour prendre la
photo.
Le voyant du retardateur s’allume pendant environ 10
secondes après que le déclencheur ait été enfoncé, puis il
clignote. La photo est prise après environ 2 secondes de
clignotement.
Fonctionnalité d’économie d’énergie
Pour économiser l’énergie de la batterie, l’appareil photo passe
automatiquement en mode veille et cesse de fonctionner après 3 minutes
d’inactivité environ. Actionnez le déclencheur ou le levier de zoom pour
réactiver l’appareil photo.
Une fois qu’il est entré en mode veille, si l’appareil n’est toujours pas utilisé au
bout de 12 minutes, l’objectif se rétracte automatiquement et l’appareil
s’éteint. Pour l’utiliser à nouveau, remettez-le sous tension.
39
Page 40

Menus et réglages
RE-
INITIALI.
PANORAMA
SILENCE
REGLAGE
QUALITE
D'IMAGE
SCENE
IMAGE +
SON
Menu principal
1 Appuyez sur la touche m pour afficher le menu principal à l’écran.
2 Utilisez la molette de défilement (ONXY) pour sélectionner des éléments
de menu.
Menu principal en mode
prise de vue
PANORAMA
PANORAMA
QUALITE
RE-
Fr
Touche m
QUITTE
QUALITE D’IMAGE
Définit la qualité de l’image et la résolution.
PANORAMA
Crée une image panoramique.
REINITIALI.
Rétablit les réglages d’usine par défaut.
SCENE
Sélectionnez une scène en fonction du sujet et des conditions de prise de vue.
SILENCE
Désactive le son de fonctionnement, d’avertissement, du déclencheur, etc. en
mode prise de vue et d’affichage.
REGLAGE
Définit la date et l’heure, la langue et d’autres paramètres.
IMAGE + SON/VIDEO AVEC SON
Permet d’enregistrer des sons lors de la prise de vue.
INITIALI.
MENU
QUALITE
D'IMAGE
D'IMAGE
SCENE
IMAGE +
SON
REGLAGE
SILENCE
SILENCE
CONF
OK
Effacement de toutes les photos
1 Appuyez sur la touche m pour afficher le
menu principal en mode d’affichage.
2 Sélectionnez [EFFACER], [TOUT EFFAC] et
appuyez sur .
3 Sélectionnez [OUI] et appuyez sur .
40
Toutes les images sont effacées.
TOUT EFFAC
ATTENTION TOUT EFFAC
OUI
NON
MENU
RETOUR
CONF
[IN]
[IN]
OK
Page 41

Connexion de l’appareil photo
Affichage sur un téléviseur
Utilisez le câble AV fourni avec l’appareil photo pour visualiser les images
enregistrées directement sur votre téléviseur. Vous pouvez lire ainsi à la fois les
images fixes et les vidéos.
1 Assurez-vous que le téléviseur et l’appareil photo sont éteints. Branchez le
connecteur multiple de l’appareil photo à la prise d’entrée vidéo du téléviseur
avec le câble AV.
Connecteur multiple
Câble AV (fourni)
Couvercle du connecteur
À brancher aux born es d’entrée
vidéo (jaune) et d’entrée audio
(blanc) du téléviseur.
2 Allumez le téléviseur et mettez-le en mode entrée vidéo.
Pour en savoir plus sur la commutation de l’entrée vidéo, veuillez consulter le manuel
du téléviseur.
3 Allumez l’appareil photo et appuyez sur la touche q pour sélectionner le
mode d’affichage.
La dernière photo prise est affichée sur le téléviseur. Utilisez la molette de défilement
(ONXY) pour sélectionner la photo que vous voulez afficher.
Fr
41
Page 42

Impression directe (PictBridge)
A l’aide du câble USB fourni, vous pouvez connecter votre appareil photo
directement à une imprimante compatible PictBridge pour effectuer des
impressions. Vous pouvez imprimer facilement des images.
1 En mode d’affichage, affichez la photo que vous souhaitez imprimer sur
l’écran ACL.
2 Connectez une des extrémités du câble USB dans le connecteur multiple de
l’appareil photo et l’autre dans le connecteur USB de l’imprimante.
Connecteur multiple
Fr
Touche OF/<
3 Appuyez sur la touche OF/<.
L’impression démarre.
Lorsque l’impression est terminee, déconnectez le
câble USB de l’appareil photo. L’écran de sélection
des photos s’affiche.
Câble USB
IMPRESSION FACILE DEMARRER
PC / IMPRESSION SPÉCIALE
OK
42
Page 43

Transfert d’images
a. Installez le logiciel
1 Insérez le CD-ROM OLYMPUS Master.
2 Windows: Cliquez sur la touche “OLYMPUS
Macintosh: Double-cliquez sur l’icône
3 Suivez simplement les instructions à l’écran.
Master 2”.
“Setup”.
b. Connectez l’appareil photo à l’ordinateur
1 Connectez l’appareil photo et l’ordinateur à l’aide du câble USB (fourni).
L’écran ACL s’allume automatiquement.
Câble USB
2
2 Sélectionnez [PC] à l’écran ACL et appuyez sur
.
Votre PC reconnaît maintenant votre appareil photo
comme unité de stockage amovible.
1
USB
PC
IMPRESSION FACILE
IMPRESSION SPÉCIALE
QUITTER
CONF
Fr
OK
43
Page 44

c. Transférez les images vers l’ordinateur
1 Gardez votre appareil photo connecté, puis ouvrez OLYMPUS Master.
2 Cliquez sur “Transférer des images” dans
la fenêtre Parcourir, puis cliquez sur “Depuis
l’appareil photo” .
3 Suivez simplement les instructions à l’écran.
Fr
Conseils
• Pour des informations plus détaillées concernant la configuration et
l’utilisation de l’appareil photo, veuillez consulter le “Manuel Avancé” de
l’appareil photo fourni sur le CD-ROM.
• Pour plus d’informations, consultez le fichier “Aide” du logiciel OLYMPUS
Master.
44
Page 45

Logiciel OLYMPUS Master
Logiciel OLYMPUS Master : Utilisez ce logiciel pour
télécharger des photos à partir de l’appareil photo, pour
afficher, organiser, retoucher, envoyer par courrier
électronique et imprimer vos photos et vidéos numériques,
etc.
(Configurations système minimales
SE Windows 2000 Professional/XP Home Edition/XP Professional/Vista
ou Mac OS X (10.3 ou version ultérieure)
UC Pentium III 500 MHz/Power PC G3 500 MHz/Intel Core Solo/
Duo 1.5 GHz, ou ultérieur
RAM 256 Mo ou plus
Disque dur 500 Mo ou plus d’espace disque
Connexion Port USB/port IEEE 1394
Écran ACL Résolution de 1024 × 768 pixels ou plus avec un minimum de 65.536
couleurs (Windows), 32.000 couleurs (Macintosh)
Autres Internet Explorer 6 ou ultérieur (Windows), Safari 1.0 ou ultérieur,
QuickTime 6 ou ultérieur (Macintosh)
Pour obtenir les dernières informations relatives à la prise en charge, consultez
le site Web d’Olympus (http://www.olympus.com/)
Enregistrement de l’utilisateur
Enregistrez votre appareil photo lorsque vous installez OLYMPUS
Master pour activer la garantie, recevoir des notifications pour le logiciel
et les mises à jour de micro-logiciels et plus encore.
Fr
45
Page 46

Caractéristiques
(Appareil photo
Type de produit : Appareil photo numérique (prise de vue et affichage)
Système
d’enregistrement
Photos : Enregistrement numérique, JPEG (conforme à la norme
Normes
applicables
Image fixe avec son
Vidéo : AVI Motion JPEG
Mémoire : Mémoire interne
Fr
Nombre de pixels
effectifs
Capteur d’image : CCD (filtre de couleur primaire) de 1/2,5"
Objectif : FE-230/X-790:
Système de mesure : Mesure ESP numérique
Vitesse d’obturation : 4 à 1/2000 sec.
Portée de prise de vue : FE-230/X-790:
Écran ACL :
Connecteurs externes : Connecteur USB, prise OUT A/V (connecteur multiple)
Calendrier automatique : de 2000 à 2099
Conditions de fonctionnement
Température : 0°C à 40°C (fonctionnement)/
Humidité : 30% à 90% (fonctionnement)/10% à 90% (stockage)
Alimentation : Une batterie au lithium-ion Olympus (LI-42B/LI-40B)
DCF (Design rule for Camera File system))
: Exif 2.2, Digital Print Order Format (DPOF), PRINT
Image Matching III, PictBridge
: Format Wave
xD-Picture Card (16 Mo à 2 Go) (Type H/M, Standard)
: 7.100.000 de pixels
7.400.000 pixels (brut)
Objectif Olympus 6,3 mm à 18,9 mm, f3,1 à 5,9
(équivalent à un objectif de 38 mm à 114 mm sur un
appareil photo de 35 mm)
FE-240/X-795:
Objectif Olympus 6,4 mm à 32 mm, f3,3 à 5,0
(équivalent à un objectif de 38 mm à 190 mm sur un
appareil photo de 35 mm)
0,6 m à ) (W), 1,0 m à ) (T) (normal)
0,1 m à ) (W), 0,6 m à ) (T) (mode gros plan)
0,05 m pour (mode super gros plan)
FE-240/X-795:
0,7 m à ) (normal),
0,2 m à ) (W), 0,6 m à ) (T) (mode gros plan)
0,03 m (mode super gros plan)
Écran couleur à cristaux liquides TFT de 2,5", 115.000 pixels
-20°C à 60°C (stockage)
46
Page 47

Dimensions : FE-230/X-790:
Poids : FE-230/X-790: 105 g sans la batterie et la carte
90,5 mm (P) × 55,0 mm (H) × 16,5 mm (D)
(hors saillies)
FE-240/X-795:
93,5 mm (P) × 56,0 mm (H) × 20,0 mm (D)
(hors saillies)
FE-240/X-795: 115 g sans la batterie et la carte
(Batterie au lithium-ion (LI-42B)
Type de produit : Batterie au lithium-ion rechargeable
Tension standard : 3,7 V CC
Capacité standard : 740 mAh
Durée de vie de la
batterie
Conditions de
fonctionnement
Température : 0°C à 40°C (charge)/
Dimensions : 31,5 × 39,5 × 6 mm
Poids : Environ 15 g
: Environ 300 charges complètes (en fonction de
l’utilisation)
-10°C à 60°C (fonctionnement)/
-20°C à 35°C (stockage)
(Chargeur de batterie (LI-40C)
Alimentation requise : 100 à 240 V CA (50 à 60 Hz)
Sortie : 4,2 V CC, 200 mA
Durée de charge : Environ 300 minutes
Conditions de
fonctionnement
Température : 0°C à 40°C (fonctionnement)/
Dimensions : 62 × 23 × 90 mm
Poids : Environ 65 g
3,2 VA (100 V) à 5,0 VA (240 V)
-20°C à 60°C (stockage)
Fr
La conception et les caractéristiques peuvent être modifiées sans préavis.
47
Page 48

Précautions de sécurité
ATTENTION
RISQUE DE DÉCHARGE
ÉLECTRIQUE NE PAS OUVRIR
ATTENTION:
RETIRER NI LA PARTIE ANTERIEURE NI POSTERIEURE DU BOÎTIER. AUCUNE
PIÈCE À L’I NTÉRIEUR NE PEUT ÊTRE RÉ PARÉE PAR L’UTILIS ATEUR. SE RÉFÉRER
Fr
DANGER
AVERTISSEMENT
ATTENTION
AVERTISSEMENT !
POUR ÉVITER LES RISQUES D’INCENDIE OU DE DÉCHARGE ÉLECTRIQUE, NE JAMAIS DÉMONTER,
EXPOSER CE PRODUIT À L’EAU NI LE FAIRE FONCTIONNER DANS UN ENVIRONNEMENT TRÈS HUMIDE.
Précautions générales
Lire toutes les instructions — Avant d’utiliser l’appareil, lire toutes les
instructions de fonctionnement. Sauvegarder tous les manuels et la
documentation pour s’y référer ultérieurement.
Nettoyage — Toujours débrancher ce produit de la prise de courant avant
nettoyage. N’utiliser qu’un chiffon humide pour le nettoyage. Ne jamais utiliser
de produits de nettoyage liquides ou aérosols, ni de solvants organiques pour
nettoyer ce produit.
Accessoires — Pour votre sécurité, et pour éviter d’endommager le produit,
n’utiliser que des accessoires recommandés par Olympus.
Eau et humidité — Pour les précautions sur des produits avec une conception
imperméable, lire les sections imperméabilisation.
Emplacement — Pour éviter d’endommager l’appareil, monter le produit
solidement sur un trépied ou un sabot stable.
Alimentation — Ne raccorder ce produit qu’à la source d’alimentation décrite
sur l’étiquette du produit.
Entrée d’objets — Pour éviter des blessures, ne jamais introduire d’objet
métallique dans le produit.
Chaleur — Ne jamais utiliser ni ranger ce produit près d’une source de chaleur
telle qu’un radiateur, un accumulateur de chaleur, ou tout type d’appareil qui
génère de la chaleur, comprenant les amplificateurs.
48
POUR RÉDUI RE LE RISQUE DE DÉCH ARGE ÉLECTRIQUE, NE
À DU PERSONN EL DE DÉPANNAGE QUALI FIÉ POUR UNE RÉPARATI ON.
Le point d’exclamation à l’intérieur d’un triangle vous alerte sur certains points
importants concernant le maniement et l’entretien de l’appareil figurant dans la
documentation fournie avec le produit.
Si le produit est utilisé sans respect er les informations données sous ce symbole,
des blessures graves, voire mortelles pourraient en résulter.
Si le produit est utilisé sans respect er les informations données sous ce symbole,
des blessures voire la mort pourraient en résulter.
Si le produi t est utilisé sans obse rver les information s données sous ce symbole, de s
blessures, des dommages à l’appareil ou des pertes de données pourraient en résulter.
Page 49

Maniement de l’appareil
AVERTISSEMENT
( Ne pas utiliser l’appareil à proximité de gaz inflammables ou
explosifs.
( Ne pas utiliser le flash de très près sur des personnes (bébés,
jeunes enfants, etc.).
• Vous devez être au moins à 1 m des visages de vos sujets. Déclencher le
flash trop près des yeux du sujet pourrait causer une perte momentanée
de la vision.
• Ne pas laisser l’appareil à la portée des enfants.
• Toujours utiliser et ranger l’appareil hors de la portée des jeunes enfants
et des bébés pour empêcher les situations dangereuses suivantes qui
pourraient causer des blessures graves :
• S’enrouler dans la courroie de l’appareil, causant la strangulation.
• Avaler accidentellement la batterie, des cartes ou d’autres petites pièces.
• Déclencher accidentellement le flash dans leurs yeux ou ceux d’un autre
enfant.
• Se blesser accidentellement par des parties en mouvement de l’appareil.
(
Ne pas regarder le soleil ni de la lumière puissante avec l’appareil.
( Ne pas utiliser ni ranger l’appareil dans des endroits
poussiéreux ou humides.
(
Ne pas couvrir le flash avec une main pendant le déclenchement.
ATTENTION
(
Arrêter immédiatement d’utiliser l’appareil si vous remarquez une
odeur, un bruit anormal ou de la fumée provenant de l’appareil.
• Ne jamais retirer les batteries les mains nues, ce qui pourrait vous brûler
les mains.
( Ne jamais manipuler l’appareil avec des mains mouillées.
( Ne pas laisser l’appareil dans des endroits où il pourrait être
soumis à des températures très élevées.
•
Ceci pourrait causer une détérioration de certaines pièces et, dans certaines
circonstances, l’appareil pourrait prendre feu. Ne pas utiliser le chargeur s’il
est couvert (par exemple par une couverture). Ce qui pourrait causer une
surchauffe, débouchant sur un incendie.
( Manipuler l’appareil soigneusement afin d’éviter une brûlure à
basse température.
• Lorsque l’appareil contient des parties métalliques, une surchauffe peut
déboucher sur une brûlure à basse température. Faire attention aux
points suivants :
• Utilisé pendant une longue durée, l’appareil devient chaud. Si vous tenez
l’appareil dans ces conditions, une brûlure à basse température risque de
se produire.
Dans des endroits sujets à des températures très froides, la température du
•
corps de l’appareil peut être plus basse que la température ambiante. Si
possible, mettre des gants en tenant l’appareil à des températures basses.
( Faire attention avec la courroie.
• Faire attention avec la courroie en portant l’appareil. Elle peut facilement
s’accrocher à des objets sur le passage et causer des dommages sérieux.
49
Fr
Page 50

Précautions de manipulation de la batterie
Veuillez suivre ces consignes importantes pour éviter le coulage du
liquide de la batterie, une génération de chaleur, des brûlures, une
explosion, ou de causer des décharges électriques ou brûlures.
DANGER
• L’appareil photo utilise une batterie lithium ion spécifiée par Olympus. Chargez
l’appareil avec le chargeur spécifié. N’utilisez aucun autre chargeur.
• Ne jamais chauffer ni mettre au feu la batterie.
• Prendre des précautions en transportant ou rangeant la batterie pour éviter
qu’elle vienne en contact avec des objets métalliques comme des bijoux, des
épingles à cheveux, des agrafes, etc.
• Ne jamais ranger la batterie dans un lieu où elle serait exposée en plein soleil,
ou sujette à des températures élevées dans un véhicule chaud, près d’une
source de chaleur, etc.
Fr
• Pour éviter de causer des coulages de liquide de la batterie ou d’endommager
ses bornes, respecter scrupuleusement toutes les instructions concernant
l’usage de la batterie. Ne jamais tenter de démonter la batterie ni la modifier,
en soudant, etc.
• Si du liquide de la batterie entrait dans vos yeux, les laver immédiatement avec
de l’eau claire et froide du robinet et consulter immédiatement un médecin.
• Toujours ranger la batterie hors de la portée des jeunes enfants. Si un enfant
avale accidentellement une batterie, consulter immédiatement un médecin.
AVERTISSEMENT
• Maintenir à tout moment la batterie au sec.
• Pour éviter un coulage du liquide de la batterie, une génération de chaleur ou
de causer un incendie ou une explosion, n’utiliser que la batterie recommandée
pour l’usage avec ce produit.
• Introduire soigneusement la batterie comme décrit dans les instructions de
fonctionnement.
• Si les batteries rechargeables n’ont pas été rechargées au bout de la durée
spécifiée, arrêter de les charger et ne pas les utiliser.
• Ne pas utiliser une batterie si elle est endommagée ou cassée.
• Si la batterie coule, devient décolorée ou déformée, ou devient anormale sous
d’autres aspects pendant le fonctionnement, arrêter d’utiliser l’appareil.
Si du liquide de la batterie coule sur vos vêtements ou sur votre peau, retirer le
•
vêtement et laver immédiatement la zone affectée avec de l’eau claire et froide du
robinet. Si le liquide vous brûle la peau, consulter immédiatement un médecin.
•
Ne jamais soumettre la batterie à des chocs violents ni à des vibrations continues.
ATTENTION
• Avant sa mise en place, toujours contrôler soigneusement la batterie pour des
coulages, décoloration, gauchissement ou toutes autres anormalités.
• La batterie peut devenir chaude pendant une utilisation prolongée. Pour éviter
des brûlures mineures, ne pas la retirer immédiatement après avoir utilisé
l’appareil.
• Toujours retirer la batterie de l’appareil avant de le ranger pour une longue
durée.
50
Page 51

Pour les utilisateurs en Europe
La marque “CE” indique que ce produit est conforme aux normes
européennes en matière de sécurité, de santé, d’environnement et de
protection du consommateur. Les appareils photo marqués “CE” sont prévus
pour la vente en Europe.
Le symbole [poubelle sur roue barrée d’une croix WEEE annexe IV] indique
une collecte sépa rée des déchets d’équipements électr iques et électroniques
dans les pays de l’UE.
Veuillez ne pas jeter l’équipement dans les ordures domestiques.
A utiliser pour la mise en rebut de ces types d’équipements conformément
aux systèmes de traitement et de collecte disponibles dans votre pays.
Précaution sur l’utilisation de la batterie et du chargeur de batterie
Il est vivement recommandé de n’utiliser que la batterie et le chargeur de batterie
spécifiques, qui sont disponibles comme accessoires d’origine Olympus, avec
cet appareil photo.
L’utilisation d’une batterie et/ou d’un chargeur de batterie qui ne sont pas
d’origine risque de provoquer un incendie ou des blessures à cause d’un coulage
de liquide, d’une surchauffe, d’une combustion ou d’un endommagement de la
batterie. Olympus n’assume aucune responsabilité pour les accidents et
dommages à cause de l’utilisation d’une batterie et/ou d’un chargeur de batterie
autres que les accessoires d’origine Olympus.
Marques déposées
• IBM est une marque déposée de la société International Business Machines
Corporation.
• Microsoft et Windows sont des marques déposées de la société Microsoft
Corporation.
• Macintosh est une marque de Apple Computer Inc.
• xD-Picture Card™ est une marque déposée.
• Tous les autres noms de sociétés et appellations de produits sont des
marques, déposées ou non, des propriétaires respectifs.
• Les normes pour les systèmes de fichiers d’appareil photo indiquées dans ce
manuel sont les normes “Design Rule for Camera File System/DCF” stipulées
par l’association JEITA (Japan Electronics and Information Technology
Industries Association).
Fr
51
Page 52

Conditions d’obtention de la garantie
1.
Si le produit s’avère défectueux malgré une manipulation correcte (conforme aux instructions du mode
d’emploi fourni) dans un délai de deux ans à partir de la date d’achat auprès d’un distributeur Olympus
agréé, ce produit sera réparé ou remplacé au choix de Olympus gratuitement au sein du secteur
d’activité de Olympus Imaging Europa GmbH défini sur le site Internet : http://www.olympus.com. Pour
toute demande de réparation sous garantie, le client doit apporter le produit et la présente carte de
garantie avant la fin de la période de deux ans de garantie au revendeur auquel il a acheté le produit ou
à tout autre centre de service après-vente agréé Olympus dans le secteur d’activité de Olympus Imaging
Europa GmbH défini sur le site Internet : http://www.olympus.com. Le client peut retourner le produit à
n’importe quel centre de service après-vente Olympus agréé pendant une période d’un an à partir de la
date d’achat, en cas de réparations, conformément à la garantie internationale. Veuillez noter que de
tels centres de service après-vente Olympus n’existent pas dans certains pays.
2. Le client est responsable des risques du transport du produit chez un distributeur Olympus ou
dans un centre de service après-vente Olympus, tous les frais de transport sont à sa charge.
3. Pendant la périod e de garantie, les frais engendrés par des réparations sont à la charge du client
dans les cas ci-dessous.
(a) tout dommage résultant d’une manipulation non conforme (contraire aux instructions du
mode d’emploi)
(b) tout dommage résultant d’une réparation, d’une modification, d’un nettoyage, etc., non
effectués par un centre de service après-vente Olympus.
(c) tout dommage causé par un transport non conforme, une chute, un choc, etc. après achat du
Fr
produit.
tout défaut ou dommage résulta nt d’un incendie, tremblement de terre, inondation, inte mpéries
(d)
et autres catastrophes naturelles, pollution, alimentation électrique non conforme.
(e) tout dommage résultant d’un stockage non conforme ou négligent (températures excessives,
humidité excessive, proximité d’insecticides tels que naphtaline ou produits chimiques nocifs,
etc.) ou d’un entretien non conforme.
(f) tout dommage résultant de piles usagées, etc.
(g) tout dommage causé par l’intrusion de sable, boue, etc. à l’intérieur de l’appareil.
(h) non-présentation de la présente garantie pour la réparation.
(i) modifications faites sur la présente carte de garantie concernant l’année, le mois et le jour
de l’achat, les noms du client et du revendeur, le numéro, de série, etc.
non-présentation d’un justificatif d’achat (ticket de caisse) en même temps que la présente garantie.
(j)
4. Cette garantie concerne uniquement le produit lui-même. Elle ne couvre pas les autres pièces
telles que sac de transport, bandoulière, couvercle d’objectif, piles, etc.
La seule obligation de Olympus dans le cadre de la présente garantie se limite à la réparation ou au
5.
remplacement du produit. Toute responsabilité pour perte ou dommage indirect ou accessoire de
quelque nature que ce soit supporté par le client à cause d’un défaut du produit est exclue, notamment
en cas de perte ou dommage causé à des objectifs, films, autres matériels ou accessoires utilisés avec
le produit ou de perte financière quelconque résultant d’un retard en réparation ou de la perte de
données. La présente disposition ne déroge pas à la législation contraignante en vigueur.
Remarques sur l’établissement de la carte de garantie
1.
Cette garantie ne sera valide que si la carte de garantie est dûment complétée par Olympus ou un
revendeur agréé ou si d’autres documents contiennent une justification suffisante. Par conséquent,
veuillez vous assurer que votre nom, le que votre nom, le nom du revendeur, le numéro de série et la
date d’achat (année, mois, jour) figurent intégralement et lisiblement sur la carte de garantie et que le
contrat d’achat original ou le justificatif d’achat (indiquant le nom et l’adresse du revendeur, la date
d’achat et la désignation du produit) est joint à la présente garantie. Olympus se réserve le droit de
refuser une prestation de service après-vente gratuit e si les informations portées sur la carte de garantie
sont incomplètes ou illisibles ou si les documents mentionnés précédemment ne sont pas joints ou si
les informations qu’ils contiennent sont incomplètes ou illisibles.
2. Cette carte de garantie ne sera pas remplacée, aussi conservez-la avec le plus grand soin.
* Veuillez vous référer à la liste du site Internet : http://www.olympus.com pour le réseau
international des centres de services autorisés Olympus.
Restrictions relatives à la garantie
Olympus ne fa it aucune déclarati on, ne délivre aucune a ssurance ou garantie, expresse ou i mplicite, pour ou
relative au contenu de la présente documentation écrite ou du logiciel, et ne pourra en aucun cas être tenu
pour responsable de toute autre garantie implicite de commercialisation ou d’adaptation à des fins
particulières, ou pour les dommages encourus, qu’ils soient directs, imprévus ou indirects (notamment non
limités aux dommages dus à une perte financière, une interruption d’activité ou la perte de données
professionnelles) sui te à l’utilisation ou la restriction ou impossi bilité d’utilis ation de la documentation écrite ou
du logiciel. Certains pays n’autorisent pas l’exclusion ni la limitation de la responsabilité de tels dommages,
les restrictions précédemment citées peuvent donc éventuellement ne pas s’appliquer à vous-même.
52
Page 53

Memo
Fr
53
Page 54

Tabla de contenidos
Contenido de la caja........................................................................ 55
Fije la correa........................................................................................55
Prepare la batería............................................................................. 56
Encienda la cámara ......................................................................... 57
Ajuste la fecha y hora...................................................................... 58
Información de la pantalla de ajuste de fecha y hora.......................... 58
Ajuste el idioma ............................................................................... 60
Tome una fotografía ........................................................................ 61
Revise sus fotografías..................................................................... 62
Borrado de imágenes .......................................................................... 62
Funcionamiento básico................................................................... 63
Botones del modo de fotografía ..........................................................63
Es
Modos de escena ................................................................................ 64
Modo macro ........................................................................................64
Modos de flash .................................................................................... 65
Disparador automático ........................................................................65
Función de ahorro de energía .............................................................65
Menús y ajustes............................................................................... 66
Menú superior ..................................................................................... 66
Borrar todas las fotografías .................................................................66
Conexión de la cámara.................................................................... 67
Reproducción en un televisor .............................................................. 67
Impresión directa (PictBridge) ............................................................. 68
Transferir imágenes......................................................................... 69
Software OLYMPUS Master ............................................................ 71
Especificaciones.............................................................................. 72
Precauciones de seguridad............................................................ 74
Antes de utilizar la cámara, lea con atención este manual para asegurarse de
su uso correcto.
Antes de tomar fotografías importantes, le recomendamos que realice varias
tomas de prueba para familiarizarse con el uso de su cámara.
Le rogamos observe todas las precauciones de seguridad que figuran al final
de este manual.
Las imágenes que aparecen en la pantalla y las ilustraciones de la cámara
utilizadas en este manual pueden ser distintas que el producto real. A menos
que se indique lo contrario, las ilustraciones están basadas en el modelo
FE-230/X-790.
54
Page 55

Contenido de la caja
Cámara digital Correa Batería de iones de litio
Cargador de
batería (LI-40C)
Componentes no mostrados: Manual Avanzado (CD-ROM), Manual Básico
(este manual) y tarjeta de garantía. Los contenidos pueden variar
dependiendo del lugar de compra.
Cable USB Cable AV OLYMPUS Master
(LI-42B)
CD-ROM
Fije la correa
Es
Tire de la correa para que quede apretada y no se suelte.
55
Page 56

Prepare la batería
a. Cargue la batería.
W
3
Cable de corriente
Toma de
corriente CA
Es
La batería viene cargada parcialmente.
2
b. Inserte la batería en la cámara.
2
4
1
5
Batería de iones
de litio
Cargador
1
Indicador de carga
Luz roja encendida: En carga
Luz apagada: Carga completa
(Tiempo de carga: Aprox. 300
minutos)
Inserte la batería en la dirección
indicada por la marca .
3
de batería
Botón de bloqueo de la batería
Para extraer la batería, presione
el botón de bloqueo de la batería
Esta cámara le permite tomar fotos sin tener que insertar la tarjeta
opcional xD-Picture Card™ (en adelante, “la tarjeta”). Para obtener
información acerca de la inserción de la tarjeta, consulte el Manual
Avanzado.
en la dirección de la flecha.
56
Page 57

Encienda la cámara
HORA
----
.--.-- --:--
/ M /
Esta sección explica cómo encender la cámara en el modo de fotografía.
a. Sitúe el disco de modo en h.
Al grabar vídeos
Al tomar fotografías
Modos de toma de fotografías
h Para toma de fotografías normal.
h Esta función reduce la posibilidad de que las fotografías salgan borrosas
B Adecuado para tomar fotografías de personas.
E Adecuado para tomar fotografías de paisajes.
M Adecuado para tomar fotografías de personas por la noche.
f Seleccione uno de los 10 modos de escena (FE-240/X-795) o 13 modos de
R Utilice la toma de imágenes que se muestra en la pantalla para fotografiar
b. Presione el botón o.
debido al movimiento del sujeto o de la cámara.
escena disponibles (FE-230/X-790) en función de las condiciones fotográficas.
según la situación.
HORA
DMA
A /M/
Botón o
----
.--.-- --:--
D
Es
Para apagar la cámara, presione de nuevo el botón o.
Consejo
En el manual de instrucciones suministrado se indica la
dirección de las teclas de control con ONXY.
MENU
CANCEL.
Esta pantalla
aparece si la fecha y
la hora no están
ajustadas.
O
N
YX
57
Page 58

Ajuste la fecha y hora
----
.--.-- --:--
HORA
/ M /
2007
.--.-- --:--
HORA
A / M / D
2007
.-- --:--
HORA
A / M / D
Información de la pantalla de ajuste de fecha y hora
A-M-D
Hora
HORA
DMA
.--.-- --:--
----
MENU
CANCEL.
A /M/
Cancela el ajuste
a. Presione los botones OF/< y NY para
Es
seleccionar [A].
• Los dos primeros dígitos del año son fijos.
b. Presione el botón Y#.
Minuto
D
Formato de fecha (A-M-D, M-D-A, D-M-A)
Botón OF/<
Botón NY
2007
.--.-- --:--
MENU
CANCEL.
DMA
HORA
A/M/D
Botón Y#
c. Presione los botones OF/< y
NY para seleccionar [M].
58
2007
.
0202.-- --:--
MENU
CANCEL.
DMA
HORA
A/M/D
Page 59

d. Presione el botón Y#.
2007
--:--
HORA
A / M / D
2007
30
HORA
A / M / D
2007
30
HORA
A / M / D
IN
3072
2304
e. Presione los botones OF/< y
NY para seleccionar [D].
f. Presione el botón Y#.
g. Presione los botones OF/< y
NY para seleccionar las horas
y los minutos.
• La hora se muestra en el formato de 24 horas.
Ajuste la fecha y hora
HORA
DMA
HORA
1212:
30
A/M/D
A/M/D
2007
.
0202.
MENU
CANCEL.
2007
.
0202.
1010 --:--
DMA
1010
MENU
CANCEL.
h. Presione el botón Y#.
i. Presione los botones OF/< y
NY para seleccionar [A/M/D].
2007
CANCEL.
.
0202.
MENU
1010
DMA
HORA
1212:
30
j. Cuando se hayan realizado todos los ajustes,
presione .
• Para un ajuste más preciso, presione cuando el reloj marque
00 segundos.
[ ]
Botón
HQHQ3072
×2304
ACEPT.
A/M/D
ACEPT.
OK
OK
[
]
IN
44
59Es59
Page 60

Ajuste el idioma
RE-
STAURAR
PANORAMA
MODO
SILENC.
CONFI-
GURAC.
CALIDAD
IMAGEN
SCENE
FOTO
Y SONIDO
RE-
STAURAR
PANORAMA
MODO
SILENC.
CONFI-
GURAC.
CALIDAD
IMAGEN
FOTO
Y SONIDO
SCENE
CONFIGURAC.
a. Presione el botón m para ver el menú superior.
Es
Botón m
b. Presione el botón Y# para
seleccionar [CONFIGURAC.] y
presione .
c. Presione los botones OF/< y
NY para seleccionar [W], y
presione .
d. Presione las teclas de control
(ONXY) para elegir un idioma
y, a continuación, presione .
• Se pueden añadir otros idiomas a la cámara
con el software OLYMPUS Master
suministrado. Consulte el Manual Avanzado.
60
RE-
STAURAR
MENU
SALIR
RE-
STAURAR
MENU
SALIR
1
FORMATEAR
2
BACKUP
3
MAPEO PÍX.
MENU
ATR ÁS
W
ENGLISH
FRANCAIS
DEUTSCH
ESPAÑOL
MENU
ATR ÁS
PANORAMA
CALIDAD
CALIDAD
IMAGEN
IMAGEN
SCENE
ACEPT.
PANORAMA
CALIDAD
CALIDAD
IMAGEN
IMAGEN
SCENE
ACEPT.
ACEPT.
ITALIANO
NEDERLANDS
ACEPT.
FOTO
Y SONIDO
CONFI-
GURAC.
MODO
SILENC.
OK
FOTO
Y SONIDO
CONFI-
GURAC.
MODO
SILENC.COMP. EXP.
OK
ESPAÑOL
NO
OK
OK
Page 61

Tome una fotografía
3072
2304
IN
a. Sujete la cámara.
Sujeción horizontal Sujeción vertical
b. Enfoque.
(Presionar a
medias)
c. Tome la fotografía.
disparador
(Presionar
completamente)
Botón
disparador
Botón
Coloque esta marca
sobre su sujeto.
[ ]
[
]
HQHQ3072
×2304
Se muestra el número
de fotografías que se
pueden tomar.
El piloto verde indica que el enfoque
y la exposición están bloqueados.
El piloto de control de la
tarjeta parpadea.
IN
44
Es
61
Page 62

Revise sus fotografías
12: 30
'0 7 .0 2.1 0
100-0004
HQ
IN
30 7 2
23 0 4
0. 0
a. Presione el botón q.
Botón q
Teclas de
control
[
]
IN
3072
HQ
×2304
0.0
Se muestra la imagen
siguiente
Se muestra la imagen anterior
Es
Borrado de imágenes
a. Presione los botones X& y Y# para ver la
fotografía que desee borrar.
b. Presione el botón S.
BORRAR
c.
Presione el botón
Botón S
OF/<
, seleccione [SI] y presione
ATRÁS
.
Botón OF/<
Botón
BORRAR
ATRÁS
MENU
MENU
'07.02.10
100-0004
SI
NO
ACEPT.
SI
NO
ACEPT.
12:30
4
[IN][IN]
OK
[IN]
OK
62
Page 63

Funcionamiento básico
Botones del modo de fotografía
En el modo de fotografía, puede usar estos botones para acceder rápidamente
a las funciones más habituales.
1
2
5
7
3
6
4
8
9
0
1 Botón K (Fotografía)
Selecciona el modo de fotografía.
2 Botón q (Reproducción)
Selecciona el modo de reproducción.
3 Botón m
Muestra el menú superior.
4 Botón S (Borrar)
Selecciona la imagen que desea borrar en el modo de reproducción.
5 Teclas de control (ONXY)
Selecciona las escenas, reproduce imágenes y elementos de menú.
6 Botón X& (Modo macro)
Activa el modo macro o supermacro para obtener primeros planos.
7 Botón OF/< (Compensación de la exposición/Imprimir)
En modo de fotografía, presione este botón para ajustar el valor de
compensación de la exposición, que influye en la luminosidad de la imagen.
8 Botón Y# (Modo de flash)
Es posible seleccionar de entre 4 modos de flash - AUTO, ! (Reducción del
efecto de ojos rojos), # (Flash de relleno) o $ (Flash desactivado).
9 Botón (OK)
Confirma los ajustes.
0 Botón NY (Disparador automático)
Seleccione el disparador automático para retrasar la toma 12 segundos
aproximadamente desde el momento de presionar el botón disparador.
Es
63
Page 64

Modos de escena
Esta función le permite cambiar el modo de f (escena) en función del
sujeto.
1 Sitúe el disco de modo en f.
1
DEPORTE
Disco de modo
ATR ÁS
MENU
ACEPT.
OK
O/N
Botón
2 Presione O/N para seleccionar los modos de escena y presione .
Fotografía de modos de escena
Es
• j DEPORTE • N INTERIORES • W VELAS
• R AUTO - RETRATO • S PUESTA SOL • X FUEG.ARTIF.
• P VITRINA • V COCINA • d DOCUMENTOS
• i SUBASTA • k
• H
SUBACUÁTICO MACRO
*1 Disponible únicamente para el modelo FE-230/X-790.
SUBACUÁTICO AMPLIO.1*1• l SUBACUÁTICO AMPLIO.2
*1
Modo macro
& Este modo le permite tomar fotos del sujeto a tan solo 10 cm de distancia con
el modelo FE-230/X-790, y a 20 cm de distancia con el modelo FE-240/X-795.
(en el ángulo mayor)
% Utilice este modo para tomar fotos del sujeto a tan solo 5 cm de distancia con
el modelo FE-230/X-790, y a 3 cm de distancia con el modelo FE-240/X-795.
En el modo %, la posición del objetivo zoom está fijada.
1
Presione varias veces el botón X& para seleccionar [&] o [%] y presione .
*1
64
Page 65

Modos de flash
1 Presione varias veces el botón Y# para seleccionar el modo de flash y
presione .
2 Presione a medias el botón disparador.
Si el flash está ajustado para dispararse, se ilumina la marca #.
3 Presione el botón disparador a fondo para tomar la fotografía.
Icono Modo de flash Descripción
Sin
indicación
!
#
$
Flash
automático
Flash con
reducción de
ojos rojos
Flash de relleno El flash se dispara independientemente de la luz
Flash
desactivado
El flash se dispara automáticamente en condiciones de
baja iluminación o de contraluz.
El modo de flash con reducción de ojos rojos reduce
significativamente este fenómeno emitiendo destellos
previos antes de dispararse el flash normal.
disponible.
El flash no se dispara, incluso en condiciones de baja
iluminación.
Disparador automático
Es
1 Presione el botón NY para seleccionar [Y] y presione
.
LED del disparador
automático
2 Presione el botón disparador a fondo para tomar la
fotografía.
El LED del disparador automático se ilumina durante unos
10 segundos después de presionar el botón disparador, luego
empieza a parpadear. Tras parpadear durante 2 segundos
aproximadamente, se toma la fotografía.
Función de ahorro de energía
Para ahorrar energía de la batería, la cámara entra automáticamente en el
modo de reposo y deja de funcionar después de unos 3 minutos de
inactividad en modo de fotografía. Utilice el botón disparador o el mando de
zoom para reactivar la cámara.
Si la cámara no se utiliza durante aproximadamente 12 minutos después de
entrar en el modo de reposo, se retrae automáticamente el objetivo y se
apaga. Para volver a utilizarla, enciendala otra vez.
65
Page 66

Menús y ajustes
RE-
STAURAR
PANORAMA
MODO
SILENC.
CONFI-
GURAC.
CALIDAD
IMAGEN
SCENE
FOTO
Y SONIDO
Menú superior
1 Presione el botón m para ver el menú superior en el monitor.
2 Use las teclas de control (ONXY) para seleccionar los elementos de
menú.
Menú superior en modo
de fotografía
PANORAMA
CALIDAD
RE-
MENU
CALIDAD
IMAGEN
IMAGEN
SCENE
Botón m
Es
STAURAR
SALIR
CALIDAD IMAGEN
Ajusta la calidad de imagen y la resolución.
PANORAMA
Crea una fotografía panorámica.
RESTAURAR
Permite restaurar los ajustes predefinidos de fábrica.
SCENE
Seleccione una escena en función del sujeto y las condiciones fotográficas.
MODO SILENC.
Desactiva los sonidos de las funciones, los sonidos de advertencia, el sonido del
disparador, etc. durante la toma de fotografías y la reproducción.
CONFIGURAC.
Ajusta la fecha y hora, el idioma y otros ajustes.
FOTO Y SONIDO/VíDEO Y SONIDO
Graba el sonido durante la filmación.
Y SONIDO
ACEPT.
FOTO
CONFI-
GURAC.
MODO
SILENC.
OK
Borrar todas las fotografías
1 Presione el botón m para ver el menú
superior en modo de reproducción.
2 Seleccione [BORRAR], [BORRAR TODO] y
presione .
3 Seleccione [SI] y presione .
66
Se borran todas las fotografías.
BORRAR TODO
PRECAUC. BORR. TODO
SI
NO
MENU
ATR ÁS
ACEPT.
[IN][IN]
OK
Page 67

Conexión de la cámara
Reproducción en un televisor
Utilice el cable AV suministrado con la cámara para reproducir imágenes
grabadas en un televisor. Puede reproducir tanto fotografías como vídeos.
1 Compruebe que el televisor y la cámara estén apagados. Conecte el
multiconector de la cámara al terminal de entrada de vídeo del televisor
usando el cable AV.
Multiconector
Cable AV (incluido)
2 Encienda el televisor y cambie al modo de entrada de vídeo.
Para más información sobre cómo cambiar a entrada de vídeo, consulte el manual
de instrucciones del televisor.
3 Encienda la cámara y presione el botón q para seleccionar el modo de
reproducción.
En el televisor aparecerá la última fotografía tomada. Utilice las teclas de control
(ONXY) para seleccionar la fotografía que desea ver.
Tapa del conector
Conéctelo al terminal de entrada
de vídeo (amarillo) y al de entrada
de sonido (blanco) del televisor.
Es
67
Page 68

Impresión directa (PictBridge)
Usando el cable USB suministrado, puede conectar la cámara a una impresora
compatible con PictBridge para imprimir fotografías. Puede imprimir una imagen
realizando unas sencillas operaciones.
1 En el modo de reproducción, localice en el monitor la fotografía que desea
imprimir.
2 Conecte un extremo del cable USB suministrado al multiconector de la
cámara y el otro extremo al conector USB de la impresora.
Multiconector
Cable USB
Es
Botón OF/<
3 Presione el botón OF/<.
Se inicia la impresión.
Cuando haya terminado, desconecte el cable USB
de la cámara con la pantalla de selección de
fotografías activa.
IMPR.SIMPLE INICIO
PC / IMPR.PERSONAL
OK
68
Page 69

Transferir imágenes
a. Instale el software
1 Inserte el CD-ROM de OLYMPUS Master.
2 Windows: Haga clic en el botón “OLYMPUS
Macintosh: Haga doble clic en el icono
3 Siga las instrucciones en pantalla.
b. Conecte la cámara a un ordenador
1 Conecte la cámara y el ordenador usando el cable USB (incluido).
El monitor se encenderá automáticamente.
Master 2”.
“Setup”.
2
Cable USB
1
Es
2 Seleccione [PC] en el monitor y presione .
Ahora el ordenador reconocerá su cámara como
una unidad de almacenamiento extraíble.
USB
PC
IMPR.SIMPLE
IMPR.PERSONAL
SALIR
ACEPT.
OK
69
Page 70

c. Transfiera las imágenes al ordenador
1 Ahora, con la cámara conectada, abra el programa OLYMPUS Master.
2 Haga clic en “Transferir imágenes” en la
ventana de examinar y haga clic en “De
cámara” .
3 Siga las instrucciones en pantalla.
Es
Consejos
• Para obtener información más detallada sobre la configuración y el uso de la
cámara, consulte el “Manual Avanzado” de la misma incluido en el CD-ROM.
• Si necesita ayuda adicional, consulte el archivo “Ayuda” del software
OLYMPUS Master.
70
Page 71

Software OLYMPUS Master
Software OLYMPUS Master: Utilice este software para
descargar fotografías de la cámara, ver, organizar,
retocar, enviar por correo electrónico e imprimir sus
fotografías y vídeos digitales, y mucho más.
(Requisitos del sistema
SO
CPU Pentium III 500 MHz/Power PC G3 500 MHz/Intel Core Solo/
RAM 256 MB o más
Disco duro 500 MB de espacio libre o más
Conexión Puerto USB/puerto IEEE 1394
Monitor 1024 × 768 píxeles de resolución o más con un mínimo de 65.536
Otres Internet Explorer 6 o posterior (Windows), Safari 1.0 o posterior,
Para obtener la información técnica más reciente, visite la página web de Olympus
(http://www.olympus.com/)
Registre su cámara cuando instale OLYMPUS Master para activar su
garantía, recibir notificaciones sobre actualizaciones de software y
firmware de la cámara, y mucho más.
Windows 2000 Professional/XP Home Edition/XP Professional/Vista o
Mac OS X (10.3 o posterior)
Duo 1.5 GHz, o posterior
colores (Windows), 32.000 colores (Macintosh)
QuickTime 6 o posterior (Macintosh)
Registro de usuario
Es
71
Page 72

Especificaciones
(Cámara
Tipo de producto : Cámara digital (para fotografía y reproducción)
Sistema de grabación
Fotografías : Grabación digital, JPEG (según la norma Design rule
Estándares
aplicables
Sonido con
fotografías
Vídeo : AVI Motion JPEG
Memoria : Memoria interna
Número de píxeles
efectivos
Dispositivo de captura
Es
de imagen
Objetivo : FE-230/X-790:
Sistema fotométrico : Medición ESP digital
Velocidad de
obturación
Alcance de fotografía : FE-230/X-790:
Monitor : Pantalla LCD TFT en color de 2,5", 115.000 píxeles
Conector exterior : conector USB, jack A/V OUT (multiconector)
Sistema de calendario
automático
Entorno de funcionamiento
Temperatura : 0 °C a 40 °C (funcionamiento)/
Humedad : 30% a 90% (funcionamiento)/
Fuente de alimentación : Una batería de iones de litio Olympus (LI-42B/LI-40B)
for Camera File system (DCF))
: Exif 2.2, Formato de reserva de impresión digital
(DPOF), PRINT Image Matching III, PictBridge
: Formato WAVE
xD-Picture Card (16 MB – 2 GB) (Type H/M, Standard)
: 7.100.000 píxeles
: CCD de 1/2,5" (filtro de colores primarios),
7.400.000 píxeles (brutos)
Objetivo Olympus 6,3 a 18,9 mm, f3,1 a 5,9
(equivalente a un objetivo de 38 a 114 mm en una
cámara de 35 mm)
FE-240/X-795:
Objetivo Olympus 6,4 a 32 mm, f3,3 a 5,0
(equivalente a un objetivo de 38 a 190 mm en una
cámara de 35 mm)
: 4 a 1/2000 seg.
0,6 m a ) (W), 1,0 m a ) (T) (modo normal)
0,1 m a ) (W), 0,6 m a ) (T) (modo macro)
0,05 m (modo supermacro)
FE-240/X-795:
0,7 m a ) (modo normal)
0,2
m a )
0,03 m (modo supermacro)
(W), 0,6
: 2000 hasta 2099
-20 °C a 60 °C (almacenamiento)
10% a 90% (almacenamiento)
m a )
(T) (
modo macro
)
72
Page 73

Dimensiones : FE-230/X-790:
90,5 mm (ancho) × 55,0 mm (altura) × 16,5 mm (prof.)
(sin incluir los salientes)
FE-240/X-795:
93,5 mm (ancho) × 56,0 mm (altura) × 20,0 mm (prof.)
(sin incluir los salientes)
Peso : FE-230/X-790: 105 g sin la batería ni la tarjeta
FE-240/X-795: 115 g sin la batería ni la tarjeta
(Batería de iones de litio (LI-42B)
Tipo de producto : Batería recargable de iones de litio
Voltaje estándar : CC 3,7 V
Capacidad estándar : 740 mAh
Duración de la batería : Aprox. 300 recargas completas (varía según el uso)
Entorno de
funcionamiento
Temperatura : 0 °C a 40 °C (durante la carga)/
-10 °C a 60 °C (funcionamiento)/
-20 °C a 35 °C (almacenamiento)
Dimensiones : 31,5 × 39,5 × 6 mm
Peso : Aprox. 15 g
(Cargador de batería (LI-40C)
Requisitos de potencia : CA de 100 a 240 V (50 a 60 Hz)
3,2 VA (100 V) a 5,0 VA (240 V)
Salida : CC 4,2 V, 200 mA
Tiempo de carga : Aprox. 300 min.
Entorno de
funcionamiento
Temperatura : 0 °C a 40 °C (funcionamiento)/
-20 °C a 60 °C (almacenamiento)
Dimensiones : 62 × 23 × 90 mm
Peso : Aprox. 65 g
Es
El diseño y las especificaciones están sujetos a cambios sin previo aviso.
73
Page 74

Precauciones de seguridad
PRECAUCIÓN
RIESGO DE DESCARGAS
ELÉCTRICAS
NO ABRIR
PRECAUCIÓN:
NO RETIRE LA CUBIERT A (O PARTE TRASERA). EN EL INTERIOR NO H AY
PIEZAS QUE EL USUARI O PUEDA REPARAR. REMITA LA REPARACIÓN A
PELIGRO
ADVERTENCIA
Es
PRECAUCIÓN
¡ADVERTENCIA!
PARA EVITAR EL RIESGO DE INCENDIO O DESCARGAS ELÉCTRICAS, NUNCA DESMONTE NI EXPONGA
ESTE PRODUCTO AL AGUA NI LO UTILICE EN UN ENTORNO MUY HÚMEDO.
Precauciones Generales
Lea todas las instrucciones — Antes de utilizar este producto, lea todas las
instrucciones operativas. Guarde todos los manuales y la documentación
para futuras consultas.
Limpieza — Siempre desenchufe el producto de la toma de corriente antes de
limpiarlo. Para la limpieza use sólo un paño húmedo. Nunca use limpiadores
líquidos o aerosoles, ni solventes orgánicos de ningún tipo para limpiar este
producto.
Accesorios — Para su seguridad y evitar daños al producto, utilice únicamente
los accesorios recomendados por Olympus.
Agua y humedad — En las precauciones de los productos diseñados a prueba
de la intemperie, consulte las secciones de resistencia a la intemperie en sus
respectivos manuales.
Ubicación — Para evitarle daños al producto, monte el producto sobre un
trípode, caballete o soporte estable.
Fuentes de alimentación — Conecte este producto únicamente con la fuente
de alimentación descrita en la etiqueta del producto.
Objetos extraños — Para evitar daños personales, nunca inserte objetos de
metal en el producto.
Calentadores — Nunca utilice ni guarde este producto cerca de fuentes de
calor, tales como radiadores, rejillas de calefacción, estufas o cualquier tipo
de equipo o aparato generador de calor, incluyendo amplificadores estéreo.
PARA REDUCIR EL RIESGO DE DESCARGAS ELÉCTRICAS,
PERSONAL DE SERVICI O ESPECIALIZA DO OLYMPUS.
El signo de admiración dentro de un triángulo equilátero tiene como finalidad alertar
al usuario de la existencia de importantes instrucciones de operación y
mantenimiento en la documentación sumini strada con el producto.
Si el producto es utilizado sin observar l a información representada bajo este
símbolo, podría causar serias lesiones o muerte.
Si el producto es utilizado sin observar l a información representada bajo este
símbolo, podría causar serias lesiones o muerte.
Si el producto es uti lizado sin observar la inform ación representada bajo es te símbolo, podría
causar lesiones per sonales menores, daños al equipo, o p érdida de datos importantes.
74
Page 75

Manejo de la cámara
ADVERTENCIA
( No utilice la cámara cerca de gases inflamables o explosivos.
( No utilice el flash a corta distancia de las personas
(especialmente niños menores y mayores, etc.).
• Cuando dispare el flash, deberá mantener, por lo menos, una distancia de
1 m de la cara de los sujetos. El disparo demasiado cercano de los ojos
del sujeto podrá causarle la pérdida de visión momentánea.
• Mantenga a los niños menores y mayores alejados de la cámara.
• Utilice y guarde siempre la cámara fuera del alcance de los niños menores
y mayores, para prevenir las siguientes situaciones de peligro que
podrían causarles serias lesiones:
• Enredarse con la correa de la cámara, ocasionando asfixia.
• Ingerir accidentalmente una batería, tarjetas, u otras piezas pequeñas.
• Disparar el flash accidentalmente hacia sus propios ojos o hacia los ojos
de otro niño.
• Lesionarse accidentalmente con las piezas móviles de la cámara.
( No mire al sol ni a luces fuertes a través de la cámara.
( No utilice ni guarde la cámara en lugares polvorientos o
húmedos.
( No cubra el flash con la mano mientras efectúa el disparo.
PRECAUCIÓN
( Interrumpa inmediatamente el uso de la cámara si percibe
algún olor, ruido o humo extraño alrededor de la misma.
• Nunca retire las baterías con las manos descubiertas, ya que podría
causar un incendio o quemarle las manos.
( Nunca sujete ni utilice la cámara con las manos mojadas.
( No deje la cámara en lugares donde pueda estar sujeta a
temperaturas extremadamente altas.
• Si lo hace puede provocar el deterioro de las piezas y, en algunas
circunstancias, provocar que se prenda fuego. No utilice el cargador si
está cubierto (por ejemplo con una manta). Esto podría causar
recalentamiento, resultando en incendio.
(
Manipule la cámara con cuidado para evitar una quemadura leve.
•
Ya que la cámara contiene partes metálicas, el recalentamiento puede resultar
en una quemadura de baja temperatura. Preste atención a lo siguiente:
• Cuando utilice la cámara durante un largo período, ésta se recalentará. Si
mantiene la cámara en este estado, podría causar una quemadura de
baja temperatura.
• En lugares sujetos a temperaturas extremadamente bajas, la temperatura
de la carcasa de la cámara puede ser más baja que la temperatura
ambiente. Si es posible, póngase guantes cuando manipule la cámara en
temperaturas bajas.
( Tenga cuidado con la correa.
• Tenga cuidado con la correa cuando transporte la cámara. Podría
engancharse en objetos sueltos y provocar daños graves.
Es
75
Page 76

Precauciones acerca del uso de la batería
Siga estas importantes indicaciones para evitar que se produzcan fugas,
recalentamientos, incendios o explosión de la batería, o que cause
descargas eléctricas o quemaduras.
PELIGRO
• La cámara utiliza una batería de iones de litio especificada por Olympus.
Cargue la batería con el cargador especificado. No utilice otros cargadores.
• Nunca caliente ni incinere las baterías.
• Tome precauciones al transportar o guardar las baterías a fin de evitar que
entren en contacto con objetos metálicos, tales como alhajas, horquillas,
cierres, etc.
• Nunca guarde las baterías en lugares donde queden expuestas a la luz solar
directa o sujetas a altas temperaturas en el interior de un vehículo con
calefacción, cerca de fuentes de calor, etc.
• Para evitar que ocurran fugas de líquido de las baterías o daños de sus
terminales, siga cuidadosamente todas las instrucciones respectivas al uso de
las baterías. Nunca intente desarmar una batería ni modificarla de ninguna
manera, por soldadura, etc.
Es
• Si el fluido de la batería penetrara en sus ojos, lávelos de inmediato con agua
corriente fresca y limpia, y solicite atención médica inmediatamente.
• Siempre guarde las baterías fuera del alcance de los niños menores. Si un niño
ingiere una batería accidentalmente, solicite atención médica inmediatamente.
ADVERTENCIA
• Conserve la batería siempre seca.
• Para evitar que ocurran fugas de líquido, recalentamiento de la batería, o que
cause incendio o explosión, utilice únicamente la batería recomendada para el
uso con este producto.
• Inserte la batería cuidadosamente, tal como se describe en el manual de
instrucciones.
• Si las baterías recargables no han sido recargadas dentro del tiempo
especificado, interrumpa la carga y no las utilice.
• No utilice una batería si está rajada o quebrada.
• Si se producen fugas de líquido, decoloración o deformación de la batería, o
cualquier otra anormalidad durante la operación, interrumpa el uso de la
cámara y consulte a su distribuidor o a un centro de servicio autorizado
Olympus. El uso continuo de la cámara puede resultar en incendio o choques
eléctricos.
• Si se producen fugas de líquido, decoloración o deformación de la batería, o
cualquier otra anormalidad durante la operación, interrumpa el uso de la
cámara.
• Nunca exponga la batería a fuertes impactos ni a vibraciones continuas.
PRECAUCIÓN
•
Antes de colocarla, siempre inspeccione la batería atentamente para verificar si
no ocurre fugas de líquido, decoloración, deformación o cualquier otra anomalía.
•
La baterías puede recalentarse durante el uso prolongado. Para evitar
quemaduras menores, no la retire inmediatamente después de utilizar la cámara.
• Siempre retire la batería de la cámara antes de guardar la cámara por un largo
tiempo.
76
Page 77

Para los clientes de Europa
La marca “CE” indica que este producto cumple con los requisitos europeos
sobre protección al consumidor, seguridad, salud y protección del medio
ambiente. Las cámaras con la marca “CE” están destinadas a la venta en
Europa.
Este símbolo [un contenedor de basura tachado con una X en el Anexo IV de
WEEE] indica que la recogida de basura de equipos eléctricos y electrónicos
deberá tratarse por separado en los países de la Unión Europea.
No tire este equipo a la basura doméstica.
Para el desecho de este tipo de equipos utilice los sistemas de devolución al
vendedor y de recogida que se encuentren disponibles.
Precaución con el uso de la pila recargable y cargador de pila
Se recomienda enfáticamente usar solamente la pila recargable y cargador de
pila especificados, que se disponen con esta cámara como accesorios
originales Olympus.
El uso de una pila recargable y/o cargador de pila que no sean originales, puede
resultar en incendios o lesiones personales, debido a la fuga de fluido,
calentamiento, encendido o daños a la pila. Olympus no asume ninguna
responsabilidad por accidentes y daños debido al uso de una pila o cargador de
pila que no sean accesorios originales Olympus.
Marcas comerciales
• IBM es una marca registrada de International Business Machines Corporation.
• Microsoft y Windows son marcas registradas de Microsoft Corporation.
• Macintosh es una marca comercial de Apple Computer Inc.
• xD-Picture Card™
• Todos los demás nombres de compañías y productos son marcas registradas
y/o marcas comerciales de sus respectivos propietarios.
• Las normas para sistemas de archivos de cámara referidas en este manual
son las “Normas de Diseño para Sistema de Archivos de Cámara/DCF”
estipuladas por la Asociación de Industrias Electrónicas y de Tecnología de
Información de Japón (JEITA).
es una marca comercial.
Es
77
Page 78

Condiciones de la garantía
1.
Si este producto sufre algún defecto, a pesar de habe r sido usado apropiadamente (de acuerdo con
las instrucciones del Manual de Servicio suministrado con el mismo), durante un período de dos
años desde la fecha de la compra a un distribuidor Olympus autorizado, qu e se halle dentro del área
comercial de Olympus Imaging Europa GmbH co mo figura en el sitio web: http://www.olympus.com,
será reparado, o a opción de Olympus reemplazado, libre de cargos. Para reclamar bajo esta
garantía el cliente deberá entregar el producto y este Certificado de Garantía antes de finalizar el
período de garantía de dos años, al concesionario donde fue comprado el producto o a cualquier
Centro de Servicio Olympus, dentro del área comercial de Olympus Imaging Europa GmbH como
figura en el sitio web: http://www.olympus.com. Durante un período de un año de la Garantía
Internacional el cliente pu ede presentar el producto a cualquier Centro de Servicio Olympus . Tenga
en cuenta que no en todos los países existe un tal Centro de Servicio Olympus.
2. El coste del transporte del producto al establecimiento vendedor o servicio técnico autorizado
correrá a cuenta del comprador.
3. Por otra parte, incluso dentro del período de garantía, el comprador deberá pagar los gastos de
reparación en los siguientes casos:
(a) Cualquier defecto que se produzca debido al uso indebido (tal como una operación no
mencionada en el Manual de Servicio.)
(b) Cualquier defecto que se produzca debido a una reparación, modificación, limpieza por
otros que no sean los servicios técnicos Olympus.
(c) Cualquier defecto o daño debido a un transporte no adecuado, a golpes, etc. después de
la compra del producto.
(d) Cualquier defecto o daño que se produzca por incendios, terremotos, inundaciones,
tempestades u otros desastres naturales, contaminación ambiental y fuentes irregulares de
tensión.
(e) Cualquier defecto que se produzca por descuido o almacenamiento inadecuado (tal como
Es
guardar el producto en lugares con alta temperatura y humedad, cerca de insecticidas, tales
como naftalina, o productos químicos nocivos, y otros),mantenimiento inadecuado, etc.
(f) Cualquier daño que se produzca debido a pilas gastadas, etc.
(g) Daños producidos por penetrar arena, barro, etc. en el producto.
(h) Cuando no se adjunte esta garantía en el momento de solicitar la reparación.
(i) Cuando se haya realizado cualquier modificación en la garantía como año, mes y fecha de
compra, nombre del comprador, nombre del establecimiento vendedor, número de serie etc.
(j) Cuando el justificante de compra no sea presentado con este certificado de garantía.
4. Esta garantía cubre sólo el propio producto: otros accesorios y equipo, tal como el estuche, Ia
correa, la tapa del objetivo, las pilas, etc. no son cubiertos por la misma.
La responsabilidad de Olympus bajo esta garantía queda limitada únicamente a la reparación y
5.
reemplazo del producto. Cualquier responsabilidad por pérdida o daño indirectos o consecuentes de
cualquier tipo que sea incurrido o sufrido por el cliente debido a un defecto del producto, y en
particular cualquier pérdida o daño ocasionado a cualquier objetivo, película u otro equipo o accesorio
usado con este producto, o ante cualquier pérdida resultante de un retraso en la reparación o pérdida
de datos, queda excluida explícitamente. Ello no afecta a las disposiciones fijadas por la ley.
Notas relativas a las condiciones de la garantía
1. Esta garantía solamente será válida si el Certificado de Garantía ha sido rellenado debidamente
por Olympus o un concesionario autorizado o exista cualquier otro documento que contenga una
prueba suficiente. Por lo tanto, asegúrese de que su nombre, el nombre del concesionario, el
número de serie y el año, mes y fecha de la compra, se encuentren todos completos y se adjunte
la factura de compra/venta original (indicando el nombre del concesionario, la fecha de compra
y tipo de producto) al Certificado de Garantía. Olympus se reserva el derecho de rechazar un
servicio gratuito si el Certificado de Garantía es incompleto o ilegible y si no se adjunta el
documento anteriormente citado o sus datos son incompletos o ilegibles.
2. ¡¡En caso de pérdida de la garantía original, ésta no será sustituida por otra!! Rogamos pues la
guarde en un lugar seguro.
* Véase la lista en el sitio web: http://www.olympus.com para la red internacional autorizada de
servicios de Olympus.
Limitación de la garantía
Olympus no hace declaración alguna ni realiza ningún tipo de afirmaciones o garantías, ni
explícitamente ni de forma concluyente, a través de o con referencia al contenido de esta
documentación impresa o en forma de software. Tampoco puede hacerse responsable de la
capacidad de mercado o de la idoneidad para un objetivo determinado, ni tampoco por daños tanto
directos como incidentes o indirectos (especialmente, pero no únicamente, a daños devengados de
una eventual pérdida de beneficios, una interrupción o pérdida de datos de negocio) que se
desprendan del uso o de la limitación o incapacida d de uso de esta documentación impresa o en forma
de software. En algunos países no está permitido limitar o inhibirse totalmente de la responsabilidad
procedente de este tipo de daños, por lo cual de garantía no tendrá efectos en este caso.
78
Page 79

Memo
Es
79
Page 80

Inhaltsverzeichnis
Überprüfen Sie, ob die folgenden Komponenten
(Verpackungsinhalt) vorhanden sind............................................. 81
Den Trageriemen an der Kamera anbringen....................................... 81
Akku vorbereiten.............................................................................. 82
Die Kamera einschalten .................................................................. 83
Datum und Zeit einstellen............................................................... 84
Informationen zum Datums- und Zeiteinstellungsmenü ......................84
Sprache einstellen........................................................................... 86
Bilder aufnehmen............................................................................. 87
Aufgenommene Bilder anzeigen.................................................... 88
Bilder löschen......................................................................................88
Grundlegende Bedienungsschritte................................................ 89
Aufnahmemodus-Tasten ..................................................................... 89
Motivaufnahmeprogramme (Scene Modus) ........................................ 90
Nahaufnahmemodus ...........................................................................90
De
Blitzprogramme ...................................................................................91
Selbstauslöser.....................................................................................91
Stromsparfunktion ...............................................................................91
Menüs und Einstellungen ............................................................... 92
Hauptmenü..........................................................................................92
Alle Bilder löschen...............................................................................92
Anschluss der Kamera.................................................................... 93
Wiedergabe auf einem Fernsehgerät .................................................. 93
Direktes Ausdrucken (PictBridge) .......................................................94
Bilder übertragen............................................................................. 95
OLYMPUS Master-Software............................................................ 97
Technische Daten............................................................................ 98
Sicherheitshinweise ...................................................................... 100
Bitte lesen Sie dieses Handbuch vor Gebrauch Ihrer Kamera sorgfältig durch,
um eine einwandfreie Handhabung zu gewährleisten.
Wir empfehlen Ihnen, vor wichtigen Aufnahmen Probeaufnahmen zu
erstellen, damit Sie sich mit der Bedienung und den Funktionen der Kamera
vertraut machen können.
Bitte beachten Sie die Sicherheitshinweise am Ende dieses Handbuchs.
Die Darstellungen auf dem LCD-Monitor und die Abbildungen der Kamera in
diesem Handbuch können vom aktuellen Produkt abweichen. Soweit nicht
anders angegeben, basieren diese Abbildungen auf der FE-230/X-790.
80
Page 81

Kurzanleitung
Überprüfen Sie, ob die folgenden Komponenten
(Verpackungsinhalt) vorhanden sind
Digitalkamera Trageriemen Lithium-Ionen-Akku
Ladegerät
(LI-40C)
Zubehör ohne Abbildung: Erweiterte Anleitung (CD-ROM), Einfache
Anleitung (dieses Handbuch) und die Garantiekarte. Die Inhalte können je
nach Land, in dem Sie Ihre Kamera gekauft haben, variieren.
USB-Kabel AV-Kabel CD-ROM mit der
(LI-42B)
OLYMPUS Master-
Software
Den Trageriemen an der Kamera anbringen
De
Ziehen Sie den Trageriemen fest, damit er sich nicht lösen kann.
81
Page 82

Akku vorbereiten
a. Laden Sie den Akku auf.
W
Netzkabel
1
Netz-
steckdose
2
Ladezustandsanzeige
Die rote LED leuchtet:
Ladevorgang läuft
LED ist aus: Ladevorgang
abgeschlossen
(Ladezeit: ca. 300 min.)
Beim Kauf ist der Akku noch nicht vollständig aufgeladen.
b. Den Akku in die Kamera einsetzen.
De
2
4
1
5
Legen Sie den Akku in -Richtung ein.
3
3
Lithium-IonenAkku
Ladegerät
Um den Akku zu entfernen, drücken
Akkuverriegelung
Sie die Akkuverriegelung in
Pfeilrichtung.
Mit dieser Kamera können Sie auch dann fotografieren, wenn keine
optionale xD-Picture Card™ (nachstehend als „Karte“ bezeichnet)
eingelegt ist. Weitere Informationen zum Einlegen der Karte finden
Sie in der Erweiterten Anleitung.
82
Page 83

Die Kamera einschalten
ZEIT
----
.--.-- --:--
J / M / T
Hier erfahren Sie, wie Sie die Kamera im Aufnahmemodus einschalten können.
a. Die Programmwählscheibe auf h stellen.
Beim Aufnehmen von Movies
Beim Aufnehmen von
Einzelbildern
Die verschiedenen Aufnahmearten für Einzelbilder
h Für normale Aufnahmen.
h Mit dieser Funktion können Sie die Unschärfe, die durch die Bewegung des
B Speziell zum Aufnehmen von Personen geeignet.
E Speziell zum Aufnehmen von Landschaften geeignet.
M Speziell zum Aufnehmen von Personen bei Nacht geeignet.
f Sie können eines von 10 Motivprogrammen (FE-240/X-795) oder 13
R Folgen Sie den angezeigten Aufnahmehinweisen, um Bilder entsprechend
b. Die o-Taste drücken.
Motivs oder Verwacklung der Kamera bei der Aufnahme entsteht, reduzieren.
Motivprogrammen (FE-230/X-790) auswählen, je nach Aufnahmesituation.
der jeweiligen Situation mit den optimalen Einstellungen aufzunehmen.
ZEIT
TMJ
o-Taste
----
.--.-- --:--
J/M/T
De
MENU
ZURÜCK
Dieser Bildschirm
wird angezeigt, falls
Datum und Uhrzeit
nicht eingestellt sind.
Drücken Sie zum Ausschalten der Kamera die o-Taste erneut.
Hinweis
Die Richtungen der Pfeiltasten werden in der mitgelieferten
Bedienungsanleitung durch ONXY angezeigt.
O
YX
N
83
Page 84

Datum und Zeit einstellen
----
.--.-- --:--
ZEIT
J / M / T
2007
.--.-- --:--
ZEIT
J / M / T
2007
.-- --:--
ZEIT
J / M / T
Informationen zum Datums- und Zeiteinstellungsmenü
J-M-T
Stunde
ZEIT
TMJ
.--.-- --:--
----
MENU
ZURÜCK
J/M/T
Zum Löschen der Einstellung
a. Drücken Sie die Tasten OF/< und NY, und
wählen Sie [J].
• Die ersten beiden Ziffern der Jahreszahl lassen sich nicht ändern.
De
b. Die Y#-Taste drücken.
Minute
Datumsformate (J-M-T, M-T-J, T-M-J)
OF/<-Taste
2007
MENU
NY-Taste
ZURÜCK
TMJ
.--.-- --:--
ZEIT
J/M/T
Y#-Taste
c. Drücken Sie die Tasten OF/<
und NY, und wählen Sie den
[M].
84
2007
.
MENU
ZURÜCK
TMJ
0202.-- --:--
ZEIT
J/M/T
Page 85

d. Die Y#-Taste drücken.
2007
--:--
ZEIT
J / M / T
2007
30
ZEIT
J / M / T
2007
30
ZEIT
J / M / T
IN
3072
2304
e. Drücken Sie die Tasten OF/<
und NY, und wählen Sie den
[T].
f. Die Y#-Taste drücken.
g. Drücken Sie die Tasten OF/<
und NY, und stellen Sie die
Stunden und Minuten ein.
• Die Uhrzeit wird stets im 24-Stunden-Format
angezeigt.
h. Die Y#-Taste drücken.
i. Drücken Sie die Tasten OF/<
und NY, und wählen Sie [J/M/
T].
Datum und Zeit einstellen
ZEIT
TMJ
ZEIT
1212:
ZEIT
1212:
30
30
EINST.
J/M/T
J/M/T
OK
J/M/T
2007
.
MENU
ZURÜCK
2007
.
MENU
ZURÜCK
2007
.
0202.
0202.
0202.
1010 --:--
TMJ
1010
TMJ
1010
MENU
ZURÜCK
EINST.
j. Wenn Sie alle Einstellungen vorgenommen haben,
drücken Sie .
• Um eine genauere Einstellung vorzunehmen, drücken Sie zur vollen
Minute (00 Sekunden) .
[ ]
[
IN
-Taste
HQHQ3072
×2304
OK
]
44
85De85
Page 86

Sprache einstellen
RUECKST.
PANORAMA
LAUTLOS
MODUS
EIN-
RICHTEN
BILDQUAL.
SCENE
BILD
+ TON
RUECKST.
PANORAMA
LAUTLOS
MODUS
EIN-
RICHTEN
BILDQUAL.
SCENE
BILD
+ TON
EINRICHTEN
a. Drücken Sie zur Anzeige des Hauptmenüs die
m-Taste.
m-Taste
b. Drücken Sie die Y#-Taste,
wählen Sie [EINRICHTEN], und
drücken Sie .
De
c. Drücken Sie die Tasten OF/<
und NY, wählen Sie [W],
und drücken Sie anschließend
.
d. Drücken Sie die Pfeiltasten
(ONXY) zur Auswahl einer
Sprache und drücken Sie .
• Mit der beiliegenden OLYMPUS MasterSoftware können Sie Ihrer Kamera weitere
Sprachen hinzufügen. Bitte lesen Sie den
entsprechenden Abschnitt in der Erweiterten
Anleitung.
RUECKST.
MENU
ZURÜCK
RUECKST.
MENU
ZURÜCK
1
FORMATIEREN
2
DATENSICHER.
3
PIXEL KORR.
MENU
ZURÜCK
W
ENGLISH
FRANCAIS
DEUTSCH
ESPAÑOL
MENU
ZURÜCK
PANORAMA
BILD-
BILD-
QUAL.
QUAL.
SCENE
PANORAMA
BILD-
BILD-
QUAL.
QUAL.
SCENE
ITALIANO
NEDERLANDS
BILD
+ TON
EIN-
RICHTEN
LAUTLOS
LAUTLOS
MODUS
MODUS
EINST.
BILD
+ TON
EIN-
RICHTEN
LAUTLOS
LAUTLOS
MODUS
MODUS
EINST.
DEUTSCH
NEIN
EINST.
OK
OK
OK
OK
86
Page 87

Bilder aufnehmen
3072
2304
IN
a. Die Kamera halten.
Querformat Hochformat
b. Motiv scharfstellen.
(Halb nach
unten drücken)
c. Bild aufnehmen.
Auslöser
(vollständig nach
unten drücken)
Auslöser
Richten Sie diese
Markierung auf Ihr Motiv.
[ ]
[
]
HQHQ3072
×2304
Die Anzahl der
aufnehmbaren Bilder
wird angezeigt.
Die grüne LED leuchtet auf, sobald
die Schärfe- und Belichtungswerte
gespeichert sind.
Die Schreibanzeige blinkt.
IN
44
De
87
Page 88

Aufgenommene Bilder anzeigen
12: 30
'0 7 .0 2.1 0
100-0004
HQ
IN
30 7 2
23 0 4
0. 0
a. Die q-Taste drücken.
q-Taste
[
]
IN
3072
Pfeiltasten
×2304
HQ
0.0
Wiedergabe des
nächsten Bilds
Wiedergabe des vorherigen Bilds
Bilder löschen
De
a. Drücken Sie die Tasten X& und Y#, um die zu
löschenden Bilder anzuzeigen.
b. Die S-Taste drücken.
BILD LÖSCHEN
S-Taste
MENU
ZURÜCK
c. Drücken Sie die OF/<-Taste, wählen Sie [JA],
und drücken Sie .
OF/<-Taste
-Taste
BILD LÖSCHEN
MENU
ZURÜCK
'07.02.10
100-0004
JA
NEIN
EINST.
JA
NEIN
EINST.
12:30
4
[IN]
OK
[IN]
OK
88
Page 89

Grundlegende Bedienungsschritte
Aufnahmemodus-Tasten
Verwenden Sie diese Tasten im Aufnahmemodus, um schnell zu einigen der
häufiger benutzten Funktionen zu gelangen.
1
2
7
8
9
0
3
5
6
4
1 K-Taste (Aufnahme)
Zum Auswählen des Aufnahmemodus.
2 q-Taste (Wiedergabe)
Zum Auswählen des Wiedergabemodus.
3 m-Taste
Ruft das Hauptmenü auf.
4 S-Taste (Bild löschen)
Zum Auswählen zu löschender Bilder im Wiedergabemodus.
5 Pfeiltasten (ONXY)
Zum Auswählen von Aufnahmeprogrammen, wiederzugebenden Bildern und
Menüelementen.
6 X&-Taste (Nahaufnahmemodus)
Zum Aktivieren des Nahaufnahme- oder Super-Nahaufnahmemodus zum
Erstellen von Nahaufnahmen.
7 OF/<-Taste (Belichtungskorrektur/Drucken)
Im Aufnahmemodus können Sie mit dieser Taste den Belichtungskorrekturwert
einstellen, der die Bildhelligkeit betrifft.
8 Y#-Taste (Blitzmodus)
Sie können eines von 4 Blitzprogrammen wählen: AUTO, ! (Blitz mit RoteAugen-Effekt-Reduzierung), # (Aufhellblitz) oder $ (Blitz aus).
9 -Taste (OK)
Zum Bestätigen von Einstellungen.
0 NY-Taste (Selbstauslöser)
Im Selbstauslösermodus erstellt die Kamera Aufnahmen innerhalb von ca.
12 Sekunden, nachdem Sie den Auslöser gedrückt haben.
De
89
Page 90

Motivaufnahmeprogramme (Scene Modus)
Mit dieser Funktion können Sie den f-Modus (Scene Modus) je nach Motiv
verändern.
1 Stellen Sie die Programmwählscheibe auf f.
1
SPORT
Programmwählscheibe
ZURÜCK
MENU
EINST.
OK
O/N
-Taste
2 Drücken Sie O/N, um das gewünschte Motivaufnahmeprogramm
auszuwählen. Drücken Sie anschließend .
Motivaufnahmeprogramme verwenden
• j SPORT • N INNENAUFNAHME • W KERZENLICHT
SELBSTPORTRÄT
• R
De
• P VITRINE • V SPEISEN • d DOKUMENTE
• i AUKTION • k
• H
UNTERWASSER-MAKRO
*1 Nur verfügbar bei FE-230/X-790.
• S
SONNENUNTERGANG
UNTERWASSER-WEITW.1*1• l
*1
• X FEUERWERK
UNTERWASSER-WEITW.2
Nahaufnahmemodus
& Mit diesem Modus können Sie Nahaufnahmen mit einer Entfernung von
lediglich 10 cm bei FE-230/X-790, 20 cm bei FE-240/X-795 erstellen.
(in Weitwinkel Position)
% Mit diesem Modus können Sie Nahaufnahmen mit einer Entfernung von
lediglich 5 cm bei FE-230/X-790, 3 cm bei FE-240/X-795 erstellen. Die Position
des Zooms ist im %-Modus fest eingestellt.
1 Drücken Sie wiederholt die Tasten X&, wählen Sie [&] oder [%] aus, und
drücken Sie anschließend .
*1
90
Page 91

Blitzprogramme
1 Drücken Sie wiederholt die Taste Y#, wählen Sie den gewünschten
Blitzmodus aus, und drücken Sie anschließend .
2 Drücken Sie den Auslöser halb nach unten.
Wenn der Blitz auslösebereit ist, leuchtet die #-Markierung.
3 Drücken Sie den Auslöser vollständig nach unten, um die Aufnahme zu
erstellen.
Symbol Blitzmodus Beschreibung
Keine
Anzeige
Automatische
Blitzabgabe
Blitz mit Rote-
!
Augen-EffektReduzierung
Aufhellblitz Der Blitz wird unabhängig von der aktuellen
#
Blitz aus Die Blitzabgabe unterbleibt auch bei unzureichender
$
Bei niedriger Umgebungshelligkeit oder starkem
Gegenlicht löst der Blitz automatisch aus.
Der Blitzmodus mit Rote-Augen-Effekt-Reduzierung
mindert dieses Phänomen erheblich, indem er vor dem
eigentlichen Blitz mehrere Vorblitze aussendet.
Umgebungslichtsituation ausgelöst.
Umgebungshelligkeit.
Selbstauslöser
De
1 Drücken Sie die Taste NY, wählen Sie [Y], und
drücken Sie .
SelbstauslöserLED
2 Drücken Sie den Auslöser vollständig nach unten, um die
Aufnahme zu erstellen.
Die Selbstauslöser-LED leuchtet nach dem Drücken des
Auslösers für ca. 10 Sekunden und wechselt dann auf ein
Blinksignal. Nachdem die LED für ca. 2 Sekunden geblinkt hat,
erfolgt die Aufnahme.
Stromsparfunktion
Um Akkustrom zu sparen, wechselt die Kamera automatisch in den Sleep-
Modus und beendet alle Funktionen, wenn innerhalb von ca. 3 Minuten kein
Bedienschritt erfolgt. Reaktivieren Sie die Kamera, indem Sie den Auslöser
oder den Zoomregler betätigen.
Wenn innerhalb von circa 12 Minuten kein Bedienschritt erfolgt, wechselt die
Kamera automatisch in den Sleep-Modus, wobei das Objektiv eingefahren
und die Kamera abgeschaltet wird. Schalten Sie die Kamera wieder ein, wenn
Sie die Kamerafunktionen wieder nutzen möchten.
91
Page 92

Menüs und Einstellungen
RUECKST.
PANORAMA
LAUTLOS
MODUS
EIN-
RICHTEN
BILDQUAL.
SCENE
BILD
+ TON
Hauptmenü
1 Drücken Sie die m-Taste, um das Hauptmenü auf dem Monitor aufzurufen.
2
Verwenden Sie zum Auswählen von Menüelementen die Pfeiltasten (
Hauptmenü im
Aufnahmemodus
PANORAMA
BILD-
MENU
BILD-
QUAL.
QUAL.
SCENE
m-Taste
RUECKST.
ZURÜCK
BILDQUAL.
Zum Einstellen der gewünschten Bildqualität und -auflösung.
De
PANORAMA
Zum Erstellen einer Panorama-Aufnahme.
RUECKST.
Setzt die Kamera auf ihre werkseitigen Grundeinstellungen zurück.
SCENE
Die Aufnahme je nach Motiv und Aufnahmebedingungen auswählen.
LAUTLOS MODUS
Damit können Sie die Bedientöne, Warntöne, den Auslöserton, usw. während
der Aufnahme und Wiedergabe stumm schalten.
EINRICHTEN
Zum Einstellen des Datums, der Uhrzeit, der Sprache und anderen Einstellungen.
BILD + TON/FILM MIT TON
Zur Tonaufnahme bei der Aufnahme.
ONXY
BILD
+ TON
EIN-
RICHTEN
LAUTLOS
LAUTLOS
MODUS
MODUS
EINST.
).
OK
Alle Bilder löschen
1 Drücken Sie im Wiedergabemodus zur Anzeige
des Hauptmenüs die m-Taste.
2 Wählen Sie [BILD LÖSCHEN], [ALLES
LÖSCHEN], und drücken Sie anschließend .
3 Wählen Sie [JA] und drücken Sie anschließend
92
.
Alle Bilder werden gelöscht.
ALLES LÖSCHEN
ACHTG. DATENLÖSCHUNG
JA
NEIN
MENU
ZURÜCK
EINST.
[IN]
[IN]
OK
Page 93

Anschluss der Kamera
Wiedergabe auf einem Fernsehgerät
Verwenden Sie das der Kamera beiliegende AV-Kabel, wenn Sie Ihre
Aufnahmen auf einem Fernsehgerät wiedergeben möchten. Es können sowohl
Einzelbilder als auch Movies wiedergegeben werden.
1 Vergewissern Sie sich, dass Fernseher und Kamera ausgeschaltet sind.
Verbinden Sie anschließend das AV-Kabel mit dem Multi-Connector der
Kamera und dem Videoeingang des Fernsehgeräts.
Multi-Connector
AV-Kabel (im Lieferumfang enthalten)
2 Schalten Sie das Fernsehgerät ein und stellen Sie den Videokanal ein.
Weitere Informationen zum Video-Eingangskanal finden Sie in der
Bedienungsanleitung Ihres Fernsehgeräts.
3 Schalten Sie die Kamera ein und drücken Sie die q-Taste, um den
gewünschten Wiedergabemodus auszuwählen.
Die zuletzt erstellte Aufnahme wird auf dem Fernsehgerät wiedergegeben.
Verwenden Sie die Pfeiltasten (ONXY) für die Bildauswahl.
Buchsenabdeckung
An den Videoeingang (gelb) und
den Audioeingang (weiß) des
Fernsehgeräts anschließen.
De
93
Page 94

Direktes Ausdrucken (PictBridge)
Mit dem der Kamera beiliegenden USB-Kabel können Sie die Kamera direkt an
einen PictBridge-kompatiblen Drucker zum Drucken anschließen. Das
Ausdrucken von Bildern ist einfach durchzuführen.
1 Rufen Sie das Bild, das Sie ausdrucken möchten, im Wiedergabemodus auf
dem Monitor auf.
2 Schließen Sie das eine Ende des mitgelieferten USB-Kabels an den Multi-
Connector der Kamera an und das anderer Ende an den USB-Anschluss
des Druckers.
Multi-Connector
USB-Kabel
De
OF/<-Taste
3 Drücken Sie die OF/<-Taste.
Der Druckvorgang beginnt.
Wenn der Druckvorgang abgeschlossen ist,
trennen Sie das USB-Kabel von der Kamera,
während das Foto-Auswahlmenü angezeigt wird.
94
EINF. DRUCK STARTEN
PC / INDIVID. DRUCK
OK
Page 95

Bilder übertragen
a. Software installieren
1 Legen Sie die OLYMPUS Master CD-ROM
ein.
2 Windows: Klicken Sie auf die Schaltfläche
Macintosh: Doppelklicken Sie auf das
3 Folgen Sie jetzt einfach den Anweisungen auf
dem Bildschirm.
b. Die Kamera an einen Computer anschließen
1 Schließen Sie die Kamera mit dem USB-Kabel (im Lieferumfang enthalten)
an den Computer an.
Der LCD-Monitor schaltet sich automatisch ein.
„OLYMPUS Master 2“.
Symbol „Setup“.
USB-Kabel
2
1
De
2 Wählen Sie [PC] auf dem LCD-Monitor und
drücken Sie dann .
Die Kamera wird jetzt vom PC als
Wechseldatenträger erkannt.
USB
PC
EINF. DRUCK
INDIVID. DRUCK
SCHLIESSEN
EINST.
OK
95
Page 96

c. Bilder auf den Computer übertragen
1 Nachdem Sie die Kamera angeschlossen haben, öffnen Sie die OLYMPUS
Master-Software.
2 Klicken Sie auf „Bilder übertragen“ im
Durchsuchen-Fenster und klicken Sie dann
auf „Von Kamera“ .
3 Folgen Sie jetzt einfach den Anweisungen auf
dem Bildschirm.
De
Tipps
• Ausführliche Informationen zum Einrichten und Gebrauch der Kamera
erhalten Sie in der „Erweiterten Anleitung“ Ihrer Kamera, das Sie auf der
mitgelieferten CD-ROM finden.
• Weitere Hilfe finden Sie auch in der Datei „Hilfe“ der OLYMPUS MasterSoftware.
96
Page 97

OLYMPUS Master-Software
OLYMPUS Master-Software: Mit dieser Software können
Sie Bilder aus Ihrer Kamera herunterladen, Ihre digitalen
Bilder und Filme anschauen, organisieren, retuschieren,
per E-Mail versenden, drucken und vieles mehr!.
(Systemanforderungen
OS Windows 2000 Professional/XP Home Edition/XP Professional/Vista
oder Mac OS X (10.3 oder höher)
CPU Pentium III 500 MHz/Power PC G3 500 MHz/Intel Core Solo/
Duo 1.5 GHz, oder höher
RAM 256 MB oder mehr
Festplatte 500 MB oder mehr freier Festplattenspeicher
Anschluss USB-Anschluss/IEEE 1394-Anschluss
LCD-Monitor 1024 × 768 Pixel Auflösung oder mehr bei mindestens 65.536 Farben
(Windows) bzw. 32.000 Farben (Macintosh)
Sonstiges Internet Explorer 6 oder höher (Windows), Safari 1.0 oder höher,
QuickTime 6 oder höher (Macintosh)
Aktuelle Informationen finden Sie auf der Olympus-Website unter
(http://www.olympus.com/)
Benutzer-Registrierung
Registrieren Sie Ihre Kamera beim Installieren der OLYMPUS MasterSoftware, um Ihre Garantie zu aktivieren, Benachrichtigungen über
Updates zur Software- und Kamera-Firmware zu erhalten und vieles
mehr.
De
97
Page 98

Technische Daten
(Kamera
Produkttyp : Digitalkamera (zur Bildaufzeichnung und -anzeige)
Aufnahmesystem
Einzelbilder : Digital-Aufzeichnung, JPEG (in Übereinstimmung mit
Gültige Standards : Exif 2.2, Digital Print Order Format (DPOF), PRINT
Tonaufzeichnung
bei Einzelbildern
Film : AVI Motion JPEG
Speicher : Interner Speicher
Anzahl der effektiven
Pixel
Bildwandler : 1/2,5 Zoll CCD-Chip (primärer Farbfilter),
Objektiv : FE-230/X-790:
De
Belichtungsmessung : Digitale ESP-Messung
Verschlusszeit : 4 bis 1/2000 Sek.
Aufnahmebereich : FE-230/X-790:
Monitor : 2,5 Zoll TFT Farb-LCD-Monitor mit 115.000 Pixeln
Anschlussbuchsen : USB-Anschluss, A/V OUT-Eingang (Multi-Connector)
Automatisches
Kalendersystem
Umgebungsbedingungen
Temperatur : 0°C bis 40°C (Betrieb)/
Luftfeuchtigkeit : 30% bis 90% (Betrieb)/10% bis 90% (Lagerung)
Spannungsversorgung : Olympus Lithium-Ionen-Akku (LI-42B/LI-40B)
der DCF-Norm „Design rule for Camera File system“)
Image Matching III, PictBridge
: Wave-Audioformat
xD-Picture Card (16 MB – 2 GB) (Type H/M, Standard)
: 7.100.000 Pixel
7.400.000 Pixel (brutto)
Olympus-Objektiv 6,3 bis 18,9 mm, f3,1 bis 5,9
(entspricht 38 bis 114 mm bei einer 35 mm Kamera)
FE-240/X-795:
Olympus-Objektiv 6,4 bis 32 mm, f3,3 bis 5,0
(entspricht 38 bis 190 mm bei einer 35 mm Kamera)
0,6 m bis ) (W), 1,0 m bis ) (T) (Normal)
0,1 m bis ) (W), 0,6 m bis ) (T)
(Nahaufnahmemodus)
0,05 m bis ) (Super-Nahaufnahmemodus)
FE-240/X-795:
0,7 m bis ) (Normal)
0,2 m bis ) (W), 0,6 m bis ) (T)
(Nahaufnahmemodus)
0,03 m (Super-Nahaufnahmemodus)
: 2000 bis 2099
-20°C bis 60°C (Lagerung)
98
Page 99

Abmessungen : FE-230/X-790:
90,5 mm (B) × 55,0 mm (H) × 16,5 mm (T)
(ohne Gehäusevorsprünge)
FE-240/X-795:
93,5 mm (B) × 56,0 mm (H) × 20,0 mm (T)
(ohne Gehäusevorsprünge)
Gewicht : FE-230/X-790: 105 g ohne Akku und Karte
FE-240/X-795: 115 g ohne Akku und Karte
(Lithium-Ionen-Akku (LI-42B)
Produkttyp : Wiederaufladbarer Lithium-Ionen-Akku
Standardspannung : Gleichspannung 3,7 V
Standardkapazität : 740 mAh
Akkulebensdauer : Ca. 300 mal vollständig aufladbar (je nach
Verwendung)
Umgebungsbedingungen
Temperatur : 0°C bis 40°C (Ladevorgang)/
-10°C bis 60°C (Betrieb)/
-20°C bis 35°C (Lagerung)
Abmessungen : 31,5 × 39,5 × 6 mm
Gewicht : Ca. 15 g
(Akkuladegerät (LI-40C)
Netzversorgung : Wechselstrom 100 bis 240 V (50 bis 60 Hz)
3,2 VA (100 V) bis 5,0 VA (240 V)
Ausgang : Gleichspannung 4,2 V, 200 mA
Aufladezeit : Ca. 300 min.
Umgebungsbedingungen
Temperatur : 0°C bis 40°C (Betrieb)/
-20°C bis 60°C (Lagerung)
Abmessungen : 62 × 23 × 90 mm
Gewicht : Ca. 65 g
De
Design und technische Daten können ohne Vorankündigung geändert werden.
99
Page 100

Sicherheitshinweise
VORSICHT
STROMSCHLAGGEFAHR
NICHT ÖFFNEN
VORSICHT:
ZUR VERMEIDUNG VON STROMSCHLÄGEN NIEMALS DAS
GEHÄUSE (ODER DIE GEHÄU SERÜCKSEITE) ENTFERNEN. DIESES
PRODUKT ENTHÄLT KEINER LEI BENUTZERSEITIG ZU WARTENDE TEIL E.
ÜBERLASSEN SIE WARTU NGSARBEITEN QUALIFIZIER TEM FACHPERSONAL.
Das Ausrufungszeichen im Dreieck verweist auf wichtige Handhabungs- und
Wartungsanweisungen in der zu diesem P rodukt gehörigen Benutzerdokumentation.
GEFAHR
ACHTUNG
VORSICHT
ACHTUNG
De
DIESES PRODUKT NIEMALS NÄSSE AUSSETZEN, AUSEINANDER NEHMEN ODER BEI HOHER F EUCHTE
BETREIBEN. ANDERNFALLS BESTEHT FEUER- UND STROMSCHLAGGEFAHR.
Allgemeine Vorsichtsmaßregeln
Die Benutzerdokumentation sorgfältig lesen — Vor dem Gebrauch dieses
Produktes erst die Bedienungsanleitung lesen. Bewahren Sie alle
Benutzerhandbücher und Dokumentationen zum späteren Nachschlagen auf.
Reinigung —
Reinigung ein befeuchtetes Tuch verwenden. Niemals Lösungsmittel, sich
verflüchtigende oder organische Reinigungsmittel verwenden.
Zubehör — Ausschließlich von Olympus empfohlenes Zubehör verwenden.
Andernfalls kann dieses Produkt schwer beschädigt und eine
Verletzungsgefahr nicht ausgeschlossen werden.
Nässe und Feuchtigkeit — Die Sicherheitshinweise zu spritzwasserfesten
Produkten finden Sie im entsprechenden Abschnitt des Referenzhandbuchs.
Standort — Um Schäden an der Kamera zu vermeiden, sollten Sie die Kamera
fest auf ein stabiles Stativ, Gestell oder auf einer Halterung befestigen.
Stromversorgung — Es dürfen ausschließlich geeignete Stromquellen
entsprechend des am Produkt angebrachten Typenschildes verwendet
werden.
Fremdkörper — Darauf achten, dass keine metallischen Gegenstände in das
Produktinnere, gelangen. Andernfalls können Sie Verletzungen davontragen.
Hitze — Dieses Produkt niemals in der Nähe von Hitze abstrahlenden
Vorrichtungen (wie Heizkörper, Ofen, Belüftungsöffnungen etc.) und Geräten
(z. B. Hochleistungsverstärker etc.) betreiben oder aufbewahren.
Die Nichtbeachtung der zu diesem Warnsymbol gehörigen Informationen kann schwere
Verletzungen mit Todesgefahr zur Folge haben!
Die Nichtbeachtung der zu diesem Warnsymbol gehörigen Informationen kann
Verletzungen mit Todesgefahr zur Folge haben!
Die Nichtbeachtung der zu diesem Warnsymbol gehörigen Informationen kann leichte
Verletzungen, Sachschäden sowie den Verlust von gespeicherten Daten zur Folge haben!
Trennen Sie dieses Produkt vor jeder Reinigung vom Netz. Zur
100
 Loading...