

Page 1
DIGITAL CAMERA
ADVANCED MANUALADVANCED MANUAL
DIGITAL CAMERA
Basic operations
Things to know before shooting
Selecting the right mode for
shooting conditions
Various shooting functions
Focusing functions
● Thank you for purchasing an Olympus digital camera. Before you start to use your new
camera, please read these instructions carefully to enjoy optimum performance and a
longer service life.
● This manual explains advanced techniques such as shooting and playback functions,
customizing functions or settings and transferring recorded images to a computer, etc.
● We recommend that you take test shots to get accustomed to your camera before
taking important photographs.
● The screen and camera illustrations shown in this manual were produced during the
development stages and may differ from the actual product.
Exposure, image and color
Playback
Customizing the settings/
functions of your camera
Printing
Transferring images to a
computer
Appendix
Information
Page 2
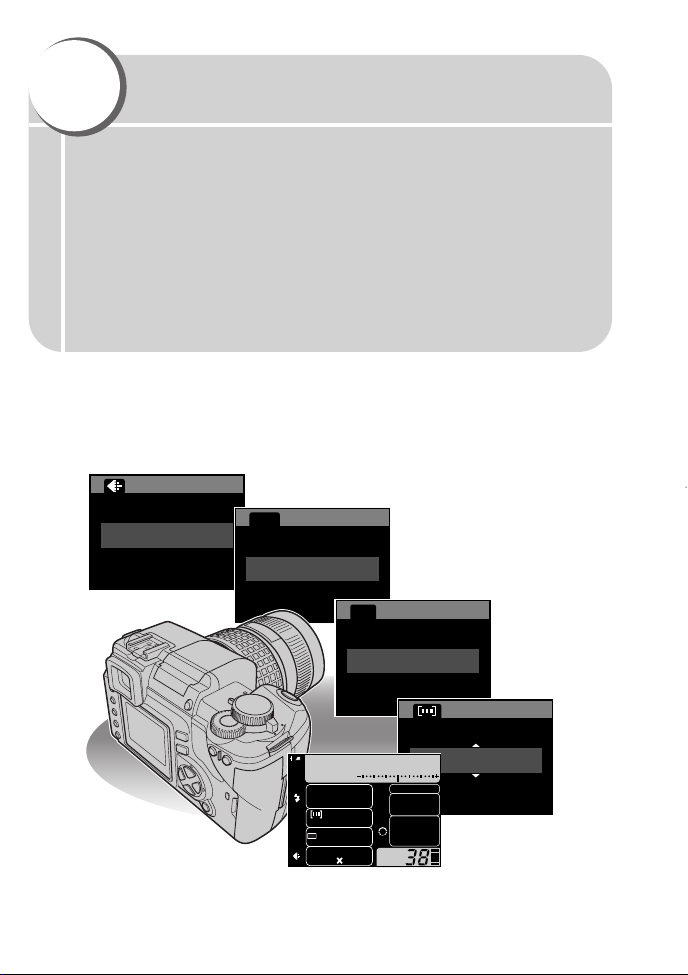
How to use this manual
7 Playback 107
Viewing still images . . . . . . . . . . . . . . . . . . . . . . . . . . . . . . . . . . . . . . . . . . . . . 108
Single-frame playback . . . . . . . . . . . . . . . . . . . . . . . . . . . . . . . . . . . . . . . . 108
Close-up playback . . . . . . . . . . . . . . . . . . . . . . . . . . . . . . . . . . . . . . . . . 109
Index display . . . . . . . . . . . . . . . . . . . . . . . . . . . . . . . . . . . . . . . . . . . . . 111
Information display INFO . . . . . . . . . . . . . . . . . . . . . . . . . . . . . . . . . . . . . . . . 112
Slideshow . . . . . . . . . . . . . . . . . . . . . . . . . . . . . . . . . . . . . . . . . . . . . . . . . . 114
Rotating images . . . . . . . . . . . . . . . . . . . . . . . . . . . . . . . . . . . . . . . . . . . . . 115
Playback on TV . . . . . . . . . . . . . . . . . . . . . . . . . . . . . . . . . . . . . . . . . . . . . . . . 116
Editing still images . . . . . . . . . . . . . . . . . . . . . . . . . . . . . . . . . . . . . . . . . . . . . . 117
Protecting images — Preventing accidental erasure . . . . . . . . . . . . . . . . 119
Erasing images . . . . . . . . . . . . . . . . . . . . . . . . . . . . . . . . . . . . . . . . . . . . . . . . 120
Single-frame erase . . . . . . . . . . . . . . . . . . . . . . . . . . . . . . . . . . . . . . . . 120
All-frame erase . . . . . . . . . . . . . . . . . . . . . . . . . . . . . . . . . . . . . . . . . . . 121
8
Customizing the settings/functions of your camera
123
AELMETERING. . . . . . . . . . . . . . . . . . . . . . . . . . . . . . . . . . . . . . . . . . . . . . . . 124
EV STEP . . . . . . . . . . . . . . . . . . . . . . . . . . . . . . . . . . . . . . . . . . . . . . . . . . . . . 124
1
Information
g
Auto flash..................................................54
B
BEACH & SNOW ................................42
Beep sound ......................................131
Bulb shooting............................................51
C
C-AF..........................................................82
CANDLE ............................................42
CARD SETUP........................................135
Card adapter ..........................................157
Center weighted averaging
metering ..........................................86
CLEANING MODE..................................182
Close-up playback ............................109
COLOR SPACE......................................106
Compact Flash........................................172
Compression............................................34
CONTRAST ......................................102
Fill-in flash ..........................................56
FIREWORKS ......................................40
Flash intensity control ........................60
Flash mode ..........................................54
FOCUS RING ........................................126
Focus lock................................................30
FORMAT................................................135
G
GRADATION ....................................104
H
HIGH KEY ..........................................40
HQ............................................................36
I
Image rotation ..................................115
Index display ....................................111
ISO BOOST..............................................92
J
JPEG........................................................35
Menu directory
–5.0 - 0.0 - +5.0 P. 88
RAW, TIFF, SHQ, HQ , SQ, P. 36
RAW
+
SHQ, RAW+HQ,
RAW
+
SQ
AUTO , , SLOW, P. 58
SLOW, SLOW2, ,
AF S-AF , C-AF, MF, S-AF
+
MF P. 79
WB AUTO , 3000K, 3600K, 4000K, P. 95
4500K, 6600K, 5300K,
6000K, 7500K, CWB1,
CWB2, CWB3, CWB4,
ISO AUTO , 100, 200, 400, P. 91
800, 1600
ESP, , P. 86
Shooting Menu
Menu Function Setting Ref.Page
This manual includes a table of contents, index and menu list to help you
easily locate the information you need.
Searching the table of contents ~ P. 4
All section titles and chapter headings are listed in the table of contents so that
you can quickly find the information you need. There is a chapter containing
information you need to know before using your camera for the first time, a
chapter that describes basic shooting procedures, etc.
For example
When you want to play back the images you have just
taken.
Go to Chapter 7 Playback and look for the page titled
“Viewing still images........108”.
Searching the index ~ P. 207
Terms used in this manual (such as the names of functions) are listed in
alphabetical order. When you come across a term that you are not familiar with or
about which you want to learn more, you can search the index to find the relevant
page. Camera part names and monitor indications are listed at the end of the
manual.
For example
If you want to know more about the term “HQ”
Go to the index at the end of this manual and look under H
for “HQ.......36”.
V
V
Searching the list of menus ~ P. 192
The camera’s menus are listed in a tree structure. When you come across a menu
whose name is unfamiliar on the menu screen, you can find the relevant pages for
this menu function in the menu list.
For example
When you want to know how to make settings for WB in
the menu screen
V
Go through the menus until you find WB and look for the
reference page number.
* For information on how to read the instructions in this manual, refer to “How to read the
instruction pages” (P. 3)
2
Page 3

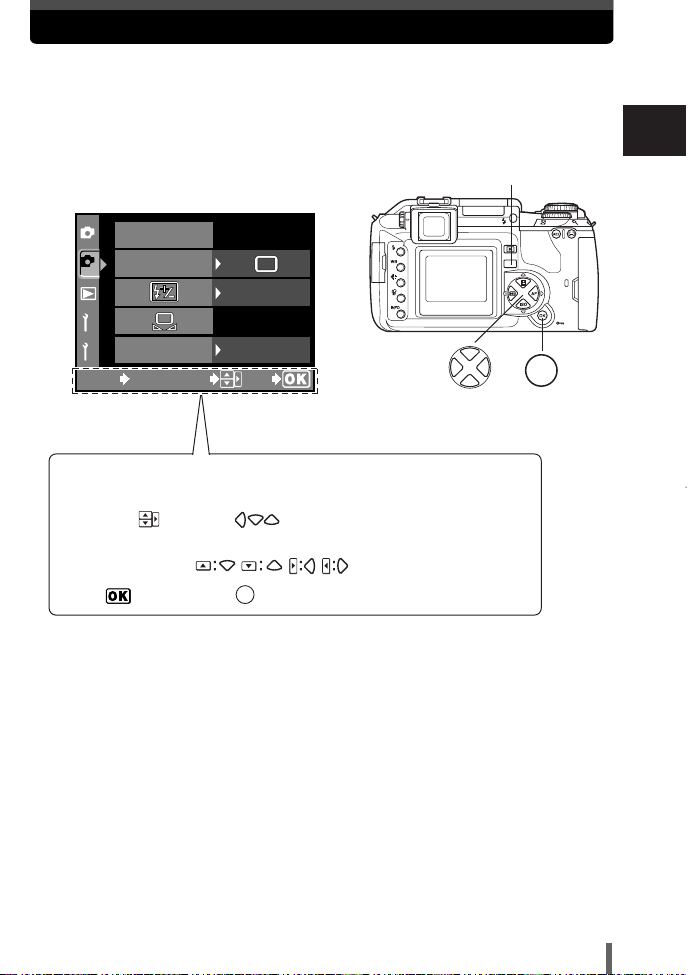
How to read the instruction pages
FORMAT
ALL ERASE
CARD SETUP
CANCEL SELECT
GO
MENU
P A S M
SCENE
Available modes
MENU
CARD SETUP— Formatting the card
Lets you format a card. Formatting prepares cards to receive data.
Non-Olympus cards or cards formatted on a computer must be formatted with the
camera before they can be used.
All data stored on the card, including protected images,is erased when the
card is formatted.When formatting a used card, confirm there are no images
that you still want to keep on the card.
Menu TTCARD SETUP
1
~ “How to use the menus” (P. 25)
Press .
2
● The CARD SETUP screen is displayed.
Press to select FORMAT. Press
3
.
● The FORMATscreen is displayed.
Press to select YES.Press OK.
4
● FORMAT is performed.
OK button
135
This sample page is only for your reference. It may differ from the actual page in
this manual.
Sets the camera to any of
the modes shown.
Step through the menus
in the order of the arrows
(P. 25)
8
Customizing the settings/functions of your camera
This represents the arrow
pad. Only arrows
applicable to the
operation are shown.
Indications used in this manual
Important information on factors which may lead to a malfunction
or operational problems. Also warns of operations that should be
absolutely avoided.
Useful information and hints that will help you get the most out of
your camera.
Reference pages describing details or related information.
TIPS
~
3
Page 4
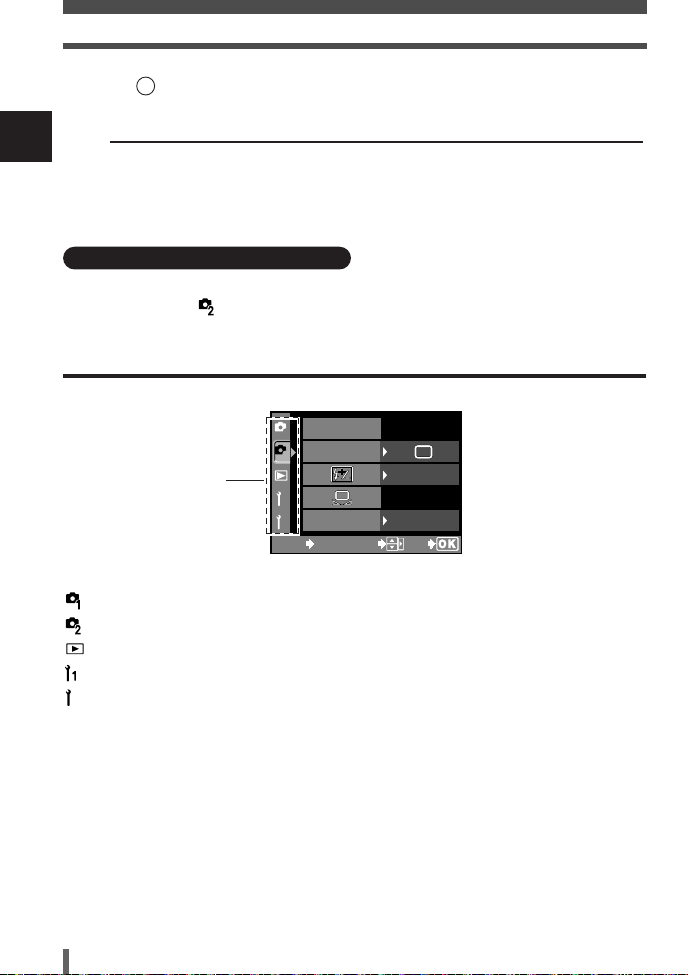
Contents
How to use this manual . . . . . . . . . . . . . . . . . . . . . . . . . . . . . . . . . . . . . . . . . . . . 2
How to read the instruction pages . . . . . . . . . . . . . . . . . . . . . . . . . . . . . . . . . . . . 3
For your safety . . . . . . . . . . . . . . . . . . . . . . . . . . . . . . . . . . . . . . . . . . . . . . . . . . 10
1 Basic operations 17
How to use the mode dial . . . . . . . . . . . . . . . . . . . . . . . . . . . . . . . . . . . . . . . . . 18
How to use the buttons and control dial. . . . . . . . . . . . . . . . . . . . . . . . . . . . . . . 19
Types of buttons . . . . . . . . . . . . . . . . . . . . . . . . . . . . . . . . . . . . . . . . . . . . . . 20
How to use the menus . . . . . . . . . . . . . . . . . . . . . . . . . . . . . . . . . . . . . . . . . . . . 25
Types of the menus. . . . . . . . . . . . . . . . . . . . . . . . . . . . . . . . . . . . . . . . . . . . 28
2 Things to know before shooting 29
If correct focus cannot be obtained . . . . . . . . . . . . . . . . . . . . . . . . . . . . . . . . . . 30
How to focus on a difficult subject — Focus lock . . . . . . . . . . . . . . . . . . . . . 30
Subjects that are difficult to focus on . . . . . . . . . . . . . . . . . . . . . . . . . . . . . . 32
Selecting the record mode . . . . . . . . . . . . . . . . . . . . . . . . . . . . . . . . . . . . . . 33
Types of record modes . . . . . . . . . . . . . . . . . . . . . . . . . . . . . . . . . . . . . . . . . 33
How to select the record mode . . . . . . . . . . . . . . . . . . . . . . . . . . . . . . . . 36
Setting HQ/SQ . . . . . . . . . . . . . . . . . . . . . . . . . . . . . . . . . . . . . . . . . . . . . . . 36
3 Selecting the right mode for shooting conditions 37
Selecting the right mode for shooting situation . . . . . . . . . . . . . . . . . . . . . . . . . 38
LANDSCAPE. . . . . . . . . . . . . . . . . . . . . . . . . . . . . . . . . . . . . . . . . . . . . . 39
LANDSCAPE+PORTRAIT . . . . . . . . . . . . . . . . . . . . . . . . . . . . . . . . . . . 39
NIGHT SCENE . . . . . . . . . . . . . . . . . . . . . . . . . . . . . . . . . . . . . . . . . . . . 39
NIGHT+PORTRAIT. . . . . . . . . . . . . . . . . . . . . . . . . . . . . . . . . . . . . . . . . 39
FIREWORKS. . . . . . . . . . . . . . . . . . . . . . . . . . . . . . . . . . . . . . . . . . . . . . 40
SUNSET . . . . . . . . . . . . . . . . . . . . . . . . . . . . . . . . . . . . . . . . . . . . . . . . . 40
PORTRAIT . . . . . . . . . . . . . . . . . . . . . . . . . . . . . . . . . . . . . . . . . . . . . . . 40
HIGH KEY . . . . . . . . . . . . . . . . . . . . . . . . . . . . . . . . . . . . . . . . . . . . . . . . 40
MACRO. . . . . . . . . . . . . . . . . . . . . . . . . . . . . . . . . . . . . . . . . . . . . . . . . . 41
DOCUMENTS . . . . . . . . . . . . . . . . . . . . . . . . . . . . . . . . . . . . . . . . . . . . . 41
MUSEUM . . . . . . . . . . . . . . . . . . . . . . . . . . . . . . . . . . . . . . . . . . . . . . . . 41
SPORT — Capturing a fast-moving subject . . . . . . . . . . . . . . . . . . . . . . 41
BEACH & SNOW — Shooting seascapes
or snow-capped mountain landscapes . . . . . . . . . . . . . . . . . . . . . . . . . . . . 42
CANDLE . . . . . . . . . . . . . . . . . . . . . . . . . . . . . . . . . . . . . . . . . . . . . . . . . 42
4
Page 5
Contents
Selecting the right mode for shooting technique — P, A, S and M. . . . . . . . . . 43
P: Program shooting . . . . . . . . . . . . . . . . . . . . . . . . . . . . . . . . . . . . . . . . . . . 43
A: Aperture priority shooting . . . . . . . . . . . . . . . . . . . . . . . . . . . . . . . . . . . . . 45
S: Shutter priority shooting . . . . . . . . . . . . . . . . . . . . . . . . . . . . . . . . . . . . . . 47
M: Manual shooting . . . . . . . . . . . . . . . . . . . . . . . . . . . . . . . . . . . . . . . . . . . 49
PREVIEW function. . . . . . . . . . . . . . . . . . . . . . . . . . . . . . . . . . . . . . . . . . . . . . . 52
4 Various shooting functions 53
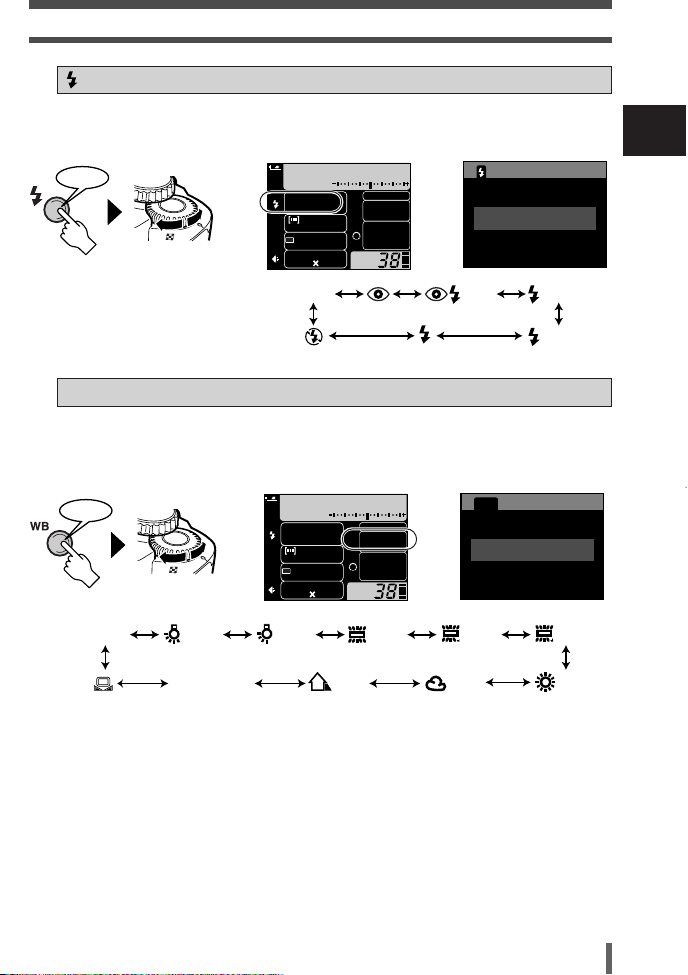
Flash shooting . . . . . . . . . . . . . . . . . . . . . . . . . . . . . . . . . . . . . . . . . . . . . . . . . . 54
Flash modes . . . . . . . . . . . . . . . . . . . . . . . . . . . . . . . . . . . . . . . . . . . . . . . 54
Setting the flash mode . . . . . . . . . . . . . . . . . . . . . . . . . . . . . . . . . . . . . . . 58
Using the built-in flash. . . . . . . . . . . . . . . . . . . . . . . . . . . . . . . . . . . . . . . . . . 59
Flash intensity control . . . . . . . . . . . . . . . . . . . . . . . . . . . . . . . . . . . . . . 60
Optional electronic flashes . . . . . . . . . . . . . . . . . . . . . . . . . . . . . . . . . . . . . . 61
Using the electronic flash . . . . . . . . . . . . . . . . . . . . . . . . . . . . . . . . . . . . . . . 62
Super FP flash . . . . . . . . . . . . . . . . . . . . . . . . . . . . . . . . . . . . . . . . . . . . . . . 63
Using commercially available flashes . . . . . . . . . . . . . . . . . . . . . . . . . . . . . . 64
Non-specified commercial flashes . . . . . . . . . . . . . . . . . . . . . . . . . . . . . . . . 65
Drive mode DRIVE . . . . . . . . . . . . . . . . . . . . . . . . . . . . . . . . . . . . . . . . . . . . . . 66
Sequential shooting . . . . . . . . . . . . . . . . . . . . . . . . . . . . . . . . . . . . . . . . 66
Auto bracketing BKT . . . . . . . . . . . . . . . . . . . . . . . . . . . . . . . . . . . . . . . . . . 68
Self-timer shooting /Remote control shooting (with optional
remote control) . . . . . . . . . . . . . . . . . . . . . . . . . . . . . . . . . . . . . . . . . . . . . . . 72
MONOTONE shooting . . . . . . . . . . . . . . . . . . . . . . . . . . . . . . . . . . . . . . . . . . . . 75
5 Focusing functions 77
AF frame selection . . . . . . . . . . . . . . . . . . . . . . . . . . . . . . . . . . . . . . . . . . . 78
Focus mode . . . . . . . . . . . . . . . . . . . . . . . . . . . . . . . . . . . . . . . . . . . . . . . . . . . . 79
AF ILLUMINATOR . . . . . . . . . . . . . . . . . . . . . . . . . . . . . . . . . . . . . . . . . . . . . . . 84
6 Exposure, image and color 85
Metering mode — Changing the metering area . . . . . . . . . . . . . . . . 86
Exposure compensation — Varying the image brightness . . . . . . . . . . . . . . 88
AE lock — Locking the exposure AEL . . . . . . . . . . . . . . . . . . . . . . . . . . . . . . . 90
5
Page 6
Contents
NR
RGB
C
S
ISO sensitivity — Setting the desired sensitivity to light. . . . . . . . . . . . . . . . . . . 91
Setting the ISO sensitivity . . . . . . . . . . . . . . . . . . . . . . . . . . . . . . . . . . . . . . . 91
ISO BOOST . . . . . . . . . . . . . . . . . . . . . . . . . . . . . . . . . . . . . . . . . . . . . . . . . 92
White balance — Adjusting the color tone . . . . . . . . . . . . . . . . . . . . . . . . . . . . . 93
Setting the white balance WB . . . . . . . . . . . . . . . . . . . . . . . . . . . . . . . . . . . 95
Setting the one-touch white balance . . . . . . . . . . . . . . . . . . . . . . . . . . . . 97
WB compensation . . . . . . . . . . . . . . . . . . . . . . . . . . . . . . . . . . . . . . . . 98
CUSTOM WB . . . . . . . . . . . . . . . . . . . . . . . . . . . . . . . . . . . . . . . . . . . . . . . 100
SHARPNESS . . . . . . . . . . . . . . . . . . . . . . . . . . . . . . . . . . . . . . . . . . . . . . . 101
CONTRAST . . . . . . . . . . . . . . . . . . . . . . . . . . . . . . . . . . . . . . . . . . . . . . . . 102
SATURATION . . . . . . . . . . . . . . . . . . . . . . . . . . . . . . . . . . . . . . . . . . . . . . . 103
GRADATION . . . . . . . . . . . . . . . . . . . . . . . . . . . . . . . . . . . . . . . . . . . . . . . 104
NOISE REDUCTION . . . . . . . . . . . . . . . . . . . . . . . . . . . . . . . . . . . . . . . . . 105
COLOR SPACE sRGB, Adobe RGB . . . . . . . . . . . . . . . . . . . . . . . . . . . . . . . 106
7 Playback 107
Viewing still images . . . . . . . . . . . . . . . . . . . . . . . . . . . . . . . . . . . . . . . . . . . . . 108
Single-frame playback . . . . . . . . . . . . . . . . . . . . . . . . . . . . . . . . . . . . . . . . 108
Close-up playback . . . . . . . . . . . . . . . . . . . . . . . . . . . . . . . . . . . . . . . . . 109
Index display . . . . . . . . . . . . . . . . . . . . . . . . . . . . . . . . . . . . . . . . . . . . . 111
Information display INFO . . . . . . . . . . . . . . . . . . . . . . . . . . . . . . . . . . . . . . . . 112
Slideshow . . . . . . . . . . . . . . . . . . . . . . . . . . . . . . . . . . . . . . . . . . . . . . . . . . 114
Rotating images . . . . . . . . . . . . . . . . . . . . . . . . . . . . . . . . . . . . . . . . . . . . . 115
Playback on TV . . . . . . . . . . . . . . . . . . . . . . . . . . . . . . . . . . . . . . . . . . . . . . . . 116
Editing still images . . . . . . . . . . . . . . . . . . . . . . . . . . . . . . . . . . . . . . . . . . . . . . 117
Protecting images — Preventing accidental erasure . . . . . . . . . . . . . . . . 119
Erasing images . . . . . . . . . . . . . . . . . . . . . . . . . . . . . . . . . . . . . . . . . . . . . . . . 120
Single-frame erase . . . . . . . . . . . . . . . . . . . . . . . . . . . . . . . . . . . . . . . . 120
All-frame erase . . . . . . . . . . . . . . . . . . . . . . . . . . . . . . . . . . . . . . . . . . . 121
8
Customizing the settings/functions of your camera
AEL METERING. . . . . . . . . . . . . . . . . . . . . . . . . . . . . . . . . . . . . . . . . . . . . . . . 124
EV STEP . . . . . . . . . . . . . . . . . . . . . . . . . . . . . . . . . . . . . . . . . . . . . . . . . . . . . 124
MANUAL FLASH . . . . . . . . . . . . . . . . . . . . . . . . . . . . . . . . . . . . . . . . . . . . . . . 124
CUSTOM OK . . . . . . . . . . . . . . . . . . . . . . . . . . . . . . . . . . . . . . . . . . . . . . . . . . 125
RESET LENS. . . . . . . . . . . . . . . . . . . . . . . . . . . . . . . . . . . . . . . . . . . . . . . . . . 126
FOCUS RING. . . . . . . . . . . . . . . . . . . . . . . . . . . . . . . . . . . . . . . . . . . . . . . . . . 126
6
123
Page 7
Contents
Date/time setting . . . . . . . . . . . . . . . . . . . . . . . . . . . . . . . . . . . . . . . . . . . . 127
RESET — Restoring the factory default setting. . . . . . . . . . . . . . . . . . . . . . . . 128
ERASE SETTING . . . . . . . . . . . . . . . . . . . . . . . . . . . . . . . . . . . . . . . . . . . . . . 128
FILE NAME . . . . . . . . . . . . . . . . . . . . . . . . . . . . . . . . . . . . . . . . . . . . . . . . . . . 129
REC VIEW — Checking the picture immediately after shooting . . . . . . . . . . . 130
Setting the warning tone . . . . . . . . . . . . . . . . . . . . . . . . . . . . . . . . . . . . . . . 131
Monitor brightness adjustment . . . . . . . . . . . . . . . . . . . . . . . . . . . . . . . . . . 131
SLEEP . . . . . . . . . . . . . . . . . . . . . . . . . . . . . . . . . . . . . . . . . . . . . . . . . . . . . . . 132
PC MODE . . . . . . . . . . . . . . . . . . . . . . . . . . . . . . . . . . . . . . . . . . . . . . . . . . . . 132
Changing the display language . . . . . . . . . . . . . . . . . . . . . . . . . . . . . . . . 133
VIDEO OUT — Selecting the video signal type before TV connection . . . . . . 134
CARD SETUP — Formatting the card . . . . . . . . . . . . . . . . . . . . . . . . . . . . . . . 135
9 Printing 137
Print reservation (DPOF) . . . . . . . . . . . . . . . . . . . . . . . . . . . . . . . . . . . . . . 138
Flowchart for printing reservation . . . . . . . . . . . . . . . . . . . . . . . . . . . . . . . . 140
Selecting the print reservation mode . . . . . . . . . . . . . . . . . . . . . . . . . . . 142
Selecting pictures you want to print . . . . . . . . . . . . . . . . . . . . . . . . . . . . . . 142
Setting printing data . . . . . . . . . . . . . . . . . . . . . . . . . . . . . . . . . . . . . . . . . . 143
Confirming your print setting . . . . . . . . . . . . . . . . . . . . . . . . . . . . . . . . . . . . 143
Resetting print reservation . . . . . . . . . . . . . . . . . . . . . . . . . . . . . . . . . . . . . 144
Direct printing (PictBridge) . . . . . . . . . . . . . . . . . . . . . . . . . . . . . . . . . . . . . . . . 146
Connecting the camera to a printer. . . . . . . . . . . . . . . . . . . . . . . . . . . . . . . 147
Flowchart for printing . . . . . . . . . . . . . . . . . . . . . . . . . . . . . . . . . . . . . . . . . 148
Selecting the print mode . . . . . . . . . . . . . . . . . . . . . . . . . . . . . . . . . . . . . . . 150
Setting the print paper items . . . . . . . . . . . . . . . . . . . . . . . . . . . . . . . . . . . . 151
Selecting pictures you want to print . . . . . . . . . . . . . . . . . . . . . . . . . . . . . . 151
Setting printing data . . . . . . . . . . . . . . . . . . . . . . . . . . . . . . . . . . . . . . . . . . 152
Printing . . . . . . . . . . . . . . . . . . . . . . . . . . . . . . . . . . . . . . . . . . . . . . . . . . . . 152
If an error code is displayed . . . . . . . . . . . . . . . . . . . . . . . . . . . . . . . . . . . . 153
10 Transferring images to a computer 155
Flowchart . . . . . . . . . . . . . . . . . . . . . . . . . . . . . . . . . . . . . . . . . . . . . . . . . . . . . 156
Using the provided OLYMPUS Master software . . . . . . . . . . . . . . . . . . . . . . . 158
What is OLYMPUS Master? . . . . . . . . . . . . . . . . . . . . . . . . . . . . . . . . . . . . 158
Installing OLYMPUS Master . . . . . . . . . . . . . . . . . . . . . . . . . . . . . . . . . . . . 159
7
Page 8

Contents
Connecting the camera to a computer. . . . . . . . . . . . . . . . . . . . . . . . . . . . . . . 163
Starting OLYMPUS Master . . . . . . . . . . . . . . . . . . . . . . . . . . . . . . . . . . . . . . . 165
Displaying the camera’s images on your computer . . . . . . . . . . . . . . . . . . . . . 166
Downloading images to save on your computer . . . . . . . . . . . . . . . . . . . . . 166
Disconnecting the camera from your computer . . . . . . . . . . . . . . . . . . . . . 167
Viewing still images . . . . . . . . . . . . . . . . . . . . . . . . . . . . . . . . . . . . . . . . . . . . . 168
Printing images . . . . . . . . . . . . . . . . . . . . . . . . . . . . . . . . . . . . . . . . . . . . . . . . 169
Transferring images to your computer without using OLYMPUS Master . . . . 170
11 Appendix 171
Card basics . . . . . . . . . . . . . . . . . . . . . . . . . . . . . . . . . . . . . . . . . . . . . . . . . . . 172
Lens basics . . . . . . . . . . . . . . . . . . . . . . . . . . . . . . . . . . . . . . . . . . . . . . . . . . . 173
If you encounter problems . . . . . . . . . . . . . . . . . . . . . . . . . . . . . . . . . . . . . . . . 174
Error codes . . . . . . . . . . . . . . . . . . . . . . . . . . . . . . . . . . . . . . . . . . . . . . . . . 174
Troubleshooting . . . . . . . . . . . . . . . . . . . . . . . . . . . . . . . . . . . . . . . . . . . . . 176
Camera maintenance. . . . . . . . . . . . . . . . . . . . . . . . . . . . . . . . . . . . . . . . . . . . 181
Cleaning and storing the camera . . . . . . . . . . . . . . . . . . . . . . . . . . . . . . . . 181
CLEANING MODE — Removing dust on the CCD . . . . . . . . . . . . . . . . . . 182
PIXEL MAPPING — Checking the image processing functions . . . . . . . . . 183
Safety precautions . . . . . . . . . . . . . . . . . . . . . . . . . . . . . . . . . . . . . . . . . . . . . . 184
Glossary. . . . . . . . . . . . . . . . . . . . . . . . . . . . . . . . . . . . . . . . . . . . . . . . . . . . . . 186
12 Information 191
Menu directory . . . . . . . . . . . . . . . . . . . . . . . . . . . . . . . . . . . . . . . . . . . . . . . . . 192
Available functions by shooting mode . . . . . . . . . . . . . . . . . . . . . . . . . . . . . . . 196
Names of parts. . . . . . . . . . . . . . . . . . . . . . . . . . . . . . . . . . . . . . . . . . . . . . . . . 198
Camera . . . . . . . . . . . . . . . . . . . . . . . . . . . . . . . . . . . . . . . . . . . . . . . . . . . . 198
Viewfinder indications . . . . . . . . . . . . . . . . . . . . . . . . . . . . . . . . . . . . . . . . . 200
Monitor indications (only for playback) . . . . . . . . . . . . . . . . . . . . . . . . . . . . 201
Control panel screen. . . . . . . . . . . . . . . . . . . . . . . . . . . . . . . . . . . . . . . . . . 202
Memory gauge . . . . . . . . . . . . . . . . . . . . . . . . . . . . . . . . . . . . . . . . . . . . . . 203
Battery check . . . . . . . . . . . . . . . . . . . . . . . . . . . . . . . . . . . . . . . . . . . . . . . 203
Specifications. . . . . . . . . . . . . . . . . . . . . . . . . . . . . . . . . . . . . . . . . . . . . . . . . . 204
Index . . . . . . . . . . . . . . . . . . . . . . . . . . . . . . . . . . . . . . . . . . . . . . . . . . . . . . . . 207
Additional functions available after updating firmware . . . . . . . . . . . . . . . . . . . 209
8
Page 9

For customers in North and South America
For customers in USA
Declaration of Conformity
Model Number : E-300
Trade Name : OLYMPUS
Responsible Party :
Address : 2 Corporate Center Drive, PO Box 9058, Melville,
New York 11747-9058 U.S.A.
Telephone Number : 1-631-844-5000
Tested To Comply With FCC Standards
FOR HOME OR OFFICE USE
This device complies with Part 15 of the FCC rules. Operation is subject to the
following two conditions:
(1) This device may not cause harmful interference.
(2) This device must accept any interference received, including interference
that may cause undesired operation.
For customers in Canada
This Class B digital apparatus meets all requirements of the Canadian
Interference-Causing Equipment Regulations.
For customers in Europe
“CE” mark indicates that this product complies with the European requirements
for safety, health, environment and customer protection.
“CE” mark cameras are intended for sales in Europe.
Trademarks
• IBM is a registered trademark of International Business Machines Corporation.
• Microsoft and Windows are registered trademarks of Microsoft Corporation.
• Macintosh is a trademark of Apple Computer Inc.
• All other company and product names are registered trademarks and/or trademarks of their respective
owners.
• The standards for camera file systems referred to in this manual are the “Design Rule for Camera File
System/DCF” standards stipulated by the Japan Electronics and Information Technology Industries
Association (JEITA).
9
Page 10
For your safety
CAUTION: TO REDUCE THE RISK OF ELECTRICAL SHOCK, DO NOT
REMOVE COVER (OR BACK). NO USER-SERVICEABLE PARTS INSIDE.
REFER SERVICING TO QUALIFIED OLYMPUS SERVICE PERSONNEL.
RISK OF ELECTRIC SHOCK
DO NOT OPEN
CAUTION
Lightning flash with an arrowhead,
enclosed in a triangle, alerts you to the
presence of uninsulated voltage points
inside the product which could cause a
serious electrical shock.
WARNING!
TO AVOID THE RISK OF FIRE OR ELECTRICAL SHOCK, NEVER EXPOSE THIS PRODUCT TO
WATER OR OPERATE IN A HIGH HUMIDITY ENVIRONMENT.
An exclamation mark enclosed in a triangle
alerts you to important operating and
maintenance instructions in the
documentation provided with the product.
General precautions
Read All Instructions — Before you use the product, read all operating instructions. For
more information on accessories such as the lithium ion battery, refer to the manuals
provided with those products.
Save These Instructions — Save all safety and operating instructions for future reference.
Heed Warnings — Read carefully and follow all warning labels on the product and those
described in the instructions.
Follow Instructions — Follow all instructions provided with this product.
Cleaning — Always unplug this product from the wall outlet before cleaning. Use only a damp
cloth for cleaning. Never use any type of liquid or aerosol cleaner, or any type of organic
solvent to clean this product.
Attachments — For your safety, and to avoid damaging the product, use only accessories
recommended by Olympus.
Water and Moisture — Never use this product around water (near a bathtub, kitchen sink,
laundry tub, wet basement, swimming pool or in the rain).
Location — To avoid damage to the product and prevent personal injury, never place this
product on an unstable stand, tripod, bracket, table or cart. Mount only on a stable tripod,
stand, or bracket. Follow the instructions that describe how to safely mount the product,
and use only the mounting devices recommended by the manufacturer.
Power Sources — Connect this product only to the power source described on the product
label. If you are not sure about the type of power supply in your home, consult your local
power company.
Refer to instruction pages for information on using the product with a battery.
Grounding, Polarization — If this product is used with a specified AC adapter, the adapter
may be equipped with a polarized alternating current line plug (a plug with one blade wider
than the other). This safety feature allows the plug to fit into the power outlet only one way.
If you cannot insert the plug into the wall outlet, pull it out, reverse it, and then reinsert it. If
the plug still fails to fit, contact an electrician and have the receptacle replaced.
Protecting the Power Cord — The power supply cord should be placed so it will not be
walked on. Never put a heavy object on the power cord or wrap it around the leg of a table
or chair. Keep the area around the power cord connection points, at the power outlet, and
at the product connection, free of all AC adapter or accessory power cords.
10
Page 11
For your safety
Lightning — If a lightning storm occurs while using a specified AC adapter, remove it from the
wall outlet immediately. To avoid damage from unexpected power surges, always unplug
the AC adapter from the power outlet and disconnect it from the camera when the camera
is not in use.
Overloading — Never overload wall outlets, extension cords, power strips, or other power
connection points with too many plugs.
Foreign Objects, Liquid Spillage — To avoid personal injury caused by fire or electrical
shock from contact with internal high voltage points, never insert a metal object into the
product. Avoid using the product where there is a danger of spillage.
Heat — Never use or store this product near any heat source such as a radiator, heat register,
stove, or any type of equipment or appliance that generates heat, including stereo
amplifiers.
Servicing — Refer all servicing to qualified personnel. Attempting to remove the covers or
disassemble the product, could expose you to dangerous high voltage points.
Damage Requiring Service — If you notice any of the conditions described below while
using a specified AC adapter, unplug it from the wall outlet and refer servicing to qualified
service personnel:
a) Liquid has been spilled onto the product or some other object has fallen into the product.
b) The product has been exposed to water.
c) The product does not operate normally despite following operating instructions. Adjust
only the controls described in the operating instructions as improper adjustment of other
controls could damage the product and require extensive repair work by a qualified
technician.
d) The product has been dropped or damaged in any way.
e) The product exhibits a distinct change in performance.
Replacement Parts — When replacement parts are required, make sure that the authorized
service center uses only parts with the same characteristics as the originals, as
recommended by the manufacturer. Unauthorized substitution of parts could result in fire,
electrical shock, or create other hazards.
Safety Check — Upon completion of servicing or repairs, ask the service technician to
perform safety checks to determine that the product is in good working order.
DANGER
WARNING
CAUTION
If the product is used without observing the information given
under this symbol, serious injury or death may result.
If the product is used without observing the information given
under this symbol, injury or death may result.
If the product is used without observing the information given
under this symbol, minor personal injury, damage to the
equipment, or the loss of valuable data may result.
11
Page 12

For your safety
Handling the camera
WARNING
Do not use the camera in areas exposed to flammable or explosive gases.
● A fire or explosion may result.
Do not use the flash on people (infants, small children, etc.) at close range.
● When you fire the flash, you must be at least 1 m (3 ft) away from the faces of your
subjects. Firing the flash too close to the subject’s eyes could cause a momentary loss of
vision.
Keep young children and infants away from the camera.
● If not, the following dangerous situations may occur:
– Becoming entangled in the camera strap or power cords, causing strangulation. If this
happens, follow the doctor’s instructions.
– Accidentally swallowing the battery or other small parts.
– Accidentally firing the flash into their own eyes or those of another child.
– Accidentally being injured by the moving parts of the camera.
Do not use or store the camera in dusty or humid places.
● Using or storing the camera in dusty or humid places may result in a fire or electric
shock.
Do not cover the flash with a hand while firing.
● Do not cover the flash or touch it after it has just been fired sequentially. It may be hot
and cause minor burns.
Do not take apart or modify the camera.
● Never attempt to disassemble the camera. The internal circuits contain high voltage
points which could cause serious burns or electrical shock.
Do not let water or foreign objects inside the camera.
● A fire or electric shock may result. If the camera is accidentally dropped in water, or if
liquid is spilled into the camera, stop using it, allow it to dry, and then remove the battery.
Contact the nearest authorized Olympus service center.
Do not touch the battery or the battery charger while battery charging is in progress.
Wait until charging is complete and the battery has cooled.
● The battery and battery charger become hot while charging. The specified AC adapter
also becomes hot when used for a long time. At these times, they may cause minor
burns.
Do not use a non-specified lithium-ion battery and/or charger.
● Use of a non-designated lithium-ion battery and/or re-charger may lead to camera or
battery failure as well as other unexpected accidents. Any accidents resulting from use of
non-designated equipment will not be compensated.
CAUTION
Stop using the camera immediately if you notice any unusual odors, noise, or smoke
around it.
● If you notice any unusual odors, noise, or smoke around the camera during operation,
switch it off immediately —and disconnect the specified AC adapter (if attached). Allow
the camera to sit idle for a few minutes to cool. Take the camera outdoors, away from
flammable objects, and carefully remove the battery. Never remove the battery with bare
hands. Contact the nearest Olympus service center immediately.
Do not use the camera with wet hands.
● Damage or electric shock may result. Also, do not connect or disconnect the power plug
with wet hands.
12
Page 13

For your safety
Be careful with the strap when you carry the camera
● It could easily catch on stray objects —and cause serious damage.
Do not leave the camera in areas subject to extremely high temperature.
● Doing so may cause parts to deteriorate and, in some circumstances, cause the camera
to catch fire.
Use only the AC adapter specified by Olympus.
● Using a different AC adapter may damage the camera or power source, or result in
accidents or fire. Ensure the adapter used is designed for your region or country. For
more information, contact the nearest Olympus service center or the store of purchase.
Olympus makes no representations or warranties regarding any damages caused by AC
adapters not recommended by Olympus.
Handle the camera with care to avoid getting a low-temperature burn.
● When the camera contains metal parts, overheating can result in a low-temperature
burn. Pay attention to the following:
– When used for a long period, the camera will get hot. If you hold on to the camera in
this state, a low-temperature burn may be caused.
– In places subject to extremely cold temperatures, the temperature of the camera’s
body may be lower than the environmental temperature. If possible, wear gloves when
handling the camera in cold temperatures.
Do not damage the AC adapter’s cable.
● Do not pull on the AC adapter’s cable or add another cable to it. Be sure to connect or
disconnect the AC adapter’s cable while holding the power plug. If the following cases
occur, stop using and contact an Olympus dealer or customer support center.
– The power plug or cable produces heat, burning smell, or smoke.
– The power plug or cable is cracked or broken. The contact is bad on the power plug.
Battery handling precautions
Follow these important guidelines to prevent the battery from leaking, overheating,
burning, exploding, or causing electrical shocks or burns.
DANGER
Never heat or incinerate the battery.
Do not connect the (+) and (-) terminals to each other using metal objects.
Do not carry or store the battery where it may come into contact with metal objects
such as jewelry, pins, fasteners, etc.
Never store the battery where it will be exposed to direct sunlight, or subjected to
high temperatures in a hot vehicle, near a heat source, etc.
Never attempt to disassemble the battery or modify it in any way, such as by
soldering.
● Doing so may break the terminals or cause battery fluid to splash, resulting in potential
fire, explosion, battery leakage, overheating or other damage.
If battery fluid gets in your eyes, loss of eyesight may result.
● If battery fluid gets in your eyes, do not rub them. Flush them immediately with clear, cold
running water and seek medical attention straight away.
13
Page 14

For your safety
WARNING
Keep the battery dry at all times. Never allow it to come into contact with fresh or
salt water.
Do not touch or hold the battery with wet hands.
If the rechargeable battery does not recharge within the specified time, stop
charging it and do not use it.
● If you do not, fire, explosion, ignition or overheating may result.
Do not use the battery if it is cracked or broken.
● Doing so may cause explosion or overheating.
Never subject the battery to strong shocks or continuous vibration.
● Doing so may cause explosion or overheating.
Never attempt to modify the battery compartment on the camera, never insert
anything (other than the specified battery) into the compartment.
If the battery leaks, becomes discolored or deformed, or appears abnormal in any
way during operation, stop using the camera immediately.
● Contact your dealer or an authorized Olympus service center. Continued use may result
in fire or electric shock.
If the battery leaks fluid onto your clothing or skin, remove the clothing and flush the
affected area with clean, running cold water immediately. If the fluid burns your skin,
seek medical attention immediately.
CAUTION
Do not remove the battery from the camera immediately after operating the camera
on battery power for a long time.
● Doing so may cause burns.
Remove the battery from the camera if it is not going to be used for a long time.
● Otherwise, battery leakage or overheating may cause a fire or injury.
Charger handling precautions
DANGER
Do not put the charger in water or use it when wet. Do not touch or hold it with wet
hands.
● Doing so may cause malfunction or electric shock.
Do not use the charger if it is covered with cloth such as a blanket.
● Do not use the charger if something is covering it (such as a blanket). Heat may be kept
in, causing the charger to deform. This may cause fire, ignition or overheating.
Do not disassemble or modify the charger.
● This may cause electric shock or injury.
Use an charger designed to operate on the AC voltage in the area where you are
using the camera.
● Otherwise, fire, explosion, smoke, overheat, electric shock or burns may result.
14
Page 15

For your safety
WARNING
Do not damage the charger’s cable.
● Do not pull on the charger’s cable or add another cable to it. Be sure to connect or
disconnect the charger’s cable while holding the power plug. If the following cases occur,
stop using and contact an Olympus dealer or authorized customer support center.
– The power plug or cable produces heat, burning smell, or smoke.
– The power plug or cable is cracked or broken. The contact is bad on the power plug.
CAUTION
Unplug the AC adapter’s cable from the outlet before cleaning the camera.
● Otherwise, electric shock or injury may result.
FCC Notice
● Radio and Television Interference
Change or modifications not expressly approved by the manufacturer may void the user’s
authority to operate this equipment. This equipment has been tested and found to comply with
the limits for a Class B digital device, pursuant to Part 15 of the FCC Rules. These limits are
designed to provide reasonable protection against harmful interference in a residential
installation.
This equipment generates, uses, and can radiate radio frequency energy and, if not installed
and used in accordance with the instructions, may cause harmful interference to radio
communications.
However, there is no guarantee that interference will not occur in a particular installation. If
this equipment does cause harmful interference to radio or television reception, which can be
determined by turning the equipment off and on, the user is encouraged to try to correct the
interference by one or more of the following measures:
– Adjust or relocate the receiving antenna.
– Increase the distance between the camera and receiver.
– Connect the equipment to an outlet on a circuit different from that to which the receiver is
connected.
– Consult your dealer or an experienced radio/TV technician for help.
Only the OLYMPUS-supplied USB cables should be used to connect the camera to
USB-enabled personal computers (PC).
Any unauthorized changes or modifications to this equipment would void the user's authority
to operate.
15
Page 16

For your safety
Legal and other notices
● Olympus makes no representations or warranties regarding any damages, or benefit
expected by using this unit lawfully, or any request from a third person, which are caused by
the inappropriate use of this product.
● Olympus makes no representations or warranties regarding any damages or any benefit
expected by using this unit lawfully which are caused by erasing picture data.
Disclaimer of Warranty
● Olympus makes no representations or warranties, either expressed or implied, by or
concerning any content of these written materials or software, and in no event shall be liable
for any implied warranty of merchantability or fitness for any particular purpose or for any
consequential, incidental or indirect damages (including but not limited to damages for loss
of business profits, business interruption and loss of business information) arising from the
use or inability to use these written materials or software or equipment. Some countries do
not allow the exclusion or limitation of liability for consequential or incidental damages, so
the above limitations may not apply to you.
● Olympus reserves all rights to this manual.
WARNING
Unauthorized photographing or use of copyrighted material may violate applicable copyright
laws. Olympus assumes no responsibility for unauthorized photographing, use or other acts
that infringe upon the rights of copyright owners.
Be sure to read the “Safety Precautions” at the end of the manual.
16
Page 17
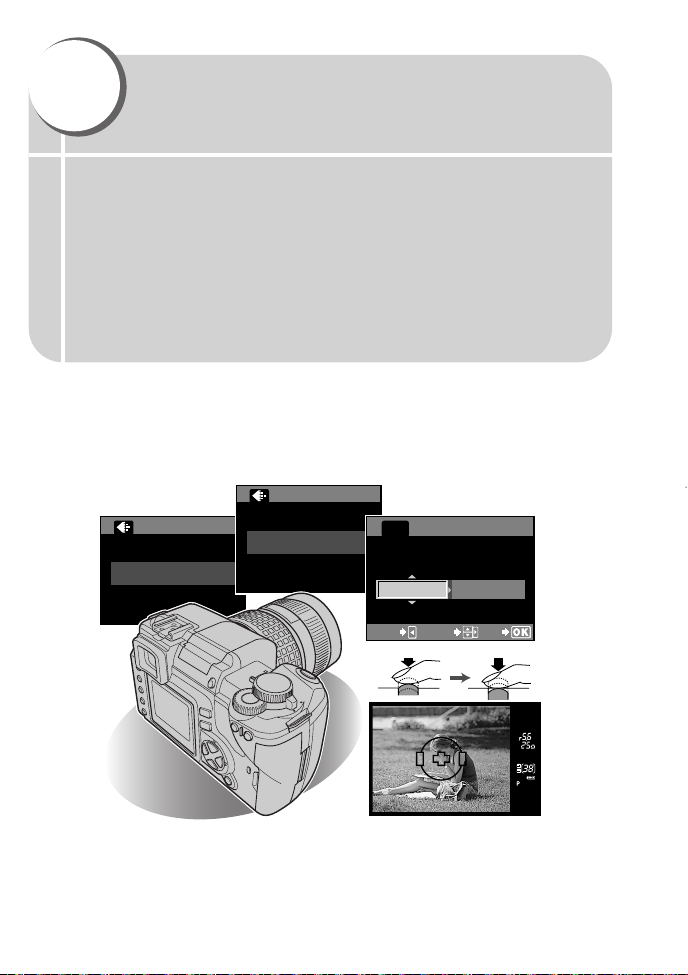
1
HQ
ISO
AUTO
WB
0
STEPAUTO
AUTO
1/250 F5.6
ESP
P
FP
FOCUS
AUTO
AUTO
ISO
DRIVE
S-AF
AF ILLUMINATOR
HQ
24483264
WB
s
RGB
Basic operations
The advanced shooting techniques used by professional photographers
are drawn from years of experience.
Now, with your digital camera, you’ll be able to take advantage of those
same advanced techniques simply by pressing a few buttons.
You’ll find a wide choice of shooting functions listed in the camera’s
menus that make it easy to change the focusing area, adjust the white
balance, etc. The menus can be navigated simply by pressing buttons
while viewing the monitor.
But before you can use these functions, you first need to learn how to
operate the buttons and menus.
Page 18
How to use the mode dial
This camera has the following shooting
modes, which can be switched using the
mode dial.
1
When the camera is turned on with the
Basic operations
mode dial set to SCENE, the shooting
mode selection screen is displayed.
P Program shooting
Allows you to shoot using an aperture and shutter speed that the camera sets.
~ P. 43
A Aperture priority shooting
Allows you to set the aperture manually. The camera sets the shutter speed
automatically. ~ P. 45
S Shutter priority shooting
Allows you to set the shutter speed manually. The camera sets the aperture
automatically. ~ P. 47
M Manual shooting
Allows you to set the aperture and shutter speed manually. ~ P. 49
Portrait shooting
Suitable for shooting a portrait-style image of a person.
Landscape shooting
Suitable for shooting landscapes and other outdoor scenes.
Macro shooting
Suitable for taking close-up pictures (macro shooting).
Sport shooting
Suitable for capturing fast-moving action without blurring.
Night scene shooting
Suitable for shooting images of outdoor scenes in the evening or at night.
SCENE
More than 10 different shooting modes are available to suit a wide range of
shooting situations. When the mode dial is set to this mode, the shooting mode
selection screen is displayed. ~ P. 38
~ P. 40
~ P. 39
~ P. 41
~ P. 41
~ P. 39
18
Page 19
How to use the buttons and control dial
HQ
MENU
1/250 F5.6
ESP
P
FP
FOCUS
AUTO
AUTO
ISO
DRIVE
S-AF
AF ILLUMINATOR
HQ
24483264
WB
sRGB
This camera has a variety of functions to make optimal settings for various
shooting conditions. You can set the function settings using the buttons, control
dial, or menu.
Functions available using the : Change camera settings with the buttons and
buttons control dial, while referring to the monitor menus
or control panel screen.
Functions available using the : Change camera settings with the monitor
monitor menus menus while referring to the monitor.
Press the button for the function you
1
want to set.
● When the control panel screen (~ P. 202) is
displayed on the monitor:
The current setting of the function you have
selected lights in green.
When the control panel screen is not
displayed:
The menu of the function you have selected
appears.
Example:When pressing the (record mode) button
button
1
Basic operations
When setting on the control panel screen
Record mode
When setting on the function menu
(control panel screen is off)
Record mode
19
Page 20
MENU
How to use the buttons and control dial
MENU
SQ
1/320 F5.6
ESP
P
FP
FOCUS
AUTO
AUTO
ISO
DRIVE
S-AF
AF ILLUMINATOR
SQ
24483264
WB
sRGB
After pressing the button, rotate the
2
control dial.
● If you do not operate the dial within 3
1
seconds, your setting is confirmed.
Basic operations
● If you press the button again, you can confirm
the setting and exit the menu immediately.
Control dial
button
Types of buttons
When setting on the control panel screen
1 ~P. 21
2 ~P. 21
3 ~P. 22
6 ~P. 23
20
When setting on the function menu
4 ~P. 22
5 ~P. 22
7 ~P. 23
8 ~P. 23
Page 21
How to use the buttons and control dial
11
7500K
3600K
22
3000K
4500K
2
2
1
1
4000K
6600K
3
3
5300K
6000K
AUTO
CWB1 - CWB4
Press
1/320 F5.6
ESP
P
AUTO
FP
FOCUS
AUTO
AUTO
ISO
DRIVE
S-AF
AF ILLUMINATOR
HQ
24483264
WB
sRGB
AUTO
SLOW
SLOW
SLOW2
Press
1/320 F5.6
ESP
P
AUTO
FP
FOCUS
AUTO
AUTO
ISO
DRIVE
S-AF
AF ILLUMINATOR
HQ
24483264
WB
sRGB
(Flash mode) button ~P. 5 8
1
Selects a flash mode from auto-flash, red-eye reduction flash, slow synchronization
or fill-in flash.
1
Basic operations
OR
WB (White balance) button ~P. 9 5
2
AUTO
Selects the white balance appropriate to the light source from the following options:
Auto, preset white balance settings, customized white balance settings or registered
white balance.
WB
OR
0
STEPAUTO
21
Page 22
How to use the buttons and control dial
Press
RAW TIFF SHQ
HQ SQ
RAW+SHQRAW+HQRAW+SQ
AUTO
Press
1/320 F5.6
ESP
P
AUTO
FP
FOCUS
AUTO
AUTO
ISO
DRIVE
S-AF
AF ILLUMINATOR
HQ
24483264
WB
sRGB
1/320 F5.6
ESP
P
AUTO
FP
FOCUS
AUTO
AUTO
ISO
DRIVE
S-AF
AF ILLUMINATOR
HQ
24483264
WB
sRGB
AUTO
1/250 F5.6
ESP
P
AUTO
FP
FOCUS
AUTO
AUTO
ISO
DRIVE
S-AF
AF ILLUMINATOR
HQ
24483264
WB
sRGB
3
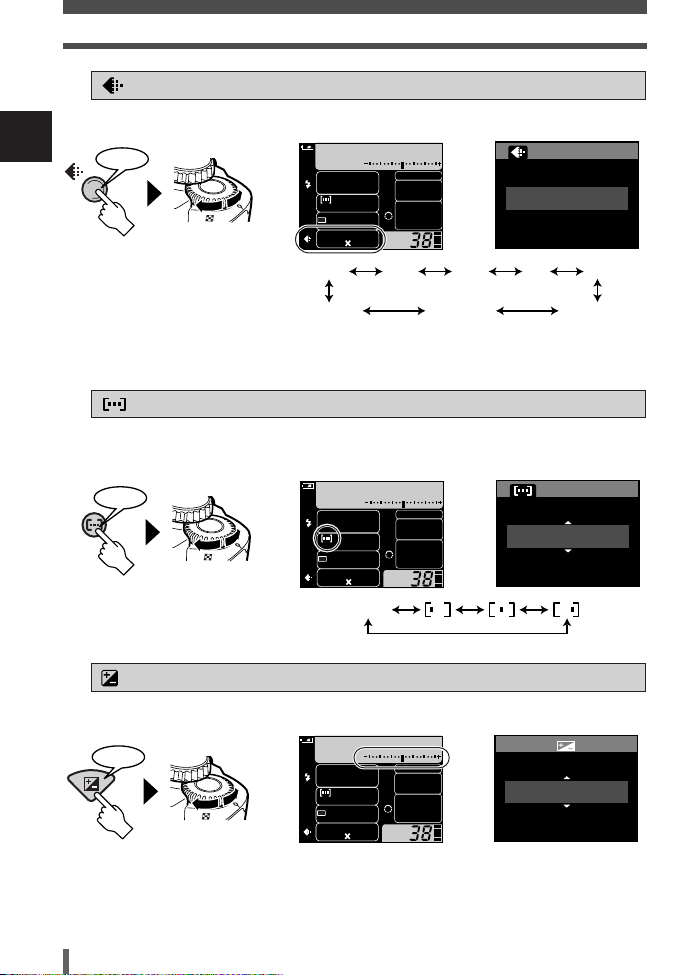
(Record mode) button ~P. 3 6
Selects image quality.
1
Basic operations
OR
● You can select the compression and number of pixels in the SQ/HQ mode.
~ “Setting SQ/HQ” (P. 36)
4
Selects the AF frame, allowing you to perform multiple AF or to perform AF using
one of the 3 frames.
(AF frame selection) button ~P. 7 8
OR
HQ
5
(Exposure compensation) button ~P. 8 8
Sets the exposure compensation value.
Press
● The exposure can be adjusted within a range of ±5.0 EV.
Available EV steps are: 1/3EV, 1/2EV, 1EV. Changing the EV value changes the amount of
exposure compensation.
22
~ “EV STEP” (P. 124)
OR
+1.5
Page 23
How to use the buttons and control dial
ESP
Press
AUTO 100 200 400
Press
1/320 F5.6
ESP
P
AUTO
FP
FOCUS
AUTO
AUTO
ISO
DRIVE
S-AF
AF ILLUMINATOR
HQ
24483264
WB
sRGB
1/320 F5.6
ESP
P
AUTO
FP
FOCUS
AUTO
AUTO
ISO
DRIVE
S-AF
AF ILLUMINATOR
HQ
24483264
WB
sRGB
S-AF C-AF MF S-AF+MF
Press
1/320 F5.6
ESP
P
AUTO
FP
FOCUS
AUTO
AUTO
ISO
DRIVE
S-AF
AF ILLUMINATOR
HQ
24483264
WB
sRGB
AF
S-AF
6
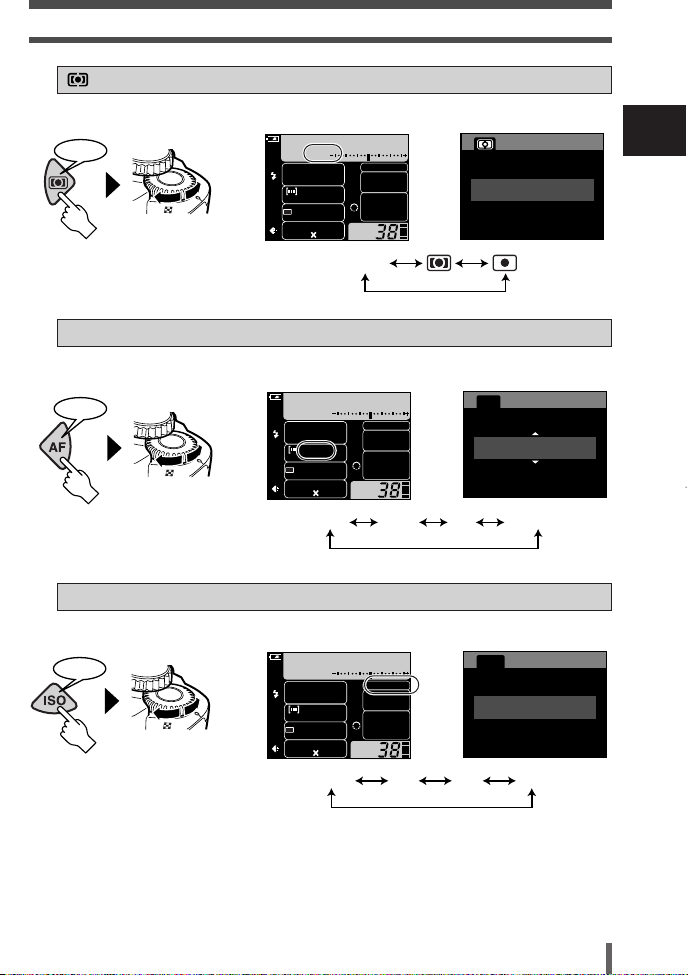
(Metering) button ~P. 8 6
Selects the metering mode.
OR
AF (focus mode) button ~P. 7 9
7
Selects the focus mode.
OR
ISO button ~P. 9 1
8
Sets the ISO sensitivity.
ISO
1
Basic operations
ESP
OR
● Setting ISO BOOST allows you to add 800 and 1600 to the ISO value options.
~ “ISO BOOST” (P. 92)
AUTO
23
Page 24
How to use the buttons and control dial
MENU
1
4
5
3
7
2
6
Other buttons
1
Basic operations
1
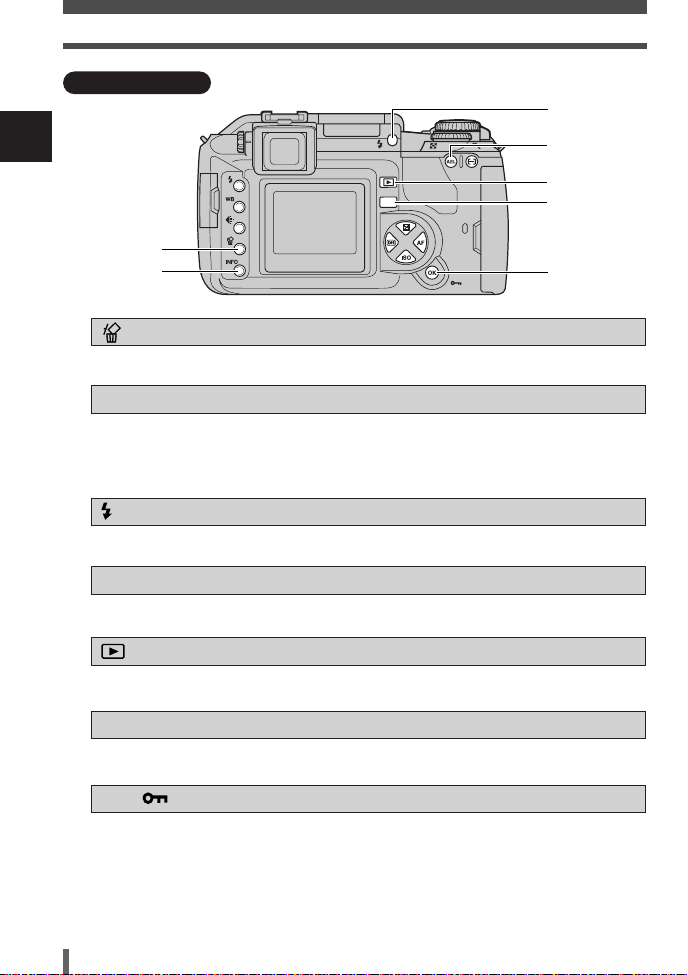
Erases unwanted images.
2
Shooting: Displays shooting information on the control panel screen.
Playback: Displays shooting information or histogram of the recorded image.
3
Raises the flash.
4
Locks the exposure.
5
Plays back images on the monitor.
6
Displays the menu.
7
Shooting : Allows you to use the function that you previously assigned to the
Playback : Protects images from being accidentally erased.
(Erase) button ~ P. 120
INFO (Information display) button ~ P. 112
Each time this button is pressed, the information display is changed.
(flash) switch ~ P. 5 8
AEL button ~ P. 9 0
(Playback mode) button ~ P. 108
MENU button ~ P. 2 5
OK/ (Protect) button ~ P. 119, 125
menu’s CUSTOM OK.
24
Page 25
How to use the menus
MENU
OK
The camera’s functions can be set. Display the menus on the monitor
and select or set them.
This section explains how the menu works using the
Press the MENU button to display
1
the menu on the monitor.
CARD SETUP
1
DRIVE
2
0.0
1
MONOTONE
2
CANCEL SELECT
MENU
Operation guide is displayed at the bottom of the screen.
CANCEL T MENU : Press
SELECT T : Press to select the item. The illustration
GO T : Press to confirm your setting.
OFF
GO
MENU to cancel the setting.
displayed corresponds to the arrow pad shown below.
P mode.
MENU button
OK
1
Basic operations
25
Page 26

How to use the menus
DRIVE
MONOTONE
0.0
OFF
CARD SETUP
1
2
1
2
CANCEL SELECT
GO
MENU
OFF
EDIT
1
2
1
2
CANCEL SELECT
GO
MENU
CUSTOM WB
MANUAL FLASH
1/3EV
OFF
OFF
EV STEP
ISO BOOST
1
2
1
2
CANCEL SELECT
GO
MENU
FILE NAME
REC VIEW
RESET
’04.01.01
01:01
5sec
OFF
AUTO
1
2
1
2
CANCEL SELECT
GO
MENU
2
Press to select a tab.
2
● The functions are categorized under tabs.
The current settings are displayed.
1
Basic operations
Ta b
1
2
AF
1
WB
2
CANCEL SELECT
MENU
tab
0.0
HQ
AUTO
S-AF
AUTO
GO
tab
tab
tab
26
tab
Page 27

OFF
BLACK & WHITE
SEPIA
1
2
1
2
DRIVE
MONOTONE
CARD SETUP
CANCEL MENU SELECT
GO
Press
Press
1
2
1
2
DRIVE
MONOTONE
0.0
OFF
CARD SETUP
CANCEL SELECT
GO
MENU
Press to move to the functions of the tab you have
Press
Press
Press
Press
3
selected.
How to use the menus
Press to select a function.
4
Function
Press to move to the settings of the function you have
5
selected.
Press to select a setting.
6
1
Basic operations
Setting
27
Page 28
How to use the menus
OK
DRIVE
MONOTONE
0.0
OFF
CARD SETUP
1
2
1
2
CANCEL SELECT
GO
MENU
2
Press repeatedly until the menu disappears.
7
● Normal shooting screen is restored.
1
TIPS
Basic operations
To return to the previous item on the menus
T Press the MENU button.
Explanations for menu operation
This manual uses the following explanations for menu operations.
Example : Menu TTMONOTONE T OFF, BLACK & WHITE, SEPIA.
Types of the menus
Tab
: Sets the functions that are available using the buttons and control dial.
: Sets shooting functions.
: Sets playback functions.
: Customizes shooting functions.
: Sets functions that allow you to use the camera efficiently.
28
Page 29
2
SHQ
SQ
SQ
PIXEL COUNT COMPRESSION
1/81280x980
CANCELCANCEL
SELECT
GO
Things to know before
shooting
The camera focuses automatically if you simply press the shutter button
in the P mode. However, sometimes you may come across a subject that
is difficult to focus on. This chapter explains how to deal with those hardto-focus subjects.
Another important thing is to select the appropriate record mode before
you start shooting. Remember that depending on what you are going to
do with your shots later, you may find that the image looks grainy in large
prints, the file size is too big for e-mail, etc. To avoid this kind of problem,
always check the record mode before shooting.
Page 30
If correct focus cannot be obtained
P A S M
SCENE
Available modes
The camera uses three AF frames to
automatically detect the subject to focus on.
Because the camera uses contrast level to
detect the subject, it may not be able to
correctly detect the desired subject if its
contrast is lower than the surroundings or it
2
is positioned higher in the composition. In
Things to know before shooting
this case, the easiest solution is to use focus
lock.
How to focus on a difficult subject – Focus lock
Position the AF frame on the subject
1
you want to focus on.
AF frame
Shutter button
Card access lamp
30
Page 31

If correct focus cannot be obtained
Press the shutter button halfway until
2
the AF confirmation mark lights.
● The focus is locked. The AF confirmation
mark and the AF focusing frame light up in
the viewfinder.
● If the AF confirmation mark blinks, the focus
and exposure are not locked. Release your
finger from the shutter button, re-position
your subject and press the shutter button
halfway again.
● The control panel screen disappears.
While keeping the shutter button
3
pressed halfway, re-compose your
shot.
Press the shutter button all the way.
4
● A picture is taken.
● The card access lamp blinks while the picture
is being stored on the card.
Halfway down
2
Things to know before shooting
AF confirmation mark
All the way
down
31
Page 32

If correct focus cannot be obtained
Subjects that are difficult to focus on
Under the following conditions, AF may not work properly. Take a picture using
focus lock (~ P. 30), manual focus (~ P. 83), or by selecting an AF frame
(~ P. 78).
2
Things to know before shooting
The AF confirmation mark
blinks. The subject cannot
be brought into focus.
Subjects with low contrast
The AF mark stays lit,
but the subject cannot
be brought into focus.
Subjects with different
distances
Subjects in excessively bright
light in the center of the frame
Fast-moving subjects The subject is not
Subject with repeated
patterns
positioned within the AF
frames.
If this happens, focus on a high-contrast object the same distance away as the
intended subject, recompose your shot and then take the picture. If the subject
has no vertical lines, hold the camera vertically and adjust the focus, then
return the camera to the horizontal position to take the picture.
32
Page 33

Selecting the record mode
You can select a record mode in which to take pictures. Choose the record mode
that’s best for your purpose (printing, editing on a PC, website editing, etc.). For
details about record modes and number of pixels, refer to the table on P. 35.
Types of record modes
Record mode allows you to select a combination of pixel count and compression
rate for the images you record. An image consists of pixels (dots). When you
enlarge an image with a low pixel count, it will be displayed as a mosaic. If an
image has a high pixel count, the file size (amount of data) will be larger and the
number of storable still pictures will be lower. The higher the compression, the
smaller the file size. However, the image will have less clarity when played back.
Image with a hign pixel count
Image with a low pixel count
2
Things to know before shooting
Application
˙
Select for the
print size
For smallsized print
and website
Number of pixels increases
(Number of storable pictures decreases)
Quality
(Compression)
Number of pixels
32642448
32002400
25601920
16001200
1280960
1024768
640480
ß
Non-
compression
1/1
TIFF
–
Image becomes clearer
Low
compression
1/2.7
SHQ
High
compression
1/4
HQ
SQ
High
compression
1/8
33
Page 34

Selecting the record mode
Number of pixels
The number of pixels (horizontal x vertical) used when saving an image. If the
image is going to be printed, higher resolutions (larger numbers) are
recommended so that the image will be clearer.
Compression
2
In record modes other than RAW/TIFF, image data are compressed. The higher
Things to know before shooting
the compression, the less clear the image will be.
Number of pixels and picture size on a computer screen
When a picture is transferred to a computer, the size of the picture on the
computer screen varies depending on the computer’s monitor setting. For
instance, a picture taken in 1024 x 768 resolution is the same size as the screen if
you set the picture to 1x when the monitor setting is 1024 x 768. However, if the
monitor setting is over 1024 x 768 (such as 1280 x 1024), the picture only takes
up part of the screen.
RAW
Raw data is original, unprocessed data, i.e. it has not been subject to image
processing such as white balance, sharpness, contrast and color space, etc.
OLYMPUS Master software is required to display RAW images on a PC. A
Photoshop plug-in is also available to allow you to open RAW images in
Photoshop (you can download it from our website). It is not possible to display
RAW data using commercially available software applications or to apply print
reservation to RAW data. With this camera, pictures taken in RAW record mode
can be edited. ~ “Editing still images” (P. 117)
34
Page 35

Record mode
Record mode
RAW
TIFF
SHQ
HQ
SQ
Number of pixels
(PIXEL COUNT)
3264 x 2448
3200 x 2400
2560 x 1920
1600 x 1200
1280 x 960
1024 x 768
640 x 480
Compression
Uncompressed
Uncompressed
1/2.7
1/4
1/8
1/2.7
1/4
1/8
1/2.7
1/4
1/8
1/2.7
1/4
1/8
1/2.7
1/4
1/8
1/2.7
1/4
1/8
1/2.7
1/4
1/8
File format
ORF
TIFF
JPEG
File size (MB)
13.5
23.3
6.1
4.3
1.9
5.9
4.1
1.9
4.0
2.4
1.2
1.4
0.9
0.5
0.9
0.6
0.3
0.6
0.4
0.2
0.2
0.2
0.1
Selecting the record mode
2
Things to know before shooting
The file size in the table is approximate.
● The number of remaining pictures may change according to the subject or
factors like whether print reservations have been made or not. In certain
instances, the number of remaining pictures displayed on the viewfinder or
the monitor does not change even when you take pictures or stored images
are erased.
● The actual file size varies depending on the subject.
Note
35
Page 36

Selecting the record mode
MENU
SQ
NOISE REDUCTION
1/4
1/8
HQ
SQ
1
2
1
2
CANCEL MENU SELECT
GO
SQ
1/81280x980
PIXEL COUNT COMPRESSION
CANCEL SELECT
GO
P A S M
SCENE
Available modes
P A S M
SCENE
Available modes
How to select the record mode
Press the (record mode) button.
1
● The current setting is displayed on the
2
monitor.
Things to know before shooting
Rotate the control dial until the setting
2
you want to select is displayed.
When the control panel screen is off
button
Setting HQ/SQ
You can select the number of pixels (PIXEL COUNT) and compression rate
(COMPRESSION).
Menu TT HQ, SQ. ~ “How to use the menus” (P. 25)
1
Press to move to the setting.
2
Press to select a setting. Press the OK button.
To select both COMPRESSION and PIXEL COUNT, press to move from
PIXEL COUNT to COMPRESSION.
Control dial
OK button
Compression rate selection
36
PIXEL COUNT: Selects the number of
pixels. (SQ only)
COMPRESSION: Selects compression rate.
Page 37

3
Selecting the right mode for
shooting conditions
Close-ups of small objects like flowers or jewelry, capturing a fastmoving subject like a child running around, shooting with a naturallooking illuminated background at night — did you ever wonder how to
achieve the results you want without complicated and time-consuming
camera settings?
With this camera, you will find a new way of capturing all those special
moments and effects in an instant. All you have to do is to select the
appropriate mode, and concentrate on your composition; no complicated
settings as with other cameras.
You can also select the exposure mode, which allows you to set the
aperture value and shutter speed. With precise value setting, images
come out better. The more you shoot, the more possibilities you will
discover.
Page 38

This camera has 4 different exposure modes (Program shooting, aperture
shooting, shutter speed, manual shooting) and more than 10 different situationrelated shooting modes. The shooting modes can be set using the mode dial and
menus.
See below.
3
Selecting the right mode for shooting conditions
Selecting the right mode for the shooting situation
When you select a mode to suit the shooting situation, the camera optimizes the
settings for the shooting situations and conditions.
Set the mode dial to the situation-related mode you want to use.
1
When you select : The camera enters the selected mode.
When you select SCENE : The SCENE menu appears.
~ P. 18
Press to select the situation-related mode. (For SCENE only)
2
~ “How to use the menus” (P. 25)
● A sample image of the selected mode is displayed.
Press the OK button.
3
● The camera enters the shooting stand-by mode.
● To change the setting, press the
OK button again. The SCENE menu appears.
38
Page 39

Selecting the right mode for the shooting situation
LANDSCAPE
Suitable for shooting landscapes and other outdoor
scenes. Vivid reproduction of blues and greens.
LANDSCAPE+PORTRAIT
Suitable for shooting both main subject and
background. The camera brings both of them into
focus.
NIGHT SCENE
Suitable for shooting images of outdoor scenes in the
evening or at night.
Usually a street at night makes a dark image with only
the sparkle of lights such as street lamps due to the
lack of brightness. This mode allows you to capture the
true appearance of the street.
•
Since the shutter speed is slow, be sure to stabilize the camera.
3
Selecting the right mode for shooting conditions
NIGHT+PORTRAIT
Suitable for shooting both the main subject and
background at night.
• Since the shutter speed is slow, be sure to stabilize the
camera.
• The flash fires in the red-eye reduction mode.
~ “Flash modes” (P. 54)
39
Page 40

Selecting the right mode for the shooting situation
Suitable for shooting fireworks.
• Since the shutter speed is slow, be sure to stabilize the
• The flash cannot be used.
• AF is not possible. Use manual focus (MF).
3
Selecting the right mode for shooting conditions
Suitable for taking sunset pictures.
Vivid red and yellow color reproduction.
• The flash cannot be used.
• Since the shutter speed is slow, be sure to stabilize the
Suitable for shooting a portrait-style image of a person.
Only the subject is brought into focus with a blurred
background.
FIREWORKS
camera.
SUNSET
camera.
PORTRAIT
40
HIGH KEY
Suitable for shooting a bright subject. Subject
brightness is enhanced, producing an image with more
impact.
Page 41

Selecting the right mode for the shooting situation
MACRO
Suitable for taking close-up pictures (macro shooting).
• If you use the flash, shadows may be noticeable and the
correct exposure may not be achieved.
DOCUMENTS
Suitable for shooting documents, etc. Increases
contrast between letters and background.
• The flash cannot be used.
MUSEUM
For shooting with no beep sound and flash. Useful in
art gallery, museum, etc.
• SHQ and HQ cannot be selected
~ "Selecting the record mode" (P. 33)
3
Selecting the right mode for shooting conditions
SPORT
Suitable for capturing fast-moving action without
blurring.
41
Page 42

Selecting the right mode for the shooting situation
BEACH & SNOW
Suitable for shooting snow-capped mountain
landscapes, white sand beaches, seascapes, etc.
3
Selecting the right mode for shooting conditions
Suitable for shooting under candlelight. Warm colors
are reproduced.
• The flash cannot be used.
• SHQ and HQ cannot be selected.
CANDLE
~ “Selecting the record mode” (P. 33)
42
Page 43

Selecting the right mode for the shooting technique — P, A, S and M
P : Program shooting
The camera sets the optimum aperture value and shutter speed
automatically according to the subject brightness.
You can also perform program shift as needed to change the
combination of aperture and shutter speed while keeping the correct EV
(exposure value).
Set the mode dial to P.
1
Press the shutter button halfway.
2
● Focusing is performed and the AF
confirmation mark lights on the viewfinder.
● The shutter speed and aperture value that
have been set automatically by the camera
are displayed on the viewfinder.
Halfway
down
AF confirmation
mark
Exposure mode
Shutter speed
Viewfinder
Aperture
value
3
Selecting the right mode for shooting conditions
Press the shutter button all the way.
3
● A picture is taken.
All the way down
43
Page 44

Selecting the right mode for the shooting technique — P, A, S and M
5
4
3
2
1
0
-1
-2
8s 4s 2s 1s
1/2 1/4 1/8 1/15 1/30 1/60
1/125 1/250 1/500
1/10001/2000 1/4000
678
F11
F16
F22
F8
F5.6
F4
F2.8
F2
F1.4
F1
9
10 11 12 13 14 15 16 17 18 19 20 EV
Aperture value
Shutter speed
Aperture values and shutter speeds in the
P (Program) mode
In the P (Program) mode, the camera is programed so that the aperture value and
shutter speed are selected automatically according to the subject brightness as
shown below. The below diagram depends on the attached lens.
ED 50mm f2 MACRO
Example:When EV is 7,
3
Selecting the right mode for shooting conditions
the aperture
value is set to
F2 and the
shutter speed to
1/30.
: When using the fixed focal lens (ED 50mm f2 MACRO)
: Maximum wide setting when using the zoom lens (14mm-54mm f2.8-f3.5)
: Maximum tele setting when using the zoom lens (14mm-54mm f2.8-f3.5)
Program shift (Ps)
By rotating the control dial in the P mode, you can change the combination of
aperture and shutter speed while keeping the optimum exposure.
The program shift setting will not be
canceled after shooting. To cancel
program shift setting, rotate the
control dial so that the viewfinder
indication Ps changes to P or turn off
the power. Program shift is not
available when you are using a flash.
44
Viewfinder
Shutter speed
Exposure mode
Aperture value
Page 45

Selecting the right mode for the shooting technique — P, A, S and M
A : Aperture priority shooting
The camera sets the optimum shutter speed automatically for the aperture value
you have selected. When you decrease the aperture value (F-number), the
camera will focus within a shorter range (shallow depth of field) and produce a
picture with a blurred background. Conversely, when you increase the aperture
value, the camera will focus over a wider range in the forward and backward
directions (more depth of field), producing a picture with clear focus throughout
the image area. Before shooting, you can use the preview function to check how
the background will look in your picture.
Aperture value (F-number) is decreased Aperture value (F-number) is increased
Set the mode dial to A.
1
3
Selecting the right mode for shooting conditions
Rotate the control dial to set the
2
aperture value.
Large aperture (F-number is decreased)
Small aperture (F-number is increased)
45
Page 46

Selecting the right mode for the shooting technique — P, A, S and M
Press the shutter button halfway.
3
● Focusing is performed and the AF
confirmation mark lights on the viewfinder.
● The shutter speed that has been set
automatically by the camera is displayed on
the viewfinder.
Shutter speed
3
Viewfinder
Selecting the right mode for shooting conditions
AF confirmation
mark
Exposure mode
Overexposed when the shutter speed
indication is blinking. Increase the aperture
value (F-number).
Press the shutter button all the way.
4
Aperture value
Shutter speed
Viewfinder
AF confirmation
mark
Exposure mode
Underexposed when the shutter speed
indication is blinking. Decrease the aperture
value (F-number).
Halfway down
Aperture value
All the way down
TIPS
The shutter speed indication does not stop blinking after the aperture value
is changed.
T If a fast shutter speed indication is blinking, set the ISO sensitivity to a lower
value or use an ND filter (for adjusting the amount of light).
~ “ISO sensitivity — Setting the desired sensitivity to light” (P. 91)
T If a slow shutter speed indication is blinking, set the ISO sensitivity to a
higher value.
~ “ISO sensitivity — Setting the desired sensitivity to light” (P. 91)
To change the EV step interval:
T In the menu, set the EV step interval to 1/3EV, 1/2EV or 1EV.
~ “EV STEP” (P. 124)
To check the depth of field with the selected aperture value:
~ “PREVIEW function” (P. 52)
46
Page 47

Selecting the right mode for the shooting technique — P, A, S and M
S : Shutter priority shooting
The camera sets the optimum aperture value automatically for the shutter speed
you have selected. Set the shutter speed depending on the type of effect you
want: a higher speed shutter allows you to capture a fast-moving subject without
blur, and a slower shutter speed blurs a moving subject, creating a feeling of
speed or motion.
3
Selecting the right mode for shooting conditions
A fast shutter speed can freeze a fast
action scene without any blur.
Set the mode dial to S.
1
Rotate the control dial to set the
2
shutter speed.
A slow shutter speed blurs a moving
subject, generating a sense of
movement to create a more powerful
visual impact.
Slower shutter speed
Faster shutter speed
47
Page 48

Selecting the right mode for the shooting technique — P, A, S and M
Press the shutter button halfway.
3
● Focusing is performed and the AF
confirmation mark lights on the viewfinder.
● The aperture value that has been set
automatically by the camera is displayed on
the viewfinder.
Shutter speed
Viewfinder
3
Aperture value
Viewfinder
Halfway down
Shutter speed
Aperture value
Selecting the right mode for shooting conditions
AF confirmation
mark
Exposure mode
If the aperture value indication at the
minimum value is blinking, the correct
exposure is not attained (underexposed). Set
the shutter speed slower.
Press the shutter button all the way.
4
AF confirmation
mark
Exposure mode
If the aperture value indication at the
maximum value is blinking, the correct
exposure is not attained (overexposed). Set
the shutter speed higher.
Shutter speed indication
If the selected shutter speed is less than 1 second, only its denominator will be
displayed such as 200 for 1/200 sec., and if more than 1 second, a double-quote
mark " will be displayed such as 1" for 1 sec.
All the way
down
48
Page 49

Selecting the right mode for the shooting technique — P, A, S and M
TIPS
The picture looks blurred.
T The possibility of camera shake spoiling your picture increases greatly during
macro or ultra-telephoto shooting. Set the shutter speed higher or use a
monopod or tripod to stabilize the camera.
The aperture value indication does not stop blinking after the shutter speed
is changed.
T If the aperture value indication at the maximum value is blinking, set the ISO
sensitivity to a lower value or use an ND filter (for adjusting the amount of
light). ~ “ISO sensitivity — Setting the desired sensitivity to light” (P. 91)
T If the aperture value indication at the minimum value is blinking, set the ISO
sensitivity to a higher value. ~ “ISO sensitivity — Setting the desired
sensitivity to light” (P. 91)
To change the EV step interval:
T In the menu, set the EV step interval to 1/3EV, 1/2EV or 1EV.
~ “EV STEP” (P. 124)
M : Manual shooting
You can set both aperture value and shutter speed manually, while referring to the
exposure level indicator. This mode gives you more creative control, allowing you
to make whatever settings you like, regardless of the correct exposure. Bulb
shooting is also possible, allowing you to take astronomical or fireworks pictures.
Set the mode dial to M.
1
3
Selecting the right mode for shooting conditions
49
Page 50

Selecting the right mode for the shooting technique — P, A, S and M
1/320 F5.6–0.3
ESP
M
FP
FOCUS
AUTO
AUTO
ISO
DRIVE
S-AF
AF ILLUMINATOR
HQ
24483264
WB
sRGB
1/320 F5.6–0.7
ESP
M
FP
FOCUS
AUTO
AUTO
ISO
DRIVE
S-AF
AF ILLUMINATOR
HQ
24483264
WB
sRGB
Rotate the control dial to set the
2
aperture value.
Decrease the aperture value (F-number)
Press the (exposure
compensation) button, then rotate the
control dial to set the shutter speed
(30 sec. -1/4000 sec.).
● The aperture value and shutter speed
3
change in 1/3 EV increments as the dial is
rotated.
Selecting the right mode for shooting conditions
● The exposure level indicator appears on the
control panel screen, showing the difference
(ranging from –3 EV to +3 EV) between the
exposure value calculated by the currently
selected aperture and shutter speed
compared to the exposure value considered
optimum by the camera.
Control panel screen
Exposure level indicator
If the difference between the currently set exposure and the optimum exposure is outside the
range of available indicator levels, “ ” or “ ” will blink on the left or right end of the
exposure level indicator.
Increase the aperture value (F-number)
Slow shutter speed
Fast shutter speed
Exposure level indicator
Underexposure
Take the picture.
3
50
Overexposure
Optimum exposure
Page 51

Selecting the right mode for the shooting technique — P, A, S and M
Noise in images
During shooting at slow shutter speeds of 30
or more seconds, noise may appear onscreen or the image may be overly bright in
the top left part of the screen. These
phenomena are caused when current is
generated in those sections of the CCD that
are not normally exposed to light, resulting
in a rise in temperature in the CCD or CCD
drive circuit. This can also occur when
shooting with a high ISO setting in an
environment exposed to heat. The NOISE
REDUCTION function helps reduce this
noise. ~ “NOISE REDUCTION” (P. 105)
Bulb shooting
You can take a picture with a bulb exposure time in which the shutter stays open
as long as you hold down the shutter button (up to 8 minutes). Set the shutter
speed to [bulb] in the M mode.
Bulb shooting can also be done using the optional power battery holder and
remote cable.
TIPS
The picture looks blurred.
T The possibility of camera shake spoiling your picture increases greatly when
you take a picture at slow shutter speed. Use a monopod or tripod to
stabilize the camera.
To change the EV step interval:
T In the menu, set the EV step interval to 1/3EV, 1/2EV or 1EV. ~ “EV STEP”
(P. 124)
3
Selecting the right mode for shooting conditions
51
Page 52

PREVIEW function
P A S M
Available modes
MENU
If you press the OK button, the viewfinder shows the actual depth of field (the
distance from the nearest to the furthest point of perceived “sharp” focus) in a
picture, with the selected aperture value. Assign preview function to the OK
button beforehand. ~ “CUSTOM OK” (P. 125)
Press the OK button.
1
3
Selecting the right mode for shooting conditions
Note
The metering values cannot be changed in the preview mode.
OK button
52
Page 53

4
Various shooting functions
The flash and drive modes (sequential shooting) are the keys to
advanced shooting techniques. Selecting a flash mode to suit a specific
shooting situation or adjusting the amount of light emitted by the flash
will produce an image that is different from what would be obtained when
less precise settings are used. Similarly, using an optional external flash
together with the built-in flash will create yet another impression.
With drive mode you can take several pictures of the same scene in
sequence with different exposure or white balance settings. There’s no
need to change the settings before taking each picture.
Page 54

Flash shooting
Flash modes
The camera sets the flash mode according to various factors such as firing pattern
and flash timing. Available flash modes depend on the exposure mode.
The flash modes are available to optional external flashes.
Auto-flash AUTO
The flash fires automatically in low light or backlight conditions.
To shoot a subject with backlighting, position the AF frame over the subject.
Red-eye reduction flash
4
Various shooting functions
The light from the flash may make the
subject’s eyes appear red in the picture. The
red-eye reduction flash mode significantly
reduces this phenomenon by emitting preflashes before firing the regular flash. This
helps accustom the subject’s eyes to the
bright light and minimizes the red-eye
phenomenon.
● After the pre-flashes, it takes about 1 second before the shutter is released.
Hold the camera firmly to avoid camera movement.
● Effectiveness may be limited if the subject is not looking directly at preflashes, or if the shooting range is too far. Individual physical characteristics
may also limit effectiveness.
The subject’s eyes appear red.
Note
Slow synchronization (1st curtain) SLOW
The slow synchronization flash is designed for slow shutter speeds. Normally,
when shooting with a flash, shutter speeds cannot go below a certain level to
prevent camera movement. But when shooting a subject against a night scene,
fast shutter speeds can make the background too dark. Slow synchronization
allows you to capture both the background and the subject. Since the shutter
speed is slow, be sure to stabilize the camera by using a tripod so as not to cause
the picture to be blurred.
54
Page 55

Flash shooting
2 sec.
2 sec. 0
1st curtain
Usually, regardless of the shutter speed, the flash fires right after the shutter fully
opens. This is called 1st curtain. Unless you change it, this is how the flash always
fires.
Slow synchronization (2nd curtain) SLOW2
2nd curtain flash fires just before the shutter closes. Changing the flash timing can
create interesting effects in your picture, such as expressing the movement of a
car by showing the tail-lights streaming backwards. The slower the shutter speed,
the better the effects turn out. The slowest possible shutter speed depends on the
shooting mode.
P mode : 2 sec.
A/S/M mode (Bulb is also available) : 30 sec.
When the shutter speed is set to 2 sec.
4
Various shooting functions
2nd curtain 1st curtain
2nd curtain flash fires
Shutter closes
1st curtain flash fires
Shutter fully opens
Slow synchronization + Red-eye reduction flash SLOW
This mode is for when you want to use slow synchronization, yet also reduce the
red-eye phenomenon. For instance, when shooting a person against a brightly lit
night background. A normal flash might make the person’s eyes red, but this mode
lets you capture the background correctly and reduce the red-eye phenomenon at
the same time. 2nd curtain flash with red-eye reduction is not available.
55
Page 56

Flash shooting
Fill-in flash
The flash fires regardless of the light
conditions. This mode is useful for
eliminating shadows on the subject’s face
(such as shadows from tree leaves), in a
backlight situation, or for correcting the color
shift produced by artificial lighting (especially
fluorescent light).
4
Various shooting functions
● When the flash fires, the shutter speed is set to 1/180 sec. or less. When
shooting a subject against a bright background with the flash, the
background may be overexposed. In this case, use the optional FL-50/FL-36
external flash and set it to the Super FP flash mode.
Fill-in flash + Red-eye reduction flash
This mode makes it possible to fire the flash regardless of the light conditions and
also to reduce red-eye phenomenon.
Fill-in flash + Slow synchronization (2nd curtain) SLOW2
The flash fires regardless of the light conditions at the timing of the 2nd curtain.
Note
56
Page 57

Flash shooting
Exposure
mode
Control panel
screen
AUTO
Auto-flash
Auto-flash
(Red-eye reduction)
1st
curtain
2nd
curtain
2nd
curtain
1st
curtain
Always fires
Fires
automatically
in dark/backlit *
conditions
Restricted to
2 - 1/180 sec.
1/30 - 1/180 with
auto/
Restricted to
60 -1/180 sec.
Always fires
1st
curtain
1st
curtain
Slow synchronization
(Red-eye reduction)
Slow synchronization
(2nd curtain)
Fill-in flash
(Red-eye reduction)
Fill-in flash
(2nd curtain)
Fill-in flash
Flash off —
—Flash off
Fill-in flash
Slow synchronization
Flash mode
Flash
timing
Conditions to
fire the flash
Shutter speed
restrictions
P
A
S
M
Flash modes available in the exposure mode
* When the flash is set to the Super FP mode, it detects backlight before emitting light.
~ “Super FP flash” (P. 63)
4
Various shooting functions
57
Page 58

Flash shooting
P A S M
Available modes
AUTO
MENU
Setting the flash mode
Press the (flash) switch to raise the
1
flash.
Press the (flash mode) button.
2
● The current setting is displayed on the
monitor.
4
Rotate the control dial until the
Various shooting functions
3
desired setting is displayed.
Control dial
Flash
(flash mode) button
(flash) switch
When the control panel screen is off
MANUAL FLASH
When MANUAL FLASH (~ P. 124) in the menu is set to ON, the flash emits a
fixed amount of light.
58
Page 59

Flash shooting
P A S M
Available modes
Using the built-in flash
If you shoot a subject from as close as 1 m using a lens that is wider than 14 mm
(equivalent to 28 mm on a 35 mm film camera), the light emitted by the flash may
produce a vignette effect.
Press the (flash) switch to raise the
1
flash.
Press the shutter button halfway.
2
● The (flash stand-by) mark lights when the
flash is ready to fire. If the mark is
blinking, the flash is charging. Wait until
charging is complete.
Press the shutter button all the way
3
down (fully) to take the picture.
(flash) switch
4
Various shooting functions
Viewfinder
Flash stand-by mark
59
Page 60

P A S M
Available modes
Flash shooting
Flash intensity control
This adjusts the amount of light emitted by the flash.
In some situations (e.g., when shooting small subjects, distant backgrounds, etc.),
you may get better results by adjusting light emission. It is useful when you intend
to increase the contrast (distinction between light and dark) of images to make the
images more vivid.
Menu TT
1
4
~ “How to use the menus” (P. 25)
Various shooting functions
Press .
2
● The setting screen is displayed.
To increase light emission:
3
Each time you press , light
emission increases in steps of 1/3EV.
To decrease light emission:
Each time you press , light emission
decreases in steps of 1/3EV.
● You can select EV steps from 1/3EV, 1/2EV
~ “EV STEP” (P. 124)
or 1EV.
Press the OK button.
4
OK button
● This does not work when the flash control mode on the electronic flash is set
to MANUAL.
● If light emission is adjusted on the electronic flash, it will be combined with
the camera’s light emission setting.
● Flash intensity control is applicable to the flash you are using (built-in flash
or external flash). When using both flashes simultaneously, flash intensity
control is applicable to the amount of light emitted by both flashes.
60
Note
Page 61

Flash shooting
Optional electronic flashes
In addition to this camera’s built-in flash capabilities, you can take advantage of a
variety of flash shooting techniques to suit different shooting conditions with the
flash units specified for use with this camera — the Olympus FL-50, FL-36, and
FL-20 electronic flashes.
These flashes communicate with the camera to make available various flash
modes, such as auto-flash, red-eye reduction flash, slow synchronization, and
controlled light emission. The flash can be mounted on the camera by attaching it
to the camera’s hot shoe.
Functions available with optional flash units
Optional flash
Flash control
mode
Using the external
flash with the
built-in flash
GN (guide number)
(ISO100)
* Calculated based on 35mm film.
FL-50
TTL-AUTO (Super
FP flash), TTLAUTO, AUTO,
MANUAL, MANUAL
(Super FP flash)
The external flash
cannot be used with
the built-in flash
while the former is
attached to the
camera’s hot shoe.
GN 50 (85 mm*)
GN 28 (24 mm*)
FL-36
TTL-AUTO (Super
FP flash), TTLAUTO, AUTO,
MANUAL, MANUAL
(Super FP flash)
The external flash can be used with the
built-in flash.
GN 36 (85 mm*)
GN 26 (24 mm*)
FL-20
TTL-AUTO, AUTO,
MANUAL
GN 20 (35 mm*)
4
Various shooting functions
61
Page 62

P A S M
Available modes
Flash shooting
Using the electronic flash
The following instructions describe how to connect and use the FL-50 electronic
flash (optional). Be sure to attach the flash to the camera before turning on the
flash’s power.
Remove the hot shoe cover by sliding
1
it in the direction indicated by the
arrow in the illustration.
4
● Keep the shoe cover in a safe place to avoid
Various shooting functions
losing it, and put it back on the camera after
flash shooting.
Attach the FL-50 electronic flash to
2
the hot shoe on the camera.
● If the lock pin is protruding, turn the shoe lock
dial as far as it will go in the direction
opposite to
pin back inside.
● For instructions on how to attach the flash,
refer to the FL-50’s manual.
Turn on the flash.
3
● When the charge lamp on the flash lights up,
charging is complete.
● The flash will be synchronized with the
camera at a speed of 1/180 sec or less.
LOCK. This will pull the lock
ß
Lock pin
Shoe lock dial
Select a flash mode.
4
~ “Selecting the flash mode” (P. 58)
62
(flash mode) button
Page 63

Flash shooting
1/250 F5.6
P
AUTO
FP
FOCUS
AUTO
AUTO
ISO
DRIVE
S-AF
AF ILLUMINATOR
HQ
24483264
WB
sRGB
Select the desired flash control mode.
5
Press the shutter button on the
6
camera halfway.
● Shooting information such as ISO sensitivity,
aperture value, and shutter speed is
communicated between the camera and
flash.
● lights up in the viewfinder.
Press the shutter button all the way.
7
Viewfinder
blinks:
The flash is
charging.
lights up:
Charging is
complete.
Note
● When shooting with the flash control mode set to TTL-AUTO, pre-flashes
are emitted before firing the regular flash.
● When the flash control mode is set to TTL-AUTO, or when shooting a
subject at a distance with ISO set to 400 or higher, flash control accuracy
will decrease.
Super FP flash
Super FP flash is available with the FL-50/FL-36. Super FP flash timing is longer
than standard flash timing. This means that pictures can be taken at a higher
shutter speed than is possible with normal flashes.
Flash shooting with the aperture open such as in portrait shooting is also possible
with Super FP flash. For details, refer to the FL-50 manual.
4
Various shooting functions
Super FP flash
63
Page 64

Flash shooting
Using commercially available flashes
The amount of light emitted cannot be adjusted on commercially available flashes
except for those specified. A small versatile flash can be synchronized with the
camera at a shutter speed of 1/180 sec. or less, whereas a large flash (such as a
studio flash) can be synchronized at 1/125 sec. or less. For details on nonspecified commercial flashes, refer to the next page.
Remove the hot shoe cover to connect
1
the flash unit to the camera.
4
Set the exposure mode to M mode,
Various shooting functions
2
then set the aperture value and
shutter speed.
~ “Manual shooting” (P. 49)
● A slower shutter speed may produce blurred
images.
Turn on the flash.
3
● Be sure to turn on the flash after attaching
the flash unit to the camera.
Set the flash control mode on the
4
flash to AUTO. Also set the ISO
sensitivity and aperture value on the
flash to match the camera’s settings.
● Refer to the manual for the flash to set its
flash control mode.
Note
● The camera’s flash mode except 2nd curtain will have no effect on the nonspecified commercial flashes.
● The flash fires each time the shutter is released. When you do not need to
use the flash, turn off the flash’s power.
● Check beforehand that the flash you are using is synchrorized with the
camera.
64
Page 65

Flash shooting
Non-specified commercial flashes
Before selecting a non-specified commercial flash, be sure to read the following
information carefully to determine whether or not it can be used with this camera.
(1) Exposures when using a flash require that adjustments be made on the flash.
If a flash is used in the auto mode, match it with the F value and ISO
sensitivity settings on the camera.
(2) Even if the auto F value and ISO sensitivity of the flash are set to the same
conditions as those on the camera, the correct exposure may not obtained
depending on the shooting conditions. In such a case, adjust the auto F value
or ISO on the flash or calculate the distance in the manual mode. (Exposure
compensation on the camera cannot be used when shooting with the flash.)
(3) Use a flash with an illumination angle that matches the focal length of the
lens. The focal length of the lens for 35 mm film is approximately twice as
long as the focal length of the lenses designed for this camera.
(4) Do not use a flash unit or other accessory TTL flash that has additional
communications functions other than the specified flashes, since it may
not only fail to function normally, but may also cause damage to the
camera’s circuitry.
4
Various shooting functions
65
Page 66

Drive mode
P A S M
Available modes
The following drive modes are available with this camera.
Single-frame shooting : Shoots 1 frame at a time when the shutter button
is pressed. (Normal shooting mode, single-frame
shooting)
Sequential shooting : Shoots 4 frames or more at 2.5 frames/sec. (in
SHQ, HQ or SQ) for as long as the shutter button
pressed. Focus and exposure are locked at the
first frame. (except C-AF shooting ~ P. 82)
Auto-bracketing BKT : Shoots multiple frames of the same scene at
4
Various shooting functions
Self-timer shooting
remote control shooting
Sequential shooting
different exposures (AE bracketing) or white
balance (WB bracketing).
~ “Auto bracketing” (P. 68)
: Triggers the shutter after a set time, either 12 sec.
or 2 sec. ~ P. 72
: Shoots using the optional remote control.
~ P. 72
DRIVE
Menu TTDRIVE T
1
~ “How to use the menus” (P. 25)
66
Shutter button
Page 67

Drive mode
Start shooting.
2
● Press the shutter button fully and keep it pressed. The camera will take pictures in
sequence until you release the button.
Note
● Sequential shooting is not possible when NOISE REDUCTION is set to ON.
● During sequential shooting, if the battery check blinks due to low battery, the
camera stops shooting and starts saving the pictures you have taken on the
card. The camera may not save all of the pictures depending on how much
battery power remains.
4
Various shooting functions
67
Page 68

Drive mode
P A S M
Available modes
Auto bracketing
Useful when you are not sure what exposure or white balance settings are
appropriate and you don’t have time to take several test shots at different settings.
AE bracketing
The camera automatically shoots a number of pictures at different exposure
values for each frame. Even in conditions where correct exposure is difficult to
obtain (such as a backlit subject or a scene at dusk), you can pick the picture you
prefer from a selected number of frames with a variety of different exposure
4
settings (exposure and compensation values). The pictures are taken in the
Various shooting functions
following order: Picture with optimum exposure, picture adjusted in – direction,
and picture adjusted in + direction.
Example:
When BKT
is set to 1.0
–1.0
Compensation value : 0.3, 0.7 or 1.0
The exposure compensation values depend on the EV step interval setting that
can be changed in the menu. Exposure compensation value can be adjusted
within a range of ±1.0. ~ “EV STEP” (P. 124)
Number of frames : 3
Menu TTDRIVE T BKT
1
~ “How to use the menus” (P. 25)
68
±0
+1.0
Shutter button
Page 69

Drive mode
BKT
3F
0.3EV
3F
0.7EV
3F
1.0EV
CANCEL SELECT
GO
MENU
Press .
2
● The BKT selection screen is displayed.
Press to select compensation
3
value. Press the OK button.
Single-frame shooting :
4
Each time the shutter button is
pressed fully, a picture is taken at a
different exposure.
● The setting for the next shot is displayed in
the viewfinder.
Sequential shooting :
Hold down the shutter button until the
selected number of frames are taken.
The camera shoots each frame at a
different exposure.
● Releasing the shutter button stops auto
bracketing shooting.
How AE bracketing compensates exposure in each
exposure mode
Depending on the selected exposure mode, exposure is compensated in the
following way:
Viewfinder
EV step
P mode : Aperture value and shutter speed
A mode : Shutter speed
S mode : Aperture value
M mode : Shutter speed
4
Various shooting functions
69
Page 70

Drive mode
1/250 F5.6+1.7
ESP
P
FP
FOCUS
AUTO
AUTO
ISO
DRIVE
AF ILLUMINATOR
0.3
AE BKT
HQ
24483264
WB
sRGB
1/250 F5.6+3.0
ESP
P
FP
FOCUS
AUTO
AUTO
ISO
DRIVE
AF ILLUMINATOR
0.3
AE BKT
HQ
24483264
WB
sRGB
TIPS
To apply AE bracketing to the exposure value you have compensated:
T Compensate the exposure value, then use the AE bracketing feature. AE
bracketing is applied to the exposure value you have compensated.
If the selected range is beyond the scale of
Auto bracketing compensation range
the exposure level indicator, only the part
within the scale is displayed.
4
Various shooting functions
Exposure compensation value
you have adjusted
● Auto bracketing is not possible when the flash is on.
● During WB bracketing, the camera cannot shoot in sequence if there is not
enough memory in the camera and card for storing more than the selected
number of frames.
● During sequential shooting, if the battery check blinks due to low battery, the
camera stops shooting and starts saving the pictures you have taken on the
card. The camera may not save all of the pictures depending on how much
battery power remains.
70
Exposure compensation value
you have adjusted
Auto bracketing compensation range
Note
Page 71

Drive mode
P A S M
Available modes
WB bracketing
Three images with different white balances are automatically created from one
shot. One is the image just taken with the specified white balance, one is the
same image adjusted in the red direction, and the third the same image adjusted
in the blue direction. All three images are saved on the card.
Menu TTWB BKT T OFF,
1
3F 2STEP, 3F 4STEP, 3F 6STEP
Shutter button
~ “How to use the menus” (P. 25)
Take the picture.
2
● When the shutter button is pressed down all
the way, three images are automatically
created.
TIPS
To apply WB bracketing to white balance you have adjusted:
T Adjust white balance manually, then use the WB bracketing feature. WB
bracketing is applied to your white balance adjustment.
4
Various shooting functions
71
Page 72

P A S M
SCENE
Available modes
Drive mode
Self-timer shooting /Remote control shooting (with optional
remote control)
You can select self-timer shooting or remote control shooting.
Self-timer shooting :
This function lets you take pictures using the self-timer. You can set the camera to
trigger the shutter after either 12 or 2 seconds. Fix the camera securely on a tripod
for self-timer shooting.
Remote control shooting (with optional remote control) :
By using the optional remote control (RM-1), you can take a picture with yourself
4
in it or a night scene without touching the camera. The camera can be set to
Various shooting functions
trigger the shutter either right away or 2 seconds after the shutter button on the
remote control is pressed.
Setting
Menu TTDRIVE T or
1
~“How to use the menus” (P. 25)
Press .
2
● The setting screen is displayed.
Press to select a mode from the
3
72
or
or settings.
: 12-second self-timer
: 2-second self-timer
: Triggers the shutter button right away.
: 2-second remote control timer
Shutter button
Page 73

Drive mode
2
SEC
CANCEL SELECT
GO
MENU
Using the self-timer
Press the shutter button all the way.
1
● A picture is taken.
● The focus and exposure are locked when the
shutter button is pressed halfway.
● When is selected: First, the self-timer
lamp lights up for approximately 10 seconds,
then it blinks for approximately 2 seconds
and the picture is taken.
When is selected: The self-timer lamp
lights up for approximately 2 seconds, then
the picture is taken.
● To cancel the activated self-timer, press the
MENU button.
TIPS
To exit the self-timer mode.
T The self-timer mode is not canceled automatically after shooting. In the
menu, switch from DRIVE to one of the other modes.
Eyepiece cover
When shooting without looking through the viewfinder, such as when using the
self-timer, attach the eyepiece cover to the viewfinder so that the light does not
enter the viewfinder.
To attach the eyepiece cover, remove the eyecup from the camera as illustrated.
4
Various shooting functions
Eyecup
Eyepiece cover
Note
Do not press the shutter button while standing in front of the camera; this could
result in the subject being out of focus since focusing is performed when the
shutter button is pressed halfway.
73
Page 74

Approx. 2m (6.6 ft.) (outdoor)
Approx. 3m (9.8 ft.) (indoor)
Approx. 3m (9.8 ft.) (indoor)
Approx. 2m (6.6 ft.) (outdoor)
15°
15°
Approx. 5m (16.4 ft.) (indoor)
Approx. 3m (9.8 ft.) (outdoor)
Drive mode
Using the remote control
Mount the camera on a tripod or place
1
it on a stable, flat surface.
Point the remote control at the remote
2
control receiver on the camera and
Remote control lamp
Remote control receiver
press the shutter button on the remote
control.
● When is selected: The focus and exposure
4
are locked, the remote control lamp blinks
and the picture is taken.
Various shooting functions
When is selected: The focus and exposure
are locked, the remote control lamp blinks
and the picture is taken after approximately 2
seconds.
Transmitted signal effective area
Point the remote control at the remote control receiver of the camera within the
effective area as shown below.
Powerful lighting such as direct sunlight, fluorescent light or devices emitting
electrical or radio waves could narrow the effective area.
Remote control receiver
Remote
control
Camera
74
Page 75

Drive mode
P A S M
Available modes
TIPS
The remote control lamp does not blink after the shutter button on the
remote control is pressed.
T The transmitted signal may not be effective if the remote control receiver is
exposed to powerful lighting. Move the remote control closer to the camera
and press the shutter button on the remote control again.
T The transmitted signal may not be effective if the remote control is too far
from the camera. Move the remote control closer to the camera and press
the shutter button on the remote control again.
T There is signal interference. Change the channel as described in the remote
control's instruction manual.
To cancel the remote control shooting mode:
T The remote control shooting mode will not be canceled after shooting. In the
menu, switch from DRIVE to one of the other modes.
To use the shutter button on the camera in the remote control shooting
mode:
T The shutter button on the camera still works even if or is displayed.
Note
● The shutter will not be released if the subject is not in focus.
● Under bright light conditions, the remote control lamp may be difficult to see,
making it hard to determine whether or not the picture has been taken.
● Zoom is not available on the remote control.
4
Various shooting functions
MONOTONE shooting
This setting lets you add special effects to pictures.
BLACK & WHITE : Records pictures in black and white.
SEPIA : Records pictures in sepia.
Menu TTMONOTONE T OFF, BLACK & WHITE, SEPIA
1
~ “How to use the menus” (P. 25)
75
Page 76

MEMO
4
Various shooting functions
76
Page 77

5
Focusing functions
When you turn a focus ring to focus on a subject it’s called manual focus.
If you’re a beginner, it usually takes some time to get used to this style of
focusing. Fortunately, your digital camera provides not only manual
focus, but also auto focus and various other focus modes — all easily
accessible through simple button operations. These different modes will
enhance your shooting flexibility. For example, if you want to capture a
fast-moving subject without blur, choosing the right shutter speed is
important. But you can also use focusing to achieve the same effect —
when the focus mode is set to continuous AF mode, the camera focuses
on the subject in anticipation of its movement.
Page 78

AF frame selection
MENU
AUTO
P A S M
Available modes
Normally, the camera measures the distance to the subject using the 3 AF frames
in the viewfinder and selects the most appropriate point. This function allows you
to select only one AF frame.
Center AF frame
(AUTO) : Focuses using the 3 AF
frames. (Factory default
setting)
: Focuses using the left AF
frame.
: Focuses using the center AF
frame.
: Focuses using the right AF
5
Focusing functions
Press the (AF frame selection)
1
button.
● The current setting is displayed on the
monitor.
Rotate the control dial until the
2
desired setting is displayed.
Take the picture.
3
● The AF frame you have selected lights up.
frame.
Viewfinder
Left AF frame
Control dial
Right AF frame
button
78
Monitor
When the control panel screen is off
Page 79

Focus mode
AF
S-AF
MENU
P A S M
Available modes
Three focus modes are available with this camera: S-AF (single AF), C-AF
(continuous AF) and MF (manual focus).
Press the AF (focus mode) button.
1
● The current setting is displayed on the
monitor.
Rotate the control dial until the
2
desired setting is displayed.
~ “S-AF (single AF) shooting” (P. 80),
“Simultaneous use of S-AF mode
and MF mode” (P. 81),
“C-AF (continuous AF) shooting”
(P. 82),
“Manual focus (MF)” (P. 83)
Control dial
AF button
Monitor
5
Focusing functions
When the control panel screen is off
79
Page 80

Focus mode
P A S M
Available modes
S-AF (single AF) shooting
Focusing is performed once when the shutter button
is pressed halfway. If focusing fails, release your
finger from the shutter button and press it halfway
again. This mode is suitable for taking pictures of
non-moving subjects or subjects with limited
movement.
Press the shutter button halfway.
1
● When the focus is locked, the AF
5
confirmation mark lights up.
Focusing functions
● A beep sound is output when the subject is in
focus.
Press the shutter button all the way.
2
TIPS
To adjust focus manually while using AF:
AF confirmation
mark
~ “Simultaneous use of S-AF mode and MF mode” (P. 81)
Shutter button
Viewfinder
80
Page 81

Focus mode
P A S M
Available modes
Simultaneous use of S-AF mode and MF mode
This function allows you to fine-adjust focus manually by turning the focus ring
after AF is performed in the S-AF mode.
Press the shutter button halfway to
1
use AF.
● When the focus is locked, the AF
confirmation mark lights up.
Fine-adjust the focus using the focus
2
ring, while keeping the shutter button
pressed halfway.
Press the shutter button all the way to
3
take the picture.
Shutter button
Focus ring
Viewfinder
AF confirmation
mark
Note
If the shutter button is pressed again after fine-adjusting focus with the focus
ring, the AF is activated and your adjustments are canceled.
5
Focusing functions
81
Page 82

Focus mode
P A S M
Available modes
C-AF (continuous AF) shooting
The camera repeats focusing. When the subject is in motion, the camera focuses
on the subject in anticipation of its movement (Predictive AF). Even if the subject
moves or you change the composition of the picture, the camera continues trying
to focus.
5
Focusing functions
Press the shutter button halfway and
1
keep it in this position.
● When the subject is in focus and exposure is
● The AF frame does not light up, even when
● The camera repeats focusing. Even if the
● A beep sound is output when the subject is in
Press the shutter button all the way.
2
82
locked, the AF confirmation mark lights up.
the subject is in focus.
subject moves or even if you change the
composition of the picture, focusing is tried
continuously.
focus. The beep sound is not output after the
third continuous AF operation, even when the
subject is in focus.
Shutter button
Viewfinder
AF confirmation
mark
Page 83

Focus mode
P A S M
Available modes
Manual focus (MF)
This function allows you to manually focus on any subject while looking through
the viewfinder.
Adjust the focus using the focus ring.
1
Take the picture.
2
Rotational direction of the focus ring
You can select the rotational direction of the focus ring to suit your preference for
how the lens adjusts to the focusing point. ~ “FOCUS RING” (P. 126)
Focus aid
When you focus the lens on a subject manually (by turning the focus ring), the AF
confirmation mark lights.
When 3 AF frames are selected, the camera performs focusing in the center AF
frame.
Shutter button
Focus ring
5
Focusing functions
83
Page 84

AF ILLUMINATOR
P A S M
Available modes
When AF ILLUMINATOR is set to ON, the flash provides light if a subject is in a
dark environment and auto focus does not work. To use this function, raise the
flash.
Setting the AF ILLUMINATOR
Menu TTAF ILLUMINATOR T
1
ON, OFF
~ “How to use the menus” (P. 25)
Using the flash as the AF illuminator
Raise the flash. ~ P. 5 8
1
5
Focusing functions
Take the picture.
2
Flash
84
Page 85

6
ISO
400
ISO
1600
Exposure, image and
color
If you wish to go beyond simple shooting using only the shutter button,
you will find various functions that can be used to modify
image/brightness/exposure parameters to achieve remarkably better
results.
For instance, if you want to shoot atmospheric pictures indoors, or if your
subject would strongly reflect the flash light, shooting without the flash
would typically result in a blurred or dark picture. To overcome this
problem, try adjusting the ISO setting; use a lower ISO value with normal
light, and a higher ISO value with dark subjects.
With exposure compensation you can adjust the image brightness and
make a significant difference to how the picture turns out. Try adjusting
toward “–” when you want to capture images with a dark background
such as green leaves in shadow or crimson foliage on a mountainside.
The red, green, and yellow of autumn leaves will be beautifully
reproduced, standing out against the background.
Page 86

Metering mode—Changing the metering area
MENU
P A S M
Available modes
ESP
There are 3 ways of measuring the subject brightness: Digital ESP metering,
Center weighted averaging metering and spot metering. Select the most suitable
mode depending on the shooting condition.
Press the (metering) button.
1
● The current setting is displayed on the
monitor.
Rotate the control dial until the
2
desired setting is displayed.
Viewfinder
Control dial
6
Exposure, image and color
The selected metering
mode is displayed in
the viewfinder.
button
86
When the control panel screen is off
Page 87

Metering mode—Changing the metering area
Digital ESP metering ESP
The camera meters and calculates the light levels or light level differences in
the center and other areas of the image separately. Recommended for
shooting under conditions where there is high contrast between the center of
the screen and the area around it, such as when shooting backlit subjects or
under excessively bright light.
Center weighted averaging metering
This metering mode provides the average
metering between the subject and the
background lighting, placing more weight on
the subject at the center. Use this mode
when you do not want the light level of
background to affect the exposure value.
Spot metering
The camera meters a very small area around
the center of the subject, defined by the spot
metering area mark in the viewfinder. Use
this mode for intensively backlit subjects, etc.
Metering area
6
Exposure, image and color
Metering area
87
Page 88

MENU
Exposure compensation—Varying the image brightness
P A S
Available modes
+1.5
In some situations, you may get better results if you manually compensate (adjust)
the exposure value set automatically by the camera. In many cases, bright
subjects (such as snow) will turn out darker than their natural colors. Adjusting
toward + makes these subjects closer to their real shades. For the same reason,
adjust toward – when shooting dark subjects. The exposure can be adjusted in
range of ±5.0 EV. Center weighted averaging metering ( ) or spot metering
( ) is recommended for exposure compensation. The EV step interval can be
selected from 1/3EV, 1/2EV or 1EV. ~ “EV STEP” (P. 124)
6
Exposure, image and color
Press the (exposure
1
compensation) button.
● The exposure compensation indicator
Rotate the control dial to make
2
adjustment.
● Adjust toward +: up to +5.0 EV
88
–2.0 EV
appears on the monitor.
Adjust toward –: up to –5.0 EV
When the control panel screen is off
0
Adjust toward –
+2.0 EV
Control dial
Adjust toward +
button
Page 89

Exposure compensation—Varying the image brightness
1/320 F5.6–0.7
ESP
P
AUTO
FP
FOCUS
AUTO
AUTO
ISO
DRIVE
S-AF
AF ILLUMINATOR
HQ
24483264
WB
sRGB
Example: When adjusting the exposure in –1/3 step
Press the button.
Rotate the control dial to set the desired exposure compensation value.
Control panel screen
Exposure compensation
indicator
Adjust toward –
Viewfinder
Exposure
compensation
value
The exposure compensation indicator disappears if the exposure is compensated
by 0.
TIPS
To change the EV step interval:
T In the menu, set the EV step interval to 1/3EV, 1/2EV or 1EV.
~ “EV STEP” (P. 124)
Exposure
compensation
indicator with
“1/3EV” selected
Exposure
compensation
indicator with
“1/2EV” or “1EV”
selected
● If the exposure compensation value exceeds the scale of the exposure compensation
indicator, – or + turns red.
Pressing the button has no effect in the M or SCENE mode.
Note
1EV
1/3EV
1EV
1/2EV
6
Exposure, image and color
89
Page 90

AE lock—Locking the exposure
P A S
SCENE
Available modes
The metered exposure value can be locked with the AEL button (AE lock). Use
AE lock when you want a different exposure setting from the one that would
normally apply under the current shooting conditions.
Normally, pressing the shutter button halfway locks both AF (auto focus) and AE
(automatic exposure), but you can lock the exposure alone by pressing AEL.
When you lock the exposure, the metering mode (digital ESP metering, center
weighted averaging metering or spot metering) selected in the menu is
automatically applied. ~ “AEL METERING” (P. 124)
AEL
Aim the camera toward the subject.
1
Hold down AEL.
2
● The exposure is locked.
6
● is displayed in the viewfinder.
Exposure, image and color
Compose your shot. While holding
3
down AEL, hold down the shutter
button halfway.
● The focus is locked.
Press the shutter button all the way.
4
● Releasing AEL cancels AE lock.
Viewfinder
AE lock
Mode dial
AEL button
Shutter button
Halfway
down
All the way
down
90
Page 91

ISO sensitivity—Setting the desired sensitivity to light
P A S M
Available modes
ISO
AUTO
MENU
The higher the ISO value, the greater the camera’s light sensitivity and the better
its ability to shoot in low light conditions. However, higher values may give pictures
a grainy appearance.
Setting the ISO sensitivity to ISO BOOST using the menu beforehand allows you
to select the high ISO sensitivity (800 or 1600). ~ “ISO BOOST” (P. 92)
AUTO, 100, 200, 400, 800 1600
With a lower ISO setting, you can shoot clear, sharp images in daylight.
The values can be selected when ISO is set to ISO BOOST.
Setting the ISO sensitivity
Press the ISO button.
1
● The current setting is displayed on the
monitor.
Rotate the control dial until the
2
desired setting is displayed.
Control dial
ISO
button
6
Exposure, image and color
When the control panel screen is off
The ISO sensitivity when it is set to auto is usually ISO 100. If the subject is
too far away for the flash illumination, the sensitivity is automatically increased.
Note
91
Page 92

ISO sensitivity—Setting the desired sensitivity to light
P A S M
Available modes
MENU
ISO BOOST
This allows you to make ISO 800 and 1600 available for ISO setting.
Menu TTISO BOOST T ON.
1
~ “How to use the menus” (P. 25)
Press the OK button.
2
6
Exposure, image and color
OK button
92
Page 93

White balance—Adjusting the color tone
Color reproduction differs depending on the light conditions. For instance, when
daylight or tungsten lighting is reflected on white paper, the shade of white
produced will be slightly different for each.
With a film camera, you can adjust color balance using different films for different
light conditions or by using filters. With a digital camera, on the other hand, white
color can be adjusted to reproduce more natural white with a digital processor.
This mechanism is called white balance. There are three options for setting the
WB with this camera.
Auto white balance
This function enables the camera to automatically detect white in images and
adjust the color balance accordingly. Auto WB is sufficient for most light
conditions. If there is no near white color in the picture, the white balance of the
image may not be correct. In such a case, use preset WB or one-touch WB to
achieve the correct white balance.
Preset white balance
You can set the white balance by selecting the appropriate color temperature for
the light source. For example, use preset WB when you want to reproduce more
red in the picture of a sunset, or capture a warmer artistic effect under artificial
lighting. You can enjoy creating different color tones by trying the different preset
WB settings.
The color temperatures available for preset WB are as follows: 3000, 3300, 3600,
3900, 4000, 4300, 4500, 4800, 5300, 6000, 6600, or 7500.
You can also select one of 4 preset color temperatures in the menu and use it as a
preset WB. ~ “CUSTOM WB” (P. 100)
6
Exposure, image and color
One-touch white balance ~ ”Setting the one-touch white balance” (P. 97)
You can set the optimum white balance for the shooting conditions by pointing the
camera at a white object like a sheet of white paper. The white balance achieved
with this setting is saved as one of the preset WB settings.
93
Page 94

White balance—Adjusting the color tone
Candle frame
Hot white light
bulb
White fluorescent
Intense white
fluorescent
Overcast
Shade on clear
day
Daylight
fluorescent
Clear day
More Red More Blue
Color temperature
The spectral balance of different white light sources is rated numerically by color
temperature—a concept of physics, expressed using the Kelvin (K) temperature
scale. The higher the color temperature, the richer the light in bluish tones and the
poorer in reddish; the lower the color temperature, the richer the light in reddish
tones and the poorer in bluish.
It follows, then, that the color temperatures of fluorescent lights make them
unsuitable as artificial light sources. There are gaps in the hues from the color
temperatures of fluorescent light. If these differences in hue are small, they can be
calculated with color temperature and this is called correlated color temperature.
The 4000K, 4500K and 6600K preset settings in this camera are correlated color
temperatures, and should not be considered strictly as color temperatures. Use
these settings for shooting conditions under fluorescent lights.
6
Exposure, image and color
TIPS
White balance with a flash:
T Auto WB is recommended when taking pictures with the flash. If you intend
to use preset WB, select the color temperature 6000K.
When shooting with the flash, be sure to play back your pictures and check
the color on the screen. Various conditions affect color temperature and how
color is reproduced on the screen.
Note
The color temperatures for each light source indicated in the above scale are
approximate. They are not an accurate indication of color. For example, the
actual sunlight is not exactly 5300K, nor fluorescent lights 4000K.
94
Page 95

MENU
White balance—Adjusting the color tone
WB
0
STEPAUTO
P A S M
Available modes
Setting the white balance
You can adjust the white balance by selecting the appropriate color temperature
for the light conditions.
Press the WB (white balance) button.
1
● The current setting is displayed on the
monitor.
Rotate the control dial until the
2
desired setting is displayed.
Viewfinder
Displayed when any WB setting
except AUTO is selected.
Control dial
WB
button
When the control panel screen is off
WB
6
Exposure, image and color
TIPS
When subjects with no white appear white in the image:
T In the auto WB setting, if there is no near-white color in the image framed in
the screen, the white balance will not be correctly determined. In such a
case, try preset WB or one-touch WB settings.
95
Page 96

White balance—Adjusting the color tone
3
3
2
2
1
1
22
11
indications
6
Exposure, image and color
Monitor
AUTO
¥
˙
¥
3000K
˙
¥
3600K
˙
¥
4000K
˙
¥
4500K
˙
¥
6600K
˙
¥
5300K
˙
¥
6000K
˙
¥
7500K
˙
¥
CWB1
˙
¥
CWB2
˙
¥
CWB3
˙
¥
CWB4
˙
¥
¥
Light conditions
Used for most light conditions (when there is a white portion framed in
the viewfinder)
For shooting under a tungsten light
For shooting under incandescent light to preserve the mood of the
lighting
For shooting under white fluorescent lighting
For shooting under a neutral white fluorescent lamp
For shooting under a daylight fluorescent lamp
For shooting outdoors on a clear day, or to capture the reds in a sunset
or the colors in a fireworks display
For shooting outdoors on a cloudy day (when using the flash)
For shooting outdoors in the shadows on a clear day
Color temperature set in custom white balance menu. When the value has
not been adjusted, it is set to 2000K.
Color temperature set in custom white balance menu. When the value
has not been adjusted, it is set to 2500K.
Color temperature set in custom white balance menu. When the value
has not been adjusted, it is set to 8000K.
Color temperature set in custom white balance menu. When the value
has not been adjusted, it is set to 10000K.
Color temperature set by one-touch WB. When the value has not been
set, it is set to 5300K.
~ “CUSTOM WB” (P. 100)
~ “Setting the one-touch white balance” (P. 97)
96
Page 97

White balance—Adjusting the color tone
NO
YES
CANCEL SELECT
GO
MENU
P A S M
Available modes
Setting the one-touch white balance
This function is useful when you need a more precise white balance than preset
WB can provide. Point the camera at a sheet of white paper under the light source
you want to use to determine the white balance. The optimum white balance for
the current shooting conditions can be saved in the camera.
This is useful when shooting a subject under natural light, as well as under various
light sources with different color temperatures.
Menu TT
1
~ “How to use the menus” (P. 25)
Press .
2
● The screen appears.
With the screen displayed, point
3
the camera at a sheet of white paper.
● Position the paper so that it fills the
viewfinder. Make sure there are no shadows.
Set the aperture and shutter speed to
4
obtain the optimum exposure.
Press the OK button.
5
● The white balance is registered.
● The registered white balance will be
stored in the camera as a preset WB
setting. Turning the power off does not
reset the data.
~ “Setting the white balance” (P. 95)
Lighting used
for shooting
6
Exposure, image and color
OK button
97
Page 98

White balance—Adjusting the color tone
MENU
0
STEP
0
STEP
0
STEP
0
STEP
AUTO
3000K
3600K
4000K
1
1
CANCEL SELECT
GO
MENU
11
22
P A S M
Available modes
TIPS
After pressing OK, “WB NG RETRY” is displayed.
T When there is not enough white in the image, or when the image is too
bright, too dark or the colors look unnatural, you cannot register the white
balance.
Repeat the procedure from Step 1.
WB compensation
This function lets you make fine changes to the auto WB and preset WB settings.
Menu T T
1
~ “How to use the menus” (P. 25)
6
Exposure, image and color
Press .
2
● The screen is displayed.
Press to select the white
3
balance to adjust, then press .
● The setting screen for WB compensation is
displayed.
98
AEL button
OK button
Page 99

The color becomes bluer each time
SAMPLE IMAGE MODE
AUTO
BLUE
RED
0
AEL
CANCEL SELECT
GO
MENU
4
you press , and redder each time
you press , depending on the
original WB conditions. Press the OK
button to save your adjustment.
● The white balance can be adjusted in 7
increments in both the RED and BLUE
directions.
Point the camera at the subject to take
5
test shots.
Press the AEL button.
6
● Sample images that have been taken with
the current WB settings are displayed.
● The WB compensation indicator indicates the
current WB compensation value.
After checking the sample images,
7
press OK.
● Press OK again to complete WB
compensation.
White balance—Adjusting the color tone
6
Exposure, image and color
99
Page 100

White balance—Adjusting the color tone
CUSTOM WB
CWB1
CWB2
CWB3
CWB4
2500K
CANCEL MENU SELECT
GO
P A S M
Available modes
MENU
CUSTOM WB
You can reset the current custom white balance values to different color
temperatures.
Menu TTCUSTOM WB
1
~ “How to use the menus” (P. 25)
Press .
2
● The CUSTOM WB SETTING screen
appears.
6
Exposure, image and color
Press to select CWB1, CWB2,
3
CWB3 or CWB4, then press .
Press to adjust the current white
4
balance.
Press the OK button.
5
● Select the other custom white balance items
to set.
OK button
100
 Loading...