

Page 1

INSTRUCTIONS
Page 2
Thank you for purchasing the Olympus AZ-4 Zoom. The AZ-4 Zoom is a totally new
handgrip type single lens reflex camera in the full-size 35mm format. It is equipped with a
35 ~ 135mm zoom lens and, of course, focus is fully automated. Furthermore, the camera is
extremely compact and easy-to-use, with features that give added flexibility including spot
metering, fill-in flash, program shift, exposure compensation, double exposure, and a
continuous shooting mode. With the AZ-4 Zoom, everyone can enjoy photography, from
snapshots and portraiture to advanced techniques.
Before using the camera, please study this instruction manual carefully with the AZ-4 Zoom
in front of you, to get the very best performance and longest service life from your new
camera.
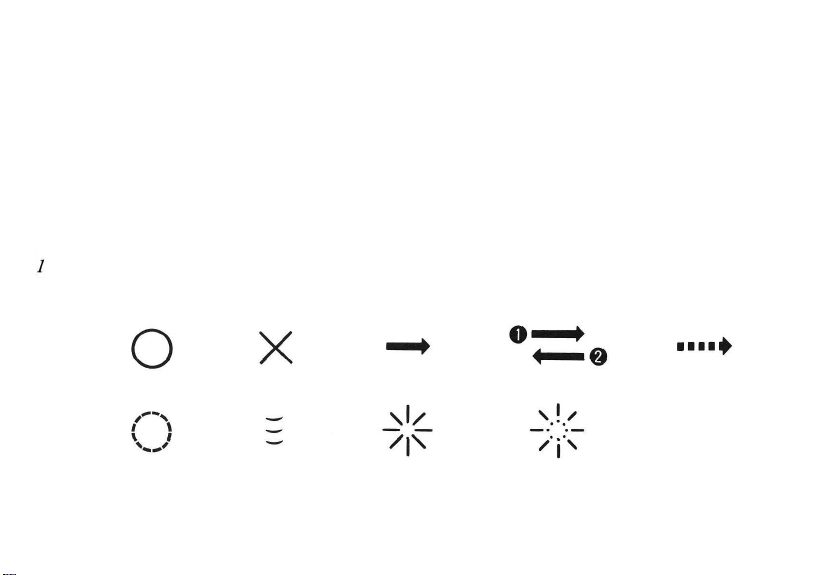
Symbols used in this manual
Correct
Attention
Incorrect
Press lightly
Operation
Lamp on
Operation order Automatic operation
Lamp blinking
Page 3

Preparations before taking pictures
Loading batteries
Checking the batteries
Taking photographs I
Loading the film
Taking photographs
Unloading the film
Taking photographs II
Using the focus lock
Taking a continuous series of shots ....
Using the self-timer
How to use the manual focus
Macro photography
Exposure compensation
Spot metering
Program shift
Double-exposure photography
Using the RESET button
Taking photographs III
Flash auto photography
Using fill-in flash
Using an exterior flash attachment
Attaching a shoulder strap
In order to take even better
photographs
Auto focus (AF)
Exposure
Viewfinder displays
LCD panel and mode buttons
For long-lasting enjoyment of your
AZ-4 Zoom
Care and storage
Questions and answers
Description of controls
Specifications
Accessories sold separately
Page 4

Preparations before Taking Pictures
Page 5
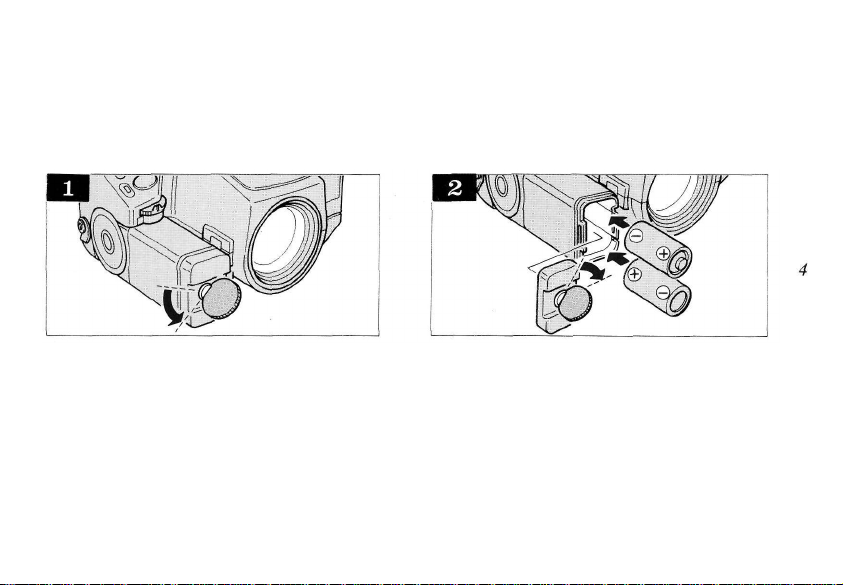
Loading Batteries
Do not use incorrect batteries or mix new and old batteries at the same time.
Before replacing batteries, set the power switch to OFF.
Please remove the batteries from your camera during long periods in which the
camera is not in use.
Turn the lock screw on the bottom of the
grip with a coin as shown to remove the
battery case lid.
Insert the batteries correctly as shown and
replace the lid using a coin to turn the screw.
Use two 3V Lithium batteries (Panasonic
CR-123A or Duracell DL-123A batteries.)
* Try to avoid changing batteries while the
film is still in the camera. (With the
batteries removed the film counter
indicator will remain active for
approximately 30 minutes.)
Page 6
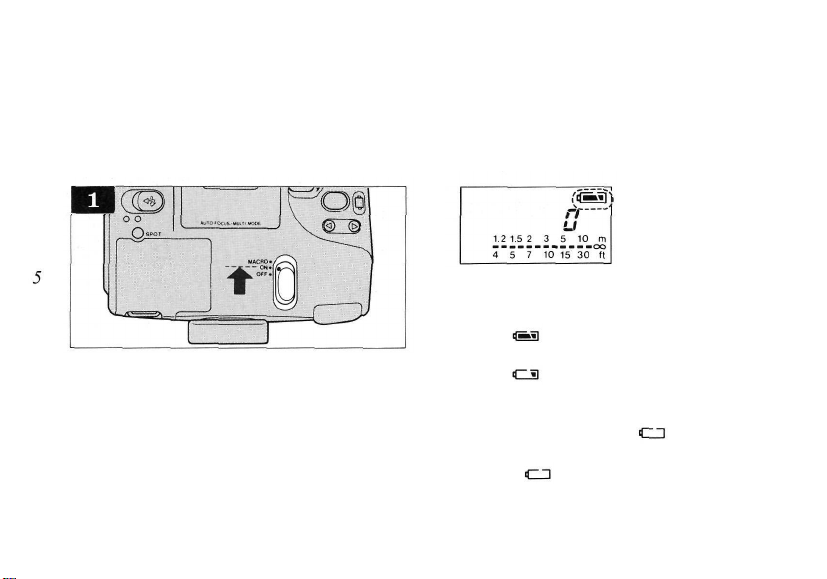
Checking the Batteries
Slide the power switch ON.
* In order to conserve power, the LCD
panel and the finder indicator will shut
off automatically after approximately 15
sec. Lightly pressing the shutter release
button will reactivate the panel and
indicator.
The charge remaining in the batteries will
be displayed on the LCD panel.
When
batteries are OK.
When
consumption is occurring. The batteries
should be replaced as soon as possible.
When the outer frame
flash cannot be used.
* When
reached their expected life span and
should be replaced immediately.
is displayed for 2 sec., the
blinks, excess battery
is blinking, the
is indicated, the batteries have
Page 7
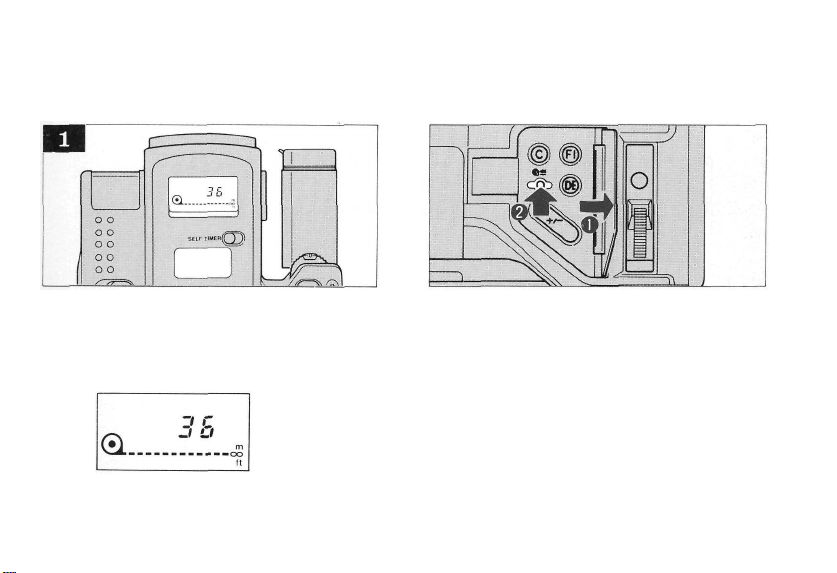
Taking Photographs I
With the AZ-4 Zoom, anyone can take photographs easily using a variety of
techniques. This section explains the basics of photography.
Page 8
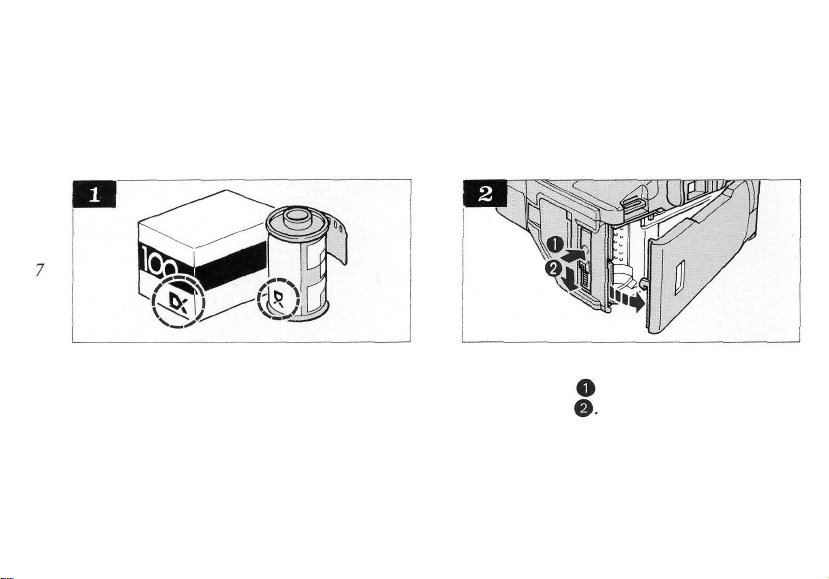
Loading the Film
Film-loading and film-speed selection (ISO) for DX film is automatic in this
camera.
Use a DX type film. Your camera will
automatically set itself for DX-coded film
speeds ranging from ISO 25 to 5000.
* In case of non-DX film, film speed is
automatically set at ISO 100.
Depress the film compartment cover lock
release button
down to open
and slide the cover latch
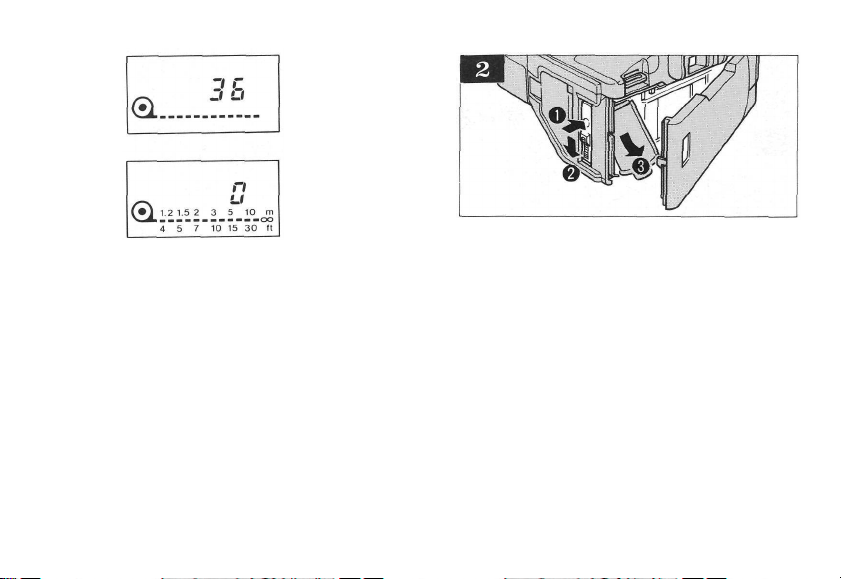
Page 9
Insert the film cartridge. Always avoid
direct sunlight when loading the film.
Align the film leader with the green mark.
Page 10
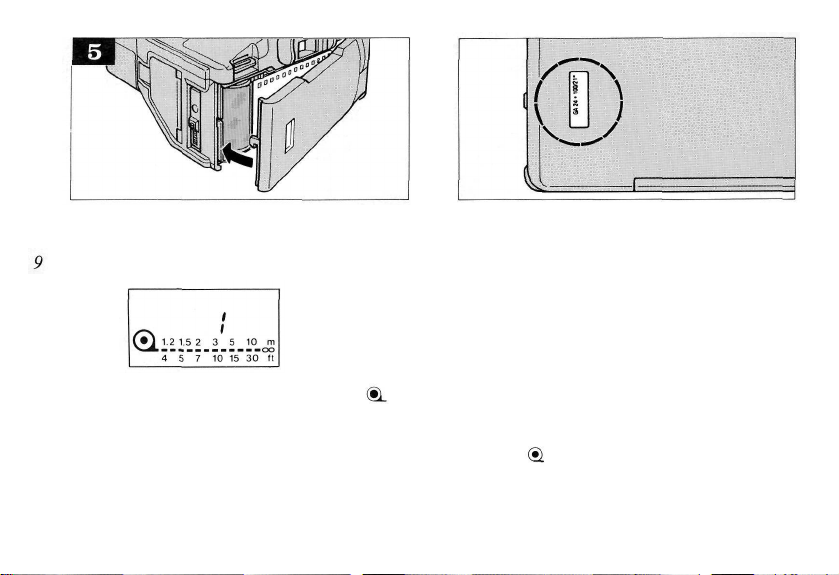
Close the camera back.
The film is automatically wound until the
exposure counter reads 1.
Film type confirmation: This is possible
through the window in the camera back.
* If the film is wound incorrectly, the
will blink and the shutter release will not
operate. In this case, open the film
compartment cover and load the film
again.
* When using a non-DX film, if the film is
not wound correctly, the number
indicator in the LCD panel will stop on
0. The
indication will not appear
in the LCD and the shutter release may
not lock.
Page 11
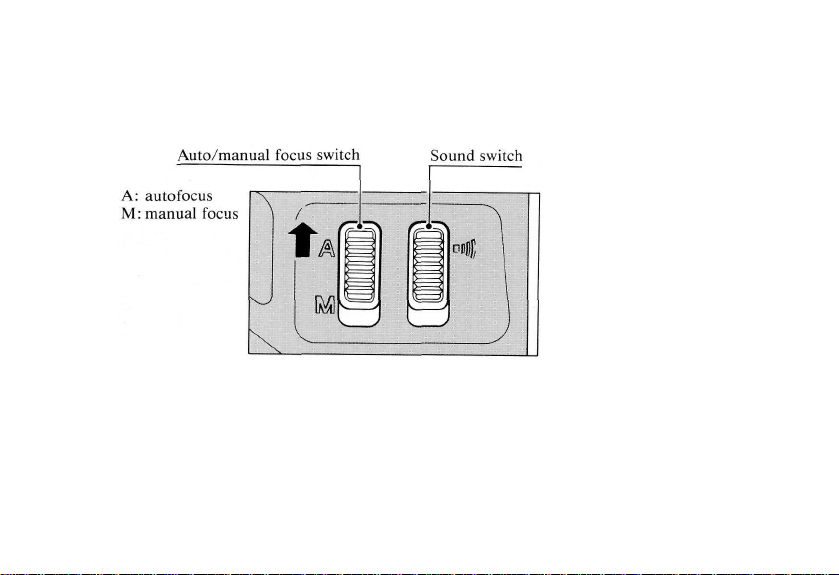
Preparations
Taking Photographs
10
Under normal operation conditions, set
the switch to A for autofocus. When you
wish to set the focus manually, set the
switch to M. (See p. 23)
When this camera is in focus, and when
the last frame of film has been exposed,
you will hear a "beep-beep" sound
signaling these conditions. In order to turn
off this sound, slide the sound switch to
the down position.
Page 12
Remove the lens cap.
11
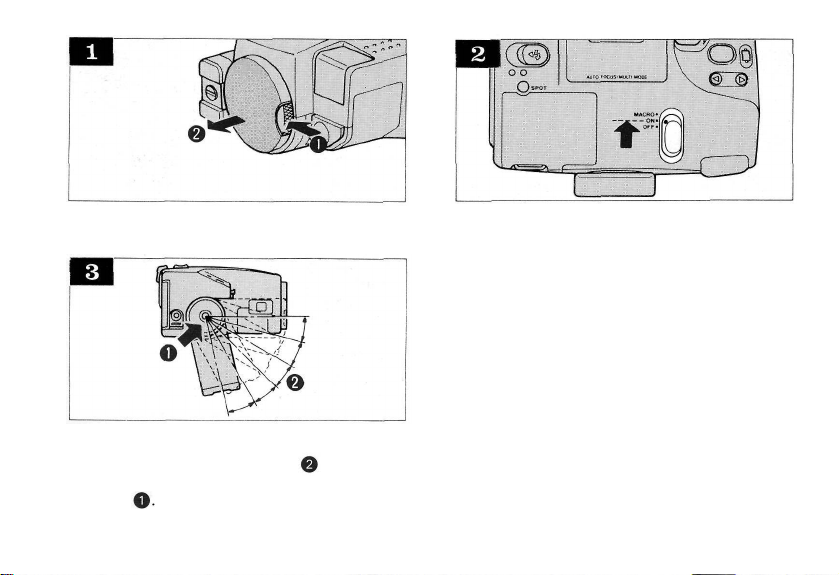
Adjust the grip angle.
* The grip angle can be adjusted
the grip as you push the grip lock release
button
The grip adjusts to 6 different angles at 15°
increments.
Slide the power switch to ON and the lens will
extend from the camera body.
* Use the MACRO position for taking photos of
objects nearby. (See p. 24)
* With the switch in the OFF position, the
Viewfinder will become dark.
by moving
Page 13
While looking through the Viewfinder, aim the
camera at the subject you want to shoot.
* When the shutter speed indicator blinks in the
Viewfinder, change to the flash AUTO
photography mode. (See p. 34)
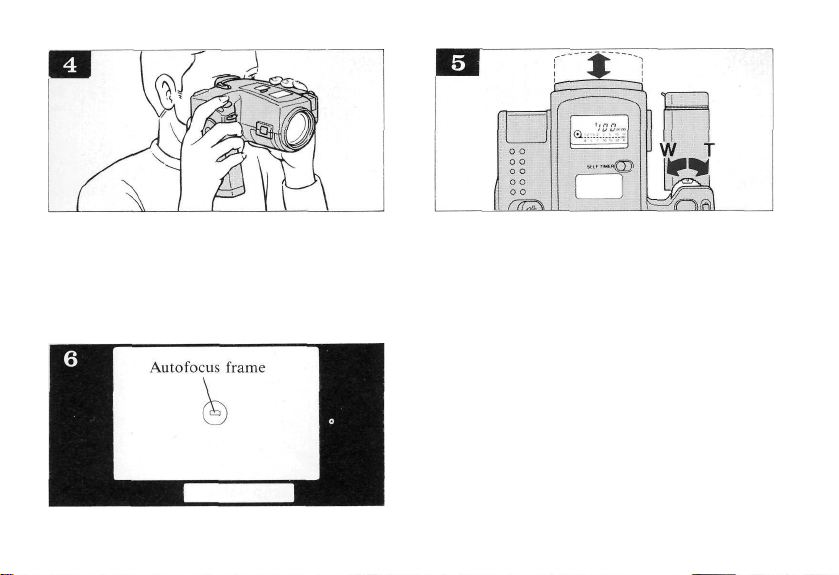
Adjust the zoom lever to the correct angle for
the photo you wish to take.
* Be careful not to touch the lens surface with
your finger.
Tele: long angle Wide: wide angle
* The LCD panel will indicate the lens focal
length for two seconds after you stop
zooming.
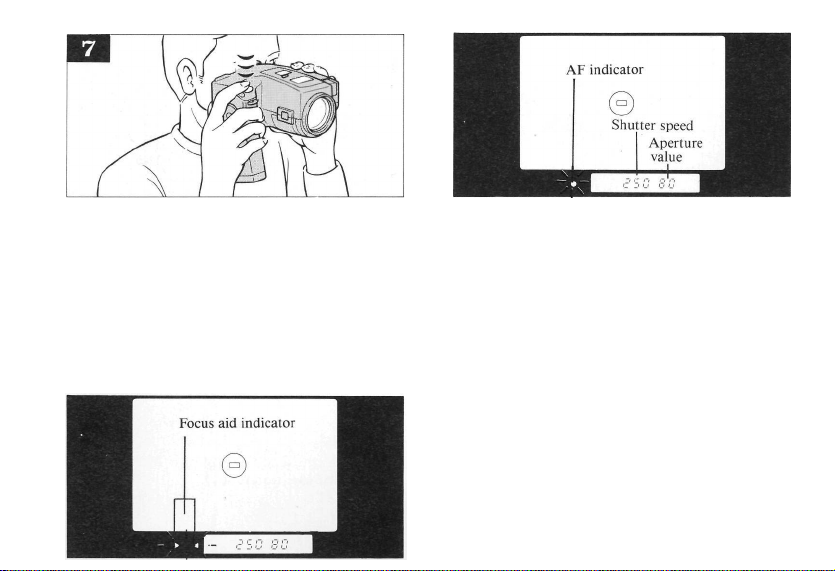
Move the camera so the subject is in the center
of the autofocus frame.
* Be sure to keep the subject within the frame.
12
Page 14
Press the shutter release button halfway to
focus.
13 * The button can be pressed in two steps;
autofocus operates when the button is
pressed to the first of these steps.
* When the camera is in focus, the green
focus lamp comes on in the Viewfinder
and you will hear the "beep-beep"
sound.
* The shutter speed and the aperture will
be indicated in the Viewfinder. (See p. 46)
* When the shutter speed indicator is
blinking, change to the flash mode.
(See p. 34) If you do not use the flash in
this case, the shutter speed may be too
slow and it is recommended that you use
a tripod to avoid the effects of camera
shake.
* If the camera is not in focus, the red
focus-aid lamp will blink. In this case,
push the shutter release button again.
* The shutter cannot be released while the
focus-aid indicator is blinking.
Page 15

Press the shutter release button fully.
* Immediately after the shutter is released,
the film is automatically wound by one
frame, and the exposure counter
advances by one.
In dark places:
A red-colored light emerging from the AF
illuminator aimed at your subject will
provide extra illumination and allow for
precise focus. (illumination distance:
approx. 5.5m (18 ft))
14
Page 16
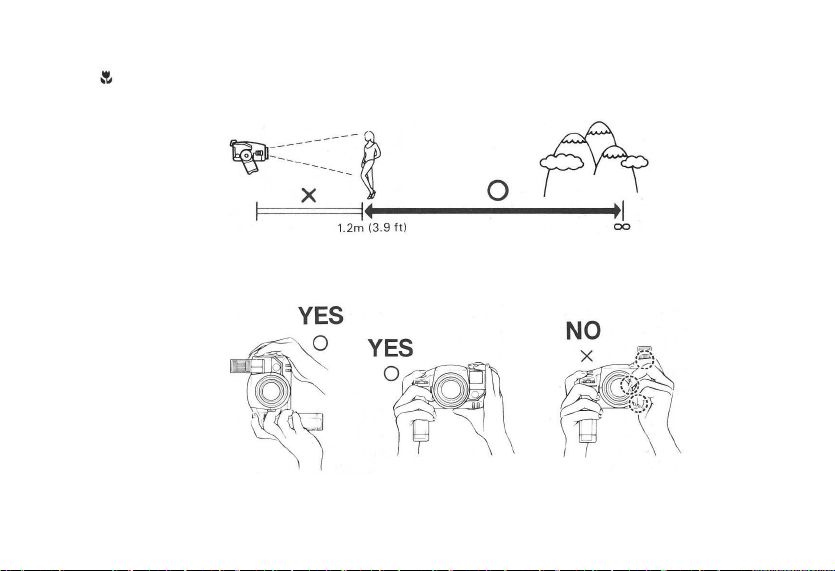
Shooting range: Photos can be taken from a range of 1.2m (3.9 ft.) to infinity. When
the
is blinking in the Viewfinder, the camera is too close to the subject. Switch to the
MACRO mode.
15
Aim correctly: Be careful not to touch the lens, flash or AF Illuminator.
As the focal distance increases, the possibilities of the camera shake also increase. Grip
the camera tightly with your right hand as you aim in order to avoid any shaking. If you
use the shoulder strap, make sure that it doesn't interfere with the flash or the lens.
Page 17
Unloading the Film
16
When you reach the end of the film, it will
rewind automatically. You will hear the
"beep-beep" sound indicating that the film
has been rewound fully.
If you want to rewind the film in the
middle of a roll, open the mode cover and
press the rewind button.
* The final reading of the exposure counter
prior to rewinding may be more than the
number of exposures specified for the
film.
Page 18
* You will hear the "beep-beep" sound
17
indicating that the film has been
completely rewound and the exposure
indicator will return to 0.
* After the film has been rewound, the
shutter cannot be released until the film
has been removed.
Open the camera back, and remove the
film.
* In order to protect the shutter, the film is
entirely rewound into the film canister.
Page 19

Taking Photographs II
The AZ-4 Zoom is equipped with various functions that add greater versatility to
photography. In this section, the operation of each of the camera's various features
will be described, explaining how to use them most effectively.
18
Page 20

19
Using the Focus Lock
For use when the subject is not in the center of the autofocus frame.
Center the subject within the autofocus
frame.
Press the shutter release button lightly to
lock focus on that subject.
* When focused, you will hear the "beep-
beep" sound. The AF indicator will light
in the Viewfinder.
The distance indicator appears in the LCD
panel. (See p. 46)
Maintain the focus lock by keeping the
release in this position and recompose the
picture. Now fully depress the shutter
release to take the picture.
Page 21

Taking a Continuous Series of Shots
You can take pictures at the rate of 2 shots per second. When using the flash,
the film will not be wound until the flash has finished charging.
20
Push the continuous mode button under
the mode cover, and the LCD panel will
indicate C for this mode. C will appear in
the LCD panel and it will blink.
* If you push the continuous mode button
again, the C indication will disappear,
and the camera will return to the single
shot mode.
The camera will shoot repeatedly as long
as the shutter release button is depressed.
* The focus will be locked to the settings
corresponding to the first shot of the
series, so be careful when shooting a
moving subject or other subject where
subject distance varies.
Page 22

21
Using the Self-timer
The camera should be set firmly, on a tripod, for example.
If you push the self-timer button, the
will be indicated in the LCD panel.
This
* If you push the self-timer button again,
the
releasing the camera from the self-timer
mode.
will blink.
indication will disappear and
Press the shutter release button lightly, and
focus on the subject you want to shoot.
* When focused, you will hear the "beep-
beep" sound and the focus lamp will
light in the Viewfinder.
Page 23

Press the shutter release button fully to
start the self-timer.
* The self-timer lamp will blink and there
will be a "beep-beep" sound indicating
that the shutter will be engaged within 10
seconds. 2 seconds before the shutter is
engaged, the self-timer lamp will remain
on and the beeping sound will continue
without interruption.
To avoid incorrect exposure in the selftimer mode, ensure that strong light does
not enter through the Viewfinder before the
self-timer mode is started.
* Once the shutter is released, the self-
timer mode is disengaged.
The self-timer can be cancelled at any time
before the shot is taken by performing any
of the following operations:
(1) Pressing the SELF-TIMER button
(2) Sliding the power switch to OFF
(3) Pressing the RESET button
22
Page 24

How to Use the Manual Focus
Use it when the autofocus system cannot focus properly or when you prefer to
focus the camera yourself. (See pg. 44)
23
Slide the focus switch to the M position. Adjust the focus by moving the zoom lever
as you press the manual focus button
* As you move the zoom lever towards the
focus aid indicator in the Viewfinder,
your subject will come into focus and the
focus lamp will go on confirming correct
focus.
Page 25

Macro Photography
You can take close-up photos at a distance of 0.49 ~ 1.2m (1.6 ~ 3.9 ft).
When using the MACRO mode, manual focusing is necessary.
24
Move the power switch to the MACRO
position.
* The
Viewfinder.
mark will light up in the
Adjust the focus by aiming through the
Viewfinder and moving the zoom lever.
Release the shutter when your subject is in
focus.
Page 26

* As you move the zoom lever in the
direction of the focus aid in the
Viewfinder, the focus lamp will light
when your picture is in focus.
25
* The autofocus does not work during
macro photography.
* In macro photography, zooming is not
possible.
* There is no need to press the manual
focus button. Do not change the focus
switch from the A position.
Page 27

Exposure Compensation
You can adjust exposure to compensate for special lighting conditions and for
special effects.
panel, you have set your exposure
compensation.
* The compensation varies between - 4EV
and +4EV in steps of 1/3EV every time
the button is pressed.
* During flash AUTO photography
(See p. 34), exposure compensation is not
possible.
As you press the exposure compensation
button under the mode cover
up-down button as illustrated
simultaneously
, and when your desired
compensation is indicated in the LCD
and the
-2EV
±OEV
+
26
2EV
Page 28

You can set the exposure for critically lighted subjects. If the pop-up flash is not
engaged, the activation of spot metering is especially effective.
27
Move the camera so that the section to be
metered is in the center of the Viewfinder.
Spot Metering
Press the SPOT button.
* The SPOT indicator blinks in the
Viewfinder and the LCD panel, and the
exposure (AE) is locked. If you remove
your finger from the SPOT button, this
exposure will be disengaged and it will
return to normal operation. To use the
focus lock jointly, simply press the
release button lightly to the first stop.
(Spot metering can be performed
regardless of which button is pressed
first.)
Page 29

Change the composition while pressing the
SPOT button.
The required subject will be exposed
correctly without being affected by
background illumination.
Press the shutter release button fully while
keeping the SPOT button pressed.
* Spot metering will not be cancelled while
the shutter release button is pressed half
way, even if the SPOT button is released
before the shutter is released.
28
Page 30

29
Program Shift
Allows you to adjust the effects of shutter speed (motion control) and aperture
(depth of field control) without affecting overall exposure.
By pushing the Up-Down button, the
aperture and shutter speeds will be
displayed in the Viewfinder as they change.
When you reach the desired combination,
release the button to lock the aperture and
speed.
With the power switch in OFF position,
the program shift will be cancelled.
* The
Viewfinder during your program shift.
mark will blink in the
To cancel the program shift, simply push
the reset button.
* It is possible to use exposure
compensation in conjunction with
program shift. (See p. 26)
(for example:)
Page 31

Double-exposure Photography
30
Press the DOUBLE EXPOSURE button
inside the mode cover.
* DOUBLE EXP. blinks in the LCD panel.
Press it again for cancellation.
Determine the photographic composition
for one frame. Press the shutter release
button.
* The DOUBLE EXP. starts blinking
faster.
The film will not be advanced to the next
frame.
Page 32

Determine the photographic composition
for the second shot, and press the shutter
release button.
* When the second exposure is finished,
the film will be advanced to the next
frame, and the DOUBLE EXP. will be
cancelled.
* If you push the reset button after taking
your first photo, the double exposure
mode will be cancelled and the film will
wind automatically.
Page 33

Using the RESET Button
If you have made a mistake in setting any controls, etc., press the Reset button
to return to the standard shooting mode.
32
Press the RESET button.
Standard shooting mode
Self-timer
Continuous series
Fill-in flash
Double exposure
Exposure compensation
Program shift
:
cancellation
: single frame
:
photography
: cancellation
:
cancellation
: ± 0EV
:
cancellation
Page 34

33
Taking Photographs III (Flash Photography)
The AZ-4 Zoom has an extended range of flash functions. This section explains
these various functions.
Page 35

Flash Auto Photography
34
When the shutter speed indicator blinks in
the Viewfinder, change to the flash
photography mode.
If you move the flash switch in the
direction of the arrow, the flash will pop
up and charging will commence.
* While the flash is being charged, the
mark will blink in the Viewfinder.
Page 36

Once the flash is fully charged, the
mark will stay on and the shutter
35
speed will be automatically adjusted to
1/100 of a second.
Press the shutter release button.
* As you lightly press the shutter release
button, if your subject exceeds the
distance of the flash potential, the
mark will start to blink. In this case,
you should move closer to your subject.
Shooting range guide:
ISO
100
400
WIDE
1.2~5m
(3.9 ~16.4
1.2~
ft)
10m
(3.9 ~32.8 ft)
TELE
1.2~4m
(3.9~13.1 ft)
1.2~8m
(3.9 ~26.2 ft)
* Under sufficient lighting conditions, the
flash will not fire.
Page 37

Using Fill-in Flash
In this mode, the flash always fires. Use this mode when performing
backlighting synchro photography, nighttime slow synchro flash photography or
shooting backlit subjects. For normal indoor photography, we recommend flash
AUTO photography to avoid any effects of camera shake.
36
Press the FILL-IN button inside the mode
cover.
FILL-IN blinks.
* Press it again for cancellation.
The flash pops up, and when it has been
charged, you can press the shutter.
Page 38

Example A: With backlighting, the person's face,
etc., will be too dark.
37
Example B: When shooting a night scene, etc.,
which includes the background, only the person in
the foreground will be illuminated.
Clear photographs of a person using daylight
synchro photography.
Using the FILL-IN flash mode, the shutter speed may be lengthened. Please check the shutter speed
indicated within the Viewfinder. If the exposure time is lengthened, it is best to use a tripod to avoid a
slower shutter speed motion blur. The slowest possible shutter speed is 2 seconds. By simultaneously
employing the PROGRAM SHIFT, it is possible to increase the exposure time to 32 sec.
The background can also be photographed using
slow synchro.
Page 39

Using an Exterior Flash Attachment
It is possible to light up a greater area by using the Electronic Flash L-30 which
is sold separately.
38
Remove the flash shoe cover by pressing
towards the back of the camera with your
finger
similar object
and opening it with a coin or
Attach the Electronic Flash L-30.
* Flash attachments other than the
Electronic Flash L-30 cannot be used.
* Be sure to read the Electronic Flash L-30
user's manual for further details.
Page 40

39
Attaching a Shoulder Strap
Page 41

In order to take even better photographs....
Everyone wants to take pictures to be proud of. Everyone wants to master the more
advanced photographic techniques. As a fundamental rule of thumb, this becomes
possible only when the photographer becomes thoroughly familiar with his or her camera
and its full potential. The following pages, which are based on each of the basic
operations that have already been introduced, have been included with the hope that you
might be able to challenge some of the more advanced techniques yourself. We'll be
pleased if they help to give you the results you are seeking.
40
Page 42

How to use your zoom lens for the best results
The AZ-4 Zoom is a compact camera equipped with a 35 ~ 135mm zoom lens. The zoom lens is a
lens that moves, and allows you to alter the focal distance. With the AZ-4 Zoom, you can change
the focal distance from 35mm to 135mm. This allows the photographer to change the composition
of a photo through zooming while remaining in the same location, such as in the case of focusing in
on a single member of a large group. This is a camera with a large amount of mobility which offers
a wide range of photographic potential. Using only this single lens, it is the equivalent of having a
number of interchangeable lenses with you at all times. Take advantage of your zoom lens and see
what it can do for you.
The zooming operations are carried out through the zoom lever on the camera grip. By operating
the zoom lens, the LCD panel will display the focal distance for approx. 2 seconds. Use this as your
standard for zooming photography. Now let's take a look at some of the pictures you can take with
your AZ-4 Zoom.
41
• 35mm Wide-angle. This is achieved by retracting your super zoom lens. The photo format is wide
and the depth of field with regard to the subject is deep, leading to a clear contrast and sharp
close-up pictures.
• 70mm Pictures taken under medium zooming conditions. In spite of the longer focal distance from
the camera to the subject, the pictures are clear. The subjects are only half the size of those in
pictures taken under 35mm conditions. The exaggeration found in close-ups is lessened and your
pictures will seem more natural, less posed. You can use the 70mm position for snapshots,
portraits, scenery and a wide variety of other photographic objectives.
Page 43

• Over 100mm In the full-zooming position, you will be using, in effect, a 135mm lens which will
give you a field nearly 4 times as narrow as what you would have with the lens in the 35mm
position. You can appreciate the excellence of a true, telephoto lens. Compared to wide-angle
photography, you have a narrow field of vision and the depth of field to be photographed is fairly
shallow.
Also, since your pictures will have less depth of field than with the lens in the wide-angle position,
you will be able to take pictures in which you enjoy having only the subject in true focus. Aim your
camera for close-up shots of sporting events or for animal subjects in their natural habitat. It is
possible to achieve close-ups unnoticed of people in crowds. These kinds of snapshots and portraits
with only the subject in focus can be quite enjoyable. Caution is necessary, when you are taking
shots with the lens in the telephoto position, to hold the camera steadily so that you can avoid any
unnecessary shaking.
* The three examples on the left are samples of the same subject photographed with the zoom lens
set at three different positions. It is easy to comprehend the effects of zooming up. The three
samples on the right of the same subject photographed with the zoom lens set at three different
positions, but the size of the subject remains the same. It is easy to comprehend the relationship of
the subject to the background in these different settings.
Total area of overall image sharpness within the angle of view of a specific focal length setting.
Depth of Field will be at its greatest when the lens is in its lowest focal length positions.
42
35mm
70mm
135mm
Page 44

Autofocus (AF)
The Autofocus (AF) mechanism automatically adjusts focus. With it, the camera measures
the distance to a subject and adjusts the lens so that the subject is in focus. Currently, with
the exception of a few cameras for professional use, this function is included in most of the
single lens reflex and compact cameras that are now on the market. Of course, this function
is used in the AZ-4 Zoom. In the AZ-4 Zoom, focusing is done by a newly-developed
"Phase-Difference" detection system. In this system, light from the subject is picked up by a
special sensor and any inconsistencies (phase differences) in the image are used by a
microprocessor chip to calculate the best focus setting. Since the lens used in the AZ-4
Zoom is very accurate, correct focusing is even more accurate and accomplished by just
aiming the lens at the subject. When there is no light reflected from the subject, for example
in a dark room, focusing is performed using a beam of light from the camera (the AF-
43
Illuminator).
Autofocus is designed so that the subject in the center of the picture frame is correctly
focused. However, sometimes you may want a subject that is not in the center of the frame
to be in focus; for such cases, the AZ-4 Zoom is also equipped with a focus lock
(1) Subject that does not
include vertical lines
(2) Subject with low
contrast
(3) A rapidly moving
subject
Page 45

mechanism. For example, when your subject is at the edge of the picture frame, not in the
center, first move the camera slightly so that the subject is in the center of the autofocus
frame, then press the shutter release button halfway to focus. While keeping the button
pressed, recompose the picture, and press the button fully. (See "Taking Photographs II" on
p. 19). By doing this, photographs with any required composition can be taken.
Manual focus is also possible.
Subjects with which autofocus is difficult
Although the AZ-4 Zoom can focus in almost any situation, there are certain conditions,
such as those illustrated below, in which it may not be possible to obtain the correct focus.
The focus aid indicator
these conditions; however, in situations (4), (5) and (6), the focus indicator in the Viewfinder
may light even though the lens is incorrectly focused. In any of these situations,
you can try focusing on a subject at a similar distance and then, using the focus lock.
Or you may also use manual focus to take the photo.
(4) Two subjects within the
focusing frame, at
different distances
in the Viewfinder will usually blink to warn you during
(5) Excessively bright light
in the center of the
focusing frame
(6) A subject with a
repeated pattern
44
Page 46

Exposure
Programmed exposure
One of the basics of photography is exposure. Exposure
refers to the amount of the light which strikes the film.
The correct amount of the light, or correct exposure, is
controlled according to the film speed (indicated on the
film package, such as ISO 100 or ISO 200), the shutter
speed and aperture. Many cameras are now equipped
with a programmed exposure function so that the correct
exposure can be obtained easily without any guess-work
or previous photographic experience.
With programmed auto exposure, the camera
automatically sets the most suitable combination of "f "
stop and shutter speed for subjects at any brightness
45
level. As a result, the correct exposure will be obtained
almost immediately. It's an automatic exposure system
that means you'll never miss the opportunity to take a
photograph. All the photographer has to do when
holding the camera is to concentrate on aiming it
correctly and press the shutter release button. For
example, when you change from a dark to bright subject,
the camera adjusts itself to maintain the correct
exposure. Anyone can take photographs without
worrying about making a mistake.
Now, through the program shift function, it is possible to
change combinations of shutter speed and aperture
without changing the overall exposure.
Program chart
The chart below is a line chart showing the AZ-4 Zoom
exposure program. In response to the use of the macro
mode or zooming, the ideal shutter speed and aperture
will be set automatically for an appropriate brightness in
your photos. As the brightness of your target decreases,
the aperture opening is increased and the shutter speed is
lengthened. In order to avoid the effects of camera
flutter, the shutter speed is automatically set at 1/100 sec.
for pictures taken with the flash auto mode. If the format
is too dark for an appropriate photo, the flash will fire
automatically. In the event that the flash does not pop
up, by using the fill-in flash mode, the shutter speed can
be increased to compensate for brightness at the EV 4
level, and it is possible to increase the shutter speed up to
a 32 sec. exposure by employing the program shift at the
same time.
Page 47

Viewfinder Displays
The Viewfinder in the AZ-4 Zoom is of the single lens reflex type which shows what is seen
through the camera lens. It also displays valuable information regarding the photographic
conditions.
Reciprocal numbers (seconds) are indicated, except in
the case of exposures of over one second.
2000 1/2000 sec. <Finder light>
L2 2 sec. Lights up automatically in dark locations.
46
Page 48

LCD Panel and Mode Buttons
The AZ-4 Zoom has an LCD panel which displays important photographic information.
These indications remain visible for 15 seconds after each operation is performed. After
they go out, if you press lightly on the shutter release button, the indication is displayed
again. After the power is switched off, any mode other than the self-timer and program
shift which have been set are held in the camera's memory, for use next time.
47
Page 49

For Long-lasting Enjoyment of
Your AZ-4 Zoom
Page 50

Care and Storage
Do not drop the camera on
the hard surfaces.
49
Do not throw used
batteries into fires, and do
not heat, disassemble or
shorten them.
Do not use thinner, benzine
or organic solvents to clean
the camera.
Do not tighten the tripod
screw too much.
Do not expose the camera
to rain shower and water.
Do not apply excessive
force to the camera.
Page 51

Do not put heavy object on
the camera.
Do not put the camera in the extreme heat (over 50°C or 122°F)
like inside of cars during hot summer weather or in the extreme
cold (below -10°C or 14°F)
50
Avoid sudden temperature
changes.
Do not leave the camera
near magnetic fields, like
on the top of TV
set,
or
radio.
In case of malfunction,
take the camera to your
nearest Olympus service
station.
Page 52

Questions and Answers
Q: What kind of batteries should I use?
A: Use two lithium Panasonic CR-123A batteries
or Duracell DL-123A batteries. Don't install
one new battery with an old one. Change
them both at the same time.
Q: How long will the batteries last?
A: Since long-life lithium batteries are used,
approximately 20 rolls (24-exposure, half the
shots with flash) can be taken. When the
51
frequency with which the flash and zoom are
used is less, the batteries will last longer.
Q: The camera does not work. What should I do?
A: (1) Make sure the power switch is set to ON.
(2) Check to make sure that the batteries are
loaded and inserted correctly.
(3) If the film has been rewound, the camera
won't work until new film is inserted.
Q: The camera does not focus correctly. What
should I do?
A: The camera may not focus correctly in some
cases. Focusing is difficult when, for example,
the subject is moving quickly, if the camera is
shaking, or if the subject is one of those with
which focusing is difficult. (See "Subjects with
which autofocus is difficult" on p. 44)
Q: Why doesn't the camera focus although the
AF Illuminator lights?
A: It may not focus if the subject is too close, too
far or if the subject reflects too little light
(when it is blue or black).
Q: Why won't the shutter fire when I press the
shutter release button.
A: (1) Probably because the camera hasn't
focused. Check the AF indicator in the
Viewfinder.
(2) The flash may still be in the process of
charging. Check for the
Viewfinder.
Q: The flash doesn't fire. What should I do?
A: Check to make sure if the flash has popped
mark in the
up.
Q: The camera does not operate in cold weather.
What can I do?
A: Battery performance will be reduced
temporarily by low temperatures, so it is
recommended that you try to use the camera
within a reasonable temperature range.
Page 53

Q: How should I take advantage of all of the
capacities of this excellent flash?
A: We recommend that you use the Flash Auto
mode (p. 34) under normal circumstances.
It will flash when conditions are dark enough
to require extra lighting, and the exposure is
automatically set at 1/100 sec. to avoid
unnecessary flutter. There is no need to worry
about lighting and the camera is easy to use.
The Fill-in Flash mode is to be used under
conditions of daylight synchro or slow
synchro photography or other special
conditions to which the Flash Auto mode
cannot respond.
Q: How should I use the Fill-in Flash mode for
daylight synchro or slow synchro
photography?
A: The Fill-in Flash mode causes the flash to fire
regardless of the available light, as well as
conditions of exposure control shown in the
exposure program line graph on p. 45. (Note
that the shutter speed will be slower than the
normal 1/100 sec.) With regard to lighting
conditions, photography will be either daylight
synchro or slow synchro photography. Please
see the examples on p. 37 for your reference.
daylight synchro: When photographing a
subject against a light source, the Flash Auto
mode will not activate and the subject will be
dark due to the affects of the backlighting in
his surroundings. By using the Fill-in Flash
mode, the flash will fire and the subject will
be well-lit for an attractive picture.
slow synchro: Often, when photographing at
night, if the subject is too far away from the
camera the flash will not suffice. Yet if you
use the Fill-in Flash mode, the shutter speed is
lengthened and the flash will fire allowing for 52
the possibility of photographing both the
subject and the background. Since the
exposure time is longer than usual, caution is
required with moving subjects. It helps to use
a tripod to avoid camera shake while using
this mode.
Page 54

Description of Controls
Shoe cover
Zoom lever
Shutter release button
Power switch
Up-down button
RESET button
Grip strap metal fitting
Shoulder strap metal fitting
Grip lock release button
Spot metering button
FLASH button
Flash reflector
LCD panel
Self-timer button
Self-timer lamp
AF illuminator
Manual focus button
Page 55

Back cover lock button
Mode cover
Shoulder strap metal fitting
Eye-piece
Camera back release knob
Sound switch
Auto/manual focus switch
Tripod socket
Film window
Grip strap metal fitting
Battery case
Page 56

Specifications
Type: Fully automatic 35mm autofocus single-lens
reflex camera with 35 ~ 135mm built-in lens
Film format: 35mm standard DX coded film
(24 x 36mm)
Lens: Olympus 35 ~ 135mm F4.2 ~5.6 lens
Shutter: Programmed electronic shutter speed:
1/2000 sec.~32 sec.
Focusing: Passive autofocus system with focus
lock, manual focus (power focus) and focus
aid potential
Viewfinder: TTL Type, magnification X0.80 (at
55
50mm) Finder view field: 87%, of actual
picture field
Viewfinder information: Auto focus frame, spot
metering frame, focus aid indicator, AF
indicator, flash charging indicator, program,
shift indicator, macro indicator, spot
metering indicator, shutter speed (with slow
speed warning), aperture and exposure
compensation indicator
Exposure control: Programmed exposure
adjustment (center-weighted average light
metering, switchable to spot metering), auto
exposure range EV4 ~20 (ISO 100), program
shift potential
Exposure compensation: ± 4EV compensation
potential (1/3 step)
Exposure counter: Progressive type, displayed in
LCD panel
Self-timer: Electronic self-timer with 10 sec. delay
Film speed range: Automatic setting with DX
coded film ISO 25 ~ 5000 with color negative
film
Film loading: Automatic loading (automatically
advances to first frame when camera back is
closed)
Film advance: Automatic film winding type
Film rewinding: Automatic film rewind
(automatic rewind activated at the end of
film), rewind possible at any point with
rewind button
Flash: Manual pop-up flash, recycling 3.5 sec. (at
normal temp.), flash working range: WIDE:
1.2m (3.9 ft)~5m (16.4 ft) (ISO 100 negative
color film). TELE: 1.2m (3.9 ft)~4m (13.1
ft) (ISO 100 negative color film). WIDE:
1.2m (3.9
negative color film). TELE: 1.2m (3.9 ft)8m (26.2 ft) (ISO 400 negative color film)
Flash modes: AUTO (automatic flash activation
in low light) FILL-IN (forced activation)
external flash unit sold separately (Electronic
Flash L-30)
Battery check: Displayed in LCD panel
ft)
~10m (32.8
ft)
(ISO
400
Page 57

Power source: Two 3V lithium batteries (Duracell
DL-123A, or Panasonic CR-123A)
Dimensions:
134.5mm(W) x 80.5mm(H) x 127.5mm(D)
(5.3" x3.2" x5.0")
Weight: l,020g (36.0 oz) (without batteries)
Specifications and design are subject to change
without notice.
56
Page 58

Accessories Sold Separately
57
ELECTRONIC
FLASH L-30
RECORDATA BACK 400
TELECONVERTER GRIP STRAP
LENS X1.5
SOFT CASE
DIOPTRIC CORRECTION
LENS (with Eye Cup 2)
 Loading...