

Page 1
DIGITAL CAMERA
AZ-2 ZOOM
ADVANCED
MANUAL
● This manual explains advanced techniques such as shooting and playback
functions, customizing functions or settings and transferring recorded images
to a computer, etc.
● We recommend that you take test shots to get accustomed to your camera
before taking important photographs.
● The screen and camera illustrations shown in this manual were produced
during the development stages and may differ from the actual product.
Basic operations
Things to know before shooting
Advanced shooting
How to optimize your settings
before shooting
Playback
Customizing the settings/
functions of your camera
Printing
Transferring images to a
computer
Appendix
Information
Page 2
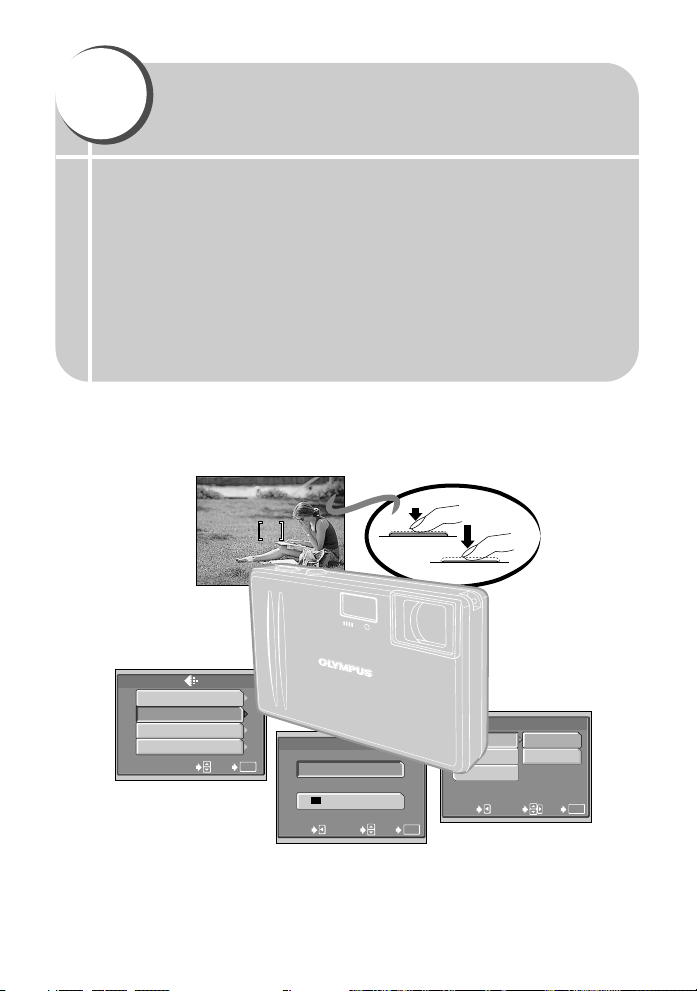
How to use this manual
Image stabilizer . . . . . . . . . . . . . . . . . . . . . . . . . . . . . . . . . . . . . . . . . . . . . 58
5 Playback 59
Viewing still images . . . . . . . . . . . . . . . . . . . . . . . . . . . . . . . . . . . . . . . . . . . . . . 60
Single-frame playback . . . . . . . . . . . . . . . . . . . . . . . . . . . . . . . . . . . . . . . . . 60
Close-up playback . . . . . . . . . . . . . . . . . . . . . . . . . . . . . . . . . . . . . . . . . . 61
Index display . . . . . . . . . . . . . . . . . . . . . . . . . . . . . . . . . . . . . . . . . . . . . . 62
Calendar display . . . . . . . . . . . . . . . . . . . . . . . . . . . . . . . . . . . . . . . . . . . 63
Slideshow (sequential auto playback) . . . . . . . . . . . . . . . . . . . . . . . . . . 64
Rotating images . . . . . . . . . . . . . . . . . . . . . . . . . . . . . . . . . . . . . . . . . . . . 65
Editing still images. . . . . . . . . . . . . . . . . . . . . . . . . . . . . . . . . . . . . . . . . . . . . . . 66
BLACK & WHITE and SEPIA . . . . . . . . . . . . . . . . . . . . . . . . . . . . . . . . . . . . 66
Resizing . . . . . . . . . . . . . . . . . . . . . . . . . . . . . . . . . . . . . . . . . . . . . . . . . 67
Trimming . . . . . . . . . . . . . . . . . . . . . . . . . . . . . . . . . . . . . . . . . . . . . . . . . 67
Adding sound to recorded images . . . . . . . . . . . . . . . . . . . . . . . . . . . . . . . . 69
MOVIE PLAY— Viewing movies . . . . . . . . . . . . . . . . . . . . . . . . . . . . . . . . . 70
Editing movies . . . . . . . . . . . . . . . . . . . . . . . . . . . . . . . . . . . . . . . . . . . . . . . . . . 72
CAPTURE — Capturing a movie frame . . . . . . . . . . . . . . . . . . . . . . . . . . . . 72
INDEX — Making movie index . . . . . . . . . . . . . . . . . . . . . . . . . . . . . . . . . . . 73
This manual includes a table of contents, index and menu list to help you
easily locate the information you need.
Searching the table of contents ~ P. 4
Chapter and section titles related to advanced functions are included in the table
of contents so that you can quickly find the chapters you want to read.
For example
When you want to play back the images you have just
taken.
Go to Chapter 5 Playback and look for the page titled
“Viewing still images........60”.
Searching the index ~ P. 174
Terms used in this manual (such as the names of functions and parts) are listed in
alphabetical order. When you come across a term that you are not familiar with or
about which you want to learn more, you can search the index to find the relevant
page.
For example
If you want to know more about the term “INFO”
Go to the index at the end of this manual and look under I for
“INFO........105”.
V
C
Camera movement warning ................53
CAPTURE................................................72
Card........................................................158
Card access mark ..................................143
CCD........................................................160
CHECKERBOARD..................................104
V
Close-up playback ..............................61
Compression............................................31
CUISINE ............................................37
D
Date/time setting ................................97
Daylight ..............................................57
DC-IN jack..............................................170
DCF........................................................160
Digital ESPlight metering ..................55,160
DIGITALZOOM ........................................40
DPOF..............................................108, 160
Flash stand-by..........................................53
Fluorescent light ................................57
Focus..................................................26, 28
Focus lock................................................26
FORMAT..........................................106
Frame number........................................172
Full press..................................................27
H
Half press..................................................27
HQ ............................................................29
I
INDEX ......................................................73
Index display ......................................62
INDOOR ............................................36
INFO ......................................................105
ISO............................................................54
Searching the list of menus ~ P. 164
The camera’s menus are listed in a tree structure. When you come across a menu
whose name is unfamiliar on the menu screen, you can find the relevant pages for
this menu function in the menu list.
For example
When you want to know how to make settings for WB in
the menu screen
Menu directory
Shooting menu ( mode)
Top menu Tab Function Setting Ref.page
MODE MENU CAMERA OFF , ON P. 42
V
Go through the menus until you find WB and look for the
reference page number.
* For information on how to read the instructions in this manual, refer to “How to read the
instruction pages” (P. 3)
2
PICTURE WB AUTO , , , , P. 57
CARD FORMAT YES, NO P. 106
SETUP ALLRESET OFF, ON P. 82
OFF , , P. 41
ESP/ ESP, P. 55
–
2.0 - 0.0 - +2.0 P. 56
DRIVE , P. 43
ISO AUTO , 80, 100, 200, 400 P. 54
DIGITALZOOM OFF, ON P. 40
OFF, ON P. 49
PANORAMA P. 44
2 IN 1 P. 46
ENGLISH, FRANCAIS, DEUTSCH, P. 84
Page 3
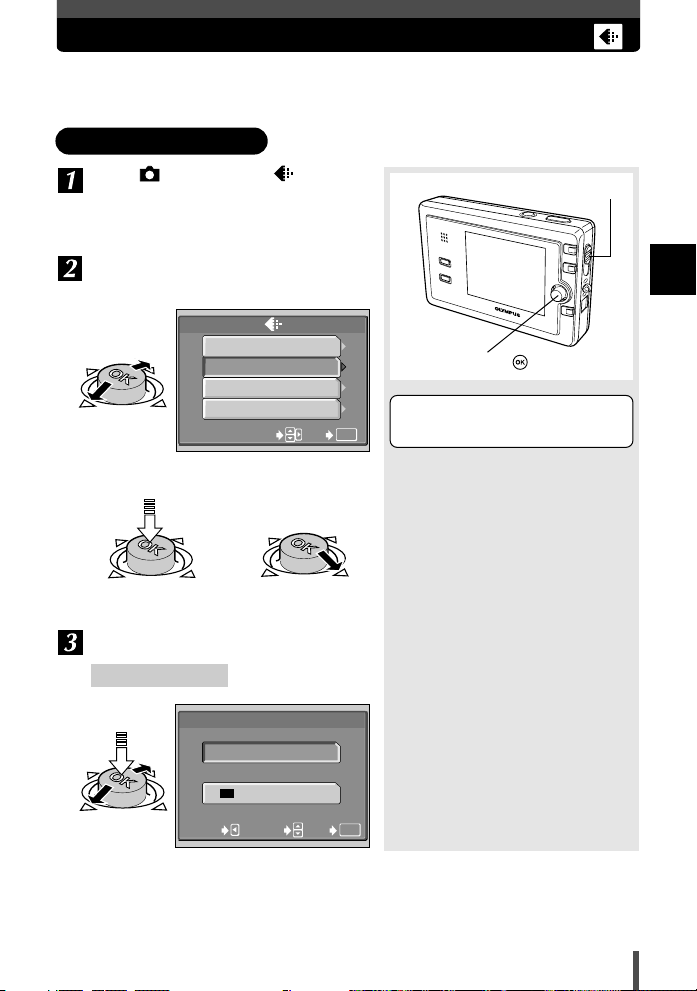
How to read the instruction pages
640 x 480
CANCEL
320 x 240
SELECT
GO
EXIT
OK
CANCEL
SELECT
GO
EXIT
OK
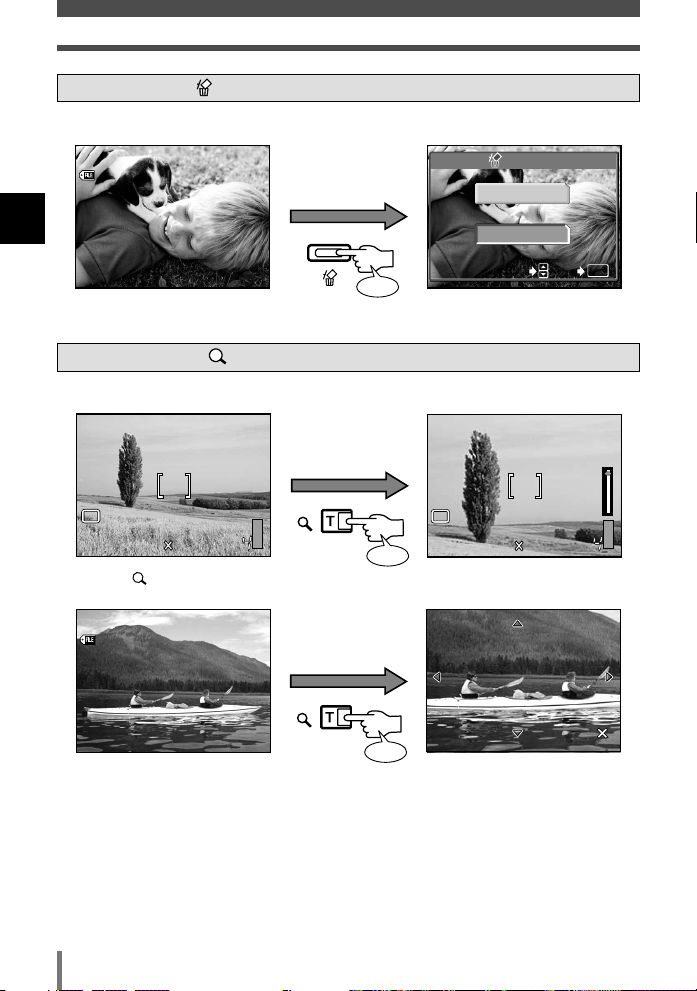
Editing still images
Resizing
Play back the image you want to
resize.
~ “Single-frame playback” (P. 60)
In the top menu, select MODE MENU
T EDIT T .
“How to use the menus” (P. 17)
~
Select the file size.
Trimming
Play back the image you want to
trim.
~ “Single-frame playback” (P. 60)
In the top menu, select MODE MENU
T EDIT T .
~ “How to use the menus” (P. 17)
Select .
Zoom button W /T
Joystick
A bar is displayed when editing is in
progress. When the bar disappears,
the normal display is restored.
67
This sample page is only for your reference. It may differ from the actual page in
this manual.
Step through the menus
in the order of the arrows
(P. 17)
The gray part on the right
shows tips for operating
5
procedures.
Playback
This shows the buttons
corresponding to the
function.
Indications used in this manual
Important information on factors which may lead to a malfunction
or operational problems. Also warns of operations that should be
absolutely avoided.
Reference pages describing details or related information.
~
3
Page 4

Contents
How to use this manual . . . . . . . . . . . . . . . . . . . . . . . . . . . . . . . . . . . . . . . . . . . . 2
How to read the instruction pages . . . . . . . . . . . . . . . . . . . . . . . . . . . . . . . . . . . . 3
1 Basic operations 9
How to use the mode switch . . . . . . . . . . . . . . . . . . . . . . . . . . . . . . . . . . . . . . . 10
How to use the buttons . . . . . . . . . . . . . . . . . . . . . . . . . . . . . . . . . . . . . . . . . . . 11
Button operation . . . . . . . . . . . . . . . . . . . . . . . . . . . . . . . . . . . . . . . . . . . . . . 11
Joystick operation . . . . . . . . . . . . . . . . . . . . . . . . . . . . . . . . . . . . . . . . . . . . . 15
How to use the menus . . . . . . . . . . . . . . . . . . . . . . . . . . . . . . . . . . . . . . . . . . . . 17
Operation . . . . . . . . . . . . . . . . . . . . . . . . . . . . . . . . . . . . . . . . . . . . . . . . . . . 17
Types of the menus. . . . . . . . . . . . . . . . . . . . . . . . . . . . . . . . . . . . . . . . . . . . 22
2 Things to know before shooting 25
If correct focus cannot be obtained . . . . . . . . . . . . . . . . . . . . . . . . . . . . . . . . . . 26
How to focus on a difficult subject. . . . . . . . . . . . . . . . . . . . . . . . . . . . . . . . . 26
Subjects that are difficult to focus on . . . . . . . . . . . . . . . . . . . . . . . . . . . . . . 28
Selecting the record mode . . . . . . . . . . . . . . . . . . . . . . . . . . . . . . . . . . . . . . 29
3 Advanced shooting 33
Using the situation-related shooting modes. . . . . . . . . . . . . . . . . . . . . . . . . . . . 34
NIGHT SCENE . . . . . . . . . . . . . . . . . . . . . . . . . . . . . . . . . . . . . . . . . . . . 34
NIGHT+PORTRAIT. . . . . . . . . . . . . . . . . . . . . . . . . . . . . . . . . . . . . . . . . 35
LANDSCAPE. . . . . . . . . . . . . . . . . . . . . . . . . . . . . . . . . . . . . . . . . . . . . . 35
LANDSCAPE+PORTRAIT . . . . . . . . . . . . . . . . . . . . . . . . . . . . . . . . . . . 35
INDOOR . . . . . . . . . . . . . . . . . . . . . . . . . . . . . . . . . . . . . . . . . . . . . . . . . 36
FIREWORKS. . . . . . . . . . . . . . . . . . . . . . . . . . . . . . . . . . . . . . . . . . . . . . 36
PORTRAIT . . . . . . . . . . . . . . . . . . . . . . . . . . . . . . . . . . . . . . . . . . . . . . . 36
SELF PORTRAIT (Shooting yourself while holding the camera) . . . . . . 37
CUISINE . . . . . . . . . . . . . . . . . . . . . . . . . . . . . . . . . . . . . . . . . . . . . . . . . 37
SPORT (Capturing a fast-moving subject) . . . . . . . . . . . . . . . . . . . . . . . 37
BEACH & SNOW (Shooting seascapes
or snow-capped mountain landscapes ) . . . . . . . . . . . . . . . . . . . . . . . . . . . 38
AVAILABLE LIGHT PORTRAIT (Shooting in low light conditions
without a flash) . . . . . . . . . . . . . . . . . . . . . . . . . . . . . . . . . . . . . . . . . . . . . . 38
SUNSET . . . . . . . . . . . . . . . . . . . . . . . . . . . . . . . . . . . . . . . . . . . . . . . . . 38
4
Page 5
Contents
Zoom . . . . . . . . . . . . . . . . . . . . . . . . . . . . . . . . . . . . . . . . . . . . . . . . . . . . . . . . . 39
Optical zoom . . . . . . . . . . . . . . . . . . . . . . . . . . . . . . . . . . . . . . . . . . . . . . . . . 39
DIGITAL ZOOM – Using the digital zoom . . . . . . . . . . . . . . . . . . . . . . . . . . . 40
Macro mode shooting . . . . . . . . . . . . . . . . . . . . . . . . . . . . . . . . . . . . . . . 41
Self-timer shooting . . . . . . . . . . . . . . . . . . . . . . . . . . . . . . . . . . . . . . . . . . . . 42
DRIVE — Sequential shooting . . . . . . . . . . . . . . . . . . . . . . . . . . . . . . . . . . . 43
PANORAMA. . . . . . . . . . . . . . . . . . . . . . . . . . . . . . . . . . . . . . . . . . . . . . . . . . . . 44
2 IN 1 . . . . . . . . . . . . . . . . . . . . . . . . . . . . . . . . . . . . . . . . . . . . . . . . . . . . . . . . . 46
Movie recording . . . . . . . . . . . . . . . . . . . . . . . . . . . . . . . . . . . . . . . . . . . . . . 47
Recording sound . . . . . . . . . . . . . . . . . . . . . . . . . . . . . . . . . . . . . . . . . . . . . . 49
4 How to optimize your settings before shooting 51
Flash . . . . . . . . . . . . . . . . . . . . . . . . . . . . . . . . . . . . . . . . . . . . . . . . . . . . . . . 52
ISO sensitivity . . . . . . . . . . . . . . . . . . . . . . . . . . . . . . . . . . . . . . . . . . . . . . . . . . 54
Changing the metering area ESP/ . . . . . . . . . . . . . . . . . . . . . . . . . . . . . . . . 55
Varying the image brightness (Exposure Compensation) . . . . . . . . . . . . . . 56
WB — Adjusting the color tone . . . . . . . . . . . . . . . . . . . . . . . . . . . . . . . . . . . . . 57
Image stabilizer . . . . . . . . . . . . . . . . . . . . . . . . . . . . . . . . . . . . . . . . . . . . . 58
5 Playback 59
Viewing still images . . . . . . . . . . . . . . . . . . . . . . . . . . . . . . . . . . . . . . . . . . . . . . 60
Single-frame playback. . . . . . . . . . . . . . . . . . . . . . . . . . . . . . . . . . . . . . . . . . 60
Close-up playback . . . . . . . . . . . . . . . . . . . . . . . . . . . . . . . . . . . . . . . . . . 61
Index display . . . . . . . . . . . . . . . . . . . . . . . . . . . . . . . . . . . . . . . . . . . . . . 62
Calendar display . . . . . . . . . . . . . . . . . . . . . . . . . . . . . . . . . . . . . . . . . . . 63
Slideshow (sequential auto playback) . . . . . . . . . . . . . . . . . . . . . . . . . . 64
Rotating images . . . . . . . . . . . . . . . . . . . . . . . . . . . . . . . . . . . . . . . . . . . . 65
Editing still images . . . . . . . . . . . . . . . . . . . . . . . . . . . . . . . . . . . . . . . . . . . . . . . 66
BLACK & WHITE and SEPIA . . . . . . . . . . . . . . . . . . . . . . . . . . . . . . . . . . . . 66
Resizing . . . . . . . . . . . . . . . . . . . . . . . . . . . . . . . . . . . . . . . . . . . . . . . . . 67
Trimming . . . . . . . . . . . . . . . . . . . . . . . . . . . . . . . . . . . . . . . . . . . . . . . . . 67
Adding sound to recorded images . . . . . . . . . . . . . . . . . . . . . . . . . . . . . . . . 69
MOVIE PLAY — Viewing movies . . . . . . . . . . . . . . . . . . . . . . . . . . . . . . . . . 70
Editing movies . . . . . . . . . . . . . . . . . . . . . . . . . . . . . . . . . . . . . . . . . . . . . . . . . . 72
CAPTURE — Capturing a movie frame . . . . . . . . . . . . . . . . . . . . . . . . . . . . 72
INDEX — Making movie index . . . . . . . . . . . . . . . . . . . . . . . . . . . . . . . . . . . 73
5
Page 6
Contents
EDIT — Editing a movie . . . . . . . . . . . . . . . . . . . . . . . . . . . . . . . . . . . . . . . . 75
Playback on TV . . . . . . . . . . . . . . . . . . . . . . . . . . . . . . . . . . . . . . . . . . . . . . . . . 77
Protecting images (preventing accidental erasure) . . . . . . . . . . . . . . . . . . . 78
Erasing images . . . . . . . . . . . . . . . . . . . . . . . . . . . . . . . . . . . . . . . . . . . . . . . . . 79
Single-frame erasure . . . . . . . . . . . . . . . . . . . . . . . . . . . . . . . . . . . . . . . . 79
All-frame erasure . . . . . . . . . . . . . . . . . . . . . . . . . . . . . . . . . . . . . . . . . . . 80
6
Customizing the settings/functions of your camera
ALL RESET — Saving the camera’s settings . . . . . . . . . . . . . . . . . . . . . . . . . . 82
Changing the display language . . . . . . . . . . . . . . . . . . . . . . . . . . . . . . . . . 84
PW ON SETUP/PW OFF SETUP — Power on/off display/sound setting . . . . . 85
SCREEN SETUP — Setting up an image for the startup/shutdown screen . . . 87
REC VIEW — Checking the picture immediately after shooting . . . . . . . . . . . . 89
VOLUME — Selecting the playback volume . . . . . . . . . . . . . . . . . . . . . . . . . . . 90
Setting the warning tone . . . . . . . . . . . . . . . . . . . . . . . . . . . . . . . . . . . . . . . . 91
BEEP — Setting the button operation sound. . . . . . . . . . . . . . . . . . . . . . . . . . . 92
SHUTTER SOUND — Setting the shutter sound. . . . . . . . . . . . . . . . . . . . . . . . 93
FILE NAME — Assigning a file name . . . . . . . . . . . . . . . . . . . . . . . . . . . . . . . . 94
PIXEL MAPPING — Checking the image processing functions . . . . . . . . . . . . 95
Adjusting the monitor brightness . . . . . . . . . . . . . . . . . . . . . . . . . . . . . . . . . 96
Setting the date and time . . . . . . . . . . . . . . . . . . . . . . . . . . . . . . . . . . . . . . . 97
VIDEO OUT — Selecting the video signal type . . . . . . . . . . . . . . . . . . . . . . . . . 99
Selecting the number of images . . . . . . . . . . . . . . . . . . . . . . . . . . . . . . . . . 100
SETUP — Changing the slideshow pattern . . . . . . . . . . . . . . . . . . . . . . . 101
INFO — Displaying shooting information on the monitor. . . . . . . . . . . . . . . . . 105
FORMAT — Formatting the card . . . . . . . . . . . . . . . . . . . . . . . . . . . . . . . . 106
81
7 Printing 107
Print reservation (DPOF) . . . . . . . . . . . . . . . . . . . . . . . . . . . . . . . . . . . . . . 108
Selecting the print reservation mode . . . . . . . . . . . . . . . . . . . . . . . . . . . 110
Single-frame reservation . . . . . . . . . . . . . . . . . . . . . . . . . . . . . . . . . . . . 111
All-frame reservation . . . . . . . . . . . . . . . . . . . . . . . . . . . . . . . . . . . . . . . 117
Resetting print reservation . . . . . . . . . . . . . . . . . . . . . . . . . . . . . . . . . . . . . 119
Direct printing (PictBridge) . . . . . . . . . . . . . . . . . . . . . . . . . . . . . . . . . . . . . . . . 121
Connecting the camera to a printer. . . . . . . . . . . . . . . . . . . . . . . . . . . . . . . 122
Flowchart for printing . . . . . . . . . . . . . . . . . . . . . . . . . . . . . . . . . . . . . . . . . 124
6
Page 7

Contents
Selecting the print mode . . . . . . . . . . . . . . . . . . . . . . . . . . . . . . . . . . . . . . . 126
Setting the print paper items . . . . . . . . . . . . . . . . . . . . . . . . . . . . . . . . . . . . 127
Selecting pictures you want to print . . . . . . . . . . . . . . . . . . . . . . . . . . . . . . 127
Setting printing data . . . . . . . . . . . . . . . . . . . . . . . . . . . . . . . . . . . . . . . . . . 127
Trimming . . . . . . . . . . . . . . . . . . . . . . . . . . . . . . . . . . . . . . . . . . . . . . . . . . . 128
Printing . . . . . . . . . . . . . . . . . . . . . . . . . . . . . . . . . . . . . . . . . . . . . . . . . . . . 128
If an error code is displayed . . . . . . . . . . . . . . . . . . . . . . . . . . . . . . . . . . . . 129
8 Transferring images to a computer 131
Flowchart . . . . . . . . . . . . . . . . . . . . . . . . . . . . . . . . . . . . . . . . . . . . . . . . . . . . . 132
Using the provided OLYMPUS Master software . . . . . . . . . . . . . . . . . . . . . . . 134
What is OLYMPUS Master? . . . . . . . . . . . . . . . . . . . . . . . . . . . . . . . . . . . . 134
Installing OLYMPUS Master . . . . . . . . . . . . . . . . . . . . . . . . . . . . . . . . . . . . 135
Connecting the camera to the computer . . . . . . . . . . . . . . . . . . . . . . . . . . . . . 139
Starting OLYMPUS Master . . . . . . . . . . . . . . . . . . . . . . . . . . . . . . . . . . . . . . . 141
Displaying the camera’s images on your computer . . . . . . . . . . . . . . . . . . . . . 142
Downloading images to save on your computer . . . . . . . . . . . . . . . . . . . . . 142
Disconnecting the camera from your computer . . . . . . . . . . . . . . . . . . . . . 143
Viewing still images and movies . . . . . . . . . . . . . . . . . . . . . . . . . . . . . . . . . . . 145
Printing images . . . . . . . . . . . . . . . . . . . . . . . . . . . . . . . . . . . . . . . . . . . . . . . . 146
Transferring images to your computer without using OLYMPUS Master . . . . 147
9 Appendix 149
If you encounter problems . . . . . . . . . . . . . . . . . . . . . . . . . . . . . . . . . . . . . . . . 150
Error codes . . . . . . . . . . . . . . . . . . . . . . . . . . . . . . . . . . . . . . . . . . . . . . . . . 150
Troubleshooting . . . . . . . . . . . . . . . . . . . . . . . . . . . . . . . . . . . . . . . . . . . . . 152
Camera maintenance. . . . . . . . . . . . . . . . . . . . . . . . . . . . . . . . . . . . . . . . . . . . 156
Safety precautions . . . . . . . . . . . . . . . . . . . . . . . . . . . . . . . . . . . . . . . . . . . . . . 157
Glossary . . . . . . . . . . . . . . . . . . . . . . . . . . . . . . . . . . . . . . . . . . . . . . . . . . . . . . 160
10 Information 163
Menu directory . . . . . . . . . . . . . . . . . . . . . . . . . . . . . . . . . . . . . . . . . . . . . . . . . 164
Available functions by shooting mode . . . . . . . . . . . . . . . . . . . . . . . . . . . . . . . 168
Names of parts. . . . . . . . . . . . . . . . . . . . . . . . . . . . . . . . . . . . . . . . . . . . . . . . . 170
Camera . . . . . . . . . . . . . . . . . . . . . . . . . . . . . . . . . . . . . . . . . . . . . . . . . . . . 170
Monitor indications . . . . . . . . . . . . . . . . . . . . . . . . . . . . . . . . . . . . . . . . . . . 171
Index . . . . . . . . . . . . . . . . . . . . . . . . . . . . . . . . . . . . . . . . . . . . . . . . . . . . . . . . 174
7
Page 8

MEMO
8
Page 9
1
PROGRAM AUTO
P
P
For
normal
shooting
For
normal
shooting
SELEC
T
GO
O
K
OFF
CAMERA
C
A
R
D
SET PIC
ESP/
DRIVE
ALL R
ESET
PW ON SETUP
PW OFF SETUP
REC VIEW
ON
ON
EN
G
LISH
S
E
T
U
P
CAM
PIC
C
A
R
D
S
C
E
N
E
S
E
L
E
C
T
F
L
A
S
H
M
O
D
E
MODE MENU
Basic operations
The advanced shooting and playback techniques used by professional
photographers are drawn from years of experience and skill in making
precise camera adjustments.
Now, with your digital camera, you’ll be able to take advantage of those
same advanced techniques simply by pressing a few buttons.
You’ll find a wide choice of shooting functions listed in the camera’s
menus that make it easy to change the focusing area, adjust the white
balance, etc. The menus can be navigated simply by pressing buttons
while viewing the monitor.
But before you can use these functions, you first need to learn how to
operate the buttons and menus.
Page 10
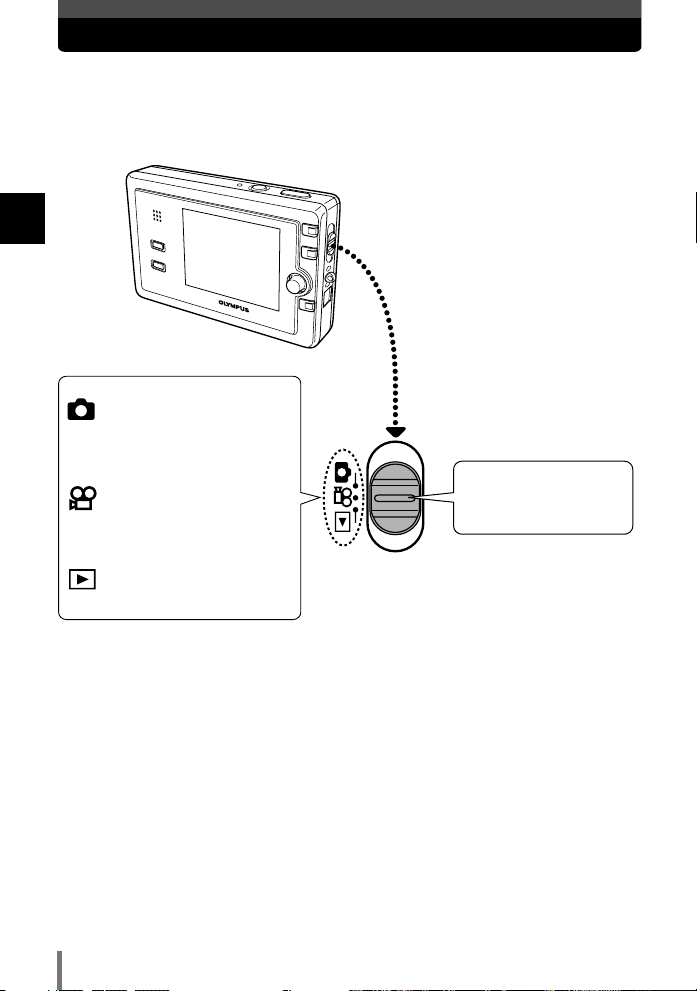
How to use the mode switch
Still picture shooting
mode
Select this for still picture
shooting.
Movie record mode
Select this for movie
shooting.
Playback mode
Select this for playback.
Slide the mode switch
to the mode position
you want to use.
This camera is equipped with the following three modes. Use the mode switch to
select the desired mode.
1
Basic operations
10
Page 11
How to use the buttons
HQHQ
2288 1712
P
100100–00100010
HQHQ
’04. 11.27 21:56 04. 11.27 21:56 1010
Press
1
2
3
4
5
QUICK VIEW
W/
MENU
Joystick
~
P. 15
T/
This camera has a variety of functions to enable you to optimize settings for
various shooting conditions. Some functions are available using the buttons
(~ See below) and others are available using the menus (~ P. 17). You can
set the functions using the buttons and the Joystick while viewing the monitor.
Button operation
Some buttons have different functions in the shooting mode and the
playback mode.
1 QUICK VIEW button
Plays back images while in the shooting mode. Pressing the shutter button
halfway down after checking the recorded images resumes the shooting mode.
1
Basic operations
Functions available in normal playback mode are also available during Quick
View.
Shooting mode
Playback mode
11
Page 12
How to use the buttons
100100–00100010
HQHQ
’04. 11.27 21:56 04. 11.27 21:56 1010
YES
NO
ERASE
Press
SELECT
GO
OK
HQHQ
2288 1712
P
HQHQ
2288 1712
P
T
W
Press
100100–00200020
HQHQ
’04. 12.10 10:00 04. 12.10 10:00 2020
2.02.0
Press
2 Erase button ~P. 7 9
Erases the selected image.
1
Basic operations
3 Zoom button T/ ~P. 39, 61
Shooting T: Enlarges a distant subject. (zoom-in, telephoto shooting)
Playback : Close-up
12
Page 13
How to use the buttons
HQHQ
2288 1712
P
HQHQ
2288 1712
P
T
W
Press
100100–00160016
HQHQ
’04. 12.16 09:56 04. 12.16 09:56 1616
1313
1616
1111
1414
1717
1212
1515
1818
1010
200412Sun Mon Tue Wed Thu Fri Sat
29 30
1 2
3 4
5 6 7 8 9 1010 1111
1212 1313 1414 1515 1616 1717 1818
1919 2020 2121 2222 2323 2424 2525
2626 2727 2828 2929 3030 3131 1
2345678
28
Press
Press
4 Zoom button W/ ~P. 39, 62
Shooting W: Enables shooting at a wider angle. (zoom-out, wide-angle shooting)
Playback :
Displays all stored images at once (index display). Pressing this button also sorts
stored images by shooting date and displays a calendar showing you
corresponding thumbnails on the respective shooting dates (calendar display).
Index display
1
Basic operations
Calendar display
13
Page 14
How to use the buttons
HQHQ
2288 1712
P
Press
P
SCENE SELECT
FLASH MODE
MODE MENU
5 Menu button ~P. 1 7
Displays or exits menu.
1
Basic operations
Press the menu button again
to exit the menu.
14
Page 15
How to use the buttons
WB
AUTO
PICTURE CAM
CARD
SET
100100–00110011
HQHQ
’04. 11.27 22:00 04. 11.27 22:00 1111
100100–00100010
HQHQ
’04. 11.27 21:56 04. 11.27 21:56 1010
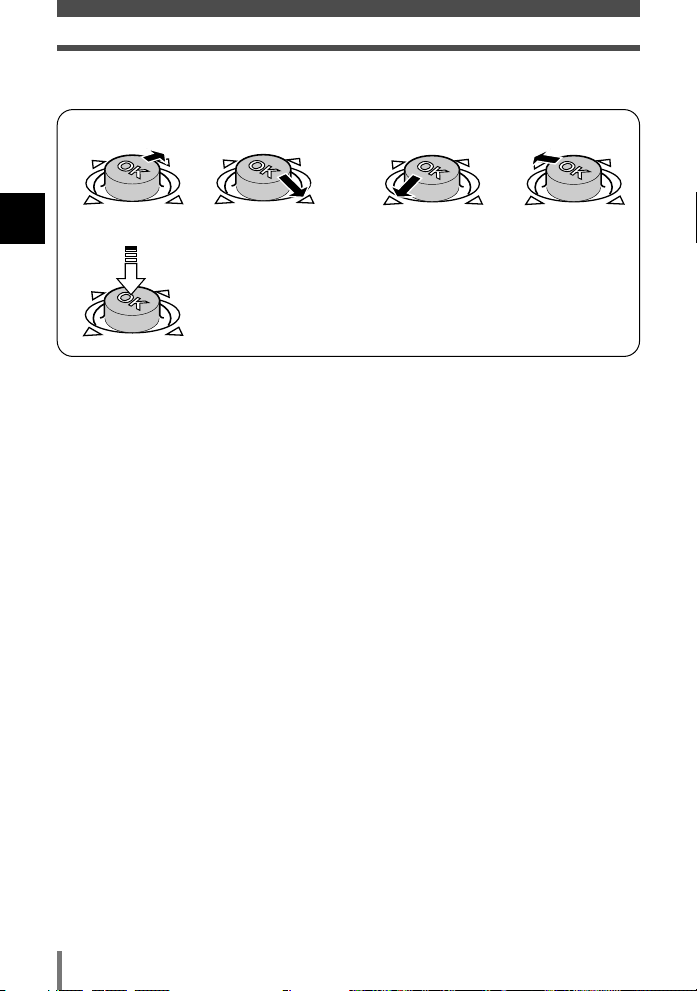
Joystick operation
The Joystick can be pushed up, down or left or right, or it can be pressed.
These operations enable you to set various functions on the menus or to
select frames during playback.
Push the upper edge, lower
edge, left edge or right
edge of the Joystick in the
direction of illustrated
arrows.
You can confirm settings
on the menus or you can
move within the menus.
~ P. 17
Press the center down
on the Joystick.
1
Basic operations
You can select frames
you want to play back.
~ P. 60
15
Page 16
How to use the buttons
The following illustrations show how to operate the Joystick.
When pushing up
1
Basic operations
When pushing left
When pushing right When pushing down
When pressing the center
16
Page 17
How to use the menus
SCENE SELECT
FLASH MODE
MODE MENU
Goes to the FLASH
MODE setting screen.
Goes to the SCENE
SELECT setting screen.
Goes to the
setting screen.
Goes to MODE MENU.
Various functions can
be set.
~ P. 19
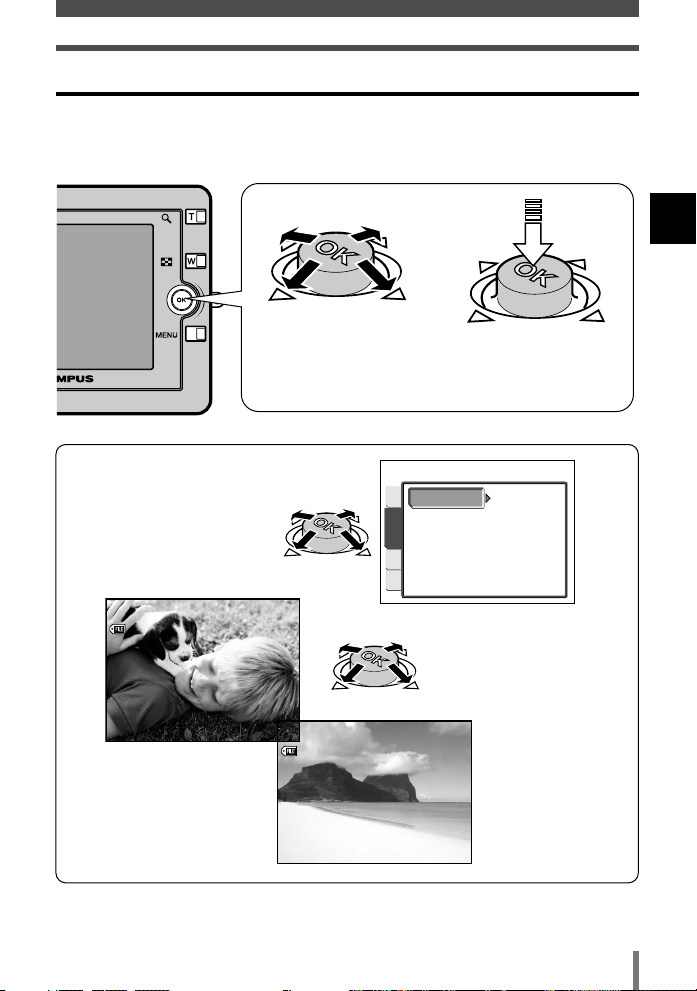
The camera’s functions can be set. Display the menus on the monitor and select
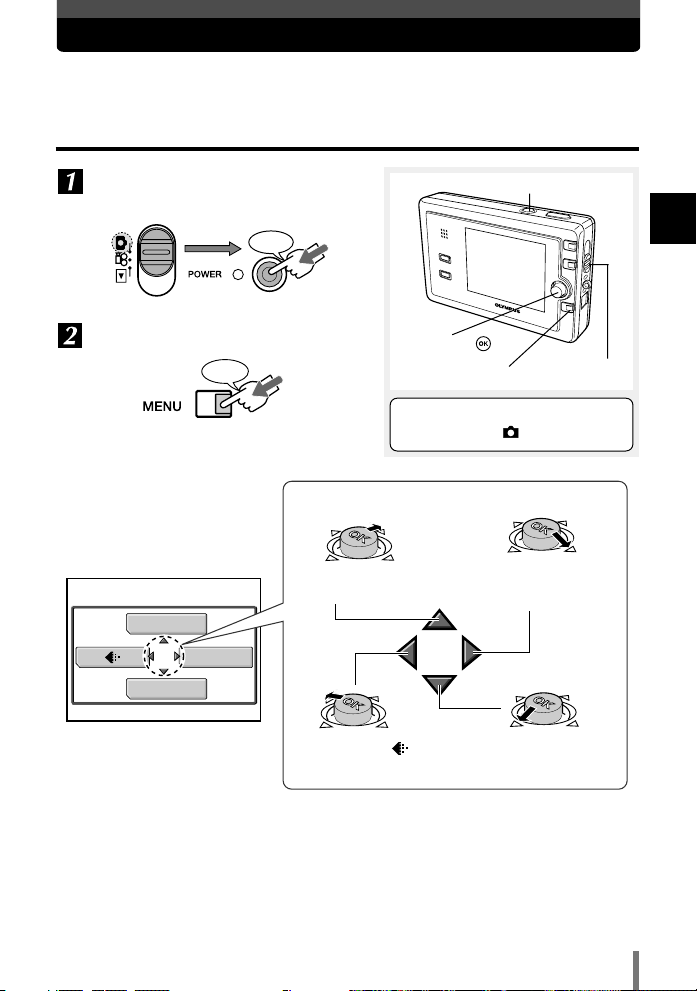
or set them.
Operation
Select the mode and turn on the
camera.
Press
Display the top menu.
Press
Top menu
POWER switch
Joystick
MENU button
This section explains how the menu
works using the mode.
The Joystick operation guide is displayed.
1
Basic operations
Mode switch
17
Page 18
How to use the menus
PROGRAM AUTO
P
P
For
normal
shooting
For
normal
shooting
SELECT
GO
OK
SHQ 2288x1712
SQ 1 1280x960
SQ 2 640x480
HQ 2288x1712
SELECT
GO
OK
AUTO
SELECT
GO
OK
FLASH MODE
SCENE SELECT
FLASH MODE
MODE MENU
Going to the setting screen directly and
setting the function
1
Basic operations
Currently selected item
18
å
å
å
ñ
Indicates that there are more menu
items and displays them.
Operation guide is displayed at the
bottom of the screen.
SELECT
Push the Joystick up or
down to select the item.
OK
GO
Press the Joystick to
confirm your selection.
SELECT
Push the Joystick up,
down or to the right to
select the item.
CANCEL
Push the Joystick left
to cancel the setting.
FLASH MODE ~ P. 52
~ P. 29
SCENE SELECT
~ P. 34
Page 19
OFF
OFF
0.0
ESP
ESP/
DRIVE
CAMERA
CARD
SET PIC
WB
AUTO
PICTURE CAM
CARD
SET
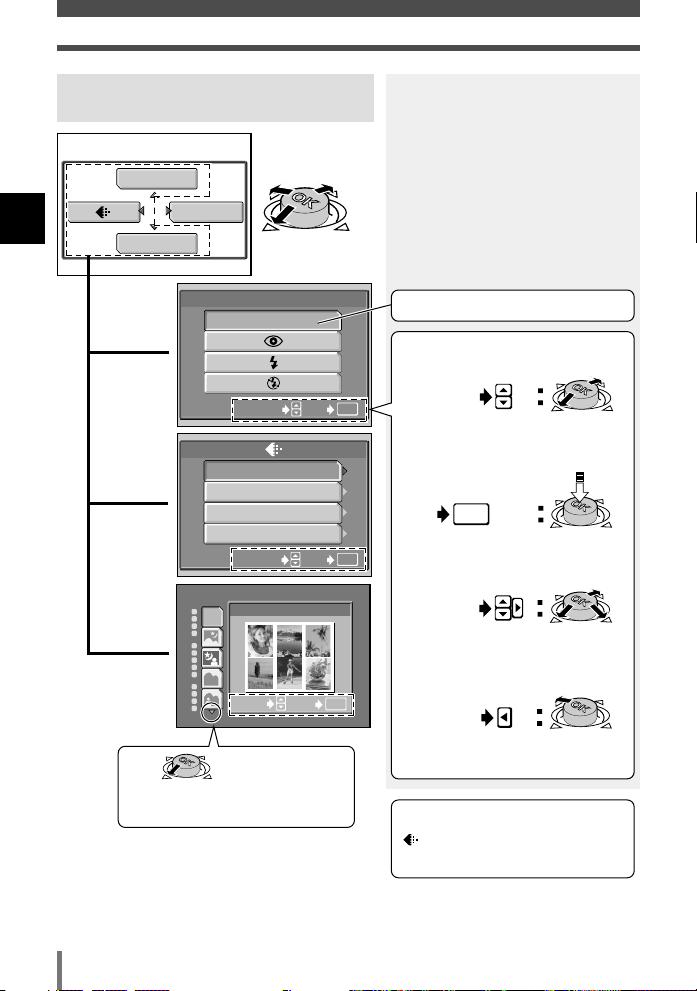
Setting functions in MODE MENU
SCENE SELECT
FLASH MODE
MODE MENU
OFF
OFF
0.0
ESP
ESP/
DRIVE
CAMERA
CARD
SET PIC
The following example shows the setting.
å
Tab ~ P. 2 3
CAMERA
PICTURE
CARD
SETUP
Select a tab.
CAMERA
tab
How to use the menus
1
Basic operations
The functions are categorized under
tabs.
PICTURE
tab
The current setting is displayed.
Push up or down to select a tab.
19
Page 20
How to use the menus
FORMAT
ALL RESET
PW ON SETUP
PW OFF SETUP
REC VIEW
ENGLISH
ON
ON
CARD
CAM
PIC
CAM
PIC
CARD
SET
SETUP
Push right
OFF
CAMERA
CARD
SET PIC
ESP/
DRIVE
CARD tab
1
Basic operations
SETUP tab
Move to the functions of the tab you
are selecting.
Select the item.
Select the
setting.
CAMERA
ESP/
CARD
DRIVE
SET PIC
OFF
OFF
ESP
0.0
When a tab is selected, the
respective functions are displayed.
Currently selected item
Indicates that there are more menu
items following DRIVE.
20
The options for the selected item
are displayed.
Page 21
Select the option and confirm it.
OFF
CAMERA
CARD
SET PIC
ESP/
DRIVE
HQHQ
2288 1712
P
Press
Press the
Joystick
repeatedly
until the menu
disappears.
Returning to the previous item on the menus
How to use the menus
1
Basic operations
Normal shooting screen is restored.
The icon corresponding to the
setting is displayed. (The super
macro icon is displayed here.)
Explanations for menu operation
This manual uses the following explanations for menu operations.
Setting functions in MODE MENU:
Example: In the top menu, select MODE MENU T SETUP T REC VIEW T
OFF or ON.
Going to the setting screen directly and setting the function:
Example: In the top menu, select FLASH MODE.
21
Page 22
How to use the menus
SCENE SELECT
FLASH MODE
MODE MENU
DIGITAL ZOOM
MODE MENU
MODE MENU
INFO
MODE MENU
MOVIE PLAY
INFO
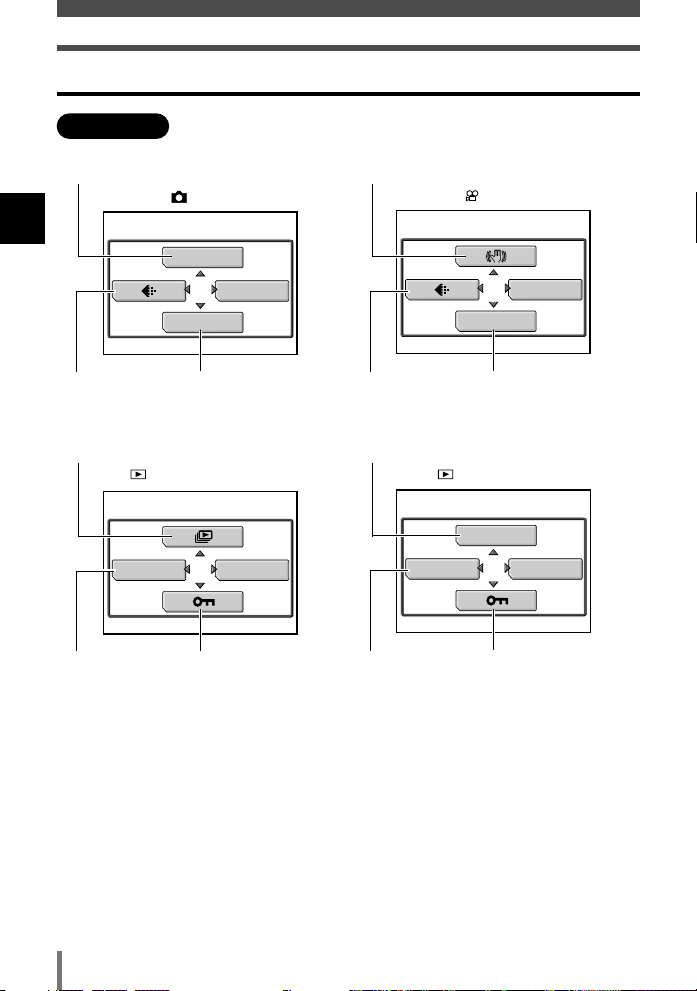
Types of the menus
Top menu
~P. 52
1
Basic operations
~P. 29 ~P. 34
~P .64
~P. 105 ~P. 78
mode
mode (still image)
~P.58
mode
~P. 29 ~P. 40
~P. 70
mode (movie)
~P. 105 ~P. 78
22
Page 23

OFF
OFF
0.0
ESP
ESP/
DRIVE
CAMERA
CARD
SET PIC
CAMERA
CARD
SET PIC
OFF
OFF
0.0
ESP
ESP/
DRIVE
WB
AUTO
PICTURE
CARD
SET
CAM
FORMAT
CARD
SET
CAM
PIC
ALL RESET
PW ON SETUP
PW OFF SETUP
REC VIEW
ON
ON
ENGLISH
SETUP
CAM
PIC
CARD
Mode menu
Tab
/
~P. 42
mode
CAMERA tab
How to use the menus
CAMERA : Sets shooting functions.
PICTURE : Sets white balance.
EDIT : Edits recorded images.
CARD : Formats the card or erases all
recorded images.
SETUP : Sets basic functions that allow you to
use the camera more efficiently, such
as date, time, language selection
, etc.
PLAY : Sets playback functions.
~P. 57
PICTURE tab
1
Basic operations
~P. 55 ~P. 43
~P. 106
CARD tab
~P. 41~P. 56
~P. 82
~P. 85 ~P. 89
SETUP tab ( mode)
~P. 84~P. 85
23
Page 24
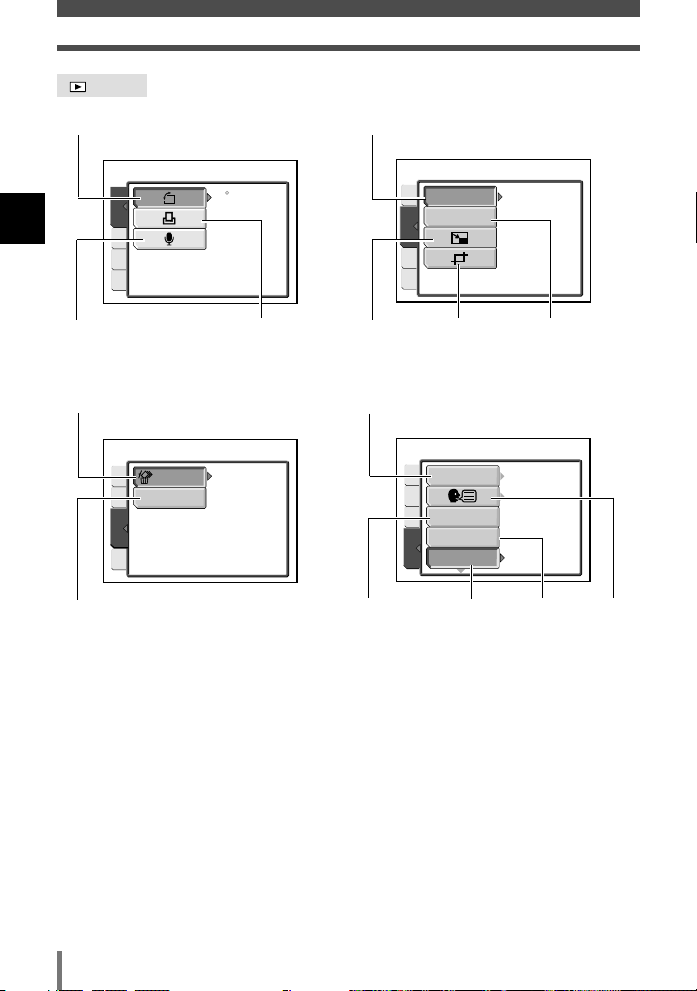
How to use the menus
0
PLAY
EDIT
CARD
SET
BLACK & WHITE
SEPIA
EDIT
PLAYCARD
SET
FORMAT
CARD
SET
PLAY
EDIT
ALL ERASE
ALL RESET
PW ON SETUP
PW OFF SETUP
SCREEN SETUP
ON
ON
ENGLISH
SETUP
PLAY
EDIT
CARD
mode
~P. 65
1
Basic operations
~P. 69
~P. 80
~P. 106
PLAY tab
CARD tab
~P. 108
~P. 66
EDIT tab
~P. 67 ~P. 67 ~P. 66
~P. 82
SETUP tab
~P. 85 ~P. 87
~P. 85
~P. 84
24
Page 25
2
SQ1
NORMAL
1600x1200
2048x1536
1280x960
HIGH
SELECT
GO
CANCEL
OK
HQ
2288x1712
2288x1520
3:2
SELECT
GO
CANCEL
OK
SHQ 2288x1712
SQ 1 1600x1200
SQ 2 640x480
HQ 2288x1712
SELECT
GO
OK
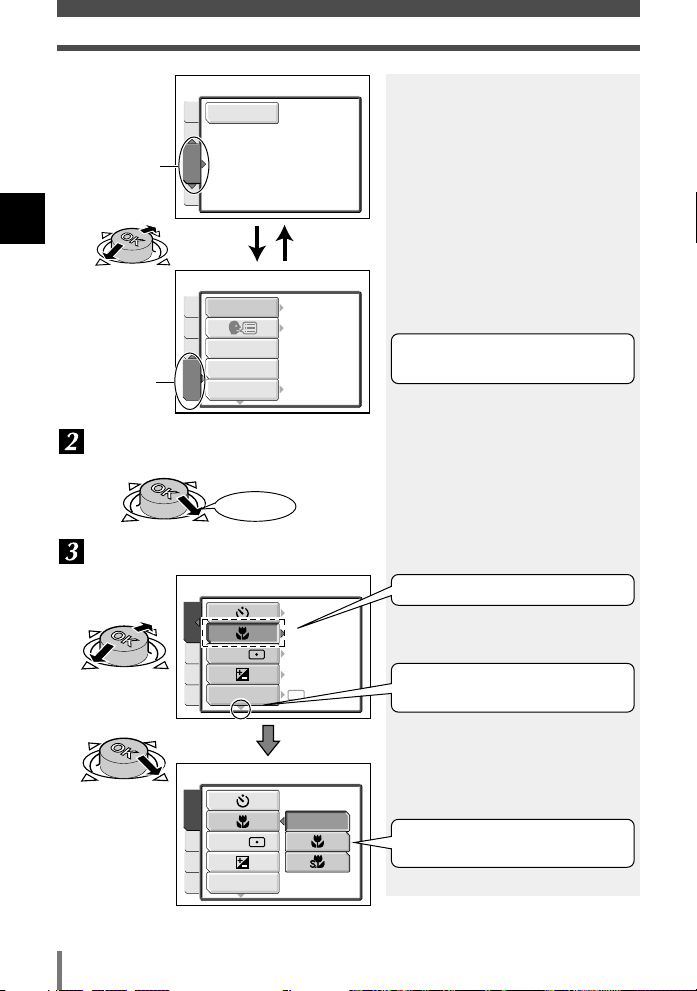
Things to know before shooting
In most shooting situations, the camera can give you satisfying results if
you simply press the shutter button. However, sometimes you may come
across a subject that is difficult to focus on. This chapter explains how to
deal with those hard-to-focus subjects.
Another important thing is to select the appropriate record mode before
you start shooting. Remember that depending on what you are going to
do with your shots later, you may find that the image looks grainy in large
prints, the file size is too big for e-mail, etc. To avoid this kind of problem,
always check the record mode before shooting.
Page 26
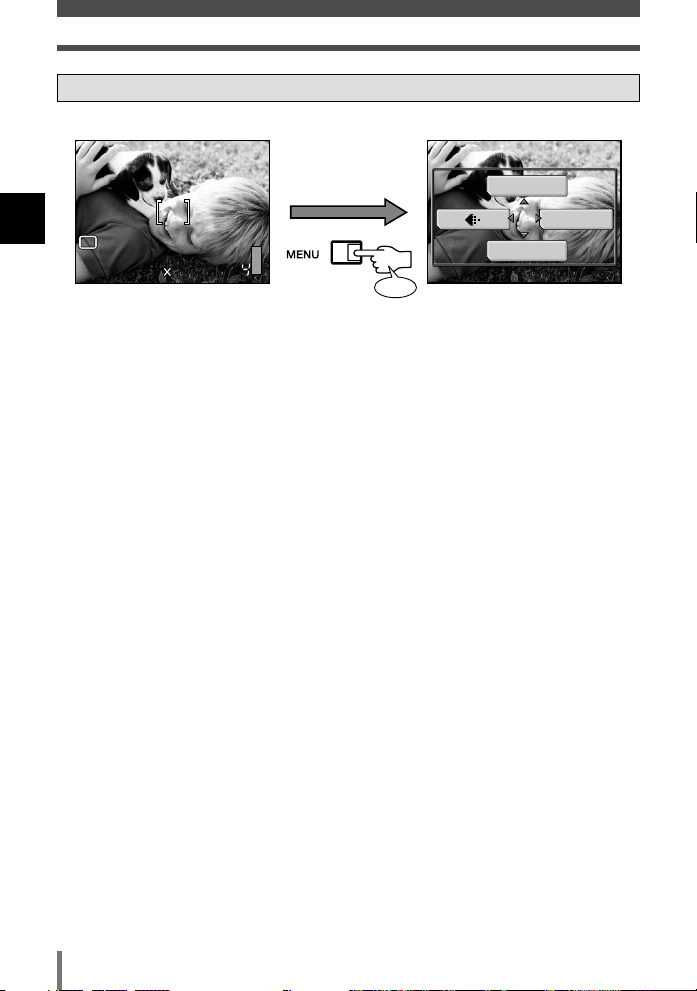
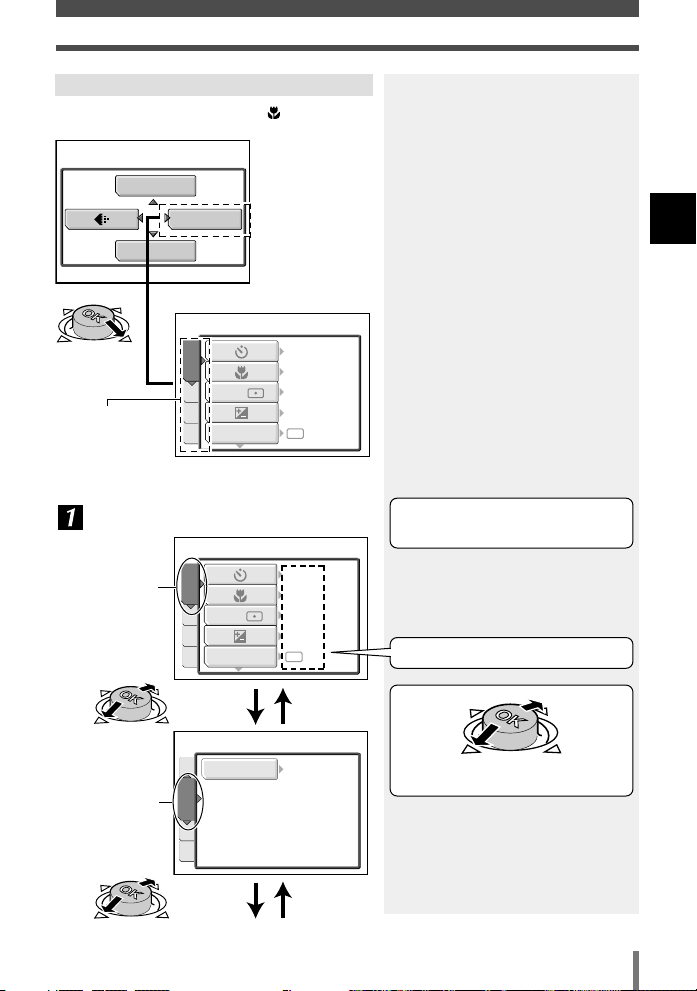
If correct focus cannot be obtained
Press
HQHQ
2288 1712
P
The camera selects the subject to focus on automatically by detecting the
contrast. If the subject’s contrast is relatively weak, the camera may focus on
something else within the chosen image composition. To avoid this you can use
Focus Lock.
2
Things to know before shooting
How to focus on a difficult subject
Turn on the power in the mode.
Position the AF target mark on the
subject you want to focus on.
AF target
mark
26
POWER switch
Shutter button
Monitor
Mode switch
Page 27
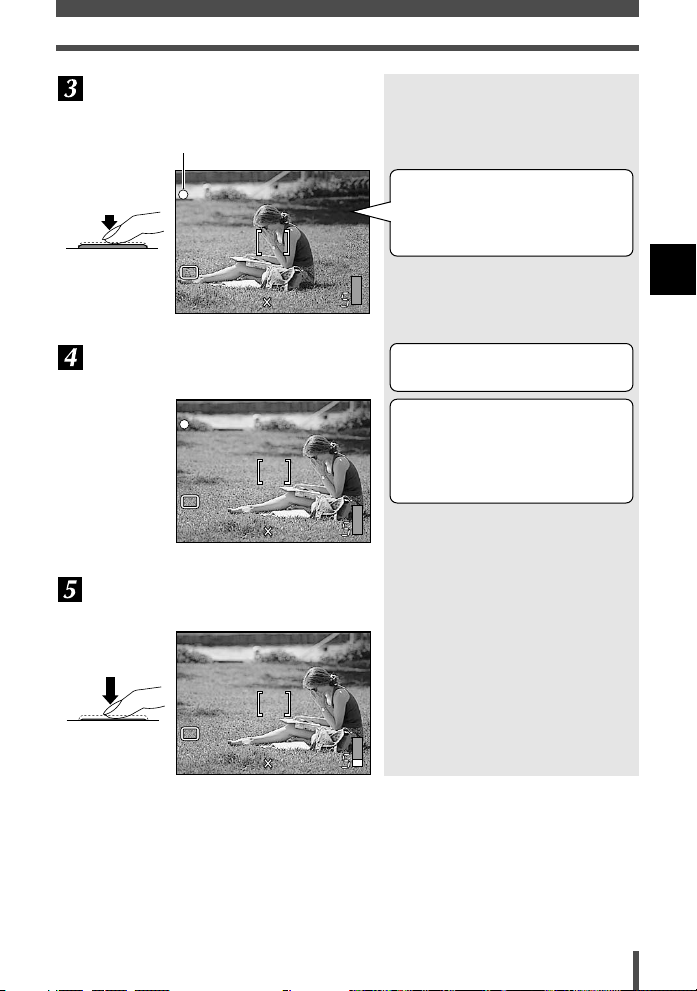
Keep the shutter button pressed
HQHQ
2288 1712
P
halfway until the green lamp lights.
Green lamp
If correct focus cannot be obtained
Half press
P
HQHQ2288 1712
Keeping the shutter button pressed
halfway, recompose your shot.
P
HQHQ2288 1712
Fully press the shutter button to
capture the picture.
Full press
When shooting a hard-to-focus
subject, point the camera at an
object about the same distance
away as the subject.
2
Things to know before shooting
The focus and exposure are locked
(autofocus).
If the green lamp blinks when the
shutter button is pressed
The subject is out of focus.
Recompose your shot and try
focusing again.
27
Page 28
If correct focus cannot be obtained
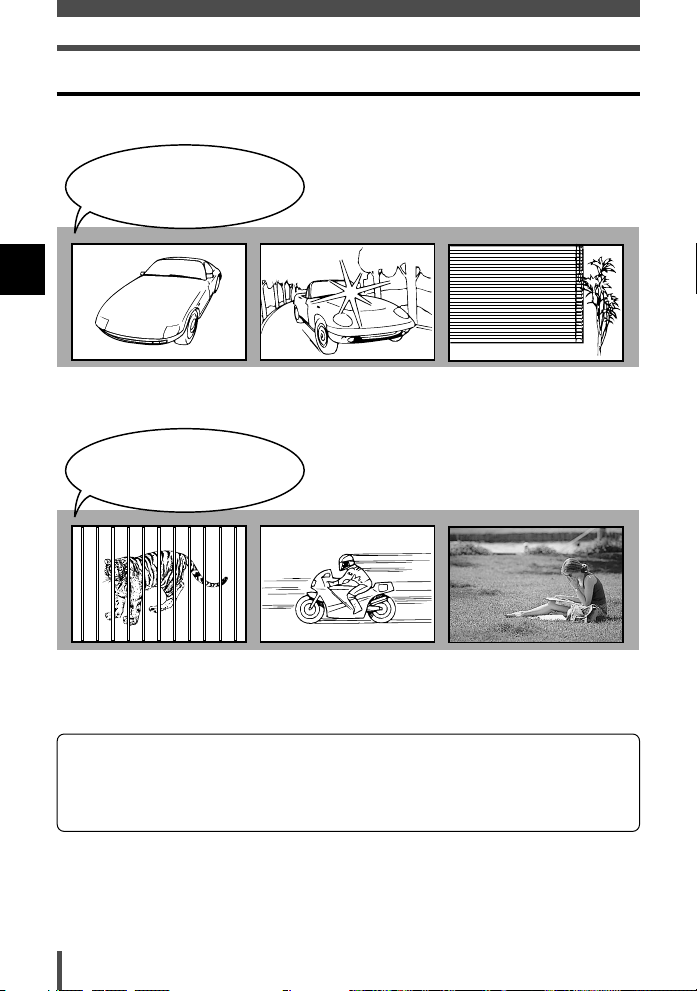
Subjects that are difficult to focus on
Under the following conditions, auto focus may not work properly.
The green lamp blinks:
The subject cannot be
brought into focus.
2
Things to know before shooting
Subjects with low contrast
The green lamp lights, but
the subject cannot be
brought into focus.
Subjects with different
distances
Subjects in excessively bright
light in the center of the frame
Fast-moving subjects The subject you are
Subjects with no vertical
lines
focusing on is not in the
center of the frame.
If this happens, focus on a high-contrast object the same distance away as the
intended subject, recompose your shot and then take the picture. If the subject has
no vertical lines, hold the camera vertically and adjust the focus, then return the
camera to the horizontal position to take the picture.
28
Page 29
Selecting the record mode
You can select the best record mode for your purpose (printing, editing on a PC,
attaching to e-mail, etc.).
Still picture record mode
In the mode, select in the top
menu.
~ “How to use the menus” (P. 17)
Select from [SHQ], [HQ], [SQ1] or
[SQ2].
SHQ 2288x1712
HQ 2288x1712
SQ 1 1280x960
SQ 2 640x480
SELECT
Confirm the setting When you select the
picture size
Select the picture size.
SHQ/HQ setting
HQ
2288x1712
GO
OK
Mode switch
2
Things to know before shooting
Joystick
Refer to the table on page 31 for
selecting the record mode.
3:2
CANCEL
2288x1520
SELECT
GO
OK
29
Page 30
Selecting the record mode
SQ1/SQ2 setting
Select the
picture size.
2
Things to know before shooting
Select the
compression.
2048x1536
1600x1200
1280x960
CANCEL
2048x1536
1600x1200
1280x960
SQ1
SELECT
SQ1
SELECT
HIGH
NORMAL
GO
HIGH
NORMAL
GO
OK
OK
30
Page 31

Larger file size, clearer image quality
Smaller file size, normal image quality
SHQ
*1
2288 x 1712
HQ
*2
SQ1
SQ2
2048 x 1536
1600 x 1200
1280 x 960
1024 x 768
640 x 480
HIGH
*1
NORMAL
*2
HIGH
*1
NORMAL
*2
For printing in larger size or
image retouching on a computer.
For printing in postcard size
For uploading to Web Site or
attaching to e-mail.
Picture sizeRecord
mode
*1 : Low compression
*2 : High compression
3:2
P
HQHQ
2288 1520
The image aspect ratio is normally 4:3. If the aspect
ratio is changed to 3:2, the image can be printed at a
photo lab without losing the image borders.
Selecting the record mode
2
Things to know before shooting
Compression
Image data are compressed with this camera. The higher the compression, the less clear
the image will be.
Note
The number of remaining pictures may change according to the subject or
factors like whether print reservations have been made or not. In certain
instances, the number of remaining pictures displayed on the monitor does not
change even when you take pictures or stored images are erased.
31
Page 32

Selecting the record mode
SHQ 640 x 480 30fps
SQ 1 320 x 240 30fps
SQ 2 320 x 240 15fps
HQ 640 x 480 15fps
SELECT
GO
OK
Movie record mode
In the mode, select in the top
menu.
~ “How to use the menus” (P. 17)
Select the record mode.
2
Things to know before shooting
Resolution
The number of pixels (horizontal x vertical) used when saving an image. If the image is
going to be printed, higher resolutions (larger numbers) are recommended so that the
image will be clearer. However, higher resolutions make the file size (amount of data)
larger, so fewer pictures can be saved.
Resolution and picture size on a computer screen
When a picture is transferred to a computer, the size of the picture on the computer screen
varies depending on the computer’s monitor setting. For instance, a picture taken in 1024 x
768 resolution is the same size as the screen if you set the picture to 1x when the monitor
setting is 1024 x 768. However, if the monitor setting is over 1024 x 768 (such as 1280 x
1024), the picture only takes up part of the screen.
640 x 480, 320 x 240 T Resolution
30 fps T 30 frames/sec.
32
Page 33

3
Advanced shooting
Close-ups of small objects like flowers or jewelry, capturing a fastmoving subject like a child running around, shooting with a naturallooking illuminated background at night — did you ever wonder how to
achieve the results you want without complicated and time-consuming
camera settings?
With this camera, you will find a new way of capturing all those special
moments and effects in an instant. All you have to do is to select the
appropriate mode, and concentrate on your composition; no complicated
settings as with other cameras.
Also, many more features are available, including panorama shooting for
assembling several images to form a single panoramic image, and 2-in-1
shooting to store two successive images as a single picture, features
which only a digital camera can provide. The more you shoot, the more
possibilities you will discover.
Page 34

Using the situation-related shooting modes
INDOOR
P
SELECT
GO
OK
In addition to the basic shooting mode (Program Auto), more than 10 different
shooting modes (~ P. 34 - 38) are available to suit a wide range of shooting
situations. The camera automatically optimizes the settings for the shooting
conditions and provides the effects you want.
In the mode, select SCENE
SELECT in the top menu.
~ “How to use the menus” (P. 17)
Select the shooting mode.
3
Advanced shooting
Currently selected mode
POWER switch
Joystick
A sample image of the selected
shooting mode is displayed.
NIGHT SCENE
Suitable for shooting images of outdoor
scenes in the evening or at night.
Usually a street at night makes a dark
image with only the sparkle of lights
such as street lamps due to the lack of
brightness. This mode allows you to
capture the true appearance of the
street.
• Since the shutter speed is slow, be sure to
stabilize the camera.
Mode switch
34
Page 35

Using the situation-related shooting modes
NIGHT+PORTRAIT
Suitable for shooting both the main
subject and background at night.
• Since the shutter speed is slow, be sure to
stabilize the camera.
• The flash fires in the red-eye reduction
mode.
~ “Flash” (P. 52)
LANDSCAPE
Suitable for shooting landscapes and
other outdoor scenes. Vivid
reproduction of blues and greens.
3
Advanced shooting
LANDSCAPE+PORTRAIT
Suitable for shooting both main subject
and background. The camera brings
both of them into focus.
35
Page 36

Using the situation-related shooting modes
3
Advanced shooting
INDOOR
Suitable for shooting both the main
subject and background indoors. Clear
reproduction of background as well.
FIREWORKS
Suitable for shooting fireworks.
• Since the shutter speed is slow, be sure to
stabilize the camera.
36
PORTRAIT
Suitable for shooting a portrait-style
image of a person. Only the subject is
brought into focus with a blurred
background.
Page 37

Using the situation-related shooting modes
SELF PORTRAIT
Allows you to take a picture of yourself
while holding the camera. The focus is
locked on you (shooter).
• Zoom position is fixed at W.
CUISINE
Suitable for still life photography. Vividly
reproduces colors of fruit, vegetables,
flowers, etc.
3
Advanced shooting
SPORT
Suitable for capturing fast-moving action
without blurring.
37
Page 38

Using the situation-related shooting modes
3
Advanced shooting
AVAILABLE LIGHT PORTRAIT
BEACH & SNOW
Suitable for shooting snow-capped
mountain landscapes, white sand
beaches, seascapes, etc.
Suitable for shooting sensitive subjects
in lowlight conditions without a flash.
• Since the shutter speed is slow, be sure to
stabilize the camera.
38
SUNSET
Suitable for taking sunset pictures.
Vivid red and yellow color reproduction.
• The flash cannot be used.
• Since the shutter speed is slow, be sure to
stabilize the camera.
Page 39

Zoom
HQ
2288 1712
P
T
W
HQ
2288 1712
P
T
W
Telephoto shooting is possible by using the optical and digital zoom. The optical
zoom uses the lens of the camera to move you closer to your subject, and digital
zoom crops the center of the image projected onto the CCD and enlarges it
digitally with slightly reduced picture quality.
This camera offers 2.8x optical zoom magnification (equivalent to 40 mm to 112
mm on a 35 mm film camera). By combining the optical zoom and digital zoom,
you can increase magnification up to approximately 30x (record mode: SQ2).
The maximum zoom magnification is 15x when shooting still pictures in the SHQ,
HQ or SQ1 modes. The maximum zoom magnification is 11x when shooting
movies.
Optical zoom
Press the zoom button in the
mode.
Zoom button ( W )
Zoom button (T )
Mode switch
3
Advanced shooting
Take the picture.
39
Page 40

Zoom
DIGITAL ZOOM — Using the digital zoom
In the mode:
In the top menu , select MODE MENU
T CAMERA T DIGITAL ZOOM T
ON.
In the mode:
In the top menu, select DIGITAL
ZOOM T ON.
3
~ “How to use the menus” (P. 17)
Advanced shooting
Press the zoom button (T ).
P
HQHQ2288 1712
Joystick
If the digital zoom is set to ON, a
red area appears on the zoom
T
indicator. When you reach the limit
of the optical zoom, the digital zoom
is activated.
W
Zoom button (T )
Note
● Pictures taken using digital zoom may appear grainy.
● Camera movement is likely to occur at higher magnification during telephoto
shooting. Stabilize the camera to avoid camera movement.
● When you are shooting in the SQ2 record mode, the images you are viewing
on the monitor will appear grainier than the actual recorded images.
● Zoom cannot be used when the shooting mode is set to SELF PORTRAIT
(~ P. 37) or is set to (~ P. 41).
40
Page 41

OFF
CAMERA
CARD
SET PIC
EPS/
DRIVE
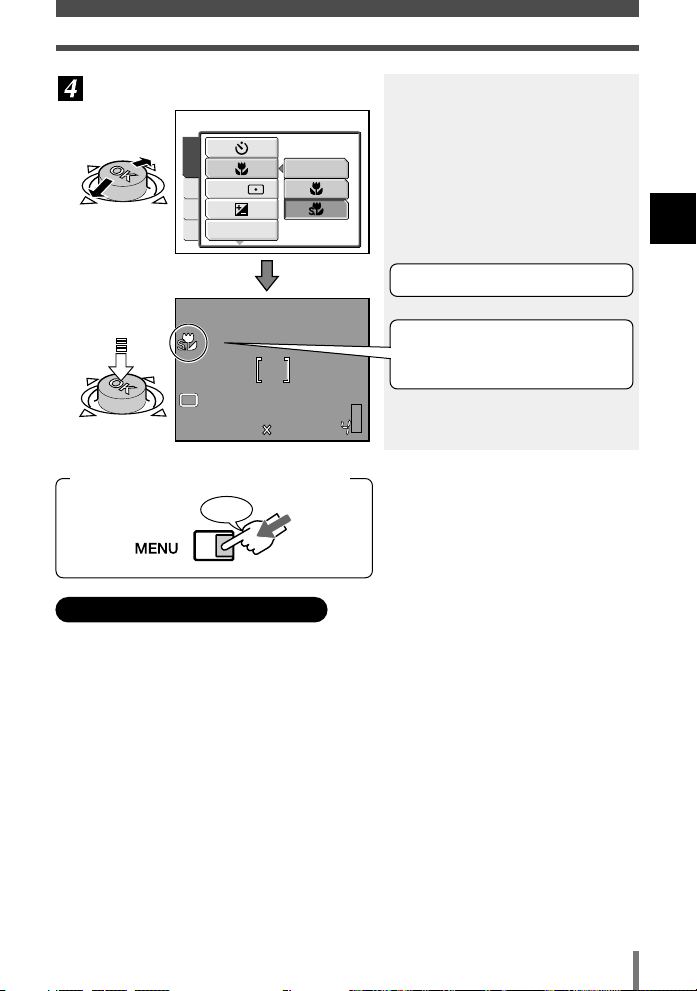
Macro mode shooting
Focusing is usually slow when you get close to a subject. In the macro mode
focusing will be performed quickly.
For shooting from as close as 30 cm
(macro)
– 50 cm (1ft - 1.6ft) to a subject.
In the or mode, select MODE
For shooting from as close as 3
cm (1.2 in) to a subject.
(super macro)
Shutter button
MENU in the top menu T CAMERA
TTor .
~ “How to use the menus” (P. 17)
Macro
Joystick
Super macro
Take the picture.
Note
● If you use the flash in the (macro) mode, shadows may be noticeable and
the correct exposure may not be achieved.
● In the (super macro) mode, flash or zoom cannot be used.
3
Advanced shooting
41
Page 42

Self-timer shooting
This feature allows you to take pictures with yourself in them. Stabilize the
camera.
In the or mode, select MODE
MENU in the top menu T CAMERA
TTON.
~ “How to use the menus” (P. 17)
P
3
Advanced shooting
HQHQ2288 1712
Take the picture.
Joystick
The mark is displayed.
The self-timer lamp lights up for
approximately 10 seconds, then
blinks for approximately 2 seconds
before the picture is taken.
To stop the self-timer, press MENU
so that the self-timer lamp goes off.
Note
The self-timer is canceled automatically when shooting is finished.
However, in 2 IN 1 (~ P. 46) or PANORAMA (~ P. 44) shooting, the selftimer is not canceled after one shot.
Shutter button
MENU button
42
Page 43

DRIVE — Sequential shooting
You can shoot pictures sequentially. In the HQ record mode, approximately 9 frames
can be shot in sequence.
In the mode, select MODE MENU
in the top menu T CAMERA T
DRIVE T .
Shutter button
~ “How to use the menus” (P. 17)
Take pictures.
Focus, exposure and white
balance are locked at the first
shot.
Joystick
The camera takes pictures in
sequence while the shutter button is
being pressed down. Releasing the
shutter button stops sequential
shooting.
Note
Sequential shooting is not available in some situation-related shooting modes.
~ “Available functions by shooting mode” (P. 168)
3
Advanced shooting
43
Page 44

PANORAMA
Right to Left Bottom to Top
Top to Bottom Left to Right
Confirm
You can take advantage of panorama shooting when you use an Olympus
xD-Picture Card. Pictures with overlapping edges can be connected to form
a single panoramic image with OLYMPUS Master software (included on the
provided CD-ROM).
In the mode, select MODE MENU
3
in the top menu T CAMERA T
PANORAMA.
Advanced shooting
~ “How to use the menus” (P. 17)
Use the Joystick to select the
direction you want the images
connected.
Joystick
Shutter button
MENU button
44
Page 45

PANORAMA
First shot Second shot Third shot
Focus, exposure and white balance
are set by the first shot.
Keeping the area in the frame at the edge of the screen in mind, position the camera so that
the same area appears in the frame for the next image.
Zooming is not possible
after the first shot.
Make sure that the edges of images
overlap, then take your pictures.
Example: When connecting images from left
to right.
Panorama shooting is possible for
up to 10 pictures.
Press MENU to finish panorama
shooting.
Note
● Panorama shooting is possible only when using the Olympus brand card.
● The following functions are not available during panorama shooting: flash
shooting, sequential shooting, 2 IN1 shooting, SELF PORTRAIT shooting
3
Advanced shooting
45
Page 46

2 IN 1
Allows you to combine two pictures taken in succession and store them as a
single picture.
3
Advanced shooting
In the mode, select MODE MENU
in the top menu T CAMERA T
2 IN 1.
~ “How to use the menus” (P. 17)
Take the first shot.
Take the second shot in succession.
First shot
HQHQ2288 1712
HQHQ2288 1712
1
2
st
nd
Second shot
Shutter button
Joystick
• The subject will be on the left in the
combined image.
• To cancel the first shot, press
MENU.
• The pictures are combined and
stored as a single picture.
• The subject will be on the right in
the combined image.
• The 2-IN-1 shooting mode is
canceled automatically after the
second shot.
MENU button
46
Page 47

Movie recording
HQ
You can record movies and sound simultaneously. When shooting in the SHQ
record mode, the maximum recording time is approximately 8 seconds.
Turn on the camera in the mode.
~ P. 1 0
Press
Compose your shot while viewing
the monitor.
Flash cannot be used.
HQ
AF target mark
~ P. 26
Remaining movie recording
time (hour: min. : sec.)
Monitor
• The subject can be magnified
using the zoom button.
~ “Zoom” (P. 39)
• The remaining recording time
depends on the selected record
mode, free space available on the
card, etc.
record mode” (P. 29)
Microphone
POWER
switch
Shutter
button
Mode switch
~ “Selecting the
3
Advanced shooting
Start recording.
Press the shutter button fully.
Displayed in red during recording
• Focus and optical zoom are locked
while recording movies with sound.
• You can record movies without
sound by setting to OFF.
~ “Recording sound” (P. 49)
HQ
47
Page 48

Movie recording
HQHQ
Stop recording.
Press the shutter button fully again.
blinks while the movie is being
stored on the card.
3
Advanced shooting
When the remaining recording time has been used up, recording stops
automatically.
Note
48
Page 49

HQHQ
2288 1712
P
Recording sound
This function lets you record sound when taking a still picture or recording movies.
In the top menu, select MODE MENU
T CAMERA TTON.
~ “How to use the menus” (P. 17)
Microphone
Shutter button
Take a picture or record movies.
Joystick
The mark is displayed.
Recording sound with still
pictures:
• Recording starts immediately after
the shutter is released and lasts
about 4 seconds.
• When recording starts, turn the
camera microphone towards the
source of the sound you want to
A bar is displayed during
record.
recording
• Sound can be added later to still
images. Recorded sound can also
be changed.
recorded images” (P. 69).
~ “Adding sound to
Note
● Sound may not be recorded clearly in the following situations:
– When the microphone is covered with your fingers
– When the camera is more than 1 m (3.3 ft.) away from the source of the sound
● It is not possible to take another picture during sound recording.
● Sound recording is not possible during sequential shooting, 2 IN 1 or
PANORAMA shooting.
● Sound recording may also pick up camera noises, such as button
operations, shutter movement, etc.
3
Advanced shooting
49
Page 50

MEMO
50
Page 51

4
ISO
DIGITAL ZOOM
PANORAMA
2 IN 1
AUTO
80
100
200
400
CAMERA
CARD
SET PIC
–2.0
CAMERA
CARD
SET PIC
ESP/
DRIVE
How to optimize your settings before shooting
If you wish to go beyond simple shooting using only the shutter button,
you will find various functions that can be used to modify
image/brightness/exposure parameters to achieve remarkably better
results.
For instance, if you want to shoot in a place where the use of a flash is
prohibited, such as a museum or theater, or if your subject would
strongly reflect the flash light, shooting without the flash would typically
result in a blurred or dark picture. To overcome this problem, try adjusting
the ISO setting; use a lower ISO value with normal light, and a higher
ISO value with dark subjects.
With exposure compensation you can adjust the image brightness and
make a significant difference to how the picture turns out. Try adjusting
toward “–” when shooting a sunset. The setting sun will glow dark red
over the dark ocean.
Page 52

Flash
You can select from 4 different flash modes depending on the light conditions and
the effect you want to achieve.
Auto-flash (No indication)
Automatically fires in low-light and backlight conditions.
Red-eye reduction flash ()
The light from the flash may make
the subject’s eyes appear red in the
image. The red-eye reduction flash
mode significantly reduces this
phenomenon by emitting preflashes before firing the regular
4
flash. This helps accustom the
How to optimize your settings before shooting
subject’s eyes to the bright light and
minimizes the red-eye
phenomenon.
Fill-in flash ()
The flash fires regardless of
available light. This mode is useful
for eliminating shadows on the
subject’s face (such as shadows
from tree leaves) or for correcting
the color shift produced by artificial
lighting (especially fluorescent light).
The subject’s eyes
appear red.
Flash off ()
The flash does not fire even in low light conditions. Use this mode in situations
where flash photography is not desired or is prohibited. You can also use this
mode when you want to shoot a natural-looking twilight or night scene.
52
Page 53

Flash
HQHQ
2288 1712
P
In the mode, select FLASH
MODE in the top menu, then select
Shutter button
the flash mode. ~“How to use the
menu” (P. 17)
Press the shutter button halfway.
Half press
The icon of the
selected flash
mode
Press the shutter
button all the way
down (fully) to
take the picture.
Full press
Joystick
The (flash stand-by) mark lights
when the flash is ready to fire. If the
mark is blinking, the flash is
charging. Wait until charging is
complete.
Flash working range
W (max.) : Approx. 0.3 m - 2.2 m
(1.0 ft - 7.2 ft)
T (max.) : Approx. 0.3 m - 1.3 m
(1.0 ft - 4.3 ft)
Note
● When using a situation-related shooting mode (~ P. 34), the flash may not
be used.
● The flash cannot be used during sequential shooting (~ P. 43), super
macro shooting (~ P. 41) or movie recording (~ P. 47).
● When there is a likelihood that camera movement will occur in the flash off
mode, the (camera movement warning) mark blinks. Use the flash.
Red-eye reduction flash ()
● After the pre-flash, it takes approximately 1 second before the shutter is
released. Hold the camera firmly after the pre-flash to prevent camera
movement.
● Effectiveness may be limited if the subject is not looking directly at the preflashes, or if the shooting range is too far. Individual physical characteristics
may also limit effectiveness.
Fill-in flash ()
● Fill-in flash may not have the desired effect under excessively bright light.
Flash off ()
● Since a slow shutter speed is automatically selected in low-light situations in
the flash off mode, it is recommended that you stabilize the camera to
prevent your pictures from being blurred by camera movement.
4
How to optimize your settings before shooting
53
Page 54

ISO sensitivity
ISO
DIGITAL ZOOM
PANORAMA
2 IN 1
AUTO
80
100
200
400
CAMERA
CARD
SET PIC
The higher the ISO value, the greater the camera’s light sensitivity and the better
its ability to shoot in low light conditions. However, higher values also introduce
noise into the resulting image, which may give them a grainy appearance.
In the mode, select MODE MENU
in the top menu T CAMERA T ISO.
Shutter button
~ “How to use the menus” (P. 17)
4
sensitivity.
How to optimize your settings before shooting
Take the picture.
Select the most suitable ISO
Joystick
Sensitivity is automatically adjusted
according to the light conditions and
the subject brightness.
With a lower ISO setting, you can
shoot clear, sharp images in
daylight. With a higher ISO setting,
you can use faster shutter speeds
with the same amount of light.
Note
● ISO sensitivity expresses the speed of photographic negative with film
cameras, and the given values with a digital camera are ISO equivalent.
● When ISO is set to AUTO and you are shooting in dark conditions without a
flash, the sensitivity automatically increases; otherwise the shutter speed will
be reduced, possibly resulting in camera movement and blurred images.
● If the subject is too far away from the flash the sensitivity will be automatically
increased when ISO is set to AUTO.
54
Page 55

Changing the metering area
Spot metering is useful when you do not want to let the brightness of the
surrounding area affect the picture. Recommended for shooting a backlit subject.
ESP
Meters the center of the monitor and the
surrounding area separately. The area in
the center of the monitor may appear dark
when there is strong backlight.
In the or mode, select MODE
MENU in the top menu T CAMERA
T ESP/ T select ESP or .
~ “How to use the menus” (P. 17)
Take the picture.
Meters only the center of the monitor to
determine exposure. A subject can be
shot with optimal exposure regardless
of the background light.
Shutter button
Joystick
4
How to optimize your settings before shooting
55
Page 56

Varying the image brightness (Exposure Compensation)
0.0
CAMERA
CARD
SET PIC
ESP/
DRIVE
In some situations, you may get better results when the exposure that the camera
sets is compensated (adjusted) manually. Often bright subjects (such as snow) will
turn out darker than their natural colors. Adjusting toward + makes these subjects
closer to their real shades. For the same reason, adjust toward – when shooting
dark subjects. Exposure can be adjusted in the range of ±2.0 EV in 1/2 EV steps.
–2.0 +2.00.0
In the or mode, select MODE
MENU in the top menu T CAMERA
4
T , then adjust the exposure.
How to optimize your settings before shooting
~ “How to use the menus” (P. 17)
Joystick
Adjusts towards + to make the
image brighter, or – to make the
image darker.
Take the picture.
Note
● If the flash is used, the image brightness (exposure) may differ from the
intended brightness.
● Exposure compensation cannot correct the image if the surroundings of the
subject are extremely bright or dark.
56
Shutter button
Page 57

WB — Adjusting the color tone
WB
AUTO
PICTURE
CARD
SET
CAM
Color reproduction differs depending on the light conditions. For instance, when
daylight, the setting sun or tungsten lighting are reflected on white paper, the
shade of white produced will be slightly different for each. By setting the WB (white
balance), you can achieve more natural-looking colors.
In the or mode, select MODE
MENU in the top menu T PICTURE
T WB, then select the white balance.
~ “How to use the menus” (P. 17)
Joystick
The white balance is adjusted
automatically so that colors look natural
irrespective of the light source.
For natural colors under a clear sky.
For natural colors under a cloudy sky.
For natural colors under tungsten
lighting.
For natural colors under fluorescent
Take the picture.
lighting.
Note
● White balance may not be effective under certain light sources.
● After setting a white balance other than AUTO, play back the image and
check the colors on the monitor. ~ “Playback” (P. 59)
● When the flash is fired with a white balance setting other than AUTO, colors
may appear different in the resulting image from the colors you see on the
monitor.
● White balance is determined automatically by the camera if a situationrelated shooting mode (~ P. 34) is selected.
Shutter button
4
How to optimize your settings before shooting
57
Page 58

Image stabilizer
OFF
ON
SELECT
GO
OK
HQHQ
Reduces the effects of camera shake during movie recording.
The camera prevents the subject from appearing blurred by adjusting the images
projected onto the CCD as the subject moves. Images will be slightly enlarged if
this function is used.
In the mode, select in the
top menu, then select ON.
~ “How to use the menus” (P. 17)
4
How to optimize your settings before shooting
Start movie recording.
Joystick
is displayed.
Note
● Image stabilizer may not be effective depending on the camera or subject
movement.
● Be sure to turn off this function when you stabilize the camera before
shooting. The resulting images may shake according to the subject
movement.
Shutter button
58
Page 59

5
1313
1616
1111
1414
1717
1212
1515
1818
1010
Playback
One of the big advantages of a digital camera is that as soon as you take
a picture, you can see how it looks right away. That means that if the
picture is out of focus or just hasn’t turned out the way you want, you can
erase it and try again. With a film camera, on the other hand, you won’t
know if there is a problem with the picture until you get the film
developed. Because a digital camera lets you erase those unwanted
images, you can keep more memory free to store images and take more
shots.You can also protect images that you do not want to erase.
Another benefit is that you can edit recorded images: change colors to
black and white or sepia, trim images, change the resolution, etc.
So take advantage of your digital camera’s benefits and have fun taking
great pictures.
Page 60

Viewing still images
Press
100–0015
HQHQ
’04.12.24 00:00 15
Single-frame playback
Turn on the camera in the mode.
The shooting information
The last recorded
image appears.
displayed on the screen
disappears after 3 seconds.
Joystick
POWER switch
5
Playback
Use the Joystick to select images you want to view.
Push the Joystick left to display
the previous image.
Push the Joystick down to jump
to the image 10 frames ahead.
Note
If the camera is not operated for more than 3 minutes, the monitor turns off,
then the camera turns off. When the AC adapter is used, the camera does not
turn off.
Push the Joystick up to jump to
the image 10 frames back.
Push the Joystick right to
display the next image.
Mode switch
60
Page 61

Press
100100–00100010
HQHQ
’04. 01.13 21:56 04. 01.13 21:56 1010
2.0
Close-up playback
Lets you enlarge and display images at up to 5 times normal size.
Play back the image you want to
view.
Zoom button W /T
~ “Single-frame playback”(P. 60)
Press the zoom button to enlarge
it.
Joystick
Each time you press the zoom button, the image is
enlarged.
• Images with the mark cannot be enlarged.
Pressing the Joystick displaces the image in
the direction of the arrow.
Viewing still images
5
Playback
Press
2.0
Each time you press the zoom button , the
image is enlarged in steps of 1 time.
The image returns to the original size (1x).
61
Page 62

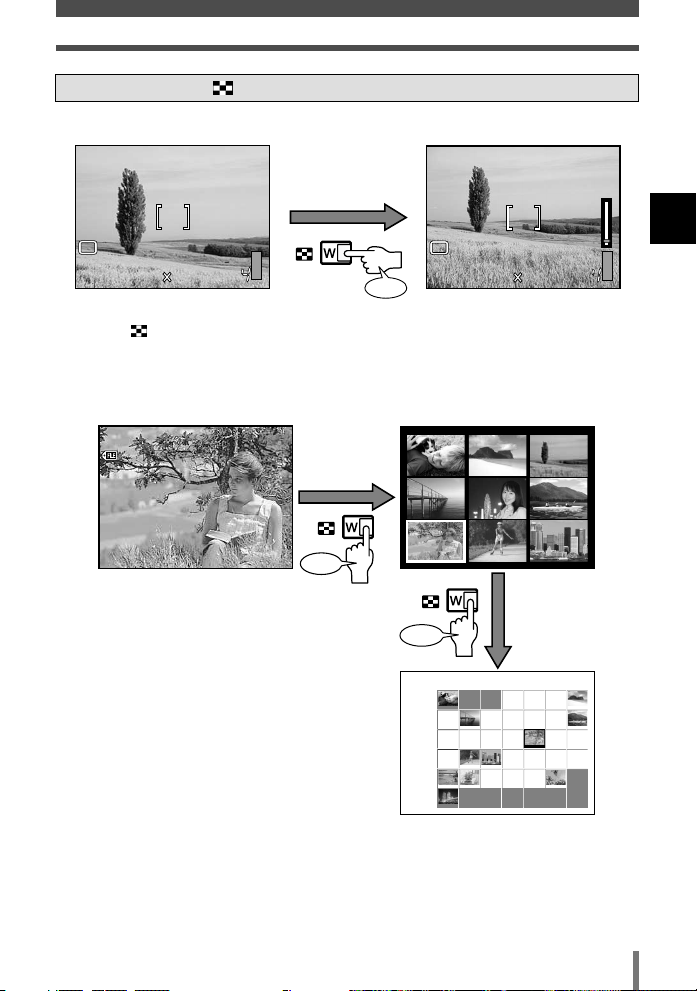
Viewing still images
1313
1616
1111
1414
1717
1212
1515
1818
1010
100100–00100010
HQHQ
’04. 01.13 21:56 04. 01.13 21:56 1010
1313
1616
1111
1414
1717
1212
1515
1818
1010
100
0012
HQ
04. 01.13 21:56 1212
Press
Index display
Lets you show several images at the same time on the monitor. It is useful when
you want to quickly search a number of images to find a particular one.
Play back an image.
~ “Single-frame playback” (P. 60)
Press the
zoom button
.
Zoom button W /T
Joystick
5
Playback
Use the Joystick to select the
desired image.
Moves to the
previous frame.
Moves to the frame
located below the frame
you are selecting.
62
Moves to the frame
located above the frame
you are selecting.
Moves to the
next frame.
• The 9-frame index screen is
displayed.
• You can also select the number of
images on an index screen from 4,
16 or 25.
~ “Selecting the
number of images” (P. 100)
Press the zoom button .The
screen returns to single-frame
playback.
100
’04. 01.13 21:56
–0012
Press
HQ
Page 63

Viewing still images
11
18
25
Calendar display
You can search and view images stored on the card according to calendar date.
Press the zoom button twice.
200412Sun Mon Tue Wed Thu Fri Sat
29 30
28
5 6 7 8 9 101011
12121313141415151616171718
19192020212122222323242425
2626272728282929303031311
2345678
Use the Joystick to select the date.
Example
20th is currently
selected.
200412Sun Mon Tue Wed Thu Fri Sat
29 30
28
5 6 7 8 9 10 11
12 13 14 15 16 17 18
19 20 21 22 23 24 25
26 27 28 29 30 31 1
2345678
3 4
1 2
Moves back to
the same day of
the week with
images.
1 2
Moves forward
to the same day
of the week with
images.
In index display mode, press the
zoom button once.
If more than one image was taken
on a single date, the image shot first
on that date is displayed.
3
4
Moves back to the
first previous date
with images.*
Moves to the
next date with
images .*
*Moves only to dates with images.
5
Playback
The first frame of the
selected date enters
single-frame playback
mode.
63
Page 64

Viewing still images
Slideshow (sequential auto playback)
Lets you run through images stored in the card one after another. If you try to use
slideshow with a movie, only the first frame of the movie is played back.
In the top menu, select .
~ “How to use the menus” (P. 17)
Joystick
Slidshow starts.
5
Playback
End slideshow.
Slideshow repeats until the Joystick
is pressed.
~ “ SETUP — Changing the
slideshow pattern” (P. 101)
Note
When running a slideshow for a long time, we recommend that you use the AC
adapter. If you use the battery, the camera will enter the sleep mode after
about 30 minutes and stop the slideshow automatically.
64
Page 65

Viewing still images
100100–00100010
HQHQ
’04. 11.27 21:56 04. 11.27 21:56 1010
HQHQ
’04. 11.27 21:56 04. 11.27 21:56 1010
100100–00100010
HQHQ
’04. 11.27 21:56 04. 11.27 21:56 1010
100100–00100010
100100–00100010
HQHQ
’04. 11.27 21:56 04. 11.27 21:56 1010
Rotating images
Images shot with the camera held vertically are displayed horizontally. This
function lets you turn such images 90 degrees counterclockwise or clockwise so
that they are displayed vertically.
Example:
Images shot with
the camera held
vertically.
In the top menu, select MODE MENU
T PLAY TT+90°,0° or –90°.
Joystick
~ “How to use the menus” (P. 17)
[+90°][–90°]
Image turned 90 degrees
clockwise
[0°]
Original image before rotating
● New picture orientations are saved even when the power is turned off.
● Protected pictures cannot be rotated. ~ P. 7 8
Image turned 90 degrees
counterclockwise
Note
5
Playback
65
Page 66

Editing still images
BLACK & WHITE
SEPIA
EDIT
PLAYCARD
SET
BLACK & WHITE
BLACK & WHITE
CANCEL
SELECT
GO
EXIT
OK
SEPIA
SEPIA
CANCEL
SELECT
GO
EXIT
OK
Lets you edit recorded still images. The following editing functions are available.
Edited images will be saved as new images.
BLACK & WHITE Creates black and white images.
SEPIA Creates sepia-toned images.
Resizing Converts the image file size to 640 x 480 or 320 x 240.
Trimming Crops part of image.
BLACK & WHITE and SEPIA
Play back the image you want to
change to a black and white image or
sepia-toned image. ~ “Single-frame
playback” (P. 60)
In the top menu, select MODE MENU
T EDIT.
~ “How to use the menus” (P. 17)
5
Select BLACK & WHITE or SEPIA.
Playback
Joystick
66
When you have selected BLACK &
WHITE: Select BLACK & WHITE.
When you have selected SEPIA:
Select SEPIA.
The black and white image or sepiatoned image is displayed.
A bar is displayed when editing is in
progress. When the bar disappears,
the normal display is restored.
Page 67

640 x 480
CANCEL
320 x 240
SELECT
GO
EXIT
OK
CANCEL
SELECT
GO
EXIT
OK
Resizing
Editing still images
Play back the image you want to
resize.
~ “Single-frame playback”(P. 60)
In the top menu, select MODE MENU
T EDIT T .
“How to use the menus” (P. 17)
~
Select the file size.
Trimming
Play back the image you want to
trim.
~ “Single-frame playback”(P. 60)
In the top menu, select MODE MENU
T EDIT T .
~ “How to use the menus” (P. 17)
Zoom button W /T
Joystick
A bar is displayed when editing is in
progress. When the bar disappears,
the normal display is restored.
5
Playback
Select .
67
Page 68

Editing still images
CANCEL
RESET
OK
SELECT GO
OK
OK
GO
OKOK
GO
OK
WT
Press
T
W
Set trimming.
Set the trimming position.
WT
GOGO
OK
OK
Set the trimming size.
5
Playback
Select OK.
● In the following cases, EDIT is not available:
– Movie
– Images processed on a personal computer
– When the card does not have enough memory
● Trimmed images may appear grainy when printed.
68
The orientation of the trimming
frame changes from horizontal to
vertical and vice versa when the
maximum or minimum size is
reached.
The preview is displayed.
A bar is displayed when editing is in
progress. When the bar disappears,
the normal display is restored.
• To change the trimming setting,
select RESET. Do the procedure
from step .
•To quit trimming setting, select
CANCEL.
Note
Page 69

Adding sound to recorded images
START
EDIT
PLAY
CARD
SET
Sound can be added to a still image that you have already shot.You can also rerecord over the sound that has already been recorded. Recording time per image
is approximately 4 seconds.
Play back the image you want to add
sound to.
~ “Single-frame playback”(P. 60)
In the top menu, select MODE MENU
PLAY
T
“How to use the menus” (P. 17)
~
Point the camera microphone at the
target and start recording.
T
.
Joystick
Microphone
5
Playback
Note
● To obtain the optimum sound, the microphone should be placed no farther
than 1 m (3.3 ft.) away from the subject.
● If you re-record the sound, the original sound is erased.
● Sound may not be recorded if there is insufficient card memory available
(the CARD FULL message is displayed).
● Sound recording may pick up camera noises, such as button operation.
● Once sound has been added to an image, it is not possible to erase the
sound only. In this case, make a re-recording without sound.
69
Page 70

MOVIE PLAY — Viewing movies
00:04/09:30
00:03/09:30
00:02/09:30
00:01/09:30
MOVIE PLAYBACK
RESTART
EXIT
SELECT
GO
OK
Display an image with the mark.
~ “Single-frame playback”(P. 60)
(movie) mark
Joystick
MENU button
In the top menu, select MOVIE PLAY.
~ “How to use the menus” (P. 17)
5
Playback
When movie play finishes, the menu
is displayed.
00:01/09:30
00:02/09:30
00:03/09:30
The first frame of the movie is played
back.
Movie play starts.
• During movie play, you can play
the movie at double the normal
speed or adjust the sound volume.
• The operation guide is displayed at
the bottom of the screen.
~ “Available operations during
movie play” (P. 71)
Elapsed playback time/Overall
recording time
00:04/09:30
Movie play starts again at the first
frame.
The camera resumes normal
playback.
70
Page 71

Plays the movie in reverse at
double the normal speed.
Each time the Joystick is
pushed, the speed changes
in the following sequence:
x2 T x20 T x1
Plays the movie at double the
normal speed.
Each time the Joystick is
pushed, the speed changes
in the following sequence:
x2 T x20 T x1
Increases the sound volume.
Movie pauses.
Decreases the sound volume.
Frame-by-frame playback
(Holding the Joystick
down T Reverse playback)
Frame-by-frame playback
(Holding the Joystick down
T Playback)
Jumps to the last frame
of the movie.
Jumps to the first frame
of the movie.
The step screen
is displayed.
Available operations during movie play
During movie play
MOVIE PLAY — Viewing movies
During pause
Note
No sound is output when a movie is played at double or 20 times the normal
speed.
5
Playback
71
Page 72

Editing movies
This function lets you create indexes as well as edit movies.
CAPTURE — Capturing a movie frame
You can take one frame from the movie and save it as a still image. CAPTURE is
available only for images recorded in the SHQ or HQ record mode.
Play back the movie frame you want
to save as a still image. ~“MOVIE
PLAY — Viewing movies” (P. 70)
In the top menu, select MODE MENU
T EDITT CAPTURE.
~“How to use the menus” (P. 17)
Joystick
Select OK.
5
Playback
CAPTURE
OK
CANCEL
SELECT
GO
The captured movie frame is saved
as a new still image. The camera
resumes normal playback.
OK
Note
● Images created from movies are saved in 640 x 480 resolution. Images may
appear grainier than still images of the same size.
● You cannot create an index if there is insufficient memory space on the card.
● When the card access mark is blinking, do not open the battery/card
compartment cover. Doing so can not only damage the recorded images but
may damage the card as well, making it unusable.
72
Page 73

Editing movies
OKOKOK
GOGO
OKOKOK
GOGO
INDEX — Making movie index
Movies can be displayed as indexes of 9 still frames and stored as still images on
the card.
Play back the movie you want to
index.
In the top menu, select MODE MENU
T EDIT T INDEX.
~ “How to use the menus” (P. 17)
Joystick
Select the first frame of the index.
Displays the
previous frame.
Holding the
Joystick down
plays the movie
back in reverse.
Jumps to the
first frame of
the movie.
5
Playback
Select the last frame of the index as
shown in step .
Jumps to the
last frame of
the movie.
Setting is confirmed.
Displays the next
frame. Holding the
Joystick down plays
back the movie.
73
Page 74

Editing movies
04.
12.23 21:56
100
0050
HQ
50
Select OK.
INDEX
OK
RESET
CANCEL
SELECT GO
100
–0050
5
’04.
12.23 21:56
OK
Playback
To select different frames, select
RESET. Repeat the procedure from
step
.
To quit index editing, select
CANCEL.
• The 9 frames extracted
HQ
50
automatically from the movie
appear as an index display.
• The index is stored as a still image
in a different record mode from the
original movie.
Record mode when Record mode when
the movie is shot stored as an index
SHQ SQ1
HQ
SQ1 SQ2
SQ2
Note
● The interval between automatically extracted frames varies depending on
the length of the movie.
● INDEX is not available if there is not enough memory on the card.
(2048 x 1536 pixels)
(1024 x 768 pixels,
HIGH)
74
Page 75

EDIT — Editing a movie
OKOKOK
GOGO
OKOKOK
GOGO
This function lets you erase parts of the movie that you do not want.
In the top menu, select MODE MENU
T EDIT T EDIT.
~ “How to use the menus” (P. 17)
Joystick
Editing movies
Select the first frame of the part you
want to keep.
Select the last frame of the part you
want to keep as shown in step .
Displays the
previous frame.
Holding the
Joystick down
plays the movie
back in reverse.
Jumps to the
last frame of
the movie.
Setting is confirmed.
Jumps to the
first frame of
the movie.
Displays the next
frame. Holding the
Joystick down plays
back the movie.
5
Playback
75
Page 76

Editing movies
EDIT
NEW FILE
OVERWRITE
SELECT
GO
EXIT
OK
EDIT
OK
RESET
CANCEL
SELECT
GO
OK
5
Playback
Select OK.
To select different frames, select
RESET. Repeat the procedure from
step .
To quit movie editing, select
CANCEL.
Select NEW FILE or OVERWRITE.
Stores the edited movie as a new
movie.
Stores the edited movie under the
same name as the original. The
original movie will be replaced by
the new one.
A bar is displayed when editing is in
progress. After the edited movie is
saved as a new file or after it is
overwritten, normal display is
resumed.
Note
NEW FILE is not available if there is not enough memory on the card.
76
Page 77

Playback on TV
Turn off the camera and the TV,
then connect the multi connector
on the camera to the video input
terminal on the TV using the AV
cable.
Turn on the TV and set it to the
video input mode. For details
on switching to the video input
mode, refer to the TV’s
instruction manual.
To the
multi
connector
AV cable (provided)
To the video input (yellow)
and audio input (white)
terminals on the TV
Set the mode switch to and turn
on the camera.
Press
Use the AV cable provided with the camera to play back recorded images on
your TV. Both still images and movies can be played back.
5
Playback
● To connect the camera to a TV, use the provided AV cable.
● Make sure that the camera’s video output signal type is the same as the TV’s
video signal type. ~ “VIDEO OUT — Selecting the video signal type” (P.
99)
● The camera’s monitor turns off automatically when the AV cable is
connected to the camera.
● The image may appear off-center depending on the TV screen.
77
Page 78

Protecting images (preventing accidental erasure)
’04. 04. 12.23 21:5612.23 21:56
100100–00300030
HQHQ
3030
Protect images you do not want to erase. Protected images cannot be erased by
the selected frame/all-frame erase function.
Play back the image you want to
protect.
~ “Single-frame playback”(P. 60)
Joystick
In the top menu, select .
~ “How to use the menus” (P. 17)
The mark is displayed. When
protect is canceled, this mark
5
Playback
Even if you protect images, they will be erased if you format the card.
~ “FORMAT — Formatting the card” (P. 106)
disappears.
Note
78
Page 79

Erasing images
Lets you erase recorded images.You can select either single-frame erase, which
erases only the currently displayed image, or all-frame erase, which erases all the
images stored on the card.
Note
● Protected images cannot be erased. Cancel protected images, then erase
them.
● Once erased, images cannot be restored. ~ “Protecting images
(preventing accidental erasure)” (P. 78)
Single-frame erase
Play back the image you want to
erase. ~ “Single-frame playback”
(P. 60)
Press
Select YES.
ERASE
YES
NO
SELECT
GO
5
Playback
button
Joystick
The erase confirmation screen is
displayed.
NO: Cancels erasing.
OK
The image is erased and the menu
disappears.
79
Page 80

Erasing images
ALL ERASE
CAUTION ERASING ALL
NO
YES
SELECT
GO
OK
BUSY
All-frame erase
In the top menu, select MODE MENU
T CARD T ALL ERASE.
~ “How to use the menus” (P. 17)
Select YES.
5
Playback
Joystick
The erase confirmation screen is
displayed.
NO: Cancels erasing.
Displayed when erasing is in
progress. When erasing is finished,
this screen disappears.
80
Page 81

6
VOLUME
BEEP
SETUP
PLAY
EDIT
CARD
OFF
ON
ALL RESET
PW ON SETUP
PW OFF SETUP
REC VIEW
SETUP
CAM
PIC
CARD
BEEP
SHUTTER SOUND
FILE NAME
PIXEL MAPPING
OFF
LOW
HIGH
SETUP
CAM
PIC
CARD
RESET
AUTO
BEEP
SHUTTER SOUND
FILE NAME
PIXEL MAPPING
SETUP
CAM
PIC
CARD
PW ON SETUP
SCREEN
OFF
1
2
SOUND
OK
GOSELECT
SCREEN SETUP
PW ON
PW OFF
SELECT
GO
EXIT
OK
SHUTTER SOUND
OFF
2
LOW
HIGH
1
SELECT
GO
CANCEL
OK
BEEP
OFF
2
LOW
HIGH
1
SELECT
GO
CANCEL
OK
Customizing the settings/functions of your camera
Thanks to digital technology you can effortlessly customize many of your
camera’s functions. For example, you can turn off the shutter sound
when you are about to take pictures inside museum, change the
slideshow transition pattern, or use one of your own images for the
camera’s startup screen. Best of all, the camera will remember your
preferred settings when you turn it on again. This chapter introduces all
those functions that accommodate your preferences.Try these functions
to find ways to use your camera even more effectively.
Page 82

ALL RESET — Saving the camera’s settings
Available modes
This function lets you save the current camera settings when the power is turned
off. Available functions for ALL RESET are listed on the next page.
The ALL RESET setting (ON/OFF) applies to all the modes. If ALL RESET is set
in one mode, this setting applies to all the other modes, both shooting and
playback.
In the top menu, select MODE MENU
T SETUP T ALL RESET.
~ “How to use the menus”(P. 17)
Joystick
Select ON or OFF.
6
Customizing the settings/functions of your camera
82
ALL RESET
CAM
PIC
PW ON SETUP
CARD
PW OFF SETUP
REC VIEW
SETUP
OFF
ON
The settings made before the power
is turned off are saved.
All settings are returned to the
factory default settings after the
power is turned off.
Ex: When ALL RESET is set to ON,
even if you change the record
mode setting to SQ1, it will
return to HQ (factory default
setting) next time the camera is
turned on.
Page 83

ALL RESET – Saving the camera’s settings
ALL RESET: Functions that reset to factory default settings when set to ON
Functions Factory default settings
FLASH MODE AUTO P. 52
SCENE SELECT PP.34
OFF P. 41
ESP/ ESP P. 55
0.0 P. 56
DRIVE P. 2 3
ISO AUTO P. 54
DIGITAL ZOOM OFF P. 40
(still pictures)
WB
SHQ 2288x1712
HQ 2288x1712
SQ 1 1280x960 NORMAL
SQ 2 640x480 NORMAL
(movies)
INFO
OFF P. 49
AUTO P. 57
HQ
OFF
OFF P. 49
OFF P. 105
Ref. page
P. 2 9
P. 2 9
P. 2 9
P. 2 9
P. 2 9
P. 5 8
6
Customizing the settings/functions of your camera
83
Page 84

Changing the display language
SELECTION DE SCENE
MENU MODE
MODE FLASH
FRANCAIS
ENGLISH
DEUTSCH
ESPAÑOL
SELECT
GO
OK
Available modes
SCENE SELECT
MODE MENU
FLASH MODE
You can change the language used for the on-screen display and error messages
from ENGLISH to another language.
In the top menu, select MODE MENU
T SETUP T .
~ “How to use the menus”(P. 17)
Joystick
Select a language.
You can add more languages to
your camera by downloading
language firmware from our Web
6
Customizing the settings/functions of your camera
Site at http://www.olympus.com
84
English display
French display
Page 85

PW ON SETUP/PW OFF SETUP — Power on/off display/sound setting
PW ON SETUP
SCREEN
OFF
1
2
SOUND
OK
GOSELECT
Available modes
PW ON SETUP
SCREEN
1
SOUND
OFF
SELECT
GO
CANCEL
OK
You can select the display and sound for the startup/shutdown screen that
appears every time the camera is turned on/off. One of your own shots can also
be used for the startup/shutdown screen. ~ “SCREEN SETUP — Setting up an
image for the startup/shutdown screen” (P. 87)
PW ON SETUP : To select the display/sound for startup screen.
PW OFF SETUP : To select the display/sound for shutdown screen.
In the top menu, select MODE MENU
T SETUP T PW ON SETUP (PW
OFF SETUP).
~ “How to use the menus”(P. 17)
Select SCREEN or SOUND.
Joystick
6
Customizing the settings/functions of your camera
Set for SCREEN.
Select SOUND at the step
menu screen.
• Example: PW ON SETUP is
selected.
• The selected startup screen will be
played back.
OFF : No image is displayed.
1 : The pre-installed image is
displayed.
2 : The image you have
selected is displayed. If no
image has been selected, no
image is displayed when the
camera is turned on/off.
85
Page 86

PW ON SETUP/PW OFF SETUP — Power on/off display/sound setting
OFF
PW ON SETUP
SCREEN
SOUND
OK
GOSELECT
1
2
Set for SOUND.
The sound volume is determined by
the VOLUME setting.
~ “VOLUME — Selecting the
playback volume” (P. 90)
Confirm your setting.
6
Customizing the settings/functions of your camera
86
Page 87

SCREEN SETUP — Setting up an image for the startup/shutdown screen
Allows you to use one of your own images stored on the card for the
startup/shutdown screen that appears every time the camera is turned on/off. To
display your new startup/shutdown screen, change the PW ON SETUP/PW OFF
SETUP setting.
~ “PW ON SETUP/PW OFF SETUP — Power on/off display/sound setting”
(P. 85)
PW ON : To set up an image for startup screen.
PW OFF : To set up an image for shutdown screen.
Available modes
In the top menu, select MODE MENU
T SETUP T SCREEN SETUP.
~ “How to use the menus”(P. 17)
Select PW ON or PW OFF.
SCREEN SETUP
PW ON
PW OFF
SELECT
EXIT
SCREEN SETUP
IMAGE EXISTING
RESET
KEEP
SELECT
EXIT
GO
GO
OK
OK
Joystick
This screen appears if an image
has already been set for the
startup/shutdown screen. To replace
the image with a new one, select
RESET. If KEEP is selected, the
PW ON (PW OFF) setting screen
reappears.
87
6
Customizing the settings/functions of your camera
Page 88

SCREEN SETUP — Setting up an image for the startup/shutdown screen
SCREEN SETUP
OK
SET AS PW ON SCREEN
CANCEL
SELECT
GO
EXIT
OK
04.
12.24 00:00 15
HQ
OK
Use the Joystick to select the image
you want to use for the
~ “Single-frame playback”(P. 60)
startup/shutdown screen.
HQ
’04.
12.24 00:00 15
OK
OK
YESYESSELECTSELECT
Select OK.
6
Example: PW ON is selected.
The image is set and the step
menu screen reappears.You can
set up an image for the other
screen as needed.
Customizing the settings/functions of your camera
Note
It is not possible to set images or movies which cannot be properly played back
on this camera.
88
Page 89

REC VIEW — Checking the picture immediately after shooting
You can select whether to display the picture you have just taken on the monitor.
Available modes
In the top menu, select MODE MENU
T SETUP T REC VIEW.
~ “How to use the menus”(P. 17)
Select ON or OFF.
ALL RESET
CAM
PIC
PW ON SETUP
CARD
PW OFF SETUP
REC VIEW
SETUP
OFF
ON
Mode switch
Joystick
The picture being recorded to the
card is not displayed.This is useful
when you want to compose your
next shot using the monitor while
the previous picture is being
recorded.
The picture you have just taken is
displayed for about 3 seconds.This
is useful for making a brief check of
the picture you have just taken.You
can release the shutter while the
picture is being displayed.
6
Customizing the settings/functions of your camera
89
Page 90

VOLUME — Selecting the playback volume
Available modes
You can set the sound volume by 5 levels when playing back a movie or a still
image or when turning the camera on/off.
In the top menu, select MODE MENU
T SETUP T VOLUME.
~ “How to use the menus”(P. 17)
Select the volume.
6
Customizing the settings/functions of your camera
VOLUME
PLAY
EDIT
CARD
SETUP
BEEP
Mode switch
Joystick
Set here to mute the playback
sound completely.
90
Page 91

Setting the warning tone
Available modes
BEEP
SHUTTER SOUND
FILE NAME
PIXEL MAPPING
OFF
LOW
HIGH
SETUP
CAM
PIC
CARD
You can change the volume of the beep sound used for warnings or turn the
sound off completely.
In the top menu, select MODE MENU
T SETUP T .
~ “How to use the menus”(P. 17)
Joystick
Select the volume.
The volume of the selected option is
played back.
6
Customizing the settings/functions of your camera
91
Page 92

BEEP — Setting the button operation sound
BEEP
OFF
2
LOW
HIGH
1
SELECT
GO
CANCEL
OK
Available modes
BEEP
OFF
2
LOW
HIGH
1
OK
GOSELECT
You can select the sound emitted when a button is pressed, or mute the sound
completely. You can also set the button sound volume to either LOW or HIGH.
In the top menu, select MODE MENU
T SETUP T BEEP.
~ “How to use the menus”(P. 17)
Joystick
Select the operation sound.
The sound of the selected option is
played back.
6
Customizing the settings/functions of your camera
Select the sound volume.
Confirm your setting.
92
Page 93

SHUTTER SOUND — Setting the shutter sound
Available modes
SHUTTER SOUND
OFF
2
LOW
HIGH
1
SELECT
GO
CANCEL
OK
SHUTTER SOUND
OFF
2
LOW
HIGH
1
OK
GOSELECT
You can select the shutter sound, or mute the sound completely.You can also set
the shutter sound volume to either LOW or HIGH.
In the top menu, select MODE MENU
T SETUP T SHUTTER SOUND.
~ “How to use the menus”(P. 17)
Select the shutter sound.
Select the sound volume.
Mode switch
Joystick
The sound of the selected option is
played back.
6
Customizing the settings/functions of your camera
Confirm your setting.
93
Page 94

FILE NAME — Assigning a file name
Available modes
RESET
AUTO
BEEP
SHUTTER SOUND
FILE NAME
PIXEL MAPPING
SETUP
CAM
PIC
CARD
When a picture is stored on the card, the camera assigns it a unique file name and
saves it in a folder. The folder and file name can later be used for file handling on a
computer. File names are assigned as shown in the illustration below.
All folders
DCIM
100 OLYMP
P2030001.jpg
P2030002.jpg
P2030003.jpg
P2030004.jpg
AUTO
Even when a new card is inserted, the folder numbers are retained from the
previous card. If the new card contains an image file whose file number coincides
with one saved on the previous card, the new card’s file numbers start at the
number following the highest number on the previous card.
RESET
When a new card is inserted, folder numbers start at 100 and file numbers start at
0001. If a card containing images is inserted, the file numbers start at the number
6
following the highest file number on the card.
Customizing the settings/functions of your camera
Folder name
000 OLYMP
Folder number (100 - 999)
File name
Pmdd0000.jpg
Day (01 - 31)
Month (10, 11, 12 are
numbered A, B, C)
File number (0001 - 9999)
After taking 9999 pictures, the counter is reset
to 0001 for the next picture, the folder number
increments by 1 to name and create a new
folder where the next image (file) is stored.
In the top menu, select MODE MENU
T SETUP T FILE NAME.
~ “How to use the menus”(P. 17)
Select RESET or AUTO.
When both the Folder and File No. reach their respective maximum number
(999/9999), it is not possible to store additional pictures even if the card is not
full. No more pictures can be taken. Replace the card with a new one.
9494
Mode switch
Joystick
Note
Page 95

PIXEL MAPPING — Checking the image processing functions
BUSY
The pixel mapping feature allows the camera to check and adjust the CCD and
image processing functions. It is not necessary to operate this function frequently.
Approximately once a year is recommended. After taking pictures or playing them
back, wait for at least one minute before using the pixel mapping function to
ensure that it operates correctly.
Available modes
In the top menu, select MODE MENU
T SETUP T PIXEL MAPPING.
Mode switch
~ “How to use the menus”(P. 17)
CAM
BEEP
PIC
SHUTTER SOUND
CARD
FILE NAME
PIXEL MAPPING
SETUP
START
Joystick
This bar is displayed to show the
progress of pixel mapping.
Note
If you accidentally turn the camera off during pixel mapping, be sure to operate
pixel mapping again.
6
Customizing the settings/functions of your camera
9595
Page 96

Adjusting the monitor brightness
SELECT
GO
OK
Available modes
Lets you adjust the brightness of the monitor.
In the top menu, select MODE MENU
T SETUP T .
~ “How to use the menus”(P. 17)
Adjust the brightness.
6
Customizing the settings/functions of your camera
Joystick
96
Page 97

Setting the date and time
SET
GO
OK
SELECT
Y M D
0101
0000 0000
010120042004
100–0015
HQHQ
’04.12.24 00:00 15
The date/time is saved with recorded images and file names are assigned based
on the date/time settings.
Available modes
In the top menu, select MODE MENU
T SETUP T .
~ “How to use the menus”(P. 17)
Joystick
Set the date/time.
Select the date format:
[Y-M-D (Year/Month/Day)],
[M-D-Y (Month/Day/Year)],
[D-M-Y (Day/Month/Year)].
The following instructions show the
procedure used when the date and
time settings are set to Y-M-D.
6
Customizing the settings/functions of your camera
97
Page 98

Setting the date and time
01
00
01
2004
0101
0000 0000
01012002004
SET
GO
OK
SELECT
Set the date.
Repeat the procedure until the date
and time are completely set.
6
Customizing the settings/functions of your camera
SELECT
2004
01
000000
SET
GO
Moves to the year setting.The first
two digits of the year are fixed.
01
The time is displayed in the 24-hour
format. For example, 2 p.m. will be
displayed as 14:00.
OK
Confirm your setting.
The clock starts when your setting
is confirmed
Note
● The current date/time settings are retained even when the power is turned
off.
● The date/time settings will be canceled and the factory default settings will be
restored if the camera is left with no battery for approximately 3 days. The
settings will be canceled more quickly if the battery was only loaded in the
camera for a short time before being removed. After loading the battery,
check that the date/time settings are correct.
● If the date/time settings have been canceled, the warning message appears
on the monitor when the camera is powered on. ~ “Error codes” (P. 150)
98
Page 99

VIDEO OUT — Selecting the video signal type
VIDEO OUT
NTSC
PAL
SETUP
CAM
PIC
CARD
You can select NTSC or PAL according to your TV’s video signal type. Select the
video signal type before connecting the AV cable. If you use the wrong video
signal type, you will not be able to play back the recorded pictures properly on
your TV.
Available modes
In the top menu, select MODE MENU
T SETUP T VIDEO OUT.
~ “How to use the menus”(P. 17)
Joystick
Select the video signal type.
TV video signal types & main
regions
Check the video signal type before
connecting the camera to your TV.
NTSC North America, Japan,
Taiwan, Korea
PAL European countries, China
6
Customizing the settings/functions of your camera
99
Page 100

Selecting the number of images
VIDEO OUT
SLIDESHOW
4
9
16
25
SETUP
PLAY
EDIT
CARD
4545 4646
4848
4747
3333 3434 3535 3636
3737 3838 3939 4040
4141 4242 4343 4444
4545 4646 4747 4848
You can select the number of frames displayed in an index display (~ P. 62).
Available modes
In the top menu, select MODE MENU
T SETUP T .
~ “How to use the menus”(P. 17)
Select the number of images.
6
Customizing the settings/functions of your camera
Mode switch
Joystick
4-frame index display
100
16-frame index display
 Loading...