


TWO CORPORATE CENTER DRIVE
MELVILLE, NY 11747-3157
DIGITAL TECHNICAL SUPPORT
CONSUMER PRODUCTS GROUP
(888) 553-4448
http://support.olympusamerica. com
DOCUMENT NUMBER 2739
HOW TO DOWNLOAD PICTURES USING AN
OLYMPUS USB AUTO CONNECT CAMERA
Introduction
USB Auto Connect is a feature that allows an Olympus digital camera to emulate a disk drive
when connected to a computer. This feature makes it simple to copy the pictures to your
computer by using standard drag-and-drop procedures. There is no need to install drivers
(except for Windows 98) since the camera is supported by the operating system. Note: The C211/3000/3030 Zoom and C-2100 Ultra Zoom are not USB Auto Connect cameras. These
models use a standard USB driver.
These instructions will walk you though step-by-step instructions to connect an Olympus USB
camera and download pictures to your computer. For camera software installation procedures,
please refer to the Software Installation Guide document included with the camera package.
Installing the USB Driver for Windows 98
NOTE: A USB driver only needs to be installed if the computer is running Windows 98/98 SE.
If you have a Camedia Master 4.0 CD-ROM
1) Insert the Camedia Master 4.0 disc into your CD-ROM drive. A selection menu
should automatically be displayed. If the menu does not start, go to Start>Run.
Type in d:\setup.exe where d: is your CD-ROM drive.
2) Choose USB Driver for Windows 98 from the selection menu.
3) Choose Continue at Install USB Driver for Windows 98.
4) Choose OK to reboot the computer.
If you do not have a Camedia Master 4.0 CD-ROM
1) Download the USB Auto-Connect Driver for Windows 98 from
http://www.olympusamerica.com/files/AutoConnDriv_Win98SE.exe.
2) Double-click the downloaded file to extract its contents. Type in a folder location of
your choice in the Extract to text box. For example: c:\windows\temp.
3) Using Windows Explorer, open the folder you noted in step 2. Double-click on the
install.exe file.
4) Choose Continue at Install USB Driver for Windows 98.
5) Choose OK to reboot the computer.
Olympus America Inc. Page 1 of 9 Last updated on 11/20/02
TWO CORPORATE CENTER DRIVE
MELVILLE, NY 11747-3157
DIGITAL TECHNICAL SUPPORT
CONSUMER PRODUCTS GROUP
(888) 553-4448
http://support.olympusamerica. com
Preparing to download pictures to your computer
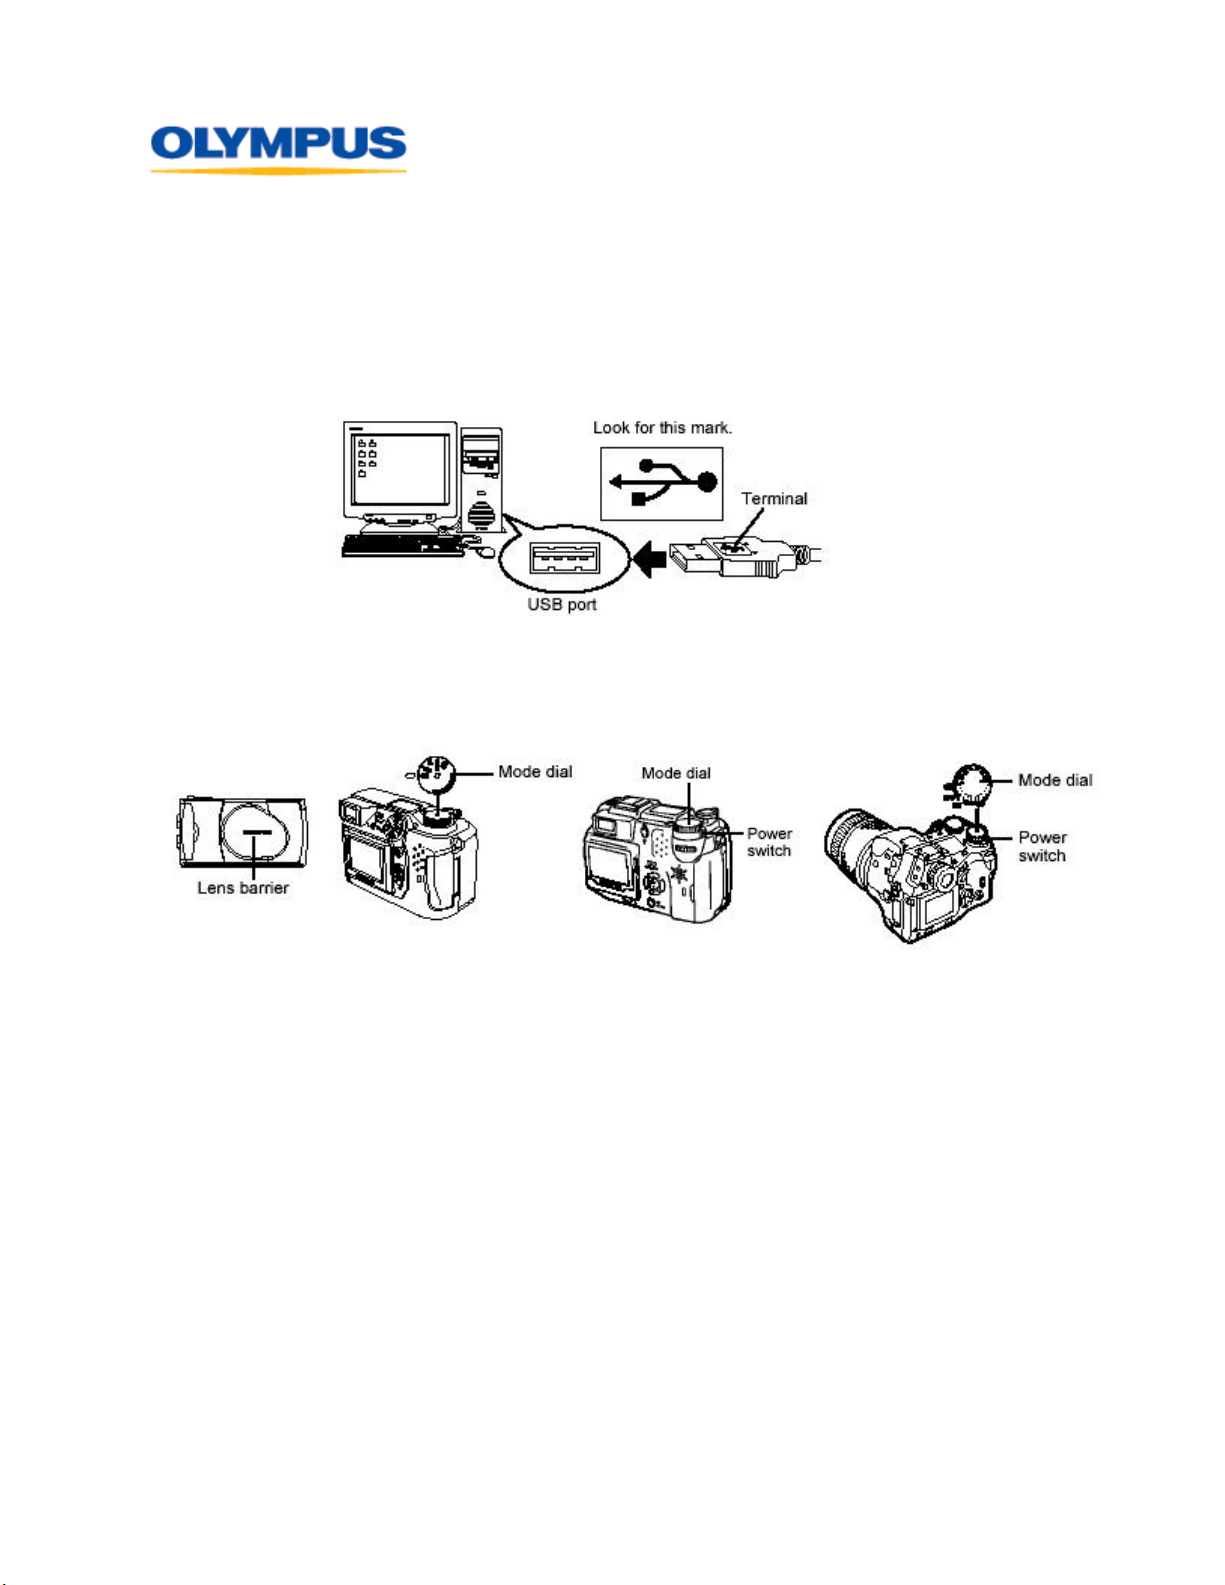
1) Connect the camera to the USB port of the computer using the provided USB cable. Refer to
your camera documentation for specific details on your camera model.
2) Turn the camera ON. For an Olympus digital camera that have a front lens barrier, open the
cover. For digital cameras models with a mode dial, choose any selection. If you have the
E-10 or the E-20N camera turn the mode dial to Setup/Connection mode.
How to transfer pictures with a USB Auto Connect digital camera
To discover the drive that represents the Olympus digital camera, follow the outlined procedures
below:
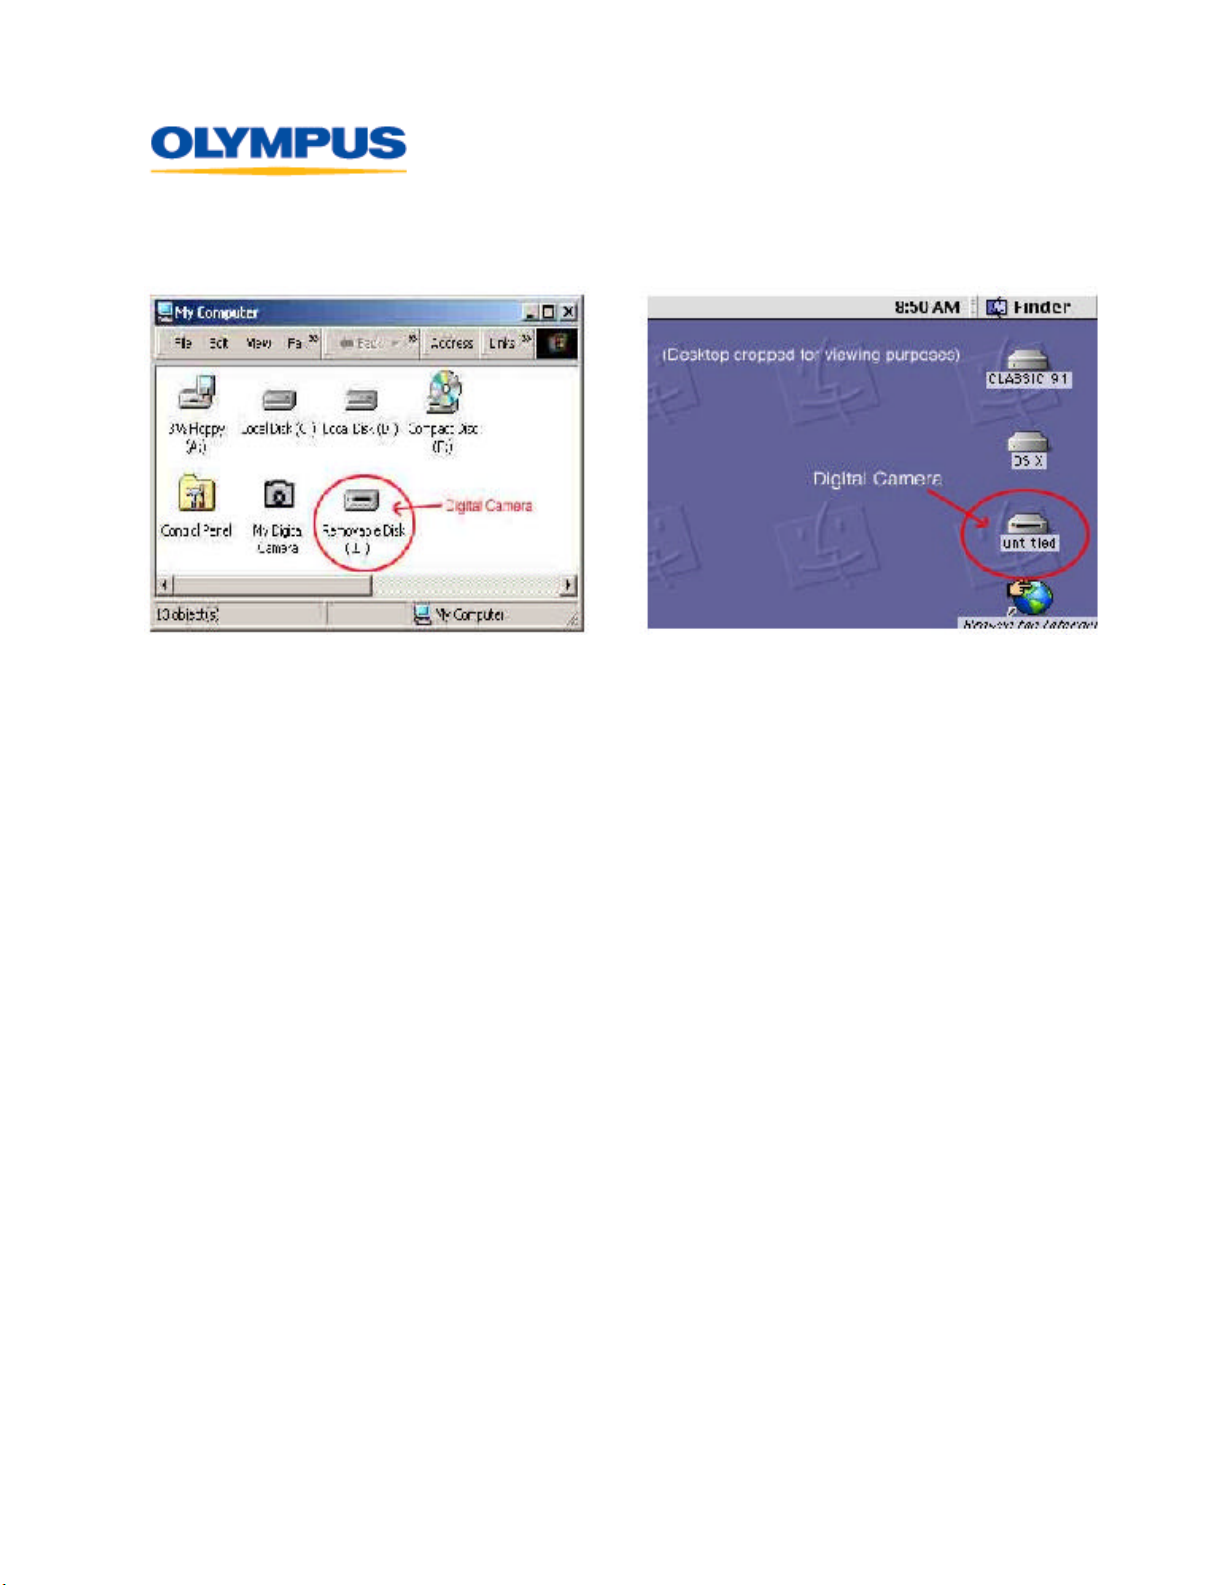
1) Turn the camera off and connect the camera’s USB download cable. For a Windows-based
PC, open “My Computer” on the desktop; for a Macintosh computer, start on the desktop.
2) Turn the camera on and then carefully watch the computer screen (for detailed instructions,
please refer to the camera’s users guide). For Windows, a new “Removable Disk” drive
letter should appear (see fig. A below). Make note of the drive letter of this disk. For
Mac, an “Untitled” drive should appear on the desktop (see to fig. B below).
Olympus America Inc. Page 2 of 9 Last updated on 11/20/02
TWO CORPORATE CENTER DRIVE
MELVILLE, NY 11747-3157
DIGITAL TECHNICAL SUPPORT
CONSUMER PRODUCTS GROUP
(888) 553-4448
http://support.olympusamerica. com
(Fig. A – Windows) (Fig. B - Macintosh)
3) Double-click on the camera’s disk drive icon, then the “DCIM” folder, and then the
“100OLYMP” folder. The pictures will be located in this folder. To copy the pictures, start
by selecting the desired pictures. To select a single picture, single-click on the desired
filename. To select multiple pictures, hold down the <Ctrl> key (or the <Shift> key on a
Macintosh) and click on the desired filenames. To select all pictures, go to Edit > Select All.
4) Drag-and-drop the pictures to the desired folder on the computer hard disk or other storage
device. Please refer to your operating system or computer user’s guide for instructions on
creating a new folder.
Downloading pictures using the Olympus Camedia Master 4.0 program
The Camedia Master 4.0 program that is included with Olympus digital camera models allows
you to view, edit, and print your pictures. You can use Camedia Master 4.0 to download pictures
from your USB Auto Connect camera by following the diagram and procedure below:
1) Choose From Camera to connect to the digital camera.
Olympus America Inc. Page 3 of 9 Last updated on 11/20/02

TWO CORPORATE CENTER DRIVE
MELVILLE, NY 11747-3157
DIGITAL TECHNICAL SUPPORT
CONSUMER PRODUCTS GROUP
(888) 553-4448
http://support.olympusamerica. com
2) If you would like to save images to an existing folder on your hard drive or create a new
folder, click on the floppy disk icon for the Media tab in the right window.
Olympus America Inc. Page 4 of 9 Last updated on 11/20/02

TWO CORPORATE CENTER DRIVE
MELVILLE, NY 11747-3157
DIGITAL TECHNICAL SUPPORT
CONSUMER PRODUCTS GROUP
(888) 553-4448
http://support.olympusamerica. com
3) Navigate to the folder where you would like to save your pictures to and then single-click to
highlight it. If you want to create a new folder, click the location of where to create the new
folder and then click the New Folder button. Type in a name for the new folder and then
click OK.
4) Find the newly created folder and single-click to highlight it. Choose Get Images to
download the images to the folder.
Olympus America Inc. Page 5 of 9 Last updated on 11/20/02

TWO CORPORATE CENTER DRIVE
MELVILLE, NY 11747-3157
DIGITAL TECHNICAL SUPPORT
CONSUMER PRODUCTS GROUP
(888) 553-4448
http://support.olympusamerica. com
5) A progress bar will be displayed while the images download to your computer. Click
Browse Images Now once the images have copied to view the pictures stored on your
computer.
6) Your pictures are now stored on your computer. You can begin to view, edit, or print your
images.
Olympus America Inc. Page 6 of 9 Last updated on 11/20/02

TWO CORPORATE CENTER DRIVE
MELVILLE, NY 11747-3157
DIGITAL TECHNICAL SUPPORT
CONSUMER PRODUCTS GROUP
(888) 553-4448
http://support.olympusamerica. com
Downloading pictures using the Olympus Camedia Master 2.5 program
The Camedia Master 2.5 program that is included with some Olympus digital camera models
allows you to view, edit, and print your pictures. To download pictures from your USB Auto
Connect camera using Camedia Master 2.5, follow the diagram and procedures below:
1) In the Olympus Camedia Master program, look at the directory tree in the upper left pane.
a) For Windows, find the Removable Disk drive letter under My Computer that represents
the camera. (the drive letter noted in step 2 of the procedures above). Double-click the
[ + ] symbol next to the camera’s disk drive icon, and then the DCIM folder. The
pictures will be located in the 100OLYMP folder (this folder may be named differently).
Click on this folder to display the thumbnails on the right-side window pane.
b) For Macintosh, find the Untitled disk icon. Double-click the [ > ] symbol next to the
camera’s disk drive icon, and then the DCIM folder. The pictures will be located in the
100OLYMP folder (this folder may be named differently). Click on this folder to
display the thumbnails on the right-side window pane.
Olympus America Inc. Page 7 of 9 Last updated on 11/20/02

TWO CORPORATE CENTER DRIVE
MELVILLE, NY 11747-3157
DIGITAL TECHNICAL SUPPORT
CONSUMER PRODUCTS GROUP
(888) 553-4448
http://support.olympusamerica. com
2) To copy the pictures, start by selecting the desired pictures. To select a single picture, singleclick on the desired thumbnail. To select multiple pictures, hold down the <Ctrl> key (or the
<Shift> key on a Macintosh) and click on the desired thumbnails. To select all pictures, go
to Edit menu and choose “Select All”.
3) Drag-and-drop the pictures to the desired folder in the directory tree window on the left. To
create a new folder in Windows, right-click on the directory tree in the left pane, then select
“New Folder”. To create a new forlder on a Macintosh, select File > New Folder.
NOTE: The following menus/features in Camedia Master 2.5 do not apply to USB Auto
Connect cameras. These features were designed to for serial or standard USB connected
cameras that do not use an emulated disk drive. Standard USB cameras include the C-3000/3030
Zoom, C-2100 Ultra Zoom and the C-211 Zoom Digital Printing Camera.
• My Camera
• All functions located under the “Camera” menu
Disconnecting the camera from the computer
After the pictures have been completely downloaded to your computer, disconnect the camera
from your computer by following the procedures below:
For Windows ME/2000/XP
1. Verify that media card access indicator is not blinking. Some camera models have either a
lamp on the right of the viewfinder or a card access lamp. The location varies depending on
the model. Refer to examples shown below.
2. Single-click the “Unplug or Eject Hardware” icon on the task bar. The
message saying that the drive has been stopped appears.
3. Click on the message. The “Unplug or Eject Hardware” window
appears.
4. When a confirmation message appears, click “OK”.
Olympus America Inc. Page 8 of 9 Last updated on 11/20/02

TWO CORPORATE CENTER DRIVE
MELVILLE, NY 11747-3157
DIGITAL TECHNICAL SUPPORT
CONSUMER PRODUCTS GROUP
(888) 553-4448
http://support.olympusamerica. com
5. Remove the USB cable from the camera. You may also remove the USB cable from your
computer, but this is not usually necessary.
For Macintosh
1) Verify that media card access indicator is not blinking. Some camera models have either a
lamp on the right of the viewfinder or a card access lamp. The location varies depending on
the model. Refer to examples shown below.
2) Drag the “untitled” icon on the desktop to “Trash”.
3) Remove the USB cable from the camera. You may also remove the USB cable from your
computer, but this is not usually necessary.
Olympus America Inc. Page 9 of 9 Last updated on 11/20/02
 Loading...