

Olympus Superzoom 800, Zoom 80S, ACCURA SuperZoom 800S, Accura Zoom 80S Instructions Manual
Page 1

INSTRUCTIONS
Read this manual careful ly before using your
camera.
ACCURA
ZOOM 80S
Page 2
WARNING
Indicates
circumstances under
which mishandling
resulting fr o m ignoring
this symbol could result
in personal inj ur y or
property damage.
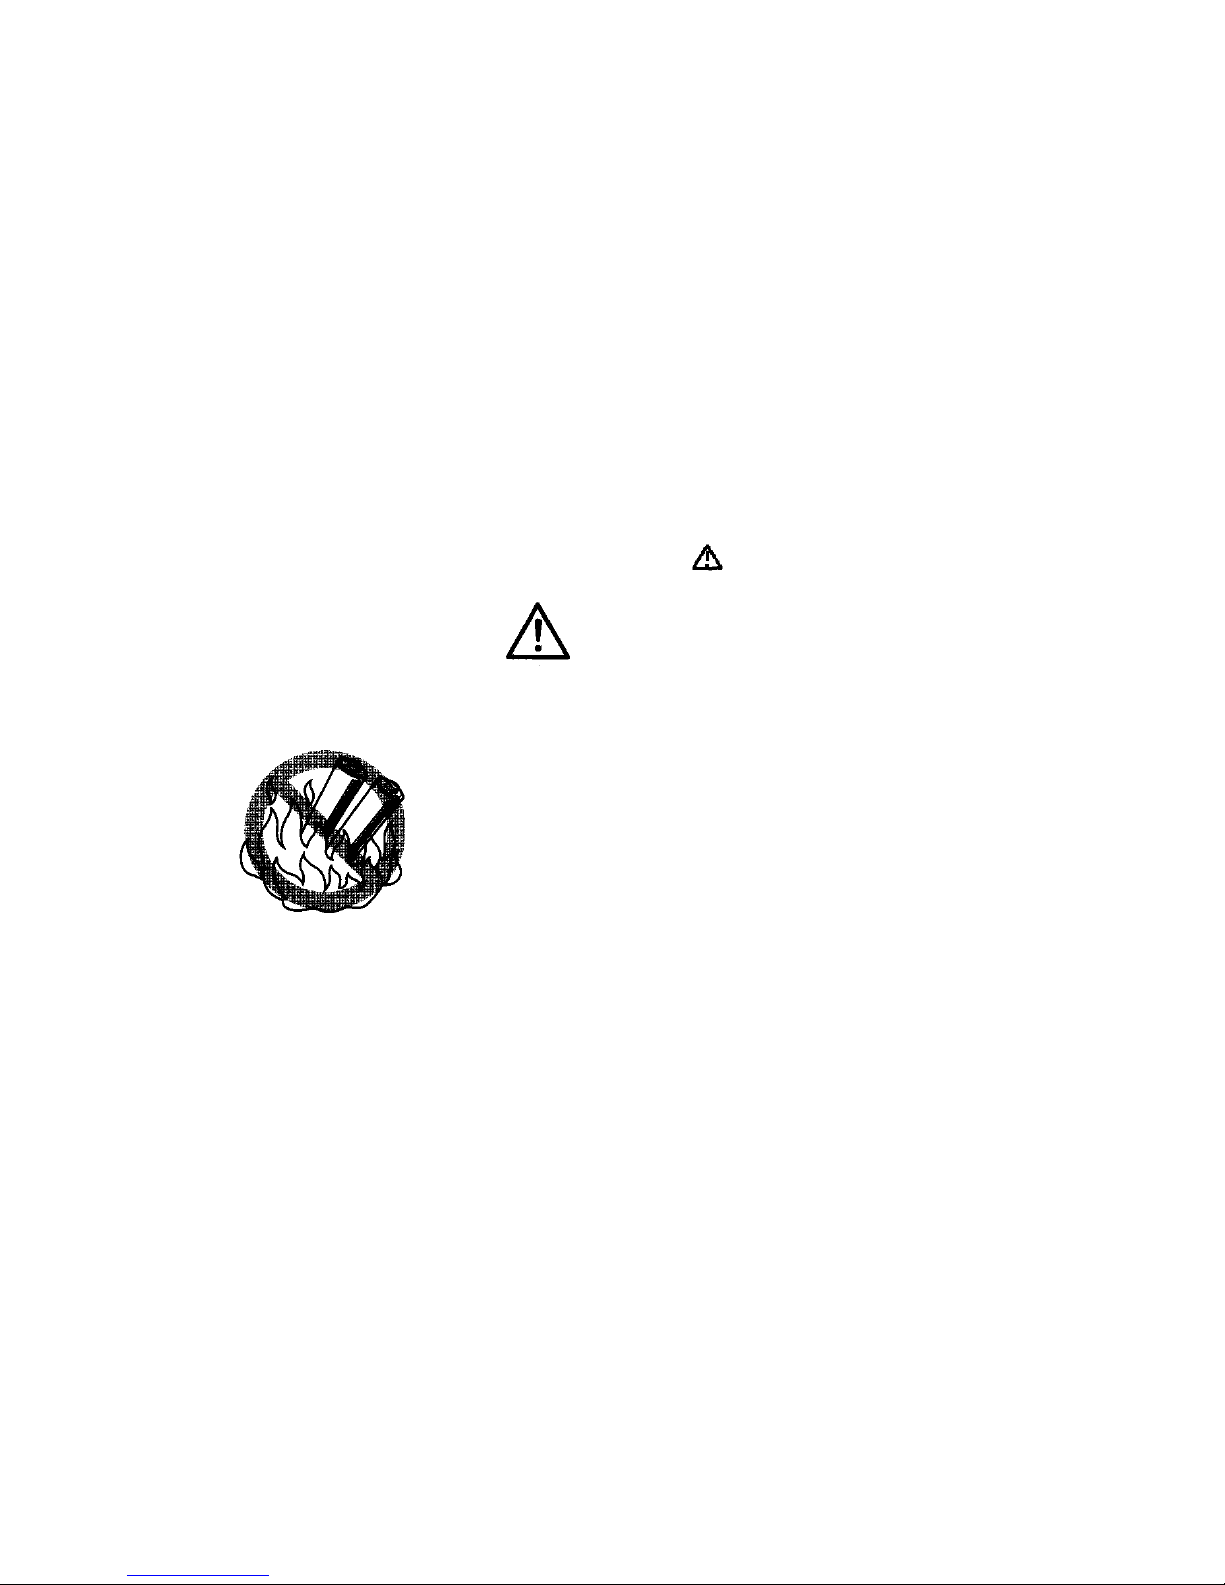
KEEP THE BATTERIES AWAY
FROM FIRE. NEVER TRY TO
DISASSEMBLE, RECHARGE, OR
SHORT-CIRCUIT BATTERIES.
2
Page 3
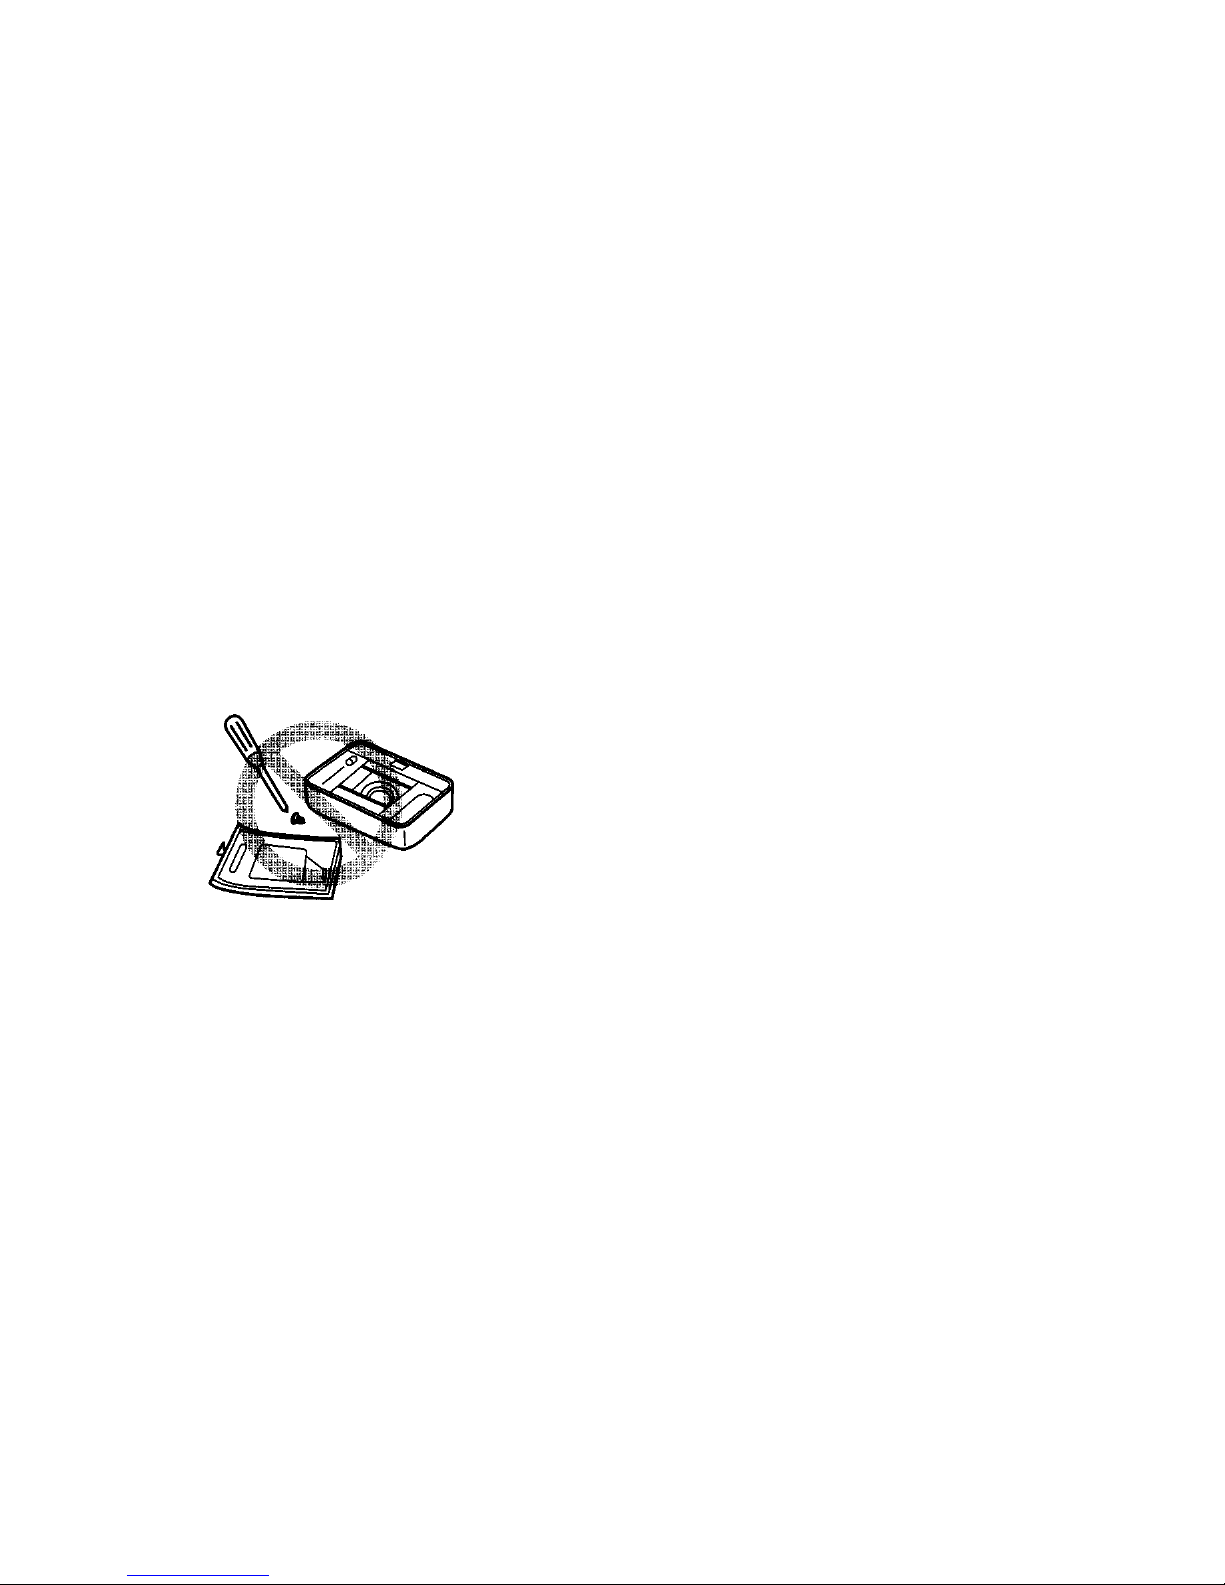
NEVER ATTEMPT TO
DISASSEMBLE THE CAMERA; IT
CONTAINS A HIGH-VOLTAGE
CIRCUIT. IF THE INTERNAL
PARTS OF THE CAMERA ARE
EXPOSED DUE TO DROPPING
OR DAMAGE, REMOVE THE
BATTERIES IMMEDIATELY TO
PREVENT FURTHER U SAGE .
IN CASE OF MALFUNCTION,
CONSULT YOUR NEAREST
OLYMPUS DEALER OR
OLYMPUS SERVICE CENTER
3
Page 4

Names of parts .......................... 6
Viewfinder display/LCD panel ...... 8
Loading the battery ................. 11
Checking the battery ............... 13
Proper shutter release ............. 14
Loading the film ....................... 15
Taking pictures ........................ 18
After shooting .......................... 24
Unloading the film ..................... 25
Using the flash modes ............. 26
Selftimer .................................. 33
4
Page 5

Using the RC-200 remote control
(optional)................................. 3 5
Correcting the data ............... 39
Printing the date and time ..... 41
Care and storage .................... 43
Specifications ......................... 47
QUARTZDATE model only.
5
Page 6
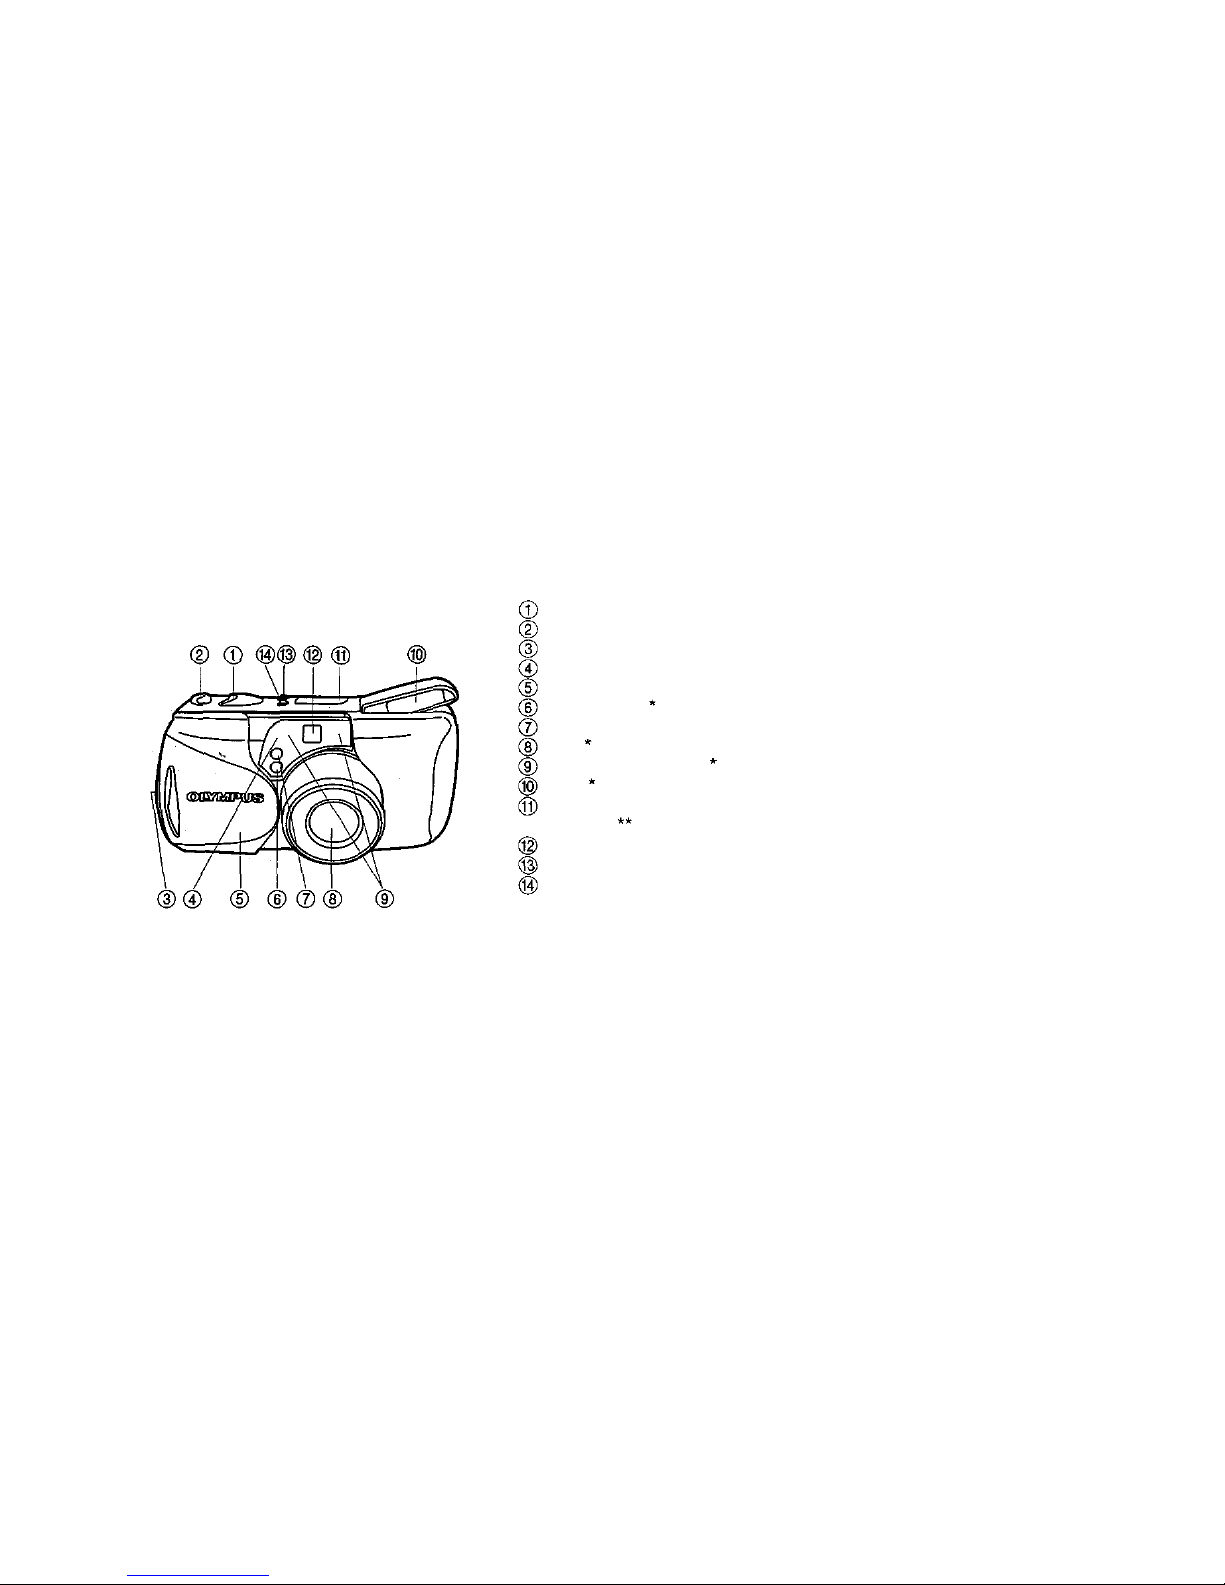
Shutter release button
Zoom lev er
Strap eyelet
Remote control sensor
Lens barrier
Light sensor
Selftimer indicator
Lens
Autofocus windows
Flash
LCD panel (date/time
indicator )
Viewfinder
Flash mode button
Selftimer/remote control button
NAM ES OF PARTS
6
Page 7
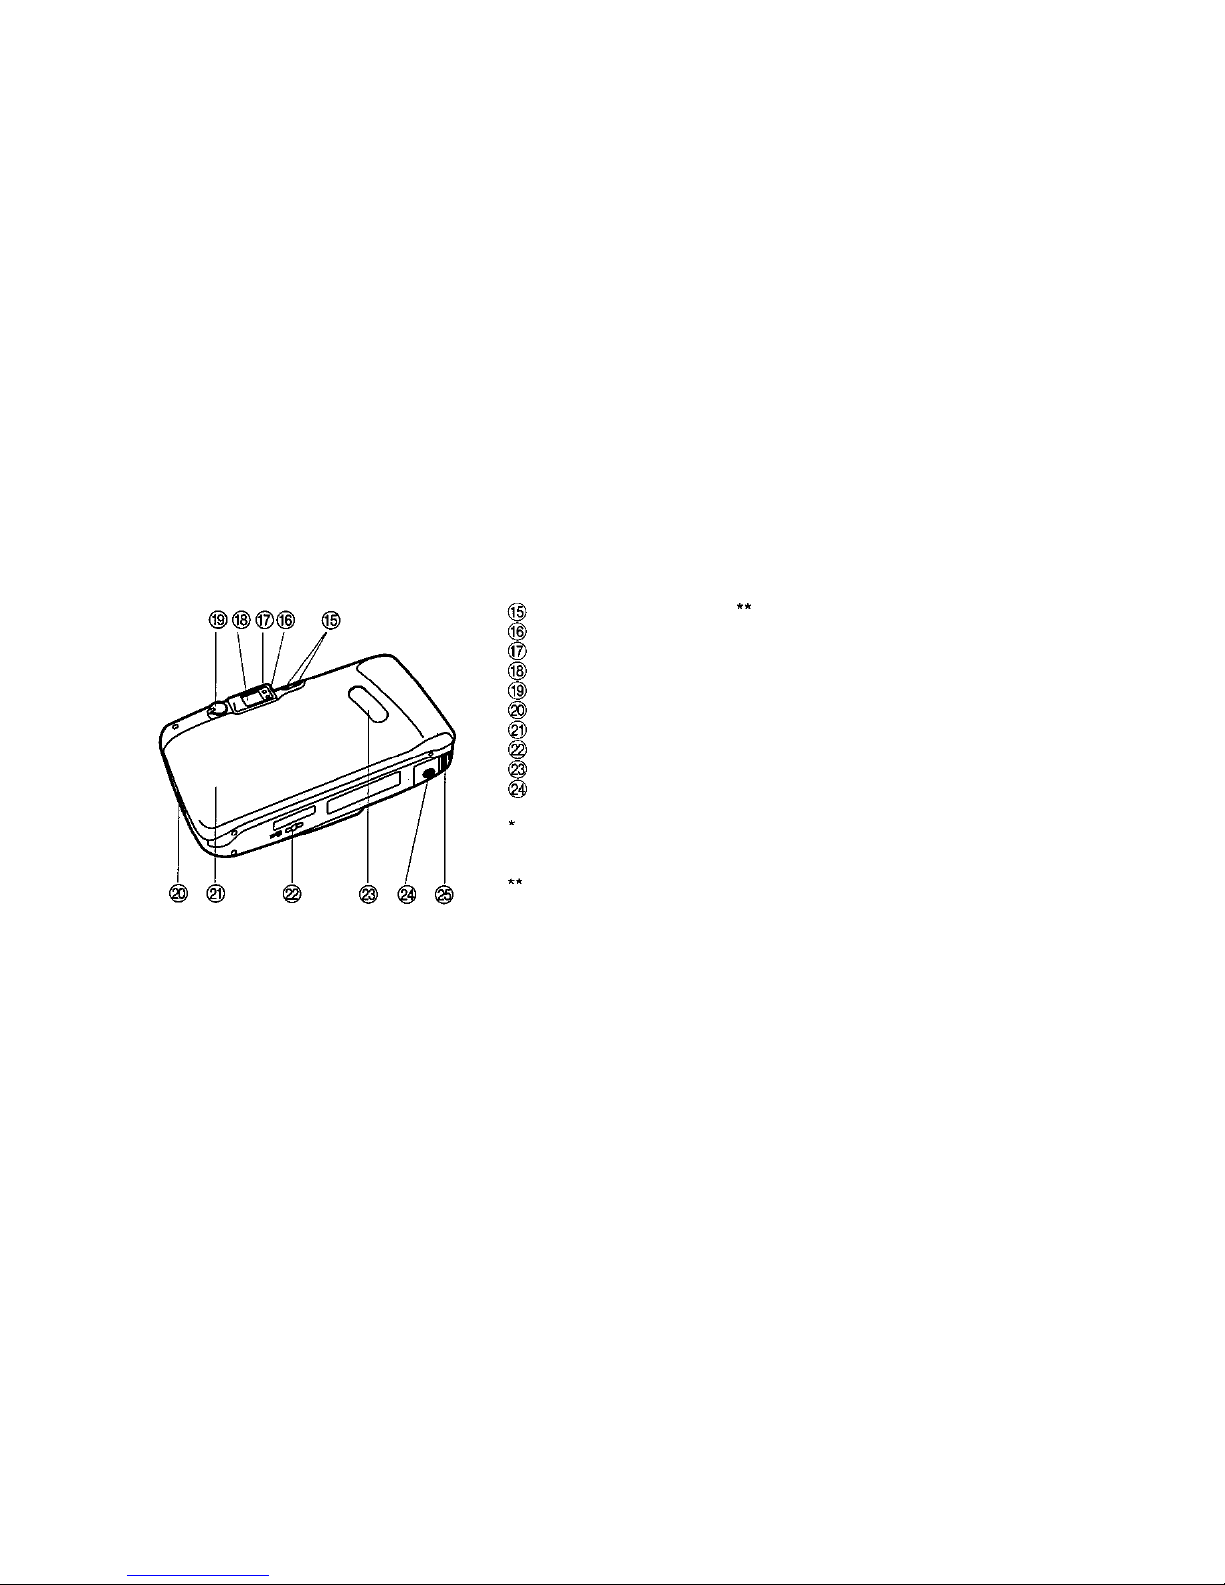
MODE and SET buttons
Green lamp
Orange lamp
Viewfinder
Back cover release
Back cover
Mid-roll rewind button
Film window
Tripod socket
Battery compartment cover
Do not soil as this can cause
blurred pictures. Wipe clean
with a soft cloth.
QUARTZDATE models only.
7
Page 8
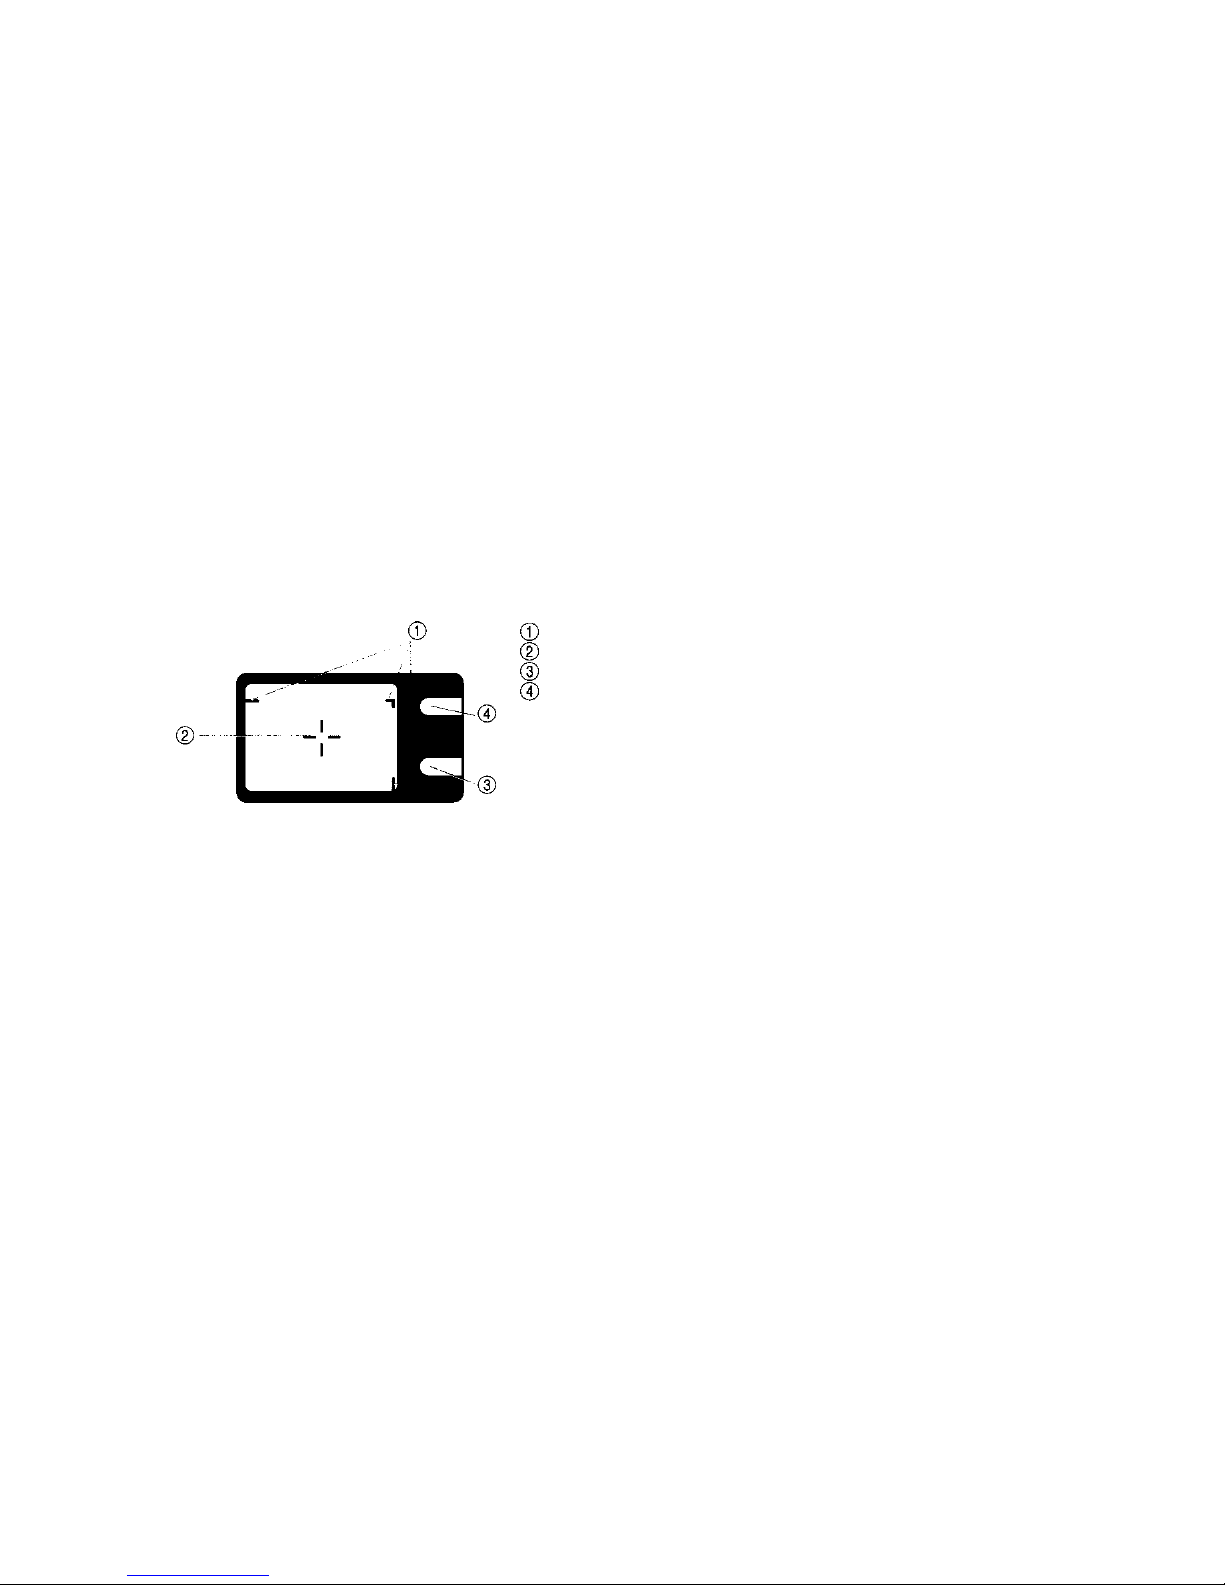
VIEWFINDER DISPLAY
LCD PANEL
Viewfinder Display
Close-up correction marks
Autofocus mark
Green lamp
Orange lamp
8
Page 9
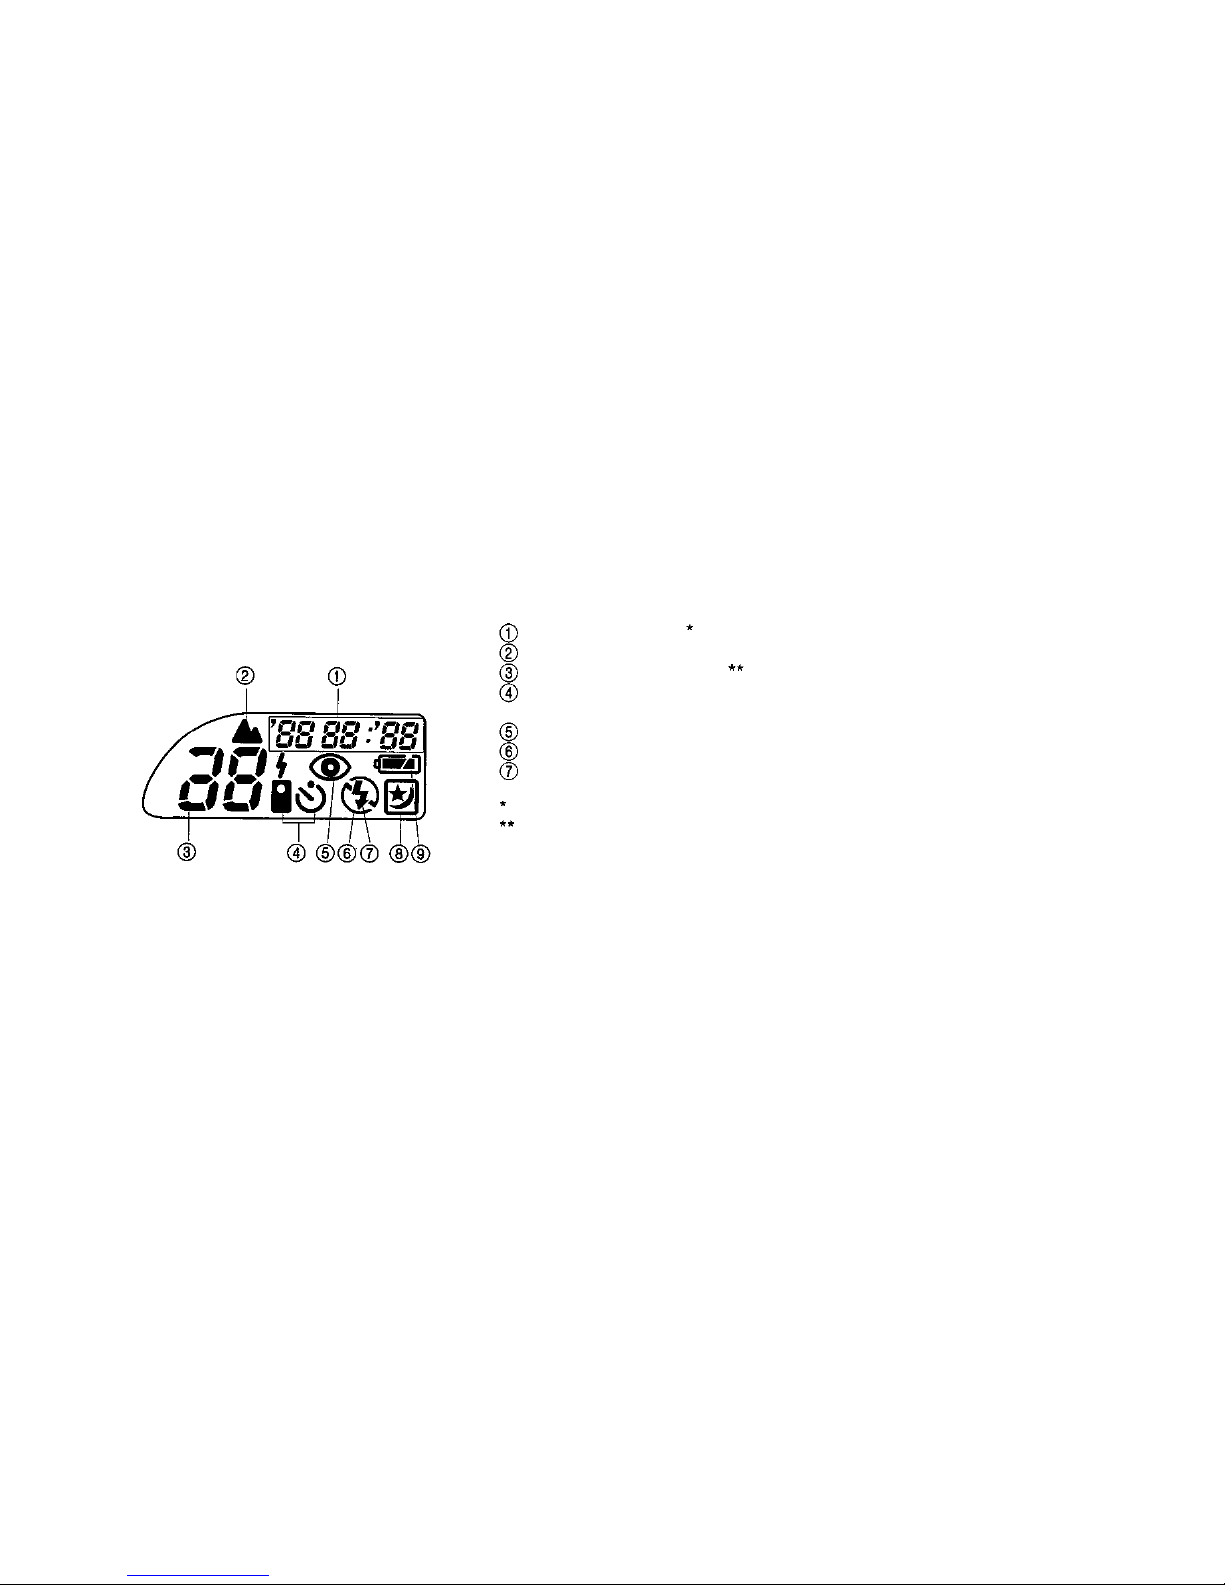
LCD Panel
Date/time indicator
Exposure counter
Selftimer/remote control
Red-Eye Reducing Flash
mode
Off (Flash Override) mode
Fill-In Flash mode
Battery check
QUARTZDATE models only.
Optionally available.
9
Page 10
Notes:
If yo u don't use the camera, the
LCD goes off after four and half
minutes.
The LCD panel does not
actually display all indications
simultaneously as shown.
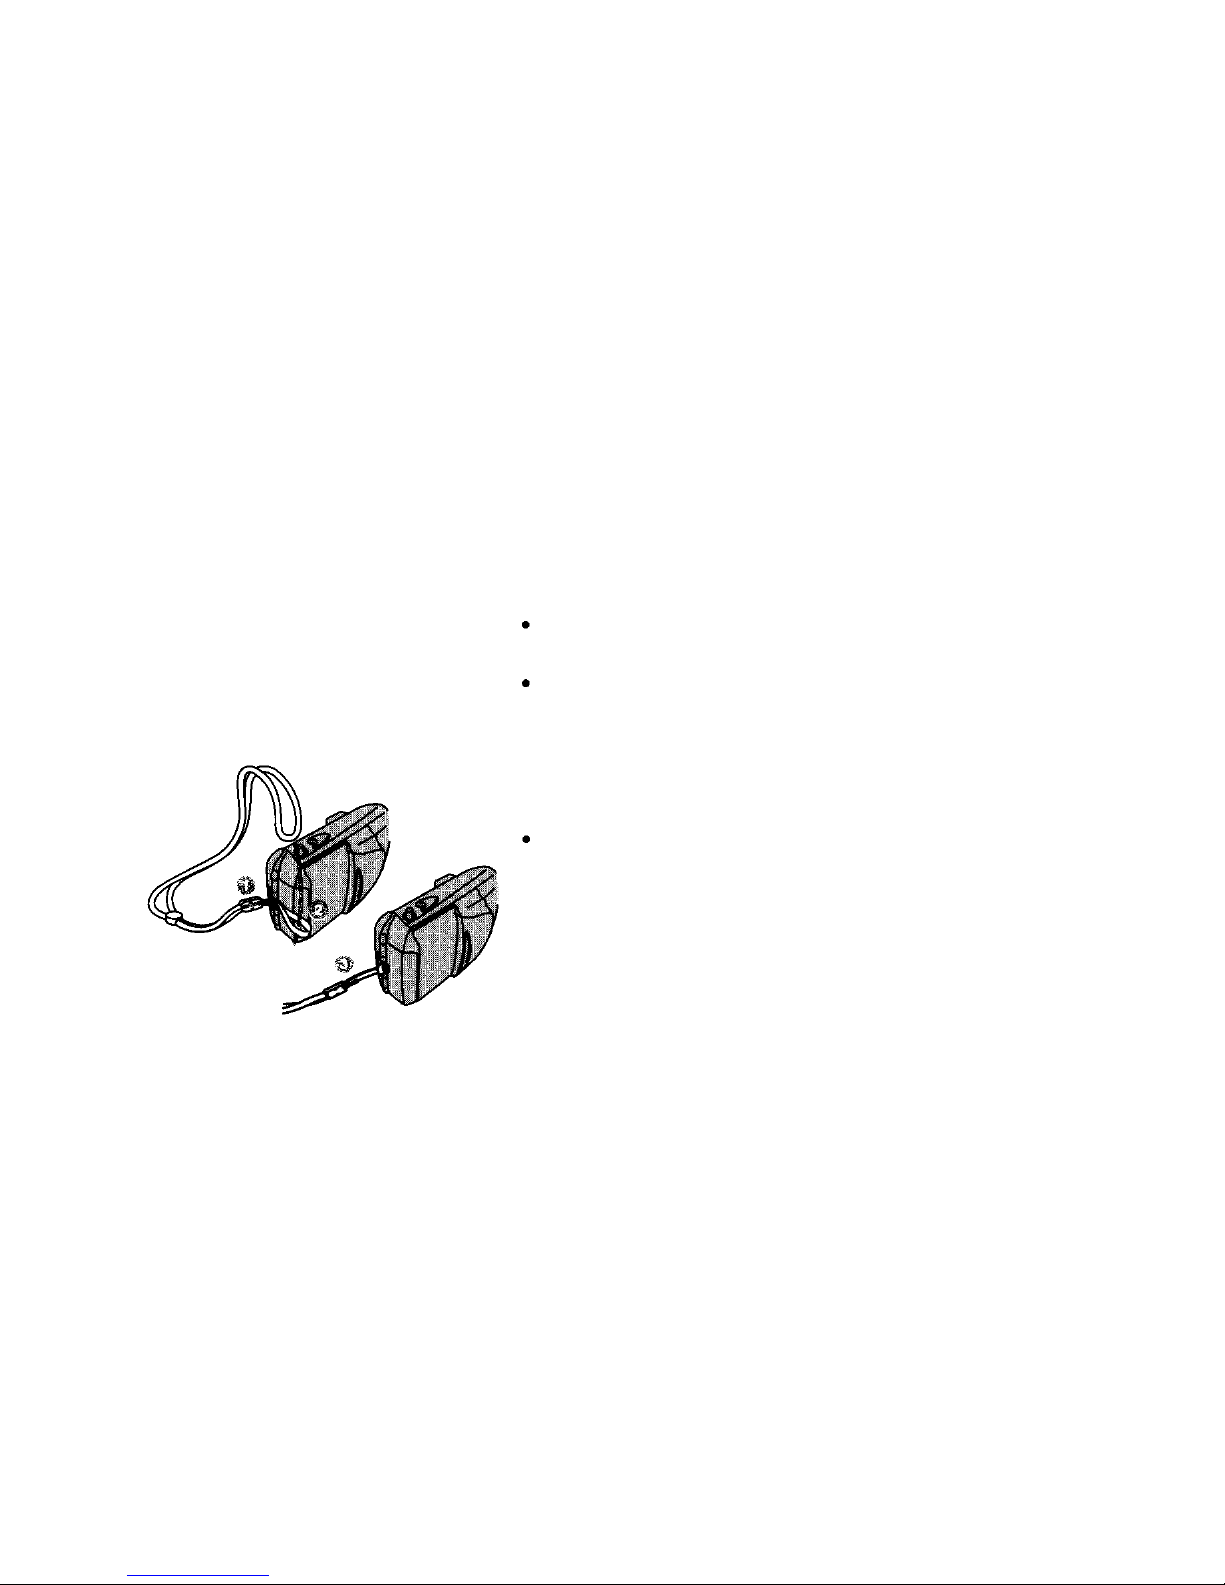
Attach the strap as shown.
10
Page 11
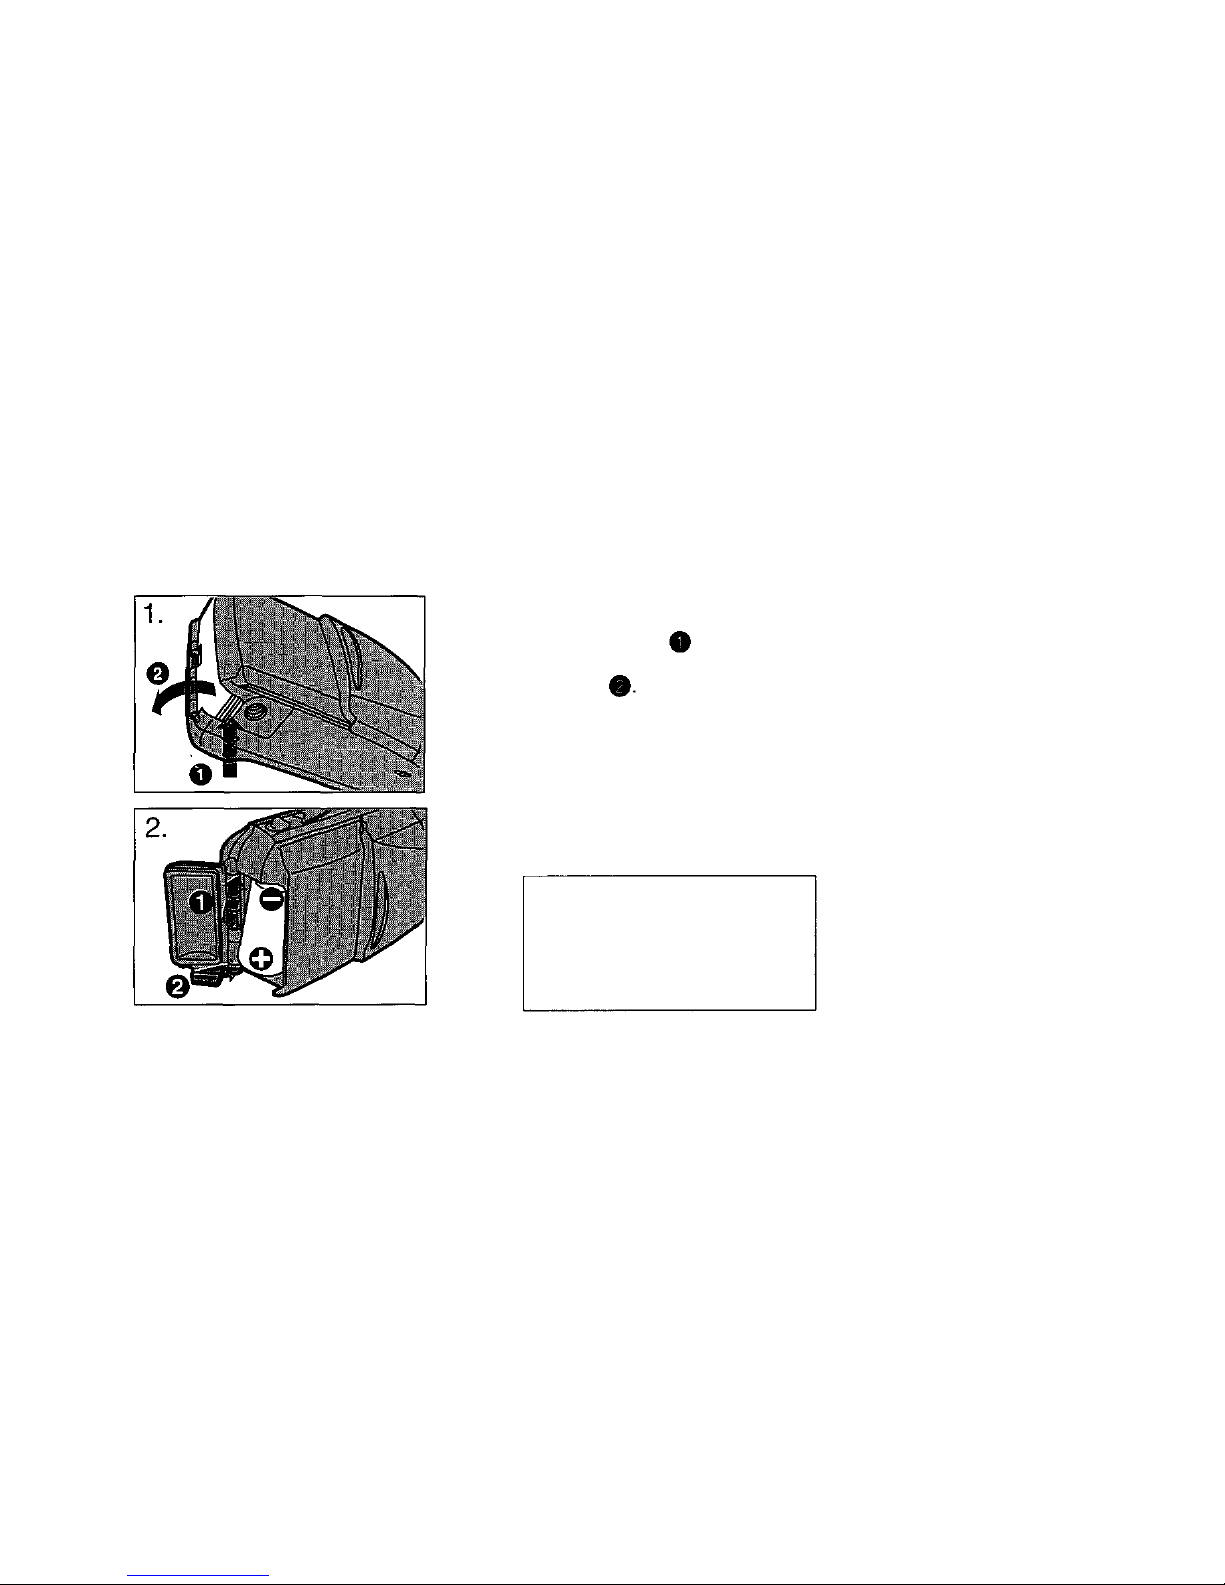
LOADING THE BATTERY
1. Close the lens barrier.
Push OP EN to open the
battery compartment
cover
2. Insert two alkaline AAA/
LR-03 batt erie s whi le
align in g them correctly as
shown.
WARNING: KEEP THE
BATTERY OUT OF THE REACH
OF CHILDREN. IF A CHILD
SWALLOWS A BATTERY,
CONTACT A DOCTOR
IMMEDIATELY.
11
Page 12

Notes:
Do not use manganese batteries.
About 7 rolls of 24-exposure
film can be used with new
batteries.
Keep spare batteries on hand
when going on a long trip or to
a cold area.
Sweat, oil, and so on can
prevent a battery's terminals
from making electrical contact.
To avoid this, wipe both
terminals before loading the
battery.
Dispose of used batteries as
general waste according to
local regulations.
12
Page 13
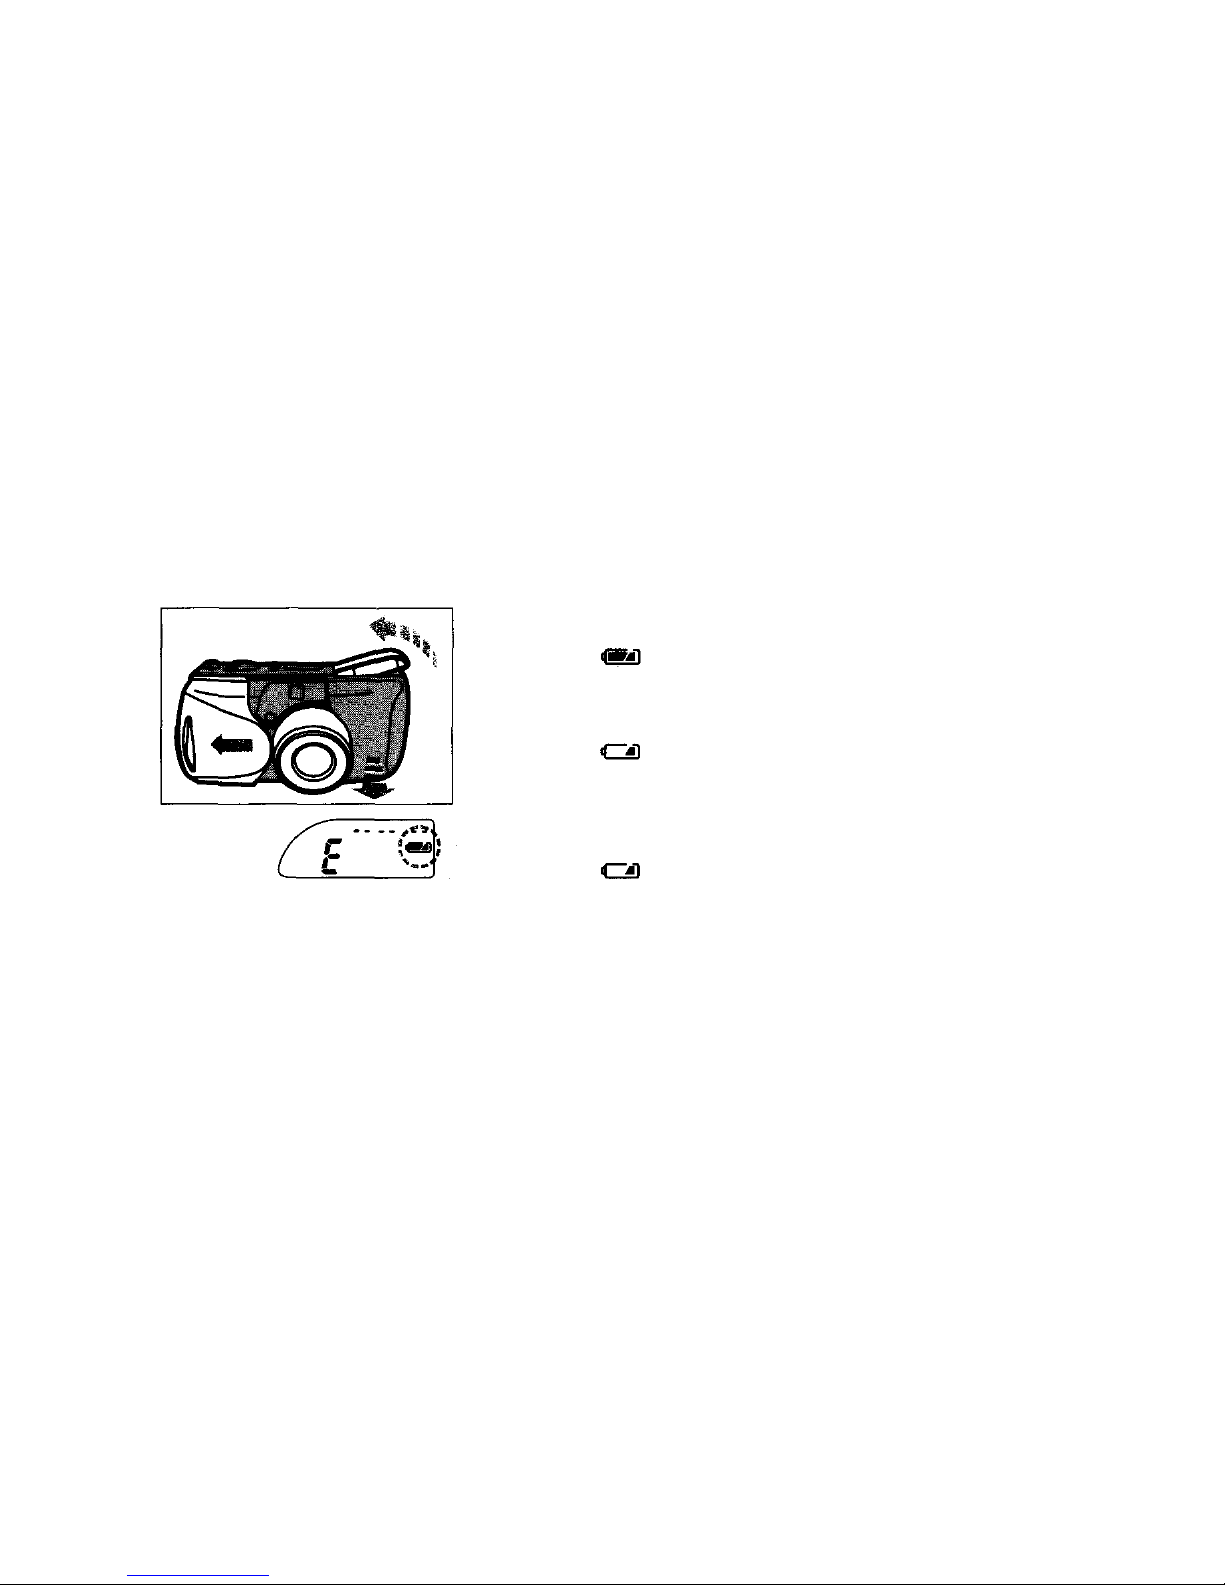
CHECKING THE BATTERIES
Open the lens barrier until
you feel a click.
Display: lights (and turns
off automatically).
Meaning: Batteries are OK. You
can shoot.
Display: blinks and other
indicators are displayed
normally.
Meaning: Battery power is low
and battery should be replaced.
Display: blinks and other
indicators go out.
Meaning: Batteries are dead and
should be replaced immediately.
13
Page 14
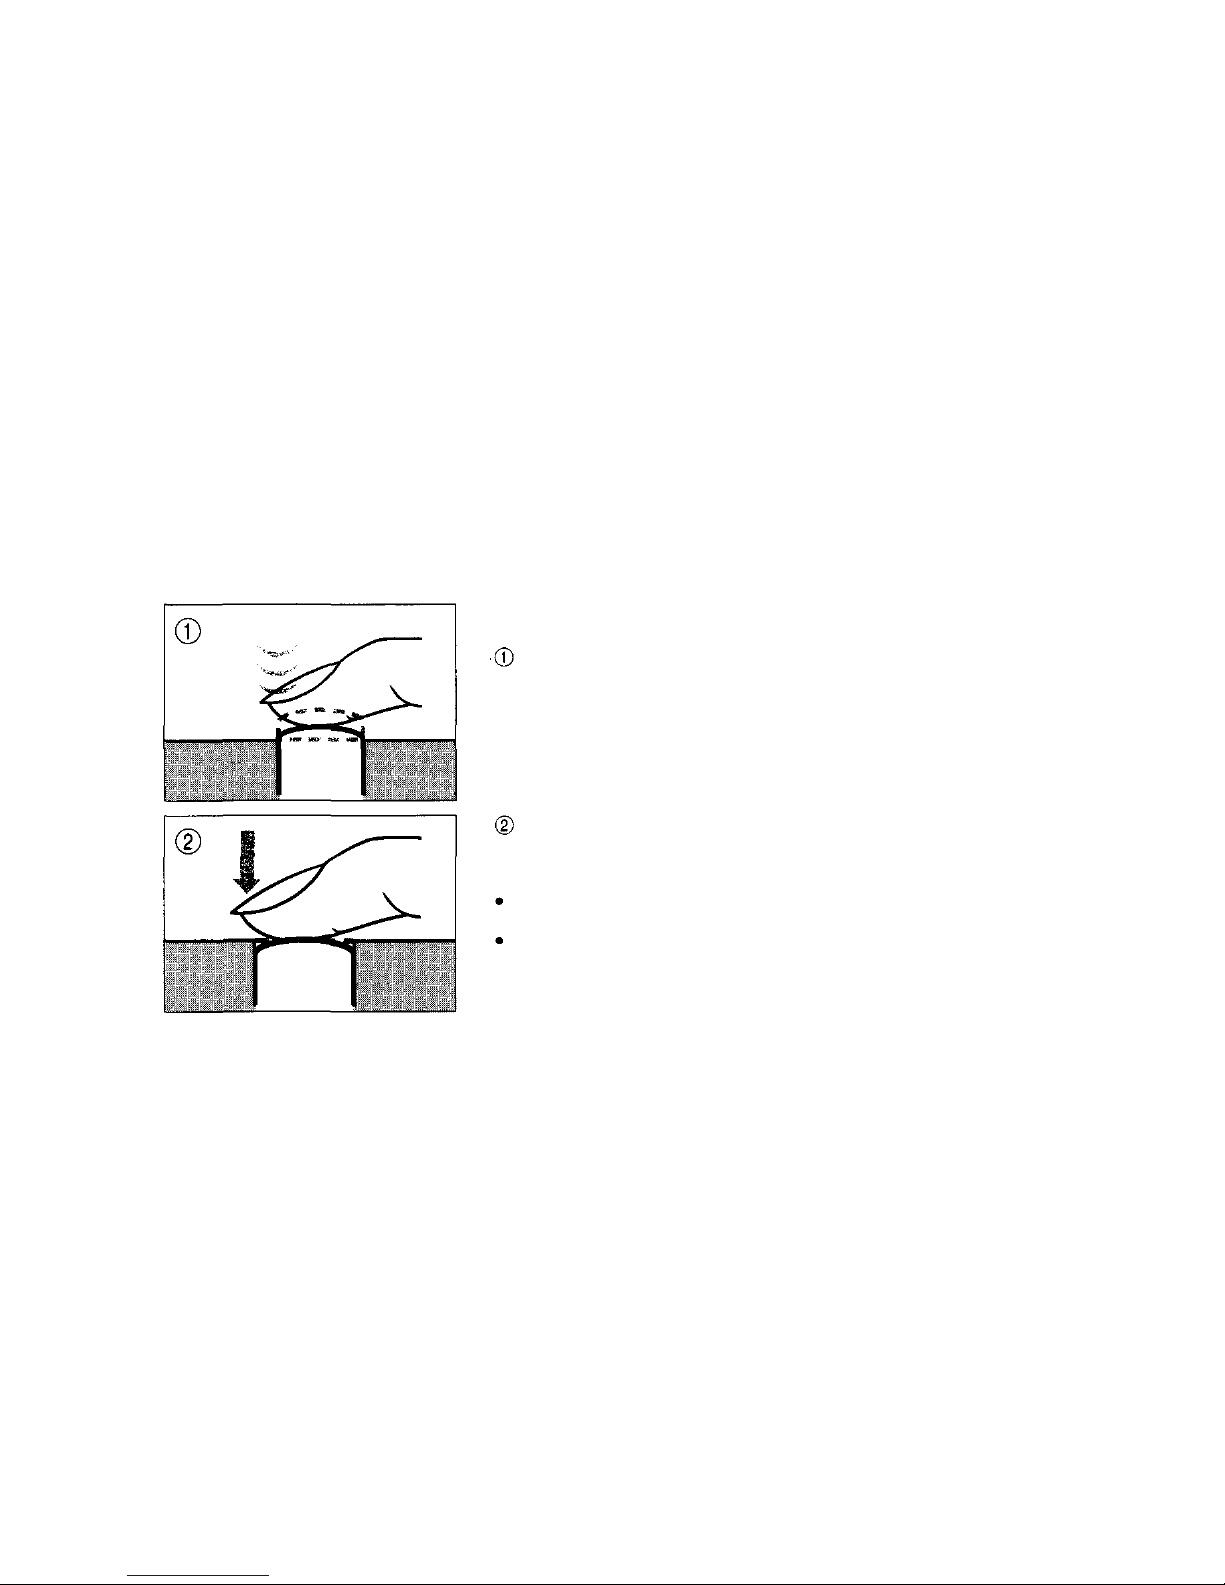
PROPER SHUTTER RELEASE
Practice before loading the
film.
Locks the focus. The green
lamp lights.
Releases the shutter to tak e
the picture.
Cautions:
Press the shutter release button
gently.
Avoid shaking the camera
when pressing the shutter
release button to prevent blurry
pictures.
14
Page 15
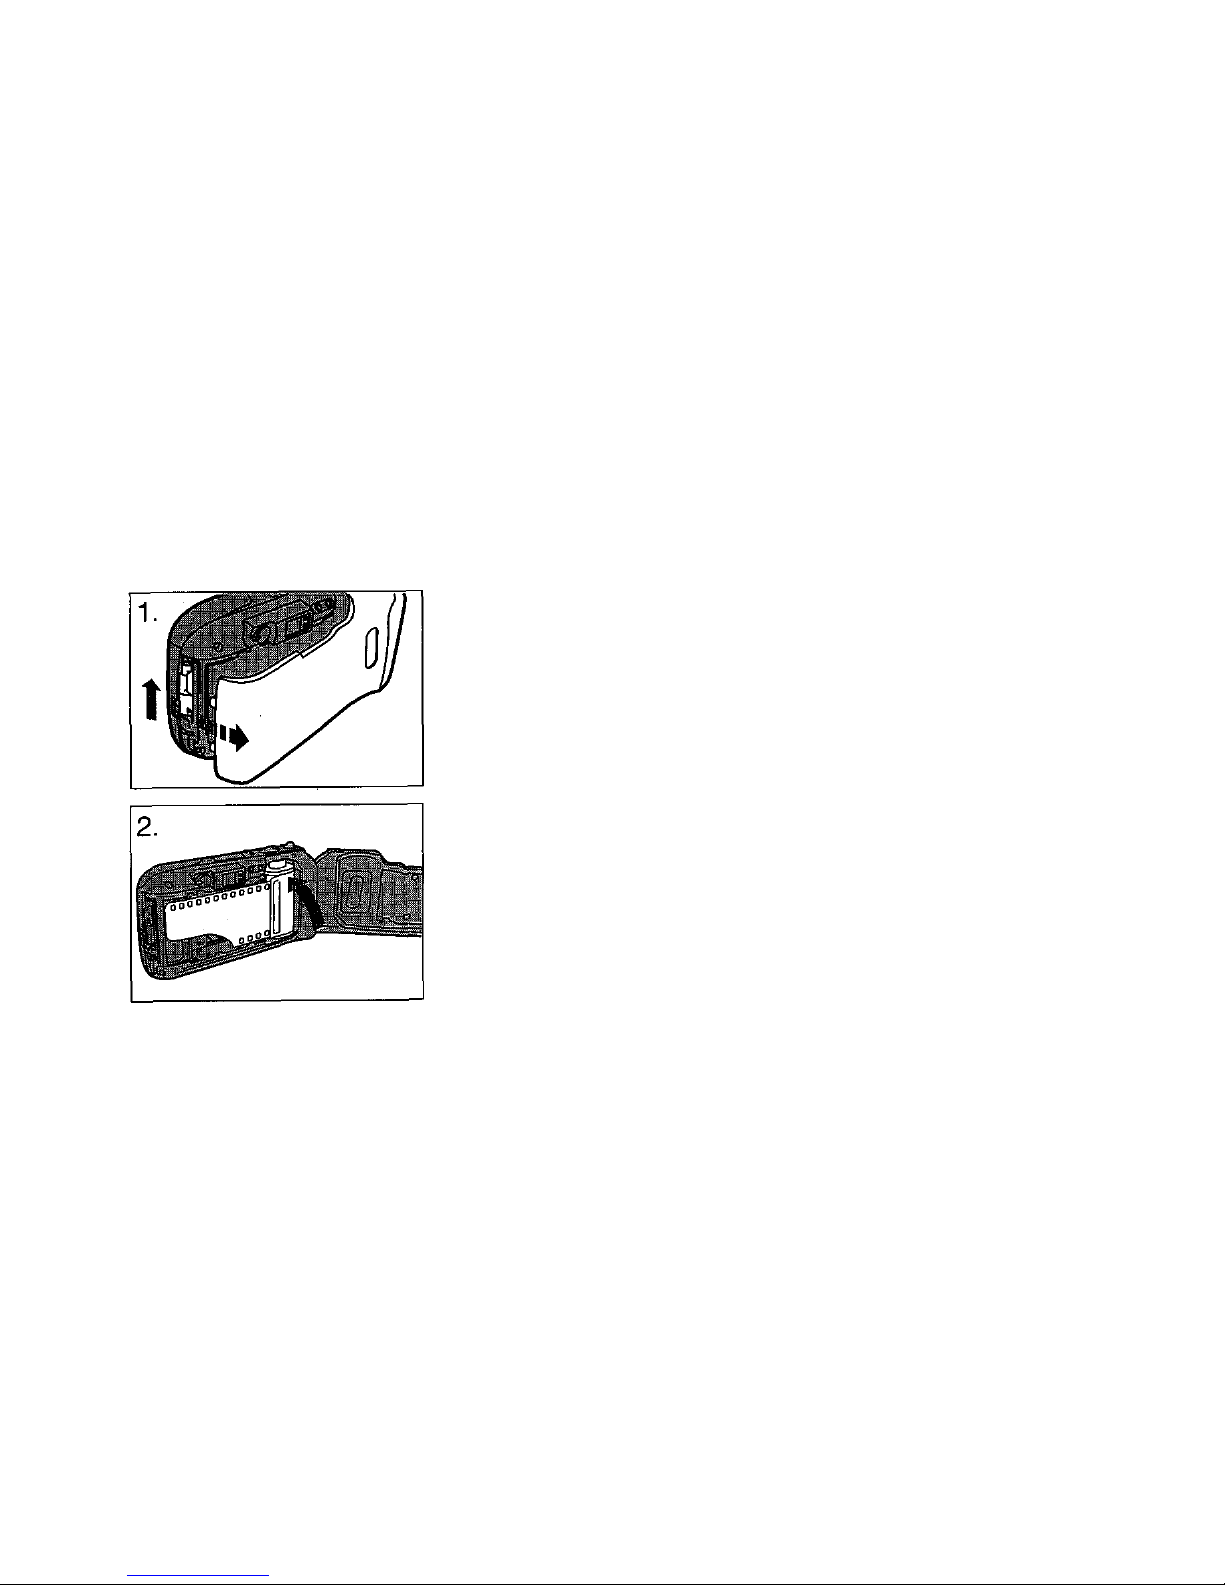
LOADING THE FILM
1. Open the back cover.
Do not touch the inside of
the camera, especially the
lens.
2. Insert the film cartridge
until it clic ks.
Note: Use of ISO 400 film is
recommended.
15
Page 16
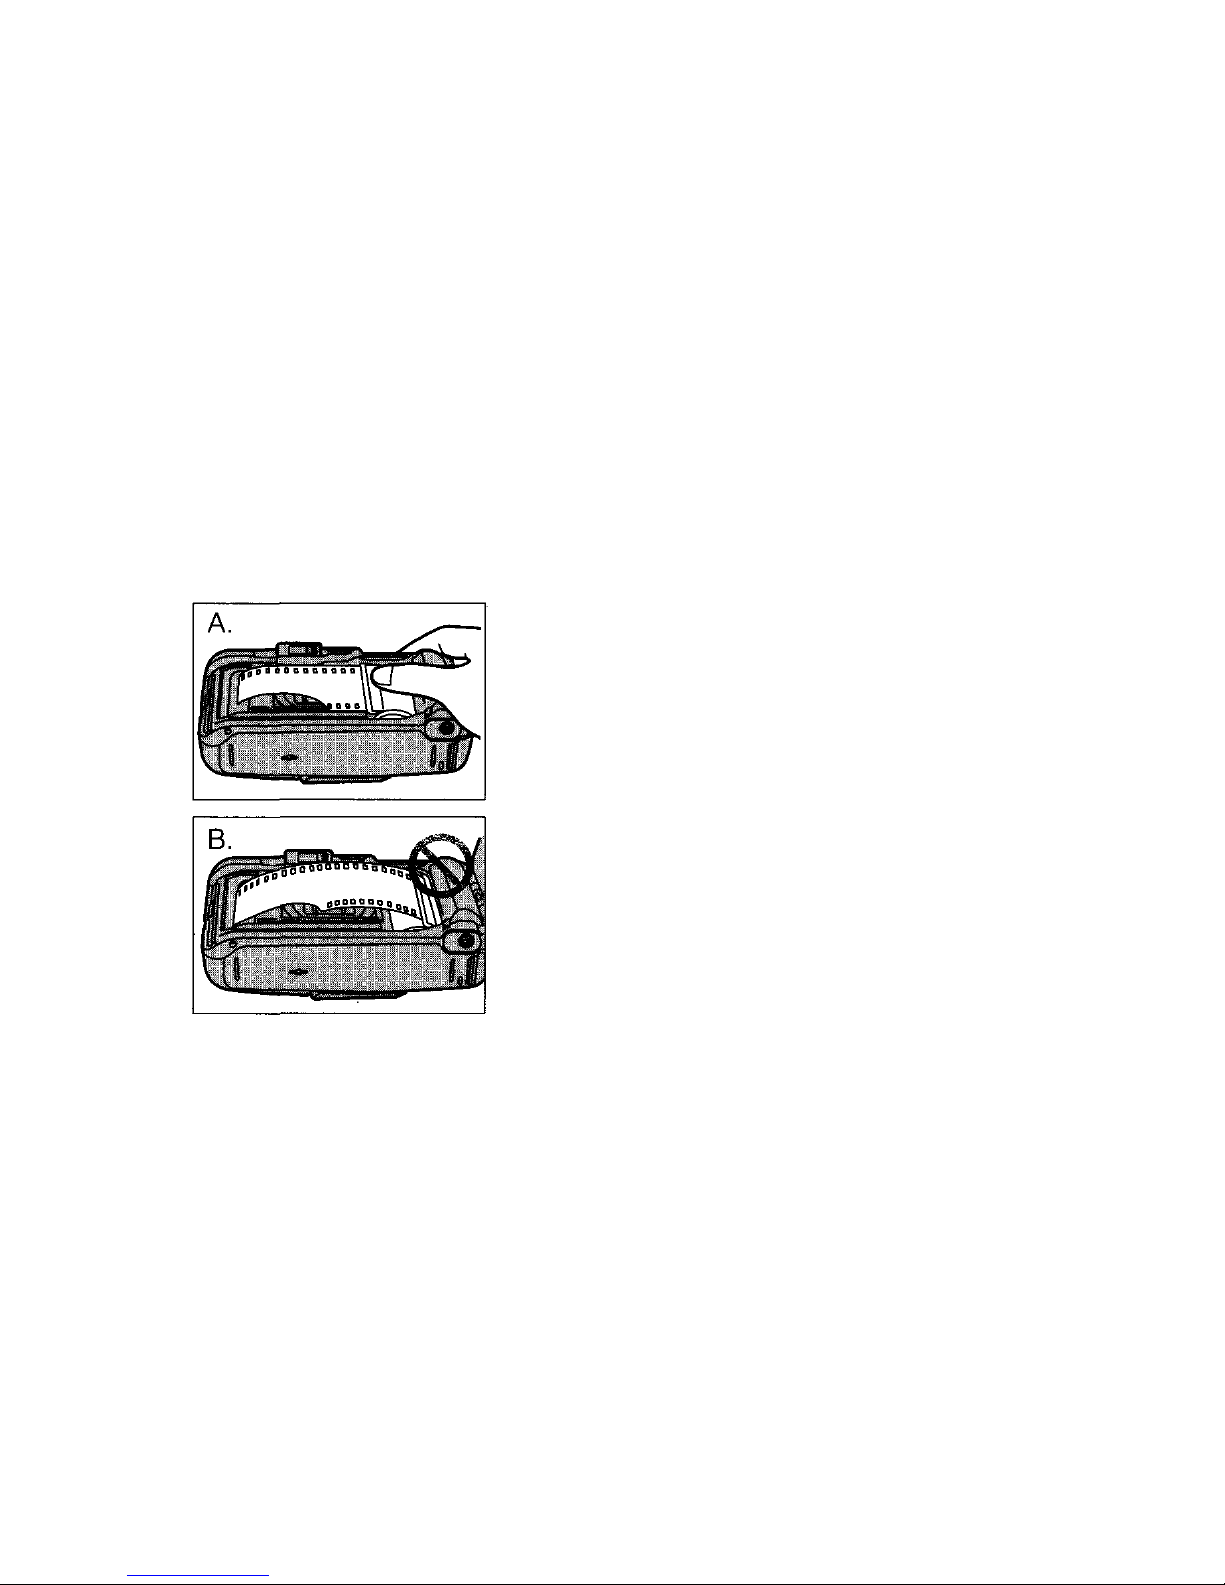
A. Correct
Make sure the film is lying flat.
B. Incorrect
Push the film cartridge gently to
position the film correctly. Then
press the left side of the back
cover and close it securely. If the
film is not lying flat, the film may
not advance to the first frame.
Caution: Do not touch the plastic
parts near the take-up spool.
16
Page 17
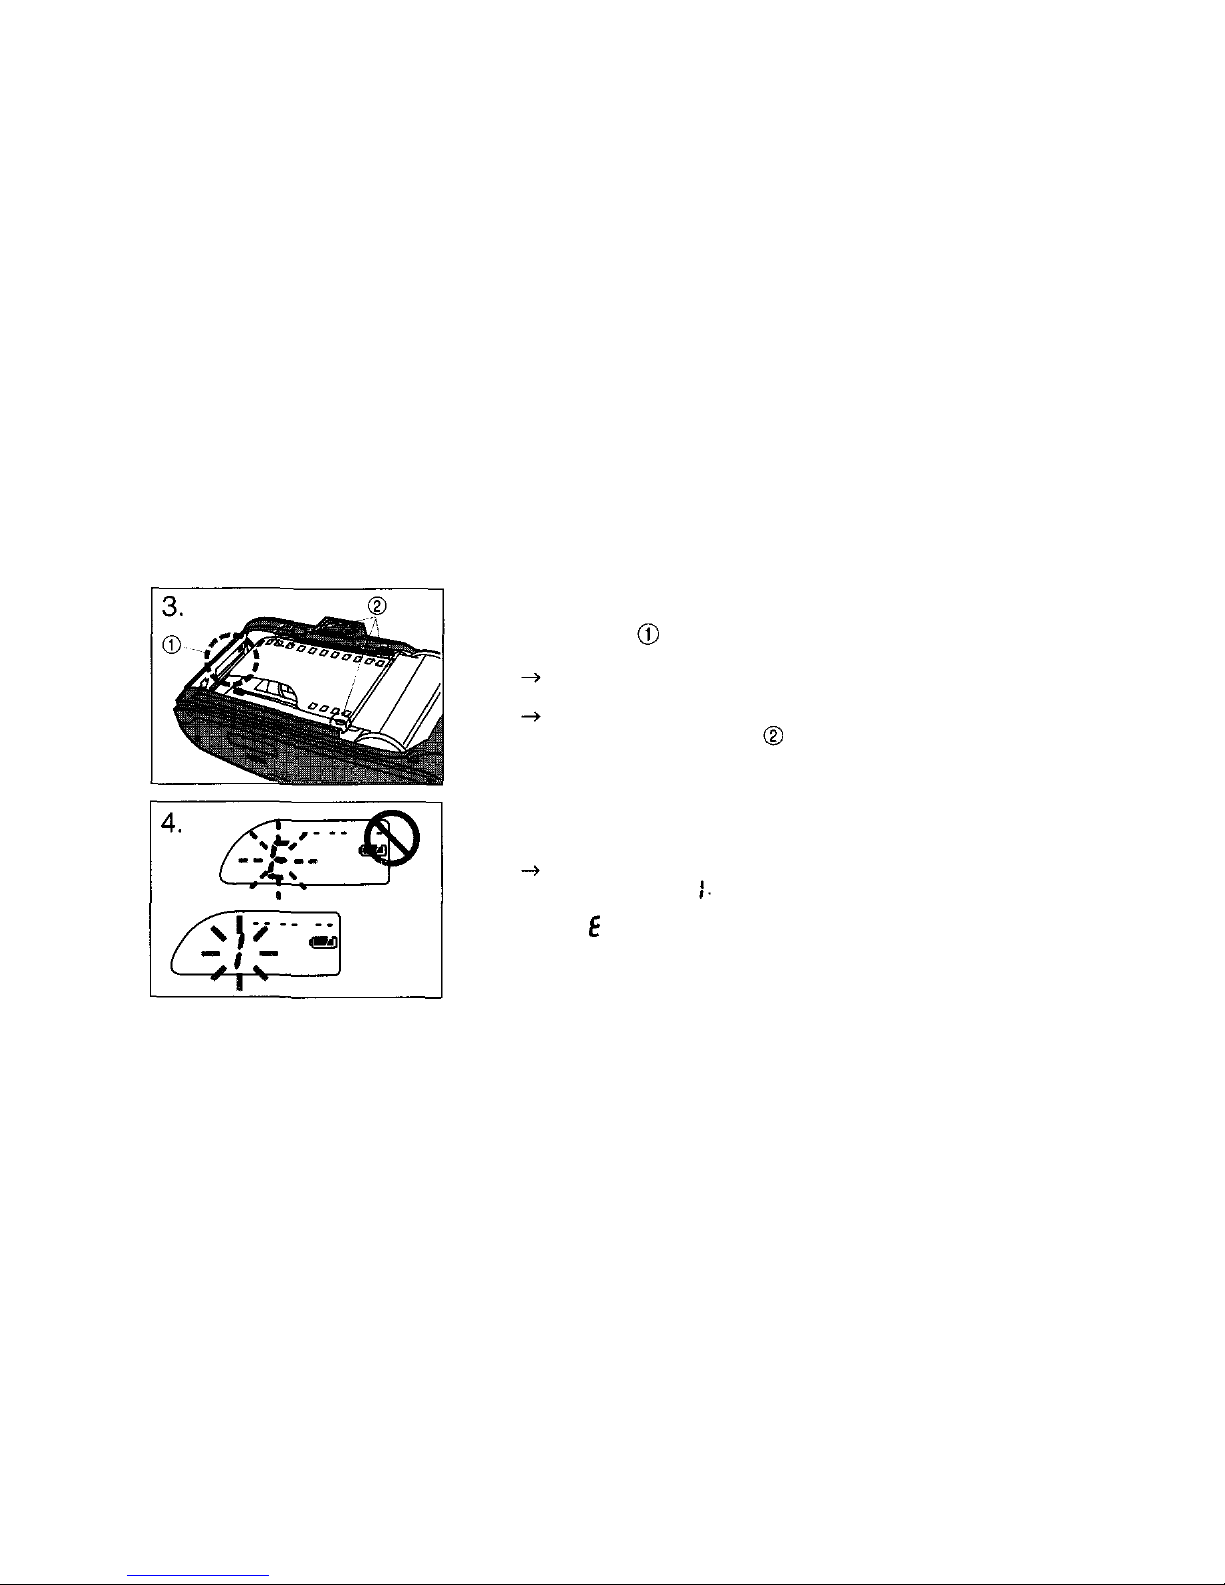
3. Align the film leader with
the mark , and close the
back cover.
The film automatically
advances to the first frame.
The film does not overlap any
of the positioning guides .
Then close the back cover.
4. Open the lens barrier until
you feel a click.
The exposure counter on the
LCD panel reads
Note: If blinks in the exposure
counter, the film is improperly
loaded. Reload the film.
17
Page 18
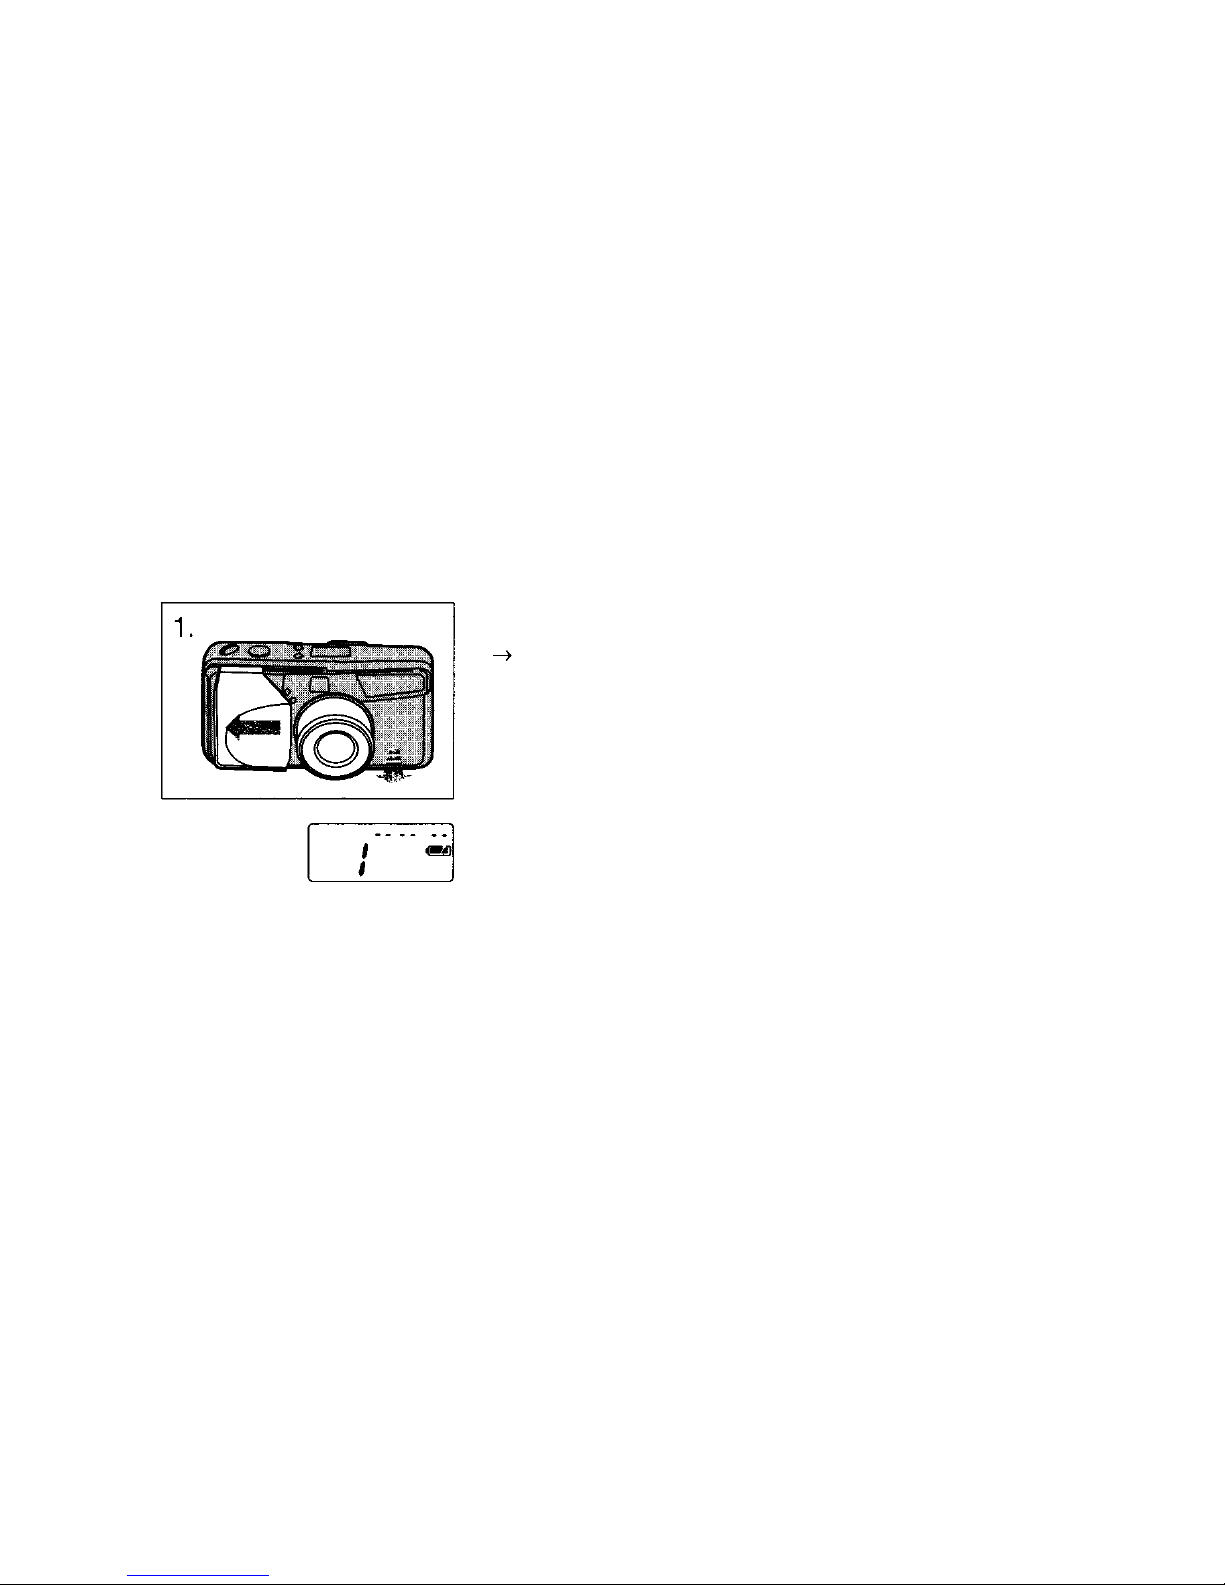
TAKING PICTURES
1. Open the lens barrier until
you feel a click.
The lens extends slightly, and
the LCD panel turns on.
Note: When the flash is held
down, the camera wil l not
activate. Release your finger
from the flash.
18
Page 19
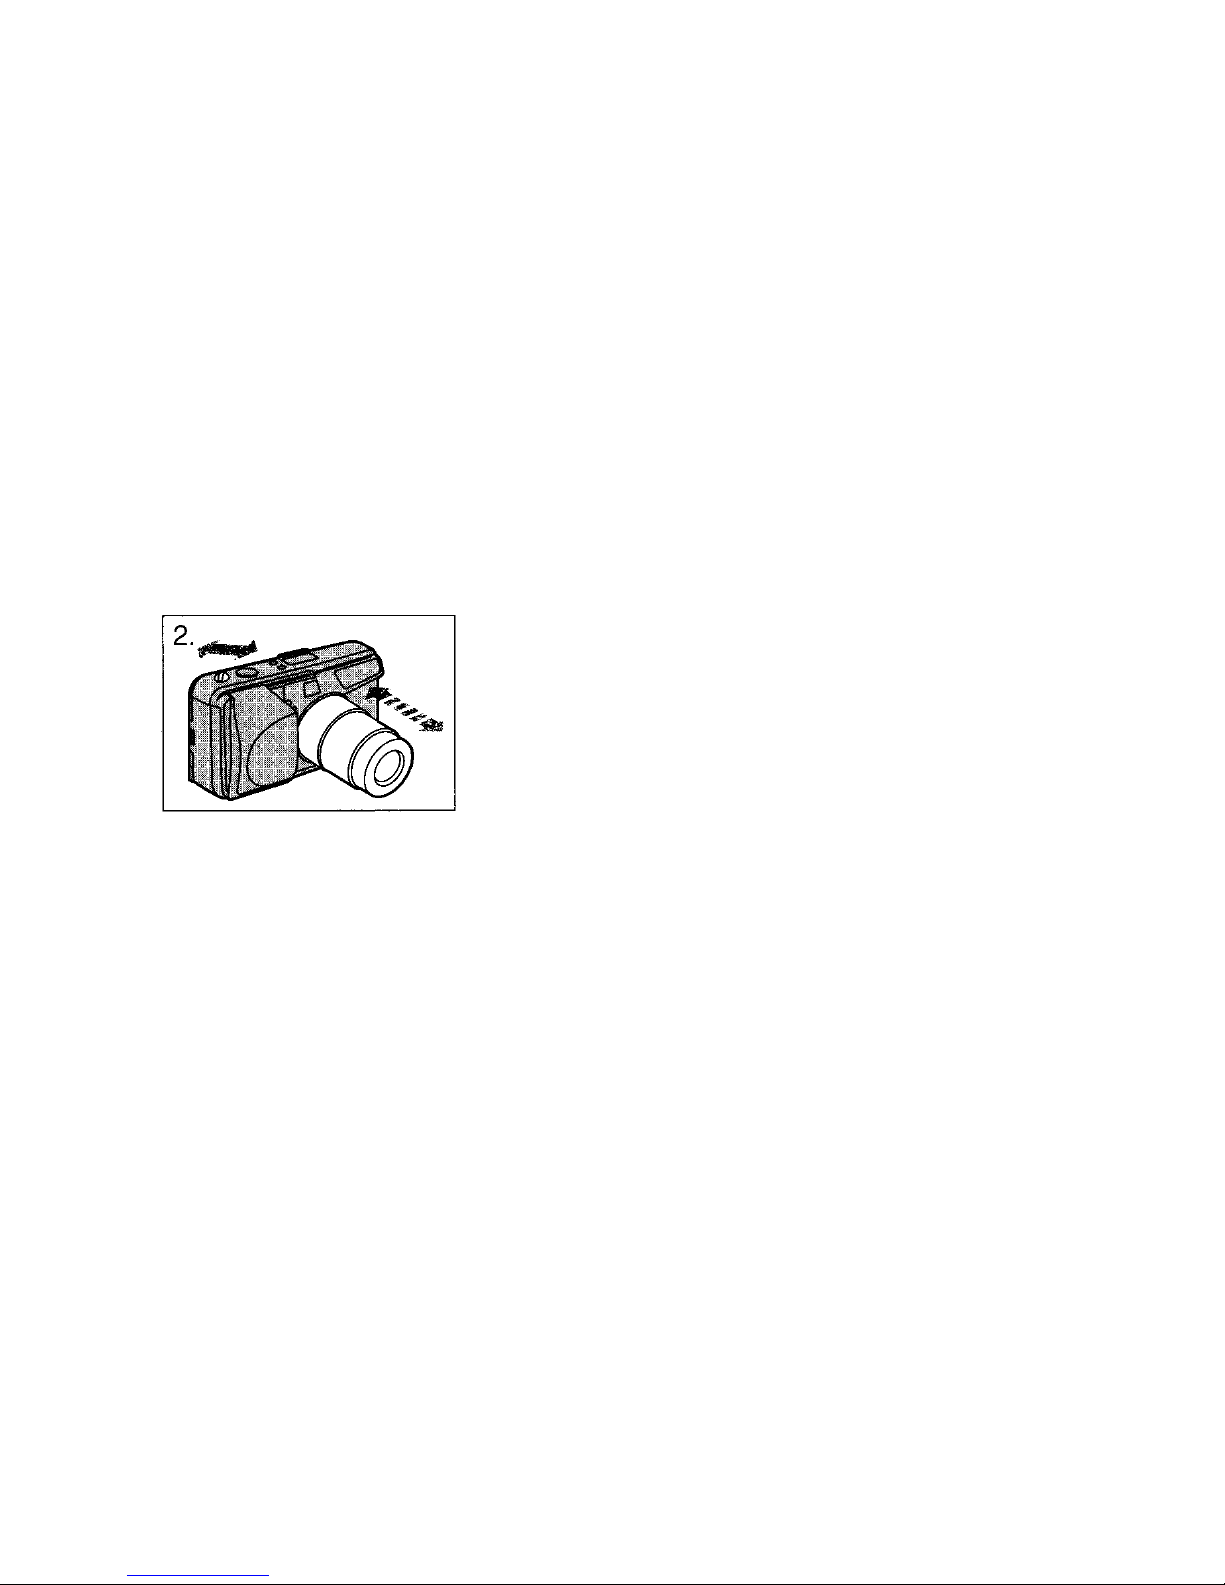
2. Aim t h e cam e ra at yo u r
subject. Use the zoom
lever for telephoto or wid e angle photography.
19
Page 20
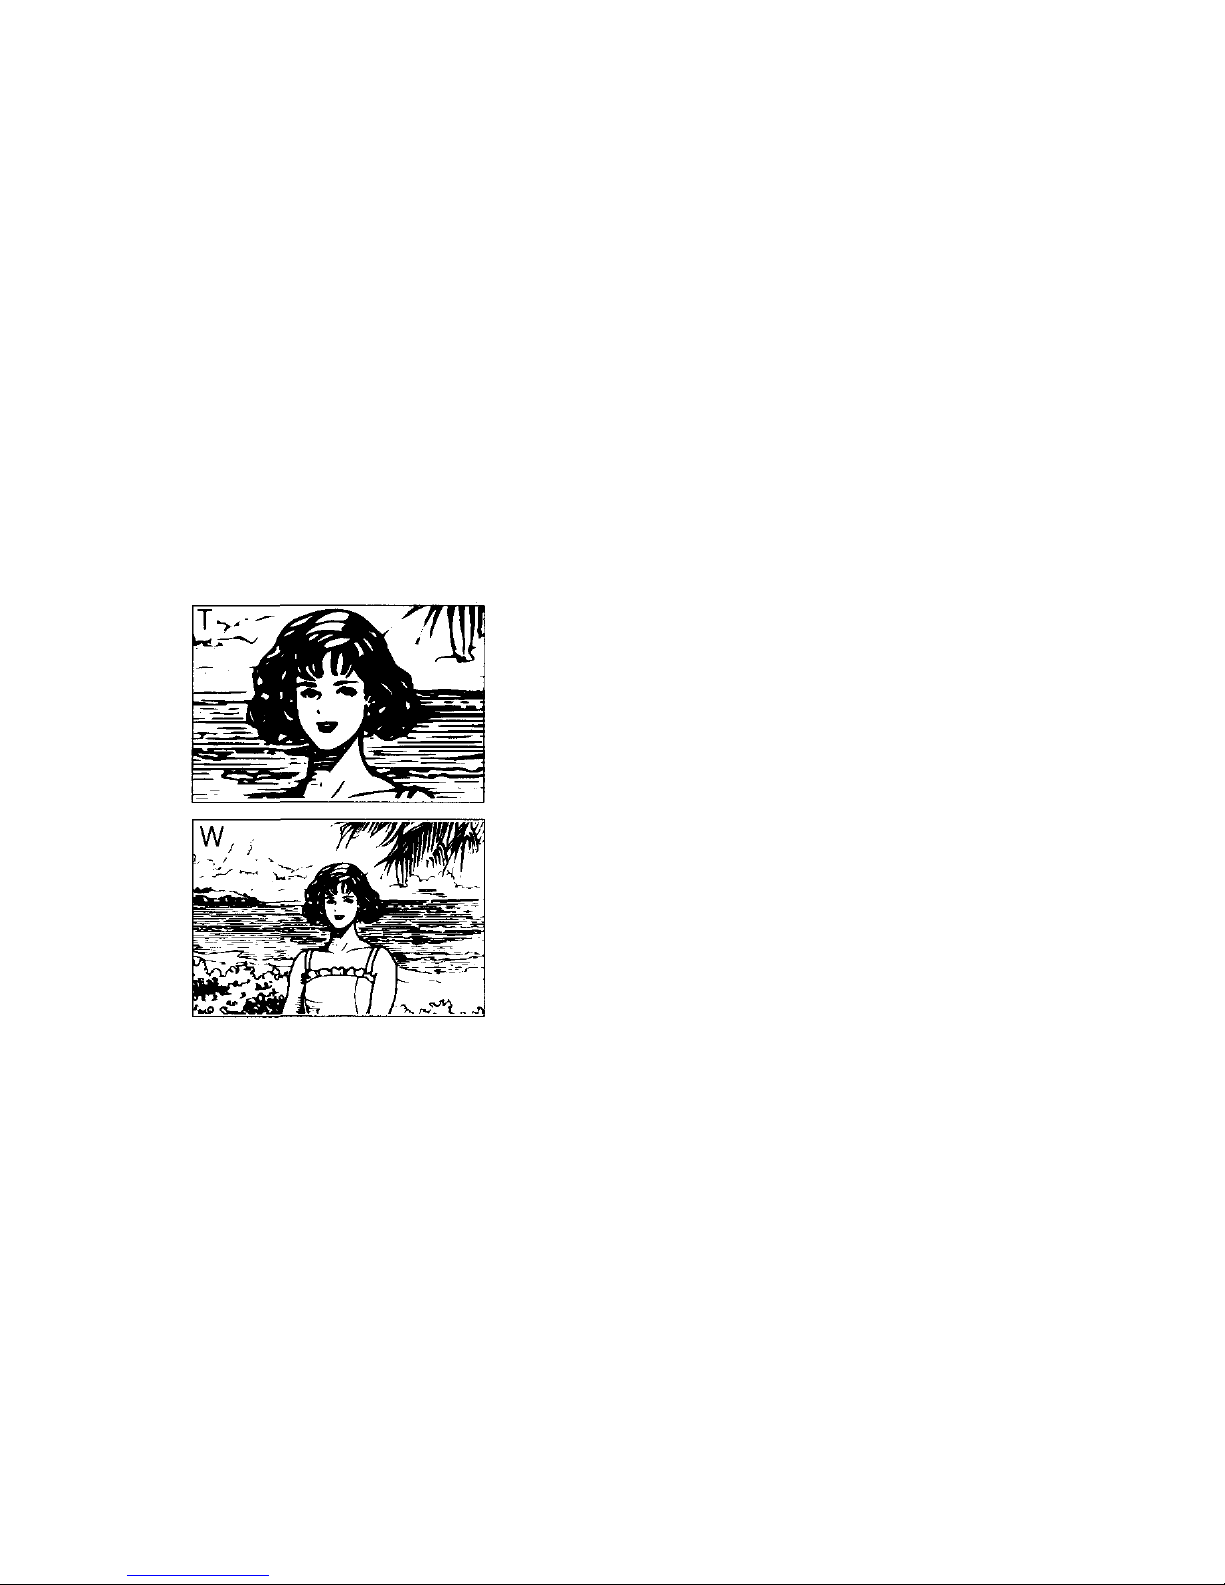
How to Use the Zoom Lever
Telephoto: Pull the lever to the
"T" side to zoom in.
Wide angle: Push the lever to the
"W" side to zoom out.
20
Page 21
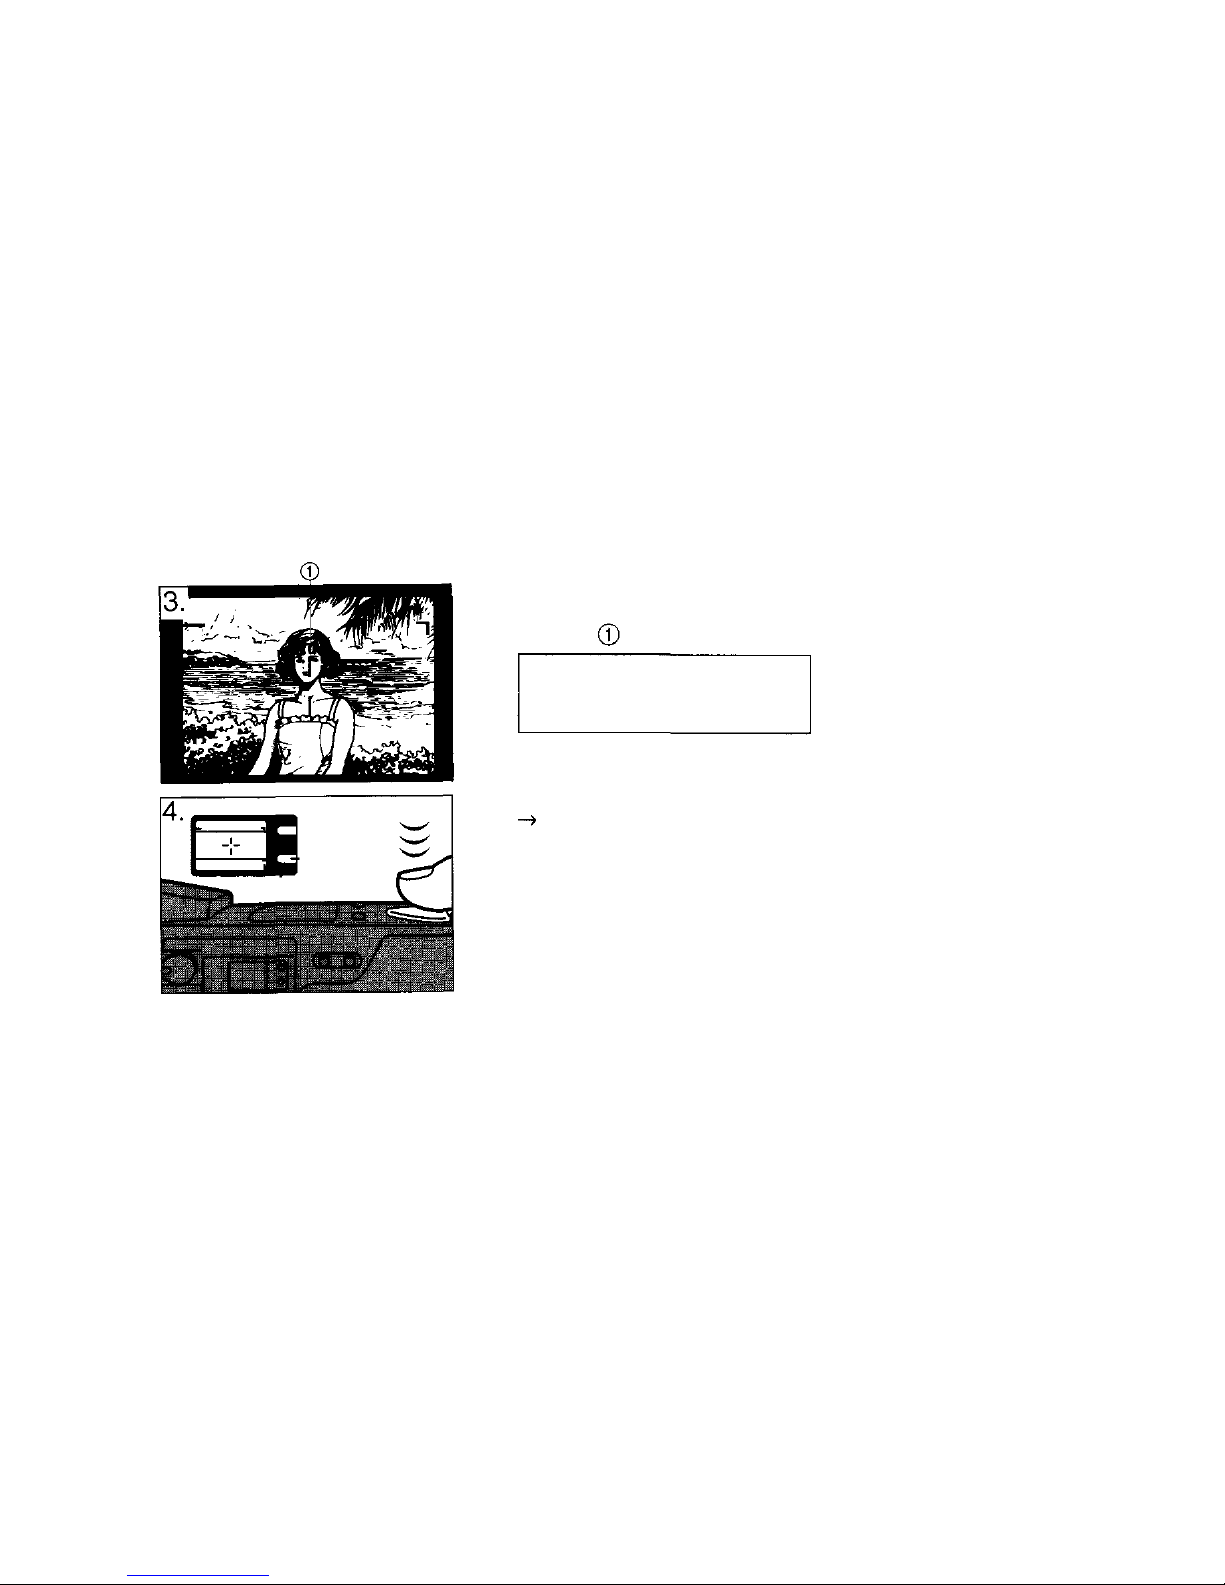
3. Position the autofocus
mark on your subject.
4. Depress the shutter
release button halfway to
adjust the focus.
Focus has been correctly
adjusted and the green lamp
lights. Exposure also will be
adjusted automatically.
The autofocus auxiliary light
will turn on automatically when
necessary to improve
autofocus accuracy.
WARNING: DO NOT LOOK
DIRECTLY AT THE SUN
THROUGH THE VIEWFINDER.
21
Page 22
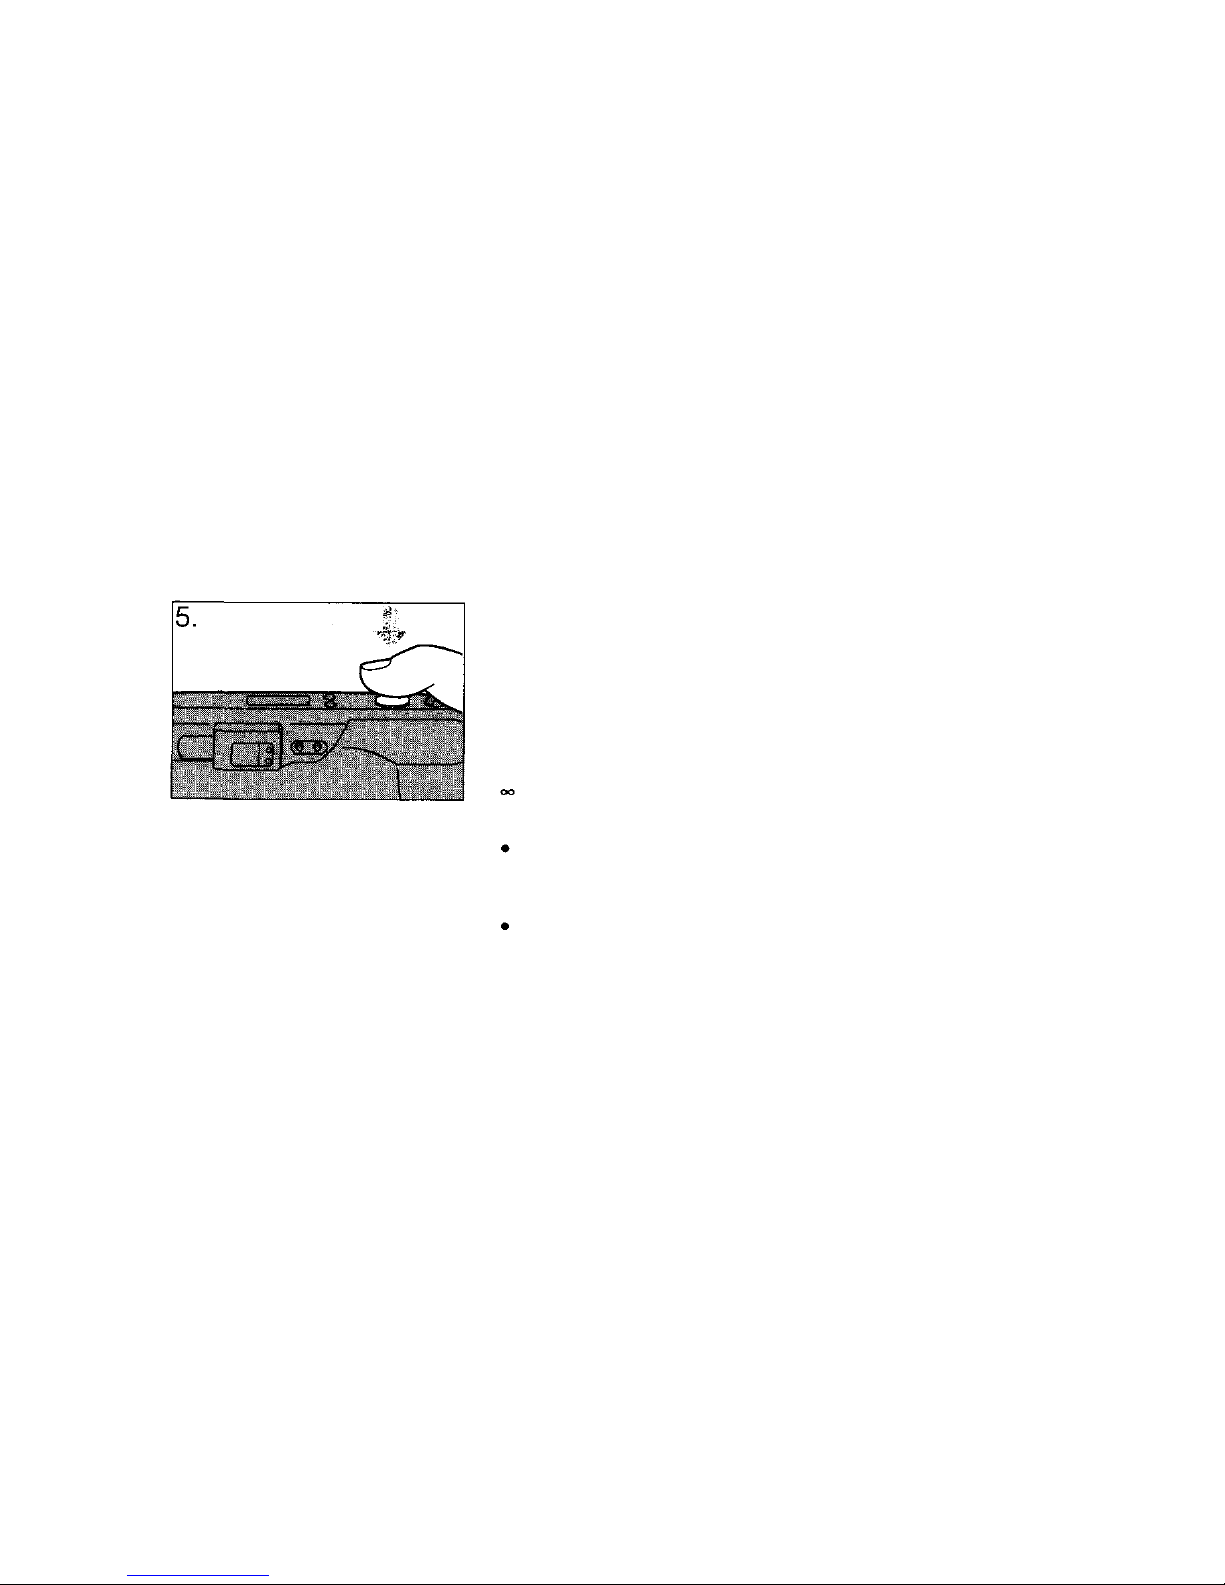
5. Depress the shutter
release button fully to take
the picture.
Note: Keep your fingers and the
strap away from the lens,
autofocus windows and flash.
Working distance: 0.6 m (2 ft) ~
(infinity)
Notes:
When the subject is closer than
the minimum working distance,
the shutter will not release.
(The green lamp blinks.)
When the subject is extremely
close to the camera, the
subject will be out of focus
although the shutter releases.
22
Page 23
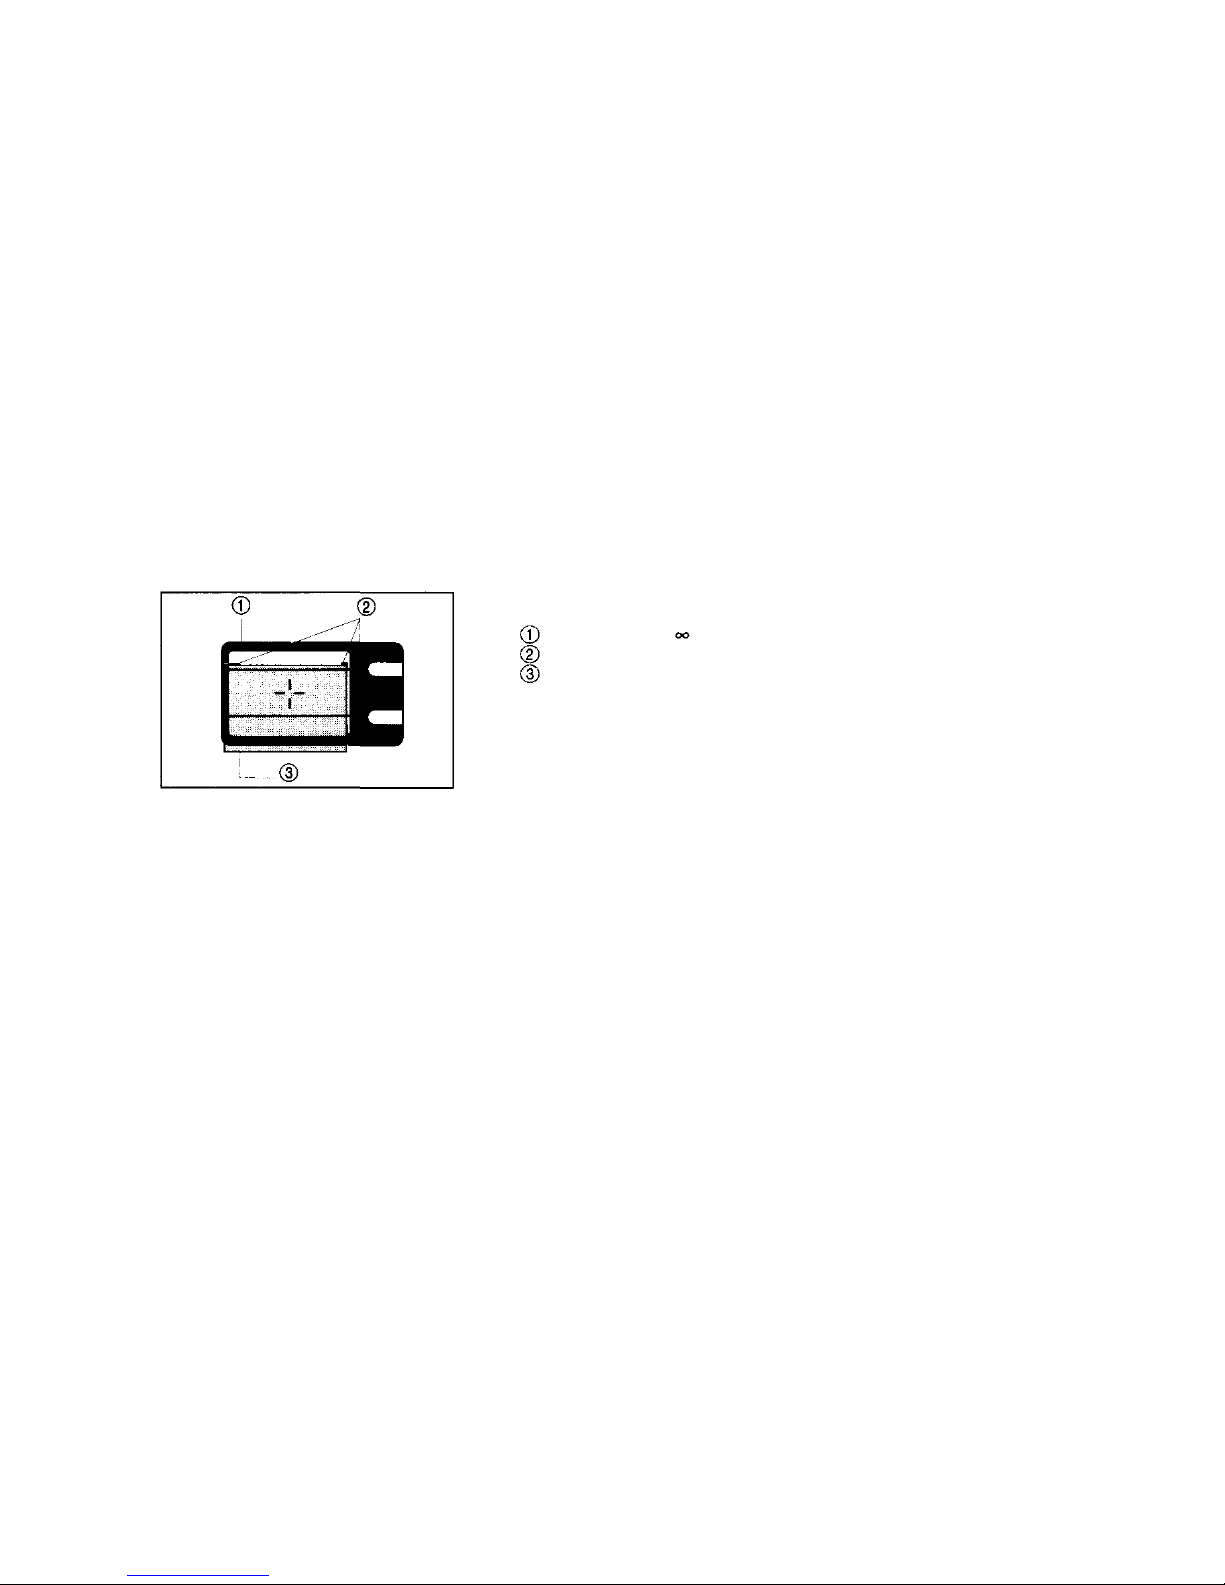
Close-up Correction
Picture area at (infinity)
Close-up correction marks
Image area of picture at 0.6 m
(2ft)
The picture area will move lower
in the viewfinder as you get
closer to the subject.
23
Page 24
AFTER SHOOTING
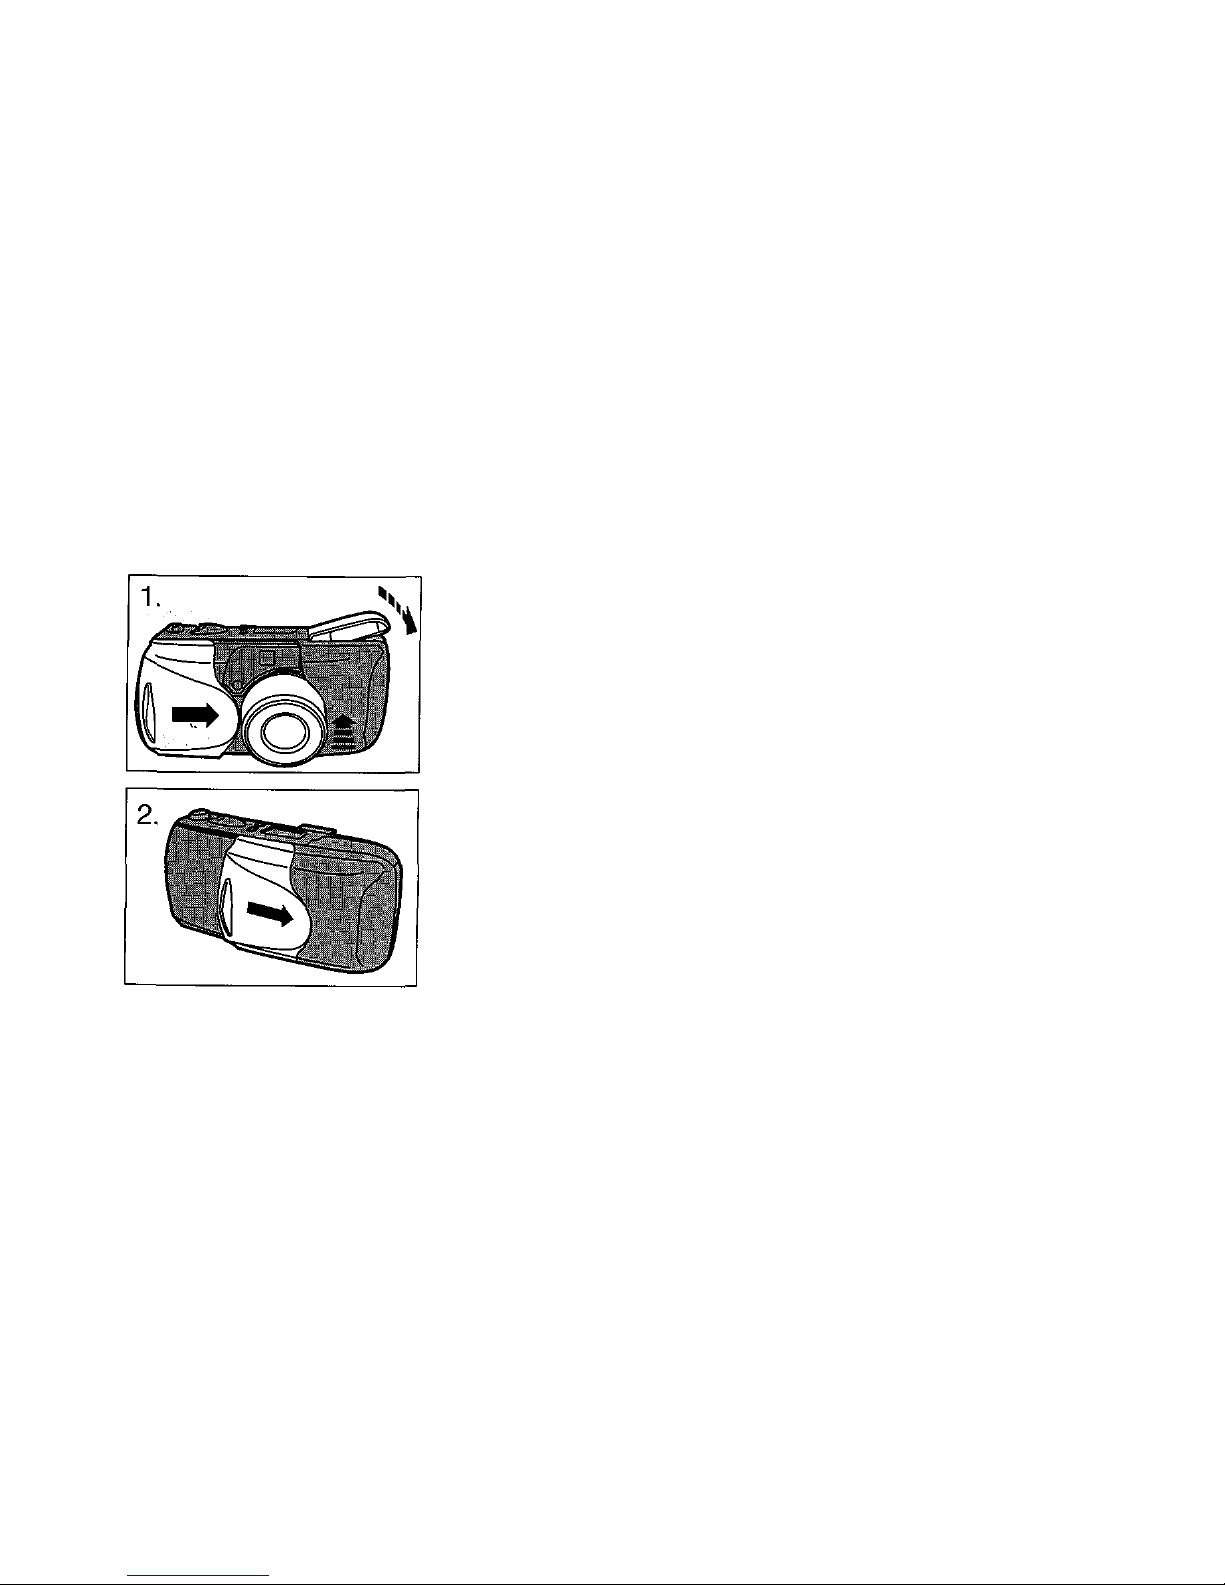
1. Close the lens barrier
slowly and carefully. The
lens will retract
automatically.
2. Close the lens barrier
completely.
Caution: Do not forcibly close the
lens barrier as it will interfere with
lens retraction.
Note: The power is turned off
automatically af ter 4.5 hours.
When the camera is not in use,
try to k eep the lens barrier
closed.
24
Page 25
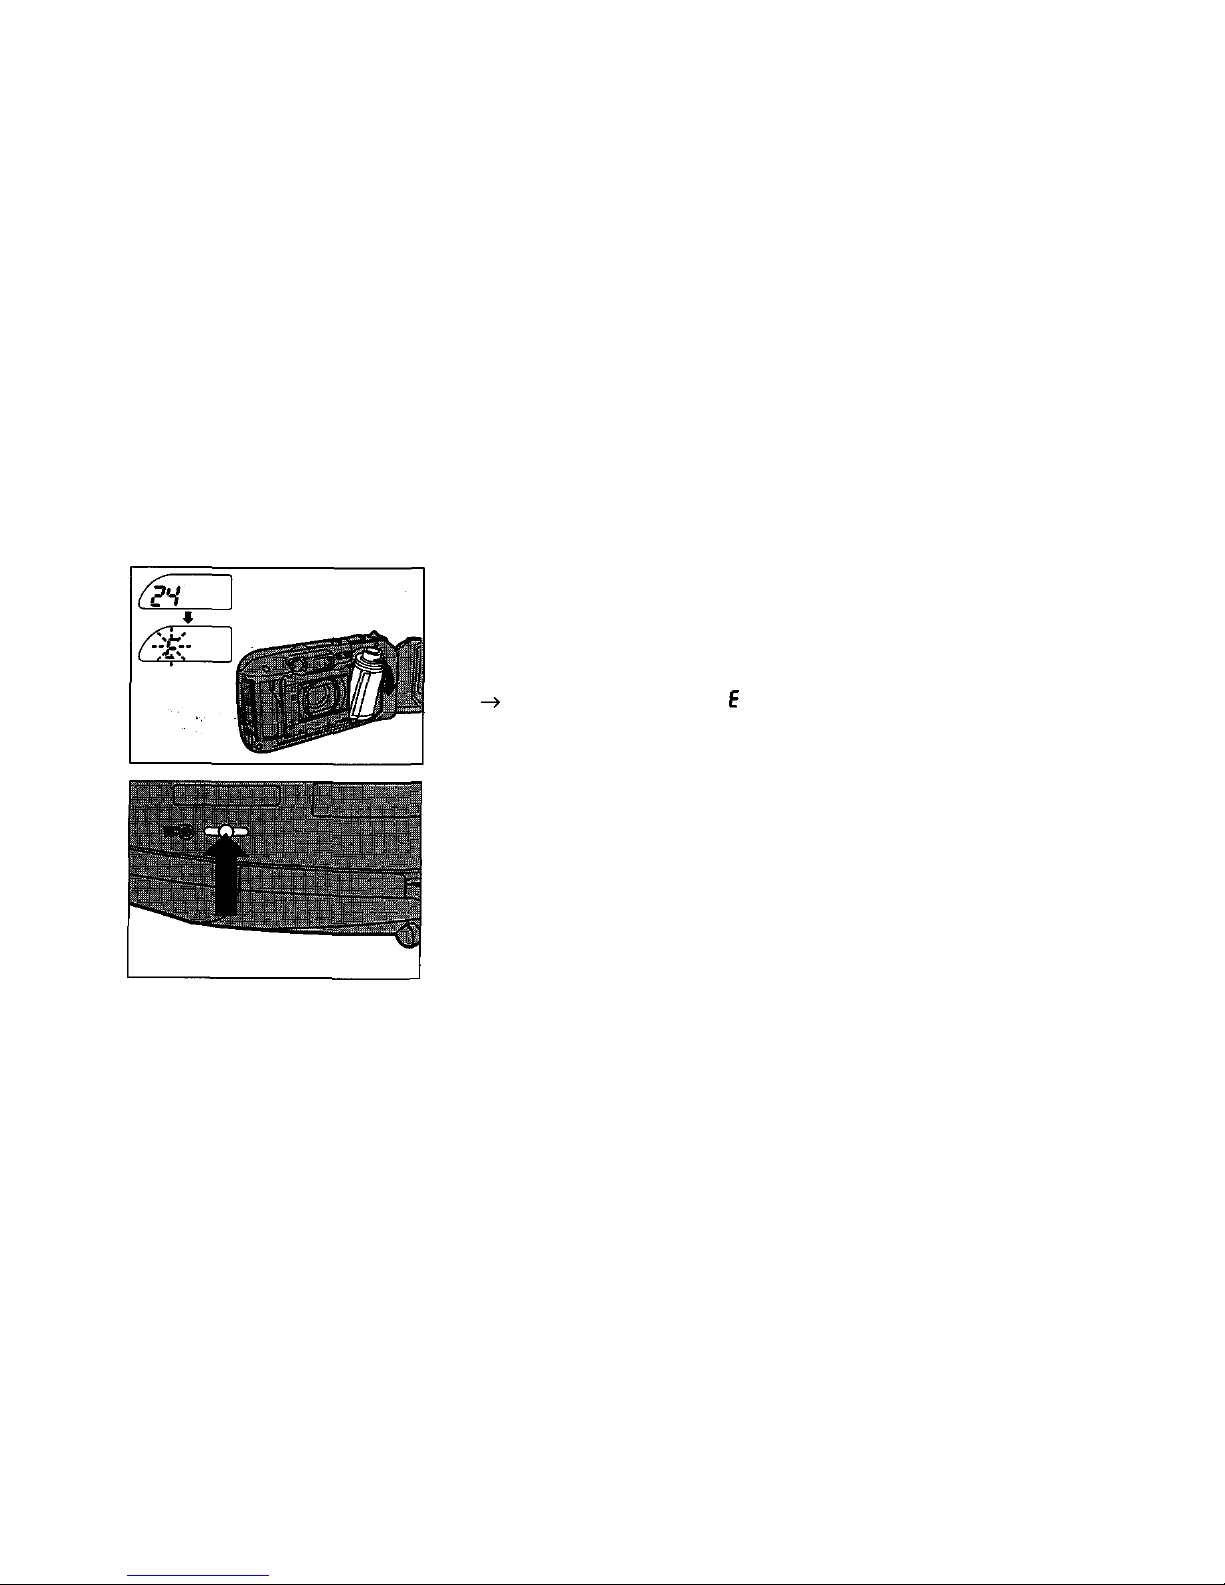
UNLOADING THE FILM
The camera automatically
rewinds the film when you
reach the end of a roll.
After the motor sto ps and
starts blinking on the LCD
panel, open the back cover
and remove the film.
Rewinding the film before the
end of the roll
Press the mid-roll rewind button
gently with your fingernail, etc.
Caution: Do not use an
instrument with a sharp tip.
25
Page 26
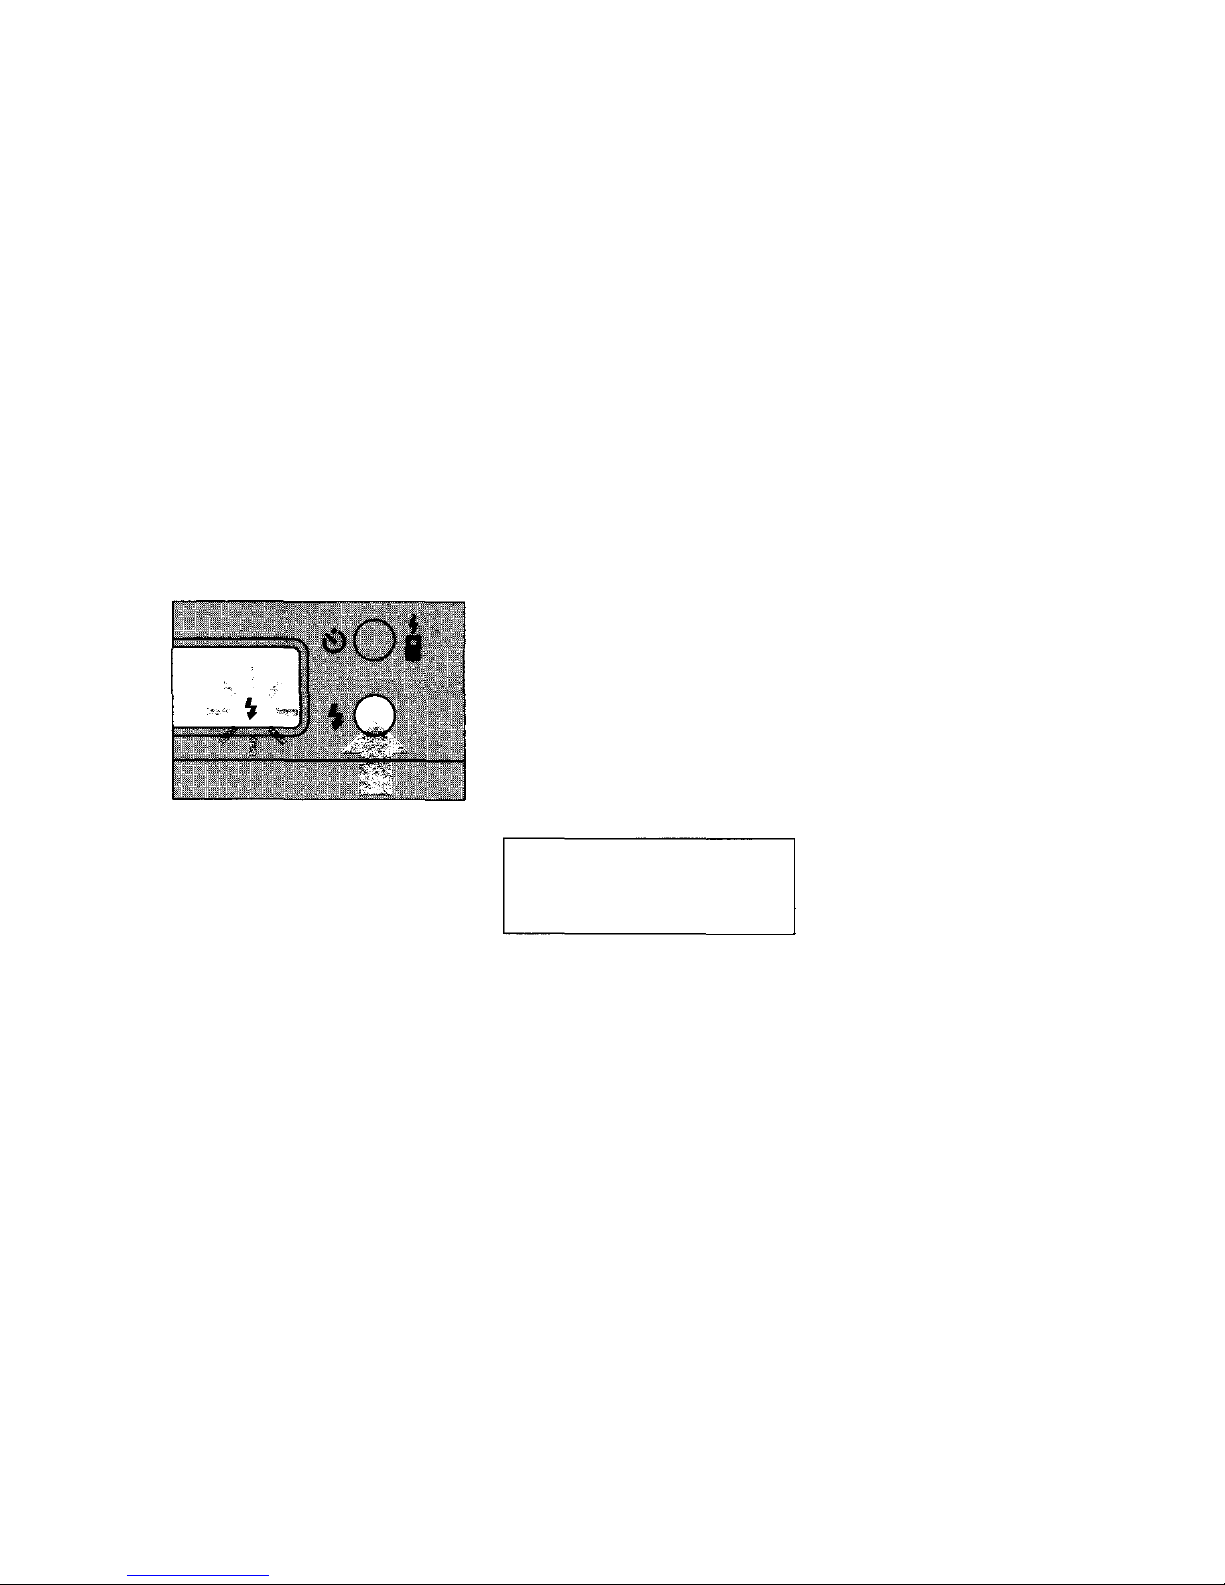
USING THE FLASH MODES
This camera has four flash
modes. Use these modes in
accordance with the
photographic conditions and
your purpose.
Setting the Modes
Each time the flash mode button
is pressed, the mode will change
sequentially as shown on page
27.
WARNING: DO NOT FIRE
FLASH TOO CLOSE TO THE
EYES OF PEOPLE OR
ANIMALS.
26
Page 27
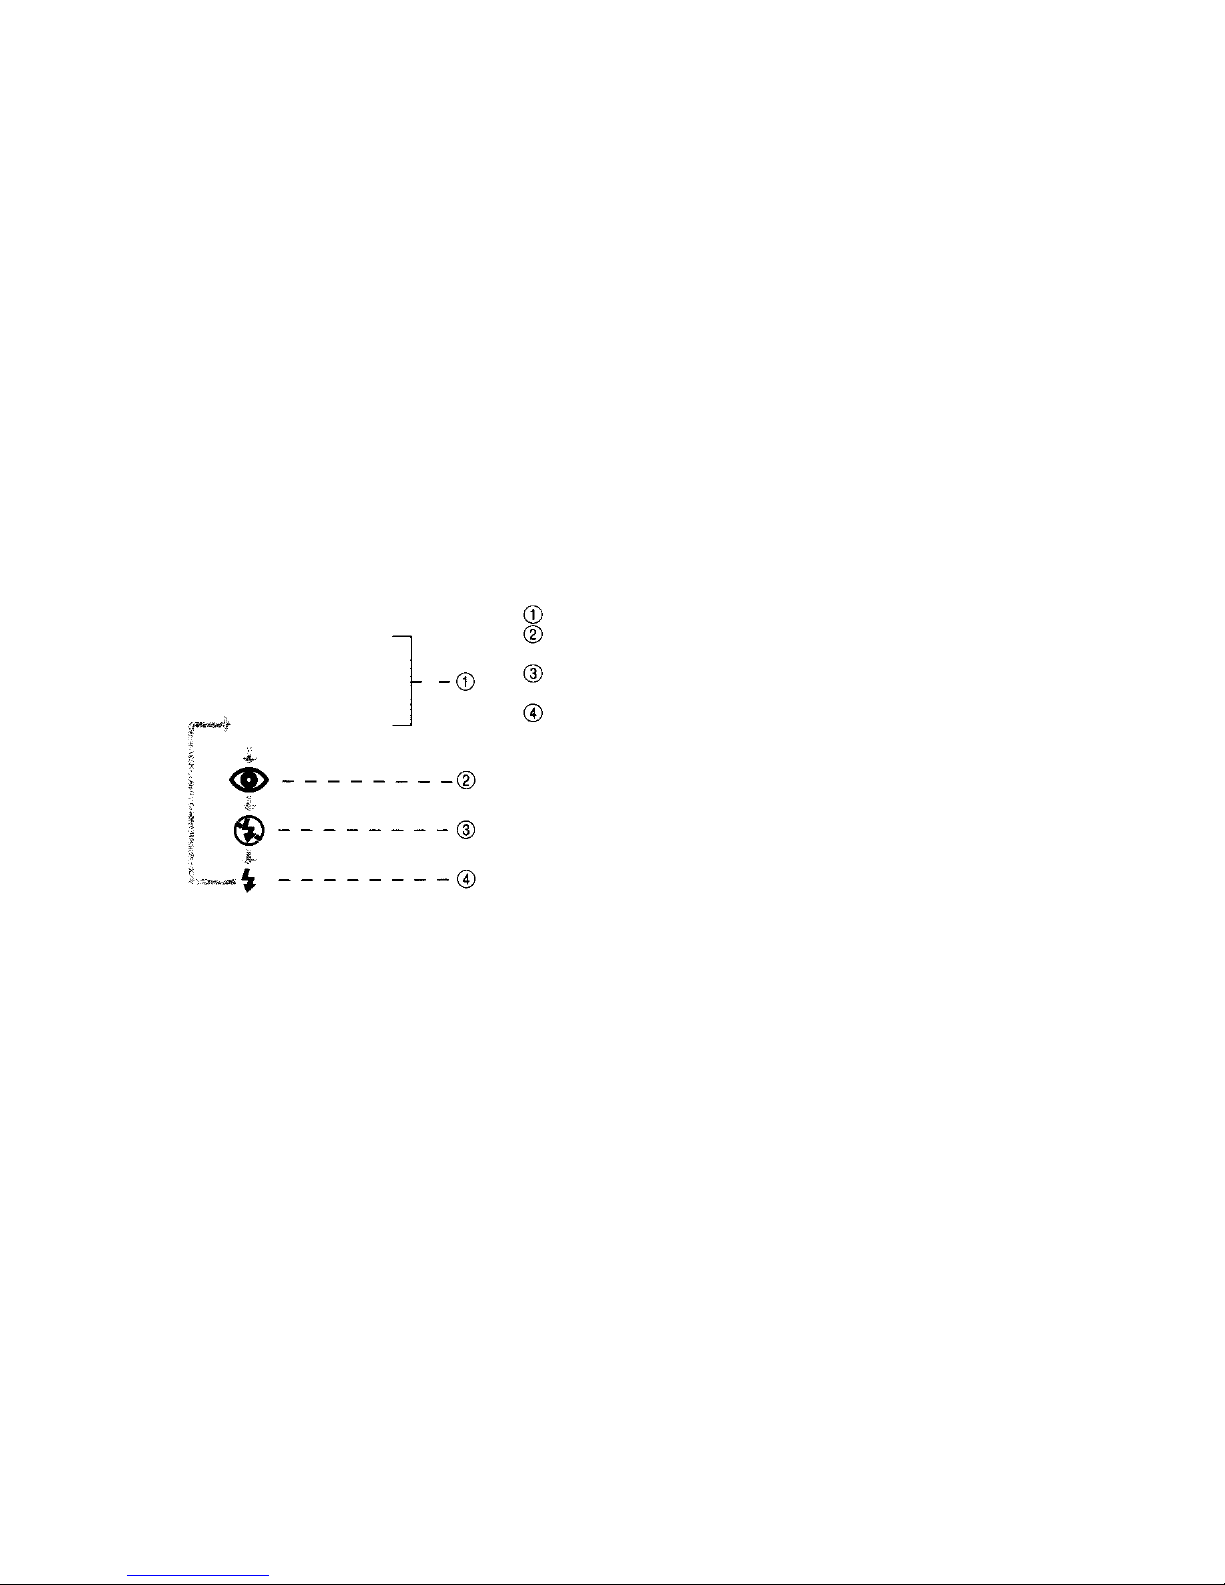
Auto Flash mode (p. 28)
Red-Eye Reducing Flash
mo de (p. 29)
Off (Flash Override) mode
(p. 31)
Fill-In Flash (Forced
Activation) mode (p. 32)
Note: The flash strength is
automatically controlled to
prevent pictures from being
overexposed even when the
subjects are close.
27
No Display
Page 28
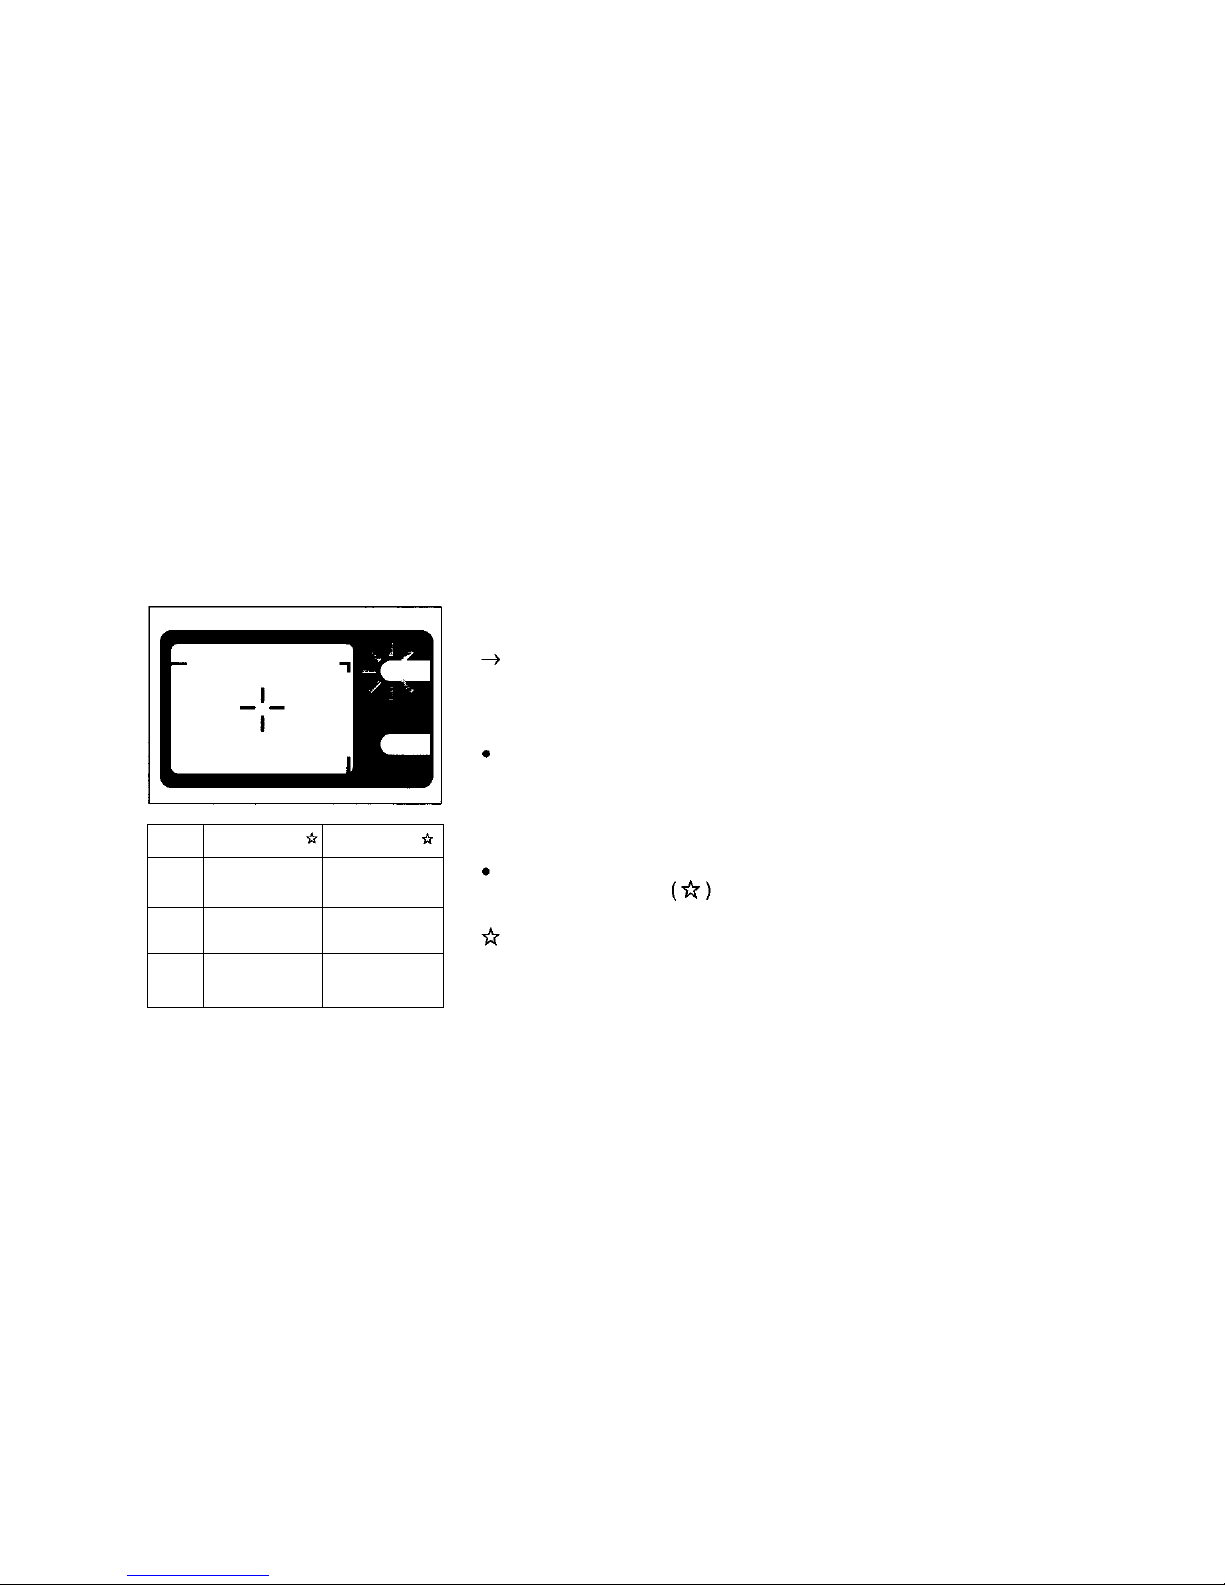
AUT O FLASH
Th e flash fires automatically in
dark places.
The orange lamp lights when
the shutter release button is
depressed halfway.
Notes:
When the orange lamp is
blinking, the flash is being
recharged and the shutter won't
release. Release your finger from
the shutter release button, and
wait for several seconds.
Maximum distance is about 70%
of the working range when
using reversal film.
Fla sh Working Range (with
color negative film)
ISO
100
200
400
W (38 mm)
0.6
~
3.8 m
(2
~
12.5 ft)
0.6
~
5.4 m
(2
~
17.7 ft)
0.6 ~ 7.6 m
(2
~
24.9 ft)
T (80 mm)
0.6
~
1.9 m
(2
~
6.2 ft)
0.6
~
2.7 m
(2
~
8.9 ft)
0.6
~
3.8 m
(2
~ 12.5 ft)
28
Page 29
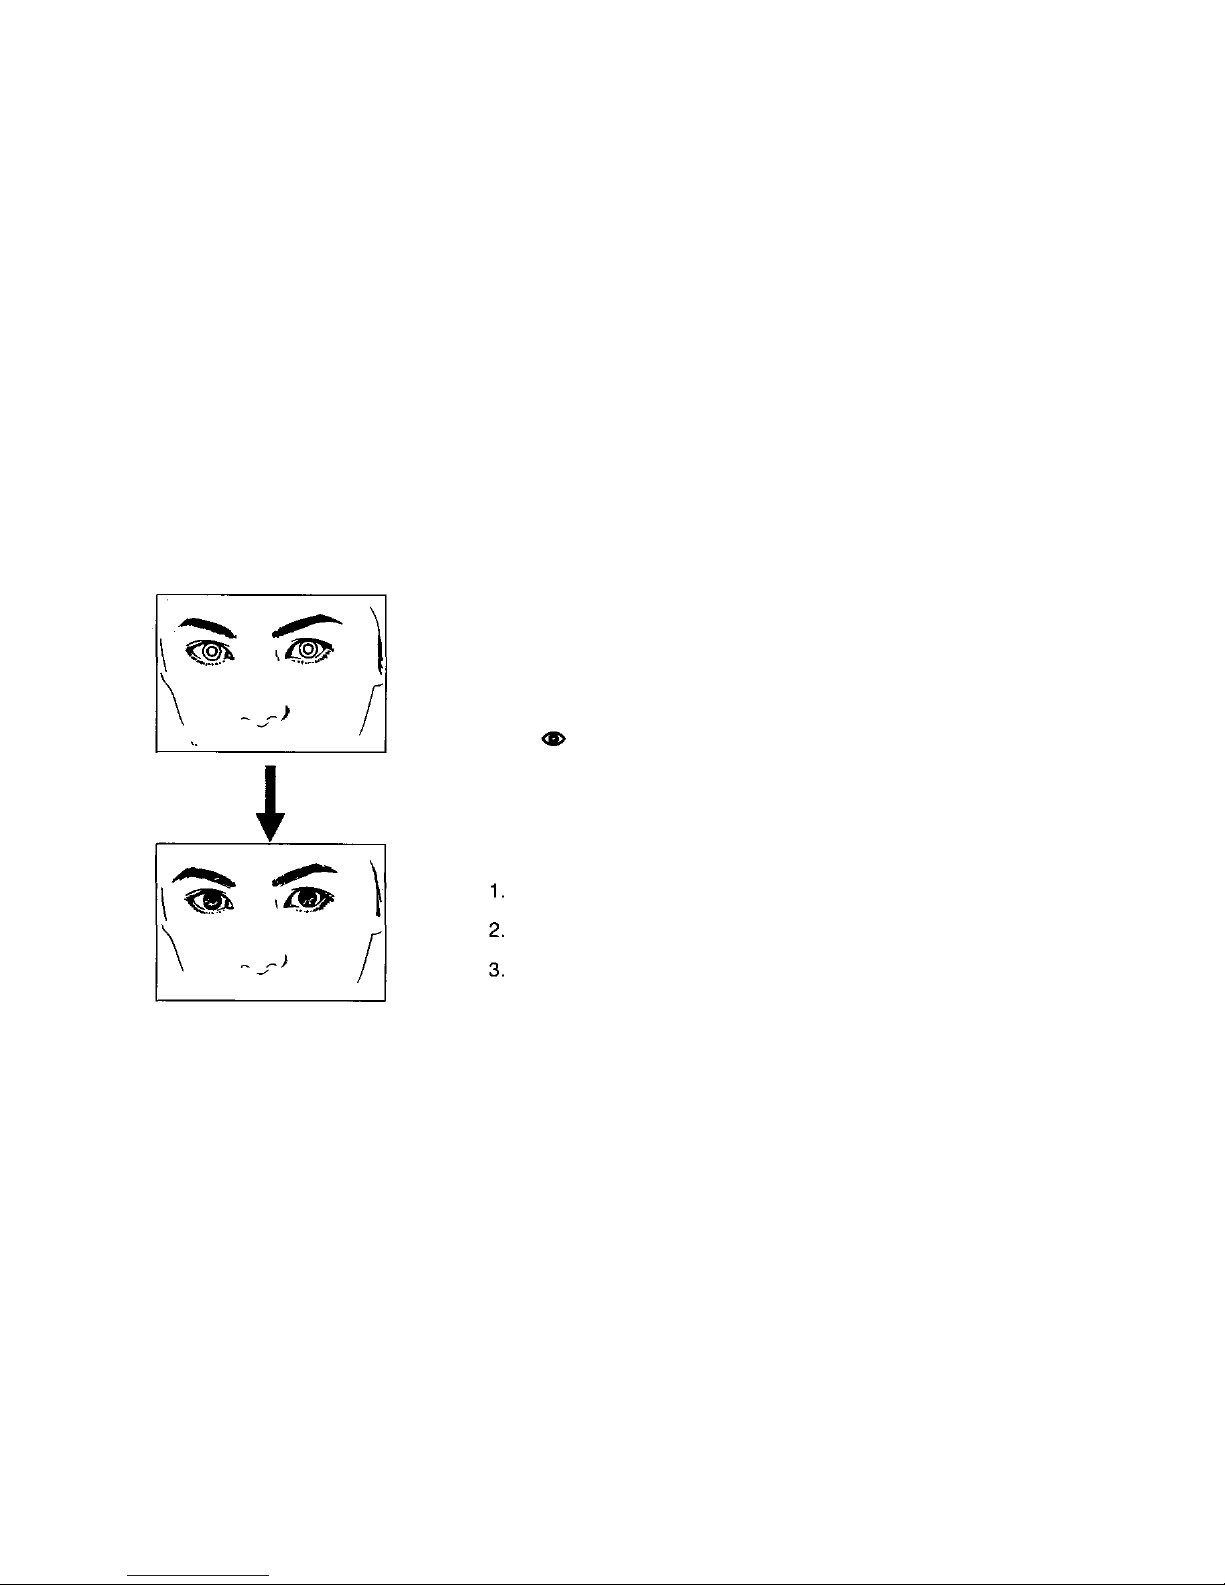
RED EYE REDUCING FLASH
Significantly reduces the
phenomenon of "red-eye"
(when a subject's eyes
appear red in flash
photography).
I n the flash mode, the camera
will fi re a series of low-power preflashes before the regular flash.
Red-eye reduction may not
be effective when the
subject:
Is not looking at the flash from
the right front.
Is not watching the pr e -
flashes.
Is to o far from the camera.
29
Page 30

The effectiveness of red-eye
reduction varies depending on
the individual characteristics of
subjects.
IMPORTANT: Be sure to hold the
camera still until the shutter
releases. It takes approximately
one second.
30
Page 31
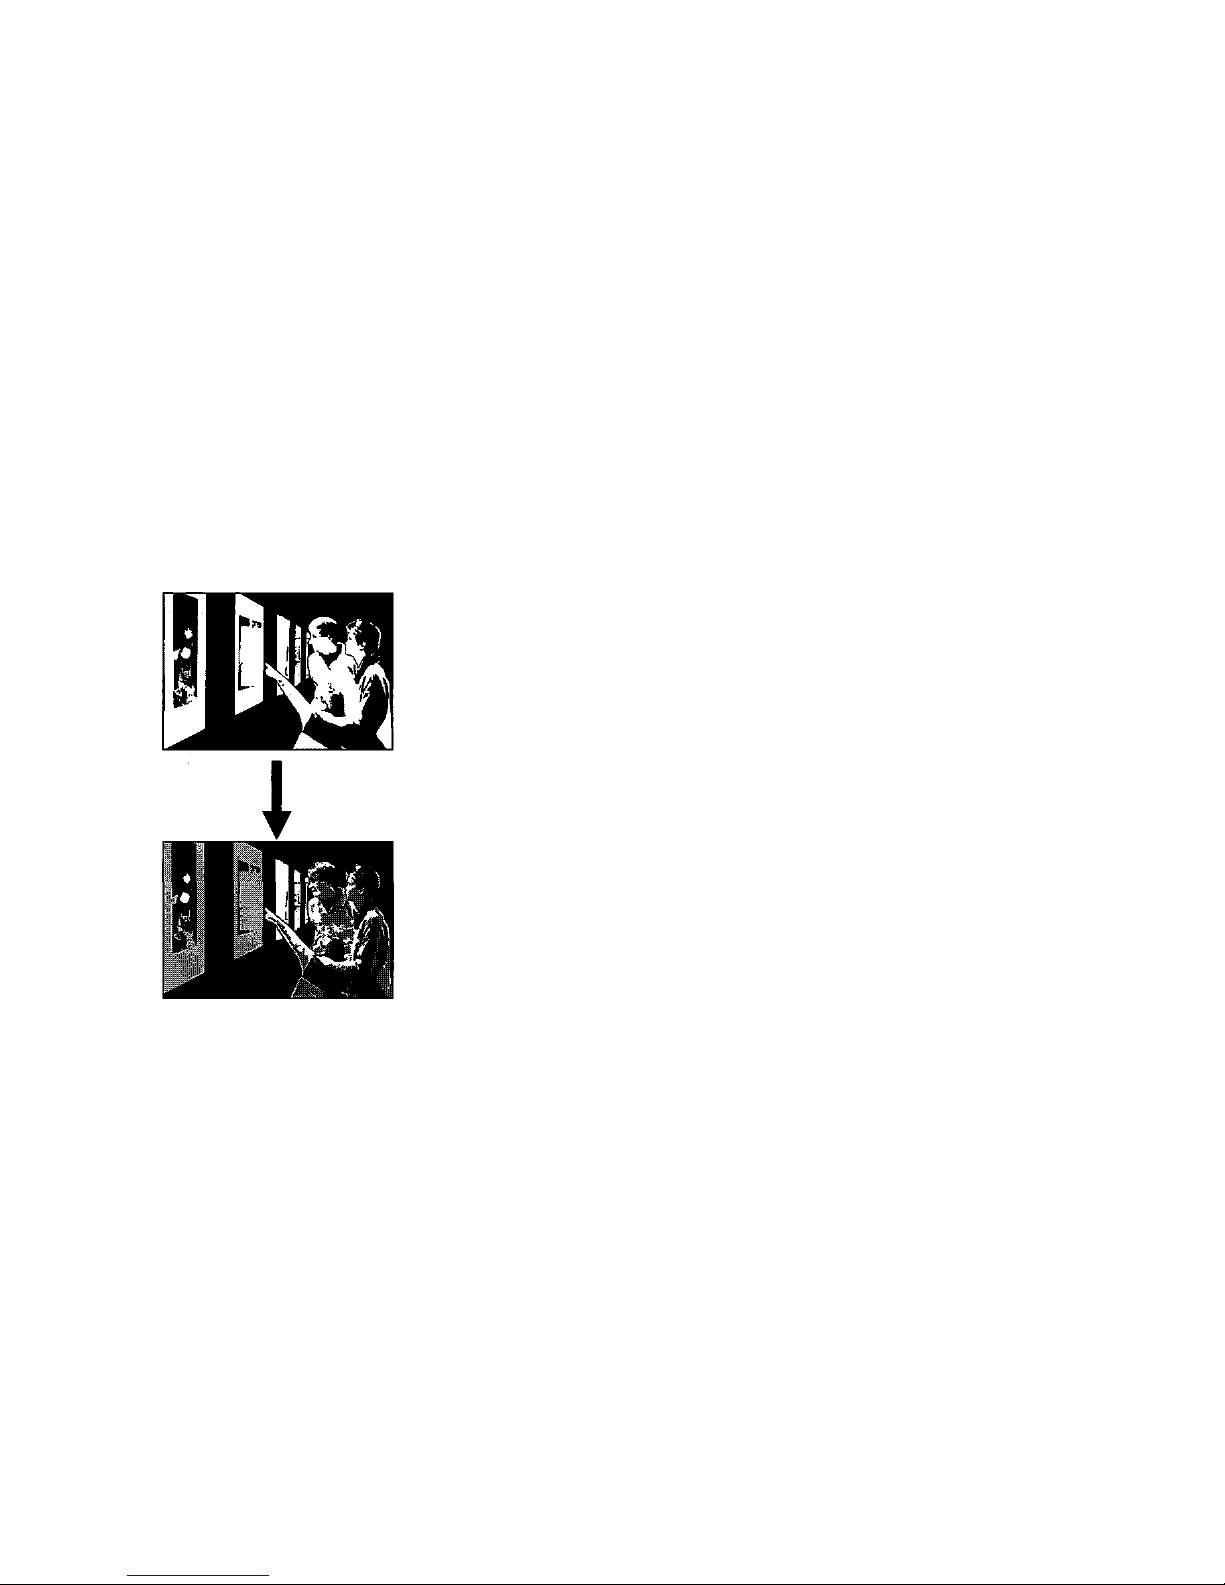
OFF (FLASH OVERRIDE)
When you don't want the
flash to f ir e even in the dark
or when you want to shoot
such subjects as fireworks.
Use this mod e in situations
where flash photography is not
desired or is prohibited or in
twilight or night scenes.
Note: Since a slow shutter speed
(down to 1 second) is
automatically selected in lowlight situations, the use of a
tripod is recommended. Closing
the lens barrier restores the Auto
Flash mod e.
31
Page 32
32
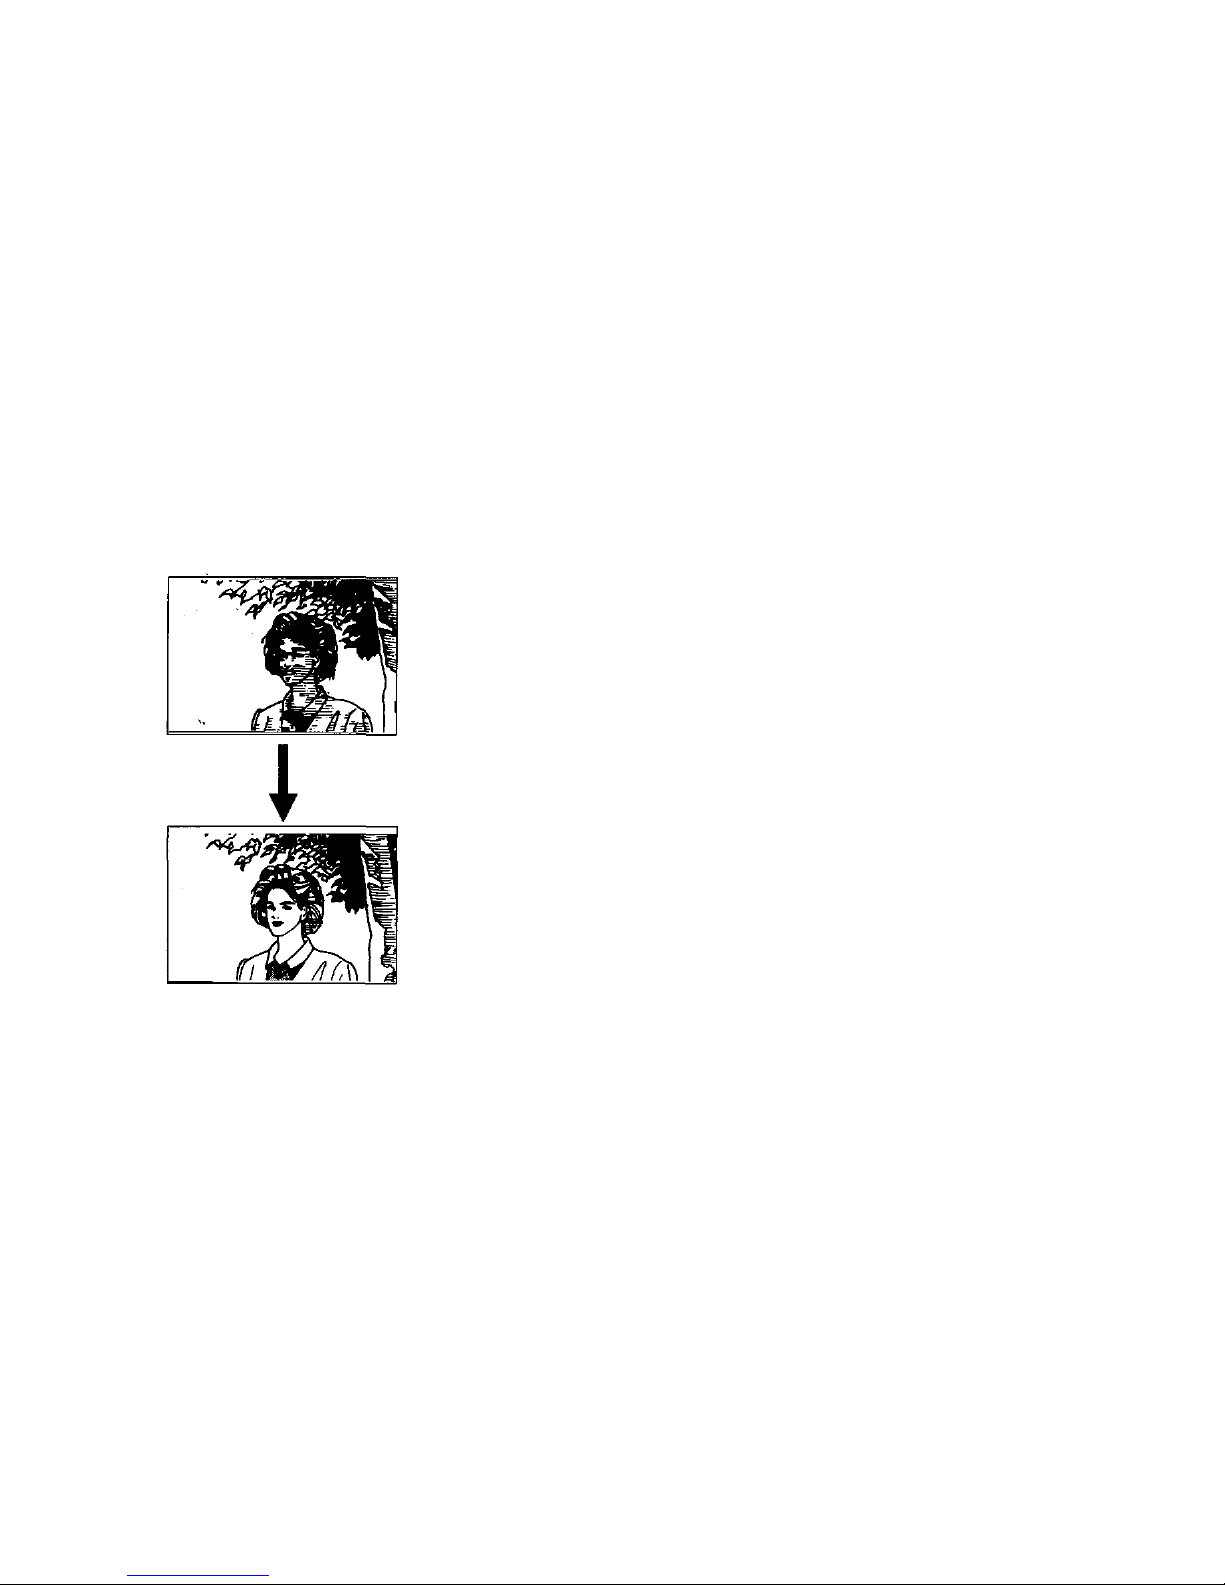
When you want the flash to
fire for each shot.
Th e flash fires regardless of
available light. Use this mode to
compensate fo r a shadow cast
on the subject's face (such as
the shadow of a tree). It is also
used when shooting in backlit
conditions or under artificial
lighting (such as fluorescent
light). Use this mode within the
flash working range (p. 28).
Closing the lens barrier restores
the Auto Flash mode.
FILL-IN FLASH
(Forced Activation)
Page 33
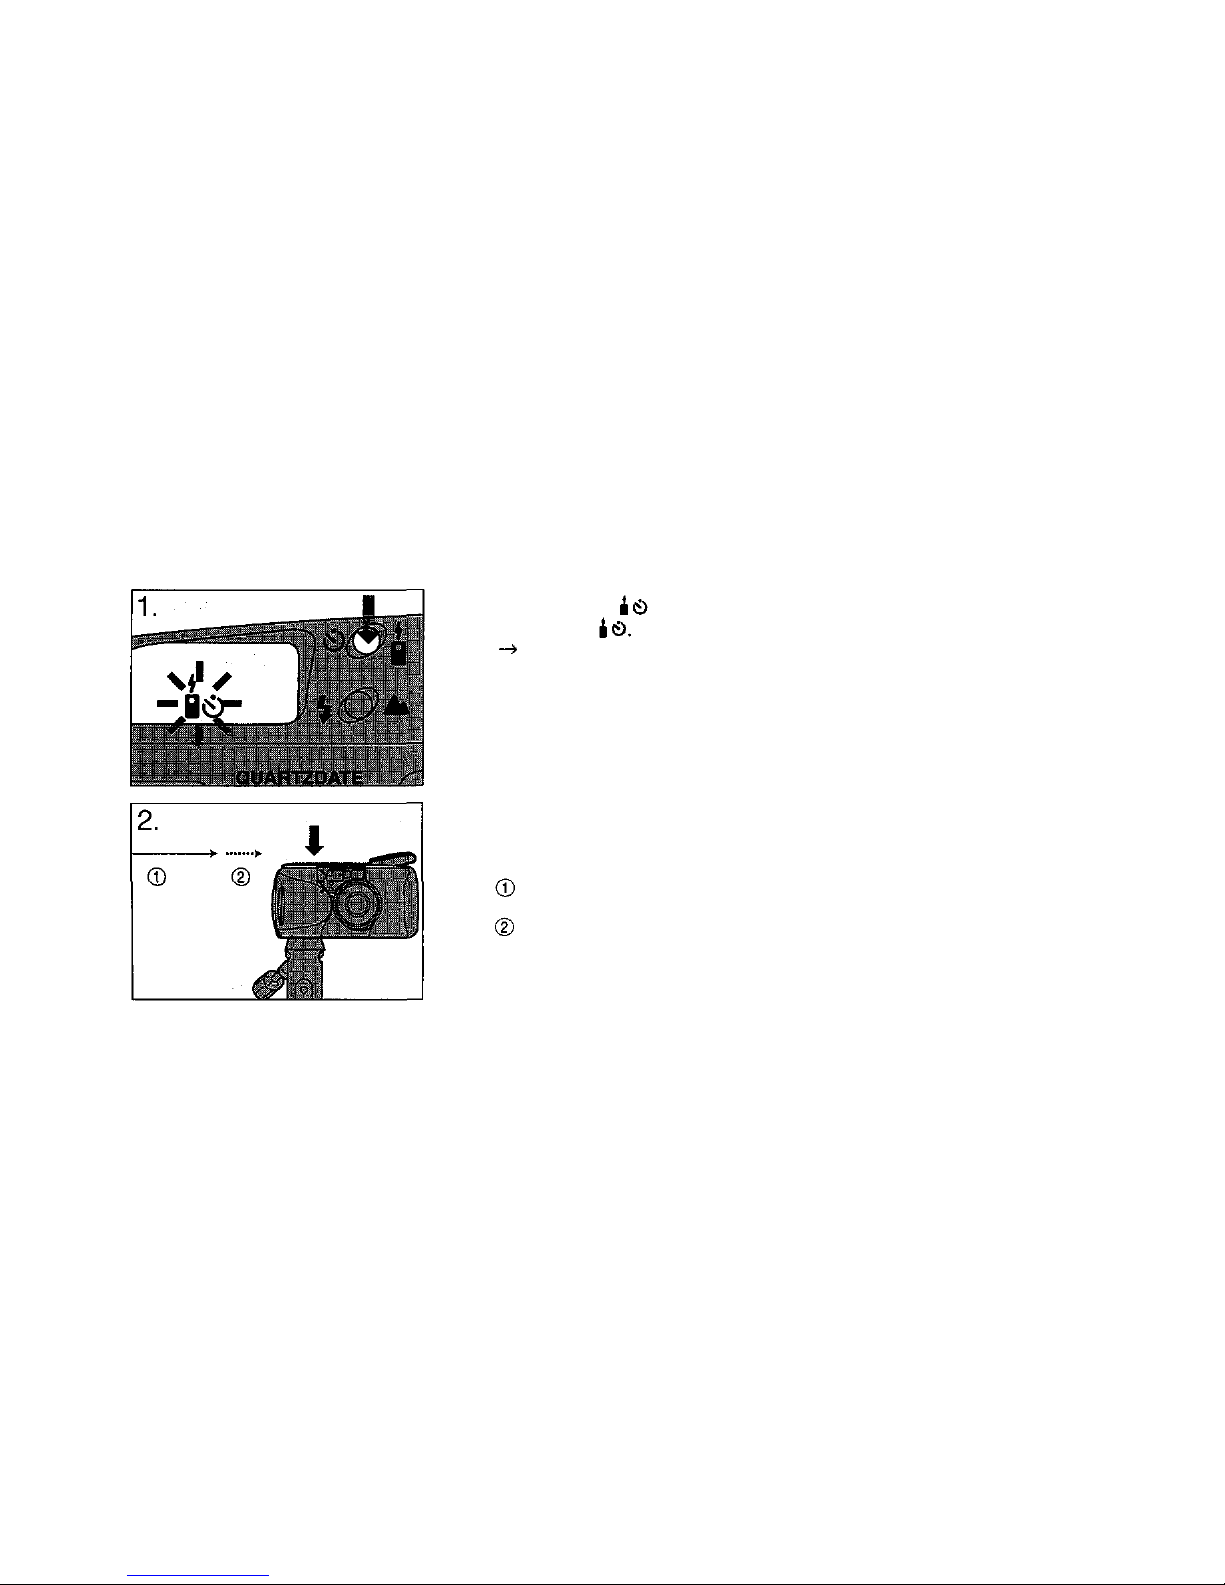
SELFTIMER
1. Press the button to
display
Fix the camera on a tripod or
other support.
2. Aim at your subject, and
press the shutter release
button. The shutter will be
released about 12
seconds after you press
the button. The selftimer
automatically disengages
after release.
10 se c : Selftimer indicator
lights
2 sec: Blinks
33
Page 34

Notes:
The focus and exposure will be
locked when the shutter
release button is depressed
halfway. Do not press the
button from right in front of the
camera.
To cancel the selftimer after it
has been activated, press the
button again.
34
Page 35
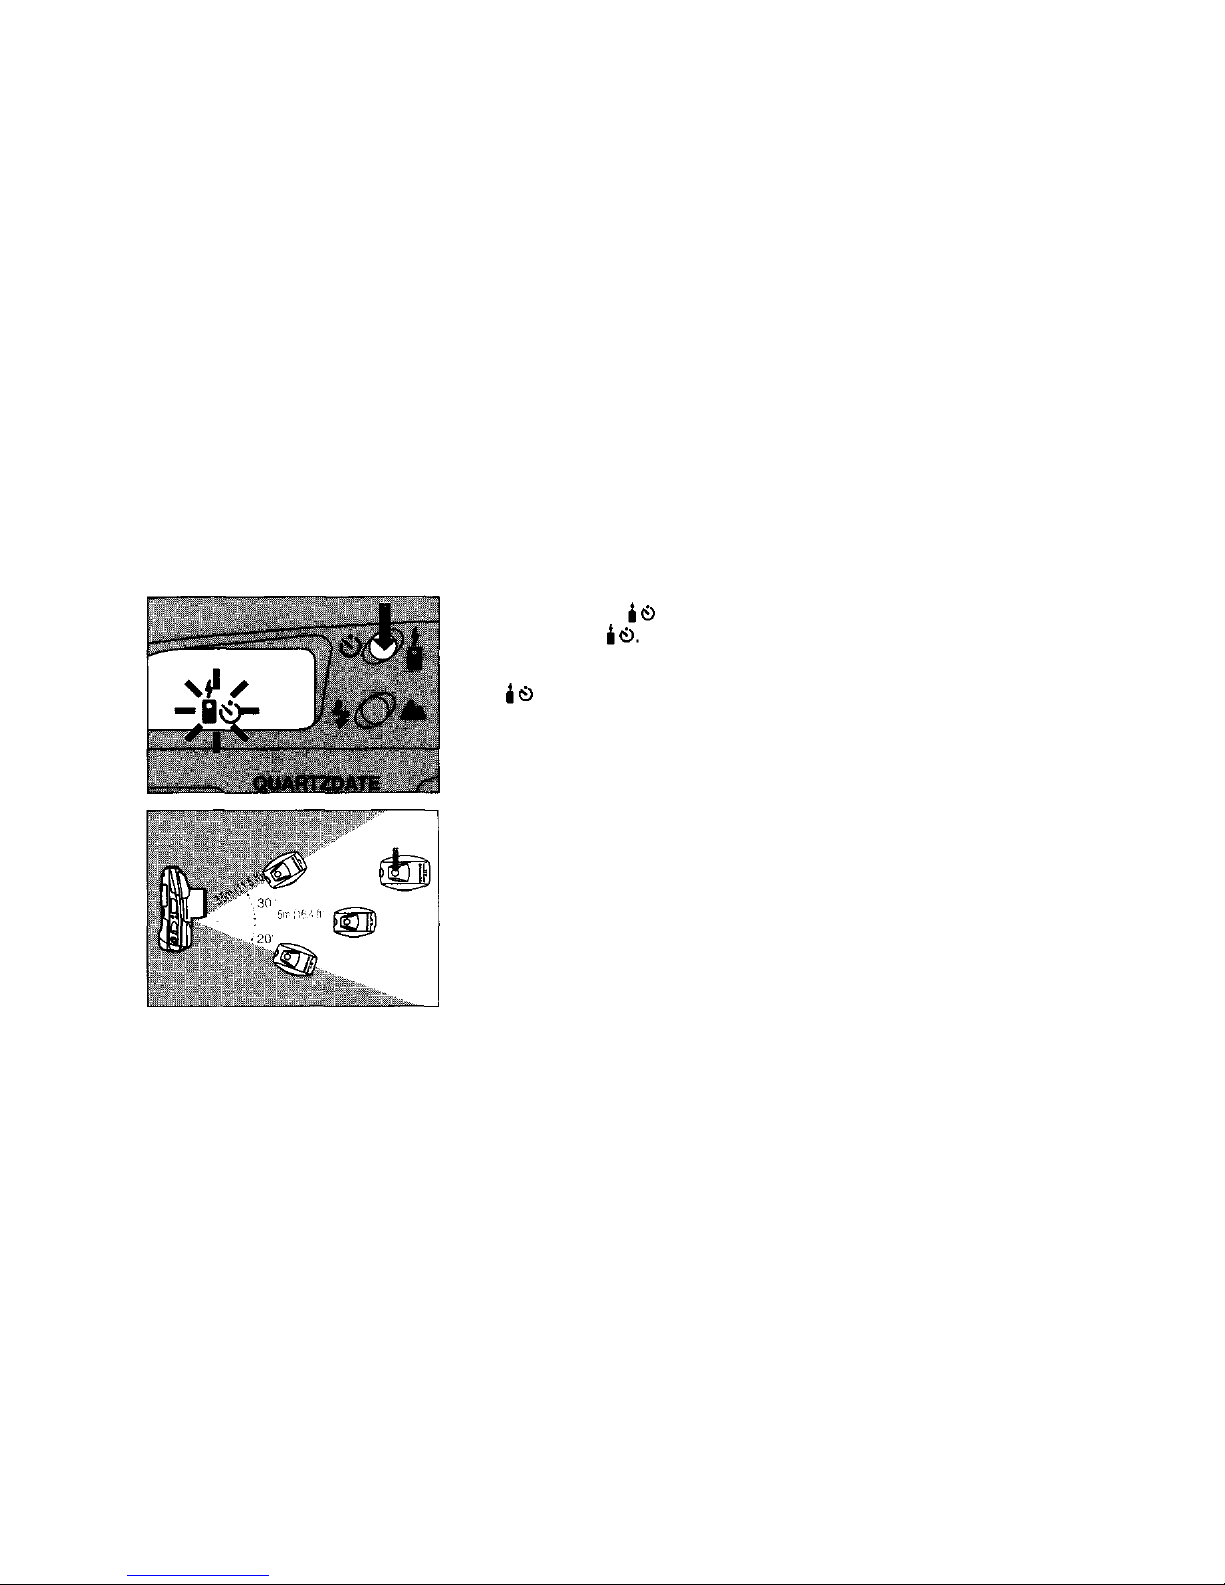
USING THE RC-200 REMOTE
CONTROL (optional)
1. Press the button to
display
To cancel this mode, press the
button again. This mode is
canceled automatically when not
used for more than 20 minutes.
2. Aim the remote control at
the camera, and press the
button. The shutter will be
released after about 3
seconds.
35
Page 36

WARNINGS:
KEE P THE REMOTE CONTROL
OUT THE REACH OF CHILDREN.
IF A CHILD SWALLOWS THE
REMOTE CONTROL, CONTACT A
DOCTOR IMMEDIATELY.
NEVER EXPOSE THE REMOTE
CONTROL TO EXCESSIVE HEAT
OR OPEN FLAME.
Notes:
Use the remote control within a
range that can be seen in the
viewfinder.
The camera will focus on th e
subject directly in front of it.
The remote control may not work
when the subject is backlit. In this
case, use the selftimer.
The remote control may not work
when there is inverted fluorescent
light near the camera.
36
Page 37
37
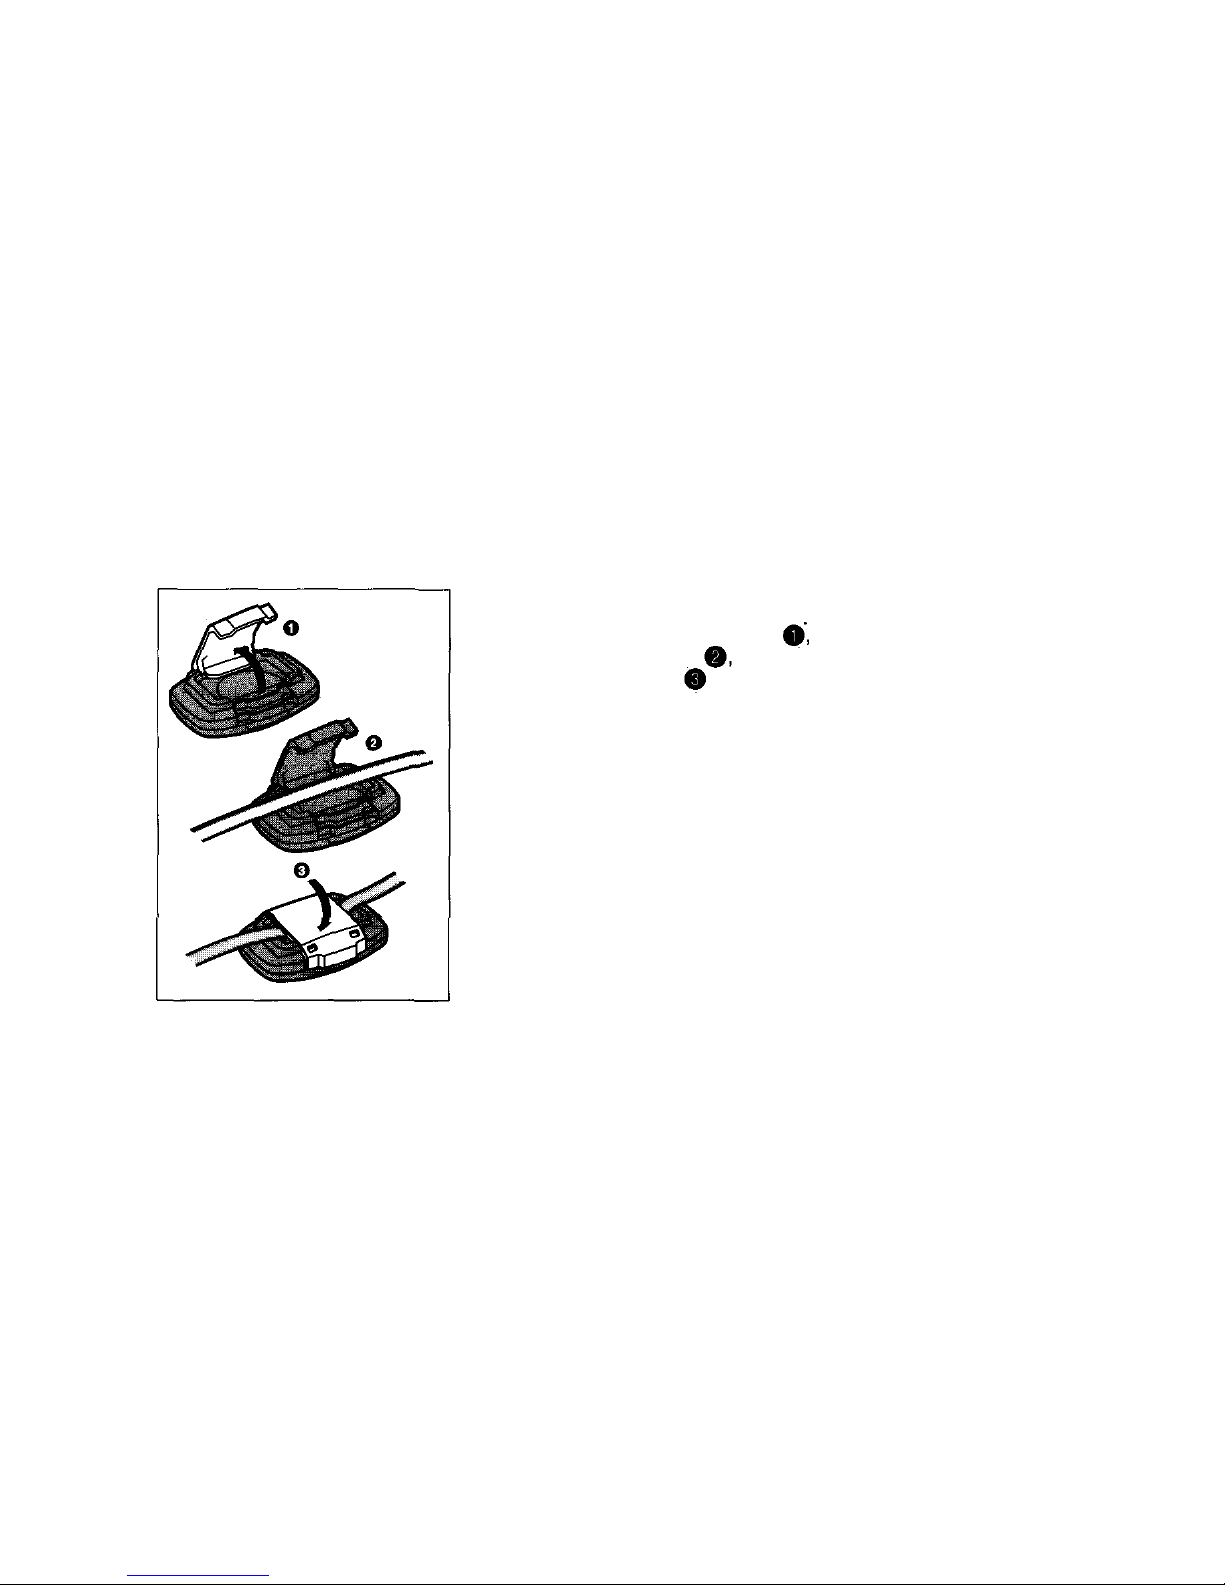
Attaching to the Strap
Open the buckle insert
the strap and close the
buckle .
The remote control can be
attached to round straps with a
diameter of 3 ~ 5 mm (0.12 ~ 0.2
in) and flat straps with a
thickness of 1.2 ~ 2 m m (0. 0 5 ~
0.08 in) and a width of 6 ~ 12.5
mm
(0.23 ~ 0.42 in).
Page 38
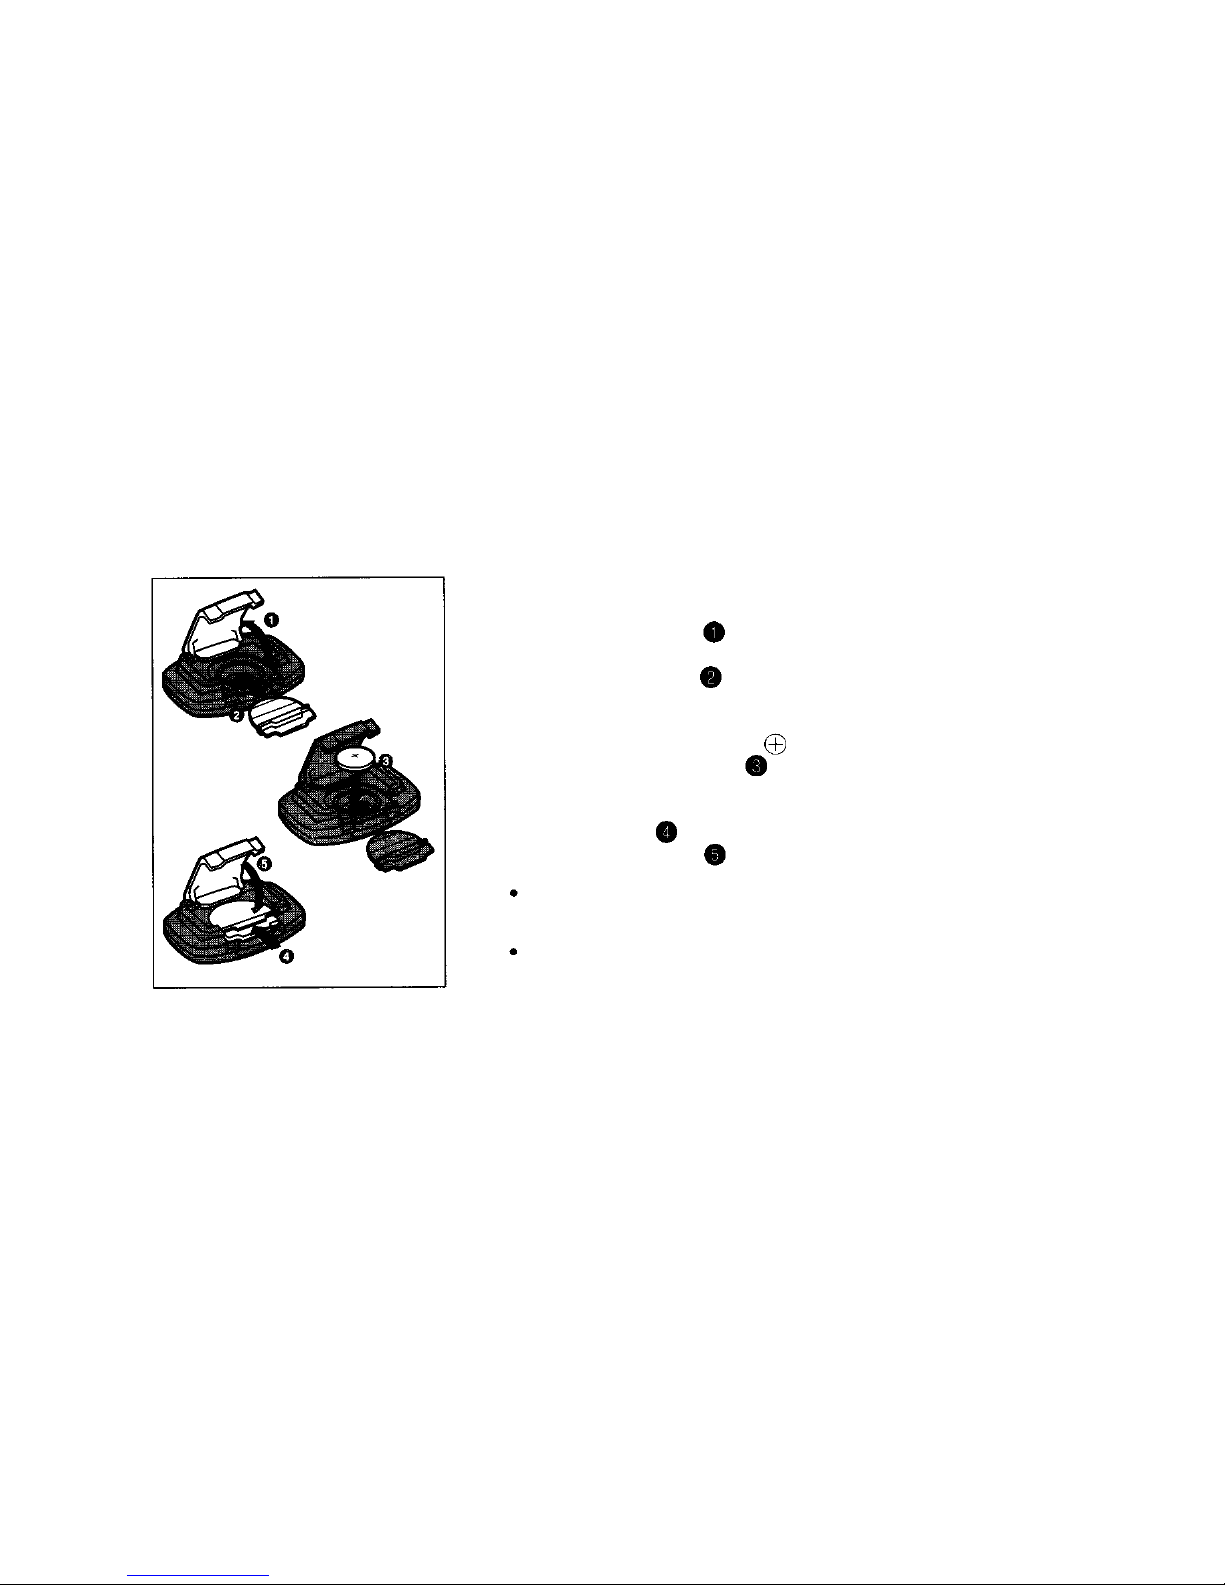
Replacing the Battery
1. Open the buckle and
remove the battery cover
inside by sliding in the
direction of the arrow.
2. Insert a new battery
(CR1220) with the plus
mark showing on top .
3. Attach the battery cover
by s l id i n g in the direction
of the arrow .
4. Close the buckle .
Handling Cautions
Never apply excessive force to
the remote control when
attached to the strap.
Usable temperature range:
-10°C ~ 40°C (14°F ~ 104°F).
38
Page 39
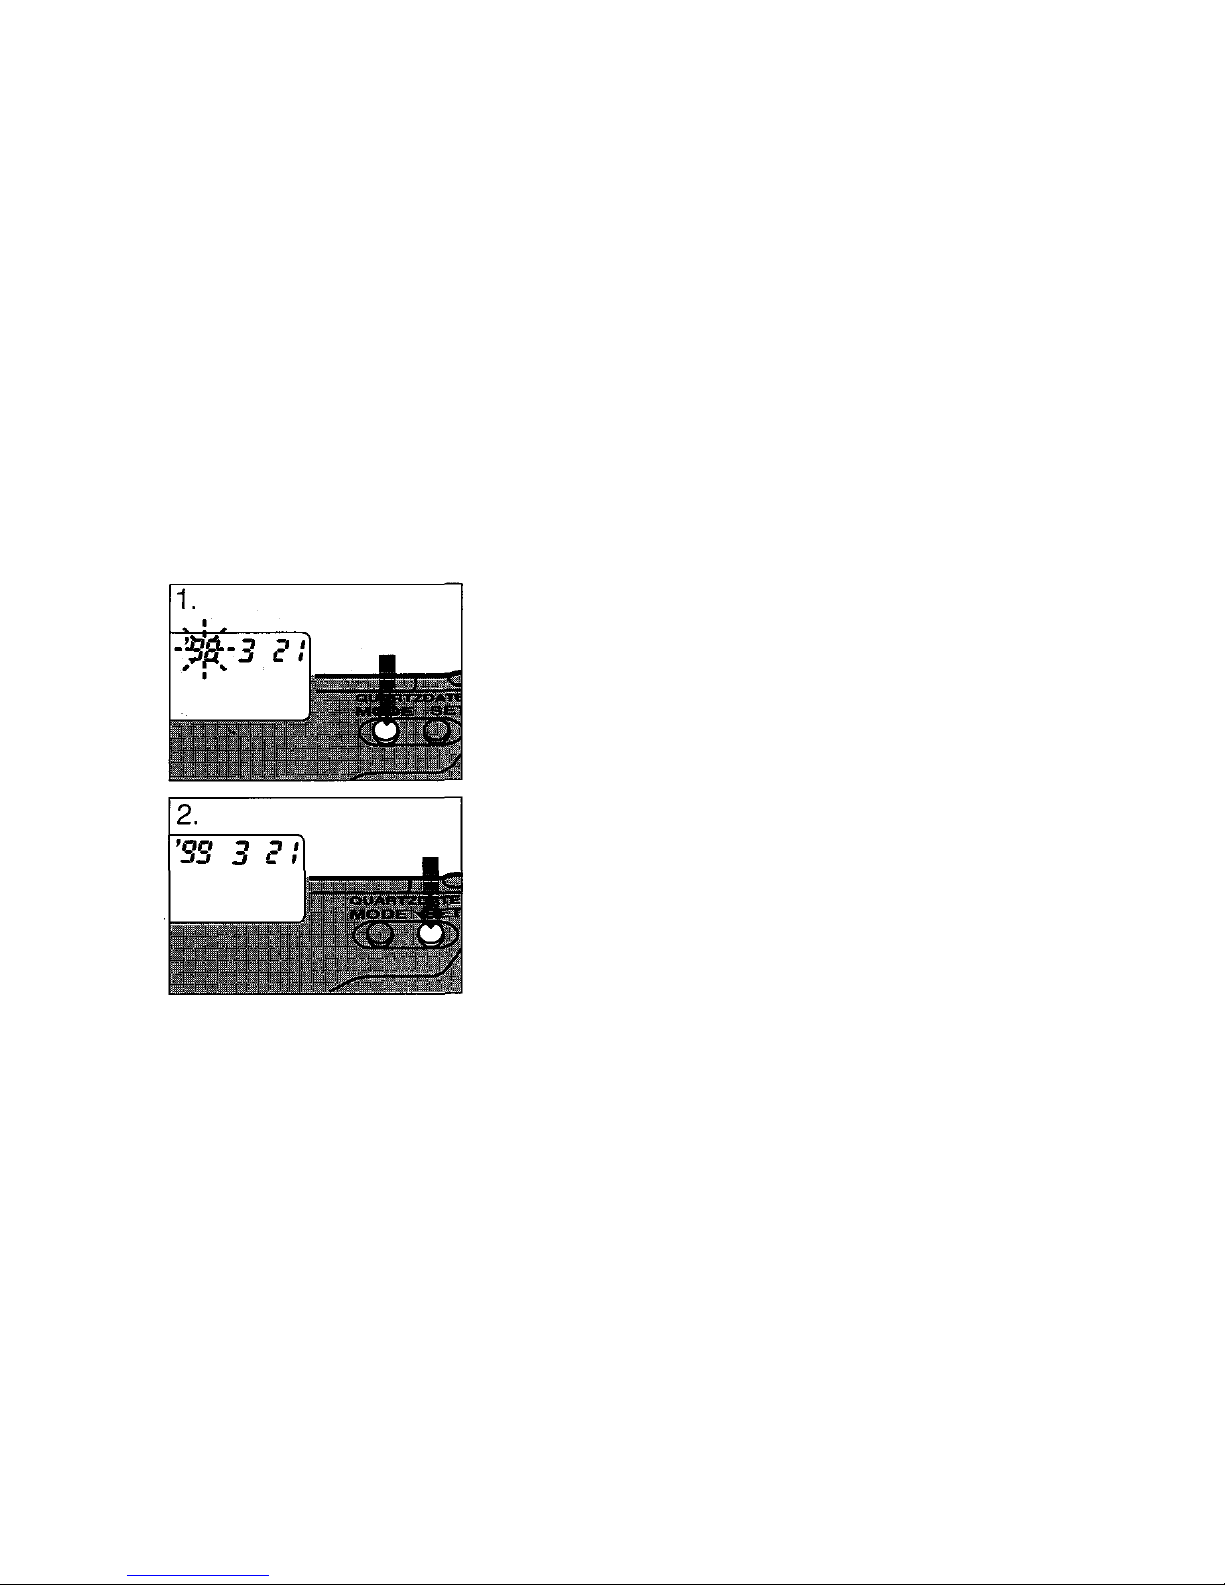
CORRECTING THE DATA (for
QUARTZDATE models only)
1. Press the MODE button for
two seconds or longer.
The year indication will start
blinking.
Caution: Do not press the button
with a pointed object such as the
tip of a mechanical pencil.
2. Press the SET button t o
correct the year.
If you press the button once,
the number on the display will
advance by 1. And if you keep
it pressed, the numbers will
run in rapid succession.
39
Page 40
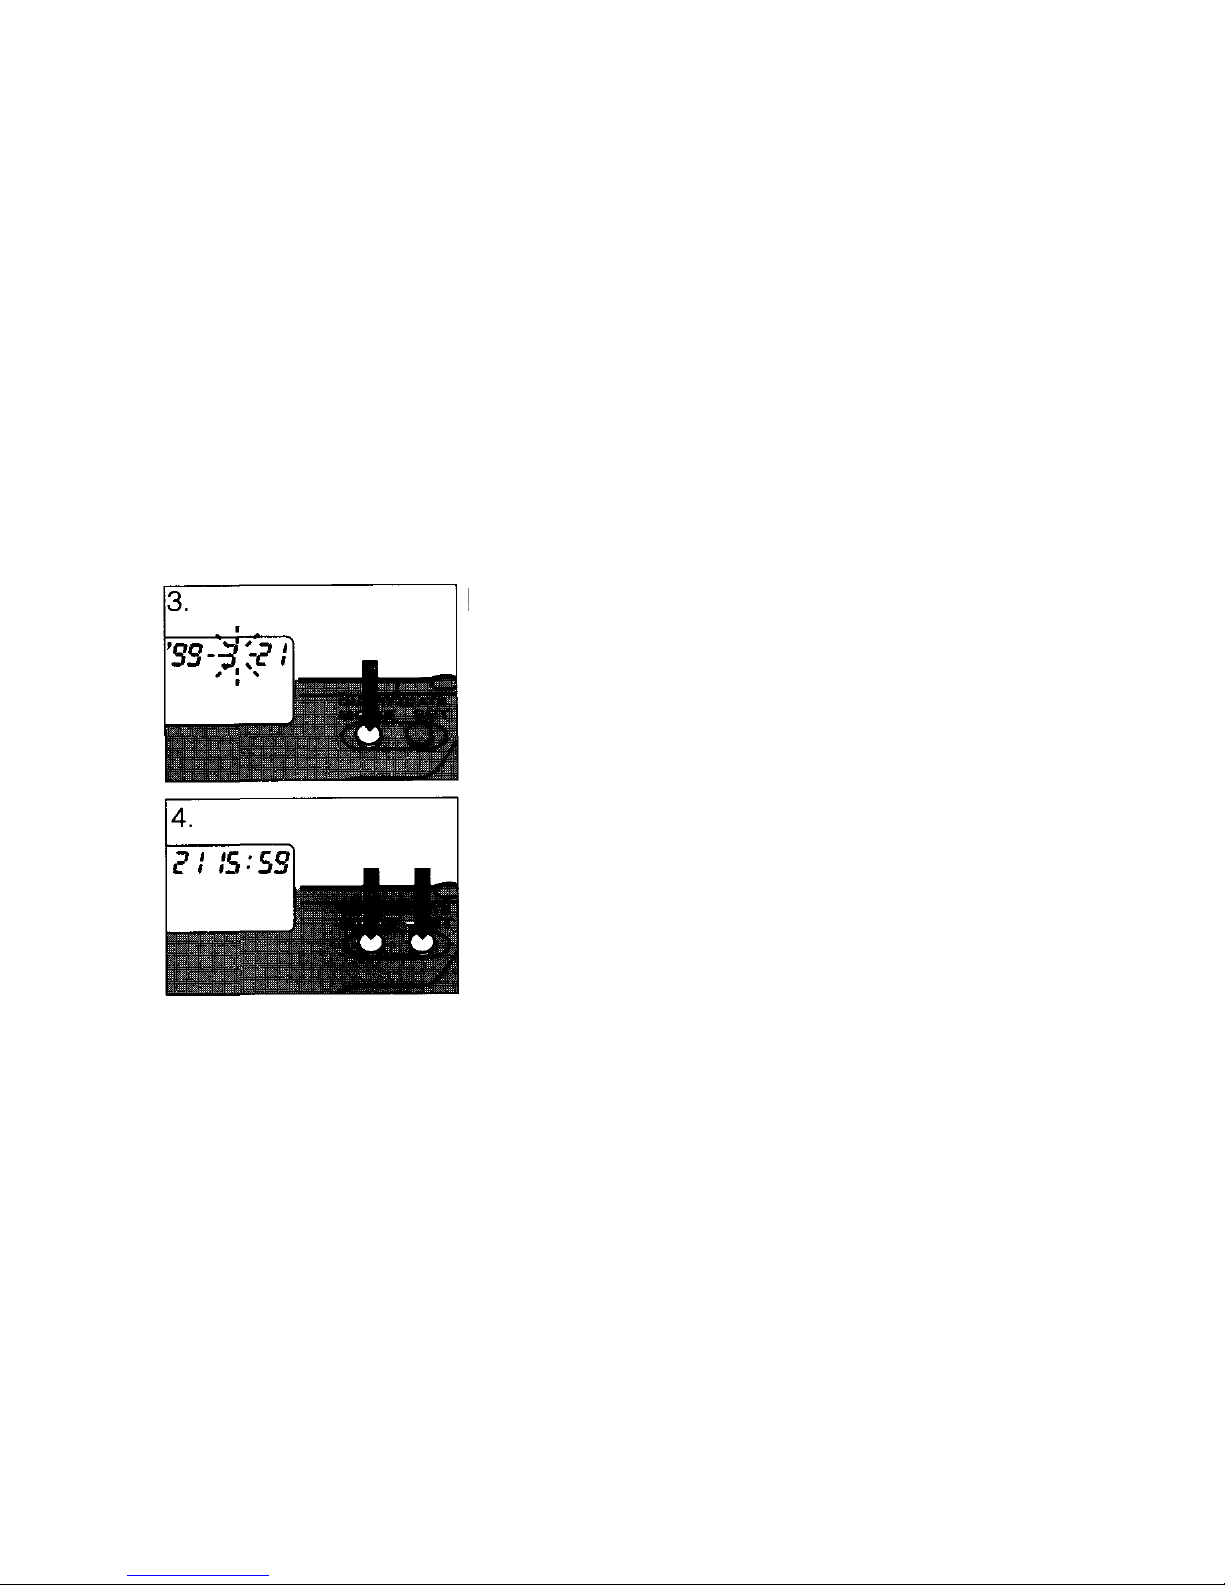
3. Press the MODE button
again.
The month indication will start
blinking.
4. Repeat steps 2 and 3 to
set th e day, hour and
minutes.
Not e : As you press the mode
button, the blinking indication
changes in the order of year,
month, day , hour, and minute.
The data correction will be
finished when the mode button is
pressed again.
40
Page 41
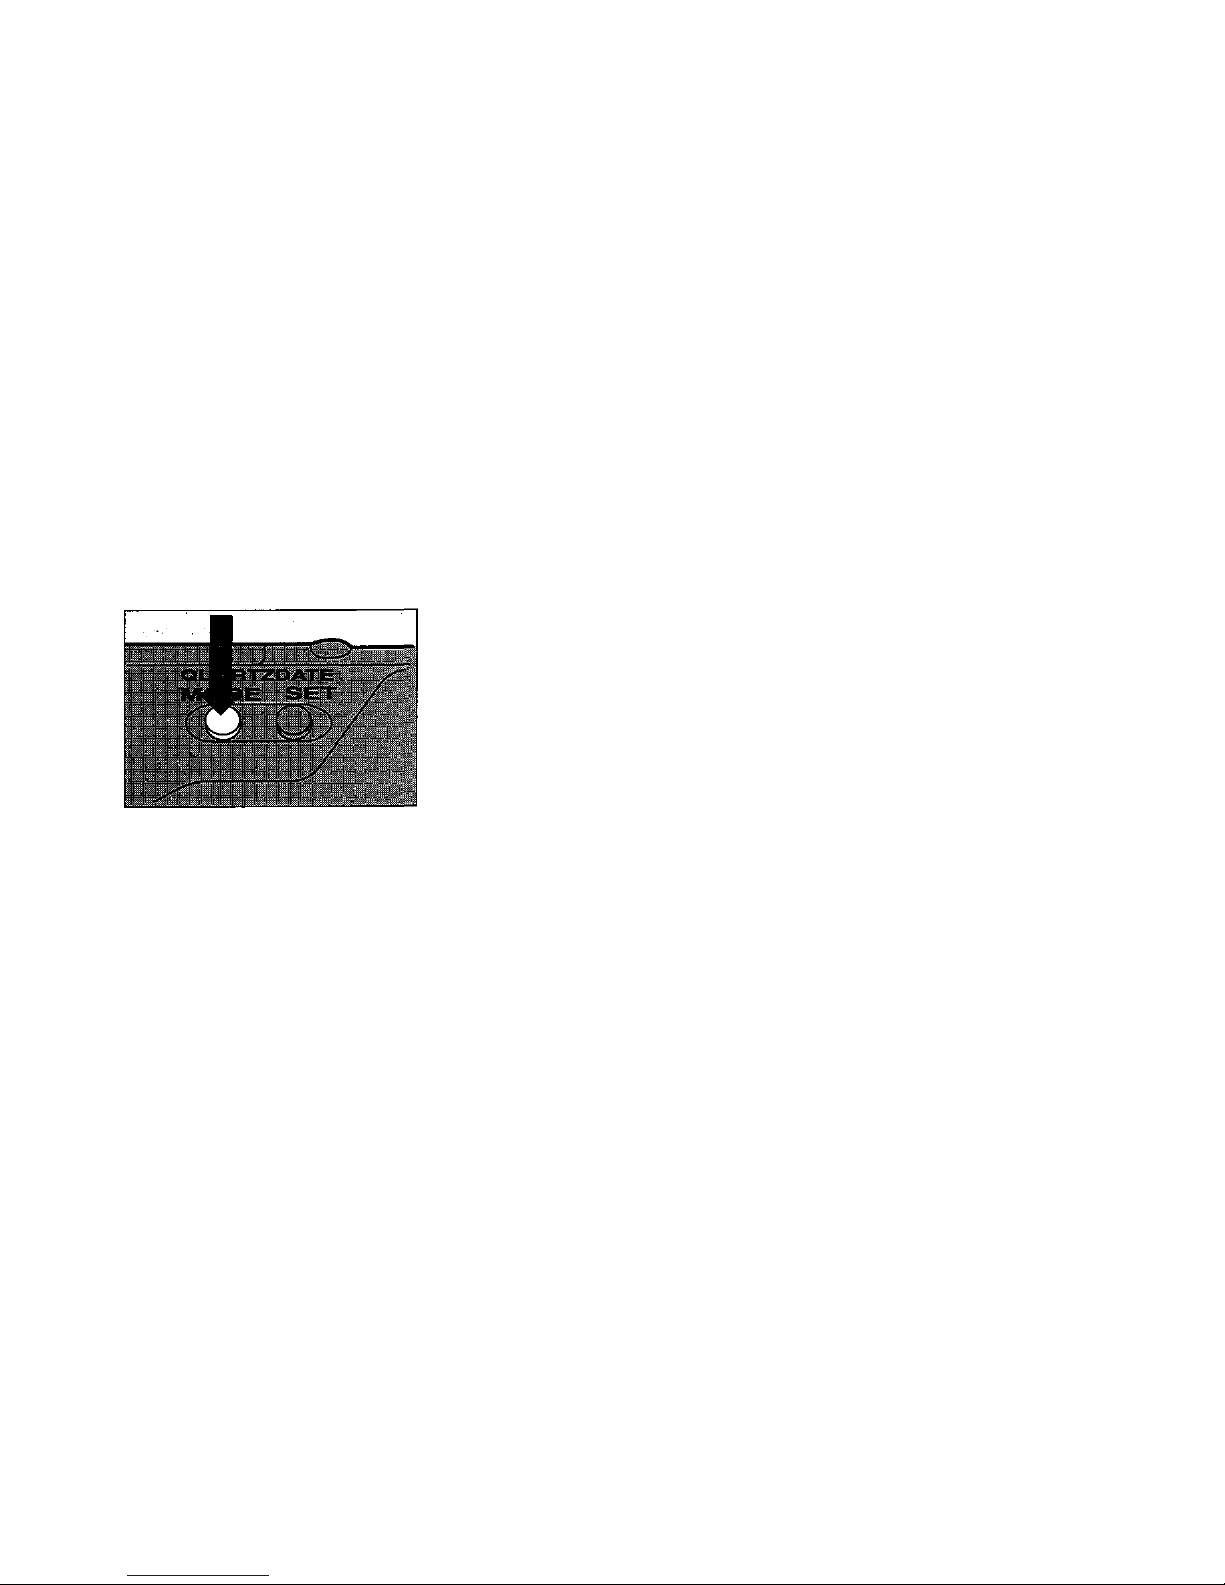
P R I N TI N G T H E DA T E AN D T I M E (f or
QUARTZDATE models only)
Choose the desired mode.
The mod e will switch in the
described order.
The date unit uses the same
power switch as the main unit.
Mak e su r e t o correct t he da t a
after the battery is replaced.
The data is imprinted in the lower
right of the picture. If there is
something whitish or tinged with
orange where the data is
imprinted, the data may be
difficult to read. The data may
not be printed correctly on the
frame(s) after the specified final
exposure of the film.
41
Page 42
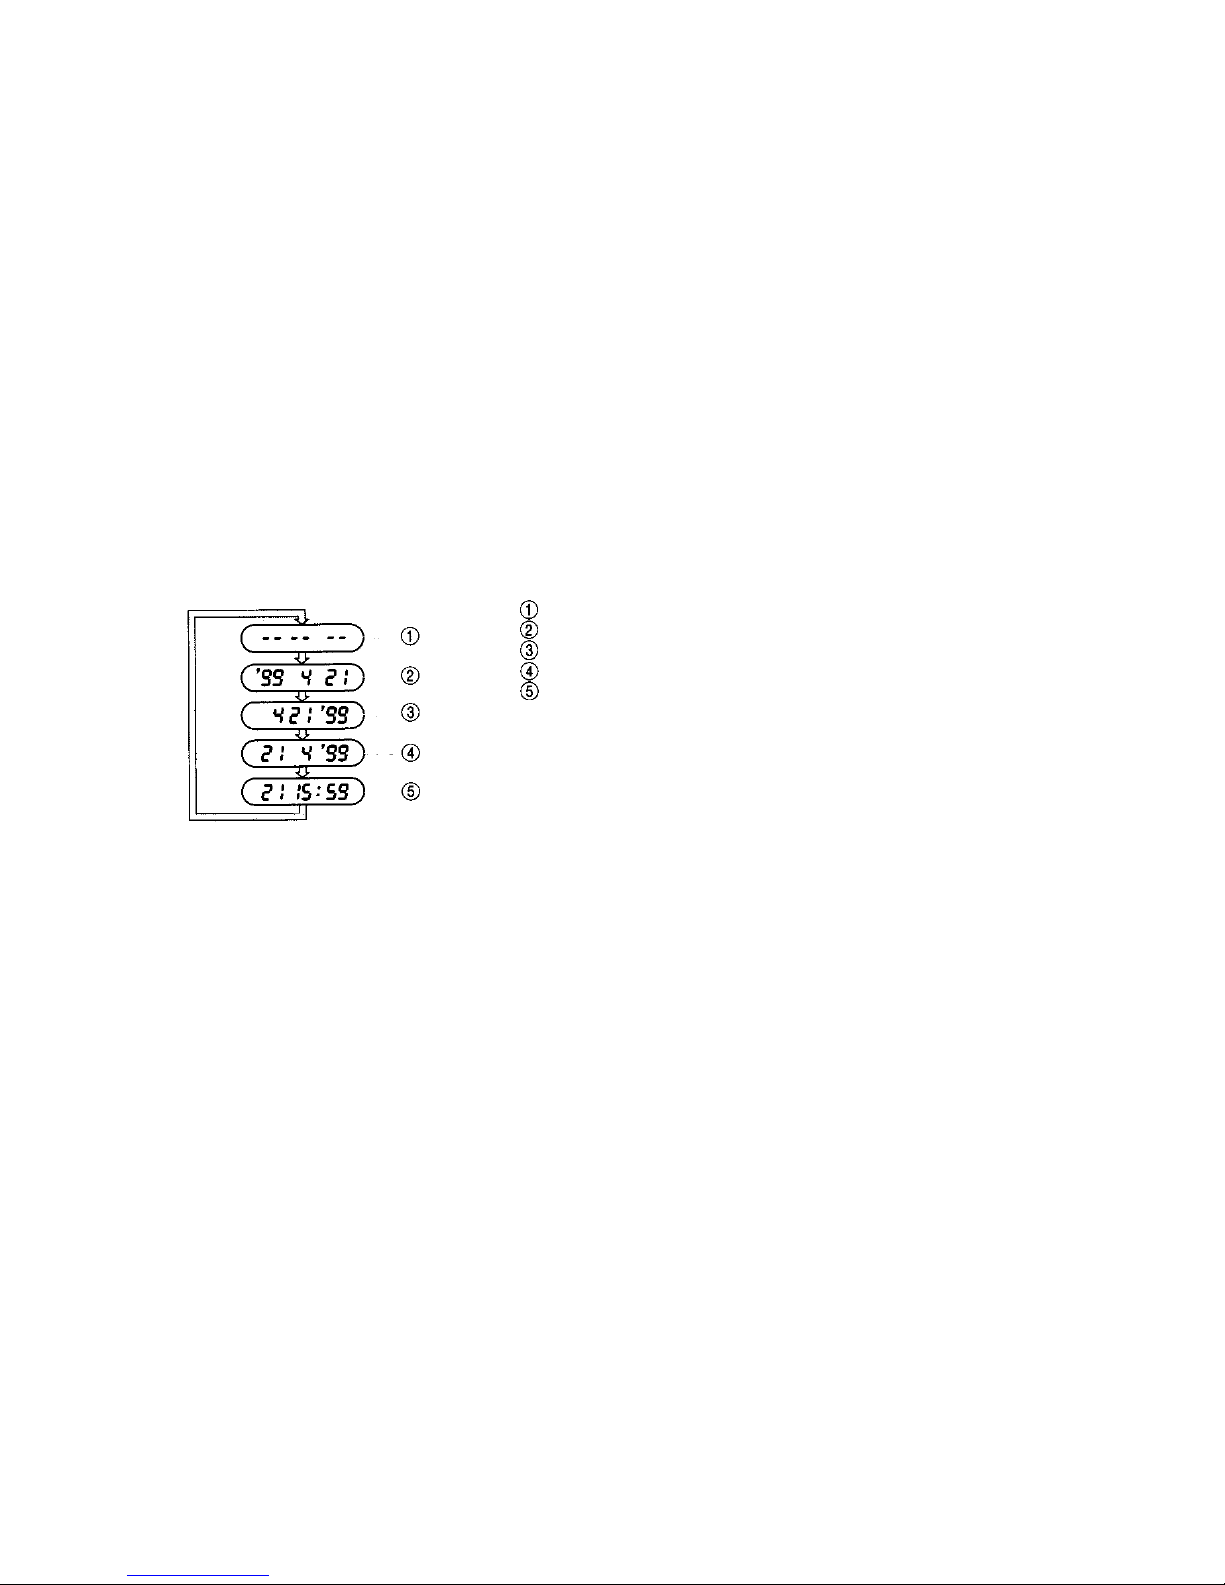
No data
Year-month-day
Month-day-year
Day-month-year
Day-hour-minute
42
Page 43

CA RE AN D STORAGE
Do not leave the camera in any
place exposed to excessive
heat, humidity, or direct
sunlight — for example, in a
car or on the beach.
Do not expose the camera to
formalin or naphthalene.
If the camera gets wet, wipe it
with a dry towel. The salt in
seawater can be especially
damaging.
Do not use organic solvents,
such as alcohol or paint thinner
when cleaning the camera.
Do not leave the camera on or
near a television, refrigerator,
or other appliance with a
magnetic field.
43
Page 44

Do not expose the camera to
dust or sand as this could
cause serious damage.
Do not shake or shock the
camera.
Do not apply excessive force to
the zoom lens.
Keep the camera in a well-
ventilated place.
Do not expose the camera to
extreme heat (over 40°C/104°F)
or to extreme cold (below
-10°C/14°F). Low
temperatures, even within this
range, may sometimes cause
deterio r a ti o n in battery
performance, temporarily
disabling the camera.
44
Page 45

When transporting the camera
from a cold place to a warm
place or in the event of a
sudden temperature change,
put the camera into a plastic
bag. This allows the camera's
temperature to change slo wly.
Once the camera has adjusted
to the new temperature, you
can remove it from the bag and
use it.
45
Page 46

Avoid leaving the camera unused for
long periods of time. This can cause
mold to grow on the camera as well
as other problems. Try to press the
shutter release button and check the
operation of the camera before use.
When boarding an airplane, do not
put rolls of exposed film into your
check-in luggage regardless of the
film speed. If your camera has film in
it, do not put it in your check-in
luggage either. Otherwise, airport X-
ray machines may cause the film to
be exposed. Always bring your film
and camera on board yourself. Also,
when carrying film in your hand
luggage, give it to the security officer
fo r manual inspection so that the film
does not have to pass through X-ray
machines.
46
Page 47

SPECIFICATIONS
Type: Full automatic 35 mm
autof ocus lens-shutter
camera wi th built-in 38 ~ 80
mm zoom lens.
Film format: 35 mm standard DX-
coded film (24 x 36 mm).
Lens: Olympus lens 38 ~ 80 mm
F4.5 ~ 8.9, 5 elements in 4
groups.
Shutter: Programmed electronic
shutter.
Viewfinder: Standard/real image
zoom viewfinder (with
autofocus mark, close-up
correction marks, autofocus
indicator and f las h
indicator).
47
Page 48

Focusing: Active-type autofocus
system. Focus lock
possible. Focusing range
— 0.6m
(2 ft) ~ (infinity).
Exposure control: Programmed
automatic exposure control,
center-weighted light
metering. Auto exposure
range: Wide angle — EV
4.4 ~ EV 16; Telephoto —
EV 6.3 ~ EV 17.
Backlight control: +1.5 EV.
Exposure counter: Progressive
type with automatic reset,
displayed on LCD panel.
Selftimer: Electronic selftimer
with approx. 12-sec. delay.
48
Page 49

Remote control (optional):
Infr are d remote control unit
with approx. 3-sec. delay.
Film speed range: Automatic
setting with DX-coded fil m
with ISO 50, 100, 200, 400,
800, 1600 an d 320 0. Film
speeds other than above
wi ll be automatically set to
next lower speed. For non-
DX-coded film and film with
less than ISO 50, film
speed is set to ISO 100.
49
Page 50

Film loading: Automatic loading.
(Automatically advances to
first frame when camera
back cover is closed.)
Film advance: Automatic film
winding.
Film rewind: Automatic film
rewind (automatic rewind
activation at end of film,
automatic rewind stop).
Rewind possible at any
point with re wind button.
50
Page 51

Flash: Built-in flash. Recycling
time : Approx. 6 sec. (at
normal temperature with
new battery). Flash working
range: W i d e angle — 0.6 ~
3.8m ( 2 ~ 12.5ft)/
Telephoto — 0.6 ~ 1.9 m (2
~ 6.2 ft) with ISO 100 color
negative film; Wide angle
— 0.6 ~ 7.6 m (2 ~ 24.9 ft)/
Telephoto — 0.6 ~ 3.8 m (2
~ 12.5 ft) with ISO 400 color
negative film.
Flash modes: Auto Flash,
Red-Eye Reducing Flash,
Off, Fill-in Flash.
51
Page 52

Battery check: Displayed on LCD
panel.
Power source; Two alkaline AAA/
LR-03 batteries.
Dimensions: 116.5 (W) x 62 (H) x
40 (D) mm
(4.6
x 2.4 x 1.6
in) (without grip and other
protrusions).
Weight: 195 g (6.89 oz) (without
battery).
52
Page 53

SPECIFICATIONS FOR DATE
UNIT
Imprinting direction: Data
imprinted onto film fr om
lens side.
Da t a coding: No data , year-
month-day, month-day-
year, day-month-year and
day-hour-minute.
External indication of data: Data
display on LC D panel
Film speed setting: Automatic
film speed setting.
Automatic calendar system: Up
to year 2029.
Power source: Ordinarily used
with camera body.
53
Page 54

54
SPECIFICATIONS FOR RC-200
REMOTE CO NTROL (optional)
Type: Infrared type remote control.
Operating range: Approx. 5 m
(16.4 ft).
Battery: One CR1220,
replaceable; service life —
approx. 5 years or approx.
20,000 operations.
Dimensions: 32 x 44 x 13 mm
(1.2
x 1.7 x 0.5
in).
Weight: 11 g (0.4 oz) (without
battery).
Other: Operating confirmation
beeper; weatherproof design.
SPECIFICATIONS A RE SUBJECT TO
CHANGE WITHOUT ANY NOTICE OR
OBLIGATION ON THE PART OF THE
MANUFACTURER.
THE ACTUAL PRODUCT MAY DIFFER
FROM ONES SHOWN IN THIS MANUAL.
Page 55
OLYMPUS
OPTICAL
CO.,LTD.
San-Ei
Building, 22-2,
Nishi
Shinjuku
1-chome,
Shinjuku-ku,
Tokyo,
Japan.
Tel.
03-3340-2211
OLYMPUS
AMERICA
INC.
Two
Corporate
Center
Drive,
Melville,
NY
11747-3157,
U.S.A.
Tel.
516-844-5000/1-800-622-6372
OLYMPUS
OPTICAL
CO.(EUROPA)
GMBH.
(Premises/Goods
delivery)
Wendenstrasse
14-16, 20097
Hamburg,
Germany. Tel.
040-237730
(Letters) Postfach 10 49 08, 20034 Hamburg, Germany.
OLYMPUS
OPTICAL
CO.(U.K.)
LTD.
2-8
Honduras
Street,
London
EC1Y0TX,
United
Kingdom.Tel.
0171-253-2772
This device complies with part 15 of the FCC Rules. Operation is subject
to the conditions that this device does not cause harmful interference.
This Class B digital apparatus meets all requirements of the Canadian Interference-Causing Equipment Regulations.
This camera complies with EU directive 89/336/EEC for CE marking.
Cet appareil numérique de la classe B respecte toutes les exigences du Règlement sur le matériel brouilleur du Canada.
Esta cámara cumple con la directiva de la Unión Europea 89/336/EEC para la marca de CE.
CZ9504-
0900.08MC C 0799
Cet appareil photo est conforme à la directive UE89/336/CEE pour le marquage CE.
Die CE-Marke zeigt an,daß diese Kamera die EG-Richtlinie 89/336EWG erfüllt.
 Loading...