

Page 1

INSTRUCTIONS
Page 2

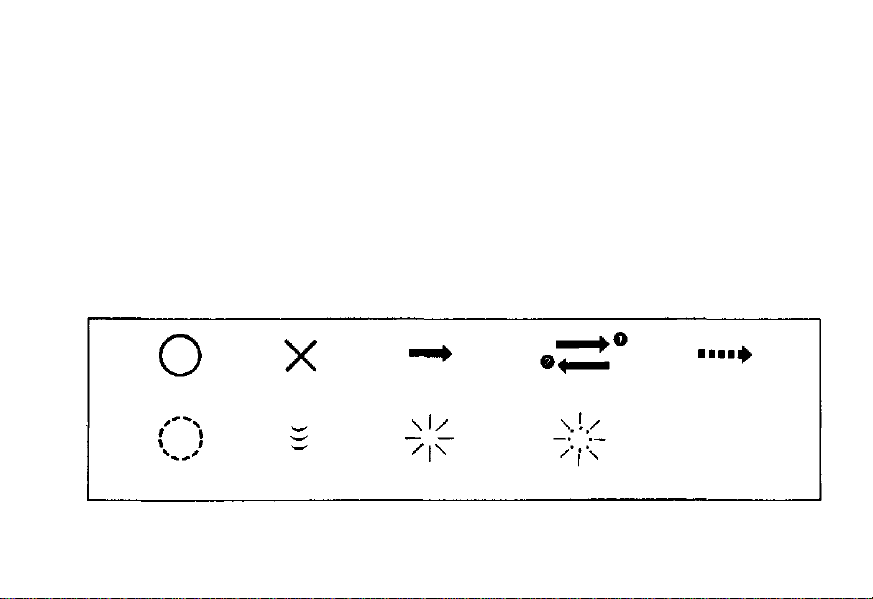
Viewfinder indicators
LCD panel/Mode button
Mode button
When using the mode button,
each mode will be displayed on
the LCD panel. However, spot
metering will be displayed in
the viewfinder.
LCD panel indicators
B. Selftimer/remote control (p. 31)
G. Macro (p. 29)
C. Single-frame advance
E. Auto zoom (p. 40)
C. Continuous - frame advance (p. 48)
E. Infinity mode (p. 43)
E. Servo AF (p. 44)
Battery remaining indicator
SPOT
SELF
REMOTE
— 1 —
Flash indicator
Autofocus
indicator
Spot metering
C. D. E. F.
DRIVE + / — SUBJECT FLASH
Autofocus frame
C. Double exposure (p. 50)
F. Auto flash (p. 21)
F. Auto-S flash (p. 23)
F. Flash OFF (p. 35)
F. Fill-in Hash (p. 36)
F. Slow-synchro fill-in flash (p. 38)
D. Exposure compensation (p. 46)
Exposure counter
G. MACRO
Page 3
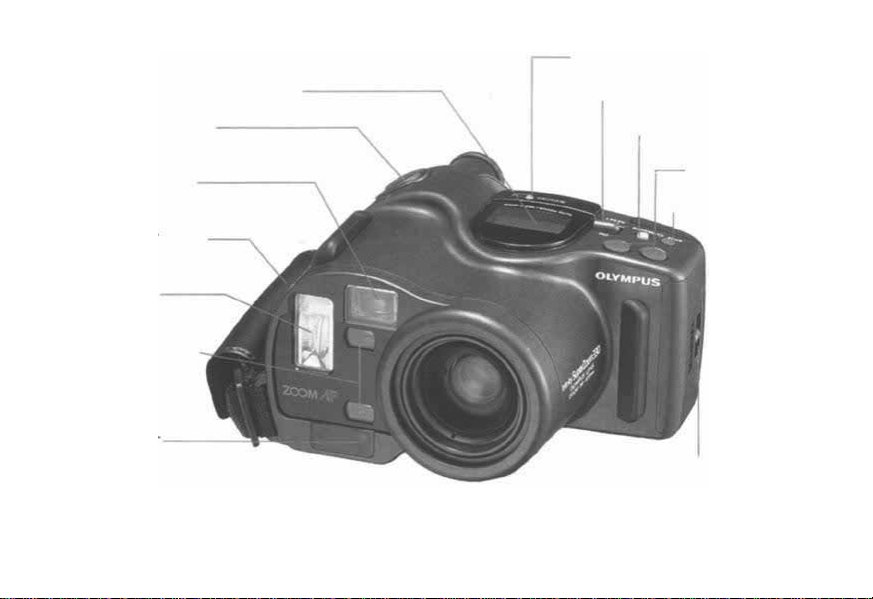
Description of controls (1)
LCD panel
Macro button
Power switch
Shutter release button
Viewfinder window
Grip / shoulder strap
Flash reflector
Autofocus windows
AF illuminator
Selftimer remote
control button
Zoom buttons
Spot metering
button
Back cover release
— 2 —
Page 4
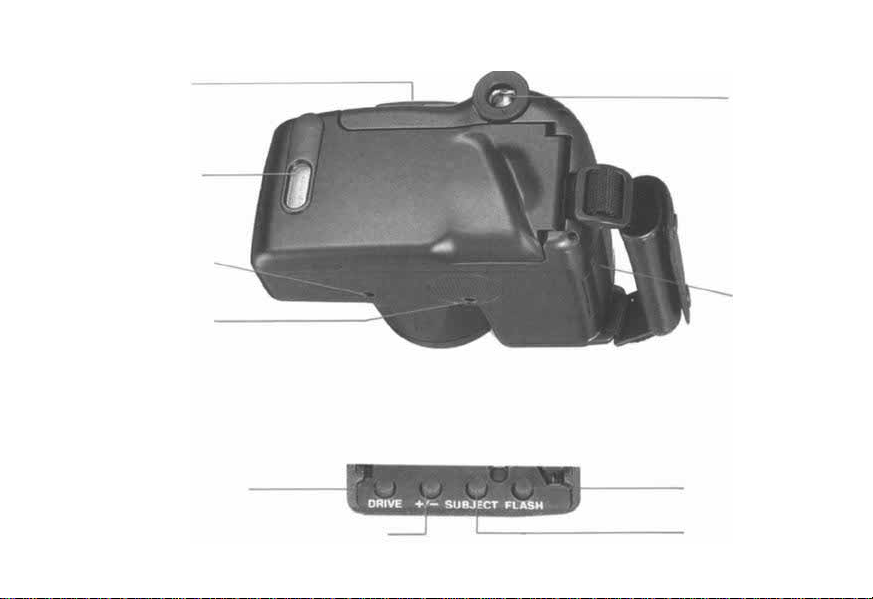
Description of controls (2)
Mode cover
Film window
Rewind button
Tripod socket
Functions listed below will not be cancelled when the power switch has been turned
OFF.
—Auto-S flash mode
—The first frame in double exposure mode
Drive mode button
Exposure compensation mode button
— 3 —
Flash mode button
Subject mode button
Viewfinder
Batte ry cover
Page 5

Table of contents
Description
Before
Loading the batteries.............................. 6
Attaching
Holding
Loading the film.................................. 10
Unloading the film............................... 13
Simple point & shoot photography............. 15
How to take pictures............................. 15
Auto flash photography......................... 21
Auto-S flash photography...................... 23
Camera functions and controls................ 25
Focus lock.......................................... 25
Spot metering...................................... 27
Macro photography.............................. 29
Selftimer/Remote
Flash OFF.......................................... 35
of
controls
you
begin...................................
the
strap
the
camera
...........................
................................
...............................
control
......................
2
6
8
9
31
Fill-in flash........................................... 36
Slow-synchro fill-in flash......................... 38
Auto zoom mode.................................... 40
Infinity
mode.........................................
Servo
AF
mode
......................................
Special effects ........................................ 46
Exposure compensation............................ 46
Continuous mode.................................... 48
Double exposure mode ............................ 50
How to use the soft case .......................... 52
Troubleshooting...................................... 53
To take better photographs........................ 55
Zoom lens............................................. 55
Autofocus
Exposure............................................... 59
Care and storage..................................... 62
Specifications......................................... 63
— 4 —
(AF)
......................................
43
44
57
Page 6
Thank you for purchasing the OLYMPUS Infinity Super Zoom 330. Please read t his
instruction manual carefully before using the camera. We also recommend that you
shoot at least one roll of film just to familiarize yourself with the camera's features.
Symbols used in this manual
Correct
Attention
Incorrect
Press li gh tl y
operation
Lamp on
— 5 —
Order of operation
Lamp blinking
Automatic operation
Page 7

Before you begin...
Loading the batteries
Be sure power switch is OFF.
Remove battery cover on the side of the
grip.
Insert two 3V lithium batteries as shown and
replace cover.
Use Panasonic CR 123A, Duracell DL
123A, or equivalent.
WARNING: Do not mix different types of
batteries or new and old
batteries at the same time.
— 6 —
Page 8
Switch power ON and check battery power
level on the LCD panel.
NOTE: LCD panel display switches of f auto-
matically after 90 seconds if no controls
are used.
Remove batteries if you do not plan to use the
camera f or a n extended period of time.
When is displayed, batteries are OK.
If flashes, batteries are low, have spares
handy.
If is displayed continuously, batteries should
be replaced immediately.
— 7 —
Page 9
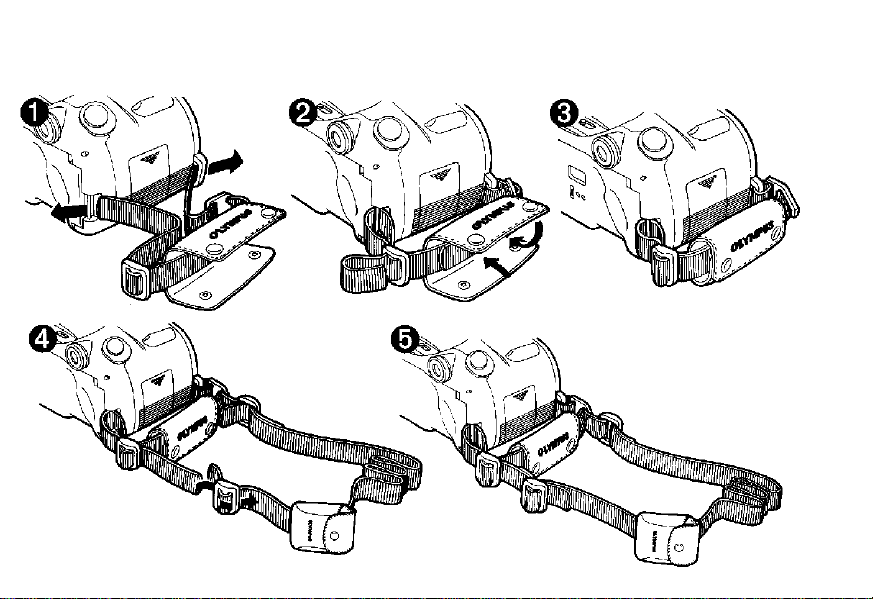
Attaching the strap
— 8 —
Page 10
Holding the camera
Hold the camera correctly. Keep fingers and camera strap away from the lens,
viewfinder and flash reflector.
NOTE: It is particularly important to hold the
camera steady when shooting at longer
focal lengths (telephoto); use bot h
hands for maximum stability.
— 9 —
Page 11
Loading the film
*Open t he ba ck cover b y sliding th e back
cover release toward t he top of the
camera.
NOTE: Avoid direct light wh en loading the
film.
This camera is designed to use DX- coded 35mm
film. DX coding is used by virtually all major film
manufacturers. DX coding allows t he camera to
identify and set the film speed automatically.
If DX-coded film is unavailable, use ISO
100 film.
— 10 —
Page 12
Insert the film cartridge. Do not touch
the lens with your finger or the film
leader when loading.
Align the film leader with the film
loading indicator.
— 11 —
Page 13
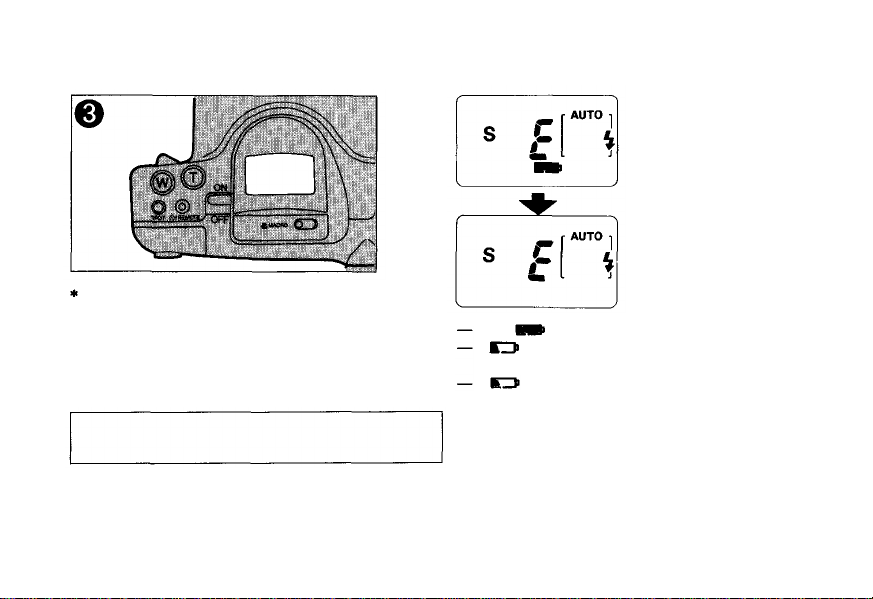
* Close the back cover.
—The film will advance automatically and
the exposure counter on the LCD panel will
display the number "1" indicating the first
picture on the roll.
—Th e LCD panel wil l also display an "S"—to
indicate single frame advance and either
"AUTO or "AUTO S"—t o ind icate flash
mode. Either flash mode may be used for
point-and-shoot photography.
—If film is improperly loaded, the LCD panel
will display a blinking "E". In this case, open
the back cover, and realign t he film leader.
NOTE: Auto-S will be displayed if the camera
was in Auto-S mode prior to being
switched OFF. In all other flash
mode, t he camera reverts to AUTO
when it is switched OFF. (For details
on Auto and Auto-S flash mode,
see
pgs.
21 or 23)
—Use the window in the camera back to check
type of film loaded.
— 12 —
Page 14
Unloading the film
* The camera automatically rewinds the film
when you reach the end o f the roll.
—The exposure counter on the LCD panel
counts down as the film is rewinding.
NOTE: If you want to rewind t he film before
the end of the r oll, press t he rewind
button with the tip of a ballpoint pen.
Do n ot us e any device with a sharp tip.
The final reading of exposure counter before
rewinding may be more than the number of
exposure specified for the film.
— 13 —
Page 15
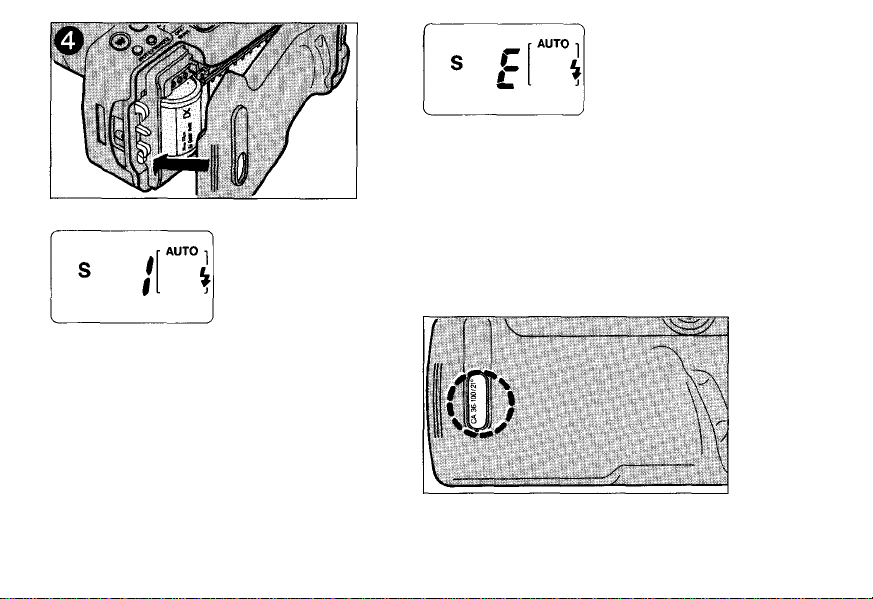
—Once the film has been rewound, a blinking
"E" will be displayed on the LCD panel.
Furt her operations are not possible until the
rewound film cartridge is removed.
*Open the back cover, and remove the
film cartridge from the camera.
— 14 —
Page 16
Simple point & shoot photography
How to take pictures
* Remove lens cap.
To remove th e lens cap, press part A.
Switch power OFF, when removing lens cap.
*Set power switch ON.
— 15 —
Page 17
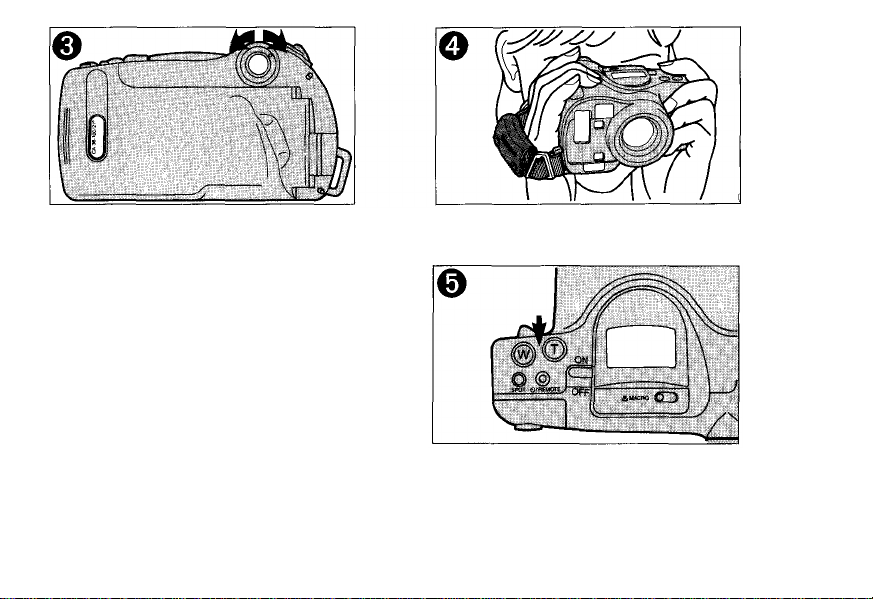
*Adjust viewfinder.
A dioptric correction ring on the view-
finder eyepiece allows photographers who
wear eyeglasses to adjust the focus of the
viewfinder. Adjustable range is — 2 to +1
diopters.
*While looking throu gh the viewfinder,
aim the camera at the subject.
*Use the zoom button to adjust the size
of your subject in the frame. (telephoto
or wide angle)
— 16 —
Page 18
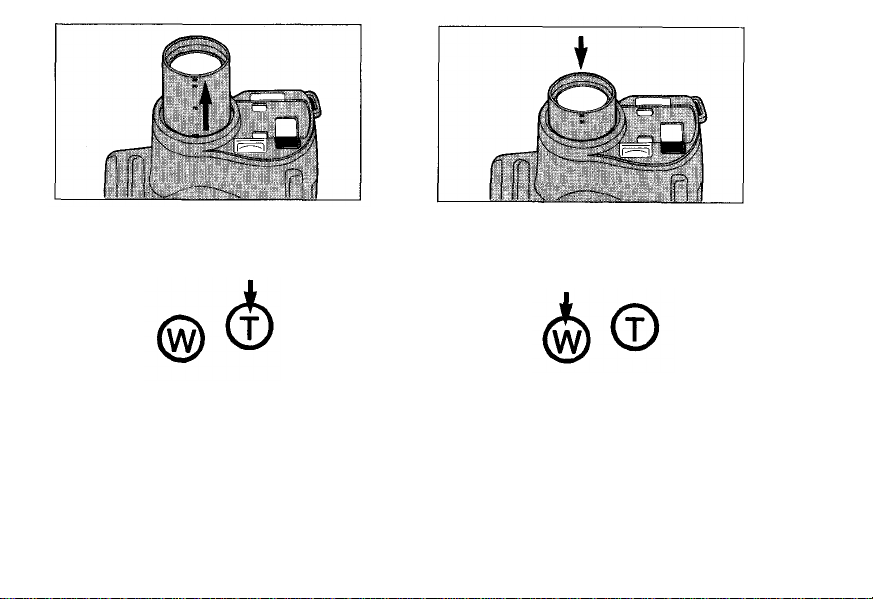
—Press th e "T" (Telephoto) on the zoom
button to zoom in. (The maximum focal
length in the "T" position is 105mm.)
—Press the "W" (Wide-angle) on the zoom
button to zoom out. (The minimum focal
length in the "W" position is 38mm.)
— 17 —
Page 19
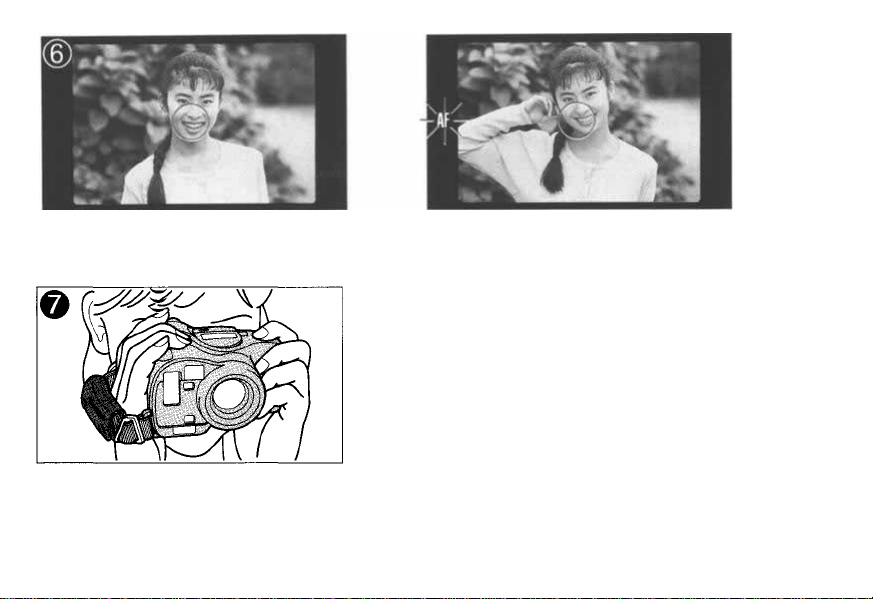
*Position your subject within the
autofocus frame in the center of the
viewfinder.
*Press th e shutter release button half-way
to focus.
—Wh en correct focus has been achieved, the
"AF" light will appear in the viewfinder.
— If th e "AF" light is blinking, correct focus
was not achieved. If this occurs, let go of the
shutter release b utto n. M ake sure your
subject is within the autofocus frame in the
center of the viewfinder and press the shutter
release button half-way again.
— 18 —
Page 20
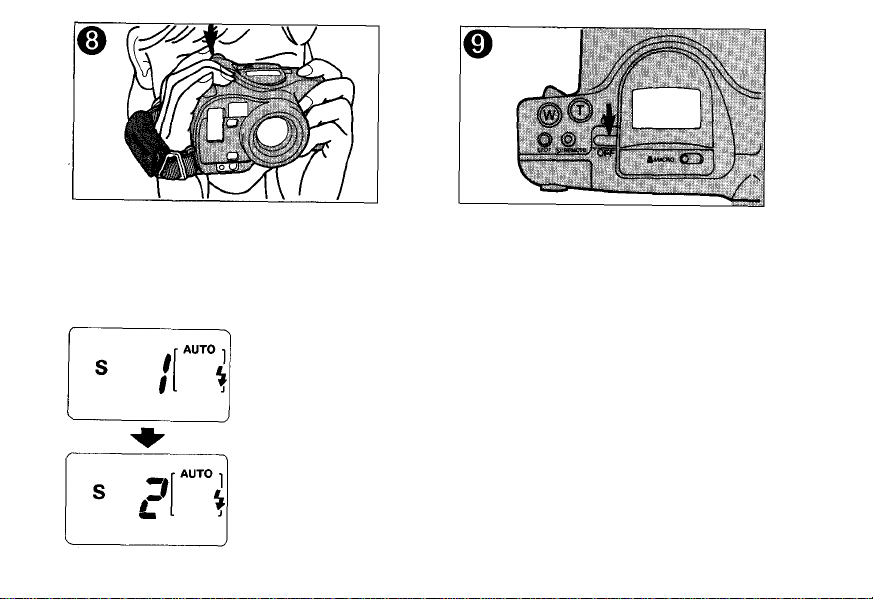
*When correct focus has been achieved
(the "AF" light has appeared), press the
shutter release bu tto n fully. As soon as
the shutter is released, film will automati-
cally advance to the next frame.
* Switch power OFF when camera is no t in
use.
— 19 —
Page 21

Shooting Range
When shooting in extremely dim light, the AF
illuminator on the front of the camera will emit a
beam of infrared light to measure the distance to
the subject. The AF illuminator has a range of
approximately 4 m (13.1 ft ).
The autofocus system is designed to handle
subjects that are among of below chart. If the
subjects are out of this shooting range, the "AF"
light in the viewfinder will blink, and the shutter
will not release.
However, th e shutter may sometimes be released
erroneously when t he subject is extremely close t o
the camera.
— 20 —
Page 22

Auto flash photography
Confirm flash charge by pressing the
shutter release button half-way.
—The light will
appear in the viewfinder
when the flash is charged.
Flash range: ( ) are for continuous shooting.
ISO
100
400
WIDE
0.8 m — 4.7
2.6 f t — 15.4 (14.1) ft
0.8 m— 9.4
2.6 ft — 30.8 (28.2) ft
(4.3)
(8.6)
m,
m,
TELE
1.3 m— 3.5
4.3 f t — 11.5 (10.5) ft
1.3 m — 7.0
4.3 ft—
23.0 (21)
Compose your shot and press the shutter
release button. The flash will fire auto-
matically.
NOTE: In Auto and Auto-S flash mode, the
amount of light emitted by the flash is
automatically adjusted according to the
distance between t he subject and
camera.
(3.2)
m,
(6.4)
m,
ft
— 21 —
Page 23

NOTE: The flash may not fire if the shutter is
released while the flash is still charging.
It takes about 3.5 seconds after the film
is advanced to recharge the flash.
— 22 —
Page 24

Auto-S flash photography
Auto-S flash significantly reduces "red-eye" phenomenon (when a subject's eyes
appear red) in flash portraits and group photos. Red-eye phenomenon is most likely to
occur in very low light, and at longer focal lengths (telephoto). Auto-S flash can also be
set in the standard operating mode.
—"AUTO-S" will be displayed on the LCD
panel.
* Activate Auto-S mode by pressing the
FLASH mode button located under the
mode cover.
— 23 —
Page 25

* Compose yo ur shot and press th e shutter
release button.—the flash will emit a
rapid series of pr e-flashes, followed
directly by the main flash.
*Hold the camera firmly while pressing
the shutter release button.
*To cancel Auto-S mode, press the Flash mode
button located under the mode cover.
NOTE: Auto-S mode will not be cancelled
when power i s switched OFF.
Flash Auto-S mode shooting range
ISO
100
400
— 24 —
WIDE
0.8 m— 4.1
2.6ft — 1 3 . 5 (12.5) f t
0.8 m — 8.2
2.6 ft — 26.9 (24.9) f t
(3.8)
(7.6)
m,
m,
TELE
1.3 m— 3.1
4.3 ft —
1.3 m — 6.2
4.3 f t— 20.3 (18.4) f t
(2.8)
10 .2 (9.2)
(5.6)
m,
ft
m,
Page 26

Camera functions and controls
Focus lock
Use focus lock when you want to position your subject outside the autofocus frame
located in the center of the viewfinder.
*Position your subject in the autofocus
frame and press the shutter release button
half-way.
—When correct focus has been achieved, the
"AF" light will appear in the viewfinder.
*While keeping the shutter release button
pressed half-way, change the position of
your subject in the viewfinder to achieve
the desired composition.
— 25 —
Page 27

* Press the shutter release button fully to
take the picture.
NOTE: When focus is locked, exposure settings
are also locked (AE lock).
— 26 —
Page 28

Spot metering
Use spot metering when you want to limit light metering to a particular area of the
composition. It is particularly useful when lighting is uneven, or when there is strong
backlight or sidelight.
*Position t he subject for spot metering
within the autofocus frame in the center
of the viewfinder.
* Press the spot button.
(green) will appear in the viewfinder, and the
automatic spot metering exposure will be
locked.
— 27 —
Page 29

*Press th e shutter release button half-way
to focus.
* Press the shutter release button fully to
take the picture.
NOTE: It is not necessary to continue pressing
the spot button while the shutter
release button is pressed half-way.
— 28 —
Page 30

Macro photography
Use macro mode to take pictures at extremely close range. (0.8 ~ , 2.6 ft ~ infinity)
*Press Macro button.
—The lens will automatically extend to
telephoto and will be displayed on the
LCD panel.
NOTE: Zooming is not possible in Macro mode.
— 29 —
Page 31

*Press th e shutter release button half-way to focus.
*To cancel macro mode, press th e macro
button again or switch t he camera OFF.
*If the distance between the subject and the
camera is less than 1. 3 m (4.3 ft) the viewfinder
image will automatically shift to correct fo r
parallax. At distances greater than 1.3 m
(4.3 ft ) the lens will function as a normal
105 mm lens; at distances less than
0.8 meters, the AF light in the viewfinder
will blink and the shutter will not release.
Shooting Range:
Macro photography is possible when the subject
is at a distance of 0.8 m (2.6 ft) to infinity ( ).
If the distance between th e subject and the
camera is less than 1.3 m (4.3 ft), and when au-
tofocus shooting is difficult (see page 57), press
the shutter release b ut to n half-way to confirm
focus. The camera will automatically correct for
parallax. Then press the shutter release button
fully.
— 30 —
Page 32

Selftimer/Remote control (Optional)
Selftimer photography
*Set t he camera firmly in position.
*Press t he /REMOTE (Selftimer/
Remote control) bu tton until
is displayed on the LCD panel.
*Press th e shutter release button half-way
to focus.
—When correct focus has been achieved, the
"AF" light will appear in the viewfinder.
— 31 —
Page 33

*Press the shutter release button fully to
start the Selftimer. The shutter will be
released 12 seconds later.
*To cancel the Selftimer, press the
/REMOTE button or switch the
camera OFF.
—The red AF illuminator on the front of the
camera will light up for the first 10 seconds,
then blink rapidly for 2 seconds until the
shu tter is released.
NOTE: To prevent light from entering the
viewfinder when setting the focus and
exposure, do not remove your eye from
the viewfinder until the Selftimer has
been activated.
— 32 —
Page 34

Remote control (Optional) shooting
*Press th e /REMOTE (Selftimer/
Remote control) button until
is displayed on t he LCD panel.
*While looking through the viewfinder,
aim t he camera at the subject.
*With the remote control lens cap un it in
your hand, position yourself in front of
the camera and press t he release button
on the unit's side.
— 33 —
Page 35

—The red AF illuminator on the front of the
camera will blink rapidly until the shutter is
released.
NOTE: Remote control operation may not be
possible in strong backlight.
Although all operating modes can be
used in conjunction with the remote
control unit, continuous-frame
advance is limited to two frames.
The battery included in the remote
control uni t is not possible to replace.
However the battery life is approx five
years.
Remote control operation may be i nfluenced erroneously by the backlight-
ing through viewfinder.
—The remote control unit functions at distance
up to 5 m (16.4 ft ) from t he camera within a
arc of about 30° (3.5 m (11.5 f t) t o the right
or left of the center of the frame).
—Th e remote control can be set to release the
shutter either 1 or 3 seconds after the release
button is pressed.
—About 90 seconds after the remote control
mode has been activated, th e remote control
indicator on the LCD panel will begin to
blink. If no remote control photographs are
taken within 15 minutes, remote control mode
will be cancelled automatically.
To cancel remote control mode, press t he
/remote button, or switch the camera
OFF.
— 34 —
Page 36

Flash OFF
This mode is to be used in situations where a flash is prohibited (as in a museum) or
when not desired (for special effect).
Press the shutter release button half-way
to focus.
Press the shutter release button fully to
take the picture.
To cancel flash OFF mode, press the
FLASH button, or switch the camera OFF.
*Activate Flash OFF mode b y pressing t he
FLASH button located under th e mode
cover.
NOTE: The necessary shut ter speed m ay be
very slow (up to 2 seconds) to attain
—"OFF" will be displayed on the LCD panel.
— 35 —
proper exposure. To prevent blurred
pictures resulting from camera shake,
the camera should be set firmly in
position (with a tripod fo r example).
Page 37

Fill-in Flash
In thi s mode, the flash always fires regardless of available light. Use this mode for
daylight shooting with backlit conditions to compensate for backlighting which may
make the subject appear too dark.
* Activate Flash fill-in mode by pressing
th e FLASH button located under the
mode cover.
—"FILL-IN" will be displayed on the LCD
panel.
*Press th e shutter release button half-way
to focus.
— 36 —
Page 38

*Press the shutter release button fully to
take the picture.
*To cancel Fill-in flash mode, press the
FLASH button again, or switch the
camera OFF.
— 37 —
Page 39

Slow-synchro fill-in flash
Use slow-synchro fill-in flash to capture dimly lit backgrounds, such as the sky at dusk,
while properly lighting the foreground with flash.
* Activate slow-synchro fill-in flash mode
by pressing the FLASH button located
under the mode cover until "SLOW" is
displayed on the LCD panel.
NOTE: The shutter speed may be very slow ( up
to 2 seconds) to attain proper exposure.
To prevent blurring, the camera should
be set firmly in position (with a tripod
for example).
— 38 —
Page 40

* Press the shutter release button half-way
to focus.
* Press the shutter release button fully to
take the picture.
*To cancel slow-synchro fill-in mode,
press th e FLASH button, or turn the
camera OFF.
— 39 —
Page 41

Auto zoom mode
Use Auto zoom mode to maintain a constant subject size within the frame, even though
the distance to the subject may vary.
—For head-and-shoulders portraits, will
appear on the LCD panel.
*Activate the a ut o zoom by pressing t he
SUBJECT button located under the
mo de cover. Choose either head-and-
shoulders portrait or full-length
portrait.
—For full-length portraits, will appear on the
LCD panel.
Zooming is not possible in Auto zoom mode.
— 40 —
Page 42

*Position your subject in the center of the
viewfinder and press the shutter release
button half-way.
*Press the shutter release button fully to
take t he picture.
—The zoom will operate automatically to attain
th e desired shot (head-and-shoulders or
full-length).
To cancel Auto zoom mode, press the
*
SUBJECT button again, or switch the
camera OFF.
— 41 —
Page 43

Shooting Range
NOTE: Outside the designated shooting range,
constant subject size cannot be
maintained.
— 42 —
Page 44

Infinity mode—for distant subjects
Use Infinity mode to photograph extremely distant subjects.
Activate Infi nity mo de by pressing the
SUBJECT button located under the
mode cover until is displayed on the
LCD panel.
Press the shutter release button fully to
take the picture.
To cancel Infinity mode, press the
SUBJECT button again, or switch the
camera OFF.
—When using infinity mode, the "AF" light will
not appear in th e viewfinder because the
camera is already focused f or distant subjects.
— 43 —
Page 45

Servo AF mode—for moving subjects
Use Servo AF mode to m aintain constant focus on a moving subject.
Activate Servo AF mode by pressing the
SUBJECT button located under the
mode cover until "SERVO AF" is
displayed on th e LCD panel.
Press the shutter release button half-way
to focus.
—The focus will adjust at one-second intervals
as long as you continue to press half-way on
the shutter release button.
—I f you remove your finger from the shutter
release button after pressing half-way to
focus, the focus will remain locked until the
shutter is released or Servo A F is cancelled.
— 44 —
Page 46

Press the shutter release button fully to
take the picture.
To cancel Servo AF mode, press the
SUBJECT button again, or switch the
camera OFF.
— 45 —
Page 47

Special effects
Exposure compensation
Use Exposure compensation to manually adjust the level of exposure to compensate for
overall brightness or darkness, and to create special effects.
—The compensation rate is adjusted at 0.5 EV
increments to + / - 1.5 EV.
*Adjust exposure compensation by press-
ing the + / - button located under the
mode cover.
*To cancel Exposure compensation mode,
press the + / - button again, or switch
the camera OFF.
— 46 —
Page 48

-1.5 EV
±0 EV
+ 1.5 EV
— 47 —
Page 49

Continuous mode
Use Continuous mode to shoot a continuous series of pictures at 1.3 frames per second.
(One frame per 3.5 seconds with flash; for details see pg. 21)
*Activate continuous mode by pressing the
DRIVE button located under the mode
cover until "C" is displayed on the LCD
panel.
* Press the shutter release button half-way
to focus.
— 48 —
Page 50

* Press the shutter release bu tton fully to
take the picture.
*While
the
shutter
release
button
is
fully
pressed, the shutter will continuously release
at a rate of 1.3 frames per second.
*To cancel Continuous mode, press th e
DRIVE button again, or switch the
camera OFF.
NOTE: The focus and exposure will remain
locked after the first frame regardless of
any change in distance between the
camera and subject.
— 49 —
Page 51

Double exposure mode
Use Double exposure mode to combine two images on a single frame.
*Activate double exposure m ode by press-
ing the DRIVE button located under the
mode cover until "DOUBLE EXP" is
displayed on th e LCD panel.
*Press th e shutter release button half-way
to focus.
*Press the shutter release button fully.
*The
film
will
not
released the first time.
advance
—The "DOUBLE EXP" display will blink.
— 50 —
after
the
shutter
is
Page 52

*Press th e shutter release button half-way
to focus the second exposure.
*Press the shutter release button fully to
take the picture.
—When the shutter release button is fully
pressed a second time, the double exposure is
complete. The film advances and DOUBLE
EXP mode is cancelled.
*To cancel Double exposure mode, press
the DRIVE button again, or turn the
camera OFF.
—Turning the camera OFF will not cancel the
DOUBLE EXP mode if the first frame has
been exposed.
— 51 —
Page 53

How to use the soft case
Shoulder strap attachment ring
*The shoulder strap can be attached to the soft case.
— 52 —
Page 54

Trouble shooting
Battery power
Abou t 30 rolls (24-exposure, half with
flash) can be taken. However, flash and
zoom operations consume more battery
power.
The camera does n ot work
Make sure the power switch is ON. If the
power switch is between the O N and OFF
position, the camera does n ot work.
Check to make sure that the batteries are
loaded and inserted correctly.
If a completed roll of rewound film has
not been removed, the camera will no t
work.
The camera does no t focus correctly
When the subject moves too fast or is not
positioned within the autofocus frame in
the center of the viewfinder (refer p. 57),
the camera may not focus properly.
For fast moving subjects try the focus lock
with Servo AF mode (refer p. 44).
Even though the AF Illuminator lights, the
camera is still not focusing correctly.
It is sometimes difficult to attain an
accurate distance measurement of subjects
that have a low reflection ratio such as
navy blue or black.
The shutter will not release.
Press the shutter release button half-way
and make sure the "AF" light appears in
the viewfinder.
Flash does not emit.
Make sure the camera is on Flash mode.
When continuous flash shooting, there is
sometimes a delay in the time required to
recharge the battery. Shoot after the flash
indicator appears in t he viewfinder.
— 53 —
Page 55

When flash shooting, peoples' eyes come out
red.
* Red-eye phenomenon is a common
problem in flash photography. The
phenomenon occurs because the reti na
behind the pupil of an eye reflects flash
light. Shooting conditions such as brightness
and darkness of surroundings also affect
red-eye phenomenon. Intensity of red eye
phenomenon will differ from person to
person as it depends on dilation of the
pupil. Generally, w hen t he distance between
the camera and the s ubject increases so
does t he occurence of red eyes. To reduce
this phenomenon use Flash Auto-S mode
(refer to p. 23).
The camera does not work in extremely cold
weather.
*In low temperature conditions, batteries
temporarily lose performance. Try to keep
the camera warm.
— 54 —
Page 56

Zoom Lens
Zoom Lens
The Infinity Super Zoom 330 is equipped wit h a 38 —105 mm zom lens. A z oom is a lens wit h a focal length
that changes when part of th e lens moves. In the case of th e Infinity Super Zoom 330, any focal length between
38 mm and 105 mm can be selected. The user, without moving, can change th e composition of the photograph
by zooming in for a close-up or out for a wide angle shot. In this way, the Infinity Super Zoom 330 makes
extremely flexible photography possible that's equivalent to a camera with a number of interchangeable lenses.
In practice, zooming can add immense pleasure to photography.
The zoom operation is performed using the zoom button on the top of the camera body. "W" stands for
wide-angle and "T" for telephoto. When the "T" is pressed, the lens moves forward towards the maximum
length of 105 mm. When the "W" is pressed, it moves back towards the widest angle of 38 mm. On th e top of
the zoom lens, there are 38, 50, 70, 105 and MACRO indications; use these as a guide whe n zooming.
38 mm:
This is a wide-angle shot which means that the lens is shorter. Wi th this setting, because the angle of view is
wide and th e depth of field is greatest, sharp photographs with clear perspective a nd contrast can be obtained.
50 mm:
The image is almost the same as that seen with t he naked eye. At 50 mm , you can take a great portrait of
2 people or other su bjects that would not look natural in a wide angle shot. Wi th this focal length, many
photographs can be taken over a wide range of applications, from snapshots and portraits to landscapes.
(1) 38 mm
59°
(2) 70 mm
— 55 —
34°
(3) 105 mm
23°
Page 57

85 mm or more:
When th e lens is set to the maximum focal length of 105 mm, magnification is approximately three times
greater tha n at 38 mm a nd you wil l be able to obtain genuine telephoto photographs. In contrast to wide-angle
shots, t he perspective is narrow, and the depth of the field becomes more shallow. Because the depth of field is
not so great, objects in front of or behind the subject being photographed will be out of focus; make use of
this in composing your photographs. Try taking close-ups with the telephoto setting. The telephoto lens is
especially useful for sports photography and taking photographs of animals without disturbing them. Telephoto
can make snapshots and portraits more interesting by using its shallow depth of field. When taking telephoto
shots, b e sure to hold th e camera securely so th at it does not shake.
*The three pictures ((1), (2) and (3)) on the left are examples taken with the photographer zooming while
standing still and the pictures clearly illustrate the differences obtained with different settings. The three
pictures on the right are examples of whe n the di mensions of the subject are not changed. From these examples,
you ca n easily see the difference in the relation between the subject and the background.
Angle of view:
This is the shooting and viewing angle of the lens, you zoom to adjust the composition, in your photograph.
When t he angle of the view is greater (W), th e wide angle view is seen. When the angle is narrower, you have
shifted towards the telephoto (T).
Depth of field:
This is the range w ithin w hich objects wil l be in focus. Outside t his range, nearer to th e camera or further from
it, objects will be out of focus. The shorter the focal length of the lens and or the larger the "f" number, the
greater the depth of field.
(4) 38 mm
(5) 70 mm
(6) 105 mm
— 56 —
Page 58

Autofocus (AF)
The Autofocus (AF) mechanism automatically adjusts focus. With it, the camera measures the distance to a
subject and adjusts the lens so that the subject is in focus. I n the Infinity Super Zoom 330, focusing is done by
a newly - developed "Phase-Difference" detection system. In this system, light from the subject is picked u p by a
special sensor and any inconsistencies (phase differences) in the image are used by a microprocessor chip to cal-
culate the best focus setting. Since the lens used in the Infinity Super Zoom 330 is very accurate, correct focusing
is even more accurate and accomplished by just aiming the lens at th e subject. When there is no light reflected
from the subject, for example in a dark room, focusing is performed using a beam of light from the camera
(the AF-Illuminator).
Autofocus is designed so that the object in the center of the picture frame is correctly focused. However,
sometimes you may want a subject that is not in the center of the fr ame to be in focus; for such cases, the
Infinity Super Zoom 330 is also equipped with a focus lock mechanism.
For example, when your subject is at th e edge of the picture frame, not in the center, first move the camera
slightly so that the subject is i n the center of the autofocus frame, then press the shutter release button halfway
to focus. Whil e keeping the button pressed, recompose the picture, and press the button fully. (See "Taking
Photographs II" on p. 33).
By doing this, photographs with any required composition can be taken. In addition, at the time t he focus is
locked, the exposure is also determined automatically and locked (AE lock).
(1) Subject that does not include (2) Subject wi th low contrast (3) A rapidly moving subject
horizontal lines
— 57 —
Page 59

Although the Infinity Super Zoom 330 can focus in almost any situation, there are certain conditions, such as
those illustrated below (on th e left), in which it may not be possible to obtain the correct focus. The AF in the
viewfinder will usually blink to warn you during these conditions; however, in situations (4), (5) and (6), the
green AF i n the viewfinder may light even though the lens is incorrectly focused. In any of these situations, you
ca n try focusing on a subject at a similar distance and then, using the focus lock.
(4) Two subjects within the
focusing frame, at different
distances
(5) Excessively bright light in the
center of the focusing frame
— 58 —
(6) A subject with a repeated
pattern
Page 60

Exposure
Programmed exposure
One of the basics of photography is exposure. Exposure refers to the amount of the light which strikes the film.
The correct amount of the light, or correct exposure is controlled according to the f ilm speed (indicated on the
film package, such as ISO 100 or ISO 200), the shutter speed and aperture. Many cameras are now equipped
wit h a programmed exposure function so that the correct exposure can be obtained easily wi thou t any
guess-work or previous photography experience.
With programmed auto exposure, the camera automatically sets the m ost suitable combination of "f" stop
and shutter speed for subjects at any brightness level. As a result, the correct exposure will be obtained almost
immediately. It's an automatic exposure system th at means you'll never miss the opportunity to take a
photograph. All th e photographer has to do when holding the camera is to concentrate on aiming it correctly
and press t he shut ter release button. For example, when you change from a dark to bright subject, the camera
adjusts itself to m aintain the correct exposure. Anyone can take photographs without worrying about making
a mistake.
Program chart
The chart shown here is a program chart when the focal length is 38 mm and 105 mm. When the subject is
brighter than EV 11 for wide-angle shots and EV 12 for telephoto shots, the aperture and shutter speed change
simultaneously. When the subject is darker, the aperture opens fully and the shutter speed changes. Naturally
the program takes any zoom setting into consideration and sets the aperture and shutter speed which are most
appropriate for every shot. So that camera shake is less of a problem, t he shu tter speed w ill not be sl ower tha n
1 7 4 0 sec. for wide-angle shots and 1/80 sec. f or telephoto shots.
When t he subject is darker and requires a slower shutter speed,
the flash fires automatically; in the slow-synchro fill-in or flash-off
mode, stays open for as long as needed-up to a long 2 sec.
automatically. (Broken line section)
— 59 —
Page 61

Spot metering
Among methods f or measuring the amount of light, the most widely used is th e "center - weighted average light
metering system" (Fig. A). This system gives excellent results when taking ordinary shots; however, w hen there
is an extremely bright or dark area in the frame, a center - weighted average light metering system may not
automatically set the best exposure. When taking a portrait for example, if the background is too bright, the
subject will be dark, and vice versa. The sophisticated light metering system used in the Infinity Super Zoom
330 which is used to obtain proper exposure in this situation is called "spot metering". Spot me teri ng (Fig. B)
measures and calculates the correct exposure only from th e brightness in the central section of the frame.
This makes spot metering very convenient when th e subject is back lit, side lit, or spot lit. Even w hen th e
subject looks dark and does not stand out from the background, your photographs wil l be exposed properly.
To make white objects look very white, use spot metering and then operate exposure compensation button to
the (+) direction, to make black objects look very black, use spot metering and then operate exposure
compensation button to the (-) direction.
Double exposure
"Double exposure" refers to a technique in which images are superimposed by releasing the shutter twice
without advancing the film.
In the case of the Infinity Super Zoom 330, you can easily take double exposures by pressing th e DRIVE button
inside the mode cover.
By doing this, even when the shutter is released, the film won't advance to t he next frame until the shutter has
been released f or the second exposure. Used together with the spot metering function, you can take extra
special - effects photographs, with the same face but with different expressions appearing twice in the same
photograph, for example. We recommend combined use of exposure compensation and the flash for
applications of this type.
— 60 —
Page 62

With the Infinity Super Zoom 330, the exposure can be compensated from -1.5 EV to +1.5 EV in 0.5 EV
steps, by simply pressing the exposure compensation button marked + / - inside the mode cover. For instance,
when shooting a back lit subject that's too far away for the flash to be effective, the exposure should be com-
pensated to the positive side (more light) so th e subject doesn't look too dark in the photograph. When the
background is dark and details can't be seen and o nly the subject is bright, the exposure should be compensat-
ed to the negative side. (less light)
— 61 —
Page 63

Care and storage
*Do not expose the camera to extreme heat or strong magnetic fields.
*Do not apply excessive force to the camera or its controls.
*Do not rotate t he camera once it is mounted on a tripod.
*Do not to uch th e contact points inside the camera.
*Do not use organic solvents, thinner or benzine to clean the camera.
*Avoid high impact from bumping or dropping the camera.
*Never disassemble the camera; it contains a high-voltage circuit.
*Do not disassemble or expose batteries to excessive heat.
*Do not expose the camera to rain shower and water.
*Avoid sudden temperature change.
*Do not put the camera in the extreme heat (over 40°C or 104°F) or in th e extreme
cold (below -10°C or 14°F).
*In case of malfunction, consult your nearest Olympus dealer, or nearest Olympus
service center.
— 62 —
Page 64

Specifications
Type: Full-automatic 35 mm autofocus lens-
shutter camera wit h built-in 38 —105 mm
Zoom lens
Film format: 35 m m standard DX coded fil m
(24 x 36 mm)
Lens: Olympus 38—105mm F4.5-6 lens wit h
12 elements in 11 groups
Shutter: Programmed electronic shutter
Viewfinder: Kepler type 0.46-1.2x bright frame
zoom-finder (with autofocus frame, AF
indicator, flash indicator, spot metering
indicator)
Parallax compensation system in mac ro
photography
Finder view-field: 85% of actual picture
field
Focusing: Passive autofocus system with focus
lock
Focusing range: 0.8 m (2.6 f t ) — (infinity)
(at 38 mm)
1.3 m (4.3 ft)— (a (at 105 mm)
0.8 m (2.6 ft ) — (infinity) (at macro mode)
Exposure control: Auto matic exposure control
with programmed electronic shutter
(Center-weighted average light metering,
switchable to spot metering)
Auto exposure range: WIDE:
EV3.4 (F4.5, 2 sec.) —EV17 (F16, 1/500 sec.)
TELE: EV4.4 (F6, 2 sec.) —EV17
(F18.4, 1/400 sec.)
Exposure compensation: ± 1.5EV Compensation
possible (1/2 step)
Exposure counter: Progressive type, displayed in
LCD panel
Selftimer: Electronic Selftimer with 12 sec.
delay
Film-speed range: Automatic setting with DX
coded film ISO 25 — 3200 with color
negative film (Actual setting at 25, 50,
100, 200, 400, 800, 1600, 3200. Fo r other
intermediate film speeds, the camera is
automatically set to the lower speed.
For ISO 32 film, it is set to ISO 100.)
Film loading: Automatic loading (automatically
advances to first frame when camera back is
closed)
— 63 —
Page 65

Film advance: Automatic film winding
Film rewind: Automatic film rewind (automatic
rewind activated at the end of film, auto-
matic rewind stop), rewind possible at any
point with rewind button.
AF illuminator: Automatic actuation in low light
Flash: Built-in flash
Recycling time: SINGLE MODE: approx.
3.5 sec. (at normal temperature)
Flash working range: at Auto Mode,
WIDE: 0.8 m (2.6 ft) —4.7 m (15.4 ft)
TELE: 1.3 m (4.3 ft) —3 .5 m (11.5 ft ) wi th
ISO 100 negative color fi lm
WI D E : 0.8 m (2.6 f t) —9 .4 m (30.8 ft)
TELE: 1.3 m (4.3 ft ) —7 .0 m (23.0 ft) with
ISO 400 negative color film
Flash modes: AUTO (automatic flash activation
in low light and backlight), AUTO-S
(Red-eye reducing, in low light and
backlight) FILL-IN (forced activation),
SLOW (slow-synchro possible with longest
shutter speed o f 2 sec.)
OFF (activation stop)
Battery check: Displayed in LCD panel
Power source: Two 3V lithium batteries
(CR 123A/DL 123A) (replaceable)
Dimensions: 137 (W) mm x 80 (H) mm x
99 (D) mm (5.4" x 3.1" x 3.9")
(excluding protrusions)
Weight: 610 g (21.5 oz ) (without batteries)
— 64 —
Page 66

San-Ei Building. 22-2. Nlshl Shinjuku 1-chome, Shinjuku-ku. Tokyo. Japan Tel 03-340-2211
Posttech 104908. Wenoenstrasse 14-16, 2 Hamburg 1. West Germany Tel: 040-23773-0
OLYMPUS OPTICAL CO., LTD.
OLYMPUS CORPORATION
Crossways Park. Woodbury. New York 11797, U.S.A. Tel. 516*364-3000
OLYMPUS OPTICAL CO. (EUROPA) GMBH
OLYMPUS OPTICAL CO. (U.K.) LTD.
2-B Honduras Street. London EC1Y OTX, England Tel. 01-253-2772
PRINTED IN JAPAN 1289. 9MM
 Loading...