

Olympus 262857, 262861, E-PL1 Instruction Manual
Printed in the Netherlands · OE · 02/2010 · E0462522
Register your product on www.olympus-consumer.com/register and get additional benets from Olympus!
http://www.olympus.com/
Premises:
Goods delivery:
Letters:
Consumer Product Division
Wendenstrasse 14 – 18, 20097 Hamburg, Germany
Tel.: +49 40 - 23 77 3-0 / Fax: +49 40 - 23 07 61
Bredowstrasse 20, 22113 Hamburg, Germany
Postfach 10 49 08, 20034 Hamburg, Germany
European Technical Customer Support:
Please visit our homepage
http://www.olympus-europa.com
or call our TOLL FREE NUMBER*:
00800 - 67 10 83 00
for Austria, Belgium, Denmark, Finland, France, Germany, Luxemburg, Netherlands,
Norway, Portugal, Spain, Sweden, Switzerland, United Kingdom.
* Please note some (mobile) phone services / provider do not permit access or request an
additional prefix to +800 numbers.
For all not listed European Countries and in case that you can’t get connected
to the above mentioned number please make use of the following
CHARGED NUMBERS:
+49 180 5 - 67 10 83or+49 40 - 237 73 48 99.
Our Technical Customer Support is available from9 am to 6 pm MET (Monday to Friday).
Authorized Distributors
United Kingdom:
/Eire
Olympus Service Department
Olympus Imaging &Audio
KeyMed House
Stock Road
Southend-on-Sea
Essex
SS2 5QH
United Kingdom
Sales - 0800 111 4777
Service - 0800 1114888
Facsimile - +44 (0)1702 445134
email - consumer@olympus.co.uk
www.olympus.co.uk
South Africa: Tudor Photographic
4th floor, Park on Long
66 Long Street
Cape Town 8001
South Africa
Tel: +27 (0) 21 423 4150
Fax: +27 (0) 21 424 4632
© 2010
Thank you fo r purc hasing an Oly mpus di gital camera. Before you star t to use you r new camera,
please rea d these instructi ons carefully to enjoy o ptimum per formance and a longer servic e life. Keep
this manua l in a safe place for futu re reference.
We recom mend that you take test shots to get accustomed to your camera before t aking important
photogra phs.
The sc reen and camera illustrat ions sho wn in this manual we re produ ced dur ing t he develo pment
stages an d may differ f rom the actual produ ct.
The content s in this man ual are based on rmware ve rsion 1.0 for this cam era. If there are additions
and/or modications of functi ons due to rmware update for the camer a, the contents wi ll differ. Fo r
the latest i nformati on, please vi sit the Olympus webs ite.
Basic guide
Quick task index
Table of Contents
1.
Basic ph otogra phy and useful
functions
2.
Other s hootin g options and
advanc ed sett ings
3.
Flash sho oting
4.
Shooting and viewing movi es
5.
Playbac k options
6.
Camera setup
7.
Custom izing camera se tting s
8.
Printi ng pictures
9.
Connec ting the camera to a
computer
10
.
Shooting tips and maintenance
11
.
Information
Instruction Manual
DIGITAL CAMERA
Instruction Manual
2
EN
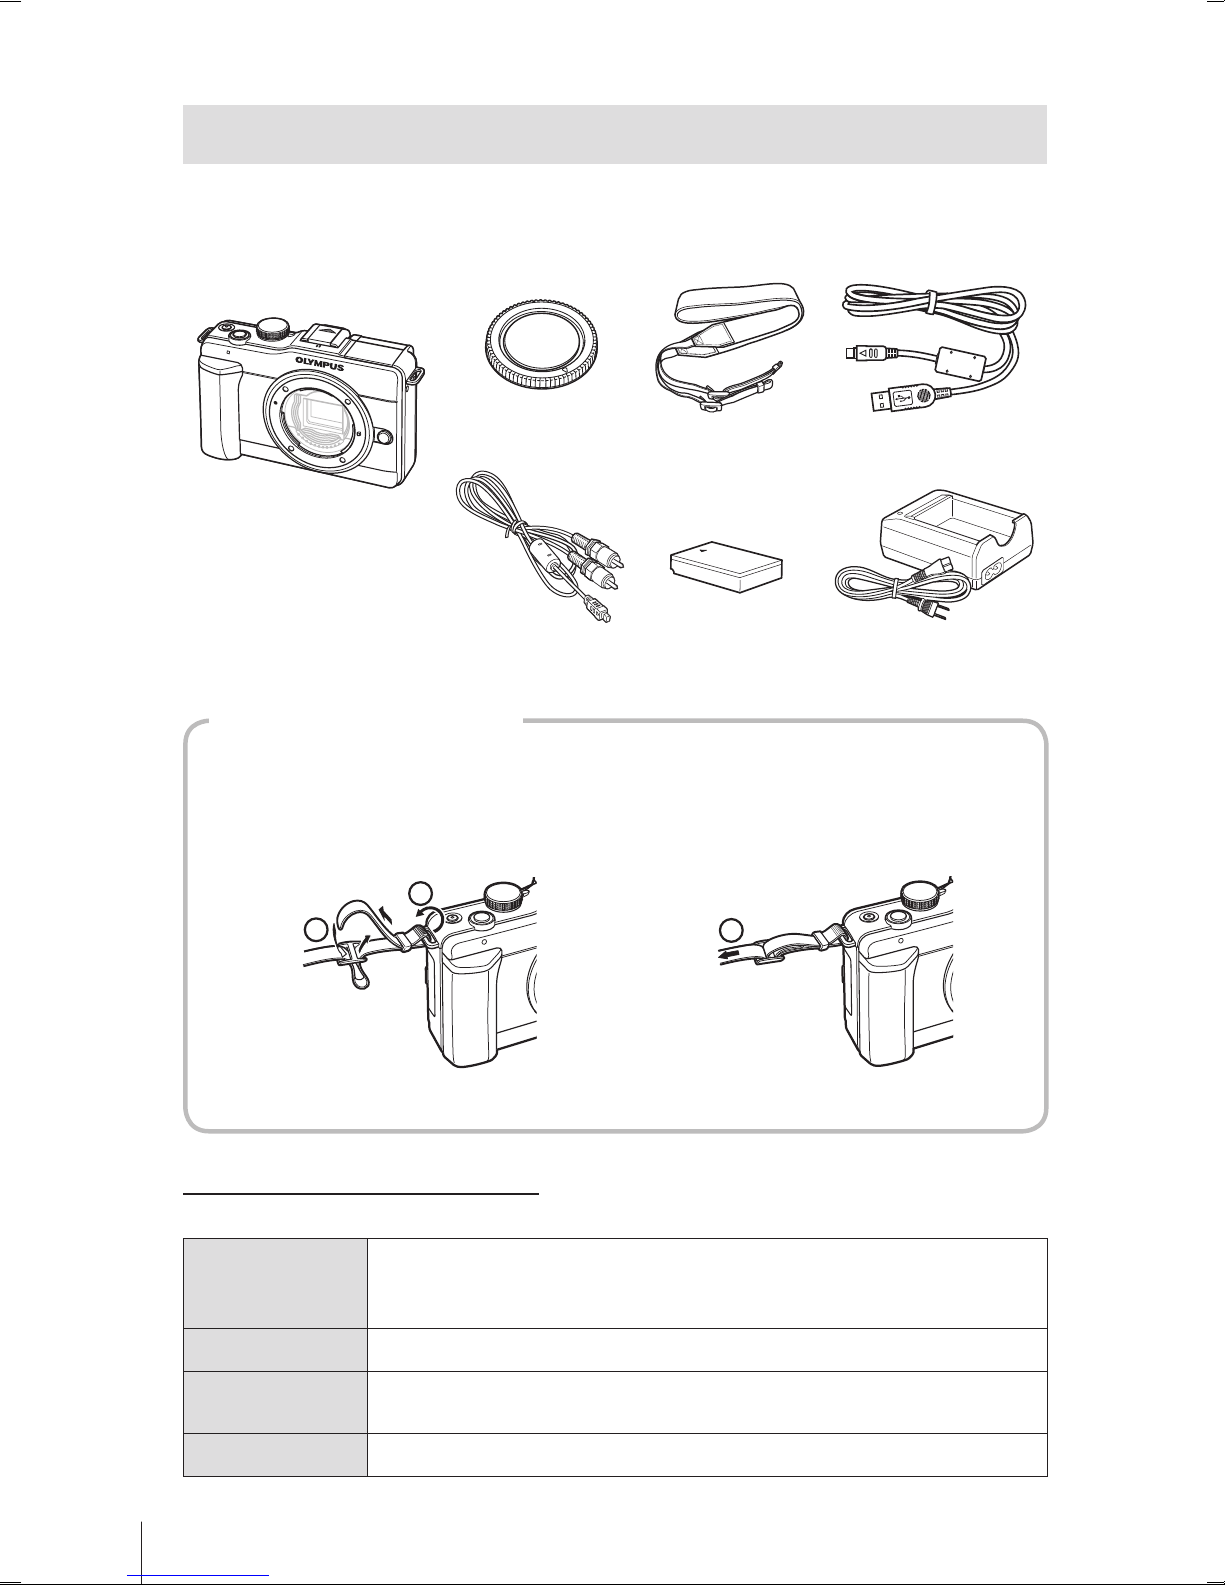
Unpack the box contents
The following items are included with the camera.
If anything is missing or damaged, contact the dealer from whom you purchased
the camera.
Camera
AV cable
(Monaural)
CB-AVC3
USB cable
CB-USB6
PS-BCS1(BCS-1)
Lithium ion charger
PS-BLS1(BLS-1)
Lithium ion battery
StrapBody cap
Computer software (ib)
CD-ROM
Instruction manual
Warranty card
•
•
•
1
Thread the strap in the
direction of the arrows.
2
Lastly, pull the strap tight
making sure that it is
fastened securely.
1
2
3
Attach the other end of the strap to the other eyelet in the same way.•
Attaching the strap
Indications used in this manual
The following symbols are used throughout this manual.
# Caution
Important information on factors which may lead to a malfunction
or operational problems. Also warns of operations that should be
absolutely avoided.
$ Notes
Points to note when using the camera.
% Tips
Useful information and hints that will help you get the most out of
your camera.
g
Reference pages describing details or related information.
3
EN
Preparations for shooting
Basic guide
1
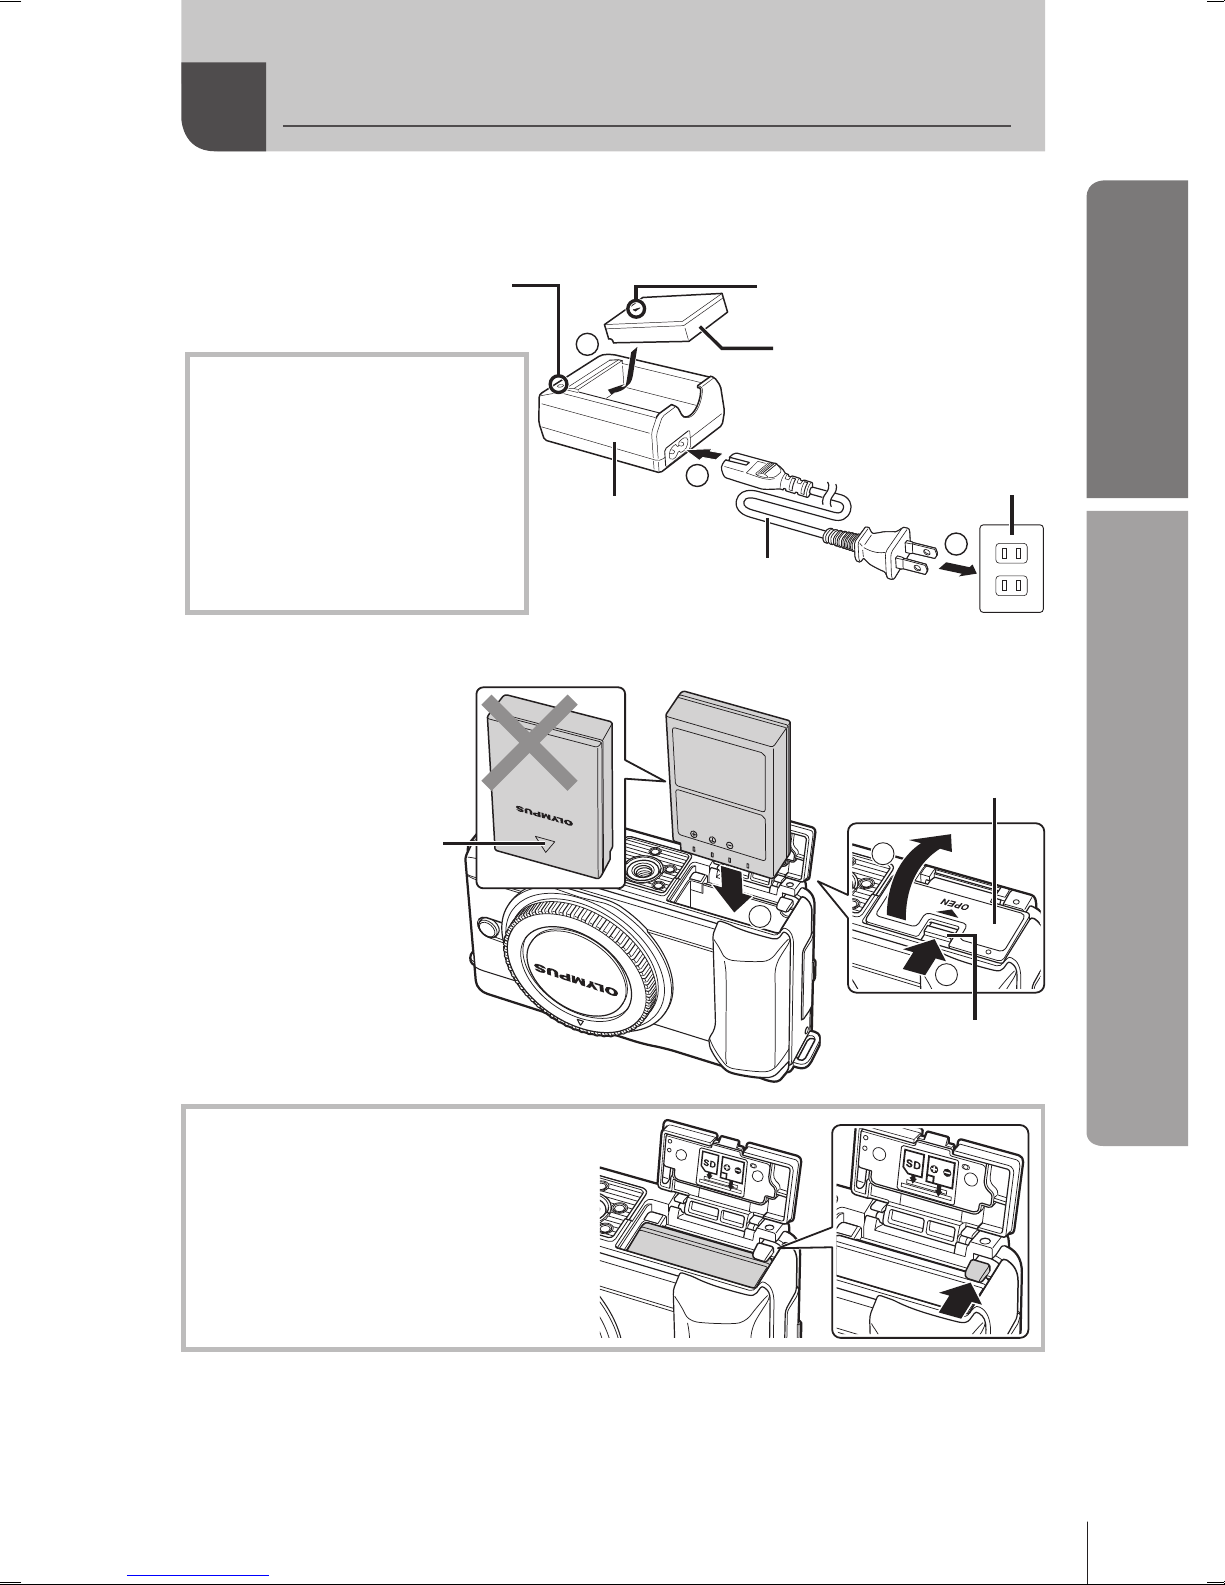
Charging the battery.
1
2
3
charging indicator
Amber light: Charging in
progress
Blue light: Charging complete
(Charging time: Up to
approximately 3 hours 30
minutes)
Amber blinking: Charging error
AC wall outlet
BCS-1 Lithium
ion charger
Direction indicating mark
BLS-1 Lithium ion battery
AC cable
Charging indicator
2
Loading the battery.
2
1
3
Battery/card
compartment lock
Battery/card
compartment cover
Direction indicating mark
Removing the battery
Turn off the camera before
opening or closing the battery/card
compartment cover.
To remove the battery, rst push the
battery lock knob in the direction of
the arrow and then remove.
$ Notes
It is recommended to set aside a backup battery for prolonged shooting in case the
battery in use drains.
•
Charging and inserting the battery
4
EN
Basic guide
Preparations for shooting
1
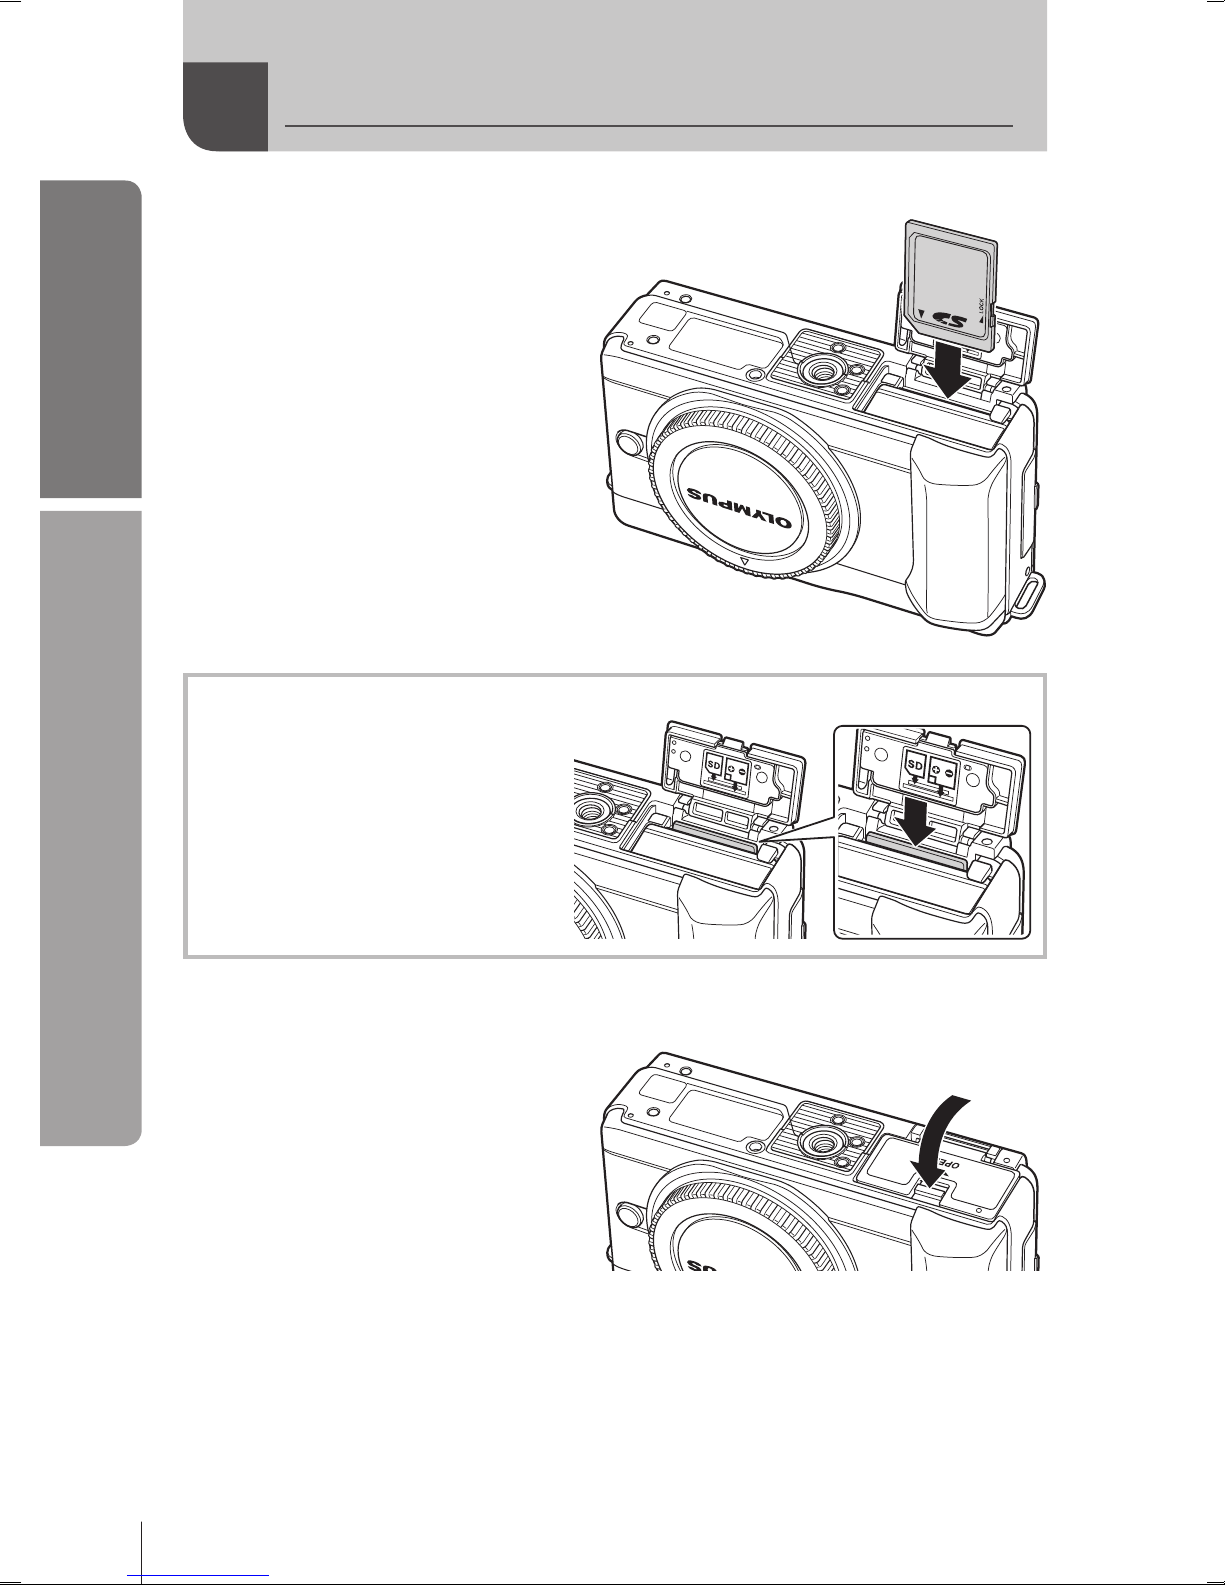
Loading the card.
Insert the SD/SDHC card
(referred to as “card” in these
instructions) until it locks in
place.
g “Card basics” (P. 95)
# Caution
Turn off the camera before
loading or removing the card.
•
•
Removing the card
Press the inserted card lightly and it
will be ejected. Pull out the card.
# Caution
Do not remove the battery or
card while the card write indicator
(P. 22) is displayed.
•
2
Closing the battery/card compartment cover.
Close the cover until you
hear a click.
•
# Caution
Close the battery/card compartment cover when using the camera.
Do not remove the battery or card while the card write indicator (P. 22) is displayed.
Failure to observe this precaution could result in the loss not only of the images
being recorded but also of existing images.
•
•
Inserting and removing cards
5
EN
Preparations for shooting
Basic guide
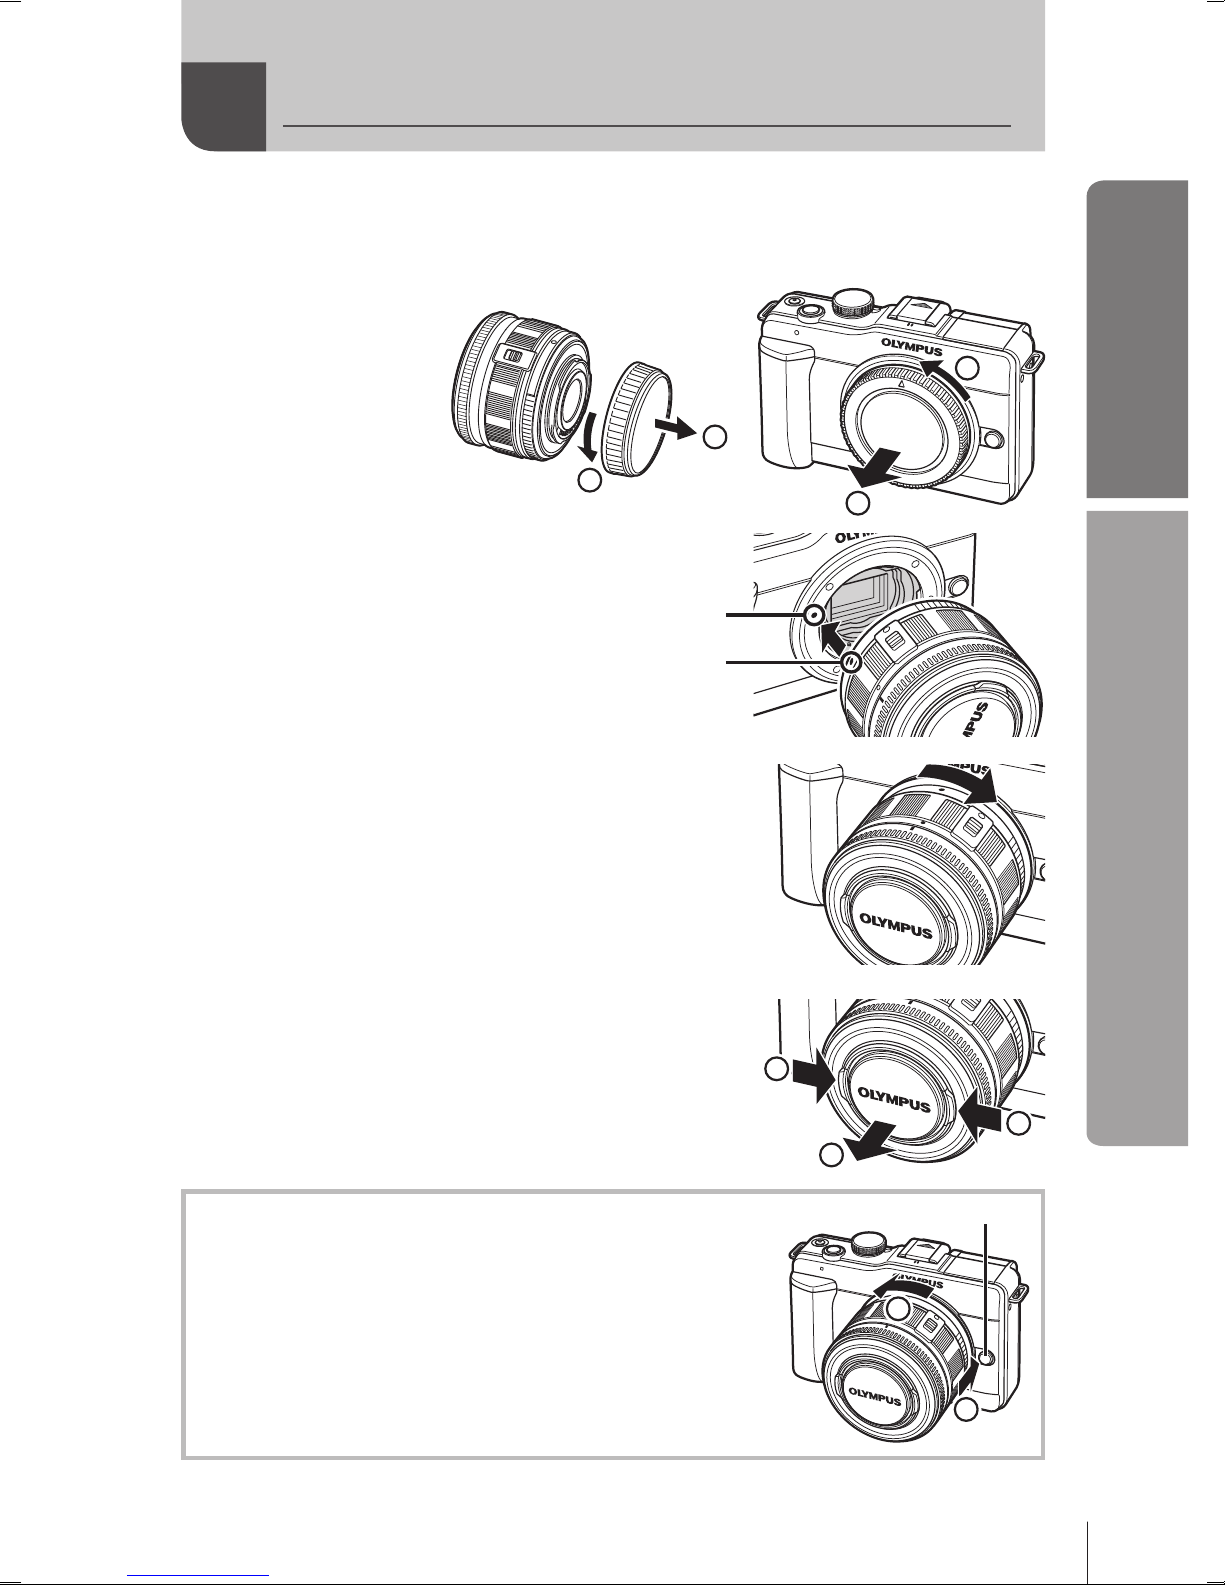
1
Remove the body cap from the camera and the rear cap from
the lens.
1
2
1
2
2
Attach a lens to the
camera.
Align the lens attachment
mark (red) on the camera with
the alignment mark (red) on
the lens, then insert the lens
into the camera's body.
•
Alignment mark
Lens attachment
mark
Rotate the lens in the direction indicated by the
arrow until you hear it click.
# Caution
Make sure the camera is turned off.
Do not press the lens release button.
Do not touch internal portions of the camera.
•
•
•
•
3
Remove the lens cap.
2
1
1
Removing the lens from the camera
While pressing the lens release button, rotate the lens in
the direction of the arrow.
g “Interchangeable lenses” (P. 97)
2
1
Lens release button
Attaching a lens to the camera

6
EN
Basic guide
Preparations for shooting
1
Press the ON/OFF button to turn on the camera.
When the camera is turned on, the (blue) power lamp will light and the monitor
will turn on.
To turn off the power, press the ON/OFF button again.
2
Set the mode dial to
h
.
■ Mode dial
■ ON/OFF button
The (blue) power lamp lights
when the camera is turned on.
•
Dust reduction function
After you turn the camera on, the
camera will remove dust from the
lter in front of the image pickup
device.
■ LCD monitor
When you turn on the power,
the LCD monitor lights up.
•
Battery level
7 (green): Camera ready to shoot
8 (green): Low battery
9 (blinks red): Charge the battery
•
•
Power on
7
EN
Preparations for shooting
Basic guide
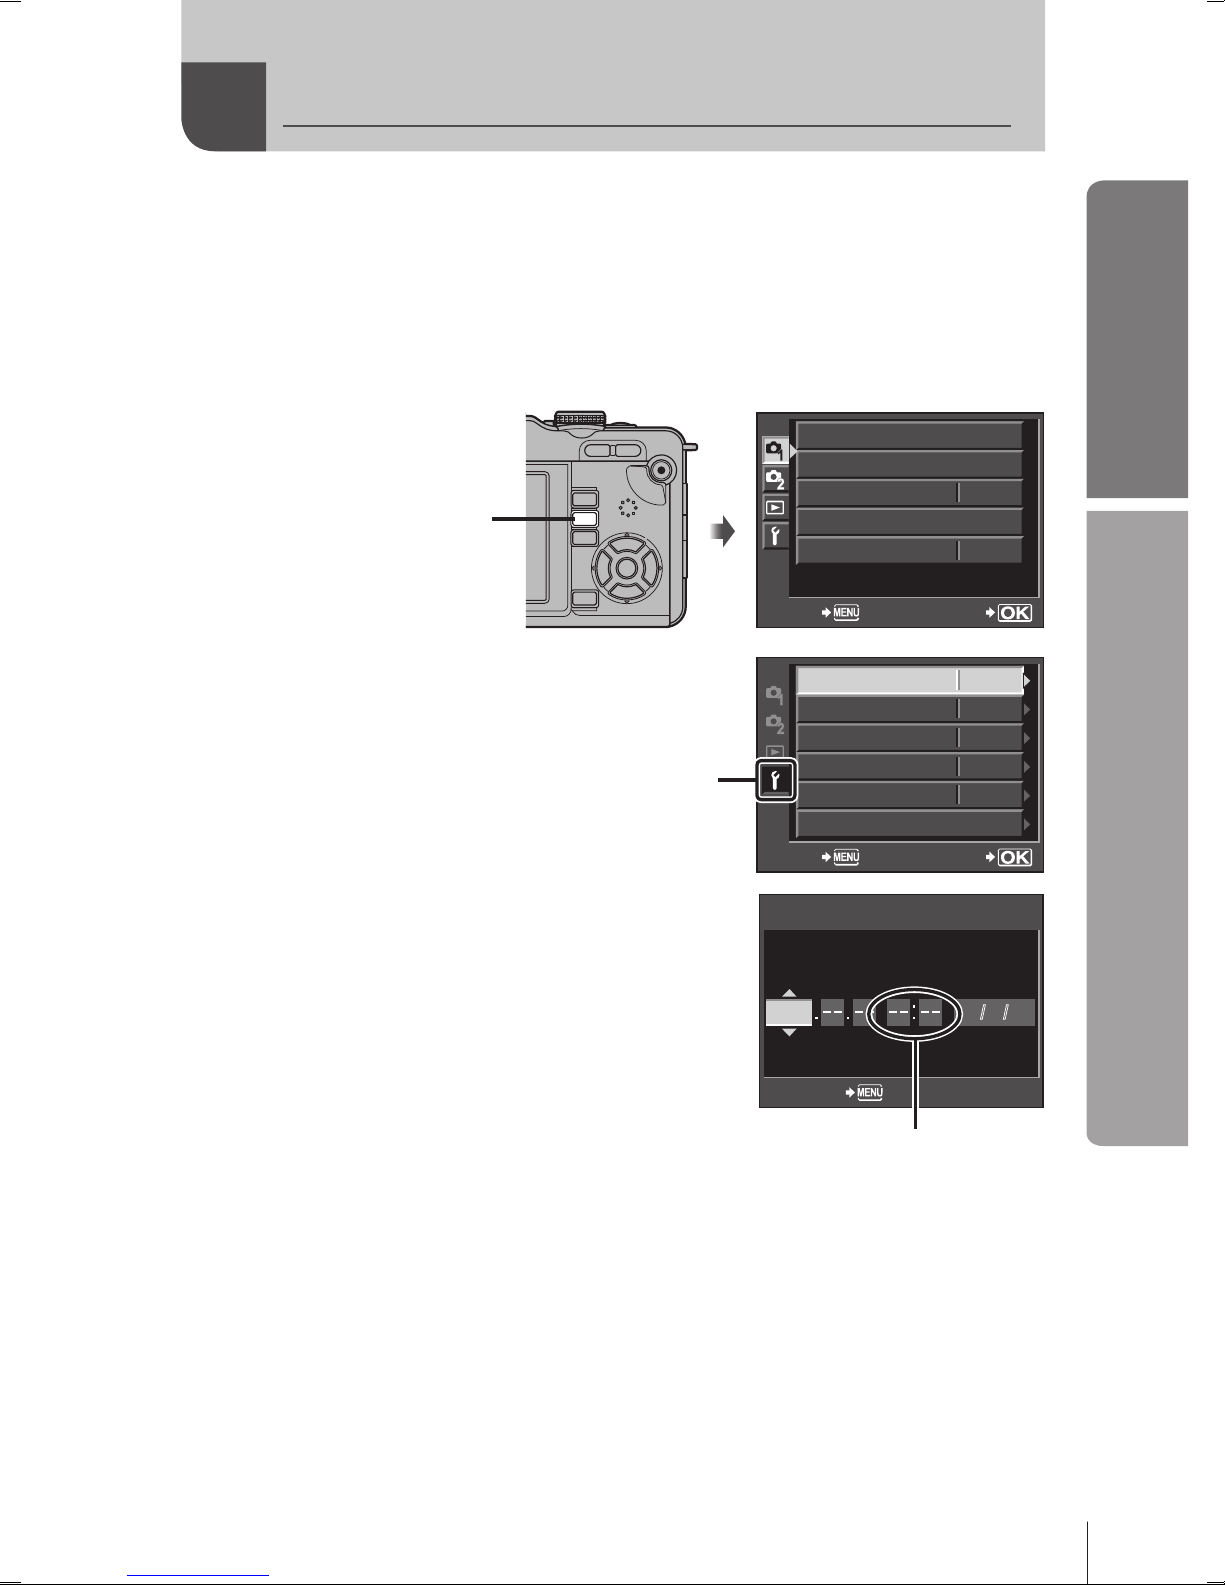
Date and time information is recorded on the card together with the images. The
le name is also included with the date and time information. Be sure to set the
correct date and time before using the camera.
1
Display the menus.
Press the MENU button to display the menus.
MENU button
CARD SETUP
CUSTOM RESET
PICTURE MODE
K
IMAGE ASPECTj4:3
BACK
SET
2
Select [X] in the [d] (setup) tab.
Use FG to select [d] and press I.•
X
W
s
REC VIEW
c
MENU DISPLAY
FIRMWARE
ENG.
j±0k
±0
5SEC
OFF
’--.--.
--
--
:
--
BACK SET
[d] tab
3
Set the date and time.
Use HI to select items.
Use FG to change the selected item.
Use FG to select the date format.
•
•
•
X
2010
CANCEL
Y
Y/
M/D
M D TIM E
The time is displayed
using a 24-hour clock.
4
Save settings and exit.
Press i to set the camera clock and exit to the main menu.
Press the MENU button to exit the menus.
•
•
•
Setting the date/time
8
EN
Basic guide
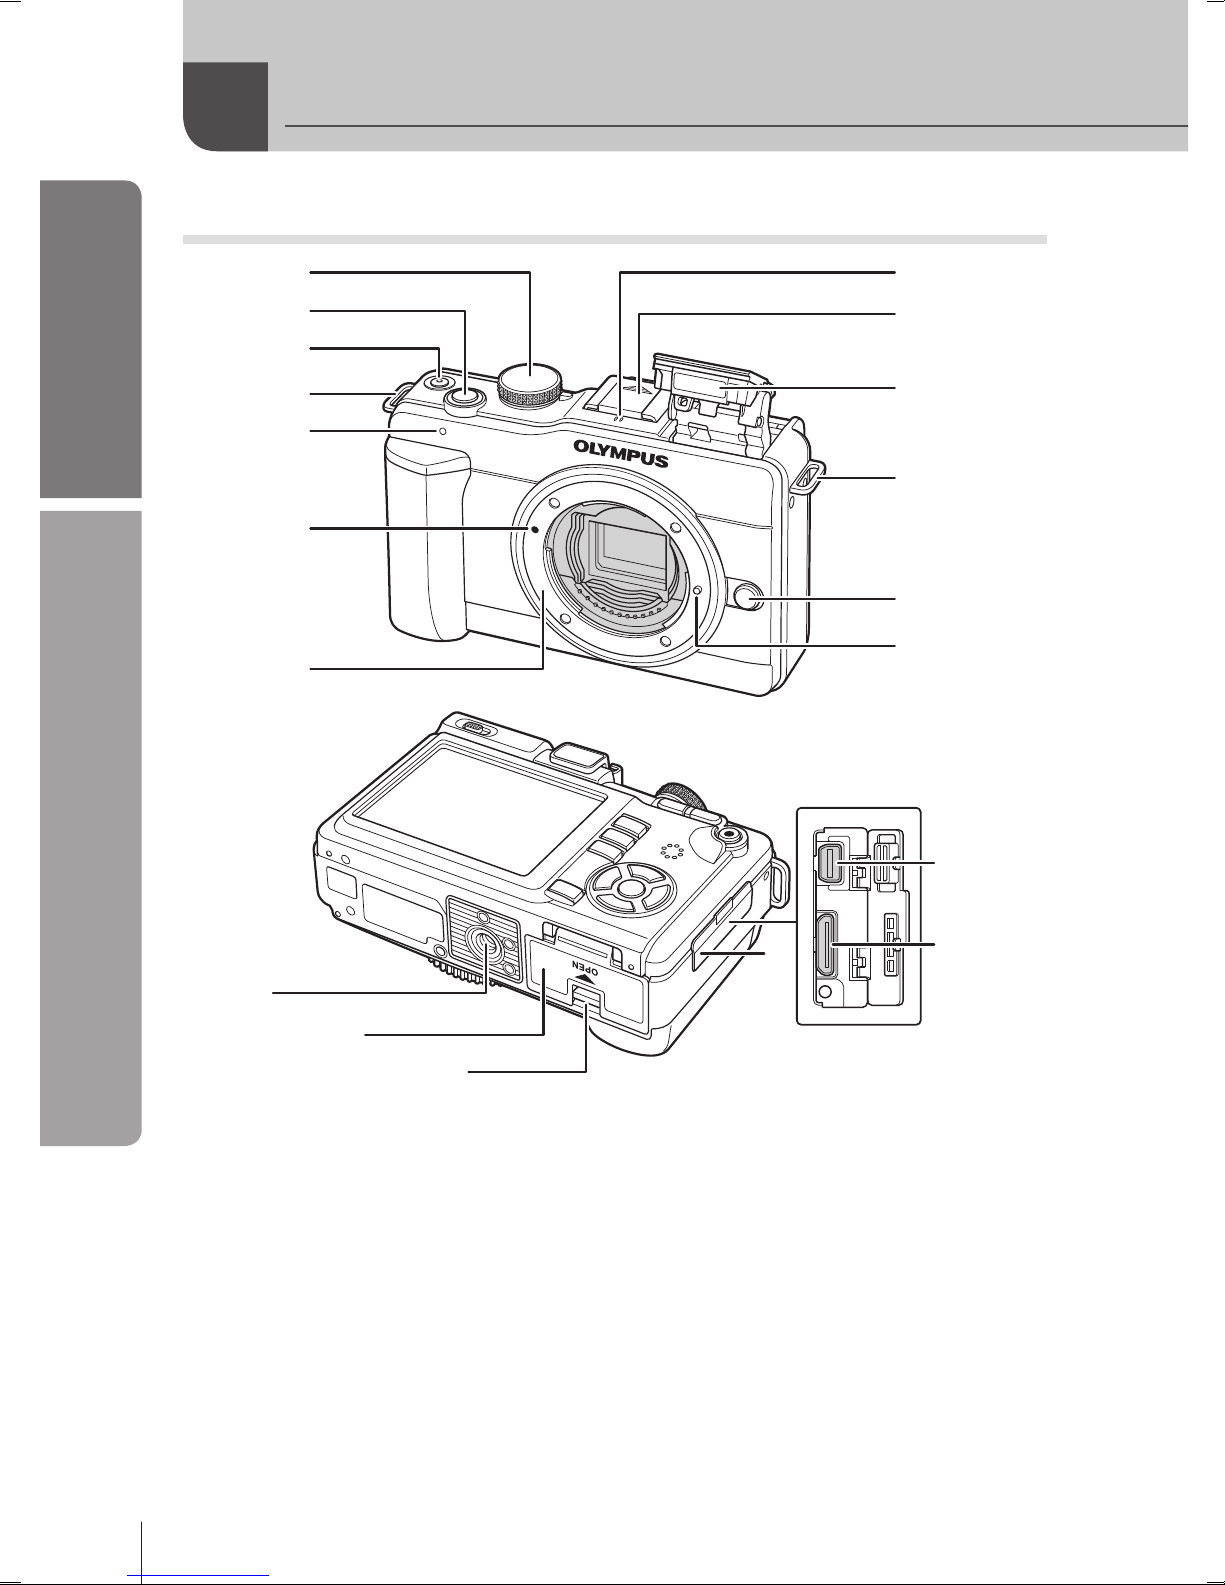
Names of parts and functions
Camera
1
2
3
4
5
7
6
b
9
a
0
4
8
f
c
d
e
g
h
1 Mode dial................................P. 6, 10
2 Shutter button................. P
. 11, 12, 46
3 ON/OFF button.............................P
. 6
4 Strap eyelet ..................................P
. 2
5 Self-timer lamp ...........................P
. 30
6 Lens attachment mark..................P
. 5
7 Mount (Remove the body cap before
attaching the lens.)
8 Microphone ..........................P
. 57, 65
9 Hot shoe cover
0 Built-in ash................................P
. 54
a Lens release button .....................P
. 5
b Lens lock pin
c T
ripod socket
d Battery/card compartment cover
.....................................................P
. 3
e Battery/card compartment lock .... P
. 3
f Connector cover
g Multi-connector...............P
. 67, 84, 87
h HDMI mini-connector (type C)....P
. 67
Names of parts and functions
9
EN
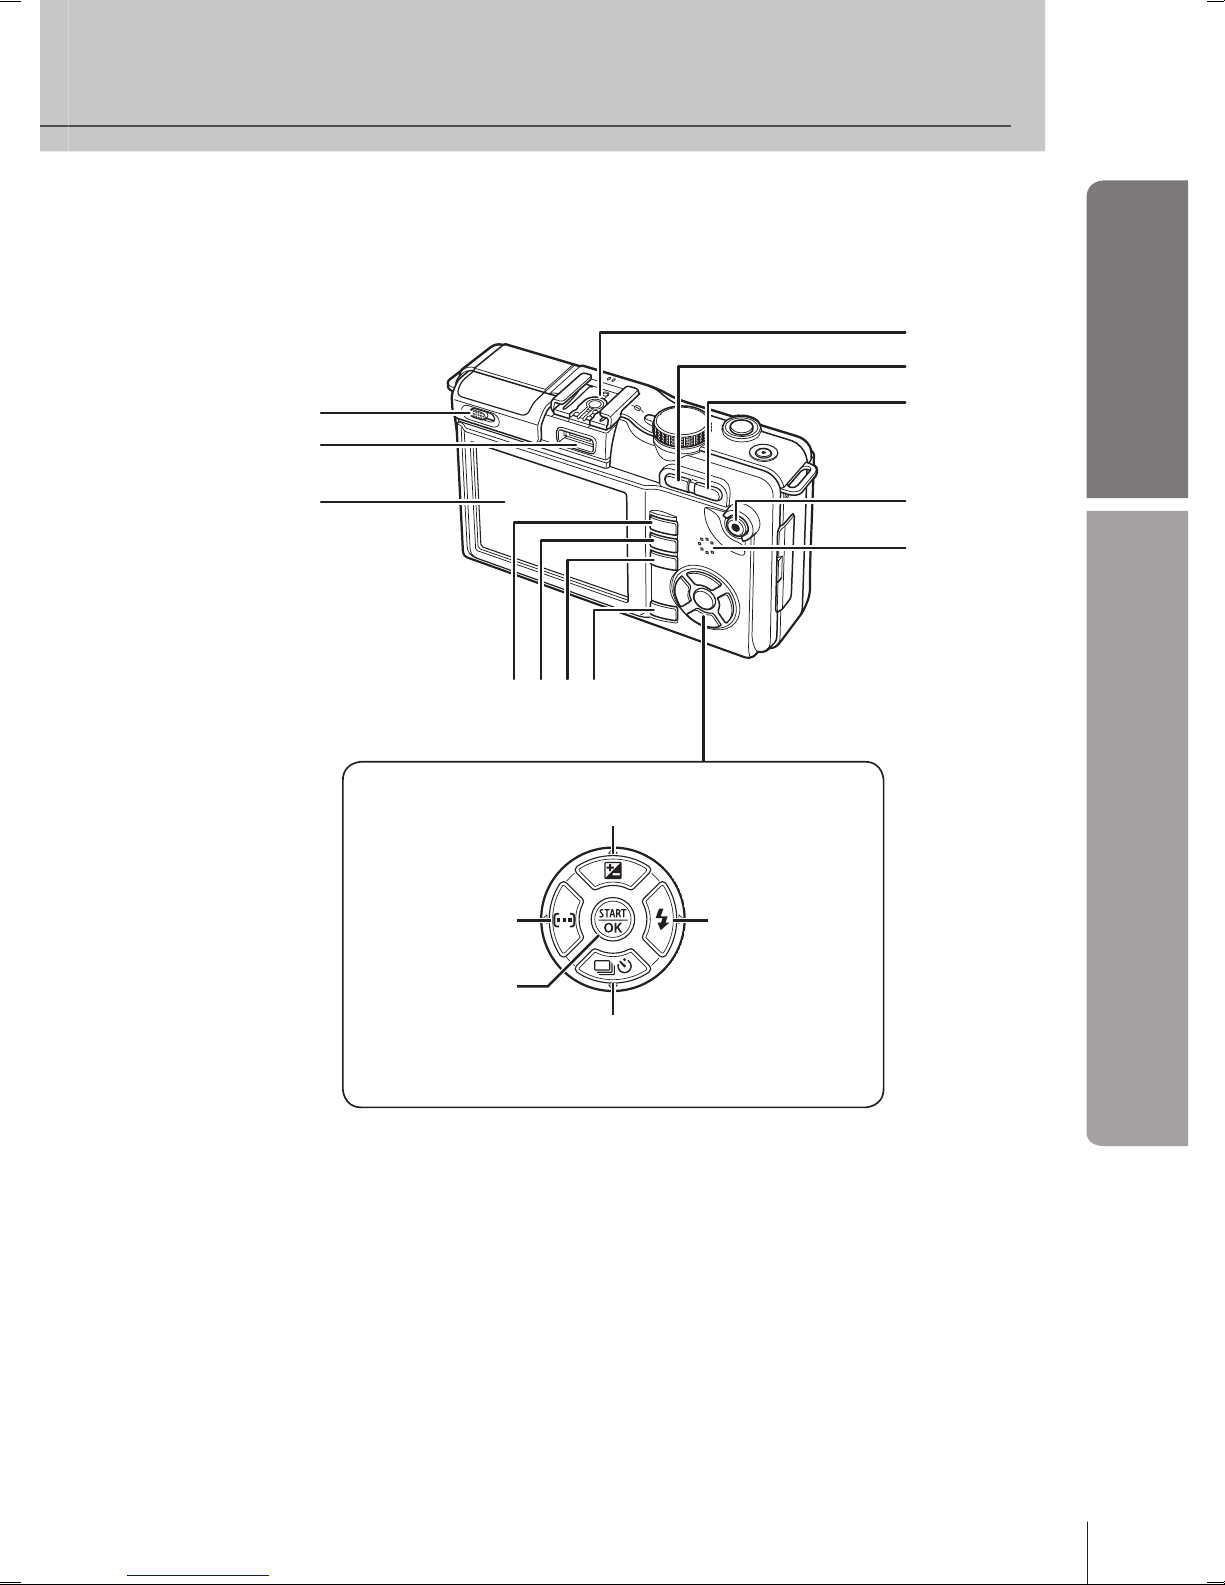
Names of parts and functions
Basic guide
1
3
2
9
0
b
4567
8
a
c
F(Up)/F(Exposure compensation) button
(P. 40)
I (Right)/
# (Flash)
button (P
. 54)
G(Down)/jY(Sequential
shooting/Self-timer) button
(P
. 30)
H (Left)/
P (AF target)
button (P
. 45)
i button
(P. 21)
1 Flash switch ...............................P. 54
2 Accessory port
3 LCD monitor .........................P
. 22, 23
4 q (Playback) button ...........P
. 14, 59
5 MENU button ............................P
. 21
6 INFO (Information display)
button .............................P
. 22, 33, 61
7 D (Erase) button ............P
. 15, 59, 66
8 Hot shoe ...................................P
. 102
9 </G button ..............P
. 80/P. 59, 60
0 U button ........................P
. 59, 60, 62
a R (Movie) /0 (Protect) button
........................ P
. 11, 13, 56/P. 59, 65
b Speaker
c Arrow pad
10
EN
Basic guide
Names of parts and functions
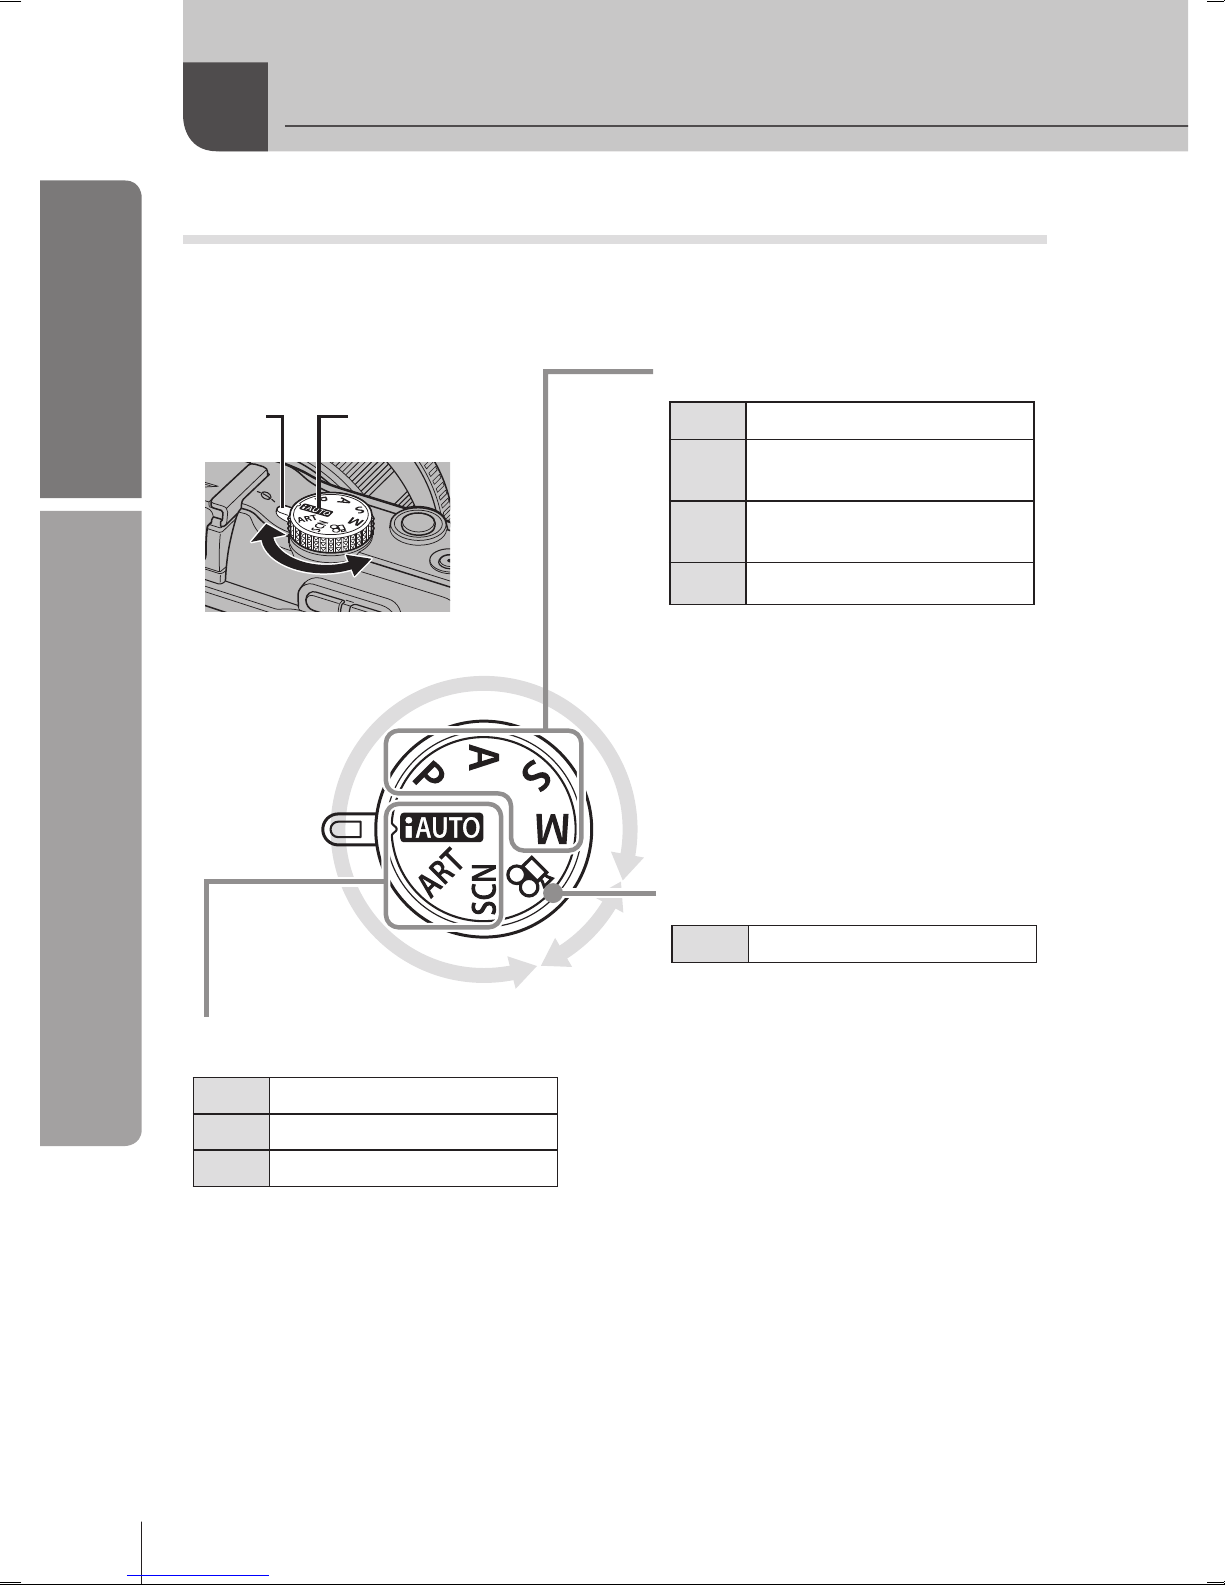
Mode dial
Use the mode dial to select the shooting mode. After choosing the shooting
mode, use the shutter button to take photographs and the R (movie) button to
shoot movies.
■ Easy shooting modes
A
iAUTO (P. 6)
Select according to the shooting scene.
The camera sets the appropriate shooting
conditions automatically.
When rotating the mode dial or turning off
the power in the easy shooting modes,
functions with changes made to their
settings are restored to the factory default
settings.
•
•
ART
Art lter (P
. 16)
SCN
Scene (P
. 17)
■ Advanced shooting modes
P
Program shooting (P. 36)
A
Aperture priority shooting
(P
. 37)
S
Shutter priority shooting
(P
. 38)
M
Manual shooting (P
. 39)
For more advanced shooting and
greater creative control, you can
set the aperture value and shutter
speed.
The settings made in the
advanced shooting modes are
retained even if the camera is
turned off.
•
•
■ Movie mode
n
Movie (P. 56)
Photo zone
Movie zone
Mode icon
Indicator
% Tips
Resetting camera settings: g “Resetting the camera settings” (P. 70)•
Names of parts and functions
11
EN
Names of parts and functions
Basic guide
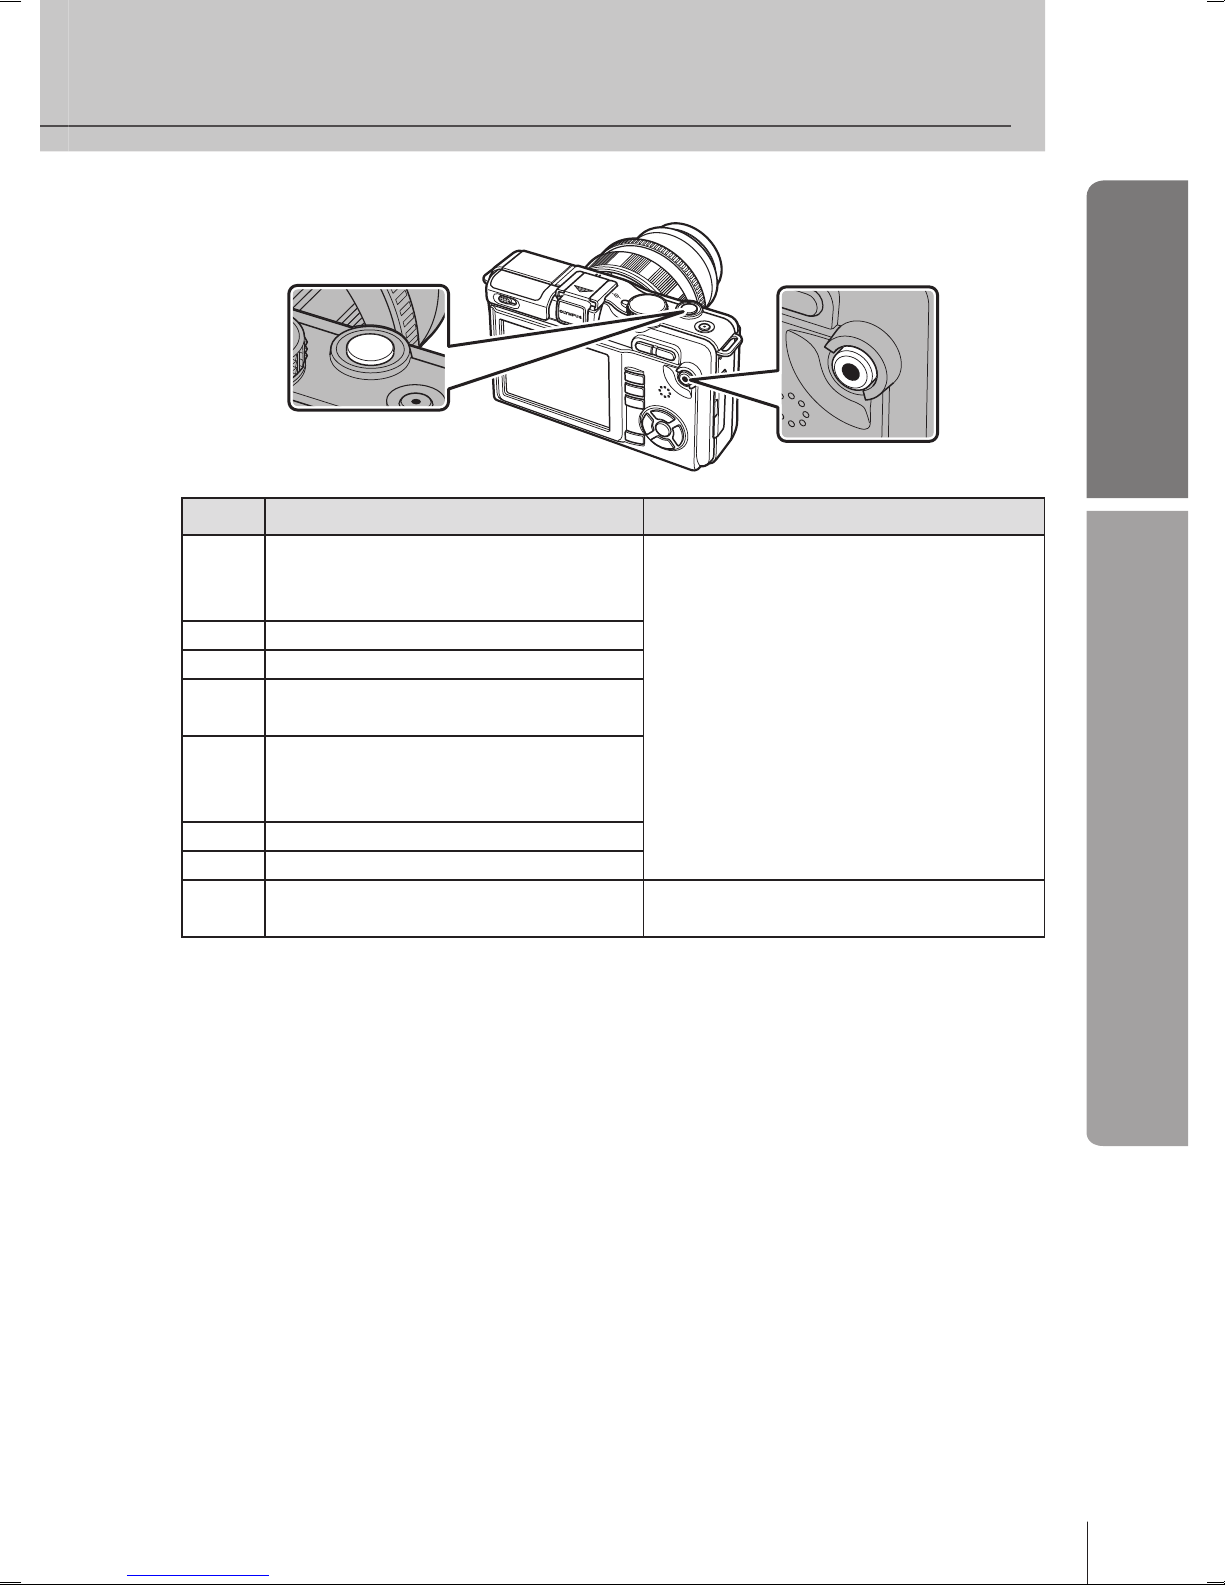
Shutter button
R (movie) button
Mode Photos: shutter button
Movies: R (movie) button
P
Aperture and shutter speed
are automatically adjusted for
optimal results.
•
The camera adjusts aperture and
shutter speed automatically.
•
A
You control aperture.•
S
You control shutter speed.•
M
You control aperture and shutter
speed.
•
A
A full auto mode in which the
camera automatically optimizes
settings for the current scene.
•
ART
Select an art lter.•
SCN
Select a scene.•
n
Photographs are recorded at the
settings selected for movies.
•
Shoot movies using art lter or
aperture and shutter speed effects.
•
To take a photograph during movie recording, press the shutter button. Three les
will be recorded to the memory card: the movie footage preceding the photograph,
the photograph itself, and the movie footage following the photograph. Press the R
(movie) button to end recording.
Only one photograph can be taken at a time during movie recording; the self-timer
and ash can not be used.
Pressing the R (movie) button during sequential shooting ends shooting. A movie
is not recorded.
Image size and quality for photographs are independent of movie frame size.
The autofocus and metering used in movie mode may differ from that used to take
photographs.
Pressing the R (movie) button during any of the following will end shooting without
recording a movie:
Sequential shooting/PANORAMA/multiple exposure/bracketing, etc
The R (movie) button can not be used to record movies in the following instances:
BULB/shutter button pressed halfway/playback zoom/PANORAMA, etc
•
•
•
•
•
•
•
12
EN
Basic guide
Basic operations
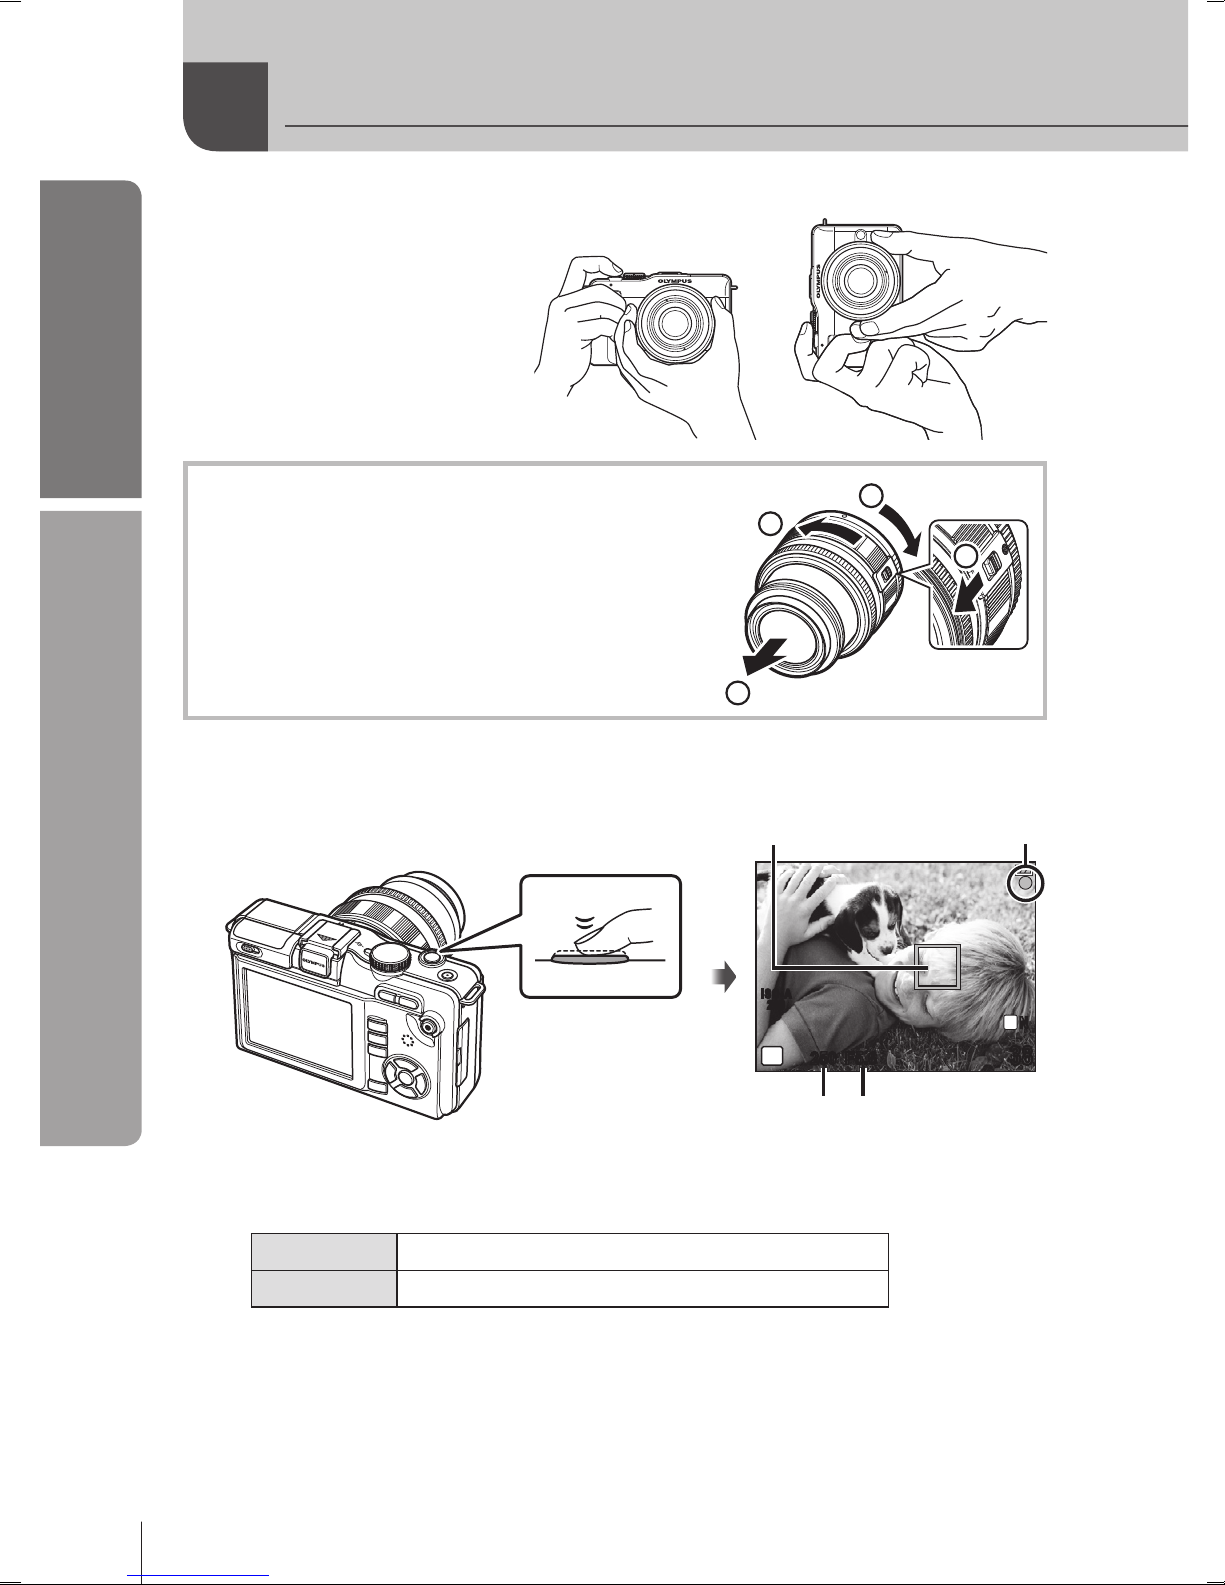
1
Frame the shot.
Keep your ngers and
the strap away from the
lens.
•
Horizontal grip Vertical grip
Using lenses with an UNLOCK switch
Retractable lenses with an UNLOCK switch can
not be used while retracted.
Turn the zoom ring in the direction of arrow (1) to
extend the lens (2).
To store, turn the zoom ring in the direction of
arrow (4) while sliding the UNLOCK switch (3).
4
1
2
3
2
Adjust the focus.
Lightly press the shutter button down to
the rst position (press the shutter button
halfway).
•
250250 F5.6
IS O - A
20 0
L
N
G
3838
Shutter speed Aperture value
AF conrmation mark
AF target
Press the shutter
button halfway.
Focus will lock, the AF conrmation mark (( or n) will light, and an AF target
will be briey displayed to show the focus position.
(
Lenses that supports Hi-Speed Imager AF*
n
Lenses with other Four Thirds mounts
Visit our website for more information.
The shutter speed and aperture value that have been set automatically by the
camera are displayed.
•
*
•
Taking photographs/shooting movies
13
EN
Basic operations
Basic guide
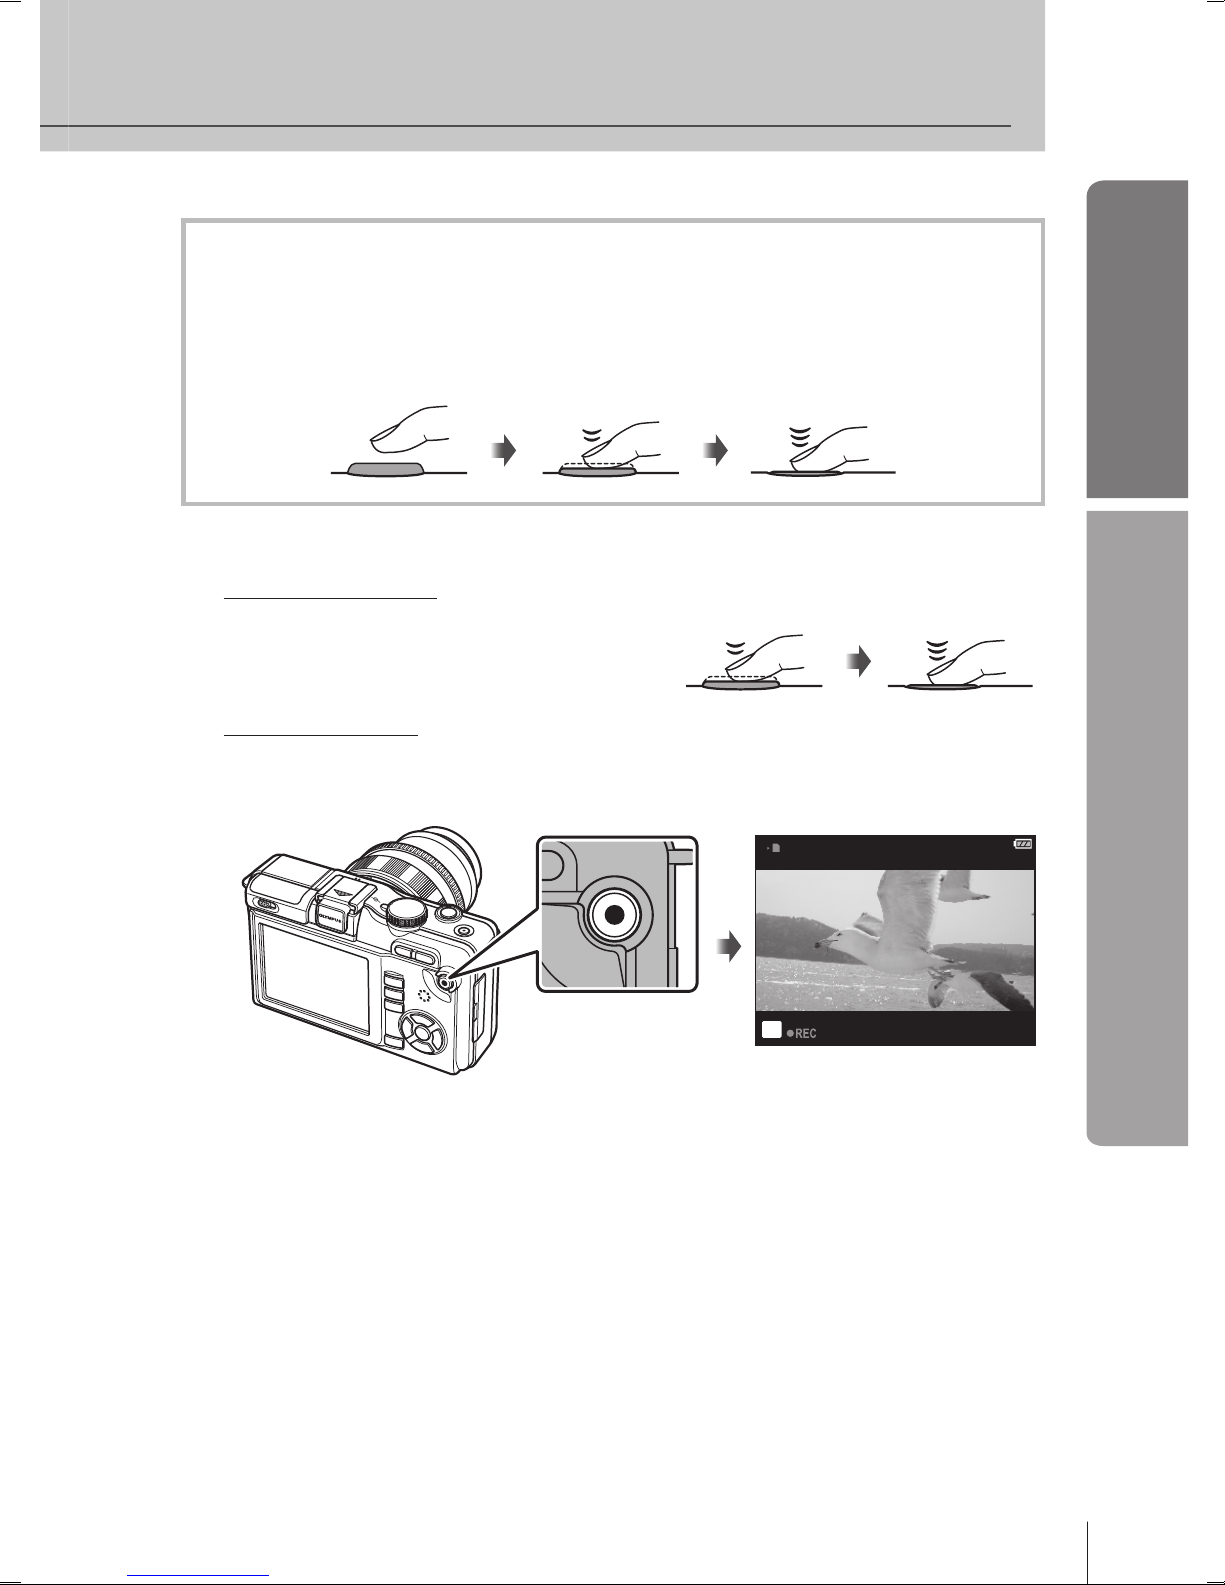
Pressing the shutter button halfway and all the way down
The shutter button has two positions. The act of lightly pressing the shutter button to
the rst position and holding it there is called “pressing the shutter button halfway,”
that of pressing it all the way down to the second position “pressing the shutter
button all (or the rest of) the way down.”
Press halfway
Press the rest of
the way down
3
Release the shutter.
Taking photographs
Press the shutter button all the way (fully).
The shutter sounds and the picture is
taken.
•
Press halfway
Press the rest of
the way down
Recording movies
Press the R (movie) button to begin recording.
Press the R (movie) button again to end recording.
n
2:182:18
R (movie) button
% Tips
If no operations are performed for about 8 seconds, the monitor will dim.
If no operations are performed for approximately another minute, the camera will
enter “sleep” (stand-by) mode and all operations will be suspended. The camera
activates again when you touch any button (the shutter button, q button, etc.).
If no operations are performed for about 5 minutes after the camera enters sleep
mode, the camera will turn off automatically. g “SLEEP” (P
. 74)
# Caution
Bright light sources appear black when framed in the monitor but are recorded
normally in the nal picture.
If the camera is used for extended periods, the temperature of the image pickup
device will rise and noise and colored fog may appear in images recorded at high ISO
sensitivities. Choose a lower ISO sensitivity or turn the camera off for a short period.
•
•
•
•
14
EN
Basic guide
Basic operations
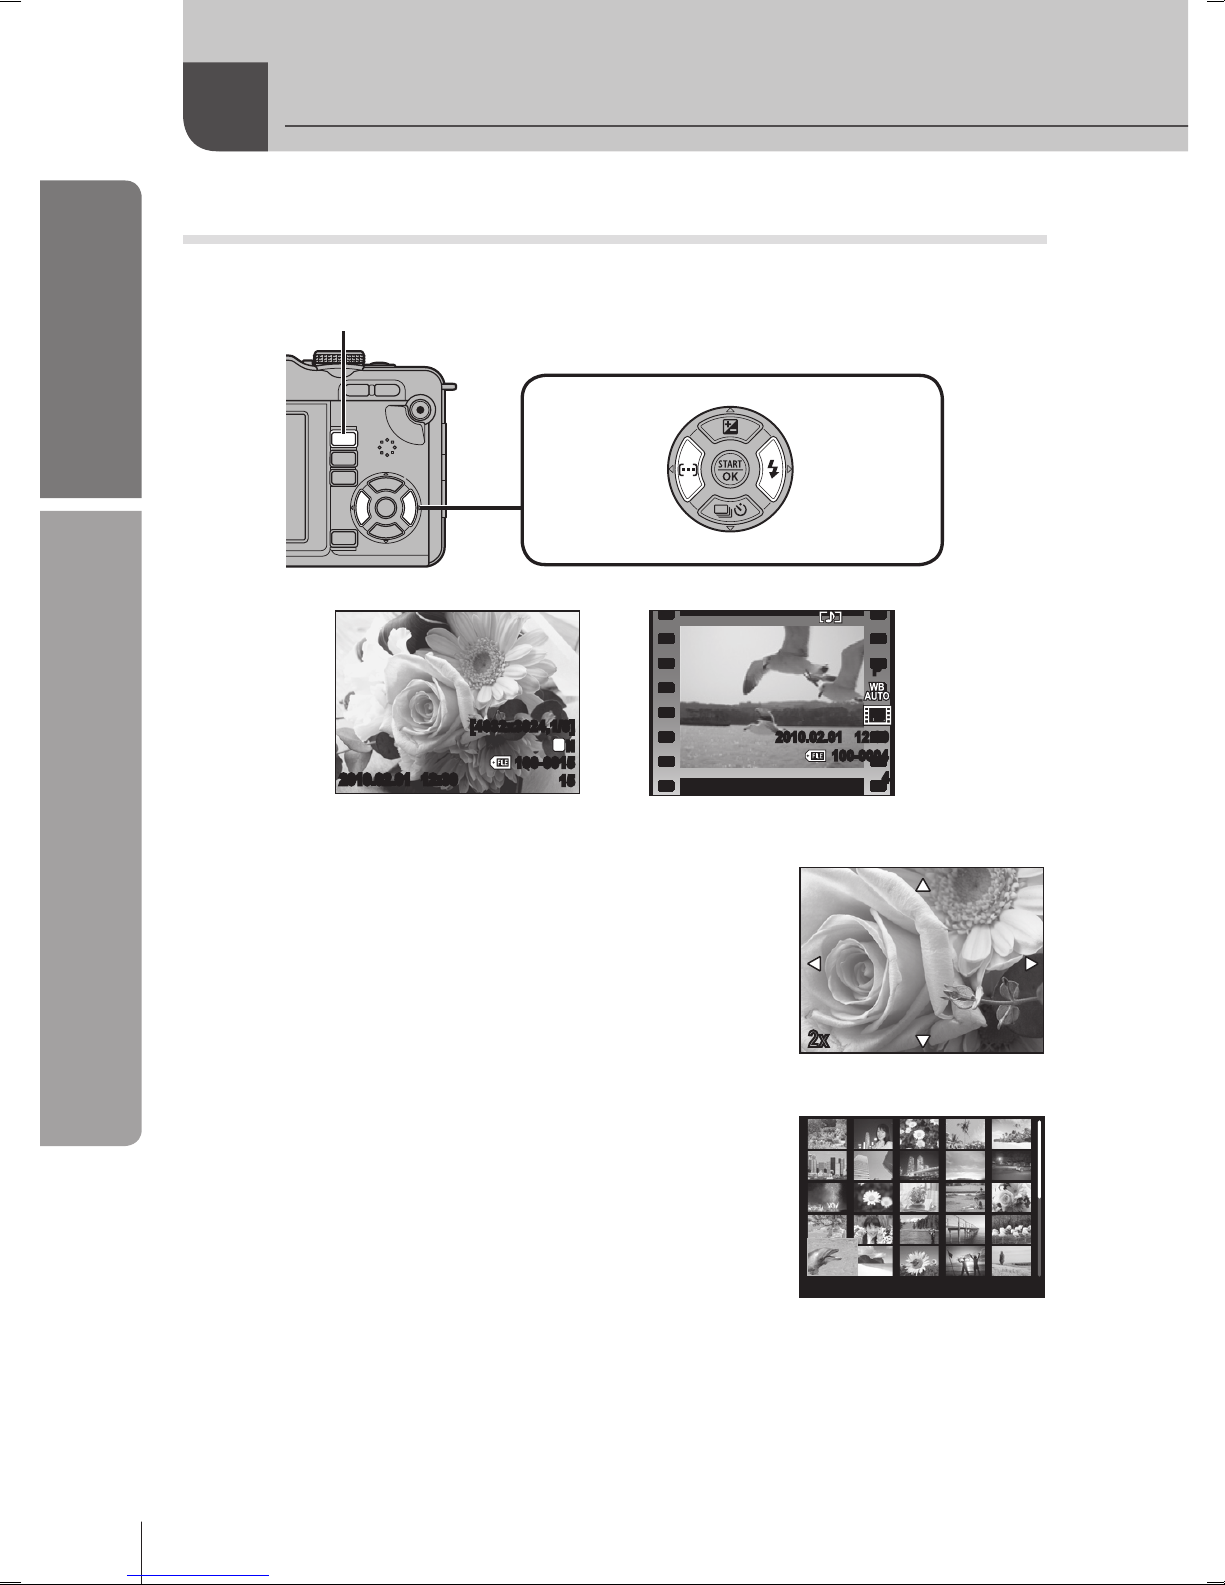
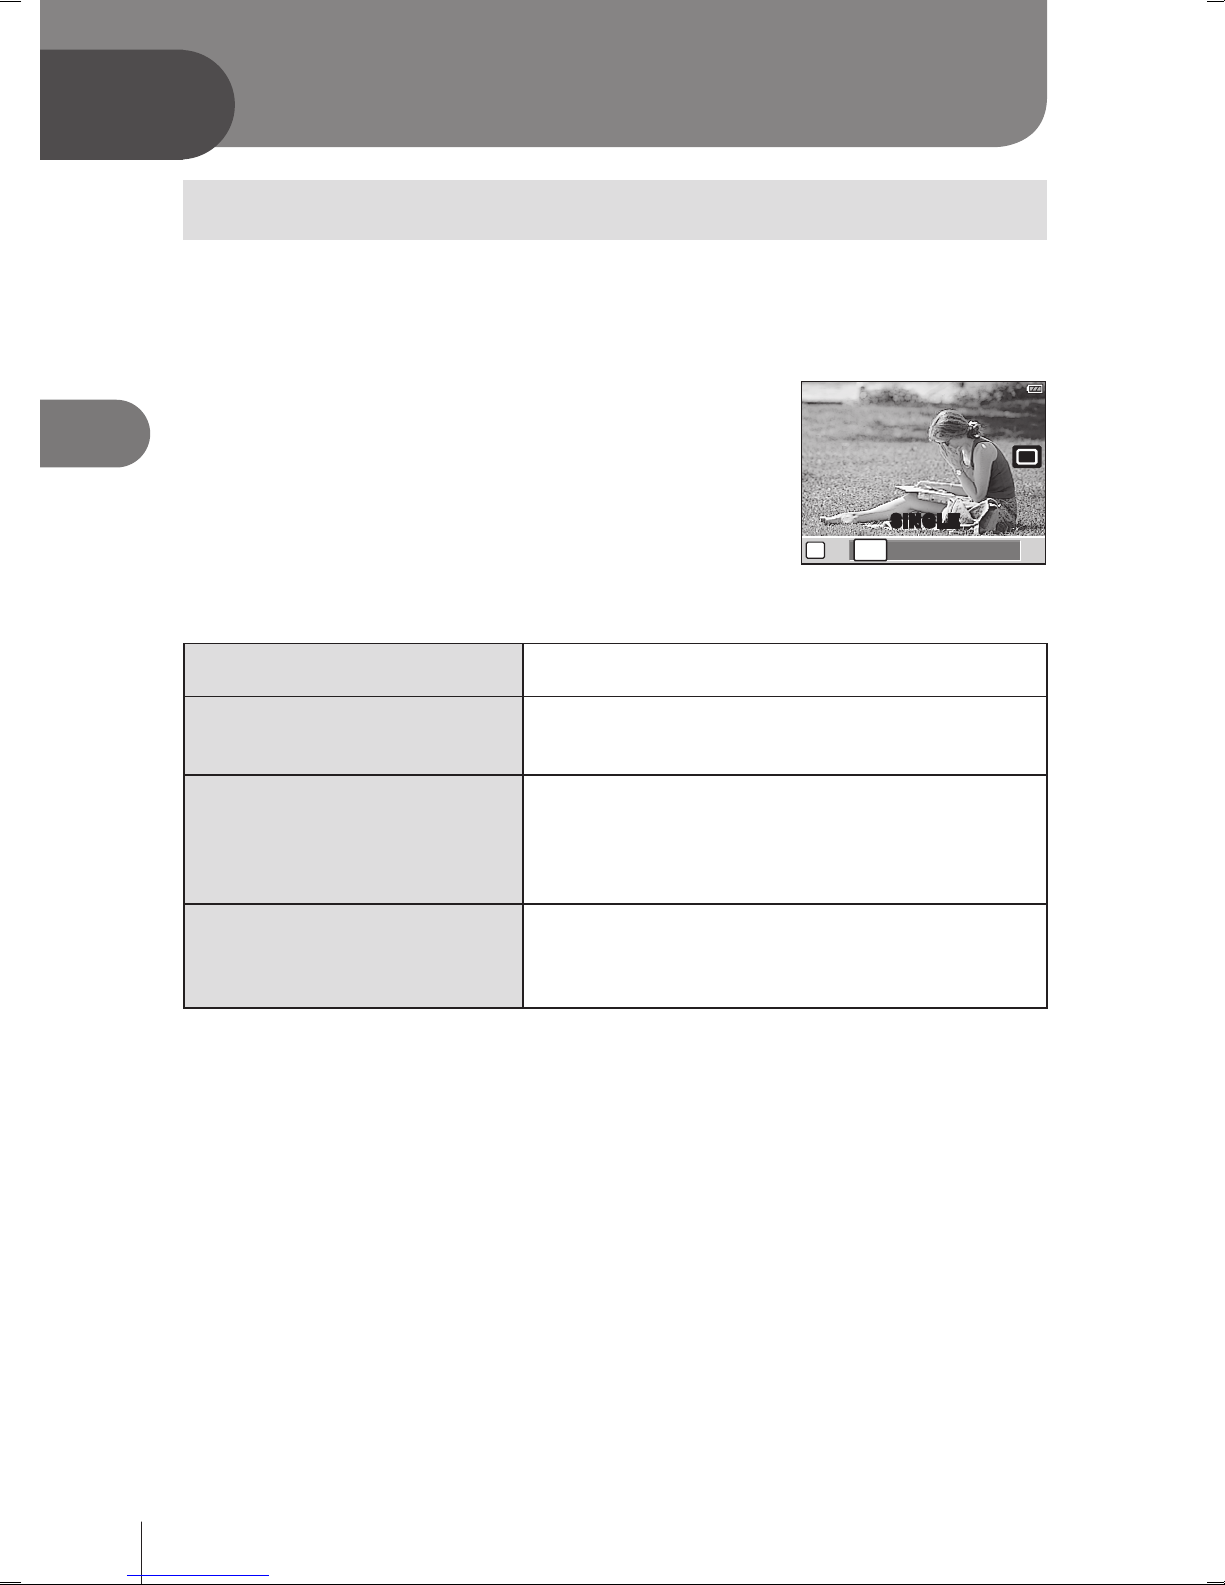
Single-frame playback
Press the q button to display your most recent photograph or movie.
q button
Arrow pad
H: Displays
the previous
frame
I: Displays
the next
frame
[40 32x3024,1/8]
201 0.02.01 12: 30
100 -0015
15
L
N
Still image
2010.02.01 12:30
100-0004
4
HDHD
P
Movie
n Close-up playback
To zoom in on the image currently displayed in singleframe playback, press the U button. Keep pressing
the button to zoom in up to 14
×. Press G to return to
single-frame playback.
•
2x2x
n Index display
To view multiple pictures, press the G button.
Press the U button to view the currently selected
picture full frame.
•
•
201 0.02.01 12:30
21
Playback/Erasing
15
EN
Basic operations
Basic guide
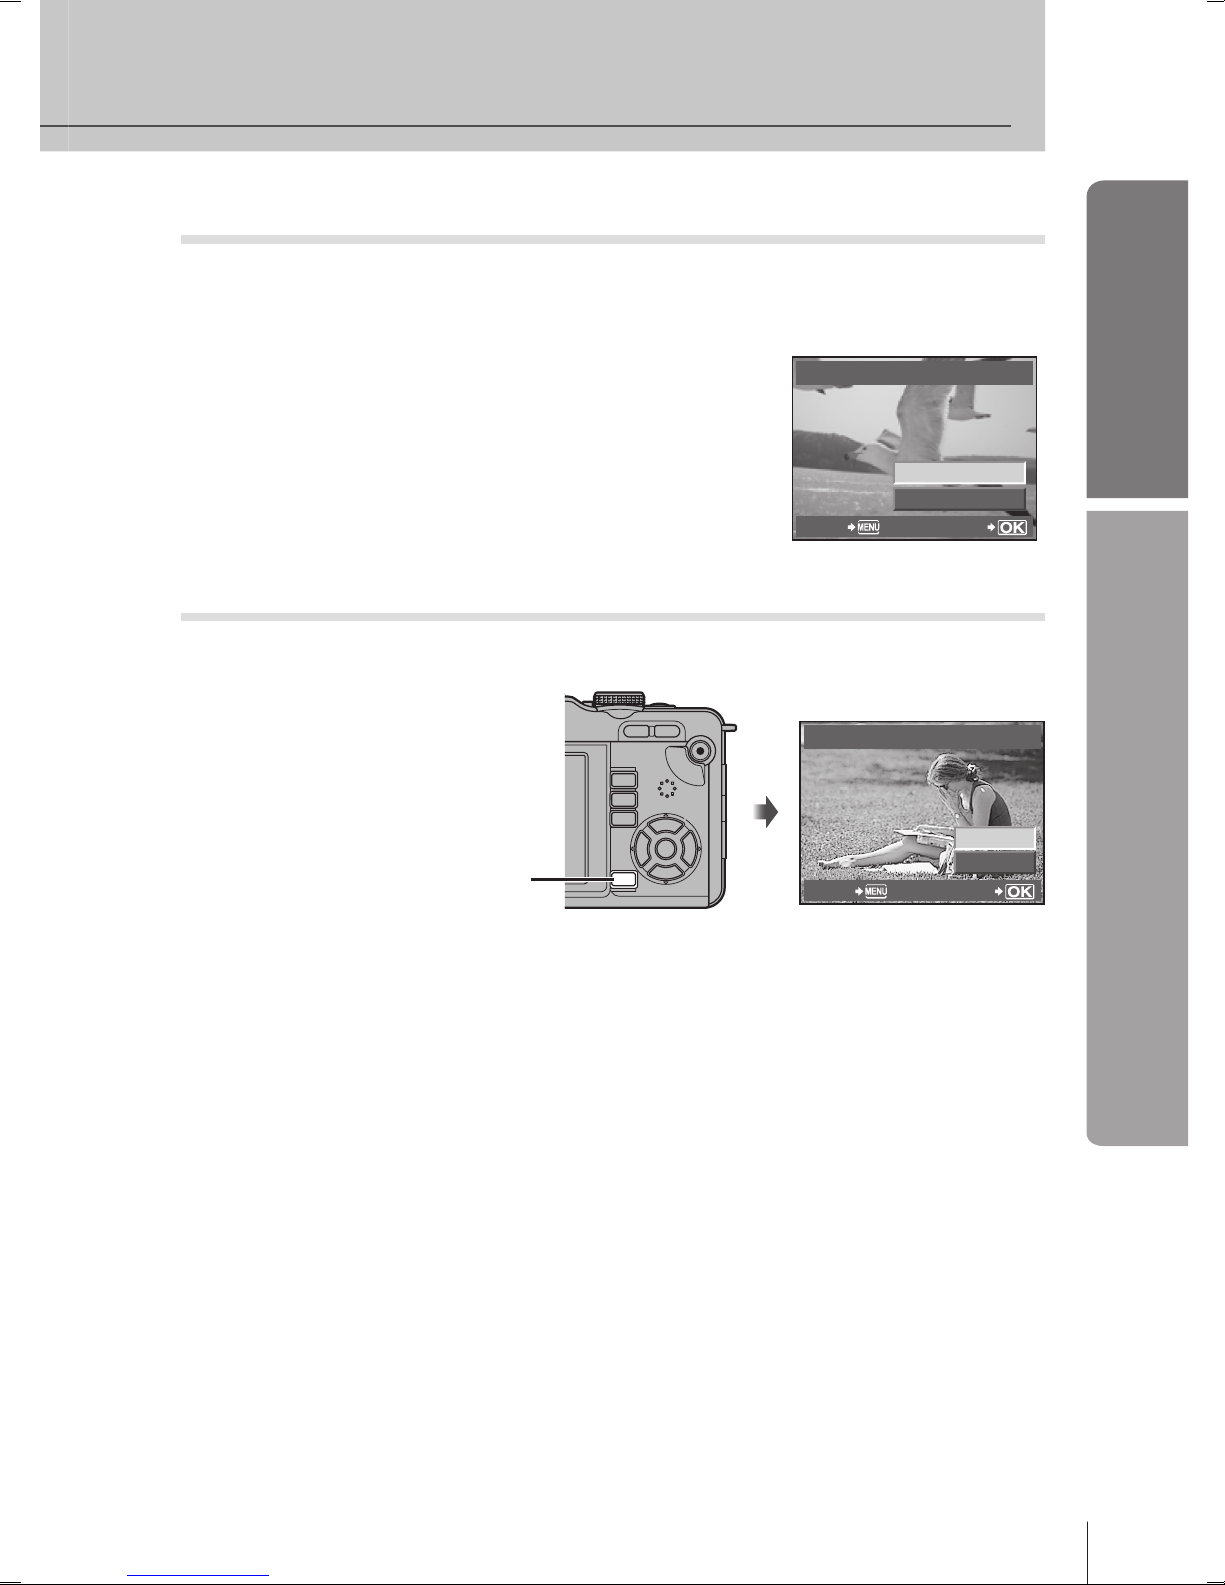
Movie playback
Display a movie in single-frame playback and press i to display the playback
menu. Select [MOVIE PLAY] and press i to begin playback.
To interrupt movie playback, press MENU.
MOVIE
MOVIE PLAY
m
BACK SET
Erasing images
Display a image you want to delete and press D. Select [YES] and press i.
D button
ERASE
YES
NO
BACK
SET
•
16
EN
Basic guide
Basic operations
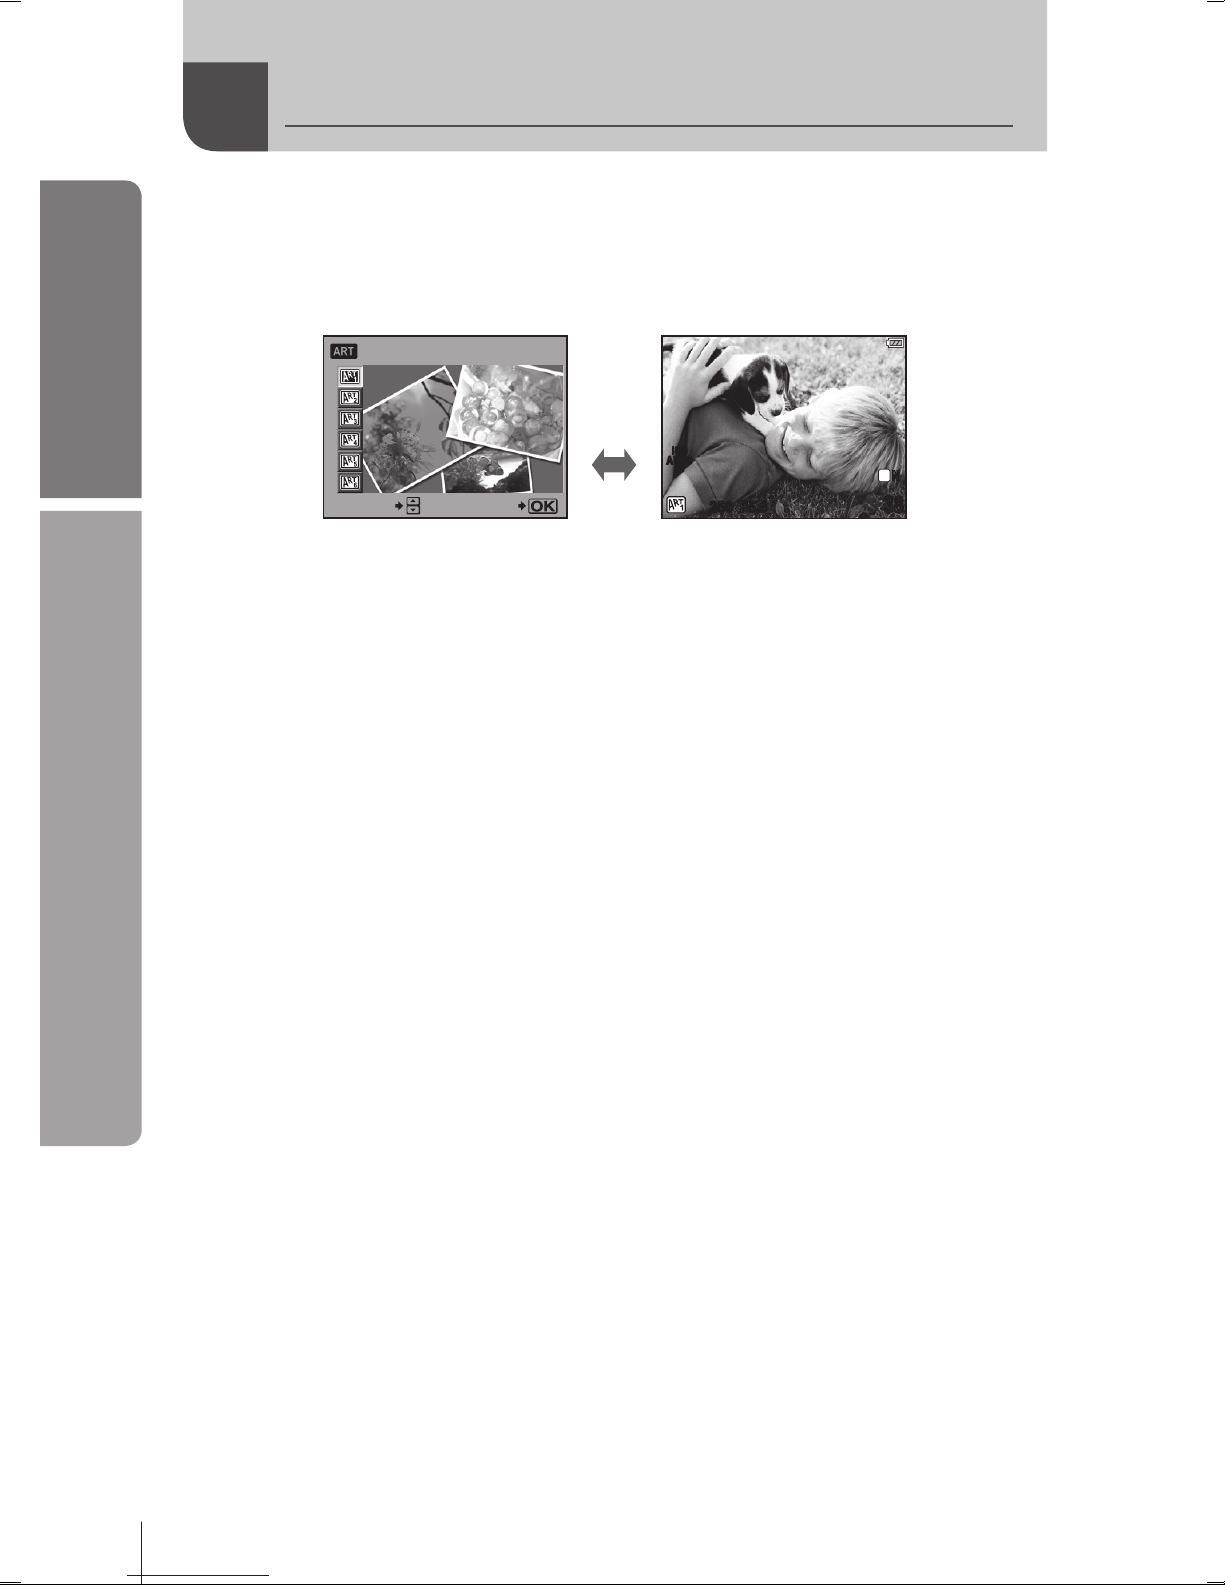
1
Rotate the mode dial to ART.
A menu of art lters will be displayed.
Select a lter using FG.
250250 F5.6
IS O
AU TO
3838
L
N
POP ART1
SELECT
SET
i
Press i or press the shutter button halfway to display the view through the
lens in the monitor. Press i to return to the art lter menu.
2
Shoot.
n Types of art lters
j
POP ART
m
PIN HOLE
k
SOFT FOCUS
n
DIORAMA
l
GRAINY FILM
o
GENTLE SEPIA
# Caution
Art lters are not applied to RAW images.
If RAW is selected for the record mode when the camera enters art lter mode, the
record mode will automatically be set to YN+RAW.
The grainy appearance of the picture may be emphasized depending on the type of
art lter.
% Tips
Camera settings can be adjusted using the menus (P. 21) and buttons (P. 9).
You can also congure the camera so that the live control (P. 20) and super control
panel (P. 81) can be used. g “KCONTROL
SETTING” (P. 74)
•
•
•
•
•
•
•
Using art lters
17
EN
Basic operations
Basic guide
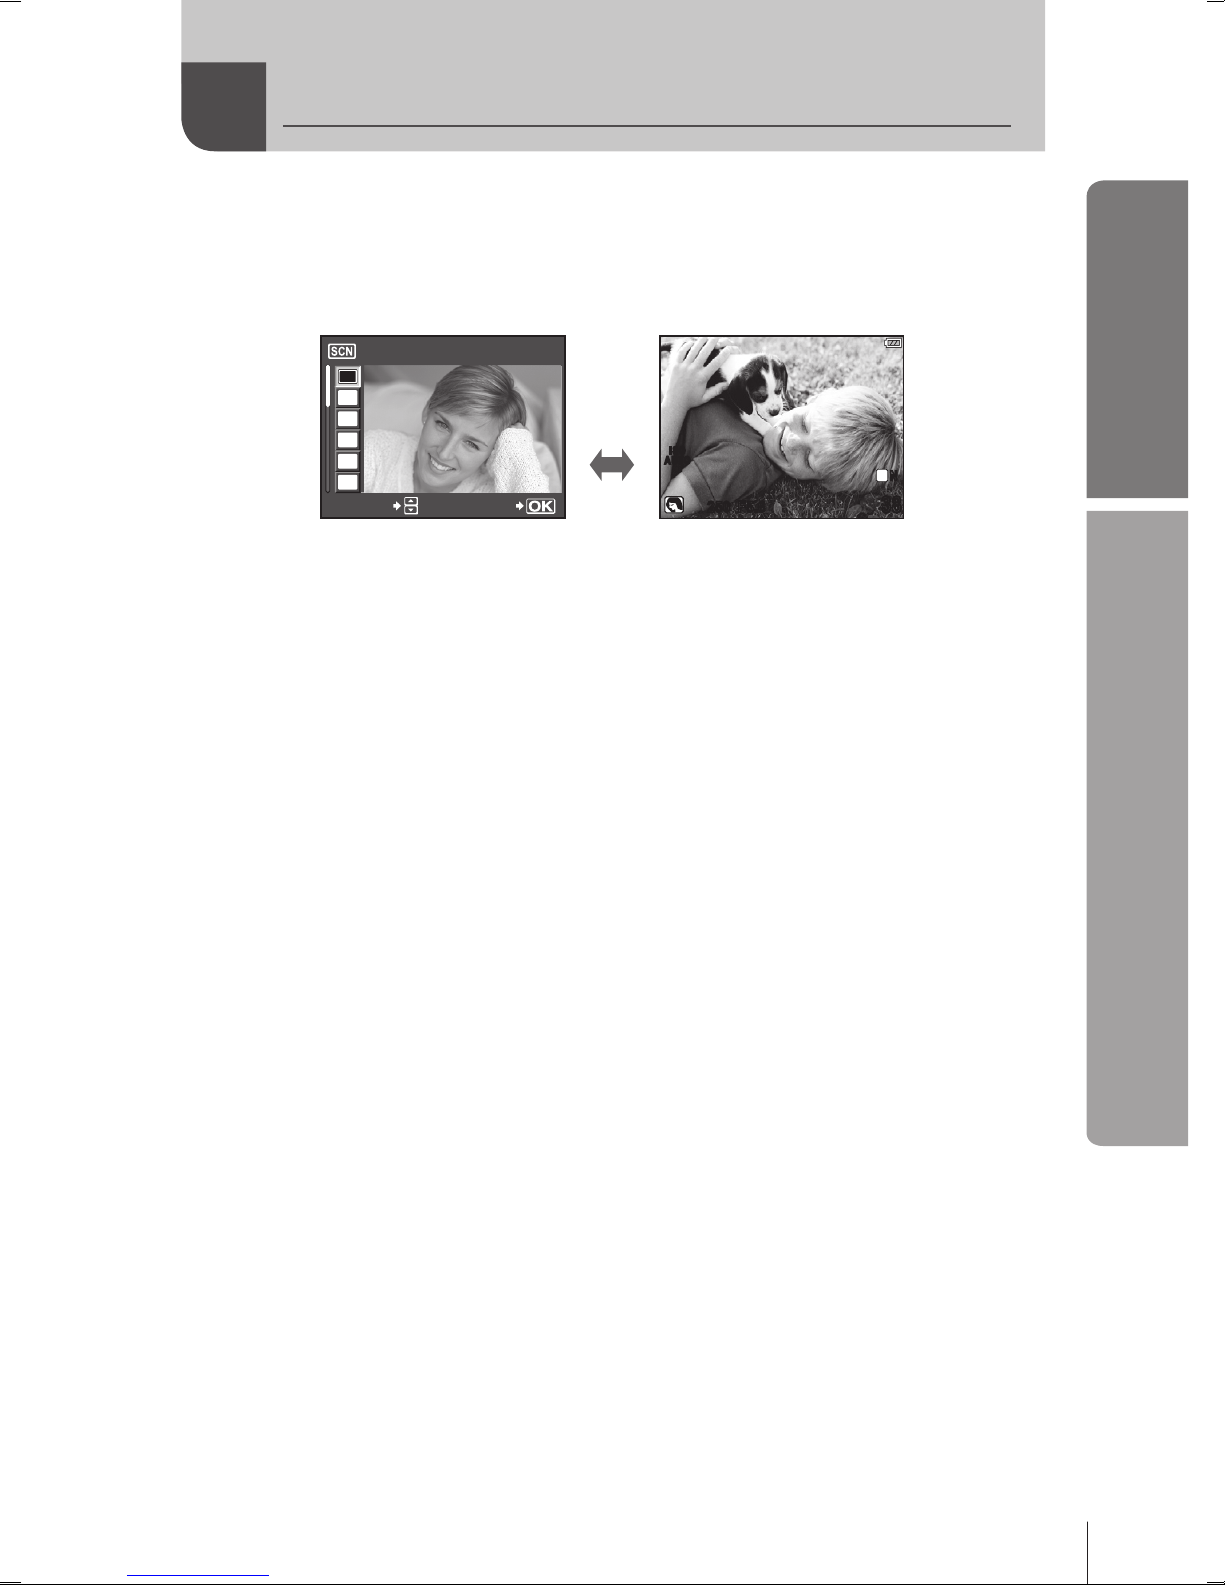
1
Rotate the mode dial to SCN.
A menu of scene menu will be displayed.
Select a scene using FG.
250250 F5.6
IS O
AU TO
3838
L
N
PORTRAIT1
B
e
F
D
C
G
SELECT
SET
i
Press i or press the shutter button halfway to display the view through the
lens in the monitor. Press i to return to the scene menu.
2
Shoot.
n Types of scene modes
I
PORTRAIT
q
DIS MODE
e
e-PORTRAIT
J
MACRO
L
LANDSCAPE
r
NATURE MACRO
K
LANDSCAPE+PORTRAIT
&
CANDLE
J
SPORT
*
SUNSET
G
NIGHT SCENE
@
DOCUMENTS
U
NIGHT+PORTRAIT
s
PANORAMA (P. 35)
G
CHILDREN
(
FIREWORKS
H
HIGH KEY
g
BEACH & SNOW
I
LOW KEY
# Caution
[e-PORTRAIT] can not be applied to RAW images.
When RAW or RAW+JPEG photos are taken using [e-PORTRAIT], two images will be
recorded: a RAW image and an X-quality (2560×1920) JPEG to which effects have
been applied.
When JPEG is set in [e-PORTRAIT], two images are saved, one from before
application of the effect (with set picture quality) and the other from after application of
the effect (X (2560×1920)).
•
•
•
•
•
Shooting in scene mode
18
EN
Basic guide
Basic operations
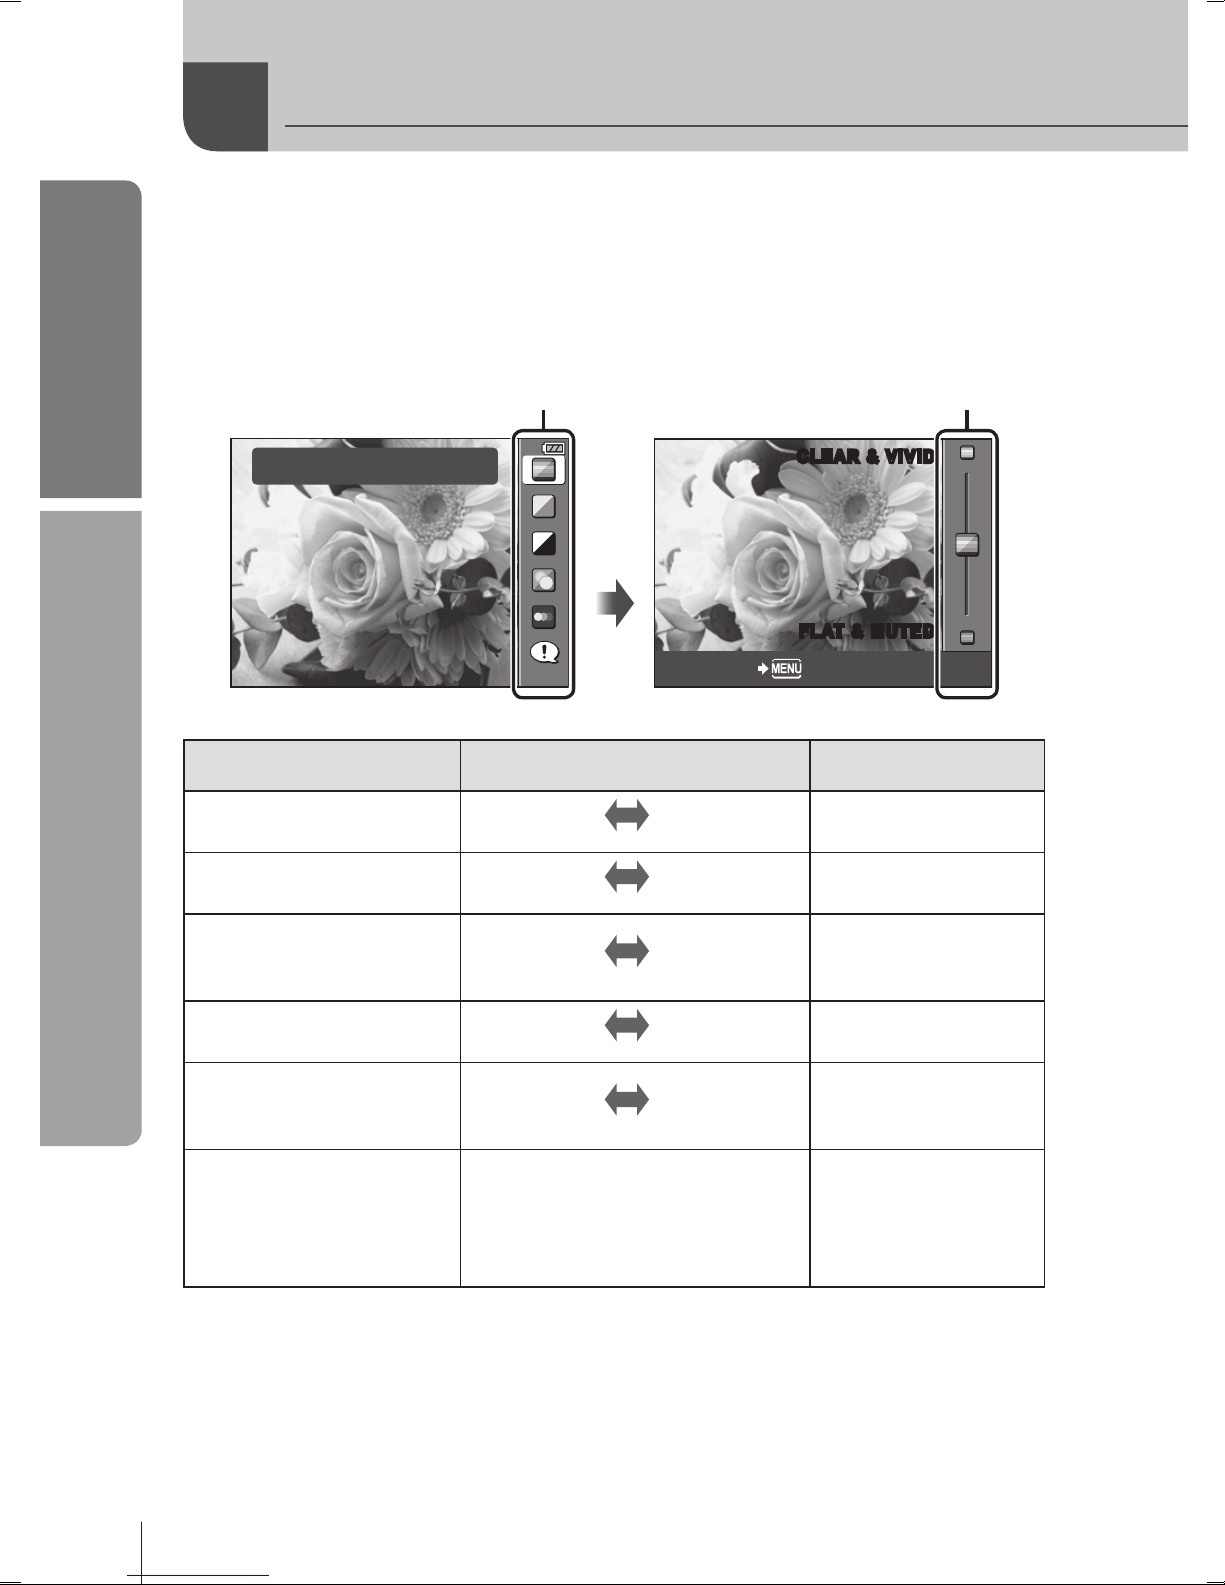
Although iAUTO (A) mode is a full auto mode, a “live guide” is available to
guide you through creative adjustments to settings controlling such elements
as vividness, hue, brightness, focus, and motion using simple operations and
easy-to-understand instructions displayed over the view through the lens in the
monitor.
CHANGE COLOR SATURATION
Guide item
CLEAR & VIVI DCLEAR & VIVI D
FLAT & MUTE DFLAT & MUTE D
CANCEL
Level bar/selection
i
Guide item Level bar/selection Affects
*2
CHANGE COLOR
SATURATION
*1
CLEAR &
VIVID
FLAT &
MUTED
Saturation, contrast,
gradation, etc.
CHANGE COLOR
IMAGE
*1
WARM
COOL
Color temperature,
gradation, etc.
CHANGE
BRIGHTNESS
*1
BRIGHT DARK
Exposure
compensation,
gradation, etc.
BLUR BACKGROUND
*1
BLUR SHARP
Aperture, live
preview, etc.
EXPRESS MOTIONS
*1
BLURRED
MOTION
STOP
MOTION
Shutter speed
(1/2
s – fastest speed),
frame rate, etc.
SHOOTING TIPS
TIPS FOR CHILD PHOTO
TIPS FOR PET PHOTO
TIPS FOR FLOWER PHOTO
TIPS FOR CUISINE PHOTO
TIPS FOR FRAMING
•
•
•
•
•
—
*1
Monitor frame rate slows.
*2 For reference only. The items listed do not correspond directly to parameters that
can be adjusted in other shooting modes.
Using the iAUTO mode live guides

19
EN
Basic operations
Basic guide
1
After pressing i to display the live guide, use the FG buttons
on the arrow pad to highlight an item and press i to select.
CHANGE COLOR SATURATION
Guide item
2
Position the cursor using the FG buttons on the arrow pad and
check the effect or read the description.
Press the shutter button halfway to select.
Although the camera exits from preview to live view when
[BLUR BACKGROUND] or [EXPRESS MOTIONS] is selected, the selected
effect still applies.
CL EAR & VI VIDCL EAR & VI VID
FL AT & M UTEDFL AT & M UTED
CANCEL
Level bar
3
Shoot.
Press the shutter button to shoot.
To clear the live guide from the display, press the MENU button.
# Caution
Selecting RAW in the live guide sets the record mode to YN+RAW.
Live guide settings are not applied to the RAW copy.
Pictures may appear grainy at some live guide setting levels.
Changes to live guide setting levels may not be visible in the monitor.
The ash can not be used with the live guide.
Changes to live guide options cancel previous changes.
Choosing live guide settings that exceed the limits of the camera exposure meters
may result in pictures that are over- or under-exposed.
•
•
•
•
•
•
•
•
•
•
•
20
EN
Basic guide
Basic operations
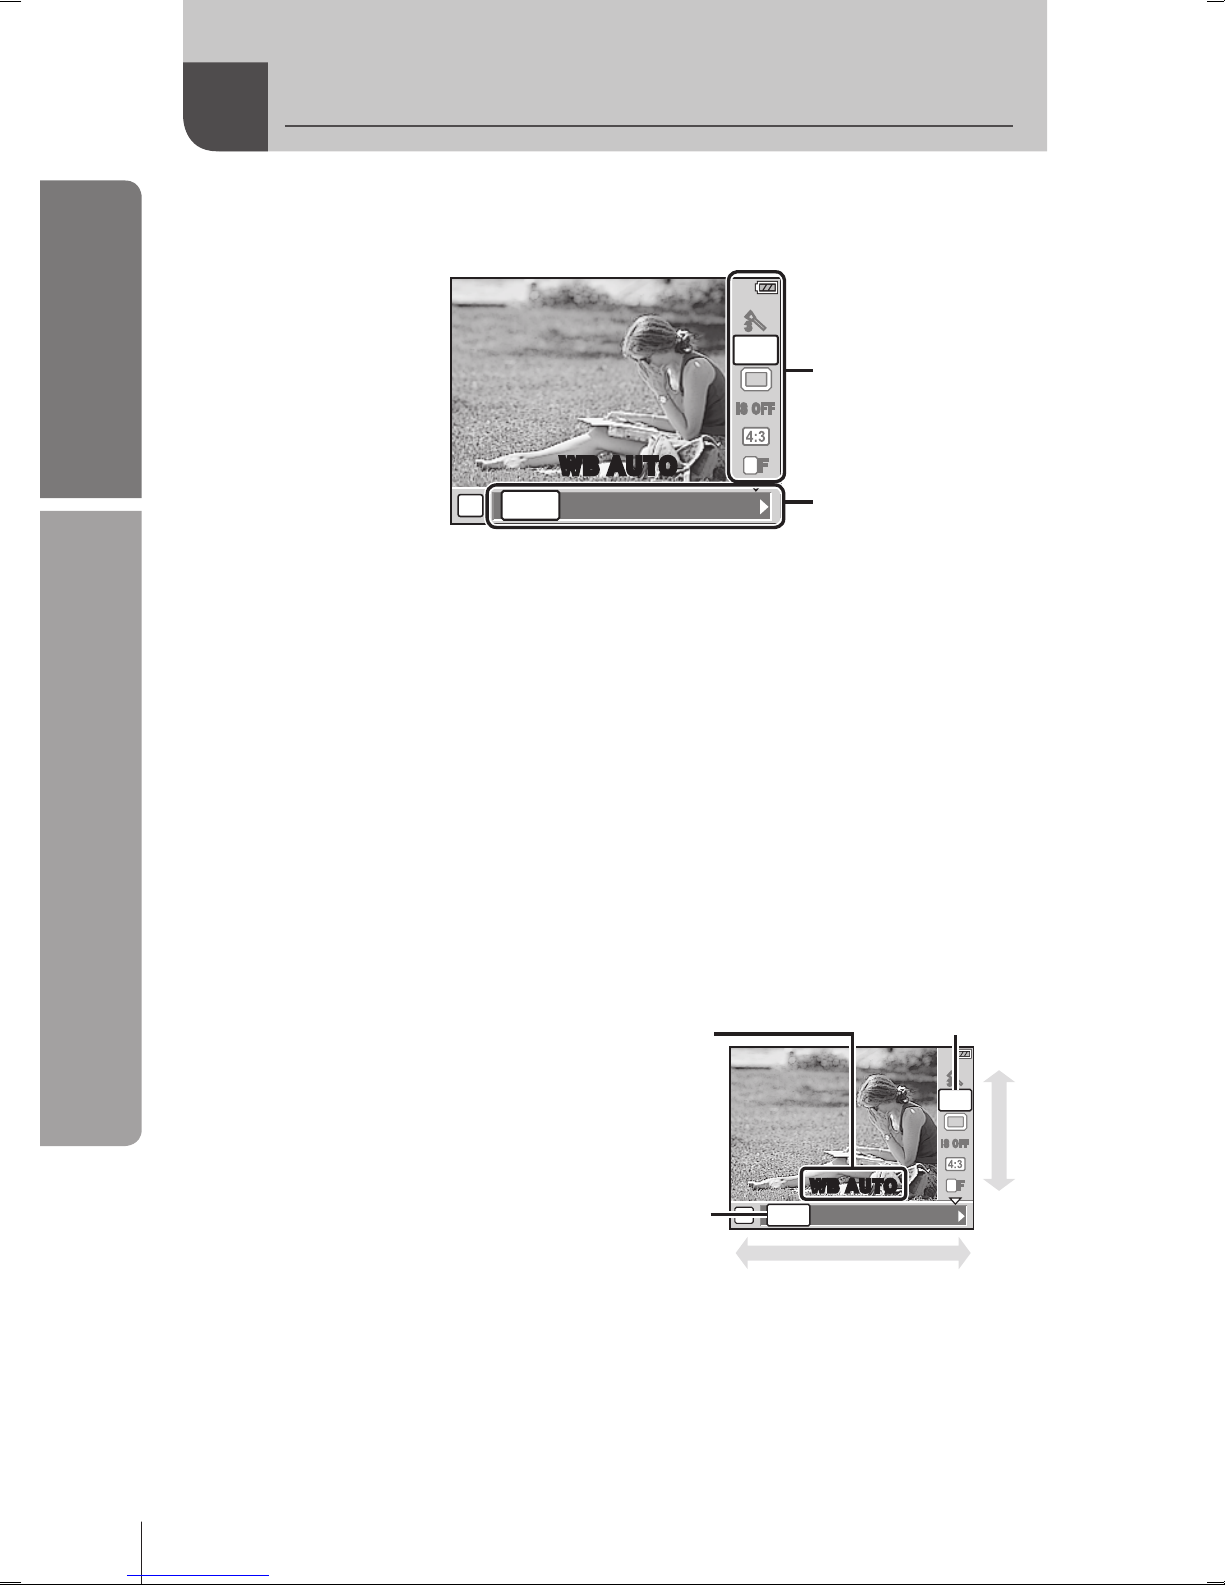
Using live control allows you to preview the effects of different settings in the
monitor.
P
AUTO
5 2 3 1
w
IS OFF
L FL F
WBWB
AUTOAUTO
j
WB AU TO
Functions
Settings
n Settings that can be modied using live control
Picture mode*1 .................................P. 52
Scene mode
*2
..................................P. 17
Art lter mode
*2
................................P. 16
n mode
*3
........................................P. 56
White balance .................................. P
. 41
Sequential shooting/self-timer .........P
. 30
Image stabilizer ...............................P
. 50
Aspect ratio
*1*2
..................................P. 32
Record mode ...................................P
. 31
Flash mode
*1*2
..................................P. 54
Flash intensity control
*1*2
..................P. 55
Metering mode
*1*2
.............................P. 47
AF mode ..........................................P
. 44
Face detection
*1*2
.............................P. 32
Movie sound record
*3
.......................P. 57
ISO sensitivity .................................. P
. 41
*1 P, A, S, M and A modes only.
*2
ART and SCN only.
*3
n mode only.
1
Press i to display the live control.
To hide the live control, press i again.
2
Use the FGbuttons on
the arrow pad to select
settings, use HI to
change the selected
setting, and press i.
The selected settings take effect
automatically if no operations are
performed for about 8 seconds.
•
P
AUTO
5 2 3 1
w
IS OF F
L FL F
WBWB
AUTOAUTO
j
WB AUTO
Cursor
Displays
the selected
function name
Cursor
Arrow pad
Arrow
pad
# Caution
Some items are not available in some shooting modes.
% Tips
For information on displaying or hiding the live control: g “KCONTROL
SETTING” (P. 74)
•
•
•
Using live control

21
EN
Basic operations
Basic guide
1
Press the MENU button to display the
menus.
CARD SETUP
CUSTOM RESET
PICTURE MODE
K
IMAGE ASPECTj4:3
BACK
SET
Press the i
button to conrm
the setting
Operation
guide
Press the MENU
button to go back
one screen
Tab
2
Use FG to select a tab and press i.
3
Select an item using FG and press i to display options for
the selected item.
j/Y
IMAGE STABILIZER
BRACKETING
MULTIPLE EXPOSURE
w
#
RC MODE
o
OFF
OFF
0.0
OFF
BACK
SET
The current setting is displayedFunction
i
j/Y
IMAGE STABILIZER
BRACKETING
MULTIPLE EXPOSURE
w
#
RC MODE
o
OFF
0.0
OFF
BACK
SET
j/Y
W
j
Y
o
4
Press the i button to conrm the setting.
Press the MENU button repeatedly to exit the menu.
$ Notes
For details on the functions that can be set with the menu, refer to “Menu directory”
(P. 108).
% Tips
Camera settings can be customized to your shooting style: g “Customizing
camera settings” (P. 71)
The settings on the Custom Menu are for customizing the camera to suit your
personal preferences or needs. They are not suited to frequent changing. The
initial menu is more than adequate for setting both simple and advanced shooting
functions. Normally, there is no need to display the Custom Menu.
•
•
•
Using the menus
22
EN
Basic guide
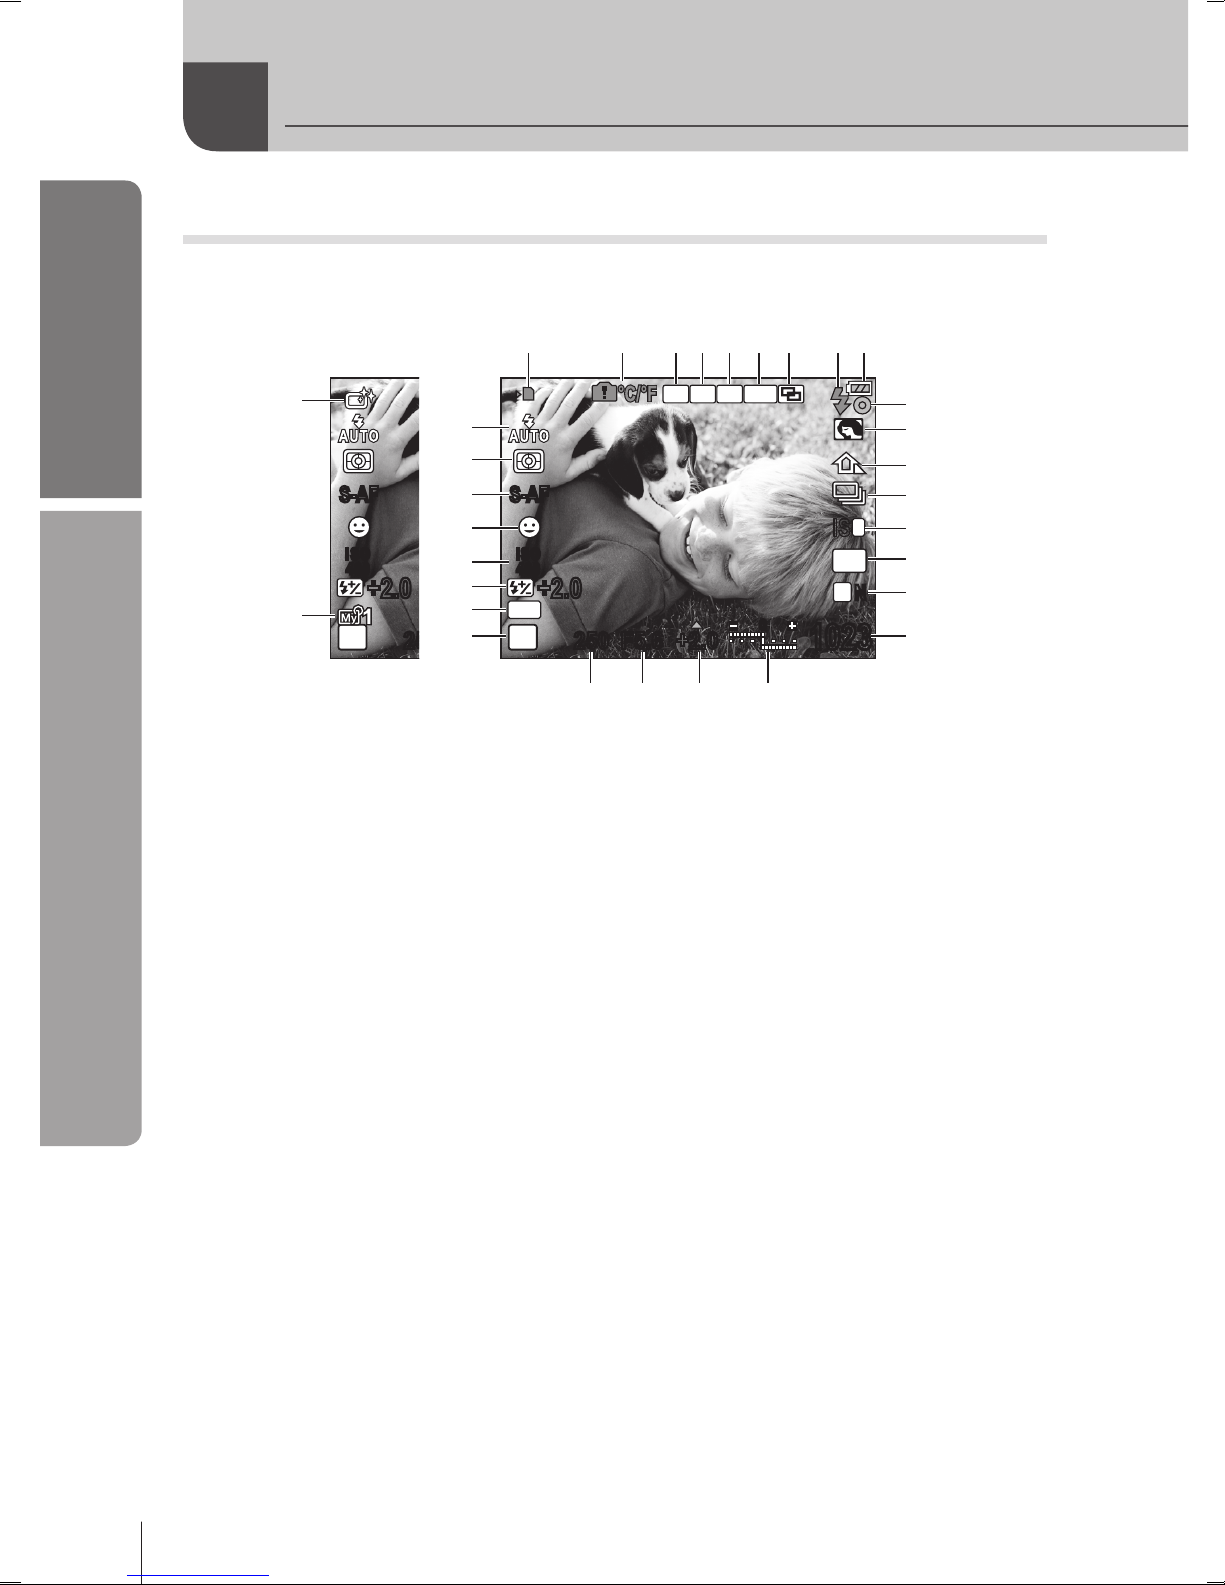
Information displayed in the monitor
Shooting
You can switch the monitor display using the INFO button.
g “Switching the information display” (P. 33)
250250 F5.6 +2.0
ISO
400
L
N
2
IS
4:34:3
P
S-AF
AEL
BKT
HP
FP
RC
+2.0
10231023
00
0
250250
ISO
400
P
S-AF
+2.0
u
t
b
0
c
d
e
f
g
a
r
s
q
p
o
n
m
l
1
2 3 4 5 6 7 98
k j i h
1 Card write indicator ......................P. 4
2 Internal temperature warning
m ......................................P
. 92
3 Super FP
ash s ...................P. 105
4 RC mode ..................................P
. 105
5 Home position p ......................P
. 45
6 Auto bracket t .......................P
. 48
7 Multiple exposure i .................P
. 51
8 Flash ..........................................P
. 54
(blinks: charging in progress,
lights up: charging completed)
9 Battery check
7 Lit up (green) (ready for use)
8 Lit up (green) (Battery is
running low)
9 Blinks (red) (charging required)
0 AF conrmation mark ...........P
. 12, 46
a Art lter .......................................P
. 16
Scene mode ...............................P
. 17
Picture mode ..............................P
. 52
b White balance ............................ P
. 41
c Sequential shooting/self-timer .... P
. 30
d Image stabilizer vws .......P
. 50
e Aspect ratio ................................P
. 32
f Record mode..............................P
. 31
g Number of storable still pictures
.................................................P
. 107
Available recording time
h T
op: Flash intensity
control .......................... P
. 55
Bottom: Exposure compensation
indicator........................P
. 40
i Exposure compensation value ...P
. 40
j Aperture value ..................... P
. 36 – 39
k Shutter speed ...................... P
. 36 – 39
l Shooting mode .............. P
. 10, 36 – 39
m AE Lock u .............................. P
. 47
n Flash intensity control ................ P
. 55
o ISO sensitivity ............................P
. 41
p Face detection g ................P
. 32, 74
q AF mode.....................................P
. 44
r Metering mode ...........................P
. 47
s Flash mode ................................P
. 54
t My Mode ....................................P
. 73
u Picture mode ..............................P
. 52
Information displayed in the monitor
23
EN
Information displayed in the monitor
Basic guide
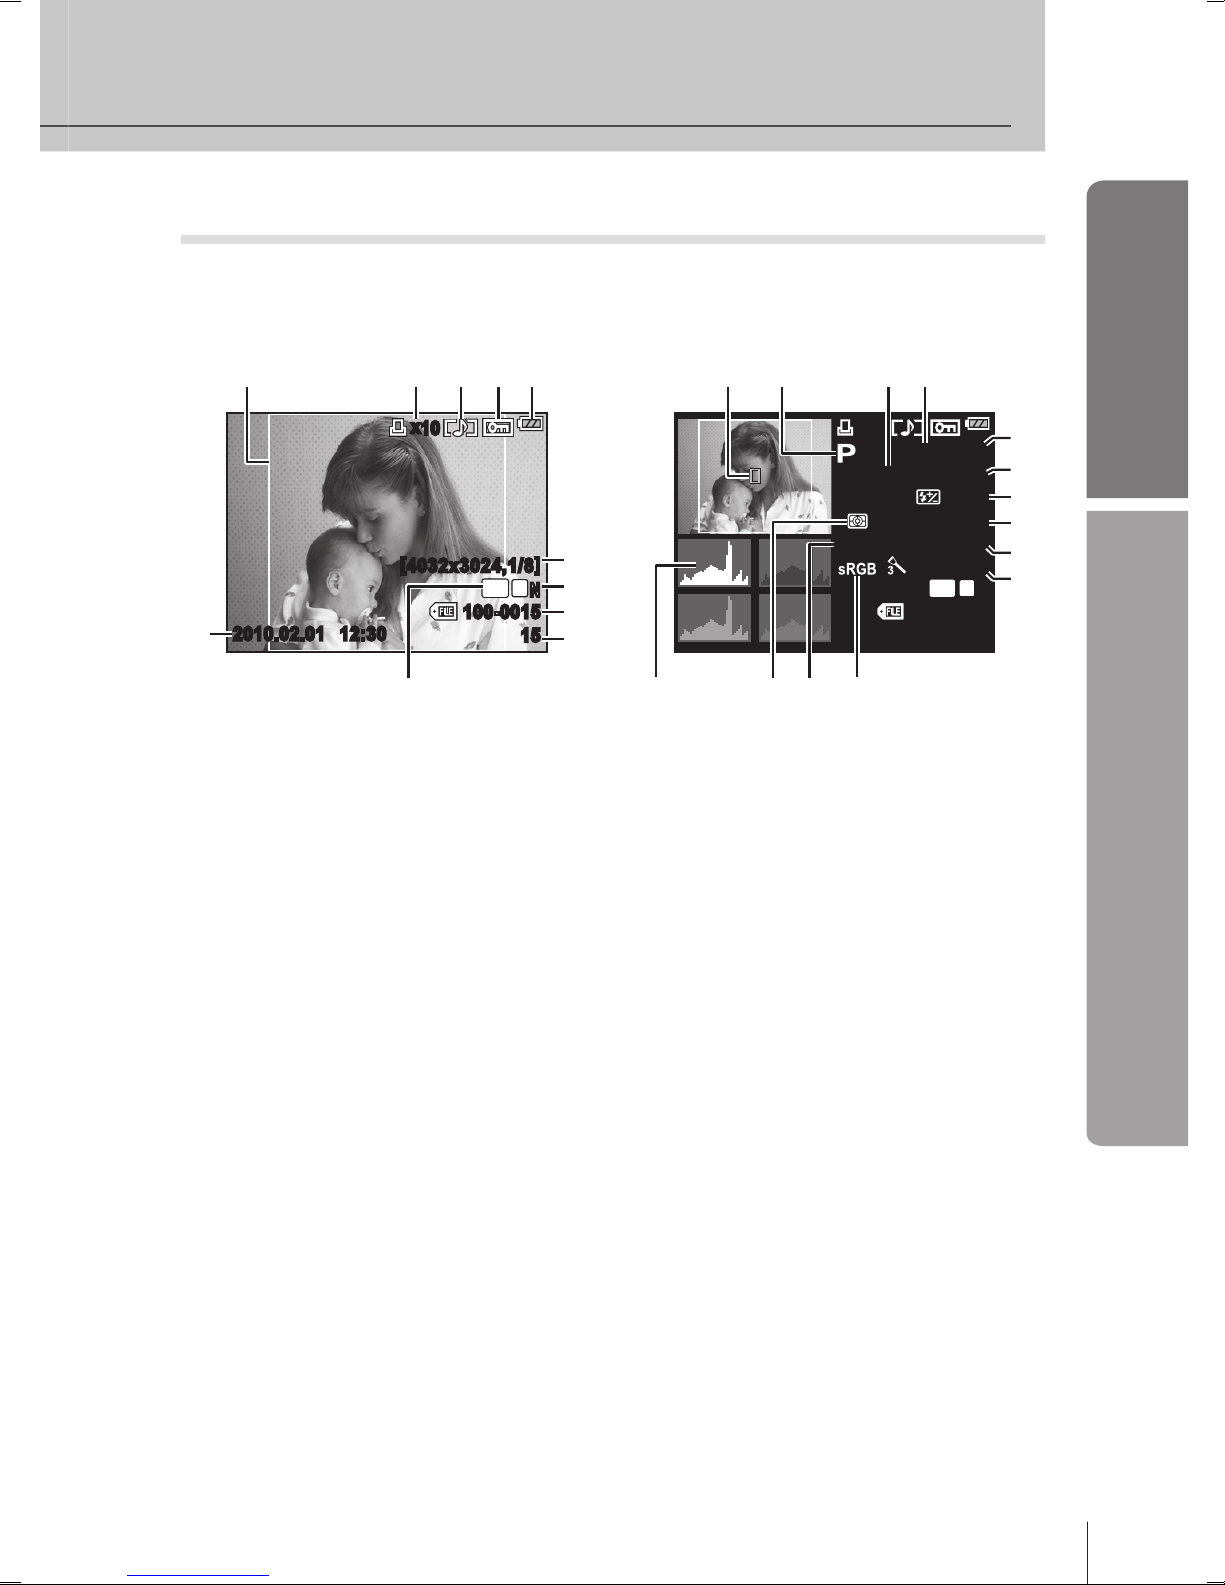
Playback
You can switch the monitor display using the INFO button.
g “Information display” (P. 61)
[
4032x3024,1/8
]
2010.02.01 12:30
100-0015
15
L
N
x
10
4:3
6
8
9
0
a
1 273 4 5
Simplied display
x
10
100-0015
F5.6
100
±
0.0
ISO
250
15
NATURAL
L
N
+
2.0 45
mm
WBAUTO
G±0A±0
4:3
f
h
i
b c d
n
lm
e
o
g
j
k
Overall display
1 Aspect border .............................P. 32
2 Print reservation
Number of prints.........................P
. 82
3 Sound record..............................P
. 65
4 Protect ........................................P
. 65
5 Battery check ............................... P
. 6
6 Date and time ...............................P
. 7
7 Aspect ratio ..........................P
. 32, 63
8 Pixel count, compression rate ....P
. 31
9 Record mode..............................P
. 31
0 File number ................................P
. 82
a Frame number............................P
. 82
b AF target ....................................P
. 45
c Shooting mode .............. P
. 10, 36 – 39
d Exposure compensation ............P
. 40
e Shutter speed ...................... P
. 36 – 39
f Aperture value ..................... P
. 36 – 39
g Focal length................................P
. 97
(The focal length is displayed in 1
mm units.)
h Flash intensity control ................ P
. 55
i ISO sensitivity ............................P
. 41
j White balance compensation .....P
. 42
k Picture mode ..............................P
. 52
l Color space ................................P
. 76
m White balance ............................ P
. 41
n Metering mode ...........................P
. 47
o Histogram ...................................P
. 33

24
EN
Quick task index
Shooting
g
Taking pictures with automatic
settings
iAUTO (A)
11
Easy photography with special
effects
Art lter (ART) 16
Easy photography suited to the
scene
Scene (SCN) 17
Focus
Focus lock 46
AF target 45
Focusing on one area
AF target 45
MF (manual focus) 44
Checking set effect before taking
a picture
Multi view display 33, 40
Preview function 37
TEST PICTURE 80
Extending the useful life of the
battery
SLEEP 74
Increasing the number of pictures
that can be taken
Record mode 31
Taking pictures in low light
situations without using the ash
ISO 41
Taking pictures without white
subjects appearing too white or
black subjects appearing too dark
Histogram 33
Exposure compensation 40
SHADOW ADJ 63
Taking monotone pictures
PICTURE MODE 52
Art lter (ART) 16
Taking pictures of a subject
against backlight
Flash shooting 54
GRADATION 53
Taking pictures with a blurred
background
Live guide 18
Aperture priority shooting 37
Taking pictures that stop the
subject in motion or convey a
sense of motion
Live guide 18
Shutter priority shooting 38
Taking pictures with the correct
color
White balance 41
WB bracketing 49
Use this index to quickly nd the page describing the task you want to perform or
the function you want to know more about.
Quick task index

25
EN
Quick task index
Taking pictures so that whites
come out white and blacks come
out black
Live guide 18
Exposure compensation 40
HIGH KEY/LOW KEY 53
Reducing image noise (mottling)
NOISE REDUCT. 76
Optimizing the LCD monitor
Monitor brightness
adjustment
69
LIVE VIEW BOOST 74
Reducing camera shake
IMAGE STABILIZER 50
DIS MODE 17
ISO 41, 75
Self-timer 30
Taking pictures while checking the
level of the camera
w
33, 74
Choosing an aspect ratio
Aspect ratio 32
Displaying guides to aid
composition
Framing grid selection 74
Playback
g
Displaying the image after the
picture is taken
REC VIEW 69
Checking whether the subject is
in focus
Close-up playback 14, 60
Quickly searching for the desired
image
Index display/Calendar
display
14, 60
Viewing images on a TV
Playback on TV 67
Brightening a dark backlit image
JPEG EDIT 63
Camera Settings
g
Saving the settings
CUSTOM RESET 70
MY MODE SETUP 73, 106
Changing the menu display
language
W
69

26
EN
Table of Contents
Table of Contents
Basic guide 3
Preparations for shooting ...........3
Charging and inserting
the battery ...............................3
Inserting and removing cards .....4
Attaching a lens to the camera ...5
Power on ....................................6
Setting the date/time...................7
Names of parts and functions .....8
Camera .......................................8
Mode dial ..................................10
Basic operations ........................12
Taking photographs/shooting
movies ...................................12
Playback/Erasing ......................14
Single-frame playback 14
Close-up playback
Index display
Movie playback
15
Erasing images
15
Using art lters..........................16
Shooting in scene mode ...........17
Using the iAUTO mode live
guides ....................................18
Using live control ......................20
Using the menus.......................21
Information displayed in the
monitor ........................................22
Shooting ...................................22
Playback ...................................23
Quick task index 24
Basic photography and useful
functions
30
Sequential shooting/
using the self timer ....................30
Image quality (record mode) .....31
Choosing a record mode ..........31
Setting the image aspect ...........32
Using face detection ..................32
Turning [g FACE DETECT]
on ..........................................32
Taking pictures using face
detection ................................32
Switching the information
display .........................................33
Display magnication ................34
Panoramas ..................................35
Taking pictures for a
panorama ..............................35
Other shooting options and
advanced settings 36
“Point-and-shoot” photography
(P program mode) ......................36
Choosing aperture
(A aperture-priority mode) ........37
Choosing shutter speed
(S shutter-priority mode) ...........38
Choosing aperture and shutter
speed (M manual mode) ............39
Choosing when the exposure
ends (bulb) ............................39
Controlling exposure
(exposure compensation) ..........40
Previewing the effects of
exposure compensation and
white balance ........................40
ISO sensitivity .............................41
Adjusting color
(white balance) ...........................41
White balance compensation ...42
One-touch white balance ..........43

27
EN
Table of Contents
Choosing a focus mode
(AF mode) ....................................44
Choosing a focus target
(AF target) ...................................45
Using a saved AF target ...........45
Focus lock ................................46
Zoom frame AF ...........................46
Measuring subject brightness
(metering) ....................................47
Exposure lock (AE lock) ............47
Varying settings over a series of
photographs (bracketing) ..........48
Reducing camera shake
(the image stabilizer) ..................50
Recording multiple exposures
in a single image
(multiple exposure) ....................51
Processing options
(picture mode) ............................52
Flash shooting 54
Using a ash
(ash photography) ...................54
Flash intensity control ...............55
Using external ash units
designated for use with
this camera .................................55
Other external ash units ..........55
Shooting and viewing movies
56
Changing the settings for
movie recording .........................56
Adding effects to a movie .........56
Record mode ............................57
Recording sound ......................57
Recording movies with the
shutter button .............................57
Taking a photograph when
recording ends.......................58
Viewing movies ..........................58
Playback options 59
Single-frame playback ...............59
Close-up playback ......................60
Index display/
calendar display .........................60
Information display ....................61
Slideshow ....................................62
Editing still images .....................63
Rotate ..........................................64
Image overlay .............................64
Audio recording ..........................65
Protecting images ......................65
Protecting selected frames .......66
Canceling all protections ..........66
Erasing images ...........................66
Erasing selected frames ...........66
All-frame erase .........................66
Playback on TV ...........................67
Camera setup 69
Setup Menu .................................69
X (Date/time setting) .............69
W (Changing the display
language) ..............................69
s (Monitor brightness
adjustment)............................69
REC VIEW ................................69
c MENU DISPLAY...................69
FIRMWARE ..............................69
Resetting the camera
settings ........................................70

28
EN
Table of Contents
Table of Contents
Registering [RESET1]/
[RESET2] ..............................70
Using reset settings ..................70
Customizing camera settings
71
Custom Menu ..............................71
Custom Menu options ................72
R AF/MF ..................................72
AF MODE 72
AF AREA 72
RESET
LENS 72
BULB FOCUSING
72
FOCUS RING
72
MF
ASSIST 72
P SET
HOME 72
S BUTTON ..............................72
AEL/AFL 72
AEL/AFL MEMO 72
; FUNCTION
72
R FUNCTION
72
MY MODE SETUP 73
BUTT
ON TIMER 73
T RELEASE ............................73
RLS PRIORITY S 73
RLS PRIORITY C 73
U DISP/8/PC .........................73
HDMI 73
VIDEO OUT 73
SLEEP 74
LIVE VIEW BOOST 74
g F
ACE DETECT 74
G/INFO SETTING
74
KCONTROL
SETTING 74
HISTOGRAM SETTING 74
EVF
ADJUST 74
BACKLIT
LCD 74
MODE GUIDE
74
qCLOSEUP
MODE 74
8 (Beep sound)
75
VOLUME 75
USB MODE 75
V EXP/e/ISO .......................75
EV STEP 75
METERING 75
AEL
Metering 75
ISO
75
ISO STEP 75
ISO-AUT
O SET 75
ISO-AUT
O 75
BULB
TIMER 75
ANTI-SHOCK z 75
W #CUSTOM ..........................75
# X-SYNC. 75
# SLOW LIMIT 75
w+F 75
X K/COLOR/WB ...................76
NOISE REDUCT. 76
NOISE FILTER 76
WB
76
ALL > 76
COLOR SP
ACE 76
SHADING COMP
. 76
K SET 76
PIXEL
COUNT 77
Y RECORD/ERASE ................77
QUICK ERASE 77
RAW+JPEG ERASE 77
FILE NAME
77
EDIT
FILENAME 77
PRIORITY
SET 78
dpi SETTING
78
Z MOVIE .................................78
nMODE 78
MOVIE+STILL 78
MOVIE R 78
b K UTILITY .........................78
PIXEL MAPPING 78
EXPOSURE SHIFT 78
8 W
ARNING LEVEL 78
Using the super control
panel ............................................81

29
EN
Table of Contents
Printing pictures 82
Print reservation (DPOF) ...........82
Creating a print order................82
Resetting the print reservation
data .......................................83
Direct printing (PictBridge) .......83
Connecting the camera to
a printer .................................84
Easy printing .............................84
Custom printing ........................85
Connecting the camera to a
computer 87
Connecting the camera to
a computer ..................................87
Installing the supplied
computer software (ib) ...............88
Shooting tips and
maintenance 89
Shooting tips and
information ..................................89
Error codes .................................91
Cleaning and storing the
camera .........................................93
Cleaning the camera ................93
Storage .....................................93
Cleaning and checking
the image pickup device ........93
Pixel mapping - Checking the
image processing functions ...94
Information 95
Card basics .................................95
Usable cards.............................95
Formatting the card ..................95
Battery and charger ...................96
Using your charger abroad .......96
Interchangeable lenses ..............97
M.ZUIKO DIGITAL
interchangeable lenses .........97
System Chart ............................98
M.ZUIKO DIGITAL lens
specications .......................100
Four Thirds Adapter ...............101
Using electronic view nder
(sold separately) .......................102
Program line diagram
(P mode) ...................................103
Exposure warning display .......103
Flash synchronization and
shutter speed ............................104
Flash modes that can be set
by shooting mode ....................104
Focal lengths that can be
set ..............................................104
External ash shooting ............105
Wireless remote control
ash photography ....................105
Functions that can be
registered with My Mode and
Custom Reset Setting ..............106
Record mode and le size/
number of storable still
pictures .....................................107
Menu directory ..........................108
Specications ........................... 111
SAFETY PRECAUTIONS .......... 113
Index ..........................................120
30
EN
Basic photography and useful functions
1
1
Sequential shooting/using the self timer
The camera will take photos at a rate of about 3 frames per second (fps) while
the shutter button is pressed all the way down. Alternatively, the self-timer can be
used for self- or group-portraits or to reduce camera shake when the camera is
mounted on a tripod or otherwise xed in place.
1
Press the jY button (G) to display the
direct menu.
o j Y
12sY2s
P
SINGL E
2
Select an option using HI and press i.
o
Single-frame shooting
Shoots 1 frame at a time when the shutter button is
pressed (normal shooting mode).
j
Sequential shooting
Shoots at approximately 3 frames/sec. for as
long as the shutter button is pressed (S-AF or MF
selected for [AF MODE] (P
. 44)).
Y12s
Self-timer 12 SEC
Press the shutter button halfway to focus, the rest
of the way down to start the timer. First, the selftimer lamp lights up for approximately 10 seconds,
then it blinks for approximately 2 seconds and the
picture is taken.
Y2s
Self-timer 2 SEC
Press the shutter button halfway to focus, the rest
of the way down to start the timer. The self-timer
lamp blinks for approximately 2 seconds, and then
the picture is taken.
$ Notes
To cancel the activated self-timer, press the jY button.
During sequential shooting, focus, exposure, and white balance are locked at the
rst frame (during S-AF, MF).
# Caution
During sequential shooting, if the battery check blinks due to low battery, the
camera stops shooting and starts saving the pictures you have taken on the card.
The camera may not save all of the pictures depending on how much battery power
remains.
Fix the camera securely on a tripod for self-timer shooting.
If you stand in front of the camera to press the shutter button halfway when using
the self-timer, the photograph may be out of focus.
•
•
•
•
•
Basic photography and useful functions
 Loading...