

Page 1

INSTRUCTIONS
Before using your camera, read this manual carefully to ensure
correct use.
We recommend that you take test shots to get accustomed to
your camera before taking important photographs.
Page 2

Thank you for purchasing an Olympus camera.
MAIN
FEATURES
Built-in 38mm~70mm (approx. 2X) zoom lens
Remote control (optional)
Quartz date or time imprinting
(QUARTZDATE/DLX
models
only)
Symbols used in this manual:
Incorrect
2
Indicator on
Manual
operation
Indicator
blinking
Next
operation
Attention
Operation
order
Depress
halfway
Automatic
operation
Page 3

PREPARATIONS
Names and f unctions of parts
Viewfinder display/LCD panel
Using the strap and soft case
Outline of operations
4
Loading the batteries
6
Checking the batteries
7
Poin ts t o remember
8
12
13
14
BASIC OPERATIONS
ADVANCED
TECHNIQUES
CAMERA
MAINTENANCE
Loading the fil m
Taking pictures
Using the focus lock
Unloading the film
Flash photography
Selftimer
Remote control RC-100 (optional)
Printing the date and time (f o r QUARTZDATE/DLX models only)
Correcting the data (for QUARTZDATE/DLX models only)
Questions and answers
Care and storage
Battery handling
Troubleshooting
Specifications
16
18
22
24
25
28
29
30
31
32
33
34
35
3
40
Page 4

NAMES AND FUNCTIONS OF PARTS
/REMOTE
button
(See
p.
28/29.)
Zoom dial
Controls zoom-in and
-out when turned
Power switch
(See
Switches the power ON
and OFF when turned
p.
18.)
(See p. 18.)
Shutter release
button
(See
p.
15.)
Strap eyele t
4
Mid-roll rewind
button
Flash
(See
p.
Flash mode button
24.)
(See
Autofocus windows
p.
25.)
LCD panel
Displays the camera's mode
and operation conditions.
MO D E a nd S E T
buttons*
Selftimer indicator
Lens
*QUARTZDATE/DLX models only
(See p. 6.)
(See
p.
30/31.)
Light sensor
Viewfinder
Page 5

Viewfinder
(See
p. 6.)
Fi lm window
Back cover
release
Tripod socket
Battery compartment
cover
Back cover
5
Page 6

VIEWFINDER DISPLAY/LCD PANEL
VIEWFINDER DISPLAY
Orange lamp
Lights when the flash is ready to fire.
Green lamp
Lights when the subject is in focus.
Close-up correction marks
At a close distance, your subject must be
positioned within the
close-up correction marks.
Autofocus mark
Position your subject within
the autofocus mark.
LCD PANEL
6
Date indicator
(QUARTZDATE/DLX
models only)
Flash modes (p. 25)
Battery check (p. 13)
Selftimer/remote control (optional)
(p. 28/29)
Exposure counter (p. 17)
Page 7

USING THE STRAP AND SOFT CASE
Attaching the Strap
Using th e Soft Case (optional)
7
Page 8

Lithium
battery
Load the batteries (p. 12).
8
Two AA
alkaline
batteries
OUTLINE OF OPERATIONS
Basic Shooting Procedures
(R6)
Open the back cover (p. 16)
Load the film (p. 16).
Page 9

Align the film leader with the
mark, and close the back cover
(p. 17).
Set the ON / O F F switch to ON
(p.
18).
Mak e sure the exposure counter
on the LCD panel reads (p. 17).
9
Page 10

Turn the zoom dial for telephoto
or wide-angle photography
(p.
18).
10
Place the au tofocus mark on the
subject you want to photograph
(p. 19).
Depress the shutter release
button halfway to make sure the
green lamp lights (p. 20).
Page 11

Depress the shutter release button
fully to ta ke a pict ure (p. 20).
When the film reaches the end of
the roll, it will automatically rewind
(p.
24).
Open the back cover to remove
the rewound film (p. 24).
11
Page 12

LOADING THE BATTERIES
Remove the battery cover.
1
.
Use one 3V lithium battery (CR123A or DL123A) or two AA
(R6) alkaline batteries.
Before loading the batteries, set the ON/OFF switch to OFF.
12
The lens protector may sometimes open and close when
the batteries have been loaded.
Insert t he batteries, and
replace the battery cover.
2.
Two AA
alkaline batteries
Lithium
battery
Be sure the batteries are aligned correctly
as shown.
Insert the bottom of the battery first.
Read "Battery Handling" on page 34.
(R6)
Page 13

Set the ON/OFF switch
to ON.
1
.
CHECKING THE BATTERIES
Batteries are OK. The ma rk
disappears after 12 sec.
Batteries are low.
Blinks
Lights
Have spares handy.
Batteries should be replaced
immediately.
13
Page 14

POINTS TO REMEMBER
Hold the Camera Correctly.
Correct.
Hold the camera firmly with both hands.
In the vertical position, hold the camera with its flash
positioned at the top.
14
Correct.
Caution:
Keep your fingers away from
the lens, flash, autofocus
windows and light sensor.
Incorrect.
Page 15
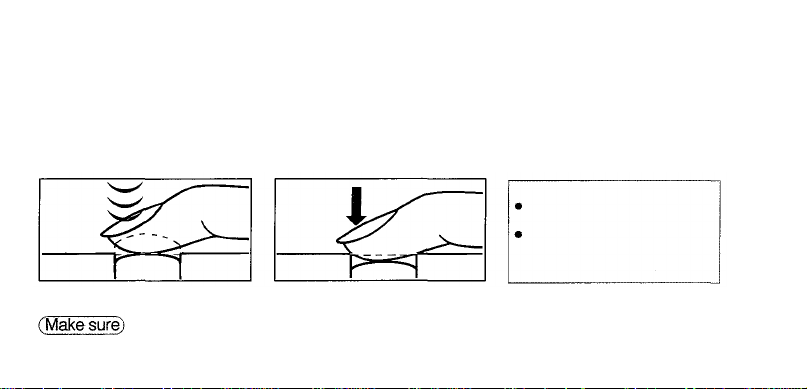
Proper Shutter Release.
Depress the shutter
1.
release button halfway
To lock th e focus.
The green lamp lights in
the viewfinder.
To release the shutter
and take the picture.
Practice before loading the film.
Depress the shutter
release button fully
2.
Cautions:
Press the shutter release
button gently.
Avoid shaking the camera when
pressing the shutter release
button to prevent blurry pictures .
15
Page 16
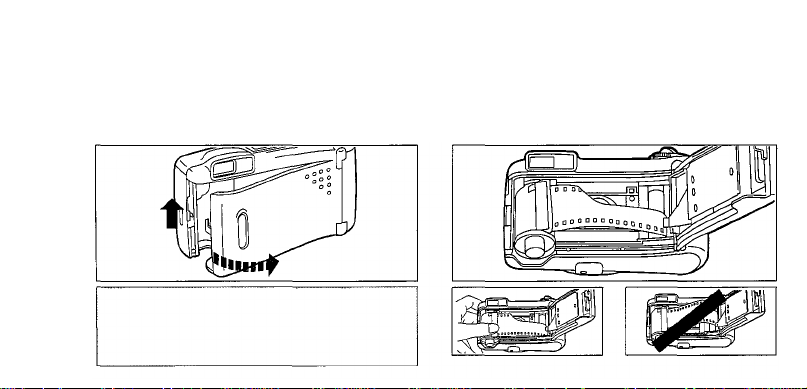
LOADING THE FILM
Slide the back cover release
upward to open the back
1.
cover.
OPERATIONS
BASIC
Note:
Be careful not to touch the camera's interior
surfaces, such as the inside of the lens. When
dust is stuck to the lens, use a blower brush, etc.,
16
to clean it.
Insert the film cartridge,
2.
making sure the film is lying
flat.
Correct
Incorrect
Page 17
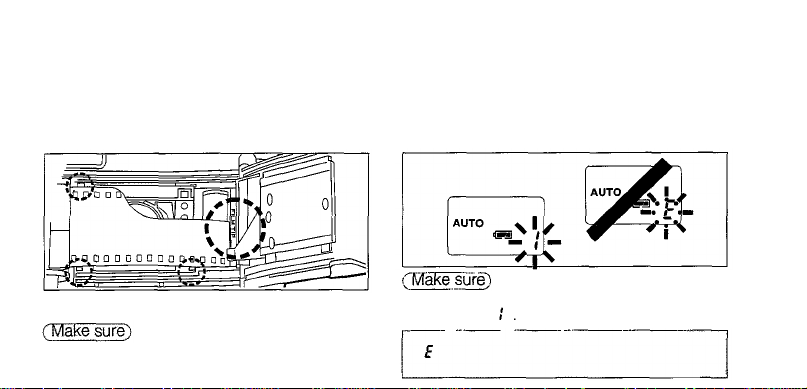
Align the film leader with the
.
red mark, and close the back
3
cover.
Set the ON/OFF switch to ON.
4
.
The film automatically advances to the first frame.
The film does not overlap any of the positioning
guides shown above.
The exposure counter on the LCD
panel reads
Note:
If blink s in the exposure counter, as shown
above, reload the film.
17
Page 18
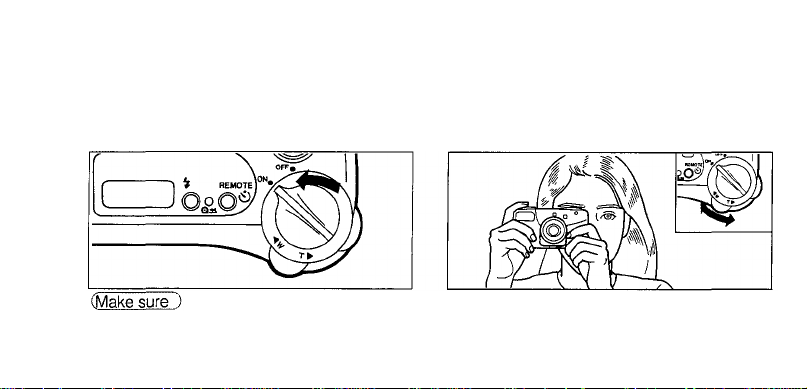
TAKING PICTURES
Rotate the power switch to
1.
turn the power ON.
The lens protector opens, the lens extends
slightly, and the LCD panel activates.
18
Aim the camera at your subject.
Use the zoom dial for telephoto
2.
or wide-angle photography.
Page 19
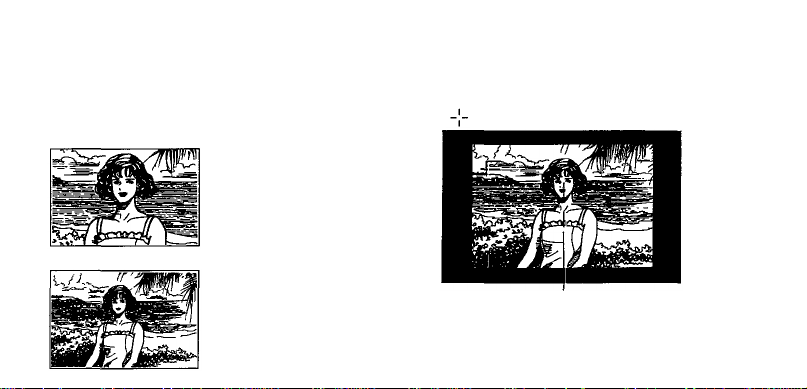
Telephoto: Turn the zoom dial to T.
Maximum
telephoto focal
length: 70 mm
Wide-angle: Turn the zoom dial to W.
Position the autofocus mark
on your subject.
.3
Maximum
wide-angle focal
length: 38 mm
Autofocus mark
19
Page 20
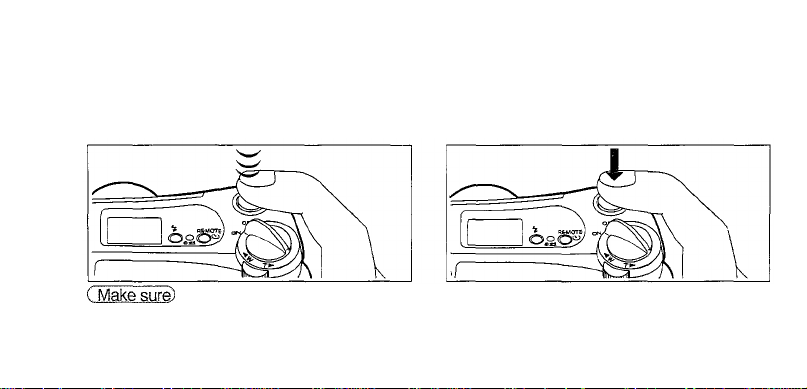
Depress the shutter release
4.
button halfway.
Depress the shutter release
5.
button fully.
The green lamp lights.
20
The film automatically advances to the
next frame.
Page 21
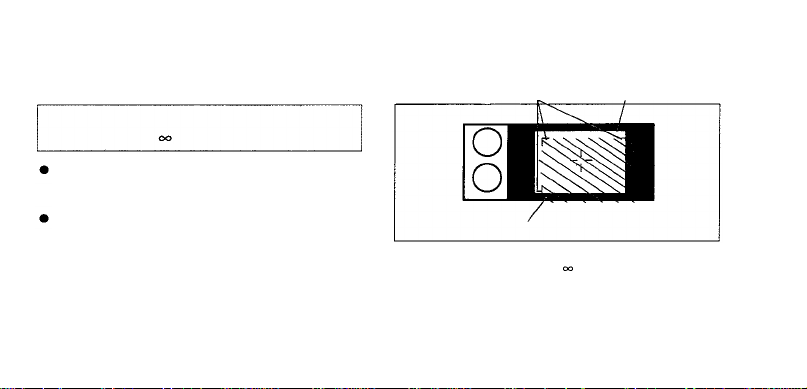
Working Distan ce
The focus range of the camera is
0.6 m (2 ft) to (infinity).
When the subject is closer tha n 0.6 m
(2 ft), the shutter will not release.
(The green lamp blinks.)
When the subject is extremely close to
the camera, the subject will be out of
focus although the shutter releases.
Close-Up Correction
Close-up correction marks
Image area of picture at 0. 6 m (2 ft)
The viewfinder's picture frame shows the area tha t
can be shot for subjects at . However, the picture
area will move lower in the viewfinder as you get
closer to the subject. At 0.6 m (2 ft), the shaded area
is the actual available image area. In this case, the
subject should be positioned b elo w the close-up
correction marks.
Picture frame
21
Page 22
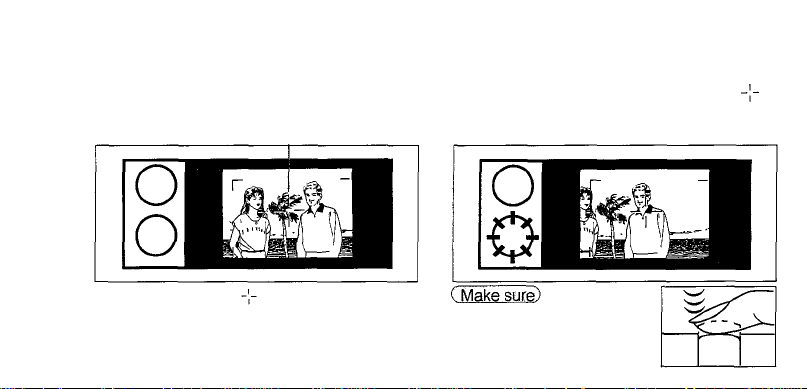
TO AVOID TAKING OUT-OF-FOCUS PICTURES
USING T HE FOCUS LOCK
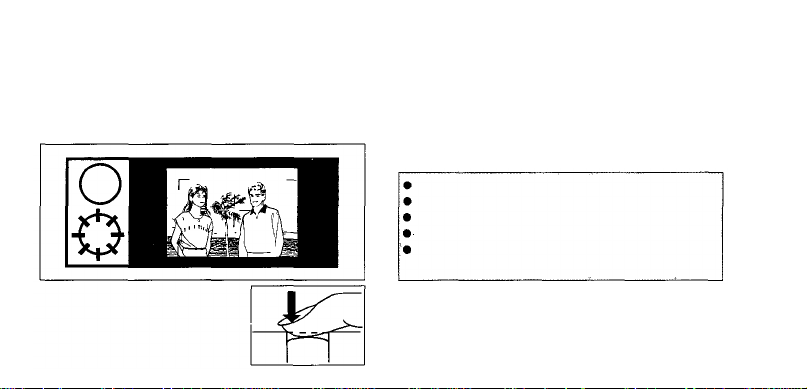
When the main subject is not in
the center of the frame, use the
focus lock.
The autofocus mark must be positioned on
the subject in order to focus on it. In the above
case, the camera will focus on the tree in the
22
background and the subjects will be out of
focus.
Autofocus mark
Position the autofocus mark on
1.
your subject and press the shutter
release button halfway.
The green lamp lights.
Page 23
Reposition your subjects in the picture
frame while keeping the shutter
2.
release button depressed halfway.
Depress the shutter release
button fully to take picture.
3.
Difficult Autofocus Subjects
Glossy and reflective surfaces
Black objects
Subjects behind glass or wire mesh
Flames and smoke
Excessively bright light within the
picture area
In the above situations, use the focus lock by
focusing on a different subject at a similar
distance. Then reposition the correct subject
in the picture frame.
23
Page 24
UNLOADING THE FILM
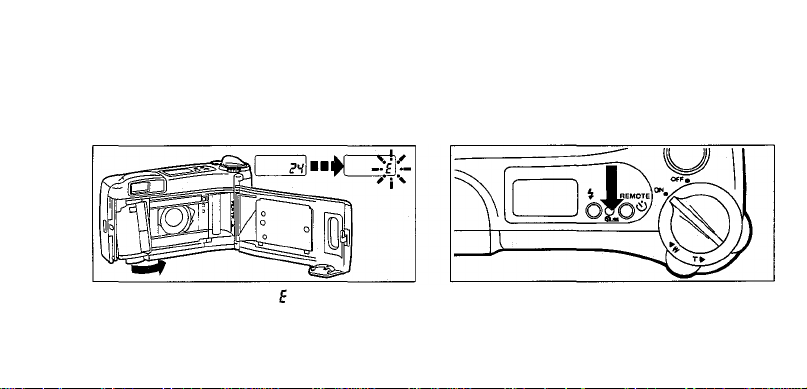
The camera automatically
rewinds the film when you reach
the end of a roll.
After the motor stops and starts blinking
on th e LCD panel, o p en the back cover and
remove the film.
Note: The final number of exposures may sometimes
24
exceed the number of exposure s specified on the film.
Rewinding the film before the end
of the roll
Press the mid-roll rewind button with the tip of
a ballpoint pen, or the like. Do not use an
instrument with a sharp tip.
Page 25
FLASH PHOTOGRAPHY
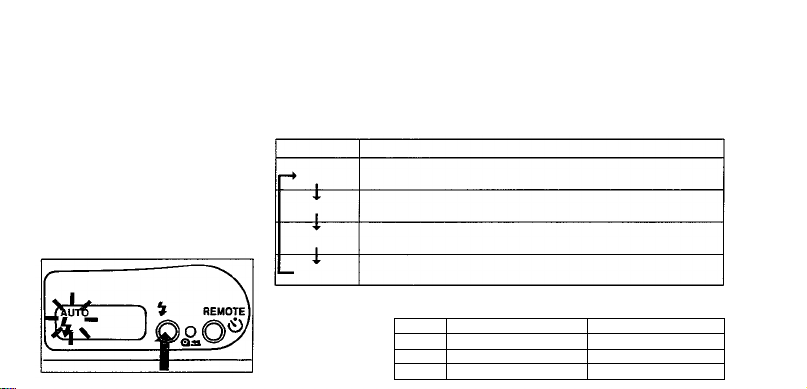
This camera has four flash modes. Select the flash mode according to
your shooting conditions and needs.
How to select the flash
mode:
When the flash mode button is
pressed, the flash mode changes
in the order shown on the right.
The selected flash mode is
displayed on the LCD panel.
Mode
AUTO
AUTO-S
OFF
FILL-IN
Note AUTO-S will not be canceled when the power is turned OFF All other modes
will return to the AUTO mode.
FLASH WORKING
RANGE
Automatically fires in low-light conditions. (p. 26)
Significantly reduces the phenomenon of "red-eye"
(when a subject's eyes appear red). (p. 26)
The flash does not fire. (p. 27)
Fires regardless of available light. (p. 27)
W (Wide-Angle)
ISO
0.6
100
200
0.6
0.6 ~ 7.6 m (2 ~ 24.9 ft)
400
~
3.8 m (2
~
5.4 m (2
Function
~
12.5 ft)
~
17.7 ft)
T (Telephoto)
0.6
~
2.2 m (2
~
3.1 m (2
0.6
0.6
~
4.4 m (2
~
~
~
7.2 ft)
10.2 ft)
14.4 ft)
TECHNIQUES
ADVANCED
25
Page 26
AUT O (Au t o Flash)
In the Aut o Flash mode, the flash will
fire automatically in low-light
conditions.
The orange lamp in the upper left of the
viewfinder lights when the shutter release
button is depressed halfway.
Note. If the orange lamp blinks when the shutter
release button is depressed halfway, the shutter
won't release because the flash is being recharged.
Remove your finger from the button and wait for
26
several seconds before shooting.
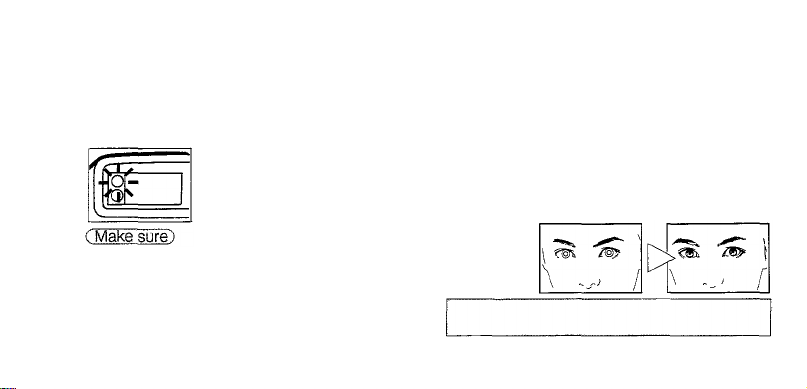
AUTO-S
(Red-Eye Reducing Flash)
Significantly reduces the phenomenon of
"red -eye " (when a subject's eyes appear
red in the final photograph).
In the Auto-S Flas h mode, the camera will emit a
series of low-power pre-flashes before the regular
flash. This makes the subjects' pupils contract,
significantly reducing red-eye. Except for the pre-
flashes, this mode is the same as the Auto Flash
mode.
IMPORTANT: Be sure to hold the camera still until
the shutter releases.
Note: Red-eye reduction may not be effective with
some individuals or if the subject wasn't watching
the pre-flashes.
Page 27
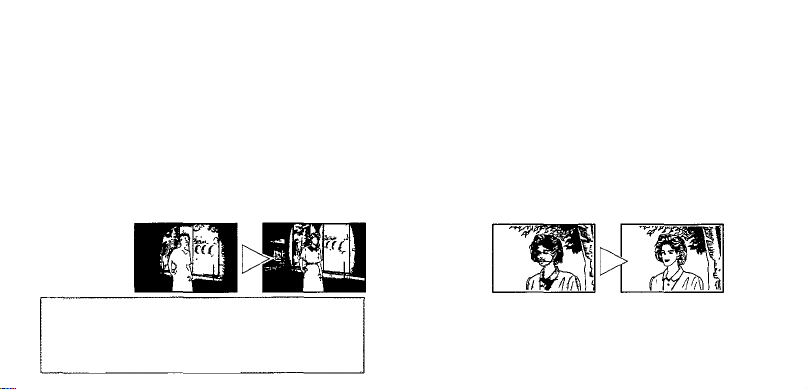
OFF (Flash Override)
FILL-IN
(Forced Activation)
When you don't want the flash to
fire, even in the dark.
In the Flash-Off mode, the flash does not fire even in
low-light conditions. Use this mode in situations
where flash photography is not desired or is
prohibited.
Note: Since a slow shutter speed (down to 1
second) is automatically selected in low-light
situations, the use of a tripod is recommended to
prevent blurred pictures caused by shaking the
camera.
When you want to fire the flash every
shot.
In the Fill-in Flash mode, the flash fires regardless of
available light. This mode can be used to brighten
up a subject's shaded face, for example.
27
Page 28
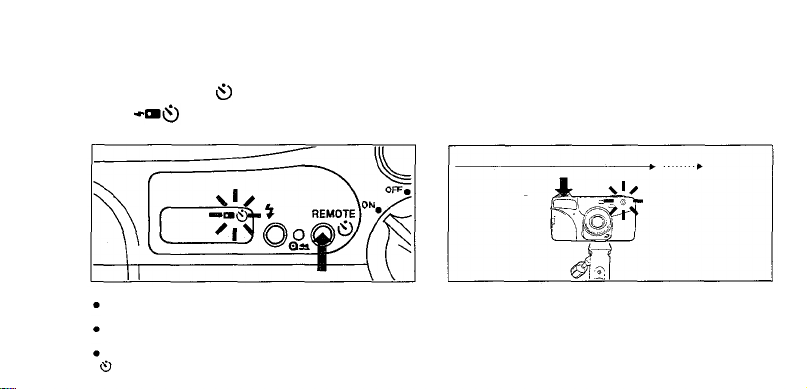
1.
Press
the
/REMOTE
is displayed on the LCD
panel.
To Put Yourself in the Picture
SELFTIMER
button.
Aim at your subject, and press
2.
the shutter release button
10 sec.
Selftimer
indicator lights.
.
2 sec.
Blinks.
Notes:
The focus and exposure will be locked when the shutter release
button is depressed halfway.
After the shutter is released, the Selftimer mode will be
disengaged.
28
To cancel the Selftimer after it has been activated, press t he
/REMOTE button again.
The shutter will be released 12 seconds
later.
Page 29
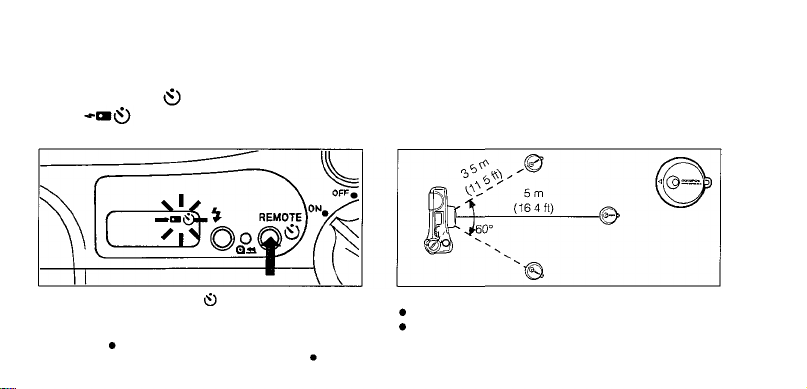
1.
Press
panel.
REMOTE CONTROL RC-100 (optional)
the
/REMOTE
is displayed on the LCD
button.
Aim the remote control at the camera,
and press the button. The shutter will
2.
be released after 3 seconds.
After shooting, press the /REMOTE button
again to cancel the Selftimer/remote control
mode.
CAUTIONS: KEEP THE REMOTE CONTROL OUT OF THE REACH OF CHILD R E N. IF A CHILD S WALLOWS THE REMOTE
CONTROL, CONTACT A DOCTOR IMMEDIATELY . NEVER TRY TO DISASSEMBLE THE REMOTE CONTROL. NEVER EXPOSE
THE REMOTE CONTROL TO EXCESSIVE HEAT OR OPEN FLAME.
Notes:
Use the remote control within the above range.
The camera will focus on the subject directly i n front of it.
29
Page 30
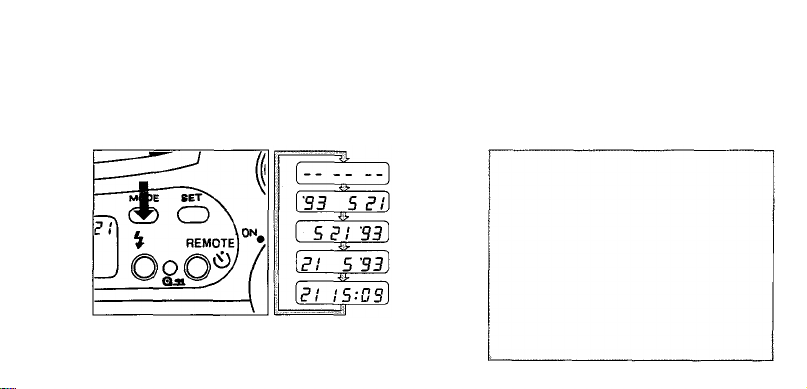
PRINTING THE DATE AND TIME
(for
QUARTZDATE/DLX
Choose the desired mode with the
MODE button.
models)
The mode will switch in the described order by
pressing the MODE button.
30
No data
Year-month-day
Month-day-year
Day-month-year
Day-hour-minute
The quartz date shares the power
source with the main unit. Make sure to
correct the data after the batteries are
replaced.
The data is imprinted in the lower right
of the picture. If there is something
whitish or tinged with orange where the
data is imprinted, the data may be
difficult to read.
On the frame(s) after the specified final
exposure of the film, the data may not
be imprinted or may be superimposed.
Page 31
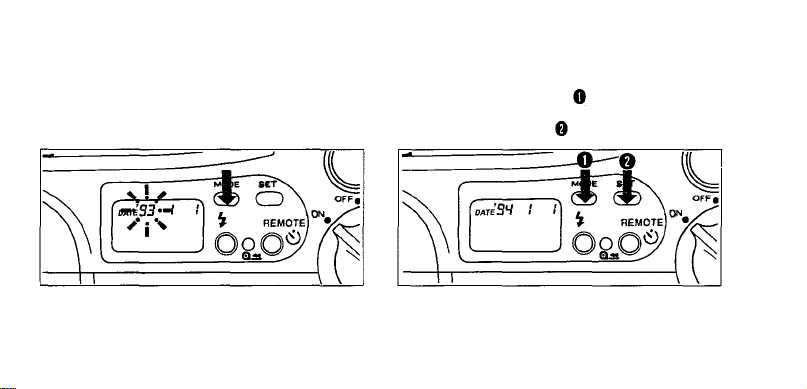
CORRECTING THE DATA
(for
QUARTZDATE/DLX
models)
Press
the
MODE
1
.
seconds or longer.
The year indication wi ll start blinking.
Note: As you press the mode button, the blinking indication changes in the order of year, month, day, hour, and minute. The data
correction will be finished when the mode button is pres s e d again.
button
for two
Pres s the mode button again to choose the
data to be corrected until it starts blinking. And
2.
press the SET button
If you press the button once, the number on display
will advance by 1. And if you keep it pressed, the
numbers will run throu gh in rapid succession.
to correct the data.
31
Page 32

QUESTIONS AND ANSWERS
Q: How long will the batteries last?
A: If you use 24-exposure rolls of film and use
the flash on half of a ll your pictures, one
new 3V lithium battery or two new AA (R6)
alkaline batteries will last for approximately
12 rolls or 8 rolls respectively. If you do not
use the flash and zoom very often, the
MAINTENANCE
CAMERA
32
batteries will last much longer.
Q: How should I clean the lens?
A: Wipe the lens gently with a soft, clean cloth.
Do not use lens cleaning fluid.
Q: Can I use film that is not DX-coded?
A: Ye s, but only ISO 100 film.
Q: When does the camera measure and set
the exposure?
A: Wh en the shutter release button is de-
pressed halfway, the camera measures both
the exposure and focus and locks them as
long as the shutter release button remains
halfway depressed.
Q: Can the battery in the optional remote
control RC-100 be replaced with a new
one?
A: No, it cannot be replaced but lasts about 5
years.
Q: It sounds like the film is advanced twice after
the shutter releases. Is this a malfunction?
A: No, it isn't. The camera sounds that way
because the motor is used to prepare the
camera for the next shot as well as to
advance the film.
Page 33
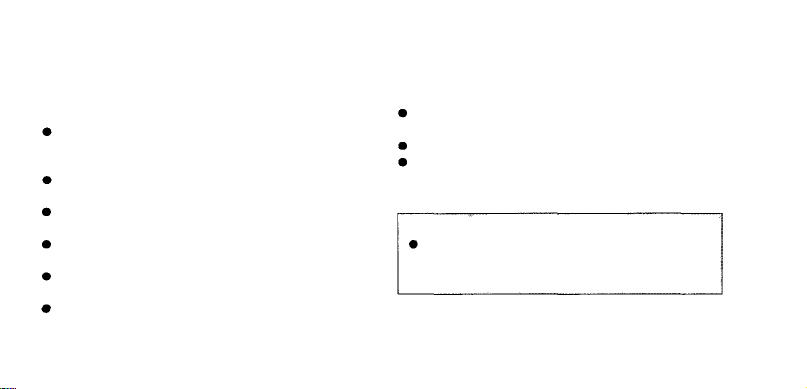
CARE AN D STORAGE
CAUTIONS
DO NOT EXPOSE THE CAMERA TO EXTREME
HEAT (O VER 40°C/104°F) OR TO EXTREME
COL D ( BE LO W -10°C/14°F).
AVOID SUDDEN TEMPERATURE CHANGES
AND HUMIDITY.
DO NOT EXPOSE THE CAMERA TO STRONG
MAGNETIC FIELDS.
DO NOT APPLY EXCESSIVE FORCE TO THE
CAMERA OR ITS CONTROLS.
DO NOT TOUCH THE CONTACT POINTS INSIDE
THE CAMERA.
DO NOT USE ORGANIC SOLVENTS, THINNERS,
OR BENZINE TO CLEAN THE CAMERA.
AVOID STRONG IMPACT CAUSED BY BUMPING
OR DROPPING THE CAMERA.
KEEP THE CAMERA DRY.
DO NOT EXPOSE THE CAMERA TO EXCESSIVE
DUST AND SAND.
WARNING
NEVER ATTEMPT TO DISASSEMBLE
THE CAMERA; IT CONTAINS A HIGH-
VOLTAGE CIRCUIT.
In case of malfunction, consult you r nearest
Olympus dealer or Olympus service center.
33
Page 34

BATTERY HANDLING
NOTES
Even when batteries are brand-new, their
service life may be shorter than specified if
an extended period of time has passed
since they were produced.
Do not mix different types of batteries or
new and old batteries.
When the camera is not to be used for an
extended period of time (more than a year),
remove the alkaline batteries fr om the
camera to avoid damage from leakage.
Keep spare batteries on hand when going
on a long trip or to a co ld area.
34
Sweat and oil can prevent a battery's
terminals from making electrical contact.
To avoid this, wipe both terminals before
loading batteries.
WARNINGS
NEVER TRY TO DISASSEMBLE, RECHARGE,
OR SHORT CIRCUIT BATTERIES. NEVER
EXPOSE BATT ERIES TO EXCESSIVE HEAT.
KEEP THE BATTERIES OUT OF THE REACH OF
CHILDREN. IF A CHILD SWALLOWS A
BATTERY, CONTACT A DOCTOR
IMMEDIATELY.
USE ONE 3V LITHIUM BATTERY (CR123A OR
DL123A) OR TWO AA (R6) ALKALINE
BATTERIES. NEVER TRY TO DISASSEMBLE OR
MODIFY ANY BATTERY OR BATTERY PACK
FOR USE IN THIS CAMERA.
Page 35
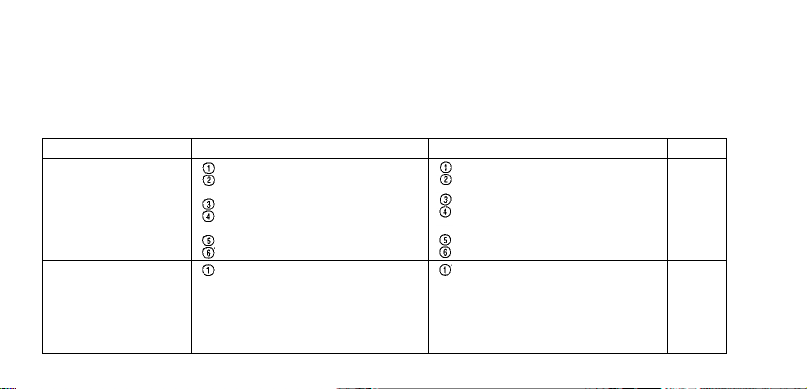
OPERATING PROBLEMS
Symptom
The camera does not
work.
The LCD display turns off
suddenly.
The power is OFF
The alignment of the battery
terminals is not correct.
The batteries are exhausted.
The batteries are temporarily
unable to function.
The loaded film has been rewound.
The film is incorrectly loaded.
The LCD display turns off after four
and a half minutes if the camera is
not used.
TROUBLESHOOTING
Cause
Set the ON/OFF switch to ON.
Reload the batteries correctly.
Replace the batteries with new ones.
Keep the camera warm while using it.
Remove the film.
Reload the film.
Turn the power off and then on again
or press the shutter release button
halfway to turn on the LCD panel.
In addition, the power is turned OF F
automatically after 4 hours. When
the camera is not in use, keep the
power OFF as much as possible.
Remedy
See
p. 18
p. 12
p. 13
p. 33
p. 24
p. 17
35
Page 36
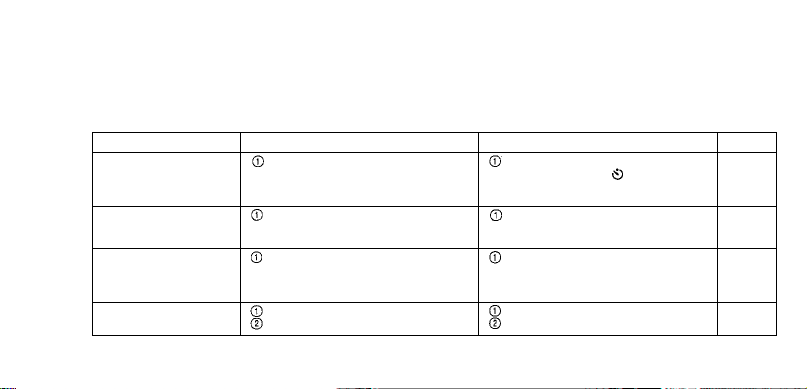
OPERATING PROBLEMS
Symptom
The shutter doesn't
release when the remote
control's shutter release
button is pressed.
The green lamp blinks,
and the shutter will not
release.
The orange la mp blinks,
and the shutter wil l not
release.
The flash does not fire,
even in the dark.
The remote control hasn't been used
in the 15 minutes since the Selftimer/
Remote Control mode was entered,
causing the LCD panel to turn off.
The camera is too close to the subject.
The flash has not been recharged yet.
The flash mode is set to OFF.
High-speed film is used.
Cause
Turn the zoom dial. The LCD will
light. Then press the /REMOTE
button again.
Move the camera farther than
0.6 m (2 ft) from the subject.
Remove your finger from the shutter
release button and wait for several
seconds until the flash is recharged
before shooting.
Set it to a mode other than OFF.
Set the flash mode to FILL-IN.
36
Remedy
See
p. 21
p. 26
p. 25
Page 37
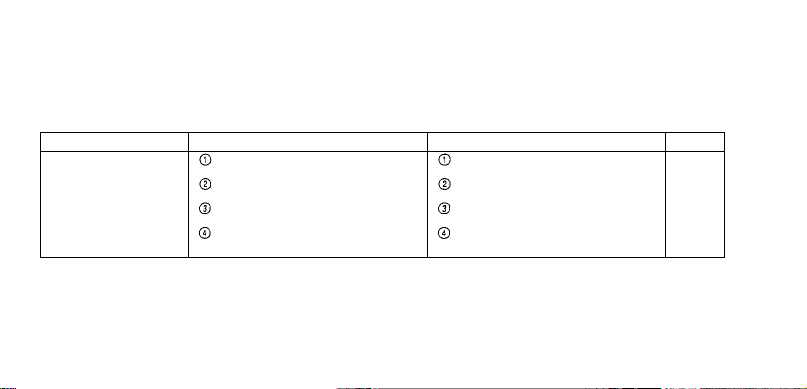
PROBLEMS WITH THE PRINTED PICTURES
Symptom
The picture is out of
focus.
The camera moved when th e shutter
release button was pressed.
The subject was not within t h e
viewfinder's autofocus mark.
The lens and autofocus windows were
dirty.
The autofocus window was
blocked, such as by a finger.
Cause
Hol d the camera correctly a nd press the
Remedy
shutter release button gently.
Position the subject in the center of the
autofocus mark, or use the focus lock.
Clean the lens and autofocus windows.
Hold the camera correctly, keeping your
fingers clear of the autofocus windows.
See
p. 14
p. 22
p. 14
37
Page 38
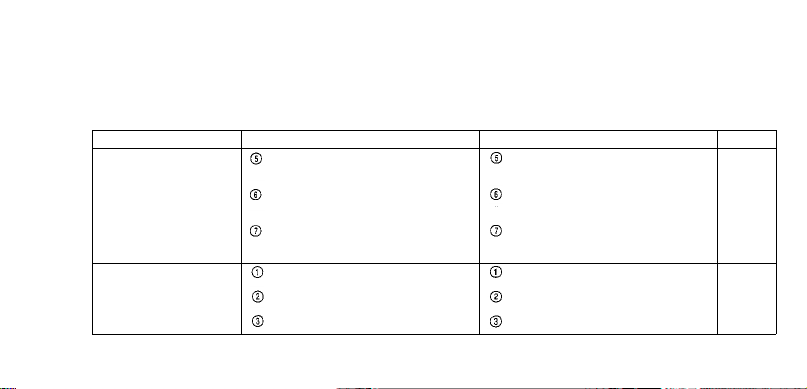
PROBLEMS WITH THE PRINTED PICTURES
Symptom
The picture is out of
focus.
The picture is too dark.
The subject was closer than the
minimum working distance to the lens
(0.6
While using the self-timer, the shutter
release button was pressed while
standing right in front of the camera.
When using the self-timer to photograph
yourself, the autofocus has been set
on the background.
The flash was blocked, such as by
a finger.
The subject was out of the working
range of the flash.
The subject was backlit.
38
m/2
ft).
Cause
Shoot from more than 0.6 m (2 ft)
away from the subject.
Do not stand in front of the camera.
Press the shutter release button while
looking through the viewfinder.
Use the focus lock to set focus on an
object at the same distance from the
camera as you will be.
Hold the camera correctly, keeping your
fingers clear of the flash.
Shoot within the flash working range.
Set the flash mode to FILL-IN.
Remedy
See
p. 21
p. 28
p.22/28
p. 14
p. 25
p. 27
Page 39
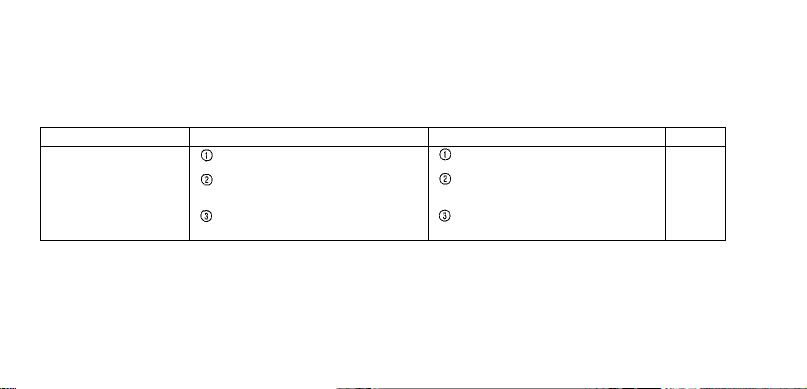
Symptom
The date has not been
printed (or looks faded).*
The dat e mod e was set t o
Cause
no dat a ( - - - )
There is a bright color l ik e white,
orange, or yellow in the area of the
picture where the date is printed.
The picture was taken with
black-and-white film.
Change the date mode to another
setting.
Avoid bright colors in the lower left
corner of your photo compositions.
Do not use black-and-white film.
*QUARTZDATE/DLX models only
Remedy
See
p. 30
39
Page 40

SPECIFICATIONS
Type: Full automatic 35mm autofocus lens-shutter
camera with built-in 38 ~ 70mm zoom lens.
Film format: 35mm standard DX-coded film
(24 X 36
Lens: Olympus lens 38 ~ 70mm F4.5 ~ 7.8,
Shutter: Programmed electronic shutter.
Viewfinder: Real image type zoom viewfinder (with
40
mm).
5 elements in 4 groups.
autofocus mark, close-up correction marks,
autofocus indicator and flash indicator).
Focusing: Active type autofocus system. Focus lock
possible. Focusing range: 0.6 m (2 ft) ~
(infinity).
Exposure control: Programmed automatic exposure
control. Center-weighted average light metering.
Auto exposure range: Wide-angle — EV4.4
(F4.5, 1 sec.) to EV16 (F11, 1/500 sec.),
Telephoto — EV5.9 (F7.8, 1 sec.) to EV17.5
(F19, 1/500 sec.).
Page 41

Exposure counter: Progressive type with automatic
reset, displayed on LCD panel.
Self-timer: Electronic self-timer 12-sec. delay.
Remote control (optional): Infrared remote control
unit with 3-sec. delay.
Film speed range: Automatic setting w i th DX - coded
film with ISO 50, 100 , 200, 400, 800, 1600, 3200.
For non-DX-coded film and film speeds lower
than ISO 50, film speed is set to ISO 100.
Film loading: Automatic loading. (Automatically
advances to first frame when camera back is
closed).
Fil m advance: Automatic film winding.
Film rewind: Automatic film rewind (automatic rewind
activation at end of film, automatic rewind stop).
Rewind possible at any point with rewind button.
41
Page 42

Flash: Built-in flash. Recycling time: Approx. 5 sec.
(at normal temperature with new batteries).
Flash working range: Wide-angle — 06 ~ 3.8 m
(2 ~ 12.5 ft), Telephoto — 0.6 ~ 2.2 m (2 ~ 7.2 ft)
with ISO 100 color negative film; Wide-angle —
0.6 ~ 7.6 m (2 ~ 24.9 ft), Telephoto — 0.6 ~
4.4 m (2 ~ 14.4 ft) with ISO 400 color negative
film. Flash m odes: AU TO (Automatic flash
activation in low light). AUTO-S (Red-eye
42
reducing, in low light). OFF (No flash). FILL-IN
(Forced activation ).
Battery check: Displayed on LCD panel.
Power source: One 3V lithium battery (CR123A or
DL123A) or two AA (R6) alkaline batteries.
Dimensions: 128(W) X 66(H) X 50(D) mm (5-1/16 X
2-5/8 X 1-15/16 in) (without protrusions).
Weight: 235 g (8.3 oz) (without batteries).
Page 43

SPECIFICATIONS FOR DATE UNIT*
Imprinting direction: Data imprinted onto film f r o m
lens side.
Data coding: No data, year-month-day, month-day-
year, day-month-year and day-hour-minute.
SPECIFICATIONS AND DESIGN ARE SUBJECT TO CHANGE WITHOUT ANY NOTICE OR OBLIGATION ON
THE PART OF THE MANUFACTURER.
External indication of data: D ata display on liquid
crystal panel.
Fil m speed setting: Automatic film speed setting.
Automatic calendar system: Up t o year 2013.
Power source: Ordinarily used wi th camera body.
*QUARTZDATE/DLX models only
43
Page 44

San-Ei Bui ldi ng , 22-2, Nishi Shinjuku 1-chome, Shinjuku-ku, Tokyo, Japan. Tel. 03-3340-2211
Two Corporate Center Drive, Melville, NY 11747-3157, U.S.A. Tel. 516-844-5000
(Premises/Goods delivery) Wendenstrasse 14-16, 20097 Ha m burg, Germany. Tel. 040-237730
2-8 Honduras Street, London EC1Y 0TX , United Kingdom. Tel. 0171-253-2772
OLYMPUS
OLYMPUS AMERICA INC.
OLYMPUS OPTICAL CO. (EUROPA) GMBH.
(Letters) Postfach 10 49 08, 20034 Hamburg, Germany.
OLYMPUS OPTICAL CO. (U.K.) LTD.
OPTICAL
CO.,
LTD.
 Loading...