

Olympus CAMEDIA P-330, CAMEDIA P-330N, 201021 - P 330N Photo Printer Installation Manual
P-330
Digital color printer
3-865-712-11(1)
Installation Guid e
• This Installation Guide explains h ow to install and use the Digital Color
Printer P-330 for Windows 95/98, 3.1 and Macintosh software.
• Keep this guide handy for future reference and refer to it when requesting
service.

Program © 1998 Olympus Optical Co.,
Ltd.
All rights reserved. This manual or th e
software described herein, in whole or
in part, may not be reproduced,
translated or reduced to any machine
readable form w ithout prior written
approval from Olympus Optical Co.,
Ltd.
IN NO EVENT SHALL OLYMPUS
OPTICAL CO., LTD. BE LIABLE FOR
ANY INCIDENTAL,
CONSEQUENTIAL OR SPECIAL
DAMAGES, WHETHER BASED ON
TORT, CONTRACT, OR
OTHERWISE, ARISING OUT OF OR
IN CONNECTION WITH THIS
MANUAL, THE SOFTWARE OR
OTHER INFORMATION
CONTAINED HEREIN O F T HE USE
THEREOF.
By breaking the seal of the envelope of
the CD-ROM package, you accept all
the terms and conditions of this
agreement. If you do not accept these
terms and conditions, please return
this disk envelope unopened, along
with th e rest of the package,
immediately to the dealer where you
obtained it.
OLYMPUS OPTICAL CO., LTD.
reserves the right to make any
modification to thi s manual or the
information contained herein at any
time without notice.
Trademarks
• IBM a nd PC/AT ar e trademarks of IBM
Corporation.
• Microsoft and Windows are registered
trademarks of Microsoft Corporation in
the United States and other countries.
• Macintosh is a trademark licensed to
Apple Computer Inc., registered in th e
U.S.A. and other countries.
• All other product names mentioned
herein may be the trademarks or
registered trademarks of their respective
companies.
Furthermore, "™" and "®" are not
mentioned in each case in this manual.
Notice f or users
2

System requirements ............................. 4
Installing the software ........................... 5
Uninstalling the software ................ 7
Printing ................................................... 8
Stopping printing .......................... 10
Hints for better printout ................. 11
Setting the resolution ........................... 12
Adjusting the picture quality .............. 13
Making the split print ......................... 14
Making multiple prints
at high speed ................................... 15
System requirements ........................... 29
Installing the software ....................... 30
Printing ............................................... 32
Stopping printing .......................... 35
Hints for better printout ................ 35
Adjusting the picture quality .............. 36
Making the split print ......................... 38
Previewing the image ....................... 39
System requirements ........................... 17
Installing the software ......................... 18
Uninstalling the software .............. 21
Printing ................................................. 22
Stopping printing ........................... 24
Hints for better printout ............... 24
Setting the resolution ........................ 25
Adjusting the picture quality ............. 26
Making the split print ......................... 27
Making multiple prints
at high speed ................................... 28
For Windows 3.1
(from page 17)
For Windows 95/98/3.1,
Macintosh (from page 41)
Troubleshooting ...................................
41
For Macintosh
(from page 29)
For Windows 95/98
(from page 4)
Contents
3

Notes
• This software is subject
to be upgraded without
notice.
• The pictures used in
this manual may be
different from the
actual screen of the
software.
Your computer and system software must meet the
following minimum requirements to run the printer
driver.
• IBM PC/AT compatible personal computer
Supporting Windows 95/98 with i486SX and above
CPU (Pentium or later recommended)
• Memory
8MB or more (32 MB or more is recommended
depending on the application software used to print)
• Hard disk space
15MB or more free space (30MB o r more is
recommended)
Larger pictures and more pages require more hard
disk space.
• Video monitor
A video board or video driver which displays 256
colors or better (32, 0 00 colors or more is
recommended)
• Drive
CD-ROM drive (needed for installation)
For th e latest information, refer to the "readme.txt"
contained in the "English\Win95-98" directory of the
supplied CD-ROM.
System requirements
For Windows 95/98
4
For Windows 95/98
Installing the software
Install the software containing the printer driver for
Windows 95/98 in the supplied CD-ROM.
Connect the printer to the computer.
See the operating instructions of the Digital Color
Printer.
Turn on the printer and the computer. Then start
Windows 95/98.
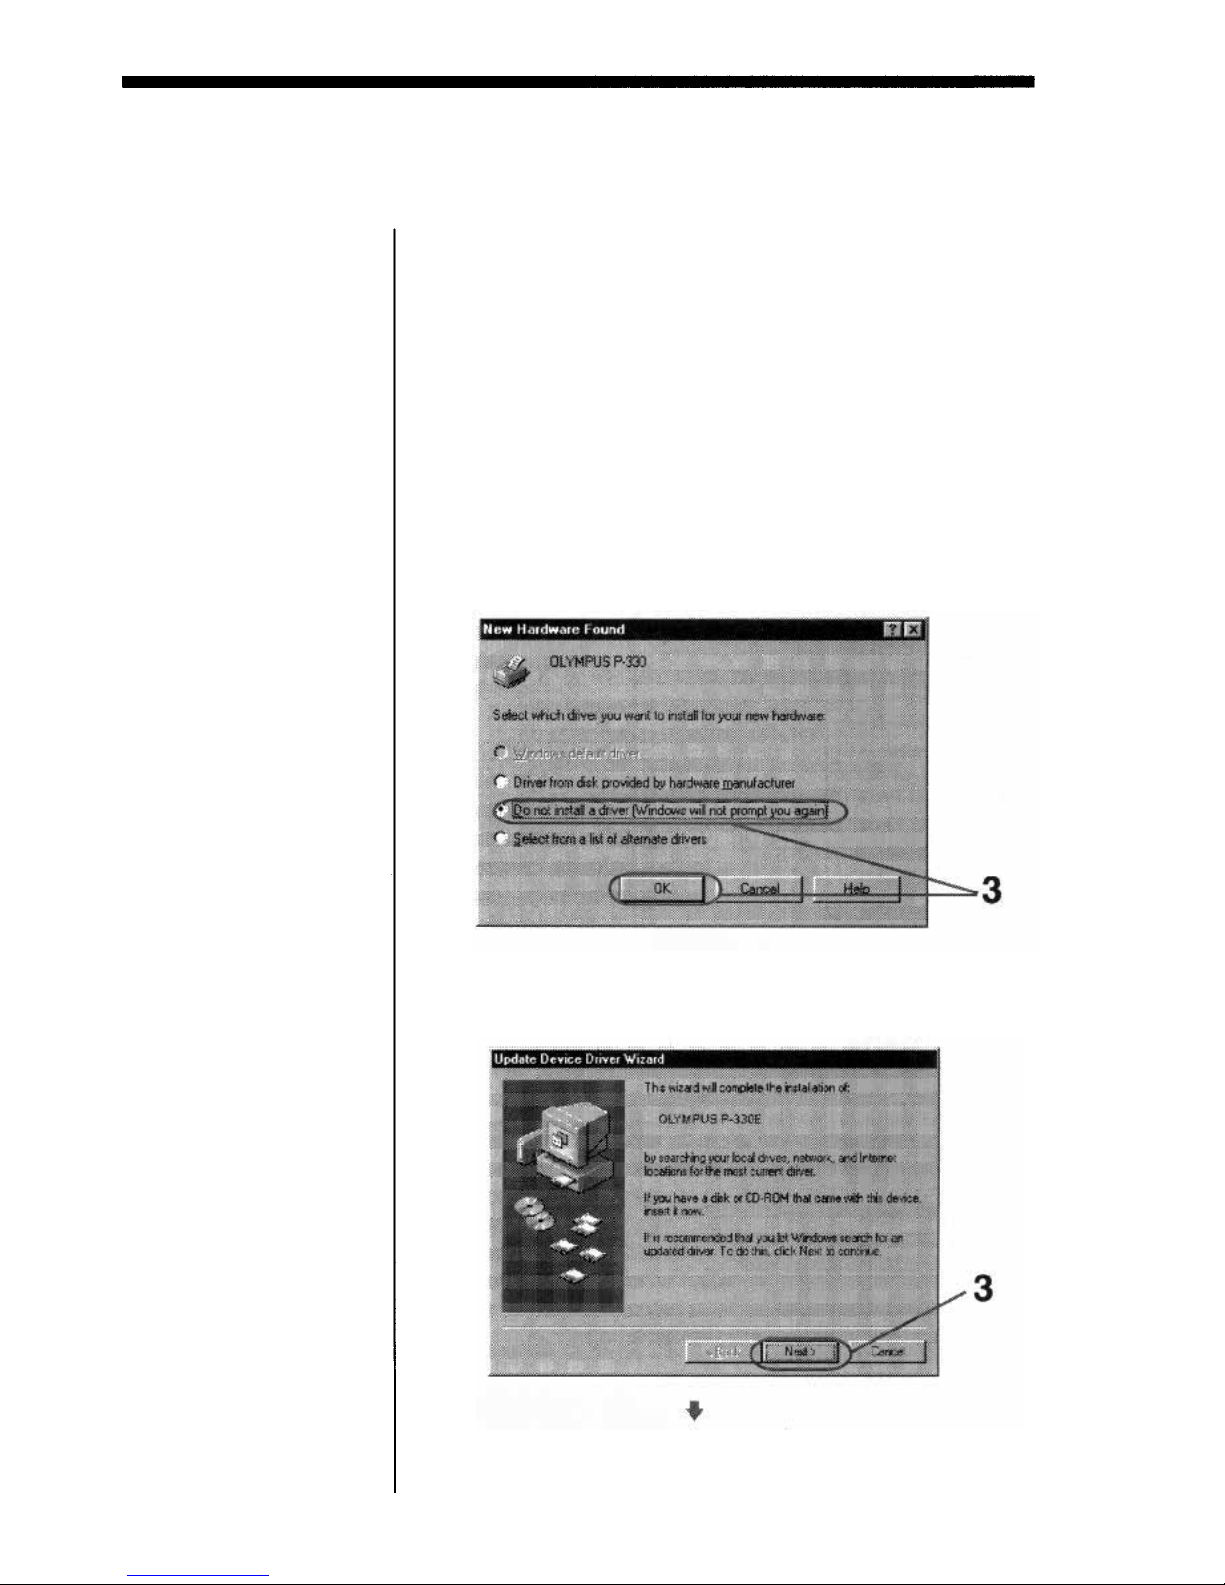
If the following [New Hardware Found] screen is
displayed, check [Do not install a driver] and click
[OK].
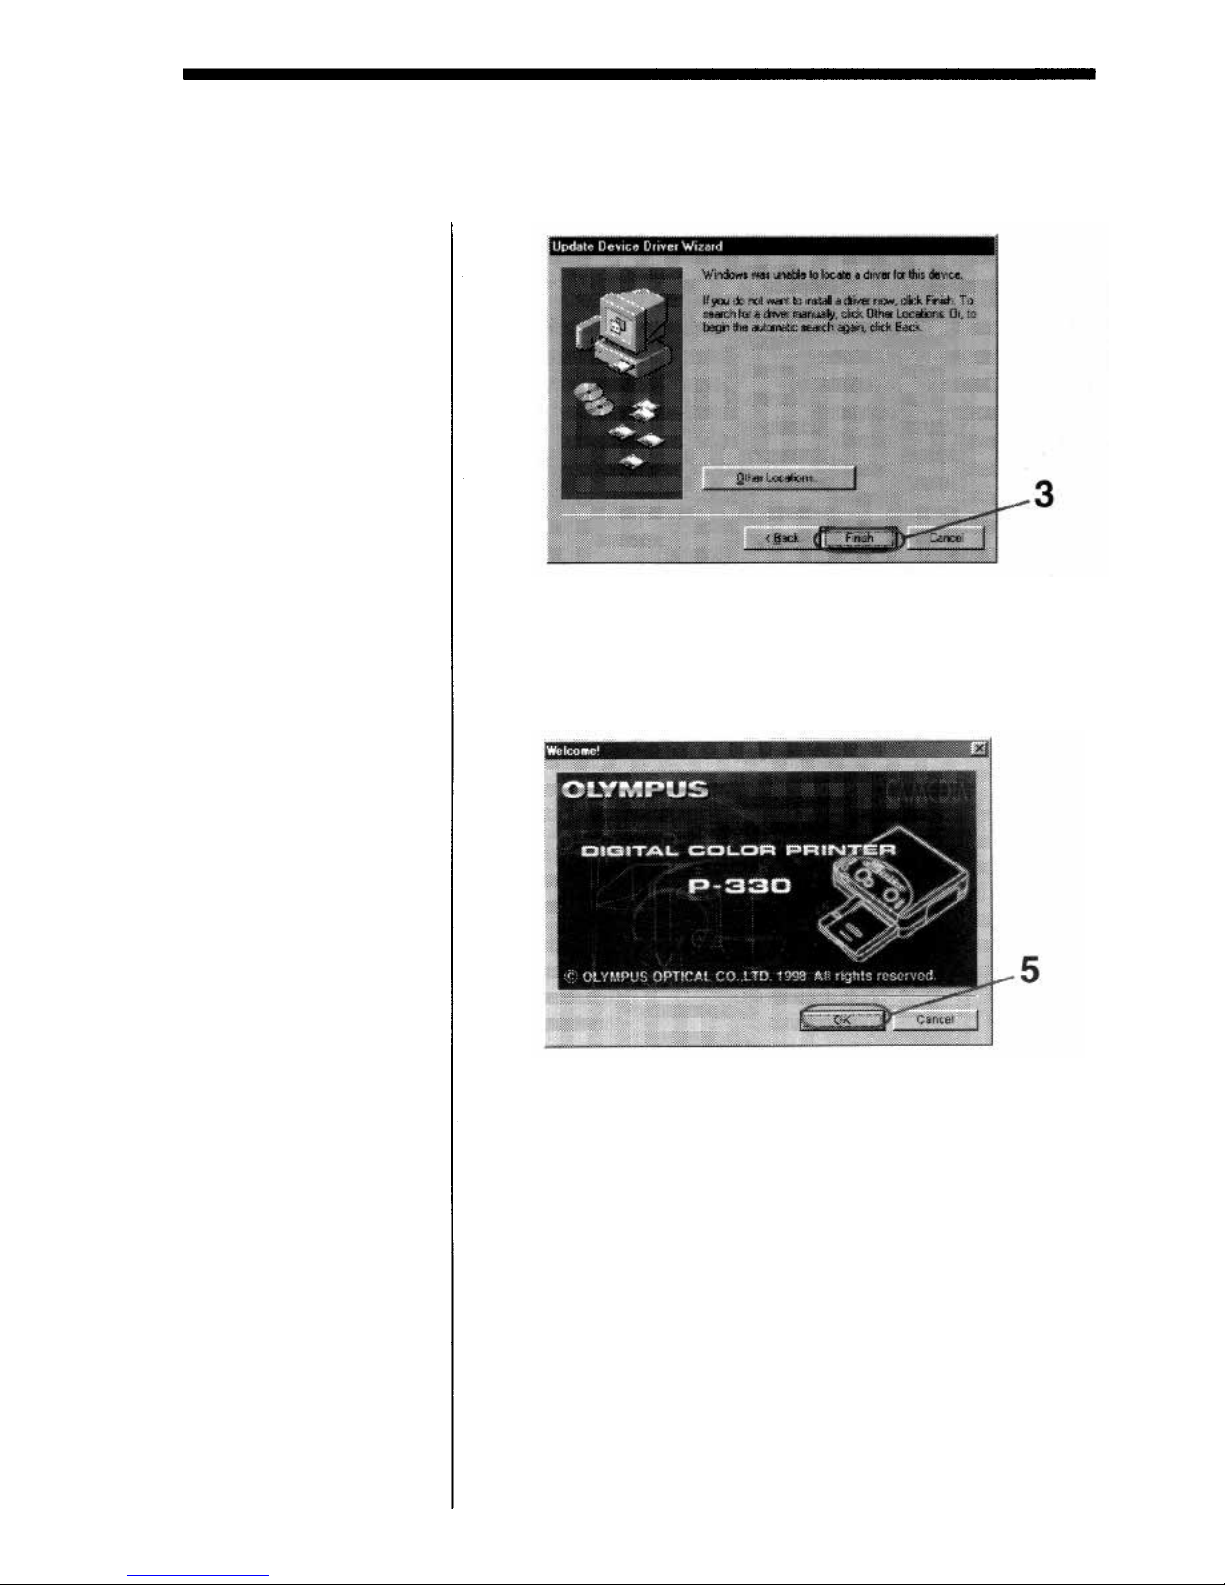
If the following [Update Device Driver Wizard]
screen is displayed, click [Next] and then [Finish].
For Windows 95/98
1
2
3
5
Notes
• When th e dialog
prompting you to insert
the Windows CD- R O M
or floppy disk appears
during installation,
insert the specified CD-
ROM or floppy di sk
and click [OK]. If the
Windows Setup starts
after the Windows CDROM is inserted, finish
the Set up program.
• You can install the
software without
performing st eps 1
through 3. Start
Windows 95/98 and
then perform steps 4
through 6. If the di al og
of step 3 appears after
the computer is
restarted, perform step
3.
• If the Setup does not
start automatically after
the supplied CD-ROM
is inserted, or if you
stop Setup midway and
resume it later, double-
click the [Setup.exe]
icon contained in the
"English\Win95-98"
directory of the
supplied CD-ROM.
Tip
For the latest information,
refer to the "readme.txt"
contained in the
"English\Win95-98"
directory of the supplied
CD-ROM.
Click [OK] repeatedly until the screen notifying
that the Setup is complete appears.
Clic k [OK].
Installation finishes.
5
6
Insert the supplied CD-ROM into the CD-ROM
drive.
The Setup starts automatically and the Setup dialog
appears.
4
For Windows 95/98
6

Uninstalling the software
When the driver software becomes unnecessary,
remove all the software files f ro m your hard disk as
follows:
Click the Windows [Start] button, click [Settings],
and click [Printers].
The [Printers] dialog appears.
Click to select [OLYMPUS P-330].
Click [Delete] f r o m the [File] menu.
Follow the on screen instructions to remove the
OLYMPUS P-330 Printer Driver from y ou r h ard
disk.
1
2
3
4
For Windows 95/98
7
Printing
Tip
When you print in 306 dpi
in the application
software, set the picture
size up to 1376 x 1024
pixels.
Note
If the message "This
printer is not supported
by the driver currently
associated with it.
Windows will use
OLYMPUS P-330
instead." appears, click
[OK].
Start the application software used to print, and
sele ct the image to b e printed.
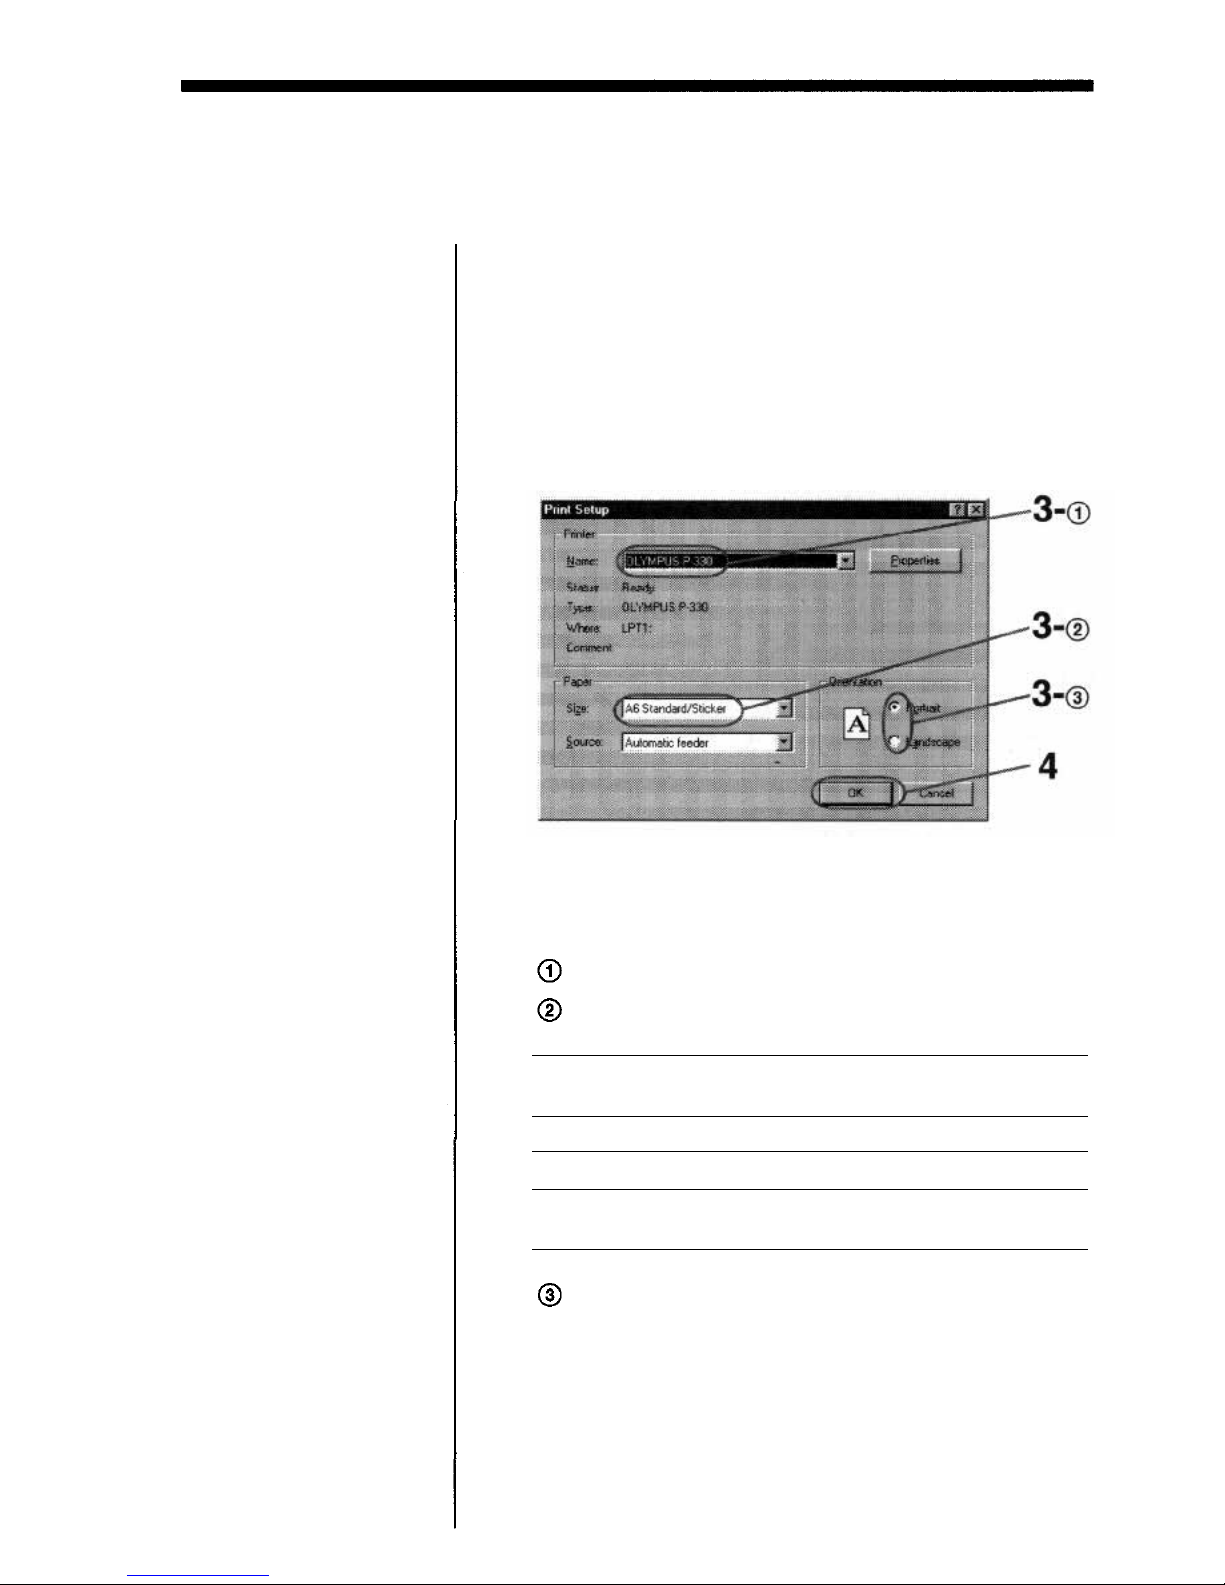
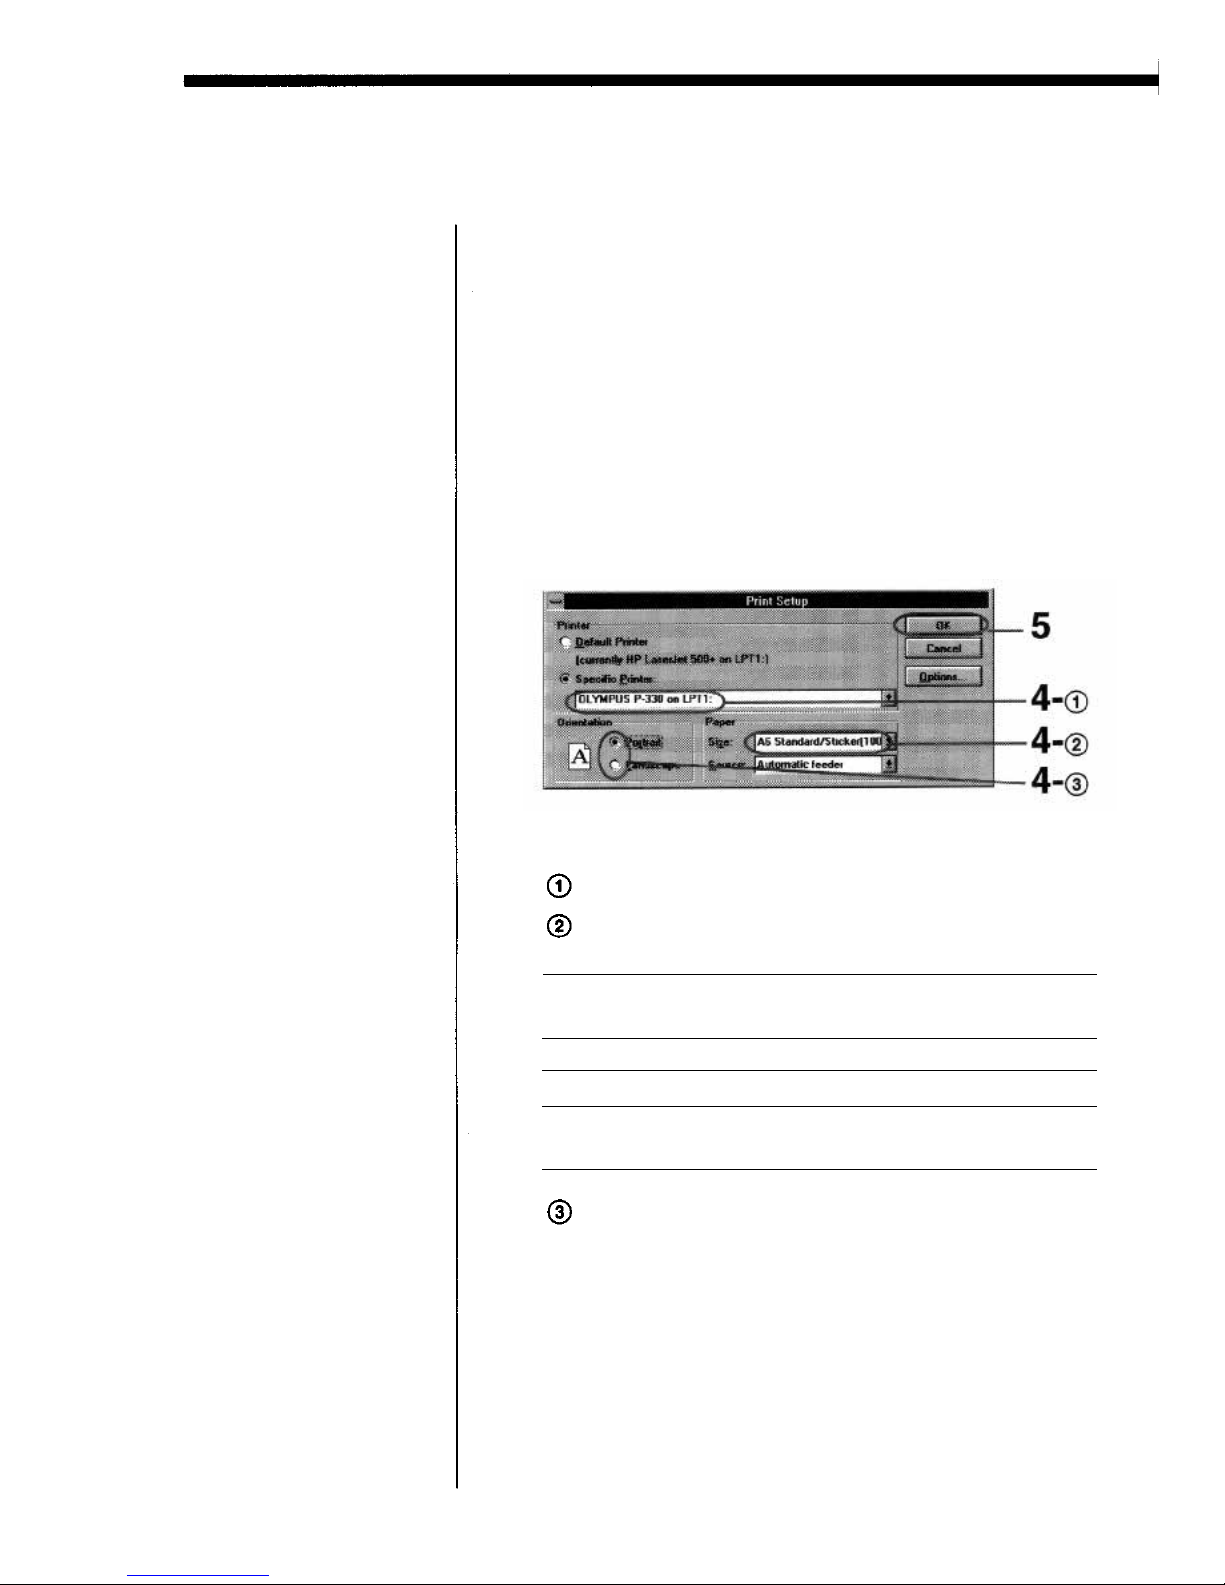
Click [Printer Setup] from the [File] menu of the
application.
The [Print Setup] dialog appears.
Se t the printer.
1
2
3
Set [Printer] to [OLYMPUS P-330].
Set [Size] referring to the combination below.
The above dialog is o f the OLYMPUS C-2.0W95 as
an example. The dialog differs depending on the
application.
Notes
• Use the se t of the print
paper and ink ribbon
cartridge supplied
together in the same
carton. Also make sure
to set [Size] in th e
combination shown in
the table. If you u se
them in different
combination, proper
printing results may
not be obtained or
other trouble may
occur.
• For the details on print
paper and ink ribbon
cartridge, refer to the
operating instructions
of the printer.
Set [Orientation].
To print i n portrait (tall) format, select Portrait.
To print i n landscape (wide) format, select
Landscape.
For Windows 95/98
Print paper
loaded
Ink ribbon
cartridge loaded
[Size] setting
Standard paper
4-,16-Cut Sticker
Passport photo
paper
Standard type
Standard type
Passport photo
type
A6 Standard/Sticker
A6 Standard/Sticker
A6 Passport photo
paper
8
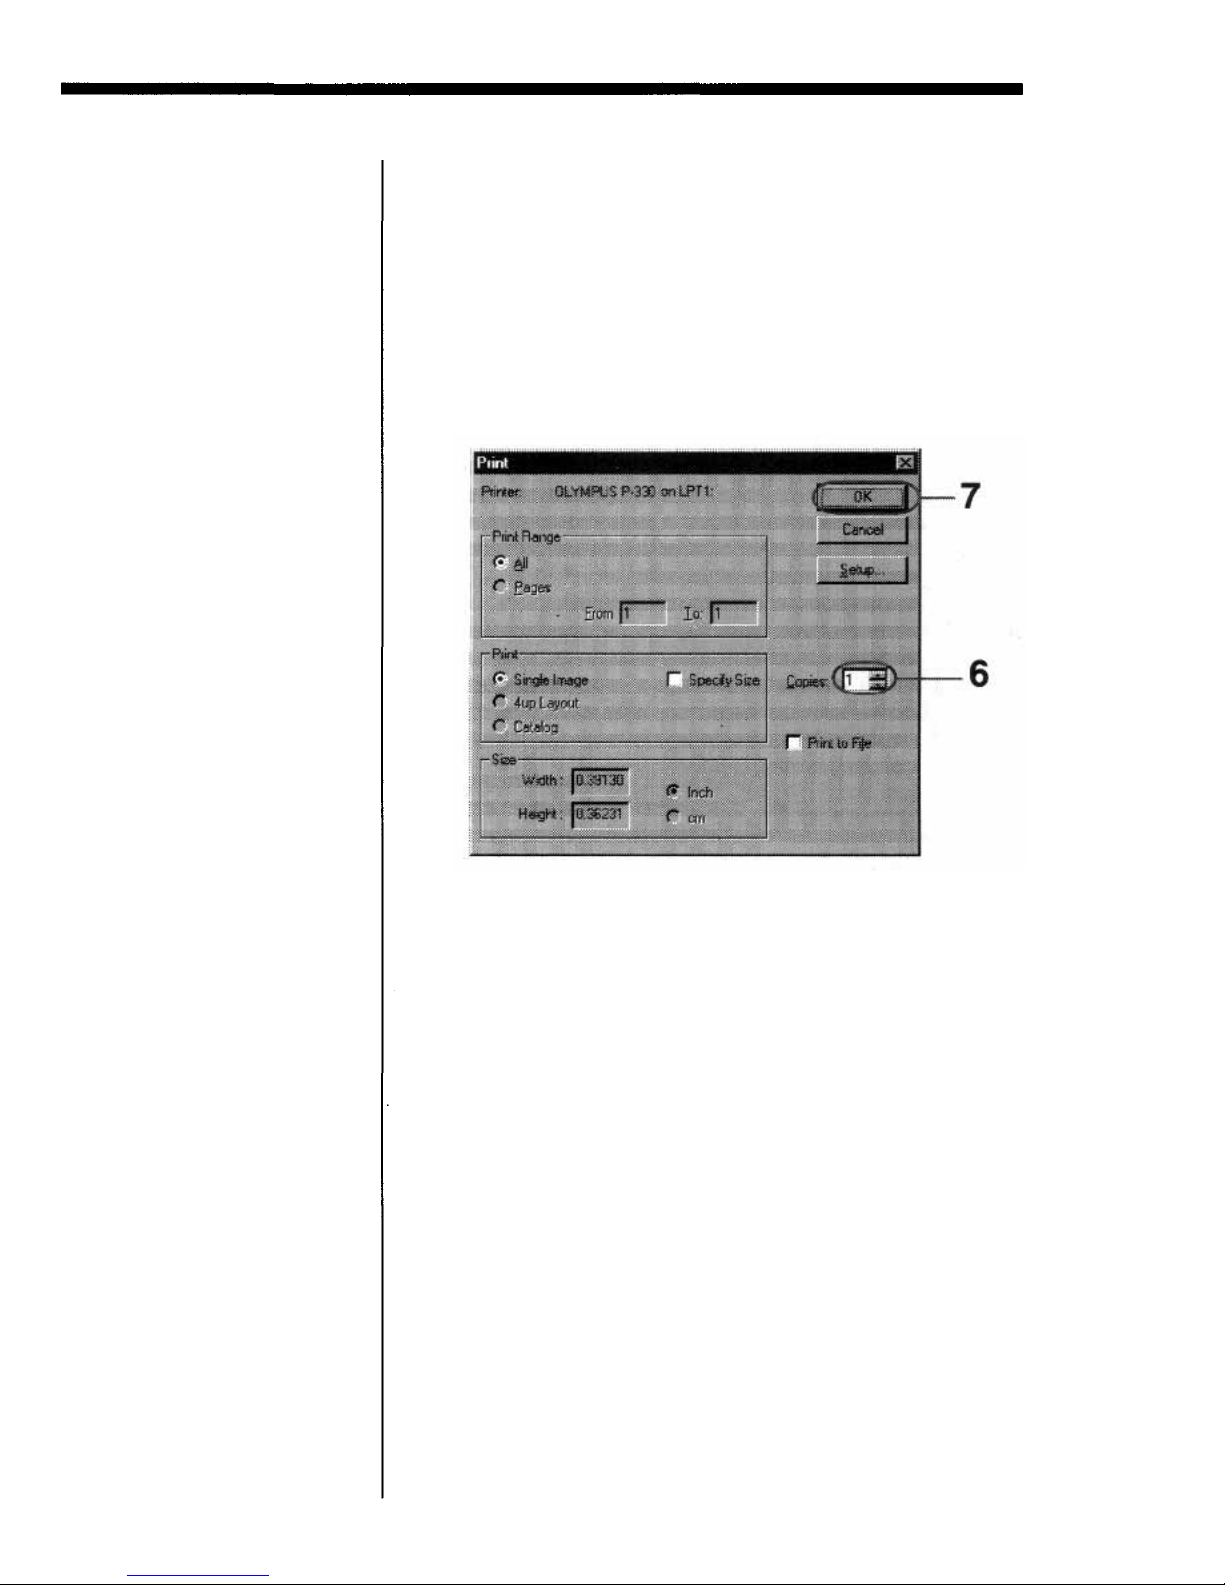
Click [OK] to close the [Print Setup] dialog.
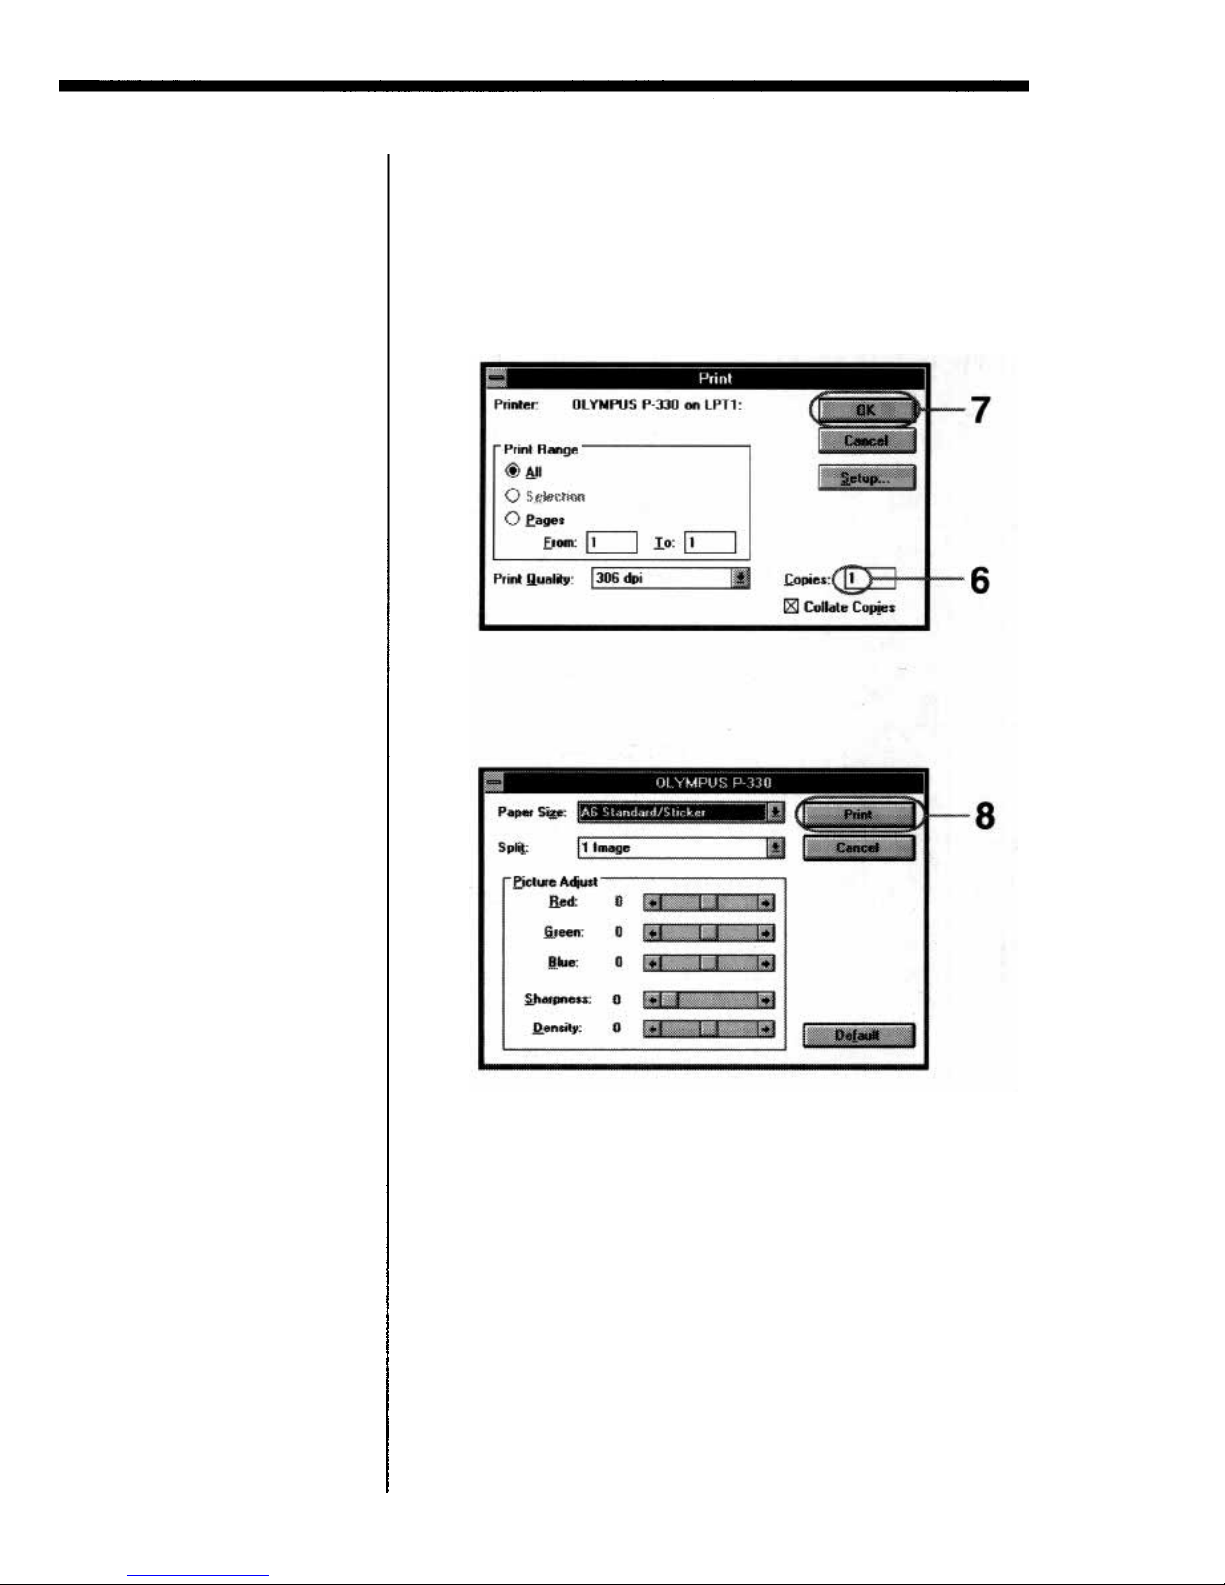
Click [Print] from the [File] me nu of the
application.
The [Print] dialog appears.
Set [Copies].
You can set up to 30 copies. You can print
continuously using the supplied automatic feeder.
4
5
6
For Windows 95/98
The above dialog is of the OLYMPUS C-2.0W95 as
an example. The dialog differs depending on the
application.
9
Click [OK].
The next dialog appears.
7
Fo r further settings and
operations
You can make split
printing (page 14), adjust
resolution (page 12 ) or
picture quality (page 13).
Notes on the high speed
print mode
• Data transmission
speed depends on the
computer.
•
If an error occurs, set to
OFF.
Note
If the printing of the data
has already started, don't
try to cancel printing.
Doing so will cause the
paper to jam.
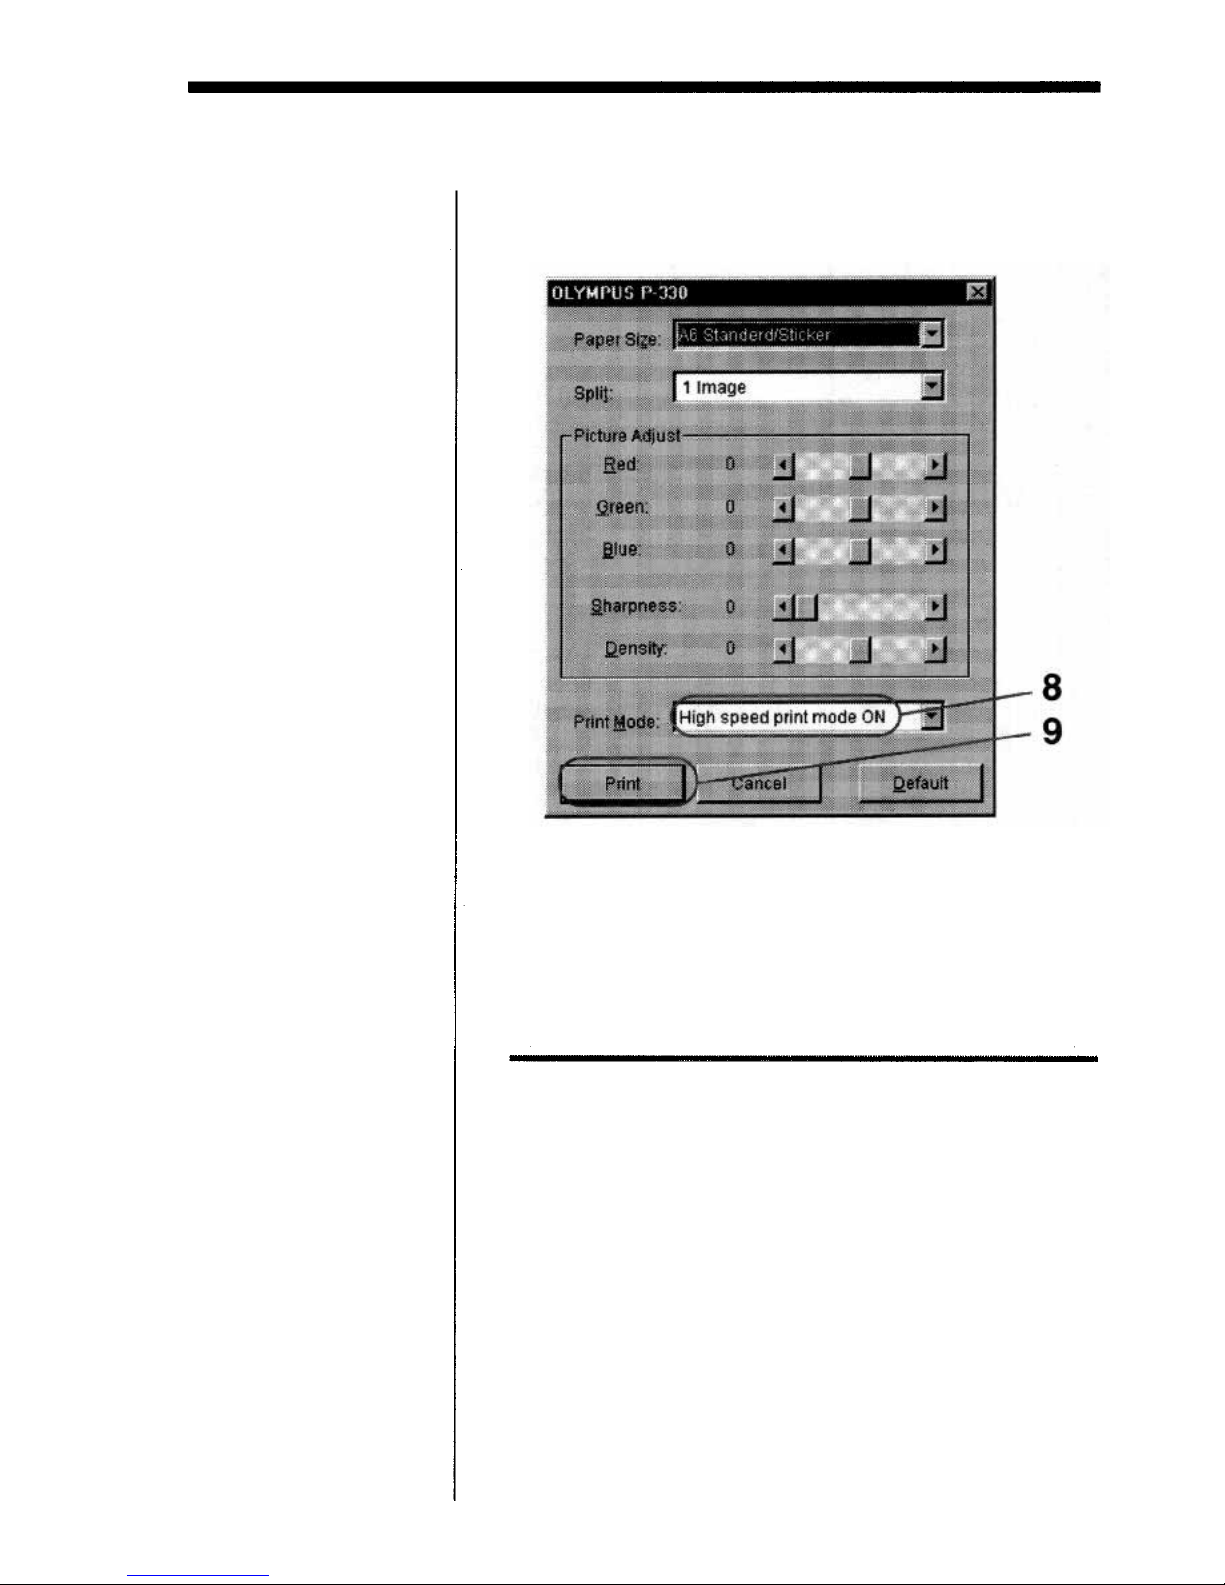
Set [Print Mode] to "High speed print mode O N . "
The data transmission is accelerated.
Click [Print].
The printer starts printing.
8
9
Stopping printing
Whe n a "printing" message is on the screen
Click the [Stop] button or the [Cancel] button. The
printing is canceled.
Whe n t he dat a is in th e print spooler of Windows
95/98
Click [Start].
Point to [Settings] and click [Printers].
Double-click [OLYMPUS P-330] and open the
[OLYMPUS P-33 0] window.
1
2
3
For Windows 95/98
10

Click the "Document Name" waiting to be printed.
Click [Document] in th e men u and then click
[Cancel Printing]. Refer to the manual of the
Windows 95/98 for details.
4
5
Hints fo r better printout
To obtain better print result, read the application
software manual carefully. Changing the resolutio n
and image size a r e very important.
The following information will be useful.
Make the environment in full-color
With some application software, the colors used to
print depends on the display color setting of the
computer you use. To print i n full-color, prepare the
environment which can display 64,000 or 16,770,000
colors.
Adjust the image si ze and resolution (If the
application is to print according to the printer's
resolution)
If yo u can adjust the image size on your application
software, make the resolution within 306 dpi and size
1 376 x 102 4 pixels or 153 dpi and size 68 8 x 51 2 pixels.
If you print an image larger than the above, the image
may be printed split into pieces depending on the
application software. Set the resolution in the paper
setting dialog according to the image resolution to
make better printout.
Fo r Windows 95/98
11
Setting the resolution
You can set the resolution depending on the image you
print.
Start the application software used to print, and
click [Pr in te r Setup] from th e [File] m en u.
The [Print Setup] dialog appears.
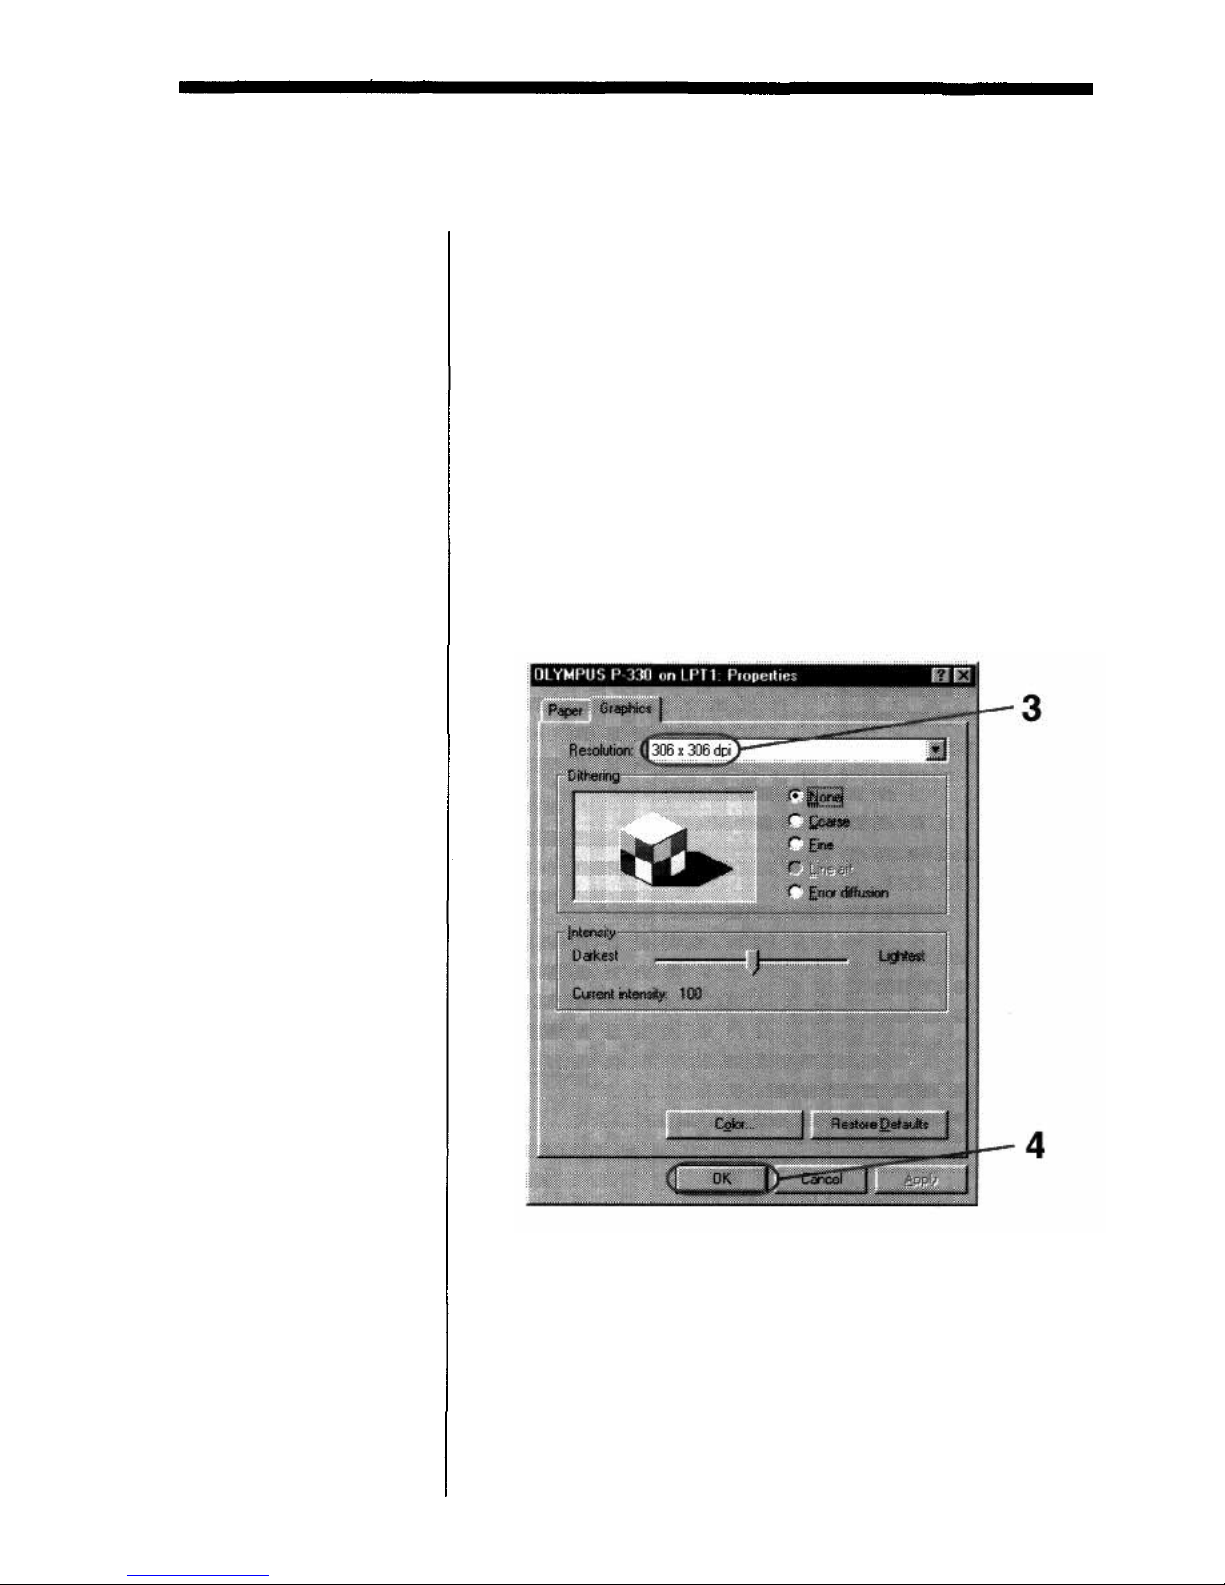
Set [Printer] to [OLYMPUS P-330], click [Properties]
and t hen click [Graphics].
Set the resolution to 30 6 dpi or 15 3 dpi.
30 6 dpi is recommended. Se t to 1 53 dpi for a small
image or to print at h i gh speed.
1
2
3
Maximum picture size
• 1376 x 1024 pixels at
306 dpi
• 68 8 x 512 pixels at 153
dpi
Tip
To print the picture
smaller than 68 8 x 512
pixels, select 1 5 3 dpi.
Printing is performed
more quickly.
Note
You cannot set Dithering,
Intensity and Color i n this
dialog.
Click [OK] to close the [Properties] dialog.
Click [OK] to close the [Print Setup] dialog.
4
5
Fo r Windows 95/98
12

Adjusting the picture quality
You can adjust the picture quality of the prints.
Click [Print] from the [File] menu of the
application, and in the [Print] dialog click [OK].
The [OLYMPUS P-330] dialog appears.
Adjust the picture.
Note
If the application software
has the same adjustment
item as the driver
software, do the
adjustment on the
application software, not
on the driver software. If
you adjust the same item
on both the application
software and the driver
software, the image may
be printed with
unexpected result.
1
2
For Windows 95/98
Move the Red/Green/Blue sliders to
adjust the level of each color ranging
from +20% (stronger) to -20%
(weaker) by 1%.
Red/Green/Blue
Sharpness
Move the slider to adjust the
sharpness by 6 steps ranging from 0, 1
(weak) to 5 (strong).
Move the slider to adjust the density
by 15 steps ranging from +7 (thick) to
-7 (thin).
Density
Default
Click to restore the default settings.
Click to cancel the adjustments and
close the dialog.
Cancel
13
Making the split print
To make the split print
correctly
If the application is to
print according to the
printer's resolution, set
the image size as follows:
• 688 x 512 pixels in 15 3
dpi
• 1376 x 1024 pixels in
306 dpi
See the application's
manual for setting the
image size.
Notes
• Since the length and
breadth ratio of the
image does not match
that of the paper, the
image of the 2-split or
4-split printing is partly
cut off.
• T he 16-split images
printed on the 16-cut
sticker are partly cut off
because the cut size of
the sticker is smaller
than the printed size.
The 4-split images
printed on the 4-cut
sticker are also cut off.
• The 16-split and 4-split
images are adjusted
and printed to the size
of sticker print paper.
• You cannot preview the
printed image.
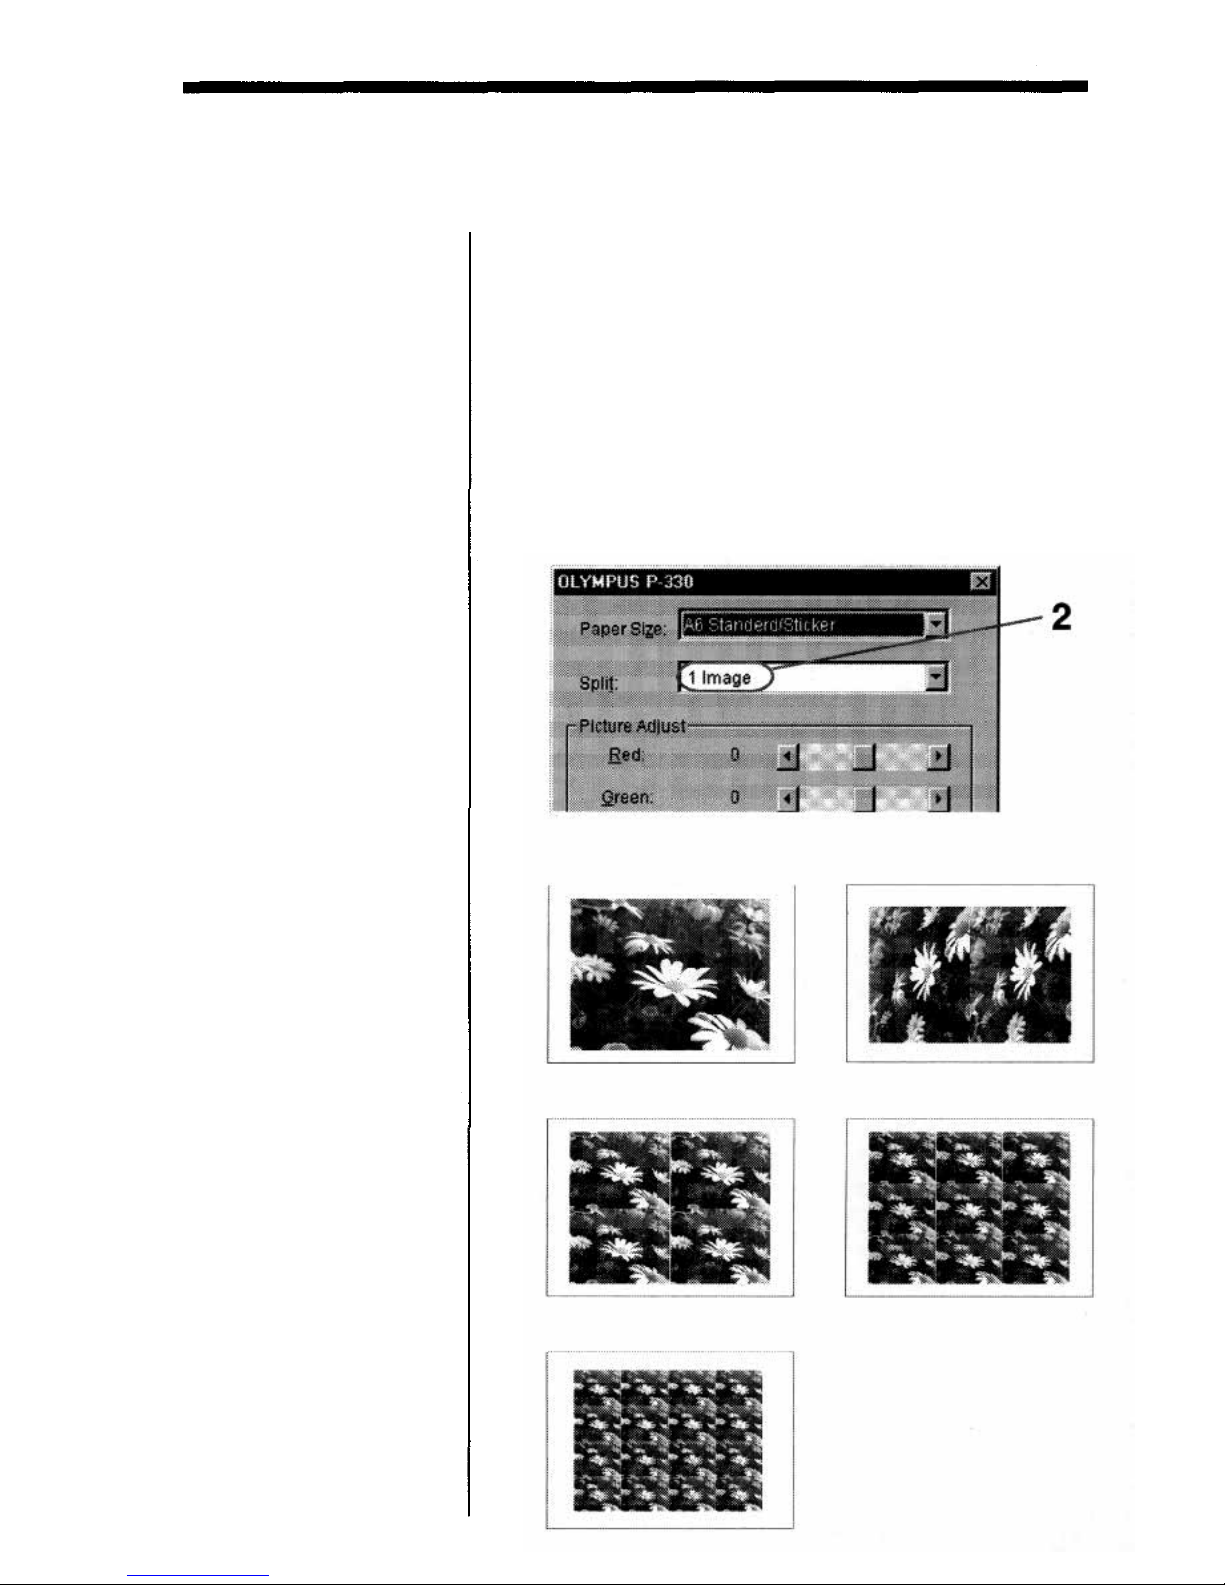
1 6 images
4 images
9 images
1 image
2 images
You c an make a 2- , 4- , 9 -, o r 16-split print with an
image inset in each split-plane.
Click [Print] f r o m the [File] menu of the
application, and in the [Print] dialog click [OK].
The [OLYMPUS P- 33 0] dialog appears.
Select the desired number o f images per sheet in
[Split].
You can select 1, 2, 4, 9, or 16 images per sheet.
1
2
For Windows 95/98
14
Making multiple prints at hig h speed
To print multiple copies at high speed or with limited
hard disk space, check [Print directly to the printer] in
th e [Spool Settings] window before you start printing.
Click [Start].
Point to [Settings] and click [Printers].
Double-click [OLYMPUS P-330] and open the
[OLYMPUS P-330] window.
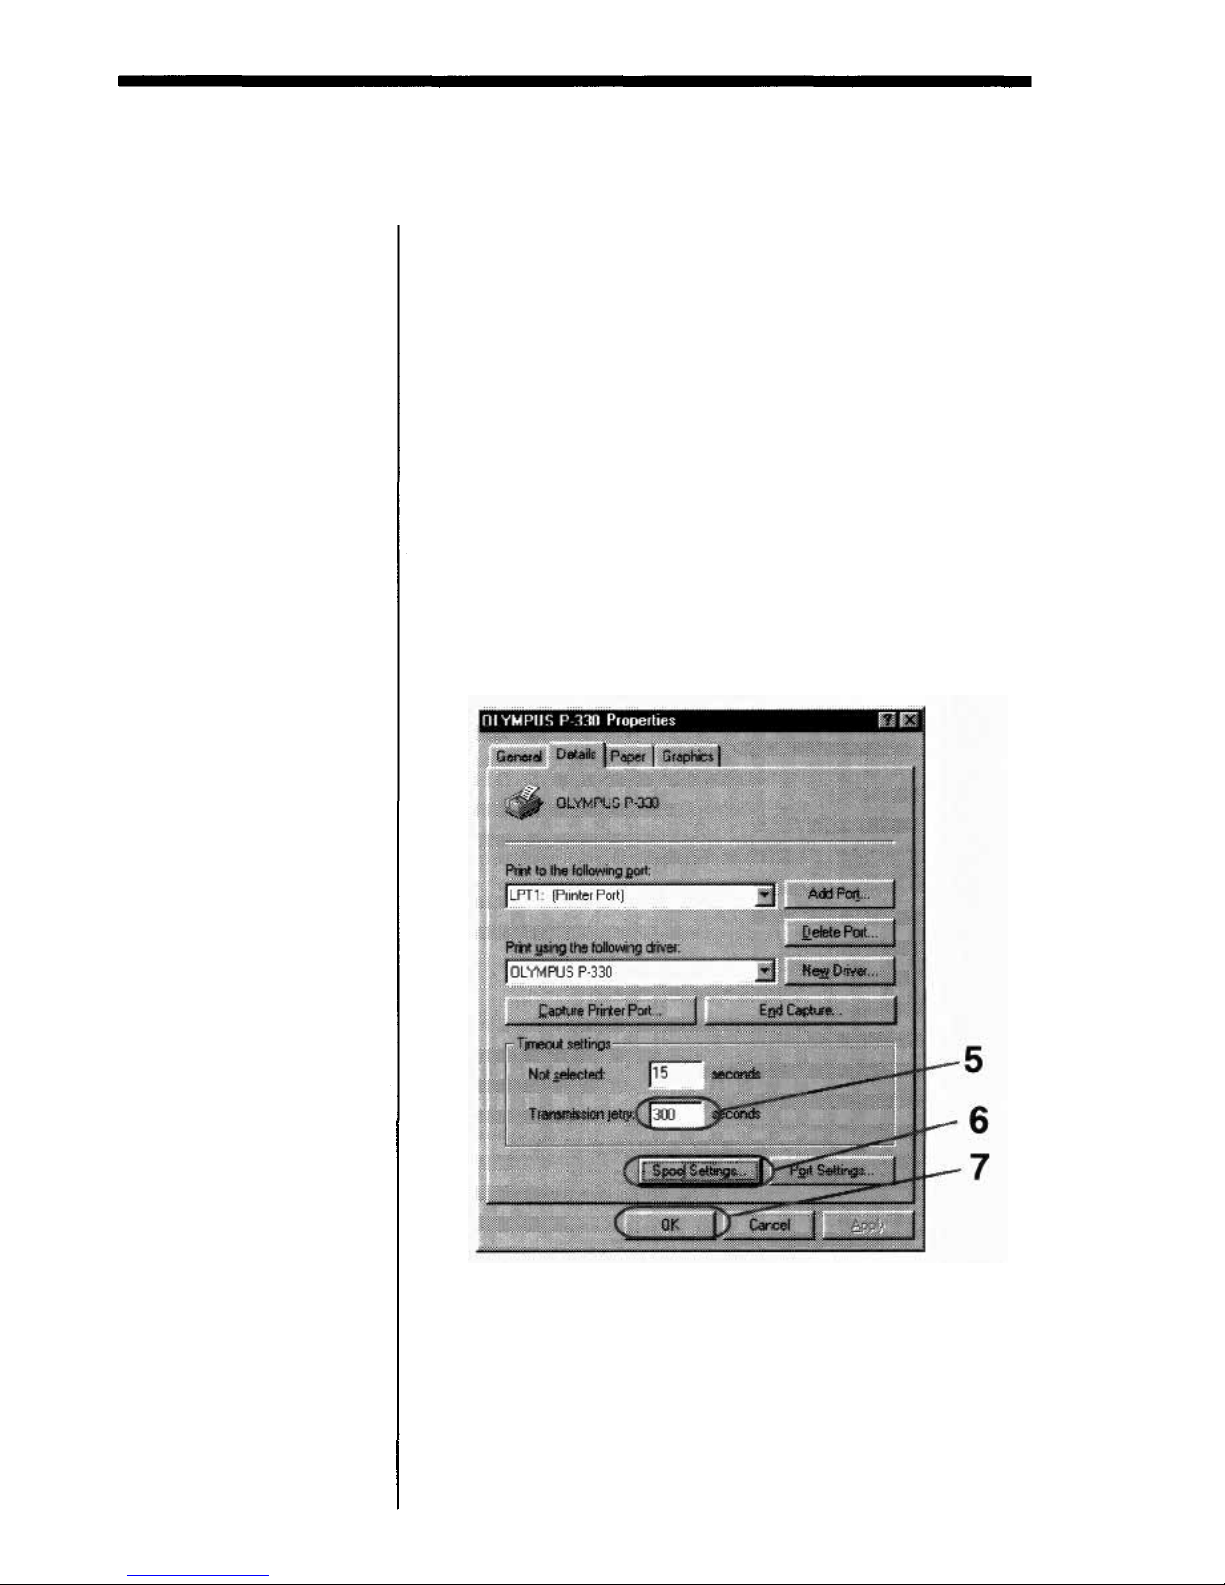
Click [Printer] on the men u bar, click [Properties]
and click [Details].
Click [Transmission retry] of [Timeout settings] to
30 0 seconds.
1
2
3
4
5
Note
You cannot operate the
computer until the
printing is completed.
Click [Spool Settings] to open the [Spool Settings]
window.
6
For Windows 95/98
15
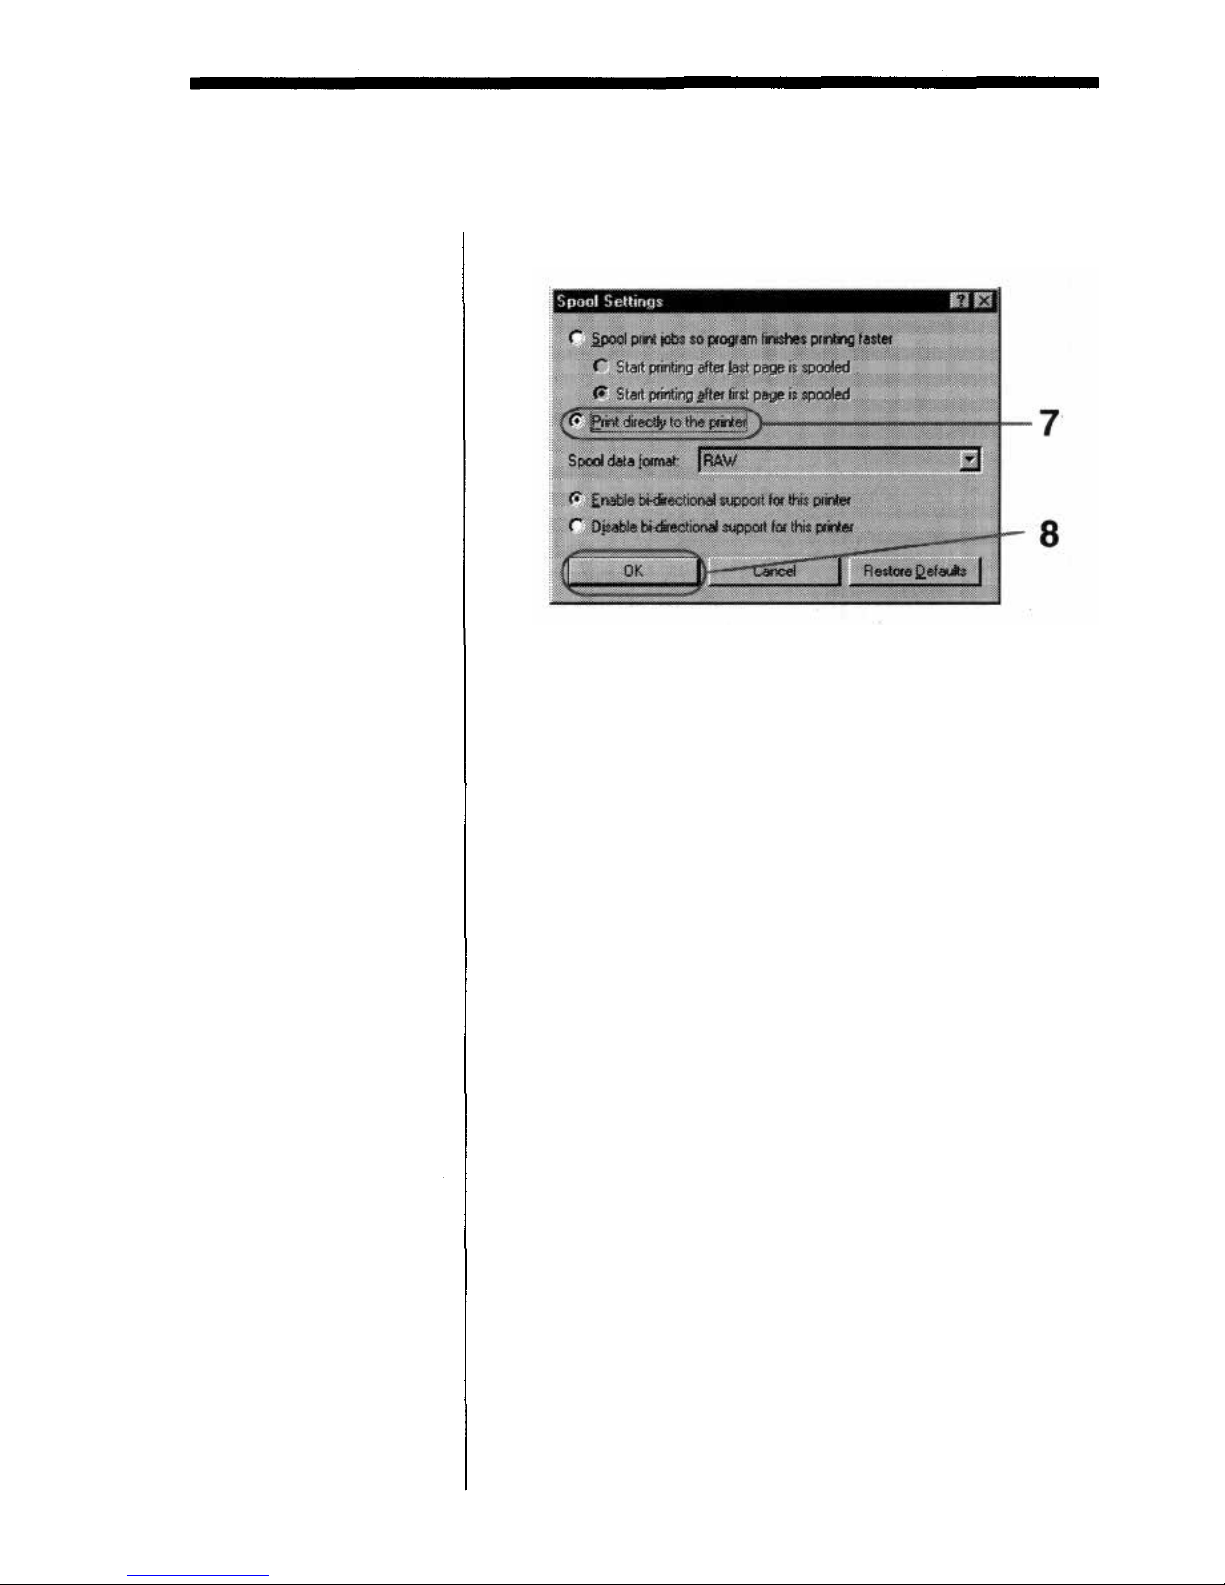
Check [Print directly to the p r inter].
7
Click [OK] and close the [Spool Settings] window.
Click [OK] and close the [OLYMPUS P-3 3 0
Properties] window.
8
9
Fo r Windows 95/98
16

System requirements
Notes
• This software is subject
to be upgraded without
notice.
• The pictures used in
this manual may be
different from the
actual screen of the
software.
Your computer and system software must meet the
following minimum requirements to run the printer
driver.
• IBM PC/AT compatible personal computer
Supporting Windows 3. 1 with i386 and above CPU
• Memory
8M B or more (3 2 MB or more is recommended
depending on the application software used to print)
• Hard disk space
15MB or mor e free space (30MB o r more is
recommended)
Larger pictures and more pages require more hard
disk space.
• Video monitor
A video board or video driver which displays 2 5 6
colors or better (32,000 colors or more is
recommended)
• Drive
CD-R OM drive (needed for installation)
For the latest information, refer to the "readme.txt"
contained in the "English\Win31" directory of the
supplied CD-ROM.
Fo r Windows 3.1
For Windows 3.1
17
Install the software containing the printer driver for the
Windows 3. 1 in the supplied CD-ROM.
Installing the software
Connect the printer to the computer.
S e e the operating instructions of the Digital Color
Printer.
Turn on the printer and the computer. Th e n start
the Windows 3.1.
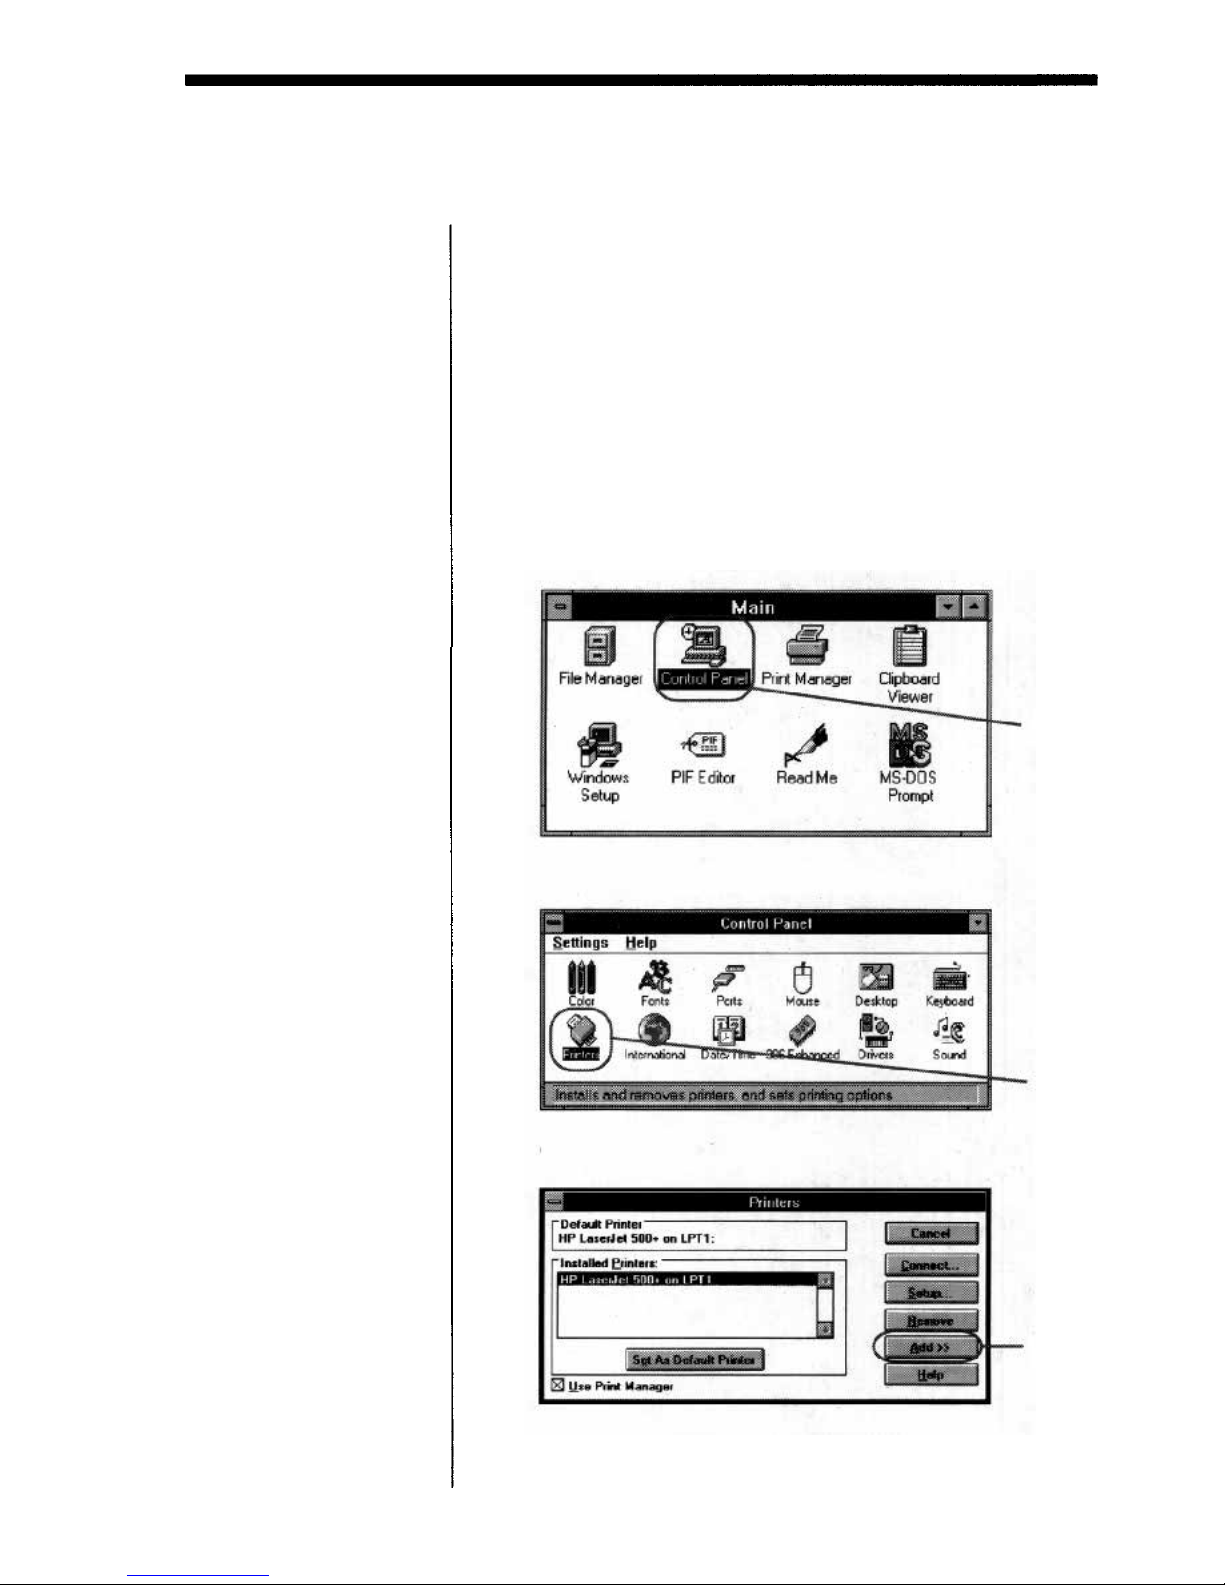
Double-click the [Control Panel] icon in the [Main]
window.
1
2
3
Double-click the [Printers] icon.
4
5
Click [Add].
Fo r Windows 3.1
18
3
4
5

Click [Install].
6
Insert the supplied CD-ROM.
Input "D:\English\Win31" and click [OK].
Input your CD-ROM drive for "D." You can also
select f r o m [Browse].
7
8
Make sure that "OLYMPUS P-330" is selected and
click [OK].
9
Fo r Windows 3.1
19
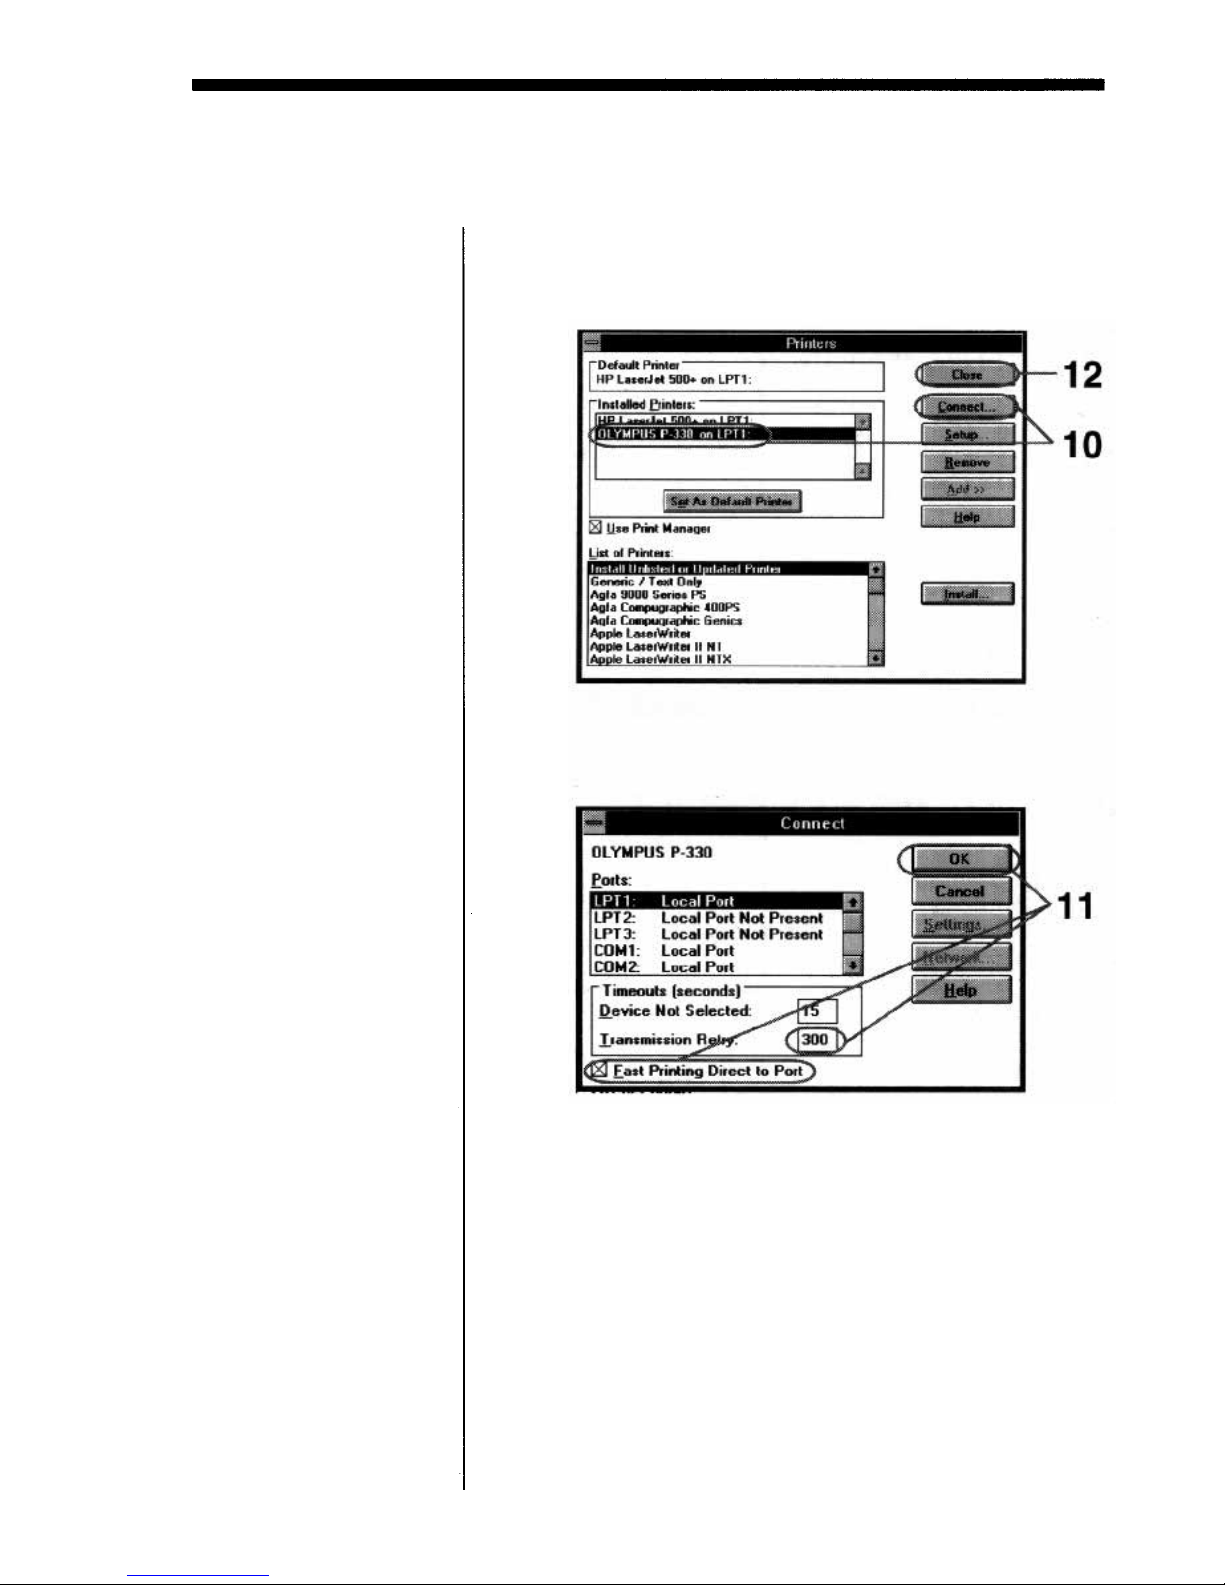
Make sure that "OLYMPUS P-330 on LPT1:" is
added in the [Installed Printers:] box and click
[Connect].
Set [Transmission Retry] to "300," check "Fast
Printing Direct to Port," and click [OK].
Click [Close].
Installation finishes.
12
11
10
For Windows 3.1
Note
You cannot print without
checking "Fast Printing
Direct to Port."
20

Uninstalling th e software
When the driver software becomes unnecessary,
remove all the software files from your hard disk as
follows:
Double-click the [Control Panel] icon in the [Main]
window.
Double-click the [Printers] icon in the [Control
Panel] window.
Click to select "OLYMPUS P-330 on LPT1:" in the
[Installe d Printers:] box.
Click [Remove].
The confirmation window appears.
Click [Yes].
1
2
3
4
5
For Windows 3.1
21
Printing
Tip
When you print in 3 0 6 dpi
in the application
software, set the picture
size to 1376 x 1024 pixels.
Start the application software used to print, and
select the image to be printed.
Click [Print] from the [File] me nu of the
application.
The [Print] dialog appears.
Click [Setup].
The [Print Setup] dialog appears.
Se t t he printer.
1
2
3
4
The dialog differs depending on the application.
Set [Specific Printer] to [OLYMPUS P-330].
Set [Size] referring to the combination below.
Notes
• Use the s e t o f th e print
paper and ink ribbon
cartridge supplied
together in the same
carton. Also make sure
to set [Size] in the
combination shown in
the table. If you use
them in different
combination, proper
printing results may
not be obtained or
other trouble may
occur.
• For the details on print
paper and ink ribbon
cartridge, refer to the
operating instructions
of the printer.
Set [Orientation].
To print i n portrait (tall) format, select Portrait.
To print i n landscape (wide) format, select
Landscape.
Fo r Windows 3.1
Print paper
loaded
Ink ribbon
cartridge loaded
[Size] setting
Standard paper
4-,16-Cut Sticker
Passport photo
paper
Standard type
Standard type
Passport photo
type
A6 Standard/Sticker
A6 Standard/Sticker
A6 Passport photo
paper
22
Click [OK].
The [Print] dialog appears.
Set [Copies].
You can set up to 30 copies. You can print
continuously using the supplied automatic feeder.
5
6
Click [OK].
The next dialog appears.
7
Tip
You ca n make split prints
(page 27), set resolution
(page 25) or adjust the
picture quality (page 26).
Click [Print].
Th e printer starts printing.
8
For Windows 3.1
23

Note
If the printing of the data
has already started, don't
try to cancel printing.
Doing so will cause the
paper to jam.
Stopping printing
When a "printing" message is on the screen
Click the [Stop] button or the [Cancel] button. The
printing is canceled.
When the data is in the Print Manager
Double-click the [Print Manager] in the [Main]
window. Click the "file" waiting to be printed and
then click [Delete].
Hints fo r better printout
To obtain better print result, read the application
software manual carefully. Changing the resolution
and image size are very important.
The following information will be useful.
Make the environment in full-color
With some application software, the colors used to
print depends on the display color setting of the
computer you use. To print in full-color, prepare the
environment which can display 64,000 or 16,770,000
colors.
Adjust the image si z e a nd resolution (If the
application is to print according to the printer's
resolution)
If yo u c an adjust t h e i ma g e s ize o n y our application
software, make the resolution within 30 6 dpi and size
137 6 x 1024 pixels or 153 dpi and size 688 x 51 2 pixels.
If yo u print an image larger than the above, the image
may be printed split into pieces depending on the
application software. Se t the resolution in the paper
setting dialog according to the image resolution to
make better printout.
Fo r Windows 3.1
24
 Loading...