

Olympus Μ 720SW User Manual
DIGITAL CAMERA
/
Advanced
Manual
Thank you for purchasing an Olympus digital camera. Before you start to use your new
camera, please read these instructions carefully to enjoy optimum performance and a
longer service life. Keep this manual in a safe place for future reference.
We recommend that you take test shots to get accustomed to your camera before taking
important photographs.
In the interest of continually improving products, Olympus reserves the right to update or
modify information contained in this manual.
The screen and camera illustrations shown in this manual were produced during the
development stages and may differ from the actual product.
Detailed explanation for each function such
as camera buttons and menus is separately
provided.
How to use this manual
Search for a topic XXXTable of Contents
Contents
How to use this manual..... .......................................................................... 2
Contents................................................. ..................................................... 3
1 Button operations................................................. 8
Test out the functions of the camera buttons by following the illustrations
and actually trying them out on the camera.
o button.....................................Turning the camera on and off 8
Shutter button .........................................................Shooting pictures 8
K/h/ button (Shooting)............Switching the shooting mode 9
K..............................................................Shooting still pictures 9
h .................Shooting pictures using digital image stabilization 9
..... Shoot pictures by selecting a scene according to the situation
Search for a term XXXIndex
Index
! Red-eye reduction flash . . . . . 12
# Fill-in flash . . . . . . . . . . . . . . . . . 12
$ Flash off . . . . . . . . . . . . . . . . . . 12
% Super macro mode . . . . . . . . . . 13
& Macro mode . . . . . . . . . . . . . . . 13
< button (print) . . . . . . . . . . . . . . . 13
button (OK/FUNC) . . . . . . . . . . 10
K/h/ button (Shooting) . . . . 9
q button (playback) . . . . . . . . . . . 10
F button (exposure compensation)
. . . . . . . . . . . . . . . . . . . . . . . . . . 12
YS button (self-timer/erase) . . 12
# button (flash mode) . . . . . . . . 12
& button (macro) . . . . . . . . . . . . 13
Search by Objective
XXX
Shooting tips and information
BEEP . . . . . . . . . . . . . . . . . . . . . . . 32
BGM . . . . . . . . . . . . . . . . . . . . . . . . 22
BLACK & WHITE . . . . . . . . . . . . . . 24
BRIGHTNESS . . . . . . . . . . . . . . . . 25
C
CALENDAR . . . . . . . . . . . . . . . 24, 25
Calendar display . . . . . . . . . . . . . . . 11
CAMERA MENU . . . . . . . . . . . . . . . 19
Card . . . . . . . . . . . . . . . . . . 21
Card access lamp . . . . . . . . 52
CCD . . . . . . . . . . . . . . . . . . . . . 34
Close-up playback U . . . . . . . . . . . 11
Cloudy day 3 . . . . . . . . . . . . . . . . 19
, 31, 74
, 62, 76
, 70
gP. 3
9
gP. 80
gP. 57
5 Getting to know your camera better
Getting to know your camera better
5
Shooting tips and information
Tips before you start taking pictures
The camera does not turn on even when a battery is loaded
The battery is not fully charged
• Charge the battery with the charger.
The battery is temporarily unable to function because of the cold
• Battery performance declines in low temperatures, and the charge may not be
sufficient to turn on the camera. Remove the battery and warm it by putting it
in your pocket for a while.
2
No picture is taken when the shutter button is pressed

Contents
How to use this manual ............................................................................... 2
Contents ...................................................................................................... 3
1 Button operations.................................................8
Test out the functions of the camera buttons by following the illustrations
and actually trying them out on the camera.
o button.....................................Turning the camera on and off 8
Shutter button ......................................................... Shooting pictures 8
K/h/s button (Shooting)............Switching the shooting mode 9
K..............................................................Shooting still pictures 9
h .................Shooting pictures using digital image stabilization 9
s
..... Shoot pictures by selecting a scene according to the situation
q button (Playback)
Arrow pad (1243)......................................................................... 10
o button (OK/FUNC)......................................................................... 10
P/AUTO.......................Shooting pictures with automatic settings 10
m button (MENU)......................................................................... 11
Zoom button.................... Zooming while shooting/close-up playback 11
1F button ........................................... Changing picture brightness 12
3# button ...................................................................Flash shooting 12
2Y/S button...................Shooting with self-timer / Erasing images 12
Shooting with self-timer................................................................ 12
Erasing pictures ........................................................................... 13
4& button.............................. Shooting pictures close to the subject 13
< button...................................................................Printing pictures 13
.... Viewing still pictures/Selecting playback mode
10
9
2 Menu operations .................................................14
Learn everything about the menus, from basic operations to the functions
of each menu and their various settings.
About the menus........................................................................................ 14
Using the menus........................................................................................ 15
Shooting mode menu................................................................................. 17
IMAGE QUALITY.................................... Changing the image quality 17
RESET ..........Change the shooting functions back to default settings 18
s (Scene)
..... Shooting pictures by selecting a scene according to the situation
18
3

CAMERA MENU................................................................................. 19
WB ...............................................Adjusting the color of a picture 19
ISO..................................................Changing the ISO sensitivity 19
DRIVE ......................................................... Continuous shooting 20
ESP/n
....Changing the area for measuring the brightness of a subject
DIGITAL ZOOM ................................Zooming in on your subject 20
AF MODE.........................................Changing the focusing area 21
R ............................................Recording sound with still pictures 21
PANORAMA ..................................Creating a panoramic picture 21
Playback mode menu................................................................................ 22
SLIDESHOW .............................. Playing back pictures automatically 22
MOVIE PLAY ..................................................... Playing back movies 23
CALENDAR ............... Playing back the pictures in a calendar format 24
INDEX........................................ Viewing the pictures as a thumbnail 24
EDIT.................................................................................................... 24
Q .................................................Changing the size of pictures 24
REDEYE FIX..................................Fixing the red-eye in pictures 24
BLACK & WHITE .............. Changing pictures to black and white 24
SEPIA .................................... Changing pictures to a sepia tone 24
FRAME ............................. Synthesize the frame and the picture 24
TITLE ....................................Synthesize the title and the picture 25
CALENDAR ............... Synthesize the calendar using the picture 25
BRIGHTNESS.................... Change the brightness of the picture 25
SATURATION......................Change the vividness of the picture 25
INDEX .............................. Making an index picture from a movie 25
PRINT ORDER ............................. Making print reservations (DPOF) 26
PLAYBACK MENU ............................................................................. 26
0................................................................. Protecting pictures 26
y ...................................................................... Rotating pictures 26
R .................................................... Adding sound to still pictures 26
ALBUM ENTRY .............................. Adding pictures to an album 27
ERASE..............................Erase selected pictures/Erase all pictures 28
SEL. IMAGE.........................Erase by selecting the single-frame 28
ALL ERASE .. Erase all the pictures in the internal memory and the card
ALBUM ............................... See the pictures registered in the album 28
Album playback menus ............................................................................. 29
SEL. ALBUM.............................................................See other album 29
PLAYBACK MENU ............................................................................. 30
UNDO ENTRY .........................................Undoing album entries 30
SELECT JACKET .........................................Selecting the jacket 30
SETUP menus........................................................................................... 31
MEMORY FORMAT (FORMAT) Formatting the internal memory or card
4
BACKUP .....Copying pictures in the internal memory to the card 31
20
28
31

W ..............................................Selecting a display language 32
Kq
........Using Shooting button / Playback button to turn on the camera
PW ON SETUP ............... Setting the startup screen and volume 32
SCREEN SETUP ..... Registering a picture as the startup screen 32
COLOR ............................ Setting the color of the menu screens 32
BEEP...... Adjust the volume of beep when the button is pressed 32
8 ..........................Adjust the volume of camera warning sound 32
SHUTTER SOUND ..... Selecting the sound of the shutter button 33
VOLUME .......................... Adjusting the volume during playback 33
REC VIEW .....................................Viewing pictures immediately 33
FILE NAME ..........................Resetting the file names of pictures 33
PIXEL MAPPING ......... Adjusting the image processing function 34
s ............................................Adjusting the monitor brightness 34
X .......................................................Setting the date and time 34
DUALTIME ......... Setting the date and time in another time zone 35
ALARM CLOCK ....................................................Setting alarms 35
VIDEO OUT ................................. Playing back pictures on a TV 36
3 Printing pictures .................................................37
Learn how to print pictures you have taken.
Direct printing (PictBridge)......................................................................... 38
Using the direct printing function......................................................... 38
EASY PRINT....................................................................................... 38
Other print modes and print settings (CUSTOM PRINT) .................... 40
Print settings (DPOF)................................................................................. 43
How to make print reservations .......................................................... 43
Single-frame reservation..................................................................... 44
All-frame reservation........................................................................... 44
Resetting print reservation data.......................................................... 45
32
5

4 Connecting the camera to a computer .............46
Learn how to transfer pictures to a computer and save them.
Flow ........................................................................................................... 46
Using OLYMPUS Master........................................................................... 46
What is OLYMPUS Master? ............................................................... 46
Install the OLYMPUS Master software ............................................... 47
Connecting the camera to a computer ...................................................... 50
Start up the OLYMPUS Master software................................................... 51
Displaying camera images on a computer ................................................ 52
Downloading and saving images........................................................ 52
Viewing still pictures and movies............................................................... 54
Printing pictures......................................................................................... 55
To download and save images to a computer without using OLYMPUS Master
5 Getting to know your camera better .................57
Find out more about your camera and learn what to do when you have a
question regarding operations.
Shooting tips and information.................................................................... 57
Tips before you start taking pictures................................................... 57
The camera does not turn on even when a battery is loaded ...... 57
No picture is taken when the shutter button is pressed ............... 57
The date and time have not been set .......................................... 58
Shooting tips....................................................................................... 58
Focusing on the subject............................................................... 58
Subjects that are difficult to focus on ........................................... 58
Taking pictures without blurring ................................................... 59
Taking pictures without the flash.................................................. 59
The picture is too grainy............................................................... 59
Taking pictures with the correct color .......................................... 60
Taking pictures of a white beach or snow scene ......................... 60
Taking pictures of a subject against backlight ............................. 60
Additional shooting tips and information ............................................. 61
Increasing the number of pictures that can be taken................... 61
Using a new card ......................................................................... 62
Lamp indicators............................................................................ 62
Extending the useful life of the battery......................................... 62
6
Functions that cannot be selected from menus ........................... 63
... 56

Selecting the optimal record mode............................................... 63
To return the settings of functions to default settings................... 63
Playback help...................................................................................... 64
The red-eye cannot be fixed ........................................................ 64
The picture cannot be registered in the album............................. 64
Playback tips....................................................................................... 64
Playing back the picture in the internal memory .......................... 64
Quickly displaying a desired picture............................................. 64
Erasing sound recorded to still pictures ....................................... 64
Viewing pictures on a computer.......................................................... 65
Viewing the entire picture on a computer screen......................... 65
When you get an error message on the camera ....................................... 66
Functions available in shooting modes and scenes .................................. 68
Glossary of terms....................................................................................... 70
6 Miscellaneous .....................................................72
Read about convenient functions and safety precautions on how to use
your camera more effectively.
Camera care.............................................................................................. 72
Battery and charger ................................................................................... 73
Useful use of the accessories.................................................................... 74
The card.............................................................................................. 74
AC adapter.......................................................................................... 76
Safety Precautions..................................................................................... 77
Index............................................................................................................ 80
7
1 Button operations
Ĵıĸij
ijĴıĵ
IN
Ĵıĸij
ijĴıĵ
IN
Ĵıĸij
ijĴıĵ
IN
Button operations
1
1
2
ᵮᵭᵵᵣᵰ
1
3
Shooting mode
P
[ ]
ʼnŒʼnŒĴıĸij
ȿijĴıĵ
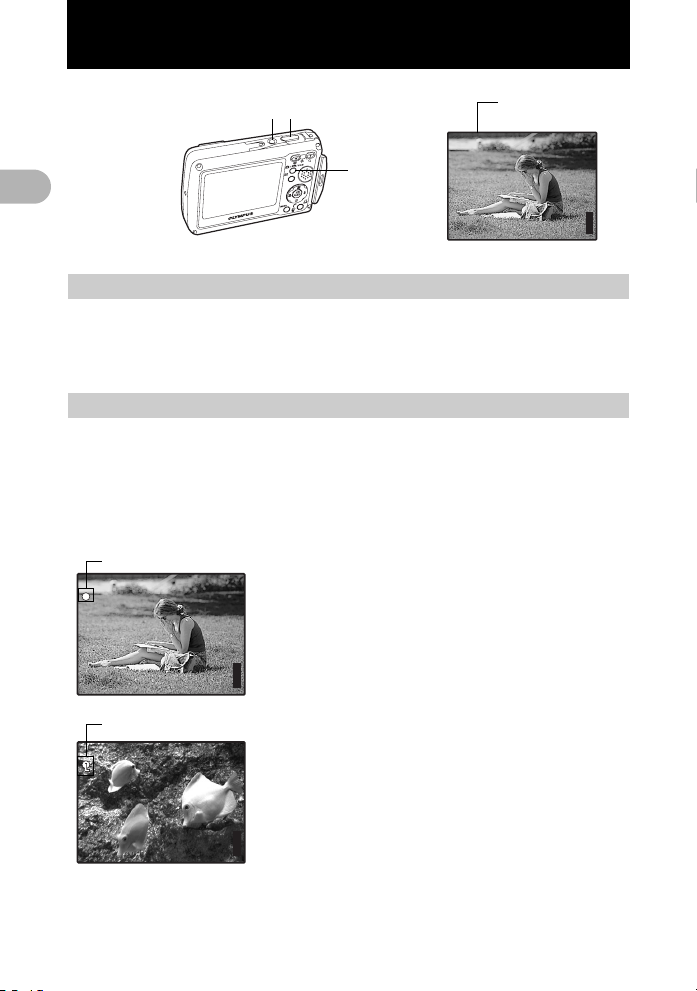
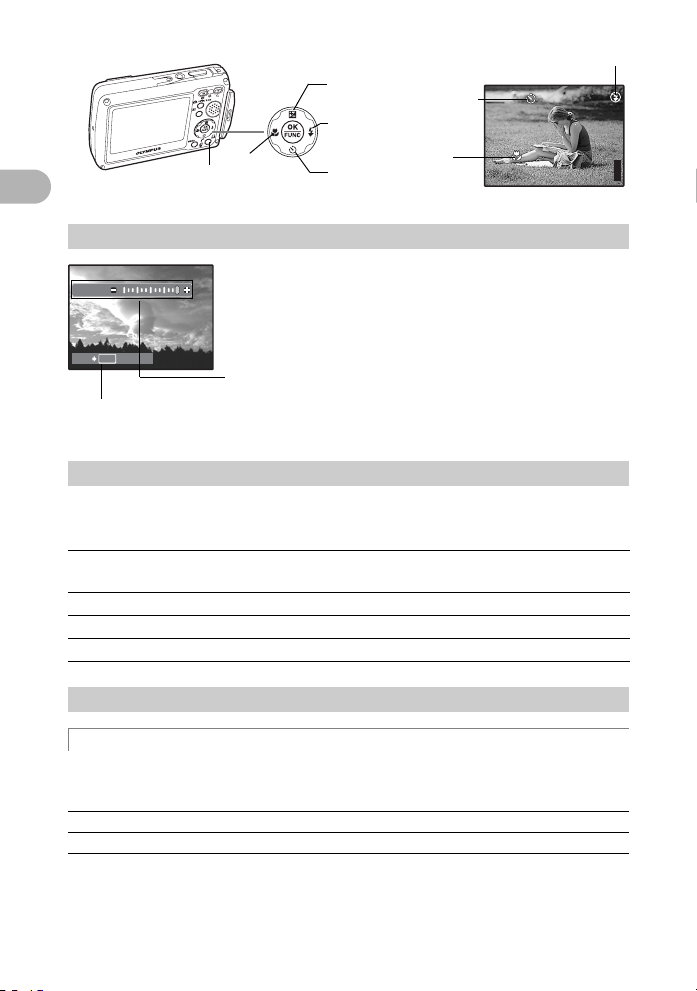
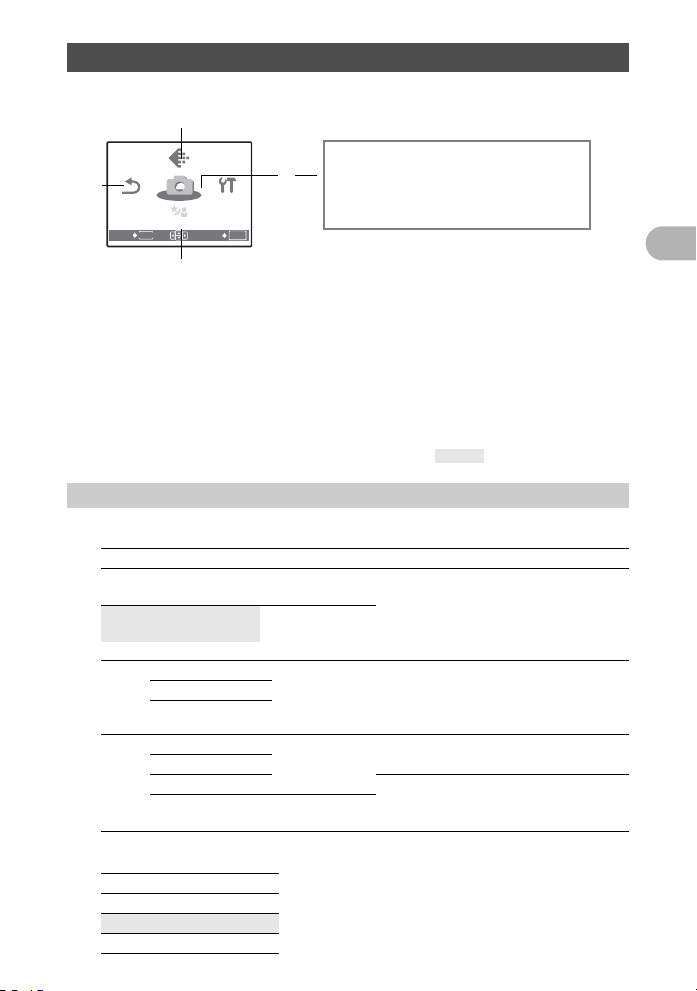
1 o button Turning the camera on and off
Power on: The camera is turned on in the shooting mode.
Button operations
• Monitor turns on
• The lens cover opens.
2 Shutter button Shooting pictures
Shooting still pictures
Press the K/h/s button to select the shooting mode from P, AUTO, h
or s, and lightly press the shutter button (halfway). The green lamp lights
when the focus and exposure are locked (focus lock). Now press the shutter
button all the way (fully) to shoot a picture.
Green lamp
P
Locking the focus and then composing the
shot (focus lock)
Compose your picture with the focus locked, and
then fully press the shutter button to shoot a picture.
[ ]
ʼnŒʼnŒĴıĸij
ȿijĴıĵ
AF lock mark
kk
[
• When the green lamp blinks, the focus is not
adjusted properly. Try locking the focus again.
]
IN
44
Locking the focus position (AF lock)
When the scene is k, H, or T, you can lock the
focus position by pressing 2. Press 2 again to
cancel the AF lock.
g“s (Scene) Shooting pictures by selecting
a scene according to the situation” (P. 18)
]
IN
44
ʼnŒʼnŒĴıĸij
[ ]
ȿijĴıĵ
[
[
]
IN
44
8

Recording movies
00:36
Press the K/h/s button to set the shooting mode to s and select n
from the shooting scene. The sound is recorded at the same time. Lightly press
the shutter button to lock the focus, and then press the shutter button to start
recording. Press the shutter button again to stop recording.
A
00:36
00:36
This lights red during movie recording.
The remaining recording time is displayed.
When the remaining recording time reaches 0,
recording stops.
3 K/h/s button (Shooting) Switching the shooting mode
Set the mode to the shooting mode. Press the K/h/s button repeatedly,
the shooting mode changes as follows: P/AUTO -> h -> s.
• The camera is turned on only by pressing the K/h/s button.
g “Kq Using Shooting button / Playback button to turn on the camera”
(P. 32)
K Shooting still pictures
The camera determines the optimum settings and shoots the picture.
h Shooting pictures using digital image stabilization
This function stabilizes the blur caused by a moving subject or camera
movement when taking pictures.
• By switching to the other mode, most settings will be changed to the default
settings of each mode.
Shoot pictures by selecting a scene according to the situation
s
You can shoot pictures by selecting a scene according to the situation.
Change the scene to another one
• Press the m button to select [SCN] from the top menu, and change it to
another scene.
• By switching to the other scene, most settings will be changed to the default
settings of each scene.
1
Button operations
9

6
őİłŖŕŐ
5
4
ᵮᵭᵵᵣᵰ
8
1
7
4 q button (Playback)Viewing still pictures/Selecting playback mode
The last picture taken is displayed.
• Press the arrow pad (43) to view other pictures.
• Use the zoom button to switch among close-up playback, index display and
calendar display.
g Movie playback “MOVIE PLAY Playing back movies” (P. 23)
• The camera is turned on only by pressing the q button.
Button operations
g “Kq Using Shooting button / Playback button to turn on the camera”
(P. 32)
5 Arrow pad (1243)
Use the arrow pad to select scenes, playback picture, and the items on the menus.
6 o button (OK/FUNC)
Displays the function menu and sets the functions often used in shooting mode.
This button is also used to confirm your selection.
The functions you can set with the function menu
P/AUTO.............................................. Shooting pictures with automatic settings
Use P/
AUTO
to select the shooting mode from P (Program auto) and
P (Program auto) The camera automatically sets the optimum aperture value
AUTO (Full auto mode) The camera automatically sets white balance and ISO
g “WB Adjusting the color of a picture” (P. 19)
“ISO Changing the ISO sensitivity” (P. 19)
“DRIVE Continuous shooting” (P. 20)
“ESP/n Changing the area for measuring the brightness of a subject”
(P. 20)
Function menu
P
and shutter speed for the brightness of the subject.
sensitivity in addition to the aperture and shutter speed.
AUTO
(Full auto mode).
10
P
WB
AUTO
ISO
AUTO
o
őİłŖŕŐ
ESP
h
P
1
: Select the setting items.
2
43: Select a setting, and press o.
7 m button (MENU)
3072
2304
HQ
3072
2304
HQ
IN
IJijĻĴ ı
Ĩıķ įı Ĵįij ķ
IJı ıĮ ı ıı ĵ
ʼnŒ
IN
IN
IN
IN
ŔŖŏ
ŎŐŏ
ijııķ
ŕŖņ
ŘņŅ
ŕʼnŖ
ŇœŊ
Ŕłŕ
IJĴIJĵIJĵIJĶIJĶIJķIJķIJĸIJĸ
IJĺ
IJĹ
ijĵ
ijķ
ijĶ
ĴIJ
IJIJ
IJij
IJı
IN
Displays the top menu.
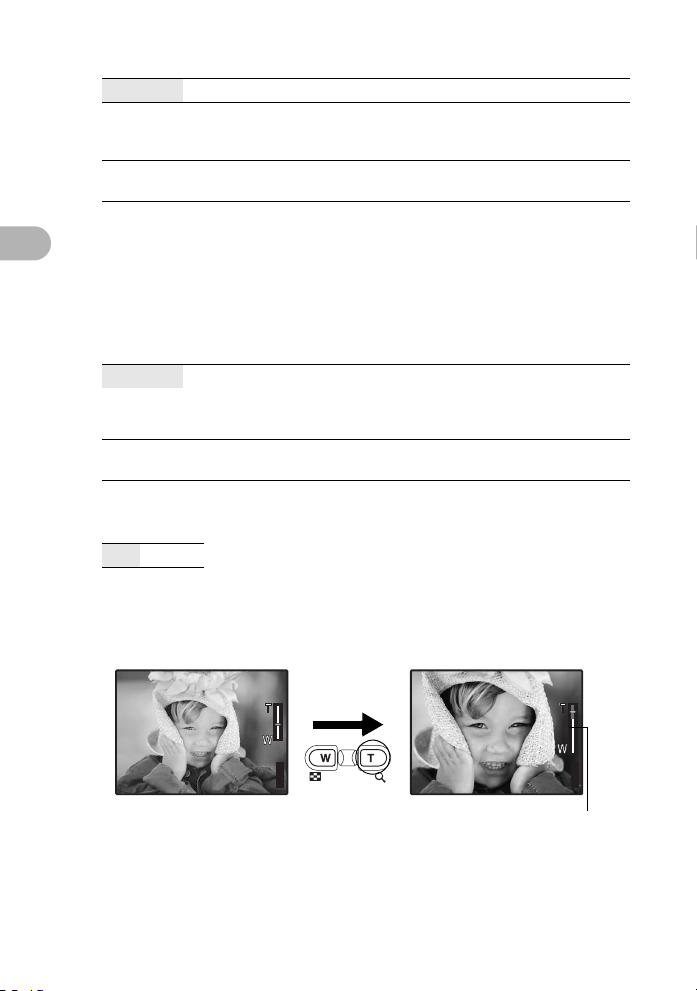
8 Zoom button Zooming while shooting/close-up playback
Shooting mode: Zooming in on your subject
Optical zoom: 3×
Zoom out:
Press W on the
zoom button.
3072
HQ
444
2304
×
3072
2304
HQ
×
Zoom in:
Press T on the
zoom button.
444
1
Button operations
Playback mode: Switching the picture display
Single-frame playback
• Use the arrow pad (1243) to browse pictures.
[
]
IN
ĨıķįıĴįijķ
ŔŖŏ
ŎŐŏ
ŕŖņ
ijııķ
ijķijķijĸijĸijĹijĹIJ ij Ĵ
Ĵ
Ķ ķ ĸ
IJĴ
IJij
IJĺ
ijıijıijIJijIJijijijijijĴijĴijĵ
ijķ
ijĸijĸijĹijĹijĺijĺĴıĴıĴIJ
ij
Ĵ
ĵ Ķ ķ
[
]
IN
IJ ij
ĵ
Ĵ
T
[
]
IN
IJ
ĵ Ķ ķ
ĸ Ĺ ĺ
T
[
]
IN
T
[
]
IN
W
Index display
ij Ĵ
• Use the arrow pad
W
W
W
(1243) to select a
picture for playback, and
press o to play back the
single-frame of the
picture selected.
ŘņŅ
IJııĮıııĵ
ŕʼnŖ
Ĺ ĺ IJı
ʼnŒ
TW
IJijĻĴı
ĵ
Close-up playback
• Press T to incrementally
enlarge the picture up to 10
times the original size. Press
W to reduce the size.
• Press the arrow pad
(1243) during close-up
playback to scroll the picture
in the indicated direction.
• When returning to the singleframe playback, press o.
Calendar display
ŇœŊ
Ŕłŕ
• Use the arrow pad (1243)
ĵ
IJIJ
to select the date, and press
IJĹ
o or T on the zoom button to
ijĶ
IJ
display the pictures on the
[
]
IN
date selected.
WT
11
Ĵıĸij
ijĴıĵ
IN
ᵮᵭᵵᵣᵰ
ijįı
9
Self-timer
P
0
b
1
c
Macro mode/
a
Super macro mode
ʼnŒʼnŒĴıĸij
9 1F button Changing picture brightness
P
ĬĬġ
Ĭġ
ijįı
ijįı
Press the 1F button in shooting mode to adjust the
exposure.
• Adjustable from - 2.0EV to +2.0 EV
Flash mode
[ ]
ȿijĴıĵ
[
]
IN
44
Button operations
SET
OK
3: Brighten
Activate the setting
4: Darken
contents.
0 3# button Flash shooting
Press the 3# button in shooting mode to select the flash mode.
Press o for setting.
AUTO (Auto-flash) The flash fires automatically in low light or backlight
conditions.
! Red-eye reduction flash This emits pre-flashes for red-eye reduction.
# Fill-in flash The flash fires regardless of the available light.
$ Flash off The flash does not fire even in low light conditions.
a 2Y/S button Shooting with self-timer / Erasing images
Shooting with self-timer
Press the 2Y/S button in shooting mode to select on and off of the self-timer.
Press o for setting.
Y ON After the setting, press the shutter button fully.
Y OFF Cancel the self-timer.
• The self-timer lamp lights for approximately 10 seconds, blinks for
approximately 2 seconds, and then the picture is taken.
• To cancel the self-timer, press the 2Y/S button.
• Self-timer shooting is automatically canceled after one shot.
12

Erasing pictures
Display the picture you want to erase one by one in the playback mode and press
the 2Y/S button.
• Once erased, pictures cannot be restored. Check each picture before erasing
to avoid accidentally erasing pictures you want to keep.
g“0 Protecting pictures” (P. 26)
• A single image cannot be erased during the close-up playback / index playback.
b 4& button Shooting pictures close to the subject
Press the 4& button in shooting mode to select the macro mode.
Press o for setting.
1
Button operations
& Macro mode This mode lets you shoot from as close as
% Super macro mode This mode lets you shoot from as close as
20cm/7.8 in. (when the zoom is set for the
zoom-out angle) and as close as 30cm/11.8
in. (when the zoom is set for the zoom-in
angle) to your subject.
7 cm/2.7 in. to your subject.
c < button Printing pictures
In playback mode, press the < button to display the picture you want to print out.
g“EASY PRINT” (P. 38)
13
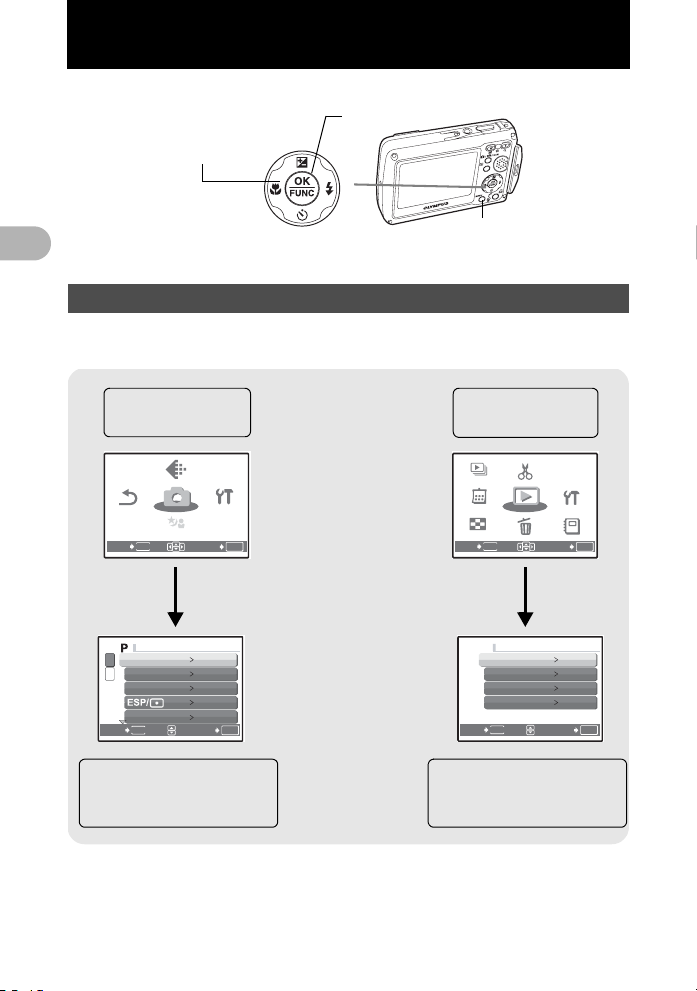
2 Menu operations
SCN
Ŕ ņ ŕ Ŗ ő
RESET
IMAGE
QUALITY
SCN
ńłŎņœł
ŎņŏŖ
INDEX
SLIDESHOW
EDIT
ERASE
SETUP
CALENDAR
PLAYBACK
MENU
PRINT
ORDER
ALBUM
CA MER A M ENU
PL AYBA CK ME NU
Menu operations
2
Arrow pad
o
(1243)
2
About the menus
Press the m button to display the top menu.
The items displayed on the top menu differ according to the mode.
Menu operations
Top menu in the
shooting mode
IMAGE
IMAGE
QUALITY
QUALITY
ńłŎņœł
ńłŎņœł
RESET
RESET
ŎņŏŖ
ŎņŏŖ
SCN
SCN
SCN
MENU
EXIT
IJ
WB
ij
ISO AUTO
DRIVE
DIGITAL ZOOM
MENU
BACK
AUTO
o
ESP
OFF
SET
ŔņŕŖő
ŔņŕŖő
OK
SET
• When [CAMERA MENU], [PLAYBACK
MENU], [EDIT], [ERASE], or [SETUP] is
selected, the menu corresponding to the
respective functions is displayed.
OK
ᵮᵭᵵᵣᵰ
m
button
Top menu in the
playback mode
SLIDE-
SLIDE-
SHOW
SHOW
CALENDAR
CALENDAR
INDEX
INDEX
MENU
EXIT
BACK
0
y
R
ALBUM ENTRY
MENU
EDIT
EDIT
PLAYBACK
PLAYBACK
MENU
MENU
ERASE
ERASE
ORDER
ORDER
SETUP
SETUP
ALBUM
ALBUM
SET
SET
PRINT
PRINT
P
OFF
ˌɋ
OK
OK
14
Menu displayed when
[CAMERA MENU] is
selected
Menu displayed when
[PLAYBACK MENU]
is selected
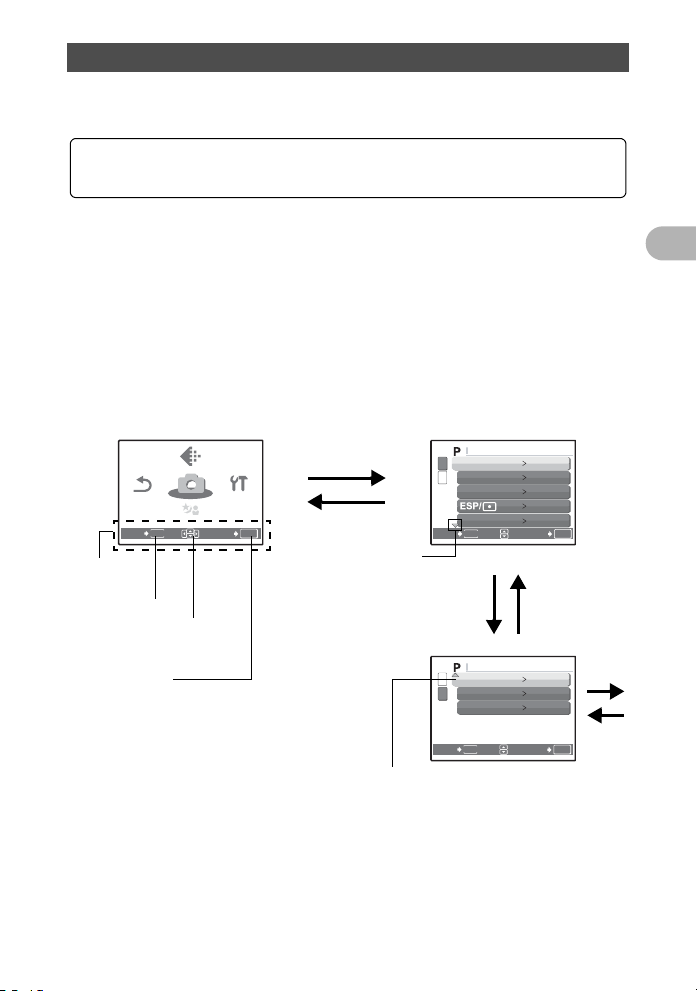
Using the menus
SCN
Ŕ ņ ŕ Ŗ ő
RESET
IMAGE
QUALITY
SCN
ńłŎņœł
ŎņŏŖ
CA MER A M ENU
CA MER A M ENU
Use the arrow pad (1243) and o to set menu items.
This explains how to use the menus with the [AF MODE] setting as an example.
Select the shooting mode or playback mode.
•Press the K/h/s button to set the shooting mode to P.
1 Press the m button to
display the top menu, and
then press o.
• [AF MODE] is on a menu in
[CAMERA MENU]. Press o.
• To display other menus, use the
arrow pad (1243) to select a
menu, and press o.
• To close the top menu, press the
m button.
Top menu
IMAGE
IMAGE
QUALITY
QUALITY
ńłŎņœł
ńłŎņœł
ŔņŕŖő
ŎņŏŖ
ŎņŏŖ
SCN
SCN
SCN
ŔņŕŖő
SET
OK
Operation
guide
m button
RESET
RESET
MENU
EXIT
1243 on
the arrow pad
o
2 Press 12 to select a setting,
o
m button
This mark is
displayed when
there are more
menu items on
the next page.
The selected
item is
displayed in a
different color.
and press o.
• [AF MODE] is the sixth menu
item, so press 2 five times, and
then press o.
• Unavailable settings cannot be
selected.
IJ
WB
ij
ISO AUTO
DRIVE
DIGITAL ZOOM
MENU
BACK
2
IJ
AF MODE SPOT
ij
R
PANORAMA
MENU
BACK
AUTO
o
ESP
OFF
SET
OFF
SET
1
OK
o
o
OK
2
Menu operations
15
3 Press 12 to select a setting, and
CA MER A M ENU
CA MER A M ENU
2
Menu operations
press o.
• Select the [AF MODE] from [iESP]
and [SPOT] and then press o.
• The menu item is set and the previous
menu is displayed.
o
o
16
IJ
ij
BACK
Page display
WB
IJ
ij
ISO AUTO
DRIVE
DIGITAL ZOOM
MENU
BACK
AF MODE
R
PANORAMA
MENU
AUTO
o
ESP
OFF
SET
ŪņŔő
SPOT
OK
SET
When there are more menu items on the next
page, press 4 on the procedure 2 screen to
move the cursor to the page display.
Press 12 to change the page.
To return to the previous page, press 3 or o.
OK
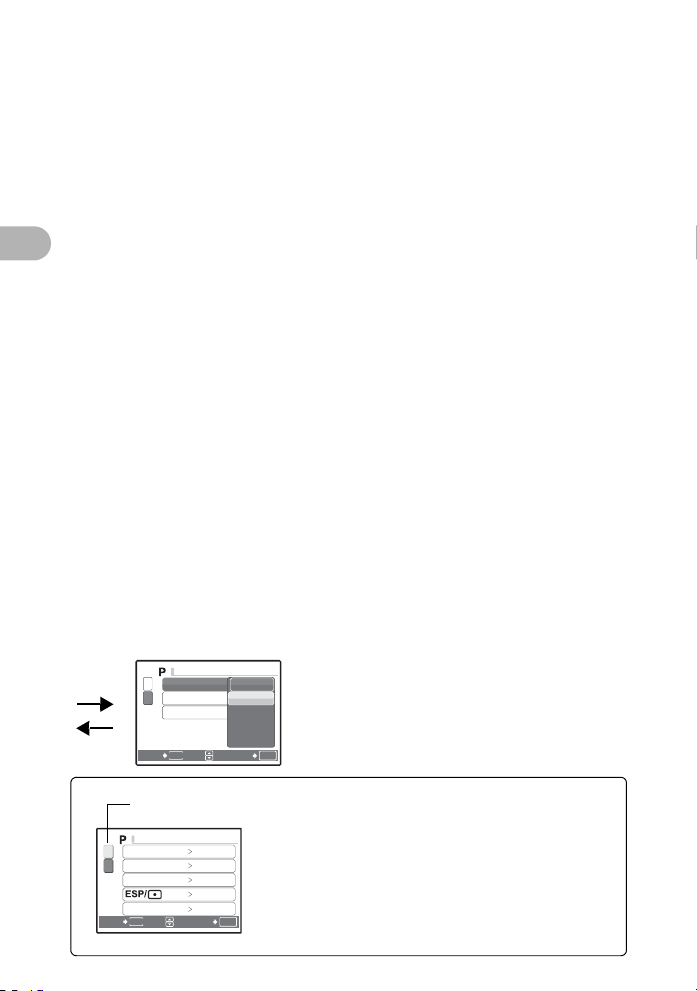
Shooting mode menu K h s
SCN
Ŕ ņ ŕ Ŗ ő
RESET
IMAGE
QUALITY
SCN
ńłŎņœł
ŎņŏŖ
1
WB
4
ISO
DRIVE
ESP/n
*1
A card is required.
*2
[RESET] cannot be selected when the
shooting mode is set to s or h.
*3
s can be selected when the shooting
mode is set to s.
2
IMAGE
IMAGE
QUALITY
RESET
RESET
EXIT
MENU
QUALITY
ńłŎņœł
ńłŎņœł
ŎņŏŖ
ŎņŏŖ
SCN
SCN
SCN
3
*3
ŔņŕŖő
ŔņŕŖő
SET
OK
*2
g “SETUP menus” (P. 31)
• Some menu cannot be selected according to the shooting mode.
g “Functions available in shooting modes and scenes” (P. 68)
• The factory default settings are displayed in gray ( ).
1 IMAGE QUALITY Changing the image quality
Still picture image quality and their applications
Image quality/Image size
SHQ 3072
× 2304 Low
HQ 3072 × 2304 Standard
SQ1 2560 × 1920 Standard
2304 × 1728
× 1536
2048
SQ2 1600
× 1200 Standard
1280 × 960
1024 × 768 • This is useful for sending as e-mail
640 × 480 Low
Compression Application
• This is useful for printing large images
compression
on full-size paper.
• This is useful for performing computer
compression
image processing, such as contrast
adjustment and red-eye correction.
• This is useful for postcard-sized prints.
compression
• This is useful for computer editing
such as rotating or adding text to a
picture.
• This is useful for viewing pictures on a
compression
computer.
attachments.
compression
Movie image quality
Image quality/Image size
SHQ 640 × 480
HQ 320 × 240
SQ 160 × 120
CAMERA MENU
DIGITAL ZOOM
AF MODE
R
PANORAMA
*1
2
Menu operations
17
2 RESET Change the shooting functions back to default settings
NO /YES
Restore shooting functions back to default settings. The mode dial has to be set
to K (P or AUTO) in order to restore default settings.
Functions for returning the settings to the original when the reset
function is executed
2
Flash AUTO P. 12
YYOFF P. 12
F 0.0 P. 12
& OFF P. 13
IMAGE QUALITY HQ P. 17
WB AUTO P. 19
Menu operations
ISO AUTO P. 19
DRIVE o P. 20
ESP/n ESP P. 20
DIGITAL ZOOM OFF P. 20
AF MODE SPOT P. 21
R OFF P. 21
Function Factory default setting Ref. Page
3 s (Scene)
Shooting pictures by selecting a scene according to the situation
The scene selection screen displays sample images
and the shooting mode to best suit the situation.
• By switching to the other scene, most settings will be
changed to the default settings of each scene.
18
Scene selection
IJȁPORTRAIT
B
F
D
G
U
BACK
MENU
SET
OK
Press o to decide the scene.
[e SHOOT & SELECT1] / [f SHOOT & SELECT2]
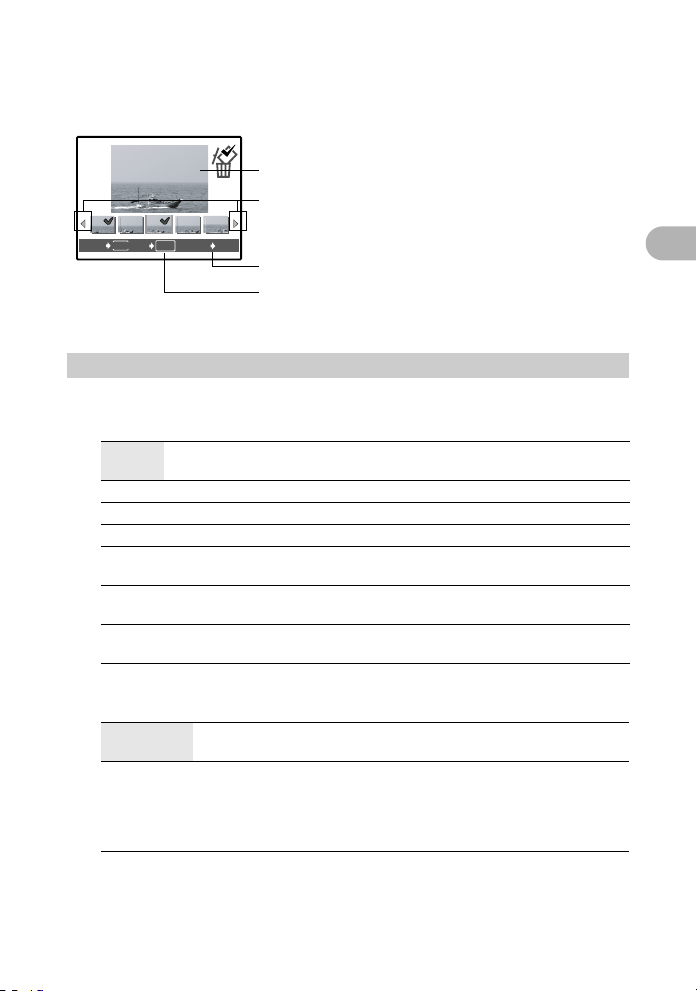
•
Press and hold the shutter button to shoot sequential pictures. After shooting
pictures, select the ones you want to erase, put the
R
to them, and press 2Y/S
button to erase them.
ee
Selected picture
Press 43 to scroll through the pictures.
MENU
SET
OK
BACK ERASE
S
Pictures with a
R mark are erased.
Select the pictures to be erased.
4 CAMERA MENU
WB
......................................................................... Adjusting the color of a picture
AUTO The white balance is adjusted automatically for natural
5 Sunny day For shooting under a clear sky.
3 Cloudy day For shooting under a cloudy sky.
1 Tungsten light For shooting under tungsten lighting.
w Fluorescent
lamp 1
x Fluorescent
lamp 2
y Fluorescent
lamp 3
color, regardless of the light source.
For shooting under daylight fluorescent lighting. (This
type of lamp is mainly used in homes.)
For shooting under a neutral white fluorescent lamp.
(This type of lamp is mainly used in desk lamps.)
For shooting under a white fluorescent lamp. (This type
of lamp is mainly used in offices.)
ISO..............................................................................Changing the ISO sensitivity
AUTO Sensitivity is automatically adjusted according to the conditions
64/100/200/
400/800/
1600
of the subject.
A low value lowers the sensitivity for daylight shooting of clear,
sharp pictures. The higher the value, the better the camera’s
light sensitivity and ability to shoot with a fast shutter speed and
in low light conditions. However, high sensitivity introduces noise
into the resulting picture, which may give it a grainy appearance.
2
Menu operations
19
DRIVE.................................................................................... Continuous shooting
Ĵıĸij
ijĴıĵ
IN
Ĵıĸij
ijĴıĵ
IN
o Shoots 1 frame at a time when the shutter button is pressed.
j Focus, exposure and white balance are locked at the first frame.
The sequential shooting speed varies depending on the record
mode setting.
i Pictures can be taken at a faster speed than normal sequential
shooting.
You can take a sequence of pictures at one time while holding down the shutter
button. The camera will take pictures in sequence until you release the shutter
2
button.
• In high speed sequential shooting, [IMAGE QUALITY] will be limited to below
[2048 × 1536].
ESP/n ............. Changing the area for measuring the brightness of a subject
Menu operations
surrounding area separately to create a picture with balanced
brightness. When taking pictures against strong backlight, the
center of the picture may appear dark.
n Only the center of the monitor is metered. Suitable for taking a
picture of the subject in the center of the monitor against backlight.
DIGITAL ZOOM....................................................... Zooming in on your subject
OFF /ON
The digital zoom can be used to take close-up pictures with stronger
magnification than the optical zoom. (Optical zoom × Digital zoom: the maximum
15x)
Optical zoom Digital zoom
ESP Meters the brightness at the center of the monitor and the
20
P
ʼnŒʼnŒĴıĸij
[ ]
ȿijĴıĵ
[
]
IN
44
P
[ ]
ʼnŒʼnŒĴıĸij
ȿijĴıĵ
White area: The optical zoom area
Red area: The digital zoom area
[
]
IN
44
Zoom bar
AF MODE ..................................................................Changing the focusing area
iESP The camera determines which subject within the screen to focus
SPOT Focus selection is based on the subject within the AF target mark.
on. Even when the subject is not in the center of the screen,
focusing is possible.
R...................................................................... Recording sound with still pictures
OFF /ON
Recording starts about 0.5 seconds after the shutter button is released and lasts
about 4 seconds.
When recording, aim the camera microphone at the source of the sound you
want to record.
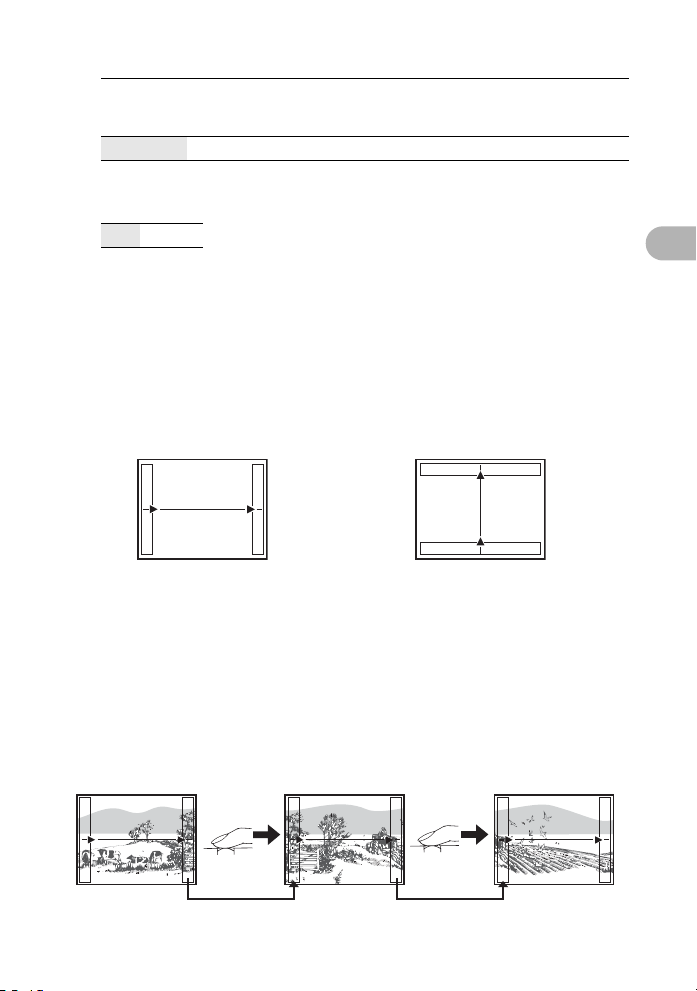
PANORAMA...........................................................Creating a panoramic picture
Panorama shooting lets you create a panoramic picture, using the OLYMPUS
Master software from the provided CD-ROM. An Olympus xD-Picture Card is
required for panorama shooting.
Connects pictures from
left to right
3: The next picture is connected at the
right edge.
4: The next picture is connected at the
left edge.
Use the arrow pad (1243) to specify at which edge you want to connect the
pictures, and then compose your shots so that the edges of the pictures overlap.
The part of the previous picture where it will be joined to the next picture does
not remain in the frame. You have to remember what the part in the frame looked
like and take the next picture so it overlaps.
Connects pictures from
bottom to top
1: The next picture is connected at the
top.
2: The next picture is connected at the
bottom.
2
Menu operations
Panorama shooting is possible for up to 10 pictures. Press m button to exit
panorama shooting.
21
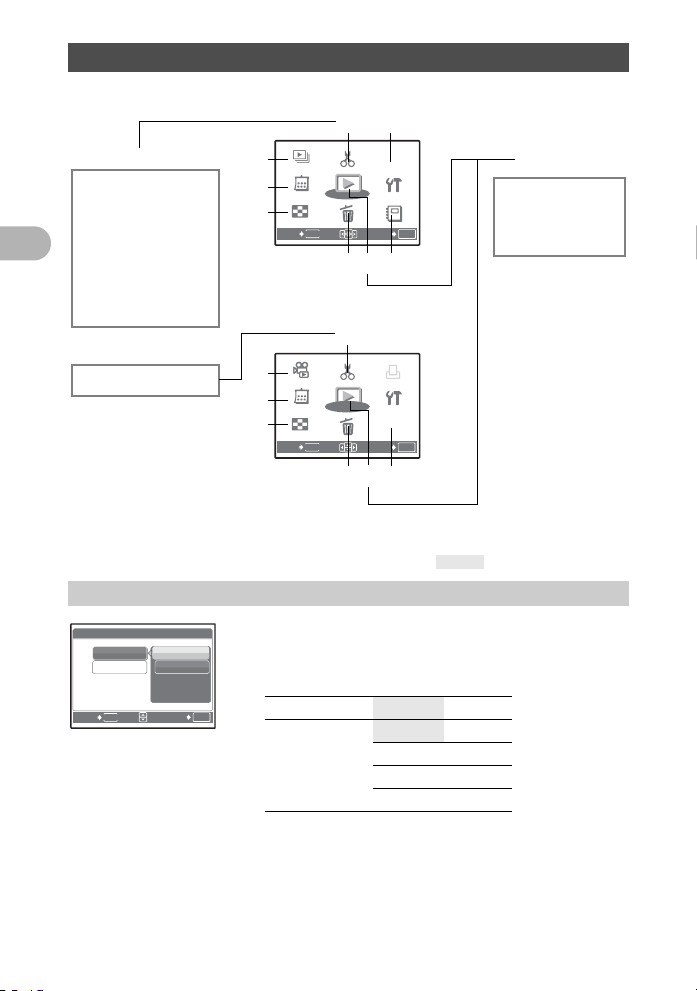
Playback mode menu q
INDEX
MOVIE
EDIT
ERASE
SETUP
CALENDAR
YBAC
MENU
PRINT
ORDER
ALBUM
INDEX
SLIDESHOW
EDIT
ERASE
SETUP
CALENDAR
PLAYBACK
MENU
PRINT
ORDER
ALBUM
When a still picture is selected
*1*3
5
6
*1
Q
REDEYE FIX
BLACK & WHITE
SEPIA
2
FRAME
TITLE
CALENDAR
BRIGHTNESS
SATURATION
INDEX
Menu operations
*1A card is required.
EDIT
EDIT
*1
SLIDE-
SLIDE-
1
SHOW
SHOW
3
CALENDAR
CALENDAR
4
INDEX
INDEX
MENU
EXIT
When the move is selected
MOVIE
MOVIE
2
PLPLAY
PLAY
3
CALENDAR
CALENDAR
4
INDEX
INDEX
MENU
EXIT
g “SETUP menus” (P. 31)
• The factory default settings are displayed in gray ( ).
1 SLIDESHOW Playing back pictures automatically
EDIT
EDIT
PLAYBACK
PLAYBACK
MENU
MENU
ERASE
ERASE
8
5
EDIT
EDIT
PLPLAYBAC
PLAYBACK
MENU
MENU
ERASE
ERASE
8
7
7
K
PRINT
PRINT
P
ORDER
ORDER
SETUP
SETUP
ALBUM
ALBUM
SET
9
PRINT
PRINT
ORDER
ORDER
SETUP
SETUP
-
ALBUM
ALBUM
SET
9
0
y
OK
*1
OK
*1
R
ALBUM ENTRY
*2This is not
displayed when a
movie is selected.
*3This cannot be
selected when the
movie is selected.
PLAYBACK
MENU
*2
*2
*1
22
SLIDESHOW
BGM
TYPE
MENU
BACK
OFF
ON
SET
• Set [BGM] to [ON] or [OFF].
[IN]
• Select the transition effect between pictures from
[TYPE].
OK
BGM
TYPE NORMAL
ON / OFF
FADER
SLIDE
ZOOM
• Only the first frame of each movie is displayed.
• After setting [BGM] and [TYPE], press o to start the slideshow.
•Press o or m button to cancel the slideshow.

2 MOVIE PLAY Playing back movies
IJijĻ Ĵı
Ĩı ķį ıĴ įij ķ
IJı ı Į ı ıı ĵ
IN
ʼnŒ
Ĵijı
ijĵı
IJijĻ Ĵı
Ĩı ķį ıĴ įij ķ
IJı ı Į ı ıı ĵ
ııĻıı
ııĻĴķ
IN
ʼnŒ
Ĵijı
ijĵı
ııĻıĶ
ııĻĴķ
IN
Select [MOVIE PLAY] from the top menu, and press o to play back the movie.
Another option is to select a picture with the movie icon (n), and press o to
play back the movie.
[
]
IN
Ĵijı
ȿijĵı
ʼnŒ
ĨıķįıĴįijķ
MOVIE PLAY
OK
IJijĻĴı
IJııĮıııĵ
ĵ
Operations during movie playback
[
]
IN
ĨıķįıĴįijķ
Ĵijı
IJııĮıııĵ
ııĻıı
ȟııĻĴķ
ȿijĵı
IJijĻĴı
ʼnŒ
Playing time/Total recording time
1 : Increases the volume.
2 : Reduces the volume.
3 : Each time you press the button, the playback speed changes
in the following order: 2×; 20×; and back to 1×.
4 : Plays the movie in reverse. Each time you press the button, the
playback speed changes in the following order: 2×; 20×; and
back to 1×.
•Press o to pause the playback.
Operations during pause
[
]
IN
ııĻıĶ
ȟııĻĴķ
3 : Displays the next frame.
4 : Displays the previous frame.
• To resume the movie, press o.
1 : Displays the first frame.
2 : Displays the last frame.
2
Menu operations
• To cancel the playback of the movie in the middle of it or during pause, press
the m button.
23

3 CALENDAR Playing back the pictures in a calendar format
This function lets you play back the pictures in a calendar format by the date of
recording.
g “Zoom button Zooming while shooting/close-up playback” (P. 11)
4 INDEX Viewing the pictures as a thumbnail
This function lets you view the pictures in 9 frames at the same time.
g “Zoom button Zooming while shooting/close-up playback” (P. 11)
2
5 EDIT
This function lets you edit still pictures saved on a card and store them as new
pictures.
Q
............................................................................ Changing the size of pictures
Menu operations
640 × 480 /320 × 240
This changes the image size of a picture and saves it as a new file.
REDEYE FIX...........................................................Fixing the red-eye in pictures
This function corrects the red-eye look that often occurs when taking pictures
with a flash.
BLACK & WHITE....................................Changing pictures to black and white
This changes the picture to black and white and saves it as a new file.
SEPIA ...............................................................Changing pictures to a sepia tone
This changes the picture to sepia and saves it as a new file.
FRAME........................................................Synthesize the frame and the picture
This function lets you select the frame, and synthesize the frame and the picture,
and store it as a new picture.
FRAME
• Select a frame with 43 and press o.
ŜŹŅŞ
• Select the picture to be synthesized with the frame with
43, and press o. (Press 12 to turn the picture 90
degrees clockwise or 90 degrees counterclockwise.)
• Press the arrow pad (1243) and the zoom button to
ŘOŕ
OK
SETMOVE
adjust the position and size of the picture, and press o.
24
TITLE ..............................................................Synthesize the title and the picture
This function lets you select the title, synthesize the title and the picture, and store
it as a new picture.
TITLE ŜŹŅŞ
• Select the picture with 43, and press o.
• Select the title with 43, and press o. (Press 12 to
turn the title 90 degrees clockwise or 90 degrees
counterclockwise.)
• Press the arrow pad (1243) and the zoom button to
OK
SET
adjust the position and size of the title, and press o.
• Set the color of the title with the arrow pad (1243),
and press o.
CALENDAR ...................................... Synthesize the calendar using the picture
This function lets you select the calendar, synthesize the calendar and the
picture, and store it as a new picture.
CALENDAR ŜŹŅŞ
• Select the picture with 43, and press o.
• Select the calendar with 43, and press o. (Press 12
to turn the picture 90 degrees clockwise or 90 degrees
counterclockwise.)
• Set the date of the calendar, and press o.
OK
SET
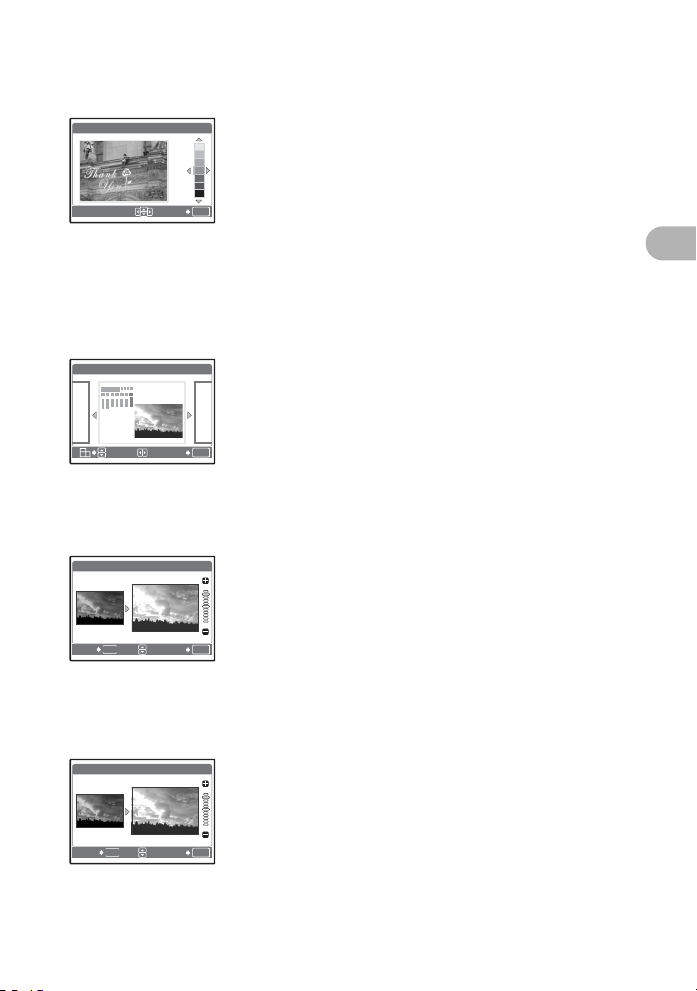
BRIGHTNESS ...........................................Change the brightness of the picture
This function lets you adjust the brightness of the picture, and store it as a new
picture.
BRIGHTNESS ŜŹŅŞ
• Select the picture with 43, and press o.
• Adjust the brightness with 12, and press o.
2
Menu operations
BACK
MENU
SET
OK
SATURATION .............................................Change the vividness of the picture
This function lets you adjust the vividness of the picture, and store it as a new
picture.
SATURATION ŜŹŅŞ
• Select the picture with 43, and press o.
• Adjust the vividness with 12, and press o.
BACK
MENU
SET
OK
INDEX ........................................................Making an index picture from a movie
This extract 9 frames from a movie and saves them as a new picture (INDEX).
25
 Loading...