

Page 1
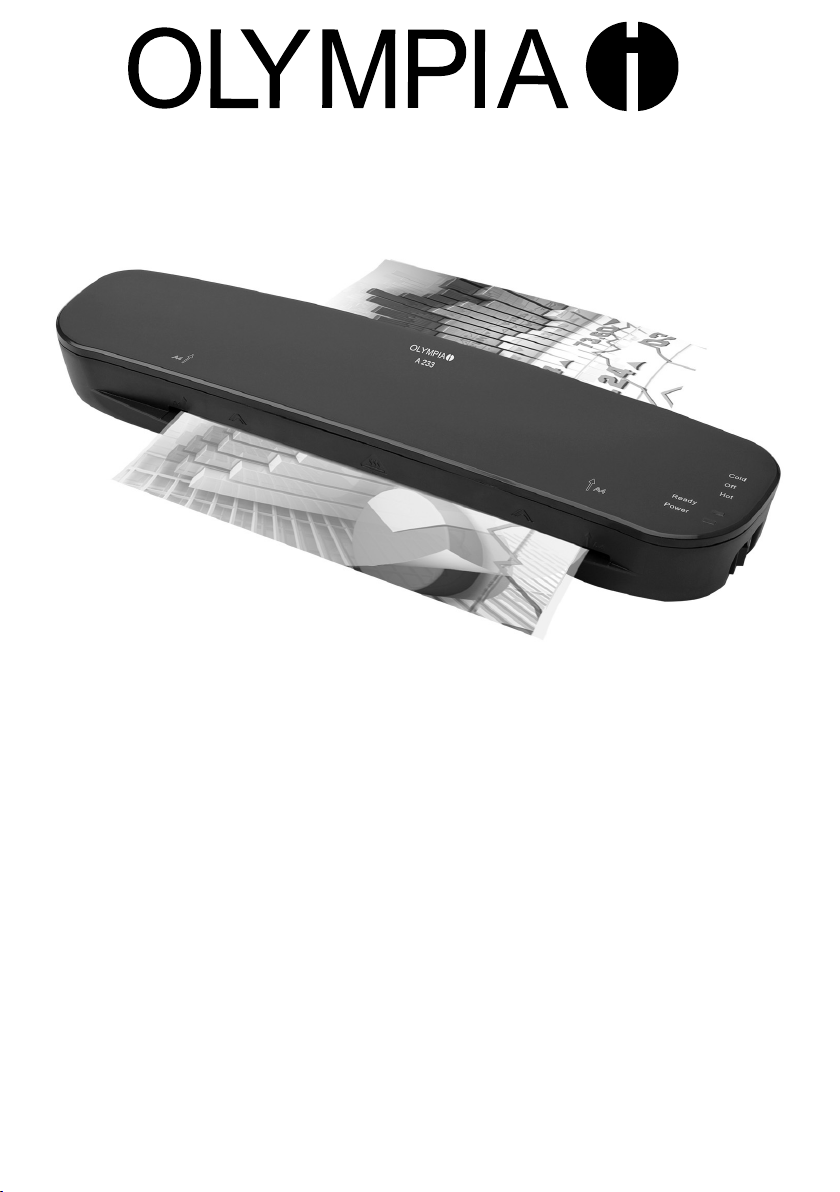
A 233
R
D Laminiergerät Seite 2
G Laminator Page 5
F Plastifieuse Page 8
E Aparato laminador Página 11
n Lamineerapparaat Pagina 14
I Plastificatrice Pagina 17
C Laminátor Strana 20
Olympia Business Systems Vertriebs GmbH
Zum Kraftwerk 1 45527 Hattingen
(27.03.2013)
Page 2

DEUTSCH
Bedienungsanleitung
Bitte lesen und beachten Sie die
nachfolgenden Informationen
und bewahren Sie diese Bedienungs
anleitung zum Nachschlagen auf!
Sicherheitshinweise
Æ Beschädigung des Netzsteckers oder Netzkabels
vermeiden. Netzkabel nie verdrillen. Das Gerät bei
beschädigtem Netzkabel oder Netzstecker nicht in Be
trieb nehmen.
Æ Verwenden Sie das Gerät nicht in der Nähe von heißen
Oberflächen oder in feuchter Umgebung.
Æ Metallische Gegenstände können nicht laminiert
werden.
Æ Laminieren Sie keine hitzeempfindlichen Materialien
mit diesem Gerät, wie z. B. Thermopapier.
Æ Nur dafür vorgesehene Folientaschen, wie unter Punkt
Leistungsmerkmale angegeben, in das Gerät einführen.
Zu groß gewählte Folientaschen können Folienstaus ver
ursachen.
Æ Schneiden Sie keine Folientaschen zu. Die ent
stehenden Schnittkanten können Folienstaus verursa
chen.
Æ Kindern ist der Aufenthalt im Arbeitsbereich des be
triebsbereiten Geräts nicht gestattet.
Æ Bei Nichtbenutzung des Geräts Netzstecker ziehen.
Æ Das Gerät immer sofort ausschalten, wenn ein
strenger Geruch entsteht oder das Gerät nicht in Betrieb
ist.
Æ Netzstecker nicht mit feuchter Hand berühren.
Æ Das Gerät nur im abgekühlten Zustand transportieren.
Æ Stellen Sie sicher, dass der Cold/Off/Hot-Schalter in
Stellung „OFF“ ist, bevor das Laminiergerät an eine Steck
dose angeschlossen wird.
Æ Verwenden Sie keine Folientaschen, die für die Kaltla
minierung vorgesehen sind, beim Heißlaminieren. Das
Gerät, die Folientasche und das Dokument können dabei
beschädigt werden.
Æ Lose Teile von Bekleidung, Krawatten, Schmuck,
langes Haar oder andere lose Gegenstände vom Foli
eneinzug fernhalten. Verletzungsgefahr!
Æ Die Steckdose und der Netzstecker des Geräts müs
sen aus Sicherheitsgründen frei zugänglich sein, damit
die Stromversorgung im Notfall schnell getrennt werden
kann!
Empfehlungen
Æ Falls Sie das Gerät an eine andere Person wei
tergeben möchten, legen Sie bitte diese Bedienungs
anleitung dazu.
Æ Wenn sehr weiche Materialien (wie Servietten) oder
kleine Formate laminiert werden sollen, dann empfehlen
wir zur Vermeidung von möglichen Staus das Laminiergut
zusätzlich in ein gefaltetes Blatt Papier zu legen. Dieses
muss mit der Knickkante voran in das Laminiergerät ein
geführt werden.
Æ Beim Laminieren von feuchten Dokumenten erzielen
Sie schlechte Laminierergebnisse.
Æ Ausweise, Dokumente und Urkunden können Ihre Gül
tigkeit verlieren, wenn sie laminiert werden.
Bestimmungsgemäß verwenden
Mit diesem Laminiergerät können Folientaschen für Heißund Kaltlaminiervorgänge verarbeitet werden. Es können
Bilder, Karten, Dokumente, Papier usw. bis zu einer Ge
samtdicke von 0,6 mm laminiert werden. Jede andere
Verwendung gilt als nicht bestimmungsgemäß. Eigen
mächtige Veränderungen oder Umbauten sind nicht zu
lässig.
Nur in geeigneter Umgebung
verwenden
Das Gerät darf nur in trockenen geschlossenen Räumen
verwendet werden.
Vermeiden Sie Belastungen durch Rauch, Staub, Er
schütterungen, Chemikalien, Feuchtigkeit, Hitze oder di
rekte Sonneneinstrahlung.
Leistungsmerkmale
Schutz und Veredelung für Ihre Dokumente.
Laminiert Bilder, Karten, Dokumente, Papier usw. bis
Größe DIN A4. Das Gerät arbeitet mit 2 Heizwalzen, hat
eine schnelle Aufwärmzeit und laminiert ohne Träger.
Æ 2 LEDs zeigen die Betriebszustände „Ready“ und
„Power“ an.
Æ Automatische Abschaltung bei Überhitzung.
Æ Hochwertiges Heizsystem verhindert Schlieren- und
Blasenbildung.
Æ Aufwärmzeit nur ca. 6 Minuten.
Æ Abkühlzeit auf Zimmertemperatur ca. 15 Minuten.
Æ Folienstärke von mindestens 80 µm und maximal
125 µm.
2
D
Page 3

Heißlaminieren
1. Stecken Sie den Netzstecker in eine ordnungsge
mäß installierte Steckdose.
2. Schalten Sie den Cold/Off/Hot-Schalter an der rech
ten Geräteseite auf „Hot“. Die rote Power-LED leuchtet.
Æ Der Antriebsmotor für die Transportrollen läuft an.
Nach etwa 6 bis 10 Minuten ist die korrekte Betriebs
temperatur erreicht und die grüne Ready-LED leuchtet.
3. Legen Sie das Laminiergut in die Folientasche so
ein, dass allseitig etwa 3 bis 5 mm Abstand vom Foli
enrand vorhanden ist.
4. Führen Sie die Folientasche mit dem Laminiergut in
den Folieneinzug an der Vorderseite des Laminierge
räts ein. Die geschlossene Seite der Folientasche ist
hierbei zuerst einzuführen. Der Laminiervorgang erfolgt
automatisch.
5. Wenn der Laminiervorgang beendet ist, schalten Sie
den Cold/Off/Hot-Schalter an der rechten Geräteseite
auf „Off“. Ziehen Sie ggf. den Netzstecker aus der
Steckdose.
Kaltlaminieren
1. Stecken Sie den Netzstecker in eine ordnungsge
mäß installierte Steckdose.
2. Schalten Sie den Cold/Off/Hot-Schalter an der rech
ten Geräteseite auf „Cold“. Die rote Power-LED leuch
tet.
Æ Der Antriebsmotor für die Transportrollen läuft an und
die grüne Ready-LED leuchtet.
Haben Sie das Laminiergerät kurz vorher zum
Heißlaminieren eingesetzt, müssen Sie das La
miniergerät abkühlen lassen. Die Abkühlzeit beträgt
ca. 15 Minuten.
3. Legen Sie das Laminiergut in die Folientasche so
ein, dass allseitig etwa 3 bis 5 mm Abstand vom Foli
enrand vorhanden ist.
4. Führen Sie die Folientasche mit dem Laminiergut in
den Folieneinzug an der Vorderseite des Laminierge
räts ein. Die geschlossene Seite der Folientasche ist
hierbei zuerst einzuführen. Der Laminiervorgang erfolgt
automatisch.
5. Wenn der Laminiervorgang beendet ist, schalten Sie
den Cold/Off/Hot-Schalter an der rechten Geräteseite
auf „Off“. Ziehen Sie ggf. den Netzstecker aus der
Steckdose.
Folienstau beheben
Dieses Laminiergerät ist mit der Funktion „ABS Jam Re
lease“ ausgerüstet, um Folienstaus schnell beheben zu
können.
- Bei einem Folienstau das Gerät ausschalten und die
„ABS“-Taste an der linken Geräteseite drücken.
- Halten Sie das Laminiergerät fest und ziehen Sie die
Folietasche mit dem Laminiergut aus dem Folieneinzug
des Laminiergeräts.
- Danach muss das Gerät ggf. mehrmals, wie unter
Punkt „Pflege und Reinigung“ beschrieben, gereinigt
werden.
Pflege und Reinigung
Ablagerungen und Klebereste an den Transportwalzen
können das Laminierergebnis beeinflussen. Darum müs
sen die Transportwalzen periodisch nach der Benutzung
gereinigt werden:
Hierzu ein gefaltetes Blatt Papier in den Folieneinzug ein
führen. Klebereste werden vom austretenden Papier mit
genommen. Den Vorgang mehrmals wiederholen.
Vor dem Reinigen der Gehäuseoberflächen immer den
Netzstecker ziehen. Falls erforderlich, kann das Gehäuse
mit einem in milder Seife und klarem Wasser angefeuch
teten Tuch gereinigt werden. Verwenden Sie keine Lö
sungsmittel oder aggressive Reinigungsmittel.
Fehlerbehebung
• Folienstau
Æ Um den Stau zu beheben, folgen Sie den Anwei
sungen unter Punkt „Folienstau beheben“.
Æ Benutzen Sie nur Folientaschen in der angegebenen
Größe.
Æ Stellen Sie sicher, dass die Folientasche gerade in das
Gerät eingeführt wurde.
Æ Prüfen Sie die Größe der verwendeten Folientasche.
• Laminierte Folientasche ist nicht vollständig durch
sichtig.
Æ Laminieren Sie die Folientasche erneut, um das La
minierergebnis zu verbessern.
Æ Beim Verwenden dickerer Folientaschen (100 µm,
125 µm) bitte das Gerät länger aufwärmen lassen.
D
3
Page 4
Technische Eigenschaften
Laminiersystem Hot-Roller-Technik
Spannungsversorgung 220 - 240 V ~ 50 Hz
Stromaufnahme 1 A
Laminiergeschwindigkeit 250 mm/Min.
Max. Laminierbreite 233 mm (A4)
Max. Laminierdicke 0,6 mm
Folienstärke 80, 100, 125 µm
Aufwärmzeit 6 - 10 Min.
Abkühlzeit ca. 15 Min.
Abmessungen (LxBxH) 380 x 106 x 48 mm
Gewicht 950 g
Entsorgung
Wollen Sie Ihr Gerät entsorgen, bringen Sie es zur
Sammelstelle Ihres kommunalen Entsorgungsträ
gers (z. B. Wertstoffhof). Nach dem Elektro- und
Elektronikgerätegesetz sind Besitzer von Altgeräten
gesetzlich verpflichtet, alte Elektro- und Elektronikge
räte einer getrennten Abfallerfassung zuzuführen. Das
nebenstehende Symbol bedeutet, dass Sie das Gerät auf
keinen Fall in den Hausmüll werfen dürfen!
Sie sind gesetzlich verpflichtet, Akkus und Batteri
en beim batterievertreibenden Handel sowie bei
zuständigen Sammelstellen, die entsprechende
Behälter bereitstellen, sicher zu entsorgen. Die
Entsorgung ist unentgeltlich. Die Symbole bedeu
ten, dass Sie Akkus und Batterien auf keinen Fall
in den Hausmüll werfen dürfen und sie über Sammel
stellen der Entsorgung zugeführt werden müssen.
Verpackungsmaterialien entsorgen Sie entsprechend
den lokalen Vorschriften.
Garantie
Lieber Kunde,
wir freuen uns, dass Sie sich für ein Qualitätsprodukt der
Marke Olympia entschieden haben. Sollte sich an Ihrem
Gerät wider Erwarten ein technisches Problem ergeben,
beachten Sie bitte folgende Punkte:
• Die Garantiezeit für Ihr Gerät beträgt 24 Monate.
• Bewahren Sie unbedingt den Kaufbeleg und die Origi
nalverpackung auf.
• Sollte ein Problem auftreten, rufen Sie bitte zuerst un
sere Hotline an:
0180 5 007514
(Kosten aus dem dt. Festnetz bei Drucklegung: 14 ct/
Min., maximal 42 ct/Min. aus den Mobilfunknetzen)
Oft kann unser Fachpersonal telefonisch weiterhelfen.
• Kann jedoch der Fehler telefonisch nicht beseitigt
werden, bitten wir Sie, das Gerät in der Originalverpa
ckung an folgende Anschrift zu senden:
Service-Center Hattingen
Zum Kraftwerk 1
45527 Hattingen
Garantiereparaturen können nur mit beigefügtem Kauf
beleg erfolgen.
Herzlichen Dank für Ihr Verständnis.
Mit freundlichen Grüßen
Ihre Olympia Business Systems Vertriebs GmbH
Konformitätserklärung
Dieses Gerät erfüllt die Anforderungen der Richt
linien:
2004/108/EG zur Angleichung der Rechtsvorschriften der
Mitgliedstaaten über die elektromagnetische Verträglich
keit und zur Aufhebung der Richtlinie 89/336/EWG.
2006/95/EG zur Angleichung der Rechtsvorschriften der
Mitgliedstaaten betreffend elektrische Betriebsmittel zur
Verwendung innerhalb bestimmter Spannungsgrenzen.
2011/65/EG zur Beschränkung der Verwendung be
stimmter gefährlicher Stoffe in Elektro- und Elektronikge
räten.
Die Konformität mit den o. a. Richtlinien wird durch das
CE-Zeichen auf dem Gerät bestätigt. Für die komplette
Konformitätserklärung nutzen Sie bitte den kostenlosen
Download von unserer Website
www.olympia-vertrieb.de
.
4
D
Page 5

ENGLISH
Operating Manual
Please read and observe the fol
lowing information and keep the
operating manual nearby for future ref
erence!
Safety information
Æ Prevent damage to the power plug and power cable.
Never twist the power cable. Do not operate the device if
the power cable or power plug is damaged.
Æ Do not use the device in the vicinity of hot surfaces or
in damp environments.
Æ Metallic objects cannot be laminated.
Æ Do not laminate heat sensitive materials, such as
thermal paper, in the device.
Æ Only insert foil pockets which comply with the device
specifications; refer to Section "Features".
Using foil pockets which are too large could lead to the unit
jamming.
Æ Do not cut foil pockets to size. The resulting cut edges
could cause the lamination foil to jam.
Æ Children must not be allowed in the vicinity of the
device when it is ready to operate.
Æ Disconnect the power adapter plug when the device is
not in use.
Æ Always switch the unit off immediately if it emits a
strong smell or it is not in operation.
Æ Do not touch the power adapter plug with moist hands.
Æ Only transport the device when it is in a cool state.
Æ Ensure that the Cold/Off/Hot switch is in the "OFF" pos
ition before connecting the laminator to the mains power
supply.
Æ Do not use foil pockets intended for cold lamination for
hot lamination. This could damage the device, lamination
foil and document.
Æ Keep loose clothing, ties, jewellery, long hair and other
loose objects away from the infeed slot. Risk of injury!
Æ The mains power socket and power connection on the
device must be freely accessible for reasons of safety,
namely to enable the power supply to be disconnected
quickly in an emergency!
Recommendations
Æ If you hand the device over to another persons, please
submit the operating manual with it.
Æ If very soft material (such as serviettes) or very small
size material is to be laminated, we recommend inserting
a folded sheet of paper in the foil pocket too, to prevent the
possibility of the document being laminated from jam
ming. The folded edge of the sheet must be inserted into
the laminator first.
Æ Lamination of moist documents produces poor results.
Æ ID cards, documents and certificates could lose their
validity if they are laminated.
Intended use
This laminator has been conceived for processing foil
pockets for hot and cold lamination purposes. It is possible
to laminate pictures, maps, documents, paper etc. up to
a total thickness of 0.6 mm. Any other use is considered
unintended use. Unauthorised modification or reconstruc
tion is not permitted.
Use only in suitable environments
The unit may only be used in dry, indoor rooms.
Prevent excessive exposure to smoke, dust, vibration,
chemicals, moisture, heat and direct sunlight.
Features
Protection and refinement of your documents.
Laminate photos, documents, graphics etc. up to A4 size.
The unit operates using 2 heating rollers, has a quick
warm-up phase and laminates without a carrier.
Æ 2 LEDs indicate the operating statuses "Ready" and
"Power".
Æ Automatic switch-off in the event of overheating.
Æ High quality heating system prevents smudging and
blistering.
Æ Warm-up phase only about 6 minutes.
Æ Cool down phase to room temperature, approx. 15
minutes.
Æ Foil thickness, minimum 80 μm and maximum 125 μm.
G
5
Page 6

Hot lamination
1. Connect the power plug to a properly installed power
socket.
2. Set the Cold/Off/Hot switch on the right-hand side of
the device, to "Hot". The red Power LED lights up.
Æ The drive motor for the transport rollers starts up. The
correct operating temperature is reached after about
6-10 minutes and the green Ready LED lights up.
3. Insert the document to be laminated in the foil pocket
so that there is a margin of approx. 3 - 5 mm to the
edge of the foil on all sides.
4. Insert the foil pocket containing the document in the
infeed slot at the front of the laminator. Feed in the
closed side of the foil pocket first. The laminating pro
cess occurs automatically.
5. When the lamination process has been completed,
set the Cold/Off/Hot switch on the right-hand side of the
device, to "Off". Disconnect the power plug from the
power socket, if necessary.
Cold lamination
1. Connect the power plug to a properly installed power
socket.
2. Set the Cold/Off/Hot switch on the right-hand side of
the device, to "Cold". The red Power LED lights up.
Æ The drive motor for the transport rollers starts up and
the green Ready LED lights up.
If you have just finished using the laminator for hot
laminating, you must let the laminator cool down.
The cool down phase takes about 15 minutes.
3. Insert the document to be laminated in the foil pocket
so that there is a margin of approx. 3 - 5 mm to the
edge of the foil on all sides.
4. Insert the foil pocket containing the document in the
infeed slot at the front of the laminator. Feed in the
closed side of the foil pocket first. The laminating pro
cess occurs automatically.
5. When the lamination process has been completed,
set the Cold/Off/Hot switch on the right-hand side of the
device, to "Off". Disconnect the power plug from the
power socket, if necessary.
Clearing foil jams
The laminator is provided with the "ABS Jam Release"
function in order to clear foil jams quickly.
- In the event of a foil pocket jam, switch the laminator off
and press the "ABS" button on the left-hand side of the
device.
- Hold the laminator firmly and pull the foil pocket, to
gether with the document to be laminated, out of the lam
inator's infeed slot.
- It may then be necessary to clean the unit several times
as described in the Section "Cleaning and Servicing".
Cleaning and servicing
Deposits and residual adhesive on the transport rollers
can influence the results of the laminating process. There
fore, the transport rollers must be cleaned periodically
after use:
To do this, insert a folded piece of paper in the infeed slot.
Residual adhesive is removed and taken up by the paper
when ejected. Repeat the process several times.
Always disconnect the power plug before starting to clean
the housing. If necessary, the housing can be cleaned us
ing a cloth moistened with clean water with a little mild
soap applied. Never use any solvents or aggressive
cleaning agents.
Troubleshooting
• Foil jam
Æ To clear the fault, follow the instructions in the Section
"Clearing foil jams".
Æ Only use foil pockets of the size specified.
Æ Ensure that the foil pocket has been inserted correctly
in the unit.
Æ Check the foil pockets being used are the correct size.
• Laminated foil pocket is not completely transparent
Æ Laminate the same foil pocket again to improve the
lamination result.
Æ If you want to laminate thicker foil pockets (100 µm,
125 µm), please allow a longer warm-up phase.
6
G
Page 7
Technical properties
Laminating system Hot roller technology
Power supply 220 - 240 V ~ 50 Hz
Current consumption 1 A
Laminating speed 250 mm/min.
Max. lamination width 233 mm (A4)
Max. lamination thickness 0.6 mm
Foil thickness 80, 100, 125 µm
Warm-up phase 6 - 10 min.
Cool down phase Approx. 15 min
Dimensions (LxWxH) 380 x 106 x 48 [mm]
Weight 950 g
Disposal
In order to dispose of your device, take it to a col
lection point provided by your local public waste
authorities (e.g. recycling centre). According to
laws on the disposal of electronic and electrical devices,
owners are obliged to dispose of old electronic and elec
trical devices in a separate waste container. The adja
cent symbol indicates that the device must not be dis
posed of in normal domestic waste!
You are legally obliged to dispose of power packs
and batteries at the point of sale or in the corres
ponding containers provided at collection points
by local waste authorities. Disposal is free of
charge. The symbols indicate that the batteries
must not be disposed of in normal domestic waste
and that they must be brought to collection points provided
by local public waste authorities.
Packaging materials must be disposed of according to
local regulations.
Guarantee
Dear Customer,
we are pleased that you have chosen this equipment.
In the case of a defect, please return the device together
with the receipt and original packing material to the pointof-sale.
Declaration of Conformity
This device fulfils the requirements stipulated in
the EU directives:
2004/108/EC on the approximation of the laws of the
Member States relating to electromagnetic compatibility
and repealing Directive 89/336/EEC.
2006/95/EC on the harmonisation of the laws of Member
States relating to electrical equipment designed for use
within certain voltage limits.
2011/65/EC on the restriction of the use of certain hazard
ous substances in electrical and electronic equipment.
Conformity to the above directives is confirmed by the CE
mark on the device. To view the complete Declaration of
Conformity, please refer to the free download available on
our website www.olympia-vertrieb.de
.
G
7
Page 8

FRANÇAIS
Mode d'emploi
Veuillez lire et observer les
informations suivantes et
conserver ce mode d'emploi afin de pou
voir le consulter en cas de besoin !
Consignes de sécurité
Æ Evitez tout endommagement de la fiche de secteur ou
du câble de réseau. Ne torsadez jamais le câble de ré
seau. Ne mettez jamais l'appareil en service si le cordon
d'alimentation ou la fiche secteur sont endommagés.
Æ N'utilisez pas l'appareil à proximité de surfaces très
chaudes ou dans un environnement humide.
Æ Des objets métalliques ne peuvent pas être plastifiés.
Æ Ne plastifiez pas avec cet appareil des matériaux sen
sibles à la chaleur tels que le papier photosensible.
Æ N'introduisez dans la plastifieuse que des pochettes
prévues à cet effet comme indiqué au point Caracté
ristiques. Le choix de pochettes trop grandes peut
provoquer un bourrage.
Æ Ne coupez pas les pochettes sur mesure. Les arêtes
de coupe qui en résultent pouvant provoquer un bourrage.
Æ Il est interdit aux enfants de se trouver dans la zone de
travail quand l'appareil est prêt à fonctionner.
Æ Retirez la fiche de secteur quand vous ne vous servez
pas de la plastifieuse.
Æ Débranchez toujours immédiatement la plastifieuse
quand une forte odeur se fait sentir ou quand elle ne
fonctionne pas.
Æ Ne touchez pas la fiche de secteur avec des mains
humides.
Æ Ne transportez l'appareil que s'il est refroidi.
Æ Assurez-vous que l'interrupteur Cold/Off/Hot est en
position „OFF“ avant de brancher la plastifieuse sur le ré
seau.
Æ N'utilisez pas, pour la plastification à chaud, des po
chettes prévues pour la plastification à froid. La
plastifieuse, la pochette et le document en seraient
endommagés.
Æ Éloignez de la fente d'insertion des parties de vête
ment volantes, cravates, bijoux, cheveux longs ou autres
objets non fixés. Risque de blessures !
Æ La prise de courant et le branchement sur secteur de
l'appareil doivent, pour des raisons de sécurité, être fa
ciles d'accès afin que l'alimentation en courant puisse être
rapidement interrompue en cas d'urgence !
Recommandations
Æ Au cas où vous désireriez remettre votre appareil à une
autre personne, veuillez accompagner ce dernier du
mode d'emploi.
Æ Lorsque vous voulez plastifier des matériaux très
souples (tels que serviettes) ou de petits formats, nous
recommandons de poser le produit à plastifier dans une
feuille de papier pliée afin d'éviter des bourrages éven
tuels. Introduisez celle-ci dans la plastifieuse avec l'arête
de pliage vers l'avant.
Æ Vous obtiendrez de mauvais résultats si vous plastifiez
des documents humides.
Æ Des pièces justificatives, documents et actes peuvent
perdre leur validité s'ils sont plastifiés.
Utilisation conforme aux prescriptions
Cette plastifieuse permet de traiter des pochettes à
plastifier à chaud et des pochettes à plastifier à froid. Des
images, des cartes, des documents, du papier etc. d'une
épaisseur totale de 0,6 mm max. peuvent être plastifiés.
Toute autre forme d'utilisation n'est pas conforme aux
prescriptions. Des modifications ou changements effec
tués d'un propre gré sont interdits.
Utiliser la plastifieuse uniquement
dans un environnement approprié
Ne s'en servir que dans des espaces secs et fermés.
Éviter toutes sortes de nuisances comme la fumée, la
poussière, les vibrations, les produits chimiques, l'hu
midité, la grande chaleur ou l'ensoleillement direct.
Caractéristiques
Protection et façonnage de vos documents.
Plastifie photos, cartes, documents, papier etc. jusqu'au
format DIN A4. L'appareil travaille avec 2 rouleaux chauf
fants, a un temps d’échauffement rapide et plastifie sans
support.
Æ 2 LEDs indiquent les états de fonctionnement „Ready“
et „Power“.
Æ Coupure automatique en cas de surchauffe.
Æ Un système de chauffage de grande qualité empêche
la formation de vague et de bulles.
Æ Temps de mise en température d'env. 6 minutes
seulement.
Æ Temps de refroidissement à température ambiante
d'env. 15 minutes.
Æ Épaisseur de la feuille d'au moins 80 μm et de 125 μm
maximum.
8
F
Page 9

Plastification à chaud
1. Introduisez la fiche dans la prise de courant posée
de manière réglementaire.
2. Positionnez l'interrupteur Cold/Off/Hot situé à droite
de l'appareil sur „Hot“. La LED rouge de mise en service
s'allume.
Æ Le moteur d'entraînement des rouleaux de transport
démarre. Au bout d'env. 6 minutes, la température de
service correcte est atteinte et la LED verte "READY"
s'allume.
3. Introduisez le produit à plastifier dans la pochette de
manière à ce que, de tous les côtés, il y ait une marge
d'env. 3 à 5 mm par rapport au bord de la pochette.
4. Introduisez la pochette avec le produit à plastifier
dans la fente d'insertion sur le devant de la plastifieuse.
Introduire en premier le côté fermé de la pochette.
L'opération de plastification se fait automatiquement.
5. Quand la plastification est terminée, positionnez
l'interrupteur Cold/Off/Hot situé à droite de l'appareil sur
„Off“. Retirez la fiche de contact de la prise de courant.
Plastification à froid
1. Introduisez la fiche dans la prise de courant posée
de manière réglementaire.
2. Positionnez l'interrupteur Cold/Off/Hot situé à droite
de l'appareil sur „Cold“. La LED rouge de mise en
service s'allume.
Æ Le moteur d'entraînement des rouleaux de transport
démarre et la LED verte Ready s'allume.
Si vous avez utilisé peu auparavant la plastifieuse
pour une plastification à chaud, vous devez la
laisser refroidir. Le temps de refroidissement est d'env.
15 minutes.
3. Introduisez le produit à plastifier dans la pochette de
manière à ce que, de tous les côtés, il y ait une marge
d'env. 3 à 5 mm par rapport au bord de la pochette.
4. Introduisez la pochette avec le produit à plastifier
dans la fente d'insertion sur le devant de la plastifieuse.
Introduire en premier le côté fermé de la pochette.
L'opération de plastification se fait automatiquement.
5. Quand la plastification est terminée, positionnez
l'interrupteur Cold/Off/Hot situé à droite de l'appareil sur
„Off“. Retirez la fiche de contact de la prise de courant.
Élimination de bourrage
Cette plastifieuse est équipée de la fonction „ABS Jam
Release“ (déblocage de bourrage) permettant d'éliminer
rapidement un bourrage.
- En cas de bourrage, éteignez l'appareil et appuyez sur
la touche „ABS“ située à gauche de l'appareil.
- Maintenez fermement la plastifieuse et tirez la po
chette avec le produit à plastifier hors de la fente d'in
sertion de la plastifieuse.
- Ensuite, l'appareil doit, le cas échéant, être nettoyé
plusieurs fois, comme décrit au point „Entretien et net
toyage“.
Entretien et nettoyage
Des dépôts et des restes de colle sur les rouleaux de
transport peuvent influencer le résultat de la plastification.
C'est pourquoi les rouleaux de transport doivent être net
toyés périodiquement après l'emploi :
À cet effet, introduisez une feuille de papier pliée dans la
fente d'insertion. Les restes de colle seront emportés par
le papier sortant. Répétez plusieurs fois l'opération.
Retirez toujours la fiche de secteur avant de nettoyer le
boîtier de la plastifieuse. Si nécessaire, le boîtier peut être
nettoyé avec un savon doux et un chiffon trempé dans de
l'eau claire. N'utilisez jamais de solvants ou de produits de
nettoyage agressifs.
Elimination d'erreurs
• Bourrage
Æ Pour éliminer le bourrage, suivez les instructions don
nées au point „Élimination de bourrage“.
Æ N'utilisez que des pochettes de la taille indiquée.
Æ Assurez-vous que la pochette a été introduite bien
droite dans l'appareil.
Æ Contrôlez la taille de la pochette utilisée.
• La pochette plastifiée n'est pas parfaitement trans
parente.
Æ Plastifiez-la une nouvelle fois pour améliorer le résul
tat.
Æ Si vous utilisez des pochettes plus épaisses (100 µm,
125 µm), faites chauffer l'appareil un peu plus longtemps.
F
9
Page 10

Propriétés techniques
Système de plastification : Technique à Hot-Roller
Alimentation en courant 220 - 240 V ~ 50 Hz
Consommation de cou
rant
Vitesse de plastification 250 mm/min
Largeur maximale de
plastification
Épaisseur maximale de
plastification
Épaisseur maximale de la
feuille
Temps d’échauffement 6 à 10 min.
Temps de refroidissement Env. 15 min.
Mesures (L x l x H) 380 x 106 x 48 mm
Poids 950 g
1 A
233 mm (A4)
0,6 mm
80, 100, 125 µm
Traitement de l'appareil hors d'usage
Si vous ne voulez plus vous servir de votre
appareil, veuillez l'apporter au centre de collecte
de l'organisme d'élimination des déchets de votre
commune (par ex. centre de recyclage). D'après la loi re
lative aux appareils électriques et électroniques, les pro
priétaires d'appareils usagés sont tenus de mettre tous les
appareils électriques et électroniques usagés dans un
collecteur séparé. L'icône ci-contre signifie que vous ne
devez en aucun cas jeter votre appareil dans les ordures
ménagères !
Vous êtes tenus par la loi d’éliminer vos piles et
piles rechargeables auprès d’un revendeur de
piles ainsi qu’auprès de centres de collecte res
ponsables de leur élimination qui mettent des
conteneurs adéquats à disposition. L'élimination
des piles est gratuite. L’icône ci−contre signifie
que vous ne devez en aucun cas jeter les piles rec
hargeables et piles dans les ordures ménagères, mais
que vous devez les éliminer auprès de centres de col
lecte.
Eliminez les fournitures d'emballage conformément au
règlement local.
Déclaration de conformité
Cet appareil répond aux exigences des directives
:
2004/108/CE relative au rapprochement des législations
des États membres concernant la compatibilité électro
magnétique et abrogeant la directive 89/336/CEE.
2006/95/CE concernant le rapprochement des
législations des États membres relatives au matériel
électrique destiné à être employé dans certaines limites
de tension.
2011/65/CE relative à la limitation de l'utilisation de
matières dangereuses dans les appareils électriques et
électroniques.
La conformité avec les directives susmentionnées est
confirmée par la marque CE apposée sur l'appareil. Vous
pouvez télécharger gratuitement la déclaration de
conformité intégrale depuis notre site Internet
www.olympia-vertrieb.de
.
Garantie
Cher client,
Nous sommes très heureux que vous ayez choisi cet
appareil.
En cas de défaut, veuillez retourner l’appareil dans son
emballage d’origine et accompagné du bon d’achat au
magasin où vous l’avez acheté.
10
F
Page 11

ESPAÑOL
Manual de instrucciones
¡Lea la información que se indica
a continuación y conserve este
manual de instrucciones para futuras
consultas!
Advertencias de seguridad
Æ Evitar cualquier daño de la clavija de red o del cable de
red. Jamás se debe torcer el cable de red. No se debe po
ner el aparato en servicio, en caso de producirse cual
quier daño en el cable o en la clavija de red.
Æ No utilice el aparato cerca de superficies calientes o en
entornos húmedos.
Æ No se pueden laminar objetos metálicos.
Æ No lamine materiales termosensibles como, por ejem
plo, papel térmico, con este aparato.
Æ En el aparato solo se deben introducir fundas de
película transparente previstas según las indicaciones del
punto Características prestacionales. Unas fundas de
película transparente excesivamente grandes pueden
originar atascos de película.
Æ No corte las fundas de película transparente. Los can
tos de corte generados pueden provocar atascos de
película.
Æ Está prohibida la permanencia de niños en el área de
trabajo del aparato cuando está en disposición de servi
cio.
Æ Extraer la clavija de red en caso de que no se utilice el
aparato.
Æ Se debe desconectar el aparato inmediatamente
cuando se percibe un olor penetrante o cuando el aparato
no se encuentre en servicio.
Æ No entrar en contacto con la clavija de red, con las ma
nos húmedas.
Æ Transportar el aparato únicamente cuando se haya
enfriado.
Æ Asegúrese de que el interruptor "Cold/Off/Hot" se en
cuentra en la posición "OFF“ antes de conectar el aparato
laminador a una toma de corriente.
Æ Para la laminación en caliente no se deben utilizar fun
das de película transparente previstas para la laminación
en frío. En ese caso, el aparato, las fundas de película
transparente y el documento sufrirían daños.
Æ La ropa holgada, corbatas, bisutería, pelo largo u otros
objetos sueltos deben mantenerse alejados de la entrada
de película. ¡Peligro de lesiones!
Æ ¡Por motivos de seguridad, la toma de corriente y la
clavija de alimentación deben estar en un lugar de fácil ac
ceso para que, en caso de emergencia, se pueda inte
rrumpir la alimentación eléctrica rápidamente!
Recomendaciones
Æ Si decide transferir el aparato a otra persona, rogamos
que adjunte este manual de instrucciones.
Æ Cuando pretenda laminar materiales muy blandos (por
ejemplo, servilletas) o formatos pequeños, recomenda
mos colocar el producto a laminar en una hoja de papel
doblada a fin de evitar posibles atascos. Esta hoja de
papel doblada debe introducirse con el borde de doblado
orientado hacia delante en el aparato laminador.
Æ La laminación de documentos húmedos conlleva un
mal resultado de laminación.
Æ Documentos Nacionales de Identidad, documentos y
escrituras puede perder la validez cuando se laminan.
Uso previsto
Con este aparato laminador se pueden procesar fundas
de película transparente para procesos de laminación en
caliente y en frío. Se pueden laminar figuras, tarjetas, do
cumentos, papel, etc. hasta un espesor total de 0,6 mm.
Cualquier otro uso será considerado no previsto. Se
prohíbe expresamente cualquier modificación o transfor
mación.
Uso exclusivo en entornos adecuados
El aparato solo debe utilizarse en locales cerrados que
estén secos.
Evite cualquier carga producida por humo, polvo, vibra
ciones, sustancias químicas, humedad, calor o radiación
solar directa.
Características prestacionales
Protección y mejora de sus documentos.
Laminación de fotos, tarjetas, documentos, papel, etc.
hasta el tamaño DIN A4. El aparato trabaja con 2 rodillos
calefactores, tiene un rápido tiempo de calentamiento y
lamina sin materias portantes.
Æ 2 LEDs muestran los estados de servicio "Ready" y
"Power".
Æ Desconexión automática en caso de sobrecalenta
miento.
Æ El sistema de calentamiento de alta calidad evita la for
mación de marcas y burbujas.
E
11
Page 12

Æ Tiempo de calentamiento reducido de aproximada
mente unos 6 minutos.
Æ El tiempo de enfriamiento hasta alcanzar temperatura
ambiente es de 15 minutos aproximadamente.
Æ Espesor de película transparente de al menos 80 µm
y como máximo de 125 µm.
Laminación en caliente
1. Conecte el clavija de alimentación a una toma de
corriente correctamente instalada.
2. Coloque el interruptor "Cold/Off/Hot" en el lado dere
cho del aparato en la posición "Hot". El LED de power
rojo se ilumina.
Æ El motor de accionamiento para los rodillos de trans
porte arranca. Al cabo de aproximadamente entre 6 y
10 minutos se alcanza la temperatura de servicio correcta
y el LED de ready verde se ilumina.
3. Introduzca el producto a laminar en el compartimen
to de laminación de tal modo que exista una distancia
de aproximadamente entre 3 y 5 mm respecto al borde
de la película transparente por todos los lados.
4. Introduzca la funda de película transparente junto
con el producto a laminar en la entrada de película en
el lado frontal del aparato laminador. En primer lugar se
debe introducir el lado cerrado de la funda de película
transparente. El proceso de laminación se realiza de
forma automática.
5. Una vez finalizado el proceso de laminación, colo
que el interruptor "Cold/Off/Hot" en el lado derecho del
aparato en la posición "Off". En caso de ser necesario,
desconecte el cable de alimentación de la toma de co
rriente.
Laminación en frío
1. Conecte el clavija de alimentación a una toma de
corriente correctamente instalada.
2. Coloque el interruptor "Cold/Off/Hot" en el lado dere
cho del aparato en la posición "Cold". El LED de power
rojo se ilumina.
Æ El motor de accionamiento para los rodillos de trans
porte arranca y el LED de ready verde se ilumina.
Si se ha utilizado el aparato laminador poco antes
para la laminación en caliente, es necesario dejar
que este se enfríe. El tiempo de enfriamiento es de
aproximadamente 15 minutos.
3. Introduzca el producto a laminar en el compartimen
to de laminación de tal modo que exista una distancia
de aproximadamente entre 3 y 5 mm respecto al borde
de la película transparente por todos los lados.
4. Introduzca la funda de película transparente junto
con el producto a laminar en la entrada de película en
el lado frontal del aparato laminador. En primer lugar se
debe introducir el lado cerrado de la funda de película
transparente. El proceso de laminación se realiza de
forma automática.
5. Una vez finalizado el proceso de laminación, colo
que el interruptor "Cold/Off/Hot" en el lado derecho del
aparato en la posición "Off". En caso de ser necesario,
desconecte el cable de alimentación de la toma de co
rriente.
Eliminar un atasco de película transpa
rente
Este aparato laminador está equipado con la función
"ABS Jam Release“ para poder eliminar rápidamente
cualquier atasco de película transparente.
- En caso de que se produzca un atasco de película
transparente, desconectar el aparato y pulsar la tecla
"ABS" en el lado izquierdo del aparato.
- Sujete el aparato laminador y extraiga la funda de
película transparente junto con el producto a laminar de
la entrada de película del aparato laminador.
- A continuación, si fuera necesario, se debe limpiar el
aparato repetidamente según se describe en el punto
"Cuidado y limpieza".
Cuidado y limpieza
Las acumulaciones y los restos de pegamento en los rodi
llos de transporte pueden repercutir sobre el resultado de
laminación. Por este motivo se deben limpiar los rodillos
de transporte periódicamente después de la utilización
del aparato:
Para ello se debe introducir una hoja plegada de papel en
la entrada de película. Los restos de pegamento son
arrastrados por el papel saliente. Repetir este proceso va
rias veces.
Antes de la limpieza de la superficie de la carcasa se debe
extraer siempre la clavija de alimentación. En caso de que
fuera necesario, puede limpiarse la carcasa con un trapo
humedecido en una mezcla de jabón suave y agua clara.
No utilice disolventes ni agentes de limpieza agresivos.
12
E
Page 13

Eliminación de fallos
• Atasco de película transparente
Æ Siga las instrucciones que figuran en el punto "Eliminar
un atasco de película transparente“ para eliminar el atas
co.
Æ Utilice solo fundas de película transparente del tamaño
indicado.
Æ Asegúrese de que la funda de película transparente
haya sido introducida de forma recta en el aparato.
Æ Compruebe el tamaño de la funda de película transpa
rente utilizada.
• La funda de película transparente laminada no es por
completo transparente.
Æ Vuelva a laminar la funda de película transparente pa
ra mejorar el resultado de laminación.
Æ Si se utilizan fundas de película transparente más
gruesas (100 µm, 125 µm) es necesario dejar calentar el
aparato durante más tiempo.
Características técnicas
Sistema de laminación Técnica Hot Roller
Alimentación de ten
sión
Consumo de corriente 1 A
Velocidad de lamina
ción
Máximo anchura de la
minación
Máximo espesor de la
minación
Espesor de película
transparente
Tiempo de calenta
miento
Tiempo de enfriamiento Aproximadamente 15 min.
Dimensiones (longitud
x anchura x altura)
Peso 950 g
220 - 240 V ~ 50 Hz
250 mm/min.
233 mm (A4)
0,6 mm
80, 100, 125 µm
6 - 10 min.
380 x 106 x 48 mm
Eliminación
Si desea eliminar su aparato, llévelo al punto de
recogida de su organismo de eliminación comunal
(por ejemplo, centro de reciclaje). Según la ley so
bre aparatos eléctricos y electrónicos, los propietarios de
aparatos antiguos están obligados por ley a clasificar los
aparatos eléctricos y electrónicos para su eliminación.
¡El símbolo adjunto significa que bajo ningún concepto
debe tirar el aparato a la basura doméstica!
Usted está obligado por ley a desechar con seguri
dad las baterías recargables y las pilas a través
del comercio de distribución de baterías, así como
los puntos de recogida competentes que ponen a
disposición los recipientes correspondientes. La
eliminación no supone coste alguno. Los símbo
los significan que en ningún caso debe tirar las baterías
recargables y pilas a la basura doméstica y que estas
deben ser eliminadas a través de los puntos de recogida.
Los materiales de embalaje se deben eliminar de forma
correspondiente siguiendo las prescripciones locales.
Garantía
Estimado cliente,
nos alegramos de que Usted se haya decidido por este
aparato.
En caso de un defecto devuelva el aparato junto con el
justificante de compra y el embalaje original al lugar don
de lo ha adquirido.
Declaración de conformidad
Este aparato cumple los requisitos de las directi
vas:
2004/108/CE sobre la aproximación de las legislaciones
de los Estados miembros en materia de compatibilidad
electromagnética y por la que se deroga la Directiva
89/336/CEE.
2006/95/CE relativa a la aproximación de las legislacio
nes de los Estados miembros sobre el material eléctrico
destinado a utilizarse con determinados límites de ten
sión.
2011/65/CE para la restricción de la utilización de ciertas
sustancias peligrosas en aparatos eléctricos y electróni
cos.
La conformidad con las directivas mencionadas queda
afirmada mediante el símbolo CE en el aparato. Puede
descargar gratis la declaración de conformidad completa
en nuestra Web www.olympia-vertrieb.de
.
E
13
Page 14

NEDERLANDS
Gebruikshandleiding
Lees de volgende informatie
door, volg de aanwijzingen op en
berg deze gebruikshandleiding voor na
slag op!
Veiligheidsinformatie
Æ Beschadiging van netstekker en netsnoer voorkomen.
Netsnoer niet laten opkrullen. Neem het apparaat niet in
gebruik als het netsnoer of de stekker beschadigd is.
Æ Gebruik het apparaat niet in de nabijheid van hete op
pervlakken of in een vochtige omgeving.
Æ Metalen voorwerpen kunnen niet gelamineerd
worden.
Æ Lamineer met dit apparaat geen hittegevoelige
materialen, zoals thermisch papier.
Æ Alleen geschikte lamineerhoesjes (zie ‘Kenmerken’) in
het apparaat plaatsen. Te groot gekozen lamineerhoes
jes kunnen tot gevolg hebben dat de folie vastloopt.
Æ Snij lamineerhoesjes niet op maat. De snijkanten die
hierbij ontstaan kunnen tot gevolg hebben dat de folie
vastloopt.
Æ Kinderen moeten uit de buurt blijven van een inge
schakeld apparaat.
Æ Als het apparaat niet wordt gebruikt, moet de stekker
uit het stopcontact worden getrokken.
Æ Het apparaat altijd direct uitschakelen als u een sterk
prikkelende geur ruikt of als het apparaat niet wordt ge
bruikt.
Æ Netstekker nooit met vochtige handen vastpakken.
Æ Het apparaat alleen in afgekoelde staat transporteren.
Æ Stel vast dat de Cold/Off/Hot-schakelaar in de stand
"OFF" staat voordat het lamineerapparaat op een contact
doos wordt aangesloten.
Æ Gebruik geen lamineerhoesjes die bestemd zijn voor
koudlamineren, bij het heetlamineren. Het apparaat, het
lamineerhoesje en het document kunnen hierbij bescha
digd raken.
Æ Losse delen van kleding, stropdassen, sieraden, lang
haar of andere losse voorwerpen uit de buurt van de folieinvoer houden. Gevaar voor persoonlijk letsel!
Æ Het stopcontact en de netstekker van het apparaat
moeten in verband met de veiligheid vrij toegankelijk zijn
om ervoor te zorgen dat de stroomvoorziening in een
noodsituatie snel kan worden gescheiden!
Adviezen
Æ Als u het apparaat aan een andere persoon wilt door
geven, voegt u deze gebruikshandleiding alstublieft bij.
Æ Als zeer zachte materialen (zoals servetten) of kleine
formaten moeten worden gelamineerd, adviseren wij het
te lamineren document bovendien in een gevouwen blad
papier te leggen om vastlopers te voorkomen. Het blad
moet met de vouwkant naar voren in het lamineerappa
raat worden ingevoerd.
Æ Bij het lamineren van vochtige documenten bereikt u
slechte lamineerresultaten.
Æ Legitimatiebewijzen, documenten en oorkonden kun
nen hun geldigheid verliezen als ze worden gelamineerd.
Beoogd gebruik
Met dit lamineerapparaat kunnen lamineerhoesjes voor
warm en koud lamineren worden verwerkt. Er kunnen fo
to's, kaarten, documenten, papier enz. tot een totale dikte
van 0,6 mm worden gelamineerd. Elk ander gebruik is niet
toegestaan. Eigenmachtige wijzigingen of ombouw zijn
niet toegestaan.
Alleen in geschikte omgevingen ge
bruiken
Het apparaat mag alleen in droge, gesloten ruimten
worden gebruikt.
Voorkom belastingen door rook, stof, schokken, chemi
caliën, vocht, hitte of directe zonnestraling.
Kenmerken
Bescherming en veredeling van uw documenten.
Lamineert foto's, kaarten, documenten, papier enz. tot en
met formaat DIN A4. Het apparaat werkt met 2 verwar
mingswalsen, heeft een korte opwarmingstijd en ge
lamineerd zonder drager.
Æ 2 leds geven de bedrijfsstatus "Ready" en "Power"
weer.
Æ Automatische uitschakeling bij oververhitting.
Æ Hoogwaardig verwarmingssysteem voorkomt vorming
van rimpels of bellen.
Æ Opwarmingstijd slechts ong. 6 minuten.
Æ Afkoelingstijd tot kamertemperatuur ong. 15 minuten.
Æ Dikte van de folie van minimaal 80 µm en maximaal
125 µm.
14
n
Page 15

Heetlamineren
1. Steek de stekker in een volgens de voorschriften
geïnstalleerd stopcontact.
2. Schakel de Cold/Off/Hot-schakelaar aan de
rechterzijde van het apparaat op "Hot". De rode PowerLED brandt.
Æ De aandrijfmotor voor de transportrollen loopt aan. Na
ongeveer 6 tot 10 minuten is de juiste bedrijfstemperatuur
bereikt en de groene Ready-LED brandt.
3. Leg het te lamineren voorwerp zodanig in het
lamineerhoesje dat aan alle kanten 3 à 5 mm afstand
tot de folierand overblijft.
4. Voer het lamineerhoesje met het te lamineren docu
ment in de folie-invoer aan de voorkant van het
lamineerapparaat in. De gesloten zijde van het
lamineerhoesje moet hierbij eerst worden ingevoerd.
Het lamineerproces verloopt automatisch.
5. Als het lamineerproces beëindigd is, schakelt u de
Cold/Off/Hot-schakelaar aan de rechterzijde van het
apparaat op "Off". Trek evt. de stekker uit het stopcon
tact.
Koudlamineren
1. Steek de stekker in een volgens de voorschriften
geïnstalleerd stopcontact.
2. Schakel de Cold/Off/Hot-schakelaar aan de
rechterzijde van het apparaat op "Cold". De rode Po
wer-LED brandt.
Æ De aandrijfmotor voor de transportrollen loopt aan en
de groene Ready-LED brandt.
Als u het lamineerapparaat kort van tevoren voor
heetlamineren hebt gebruikt, moet u het lamineer
apparaat eerst laten afkoelen. De afkoelingstijd be
draagt ong. 15 minuten.
3. Leg het te lamineren voorwerp zodanig in het
lamineerhoesje dat aan alle kanten 3 à 5 mm afstand
tot de folierand overblijft.
4. Voer het lamineerhoesje met het te lamineren docu
ment in de folie-invoer aan de voorkant van het
lamineerapparaat in. De gesloten zijde van het
lamineerhoesje moet hierbij eerst worden ingevoerd.
Het lamineerproces verloopt automatisch.
5. Als het lamineerproces beëindigd is, schakelt u de
Cold/Off/Hot-schakelaar aan de rechterzijde van het
apparaat op "Off". Trek evt. de stekker uit het stopcon
tact.
Klem zitttende folie losmaken
Dit lamineerapparaat biedt de functie ‘ABS Jam Release’
om vastgelopen folie snel te kunnen losmaken.
- Als de folie is vastgelopen, het apparaat uitschakelen
en de "ABS"-knop op de linker zijkant van het apparaat in
drukken.
- Houd het lamineerapparaat vast en trek het lamineer
hoesje met het te lamineren document uit de folie-invoer
van het lamineerapparaat.
- Vervolgens moet het apparaat evt. enkele malen
worden gereinigd, zoals beschreven onder het kopje ‘Ver
zorging en reiniging".
Verzorging en reiniging
Aangekoekt materiaal en lijmresten op de transportrollen
kunnen het lamineerresultaat verslechteren. Daarom
moeten de transportrollen regelmatig na gebruik worden
schoongemaakt:
Hiervoor een gevouwen vel papier in de folie-invoer invoe
ren. Lijmresten worden door het eruit komend papier mee
genomen. Herhaal deze handeling enkele malen.
Voorafgaand aan de reiniging van de oppervlakken van
de behuizing altijd de stekker uit het stopcontact trekken.
Indien nodig kan de behuizing worden afgewist met een
doek die met milde zeep en schoon water bevochtigd is.
Gebruik geen oplosmiddelen of agressieve reinigings
middelen.
Storingen verhelpen
• Folie is vastgelopen
Æ Volg de instructies onder het kopje ‘Vastgelopen folie
losmaken’ op om vastgelopen folie uit het apparaat te
trekken.
Æ Gebruik alleen lamineerhoesjes met het voorge
schreven formaat.
Æ Overtuig uzelf ervan dat het lamineerhoesje recht in
het apparaat werd gestoken.
Æ Controleer het formaat van het gebruikte lamineer
hoesje.
• Gelamineerd lamineerhoesje is niet volledig transpa
rant.
Æ Lamineer het lamineerhoesje opnieuw om het
lamineerresultaat te verbeteren.
Æ Bij gebruik van dikkere lamineerhoesjes (100 µm,
125 µm) het apparaat langer laten opwarmen.
n
15
Page 16

Technische eigenschappen
Lamineersysteem Verwarmingsrollen
Voedingsspanning 220 - 240 V ~ 50 Hz
Opgenomen stroom 1 A
Lamineersnelheid 250 mm/min.
Max. lamineerbreedte 233 mm (A4)
Max. lamineerdikte 0,6 mm
Foliedikte 80, 100, 125 µm
Opwarmingstijd 6 - 10 min.
Afkoelingstijd ong. 15 min.
Afmetingen (l x b x h) 380 x 106 x 48 mm
Gewicht 950 g
Gescheiden inzameling
Als u het apparaat wilt afvoeren, brengt u het naar
het inzamelingspunt in uw gemeente (bijv. KCAdepot). Volgens de wet op elektrische en elektroni
sche apparaten zijn eigenaars van oude apparaten ver
plicht om oude elektrische en elektronische apparaten
naar een gescheiden afvalinzameling te brengen. Het
symbool hiernaast betekent dat u het apparaat in geen
geval in het huisvuil mag gooien!
U bent wettelijk verplicht accu's en batterijen via de
leverancier of via een KCA-depot af te voeren
waar speciale bakken klaarstaan. De afvoer is
kosteloos. De symbolen betekenen dat u accu's
en batterijen in geen geval in het huisvuil mag
gooien en ze via inzamelingspunten milieuver
antwoord moet afvoeren.
Verpakkingsmaterialenvoert u volgens de lokale voor
schriften af.
Verklaring van overeenstemming
Dit apparaat voldoet aan de eisen van de richtlij
nen:
2004/108/EG inzake de onderlinge aanpassing van de
wetgevingen van de lidstaten betreffende de elektromag
netische compatibiliteit en voor intrekking van de richtlijn
89/336/EEG.
2006/95/EG inzake de onderlinge aanpassing van de wet
gevingen van de lidstaten betreffende elektrische pro
ductiemiddelen voor gebruik binnen bepaalde spannings
grenzen.
2011/65/EG ter beperking van het gebruik van bepaalde
gevaarlijke stoffen in elektrische en elektronische appa
raten.
De overeenstemming met de bovengenoemde richtlijnen
wordt door de CE-markering op het apparaat bevestigd.
Voor de complete verklaring van overeenstemming ge
bruikt u alstublieft de kosteloze download van onze web
site www.olympia-vertrieb.de
.
Garantie
Geachte klant,
Het verheugt ons dat u voor dit apparaat hebt gekozen.
Geef het apparaat in geval van een defect met de kassa
bon en de originele verpakking terug in de zaak, waar u
het gekocht heeft.
16
n
Page 17

ITALIANO
Manuale d’uso
Si prega di leggere e osservare le
seguenti informazioni e di con
servare il presente manuale d’uso per
futura consultazione!
Indicazioni di sicurezza
Æ Evitare danni alla spina o al cavo di alimentazione. Non
attorcigliare il cavo di alimentazione. In caso di spina o
cavo di alimentazione danneggiati, non mettere in fun
zione l'apparecchio.
Æ Non utilizzare l'apparecchio in prossimità di superfici
surriscaldate o in ambiente umido.
Æ Non è consentita la plastificazione di oggetti metallici.
Æ Evitare di plastificare materiali sensibili al calore come
ad es. carta termica per fax.
Æ Inserire nell'apparecchio solo pellicole per plastifica
zione conformi a quanto specificato al punto "Caratteristi
che di prestazione". La scelta di pellicole per plastifica
zione troppo grandi può causare intasamenti della
pellicola.
Æ Non tagliare le pellicole per plastificazione nel tentativo
di adattarne le dimensioni. Gli spigoli di taglio risultanti
possono infatti causare un intasamento da pellicola.
Æ Tenere lontano i bambini dall'area di lavoro dell'appa
recchio pronto all'esercizio.
Æ In caso di inutilizzo dell'apparecchio, estrarre la spina
di alimentazione.
Æ Procedere allo spegnimento immediato dell’apparec
chio non appena si sviluppa un forte odore o in caso di non
impiego.
Æ Non toccare la spina di alimentazione con mani bagna
te.
Æ Trasportare l’apparecchio solo se raffreddato.
Æ Assicurarsi che l’interruttore Cold/Off/Hot sia in posi
zione „OFF“ prima di collegare la plastificatrice ad una
presa elettrica.
Æ Evitare durante la plastificazione a caldo l'uso di pelli
cole di plastificazione previste per la plastificazione a fred
do. In caso contrario l'apparecchio, la pellicola per plastifi
cazione ed il documento possono subire danni.
Æ Tenere lontano dalla fessura di inserimento lembi di
abbigliamento, cravatte, gioielli, capelli lunghi o altri og
getti sparsi. Pericolo di lesioni!
Æ Per motivi di sicurezza è necessario assicurare il libero
accesso di presa elettrica e spina dell’apparecchio in
modo da poter scollegare, in caso d'emergenza, rapida
mente l'alimentazione elettrica!
Suggerimenti
Æ In caso di ulteriore cessione dell’apparecchio ad una
terza persona, consegnare altresì il presente manuale
d’uso.
Æ Volendo plastificare materiali molto morbidi (come to
vaglioli di carta) o di piccolo formato, al fine di escludere
possibili intasamenti si consiglia di introdurre insieme al
documento da plastificare un foglio di carta piegato. La
parte piegata va in tal caso introdotta per prima nell'aper
tura della plastificatrice.
Æ In caso di plastificazione di documenti umidi i risultati
saranno insoddisfacenti.
Æ Tessere e documenti possono perdere la loro validità
in caso di plastificazione.
Impiego conforme
La presente plastificatrice consente la lavorazione di pelli
cole per plastificazione a caldo e a freddo. Possono esse
re plastificate fotografie, cartine, documenti, lettere ecc.
con uno spessore complessivo di 0,6 mm. Qualsiasi altro
impiego è considerato improprio. Non sono consentite
modifiche o trasformazioni non autorizzate.
Utilizzare solo in ambiente conforme
Il dispositivo va usato esclusivamente in ambienti chiusi
e asciutti.
Evitare sollecitazioni causate da fumo, polvere, vibra
zioni, sostanze chimiche, umidità, calore o irradiazioni so
lari dirette.
Caratteristiche di prestazione
Protezione e valorizzazione dei vostri documenti.
Plastificazione di immagini, cartoline, documenti, carta
ecc. fino al formato DIN A4. L'apparecchio dispone di
2 rulli a caldo, il tempo di riscaldamento è breve e la plasti
ficazione viene eseguita senza supporto.
Æ 2 LED indicano gli stati d’esercizio „Ready“ e „Power“.
Æ Spegnimento automatico in caso di surriscaldamento.
Æ Ottimo sistema di riscaldamento contro la formazione
di strie e bolle.
I
17
Page 18

Æ Tempo di riscaldamento di soli ca. 6 minuti.
Æ Tempo di raffreddamento fino a temperatura ambiente
ca. 15 minuti
Æ Spessore di pellicola da minimo 80 μm a massimo
125 μm.
Plastificazione a caldo
1. Introdurre la spina in una presa di corrente installata
correttamente.
2. Passare con l’interruttore Cold/Off/Hot sul lato destro
dell’apparecchio in posizione „Hot“. La spia LED rossa
(Power) si accende.
Æ Il motorino dei rulli trasportatori è avviato. Dopo circa
6-10 minuti viene raggiunta la corretta temperatura
d'esercizio e si accende la spia LED verde (Ready).
3. Inserire il foglio da plastificare nella pellicola per pla
stificazione in modo da avere su tutti i lati una distanza
di circa 3-5 mm dal bordo.
4. Introdurre quindi la pellicola per plastificazione in
sieme al foglio da lavorare nella fessura di inserimento
sul davanti della plastificatrice. Introdurre per primo il
lato chiuso della pellicola per plastificazione. La proce
dura di plastificazione si svolge automaticamente.
5. Una volta conclusa la plastificazione, passare con
l’interruttore Cold/Off/Hot sul lato destro dell’apparec
chio in posizione „Off“. Estrarre se occorre la spina dalla
presa di corrente.
Plastificazione a freddo
1. Introdurre la spina in una presa di corrente installata
correttamente.
2. Passare con l’interruttore Cold/Off/Hot sul lato destro
dell’apparecchio in posizione „Cold“. La spia LED rossa
(Power) si accende.
Æ Il motorino dei rulli trasportatori è avviato e la spia LED
verde (Ready) si accende.
Se la plastificatrice è stata utilizzata poco prima per
una plastificazione a caldo, fare raffreddare la pla
stificatrice prima di procedere. Il tempo di raffreddamen
to è di ca. 15 minuti.
3. Inserire il foglio da plastificare nella pellicola per pla
stificazione in modo da avere su tutti i lati una distanza
di circa 3-5 mm dal bordo.
4. Introdurre quindi la pellicola per plastificazione in
sieme al foglio da lavorare nella fessura di inserimento
sul davanti della plastificatrice. Introdurre per primo il
lato chiuso della pellicola per plastificazione. La proce
dura di plastificazione si svolge automaticamente.
5. Una volta conclusa la plastificazione, passare con
l’interruttore Cold/Off/Hot sul lato destro dell’apparec
chio in posizione „Off“. Estrarre se occorre la spina dalla
presa di corrente.
18
Rimozione di intasamenti da pellicola
La plastificatrice è equipaggiata con la funzione „ABS Jam
Release“ allo scopo di rimuovere rapidamente eventuali
intasamenti causati da pellicole.
- Disinserire l’apparecchio in presenza di intasamento e
premere il tasto „ABS“ sul lato sinistro dell’apparecchio.
- Tenere ferma la plastificatrice ed estrarre la pellicola
assieme al documento da plastificare dalla fessura di in
serimento della plastificatrice.
- Fatto questo è necessario pulire l'apparecchio più vol
te seguendo quanto riportato al punto „Cura e pulizia“.
Cura e pulizia
Incrostazioni e residui di adesivo sui rulli di trasporto pos
sono influire sul risultato di plastificazione. Effettuare
quindi periodicamente una pulizia dei rulli di trasporto do
po l'utilizzazione:
Introdurre allo scopo un foglio di carta ripiegato nella fes
sura di inserimento pellicola. I residui di adesivo vengono
asportati dal foglio di carta in uscita. Ripetere più volte tale
procedura.
Staccare sempre la spina di alimentazione prima di pulire
le superfici esterne dell’apparecchio. Pulire se necessario
l'involucro con un panno inumidito in sapone neutro ed ac
qua pulita. Non utilizzare solventi o detergenti corrosivi.
Eliminazione di guasti
• La pellicola si intasa.
Æ Per rimuovere l'intasamento, seguire le istruzioni ripor
tate al punto „Rimozione di intasamenti da pellicola“.
Æ Impiegare solo pellicole per plastificazione nelle
dimensioni indicate.
Æ Assicurarsi che la pellicola per plastificazione sia stata
appena inserita nell'apparecchio.
Æ Verificare la dimensione della pellicola per plastifica
zione utilizzata.
• La pellicola plastificata non è completamente traspa
rente.
Æ Sottoporre a plastificazione la stessa pellicola un'altra
volta allo scopo di migliorare il risultato della plastifica
zione.
Æ Se si utilizzano pellicole per plastificazione più spesse
(100 µm, 125 µm) si prega di prolungare la fase di riscal
damento dell’apparecchio.
I
Page 19

Specifiche tecniche
Sistema di plastifica
zione
Alimentazione 220 - 240 V ~ 50 Hz
Assorbimento di corrente1 A
Velocità di plastifica
zione
Max. larghezza di plasti
ficazione
Max. spessore di plastifi
cazione
Spessore della pellicola
per plastificazione
Tempo di riscaldamento 6 - 10 min.
Tempo di raffreddamentoca. 15 min.
Dimensioni (LxPxA) 380 x 106 x 48 mm
Peso 950 g
Tecnica "rullo a caldo"
250 mm/min.
233 mm (A4)
0,6 mm
80, 100, 125 µm
Smaltimento
Procedere allo smaltimento dell'apparecchio
esaurito consegnandolo presso un punto di rac
colta istituito dalla propria società di smaltimento
rifiuti comunale (ad es. centro di riciclo materiali). Secon
do quanto previsto dalla legge sugli apparecchi elettrici ed
elettronici, i proprietari di apparecchi esauriti sono per leg
ge tenuti alla consegna di tutti gli apparecchi elettrici ed
elettronici presso un centro di rilievo rifiuti in raccolta dif
ferenziata. Il simbolo riportato qui a lato indica che non è
assolutamente consentito smaltire l'apparecchio assieme
ai normali rifiuti domestici!
Per legge sussiste l’obbligo di consegnare batterie
e pile presso rivenditori di batterie o centri di riciclo
utilizzando gli appositi contenitori di raccolta e
provvedendo in tal modo al corretto smaltimento.
Lo smaltimento è gratuito. I simboli indicano che
non è assolutamente consentito gettare batterie e
pile nei rifiuti domestici, consegnandole ai fini dello smalti
mento nei rispettivi punti di raccolta.
Smaltire i materiali d’imballaggio in modo rispondente
alle prescrizioni locali.
Dichiarazione di conformità
Questo apparecchio risponde a quanto disposto
dalle direttive:
2004/108/CE concernente il riavvicinamento delle legi
slazioni degli Stati membri relative alla compatibilità elet
tromagnetica e che abroga la direttiva 89/336/CEE.
2006/95/CE concernente il ravvicinamento delle legi
slazioni degli Stati membri relative al materiale elettrico
destinato ad essere adoperato entro taluni limiti di ten
sione.
2011/65/UE concernente la restrizione dell’uso di deter
minate sostanze pericolose nelle apparecchiature elettri
che ed elettroniche.
La conformità con le normative indicate sopra è conferma
ta dal marchio CE presente sul dispositivo. Per la dichiara
zione di conformità completa si prega di usufruire del do
wnload gratuito dal nostro sito web
www.olympia-vertrieb.de
.
Garanzia
Caro cliente,
ci congratuliamo con Lei per aver scelto questo apparec
chio.
In caso di difetti la preghiamo di ritornare l'apparecchio,
completo di imballo originale e scontrino di acquisto, al
punto vendita dove è stato effettuato l'acquisto.
I
19
Page 20

ČESKY
Návod k obsluze
Přečtěte si a řiďte se následující
mi informacemi a tento návod k
obsluze uschovejte k opětovnému pou
žití!
Bezpečnostní pokyny
Æ Chraňte zástrčku a síťový kabel před poškozením.
Síťový kabel nikdy nepřekrucujte. Neuvádějte přístroj do
provozu v případě, že je poškozen síťový kabel nebo zá
strčka.
Æ Přístroj nepoužívejte v blízkosti horkých povrchů nebo
ve vlhkém prostředí.
Æ Kovové předměty nelze laminovat.
Æ Tímto přístrojem nelaminujte materiály, které jsou cit
livé na teplo, jako např. termopapír.
Æ Do přístroje zavádějte pouze fóliové obaly určené k to
muto účelu, jak je uvedeno v části Výkonové parametry.
Výběrem příliš velkého formátu fóliového obalu můžete
způsobit nakupení fólie.
Æ Nezastřihávejte fóliové obaly. Vzniklé řezné hrany
mohou způsobit nakupení fólie.
Æ Dětem není dovoleno se zdržovat v blízkosti přístroje
v době jeho provozu.
Æ Vytáhněte zástrčku ze sítě vždy, když přístroj nepou
žíváte.
Æ Přístroj ihned vypněte, pokud z něj vychází pronikavý
zápach nebo není-li přístroj v provozu.
Æ Nedotýkejte se zástrčky vlhkýma rukama.
Æ Přístroj můžete přepravovat až po jeho ochlazení.
Æ Před zapojením laminátoru do zásuvky se ujistěte, zda
se přepínač Cold/Off/Hot nachází v poloze „OFF”.
Æ Při laminování za tepla nepoužívejte fóliové obaly, kte
ré jsou určené k laminování za studena. Přitom by mohlo
dojít k poškození přístroje, fóliového obalu a dokumentu.
Æ Volné součásti oděvu, kravaty, šperky, dlouhé vlasy
nebo jiné volné předměty udržujte v bezpečné vzdálenosti
od vstupního otvoru. Nebezpečí zranění!
Æ Zásuvka a síťová zástrčka přístroje musejí být z bez
pečnostních důvodů volně přístupné, aby mohlo být v
nouzovém případě rychle odpojeno napájení proudem!
Doporučení
Æ V případě, že předáte přístroj jiné osobě, přiložte k ně
mu prosím vždy tento návod k obsluze.
Æ Pokud chcete laminovat velmi měkké materiály (jako
např. ubrousky) nebo malé formáty, pak doporučujeme,
abyste laminovaný materiál navíc vložili do přeloženého
listu papíru, a tím zabránili zvrásnění fólie. Tento lami
novaný materiál musíte do přístroje zasunout uzavřenou
stranou.
Æ Laminováním vlhkých dokumentů dosáhnete jen
špatných výsledků.
Æ Průkazy, dokumenty a listiny mohou ztratit svou
platnost, pokud budou zalaminovány.
Používání k určenému účelu
Tímto laminátorem mohou být laminovány fóliové obaly
určené k laminování za tepla a studena. Lze laminovat ob
rázky, vizitky, dokumenty, papír atd. s max. tloušťkou 0,6
mm. Jakékoliv jiné použití se považuje za použití ne
odpovídající účelu. Svévolné provádění změn nebo pře
stavení není přípustné.
Používejte jej jen ve vhodném prostře
dí
Přístroj lze používat pouze v suchých, uzavřených prosto
rách.
Chraňte přístroj před působením kouře, prachu, otřesů,
chemikálií, vlhkosti, horka nebo přímého slunečního zá
ření.
Výkonové parametry
Ochrana a zlepšení vlastností vašich dokumentů.
Laminuje obrázky, karty, dokumenty, papír atd. do ve
likosti formátu DIN A4. Přístroj pracuje se 2 výhřevnými
válečky, rychle se zahřívá a laminuje bez nosiče.
Æ 2 LED indikují provozní stavy „Ready” a „Power”.
Æ Automatické vypnutí při přehřátí.
Æ Vysoce kvalitní zahřívací systém znemožňuje vytvo
ření šmouh a bublin.
Æ Doba zahřívání pouhých přibližně 6 minut.
Æ Doba vychladnutí na pokojovou teplotu přibližně 15 mi
nut.
Æ Tloušťka fólie minimálně 80 µm a maximálně 125 µm.
20
C
Page 21

Laminování za tepla
1. Síťovou zástrčku zasuňte do řádně instalované zá
suvky.
2. Přepínač Cold/Off/Hot na pravé straně přístroje na
stavte do polohy „Hot”. Power LED svítí červeně.
Æ Hnací motor posouvacích válečků se rozběhne. Asi po
6 až 10 minutách je dosaženo správné provozní teploty a
rozsvítí se zelená LED Ready.
3. Vložte materiál určený k laminování do fóliového
obalu tak, aby zůstal na všech stranách zachován asi 3
až 5 mm odstup od okraje fólie.
4. Fóliový obal současně s laminovaným materiálem
zasuňte do vstupní štěrbiny na přední straně lamináto
ru. Fóliový obal zasuňte uzavřenou stranou napřed.La
minování proběhne automaticky.
5. Po ukončení laminování, nastavte přepínač Cold/Off/
Hot na pravé straně přístroje do polohy „Off”. Event.
vytáhněte síťovou zástrčku ze zásuvky.
Laminování za studena
1. Síťovou zástrčku zasuňte do řádně instalované zá
suvky.
2. Přepínač Cold/Off/Hot na pravé straně přístroje na
stavte do polohy „Cold”. Power LED svítí červeně.
Æ Hnací motor posouvacích válečků se rozběhne a roz
svítí se zelená LED Ready.
Pokud jste laminátor krátce předtím použili k lami
nování za tepla, musíte jej nechat vychladnout.
Doba vychladnutí činí přibližně 15 minut.
3. Vložte materiál určený k laminování do fóliového
obalu tak, aby zůstal na všech stranách zachován asi 3
až 5 mm odstup od okraje fólie.
4. Fóliový obal současně s laminovaným materiálem
zasuňte do vstupní štěrbiny na přední straně lamináto
ru. Fóliový obal zasuňte uzavřenou stranou napřed.La
minování proběhne automaticky.
5. Po ukončení laminování nastavte přepínač Cold/Off/
Hot na pravé straně přístroje do polohy „Off”. Event.
vytáhněte síťovou zástrčku ze zásuvky.
Odstranění nakupené fólie
Tento laminátor je vybaven funkcí „ABS Jam Release”, je
jíž pomocí lze rychle odstranit nakupenou fólii.
- Při nakupení fólie přístroj vypněte a stiskněte tlačítko
„ABS” na levé straně přístroje.
- Laminátor pevně držte a fóliový obal vytáhněte spolu
s laminovaným materiálem ze vstupního otvoru lamináto
ru.
- Poté je nutno přístroj eventuálně několikrát vyčistit, jak
je popsáno v části „Údržba a čištění”.
Údržba a čištění
Usazeniny a zbytky lepidla mohou negativně ovlivnit vý
sledek laminování. Proto je nutné posouvací válečky
pravidelně po použití vyčistit:
K tomu účelu zasuňte přeložený list čistého papíru do
vstupní štěrbiny. Zbytky lepidla se zachytí na papíře a
spolu s ním budou vytlačeny ven. Tento postup několikrát
opakujte.
Před čištěním povrchů přístroje vždy vytáhněte síťovou
zástrčku. V případě potřeby lze skříň laminátoru očistit
utěrkou namočenou v čisté vodě s jemným mýdlem. Ne
používejte rozpouštědla nebo agresivní čisticí prostředky.
Odstranění závady
• Nakupení fólie
Æ K odstranění nakupení postupujte podle pokynů uve
dených v části „Odstranění nakupené fólie”.
Æ Používejte pouze fóliové obaly uvedené velikosti.
Æ Ujistěte se, zda byl fóliový obal zasunut do přístroje
rovně.
Æ Překontrolujte velikost používaného fóliového obalu.
• Laminovaný fóliový obal není dokonale průhledný.
Æ Laminujte znovu stejný fóliový obal, abyste dosáhli
lepšího výsledku laminování.
Æ Používáte-li tlustější fóliové obaly (100 µm, 125 µm),
nechte přístroj déle zahřívat.
C
21
Page 22

Technické parametry
Systém laminování Technika Hot-Roller
Napájení 220 - 240 V ~ 50 Hz
Příkon proudu 1 A
Rychlost laminování 250 mm/min.
Max. šířka lami
novaného dokumentu
Max. tloušťka lami
novaného dokumentu
Tloušťka fólie 80, 100, 125 µm
Doba zahřívání 6 - 10 min.
Doba vychladnutí asi 15 min.
Rozměry (dxšxv) 380 x 106 x 48 mm
Hmotnost 950 g
233 mm (A4)
0,6 mm
Likvidace
Pokud chcete svůj přístroj zlikvidovat, odvezte jej
na sběrné místo vašeho komunálního likvidátora
odpadu (např. do sběrných surovin). Podle
zákona o elektrických a elektronických přístrojích jsou
vlastníci starých přístrojů povinni ze zákona odvézt staré
elektrické a elektronické přístroje do speciálních
sběrných surovin. Zde uvedený symbol znamená, že se
přístroj nesmí v žádném případě vyhazovat do domácího
odpadu!
Ze zákona jste povinni bezpečně zlikvidovat aku
mulátory a baterie prostřednictvím prodejny bate
rií nebo na sběrných místech specializovaných na
likvidaci akumulátorů a baterií. Likvidace je
bezplatná. Symboly značí, že akumulátory a
baterie nelze v žádném případě vyhodit do
domovního odpadu a že se musí odvézt do sběrných
surovin k jejich likvidaci.
Obalový materiál zlikvidujte podle místních předpisů.
Prohlášení o shodě
Tento přístroj splňuje požadavky následujících
směrnic:
2004/108/ES o sbližování právních předpisů členských
států týkajících se elektromagnetické kompatibility a o
zrušení směrnice 89/336/EHS.
2006/95/ES o harmonizaci právních předpisů členských
států týkajících se elektrických zařízení určených pro pou
žívání v určitých mezích napětí.
2011/65/ES o omezení používání některých nebez
pečných látek v elektrických a elektronických zařízeních.
Shoda se shora uvedenými směrnicemi je na přístroji po
tvrzena značkou CE. Chcete-li získat kompletní prohlá
šení o shodě, pak využijte bezplatné stažení na naší we
bové stránce www.olympia-vertrieb.de
.
Záruka
Vážený zákazník,
těší nás, že jste se rozhodli pro tento přístroj.
V případě vzniku závady odevzdejte přístroj spolu s
pokladničním dokladem a originálním obalem v prodejně,
kde jste přístroj zakoupili.
22
C
Page 23

Page 24

Wir behalten uns inhaltliche und technische Änderungen vor.
 Loading...