

Page 1
R
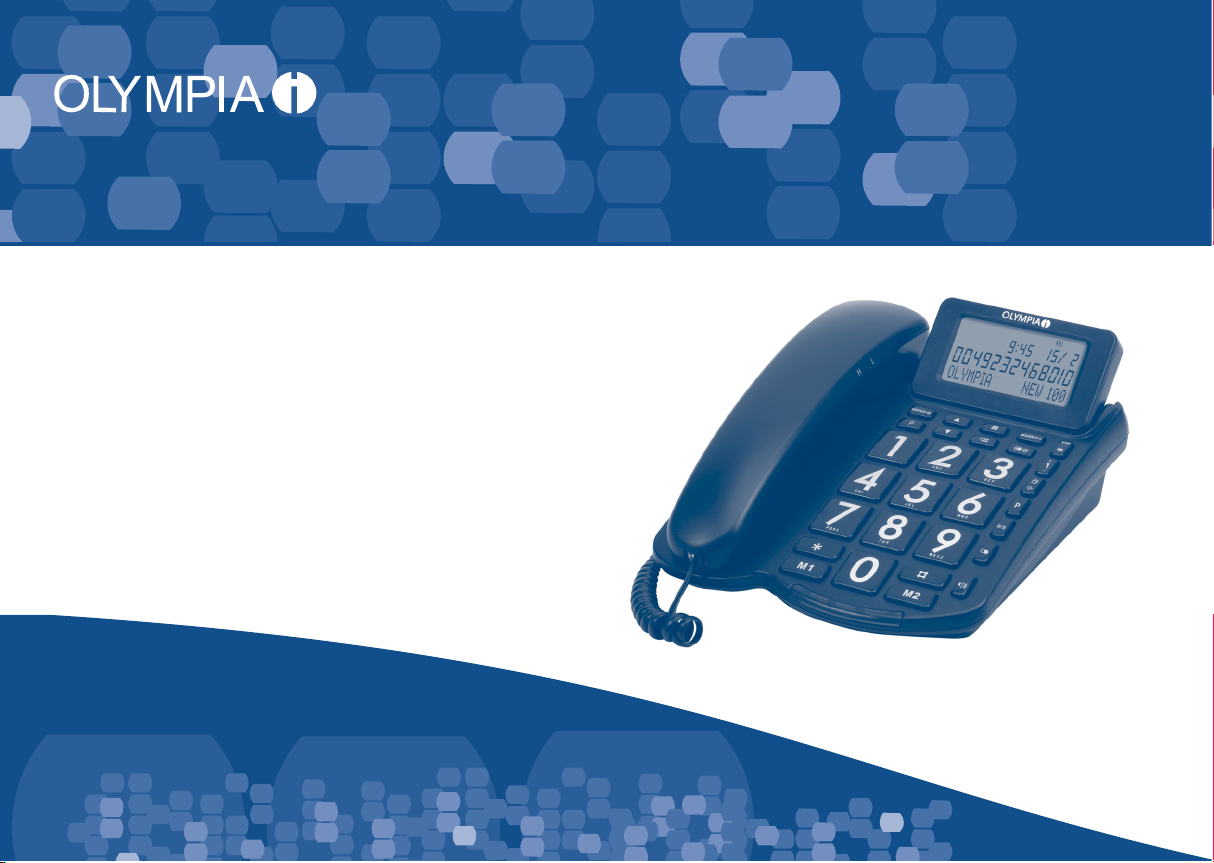
4210 Desk Telephone
Operating Instructions
25.05.2011 gb/gb
4210
Page 2

Olympia Business Systems Vertriebs GmbH
Zum Kraftwerk 1
45527 Hattingen
Page 3

Contents
1. Introduction 1..................................
Significance of the Symbols 1...................................
Important Safety Precautions 1..................................
Exemption From Liability 1......................................
Intended Use 1...............................................
Information on Disposal 1.......................................
2. Installation 2....................................
Package Contents 2...........................................
Positioning and Connecting 2...................................
Important Information 3.........................................
3. Features 4......................................
4. Operating Elements and Indicators 5.............
Equipment Description 5.......................................
Display 6....................................................
Other Icons/Texts in the Display 6................................
5. Menu Structure 7................................
Overview 7...................................................
Editing Phone Book Entries 8...................................
Creating Phone Book Entries 8..................................
Flash Time 8.................................................
Ringing Melodies 8............................................
Babycall 8...................................................
Display Contrast 8............................................
Date and Time 8..............................................
Long Distance Access Code 9..................................
Area Code 9.................................................
Language of the Menu Guidance 9...............................
6. Telephoning 10................................
Taking a Call 10..............................................
Making a Call 10.............................................
Redialling 10................................................
Putting a Call on Hold 10......................................
Changing the Receiver Volume 10..............................
Changing the Ringing Volume 10...............................
Changing the Loudspeaker Volume 11............................
Compiling the Call Time 11.....................................
Muting the Microphone 11......................................
Using the R Button 11..........................................
Entering a Dialling Pause (P) 11.................................
Dialling Phone Numbers from the List of Incoming Calls 11...........
OPERATING
INSTRUCTIONS
iPage
Page 4

Contents
7. Speed Dial Memory and Phone Book 12.........
Saving Entries in the Phone Book 12............................
Editing Entries in the Phone Book 12............................
Storing Numbers of Incoming Calls in the Phone Book 12...........
Dialling Phone Numbers from the Phone Book 12.................
Deleting an Entry from the Phone Book 13.......................
Programming One−touch Dialling Keys (M1 to M4) 13..............
Dialling with One−touch Dialling Keys (M1 to M4) 13...............
Programming the Speed−dial Keys (0 to 9) 13....................
Dialling with the Speed−dialling Keys 13.........................
8. Call Identification (CLIP) 14.....................
Call List 14..................................................
9. Miscellaneous 15...............................
Alarm 15....................................................
Snooze 15..................................................
Voice Mail 15................................................
Callback When Engaged 15....................................
Filter 16....................................................
Filter Properties 16...........................................
Deleting Filter Entries 17......................................
10. Operating in a PABX System 18................
11. Disassembling 18.............................
12. In Case of Problems 19........................
13. Cleaning and Servicing 19.....................
14. Guarantee 20.................................
15. Technical Modifications and Data 20...........
16. Index 21......................................
17. Declaration of Conformity 23...................
OPERATING
INSTRUCTIONS
iiPage
Page 5

Introduction
Significance of the Symbols
CAUTION: Indicates a potentially dangerous situation and, if
ignored, could lead to minor injuries.
NOTE: Indicates a potentially dangerous situation and, if
ignored, could lead to damage to property and the
environment.
Important Safety Precautions
Please observe the following to ensure the telephone can be operated
reliably:
CAUTION: Risk of electric shock!
Never open the equipment! Never use the equipment
when it is wet or in the vicinity of a bathtub, shower or
such facilities!
CAUTION: Risk of electric shock!
Repairs to defect equipment may only be carried out
by authorised service centres.
CAUTION: Risk of suffocation!
Keep telephone and packaging materials out of
reach of children.
NOTE: If the telephone is transferred to others, it is essential to
enclose the instruction manual with it.
1. Introduction
Exemption From Liability
We cannot guarantee that the information which relates to the technical
properties of the product or to the product itself contained in this document
is correct. The product and its accessories described in this document are
subject to constant improvement and further development. For this reason,
we reserve the right to modify components, accessories, technical
specifications and related documentation of the product described herein at
any time without notice.
Intended Use
The 4210 desk telephone has been designed for telephoning via a landline
using a conventional analogue telephone network. A condition for intended
use is that it is installed properly.
Any other use is considered unintended use. Unauthorised modification or
reconstruction not described in this manual are not permitted.
Information on Disposal
The implementation of European law in national laws and directives obliges
you to dispose of consumable goods appropriately. This serves to protect
both persons and the environment.
The adjacent symbol indicates that electrical and electronic
apparatus as well as batteries no longer required must be
disposed of separate from domestic waste.
Old or unwanted devices must be disposed of at collection
points provided by public waste authorities.
Batteries and power packs must be disposed of at shops
which sell batteries or collection points which provide the
corresponding containers.
Packaging materials must be disposed of according to local
regulations.
OPERATING
INSTRUCTIONS
1Page
Page 6

2. Installation
Installation
Package Contents
Desk telephone 1
Receiver 1
Helix cable 1
Telephone connection cable 1
AAA batteries 3
Operating manual 1
Please check the contents of the package carefully. If anything is missing
or shows signs of transport damage, do NOT put the telephone into
service! In such a case, contact your sales outlet, with the purchase receipt
to hand, or the OLYMPIA Service Centre directly.
NOTE: Keep the equipment packaging so that it can be used to
prevent equipment damage in the event of future
transport.
Positioning and Connecting
NOTE: Position the desk telephone where it is easy to access.
NOTE: Ensure that it is set down on a stable, level, non−slip
surface.
NOTE: In addition, ensure that the equipment is positioned
where all the necessary cables can be laid in such a way
that nobody can trip over them.
NOTE: Do not place the desk telephone in the direct vicinity of
other electrical apparatus, such as microwave ovens,
PCs or hi−fi equipment, for example.
NOTE: Do not expose the desk telephone to direct sunlight.
NOTE: Protect the desk telephone from getting wet.
NOTE: The desk telephone must not be set up in rooms in
which condensation, corrosive vapours or high
concentrations of dust develop and accumulate (e.g.
cellar rooms, garages or winter gardens).
NOTE: The ambient temperature must be between 0 _C and
35_C.
OPERATING
2Page
INSTRUCTIONS
Page 7
Important Information
NOTE: Refer to Section Equipment Description for information
on the location of the equipment elements mentioned
below.
NOTE: Do not mix old and new batteries.
2. Installation
NOTE: Do not mix alkaline, standard (zinc−carbon) or
rechargeable batteries.
NOTE: If the telephone will not be used for a longer period,
remove the batteries to prevent damage caused by the
batteries leaking. Pull out the phone plug from
telephone line socket before opening the battery
compartment.
NOTE: Ensure that the batteries are inserted the right way
round (refer to the direction on the diagram in the
battery compartment). Reversed polarity can cause
damage to the telephone.
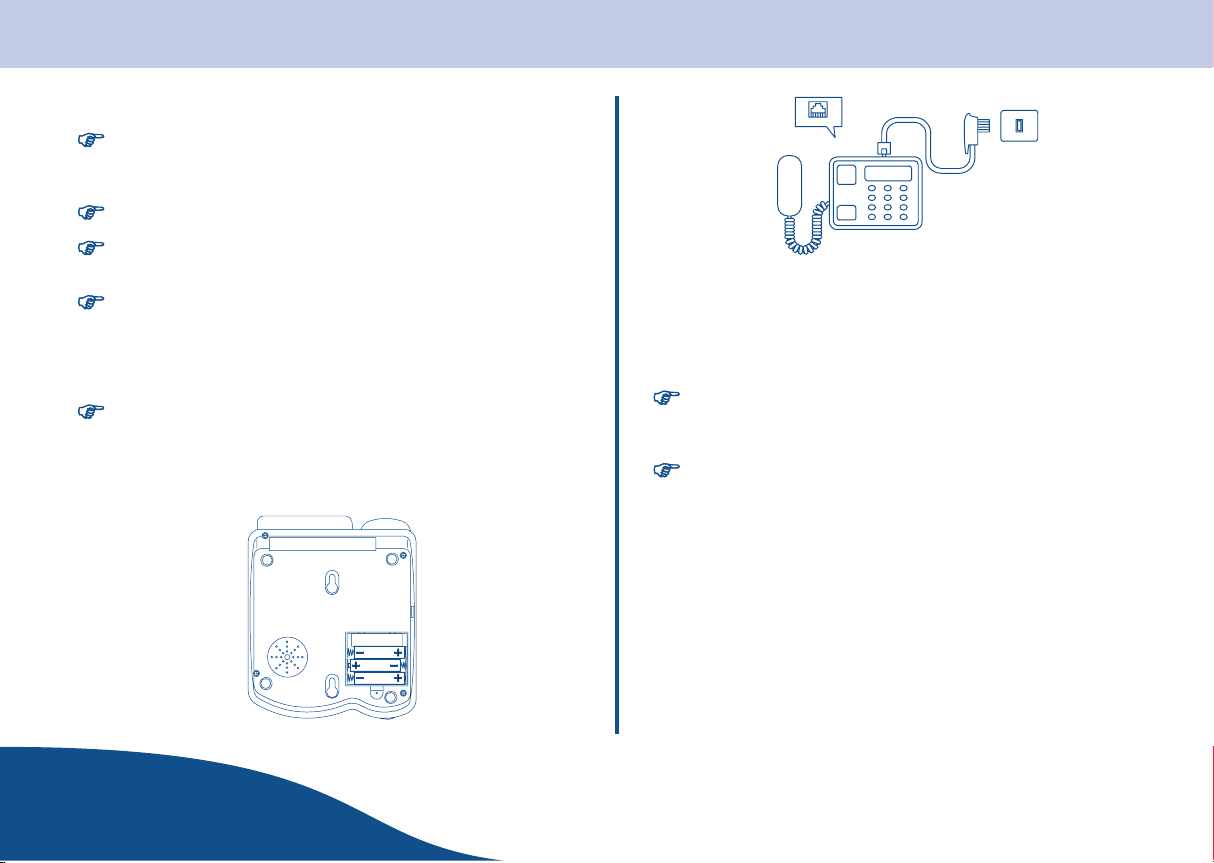
1. Open the battery compartment and insert 3 AAA batteries.
OPERATING
INSTRUCTIONS
2. Insert the plugs in the relevant sockets provided on the desk telephone
(they cannot be incorrectly connected because the sockets and plugs
are designed to prevent reverse poling).
3. Plug the telephone line plug in the corresponding socket in the
telephone connection socket.
NOTE: The display lighting is only active when batteries are
inserted/fully charged. If the display no longer
functions, change the batteries.
NOTE: Pull out the phone plug from telephone line socket
before opening the battery compartment.
4. Set the volume control switch for the receiver to the required position.
The switch is located on the side of the receiver.
3Page
Page 8

3. Features
Features
We are pleased that you have purchased this high quality telephone which
is equipped with the following features:
S Call identification, compatible with FSK/DTMF (automatic)
S Menu guidance in 9 languages
S 3-line display: 16-digit phone numbers, 16-character names
S Phone number memory for max. 44 incoming and 16 outgoing calls
S Phone book for 32 entries
S 2 one−touch dialling keys and 10 speed dialling keys
S Protection from unwanted calls
S 5-level display contrast setting
S Adjustable call volume
S Put calls on hold
S Redialling, handsfree, muting, flash, dialling pause
S Date, time, call time display
S Adjustable flash time
S Adjustable ringing tone volume
S New calls signalled by LED and in the display
S Display with back−lighting
OPERATING
4Page
INSTRUCTIONS
Page 9
4. Operating Elements and Indicators
Operating Elements and Indicators
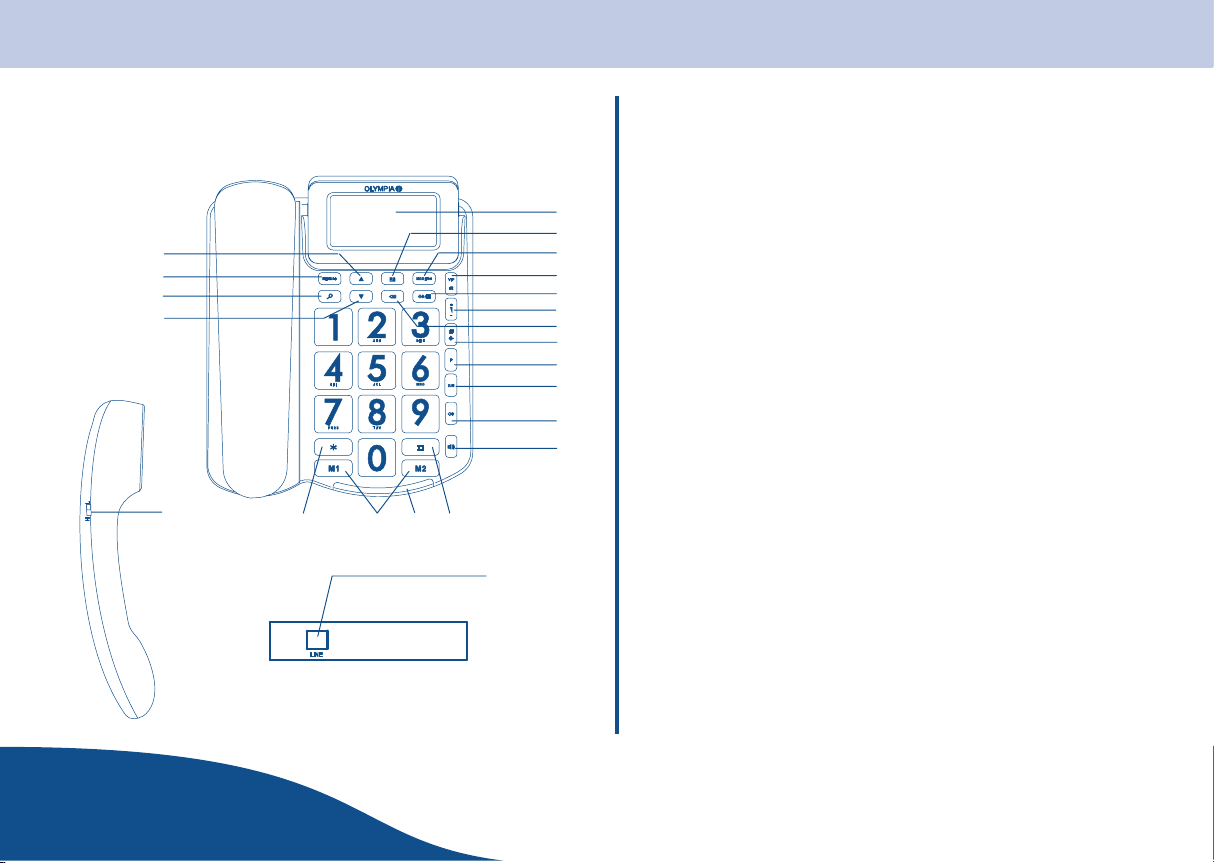
Equipment Description
20
19
18
17
22
16
15 14
13
21
10
11
12
1 Display
2 Ï Phone book button
3 Å/Ë MODE / Alarm button
4 È/Ç VIP (filter) / Microphone muting button
1
2
3
4
5
6
7
8
9
5 Æ/Í Automatic redialling / Hold call button
6 Ä Volume button
7 S Delete button
8 Ñ/Ê Copy / Initiate speed dialling button
9 É Dialling pause button
10 R/S R (Flash) / Snooze button
11 O Redialling button
12 < Handsfree button
13 ; Hash button
14 LED, telephone is ringing
15 À − Á One−touch dialling keys
16 : Star button
17 ` Scroll down button
18 Î Call list, outgoing calls button
19 #/I MENU / OK button
20 _ Scroll up button
21 L Telephone line socket
22 Receiver volume sliding switch
OPERATING
INSTRUCTIONS
5Page
Page 10

4. Operating Elements and Indicators
Display
3
1
2
4
j d efghi
a e i Ò / Ó
ALL:000 NEW:000
567
1 Data record number
2 Time
3 Weekday *
4 Day / Month
5 Number of new calls in the memory
6 Year
7 Number of incoming calls in the memory
* SUN - Sunday, MON - Monday, TUE - Tuesday, WED - Wednesday,
THU - Thursday, FRI - Friday, SAT - Saturday
Other Icons/Texts in the Display
IN
OUT
NEW
REP
FILTER
T
x
Incoming calls
Outgoing calls
New calls
Repeat call (redial)
Filter is active
New messages recorded
Handsfree function has been switched on
No batteries inserted / Batteries empty
Ó
VIP
AM
PM
Call from a number entered in the VIP list
Ante Meridiem = before midday
Post Meridiem = after midday
OPERATING
6Page
INSTRUCTIONS
Page 11

Menu Structure
Overview
Please follow the operating steps below in order to access the various menus:
1. Replace the receiver and press the #/I button.
2. Press the _ or ` button to select the required menu.
3. Press the #/I button to open the required menu.
4. Press the _ and ` buttons to select the required parameter.
5. Press the #/I button to save the corresponding setting and exit from the menu.
6. Press the S button to return to Standby mode.
Display Function
Phonebook edit Edit phone book entries
Phonebook input Create phone book entries
Flash time Set the Flash time (10 times available for selection)
Ring melody Set the ringing melody (8 melodies available for selection)
Babycall Switch babycall on/off / Enter the babycall number
Contrast adjust Set the display contrast (5 levels)
Date/Time Set the date, time
Long dist access Set the long distance access code (max. 6 digits)
Set area code Set the area code (max. 6 digits)
Select language Select the language for the menu guidance (9 languages available for selec-
tion)
5. Menu Structure
Tip: If no input is made for approx. 15 seconds, the menu is automatically closed.
OPERATING
INSTRUCTIONS
7Page
Page 12

5. Menu Structure
Tip: Press the S button to exit from a menu.
Editing Phone Book Entries
Refer to chapters Speed Dial Memory and Phone Book.
Creating Phone Book Entries
Refer to chapters Speed Dial Memory and Phone Book.
Flash Time
The Flash relates to a specific time for which the line is interrupted in
order to trigger certain switch functions. The Flash time defines the period
of the interruption.
There are 10 times available for selection in the Flash time menu. Select
the Flash time required for your country / PABX system.
1. Press the #/I button.
2. Press the _/` buttons to select the Flash time menu.
3. Confirm the selection by pressing the #/I button.
4. Press the _/` buttons to select the required flash time.
5. Confirm the selection by pressing the #/I button.
Tip: For further information, refer to “Using the R Button” and
Chapter “Operating in a PABX System”.
Ringing Melodies
There are 8 ringing melodies available for selection in the Ring melody
menu.
1. Press the #/I button.
2. Press the _/` buttons to select the Ring melody menu.
3. Confirm the selection by pressing the #/I button.
4. Press the _/` buttons to select a ringing melody.
5. Confirm the selection by pressing the #/I button.
Babycall
Use the Babycall menu to save a phone number which is then
automatically dialled after pressing any button (except the #/I
button).
1. Press the #/I button.
2. Press the _/` buttons to select the Babycall menu.
3. Confirm the selection by pressing the #/I button.
4. Press the _/` buttons to select Babycall on or Babycall off.
5. Confirm the selection by pressing the #/I button.
If you have selected Babycall on:
6. Enter the babycall number and confirm by pressing the #/I
button.
Display Contrast
There are 5 different settings available in the Contrast adjust menu.
1. Press the #/I button.
2. Press the _/` buttons to select the Contrast adjust menu.
3. Confirm the selection by pressing the #/I button.
4. Press the _/` buttons to select a setting.
5. Confirm the selection by pressing the #/I button.
Date and Time
The Date/Time menu can be used to set the current date and time.
OPERATING
8Page
INSTRUCTIONS
Page 13

5. Menu Structure
1. Press the #/I button.
2. Press the _/` buttons to select the Date/Time menu.
3. Confirm the selection by pressing the #/I button.
4. Press the _/` buttons to set the year.
5. Confirm the selection by pressing the #/I button.
6. Press the _/` buttons to set the hour.
7. Confirm the selection by pressing the #/I button.
8. Press the _/` buttons to set the minute.
9. Confirm the selection by pressing the #/I button.
10.Press the _/` buttons to set the day.
11.Confirm the selection by pressing the #/I button.
12.Press the _/` buttons to set the month.
13.Confirm the selection by pressing the #/I button.
Long Distance Access Code
The Long dist access menu can be used to store a long distance access
code (LDAC*). This unique 6−digit access code serves for accounting
long distance calls and special call numbers to the respective users
instead of being charged to the telephone subscriber. The telephone
network infrastructure must support the function in order to use it. Contact
your telephone provider for details.
Tip: This programming procedure is not normal within European
countries.
1. Press the #/I button.
2. Press the _/` buttons to select the Long dist access menu.
* LDAC = Long Distance Access Code.
3. Confirm the selection by pressing the #/I button.
4. Press the _/` buttons to select the first digit.
5. Confirm the selection by pressing the #/I button.
Repeat the procedure to enter up to 6 digits.
Area Code
The Set area code menu can be used to store your area code. The effect
of this setting is that calls received, with the area code defined, appear in
the call list without the area code.
1. Press the #/I button.
2. Press the _/` buttons to select the Set area code menu.
3. Confirm the selection by pressing the #/I button.
4. Press the _/` buttons to select the first digit.
5. Confirm the selection by pressing the #/I button.
Repeat the procedure to enter up to 6 digits.
Language of the Menu Guidance
The Select language menu can be used to set the language for the menu
guidance. There are 9 languages available for selection.
1. Press the #/I button.
2. Press the _/` buttons to select the Select language menu.
3. Confirm the selection by pressing the #/I button.
4. Press the _/` buttons to select a language.
5. Confirm the selection by pressing the #/I button.
Tip: Press the S button to exit from a menu.
OPERATING
INSTRUCTIONS
9Page
Page 14

6. Telephoning
Telephoning
Taking a Call
1. The telephone rings, a call is received.
2. Pick up the receiver or press the < button to take the call. The call time
indicator starts.
3. Replace the receiver or press the < button again to end the call.
Making a Call
1. Pick up the receiver or press the < button and wait for the dialling tone.
2. Dial the phone number. The call time indicator is started approx. 5
seconds after the first ringing tone.
It is also possible to make a call by dialling the number first and then lifting
the receiver or pressing the < button. When entering the number, it is
possible to correct wrong digits by pressing the S button.
Redialling
1. Pick up the receiver or press the < button.
2. Press the O button in order to redial the last number dialled.
The telephone stores up to 16 phone numbers which have been dialled.
Tip: When the memory is full, the oldest entry will subsequently be
automatically overwritten.
1. Press the Î button.
2. Press the _/` buttons to select a phone number.
3. Pick up the receiver or press the O button to dial the number.
Delete entries:
1. Press the Î button.
2. Press the _/` buttons to select a phone number.
3. Press the S button to delete the entry currently selected.
4. Press the _/` button to select End of list.
5. Press the S button to return to Standby mode.
Putting a Call on Hold
1. Press the Æ/Í button during a call and replace the receiver on−hook in
order to put the call on hold.
2. Pick up the receiver or press the < button to resume the call.
Changing the Receiver Volume
On the inner side of the receiver is a sliding switch (E) which is used to
set the receiver volume. This switch can be adjusted at any time to the
volume required, even during a call.
Changing the Ringing Volume
Press the Ä button in order to adjust the volume of the ringing tone.
There are 4 levels available for selection.
OPERATING
10Page
INSTRUCTIONS
Page 15

6. Telephoning
Changing the Loudspeaker Volume
Press the Ä button while the loudspeaker is switched on in order to
adjust the volume. There are 4 levels available for selection.
Compiling the Call Time
Compiling of the call time is started approx. 5 seconds after the call has
been taken or the phone number dialled. Even if the phone number dialled
is engaged, the phone number and duration of the call are stored in the
outgoing call memory.
Muting the Microphone
While a call is in progress, you can press the È/Ç button to switch off the
microphone. Press the button again to resume the call.
Using the R Button
If your telephone is connected to a PABX system, the R button is used
during a call to enable consultation with other subscribers and/or to forward
a call to them.
This function is also used by network operators to provide customers with
various other services. For details, contact your telephone network
operator.
1. Pick up the receiver or press the < button to make the call.
2. During the call, press the R button and dial the phone number of another
subscriber in order to consult with him or forward the call to him.
3. Press the R button in order to take the initial call back following
consultation
or
4. Replace the receiver to forward the call to the subscriber contacted.
Tip: The above information could vary according to the PABX system
used. Please read the information provided in the manuals
supplied with your PABX system.
Entering a Dialling Pause (É)
If the telephone is connected to a PABX, it may be necessary to enter a
dialling pause. Press the É button after entering the digit following which a
pause is required, e.g. 0 for an outside line (0P....). A É then appears in the
display to represent the pause. A pause can also be programmed for
entries in the phone book.
Dialling Phone Numbers from the List of Incoming
Calls
The telephone automatically saves information on the last 44 incoming
calls. Proceed as follows to dial a phone number from this call list:
1. Press the _ or ` button to open the call list.
2. Press the _/` buttons to select a phone number.
3. Pick up the receiver or press the < button to dial the number.
Tip: If a call from the same phone number is received several times,
only the last call and time is displayed.
OPERATING
INSTRUCTIONS
11Page
Page 16

7. Speed Dial Memory and Phone Book
Speed Dial Memory and Phone Book
Up to 32 entries can be stored in the phone book. The names can be
comprised of capital letters, spaces and special characters (buttons 0 to 9).
Press the S button to make corrections.
Saving Entries in the Phone Book
1. Press the #/I button.
2. Press the _/` buttons to select the Phonebook input menu.
3. Confirm the selection by pressing the #/I button.
4. Enter the phone number (max. 16 digits).
5. Confirm the entry by pressing the #/I button.
6. Enter the corresponding name (max. 16 characters).
7. Confirm the entry by pressing the #/I button.
Editing Entries in the Phone Book
1. Press the #/I button.
2. Press the _/` buttons to select the Phonebook edit menu.
3. Confirm the selection by pressing the #/I button.
4. Press the _/` buttons to select an entry.
5. Confirm the selection by pressing the #/I button.
6. Edit the phone number (max. 16 digits).
7. Confirm the entry by pressing the #/I button.
8. Edit the name (max. 16 characters).
9. Confirm the entry by pressing the #/I button.
Storing Numbers of Incoming Calls in the Phone
Book
1. Press the _/` button to open the call list.
2. Press the _/` buttons to select an entry.
3. Press the #/I button.
4. The message Store appears in the display.
5. Press the Ï button.
6. Edit the phone number (max. 16 digits).
7. Confirm the entry by pressing the #/I button.
8. Enter the corresponding name (max. 16 characters).
9. Confirm the entry by pressing the #/I button.
Dialling Phone Numbers from the Phone Book
1. Press the Ï button.
2. Enter the initial letters
or
3. Press the _/` buttons to select an entry.
4. Pick up the receiver or press the < button.
OPERATING
12Page
INSTRUCTIONS
Page 17

7. Speed Dial Memory and Phone Book
Deleting an Entry from the Phone Book
1. Press the Ï button.
2. Enter the initial letters
or
3. Press the _/` buttons to select an entry.
4. Press the S button to delete the entry.
5. Press the _/` button to select End of list.
6. Press the S button to return to Standby mode.
Programming One−touch Dialling Keys (À to Á)
1. Enter a phone number
or
2. Press the _/` buttons to select an entry from the call list.
3. Press the #/I button.
4. The message Store appears in the display.
5. Press the required one−touch dialling key.
Dialling with One−touch Dialling Keys (À to Á)
1. Press the required one−touch dialling key.
2. Pick up the receiver or press the < button.
Tip: The numbers programmed to the one−touch dialling keys cannot be
deleted. The existing phone numbers are overwritten when new
ones are saved.
Programming the Speed−dial Keys (0 to 9)
1. Enter a phone number
or
2. Press the _/` buttons to select an entry from the call list.
3. Press the #/I button.
4. The message Store appears in the display.
5. Press the required digit key (0 to 9).
Dialling with the Speed−dialling Keys
1. Press the Ñ/Ê button.
2. Press the required speed dialling key.
3. Pick up the receiver or press the < button.
Tip: The numbers programmed to the speed dialling keys cannot be
deleted. The existing phone numbers are overwritten when new
ones are saved.
OPERATING
INSTRUCTIONS
13Page
Page 18

8. Call Identification (CLIP)
Call Identification (CLIP)
This service must be enabled by your telephone network provider* in order
that the phone number of the caller can appear in your telephone display
and be saved.
The telephone can save information on up to 44 incoming calls, such as
phone number (or name), date and time. When the memory is full, the
Memory full message appears in the display. The last data record received
overwrites the first (First In/First Out principle). Information on incoming
calls not taken is saved.
If a call from the same number is received again, the existing data record is
replaced by the new one.
Call List
All incoming calls are assigned to a data record number. It appears in the
display. When a new call is received, the NEW icon appears in the display.
The REP icon appears when that caller has already called previously but
the call was not taken.
Incoming calls can be deleted individually. To do this, press the S button.
* Enabling the function may be liable for costs.
OPERATING
14Page
INSTRUCTIONS
Page 19

9. Miscellaneous
Miscellaneous
Alarm
You can program an alarm in your telephone.
1. Press the Å/Ë button.
2. The message Alarm off appears in the display.
3. Press the _/` buttons to select Alarm on.
4. Confirm the selection by pressing the Å/Ë button.
5. Press the _/` buttons to set the hour.
6. Confirm the selection by pressing the Å/Ë button.
7. Press the _/` buttons to set the minute.
8. Confirm the selection by pressing the Å/Ë button.
Snooze
When the time set for the alarm is reached, press the R/S button so that the
alarm will be issued again in 9 minutes. To switch the alarm off, press the
Å/Ë button and select Alarm off.
Voice Mail
The option of receiving voice mails must be enabled by the telephone
network provider.
If a voice mail has been recorded, the T icon appears in the display.
After the mail has been played, the icon disappears from the display.
Callback When Engaged
Tip: The function can operate differently depending on your network
provider.
1. Enter the phone number and pick up the receiver or press the < button.
2. If the number is engaged, press the Æ/Í button to end the connection
3. As soon as the person called has replaced the receiver on−hook, the
callback function is signalled.
4. Pick up your receiver and a connection is established.
Tip: If you receive another call in the meantime, the callback function
is automatically terminated when an engaged status is detected.
OPERATING
INSTRUCTIONS
15Page
Page 20

9. Miscellaneous
Filter
You can programme a filter function for your telephone whereby the ringing
tone for incoming calls is deactivated for a specific time (lunch break,
important meeting, etc.).
1. Press the È/Ç button.
2. The message Filter start appears in the display.
3. Press the _/` buttons to set the hour.
4. Confirm the selection by pressing the #/I button.
5. Press the _/` buttons to set the minute.
6. Confirm the selection by pressing the #/I button.
7. The message Filter stop appears in the display.
8. Press the _/` buttons to set the hour.
9. Confirm the selection by pressing the #/I button.
10.Press the _/` buttons to set the minute.
11.Confirm the selection by pressing the #/I button.
The filter is programmed for the set period of time.
12.The message FILTER appears in the display.
13.Press the È/Ç button to switch the filter off.
Filter Properties
You can assign a filter property to the existing entries in the call list.
1. Press the _ or ` button to open the call list.
2. Press the _/` buttons to select a phone number.
3. Press the Ñ/Ê button.
4. The message Norm Vip Rej Esc appears in the display.
5. Press the _/` buttons to switch a property off.
6. Press the Ñ/Ê button again.
7. Press the S button to return to Standby mode.
The property selected determines the behaviour when the filter is switched
on.
Tip: Entries which are not assigned have the property ESC.
NORM: When the filter is switched on, this call is signalled by 2 rings.
Entries are not overwritten when the memory is full.
VIP: When the filter is switched on, this call is signalled by 4 rings. Entries
are not overwritten when the memory is full.
REJ: When the filter is switched on, this call is not signalled at all. Entries
are not overwritten when the memory is full.
ESC: When the filter is switched on, this call is not signalled at all. Entries
are automatically overwritten when the memory is full.
OPERATING
16Page
INSTRUCTIONS
Page 21

Deleting Filter Entries
Before assigning a phone number to a different filter list, you must delete
the existing entry in the “old” filter list. Proceed as follows to delete phone
numbers from a filter list.
1. Press the _ or ` button to open the call list.
2. Press the _/` buttons to select a phone number.
3. Press the Å/Ë button.
4. The message Norm Vip Rej Esc appears in the display.
5. Press the _/` buttons to switch a property off.
6. Press the Å/Ë button again.
7. Press the _/` buttons to select the required phone number.
8. Press the S button to delete the entry.
9. Press the _/` button to select End of list.
10.Press the S button to return to Standby mode.
9. Miscellaneous
OPERATING
INSTRUCTIONS
17Page
Page 22

10. Operating in a PABX System / 11. Disassembly
Operating in a PABX System
The telephone may operate differently when connected to a PABX system
as compared to connection as a main terminal. In the event of interference
or malfunction, please contact your network operator or the retailer where
you purchased the PABX system.
The following Flash times are available for selection (refer to Menu
Structure):
80 ms
100 ms
110 ms
200 ms
300 ms
400 ms
500 ms
600 ms
800 ms
1000 ms
Disassembling
1. Disconnect the plugs from the corresponding sockets on the desk
telephone.
2. Disconnect the telephone line plug from the telephone connection
socket.
NOTE: If the telephone will not be used for a longer period,
remove the batteries to prevent damage caused by the
batteries leaking.
OPERATING
18Page
INSTRUCTIONS
Page 23

12. In Case of Problems / 13. Cleaning and Servicing
In Case of Problems
If you experience problems with the telephone, please refer to the
information below first. The housing may only be opened and repair work
completed by trained personnel. Failure to observe this annuls all rights to
claims under the terms of guarantee.
Problem Measures
The caller hears you poorly or
not at all
Display appears weak or not
at all
No call indication in the
display
S Check the receiver and helix cable
S Place the telephone on a stable,
clean surface for the handsfree
function
S Check the charge status of the
batteries and their position in the
battery compartment
S Increase the contrast setting of the
display
S Avoid reflective light falling on the
display
S Check the charge status of the
batteries and their position in the
battery compartment
S Has the CLIP service been enabled
by your telephone provider?
Problem Measures
No function
No ringing or dialling tones
S Unplug the telephone line plug,
remove the batteries, disconnect all
lines and install the telephone again
as described
S Check the telephone connection
line
S Check the helix cable from the
receiver
S Check the telephone or PABX
system switch line
S Switch the filter off
Only one ring and the line is
interrupted
S Check the plug connections
S Check whether other equipment is
connected parallel in the same line
and disconnect them, if necessary
Cleaning and Servicing
S Clean the housing surfaces with a soft, lint−free cloth.
S Do not use cleaning agents or solvents to clean the equipment.
OPERATING
INSTRUCTIONS
19Page
Page 24

14. Guarantee / 15. Technical Modifications and Data
Guarantee
In the case of a defect, please return the device together with the receipt
and original packing material to the point-of-sale.
Technical Modifications
This operating instruction manual serves purely for information purposes.
Its content is not part of any contract for sale.
All the data relates to nominal values. The equipment and options
described may differ from country to country according to national
requirements.
Technical Data
Feature Value
Weight 610 g
Dimensions, incl. receiver (WxHxD) 165 mm x 82 mm x 198 mm
Batteries 3 x AAA 1.5 V
Telephone connection cable TAE F−Kodierung
Dialling mode Tone (DTMF) / Pulse
Flash times 80 ms, 100 ms, 110 ms, 200 ms
Permissible ambient temperature 0 °C to 35 °C
Permissible relative humidity 20% to 75%
Permissible storage temperature −10 °C to 50 °C
Permissible relative humidity in
storage
300 ms, 400 ms, 500 ms, 600 ms
800 ms, 1000 ms
15% to 95%
OPERATING
20Page
INSTRUCTIONS
Page 25

16. Index
Index
A
Alarm, 15
Area code, 9
B
Babycall, 8
C
Call identification (CLIP), 14
Call list, 14
Callback when engaged, 15
Changing the loudspeaker volume, 11
Changing the receiver volume, 10
Changing the ringing volume, 10
Cleaning and servicing, 19
Compiling the call time, 11
D
Date and time, 8
Deleting an entry from the phone book , 13
Deleting filter entries, 17
Disassembling, 18
Display, 6
Display contrast, 8
E
Editing entries in the phone book, 12
Entering a dialling pause, 11
Equipment description, 5
Exemption From Liability, 1
F
Features, 4
Filter, 16
Filter properties, 16
Flash time, 8
G
Guarantee, 20
I
Important Information, 3
Important safety precautions, 1
In case of problems, 19
Installation, 2
Intended use, 1
Introduction, 1
L
Language of the menu guidance, 9
Long distance access code, 9
OPERATING
INSTRUCTIONS
21Page
Page 26

16. Index
M
Making a calls, 10
Menu structure, 7
Muting the microphone, 11
O
One−touch dialling keys, 13
Operating elements and indicators, 5
Operating in a PABX system, 18
Other icons in the display, 6
P
Package contents, 2
Phone book, 12
Positioning and connecting, 2
Putting a call on hold, 10
R
Redialling, 10
Ringing melodies, 8
S
Saving entries in the phone book, 12
Significance of the symbols, 1
Snooze, 15
Speed dial memory , 12
Speed dialling keys, 13
T
Taking a call, 10
Technical data, 20
Technical modifications, 20
Telephoning, 10
U
Using the R button, 11
V
Voice mail, 15
OPERATING
22Page
INSTRUCTIONS
Page 27

17. Declaration of Conformity
OPERATING
INSTRUCTIONS
23Page
Page 28

Please note that the copyright for this operating instruction manuallies with Olympia and, therefore, may not be copied or sold.
The data and information in the operating instruction manual is only intended for personal use.
All rights reserved.
e
 Loading...