

Page 1

&AcSIMILE
/&81
)N3425CTIONS
Page 2

PUBLICATION ISSUED BY:
Ing. C. Olivetti & C., S.p.A.
Servizi di Documentazione
77, Via Jervis - 10015 Ivrea (Italy)
Copyright © 1994, Olivetti
All rights reserved
This equipment complies with the provisions laid down by the CEE 87/308
directive for the prevention and elimination of radio interference
copy-e.p65 17/04/00, 23.041
Page 3

CONTENTS
BEFORE USE 1
INTRODUCTION 3
PRODUCT OVERVIEW 3
HOW TO PREPARE THE FAX MACHINE FOR USE 4
GETTING TO KNOW THE FACSIMILE MACHINE 5
COMPONENTS 5
CONSOLE 6
PREREQUISITE FOR ACCESS 14
CONSUMABLES 15
PAPER 15
ADJUSTING THE PAPER TRAY 16
PRINT CARTRIDGE 16
PROGRAMMING 17
ACCESS TO PROGRAMMING PROCEDURES 17
PROGRAMMING ONE-TOUCH DIALLING KEYS 19
PROGRAMMING SPEED DIALLING CODES - NORMAL AND EXTENDED 23
CLEARING PROGRAMMED DATA 27
PRINTING PROGRAMMED DATA 27
CHANGING THE DATE AND TIME 29
CHANGING THE SENDER’S FACSIMILE NUMBER 30
STORING THE SENDER’S NAME 31
SETTING PASSWORDS 33
CHANGING OR DELETING PASSWORDS 35
SETTING RESERVED POLLING IDENTIFIERS 36
PRINTING THE RESERVED POLLING IDENTIFIERS 38
SELECTING THE DIALLING MODE 39
SETTING OPERATING CONFIGURATION PARAMETERS 40
PRINTING THE OPERATING CONFIGURATION PARAMETERS 45
CLOSED NETWORK FEATURE 47
BEFORE TRANSMITTING/COPYING 48
DOCUMENTS THAT CAN BE TRANSMITTED/COPIED 48
PREPARING THE DOCUMENT FOR TRANSMISSION/COPYING 48
TRANSMISSION 53
AUTOMATIC STORAGE 53
TRANSMISSION FROM THE ADF 53
TRANSMISSION DIALLING ON THE TELEPHONE 56
DELAYED TRANSMISSION 57
RESERVED TRANSMISSION 59
BROADCAST TRANSMISSION FROM THE MEMORY - IMMEDIATE OR DELAYED 61
POLLING TRANSMISSION 63
indice.p65 13/04/00, 23.121
I
Page 4

CONTENTS
RECEPTION 65
CHANGING FROM AUTOMATIC TO MANUAL RECEPTION AND VICEVERSA 65
MANUAL RECEPTION 66
MANUAL RECEPTION WITH THE FAX/PHONE SWITCH ENABLED 67
AUTOMATIC RECEPTION 68
POLLING RECEPTION 68
RECEPTION REPLY STORING 70
ACTIVITY HANDLING 71
ACCESS TO “ACTIVITY HANDLING” 71
CONNECTION ACTIVITIES 72
DOCUMENTS STORED 77
COMPLEMENTARY FUNCTIONS 80
TELEPHONE CONVERSATION ON THE FACSIMILE MACHINE 80
ANSWERING A FACSIMILE OR TELEPHONE CALL WITH THE FAX/PHONE SWITCH ENABLED 81
ANSWERING A FACSIMILE OR TELEPHONE CALL WITH AN ANSWERING DEVICE
CONNECTED 81
ANSWERING A TELEPHONE CALL WHILE SENDING OR RECEIVING A DOCUMENT 82
SENDING OR RECEIVING A DOCUMENT AFTER A TELEPHONE CONVERSATION82
TELEPHONE CONVERSATION AFTER SENDING OR RECEIVING A DOCUMENT 83
REGULATING THE VOLUME OF THE SPEAKER 83
COPYING FUNCTION (SINGLE OR MULTICOPY) 84
REPORTS 86
LAST TRANSMISSION REPORT 86
LAST RECEPTION REPORT 88
ACTIVITY REPORT 90
POWER FAILURE REPORT 93
FILLING UP/ELIMINATING PAPER JAMS 94
ADDING PAPER 94
REMOVING JAMMED DOCUMENTS 94
REMOVING JAMMED PAPER 95
MAINTENANCE 97
REPLACING THE PRINT CARTRIDGE 97
REPLACING THE PRINT HEAD 99
CLEANING THE OPTICAL READER 100
CHECKING THE PRINT HEAD NOZZLES 101
CLEANING THE ELECTRICAL CONTACTS OF THE PRINT CARTRIDGE 103
CLEANING THE PRINT HEAD PAD 103
PURGING THE PRINT HEAD 104
SOLVING PROBLEMS BY YOURSELF 104
II
indice.p65 13/04/00, 23.122
Page 5

CONTENTS
SIGNALS AND SERVICE CODES 107
AUDIBLE SIGNALS 107
MESSAGES ON THE DISPLAY 109
SERVICE CODES 111
CHARACTER SET TABLE 114
OPTIONS 115
PC/FAX MULTIFUNCTIONS 115
GENERAL CHARACTERISTICS OF THE FACSIMILE MACHINE 116
indice.p65 13/04/00, 23.123
III
Page 6

FOR USA USERS
FCC Regulation
In accordance with FCC regulations, the following information concerns the information required
to be supplied on a fax.
Part 68, Section 68.381 (c) (3) of FCC Regulations states the following:
"Telephone facsimile machines: identification of the sender of the message. It shall be unlawful for
any person within the United States to use a computer or other electronic device to send any
message via a telephone facsimile machine unless such message clearly contains, in a margin at
the top or bottom of each transmitted page or on the first page of the transmission, the date and
time it is sent and an identification of the business, other entity, or individual sending the message
and the telephone number of the sending machine or such business, other entity, or individual.
Telephone facsimile machines manufactured on and after December 20, 1992 must clearly mark
such identifying information on each transmitted message".
NOTE: This equipment has been tested and found to comply with the limits for a Class B digital
device pursuant to Part 15 of the FCC Rules.
These limits are designated to provide reasonable protection against interference in a residential
installation.
This equipment generates, used and can radiate radio frequency energy and, if not installed and
used in accordance with the instruction, may cause harmful interference to radio communications.
However, there is no guarantee that interference will not occur in a particular installation.
If this equipment does cause harmful interference to radio or television reception, which can be
determined by turning the equipment off and on, the user is encouraged to try to correct the
interference by one or more of the following measures:
- Reorient or relocate the receiving antenna.
- Increase the separation between the equipment and receiver.
- Connect the equipment into an outlet of a circuit different from that to which the receiver is
connected.
- Consult the dealer or an experienced radio/TV technician for assistance.
Changes or modification not expressly approved by the party responsible for compliance could void
the user's authority to operate the equipment.
Connecting of peripherals required the use of grounded shielded signals cables.
This equipment complies with Part 68 of the FCC rules. On the rear of this equipment is a label that
contains, among other information, the FCC Registration Number and Ringer Equivalence Number
(REN) for this equipment. You must, upon request, provide this information to your telephone
company.
This equipment uses the following USOC jacks: RJIIC
warb2100.p65 13/04/00, 23.171
Page 7

The REN is used to determine the quantity of devices that may be connected to the telephone line,
Excessive RENs on the telephone line may result in the devices not ringing in response to an
incoming call. In most, but not all areas, the sum of the RENs should not exceed five (5.0). To be
certain of the number of devices that may be connected to the line, as determined by the total RENs,
contact the telephone company to determine the maximum REN for the calling area.
If this equipment causes harm to the telephone network, the telephone company will notify you in
advance that temporary discontinuance of service may be required. If advance notice is not
practical, the telephone company will notify the customer as soon as possible. Also, you will be
advised of your right to file a complaint with the FCC if you believe it is necessary.
The telephone company may make changes in its facilities, equipment operations, or procedures
that could affect the operation of the equipment. If this happens, the telephone company will provide
advance notice in order for you to make the necessary modifications in order to maintain
uninterrupted service.
If trouble is experienced with this equipment, please contact Olivetti Office USA 1-800-2222310 for
repair and warranty information. If the trouble is causing harm to the telephone network, the
telephone company may request you remove the equipment from the network until the problem is
resolved.
No repairs may be done by the customer.
This equipment cannot be used on telephone company-provided coin service.
Connection to Party Line Service is subject to state tariffs.
This equipment is hearing-aid compatible.
When programming and/or making test calls to emergency numbers:
. Remain on the line and briefly explain to the dispatcher the reason for the call.
. Perform such activities in the off-peak hours such as early morning or late evenings.
warb2100.p65 13/04/00, 23.172
Page 8

FOR CANADIAN USERS
INDUSTRY CANADA NOTICE
The Load Number of this modem is 3.
The standard connecting arrangement code for this equipment as specified in CP-01, Section 1.8.3
is CA11A.
The Load Number assigned to each terminal device denotes the percentage of the total load to be
connected to a telephone loop that is used by the device to prevent overloading. The termination
on a loop may consist of any combination of devices subject only to the requirement that the total
of the load numbers of all devices does not exceed 100.
This digital apparatus does not exceed the Class B limits for radio noise emissions from digital
apparatus as set out in the interference-causing equipment standard entitled "Digital Apparatus",
ICES-003 of the Industry Canada".
Cet appareil numérique respecte les limites de bruits radioélectriques applicables aux appareils
numériques de Classe B prescrites dans la norme sur le matériel brouilleur: "Appareils Numeriques",
NMB-003 édictée par le ministre des Communications".
The Industry Canada label identifies certified equipment. This certification means that the
equipment meets certain telecommunications network protective operational and safety requirements. Industry Canada does not guarantee the equipment will operate to the user's satisfaction.
Before installing this equipment, users should ensure that it is permissible to be connected to the
facilities of the local telecommunications company. The equipment must also be installed using an
acceptable method of connection. In some cases, the company's inside wiring associated with a
single line individual service may be extended by means of a certified connector assembly
(telephone extension cord). The customer should be aware that compliance with the above
conditions may not prevent degradation of service in some situations.
Repairs to certified equipment should be made by an authorized Canadian maintenance facility
designated by the supplier. Any repairs or alterations made by the user to this equipment, or
equipment malfunctions, may give the telecommunications company cause to request the user to
disconnect the equipment.
Users should ensure for their own protection that the electrical ground connections of the power
utility, telephone lines and internal metallic water pipe system, if present, are connected together.
This precaution may be particularly important in rural areas.
CAUTION: Users should not attempt to make such connections themselves, but should contact
the appropriate electric inspection authority, or electrician, as appropriate.
warb2100.p65 13/04/00, 23.173
Page 9

Notice for Connection to the Telecommunication Systems
1. BABT Certificate Number/Approval Number for the OFX 2100: NS/1258/3/P/603987.
APPROVED for connection to telecommunication systems specified in the instructions for use subject
to the conditions set out in them.
2. This apparatus has been approved for the use of the following facilities.
1. Storage of telephone numbers for retrieval by a predetermined code. (If problems occur, verify
stored number).
2. Automatic Call initiation
3. Use on a PABX which returns Secondary Proceed Indication.
4. Operation in the presence or absence of Initial or Secondary Proceed Indication.
5. Automatic Dialling Facilities
6. Automatic Storage of last number dialled
7. Automatic Repeat Attempt Facilities
8. Auto Clear from the call originating end
9. Series Connection Facility
10. Call Progress Monitor
Any other usage will invalidate the approval of the apparatus if as a result, it then ceases to conform
to the standards against which approval was granted.
3. The connection to the telecommunication systems must be unplugged before the earth is disconnected.
The connection to the telecommunication systems must not be hardwired.
4. This apparatus may be used on telecommunication systems employing loop disconnect of MF signalling.
5. This apparatus is not suitable as an extension to a payphone for use on shared service lines or for use
on 1+1 carrier systems.
6. THE USER MUST ENSURE THAT ALL TELEPHONE NUMBERS PROGRAMMED INTO THE "SPEED
DIALLING" AND "CODED SPEED DIALLING" MEMORIES ARE ENTERED CORRECTLY.
7. This apparatus is suitable for connection only to direct exchange lines on the path directly or via a
compatible PABX. The supplier of the apparatus should be consulted for an up to date list of PABXs with
which the apparatus is compatible.
It cannot be guaranteed that the apparatus will operate under all possible conditions of connection to a
compatible PABX. Any cases of difficulty should be referred in the first instance to the supplier of the
apparatus.
notice.p65 13/04/00, 23.141
Page 10

8. Ringer Equivalence Number (REN) = 3
The REN is a customer guide indicating approximately the maximum number of items of apparatus that
should be connected simultaneously to the line.
The sum of the REN's of the individual items should not exceed 4. The REN value of a B1 telephone is
assumed to be 1 unless otherwise marked.
Only one telephone and the facsimile machine should be connected to the line. Where the telephone is
a separate unit it must only be connected to the appropriate socket on the facsimile apparatus.
9. THE VOLTAGE DROP INTRODUCED BY THE APPARATUS BETWEEN THE PSTN AND THE
ASSOCIATED TELEPHONE AT A CURRENT OF 40mA dc IS 0,4 Volts.
10. FOR THE DEFINITION OF A "RELEVANT BRANCH SYSTEM" OR "RBS", REFER TO BS 6789
SECTION 6.1 CLAUSE 2.4
11. THE LJU SERIES CONNECTOR IS FOR USE WITH AN APPROVED SIMPLE TELEPHONE ONLY.
THIS PORT IS A TNV CIRCUIT AND IS INTENDED FOR CONNECTION TO THE TELEPHONE
NETWORK ONLY.
APPLICATION FOR INSTALLATION OF B.T. SOCKETS
This form may only be required if the wiring is owned by B.T.
If you require suitable sockets for connection of this apparatus complete this form and send it to
your local British Telecom sales office, at the address listed in your telephone book.
To: BRITISH TELECOM
I require .................. sockets for connection of the following equipment
Title FACSIMILE MACHINE
Model OFX 2100
Approval No. NS/1258/3/P/603987
Name ......................................................................................................................................
Address ......................................................................................................................................
......................................................................................................................................
Telephone number ...................................................................................................................
Date ............................ Signed ...................................................................
notice.p65 13/04/00, 23.142
Page 11

BEFORE USEBEFORE USE
This manual is an essential guide for those wishing to learn how to use this facsimile machine.
The “GETTING TO KNOW THE FAX” chapter provides an overview of the product. The drawings which are
easy-to-understand and cover all aspects will help you to quickly become familiar with the product and get
the most out of your fax in no time.
The “CONSUMABLES” chapter provides information on the technical characteristics of the paper and print
cartridge.
The “PROGRAMMING” chapter describes how to set the machine to suit your requirements and explains how
to store your most frequently used facsimile and telephone numbers for fast, automatic dialling.
The “BEFORE TRANSMITTING/COPYING” chapter introduces you to transmission operations.
The “TRANSMISSION”, “RECEPTION”, “ACTIVITY HANDLING” and “COMPLEMENTARY FUNCTIONS”
chapters illustrate how to implement the most advanced features of the facsimile machine, including the
various
transmission and reception methods, use of the memory, copying, voice calls, etc.
The “REPORTS” chapter provides you with information on the transmission and reception transactions
carried out.
The “FILLING UP/ELIMINATING PAPER JAMS” chapter provides instructions on how to add paper and insert
the print cartridge. It shows in what areas paper jams are most likely to occur and how to deal with them.
The “MAINTENANCE” chapter informs you of the periodic maintenance operations required and how you can
eliminate faults by yourself.
The “SIGNALS AND SERVICE CODES” chapter describes how the machine informs you of operating errors
and provides additional information on the current operating modes.
The “CHARACTER SET TABLE” chapter shows all the alphanumeric characters that you can display and
select.
The "OPTIONS" chapter describes the additional features that can be used on the facsimile machine.
Finally, the “GENERAL FEATURES OF THE FACSIMILE MACHINE” chapter lists the technical features of
the facsimile machine.
The chapters from the “PROGRAMMING” chapter to the “REPORTS” chapter are laid out in independent
sections, each of which deals with one complete feature. The features are discussed in an order that will
enable you to learn more quickly. As they are independent of each other, they can, however, be consulted
in any order.
Each of these sections consists of:
- An introduction with a short definition of the feature.
- A section preceded by the
the procedure described (if this part is not included, the feature requires no specific conditions).
o symbol describing the situation in which you must be in order to carry out
cap01.p65 13/04/00, 19.431
1
Page 12

BEFORE USE
- A last part which describes the operating procedure. When the text appears in two columns, this means
that the information shown on the display (right-hand column) is essential to be able to take the steps
of the procedure (left-hand column).
Text in italics indicates errors, how to prevent and correct them, other actions possible at that point and other
useful hints.
This manual does not describe how to install the facsimile machine as this procedure is performed by the
service technician.
2
cap01.p65 13/04/00, 19.432
Page 13

INTRODUCTION
PRODUCT OVERVIEW
A wide range of functions - aimed at reducing costs and increasing productivity - and a high-level reproductive
quality are the product's special features.
SIMULTANEOUS OPERATION
The simultaneous operation of functions (transmission/
reception with programming operations, booking, printing
and copying) ensures a considerable saving in terms of
the operating times required.
CONFIDENTIAL
The use of passwords enable the entire working process
to be controlled, thus guaranteeing that the documents
sent and received will be kept absolutely confidential.
QUALITY
VERSATILITY
FLIEXIBLE PAPER FEED
MULTIFUNCTIONS
Bubble ink jet technology. Resolution, text/image
separation and grey scale functions ensure that a high
quality reproduction is obtained for all kinds of documents.
Use of the memory in the advanced functions saves time
and reduces operating costs.
Large sized documents (max. A3) can be sent directly by
the facsimile machine, which automatically reduces the
format.
Its serial port enables the facsimile machine to be
connected to a PC and thus work as a printer and scanner.
cap02.p65 13/04/00, 19.453
3
Page 14

INTRODUCTION
HOW TO PREPARE THE FAX MACHINE FOR USE
Place the facsimile unit on a stable surface. Leave enough space for a sufficient air flow and so that the
document out tray can be positioned correctly so as to avoid paper piling up and jamming.
Do not expose to direct sunlight and avoid damp, dusty rooms and environments subject to rapid changes in
temperature and humidity.
Set the unit close to a telephone socket. In this way, the existing telephone line can be used and no new line
need be installed.
Connect the facsimile machine to a grounded socket to which no other devices are connected.
WARNING
Take care to remove paper clips and staples from your originals to avoid damaging the facsimile machine.
To prevent paper jams, do not switch the fax off or raise the operator console during transmission, reception
or copying.
For optimum print quality, use the recommended paper of the weight, thickness and format specified in this
manual.
Should the unit malfunction, refer to the “Solving Problems by Yourself” section. In most cases, you will find the
solution to the problem. If not, call the technical service engineer.
The manufacturers decline all liability for faults caused by improper use or installation, the connection of
unauthorized devices, or tampering by unauthorized persons.
WARNING: THIS MACHINE MUST BE CONNECTED TO PROTECTIVE EARTH
The ON/OFF switch is only operational. An easily accessible and nearby wall outlet must be used.
To disconnect the machine, remove the power cable plug from the socket.
4
cap02.p65 13/04/00, 19.454
Page 15
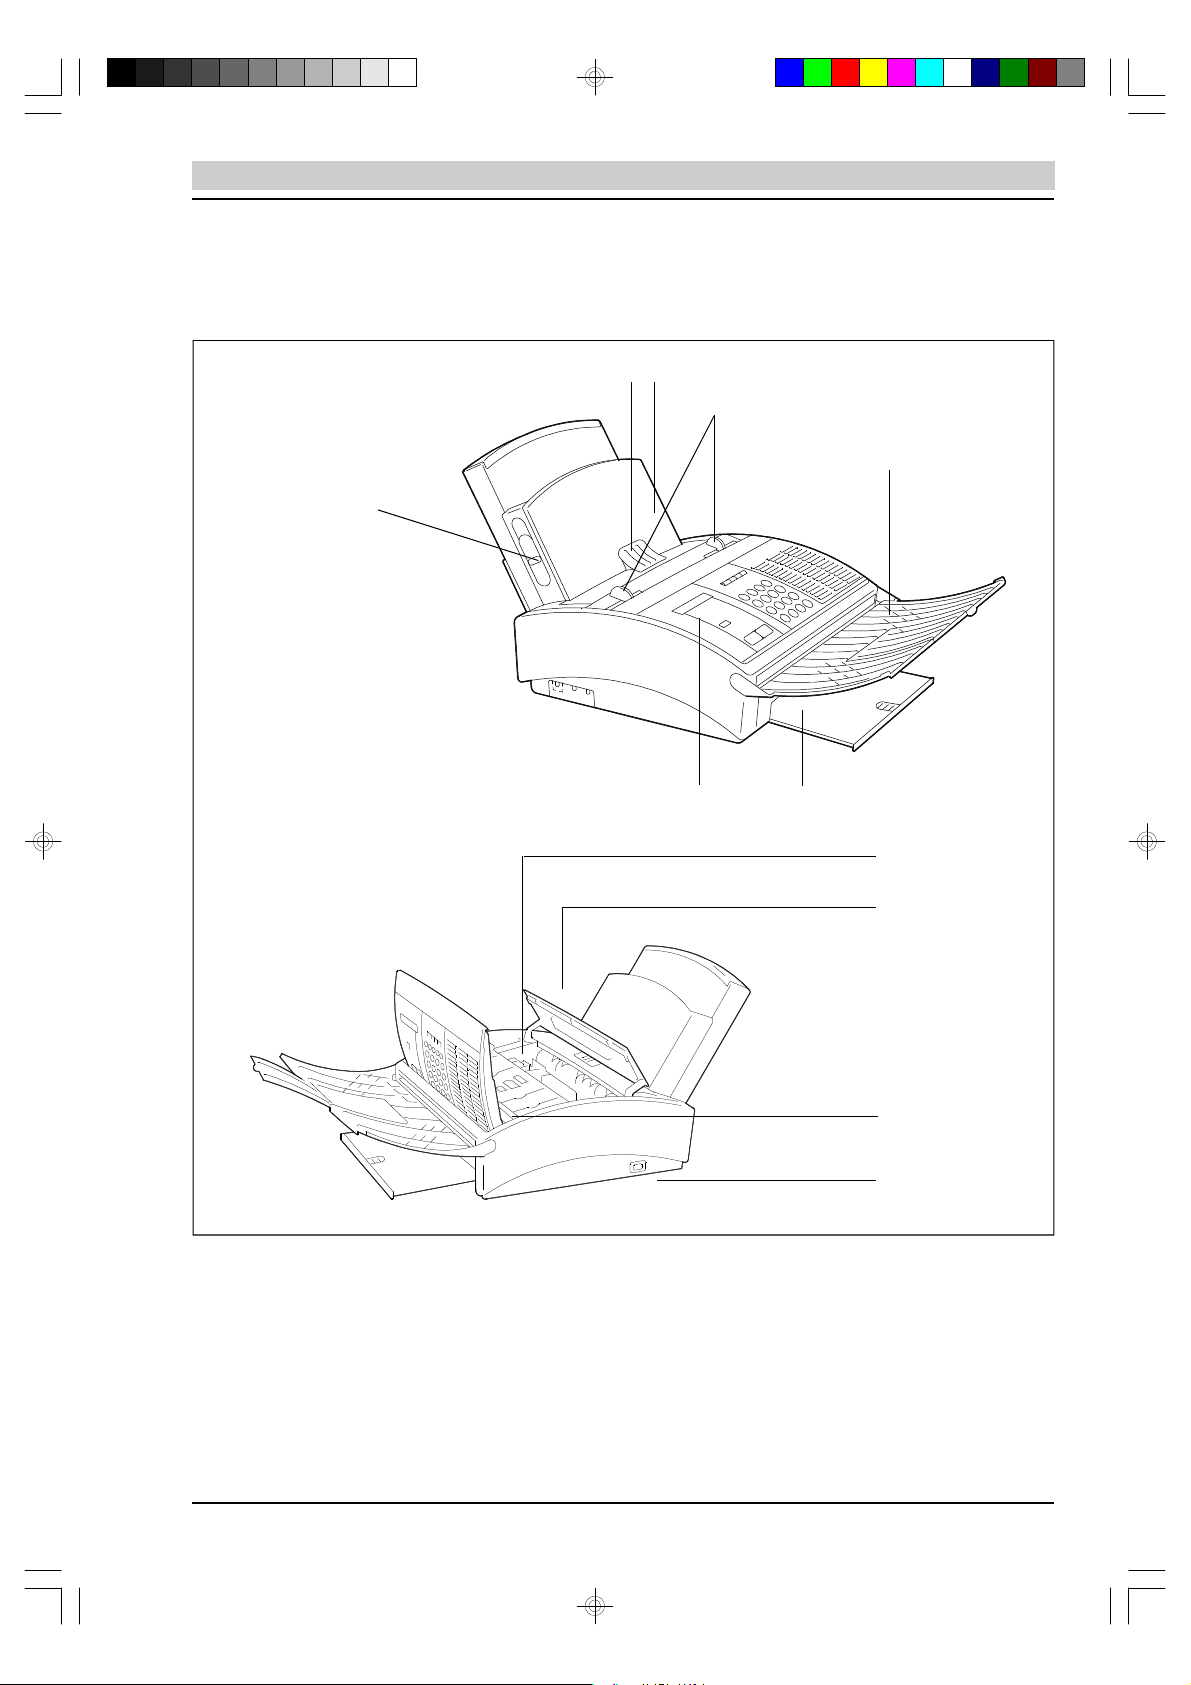
COMPONENTS
GETTING TO KNOW THE FACSIMILE MACHINE
GETTING TO KNOW THE FACSIMILE MACHINE
2 3
4
5
1
KEY:
1. Paper positioning lever
2. Document feed slide
3. Paper cassette
4. Paper guides
5. Sent/copied document tray
6. Received/copied document tray
7
6
8
9
10
11
7. Operator console
8. Print cartridge
9. Cartridge compartment lid
10. Optical reader
11. ON/OFF switch
cap03.p65 13/04/00, 19.505
5
Page 16
GETTING TO KNOW THE FACSIMILE MACHINE
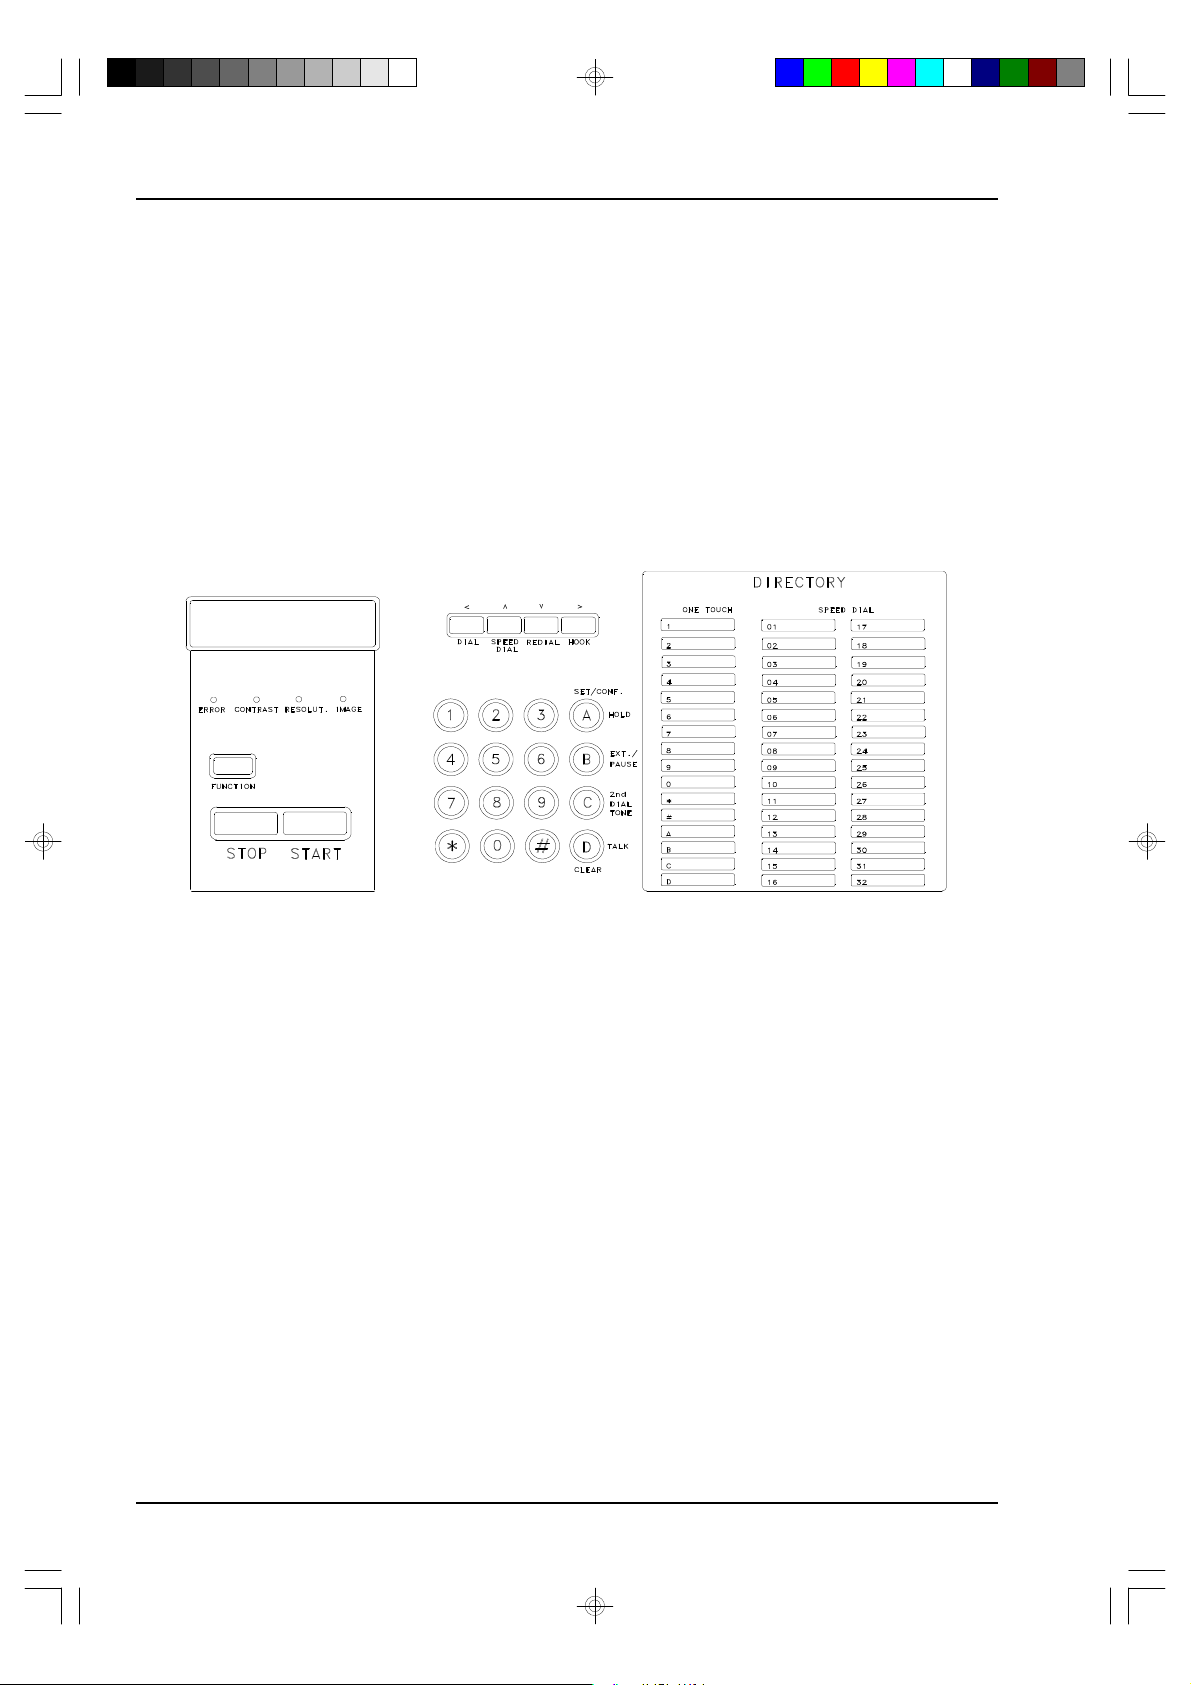
CONSOLE
The operator console has an alphanumeric liquid crystal display, keys and LEDs that indicate the operating
modes and provide a user-friendly interface with the machine.
A brief description of the keys and LEDs is provided below. How each of them is used will be explained during
the relevant operating procedures.
6
cap03.p65 13/04/00, 19.506
Page 17
GETTING TO KNOW THE FACSIMILE MACHINE
To present the various features of the machine in a gradual and systematic way, the operator console has
been divided into two sections; each of which contains a brief description of the keys and other elements they
contain.
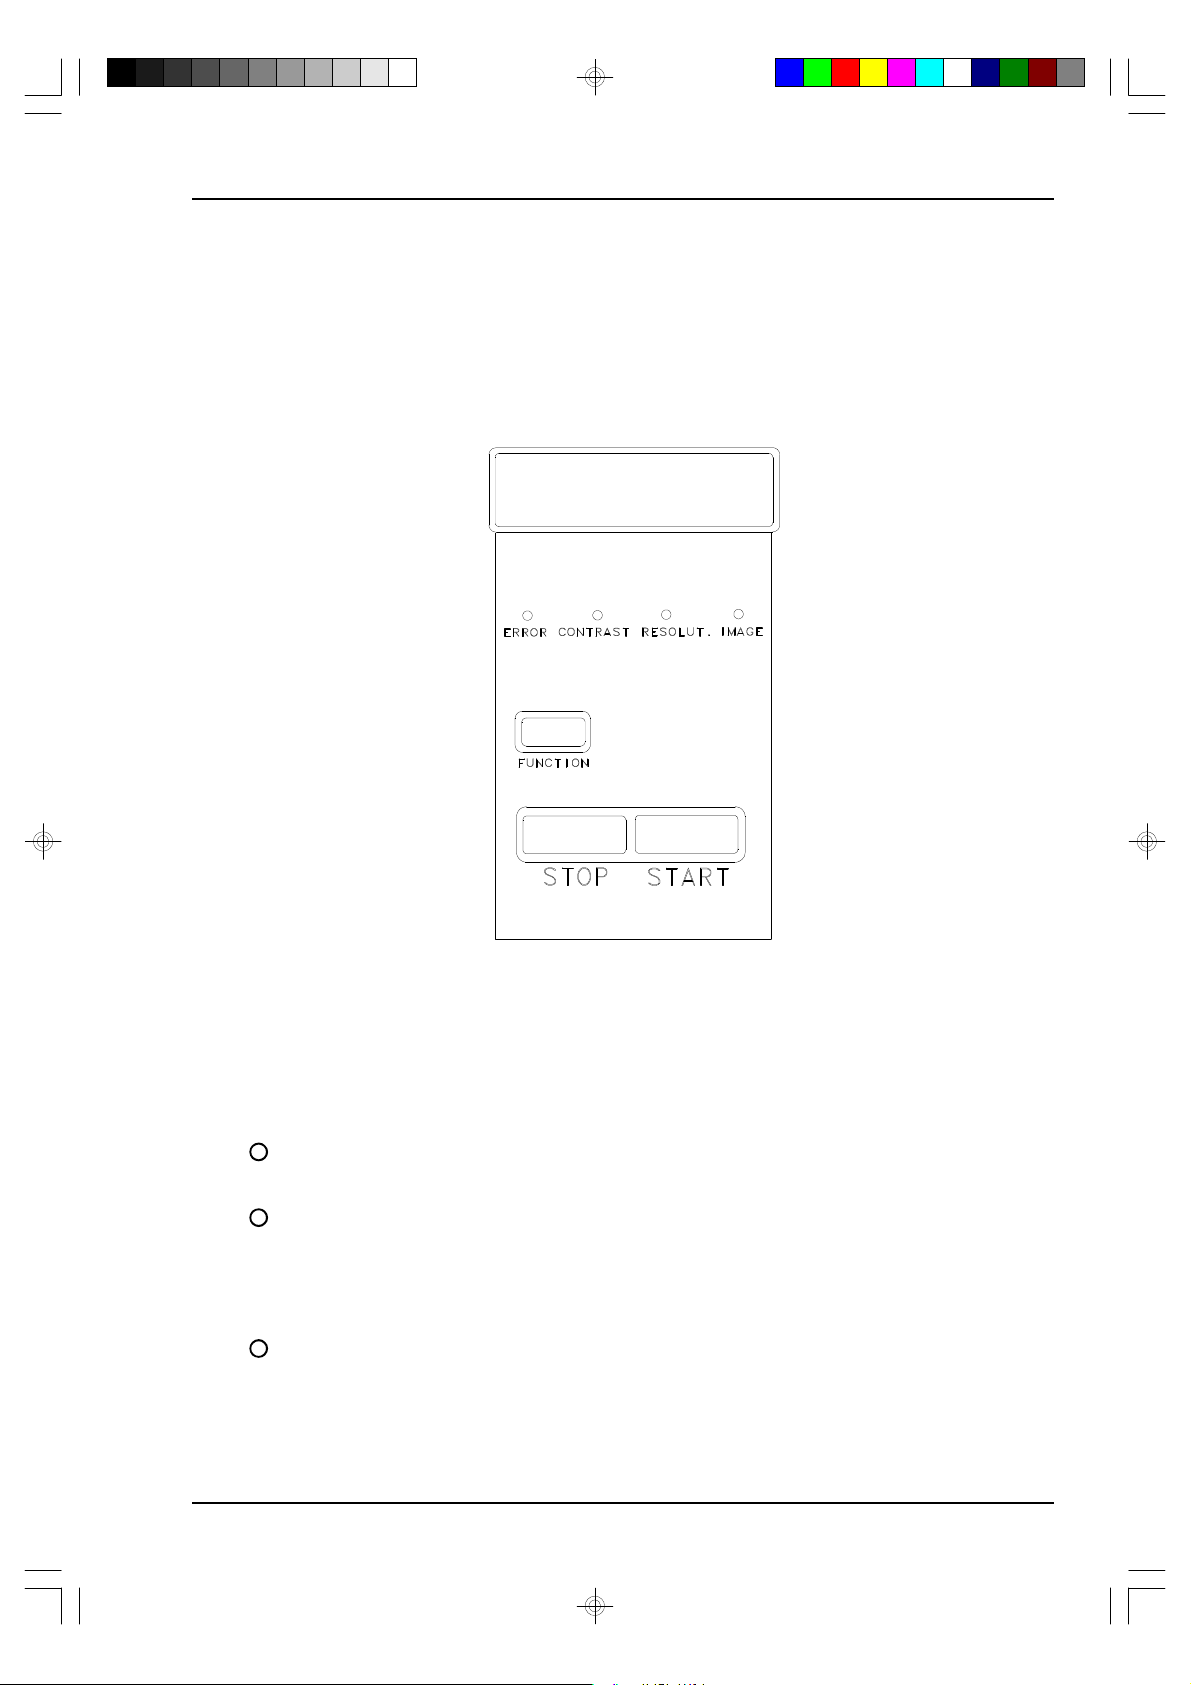
- The left-hand section consists of the display, keys and LEDs.
The DISPLAY consists of two lines of 16 characters each, displays the data entered directly on the keypad
and provides information and messages to guide you through the operations to be performed. It also operates
as a Clock/Calendar displaying the time automatically.
ERROR
CONTRAST
RESOLUT.
cap03.p65 13/04/00, 19.507
LEDs
Lights up to indicate that an error occurred during communication.
Indicates the contrast level selected:
- off: normal
- on: dark (for very light documents)
- blinking: light (for very dark documents)
Indicates the type of definition to be used when scanning the document:
- off: standard
- on: fine
- blinking: superfine or proprietary
7
Page 18

GETTING TO KNOW THE FACSIMILE MACHINE
IMAGE
KEYS
FUNCTION
STOP
Indicates whether the document will be scanned in black and white or the grey
tones feature is enabled:
- off: black and white
- on: automatic text/image separation
- blinking: halftones
To set the graphic definition (resolution, contrast and image) of the document to be
sent or copied, press the FUNCTION key followed by 2. (For further information,
see the “Preparing the document for transmission/copying” section of the “BEFORE
TRANSMISSION/COPYING” chapter).
When pressed in STANDBY, provides access to the functions available. The
functions are then selected by pressing the scroll or function keys described later
on.
Multi-purpose key:
- stops a copying operation and interrupts printing.
- during programming, when pressed once, aborts the procedure in progress
and displays the current menu function. When pressed a second time, quits
the menu.
START
- when pressed during communication, interrupts the connection.
- switches off the error LED, when it has come on to indicate that an error has
occurred.
Multi-purpose key
- starts normal transmission after the number has been dialled on the telephone
or on the numeric keypad.
- activates manual reception
- activates a single copying operation
- activates the menu function selected.
8
cap03.p65 13/04/00, 19.508
Page 19
GETTING TO KNOW THE FACSIMILE MACHINE
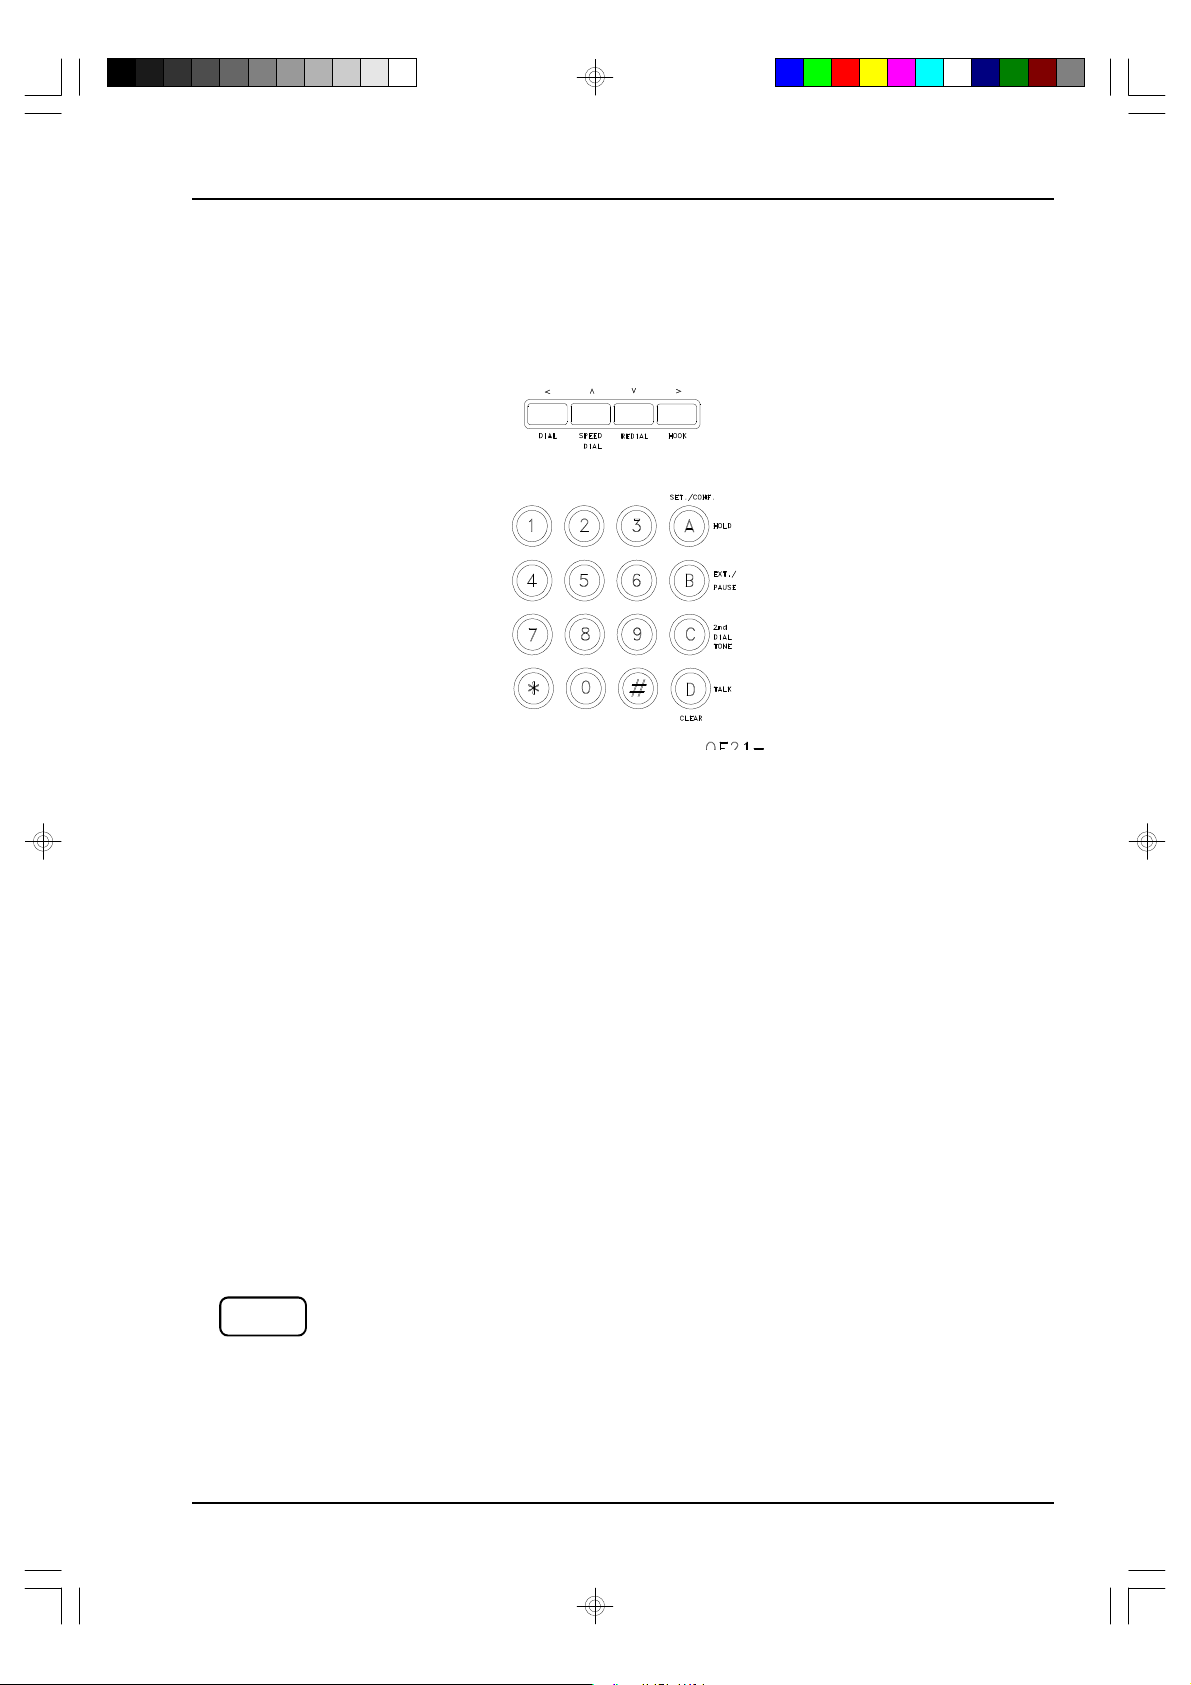
- The central section consists of a number of keys, which perform a wide variety of functions.
The illustration of the section provided below is followed by a description of all the relevant functional units.
NUMERIC KEYPAD
keys 0 ÷ 9 including ∗∗ and # Used for dialling your correspondent’s facsimile or telephone number and
entering data.
keys 0
÷ 9 Used together with the SPEED DIAL key to dial a coded speed dialling
number.
∗∗ key Can be used while entering a number to switch to tone dialling
ONE-TOUCH DIALLING KEYS
keys 0 ÷ 9 including ∗∗ and # Used for automatically dialling your correspondent’s facsimile or telephone
number
and keys A
÷ D once they have been stored.
DIALLING, CURSOR AND MENU SCROLL KEYS
<
DIAL
DIALLING
- with the document inserted in the ADF (Automatic Document Feeder),
enables you to dial the facsimile number on the numeric keypad.
- during data entry, moves the cursor to the left.
cap03.p65 13/04/00, 19.509
9
Page 20

GETTING TO KNOW THE FACSIMILE MACHINE
∧∧
SPEED
DIAL
∨∨
REDIAL
>
HOOK
- used for moving cyclically through the functions of a menu or the options of
each function. (Indicated on the display by the symbol “
- used, in some functions, for running through the character set table.
REDIAL
Redials the last number dialled on the numeric keypad;
- used for moving cyclically through the functions of a menu or the options of
each function. (Indicated on the display by the symbol “
- used, in some functions, for running through the character set table.
HOOK
Enables connection to the telephone line and the dialling tone to be heard
(handsfree dialling).
- during data entry, moves the cursor to the right.
- used in some cases for displaying the options of some functions on a menu.
∧”).
∨”).
- used in some functions for confirming the alphanumeric character selected.
KEYS FOR SELECTING, CONFIRMING AND CLEARING DATA
SET/CONF.
A HOLD
B EXT./
PAUSE
HOLD
- Sets the line on hold during a telephone conversation
SET/CONFIRM
Confirms the data entered.
EXTERNAL
- Must be pressed before dialling or storing an external number when the
facsimile machine is connected to a private exchange (PBX).
PAUSE
- Inserts a pause between the digits forming a facsimile or telephone number.
10
cap03.p65 13/04/00, 19.5010
Page 21

GETTING TO KNOW THE FACSIMILE MACHINE
C 2nd DIAL
TONE
D TALK
CLEAR
FUNCTION KEYS
1
SECOND DIALLING TONE
- Enables a second tone to be detected during dialling when connecting to
special intercontinental stations.
TALK
- books the line for a telephone call during transmission or reception of a
document.
CLEAR
- Clears data entered.
(BROADCAST/MEMORY) - Available with a document inserted in the ADF.
- Used for starting single or broadcast transmission from memory, immediate
or delayed.
- Used for storing the document while setting a polling ransmission operation
or a delayed or reserved transmission operation.
2
3
(PREPARING FOR TRANSMISSION/COPYING) - Available with a document
inserted in the ADF.
Provides access to the “Preparation” menu which comprises the page numbering
function and the graphic definition parameters:
- Resolution
- Image
- Contrast
(PRINT/MULTICOPY)
Used during operating procedures, for printing:
- any document in memory;
- reports selected on the “Reports” menu;
- numbers stored for one-touch or coded speed dialling;
- numbers stored for reserved polling transmission;
- operating configuration parameters.
- With the document inserted in the ADF, it is used for setting a multicopy
operation.
cap03.p65 13/04/00, 19.5011
11
Page 22

GETTING TO KNOW THE FACSIMILE MACHINE
4
5
6
(STORING TELEPHONE NUMBERS) - Available without a document in the ADF.
Provides access to the “Phone Book” menu which comprises the following
functions:
- One-touch dialling
- Coded speed dialling
(DATA ENTRY) - Available without a document in the ADF.
Provides access to the “Data entry” menu which comprises the following
functions:
- Changing the date/time
- Storing the sender’s name
- Storing the TX password
- Storing the configuration password
- Storing reserved polling identifiers
(CONFIGURATION) - Available without a document in the ADF.
Provides access to the “Configuration” menu which comprises the following
parameters:
- ECM
- Automatic RX
- Fax/phone
- Fax/TAD
- Sender ID line position
- TTI in sender ID line
- Activity report
- Last TX report
- Last RX report
- Last error report
- Broadcast report
- Closed network in reception
- Closed network in transmission
- Inhibit transmission
- Reception reply storing
- Reduction
- Print overflow
- Automatic storage
- Automatic clearing of a stored document after all specified retries
- Automatic clearing of documents stored for polling transmission
- Automatic retransmission of pages on which a transmission error occurred
- Transmission speed - 4800 BPS
- Automatic selection of FINE resolution during image regulation
- Restore FINE resolution after transmission or copying
- Restore TEXT/IMAGE SEPARATION value after transmission or copying
- Paper format
- Telediagnosis
- Silence timeout
12
cap03.p65 13/04/00, 19.5012
Page 23

GETTING TO KNOW THE FACSIMILE MACHINE
- Date format
- Reception on PC and fax
- PC communication speed
- Language
(POLLING)
7
8
9
0
- With the document inserted in the ADF, sets the fax for polling transmission
(free or reserved).
- With no document, sets the facsimile machine for polling reception (single or
broadcast).
(REPORTS) - Available with no document inserted in the ADF.
Provides access to the “Reports” menu which comprises the following functions:
- last TX report
- last RX report
- activity report.
(PRINT HEAD PURGING AND VOLUME REGULATION) - Available with no
document in the ADF.
Provides access to the “Head/volume” menu which comprises the following
functions:
- Print head purge and nozzle test
- Speaker volume regulation
(ACTIVITY HANDLING) - Available with no document in the ADF.
Provides access to the “Activity Handling” menu which comprises the following
functions:
SET/CONF.
A HOLD
cap03.p65 13/04/00, 19.5013
- Connection activities
- Documents stored
(SETTING UP TRANSMISSION) - Availabe with the document inserted in the
ADF.
Provides access to the “TX Setup” menu which comprises the following
functions:
- Delayed transmission
- Reserved transmission
13
Page 24

GETTING TO KNOW THE FACSIMILE MACHINE
PREREQUISITE FOR ACCESS
Before any operation can be performed, the facsimile machine must be in stand-by mode. When the machine
is in stand-by, the display shows the following indications:
• With a document in the ADF:
D O C . I N S E R T E D
• With no document in the ADF:
Current time and date
D D/ M M 'Y Y H H : M M
X X X X X X X X X n n n%
Operating modes:
AUTO RX
MANUAL RX
FAX/PHONE
TAD
In either case, if a procedure that involves the ADF has been set (for example, delayed or polling
transmission), the display shows the corresponding message on the top line.
Percentage of free
memory
14
cap03.p65 13/04/00, 19.5014
Page 25

MATERIALI DI CONSUMOCONSUMABLES
PAPER
Types
One of the most important things to do to ensure optimum printing quality is to choose the right paper.
The facsimile machine has been designed to operate with most types of paper, though the various differences
in the paper’s composition may have a considerable effect on print quality or the ease with which the paper is
fed through the machine. The best printing results are obtained using Xerox paper for photocopiers.
Photocopier paper has a recto and verso; for best results, always use the recto side. This side cannot be
distinguished by the human eye so look out for the label on the packet. Try out all the different types of paper
you are thinking of using before purchasing large quantities.
Precautions for use and paper storage
• Never store paper in rooms that are damp or subject to changes in temperature.
• Never leave paper in direct sunlight as it may turn yellow.
• Do not open the packet of paper until you are ready to use it.
• After adding paper to the tray, put any remaining paper back in the packet and store in a dry place.
Paper tray
The paper tray provided can be adapted to the following formats:
A4
US Letter
US Legal
Dimensions of format: A4 (210 mm x 297 mm / 8.26 x 11.7")
US Letter (216 mm x 272 mm / 8.5" x 11")
US Legal (216 mm x 349 mm / 8.5" x 14").
Capacity: 200 sheets with unit weight of 80 g/sq.m.
Paper characteristics: xerographic paper with a unit weight of 60 to 90 g/sq.m.
15
Page 26
MATERIALI DI CONSUMO
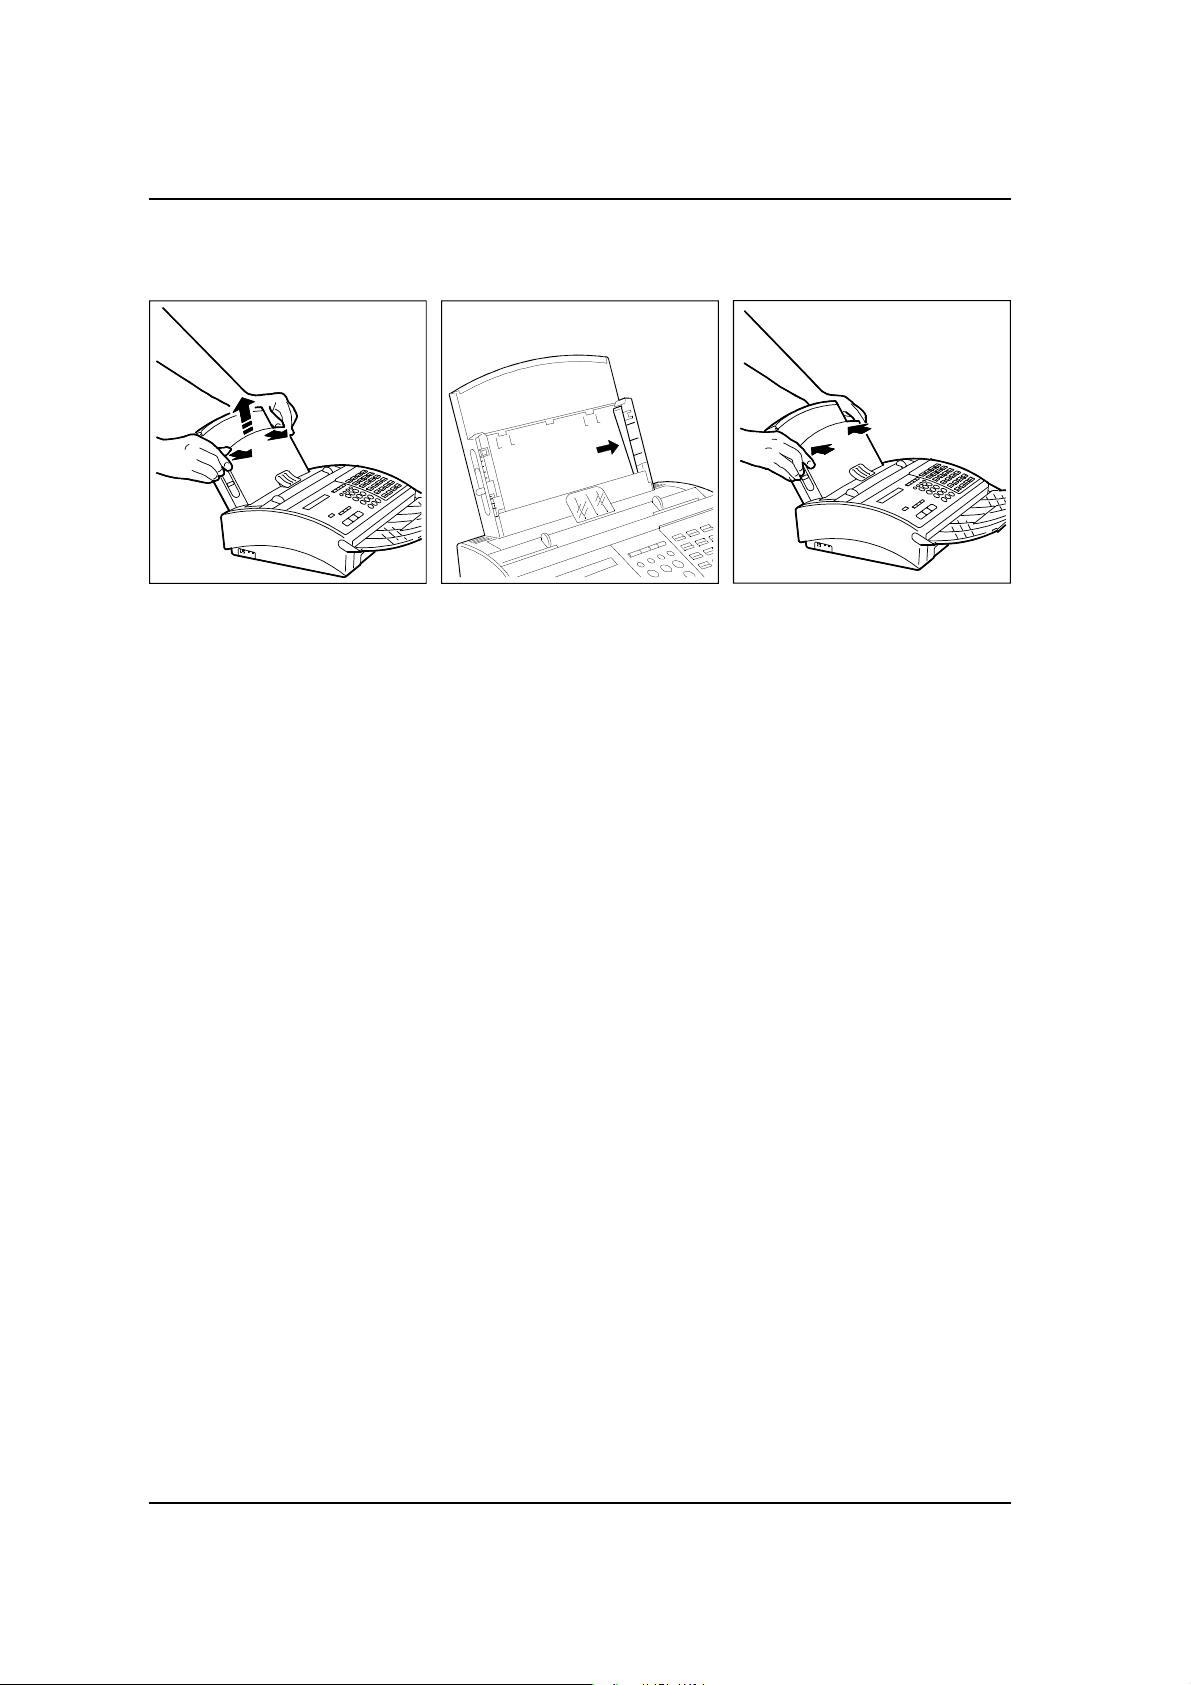
ADJUSTING THE PAPER TRAY
1. Remove the front cover of the
paper tray by releasing it and
lifting it up.
Note: Having adjusted the paper tray, make sure that the format set in the operating configuration
parameter "PAPER FORMAT" is correct. See the "Setting the operating configuration parameters"
section of the "PROGRAMMING" chapter.
2. Hold the lever shown in the
figure from the bottom and
move it in the direction
indicated. Move it from right to
left to change from A4 to Letter
and Legal formats. Move it in
the opposite direction to change
from Letter and Legal to A4
format.
3. Close the cover by pressing on
both sides until it clicks into
position.
PRINT CARTRIDGE
The facsimile machine can use two types of print cartridge: a disposable cartridge and a cartridge with an
interchangeable tank.
The print cartridge must be kept at room temperatures, away from direct sunlight. Do not open the sealed pack
until you actually need to install or replace the cartridge.
16
Page 27

PROGRAMMINGPROGRAMMING
Programming means adapting the fax machine to suit your needs. It consists in storing functions that will be
activated during use, thus enabling work to be done more efficiently.
This chapter describes the programming procedures available on your facsimile machine.
This chapter explains how to set the date and time, how to store the sender’s name and number, how some
fax functions can be controlled through operating configuration parameters and how to store the fax numbers
of your main correspondents so that you can subsequently dial them when required simply by pressing one
key (one-touch dialling) or a key and a code (coded speed dialling).
Note, however, that if you want to send and receive documents right away, all you have to do is insert the
document in the ADF (Automatic Document Feeder) and refer to the “Normal transmission from the ADF” or
“Manual reception” section of the “TRANSMISSION” and “RECEPTION” chapters, respectively.
Note: Any of the procedures described in this chapter can be interrupted at any time by pressing the STOP
key once or twice, depending on the procedure.
If no data is entered for two minutes while performing a programming procedure, the procedure
is interrupted and the facsimile machine returns to stand-by mode.
ACCESS TO PROGRAMMING PROCEDURES
The programming procedures may be accessed from three menus each containing a list of available functions
or parameters:
- the “Phone Book” menu Includes all the functions that enable you to program one-touch
dialling keys, and speed dialling codes.
- the “Data entry” menu Comprises the functions that enable you to set the date and time,
store the sender’s ID, passwords and reserved polling identifiers.
- the “Configuration” menu Comprises the facsimile machine’s operating configuration
parameters.
To access one of the menus, press the FUNCTION key followed by the relevant key indicated in the table
below:
Note: If a configuration password has been set, access to the “Data entry” and “Configuration” menus is
denied until the password has been entered.
KEY TO BE PRESSED MENU AVAILABLE FUNCTIONS/PARAMETERS
4
5
PHONE BOOK ONE-TOUCH DIALLING
CODED SPEED DIALLING
DATA ENTRY DATE/TIME
SENDER’S NAME
TX PASSWORD
CONFIG. PASSWORD
POLLING ID
cap05.p65 13/04/00, 22.1717
+
17
Page 28
PROGRAMMING
KEY TO BE PRESSED MENU AVAILABLE FUNCTIONS/PARAMETERS
6
CONFIGURATION ECM
AUTOMATIC RX
FAX/PHONE
FAX/TAD
SENDER ID POSITN
TTI IN SENDER ID
ACTIVITY REPORT
LAST TX REPORT
LAST RX REPORT
LAST ERR. REPORT
BROADCAST REPORT
CLOSED NETWRK RX
CLOSED NETWRK TX
INHIBIT TX
RX REPLY STORED
REDUCTION
PRINT EXTRA A4
AUTOMATIC STORAGE
TX FIL DEL. DOC
TX POLL. DEL.DOC
AUT PAG. RETRANS
TX SPD 4800 B/S
FINE IMAGE RESLT
FINE AFTER TX/CY
IM. AFTER TX/CPY
PAPER FORMAT
TELEDIAGNOSIS
SILENCE TIMEOUT
DATE FORMAT
RX ON PC & FAX
PC COMMUNICATION SPEED
LANGUAGE
Both the functions and parameters are independent of each other so they may be programmed without
necessarily following the order in which they are presented in the manual.
The messages in the “AVAILABLE FUNCTIONS/PARAMETERS” column are indicated in abbreviated form
exactly as they appear on the display, while the full message is indicated in the “Function keys” section of the
“GETTING TO KNOW THE FACSIMILE MACHINE” chapter.
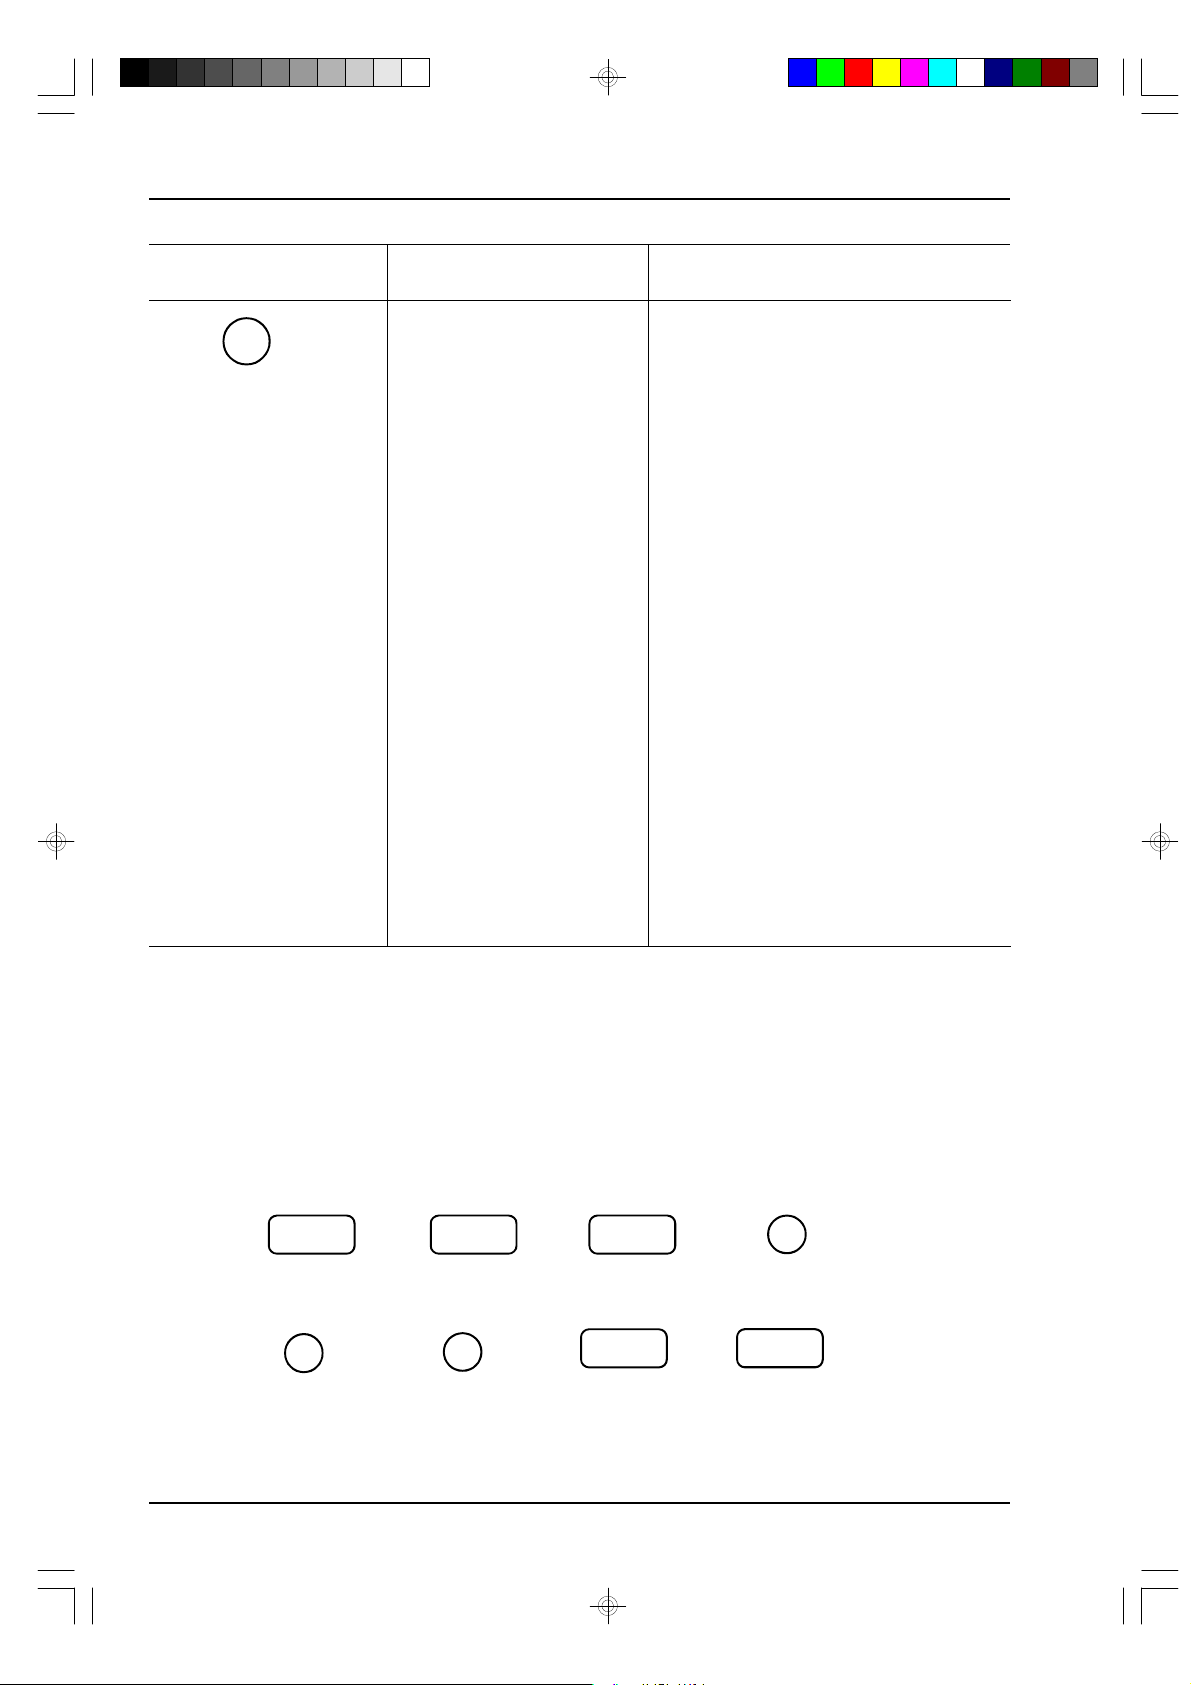
On each menu, the various programming functions require you to press function keys to make a selection,
confirm a data setting, clear incorrect data and so on. The keys used are shown below:
∧∧ ∨∨
D
TALK
CLEAR
START
SET/CONF.
A
HOLD
SPEED DIAL REDIAL
3
(PRINT)
<
DIAL
>
HOOK
For a more detailed description of the keys, refer to the “Console” section of the “GETTING TO KNOW THE
FACSIMILE MACHINE” chapter.
18
cap05.p65 13/04/00, 22.1718
Page 29

PROGRAMMING
PROGRAMMING ONE-TOUCH DIALLING KEYS
The facsimile machine offers several methods of dialling prerecorded facsimile and telephone numbers.
The easiest and fastest method of dialling a number is by pressing one key. There are 16 of these one-touch
dialling keys (0
- Facsimile number
- Telephone number
- Name of correspondent
- Transmission speed (normal speed 9600 bps - half-speed 4800 bps, useful on a disturbed line).
- Closed network. This parameter enables you to create a communication network with limited access.
Access is limited by checking the last 4 or 6 digits in the receiver’s or sender’s facsimile number. This
parameter can only be set here if it has been enabled in the operating configuration.
This section explains how to program one-touch dialling keys. How to use these keys to dial a number is
explained in the “TRANSMISSION” chapter.
o The facsimile is on. There is no document in the ADF.
÷ 9, *, # and A ÷ D). Each key may be programmed with the following data:
1. Press FUNCTION followed by 4.
2. Press START to access the menu.
3. Press START to enable one-touch dialling.
4 Using the
key that you want to program, e.g. 6.
∨∨ οr ∧∧ key, select the one-touch dialling
F U N C T I O N
4 : P H O N E B O O K
P H O N E B O O K
1 - T O U C H D I A L I N G
1 - T O U C H D I A L I N G
1 :
1 - T O U C H D I A L I N G
6 :
+
cap05.p65 13/04/00, 22.1719
19
Page 30

PROGRAMMING
If the key has already been programmed, the display
shows the number of the programmed fax user.
If this is the case, select a different key (using
or ∧∧ ) or change the value displayed, see the “Clearing
programmed data” section.
5. Press START.
The facsimile machine is set for entry of the parameters
to be associated with the selected one-touch dialling
key.
∨∨
1 - T O U C H F A X N O .
6 :
If you want to skip a parameter, simply press the
or ∧∧ key. Each time either of these is pressed, the
next parameter will be displayed.
6. Press START to start entering the selected parameter,
e.g. “FAX NO."
7. Enter the relevant facsimile number (max. 32 digits)
on the numeric keypad, e.g. 0125 45812.
By pressing the
The "
∗" symbol appears on the display.
If the display shows a previously set number, you can
confirm it by pressing SET/CONF. , or replace it with
a new number by typing the new number on the
numeric keypad and pressing SET/CONF. .
To delete a setting, press CLEAR.
To make a correction, move the cursor to the digit to
be changed (using the < or > key) and overwrite it
with the new digit.
∗ key, you can switch to tone dialling.
∨∨
E N T E R F A X N O .
E N T E R F A X N O
.
0 1 2 5 4 5 8 1 2
If you want to leave a blank between one digit and
another, use the > key to move the cursor one
position forward.
By pressing EXT./PAUSE you can insert one or more
pauses (during dialling) between the digits in the
number. The pause is identified on the display by the
character “p”.
It’s a good idea to insert a pause between the code
and the number. In some countries, an answering
tone must be heard before the whole number can be
dialled. In this case, press 2nd DIAL TONE . The
display shows the symbol “:”.
20
cap05.p65 13/04/00, 22.1720
+
Page 31

If the facsimile machine is connected to an exchange
and the user is an external user, press EXT./PAUSE
before entering the number. In this case the display
shows the letter “E” before the numeric sequence.
8. Press SET/CONF. to confirm the number set.
At this point, as the remaining parameters are optional, you can quit the menu by pressing STOP twice.
The facsimile returns to stand-by mode.
9. Enter the correspondent’s name - max. 30
alphanumeric characters - e.g. Clare.
Each character is entered by pressing the
to scroll through the entire set of alphanumeric
characters until the desired character is displayed
and then by pressing the > key to confirm selection.
The character to be selected appears in the top righthand corner. (For a complete list of the alphaumeric
characters available, refer to the “CHARACTER SET
TABLE” chapter).
∨∨ or ∧∧ key
PROGRAMMING
E N T E R N A M E A
E N T E R N A M E e
C l a r e
To delete an entire setting, press CLEAR and repeat
the entry procedure.
10. Press SET/CONF. to confirm the name entered.
11. Enter the relevant telephone number - max. 32 digits
- on the numeric keypad, e.g. 0125 230025.
If the display shows a previously set number, you can
confirm it by pressing SET/CONF. , or replace it with
a new number by typing the new number on the
numeric keypad and pressing SET/CONF.
To delete a setting, press CLEAR.
E N T E R T E L . N O .
6 :
E N T E R T E L . N O .
0 1 2 5 2 3 0 0 2 5
+
cap05.p65 13/04/00, 22.1721
21
Page 32

PROGRAMMING
To make a correction, move the cursor to the digit to
be changed (using the < or > keys) and overwrite it
with the new digit.
You can insert pauses, leave a blank between one
digit and another, request acknowledgement of an
answering tone, etc. (as explained in step 7).
12. Press SET/CONF. to confirm the number set.
The facsimile machine is set for the transmission
speed setting (9600/4800).
To confirm the value displayed, move straight on to
the next step or:
press
∨∨ or ∧∧ to select the alternative value.
13. Press SET/CONF. to confirm the value set.
The facsimile machine is automatically set for the
closed network setting (YES/NO).
E N T E R S P E E D
9 6 0 0
E N T E R C L S D N T W R K
N O
To confirm the option displayed, go straight on to the
next step or:
press
14. Press SET/CONF. to confirm the option set.
Having completed data entry for one-touch dialling
key 6, the facsimile machine is automatically set for
programming the next one-touch dialling key.
Repeat the procedure from step 6 if you want to
continue programming keys, or:
press STOP once to return to the “PHONE BOOK”
menu functions, or:
press STOP twice to quit the menu.
∨∨ or ∧∧ to select the alternative option.
1 - T O U C H F A X N O
7 :
22
cap05.p65 13/04/00, 22.1722
Page 33

PROGRAMMING
PROGRAMMING SPEED DIALLING CODES - NORMAL AND EXTENDED
In coded speed dialling, a previously stored facsimile number can be dialled simply by pressing three keys: the
SPEED DIAL key and the two keys on the numeric pad that constitute the number code.
In “normal” coded speed dialling, you can store up to 30 facsimile numbers with a maximum of 32 digits each
for which the codes range from 01 to 30; in “extended” coded speed dialling, you can store two facsimile numbers
with a maximum of 100 digits and for which the codes range from 31 to 32.
For each code, you can program:
- Facsimile number
- Correspondent’s name
- Correspondent’s telephone number
- Transmission speed (normal speed 9600 bps - half-speed 4800 bps, useful on a disturbed line).
- Closed network (see “One-touch Dialling”)
This section explains how to program coded speed dialling keys. How to use these keys to dial a number is
explained in the “TRANSMISSION” chapter.
o The facsimile is on. There is no document in the ADF.
1. Press FUNCTION and then 4.
2. Press START.
3. Press
procedure.
4. Press START to enable speed dialling
5. Press
32) that you want to program, e.g. 06.
If the code has already been programmed, select a
different code (using
displayed, or see the "Clearing programmed data"
section.
∨∨ once to move on to the coded dialling
∨∨ or ∧∧ to select the speed dialling code (01-
∨∨ or ∧∧ ) or change the data
F U N C T I O N
4 : P H O N E B O O K
P H O N E B O O K
1 - T O U C H D I A L I N G
P H O N E B O O K
S P E E D D I A L I N G
S P E E D D I A L I N G
0 1 :
S P E E D D I A L I N G
0 6 :
cap05.p65 13/04/00, 22.1723
+
23
Page 34

PROGRAMMING
6. Press START.
The facsimile is automatically set for entry of the data
to be associated with the selected speed dialling
code.
If you want to skip a parameter, simply press the
∧∧ key. Each time the key is pressed, the next parameter
will be displayed.
7. Press START to start setting the parameter selected,
e.g. “FAX NO."
8. Enter the relevant facsimile number - max. 32 digits
- on the numeric keypad, e.g. 0125 45812.
Remember that numbers associated with the
extended speed dialling codes 31 and 32 may consist
of 100 digits.
By pressing the key, you can switch to tone dialling.
∗
The " " symbol appears on the display.
If the display shows a previously set number, you can
confirm it by pressing SET/CONF. , or replace it with
a new number by typing the new number on the
numeric keypad and pressing SET/CONF.
∗
∨ ∨ or
S P E E D D I A L F A X
0 6 :
E N T E R F A X N O .
0 1 2 5 4 5 8 1 2
To delete a setting, press CLEAR.
To make a correction, move the cursor to the digit to
be changed (using the < or > keys) and overwrite it
with the new digit.
If you want to insert a blank between one digit and
another, press the > key to move the cursor one
position forward.
By pressing EXT./PAUSE you can insert one or
more pauses (during dialling) between the digits in
the number. The pause is identified on the display by
the character “p”. It is a good idea to insert a pause
between the code and the number.
In some countries, a second answering tone must be
heard before the whole number can be dialled. In this
case, press 2nd DIAL TONE . The display shows the
symbol “:”.
If the facsimile machine is connected to an exchange
and the user is an external user, press EXT./PAUSE
before entering the number. In this case the display
shows the letter “E” before the numeric sequence.
+
24
cap05.p65 13/04/00, 22.1724
Page 35

PROGRAMMING
9. Press SET/CONF . to confirm the number set.
At this point, as the remaining parameters are optional, you can quit the menu by pressing STOP twice.
The facsimile returns to stand-by mode.
10. Enter the relevant telephone number - max. 30 digits
- on the numeric keypad - e.g. LANDRE S.p.A..
Each character is entered by pressing the
to scroll through the entire set of alphanumeric
characters until the desired character is displayed and
then by pressing the > key to confirm selection. The
character to be selected appears in the top right-hand
corner. (For a complete list of the alphanumeric
characters available, refer to the “CHARACTER SET
TABLE” chapter).
To delete an entire setting, press CLEAR and repeat
the entire entry procedure.
11. Press SET/CONF. to confirm the name stored.
Type the relevant telephone number - max. 32 digits -
on the numeric keypad, e.g. 0125 230025. Remember
that extended coded dialling codes 31 and 32 may
consist of 100 digits.
∨∨ or ∧∧ key
E N T E R N A M E A
E N T E R N A M E .
L A N D R E S . p . A .
E N T E R T E L . N O .
0 1 2 5 2 3 0 0 2 5
If the display shows a previously set number, you can
confirm it by pressing SET/CONF. , or replace it with a
new number by typing the new number on the numeric
keypad and pressing SET/CONF. .
To delete a setting, press CLEAR.
To correct a typing mistake, move the cursor to the
digit to be changed (using the < or > key) and
overwrite it with the new digit.
You can also insert pauses, leave a blank between
one digit and another and wait for a second dialling
tone, etc. (see the explanation provided in step 8).
+
25
cap05.p65 13/04/00, 22.1725
Page 36

PROGRAMMING
12. Press SET/CONF. to confirm the number stored.
The facsimile machine is automatically set to receive
the transmission speed setting (9600/4800).
To confirm the value displayed, skip to the next step
or:
press
∨∨ or ∧∧ to select the alternative value.
13. Press SET/CONF. to confirm the option set. The
facsimile machine is automatically set for the closed
network setting (YES/NO).
To confirm the option displayed, move straight on to
the next step, or:
press
∨∨ or ∧∧ to select the alternative option.
E N T E R S P E E D
9 6 0 0
E N T E R C L S D N T W R K
N O
14. Press SET/CONF. to confirm the value set.
Having completed data entry for speed dialling code
06, the facsimile machine is automatically set for
programming the next speed dialling code data.
Repeat the procedure from step 7 if you want to
continue programming codes, or:
press STOP once to return to the “PHONE BOOK”
menu functions, or:
press STOP twice to quit the menu.
S P E E D D I A L F A X
0 7 :
26
cap05.p65 13/04/00, 22.1726
Page 37

PROGRAMMING
CLEARING PROGRAMMED DATA
If you like, you can clear the data programmed under one-touch dialling keys or speed dialling codes.
This section describes the data clearing procedure in relation to the storing procedures described in the
previous two sections.
o The facsimile machine is on. There is no document in the ADF. One-touch dialling keys and speed dialling
codes have been programmed.
1. Follow the procedure described in steps 1 to 3 of the
“PROGRAMMING ONE-TOUCH DIALLING KEYS”
section or the procedure described in steps 1 to 4 of
the “PROGRAMMING SPEED DIALLING CODES”
section.
Example: follow the procedure described in steps 1
to 3 of the “PROGRAMMING ONE-TOUCH DIALLING
KEYS” section.
1 - T O U C H D I A L I N G
1 : 0 0 3 4 2 2 4 5 7 7 3 0
2. Press
3. Press CLEAR. All the data set for the one-touch
4. Repeat steps 2 and 3 to clear the data for the next key,
∨∨ or ∧∧ to select the one-touch dialling key or
speed dialling code that you want to select.
Example: select the one-touch dialling key 3.
dialling key selected is cleared.
The facsimile machine then immediately displays the
next one-touch dialling key after the cleared one: in
the example given in the manual, the one-touch
dialling key “4”.
or press STOP twice to quit the menu.
1 - T O U C H D I A L I N G
3 : 0 0 3 4 2 2 5 6 7 8 9 0
1 - T O U C H D I A L I N G
4 : 0 1 1 2 3 4 7 8 8
PRINTING PROGRAMMED DATA
You can print out the data programmed under the 16 one-touch dialling keys and the 32 speed dialling codes.
In this way, you can keep track of all the numbers stored (fax and telephone) and the data entered for each key
or code, checking the keys or codes that have been programmed and those that have not.
cap05.p65 13/04/00, 22.1727
27
Page 38

PROGRAMMING
The one-touch dialling key and speed dialling code data is printed:
- in ascending numeric order, if a name has not been associated with the facsimile machine.
- in alphabetical order, if the corresponding key has been associated with the correspondent’s name as well
as the facsimile number.
If any of the parameters have not been programmed, this is indicated by “—” on the display. If the key or code
has not been programmed at all, it will not be printed.
This section explains how to print out the data and provides a practical example.
o The facsimile machine is on. There is no document in the ADF. One-touch dialling keys and speed dialling
codes have been programmed.
1. Follow the procedure described in steps 1 and 2 of the
“PROGRAMMING ONE-TOUCH DIALLING KEYS”
section or the procedure described in steps 1 to 3 of
the “PROGRAMMING SPEED DIALLING CODES”
sections.
Example: follow the procedure described in steps 1
to 3 of the “PROGRAMMING SPEED DIALLING
CODES” section.
P H O N E B O O K
S P E E D D I A L I N G
2. Press 3. All the data programmed for coded speed
dialling is printed.
3. Press STOP to quit the menu.
Printing may be interrupted by pressing the STOP
key.
Example of a printout of the data programmed under the speed dialling codes.
28
cap05.p65 13/04/00, 22.1728
Page 39

PROGRAMMING
CHANGING THE DATE AND TIME
When you send a document, the facsimile machine automatically prints the date and time, the sender’s facsimile
number and the progressive page number at the top of the receiver’s copy. The date/time format can be changed
by setting the operating configuration parameter "DATE FORMAT" (see the "Setting the operating configuration
parameters" section of this chapter).
You can change the date and time whenever you like.
The procedure described below explains how to change the date and time.
o The facsimile machine is on. There is no document in the ADF.
1. Press FUNCTION followed by 5.
F U N C T I O N
5 : D A T A E N T R Y
2. Press START to access the menu.
D A T A E N T R Y
D A T E / T I M E
3. Press START to display the previously recorded date
and time.
The date and time are automatically shown on the
display. The cursor is positioned on the first digit of the
day.
4. Type the date and time on the numeric keypad, e.g.
15/04/92 16:30. Each time a digit is pressed, the
cursor will move automatically to the next digit.
Two digits have to be set for each parameter, inserting
a zero when the data consists of one digit only.
At the end of the setting, after the minutes, the cursor
moves back to the first digit of the first parameter.
If you want to delete the entire setting, press CLEAR.
The display shows the previously recorded date and
time.
If you want to delete one of the digits set (for example,
to move from normal time to daylight-saving time or
vice versa), move the cursor to the digit to be modified
(using the < or > key) and overwrite it with the new
one.
D A T E / T I M E
D D / M M ‘ Y Y H H : M M
D A T E / T I M E
1 5 / 0 4 ' 9 2 1 6 : 3 0
+
cap06.p65 13/04/00, 22.2029
29
Page 40

PROGRAMMING
5. To confirm the change, press SET/CONF.
The display shows the next function on the menu.
Having set the date and time, the facsimile machine
is automatically set for programming the next function.
Move straight on to step 4 of the “STORING THE
SENDER’S NAME” section, if you want to continue
programming the remaining menu functions, or:
press STOP twice to quit the menu.
CHANGING THE SENDER’S FACSIMILE NUMBER
The procedure described below explains how to change the CSI of your own device.
The mnemonic part (sender’s name) and the numeric sequence - CSI (sender’s facsimile number) form the
device’s ID code: TTI - Transmission Terminal Identifier.
D A T A E N T R Y
S E N D E R ’ S N A M E
o The facsimile machine is on.
1. Press FUNCTION , followed by ∗∗ and then #.
2. Press START.
C S I / D I A L M O D E
C H A N G E C S I
C H A N G E C S I
+ 3 9 1 2 4 6 3 2 1 8 2
+
30
cap06.p65 13/04/00, 22.2030
Page 41

3. Change the CSI by entering the new number (max. 20
digits) on the numeric keypad. On entry of each
character, the cursor automatically moves on to the
next digit.
PROGRAMMING
C H A N G E C S I
+ 3 4 2 2 2 5 7 8 8 1
If you want to enter the international code, press T
before entering the number. The symbol + will appear
on the display.
If you want to confirm the previous setting, simply
press SET/CONF.
To correct an incorrect setting, press CLEAR.
If you need to correct single characters, move the
cursor to the digit to be changed (using the < or > key)
and overwrite it with the new digit.
If you want to leave a blank between digits, press the
> key to move the cursor one position forward.
4. Press START to confirm the setting.
5. Press STOP to terminate the procedure.
∗
C S I / D I A L M O D E
D I A L L I N G M O D E
STORING THE SENDER’S NAME
As mentioned previously, each page sent bears the date and time of transmission, the sender’s facsimile
number and the progressive page number.
The sender’s name can be included with the above items, if required.
This section explains how to store the name.
o The facsimile machine is on. There is no document in the ADF.
1. Press FUNCTION followed by 5.
cap06.p65 13/04/00, 22.2031
F U N C T I O N
5 : D A T A E N T R Y
+
31
Page 42

PROGRAMMING
2. Press START to access the menu.
D A T A E N T R Y
D A T E / T I M E
3. Press the
function.
4. Press START to start storing the name, e.g. P.I.S.A.
S.p.A..
Each character is entered by pressing the
to scroll through the entire set of alphanumeric
characters until the desired character is displayed and
then by pressing the > key to confirm selection. The
character to be selected appears in the top right-hand
corner. (For a complete list of the alphaumeric
characters available, refer to the “CHARACTER SET
TABLE” chapter).
If you make a typing error, delete the entire setting by
pressing CLEAR.
5. To confirm the name set, press SET/CONF.
Having stored the sender’s name, the facsimile is
automatically set for programming the next function.
∨∨ key once to select the “Sender’s name”
∨∨ or ∧∧ key
D A T A E N T R Y
S E N D E R ’ S N A M E
S E N D E R ’ S N A M E A
S E N D E R ’ S N A M E .
P . I . S. A . S . p . A .
D A T A E N T R Y
T X P A S S W O R D
Move straight on to step 4 of the “SETTING
PASSWORDS” section, if you want to continue
programming the remaining functions on the menu, or:
press STOP twice to quit the menu.
32
cap06.p65 13/04/00, 22.2032
Page 43

PROGRAMMING
SETTING PASSWORDS
You may want to prevent others from using the facsimile. If this is the case, you can set passwords so that some
of the functions can only be performed by authorized persons and the documents can be sent selectively with
maximum privacy.
- TX password.
Used for preventing unauthorized users from making any kind of transmission.
- Configuration password.
Used for controlling access to the “DATA ENTRY” and “CONFIGURATION” menus. It has priority over the
TX password.
The passwords are sequences of 4 alphanumeric characters. Once the password has been set, it can no longer
be displayed, so take note of the characters typed. To change the password you must enter the current one first.
Note: If the passwords include national characters and you then change the language in which the
messages are displayed, the passwords will not be recognized.
This section explains how to set the TX password.
To set the configuration password: press the FUNCTION key followed by 5, press the
have selected the config. password and then follow the procedure described in steps 4 and 5.
o The facsimile machine is on. There is no document in the ADF.
1. Press FUNCTION followed by 5.
2. Press START to access the menu.
3. Press
∨ ∨ twice to select the “TX password” function.
F U N C T I O N
5 : D A T A E N T R Y
D A T A E N T R Y
D A T E / T I M E
D A T A E N T R Y
T X P A S S W O R D
∨ ∨ or ∧∧ key until you
cap06.p65 13/04/00, 22.2033
+
33
Page 44

PROGRAMMING
4. Press START to start setting the password ( max. 4
alphanumeric characters).
Each character is entered by pressing the
to scroll through the entire set of alphanumeric
characters until the desired character is displayed
and then by pressing the > key to confirm selection.
The character selected appears in the top right-hand
corner. (For a complete list of the alphaumeric
characters available, refer to the “CHARACTER SET
TABLE” chapter).
If you make a typing error, press CLEAR and repeat
the entire entry procedure.
5. To confirm the password set, press SET/CONF.
The display shows the next function on the menu.
Having set the transmission password, the facsimile
machine is automatically set for programming the
next function (“Storing the config. password”).
Repeat the procedure from step 4, if you want to set
the config. password, or:
∨ ∨ or ∧ ∧ key
N E W : A
N E W : g
P o n g
D A T A E N T R Y
C O N F I G . P A S S W O R D
press STOP twice to quit the menu.
34
cap06.p65 13/04/00, 22.2034
Page 45

PROGRAMMING
CHANGING OR DELETING PASSWORDS
You can change or delete a password that has been set.
This section explains how to change or delete the transmission password.
To change or delete the configuration password: follow steps 1 and 2 of the procedure described below, enter
the current password, press the
confirm the selection made. At this point you can change the password by typing a new sequence of four
alphanumeric characters (max.)and pressing SET/CONF. or delete it simply by pressing CLEAR.
o The facsimile machine is on. A transmission password has been set. There is no document in the ADF.
1. Press FUNCTION followed by 5.
2. Press START to access the menu.
∨∨ or ∧∧ key to select the “config. password” function and press START to
F U N C T I O N
5 : D A T A E N T R Y
D A T A E N T R Y
D A T E / T I M E
3. Press the
function.
4. Press START to confirm the selection made.
5. Type the current password (see the example given in
the previous section).
6. To confirm the password set, press SET/CONF.
You now have the following options:
Change the current password, by typing a new sequence
of four alphanumeric characters (max.) and pressing
SET/CONF , or:
∨∨ key to select the “Transmission password”
D A T A E N T R Y
T X P A S S W O R D
C U R R E N T :
A
C U R R E N T :
g
P o n g
N E W : A
cap06.p65 13/04/00, 22.2035
+
35
Page 46

PROGRAMMING
delete the current password, simply by pressing
CLEAR.
The display shows the next function on the menu.
7. Press STOP twice to quit the menu.
SETTING RESERVED POLLING IDENTIFIERS
The polling function enables your facsimile machine to ask another facsimile machine to send a document. The
receiving facsimile machine calls the fax in possession of the original and requests transmission. Using this
method, the receiver is charged for the call instead of the sender. The document must be inserted in the ADF
or must have been stored in the memory.
This feature therefore enables you to receive a document even when the user in possession of the document
is not in.
To prevent this function from being activated by unauthorized persons, the user in possession of the original
document can limit polling by setting a polling identifier (which corresponds to the CSI of the receiving machine).
In this way, transmission will only take place if the receiving and transmitting facsimile machines have the same
polling identifiers. This function is called “reserved polling”.
D A T A E N T R Y
C O N F I G . P A S S W O R D
On this facsimile machine, you can set up to 10 polling identifiers consisting of up to 20 digits each.
This section explains how to store reserved polling identifiers. The polling transmission and reception
procedures are explained in the “Polling transmission” and “Polling reception” sections of the “TRANSMISSION”
and “RECEPTION” chapters, respectively.
o The facsimile machine is on. There is no document in the ADF.
1. Press FUNCTION followed by 5.
F U N C T I O N
5 : D A T A E N T R Y
2. Press START to access the menu.
D A T A E N T R Y
D A T E / T I M E
3. Press
∨∨ or ∧ ∧ key until the "Polling identifiers" function
is selected.
D A T A E N T R Y
P O L L I N G I D
36
cap06.p65 13/04/00, 22.2036
+
Page 47

4. Press START to activate the function selected.
PROGRAMMING
P O L L I N G I D 0 1
5. By pressing the
number to which the polling identifier is to be
associated, e.g. 03.
If a polling identifier has already been stored under
the reference number selected (03), it appears on the
display.
If this is the case, select another number (using the
∨∨ or ∧ ∧ key) or follow the steps in the procedure if you
want to change the previously programmed polling
identifier.
6. Press START to start storing (or to change) the
polling identifier for the number chosen (03). Enter the
digits that form the number, e.g. 44 0276, on the
numeric keypad.
If you want to leave a blank between one digit and the
next, press the > key to move the cursor one position
forward.
To delete an entire setting, press CLEAR.
If you want to delete one of the characters set, move
to the character to be changed (using the < or > key)
and overwrite it with the correct one.
∨ ∨ or ∧∧ key, select the reference
P O L L I N G I D 0 3
P O L L I N G I D 0 3
4 4 0 2 7 6
7. Press SET/CONF . to confirm the polling identifier set.
After the polling identifier has been stored for the
reference number (03), the facsimile machine is
automatically set for programming the remaining
polling identifiers.
Repeat the procedure from step 6 if you want to
continue to store other polling identifiers, or:
press STOP once to return to the “DATA ENTRY”
menu functions, or:
press STOP twice to quit the menu.
cap06.p65 13/04/00, 22.2037
P O L L I N G I D 0 4
37
Page 48

PROGRAMMING
PRINTING THE RESERVED POLLING IDENTIFIERS
For an overall view of the stored polling identifiers, you can print them.
This section explains how to print them and provides some practical examples.
o The facsimile machine is on. Reserved polling identifiers have been set. There is no document in the ADF.
1. Follow the procedure described in steps 1 to 3 of the
“STORING POLLING IDENTIFIERS” sections.
2. Press 3. All the identifiers programmed will be
printed.
3. Press STOP to quit the menu.
If you press STOP during printing, the facsimile
machine will stop printing.
D A T A E N T R Y
P O L L I N G I D
Example of “Reserved polling identifiers” printout.
38
cap07.p65 13/04/00, 22.2338
Page 49

PROGRAMMING
SELECTING THE DIALLING MODE
This section explains how to select the dialling mode (pulse or tone). The selection must be made according
to the type of connection made by the telecommunications company.
This function has no effect when the fax is connected to an exchange.
o The facsimile machine is on.
1. Press FUNCTION followed by * and then #.
C S I / D I A L M O D E
C H A N G E C S I
2. Press the
3. Press START. The facsimile machine is automatically
set for programming the dialling mode (PULSE or
TONE).
4. Press SET/CONF. to confirm pulse dialling and then
move on to the next step or:
press
“TONE DIALLING”) and then press SET/CONF. to
confirm.
∨∨ key once.
∨∨ to select the alternative option (in this case,
C S I / D I A L M O D E
D I A L L I N G M O D E
D I A L L I N G
P U L S E
C S I / D I A L M O D E
D I A L L I N G M O D E
D I A L L I N G
T O N E
5. Press STOP to terminate the procedure.
cap07.p65 13/04/00, 22.2339
C S I / D I A L M O D E
C H A N G E C S I
39
Page 50

PROGRAMMING
SETTING OPERATING CONFIGURATION PARAMETERS
You can control some of the facsimile machine’s functions by setting operating configuration parameters which
concern, for example, automatic printing of the activity report, transmission report and reception report,
transmission inhibition, etc.
To have an overall view of the operating configuration parameters initially set on the facsimile machine, consult
the table at the end of this section or see the description of key 6 in the “GETTING TO KNOW THE FACSIMILE
MACHINE” chapter.
At the time of installation, these parameters are already set with initial values. To select and change the
parameters displayed by the facsimile machine, follow the procedure described below.
o The facsimile machine is on. There is no document in the ADF.
1. Press FUNCTION followed by 6.
F U N C T I O N
6 : C O N F I G U R A T I O N
2. Press START to access the menu.
3. Press
4. Press START to confirm the parameter selected.
5. Press SET/CONF . to confirm the value displayed or:
∨ ∨ or ∧ ∧ to select the parameter that you want
to program.
Example: select the “LAST TX REPORT” parameter
The display shows the current value of the parameter
selected.
press
∨ ∨ or ∧ ∧ to select the alternative value and
then press SET/CONF . to confirm.
The facsimile machine is automatically set for
programming the next parameter.
C O N F I G U R A T I O N
E C M
C O N F I G U R A T I O N
L A S T T X R E P O R T
L A S T T X R E P O R T
N O
C O N F I G U R A T I O N
R X R E P O R T
40
cap07.p65 13/04/00, 22.2340
+
Page 51

PROGRAMMING
Repeat the procedure from step 3 if you want to
continue programming the other parameters, or:
press STOP twice to quit the menu.
The table below shows all the operating configuration parameters. The initial value of each parameter is
underlined.
The names in the PARAMETER column appear in their abbreviated form, exactly as they appear on the display,
while the full form of each parameter is given in the “Function keys” section of the “GETTING TO KNOW THE
FACSIMILE MACHINE”.
Operating configuration parameter table
PARAMETER
ECM
AUTOMATIC RX
FAX/PHONE SWITCH
FAX/TAD
OPERATING
VALUES
YES:
ECM enabled.
NO: ECM disabled.
YES:
Automatic reception.
NO: Manual reception.
YES: function enabled.
NO:
function disabled.
YES: function enabled.
NO:
function disabled.
MEANING
Error Correction Mode
Enables you to send/receive a document
correcting errors caused by line
interference which would otherwise
prevent the document from being read.
This function is only active when both
facsimile machines have the feature.
Enables/disables automatic reception.
Automatically distinguishes between
facsimile and telephone calls. This
function can only be enabled when it has
been activated by the customer
engineering service.
Enables/disables connection to a telephone answering device and recognition
of the dialling tone. This function can
only be enabled if activated by the
customer engineering service.
SENDER ID POSITN
cap07.p65 13/04/00, 22.2341
SUPERIMPOSED
TOP EDGE
Selects the position in which the sender
ID line is to be printed.
+
41
Page 52

PROGRAMMING
PARAMETER
TTI IN SENDER ID
ACTIVITY REPORT
LAST TX REPORT
LAST RX REPORT
LAST ERR. REPORT
OPERATING
VALUES
YES:
TTI included.
NO: TTI excluded.
YES:
function enabled
NO: function disabled
YES: printing enabled
NO:
printing disabled
YES: printing enabled
NO:
printing disabled
YES:
printing enabled
NO: printing disabled
MEANING
Includes/excludes the TTI (sender’s
facsimile number and name) in the ID
line.
Enables/disables the facsimile machine
to print the activity report every 30
transactions.
Enables/disables the facsimile machine
to print a report after each transmission
operation.
Enables/disables the facsimile machine
to print a report after each reception
operation.
Enables/disables the facsimile machine
to print a report after each transmission
in which an error occurred.
BROADCAST REPORT
CLOSED NETWORK RX
CLOSED NETWORK TX
INHIBIT TX
YES:
printing enabled
NO: printing disabled
YES: limit enabled
NO:
limit disabled
YES: limit enabled
NO:
limit disabled
YES: Transmission inhibited
NO:
Tranmission allowed
Enables/disables the facsimile machine
to print a report after each broadcast
transmission operation.
Enables/disables limited reception.
Reception is limited by checking the
last 4 or 6 digits in the sender’s facsimile
number.
Enables/disables limited transmission.
Transmission is limited by checking the
last 4 or 6 digits in the receiver’s facsimile
number.
Inhibits all kinds of transmission. This
function is only valid if the TX password
has been enabled.
+
42
cap07.p65 13/04/00, 22.2342
Page 53

PROGRAMMING
PARAMETER
SUBSTITUTE RX
REDUCTION
PRINT OVERFLOW
AUTOMATIC STORAGE
OPERATING
VALUES
YES:
Storage enabled
NO: Storage disabled.
YES:
Reduction enabled.
NO: Reduction disabled.
YES:
Print overflow
NO: Exclude overflow
YES: Function enabled
NO:
Function disabled
MEANING
Enables/disables storage of incoming
documents in memory when there is no
paper or ink left.
Automatically reduces received and
copied documents to a minimum of 70%
of the size of the original document.
The reduction values are: 70%, 73%,
76%, 80%, 84%, 89%, 94%.
Recommended values: for A4 documents: 94%; for Letter documents: 89%;
for Legal documents: disable the feature.
Enables printing of what lies outside the
A4 format on another sheet.
Enables documents inserted in the ADF
to be stored automatically.
TX FAIL DEL.DOC
TX POLL DEL. DOC
AUT. PAG. RETRANS
TX SPD 4800 B/S
YES:
Deletion enabled
NO: Deletion disabled
YES:
Deletion enabled
NO: Deletion disabled
YES:
Retransmission enabled
NO: Retransmission disabled
YES: Function enabled
NO:
Function disabled
Enables/disables automatic deletion of
a previously stored document after all
transmission retries even if transmission
was not completed successfully.
Enables/disables automatic deletion of
a previously stored document after a
polling transmission operation.
Enables/disables automatic retransmission of pages on which transmission
errors occurred. This function can only
be enabled if the document has been
stored in memory.
Sets the transmission speed to 4800
BPS. The transmission speed selected
by default on the facsimile machine is
9600 B/S.
+
cap07.p65 13/04/00, 22.2343
43
Page 54

PROGRAMMING
PARAMETER
FINE IMAGE RESLT
FINE AFTER TX/CY
IM. AFTER TX/CPY
PAPER FORMAT
OPERATING
VALUES
YES: Function enabled
NO:
Function disabled
YES: Function enabled
NO:
Function disabled
YES: Function enabled
NO:
Function disabled
A4
LETTER
LEGAL
MEANING
Automatically selects the FINE
resolution during image adjustment. If
the function is not enabled, the resolution value will be the one set by the
user.
Restores the FINE resolution after a
transmission or copying operation. The
resolution selected by default on the
facsimile machine is “STANDARD”.
Restores the TEXT/IMAGE value after
a transmission or copying operation.
The image value selected by default
on the facsimile machine is
“DISABLED”.
Selects one of the three formats.
Note: the instructions for regulating
the paper tray are given in the
"CONSUMABLES" chapter.
TELEDIAGNOSIS
SILENCE TIMEOUT
DATE FORMAT
YES: Function enabled
NO:
Function disabled
4
6
8
12
DD/MM 'YY
'YY MM/DD
MM/DD/YY 24h
MM/DD/YY 12h
Enables/disables diagnostic testing
from a remote terminal. This function
can only be activated if it has been
activated by the engineering service.
Enables you to set the time the machine
is to wait (in seconds) before moving
into automatic document reception
mode when the fax is connected to an
answering device. This parameter is
only available if the FAX/TAD function
is enabled.
Enables you to select one of the four
available date formats (European,
Asiatic and the two American)
+
44
cap07.p65 13/04/00, 22.2344
Page 55

PROGRAMMING
PARAMETER
RX ON PC & FAX
PC COMMUNICATION SPEED
LANGUAGE
OPERATING
VALUES
YES: Function enabled
NO:
Function disabled
9600
19200
38400
ITALIAN
ENGLISH
SPANISH
Enables/disables the facsimile
machine for the reception and printing
of a document from the PC.
Enables you to select the serial port
(RS232) communication speed.
Note: If the speed is reduced to 9600
B/S, the transmission speed must be
reduced to 4800 B/S using the
corresponding operating configuration
parameter.
Enables you to choose the language
in which the messages are to be printed
and displayed.
MEANING
PRINTING THE OPERATING CONFIGURATION PARAMETERS
You can print the parameters - set initially and then modified - of the operating configuration at any time.
This section explains how to print them and provides a practical example.
o The facsimile machine is on.
1. Press FUNCTION followed by 6.
F U N C T I O N
6 : C O N F I G U R A T I O N
2. Press START to access the menu.
C O N F I G U R A T I O N
E C M
3. Press 3.
The facsimile machine prints all the configuration
parameters.
4. Press STOP to quit the menu.
Printing can be interrupted by pressing STOP.
cap07.p65 13/04/00, 22.2345
45
Page 56

PROGRAMMING
Example of an “Operating Configuration Parameters” printout.
46
cap07.p65 13/04/00, 22.2346
Page 57

PROGRAMMING
CLOSED NETWORK FEATURE
The closed network feature enables you to restrict the number of correspondents to whom the facsimile machine
can communicate. It is designed for transmission applications in a multiuser environment to prevent an
indiscriminate and wasteful use of the facsimile machine. In reception, it prevents the paper and ink from being
wasted on undesired reception of advertisements, etc.
The closed network is enabled by two separate operating configuration parameters: "CLOSED NETWORK IN
RX" and "CLOSED NETWORK IN TX" which can be selected from the operating configuration menu. The
CLOSED NETWORK IN TX parameter only enables transmission to remote users whose IDs are stored under
the one-touch dialling keys and who have been declared as belonging to the network by setting the relevant
field to YES when their ID were recorded.
Transmission in other modes or with IDs stored but not included in the network will not be allowed.
The latter parameter enables reception from remote users whose IDs have been stored under the one-touch
dialling keys and who have been declared as belonging to the network by setting the relevant field to YES when
his ID was recorded.
Reception from IDs not included in the network will not be allowed.
cap07.p65 13/04/00, 22.2347
47
Page 58

BEFORE TRANSMITTING/COPYING
BEFORE TRANSMITTING/COPYING
DOCUMENTS THAT CAN BE TRANSMITTED/COPIED
The facsimile machine can read all documents on plain paper with a format between the minimum and maximum
limits indicated below:
By means of the automatic document feeder (ADF), the facsimile machine can handle A4, A5, A6, LETTER and
LEGAL format documents with a thickness of between 0.07 mm and 0.14 mm (unit weight 50 - 104 g/m2.
The ADF can feed up to 15 sheets (max. 0.1 mm thick).
Check the document before sending it; if it belongs to one of the following types of documents, it must be
photocopied or inserted in a special transparent cover. The copy must then be sent in place of the original.
The following tyes of original must not be used:
• damp or moist;
• torn or perforated;
• folded or crumpled;
• clipped or stapled;
• with carbon paper rears;
• with a width of less than 148 mm and a length of less than 105 mm (e.g. cheques, current account receipts,
etc.);
• with a width of more than 216 mm and a length of more than 2 m.
• transparencies for overhead projectors.
PREPARING THE DOCUMENT FOR TRANSMISSION/COPYING
o The facsimile machine is on.
INSERTING THE DOCUMENT
Inserting the document is the first step in all transmission/copying operations.
First of all, check that the document is not tattered, have paper clips or a glossy surface, etc. See the precautions
listed above.
Insert the document face down in the document feed slot and fit the guides against its side edges. The document
must be not be forced into the slot: it will automatically be fed in when transmission starts.
48
cap08.p65 13/04/00, 22.2748
Page 59

BEFORE TRANSMITTING/COPYING
SELECTING THE GRAPHIC DEFINITION
Selects the graphic definition according to the document's features.
CHOOSING THE RESOLUTION, CONTRAST AND IMAGE VALUES
For pages containing text and drawings:
PARAMETERS VALUES LEDS
FINE
For documents consisting of small
characters and drawings
On
RESOLUTION
CONTRAST
Note: If a document is sent from the memory, the PROPRIETARY resolution mode is disabled.
For documents with photographs:
PARAMETERS VALUES LEDS
PROPRIETARY
For documents consisting of very small
characters and complex drawings;
SUPERFINE (copying only)
STANDARD
For easily legible documents
LIGHT
For dark documents
DARK
For light documents
NORMAL
For normal documents
TEXT/IMAGE
For documents consisting of both text
and photographs.
RESOLUT. LED
CONTRAST LED
Blinking
Blinking
Off
Blinking
On
Off
On
IMAGE
cap08.p65 13/04/00, 22.2749
64 GREY TONES
For documents consisting of photographs
only.
OFF
For documents consisting of text only.
IMAGE LED
Blinking
Off
49
Page 60

BEFORE TRANSMITTING/COPYING
To perform this operation:
a. Press FUNCTION followed by 2.
b. Press START to access the menu.
F U N C T I O N
2 : P R E P A R A T I O N
P R E P A R A T I O N
R E S O L U T I O N
c. Press
d. Press START to start programming the parameter
e. Press SET/CONF. to confirm the value or:
∨∨ or ∧∧ to select the parameter that you want
to program.
Example: Select the “IMAGE” parameter.
selected. The display shows the current value of the
selected parameter.
press
∨∨ or ∧∧ to select an alternative value (64 GREY
TONES or OFF).
The facsimile machine is automatically set for the
next parameter.
Repeat the procedure from step c if you wish to
program the remaining parameters or:
press STOP twice to quit the menu.
P R E P A R A T I O N
I M A G E
I M A G E
T E X T / I M A G E
P R E P A R A T I O N
C O N T R A S T
50
cap08.p65 13/04/00, 22.2750
Page 61

Example of print resolutions
ORIGINAL
BEFORE TRANSMITTING/COPYING
Transmission
in
cap08.p65 13/04/00, 22.2751
51
Page 62

BEFORE TRANSMITTING/COPYING
SETTING PAGE NUMBERING (TRANSMISSION ONLY)
If you wish, set the number of pages in the document. If you do this, the document received will be numbered
at the top in the following way: 01/nn, 02/nn, 03/nn,... nn/nn, where “nn” represents the total number of pages
in the document (max. 15).
The facsimile machine will also carry out a check on page numbering:
• If the document is sent from memory: At the end of storage, if the number of pages selected does not
correspond to the number stored, the message “WRONG NO. PAGES” will appear (for a few seconds) on
the display and the document will be automatically cleared from memory.
• If the document is sent from the ADF: At the end of transmission, if the number of pages selected does not
correspond to the number sent, the facsimile machine emits a beep, the “error” LED comes on and an error
report is printed.
To perform this operation:
a. Follow steps a and b of the graphic definition setting
procedure.
P R E P A R A T I O N
R E S O L U T I O N
b. Use the
NUMBERING” function.
c. Press START and type the number of pages, e.g. 12,
on the numeric keypad.
If you want to delete the entire setting, press CLEAR.
If you want to change one of the digits set, move the
cursor to the digit to be changed (by pressing the < or
> key) and overwrite it with the new digit.
d. Press SET/CONF. to confirm the setting.
e. Press STOP twice to quit the menu.
∨∨ or ∧∧ key to select the “PAGE
P R E P A R A T I O N
P A G E N U M B E R I N G
E N T E R
P A G E S :
52
cap08.p65 13/04/00, 22.2752
Page 63

TRANSMISSION
TRANSMISSION
This chapter describes the various methods of transmission available for you to choose according to your
needs. The two main methods are transmission from the ADF and transmission from memory. The facsimile
machine also enables you to send a document at a preset time, send a document - by using the memory - to
several different users immediately or at a preset time and to send reserved documents.
Finally, you can send documents by “polling”, i.e. send a document on request by the receiver, even while you’re
out.
For all the methods mentioned, make sure you prepare the document for tranmission as explained in the
“Preparing the document for transmission/copying” section of the “BEFORE TRANSMISSION/COPYING”
chapter.
We remind you that you can interrupt any of the procedures described in this chapter at any time by pressing
the STOP key. Note that if you press STOP during transmission, the connection is interrupted.
If no data is entered for two minutes while carrying out a procedure, the procedure is aborted and the
facsimile machine returns to stand-by mode.
If the document gets jammed during any transmission operation, the facsimile machine emits a beep and the
message “CHECK DOC. (XX)” appears on the display. Remove the document (see the “FILLING UP/
ELIMINATING PAPER JAMS” chapter); and then repeat the transmission procedure.
Note: To transmit a document (with a TX password enabled), type the password).
AUTOMATIC STORAGE
When enabled by means of the relevant operating system parameter, automatic storage enables you to
automatically store documents before sending them. To activate automatic storage, simply insert the document
in the ADF and dial the number of the correspondent (using one-touch keys, speed dialling codes or directly
on the numeric keypad).
This feature enables the documents to be retrieved immediately so that you can continue to work on them. In
addition, the errors that may occur are no longer a problem as the facsimile machine automatically retries the
pages that were not successfully sent, so that you can be sure that all of the document will reach its destination.
In transmission, the facsimile machine can store about ten pages of A4 in standard resolution.
When operations requiring the use of the memory are performed, check the amount of free memory. If it is almost
full, clear it of undesired documents to make space for new ones (see the "Connection activities" and "Number
of documents in the memory" sections of the "ACTIVITY HANDLING" chapter).
The message “STORING” appears on the display while the document is being stored. Once the document has
been stored, the message “STORING COMPLETE” appears on the first line of the display for a few seconds
and the message “PAG. NO.: XX DOC. R.: XXXX” appears on the second line. The latter message provides
you with reference data that you may require for document deletion or transmission cancellation operations, i.e.
the number of pages and the document reference number.
TRANSMISSION FROM THE ADF
This is the traditional method of transmission. Insert the document, call the correspondent, wait for the end of
the operation and then pick up the document and continue to work on it, if necessary. If automatic storage has
been enabled, the machine will automatically store the document once the number has been dialled. See the
"AUTOMATIC STORAGE" section for further details.
o The facsimile machine is on. The document has been inserted and prepared for transmission (see the
“BEFORE TRANSMITTING/COPYING” chapter).
cap09.p65 13/04/00, 22.3053
+
53
Page 64

TRANSMISSION
1. Call the correspondent in one of the four ways listed
below.
a) Press the DIAL key.
Type the correspondent’s facsimile number (max.
32 digits), e.g. 0124 56888, on the numeric keypad
and press START to confirm.
0 1 2 4 p 5 6 8 8 8
By pressing the
dialling.
To delete an entire setting, press CLEAR.
If you want to make a correction, move the cursor
to the digit to be changed (using < or >) and
overwrite it with the new digit.
If you want to insert a blank between one digit and
another, press the > key to move the cursor one
position forward.
One or more pauses can also be inserted in
dialling, by pressing EXT./PAUSE , between the
digits that form the number. The pause is identified
on the display by the character “p”. It is a good
idea to insert a pause between the code and the
number.
In some countries, a second dialling tone has to
be heard before the rest of the number can be
dialled. If this is the case, press 2nd DIAL TONE .
The display shows the symbol “:”.
If the facsimile machine is connected to an
exchange and the correspondent is an external
user, press EXT./PAUSE before typing the
number. In this case, the display shows the letter
“E” before the numeric sequence.
∗ key, you can switch to tone
b) Press the one-touch dialling key under which the
correspondent’s number has been programmed.
The number and name associated with the key
appear on the display for a few seconds.
If, when you press a one-touch dialling key, the
message “NOT ENABLED” appears on the display
for a few seconds, this means that no number has
been stored under that key. If this is the case,
refer to the “Programming one-touch keys” section
of the “PROGRAMMING” chapter and program
the key.
54
cap09.p65 13/04/00, 22.3054
0 1 2 5 4 5 8 1 2
L a r a
+
Page 65

c) Press SPEED DIAL.
Enter the speed dialling code under which the
correspondent’s facsimile number has been
stored. Otherwise press
relevant correspondent’s facsimile number
appears on the display and then press START
to confirm your selection.
∨∨ or ∧∧ until the
TRANSMISSION
∗∗
P R E S S ∨ ∨ ∧∧ o r N O .
The number and name associated with the
code appear on the display for a few seconds.
If, when you set a speed dialling code, the
message “NOT ENABLED” appears on the
display for a few seconds, this means that no
number has been stored under that code. If this
is the case, refer to the “Programming speed
dialling codes - normal and extended” section of
the “PROGRAMMING” chapter and program
the code.
2. The facsimile machine starts to send the document.
If transmission was completed successfully, the
facsimile machine beeps and returns to stand-by
mode.
If the correspondent does not answer or the line is
busy, the facsimile machine, after a few seconds,
automatically retries transmission (automatic redial
feature). The message "REDIAL" appears on the
display.
If the document is removed, redialling is aborted.
0 1 2 5 4 5 8 1 2
L A N D R E S . p . A .
If transmission still proves unsuccessful, after the last
retry, you can try to retransmit the document, providing
the document has not been removed. If the
correspondent’s name was entered on the numeric
keypad, you can retransmit by pressing REDIAL.
If you hear a beep and the error LED comes on, this
means that an error has occurred (e.g. an interruption
in the connection). If this is the case, press STOP to
switch the LED off and repeat the transmission procedure.
If the “LAST TX REPORT” parameter was enabled in
the operating configuration, the facsimile machine
with print the report at the end of transmission.
cap09.p65 13/04/00, 22.3055
55
Page 66

TRANSMISSION
TRANSMISSION DIALLING ON THE TELEPHONE/HANDSFREE UNIT
Insert the document, call the correspondent, wait for transmission to end and then pick up the document and
continue to work on it, if necessary.
o The facsimile machine is on. The document has been inserted and prepared for transmission (see the
“BEFORE TRASMITTING/COPYING” chapter).
From the telephone:
1. Lift the handset, dial the correspondent’s number and wait for the answering signal.
If the remote user answers, ask him to press START on his machine and wait for the answering signal.
2. As soon as you hear the signal, press START and hang up. Transmission is started.
If you inadvertently left the handset off the hook, the facsimile machine beeps and the message
“HANDSET OFF HOOK” appears on the display.
Handsfree unit:
1. Press HOOK and type the correspondent's facsimile number on the numeric keypad (by pressing * you
can switch to tone dialling).
2. As soon as you hear the answering signal, press START to transmit.
If the line is busy, press STOP or HOOK to abort the procedure. The facsimile machine returns to standby
mode.
For both modes:
If the machine beeps and the error LED comes on, this means that an error has occurred (e.g. an interruption
in the connection). In this case, press STOP to switch off the LED and repeat transmission.
If the “LAST TX REPORT” parameter has been enabled in the operating configuration, the facsimile machine
will print the report, at the end of transmission.
56
cap09.p65 13/04/00, 22.3056
Page 67

TRANSMISSION
DELAYED TRANSMISSION
The facsimile machine can automatically transmit at a preset time. This overcomes problems created by time
zones when the correspondent is based, for example, on a different continent, and enables you to transmit at
cheaper times and when the lines are less busy.
To transmit a document in this way, you must leave the document (having prepared it and set the time at which
it is to be sent) in the automatic document feeder (ADF), until it is sent, or store it using the automatic storage
feature.
Note that, even after setting the facsimile machine for delayed transmission, you can receive, copy or send
documents; just remember to replace the document in the ADF before the preset time.
This section explains how to set delayed transmission. To cancel a delayed transmission operation, see the
“Connection activities” section of the “ACTIVITY HANDLING” chapter.
o The facsimile machine is on. The document has been inserted and prepared for transmission (see the
“BEFORE TRANSMITTING/COPYING” chapter). No delayed transmission operation has been set.
1. Press FUNCTION , followed by A.
F U N C T I O N
A : T X S E T U P
2. Press START.
3. Press START.
The display shows the current time.
If, when you press START, the machine beeps and
the message “ALREADY ENTERED” appears on the
display for a few seconds, this means that a delayed
transmission operation has already been set.
4. Type the time at which the document is to be sent
(within 24 hours), e.g. 22:10. After each digit is typed,
the cursor moves on to the next digit.
Two digits must be set for each parameter, inserting
a zero for parameters that consist of one digit only.
Having completed the setting by entering the minutes,
the cursor moves back to the first digit of the first
parameter.
T X S E T U P
D E L A Y E D T X
D E L A Y E D T X
S E T T I M E : 2 2 : 1 0
cap09.p65 13/04/00, 22.3057
+
57
Page 68

TRANSMISSION
If you want to delete the entire setting press CLEAR.
If you want to change one of the digits set, move the
cursor to the digit to be changed (using the < or > key)
and overwrite it with the new digit.
5. Press SET/CONF. to confirm the time set.
6. Press SET/CONF.
The display shows the message “TX SETUP” for a
few seconds and is set for entry of the correspondent’s
facsimile number.
7. Call the correspondent in one of the three ways listed
below:
By pressing the DIAL key, typing the facsimile number
on the numeric keypad and pressing START to
confirm, or:
T X S E T U P
D I A L / K E Y / S P . D I A L
by pressing the one-touch dialling key under which
the number was stored or:
by pressing SPEED DIAL followed by the speed
dialling code under which the number was stored.
(The operating procedures summarized above, are
explained in greater detail in the “NORMAL
TRANSMISSION FROM THE ADF” section).
If the AUTOMATIC STORAGE parameter has been
enabled, the document will be stored automatically.
Having finished dialling the number, the message
“*TX ADF ACTIVE” appears on the first line of the
display and “DOC. INSERTED” appears on the second
line.
This message indicates that a transmission operation
is in progress and that the document is present in the
ADF. If the message “*TX ADF ACTIVE*” appears (in
place of the date and time), this means that the
document has been removed from the ADF, so
remember to reinsert it.
If the “LAST TX REPORT” parameter has been
enabled in the operating configuration, the facsimile
machine will print the report at the end of transmission.
58
cap09.p65 13/04/00, 22.3058
Page 69

TRANSMISSION
RESERVED TRANSMISSION
When documents are reserved you can adopt a special procedure which assigns a password consisting of four
alphanumeric characters to each document to be sent. Instead of being printed immediately by the receiving
machine, the document will be stored in a specific location in the memory (private mailbox). It can be printed
once the password has been entered.
The password must be selected previously in agreement between the users of the transmitting and receiving
facsimile machines.
This kind of transmission can only be carried out between compatible facsimile machines that have the private
mailbox feature.
This section explains how to set reserved transmission. To cancel a reserved transmission operation, see the
“Connection activities” section of the “ACTIVITY HANDLING” chapter.
o The facsimile machine is on. The document has been inserted and prepared for transmission (see the
“BEFORE TRANSMITTING/COPYING” chapter).
1. Press FUNCTION followed by A.
F U N C T I O N
A : T X S E T U P
2. Press START.
3. Press the
“RESERVED TX”.
4. Press START.
5. Type the password (max. 4 alphanumeric characters).
Each character is entered first by pressing the
key (to scroll through the entire set of alphanumeric
characters) until the character you want is displayed
and then the > key to confirm selection. The character
to be selected appears in the top right-hand corner.
If you make a typing error, press CLEAR and repeat
the entire entry procedure.
∨∨ or ∧∧ key to select the option
∨∨ or ∧∧
T X S E T U P
D E L A Y E D T X
T X S E T U P
R E S E R V E D T X
R E S E R V E D T X A
P A S S W O R D :
cap09.p65 13/04/00, 22.3059
+
59
Page 70

TRANSMISSION
6. Press SET/CONF. to confirm the password set.
7. Press SET/CONF.
The message “TX SETUP” appears for a few seconds
on the display and then the facsimile machine is set for
entry of the correspondent’s facsimile number.
8. Call the correspondent in one of the three ways listed
below:
by pressing the DIAL key, typing the facsimile number
on the numeric keypad and pressing START to confirm,
or:
by pressing the one-touch dialling key under which the
number was stored or:
by pressing SPEED DIAL followed by the speed
dialling code under which the number was stored.
If the AUTOMATIC STORAGE parameter has been
enabled, the document will be stored automatically.
T X S E T U P
D I A L / K E Y / S P . D I A L
(The operating procedures summarized above are
explained in greater detail in the “NORMAL
TRANSMISSION FROM THE ADF” section).
9. Transmission is started.
If transmission was completed successfully, the
facsimile machine beeps and returns to stand-by
mode.
If the correspondent does not answer or the line is
busy, the facsimile machine, after a few seconds,
automatically retries transmission (automatic redial
feature).
If transmission still proves unsuccessful, after the last
retry, you can try to retransmit the document, providing
the document has not been removed. If the correspondent’s name was entered on the numeric
keypad, you can retransmit by pressing REDIAL.
If you hear a beep and the error LED comes on, this
means that an error has occurred (e.g. an interruption
in the connection). If this is the case, press STOP to
switch the LED off and repeat the transmission procedure.
If the “LAST TX REPORT” parameter was enabled in
the operating configuration, the facsimile machine
with print the report at the end of transmission.
60
cap09.p65 13/04/00, 22.3060
Page 71

TRANSMISSION
BROADCAST TRANSMISSION FROM THE MEMORY - IMMEDIATE OR DELAYED
With the aid of the memory, the facsimile machine can send a document to several correspondents (maximum
16). The document is stored (about 10 pages of A4 format with normal resolution) and then sent, immediately
or at a preset time, to each destination in the order programmed.
When you perform operations that require use of the memory, check the percentage of free memory on the
display. If the memory is almost full, clear it of documents no longer required so as to create space for new
storage operations (see the “Connection activities” and “Documents stored” sections of the “ACTIVITY
HANDLING” chapter.
This section explains how to set broadcast transmission (immediate or delayed) from the memory. To clear any
of the types of transmission operations mentioned above, see the “Documents stored” and “Connection
activities” sections of the “ACTIVITY HANDLING” chapter.
o The facsimile machine is on. The document has been inserted and prepared for transmission (see the
“BEFORE TRANSMITTING/COPYING” chapter).
1. Press FUNCTION followed by 1.
F U N C T I O N
1 : B R O A D C A S T M E M Y
2. Press START.
If no other BROADCAST tranmission is allowed,
when you press START you hear a beep and the
message “ALREADY ENTERED” appears on the
display for a few seconds.
3. Press SET/CONF . to confirm the current time (immediate transmission) or:
type the time at which the document is to be sent
(within the next 24 hours) and press SET/CONF.
again to confirm the new setting.
If no other DELAYED tranmission is allowed, when
you press SET/CONF . you hear a beep and the
message “ALREADY ENABLED” appears on the
display for a few seconds.
The message “STORING” appears on the display
while the document is being stored.
Once the document has been stored, the message
“COMPLETED” appears on the first line of the display
for a few seconds and the message “PG:XX DOC. R.:
XXXX appears on the second line. The latter message
provides you with reference data that you may require
for document deletion or transmission cancellation
operations, i.e. the number of pages and the document
reference number.
B R O A D C A S T TX
S E T T I M E : H H : M M
cap09.p65 13/04/00, 22.3061
+
61
Page 72

TRANSMISSION
4. Call the correspondent in one of the following three
ways:
by pressing the DIAL key, typing the facsimile number
on the numeric keypad and pressing pressing START
to confirm, or:
by pressing the one-touch dialling key under which
the number was stored or:
by pressing SPEED DIAL followed by the speed
dialling code under which the number was stored.
B R O A D C A S T T X
D I A L / K E Y / S P . D I A L
In the example provided in the manual, the one-touch
dialling key 01 has been selected.
The correspondent’s name and number associated
with the key appear on the display for a few seconds.
(The operating procedures summarized above are
explained in greater detail in the “TRANSMISSION
FROM THE ADF” section).
5. Repeat step 4 for all the other numbers that you want
to dial or move straight on to the next step.
6. Press START to confirm all the numbers set and end
the procedure.
If a delayed broadcast transmission has been set, the
facsimile machine returns to stand-by mode.
7. The facsimile machine starts transmitting to the first
correspondent selected.
If transmission was completed successfully, the facsimile machine beeps and returns to stand-by mode.
If the correspondent does not answer or the line is
busy, the facsimile machine continues dialling the
remaining numbers. At the end it retries transmission
to the numbers to which transmission was
unsuccessful (automatic redial feature).
0 1 2 5 5 8 1 5 1
S I L V E R S . p . A
B R O A D C A S T T X
D I A L / K E Y / S P. D I A L
If you hear a beep and the error LED comes on, this
means that an error has occurred (e.g. an interruption
in the connection). If this is the case, let the facsimile
machine redial the numbers to which transmission
was not successful and then press STOP to switch
the LED off and repeat the transmission procedure to
the correspondents who did not receive the document.
62
cap09.p65 13/04/00, 22.3062
+
Page 73

TRANSMISSION
If the “BROADCAST REPORT” parameter was
enabled in the operating configuration, the facsimile
machine with print the report at the end of transmission.
For information on how to interpret the parameters
indicated on this report, see the “Connection activities”
section of the “ACTIVITY HANDLING” chapter.
POLLING TRANSMISSION
Using the “polling” method, a facsimile machine can request another facsimile machine to send a document.
The receiving facsimile machine calls the facsimile machine in possession of the original document and
requests transmission. The document must have been inserted in the ADF or previously stored. The receiver
is charged for the call instead of the sender.
This function enables you to send a document, on request by the correspondent, when you are out of the office.
To prevent this function being activated by unauthorized persons, the user in possession of the original
document can control polling by setting a polling identifier (which corresponds to the CSI of the receiving unit).
In this case, the document can only be sent if the transmitting and receiving facsimile machines have the same
polling identifier. This function is called reserved polling.
When you perform a polling operation that requires use of the memory, check the percentage of free memory
on the display. If the memory is almost full, clear it of documents no longer required and connection activities
already performed, so as to create space for new storage operations (see the “Connection activities” and
“Documents stored” sections of the “ACTIVITY HANDLING” chapter.
This section explains how to set and clear polling transmission operations.
o The facsimile machine is on. The document has been inserted and prepared for transmission (see the
“BEFORE TRANSMITTING/COPYING” chapter). Enter the polling identifiers if you want to use reserved
polling.
1. Press FUNCTION followed by 7.
F U N C T I O N
7 : T X P O L L I N G
2. Press START.
T X P O L L I N G
If no other polling tranmission is allowed, when you
press START you hear a beep and the message
“ALREADY BOOKED” followed by “BOOKING
CANCELLD” appears on the first line and
“YES=CONF. NO=CLR” appears on the second line
of display. Press CLEAR to confirm the previous
transmission or SET/CONF . to set a new one.
F R E E
cap09.p65 13/04/00, 22.3063
+
63
Page 74

TRANSMISSION
3. Press the
If you try to set a reserved polling transmission
operation without first storing the polling identifiers,
the message “POLLING ID” will appear on the first
line and “NOT PROGRAMMED” on the second line.
The facsimile machine will then return to the POLLING
TRANSMISSION menu functions.
4. Press SET/CONF . to confirm the option selected and
set the facsimile machine for transmission or move
straight on to step 5 to set a polling transmission from
the memory.
Having pressed SET/CONF ., the message “POLLING ACTIVE” appears on the first line of the display
to indicate that a polling transmission operation has
been set and that the document is present in the ADF.
If this message blinks, this means that the document
has been removed from the ADF, so remember to
reinsert it.
If the ADF is already being used in other transmission
operations, (delayed transmission), the message “ADF
ALREADY ACTV” will appear on the display for a few
seconds. If this is the case, only polling transmission
from the memory is allowed.
∨ ∨ or ∧ ∧ key to select the alternative option.
P O L L I N G T X
R E S E R V E D
5. Press 1.
The message “STORING” appears on the display
while the document is being stored.
Once the document has been stored, the message
“COMPLETED” appears on the first line of the display
for a few seconds and the message “PG:XX DOC. R.:
XXXX appears on the second line. The latter message
provides you with reference data that you may require
for document deletion or transmission cancellation
operations, i.e. the number of pages and the document
reference number.
6. Enter the number of correspondents to whom you
want to send the document (maximum 10, for example,
05). The facsimile machine will transmit the same
document to the remote terminals that request
transmission and that have the correct polling identifier.
7. Press SET/CONF. to confirm the setting and end the
procedure.
If the “LAST RX REPORT” parameter was enabled in
the operating configuration, the facsimile machine
will print the report, for each correspondent, at the end
of transmission.
T X P O L L I N G S T O R D
R E C I P I E N T N O . : X X
P O L L . I N T X/ M E M
R E C I P I E N T N O . : 0 5
64
cap09.p65 13/04/00, 22.3064
Page 75

RECEPTION
RECEPTION
This chapter describes the various methods of reception that can be adopted on the facsimile machine:
- Manual reception, which requires you to be present when a facsimile or telphone call is received. In this
case, the telephone takes priority over the facsimile machine.
- Manual reception with the fax/phone switch enabled, which distinguishes between the two types of call
(facsimile or telephone).
- Automatic reception, which enables documents to be received automatically, even if you are out. In this
way, you can receive important documents even outside office hours.
- Polling reception, which enables you to receive a previously stored document even if the remote user
in possession of the document is not present.
- Reception reply storing, which enables documents to be received when there is no paper or ink left, or
if the paper has jammed.
The documents will be stored in a specific location of the memory and will automatically be printed when
the facsimile is restored to normal operation.
Remember that any of the procedures described in this chapter can be interrupted at any time by pressing
STOP. Note that if you press STOP during a reception operation, communication will be interrupted.
If no data is entered for two minutes while carrying out a procedure, the procedure is aborted and the
facsimile machine returns to stand-by mode.
If the printing paper gets jammed during reception, the facsimile machine emits a beep and the message
“PAPER ERROR (XX)” appears on the first line and “PRESS CLEAR” appears on the second line of the
display.
CHANGING FROM AUTOMATIC TO MANUAL RECEPTION AND VICE VERSA
The facsimile machine is set initially for automatic reception. You can, however, choose the reception method
before starting an operation, by following the procedure described below.
o The facsimile machine is on. There is no document in the ADF.
1. Press FUNCTION followed by 6.
F U N C T I O N
6 : C O N F I G U R A T I O N
2. Press START to access the menu.
C O N F I G U R A T I O N
E C M
3. Press the
parameter.
∨∨ or ∧∧ key to select the “AUTOMATIC RX”
C O N F I G U R A T I O N
A U T O M A T I C R X
cap10.p65 13/04/00, 22.3365
+
65
Page 76

RECEPTION
4. Press START.
The current value for the selected parameter will
appear on the display.
5. Press SET/CONF . to confirm the value selected or:
press
∨∨ or ∧ ∧ to select the alternative condition and
then press SET/CONF . to confirm it.
6. Press STOP twice to quit the menu and return to
stand-by.
MANUAL RECEPTION
You must take action when an incoming call is received if the facsimile machine has been set for manual
reception. This method is probably most convenient when you are in the office as it enables you to use the
telephone line both for telephone and facsimile calls. When the telephone rings, as soon as you lift the
handset, you will realize if it is a voice call or if you have to activate the facsimile machine to receive a
document.
A U T O M A T I C R X
Y E S
o The facsimile machine is on. The message “MANUAL RX” appears on the second line of the display.
1. When the telephone rings, lift the handset.
If you hear someone’s voice, talk as normal.
If you hear an intermittent tone, this means that the caller wants to send you a document via fax.
2. Press START.
The message “IN RX” appears on the first line and the correspondent’s number appears on the second
line of the display.
3. Lower the handset.
If the handset has been left off the hook, the facsimile machine beeps and the message “HANDSET OFF
HOOK” appears on the display. Hang up.
4. Once reception has been completed, the facsimile machine beeps and returns to stand-by mode.
If the “LAST RX REPORT” parameter has been enabled in the operating configuration, the facsimile
machine will print the report at the end of reception.
If the machine beeps and the error LED comes on during reception, this means that an error has occurred
(e.g. an interruption in the connection). If this is the case, press STOP to switch off the LED and call the
correspondent to ask him to send the document again.
66
cap10.p65 13/04/00, 22.3366
Page 77

RECEPTION
MANUAL RECEPTION WITH THE FAX/PHONE SWITCH ENABLED
With the fax/phone parameter enabled, the facsimile machine recognizes whether an incoming call is a
facsimile or a telephone call. When this parameter is enabled, the facsimile machine is automatically set for
manual reception. Automatic reception can be re-enabled by setting the relevant operating configuration
parameter (see the "PROGRAMMING" chapter). This feature is useful in that it enables you to use the
facsimile and telephone on the same line.
o The facsimile machine is on. The “FAX/PHONE SWITCH” parameter has been enabled in the operating
configuration (see the “Setting the operating configuration parameters” section of the “PROGRAMMING”
chapter.The message “FAX/PHONE” appears on the second line of the display.
When you receive a call, the telephone rings and the facsimile machine (with the fax/phone switch
enabled) checks whether it is a facsimile or a telephone call.
If it is a facsimile call:
1. The facsimile machine prepares to receive the document.
The message “IN RX” appears on the first line and the correspondent’s number appears on the second
line.
2. Once reception has been completed, the facsimile machine beeps and returns to stand-by mode.
If the “LAST RX REPORT” parameter has been enabled in the operating configuration, the facsimile
machine will print the report at the end of reception.
If the machine beeps and the error LED comes on during reception, this means that an error has occurred
(e.g. an interruption in the connection). If this is the case, press STOP to switch off the LED and call the
remote user to ask him to send the document again.
If it is a telephone call:
1. The machine beeps for a time programmed by the installation technician and the message “TALK” blinks
on the display.
2. Lift the handset and talk as normal.
If you do not lift the handset within a few seconds, the facsimile machine prepares to receive a document.
If the handset remains off the hook at the end of the conversation, the facsimile machine beeps and the
message “HANDSET OFF HOOK” appears on the display. Hang up.
If you want to send or receive a document at the end of the conversation, follow the procedure described
in the “Sending or receiving a document after a telephone conversation” section of the “COMPLEMENTARY
FUNCTIONS” chapter.
cap10.p65 13/04/00, 22.3367
67
Page 78

RECEPTION
AUTOMATIC RECEPTION
Automatic reception enables you to automatically receive documents even when you are out.
o The facsimile machine is on. The message “AUTOMATIC RX” appears on the second line of the display.
1. When you receive a call, the telephone rings, then the facsimile machine activates automatic document
reception.
The message “IN RX” appears on the first line and the correspondent’s number appears on the second
line.
2. Once reception has been completed, the facsimile machine beeps and returns to stand-by mode.
If the “LAST RX REPORT” parameter has been enabled in the operating configuration, the facsimile
machine will print the report at the end of reception.
If the machine beeps and the error LED comes on during reception, this means that an error has occurred
(e.g. an interruption in the connection). If this is the case, press STOP to switch off the LED and call the
correspondent to ask him to send the document again.
POLLING RECEPTION
By using the “polling” method, a facsimile machine can ask another facsimile machine to send a document.
The receiving facsimile machine calls the facsimile machine in possession of the document and requests
transmission.
The receiver is charged for the call instead of the sender.
This function therefore enables you to receive a document even if the user in possession of the document is
out.
To prevent this function from being activated by unauthorized persons, the user in possession of the document
can control polling by setting a password (which corresponds to the CSI of the receiving machine). In this way,
the document can only be received if the receiving and transmitting facsimile machines have the same polling
identifier. This function is called reserved polling.
A polling request may be made to several facsimile machines (maximum 10). This function is called broadcast
or serial polling.
This section explains how to set polling reception. To cancel a polling reception operation, see the
“Connection activities” section of the “ACTIVITY HANDLING” chapter.
o The facsimile machine is on. There is no document in the ADF. The two facsimile machines have the
same polling identifiers, or a free polling operation is about to be performed.
1. Press FUNCTION followed by 7.
F U N C T I O N
7 : R X P O L L I N G
68
cap10.p65 13/04/00, 22.3368
+
Page 79

2. Press START to access the menu.
3. Dial the correspondent’s number in one of the
following three ways:
By pressing DIAL, typing the facsimile number
directly on the numeric keypad and then pressing
START to confirm.
By pressing the one-touch dialling key under which
the number was stored or:
By pressing SPEED DIAL followed by the speed
dialling code under which the number was stored.
(The operating procedures summarized above, are
explained in greater detail in the “TRANSMISSION
FROM THE ADF" section).
RECEPTION
R X P O L L I N G
D I A L / K E Y / S P . D I A L
In the example provided in the manual, the onetouch dialling key 01 was selected.
The name and number of the correspondent
associated with the key appear on the display for a
few seconds.
4. Repeat step 3 for each number that you want to dial
or move straight on to the next step.
5. Press START to confirm all the numbers set and end
the procedure.
6. The facsimile machine makes the first transmission
request.
7. Once reception has been completed, the facsimile
machine beeps.
If the “LAST RX REPORT” parameter of the operating
configuration has been enabled, the facsimile
machine will print the report at the end of reception.
If a number is busy or the correspondent does not
answer, the facsimile machine continues dialling the
remaining numbers. At the end, it tries to dial all the
numbers waiting for transmission (automatic redial
feature).
0 1 1 5 4 6 8 5
A n n e
R X P O L L I N G
D I A L / K E Y / S P . D I A L
cap10.p65 13/04/00, 22.3369
+
69
Page 80

RECEPTION
If the machine beeps and the error LED comes on,
this means that an error has occurred (e.g. an
interruption in the connection). If this is the case,
let the facsimile machine finish redialling the numbers
waiting for transmission and then press STOP to
switch off the LED and repeat the polling request to
the correspondents who have not transmitted the
document. To identify the correspondents see the
“Last RX report” or print out the connection activity
data (see the “Connection activites” section of the
“ACTIVITY HANDLING” chapter.
RECEPTION REPLY STORING
This function enables the facsimile machine to receive documents even when there is no paper or ink left, or
the paper has jammed.
After restoring the facsimile machine to normal operation, the documents will automatically be printed.
Reception reply storing is activated by means of the operating configuration parameter “RX REPLY STORED”
(see the “PROGRAMMING” chapter).
To find out the reference parameters that help you to identify a document waiting to be printed, refer to the
“Documents stored” section of the “ACTIVITY HANDLING” chapter.
70
cap10.p65 13/04/00, 22.3370
Page 81

ACTIVITY HANDLING
ACTIVITY HANDLING
The facsimile machine has a working memory structured so that you can keep track of all the activities carried
out (the only operations that are not recorded in the memory are: immediate transmission from the ADF and
reception not into the memory).
The availability of a structured memory provides many advantages both from a functional point of view (a
single setting for different times and correspondents) and an economical point of view (use of the facsimile
machine at low-cost times). Reliable reception (even when there is no paper or ink left) is provided by
optimized use of the memory. The memory cannot be used when there is less than 25% left so there is
sufficient space to ensure reception. When the space available in the memory falls to 25%, the facsimile
machine prevents other documents from being stored and displays the message "TX MEMORY FULL".
ACCESS TO “ACTIVITY HANDLING”
KEYS MENU AVAILABLE FUNCTIONS
0
FUNCTION
ACTIVITY HANDG CONCT. ACTVY
DOCS. STORED
The AVAILABLE FUNCTIONS column lists the functions in abbreviated form exactly as they appear on the
display while the full name of each function is given in the “Function keys” section of the “GETTING TO KNOW
THE FACSIMILE MACHINE” chapter.
The functions can be selected independently without having to follow the order in which they are presented
in the manual. For a more detailed description of each function, see the following sections.
Within each function (except for the data concerning documents waiting to be printed) you can select, print
or delete the data stored. The keys used are the following:
START
SPEED DIAL
∨∧
REDIAL
D
CLEAR
TALK
3
PRINT
For a detailed description of the keys, see the “Console” section of the “GETTING TO KNOW THE FACSIMILE
MACHINE” chapter.
Note: All the procedures described in this chapter can be interrupted at any time by pressing STOP once
or twice, depending on the procedure.
If no data is entered for two minutes during a procedure, the procedure is automatically aborted
and the facsimile machine returns to stand-by.
cap11.p65 13/04/00, 22.3671
71
Page 82

ACTIVITY HANDLING
CONNECTION ACTIVITIES
This section explains how to select, print or delete one or all the connection activities set.
o The facsimile is on. There is no document in the ADF. The same conditions apply to the deletion
and printing operations.
TO SELECT
1. Press FUNCTION followed by 0.
F U N C T I O N
0 : A C T I V I T Y H A N D G
2. Press START to access the menu.
The display shows the first function on the menu.
3. Press START. The display shows the number
associated with the first connection activity.
If the message “END OF LIST” appears on the display,
this means that no connection has been made. In this
case, the facsimile machine returns to the “ACTIVITY
HANDLING” menu functions.
4. Press the
If the message “END OF LIST” appears, this means
there are no other connection activities.
5. Press STOP once to return to the “ACTIVITY
HANDLING” functions, or:
press STOP twice to quit the menu.
∨∨ or ∧∧ key to select the activity, e.g. 0015.
A C T I V I T Y H A N D L N G
C O N C T . A C T V Y . : X X X
C O N N E C T I O N S
C O N N . N O . : X X X X
C O N N E C T I O N S
C O N N . N O . : 0 0 1 5
72
cap11.p65 13/04/00, 22.3672
Page 83

TO PRINT
a) All connections carried out:
1. Follow steps 1 and 2 of the selection procedure.
2. Press 3.
3. Press STOP once to quit the menu.
Printing can be interrupted by pressing the STOP
key.
b) A single connection:
ACTIVITY HANDLING
A C T I V I T Y H A N D L N G
C O N C T . A C T V Y . : X X X
1. Follow steps 1 to 4 of the selection procedure.
2. Press 3.
3. Press STOP once to return to the “ACTIVITY
HANDLING” menu functions, or:
press STOP twice to quit the menu.
Printing can be interrupted by pressing the STOP key.
1. Follow steps 1 to 4 of the selection procedure.
C O N N E C T I O N S
C O N N . N O . : 0 0 1 5
cap11.p65 13/04/00, 22.3673
73
Page 84

ACTIVITY HANDLING
Example of an all connection activities printout
Example of an all connection activities printout
Example of a single connection activity printout
Example of a single connection activity printout
74
cap11.p65 13/04/00, 22.3674
Page 85

ACTIVITY HANDLING
How to interpret the printout.
Con. No. Indicates the progressive number of the connection activities
carriedout or to be carried out.
Doc. R. Indicates the specific nature of the document.
ADF Document sent in delayed transmission or waiting to be sent. In
either case the document was sent from the ADF.
***
POLL. Document received by polling.
0001-9999 Reference number of document sent from memory.
Page No. Indicates the number of pages in the document
ADF Document sent from the ADF (number of pages not counted).
*** Number of pages not counted as the document was cleared
POLL. Document received by polling (number of pages not counted).
XXX/XXX The first three digits indicate the number of pages sent
Identifier Indicates the correspondent’s facsimile number
Date/time Indicates the date and time of the connection.
State Indicates the operating status of the connection.
WT Waiting for connection or retransmission
Document cleared by the user
from the memory by the user
while the last three indicate the total number of pages in the
document sent from the memory.
OC Line busy
ND Exchange busy
AB Procedure interrupted by user
FT Error in transmission or reception.
Note: To identify the document, it must have been stored. The “Doc. R.” column shows the document’s
reference number. In this case, the document can be printed or deleted.
cap11.p65 13/04/00, 22.3675
75
Page 86

ACTIVITY HANDLING
TO DELETE
2. Press CLEAR to delete the connection selected.
The reference data and connection number are deleted.
The facsimile machine immediately presents the connection after the deleted one, in the example, no.
0016.
If you delete the last connection, the facsimile machine
immediately presents the previous one.
If there are no other connections after you pressed
CLEAR, the message “END OF LIST” appears on the
display for a few seconds and the facsimile machine
returns to the “ACTIVITY HANDLING” menu functions.
C O N N E C T I O N S
C O N N . N O . : 0 0 1 5
C O N N E C T I O N S
C O N N . N O . : 0 0 1 6
If you delete all the connection activities associated
with a document, the document will be automatically
cleared from the memory.
3. Press STOP once to return to the “ACTIVITY
HANDLING” menu functions, or:
press STOP twice to quit the menu.
76
cap11.p65 13/04/00, 22.3676
Page 87

ACTIVITY HANDLING
DOCUMENTS STORED
This function provides you with an overall view of all the documents stored in the memory.
The section explains how to print or delete these documents and how to select, print or delete their reference
parameters. The only exception concerns documents waiting to be printed which cannot be deleted or
printed. The facsimile machine automatically prints them once the paper or ink out condition has been
resolved.
o The facsimile machine is on. There is no document in the ADF. Some documents have been stored. The
same conditions apply to the deletion and printing procedures.
TO SELECT
1. Press FUNCTION followed by 0.
F U N C T I O N
0 : A C T I V I T Y H A N D G
2. Press START to access the menu.
3. Press the
stored” function.
4. Press START to activate the function selected.
The display shows the reference number of the first
document stored (in chronological order). Beside the
number there is one of the following abbreviations:
“WT”, “PL” or “RP”, which indicate the type of activity
that is related with the document (see the table at the
end of this section).
If the message “END OF LIST” appears on the display,
this means that no document has been stored. In this
case, the facsimile machine returns to the “ACTIVITY
HANDLING” menu functions.
5. Press the
If the message “END OF LIST” appears, this means
there are no other documents stored.
∨∨ or ∧∧ key to move to the “Documents
∨∨ or ∧∧ key to select the activity, e.g. 0009.
A C T I V I T Y H A N D L N G
C O N C T . A C T V Y . : X X X
A C T I V I T Y H A N D L N G
D O C S . S T O R E D : X X X
D O C U M E N T S T O R E D
D O C . R . : X X X X P
L
D O C U M E N T S T O R E D
D O C . R . : 0 0 0 9 W T
6. Press STOP once to return to the “ACTIVITY
HANDLING” functions, or:
press STOP twice to quit the menu.
cap11.p65 13/04/00, 22.3677
77
Page 88

ACTIVITY HANDLING
a) The reference parameters
TO PRINT
1. Follow steps 1 to 3 of the selection procedure.
2. Press 3.
3. Press STOP once to quit the menu.
Printing can be interrupted by pressing the STOP key.
b) The document:
1. Follow steps 1 to 5 of the selection procedure.
2. Press 3.
3. Press STOP once to return to the “ACTIVITY
HANDLING” menu functions, or:
press STOP twice to quit the menu.
A C T I V I T Y H A N D L N G
D O C S . S T O R E D : X X X
D O C U M E N T S T O R E D
D O C . R . : 0 0 0 9
Printing can be interrupted by pressing the STOP key.
Example of a reference parameters printout.
78
cap11.p65 13/04/00, 22.3678
Page 89

ACTIVITY HANDLING
How to interpret the printout.
Doc. Reference Indicates the document reference number.
No. Pg. Indicates the number of pages in the document.
Doc. Indicates the type of activity associated with the document.
WT Document stored waiting for connection or retransmission
PL Document stored for polling transmission
RP Documents waiting to be printed
Date/time Indicates the date and time of storage.
TO DELETE
1. Follow steps 1 to 5 of the document number selection
procedure.
2. Press CLEAR.
The display shows the message “CONFIRM?” on the
first line and “YES=CONF NO=CLR” on the second
line.
Press SET/CONF . to delete both the document and
its reference parameters.
The facsimile machine immediately presents the
document after the deleted one.
When a document is deleted, all the connections
associated with it are immediately cancelled.
If you delete the last document, the facsimile machine
immediately presents the first on the last.
If there are no other documents left in the memory, the
message "END OF LIST" appears on the display end
the facsimile machine returns to the “ACTIVITY
HANDLING” menu functions.
D O C U M E N T S T O R E D
D O C . R . : 0 0 0 9
D O C U M E N T S T O R E D
D O C . R : 0 0 1 0
3. Press STOP once to return to the “ACTIVITY
HANDLING” menu functions, or:
press STOP twice to quit the menu.
cap11.p65 13/04/00, 22.3679
79
Page 90

COMPLEMENTARY FUNCTIONS
COMPLEMENTARY FUNCTIONS
In addition to the functions described, the facsimile machine can perform specific communications and
document copying operations, which are listed and described below - grouped together as complementary
functions:
Telephone conversation on the facsimile machine.
Answering a facsimile or telephone call with the fax/phone switch enabled.
Answering a facsimile or telephone call with the answering device connected.
Answering a telephone call request during the transmission or reception of a document.
Transmission or reception of a document after a telephone conversation.
Telephone conversation after transmitting or receiving a document.
Regulating the volume of the speaker.
Copying function (single or multicopy).
Note: if you press the HOLD key during a telephone conversation, the message “PHONE MODE” appears
on the first line of the display and the message “HOLD” appears on the second line.
The telephone conversation can be resumed by pressing the HOLD key again.
TELEPHONE CONVERSATION ON THE FACSIMILE MACHINE
This function enables you to make a voice call over the line connected to your facsimile machine. As any
telephone number can be called, the user called does not necessarily have to be connected to a facsimile line.
If the user called is connected to a facsimile line, his facsimile line must be set for manual reception. In this
case, at the end of the conversation, a document can be sent or received.
o The facsimile machine is on. The facsimile machine may be set for automatic or manual reception. No
document has been inserted in the ADF.
1. Press the key under which the telephone number
has been stored or:
press SPEED DIAL followed by the speed dialling
code under which the number has been stored or:
press HOOK and type the telephone number directly
on the numeric keypad.
2. When the connection has been established and you
hear your correspondent answer (through the
speaker), lift the handset.
If you want to send or receive a document at the end
of the telephone conversation, follow the procedure
described in the “Sending or receiving a document
after a telephone conversation” section.
P H O N E M O D E
6 3 4 9 8
80
cap12.p65 13/04/00, 22.3880
Page 91

COMPLEMENTARY FUNCTIONS
ANSWERING A FACSIMILE OR TELEPHONE CALL WITH THE FAX/PHONE SWITCH
ENABLED
This section explains what to do when an incoming call (facsimile or telephone) is received with the "FAX/
PHONE" parameter enabled. When this parameter is enabled, the facsimile machine is set for manual
reception. Automatic reception can be re-enabled by setting the operating configuration parameter (see the
"PROGRAMMING" chapter).
o The facsimile machine is on. The fax/phone parameter has been enabled in the operating configuration
(see the “Setting the operating configuration parameters” section of the “PROGRAMMING” chapter). The
message “FAX/PHONE” appears on the second line of the display.
1. When a call is received, the facsimile machine (with the fax/phone switch enabled) checks whether it is
a facsimile or telephone call. If it is a fax call, it is automatically set to receive a document, while if it is
a telephone call, the machine beeps (for a period that depends on the setting made by the technician
who installed the machine) and the message “TALK” blinks on the display.
2. If the message “TALK” appears on the display, lift the handset and talk as normal.
If you do not lift the handset within a few seconds, the facsimile machine will prepare to receive a
document.
If you want to send or receive a document at the end of the telephone conversation, follow the procedure
described in the “Sending or receiving a document after a telephone conversation” section.
ANSWERING A FACSIMILE OR TELEPHONE CALL WITH AN ANSWERING DEVICE
CONNECTED
The facsimile can be connected to an external telephone answering device provided it has the relevant
interface port (a third modular socket situated on one of the sides of the machine). Plug the answering device
cable into connector TEL2 (or TAD, depending on the country) on the facsimile machine and connect the
telephone, if connected to the facsimile machine, to the telephone answering device. Then set the answering
device:
- by recording a message that lasts about 20 seconds, such as:
"This is the telephone answering device on fax number nnnnnn. Leave a message as soon as you hear the
beep. To send a fax, just press the start button on your fax machine".
- and setting the number of rings (2 or 3) the answering device waits before answering the call.
Note: Connection is only allowed if it has been enabled by the customer engineering service.
o The FAX/TAD function has been enabled in the operating configuration (see the “Setting the operating
configuration parameters” section of the “PROGRAMMING” chapter). The facsimile machine is set for
manual reception and the message “TAD” will appear on the second line of the display.
When a call is received, the facsimile machine (with the answering device connected and enabled) checks
whether it is a facsimile or telephone call. If it is a fax call, it automatically disables the answering device and
prepares to receive a document, while if it is a telephone call, the answering device will answer with your
prerecorded message and record the caller's message. If the caller dialled on his telephone or wants to send
a document after leaving his message, he must press the start button on his fax machine. The fax machine
intercepts the call signal and prepares for reception.
cap12.p65 13/04/00, 22.3881
81
Page 92

COMPLEMENTARY FUNCTIONS
If the fax machine hears nothing for six seconds (the caller leaves no message or at the end of the recorded
message), it is set for automatic reception. This period of silence can be changed by setting the SILENCE
TIMEOUT parameter, set to six seconds by default.
If the silence timeout set on the telephone answering device is shorter than the timeout set on the fax machine,
the TAD interrupts the connection. If this mode of operation, which stops the fax machine preparing for
reception, prevents the caller sending a fax during the same call, the value set as the SILENCE TIMEOUT
configuration parameter of the fax machine must be changed.
ANSWERING A TELEPHONE CALL WHILE SENDING OR RECEIVING A DOCUMENT
This section explains how to proceed when you receive a request for a telephone conversation while sending
or receiving a document.
o The facsimile machine is switched on. You are sending or receiving a document.
1. When the facsimile machine beeps and the message “TALK” blinks on the display, lift the handset and
talk as normal. If you hear no dialling tone, press TALK before starting to converse.
SENDING OR RECEIVING A DOCUMENT AFTER A TELEPHONE CONVERSATION
After a telephone conversation you can send or receive a document without having to repeat the call.
o The facsimile machine is on and in stand-by. If you want to transmit you must have inserted and prepared
the document.
1. Press HOOK.
P H O N E M O D E
2. Dial the correspondent’s number directly on the
numeric keypad.
P H O N E M O D E
5 1 1 0 3 2
3. As soon as you hear your correspondent answer
(through the speaker), lift the handset and talk
as normal.
4. When you want to send or receive the document,
the receiver must press START. After the
acoustic signal, the sender must also press
START.
5. Transmission or reception starts.
6. Hang up.
82
cap12.p65 13/04/00, 22.3982
Page 93

COMPLEMENTARY FUNCTIONS
TELEPHONE CONVERSATION AFTER SENDING OR RECEIVING A DOCUMENT
This function enables you to book a telephone conversation while you are sending or receiving a document.
o The facsimile machine is on. You are sending or receiving a document.
1. Press TALK.
The message “TALK” blinks on the display.
2. At the end of transmission or reception, if the correspondent answers the request for a voice
conversation, the facsimile machine beeps.
3. Lift the handset and talk as normal. If you hear no dialling tone, press TALK before starting the
conversation.
If the correspondent does not answer within a few seconds, the facsimile machine returns automatically
to stand-by.
If you want to send or receive a document at the end of the conversation, follow the procedure described
in the “Sending or receiving a document after a telephone conversation”.
REGULATING THE VOLUME OF THE SPEAKER
This section explains how to regulate the volume of the speaker to one of the four levels available.
o The facsimile machine is on. No document has been inserted in the facsimile machine.
1. Press FUNCTION followed by 9.
F U N C T I O N
9 : H E A D / V O L U M E
2. Press START.
H E A D / V O L U M E
H E A D T E ST
3. Press the
function is displayed.
∨ ∨ or ∧∧ key until the “Speaker volume”
H E A D / V O L U ME
S P E A K ER V O L U M E
cap12.p65 13/04/00, 22.3983
+
83
Page 94

COMPLEMENTARY FUNCTIONS
4. Press START again to access the function.
S P E A K E R V O L U M E
L E V E L X
5.
Press the ∨ ∨ or ∧∧ key to select the volume level
required (e.g. 2) and press SET/CONF. to confirm
selection.
6. Press STOP twice to quit the menu.
COPYING FUNCTION (SINGLE OR MULTICOPY)
This function enables the facsimile machine to be used as a photocopier.
The procedure for making a single copy is very simple: just insert the document to be copied in the document
feed slot, set the graphic definition parameters and press START.
S P E A K E R V O L U M E
L E V E L 2
For optimum quality and jam-free operation, read the “Preparing the document for transmission/copying”
section of the “BEFORE TRANSMITTING/COPYING” chapter. Remember that the higher the resolution, the
better the quality of the copy.
If you want to make more than one copy of each page (multicopy function), follow the procedure described
below:
o The facsimile is on. The document has been prepared and inserted in the document feed slot.
1. Press FUNCTION followed by 3.
2. Press START to access the menu.
3. Set the number of copies you require (max. 99), e.g.
05.
If you want to delete the entire setting, press CLEAR.
F U N C T I O N
3 : M U L T I C O P Y
E N T E R
N O . C O P I E S : 0 5
If you want to delete one of the digits set, move the
cursor to the digit to be changed (by pressing the
< or > key) and overwrite it with the new one.
84
cap12.p65 13/04/00, 22.3984
+
Page 95

4. Press SET/CONF .
The document is first stored and then copied. At the
end of the procedure, the facsimile machine returns
to stand-by mode.
If a message appears on the display, refer to the
"SIGNALS AND SERVICE CODES" chapter and to
the "FILLING UP/ELIMINATE PAPER JAMS" chapter.
Having completed storage, the message shown here
appears on the display: the first two digits represent
the number of pages copied and the last two represent
the total number of pages in the document.
COMPLEMENTARY FUNCTIONS
M U L T I C O P Y
S T O R I N G
M U L T I C O P Y
C O P Y : 0 1 / N N
cap12.p65 13/04/00, 22.3985
85
Page 96

REPORTS
REPORTS
By printing reports, the facsimile machine enables you to check on most of the transmission and reception
operations carried out.
These reports represent a record that enables you to check the date and time of a transaction, the number
and size of documents handled and other useful information.
You can choose whether to print the reports or not. If you decide to, remember that the print format of each
report - irrespective of the amount of information - is a single sheet and that it is not printed automatically if
any of the following conditions arise: "paper out, print head missing, ink out, cover open, paper jam, power
failure and interruption of the operating procedure". If you like, you can display or print the report by following
the procedure described below.
For other information on the facsimile transactions, see the “Connection activities” section of the “ACTIVITY
HANDLING” chapter.
To display the data and print the reports:
KEY MENU AVAILABLE FUNCTIONS
8
FUNCTION
REPORTS LAST TX REPORT
LAST RX REPORT
ACTIVITY REPORT
The functions can be selected independently without having to follow the order in which they are presented
in the manual.
Within each function, you can display or print the data stored. The keys used are the following:
∧ ∨
3
START
SPEED DIAL
REDIAL
(PRINT)
For a more detailed description of the keys, see the “Console” section of the “GETTING TO KNOW THE
FACSIMILE MACHINE” chapter.
Note also that any of the procedures described in this chapter can be aborted at any time by pressing the
STOP key once or twice, depending on the procedure.
If no data is entered for two minutes while carrying out a procedure, the procedure is abandoned and
the facsimile machine returns to stand-by mode.
LAST TRANSMISSION REPORT
This report provides information on the last transmission operation performed.
It is printed automatically if the “LAST TX REPORT” parameter was enabled in the operating configuration
(refer to the “Setting the operating configuration parameters” section of the “PROGRAMMING” chapter).
If the “LAST ERROR REPORT” parameter was enabled in the operating configuration, the facsimile machine
will only print the report if transmission is unsuccessful.
86
cap13.p65 13/04/00, 22.4186
Page 97

The report can also be printed, on request, by following the procedure described below:
o The facsimile machine is on. At least one transmission operation has been performed.
1. Press FUNCTION followed by 8.
F U N C T I O N
8 : R E P O R T S
2. Press START to access the menu.
R E P O R T
L A S T T X
3. Press 3.
If the message “NO TRANSACTION” appears on the
second line of the display, this means that no
transmission transaction has been carried out. In this
case, the facsimile machine returns to the “REPORTS”
menu functions.
REPORTS
4. Press STOP to quit the menu.
Printing can be interrupted by pressing the STOP key.
Example of a last transmission report.
cap13.p65 13/04/00, 22.4187
87
Page 98

REPORTS
How to interpret the last transmission report.
Act. No. Indicates the activity reference number.
Type Indicates the type of activity associated with the document.
Doc. R. Indicates the specific nature of the document.
ADF Document sent from the ADF.
POLL Document received by polling.
0001
÷ 9999 Document reference number.
PC Document sent during connection to PC
Identifier Indicates the correspondent’s facsimile number.
Date/time Indicates the date and time of transmission.
Length Indicates the transmission duration. If the values appear in
brackets, this means that several transmission attempts were
made (automatic redial feature).
Page Indicates the number of pages sent.
Result Indicates the result of transmission.
OK Transmission successfully completed.
XXXX (service code) Error occurred during transmission (see the
“SIGNALS AND SERVICE CODES” chapter.
LAST RECEPTION REPORT
This report provides information on the last reception operation.
It is printed automatically if the “RX REPORT” parameter was enabled in the operating configuration (refer
to the “Setting the operating configuration parameters” section of the “PROGRAMMING” chapter).
The report can also be printed, on request, by following the procedure described below:
o The facsimile machine is on. At least one reception operation has been performed.
1. Press FUNCTION followed by 8.
F U N C T I O N
8 : R E P O R T S
88
cap13.p65 13/04/00, 22.4188
+
Page 99

2. Press START.
The display shows the first function on the menu.
REPORTS
R E P O R T
L A S T T X
3. Press the v key once to move to the “Last RX”
function.
4. Press 3.
If the message “NO TRANSACTION” appears on the
second line of the display for a few seconds, this
means that no reception transaction has been carried
out. In this case, the facsimile machine returns to the
“REPORTS” menu functions.
5. Press STOP to quit the menu.
Printing can be interrupted by pressing the STOP
key.
Example of a last reception report.
R E P O R T
L A S T R X
cap13.p65 13/04/00, 22.4189
89
Page 100

REPORTS
How to interpret the last reception report.
Act. No. Indicates the activity reference number.
Type Indicates the type of transaction associated with the document.
Doc. R. Indicates the specific nature of the document.
POLL. Document sent by polling.
Document received and printed.
0001
÷ 9999 Document reference number.
PC Document received during transmission on PC
RDR Information sent to the remote device during diagnostic session
RDS Information received from the remote device during diagnostic
session
Identifie r Indicates the correspondent’s facsimile number.
Date/time Indicates the date and time of reception.
Length Indicates the reception duration.
Page Indicates the number of pages received.
Result Indicates the result of reception.
OK Reception successfully completed.
XXXX (service code) Error occurred during reception (see the “SIGNALS
AND SERVICE CODES” chapter.
ACTIVITY REPORT
This report provides information on the transmission/reception transactions performed.
It is printed automatically every 30 transmission/reception operations, if the “ACTIVITY REPORT” parameter
was enabled in the operating configuration (see the “Setting the operating configuration parameters” section
of the “PROGRAMMING” chapter). When this report is printed, all the information on the operations performed
is cleared from the memory.
90
cap13.p65 13/04/00, 22.4190
 Loading...