

Page 1

&AcSIMILE
/&819
)N3425CT)/.
Page 2
PUBLICATION ISSUED BY:
Olivetti Lexikon, S.p.A.
Documentazione
Via Jervis, 77 - 10015 Ivrea (Italy)
Copyright © 1998, Olivetti
All rights reserved
The manufacturer reserves the right to carry out modifi cations to the product described in this m anual at
any time and without any notice.
This product’s conformity with
quality requirements is certified
by the
Your attention is drawn to the following acti ons which could com pr omi se the conformi ty at tested to above,
as well as the characteristics of the product:
• incorrect electrical power supply;
• incorrect installat ion, incorrect or improper use or use not in compliance with the warnings provided in
the User’s Manual supplied with the product;
• replacement of original components or accessories with others of a type not approved by the
manufacturer, or performed by unauthorised personnel.
Mark it bears
ATTENZIONE: QUESTA APPARECCHIATURA DEVE ESSERE COLLEGATA A TERRA.
WARNING: THIS EQUIPMENT MUST BE EARTHED.
ATTENTION : CETTE UNITE DOIT ETRE CONNECTEE A LA TERRE.
ACHTUNG: DIESES GERÄT MUSS EINEN ERDUNGSANSCHLUSS HABEN.
ATENCION: ESTE EQUIPO DEBE ESTAR CONECTADO A UNA TOMA DE TIERRA.
APPARATET MÅ KUN TILKOBLES JORDET STIKKONTAKT.
APPARATEN SKALL ANSLUTAS TILL JORDAT NÄTUTTAG.
LAITE ON LIITETTÄVÄ MAADOITETTUUN PISTORASIAAN.
LEDEREN MED GRØN/GUL ISOLATION MÅ KUN TILSLUTTES EN KLEMME MÆRKET
The wall socket must be easily accessible and in close proximity. To disconnect the machine from the
electrical power supply, remove the power cable plug from the wall socket.
.
Page 3

FOR U.K. USERS
NOTICE FOR CONNECTION TO THE PUBLIC TELECOMMUNICATIONS NETWORK
1. BABT Certificate Number/Approval Number for the OFX (1900): see label on the rear of the machine.
2. This terminal equipment is intended for connection to the public telecommunications network via the LJU
cable shown on pages 13 and 14 of these instructions.
3. This terminal equipment complies with the following approval requirements:
a) Automatic dialling facilities.
b) Automatic storage of last number dialled.
c) Call Progress Monitor facility.
d) Automatic repeat attempt facility.
e) Automatic answering of incoming call.
f) DTMF (tone) dialling.
4. The following facilities are also supported:
a) Storage of telephone numbers for retrieval by a predeterminated code.
b) Operation in the presence or absence of Initial or Secondary Proceed Indication (Dial Tone).
c) Pulse dialling.
NB: Although this equipment can use either loop disconnect or DTMF signalling, only the performance
of the DTMF signalling is subject to regulatory requirements for correct operation. It is therefore
strongly recommended that the equipment is set to use DTMF signalling for access to public or
private emergency services. DTMF signalling also provides faster call set up.
d) Automatic Fax/Phone recognition facility.
e) Automatic Fax/Telephone Answering Device recognition.
5. An approved simple telephone and/or an approved telephone answering device can be series connected to
the public telecommunications network via the supplied LJU cable. The LJU socket allows access to a TNV
circuit and is intended for the connection to the telecommunications network only.
Page 4

6. The parallel comminications connector, on the rear of the apparatus, is for the indirect connection to the
public telecommunications network of suitable equipment (Personal Computer). Do not connect equipment
that will result in signals at the point of connection to the public telecommunications network that do not
conform to the physical parts of the public network access requirements. Always follow the suppliers
Instructions For Use provided with the parallel communications kit.
7. The connection to the telecommunications network must be unplugged before the mains earth is
disconnected. The connection to the telecommunications network must not be hard wired.
8. This apparatus is not suitable as an extension to a payphone, for use on shared service lines, or for use on
I+1 carrier systems.
9. The user must ensure that all telephone numbers programmed into the dialling memories are entered
correctly.
10. This apparatus is suitable for primary connection to a direct exchange line, or secondary connection to a
direct exchange line via a compatible PABX (Private Automatic Branch Exchange). Contact your supplier for
details of compatible PABX's.
NB.: It cannot be guaranteed that the apparatus will operate under all possible conditions of connection to
a PABX. Any cases of difficulty should be referred in the first instance to the supplier of the apparatus.
11. Ringer Equivalence Number (REN) = 3
The REN is a customer guide indicating approximately the maximum number of items of apparatus that
should be connected simultaneously to the line. The sum of the REN's of the individual items should not
exceed 4. The REN value of most telephones is assumed to be 1 unless otherwise marked. Therefore, only
1 telephone and the facsimile machine should be connected to the line.
12. The voltage drop introduced by this apparatus between the public telecommunications network and the
associated telephone or telephone answering device (connected via the LJU connector) at a current of 40mA
is 0.4 Volts.
Page 5

APPLICA TION FOR INSTALLA TION OF B.T . SOCKETS
This form may only be required if the wiring is owned by B.T.
If you require suitable sockets for connection of this apparatus, complete this form and send it to your
local British Telecom sales office at the address listed in your telephone book.
To: BRITISH TELECOM
I require ........................ sockets for connection of the following equipment
Title FACSIMILE MACHINE
Model OFX 1900
Approval No. See label on the rear of the machine
Name
Address
.............................................................................................................................................
.............................................................................................................................................
.............................................................................................................................................
Telephone
number .............................................................................................................................
Date ................................. Signed .............................................................................
FOR AUSTRALIAN AND NEW ZEALAND USERS
This operation of this equipment on the same line as telephones or other equipment with audible warning devices or
automatic ring detectors will give rise to bell tinkle or noise and may cause false tripping of the ring detector. Should
such problems occur, the user is not to contact Telecom Faults Service.
Not all standard telephones will respond to incoming ringing when connected to the extension socket.
Page 6
QUICK REFERENCE GUIDE
KEYS FOR MANAGING MENUS, SUB-M E NUS AND PARAMETERS
START
or
or
STOP to exit each operating situation.
CHANGING DATE AND TIME
1.
Press FUNCTION followed by 5 to select the “Set-up” menu.
2.
Press START to select the “Storing data” sub-menu.
3.
Press START to select the “Date and time” sub-menu.
4.
Press START and type in the new date and time in full.
5.
Press START to confirm.
RECORDING THE SENDER’S NAME AND NUMBER
1.
Press FUNCTION foll owed by 5 to select the “Set-up” menu.
2.
Press START to select the “Storing data” sub-menu.
3.
Press to select “Installat ion parameters”.
4.
Press START to select the parameter associated with the name.
5.
Press START. the display shows the cursor for entering the name.
6.
Enter, for instance, the nam e “ROSSI”, pressing the 7 key until the letter “R” is displayed,
then move the cursor to the right pressing the 6 key until the character “O” is entered. Proceed
the same way until the name is complete.
IF...
• you want to reposition the cursor to the left, press
• you want to erase the name completely, press the CLEAR key.
• you want to introduce a space, move the cursor using the
7.
Confirm with START. The display shows the parameter for the fax number.
8.
Press START. The display shows the cursor for entering the number.
9.
Set the number with or without pr efixes typing the digi t s on t he num eric keypad.
10.
Confir m with START.
confirm menu
to
• i f you conf i r m a
• i f you conf i r m a
• i f you conf i r m a
to scroll thr ough menu and sub-menu items.
to choose the values of a parameter, scrol ling for ward and backwar d through
the options available in the machine or to position the cursor along the
characters comprising the values of the parameter. In this case, after
positioning, you have to set the value using the numeric key pad.
sub-menu
and
menu
item, you access the corresponding
sub-menu
parameter
items,
item, you access the corresponding
or its
parameters
value
, you access the
.
and their
key without entering a character.
values
:
sub-menu
parameters
next parameter.
.
Detach and retain - Detach and retain - Detach and retain - Detach and retain - Detach and retain - Detach and ret ain - Detach and r et ain - - Detach and ret ain - - Detach and
TO TRANSMIT A DOCUMENT
1.
Insert the document on the Automatic Document Feeder (ADF).
2.
On the numeric key pad, dial the recipient’s fax number.
3.
Press START. The fax stores the document, then transmits.
IF...
An error occurred during the transmission attempts, the ERROR LED will be on. Reinsert the
document into the ADF, press REDIAL and START. The fax machine tries to transmit again.
Page 7
USING THE MACHINE AS A COPIER
1.
Insert the document into the ADF.
2.
Press
START.
PRINTING PROGRAMMED ONE TOUCH AND SPEED DI ALLING DATA
1.
Press
2.
Press
FUNCTION
START
.
followed by
6.
IF...
you want to print t he rapid dialling progr amme, press
3.
Press
4.
At the end of the operation, press
PRINT
. The data for the program med dialling codes are printed.
STOP
to exit the menu.
to display the related parameter.
or
RESENDING A TRANSMISSION FRO M M EMORY
1.
Press
2.
Press
3.
Use or to display the “MEMORY TRANSMISSIONS ” function, then press
4.
Select the activity with the or key or by entering the number directly on the numeric key
FUNCTION
START.
followed by 9.
START.
pad. At this point , you can modify the tr ansmission date/tim e (a) and/or the recipient’s fax
number (b):
a)
Display the “DATE/TIME” field using t he or key.
START
Press
the current one, and confirm pressing
b)
Display the “NUMBER” field using the or key.
START
Press
5.
To exit the menu, press
. The display shows the current time. Modify t he tim e of transm issi on, or accept
START
.
. Modify the recipient’s fax number and press
STOP
twice.
START.
DELETING A DOCUMENT
1.
Select the document as described in steps 1 through 4 of the previous operation, then press
CLEAR
the
key. Remember that deleting a document also elimi nates any acti vity associated
to it. Before proceeding with the deletion, the fax machine will ask you to confirm the
operation.
2.
Press 1 to confirm the deletion of the selected document or 0 to cancel the operation.
3.
To leave the menu, press
STOP
twice.
ACTIVITY REPORT
1.
Press
2.
Press
3.
Use th e or key to display the “ACTIVITY REPORT” function.
4.
Press
5.
Press
FUNCTION
followed by
START.
PRINT
. The fax machine prints the report.
STOP
to exit the menu.
0.
Page 8
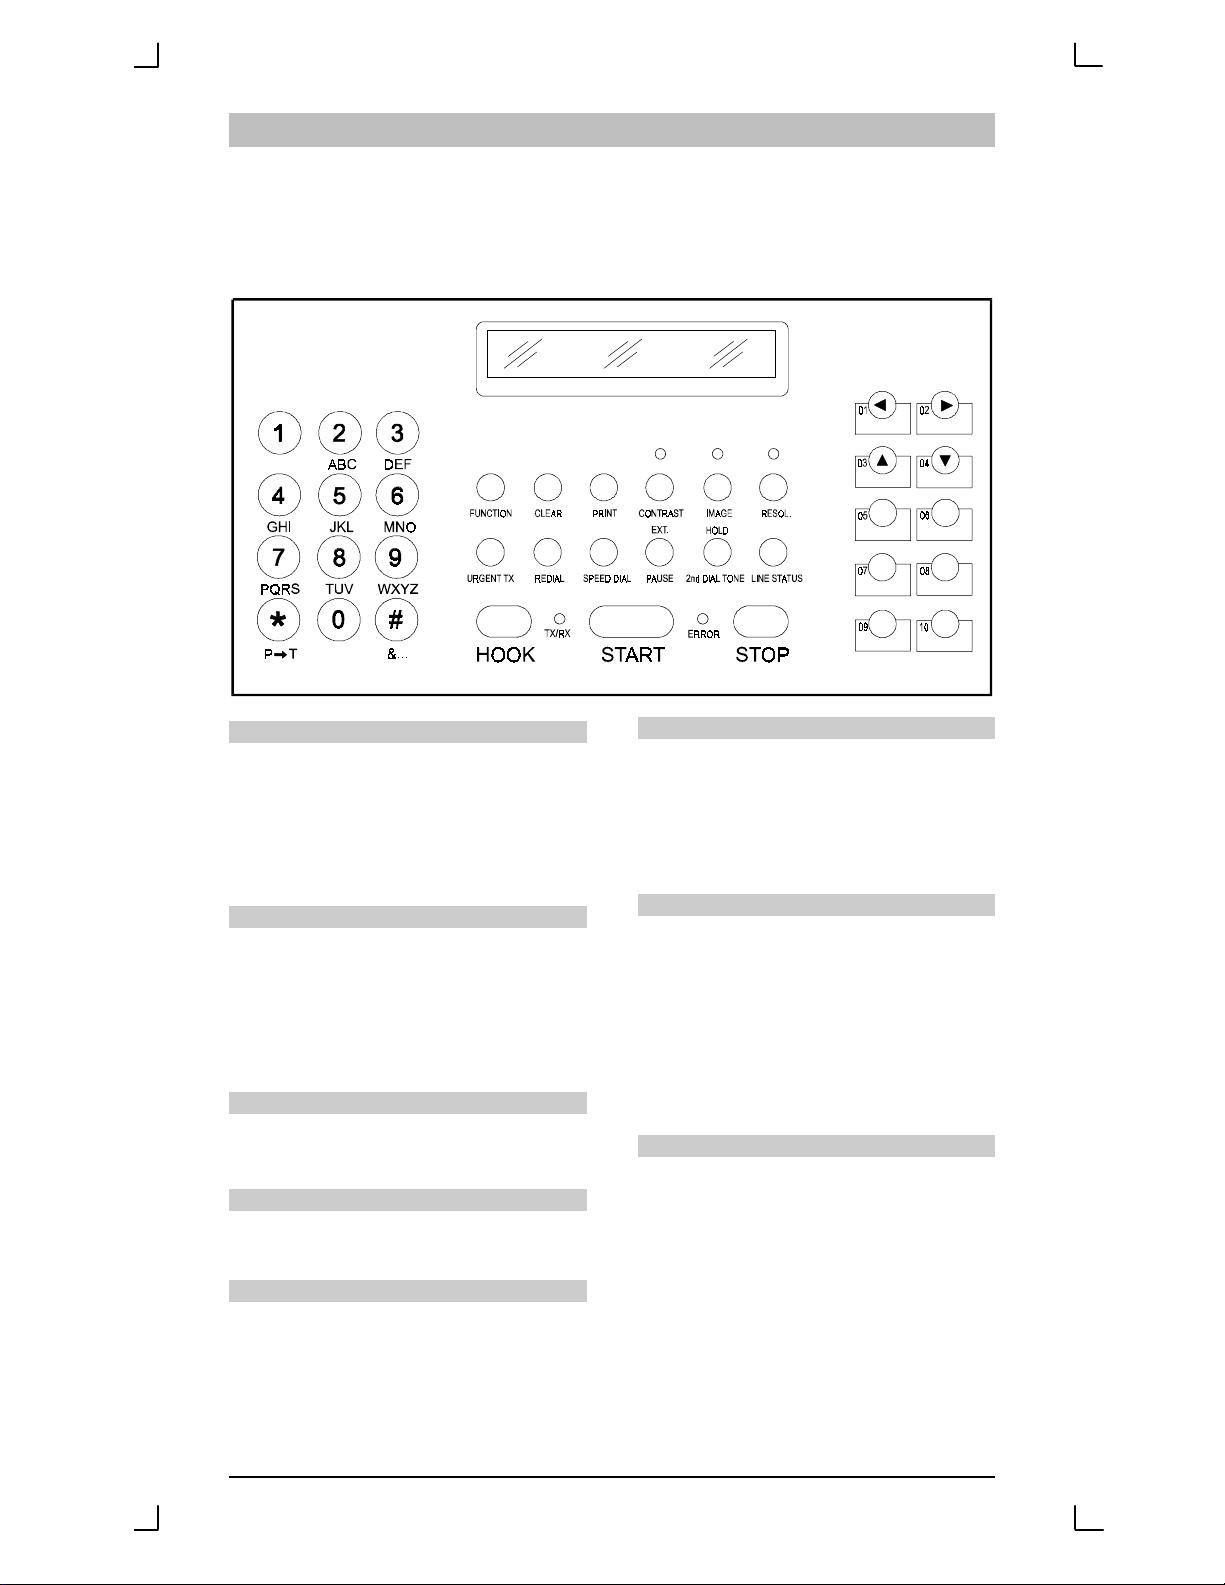
CONSOLE
The console is characterised by an alphanumeric LCD display, keys and LEDs which all ow t o
recognise the operating status of the machine and guide its utilisation.
The following is a brief description of the console. The specific use of each key will be
explained at the appropriate time in the operating procedures.
DISPLAY
It comprises two lines of 24 characters
each, and it shows:
• Date and time
• Machine status, menu and sub-menu
items, parameters and relative values
• Error messages
NUMERIC KEYS (0-9)
• For dialling the fax or phone number of
the recipient
• For setting any numeric data
• For entering digits and alphanumeric
characters when setting numbers and
names
FUNCTION
• Provides access to the Functions menu
• Selects menus and sub-menus
CLEAR
Cancels wrong settings on the display or
when programming.
PRINT
Prints reports.
CONTRAST
Adjusts the contrast of the origi nals to be
transmi t t ed and copied (only wit h t he
original in the ADF)
• LED on for excessively light originals
• LED blinks for excessively dark originals
• LED off for normal originals
IMAGE
Adjusts the colours (and shades of grey) of
the original document to be transmit ted or
copied, which will be received or copied in
shades of grey.
• LED on: documents containing text and
photographic images
• LED blinks: for documents containing
photographic images
• LED off: for documents with text only
RESOL.
Adjusts the definiti on of the originals to be
transmi t t ed or copied (only with the original
in the ADF)
• LED on: for documents with small
characters and drawings
• LED blinks: for documents with very
small characters and detailed drawings
• LED off: easy to read documents
Page 9

URGENT TX
Starts an urgent transmission to a single
recipient (only with original in the ADF)
P → T
It temporarily changes dialling from pulse
to tone.
REDIAL
Redials the last fax number dialled (only
with the original in the ADF)
SPEED DIAL
Followed by setting numeric codes (00-89)
it automatically selects, after programming,
the phone or fax number associated to
them.
PAUSE
Inserts a dialling pause between the digits
of a fax or phone number.
EXT.
It needs to be pressed before dialling or
recording an outside number when the fax
machine is connected through exchange
(PBX).
2nd DIAL TONE
This feature is enabled only in some
Countries.
• Pressed while dialling the fax or
telephone number, it provides that
number the ability to detect a second
tone when dialling, in some telephone
exchanges.
• It performs the same function for
numbers programmed under one-touch
dial and speed dialling.
HOLD
During a telephone conversation, puts the
call on hold.
LINE STATUS
• If kept pressed, it checks on the display
the operating condition of the fax
machine with respect to the selection,
transmission or reception procedures.
• Pressed with STOP, it causes the
connection to be dropped.
START
• It starts t he copying operation (only wi th
the original in the ADF)
• Starts reception
• After dialling the fax number, it starts
transmission (only with the document
inserted in ADF).
Confirms the selection of menus, submenus, parameters and related values and
moves on to next procedure
STOP
• Interrupts a copying operation.
• Ejects a document from ADF.
• Switches off the ERROR led after the
HOOK key.
• Restores the fax machine waiting mode.
• Interrupts a programming operation.
• Interrupts a transmission or reception
operation.
• Pressed after the LINE STATUS key, it
interrupts the transmission or reception
in progress.
ONE TOUCH DIALLING KEYS (01-10)
If program med, they automatic ally dial the
fax or phone number associated to them.
TX/RX LED
When on, it indicates that a transmission
or reception is in progress.
ERROR LED
It signals an operating anomaly occurred
during transmission or reception.
.
.
HOOK
It allows to detect the line tones while
dialling t he recipient’s fax or phone num ber
(“hands free” dialling). It is equivalent to
lifting the handset.
Page 10

INTRODUCTION
This fax machine, com pli ant with t he essential requirem ents set out by the
overleaf, is a
ability to send and receive documents easily and rapidly, it can also be connected do and configured from
Personal Computer
a
for capturing images and operate the machine as a colour
Moreover, being able to use
highly reliable printing instrument.
Naturally, the fax machine can also be used as an
operation capability
Regarding the need for the user to absent him/ herself, thi s fax m achine allows to do so wi th no pr oblems:
memory
the
paper or the ink has run out.
For all activities performed, the fax then provides thorough
security
In short, what you have is much more than just “a fax machine”...
multi funct ional
through which the user can manage documents, perform the functions of a
product, able to offer a wide range of services. In addit ion to the tradi tional
printer
.
plain paper
, it allows to save m oney since its
emergency copier
, an operation can be reserved whilst the other one is taking place.
it is fitted with allows to send documents at a set time or to receive them even if there is no
automatic reports
functions,
password
programming prevents unauthorised persons from using the device.
EC
Directives contained in the
ink jet
technology makes it a
and thanks to its
and, lastly, thanks to its
scanner
simultaneous
INTRODUCTION
III
Page 11

TABLE OF CONTENTS
INSTALLING THE FAX MACHINE AND GETTING STARTED.......................................3
MAIN COMPONENTS OF THE MACHINE.............................................................................................3
CONTENTS OF THE PACKAGE...........................................................................................................4
PRELIMINARY RECOMMENDATIONS .................................................................................................4
LOCATION........................................................................................................................................4
CONNECTION TO THE ELECTRICAL POWER SUPPLY ..................................................................5
MAINTENANCE.................................................................................................................................5
REPAIRS ..........................................................................................................................................5
FOR CORRECT USE ........................................................................................................................5
MOUNTING THE SUPPORTS AND PAPER TRAY................................................................................6
CONNECTION TO THE TELEPHONE LINE AND TO MAINS POWER..................................................6
PAPER INSERTION FOR RECEPTION AND COPYING .......................................................................7
PAPER TRAY ADJUSTMENT............................................................................................................7
INSERTING THE PRINT HEAD............................................................................................................8
ENTERING THE IDENTIFICATION DATA...........................................................................................10
DATE AND TIME.............................................................................................................................10
SENDER’S NAME AND NUMBER....................................................................................................11
SETTING THE INSTALLATION PARAMETERS ..................................................................................12
PRINTING THE INSTALLATION PARAMETERS..............................................................................12
CONNECTION TO PUBLIC OR PRIVATE NETWORK.....................................................................13
ELEMENTARY USE OF THE FAX MACHINE......................................................................................14
SENDING A DOCUMENT................................................................................................................14
RECEIVING A DOCUMENT.............................................................................................................15
THEORY OF OPERATION...........................................................................................19
METHODS OF MAKING A CALL (DIALLING)......................................................................................20
METHODS OF TRANSMISSION.........................................................................................................21
METHODS OF RECEPTION...............................................................................................................22
POLLING............................................................................................................................................22
MEMORY MANAGEMENT..................................................................................................................24
THE REPORTS: AN AUTOMATIC RECORD.......................................................................................24
SECURITY FUNCTIONS.....................................................................................................................25
PASSWORDS.................................................................................................................................26
CLOSED NETWORK.......................................................................................................................26
CUSTOMISING THE MACHINE..........................................................................................................27
ADVANCED FEATURES.....................................................................................................................29
CONNECTING TO A PERSONAL COMPUTER ...............................................................................29
COMPLEMENTARY FUNCTIONS.......................................................................................................30
TRANSMISSION WITH TELEPHONE / HANDS FREE DIALLING....................................................30
SUSPENDING OR REQUESTING A TELEPHONE CONVERSATION..............................................31
ADJUSTING....................................................................................................................................31
USING THE FACSIMILE MACHINE AS A PHOTOCOPIER..............................................................31
GENERAL ISSUES......................................................................................................35
THE STAND-BY STATE......................................................................................................................35
BASIC OPERATIONS.........................................................................................................................36
TABLE OF CONTENTS
V
Page 12

PROCEDURES ............................................................................................................ 4 1
CUSTOMISING THE FAX MACHINE .................................................................................................. 41
PRINTING THE CONFIGURATION PARAMETERS............................................................................ 42
SETTING OPERATING CONFIGURATION PARAMETERS................................................................42
DIALLING........................................................................................................................................... 43
PROGRAMMING ONE-TOUCH DIALLING KEYS............................................................................ 43
PROGRAMMING SPEED DIALLING CODES...................................................................................... 44
PRINTING PROGRAMMED DATA FOR ONE TOUCH AND SPEED DIALLING ............................... 45
DELETING PROGRAMMED DATA.................................................................................................. 46
PROGRAMMING DIALLING GROUPS ............................................................................................... 47
PRINTING THE PROGRAMMED DATA...........................................................................................48
DELETING THE GROUPS............................................................................................................... 48
PASSWORD....................................................................................................................................... 49
RECORDING THE PASSWORDS................................................................................................... 49
MODIFYING OR DELETING PASSWORDS.................................................................................... 50
TRANSMISSION.................................................................................................................................51
DOCUMENTS THE MACHINE CAN TRANSMIT.............................................................................. 51
TRANSMITTING TO A SINGLE RECIPIENT.................................................................................... 52
TRANSMISSION TO MULTIPLE RECIPIENTS ("BROADCAST").................................................... 55
URGENT TRANSMISSION.............................................................................................................. 57
RECEPTION....................................................................................................................................... 58
AUTOMATIC RECEPTION.............................................................................................................. 58
MANUAL RECEPTION.................................................................................................................... 58
RECEPTION WITH FAX/PHONE RECOGNITION........................................................................... 59
POLLING............................................................................................................................................60
RECORDING POLLING IDENTIFIERS............................................................................................ 60
PRINTING THE POLLING IDENTIFIERS......................................................................................... 61
POLLING TRANSMISSION ............................................................................................................. 61
POLLING RECEPTION ................................................................................................................... 62
REPORTS.......................................................................................................................................... 65
LAST TRANSMISSION REPORT.....................................................................................................65
ACTIVITY REPORT......................................................................................................................... 67
MEMORY MANAGEMENT.................................................................................................................. 68
DOCUMENTS STORED IN THE MEMORY...................................................................................... 68
BROADCAST TRANSMISSIONS..................................................................................................... 69
TRANSMISSIONS FROM MEMORY................................................................................................ 70
SIGNALS, ACCESSORIES, MAINTENANCE...............................................................75
SIGNALS............................................................................................................................................ 75
AUDIBLE SIGNALS......................................................................................................................... 75
PAPER REMOVAL .............................................................................................................................79
REMOVING JAMMED ORIGINALS.................................................................................................. 79
REMOVING THE JAMMED PAPER................................................................................................. 79
MAINTENANCE.................................................................................................................................. 81
OUT OF INK INDICATION............................................................................................................... 81
REPLACING THE INK CARTRIDGE................................................................................................ 81
REPLACING THE PRINT HEAD...................................................................................................... 82
AUTOMATIC NOZZLE CLEANING AND CHECKING PROCEDURE................................................ 83
ORDINARY MAINTENANCE............................................................................................................84
USER SERVICING.......................................................................................................................... 87
TECHNICAL DATA.......................................................................................................................... 89
INDEX
................................................................................................................................................ 93
VI
TABLE OF CONTENTS
Page 13

INSTALLING THE FAX MACHINE AND
GETTING STARTED
Page 14
INSTALLING THE FAX MACHINE AND GETTING STARTED
This section contains the guidelines for correct operation of the fax machine, including those for
connecting it to mains and telephone outlets, inserting paper and the print head, setting the extensible
collection tray for original documents. It also describes commonly used essential functions such as
document
transmission
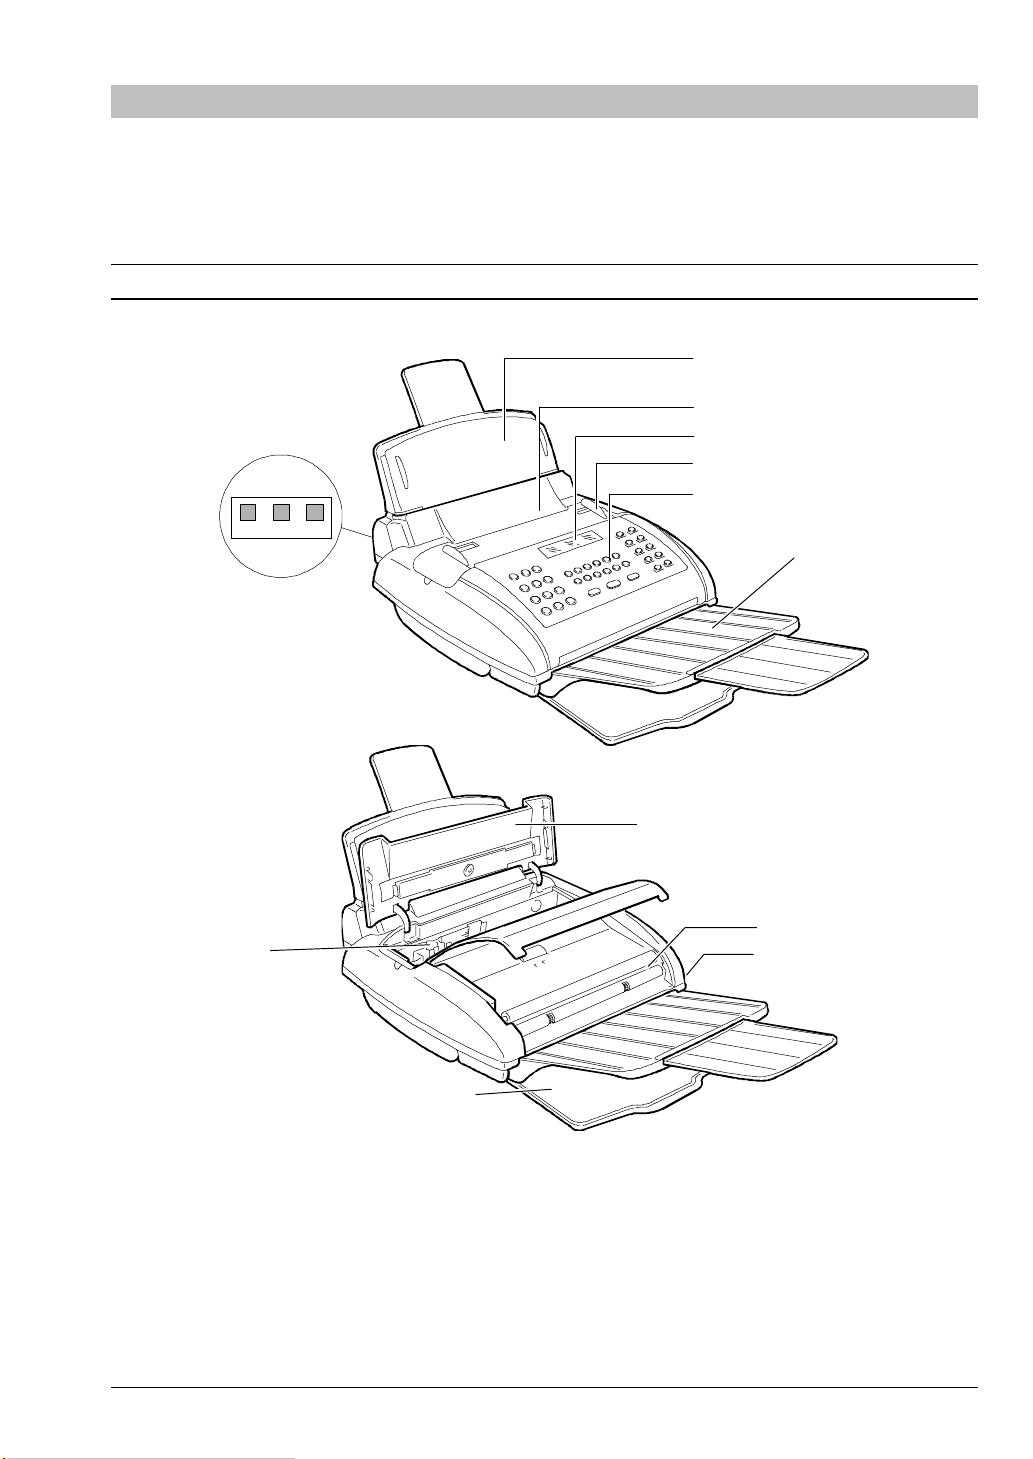
MAIN COMPONENTS OF THE MACHINE
10
TEL 2 TEL 1 LINE
and
reception
.
1
2
4
3
5
6
9
7
Adjustable paper feed tray
1.
Feed slide for original documents to be transmitted
2
.
or copied
Adjustable paper guides
3.
Display
4.
Operator console
5.
Extensible original document support tray
6.
INSTALLING THE FAX MACHINE AND GETTING STARTED
8
11
12
Printed/copied document tray
7.
Print head compartment cover
8.
Print head compartment
9.
Connecting outlets
10.
Optical reader (scanner)
11.
Speaker
12.
3
Page 15

CONTENTS OF THE PACKAGE
In addition to the machine, already fitted with mains connection cable, the package contains:
• Plug
• Telephone cable
• Parallel cable for PC connection
• Extensible collection tray for original documents
• Extensible collection tray for printed or copied documents
• User’s manual
• Installation manual
• Document holder
• Print head with monochrome interchangeable ink cartridge
• Print head holder
• Paper tray
• CD-ROM with PC connection software
• Promotional brochure
PRELIMINARY RECOMMENDATIONS
In order to keep serving you at its best level of performance, your fax machine, not unlike any other
product, needs to be properly installed and operated, following the few recommendations that follow.
LOCATION
• Place the fax machine on a stable, flat surface with no vibr ations, in order to avoid f alls which could
cause injury to people or damage to the product.
• Keep the fax away from water or steam sour ces, excessive heat sources and dusty rooms. Also, do not
expose it to direct sunlight.
• Keep the fax away from other electrical or electronic appli ances which may generate interference, e.g.
radio, television, etc.
•
Do not surround the fax with books, documents or obj ects which reduce the space necessar y for air
circulati on. Ideal environmental conditions for its location are from 5°C to 35°C with a humidity rat e
between 20% and 80%.
4
INSTALLING THE FAX MACHINE AND GETTING STARTED
Page 16

CONNECTION TO THE ELECTRICAL POWER SUPPLY
• The fax machine is provided with a power cable with a grounded plug. If your wal l power socket does
not allow plug insertion or if it does not have a ground, get in touch with a qualified electrician to
update your electrical mains outlet to the current standards.
• Make sure that the power cable is easily accessible without im peding the passage, avoiding treading
on, or tripping over it.
• Never connect the fax to a multi ple plug or to an extension cable which already has another appliance
connected: poor electrical contact may cause overheating and originate fire or electrical shocks.
MAINTENANCE
• W hen cleaning the fax, first of al l di sconnect it fr om the electrical power supply. Use onl y a dam pened
cloth. Do not use corrosive substances, such as solvents, alcohol, petrol or abrasive components.
• Never introduce foreign bodies (liquids included) in the fax machine: their accidental contact with
powered parts may cause a fire or electric shocks.
REPAIRS ...
• Never try to repair the fax if you do not have the necessary competence: by removing the outer casing,
you may risk electrical shocks or other injury. Always call a qualified service technician.
• W hen you replace components (accessories included), make sure that you use only original mat erial
approved by the manufacturer. Use of other material might com promise the safety features, besides
being a cause of fire and electrical shocks.
• If any of the following conditions occur, disconnect the fax from the power supply and contact a
qualified service technician:
− the power cable, or its plug are damaged or worn
− the outer casing is damaged
− liquid has been poured inside by accident
− a sharp drop in performance occurs
− the fax machine fails to r espond correctly to the instructi ons reported on the manual. In thi s case,
perform only the actions specified for the function that causes the problems: interventions
performed improperly or on components that are not involved may cause damages that often
require additional work to be carried out by the service personnel called to solve the problem.
• Never try to repair or modify t he fax machine personally. If you remove the casing, you risk electri cal
shock and other hazards. Contact only qualified technical personnel.
FOR CORRECT USE ...
• Before operating with your fax machine, read carefully al l the instructions contained i n this manual.
Keep the manual for further consultation.
• The fax machine has already been set for operation according to the standards of the telephone
network within your country.
• If you do not use the fax machine for long periods it should be disconnected from t he power supply to
avoid damage from power surges and peaks.
INSTALLING THE FAX MACHINE AND GETTING STARTED
5
Page 17
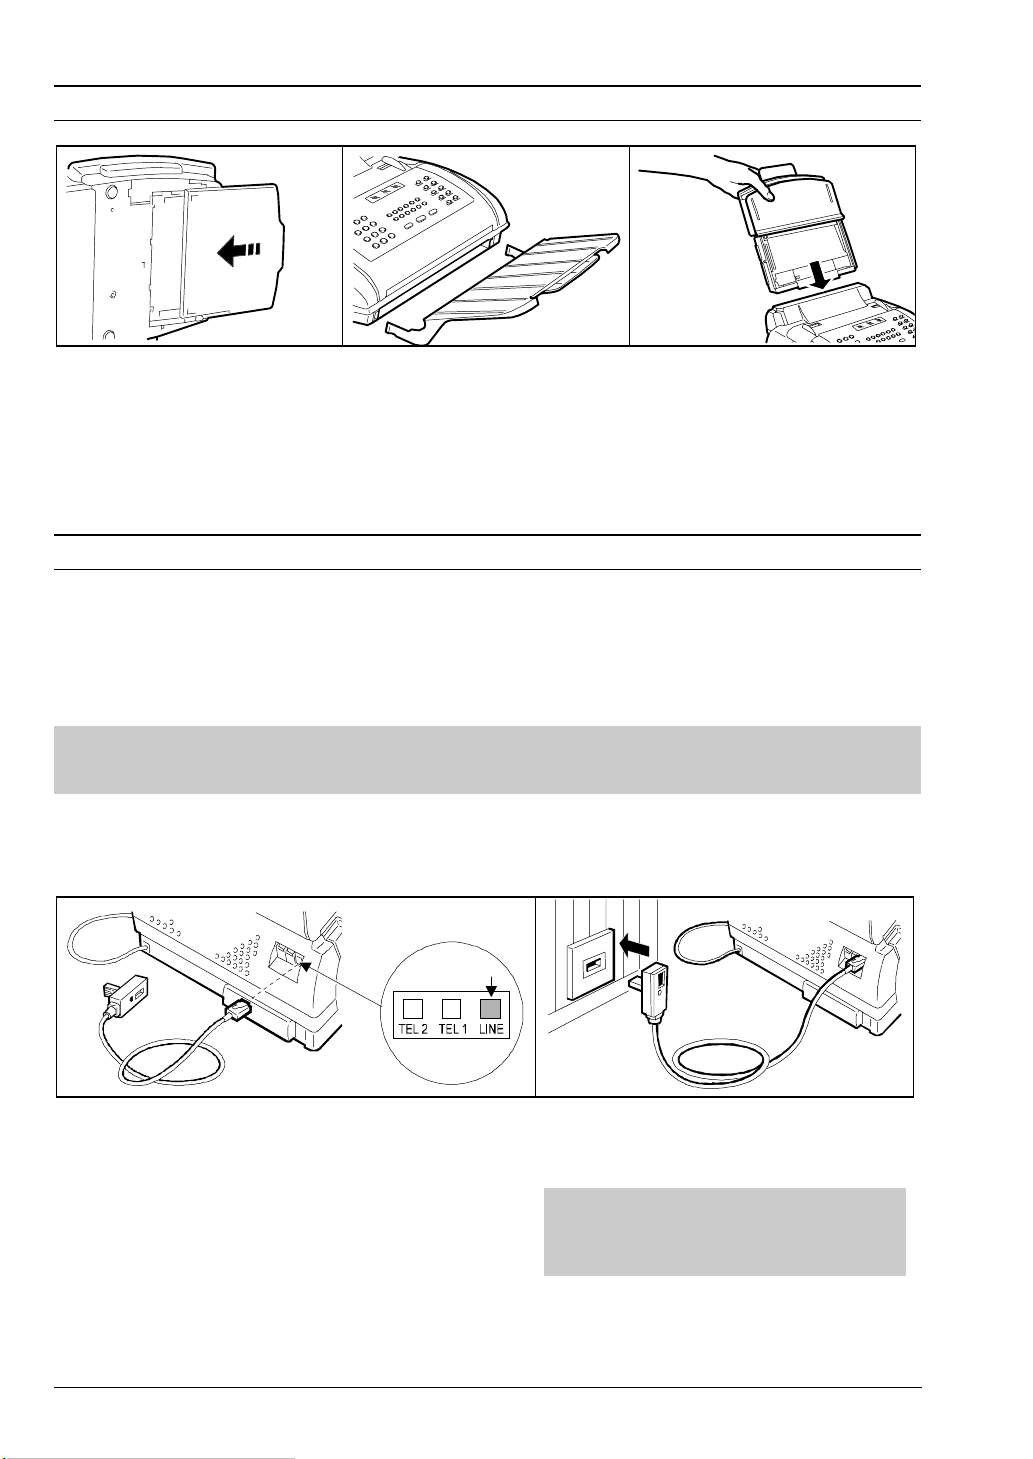
MOUNTING THE SUPPORTS AND PAPER TRAY
1.
Set the fax machine on its
right side and insert the
document collection tray in
its guides pushing it until it
latches.
2.
Insert the extensible original
document collection tray into
the side slots.
3.
Insert the paper feed tray into
its housing.
CONNECTION TO THE TELEPHONE LINE AND TO MAINS POWER
Connection to mains power
1.
Insert the plug of the power cable into the mains wall socket. The fax machine will automatically
perform a short test to check the operating condition of its components, then it will show the
appropriate messages on the display. The fax machine stays connected all the tim e, ready to receive
and transmit documents 24 hours a day.
IF...
You want to shut the fax m achine off, simply pull the main power cable plug out of the socket, since the
fax has no on/off switch.
Connecting the fax machine to the telephone line and connecting the telephone/answering device.
1.
After checking whether the mains power cable is
disconnected, insert the small, clear connector of the
connecting wire into the LINE outlet of the fax
machine. The other end needs to be connected to
the appropriate plug. A click confirms correct
insertion.
6
INSTALLING THE FAX MACHINE AND GETTING STARTED
2. Insert the plug into the telephone line
connection wall socket.
IF...
the system has multiple outlet in series,
connect the fax machine to the primary
outlet.
Page 18
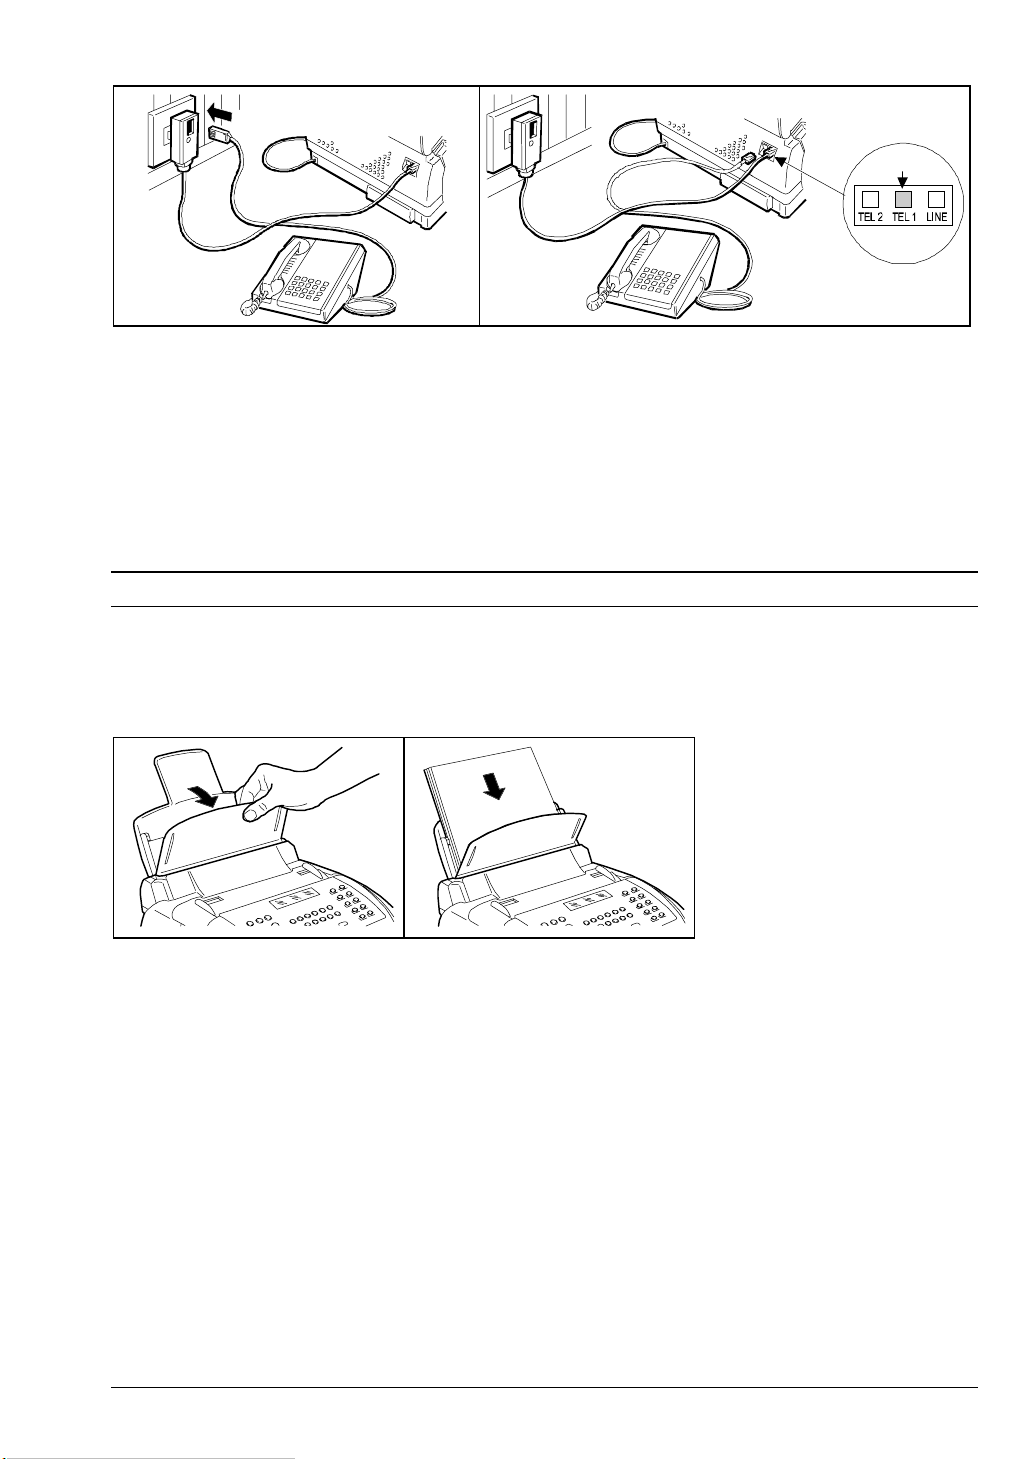
3.
a) In the case of telephone fitted with
national plug, insert the plug of the
telephone wire or of the answering
device’s wire into the plug-outlet.
CAUTION:
Since the telephone connection depends on national standards whi ch vary from Country to Count ry, the
last two figures show an intentionally generic connection. Refer to your Country’s current standard.
3.
b) In the case of telephone fitted with international
connector, insert the connector directly into the
telephone outlet. (TEL 1).
PAPER INSERTION FOR RECEPTION AND COPYING
The paper feeding tray contains t he sheets (up to 150) necessary to print the documents received or just to
copy a document. The paper tray (not in all Countri es) is designed to house the A4 (210 x 297 mm) paper
format , however it can be adjusted to house also the US Letter (216 x 279.4 mm ) and US Legal (216 x
355.6 mm) formats.
1.
Rotate the front cover of the
paper tray.
2.
Hold the sheets by their top
edge. Insert them letting
them fall into the paper tray
without folding them and
without forcing them, then
rotate the cover to close it.
The display will show date
and time.
PAPER TRAY ADJUSTMENT
When you replenish the paper for printing received and copied documents, you should pay attention to t he
following thr ee factors which must always coincide in order to guarantee the correct operation of the fax
machine:
• paper format, i.e. width of the sheet in use
• format of the tray i.e. distance between the inner stops of the container
• print f ormat i.e. the value of the FORMAT parameter of the PRINT PARAMETERS menu. Reference
chapter: THEORY OF OPERATION.
INSTALLING THE FAX MACHINE AND GETTING STARTED
7
Page 19
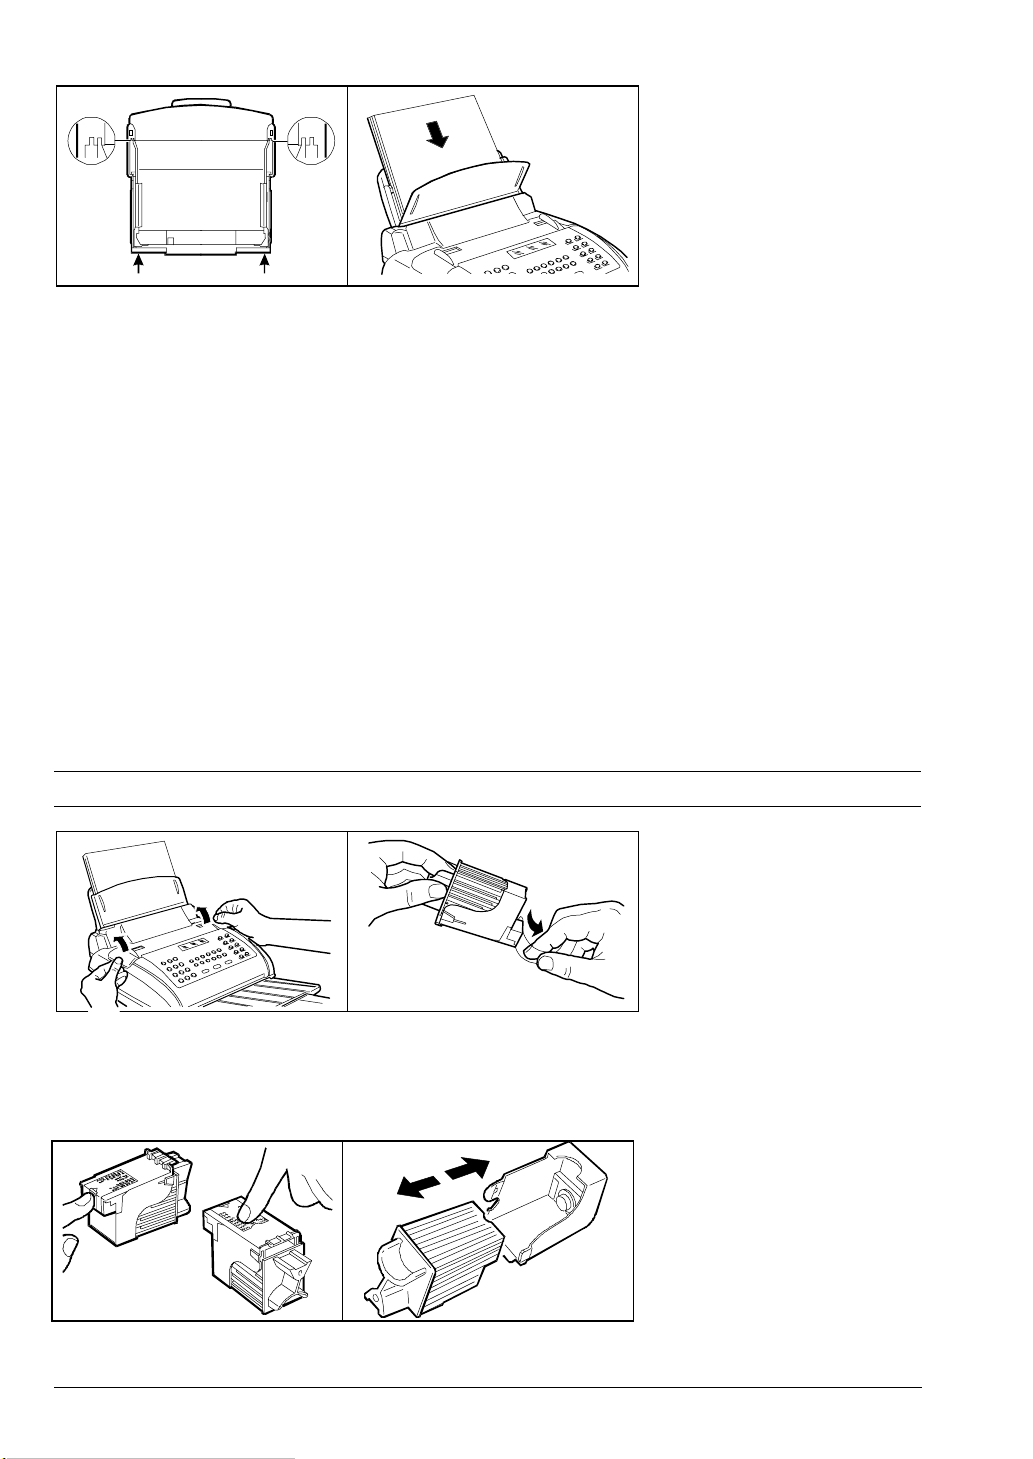
2 1
1 2
1.
Check whether the paper tray is
set up for the desired paper
format, hence that the distance
between the inner stops
coincides with the width of the
sheet.
If this is not the case, extract the
tray and release the cover
pressing its side towards the
inside of the paper tray. Release
the two inner stops from the lower
edge of the paper tray pressing in
the direction of the arrows, then
position them according to the
paper format:
• on t he inner guides (1) for the
A4 format
• on the outer guides (2), for
the LETTER and LEGAL
formats.
2.
INSERTING THE PRINT HEAD
Place the cover back and
insert the paper tray in its
housing, then flip the cover
over and insert the sheets of
the correct format (max.
150). Lastly close the cover
back again.
1.
Lift the lid of the print head
compartment positioning your
fingers in the side notches.
2.
Remove the print head from its
package and, holding it by its
grip, remove the film that
protects the nozzles.
NO!
Do not touch
remove the ink cartridge from the print head.
8
either the nozzles or the electrical contacts and do not
NO!
INSTALLING THE FAX MACHINE AND GETTING STARTED
Page 20

3.
Insert the print head into its
housing with the contacts
facing the front of the fax.
IF...
• the “CHECK PRINT HEAD” message appears on the display, remove and reinsert the print head,
pressing harder. If the message remains, call customer assistance.
• the print head supplied has an interchangeable ink cartridge, you can change the cartridge up to 6
times before replacing the whole print head.
• you want to replace both t he ink cartri dge and the print head, refer to the SIG NALS, ACCESSORI ES,
MAINTENANCE chapter.
4.
Push the print head in the
direction of the arrow until
you hear the click that
confirm its correct insertion.
Close the cover of the print
head compartment. The fax
machine will perform the
“Automatic nozzle cleaning
and checking procedure”
(Procedures).
5.
To release the print head,
including the cartridge, push
the levers in the direction of
the arrow.
INSTALLING THE FAX MACHINE AND GETTING STARTED
9
Page 21

ENTERING THE IDENTIFICATION DATA
v
5.
The facsimile automatically prints data at the top of the document received so that the correspondent can
identify the sender of the document at a glance. This data constitutes the sender ID and consists of the
date/time of transmission and the sender's name.
The gradual approach to the capabilities of your fax machine allows you to learn first the essential
functions such as changing date and time, entering the sender’s name and number, transmitting and
receiving a document or simply copying it.
when it is turned on, the fax machine automatically runs a short test to check its components’ operating
condition, then it gets ready to operate.
The display shows the date present in the machine. Date and time can be changed by the operator and,
once set, they are updated automatically. Every document transmitted will then bear, on the recipient’s
copy, the date and time of transmission and the sender’s name.
This card explains how to change date, time, sender’s name and number.
To enter the data, refer to the chapter GENERAL ISSUES - Basic Operations.
NOTE: You can program the facsimile’s parameters and customisation data from the PC through the
appropriate function made available by the Linkfax application and described under this manual’s
THEORY OF OPERATION chapter - ADVANCED FEATURES section.
Mains connection complete. The fax is on. The display shows
the machine state the fax is normally set in, i.e. the one for
receiving a document. The display also shows the date and
time present in the machine. The manual adopts a sample date.
12/12 ‘ 97 12:16 100%
AUTOMATIC RX
DATE AND TIME
In addition to being printed on the top margin of all documents transmitted, date and time will also be
shown on the display when the fax machine is in stand-by. Once set, date and time can be changed by the
user at any time (unless a delayed transmission has been set up) by repeating the procedure described
below.
The user can also modify the format of the date and time through the operating configuration parameter
“DATE FORMAT”. Refer to the chapter THEORY OF OPERATION Reminder.
1. Press FUNCTION followed by 5.
FUNCTION (0-9)
5. SET-UP
2. Press START.
OPERATING CONFIGURATION
STORING DATA
3. Press START.
STORING DATA
DATE/TIME
4. Press START.
Type the new date and time using the keys on the
numeric keypad, e.g. 25/11, 97 17: 05. After each digit
typed, the cursor will automatically move on to the next
position. Two digits must be typed for each parameter,
inserting a zero before one-digit numbers. Having set the
minutes, the cursor will automatically move back to the
first digit of the first parameter.
10
DATE/TIME
24/11 ’ 97 17:05
DATE/TIME
25/11 ’ 97 17:05
INSTALLING THE FAX MACHINE AND GETTING STARTED
Page 22

6. To confirm the setting, press START. The facsimile
6.
machine automatically moves on to the next item on the
"STORING DATA" menu.
STORING DATA
MAILBOX PASSWORD
7. Press STOP to leave the menu.
SENDER’S NAME AND NUMBER
In addition to the date and time, you can also enter the sender’s name and fax number or other
identifying information. This information will remain stored until it is changed again and it will appear on
every document received by the recipient
1. Press FUNCTION followed by 5.
2. Press START.
3. Press the 6 key.
4. Press START. The display shows the sender name
installation parameter.
5. Press START. The display shows the cursor for entering
the name.
To type in the sender’s name (e.g. ROSSI), press the 7
key until the letter R is displayed, then press 44 to move
the cursor to the right and, in the new position, enter the
O character. Every numeric key cyclically selects the
characters of its repertory starting from the digit and
providing the next character every time it is pressed.
Proceed the same way until the name is complete, for up
to 16 characters.
FUNCTION (0-9)
5. SET-UP
OPERATING CONFIGURATION
STORING DATA
OPERATING CONFIGURATION
INSTALLATION PARAMETERS
INSTALLATION PARAMETERS
SENDER'S NAME
SENDER'S NAME
_
SENDER'S NAME
ROSSI
IF...
• a character is entered in error, position the cursor on it using the 33 key and overwrite the correct
character.
• you want to erase the name completely and enter it anew, press the CLEAR key.
• you want to enter a space press 44 without entering any character.
7. Press START to confirm. The display shows the
parameter for entering the fax number.
INSTALLATION PARAMETERS
SENDER’S NUMBER
8. Press START. The display shows the cursor for entering
the fax number.
INSTALLING THE FAX MACHINE AND GETTING STARTED
SENDER’S NUMBER
_
11
Page 23

9. Set the fax number typing the digits on the numeric key pad
v
with or without area code (e.g. 659876) according to your
requirements
IF...
you want to set the number complete with Country code, keep in mind that, instead of the zeroes, you
need to press the * key. E.g. for the number 0039-125-526433, press:
1) The * key instead of “00”. The displays shows the symbol +. That symbol will also be printed instead of
“00” .
2) Type 39.
3) Enter a space moving the cursor with 44.
4) Type 125 without “0”.
5) Type another space and then the number 526433.
SENDER’S NUMBER
659876
10. Press START to confirm. The display shows the next
parameter. The procedure is complete. The sender’s
name and number will remain stored until changed again
and they will be printed on each document received by
the recipient.
INSTALLATION PARAMETERS
DIAL TYPE
11. To go back to the initial machine state, press STOP.
SETTING THE INSTALLATION PARAMETERS
The last phase of the installation procedure consists of setting parameters that determine how the
machine is to operate. The procedure below assumes that you can access all the installation parameters
but this may not be the case. In fact, depending on the country where you live, some of them may be
"hidden" as local legislation specifies that they can be changed exclusively by service engineers.
A general rule to be followed is not to change the settings made by the manufacturers unless you are sure
that no errors will result and to print the current installation parameters before changing them.
Having changed the relevant installation parameters, the machine can be used with the basic configuration
set by the manufacturers. You can tailor the configuration to your specific needs later on when you have
become more familiar with the machine, having read the manual and identified your precise requirements,
to ensure that the configuration set will be the one most suited to your activity. Refer to the chapter
THEORY OF OPERATION - Personalising the machine.
PRINTING THE INSTALLATION PARAMETERS
If you are not navigating in the menu already, the display shows
the machine state for receiving a document.
1. Press FUNCTION followed by 5.
2. Press START.
12
12/12 ‘ 97 12:16 100%
AUTOMATIC RX
FUNCTION (0-9)
5. SET-UP
OPERATING CONFIGURATION
STORING DATA
INSTALLING THE FAX MACHINE AND GETTING STARTED
Page 24

3. Press the 5 key.
OPERATING CONFIGURATION
INSTALLATION PARAMETERS
4. Press PRINT. The fax machine prints the values set in
the installation parameters.
CONNECTION TO PUBLIC OR PRIVATE NETWORK
After entering date, time, name and number, the fax machine has to be adapted to the characteristics of
the exchange it is connected to. So other installation parameters have to be set, and particularly important
is the connection to a public network or to a private exchange.
Public network
The fax machine is already set up for connection to the public network, however it is best to check
whether:
• the PUBLIC TEL. NETWORK parameter is selected
• the dialling parameter (pulse or tone) is set in accordance with the characteristics of the public network
your fax machine is connected to. If in doubt, ask the operator of the private telephone network.
Private exchange
The fax machine can be connected to a private exchange and be used on a public network as well.
To do so, it is necessary for:
• the PRIVATE BRANCH EXCHANGE parameter to be selected
• the dialling parameter (pulse or tone) is set in accordance with the characteristics of the private
exchange your fax machine is connected to. If in doubt, ask the operator of the private telephone
network.
• outside line modes (prefix, ground, or flash) for accessing the public network from the private exchange
have been set.
INSTALLATION PARAMETERS
PRINTING...
See the chapter GENERAL ISSUES - Basic Operations.
1. Repeat the “SENDER’S NAME AND NUMBER”
procedure until step 8 then press START.
2. Press START.
IF...
• the fax machine is connected to the private network (private exchange), press 6 to select connection
to the public network.
• instead you want to connect the fax machine to the private exchange:
1) Use 5 or 6to display the message: DIAL TYPE PRIVATE BRANCH EXCHANGE
2) Press START. The display shows PRIVATE BRANCH EXCHANGE OUTSIDE TYPE
3) Press START. The display shows OUTSIDE TYPE DIAL NUMBER. There are three outside line
modes selectable through the 5 or 6keys: Dial Number, Earth and Flash.
4) Press START. The display shows DIAL NUMBER.
5) Type the prefix number, max 3 digits from 0 to 9 and press START. The display shows
PRIVATE BRANCH EXCHANGE DIAL TYPE.
6) Press START. The display shows DIAL TYPE PULSE.
INSTALLING THE FAX MACHINE AND GETTING STARTED
INSTALLATION PARAMETERS
DIAL TYPE
DIAL TYPE
PUBLIC TEL. NETWORK
13
Page 25

7) Press START to confirm or select tone dialling with 6 and press START. The display shows
6.
1.
PRIVATE BRANCH EXCHANGE OUTSIDE TYPE. Dialling depends on the characteristics
of your private exchange.
8) Press STOP. The display shows INSTALLATION PARAMETERS DIAL TYPE FOR PUB. NET.
At this point the procedure is unified with the main one. To connect also to the public network, go
to step 4 of the main procedure.
3. Press START.
INSTALLATION PARAMETERS
DIAL TYPE FOR PUB. NET.
4. Press START.
DIAL TYPE FOR PUB. NET.
TONE
IF...
you want to display tone dialling, press 5 or6.
5. Press START to confirm. The display shows the fax
remote control message.
Press STOP to leave the procedure and go back to the
initial machine state.
INSTALLATION PARAMETERS
REMOTE START
ELEMENTARY USE OF THE FAX MACHINE
This section describes the facsimile's basic functions, that is, how to send and receive a fax and how to
redial a fax number manually (when the automatic redials carried out by the machine do not succeed in
establishing a connection with the desired correspondent). If you use the machine as described here,
remember that you are not using it to its full potential: we therefore recommend you carefully read the
chapter: THEORY OF OPERATION.
SENDING A DOCUMENT
v The facsimile machine is switched on and in standby. The display shows the message "AUTOMATIC
RX". The procedure described in the "Setting the Installation Parameters" section has been carried out.
Place the document face down in the ADF and fit the
paper to its width. After a few seconds the edge of the
document will automatically be inserted into the ADF.
2. Dial the recipient’s fax number (up to 32 digits) on the
numeric keypad.
14
INSTALLING THE FAX MACHINE AND GETTING STARTED
27/11 ‘97 12:04 100 %
DOCUMENT INSERTED
FAX: 125 240342
Page 26

3.
Press START. The facsimile machine starts to store the
document (the percentage of free memory decreases). It
then activates transmission (the TX/RX LED lights up). At
the end of transmission, the TX/RX LED goes off and the
fax machine goes back to stand-by.
IF...
There was an error on the telephone line when the fax machine was trying to send the document, the
ERROR led lights up. Place the document back in the ADF, press REDIAL and then START. The fax
machine tries to send again.
27/11 ‘97 12:04 100 %
AUTOMATIC RX
RECEIVING A DOCUMENT
v The facsimile machine is switched on and in standby. The display shows the message "AUTOMATIC
RX". The procedure described in the "Setting the Installation Parameters" section has been carried out.
1. The telephone rings and the facsimile automatically activates fax reception (the TX/RX LED
lights up).
2. When reception has been completed successfully, the facsimile machine emits a beep (the
TX/RX LED goes off).
INSTALLING THE FAX MACHINE AND GETTING STARTED
15
Page 27

THEORY OF OPERATION
Page 28

THEORY OF OPERATION
A facsimile machine enables an exact copy of a document to be produced at a remote location. It
incorporates three main devices:
A SCANNER
This is the device that optically scans the page containing data, text and/or images, to be transmitted.
The page is illuminated by a series of LEDs (Light Emission Diode) and the reflected light rays, whose
intensity will depend on whether the area struck contains a mark or is empty, are captured by sensors
that convert them into electrical signals. These signals are then coded using internationally recognized
standards. The coded image is "compressed" (in other words, the black and white sequences are
"shortened", representing them with a single code that indicates their length and position) to save
space in the memory and reduce the time required for transmission.
A PRINTER
As its name suggests, this device is used for printing documents. Many different printing techniques
are used. Your facsimile machine is based on Bubble Ink Jet technology, which uses a print head fitted
with a series of nozzles which "fire" microscopic particles of ink onto the paper, reproducing the exact
image of the document read by the sender's scanner. One of the main advantages of your facsimile
machine is that you can print on plain paper, which does not roll up like the thermal paper commonly
used by other facsimile machines available on the market, and costs much less.
A MODEM
This component enables you to connect to the telephone line and exchange data with remote devices.
The various integrated circuits it contains convert binary signals (sequences of 1's and 0's) into analog
signals (i.e. variable electrical voltages) and vice versa. The communication process is regulated on an
international scale by "protocols" which represent, for electronic devices, the equivalent of the various
languages spoken. This facsimile machine uses the Half Duplex protocol and can send and receive
data at various speeds, from 2400 to 14400 bps (bits per second).
In addition to these main devices, the machine is also equipped with other functional elements that enable
it to:
• receive user commands (the console)
• indicate the status of operations in progress and display the data entered (the display)
• feed in the original documents to be sent (ADF - Automatic Document Feeder)
• feed the paper on which the documents are printed (paper cassette and ASF - Automatic Sheet
Feeder)
• communicate with a personal computer (parallel interface).
Special mention must be made of the memory. It consists of electronic chips used for storing data. The
memory is divided into two main areas: the data memory, which basically contains the data relating to the
machine's set-up and adjustment, and the document memory, used for storing the original documents to
be sent or copied or those received (100 pages*). The data stored is retained for several hours, even in
the event of a power failure. The main advantage of the memory is that it enables several operations to be
carried out at the same time. For example, you can set a transmission transaction while receiving a
document, or print a file from the PC and send a stored document at the same time.
* ITU-TS format , Test Sheet n° 1 (Slerexe Letter) in standard resolution and MH compression mode.
THEORY OF OPERATION
19
Page 29

METHODS OF MAKING A CALL (DIALLING)
One of the essential operations involved in sending a document is dialling the correspondent's facsimile
number. During this preliminary phase, the facsimile machine connects to the telephone line and dials the
number you enter. Your device can store a large number of numbers and associate additional information
with them, thus creating an electronic telephone directory which not only saves you time but eliminates
the risk of making dialling errors. The numbers stored can be dialled in four different ways:
One touch dialling
This is the fastest method and consists of dialling the number by pressing just one key to which the
desired number has been associated. There are 10 one-touch dialling keys (from 01 to 10) and are
grouped on the right-hand section of the console. A fax number and a telephone number can be
associated with each key. See PROCEDURES chapter.
Speed dialling
Dials a previously stored number when you press three keys, that is SPEED DIAL and two keys on the
numeric keypad which constitute the speed dialling code (from 00 to 89). This method can be used for
dialling up to 90 facsimile numbers. See PROCEDURES chapter.
Alphabetical dialling
This is the most functional method as it combines the utility of finding a person's number by using his
name with the speed at which it may be dialled. In fact, all you have to do is press SPEED DIAL and
the 5 or 6 key to display the names associated with the speed dialling codes in alphabetical order
and press START to dial the relevant number
Group dialling
Up to 10 distinct groups of recipients can be prepared, each comprising one touch or speed dialled fax
numbers, up to 100 recipients. Groups are numbered from 90 to 99. By selecting a transmission
group, the same document will be sent to each of the recipients listed in the group.
There are three additional, slower, methods for dialling numbers not stored in the memory.
Dialling on the numeric keypad
Consists of typing the desired number on the numeric keypad and pressing START to confirm.
Manual dialling
You gain direct access to the telephone line by pressing the HOOK key (to hear the dial tones), enter
the desired number on the numeric keypad of the facsimile machine and confirm by pressing START.
In addition, there are some dialling functions that change the method of connection used by the
facsimile machine. These may be activated manually, that is, while dialling the number, or
automatically, while programming one-touch dialling keys or speed dialling code.
These functions are:
− − Changing the type of dialling
By pressing the* key, you can switch from pulse to tone dialling, while dialling a number. When
the function is activated, the symbol "*" appears on the display.
− − Connecting to an outside line
If you press the EXT.//PAUSE key before dialling the number, you connect to an outside
telephone line using the method set in the "DIAL TYPE" installation parameter (Dial number,
Flash, Earth). This function is used when the facsimile machine is connected to a private branch
exchange. When it is activated, the letter "E" appears on the display
− Pause
If you press the EXT.//PAUSE key while dialling the number (that is, between one digit and
another), the facsimile machine inserts a pause before dialling the remaining digits of the
number dialled. When it is activated, the letter "p" appears on the display.
20
THEORY OF OPERATION
Page 30

− Second tone
If you press the 2nd DIAL TONE//HOLD key while dialling the number, the facsimile machine
detects a second exchange dial tone. This function is used when the machine is connected to
particular types of telephone exchanges. When it is activated, the symbol " :" appears on the
display.
Dialling on an external telephone
You simply dial the number and then press START.
METHODS OF TRANSMISSION
The facsimile machine enables you to send a document in several ways, according to the urgency, the
number of correspondents or confidentiality with which it is to be handled. The methods of transmission
can be divided into two groups.
SINGLE RECIPIENT TRANSMISSION
document can be sent to a single recipient using the following methods:
in immediate mode
when you want to send a document in the simplest and quickest way. Remember, however, that, if the
set-up parameter "AUTOMATIC STORING" is disabled, the document must be left in the ADF
(otherwise the setting will be cancelled) and the facsimile machine cannot be used for other operations
until the end of the transmission transaction in progress. Refer to PROCEDURES chapter.
in delayed mode
when you want to send the document at a preset time. This enables you to get round time zone
problems should the recipient be thousands of kilometres away, and to choose times when the lines
are less busy and cheaper rates apply.
Remember that you can receive, copy or send other documents after setting the facsimile machine for
delayed transmission, as the document is automatically stored. Refer to PROCEDURES chapter.
in confidential mode
if the document contains confidential information. The document sent is not printed immediately by the
receiving facsimile machine, but stored and only printed when the recipient has entered the password
(4 characters) previously agreed upon with the sender. With this method of transmission, the two
facsimile machines must be compatible and the receiving facsimile machine must have a special
memory location called a "confidential mailbox". Refer to PROCEDURES chapter.
With the exception of delayed mode in which the document is always stored automatically, you can leave
the document in the ADF until the time of transmission or store it and remove it immediately, depending
on whether the set-up parameter "AUTOMATIC STORING" is, respectively, disabled or enabled.
MULTI-RECIPIENT TRANSMISSION ("BROADCAST")
This type of transmission enables you to send a document to several recipients (max. 100). The document
is stored and then sent immediately or later on, to the various recipients in the order in which they were
selected. The facsimile machine enables you to carry out a maximum of 10 broadcast transmissions.
Refer to PROCEDURES chapter.
URGENT TRANSMISSION
This type of transmission takes precedence over the other ones stored, if a special key is pressed. Refer to
PROCEDURES chapter.
REPEATING TRANSMISSION
Stored documents or broadcast transmissions that were unsuccessful can be repeated providing the setup parameter "RESEND FAILED TX" is enabled, by manually changing the time of transmission and/or the
recipient's facsimile number. Refer to PROCEDURES chapter.
THEORY OF OPERATION
21
Page 31

METHODS OF RECEPTION
A document can be received in one of the following five ways:
IN AUTOMATIC MODE
This method enables you to leave the room in which the facsimile machine is installed and receive any
document sent in the meantime. The machine can handle reception without any help at all. Refer to
PROCEDURES chapter.
IN MANUAL MODE
This method requires you to be present and is particularly suited to the situation in which the telephone
line is not dedicated exclusively to the facsimile machine. When the telephone rings, lift the handset to
see if it is a voice call or a fax call: a modulated tone indicates that someone is trying to send a fax. If
you do not answer within a given number of rings, the facsimile machine enters the automatic
reception mode. Refer to PROCEDURES chapter.
WITH CALL TYPE RECOGNITION (FAX OR TELEPHONE)
With the "FAX/PHONE" switch enabled (in countries where this function is permitted), the facsimile
machine recognizes whether the call is an ordinary telephone call or the caller wants to send a fax.
Refer to PROCEDURES chapter.
IN CONFIDENTIAL MODE
When confidential documents are to be received, you can have them stored in a special memory
location called a "confidential mailbox" instead of having them printed immediately. In this way, the
password (to be agreed upon with the sender) will have to be entered before they can be printed. Refer
to PROCEDURES chapter.
WITH FAX-ANSWERING DEVICE
If the fax machine is connected to an answering device, this reception mode can be used (only in
Countries where the standards allow for it). The answering machine waits for a certain number of rings,
then answers with the recording. Thereupon it can either record the message left by the caller or signal
the fax machine to set up to receive a document automatically.
The type of reception adopted by the machine depends on the setting of the set-up parameter
"RECEPTION MODE". In addition, by enabling the set-up parameter "SUBSTITUTE RECEPTION", the
facsimile machine can store the documents received when the printer is occupied by other functions or out
of operation due to the paper or ink running out or a paper jam in the paper feed mechanism. The
facsimile machine's memory contains about 70 pages.
POLLING
Polling could be defined as a "self-service data communications" method. It enables you to connect to a
remote facsimile machine and request it to send a document automatically. This means that the owner of
the remote machine does not have to be present. This method of distributing documents can be limited to
a group of recipients (for example, for sending confidential documents) or entirely free to anyone who
requests it (for example, for distributing price lists). There are two main features of communication by
polling:
the recipient activates transmission of the document
i.e. you can connect to a remote facsimile machine and get it automatically to send an appropriately
prepared document even if the remote user is not present
22
THEORY OF OPERATION
Page 32

the recipient is charged for the call
i.e. the cost for the call is charged to the recipient instead of the sender.
The facsimile machine that sends the document and the one that requests transmission have several
different methods of polling.
POLLING TRANSMISSION
When the device sends a document by polling, it may use the following methods:
free
by which the document can be sent to a single correspondent or several correspondents, depending on
whether the set-up parameter "DEL POLL TX DOC" is, respectively, enabled or disabled: if it is
enabled, when the document has been sent, the facsimile machine automatically clears the document
from the memory; if it is disabled, the document remains at the disposal of other users who request it
Refer to PROCEDURES chapter.
secure
by which the document can only be sent to a preset group of correspondents. The list of enabled
correspondents is drawn up by programming special identification codes. If a correspondent whose ID
is not included in the list requests your facsimile machine to send a document, the request will be
denied. The IDs range from 01 to 10 and each one is associated with the CSI of a user who is to be
authorized to receive one of your documents (max. 20 digits - the CSI corresponds to the numeric part
of the sender's ID). They can be printed to facilitate consultation. Refer to PROCEDURES chapter.
RECEPTION BY POLLING
When the device receives a document by polling, it may use the following methods:
single
by which a request is made to a single remote device to send a document. The request may be
immediate or delayed
multiple
by which you can request several remote devices to send a document. Also in this case the request
may be made immediately or at a preset time.
You can set a maximum of 100 polling reception operations A set reception operation can be changed
or cancelled. At the end of the transaction, the facsimile machine will automatically print a report on
the transactions carried out. Refer to PROCEDURES chapter.
THEORY OF OPERATION
23
Page 33

MEMORY MANAGEMENT
The facsimile machine has a working memory, structured so that it keeps a detailed record of
transactions and documents. The stored documents that have been sent successfully are cleared from the
memory.
You can access the data in the memory from the "MEMORY STATUS" menu. The information it contains
is divided into three submenus:
• DOCUMENTS IN MEMORY
Enables you to display and print a list of the documents present in the memory Refer to
PROCEDURES chapter. In addition, any of the documents in the memory can be printed, unless they
are in the process of being sent or received, or cleared, with the exception of received documents that
have not yet been printed: these are automatically printed when the conditions that activated substitute
reception have been eliminated.
• BROADCAST TRANSMISSIONS
Enables you to handle a broadcast transmission, i.e. display and print a list of the documents
associated with the broadcast transmissions set. This menu is also used for clearing or printing an
entire broacast transmission or resetting or repeating the transmission of each individual transaction
included in it. Refer to PROCEDURES chapter.
The broadcast transmission is identified by the number of the document associated with it, indicated in
the Doc. Ref. field. The individual transactions of the broadcast transmission are identified by the
Transaction No. field. At the end of all the retries for all of the transactions of the broadcast
transmission, the facsimile machine automatically prints the report (if the set-up parameter
"BROADCAST REPORT" is enabled - in this case, the reports for the individual transactions of the
broadcast transmission are automatically disabled). After printing the report, the transactions
concluded successfully are automatically cleared from the memory, while those not sent successfully
are kept in the memory until they are re-transmitted or deleted manually.
• MEMORY TRANSMISSIONS
Enables you to handle single transactions from the memory, i.e. to display and print a list of the
transmissions set. Refer to PROCEDURES chapter.
In addition, it enables you to delete, reset and repeat each individual transmission from the memory.
The documents sent successfully are automatically cleared from the memory.
This memory structure put to good use provides many advantages both from the functional viewpoint (the
same method of programming for different times and correspondents) and the economical viewpoint
(identification and use of times with cheaper rates); reliable reception (even when the paper or ink runs
out) is ensured by optimized memory occupation. When the space available drops to a preset value, the
facsimile machine prevents subsequent storage operations and displays the message "TX MEMORY
FULL".
THE REPORTS: AN AUTOMATIC RECORD
The facsimile machine provides a detailed account of the transactions carried out by printing (or
displaying) reports. The reports enable you to check the order in which the transactions were carried out,
the number of documents handled and many other important features. Some of them can be printed
manually, from the "REPORTS" menu, or automatically (except for the Power Failure Report), by enabling
the corresponding set-up parameter.
24
THEORY OF OPERATION
Page 34

REPORTS THAT MAY BE ACCESSED FROM THE "REPORTS" MENU:
Last transmission report
It contains all the information about the last transmission transaction carried out by the facsimile
machine. It can be printed automatically if the set-up parameter "LAST TX REPORT" is enabled. If the
set-up parameter "LAST ERROR REPORT" is enabled, the facsimile machine will only print the report
if the transaction was not concluded successfully. Refer to PROCEDURES chapter.
Last reception report
It contains all the information about the last reception transaction carried out by the facsimile machine.
It can be printed automatically if the set-up parameter "LAST RX REPORT" is enabled Refer to
PROCEDURES chapter.
Activity report
It contains the information about the transmission and reception transactions carried out. It may be
printed automatically if the set-up parameter "ACTIVITY REPORT" is enabled. In this case, after 30
transactions, the report is printed and all the transactions are cleared from the memory. Refer to
PROCEDURES chapter.
REPORTS THAT CAN BE OBTAINED BY ENABLING A SET-UP PARAMETER:
Last error report
When the set-up parameter "LAST ERROR REPORT" is enabled, the facsimile machine prints the
report only when transmission is concluded unsuccessfully.
Broadcast report
It contains the information about the transactions included in a broadcast transmission. It may be
printed automatically by enabling the set-up parameter "BROADCAST REPORT", which also enables
printing of the polling reception report.
Polling for reception report
It contains information about the document received by polling.
Polling for transmission report
It contains information about the documents sent by polling, indicating the number of transactions
carried out and, if in secure mode, the IDs of the recipients.
Power failure report
It contains information about the documents present in the memory when the power failure occurred.
SECURITY FUNCTIONS
Your facsimile machine has security functions which will enable you to prevent unauthorized persons from
using the facsimile machine to indiscriminately transmit documents, make copies or change the
configuration set. The security functions are called "Password" and "Closed network".
NOTE
Access to configuration parameters through PC can be prohibited entering a password.
THEORY OF OPERATION
25
Page 35

PASSWORDS
The "passwords" are requested by the facsimile machine whenever an attempt is made to activate certain
functions or to change the machine's configuration: access is denied until the password is entered. There
are four passwords:
Confidential Mailbox Password
Enables you to send, receive and print confidential documents. The received document is stored in a
special memory location called the "confidential mailbox" instead of being printed immediately. The
document cannot be printed until the password has been entered.
System Password
Controls access to the "OPERATING CONFIGURATION" and "STORING DATA" menus, which
contain the functions and parameters that determine the machine's overall operation. Once set, this
password will be requested when you access the menus. It takes priority over the other passwords.
Inhibit transmission password
Enables you to prevent unauthorised persons from carrying out any kind of transmission transaction. It
is requested when you start to dial the facsimile number or before storing the document if you are
trying to carry out a broadcast transmission.
Inhibit copying password
Enables you to prevent unauthorised copying on the facsimile machine. It is requested when you press
START to activate the copying operation.
The latter two passwords are enabled by specific configuration parameters. They may be changed or
deleted. In addition, remember that the security functions must be disabled when you use the machine in
communication with a personal computer in that they prevent transmission and reception operations from
being performed
CLOSED NETWORK
This feature enables you to limit the number of remote users with which communication is to take place on
your facsimile machine. It can regulate both transmission operations, for example, in multi-user work
environments, where the machine could be used indiscriminately with consequent additional costs, and
reception operations, for example, to avoid receiving undesired documents (advertising material,
propaganda, etc.). The numbers of the remote correspondents enabled for communication with your
facsimile machine are managed by checking the last 4 or 6 digits of the facsimile numbers.
The closed network feature can be activated by two separate set-up parameters:
• CLOSED NETWORK IN TX
Enables transmission exclusively to correspondents whose facsimile numbers have been stored as
one-touching dialling or speed dialling numbers and declared as belonging to the network by setting
the corresponding Closed Network parameter to YES, while storing the IDs. Attempts to transmit using
other methods of dialling or to correspondents whose numbers have been stored for one-touch or
speed dialling but do not belong to the network (with the Closed Network parameter set to NO), will not
be accepted.
• CLOSED NETWORK IN RX
Enables you to receive exclusively from correspondents whose facsimile numbers have been stored as
one-touch dialling or speed dialling numbers and declared as belonging to the network by setting the
corresponding Closed Network parameter to YES, while storing the IDs. The machine will not receive
documents sent by correspondents whose numbers have been stored for one-touch or speed dialling
but do not belong to the network (with the Closed Network parameter set to NO).
26
THEORY OF OPERATION
Page 36

CUSTOMISING THE MACHINE
The facsimile machine offers a series of parameters which enable you to radically change the machine's
set-up, so that you can adapt it to various situations and the requirements of your workplace. Refer to
PROCEDURES chapter.
A description of the set-up parameters is given below, arranged according to their function.
NOTE: You can program the facsimile’s parameters and customisation data from the PC through the
appropriate function made available by the Linkfax application and described under this manual’s
THEORY OF OPERATION chapter - ADVANCED FEATURES section.
TRANSMISSION
AUTOMATIC STORING
Enables/disables automatic storage of documents inserted in the ADF for transmission. Automatic storage
gives the following advantages:
• the document can be removed immediately for other purposes
• other operations can be performed at the same time, taking full advantage of the machine's
multifunctional operation
• you can check whether the document has been scanned correctly.
In addition, by storing the document, you can display the number of pages in the document and its
reference number which you may need to know if you subsequently need to change the setting.
SENDER ID LINE
This parameter enables you to define where the machine will print the sender's ID data, i.e. name and fax
number, date and time of transmission and the number of the current page (printed on a single line). The
ID may be:
• INSIDE THE DOCUMENT (superimposed in the top few millimetres of the document)
or
• OUTSIDE THE DOCUMENT (just below the top edge)
• TRANSMISSION SPEED
Enables you to select the transmission speed (bits per second). The possible values are:
14400 bps
9600 bps
4800 bps (recommended for lines with a lot of interference)
DOCUMENT RETRANSMISSION
Enables you to enable or disable automatic retransmission of the pages not sent satisfactorily due to
errors on the line. This function can only be activated if the document has been stored.
RESEND FAILED TX
Enables you to keep or clear the documents that were not sent successfully in the memory for manual
retransmission.
RECEPTION
RECEPTION MODE
Enables you to select the type of reception adopted by the facsimile machine. The available settings are:
• AUTOMATIC RX
In this mode, after the programmed number of rings, the facsimile machine connects to the line and
answers automatically.
• MANUAL RX
In this mode, the user carries out the reception operation.
• FAX/PHONE
In this mode, the facsimile machine recognises whether an incoming call is a voice or a fax call. It enables
you to use the same line for fax and telephone calls (this feature is only available in some countries).
THEORY OF OPERATION
27
Page 37

SUBSTITUTE RECEPTION
With this parameter enabled, due to the automatic storage feature, incoming documents can be received
even when there is no paper or ink left, a paper jam has occurred, the cover is open or the facsimile
machine is busy printing.
RX ON PC & FAX
Enables you to receive a document on the personal computer and print it on the facsimile machine at the
same time.
REPORTS
ACTIVITY REPORT
Used for enabling or disabling automatic printing of the activity report after 30 transactions.
LAST TX REPORT
Used for enabling or disabling automatic printing of a report after each transmission transaction.
LAST RX REPORT
Used for enabling or disabling automatic printing of a report after each reception transaction.
LAST ERROR REPORT
Used for enabling or disabling automatic printing of a report after an unsuccessful transmission attempt.
BROADCAST REPORT
Used for enabling or disabling automatic printing of a global report after each broadcast transmission and
polling reception operation. If enabled, the individual transaction reports will not be printed.
SECURITY FUNCTIONS
INHIBIT TRANSMISSION
Used for enabling or disabling the request for a password for transmission (set in the "STORING DATA"
menu) whenever an attempt is made to transmit.
INHIBIT COPY
Used for enabling or disabling the request for a password for copy (set in the "STORING DATA" menu)
whenever an attempt is made to copy a document.
CLOSED NETWORK IN TX
Used for enabling or disabling the list of users to whom a document can be sent. The users enabled are
those stored as one-touch or speed dialling numbers, for whom the "CLOSED NETWORK" parameter is
enabled. When this function is enabled, you cannot send a document to a correspondent not included in
the list. This feature is ensured by the machine checking the last 4 or 6 digits of the correspondent's
facsimile number.
CLOSED NETWORK IN RX
Used for enabling or disabling the list of users from whom a document can be received. The users enabled
are those stored as one-touch or speed dialling numbers, for whom the "CLOSED NETWORK" parameter
is enabled. When this function is enabled, you cannot receive a document from a correspondent not
included in the list. This feature is ensured by the machine checking the last 4 or 6 digits of the
correspondent's facsimile number.
PRINTING
PRINT FORMAT
Enables you to select the desired paper format:
- A4
- LETTER
- LEGAL
Having selected a format, you must position the paper guides accordingly.
REDUCTION
Enables you to automatically reduce the documents received to 70% of their original size. The available
values are 70, 73, 76, 80, 84, 89 and 94. The best value to choose depends on the size of the document,
as indicated below:
- A4 / 94%
- LETTER / 89%
- LEGAL / disabled (NO)
28
THEORY OF OPERATION
Page 38

PRINT OVERFLOW
Enables or disables printing, on one or more additional sheets, of any information that does not fit on the
paper size chosen for received documents.
QUALITY PRINTING
Enables or disables quality printing of the documents. When this parameter is disabled, documents can be
printed in draft mode, which requires less ink than quality printing.
QUALITY COPIES
Enables or disables quality reproduction ("PROPRIETARY") of copied documents.
RESOLUTION TX/COPY
Enables you to select the type of resolution adopted during the transmitting/copying of documents. The
available settings are STANDARD and FINE. The setting of this parameter has no effect if the "QUALITY
COPIES ?" parameter is set to Yes.
OTHER FUNCTIONS
ECM
Used for enabling or disabling Error Correction Mode. This function eliminates errors caused by a
telephone line with a lot of interference. It must however be activated at the same time on both the sending
and receiving facsimile machines. It must be remembered that this function increases the time required for
transmission.
DEL FAILED POLL TX DOC
Used for enabling or disabling the clearing of a previously stored document at the end of the polling
transmission session.
MONITOR LINE
When this parameter is enabled you can hear the signals exchanged by the sending and receiving
machines in the initial phase of the connection.
REMOTE DIAGNOSTICS
Enables you to enable or disable a diagnostic test run from a remote terminal. This feature is only
available in certain countries.
DATE FORMAT
Enables you to set the desired format for the date and time. The available formats are:
- DD/MM 'YY
- 'YY MM/DD
- MM/DD/YY 24h
- MM/DD/YY 12h
LANGUAGE SELECTION
Enables you to select the language in which the messages are displayed or printed.
ADVANCED FEATURES
CONNECTING TO A PERSONAL COMPUTER
The facsimile machine has a bidirectional parallel interface which, once fitted with the optional kit, can be
connected to a personal computer. In this configuration, the facsimile machine can be used as a:
• scanner ("pass-through", black and white)
for scanning documents or pictures
• printer (300x300 dpi resolution)
for printing documents from any Windows application
• modem (14400 bps)
for handling the facsimile service via a PC
THEORY OF OPERATION
29
Page 39

To handle the connection, the PC must have the following minimum configuration:
CPU i80486 sx
RAM 1760 KBytes
HDU 40 MBytes
MS-DOS Rel. 5.0
Microsoft Windows Rel. 3.1
When used in conjunction with a personal computer, the facsimile machine enables you to activate one of
the functions mentioned above and send/receive documents in the memory at the same time.
For more detailed information on the features of the connection and how it is used, consult the
documentation of the software to be installed on the PC.
Diagnostic Test of Facsimile Machine
The facsimile machine can be subjected to a diagnostic test from a remote location. The feature is
enabled by means of the set-up parameter "REMOTE DIAGNOSTICS".
Using a special software program and by making a call by polling, the remote machine can:
• install the facsimile machine
the remote station requests display of the facsimile machine's installation parameters. The operator
can change the parameter settings and update them on the facsimile machine, thus installing it from a
distance
• make a diagnosis
the remote station asks the facsimile machine for information on its set-up parameters, the last activity
report printed and transaction statistics (status of connections, type of errors detected, number of
pages sent and received, etc.). By analysing this data, the remote operator can change some settings
to make the facsimile machine work to its full potential.
Colour printer
The colour print head (optional) is mounted on the fax machine just like the monochrome (black) print
head. Its use allows to transform the fax machine, connected to a PC, into a colour printer. For better
colour printing quality, special paper can also be used. You will find all the information you need on this
subject in the ON LINE OPERATING GUIDE.
Programming the fax machine
The fax machine can be programmed directly from the PC both displaying the data and setting the
parameter. Reference: INSTALLATION MANUAL.
COMPLEMENTARY FUNCTIONS
Installing the facsimile machine does not, of course, stop you using the telephone for normal
conversations. To make a telephone call, all you have to do is dial the relevant telephone number (if you
hear no dial tone, press the HOOK key) and when you hear the correspondent answer through the
facsimile machine's built-in speaker, lift the handset and talk in the ordinary way.
TRANSMISSION WITH TELEPHONE / HANDS FREE DIALLING
If the user who was called using the method described above, is connected to a facsimile line, you can
send him or her a document. The transmission procedure can be carried out in one of two ways:
• From the telephone
Insert the document in the ADF, dial the correspondent's facsimile number and ask him to press the
START key on his facsimile machine. When you hear the tone emitted by the remote machine, press
START on your machine and HANG UP. Transmission is activated.
• Hands free
In this case, you do not have to have a conversation with the called user. Insert the document in the
ADF, press HOOK and dial the correspondent's facsimile number on the numeric keypad. When you
hear the signal emitted by the remote machine, press START.
30
THEORY OF OPERATION
Page 40

SUSPENDING OR REQUESTING A TELEPHONE CONVERSATION
A telephone conversation can be suspended momentarily by pressing the HOLD key. The display shows
the message “TELEPHONE MODE” on the top line and “HOLD MODE” on the bottom line. The
conversation is resumed by pressing the HOLD key again.
ADJUSTING
You can change the volume level of the facsimile machine's built-in speaker. The procedure for setting the
speaker volume to one of the five pre-set levels is described below:
1. Press FUNCTION followed by 8.
2. Press START and then the 6 key until the desired
message is displayed.
3. Press START. The display shows the selected volume
level (from 1 to 5).
FUNCTION .. (0-9)
8.ADJUSTMENTS
8.ADJUSTMENTS
SPEAKER VOLUME
SPEAKER VOLUME
LEVEL 1
4. Confirm the selected level pressing START or press the
5 or 6 key to select the desired vlaue, then press
START.
USING THE FACSIMILE MACHINE AS A PHOTOCOPIER
The facsimile machine can also be used as a photocopier. The copying function is controlled by the value
of the set-up parameters set on the relevant menu, namely the set-up parameter "QUALITY COPIES". If
the quality copy parameter is enabled, a clearer copy will be produced. The result obtained also depends
on the Contrast, Resolution and Image settings, which must be made before activating the copying
function.
You can make one or more copies of the document. Having inserted the document in the ADF and made
the relevant settings, proceed as follows:
• • for a single copy
Press START. The fax machine copies the document
and goes back to stand-by.
8.ADJUSTMENTS
SPEAKER VOLUME 1
• for multiple copies:
1. Press FUNCTION followed by 7.
2. Press START.
IF...
The display shows PAGINATING, press the 5 or 6 keys to display MULTICOPY.
THEORY OF OPERATION
FUNCTION (0-9)
7.PAGINATING/MULTICOPY
PAGINATING/MULTICOPY
MULTICOPY
31
Page 41

3. Press START.
MULTICOPY
NO. PAGES/COPIES:
4. Set the desired number of copies (max. 99) and press
START. The fax machine stores the original document
and then makes the selected number of copies.
MULTICOPY
STORING DOCUMENT
MULTICOPY
COPYING... 01/nn
32
THEORY OF OPERATION
Page 42

GENERAL ISSUES
Page 43

GENERAL ISSUES
THE STAND-BY STATE
The stand-by condition is not discriminating in terms of access to the functions of the fax machine. When
access to the functions takes place from the stand-by condition, the display will show the following
messages:
Without any document inserted:
Reception modes:
• AUTOMATIC RX
• MANUAL RX
• FAX/PHONE
• FAX/TAD
With a document inserted:
Instead of the stand-by state, the display may show
error indications caused by the impossibility to
print:
If there are any automatic reports waiting to be
printed:
21/10/’97 10:35 95 %
AUTOMATIC RX
21/10/’97 10:35 95%
DOCUMENT INSERTED
21/10/’97 10:35 95%
MEMORY FULL
21/10/’97 10:35 95%
DOC. RECEIVED IN MEMORY
21/10/’97 10:35 95%
ACTIVITY REPORT
These indications will alternate with the messages that identify the errors: “ADD PAPER”, “OUT OF INK”.
If the error is caused by a paper jam or stuck print carriage, the “PAPER ERROR - CHECK AND PRESS
STOP” message will be shown. In this case, to restore the fax machine to operation, after removing the
anomaly, press STOP.
GENERAL ISSUES
35
Page 44

BASIC OPERATIONS
This section describes all basic operations which may be required when performing the various
procedures.
You can use it for a quick review of the procedures required by the fax machine to perform a function.
DATA ENTRY
To confirm data
To delete data
To overwrite data
To insert a space between characters and/or digits
SETTING DIALLING FUNCTIONS WHILE ENTERING A FACSIMILE OR TELEPHONE NUMBER
To insert a pause while dialling the number. A
pause should always be inserted between the code
and the number
To wait for an answering tone (for countries in
which it is required), before completing the dialling
of a number
To call an external user when the facsimile
machine is connected to a private branch
exchange
Press START
Press CLEAR
Move to the data to be overwritten by pressing 5
or 6 and enter the new data
Press the 4 key to move the cursor one place to
the right
Press EXT.//PAUSE.
The letter "p" appears on the display to identify the
pause set
Press 2nd DIAL TONE//HOLD. The symbol ":"
appears on the display
Press EXT.//PAUSE before entering the number.
The display shows the letter "E" before the
sequence of numbers
To switch from pulse to tone dialling
OPERATING PROCEDURES
To confirm a setting
To skip a parameter
To return to the menu functions on the display
To interrupt a procedure
To interrupt a printing operation
To scroll through the functions on the menus
36
Press * while setting the number.
The symbol * will appear on the display
Press START
Press START
Press STOP
Press STOP once or twice
Press STOP
Press 5 or 6
GENERAL ISSUES
Page 45

TRANSMISSION/RECEPTION OPERATIONS
To interrupt a transaction
To resume a transmission.
Conditions:
- the document must not be removed from the ADF
- the number must have been dialled on the
numeric keypad
To print a report automatically after each fax
transmitted
To shut off the error LED
To print a report automatically after each fax
received
Press LINE STATUS and then STOP
Press REDIAL
Enable the "LAST TX REPORT" parameter in the
operating configuration (see the "Setting the Set-up
Parameters" section)
Press LINE STATUS and then STOP
Enable the "LAST RX REPORT" parameter in the
operating configuration (see the "Setting the Set-up
Parameters" section)
GENERAL ISSUES
37
Page 46

PROCEDURES
Page 47

PROCEDURES
ITALIAN - SPANISH - GERMAN - FRENCH - DANISH -
CUSTOMISING THE FAX MACHINE
PARAMETER OPTION 1 OPTION 2 OPTION 3
RECEPTION MODE AUTOMATIC RX MANUAL RX FAX/PHONE
FAX/TAD
SILENCE TIME 00-03-04-06-08-10
AUTOMATIC STORING YES NO
ACTIVITY REPORT YES NO
LAST TX REPORT YES NO
LAST RX REPORT YES NO
LAST ERROR REPORT YES NO
BROADCAST REPORT YES NO
PRINT FORMAT A4 LETTER LEGAL
REDUCTION YES (%) 70 to 94 NO
PRINT OVERFLOW AUTO NO YES
QUALITY PRINTING ? YES NO
INHIBIT TRANSMISSION YES NO
INHIBIT COPY YES NO
CLOSED NETWORK IN RX YES No. of digits
to control 4-6
CLOSED NETWORK IN TX YES No. of digits
to control 4-6
SENDER ID LINE INSIDE THE
DOCUMENT
QUALITY COPIES ? YES NO
RESOLUTION TX/COPY STANDARD FINE
SUBSTITUTE RECEPTION YES NO
ECM YES NO
DOCUMENT RETRANSMISSION YES NO
TRANSMISSION SPEED 14400 9600 4800
RESEND FAILED TX YES NO
DEL POLL TX DOC YES NO
RX ON PC & FAX YES NO
MONITOR LINE YES NO
REMOTE DIAG. YES NO
DATE FORMAT DD/MM 'YY 'YY MM/DD MM/DD/YY 24h
LANGUAGE SELECTION
PORTUGUESE - ENGLISH - DUTCH - SWEDISH - CROATE -
SLOVENE
NO
NO
OUTSIDE THE
DOCUMENT
MM/DD/YY 12h
NOTE: Shaded parameters or options are not available in all Countries.
PROCEDURES
41
Page 48

PRINTING THE CONFIGURATION PARAMETERS
v
You can print the complete list of set-up parameters at any time. This section describes how.
v The configuration menu on the display.
1. Press START and then the 5 or 6 keys until the related
menu is selected.
2. Press PRINT.
The fax machine prints all configuration parameters.
FUNCTION (0-9)
5. SET-UP
OPERATING CONFIGURATION
SET-UP PARAMETERS
SET-UP PARAMETERS
PRINTING...
3. Press STOP to leave the procedure.
SETTING OPERATING CONFIGURATION PARAMETERS
Initially, configuration parameters take the values set by the manufacturer.
The configuration menu on the display. Before modifying
the configuration parameters, it is best to print them using
the procedure described above.
1. Press START and then the 5 or 6 keys until the related
menu is selected.
FUNCTION (0-9)
5. SET-UP
OPERATING CONFIGURATION
SET-UP PARAMETERS
2. Press START.
3. Use the 5 or 6 key to display the desired parameter
(e.g. " QUALITY COPIES ?").
4. Press START.
5. Press START to accept the value proposed or the 5 or
6 to select the alternative value and press START. The
display shows the next parameter.
6. Repeat the procedure in step 3 to set other parameters or
press STOP to leave the procedure.
42
SET-UP PARAMETERS
RECEPTION MODE
SET-UP PARAMETERS
QUALITY COPIES ?
QUALITY COPIES ?
NO
SET-UP PARAMETERS
RESOLUTION TX/COPY
PROCEDURES
Page 49

DIALLING
PROGRAMMING ONE-TOUCH DIALLING KEYS
There are 10 one-touch dialling keys (01 - 10), situated on the right-hand section of the console. On each
key, you can program:
– Facsimile number
– Telephone number
– Subscriber's name
– Closed network.
This parameter enables you to set up a limited-access communication network. Communication is
restricted by checking the last 4 or 6 digits in a recipient's or sender's facsimile number. This
parameter can only be activated if it is enabled in the operating configuration
See the THEORY OF OPERATION - Customising the machine chapter. To enter data, refer to the
GENERAL ISSUES - Basic Operations chapter.
1. Press FUNCTION followed by 6.
2. Press START to activate one touch dialling.
3. Press START.
4. Using the 33 or 44 key, choose the one touch dialling key
you want to program (1 to 10), for instance 06.
IF...
the key has already been programmed, the display shows the fax number of the recipient "Deleting
programmed data".
5. Press START to begin recording the parameters for the
selected one touch dialling key.
IF...
The display shows a previously set number, you can confirm it or overwrite a new one.
6. Type in the desired fax number (max. 32 digits), e.g.
0125 35823.
FUNCTION (0-9)
6.TELEPHONE DIRECTORY
6.TELEPHONE DIRECTORY
ONE-TOUCH DIALLING
ONE-TOUCH DIALLING
01:
ONE-TOUCH DIALLING
06:
1-TOUCH DL. FAX
06:
1-TOUCH DL. FAX
06: 0125 35823
7. Press START. The display shows the parameter for the
telephone number.
1-TOUCH DL. TEL.
06:
8. Enter the desired telephone number (max. 32 digits), e.g.
es. 0125 230223 (entering the phone number is optional).
IF...
The display shows a previously set number, you can confirm it or overwrite a new one.
9. Press START to confirm the number. The display shows
the next parameter (user’s name)
PROCEDURES
1-TOUCH DL. TEL.
06: 0125 230223
1-TOUCH DL. NAME
06:
43
Page 50

10. Enter the user’s name - max 20 alphanumeric characters
- for instance Elba (entering the name is optional).
1-TOUCH DL. NAME
06: ELBA
11. Press START. The display shows the parameter:
“CLOSED NET.” (YES/NO).
IF...
you want to choose a different value from the one on display, press 5 or 6
12. Press START. The display shows the parameter for the
next one touch dialling key.
IF....
you desire to program other keys, repeat the procedure from step 5 or press STOP twice to leave the
procedure.
1-TOUCH DL. CLOSED NET.
06: NO
1-TOUCH DL. FAX
07:
PROGRAMMING SPEED DIALLING CODES
Speed dialling enables you to program up to 90 IDs (00 to 89) consisting of a maximum of 32 digits.
For each code, you can program:
– Facsimile number
– Subscriber's name
– Closed network.
We recommend you set the user's name associated with each speed dialling code. In this way, while
dialling a number during transmission, by pressing SPEED DIAL and the 5 or 6 key, you can display all
the names associated with the facsimile numbers in alphabetical order. You will then be able to dial the
desired number, simply by pressing START.
This parameter enables you to set up a limited-access communication network. Communication is
restricted by checking the last 4 or 6 digits in a recipient's or sender's facsimile number. This parameter
can only be activated if it is enabled in the operating configuration. Refer to THEORY OF OPERATION Customising the machine chapter.
1. Press FUNCTION followed by 6.
2. Press START to activate speed dialling.
FUNCTION (0-9)
6.TELEPHONE DIRECTORY
6.TELEPHONE DIRECTORY
ONE-TOUCH DIALLING
3. Press the 5 or 6 keys to select speed dialling.
6.TELEPHONE DIRECTORY
CODED SPEED DIALLING
4. Press START to activate speed dialling.
44
CODED SPEED DIALLING
00:
PROCEDURES
Page 51

5. Using the 5 or 6 key, choose the speed dialling code
10.
you wish to programme, for instance 01.
IF...
• the code was previously programmed, the display will show the recipient’s fax number. In this case,
choose another code or see “Deleting programmed data”.
CODED SPEED DIALLING
01:
6. Press START. The display shows the parameter for
introducing the recipient’s fax number.
CD.SPEED DL. FAX
01:
7. Enter the desired fax number on the numeric key pad
(max. 32 digits), e.g. 011 601234.
IF...
the display shows a previously set number, you can confirm it or overwrite a new one.
CD.SPEED DL. FAX
01: 011 601234
8. Press START to confirm the number you set. The display
shows the message for the recipient’s name.
CD.SPEED DL. NAME
01:
9. Enter the recipient’s name (max. 20 characters) and
press START. The display shows the “Closed network”
parameter (YES/NO).
IF...
you do not want to enter the name, which is optional, go on to the next step.
Press START to confirm the displayed value or press 5
or 6 to choose an alternative one and press START.
Press START to confirm the displayed option.
Recording the parameters for code 01 is complete. The
display shows the parameters from the beginning in case
a second code needs to be programmed.
CD.SPEED DL. CLOSED NET.
01: NO
CD.SPEED DL. CLOSED NET.
01: NO
CD.SPEED DL. CLOSED NET.
01: NO
IF...
you wish to continue programming the remaining codes, repeat the procedure from step 6 or press STOP
twice to exit the menu.
PRINTING PROGRAMMED DATA FOR ONE TOUCH AND SPEED DIALLING
You can print the data programmed on the 30 one-touch dialling keys and 100 speed dialling codes. This
enables you to check that the numbers (facsimile and telephone) and data set for each key or code (user
name, transmission speed and closed network settings) are correct, and which keys or codes have been
programmed. In addition, if you keep a copy beside the facsimile machine, you will be able to see which
user a given number corresponds to at a glance.
The data is printed:
– in progressive numerical order, if no names have been associated with the numbers
– in alphabetical order, if the correspondents' names have been associated with the facsimile numbers.
The parameters not set for a given key or code will be marked with "--". Unprogrammed keys or codes are
not printed.
PROCEDURES
45
Page 52

To print this data, once programmed, proceed as follows (the example refers to speed dialling codes):
6.
v Procedure 6 selected.
1. Press START
IF...
you want to print the speed dialling selection, press 33 or 44 to display the associated parameter.
FUNCTION (0-9)
6.TELEPHONE DIRECTORY
6.TELEPHONE DIRECTORY
ONE-TOUCH DIALLING
2. Press PRINT. The data for the programmed selection
codes are printed.
ONE TOUCH DIALLING
PRINTING...
3. At the end of the operation, press STOP to exit the menu.
DELETING PROGRAMMED DATA
This section describes the procedure for deleting programmed data for one touch dialling keys and speed
dialling codes.
1. Press FUNCTION followed by 6.
FUNCTION (0-9)
6.TELEPHONE DIRECTORY
2. Press START to activate one touch dialling.
3. Press START. The display shows the first programmable
key. If a number is set, it is shown.
4. Using the 5 or 6 key, choose the programmed key (for
instance, 06). The display shows the programmed fax
number.
5. Press CLEAR. All parameters associated to the selected
key are deleted and the display shows “deleted”.
Programme the key again, or use 5 or 6 to move the
cursor on another key to delete, or press STOP to exit the
menu.
6.TELEPHONE DIRECTORY
ONE-TOUCH DIALLING
ONE-TOUCH DIALLING
01:
ONE-TOUCH DIALLING
06: 0125 35823
ONE-TOUCH DIALLING
06:
46
PROCEDURES
Page 53

PROGRAMMING DIALLING GROUPS
v
6.
You can compile up to 10 distinct groups or list of correspondents, comprising solely fax numbers
programmed for one touch or speed dialling, up to 100 correspondents each. The groups are numbered
according to the typical coding system used for speed dialling, using codes 90 / 99.
Through this programming, when a group is selected for transmission, the same document will be sent to
each of the correspondents listed in the group.
If you are not navigating in the menu already, the starting
function is number 6 reported here.
FUNCTION (0-9)
6.TELEPHONE DIRECTORY
1. Press START.
6.TELEPHONE DIRECTORY
ONE-TOUCH DIALLING
2. Press the 5 or 6 key to select the function you require.
6.TELEPHONE DIRECTORY
GROUP DIALLING
3. Press START. The display shows the first code (90) to
which a group can be associated and a three digit
counter indicating the number of correspondents in the
group (0 to 100).
IF...
• a code has already been programmed, the display will show that code first with the counter to indicate
a number other than 0.
• you want to programme a code other than the one proposed, press 5 o 6 to make the selection.
4. Press START.
IF...
you want to delete one of the previous settings, press 5 or 6 to select the deletion message, then follow
the deletion procedure.
GROUP DIALLING
*90: 000
*90:
INSERT
5. Press START.
*90:
ENTER FAX NO. _
Press the one touch dialling key you desire (01 /10), then
press START. The display briefly shows the fax number
and the name of the recipient stored in the rapid selection
key chosen, then again the message requesting you to set
another fax number. By pressing another one touch
dialling key, you compose the group.
IF...
• you press an unprogrammed one touch dialling key, an appropriate message will appear. At this point,
press another key.
• you want to associate a speed dialling key, press SPEED DIAL. and type in the required speed dialling
code. The procedure for compiling the group is identical to the one followed with the one touch dialling
keys except for the display. The symbol * on the display indicates that a speed dialling code has been
selected instead of a one touch key.
PROCEDURES
*90:
ENTER FAX NO. _
47
Page 54

7. After entering the data you require, press START until
9.
v
the display shows the second programmable parameter,
i.e. the name.
GROUP DIAL. NAME
*90: _
8. Enter the name you wish to associate to the fax number
you are programming and press START. The display
shows the message for the next programming group, in
this case 91.
Proceed to programme the desired groups repeating the
steps from number 3 on, or press STOP to exit the
procedure.
PRINTING THE PROGRAMMED DATA
You can print the programmed groups, to check which fax numbers have been associated for each group.
GROUP DIALLING
*91: 000
v After completing group programming.
1. Press START.
2. Press the 5 or 6 to select the required function.
3. Press PRINT.
4. Press STOP to exit the menu.
6.TELEPHONE DIRECTORY
ONE-TOUCH DIALLING
6.TELEPHONE DIRECTORY
GROUP DIALLING
GROUP DIALLING
PRINTING...
DELETING THE GROUPS
You can delete the dialling groups at any time. You can delete them individually, for each fax number
associated to the group, or cumulatively.
If you are not navigating in the menu already, the starting
function is number 6 reported here.
FUNCTION (0-9)
6.TELEPHONE DIRECTORY
After completing group programming.
1. Press START.
2. Press the 5 or 6 keys to select the required function.
3. Press START. The display shows the first group (code
90= and the associated name, for instance technical).
The counter indicates how many fax numbers are
comprised in the group (e.g. 2).
IF...
you want to delete all fax numbers and their associated names in group 90, press CLEAR.
4. Press START.
6.TELEPHONE DIRECTORY
ONE-TOUCH DIALLING
6.TELEPHONE DIRECTORY
GROUP DIALLING
GROUP DIALLING
*90: TECHNICAL 002
*90: TECHNICAL
INSERT
48
PROCEDURES
Page 55

5. Press the 5 or 6 keys. The display shows the individual
8.
9.
10.
v
deletion message.
*90: TECHNICAL
DELETE
6. Press the 5 or 6 keys. The display shows the one touch
dialling or speed dialling code associated to the group
and the fax number recorded there (e.g. 01 and 780277).
7. Press CLEAR.
Type 1. The first number of the group is deleted together
with its name. The display shows the “DELETED”
message, then it again presents the situation as per step 6
similarly to the fax number and name for the second one
touch dialling key or speed dialling code associated to
group 90.
Repeat step 7 for each item to be deleted. When you are
about to delete the last item in the group, the display
indicates that condition with an appropriate message,
requesting confirmation for the deletion.
Press STOP to exit the menu.
*01: TECHNICAL
N. FAX: 780277
CONFIRM DELETION
1=YES 0=NO
PASSWORD
RECORDING THE PASSWORDS
After it is set, a password can no longer be displayed. Moreover, to modify it you have to access functions
controlled by the existing password. Therefore we recommend that you WRITE DOWN THE
PASSWORDS YOU SET! To enter the characters, refer to the Reminder.
If you are not already navigating in the menu, the starting
function is number 5 shown here.
Group programming is complete.
1. Press START.
2. Press START.
3. Press 5 or 6 until the required function is displayed (for
instance “System password”).
4. Press START to begin recording the password.
5. Enter the characters of the password and press START.
The display shows the message for the next password.
6. Press STOP to exit the menu.
PROCEDURES
FUNCTION (0-9)
5.SET-UP
OPERATING CONFIGURATION
STORING DATA
OPERATING CONFIGURATION
DATE/TIME
STORING DATA
SYSTEM PASSWORD
NEW PASSWORD
-
STORING DATA
PASSWORD FOR TX
49
Page 56

MODIFYING OR DELETING PASSWORDS
v
4.
The password set can be modified or deleted. This section describes how to modify or delete the
transmission inhibit password.
If you are not navigating in the menu already, the starting
function is number 5 reported here.
FUNCTION (0-9)
5.SET-UP
1. Press START. The display asks for the password.
OPERATING CONFIGURATION
STORING DATA
2. Press START.
OPERATING CONFIGURATION
DATE/TIME
3. Press 5or 6 until the desired function is displayed.
STORING DATA
SYSTEM PASSWORD
IF...
you have set a system password, the machine will require that password to be entered before it allows you
to modify or delete passwords.
Enter the current password and confirm it with the START
key. At this point you can:
− modify the current password, overwriting a new one
or
− delete the current password, pressing the CLEAR key. The
display shows the next function.
5. Press STOP to exit the menu.
50
PROCEDURES
Page 57

TRANSMISSION
DOCUMENTS THE MACHINE CAN TRANSMIT
Format
The fax machine allows to transmit any kind of document, as long as its format falls within the minimum
and maximum limits discussed below. If the document is larger or smaller, photocopy it, reducing it or
enlarging it to adapt it to the accepted format.
Actual size of the image
To guarantee that the document is reproduced in full, its right and left margins have to be greater than 1
mm.
ADF capacity
With the automatic document feeder (ADF), the fax machine can feed originals of A4, A5, LETTER and
LEGAL formats.
The ADF can feed up to 20 sheets (max thickness 0.1 mm) for the A4, A5, LETTER and LEGAL formats.
Originals not to be used
• Crumpled or folded originals
• Coiled up, wet or damp originals
Before you make a transmission, check the original: if it corresponds to one of the following types of
documents, you have to photocopy it or insert it in an appropriate clear document holder. The copy may
then used for transmission instead of the original.
• Torn originals
• Coated originals
• Holed originals
• Originals with cardboard paper at the back
• Transparencies
• Originals with clips or metal staples
Preparing the document for transmission
Document preparation is the first step in each transmission operation. Before you transmit a document,
follow the indications reported below.
INSERTION
First of all, check the document to ensure it is not crumpled, it has no staples, etc. If so, follow the
precautions listed in the previous section.
Insert the document into the originals inlet slide with the face to be transmitted pointed downward and
adjust the guides to its width. The document has to be placed in the slide without forcing it in, and it will
advance automatically when it is transmitted.
The display shows the “DOCUMENT INSERTED” message.
PROCEDURES
51
Page 58

SELECTING THE GRAPHIC DEFINITION
CONTRAST
IMAGE
RESOL.
SETTING THE PAGE NUMBERING
If you want, you can set the number of pages that form the document. In this way, the document received
will be numbered at the top in the following format: 01/nn, 02/nn, 03/nn, ......nn/nn where "nn" represents
the total number of pages that make up the document.
The facsimile machine will automatically check the number of pages sent:
– when sending a document from the memory: after the document has been stored, if the number of
pages set does not correspond to the number of pages stored, the machine beeps and the document is
automatically cleared from the memory.
– when sending a document from the ADF: after the document has been sent, if the number of pages set
does not correspond to the number of pages sent, the machine beeps, the error LED lights up and, if
the relevant set-up parameter has been enabled, an error report will be printed.
In either case, the message "INCORRECT PAGE COUNT" will appear on the display.
Proceed as follows:
This adjusts the contrast of the originals to be transmitted and copied (only
with the original in the ADF).
• LED on for excessively light originals.
• LED blinks for excessively dark originals.
• LED off: normal originals.
This recognises the colours (and the shades of grey) of the original
document to be transmitted or copied, which will then be received or copied
in shades of grey.
• LED on: documents containing text and photographic images.
• LED blinking: for documents containing photographic images.
• LED off: for documents with text only.
This adjusts the definition of the originals to be transmitted or copied.
• LED on: for documents with small characters and drawings.
• LED blinking: for documents with very small characters and detailed
drawings.
• LED off: for easy to read documents.
1. Press FUNCTION followed by 7.
2. Press START.
3. Type the number of pages on the numeric key pad, e.g. 12.
4. Press START to confirm the setting. The fax machine
gets ready to transmit.
52
FUNCTION (0-9)
7.PAGINATING/MULTICOPY
7.PAGINATING/MULTICOPY
PAGINATING
PAGINATING
NO. PAGES/COPIES: 12
SELECTED PAGE NO. 12
DOCUMENT INSERTED
PROCEDURES
Page 59

TRANSMITTING TO A SINGLE RECIPIENT
5.
All transmission operations can be interrupted at any time by pressing the LINE STATUS key together
with the STOP key (if you only press the former, you can view the fax machine’s operating status).
The “Display indications” section reports the messages displayed during transmission operations.
Immediate
v Remember that if the “AUTOMATIC STORING” configuration parameter is disabled, the document has
to be left in the ADF (otherwise the setting is cancelled) and the fax machine cannot be used for other
operations until the current one is complete.
1. Insert the document into the ADF. The fax machine shows the "DOCUMENT INSERTED”
message.
2. Dial the number of the recipient in one of the available modes. The fax machine starts to store
the document (the percentage of free memory decreases). It then starts the transmission (the
TX/RX LED lights up).
3. At the end of the operation the TX/RX LED goes off. The successful outcome of the operation
can be checked by pressing the LINE STATUS key and by looking at the percentage of free
memory, which goes back to the maximum available value.
Delayed
The facsimile machine can send a document at a preset time. This enables you to get around time zone
difficulties when the correspondent is thousands of kilometres away, or to choose times when the lines are
less busy and cheaper rates apply.
Remember that, having set a transmission transaction, you can receive, copy or send other documents as
the document is stored automatically.
1. Insert the document in the ADF. The facsimile machine
displays the message "DOCUMENT INSERTED".
09/12 ‘ 97 15:46 97%
DOCUMENT INSERTED
2. Press FUNCTION 2.
FUNCTION (0-9)
2.DELAYED TRANSMISSION
3. Press START.
DELAYED TX
ENTER TIME: HH. MM
4. Set the time for the transmission (within the next 24
hours) and press START.
Select the recipient’s fax number in one of the available
modes and press START. The fax machine starts
automatically storing the document, and after completing
that it goes back to stand-by.
DELAYED TX: (HH:MM)
ENTER FAX NO.
IF...
you use the one touch dialling key, you do not need to press START.
PROCEDURES
53
Page 60

Confidential
5.
v Remember that if the “AUTOMATIC STORING” configuration parameter is disabled, the document must
be left in the ADF (otherwise the setting is cancelled) and the fax machine cannot be used for other
operations until the end of the on going transmission.
1. Insert the document into the ADF.
09/12 ‘ 97 15:46 97%
DOCUMENT INSERTED
2. Press FUNCTION 3.
FUNCTION (0-9)
3.CONFIDENTIAL TX
3. Press START.
CONFIDENTIAL TX
PASSWORD: _
4. Insert the password, agreed with the recipient, to be
associated with the document and press START.
Select the number of the recipient fax in one of the
available modes and press START. The fax machine
starts transmitting the document and returns to stand-by.
IF...
you use the one touch dialling key or the speed dialling code, you do not need to press START.
CONFIDENTIAL TX
ENTER FAX NO.
Resend a transmission from memory
To resend a failed transmission, proceed as follows:
v A transmission from memory has been set and it has not been completed successfully, and the
“RESEND FAILED TX” configuration parameter is enabled.
1. Press FUNCTION followed by 9.
2. Press START.
3. Use 33 or 44 to display the function "MEMORY
TRANSMISSIONS " and press START.
54
FUNCTION (0-9)
9.MEMORY STATUS
9.MEMORY STATUS (0-9)
DOCUMENTS IN MEMORY
MEMORY TRANSMISSIONS
TRANS. NO.: NNNN
PROCEDURES
Page 61

4.
Select the activity with the 5 or 6 key or enter the
4.
5.
6.
number directly on the numeric key pad. At this point you
can modify the date/time of transmission (a) and/or the
recipient’s fax number (b):.
a) Display the “DATE/TIME” field using the 5or6 key.
Press START.
The display shows the current time. Modify the
transmission time, or accept the current one, and confirm
by pressing START.
b) Display the "NUMBER" field using the 5or 6 key.
Press START. Modify the recipient’s fax number and
press START.
MEMORY TRANSMISSIONS
DATE/TIME: DD/MM 'YY
DELAYED TX
ENTER TIME: HH.MM
MEMORY TRANSMISSIONS
NUMBER:
MEMORY TRANSMISSIONS
NUMBER:
5. To exit the menu, press STOP twice.
TRANSMISSION TO MULTIPLE RECIPIENTS ("BROADCAST")
1. Insert the document into the ADF.
2. Press FUNCTION followed by 1.
3. Press START.
Press START to accept the time displayed (immediate
transmission) or type the time of transmission (delayed
transmission - within the next 24 hours) and press
START. The fax machine stores the document.
In one of the available modes, select the number of a
recipient to which the document is to be sent.
Repeat step 4 for all other recipients (max. 100). After
selecting the last number press START to confirm the
whole series. The fax machine starts the transmission (if
immediate) or goes back to stand-by (if delayed).
09/12 ‘ 97 15:46 97%
DOCUMENT INSERTED
FUNCTION (0-9)
1.BROADCAST TRANSMISSION
BROADCAST TRANSMISSION
ENTER TIME: HH:MM
BROADCAST DOC.R: NNNN
ENTER FAX NO.
PROCEDURES
55
Page 62

Resending a single transaction of the broadcast
6.
To resend a transaction of the broadcast whose transmission failed, proceed as follows:
v A transaction of a broadcast transmission failed, and the “RESEND FAILED TX” configuration
parameter is enabled.
1. Press FUNCTION 9.
2. Press START.
3. Press START.
4. Then with the 5 or 6 key, display the “BROADCAST
TRANSMISSIONS” function and press START. The
display shows the reference number of the first document
associated to a broadcast transmission.
5. Select the broadcast with the 5 or 6 and then press
START.
Select the desired activity with the 5 or 6 key, or
introduce the reference number on the numeric key pad.
At this point you can modify the date/time of transmission
(a) and the recipient’s fax number (b):
a) Display the "DATE/TIME" field using the 5 or 6.
Press START.
The display shows the current time. Modify the time of
transmission, or accept the current one, and confirm by
pressing START.
b) Display the "NUMBER" field using the 5 or 6 key.
Modify the recipient’s fax number and press START.
7. To exit the menu, press STOP twice.
FUNCTION (0-9)
9.MEMORY STATUS
9.MEMORY STATUS (0-9)
DOCUMENTS IN MEMORY
9.MEMORY STATUS
BROADCAST TRANSMISSION
BROADCAST TRANSMISSION
BROADCAST DOC.R: NNNN
BROADCAST DOC.R: NNNN
TRANS. NO.: NNNN
BROADCAST DOC.R: NNNN
DATE/TIME: DD/MM 'YY HH:MM
DELAYED TX
ENTER TIME: HH.MM
BROADCAST DOC.R: NNNN
NUMBER:
BROADCAST TRANSMISSION
NUMBER:
56
PROCEDURES
Page 63

Display messages (with LINE STATUS key pressed - transmission from memory)
3.
MEANING DISPLAY
The facsimile machine is sending a document. The display shows
the number of the page being sent (P.nn), the transmission speed
(expressed in thousands of bauds, 14.4, 9.6 or 4.8) and whether or
not Error Correction Mode (E) is enabled.
The facsimile machine is sending a document from the memory. At
the end of the operation, it sends the document inserted in the ADF.
The facsimile machine is automatically redialling the number dialled.
In this situation, the console is disabled. If the document has been
removed from the ADF, the facsimile machine beeps and aborts
transmission.
The line is busy or the correspondent's fax is not connected. If the
document is sent from the ADF, press STOP to remove the
message and retry transmission.
Transmission was aborted by the operator.
A communication error has occurred. The transmission transaction
was not successful. If the document is sent from the ADF, press
STOP to remove the message and retry transmission.
Transmission was successful. The document was sent.
TRANSMITTING P. NN 14,4
TRANSMISSION IN PROGRESS
PLEASE WAIT
REDIAL
NUMBER
NO CONNECTION
NUMBER
TRANSMISSION INTERRUPTED
NUMBER
TRANSMISSION FAILED
NUMBER
TRANSMISSION COMPLETED
NUMBER
URGENT TRANSMISSION
If you have to make a transmission with precedence over the others already stored, just insert the
document to be sent into the fax machine and press the specific key.
v
1. Insert the document in the ADF.
2. Press URGENT TX.
Select the recipient’s number in one of the available mode
and press START. The fax starts storing the document
and transmits it.
PROCEDURES
09/12 ‘ 97 15:46 97%
AUTOMATIC RX
09/12 ‘ 97 15:46 97%
DOCUMENT INSERTED
URGENT TX
ENTER FAX NO.
57
Page 64

RECEPTION
1.
1.
AUTOMATIC RECEPTION
By using this reception mode, you can leave the room where the fax machine is installed and still receive
documents sent to you.
v The fax machine is in stand-by. The display shows the "AUTOMATIC RX” message.
When an incoming call arrives, the fax machine gets
ready to receive the document (a beep is emitted and the
TX/RX LED lights up). By pressing the LINE STATUS
key, you can display information about the document
(current page, RX speed, ECM function if on) and the
sender’s fax number (or name, if stored on the sender’s
device).
At the end of the operation, the fax machine goes back to
stand-by (a beep is emitted and the TX/RX LED goes off).
RECEIVING P. NN 14.4 E
SENDER'S NUMBER
MANUAL RECEPTION
This reception mode requires the user’s presence. When the phone rings, you have to lift the handset and
ascertain whether the call is a voice or fax call. If the handset emits modulated tones, then someone is
trying to send a document. In this case, proceed as follows:
v The fax machine is in stand-by. The display shows the “MANUAL RX” message.
When you hear the tones, press START (a beep is
emitted and the TX/RX LED lights up). By pressing the
LINE STATUS key, you can display information about the
document (current page, RX speed, ECM function if on)
and the sender’s fax number (or name, if stored on the
sender’s device).
RECEIVING P. NN 14.4 E
SENDER'S NUMBER
Hang up the phone. At the end of the operation, the fax
machine goes back to stand-by (a beep is emitted and the
TX/RX LED goes off).
58
PROCEDURES
Page 65

RECEPTION WITH FAX/PHONE RECOGNITION
1.
With the “FAX/PHONE” configuration parameter enabled, the fax machine can recognise whether the call
is a normal voice call or the caller wants to send a document (this feature is not available in all Countries).
v The fax machine is in stand-by. The display shows the “FAX/PHONE” message.
When the caller wants to send a document:
The machine recognises the fax call and, after a certain
number of rings, it gets ready to receive the document. By
pressing the LINE STATUS key, you can display
information about the document (current page, RX speed,
ECM function if on) and the sender’s fax number (or
name, if stored on the sender’s device).
At the end of the operation, the fax machine goes back to
stand-by (a beep is emitted and the TX/RX LED goes off).
When the caller wants to speak to us:
The machine recognises a voice call and alerts you by emitting a
beep and flashing the TX/RX LED. Lift up the handset and speak
normally.
IF...
the telephone is not lifted after a few seconds, the fax machine gets ready to receive the document
automatically.
Display messages (with LINE STATUS pressed)
MEANING DISPLAY
The facsimile machine is receiving a document. The display
indicates the number of the page being sent (P.nn), the
transmission speed (expressed in thousands of bauds, 14.4, 9.6
or 4.8) and whether or not Error Correction Mode (E) is enabled
or not.
RECEIVING P. NN 14.4 E
SENDER'S NUMBER
RECEIVING P. NN 14.4 E
SENDER'S NUMBER
The facsimile machine has established a connection with the
sender of the document.
The document was received successfully.
An error occurred during reception. Check the result of the
operation on the "Activity Report”.
CONNECTION
RECEPTION COMPLETED
SENDER'S NUMBER
RECEPTION FAILED
SENDER'S NUMBER
RECEPTION WITH EXTERNAL TELEPHONE ANSWERING DEVICE
Refer to ADDITIONAL NOTES at the end of this manual.
PROCEDURES
59
Page 66

POLLING
RECORDING POLLING IDENTIFIERS
This section describes how to record the identifiers to be used in the secure polling transmission mode.
Identifiers range from 01 to 10 and to each of them is associated the CSI (max. 20 digits) of the user you
want to authorise to request your document.
v Function 5 selected.
FUNCTION (0-9)
5.SET-UP
1. Press START.
OPERATING CONFIGURATION
STORING DATA
2. Press START.
3. Press 5 or 6 until the required selection is displayed.
4. Press START and use the 5 or 6 to display the
identifier you want to associate to a fax number, for
instance 03.
IF...
the polling identifier you chose has already been associated to a fax number, then that number is
displayed. In this case, use the 5 or 6 keys to choose another identifier or follow the procedure below to
change a fax number previously associated to that polling identifier.
STORING DATA
DATE/TIME
STORING DATA
SECURE POLLING ID.
SECURE POLLING ID.
ID. 03:
5. Press START. The display shows the cursor for setting
(or modifying) the fax number associated to the polling
identifier you chose (03). Enter the digits of the number,
for example 440276.
6. Press START to confirm the polling identifier. The fax
machine automatically gets ready to record the next
polling identifier.
IF...
you want to continue recording the remaining polling identifiers, repeat the procedure from step 4.
SECURE POLLING ID.
ID. 03: 440276
SECURE POLLING ID.
ID. 04:
7. Press STOP twice to exit the menu.
60
PROCEDURES
Page 67

PRINTING THE POLLING IDENTIFIERS
3.
4.
To check the recorded secure polling identifiers thoroughly, you need to print them out.
v The secure polling identifiers have been recorded. Function 5 selected.
1. Press START.
OPERATING CONFIGURATION
STORING DATA
2. Press START.
3. Press 5 or 6 until the required selection is displayed.
4. Press PRINT. The machine prints the recorded secure
polling identifiers.
STORING DATA
DATE/TIME
STORING DATA
SECURE POLLING ID.
SECURE POLLING ID.
PRINTING...
5. Press STOP to exit the menu.
POLLING TRANSMISSION
Free
If the "DEL POLL TX DOC" configuration parameter is enabled, the document will be erased from memory
after only one transmission!
v Function 4 has been selected.
1. Press START.
2. Press START.
Insert the document in the ADF and press START. The
fax machine starts storing the document, then displays
the document’s data and the desired polling mode, i.e.
free or secure.
Press START to activate the free polling mode. The fax
machine confirms the selection and goes back to standby. From this point on, if there is a request by a remote
user, the fax machine will send the document.
PROCEDURES
FUNCTION (0-9)
4. POLLING
4. POLLING
POLLING FOR TRANSMISSION
POLLING FOR TRANSMISSION
SET
POLLING FOR TRANSMISSION
FREE POLLING
61
Page 68

Secure
3.
4.
v You must have recorded the secure polling identifiers.
1. Follow steps 1 through 3 of the procedure described above.
2. Use the 5 or 6 key to select the “SECURE POLLING
ID.” option and press START. The fax machine asks for
the identifiers authorised to ask for the document to be
sent.
Enter the identifiers of the users authorised to ask for the
document (01 to 10), confirming each with the START
key.
After entering the last identifier and confirming it with the
START key, press START again. The fax machine
confirms the setting and goes back to stand-by. When it
receives a request to send the document, the fax machine
checks whether the requesting identifier is among the
secure polling identifiers you set. If not, it refuses
transmission and hangs up. The stored document is
deleted automatically when all identifiers set have made
their document transmission request.
Display messages
POLLING FOR TRANSMISSION
TYPE POLLING ID.:
MEANING DISPLAY
A polling operation has already been booked.
The document has not been inserted in the ADF.
The document has been stored. The display shows the number of
pages and the reference assigned to the document.
POLLING FOR TRANSMISSION
POLLING ALREADY BOOKED
INSERT DOCUMENT
STORING COMPLETED
PAGES : NN DOC.R: NN
POLLING RECEPTION
v Function 4 selected.
FUNCTION (0-9)
4. POLLING
1. Press START.
4. POLLING
POLLING FOR TRANSMISSION
2. Use the 5 or 6 to select the function "POLLING FOR
RECEPTION" function and press START.
62
POLLING FOR RECEPTION
SET
PROCEDURES
Page 69

3. Press START again. The fax machine asks for the time
5.
6.
7.
when the transmission request is to be placed. The
display shows the current time.
POLLING FOR RECEPTION
ENTER TIME: HH: MM
4. Set the time (if necessary) and confirm it by pressing
START. The fax machine asks for the fax number from
which to request transmission of the document.
Select the sender’s number in one of the available modes
and press START. The display shows, for a few seconds,
the number and name of the correspondent associated to
the key.
Repeat step 5 for each number to be selected (max. 100)
or go directly to the next step.
Press START to confirm the numbers set and thus end
the procedure. The fax machine sends the transmission
request or, if a different time from the current one has
been entered, it goes into a reception state.
Modifying a set polling reception
The following procedure allows to modify a polling reception activity after it has been set.
v Function 5 selected.
POLLING NO.: NNNN
ENTER FAX NO.
FUNCTION (0-9)
4. POLLING
1. Press START.
2. With the 5 or 6 key, select the “POLLING FOR
RECEPTION” function and press START.
3. With the 5 or 6 key, select the CHANGE option.
4. Press START.
4. POLLING
POLLING FOR TRANSMISSION
POLLING FOR RECEPTION
SET
POLLING FOR RECEPTION
CHANGE
POLLING FOR RECEPTION
POLLING NO.: NNNN
PROCEDURES
63
Page 70

5.
Use the 5 or 6 key to select one of the two activities. At
this point you can:
a) cancel the activity by pressing the CLEAR key.
Press 1 to confirm the cancellation of the activity or 0 to
quit without cancelling it.
CONFIRM DELETION
1= YES 0=NO
b) print the information about the selected reception
activity by pressing the PRINT key.
c) access individual items of information about the activity
by pressing the START key.
The information associated to the activity can be
displayed in sequence by pressing the 5 or 6 key.
The following information is available:
• Activity number: this can be selected through the 5 or
6 key (or entered directly from the numeric key pad) or
cancelled with the CLEAR key (see a) above).
• Fax number: sender’s fax number. To modify this
number, press START, enter the new number and
confirm with START.
• Date/time: this indicates the date and time of reception.
To modify the date/time of reception, press START,
enter the new date/time and confirm with START.
• Status: indicates the status of the activity.
Display messages
MEANING DISPLAY
POLLING NO.: NNNN
PRINTING...
10 polling reception transactions have been booked
More than 100 fax numbers have been set
64
POLLING FOR RECEPTION
POLLING ALREADY BOOKED
TOO MANY DESTINATIONS
PROCEDURES
Page 71

REPORTS
3.
LAST TRANSMISSION REPORT
Printing
To print the report, proceed as follows:
v Function 0 selected.
1. Press START.
2. Press the PRINT key.
3. To leave the menu, press STOP.
Display
To display the individual items in the report, proceed as follows:
v Function 0 selected.
1. Press START.
FUNCTION (0-9)
0. REPORTS
0. REPORTS
LAST TX REPORT
LAST TX REPORT
PRINTING...
FUNCTION (0-9)
0. REPORTS
REPORTS
LAST TX REPORT
2. Press START. the facsimile shows the progressive
number of the activity.
Display information about the activity through the 5 or 6
key.
4. Press STOP twice to exit the menu.
PROCEDURES
LAST TX REPORT
TRANS. NO.: NNNN
65
Page 72

Last reception report
4.
Print
To print the report, proceed as follows:
v Function 0 selected.
1. Press START.
2. Use the 5 or 6 key to display the “LAST RX REPORT”
function.
3. Press PRINT. The fax machine prints the report.
4. Press STOP to exit the menu.
Display
To display individual items of the report, proceed as follows:
v Function 0 selected.
FUNCTION (0-9)
0. REPORTS
REPORTS
LAST TX REPORT
REPORTS
LAST RX REPORT
LAST RX REPORT
PRINTING...
FUNCTION (0-9)
0. REPORTS
1. Press START.
2. Use the 5 or 6 key to display the “LAST RX REPORT”
function.
3. Press START. The fax machine shows the progressive
number of the activity.
Display information about the activity using the 5 or 6
key.
5. Press STOP twice to exit the menu.
66
REPORTS
LAST TX REPORT
REPORTS
LAST RX REPORT
LAST RX REPORT
TRANS. NO.: NNNN
PROCEDURES
Page 73

ACTIVITY REPORT
3.
Printing
To print the activity report, proceed as follows:
v Function 0 selected.
1. Press START.
3. Use the 5 or 6 key to display the “ACTIVITY REPORT”
function.
4. Press PRINT. The fax machine prints the report.
5. Press STOP to exit the menu.
Display
To display the individual items in the report, proceed as follows:
1. Go through steps 1 through 3 of the procedure described
above, then press START again. The fax machine shows
the progressive number of the activity.
FUNCTION (0-9)
0. REPORTS
REPORTS
LAST TX REPORT
REPORTS
ACTIVITY REPORT
ACTIVITY REPORT
PRINTING...
ACTIVITY REPORT
TRANS. NO.: NNNN
2. Use the 5 or 6 key to select the activity.
Use the 5 or 6 key to display information about the
activity.
4. Press STOP to exit the menu.
Display messages
MEANING DISPLAY
The selected report does not require any activity. Press STOP to exit
the menu.
PROCEDURES
TX, RX OR ACTIVITY REPORT
NO TRANSACTION
67
Page 74

MEMORY MANAGEMENT
2.
3.
DOCUMENTS STORED IN THE MEMORY
This section explains how to select documents, print information about them or delete them from the
memory.
Printing the document list
You can print the list of all stored documents.
v Function 9 selected.
1. Press START.
Press PRINT. The fax machine prints the list of
documents in the memory.
3. To exit the menu press STOP.
Selecting a document
v Function selected 9.
1. Press START.
2. Press START.
FUNCTION (0-9)
9. MEMORY STATUS
9. MEMORY STATUS
DOCUMENTS IN MEMORY
DOCUMENTS IN MEMORY
PRINTING...
FUNCTION (0-9)
9. MEMORY STATUS
9. MEMORY STATUS
DOCUMENTS IN MEMORY
DOCUMENTS IN MEMORY
DOC.R: NNNN+TYPE
Press 5 or 6 until the reference to the desired document
is displayed (or enter the reference number directly from
the key pad). Then through the 5 or 6 key, you can also
display the number of pages in the document and the
date/time it was stored.
4. To exit the menu, press STOP twice.
68
PROCEDURES
Page 75

Deleting a document
1.
2.
3.
Select the document following steps 1 through 3 of the
previous procedure, then press the CLEAR key.
Remember that if you delete a document you also
eliminate any activity associated to it. Before proceeding
with the deletion, the fax machine asks you to confirm the
operation.
Press 1 to confirm the deletion of the selected document
or 0 to cancel the operation. To exit the menu, press
STOP twice.
Printing a document
1. Select the document following steps 1 through 3 of the
Selecting a document procedure, then press the PRINT
key. The fax machine prints the document.
CONFIRM DELETION
1=YES 0=NO
DOCUMENTS IN MEMORY
PRINT IN MEMORY
2. To exit the menu, press STOP twice.
BROADCAST TRANSMISSIONS
This menu allows to display and print information about the stored documents associated to broadcast
transmissions.
Printing the list of recipients associated to the broadcasts
You can obtain the list of all documents associated to broadcast transmissions.
v Function 9 selected.
1. Press START.
2. Use the 5 or 6 key to display the BROADCAST
TRANSMISSIONS functions and press START.
Press START. Then use the 5 or 6 key to select the
desired broadcast and press PRINT. The fax machine
prints the list.
FUNCTION (0-9)
9. MEMORY STATUS
9. MEMORY STATUS
DOCUMENTS IN MEMORY
BROADCAST TRANSMISSION
BROADCAST DOC.R: NNNN
BROADCAST DOC.R: NNNN
PRINTING...
4. To exit the menu, press STOP twice.
PROCEDURES
69
Page 76

Displaying data about a broadcast transmission
You can display the data about a broadcast transmission set previously.
v Function 9 selected.
1. Press START.
2. Then use the 5 or 6 key to display the “BROADCAST
TRANSMISSIONS” function and press START. The
display shows the reference number of the first document
associated to a broadcast transmission.
IF...
necessary, select the desired broadcast using the 5 or 6 key (or enter the reference number directly from
the numeric key pad). At this point you can:
• print a report with all information associated to the broadcast (by pressing the PRINT key),
or
• cancel it (by pressing the CLEAR key and confirming the operation with the 1 key),
or
• select an activity by pressing the START key and using the 5 or 6 key (or enter the reference number
directly from the numeric key pad).
You can display the information about the selected activity using the 5 or 6 key.
The following information can be displayed:
• ACTIVITY: represents the number of one of the activities associated to the broadcast. It can be selected
using the 5 or 6 key (or entered directly from the numeric key pad). The chosen activity can be
eliminated by pressing the CLEAR key and confirming the operation with the 1 key.
• NO. OF PAGES: indicates the number of pages comprising the document/ pages transmitted.
• NUMBER: indicates the recipient’s fax number.
• DATE/TIME: indicates the date and time of transmission.
• STATUS: indicates the current status of the activity.
FUNCTION (0-9)
9. MEMORY STATUS
9. MEMORY STATUS
DOCUMENTS IN MEMORY
BROADCAST TRANSMISSIONS
BROADCAST DOC.R: NNNN
3. To exit the menu, press STOP twice.
TRANSMISSIONS FROM MEMORY
The fax machine allows to store and print information about documents in the memory which are
associated to transmissions from memory.
Printing the list of transmissions from memory
You can obtain the list of all documents associated to transmissions from memory.
v Function 9 selected.
1. Press START.
70
FUNCTION (0-9)
9. MEMORY STATUS
9. MEMORY STATUS
DOCUMENTS IN MEMORY
PROCEDURES
Page 77

2. Then, using the 5 or 6 key, display the “MEMORY
TRANSMISSIONS” function.
MEMORY STATUS
MEMORY TRANSMISSIONS
3. Press PRINT.
MEMORY TRANSMISSIONS
PRINTING...
4. To exit the menu, press STOP.
Displaying data about a transmission from memory
You can display the data about a transmission from memory set previously.
v Function 9 selected.
1. Press START.
2. Then use the tasto 5 or 6 key to display the “MEMORY
TRANSMISSIONS” function and press START.
Use the 5 or 6 key to select the desired activity (or enter
the reference number directly on the key pad). At this
point you can:
• delete the activity (pressing the CLEAR key and
confirming the operation with the 1 key),
or
• display the information about the selected activity, using
the 5 or 6 key.
You can display the following information:
DOC.R.: indicates the reference number associated
to the document.
PAGE NO: indicates the number of pages transmitted/
number of pages in the document.
NUMBER: indicates the recipient’s fax number.
DATE/TIME: indicates the date and time of transmission.
STATUS: indicates the current status of the activity.
FUNCTION (0-9)
9. MEMORY STATUS
9. MEMORY STATUS
DOCUMENTS IN MEMORY
MEMORY TRANSMISSIONS
TRANS. NO.: NNNN
3. To exit the menu, STOP twice.
PROCEDURES
71
Page 78

SIGNALS, ACCESSORIES,
MAINTENANCE
Page 79

SIGNALS, ACCESSORIES, MAINTENANCE
SIGNALS
AUDIBLE SIGNALS
The facsimile machine emits the following types of audible and visual signals:
• brief (1 second)
indicates that the transaction has been concluded successfully
• long (3 seconds)/the ERROR LED lights up
indicates that the transaction was concluded unsuccessfully. Press
and check the type of error on the corresponding report (last transmission/reception)
• blinking (continually)
the handset is off the hook. Hang up and press STOP
• blinking (in intervals)
Display messages
The table below shows a list of t he messages that may appear on the display, t ogether with their m eaning
and the action to be taken to eliminate the problem.
MESSAGE MEANING ACTION
LINE STATUS
and then
STOP
,
DOC. RECEIVED IN MEMORY The documents received have
been stored in the memory
because there was an error
preventing them from being
printed immediately.
OUT OF INK There is no ink in the cartridge. Replace the cartridge.
ADD PAPER There is no paper left. Put some paper in the cassette
CHECK PRINTING QUALITY Some of the nozzles on the print
head are not working and this is
having a negative effect on the
print quality.
CHECK THE DOCUMENT (nn) There is no document in the ADF,
it is jammed or is over 2 metres
long.
REMOVE DOCUMENT
AND PRESS STOP
MEMORY FULL There is no space left in the
TX MEMORY FULL There is no space left in the area of
Scanning of the document was
interrupted.
memory. Transmission and re-
ception operations are inhibited.
memory dedicated to tr ansmission.
Transmissions from the memory
are inhibited.
Check the type of error (out of
paper or ink, etc.) and correct it.
and check that the paper
positioning lever is in its lower
position.
Make a copy of a document: if
the quality is acceptable, press
STOP
the message (which will be
displayed again the next time the
cover is opened or print head is
adjusted) otherwise carry out the
manual nozzle testing procedure
(Maintenance).
Insert the document or eliminate
the jam.
Remove the document and press
STOP
Clear the memory of unwanted
documents.
Clear the memory of unwanted
documents.
to momentarily eliminate
.
SIGNALS, ACCESSORIES, MAINTENANCE
75
Page 80

MESSAGE MEANING ACTION
CLOSE THE COVER The cover is open or not firmly
closed.
PAPER ERROR (nn)
CHECK AND PRESS STOP
PRINTER ERROR (nn)
SWITCH OFF/ON
CHECK PRINT HEAD The print head is missing or
DIAGNOSTIC ERROR (nn) An error was detected by the
SCANNER ERROR (nn) An error was detected while the
PURGE PRINT HEAD The facsim ile machi ne is carryi ng
NEW PRINT HEAD?
1=YES 0=NO
PROCEDURE INTERRUPTED You interrupted a procedure by
DATA CONFIRMED The facsimile machine has
TRANSMISSION COMPLETED The transmission operation was
TRANSMISSION FAILED The transmission operation was
NO CONNECTION No connection can be establi shed
*REDIAL* The facsimi le m achine is tryi ng t o
TRANSMISSION INTERRUPTED You interrupted the operation. None.
DOCUMENT IN USE An attempt was made to perform
DOCUMENT NOT PRESENT The document selected does not
NO TRANSACTION ! The transacti on selected does not
There is a paper jam. Check and insert the paper
An error has been detected in the
movement of the print head.
some of the nozzles are not
working properly.
diagnostic test carried out
automatically at power-on.
document was scanned.
out the print head purging
procedure.
The print head has been
reinserted.
pressing STOP.
accepted the setting made or
performed the operation requested.
concluded sucessfully.
not concluded successfully.
with the remote device.
retransmit the document.
an operation on a document in
use.
exist or has been deleted.
exist.
Close the cover correctly.
correctly.
Switch off the machine. Check
that the print head slides freely.
Then switch the machine back
on.
Check that the print head is
inserted and carry out the
manual nozzle testing procedure
(Maintenance).
Try pressing START to remove
the message and call the
Customer Engineering Service.
Remove the document and repeat
the operation.
None.
Answer as appropriate. If you
answer yes but the print head is
not new, the facsimile machine
will not detect when the ink runs
out.
None.
None.
None.
Repeat the operation.
None.
None.
None.
None.
None.
76
SIGNALS, ACCESSORIES, MAINTENANCE
Page 81

Report indications
The table below lists the indications given in the RESULT field of the single-transaction reports. They
consist of a numeric code and a brief message enabling you to identify the cause of the error that has
occurred (due to the limited space available, the Activity Report only shows the numeric part of the
indication). The ACTION column shows the action you must take to solve the problem.
MESSAGE MEANING ACTION
01:DOCUMENT NOT PRESENT The scanner does not detect the
presence of the document to be
read.
02:IMPOSSIBLE CONNECTION The machine does not detect any
dialling tone or it receives
irregular signals.
03:RECIPIENT DID NOT
RESPOND
04:ERRORS WHILE
TRANSMITTING
RESEND FROM PAGE. nn
05:RESEND PAGES: nn,...,nn The remote facsimile machine
07:DOCUMENT TOO LONG The document is too long. The
08:CHECK THE DOCUMENT The scanner cannot read the
09:DOCUMENT NOT PRESENT
DOCUMENT ALREADY IN USE
10:ERRORS WHILE RECEIVING The facsimile machine detects an
11:IMPOSSIBLE RECEPTION
MEMORY FULL
12:SECURE POLLING NOT
ALLOWED
13:ERRORS WHILE POLLING The remote facsimile machine
The remote machine is not
answering.
An error was detected during
transmission (nn = number of
page on which error occurred).
detected faulty reception of som e
pages (nn = number of page on
which error occurred).
time required to send and receive
it exceeds the allowed limit.
document.
The document is already being
used for another operation or has
been deleted.
error during reception.
The facsimile machine does not
have enough space in the
memory to receive the document.
The secure polling IDs do not
correspond.
has no document to be sent.
Check that the document is
inserted in the ADF and that it is
positioned correctly.
Check that the machine is
connected correctly to the line
and that the handset is not off t he
hook. Contact the correspondent
and try to establish a connection
again.
Contact the correspondent.
Retransmit starting from the
page indicated in the Last
Transmission Report.
Retransmit the pages indicated in
the Last Transmission Report.
Split up the document.
Remove the document from the
ADF and reinsert it before
retransmitting.
Make sure that no activities are
being carried out on the
document or store the document
again before transmitting.
Contact the correspondent and
ask him to send the document
again.
Clear unwanted documents from
the memory.
Contact the correspondent and
check that the polling IDs stored
are correct.
Contact the correspondent.
SIGNALS, ACCESSORIES, MAINTENANCE
77
Page 82

MESSAGE MEANING ACTION
14:CONFID. TX
NOT ALLOWED
15:CLOSED NETWORK
REMOTE ID NOT QUALIFIED
16: POWER FAILURE REPORT Emitted after a power failure. Contact the correspondent.
17:INCORRECT PAGE COUNT The facsimile machine detects
18:SYSTEM ERROR The facsimile machine has
20:CONNECTION IS
INCOMPATIBLE CHECK WITH
THE OTHER PARTY
21:'STOP' PRESSED You interrupted the transaction. None.
22:LINE BUSY The busy tone was detected
The remote facsimile machine is
not compatible or has no private
mailbox.
The correspondent's number is
not included in the list of those
belonging to the network.
that the number of pages set
does not correspond to the
number of pages actually sent.
detected an error in the operating
sequence.
The passwords do not correspond
or the receiving facsimile
machine has interrupted the
connection.
before or after the connection.
Contact the correspondent.
Contact the correspondent and
check the facsimile numbers.
Retransmit.
Switch the facsimile machine off
and on again.
Contact the correspondent.
Reattempt transmission.
78
SIGNALS, ACCESSORIES, MAINTENANCE
Page 83

PAPER REMOVAL
REMOVING JAMMED ORIGINALS
If an original jams or is not ejected properly and the display shows
proceed as follows:
1.
Lift the operating console
and remove the remaining
originals from the slide.
2.
Release the roller (see
optical scanner) and remove
the jammed original.
REMOVING THE JAMMED PAPER
When a paper jam occurs and the display shows
CHECK THE DOCUMENT(XX)
3.
Reassemble the roller,
lower the operating
console, reposition the
originals in the slide.
PAPER ERROR (NN)
CHECK AND PRESS STOP
proceed as follows:
When the sheet jams in the received/copied documents outlet area
1.
Remove the extensible
collection tray for original
documents.
2.
Remove the jammed sheet
and reinsert the tray.
SIGNALS, ACCESSORIES, MAINTENANCE
79
Page 84

When the paper jams in the paper feed area
1.
Rotate the paper tray lid.
CAUTION:
If the jammed sheet cannot be reached manually, wait until the end of the transmission/r eception which
may be in progress and then shut off the fax machine and switch i t on again. If the paper i s not ejected
automatically, call the technical assistance service.
2.
Remove the jammed sheet.
If you cannot remove the sheet
as described, perform the same
operations after removing the
tray.
3.
Close the lid of the paper
tray.
80
SIGNALS, ACCESSORIES, MAINTENANCE
Page 85

MAINTENANCE
1.
2.
3.
The fax machine requires only a minimum amount of maintenance by the user: ordinary maintenance, to
be performed periodically (cleaning the optical scanner, cleaning and purging the print head, etc.), and
maintenance operations to be performed when the machine gives the “out of ink” indication . The care you
devote to maintaining the fax machine is important and it has positive consequences on the print quality of
the received documents and of the copies.
OUT OF INK INDICATION
When the ink in the cartridge runs out, the display shows the
message:
To invite the user to:
• replace the print head, if the one in use is of the disposable single-use type
or
• replace the ink cartridge, if the print head has an interchangeable cartridge. (The ink cartridge can be
replaced several times. After a certain number of replacements, however, print quality inevitably drops.
In this case, we recommend removing the entire worn out print head.)
During these operations, the release of a small quantity of ink could contaminate the print compartment: to
prevent this occurrence, the fax machine automatically inserts a sheet under the print carriage.
OUT OF INK
REPLACING THE INK CARTRIDGE
This operation can be performed only if the fax machine is fitted with a print head with interchangeable ink
cartridge.
Lift the cover of the print head
compartment placing your
fingers in the side notches.
SIGNALS, ACCESSORIES, MAINTENANCE
Release the ink cartridge,
using the black lever.
Extract the cartridge.
81
Page 86

NO!
4.
5.
1.
2.
3.
Extract the new cartridge from
its package and remove the
protective film.
At this point, the fax machine performs the “Automatic nozzle cleaning and checking procedure” (described
below), and prints its result on the sheet inserted automatically as a result of the out of ink indication.
Do not touch the ink filled area.
Immediately insert the
cartridge into its housing and
press it until you hear the
click that confirms its proper
insertion.
REPLACING THE PRINT HEAD
The following procedure describes how to replace the print head (single use disposable or with
interchangeable ink cartridge).
Lift the cover of the print head
compartment placing your
fingers in the side notches.
82
Release the print head
(including the cartridge, if the
print head is fitted with an
interchangeable cartridge)
using the levers, then extract it
from its housing.
SIGNALS, ACCESSORIES, MAINTENANCE
Extract the new print head
from its package and
holding it by its grip remove
the protective film from the
nozzles.
Page 87

NO!
!
4.
5.
NO
Do not touch the nozzles and the
electrical contacts and, if the
print head is fitted with an interchangeable ink cartridge, do not
remove the cartridge from the
print head.
Insert the print head in its
housing with the electrical
contacts facing the front of the
machine.
IF...
The new print head is of the single-use disposable type, the display will show the message: NEW PRINT
HEAD? 1=YES 0=NO. Press 1 to confirm.
At this point, the fax machine goes through the “Automatic nozzle cleaning and checking procedure”
(described below) and prints its result on the previously inserted sheet.
Press the print head in the
direction of the arrow until
you hear the click that
confirms its correct insertion,
then close the cover of the
print head compartment.
REPLACING THE PRINT HEAD BEFORE INK RUNS OUT
Refer to ADDITIONAL NOTES at the end of this manual.
AUTOMATIC NOZZLE CLEANING AND CHECKING PROCEDURE
After the print head or the ink cartridge has been replaced, the fax machine automatically follows a nozzle
cleaning procedure. Then it checks them for proper operation and it prints the result on a sheet inserted
automatically after the out of ink indication. The print test contains a numbered scale and a set of graphics
and text in order to allow the user to evaluate print quality immediately.
At the end of the procedure, the display shows the message:
CHECK PRINTING QUALITY
1=QUIT 0=REPEAT
Ensure that the numbered scale has no interruptions and that the black areas have no horizontal white
lines. Under these conditions, which confirm the correct insertion and the proper operation of the print
head, enter 1: the fax machine goes back to stand-by and it is ready for use.
If instead there are interruptions or white lines, but you consider print quality sufficient, press 1, otherwise
type 0 to repeat the nozzle cleaning operation: if even the new print test is still unsatisfactory, repeat the
procedure for the last time. If in spite of the three consecutive runs of the procedure, print quality remains
unsatisfactory, enter 1 and run the “Manual nozzle checking procedure” described in the ordinary
maintenance section. If this procedure also fails to yield any results, the print head is probably defective.
We recommend its replacement.
SIGNALS, ACCESSORIES, MAINTENANCE
83
Page 88

ORDINARY MAINTENANCE
1.
2.
3.
Cleaning the optical scanner
The dust that accumulates on the glass of the optical scanner may cause problems in scanning the
documents; to avoid these problems, you should from time to time clean the glass, in the following
manner:
With the fax machine off, lift
the operating console.
Manual nozzle checking procedure
If in the course of normal use you notice a drop in print quality, proceed as follows:
Release the lever on the left
side of the roller and extract
it, then clean the roller with a
soft cloth to remove and dust
residues.
Clean the glass of the optical
scanner using a cloth you
have dampened with a glass
detergent, then dry it
thoroughly (do not apply the
product directly on the
glass). Reassemble the roller
and lower the operating
console again.
1. Press FUNCTION followed by 8.
FUNCTION (0-9)
8.ADJUSTMENTS
2. Press START.
8.ADJUSTMENTS
NEW PRINT HEAD
3. Use the 5 or 6 key to display the PRINT HEAD
ADJUSTMENT function.
8.ADJUSTMENTS
PRINT HEAD ADJUSTMENT
4. Press START.
PRINT HEAD ADJUSTMENT
PURGE PRINT HEAD
5. Then use the 5 or 6 to display the “NOZZLES TEST”
function and press START. The fax machine starts the
nozzle checking operation and prints out its diagnostic
outcome.
IF ...
you replace the print head before the ink runs out, refer to ADDITIONAL NOTES at the end of this
manual.
84
SIGNALS, ACCESSORIES, MAINTENANCE
PRINTING...
Page 89

DIAGNOSTIC OUTCOME
The print test performed by the fax machine contains a numbered scale and a message about the
operating condition of the nozzles.
Correct
If the numbered scale looks like the figure below:
and the message about the print head nozzles is ALL NOZZLES OK!, then the print head is inserted
properly and all electrical circuits are operational. Press STOP to end the procedure.
Defective
If the numbered scale looks like the following figure:
and the message is ALL NOZZLES OK!, then there is a mechanical problem. In this case, consult the
following table:
CAUSE ACTION
The paper you are using has a very porous
surface.
The print nib has a particle that the print head
cleaner cannot remove.
The print nozzle is dirty. Run the “Print head cleaning" procedure.
Plugged nozzles. Run the “Print head purge” procedure (no more
If instead the numbered scale looks like the following figure:
and the message is NOZZLES DAMAGED, then there is an electrical problem. In this case, consult the
following table:
Try printing on the other side of the sheet or
changing paper type.
Extract the print head. Carefully remove the
particle, taking care not to touch the electrical
contacts and print nib. Reinsert the print head and
refer to the "Automatic nozzle cleaning and
checking procedure”.
than three times - then replace the print head).
SIGNALS, ACCESSORIES, MAINTENANCE
85
Page 90

CAUSE ACTION
1.
2.
3.
4.
5.
The print head was replaced or reinserted
improperly.
Presence of one or more spurious contacts. Run the "Print head electrical contact cleaning”
One or more contacts are interrupted. Replace the print head.
Cleaning the electrical contacts of the print head
With the fax machine off, lift
the cover of the print head
compartment placing your
fingers in the side notches.
Release the print head
(including the cartridge, if the
print head has an
interchangeable ink cartridge)
using the levers.
Extract and reinsert the print head, then refer to the
“Automatic nozzle cleaning and checking
procedure”.
procedure and then refer to the “Automatic nozzle
cleaning and checking procedure”.
Extract the print head.
Clean the electrical contacts
using a soft dry cloth.
Do not touch the nozzles.
86
Use a soft dry cloth also to
clean the electrical contcts of
the print head carriage, then
close the cover
SIGNALS, ACCESSORIES, MAINTENANCE
Page 91

Cleaning the print head wiper
1.
2.
3.
With the fax machine off, lift the
cover of the print head
compartment placing your
fingers in the side notches of
the operating console.
Move the print head as
shown in the figure.
Clean the print head wiper
with a dry cotton swab, then
close the cover of the print
head.
USER SERVICING
You may be faced with problems not due to the poor operation of the fax machine; the purpose of the
indications below is to help you solve these problems, avoiding time wastage and additional costs. If the
solutions proposed here are not found effective or if you face problems different from those listed, consult
the technical assistance service.
PROBLEM CHECK:
The display does not switch on • the facsimile machine is switched on
• the power cable is connected correctly
You cannot insert the document • the operator console is correctly closed
• the thickness of the document is within the specified
limits
• the document is crumpled or folded
• the document is correctly inserted in the slot
• a document is jammed inside the machine
• the feed rollers are dirty
You cannot send a document • the facsimile machine is on
• the document is correctly inserted
• the receiving machine is set for reception
• with a telephone connected to the telephone socket
of the facsimile machine, the dial tone can be heard
• when you press the HOOK key, the dial tone can be
heard
You cannot receive a document • the facsimile machine is on
• there is no paper left in the cassette and the memory
is full
• a sheet of paper is jammed inside the machine and
the memory is full
• with a telephone connected to the telephone socket
of the facsimile machine, the dial tone can be heard
• when you press the HOOK key, the dial tone can be
heard
You cannot print a document received in
memory
You cannot get a connection
• no more sheets in the paper tray
• a sheet has jammed in the machine
• the telephone is correctly connected to the fax
machine’s outlet
SIGNALS, ACCESSORIES, MAINTENANCE
87
Page 92

PROBLEM CHECK:
The document received is not reduced
automatically
The document received is totally white
The document transmitted is totally white
The document received is very light
The document received is very dark
The document received contains vertical
lines
The copied original contains vertical lines
The received or copied document contains
running characters and/or figures or runs all
over the page
Table of the character set the user can introduce
The table reports all the alphanumeric characters
that can be printed and shown on the display.
National characters can be displayed only after
selecting the language using the LANGUAGE
configuration parameter.
• the REDUCTION parameter has been enabled in the
• the sender has inserted the original correctly in his
• the original has been inserted with the dark side
• the transmitted original is actually very light
• the transmitted original is actually very dark
• the glass of the optical scanner in the sending fax
• the glass of the optical scanner is dirty
• the printing paper is correct
• the print nib is dirty
• the electrical contacts in the print head are dirty
• the print head is damaged
operating configuration (see section “Setting up
operating configuration parameters”)
device
facing downward
machine is dirty
A M Y [
B N Z 0 ]
C O 1 . '
D P 2 + >
E Q 3 ? #
F R 4 - &
G S 5 / ,
H T 6 :
I U 7 *
J V 8 space `
K W 9 %
L X !
88
SIGNALS, ACCESSORIES, MAINTENANCE
Page 93

TECHNICAL DATA
General characteristics
Model Desk top transceiver
Display LCD 24+24 crt
Compatibility ITU
Resolution Horizontal scanning: 8 pixel/mm
Vertical scanning: standard 3.85 lines/mm
fine 7.7 lines/mm
proprietary 11.81 lines/mm
surface 15.4 lines/mm
Transmission time 7 s (14400 bps in MMR)
Modem speed 14400/9600/7200/4800/2400 bps
Data compression MH, MR, MMR, Proprietary
Scanning method CIS
Memory capacity 70 pages ITU-TS Test Sheet n° 1 (Slerexe Letter)
ADF 25 A4, Letter, Legal sheets
Printing system On ordinary paper with bubble jet printer
Max. printing width 208 mm
Print paper A4, Letter, Legal
Paper feeding Plain paper tray (150 A4 80 gr/m² sheets)
Dimensions:
Width 324 mm
Depth 325 mm
Height 230 mm
Weight 6 Kg
Electrical characteristics:
Power supply voltage 220 - 240 Vca
110-120 Vca
50/60 Hz
(according to national version)
Environmental conditions:
Temperature from 5 °C to +35 °C (operation)
from -15 °C to +45 °C (transport)
from 0 °C to +45 °C (storage and stationing)
Relative humidity 15% - 85% (operation, storage and stationing)
(without condensation) 5% - 95% (transport)
SIGNALS, ACCESSORIES, MAINTENANCE
89
Page 94

ADDITIONAL NOTES
Read these additional notes referring their first part to the SIGNALS, ACCESSORIES,
MAINTENANCE chapter and the second part to the PROCEDURES (Reception) chapter.
REPLACING THE PRINT HEAD BEFORE INK RUNS OUT
If, to optimise print quality, you desire to replace the disposable print head regardless of the ink runs out
signal:
1. Open the lid and extract the print head.
2. Insert the new print head and close the lid.
3. Press FUNCTION 8.
4. Press START. The display shows the message pertaining to the adjustment of the new print head.
5. Press START. The display shows the message requesting to confirm the insertion.
6. Press 1 to confirm.
7. Press STOP to leave the procedure.
RECEPTION WITH EXTERNAL TELEPHONE ANSWERING DEVICE
If there is an telephone answering device, set it up recording a message of about 10 s. along the following
lines:
“This is the answering device of the fax machine at the number nnnnnn. If you like you may leave a
message after the tone. To send a fax, press the start key on your device. Thank you”
On the answering device, set the number of rings before it is to answer the call (we recommend setting 2
or 3 rings).
Enable the “FAX/TAD” configuration parameter (not available in all countries).
When a call comes in, the fax machine recognises whether it is a fax or voice call. In the first case, the fax
machine disables the answering device and automatically gets ready to receive a document. In the second
case, the answering device answers with the message recorded by the user and then records the one left
by the caller.
If the caller dialled from a phone set or if he/she wants to send a fax after leaving the message, he/she has
to press the start key on his/her own device. The recipient fax machine intercepts the call signal and gets
ready to receive.
If the fax machine detects a silence of about six seconds (either because the caller leaves no message or
because the message is complete), it goes into auto receive mode. The duration of the silence time can be
modified through the “SILENCE TIME” configuration parameter of the fax machine.
90
Page 95

COMPACT TELEPHONE - INSTALLATION
Option which has been homologated in some countries.
COMPACT TELEPHONE - INSTALLATION
91
Page 96

INDEX
A
ADF, 51
Adjusting
speaker volume, 31
Automatic storing, 21
B
Basic operations, 36
changing operating procedures, 36
data entry, 36
setting dialling functions, 36
C
Characters, 88
Confidential reception, 22
Connecting the telephone/answering device, 6
Connection to the telephone line, 6
Copying, 31
Customising the machine, 27
printing the configuration parameters, 42
setting configuration parameters, 41
D
I
Identification data, 10
Inserting the print head, 8
Installation
setting parameters, 12
Installation parameters, 12
modification, 13
L
Language, 29
M
Maintenance, 81
out of ink indication, 81
replacing the print head, 82
Memory, 68
automatic storing, 27
Memory management, 24
Modem, 19
O
Operating set-up, 27
Date and time
format, 10
setting, 10
Date/time
format, 29
Dialling, 20
alphabetical, 20
changing type of dialling, 20
deleting programmed data, 43
pause, 20
second tone, 20
speed, 20
Documents
removal, 79
Documents in the memory, 68
Documents the machine can transmit, 51
E
ECM error correction mode, 29
Elementary use, 14
P
Page numbering, 52
Paper tray adjustments, 7
Personal Computer, 26, 29
connecting to, 29
Polling, 60
free, 61
printing the identifiers, 61
reception, 23, 62
secure, 62
transmission, 61
Prin thead
cleaning the print head wiper, 87
Print head, 3
cleaning the electrical contacts, 86
insertion, 8
replacement, 82
Printer, 19
paper size, 28
Printing
paper tray, 6
INDEX
93
Page 97

R
T
Reception, 22
automatic, 22, 58
call type recognition, 22
manual, 22, 58
Reports
activity, 25
broadcast, 25, 28
last reception, 25
last transmission, 25
power failure, 25
S
Scanner, 3, 19
cleaning the optical scanner, 84
Security, 25
closed network, 26
passwords, 26
Sender’s name, 11
storing, 12
Sender’s number
typing, 12
Settings, 31
Signals, 75
Telephone conversation, 31
suspending/booking a call, 31
The report, 24
Transmission
autoretransmission, 27
broadcast, 21, 55
dial tones, 29
from memory, 57
from telephone, 30
hands free, 30
repeating, 21, 27
resend, 54
sender's ID, 27
speed, 27
type of resolution, 29
Transmission to multiple recipients, 55
U
User servicing, 87
94
INDEX
Page 98

Part Number 057621U
 Loading...