

Page 1

INTRODUCTION
d-COLOR MF3100
Page 2

Page 3

Table of contents
1 Introduction
1.1 Welcome .......................................................................................................................................... 1-3
1.2 User's Guides .................................................................................................................................. 1-3
User's guides included in User's Guide CD/DVD-ROM .................................................................... 1-3
1.3 Notations and symbols used in this manual................................................................................. 1-4
2 Before Using This Function
2.1 CD/DVD-ROM supplied with this machine................................................................................... 2-3
2.2 Installation location and environment........................................................................................... 2-4
2.2.1 Installation location .............................................................................................................................2-4
2.2.2 Installation environment......................................................................................................................2-5
3 About This Machine
3.1 Checking the name of each part ................................................................................................... 3-3
3.2 Checking the option configuration................................................................................................ 3-7
3.3 Installing optional units .................................................................................................................. 3-9
3.3.1 Installing Lower Feeder Unit (Tray 2) ..................................................................................................3-9
Procedural instruction........................................................................................................................ 1-4
Symbols used in this manual ............................................................................................................. 1-4
Product and key names..................................................................................................................... 1-4
Driver & Utilities CD/DVD-ROM ......................................................................................................... 2-3
Front view .......................................................................................................................................... 2-4
Right view .......................................................................................................................................... 2-4
Right view (with optional devices installed) ....................................................................................... 2-4
Front side ........................................................................................................................................... 3-3
Rear side............................................................................................................................................ 3-6
List of optional components .............................................................................................................. 3-7
Front view (with optional devices installed) ....................................................................................... 3-8
Configuration of Lower Feeder Unit................................................................................................... 3-9
Installing the Lower Feeder Unit ........................................................................................................ 3-9
4 Turning the Power ON or OFF
4.1 Turning the Power Switch ON or OFF........................................................................................... 4-3
4.2 Switching to Power Save mode..................................................................................................... 4-4
5 Loading the Original
5.1 Loading the original into the ADF.................................................................................................. 5-3
Original available for ADF................................................................................................................... 5-3
Loading the original into the ADF ...................................................................................................... 5-4
5.2 Loading the original onto the Original Glass................................................................................ 5-5
Original available on the Original Glass ............................................................................................. 5-5
Loading the original onto the Original Glass...................................................................................... 5-5
6 Loading Paper
6.1 Paper ................................................................................................................................................ 6-3
6.1.1 Checking the available paper types....................................................................................................6-3
6.1.2 Checking the available paper sizes ....................................................................................................6-4
6.1.3 Precautions for correct operations .....................................................................................................6-5
Unavailable paper .............................................................................................................................. 6-5
d-COLOR MF3100 Contents-1
Page 4

Storing paper ..................................................................................................................................... 6-5
6.2 Loading paper into the Manual Feed Tray.................................................................................... 6-6
How to load paper into the Manual Feed Tray .................................................................................. 6-6
Loading postcards ............................................................................................................................. 6-7
Loading envelopes............................................................................................................................. 6-8
6.3 Loading paper into Tray 1 .............................................................................................................. 6-9
6.4 Loading paper into Tray 2 ............................................................................................................ 6-11
7 Control Panel
7.1 Names and functions of the Control Panel keys.......................................................................... 7-3
7.2 Screen layout................................................................................................................................... 7-5
7.2.1 Main screen.........................................................................................................................................7-5
7.2.2 Help screen.........................................................................................................................................7-6
7.3 Entering Characters........................................................................................................................ 7-7
7.4 REPORT/STATUS............................................................................................................................ 7-8
Copy mode ........................................................................................................................................ 7-5
Scan mode......................................................................................................................................... 7-5
Fax mode ........................................................................................................................................... 7-6
Changing the entry mode .................................................................................................................. 7-7
Available characters........................................................................................................................... 7-7
8 Login Screen
9 Specifications
9.1 Checking the specifications of this machine ............................................................................... 9-3
9.2 Checking the specifications of optional devices ......................................................................... 9-5
9.3 Standard operating life of consumables and periodic replacement parts ................................ 9-6
Fax function specifications ................................................................................................................ 9-4
Lower Feeder Unit PF-P14 ................................................................................................................ 9-5
Authentication Unit AU-201 ............................................................................................................... 9-5
10 Trademarks and copyrights
Trademark acknowledgements........................................................................................................ 10-3
OpenSSL Statement ........................................................................................................................ 10-3
OpenSLP License ............................................................................................................................ 10-5
Bonjour............................................................................................................................................. 10-5
NetSNMP License............................................................................................................................ 10-7
Kerberos........................................................................................................................................... 10-9
WPA Supplicant ............................................................................................................................. 10-12
Note ............................................................................................................................................... 10-12
SOFTWARE LICENSE AGREEMENT............................................................................................. 10-12
About Adobe Color Profile............................................................................................................. 10-14
ICC Profile for TOYO INK Standard Color on Coated paper (TOYO Offset Coated 3.0)............... 10-16
DIC STANDARD COLOR PROFILE LICENSE AGREEMENT ......................................................... 10-16
11 Index
Contents-2 d-COLOR MF3100
Page 5

1
Introduction
Page 6

Page 7

1.1 Welcome
1 Introduction
1.1 Welcome
Thank you for purchasing this machine.
To obtain maximum performance from this product and to learn how to use it effectively, please read this
User's Guide as necessary.
1.2 User's Guides
User's guides included in User's Guide CD/DVD-ROM
Manual title Overview
[Quick Guide] This guide describes notes and precautions that should be fol-
[User's Guide: Introduction] This guide contains information that is useful to know before be-
[User's Guide: Print] This guide describes how to install the printer driver as well as
[User's Guide: Copy] This guide describes various methods to make copies.
[User's Guide: Scan] This guide describes scan transmission operations and neces-
[User's Guide: Fax] This guide describes fax operations and necessary prepara-
[User's Guide: PC-FAX] This guide describes PC- Fax operations and necessary prepa-
[User's Guide: Advanced Functions] This guide describes how to install optional license kits and
[User's Guide: Maintenance/Troubleshooting]
[User's Guide: Description of Utility
Keys]
[User's Guide: Applied Functions] This guide describes the special usages of this machine such as
1
lowed in order to use this machine safely. Please be sure to read
this manual before using this machine.
This guide also describes how to perform basic operations and
configure initial settings of this machine.
ginning to operate this machine, such as the name of each part
and how to turn the power on and off, use the Control Panel,
and load an original or paper.
basic usage and applications.
sary preparations.
You can scan a paper document, convert it to digital data, and
send the result to the computer or server.
tions.
rations.
You can send the original data created on the computer by fax
directly without printing it out to paper.
functions that can be used by installing the license kits.
This guide describes how to replace consumables, clean this
machine, and perform troubleshooting.
This guide describes Utility settings such as [User Settings] and
[Admin Settings] for this machine.
how to use Web Connection, manually install the printer driver,
configure print settings using Linux, and use the authentication
unit.
d-COLOR MF3100 1-3
Page 8

1
Tips
Related setting
Related setting (for the administrator)
Notations and symbols used in this manual
1.3 Notations and symbols used in this manual
Procedural instruction
0 This check mark symbol shows a precondition of a procedure.
1 This format number "1" represents the first step.
2 This format number represents the order of consecutive steps.
% This symbol indicates a supplementary explanation of a procedural instruction.
Symbols used in this manual
7WARNING
- This symbol indicates that a failure to heed the instructions may lead to death or serious injury.
7CAUTION
- This symbol indicates that a failure to heed the instructions may lead to mishandling that may cause
injury or property damage.
1.3
NOTICE
This symbol indicates a risk that may result in damage to this machine or documents.
Follow the instructions to avoid property damage.
This symbol indicates supplemental information of a topic as well as options required to use a function.
dReference
This symbol indicates reference functions related to a topic.
This shows the settings related to a particular topic for any user.
This shows the settings related to a topic only for administrators.
Product and key names
Notations used
in this manual
[ ] This presents a key name in the Message Window or computer screen, or the name
Bold text This presents a key name, part name, product name, or option name on the Control
Description
of a user's guide.
Panel.
1-4 d-COLOR MF3100
Page 9

2
Before Using This Function
Page 10

Page 11

2.1 CD/DVD-ROM supplied with this machine
2 Before Using This Function
2.1 CD/DVD-ROM supplied with this machine
Driver & Utilities CD/DVD-ROM
Item Overview
[Printer/FAX] Allows you to install the printer driver and fax driver.
For details, refer to [User's Guide: Print] and [User's Guide:
PC-FAX].
[Scanner] Allows you to install the scanner driver.
For details, refer to [User's Guide: Scan].
[Utilities] Various utilities are provided to optimize functions of this ma-
chine.
Clicking this displays the download page.
The CD/DVD-ROM also contains various user's guides.
For details on the user's guide types, refer to page 1-3.
2
d-COLOR MF3100 2-3
Page 12
2
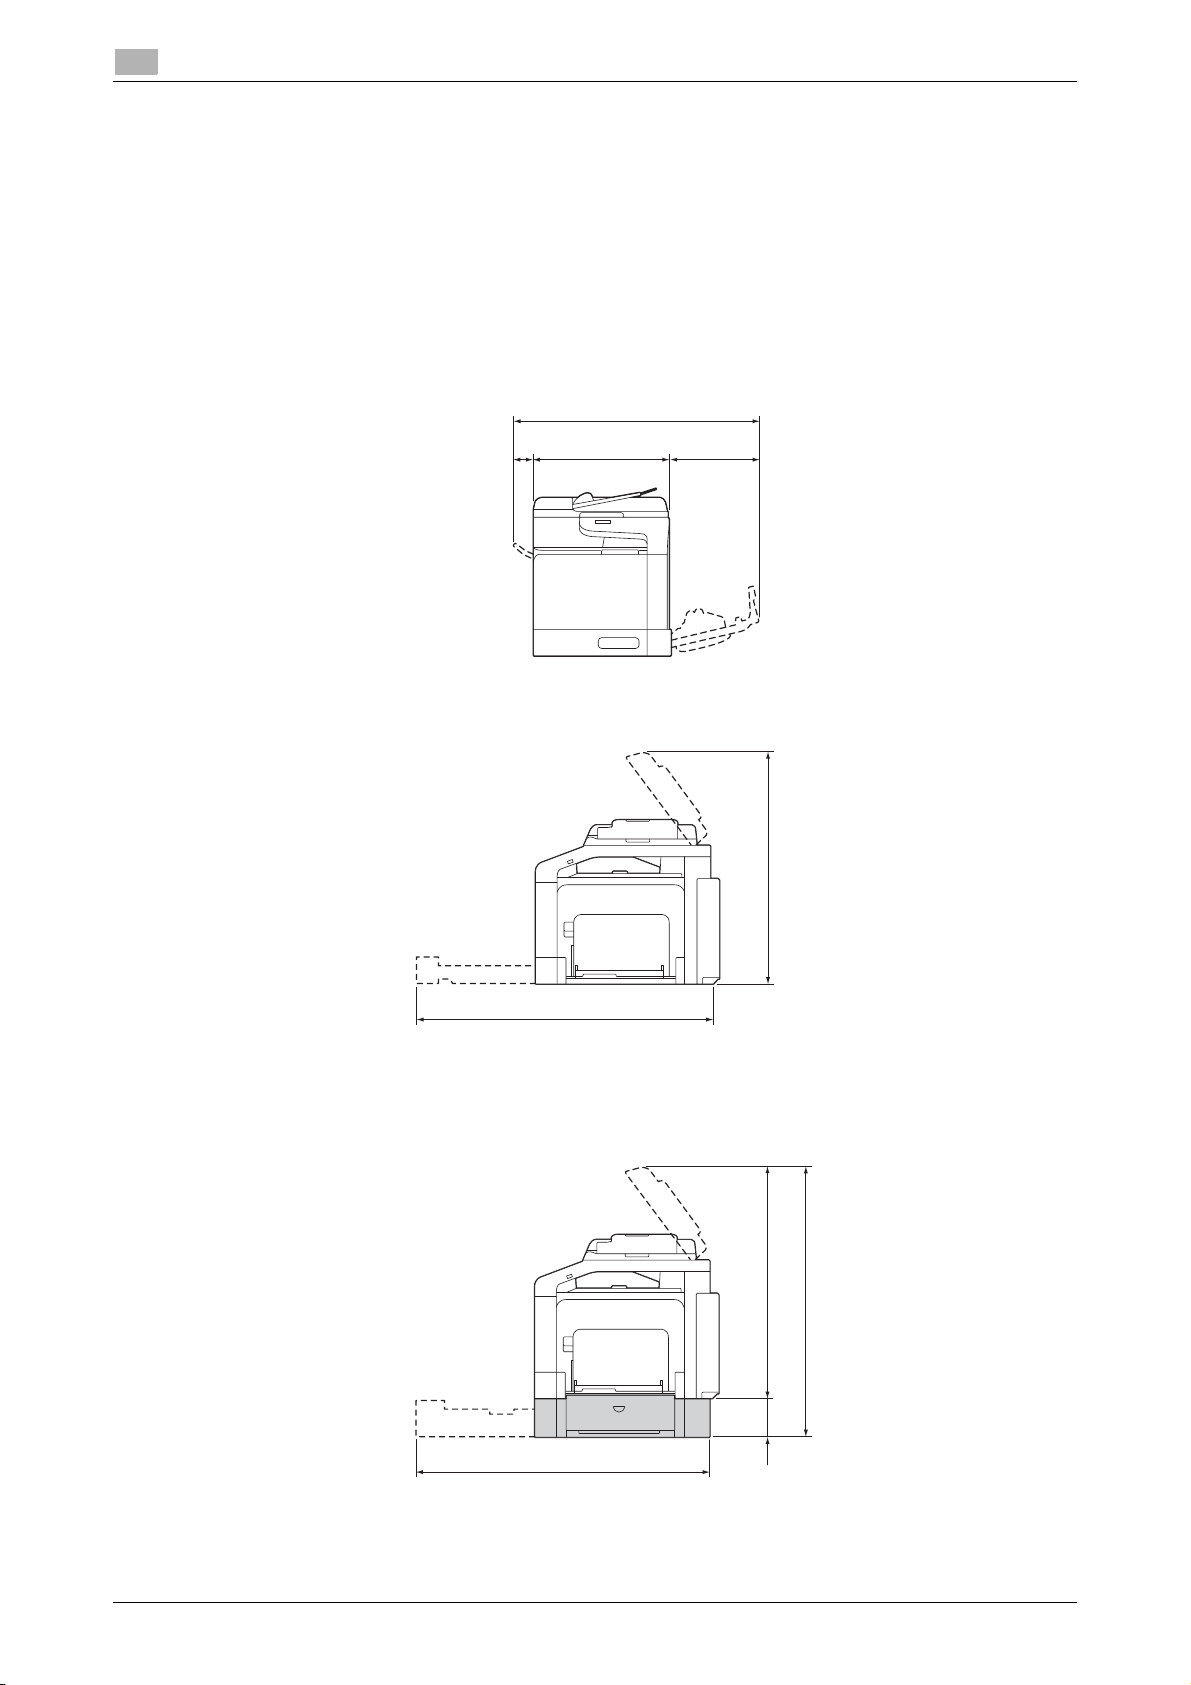
28-7/16(723)
10-5/8
(270.5)
1-7/8
(47.5)
15-15/16
(405)
34-13/16(885)
28-11/16(729)
35-1/12(902)
33-5/16(846)
28-11/16(729)
4-5/8
(117)
Installation location and environment
2.2 Installation location and environment
2.2.1 Installation location
To simplify tasks such as operations, consumable replacement, or inspection, create an installation environment as shown below.
Unit: Inch (mm)
Front view
2.2
Right view
Right view (with optional devices installed)
The hatched parts indicate optional devices in this figure.
2-4 d-COLOR MF3100
Page 13

2.2 Installation location and environment
Tips
2.2.2 Installation environment
Install this machine in a location that can support its weight, including consumables and paper.
Configuration Weight
Main unit (including consumables) Approx. 75-5/8 lb (34.3 kg)
Main unit (including packages) Approx. 95-7/16 lb (43.3 kg)
Install this machine in the place shown below.
- Stable and horizontal (inclination around this machine: 1 degree or less) location with a hard, even sur-
face
- To check whether the installation location is level, use a normal round pencil. If the pencil rolls, the location is not horizontal. Ensure this machine is horizontal, and make sure that there are no objects such
as cables caught under this machine.
- Location close to a dedicated power outlet that is grounded
- Location close to your computer
- Sufficiently spacious location that ensures ease of use and appropriate air ventilation
- Location in which ambient temperature is 50°F to 86°F (10°C to 30°C) and humidity is 15% to 85%
Do not install this machine in the locations described below.
- Location exposed to direct sunlight
- Location in which excessive differences in temperature and humidity are detected due to close prox-
imity to a heater or cooling equipment
- Location exposed to direct flame or combustible materials
- Location close to equipment such as a copy machine or air-conditioner that generates noise, or equip-
ment such as a refrigerator that generates a strong magnetic or electromagnetic force
- Location close to water, water pipes, or fluid (drink) containers, corrosive chemicals, or corrosive gases
such as ammonia
- Location in which fine metallic pieces such as clips or staples are scattered
- Location subject to thumping vibrations
2
- Do not connect to the same power outlet as that used for a high-current equipment.
- If this machine is installed in or moved to an environment subject to excessive changes in temperature,
condensation will form in this machine, which may reduce printing quality. If condensation is detected,
leave this machine for approximately 1 hour before using it to adjust to the environment.
- When using a humidifier or vaporizer in the room where this machine is installed, use purified or distilled
water. If impurities in water are emitted into the air, they will collect in this machine and reduce printing
quality.
d-COLOR MF3100 2-5
Page 14

2
Installation location and environment
2.2
2-6 d-COLOR MF3100
Page 15

3
About This Machine
Page 16

Page 17

3.1 Checking the name of each part
Tips
4
5
1
2-a
2-c
2
2-d
2-e
2-f
3
2-b
3 About This Machine
3.1 Checking the name of each part
Front side
3
No. Name
1 Control Panel
2 Automatic Document Feeder (ADF)
2-a ADF Feed Cover
2-b Document Guide
2-c Document Feed Tray
2-d Extension Tray
2-e Document Output Tray
2-f Document Stopper
3 USB Host Port
4 Manual Feed Tray
5 Tray 1
- To scan the legal-size original using the ADF, fold the Document Stopper outward.
d-COLOR MF3100 3-3
Page 18

3
View with Automatic Document Feeder (ADF) opened
10
9
8
Checking the name of each part
6
7
3.1
No. Name
6 Original Cover Pad
7 Original Glass
8 Extension Tray
9 Output Tray
10 Scanner Unit
3-4 d-COLOR MF3100
Page 19

3.1 Checking the name of each part
15
16
17
18
11
12
13
14
View with Front Door and Right Door opened
3
No. Name
11 Fuser Unit
12 Right Door
13 Transfer Roller
14 Transfer Belt Unit
15 Imaging Unit
16 Front Door
17 Waste Toner Bottle
18 Toner Cartridge
d-COLOR MF3100 3-5
Page 20

3
Checking the name of each part
Rear side
This view shows the machine with the optional Fax Kit FK-512 and Mount Kit MK-P04 installed.
3.1
6
3
7
4
5
No. Name
1 Power Switch
2 Power Connection
3 USB Port (for authentication unit)
4 Ethernet (LAN) Port (1000Base-T/100Base-TX/10Base-T)
5 USB Port (Type B)
6 LINE (telephone line) Jack
7 TEL (telephone) Jack
2
1
3-6 d-COLOR MF3100
Page 21

3.2 Checking the option configuration
3.2 Checking the option configuration
List of optional components
3
1
2
No. Name Description
1 Authentication Unit
AU-201
2 Lower Feeder Unit PF-
P14
The following optional components are built into this machine and are not shown in the figure above.
3 Hard Disk HD-P06 Increases the HDD capacity and extends functions.
4 i-Option LK-106 Used to add a bar code font, which is one of special fonts.
5 i-Option LK-107 Used to add a unicode font, which is one of special fonts.
6 i-Option LK-108 Used to add an OCR font, which is one of special fonts.
7 i-Option LK-111 Supports the ThinPrint function, which is one of a number of ad-
8 Fax Kit FK-512 Used to operate this machine as a fax machine.
9 Mount Kit MK-P04 Required when installing the Fax Kit FK-512.
Performs user authentication by scanning information recorded on
the IC card.
Allows you to load up to 500 sheets.
This function is available when an optional Hard Disk is installed.
This function is available when an optional Hard Disk is installed.
This function is available when an optional Hard Disk is installed.
vanced functions.
dReference
For details on how to register i-Option license kits, refer to [User's Guide: Advanced Functions].
d-COLOR MF3100 3-7
Page 22

3
1
Front view (with optional devices installed)
Checking the option configuration
3.2
No. Name
1 Lower Feeder Unit PF-P14 (Tray 2)
3-8 d-COLOR MF3100
Page 23

3.3 Installing optional units
3.3 Installing optional units
3.3.1 Installing Lower Feeder Unit (Tray 2)
Configuration of Lower Feeder Unit
Lower Feeder Unit (with 500-sheet paper tray)
Installing the Lower Feeder Unit
3
7CAUTION
- This printer contains consumables. When moving the printer, keep it level so that toner does not spill
from it.
1 Turn the printer power off, then remove all cables.
2 Prepare the Lower Feeder Unit.
% Be sure to place the Lower Feeder Unit on a level surface.
3 Open the Right Door of the Lower Feeder Unit.
% Be sure to open the Right Door of the Lower Feeder Unit before setting the printer.
d-COLOR MF3100 3-9
Page 24

3
34.3 kg
75.6 lbs
Installing optional units
3.3
4 The printer must be held by two people. Correctly set the Lower Feeder Unit by aligning the positioning
pins with the pin receiving holes at the bottom of the printer.
NOTICE
This printer weighs approximately 75-5/8 lb (34.3 kg), including consumables. Two people are always
required to lift the printer.
5 Close the Right Door of the Lower Feeder Unit.
6 Connect the interface cable.
3-10 d-COLOR MF3100
Page 25

3.3 Installing optional units
7 Connect the power cable, then turn the printer power on.
8 On the main screen, select [REPORT/STATUS] - [REPORT] - [Configuration Page] to print out the Con-
figuration Page, then check that the Lower Feeder Unit is installed.
9 Check that the installed Lower Feeder Unit is correctly recognized by the printer driver.
% For details, refer to [User's Guide: Print].
3
d-COLOR MF3100 3-11
Page 26

3
Installing optional units
3.3
3-12 d-COLOR MF3100
Page 27

4
Turning the Power ON or OFF
Page 28

Page 29

4.1 Turning the Power Switch ON or OFF
4 Turning the Power ON or OFF
4.1 Turning the Power Switch ON or OFF
Connect the Power Cord to this machine.
1
2 Connect the Power Cord to the power outlet.
3 When turning the main power on, press n of the Power Switch.
4
This displays the screen showing that the machine is running the start-up process.
When the main screen appears, this machine is ready to operate.
4 When turning the main power off, press o of the Power Switch.
NOTICE
While printing, do not turn the Power Switch off or press the Power key. Otherwise, it may lead to a paper
jam.
If the Power Switch is turned off or the Power key is pressed while this machine is running, the system deletes the currently loaded data or communicating data as well as queued jobs.
When restarting this machine, turn the Power Switch off and on again after 10 or more seconds have elapsed.
Not doing so may result in an operation failure.
d-COLOR MF3100 4-3
Page 30

4
Tips
Related setting (for the administrator)
4.2 Switching to Power Save mode
Hold down the Scan/Sleep or Copy/Power key to switch this machine to Power Save mode.
When each key is held down, the status of this machine changes as shown below.
Switching to Power Save mode
4.2
Key Status of
this machine
Scan/Sleep Sleep Flash: Blue Enable Turns off the backlight of the Message
Deep Sleep Flash: Blue Enable Reduces power consumption further
Copy/Pow-erErP Auto
Power OFF
Status of
Start Indicator
Flash:
Orange
Print / Fax RXDescription
Window to reduce power consumption.
If a fax or print job is received, it is printed while Sleep mode is maintained in
the active state.
Operating the Control Panel returns to
Normal mode.
than when in Sleep mode.
The display of the Message Window is
turned off completely.
If a fax or print job is received, this machine shifts to Sleep mode to make
prints, then returns to Deep Sleep
mode.
The time required to return to Normal
mode is longer than that required to return from Sleep mode.
Operating the Control Panel returns to
Normal mode.
Disable This function provides a more signifi-
cant power saving effect than Deep
Sleep mode, which is close to the state
where the main power is turned off.
To enable the machine to return to Normal mode from the ErP Auto Power OFF
status, press the Copy/Power key
again.
If this machine is switched to Sleep mode in factory settings, it automatically shifts to Deep Sleep mode that
reduces power consumption further than when in Sleep mode.
However, this machine cannot be shifted to Deep Sleep mode if:
- An optional i-Option LK-111 is employed and the ThinPrint function is enabled.
- An optional Authentication Unit is connected.
When this machine is in Sleep mode, you can select whether or not to shift to Deep Sleep mode that reduces
power consumption further than when in Sleep mode.
To configure settings: [UTILITY] - [Admin Settings] - [System Settings] - [Pwr Sup/Pwr Sav ]- [SleepMdPwrConsump] (Default: [Enabled])
4-4 d-COLOR MF3100
Page 31

5
Loading the Original
Page 32

Page 33

5.1 Loading the original into the ADF
5 Loading the Original
5.1 Loading the original into the ADF
Original available for ADF
Item Specifications
Original types Plain paper (13-5/16 lb to 29-1/4 lb (50 g/m
Max. original size A4 or Legal
Fax only: 8-1/2 inches (216 mm) e 19-11/16 inches (500 mm)
Original loading capaci-tyMax. 50 sheets (21-1/4 lb (80 g/m
Do not load the following originals into the ADF. Doing so may cause an original paper jam, or damage the
originals.
- Wrinkled, folded, curled, or torn originals
- Highly translucent or transparent originals, such as transparencies or diazo photosensitive paper
- Coated originals such as carbon-backed paper
- Original that is less than basic weight 13-5/16 lb (50 g/m
- Originals that are bound, for example, with staples or paper clips
- Originals that are bound in booklet form
- Originals with pages bound together with glue
- Originals with pages that have had cutouts removed or that are cutouts
- Label sheets
- Offset printing masters
- Photographic Paper
- Glossy original such as gloss coated paper
2
to 110 g/m2))
2
))
2
) or greater than 29-1/4 lb (110 g/m2)
5
d-COLOR MF3100 5-3
Page 34

5
Loading the original into the ADF
5.1
Loading the original into the ADF
The ADF feeds original sheets one by one in order from the top, and automatically loads them. It also loads
a 2-sided original automatically.
The ADF is helpful when loading a large number of original.
1 Put the first page of an original at the top, and load the original into the Document Feed Tray with the
side to be photocopied facing upward.
% Load the original so that its top side is placed at the back. When loading in a different orientation,
be sure to specify the loading direction of originals.
NOTICE
Do not load more than 50 sheets at a time into Document Feed Tray, and do not load the sheets up to
the point where the top of the stack is higher than the
damage the originals, and/or cause ADF failure. However, if the original contains more than 50 pages,
it can be scanned separately.
,
mark. Doing so may cause the originals to jam,
2 Slide the Document Guide to fit the loaded original.
5-4 d-COLOR MF3100
Page 35

5.2 Loading the original onto the Original Glass
5.2 Loading the original onto the Original Glass
Original available on the Original Glass
Item Specifications
Original types Sheets, books (two-page spread), cards, three-dimensional objects
Max. original size A4
Original loading capaci-tyMax. 6-5/8 lb (3 kg)
Loading the original onto the Original Glass
Using the Original Glass allows you to scan an original such as a book or card, which is not available in the
ADF.
1 Open the ADF.
2 Load the original into the Original Glass with the side to be photocopied facing downward.
5
% Place the top side of the original at the back, and align the original to the mark at the left rear of
the Original Scale. When loading in a different orientation, be sure to specify the loading direction
of originals.
% When copying a highly transparent original such as transparencies or tracing paper, place a blank
sheet that is the same size as the original on the original to enable clear scanning.
NOTICE
Do not place an original heavier than 3 kg on the original glass. Furthermore, do not use excessive force
to press down on a book or any other form of original that must be spread on the original glass. Otherwise, the machine may be damaged or a failure may occur.
3 Close the ADF.
NOTICE
When placing a thick book or a three-dimensional object on the original glass, you do not need to close
the ADF to scan it. A bright light may be emitted through the Original Glass. Be careful not to look directly at it. Note, however, that the light coming through the original glass is not a laser beam, and will
not expose the user to related hazards.
d-COLOR MF3100 5-5
Page 36

5
Loading the original onto the Original Glass
5.2
5-6 d-COLOR MF3100
Page 37

6
Loading Paper
Page 38

Page 39

6.1 Paper
6 Loading Paper
6.1 Paper
6.1.1 Checking the available paper types
Paper type Paper weight Paper capacity
Plain paper
Recycled paper
Two-side unavailable
*1
paper
Thick 1 24-3/16 lb to 39-7/8 lb
Thick 2 40-3/16 lb to 55-7/8 lb
Glossy paper 1 26-5/8 lb to 34-1/16 lb
Glossy paper 2 34-5/16 lb to 42 lb
Postcard - Manual Feed Tray: 20 sheets
Envelope - Manual Feed Tray: 10 sheets
Label sheet - Manual Feed Tray: 20 sheets
Letterhead
*2
15-15/16 lb to 23-15/16 lb
(60 g/m
(91 g/m
(151 g/m
(100 g/m
(129 g/m
- Tray 1: 20 sheets
2
to 90 g/m2)
2
to 150 g/m2)
2
to 210 g/m2)
2
to 128 g/m2)
2
to 158 g/m2)
6
Manual Feed Tray: 100 sheets
Tray 1: 250 sheets
Lower Feeder Unit (Tray 2): 500 sheets
Manual Feed Tray: 20 sheets
Tray 1: 20 sheets
Manual Feed Tray: 20 sheets
Tray 1: 20 sheets
Manual Feed Tray: 20 sheets
Tray 1: 20 sheets
Manual Feed Tray: 20 sheets
Tray 1: 20 sheets
Tray 1: 20 sheets
Tray 1: 20 sheets
*1
Paper on which you will not print on both sides (for example, when something has already been printed on
the front side).
*2
Paper where company names, preset text, and other text have already been printed.
NOTICE
Paper other than plain paper is referred to as special paper. When loading special paper into the paper tray,
specify the correct paper type. Otherwise, it may result in a paper jam or image error.
d-COLOR MF3100 6-3
Page 40

6
Tips
6.1.2 Checking the available paper sizes
Paper feed port Allowable sizes
Manual Feed Tray A4, A5, A6, B5 (JIS), B6
Tray 1 A4, A5, A6, B5 (JIS), B6
Lower Feeder Unit
(Tray 2)
Auto Duplex Unit A4, B5 (JIS)
Legal (8-1/2 e 14), Letter (8-1/2 e 11), SP Folio (8-1/2 e 12-11/16), Executive
(7-1/4 e 10-1/2), Invoice (5-1/2 e 8-1/2)
Foolscap (8 e 13), 8-1/8 e 13-1/4, Folio (8-1/4 e 13), Government Legal (8-1/2
e 13), 8-1/2 e 13-1/2, 16K, Kai 16, Kai 32
Postcard (100 mm e 148 mm), Reply postal card (148 mm e 200 mm)
Photo Size 4 e 6
Envelope #10, Western-style envelope #6, Envelope DL, Western-style envelope #2, End-opening envelope #3, End-opening envelope #4
B5 (ISO), UK Quarto (8 e 10), Government letter (8 e 10-1/2)
Width: 3-5/8 to 8-1/2 inches (92.0 mm to 215.9mm), Length: 5-13/16 to 14
inches (148.0 mm to 355.6 mm)
Letter (8-1/2 e 11), Executive (7-1/4 e
ment legal (8-1/2 e 13)
16K, Kai 16, Kai 32, Postcard (100 mm e 148 mm), Reply postal card (148 mm
e 200 mm)
Photo Size 4 e 6
UK Quarto (8 e 10), Government letter (8 e 10-1/2)
Width: 3-5/8 to 8-1/2 inches (92.0 mm to 215.9 mm), Length: 5-13/16 to 1111/16 inches (148.0 mm to 297.0 mm)
A4, B5 (JIS)
Legal (8-1/2 e 14), Letter (8-1/2 e 11), Executive (7-1/4 e 10-1/2), Folio (8-1/4
e 13)
Legal (8-1/2 e 14), Letter (8-1/2 e 11), SP Folio (8-1/2 e 12-11/16), Executive
(7-1/4 e 10-1/2)
Foolscap (8 e 13), 8-1/8 e 13-1/4, Folio (8-1/4 e 13), Government legal (8-1/2
e 13), 8-1/2 e 13-1/2, 16K
Government letter (8 e 10-1/2), UK Quarto (8 e 10), Kai 16
Width: 7-3/16 to 8-1/2 inches (182 mm to 216 mm), Length: 10-1/8 to 14 inches (254 mm to 356 mm)
Paper
10-1/2), Invoice (5-1/2 e 8-1/2) Govern-
6.1
- The area, excluding 3/16 inches (4.2 mm) from the paper edge, is used as the printable area on all paper
sizes. When configuring a user setting of the page size using the application, specify the paper size
within the printable area so that the optimal result is obtained.
- On an envelope, it is only possible to print on the front (address) side. Also, the result of printing on the
seal overlapping part on the front side cannot be assured. The area that cannot be assured varies depending on envelope types.
- The page margin setting is determined depending on your application. If the default paper size or margin is selected, there may be some part of the paper that is not able to be printed on. To obtain the
optimal result, configure the custom size setting so that an image is included in the printable area of
this machine.
- Specify the custom size in the range of the numeric values shown in the table above using the printer
driver.
- When custom-size paper with dimensions larger than width 8-1/4 inches (210 mm) and length 11 inches
(279 mm) is used in Tray 1, trailing edges will be loaded in the bent state due to the tray structure. (Maximum length 11-11/16 inches (297 mm)) To load such custom-size paper, use the Manual Feed Tray
or load up to 100 sheets in Tray 1.
- In Mac OS X environment, the maximum size of the Manual Feed Tray that can be used for 2-sided
printing is "width 8-1/2 inches (216 mm) x length 14 inches (355 mm)".
6-4 d-COLOR MF3100
Page 41

6.1 Paper
Tips
6.1.3 Precautions for correct operations
Unavailable paper
Do not load the following types of paper into the tray. Not observing these precautions may lead to reduced
print quality, a paper jam, or machine damage.
- Paper that has been printed on using a heat-transfer printer or an inkjet printer
- Folded, curled, wrinkled, or torn paper
- Paper that has been left unwrapped for a long period of time
- Paper that is damp, perforated, or that has been hole punched
- Extremely smooth or extremely rough paper, or paper with an uneven surface
- Treated paper such as carbon-backed paper, thermal paper, pressure-sensitive paper, or iron-on
transfer paper
- Paper that has been decorated with foil or embossing
- Paper of a non-standard shape (paper that is not rectangular)
- Paper that is bound with glue, staples or paper clips
- Paper with labels attached
- Paper with ribbons, hooks, buttons, etc., attached
- Paper with different paper quality (roughness) on the front and back sides
- Paper that is too thin or too thick
- Paper containing static electricity
- Acidic paper
- Other types of unavailable paper
6
Storing paper
To store paper, be sure to note the following points.
- Store paper on an even, horizontal surface, and do not take the paper out of its packaging until it is
loaded into a tray. If paper is left for a long period of time outside its package, it may cause a paper jam.
- When not using paper that has been taken out of its package once, return it to the original package and
store it in a horizontal, cool, dark place.
- Do not store paper in locations or in environments that are:
- Too humid
- Exposed to direct sunlight
- Subject to high temperatures (95°F (35°C) or more)
- Too dusty
- Do not set paper against the other or store it vertically.
When purchasing a large quantity of paper or special paper, carry out a trial print to check the printing quality
in advance.
d-COLOR MF3100 6-5
Page 42

6
Loading paper into the Manual Feed Tray
6.2 Loading paper into the Manual Feed Tray
How to load paper into the Manual Feed Tray
When selecting a paper size other than for paper trays, use the Manual Feed Tray.
To use the Manual Feed Tray, load paper and specify the paper type.
1 Open the Manual Feed Tray.
6.2
2 Spread out the paper guide.
3 Push up the center of the flip-top plate until the lock latches (white) at the right and left are locked.
6-6 d-COLOR MF3100
Page 43

6.2 Loading paper into the Manual Feed Tray
4 With the side to be printed on facing down, insert the paper as far as possible into the feed slot.
% For details on the available paper sizes, refer to page 6-3.
% For details on how to load postcards, refer to page 6-7.
% For details on how to load envelopes, refer to page 6-8.
NOTICE
Load paper within the guide indicating the upper limit.
If paper is curled, flatten it before loading.
6
5 Align the paper guide to the paper size.
6 Change the paper type and paper size on the Control Panel. When loading custom sized paper, also
specify the paper size.
% To configure settings: [UTILITY] - [Paper Settings] - [Manual]
Loading postcards
Up to 20 postcards can be loaded into the tray at a time.
1 With the print side facing down, load a postcard as shown in the figure.
2 Align the paper guide to the paper size.
3 Change the paper type and paper size on the Control Panel.
% To configure settings: [UTILITY] - [Paper Settings] - [Manual]
dReference
When printing data stored on a computer onto a postcard, use the [Basic] tab of the printer driver to configure
settings. For details, refer to [User's Guide: Print].
d-COLOR MF3100 6-7
Page 44

6
Loading paper into the Manual Feed Tray
6.2
Loading envelopes
Up to 10 envelopes can be loaded into the tray at a time.
NOTICE
Before loading, remove air from the envelope(s), and securely press along the flap fold line. Otherwise, it will
result in wrinkles or a paper jam.
1 Position so the flap part is facing up, and load an envelope as shown in the figure.
% If a cap is in the long side of an envelope (western-style envelope #2, western-style envelope #6, or
envelope DL), load the cap into the machine side.
2 Align the paper guide to the paper size.
3 Change the paper type and paper size on the Control Panel.
% To configure settings: [UTILITY] - [Paper Settings] - [Manual]
6-8 d-COLOR MF3100
Page 45

6.3 Loading paper into Tray 1
6.3 Loading paper into Tray 1
Pull out Tray 1.
1
2 Press the flip-top plate down until it is locked.
6
3 Spread out the paper guide.
d-COLOR MF3100 6-9
Page 46

6
Loading paper into Tray 1
4 Load paper into the tray with the print side facing up.
% For details on the available paper sizes, refer to page 6-3.
% Load a postcard or reply postal card, turning the short side to the right-hand side of the tray.
NOTICE
Do not load the sheets up to the point where the top of the stack is higher than the , mark.
If paper is curled, flatten it before loading.
6.3
5 Align the paper guide to the paper size.
6 Close Tray 1.
7 Change the paper type and paper size on the Control Panel.
% To configure settings: [UTILITY] - [Paper Settings] - [Tray1]
6-10 d-COLOR MF3100
Page 47

6.4 Loading paper into Tray 2
6.4 Loading paper into Tray 2
0 Tray 2 is available when the optional Lower Feeder Unit is installed.
1 Pull out Tray 2.
2 Press the flip-top plate down until it is locked.
6
3 Spread out the paper guide.
d-COLOR MF3100 6-11
Page 48

6
Loading paper into Tray 2
4 Load paper into the tray with the print side facing up.
% For details on the available paper sizes, refer to page 6-3.
NOTICE
Do not load the sheets up to the point where the top of the stack is higher than the , mark.
If paper is curled, flatten it before loading.
5 Align the paper guide to the paper size.
6.4
6 Close Tray 2.
7 If necessary, change the paper type on the Control Panel.
% To configure settings: [UTILITY] - [Paper Settings] - [Tray2]
% The paper size is automatically set.
6-12 d-COLOR MF3100
Page 49

7
Control Panel
Page 50

Page 51

7.1 Names and functions of the Control Panel keys
7 Control Panel
7.1 Names and functions of the Control Panel keys
The Control Panel on the top of this machine allows you to directly operate this machine. The Message Window displays a message that indicates the status of this machine or the required operations.
7
No. Name Description
1 Addressbook Recalls the registered target destination (Favorites, Address Book,
Group, or Program).
2 Auto RX Indicator Lights up when the fax receiving mode is set to Auto RX.
3 Message Window Displays Utility items or messages.
4 Error Indicator Lights up when an error has occurred. It also flashes when a service
call has occurred.
5 Fax/Access • Shifts to Fax mode. Lights up green in Fax mode.
• If user authentication is enabled on this machine, hold down this
key to log in or log out. For details, refer to page 8-3.
6 Scan/Sleep • Shifts to Scan mode. Lights up green in Scan mode.
• Holding down this key shifts to Sleep mode. For details, refer to
page 4-4.
7 Copy/Power • Shifts to Copy mode. Lights up green in Copy mode.
• Holding down this key shifts to ErP Auto Power Off mode. For details, refer to page 4-4.
8 Stop/Reset Cancels a changed setting or stops a function.
9 Start (Color) Starts copying, scanning, or sending a fax in color.
10 Start Indicator Indicates the status of this machine via the lamp color, flashing, or a
lamp lighting up.
• Lights up blue: This machine is ready to begin operating.
• Flashes blue: This machine is in Power Save mode, but it can receive faxes or execute print jobs.
• Flashes orange: This machine is not ready to begin operating because it is in Power Save mode.
• Lights up orange: This machine is not ready to begin operating.
11 Start (B&W) Starts copying, scanning, or sending a fax in black and white.
d-COLOR MF3100 7-3
Page 52

7
Names and functions of the Control Panel keys
No. Name Description
12 Keypad Enter the number of copies. Also, enter the fax number, E-mail ad-
dress, name, and other items.
For details on how to enter characters, refer to page 7-7.
13 Back • Cancels the entered character or numeric value.
• Returns to the previous screen.
• Cancels the displayed setting.
14 */) Moves the cursor right or left.
15 Select Determines the selected menu item.
16 +/, Moves the cursor up or down.
17 On hook Places the machine into the off-hook mode. Pressing this key again
returns to the on-hook mode.
18 Redial/Pause • Displays the fax number to which the last fax was sent by specify-
ing the destination using Direct Input.
• Inserts a pause into the fax number to be used for sending.
7.1
7-4 d-COLOR MF3100
Page 53

7.2 Screen layout
ORIGINAL: A4
ZOOM
MIX
SELECT
Scan to
PDF
MIX
SELECT
Memory:
300×300 dpi
7.2 Screen layout
7.2.1 Main screen
Copy mode
No. Display Details
1 Copier settings Check the current setting or change various settings. For details, refer
2 Status Displays a message depending on your operating status.
3 Copy density Displays the copy density.
4 Number of copies Displays the number of copies.
7
to [User's Guide: Copy].
Scan mode
No. Display Details
1 Scan settings Check the current setting or change various settings. For details, refer
2 Status Displays a message depending on your operating status.
3 Free space Displays the free memory space in percentage form (%).
to [User's Guide: Scan].
d-COLOR MF3100 7-5
Page 54

7
Fax to
STD/MIX
SELECT
Memory:
Screen layout
Fax mode
No. Display Details
1 Time Displays the current time.
To specify the time, select [UTILITY] - [Admin Settings] - [System Settings] - [CLOCK].
2 Free space Displays the free memory space in percentage form (%).
3 Fax settings Check the current setting or change various settings. For details, refer
to [User's Guide: Fax].
4 Status Displays a message depending on your operating status.
7.2
7.2.2 Help screen
If an error such as a paper jam has occurred, press the ) key; the help screen appears to help you perform
error processing.
7-6 d-COLOR MF3100
Page 55

7.3 Entering Characters
Tips
7.3 Entering Characters
Enter digits, characters, and symbols using the Keypad.
Changing the entry mode
The entry mode shifts in the order of alphabet characters -> digits each time the key on the Control Panel
is pressed.
Display Description
[A…] Alphabet character entry mode
[1…] Digit entry mode
Available characters
The available characters vary depending on the entry mode. The following characters are available in each
entry mode.
7
Keypad [1…] Digit entry mode [A…] Alphabet character entry
11.,'?!"1-()@/:;_
22ABC2abc
33DEF3def
4 4 GHI4ghi
55JKL5jkl
6 6 MNO6mno
7 7 PQRS7pqrs
8 8 TUV8tuv
99WXYZ9wxyz
0 0 (space)0
# # +&/*=!?()%[]^` ´ {}|$ , :
- On the fax number entry screen, an asterisk, "*", is displayed if the key is pressed.
- To delete all characters you entered, hold down the Back key.
- To delete some characters you entered, press the * or ) key to move the cursor to the character you
want to delete, then press the Back key.
- To continuously enter characters using the same key, type the first character, then press the ) key to
type the next character.
- To enter a space, press the 0 key once in the alphabet character entry mode.
mode
d-COLOR MF3100 7-7
Page 56

7
7.4 REPORT/STATUS
To display the REPORT/STATUS menu, press the + or , key on the main screen of each mode to select
[REPORT/STATUS], then press the Select key.
This menu allows you to check the total number of sheets printed on this machine or the fax sending and
receiving results, and print various reports.
Settings Description
[Counter] Check the total number of pages printed on this machine on a function or color
[Remaining Supply] Check the status of consumables (consumption level).
[TX/RX RESULT] Check the fax sending and receiving results (maximum 300 jobs).
[REPORT] Print various reports. Select the report you want to print, then press the Start
REPORT/STATUS
basis.
For details, refer [User's Guide: Maintenance/Troubleshooting].
For details, refer to [User's Guide: Maintenance/Troubleshooting].
key to start printing.
• [Configuration Page]: Prints a list that contains setting details of this machine.
• [PS FONT LIST]: Prints a list of PS fonts built in to this machine.
• [PCL FONT LIST]: Prints a list of PCL fonts built in to this machine.
• [Remaining Supply]: Prints a list of directories on the hard disk.
7.4
7-8 d-COLOR MF3100
Page 57

8
Login Screen
Page 58

Page 59

8 Login Screen
Tips
If user authentication is enabled on this machine, the Login screen appears.
- If an optional Authentication Unit is installed, place the IC card on the Authentication Unit. If authen-
tication succeeds, you can log in to this machine.
- To log in to this machine as a public user, select [Public login] on the login screen, then press the Select
key or hold down the Fax/Access key.
- To employ user authentication, an optional Hard Disk is required.
- To employ IC card user authentication, the setting by your service engineer is required in addition to
optional Hard Disk and Authentication Unit. For details, contact your service representative.
- To log out from this machine, hold down the Fax/Access key on the main screen when logging in.
- If you do not operate this machine for a certain period of time during login, you will be logged out au-
tomatically.
dReference
For details on how to configure user authentication settings, refer [User's Guide: Applied Functions].
For details on IC card authentication, refer [User's Guide: Applied Functions].
8
If an optional Authentication Unit is installed, the ID & Print function is available. For details on the ID & Print
function, refer to [User's Guide: Print].
d-COLOR MF3100 8-3
Page 60

8
8-4 d-COLOR MF3100
Page 61

9
Specifications
Page 62

Page 63

9.1 Checking the specifications of this machine
9 Specifications
9.1 Checking the specifications of this machine
Item Description
Name d-COLOR MF3100
Type Flatbed, reverse automatic document feeder, desktop type printer
Color mode Full Color
Scanning resolution 600 dpi e 300 dpi , 600 dpi e 600 dpi (with hard disk installed)
Writing resolution At copying:
600 dpi e 600 dpi
At printing:
600 dpi e 600 dpi (Standard mode)
1200 dpi e 1200 dpi (High quality mode)
Gradation 256
Memory size 1 GB
HDD 320 GB
Originals Sheets, books, objects (Max. weight limit: 6-5/8 lb (3 kg))
Max. original size A4 or Legal (ADF only)
Print size Paper size Main unit:
Width: 3-5/8 to 8-1/2 inches (92 mm to 216 mm),
Length: 5-13/16 to 11-11/16 inches (148 mm to
297mm)
Manual Feed Tray:
Width: 3-5/8 to 8-1/2 inches (92 mm to 216 mm),
Length: 5-13/16 to 14 inches (148 mm to 356 mm)
Supported up to 11 inches (279.4 mm) in length
when the width exceeds 8-1/4 inches (210 mm).
Image chipping width Leading edge or trailing edge: 3/16 inches (4.2 mm)
or less, Left or right: 3/16 inches (4.2 mm) or less
Warm-up time
(73.4 °F (23 °C), std.
voltage)
Time period from when the Power Switch is turned on to when this machine
is ready for printing
120 V: 38 sec. or less
220 V: 38 sec. or less
230 V: 38 sec. or less
240 V: 38 sec. or less
9
Time period from when Sleep mode is released to when this machine is ready
for printing while the Power Switch is on
120 V: 35 sec. or less
220 V: 38 sec. or less
230 V: 35 sec. or less
240 V: 33 sec. or less
First copy time Full color: 17.0 sec. or less, Black: 13.0 sec. or less (Standard)
Full color: 14.0 sec. or less, Black: 10.0 sec. or less (Fastest)
Copy speed 31 sheets/min. (A4, plain paper), 32.5 sheets/min. (Letter (8-1/2 e 11 inches),
plain paper)
Paper handling/paper
capacity
Paper weight Main unit: 15-15/16 lb to 55-7/8 lb (60 g/m
Number of continuous
copies
d-COLOR MF3100 9-3
Paper tray, 1 level (universal cassette: 250 sheets)
Manual Feed Tray 100 sheets
2
to 210 g/m2)
Manual Feed Tray: 15-15/16 lb to 55-7/8 lb (60 g/m
1 to 99 sheets
2
to 210 g/m2)
Page 64

9
Checking the specifications of this machine
Item Description
Auto duplex Paper size Width: 7-3/16 to 8-1/2 inches (182 mm to 216 mm),
Length: 10 to 14 inches (254 mm to 356 mm)
Paper weight 15-15/16 lb to 55-7/8 lb (60 g/m
Stacking capacity 150 sheets (plain paper), 10 sheets (special paper)
Power supply AC 110 V, 9 A, 60 Hz
AC 120 V, 8.3 A, 60 Hz
AC 127 V, 8.5 A, 60 Hz
AC 220 V to 240 V, 4.5 A, 50/60 Hz
Max. power consumption
Dimensions [W] e [D] e
[H]
Space Requirements
[W] e [D] e [H]
Weight Approx. 75-5/8 lb (34.3 kg (including consumables))
110 V: 990 W
120 V: 990 W
127 V: 1070 W
220 V to 240 V: 1.08 kW
17-9/16 inches (446.5 mm) e 21-7/16 inches (544 mm) e 18-3/4 inches (476
mm) (Main unit + ADF (excluding projections on some parts))
26-5/8 inches (675.5 mm) e 34-13/16 inches (885 mm) e 27-11/16 inches (703
mm) (View with Paper Feeder Unit pulled out and Manual Feed Tray and ADF
opened (excluding the extension part of the Output Tray))
2
to 210 g/m2)
9.1
Fax function specifications
Item Specifications
Communication Super G3
Compatible lines Public switch telephone network (including fax communication line)
PBX lines
Line density Ultra Fine:
Modem speed 2400/4800/7200/9600/12000/14400/16800/19200/
Compression JBIG, MMR, MR, MH
Sending paper size Max. A4
Recording paper size Max. legal
Transmission speed Approx. 3 sec.
Address Book 250 destinations
Program 50 destinations
Group 20 destinations
Sequential multiple station transmission
600 dpi e 600 dpi
Super Fine:
16 dot/mm e 15.4 line/mm, 400 dpi e 400 dpi
Fine:
8 dot/mm e 7.7 line/mm, 200 dpi e 200 dpi
Normal:
8 dot/mm e 3.85 line/mm
Faxes are transmitted at any of the above scanning line densities according to
the capabilities of a recipient's machine.
21600/24000/26400/28800/31200/33600 bps
Long original: 8-1/2 inches e 19-11/16 inches (216 mm e 500 mm) (in use of
ADF)
* Time when sending an our standard A4 original including 700 characters with
the normal image quality (8 dot/mm e 3.85 line/mm) in super G3 mode (ITU-T
V.34 base 33.6 kbps or more) with JBIG.
Max. 500 destinations (Max. 250 destinations when dialing using the keypad)
9-4 d-COLOR MF3100
Page 65

9.2 Checking the specifications of optional devices
9.2 Checking the specifications of optional devices
Lower Feeder Unit PF-P14
Item Specifications
Model number PF-P14
Paper type Plain paper, recycled paper
Paper size A4, B5 (JIS)
Paper capacity 500 sheets
Power supply Supply from machine
Dimensions [W] e [D] e
[H]
Weight Approx. 17-5/8 lb (8.0 kg)
(15-15/16 lb to 23-15/16 lb (60 g/m
Legal (8-1/2 inches e 14 inches), Letter (8-1/2 inches e 11 inches, Executive (71/4 inches e 10-1/2 inches), Government legal (8-1/2 inches e 13 inches)
17-5/8 inches (447 mm) e 20-7/16 inches (519 mm) e 4-5/8 inches (117 mm)
Authentication Unit AU-201
2
to 90 g/m2))
9
Item Specifications
Name Card Authentication Unit AU-201
Dimensions [W] e [D] e
[H]
Weight Approx. 1/4 lb (0.1 kg)
Power supply Power feeding from USB port
System conditions (operating state)
System conditions
(non-operating state)
Radio law division Self-guided read-write communication facility
Applicable card FeliCa (IDm), SSFC, FCF, FCF (campus), MIFARE (UID)
Acquired standard VCCI class B
Compatible computer Computer PC-AT compatible machine
3-5/8 inches (92 mm) e 2-1/2 inches (64 mm) e 5/8 inches (16 mm)
Ambient temperature 32°F to 104°F (0°C to 40°C)
Humidity 20% to 85% (No condensation)
Ambient temperature -4°F to 122°F (-20°C to 50°C)
Humidity 20% to 85% (No condensation)
CPU Conforms to the recommended operating environ-
ment of your operating system.
Memory (RAM) Conforms to the recommended operating environ-
Free space on hard disk 600 MB or more
Monitor 800 e 600 pixels or more
Network Must be configured with the correct TCP/IP or
Application Microsoft Internet Explorer 6.0 (SP1) or later
Interface Conforms to USB 1.1.
Supported operating
systems
ment of your operating system.
IPX/SPX protocol settings.
Windows XP: Microsoft .NET Framework 2.0 (SP2
or later)
Windows Vista/8: Microsoft .NET Framework 3.5
(SP1 or later)
Windows 7 is equipped with .NET Framework required to operate Data Administrator as the
standard.
For the supported operating systems, refer to Readme.
d-COLOR MF3100 9-5
Page 66

9
Tips
Standard operating life of consumables and periodic replacement parts
9.3
9.3 Standard operating life of consumables and periodic replacement parts
Item Standard average operating life
Print Unit Approx. 30,000 pages (Continuous printing)
Toner Cartridge Toner Cartridge supplied with the product: Approx. 5,000 pages (3 pages/job)
Toner Cartridge for replacement: Approx. 5,000 pages (3 pages/job)
Waste Toner Bottle Approx. 6,500 pages (full color)
Secondary Transfer
Unit
Fuser Unit Approx. 100,000 pages (3 pages/job)
Transfer Unit Approx. 100,000 pages (3 pages/job)
Media Feed Roller Approx. 300,000 pages
- The above indicates a numeric value for 1-sided printing with A4- or letter-size paper. The actual oper-
ating life varies (decreases) depending on printing conditions (printing ratio, paper size, etc.), printing
method such as the continuous printing (a print job of four pages on average is optimal for consumables) or the intermittent printing (when a print job of one page is executed multiple times), and the paper
type such as thick paper printing. It is also affected by the ambient temperature and humidity.
- In a color printer, all toners are consumed in minute amounts regardless of black and white printing or
color printing at the time of initialization by machine power-on or -off or automatic adjustment to maintain printing quality. Even when printing in black and white, color toners are consumed, and their cartridges must be replaced.
Approx. 100,000 pages (3 pages/job)
9-6 d-COLOR MF3100
Page 67

10
Trademarks and copyrights
Page 68

Page 69

10 Trademarks and copyrights
Trademark acknowledgements
Mozilla and Firefox are trademarks of the Mozilla Foundation.
Microsoft, Windows, Windows Vista, Windows 7, Windows 8, and Windows 8.1 are either registered trademarks or trademarks of Microsoft Corporation in the United States and/or other countries.
PowerPC is a trademark of IBM Corporation in the United States, or other countries, or both.
Apple, Macintosh, Mac OS, and Safari are trademarks of Apple Inc.
CUPS and CUPS logo are trademarks of Apple Inc.
Adobe, the Adobe logo, Acrobat and PostScript are either registered trademarks or trademarks of Adobe
Systems Incorporated in the United States and/or other countries.
Ethernet is a registered trademark of Xerox Corporation.
PCL is a registered trademark of Hewlett-Packard Company Limited.
TOYO is a registered trademark of TOYO INK MFG. CO., LTD. in the United States and/or other countries.
DIC and the DIC logo are registered trademarks or trademarks of DIC Corporation in the United States and/or
other countries.
IEEE and the IEEE logo are registered trademarks or trademarks of The Institute of Electrical and Electronics
Engineers, Inc. in the United States and/or other countries.
ThinPrint is a registered trademark or trademark of Cortado AG in Germany and other countries.
All other product and brand names are trademarks or registered trademarks of their respective companies or
organizations.
10
OpenSSL Statement
OpenSSL License
Copyright ©1998-2006 The OpenSSL Project. All rights reserved.
Redistribution and use in source and binary forms, with or without modification, are permitted provided that
the following conditions are met:
1. Redistributions of source code must retain the above copyright notice, this list of conditions and the
following disclaimer.
2. Redistributions in binary form must reproduce the above copyright notice, this list of conditions and the
following disclaimer in the documentation and/or other materials provided with the distribution.
3. All advertising materials mentioning features or use of this software must display the following acknowl-
edgment:
“This product includes software developed by the OpenSSL Project for use in the OpenSSL Toolkit.
(http://www.openssl.org/)”
4. The names “OpenSSL Toolkit” and “OpenSSL Project” must not be used to endorse or promote prod-
ucts derived from this software without prior written permission. For written permission, please contact
openssl-core@openssl.org.
5. Products derived from this software may not be called “OpenSSL” nor may “OpenSSL” appear in their
names without prior written permission of the OpenSSL Project.
6. Redistributions of any form whatsoever must retain the following acknowledgment:
“This product includes software developed by the OpenSSL Project for use in the OpenSSL Toolkit
(http://www.openssl.org/)”
THIS SOFTWARE IS PROVIDED BY THE OpenSSL PROJECT “AS IS” AND ANY EXPRESSED OR IMPLIED
WARRANTIES, INCLUDING, BUT NOT LIMITED TO, THE IMPLIED WARRANTIES OF MERCHANTABILITY
AND FITNESS FOR A PARTICULAR PURPOSE ARE DISCLAIMED. IN NO EVENT SHALL THE OpenSSL
PROJECT OR ITS CONTRIBUTORS BE LIABLE FOR ANY DIRECT, INDIRECT, INCIDENTAL, SPECIAL, EXEMPLARY, OR CONSEQENTIAL DAMAGES (INCLUDING, BUT NOT LIMITED TO, PROCUREMENT OF
SUBSTITUTE GOODS OR SERVICES; LOSS OF USE, DATA, OR PROFITS; OR BUSINESS INTERRUPTION)
d-COLOR MF3100 10-3
Page 70

10
HOWEVER CAUSED AND ON ANY THEORY OF LIABILITY, WHETHER IN CONTRACT, STRICT LIABILITY,
OR TORT (INCLUDING NEGLIGENCE OR OTHERWISE) ARISING IN ANY WAY OUT OF THE USE OF THIS
SOFTWARE, EVEN IF ADVISED OF THE POSSIBILITY OF SUCH DAMAGE.
This product includes cryptographic software written by Eric Young (eay@cryptsoft.com). This product includes software written by Tim Hudson (tjh@cryptsoft.com).
Original SSLeay License
Copyright ©1995-1998 Eric Young (eay@cryptsoft.com) All rights reserved.
This package is an SSL implementation written by Eric Young (eay@cryptsoft.com).
The implementation was written so as to conform with Netscapes SSL.
This library is free for commercial and non-commercial use as long as the following conditions are aheared
to. The following conditions apply to all code found in this distribution, be it the RC4, RSA, Ihash, DES, etc.,
code; not just the SSL code.
The SSL documentation included with this distribution is covered by the same copyright terms except that
the holder is Tim Hudson (tjh@cryptsoft.com).
Copyright remains Eric Young's, and as such any Copyright notices in the code are not to be removed. If this
package is used in a product, Eric Young should be given attribution as the author of the parts of the library
used. This can be in the form of a textual message at program startup or in documentation (online or textual)
provided with the package.
Redistribution and use in source and binary forms, with or without modification, are permitted provided that
the following conditions are met:
1. Redistributions of source code must retain the copyright notice, this list of conditions and the following
disclaimer.
2. Redistributions in binary form must reproduce the above copyright notice, this list of conditions and the
following disclaimer in the documentation and/or other materials provided with the distribution.
3. All advertising materials mentioning features or use of this software must display the following acknowl-
edgement:
“This product includes cryptographic software written by Eric Young (eay@crypt-soft.com)”
The word ‘cryptographic’ can be left out if the rouines from the library being used are not cryptographic
related.
4. If you include any Windows specific code (or a derivative thereof) from the apps directory (application
code) you must include an acknowledgement:
“This product includes software written by Tim Hudson (tjh@cryptsoft.com)”
THIS SOFTWARE IS PROVIDED BY ERIC YOUNG “AS IS” AND ANY EXPRESS OR IMPLIED WARRANTIES,
INCLUDING, BUT NOT LIMITED TO, THE IMPLIED WARRANTIES OF MERCHANTABILITY AND FITNESS
FOR A PARTICULAR PURPOSE ARE DISCLAIMED. IN NO EVENT SHALL THE AUTHOR OR CONTRIBUTORS BE LIABLE FOR ANY DIRECT, INDIRECT, INCIDENTAL, SPECIAL, EXEMPLARY, OR CONSEQUENTIAL DAMAGES (INCLUDING, BUT NOT LIMITED TO, PROCUREMENT OF SUBSTITUTE GOODS OR
SERVICES; LOSS OF USE, DATA, OR PROFITS; OR BUSINESS INTERRUPTION) HOWEVER CAUSED AND
ON ANY THEORY OF LIABILITY, WHETHER IN CONTRACT, STRICT LIABILITY, OR TORT (INCLUDING
NEGLIGENCE OR OTHERWISE) ARISING IN ANY WAY OUT OF THE USE OF THIS SOFTWARE, EVEN IF
ADVISED OF THE POSSIBILITY OF SUCH DAMAGE.
The licence and distribution terms for any publically available version or derivative of this code cannot be
changed. i.e. this code cannot simply be copied and put under another distribution licence [including the
GNU Public Licence.]
10-4 d-COLOR MF3100
Page 71

10
OpenSLP License
Copyright ©2000 Caldera Systems, Inc All rights reserved.
Redistribution and use in source and binary forms, with or without modification, are permitted provided that
the following conditions are met:
Redistributions of source code must retain the above copyright notice, this list of conditions and the following
disclaimer.
Redistributions in binary form must reproduce the above copyright notice, this list of conditions and the following disclaimer in the documentation and/or other materials provided with the distribution.
Neither the name of Caldera Systems nor the names of its contributors may be used to endorse or promote
products derived from this software without specific prior written permission.
THIS SOFTWARE IS PROVIDED BY THE COPYRIGHT HOLDERS AND CONTRIBUTORS “AS IS” AND ANY
EXPRESS OR IMPLIED WARRANTIES, INCLUDING, BUT NOT LIMITED TO, THE IMPLIED WARRANTIES OF
MERCHANTABILITY AND FITNESS FOR A PARTICULAR PURPOSE ARE DISCLAIMED. IN NO EVENT
SHALL THE CALDERA SYSTEMS OR CONTRIBUTORS BE LIABLE FOR ANY DIRECT, INDIRECT, INCIDENTAL, SPECIAL, EXEMPLARY, OR CONSEQUENTIAL DAMAGES (INCLUDING, BUT NOT LIMITED TO, PROCUREMENT OF SUBSTITUTE GOODS OR SERVICES; LOSS OF USE, DATA, OR PROFITS; OR BUSINESS
INTERRUPTION) HOWEVER CAUSED AND ON ANY THEORY OF LIABILITY, WHETHER IN CONTRACT,
STRICT LIABILITY, OR TORT (INCLUDING NEGLIGENCE OR OTHERWISE) ARISING IN ANY WAY OUT OF
THE USE OF THIS SOFTWARE, EVEN IF ADVISED OF THE POSSIBILITY OF SUCH DAMAGE.
Bonjour
Apache License
Version 2.0, January 2004
http://www.apache.org/licenses/
TERMS AND CONDITIONS FOR USE, REPRODUCTION, AND DISTRIBUTION
1. Definitions.
“License” shall mean the terms and conditions for use, reproduction, and distribution as defined by Sections
1 through 9 of this document.
“Licensor” shall mean the copyright owner or entity authorized by the copyright owner that is granting the
License.
“Legal Entity” shall mean the union of the acting entity and all other entities that control, are controlled by, or
are under common control with that entity. For the purposes of this definition, "control" means (i) the power,
direct or indirect, to cause the direction or management of such entity, whether by contract or otherwise, or
(ii) ownership of fifty percent (50%) or more of the outstanding shares, or (iii) beneficial ownership of such
entity.
“You” (or "Your") shall mean an individual or Legal Entity exercising permissions granted by this License.
“Source” form shall mean the preferred form for making modifications, including but not limited to software
source code, documentation source, and configuration files.
“Object” form shall mean any form resulting from mechanical transformation or translation of a Source form,
including but not limited to compiled object code, generated documentation, and conversions to other media
types.
“Work” shall mean the work of authorship, whether in Source or Object form, made available under the License, as indicated by a copyright notice that is included in or attached to the work (an example is provided
in the Appendix below).
“Derivative Works” shall mean any work, whether in Source or Object form, that is based on (or derived from)
the Work and for which the editorial revisions, annotations, elaborations, or other modifications represent, as
a whole, an original work of authorship. For the purposes of this License, Derivative Works shall not include
works that remain separable from, or merely link (or bind by name) to the interfaces of, the Work and Derivative Works thereof.
“Contribution” shall mean any work of authorship, including the original version of the Work and any modifications or additions to that Work or Derivative Works thereof, that is intentionally submitted to Licensor for
inclusion in the Work by the copyright owner or by an individual or Legal Entity authorized to submit on behalf
of the copyright owner. For the purposes of this definition, "submitted" means any form of electronic, verbal,
or written communication sent to the Licensor or its representatives, including but not limited to communication on electronic mailing lists, source code control systems, and issue tracking systems that are managed
d-COLOR MF3100 10-5
Page 72

10
by, or on behalf of, the Licensor for the purpose of discussing and improving the Work, but excluding communication that is conspicuously marked or otherwise designated in writing by the copyright owner as “Not
a Contribution.”
“Contributor” shall mean Licensor and any individual or Legal Entity on behalf of whom a Contribution has
been received by Licensor and subsequently incorporated within the Work.
2. Grant of Copyright License.
Subject to the terms and conditions of this License, each Contributor hereby grants to You a perpetual,
worldwide, non-exclusive, no-charge, royalty-free, irrevocable copyright license to reproduce, prepare Derivative Works of, publicly display, publicly perform, sublicense, and distribute the Work and such Derivative
Works in Source or Object form.
3. Grant of Patent License.
Subject to the terms and conditions of this License, each Contributor hereby grants to You a perpetual,
worldwide, non-exclusive, no-charge, royalty-free, irrevocable (except as stated in this section) patent license to make, have made, use, offer to sell, sell, import, and otherwise transfer the Work, where such license
applies only to those patent claims licensable by such Contributor that are necessarily infringed by their Contribution(s) alone or by combination of their Contribution(s) with the Work to which such Contribution(s) was
submitted. If You institute patent litigation against any entity (including a cross-claim or counterclaim in a lawsuit) alleging that the Work or a Contribution incorporated within the Work constitutes direct or contributory
patent infringement, then any patent licenses granted to You under this License for that Work shall terminate
as of the date such litigation is filed.
4. Redistribution.
You may reproduce and distribute copies of the Work or Derivative Works thereof in any medium, with or
without modifications, and in Source or Object form, provided that You meet the following conditions:
a. You must give any other recipients of the Work or Derivative Works a copy of this License; and
b. You must cause any modified files to carry prominent notices stating that You changed the files; and
c. You must retain, in the Source form of any Derivative Works that You distribute, all copyright, patent, trademark, and attribution notices from the Source form of the Work, excluding those notices that do not pertain
to any part of the Derivative Works; and
d. If the Work includes a “NOTICE” text file as part of its distribution, then any Derivative Works that You distribute must include a readable copy of the attribution notices contained within such NOTICE file, excluding
those notices that do not pertain to any part of the Derivative Works, in at least one of the following places:
within a NOTICE text file distributed as part of the Derivative Works; within the Source form or documentation,
if provided along with the Derivative Works; or, within a display generated by the Derivative Works, if and
wherever such third-party notices normally appear. The contents of the NOTICE file are for informational purposes only and do not modify the License. You may add Your own attribution notices within Derivative Works
that You distribute, alongside or as an addendum to the NOTICE text from the Work, provided that such additional attribution notices cannot be construed as modifying the License. You may add Your own copyright
statement to Your modifications and may provide additional or different license terms and conditions for use,
reproduction, or distribution of Your modifications, or for any such Derivative Works as a whole, provided
Your use, reproduction, and distribution of the Work otherwise complies with the conditions stated in this
License.
5. Submission of Contributions.
Unless You explicitly state otherwise, any Contribution intentionally submitted for inclusion in the Work by
You to the Licensor shall be under the terms and conditions of this License, without any additional terms or
conditions. Notwithstanding the above, nothing herein shall supersede or modify the terms of any separate
license agreement you may have executed with Licensor regarding such Contributions.
10-6 d-COLOR MF3100
Page 73

10
6. Trademarks.
This License does not grant permission to use the trade names, trademarks, service marks, or product names
of the Licensor, except as required for reasonable and customary use in describing the origin of the Work and
reproducing the content of the NOTICE file.
7. Disclaimer of Warranty.
Unless required by applicable law or agreed to in writing, Licensor provides the Work (and each Contributor
provides its Contributions) on an “AS IS” BASIS, WITHOUT WARRANTIES OR CONDITIONS OF ANY KIND,
either express or implied, including, without limitation, any warranties or conditions of TITLE, NON-INFRINGEMENT, MERCHANTABILITY, or FITNESS FOR A PARTICULAR PURPOSE. You are solely responsible for determining the appropriateness of using or redistributing the Work and assume any risks associated
with Your exercise of permissions under this License.
8. Limitation of Liability.
In no event and under no legal theory, whether in tort (including negligence), contract, or otherwise, unless
required by applicable law (such as deliberate and grossly negligent acts) or agreed to in writing, shall any
Contributor be liable to You for damages, including any direct, indirect, special, incidental, or consequential
damages of any character arising as a result of this License or out of the use or inability to use the Work (including but not limited to damages for loss of goodwill, work stoppage, computer failure or malfunction, or
any and all other commercial damages or losses), even if such Contributor has been advised of the possibility
of such damages.
9. Accepting Warranty or Additional Liability.
While redistributing the Work or Derivative Works thereof, You may choose to offer, and charge a fee for, acceptance of support, warranty, indemnity, or other liability obligations and/or rights consistent with this License. However, in accepting such obligations, You may act only on Your own behalf and on Your sole
responsibility, not on behalf of any other Contributor, and only if You agree to indemnify, defend, and hold
each Contributor harmless for any liability incurred by, or claims asserted against, such Contributor by reason
of your accepting any such warranty or additional liability.
END OF TERMS AND CONDITIONS
APPENDIX: How to apply the Apache License to your work
To apply the Apache License to your work, attach the following boilerplate notice, with the fields enclosed by
brackets "[]" replaced with your own identifying information. (Don’t include the brackets!) The text should be
enclosed in the appropriate comment syntax for the file format. We also recommend that a file or class name
and description of purpose be included on the same "printed page" as the copyright notice for easier identification within third-party archives.
NetSNMP License
Part 1: CMU/UCD copyright notice: (BSD like)
Copyright 1989, 1991, 1992 by Carnegie Mellon University Derivative Work - 1996, 1998-2000
Copyright 1996, 1998-2000 The Regents of the University of California All Rights Reserved
Permission to use, copy, modify and distribute this software and its documentation for any purpose and without fee is hereby granted, provided that the above copyright notice appears in all copies and that both that
copyright notice and this permission notice appear in supporting documentation, and that the name of CMU
and The Regents of the University of California not be used in advertising or publicity pertaining to distribution
of the software without specific written permission.
CMU AND THE REGENTS OF THE UNIVERSITY OF CALIFORNIA DISCLAIM ALL WARRANTIES WITH REGARD TO THIS SOFTWARE, INCLUDING ALL IMPLIED WARRANTIES OF MERCHANTABILITY AND FITNESS. IN NO EVENT SHALL CMU OR THE REGENTS OF THE UNIVERSITY OF CALIFORNIA BE LIABLE
FOR ANY SPECIAL, INDIRECT OR CONSEQUENTIAL DAMAGES OR ANY DAMAGES WHATSOEVER RESULTING FROM THE LOSS OF USE, DATA OR PROFITS, WHETHER IN AN ACTION OF CONTRACT, NEGLIGENCE OR OTHER TORTIOUS ACTION, ARISING OUT OF OR IN CONNECTION WITH THE USE OR
PERFORMANCE OF THIS SOFTWARE.
d-COLOR MF3100 10-7
Page 74

10
Part 2: Networks Associates Technology, Inc copyright notice (BSD)
Copyright ©2001-2003, Networks Associates Technology, Inc
All rights reserved.
Redistribution and use in source and binary forms, with or without modification, are permitted provided that
the following conditions are met:
* Redistributions of source code must retain the above copyright notice, this list of conditions and the following disclaimer.
* Redistributions in binary form must reproduce the above copyright notice, this list of conditions and the following disclaimer in the documentation and/or other materials provided with the distribution.
* Neither the name of the Networks Associates Technology, Inc nor the names of its contributors may be used
to endorse or promote products derived from this software without specific prior written permission.
THIS SOFTWARE IS PROVIDED BY THE COPYRIGHT HOLDERS AND CONTRIBUTORS “AS IS” AND ANY
EXPRESS OR IMPLIED WARRANTIES, INCLUDING, BUT NOT LIMITED TO, THE IMPLIED WARRANTIES OF
MERCHANTABILITY AND FITNESS FOR A PARTICULAR PURPOSE ARE DISCLAIMED. IN NO EVENT
SHALL THE COPYRIGHT HOLDERS OR CONTRIBUTORS BE LIABLE FOR ANY DIRECT, INDIRECT, INCIDENTAL, SPECIAL, EXEMPLARY, OR CONSEQUENTIAL DAMAGES (INCLUDING, BUT NOT LIMITED TO,
PROCUREMENT OF SUBSTITUTE GOODS OR SERVICES; LOSS OF USE, DATA, OR PROFITS;
OR BUSINESS INTERRUPTION) HOWEVER CAUSED AND ON ANY THEORY OF LIABILITY, WHETHER IN
CONTRACT, STRICT LIABILITY, OR TORT (INCLUDING NEGLIGENCE OR OTHERWISE) ARISING IN ANY
WAY OUT OF THE USE OF THIS SOFTWARE, EVEN IF ADVISED OF THE POSSIBILITY OF SUCH DAMAGE.
Part 3: Cambridge Broadband Ltd. copyright notice (BSD)
Portions of this code are copyright ©2001-2003, Cambridge Broadband Ltd.
All rights reserved.
Redistribution and use in source and binary forms, with or without modification, are permitted provided that
the following conditions are met:
* Redistributions of source code must retain the above copyright notice, this list of conditions and the following disclaimer.
* Redistributions in binary form must reproduce the above copyright notice, this list of conditions and the following disclaimer in the documentation and/or other materials provided with the distribution.
* The name of Cambridge Broadband Ltd. may not be used to endorse or promote products derived from
this software without specific prior written permission.
THIS SOFTWARE IS PROVIDED BY THE COPYRIGHT HOLDER “AS IS” AND ANY EXPRESS OR IMPLIED
WARRANTIES, INCLUDING, BUT NOT LIMITED TO, THE IMPLIED WARRANTIES OF MERCHANTABILITY
AND FITNESS FOR A PARTICULAR PURPOSE ARE DISCLAIMED.
IN NO EVENT SHALL THE COPYRIGHT HOLDER BE LIABLE FOR ANY DIRECT, INDIRECT, INCIDENTAL,
SPECIAL, EXEMPLARY, OR CONSEQUENTIAL DAMAGES (INCLUDING, BUT NOT LIMITED TO, PROCUREMENT OF SUBSTITUTE GOODS OR SERVICES; LOSS OF USE, DATA, OR PROFITS; OR BUSINESS
INTERRUPTION) HOWEVER CAUSED AND ON ANY THEORY OF LIABILITY, WHETHER IN CONTRACT,
STRICT LIABILITY, OR TORT (INCLUDING NEGLIGENCE OR OTHERWISE) ARISING IN ANY WAY OUT OF
THE USE OF THIS SOFTWARE, EVEN IF ADVISED OF THE POSSIBILITY OF SUCH DAMAGE.
Part 4: Sun Microsystems, Inc. copyright notice (BSD)
Copyright ©2003 Sun Microsystems, Inc., 4150 Network Circle, Santa Clara, California 95054, U.S.A. All
rights reserved.
Use is subject to license terms below.
This distribution may include materials developed by third parties.
Sun, Sun Microsystems, the Sun logo and Solaris are trademarks or registered trademarks of Sun Microsystems, Inc. in the U.S. and other countries.
Redistribution and use in source and binary forms, with or without modification, are permitted provided that
the following conditions are met:
* Redistributions of source code must retain the above copyright notice, this list of conditions and the following disclaimer.
* Redistributions in binary form must reproduce the above copyright notice, this list of conditions and the following disclaimer in the documentation and/or other materials provided with the distribution.
* Neither the name of the Sun Microsystems, Inc. nor the names of its contributors may be used to endorse
or promote products derived from this software without specific prior written permission.
THIS SOFTWARE IS PROVIDED BY THE COPYRIGHT HOLDERS AND CONTRIBUTORS “AS IS” AND ANY
EXPRESS OR IMPLIED WARRANTIES, INCLUDING, BUT NOT LIMITED TO, THE IMPLIED WARRANTIES OF
MERCHANTABILITY AND FITNESS FOR A PARTICULAR PURPOSE ARE DISCLAIMED. IN NO EVENT
SHALL THE COPYRIGHT HOLDERS OR CONTRIBUTORS BE LIABLE FOR ANY DIRECT, INDIRECT, INCIDENTAL, SPECIAL, EXEMPLARY, OR CONSEQUENTIAL DAMAGES (INCLUDING, BUT NOT LIMITED TO,
PROCUREMENT OF SUBSTITUTE GOODS OR SERVICES; LOSS OF USE, DATA, OR PROFITS;
OR BUSINESS INTERRUPTION) HOWEVER CAUSED AND ON ANY THEORY OF LIABILITY, WHETHER IN
CONTRACT, STRICT LIABILITY, OR TORT (INCLUDING NEGLIGENCE OR OTHERWISE) ARISING IN ANY
WAY OUT OF THE USE OF THIS SOFTWARE, EVEN IF ADVISED OF THE POSSIBILITY OF SUCH DAMAGE.
10-8 d-COLOR MF3100
Page 75

10
Part 5: Sparta, Inc copyright notice (BSD)
Copyright ©2003-2004, Sparta, Inc All rights reserved.
Redistribution and use in source and binary forms, with or without modification, are permitted provided that
the following conditions are met:
* Redistributions of source code must retain the above copyright notice, this list of conditions and the following disclaimer.
* Redistributions in binary form must reproduce the above copyright notice, this list of conditions and the following disclaimer in the documentation and/or other materials provided with the distribution.
* Neither the name of Sparta, Inc nor the names of its contributors may be used to endorse or promote products derived from this software without specific prior written permission.
THIS SOFTWARE IS PROVIDED BY THE COPYRIGHT HOLDERS AND CONTRIBUTORS “AS IS” AND ANY
EXPRESS OR IMPLIED WARRANTIES, INCLUDING, BUT NOT LIMITED TO, THE IMPLIED WARRANTIES OF
MERCHANTABILITY AND FITNESS FOR A PARTICULAR PURPOSE ARE DISCLAIMED. IN NO EVENT
SHALL THE COPYRIGHT HOLDERS OR CONTRIBUTORS BE LIABLE FOR ANY DIRECT, INDIRECT, INCIDENTAL, SPECIAL, EXEMPLARY, OR CONSEQUENTIAL DAMAGES (INCLUDING, BUT NOT LIMITED TO,
PROCUREMENT OF SUBSTITUTE GOODS OR SERVICES; LOSS OF USE, DATA, OR PROFITS;
OR BUSINESS INTERRUPTION) HOWEVER CAUSED AND ON ANY THEORY OF LIABILITY, WHETHER IN
CONTRACT, STRICT LIABILITY, OR TORT (INCLUDING NEGLIGENCE OR OTHERWISE) ARISING IN ANY
WAY OUT OF THE USE OF THIS SOFTWARE, EVEN IF ADVISED OF THE POSSIBILITY OF SUCH DAMAGE.
Part 6: Cisco/BUPTNIC copyright notice (BSD)
Copyright ©2004, Cisco, Inc and Information Network Center of Beijing University of Posts and Telecommunications. All rights reserved.
Redistribution and use in source and binary forms, with or without modification, are permitted provided that
the following conditions are met:
* Redistributions of source code must retain the above copyright notice, this list of conditions and the following disclaimer.
* Redistributions in binary form must reproduce the above copyright notice, this list of conditions and the following disclaimer in the documentation and/or other materials provided with the distribution.
* Neither the name of Cisco, Inc, Beijing University of Posts and Telecommunications, nor the names of their
contributors may be used to endorse or promote products derived from this software without specific prior
written permission.
THIS SOFTWARE IS PROVIDED BY THE COPYRIGHT HOLDERS AND CONTRIBUTORS “AS IS” AND ANY
EXPRESS OR IMPLIED WARRANTIES, INCLUDING, BUT NOT LIMITED TO, THE IMPLIED WARRANTIES OF
MERCHANTABILITY AND FITNESS FOR A PARTICULAR PURPOSE ARE DISCLAIMED. IN NO EVENT
SHALL THE COPYRIGHT HOLDERS OR CONTRIBUTORS BE LIABLE FOR ANY DIRECT, INDIRECT, INCIDENTAL, SPECIAL, EXEMPLARY, OR CONSEQUENTIAL DAMAGES (INCLUDING, BUT NOT LIMITED TO,
PROCUREMENT OF SUBSTITUTE GOODS OR SERVICES; LOSS OF USE, DATA, OR PROFITS;
OR BUSINESS INTERRUPTION) HOWEVER CAUSED AND ON ANY THEORY OF LIABILITY, WHETHER IN
CONTRACT, STRICT LIABILITY, OR TORT (INCLUDING NEGLIGENCE OR OTHERWISE) ARISING IN ANY
WAY OUT OF THE USE OF THIS SOFTWARE, EVEN IF ADVISED OF THE POSSIBILITY OF SUCH DAMAGE.
Kerberos
Copyright ©1985-2007 by the Massachusetts Institute of Technology.
All rights reserved.
Export of this software from the United States of America may require a specific license from the United
States Government. It is the responsibility of any person or organization contemplating export to obtain such
a license before exporting.
WITHIN THAT CONSTRAINT, permission to use, copy, modify, and distribute this software and its documentation for any purpose and without fee is hereby granted, provided that the above copyright notice appear in
all copies and that both that copyright notice and this permission notice appear in supporting documentation,
and that the name of M.I.T. not be used in advertising or publicity pertaining to distribution of the software
without specific, written prior permission. Furthermore if you modify this software you must label your software as modified software and not distribute it in such a fashion that it might be confused with the original
MIT software. M.I.T. makes no representations about the suitability of this software for any purpose. It is provided "as is" without express or implied warranty.
THIS SOFTWARE IS PROVIDED "AS IS" AND WITHOUT ANY EXPRESS OR IMPLIED WARRANTIES, INCLUDING, WITHOUT LIMITATION, THE IMPLIED WARRANTIES OF MERCHANTIBILITY AND FITNESS FOR
A PARTICULAR PURPOSE.
Individual source code files are copyright MIT, Cygnus Support, Novell, OpenVision Technologies, Oracle,
Red Hat, Sun Microsystems, FundsXpress, and others.
d-COLOR MF3100 10-9
Page 76

10
Project Athena, Athena, Athena MUSE, Discuss, Hesiod, Kerberos, Moira, and Zephyr are trademarks of the
Massachusetts Institute of Technology (MIT). No commercial use of these trademarks may be made without
prior written permission of MIT.
"Commercial use" means use of a name in a product or other for-profit manner. It does NOT prevent a commercial firm from referring to the MIT trademarks in order to convey information (although in doing so, recognition of their trademark status should be given).
Portions of src/lib/crypto have the following copyright:
Copyright ©1998 by the FundsXpress, INC.
All rights reserved.
Export of this software from the United States of America may require a specific license from the United
States Government. It is the responsibility of any person or organization contemplating export to obtain such
a license before exporting.
WITHIN THAT CONSTRAINT, permission to use, copy, modify, and distribute this software and its documentation for any purpose and without fee is hereby granted, provided that the above copyright notice appear in
all copies and that both that copyright notice and this permission notice appear in supporting documentation,
and that the name of FundsXpress. not be used in advertising or publicity pertaining to distribution of the software without specific, written prior permission. FundsXpress makes no representations about the suitability
of this software for any purpose. It is provided "as is" without express or implied warranty.
THIS SOFTWARE IS PROVIDED "AS IS" AND WITHOUT ANY EXPRESS OR IMPLIED WARRANTIES, INCLUDING, WITHOUT LIMITATION, THE IMPLIED WARRANTIES OF MERCHANTIBILITY AND FITNESS FOR
A PARTICULAR PURPOSE.
The implementation of the Yarrow pseudo-random number generator in src/lib/crypto/yarrow has the following copyright:
Copyright 2000 by Zero-Knowledge Systems, Inc.
Permission to use, copy, modify, distribute, and sell this software and its documentation for any purpose is
hereby granted without fee, provided that the above copyright notice appear in all copies and that both that
copyright notice and this permission notice appear in supporting documentation, and that the name of ZeroKnowledge Systems, Inc. not be used in advertising or publicity pertaining to distribution of the software without specific, written prior permission. Zero-Knowledge Systems, Inc. makes no representations about the
suitability of this software for any purpose. It is provided "as is" without express or implied warranty.
ZERO-KNOWLEDGE SYSTEMS, INC. DISCLAIMS ALL WARRANTIES WITH REGARD TO THIS SOFTWARE,
INCLUDING ALL IMPLIED WARRANTIES OF MERCHANTABILITY AND FITNESS, IN NO EVENT SHALL
ZERO-KNOWLEDGE SYSTEMS, INC. BE LIABLE FOR ANY SPECIAL, INDIRECT OR CONSEQUENTIAL
DAMAGES OR ANY DAMAGES WHATSOEVER RESULTING FROM LOSS OF USE, DATA OR PROFITS,
WHETHER IN AN ACTION OF CONTRACT, NEGLIGENCE OR OTHER TORTUOUS ACTION, ARISING OUT
OF OR IN CONNECTION WITH THE USE OR PERFORMANCE OF THIS SOFTWARE.
The implementation of the AES encryption algorithm in src/lib/crypto/aes has the following copyright:
Copyright ©2001, Dr Brian Gladman <brg@gladman.uk.net>, Worcester, UK.All rights reserved.
LICENSE TERMS
The free distribution and use of this software in both source and binary form is allowed (with or without changes) provided that:
1. distributions of this source code include the above copyright notice, this list of conditions and the fol-
lowing disclaimer;
2. distributions in binary form include the above copyright notice, this list of conditions and the following
disclaimer in the documentation and/or other associated materials;
3. the copyright holder's name is not used to endorse products built using this software without specific
written permission.
10-10 d-COLOR MF3100
Page 77

10
DISCLAIMER
This software is provided 'as is' with no explcit or implied warranties in respect of any properties, including,
but not limited to, correctness and fitness for purpose.
Portions contributed by Red Hat, including the pre-authentication plug-ins framework, contain the following
copyright:
Copyright ©2006 Red Hat, Inc.
Portions copyright ©2006 Massachusetts Institute of Technology
All Rights Reserved.
Redistribution and use in source and binary forms, with or without modification, are permitted provided that
the following conditions are met:
* Redistributions of source code must retain the above copyright notice, this list of conditions and the following disclaimer.
* Redistributions in binary form must reproduce the above copyright notice, this list of conditions and the following disclaimer in the documentation and/or other materials provided with the distribution.
* Neither the name of Red Hat, Inc., nor the names of its contributors may be used to endorse or promote
products derived from this software without specific prior written permission.
THIS SOFTWARE IS PROVIDED BY THE COPYRIGHT HOLDERS AND CONTRIBUTORS "AS IS" AND ANY
EXPRESS OR IMPLIED WARRANTIES, INCLUDING, BUT NOT LIMITED TO, THE IMPLIED WARRANTIES OF
MERCHANTABILITY AND FITNESS FOR A PARTICULAR PURPOSE ARE DISCLAIMED. IN NO EVENT
SHALL THE COPYRIGHT OWNER OR CONTRIBUTORS BE LIABLE FOR ANY DIRECT, INDIRECT, INCIDENTAL, SPECIAL, EXEMPLARY, OR CONSEQUENTIAL DAMAGES (INCLUDING, BUT NOT LIMITED TO,
PROCUREMENT OF SUBSTITUTE GOODS OR SERVICES; LOSS OF USE, DATA, OR PROFITS; OR BUSINESS INTERRUPTION) HOWEVER CAUSED AND ON ANY THEORY OF LIABILITY, WHETHER IN CONTRACT, STRICT LIABILITY, OR TORT (INCLUDING NEGLIGENCE OR OTHERWISE) ARISING IN ANY WAY
OUT OF THE USE OF THIS SOFTWARE, EVEN IF ADVISED OF THE POSSIBILITY OF SUCH DAMAGE.
Portions funded by Sandia National Laboratory and developed by the University of Michigan's Center for Information Technology Integration, including the PKINIT implementation, are subject to the following license:
COPYRIGHT ©2006-2007
THE REGENTS OF THE UNIVERSITY OF MICHIGAN
ALL RIGHTS RESERVED
Permission is granted to use, copy, create derivative works and redistribute this software and such derivative
works for any purpose, so long as the name of The University of Michigan is not used in any advertising or
publicity pertaining to the use of distribution of this software without specific, written prior authorization. If
the above copyright notice or any other identification of the University of Michigan is included in any copy of
any portion of this software, then the disclaimer below must also be included.
THIS SOFTWARE IS PROVIDED AS IS, WITHOUT REPRESENTATION FROM THE UNIVERSITY OF MICHIGAN AS TO ITS FITNESS FOR ANY PURPOSE, AND WITHOUT WARRANTY BY THE UNIVERSITY OF MICHIGAN OF ANY KIND, EITHER EXPRESS OR IMPLIED, INCLUDING WITHOUT LIMITATION THE IMPLIED
WARRANTIES OF MERCHANTABILITY AND FITNESS FOR A PARTICULAR PURPOSE. THE REGENTS OF
THE UNIVERSITY OF MICHIGAN SHALL NOT BE LIABLE FOR ANY DAMAGES, INCLUDING SPECIAL, INDIRECT, INCIDENTAL, OR CONSEQUENTIAL DAMAGES, WITH RESPECT TO ANY CLAIM ARISING OUT
OF OR IN CONNECTION WITH THE USE OF THE SOFTWARE, EVEN IF IT HAS BEEN OR IS HEREAFTER
ADVISED OF THE POSSIBILITY OF SUCH DAMAGES.
The pkcs11.h file included in the PKINIT code has the following license:
Copyright 2006 g10 Code GmbH
Copyright 2006 Andreas Jellinghaus
This file is free software; as a special exception the author gives unlimited permission to copy and/or distribute it, with or without modifications, as long as this notice is preserved.
This file is distributed in the hope that it will be useful, but WITHOUT ANY WARRANTY, to the extent permitted by law; without even the implied warranty of MERCHANTABILITY or FITNESS FOR A PARTICULAR PURPOSE.
d-COLOR MF3100 10-11
Page 78

10
WPA Supplicant
Copyright ©2003-2008, Jouni Malinen <j@w1.fi> and contributors All Rights Reserved.
License
-------
This software may be distributed under the terms of BSD license:
Redistribution and use in source and binary forms, with or without modification, are permitted provided that
the following conditions are met:
1. Redistributions of source code must retain the above copyright notice, this list of conditions and the
following disclaimer.
2. Redistributions in binary form must reproduce the above copyright notice, this list of conditions and the
following disclaimer in the documentation and/or other materials provided with the distribution.
3. Neither the name(s) of the above-listed copyright holder(s) nor the names of its contributors may be
used to endorse or promote products derived from this software without specific prior written permission.
THIS SOFTWARE IS PROVIDED BY THE COPYRIGHT HOLDERS AND CONTRIBUTORS "AS IS" AND ANY
EXPRESS OR IMPLIED WARRANTIES, INCLUDING, BUT NOT LIMITED TO, THE IMPLIED WARRANTIES OF
MERCHANTABILITY AND FITNESS FOR A PARTICULAR PURPOSE ARE DISCLAIMED. IN NO EVENT
SHALL THE COPYRIGHT OWNER OR CONTRIBUTORS BE LIABLE FOR ANY DIRECT, INDIRECT, INCIDENTAL, SPECIAL, EXEMPLARY, OR CONSEQUENTIAL DAMAGES (INCLUDING, BUT NOT LIMITED TO,
PROCUREMENT OF SUBSTITUTE GOODS OR SERVICES; LOSS OF USE, DATA, OR PROFITS; OR BUSINESS INTERRUPTION) HOWEVER CAUSED AND ON ANY THEORY OF LIABILITY, WHETHER IN CONTRACT, STRICT LIABILITY, OR TORT (INCLUDING NEGLIGENCE OR OTHERWISE) ARISING IN ANY WAY
OUT OF THE USE OF THIS SOFTWARE, EVEN IF ADVISED OF THE POSSIBILITY OF SUCH DAMAGE.
-------
The WPA Supplicant is provided to Licensee under the terms of the BSD license set forth below and any use
of the WPA Supplicant Patch shall comply with the terms and conditions of the following:
Copyright ©2002-2007, Jouni Malinen <j@w1.fi> and contributors
Copyright ©Marvell International Ltd. and its affiliates
All rights reserved.
1. Redistributions in binary form must reproduce the above copyright notice, this list of conditions and the
following disclaimer in the documentation and/or other materials provided with the distribution.
2. Neither the name of the copyright owner, Marvell, nor the names of contributors may be used to en-
dorse or promote products derived from this software without specific prior written permission.
THIS SOFTWARE IS PROVIDED BY THE COPYRIGHT HOLDERS AND CONTRIBUTORS "AS IS" AND ANY
EXPRESS OR IMPLIED WARRANTIES, INCLUDING, BUT NOT LIMITED TO, THE IMPLIE WARRANTIES OF
MERCHANTABILITY AND FITNESS FOR A PARTICULAR PURPOSE ARE DISCLAIMED. IN NO EVENT
SHALL THE COPYRIGHT OWNER OR CONTRIBUTORS BE LIABLE FOR ANY DIRECT, INDIRECT, INCIDENTAL, SPECIAL, EXEMPLARY, OR CONSEQUENTIAL DAMAGES (INCLUDING, BUT NOT LIMITED TO,
PROCUREMENT OF SUBSTITUTE GOODS OR SERVICES; LOSS OF USE, DATA, OR PROFITS; OR BUSINESS INTERRUPTION) HOWEVER CAUSED AND ON ANY THEORY OF LIABILITY, WHETHER IN CONTRACT, STRICT LIABILITY, OR TORT (INCLUDING NEGLIGENCE OR OTHERWISE) ARISING IN ANY WAY
OUT OF THE USE OF THIS SOFTWARE, EVEN IF ADVISED OF THE POSSIBILITY OF SUCH DAMAGE.
Note
User's Guide may not be reproduced in part or in full without permission.
Information included in User's Guide is subject to change without notice.
SOFTWARE LICENSE AGREEMENT
PLEASE READ CAREFULLY THE LICENSE AGREEMENT BELOW BEFORE DOWNLOADING, INSTALLING
OR USING THE SOFTWARE. DOWNLOADING, INSTALLING OR USING THE SOFTWARE SHALL BE
DEEMED YOUR LAWFUL ACCEPTANCE OF THE TERMS AND CONDITIONS BELOW. IF YOU DO NOT
AGREE TO THEM, DO NOT DOWNLOAD, INSTALL, NOR USE THE SOFTWARE.
1. SOFTWARE
"Software" means this computer program (software), independent from its distribution channel, i.e.
10-12 d-COLOR MF3100
Page 79

whether downloaded on royalty-free basis (which may include digitally encoded, machine readable,
scalable outline font data as encoded in a special format) or obtained on DVD or any other physical data
carrier, together with all codes, techniques, software tools, format, design, concepts, methods and ideas associated with the computer program and all documentation related thereto.
2. COPYRIGHT AND INTELLECTUAL PROPERTY RIGHTS
This is a license agreement and not an agreement for sale. Konica Minolta Business Solutions Europe
GmbH ("Konica Minolta") owns, or has been licensed from other owners ("Konica Minolta Licensor"),
copyrights and other intellectual property rights of the Software, and any and all rights and title to the
Software and any copy made from it are retained by Konica Minolta or Konica Minolta Licensor. In no
event, this Agreement shall be deemed to assign any copyright and/or any intellectual property rights
of the Software from Konica Minolta or Konica Minolta Licensor to you. Except as stated in this Agreement, you are not granted any rights to patents, copyrights, trade names, trademarks (whether registered or unregistered), or any other rights, franchises or licenses in respect of the Software. The
Software is protected by copyright laws and international treaty provisions.
3. LICENSE
Konica Minolta hereby grants to you, and you agree to accept a non-exclusive, non-transferable and
limited license, and you may:
(i) install and use the Software only on your computer(s) connected via inhouse network with a product
for which this Software is designed;
(ii) allow users of the computers described above to use the Software, provided that you assure that all
such users comply with the terms of this Agreement;
(iii) use the Software only for your own customary business or personal purpose;
(iv) make one copy of the Software only for backup or installation purpose in the support of the normal
and intended use of the Software;
(v) transfer the Software to other party by transferring a copy of this Agreement and all documentation
along with the Software, provided that (a) you must, at the same time, either transfer to such other party
or destroy all your other copies of the Software, (b) such transfer of possession terminates your license
from Konica Minolta, and (c) you must assure that such other party has agreed to accept and be bound
by the terms and conditions of this Agreement. If such other party does not accept such terms and conditions then you shall not transfer any copy of the Software.
10
4. RESTRICTIONS
(1) You must not without the prior written consent of Konica Minolta:
(i) use, copy, modify, merge or transfer copies of the Software except as provided herein;
(ii) reverse engineer, reverse assemble, reverse compile or any other way analyze the Software except
permitted by law;
(iii) sublicense, rent, lease or distribute the Software or any copy thereof; or
(iv) remove, use, or alter any trademark, logo, copyright or other proprietary notices, legends, symbols
or labels in the Software.
(2) You agree that you will not export the Software in any form in violation of any applicable laws and
regulations regarding export control of any country.
5. LIMITED WARRANTIES
The Software is provided to you “as is” without any warranties whatsoever. The express terms of this
Agreement are in lieu of all other warranties, express or implied and Konica Minolta, its affiliate companies and Konica Minolta Licensor disclaim all warranties with regard to the Software, express or implied,
including, without limitation, implied warranties of merchantability, fitness for a particular purpose and
non-infringement of third party rights. The disclaimer of warranty hereunder does not affect your statutory rights. In case of the disclaimer is not allowed by applicable law, the disclaimer shall only apply
to you to the maximum extent permitted by the law.
6. LIMITATION OF REMEDIES
In no event will Konica Minolta, its affiliate companies nor Konica Minolta Licensor be liable for any lost
profits, lost data, or any other indirect, special, punitive, incidental or consequential damages that result
from use or inability to use the Software, even if Konica Minolta, its affiliate companies, its authorized
remarketers or Konica Minolta Licensor have been advised of the possibility of such damages or for any
claim by you based on a third party claim.
7. TERMINATION
You may terminate this license at any time by destroying the Software and all your copies of it. This
Agreement shall also terminate if you fail to comply with any terms hereof. Upon such termination, you
must immediately destroy all copies of the Software in your possession.
8. GOVERNING LAW
This Agreement shall be governed by the laws of the country where the delivery is made to the original
customer.
d-COLOR MF3100 10-13
Page 80

10
9. SEVERABILITY
In the event that any part or parts of this Agreement shall be held illegal or null and void by any court or
administrative body of competent jurisdiction, such determination shall not affect the remaining parts
of this Agreement and they shall remain in full force and effect as if such part or parts determined illegal
or void had not been included.
10. NOTICE TO US GOVERNMENT END USERS
The Software is a "commercial item," as that term is defined at 48 C.F.R. 2.101 (October 1995), consisting of "commercial computer software" and "commercial computer software documentation," as
such terms are used in 48 C.F.R. 12.212 (September 1995). Consistent with 48 C.F.R. 12.212 and 48
C.F.R. 227.7202-1 through 227.7202-4 (June 1995), all U.S. Government End Users shall acquire the
Software with only those rights set forth herein.
YOU ACKNOWLEDGE THAT YOU HAVE READ THIS AGREEMENT, UNDERSTAND IT, AND AGREE TO BE
BOUND BY ITS TERMS AND CONDITIONS. NEITHER PARTY SHALL BE BOUND BY ANY OTHER STATEMENTS OR REPRESENTATIONS THAT ARE INCONSISTENT WITH THE TERMS AND CONDITIONS OF
THIS AGREEMENT. NO AMENDMENT TO THIS AGREEMENT IS EFFECTIVE UNLESS IN WRITING AND
SIGNED BY DULY AUTHORIZED REPRESENTATIVES OF EACH PARTY.
About Adobe Color Profile
ADOBE SYSTEMS INCORPORATED
COLOR PROFILE LICENSE AGREEMENT
NOTICE TO USER: PLEASE READ THIS CONTRACT CAREFULLY. BY USING ALL OR ANY PORTION OF
THE SOFTWARE YOU ACCEPT ALL THE TERMS AND CONDITIONS OF THIS SOFTWARE YOU ACCEPT
ALL THE TERMS AND CONDITIONS OF THIS AGREEMENT. IF YOU DO NOT AGREE WITH THE TERMS OF
THIS AGREEMENT, DO NOT USE THE SOFTWARE.
1. DEFINITIONS In this Agreement, "Adobe" means Adobe Systems Incorporated, a Delaware corpora-
tion, located at 345 Park Avenue, San Jose, California 95110. "Software" means the software and related items with which this Agreement is provided.
2. LICENSE Subject to the terms of this Agreement, Adobe hereby grants you the worldwide, non-exclu-
sive, nontransferable, royalty-free license to use, reproduce and publicly display the Software. Adobe
also grants you the rights to distribute the Software only (a) as embedded within digital image files and
(b) on a standalone basis. No other distribution of the Software is allowed; including, without limitation,
distribution of the Software when incorporated into or bundled with any application software. All individual profiles must be referenced by their ICC Profile description string. You may not modify the Software. Adobe is under no obligation to provide any support under this Agreement, including upgrades
or future versions of the Software or other items. No title to the intellectual property in the Software is
transferred to you under the terms of this Agreement. You do not acquire any rights to the Software
except as expressly set forth in this Agreement.
3. DISTRIBUTION If you choose to distribute the Software, you do so with the understanding that you
agree to defend, indemnify and hold harmless Adobe against any losses, damages or costs arising from
any claims, lawsuits or other legal actions arising out of such distribution, including without limitation,
your failure to comply with this Section 3. If you distribute the Software on a standalone basis, you will
do so under the terms of this Agreement or your own license agreement which (a) complies with the
terms and conditions of this Agreement; (b) effectively disclaims all warranties and conditions, express
or implied, on behalf of Adobe; (c) effectively excludes all liability for damages on behalf of Adobe; (d)
states that any provisions that differ from this Agreement are offered by you alone and not Adobe and
(e) states that the Software is available from you or Adobe and informs licensees how to obtain it in a
reasonable manner on or through a medium customarily used for software exchange. Any distributed
Software will include the Adobe copyright notices as included in the Software provided to you by Adobe.
10-14 d-COLOR MF3100
Page 81

10
4. DISCLAIMER OF WARRANTY Adobe licenses the Software to you on an "AS IS" basis. Adobe makes
no representation as to the adequacy of the Software for any particular purpose or to produce any particular result. Adobe shall not be liable for loss or damage arising out of this Agreement or from the distribution or use of the Software or any other materials. ADOBE AND ITS SUPPLIERS DO NOT AND
CANNOT WARRANT THE PERFORMANCE OR RESULTS YOU MAY OBTAIN BY USING THE SOFTWARE, EXCEPT FOR ANY WARRANTY, CONDITION, REPRESENTATION OR TERM TO THE EXTENT
TO WHICH THE SAME CANNOT OR MAY NOT BE EXCLUDED OR LIMITED BY LAW APPLICABLE TO
YOU IN YOUR JURISDICTION, ADOBE AND ITS SUPPLIERS MAKE NO WARRANTIES, CONDITIONS,
REPRESENTATIONS OR TERMS, EXPRESS OR IMPLIED, WHETHER BY STATUTE, COMMON LAW,
CUSTOM, USAGE OR OTHERWISE AS TO ANY OTHER MATTERS, INCLUDING BUT NOT LIMITED
TO NONINFRINGEMENT OF THIRD PARTY RIGHTS, INTEGRATION, SATISFACTORY QUALITY OR
FITNESS FOR ANY PARTICULAR PURPOSE. YOU MAY HAVE ADDITIONAL RIGHTS WHICH VARY
FROM JURISDICTION TO JURISDICTION. The provisions of Sections 4, 5 and 6 shall survive the termination of this Agreement, howsoever caused, but this shall not imply or create any continued right to
use the Software after termination of this Agreement.
5. LIMITATION OF LIABILITY IN NO EVENT WILL ADOBE OR ITS SUPPLIERS BE LIABLE TO YOU FOR
ANY DAMAGES, CLAIMS OR COSTS WHATSOEVER OR ANY CONSEQUENTIAL, INDIRECT, INCIDENTAL DAMAGES, OR ANY LOST PROFITS OR LOST SAVINGS, EVEN IF AN ADOBE REPRESENTATIVE HAS BEEN ADVISED OF THE POSSIBILITY OF SUCH LOSS, DAMAGES, CLAIMS OR COSTS
OR FOR ANY CLAIM BY ANY THIRD PARTY. THE FOREGOING LIMITATIONS AND EXCLUSIONS APPLY TO THE EXTENT PERMITTED BY APPLICABLE LAW IN YOUR JURISDICTION. ADOBE'S AGGREGATE LIABILITY AND THAT OF ITS SUPPLIERS UNDER OR IN CONNECTION WITH THIS
AGREEMENT SHALL BE LIMITED TO THE AMOUNT PAID FOR THE SOFTWARE. Nothing contained
in this Agreement limits Adobe's liability to you in the event of death or personal injury resulting from
Adobe's negligence or for the tort of deceit (fraud). Adobe is acting on behalf of its suppliers for the
purpose of disclaiming, excluding and/or limiting obligations, warranties and liability as provided in this
Agreement, but in no other respects and for no other purpose.
6. TRADEMARKS Adobe and the Adobe logo are the registered trademarks or trademarks of Adobe in the
United States and other countries. With the exception of referential use, you will not use such trademarks or any other Adobe trademark or logo without separate prior written permission granted by Adobe.
7. TERM This Agreement is effective until terminated. Adobe has the right to terminate this Agreement im-
mediately if you fail to comply with any term hereof. Upon any such termination, you must return to Adobe all full and partial copies of the Software in your possession or control.
8. GOVERNMENT REGULATIONS If any part of the Software is identified as an export controlled item un-
der the United States Export Administration Act or any other export law, restriction or regulation (the
"Export Laws"), you represent and warrant that you are not a citizen, or otherwise located within, an
embargoed nation (including without limitation Iran, Iraq, Syria, Sudan, Libya, Cuba, North Korea, and
Serbia) and that you are not otherwise prohibited under the Export Laws from receiving the Software.
All rights to use the Software are granted on condition that such rights are forfeited if you fail to comply
with the terms of this Agreement.
9. GOVERNING LAW This Agreement will be governed by and construed in accordance with the substan-
tive laws in force in the State of California as such laws are applied to agreements entered into and to
be performed entirely within California between California residents. This Agreement will not be governed by the conflict of law rules of any jurisdiction or the United Nations Convention on Contracts for
the International Sale of Goods, the application of which is expressly excluded. All disputes arising out
of, under or related to this Agreement will be brought exclusively in the state Santa Clara County, California, USA.
10. GENERAL You may not assign your rights or obligations granted under this Agreement without the prior
written consent of Adobe. None of the provisions of this Agreement shall be deemed to have been
waived by any act or acquiescence on the part of Adobe, its agents, or employees, but only by an instrument in writing signed by an authorized signatory of Adobe. When conflicting language exists between this Agreement and any other agreement included in the Software, the terms of such included
agreement shall apply. If either you or Adobe employs attorneys to enforce any rights arising out of or
relating to this Agreement, the prevailing party shall be entitled to recover reasonable attorneys' fees.
You acknowledge that you have read this Agreement, understand it, and that it is the complete and exclusive statement of your agreement with Adobe which supersedes any prior agreement, oral or written,
between Adobe and you with respect to the licensing to you of the Software. No variation of the terms
of this Agreement will be enforceable against Adobe unless Adobe gives its express consent, in writing,
signed by an authorized signatory of Adobe.
d-COLOR MF3100 10-15
Page 82

10
ICC Profile for TOYO INK Standard Color on Coated paper (TOYO Offset Coated 3.0)
About "ICC Profile for TOYO INK Standard Color on Coated paper version 3.0"
This is the ICC Profile for color reproduction of sheet-fed offset press on Coated paper.
This ICC Profile was developed by TOYO INK MFG. CO., LTD. ("TOYO INK") using printing tests with TOYO
INK's Japan Color sheet-fed offset printing inks and TOYO INK's own printing conditions.
"TOYO INK Standard Color on Coated paper" is compatible with "Japan Color 2007".
Agreement
1. The reproduction of images on a printer or a monitor using this ICC Profile do not completely match the
TOYO INK Standard Color on Coated paper.
2. Any and all copyrights of this ICC Profile shall remain in TOYO INK; therefore you shall not transfer, pro-
vide, rent, distribute, disclose, or grant any rights in this ICC Profile to any third party without the prior
written consent of TOYO INK.
3. In no event will TOYO INK its directors, officers, employees or agents be liable to you for any conse-
quential or incidential, either direct or indirect, damages (including damages for loss of business profits,
business interruption, loss of business information, and the like) arising out of the use or inability to use
this ICC Profile.
4. TOYO INK shall not be responsible for answering any question related to this ICC Profile.
5. All company names and product names used in this document is the trademarks or registered trade-
marks of their respective holder.
This ICC Profile was made by TOYO INK using X-Rite ProfileMaker and a license to distribute the profile has
been granted by X-Rite, Incorporated.
TOYO Offset Coated 3.0 ©TOYO INK MFG. CO., LTD. 2010
DIC STANDARD COLOR PROFILE LICENSE AGREEMENT
IMPORTANT: PLEASE READ THIS STANDARD COLOR PROFILE LICENSE AGREEMENT ("LICENSE
AGREEMENT") CAREFULLY BEFORE USING THE DIC STANDARD COLOR PROFILE, INCLUDING THE DIC
STANDARD COLOR SFC1.0.1, DIC STANDARD COLOR SFC1.0.2, DIC STANDARD COLOR SFM1.0.2, DIC
STANDARD COLOR SFU1.0.2, PROVIDED BY DIC HEREWITH, AND ANY CORRESPONDIMG ONLINE OR
ELECTRONC DOCUMENTATION AND ALL UPDATES OR UPGRADES OF THE ABOVE THAT ARE PROVIDED TO YOU (COLLECTIVELY, THE "PROFILE").
THIS LICENSE AGREEMENT IS A LEGAL AGREEMENT BETWEEN YOU (EITHER AN INDIVIDUAL OR, IF ACQUIRED BY OR FOR AN ENTITY, AN ENTITY) AND DAINIPPON INK & CHEMICALS, INC., A JAPANESE
COMPANY ("DIC"). THIS LICENSE AGREEMENT PROVIDES A LICENSE TO USE THE PROFILE AND CONTAINS WARRANTY INFORMATION AND LIABILITY DISCLAIMERS. IF YOU DO NOT AGREE TO BE BOUND
BY ALL OF THESE TERMS, YOU MAY NOT USE THE PROFILE.
1. License Grant
DIC grants you a gratis non-exclusive and non-transferable license to use the Profile and to allow your
employees and authorized agents, if any, to use the Profile, solely in connection with their work for you,
subject to all of the limitations and restrictions in this License Agreement.
2. Ownership
The foregoing license gives you limited license to use the Profile. You will own the rights in the media
containing the recorded Profile, but DIC retains all right, title and interest, including all copyright and
intellectual property rights, in and to, the Profile and all copies thereof. All rights not specifically granted
in this License Agreement, including all copyrights, are reserved by DIC.
3. Term
a. This License Agreement is effective until terminated.
b. You may terminate this License Agreement by notifying DIC in writing of your intention to terminate
this License Agreement and by destroying, all copies of the Profile in your possession or control.
c. DIC may terminate this License Agreement without prior notice to you if you fail to comply with any
of the terms and conditions of this License Agreement (either directly or through your employees or
agents), retroactive to the time of such failure to comply. In such event, you must immediately stop using the Profile and destroy all copies of the Profile in your possession or control.
d. All provisions in this License Agreement relating to warranty disclaimers (Section 5) and the limitation
of liability (Section 6) shall survive any termination of this License Agreement.
10-16 d-COLOR MF3100
Page 83

4. License Method and Restrictions
a. You may install and use the Profile on a single desktop computer; provided, however, that, notwithstanding anything contrary contained herein, you may not use the Profile on any network system or
share, install or use the Profile concurrently on different computers, or electronically transfer the Profile
from one computer to another or over a network.
b. You may not make or distribute copies, fix, alter, merge, modify, adapt, sublicense, transfer, sell,
rent, lease, gift or distribute all or a portion of the Profile, or modify the Profile or create derivative works
based upon the Profile.
c. You acknowledge that the Profile is not intended for any usage which may cause death or physical
injury or environmental damage and agree not to use the Profile for such usage.
d. You shall not use the Profile to develop any software or other technology having the same primary
function as the Profile, including but not limited to using the Profile in any development or test procedure that seeks to develop like software or other technology, or to determine if such software or other
technology performs in a similar manner as the Profile.
e. DIC and other trademarks contained in the Profile are trademarks or registered trademarks of DIC in
Japan and/or other countries. You may not remove or alter any trademark, trade names, product
names, logo, copyright or other proprietary notices, legends, symbols or labels in the Profile. This License Agreement does not authorize you to use DIC's or its licensors' names or any of their respective
trademarks.
5. WARRANTY DISCLAIMER
a. THE PROFILE IS PROVIDED TO YOU FREE OF CHARGE, AND ON AN "AS-IS" BASIS, IN ACCORDANCE WITH THE TERMS AND COONDITIONS OF THIS LICENSE AGREEMENT. DIC PROVIDES NO
TECHNICAL SUPPORT, WARRANTIES OR REMEDIES FOR THE PROFILE.
b. DIC DISCLAIMS ALL WARRANTIES AND REPRESENTATIONS, WHETHER EXPRESS, IMPLIED, OR
OTHERWISE, INCLUDING BUT NOT LIMITED TO, THE WARRANTIES OF MERCHANTABILITY OR FITNESS FOR A PARTICULAR PURPOSE, NON-INFRINGEMENT, TITLE AND QUIET ENJOYMENT. YOU
SHALL ASSUME AND BE FULLY LIABLE AND RESPONSIBLE FOR ALL RISKS IN CONNECTION WITH
YOUR USE OF THE PROFILE. DIC DOES NOT WARRANT THAT THE PROFILE IS FREE OF DEFECTS
OR FLAWS OR WILL OPERATE WITHOUT INTERRUPTION, AND IS NOT RESPONSIBLE FORCORRECTING OR REPAIRING ANY DEFECTS OR FLAWS, FOR FEE OR GRATIS. NO RIGHTS OR REMEDIES WILL BE CONFERRED ON YOU UNLESS EXPRESSLY GRANTED HEREIN.
10
6. LIMITATION OF LIABILITY
DIC SHALL NOT BE LIABLE TO YOU OR ANY THIRD PARTY FOR ANY DIRECT, INDIRECT, SPECIAL,
INCIDENTAL, PUNITIVE, COVER OR CONSEQUENTIAL DAMAGES (INCLUDING, BUT NOT LIMITED
TO, DAMAGES FOR THE INABILITY TO USE EQUIPMENT OR ACCESS DATA, LOSS OF BUSINESS,
LOSS OF PROFITS, BUSINESS INTERRUPTION OR THE LIKE), ARISING OUT OF THE USE OF, OR
INABILITY TO USE, THE PROFILE AND BASED ON ANY THEORY OF LIABILITY INCLUDING BREACH
OF CONTRACT, BREACH OF WARRANTY, TORT (INCLUDING NEGLIGENCE), PRODUCT LIABILITY
OR OTHERWISE, EVEN IF DIC OR ITS REPRESENTATIVES HAVE BEEN ADVISED OF THE POSSIBILITY OF SUCH DAMAGES.
THE FOREGOING LIMITATIONS ON LIABILITY SHALL APPLY TO ALL ASPECTS OF THIS LICENSE
AGREEMENT.
7. General
a. This License Agreement shall be governed and construed in accordance with the laws of Japan, without giving effect to principles of conflict of laws. If any provision of this License Agreement shall be held
by a court of competent jurisdiction to be contrary to law, that provision will be enforced to the maximum extent permissible, and the remaining provisions of this License Agreement will remain in full force
and effect. You hereby consent to the exclusive jurisdiction and venue of Tokyo District Court to resolve
any disputes arising under this License Agreement.
b. This License Agreement contains the complete agreement between the parties with respect to the
subject matter hereof, and supersedes all prior or contemporaneous agreements or understandings,
whether oral or written. You agree that any varying or additional terms contained in any written notification or document issued by you in relation to the Profile licensed hereunder shall be of no effect.
c. The failure or delay of DIC to exercise any of its rights under this License Agreement or upon any
breach of this License Agreement shall not be deemed a waiver of those rights or of the breach.
d-COLOR MF3100 10-17
Page 84

10
10-18 d-COLOR MF3100
Page 85

11
Index
Page 86

Page 87

11 Index
A
ADF 5-3
C
CD-ROM 2-3
Consumables
Control Panel
E
Entering Characters 7-7
ErP Auto Power Off
I
Installation
Installation environment 2-5
Installation location
L
Loading paper
Lower Feeder Unit
Manual Feed Tray 6-6
Tray 1 6-9
Loading the Original
5-4
ADF
Original Glass
11
9-6
7-3
4-4
2-4
6-11
5-5
M
Main Screen 7-5
N
Name of each part 3-3
O
Option configuration 3-7
Original Glass
5-5
P
Paper
Available paper sizes
Available paper types
Storing paper 6-5
Unavailable paper
Power Save mode
Power supply
Power Switch
6-5
4-4
4-3
R
REPORT/STATUS 7-8
S
Sleep 4-4
Specifications
Main unit
Optional devices
9-3
9-3
9-5
6-4
6-3
d-COLOR MF3100 11-3
Page 88

11
11-4 d-COLOR MF3100
Page 89

Page 90

N ° 14-113
DICHIARAZIONE CE DI CONFORMITA' del COSTRUTTORE secondo ISO/IEC 17050
MANUFACTURER’S CE DECLARATION of CONFORMITY according to ISO/IEC 17050
OLIVETTI S.p.A Via Jervis, 77 - IVREA (TO) - ITALY
Dichiara sotto la sua responsabilita' che il prodotto:
Declares under its sole responsibility that the product:
Categoria generale: Apparecchiature per la Tecnologia dell' Informazione
Equipment category: Information Technology Equipment
Tipo di apparecchiatura: Copiatrice Laser digitale Multifunzionale
Product type: Multifunctional Digital Laser Copier
Modello/Product name: d-Color MF3100
Opzioni/Options: PF-P14, AU-201, HD-P06, FK-512
è conforme e soddisfa i requisiti essenziali di Compatibilità Elettromagnetica, Consumo Energetico e Sicurezza
previsti dalle Direttive:
is in compilance and fulfills the essential requirements of Electromagnetic Compatibility, Electrical Power
Consumption and Electrical Safety as prescribed by the Directives:
2004/108/CE del 15 Dicembre 2004 (EMC) - 2004/108/EC dated 15
2009/125/CE del 21 Ottobre 2009 (ErP) - 2009/125/EC dated 21
2006/95/CE del 12 Dicembre 2006 (LVD) - 2006/95/EC dated 12
2011/65/UE del 8 Giugno 2011 (RoHS) - 2011/65/EU dated 8
th
December 2004
st
October 2009
th
December 2006
th
June 2011
in quanto progettato e costruito in conformità alle seguenti Norme Armonizzate:
since designed and manufactured in compliance with the following European Harmonized Standards:
EN 55022:2010 (Limits and methods of measurements of radio interference characteristics of Information
Technology Equipment) / Class B
EN 61000-3-2:2006 + A1:2009 + A2:2009 (Electromagnetic Compatibility (EMC) - Part 3: Limits - Section 2:
Limits for harmonic current emissions (equipment input current 16 A per phase)
EN 61000-3-3:2008 (Electromagnetic Compatibility (EMC) - Part 3: Limits - Section 3: Limitation of voltage
fluctuations and flicker in low voltage supply systems for equipment with rated current up to and including
16A)
EN 55024:2010 (Electromagnetic Compatibility – Information technology equipment – Immunity characteristics
– Limits and methods of measurement)
EN 62311:2008 (Assessment of electronic and electrical equipment related to human exposure restrictions for
electromagnetic fields (0 Hz - 300 GHz))
EN 60950-1:2006 + A11:2009 + A1:2010 + A12:2011 (Safety of Information Technology Equipment,
including electrical business equipment)
EN 60825-1:2007 (Radiation Safety of laser products, equipment classification, requirements and user's guide)
EN 50581:2012 (Technical documentation for the assessment of electrical and electro electronic products with
respect to the restriction of hazardous substances)
ES 203 021-1:V2.1.1, ES 203 021-2:V2.1.2, ES 203 021-3:V2.1.2 (Referred Voluntary Requirements)
EG 201 120:V1.1.1, EG 201 121:V1.1.3 (Referred Voluntary Requirements)
1275/2008/EC (Ecodesign requirements for standby and off mode electric power consumption)
La conformità ai suddetti requisiti essenziali viene attestata mediante l'apposizione della Marcatura CE sul
prodotto.
Compliance with the above mentioned essential requirements is shown by affixing the CE marking on the product.
Ivrea, 2 April 2014
Ivrea, 2
Walter Fontani
Quality Director
Olivetti S.p.A.
Note: 1) La Marcatura CE è stata apposta nel 2014
Notes: 1) CE Marking has been affixed in 2014
2) Il Sistema della Qualità è conforme alle norme serie UNI EN ISO 9000.
2) The Quality System is in compliance with the UNI EN ISO 9000 series of Standards
nd
April 2014
Olivetti S.p.A. - Via Jervis, 77 - 10015 Ivrea (To) - Italy - Tel +39 0125 7751 - Cap. Soc. € 13.200.000 i.v. - R.E.A. 547040 - Cod. Fisc./P.IVA e iscriz. al Reg. Imp. Di Torino 02298700010
Società con unico azionista, Gruppo Telecom Italia - Direzione e coordinamento di Telecom Italia S.p.A.
 Loading...