

Page 1
LCD TV
LT20S
Englis h
Page 2
Table of Contents
Import an t Safety Instructions
Import an t Safety Precautions
FCC Stat em ent
Access or ies
Instal la tion And Connectio n G uide
Identi fy ing Front and Rear Panels
Descri pt ions of Connector Input Types
Connec ti ng the TV power cord
Adjust in g the TV Viewing Angle
Instal la tion
Connec ti ng to an Antenn a or Video Equ ip ment with Antenna outlet
Connec ti ng to a VCR
Connec ti ng to a DVD player with A/V or S-Video Cables
Connec ti ng to a DVD player with Component Cab le s
Connec ti ng to a Satellite Receiver or Cable B ox w ith A/V Cables
Connec ti ng to a Satellite Receiver or Cable B ox w ith Component Connectors
Connec ti ng to a PC with VGA Connector / Other Conn ec tions
Remote C on trol Guide
Key Func ti on and Descriptions
Hotkey s Tut orial
Adjust in g the On Screen Display (OSD)
Introd uc tion: To Ope ra te in the OSD
Adjust in g Picture Quality
To Re se t Factory Settings
Adjust in g Sound Quality
To Se le ct Stereo or Bilingual Progra ms
Adjust in g Personal TV Settings
Settin g th e Channels
Editin g th e Channels: Add/Delete Channel s
Channe l So urce
Closed C ap tion
Parent al C ontrol
Sleep
Langua ge s
Adjust in g TV Sourc e
Adjust in g TV Sourc e un der PC (VGA) Mode
Screen Ad ju stments
Pictur e Adj ustments
Audio Adju st ments
OSD Adjus tm ents
Trouble sh ooting
Specif ic ations
Timing Mode for VGA
Wall Mount Kit
Pixels P ol icy
01
02
05
06
08
10
11
12
14
15
16
17
18
19
20
21
22
24
25
25
26
26
27
28
28
29
29
29
32
32
33
33
33
34
35
35
36
37
38
39
40
Page 3

Important Safety Instructions
The lightning flash with arrowhead symbol. Within an equilateral triangle. is intended to alert
the presence of uninsulated "dangerous voltage" within the product's enclosure that may be of
a sufficient magnitude to constitute a risk of electric shock to persons.
The exclamation point within an equilateral triangle. is intended to alert the user to the
presence of important operating and maintenance (servicing) instructions in the literature
accompanying the appliance.
To reduce the risk of el ectronic shock, d o n ot remove cover (or bac k).
No user-servicea bl e p arts inside.
Refer service to q ua li fied Repair Techn ic ia n or Repair Center.
01
Risk of electronic shock
Do not open
Ca uti on
Caution
18. WARNING: To prevent injury, this apparatus must be securely attached to the floor/wall in accordance
with the installation instructions.
0
0
0
0
0
0
0
0
0
1. Read these instructions.
2. Keep these instructions.
3. Heed all warnings.
4. Follow all instructions.
5. Do not use this apparatus near water.
6. Clean only with a dry cloth.
. Do not block any ventilation openings. Install in accordance with the manufacturer's instructions.
. Do not install near any heat source such as radiators, heat registers, stoves or other apparatus that
produce heat.
. Do not defeat the safety purpose of the polarized or grounding type plug. A polarized plug has type
blades with one wide than the other. A grounding - type plug has two blades and a third grounding
prong. The wide blade or third prong are provide for your safety.
When the provide plug does not fit into your outlet, consult an electrician for replacement of the
obsolete outlet.
10. Protect the power cord from being walked on or pinched particularly at plugs, convenience
receptacles, and the point where they exit from the apparatus.
11. Only use attachment/accessories specified by the manufacturer.
12. Use only with a cart, stand, tripod, bracket or table specified by the manufacturer,
or sold with the apparatus. When a cart is used, use caution when moving the
cart/apparatus combination to avoid injury from tip-over.
13. Unplug this apparatus during lightning storms or when unused for long periods
of time.
14. Refer all servicing to qualified service personal. Servicing is required when the
apparatus has been damaged in
any way, such as power supply cord or plug is damaged, liquid has been spilled or objects have fallen
into the apparatus, the apparatus has been exposed to rain or moisture, does not operate normally, or
have been dropped.
15. WARNING: To reduce to the risk of fire or electric shock, do not expose this apparatus to rain or moisture.
16. Apparatus shall not be exposed to dripping or splashing and no objects filled with liquids, such as vases,
shall be placed on the apparatus.
16. Unplug the unit and inform the service center in case of abnormalities seen with regards to the operation
of the unit.
17. CAUTION:Danger of explosion if battery is incorrectly replaced. Replace only with the same or
equivalent type.
Caution
These servicing instructions are for use by qualified service personnel only. To reduce the risk of electric
shock, do not perform any servicing other than that contained in the operating instructions unless you are
qualified to do so.
7
8
9
Page 4
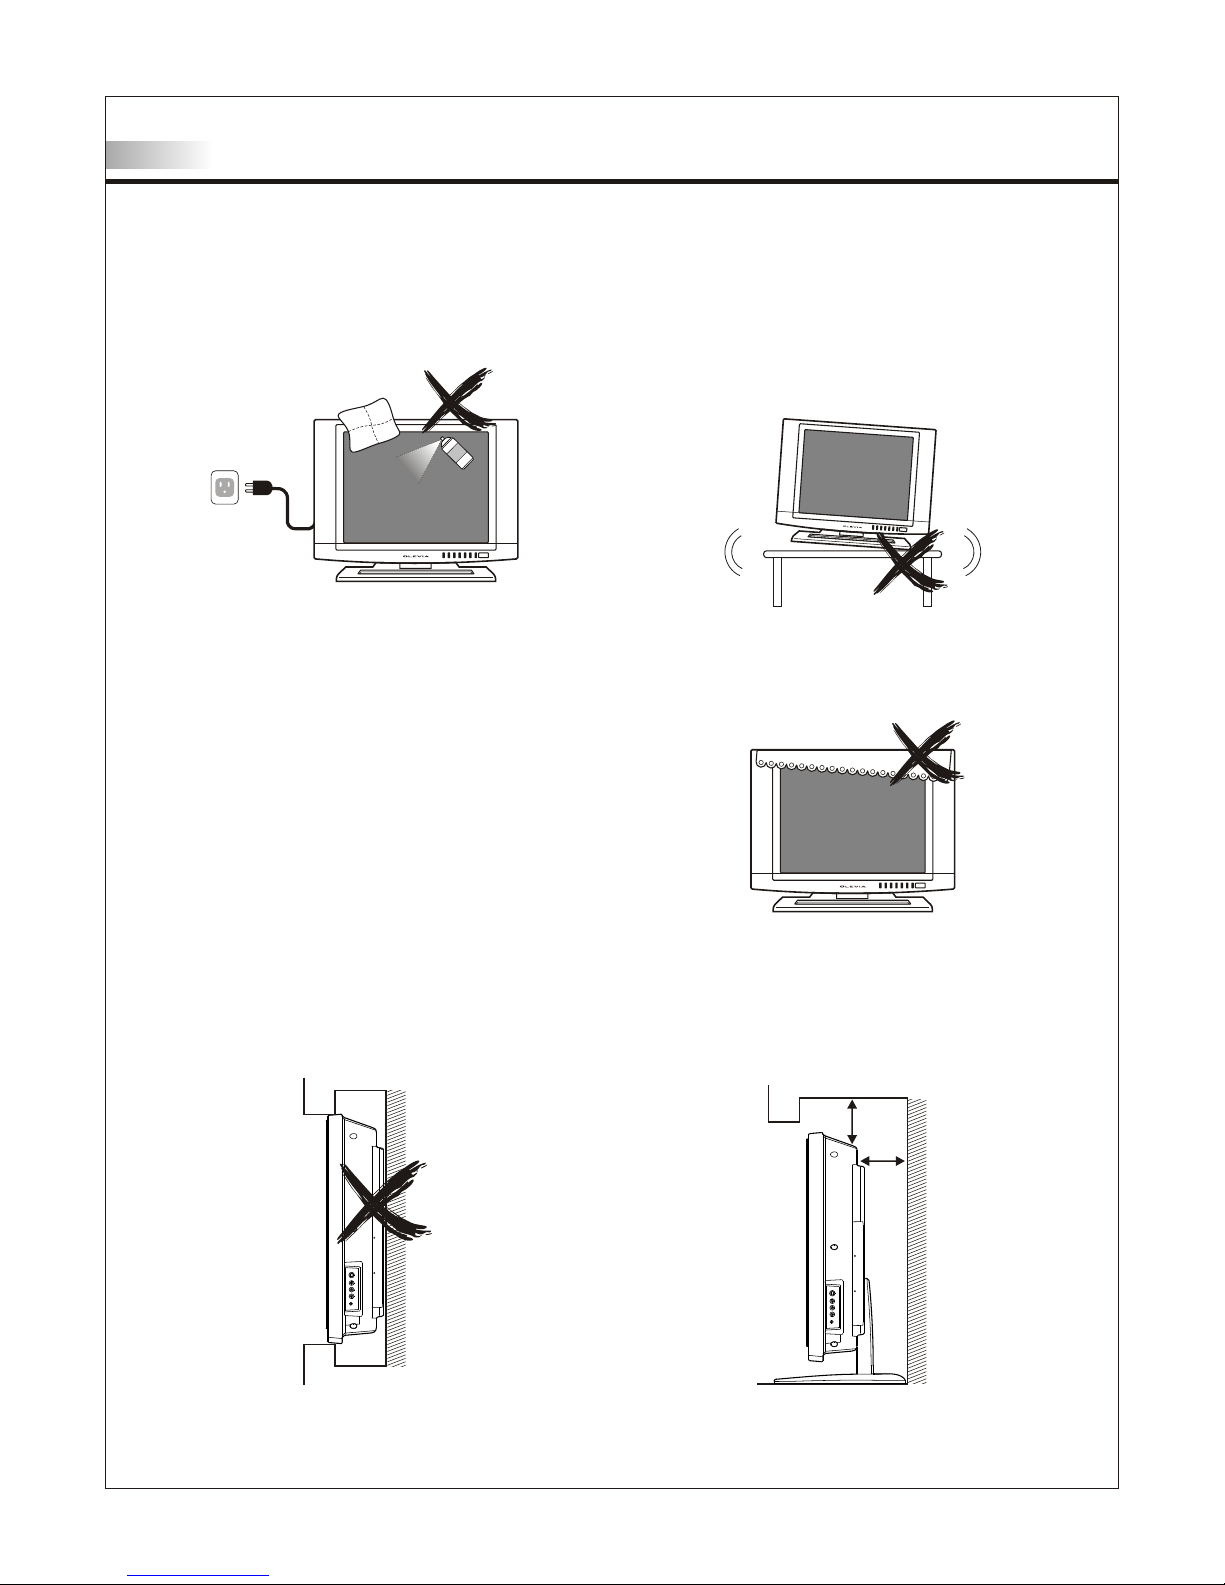
Cleaning
Remember to unplug the AC cord from the AC outlet
before cleaning the display unit. And do not use
liquid cleaners or aerosol cleaners to clean the
display.
Stand
Do not place the display unit on an unstable place.
The TV may fall resulting in serious personal
injuries to nearby people as well as damage to the
display unit.
Ventilation
Do not cover or block these vents and openings
located on the top and back of the display. Inadequate
ventilation may cause overheating and shorten the
life span of the display.
Do not place in an enclosed area such as a built-in
shelf, unless proper ventilation is provided or the
manufacturer's instructions are followed. Keep the
distance of 10cm minimum between the display unit
and wall. Never install the display unit as indicated in
the picture below.
Air circulation i s bl ocked
10cm
10cm
Air circulatio n i s not blocked
Important Safety Precautions
02
Page 5
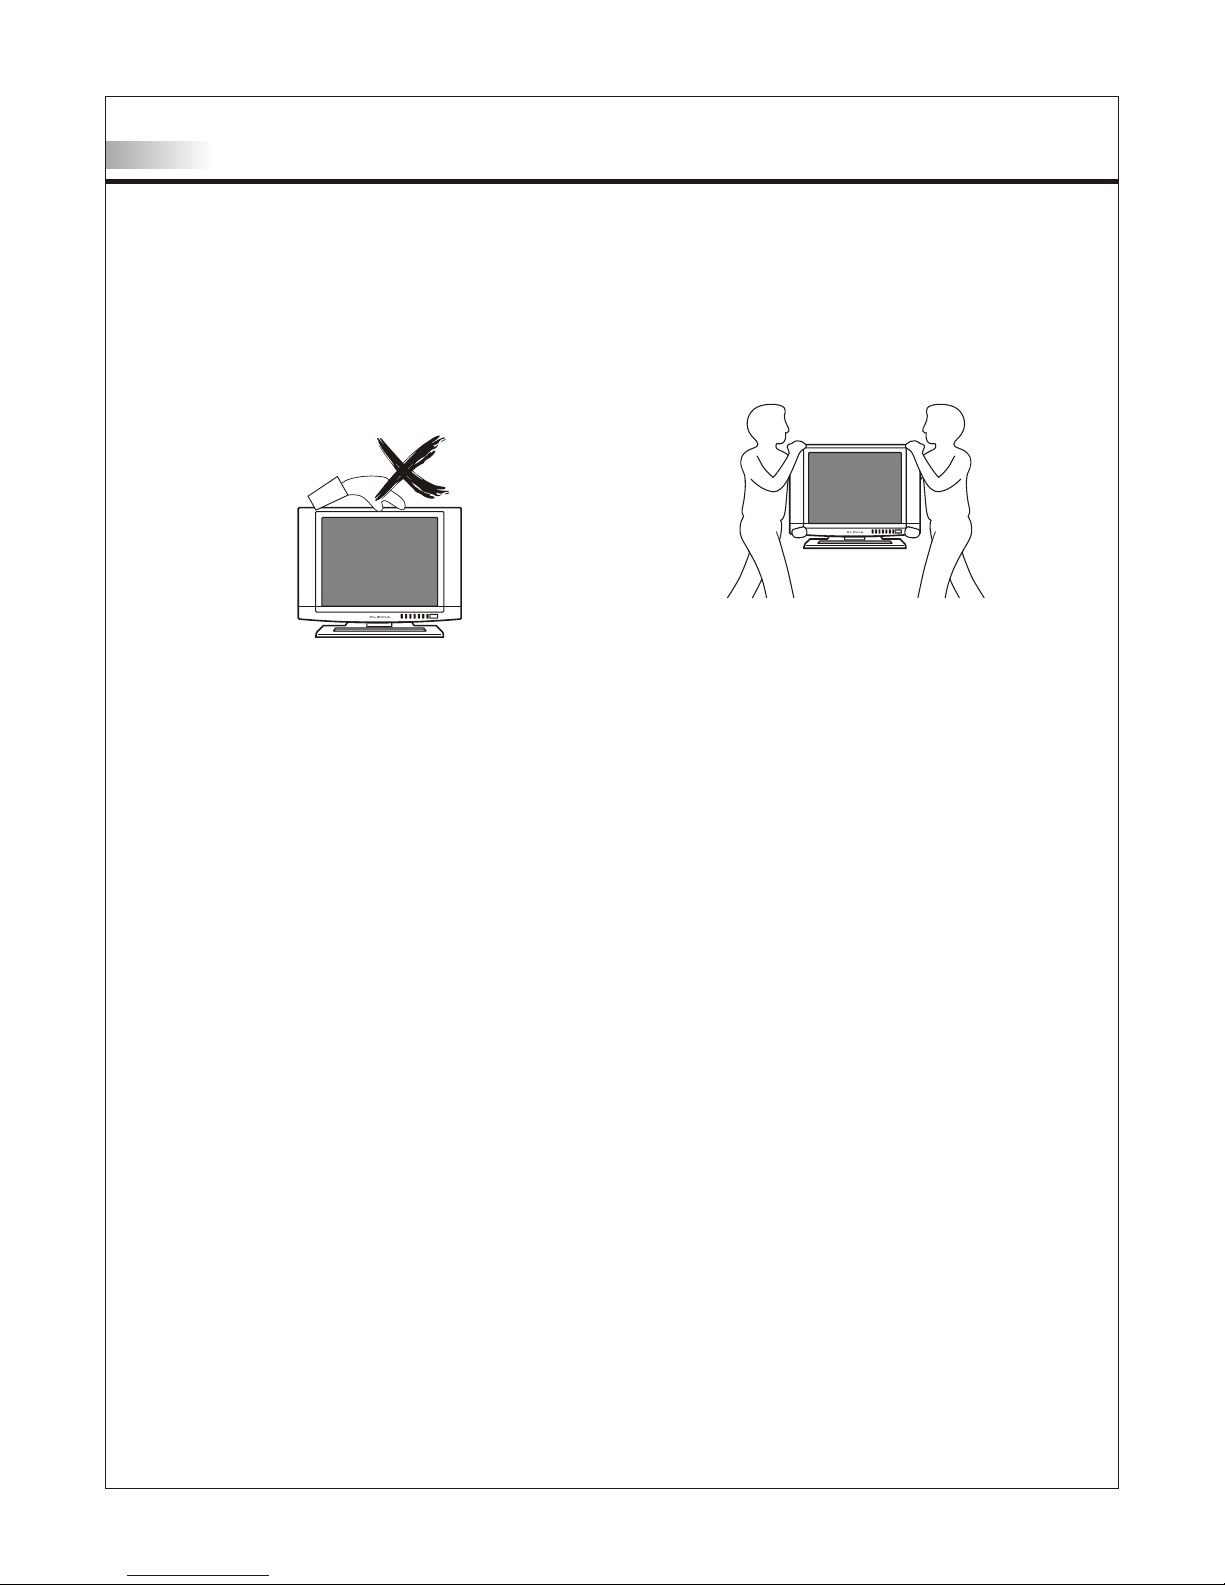
Never insert objects or spill liquid
into the display unit
Never insert any object into the display unit through
openings or spill liquid on the display unit. High
voltage flows in the display unit, and inserting an
object can cause electric shock and/or short internal
parts.
Keep away from water and moisture
Do not place the display in areas where moisture is
present or where the unit may get wet such as bathrooms, kitchen, pool area or in a wet basement.
AC cord protection
The AC cords must be routed properly to prevent
people from stepping on them or objects from resting
on them. Check the cords at the plugs and product.
Keep away from heat sources
Keep the display unit away from heat sources such
as radiators, heaters, stoves and other
heat-generating products.
The liquid crystal panel used in this
product is made of glass
Do not hit the panel. Be careful to prevent from
getting hurt by broken glass pieces in case the panel
breaks.
Follow operating instructions
All operating instructions must be followed.
Precautions when transporting the
display
Carrying the display requires two or more people.
Attachments
Do not use attachments not recommended by the
manufacturer. Use of inadequate attachments may
result in accidents to nearby people or to the unit.
Power source
This product must operate on a power source
specified on the specification label. If you are not
sure of the type of power supply used in your home,
consult your dealer or local power company. For
units designed to operate on batteries or another
power source, refer to the operating instructions.
Overloading
Do not overload AC outlets or extension cords. It
may result in electric shock or start a fire.
Wall mounting
Be sure to install the display unit according to the
method recommended by the manufacturer. Use
only the mounting hardware recommended by the
manufacturer.
Servicing
Do not attempt to service the display unit yourself.
Removing covers expose you to high voltage and
other dangerous conditions. Request a qualified
service technician to perform the service.
Important Safety Precautions
03
Page 6

Replacement parts
In case th e display unit needs replac em ent parts, make sure that th e s ervice technician uses
replac em ent parts specified by the m an ufacturer, or those with the sa me characteristics and
perfor ma nce as the original parts. U se of unauthorized parts can r es ult in fire, electric shock
and/or ot her danger.
Safety checks
Upon co mp letion of service or mainte na nce, request the service te ch nician to perform safety
checks to ensure that the display uni t i s in proper operating condi ti on.
Repair
When th e d isplay unit displays an abn or mal condition, any noticea bl e abnormality in the displa y
unit in di cates that the display unit ne eds servicing.
If any o f t he following conditions oc cu rs, unplug the AC cord from th e AC outlet, and request a
qualif ie d service person to perform re pairs.
1.A liqu id was spilled on the display u ni t or objects have fallen int o t he display unit.
2.The d is play unit has been exposed t o r ain or water.
3.The d is play unit has been dropped o r d amaged.
Environment
O O
The dis pl ay unit only operates withi n t he temperature 0 C to 40 C.Operation outside of the
recomm en ded may cause damage to your pr oduct.
Important Safety Precautions
04
Page 7
Caution
This pro du ct satisfies FCC regulations wh en s hielded cables and connectors a re u sed to
connec t th e unit to other equipment.
Preven t el ectromagnetic interferenc e fr om electrical appliances such a s ra dios and televisions.
Please u se s hielded cables and connectors f or c onnections.
Warning
FCC Regu la tions state that any unauthoriz ed c hanges or modifications to this e qu ipment
not expr es sly approved by the manufacture r co uld void the user's authority to op er ate this
equipm en t.
FCC notice
This equ ip ment has been tested and found to com pl y with the limits for a Class B digital d ev ice,
pursua nt t o part 15 of the FCC Rules. These limits are design ed t o provide reasonable protecti on
agains t ha rmful interference in a residen ti al installation. This equipment generat es , uses and can
radiat e ra dio frequency energy and, if not in st alled and used in accordance with t he i nstructions,
may caus e ha rmful interference to radio com mu nications. However, there is no gu ar antee that
interf er ence will not occur in a particular i ns tallation. If this equipment do es c ause harmful
interf er ence to radio or television recep ti on, which can be determined by turn in g the equipment off
and on, th e us er is encouraged to try to correct th e in terference by one or more of the foll ow ing
measur es :
1.Reori en t or relocate the receiving anten na .
2.Incre as e the separation between the equi pm ent and receiver.
3.Conne ct t he equipment into an outlet on a circ ui t differ en t from that to which the receiver is
connec te d.
4.Consu lt t he dealer or an experienced radio /T V technician for help.
Modifi ca tions not expressly approved by t he m anufacturer could void the user 's a uthority to
operat ed t he equipment under FCC rules. This device com pl ies with part 15 of the FCC Rules.
Operat io n is subject to the following two con di tions:
1.This de vi ce may not cause harmful interfer en ce.
2.This de vi ce must accept any interference r ec eived, including interferen ce t hat may cause
undesi re d operation.
For Canadian model
This Cla ss B d igital apparatus complies wit h Ca nadian ICES-003.
FCC Statement
Approval
05
LISTED
I.T.E.
E247591
Also Listed
as AV Product
Page 8

Accessories
Supplied accessories
Remote co ntrol & batteries (AAA x 2)
Power co rd x 1
VGA cable ( D- Sub 15 male) x 1
User man ua l booklet x 1
LCD Multi-Med ia Displ ay
LT20 S
Quick st ar t guide x 1
06
Page 9
Accessories
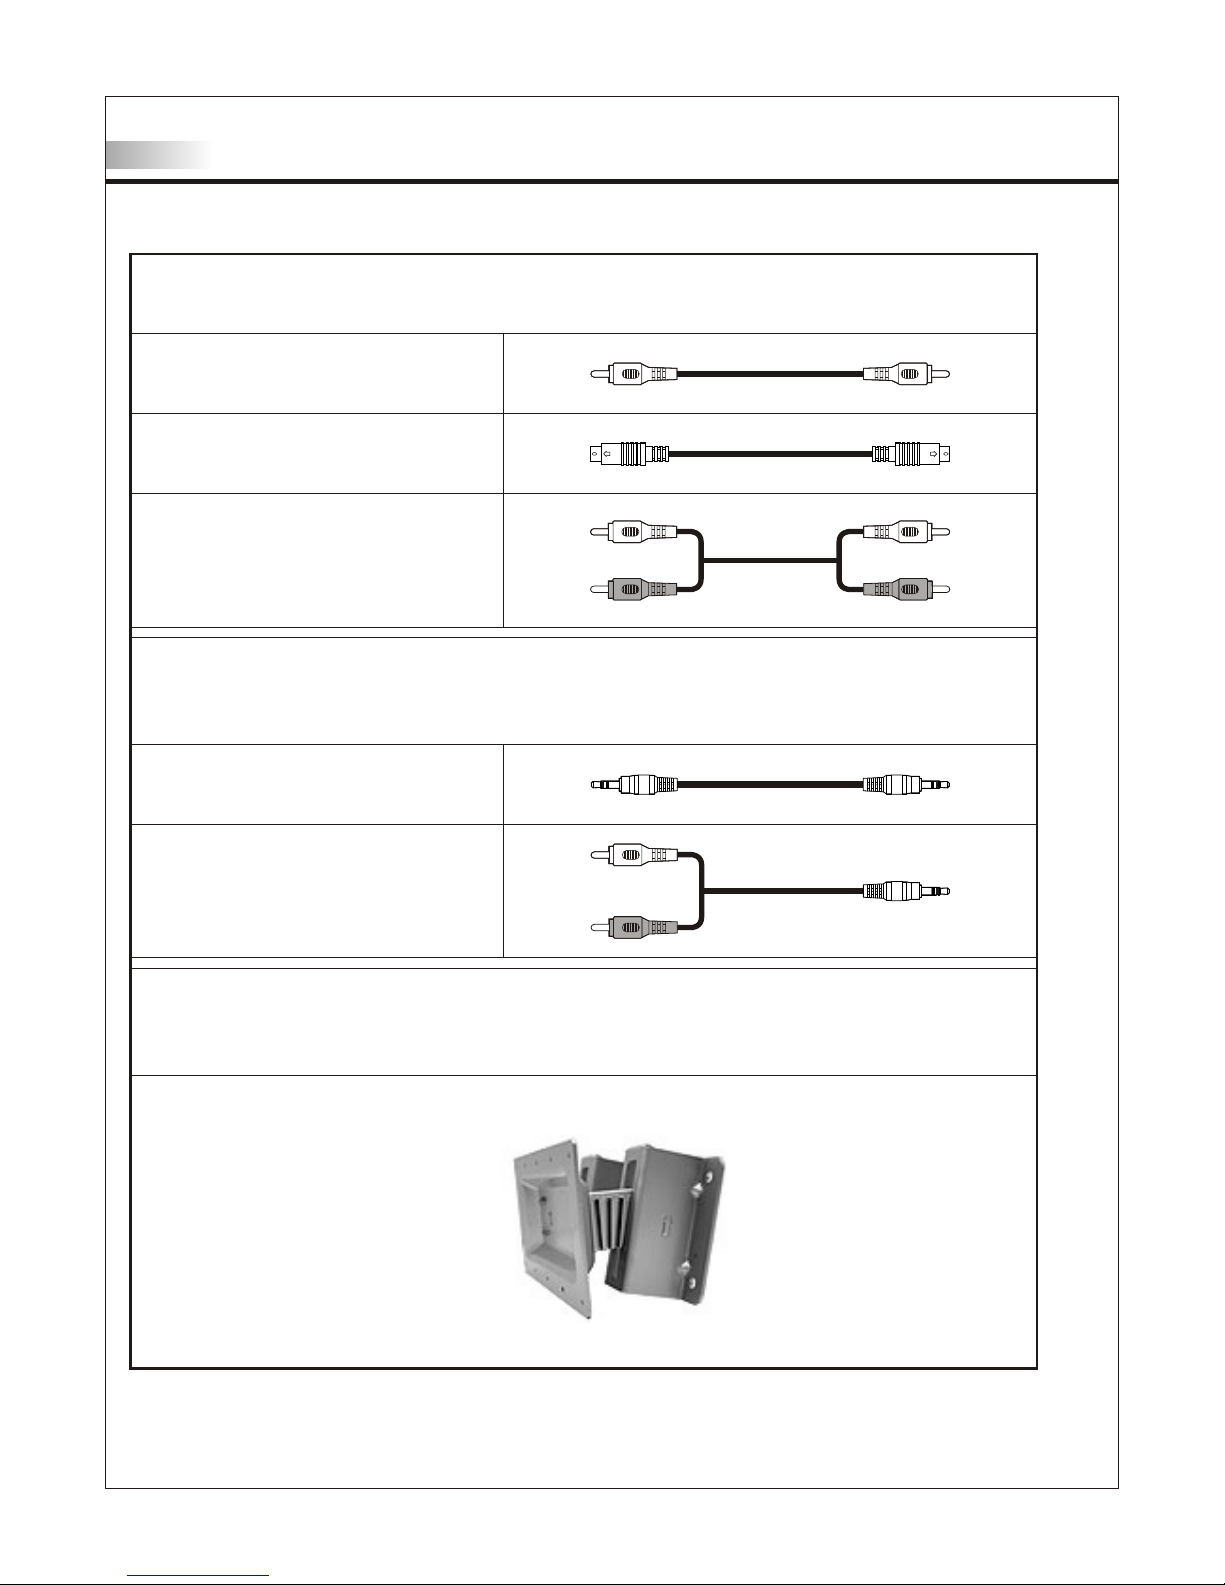
Optional accessories
Audio cable with stereo mini jack
Use the pr op er cable for the device.
Stereo m in i jack cable
Stereo m in i jack to RCA cable
AV cable with RCA connec to r
S-Video cable
Audio ca bl e with RCA conn ec tor
Wall mount set
07
Use VESA 10 0 st andard wall monut.
WM15D
Page 10
TV Installation and Connection Guide
Identifying Front and Rear Panels
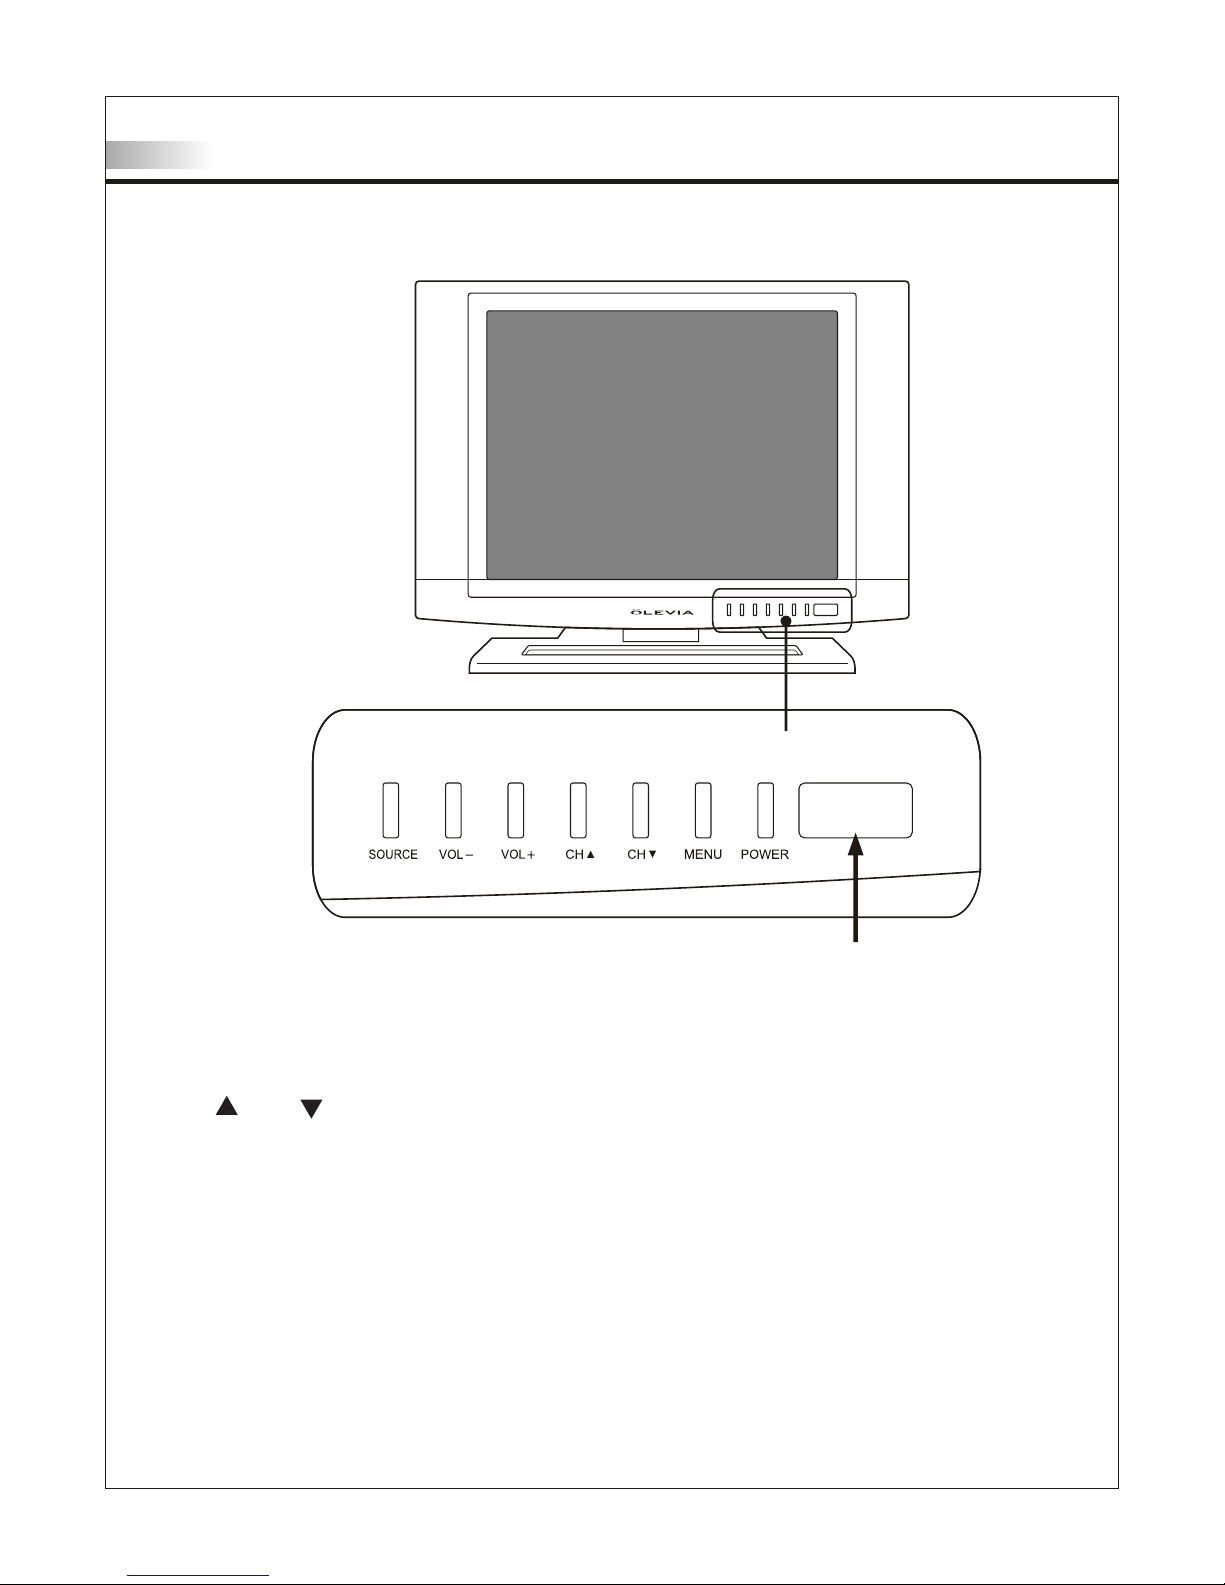
Front Panel
POWER
Turns display On/Off.
MENU
Displa ys the On Screen Display(OSD) me nu. In the OSD menu, press to re tu rn to pre-phase .
CH / CH
Adjust s c hannel programming up or do wn .
In the O SD menu, both keys are used to n av igate within menu.
VOL+ / VOL-
Adjust s v olume. In OSD menu, both key s a re used to navigate within m en u.
VOL+ is us ed to select the highlighte d o ption.
SOURCE
Press t o s witch the input sources.
IR SENSOR
Contai ns Infra-red (IR) light senso r f or digital data transmissi on by the remote control .
Please po int remote control at IR Sen so r for function.
IR Sensor
08
Page 11
These inputs can be used for the connection of A/V equipment with component video
outputs, such as a DVD player, Digital Satellite Receiver, or compatible Video Game
System.
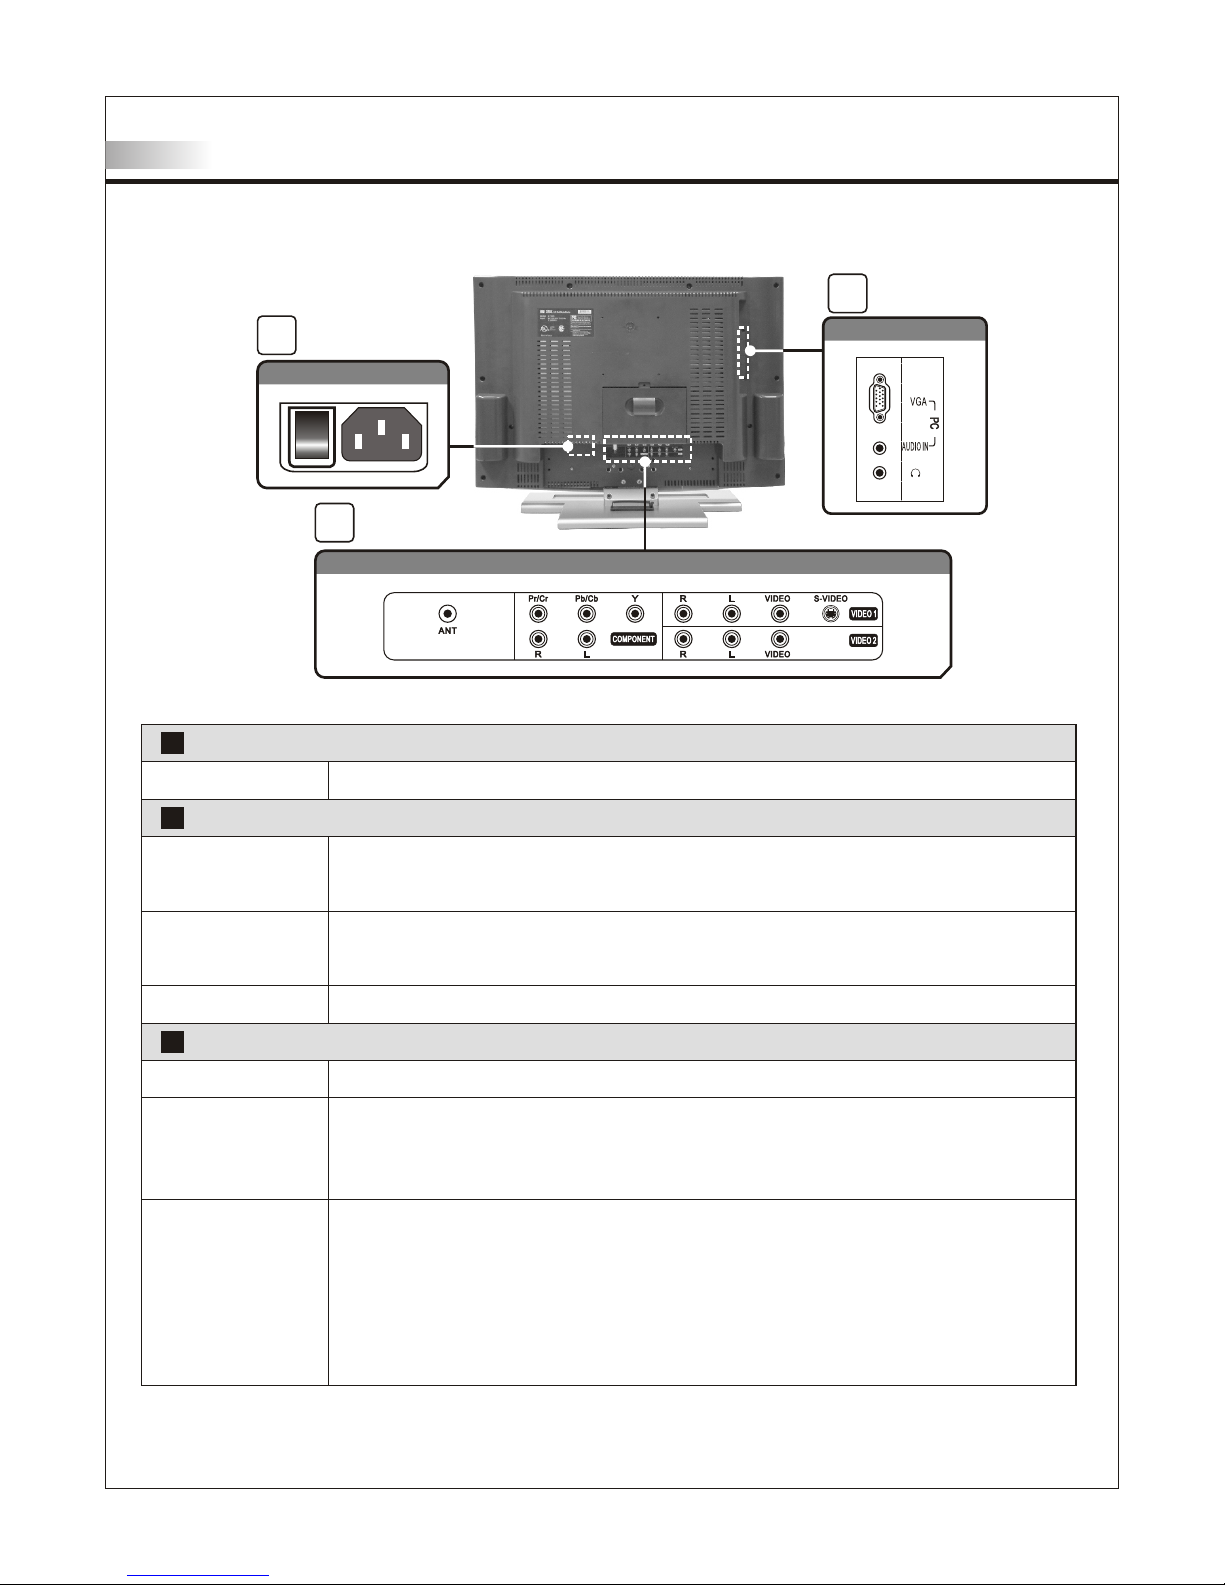
Rear Panel
TV Installation and Connection Guide
Identifying Front and Rear Panels
AC IN
1
I
o
3
2
VGA Connec tio ns
Power Connections
The power cord connects here.
Headphone
Antenna receives signals from VHF / UHF antennas or a cable system.
Component
Video 1,2
NOTE: The S-Video input has a better quality of picture than a composite Video signal.
1
VGA Connections
2
Audio / Video Connections
3
09
Vid eo / Au dio Con nec tions
VGA (PC) Port
The VGA input can be used for analog RGB signals from a personal computer.
VGA has 1 Audio input.
Audio input The audio input sends the TV's connected audio signals to an AV receiver or other
equipment.
AC In
The headphone jack is also located here for audio output.
Antenna (ANT)
These inputs can be used for the connection of a VCR, Super VHS (S-VHS) VCR,
DVD player, or other video devices to the TV. For Video 1, there is an S-Video input.
Video 2 has only a Video input.
When you connect video equipment to both the same Video and S-Video input jacks,
display will automatically select S-Video first. The display will automatically detect the
input being used.
Page 12
75-ohm c oa xial cable
Used for TV cable conn ec tion .
S-Video Cable
High qua li ty video cable for
enhanc ed p icture quality.
Some DVD p la yers are equipped
with the f ol lowing three video
connec to rs
Video Yellow
Audio (Left) White
Audio (Right) Red
Audio/ Video Cable
Y- Green
Pb/Cb - Blu e
Pr/Cr - R ed
Descriptions of Connector Input Types
You may find it necessary to use some of the following connector types
during setup.
TV Installation and Connection Guide
10
Page 13
TV Installation and Connection Guide
Connecting the Power Cord
I
o
Complete other connections prior to connecting the power cord:
1.Conn ec t the power cord to the AC IN connector of t he TV
2.Conn ec t the other end of the power cord to the wa ll o utlet. Turn Power Button switch ON .
11
Page 14

TV Installation and Connection Guide
Adjusting the TV Viewing Angle
You can adjust the vertical viewi ng a ngle of the screen to 5 degrees forwa rd a nd 15 degrees backward.
Adjust w it hin range to preferred position .
Do not exc ee d mentioned maximum angle of this p ro duct. Otherwise, the screen, st an d and hinge
are at ris k fo r da mage.
This product may fall do wn a fter impact or earthquake and cau se h armful damage. To assure
safety, please place th is p roduct on firm surface.
Power Cord and Connector Cord Protection
Power an d co nnector cords should be routed so t ha t they are not likely to be walked on or pi nc hed by
items pl ac e upon them or against them.
You can attach all cords through th e pl astic bundle located at the rear st an d. See below for
instru ct ions.
12
O
15
O
5
Page 15

Installation
In the following pages, you will find directions on how to install your TV with
your choice of video equipment.
• Connecting to an Antenna or Video Equipment with Antenna outlet
• Connecting to a VCR
• Connecting to a DVD Player with A/V or S-Video Cables
• Connecting to a DVD Player with Component Cables
• Connecting to a Satellite Receiver or Cable Box with A/V Cables
• Connecting to a Satellite Receiver or Cable Box With Component Connectors
• Connecting to a PC with VGA Connector
• Other Connections
TV Installation and Connection Guide
13
Page 16

TV Installation and Connection Guide
Connecting to an Antenna or Video Equipment
with Antenna outlet
1.Conne ct a 7 5ohm coaxial cable into the ANT input on the back of t he TV's righ t si de p anel.
Disconnect all power sources before making any connection.
Rear of TV
75-ohm c oa xial cable
If connecting to Video Equipment with Antenna outlet
1.Usin g a 75 -ohm coaxial cable (or choice of Ant en na Cable), connect the cable box' s OU T
jack to th e TV's ANT jack (RF Terminal).
IN
jack
OUT
jack
75-ohm c oa xial cable 75-ohm c oa xial cable
Rear of TV
14
Page 17

TV Installation and Connection Guide
Connecting to a VCR
Disconnect all power sources before making any connection.
1.Usin g A/V c able and S-Video cables, connect the VCR's Aud io a nd S-Vid eo O UT jacks to th e
TV's Audio and S-Video IN jacks.
Rear of TV
VCR
Red White Yellow
S-Video cable
A/V cabl e wi th RCA connec to r
When Connecting both Video IN and S-Video IN
When you c on nect video equipment to both the sa me Video and S -Video inp ut j acks,
displa y wi ll automatically select S-Video first.
To view Video signal, pl ea se disconnect the S-Video jack or turn off the S-Video signal
on the vid eo e quipment.
S-Video is strongl y re commended for use if your VCR or vide o eq uipment has it.
S-Video input has a be tt er quality of picture than a compos it e Video si gn al.
Note: You can also use the Video 2 jacks located on the TV rear.
15
Page 18

TV Installation and Connection Guide
Connecting to a DVD Player with A/V or S-Video
Cables
Use this h oo kup if your DVD player does not have co mp onent (Y, Pb, Pr) jacks.
Note: If y ou r DVD player has component video ou tp ut connectors, for best picture q ua lity, use
the conn ec ti on described for Connecting to a DV D Pl ayer With Component Connectors.
1.Usin g an A/ V cable, connect the DVD player's Au di o OUT jack s to t he TV's Aud io I N ja cks.
2.Usin g an S -Video C ab le, connect the DVD player's S-Video OUT jack to the TV's S-Video IN jack.
Disconnect all power sources before making any connection.
Rear of TV
DVD play er
Red White Yellow
S-Video cable
A/V cabl e wi th RCA connec to r
Note:
1.When y ou c on nect Vid eo e quipment has it. To both the s am e Video an d S- Video in pu t jacks, the
displa y wi ll a utomatically select S-Video first.
2.To view Video signal , pl ea se disconnect the S-Video jack or turn off the Video signal on
the video eq ui pment.
3.S-Video is strongl y re commended for use if your VCR or vide o eq uipment has it S-Video
input has be tt er quality of picture than a compos it e Video si gn al.
16
Page 19

TV Installation and Connection Guide
Disconnect all power sources before making any connection.
Connecting to a DVD Player with Component
Cables
Use this h oo kup if your DVD Player has componen t (Y, Pb, Pr) jack s.
1.Usin g a co mponent video cable, connect th e DV D Player's Y, P b an d Pr jacks to the Y, Pb and
Pr jacks o n th e TV.
Colors o n Co mponent Vi de o connectors:
Y: Green
Pb (also i de ntified as Cb, CB or B-Y): Blue
Pr (also i de ntified as Cr, CR or R-Y): Red
Note: Th e Y, Pb and P r ja cks on your DVD player are sometime s la beled as Y, Cb an d Cr,
or B-Y and R-Y.
If so, conne ct t he cables to the matching colors.
2.Usin g an d Audio cable, connect the DVD playe r' s Audio OUT jac ks to the TV 's Au dio IN jacks.
Red Blue Green
Red White
Rear of TV
DVD play er
Compon en t cable with RCA co nnector
Audio ca bl e
Note: Th e Y, Pb and P r ja cks do not provide audio, so audio ca bl es must be connected to
provid e so und. The Y Pb Pr connection provides t he b est quality of video signal
compar ed t o AV (Composit e) a nd S-Vid eo c onnection.
17
Page 20

Connecting to a Satellite Receiver or Cable Box
with A/V Cables
TV Installation and Connection Guide
Disconnect all power sources before making any connection.
1.Usin g Aud io and S-Vid eo cables, connect the satellit e re ceiver's Au di o and S-Vi de o OUT jacks
to the TV Audio and S-Video IN jacks.
2.Conn ec t a 75-ohm coaxial cable from your ca bl e or antenna to the TV ANT (Antenna) jack.
Rear of TV
Red White Yellow
S-Video cable
A/V cabl e wi th RCA connec to r
Satell it e Receiver or Cable Box
Rear of TV
Note: Wh en y ou connect video equipment to bot h th e same Vid eo a nd S-Vid eo i nput jacks,
displa y wi ll automatically select S Video first.
To vi ew S -Video s ig nal, please disconnect Video jack or turn off the Video signal on the
video eq ui pment.
S-Video is strongl y re commended for use if your VCR or vide o eq uipment has it.
S-Video input has be tt er quality of picture than a compos it e Video si gn al.
18
Page 21

Connecting to a Satellite Receiver or Cable Box
With Component Connectors
TV Installation and Connection Guide
Disconnect all power sources before making any connection.
Use this h oo kup if your Satellite Receiver or C ab le Box has component (Y, Pb, Pr) jacks.
1.Usin g a co mponent video cable, connect th e Sa tellite Receiver or Cable Boxes ' Y, Pb and P r
jacks to t he Y, Pb and Pr jacks on the TV.
Colors o n Co mponent Vi de o connectors:
Y: Green
Pb (also i de ntified as Cb, CB or B-Y): Blue
Pr (also i de ntified as Cr, CR or R-Y): Red
Note: Th e Y, Pb and P r ja cks on your Satellite Receiver or C ab le Box are sometimes labelled
as Y, Cb and Cr, or B-Y an d R-Y. If so, co nn ec t the cables to the matching colors .
2.Usin g an Au dio cable, connect the Satellit e Re ceiver or Cable Boxes' Audio OUT jacks to
the TV's Audio IN jacks .
Red Blue Green
Red White
Rear of TV
Compon en t cable with RCA co nnector
Audio ca bl e
Satell it e Receiver or Cable Box
Note: Th e Y, Pb and P r ja cks do not provide audio, so audio ca bl es must be connected to
provid e so und.
The Y Pb Pr con ne ction provides the best quality o f vi deo signal compared to AV (com po site)
and S-Video connecti on .
19
Page 22

TV Installation and Connection Guide
Rear of TV
Connecting to a PC with VGA Connector
1.Using a D -S ub 15 pin cable, connect the VGA outpu t te rminal of the PC to the TV's VGA si gn al
input te rm inal.
2.You may need to use a Stereo mini jac k to S te reo mini jack connector to receiv e au dio.
Disconnect all power sources before making any connections.
Other Connections
Disconnect all power sources before making any connection.
Headph on e Set
Note: Wh en h eadphone is plugged in the speake rs w ill
turn int o mu te m ode.
20
Page 23

Remote Control Guide
Remote Function Keys & Description
Regular Buttons
01. POWE R Pr ess to turn display on/off.
13. CH / CH Pr es s to adjust channel up and channe l down.
09. NUMB ER B UTTONS P re ss the number buttons
to selec t ch annels on the display.
12. VOL / VOL Press to adjust the volu me .
10. RETU RN P ress to return the to previous chan ne l.
11. ENTER Press to quic kl y en ter the channel number,
highli gh ted menu or submenu item.
02. MTS Pr es s to select from SAP, Mono or Ster eo m ode.
03. MUTE P re ss to mute the sound.
04. MENU P re ss to activate or close the On Screen
Displa y me nu. In OSD Menu, acts as a cancel button
while na vi gating through the OSD.
05 / butto ns ( Direction Buttons) Press to
naviga te i n OSD
06. / but to ns ( Direction Buttons) Press to m ov e
highli gh ted selection in OSD
07. SOUR CE P ress to show the source input from TV,
Video 1, Video 2 or Component , VGA.
08. DISP LAY Press to display the info rm ation of current
channe l nu mber and time.
14 Hotkeys Press to direct ly a ccess certain TV shortcut functions..
1
14
2
3
4
5
6
7
8
9
10
12
13
11
1
2
3
4
5
6
7
8
9
10
11
12
13
14
21
MENU
MENU
Page 24

Remote Control Guide
Remote Function Keys & Description
Hot Keys Tutorial
The remo te c ontrol contains 8 additional Ho tk eys . Hot keys enable you to directly c ha nge the
settin g to y our preference without having t o na vigate through the OSD (On Screen D is play) Menu.
How to use your Hot Keys
HOT KEY FUNCTION
TV
Press to s wi tch between TV and DTV Mode
(optio na l function currently unavaila bl e)
PC
Press to s wi tch to VGA Mode .
VIDEO
Press to s wi tch between Video 1 and Vi deo 2 sources .
COMPON EN T
Press to s wi tch to Component source.
SLEEP
Press to c ho ose preset time interval for auto ma tic shutoff.
BACKLI GH T
Press to v ie w the screen at different levels of lighting at :
Bright , No rmal and Soft
C.C.
Press to c al l up the Close Caption (CC) and Capti on
Servic e (C S) list. You can p re -select one to see Closed Caption .
P.C TR L
Press to a cc ess Parental Control password a nd / or program
parent al l ocks.
TV
PC
VIDEO
COMPO NE NT
SLEEP
BACKLIG HT
C.C
P.CTRL
22
Page 25

Remote Control Guide
Remote Function Keys & Description
Battery Installation
1. Push th e ta b and pull it out as illustrated belo w.
2. Inser t tw o size AAA batte ri es (supplied) by matching the (+) a nd ( -) on the batteries to
the diag ra m inside the remote control's bat te ry department.
3. Repla ce t he cover back and make sure the cover " sn aps" into the remote control.
Note:
1. The display unit come s wi th two new AAA bat te ries as accessories.
However, du e to u ncontrollable causes, the e le ctricity of the accessorized batt er ies
may be parti al ly or completely drained. We do not warrant the q ua lity of the
batterie s in a ny case since many factors are cons id ered. If replacement is needed,
please pur ch ase two AAA batt er ies.
2. Handl e re mote with care. Avoid dropping it, placing in di re ct sunlight, near a heater,
high areas o f hu midity or getting it wet. If the remo te g ets wet, please wipe it dry
immediat el y. In the eve nt o f the remote not working properly o r is i n operational,
a replacem en t of remote control may be required .
3. If you do not u se t he remote control for a long period o f ti me, please remove the
batterie s an d store in a cool place to preserve bat te ry life.
4. Do not mi x ne w an d used or with different types of batteries for o pe ration.
23
Page 26

MENU
MTS
MUTE
DISPLAY
SOURCE
Adjusting On Screen Displays (OSD)
After yo u ha ve finished connecting your TV, you a re n ow ready to choose and personal iz e yo u
TV setti ng s in the OSD (On Screen Display) menu .
SELECTSELECT ADJUSTADJUST
EXITEXIT
MENUMENU
PICTUREPICTURE
AUDIOAUDIO
SETUPSETUP
SOURCESOURCE
MENUMENU
TVTV
To Operate in the OSD
1. Press " Me nu" button to enter OSD menu mode.
2. To enter each main OS D fu nction, use the keys a nd
3. To select the functio n, p ress the keys and
4. To adjust the value b ar, u se the keys and
5. After ch oo sing your setting, press "Menu" t o ex it and
go back to t he l ast picture.
6. To exit the OSD menu, pre ss "Menu" until you exit the
OSD menu , or w ithout action for 12 seconds of i na ctivity.
This is also adjusta bl e in the OSD.
24
Introduction
Page 27

Adjusting On Screen Displays (OSD)
Picture: Adjusting Picture Quality
In this Se tu p Index, you can adjust picture set ti ngs to suit your personal prefere nc es.
Picture Settings
COLOR TEMP
Cool / Nor ma l / Warm
Adjust s im age color intensity.
Warm: More red-tinted colors
Normal : St andard color temperature
Cool: Mo re b lue-tinted colors
SHARPN ES S
Adjust s th e picture sharpness or softness
DEFAULT
Change s OS D Settings back to original
factor y de fault settings
Soft / Nor ma l / Bright
BRIGHT NE SS
CONTRA ST
BACKLI GH T
Adjust s pi cture brightness contrast
Adjust s pi cture color contrast
Adjust s da rkness or lightness of the screen
Item
Adjustment
Function
To Reset Factory Settings
If, at any t im e, you wish to go back to original fact or y se tting, you may do so by choosing the
Defaul t se tting in the OSD Picture and Audio Sec ti ons.
Select in g "Default," will reset all OSD set ti ngs to the original manufacture s et tings. The o nl y
items wh ic h will remain unaffected, are:
• Auto Sca n Ch annels
• Edited Channels
• Parental Control Passwor d
SELECTSELECT ADJUSTADJUST
EXITEXIT
MENUMENU
PICTUREPICTURE
BRIGHTNESSBRIGHTNESS
CONTRASTCONTRAST
BACKLIGHTBACKLIGHT
COLOR TEMP.COLOR TEMP.
SATURATIONSATURATION
HUEHUE
SHARPNESSSHARPNESS
DEFAULTDEFAULT
NORMALNORMAL
SATURATION
Adjust s th e color intensity
HUE
Adjust s sk in color to a natural tone.
25
NORMALNORMAL
Page 28

Adjusting On Screen Displays (OSD)
Aaudio: Adjusting Sound Quality
SELECTSELECT ADJUSTADJUST
EXITEXIT
MENUMENU
AUDIOAUDIO
TREBLETREBLE
BASSBASS
BALANCEBALANCE
DEFAULTDEFAULT
SELECTSELECT ADJUSTADJUST
EXITEXIT
MENUMENU
PICTUREPICTURE
AUDIOAUDIO
SETUPSETUP
SOURCESOURCE
MENUMENU
TVTV
There ar e th ree adjustments to the OSD Audio Fun ct ion. You can adj us t these individually to your
person al p reference.
Audio Settings
Item
Function
TREBLE
BASS
BALANC E
Adjust s hi gher pitched sounds
Adjust s lo wer pitched sounds
Adjust s vo lume balance in Left and Right
Selecting Stereo or Bilingual Programs
You can enjoy stereo, bilingual a nd m ono programs under the TV Source.
Press th e ho tkey "MTS" until the desired soun d in dication appears.
Each tim e yo u press the button, the sound indic at ion changes as
follow s: M ono, SAP, Stereo*
Sound Effect
Description
STEREO
SAP
MONO
Select f or s tereo reception when viewing a pr og ram
broadc as t in stereo
Select t o au tomatically switch the TV to Secondary Analo g
Progra m wh en a signal is received. (If no SAP signal is
presen t, t he TV rema in s in Stereo Mode)
Select f or m ono reception. (Use to reduce noi se d uring
weak ste re o broadcasts)
DEFAULT
Change s OS D Settings back to original
factor y de fault settings
26
LL RR
Page 29

Adjusting On Screen Displays (OSD)
Setup: Adjusting Personal TV Settings
PICTUREPICTURE
AUDIOAUDIO
SETUPSETUP
SOURCESOURCE
MENUMENU
TVTV
AUTO SCANAUTO SCAN
CH EDITCH EDIT
CH SOURCECH SOURCE
CAPTIONCAPTION
PARENTALPARENTAL
SLEEPSLEEP
LANGUAGELANGUAGE
SETUPSETUP
OFFOFF
CATVCATV
OFFOFF
OFFOFF
ENGLISHENGLISH
Item
Adjustment
Function
In this Se ct ion, you can edit the setting of chan ne ls adjustment and selections th at
includ e: d isplay "time" and "language", " ca ption" option, and "parental co nt rol".
Description of Settings
Sets up available channels.
Add : To add available channel.
Skip : To cancel available channel
Add / DeleteCH EDIT
(Channel Edit)
Chooses the source from ANT.CATV / TVCH SOURCE
(Channel Source)
Selects to auto scan the available channels
of the TV or CATV.
Auto scan
Sets a preset time interval for automatic
shutoff.
OFF/ 30 min / 60min / 90 min / 120 min
Sleep
Switches different types of caption or
cancel caption functions.
CC1 / CC2 / CC3 / CC4
Text1 / Text2 / Text3 / Text4 / OFF
CAPTION
(Closed Caption)
Enable / Disable
MPAA
G / PG-13 / R / NC-17 / X
TV GUIDELINE
TV-Y / TV-Y7 / TV-G / TV-PG /
TV-14 / TV-MA
TV CONNECT(D / L / S / V / FV)
PASSWORD
PARENTAL DISABLE / ENABLE
PARENTAL
(Parental Control)
Langua ge
Englis h / Fr ancais / Espanol
Switch es t he OSD language
27
Sets up the parental locks
SELECTSELECT ADJUSTADJUST
EXITEXIT
MENUMENU
SELECTSELECT ADJUSTADJUST
EXITEXIT
MENUMENU
Page 30

Adjusting On Screen Displays (OSD)
Setup: Adjusting Personal TV Settings
Setting the Channels
After yo u fi nish connecting your TV, you can run Aut o Sc an program to setup your channels .
The prog ra m will scan and preset all receivab le c hannels automatically.
To Cancel Au to P rogram
Exit Auto S ca n program by pressing "MENU" Key.
Note: The Auto Scan is se t to s ca n cable TV
channe ls b y default.
You cannot r ec eive and set the cable TV
channe ls V HF/ UHF channels at the
same tim e.
PRESS TO STOPPRESS TO STOP
MENUMENU
CHANNEL SEARCHING
PLEASE WAIT...
CHANNEL SEARCHING
PLEASE WAIT...
99
Editing Channels
You can also edit channels to your pe rs onal preference. Once you edit a ch an nel, it will be skipped
when sur fi ng through TV channels.
SELECT CHSELECT CH ADJUSTADJUST
EXITEXIT
MENUMENU
CH 7 ADDCH 7 ADD
CH EDITCH EDIT
CH 4 DELETECH 4 DELETE
CH EDITCH EDIT
To Add or Skip a Channel:
1. To Change the Channel N um ber, use the and keys
2. To specify Add or Skip fun ct ion, use the key
3. When co mp leted, press Menu to exit and back to S et up OSD Page
SELECT CHSELECT CH ADJUSTADJUST
EXITEXIT
MENUMENU
28
Page 31

Adjusting On Screen Displays (OSD)
Setup: Adjusting Personal TV Settings
Channel Source
Please choose between TV or CATV Source by using the key.
Watching with Closed Caption
You can display closed captioni ng i f the
broadc as ter offe rs t his service.
Close Ca pt ion option can be set On/Off from the
OSD page . This funct io n also can be accessed by
pressi ng " C.C " hotkey on the remote control.
You have the option of choosing fro m: O FF, CC 1,
CC2, CC3 , CC 4, Te xt1, Text2, Text3, Text4
1.Not al l pr ograms off er the Closed Caption option.
2. Close d Ca ption may not be seen clearly (whit e bl ocks, strange characters, etc .) i f the signal
condit io n is poor, or if there are technical difficultie s wi th the broadcaster.
3. If no TEXT broadcast is being recei ve d while viewing in the [TEXT] mode, t he s creen may become
dark and b la nk for some programs.
4. Switc h Off to close the C lo sed Caption mode.
Using the Parental Control Feature
To block pro gr ams you feel unsuitable for your ch il dren, you need to set the TV for desired rating
system s. The TV Parental Control f ea ture functions by receiving the r at ing signal from your local
broadc as ting station or cable service pro vi der.
The TV programs and mo vi es shown on TV a re g iven a rating signal based on the f ol lowing rating
system s.
In U.S.A .: U .S. Televisi on P arental Guidelines to rate te le vi sion pro grams (U.S. TV Ratings) and
Motion P ic ture Associ at ion of Americ a (M PAA) Guidel in es to rate movies including those s ho wn on
TV (Movi e ra tings).
In Canad a: C anadian English Language rati ng s to rate television programs in En gl ish, and Canadian
French L an guage ratings to rate those in Fren ch .
SELECTSELECT ADJUSTADJUST
EXITEXIT
MENUMENU
AUTO SCANAUTO SCAN
CH EDITCH EDIT
CH SOURCECH SOURCE
CAPTIONCAPTION
PARENTALPARENTAL
SLEEPSLEEP
LANGUAGELANGUAGE
SETUPSETUP
OFFOFF
CATVCATV
CC1CC1
OFFOFF
ENGLISHENGLISH
29
Page 32

MPAAMPAA
TV GUIDELINETV GUIDELINE
PASSWORDPASSWORD
PARENTALPARENTAL
PARENTAL SETTINGPARENTAL SETTING
DISABLEDISABLE
Adjusting On Screen Displays (OSD)
Setup: Adjusting Personal TV Settings
Activating the Parental Control Feature
SELECTSELECT ADJUSTADJUST
EXITEXIT
AUTO SCANAUTO SCAN
CH EDITCH EDIT
CH SOURCECH SOURCE
CAPTIONCAPTION
PARENTALPARENTAL
SLEEPSLEEP
LANGUAGELANGUAGE
SETUPSETUP
OFFOFF
CATVCATV
OFFOFF
OFFOFF
ENGLISHENGLISH
1. Press the key to enter Parental Control Setup Page. This function can also be directly accessed
through pressing the P.CTRL hotkey on the remote control.
2. Initially, you will be taken to this page. To turn ON Parental Control Functionality, change from Disable
to Enable.
30
PASSWORD DISABLEPASSWORD DISABLE
CHANGECHANGE
PASSWORDPASSWORD
SELECTSELECT ADJUSTADJUST
EXITEXIT
SELECTSELECT ADJUSTADJUST
EXITEXIT
Page 33

Adjusting On Screen Displays (OSD)
Setup: Adjusting Personal TV Settings
3.Press the and input a 4 digit Password. Confirm again.
PASSWORD DISABLEPASSWORD DISABLE
CHANGECHANGE
PASSWORDPASSWORD
EXITEXIT
MENUMENU
INPUT NEW PASSWORD (----)INPUT NEW PASSWORD (----)
4. If you enter the incorrect password, you will see Incorrect Password on the screen.
Press Menu to exit and begin again.
EXITEXIT
MENUMENU
INPUT PASSWORD (----)INPUT PASSWORD (----)
INCORRECT PASSWORDINCORRECT PASSWORD
EXITEXIT
MENUMENU
INPUT PASSWORD (----)INPUT PASSWORD (----)
31
SELECTSELECT ADJUSTADJUST
EXITEXIT
MENUMENU
Page 34

Setup: Adjusting Personal TV Settings
Sleep: Turning off the TV Automatically
AUTO SCANAUTO SCAN
CH EDITCH EDIT
CH SOURCECH SOURCE
CAPTIONCAPTION
PARENTALPARENTAL
SLEEPSLEEP
LANGUAGELANGUAGE
SETUPSETUP
OFFOFF
CATVCATV
OFFOFF
30 MIN30 MIN
ENGLISHENGLISH
You can set the TV t o turn off a ut omatically after
a predet er mined period of time (30, 60, 90, or
120 minu te s). This i s al so available through
hotkey " SL EEP".
Press SL EE P repeat ed u ntil the desired period
of time ap pe ars. Each time you press the button ,
you will s ee t he options appear on the screen.
Note: If y ou t urn the TV off, and then tur n it o n again, the Sleep timer automati ca lly returns to "Off ".
"The clo ck t im er" appears one minute before the TV shuts off.
This message may not app ea r if you perform any operation with t he m enu opened.
Choosing a Language
You have the option of viewing the OS D la nguages in English, Spanish and F re nch.
5. To set Parental Guidelines, choose Block settings
in MPAA and TV Guideline sub-pages.
6. To turn OFF Parental Control Functionality,
change from Enable to Disable .
Note: If you forget the password, press "9999" to
lift the lock and enter Parental Control Setup
Page.
MPAAMPAA
TV GUIDELINETV GUIDELINE
PASSWORDPASSWORD
PARENTALPARENTAL
PARENTAL SETTINGPARENTAL SETTING
DISABLEDISABLE
32
SELECTSELECT ADJUSTADJUST
EXITEXIT
MENUMENU
SELECTSELECT ADJUSTADJUST
EXITEXIT
MENUMENU
Adjusting On Screen Displays (OSD)
Page 35

Adjusting On Screen Displays (OSD)
Source: Adjust TV Input Source
You can choose the Input Source of your TV to best display the picture based on your TV connection settings.
Available Input sources: TV, Video1, Video2, Component , PC
There are two ways to choose the Input Source.
1. Choose SOURCE function on the OSD Menu,
and press the key to switch between sources
2. Press the SOURCE hotkey on the remote control.
You can view each source per screen view as noted
on the top upper right hand corner.
3. Direct source screen may also be directly accessed
through the TV, PC (VGA Mode), VIDEO and
COMPONENT hotkeys on the remote control.
PICTUREPICTURE
AUDIOAUDIO
SETUPSETUP
SOURCESOURCE
MENUMENU
COMPONENTCOMPONENT
SCREEN ADJ.SCREEN ADJ.
CLOCK 16CLOCK 16
PHASE 16PHASE 16
H-POS. 16H-POS. 16
V-POS. 16V-POS. 16
DEFAULT NODEFAULT NO
SELECTSELECT ADJUSTADJUST
EXITEXIT
MENUMENU
AUTO NOAUTO NO
33
Adjust TV Source under PC (VGA) MODE
Under the PC (VGA) Source mode, there will be different options for the OSD Settings.
There are four TV Setting to choose from, under the PC Source Mode: Screen, Picture, Audio and OSD
Settings.
Screen
Picture
Audio
OSD
To view each setting, use the and keys.
To make adjustments press the key.
Screen Adjustment
You can adjust the screen display settings
to suit your personal preferences.
AUTO
CLOCK
PHASE
H-POS
V-POS
DEFAULT
Adjust t he i mage to its best position and autom at ically
displa ys o n the screen
Adjust t he p ixel clock
Adjust p ha se
Adjust h or izontal display position
Adjust v er tical display position
Adjust t o or iginal factory default settin gs
Item
Adjustment
Function
YES / NO
0-31
0-31
0-31
0-31
YES / NO
SELECTSELECT ADJUSTADJUST
EXITEXIT
MENUMENU
1024X768 H60KHZ V75HZ1024X768 H60KHZ V75HZ
Page 36

Adjusting On Screen Displays (OSD)
Choosing TV Input Source
Picture Adjustment
You can adjust picture display se tt ings to suit your personal prefer en ces.
PICTURE ADJ.PICTURE ADJ.
CONTRAST 10CONTRAST 10
BRIGHTNESS16BRIGHTNESS16
COLOR TMP.NORMALCOLOR TMP.NORMAL
RED GAINRED GAIN
GREEN GAINGREEN GAIN
BLUE GAINBLUE GAIN
SELECTSELECT ADJUSTADJUST
EXITEXIT
MENUMENU
BACKLIGHT SOFTBACKLIGHT SOFT
Item
Adjustment
Function
BACKLIGHT
CONTRAST
BRIGHTNESS
COLOR TMP.
SOFT/NORMAL/BRIGHT
0-31
0-31
COOL/NORMAL/WARM/USER
Adjusts darkness or lightness of the screen
Adjusts picture color contrast
Adjusts picture brightness contrast
Adjusts image color intensity
Warm: More red-tinted colors
Normal: Standard color temperature
Cool: More blue-tinted colors
Note: Co lo r Temp must be u nd er "USER" in order to manually adju st R ed/Green/Blue gain.
• The auto ma tic display of the VGA image res ol ution, horizontal and verti ca l frequency will remain
flashi ng i ntermittently.
34
Page 37

Adjusting On Screen Displays (OSD)
Choosing TV Input Source
Audio Adjustment
You can adjust audio settings to su it y ou r personal preferences
SELECTSELECT ADJUSTADJUST
EXITEXIT
MENUMENU
PICTURE ADJ.PICTURE ADJ.
VOLUME 31VOLUME 31
MUTE NOMUTE NO
800¡600 H37KHZ V60HZ800¡600 H37KHZ V60HZ
Item
Adjustment
Function
MUTE
VOLUME
ON / OFF
0-31
Note: Th e au tomatic display of the VGA
image re so lution, horizontal and
vertic al f re quency will remain
flashi ng i ntermittently.
OSD Adjustment
EXIT
H-POS
V-POS
DURATION
LANGUA GE
Press to e xi t OSD screen
Adjust s cr een horizontal position
Adjust s cr een vertical position
Adjust t he t ime of OSD menu display on the screen
Englis h / Sp anish / French
Note: The automatic display of the VGA image
resolution, horizontal and vertical frequency
will remain flashing intermittently.
To Exit PC (VGA Mode) Source OSD Menu, press the Menu button.
Item
Adjustment
Function
OSD ADJ.OSD ADJ.
SELECTSELECT ADJUSTADJUST
EXITEXIT
MENUMENU
EXIT NO
H-POS. 16
V-POS. 16
DURATION 10
LANGUAGE ENGLISH
EXIT NO
H-POS. 16
V-POS. 16
DURATION 10
LANGUAGE ENGLISH
YES / NO
0-31
0-31
3-31
Press to m ut e the sound
Press to a dj ust volume
35
1024X768 H60KHZ V75HZ1024X768 H60KHZ V75HZ
Page 38

Troubleshooting
If you are s ti ll experiencing some difficulties with th e TV Setup, plea se r efer to the following suggested
soluti on s for common problems and symptom s.
Power On failed
No picture or sound
Full of spots or noise on the screen
Poor color display
Image distortion
The image is blue
The image is too bright, and the
image is saturated in the brightest
areas.
The screen shows searching for
signal but no image.
Out of range
Remote control does not work
Stripes on the screen
Power plug is not securely inserted into the socket.
1. Check LCD TV power status.
2. Check if the terminal is properly connected and the input mode has a
right connection.
3. Check if the cable is well connected between the video source and
the TV.
Check if any interference from automobiles, trains, high-voltage
transmission lines, neon signs or other potential sources of interference.
Check OSD and adjust in "Picture" function.
Check aspect ratio in "Screen" function.
Check the setting of source in the TV and set it in the right type.
1. Check if the contrast setting is too high.
2. The DVD player is set for a high-level output.
1. Check if the signal cable is disconnected.
2. Check if the terminal is properly connected and the input mode has a
right connection.
Check if input signal is suitable to the display.
1. Check if the batteries are properly installed.
2. Check if the batteries are out of power.
3. Check both distance and angle from the TV's infrared (IR receiver) to
remote control.
4.Check if any object is in between remote control and IR receiver.
5.Check if the IR is under strong fluorescent lighting.
Any antenna from a radio or cell phone may cause interference.
Keep display away from these types of devices.
Problem
Possible Solution
36
Page 39

Specifications
TFT LCD Panel
Screen Size
Display Type
Resolution
Colors
View Angle
Dot Pitch
Brightness
Contrast Ratio
Aspect Ratio
Response Time
Lamp Life
VGA Resolution
VGA Input
Vertical Frequency
Horizontal Frequency
TV System
TV Channels
Video Input Format
Video Input
Audio Input
Audio Output
Earphone
Special Features
OSD
IR Remote Control
Power Source
Power Consumption
Dimension (w¡h¡d)
Mounting Interface
Weight
Safety / EMI
Accessories
VGA
TV
Video / Aud io
Others
20.1 Inch,51cm(Diagonal)
TFT LCD(Active Matrix)
800xRGBx600
16.7 Million colors
Horizontal 170 degrees,Vertical 170 degrees,CR greater or equal to 10
0.51mm
500 cd/m2
500:1
4:3
12ms(typical)
6xCCFL backlight lamps w/50,000 hrs
Support 640x480, 800x600 & 1024x768*
Plase at bottom (*1024x768 dependant on video card)
analog, 15pin mini D-SUB female connector
56Hz ~ 75Hz
30kHz ~ 48kHz
NTSC M/N
NTSC:RF Input, type F connector
MTS, V-Chip & Close Caption.(Optional)
Air and Cable TV
NTSC only unless specified by manufacturer
Video1:Composite Video / S-Video:1, S-Video priority.
Video2:Composite Video in
Component:(Y Pb/Cb Pr/Cr 480i, 576i; 480p, 576p)
R/Lx4(CVB, S-Video) x 1, Video2 x 1, Component x 1, PC x 1
Speaker R / Lx1(3Wx2), volume, bass, treble, adjustable.
Build-in,Stereo
Wall mount option.
English, Spanish, French
Included
100-240V a.c. 50/60Hz,
70W
22.83"x15.26"x3.47"(w/o stand), 22.83"x16.97"x9.01"(w/stand)
VESA 100
19 lbs
CE / CSA / FCC-B
Remote Control x 1, AC power cord x 1, User's Manual x 1,
Quick start guide x 1, VGA cable x 1
LCD Pane l
37
Page 40

15.95 in
22.84 in
9.01 in
16.97 in
3.47 in
Timing Mode for VGA
Source
Resolution
Horizontal frequency (Khz) Vertical frequency(Hz)
Note
VGA
640x40 0
640x48 0
640x48 0
640x48 0
800x60 0
800x60 0
800x60 0
800x60 0
31.469
31.649
37.861
37.500
35.156
37.879
48.077
46.865
70
60
72
75
56
60
72
75
VGA
VESA
VESA
VESA
VESA
VESA
VESA
VESA
Dimensional drawing
38
Page 41

Wall Mount Kit
39
1.Befo re u sing wall mount, please read manual o f wa ll mount and following assembly gui de .
2.For sa fe ty purpose, please purchase wal l mo un t which can bear the LCD TV weight.
3.Foll ow ing installation instruction is o nl y for your reference.
4.Plea se c onsult authorized service per so nnel for the installation of wall mou nt .
CAUTION
*There a re m any small components used in the co ns truction of this unit. These loose items
should b e ke pt away from young children while a ss embling your unit.
*Incom pl ete or inadequate mounting of thi s un it to the wall may cause it to fall down, r es ulting in
potent ia lly fatal accidents.
*Pleas e co nsult authorized service pers on nel for the installation of this un it .
*Place L CD w ith faci ng
downwa rd o n flat surface .
Place mo un ting unit on
the LCD ba ck a s figure
and leve l at h oles.
Secure t he m together
with si x screw s . An d then
tighte n th em up with
screw drive r (n ot supplied).
X6
2
X6
*Secu r e co mponent base firmly to
the soli d ce ment wall with six
exp ansi ve bolt.
12 ¡0
.
1
0
O
OO
O O
,
5
0
,
5
1
0 ,1 ,20
0
73
80
Insert t he m ounting unit
(with LC D on a lready) into the
compon en t base and press it down, please
check th e an gle that use r desi red then tighte n
the knob s as f igure above.
Unit : mm
O
20
Page 42

Pixels Policy
Syntax's D.O.A. Policy for LCD TVs for
Defective Pixels on LCD Panels
(Applicable to the LCD TV sold within USA & Canada only)
TM
Syntax L CD TVs are evalu at ed at a distance of approximately 5 0 ce ntimeters
(appro xi mately 20 inches) between the LCD p an el and the eyes of the user at a 90 degrees
viewin g an gle. All LCD pa ne ls have been tested to ensure they co mp ly with our factory standards.
Our eval ua tion is based on the number of defect iv e pixels and the distance between a ny t wo
defect iv e pixels. Bright dots are dots that a pp ear bright and unchanged in size wh en a L CD TV
screen d is plays under a black pattern; dark d ot s are dots that appear dark and uncha ng ed in size
when a LCD TV screen is di sp layed under pure red, green, or blu e pa tterns ( defective pixels ).
Adjace nt d ots are dots located directly nex t to e ach other.
Custom er s are required to check their LCD pan el i mmediately after purchase. To identify defe ct ive
pixels , th e LCD panel should be examined unde r no rmal operating conditions a s me ntioned above,
prefer ab ly in its native display resoluti on , and with a 90 degrees viewing ang le .
A LCD TV will be consider ed d ead on arrival (D.O.A.) with rega rd s to defective pixels on the LCD pane l
when any o ne o f the following criteria is met:
• A t ot al of 7 defective pixels includ in g both bright dots and dark dots ar e present (the typical
30 LCD Television screen h as 1 6.7 million pixels), or
• 2 or more pa ir s of adjacent bright dots are pre se nt, or
• 3 adjace nt b right dots are present, or
• 3 adjace nt d ark dots are present.
In view of c us tomers' concerns about dead pix el s, Syntax would like to address tha t de fective pixels
are not ul ti mately avoidable with the curre nt L CD industry standard panel manu fa cturing processes.
We always strive to im pr ove our technology and minimize t he c hance of occurrence of defectiv e pi xels
by apply in g strict screening processes in o ur f actory production processes . Ho wever, Syntax cannot
guaran te e that a return unit to our customers w il l be 100% free of defective pixels.
For ques ti ons, please call our toll free serv ic e number in the USA at 888-SYNTAX-8.
" At SyntaxGr ou ps, a satisfied customer is our most im po rtant focus. "
40
Page 43

 Loading...