

Page 1
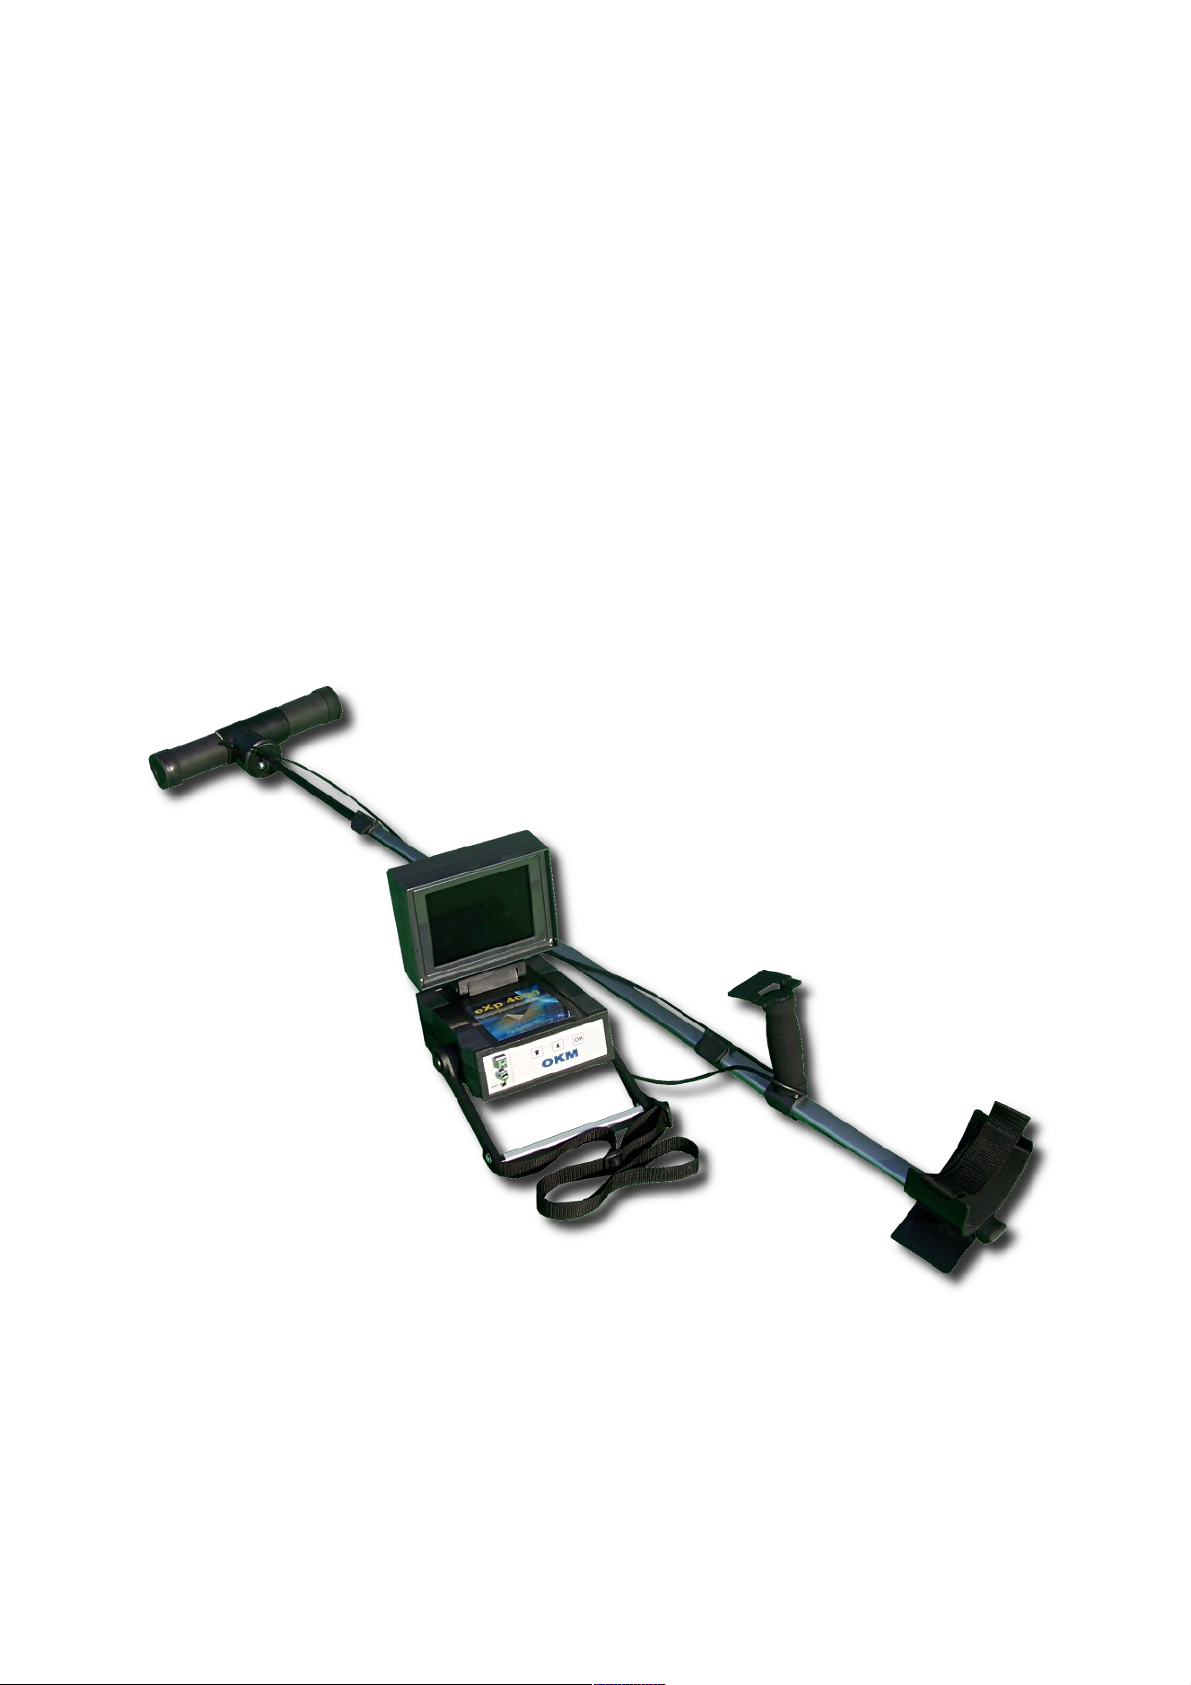
FS Future Series
eXp 4000
Version 2.1
User's Manual
Page 2

Any information contained in these operating instructions may be changed without prior notice.
OKM does not make any warranty for this document. This also applies without limitation to implied assurances of
merchantability and fitness for a specific purpose. OKM does not assume any responsability for errors in this manual
or for any incidental or consequential damage or loss associated with the delivery, exploitation or usage of this
material.
This documentation is available "as presented" and without any kind of warranty. In no circumstances OKM takes
responsibility for lost profits, usage or data losts, interruption of business activities or all kind of other indirectly
damages, which developed because of errors in this documentation. This instruction manual and all other stored
media, which are delivered with this package should only be used for this product. Program copies are allowed only
for security- and savety purposes. The resale of these programs, in original or changed form, is absolutely forbitten.
This manual may not be copied, duplicated or translated into another language, neither in part nor completely, over
the copyright matters without the prior written consent of OKM.
Copyright ©2002 – 2010 OKM Ortungstechnik GmbH. All rights reserved.
Page 3

3
Table of Contents
1 Introduction ........................................................................................................................................... 7
1.1 Preface ........................................................................................................................................... 8
1.2 Important Notes ............................................................................................................................. 9
1.2.1 General Notes ........................................................................................................................ 9
1.2.2 Possible Health Hazards ......................................................................................................... 9
1.2.3 Surrounding Area ................................................................................................................... 9
1.2.4 Voltage ................................................................................................................................... 9
1.2.5 Data safety ........................................................................................................................... 10
1.3 Maintenance and Services ........................................................................................................... 10
1.4 Danger of Explosion during Excavation ....................................................................................... 10
2 Install/Uninstall USB drivers on Windows ........................................................................................... 13
2.1 Windows XP ................................................................................................................................. 14
2.1.1 Install USB drivers on Windows XP ...................................................................................... 14
2.1.2 Uninstall USB drivers on Windows XP ................................................................................. 17
2.2 Windows Vista .............................................................................................................................. 20
2.2.1 Install USB drivers on Windows Vista .................................................................................. 20
2.2.2 Update USB drivers on Windows Vista ................................................................................. 22
2.2.3 Uninstall USB drivers on Windows Vista .............................................................................. 26
2.3 Windows 7 .................................................................................................................................... 27
2.3.1 Install USB drivers on Windows 7 ........................................................................................ 27
2.3.2 Uninstall USB drivers on Windows 7 .................................................................................... 32
3 Technical Specifications ....................................................................................................................... 33
3.1 Control Unit ................................................................................................................................. 34
3.2 Data Transmission ........................................................................................................................ 34
3.3 Computer, Minimum Requirements ............................................................................................. 34
4 Scope of Delivery ................................................................................................................................. 35
5 Assembly .............................................................................................................................................. 37
6 Control Elements ................................................................................................................................. 41
6.1 Control Unit ................................................................................................................................. 43
6.1.1 Front View ............................................................................................................................ 43
6.1.2 Rear View ............................................................................................................................. 44
7 Operating Modes ................................................................................................................................. 45
7.1 Magnetometer .............................................................................................................................. 47
7.2 Ground Scan ................................................................................................................................ 48
7.2.1 New Scan ............................................................................................................................. 49
7.2.2 Browse Scans ....................................................................................................................... 51
7.3 Metal Detector ............................................................................................................................. 52
7.4 Discrimination .............................................................................................................................. 52
7.5 Empty Memory ............................................................................................................................. 54
OKM Ortungstechnik GmbH
www.okmmetaldetectors.com
Page 4

7.6 Exit ............................................................................................................................................... 54
7.7 Thermograph ............................................................................................................................... 55
7.8 Thermo Scan ................................................................................................................................ 55
8 Field procedure .................................................................................................................................... 57
8.1 General scanning procedure ....................................................................................................... 58
8.1.1 Scan Mode ............................................................................................................................ 58
8.1.2 Regulation of the number of impulses per scanning path .................................................... 59
8.2 Special advices for field procedure .............................................................................................. 61
8.2.1 Orientation of probe ............................................................................................................. 62
8.2.2 Parallel or Zig-Zag? .............................................................................................................. 62
8.2.3 Manual or automatic impulse mode? .................................................................................... 63
8.2.4 Tips from the trainers themselves ........................................................................................ 63
9 Optional Equipment ............................................................................................................................. 65
9.1 Super Sensor ................................................................................................................................ 66
9.1.1 Usage ................................................................................................................................... 66
9.2 DDV system .................................................................................................................................. 67
9.2.1 Calibration ........................................................................................................................... 67
9.2.2 Adjust the discriminator ....................................................................................................... 69
9.2.3 Ground Balance .................................................................................................................... 70
4
10 Error Messages .................................................................................................................................. 71
OKM Ortungstechnik GmbH
www.okmmetaldetectors.com
Page 5

5
Illustration Index
Illustration 2.1: Install USB drivers: Windows XP, Step 1 ....................................................................... 14
Illustration 2.2: Install USB drivers: Windows XP, Step 2 ....................................................................... 14
Illustration 2.3: Install USB drivers: Windows XP, Step 3 ....................................................................... 15
Illustration 2.4: Install USB drivers: Windows XP, Step 4 ....................................................................... 15
Illustration 2.5: Install USB drivers: Windows XP, Step 5 ....................................................................... 16
Illustration 2.6: Install USB drivers: Windows XP, Step 6 ....................................................................... 16
Illustration 2.7: Uninstall USB drivers: Windows XP, Step 1 ................................................................... 17
Illustration 2.8: Uninstall USB drivers: Windows XP, Step 2 ................................................................... 17
Illustration 2.9: Uninstall USB drivers: Windows XP, Step 3 ................................................................... 18
Illustration 2.10: Uninstall USB drivers: Windows XP, Step 4 ................................................................. 18
Illustration 2.11: Uninstall USB drivers: Windows XP, Step 5 ................................................................. 19
Illustration 2.12: Install USB drivers: Windows Vista, Step 1 ................................................................. 20
Illustration 2.13: Install USB drivers: Windows Vista, Step 2 ................................................................. 20
Illustration 2.14: Install USB drivers: Windows Vista, Step 3 ................................................................. 21
Illustration 2.15: Install USB drivers: Windows Vista, Step 4 ................................................................. 21
Illustration 2.16: Install USB drivers: Windows Vista, Step 5 ................................................................. 21
Illustration 2.17: Update USB drivers on Windows Vista, Step 1 ............................................................ 22
Illustration 2.18: Update USB drivers on Windows Vista, Step 2 ............................................................ 22
Illustration 2.19: Update USB drivers on Windows Vista, Step 3 ............................................................ 23
Illustration 2.20: Update USB drivers on Windows Vista, Step 4 ............................................................ 23
Illustration 2.21: Update USB drivers on Windows Vista, Step 5 ............................................................ 24
Illustration 2.22: Update USB drivers on Windows Vista, Step 6 ............................................................ 24
Illustration 2.23: Update USB drivers on Windows Vista, Step 7 ............................................................ 25
Illustration 2.24: Uninstall USB drivers on Windows Vista, Step 1 ......................................................... 26
Illustration 2.25: Uninstall USB drivers on Windows Vista, Step 2 ......................................................... 26
Illustration 2.26: Install USB drivers on Windows 7 - Step 1 .................................................................. 27
Illustration 2.27: Install USB drivers on Windows 7 - Step 2 .................................................................. 27
Illustration 2.28: Install USB drivers on Windows 7 - Step 3 .................................................................. 27
Illustration 2.29: Install USB drivers on Windows 7 - Step 4 .................................................................. 28
Illustration 2.30: Install USB drivers on Windows 7 - Step 5 .................................................................. 28
Illustration 2.31: Install USB drivers on Windows 7 - Step 6 .................................................................. 29
Illustration 2.32: Install USB drivers on Windows 7 - Step 7 .................................................................. 29
Illustration 2.33: Install USB drivers on Windows 7 - Step 8 .................................................................. 30
Illustration 2.34: Install USB drivers on Windows 7 - Step 9 .................................................................. 30
Illustration 2.35: Install USB drivers on Windows 7 - Step 10 ................................................................ 31
Illustration 2.36: Uninstall USB drivers on Windows 7 - Step 1 .............................................................. 32
Illustration 2.37: Uninstall USB drivers on Windows 7 - Step 2 .............................................................. 32
Illustration 5.1: Connection of probe ...................................................................................................... 38
Illustration 5.2: Connection of Power Pack ............................................................................................. 38
Illustration 5.3: Connection of headphones ............................................................................................ 38
Illustration 5.4: Connection of joystick ................................................................................................... 39
Illustration 6.1: Control unit with power supply and probe .................................................................... 42
Illustration 6.2: Control unit, front view ................................................................................................. 43
Illustration 6.3: Control unit, rear view .................................................................................................. 44
Illustration 7.1: Magnetometer: Main Menu, Representation of Values .................................................. 47
Illustration 7.2: Ground Scan .................................................................................................................. 48
OKM Ortungstechnik GmbH
www.okmmetaldetectors.com
Page 6

Illustration 7.3: Ground Scan – Submenu ............................................................................................... 48
Illustration 7.4: Ground Scan – Parameter .............................................................................................. 49
Illustration 7.5: Zig-Zag or Parallel ......................................................................................................... 49
Illustration 7.6: Start first scan line? ...................................................................................................... 50
Illustration 7.7: Graphical Representation of a Measurement in Operating Mode Ground Scan ............ 50
Illustration 7.8: Select Stored Measurement .......................................................................................... 51
Illustration 7.9: Submenu: Browse Scans ............................................................................................... 51
Illustration 7.10: Metal Detector ............................................................................................................. 52
Illustration 7.11: Discrimination ............................................................................................................. 52
Illustration 7.12: Signature of a ferromagnetic metal target .................................................................. 53
Illustration 7.13: Signature of a non-ferromagnetic metal target .......................................................... 53
Illustration 7.14: Signature of a non-metallic target ............................................................................... 53
Illustration 7.15: Empty Memory ............................................................................................................ 54
Illustration 7.16: Exit .............................................................................................................................. 54
Illustration 9.1: Position of Super Sensor ............................................................................................... 66
Illustration 9.2: Control Elements of the Detector .................................................................................. 67
Illustration 9.3: Calibration of the DDV system, step 1 ........................................................................... 68
Illustration 9.4: Calibration of the DDV system, step 2 ........................................................................... 68
Illustration 9.5: Adjustment of discrimination ......................................................................................... 69
Illustration 10.1: Only a small amount of memory available ................................................................... 72
Illustration 10.2: No free memory available ............................................................................................ 72
Illustration 10.3: Internal Hardware Error ............................................................................................. 72
Illustration 10.4: The external power supply has to be charged ............................................................. 73
Illustration 10.5: Shutting down the system ........................................................................................... 73
Illustration 10.6: Shutting down the system is not possible .................................................................... 73
6
OKM Ortungstechnik GmbH
www.okmmetaldetectors.com
Page 7

1 Introduction
CHAPTER 1
Introduction
Page 8

8 Introduction
1.1 Preface
Dear customer,
all of the engineers, sales, training and support staff at OKM Ortungstechnik GmbH would like to thank
you for your purchase of the eXp 4000.
The eXp 4000 detector works on the principle of Electro-Magnetic Signature Reading (EMSR). Besides
the detection of metallic objects this device is also capable of detecting natural features of the earth like
formations of strata, cavities, voids, faults, ground water and other non-metallic objects. Then of course
this equipment is best suited at detecting sepulchers, treasure, buried utilities, tanks and the like.
The eXp 4000 is able to locate, document and analyze buried objects within various structures and
vessels non-intrusively without having to excavate the area. Using EMSR is particularly useful in areas
where detection is a must and excavation is not possible. The facile and flexible handling of the eXp
4000 can easily and quickly give reproducible results.
With our team of specialists we guarantee that our products are under recurrent control. Our specialists
try to implement new developments in terms of further quality improvements for you.
By purchasing or using one of our products, we cannot guarantee that during the course of your
research that you will be successful and have a find. The recognition of hidden and buried objects
depends on a huge number of factors. As you well may know there are different soil types all over the
world with different levels of natural attenuation. Variable soil properties can and will hamper and alter
ultimate scan measurements. Areas where there is an extreme amount of ground water, varying clays,
sands and wet soils making scanning more difficult and may reduce the maximum depth capabilities of
any and all detection equipment, regardless of make or model.
For more information regarding where this equipment has been used and operated, please visit our web
site. Our equipment is constantly being tested and when improvements or upgrades are available, we
will list them also on our web site.
It is necessary for our company to protect our developments and all of the information learned during
the “Research and Development” phases in creating our technology. We strive to stay within the given
framework of legislation, patents and trademark registration.
Please take your time to read this User Manual and familiarize yourself with the operation, functionality
and how to utilize the eXp 4000. We also offer training for your equipment in our factory and on-site. We
strive to maintain worldwide dealer network for assistance and support. Please visit our web site for
more information.
OKM Ortungstechnik GmbH
www.okmmetaldetectors.com
Page 9

Introduction 9
1.2 Important Notes
Prior to using the eXp 4000 and its accessories, please read these operating instructions carefully.
These instructions give information on how to use the detector and potential sources where precautions
should be taken.
The eXp 4000 and its accessories serve for the analysis, documentation and detection of sub-surface
anomalies and ground disturbances. The recorded data of the ground structure will be transmitted to a
PC to give a visual representation using our proprietary software program. Any additional notes to the
software should be observed. Please read the user manual of the software!
1.2.1 General Notes
Being an electronic device, the eXp 4000 has to be treated with caution and treated with care as with
any electronic device. Any failure to observe the safety precautions given or any use for purposes other
than the ones it is designed for may result in damage or destruction of the processing unit and/or its
accessories or connected components.
The device has a built in anti-tampering module which will destroy the unit if it is improperly opened.
There are no end user serviceable parts on the inside of the unit.
1.2.2 Possible Health Hazards
If used properly this device normally does not pose any health hazards. According to current scientific
knowledge, the high-frequency signals are not harmful to the human body on account of their low power.
1.2.3 Surrounding Area
When moving this unit from a cold place to a warmer place, watch out for condensation. Do not
immediately operate the unit until any possible condensation could have evaporated. The unit is not
weather proof and water or condensation can destroy the unit.
Avoid strong magnetic fields, which may occur in places where there are large electric motors or
unshielded loudspeakers. Try to avoid using this equipment within 50 meters (150 ft) of this type of
equipment.
Metallic objects on the ground such as cans, tin, nails, screws or debris can influence your scan data and
present negative results regarding your scan data. Also it is a good habit to remove any metallic objects
off of your person like cellular telephones, keys, jewelry, etc... Do not wear steel toe boots.
1.2.4 Voltage
The power supply should not be outside the indicated range of values. Use only approved chargers,
batteries and rechargeable batteries which are included in the scope of delivery.
Never use the 115/230 Volt mains supply.
OKM Ortungstechnik GmbH
www.okmmetaldetectors.com
Page 10

10 Introduction
1.2.5 Data safety
Data errors can occur if:
• the range of the sender module has been exceeded,
• the power supply of the device or the batteries are too low,
• the cables are too long,
• the unit is operating to close to devices which sends out disturbances or
• atmospheric conditions (electrical storms, lightning, etc...).
1.3 Maintenance and Services
In this section you will learn how to maintain your measuring instrument with all included accessories to
keep it in good condition a long time and to get good measuring results.
The following list indicates what you absolutely should avoid:
• penetrating water
• strong dirt and dust deposits
• hard impacts
• strong magnetic fields
• high and long lasting heat effect
To clean your device please use a dry soft rag. To avoid any damage you should transport the device and
accessories always in the appropriate carrying cases.
Prior to using your eXp 4000 please be sure that all batteries and accumulators are fully charged. Also
allow the batteries to completely discharge before recharging them, regardless if you are working with
the external battery or with internal accumulators. This way your batteries will have a long and durable
life.
To charge the external and internal batteries, use only the approved chargers which are part of
our scope of delivery.
1.4 Danger of Explosion during Excavation
Unfortunately, the last two world wars also made the ground in many places of the world a potentially
explosive scrap heap. A host of those lethal relics are still buried in the ground. Do not start digging and
hacking for an object wildly when you receive a signal of a piece of metal from your device. Firstly, you
might indeed cause irreparable damage to a truly rare find, and secondly, there is a chance that the
object reacts in an insulted way and strikes back.
Note the color of the ground close to the surface. A red or reddish color of the ground is an indicator of
rust traces. As regards the finds themselves, you should definitely pay attention to their shape. Curved
OKM Ortungstechnik GmbH
www.okmmetaldetectors.com
Page 11

Introduction 11
or round objects should be a sign of alarm, especially if buttons, rings or little pegs can be identified or
felt. The same applies to recognizable ammunition or bullets and shells. Leave that stuff where it is, do
not touch anything and, most importantly, do not take any of it home with you. The killing machines of
war made use of diabolical inventions such as rocker fuses, acid fuses and ball fuses. Those components
have been rusting away in the course of time, and the slightest movement may cause parts of them to
break and be triggered. Even seemingly harmless objects such as cartridges or large ammunition are
anything but that. Explosives may have become crystalline over time, that is, sugar-like crystals have
formed.
Moving such an object may cause those crystals to produce friction, leading to an explosion. If you come
across such relics, mark the place and do not fail to report the find to the police. Such objects always
pose a danger to the life of hikers, walkers, farmers, children and animals.
OKM Ortungstechnik GmbH
www.okmmetaldetectors.com
Page 12

Page 13

2 Install/Uninstall USB drivers on Windows
CHAPTER 2
Install/Uninstall USB drivers on
Windows
In this chapter you will learn how to install the USB drivers, that are necessary to transfer data from the
machine to your computer software. Please make sure to read the proper section appropriate to your
Windows operating system.
Page 14
14 Install/Uninstall USB drivers on Windows
2.1 Windows XP
The instructions in this section are only valid for Windows XP.
2.1.1 Install USB drivers on Windows XP
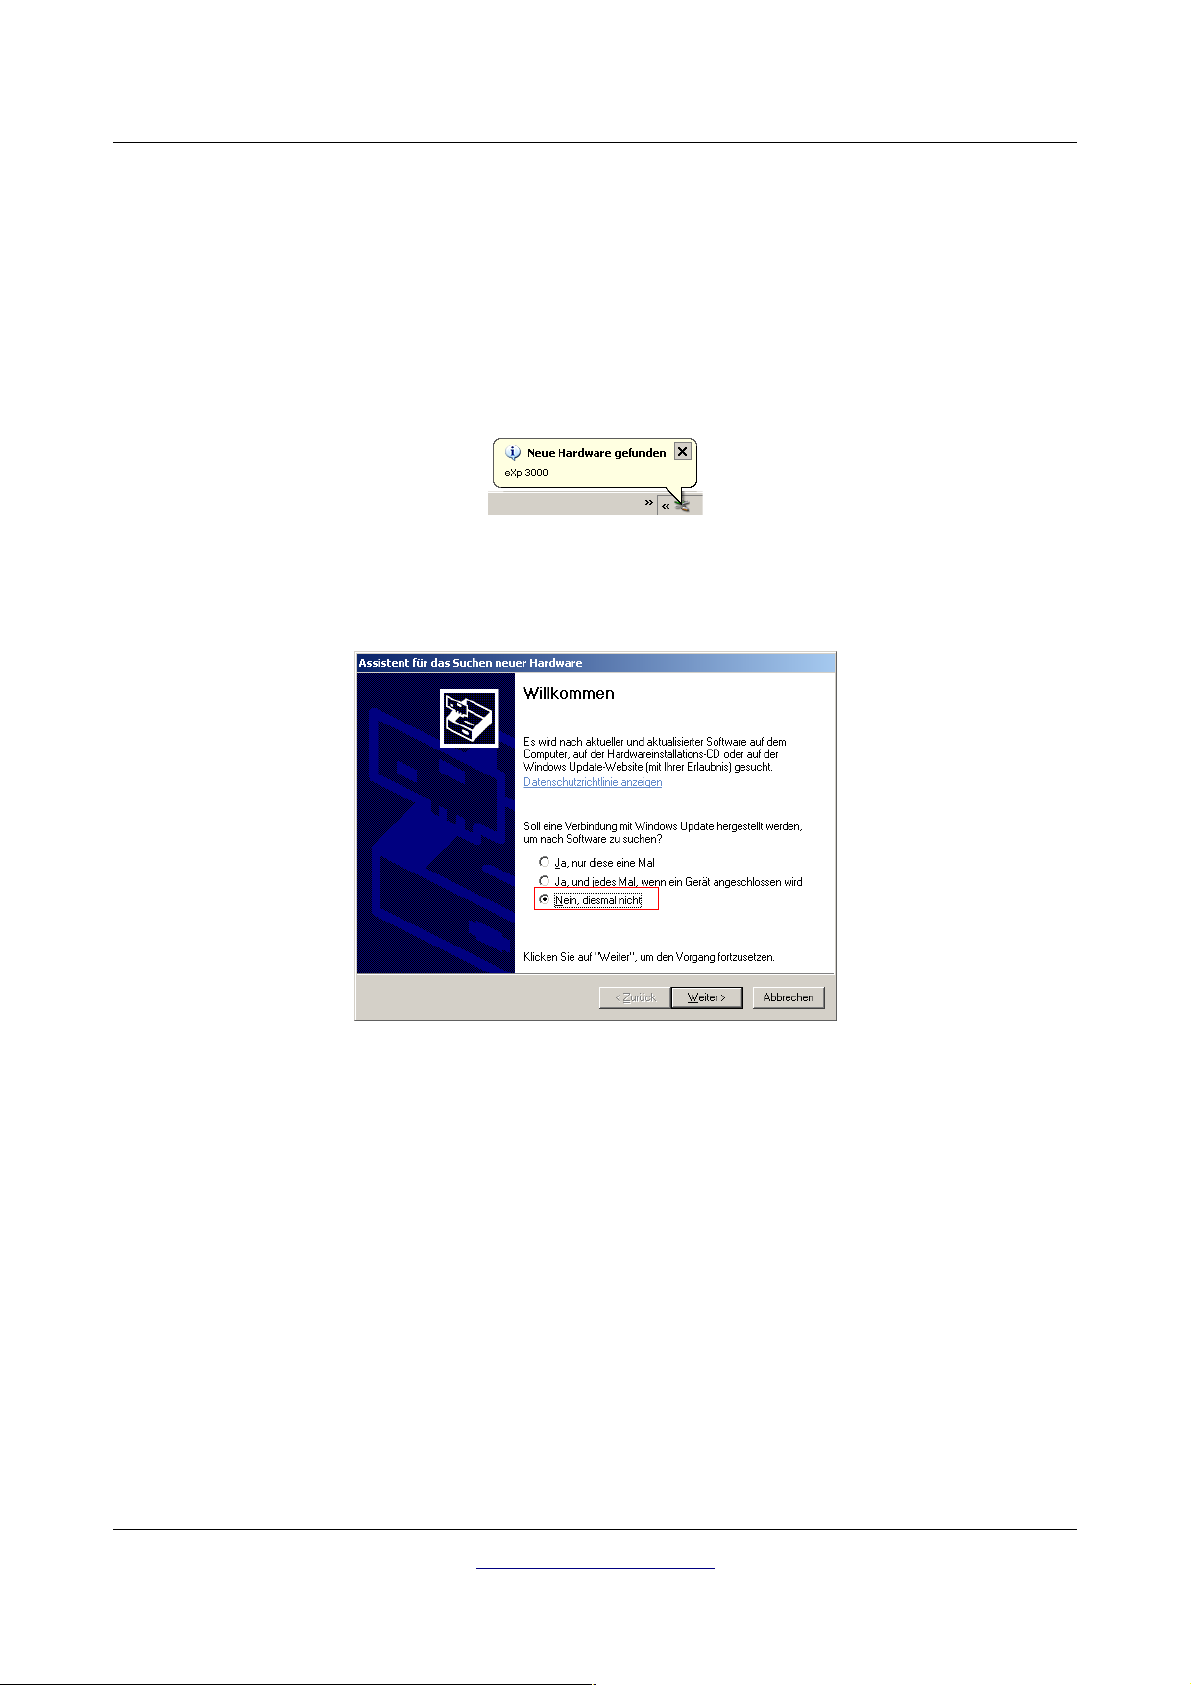
The installation of the USB drivers in Windows XP is relatively simple. After you have connected the
device with your computer, switch it on and the message from figure 2.1 appears on your screen.
Illustration 2.1: Install USB drivers: Windows XP, Step 1
If your Windows XP has Service Pack 2 installed, you will see the dialog from figure 2.2 if Windows
Update has to search for drivers up to date. Mark entry
"No, not this time"
and click on
Next
.
Illustration 2.2: Install USB drivers: Windows XP, Step 2
In other versions of Windows this window should not appear.
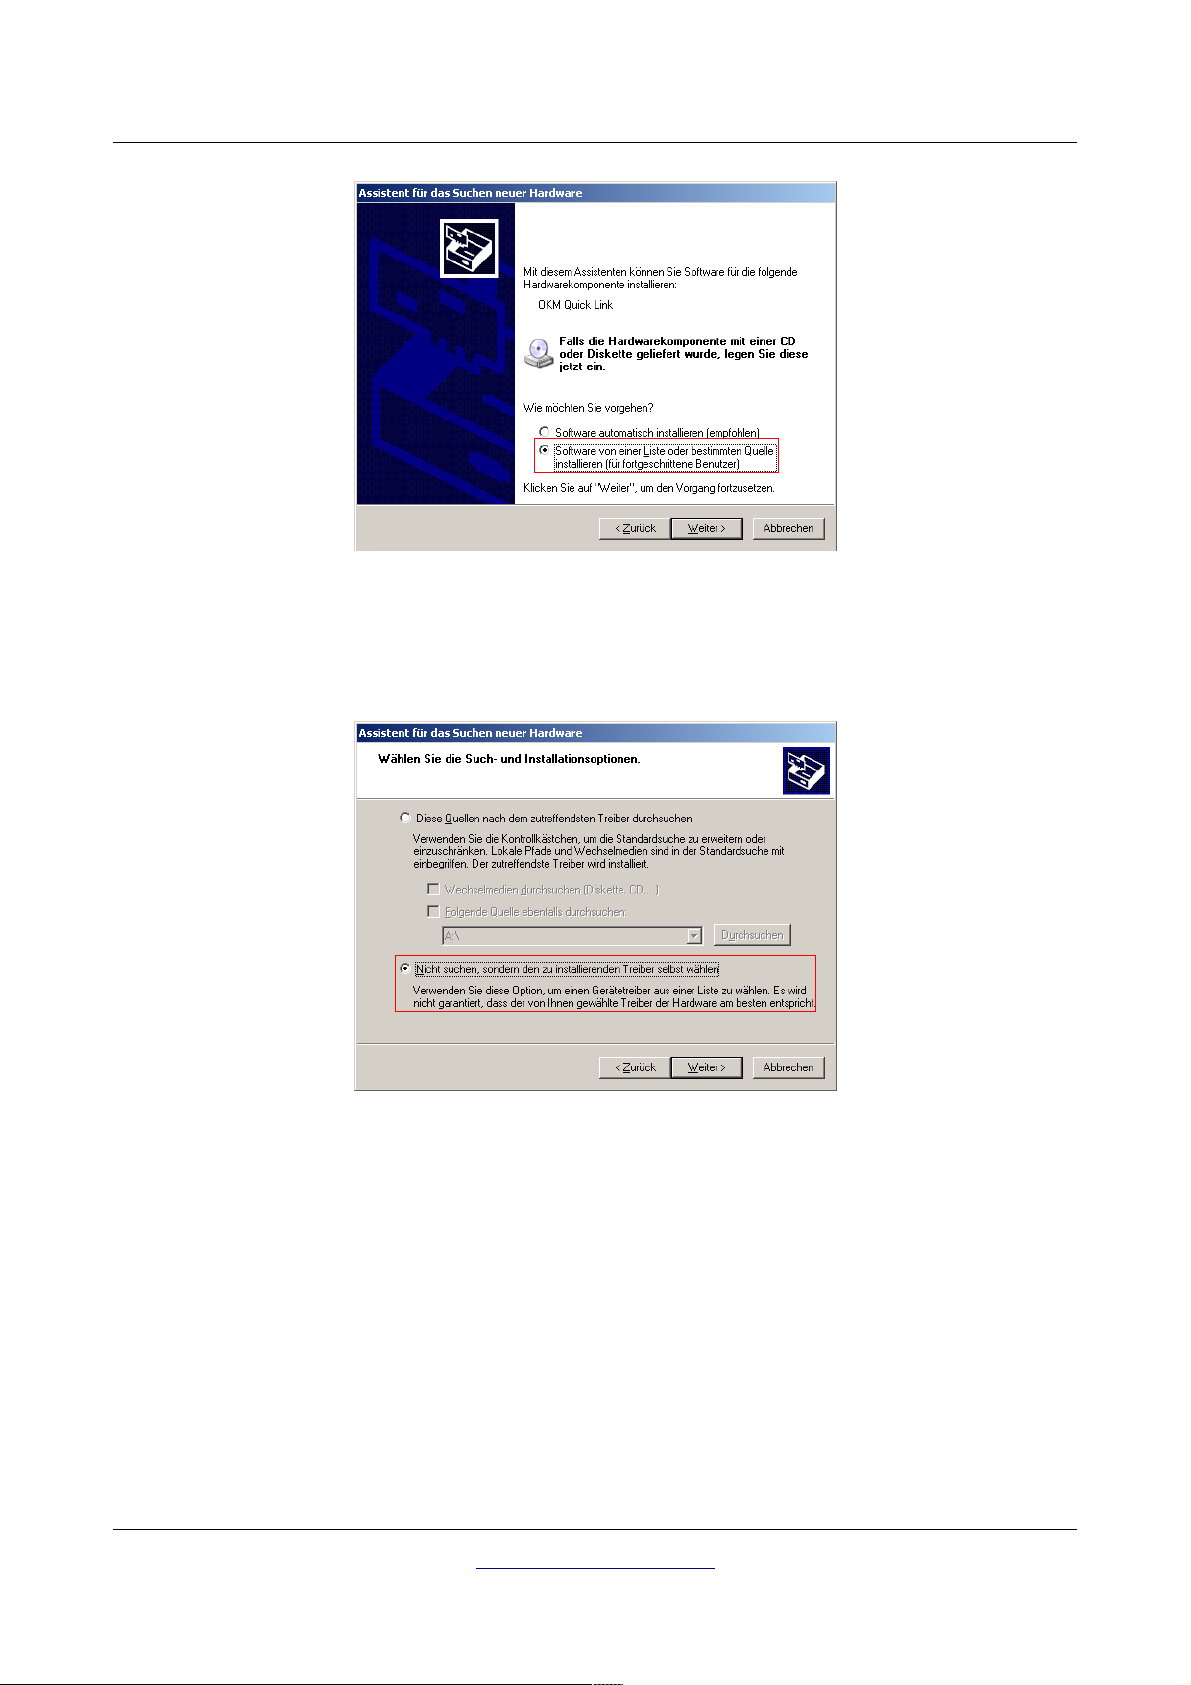
In the following dialog window like figure 2.3 select the entry
Next.
OKM Ortungstechnik GmbH
www.okmmetaldetectors.com
"Install software from a list …"
and click
Page 15
Install/Uninstall USB drivers on Windows 15
Illustration 2.3: Install USB drivers: Windows XP, Step 3
In the next dialog window from figure 2.4 mark the entry No search, select driver individually and click
on Next.
Illustration 2.4: Install USB drivers: Windows XP, Step 4
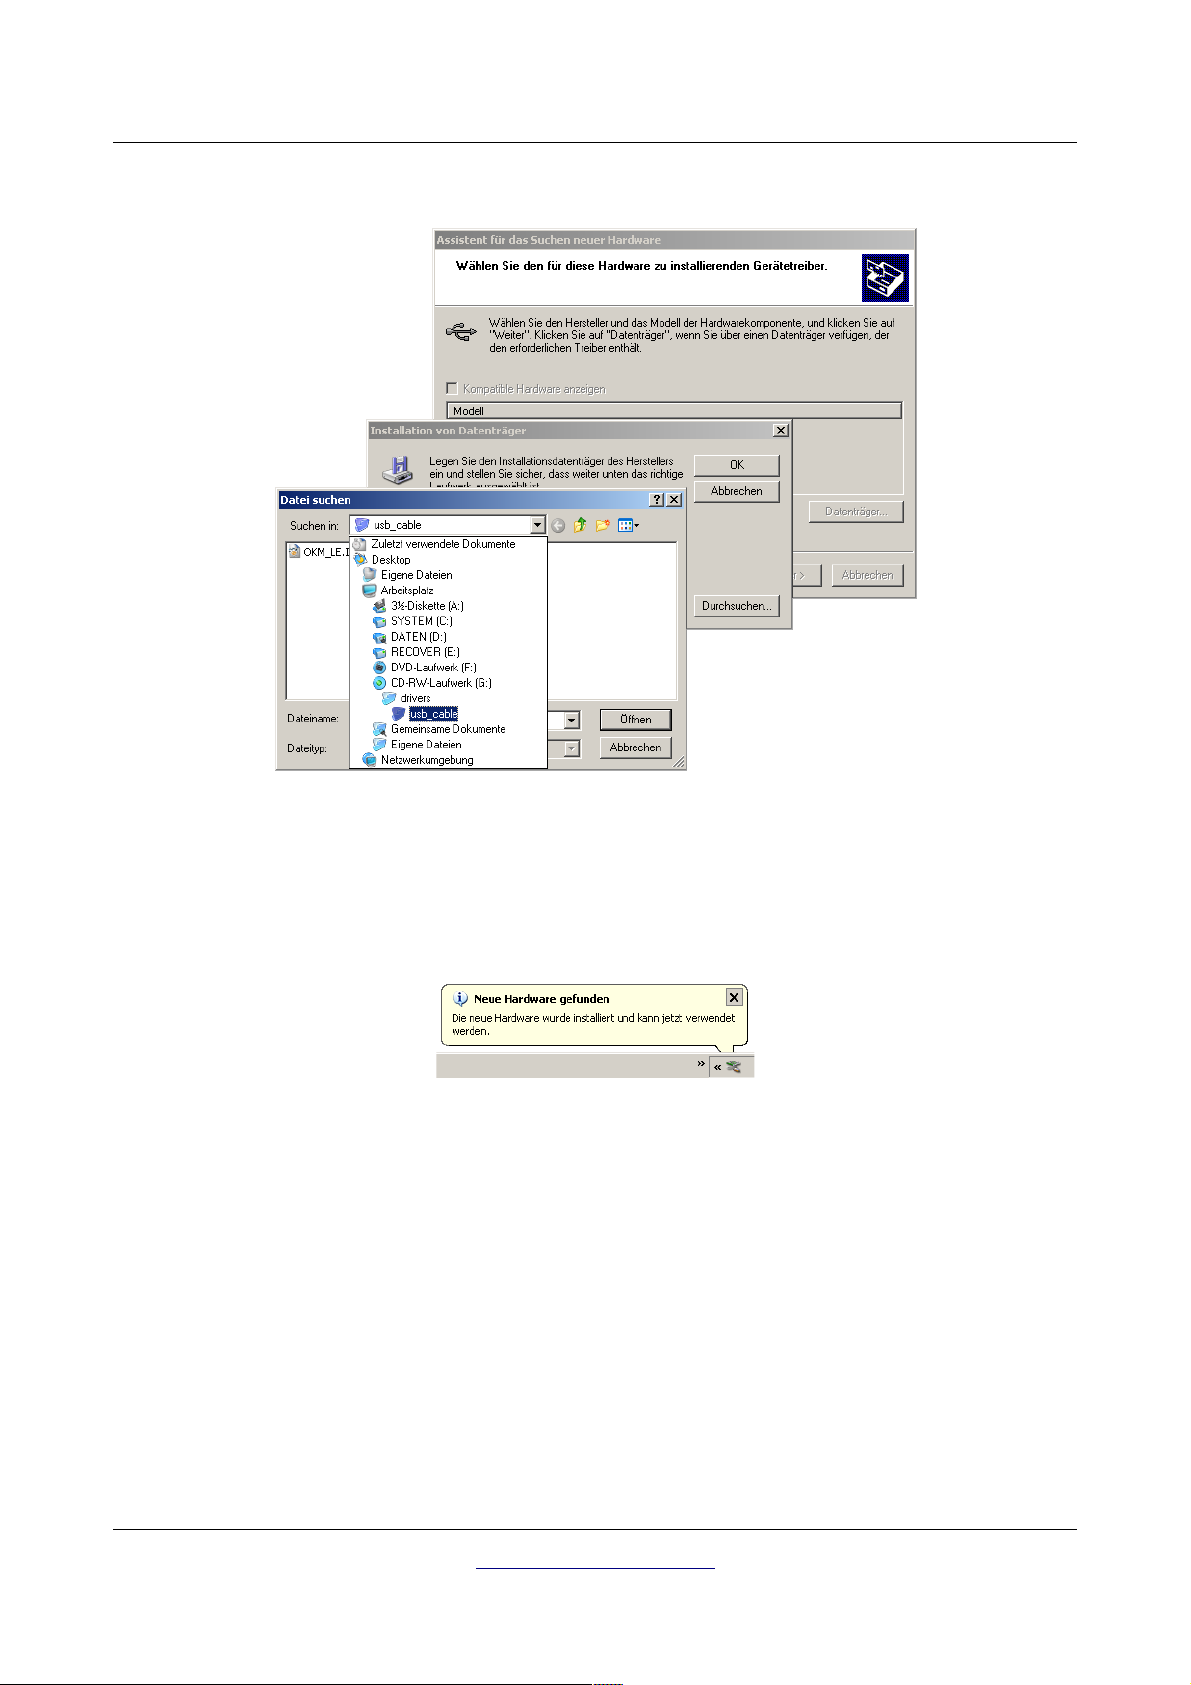
Another window will open, represented in figure 2.5, where you have to select the driver file. Therefore
click on Data carrier. ... Immediately another window appears where you click on the button Search ...
Then select the file OKM_LE.INF, which you can find in the directory \drivers\usb_cable of your
software CD. Afterwards you have to click on Open, OK and Next, to start the installation of the files.
OKM Ortungstechnik GmbH
www.okmmetaldetectors.com
Page 16
16 Install/Uninstall USB drivers on Windows
Illustration 2.5: Install USB drivers: Windows XP, Step 5
After successful installation of the driver a message like in figure 2.6 will appear on your computer
screen. Now the drivers of your device are installed and you can transfer data to your PC.
Illustration 2.6: Install USB drivers: Windows XP, Step 6
OKM Ortungstechnik GmbH
www.okmmetaldetectors.com
Page 17
Install/Uninstall USB drivers on Windows 17
2.1.2 Uninstall USB drivers on Windows XP
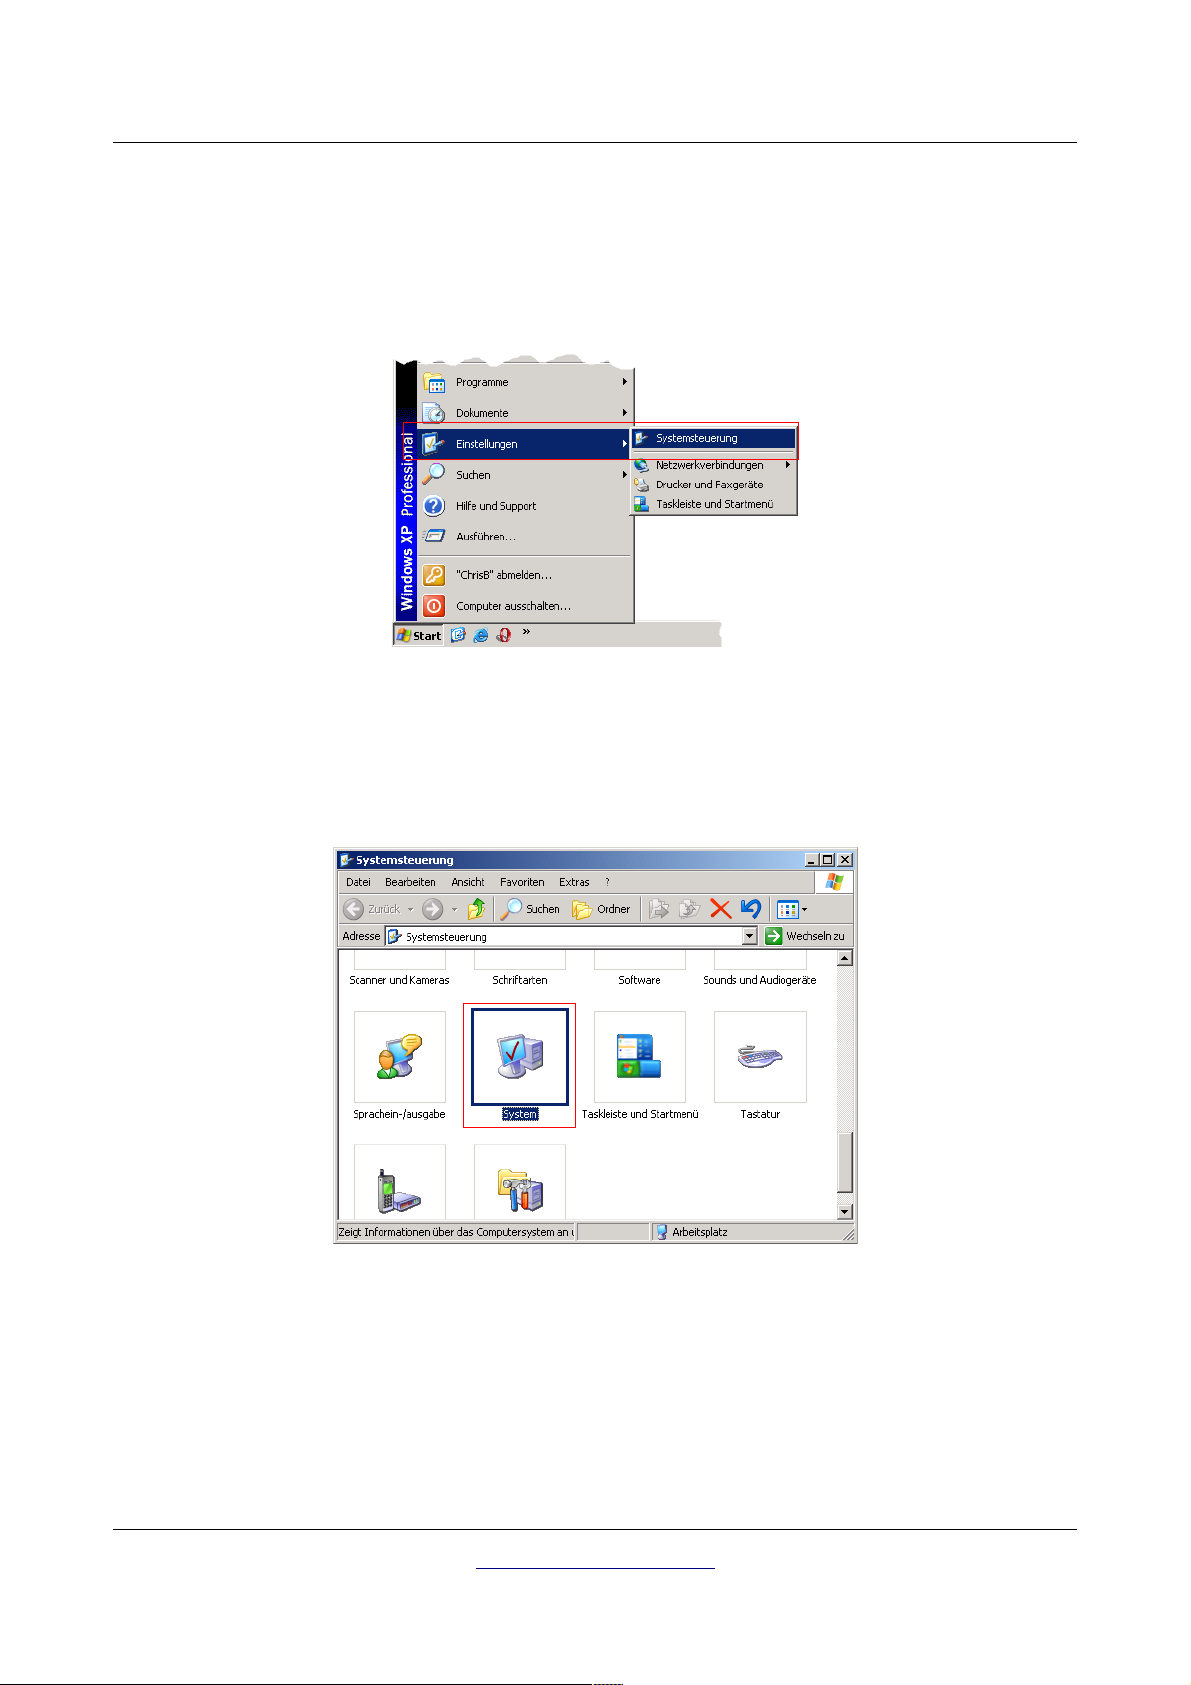
If you need to delete the USB drivers from your operating system because of a wrong installation, please
open the device manager of Windows XP. Therefore please click on Start > control panel, like
represented in figure 2.7.
Illustration 2.7: Uninstall USB drivers: Windows
XP, Step 1
After that a dialog like in figure 2.8 appears. There you can find the entry system and click twice on it.
Illustration 2.8: Uninstall USB drivers: Windows XP, Step 2
The dialog from figure 2.9 appears on your screen. Click on the tab hardware and after that the button
device manager.
OKM Ortungstechnik GmbH
www.okmmetaldetectors.com
Page 18

18 Install/Uninstall USB drivers on Windows
Illustration 2.9: Uninstall USB drivers: Windows
XP, Step 3
A list of devices like in figure 2.10 will be represented. There you can find the entry USBController. By
clicking the plus symbol next of this entry, all available USB devices will be shown.
Illustration 2.10: Uninstall USB drivers: Windows XP, Step 4
Mark the device which you like to delete, which means "eXp 4000. Additionally the device may be listed
as “OKM Quick Link”. Then click on the button. Alternatively you can select the entry Uninstall in the
menu Action.
OKM Ortungstechnik GmbH
www.okmmetaldetectors.com
Page 19

Install/Uninstall USB drivers on Windows 19
Illustration 2.11: Uninstall USB drivers:
Windows XP, Step 5
The dialog from figure 2.11 appears. Click there on the button OK. Now all drivers will be deleted from
your computer. If needed you can now install the USB driver again correctly.
OKM Ortungstechnik GmbH
www.okmmetaldetectors.com
Page 20
20 Install/Uninstall USB drivers on Windows
2.2 Windows Vista
The instructions in this section are only valid for the Windows Vista operating system.
2.2.1 Install USB drivers on Windows Vista
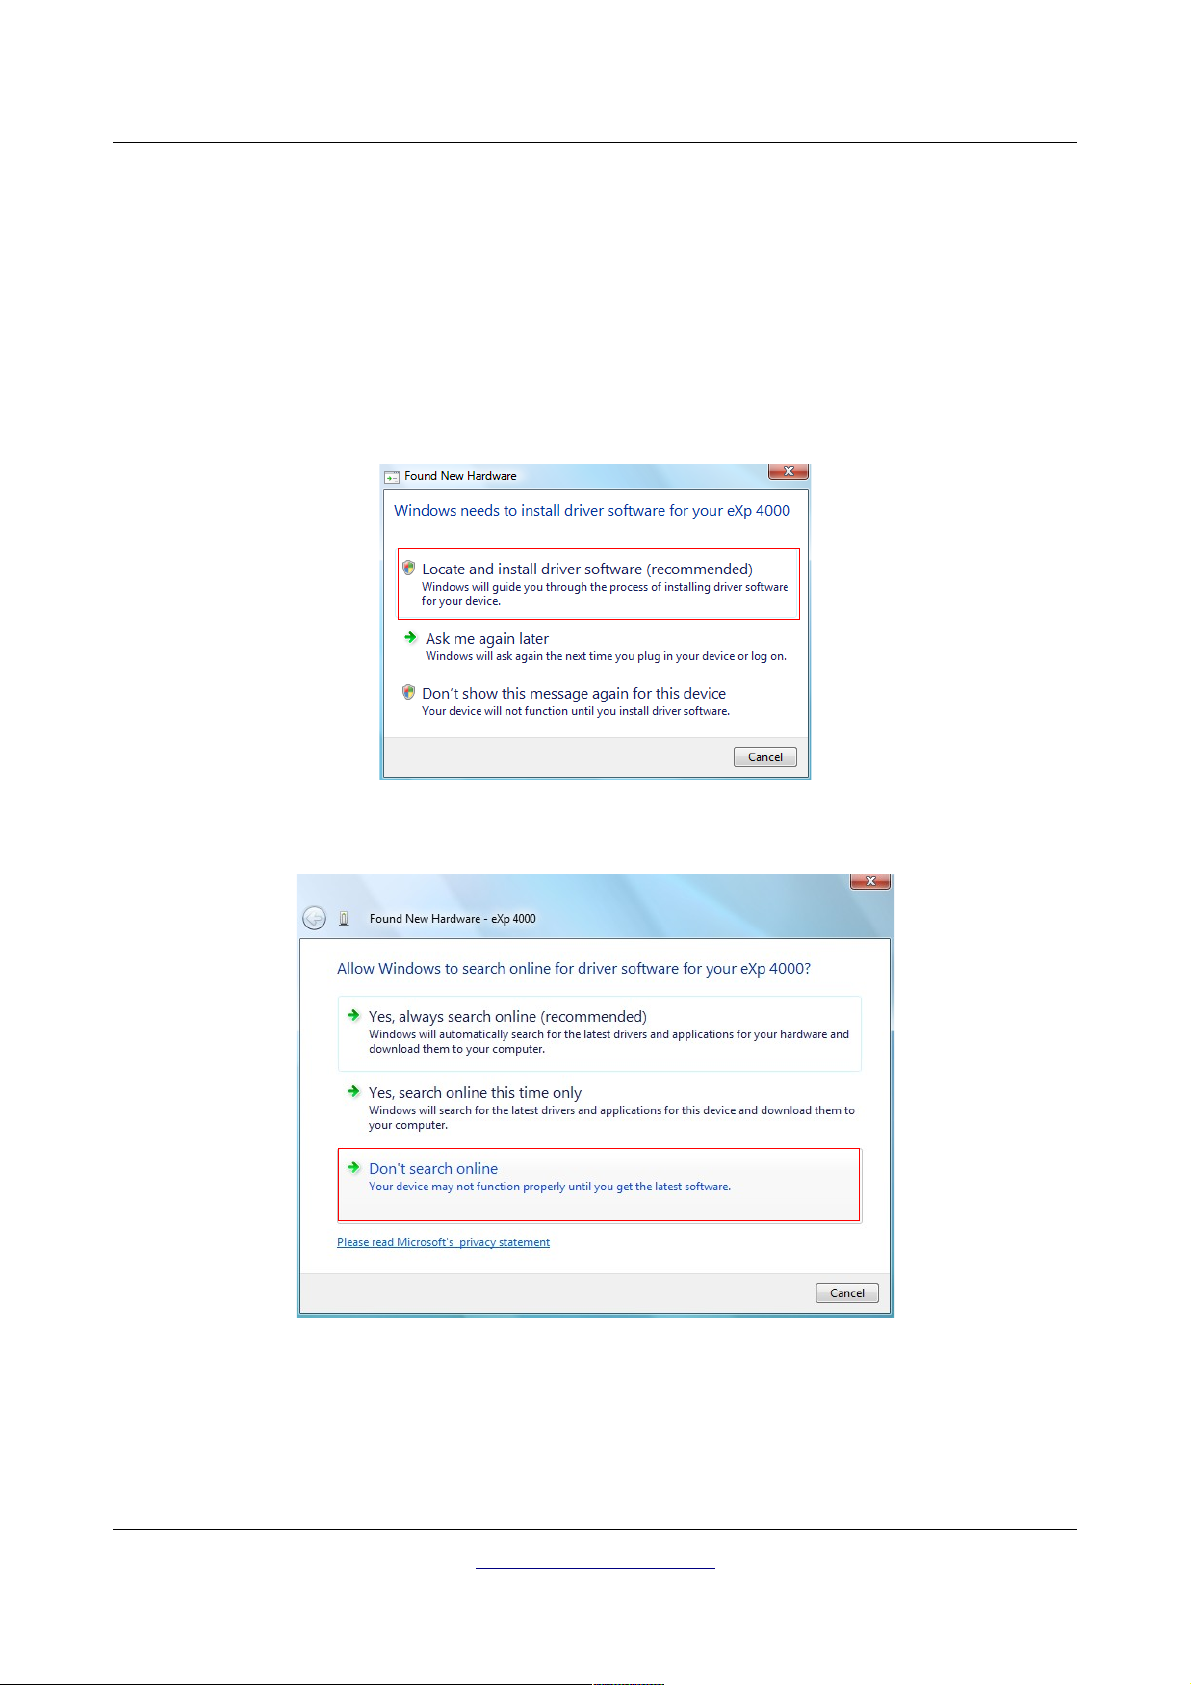
The installation of the USB drivers in Windows Vista is relatively simple. After you have connected the
device with your computer, switch it on and the message from figure 2.12 appears on your screen. Click
on Locate and install driver software (recommended).
Illustration 2.12: Install USB drivers: Windows Vista, Step 1
At the next window, shown in figure 2.13, click on Don't search online.
Illustration 2.13: Install USB drivers: Windows Vista, Step 2
OKM Ortungstechnik GmbH
www.okmmetaldetectors.com
Page 21
Install/Uninstall USB drivers on Windows 21
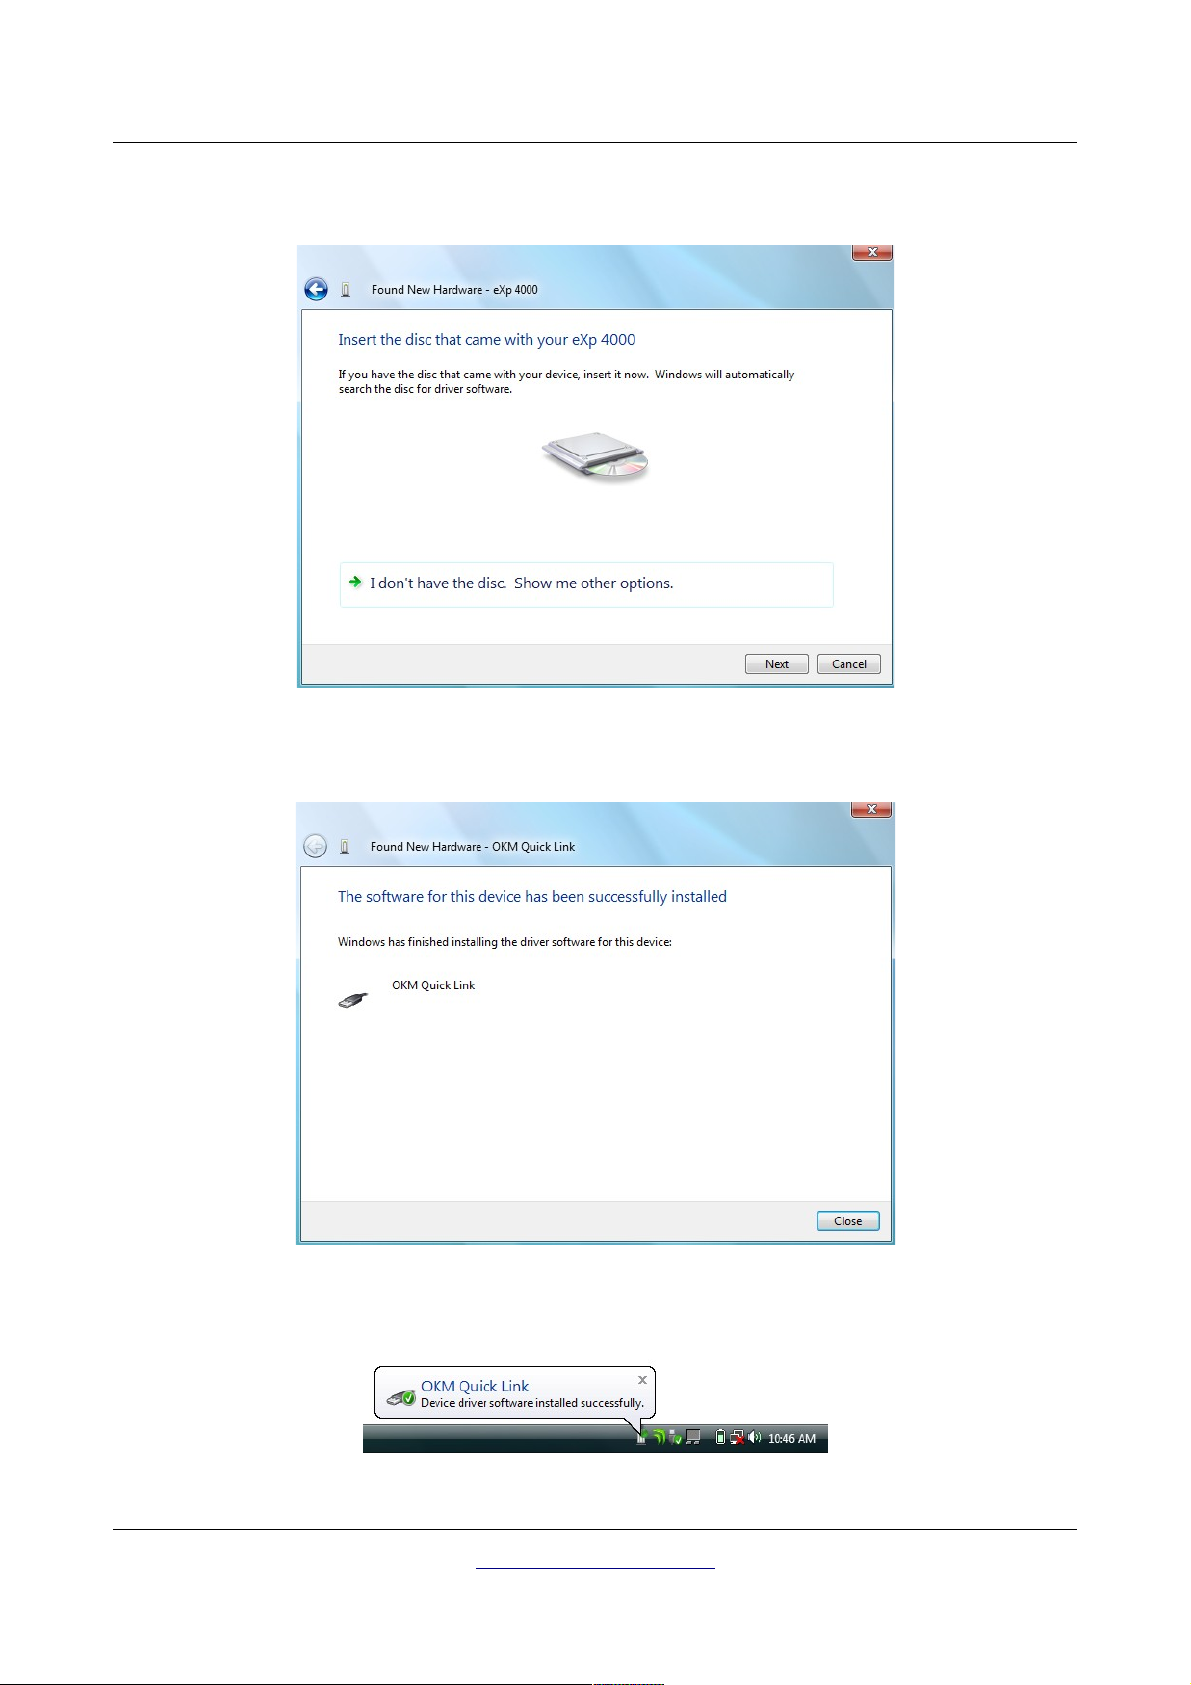
When the window from figure 2.14 is visible, insert the software CD with the USB drivers into your CD
drive and click on the Next button. Windows will now search for the correct USB drivers automatically.
Illustration 2.14: Install USB drivers: Windows Vista, Step 3
When the installation has finished the completion screen from figure 2.15 is displayed. Press Close to
close this window.
Illustration 2.15: Install USB drivers: Windows Vista, Step 4
Now you have completed the installation of the USB drivers in Windows Vista, which will be confirmed
by presenting the message from figure 2.16.
Illustration 2.16: Install USB drivers: Windows Vista, Step 5
OKM Ortungstechnik GmbH
www.okmmetaldetectors.com
Page 22
22 Install/Uninstall USB drivers on Windows
2.2.2 Update USB drivers on Windows Vista
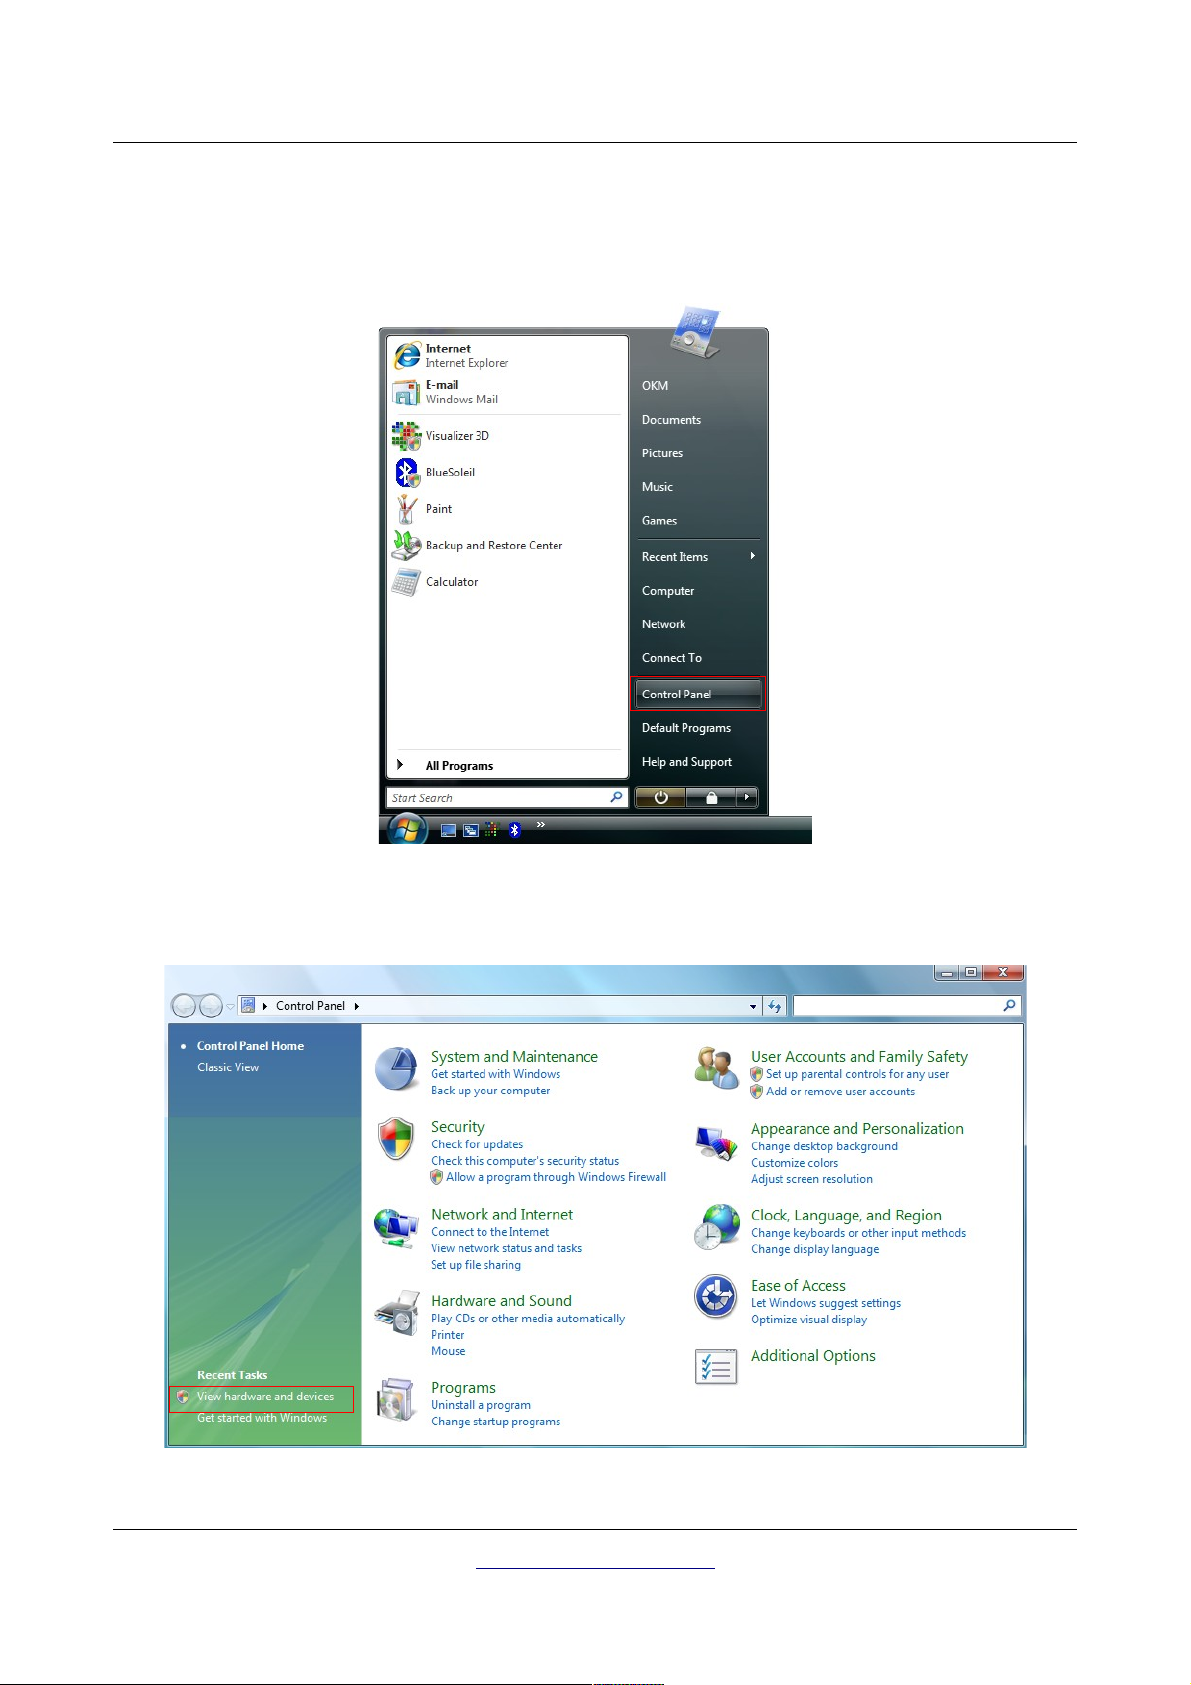
If you need to update the USB drivers on your operating system or the initial installation failed, please
open up the Device Manager of Windows Vista. Therefore press the Windows start button and click on
Control Panel.
Illustration 2.17: Update USB drivers on Windows Vista, Step 1
At the next screen, shown in figure 2.18, select View hardware and devices which can be found on the
bottom of the left sidebar.
Illustration 2.18: Update USB drivers on Windows Vista, Step 2
OKM Ortungstechnik GmbH
www.okmmetaldetectors.com
Page 23
Install/Uninstall USB drivers on Windows 23
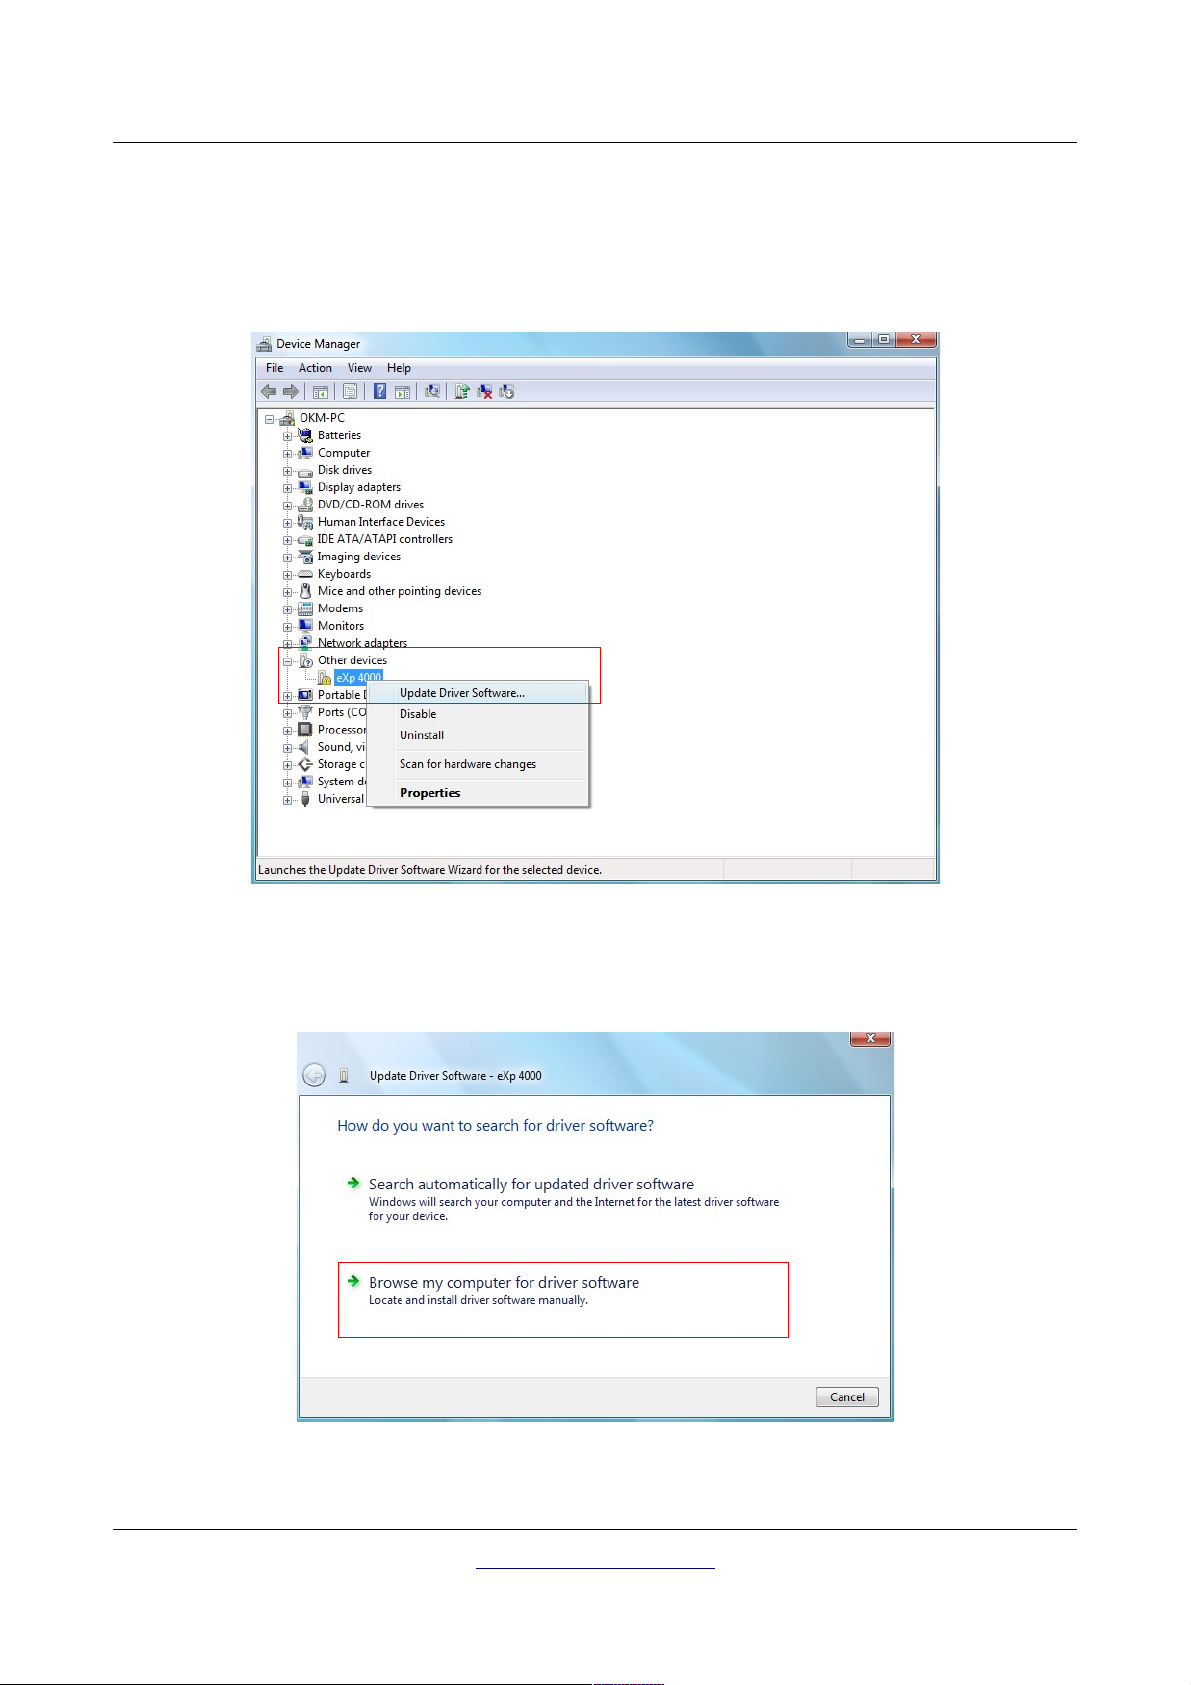
In the Device Manager (see figure 2.27) there will be a device under
Other devices
with a yellow
warning symbol to indicate a problem i.e. no driver installed. If the drivers has been installed already it
will show up under
Universal Serial Port Controllers
. The text next to this device will depend on the
device attached. In this example the device was an eXp 4000 device. Right click on the device (eXp 4000
in this example) to bring up a menu as shown below.
Illustration 2.19: Update USB drivers on Windows Vista, Step 3
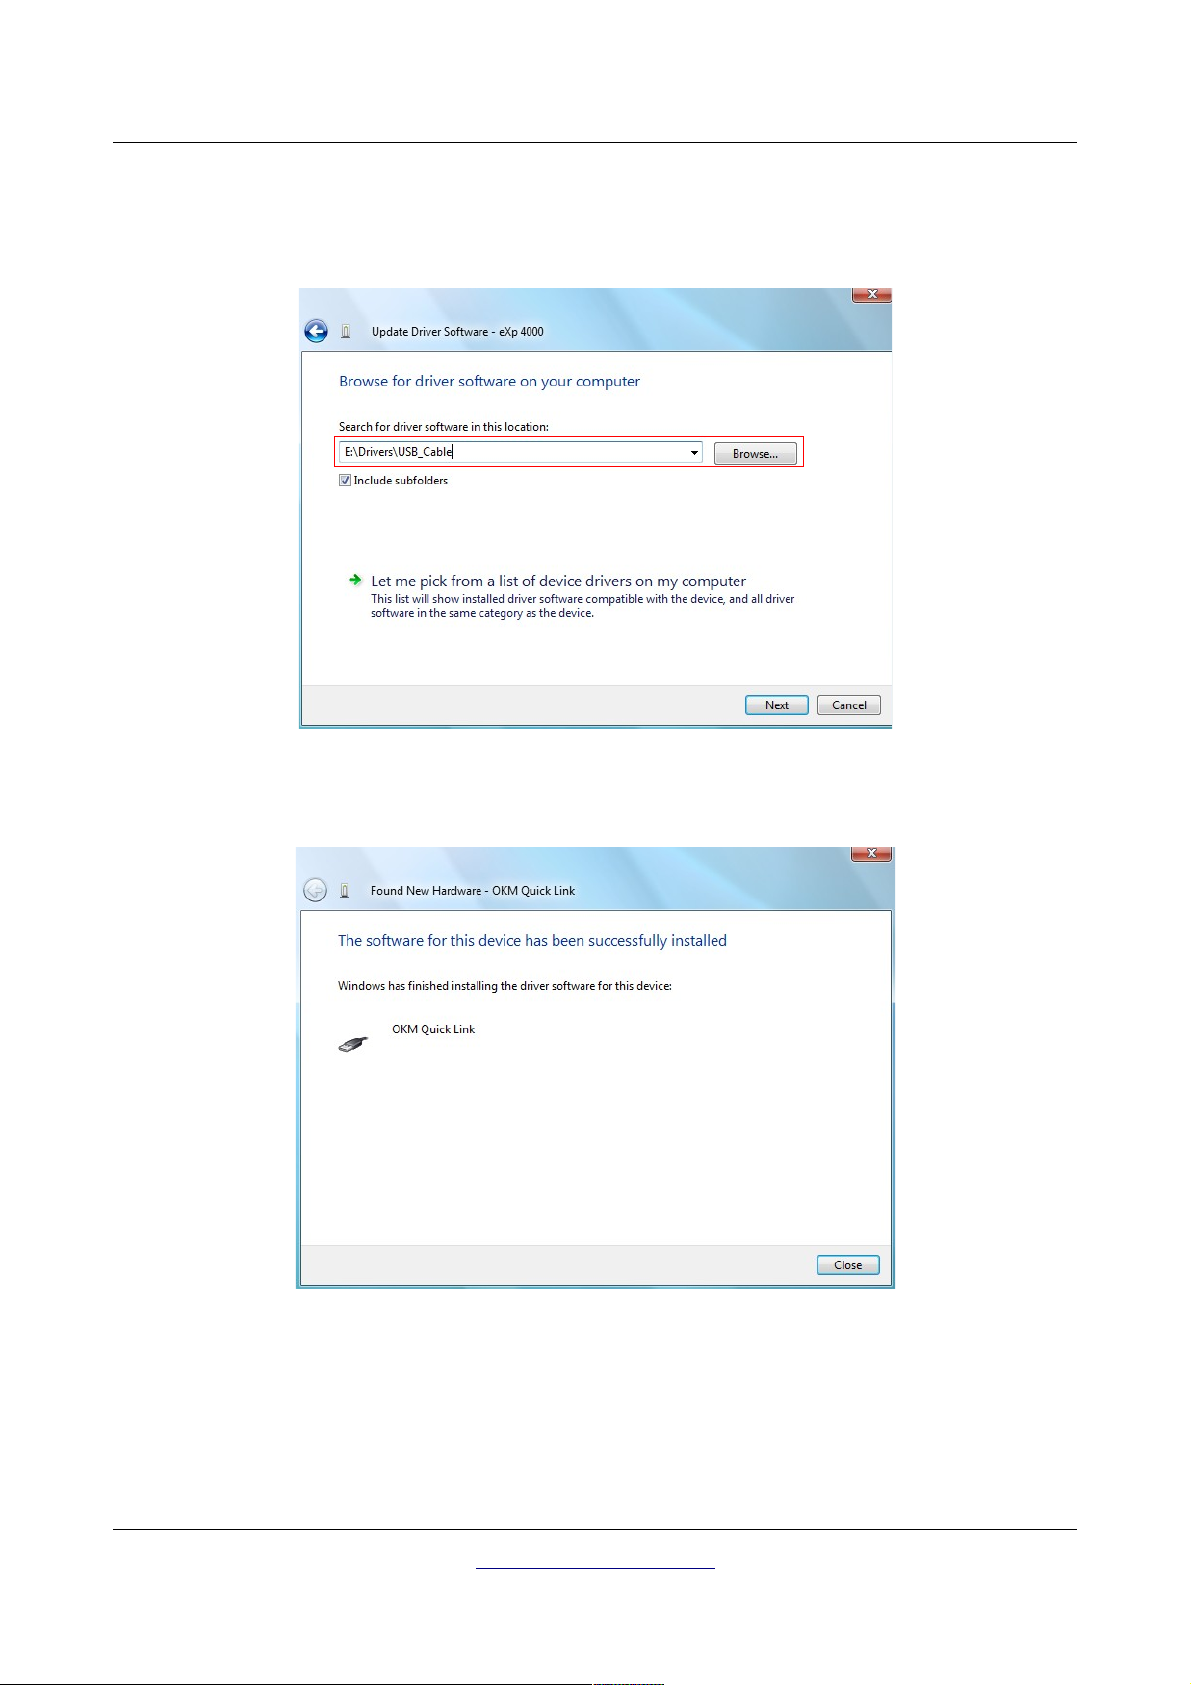
From the displayed menu select Update Driver Software… which then displays the option for an
automatic or manual search. Select the second option to browse manually.
Illustration 2.20: Update USB drivers on Windows Vista, Step 4
OKM Ortungstechnik GmbH
www.okmmetaldetectors.com
Page 24
24 Install/Uninstall USB drivers on Windows
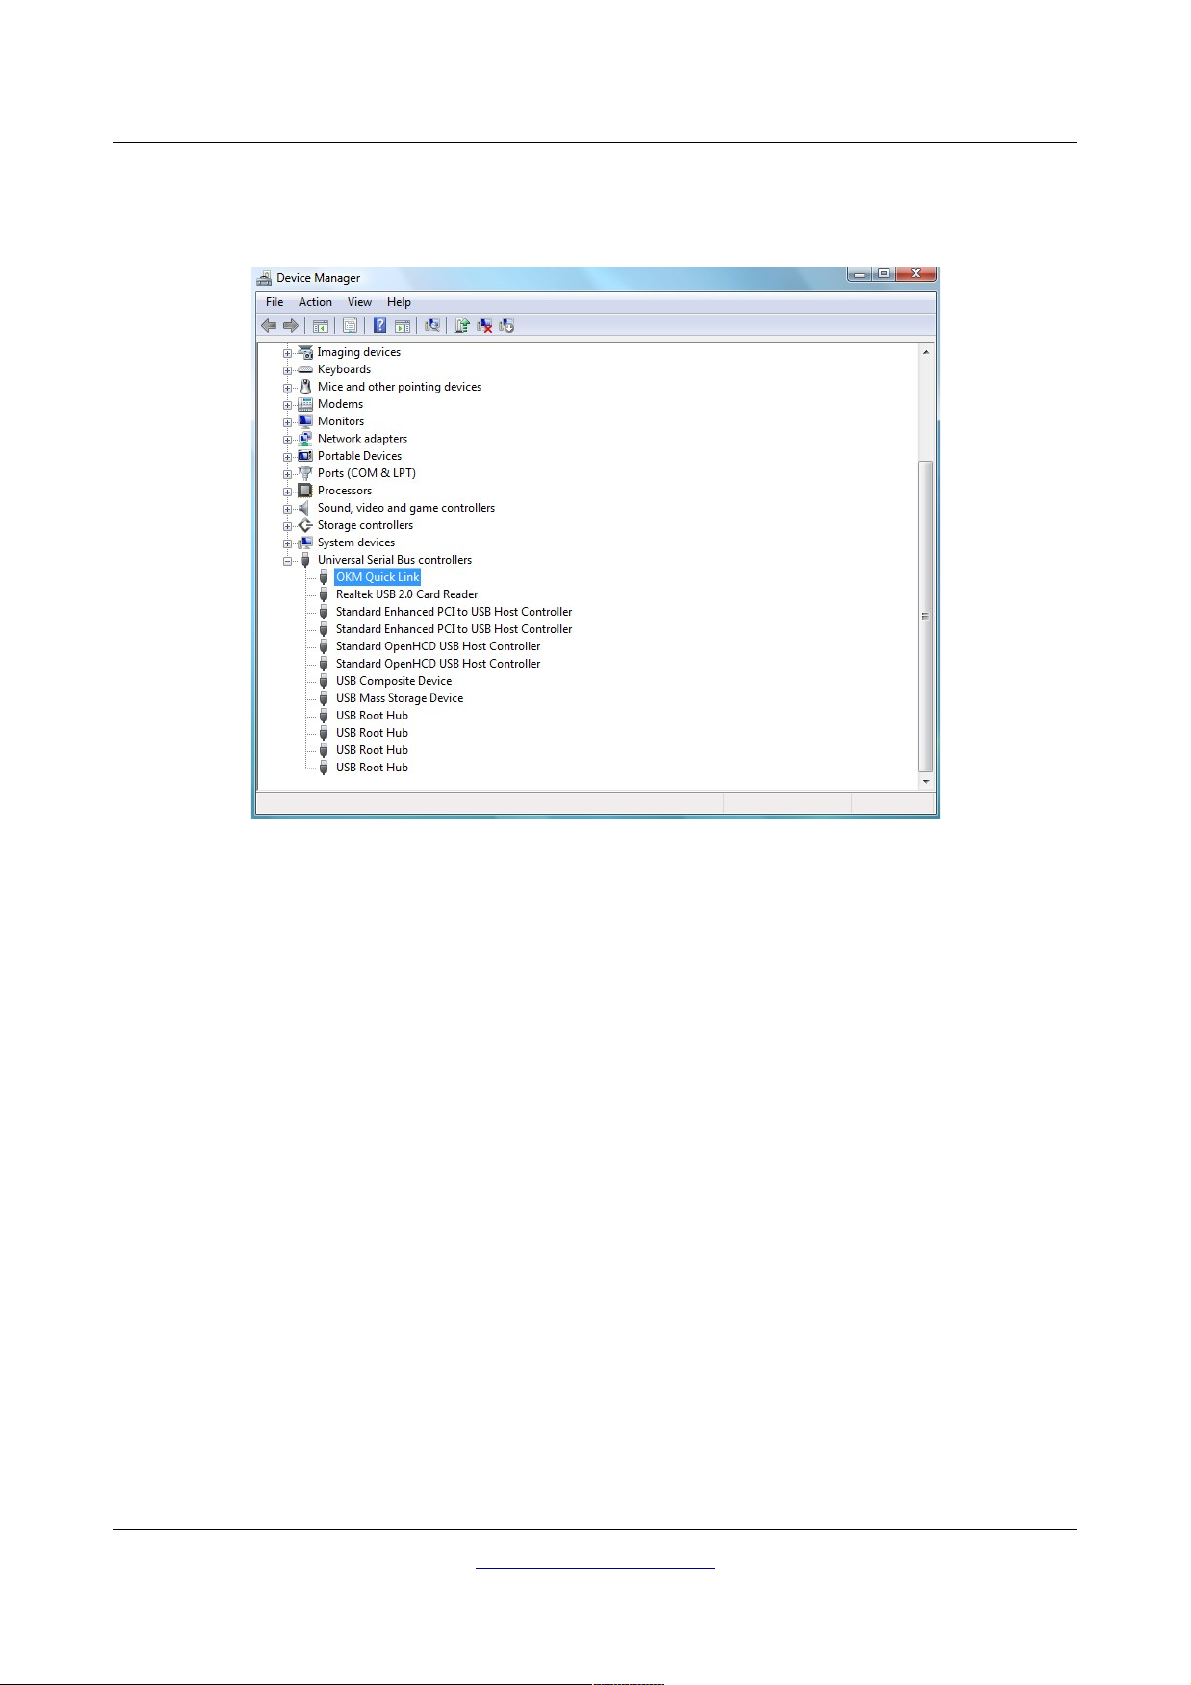
In the address box put the exact location where the drivers have been saved to. Usally this may be your
software CD or a folder on the PC if you downloaded the drivers from our website. It is not necessarily
the exact same location as shown in the screenshot of figure 2.28.
Illustration 2.21: Update USB drivers on Windows Vista, Step 5
After entering the drivers location select Next to start the installation.
Illustration 2.22: Update USB drivers on Windows Vista, Step 6
When the installation has finished the completion screen from figure 2.17 is displayed. Press Close to
close this window and go back to the Device Manager.
OKM Ortungstechnik GmbH
www.okmmetaldetectors.com
Page 25
Install/Uninstall USB drivers on Windows 25
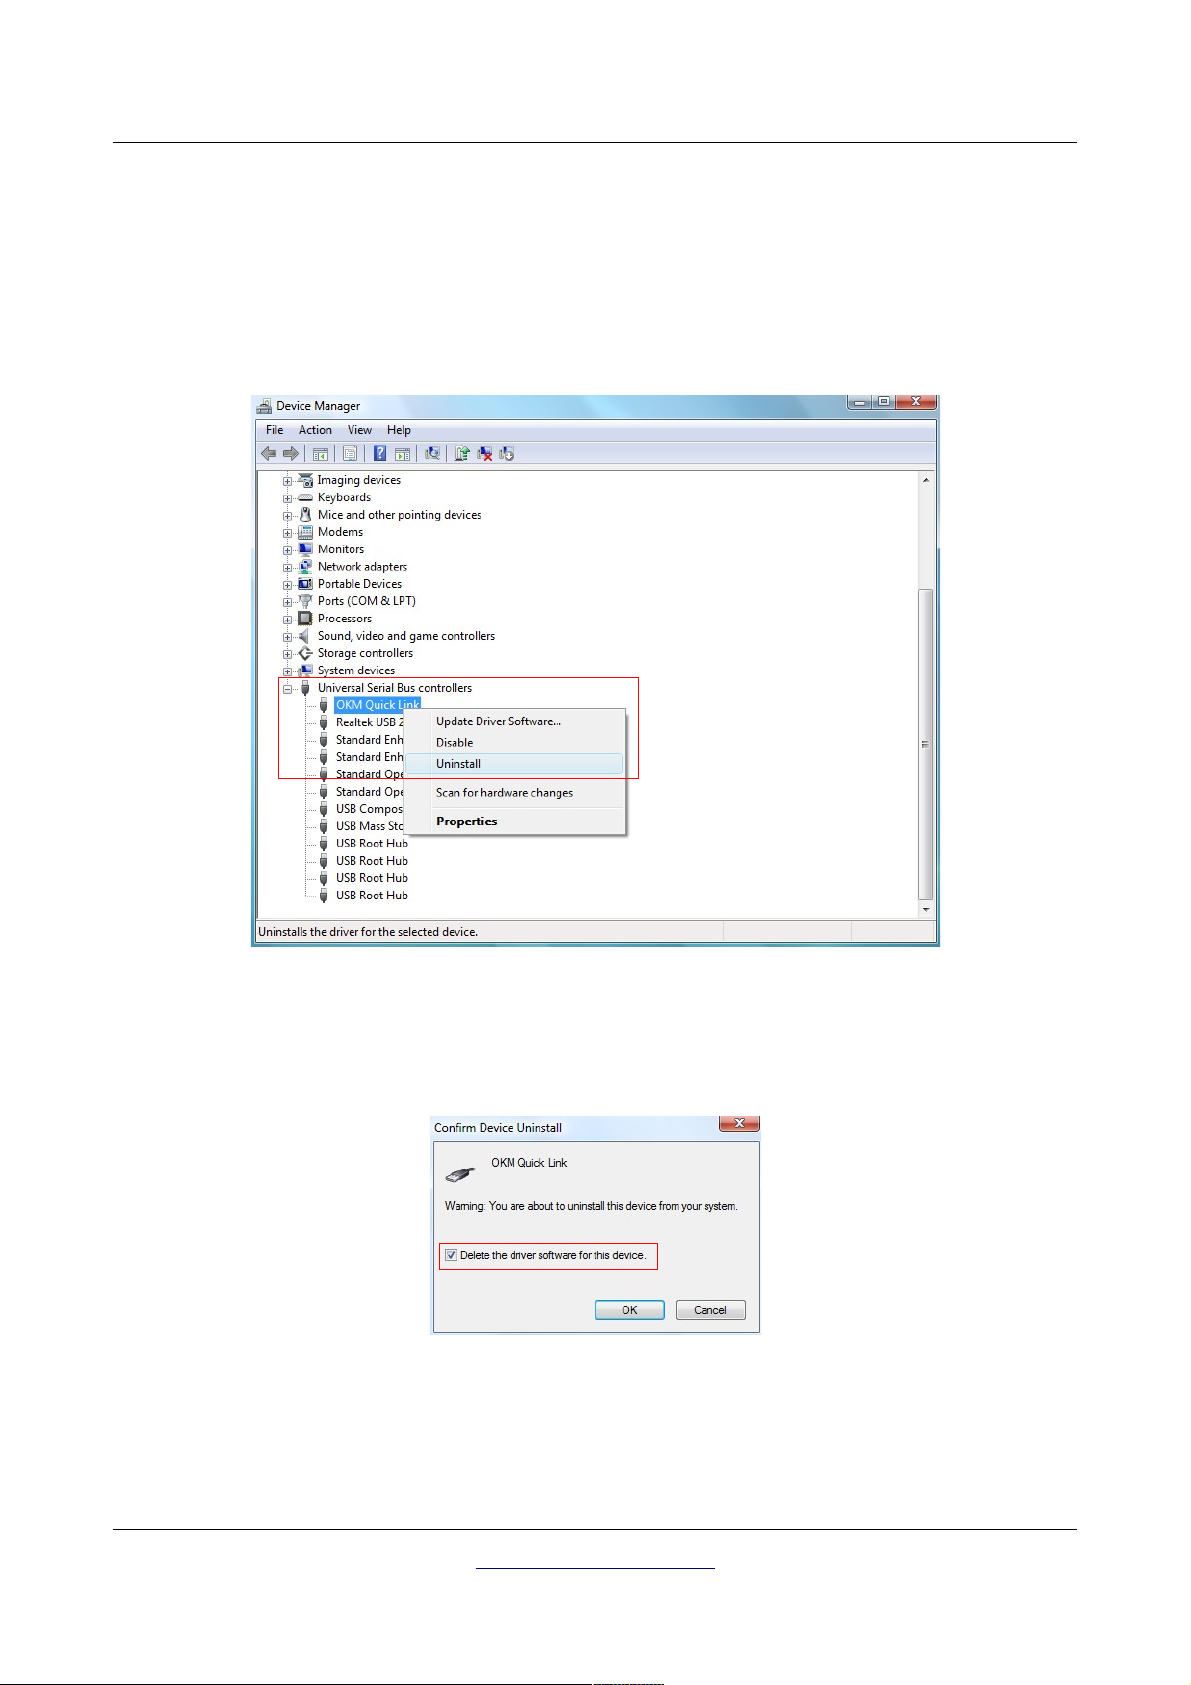
The Device Manager will now show a device under
screenshot below as
OKM Quick Link
.
Universal Serial Bus Controllers
indicated in the
Illustration 2.23: Update USB drivers on Windows Vista, Step 7
The USB drivers are correctly updated/installed now and you can close the Device Manager window.
OKM Ortungstechnik GmbH
www.okmmetaldetectors.com
Page 26
26 Install/Uninstall USB drivers on Windows
2.2.3 Uninstall USB drivers on Windows Vista
If you need to delete the USB drivers from your Windows Vista operating system, please open up the
Device Manager as described in the previous subsection.
Installed devices can be removed using the Device Manager by simply right-clicking on the mouse and
selecting Uninstall. This will delete the associated registry entries for that device only.
Illustration 2.24: Uninstall USB drivers on Windows Vista, Step 1
Windows Vista provides an automatic method to delete driver files via check box
software for this device"
on the uninstall dialog box. Just mark the check box and click OK to remove the
installed USB drivers of your device.
Illustration 2.25: Uninstall USB drivers on Windows Vista, Step 2
OKM Ortungstechnik GmbH
www.okmmetaldetectors.com
"Delete the driver
Page 27
Install/Uninstall USB drivers on Windows 27
2.3 Windows 7
The instructions in this section are only valid for the Windows 7 operating system.
2.3.1 Install USB drivers on Windows 7
The installation of the USB drivers on Windows 7 is a little bit different as known from previous
Windows versions. Connect the device to a spare USB port on your PC and make sure everything is
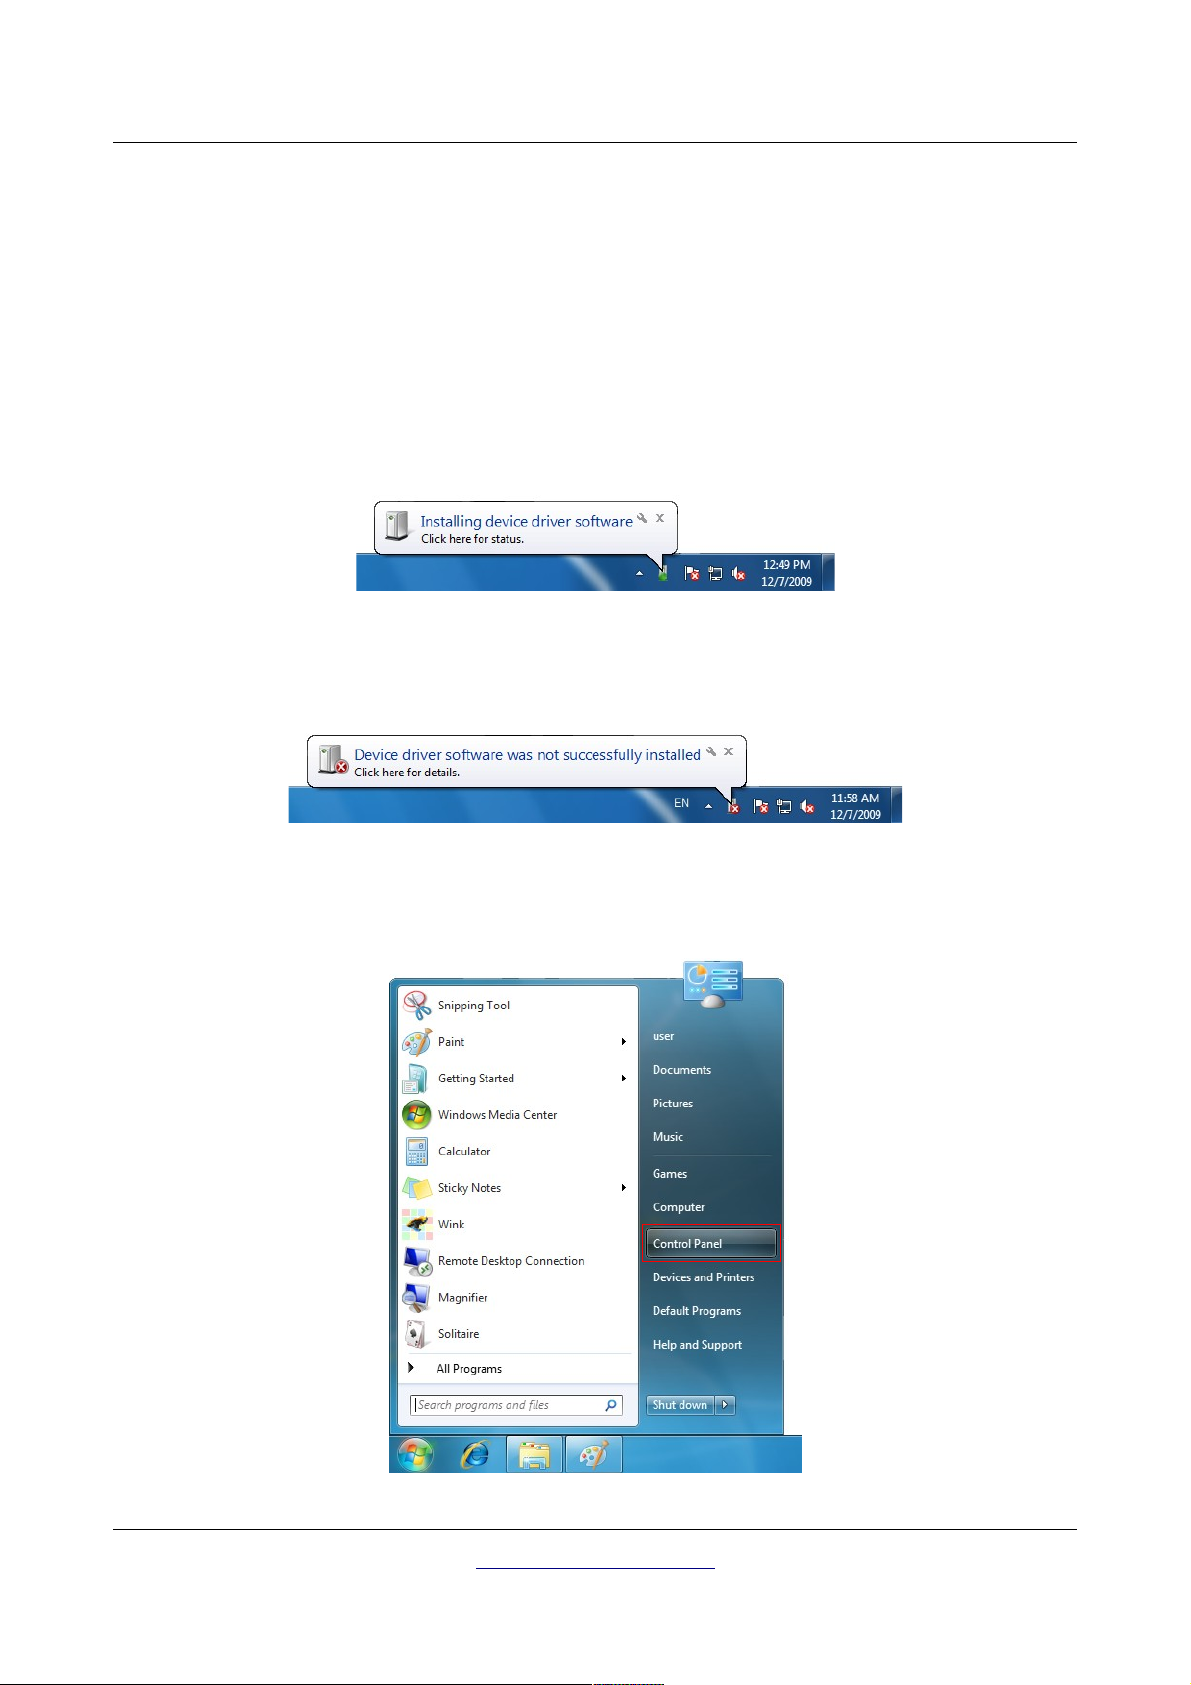
switched on. Windows 7 is now trying to install the latest USB drivers and displays the message from
figure 2.19.
Illustration 2.26: Install USB drivers on Windows 7 - Step 1
Shortly after this Windows 7 will bring up a new message as shown in figure 2.20 to inform you about
the fact that it could not install any drivers for your device successfully.
Illustration 2.27: Install USB drivers on Windows 7 - Step 2
Press the Windows 7 start button to bring up the start menu and select Control Panel as shown in
figure 2.26.
Illustration 2.28: Install USB drivers on Windows 7 - Step 3
OKM Ortungstechnik GmbH
www.okmmetaldetectors.com
Page 28
28 Install/Uninstall USB drivers on Windows
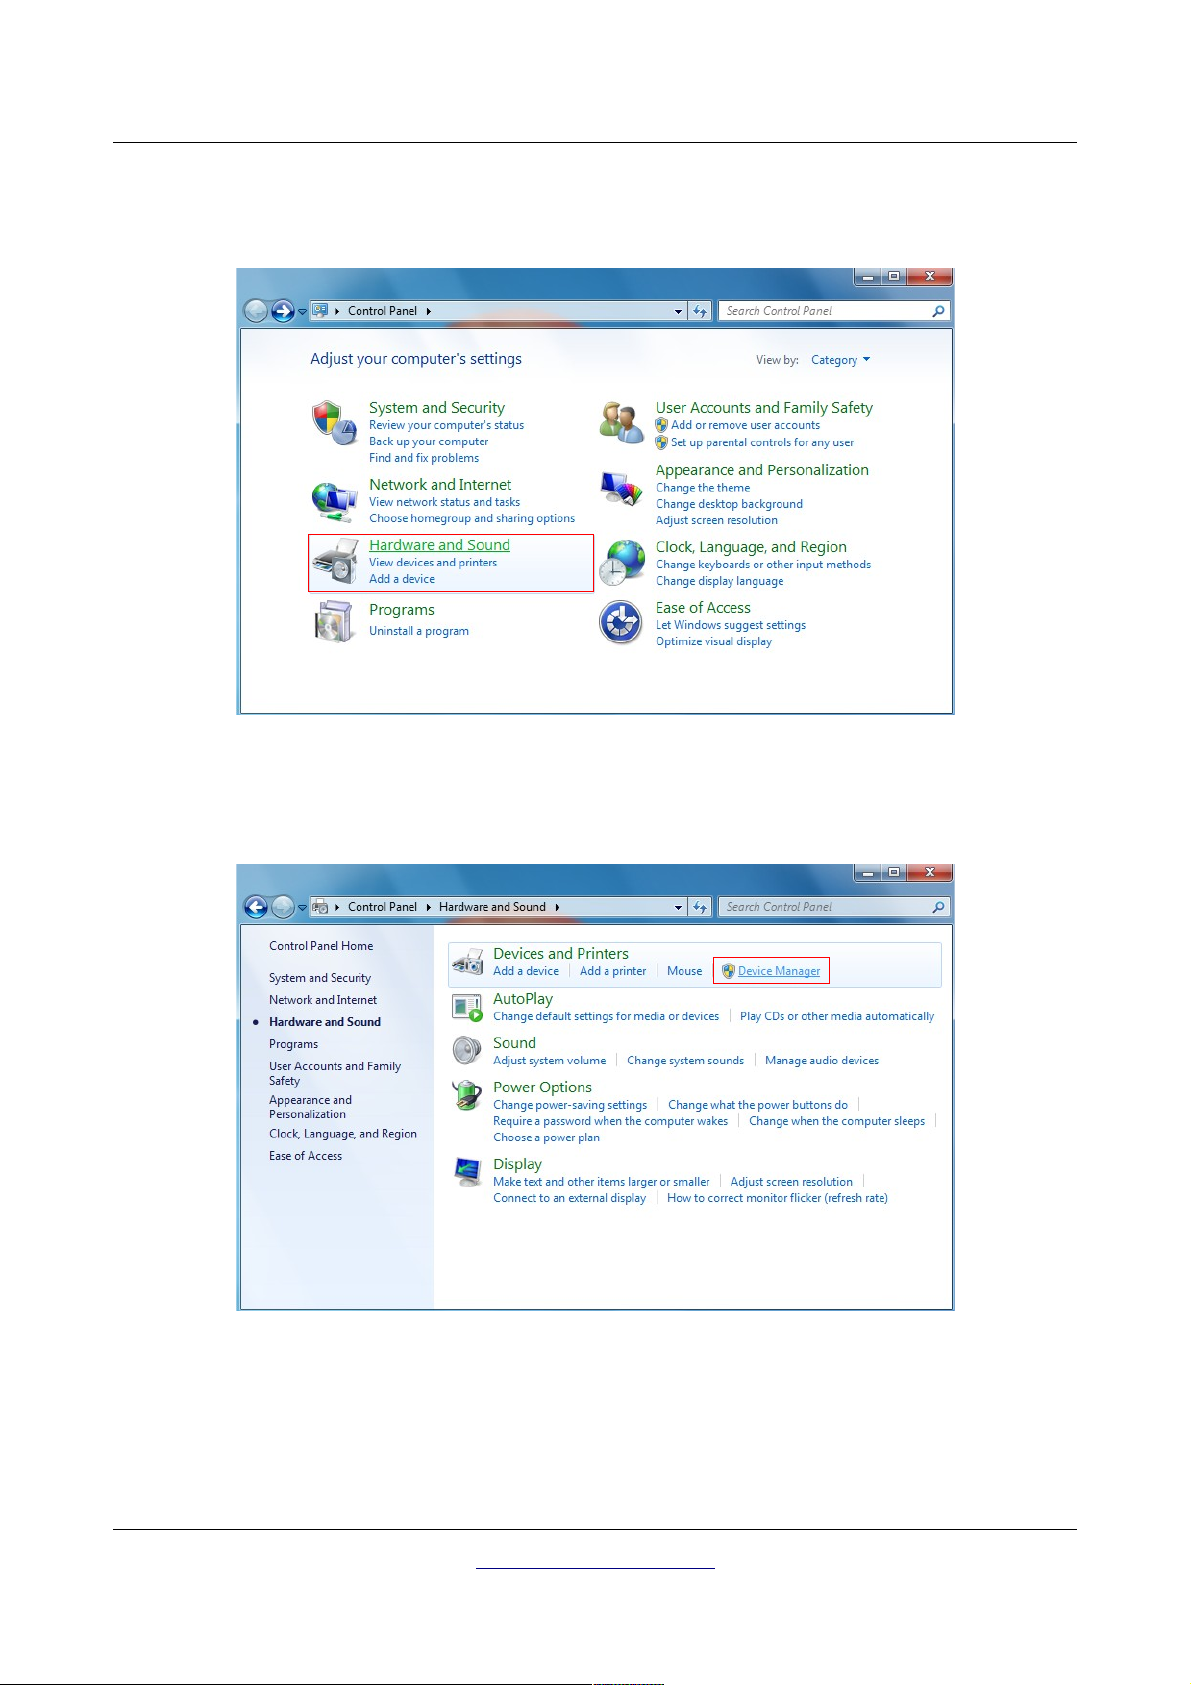
This will open up the control panel window as shown in figure 2.29. From the control panel window you
have to select Hardware and Sound.
Illustration 2.29: Install USB drivers on Windows 7 - Step 4
At the next screen, shown in figure 2.30, select Device Manager which can be found under
Printers
.
Devices and
Illustration 2.30: Install USB drivers on Windows 7 - Step 5
OKM Ortungstechnik GmbH
www.okmmetaldetectors.com
Page 29
Install/Uninstall USB drivers on Windows 29
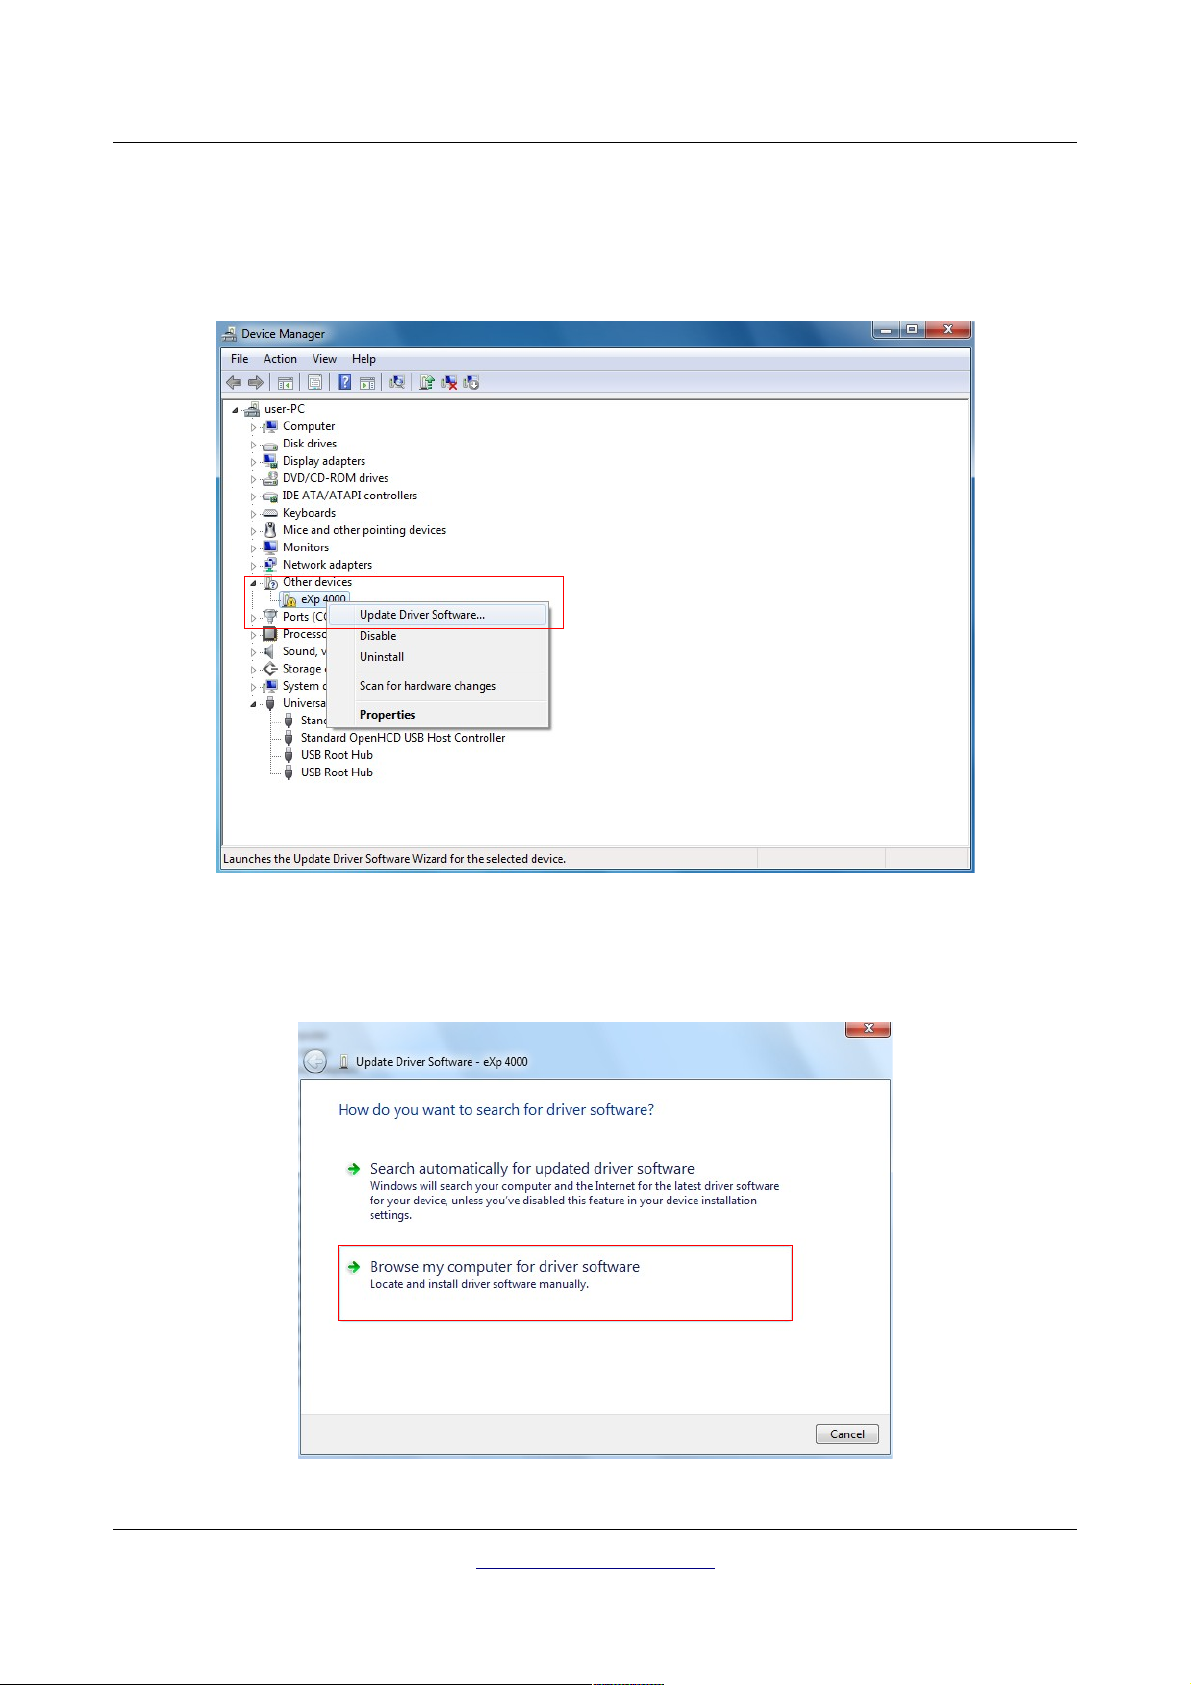
In the Device Manager (see figure 2.27) there will be a device under
Other devices
with a yellow
warning symbol to indicate a problem i.e. no driver installed. The text next to this device will depend on
the device attached. In this example the device was an eXp 4000 device. Right click on the other device
(eXp 4000 in this example) to bring up a menu as shown below.
Illustration 2.31: Install USB drivers on Windows 7 - Step 6
From the displayed menu select Update Driver Software… which then displays the option for an
automatic or manual search. Select the second option to browse manually.
Illustration 2.32: Install USB drivers on Windows 7 - Step 7
OKM Ortungstechnik GmbH
www.okmmetaldetectors.com
Page 30
30 Install/Uninstall USB drivers on Windows
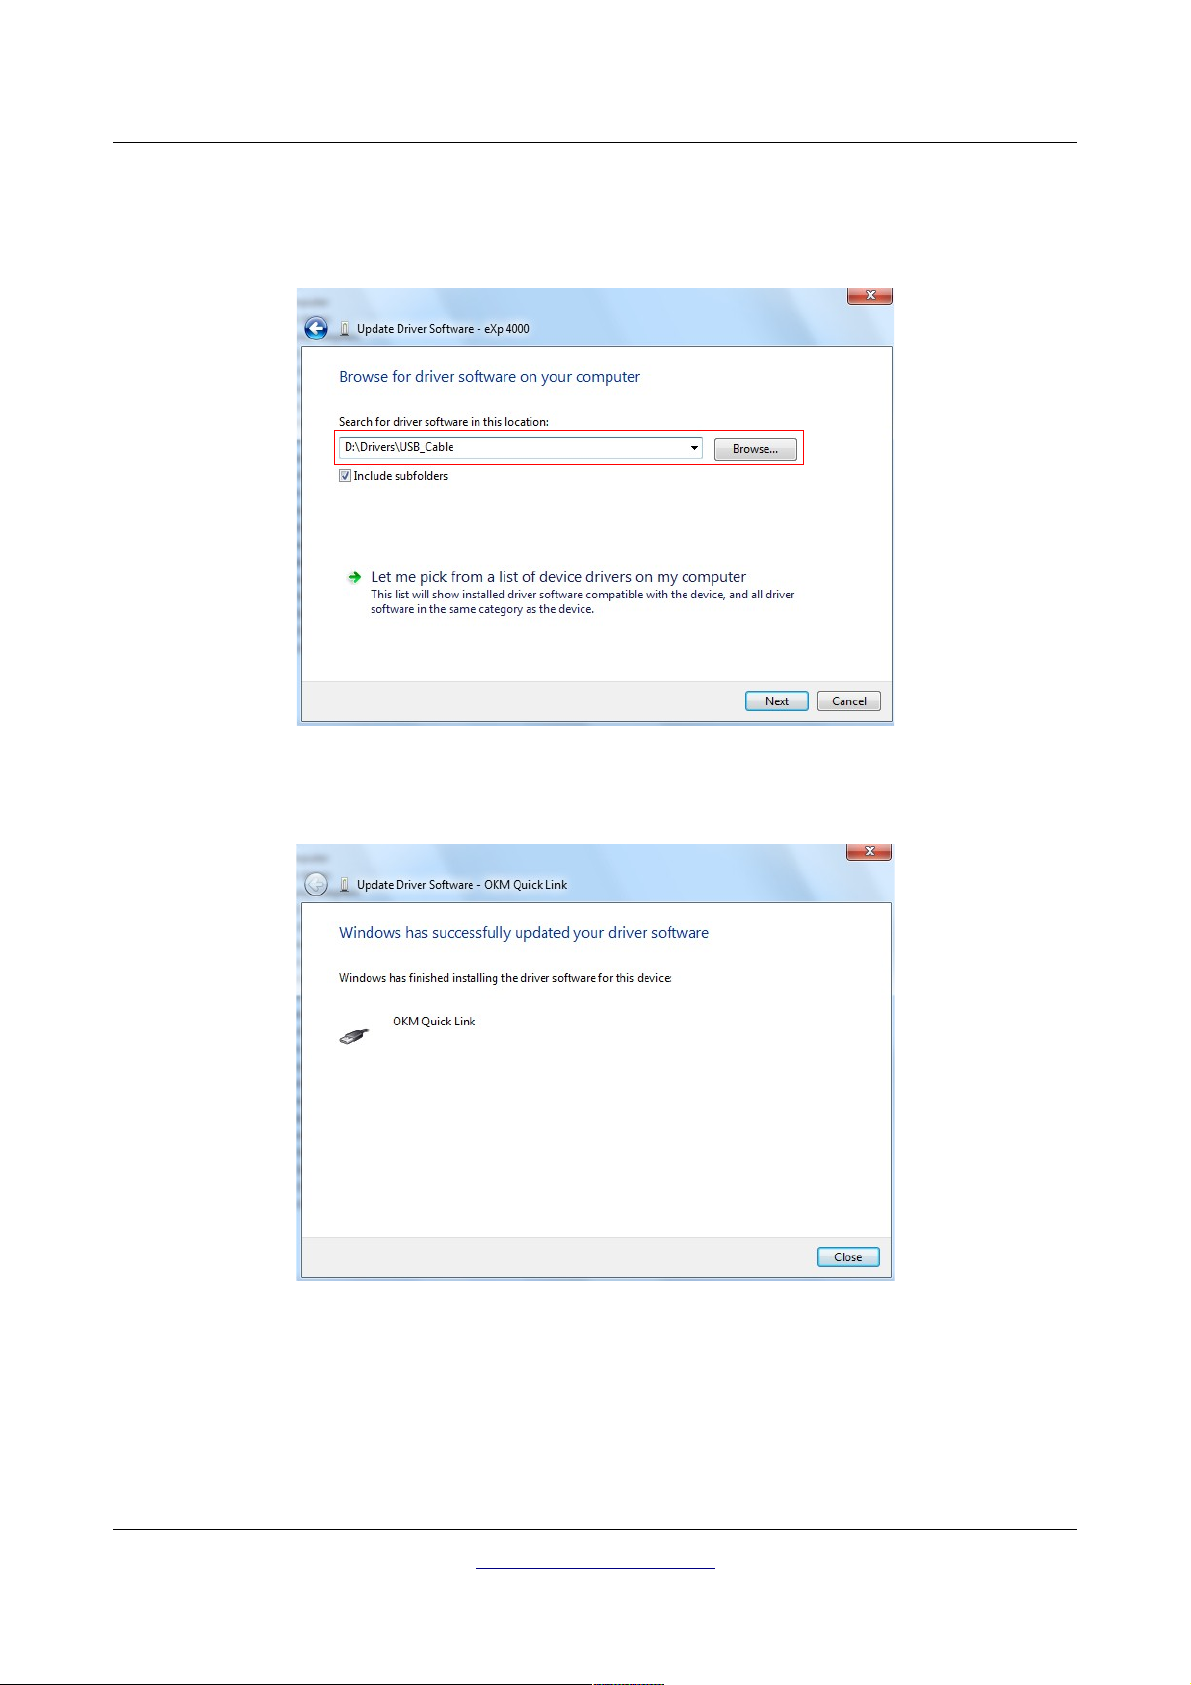
In the address box put the exact location where the drivers have been saved to. Usally this may be your
software CD or a folder on the PC if you downloaded the drivers from our website. It is not necessarily
the exact same location as shown in the screenshot of figure 2.31.
Illustration 2.33: Install USB drivers on Windows 7 - Step 8
After entering the drivers location select Next to start the installation.
Illustration 2.34: Install USB drivers on Windows 7 - Step 9
When the installation has finished the completion screen from figure 2.32 is displayed. Press Close to
close this window and go back to the Device Manager.
OKM Ortungstechnik GmbH
www.okmmetaldetectors.com
Page 31
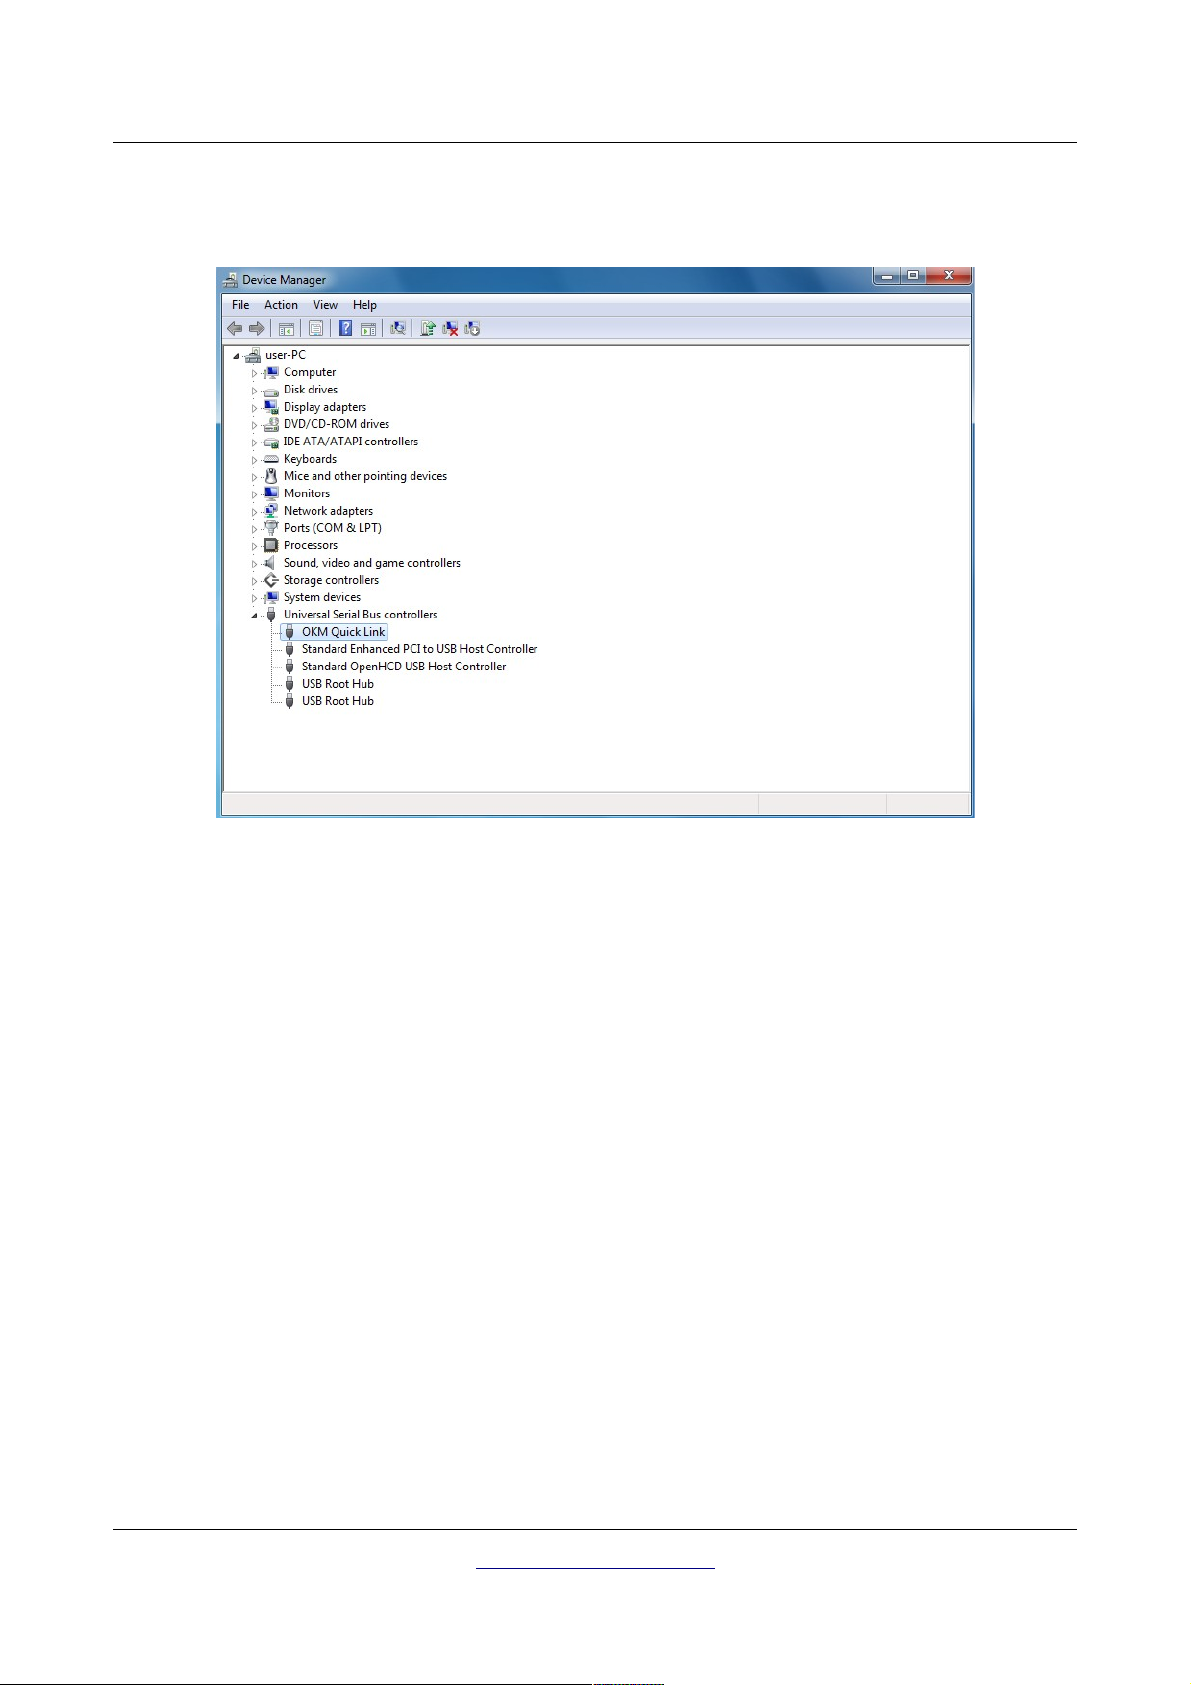
Install/Uninstall USB drivers on Windows 31
The Device Manager will now show a device under
screenshot below as
OKM Quick Link
.
Universal Serial Bus Controllers
indicated in the
Illustration 2.35: Install USB drivers on Windows 7 - Step 10
The USB drivers are correctly installed now and you can close the Device Manager window.
OKM Ortungstechnik GmbH
www.okmmetaldetectors.com
Page 32
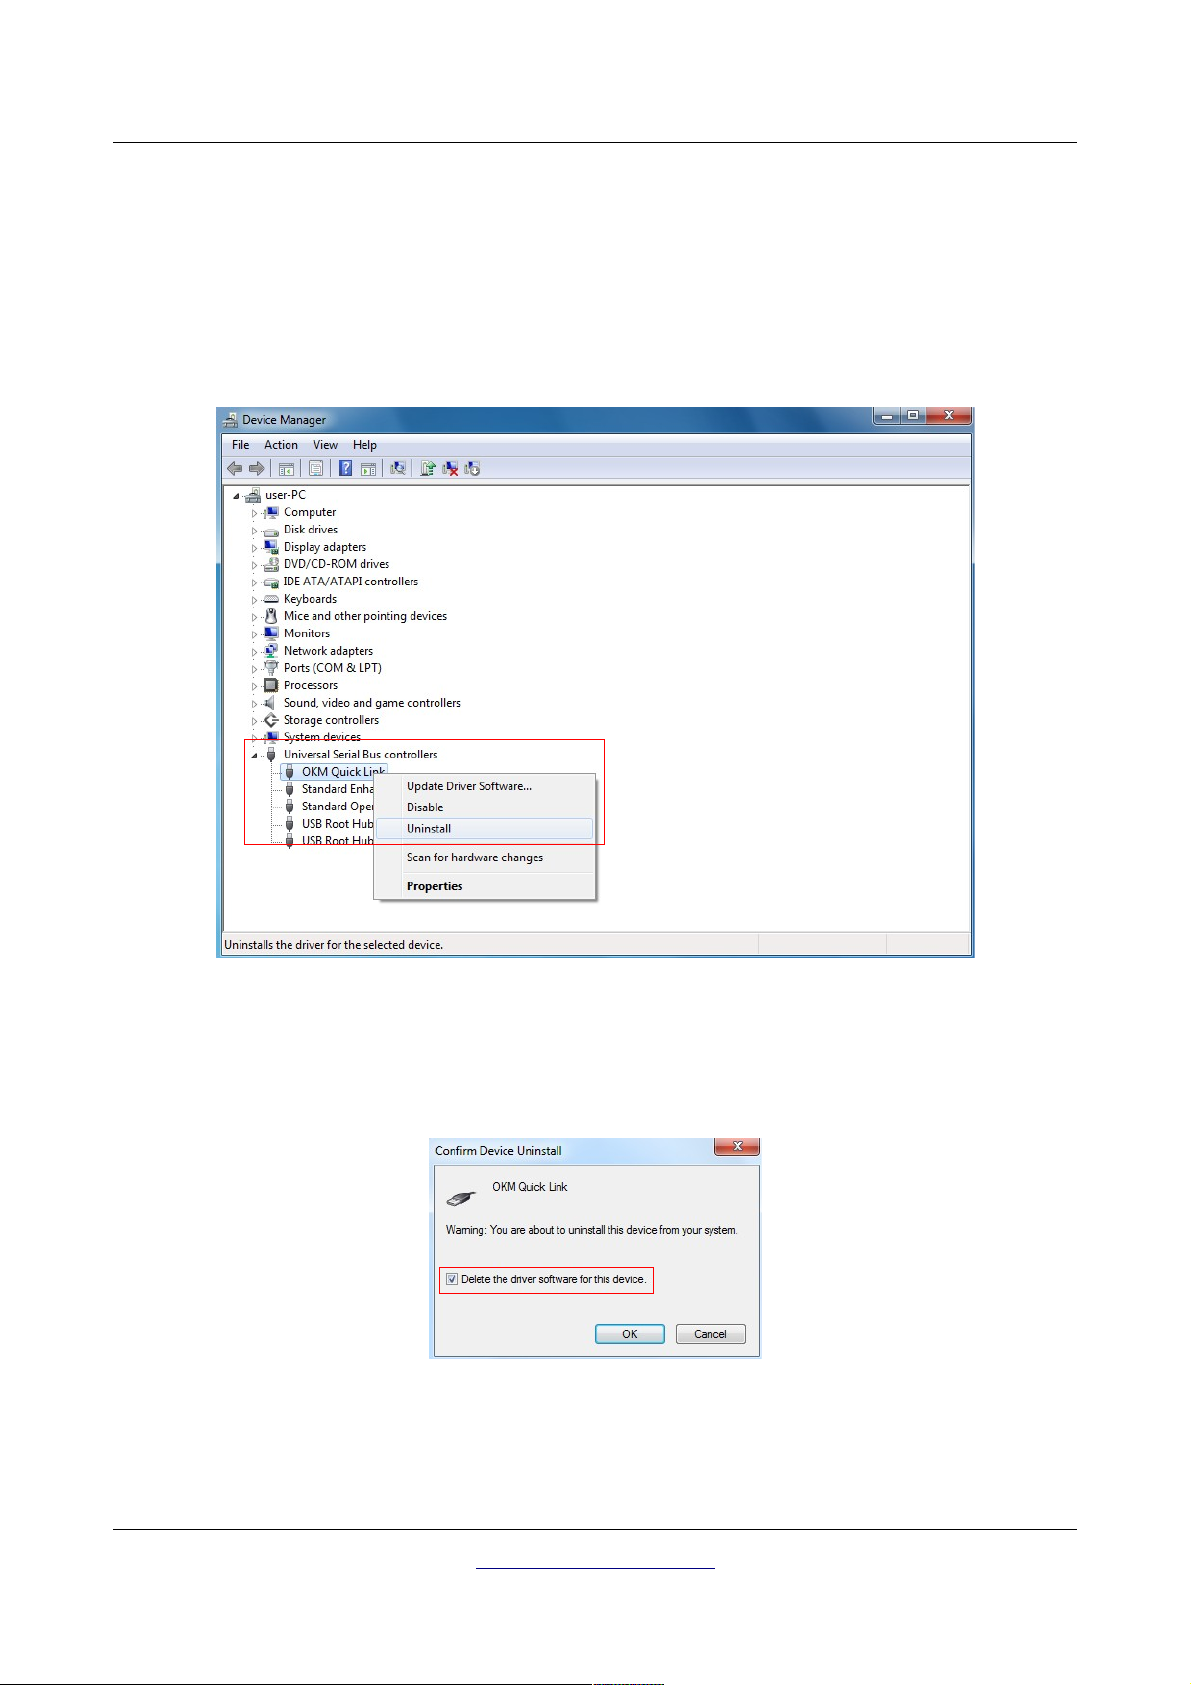
32 Install/Uninstall USB drivers on Windows
2.3.2 Uninstall USB drivers on Windows 7
If you need to delete the USB drivers from your Windows 7 operating system, please open up the Device
Manager as described in the previous subsection.
Installed devices can be removed using the Device Manager by simply right-clicking on the mouse and
selecting Uninstall. This will delete the associated registry entries for that device only.
Illustration 2.36: Uninstall USB drivers on Windows 7 - Step 1
Windows 7 provides an automatic method to delete driver files via check box
for this device"
on the uninstall dialog box. Just mark the check box and click OK to remove the installed
USB drivers of your device.
Illustration 2.37: Uninstall USB drivers on Windows 7 - Step 2
OKM Ortungstechnik GmbH
www.okmmetaldetectors.com
"Delete the driver software
Page 33

3 Technical Specifications
CHAPTER 3
Technical Specifications
Page 34

34 Technical Specifications
The following technical indications are medial values. During operation small variations are quite
possible.
3.1 Control Unit
Dimensions (H x W x D) .............................................................................................. 430 x 150 x 260 mm
Weight ........................................................................................................................................ about 3 kg
Voltage ......................................................................................................... 9.6 - 14.4 VDC, 22 W maximal
Safety Class ......................................................................................................................................... IP40
Operating Time (full charged Power Pack, 25 °C) ................................................................. about 3 hours
Operating Temperature ........................................................................................................... 0 °C – 40 °C
Display ..................................... 300 mcd Background lighting, 6.4" Diagonale, 640 x 480 Pixel TFT, Color
Computer .............................................................................. 800 MHz Processor, INTEL i586- compatible
Working Memory (RAM) ................................................................................................................. 256 MB
Data Memory .................................................................................................................................. 256 MB
Feedback ............................................................................................................................. accustic, visual
Storage temperature ............................................................................................................ -20 °C – 60 °C
Air humidity ............................................................................................................................... 5 % – 75 %
Waterproof ............................................................................................................................................. No
Sensor technology ...................................................................................................................... TCFX-01-A
3.2 Data Transmission
Technology ........................................................................................................................................... USB
Maximal Data Transmission Rate ............................................................................................ 19200 Baud
3.3 Computer, Minimum Requirements
The computer is not part of the scope of delivery. The indicated values should help you for a correct
selection of a suitable computer for analysis of your measured results.
Processor ........................................................................................................................ minimum 1.5 GHz
CD-ROM Drive ......................................................................................................................... minimum 4x
Port (Data Transmission) ..................................................................................................................... USB
Free Memory .................................................................................................................... minimum 50 MB
Working Memory (RAM) ................................................................................................. minimum 256 MB
Graphic Card ................................................................................. minimum 128 MB, OpenGL-compatible
Operating System ........................................................................ Windows XP, Windows Vista, Windows 7
OKM Ortungstechnik GmbH
www.okmmetaldetectors.com
Page 35

4 Scope of Delivery
CHAPTER 4
Scope of Delivery
Page 36

36 Scope of Delivery
In the following section you can find all standard equipment. The scope of delivery can be different in
some circumstances because of some optional accessories which should not be included in the basic
equipment.
Basic Gold Edition Professional
Control unit incl. carrying strap 1 1 1
Headphones 1 1 1
Telescopic rod assembly for GPR antenna 1 1 1
Power Pack with charger and travel adapter 1 2 1
GPR antenna 25 cm 1 1 1
Joystick 1 1 1
User's manual 1 1 1
Carrying case 1 1 2
3D Software (Visualizer 3D) 1 1 1
USB cable 1 1 1
Super sensor - 1 1
Antenna for metal discrimination (DDV
- 1 1
system)
GPR antenna 50 cm - - 1
GPR antenna 75 cm - - 1
GPR antenna 100 cm - - 1
Antenna for tunnel detection - - 1
FS-Thermoscan - - 1
Table 1: Scope of delivery
OKM Ortungstechnik GmbH
www.okmmetaldetectors.com
Page 37

5 Assembly
CHAPTER 5
Assembly
This section explains how to assemble the eXp 4000 and to prepare the unit for operation.
Page 38
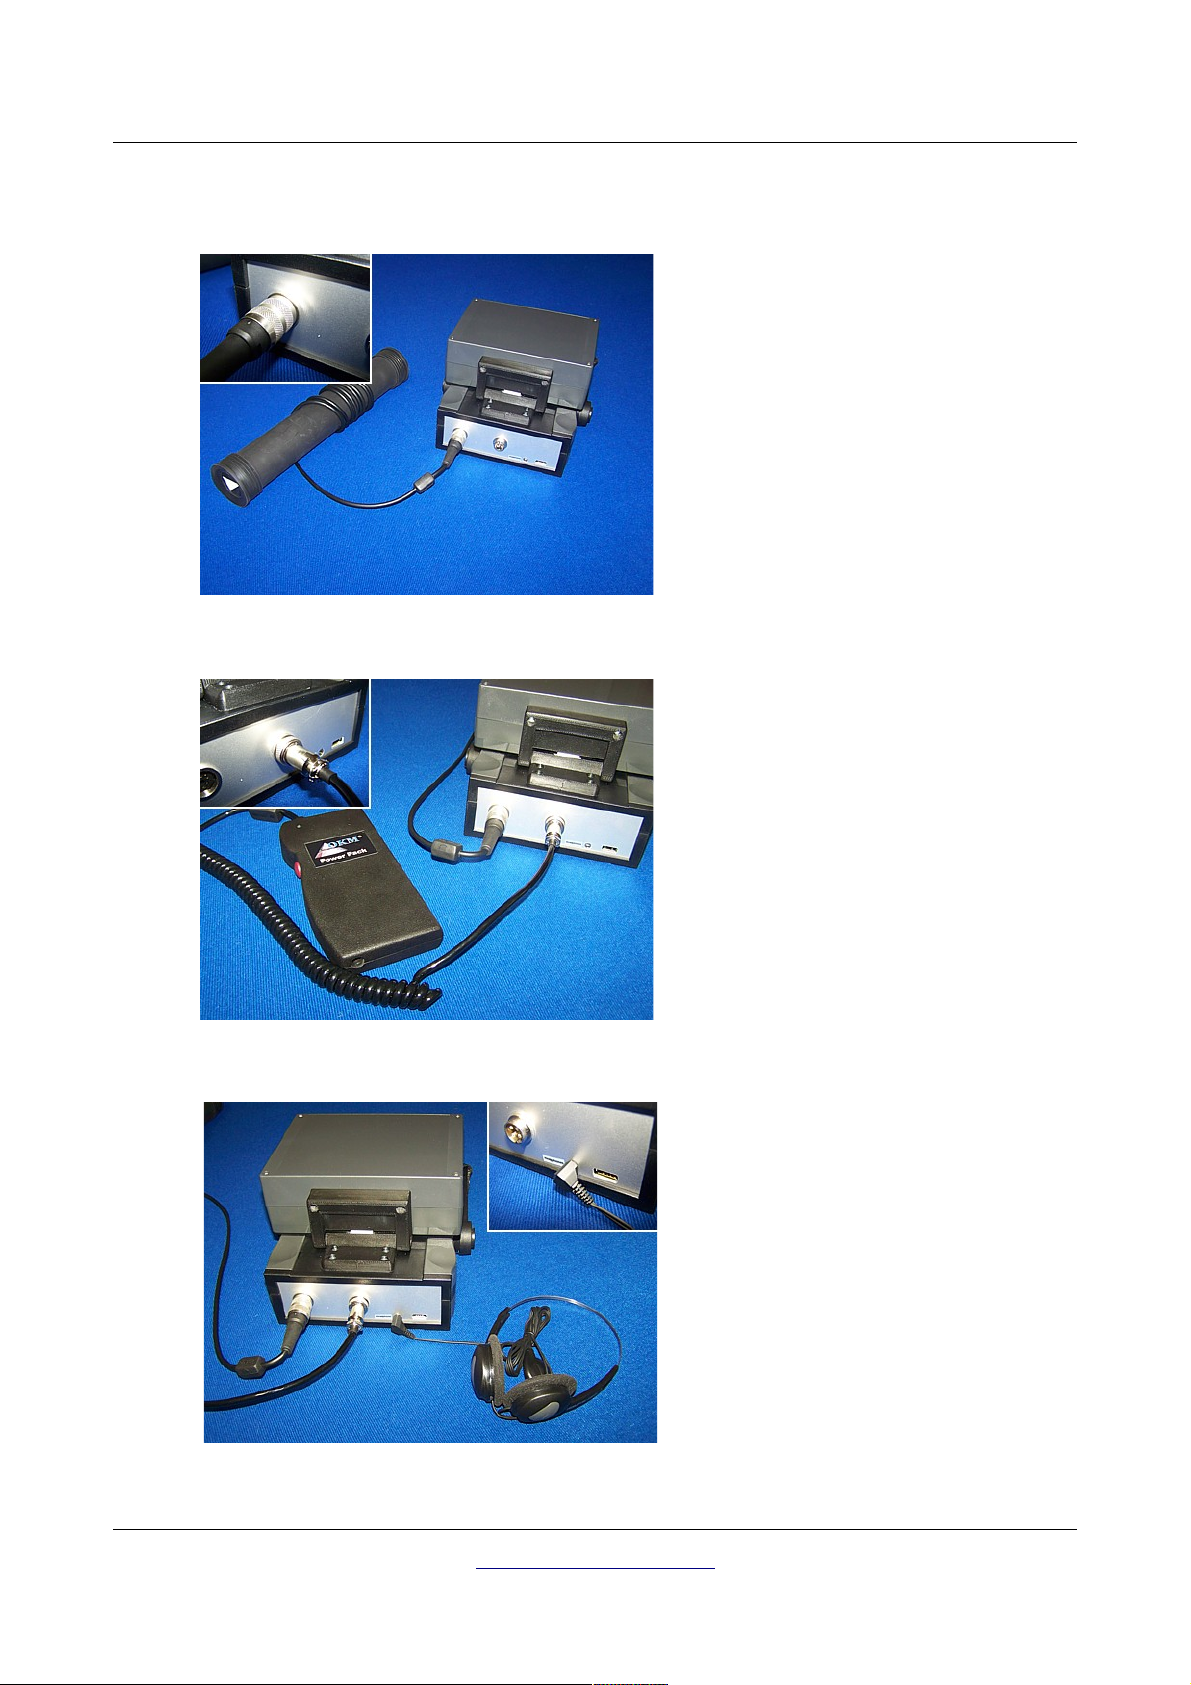
38 Assembly
Before you can use the device eXp 4000 for a field measurement you should do some preparations.
Please make notes to the following steps.
Ste p 1
Connect the probe which you would like to
use to the control unit. Regardless of which
probe you are using, you will always use the
same plug for each probe.
You can only use one probe at a time for one
measurement.
Illustration 5.1: Connection of probe
Ste p 2
Now you can connect the Power Pack to the
control unit. Af ter powering on the Power
Pack you can put it in your pocket.
Now you should power on the device by
using the Power On/Off button.
Illustration 5.2: Connection of Power Pack
Ste p 3
The headphones are necessary to hear the
acoustic output of the dev ice.
But you are also able to scan the field
without connecting the headphones.
Illustration 5.3: Connection of headphones
OKM Ortungstechnik GmbH
www.okmmetaldetectors.com
Page 39
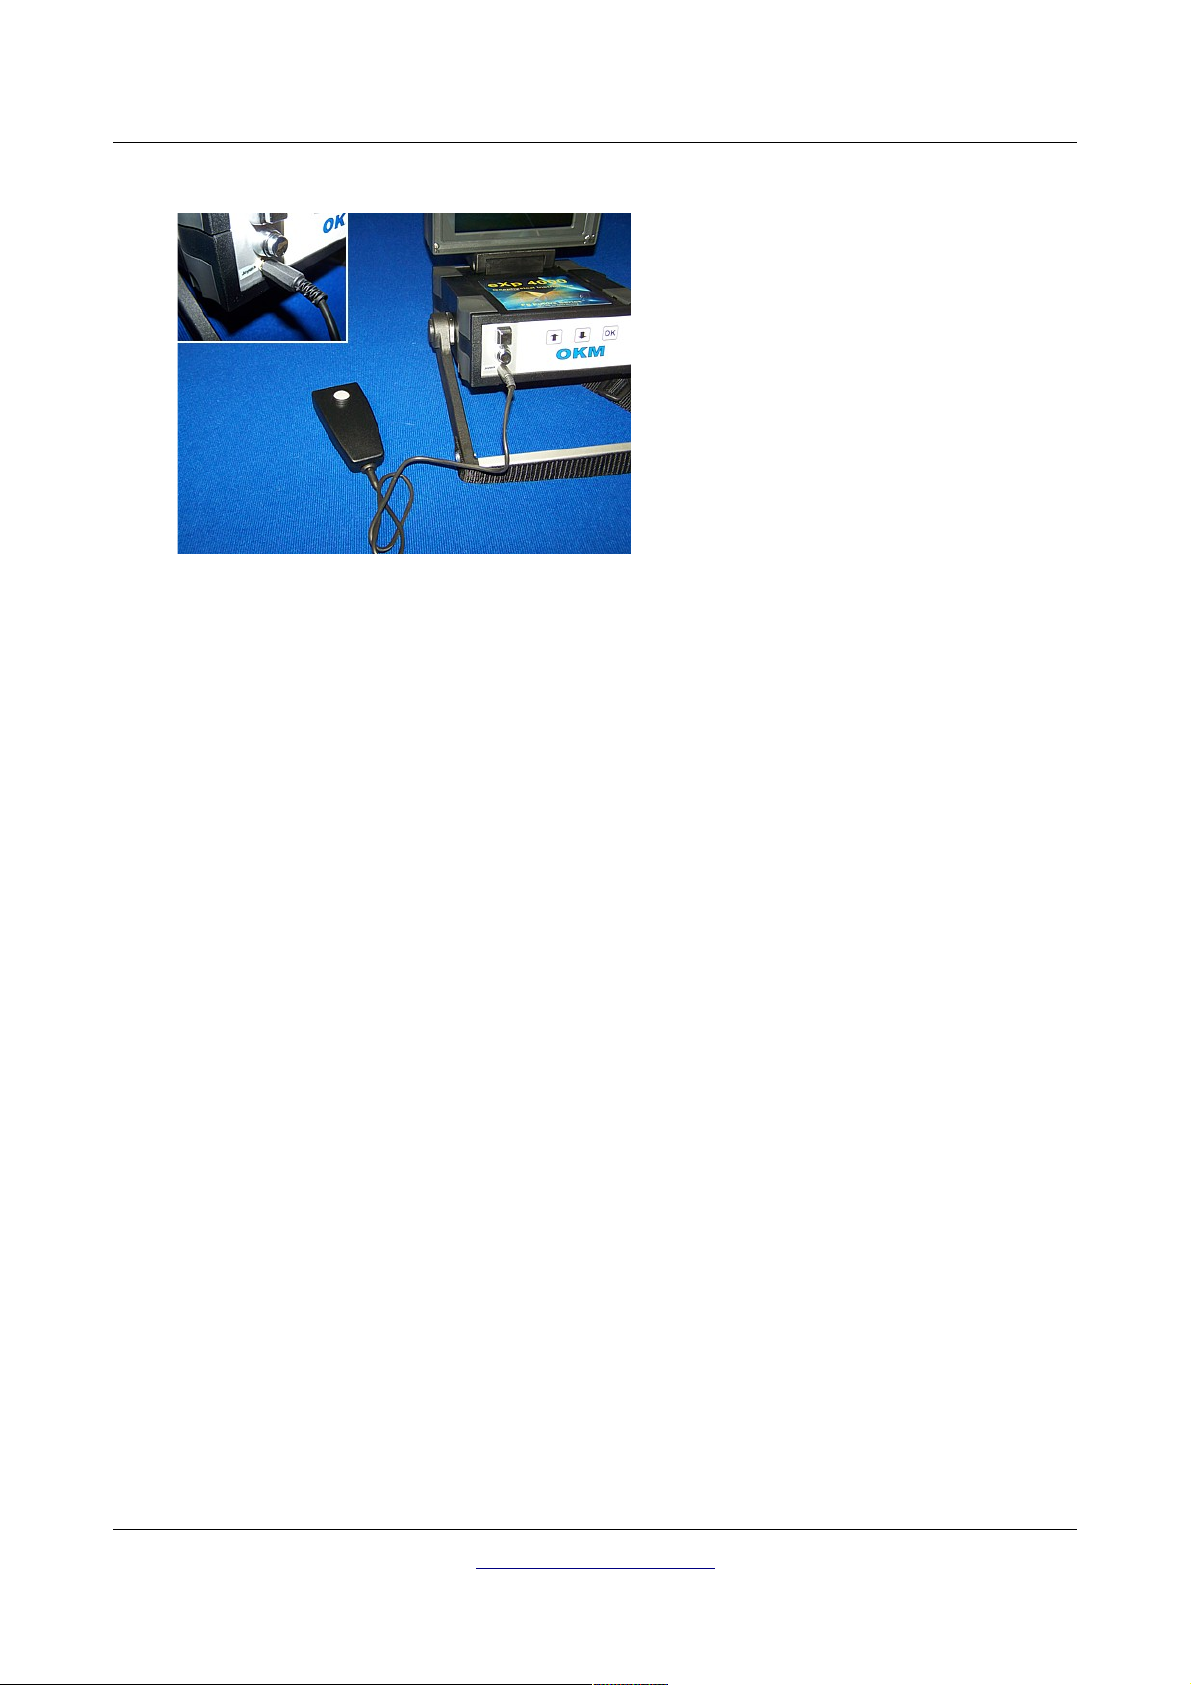
Assembly 39
Ste p 4
If you are going to be conducting a scan in
“Manual” mode, plug in the joystick to the control
unit.
Illustration 5.4: Connection of joystick
OKM Ortungstechnik GmbH
www.okmmetaldetectors.com
Page 40

Page 41

6 Control Elements
CHAPTER 6
Control Elements
In this section you will learn more about the fundamental use of all control elements for the eXp 4000
measuring instrument. All connections, inputs and outputs are explained in detail.
Page 42
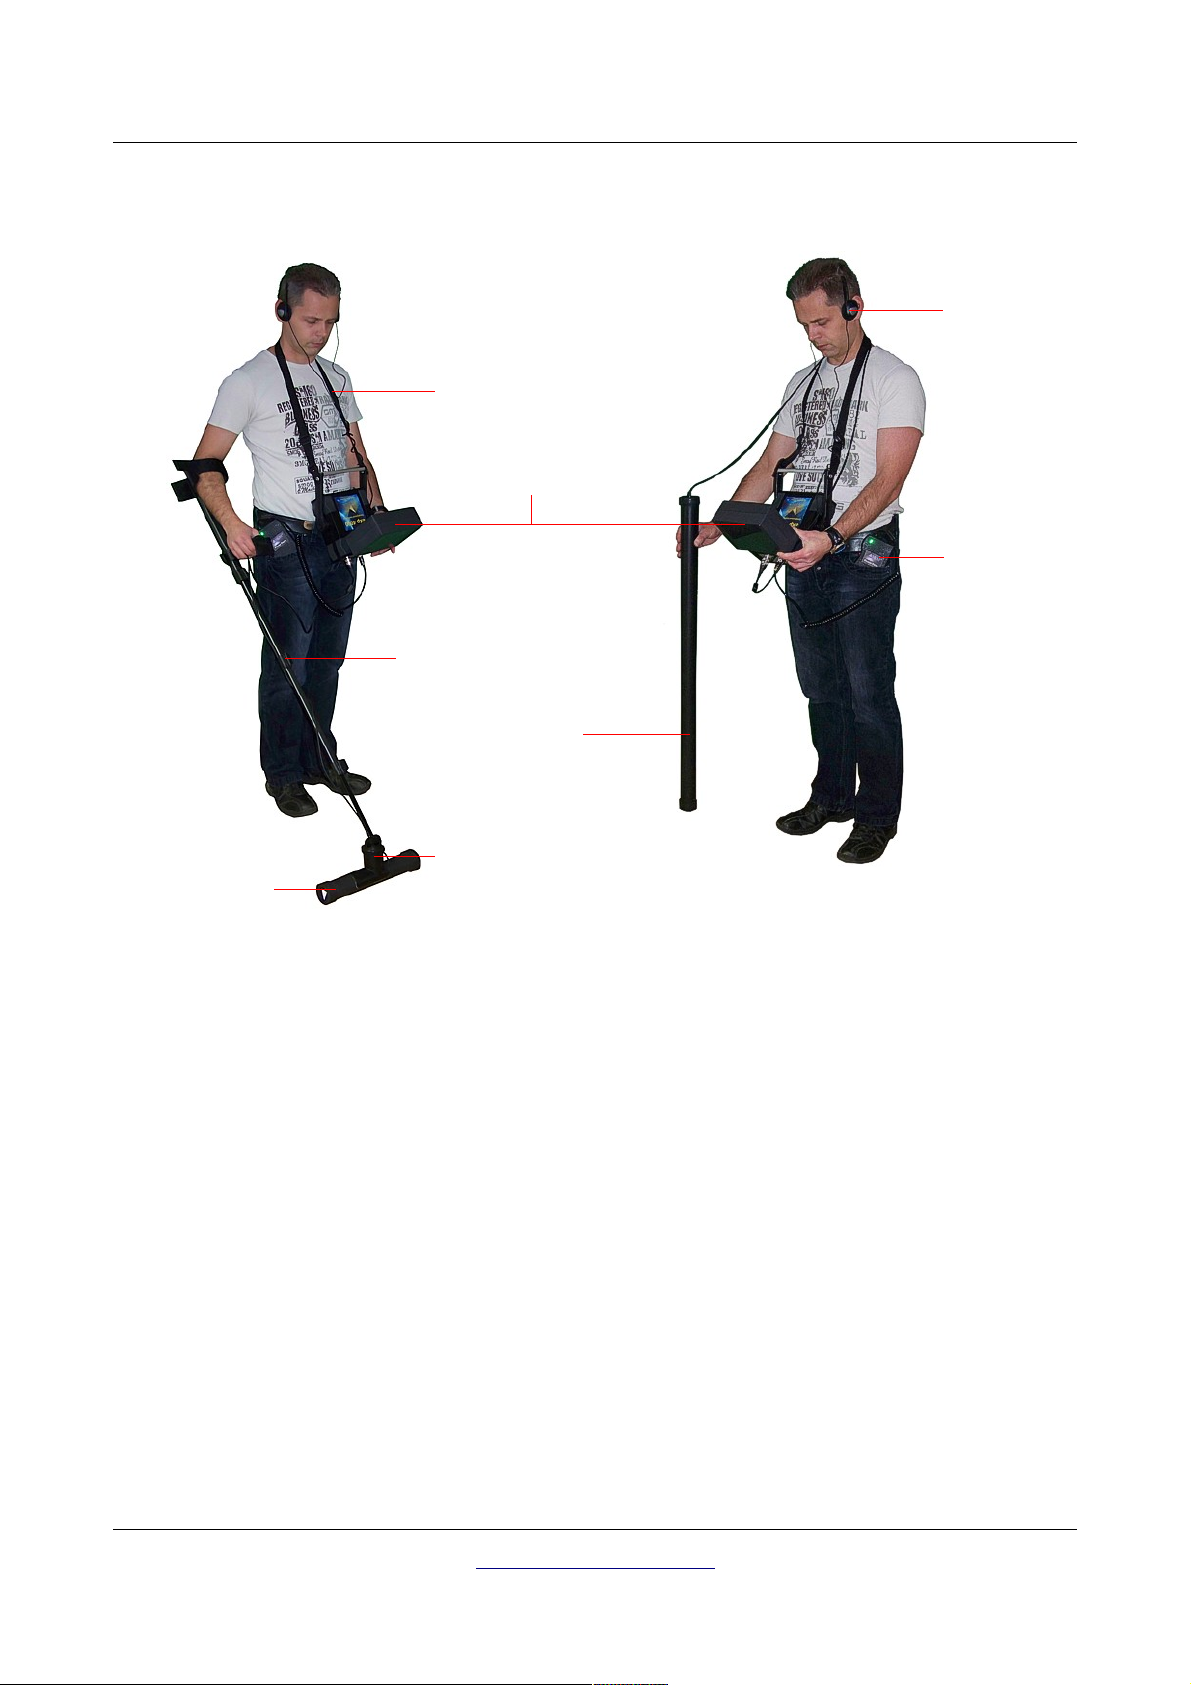
42 Control Elements
Headphones
Carrying strap
Control unit
External
power supply
Telescopic rod
assembly
Supersensor
T-mount
GPR probe 25 cm
Illustration 6.1: Control unit with power supply and probe
Via the display you can see the navigation menu and all recorded scans.
The horizontal antennas like the 25 cm GPR probe have to be connected via the T-mount to the
Telescopic rod assembly. Vertical probes like the Super Sensor can simply be held in your hand.
OKM Ortungstechnik GmbH
www.okmmetaldetectors.com
Page 43
Control Elements 43
6.1 Control Unit
The control unit is the processing center of the eXp 4000. Via the control unit, various functions can be
selected, all measured values can be recorded and stored.
6.1.1 Front View
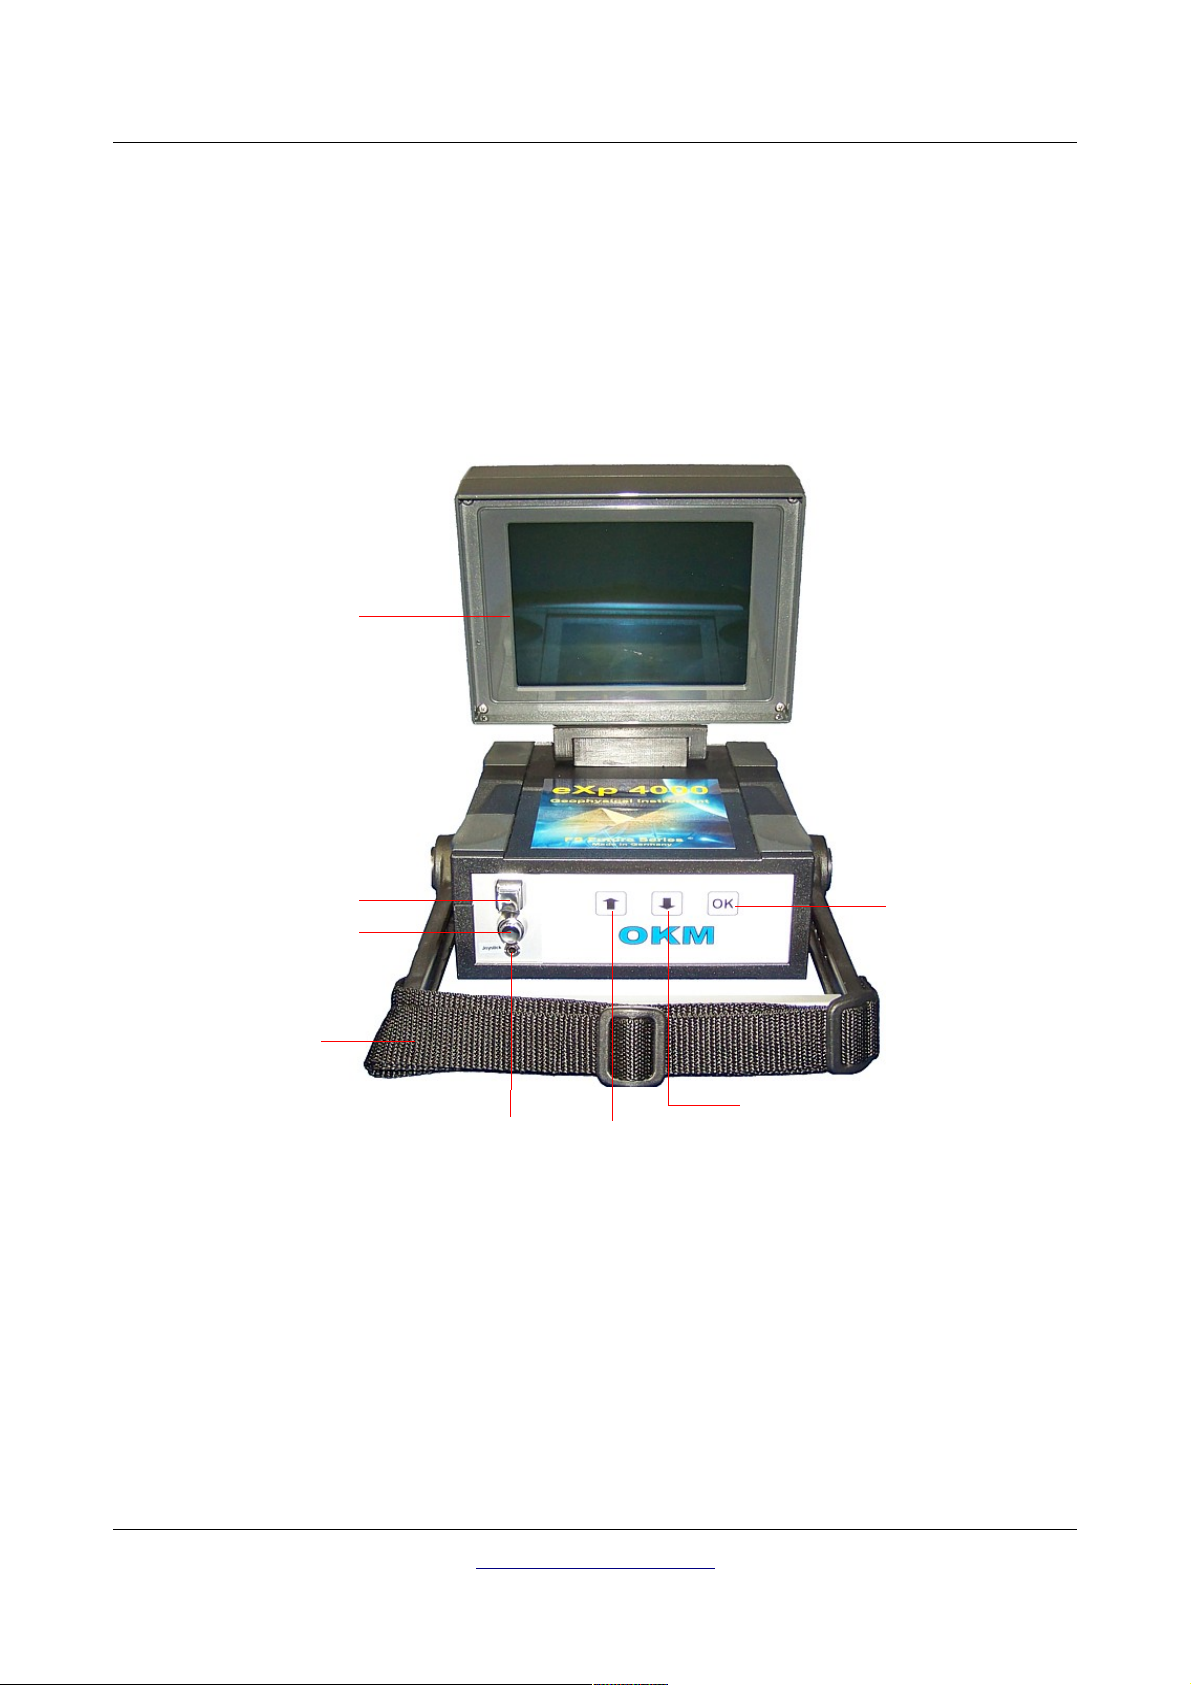
Figure 6.2 shows the front side of the control unit with its control elements.
Display
Power switch
Start button
Carrying strap
Connector
for joyst ick
Illustration 6.2: Control unit, front view
Prev ious
operating mode
Next operating mode
Activate
operating mode
The Power switch is used to power on the device. Prior to operating your unit, connect the external
Power Pack and turn it on.
The Start button is used to start a scan. When in "Manual" mode, it is also a secondary trigger to record
a measurement.
The joystick Connector is used to connect the joystick to the device. The joystick fullfils the same
functions as the Start button, but is more comfortable and can facilitate the measurement procedure.
OKM Ortungstechnik GmbH
www.okmmetaldetectors.com
Page 44
44 Control Elements
With the keys and you can select the operating mode. To confirm your selection you have to press
the OK button.
6.1.2 Rear View
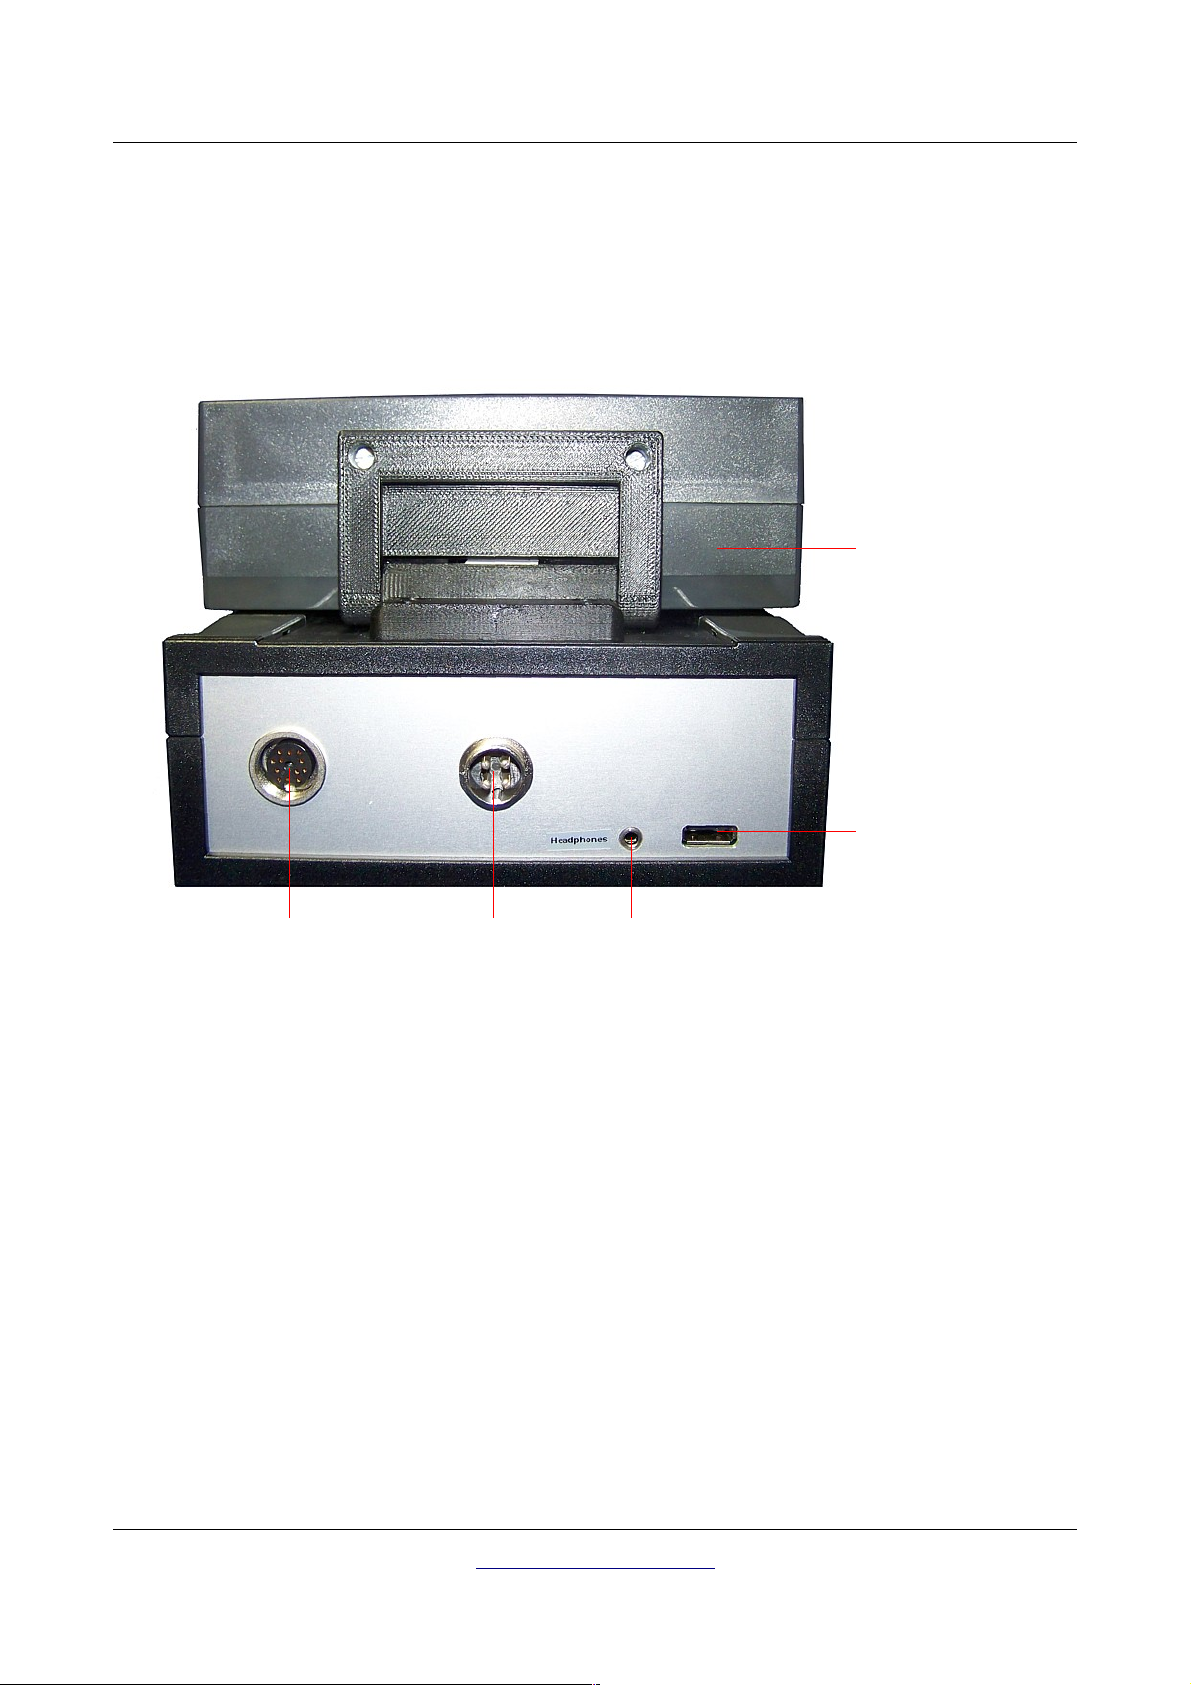
Figure 6.3 shows the rear view of the control unit and its connections.
Display
Connector for
USB cable
Connector for
probe
Connector for
power supply
Illustration 6.3: Control unit, rear view
Connector for
headphones
The connector for the power supply is used to connect the battery. There the external power supply has
to be plugged in.
On the probe connector the different probes as well as the DDV system can be connected.
The connector for the headphones is used to plug in the delivered headphones enabling the user to hear
an audio output.
Via the connector for the USB cable the device can be connected to a computer via the USB cable. This
is necessary to transfer data from the device to a computer.
OKM Ortungstechnik GmbH
www.okmmetaldetectors.com
Page 45

7 Operating Modes
CHAPTER 7
Operating Modes
In this section you will learn more about the different operating modes of the eXp 4000. Every function
is explained in its proper subsection.
Page 46

46 Operating Modes
Selecting the correct operating mode depends primarily on the desired output. So for example there are
some functions which have to be used for an initial first measurement in an unknown area to get a
general overview, whereas others are more suitable for a more detailed search and analysis with a
special processing software program.
The eXp 4000 has the following operating modes:
• Magnetometer
Search an area with the integrated magnetometer.
• Ground Scan
Measurement with graphical evaluation, whereby measured data can be stored in the internal
memory of the device for later review.
• Metal Detector
Activate optional DDV system to discriminate between metals.
• Discrimination
Examination of detected objects regarding their characteristics on iron contents.
• Empty Memory
Delete all data stored in the internal memory.
• Exit
Power off the device and shut down the integrated PC module.
If you are connecting the optional FS-Thermoscan to the eXp 4000, there will be two more operating
modes available. Without FS-Thermoscan those functions are inactive and not visible.
• Thermograph
This operating mode is used to view and analyze differences in temperature measured with FS-
Thermoscan.
• Thermo Scan
In Thermo Scan you can create graphical infra red images to visualize the distribution of
temperatures of a field.
Both operating modes will be visible in the main menu as soon as the optional device FS-Thermoscan is
connected to the eXp 4000. These options are useful for seeking cavities.
Via the touchpad on the front of your device you can select and confirm your desired operating mode.
OKM Ortungstechnik GmbH
www.okmmetaldetectors.com
Page 47
Operating Modes 47
7.1 Magnetometer
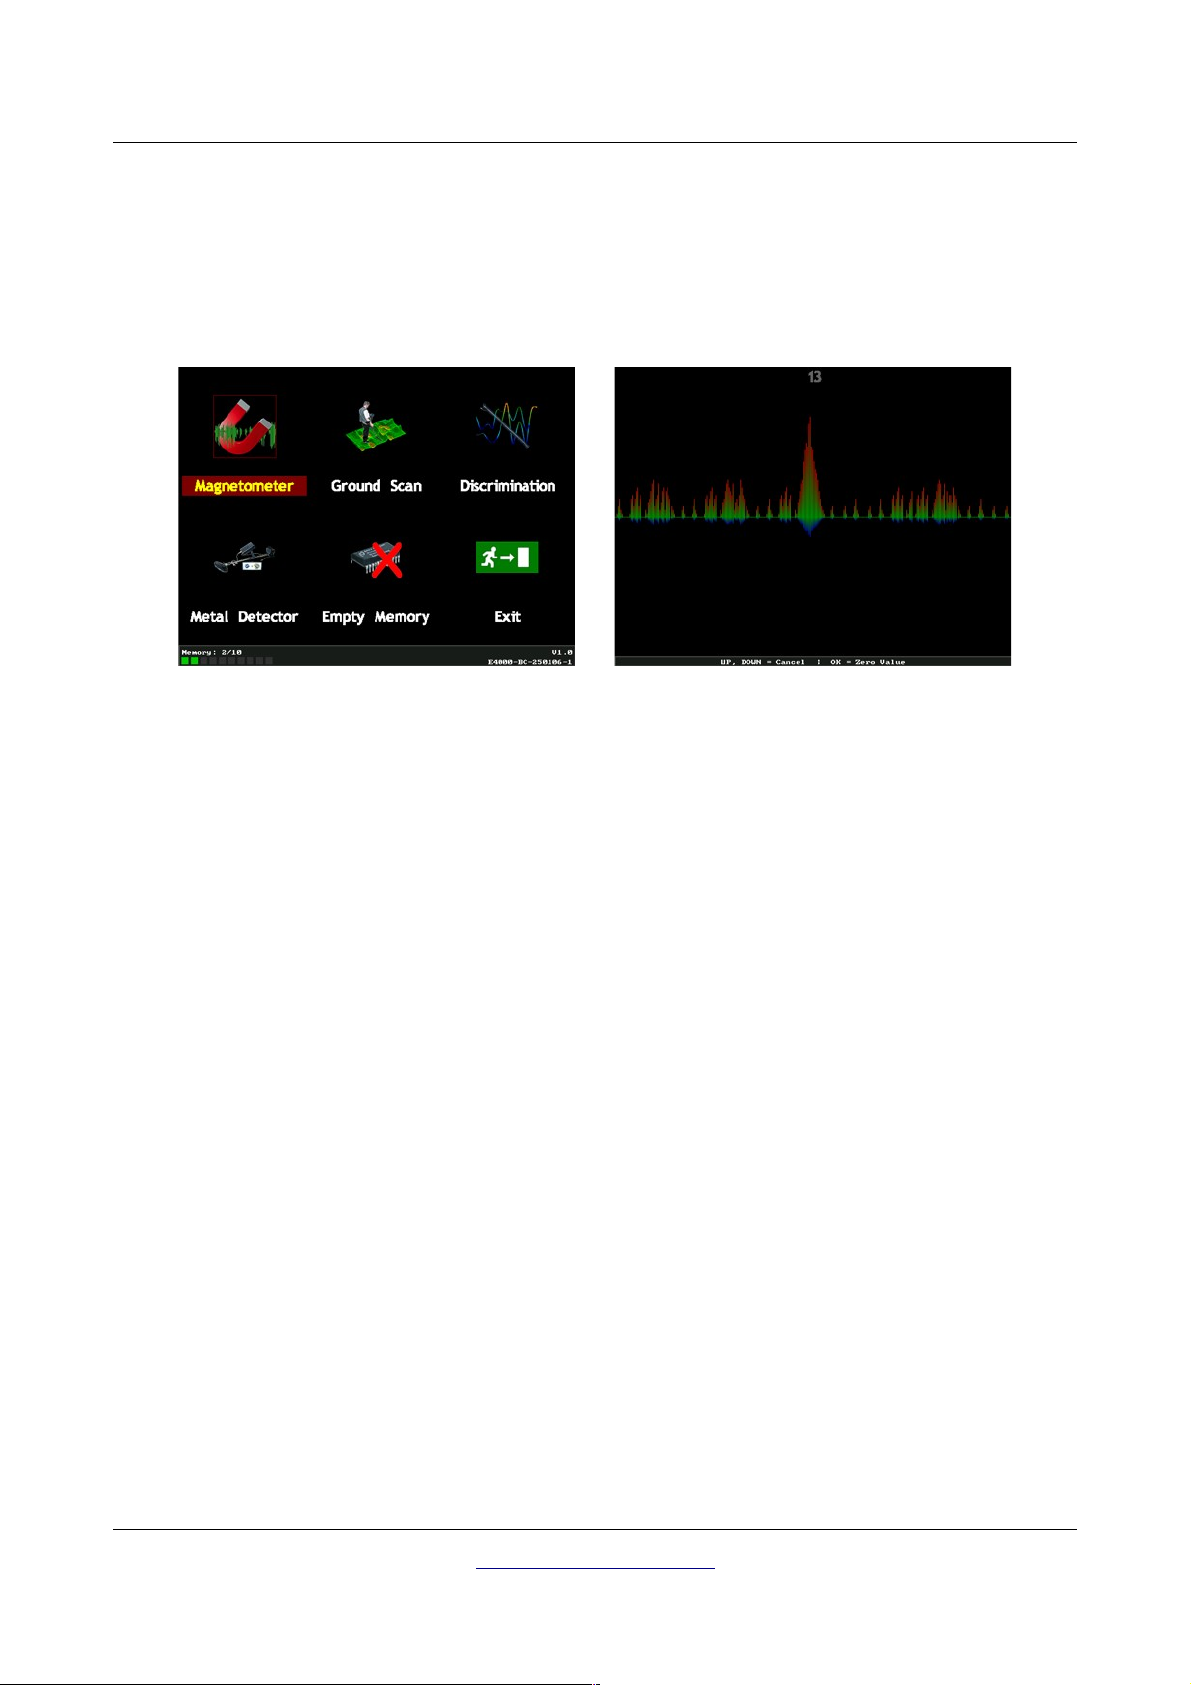
By selecting the Magnetometer mode from the main menu, you can scan the sub-surface for
ferromagnetic targets and areas of the soil with a high iron content. Also, you may view the oscilloscope
output on the monitor to be able to identify ferromagnetic materials in the ground.
Illustration 7.1: Magnetometer: Main Menu, Representation of Values
The Magnetomer mode can be used with all the antennas except the DDV system. As soon as you
confirm the operating mode "Magnetometer", the integrated magnetometer will be adjusted to the
current ground value of the place where it is situated at that moment. During the initialization process
the message "
can you start your search.
When powering on the unit above a neutral soil, all metallic signatures will be shown in upward spikes.
If by mistake, you start the unit above a metal target, all like metals will not be recognized.
To re-balance the Magnetometer, press the OK button, while staying on a neutral place. To exit the
Magnetometer mode, press the or to return to the main menu.
When you use this mode, you can actually move quite quickly to clear a field of easily identified metallic
objects. Most of the time when your target may be of a newer nature or is located in an area where there
is a lot of modern construction, this is the first choice to identify potentially “Hot” targets. A hot target
can be debris like cans, nails, screws, old automobile parts, etc... These should be cleared first. The
magnetometer measures usually only near to the surface for quick hunts.
Ground Balance, Please Wait"
appears on the display. Only after this message disappears
OKM Ortungstechnik GmbH
www.okmmetaldetectors.com
Page 48
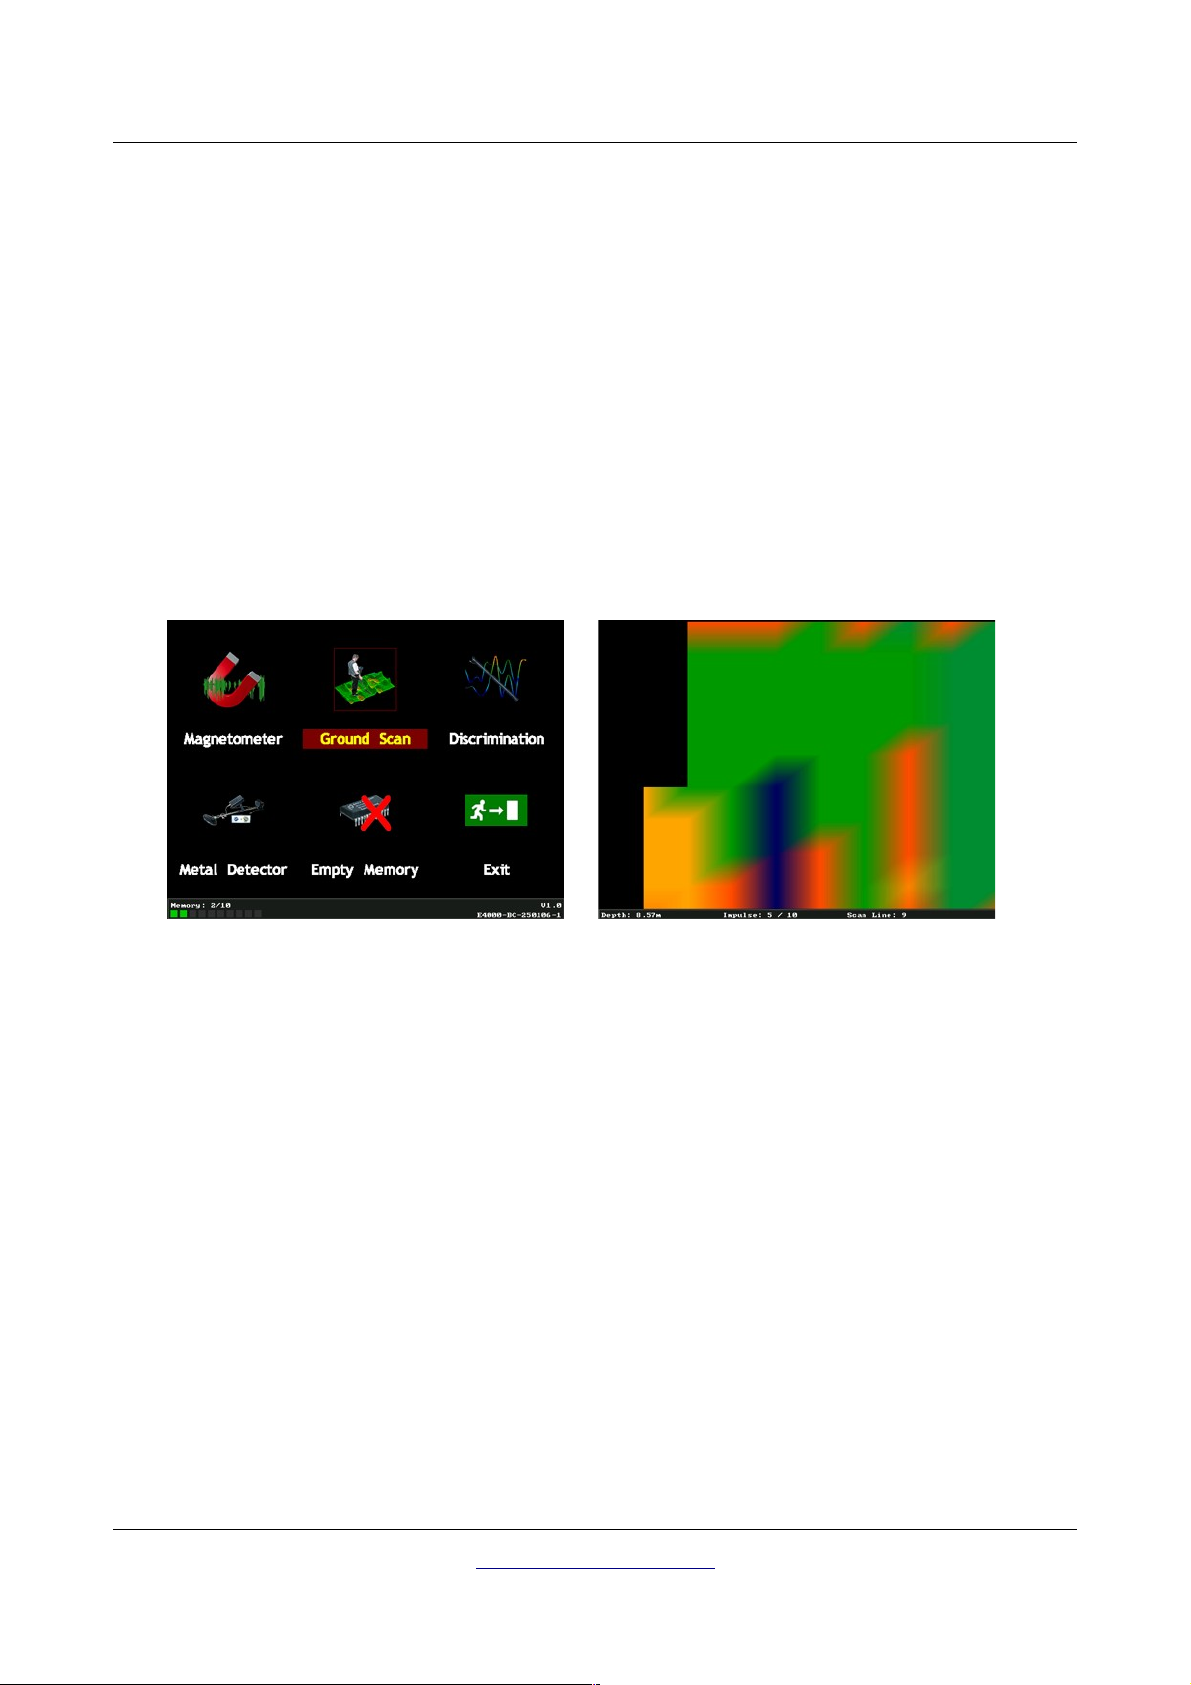
48 Operating Modes
7.2 Ground Scan
This operating mode allows you to do a measurement with graphical representation whereby all
measured values will be stored in the internal memory of the device. Also you have the possibility to
recall and see previous stored graphics. This mode can be used with all antennas except the DDV
system.
The Ground Scan mode is your primary function. This is the mode where you are going to find the
targets and locate areas of disturbed soils. When something is buried, then whoever buried it had to dig
a hole. Look for the disturbance in the soil first. If a hole was created at 4½ feet (1.5m) deep, after a
couple of seasons the hole will appear to be over 6 ft (2m) in diameter at the surface. Start with a scan
that has an impulse approximately every 1½ to 2 feet (40cm – 60cm) forward and to the sides. Don't go
too fine on the first scans until you have a possible anomaly. Look for the holes! Usually without a hole
you could be looking at mineralization.
Illustration 7.2: Ground Scan
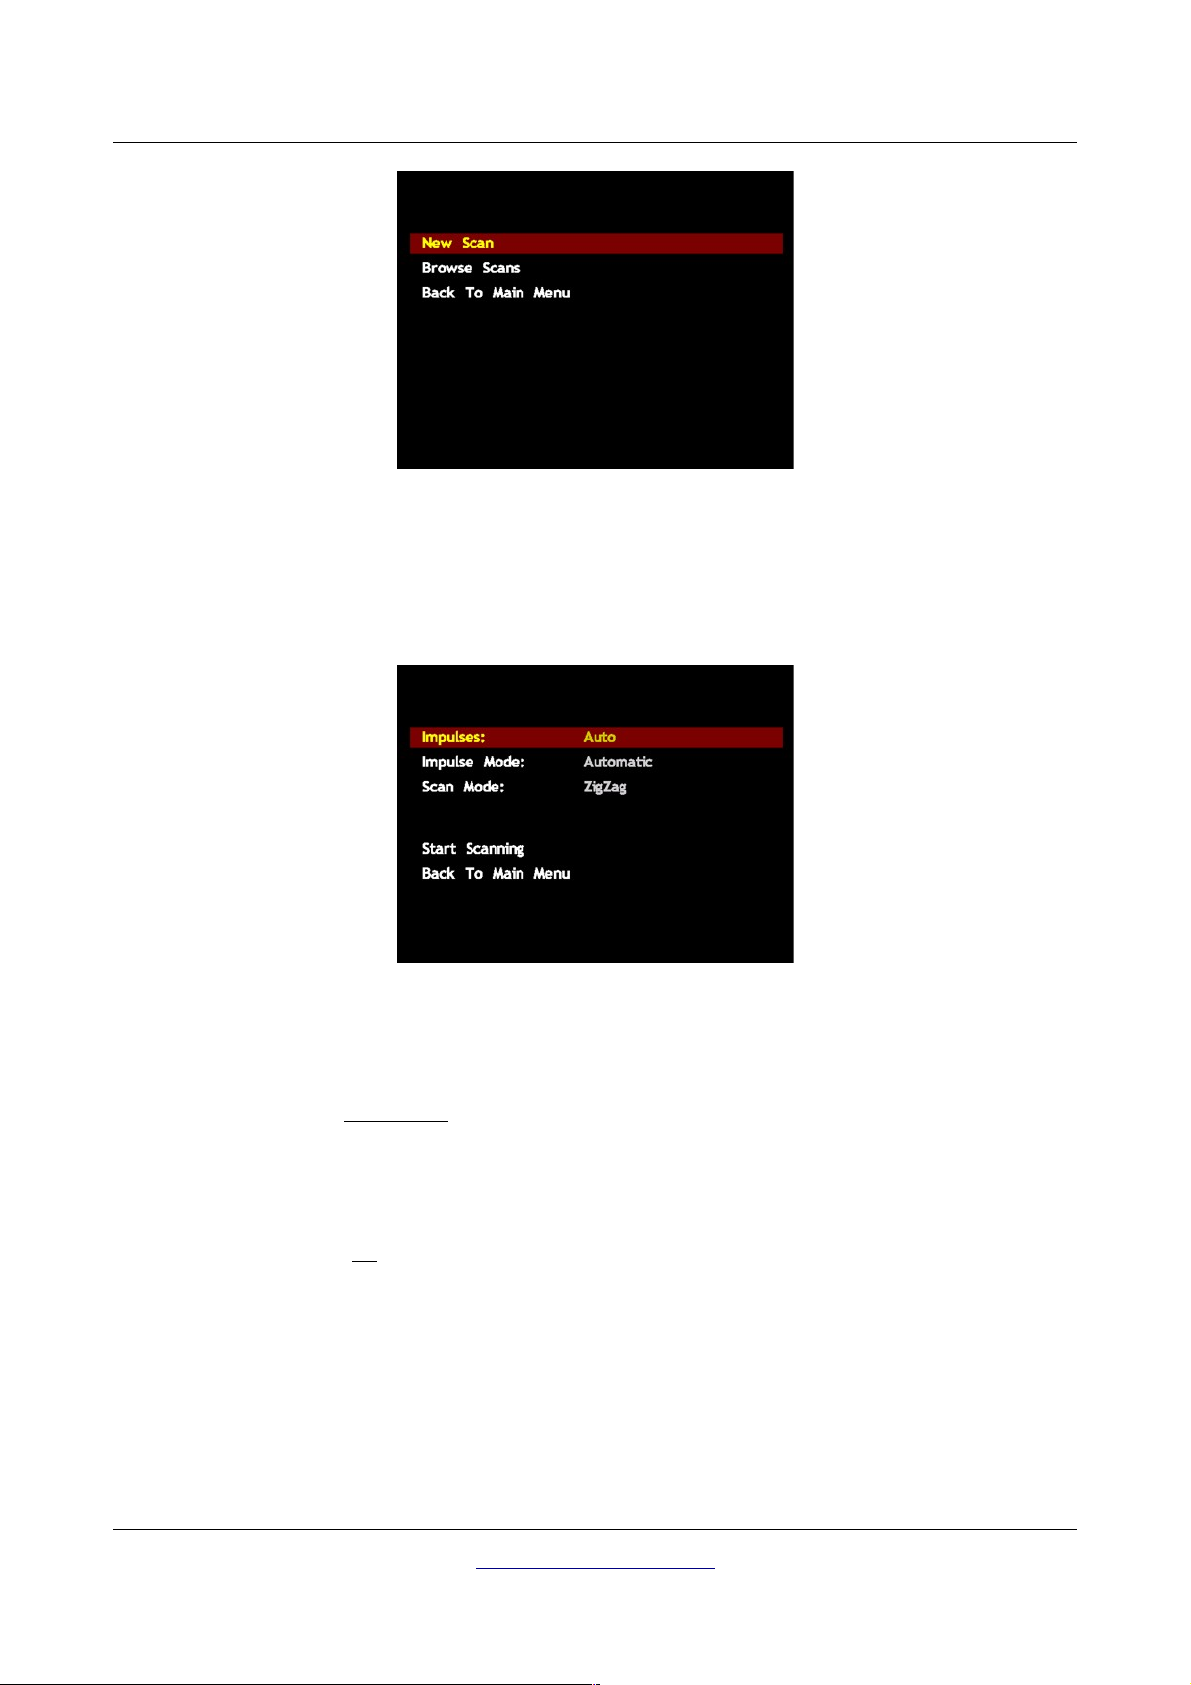
In the first submenu which is shown in figure 7.3, you can choose between the following alternatives:
• New Scan
Set up and record a new graphic.
• Browse Scans
See or delete stored graphics.
• Back To Main Menu
Finish
Ground Scan
and go back to the main menu.
OKM Ortungstechnik GmbH
www.okmmetaldetectors.com
Page 49
Operating Modes 49
Illustration 7.3: Ground Scan – Submenu
7.2.1 New Scan
After activating this operating mode you have the possibility to adjust certain settings. There are
different parameters which influence the measurement. In figure 7.4 you can see the corresponding
submenu.
Illustration 7.4: Ground Scan – Parameter
You can modify the following parameters (the underlined values correspond to the setting made
by the factory):
• Impulse Mode (Automatic, Manual)
If you are working in the Manual mode the measured values will only be recorded when using
the joystick or by pushing on the start button. If you select the Automatic mode, the measured
values will be recorded represented on the display continuously.
• Impulses (Auto, 10, 20, ..., 50)
Number of measured values per search line. If you select "Auto" the number of impulses can be
adapted to the current length of your search line. During the first line the device will read values
regulary without stopping. When you want to finish your first line you have to press the OK key,
to stop the measuring process of the current line. The device will store the number of impulses
and use it for all further scan lines on the same scan. By selecting the value 10, 20, ... or 50 you
can preset the number of impulses you need in one measured line.
OKM Ortungstechnik GmbH
www.okmmetaldetectors.com
Page 50
50 Operating Modes
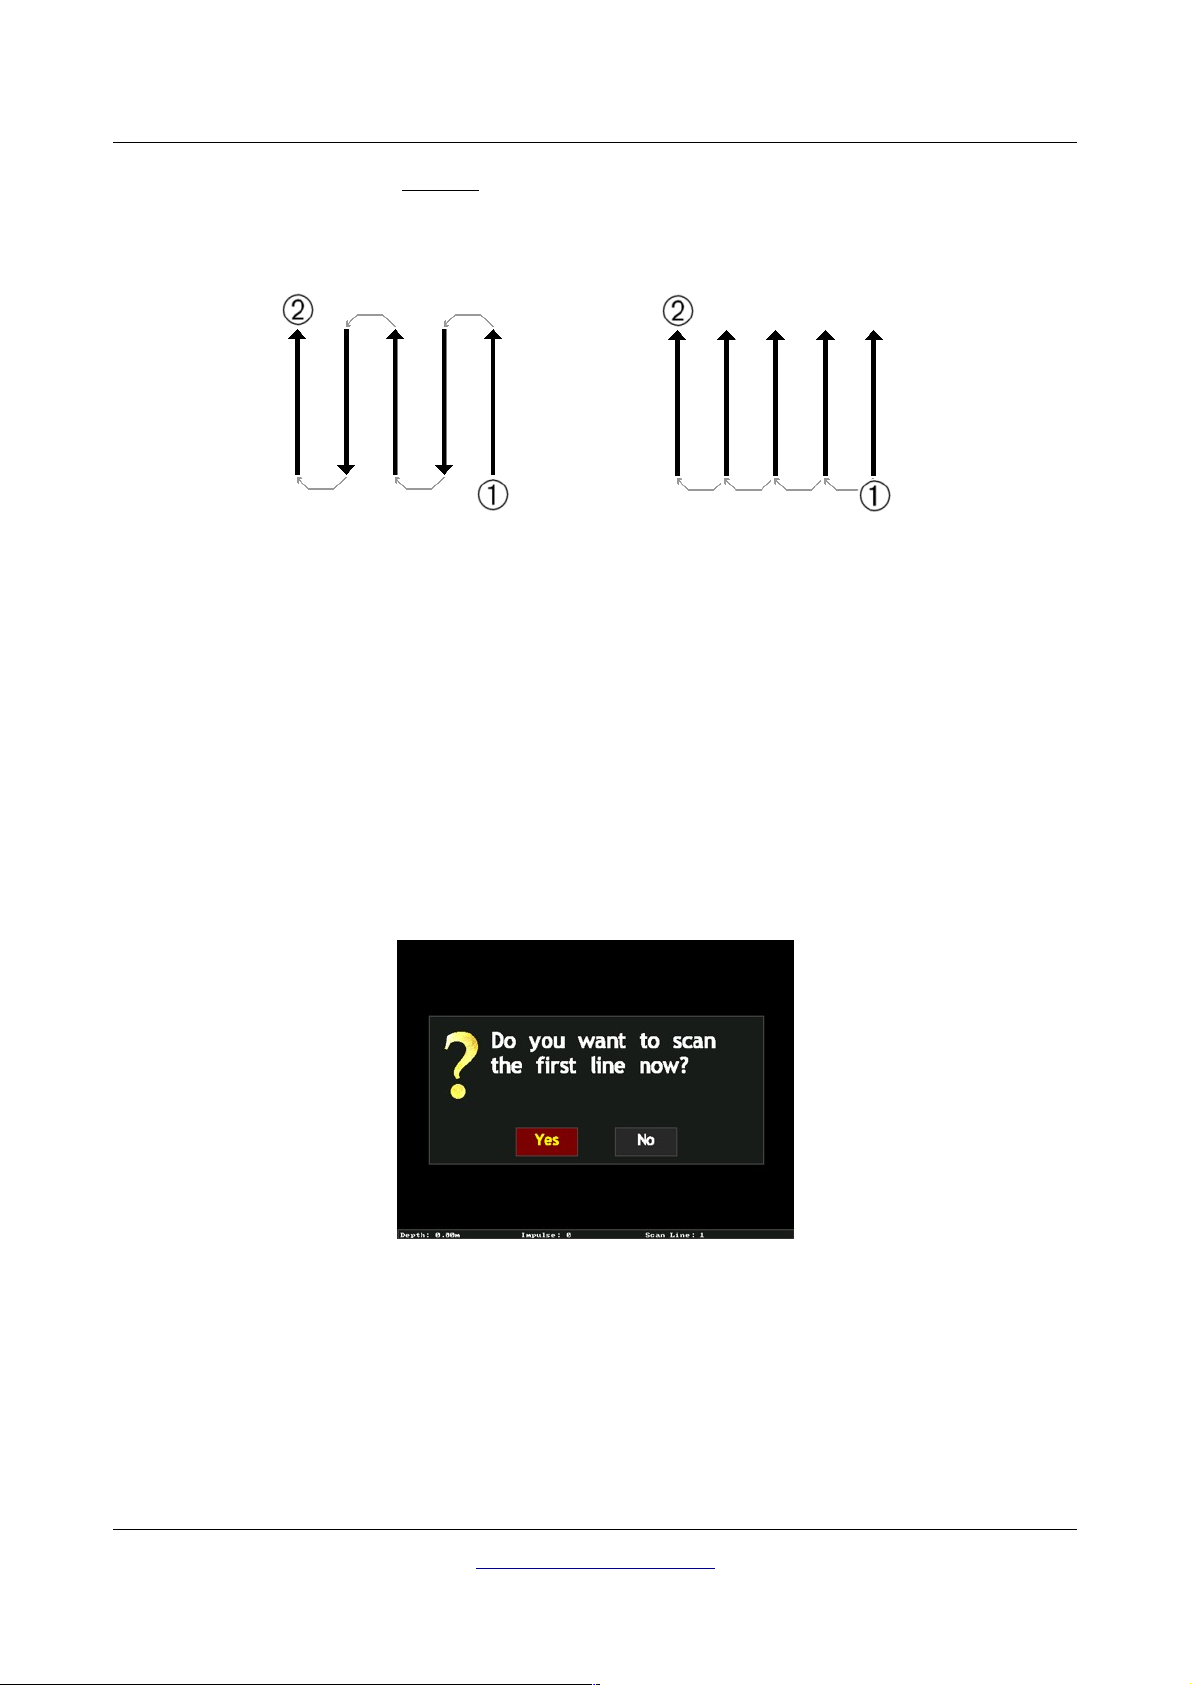
• Scan Mode (Parallel, Zig-Zag)
Scan Mode defines the method of scanning an area. In the Parallel mode measurement starts
always from the starting line, whereas in the Zig-Zag mode measurements starts at the end of
Illustration 7.5: Zig-Zag or Parallel
the line which was scanned before, like represented in figure 7.5. In the last scanning method
(Zig-Zag) you have to take care not to change the orientation of the antenna, which means if the
white arrow on the side of the probe shows to north direction for example it has to show to north
direction in every measured line.
Select the parameter, which you want to change with the keys and , until it is highlighted in red
color. Now press the OK key. The marking will change, so that only the current value is highlighted in
red color. Now you can change the value of the selected parameter by using the keys and . To finish
this process you have to press the OK key again.
Go to your start position and adjust all necessary parameters to your needs. Then you have to select
option
Start Scanning
, to start the measurement. The message from figure 7.6 will appear and ask you if
you are ready to start your first scan line now.
Illustration 7.6: Start first scan line?
While using the keys and select option "Yes", if you want to start the measurement. Confirm your
selection by pressing the OK key. As soon as you press the OK button, begin walking immediately for the
eXp 4000 is now recording data. As soon as your first scan line is finished a new message will appear,
where you have to select "Yes" if you want to scan another measured line.
OKM Ortungstechnik GmbH
www.okmmetaldetectors.com
Page 51
Operating Modes 51
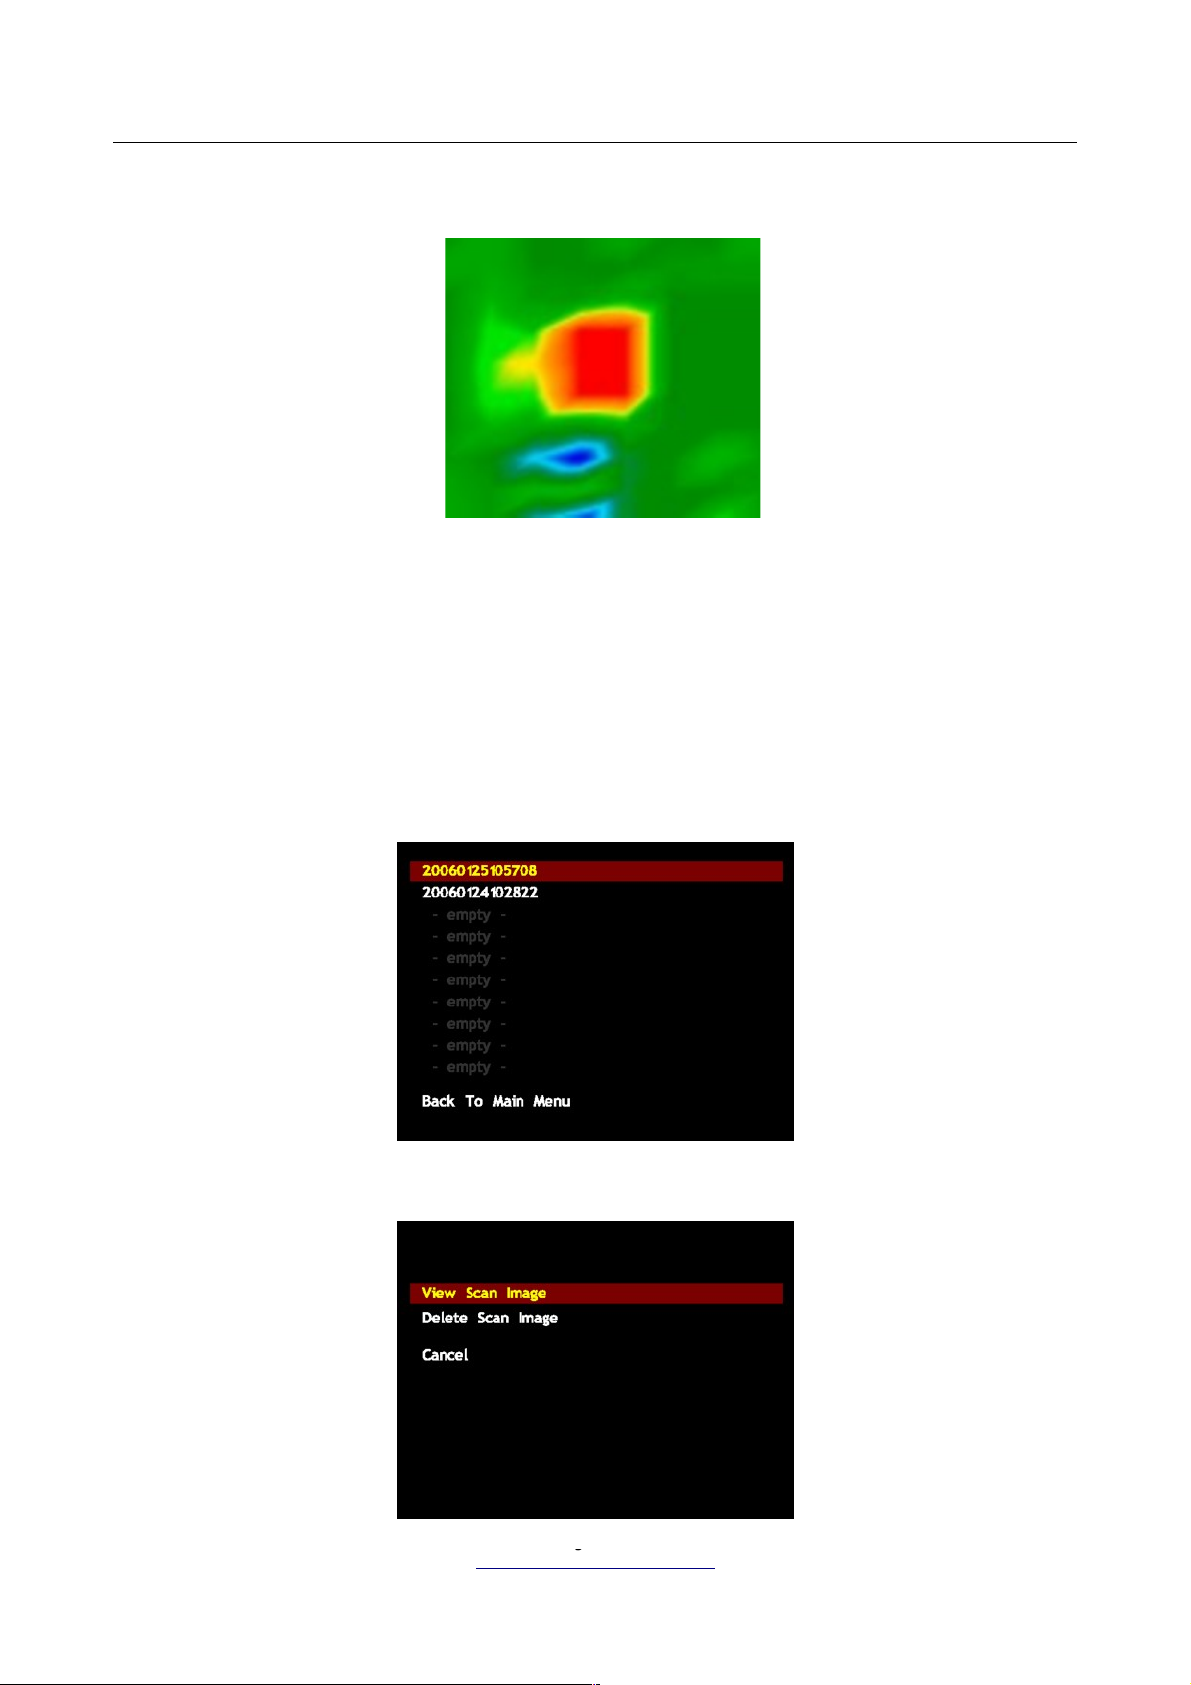
Repeat this procedure until your complete area is scanned. Step by step a graphical representation
similiar to figure 7.7 will appear.
Illustration 7.7: Graphical Representation of a Measurement in Operating Mode Ground Scan
The graphic where a target is present should primarily be a green color for the background, which
represents normal ground. In this green area red and blue objects can be placed. Metallic objects are
normally represented in red and cavities, water reserves and earth interferences in blue colors. Areas
where ground mineralization is present is often shown in red also.
7.2.2 Browse Scans
After selecting the "Browse Scans" function with the OK key, you will see a list of the stored scans, as
represented in figure 7.8. Select the measurement which you like to see with the keys and . For the
Illustration 7.8: Select Stored Measurement
selected measurement the following options represented in figure 7.9 are provided.
Illustration 7.9: Submenu: Browse Scans
OKM Ortungstechnik GmbH
www.okmmetaldetectors.com
Page 52

52 Operating Modes
• View Scan Image
The selected measurement will be displayed once again. Press any key to go back to the
selection menu.
• Delete Scan Image
The current selected measurement will be deleted, if you confirm the following message with
"Yes". Following you will go back to the menu Ground Scan.
• Back To Ground Scan Menu
You go back to menu Ground Scan.
OKM Ortungstechnik GmbH
www.okmmetaldetectors.com
Page 53
Operating Modes 53
7.3 Metal Detector
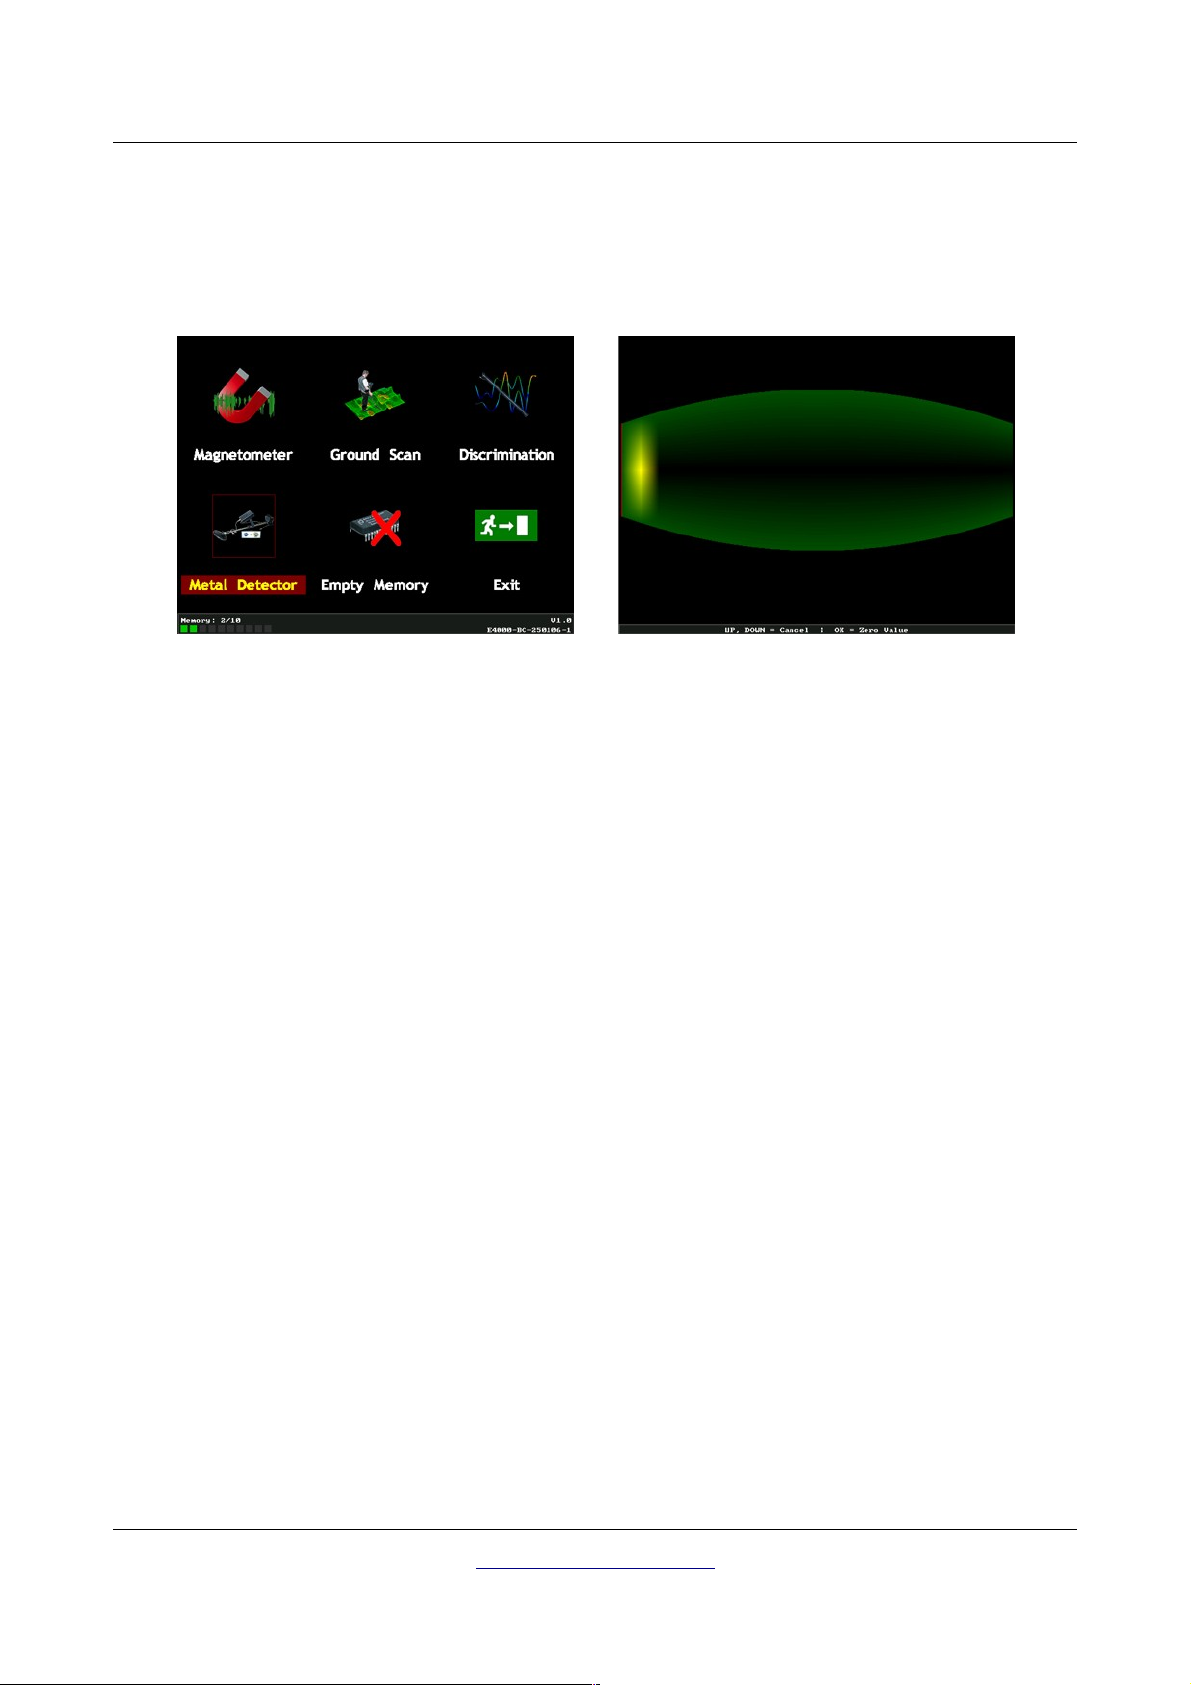
To use this operating mode you have to connect the optional DDV system first. This detector is
specialized to find small objects (e.g. coins) which are located near to the surface.
Illustration 7.10: Metal Detector
Also with this detector you have the possibility to discriminate between different metals. So for example
you can find out if an object is gold, silver or iron.
Further information about the correct usage of the detector and the principle of discrimination you can
find in section "Optional Equipment / DDV system" of this users manual!
OKM Ortungstechnik GmbH
www.okmmetaldetectors.com
Page 54
54 Operating Modes
7.4 Discrimination
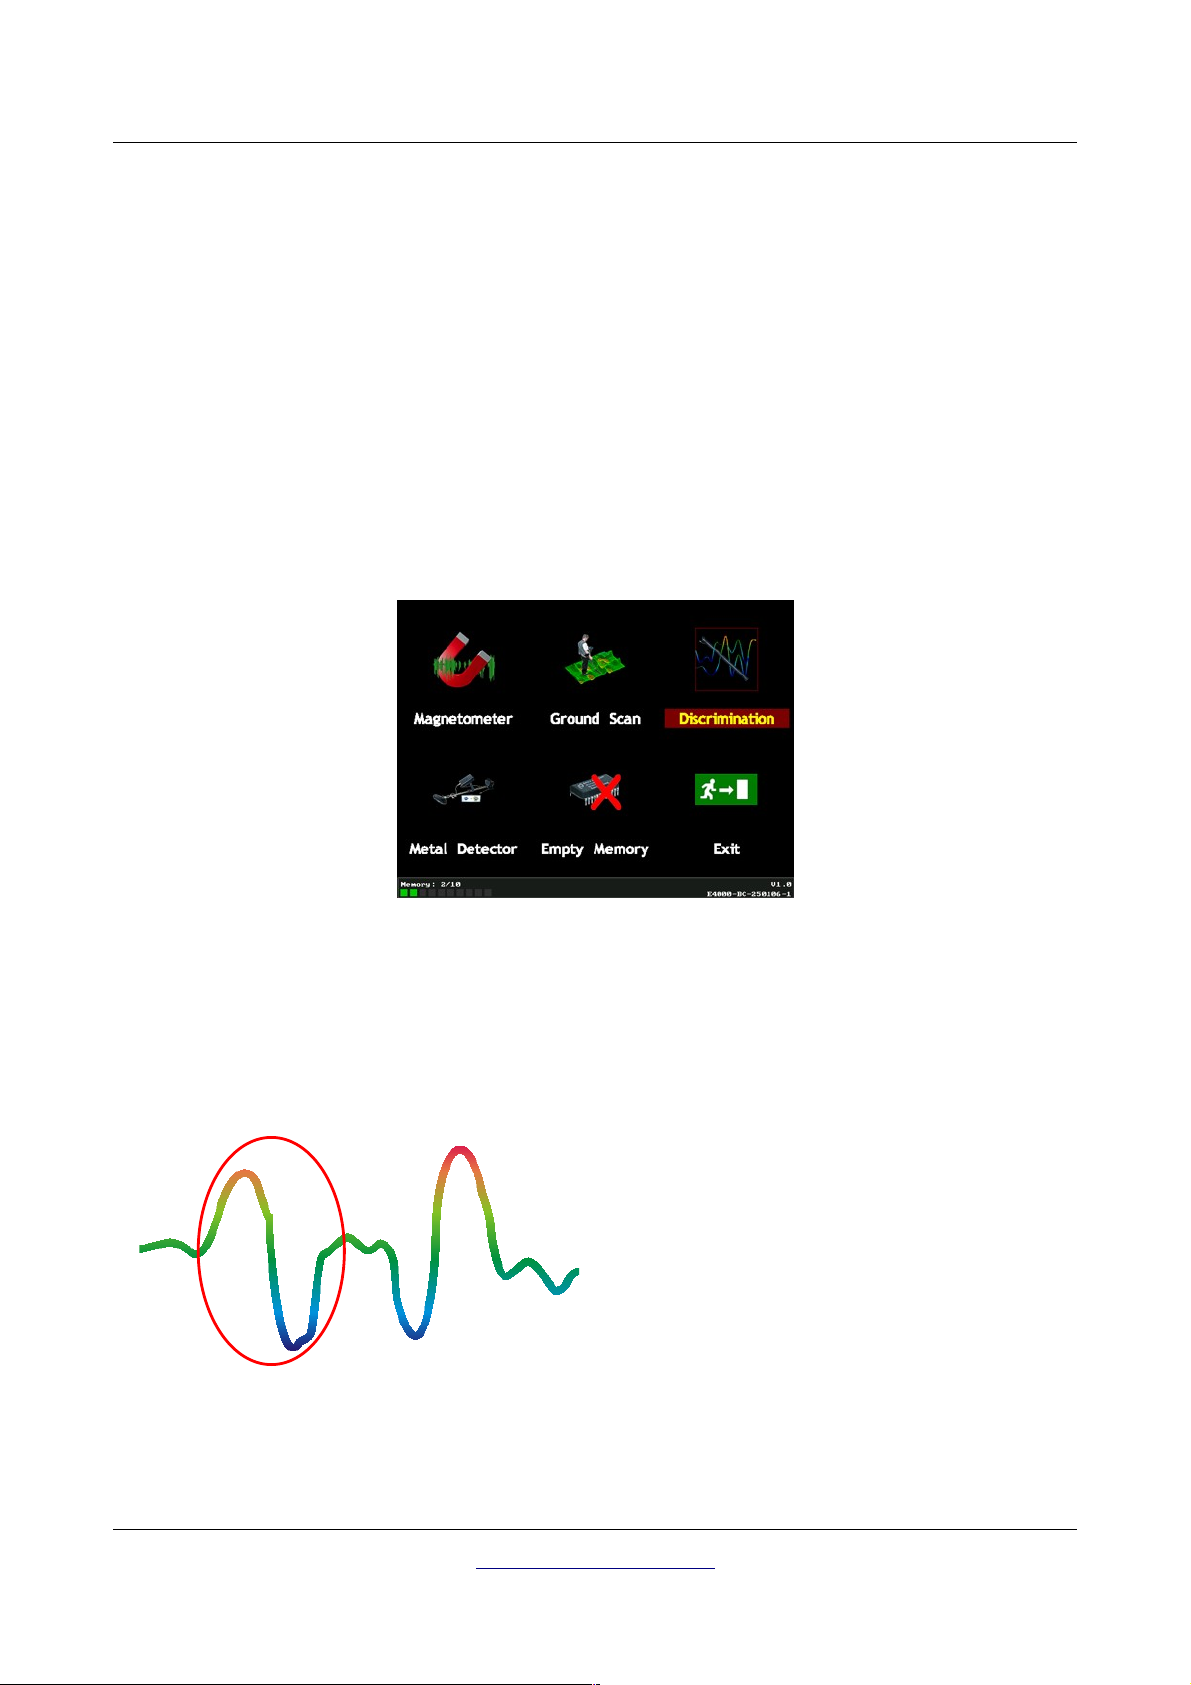
This operating mode is used to identify metals and cavities. Therefore it is necessary to connect the
optional available Supersensor. If you don't have the optional Super Sensor, contemplate very seriously
on acquiring one. This is an extremely powerful function and can assist you in verifying real targets.
There are three basic modes in which you will use this function. Discrimination of course, tunnel
recognition, and then also when on the water from a boat. For water operations, please contact one of
our trainers at the factory to receive a more detailed operation. In this section we will only cover
Discrimination and Tunnel Recognition.
In this mode there is no given manner fixed or a scan direction. You can walk as you want to determine
the soil. This operating mode is most effective if you have already detected possible objects and now
want to know more details about them.
Illustration 7.11: Discrimination
The Supersensor should point vertical towards the ground. It should not be turned or pivoted.
Now you can slowly move the Supersensor from one side to another above the possible object. Please try
to capture the complete object, which means you should measure beyond the edges of the object. Repeat
this measurement a few times to get a clear signature of the object. There are 3 different signatures,
from which you can recognize a specific characteristic of any target.
Ferrom a gnetic meta ls
Ferromagnetic targets hav e a positivenegative-signature.
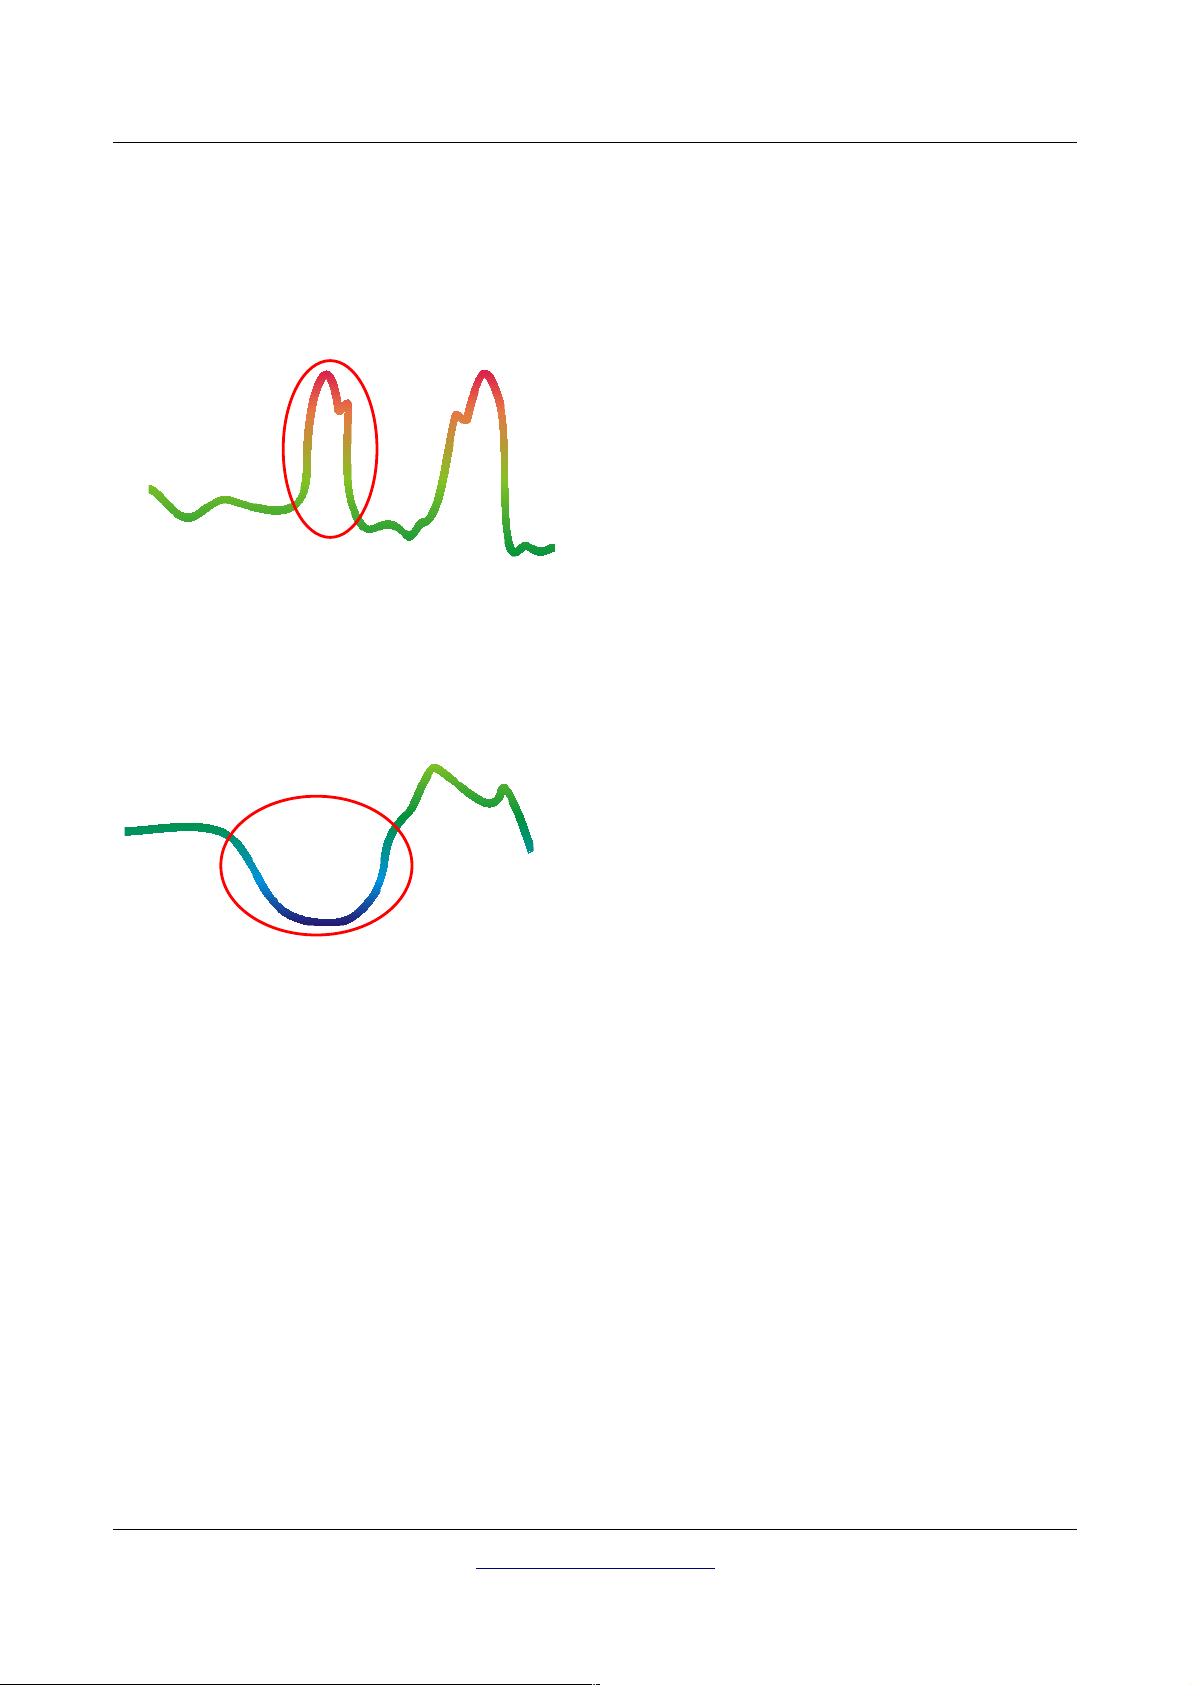
Illustration 7.12: Signature of a ferromagnetic metal target
The figure 7.12 shows a typical signature of a ferromagnetic metal like iron. The signature includes a
positive (red) and a negative (blue) amplitude. When looking closely you can see even 2 ferromagnetic
signatures. The first signature starts with a positive amplitude and the second signature starts with a
OKM Ortungstechnik GmbH
www.okmmetaldetectors.com
Page 55
Operating Modes 55
negative amplitude. The order is not important, it depends on the direction of movement of the
Supersensor. If you keep moving the probe from one side to another, these 2 signatures will change
continuously.
Take care to move the Supersensor slowly and at the same height above the ground and above a
detected object to get a clear signature.
Non-ferrom agne tic metals
Non-ferrous targets have a pure positive
signature.
Illustration 7.13: Signature of a non-ferromagnetic metal target
The figure 7.13 represents a signature of a non-ferrous target. You can recognize that there is only a
positive amplitude (red). Additionally to the main amplitude there is another small peak, which is
typically for precious metals. Also here the order of amplitude and the small peak is not important and
depends on the scan direction.
Non-m e tallic ta rgets
All non-metallic items have a pure
negative signature.
Illustration 7.14: Signature of a non-metallic target
The last of the typical signatures is represented in figure 7.14. It is the signature of all non-metallic
targets and structures. These can be voids, tunnels or buried plastic pipes or boxes. You can recognize
that there is only a negative amplitude (blue).
7.5 Empty Memory
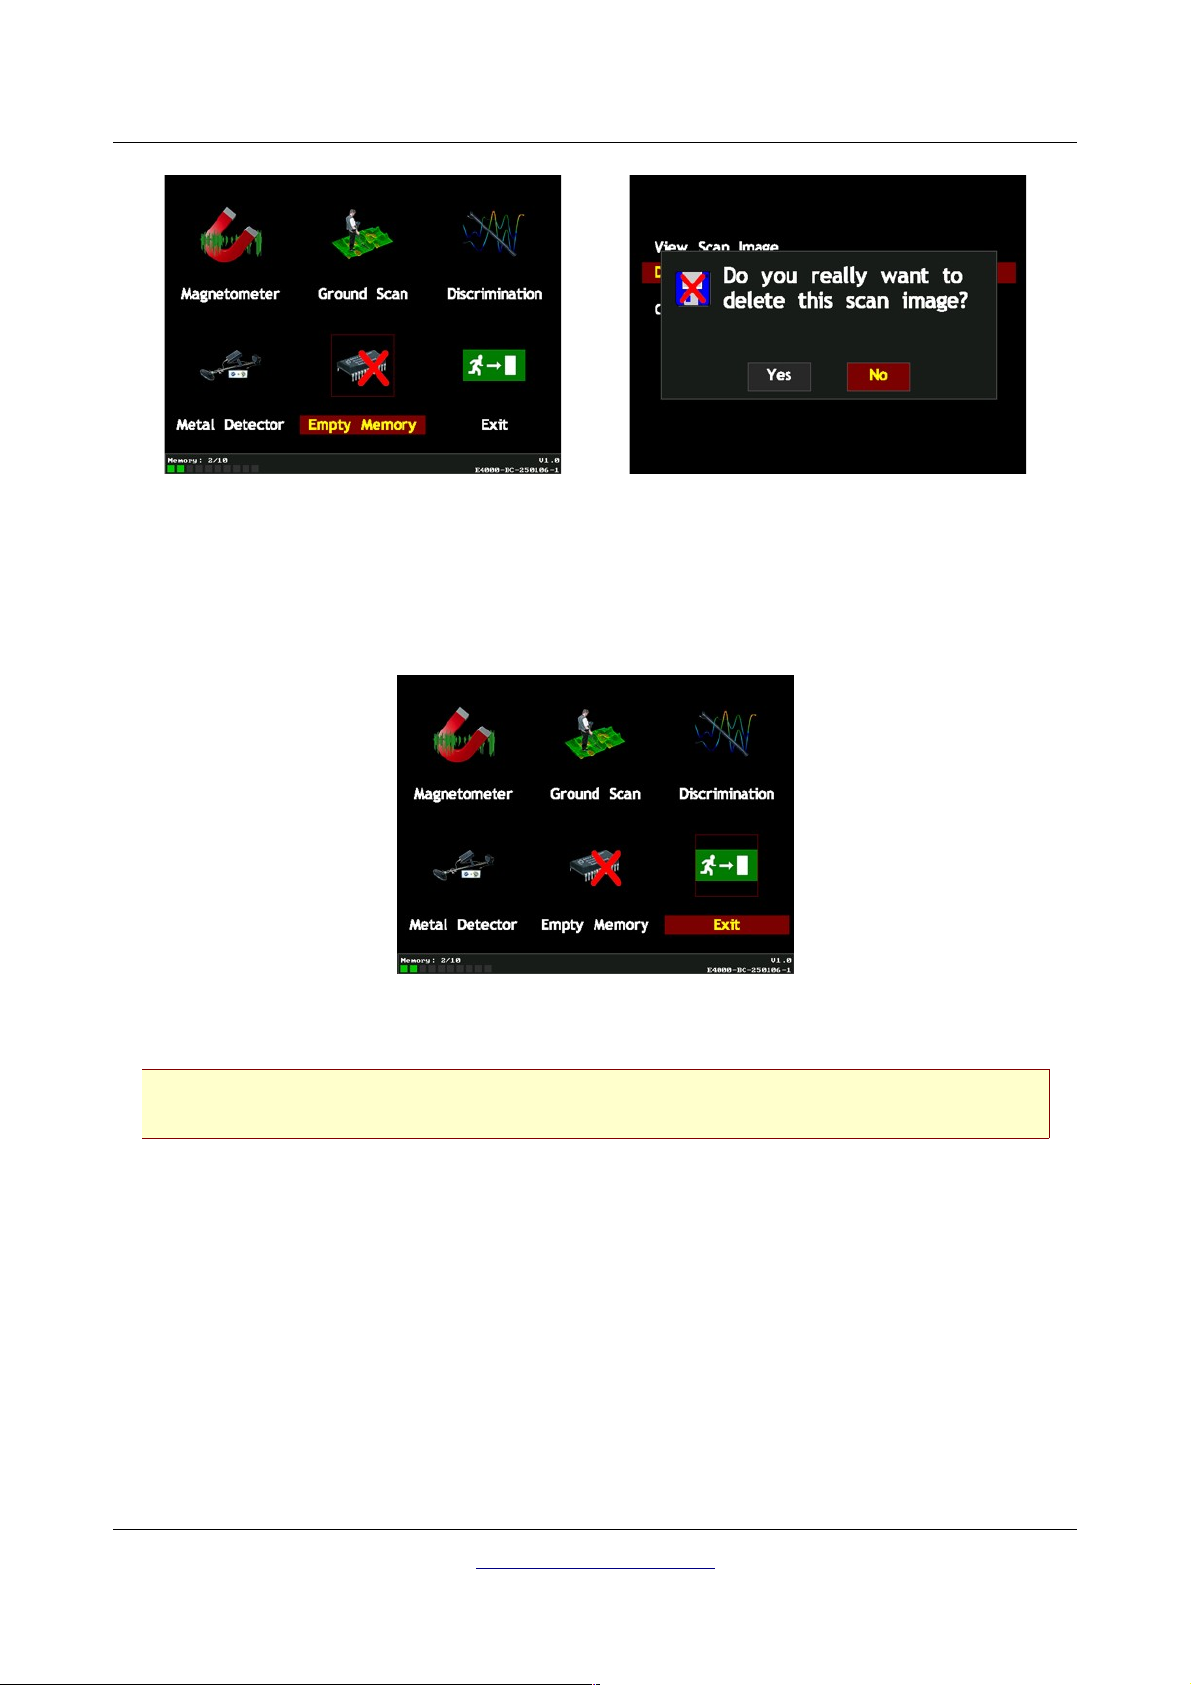
The
Empty Memory
If you confirm this option you will be asked again if you really want to delete all data. If you confirm now
by pressing Yes all data will be deleted and cannot be rebuilt or transferred to a computer.
mode is used to delete all data which is stored in the internal memory of the device.
OKM Ortungstechnik GmbH
www.okmmetaldetectors.com
Page 56
56 Operating Modes
Illustration 7.15: Empty Memory
7.6 Exit
You have to select the
confirmed this selection the integrated pc module will shut down and the device will power off itself.
Please wait until the device has powered itself off. After the device is off, you can power off the
Exit
mode, to finish the operation with this unit and to power it off. As soon as you
Illustration 7.16: Exit
external power supply.
7.7 Thermograph
This operating mode is only visible and usable if the optional device FS-Thermoscan is connected.
Detailed information about this functionality is available in the user’s manual of FS-Thermoscan!
7.8 Thermo Scan
This operating mode is only visible and usable if the optional device FS-Thermoscan is connected.
Detailed information about this functionality is available in the user’s manual of FS-Thermoscan!
OKM Ortungstechnik GmbH
www.okmmetaldetectors.com
Page 57

8 Field procedure
CHAPTER 8
Field procedure
This chapter gives practical instructions about the general procedure of scanning an area. The different
scanning methods and procedures will be explained in detail.
Page 58
58 Field procedure
8.1 General scanning procedure
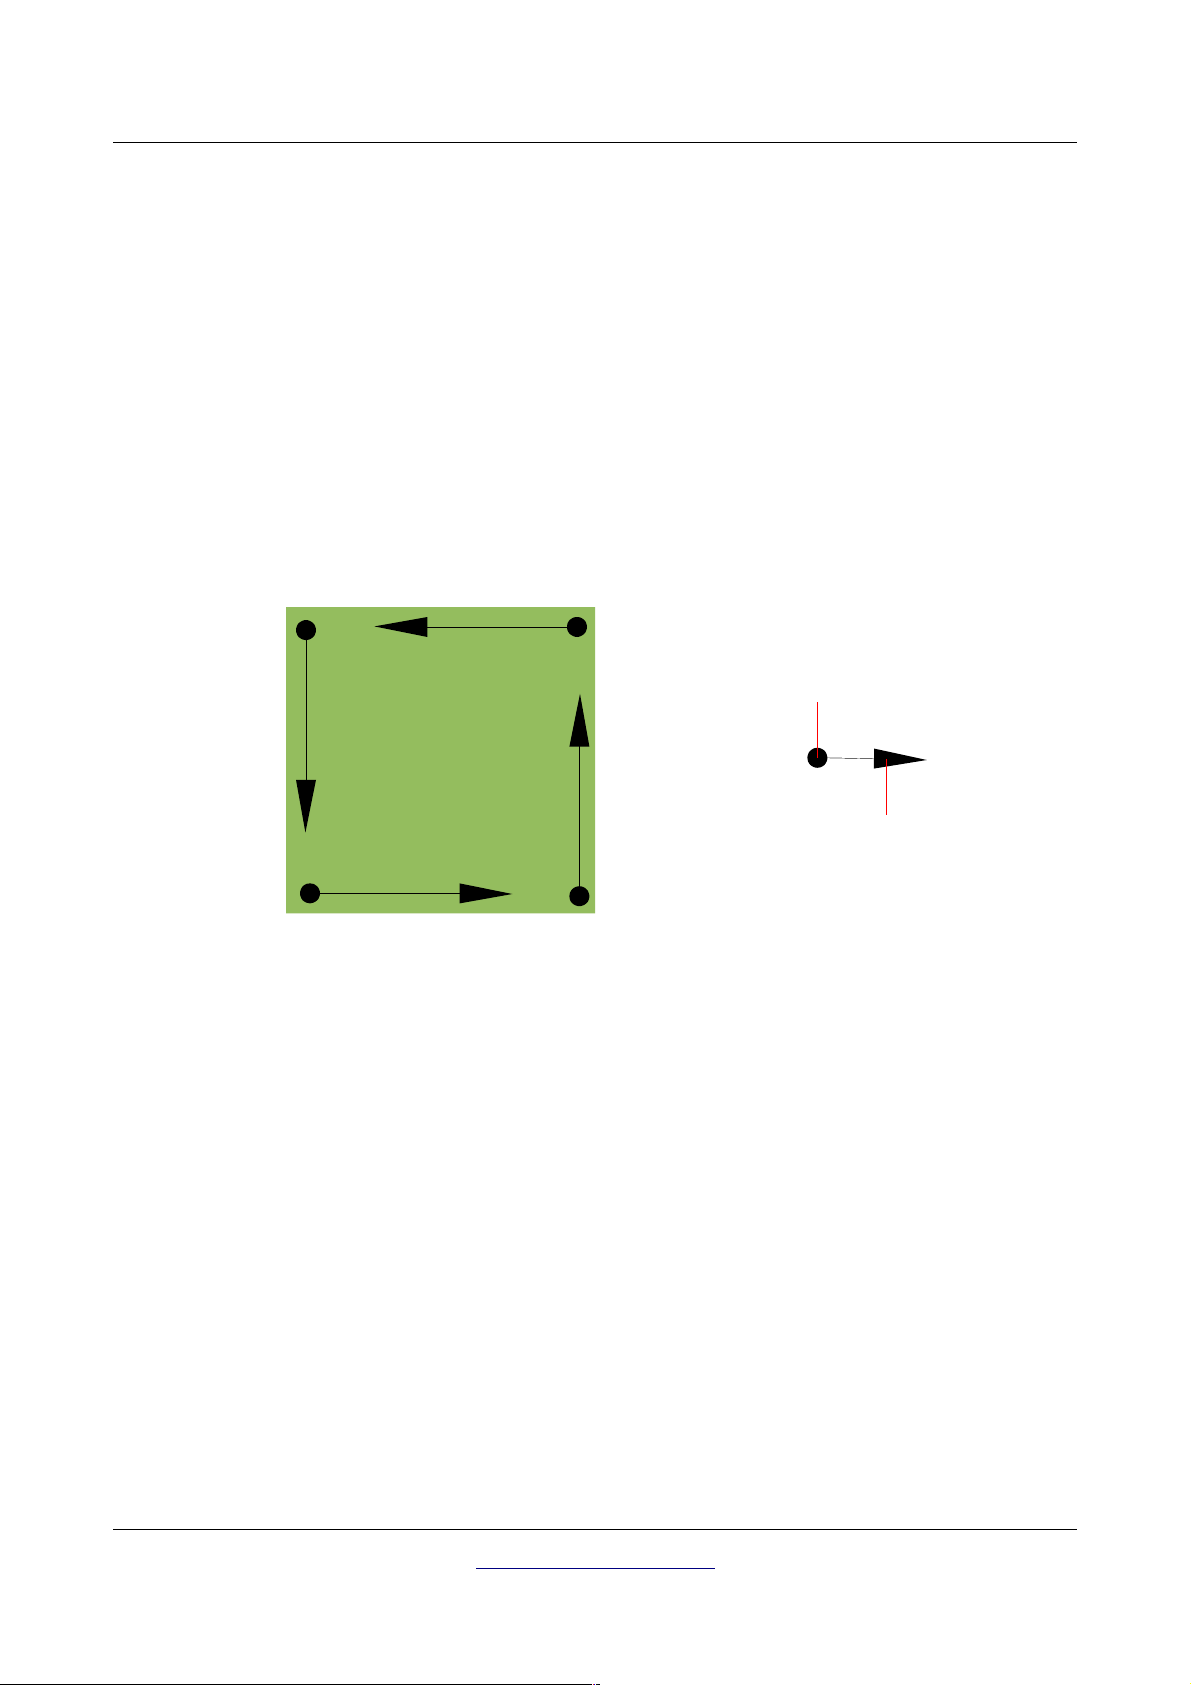
In general every scan always starts on the bottom right corner of your scan area. Starting from this
point, you should walk scan path by scan path, whereby every following path is situated on the left side
of its previous path. During walking these lines, the measurement values will be recorded and
depending on the selected operating mode either transferred directly to a computer or saved into the
memory of the device.
The device stops at the end of each finished scan line, so that the user can find the starting position of
the next line. In this way, all paths will be recorded and the area will be measured.
Figure 8.1 shows all 4 possible starting positions and the corresponding first scanning path. Depending
on the composition of your terrain you can determine the optimal starting point for your measurement
by yourself.
3
4
Figure 8.1: Starting position of a scan area
2
Start of
1. scanning
path
End of
1. scanning
path
1
The scanning paths may be referred as "Zig-Zag" or "Parallel" traverses. Also the number of impulses
(measure points), which are recorded during one scanning path can be adjusted individually depending
on the size of your scan area (length of scanning path).
8.1.1 Scan Mode
There are two general techniques to surveying an area with the eXp 4000:
• Zig-Zag
The starting position of two scanning paths next to each other is on the opposite side of the
measured area. You will record data on your scanning path and on the return path as well.
• Parallel
The starting position of two scanning paths is always on the same side of the measured area. You
will only record data in one way and in one direction, while you should return and walk back to
the starting position of the next scanning path without recording data.
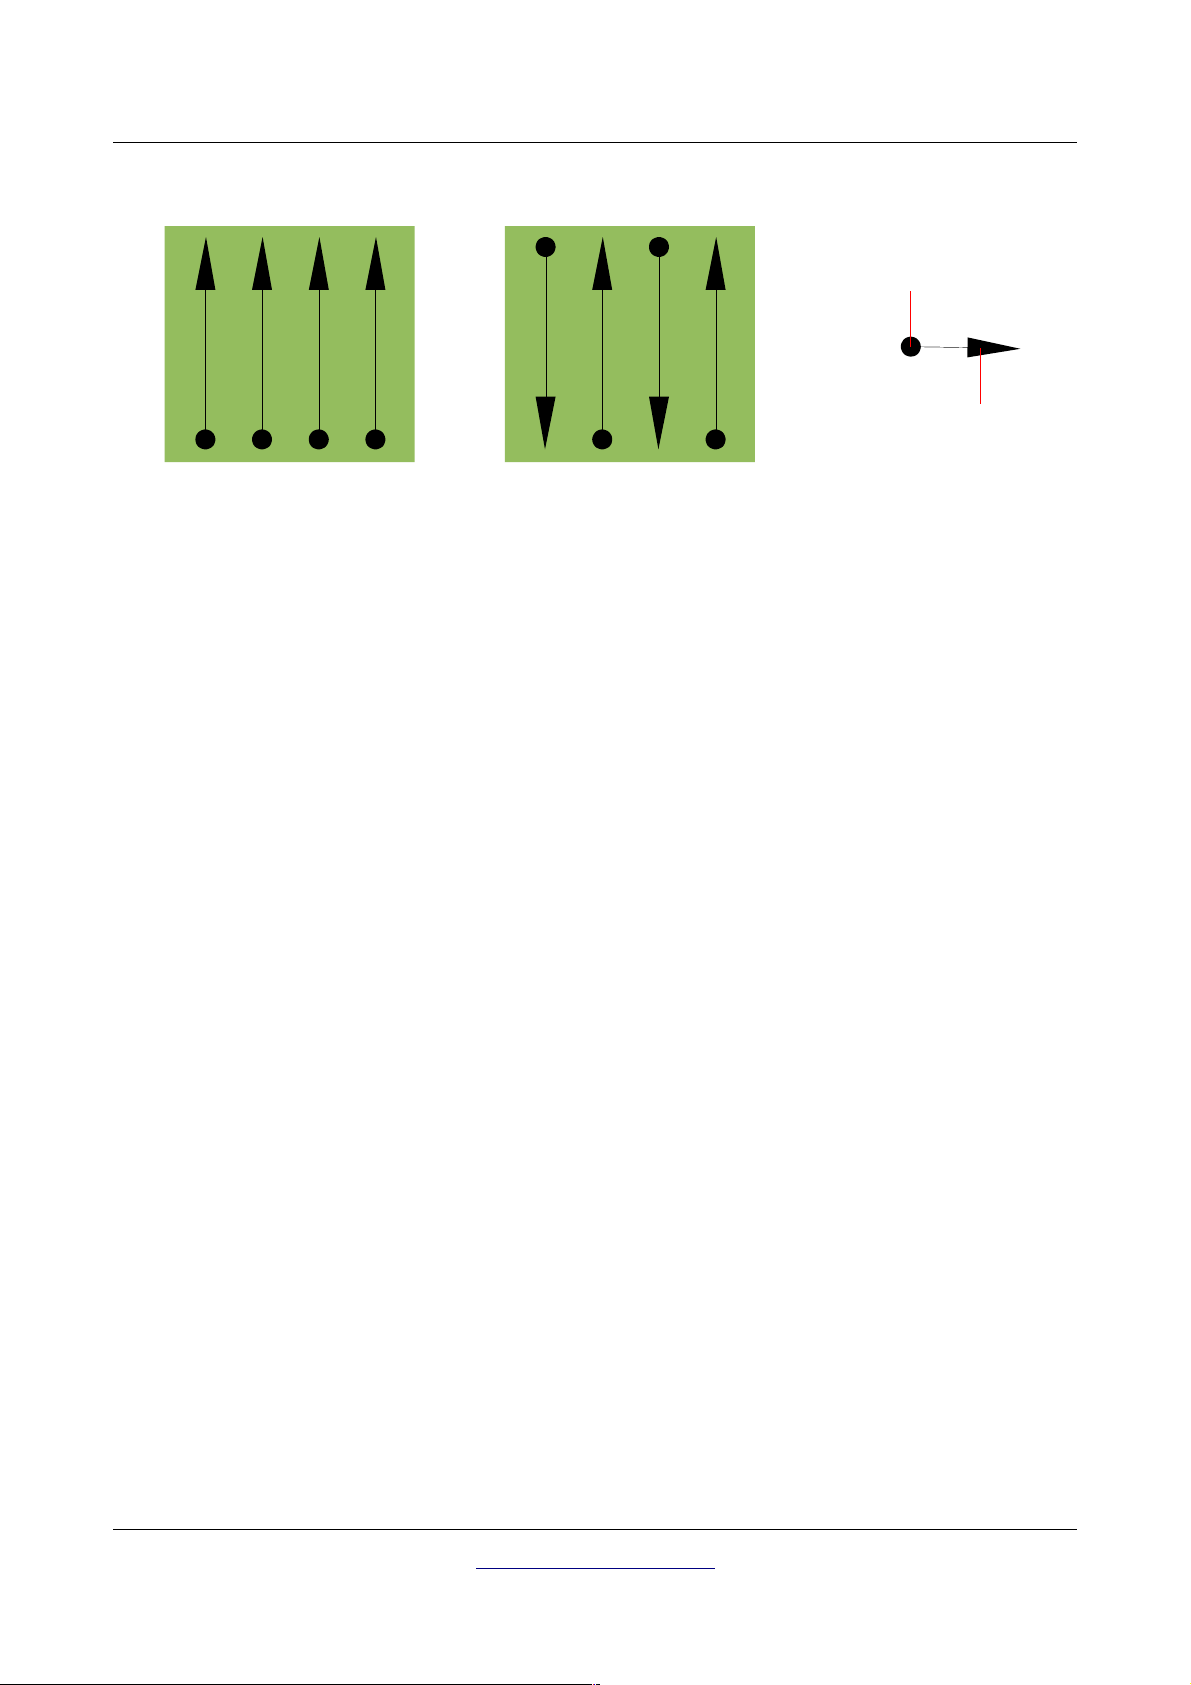
Figure 8.2 represents both techniques schematically.
OKM Ortungstechnik GmbH
www.okmmetaldetectors.com
Page 59
Field procedure 59
Parallel scanning
4 2
31234
Zig-Zag scanning
Figure 8.2: Scan modes to measure an area
1
Start of
scanning
path
End of
scanning
path
Doing the scan in "Parallel" mode you will start on the bottom right corner of your scan area (point ) to
walk and record a scan path towards the upper right corner of the area. After recording the first line,
you should walk back to the starting point and move to the left of the first scan line to start the scan
path 2 (point ), to start there the second scanning path. In this way all other paths will be scanned,
until you have reached the left side of your measure area.
Doing the scan in "Zig-Zag" mode you will start also from the bottom right side of your measure area
(point ) to walk and record a scanning path towards the right upper corner of the measure area.
Different from the parallel measurement, you should continue recording data while walking back the
second scanning path. So you go to the starting point of the second scanning path (point ) and scan in
the opposite direction. In this way, all other paths will be scanned in the scan mode "Zig-Zag" until you
have reached the left side of your measure area.
The distance between the scanning paths should be consistent during one measurement but can vary
from measure area to measure area. If you mostly look for smaller targets than you should also select a
smaller distance between the lines. A standard rule is: The smaller the distance between the paths, the
more accurate your scans will be. When you are conducting your first scans the lines should not be to
close together to locate possible targets.
8.1.2 Regulation of the number of impulses per scanning path
It is possible to select the number of impulses before starting the measurement or selecting the
automatic mode ("Auto") to adjust the number of measure points after finishing the first scanning path.
When the number of measure points has been configured, the device will stop automatically when this
number has been reached and waits for the start of the new scanning path.
In the automatic mode you should stop the measurement of the first scanning path by yourself, by
pressing the appropriate button, as soon as you have reached the end of the first scanning path. This
effective amount of measure points will be used for all further scanning paths of this measurement.
Starting from the second scanning path, the device now stops automatically after the assumed number
of impulses has been reached.
OKM Ortungstechnik GmbH
www.okmmetaldetectors.com
Page 60
60 Field procedure
Keep in mind the number of impulses which you have recorded per scanning path. This amount
should be entered later in the software program, when transferring the data to a PC, to receive
all measured data correctly from your measuring instrument!
There is no special rule for selecting the right number of impulses. But there are different aspects which
should be considered. These are some considerations
• the length of your measured area and
• the size of the objects you are searching for.
A preferable distance between two impulses is about 15 cm to 30 cm. The smaller the distance between
two impulses is, the more exactly the graphical representation will be. If you are looking for small
objects you have to select a smaller distance, for big objects you can increase the distance between the
impulses.
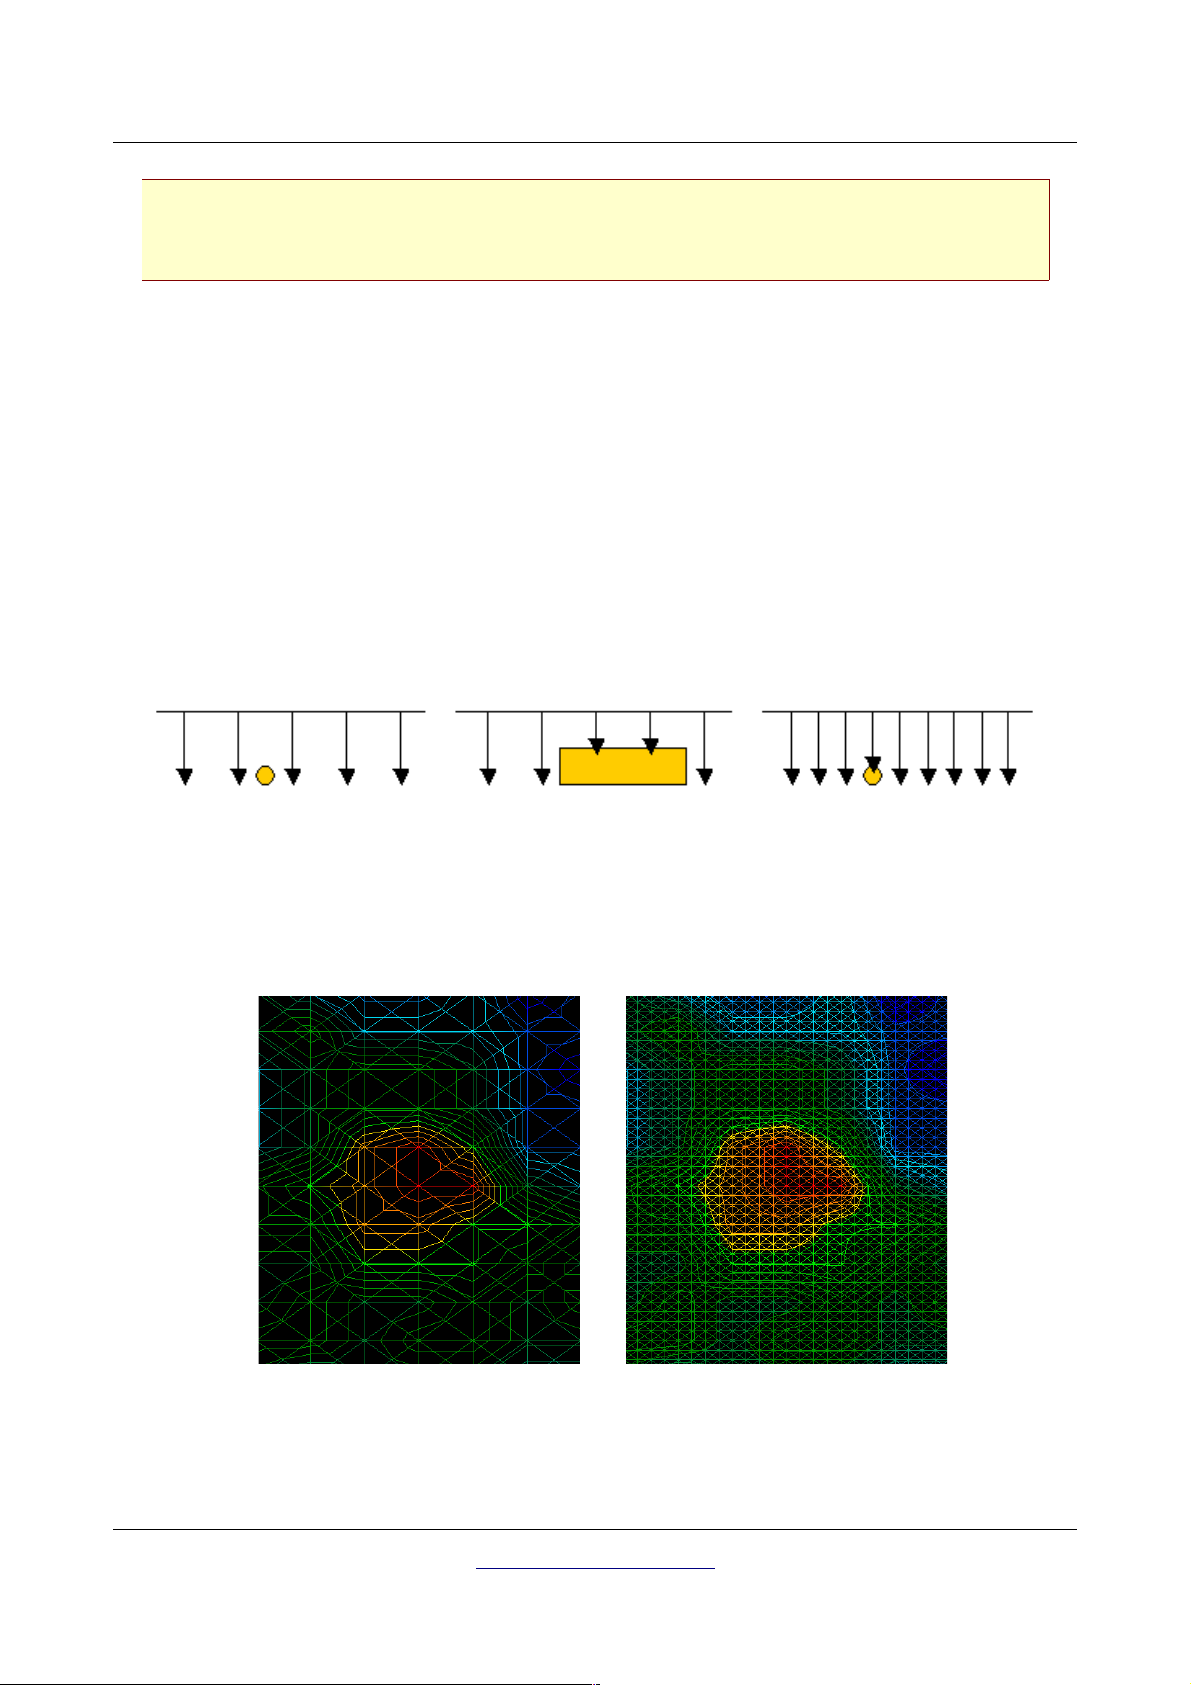
Figure 8.3 shows the effects of the distance and the number of impulses per scanning path for some
objects.
Figure 8.3: Effects of changing the number of impulses and their distance
Figure 8.4 shows the difference between very few impulses (left side) and much more impulses (right
side) on the same length of scanning path. Therefor the second record (right side) shows much more
details and also smaller objects can be seen.
Figure 8.4: Comparison of low and high number of impulses
Do not hesitate to record more measurements with different numbers of impulses. For example you can
scan a large area before doing a second detailed precision measurement. Especially if searching for
OKM Ortungstechnik GmbH
www.okmmetaldetectors.com
Page 61
Field procedure 61
bigger objects you can proceed like this. With this manner you can measure a larger area very quickly
and afterward you make new scans localizing the suspect targets.
When conducting a scan it is important to not only make note of how many impulses are being used but
to get a clear picture of what you are scanning, it is very important to watch your speed. Every scan line
should be measured at the same speed as the previous line.
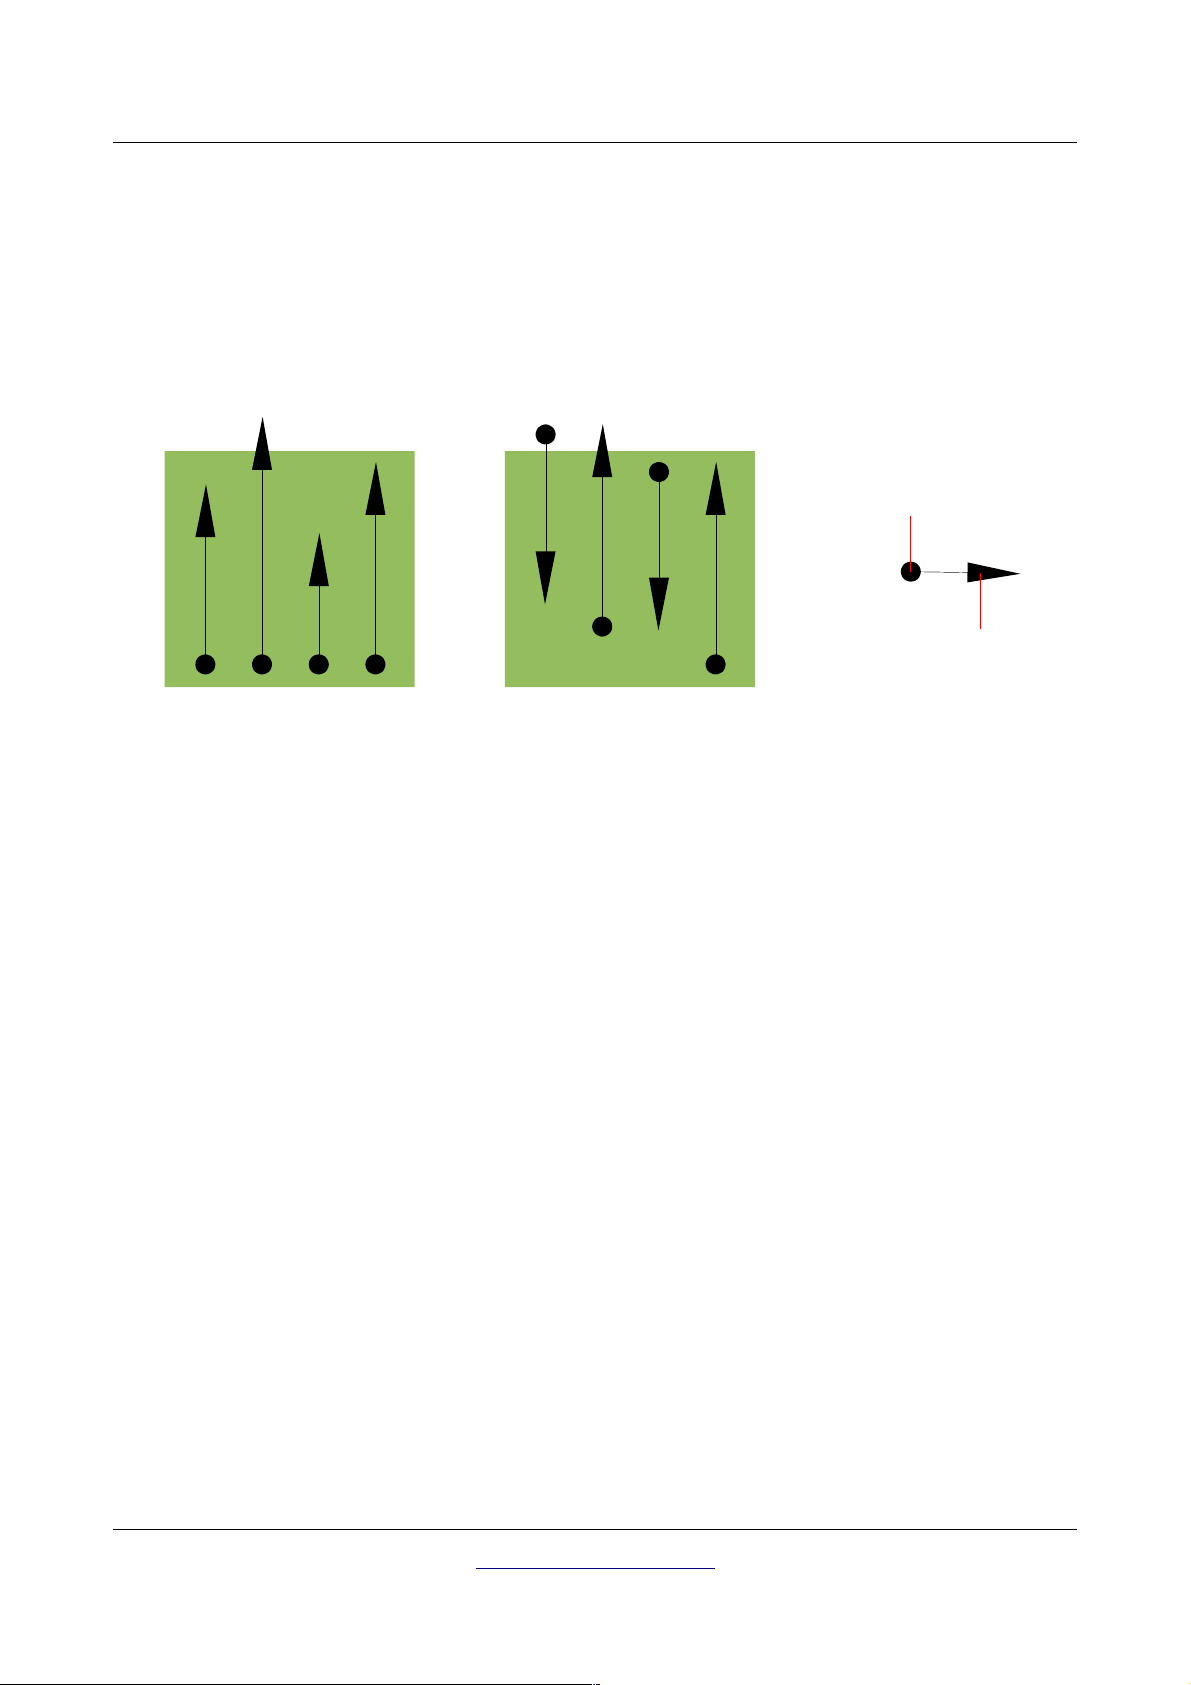
Figure 8.5 shows what can happen, if you walk at different speeds during your scan.
4
Parallel scanning
2
3
1234
Zig-Zag scanning
Figure 8.5: Different walking speeds during scanning
1
Start of
scanning
path
End of
scanning
path
Using a different walking speed in the scanning paths, will cause displacements in the scanning path.
As a matter of fact, a target can get cut into several smaller items or completely lost because it was
missed. Later when the data is downloaded for further analysis, speed errors can make a target
completely unidentifiable and may be discarded.
In general, the following rule is valid: Keep scans at practical sizes where you can see the beginning and
stop lines and can comfortably traverse an area to keep your speed and the distances reasonable.
8.2 Special advices for field procedure
There are some aspects which you should take note of when conducting scans. In principle, a scan is
only as good as the path that was taken. Making errors while scanning will show up in the final
graphical representation also as an error. This will cause frustration and lost time.
Before you start with a measurement in the field, you should think of what you are looking for and if the
selected area is suitable. Measuring without a plan usually will produce unacceptable results. Please
consider the following advice:
• What are you looking for (graves, tunnel, buried objects, ...)? This question has direct effects on
how a scan is conducted. If you are looking for larger targets, the distance between the single
measure points and scanning paths can be larger, as if you are looking for small targets.
• Inform yourself about the area, where you are searching. Does it make sense to detect here? Are
there historical references which confirms your speculation? What type of soil is on this area?
Are there good conditions for data recording? Is it allowed to search at this place (e.g. private
property)?
OKM Ortungstechnik GmbH
www.okmmetaldetectors.com
Page 62

62 Field procedure
• Your first measurement in an unknown area has to be large enough to get representative values.
All further control measurements should be adjusted individually.
• What is the form of the object you search? If you are looking for an angular metal box, the
identified object in your graphic should have a form according to this.
• To get better values concerning depth measurements, the object has to be in the center of the
graphic, which means it has to be framed by normal reference values (normal ground). If the
object is on the side of the graphic and not totally visible an estimated depth measurement is not
possible and also measurement of size and form are limited. In this case, repeat the scan and
change the position of your scan area, to receive an optimal position of the anomaly inside of the
graphic.
• There should not be more than one object in a scan. This will influence the depth measurement.
It is useful to scan partial areas over such targets.
• You should do at least two controlled scans to be more sure about your results. This is also
important to recognize areas of mineralization.
• Most important rule when dealing with mineralization. REAL TARGETS DON'T MOVE! If your
target moves then it is most likely mineralization.
8.2.1 Orientation of probe
During one measurement the probe should have always the same distance to the ground. Generally we
recommend a height of about 5 – 15 cm from the surface of the ground if possible.
In the event that you are going to go over stones, wood or high grass that is higher, start your scan with
the sensor higher right from the beginning. In circumstances like these, then perhaps you will need to
start the scan with the probe at a height of 2 feet (50 cm) and keep it at that level for the entire scan. It
is important to maintain the height, this will eradicate many errors. As a rule, do not change the height
during a scan for it may create unnecessary errors.
Another important aspect is the physical orientation of the probe. During the "Parallel" scan mode the
orientation of the probe does not change because you are always measuring in the same direction. Even
in the "Zig-Zag" scan mode the orientation of the probe must not be changed. That means you are not
allowed to turn yourself with the device and the probe at the end of the scanning path. Instead you
should walk backwards and continue scanning. Otherwise your obtained graphic includes red or blue
stripes. These stripes throughout a scan are commonly referred to as “Rotational Errors”.
8.2.2 Parallel or Zig-Zag?
For skilled users of the eXp 4000 both scan modes are suitable. According to experience the best
graphics has been received in the "Parallel" mode, because you are starting at the same point and
traveling in the same direction. It is also easier to control your walking speed.
OKM Ortungstechnik GmbH
www.okmmetaldetectors.com
Page 63

Field procedure 63
Especially in uneven territories like mountain sides, acclivities or other inclined layers the parallel mode
is preferred. When it comes to speed, the experienced user will very often use the Zig-Zag mode for the
initial scan to determine if there are anomalies in the area worth further research.
8.2.3 Manual or automatic impulse mode?
Large even or passable surfaces are commonly measured in the automatic mode. The manual impulse
mode is mostly used for difficult uneven terrain, areas where there is quite a bit of growth and if the
measurement result needs to be very accurate.
In terrains with difficult access like mountain cliffs and sides, slippery surfaces or overgrown areas, it is
wise to use the manual impulse mode. Because each impulse will be released manually, you have enough
time to position the probe in the correct way and record the measured value. In this way, you can also
measure accurately previously marked dots of a predefined grid.
8.2.4 Tips from the trainers themselves
When conducting scans, there are some extremely important items that need to be noted. First of all it is
crucial that you relax. When you are tense, you are putting too much pressure on yourself to do the scan
correctly; often resulting in errors.
• Newly buried targets are difficult to see. Many users receive the equipment and the first thing
they do is go out and bury an object. When an object goes into the ground it changes the natural
signature of the soil and creates some kind of noise. Usually the buried object has a weaker
signature than the unnatural noise and therefor is not detectable. So taken scan images will not
show the buried item but visualize the noisy area in blue colors. After the item has been
seasoned, meaning it has been in the ground for a complete cycle of seasons (usually a year), the
noise gets reduced and the signature of the buried object becomes visible again.
• Train on known targets. In the training course at the factory we have several objects that have
been buried for years, just like real targets in the field. These targets can be quickly and easily
identified because they are not natural to the soil. Other targets that you can use in your own
area are buried utilities. Pipes, tanks, electrical, sewers, graveyards, etc... Most of these items
can be found in every community, town or city. This is where you need to begin your training if
you are going to self-train.
• Get professional training. When you take advantage of receiving the training, either from the
factory or a qualified dealer, you will understand not only the use and operation of the OKM
detector but also the software so much easier and be able to identify targets as well as errors.
• Do not rely on just one scan measurement. So many users go out into the field and they make a
measurement and see a target. Instead of repeating the scan and reproducing it several times,
they go out and get a shovel and dig. On very rare occasion will the first scan be perfect. Even
the trainers do multiple scans to ensure that they are not looking at areas of mineralization or an
error.
OKM Ortungstechnik GmbH
www.okmmetaldetectors.com
Page 64

64 Field procedure
• Soil Mineralization – Oh! Very frustrating! We will all experience it. When you are in an area that
is known to have pockets of mineralization, be prepared to conduct more scans than normal.
◦ Clay is probably the number one foe. Depending on the iron content of the clay will
determine how strong the attenuation will be. A quick rule of iron content is how dark it is, it
can vary from a light gray up to a dark orange. The darker the more iron it will have in it.
◦ Sand is usually very clear and easy to hunt in. There are two factors of sand that need to be
noted. Sand where the ground water is very shallow, meaning that the ground water is
usually just a couple of meters from the surface or desert sand where it is very arid. In
desert sand, the targets can be situated 3x deeper than indicated.
◦ Farmland is another area to take note of. In modern farms, so many nutrients and fertilizers
are introduced creating an unnatural area of mineralization.
◦ Rocky mountainous areas. Areas with many mountains are also riddled with patches of
mineralization. Mountainous areas are created from faults in the earth and this is probably
the biggest area for natural treasures as well as mineralization.
OKM Ortungstechnik GmbH
www.okmmetaldetectors.com
Page 65

9 Optional Equipment
CHAPTER 9
Optional Equipment
Here you can find additional information on accessories that can compliment the basic unit. Keep in
mind that the mentioned accessories are not included in the normal scope of delivery.
Page 66
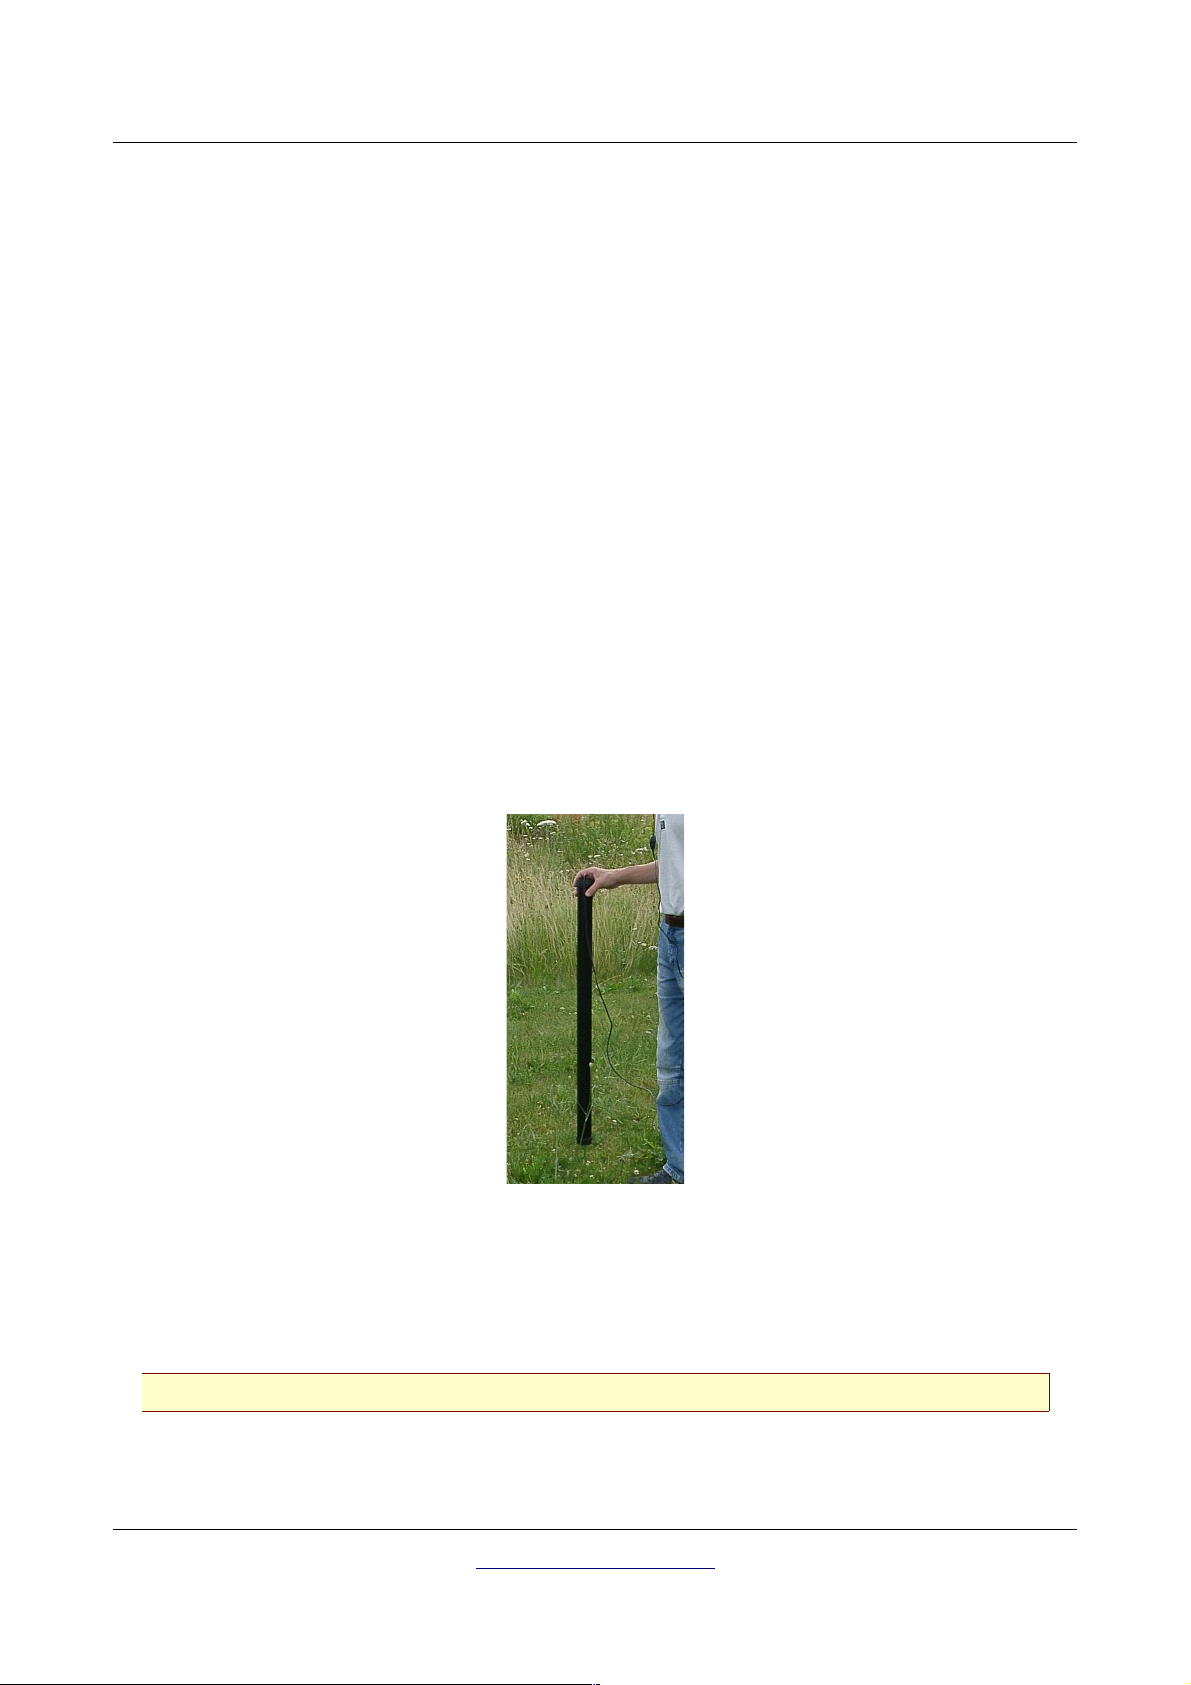
66 Optional Equipment
9.1 Super Sensor
The Super Sensor is a hig hresolution antenna, which is specially adjusted to detect metals. Yet it is also
possible to recognize larger voids with this antenna. A particular characteristic is to distinguish ferrous
metals from nonferrous metals. This discrimination is possible in the operating mode Discrimination.
Compared to the standard Horizontal GPR-antennas the Super Sensor can find much smaller and deeper
situated metal objects.
9.1.1 Usage
The Super Sensor can be used in the following operating modes:
• Magnetometer
• Ground Scan
• Discrimination
To use the Super Sensor with the device, you just have to connect it to the main unit. Therefore you have
to plug in the connector of the antenna in the appropriate input of the device. Hold the antenna always
vertical to the ground in your hand, whereby the cable should come out at the upper end of the antenna.
The figure 9.1 shows how the Super Sensor has to be hold in a correct way.
Illustration 9.1: Position of Super Sensor
The Super Sensor should not be swinged nor moved up and down during the measurement. The more
even you hold the antenna the better will be your measured graphical results. The distance between the
ground and lower part of the antenna should be about 10 cm, but can be enlarged depending on the
terrain conditions.
The orientation of the antenna should not be changed during the complete measurement!
OKM Ortungstechnik GmbH
www.okmmetaldetectors.com
Page 67
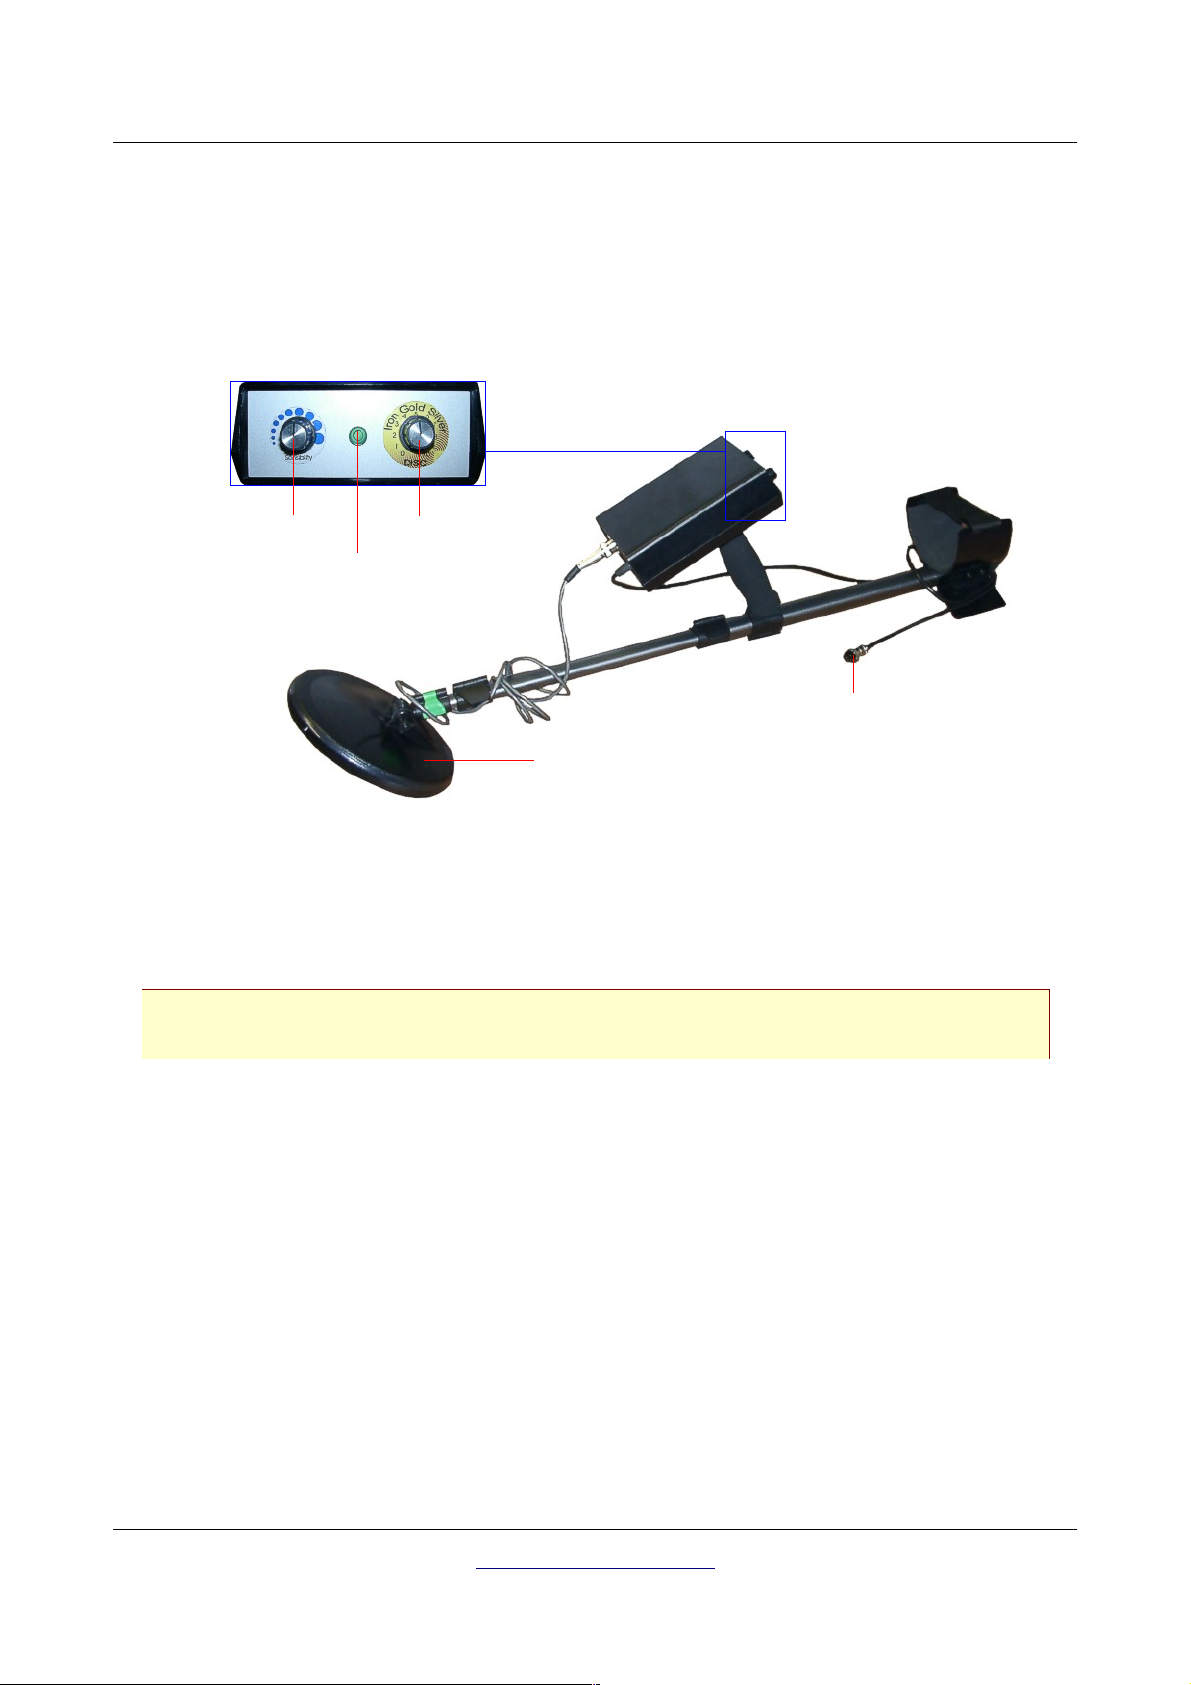
67 Optional Equipment
9.2 DDV system
With the DDV system (Disc Detector Visualization System) a powerful metal detector is on your disposal,
which not only supports your underground research with a visual representation but also offers you
various filter possibilities.
Sensitivity
regulator
LED
Discriminator
Connector plug
Coil
Illustration 9.2: Control Elements of the Detector
To use the DDV system just plug in the connector plug into the control unit of your eXp 4000. Then
select the operating mode "Metal Detector" in the main menu.
Attention: As soon as you confirm this option the ground balance will start. Detailed information
you can find in section 9.2.3 on page 70!
Now you have to pivot the detector coil continiously right above the ground, trying to keep the same
distance to the soil. Adopt the rhythm of the graphical representation on the screen. As soon as you pass
above a metallic object a yellow colored trace will appear in your graphic and you can hear an acoustical
sound through the headphones.
9.2.1 Calibration
The manual calibration is only possible for product version
product versions have to be calibrated from the manufacturer. The version of your device you can read
inside the main menu.
Before using the metal detector for the first time the DDV system has to be adjusted on the eXp 4000. If
you purchased the DDV system together with the main unit the metal detector has already been
OKM Ortungstechnik GmbH
www.okmmetaldetectors.com
V1.1
and following. In case of need all former
Page 68
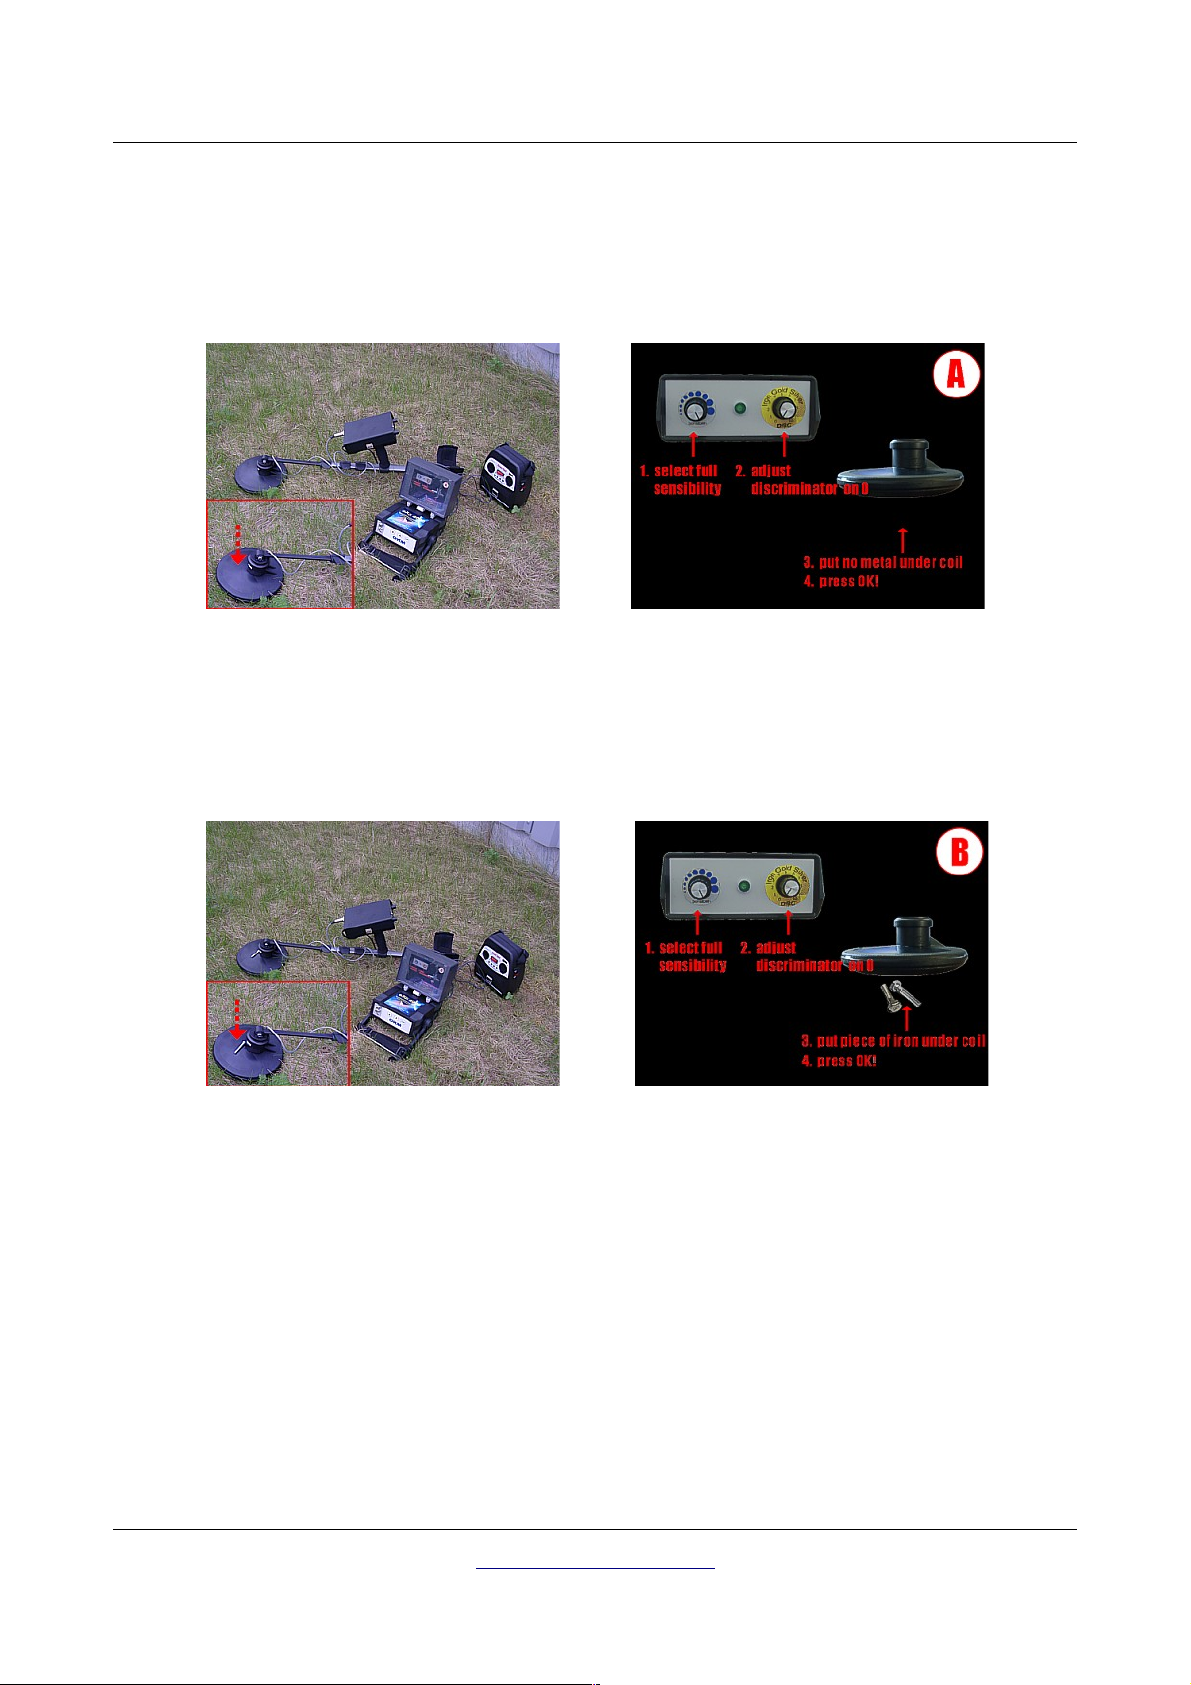
9Optional Equipment 68
calibrated in the optimal way. Anyway you have the possibility at any time to recalibrate the DDV
system. Therefore you have to activate at first the operating mode "Metal Detector".
Place the DDV system on the ground like shown in figure 9.3. Take care that no metal is situated near to
the coil! Press the key OK, to start the calibration.
Illustration 9.3: Calibration of the DDV system, step 1
In the first step of calibration you have to turn the sensitivity regulator completely to the right side and
so adjust it on full power. The discriminator has to be adjusted on the value 0. Take care that no metal is
located near to the coil! Now press the key OK, to start the calibration. Wait until this process is
finished.
Illustration 9.4: Calibration of the DDV system, step 2
In the second step of calibration you have to leave the sensitivity regulator in the same position and
place a piece of iron (e.g. screw or nail) under the detectors coil. Alternative choice is to place the metal
directly on the top of the coil, like you can see in figure 9.2. Now press again the key OK and wait until
this process is also finished.
After finishing the calibration a visual signal (yellow light) should be visible on the screen. If the
headphones are connected you will also hear an acoustical signal. The DDV system is now calibrated to
work correctly on-site.
OKM Ortungstechnik GmbH
www.okmmetaldetectors.com
Page 69

69 Optional Equipment
9.2.2 Adjust the discriminator
The discriminator serves to filter certain materials. So it is possible to ”exclude“ for example worthless
iron and steel objects. Or people who are hunting for treasures and gold are able to exclude other
materials with the help of this discriminator.
Illustration 9.5: Adjustment of discrimination
In figure 9.5 the regulator to adjust the discrimination is represented. This regulator can filter certain
materials. Table 2 explains the adjustment in the case of normal ground conditions1.
Adjustment Indicated materials
0 All metallic objects
3 Iron, gold, bronze, silver, aluminium
5 Gold, bronze, silver, aluminium
7 Silver, aluminium
10 Aluminium
Table 2: Standard adjustment of the discrimination
When you adjust the regulator for discrimination on gold, the detector reacts besides gold also on
bronze, silver and aluminium. To find out if there is really gold in the ground you have to follow the
following instructions:
1. Switch the discriminator on gold and start your soil examinations until you reach a place where
the detector reacts positive, which means you can hear an accustical sound signal.
2. Now switch the discriminator on silver and examine this place again. Following there will be two
possibilities:
• The detector reacts positive! The material under the ground is not gold, but could be
silver or aluminium.
• The detector does not react! There is probably golden material in the ground but also
bronze is possible.
Please consider that you always should do the ground balance, which is explained in this following
section.
1 The indications from table 2 concern the use in normal type of soil. In extreme conditions (mineralisation, salt
deposits, ... ) they can variate from this normal value.
OKM Ortungstechnik GmbH
www.okmmetaldetectors.com
Page 70

9Optional Equipment 70
9.2.3 Ground Balance
A correct soil reconcilation (Ground Balance) is absolutely necessary that the adjusted discrimination
can work properly. If the soil reconciliation is not done correctly the operation of the device and the
integrated discriminator cannot work properly.
In the following section you can find a list of all necessary working procedures to do a correct soil
reconciliation:
1. Power on the eXp 4000 and connect the DDV system.
2. Adjust the discriminator on the material you like, see previous section.
3. Put the device with coil approx. 10 cm above the ground.
4. Select the operating mode "Metal Detector" and confirm it.
If you hear an acoustic signal from the DDV system after these indications, then the ground balance is
not finished correctly. Repeat these steps until there is no acoustic signal from the metal detector.
The following causes can prevent a correct soil reconciliation:
• You are staying above a metalic object.
• You confirm the operating mode "Metal Detector" without holding the coil directly above the
ground.
• During the confirmation of the operating mode "Metal Detector" you are holding the coil to high
and then minimize the distance to the ground.
• You are turning the discriminator during ground balance.
Only if you are doing a correct soil reconciliation the functionality of discrimination can be
guaranteed!
OKM Ortungstechnik GmbH
www.okmmetaldetectors.com
Page 71

10 Error Messages
CHAPTER 10
Error Messages
In this chapter you will find possible error messages which can appear during the work with the device.
Page 72

72 Error Messages
In case you are scanning very large areas in the operating mode "Ground Scan" the stored files will also
be very large, which could fill up the internal memory completely. As soon as the free memory cell is less
than 20% the message shown in figure 10.1 will appear.
Illustration 10.1: Only a small amount of memory available
If there is no more free memory available you will see a message like in figure 10.2. You can free
memory space by transfering all stored data via software to your computer or by selecting the option
"Empty Memory" to delete all stored data without having transferred them to your computer.
Illustration 10.2: No free memory available
If message 10.3 appears the device cannot control the operating voltage. This also means it cannot warn
you in case of a low status of the battery. Also the automatic shutdown of the device may be affected. It
is adviced to let the device check from the manufacturer to avoid further damages.
Illustration 10.3: Internal Hardware Error
OKM Ortungstechnik GmbH
www.okmmetaldetectors.com
Page 73
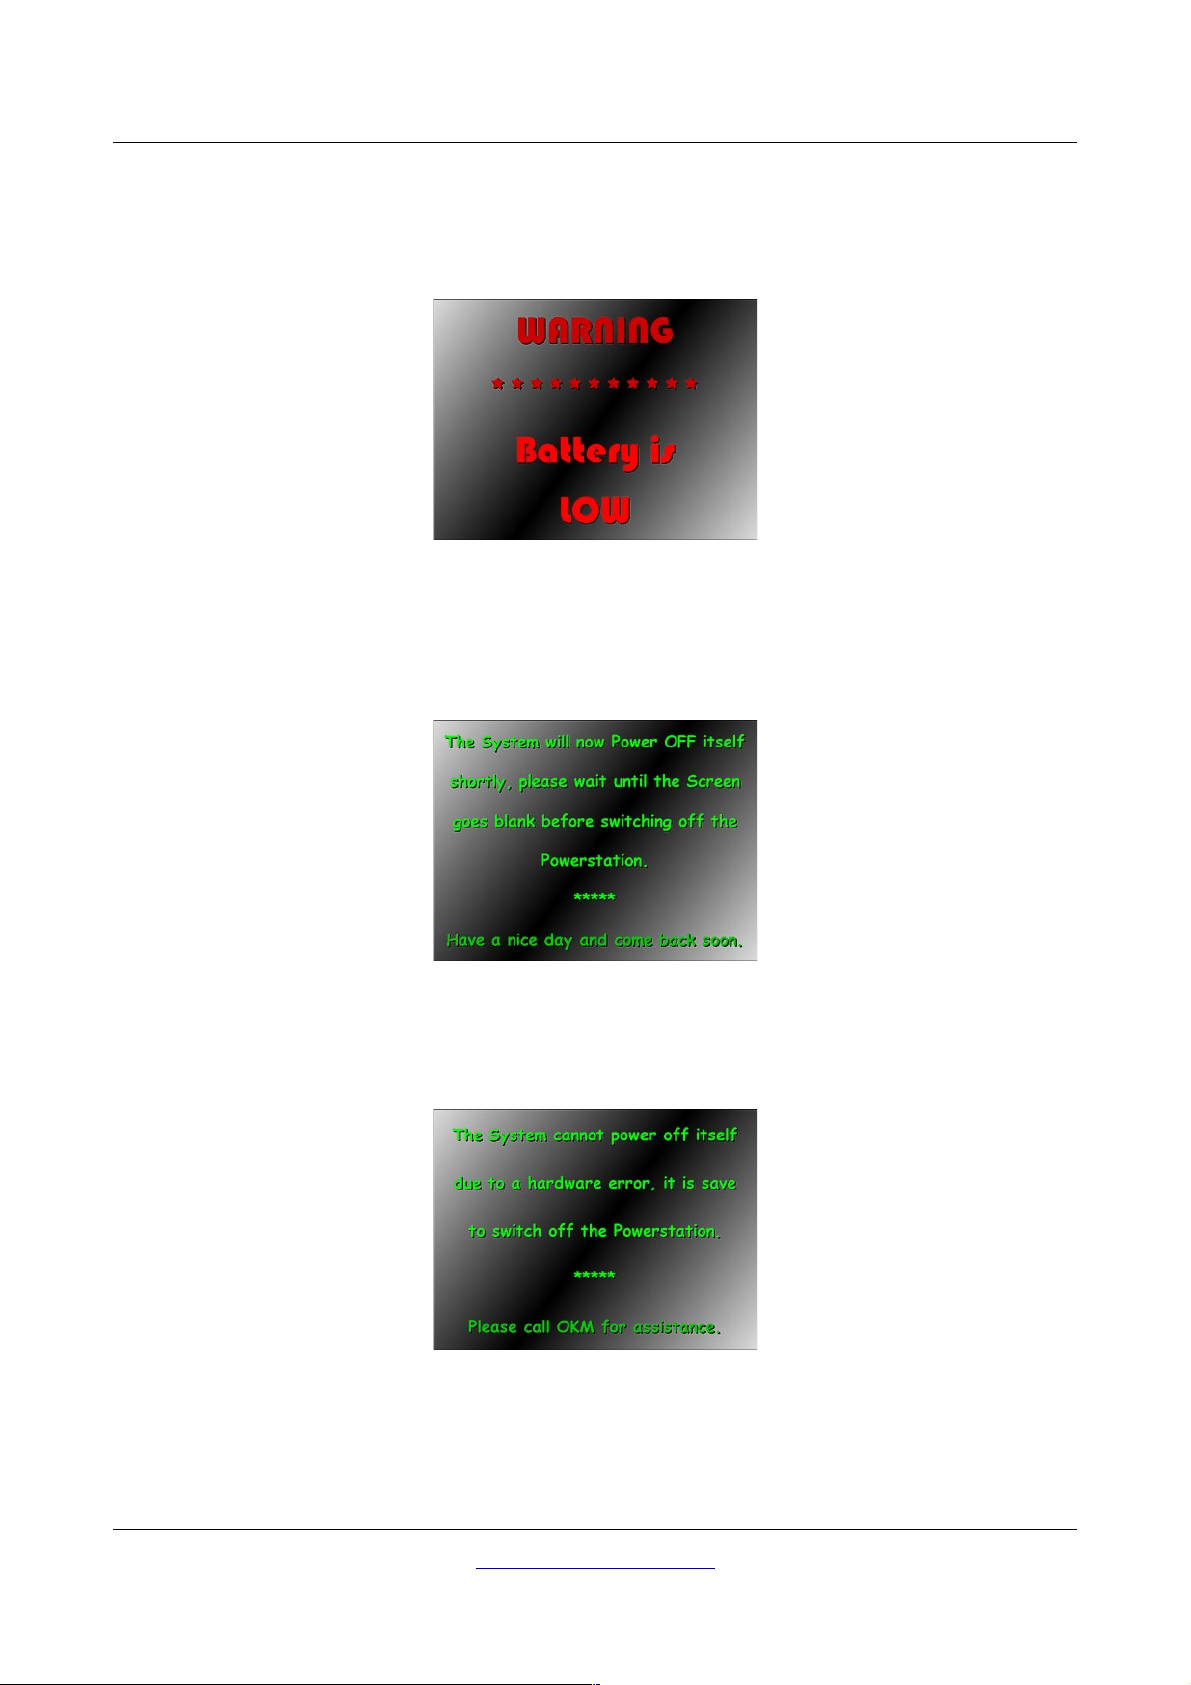
Error Messages 73
Message 10.4 appears if the battery is low because of a long operating time with the device and not
enough voltage is available. You should power off the device and charge the external power supply as
soon as possible. If you continue operating with the device it could be possible that data gets lost.
Illustration 10.4: The external power supply has to be charged
Because there is a PC module integrated in the device you have to shutdown it like a normal computer.
Therefore you have to use option "Exit" from the main menu. The message like in figure 10.5 remind you
to wait until the device powered off by itself.
Illustration 10.5: Shutting down the system
If the device itself is not able to power off, a message like in figure 10.6 is shown. In this case you simply
power off your external power supply.
Illustration 10.6: Shutting down the system is not possible
OKM Ortungstechnik GmbH
www.okmmetaldetectors.com
 Loading...