


_____________________________________________________________________
OPERATING MANUAL
Before attempting to connect or operate this product,
please read these instructions completely
ON-SCREEN-DISPLAY
Optical Low Pass Filter (OLPF) Switching Mechanism
CCD ZOOM CAMERA
SZX23-1480 NTSC
SZX23-1480P PAL
12V DC
WARNING:
AND DO NOT REMOVE COVER OR BACK.
CAUTION:
FILES INSTALLATION MARKING:
TO REDUCE THE RISK OF FIRE OR ELECTRONIC SHOCK,
DO NOT EXPOSE THIS APPLIANCE TO RAIN OR MOISTURE
1. CONNECT 12V DC UL LISTED POWER SUPPLY.
2. INSTALL CAMERA UNDER UNSTABLE LIGHT SOURCE MAY CAUSE
ABNORMAL FUNCTION.
3. ONLY USE CAMERA UNDER CONDITIONS WHERE TEMPERATURES
ARE BETWEEN -10°C to 50°C.
INSTALLATION SHOULD BE MADE BY A QUALIFIED SERVICE PERSON
AND SHOULD CONFORM TO ALL LOCAL CODES

______________________________________________________________________
1. General……
This camera features a new Ultra Super high sensitive Near Infra-red CCD sensor and the
combination of special optical and digital electronic processing circuit, deliver a high
resolution, sharp, crisp image at daytime, and a clear monochrome picture under low light
or minimal IR projection. This superior and high sensitive series ensure to meet any strike
24 hour’s surveillance monitoring demand. This color CCD video camera employs a 1/4 inch
charge coupled device solid-state imaging device with 470/410 k (hi- res.) picture elements,
a 23x optical zoom lens, a 10x digital zoom, and external sync function. T his unit is
equipped with a newly developed DSP (Digital Signal Processor) for video signal process.
A micro-controller is also introduced to provide excellent color reproduction, sharp, stable
picture and most of the function’s control; the special for this camera is it has more than 4
times sensitivity on NIR range and 2 times on visible light range compare to conventional
camera.
…………………… ……………………… ………
2. Features…
1. Easy recognize the objects under extreme low light.
2. Accept minimal IR illumination for completely dark surveillance for excellent picture
quality.
3. Daytime color and auto switchover to black-w hite picture at night (IR filter removable).
4. 480 lines of horizontal resolution and high quality picture by utilizing digital processing
LSI’s
5. 230x zoom (23x optical & 10x digital zoom).
6. Minimum illumination of 0.5Lux (F1.2, Target) and signal-to-noise ratio of 50 dB is
realized by employing an extra high sensitivity image sensor with micro lenses and low
noise circuit design.
7. High quality picture –A digital signal processor (DSP) performs digital horizontal and
vertical aperture enhancement to produce high-resolution picture.
8. A newly developed intelligent wide range Auto Tracing White Balance (ATW) that
automatically adjusts the white balance according to the color temperature of the light
source illuminating the subject.
9. Smart digital control Auto BLC.
10. Advanced Auto Exposure System for both fix iris and auto iris lenses control the
amount of light to ensure it is always optimized.
11. Internal or Line-lock external sync.
12. Long life and high reliability.
………………………… ……………………………….
- 1 www.OKIUSA.com
______________________________________________________________________
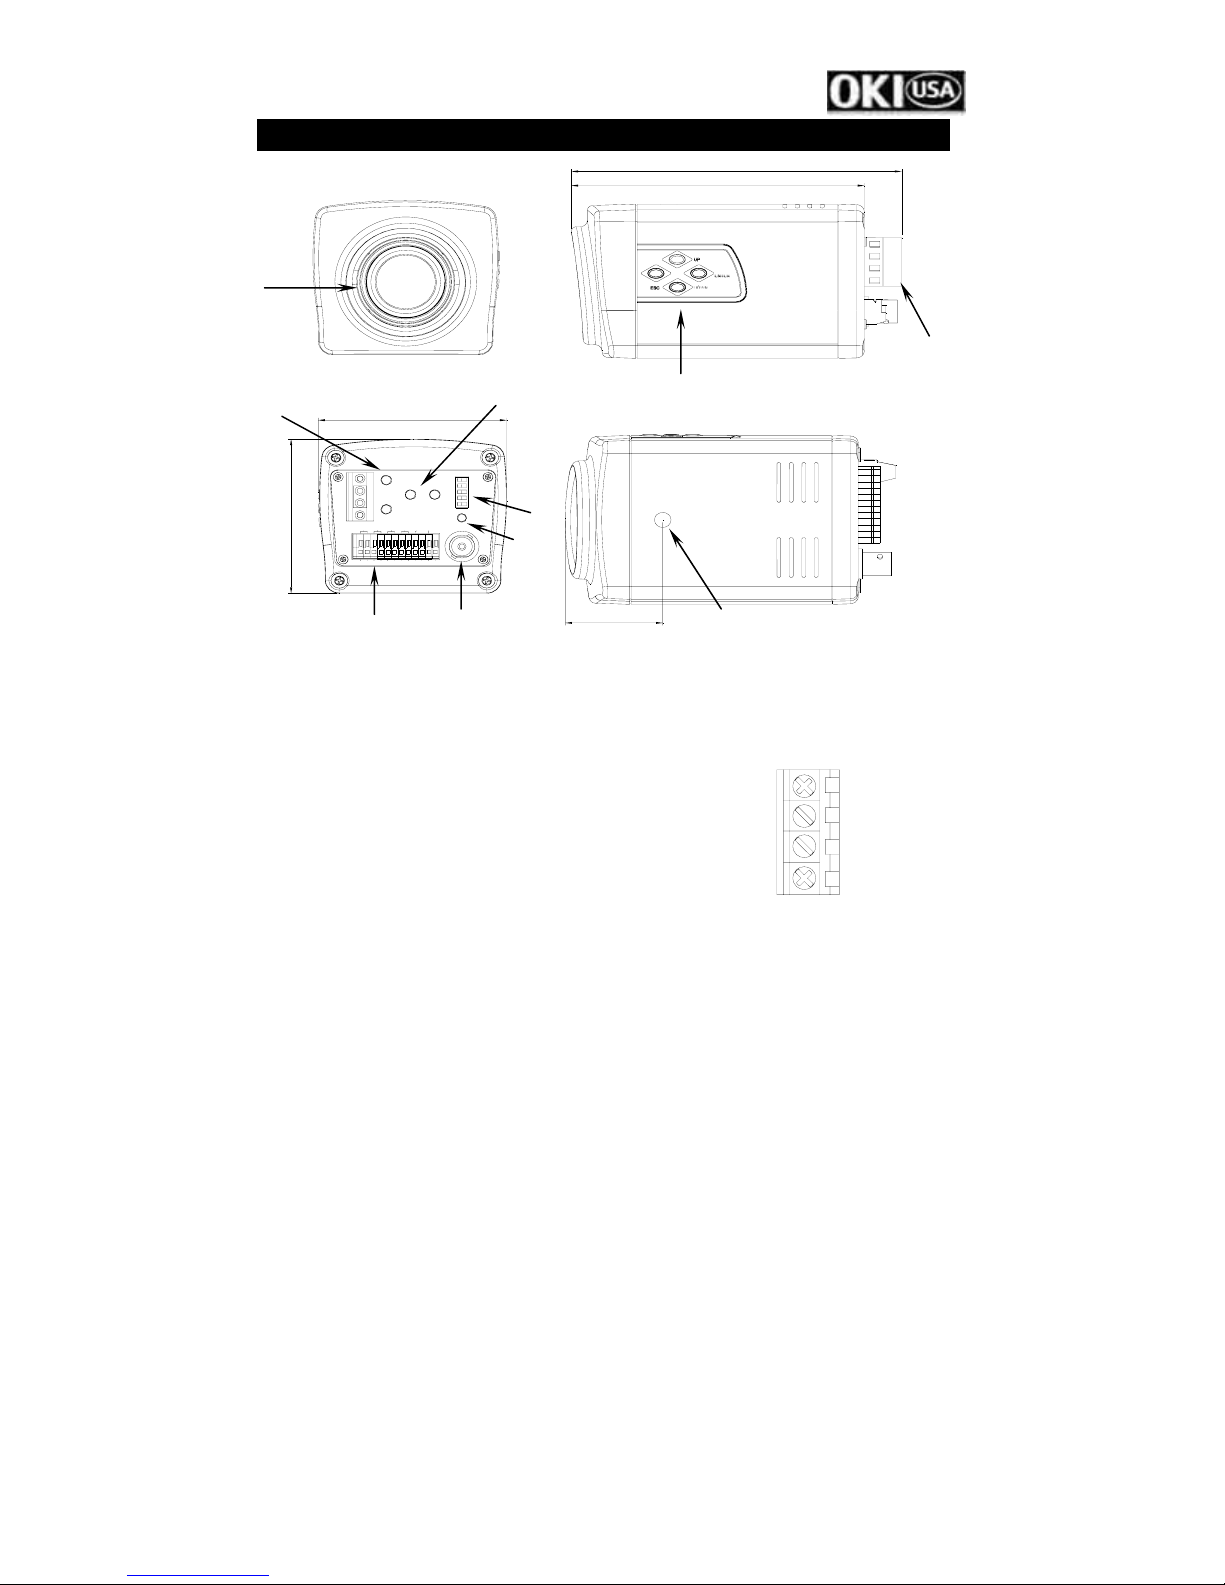
3. Major Control And Their Function-- -----------------------
109.5
123.5
70
D
DC12V
WIDE
+
-
63.6
I
03 1211100908070605040201
TELE
FZRS485 D0
1
0
5
4
3
FAR
2
NEAR
1
PROTOCOL
PL
DI
VIDEO OUT
E
G
H
F
36.4
A. Holder screw hole
The mounting hole is a standard photographic pan-head screw size
(1/4” – 20)
B. DC12V Block Terminal
This terminal accepts DC12V Please add + & - to power
terminals drawing
C. Zoom adjustment ( WIDE / TELE )
D. Focus adjustment ( FAR / NEAR )
E. Protocol select DIP Switch
F. Video output terminal (BNC)
This connector is used to connect with the VIDEO IN connector of monitor.
G. Power LED
H. Screwless type terminal 12 pin (Remote).
I. On-Screen Display keypad (UP / DOWN / ENTER / ESC)
J. Filter holder (M30.5 x 0.5mm)
230 X
COLOR CCD CAMERA
DIGITAL ZOOM
A
B
DC 12V
- 2 www.OKIUSA.com
______________________________________________________________________
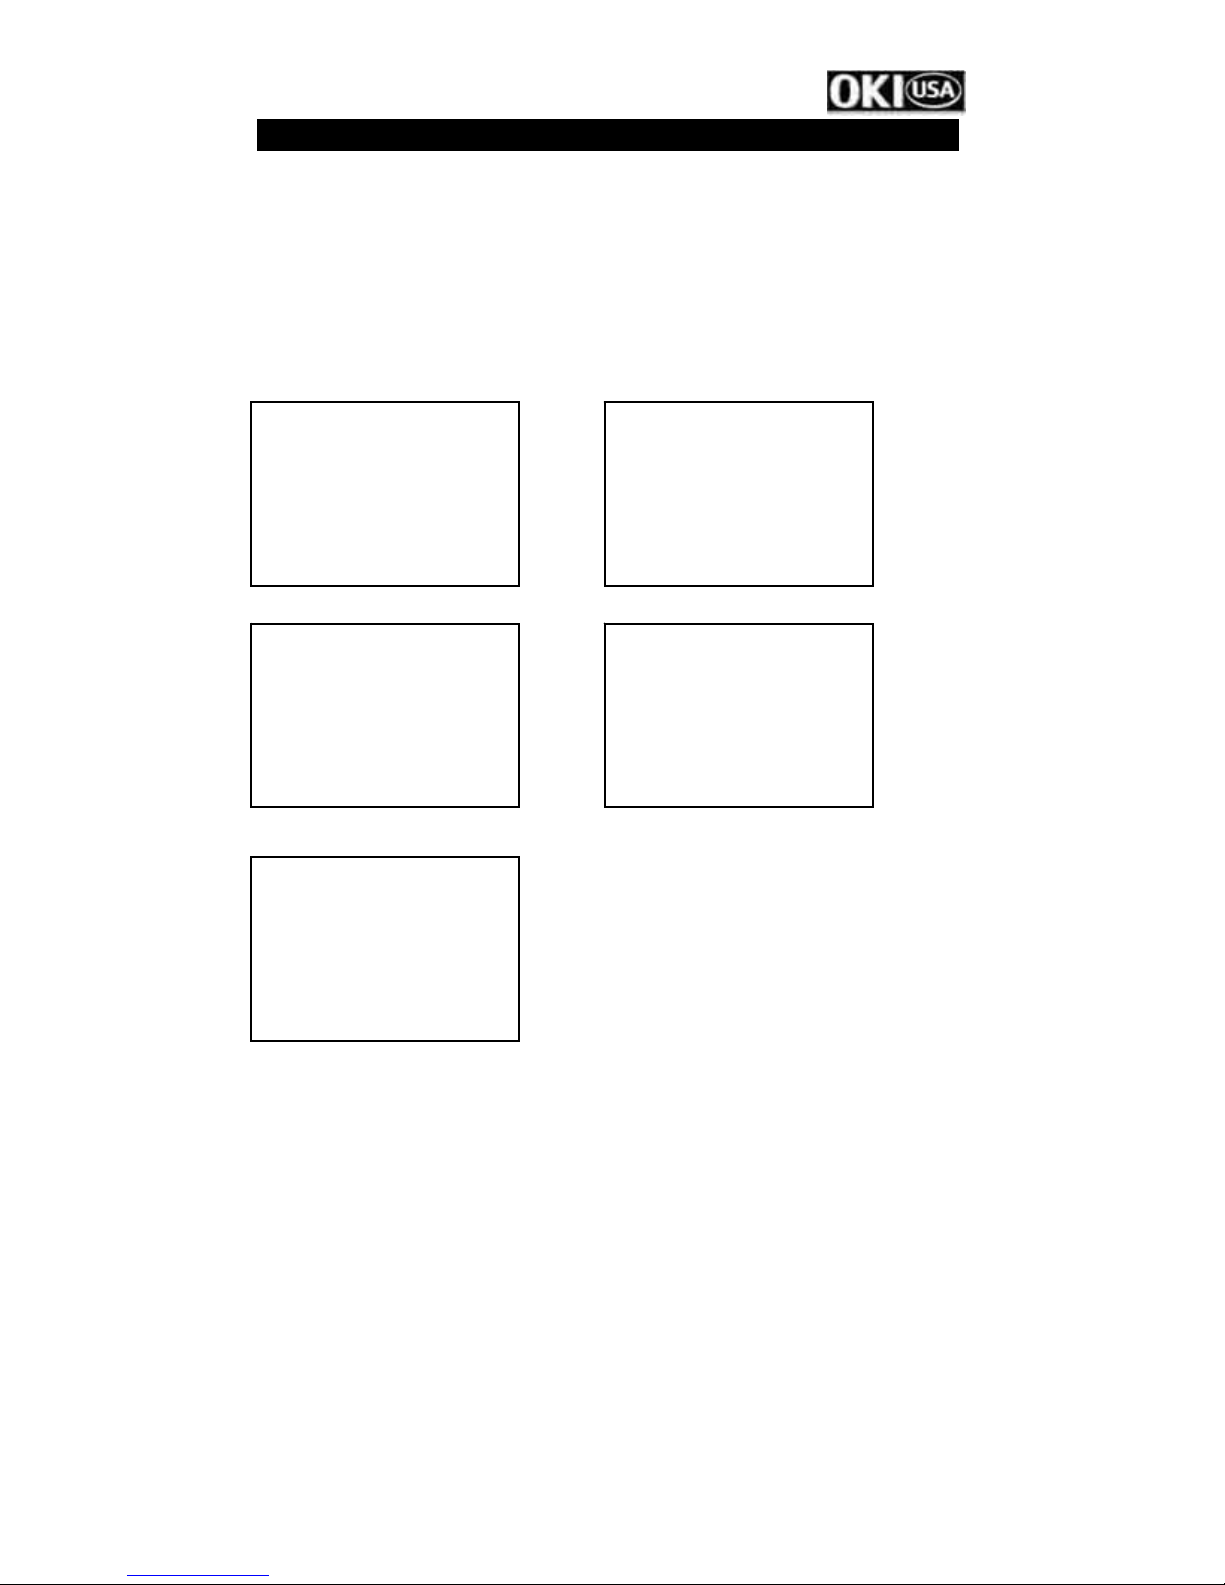
4. User OSD Setting Menu And Functions----- ---------------
[UP]
[DOWN]
[ENTER]
[ESC]
Push [ENTER] key 3 sec. to get into the OSD menu.
Push [ESC] key to leave menu.
If pushed [ESC] key, all set parameter data will be saved and return back to the previous
menu page, this will occur while setting the parameter and without push [E NTER] key.
:
UP & RIGHT MOVE KEY
:
DOWN & LEFT MOVE KEY
:
ENTER KEY
:
ESC KEY
SETUP MENU [1/5]
CAMERA ID ON
SENSE UP x4
AISHUT AUTO.
AES FIX.
BLC OFF
AGC +4
Page1 MAIN MENU Page2 MAIN MENU
SETUP MENU [2/5]
WHITE BAL ATW.
SYNC OFF
ZOOM
DIGITAL ZOOM OFF
FOCUS
AUTO FOCUS OFF
SETUP MENU [3/5]
POSITION LOAD.
H-GAIN +6
V-GAIN +6
MOTION OFF
IR ON.
INITIAL ON
Page3 MAIN MENU Page4 MAIN MENU
SETUP MENU [4/5]
DEFAULT CANCEL
FREEZE OFF
FREEZE MODE FIELD
ZOOM SPEED +3
FOCUS SPEED MIN
GAMMA GAMMA1
SETUP MENU [5/5]
ZOOM+AF OFF
AF SLEEP OFF
SCALE OFF
LANGUAGE ENGLISH
WINKER OFF
MISC
Page 5 MAIN MENU
- 3 www.OKIUSA.com

______________________________________________________________________
4.1 Camera Identification Setting (CAMERA ID)
SETUP MENU [1/5]
CAMERA ID →ON.
SENSE UP x4
AISHUT AUTO.
AES FIX.
BLC OFF
AGC +4
Page1 MAIN MENU
Move cursor to CAMERA ID, press ENTER key to enter
ID FUNCTION SELECTING menu, then Press UP or
DOWN key to select ON.
Press ENTER key to enter CAMERA ID EDIT menu.
CAMERA ID
EDIT
POSITION L-U
↓
- - - - - - - - - - - - - - - - - - - -
CAMERA ID EDIT MENU
Press ENTER key to edit ID character, and then press UP
or DOWN key to select ID character position (total twenty
character positions).
Press ENTER key to enter ID characters menu.
Select the desired character by using UP and DOWN
CAMERA ID
EDIT
POSITION L-U
↓
- - - - - - - - - - - - - - - - - - - -
ID CHARACTER MENU
button, and Press ENTER key to confirm the blinking
character .The first character is saved and the cursor in
the button of the screen moves to next (Maximum 20
characters).
CAMERA ID
EDIT
→POSITION L-U
- - - - - - - - - - - - - - - - - - - -
Move cursor to POSITION, press ENTER key to enter ID
POSITION SELECTING menu, then Press UP or DOWN
key to select ID POSTION L-U, R-D, L-D or R-U.
CAMERA ID EDIT MENU
- 4 www.OKIUSA.com

______________________________________________________________________
4.2 SENSE UP
SETUP MENU [1/5]
CAMERA ID ON
SENSE UP →x4
AISHUT AUTO.
AES FIX.
BLC OFF
AGC +4
Page1 MAIN MENU
Move cursor to SENSE UP, press ENTER key to enter
SENSE UP FUNCTION SELECTING menu, then Press UP
or DOWN key to select OFF, x2, x4, x6, x8, x12, x16, x32
or x64 (0 Frame, 2 Frames, 4 Frames, 6 Frames, 8
Frames, 12 Frames, 16 Frames, 32 Frames, 64 Frames, 9
steps adjustable).
4.3 AISHUT (Auto Iris)
4.3.1 AISHUT AUTO MODE
SETUP MENU [1/5]
CAMERA ID ON
SENSE UP x4
AISHUT →AUTO.
AES FIX.
BLC OFF
AGC +4
Page1 MAIN MENU
AISHUT
AUTO LEVEL →+4
AUTO LEVEL ADJUSTMENT MENU
Move cursor to AISHUT, press ENTER key to enter
AISHUT FUNCTION SELECTING menu, then Press UP
or DOWN key to select AUTO.
Press ENTER key to enter AUTO LEVEL ADJUSTMENT
menu.
Press ENTER key to enter AUTO LEVEL SELECTING
menu, then Press UP or DOWN key to select MIN, +1,
+2, +3, +4, +5, +6, +7, MAX.
- 5 www.OKIUSA.com

______________________________________________________________________
4.3.2AISHUT FIX MODE
Move cursor to AISHUT, press ENTER key to enter
SETUP MENU [1/5]
CAMERA ID ON
SENSE UP x4
AISHUT →FIX.
AES FIX.
BLC OFF
AGC +4
Page1 MAIN MENU
AISHUT
FIX LEVEL →+4
FIX LEVEL ADJUSTMENT MENU
AISHUT FUNCTION SELECTING menu, then Press UP or
DOWN key to select FIX.
Press ENTER key to enter FIX LEVEL ADJUSTMENT
menu.
Press ENTER key to enter FIX LEVEL SELECTING menu,
then Press UP or DOWN key to select MIN, +1, +2, +3, +4,
+5, +6, +7, MAX.
4.4 AES (Auto Exposure Mode)
4.4.1 AES FIX MODE
SETUP MENU [1/5]
CAMERA ID ON
SENSE UP x4
AISHUT AUTO.
AES →FIX.
BLC OFF
AGC +4
Page1 MAIN MENU
AES
FIX LEVEL →OFF
FIX LEVEL ADJUSTMENT MENU
Move cursor to AES, press ENTER key to enter AES
FUNCTION SELECTING menu, then Press UP or
DOWN key to select FIX.
Press ENTER key to enter FIX LEVEL ADJUSTMENT
menu.
Press ENTER key to enter FIX LEVEL SELECTING
menu, then Press UP or DOWN key to select OFF,
1/100, 1/250, 1/500, 1/1000, 1/2000, 1/4000 or 1/10000.
- 6 www.OKIUSA.com

______________________________________________________________________
4.4.2 AES AUTO MODE
SETUP MENU [1/5]
CAMERA ID OFF
SENSE UP OFF
AISHUT AUTO.
AES →AUTO.
BLC OFF
AGC +4
Page1 MAIN MENU
Move cursor to AES, press ENTER key to enter AES
FUNCTION SELECTING menu, then Press UP or
DOWN key to select AUTO.
Press ENTER key to enter AUTO LEVEL
ADJUSTMENT m enu.
AES
AUTO LEVEL →+4
AUTO LEVEL ADJUSTMENT MENU
Press ENTER key to enter AUTO LEVEL SELECTING
menu, then Press UP or DOWN key to select MIN, +1,
+2, +3, +4, +5, +6, +7, MAX.
4.5 BLC (Backlight Compensation)
SETUP MENU [1/5]
CAMERA ID ON
SENSE UP x4
AISHUT AUTO.
AES AUTO.
BLC →ON.
AGC +4
Page1 MAIN MENU
Move cursor to BLC, press ENTER key to enter BLC
FUNCTION SELECTING menu, then Press UP or
DOWN key to select ON.
Press ENTER key to enter BLC AREAS AND LEVEL
ADJUSTMENT m enu.
BLC
→BLC AREA
BLC LEVEL MIN
AREA AND LEVEL ADJUSTMENT MENU
Press ENTER key to enter BLC AREA ADJUSTMENT
menu.
- 7 www.OKIUSA.com

______________________________________________________________________
Press ENTER key to set BLC AREA BLOCK. Press UP or DOWN key to select BLC AREA
BLOCK.
OPD WINDOW
This method is suited for cases where the main subject is fixed within the screen.
The important object in a scene is usually placed in the center of the monitor’s screen. In
this mode more photometric weight is given to the center of the screen than to the edge of
the picture, this function will eliminate the interference by strong background light, which
makes the camera picture dark. The size and location of center window can be adjusted
freely by user within 48 areas on screen.
BLC
BLC AREA
BLC LEVEL →MIN
Press ENTER key to enter BLC LEVEL ADJUSTMENT
menu, then Press UP or DOWN key to select MIN, +1,
+2, +3, +4, +5, +6, MAX.
4.6 AGC (Auto Gain Control)
SETUP MENU [1/5]
CAMERA ID ON
SENSE UP x4
AISHUT AUTO.
AES FIX.
BLC OFF
AGC →+4
AGC ADJUSTMENT MENU
Move cursor to AGC, press ENTER key to enter AGC
LEVEL SELECTING menu, then Press UP or DOWN
key to select BASE, +1, +2, +3, +4, +5, +6, +7, MAX
(0dB ~ 36dB, 9 steps adjustable).
- 8 www.OKIUSA.com

______________________________________________________________________
Y
Y
4.7 WHITE BALANCE
4.7.1 ATW (Auto Trace White Balance)
Move cursor to WHITE BAL, press ENTER key to enter
SETUP MENU [2/5]
WHITE BAL →ATW.
SYNC OFF
ZOOM
DIGITAL ZOOM OFF
FOCUS
AUTO FOCUS OFF
Page 2 MAIN MENU
WHITE BAL FUNCTION SELECTING menu, then Press
UP or DOWN key to select ATW.
Press ENTER key to enter ATW LEVEL ADJUSTMENT
menu.
ATW LEVEL
ATW LEVEL →MIDDLE
R-
GAIN +4
B-Y GAIN +4
ATW LEVEL ADJUSTMENT MENU
Press ENTER key to enter ATW LEVEL ADJUSTMENT
menu, then Press UP or DOWN key to select RED,
RED+, RED++, RED+++, MIDDLE, BLUE, BLUE+,
BLUE++,BLUE+++, 9 steps adjustable.
ATW LEVEL
ATW LEVEL MIDDLE
R-Y GAIN →+4
B-Y GAIN +4
R-Y GAIN ADJUSTMENT MENU
Move cursor to R-Y GAIN, press ENTER key to enter
R-Y GAIN ADJUSTMENT menu, then Press UP or
DOWN key to select MIN, +1, +2, +3, +4, +5, +6, +7,
MAX, 9 steps adjustable.
ATW LEVEL
ATW LEVEL MIDDLE
R-
GAIN +4
B-Y GAIN →+4
R-Y GAIN ADJUSTMENT MENU.
Move cursor to B-Y GAIN, press ENTER key to enter
B-Y GAIN ADJUSTMENT menu, then Press UP or
DOWN key to select MIN, +1, +2, +3, +4, +5, +6, +7,
MAX, 9 steps adjustable.
- 9 www.OKIUSA.com

______________________________________________________________________
Y
Y
4.7.2 AWB (Auto White Balance)
SETUP MENU [2/5]
WHITE BAL →AWB.
SYNC OFF
ZOOM
DIGITAL ZOOM OFF
FOCUS
AUTO FOCUS OFF
Page 2 MAIN MENU
Move cursor to WHITE BAL, press ENTER key to
enter WHITE BAL FUNCTION SELECTING menu, then
Press UP or DOWN key to select AWB.
Press ENTER key to enter AWB LEVEL ADJUSTMENT
menu.
AWB LEVEL
AWB LEVEL →MIDDLE
R-
GAIN +4
B-Y GAIN +4
AWB LEVEL ADJUSTMENT MENU
Press ENTER key to enter AWB LEVEL ADJUSTMENT
menu, then Press UP or DOWN key to select RED,
RED+, RED++, RED+++, MIDDLE, BLUE, BLUE+,
BLUE++, BLUE+++, 9 steps adjustable.
AWB LEVEL
AWB LEVEL MIDDLE
R-Y GAIN →+4
B-Y GAIN +4
R-Y GAIN ADJUSTMENT MENU
AWB LEVEL
AWB LEVEL MIDDLE
R-
GAIN +4
B-Y GAIN →+4
R-Y GAIN ADJUSTMENT MENU
Move cursor to R-Y GAIN, press ENTER key to enter
R-Y GAIN ADJUSTMENT menu, then Press UP or
DOWN key to select MIN, +1, +2, +3, +4, +5, +6, +7,
MAX, 9 steps adjustable.
Move cursor to B-Y GAIN, press ENTER key to enter
B-Y GAIN ADJUSTMENT menu, then Press UP or
DOWN key to select MIN, +1, +2, +3, +4, +5, +6, +7,
MAX, 9 steps adjustable.
- 10 www.OKIUSA.com

______________________________________________________________________
4.8 SYNC
This function is used to adjust phase of external
SETUP MENU [2/5]
WHITE BAL AWB.
SYNC →OFF
ZOOM
DIGITAL ZOOM OFF
FOCUS
AUTO FOCUS OFF
Page 2 MAIN MENU
sync.
When input external sync, we can press ENTER key
to set SYNC ON, then press UP or DOWN key to
adjust phase.
4.9 ZOOM
SETUP MENU [2/5]
WHITE BAL AWB.
SYNC OFF
→ZOOM
DIGITAL ZOOM OFF
FOCUS
AUTO FOCUS OFF
Page 2 MAIN MENU
ZOOM
WIDE - - - - - - - - - - - TELE
ZOOM ADJUSTMENT MENU
Move cursor to ZOOM, press ENTER key to enter
ZOOM ADJUSTMENT menu.
Press UP or DOWN key to select ZOOM WIDE to TELE,
1 to 23 times adjustable.
4.10 DIGITAL ZOOM
Move cursor to DIGITAL ZOOM, press ENTER key to
SETUP MENU [2/5]
WHITE BAL AWB.
SYNC OFF
ZOOM
DIGITAL ZOOM →ON
FOCUS
AUTO FOCUS OFF
Page 2 MAIN MENU
enter DIGITAL ZOOM FUNCTION SELECTING menu.
Press UP or DOWN key to select DIGITAL ZOOM ON
or OFF (1 to 10 times adjustable).
- 11 www.OKIUSA.com

______________________________________________________________________
4.11 FOCUS
Move cursor to FOCUS, press ENTER key to enter
SETUP MENU [2/5]
WHITE BAL AWB.
SYNC OFF
ZOOM
DIGITAL ZOOM OFF
→FOCUS
AUTO FOCUS OFF
Page 2 MAIN MENU
FOCUS
FAR - - - - - - - - - - - NEAR
FOCUS ADJUSTMENT MENU
FOCUS ADJUSTMENT menu.
Press UP or DOWN key to select FOCUS FAR to
NEAR.
4.12 AUTO FOCUS
SETUP MENU [2/5]
WHITE BAL AWB.
SYNC OFF
ZOOM
DIGITAL ZOOM OFF
FOCUS
AUTO FOCUS →ON
Page 2 MAIN MENU
Move cursor to AUTO FOCUS, press ENTER key to
enter AUTO FOCUS FUNCTION SELECTING menu.
Press UP or DOWN key to select AUTO FOCUS ON or
OFF.
4.13 POSITION
SETUP MENU [3/5]
POSITION →LOAD.
H-GAIN +6
V-GAIN +6
MOTION OFF
IR ON.
INITIAL ON
Page3 MAIN MENU
Move cursor to POSITION, press ENTER key to enter
POSITION FUNCTION SELECTING menu.
Press UP or DOWN key to select LOAD, SAVE,
ALARM, and OSD.
- 12 www.OKIUSA.com

______________________________________________________________________
There have 64 steps (position with zoom & focus) can
POSITION SAVE
POSITION SAVE →1
POSITION SAVE MENU
POSITION LOAD
POSITION LOAD →1
POSITION LOAD MENU
be programmed.
After adjusting position with zoom & focus, Press
ENTER key to enter POSITION SAVE SELECTNG
menu.
Press UP or DOWN key to select position (1 to 64
position that you want to save), then press ENTER
key that will be saved.
Press ENTER key to enter POSITION LOAD
SELECTNG menu. Press UP or DOWN key to select
position (1 to 64 position that you want to LOAD),
then press ENTER key that will be loaded.
ALARM POSITION
ALARM POSITION →OFF
ALARM POSITION MENU
Press ENTER key to enter ALARM POSITION
SELECTNG menu.
Press UP or DOWN key to select alarm position (OFF,
1 to 64 position that you want to set), then press
ENTER key that will be set.
When input alarm signal, alarm position will be
loaded.
POSITION OSD
OSD →OFF
POSITION R-U
POSITION OSD MENU
Display position number.
OSD set ON, position number will be display on
right-up(R-U) or right-down(R-D) of the screen.
- 13 www.OKIUSA.com

______________________________________________________________________
4.14 H-GAIN
This is used to enhance the compensation of the picture quality.
H-GAIN: Horizontal Compensation
SETUP MENU [3/5]
POSITION LOAD.
H-GAIN →+6
V-GAIN +6
MOTION OFF
IR ON.
INITIAL ON
Page 3 MAIN MENU
Move cursor to H-GAIN, press ENTER key to enter
H-GAIN ADJUSTMENT menu.
Press UP or DOWN key to select MIN, +1, +2, +3, +4,
+5, +6, +7, +8, +9, +11, MAX, 13 steps adjustable.
4.15 V-GAIN
This is used to enhance the compensation of the picture quality.
V-GAIN: Vertical Compensation
SETUP MENU [3/5]
POSITION LOAD.
H-GAIN +6
V-GAIN →+6
MOTION OFF
IR ON.
INITIAL ON
Page 3 MAIN MENU
Move cursor to V-GAIN, press ENTER key to enter
V-GAIN ADJUSTMENT menu.
Press UP or DOWN key to select MIN, +1, +2, +3, +4,
+5, +6, +7, +8, +9, +11, MAX, 13 steps adjustable.
4.16 MOTION
MOTION DETECTION FUNCTION
SETUP MENU [3/5]
POSITION LOAD.
H-GAIN +6
V-GAIN +6
MOTION →ON.
IR ON.
INITIAL ON
Page 3 MAIN MENU
Move cursor to MOTION, press ENTER key to enter
MOTION ON/OFF menu.
Press UP or DOWN key to select ON.
- 14 www.OKIUSA.com

______________________________________________________________________
MOTION
→AREA
LEVEL +4
TIME 30sec
OSD OFF
MOTION MENU
Press ENTER key to enter MOTION FUNCTION menu.
Press UP or DOWN key to select motion detection
AREA, LEVEL (Sensitivity), TIME, OSD.
When detecting motion, it will output alarm signal.
4.17 IR
IR FILTER REMOVABLE FUNTION (DAY & NIGHT FUNCTION)
SETUP MENU [3/5]
POSITION LOAD.
H-GAIN +6
V-GAIN +6
MOTION ON.
IR →ON.
INITIAL ON
Page 3 MAIN MENU
IR SW
IR SW →INT.
IR SW INT. MENU
IR INT LEVEL
IR INT LEVEL →MAX
IR INT LEVEL MENU
Move cursor to IR, press ENTER key to enter IR
ON/OFF menu.
Press UP or DOWN key to select ON.
Press ENTER key to enter IR SW FUNCTION menu.
Press UP or DOWN key to select IR SW detection INT.
IR SW can detect INT. (AGC and SENSE UP) signal.
Press ENTER key to enter IR INT LEVEL
ADJUSTMENT m enu.
Press UP or DOWN key to select IR INT LEVEL MIN,
+1, +2, +3, +4, +5, +6, +7, +8, +9, +11, +12, +13, +14,
+15, +16, MAX, 18 steps adjustable.
- 15 www.OKIUSA.com

______________________________________________________________________
*3
*2
OFF x 2 x 4 x 6 x 8 x 12 x 16 x 32 x 64
*1
BASE x x MAX 16 15 14 13 11 9
+1 x MAX 15 14 13 12 11 9 7
+2 x 16 14 13 12 11 10 8 6
+3 x 15 13 12 11 10 9 7 5
+4 MAX 14 12 11 10 9 8 6 4
+5 16 13 11 10 9 8 7 5 3
+6 15 12 10 9 8 7 6 4 2
+7 14 11 9 8 7 6 5 3 1
MAX 13 10 8 7 6 5 4 2 MIN
IR INT LEVEL TABLE
NOTE1:
*1: AGC LEVEL
*2: IR INT LEVEL (ACT UP THE LEVEL)
*3: SENSE UP
NOTE2: IR INT LEVEL (MAX) Approach 15Lux (illumination)
IR INT LEVEL (MIN) Approach 0.02Lux (illumination)
Press ENTER key to enter IR SW FUNCTION menu.
IR SW
IR SW →EXT.
IR SW EXT. MENU
IR EXT LEVEL
IR INT LEVEL →MAX
IR EXT LEVEL MENU
Press UP or DOWN key to select IR SW detection EXT.
IR SW will be set manual mode.
Press UP or DOWN key to select IR EXT LEVEL MAX
or MIN.
IR EXT LEVEL MAX: IR CUT OFF (B/W MODE)
IR EXT LEVEL MIN: IR CUT ON (COLOR MODE)
- 16 www.OKIUSA.com

______________________________________________________________________
4.18 INITIAL
FOCUS RESET FUNCTION
SETUP MENU [3/5]
POSITION LOAD.
H-GAIN +6
V-GAIN +6
MOTION ON.
IR ON.
INITIAL →ON
Page 3 MAIN MENU
Move cursor to INITIAL, press ENTER key to enter
INITIAL ON/OFF menu.
Press UP or DOWN key to select ON/OFF.
4.19 DEFAULT
RESTART THE CAMERA AND RESET PARAMETERS TO FACTORY’S DEFAULT.
SETUP MENU [4/5]
DEFAULT →CANCEL
FREEZE OFF
FREEZE MODE FIELD
ZOOM SPEED +3
FOCUS SPEED MIN
GAMMA GAMMA1
Page 4 MAIN MENU
Move cursor to DEFAULT, press ENTER key to enter
DEFAULT CANCEL/OK menu.
Press UP or DOWN key to select OK, and then press
ENTER key.
4.20 FREEZE
FREEZE PICTURE FUNCTION
SETUP MENU [4/5]
DEFAULT CANCEL
FREEZE →OFF
FREEZE MODE FIELD
ZOOM SPEED +3
FOCUS SPEED MIN
GAMMA GAMMA1
Page 4 MAIN MENU
Move cursor to FREEZE, press ENTER key to enter
FREEZE ON/OFF menu.
Press UP or DOWN key to select ON/OFF.
- 17 www.OKIUSA.com

______________________________________________________________________
4.21 FREEZE MODE
FREEZE FIELD (or FRAME) OF PICTURE FUNCTION
Move cursor to FREEZE MODE, press ENTER key to
SETUP MENU [4/5]
DEFAULT CANCEL
FREEZE OFF
FREEZE MODE →FIELD
ZOOM SPEED +3
FOCUS SPEED MIN
GAMMA GAMMA1
Page 4 MAIN MENU
select FREEZE MODE menu.
Press UP or DOWN key to select FIELD/FRAME.
4.22 ZOOM SPEED
ZOOM SPEED ADJUSTMENT
SETUP MENU [4/5]
DEFAULT CANCEL
FREEZE OFF
FREEZE MODE FIELD
ZOOM SPEED →+3
FOCUS SPEED MIN
GAMMA GAMMA1
Page 4 MAIN MENU
Move cursor to ZOOM SPEED, press ENTER key to
enter ZOOM SPEED SELECTING menu, then Press
UP or DOWN key to select MAX, +3, +2, +1, MIN (5
steps adjustable).
4.23 FOCUS SPEED
FOCUS SPEED ADJUSTMENT
SETUP MENU [4/5]
DEFAULT CANCEL
FREEZE OFF
FREEZE MODE FIELD
ZOOM SPEED +3
FOCUS SPEED →MIN
GAMMA GAMMA1
Page 4 MAIN MENU
Move cursor to set FOCUS SPEED, press ENTER
key to FOCUS SPEED SELECTING menu, then
Press UP or DOWN key to select MIN, +1, +2, +3,
MAX (5 steps adjustable).
- 18 www.OKIUSA.com

______________________________________________________________________
4.24 GAMMA
GAMMA SELECTION
SETUP MENU [4/5]
DEFAULT CANCEL
FREEZE OFF
FREEZE MODE FIELD
ZOOM SPEED +3
FOCUS SPEED MIN
GAMMA →GAMMA1
Page 4 MAIN MENU
Move cursor to set GAMMA menu, press ENTER key
to select GAMMA mode , then Press UP or DOWN
key to select GAMMA1 or GAMMA2.
GAMMA1 = 0.45
GAMMA2 = 1.0
4.25 ZOOM + AF
ZOOM TRIGGER AUTO FOCUS
SETUP MENU [5/5]
→ZOOM+AF OFF
AF SLEEP OFF
SCALE OFF
LANGUAGE ENGLISH
WINKER OFF
MISC
Page 5 MAIN MENU
Move cursor to set ZOOM+AF mode, press ENTER
key into select ZOOM+AF menu.
Press UP or DOWN key to select ON/OFF.
4.26 AF SLEEP
AUTO FOCUS SLEEP (WORK IN AUTO FOCUS ON MODE)
SETUP MENU [5/5]
ZOOM+AF OFF
→AF SLEEP OFF
SCALE OFF
LANGUAGE ENGLISH
WINKER OFF
MISC
Page 5 MAIN MENU
Move cursor to AF SLEEP, press ENTER key to enter
AF SLEEP ON/OFF menu.
Press UP or DOWN key to select ON/OFF.
The image change less than auto focus range in five
minutes; the auto focus will sleep in AF SLEEP ON
mode. Then the image change more ±6dB than auto
focus range, the auto focus will wake up.
- 19 www.OKIUSA.com

______________________________________________________________________
4.27 SCALE
ZOOM SCALE DISPLAY
SETUP MENU [5/5]
ZOOM+AF OFF
AF SLEEP OFF
→SCALE OFF
LANGUAGE ENGLISH
WINKER OFF
MISC
Page 5 MAIN MENU
Move cursor to SCALE, press ENTER key to enter
SCALE ON/OFF menu.
Press UP or DOWN key to select ON/OFF.
The zoom scale will be display on right-down of the
screen in SCALE ON mode.
Note: The zoom scale is non-linear approximate
value. It’s a reference value for user.
4.28 LANGUAGE
OSD LANGUAGE SELECTION
SETUP MENU [5/5]
ZOOM+AF OFF
AF SLEEP OFF
SCALE OFF
→LANGUAGE ENGLISH
WINKER OFF
MISC
Page 5 MAIN MENU
Move cursor to LANGUAGE, press ENTER key to
enter LANGUAGE selecting menu.
Press UP or DOWN key to select ENGLISH,
DEUTSCH or ITALIANO language.
4.29 WINKER
WINKER
SETUP MENU [5/5]
ZOOM+AF OFF
AF SLEEP OFF
SCALE OFF
LANGUAGE ENGLISH
→WINKER OFF
MISC
Page 5 MAIN MENU
Move cursor to WINKER, press ENTER key to enter
WINKER selecting menu.
Press UP or DOWN key to select WINKER ON or
OFF.
- 20 www.OKIUSA.com

______________________________________________________________________
4.30 MISC
SETUP MENU [5/5]
ZOOM+AF OFF
AF SLEEP OFF
SCALE OFF
LANGUAGE ENGLISH
WINKER OFF
→MISC
Page 5 MAIN MENU
4.30.1 H-REVERS
Horizontal Reverse (Mirror) Function
MISC
H-REVERS →OFF
V-REVERS OFF
POSI/NEGA POSI
PRIORITY AGC
MASK A OFF
MASK B OFF
MISC MENU
Move cursor to MISC, press ENTER key to enter
MISC menu.
Move cursor to H-REVERS, press ENTER key to enter
FREEZE ON/OFF menu.
Press UP or DOWN key to select ON/OFF.
4.30.2 V-REVERS
Vertical Reverse (Up-side Down) Function
Move cursor to V-REVERS, press ENTER key to enter
MISC
H-REVERS OFF
V-REVERS →OFF
POSI/NEGA POSI
PRIORITY AGC
MASK A OFF
MASK B OFF
MISC MENU
FREEZE ON/OFF menu.
Press UP or DOWN key to select ON/OFF.
- 21 www.OKIUSA.com

______________________________________________________________________
4.30.3 POSI/NEGA
Positive or Negative Picture Function
MISC
H-REVERS OFF
V-REVERS OFF
POSI/NEGA →POSI
PRIORITY AGC
MASK A OFF
MASK B OFF
MISC MENU
Move cursor to POSI/NEGA, press ENTER key to
enter POSI/NEGA menu.
Press UP or DOWN key to select POSI/NEGA.
4.30.4 PRIORITY
Selecting IR SW INT Detecting Signal
MISC
H-REVERS OFF
V-REVERS OFF
POSI/NEGA POSI
PRIORITY →AGC
MASK A OFF
MASK B OFF
MISC MENU
Move cursor to PRIORITY, press ENTER key to enter
PRIORITY menu.
Press UP or DOWN key to select AGC/SENSE UP.
4.30.5 MASK A / B
MASKING AREA SETTING
MISC
H-REVERS OFF
V-REVERS OFF
POSI/NEGA POSI
PRIORITY AGC
MASK A →ON.
MASK B OFF
MISC MENU
Move cursor to MASK A/B, press ENTER key to enter
MASK A / B menu .
Press UP or DOWN key to select ON/OFF.
Then press ENTER key to enter MASK A/B SETTING
menu.
- 22 www.OKIUSA.com

______________________________________________________________________
Move cursor to H-POSITION, V-POSITION, H-SIZE or
MASK A / B
H-POSITION →032
V-POSITION 064
H-SIZE 048
V-SIZE 032
CONNECTED OFF
MASK A / B SETING MENU
V-SIZE press ENTER key to enter NUMBER SETTING
menu.
Press UP or DOWN key to adjust number (Adjusting
H-POSITION, V-POSITION, H-SIZE or V-SIZE).
CONNECTED set OFF, MASK will be fixed.
CONNECTED set ON, MASK will be connected with
zoom.
4.31 Camera Address ID Setting
Push [ENTER] + [ESC] key 3 sec. to get into the OSD COMM menu.
Move cursor to COMM ID, press ENTER key to enter
COMM
→COMM ID 001
COMM MODE 1:1
COMM ID SELECTING menu, then Press UP or DOWN
key to select COMM ID 001~239.
(COMM MODE must set at 1:1)
COMM SETING MENU
5. Control Methods--- ---------------------------------------------------
5.1 PC Control
For window 95/98/2000
1. Execute KB350SP_V.exe.
2. A virtue keypad icon will display on screen.
3. Use mouse to point the icons for on-screen-display setting.
4. Another methode, user can use RS-485 protocol to command zoom camera.
** To control camera via PC, RS-485 converter will be required to convert RS-232C protocol
to RS-485 protocol.
- 23 www.OKIUSA.com

______________________________________________________________________
A
A
I
5.2 Controller
The keyboard controller can control most of the camera functions. (reference circuit).
Screwless type Terminal (REMOTE) Pin Assignment
I
FZ
RS485
DO
DI
03 1211100908070605040201
+12V
GND
R3
1K
1
2
RIS
0
01 Iris + 07 RS485 +
02 Iris - 08 RS485 03 Focus + 09 Motion out
04 Focus - 10 GND
05 Zoom + 11 Alarm in
06 Zoom - 12 GND
OPEN
SW8
IRIS+
IRIS-
CLOSE
SW9
2
1
2
FAR
1
FOCUS
LARM
2
1
NEAR
MOTION-H OUTPUT
2
1
ZOOM
2
WIDE
Correct Reference Circuit
TELE
1
- 24 -
1 2
R2
1K
1 2
+12V
MDET-H
LARM
ZOOM+
ZOOMFOCUS+
FOCUS-
+12V
R1
1K
+12V
+12V
www.OKIUSA.com

______________________________________________________________________
6. RS-485 Control------------------ ------------------
** For using RS-485 serial control, camera address ID must be set before
connecting to the chain system, please refer to 4.31 Camera Address ID
Setting (p.23).
6.1 Protocol Select
PELCO-P 9600
PELCO-D 2400
1 0
5
4
3
2
1
1 0
5
4
3
2
1
1 0
5
4
3
2
1
PELCO-P 4800
1 0
5
4
3
2
1
KAMPRO 9600
1 0
5
4
3
2
1
PELCO-P 2400
1 0
5
4
3
2
1
KAMPRO 19200
1 0
5
4
3
2
1
PELCO-D 9600
1 0
5
4
3
2
1
KAMPRO 38400
1 0
5
4
3
2
1
PELCO-D 4800
1 0
5
4
3
2
1
KALATEL 9600
6.2 Keyboard Functions
Camera is able to receive standard commands from universal keyboard.
To call /cancel preset functions of the camera, combination key of the keyboard will be
designated for every individual function. I.e. to call the OSD manual through remote
keyboard controller, using the universal keyboard, to press “70” and then “PRESET”
Relevant Function Key Camera Function
ZOOM IN Zoom Wide (Z-)
ZOOM OUT Zoom Tele (Z+)
FOCUS+ Focus Near (F+)
FOCUS- Focus Far (F-)
CLOSE Iris Close (AIS / AES)
OPEN Iris Open (AIS / AES)
[1~64]+Preset Go To Preset Point
- 25 www.OKIUSA.com

______________________________________________________________________
[70]+Preset Camera OSD Key ON. *
[71]+Preset Camera ID ON
[72]+Preset Position OSD ON
[73]+Preset Zoom Scale ON
[74]+Preset Sense UP ON (+4)
[75]+Preset AIS (Auto IRIS ON)
[76]+Preset BLC ON
[77]+Preset AGC Super (MAX)
[78]+Preset Day/Night (IR) Auto ON
[79]+Preset Manual Night Mode (B/W)
[80]+Preset ATW
[81]+Preset Digital Zoom ON
[82]+Preset Auto Focus ON
[83]+Preset Zoom +AF ON
[84]+Preset Lens Initial ON
[85]+Preset Motion ON
[86]+Preset Freeze ON
[87]+Preset Mirror ON
[88]+Preset Up/Down ON
[89]+Preset Mask 1 ON
[90]+Preset Mask 2 ON
[99]+Preset Camera Address ID Display ON
* For OSD display, the commands are as follow ==> "70" + "PRESET" and to follow with
"ENT" for the display of OSD manual, when cancel display of OSD manual, combination key
"70" + "SET" for disabling of OSD manual. Also when OSD manual is activated, that joystick
command of ZOOM OUT, ZOOM IN, FOCUS +, FOCUS - representing UP, DWN, ESC, ENT
respectively to the camera.
- 26 www.OKIUSA.com

______________________________________________________________________
[1~64]+Set Set (Save) Preset Point
[70]+Set Camera OSD Key OFF
[71]+Set Camera ID OFF
[72]+Set Position OSD OFF
[73]+Set Zoom Scale OFF
[74]+Set Sense Up OFF
[75]+Set AES (Auto Iris OFF)
[76]+Set BLC OFF
[77]+Set AGC Normal (+4)
[78]+Set Day/Night (IR) Auto OFF
[79]+Set Manual Day Mode (Color)
[80]+Set AWB (Hold)
[81]+Set Digital Zoom OFF
[82]+Set Auto Focus OFF
[83]+Set Zoom +AF OFF
[84]+Set Lens Initial OFF
[85]+Set Motion OFF
[86]+Set Freeze OFF
[87]+Set Mirror OFF
[88]+Set Up/Down OFF
[89]+Set Mask 1 OFF
[90]+Set Mask 2 OFF
[99]+Set Camera Address ID Display OFF
- 27 www.OKIUSA.com

______________________________________________________________________
** For keyboard not containing “CLEAR” key, following commands cannot be executed.
[1~64]+Clear Clear Preset Point
[69]+Clear One Push Auto focus
[90]+Clear Zoom Speed MIN
[91]+Clear Zoom Speed +1
[92]+Clear Zoom Speed +2
[93]+Clear Zoom Speed +3
[94]+Clear Zoom Speed MAX
[95]+Clear Focus Speed MIN
[96]+Clear Focus Speed +1
[97]+Clear Focus Speed +2
[98]+Clear Focus Speed +3
[99]+Clear Focus Speed MAX
7. Colour / Monochrome Auto Change----------------------------------
The camera provides auto change function between color picture and monochrome (IR filter
removable function), The vivid color picture output on daytime, while under minimal lighting
around IR INT. level, the picture turned into monochrome automatically, in order to reduce
the color noise and obtain a easy identify playback picture quality after VCR recording.
8. Low Light Performance and Infrared---------------------------------
Under minimal lighting environment, this came ra has much better sensitivity and picture
performance than any others conventional camera does. Especially good for applications
that not allow for IR illumination. A normal color camera cannot obtain a clear picture
under IR illumination. This camera has been specially designed with the capability to accept
both IR LED and IR lamp projection to have a clear black and white picture under even
completely dark area. The range of Infrared wavelength is from 800 Nm to 1050 Nm.
The focus may slightly vary with IR wavelength due to lens diffraction to long-wave, while
installing the camera with IR projector, please check the focus under IR illumination and
normal light condition, and find an adequate focusing position.
It is recommended to close lens aperture one or two stops to increase the depth of filed in
order to compensate the lens diffraction.
- 28 www.OKIUSA.com

______________________________________________________________________
9.Specifications-------------------- ----------------------------------------
MODEL NO. SZX23-1480 SZX23-1480P
TV System NTSC PAL
Image Sensor 1/4-inch SUPER HAD CCD Image sensor
Picture Elements 811(H) x 508(v) 795(H) x 596(V)
Scanning System 525 lines, 2:1 Interlace 625 lines, 2:1 Interlace
Sync System Internal
Minimum Illumination
IR-Cut Filter Auto switching / Manual
Day-Night Change
Level ADJ.
Day-Night Change
Delay Time
Diagonal Angle
Zoom Speed 4.2 s
Resolution 480 TVL
S / N Ratio Over 50dB
White Balance ATW 2800ºK ~ 7500 ºK Preset / Manual
White Balance Range 2800 ~ 7500 ºK
B.L.C. Function Auto on/off
Gamma Correction 0.45 or 1
AGC Super AGC 0~36dB
ALC Auto / Fix
Electronic Shutter
Sense Up OFF, 2x ~ 64x (option)
Lens
Motor- Zoom / Focus / Iris 800,000 times life
Zoom 230x (23x optical & 10x digital zoom)
Focus Auto / Manual
Position
Video Output Composite output 1.0Vp-p at 75 ohm
External Control RS-485 Control or controller
Function Optical & Digital zoom, Focus, Iris, Gain, White balance
Protocol Type PELCO-P, PELCO-D, KAMPRO, KALATEL
Communication Baud Rate 2400, 4800, 9600, 19200, 38400 BPS
Operation Temperature -10 ºC TO 50 ºC
Storage Temperature -20 ºC TO 70 ºC
Operation Humidity 10%~ 85% RH
Power Supply
Dimensions 70 mm (H) × 63.6 mm (W) × 123.5 mm (D)
Weight 390g
The specifications and appearance of the product may change without notice.
1/60 ~ 1/100,000 sec
Flickerless
0.5 Lux Color, IR-cut on
0.1 Lux B/W, IR-cut off (Super HAD)
0 Lux under IR illumination
0.02 ~ 15 Lux Adjustable
5 ~ 8 sec.
58°(W) ~ 2.8°(T)
Canon 23x Optical Zoom Lens
(F1.6~3.8,f =3.6~82.8 mm)
64 Position (Zoom,Focus)
DC12V ±1V / 2.8W(Max)
1/50 ~ 1/100,000 sec.
Flickerless
- 29 -
www.OKIUSA.com
 Loading...