

Page 1

smart Extendable Platform2
Indexed Scan
User's Manual
Copyright 2015 Oki Data Corporation All rights reserved
2015. October 46219502EE Rev1
Page 2

Table of Contents
1. About this Document ............................................................ 3
Introduction .................................................................................................3
2. Overview ............................................................................ 4
Basic structure ..............................................................................................4
Conguration and function image ...................................................................................4
Initial conguration tool ................................................................................................4
Conguration for use ....................................................................................................5
Basic usage models .......................................................................................6
Entry registration (settings) ........................................................................................... 6
Obtaining and editing a metadata template .....................................................................7
Information embedded in metadata le ........................................................................... 7
Setting access privilege to entry ..................................................................................... 7
Use of Indexed Scan (Operation) ....................................................................................7
3. Entry Registration Details ...................................................... 8
Displaying the entry registration screen on the web page of this MFP .....................8
Adding entry .............................................................................................. 11
Entry name (Step 1) ................................................................................................... 12
Sending settings (Step 2) ............................................................................................ 12
Scanning settings (Step 3) .......................................................................................... 15
Default values of access privileges (Step 4) ................................................................... 17
Selection and setting of attributes (Step 5) .................................................................... 17
Selecting metadata template (Step 6) ........................................................................... 29
4. Editing a Metadata Template ............................................... 30
5. Entry List Batch Operation .................................................. 31
All entries displayed in entry list are temporarily saved in personal computer. ........ 31
Settings values of the Indexed Scan temporarily saved on the personal
are set on the MFP. ...................................................................................... 31
computer
Appendix .............................................................................. 32
- 2 -
Page 3

1. About this Document
1. About this Document
Introduction
Indexed Scan is a built-in feature that allows to manage paper documents in a document
management system or to use them in an electronic workflow by digitizing the paper
documents.
When digitizing paper documents, a file containing attribute information (such as the
document type, contract number, etc.) for the digitized paper document is generated along
with the scanned image. This attribute information is called metadata. A le with metadata
is called a metadata file. If your system can import the image and metadata file pair, a
multifunction printer (MFP) will be able to cooperate with your system. By conguring an MFP
as described in this document, the user can specify and enter metadata on the operator panel
when scanning paper documents.
Normally, the metadata le format is specied in a certain format specic to your system.
With Indexed Scan, metadata les are generated in a format that can be read by your system
by importing this format to an MFP as a metadata template.
This enables an MFP to cooperate with your system without making any changes.
This document is for people who have experience deploying document management systems
in companies and the sales support staff of companies that build such systems.
- 3 -
Page 4
2. Overview
Basic structure
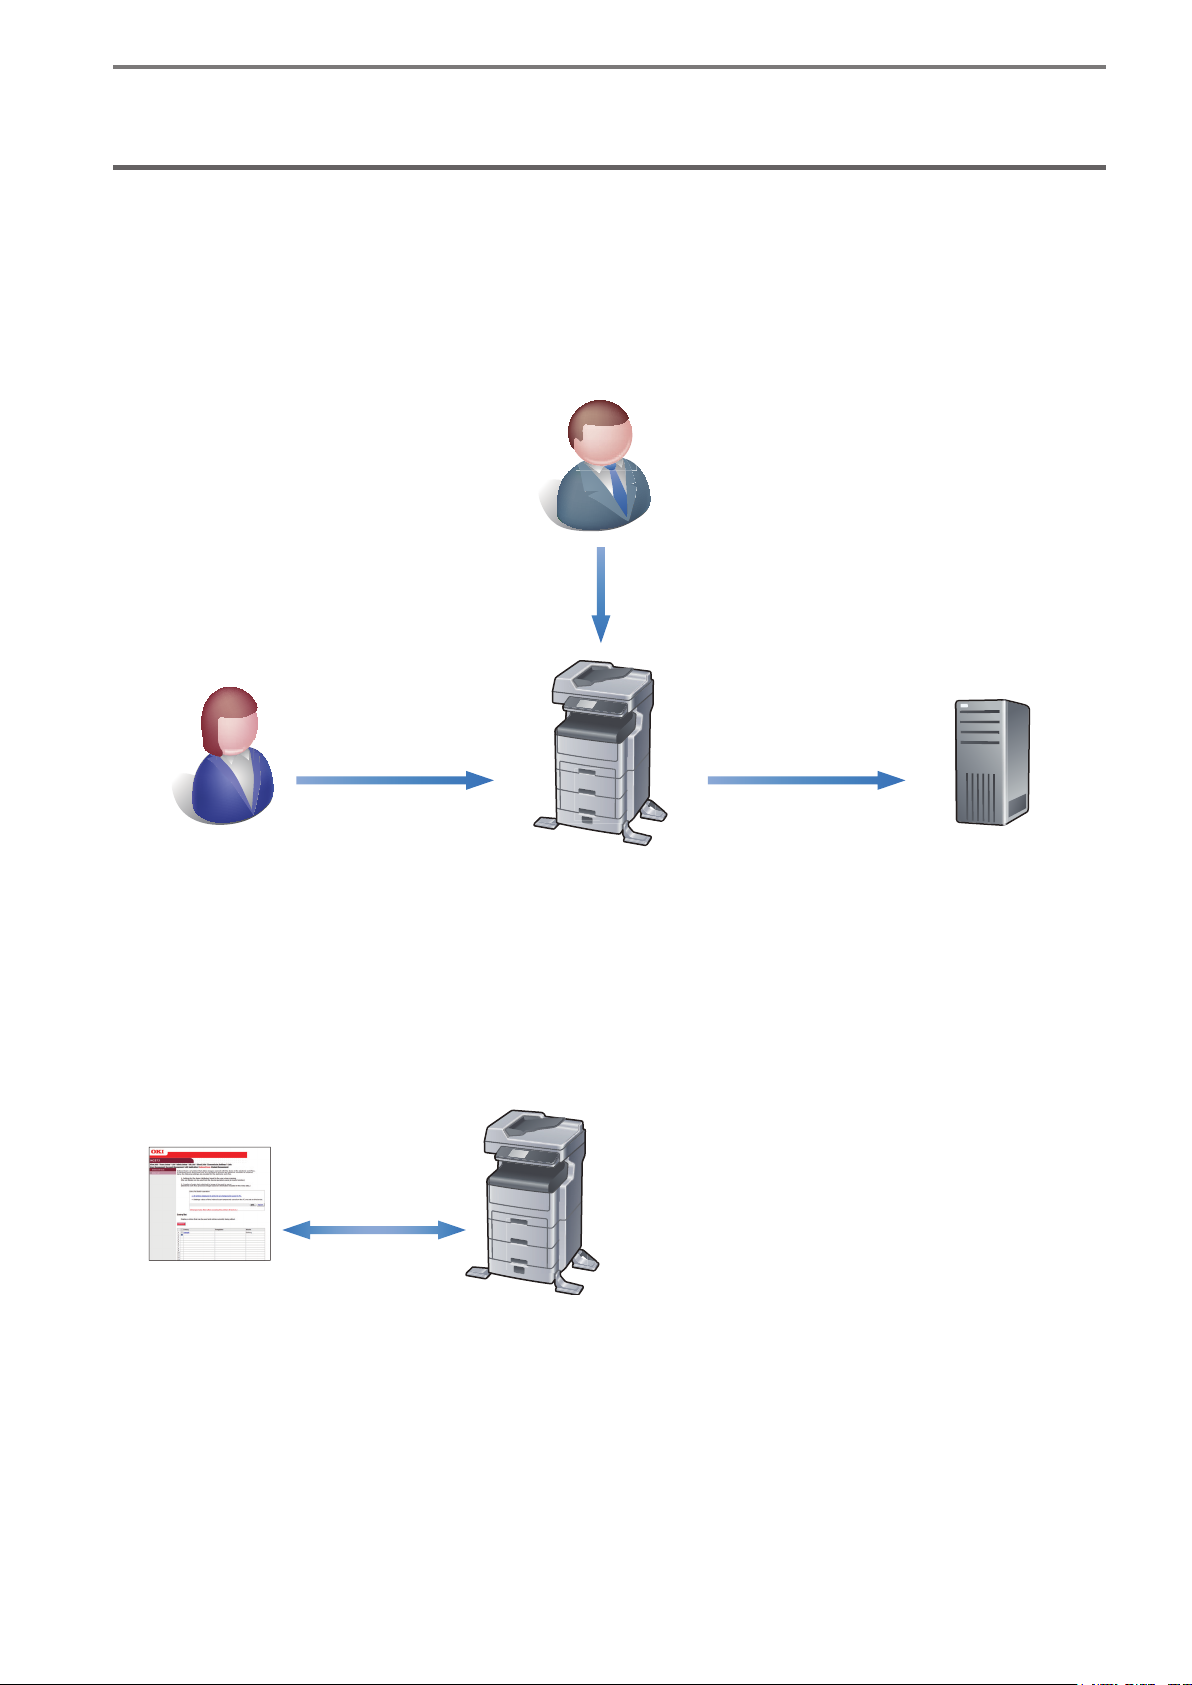
Conguration and function image
The overall function conguration of Indexed Scan is as follows.
Administrator
Initial settings
2. Overview
Metadata le & Scan
Use
General user
MFP
data transmission
Initial conguration tool
Indexed Scan settings are performed entirely from a web browser.
Details of the initial settings are described in "3. Entry Registration Details" (p. 8).
Indexed Scan Settings Conguration
HTTP
Web browser
MFP
http://<IP address of this MFP>/
Electronic workow
server
- 4 -
Page 5

2. Overview
Conguration for use
Indexed Scan operation is made up of an MFP and electronic workow server combination.
Indexed Scan is displayed as a job macro on an MFP. Job macro is a function that creates a
macro for settings of functions used frequently and registers a shortcut for this.
Supported protocols between the MFP and the electronic workow server are SMB, FTP, FTPS,
http, and https.
Indexed Scan Operation Conguration
SMB, FTP, FTPS,
http, https
MFP
Supported browser is as follows.
Windows
• Internet Explorer 7.0 or higher
• Firefox 3.5 or higher
Macintosh
• Safari 4.0 or higher
UNIX
• Firefox 3.5 or higher
Electronic workow server
- 5 -
Page 6

2. Overview
Basic usage models
To use the Indexed Scan functions, it is necessary to perform entry registration to the MFP
and register a metadata le template. The procedure and rules for registration are described
here.
Obtain the metadata le template specied in a system that the MFP cooperates with, such as
an electronic workow system.
Entry registration (settings)
An entry is an aggregation that collects the operation settings for Indexed Scan. Normally, the
document to be scanned differs depending on your work and the content of the metadata that
needs to be generated also differs, so entries are to be created per individual work.
Up to 30 entries can be registered.
Setting items can be broadly categorized into 6 categories (see "List of Entry Registration
Items" shown below).
Writing entry registration to the MFP is feasible even if not all settings are complete.
Entries can be edited any number of times.
List of Entry Registration Items
Setting Item Description
Entry name Provide a name for an entry created.
After registering the entry, assign it a name referring to the
digitization of paper documents for identication purposes.
(Example: Contract archive management)
The entry name is used as the JobMacro name because, to use
the entry, it is registered to the entry and executed from the
JobMacro.
Transmission settings This is for transmission settings for the images and the
metadata. This is for various settings needed for communication
such as communication protocol, subfolder, and filename. The
transmission destination for the image le and metadata can be
set separately, so it is possible to send each of them to different
servers.
Scan settings This is for various settings needed to scan images such as scan
size, document type, quality, and le format.
Initial value settings for
access privileges
This is for settings for entry usage authorization. This sets usage
to permitted or prohibited for all users in the entry registration
screen.
Detailed access control for each user can be performed at user
management access control settings.
Attribute selection and
settings
Metadata Template
selection
This is for selecting and setting attributes to embed in the
metadata. There are two types of attributes [Existing Attributes]
and [User Defined Attributes]. Existing Attributes are stored
in the MFP and users are not requested to input. User Defined
Attributes are those that users are requested to input through
the input screen on the operator panel.
The input order of User Dened Attributes can be changed.
This is for uploading a metadata template to the MFP and
associating this with an entry.
- 6 -
Page 7

2. Overview
Obtaining and editing a metadata template
A metadata template is a text le to register the format of the generated metadata.
A metadata template can be obtained from the system that the MFP cooperates with, such as
the electronic workow.
By inserting attributes dened according to the procedure "Selection and setting of attributes
(Step 5)" (p. 17) in the metadata template, unique information of the MFP and information
input by the user with the operator panel can be embedded in metadata les.
Information embedded in metadata le
There are two types of information embedded in metadata le: Existing Attributes and User
Dened Attributes.
Existing Attributes are information referred to when information held in the MFP is used as
metadata. Examples are the printer name or serial number.
User Dened Attributes are information input or selected by the user from the operator panel
according to your work.
User Dened Attributes can be freely dened by adding and editing them. Dened attributes
are displayed on the operator panel as items that must be input when executing entry on the
MFP.
Individual attribute information has an attribute ID in a format where it is surrounded by %%.
Attribute IDs play a role like a variable, so by embedding attribute IDs in metadata templates,
the text string part of the attribute ID is replaced with information input by the user and
generated by the MFP as a metadata le.
Setting access privilege to entry
If the access control of the MFP is enabled, it is possible to perform access control for each
entry.
If the access control is disabled, all users can execute all entries.
Initial value settings are performed for access privileges when entries are registered. If
registered as [Allow all users], entry usage privileges are provided to all users upon enabling
access control. If the initial value is set to [Prohibits all users], nobody can execute entry if
access control is enabled.
Access privilege settings can be performed at user management access control settings.
Note
Execution of Indexed Scan requires ScanToServer access permission in addition to
entry access permission.
Use of Indexed Scan (Operation)
The registered entry will appear on the job macro screen as a job macro.
Select the job macro for the entry and start execution of the entry.
The screen for input of information that is to be embedded in the metadata le is displayed on
the operator panel.
Upon completion of all inputs, the paper document is scanned and then the image data and
metadata le are transmitted to the server set up beforehand.
- 7 -
Page 8

3. Entry Registration Details
3. Entry Registration Details
Entry registration is performed using the MFP's web page. The procedure for entry registration
on the web page is described below.
Displaying the entry registration screen on the web
page of this MFP
Open a web browser, enter the URL "http://(IP address for this MFP)" and press the Enter
1
key.
Click [Administrator Login].
2
- 8 -
Page 9
3. Entry Registration Details
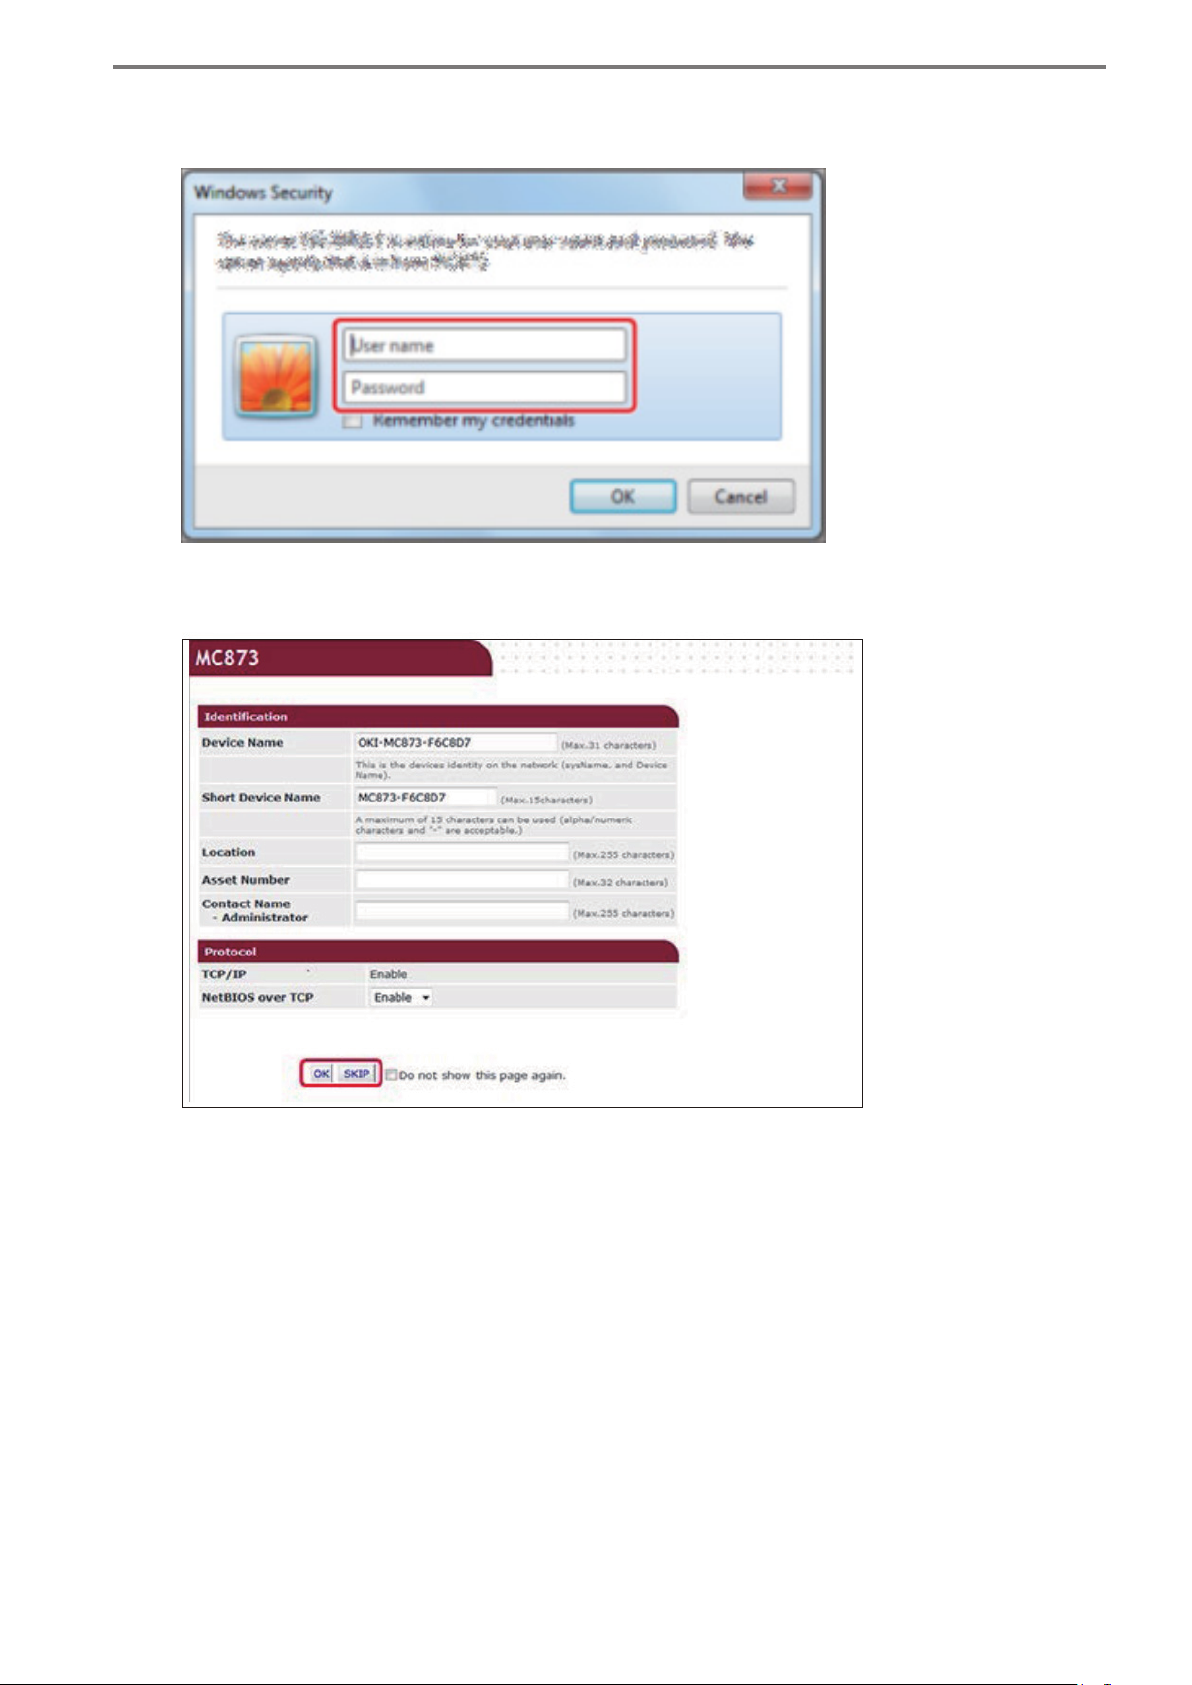
Enter "admin" in "User name" and the administrator password of this MFP in "Password"
3
and click [OK].
Click [SKIP].
4
- 9 -
Page 10
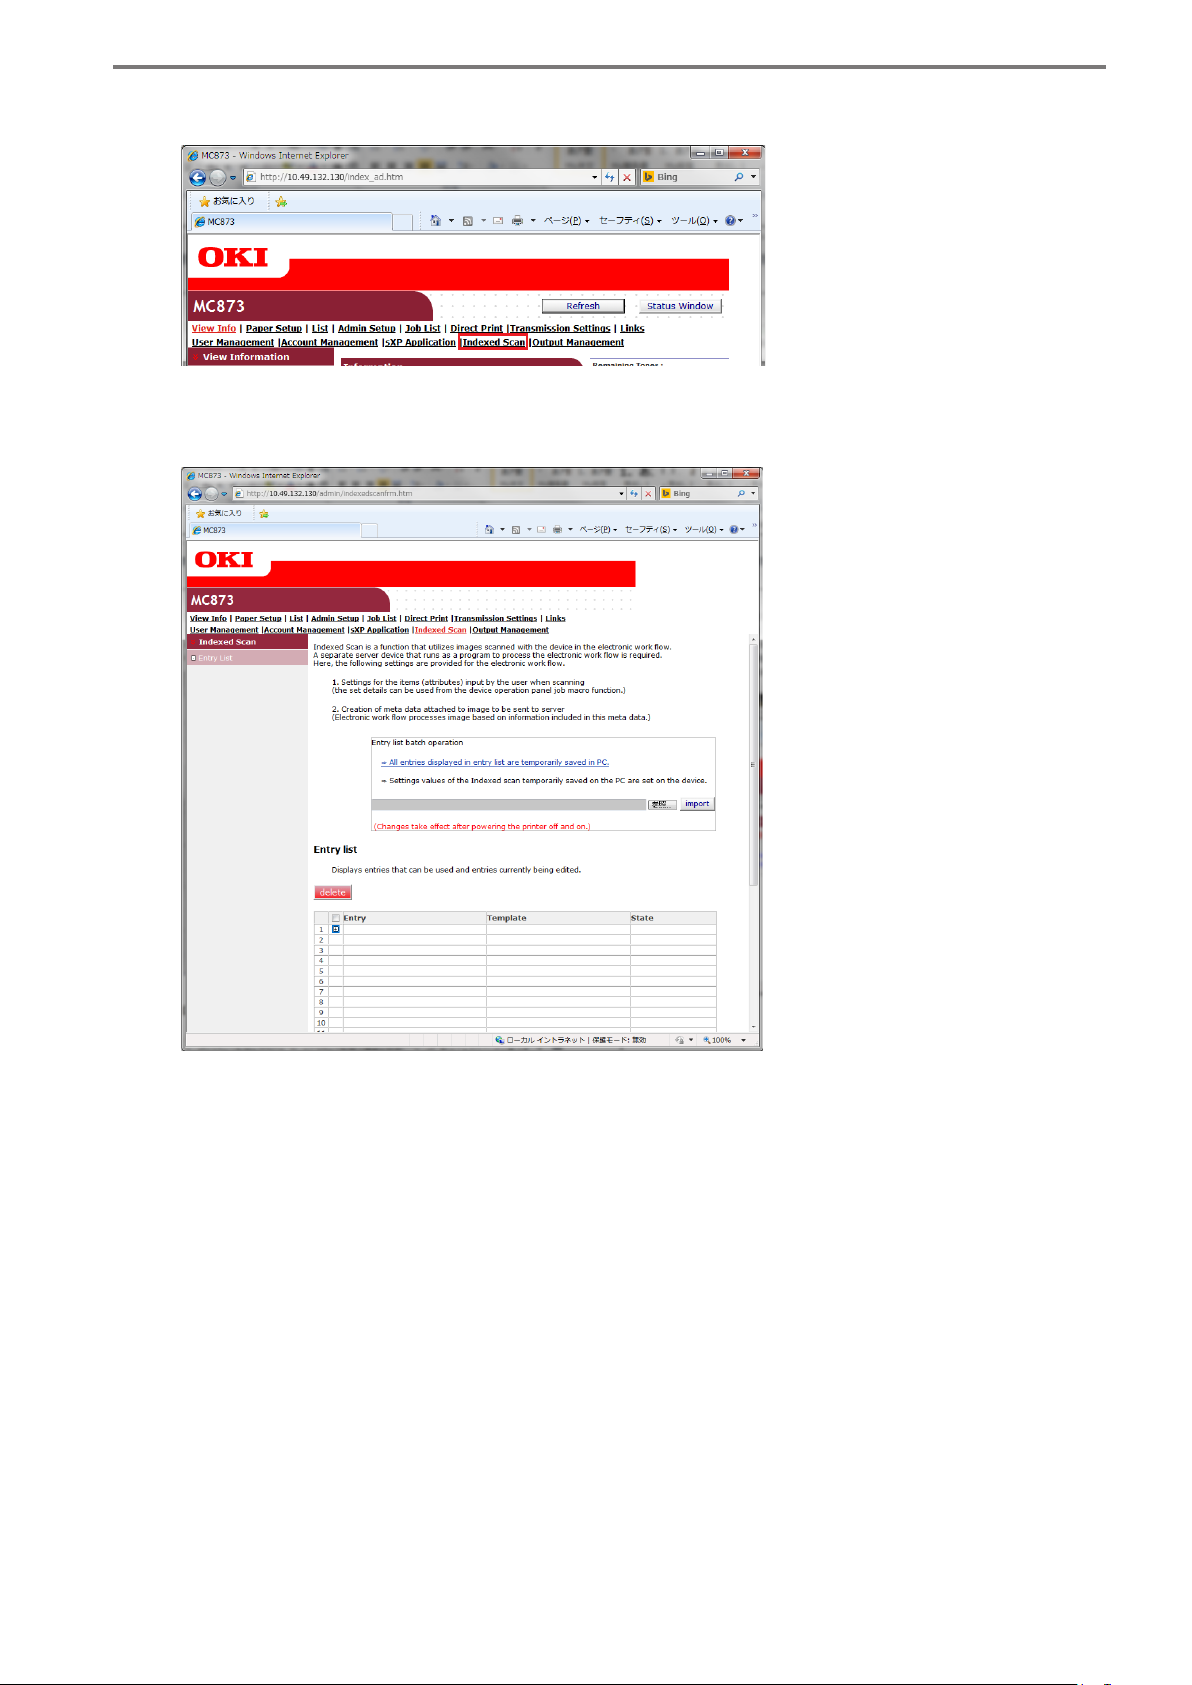
Click [Indexed Scan] at the top of the screen.
5
The entry registration screen is displayed.
3. Entry Registration Details
- 10 -
Page 11

3. Entry Registration Details
Adding entry
When [+] inside the entry list is clicked, the add entry screen shown below is displayed.
- 11 -
Page 12

3. Entry Registration Details
Entry name (Step 1)
Input the entry name to register.
The entry name is displayed on the operator panel as the job macro name.
Enter a character string up to 30 UTF-8 string characters.
Sending settings (Step 2)
Set transmission protocol, transmission path, lename, etc.
The destinations to transmit the metadata les and image les can be set separately. They
can be sent to different servers.
In the case of saving metadata le to a different location, place a check in the [Sets display
and META-DATA individually.] checkbox at the top of the [Display sending settings] screen.
When a check is placed, the settings of protocol, save destination server, and sub-folder
are displayed in the "META-DATA sending settings" screen in the same way as the "Display
sending settings" screen.
Note
The file with the same file name stored in the metadata file transmission
destination is overwitten with the matadata le transmitted later unconditionally.
- 12 -
Page 13

Transmission protocol settings
The transmission protocols that can be used by this MFP are as follows.
•
S
CIF
•
FTP
•
FTPS
•
http(WebDAV)
•
https(WebDAV)
Port number settings
Enter the port number used.
Set the port number using a numeric value of 1-65535.
Settings required for each protocol
Settings are different for each protocol. Set up as needed.
User name and password settings
3. Entry Registration Details
Set when the access privilege is set up for a shared folder.
Set the User Name and password of the account used to login to the transmission destination
server.
User name and password can be a maximum of 32 alphanumeric characters, and double-byte
characters cannot be used.
Target URL settings
Enter the path for the shared folder set up on the server in the Target URL.
Subfolder name settings
A subfolder can be created in the location specied using the transmission destination path
and used as the save destination.
In addition to a uniquely specified string, "Existing Attributes" defined using "Attribute
Selection and Setup" at entry registration can be used as the subfolder name. "Existing
Attributes" can be used after inputting the attribute ID (attribute ID of Existing Attributes are
described in "Selecting Existing Attributes" (p. 18) for subfolder name. There are two input
methods; method of direct text input and the method of selecting [Structure Elements] using
a pull down menu and pressing the [Add] button.
If a serial number or date/time that is different for each MFP is used in the subfolder name,
this enables avoiding conict even if entries with the same content are executed on multiple
MFPs. If there is conict with a lename, the MFP overwrites using the new le.
- 13 -
Page 14

3. Entry Registration Details
Filename settings
Similar to subfolders, Existing Attributes can be used instead of unique string for the lename.
The method using Existing Attributes is described in "Subfolder name settings" (p. 13).
The MFP will automatically add the extension of the image le based on the format of the
image le to save.
In addition, if SinglePage save format is selected for le segmentation, "-xxx" is automatically
added between the specied lename and the extension. (Example: Page 1 scan data name →
"SINGLETIFF-001.tif", Page 2 scan data name → "SINGLETIFF-002.tif")
Image File Extension
Save format File Segmentation Extension
Single-TIFF SinglePage .tif
Multi-TIFF MultiPage .tif
Single-PDF SinglePage .pdf
Multi-PDF MultiPage .pdf
Single-HC-PDF SinglePage .pdf
Multi-HC-PDF MultiPage .pdf
Multi-PDF/A MultiPage .pdf
XPS MultiPage .xps
JPEG SinglePage .jpg
Target URL conrmation
The transmission destination is created by combining the Target URL, subfolder name, and
lename.
The displayed URL may not be accurate, because it includes information before the Existing
Attributes are xed.
The maximum length of the transmission destination is 260 characters for alphanumeric
characters. This restriction is based on the le system specication for Windows Server. The
check for exceeding the maximum number of characters is performed at entry execution
timing. If the maximum number of characters is exceeded, an error is displayed on the
operator panel and the entry execution request is canceled.
- 14 -
Page 15

3. Entry Registration Details
Scanning settings (Step 3)
This performs various settings for image les sent to the server such as scan size, color mode,
and image format to save.
Setting Value Description
Scan Size Species read size.
Mixed Scan Scans documents that are different sizes.
Duplex Species reading both sides.
Set this for reading both front and back of documents.
Direction Species the direction of images to be scanned.
Continuous Scan Reads multiple documents as one job.
Preview Species display of scan image preview.
Density Can be set in range of -3 to +3.
Higher values lead to darker reading of images.
Document type Select the suitable document type from selection shown below.
Text: Documents with a lot of text
Text/picture: Documents with mixture of text and pictures
Picture: Documents of pictures or graphics
Glossy picture: Documents that are glossy pictures or printed using glossy ink jet paper
Background removal Reads documents with ground color easier to view.
Background removal settings are as follows;
Auto adjustment: MFP automatically performs adjustment.
6 Step Adjustment: Enables manual adjustment of background
removal
stronger background
Off: Background removal not performed
Resolution Species resolution for reading.
The following values can be set in this MFP:
75dpi, 100dpi, 150dpi, 200dpi, 300dpi, 400dpi, and 600dpi
Contrast Adjusts contrast.
Can be set between -3 and +3.
Larger values lead to stronger contrast being read.
Hue Adjusts tint.
Can be set between -3 and +3.
Smaller values lead to stronger emphasis of red color. Higher
values lead to stronger emphasis of green color.
settings in range of 1 through 6. Larger numbers lead to
removal.
Saturation Adjusts color brilliance.
Can be set between -3 and +3.
Higher values lead to greater brilliance for reading.
RGB Adjusts the strength of each color red, green, blue.
Adjusts the strength of reading each of the colors.
Can be set between -3 and +3.
Higher set values lead to higher concentration reading.
- 15 -
Page 16

Setting Value Description
Color mode Sets color mode.
Automatic (color/monochrome): color documents scanned using
color, black and white documents scanned using monochrome
Automatic (color/gray scale): color documents scanned using
color, black and white documents scanned using gray scale
Color: scanned using color
Gray scale: scanned using gray scale
Monochrome: scanned using monochrome
Memo
The judgment criteria between color documents and black
and white documents can be changed in [Device Settings] of the
M F P.
File format Sets the format of les to be saved.
The selections are as follows.
Single-PDF, Multi-PDF, Single-HC-PDF, Multi-HC-PDF, Multi-PDF/A,
Single-TIFF, Multi-TIFF, and XPS
The le format that can be selected differs depending on the
color mode selected.
Automatic (Color/Monochrome): Single-PDF, Multi-PDF, Multi-PDF/
A, Single-TIFF, Multi-TIFF, and XPS
Automatic (Color/Gray scale): Single-PDF, Multi-PDF, Single-HCPDF, Multi-HC-PDF, Multi-PDF/A, Single-TIFF, Multi-TIFF, JPEG, and
XPS
Color: Single-PDF, Multi-PDF, Single-HC-PDF, Multi-HC-PDF, MultiPDF/A, Single-TIFF, Multi-TIFF, JPEG, and XPS
Gray scale: Single-PDF, Multi-PDF, Single-HC-PDF, Multi-HC-PDF,
Multi-PDF/A, Single-TIFF, Multi-TIFF, JPEG, and XPS
Monochrome: Single-PDF, Multi-PDF, Multi-PDF/A, Single-TIFF,
Multi-TIFF, and XPS
3. Entry Registration Details
Encrypted PDF When selecting the le formats as Single-PDF, Multi-PDF, Single-
HC-PDF, or Multi-HC-PDF, options are displayed.
If encryption is desired, the encryption level and password etc.
have to be input.
The password used for encryption is xed for each entry.
Compression Rate Sets the compression level respectively for color, monochrome
(gray scale), and monochrome (2 value).
Edge Erase Setting for removing dark shadow and frame border that occurs
at the edge.
If needed set this to on.
The erase width setting can be set in the range of 5 mm to 50
mm at 1 mm increments.
Center Erase Setting for erasing dark shadow in center.
If needed set this to on.
The erase width setting can be set in the range of 1 mm to 50
mm at 1 mm increments.
White Page Skip Setting for removal of white pages when scanning.
When the document includes white pages, this enables removal
of the white pages from the scan results.
- 16 -
Page 17

3. Entry Registration Details
Default values of access privileges (Step 4)
Sets the initial setting values of entry access privileges added.
Here, whether or not to permit entry of all users can be decided. Once registered, the
information of this setting cannot be changed later.
Note
The access privilege for entry can be edited using the edit role screen at user
management/access control settings. The permission with the same name is
displayed in the permission list on the the edit role screen. The access privilege for
entry can be edited for each role after the entry is registered.
Selection and setting of attributes (Step 5)
There are two types of attributes to embed in metadata; Existing Attributes and User Dened
Attributes.
An ID called attribute ID is allocated to attributes as an identier. When attribute values are
embedded in metadata, the attribute ID is an identier for showing the embed destination in
the metadata template. Since the attribute IDs are created and allocated by the MFP itself, the
attribute ID must be xed by completing "Selection and setting of attributes" before metadata
template is created.
Click [Next Step] on the rst entry list screen to show the "Selection and setting of attributes"
screen (shown below).
- 17 -
Page 18

3. Entry Registration Details
Selecting Existing Attributes
Existing Attributes are attributes that are prepared in the MFP beforehand. This is the
collection of information retained in the MFP and does not include information that can be
input using the operator panel during work ow execution.
When Existing Attributes are used to embed in metadata, the Existing Attributes must be
added to the usage attribute list inside entry. The following is a method to add a default
attribute to the usage attribute list.
Click [Attributes prepared in advance in device] at "Selection of existing attributes" of STEP5
1
"Selection and setting of attributes".
The "Selection of attributes" screen will appear. Select the attributes to be embedded in
2
metadata from the "List of attributes" on the left of the screen and click [Add] to add them
to "Previously selected attributes" on the right of the screen.
After nishing selection of attributes, click [OK] at the bottom of the screen to close the
select attributes screen.
Make sure the Existing Attributes added to the entry list are displayed.
3
All the Existing Attributes that exist in the MFP can be used for entry registration.
In addition, there are Exisitng Attributes whose format can be changed when embedding in
metadata, such as date and time. The items in blue characters on the entry list are Existing
Attributes that can be changed.
The embed format is changed by clicking the Existing Attribute name in blue characters to display
the following screen.
- 18 -
Page 19

The following table shows examples of Existing Attributes.
Existing Attributes Examples
No Attribute ID Name
1 %%PRT_PRINTERNAME%% Printer name
2 %%PRT_SERIAL%% Printer serial number
3 %%PRT_MANUFACT%% Manufacturer name
3. Entry Registration Details
4 %%PRT_FWVER%% Firmware version
5 %%PRT_IPADDRESS%% IP address
6 %%PRT_LOCATION%% Location
7 %%PRT_CONTACT%% Contact address information
8 %%PRT_FQDN%% FQDN
9 %%PRT_DEPTNAME%% Department name
10 %%PRT_ENTRYNAME%% Entry name
11 %%PRT_JOBMACRONAME%% Job macro name
12 %%PRT_METATEMPNAME%% META-DATA template name
13 %%PRT_NUMATTRIBUTE%% Number of registered attributes
14 %%PRT_PICTURL%% Transmission destination path (image)
15 %%PRT_PICTPROTOCOL%% Transmission protocol (image)
16 %%PRT_PICTPORT%% Port number (image)
17 %%PRT_PICTUSER%% User ID (image)
18 %%PRT_PICTFILENAME%% Filename (image)
19 %%PRT_METAURL%% Transmission destination path (META-DATA)
20 %%PRT_METAPROTOCOL%% Transmission protocol (META-DATA)
21 %%PRT_METAPORT%% Port number (META-DATA)
22 %%PRT_METAUSER%% User ID (META-DATA)
23 %%PRT_METAFILENAME%% Filename (META-DATA)
24 %%PRT_COLORMODE%% Color mode
25 %%PRT_RESOLUTION%% Resolution
26 %%PRT_FILEFORMAT%% File format
- 19 -
Page 20

3. Entry Registration Details
No Attribute ID Name
27 %%PRT_USERNAME%% User name
28 %%PRT_STARTTIME%% Workow execution start time
29 %%PRT_COMPTIME%% Workow execution end time
30 %%PRT_RESULT%% Workow process results
31 %%PRT_NUMFILE%% Multipage information
32 %%PRT_PAGES%% Number of scanned pages
33 %%PRT_DATE%% Date
34 %%PRT_YEAR%% Year
35 %%PRT_MONTH%% Month
36 %%PRT_DAY%% Day
37 %%PRT_RANDOM%% Random Number
Setting User Dened Attributes
User Dened Attributes are the attributes to dene the information that users want to embed
in metadata. Unlike exisitng attributes, User Defined Attributes require the person who
execute workow to input through the operator panel.
The number of attributes that can be registered in entry is 300 aggregating Existing Attributes
and User Dened Attributes.
The denition of User Dened Attributes is performed at "User dened attribute settings" of
STEP 5 "Selection and setting of attributes".
There are 8 types of input method of input information and there is a settings start button
prepared for each input method.
The attribute ID allocated to each User Dened Attribute will be of the form "%%USERXXXX%%".
A number allocated to the User Defined Attribute is included at XXXX. The attribute ID is
created by the MFP so the user cannot set this. Attribute IDs assigned to the User Dened
Attribute can be checked in the entry list in the example in "Selection and setting of attributes
(Step 5)" (p. 17).
Note
• User Dened Attributes are items that are independently dened for each entry
and cannot be shared across entries.
•
The number of attributes that can be registered in the entire MFP is 900. If the
number of attributes for the entire MFP is exceeded, the registration fails even if
the the number of attributes used in entries is less than 300.
- 20 -
Page 21

3. Entry Registration Details
Input method 1: Text string
This requests input of a string from the person executing workflow on the operator panel.
Following settings are required for dening a User Dened Attribute in the text string format.
Type Description
Name Set the attribute name using maximum 30 characters. The attribute
name is used as a text string displayed on the operator screen.
Panel display Sets whether to display or not display the attribute value settings
screen. The standard text string is unconditionally applied if the
screen is set to not display.
Changes from panel Sets whether or not to permit input using the panel. This setting is
not valid if the panel display is set to not display. If this setting is set
to forbidden, the operator screen displays the screen that shows the
standard text string and only the set button is enabled.
Allow space Permits or forbids setting a null value. An error occurs if a person
executing workow attempts to set a null value using the operator
panel when this setting is set to forbidden.
Text string length Sets the upper and lower limit of the text string length. If values are
set out of the range, an error occurs.
Standard text string Sets the initial text string of the setting value.
Help display content Denes the help string using a maximum of 300 characters.
- 21 -
Page 22

3. Entry Registration Details
Input method 2: Integer value
This requests input of an integer value from the person executing workflow on the operator
panel. Following settings are required for dening a User Dened Attribute in integer value.
Type Description
Name Set the attribute name using maximum 30 characters. The attribute
name is used as a text string displayed on the operator screen.
Panel display Sets whether to display or not display the attribute value settings
screen. The standard value is unconditionally applied if the screen is
set to not display.
Changes from panel Sets whether or not to permit input using the panel. This setting is
not valid if the panel display is set to not display. If this setting is set
to forbidden, the operator screen displays the screen that shows the
standard value and only the set button is enabled.
Allow space Permits or forbids setting a null value. An error occurs if a person
executing workow attempts to set a null value using the operator
panel when this setting is set to forbidden.
Value range Sets the upper and lower limit of the values that can be set. If val-
ues are set out of the range, an error occurs. The values can be set
from -999,999,999,999 to 999,999,999,999.
Stride Sets the step size of the set value in the range from 1 to the maxi-
mum value. Value range and standard value must be set as a multiple of the stride. Re-entry is requested if the set value is not a multiple of the stride when executing entry.
Standard value Sets the initial value of the set value.
Help display content Denes the help string using a maximum of 300 characters.
- 22 -
Page 23

3. Entry Registration Details
Input method 3: Decimal value
This requests input of a decimal number from the person executing workow on the operator
panel. The following settings are required for dening a User Dened Attribute in decimal value.
Type Description
Name Set the attribute name using maximum 30 characters. The attribute
name is used as a text string displayed on the operator screen.
Panel display Sets whether to display or not display the attribute value settings
screen. The standard value is unconditionally applied if the screen is
set to not display.
Changes from panel
Allow space Permits or forbids setting a null value. An error occurs if a person
Value range Sets the upper and lower limit of the values that can be set. If val-
Stride
Sets whether or not to permit input using the panel. This setting is not
valid if the panel display is set to not display. If this setting is set to forbidden, the operator screen displays the screen that shows the standard
value and only the set button is enabled.
executing workow attempts to set a null value using the operator
panel when this setting is set to forbidden
ues are set out of the range, an error occurs. The values can be set
from -999,999,999,999 to 999,999,999,999.
Sets the step size of the set value in the range from 0.000001 to the
maximum value. Value range and standard value must be set as a multiple of the stride. Re-entry is requested if the set value is not a multiple
of the stride when executing entry.
Standard value Sets the initial value of the setting value.
Help display content Denes the help string using a maximum of 300 characters.
- 23 -
Page 24

3. Entry Registration Details
Input method 4: List
This requests information input by selecting an item in the item list from the person executing
workow on the operator panel. The following settings are required for dening a User Dened
Attribute in list input format.
Type Description
Name Set the attribute name using maximum 30 characters. The attribute
name is used as a text string displayed on the operator screen.
Panel display Sets whether to display or not display the attribute value settings
screen. The standard value is unconditionally applied if the screen is
set to not display.
Changes from panel
Allow space Permits or forbids setting a null value. An error occurs if a person
list items Sets the list item used for list input. List items consist of the follow-
Sets whether or not to permit input using the panel. This setting is not
valid if the panel display is set to not display. If this setting is set to forbidden, the operator screen displays the screen that shows the standard
value and only the set button is enabled.
executing workow attempts to set a null value using the operator
panel when this setting is set to forbidden.
When using list input, a null value is input when you select an item
whose transmission text string is null.
ing 3 elements of information. Up to 20 items can be set.
S
tandard: Selects the initial value of the list selection. The initial screen
of the list selection displays the selected item as an initial value.
Display text strings: Denes the text string that is displayed when
an item is selected using maximum 30 characters.
Sent text strings: Sets the text string that is actually embedded in
metadata using maximum 80 characters.
Help display content Denes the help string using a maximum of 300 characters.
- 24 -
Page 25

3. Entry Registration Details
Input method 5: Date
This requests input of a date to the person executing workflow on the operator panel. The
following settings are required for dening a User Dened Attribute in date format.
Type Description
Name Set the attribute name using maximum 30 characters. The attribute
name is used as a text string displayed on the operator screen.
Panel display Sets whether to display or not display the attribute value settings
screen. The default value is unconditionally applied if the screen is
set to not display.
Changes from panel Sets whether or not to permit input using the panel. This setting is
not valid if the panel display is set to not display. If this setting is set
to forbidden, the operator screen displays the screen that shows the
default value and only the set button is enabled.
Allow space Permits or forbids setting a null value. An error occurs if a person
executing workow attempts to set a null value using the operator
panel when this setting is set to forbidden.
Date display type
Sets the format applied when embedding in metadata. Select from
twelve types.
● YYYYMMDD
● MMDDYYYY
● DDMMYYYY
● YYYY/MM/DD
● MM/DD/YYYY
● DD/MM/YYYY
● YYYY.MM.DD
● MM.DD.YYYY
● DD.MM.YYYY
● YYYY-MM-DD
● MM-DD-YYYY
● DD-MM-YYYY
Default value Sets the initial value of the set value. When the panel display is set
to not display or the setting of the changes from panel is set to forbidden, this value is embedded to metadata.
Help display content Denes the help string using a maximum of 300 characters.
- 25 -
Page 26

3. Entry Registration Details
Input method 6: Password
This requests input of a password to the person executing workow on the operator panel. The
input string is concealed by asterisks. The following settings are required for defining a User
Dened Attribute in password format.
Type Description
Name Set the attribute name using maximum 30 characters. The attribute
name is used as a text string displayed on the operator screen.
Panel display Sets whether to display or not display the attribute value settings
screen. The default password is unconditionally applied if the screen
is set to not display.
Changes from panel Sets whether or not to permit input using the panel. This setting is
not valid if the panel display is set to not display. If this setting is set
to forbidden, the operator screen displays the screen that shows the
default password and only the set button is enabled.
Allow space Permits or forbids setting a null value. An error occurs if a person
executing workow attempts to set a null value using the operator
panel when this setting is set to forbidden.
Length of Password Sets the length of the password string in a numeric value from 1 to
30.
Default Password Sets the initial value of the set value. When the panel display is set
to not display or the setting of the changes from panel is set to forbidden, this value is embedded to metadata.
Help display content Denes the help string using a maximum of 300 characters.
- 26 -
Page 27

3. Entry Registration Details
Input method 7: ON/OFF
This displays an ON/OFF selection screen and requests input to the person executing workow
on the operator panel. The following settings are required for dening a User Dened Attribute in
ON/OFF format.
Type Description
Name Set the attribute name using maximum 30 characters. The attribute
name is used as a text string displayed on the operator screen.
Panel display Sets whether to display or not display the attribute value settings
screen. The default value of attributes is unconditionally applied if
the screen is set to not display.
Changes from panel Sets whether or not to permit input using the panel. This setting is
not valid if the panel display is set to not display. If this setting is set
to forbidden, the operator screen displays the screen that shows the
default value of attributes and only the set button is enabled.
Text string sent when ON
is selected
Text string sent when OFF
is selected
Help display content Denes the help string using a maximum of 300 characters.
Denes the text string embedded to metadata when ON is selected
using maximum 80 characters.
Denes the text string embedded to metadata when OFF is selected
using maximum 80 characters.
- 27 -
Page 28

3. Entry Registration Details
Input method 8: Address book type input
This displays a screen on the operator panel to prompt the person exexuting workow to select a
telephone number or e-mail address from a telephone book. The following settings are required
for dening a User Dened Attribute in address book type input format.
Type Description
Name Set the attribute name using maximum 30 characters. The attribute
name is used as a text string displayed on the operator screen.
Panel display Sets whether to display or not display the attribute value settings
screen. If the screen is set not display, a null value is embedded in
metadata for this information has no standard value.
Changes from panel Sets whether or not to permit input using the panel. This setting is
not valid if the panel display is set to not display. If this setting is set
to forbidden, the operator screen displays the screen that shows a
null value and only the set button is enabled.
Allow space Permits or forbids setting a null value. An error occurs if a person
executing workow attempts to set a null value using the operator
panel when this setting is set to forbidden.
Address book type Selects from address book and E-mail address.
Help display content Denes the help string using a maximum of 300 characters.
- 28 -
Page 29

3. Entry Registration Details
Changing the order of display in panel
The the input screens of the User Dened Attributes shown on the operator panel are basically
displayed in an order of the timing of denition completion. However, the order can be changed
after denition is complete.
Change of the order displayed on the panel is performed using "Change order of display in
panel" in STEP5 "Selection and setting of attributes". When "Change order of display in panel"
is clicked, the following screen appears. Select the User Dened Attribute of that you want to
change the order and move it to your desired place by clicking [Move Up] or [Move Down].
The higher up in the order, the more quickly it is displayed on the operator panel.
Selecting metadata template (Step 6)
This uploads a metadata template to the MFP.
This species a metadata template and executes upload. When this operation is executed, the
metadata template is associated with the entry.
If a metadata template had been previously uploaded, the old metadata template in the MFP
is deleted and replaced with the new metadata template.
The metadata template must be created before uploading. For information on creating
metadata templates, see "4. Editing a Metadata Template" (p. 30).
The entry can be saved before editing is complete. If the metadata template has not yet been
created in this step, save the entry to create the metadata template, and then edit the entry
again and upload the metadata template.
- 29 -
Page 30

4. Editing a Metadata Template
4. Editing a Metadata Template
After obtaining a metadata template specied by a system such as the electronic workow
that the MFP cooperates with, edit the template file to insert the attribute ID text string
dened in the entry. The maximum size of a metadata template is 10 kbytes.
When an entry is deleted, a metadata template uploaded to the MFP will be deleted
simultaneously.
When an attribute ID is not added to the usage attribute list and you add it to a metadata
template, that attribute ID will not be replaced with the actual value, and the attribute ID
itself will be output to the metadata.
The following is an example of a metadata template.
In metadata, the section written as the attribute ID is replaced with the actual value.
--User Dened Attributes--
NUM=%%USER0001%%
DEC=%%USER0002%%
CHAR=%%USER0003%%
LIST=%%USER0004%%
ONOFF=%%USER0005%%
DATE=%%USER0006%%
ADDRS=%%USER0007%%
PSWD=%%USER0008%%
--Existing Attributes-PRINTERNAME =%%PRT_PRINTERNAME%%
SERIAL =%%PRT_SERIAL%%
MANUFACT =%%PRT_MANUFACT%%
FWVER =%%PRT_FWVER%%
IPADDRESS =%%PRT_IPADDRESS%%
PICTFILENAME =%%PRT_PICTFILENAME%%
- 30 -
Page 31

5. Entry List Batch Operation
5. Entry List Batch Operation
All entries displayed in entry list are temporarily saved
in personal computer.
This enables saving the entry list registered on the MFP to a local disk on a personal computer.
A destination folder and lename can be specied to use this le as a backup for the entry
list.
All the setting contents of the entry and metadata templates uploaded to the MFP are saved.
Settings values of the Indexed Scan temporarily saved
on the personal
This updates the entry list on the MFP using an entry list saved on a personal computer.
The entry lists on the MFP to be updated are all deleted.
Entry access privileges become the same as when setting entry registration ("Allow all users"
or "Prohibits all users"). Access privileges that are changed individually per roles using user
management/access control are not saved.
computer are set on the MFP.
- 31 -
Page 32

Appendix
Metadata Template Sample
<Dokumente>
<Dokument>
<printer_name>%%PRT_PRINTERNAME%%</printer_name>
<printer_serial_number>%%PRT_SERIAL%%</printer_serial_number>
<manufacturer>%%PRT_MANUFACT%%</manufacturer>
<rmware_version>%%PRT_FWVER%%</rmware_version>
<ip_address>%%PRT_IPADDRESS%%</ip_address>
<location>%%PRT_LOCATION%%</location>
<contact>%%PRT_CONTACT%%</contact>
<domain_name>%%PRT_FQDN%%</domain_name>
<department_name>%%PRT_DEPTNAME%%</department_name>
<entry_name>%%PRT_ENTRYNAME%%</entry_name>
<meta_template_name>%%PRT_METATEMPNAME%%</meta_template_name>
<attribute_number>%%PRT_NUMATTRIBUTE%%</attribute_number>
<picture_targeturl>%%PRT_PICTURL%%</picture_targeturl>
<picture_protocol>%%PRT_PICTPROTOCOL%%</picture_protocol>
<picture_port>%%PRT_PICTPORT%%</picture_port>
<picture_userid>%%PRT_PICTUSER%%</picture_userid>
<picture_lename>%%PRT_PICTFILENAME%%</picture_lename>
<meta_targeturl>%%PRT_METAURL%%</meta_targeturl>
<meta_protocol>%%PRT_METAPROTOCOL%%</meta_protocol>
<meta_port>%%PRT_METAPORT%%</meta_port>
<meta_userid>%%PRT_METAUSER%%</meta_userid>
<meta_lename>%%PRT_METAFILENAME%%</meta_lename>
<colormode>%%PRT_COLORMODE%%</colormode>
<resolution>%%PRT_RESOLUTION%%</resolution>
<leformat>%%PRT_FILEFORMAT%%</leformat>
<user_name>%%PRT_USERNAME%%</user_name>
<start_time>%%PRT_STARTTIME%%</start_time>
<complete_time>%%PRT_COMPTIME%%</complete_time>
<result>%%PRT_RESULT%%</result>
<le_number>%%PRT_NUMFILE%%</le_number>
<pages>%%PRT_PAGES%%</pages>
<date>%%PRT_DATE%%</date>
<year>%%PRT_YEAR%%</year>
<month>%%PRT_MONTH%%</month>
<day>%%PRT_DAY%%</day>
<random>%%PRT_RANDOM%%</random>
</Dokument>
</Documente>
Appendix
- 32 -
Page 33

Metadata Sample
<Dokumente>
<Dokument>
<printer_name>MC873</printer_name>
<printer_serial_number>AA00000000</printer_serial_number>
<manufacturer>OKI DATA CORP</manufacturer>
<rmware_version>A06.02_0_6</rmware_version>
<ip_address>192.168.100.100</ip_address>
<location>OfceA1</location>
<contact>0123456789</contact>
<domain_name></domain_name>
<department_name></department_name>
<entry_name>Entry_PrintAttr</entry_name>
<meta_template_name>METATEMP_printattr.txt</meta_template_name>
<attribute_number>42</attribute_number>
<picture_targeturl>//192.168.100.150/picture</picture_targeturl>
<picture_protocol>FTP</picture_protocol>
<picture_port>21</picture_port>
<picture_userid>sample</picture_userid>
<picture_lename>image.pdf</picture_lename>
<meta_targeturl>//192.168.100.150/metadata</meta_targeturl>
<meta_protocol>FTP</meta_protocol>
<meta_port>21</meta_port>
<meta_userid>sample2</meta_userid>
<meta_lename>meta.xml</meta_lename>
<colormode>AUTOCOLOR</colormode>
<resolution>200dpi</resolution>
<leformat>MultiplePDF</leformat>
<user_name>default</user_name>
<start_time>12:19:16</start_time>
<complete_time>12:19:24</complete_time>
<result>completed</result>
<le_number>1</le_number>
<pages>1</pages>
<date>20150425</date>
<year>2015</year>
<month>04</month>
<day>25</day>
<random>578954</random>
</Dokument>
</Dokumente>
Appendix
- 33 -
 Loading...