

Page 1
Wide Format Solvent Inkjet Printer
IP-7900-22/23
Read this User’s Guide carefully before use of this printer and
handle it properly.
After reading, keep it for later use.
U00133704002
IP-7900-22
Page 2

IP-7900-22/23 Wide Format Solvent Inkjet Printer Advanced Operation Guide
Documents Number U00133704002, Third edition, December 2015
Copyright© 2015 OKI Data Infotech Corporation.
All rights reserved
OKI Data Infotech Corporation. reserves the right to make changes without notice to the specications and materials contained herein and
shall not be responsible for any damages (including consequential) caused by reliance on the materials presented, including but not limited
to typographical, arithmetic, or listing errors.
Please address any questions, comments, and suggestions to the regional oce on :
See http://www.okidata-infotech.com/
This guide acknowledges the following trademarks :
All other trademarks are the properties of their respective companies.
This equipment has been tested and found to comply with the limits for a Class A digital device, pursuant to Part 15 of the FCC Rules. These
limits are designed to provide reasonable protection against harmful interference when the equipment is operated in a commercial
environment.
This equipment generates, uses, and can radiate radio frequency energy and, if not installed and used in accordance with the instruction
manual, may cause harmful interference to radio communications. Operation of this equipment in a residential area is likely to cause harmful
interference in which case the user will be required to correct the interference at his own expense.
The CE mark, that shows that the products sold in the EU are conformed to the requirements of EC directive, is statutorily obliged to be
axed to the products.
In each directive, the scope of directive to be applied to equipment is explicitly dened. Our company’s product IP-7900 conforms to the
EMC directive, low voltage directive and RoHS Directive.
Inquiry of CE mark:
OKI Europe Ltd.
Wide Format Division
Siemensstrasse 9 , D-63263 Neu-Isenburg
Germany
Tel.: +49 (0)6102 297 400
Fax: +49 (0)6102 297 50 400
OKI Data Infotech Corporation
8 Nakase 1-chome, Mihama-ku, Chiba-shi, Chiba 261-8507, Japan
Phone : +81 43 211 1363
Fax : +81 43 211 8709
Page 3

Introduction
IP-7900-22/23 Wide Format Solvent Inkjet Printer (hereafter simply called the Printer below.) is equipped with
built-in USB interface that adopts solvent ink and supports media of up to 104-inch width.
The IP-7900-22-23 Wide Format Solvent Inkjet Printer Advanced Operation Guide describes:
- Function setting operation
- Adjustment procedures
For the information below required to start operating the Printer, refer to the Basic Operation Guide.
- Basic information required for the operation
- Basic operations to turn the Printer on and off and to handle the media and ink system
To operate the Printer safely and properly, before starting the operation be sure to read the following of the Basic
Operation Guide.
• Safety precautions
• Components delivered with the Printer
• Manual legend (notation rules)
Keep these Guides near the Printer so that you can quickly access it at any time.
3
Page 4
How do the two Guides work?
Basic Operation Guide
Read the Basic Operation Guide before your rst Printer operation.
This guide describes the basic handling and daily operation of
media, printing, and maintenance.
To perform your rst printing
To print on other media
To perform double-sided printing
To perform the Printer’s maintenance
To replace the Printer’s ink cartridge
page 24
page 50
page 56
page 60
page 129
To replace the Printer’s waste ink bottle
To recover error messages
To clear media jams
IP-7900 Advanced Operation Guide
4
page 127
page 116
page 115
Page 5
Advanced Operation Guide
Read the Advanced Operation Guide so that you can operate
the Printer eectively.
This Guide describes the Printer’s ne setting and adjustment to
maximize the Printer’s performance.
To operate the Printer with ne settings
To create a new media preset
To clear banding, white lines, and bleeding
To turn the Printer o for a long time
page 77
page 26
page 55
page 8
To print on cut-sheet media
To change heater temperature while printing
page 42
page 69
5
Page 6

TABLE OF CONTENTS
Manage the media advance compensation
Change media advance compensation
51
51
Introduction
Manual legend (Notational rules)
To assist your Printer in operating
effectively
When you do not use the Printer for
2 weeks or longer
Service cleaning
Head wash
Charging the ink system after head wash
Check the Printer status
Check the remaining ink level
Check remaining media length
Print reports on the Printer status.
Check the USB connection status
Check the firmware version on your Printer
Check the total print distance
Handle the media
Create a new media preset
Select a preset media
Minimize the right and left margins
Prevent the media from sticking and wrinkling
Solve media lifting up problem
Print on a thick media
Suspend printing when media wrinkles are detected
Change the automatic cleaning timing
Copy a preset media type to create a new one
Change the type of the preset media without
reloading the media
Feed or rewind media
Move a print start position (nest function)
Use the media until the very end
Print on a cut-sheet media
Adjust the head margin before printing
Reinstall the edge guards during printing
Remove some media wrinkles during printing
Solve skew in LOOSE winding mode
8
14
19
22
22
23
23
24
25
25
26
26
28
28
30
31
32
33
34
35
37
37
39
40
42
44
45
46
46
Print conditions
3
Set PRINT MODE
7
Set SMART PASS
Set DENSITY
Troubleshoot print quality issues
The print is light.
Missing dots are found at the beginning of printing.
The media is curled or wrinkled.
8
White stripes appear on the print.
9
Edges of objects are blurred.
A vertical barding appears at the print's edge.
Different bandings appear on the print’s right and left.
Clear missing dots (nozzle clogging)
Strong cleaning
Fill the cap with ink
Adjust the heaters’ temperature
Procedure to set the heater temperature
Display the heater control menu.
Button operation in the heater control menu
Finish displaying the heater control menu
Set the heater preset temperature
Select the standby time
Smart pass technology
Adjust and calibrate the Printer
Before adjustment and calibration
Cautions regarding automatic print adjustment
Automatic print adjustment cannot be performed
Procedures
Adjusting media feeding: Media advance adjustment
Correcting ink output position: Bidirectional
print position adjustment
Adjust the print linkage before or after automatic
cleaning
Adjust the print head position and the nozzle
positions at the print head's right and left
Asjust the edge sensor position
52
52
53
53
55
55
55
56
57
63
64
65
66
66
67
69
69
70
70
70
71
72
73
74
74
75
75
77
77
82
87
89
92
To change the Printer’s basic settings
Turn the audio warning beep off
Update the system firmware
Cleaning options
Perform cleaning only for the specified print head
IP-7900 Advanced Operation Guide
6
48
48
48
49
49
Menu tree
Index
94
100
Page 7
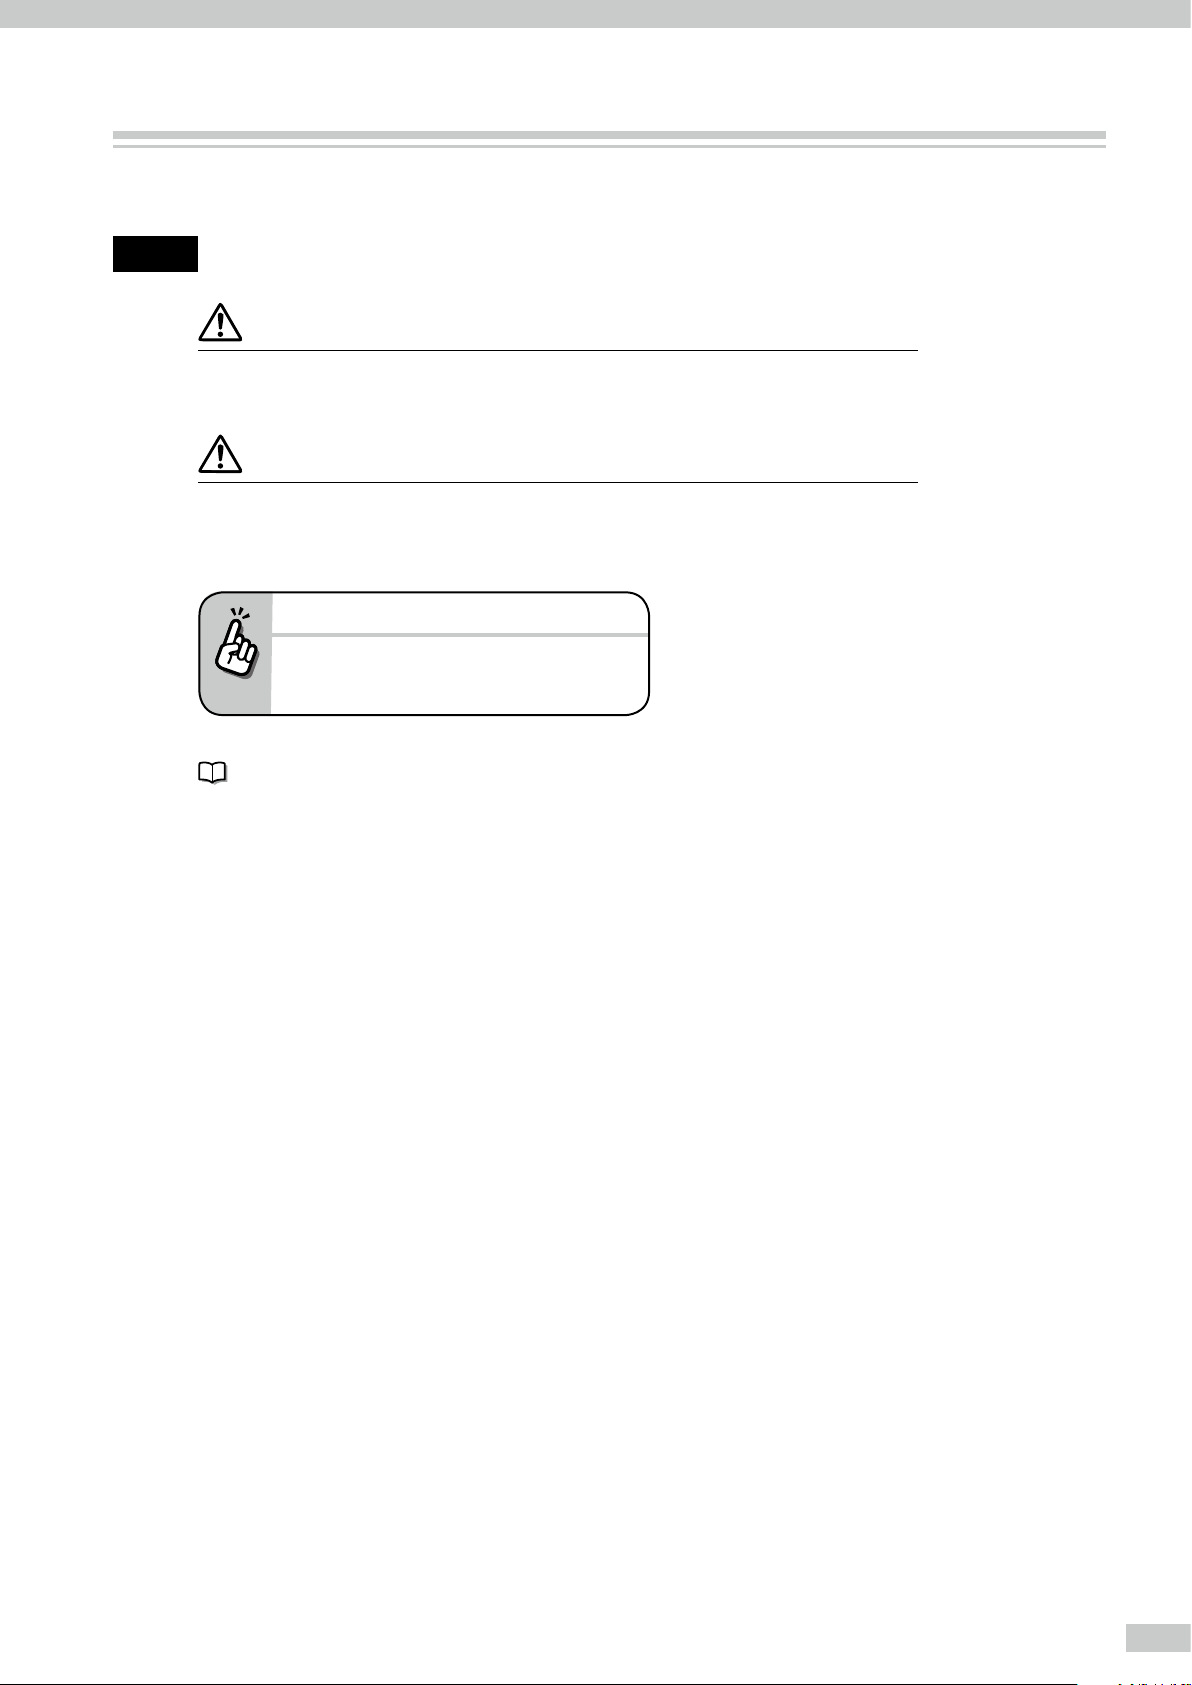
Manual legend (Notational rules)
The notational rules such as marks, buttons, LCD, and LEDs used for explanation in this guide are as follows:
Marks
WARNING
- Boxes marked with a WARNING describe points of caution for avoiding serious personal
injury.
CAUTION
- Boxes marked with a CAUTION describe points of caution for avoiding injury to yourself or
damage to the Printer.
TIP:
- This mark offers you the information to
facilitate the Printer operation.
Reference mark
This mark is followed by a reference section or page number.
7
Page 8

To assist your Printer in operating effectively
When you do not use the Printer for 2 weeks or longer
Always set the Printer power to on to perform the fill cap operation.
Fillcap is...?
- To remove nozzle clogging from nozzle surface, use fillcap option. This option fills the cap with ink to
soak the print head (nozzle surface) in the ink for a minimum of 1 to 2 hours. If possible, leave the Printer
overnight.
Use this option also when nozzles cannot be fixed by cleaning repeatedly.
The Printer has an internal clock which allows it to automatically wash the print heads, flushing some ink through
the print heads, which keeps the print heads in good condition. The Printer automatically washes the print heads
72 hours after the last printing, and then regularly washes every 3 days.
If the Printer has been left turned on and has not been used for 2 weeks or longer, it is necessary to wash the
print heads, charge the ink system, and perform daily maintenance using the procedure below.
If you have to keep the Printer turned off for a long without using it, first perform a service cleaning using the
procedure below, and then turn the Printer off.
Power-off
For a short period
Power-on
For a several days For two weeks or more
(
(
page 14
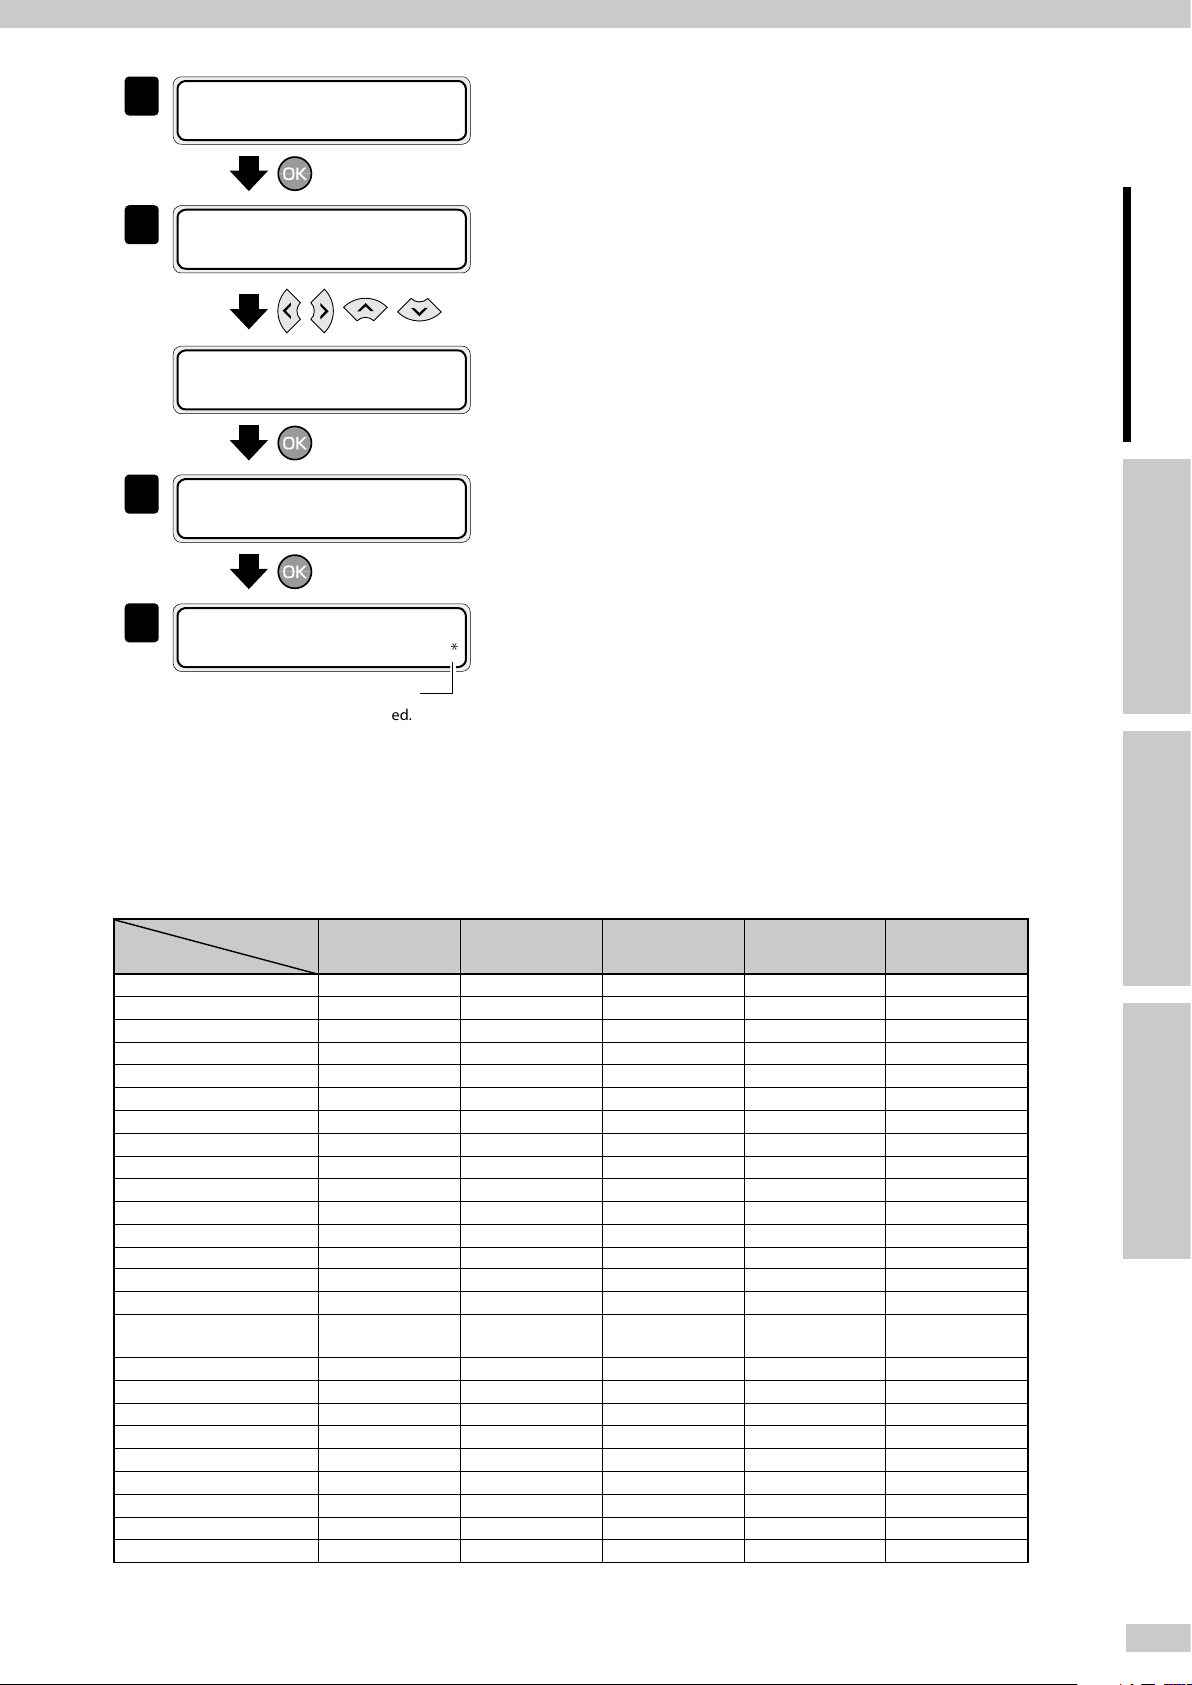
Service cleaning
Clean the print head and the ink flow path with the
storage liquid, and leave the printer with storage
liquid filled.
Prepare the storage liquid set (IP7-137).
Head wash
Clean the print head and the ink flow path with the
cleaning liquid.
Prepare the cleaning liquid set (IP7-136).
Charging ink after head wash
After the head wash, Insert ink trays and charge the
ink system.
Daily maintenance
(
Basic Operation Guide page 60
Perform the daily maintenance.
page 9
)
)
(
)
page 19
For one month or more
When leaving the Printer for
more than one month,
contact your service
representative beforehand.
A service call error is
displayed when the Printer is
turned on. Contact your
dealer or a service
representative.
)
CAUTION
- To protect the print head, do not leave your Printer for more than one month with no ink charged.
- During the service cleaning or head wash, do not open or close the front cover or the lever. Otherwise, the Printer may
restart its initial operation from the beginning, while wasting the ink and cleaning liquid.
IP-7900 Advanced Operation Guide
8
Page 9
Turn the Printer o / Check the Printer status / Handle the media / To change the Printer’s basic settings /
MENU
Cleaning options / Manage the media advance compensation / Manage print modes / Troubleshoot print quality issues /
Clear missing dots (nozzle clogging) / Adjust the heaters’ temperature / Smart pass technology
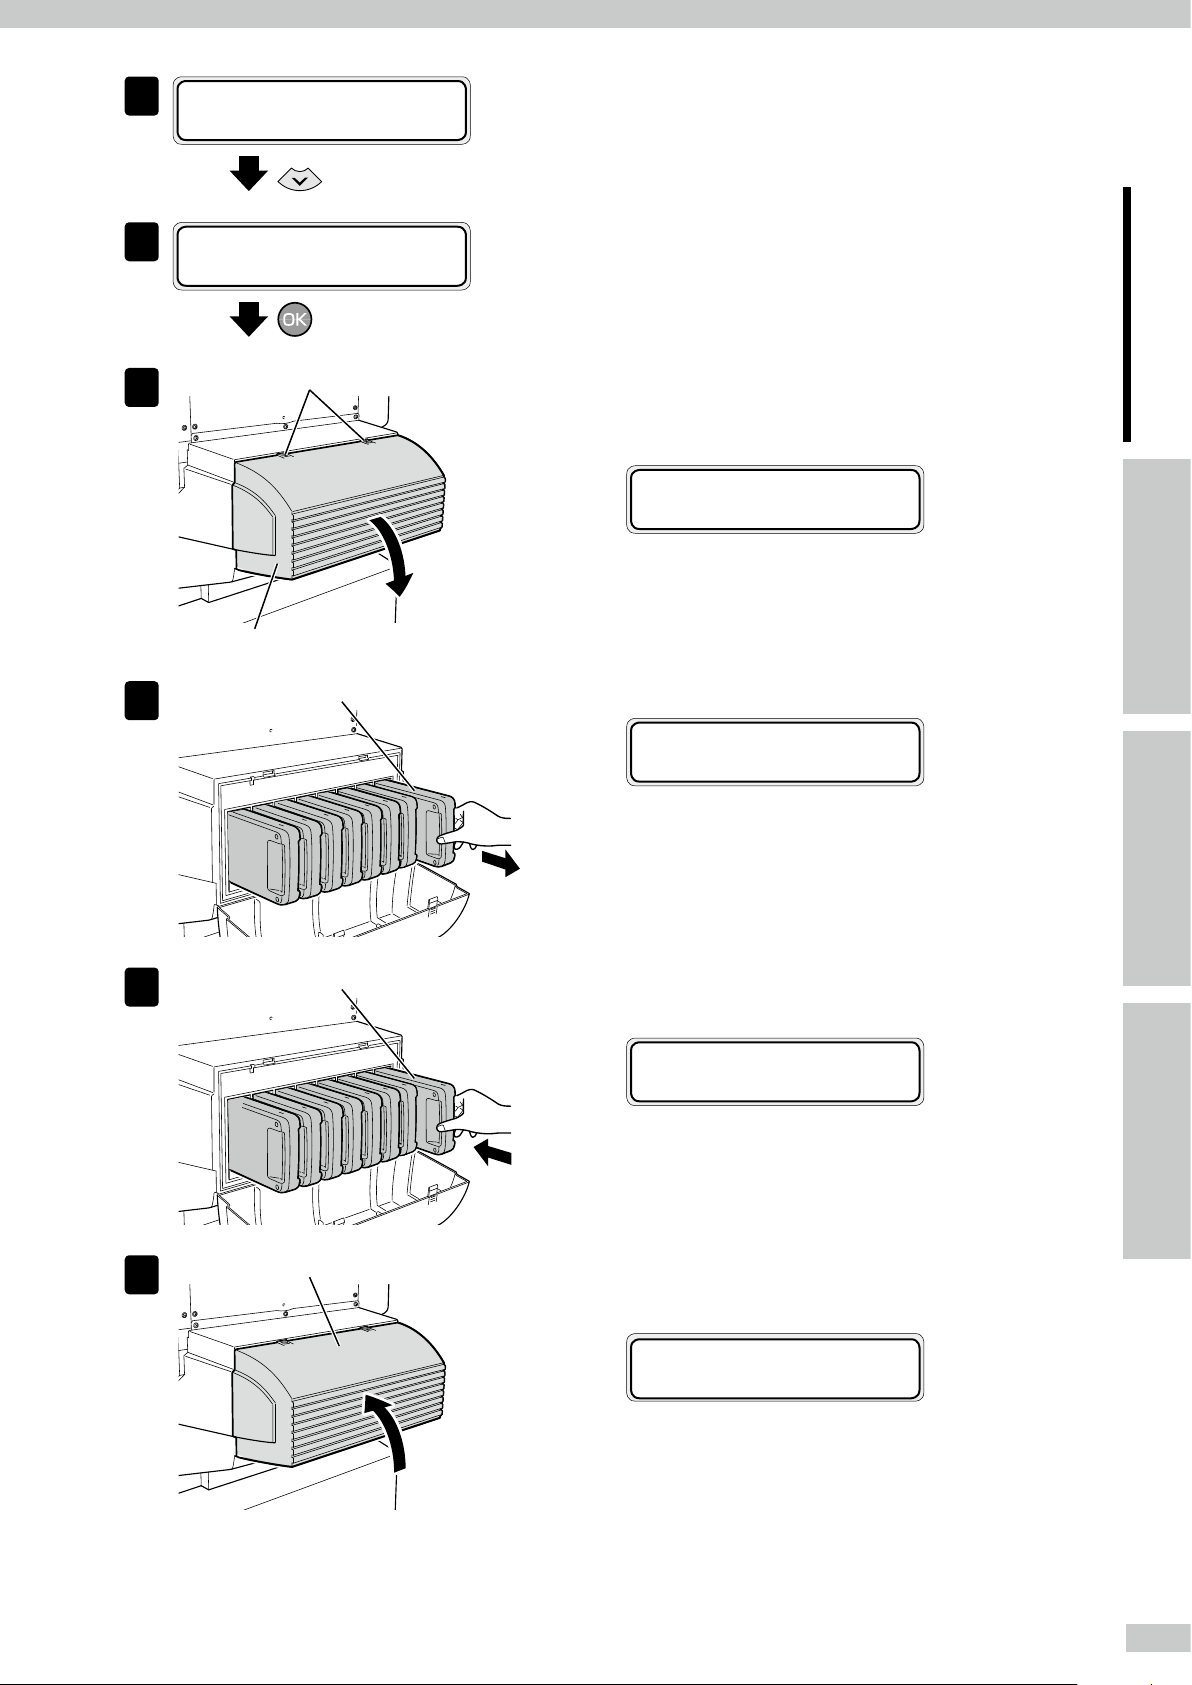
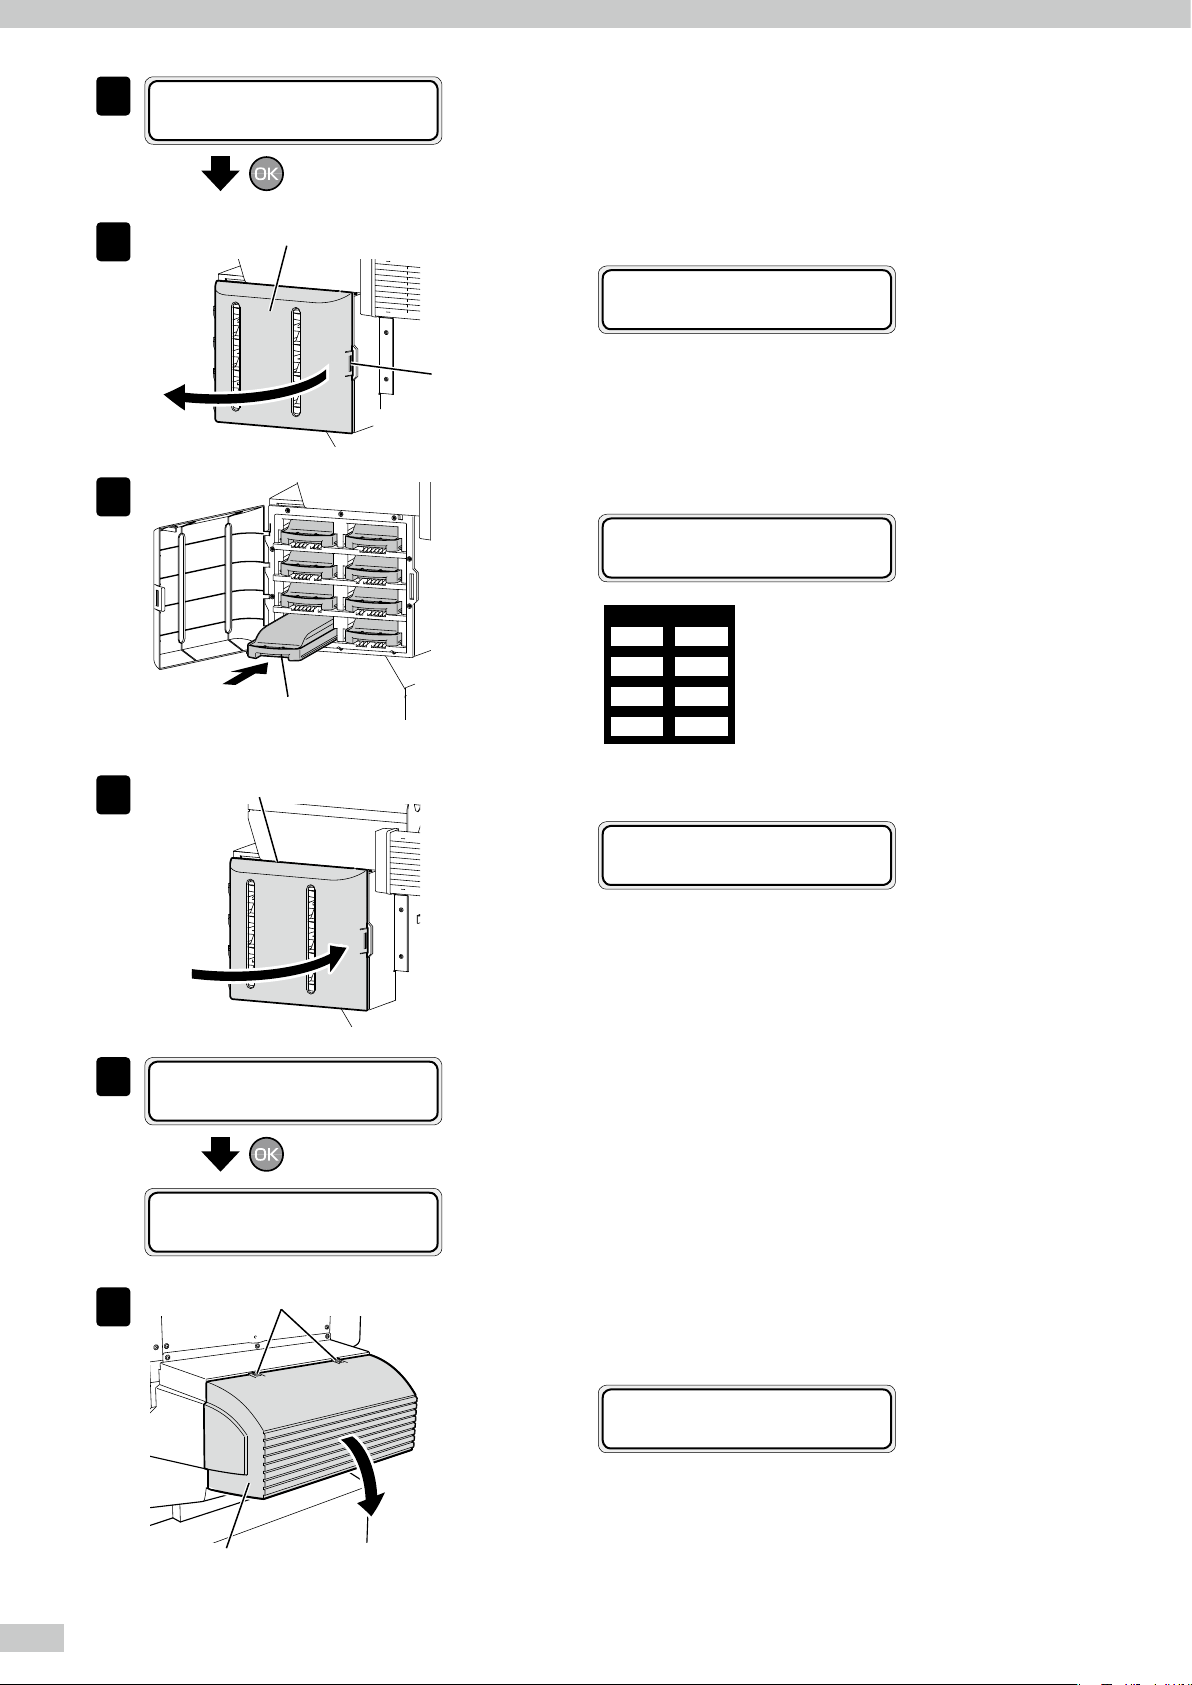
Service cleaning
Required items
Use the eight storage liquid cartridges completely in a single service cleaning.
NOTE
On the LCD, ink box cover is indicated as INK COVER.
OPEN
INK COVER
Before the operation check that the items below are prepared.
Storage liquid set A (IP7-237)
Storage liquid cartridge
INK COVER is displayed to indicate an ink box cover.
Dummy subcartridge
To assist your Printer
in operating eectively
Adjust and calibrate
the Printer
To facilitate this work, set the storage liquid cartridges to the optional ink trays in advance.
Install an empty waste ink bottle.
1
2
INK MEDIA REGâ
á
MEDIA M.ADV
ß
3
REWIND FORM FEED
á
PH.REC PH.MAIN
ß
#CAP CLEANING
4
>
à
â
à
Set the Printer to oine state and press the
MENU button.
IndexMenu tree
Press the Right button.
With the Down button scroll to #INK SYSTEM
OPT.
#INK SYSTEM OPT
5
>STORE INK SYS
Press the OK button.
9
Page 10

#INK SYSTEM OPT
6
*STORE INK SYS
Press the OK button.
7
8
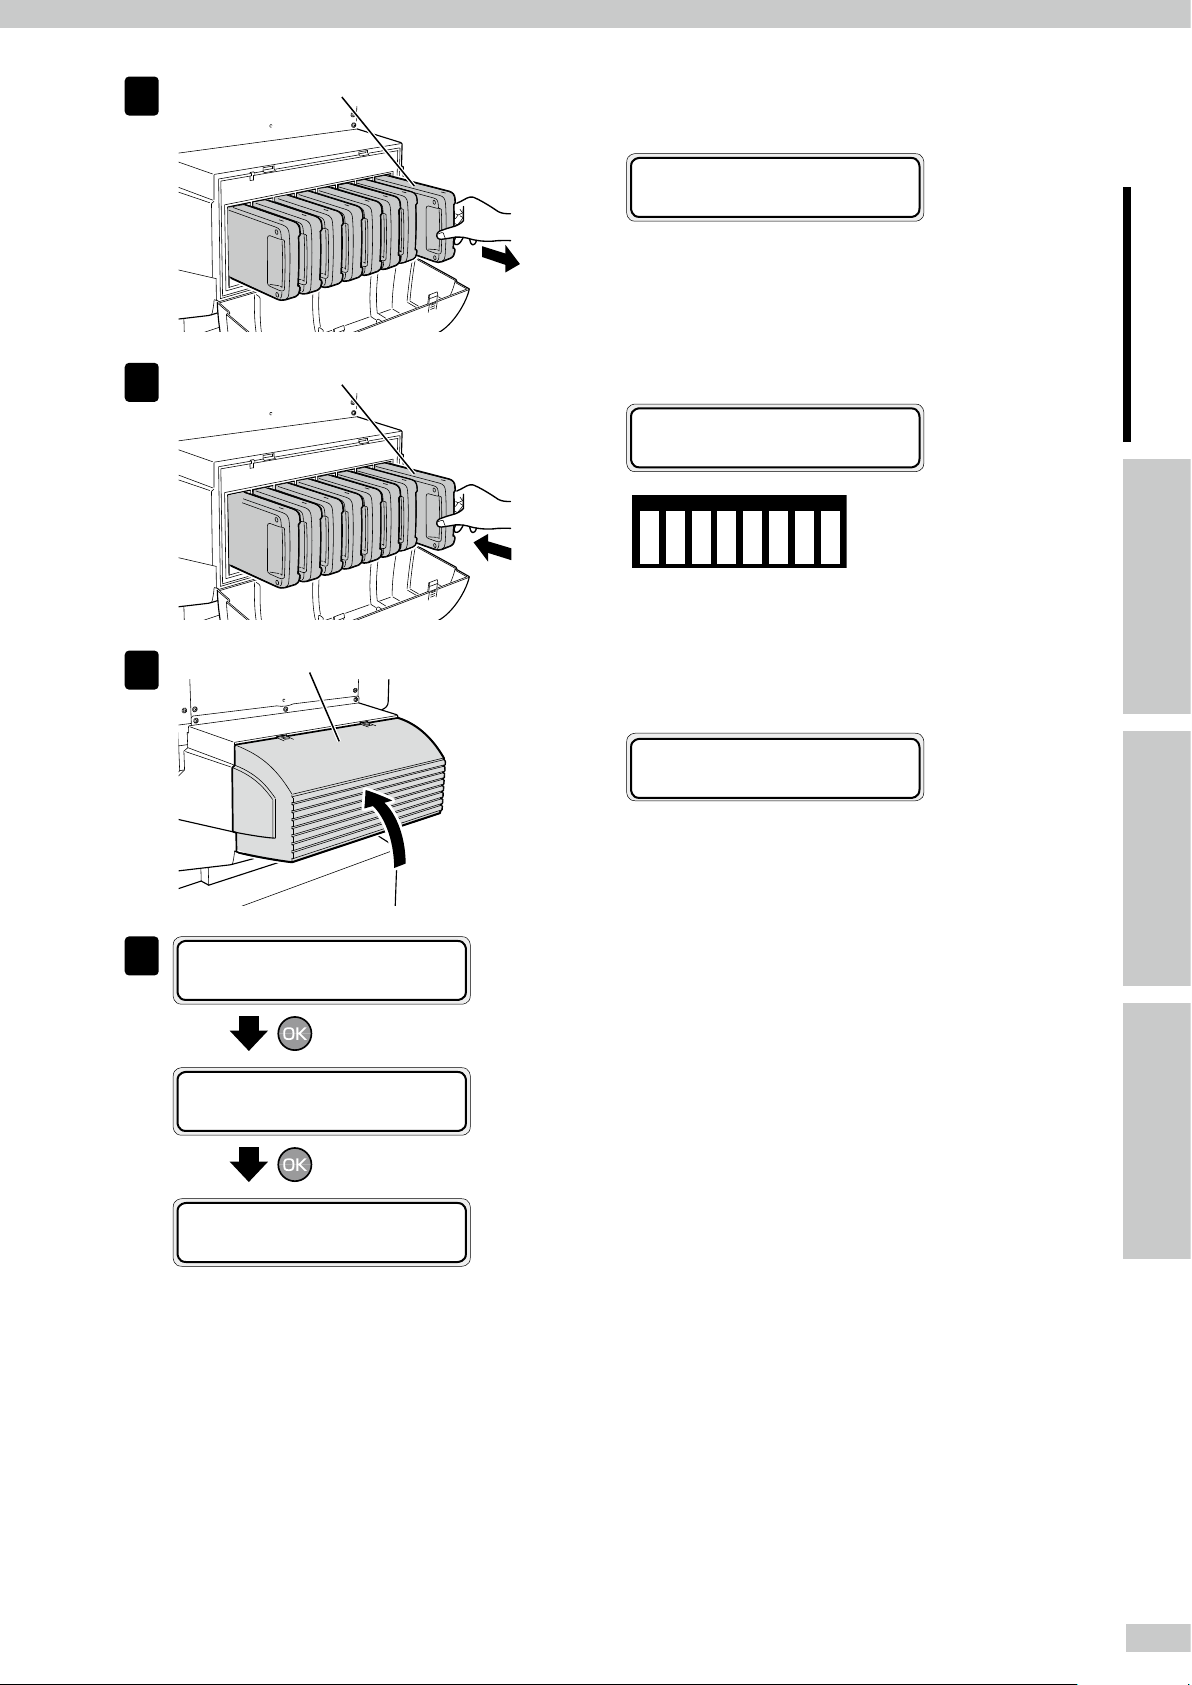
Knob screws
Subcartridge cover
Subcartridges to be removed
Open the subcartridge cover.
Loosen the two knob screws on the subcartridge cover
and open the subcartridge cover.
OPEN
SUBCARTRIDGE COVER
Remove the eight subcartridges.
REMOVE
Y1 SUBCARTRIDGE
9
10
Dummy subcartridges
Subcartridge cover
Set the dummy subcartridges of the storage
liquid set A.
LOAD
Y1 DUMMY SUBCART
Close the subcartridge cover and tighten the
two knob screws.
CLOSE
SUBCARTRIDGE COVER
10
IP-7900 Advanced Operation Guide
Page 11
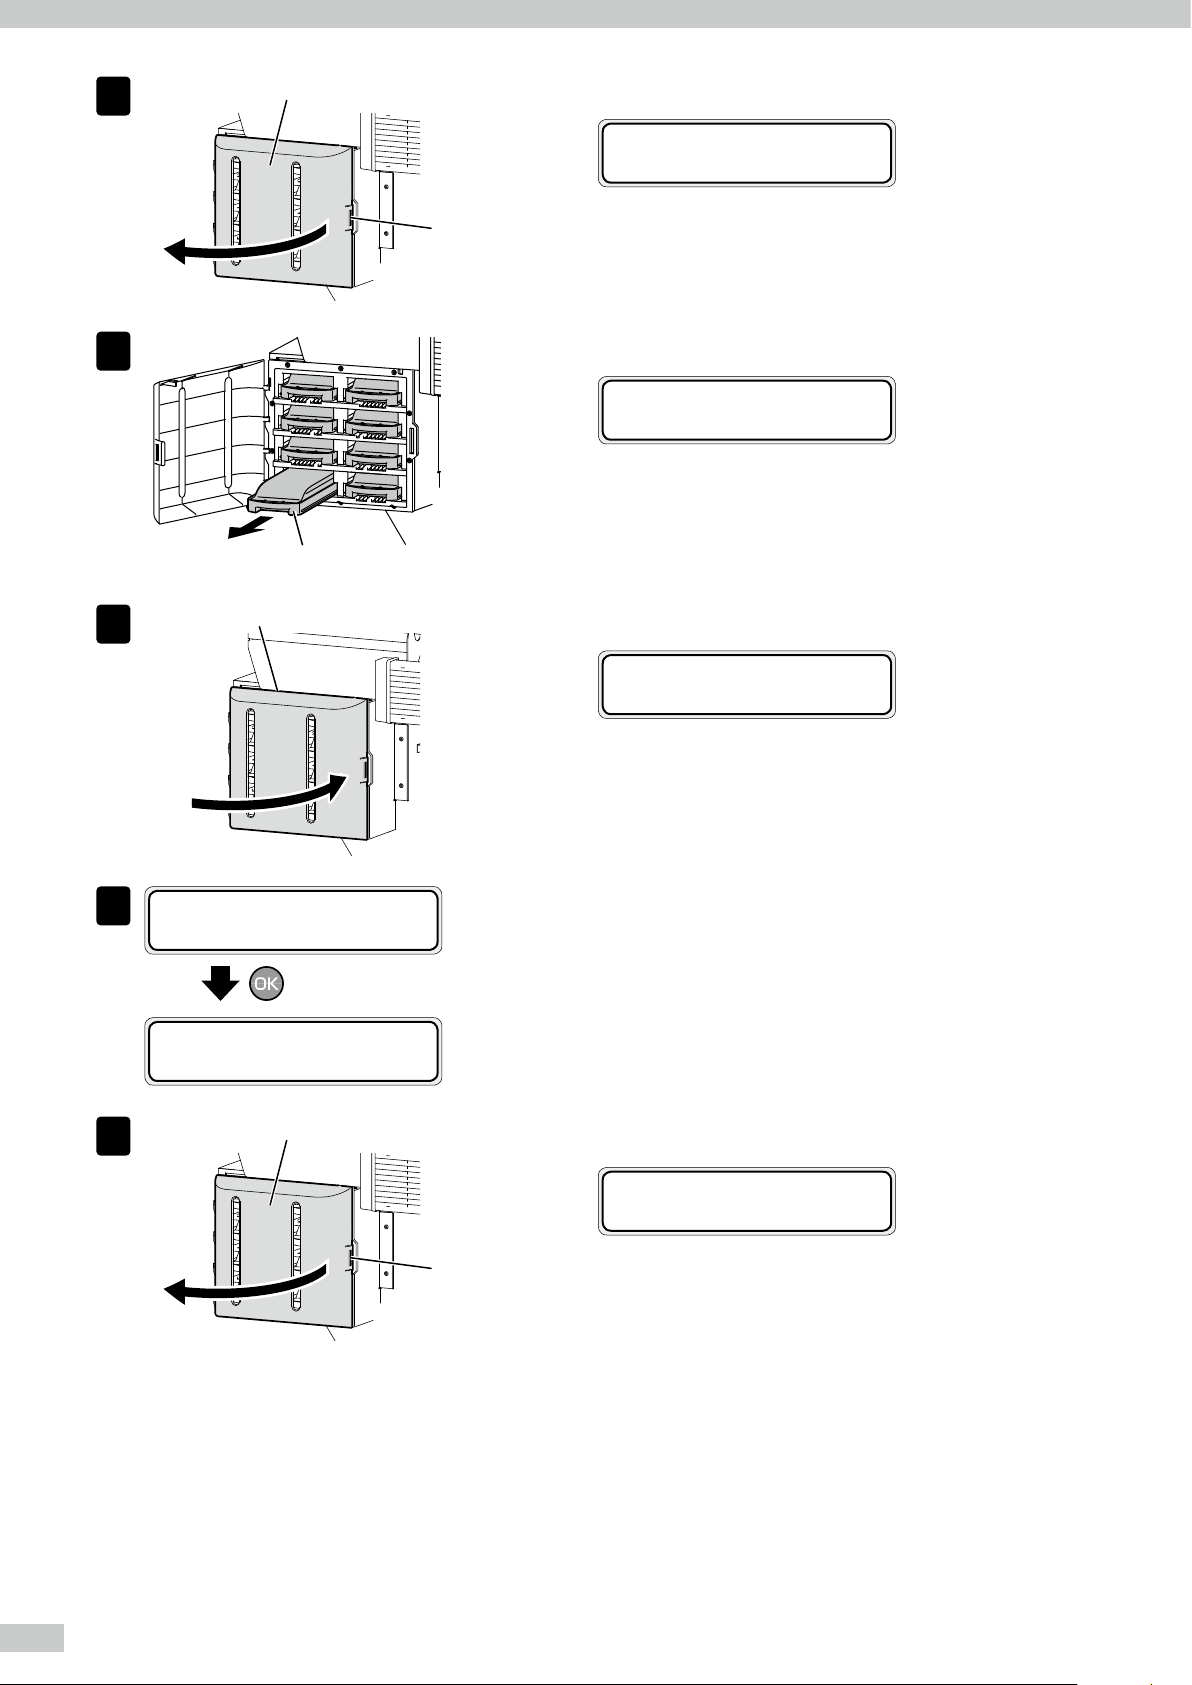
11
Ink box cover
Knob
Open the ink box cover.
OPEN
INK COVER
To assist your Printer
in operating eectively
12
13
START PURGING
14
*BOTTLE OK?
Ink trays to be removed
Ink box cover
Remove the eight ink trays.
REMOVE
Y1 INK PACK
Adjust and calibrate
the Printer
Close the ink box cover.
CLOSE
INK COVER
Press the OK button.
Ink is purged from the ink system.
PURGING
PLEASE WAIT 12
15
Ink box cover
16
Knob
Open the ink box cover.
OPEN
INK COVER
Insert the ink trays with storage liquid cartridges
into the slots of the ink box.
LOAD
Y1 SL PACK
IndexMenu tree
Ink trays to be set
11
Page 12
17
Ink box cover
Close the ink box cover.
CLOSE
INK COVER
START SL CHARGING
18
*BOTTLE OK?
CHARGING SL
PLEASE WAIT 12
19
Ink box cover
20
Press the OK button.
Open the ink box cover.
OPEN
INK COVER
Knob
Remove the ink trays with cleaning liquid
cartridges.
REMOVE
Y1 SL PACK
21
12
Ink trays to be removed
Ink box cover
IP-7900 Advanced Operation Guide
Close the ink box cover.
CLOSE
INK COVER
Page 13

START PURGING
22
*BOTTLE OK?
Press the OK button.
Ink is purged from the ink system.
PURGING
PLEASE WAIT 12
23
Ink box cover
24
Knob
Open the ink box cover.
OPEN
INK COVER
Insert the ink trays with storage liquid cartridges
into the slots of the ink box.
LOAD
Y1 SL PACK
To assist your Printer
in operating eectively
Adjust and calibrate
the Printer
Ink trays to be set
25
START SL CHARGING
26
*BOTTLE OK?
Ink box cover
CHARGING SL
PLEASE WAIT 12
Close the ink box cover.
CLOSE
INK COVER
IndexMenu tree
Press the OK button.
#INK SYSTEM OPT
>STORE INK SYS
13
Page 14
Head wash
MENU
Required items
Use the eight cleaning liquid cartridges completely in a single head wash.
Before the operation check that the items below are prepared.
Cleaning liquid set A (IP7-236)
Cleaning liquid cartridge
Dummy subcartridge
NOTE
On the LCD, ink box cover is indicated as INK COVER.
OPEN
INK COVER
INK COVER is displayed to indicate an ink box cover.
To facilitate this work, set the cleaning liquid cartridges to the optional ink trays in advance.
Install an empty waste ink bottle.
1
2
INK MEDIA REGâ
á
MEDIA M.ADV
ß
à
Set the Printer to oine state and press the
MENU button.
3
REWIND FORM FEED
á
PH.REC PH.MAIN
ß
â
à
Press the Right button.
#CAP CLEANING
4
>
With the Down button scroll to #INK SYSTEM
OPT.
5
14
#INK SYSTEM OPT
>STORE INK SYS
IP-7900 Advanced Operation Guide
Press the OK button.
Page 15
#INK SYSTEM OPT
6
*STORE INK SYS
With the Down button scroll to *CLEAN INK
SYS.
#INK SYSTEM OPT
7
*CLEAN INK SYS
8
Subcartridge cover
9
Subcartridges to be removed
Knob screws
Press the OK button.
Open the subcartridge cover.
Loosen the two knob screws on the subcartridge cover
and open the subcartridge cover.
OPEN
SUBCARTRIDGE COVER
Remove the eight subcartridges.
REMOVE
Y1 SUBCARTRIDGE
To assist your Printer
in operating eectively
Adjust and calibrate
the Printer
10
11
Dummy subcartridges
Subcartridge cover
Set the dummy subcartridges of the cleaning
liquid set.
LOAD
Y1 DUMMY SUBCART
Close the subcartridge cover and tighten the
two knob screws.
CLOSE
SUBCARTRIDGE COVER
IndexMenu tree
15
Page 16
12
Ink box cover
Open the ink box cover.
OPEN
INK COVER
Knob
13
14
START PURGING
15
*BOTTLE OK?
Ink trays to be removed
Ink box cover
Remove the eight ink trays.
REMOVE
Y1 SL PACK
Close the ink box cover.
CLOSE
INK COVER
Press the OK button.
Ink is purged from the ink system.
PURGING
PLEASE WAIT 12
16
Ink box cover
Open the ink box cover.
OPEN
INK COVER
Knob
16
IP-7900 Advanced Operation Guide
Page 17
17
Ink trays to be set
Insert the ink trays with cleaning liquid
cartridges into the slots of the ink box.
LOAD
Y1 CL PACK
To assist your Printer
in operating eectively
18
START CL CHARGING
19
*BOTTLE OK?
Ink box cover
CHARGING CL
PLEASE WAIT 12
20
Ink box cover
Close the ink box cover.
CLOSE
INK COVER
Adjust and calibrate
the Printer
Press the OK button.
Close the ink box cover.
OPEN
INK COVER
21
Knob
IndexMenu tree
Remove the ink trays with cleaning liquid
cartridges.
REMOVE
Y1 CL PACK
Ink trays to be removed
17
Page 18
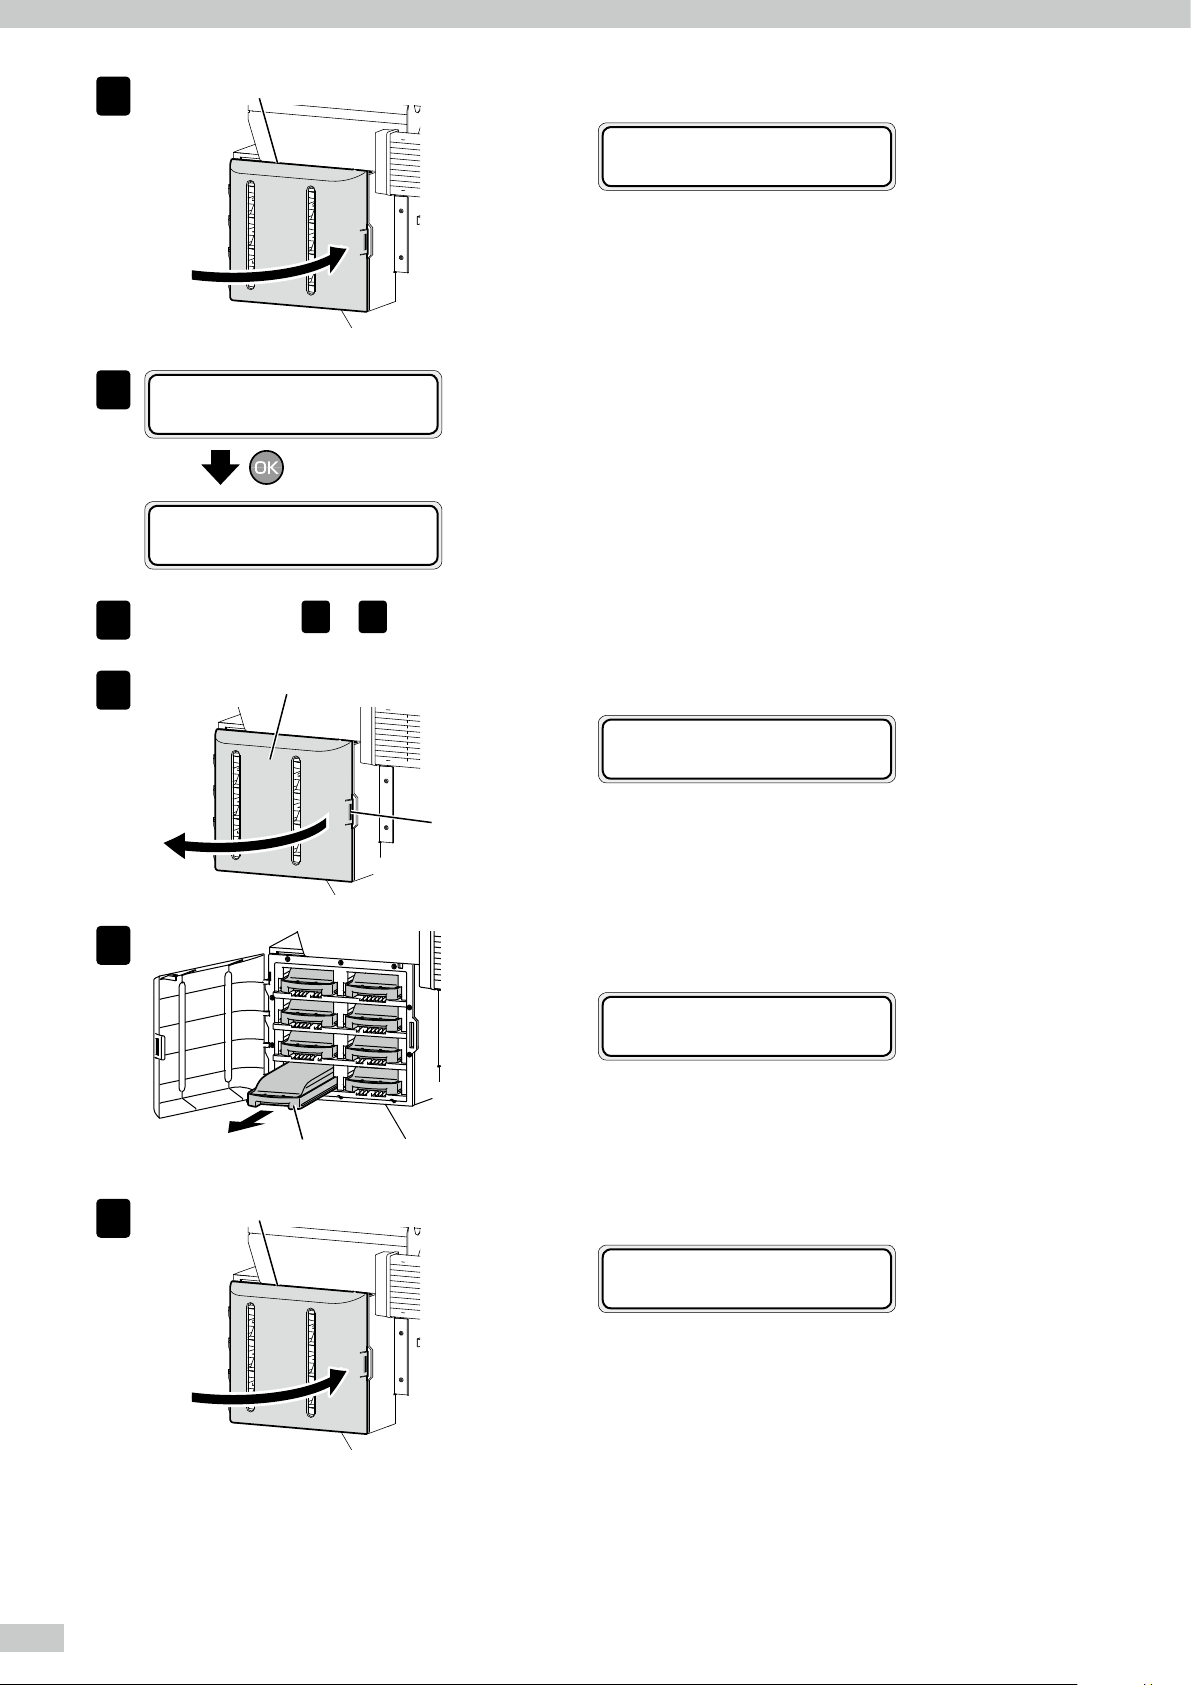
22
Ink box cover
Close the ink box cover.
CLOSE
INK COVER
START PURGING
23
*BOTTLE OK?
PURGING
PLEASE WAIT 12
Repeat the steps 16 to 19 to perform the cleaning again.
24
25
Ink box cover
Knob
26
Press the OK button.
Ink is purged from the ink system.
Open the ink box cover.
OPEN
INK COVER
Remove the ink trays with cleaning liquid
cartridges.
27
Ink trays to be removed
Ink box cover
REMOVE
Y1 CL PACK
Close the ink box cover.
CLOSE
INK COVER
18
IP-7900 Advanced Operation Guide
Page 19
START PURGING
MENU
28
*BOTTLE OK?
Press the OK button.
PURGING
PLEASE WAIT 12
OPEN INK COVER
Y1 LOAD INK PACK
Charging the ink system after head wash
Clear out the waste ink bottle.
1
2
3
INK MEDIA REGâ
á
MEDIA M.ADV
ß
REWIND FORM FEED
á
PH.REC PH.MAIN
ß
à
â
à
Set the Printer to oine state and press the
MENU button.
Press the Right button.
To assist your Printer
in operating eectively
Adjust and calibrate
the Printer
#CAP CLEANING
4
>
#INK SYSTEM OPT
5
>STORE INK SYS
#INK SYSTEM OPT
6
*STORE INK SYS
#INK SYSTEM OPT
7
*CHARGE(INKPACK)
With the Down button scroll to #INK SYSTEM
OPT.
Press the OK button.
IndexMenu tree
With the Down button scroll to
*CHARGE(INKPACK).
Press the OK button.
19
Page 20
#INK SYSTEM OPT
8
*BOTTLE OK?
Check that the waste ink bottle is empty, and
press the OK button.
9
10
11
Ink box cover
Ink tray
Ink box cover
Knob
Open the ink box cover.
OPEN
INK COVER
Insert the eight ink trays.
LOAD
Y1 INK PACK
Inktray
Lg8
M7
Lc6
K5
Y1
Lm2
C3
Gy4
Close the ink box cover.
START INK CHARGING
12
*BOTTLE OK?
CHARGING INK
PLEASE WAIT 12
13
Knob screws
CLOSE
INK COVER
Press the OK button.
Open the subcartridge cover.
Loosen the two knob screws on the subcartridge cover
and open the subcartridge cover.
OPEN
SUBCARTRIDGE COVER
20
Subcartridge cover
IP-7900 Advanced Operation Guide
Page 21
14
Subcartridge
Dummy subcartridges
Remove the eight dummy subcartridges of the
cleaning liquid set A.
REMOVE
Y1 DUMMY SUBCART
To assist your Printer
in operating eectively
15
16
CLEANING
17
*BOTTLE OK?
Subcartridges
Subcartridge cover
CLEANING
PLEASE WAIT 12
Set the eight subcartridges.
LOAD
SUBCARTRIDGE
Y1Lm
2C3Gy4K5Lc6M7Lg8
Close the subcartridge cover and tighten the
two knob screws.
CLOSE
SUBCARTRIDGE COVER
Press the OK button.
A normal cleaning is performed.
When the normal cleaning is completed, the LCD
displays message at the step 7.
Adjust and calibrate
the Printer
IndexMenu tree
#INK SYSTEM OPT
*CHARGE(INKPACK)
21
Page 22
Check the Printer status
MENU
MENU
MENU
MENU
MENU
MENU
Check the remaining ink level
■ Check in oine
1
INK MEDIA REGâ
á
MEDIA M.ADV
ß
Y1 INK LEVEL 95%
2
DATE:09/08/01
Ink color/location
Lm2 INK LEVEL 85%
DATE:09/08/01
C3 INK LEVEL 90%
DATE:09/08/01
à
Remaining ink
Manufactured date of
ink cartridge
or 3 seconds later
or 3 seconds later
or 3 seconds later
Set the Printer to oine state and press the Up
button.
Press the MENU button to switch from one ink
data to the other ink data.
Displayed at intervals of 3 seconds.
When the CANCEL or Left button is pressed, the
display returns to offline state (menu mode) display.
To move to online state (idle mode) display, press the
ONLINE button.
When ink is running out...
- The message below is displayed.
Y1 INK LEVEL LOW
DATE:09/08/01
Ink color/location
■ Check at printing in online
PRINTING
1
NORMAL M ND BI
Y1 INK LEVEL 95%
2
Lm2 INK LEVEL 85%
C3 INK LEVEL 90%
Gy4 INK LEVEL 87%
x2
Press the MENU button twice.
Press the MENU button to switch from one ink
data to the other ink data.
22
IP-7900 Advanced Operation Guide
Page 23
Check remaining media length
MENU
MENU
■ Check in oine
1
INK MEDIA REGâ
á
MEDIA M.ADV
ß
à
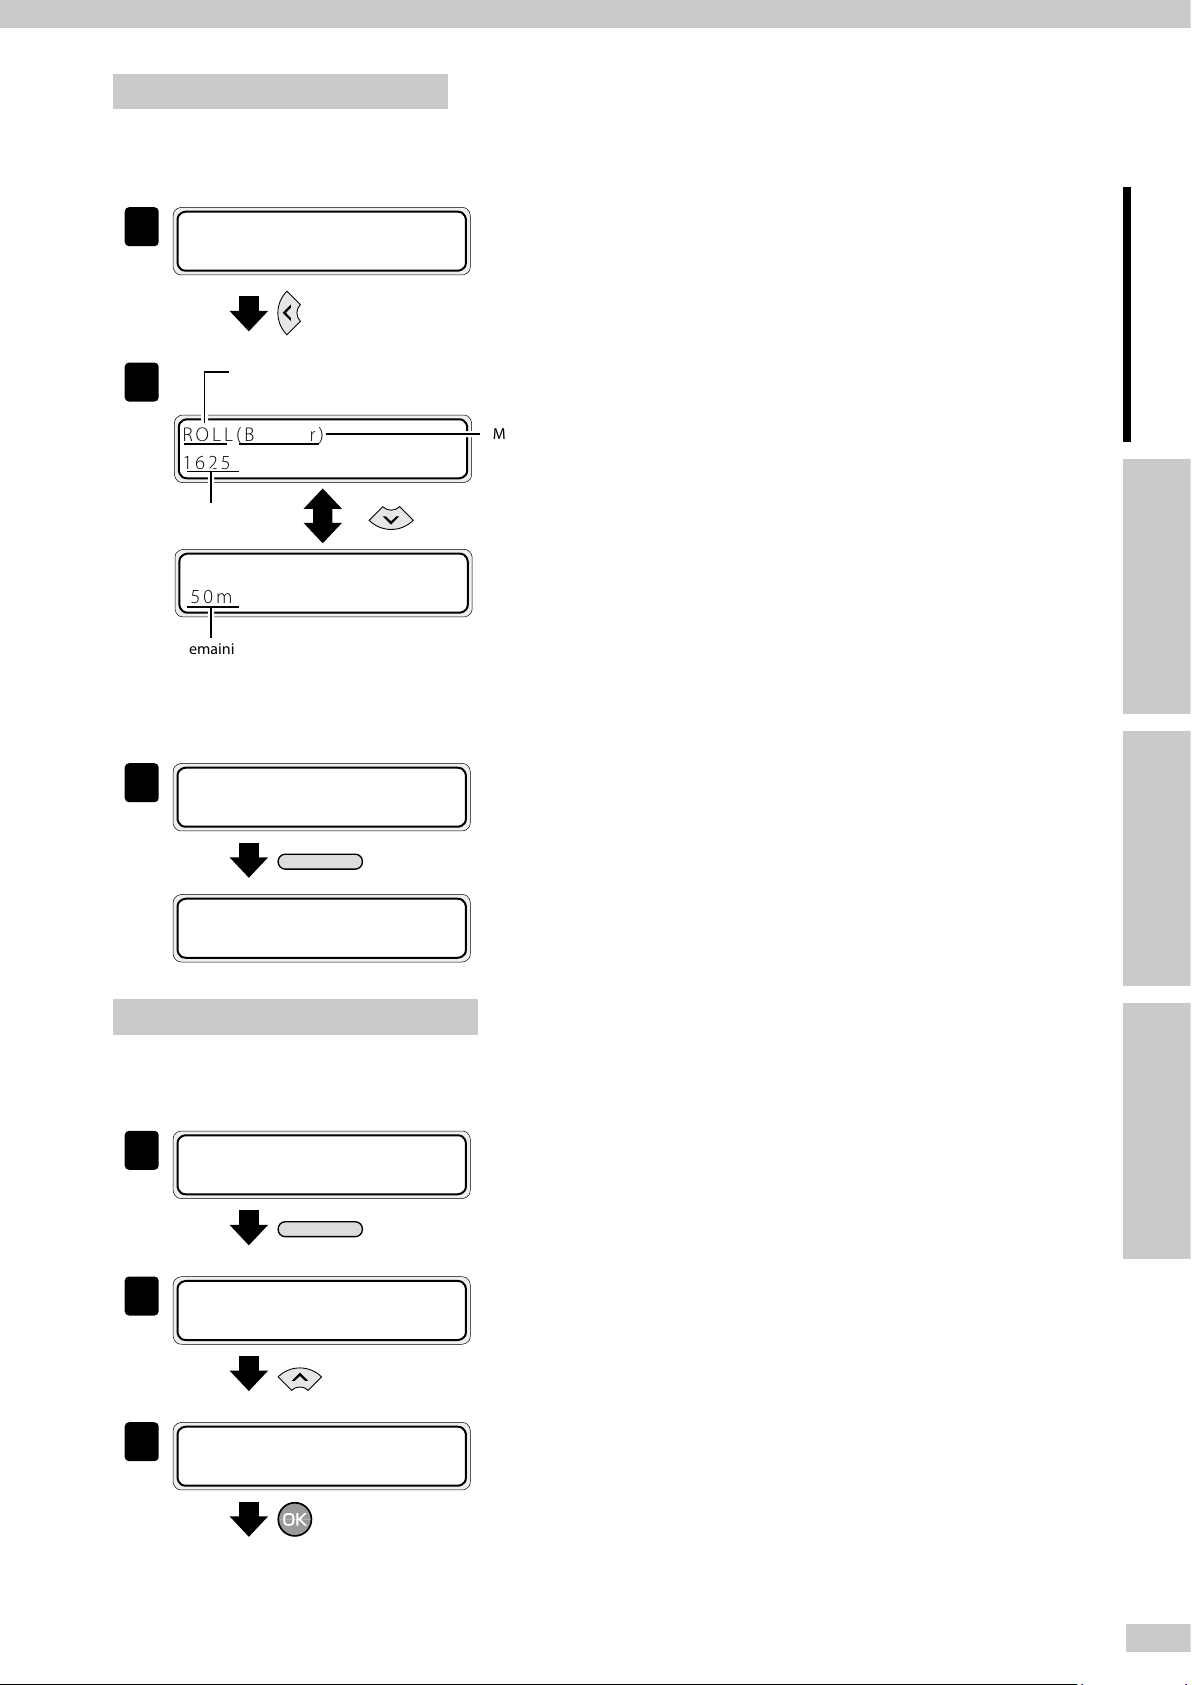
Set the Printer to oine state and press the
Left button.
To assist your Printer
in operating eectively
2
Media status
ROLL/SHEET/FACE/BACK/NEST
ROLL(Banner)
1625mm
Media width
REMAINING MEDIA
50m
Remaining media
■ Check at printing in online
PRINTING
1
NORMAL M ND BI
REMAINING MEDIA
50m
x6
Media type
Adjust and calibrate
the Printer
Press the MENU button six times.
Print reports on the Printer status.
Perform the operation below to print reports on the Printer status and panel settings.
1
INK MEDIA REGâ
á
MEDIA M.ADV
ß
2
PRINTER SETUP
á
ADJUST HEATER
ß
#CONFIG PRINT
3
>
à
x2
â
à
Set the Printer to oine state and press the
MENU button twice.
Press the Up button.
Press the OK button.
IndexMenu tree
23
Page 24
#CONFIG PRINT
MENU
*OK?
#CONFIG PRINT
*EXECUTING
Check the USB connection status
Press the OK button.
The Printer prints the reports on the Printer status.
1
INK MEDIA REGâ
á
MEDIA M.ADV
ß
2
PRINTER SETUP
á
ADJUST HEATER
ß
#LANGUAGE
3
>ENGLISH
#USB ADDRESS
4
*001
000 is NG.
x2
à
â
à
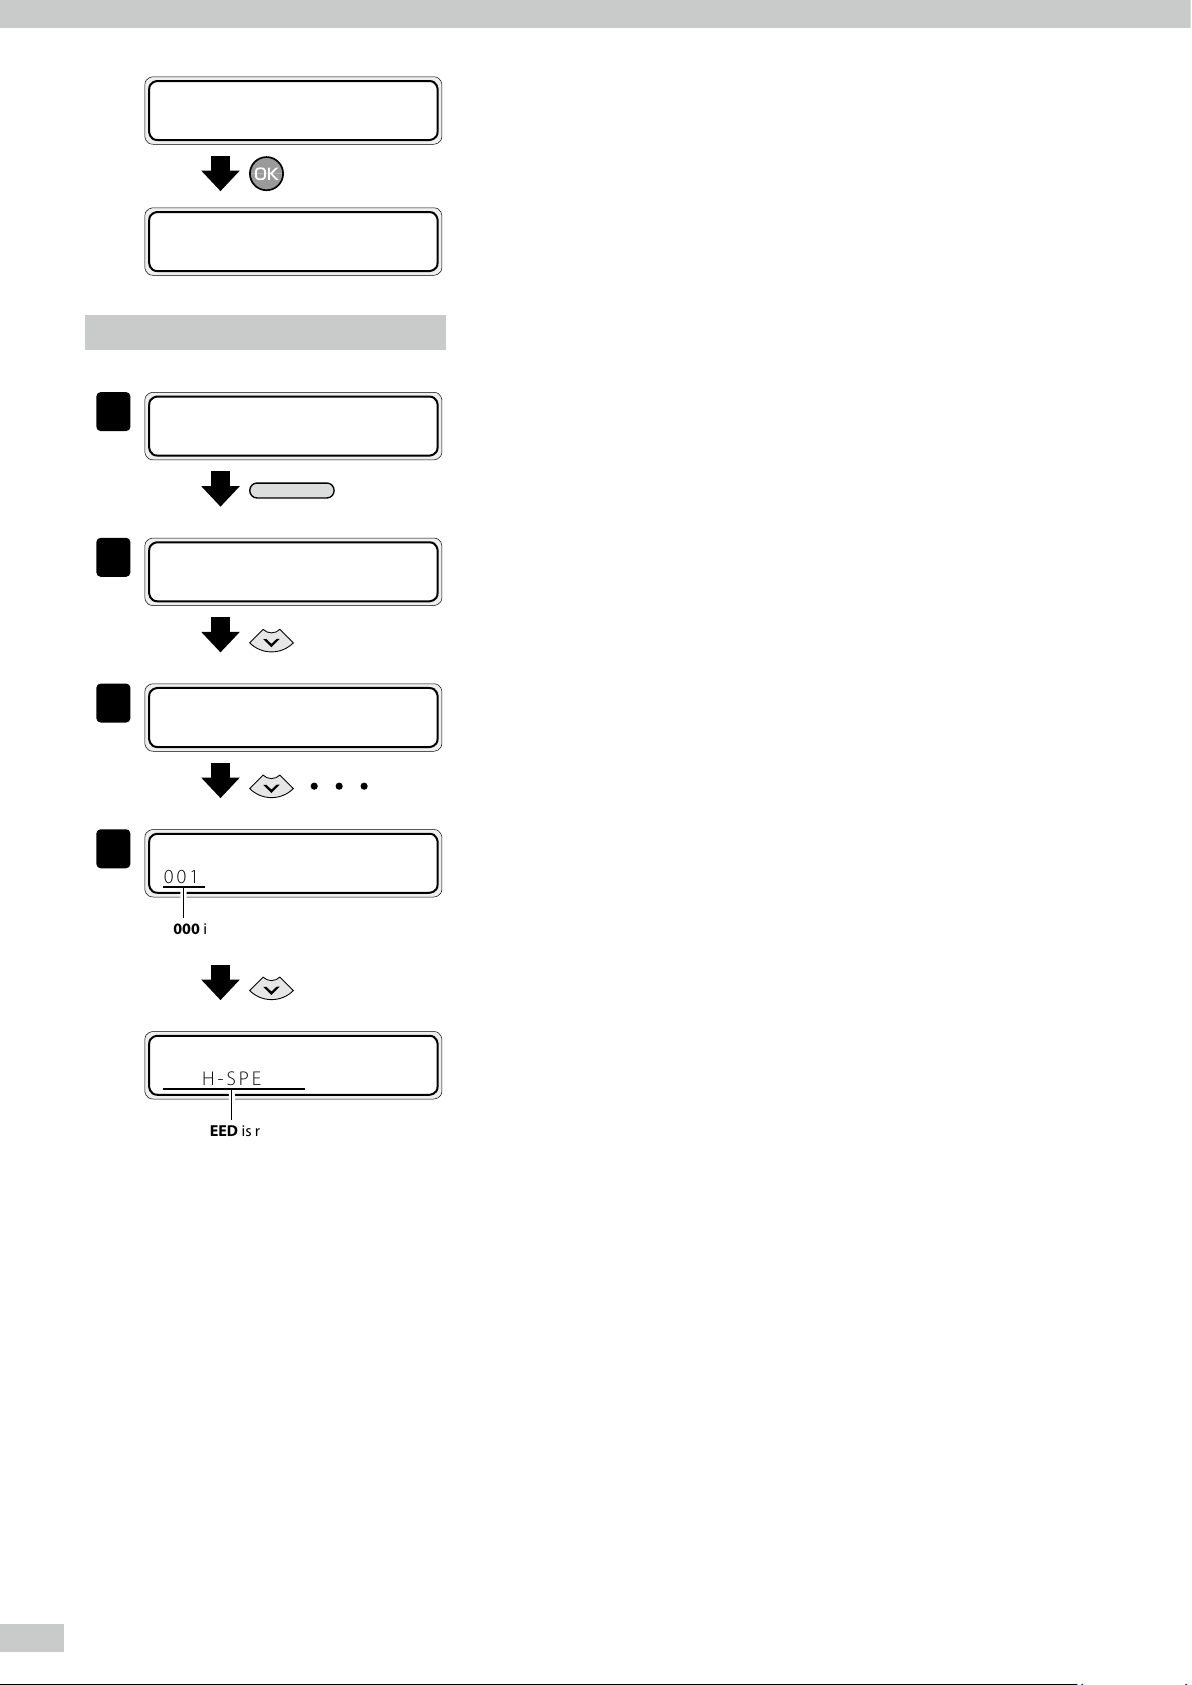
Set the Printer to oine state and press the
MENU button twice.
Press the Down button.
With the Down button scroll to #USB
ADDRESS.
The LCD displays the USB address,
If the LCD displays the USB address as 000, start the
USB cable connection over again.
Press the Down button.
#USB SPEED
*HIGH-SPEED
HIGH-SPEED is recommended.
The LCD displays the USB speed.
If the LCD displays FULL-SPEED, print speed is
reduced.
24
IP-7900 Advanced Operation Guide
Page 25
Check the rmware version on your Printer
1
MENU
MENU
INK MEDIA REGâ
á
MEDIA M.ADV
ß
2
INK MEDIA REGâ
á
MEDIA M.ADV
ß
#LANGUAGE
3
>ENGLISH
#PRINTER FW VER
*X.XX_YY
x2
à
à
Set the Printer to oine state and press the
MENU button twice.
Press the Down button.
With the Down button scroll to #PRITER FW
VER.
The LCD displays your Printer’s rmware version.
To assist your Printer
in operating eectively
Adjust and calibrate
the Printer
Check the total print distance
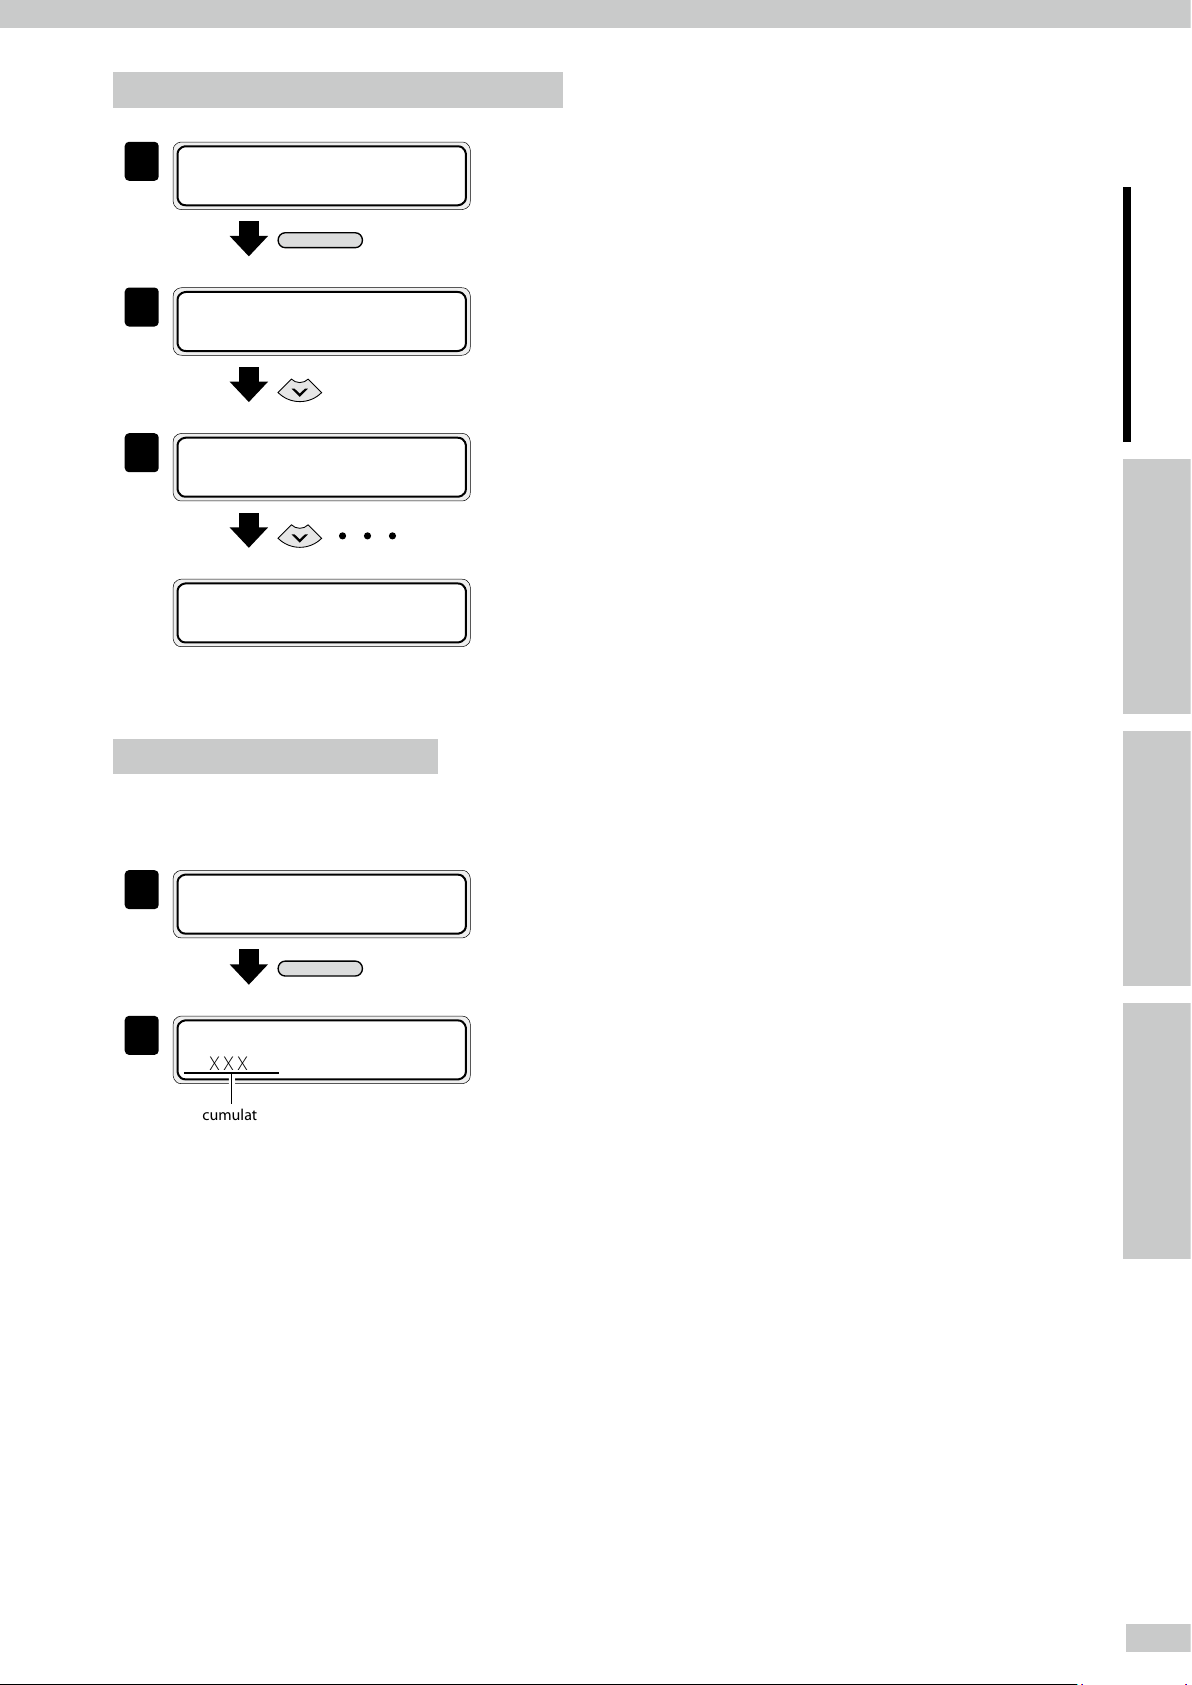
The Printer’s accumulated print distance is checked with the operation below.
PRINTING
1
NORMAL M ND BI
MEDIA USED:
2
XXXXXXXm
Accumulated print distance
Press the MENU button in online state.
IndexMenu tree
25
Page 26
Handle the media
Create a new media preset
As preset media, up to 20 types of media with the information below are registered.
(1) SELECT MEDIA
(2) RENAME MEDIA
(3) USE EDGE GUARD
(4) SKEW CHECK
(5) MEDIA ADV MODE
(6) MEDIA BACK MODE
(7) SUCTION FAN LEVEL
(8) AFTERHEATER INIT
(9) PRINTHEATER INIT
(10) PREHEATER INIT
(11) COLOR STRIPE
(12) PH HEIGHT ADJ
(13) PH CLEANING
(14) ROLL END DETECTION
(15) ADVANCE PREF
(16) HEATER PREF
(17) PH REST PERIOD
(18) PH REST TIME
(19) CARRIAGE SPEED
(20) SAFE SCANNING
(21) MEDIA ADV VALUE
(22) BACK ADJUST VAL
(23) BIDIR VALUE1
(24) BIDIR VALUE2
(25) BIDIR VALUE3
(26) BIDIR VALUE4
(27) SET REMAINING MEDIA
(28) DELETE MEDIA
The parameter setting procedure is described below using an example of setting the media advance adjustment
value in media number 02.
1
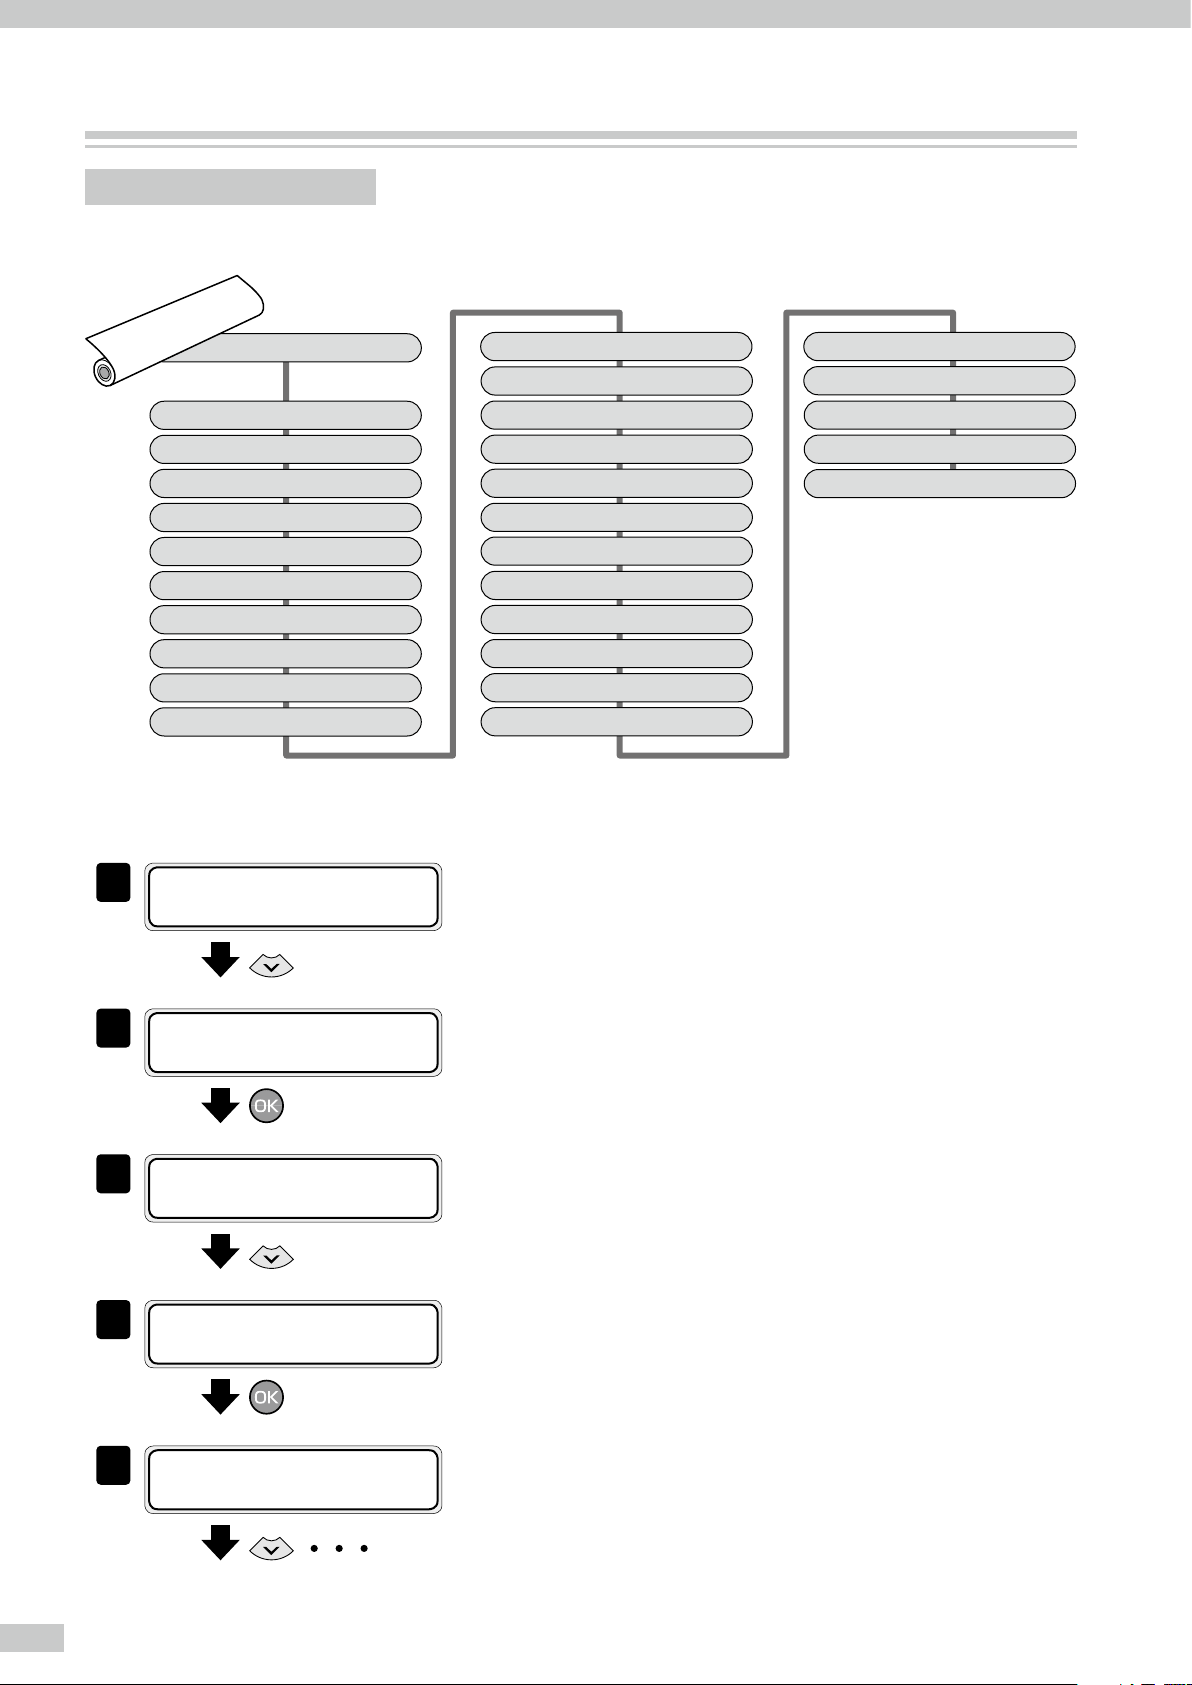
INK MEDIA REGâ
á
MEDIA M.ADV
ß
à
Set the Printer to oine state and press the
Down button.
#SELECT MEDIA
2
>01:PAPER *
#SELECT MEDIA
3
*01:PAPER *
#SELECT MEDIA
4
*02:Glossy *
#SELECT MEDIA
5
>02:Glossy *
Press the OK button.
Press the Down button.
Press the OK button.
With the Down button scroll to #MEDIA ADV
VALUE.
26
IP-7900 Advanced Operation Guide
Page 27
#MEDIA ADV VALUE
6
>02:100. 00%
Press the OK button.
#MEDIA ADV VALUE
7
*02:100. 00%
, , ,
#MEDIA ADV VALUE
*02:099. 80%
#MEDIA ADV VALUE
8
*02:OK?
#MEDIA ADV VALUE
9
*02:099. 80% *
When the media is already
registered, a * mark is displayed.
Enter the media advance adjsutment value and
press the OK button.
Align the digit with the Right or Left button and set
the value with the Up or Down button.
Press the OK button.
To assist your Printer
in operating eectively
Adjust and calibrate
the Printer
■ Preset media defult values
Up to 20 types (media No. 01 to 20) of media can be registered. Registered media can also be deleted or
changed. However, the information of the preset media No. 01 to No. 05 below initially set in the Printer cannot
be deleted.
For the preset media 01-05, the initial values are listed below.
Media No
Setting
RENAME MEDIA PAPER Glossy Matte Banner BLT_B
USE EDGE GUARD YES YES YES YES YES
SKEW CHECK ON ON ON ON ON
MEDIA ADV MODE FWD ONLY FWD ONLY FWD ONLY BACK & FWD1 BACK & FWD1
MEDIA BACK MODE BACK & FWD BACK & FWD BACK & FWD BACK & FWD BACK & FWD
SUCTION FAN LEVEL NORMAL NORMAL NORMAL LOW LOW
AFTERHEATER INIT **˚C 50˚C 50˚C 50˚C 50˚C
PRINTHEATER INIT **˚C 40˚C 40˚C 40˚C 40˚C
PREHEATER INIT **˚C 45˚C 45˚C 45˚C 45˚C
COLOR STRIPE OFF OFF OFF OFF OFF
PH HEIGHT ADJ +0.00mm +0.00mm +0.00mm +0.00mm +0.00mm
PH CLEANING START & END START & END START & END START & END START & END
ROLL END DETECTION DETECT ONLY DETECT ONLY DETECT ONLY DETECT ONLY DETECT ONLY
ADVANCE PREF SOFTWARE SOFTWARE SOFTWARE SOFTWARE SOFT WARE
HEATER PREF SOFT WARE SOFTWARE SOFTWARE SOFTWARE SOFTWARE
PH REST PERIOD 0000 CYCLES
PH REST TIME 1 second 1 second 1 second 1 second 1 second
CARRIAGE SPEED NORMAL NORMAL NORMAL NORMAL NORMAL
SAFE SCANNING STOP PRINTING STOP PRINTING STOP PRINTING STOP PRINTING STOP PRINTING
MEDIA ADV VALUE 100.00% * 100.00% 100.00% 100.00%
BACK ADJUST VAL +0000PULSE +0000PULSE +0000PULSE +0000PULSE +0000PULSE
BIDIR VALUE1 +00 +00 +00 +00 +00
BIDIR VALUE2 +00 +00 +00 +00 +00
BIDIR VALUE3 +00 +00 +00 +00 +00
BIDIR VALUE4 +00 +00 +00 +00 +00
* The default values are adjusted at the factory shipment.
01 02 03 04 05
(not provided)
0000 CYCLES
(not provided)
0000 CYCLES
(not provided)
0000 CYCLES
(not provided)
0000 CYCLES
(not provided)
IndexMenu tree
27
Page 28

Select a preset media
1
INK MEDIA REGâ
á
MEDIA M.ADV
ß
2
#SELECT MEDIA
>01:PAPER *
When the media is already
registered, a * mark is displayed.
#SELECT MEDIA
3
*01:PAPER *
#SELECT MEDIA
4
*02:Glossy *
à
Set the Printer to oine state and press the
Down button.
Press the OK button.
Press the Down button.
Select your preferred preset media.
Press the OK button.
#SELECT MEDIA
>02:Glossy *
Minimize the right and left margins
■ Deactivate the media edge guards
1
INK MEDIA REGâ
á
MEDIA M.ADV
ß
à
#SELECT MEDIA
2
>01:PAPER *
Set the Printer to oine state and press the
Down button.
With the Down button scroll to #USE EDGE
GUARD.
3
28
#USE EDGE GUARD
>01:YES
IP-7900 Advanced Operation Guide
Press the OK button.
Page 29
#USE EDGE GUARD
4
*01:YES
Press the Down button.
#USE EDGE GUARD
5
*01:NO
#USE EDGE GUARD
>01:NO
■ Activate the color stripe bar
1
INK MEDIA REGâ
á
MEDIA M.ADV
ß
#SELECT MEDIA
2
>01:PAPER *
à
Press the OK button.
Set the Printer to oine state and press the
Down button.
With the Down button scroll to #COLOR
STRIPE.
To assist your Printer
in operating eectively
Adjust and calibrate
the Printer
#COLOR STRIPE
3
>01:OFF
#COLOR STRIPE
4
*01:OFF
#COLOR STRIPE
5
*01:ON
#COLOR STRIPE
>01:ON
Press the OK button.
Press the Down button.
IndexMenu tree
Press the OK button.
29
Page 30
Prevent the media from sticking and wrinkling
■ Decrease the platen suction fan level
The vacuum pressure applied to the media in the printing zone helps to hold the media down on the platen,
which keeps the distance from media to print heads constant.
When the media sticks to the platen, set the vacuum pressure to LOW. The LOW vacuum pressure is also effective
when your media is so flexible and easily wrinkled.
1
INK MEDIA REGâ
á
MEDIA M.ADV
ß
#SELECT MEDIA
2
>01:PAPER *
#SUCTION FAN LEVEL
3
>01:HIGH
#SUCTION FAN LEVEL
4
*01:HIGH
x2
#SUCTION FAN LEVEL
5
*01:LOW
à
Set the Printer to oine state and press the
Down button.
With the Down button scroll to #SUCTION FAN
LEVEL
Press the OK button.
Press the Down button twice.
Press the OK button.
#SUCTION FAN LEVEL
>01:LOW
■ Change the media advance mode
Select the media advance mode according to the media used.
1
INK MEDIA REGâ
á
MEDIA M.ADV
ß
à
Set the Printer to oine state and press the
Down button.
#SELECT MEDIA
2
>01:PAPER *
With the Down button scroll to #MEDIA ADV
MODE
#MEDIA ADV MODE
3
>01:FWD ONLY
Press the OK button.
30
IP-7900 Advanced Operation Guide
Page 31

#MEDIA ADV MODE
4
*01:FWD ONLY
Press the Down button.
#MEDIA ADV MODE
5
*01:BACK & FWD1
#MEDIA ADV MODE
>01:BACK & FWD1
FWD ONLY
BACK&FWD1
BACK&FWD2
FWD WRINKLEFREE
Press the OK button.
Media is fed in the normal advance sequence.
Media is fed in the media adhesion prevention sequence. At the beginning of printing,
media peeling is performed during feeding when the pause mode is cancelled.
Media is fed in the media adhesion prevention sequence. Media peeling is performed
during feeding at each scan.
Advance sequence to prevent wrinkles on solvent printing coated paper.
If five minutes have elapsed after the end of the last printing, the Printer feeds 30 cm of
media before starting to print.
To assist your Printer
in operating eectively
Adjust and calibrate
the Printer
Solve media lifting up problem
The vacuum pressure applied to the media in the printing zone helps to hold the media down on the platen,
which keeps the distance from media to print heads constant.
When the media lifts up off the platen, set the vacuum pressure to HIGH.
1
INK MEDIA REGâ
á
MEDIA M.ADV
ß
#SELECT MEDIA
2
>01:PAPER *
#SUCTION FAN LEVEL
3
>01:LOW
à
Set the Printer to oine state and press the
Down button.
With the Down button scroll to #SUCTION FAN
LEVEL
Press the OK button.
IndexMenu tree
#SUCTION FAN LEVEL
4
*01:LOW
x2
Press the Down button twice.
31
Page 32

#SUCTION FAN LEVEL
5
*01:HIGH
Press the OK button.
#SUCTION FAN LEVEL
>01:HIGH
Print on a thick media
■ Change the print head height
The Printer automatically adjusts the print head height to the best position when the Printer is turned on or when
a media is loaded on the Printer. However, you may need to adjust the position finely as the media rigidity and
temperature response are relevant.
To adjust the print head height depending on the loaded media, select MEDIA REG MENU on the operation panel
and adjust the print head height.
CAUTION
- Adjust the print head height carefully to avoid the print head touching the media. The print head scratched by media
causes the poor ink ejection and degrades the print quality.
On the other hand, a too high print head position also degrades the print quality.
You are recommended to operate the Printer with the print head height automatically set by the Printer.
1
INK MEDIA REGâ
á
MEDIA M.ADV
ß
à
Set the Printer to oine state and press the
Down button.
#SELECT MEDIA
2
>01:PAPER *
With the Down button, scroll to #PH HEIGHT
VAL.
#PH HEIGHT VAL
3
>01:+0.0mm
Press the OK button.
#PH HEIGHT VAL
4
*01:+0.0mm
, , ,
#PH HEIGHT VAL
*01:+0.1mm
Enter the print head height adjustment value,
and press the OK button.
Align the digit with the Right or Left button and set
the value with the Up or Down button.
The adjustment value range is: +0.0 to +1.0 mm.
32
#PH HEIGHT VAL
>01:+0.1mm
IP-7900 Advanced Operation Guide
Page 33

Suspend printing when media wrinkles are detected
To prevent the printouts to be soiled due to the print heads touching the media, this function can suspend
printing when contact between the print heads and the media is detected. Select the mode according to the
characteristics of the media used.
To assist your Printer
in operating eectively
STOP PRINTING
(default setting)
SUSPEND PRINTING
SUSPEND&WARNING
WARNING ONLY
Printing is stopped immediately if a contact between the print heads and the media is detected.
The printing interruption is notified by a warning sound and a message displayed on the panel.
Printing cannot be resumed after it has been stopped, so it is required to perform printing again after
reloading the media.
Printing is suspended temporarily and the print heads are capped if a contact between the print heads
and the media is detected.
The printing temporary suspension is notified by a warning sound and a message displayed on the
panel.
Printing can be resumed after checking the media conditions and removing the wrinkles, if any.
Printing is suspended temporarily and the print heads are capped if five contacts between the media
and the print heads are detected consecutively.
Any contact detected between the media and the print heads is notified by a warning sound and a
message displayed on the panel.
Printing suspension is also notified by a warning sound and a message displayed on the panel.
Printing can be resumed after checking the media conditions and removing the wrinkles, if any.
Printing continues even when contacts between the media and the print heads are detected.
However, any contact detected between the media and the print heads is notified by a warning sound
and a message displayed on the panel.
The warning sound stops and the panel message disappears when contact is not detected anymore.
Printing can be suspended manually and resumed after all wrinkles have been removed.
Adjust and calibrate
the Printer
CAUTION
Pay attention to the following when Safe Scanning is set to STOP PRINTING.
- When the printing has been stopped, load the media again without delay to prevent the print heads from drying.
Pay attention to the following when Safe Scanning is set to WARNING ONLY.
- The print heads may be damaged if printing is performed during a long time while the warning indicating that the
print heads contact the media is emitted.
Pay attention to the following when Safe Scanning is set to SUSPEND PRINTING or SUSPEND&WARNING.
- Make sure that all the wrinkles have been removed when resuming the printing after it has been suspended.
- If missing dots appear on the printout after resuming the printing, pause printing and perform PH Recovery.
The procedure to change the Safe Scanning setting is explained below, taking the procedure to change STOP
PRINTING to SUSPEND&WARNING for the preset media 1 as an example.
1
INK MEDIA REGâ
á
MEDIA M.ADV
ß
#SELECT MEDIA
2
>01:PAPER *
à
Set the Printer to oine state and press the
Down button.
With the Down button, scroll to #SAFE
SCANNING.
IndexMenu tree
#SAFE SCANNING
3
>01:STOP PRINTING
Press the OK button.
33
Page 34

#SAFE SCANNING
This mode shows less misalignment at the linkage than the DURING PRINT1. However, the hue after
4
*01:STOP PRINTING
Press the Down button.
#SAFE SCANNING
5
Press the OK button.
*01:SUSPEND&WARNING
#SAFE SCANNING
>01:SUSPEND&WARNING
Change the automatic cleaning timing
To ensure that the print heads are in the best condition, the Printer performs automatic cleaning. The cleaning
mode can be specified for each preset media. Select the cleaning mode depending on the media characteristics.
START & END
DURING PRINT1
Based on the past print operation history, the Printer performs the automatic cleaning on starting
and completing the print operation.
Based on the past print operation history, the cleaning is performed when printing starts or during
printing. In this mode, the Printer completes the print band in process before the cleaning starts.
This mode is recommended when printing on the media subject to the heater temperature, for
example, on Vinyl.
After the cleaning, the Printer starts the rest of the interrupted print job.
Some media shows misalignment at the linkage of the prints before and after the cleaning. In such
a case, START & END or DURING PRINT2 is recommended.
DURING PRINT2
OFF
Cleaning
Correct with
the BACK
ADJUST VAL.
Based on the past print operation history, the cleaning is performed when printing starts or during
printing. In this mode, the Printer completes the print band in process before the cleaning starts.
This mode is recommended when printing on the media less subjected to the heater temperature,
for example, on Banner.
After the cleaning, the Printer starts the rest of the interrupted print job.
the cleaning may be dierent from the one before the cleaning.
Cleaning
Current print band
Automatic cleaning is not performed. Set this mode in the following case.
- When printing continuously several data les on media with which dierences between
printouts will be noticeable if automatic cleaning is performed between two les.
If automatic cleaning is set to OFF, determine suitable timing to execute cleaning manually.
INK SAVE
34
Based on the past print operation history, the Printer performs the automatic cleaning when the
printing starts or nishes.
* With INK SAVE, the interval between automatic cleaning operations is longer than with START &
END.
IP-7900 Advanced Operation Guide
Page 35

CAUTION
- Pay attention to the following points when automatic cleaning is set to OFF or INK SAVE.
- Missing dots may appear if the cleaning operation has not been performed for a long time.
- Manually perform cleaning when the PERFORM PH RECOVERY NOW message is displayed on the panel to prevent
the missing dots problem.
The procedure to change the automatic cleaning timing is explained as follows, taking the procedure to select
the automatic cleaning DURING PRINT1 for the preset media 1 as example.
To assist your Printer
in operating eectively
1
INK MEDIA REGâ
á
MEDIA M.ADV
ß
#SELECT MEDIA
2
>01:PAPER *
#PH CLEANING
3
>01:START & END
#PH CLEANING
4
*01:START & END
à
Set the Printer to oine state and press the
Down button.
With the Down button, scroll to #PH
CLEANING.
Press the OK button.
Press the Down button.
Adjust and calibrate
the Printer
#PH CLEANING
5
*01:DURING PRINT1
Press the OK button.
#PH CLEANING
>01:DURING PRINT1
Copy a preset media type to create a new one
The following describes the procedure to copy the parameter registered in media No. 13 to media No. 20.
1
INK MEDIA REGâ
á
MEDIA M.ADV
ß
#SELECT MEDIA
2
>01:PAPER *
à
Set the Printer to oine state and press the
Down button.
With the Down button scroll to #COPY MEDIA.
IndexMenu tree
35
Page 36

#COPY MEDIA
3
3
>01
Press the OK button.
#COPY MEDIA
4
*01
#COPY MEDIA
5
*13
#COPY MEDIA
6
>13
#PASTE MEDIA
7
>13à01*
Select a copy source with the Up or Down
button.
,
Only numbers for media types that already exist are
displayed.
By pressing the CANCEL button the operation returns
to the step
.
3
Press the OK button.
By pressing the CANCEL button the operation returns
to the step
.
Press the Down button.
Press the OK button.
#PASTE MEDIA
8
*13à01*
#PASTE MEDIA
9
*13à20
#PASTE MEDIA
10
*13à20OK?
#PASTE MEDIA
11
*13à20*
Select a copy destination with the the Up or
Down button.
,
Copy destination numbers 01 to 20 are displayed.
If the number on the right is followed by an asterisk
(*), the number displayed already contains media type
information.
Press the OK button.
Press the OK button.
The operation was completed.
36
IP-7900 Advanced Operation Guide
Page 37

Change the type of the preset media without reloading the media
The settings of the preset media are also changed.
To assist your Printer
in operating eectively
1
INK MEDIA REGâ
á
MEDIA M.ADV
ß
ROLL(XXXXXX)
2
YYYYmm
#SELECT MEDIA
3
>01:TYPE01
#SELECT MEDIA
4
*01:TYPE01
à
Set the Printer to oine state and press the Left
button.
With the Down button scroll to #SELECT
MEDIA.
Press the OK button.
Press the Down button several times to select
the desired media.
Adjust and calibrate
the Printer
#SELECT MEDIA
5
*04:Banner
#SELECT MEDIA
6
>04:Banner
Feed or rewind media
■ Feed or rewind media in online state (idle mode)
PRINT READY
1
ROLL:1625/PAPER
Press and hold the or button.
Press the OK button.
IndexMenu tree
Press and hold the Up or Down button.
To feed media, press the Down button.
To rewind media, press the Up button.
(A cut-sheet media, if installed into the Printer, is
discharged from the Printer.)
37
Page 38

The button is pressed.
MENU
2
FEEDING MEDIA
The button is pressed.
REWINDING MEDIA
Release the or button.
PRINT READY
ROLL:1625/PAPER
■ Feed or rewind media in oine state
Release the Up or Down button.
The Printer stops feeding or rewinding media, and the
display returns to online state (idle mode).
1
INK MEDIA REGâ
á
MEDIA M.ADV
ß
à
2
REWIND FORM FEED
á
PH.REC PH.MAIN
ß
â
à
Press and hold the or button.
The button is pressed.
3
FEEDING MEDIA
The button is pressed.
REWINDING MEDIA
Set the Printer to oine state and press the
MENU button.
Press and hold the Up or Down button.
To feed media, press the Down button.
To rewind media, press the Up button.
(A cut-sheet media, if installed into the Printer, is
discharged from the Printer.)
Release the Up or Down button.
The Printer stops feeding or rewinding media, and the
display returns to offline state (menu mode).
Release the or button.
REWIND FORM FEED
á
PH.REC PH.MAIN
ß
â
à
CAUTION
- Apply the roll feed unit to backfeed media only for a short distance. For a long distance, carefully apply it and lower the
slack position gradually so that the media slack would not reach the oor.
Besides note that the take-up reel unit does not perform the backfeed operation.
Do not backfeed media with the take-up reel unit applied.
38
IP-7900 Advanced Operation Guide
Page 39

Move a print start position (nest function)
2
By moving a print start position, the image is printed on your preferred position.
After printing, rewind the roll, and with this function you can print an image in the blank area.
(First print)
(Media rewound)
(Second print)
To assist your Printer
in operating eectively
Blank
Second image with the print start
position moved
CAUTION
- Complete this operation as immediately as possible. Otherwise the print heads dry, which may cause ink ejection
failure. In such a case perform a cleaning.
REWINDING MEDIA
1
PRINT READY
ROLL:1625/PAPER
Press and hold the button for 1.5 seconds.
Rewind the media.
See Feed or rewind media on the
page 37
CAUTION
- Rewind the media after the printed image completely
dries. If the media is rewound while the image is not
suciently dry, the image may be damaged.
Press and hold the Left button for 1.5 seconds.
The carriage moves and the nest function is activated.
Align the
cover’s front panel with the origin of the next print
image.
mark at the lower left of the carriage
Adjust and calibrate
the Printer
.
IndexMenu tree
Origin
NEST ORIGIN SETTING
3
CARRIAGE MOVING
Move the carriage with the Right or Left button
to the position to be set as an origin.
,
39
Page 40

NEST ORIGIN SETTING
4
*OK?
Press the OK button to x the origin setting.
The carriage returns, and the Printer enters online state
(idle mode) and becomes ready to print.
NEST ORIGIN SETTING
PLEASE WAIT
To cancel the origin above, press and hold the Right
button for 1.5 seconds in the idle mode or raise the
pressure control knob. When the origin is cancelled,
the display returns from NEST to ROLL.
PRINT READY
NEST:1625/PAPER
<Display when the origin is cancelled>
PRINT READY
ROLL:1625/PAPER
Use the media until the very end
Even when the media end is detected during printing (online mode), a margin remains at the media bottom end.
This remaining margin can also be used for printing.
Print quality may be affected when printing near the media bottom end. Use this function only if you can afford this loss
in print quality.The tension bar on the supply side must be removed to print near the media bottom end. The media
advance adjustment value may not be adequate anymore after the tension bar has been removed, which may affect the
print quality.
Set roll end detection to Action Selection beforehand.
Detect Only Printing stops when media end is detected.
Action Selection Printing stops temporarily when media end error is detected.
Select Print or Cancel with the operation panel.
1
INK MEDIA REGâ
á
MEDIA M.ADV
ß
à
Set the Printer to oine state and press the
Down button.
#SELECT MEDIA
2
>01:TYPE01 *
With the Down button scroll to #SELECT
MEDIA.
#ROLL END DETECTION
3
>01:DETECT ONLY *
Press the OK button.
40
IP-7900 Advanced Operation Guide
Page 41

#ROLL END DETECTION
4
*01:DETECT ONLY *
Press the Down button.
#ROLL END DETECTION
5
*02:ACTION SELECT. *
Press the OK button.
#ROLL END DETECTION
6
>02:ACTION SELECT. *
When roll end is detected during printing (online mode), printing stops temporarily and the following screen is
displayed.
ROLL END DETECTED
PRINT/CANCEL
<Procedure to continue printing>
Tension bar
1. Remove the tension bar.
To assist your Printer
in operating eectively
Adjust and calibrate
the Printer
ROLL END DETECTED
PRINT/CANCEL
Peel roller
Peel roller
2. Detach the media end from the paper tube
using the cutter.
Press the OK button.
IndexMenu tree
41
Page 42

PREHEATING
CANCEL
ROLL:1626/PAPER
<Procedure to suspend or stop printing>
The printing resumes.
The loss in print quality can be
compensated by pulling the media
by hand to keep it stretched during
printing.
ROLL END DETECTED
PRINT/CANCEL
NO MEDIA LOADED
LOAD MEDIA
Print on a cut-sheet media
1
Front cover
Protection bar
Press the CANCEL button.
The printing is suspended and the following
message is displayed. Load the new media.
Remove the protection bar, and open the front
cover.
42
2
Wiping unit side
With pressing the media
edge guard’s your side
part, move each media
edge guard.
IP-7900 Advanced Operation Guide
Capping unit side
Move the media edge guards to each side.
Move the media edge guards to each side so that they
are not under the media.
With pressing the media edge guard’s your side part,
move each media edge guard.
CAUTION
- Be sure to press the media edge guard on your side
when moving the media edge guards. You may get
injured if your nger slips while strongly pressing the
plate’s edge.
Page 43

3
Media output side
Set the pressure to Open by rotating the
pressure control knob.
To assist your Printer
in operating eectively
Pressure control knob
4
Insert a cut-sheet media into the paper feeder
slot.
Insert the cut-sheet media so that the media feed
sensor is covered with the media.
Adjust and calibrate
the Printer
5
Suppy side
6
Set the pressure to Normal by rotating the
pressure control knob.
Point to be checked again
- Check that the media on the platen is not lifted
up or wrinkled.
Set the media edge guards.
(1) With pressing the media edge guard’s your side part,
move each media edge guard to the media edge.
(2) Align each media edge guard’s notch with the
media edge.
Check that:
- The media edge guards are not under the media.
- The thick media, being inserted forcibly, is not jammed
under the media edge guards.
IndexMenu tree
(1) (2)
With pressing the media
edge guard’s your side part,
move each media edge
guard.
Align each media edge
guard’s notch with the
media edge.
Notch
CAUTION
- To prevent a media jam, be sure to apply the media
edge guards to prevent a media jam.
- Be sure to press the media edge guard on your side
when moving the media edge guards. You may get
injured if your nger slips while strongly pressing the
plate’s edge.
43
Page 44

7
ONLINE
Close the front cover, and then install the
protection bar.
8
CHECK EDGE GUARD
*OK?
SELECT MEDIA
9
ROLL/SHEET:ROLL
ROLL/SHEET:SHEET
SELECT MEDIA
10
MEDIA:PAPER
SELECT MEDIA
MEDIA:Banner
SET MEDIA
11
*OK?
Press the OK button.
Select SHEET and press the OK button.
(To return to the media selection, press the CANCEL
button.)
Select the type of media, and then press the OK
button.
Select a preset media with the Up or Down button.
Here explains the procedure taking banner for
example.
Press the OK button.
PREPARING MEDIA
PLEASE WAIT
Adjust the head margin before printing
Advance or rewind the media during the preheating time before printing to adjust the margin to the previous
printout.
This function cannot be used for the current job once printing
(or scan) has started.
PREHEATING
1
MAX-QUA M ND UNI
Press the ONLINE button during the preheating
time before printing.
44
IP-7900 Advanced Operation Guide
Page 45

PRINTER PAUSED
ONLINE
ONLINE
ONLINE
2
ROLL:1626/PAPER
The Printer enters pause mode. Keep the Down
button pressed.
FEEDING MEDIA
3
PRINTER PAUSED
4
ROLL:1626/PAPER
PREHEATING
5
MAX-QUA M ND UNI
Reinstall the edge guards during printing
Release the Down button to stop feeding the
media.
Press the ONLINE button to resume printing.
Press the Up button to rewind the
media.
To assist your Printer
in operating eectively
Adjust and calibrate
the Printer
If the edge guards are accidentally removed or particles adhere to the media advance path during printing, put
the Printer into pause mode to be able to open and close the front cover.
PRINTING
1
MAX-QUA M ND UNI
Press the ONLINE button during printing.
PRINTER PAUSED
2
ROLL:1626/PAPER
CLOSE
3
COVER
PRINTER PAUSED
4
ROLL:1626/PAPER
Open the front cover
Close the front cover
The Printer enters pause mode. Open the front
cover.
Close the cover to return to the Printer pause
display.
Press the ONLINE button to resume printing.
IndexMenu tree
PRINTING
5
MAX-QUA M ND UNI
45
Page 46

Remove some media wrinkles during printing
ONLINE
ONLINE
If the media wrinkles during printing (online mode), put the Printer into pause mode to be able to release the
grip.
Media wrinkles can be partially removed by releasing the grip.
However, in that case the media may skew and the print quality
may decrease.
PRINTING
1
MAX-QUA M ND UNI
PRINTER PAUSED
2
ROLL:1626/PAPER
HOLD MEDIA
3
PRINTER PAUSED
4
ROLL:1626/PAPER
Release the grip
Set the grip
Press the ONLINE button during the preheating
time before printing.
The Printer enters pause mode. Release the
grip.
CAUTION
- When the grip is released, hold the media in your
hands to prevent it from skewing.
Set the grip back to return to the Printer pause
display.
Press the ONLINE button to resume printing.
PRINTING
5
MAX-QUA M ND UNI
Solve skew in LOOSE winding mode
1
Tension bar hook
Tension bar
Hook the tension bar to the tension bar hook
beforehand.
46
IP-7900 Advanced Operation Guide
Page 47

2
Load the media on the Printer.
3
For the procedure, see the Basic Operation Guide, To take up media in LOOSE winding mode .
Close the tension bar guide’s cover.
Close the cover, and x the cover by fastening the knob
screw.
To assist your Printer
in operating eectively
4
Input the data in the software RIP.
5
Place the tension bar with gear on the closed
tension bar guide.
Place the tension bar carefully to prevent the tension
bar with gear from being dropped.
Media
Tension bar with gear
LOOSE winding mode
Supply-side tension bar
Adjust and calibrate
the Printer
47
IndexMenu tree
Page 48

To change the Printer’s basic settings
MENU
Turn the audio warning beep o
The default beep is set to on. So the Printer issues the audio warning beep when:
- The print heads are not capped during the daily maintenance or print head height adjustment.
- The print heads cannot be capped because of a media jam during the print operation.
With the procedure below the audio warning beep is turned off.
1
INK MEDIA REGâ
á
MEDIA M.ADV
ß
2
PRINTER SETUP
á
ADJUST HEATER
ß
#LANGUAGE
3
>JAPANESE
#BEEP(UNCAP CARRI)
4
>ON
x2
à
â
à
Set the Printer to oine state and press the
MENU button twice.
Press the Down button.
With the Down button scroll to #BEEP(UNCAP
CARRI).
Press the OK button.
#BEEP(UNCAP CARRI)
5
*ON
Press the Down button.
#BEEP(UNCAP CARRI)
6
*OFF
Press the OK button.
#BEEP(UNCAP CARRI)
>OFF
Update the system rmware
To improve the Printer’s performance, you are recommended to update the system firmware.
For the procedure, refer to the documents attached to the system firmware.
48
IP-7900 Advanced Operation Guide
Page 49

Cleaning options
MENU
Perform cleaning only for the specied print head
When a specific length of media has been printed since the last
cleaning operation, print heads cannot be selected and cleaned
individually.
1
2
3
INK MEDIA REGâ
á
MEDIA M.ADV
ß
REWIND FORM FEED
á
PH.REC PH.MAIN
ß
#PH RECOVERY
>NORMAL
à
â
à
Set the Printer to oine state and press the
MENU button.
Press the Left button.
Press the OK button.
To assist your Printer
in operating eectively
Adjust and calibrate
the Printer
#PH RECOVERY
4
*NORMAL
*STRONG
#PH RECOVERY
5
*NORMAL
#PH RECOVERY
6
*NORMAL:8 7654321
, , ,
With the Up or Down button scroll to
*STRONG.
,
Press the OK button.
IndexMenu tree
Select your preferred print head for cleaning.
With the Right or Left button, select the print head
number. Then with the Up or Down button, display or
delete the number. Display it to clean the print head,
or delete it not to clean the print head.
The ink colors and print head numbers
correspondence is shown in the table below.
Lg M Lc K Gy C Lm Y
8 7 6 5 7 3 2 1
49
Page 50

#PH RECOVERY
7
*NORMAL:8 5
Press the OK button.
The left LCD display shows that the Printer performs
the cleaning only for the print heads 5 and 8.
#PH REC 8 5
8
*BOTTLE OK?
#PH REC 8 5
*EXECUTING 12
This value is counted down every 10 seconds.
#PH RECOVERY
9
>NORMAL
REWIND FORM FEED
á
PH.REC PH.MAIN
ß
Press the OK button.
Check visually that the waste ink bottle is not full.
Cleaning is started.
Print head cleaning takes several minutes.
When the cleaning starts, the required time is
displayed and the time is counted down every 10
seconds.
Press the Left button.
The Printer returns to offline state, that is, menu mode.
â
à
50
IP-7900 Advanced Operation Guide
Page 51

Manage the media advance compensation
Change media advance compensation
PRINTING
1
NORMAL M ND BI
MEDIA ADV:099.80%
2
*099. 80%
The value is incremented or decremented by 0.01%
with the
(Settable range: 97.00% to 106.00%)
MEDIA ADV:099.80%
3
*099. 96%
,
The value at
the start of
printing
or button.
,
Press the Up or Down button while PRINTING
is displayed.
With the Up or Down button, change the
media advance compensation.
When the value is changed, it is reflected in printing
immediately.
The value displayed at the start of printing does not
changeuntil the printing is completed. However, when
the cleaning mode is set to DURING PRINT, the value
displayed changes after the cleaning is completed.
The changed value is registered and retained.
When no button is operated for three seconds, the
display returns to the original one.
To assist your Printer
in operating eectively
Adjust and calibrate
the Printer
PRINTING
NORMAL M ND BI
IndexMenu tree
51
Page 52

Print conditions
On the Printer, print conditions can be configured with the following interrelated settings
- 5 print mode settings
- 2 smart pass settings
in addition to
- 2 density settings.
- 2 carriage speeds
Configure the print conditions according to the media type, productivity and print quality.
Generally, we recommend printing with NORMAL print mode, NORMAL density, and NORMAL carriage speed
settings.
Use other modes and settings to emphasize productivity or print quality.
After changing the print mode
Adjust the media advance compensation again (
Settings for the print mode, smart pass, and density can be configured only from the RIP software.
page 77
).
Set PRINT MODE
Set the print resolution.
Reduce the resolution to maximize productivity.
Increase the resolution for high definition printout with no visible grains.
Print mode Resolution Explanation
MAX SPEED 360dpi x 360dpi x DDP This is the fastest print mode. Use it to emphasize productivity.
The smart pass setting can be configured.
HIGH SPEED 360dpi x 540dpi x DDP This print mode is balanced between print speed and quality.
NORMAL 540dpi x 540dpi x DDP This is the normal print mode. Usually, use this print mode.
HIGH QUALITY 720dpi x 720dpi The quality is emphasized rather than print speed.
MAX QUALITY 900dpi x 900dpi This print mode has the highest resolution.
CAUTION
- The NORMAL print mode is recommended. Use the other modes according to your needs regarding productivity and quality.
52
IP-7900 Advanced Operation Guide
Page 53

Set SMART PASS
Set the auto correction level to enhance image quality by correcting unevenness or other print defects. Adjust
the enhancing effect by setting the correction level to low or to medium for further effect.
Smart pass Explanation
LOW The productivity is emphasized rather than the quality. Since the enhancing effect is low,
unevenness, banding, spots, or other print defects may appear. Smart pass can be set to
LOW only in MAX SPEED print mode.
MEDIUM The enhancing effect is fully used. Smart pass setting is fixed to MEDIUM in print modes
other than MAX SPEED.
To assist your Printer
in operating eectively
CAUTION
- Print speed with LOW setting is approximately 50% faster than with MEDIUM setting.
Set DENSITY
The print density can be set to NORMAL and HIGH DENSITY.
The following shows the relationship between the density level for HIGH DENSITY and each print mode, when
the density for NORMAL is assumed to be 1.0.
Density
Print mode
NORMAL HIGH DENSITY
MAX SPEED 1.0 1.0 (*1)
HIGH SPEED 1.0 2.0
NORMAL 1.0 1.9
HIGH QUALITY 1.0 2.0
Adjust and calibrate
the Printer
MAX QUALITY 1.0 1.9
*1 With MAX SPEED print mode, the density does not change even when HIGH DENSITY is set.
CAUTION
- The print speed does not change between NORMAL and HIGH DENSITY printing.
- Since a large quantity of ink is used with HIGH DENSITY, printing with this setting may generate ink bleeding or drying
unevenness. In this case, select a slower print speed.
IndexMenu tree
53
Page 54

- The print speed depends on the combination of the three following settings.
- Print mode
- Smart pass
- Carriage speed
Approximate speed values are shown in the tables below.
- The indicated print speeds can be reduced by print conditions such as the media width.
Print speed (*1)
CARRIAGE SPEED
NORMAL SLOW
Print mode
Smart pass Smart pass
LOW MEDIUM LOW MEDIUM
MAX SPEED 56.6 m2/h 37.7 m2/h 35.4 m2/h 23.6 m2/h
2
HIGH SPEED Cannot be set 25.1 m
NORMAL Cannot be set 17.6 m
HIGH QUALITY Cannot be set 9.8 m
MAX QUALITY Cannot be set 6.0 m
/h Cannot be set 15.7 m2/h
2
/h Cannot be set 10.5 m2/h
2
/h Cannot be set 5.9 m2/h
2
/h Cannot be set 3.8 m2/h
*1 Print speed values are for full width print on a media of 2642 mm width (104 inches). The values in the upper rows are for 8-color
mode, and the values for the lower rows are for the 4-color mode.
54
IP-7900 Advanced Operation Guide
Page 55

Troubleshoot print quality issues
This section describes the hint for you for one symptom, to get good image quality with the Printer.
Take appropriate actions according to the printout's symptom.
When several actions are described, they are arranged in the order of effectiveness. Therefore, you are
recommended to take actions from the top and confirm the effect on the improvement. (Note that all the
described actions are not always necessary to solve the problem.)
The print is light.
Cause Solution
The density setting does not
l
match.
The operating environment is
l
outside the specication of the
Printer.
Media is not selected properly.
l
Set density to HIGH DENSITY if high density printing is required, such as when
using backlit banner media. (
Raise the ambient temperature to 15°C or more (20 to 25°C recommended) to
warm the Printer adequately
Check the media selection. (
page 53
Basic Operation Guide page 50
)
)
Missing dots are found at the beginning of printing.
To assist your Printer
in operating eectively
Adjust and calibrate
the Printer
Cause Solution
Outside the operating
l
temperature/humidity range
Obstructions in the nozzle
l
surface path
Use the Printer within the operating temperature/humidity range.
(
Basic Operation Guide page 17
Check the obstructions in the nozzle surface path, with the order of on: platen,
media edge guards, spittoon case, capping unit, and wiper blade, and remove the
obstruction and stains.
Lint or paper fibers caused by a ragged media may touch the print head, which
may cause missing dots. Replace the media with a media with no lint or paper fiber.
Check that the exhaust fan filter is not encrusted with dust. If it is, replace the filter.
(
Basic Operation Guide page 74
)
)
IndexMenu tree
55
Page 56

The media is curled or wrinkled.
Cause Solution
Outside the operating
l
temperature/humidity range
(1) Use the Printer within the operating temperature/humidity range.
* Note that some media may be wrinkled even within the operating temperature and
humidity range.
(2) Use the proven media.
The media storage conditions
l
are not the same as the printer
operation conditions.
The difference between the media storage conditions and the printer operation
conditions may cause the media curled or wrinkled. To prevent it, when carrying
the media in storage to the operation area, before printing leave the media for a
proper time.
*The time depends on the media type and the storage conditions.
The media was poorly installed. Check that the media was installed properly with the conditions below.
l
- The installed media is properly parallel to the Printer and the ange.
- The operation panel shows the media type correctly.
- The supply-side tension bar length is proper and it is placed on the center of the
media.
- The media winding mode is optimal to the installed media.
The heater temperature wrinkled
l
the media.
(1) If the media is wrinkled while the Printer is warmed by the heaters, install the
media only after the Printer is warmed up by the heaters.
(2) Change the heater temperature. Increase or decrease the all three heaters by
*1
5°C.
(3) Use the proven media.
The media is curled. (1) Do not use the media curled in the x direction, that is, the vertical direction of
l
the media.
(2) Do not use the media curled in the y direction, that is, on the right and left
edges of the media. The curl is so excessive that the media edge guards and the
suction fan cannot flat the media
(3) Use the proven media.
*1
When the heaters temperature is changed, again adjust the media advance compensation.
56
IP-7900 Advanced Operation Guide
Page 57

White stripes appear on the print.
Basic image Symptom A Symptom B Symptom C
To assist your Printer
in operating eectively
[Cause]
Media advance compensation is
not proper.
[Check]
White stripes appear in all
colors when a color stripe
bar is printed.
Cause Solution
[Symptom A]
Media feed is not adjusted
l
properly.
[Symptom A]
The media advance accuracy is
l
poor, or is not stable.
[Cause]
The print head nozzles are
clogged.
[Check]
White stripes appear in some
colors when a color stripe bar
is printed.
[Cause]
The ink does not match well with
the media.
Adjust the media advance compensation.
* The media advance compensation diers depending on the winding mode, LOOSE or
TENSION.
(1) Check that the media was installed properly with the conditions below.
- The installed media is properly parallel to the Printer and the ange.
- The operation panel shows the media type correctly.
- The supply-side tension bar length is proper and it is placed on the center of the
media.
- The media winding mode is optimal to the installed media.
- If the media is curled or wrinkled, see the description on the problem, The media is
curled or wrinkled.
(2) Adjust the pressure on the media with the pressure control knob.
(3) Set smart pass to a higher setting.
(4) Change the print mode to be slower.
*1*2*3
*1*2
*1
Adjust and calibrate
the Printer
[Symptom B]
Print head nozzles are clogged.
l
(1) Perform a nozzle print, and set nozzle map for the clogged nozzles.
(
Basic Operation Guide page 101
)
(2) Check the obstructions such as media lint or ink clot in the nozzle surface path
including the platen surface, and remove them.
(3) If the ink is accumulated or the net tears on the spittoon case surface, replace
them.
(4) If the media is curled or wrinkled, solve the problem by referring to the
description on the problem, The media is curled or wrinkled.
(5)
Perform the daily maintenance.
* Do not forget to clean the head guard and edge guards.
* Be sure to perform the print head cleaning.
(6) With the print sheet mount cleaning (
Basic Operation Guide page 105
clean the print head surface.
- Printing with a color stripe bar is effective to prevent missing dots. (
page 29
IndexMenu tree
),
)
57
Page 58

[Symptom C]
The ink does not match well with
l
the media.
(Media with low dot spread rate)
(1) Decrease the all three heaters by 5°C.
* Before starting the print, ensure that the heater temperature was decreased to the
target temperature.
* With some media, the heater temperature increased would be eective.
(2) Set smart pass to a higher setting.
(3) Change the print mode to be slower.
(4) Use the proven media.
*1
Adjust the media advance compensation again.
*2
Note that the print speed differs depending on the mode selected.
*3
The smart pass setting can be changed only when the print mode is set to MAX SPEED.
*1
*1*2*3
*1*2
58
IP-7900 Advanced Operation Guide
Page 59

Black stripes appear on the print.
leftward print.
Basic image Symptom A Symptom B Symptom C Symptom D
To assist your Printer
in operating eectively
[Cause]
The print head periphery
is smeared.
Cause Solution
[Symptom A]
The print head periphery is
l
smeared.
[Symptom B]
At bidirectional printing, the
l
ejected ink’s color order in
rightward print is dierent from
in leftward print.
[Cause]
At bidirectional printing,
the ejected ink’s color
order in rightward print
is dierent from in
* Black stripes appear over the print. * Black stripes appear partly on the
[Cause]
The media advance
compensation is not
proper.
print.
[Cause]
The ink dries too slowly.
(1) Check the obstructions such as media lint or ink clot in the nozzle surface path
including the platen surface, and remove them.
(2) If the ink is accumulated or the net tears on the spittoon case surface, replace
them.
(3) If the media is curled or wrinkled, solve the problem by referring to the
description on the problem, The media is curled or wrinkled.
(4)
Perform the daily maintenance.
* Do not forget to clean the head guard and edge guards.
* Be sure to perform the print head cleaning.
(5) With the print sheet mount cleaning (
Basic Operation Guide page 105
clean the print head surface.
(1) Set smart pass to a higher setting.
(2) Change the print mode to be slower.
*1*2*3
*1*2
(3) Print in unidirectional mode.
(4) Use the proven media.
Adjust and calibrate
the Printer
),
[Symptom C]
The media advance
l
compensation is not proper.
[Symptom C]
The media advance accuracy is
l
poor, or is not stable.
Adjust the media advance compensation.
* The media advance compensation diers depending on the winding mode, LOOSE or
TENSION.
(1) Check that the media was installed properly with the conditions below.
- The installed media is properly parallel to the Printer and the ange.
- The operation panel shows the media type correctly.
- The supply-side tension bar length is proper and it is placed on the center of the
media.
- The media winding mode is optimal to the installed media.
- If the media is curled or wrinkled, see the description on the problem, The media is
curled or wrinkled.
(2) Adjust the pressure on the media with the pressure control knob.
(3) Set smart pass to a higher setting.
(4) Change the print mode to be slower.
*1*2*3
*1*2
*1
IndexMenu tree
59
Page 60

[Symptom D]
The ink dries too slowly.
l
(Mottling or bleeding is found.)
(1) Increase the all three heaters by 5°C.
* Before starting the print, ensure that the heater temperature was decreased to the
target temperature.
(2) Set smart pass to a higher setting.
(3) Change the print mode to be slower.
(4) Print in unidirectional mode.
(5) Use the proven media.
(6) With the RIP software, apply the profile with the low ink amount ejected.
* Note that the hue may change by decreasing the ejected ink amount.
*1
Adjust the media advance compensation again.
*2
Note that the print speed differs depending on the mode selected.
*3
The smart pass setting can be changed only when the print mode is set to MAX SPEED.
*1
*1*2*3
*1*2
60
IP-7900 Advanced Operation Guide
Page 61

The print is smeared.
The print head is scratched by
Basic image Symptom A Symptom B Symptom C
To assist your Printer
in operating eectively
Cause Solution
[Symptom A]
The ink is improperly sprayed
l
from the print head.
[Symptom B]
The ink is drooling.
l
[Cause]
The ink is improperly sprayed
from the print head.
(1) Use the Printer within the operating temperature/humidity range.
(2) Check the #PH HEIGHT VAL value. If the value is more than 0, set the value to 0.
(3)
Perform the daily maintenance.
* Do not forget to clean the head guard and media edge guards.
(4) Perform print head cleaning (STRONG).
(5) Change the print mode to be slower.
(6) With the print sheet mount cleaning (
clean the print head surface.
(7) Set the carriage speed to SLOW.
(1) Use the Printer within the operating temperature/humidity range.
(2) Check the obstructions such as media lint or ink clot in the nozzle surface path
including the platen surface, and remove them.
(3) If the ink is accumulated or the net tears on the spittoon case surface, replace
them.
(4) If the media is curled or wrinkled, solve the problem by referring to the
description on the problem, The media is curled or wrinkled.
(5)
Perform the daily maintenance.
* Do not forget to clean the head guard and media edge guards.
* Be sure to perform print head cleaning.
(6) With the print sheet mount cleaning (
clean the print head surface.
(8) Note that some media are staticky, on which by static electricity the ink droplets
on the nozzle surface may cause the ink drooling. Use the proven media.
(8) With some banner media, feathery media edge scratches the print head, which
may cause the ink drooling.
[Cause]
The ink is drooling.
[Cause]
media.
*1*2
Basic Operation Guide page 105
*2*3
Basic Operation Guide page 105
Adjust and calibrate
*3
the Printer
),
),
IndexMenu tree
61
Page 62

[Symptom C]
The print head is scratched by
l
media.
(1) Check that the media was installed properly with the conditions below.
- The installed media is properly parallel to the Printer and the ange.
- The operation panel shows the media type correctly.
- The supply-side tension bar length is proper and it is placed on the center of the
media.
- The media winding mode is optimal to the installed media.
- If the media is curled or wrinkled, see the description on the problem, The media is
curled or wrinkled.
(2) Check the obstructions such as media lint or ink clot in the nozzle surface path
including the platen surface, and remove them.
(3) If the ink is accumulated or the net tears on the spittoon case surface, replace
them.
(4)
Perform the daily maintenance.
* Do not forget to clean the head guard and media edge guards.
* Be sure to perform print head cleaning.
(5) With the print sheet mount cleaning (
clean the print head surface.
*1
Adjust the media advance compensation again.
*2
Note that the print speed differs depending on the mode selected.
*3
Adjust the bidirectional print positions.
Basic Operation Guide page 105
),
62
IP-7900 Advanced Operation Guide
Page 63

Edges of objects are blurred.
Basic image Symptom A Symptom B Symptom C
To assist your Printer
in operating eectively
[Cause]
The ink dries too slowly.
The ink is ejected excessively.
Cause Solution
[Symptom A]
The ink dries too slowly.
l
The ink is ejected excessively.
l
[Symptom B]
The print head position is
l
misaligned.
The bidirectional print position is
l
misaligned.
[Cause]
The print head position is misaligned.
The bidirectional print position is
misaligned.
(1) Decrease the all three heaters by 5°C.
* Before starting the print, ensure that the heater temperature was decreased to the
target temperature.
(2) Set smart pass to a higher setting.
(3) Change the print mode to be slower.
*1
*1*2*3
*1*2
[Cause]
The media advance
compensation is not proper.
(4) Print in unidirectional mode.
(4) If density is set to HIGH DENSITY, change it to NORMAL. (
page 53
)
(5) Use the proven media.
(6) With the RIP software, apply the profile with the low ink amount ejected.
* Note that the hue may change by decreasing the ejected ink amount.
(1) Adjust the print head position. (
page 89
(2) Adjust the bidirectional print positions. (
)
page 82
)
Adjust and calibrate
the Printer
[Symptom C]
The media advance
l
compensation is not proper.
[Symptom C]
The media advance accuracy is
l
poor, or is not stable.
Adjust the media advance compensation.
* The media advance compensation diers depending on the winding mode, LOOSE or
TENSION.
(1) Check that the media was installed properly with the conditions below.
- The installed media is properly parallel to the Printer and the ange.
- The operation panel shows the media type correctly.
- The supply-side tension bar length is proper and it is placed on the center of the
media.
- The media winding mode is optimal to the installed media.
- If the media is curled or wrinkled, see the description on the problem, The media is
curled or wrinkled.
(2) Adjust the pressure on the media with the pressure control knob.
(3) Set smart pass to a higher setting.
(4) Change the print mode to be slower.
*1
Adjust the media advance compensation again.
*2
Note that the print speed differs depending on the mode selected.
*3
The smart pass setting can be changed only when the print mode is set to MAX SPEED.
*1*2*3
*1*2
IndexMenu tree
*1
63
Page 64

A vertical barding appears at the print's edge.
Basic image Symptom A Symptom B
* Avoid the platen’s vacuum hole for this area.
Cause Solution
[Symptom A] [Symptom B]
When, on the platen, the
l
contacting point of a media edge
and the media edge guard is
near the platen’s vacuum hole,
the Printer may suck the ejected
ink partially between the media
and the media edge guard. As
a result, a vertical banding may
appear.
[Cause]
On the platen, the contacting point of the
media left edge and the media edge guard
is near the platen’s vacuum hole.
(1) Shift the media so that the contacting
point of the media edge and the
media edge guard on the platen does
not come close to the vacuum hole.
An example of media position when a
vertical banding appear
Example (1) of shifting the media
position when a vertical banding appear
Example (2) of shifting the media position
when a vertical banding appear
[Cause]
On the platen, the contacting point of the
media right edge and the media edge guard
is near the platen’s vacuum hole.
Media
Media
Platen
Media edge guard
Vacuum hole
64
IP-7900 Advanced Operation Guide
Page 65

Dierent bandings appear on the print’s right and left.
Basic image
Example of skew
Example of dent
Media
Media
Example of skew
Example of dent
Printer
[Cause]
The media is skewed.
Cause Solution
The skewed media is fed.
l
To assist your Printer
in operating eectively
Adjust and calibrate
(1) Check that the media condition is good. If the media roll is dent or wound
(2) Check that the media was installed properly with the conditions below.
- The installed media is properly parallel to the Printer and the ange.
- The operation panel shows the media type correctly.
- The supply-side tension bar length is proper and it is placed on the center of the
Bad example
Media
- The media winding mode is optimal to the installed media.
- If the media is curled or wrinkled, see the description on the problem, The media is
Printer
(3) Check that the takeup-side media shows no irregular winding. If an irregular
Good example
Media
(4) Adjust the pressure on the media with the pressure control knob.
(5) Change the tension bar length.
(6) Use the proven media.
*1
Adjust the media advance compensation again.
the Printer
telescopically, replace the roll with a good one.
media.
curled or wrinkled.
winding is found, re-install the media on the Printer and onto the take-up reel
unit.
*1
*1
IndexMenu tree
65
Page 66

Clear missing dots (nozzle clogging)
MENU
If the missing dots persist after the daily maintenance and after setting NOZZLE MAP, perform the operation
below.
Strong cleaning
Perform the NOZZLE PRINT
Fill the cap with ink
Perform the NOZZLE PRINT
Perform sheet mount cleaning
Strong cleaning
1
INK MEDIA REGâ
á
MEDIA M.ADV
ß
Perform the strong cleaning when the missing dots persist after the
normal cleaning.
To clear the nozzle clogging, ll the cap with ink and moisten the
print head nozzle surface with ink. After this operation, hold the
Printer for 1 to 2 hours.
Clean the print heads surfaces with sheet mount cleaning
( Basic Operation Guide
(Generally perform sheet mount clean approximately once per month.)
page 105
).
Set the Printer to oine state and press the
à
MENU button.
2
REWIND FORM FEED
á
PH.REC PH.MAIN
ß
#PH RECOVERY
3
>NORMAL
#PH RECOVERY
4
*NORMAL
#PH RECOVERY
5
*STRONG
â
à
Press the Left button.
Press the OK button.
Press the Down button.
Press the OK button.
66
IP-7900 Advanced Operation Guide
Page 67

#PH RECOVERY
MENU
6
*STRONG:87654321
Press the OK button.
- When a specific length of media has been
printed since the last cleaning operation,
print heads cannot be selected and cleaned
individually.
To assist your Printer
in operating eectively
#PH REC 87654321
7
*BOTTLE OK?
#PH REC 87654321
*EXECUTING 12
This value is counted down every 10
seconds.
#PH RECOVERY
8
>NORMAL
REWIND FORM FEED
á
PH.REC PH.MAIN
ß
â
à
Press the OK button.
Check visually that the waste ink bottle is not full.
Cleaning is started.
Print head cleaning takes several minutes.
When the cleaning starts, the required time is
displayed and the time is counted down every 10
seconds.
Press the Left button.
The display returns offline state (menu mode).
Adjust and calibrate
the Printer
Fill the cap with ink
1
2
3
4
INK MEDIA REGâ
á
MEDIA M.ADV
ß
REWIND FORM FEED
á
PH.REC PH.MAIN
ß
#CAP CLEANING
>
#WASH PRINTHEADS
>
à
â
à
Set the Printer to oine state and press the
MENU button.
IndexMenu tree
Press the Right button.
With the Down button scroll to #WASH
PRINTHEADS.
Press the OK button.
67
Page 68

#WASH PRINTHEADS
5
*OK?
Press the OK button.
#WASH PRINTHEADS
*EXECUTING
Hold the Printer for 1 to 2 hours.
After the Printer was held for 1 to 2 hours, perform the
normal cleaning.
68
IP-7900 Advanced Operation Guide
Page 69

Adjust the heaters’ temperature
When a media type is selected at installing media, initial
(1) The heaters are standby with the initial
The each heater’s initial value is set with MEDIA REG MENU, and the value is automatically set for the heater’s
temperature.
Therefore, normally the heater control menu is not required.
The heater control menu is used to:
- Complete the temperature’s fine adjustment during the print operation; or
- Confirm the current heater temperature
Procedure to set the heater temperature
temperature registered with the applied
media.
#AFTERHEATER T
>01:40°C
#PRINTHEATER T
>01:50°C
#PRINTHEATER T
>01:40°C
temperature values of each heater for the selected media
type are displayed on the menu.
To assist your Printer
in operating eectively
Adjust and calibrate
the Printer
(2) With receiving the RIP data, heating is started.
RIPdata
(3) When the heater temperature increased
almost to the setup temperature, the print
operation is started.
(4) The heaters’ temperature is changed during
the print operation.
When the heater temperature is set with the RIP’s print data
and job, the heater control menu’s temperature is
overwritten by the RIP’s temperature.
- To use the initial temperature values set on the
operation panel rather than the temperature set with
the RIP, set HEATER PREF in the MEDIA REG MENU to
HEATER PANEL.
When the current temperature of the afterheater, printheater,
and preheater reaches the temperature that is 1°C lower than
the set temperature, the printer starts printing.
- The heaters’ maximum setup temperature is as follows.
Afterheater: 70°C, Printheater: 55°C, Preheater: 55°C
- Even after the print is completed, the temperature
changed at this procedure remains as the heaters’
setup temperature, until the media is installed again or
the Printer is turned off.
Note that the heaters’ initial values set with MEDIA REG
MENU are not changed with this procedure.
During the print operation the heaters’ temperature is
changed by specifying the setup temperature with the
heater control menu.
IndexMenu tree
HEATER
Aft 40 Prn 50 Pre 45
C) 40 C) +55 C) 45
69
Page 70

■ The heater temperature control system for printing
The Printer receives the RIP data.
Printheater set temperatur
Af
ime)
(Temperature)
Print
Standby time
e
Preheater set temperature
terheater set temperature
Standby set temperature
Ambient temperature
Set temperature maintained Standby temperature maintained Temperature control stop
- The heaters become standby at the temperature below.
Preheater: 45 ºC
Printheater: 45 ºC
Afterheater: 60 ºC
However, the temperature above is lowered to the setup temperarure if the
setup temperature is lower than the standby temperature above.
Display the heater control menu.
Press the HEATER button to display the heater control menu.
(T
Button operation in the heater control menu
Right and Left buttons Select the heater whose temperature is to be set.
Up and Down buttons Set the heater temperature.
MENU button Turns the heater ON or OFF.
CANCEL button
Finish displaying the heater control menu
Press the HEATER button while the heater control menu is displayed.
■ When the heater control menu display nishes automatically
When this button is pressed for 1.5 seconds while the heater control
OK button
menu is displayed, all the heaters are forcibly turned on even without print
operation. (The heating control starts.)
Pressing this button for 1.5 seconds with the heater control menu displayed
cancels the heater-on state forcibly specied by the OK button. (The
heating control stops.)
HEATER DISPLAY END
If no button is input for 30 seconds while the heater control menu is displayed, a message HEATER DISPLAY
END appears automatically for two seconds and then the heater control menu display finishes. While this
message is displayed, no button input is effective.
70
IP-7900 Advanced Operation Guide
Page 71

■ Heater preset temperature by medium
The heater preset temperature for each media type is listed below. Preset the heater temperature according to
the media you use.
Medium Media type
Glossy vinyl Glossy 50ºC 40ºC 45ºC NORMAL, bidirectional
Matte vinyl Matte 50ºC 40ºC 45ºC NORMAL, bidirectional
Banner Banner 50ºC 40ºC 45ºC NORMAL, bidirectional
Recommended heater temperature setting
Afterheater Printheater Preheater
Print mode
We recommend that the preheater, the printheater, and the afterheater be set to lower than 50ºC, 45ºC, and 60ºC
respectively.
NOTE
- When the printheater temperature is set too high, the ink fusion on the media is improved, however media wrinkle or mat
print mahy be caused. Adjust heater temperature according to the media type and environmental temperature.
- When the printheater temperature is set to high, the printer may print at low speed to ensure stable print quality.
- Set:
preheater temperature 5°C higher, and
afterheater temperature 5 to 10°C higher
than the printheater temperature, respectively.Bad temperature balance between the preheater/afterheater and the
printheater may cause the media to wrinkle.
- Setting the printheater temperature to high may cause missing dots.
Set the heater preset temperature
To assist your Printer
in operating eectively
Adjust and calibrate
the Printer
1
INK MEDIA REGâ
á
MEDIA M.ADV
ß
#SELECT MEDIA
2
>01:PAPER *
#AFTERHEATER T
3
>01:40°C
#AFTERHEATER T
4
*01:40°C
, , ,
#AFTERHEATER T
5
*01:50°C
à
Set the Printer to oine state and press the
Down button.
With the Down button scroll to
#AFTERHEATER T.
Press the OK button.
Enter the heater preset temperature.
Align the digit with the Right and Left buttons and
set the value with the Up and Down buttons.
Press the OK button.
IndexMenu tree
71
Page 72

#AFTERHEATER T
MENU
2
>01:50°C
Select the standby time
Select the time to maintain the standby set temperature of the heater (including the time for transition to the
standby set temperature) after printing.
1
INK MEDIA REGâ
á
MEDIA M.ADV
ß
PRINTER SETUP
á
ADJUST HEATER
ß
#HEATER DELAY TIME
3
>30 min
#HEATER DELAY TIME
4
*30 min
Set the Printer to oine state and press the
à
MENU button twice.
x2
â
à
Press the Right button.
Press the OK button.
With the Up or Down button, select the
time to maintain the heater’s standby setup
temperature.
,
#HEATER DELAY TIME
5
*60 min
#HEATER DELAY TIME
>60 min
Press the OK button.
The operation was completed.
72
IP-7900 Advanced Operation Guide
Page 73

Smart pass technology: ON
Smart pass technology
With inkjet printers, a horizontal banding may appear between the bands, which are the areas printed by one
scan. This symptom is called as banding.
The banding is caused mainly by setting the media advance compensation improperly. With the proper
compensation, the bands are linked without gap. However, with the larger compensation the bands are linked
with gaps, showing white lines, while with the smaller one the bands overlap, showing black lines.
The banding is also caused in the following cases.
- The ink dries so slowly.
- The media advance changes considerably depending on the print head scan.
Correct media advance
Print head Print head
A band of print
A band of print
White banding at incorrect media advance
A band of print
A band of print
The bands’ gap
The bands’ gap
shows a white
shows a white
banding.
banding.
Black banding at incorrect media advance
Print head
A band of print
A band of print
The bands’
The bands’
overlap shows
overlap shows
a black banding.
a black banding.
To assist your Printer
in operating eectively
Adjust and calibrate
the Printer
The Smart Pass Technology is the function used to reduce this banding
problem.
Print head
The smart pass setting can be selected and set from the RIP software only
in MAX SPEED print mode.
A band of print
In the other print modes, the smart pass setting is always set to MEDIUM.
With Smart Pass Technology, the bands are printed overlapping even
First scan Second scan
when the media advance compensation is proper. The overlapping part
is processed with the OKI Data Infotech’s unique algorithm so that the
bands are not noticeable.
The Printer features two overlapping intensities (LOW, MEDIUM).
Increasing the process intensity in the overlapping parts makes the banding less noticeable, but decreases the
print speed.
Increase the overlapping intensity to prioritize quality, and decrease the intensity to prioritize print speed.
IndexMenu tree
73
Page 74

Adjust and calibrate the Printer
Before adjustment and calibration
Before adjustment and calibration, perform the operation below.
(1) Forcedly set the media heater to ON to warm up the Printer for 30 minutes or more.
Start the adjustment only after confirming that the Printer is warmed up sufficiently. The adjustment may not
be performed correctly when the Printer is not warmed up sufficiently.
(2) Rotate the control pressure knob to OPEN and reinstall the media to adjust the print head height.
Always make print adjustment after installing a new media or changing the print mode.
Two types of adjustment are available: Media advance adjustment and bidirectional print position
adjustment.
You can select automatic print adjustment and manual print adjustment for each type.
Automatic print adjustment Manual print adjustment
Media advance adjustment
Adjust the media feeding
Bidirectional print position adjustment
Adjust the ink output position during bidirectional
printing
page 77
page 82
page 79
page 84
Two modes are available for print adjustment: automatic print adjustment and manual print adjustment.
With automatic print adjustment, the printer prints an adjustment pattern, checks the result with sensors, and
sets an adjustment value automatically.
With manual print adjustment, the printer prints an adjustment pattern, then the user selects visually an
adjustment value and sets the value on the printer.
How to dierentiate between automatic and manual print adjustment
Automatic print adjustment is recommended for the following users.
- Users who do not have much experience with the printer
- Users who find manual print adjustment difficult
- Users who want finish adjustment quickly
* Automatic print adjustment may not be available depending on the media type. If automatic print adjustment does
not improve the print quality, use manual print adjustment.
Manual print adjustment is recommended for the following users.
- Users who needs the best print quality
74
IP-7900 Advanced Operation Guide
Page 75

Before adjustment and calibration / Procedures
Cautions regarding automatic print adjustment
NOTE
- The printer cannot set a correct adjustment value through automatic print adjustment in the following cases. In such cases,
improve the conditions or perform manual print adjustment.
The automatic print adjustment determines mechanically the adjustment value, so absolute precision of the setting cannot
be guaranteed.
- The media used makes the check via sensors impossible.
(Some types of generally used media may also not be compatible with automatic print adjustment.)
<Examples>
- Transparent or colored media
- Media with a rough surface
- Media with an extremely high or low degree of reection
- Media on which the pattern cannot be printed properly, such as when the ink tends to bleed
- Media on which density dierences between adjustment patterns are not visible
- The media surface is soiled with dust, ink, nger marks, etc.
- A gap tends to form between the platen and the media.
- Lots of nozzles are clogged.
- The media heater temperatures are not suitable.
- The environmental luminosity is too strong.
- With automatic print adjustment, the adjustment value is determined through reading of printed patterns. However, the
print results of the patterns may vary depending also on the media deterioration due to aging or the media lot.
Therefore, it may not be possible to set a correct adjustment value even when using the same media, leading to a decrease
in actual print quality.
In such cases, use manual print adjustment.
To assist your Printer
in operating eectively
Adjust and calibrate
the Printer
Automatic print adjustment cannot be performed
Automatic adjustment is not possible if one of the following messages appears when automatic print adjustment
is performed.
In such a case, perform manual adjustment or check the items and perform the measures described below.
MANUALLY ADJUST 1
ADV VAL/PRINT POS
Meaning The amount of light received by the sensors did not reach the
reference level.
Items to be checked Corrective measures
Check that the sensors for
automatic print adjustment
are not covered with ink mist.
Clean the sensors for automatic print
adjustment.
(See Clean the surface of the sensors for
automatic print adjustment on
page 92
of the Basic Operation Guide.)
Check that the media is clean. Feed the media until you reach a clean section.
Check that the media is not
wrinkled.
Check that you are not using
a media type with a light
reection rate too low.
Reinstall the media or feed the media until you
reach a section without wrinkles.
Automatic print adjustment may not be
possible with some media types. In such a
case, use manual print adjustment.
IndexMenu tree
75
Page 76

MANUALLY ADJUST 2
ADV VAL/PRINT POS
Meaning The amount of light received by the sensors exceeds the reference
level.
Items to be checked Corrective measures
Check that the media is not
wrinkled.
Check that no external light
reaches the sensors.
Check that you are not using
a media type with a light
reection rate too high.
Reinstall the media or feed the media until you
reach a section without wrinkles.
Block the external light or change the printer
installation location.
Automatic print adjustment may not be
possible with some media types. In such a
case, use manual print adjustment.
MANUALLY ADJUST 3
ADV VAL/PRINT POS
Meaning The adjustment values cannot be determined correctly.
Items to be checked Corrective measures
Check that the media is not
wrinkled.
Check that no nozzles are
clogged.
Check that the media heater
temperature is correct.
Check that you are not using
a media type on which
the pattern does not form
correctly and from which
the pattern cannot be read
properly.
Reinstall the media or feed the media until you
reach a section without wrinkles.
Perform a print head cleaning.
Change the media heater temperature so that
the ink does not spread too much.
Automatic print adjustment may not be
possible with some media types. In such a
case, use manual print adjustment.
76
IP-7900 Advanced Operation Guide
Page 77

Procedures
ONLINE
Adjusting media feeding: Media advance adjustment
The media feeding operation can be adjusted depending on media characteristics, such as thickness, rigidness,
and smoothness of the surface.
To maintain a high print quality, perform media advance adjustment and set the most suitable media advance
adjustment value.
What is the timing to perform media advance adjustment?
When one of the following parameters has changed.
- Change the print mode
- Change the pressure with the pressure control know.
- Print with/without the take-up reel unit
- Change the media type
- Change the media advance path
When the media advance adjustment value is incorrect.
- When the media advance adjustment value is incorrect, banding (horizontal bands) appears periodically on the printout.
Automatic print adjustment
See Cautions regarding automatic print adjustment (
page 75
)
To assist your Printer
in operating eectively
Adjust and calibrate
the Printer
<Workow>
Step1
Select the print mode
Set more than 4 m of media. Load the media.
1
PRINTER READY
2
ROLL:1625/PAPER
Step2
Execute automatic
print adjustment
Load the media in the same conditions as normal
printing.
Set the printer to the oine state.
(Press the ONLINE button.)
3
INK MEDIA REGâ
á
MEDIA M.ADV
ß
à
Press the Right button to enter the M.ADV
menu.
Completed
If the print quality has not been improved
i
Perform manual print adjustment (
page 79
)
IndexMenu tree
77
Page 78

# MEDIA ADVANCE AUTO
4
#EXECUTE >
Select #MEDIA ADVANCE AUTO with Up or
Down button.
# MEDIA ADVANCE AUTO
5
#EXECUTE >
,
#MEDIA ADVANCE AUTO
6
# EXECUTE >
#MEDIA ADVANCE AUTO
7
# MODE >MAX SPEED L
,
#MEDIA ADVANCE AUTO
8
# MODE *MAX SPEED L
,
Press the OK button.
Select MODE with Up or Down button.
Press the OK button.
Select the print mode you want to adjust with
the Up or Down button, and press the OK
button.
#MEDIA ADVANCE AUTO
# MODE *NORMAL
#MEDIA ADVANCE AUTO
9
# MODE >NORMAL
#MEDIA ADVANCE AUTO
# EXECUTE >
#MEDIA ADVANCE AUTO
10
*EXECUTE >OK?
Print mode
MAX SPEED L
MAX SPEED M
H SPEED
NORMAL
HIGH QLTY
MAX QLTY
Select EXECUTE with the Up or Down button,
and press the OK button.
,
Press the OK button to execute media advance
value adjustment.
78
#MEDIA ADVANCE AUTO
*EXECUTE >
IP-7900 Advanced Operation Guide
Page 79

11
The Printer prints the media advance value
adjustment pattern and then the pattern is read
by the sensors.
To perform ner adjustment, execute SING.
ADV or MULTI ADV.
See
page 79
for details about how
to execute SING. ADV and MULTI ADV
adjustment.
Manual print adjustment
With manual print adjustment, the media advance adjustment value can be determined by printing either of the
SINGLE and MULTI media advance adjustment patterns.
Select SING. ADV to print one pattern with the current MEDIA ADV VALUE.
Select MULTI ADV to print three patterns, one with the current MEDIA ADV VALUE -0.2%, one with the current
MEDIA ADV VALUE, and one with the current MEDIA ADV VALUE +0.2%.
<Workow>
To assist your Printer
in operating eectively
Adjust and calibrate
the Printer
Step1
Enter the media
advance
compensation.
If a misalignment is found
Step3
Enter the media
advance
compensation.
Print MULTI ADV adjustment pattern
Set more than 4 m of media.
1
2
INK MEDIA REGâ
á
MEDIA M.ADV
ß
à
Step2
Print the media
advance adjustment
pattern.
Step4
Print the media
advance adjustment
pattern.
Set the media on the same conditions as when
actually printing.
Set the Printer to oine state and press the
Right button.
Select a rough
media advance
compensation from
the print result.
Completed
IndexMenu tree
79
Page 80

#SING. ADV
3
#EXECUTE >
Display the MULTI ADV adjustment pattern
with the Up or Down button.
# MULTI ADV
4
#EXECUTE >
#MULTI ADV:100.00%
5
# EXECUTE >
#MULTI ADV
6
# MODE >NORMAL
#MULTI ADV:100.00%
7
#EXECUTE >
,
With the Right button, select #MULTI ADV
print pattern.
Select the print mode with the Up, Down, and
OK buttons.
,
Select the print mode you normally use with the
media for which you want to adjust the media
advance compensation value.
Select EXECUTE with the Up or Down button.
,
Press the OK button.
#MULTI ADV:100.00%
8
#ADJ VALUE *100.00%
#MULTI ADV:100.00%
9
#ADJ VALUE *100.20%
#MULTI ADV:100.20%
10
#ADJ VALUE >OK?
#MULTI ADV:100.20%
11
*EXECUTING
Set the media advance compensation with
the Up or Down button when the value is
displayed.
,
Press the OK button.
Conrm the media advance compensation
value and press the OK button.
The adjustment pattern is printed.
Check the print results. If the media advance compensation appears to be incorrect, perform steps 7 to 11 again
to determine the correct value.
80
IP-7900 Advanced Operation Guide
Page 81

To assist your Printer
Check the media advance adjustment pattern
When the media advance
compensation is too low.
When the media advance
compensation is correct.
When the media advance
compensation is too high.
in operating eectively
Adjust and calibrate
the Printer
CAUTION
- If the correct media advance compensation diers with each print head (each color), set the average value. However, if a color
is predominant in the printed image, set the compensation for this color.
- If the correct media advance compensation diers between the media right and left sides, set the average value.
- If the correct media advance compensation diers between the media right and left sides, it may be cause by a skewed media.
Check that the media is not skewed.
IndexMenu tree
81
Page 82

Correcting ink output position: Bidirectional print position adjustment
ONLINE
During bidirectional printing, a slight difference may appear in the ink output position between the first scanning
direction and the second scanning direction.
To maintain a high print quality, perform bidirectional print position adjustment and set the most suitable
bidirectional print position adjustment value.
What is the timing to perform bidirectional print position adjustment?
When one of the following parameters has changed.
- The media has been changed
- The print mode has been changed
- The carriage speed (normal, slow) has been changed
- The height of the print heads has been changed
When the bidirectional print position adjustment value is incorrect.
- When the bidirectional print position adjustment value is incorrect, grains may appear on the printout or the printout may
be blurred.
Automatic print adjustment
See Cautions regarding automatic print adjustment (
page 75
)
<Workow>
Step1
Select a bidirectional print
position adjustment pattern
suitable for the print mode
Set more than 4 m of media. Load the media.
1
PRINTER READY
2
ROLL:1625/PAPER
Step2
Execute automatic
print adjustment
Perform manual print adjustment (
Load the media in the same conditions as normal
printing.
Set the printer to the oine state.
(Press the ONLINE button.)
3
INK MEDIA REGâ
á
MEDIA M.ADV
ß
à
Press the Right button to enter the M.ADV
menu.
Completed
If the print quality has not
i
been improved
page 84
)
4
82
# MEDIA ADVANCE AUTO
#EXECUTE >
IP-7900 Advanced Operation Guide
,
Select #AUTO BIDIR ADJUST with Up or Down
button.
Page 83

# AUTO BIDIR ADJUST
5
#EXECUTE >
Press the OK button.
#AUTO BIDIR ADJUST
6
# EXECUTE >
#AUTO BIDIR ADJUST
7
# MODE >ALL MODES
#AUTO BIDIR ADJUST
8
# MODE *ALL MODES
#AUTO BIDIR ADJUST
# MODE *ALL MODES
To assist your Printer
in operating eectively
Select MODE with Up or Down button.
,
Press the OK button.
Adjust and calibrate
Select the print mode you want to adjust with
the Up or Down button, and press the OK
button.
,
Bidirectional print position
adjustment pattern
ALL MODES All print modes
1:MAX/H SPD MAX SPEED, HIGH SPEED
2:NORMAL NORMAL
3:HIGH QLTY HIGH QUALITY
4:MAX QLTY MAX QUALITY
Print mode with
adjustment
the Printer
#AUTO BIDIR ADJUST
9
# MODE >ALL MODES
#AUTO BIDIR ADJUST
# EXECUTE >
#AUTO BIDIR ADJUST
10
*EXECUTE >OK?
#AUTO BIDIR ADJUST
*EXECUTE >
11
Select EXECUTE with the Up or Down button,
and press the OK button.
,
IndexMenu tree
Press the OK button to execute bidirectional
print position adjustment.
The printer prints the bidirectional print
position adjustment pattern and then the
pattern is read by the sensors.
To perform ner adjustment, select MANUAL
BIDIR ADJUST. See
page 84
about how to execute MANUAL BIDIR ADJUST
adjustment.
for details
83
Page 84

Manual print adjustment
This function adjusts each print head’s bidirectional print position.
<Workow>
Step1 Step2
Print BIDIRECTION
adjustment pattern.
Enter the adjustment
value.
Obtain the adjustment
value from the
adjustment pattern.
Completed
This function adjusts each print head’s bidirectional print position. Enter the adjustment value based on print
results of MANUAL BIDIR ADJUST.
<Procedure>
STEP 1 Print MANUAL BIDIR adjustment pattern.
1
INK MEDIA REGâ
á
MEDIA M.ADV
ß
à
Select M.ADV with the Right button.
# SING. ADV
2
#EXECUTE >
Select #MANUAL BIDIR ADJUST with the Up
or Down button.
# MANUAL BIDIR ADJUST
3
#EXECUTE >
,
#MANUAL BIDIR ADJUST
4
# EXECUTE >
#MANUAL BIDIR ADJUST
5
# MODE >1:MAX/H SPD
,
Press the Right button.
Select MODE with the Up or Down button.
Press OK button to change the print pattern.
84
IP-7900 Advanced Operation Guide
Page 85

#MANUAL BIDIR ADJUST
Media advance direction
6
#MODE * 1:MAX/H SPD
Select the print pattern with the Up or Down
button. Press the OK button to conrm.
#MANUAL BIDIR ADJUST
7
# MODE >2:NORMAL
, ,
#MANUAL BIDIR ADJUST
8
# EXECUTE >
To assist your Printer
Bidirectional print position adjustment pattern <print mode>
Mode Print mode
1:MAX/H SPD MAX SPEED, HIGH SPEED
2:NORMAL NORMAL
3:HIGH QLTY HIGH QUALITY
4:MAX QLTY MAX QUALITY
Select #EXECUTE with the Up or Down button.
,
Press the OK button.
in operating eectively
Adjust and calibrate
the Printer
#MANUAL BIDIR ADJUST
9
#EXECUTE >OK?
Press the OK button.
#MANUAL BIDIR ADJUST
10
*EXECUTING
Print sample
+15+14 +13+5+4+3+2+10 -1 -2 -3 -4 -5 -13 -14 -15
The adjustment pattern is printed.
IndexMenu tree
85
Page 86

STEP 2 Enter the adjustment value.
#MANUAL BIDIR ADJUST
1
# EXECUTE >
#MANUAL BIDIR ADJUST
2
# ADJ2 L M7 >+00
,
#MANUAL BIDIR ADJUST
3
#ADJ2 L M7 *+ 00
Enter the value of the adjustment pattern where
each print head’s two lines overlap with the least
misalignment.
For example, on the right adjustment patterns for
M7 print head, the two lines misalign at -11 while
they overlap to be one line at +2. So enter +2 for
the adjustment value.
Select ADJ L or ADJ R with the Up or Down
button.
Select the print head to adjust with the OK
button.
Here, BIDIR ADJ2 L for M7 print head is adjusted as
an example.
Select the digit with the Right or Left button,
and set the value with the Up or Down button.
-11
+2
#MANUAL BIDIR ADJUST
4
#ADJ2 L M7 *+02
#MANUAL BIDIR ADJUST
5
# ADJ2 L M7 >+02
M
M
Press the OK button.
Adjust the ADJ2 R value and the values for the
other print heads with the same procedure.
86
IP-7900 Advanced Operation Guide
Page 87

Adjust the print linkage before or after automatic cleaning
In DURING PRINT1, automatic cleaning is performed even while the Printer is printing. In such a case, after the
cleaning, adjust the position of the linkage for the prints before and after the cleaning.
Enter the adjustment value based on the media back feed adjustment pattern.
Before this adjustment, set the cleaning mode to DURING PRINT1 at MEDIA REG menu.
<Procedure>
STEP 1 Print BACK ADJ PRINT adjustment pattern.
To assist your Printer
in operating eectively
1
INK MEDIA REGâ
á
MEDIA M.ADV
ß
#SING. ADV
2
#EXECUTE >
# BACK ADJ PRINT
3
#EXECUTE >
#BACK ADJ PRINT
4
# EXECUTE >
Set the Printer to oine state and press the
à
Right button.
Adjust and calibrate
the Printer
Select BACK ADJ PRINT with the Up or Down
button.
,
Press the Right button.
Select the MODE with the Up or Down button.
,
#BACK ADJ PRINT
5
# MODE >NORMAL
#BACK ADJ PRINT
6
#MODE *MAX SPEED L
#BACK ADJ PRINT
7
# MODE >MAX SPEED K
Press the OK button.
IndexMenu tree
Select the print mode with the Up or Down
button. Press the OK button to conrm.
, ,
Select EXECUTE with the Up or Down button.
,
87
Page 88

#BACK ADJ PRINT
Media advance direction
8
# EXECUTE >
Press the OK button.
#BACK ADJ PRINT
9
#EXECUTE >OK?
#BACK ADJ PRINT
10
*EXECUTING
Print sample
Press the OK button.
The adjustment pattern is printed.
STEP 2 Enter the adjustment value.
#BACK ADJ PRINT
1
#EXECUTE >
#BACK ADJ PRINT
2
#ADJ VALUE >+0000P
,
#BACK ADJ PRINT
3
#ADJ VALUE >* +0000P
#BACK ADJ PRINT
4
#ADJ VALUE >*+04 00P
#BACK ADJ PRINT
5
# ADJ VALUE >+0400P
Select ADJ VALUE with the Up or Down
button.
Press the OK button.
Select the digit with the Right or Left button,
set the value with the Up or Down button, and
press the OK button.
Press the OK button.
The procedure is complete.
88
IP-7900 Advanced Operation Guide
Page 89

STEP 3 Print BACK ADJ PRINT again to check that the horizontal lines overlap on the print pattern.
Validate the media back feed adjustment pattern
Determine the adjustment value so that the pattern’s horizontal lines overlap.
If the value is larger, the upper and lower patterns overlap at the center.
If the value is smaller, the upper and lower patterns show a gap.
MENU
Perform STEP 1 and STEP 2 until the horizontal lines on the print pattern overlap.
1
To assist your Printer
in operating eectively
Adjust and calibrate
the Printer
Adjust the print head position and the nozzle positions at the print head's right and left
This function adjusts each print head’s position in the scanning direction, media right to left direction, based on
the K5 print head position. Input the correction value based on the PRINT HEAD ADJUST print result.
<Procedure>
STEP 1 Print PRINT HEAD ADJUST adjustment pattern
1
2
INK MEDIA REGâ
á
MEDIA M.ADV
ß
PRINTER SETUP
á
ADJUST HEATER
ß
x2
à
â
à
Set the Printer to oine state and press the
MENU button twice to display ADJUST menu.
Press the Left button.
IndexMenu tree
89
Page 90

# NOZZLE PRINT
Media advance direction
3
#EXECUTE>
Select #PRINT HEAD ADJUST with the Up or
Down button.
# PRINT HEAD ADJUST
4
#EXECUTE >
#PRINT HEAD ADJUST
5
# EXECUTE >
#PRINT HEAD ADJUST
6
# EXECUTE >OK?
#PRINT HEAD ADJUST
7
*EXECUTING
,
Press the Right button.
Press the OK button.
Press the OK button.
The print head position adjustment pattern is
printed.
Print sample
+25+24 +23+5+4+3+2+10 -1 -2 -3 -4 -5 -23 -24 -25
STEP 2 Enter the adjustment value.
Enter the head position adjustment value.
#PRINT HEAD ADJUST
1
# EXECUTE >
Select the head color with the Up or Down
button.
#PRINT HEAD ADJUST
2
# POS ADJ Lc6>+00
, , ,
90
IP-7900 Advanced Operation Guide
,
Select the print head to adjust with the OK
button.
Here, the Lc6 print head is adjusted as an example.
Page 91

#PRINT HEAD ADJUST
3
#POS ADJ Lc6 *+ 00
Select the digit with the Right or Left button,
and set the value with the Up or Down button.
Enter the value of the adjustment pattern where the K5
print head’s line and the determined print head’s line
overlap with the least misalignment.
For example, on the right adjustment patterns for Lc6 print
head, the two lines misalign at -21 while they overlap at +2.
So enter +2 for the adjustment value.
#PH TO PH VAL
#Lc6 *+02
#PRINT HEAD ADJUST
4
#POS ADJ Lc6 *+02
#PRINT HEAD ADJUST
5
# POS ADJ Lc6>+02
Lc
-21
Lc
+2
Press the OK button.
Adjust values for the other color with the same
procedure.
To assist your Printer
in operating eectively
Adjust and calibrate
the Printer
Next, enter the head right to left adjustment value.
#PRINT HEAD ADJUST
6
# R/L ADJ M7>+00
#PRINT HEAD ADJUST
7
#R/L ADJ M7 *+ 00
Input the value of the test pattern where each print head’s
two lines overlap with the least misalignment.
For example, on the right test patterns for M7 print head,
the two lines misalign at -21 while they overlap to be one
line at +2. So input +2 for the correction value.
Select the print head to adjust with the OK
button.
Here, the M7 print head is adjusted as an example.
Select the digit with the Right or Left button,
and set the value with the Up or Down button.
-21
M
+2
M
IndexMenu tree
91
Page 92

#PRINT HEAD ADJUST
MENU
8
#R/L ADJ M7 *+ 02
Press the OK button.
#PRINT HEAD ADJUST
9
# R/L ADJ M7 >+02
Adjust values for the other print heads with the
same procedure.
Asjust the edge sensor position
Print the edge sensor adjustment pattern, and adjust the edge sensor position.
After printing, measure the distance and specify the parameter.
1
á
ß
2
á
ß
INK MEDIA REGâ
MEDIA M.ADV
à
x2
PRINTER SETUP
ADJUST HEATER
â
à
Set the Printer to oine state and press the
MENU button twice.
Press the Left button.
# SING. ADV
3
#EXECUTE >
# EDGE SENSOR ADJUST
4
#EXECUTE >
#EDGE SENSOR ADJUST
5
# EXECUTE >
#EDGE SENSOR ADJUST
6
#EXECUTE >OK?
Select EDGE SENSOR ADJUST with the Up or
Down button.
,
Press the Right button.
Press the OK button.
Press the OK button.
7
92
#EDGE SENSOR ADJUST
*EXECUTING
IP-7900 Advanced Operation Guide
Edge sensor adjustment pattern is printed.
Page 93

8
Media advance direction
Print sample
15 mm
To obtain the correction value:
Obtain the adjustment value by measuring the margin setting the reference value to 15 mm.
<Example>
The margin is 14 mm: The adjustment value is -1.0 mm.
The margin is 16 mm: The adjustment value is +1.0 mm.
Judge the print results.
Measure the margin of the printing result with a ruler,
and obtain an difference between the measured
margin and the value (15 mm) shown in the
specifications.
If the difference is 0 mm, complate this procedure.
If not, follow the prcedure below to adjust the value.
To assist your Printer
in operating eectively
Adjust and calibrate
the Printer
#EDGE SENSOR ADJUST
9
# EXECUTE >
#EDGE SENSOR ADJUST
10
# POS ADJ >+0.0mm
#EDGE SENSOR ADJUST
11
#POS ADJ *+ 0.0mm
, , ,
#EDGE SENSOR ADJUST
12
#POS ADJ *+0.5 mm
Select POS ADJ with the Up or Down button.
,
Press the OK button.
Select the digit with the Right or Left button,
set the value with the Up or Down button, and
press the OK button.
Press the OK button.
IndexMenu tree
#EDGE SENSOR ADJUST
13
# POS ADJ >+0.5mm
The adjustment is complete.
93
Page 94

Menu tree
INK MEDIA REG
MEDIA M.ADV
MENU
INK menu
MEDIA menu
XXX INK LEVELZZZ%
DATE:YY/MM/DD
ROLL(PAPER)
XXXmm
REMAINING MEDIA
ZZZm
SHEET(PAPER)
YYYYmm
NEST(PAPER)
YYYYmm
REMAINING MEDIA
ZZZm
FACE(PAPER)
YYYYmm
REMAINING MEDIA
ZZZm
MEDIA REG menu
BACK(PAPER)
YYYYmm
#SELECT MEDIA
>XX:YYYY
#SELECT MEDIA
>01:PAPER
#RENAME MEDIA
>01:PAPER
#USE EDGE GUARD
>01:YES
#SKEW CHECK
>01:ON
#MEDIA ADV MODE
>01:FWD ONLY
>01:TYPE01
01 to 20
6-digit character input
(codes, alphanumerics,
katakana characters, etc.)
>01:YES
>01:NO
>01:ON
>01:OFF
>01:FWD ONLY
>01:BACK & FWD1
>01:BACK & FWD2
>01:FWD WRINKLEFREE
①② ③
94
IP-7900 Advanced Operation Guide
Page 95

To assist your Printer
①② ③
①②
in operating eectively
#MEDIA BACK MODE
>01:BACK & FWD
#SUCTION FAN LEVEL
>01:NORMAL
#AFTERHEATER T
>01:**°C
#PRINTHEATER T
>01:**°C
#PREHEATER T
>01:**°C
#COLOR STRIPE
>01:OFF
#PH HEIGHT VAL
>01:+0.0mm
#PH CLEANING
>01:START & END
>01:BACK & FWD
>01:FWD ONLY
>01:HIGH
>01:NORMAL
>01:LOW
>01:OFF
15°C to 70°C
59°F to 158°F
15°C to 55°C
59°F to 131°F
15°C to 55°C
59°F to 131°F
>01:OFF
>01:ON
+0.0 to +1.0
(Unit: 0.1 mm)
>01:START & END
>01:DURING PRINT1
>01:DURING PRINT2
>01:OFF
>01:INK SAVE
Adjust and calibrate
the Printer
#ROLL END DETECTION
>01:DETECT ONLY
#ADVANCE PREF
>01:SOFTWARE
#HEATER PREF
>01:SOFTWARE
#PH REST PERIOD
>01:0000CYCLES
#PH REST TIME
>01:10sec
#CARRIAGE SPEED
>01:NORMAL
④
>01:DETECT ONLY
>02:ACTION SELECT.
>01:SOFTWARE
>01:FRONT PANEL
>01:SOFTWARE
>01:FRONT PANEL
0000 to 9999
1 to 99
>01:NORMAL
>01:SLOW
IndexMenu tree
95
Page 96

①② ④
①②
#SAFE SCANNING
>01:100.00%
#MEDIA ADV VALUE
>01:100.00%
>01:STOP PRINTING
>01:SUSPEND PRINTING
>01:SUSPEND&WARNING
>01:WARNING ONLY
097.00 to 106.00%
#BACK ADJUST VAL
>01:+0000PULSE
#BIDIR ADJ1 L PAPER
>01:+00
#BIDIR ADJ1 R PAPER
>01:+00
#BIDIR ADJ2 L PAPER
>01:+00
#BIDIR ADJ2 R PAPER
>01:+00
#BIDIR ADJ3 L PAPER
>01:+00
#BIDIR ADJ3 R PAPER
>01:+00
#BIDIR ADJ4 L PAPER
>01:+00
±2000 pulses
(Unit: Approx. 2.5 μm)
±, -15 to +15
±, -15 to +15
±, -15 to +15
±, -15 to +15
±, -15 to +15
±, -15 to +15
±, -15 to +15
#BIDIR ADJ4 R PAPER
>01:+00
#REMAINING MEDIA
>01:YYYm
#DELETE MEDIA
>02:TYPE02 OK?
#COPY MEDIA
>01
#PASTE MEDIA
>01-> 02*
±, -15 to +15
0 to 999m
0 to 3278ft
01 to 20
01 to 20
96
IP-7900 Advanced Operation Guide
Page 97

①②
①
⑤
M.ADV menu
#MEDIA ADVANCE AUTO
#EXECUTE >
#AUTO BIDIR ADJUST
#EXECUTE >
#SING. ADV
#EXECUTE >
#MULTI ADV
#EXECUTE >
To assist your Printer
in operating eectively
REWIND FORM FEED
PH.REC PH.MAIN
MENU
REWIND menu
PH.REC menu
FORM FEED menu
PH.MAIN menu
#MANUAL BIDIR ADJUST
#EXECUTE >
#BACK
#EXECUTE >
REWINDING MEDIA
#PH RECOVERY
>NORMAL
FEEDING MEDIA
#START MAINTENANCE
>
#MAINTENANCE
>SPITTOON CASE/UNIT
>NORMAL
>STRONG
>SPITTOON CASE/UNIT
>DUST FILTER
>EXHAUST FAN FILTER
>CARRIAGE
>EXTERIOR
>WIPER BLADE
>WIPER LIQUID
>SPITTOON LIQUID
>MEDIA EDGE GUARD
>PRINT HEAD GUARD
Adjust and calibrate
the Printer
IndexMenu tree
#CAP CLEANING
>
#SHEETMOUNT CLEANING
>
#REPLACE WIPER BLADE
>
97
Page 98

①
⑤
#REPLACE WIPER LIQD
>
PRINTER SETUP
ADJUST HEATER
PRINTER menu
#INK SYSTEM OPT
>
#RESEAT PRINTHEAD
>
#CHECK PH QUALITY
>
#WASH PRINTHEADS
>
#CONFIG PRINT
>
#ERROR LOG PRINT
>
#HISTORY PRINT
>
>STORE INK SYS
>CLEAN INK SYS
>INITIAL CHARGE
>CHARGE(INKPACK)
ADJUST menu
SETUP menu
#NOZZLE PRINT
#EXECUTE
#PRINT HEAD ADJUST
#EXECUTE
#EDGE SENSOR ADJUST
#EXECUTE
#LANGUAGE
>ENGLISH
#TIME ZONE (GMT+)
>YY/MM/DD HH:MM +00
>ENGLISH
>FRENCH
>ITALIAN
>GERMAN
>SPANISH
>PORTUGUESE
>JAPANESE
-12 to +12
98
IP-7900 Advanced Operation Guide
⑥
⑦
Page 99

⑥⑦
#LENGTH UNITS
>MILLIMETER
#TEMPERATURE UNITS
>CENTIGRADE
>MILLIMETER
>INCH
>CENTIGRADE
>FAHRENHEIT
To assist your Printer
in operating eectively
#BEEP(UNCAP CARRI)
>ON
#BEEP(TUR TIMEOUT)
>ON
#BEEP(INK ERROR)
>ON
#BEEP(SAFE SCANNING)
>ON
#BOOT VERSION
*X.XX
#PRINTER FW VER
*X.XX_YY
#MAIN PCA VER
*XXXXX
#ACT PCA VER
*X.XX
>ON
>OFF
>ON
>OFF
>ON
>OFF
>ON
>OFF
Adjust and calibrate
the Printer
HEATER menu
#CARRIAGE PCA VER
*XXXXX
#BTC VER
*XXX
#USB ADDRESS
*XXX
#USB SPEED
*HIGH-SPEED
#FACTORY DEFAULT
>
#PRINTER FW UPGRADE
>
#JAM SENSITIVITY
>HIGH(DEFAULT)
#HEATER STANDBY TIME
>30 min
IndexMenu tree
000 to 255
HIGH-SPEED
FULL-SPEED
>HIGH(DEFAULT
>LOW
>NONE
>30min
>60min
>120min
>CONTINUOUS
99
Page 100

Index
A
audio warning beep …………………………
C
cleaning liquid set ……………………………
F
ll cap …………………………………………
H
head wash ……………………………………
charging the ink system ……………………
heater control menu …………………………
heater preset temperature ……………………
heater temperature …………………………
I
47
14
66
14
19
69
70
68
menu tree ……………………………………
N
nozzle clogging ………………………………
P
preset media
defult values …………………………………
select ………………………………………
printer
turning o ……………………………………
print quality problems
black banding ………………………………
edges rough or blurred ……………………
missing dots …………………………………
smudged print ………………………………
vertical banding ……………………………
96
65
27
28
8
58
62
65
60
63
ink
remaining ……………………………………
L
LOOSE winding mode ………………………
M
margin
minimizing right and left ……………………
media
cut-sheet media ……………………………
feed or rewind ………………………………
lifting up o the platen ……………………
remaining ……………………………………
rewind ………………………………………
thick media …………………………………
22
46
28
41
36
31
23
36
32
white banding ………………………………
S
service cleaning …………………………………
smart pass technology ………………………
strong cleaning ………………………………
56
9
72
65
media preset
copy …………………………………………
creating a new preset ………………………
100
IP-7900 Advanced Operation Guide
34
26
 Loading...