

Page 1

Start-up Guide
This guide supports the following models:
MC332dn, MC342dn, MC342dw, MC352dn,
MC362dn, MC362w, MC562dn, MC562w,
MC562dw, ES3452 MFP, ES5462 MFP,
ES5462dw MFP, MPS2731mc
Page 2
PREFACE
Every effort has been made to ensure that the information in this document is complete, accurate,
and up-to-date. The manufacturer assumes no responsibility for the result of errors beyond its
control. The manufacturer also cannot guarantee that changes in software and equipment made by
other manufacturers and referred to in this manual will not affect the applicability of the information
in it. Mention of software products manufactured by other companies does not necessarily constitute
endorsement by the manufacturer.
While all reasonable efforts have been made to make this document as accurate and helpful as
possible, we make no warranty of any kind, expressed or implied, as to the accuracy or completeness
of the information contained herein.
All rights reserved by Oki Data Corporation. No part of this document may be reproduced in any form
or by any means without prior written permission from Oki Data Corporation.
© 2012 Oki Data Corporation
OKI is a registered trademark of Oki Electric Industry Co., Ltd.
Energy Star is a trademark of the United States Environmental Protection Agency.
Microsoft, Windows, Windows Server, Windows Vista and Internet Explorer are registered trademarks of
Microsoft Corporation.
Apple, Macintosh, Mac and Mac OS are the registered trademarks of Apple Inc.
Other product names and brand names are registered trademarks or trademarks of their proprietors.
AirPrint
AirPrint logo
iPad
iPhone
iPod
iPod touch
iPad, iPhone, iPod, and iPod touch are trademarks of Apple Inc., registered in the U.S. and other
countries. AirPrint and the AirPrint logo are trademarks of Apple Inc.
As an Energy Star Program Participant, the manufacturer has determined that this product meets the
Energy Star guidelines for energy efciency.
This product complies with the requirements of the Council Directives 2004/108/EC (EMC), 2006/95/
EC (LVD), 1999/5/EC (R&TTE), 2009/125/EC (ErP) and 2011/65/EU (RoHS), as amended where
applicable, on the approximation of the laws of the member states relating to Electromagnetic
Compatibility, Low Voltage, Radio & Telecommunications Terminal Equipment, Energy related Products
and Restriction on the use of certain Hazardous Substances in electrical and electronic equipment.
TM
TM
®
®
®
®
The following cables were used to evaluate this product for EMC directive
2004/108/EC compliance, and congurations other than this may affect that compliance.
CABLE TYPE
Power 1.8
USB 5.0
LAN 7.0
Telephone 7.0
LENGTH
(METER)
CORE SHIELD
8 8
8 4
8 8
8 8
- 2 -
Page 3

EMERGENCY FIRST AID
Exercise care in the handling and use of toner powder:
If swallowed, give small amounts of cold water and seek medical attention. DO NOT attempt
to induce vomiting.
If inhaled, move the person to an open area for fresh air. Seek medical attention.
If it comes into contact with the eyes, ush with large amounts of water for at least 15 min-
utes keeping eyelids open. Seek medical attention.
Spills on clothing or exposed skin should be washed with cold water and soap to help reduce
risk of staining.
MANUFACTURER
Oki Data Corporation,
4-11-22 Shibaura, Minato-ku,
Tokyo 108-8551,
Japan
For all sales, support and general enquiries contact your local distributor.
IMPORTER TO THE EU/AUTHORISED REPRESENTATIVE
OKI Europe Limited (trading as OKI Printing Solutions)
Blays House
Wick Road
Egham
Surrey, TW20 0HJ
United Kingdom
For all sales, support and general enquiries contact your local distributor.
ENVIRONMENTAL INFORMATION
- 3 -
Page 4
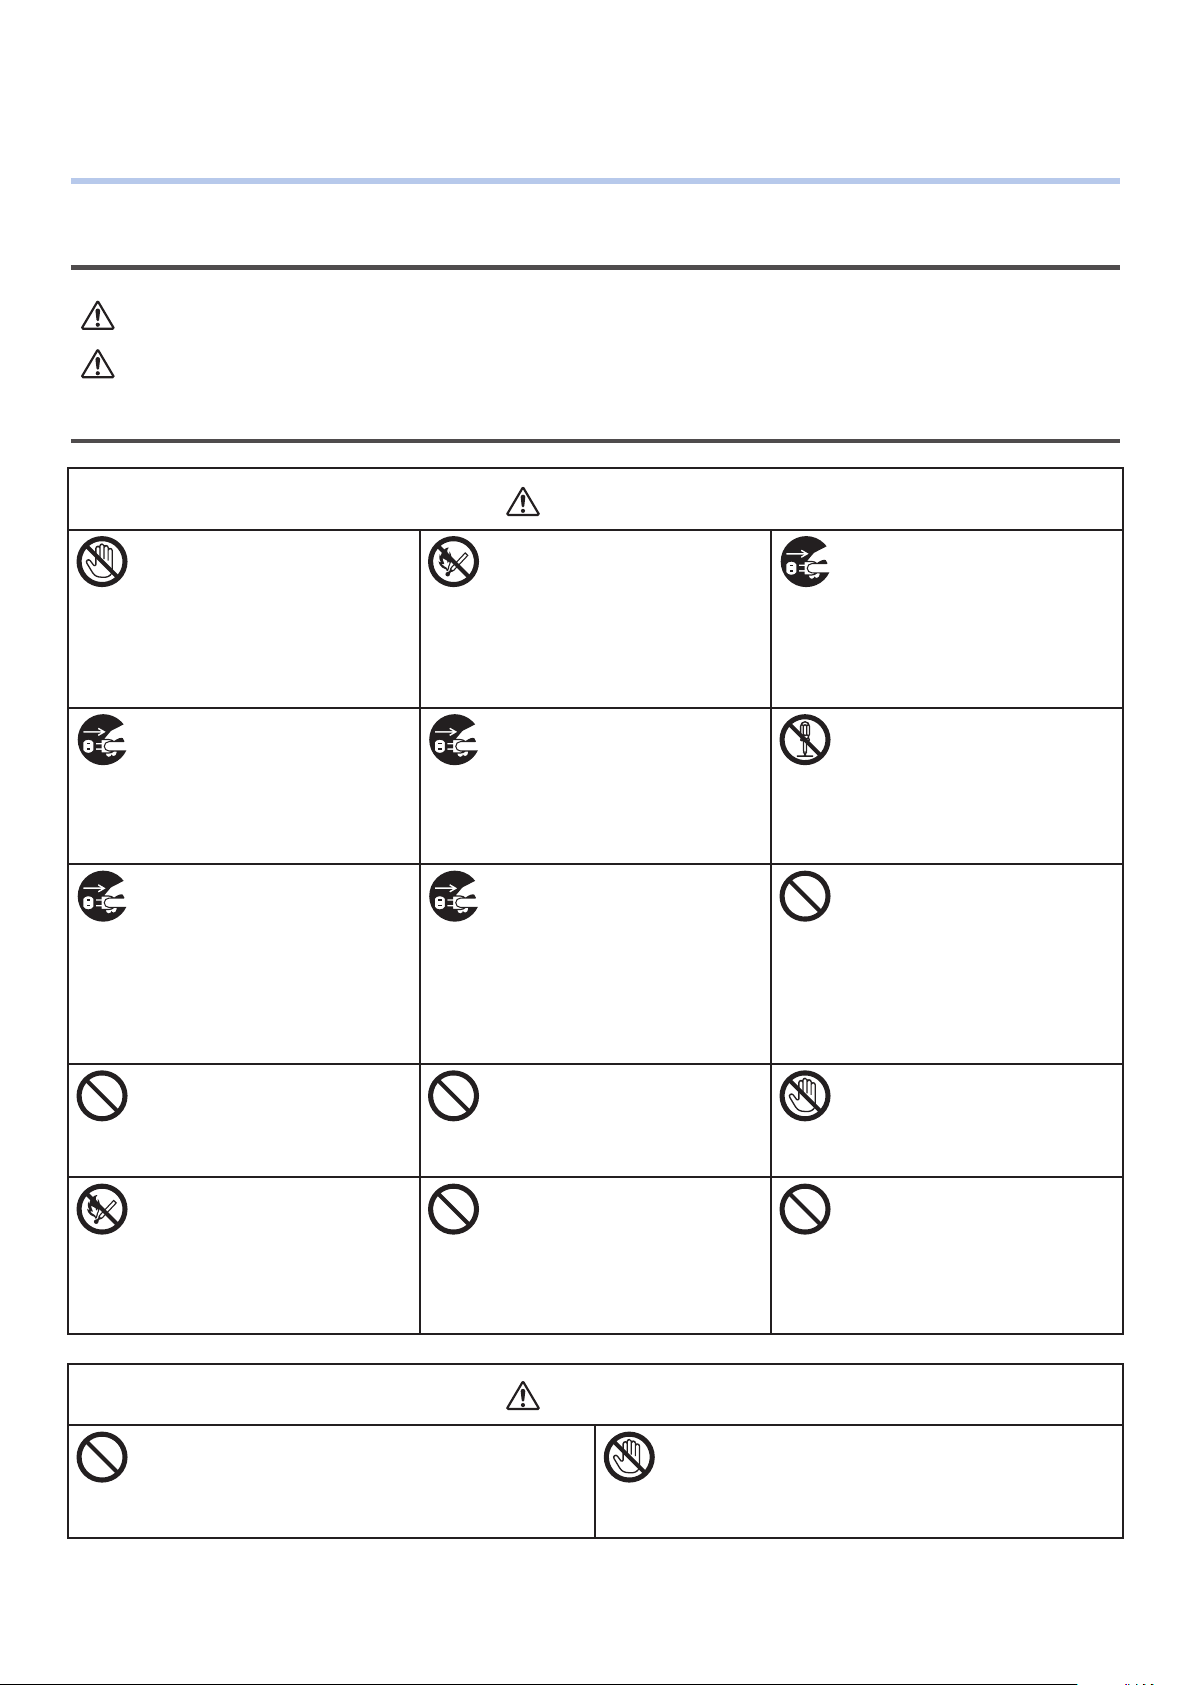
●● For Your Safety
Read the Start-up Guide (this guide) and User’s Guide for your safety before using the product.
Cautions related to safety
WARNING
CAUTION
Indicates the presence of a hazard for which not following the instructions noted may result
in serious injury or death.
Indicates the presence of a hazard for which not following the instructions noted may result
in injury.
General cautions
Do not touch the safety
switch inside the machine.
Doing so may cause electric
shock due to high voltage.
In addition, gears can rotate,
which may result in personal
injury.
Remove the power plug from
the socket and contact a
customer’s service center if
a liquid such as water comes
into contact with the internal
parts of the machine. Failure
to do so may cause re.
Remove the power cord
and contact a customer’s
service center if the machine
is dropped or the cover is
damaged.
Failure to do so may cause
electric shock and/or re
leading to injury.
Do not insert materials into a
vent holes.
Doing so may cause electric
shock and/or re resulting in
injury.
Do not throw toner or image
drum cartridges into re.
Doing so may cause dust
explosion leading to burns.
WARNING
Do not use inammable
sprays near the machine.
Doing so may result in
re due to heat within the
machine.
Remove the power plug
from the socket and remove
foreign material such as
clips if they fall inside the
machine. Failure to do so
may cause electric shock
and/or re leading to injury.
Remove the power cord
periodically to clean the
plug blades and root section
between the blades.
If the power plug remains
inserted for a long period of
time, the root section will
become dusty resulting in a
short which may cause re.
Do not place containers with
liquids such as water on the
machine.Doing so may cause
electric shock and/or re
resulting in injury.
Do not use power cords,
cables, or ground wires other
than those that are indicated
in the User’s Manual.
Doing so may cause re.
If the machine casing gets
extremely hot or if smoke,
unusual odour or abnormal
noises are emitted from the
machine, there is a risk of
re. Switch off and unplug
the mains connector and
contact your dealer.
Do not operate and do not
disassemble the machine
other than as directed in the
User’s Manual.
Doing so may cause electric
shock and/or re leading to
injury.
Do not clean spilled toner
with a vacuum cleaner.
Doing so may result in re
due to the sparks from
electric contact.
Toner spilled on the oor
should be wiped off with a
wet cloth.
Do not touch the fuser and
other parts when opening the
cover of the machine.
Doing so may cause burns.
The operation of UPS
(uninterruptible power
source) or inverters is not
guaranteed. Do not use
uninterruptible power source
or inverters.
Doing so may cause re.
CAUTION
Do not come closer to the paper’s exit area when
the power is turned on, while printing.
Doing so may result in personal injury.
- 4 -
Do not touch the liquid-crystal display if
damaged. If liquid (liquid crystal) leaked from
the liquid-crystal display comes into contact with
the eyes or mouth, ush with a large amount of
water. Seek medical attention if necessary.
Page 5

Table of Contents
PREFACE ................................................................................................2
EMERGENCY FIRST AID ...........................................................................3
MANUFACTURER .....................................................................................3
IMPORTER TO THE EU/AUTHORISED REPRESENTATIVE ................................3
ENVIRONMENTAL INFORMATION ...............................................................3
For Your Safety ....................................................................................... 4
About This Guide ....................................................................................8
1 Machine Setup ................................................................... 10
Names of Components ........................................................................... 10
Machine ................................................................................................................. 10
Operator Panel ....................................................................................................... 12
Installing Your Machine .......................................................................... 13
Installation Requirements ........................................................................................ 13
Installation Environment ....................................................................................................13
Installation Space .............................................................................................................13
Wireless LAN Environment
(MC342dw, MC362w, MC562w, MC562dw, ES5462dw MFP, MPS2731mc only) ................. 14
Precautions for use in a wireless LAN environment ................................................................. 14
Terminology ..................................................................................................................... 14
Unpacking and Installing Your Machine ...................................................................... 15
Available Options .................................................................................................... 17
Turning Your Machine On and Off .............................................................................. 18
Power Supply Conditions ....................................................................................................18
Turning On Your Machine .................................................................................................... 19
Turning Off Your Machine ....................................................................................................19
Loading Paper ........................................................................................................ 20
Step 1 Loading Paper into Tray 1 ......................................................................................... 20
Step 2 Conguring the Settings for Tray 1 ............................................................................ 21
Printing Conguration ............................................................................ 22
Printing Procedure .................................................................................................. 22
2 Copying ............................................................................. 23
Starting a Copy Job ................................................................................................. 23
- 5 -
Page 6

Table of Contents
3 Faxing (Fo
r MC342dn, MC342dw, MC362dn, MC362w,
MC562dn, MC562w, MC562dw, ES5462 MFP, ES5462dw MFP,
MPS2731mc only) ................................................................................. 25
Initial Setup for Faxing .......................................................................... 26
Step 1 Setting Country Code .................................................................................... 26
Step 2 Connecting a Telephone Line .......................................................................... 27
Connecting to a Public Line (Connecting for Fax Only) ............................................................27
Connecting to a Public Line (Connecting for Fax and Telephone) .............................................. 28
Connecting to an ADSL Environment .................................................................................... 29
Connecting to an IP Telephone ............................................................................................ 29
Connecting to a CS Tuner or Digital Television .......................................................................30
Connecting to a PBX, Home Telephone or Business Phone ....................................................... 30
Connecting as an Internal Telephone .................................................................................... 31
Step 3 Conguring Basic Settings .............................................................................. 31
Step 3-1 Settings for Each Dialing Type ................................................................................ 31
Step 3-2 Setup of Date/Time ..............................................................................................32
Step 3-3 Specifying Sender Information ...............................................................................34
Step 3-4 PBX Connecting ...................................................................................................35
Step 3-5 Setting for Super G3 ............................................................................................. 36
Step 3-6 Specifying Reception Mode ....................................................................................37
Faxing ................................................................................................. 39
Procedure for Fax .................................................................................................... 39
Receiving a Fax ...................................................................................................... 41
Reception Behavior ............................................................................................................41
Printing Received Faxes ...................................................................................................... 41
Faxing from a Computer (For Windows) ................................................... 42
Installing a Fax Driver ............................................................................................. 42
Procedure for Fax from a Computer ........................................................................... 50
- 6 -
Page 7

Table of Contents
4 Scanning ............................................................................ 51
Scanning to E-mail ................................................................................ 51
Initial Setup for Scan to E-mail ................................................................................. 51
Step 1 Conguring the Network Settings of Your Machine ....................................................... 51
Step 2 Conguring the E-mail Settings of Your Machine .......................................................... 56
Procedure of Scan to E-mail ..................................................................................... 59
Scanning to Shared Folder .....................................................................61
Initial Setup for Scan to Shared Folder ....................................................................... 61
Step 1 Conguring the Network Settings of Your Machine ....................................................... 61
Step 2 Setting Up Your Computer and Machine for Scan to Shared Folder ................................. 65
Procedure for Scan to Shared Folder .......................................................................... 76
Scanning to Computer ........................................................................... 77
Initial Setup for Scan to Computer ............................................................................ 77
For Windows ..................................................................................................................... 77
For Mac OS X ....................................................................................................................90
Procedure for Scan to Computer ............................................................................... 97
5 Printing ........................................................................... 102
Printing from a Computer ..................................................................... 102
Installing a Printer Driver ........................................................................................102
For Windows ................................................................................................................... 102
For Mac OS X .................................................................................................................. 111
Starting a Print Job ................................................................................................123
For Windows PCL/PCL XPS Printer Driver ............................................................................ 123
For Windows PS Printer Driver........................................................................................... 124
For Mac OS X PS Printer Driver.......................................................................................... 125
For Mac OS X AirPrint ...................................................................................................... 125
For iOS AirPrint ............................................................................................................... 126
Index .................................................................................... 127
- 7 -
Page 8
●● About This Guide
Terms in this document
The following terms are used in this guide:
Note
● Indicates important information on operations. Please ensure you read these.
Memo
● Indicates additional information on operations. It is recommended that this be read.
Reference
● Indicates where to look when you require more detailed or related information.
WARNING
● Indicates the presence of a hazard for which not following the instructions noted may result in serious injury or death.
CAUTION
● Indicates the presence of a hazard for which not following the instructions noted may result in injury.
Symbols in this document
The following symbols are used in this guide:
Symbols Description
[ ] ● Indicates menu names on the display screen.
● Indicates menu, window, dialog box names on the computer.
● Indicates part names of the machine or supplied parts.
" " ● Indicates messages and text entered on the display screen.
● Indicates le names on the computer.
● Indicates reference titles.
< > key Indicates a hardware key on the operator panel or a key on the keyboard of the computer.
> ● Indicates how to get to the menu you want on the menu of the machine or the computer.
● Indicates how to get to the section where the related information is described.
- 8 -
Page 9

Notation used in this guide
The following notations may be used in this manual.
● PostScript3 Emulation → PSE, POSTSCRIPT3 Emulation, POSTSCRIPT3 EMULATION
● Microsoft
● Microsoft
version) *
● Microsoft
● Microsoft
● Microsoft
● Microsoft
version) *
● Microsoft
● Microsoft
version) *
● Microsoft
● Microsoft
● Microsoft
● Microsoft
● Microsoft
● Microsoft
®
Windows® 8 64-bit Edition operating system → Windows 8 (64bit version) *
®
Windows Server® 2012 64-bit Edition operating system → Windows Server 2012 (64bit
®
Windows® 7 64-bit Edition operating system → Windows 7 (64bit version) *
®
Windows Vista® 64-bit Edition operating system → Windows Vista (64bit version) *
®
Windows Server® 2008 R2 64-bit Edition operating system → Windows Server 2008 *
®
Windows Server® 2008 64-bit Edition operating system → Windows Server 2008 (64bit
®
Windows® XP x64 Edition operating system → Windows XP (x64 version) *
®
Windows Server® 2003 x64 Edition operating system → Windows Server 2003 (x64
®
Windows® 8 operating system → Windows 8 *
®
Windows® 7 operating system → Windows 7 *
®
Windows Vista® operating system → Windows Vista *
®
Windows Server® 2008 operating system → Windows Server 2008 *
®
Windows® XP operating system → Windows XP *
®
Windows Server® 2003 operating system → Windows Server 2003 *
● Generic name for Windows 8, Windows Server 2012, Windows 7, Windows Vista, Windows Server
2008, Windows XP, and Windows Server 2003 → Windows
● Web Services on Devices → WSD
* If there is no special description, 64bit version is included in Windows 8, Windows Server 2012,
Windows 7, Windows Vista, Windows Server 2008, Windows XP, and Windows Server 2003. (64bit
version and Windows Server 2008 R2 is included in Windows Server 2008.)
If there is no special description, Windows 7 is used as Windows, Mac OS X 10.7 is used as Mac OS X,
and MC562dn is used as the machine for examples in this document.
The descriptions in this document may be different depending on your OS or model.
- 9 -
Page 10
1 Machine Setup
1
This chapter explains the initial setup for the machine, including the names of the machine
Machine Setup
components, how to unpack and install the machine, how to turn on/off the machine, and how to load
paper into tray 1.
●● Names of Components
This section shows the names of the components of the machine and operator panel.
Machine
The following shows the names of the machine
components.
7
13
6
5
4
3
2
1
No. Name
1 Top cover
2 Power switch
3 Tray 1
4 Multipurpose (MP) tray
5 Top cover open button
6 Operator panel
7 Auto document feeder (ADF) cover
8 Document tray
9 Scanner unit
10 Document glass cover
11 Air vents
12 USB port
11
12
8
9
10
No. Name
13 Document glass
20
19
No. Name
14 Fuser unit
15 Toner cartridge (Y: yellow)
16 Toner cartridge (M: magenta)
17 Toner cartridge (C: cyan)
18 Toner cartridge (K: black)
19 Image drum unit
20 LED head (four heads)
14
15
16
17
18
- 10 -
Page 11

Names of Components
LINE TEL
24
21
22
23
No. Name
21 Faceup stacker
22 AC power socket
23 Air vents
24 LINE connection (for MC342dn/MC342dw/
MC362dn/MC362w/ MC562dn/MC562w/
MC562dw/ES5462 MFP/ES5462dw MFP/
MPS2731mc only)
25 TEL connection (for MC342dn/MC342dw/
MC362dn/MC362w/MC562dn/MC562w/
MC562dw/ES5462 MFP/ES5462dw MFP/
MPS2731mc only)
1
25
Machine Setup
MC562dn/MC362dn/MC352dn/
MC332dn/ES5462/ES3452
MC562dw/MC362w/MC342w/
ES5462dw/MPS2731mc
No. Name
26 USB interface connection
27 Network interface connection
28 SD memory card slot
(for MC562dn/MC562w/MC562dw/ES5462 MFP/
ES5462dw MFP/MPS2731mc only)
26
28
27
27
28
26
- 11 -
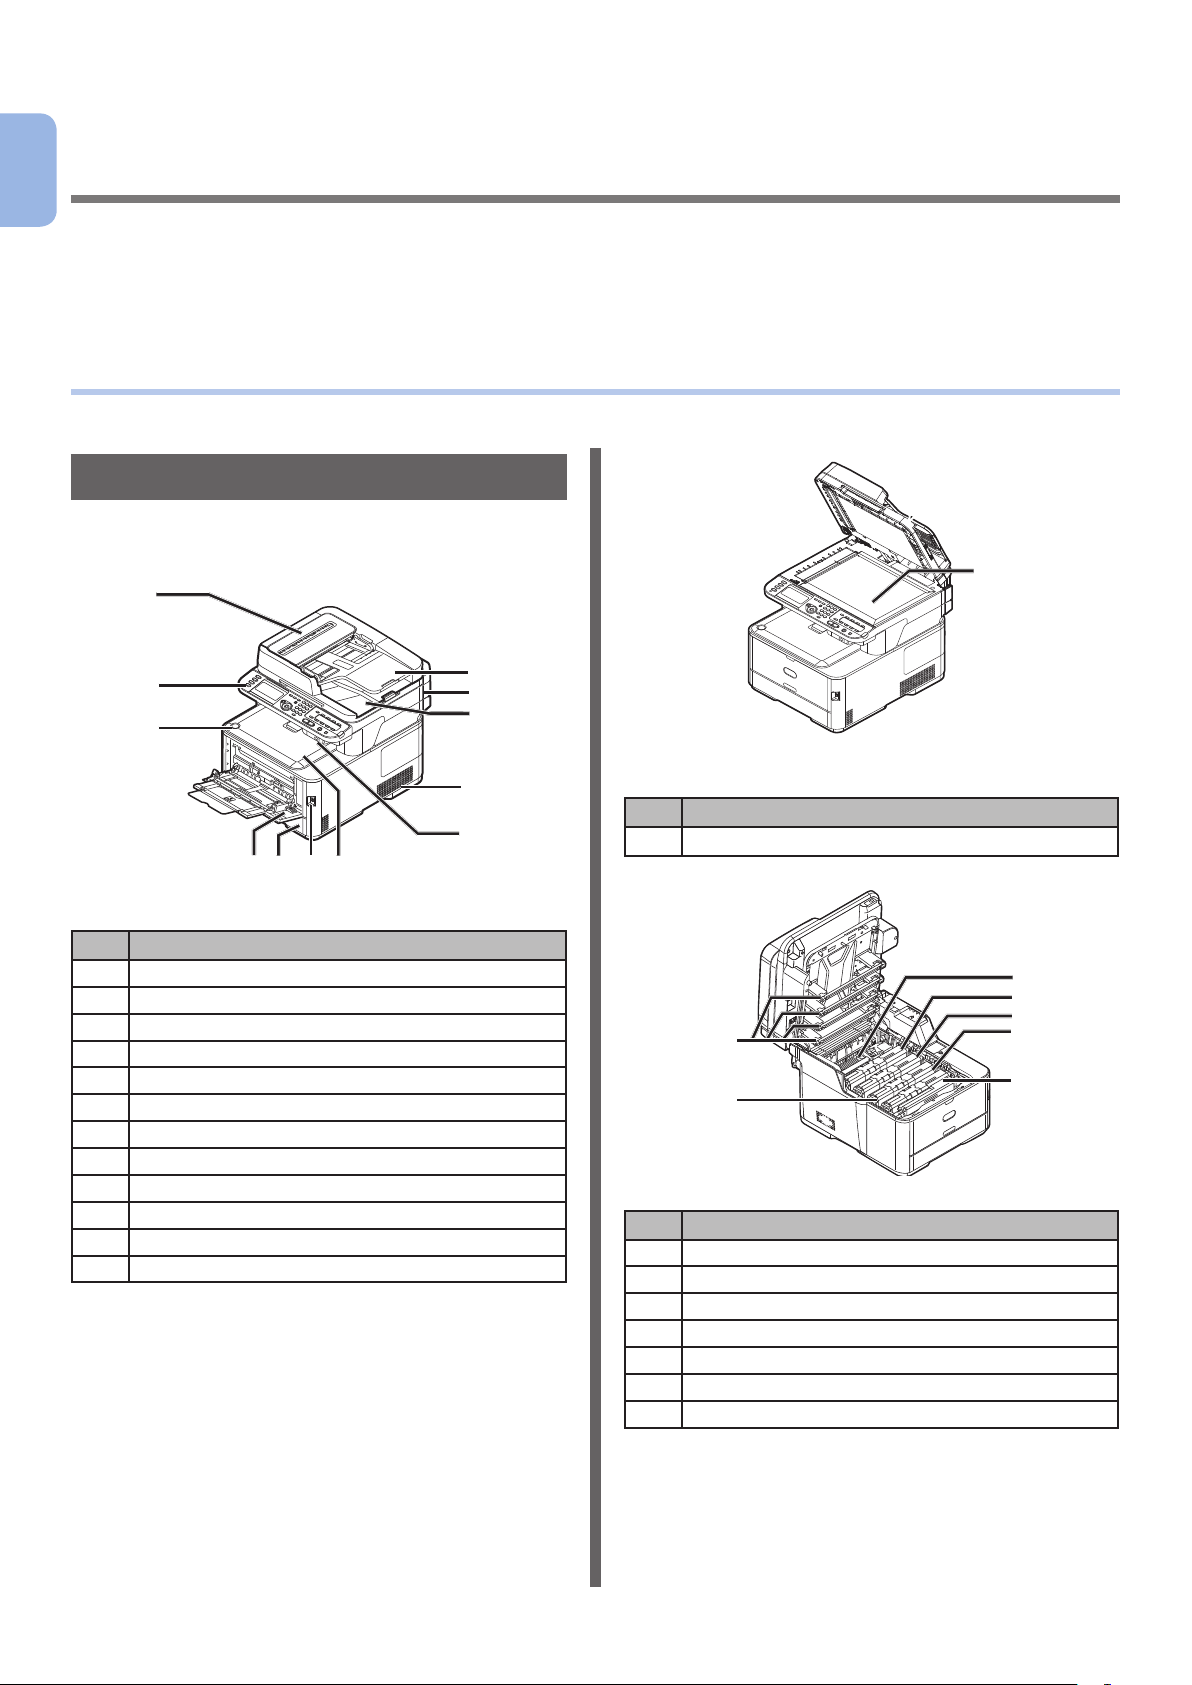
Page 12
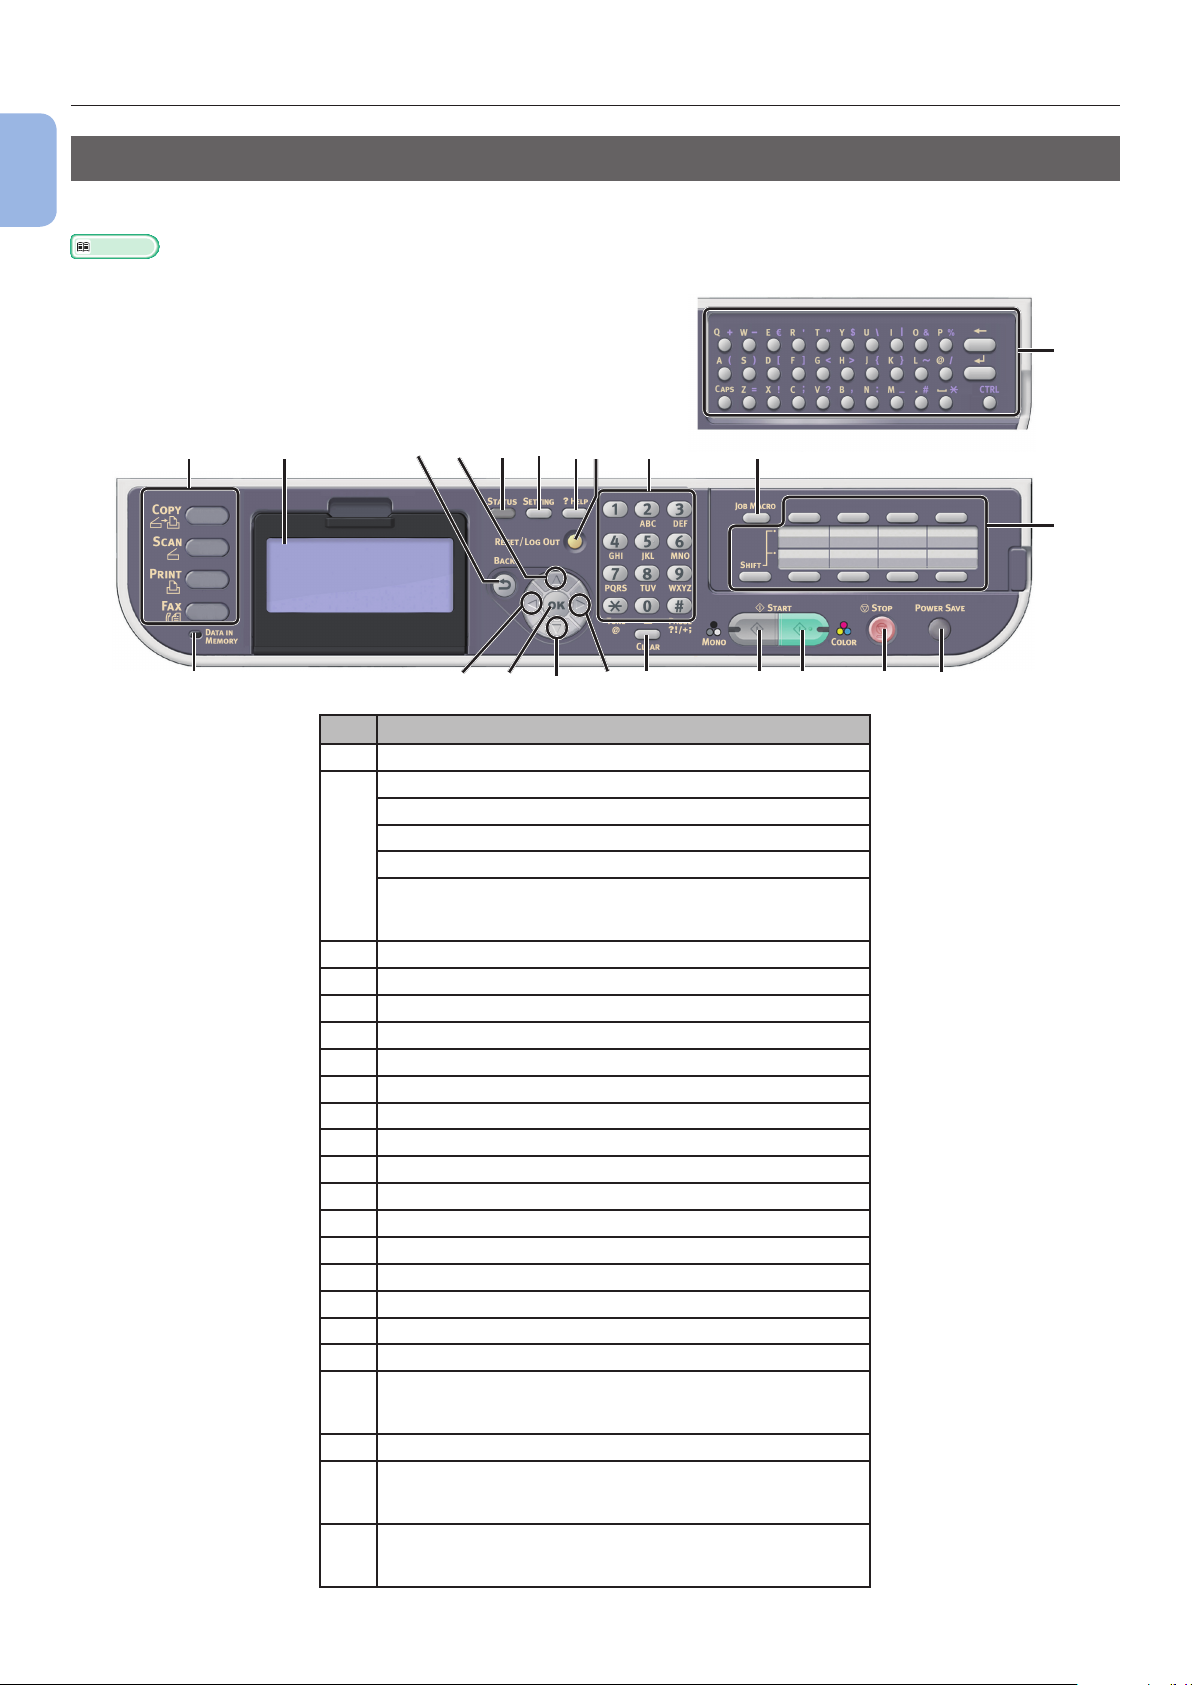
Names of Components
Operator Panel
1
The following shows the names of the components of the operator panel.
Machine Setup
Reference
● For the details on the functions of each component, refer to the User’s Guide > “Introduction” > “Control panel”.
22
2
19
161
11
13
6
15
7
9
8
12
14
10
17
21
3
No. Name
1 Display screen
2 Main function keys
<COPY> key
<SCAN> key
<PRINT> key
<FAX> key
(for MC342dn/MC342dw/MC362dn/MC362w/MC562dn/
MC562w/MC562dw/ES5462 MFP/ES5462dw MFP/MPS2731mc)
3 <START (MONO)> key
4 <START (COLOR)> key
5 <STOP> key
6 <STATUS> key
7 <SETTING> key
8 <?HELP> key
9 <RESET/LOG OUT> key
10 Ten-key pad
11 <UP> key
12 <DOWN> key
13 <LEFT> key
14 <RIGHT> key
15 <OK> key
16 <BACK> key
17 <CLEAR> key
18 <POWER SAVE> key
19 <DATA IN MEMORY> indicator
(for MC342dn/MC342dw/MC362dn/MC362w/MC562dn/
MC562w/MC562dw/ES5462 MFP/ES5462dw MFP/MPS2731mc)
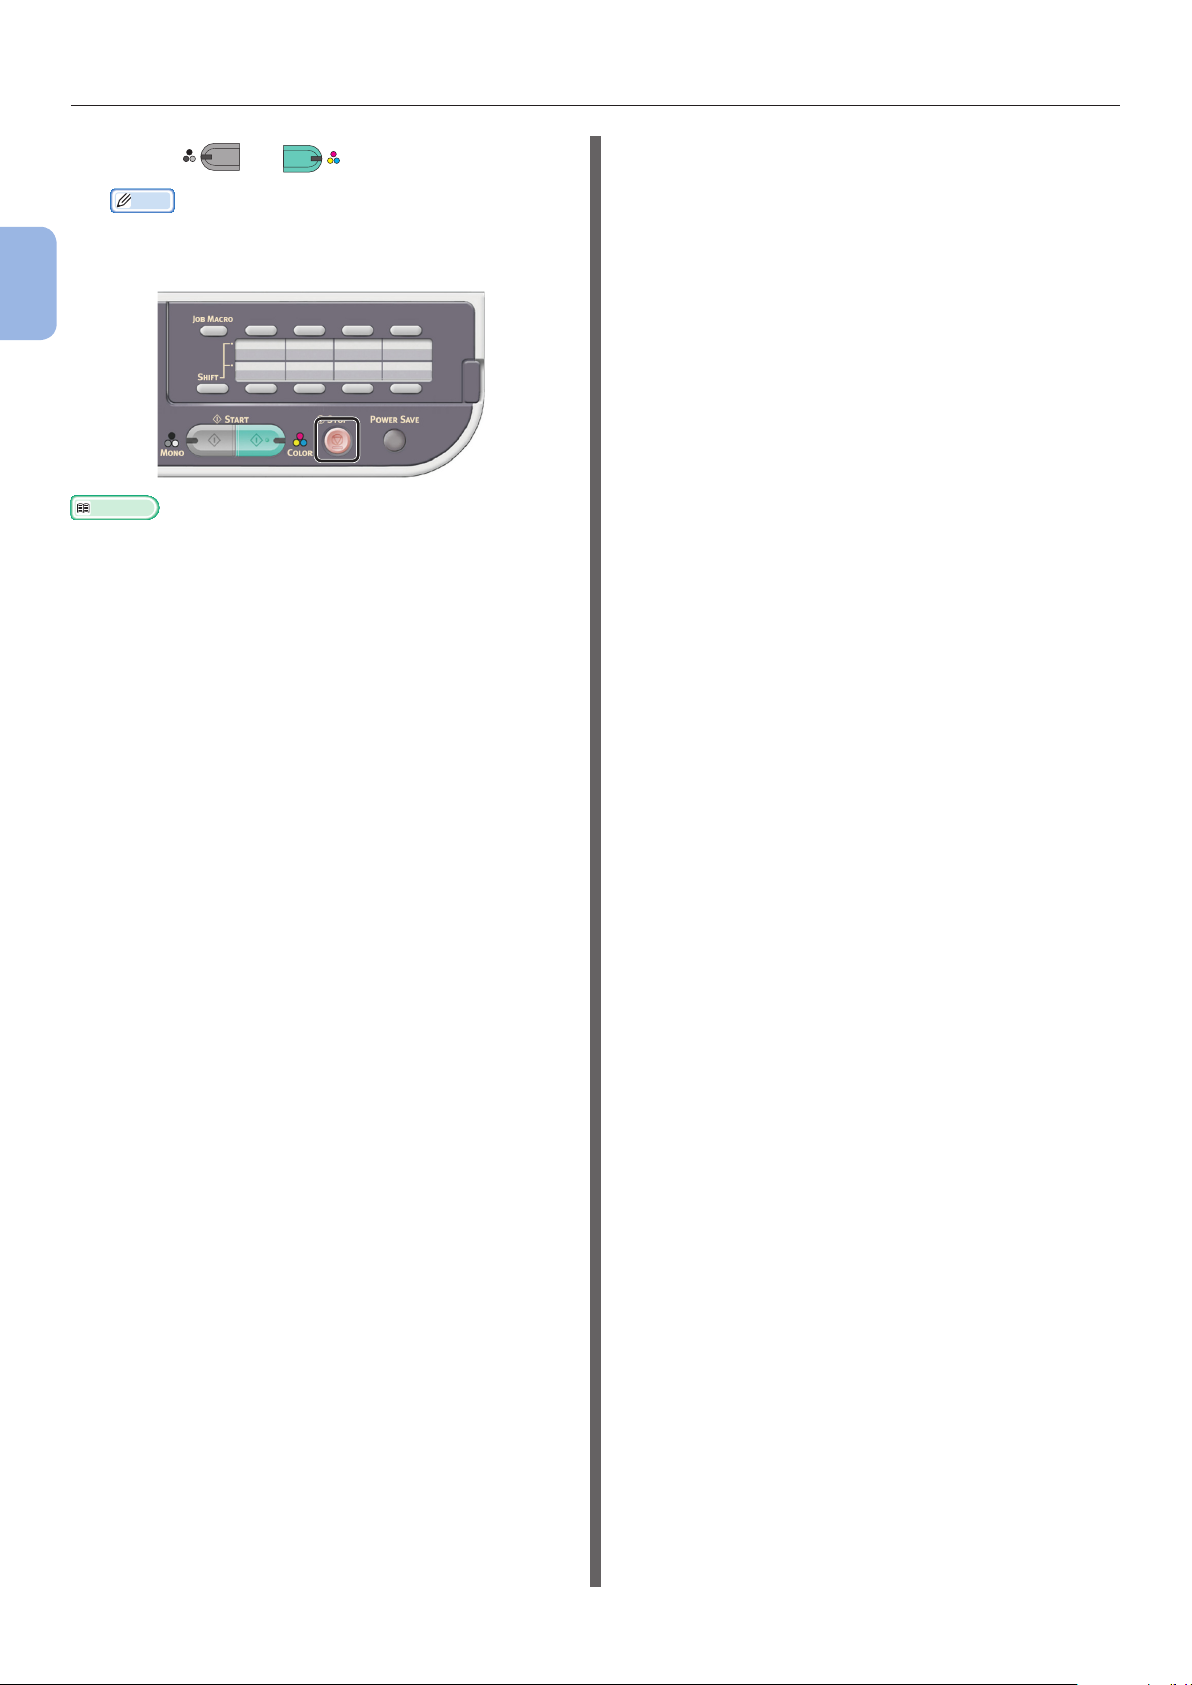
20 One-Touch key pad
21 <JOB MACRO> key
(for MC562dn/MC562w/MC562dw/ES5462 MFP/
ES5462dw MFP/MPS2731mc)
22 Qwerty keyboard
(for MC562dn/MC562w/MC562dw/ES5462 MFP/
ES5462dw MFP/MPS2731mc)
20
4
5 18
- 12 -
Page 13
Installing Your Machine
●● Installing Your Machine
This section explains how to unpack and install the machine.
Installation Requirements
This section explains the required environment
and space for machine installation.
Installation Environment
Your machine must be installed in the following
environment:
Temperature: 10°C~32°C
Humidity: 20%~80% RH (relative
humidity)
Maximum wet bulb
temperature: 25°C
Note
● Be careful of condensation. It may cause a malfunction.
● If installing your machine where the relative humidity of
the surrounding air is less than 30%, use a humidier or
antistatic mat.
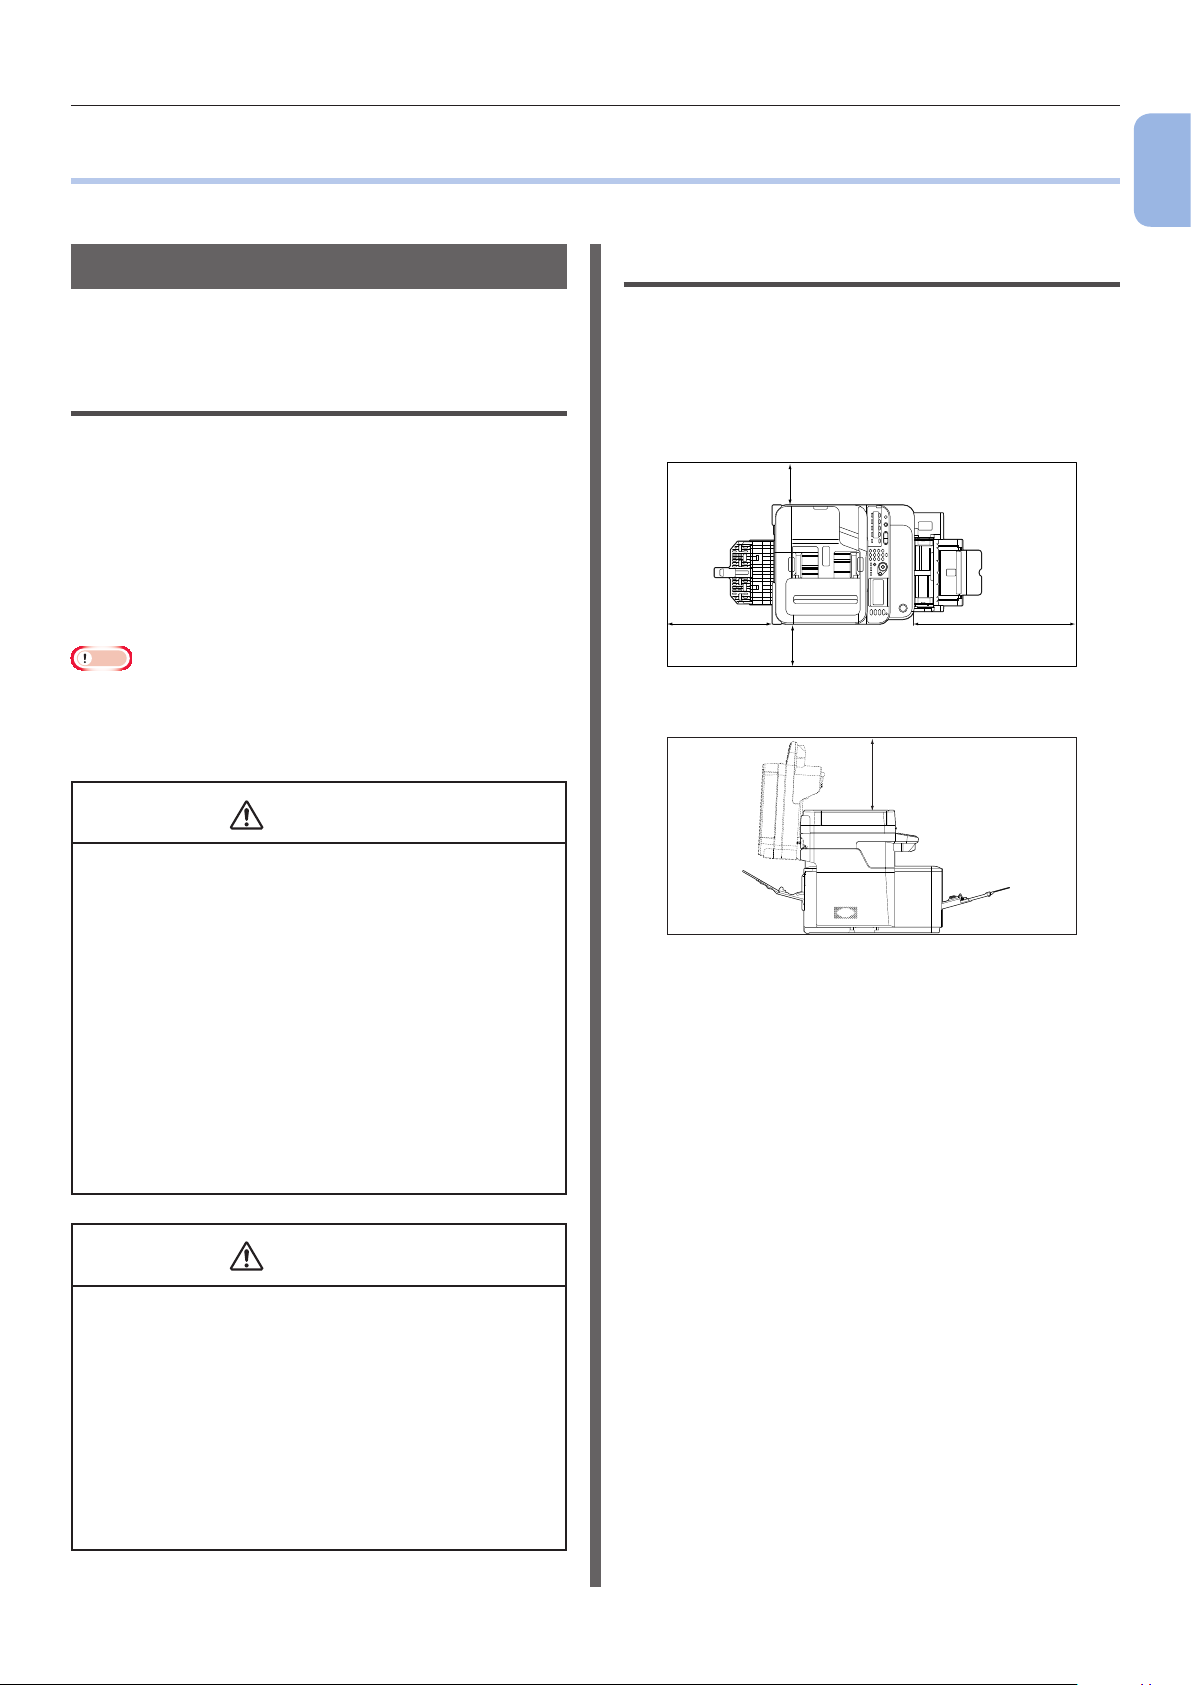
Installation Space
Install your machine on a at surface that is
wide enough to accommodate the machine.
Allow for enough room around your machine
according to the images below.
● Top view
● Side view
60cm
1
Machine Setup
20cm
100cm
20cm
60cm
WARNING
● Do not place in hot locations or near re.
● Do not install in locations where chemical
reactions take place (laboratory etc.).
● Do not place in locations near ammable solutions
such as alcohol and thinner.
● Do not place in locations within reach of small
children.
● Do not install in unstable locations (wobbly stand,
angled place, etc.).
● Do not install in locations with high humidity or
dust and where exposed to direct sunlight.
● Do not install in an environment exposed to briny
air and corrosive gas.
● Do not install in locationss with much vibration.
● Do not install in locations where the ventilation
holes of the machine are blocked.
CAUTION
● Do not place directly on a rug or carpet with long
strands.
● Do not install in a closed room with poor
ventilation or circulation.
● If you use the machine in a small room for a long
time, please make sure that you ventilate the
room.
● Install away from strong magnetic elds and
sources of noise.
● Install away from monitors or TVs.
● When moving the machine, hold it on both sides,
and move it by slightly tilting the back down.
- 13 -
Page 14
Installing Your Machine
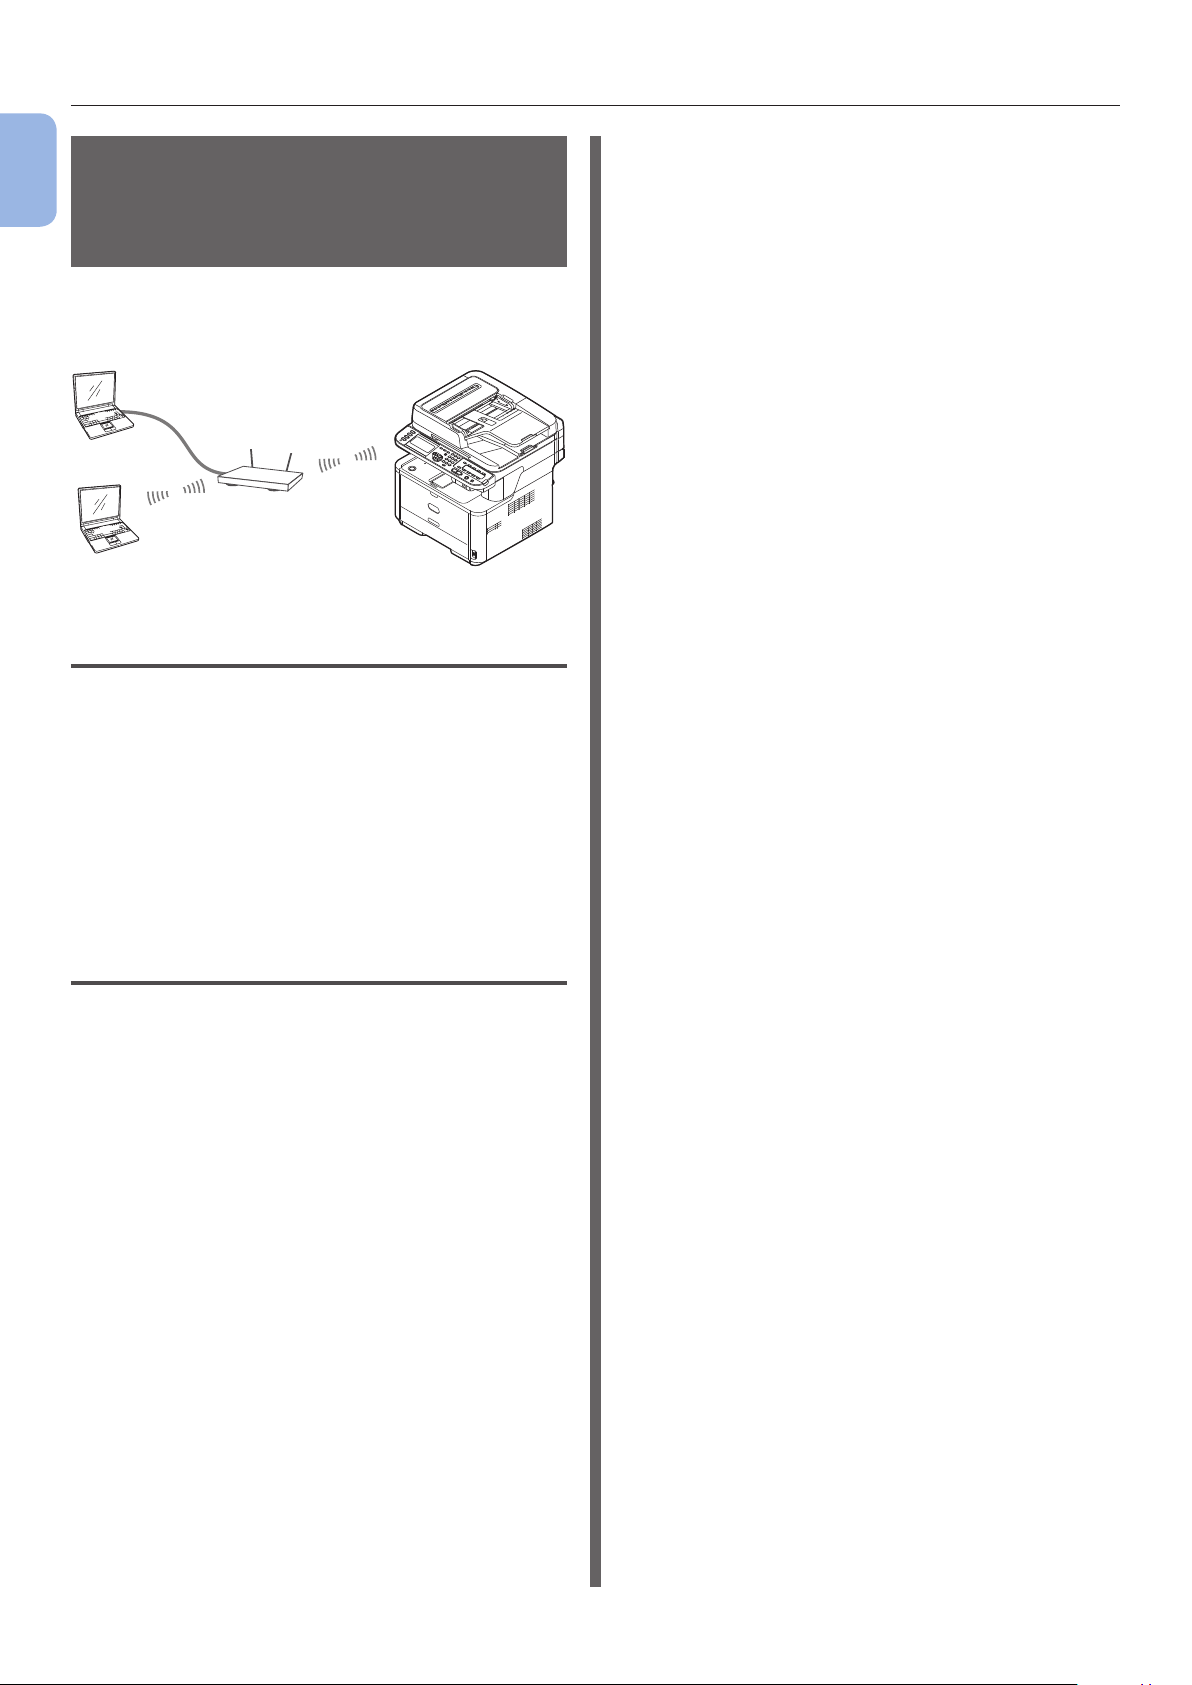
Wireless LAN Environment
1
(MC342dw, MC362w, MC562w,
MC562dw, ES5462dw MFP,
Machine Setup
MPS2731mc only)
This product connects wirelessly to a wireless
access point, and can then be used on the network.
Wireless access point
PC
Precautions for use in a wireless LAN environment
● This product cannot connect to a wired LAN
and wireless LAN at the same time. While
using wireless LAN, please remove network
cable from the device.
● Check the wireless access point settings
before conguring the SSID and security
settings. This product cannot connect to the
LAN if the settings are wrong.
● This product supports infrastructure mode.
Ad-hoc mode is not supported.
● Infrastructure mode
This mode communicates through the wireless
access point. This product does not support
the ad-hoc mode in which communication is
performed directly with the computer.
MFP
Terminology
● SSID
An ID used to identify the connection destination
network. Wireless communication can be used
by setting this product with the SSID of the
connection destination wireless access point.
● Security Settings
When using a wireless LAN, security settings
can be congured to prevent the transmitted
information from being intercepted or illegal
access to the network. The security settings
need to be congured to the same settings as
the wireless access point.
● WPS
A wireless LAN setting method provided
by Wi-Fi Alliance, a wireless LAN industry
group. There are two available methods, a
push button method and PIN code method,
and in the push button method the wireless
LAN settings can easily be congured simply
by pressing a [WPS] button on the wireless
access point. In the PIN code method, the
wireless LAN settings can easily be congured
by registering the 8-digit number assigned to
this product to the wireless access point.
- 14 -
Page 15
Installing Your Machine
Unpacking and Installing Your Machine
This section explains how to unpack and install
the machine.
Note
● The image drum is very delicate. Handle it carefully.
● Do not expose the image drum to direct sunlight or very
bright interior light (approximately more than 1500lux).
Even under the normal interior light, do not leave it for
more than 5 minutes.
● Packaging and cushioning material are needed if
transporting the machine. Do not throw them away.
1 Remove your machine from the box and
remove cushioning materials and the
plastic bag from your machine.
The accessories (an AC cord, Telephone cable and
the “Software DVD-ROM”) are packed within the
cushioning material (1).
Note
● Telephone cable is not supplied in some countries.
3 Remove the protection tapes (2) at the
top and sides of your machine, and take
out cushioning materials (3).
2
3
2
4 Remove the protection tapes (4), and
open the MP tray.
1
Machine Setup
1
2 Lift your machine and place it where it is
to be installed.
Note
● Do not open the scanner unit till step 9 is completed.
4
5 Remove the protection tape (5), and pull
the paper up.
5
6 Close the MP tray.
7 Open the document glass cover.
- 15 -
Page 16
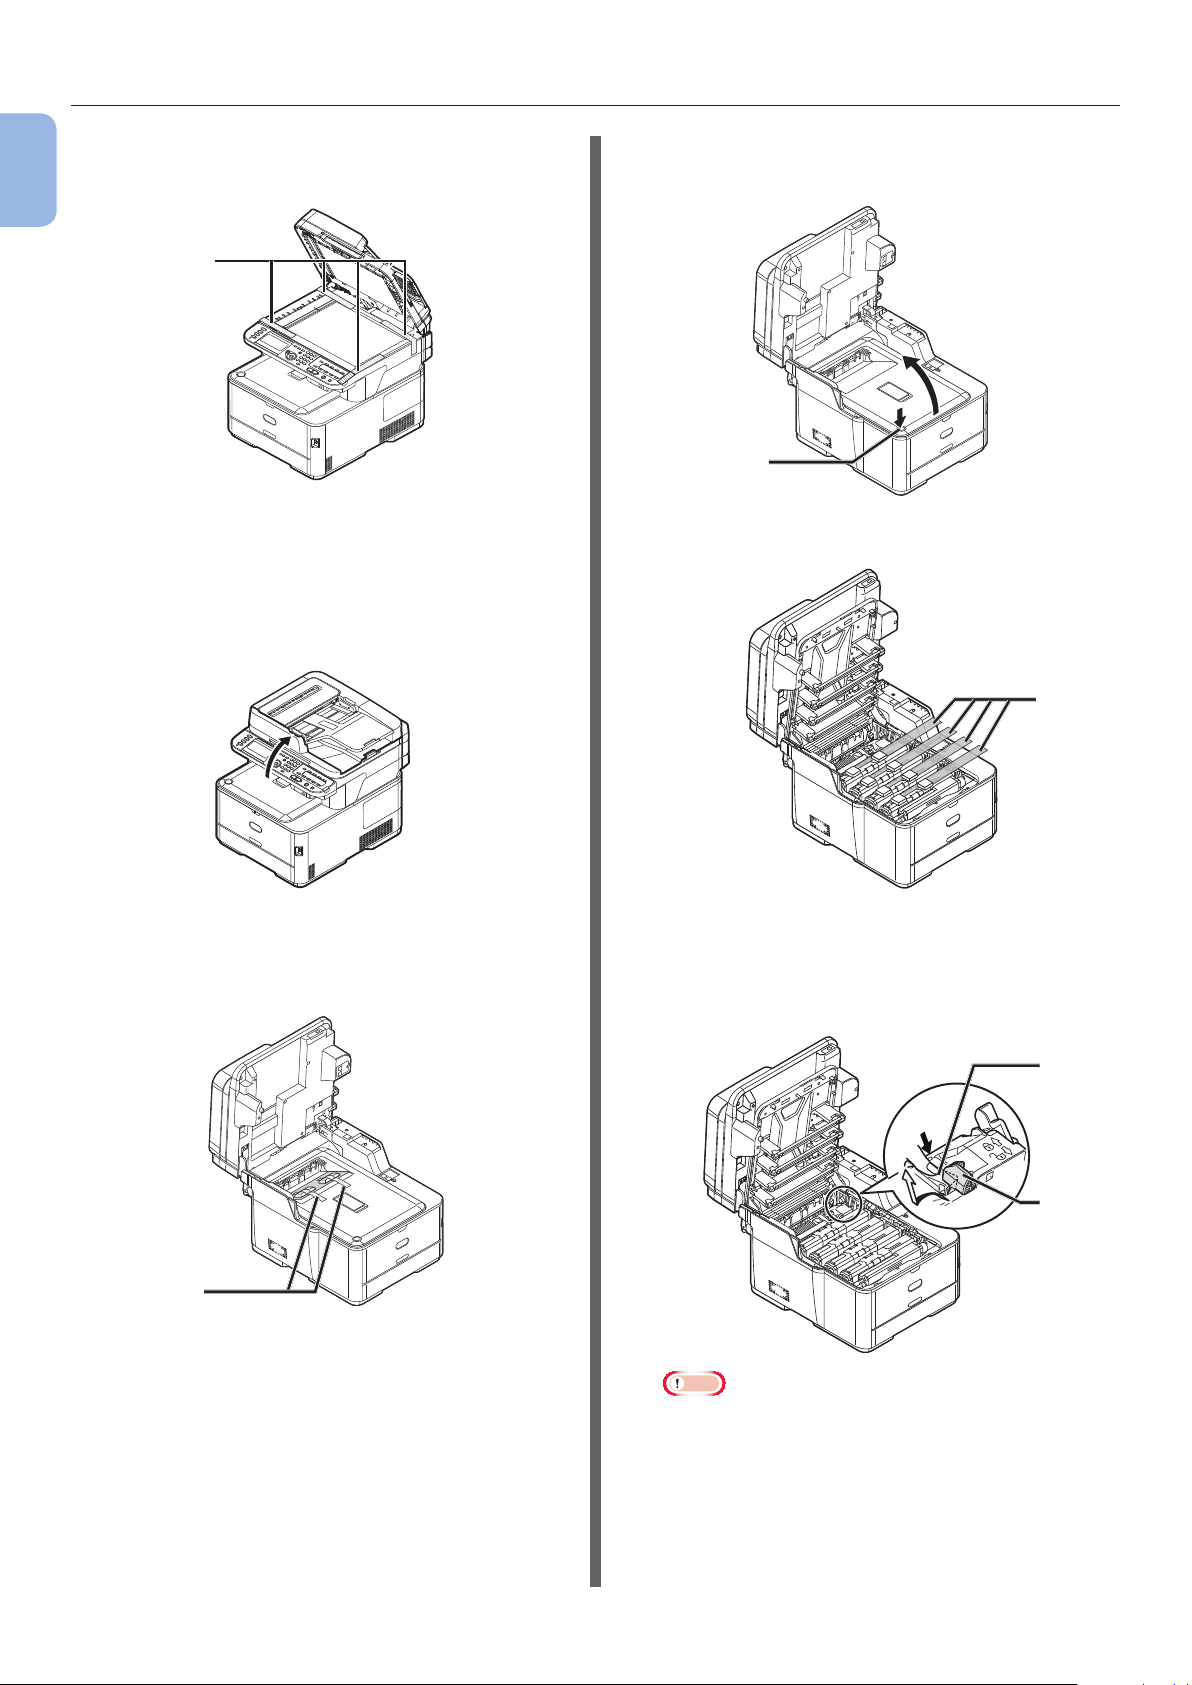
Installing Your Machine
8 Remove the protection tapes (6).
1
Machine Setup
Open the ADF and remove the protection tapes.
6
9 Close the document glass cover.
Now, you can open or close the scanner.
10 Open the scanner unit.
12 Press the top cover open button (8) and
open the top cover.
8
13 Remove the protective sheets (9).
9
11 Remove the protection tapes (7), and
remove desiccants and lms.
7
14 Remove the orange stopper (11) while
pressing the blue lever of the fuser unit
(10) in the direction of the arrow.
10
9
Note
● Keep the orange stopper, it is necessary to transport
the machine.
11
- 16 -
Page 17
Installing Your Machine
15 While pushing the right side of the toner
cartridge, quickly slide the blue lock (12)
to the left side to lock it.
Slide the locks on all 4 toner cartridges.
12
16 Close the top cover.
17 Close the scanner unit.
Reference
● Please refer to “Loading Paper” P.20 for information on
how to load paper into the machine.
Available Options
The following option is available for your
machine:
● Second tray unit (tray 2) (MC362dn/MC362w/
MC562dn/MC562w/MC562dw/ES5462 MFP/
ES5462dw MFP/MPS2731mc only)
● Additional RAM (256 MB or 512 MB)
● 16 GB SD card (MC562dn/MC562w/MC562dw/
ES5462 MFP/ES5462dw MFP/MPS2731mc
only)
Reference
● For details on how to install the option, refer to the User’s
Guide > “Installing upgrades”.
● An SD card is used as a storage for spooling when copying
sectors, saving secure print/encrypted print data, as a
storage destination for form data, and for saving auto
delivery and transmission data.
For information on secure print, encrypted secure print,
form data, and auto delivery/transmission data storage
functions, please refer to Conguration Guide.
Memo
● There is a 4 GB SD card inside the MC562dn/MC562w/
MC562dw/ES5462 MFP/ES5462dw MFP/MPS2731mc.
If you expand the memory capacity, please replace with
an optional 16 GB SD card.
1
Machine Setup
- 17 -
Page 18
Installing Your Machine
Turning Your Machine On and
1
Off
Machine Setup
This section explains how to turn the machine on
and off.
Power Supply Conditions
The power supply must meet the following
conditions:
Current: 110 - 127VAC
(Range 99 - 140VAC)
220 - 240VAC
(Range 198 - 264VAC)
Frequency: 50/60 Hz ± 2%
Note
● If the power supply is unstable, use a voltage regulator.
● The maximum power consumption of this machine is
1170W. Ensure that the power supply is sufcient to
operate this machine.
● We do not guarantee the operation where an
uninterruptible power system (UPS) or inverter is used.
Do not use an uninterruptible power system (UPS) or
inverter.
WARNING
● Be sure to turn off the power switch when
attaching or removing the AC cable and earth
wire.
● Be sure to connect the earth wire to a dedicated
grounding terminal.
● Never connect the earth wire to a water pipe, gas
pipe, telephone line earth, lightning rod or the
like.
● Make sure to connect the earth wire before
connecting the AC cable to the electric socket.
● Be sure to plug in and unplug the AC cable while
holding on to the power supply plug.
● Insert the power supply plug deep into the wall
socket securely.
● Do not insert or remove the power supply plug
with a wet hand.
● Install the power cord in a place where it will not
be stepped on, and do not place anything on the
power cord.
● Do not tie the cord in a bundle.
● Do not use the power cord if damaged.
● Do not use multi-outlet adapters.
● Do not connect this machine and other electric
items to the same wall socket. If connected
simultaneously with an air-conditioner unit, a
copy machine, shredder, etc., electric noise may
interfere with machine operation. If connection
to the same wall socket as another item is
unavoidable, please use a commercial noise lter
or a commercial noise cut transformer.
● Use the attached power cord and insert it directly
with the ground terminal. Do not use power cords
for other products for the machine.
● Do not use an extension cord. When use of an
extension cord is unavoidable, use a cord rated
15A or higher.
● Use of an extension cord may cause the machine
to operate at lower than normal capacity due to
AC voltage descent.
● During printing, do not shut off the power supply
or remove the power supply plug.
● When not in use for extended periods
(consecutive holidays or extended travel), remove
the power cord from the socket.
● Do not use the attached power cord for other
products.
There is a risk of electric
shock and/or re.
- 18 -
Page 19
Installing Your Machine
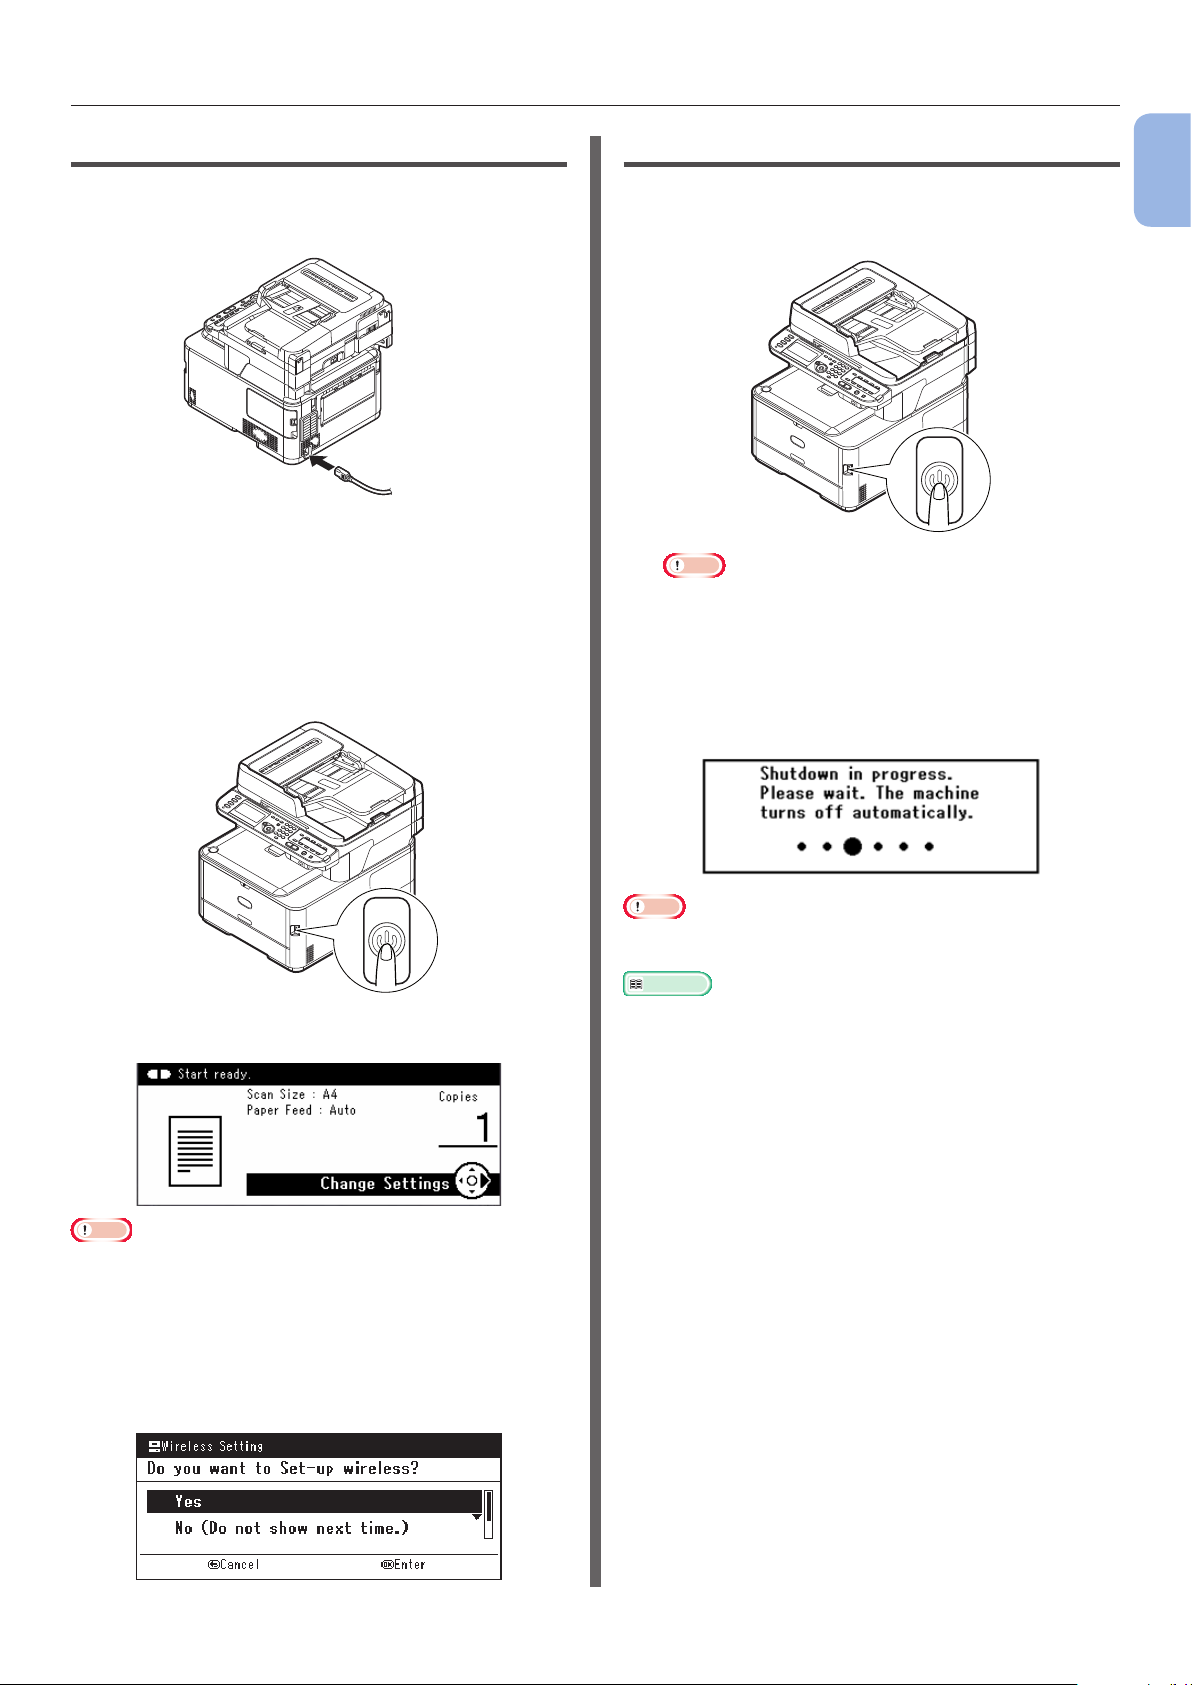
Turning On Your Machine
1
Plug the AC cord into the AC power
socket of your machine.
2 Plug the AC cord into the electric socket.
3 Check that no documents are on the
document glass or ADF, and that the
ADF cover is closed.
4 Hold down the power switch for approximately
one second to turn the power on.
Turning Off Your Machine
1
Hold down the power switch for
approximately one second.
Note
● Press the power switch for less than 5 seconds.
The message [Shutdown in progress. Please
wait. The machine turns off automatically.]
will appear in the operator panel, and power
switch indicator will blink every 1 second. The
machine then turns off automatically and the
power switch indicator extinguishes.
1
Machine Setup
The copy standby screen is displayed after your
machine attains ready status.
Note
● Wait a few seconds after turning the power on or off
before turning the power on or off again.
● With wireless LAN models, a request to make the wireless
LAN settings is displayed before the standby screen.
Select [Yes] to perform the wireless LAN Set-up or select
[No (Do not show next time.)] for not to be displayed
from the next time. (MC342dw, MC362w, MC562w,
MC562dw, ES5462dw MFP, MPS2731mc only)
Note
● Wait a few seconds after turning the power on or off
before turning the power on or off again.
Reference
● Your machine has a power save mode and sleep mode,
and an auto power off function. For details, refer to the
User’s Guide > “Getting started” > “Power saving mode” /
“Sleep mode” / “Auto power off”.
- 19 -
Page 20
Installing Your Machine
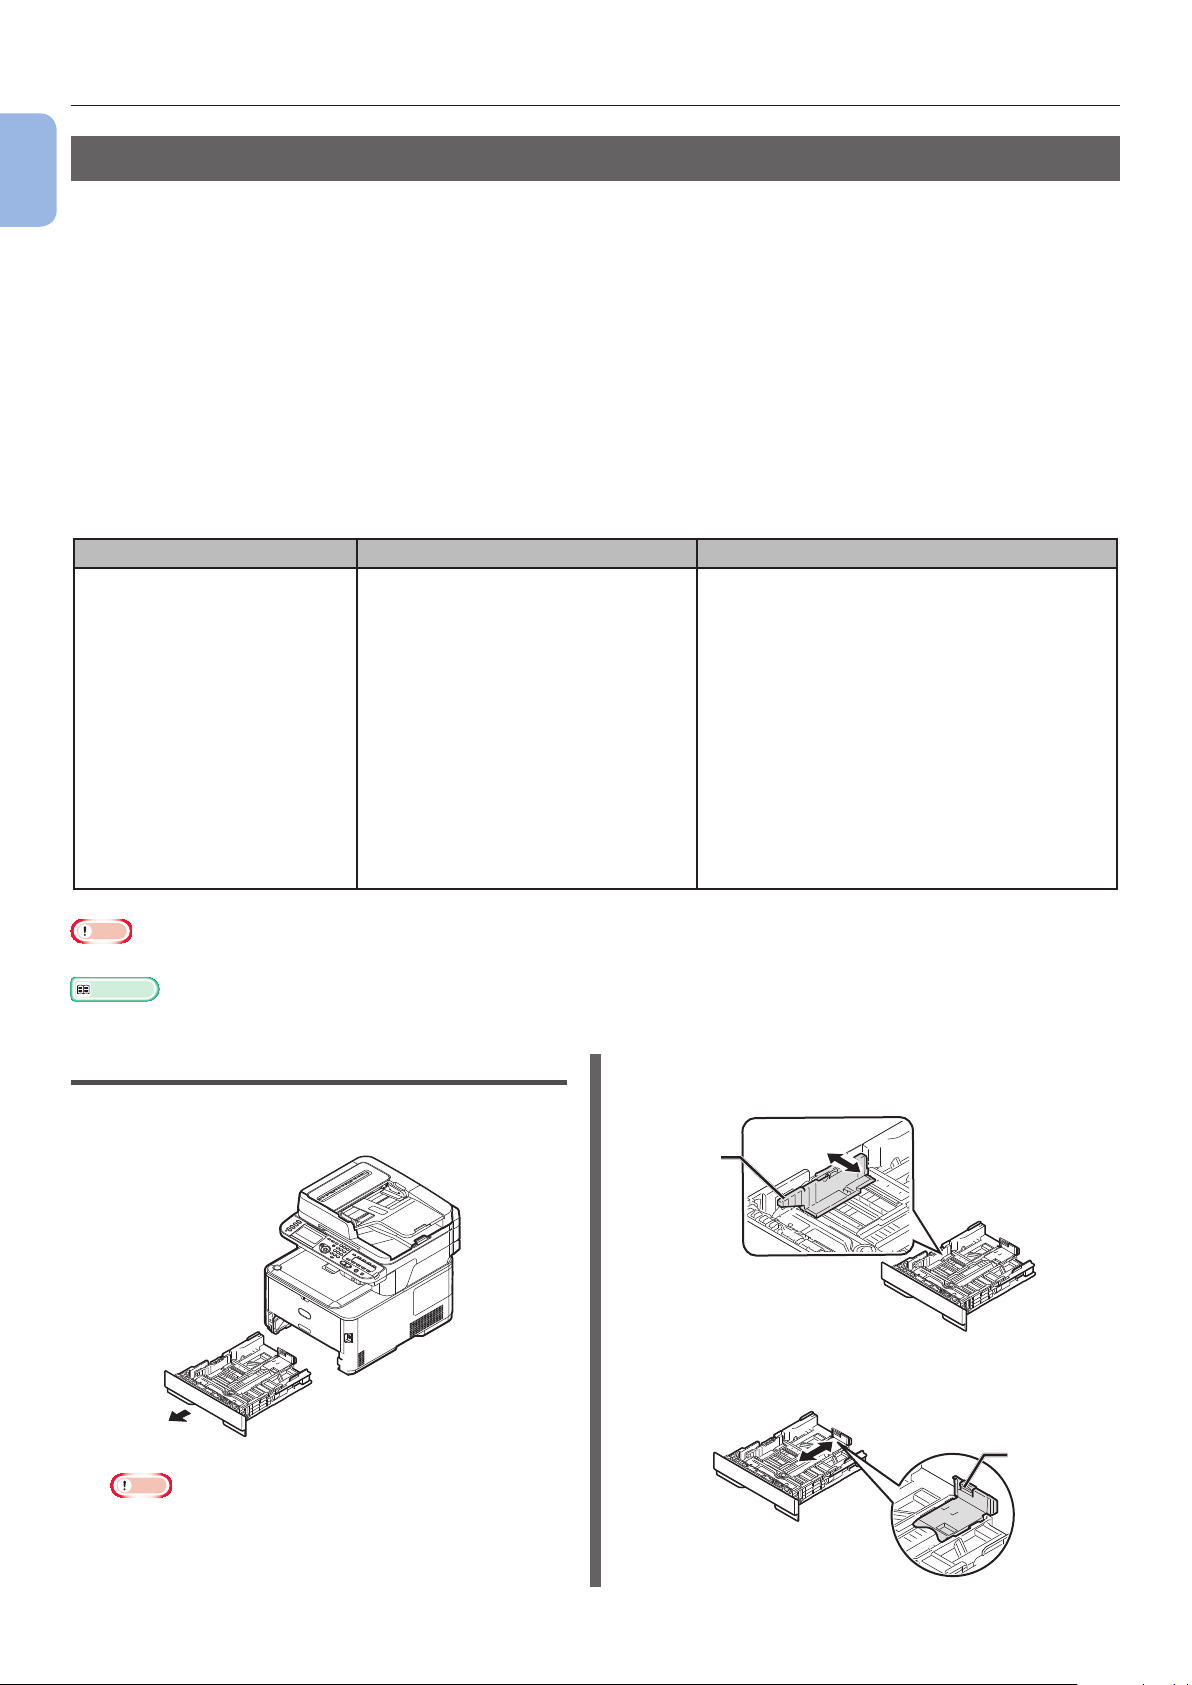
Loading Paper
1
Your machine has two built-in trays (tray 1 and MP tray) and an optional tray (tray 2).
Machine Setup
The Option Tray (tray 2) is only available on MC362dn, MC362w, MC562dn, MC562w, MC562dw,
ES5462 MFP, ES5462dw MFP and MPS2731mc.
This section explains the supported paper and capacity of tray 1 and how to load paper into the tray 1.
After you load paper, you need to register the loaded paper on your machine.
To complete the loading procedures, follow the 2 steps below:
● “Step 1 Loading Paper into Tray 1” P.20
● “Step 2 Conguring the Settings for Tray 1” P.21
Tray 1 Specication
Supported paper size Paper capacity Paper weight
● A4
● A5*
● B5
● A6*
● Letter
● Legal 13
● Legal 13.5
● Legal 14
● Executive
● 16K (184 x 260 mm)
● 16K (195 x 270 mm)
● 16K (197 x 273 mm)
● Hagaki
● Custom
250 sheets
(when paper weight is 80 g/m2)
● Light
64 to 74 g/m2 (17 to 19 lb)
● Medium Light 75-82g/m
● Medium 83-104g/m
● Heavy
105 to 120 g/m2 (28 to 32 lb)
● Ultra Heavy1
2
121 to 176 g/m
● Ultra Heavy2
177 to 220 g/m
(33 to 46 lb)
2
(47 to 58 lb)
2
2
Note
● Duplex printing cannot be performed on paper marked with “*”.
Reference
● For the specications and how to load paper in tray 2 (optional), MP tray, refer to the User’s Guide > “Loading paper”.
Step 1 Loading Paper into Tray 1
2 Slide the paper guide (1) to the width of
the paper to be loaded.
1
Pull out tray 1.
1
3 Slide the paper stopper (2) to the length
of the paper to be loaded.
Note
● Once the tray is pulled out, the media selection
screen will be displayed on the panel (for
approximately 6 seconds). Further conguration of
item 4 in Step 2 is possible.
2
- 20 -
Page 21
Installing Your Machine
4 Flex paper back and forth, and then fan
it. Straighten the edges of the paper
stack on a level surface.
5 Load paper with the print side face
down.
Note
● Do not load paper above the ll line (3).
2 Press the to select [Paper Setup] and
then press OK.
3 Check that [Tray 1] is selected and then
press OK.
4 Check that [Paper Size] is selected and
then press OK.
5 Press the to select the size of the
loaded paper and then press OK.
Reference
● If [Custom] is selected for [Paper Size], you need
to register the custom size. For how to register the
custom size, refer to the User’s Guide > “Loading
paper” > “Registering custom sizes”.
1
Machine Setup
[ ▼ ▼ ▼ ]
3
6 Push tray 1 until it stops.
Step 2 Conguring the Settings for
Tray 1
1
Press the <SETTING> key on the
operator panel.
6 Press the to select [Media Type] and
then press OK.
7 Press the to select the type of media
loaded and then press OK.
8 Press the to select [Media Weight]
and then press OK.
9 Press the to select the weight of the
loaded paper and then press OK.
10 Press the until the top screen is
displayed.
- 21 -
Page 22
Printing Conguration
1
●● Printing Conguration
This section explains how to print the Conguration on which you can check the detailed information of
your machine, such as the settings and status of your machine.
Machine Setup
When you nished the initial setup, follow the procedure below to conrm that the machine is properly
installed.
Printing Procedure
1 Press the <SETTING> key on the
operator panel.
2 Check that [Reports] is selected and
press OK.
3 Check that [Conguration] is selected
OK
and press
.
4 For the conrmation message, check
that [Yes] is selected and press OK.
When the Conguration is properly printed, the
initial setup has succeeded.
- 22 -
Page 23
2 Copying
This chapter explains the basic operation for your machine’s copy function.
Starting a Copy Job
Memo
● The following procedure uses the factory default settings.
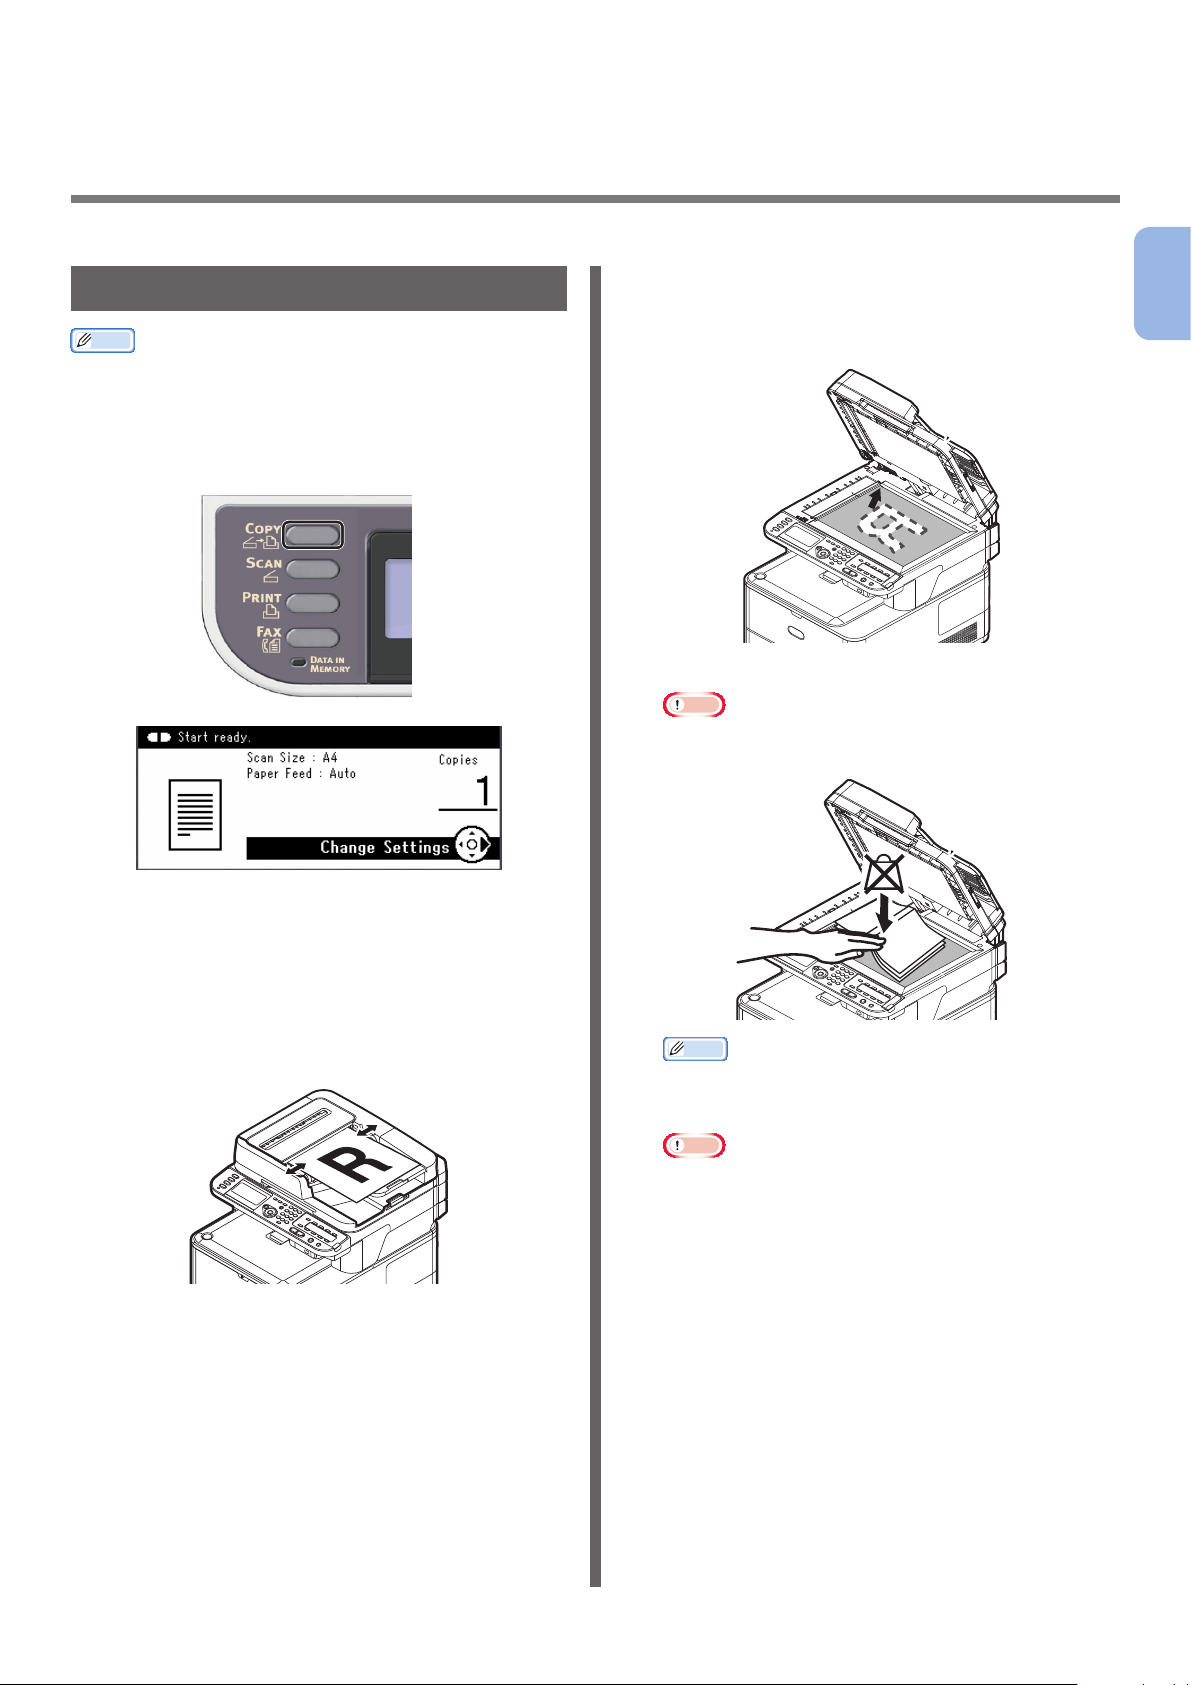
1 Press the <COPY> key on the operator
panel to open the copy standby screen.
● Document Glass
Place the document face down and align its top
edge to the upper-left corner of the glass.
Close the document glass cover gently.
Note
● Do not apply an excessive load to the document
glass.
2
Copying
2 Place your document in the ADF or on
the document glass as below:
● ADF
Load documents face up with the top edge of the
documents in rst.
Adjust the document guides to the width of your
documents.
Memo
● The machine prioritizes the ADF when copying
documents. Be sure not to place documents on the
ADF when you use the document glass.
Note
● If Carriage Error <02> is displayed, press Power
OFF/ON.
- 23 -
Page 24
Starting a Copy Job
3 Press
MONO
Memo
● You can cancel the operation by pressing the
<STOP> key on the operator panel until the
message showing the copy completion is displayed.
or
to start copying.
COLOR
2
Copying
Reference
● To load a landscape document, refer to the User’s Guide >
“Operation” > “Loading document(s)”.
● You can change the copy settings such as scan size,
document’s orientation and duplex copying as necessary.
For details, refer to the User’s Guide > “Copying” >
“Advanced operation”.
- 24 -
Page 25

3
Faxing (For MC342dn, MC342dw, MC362dn, MC362w, MC562dn, MC562w, MC562dw, ES5462 MFP, ES5462dw MFP, MPS2731mc only)
This chapter explains the initial setup, such as how to set the country code, connect a telephone line
and congure the basic settings, and basic procedure for the Fax and Fax from Computer functions.
Your machine supports the following functions regarding fax.
Function Overview
“Faxing” Scans documents and transmits them as faxes or receives faxes via a telephone line.
You need to complete the initial setup for faxing before using this function.
“Faxing from a Computer
(For Windows)”
Internet Faxing Scans documents and transmits them as faxes or receives faxes by e-mails via
Auto Delivery
(MC562dn/MC562w/
MC562dw/ES5462
MFP/ES5462dw MFP/
MPS2731mc only)
Transmits faxes from your computer connected via USB or network. The faxes are
transmitted directly from your computer to a destination via the machine using a
telephone line. The fax driver must be installed on the computer to use this function.
You also need to complete the initial setup for faxing before using this function.
network.
For the initial setup for the function, refer to the Conguration Guide > “Conguring
the network settings” > “Setting up Scan to E-mail and internet fax”.
For the procedure for the function, refer to the User’s Guide > “Internet fax” >
“Sending a fax from your PC” > “Basic operation”.
Forwards the received faxes and les attached to e-mails automatically to specied
destinations. You can specify E-mail addresses and a network folder as the
destination.
For the initial setup for the function, refer to the Conguration Guide > “Conguring
the network settings” > “Setting up Scan to E-mail and internet fax” / “Setting up
Scan to Shared Folder”.
3
Faxing (For MC342dn, MC342dw, MC362dn, MC362w, MC562dn,
MC562w, MC562dw, ES5462 MFP, ES5462dw MFP, MPS2731mc only)
- 25 -
Page 26
Initial Setup for Faxing
●● Initial Setup for Faxing
This section explains the initial setup necessary for the Fax and Fax from Computer functions.
To set up the machine for the Fax and Fax from Computer functions, follow the 3 steps below:
● “Step 1 Setting Country Code” P.26
● “Step 2 Connecting a Telephone Line” P.27
● “Step 3 Conguring Basic Settings” P.31
3
Step 1 Setting Country Code
Faxing (For MC342dn, MC342dw, MC362dn, MC362w, MC562dn,
MC562w, MC562dw, ES5462 MFP, ES5462dw MFP, MPS2731mc only)
This section explains how to set the country
code. Be sure to select the suitable country code
before connecting the telephone line.
Note
● If you set wrong country code, you may not be able to
send or receive faxes. When you cannot send or receive
faxes even though you have properly connected the
telephone line, check if [Country Code] is set correctly.
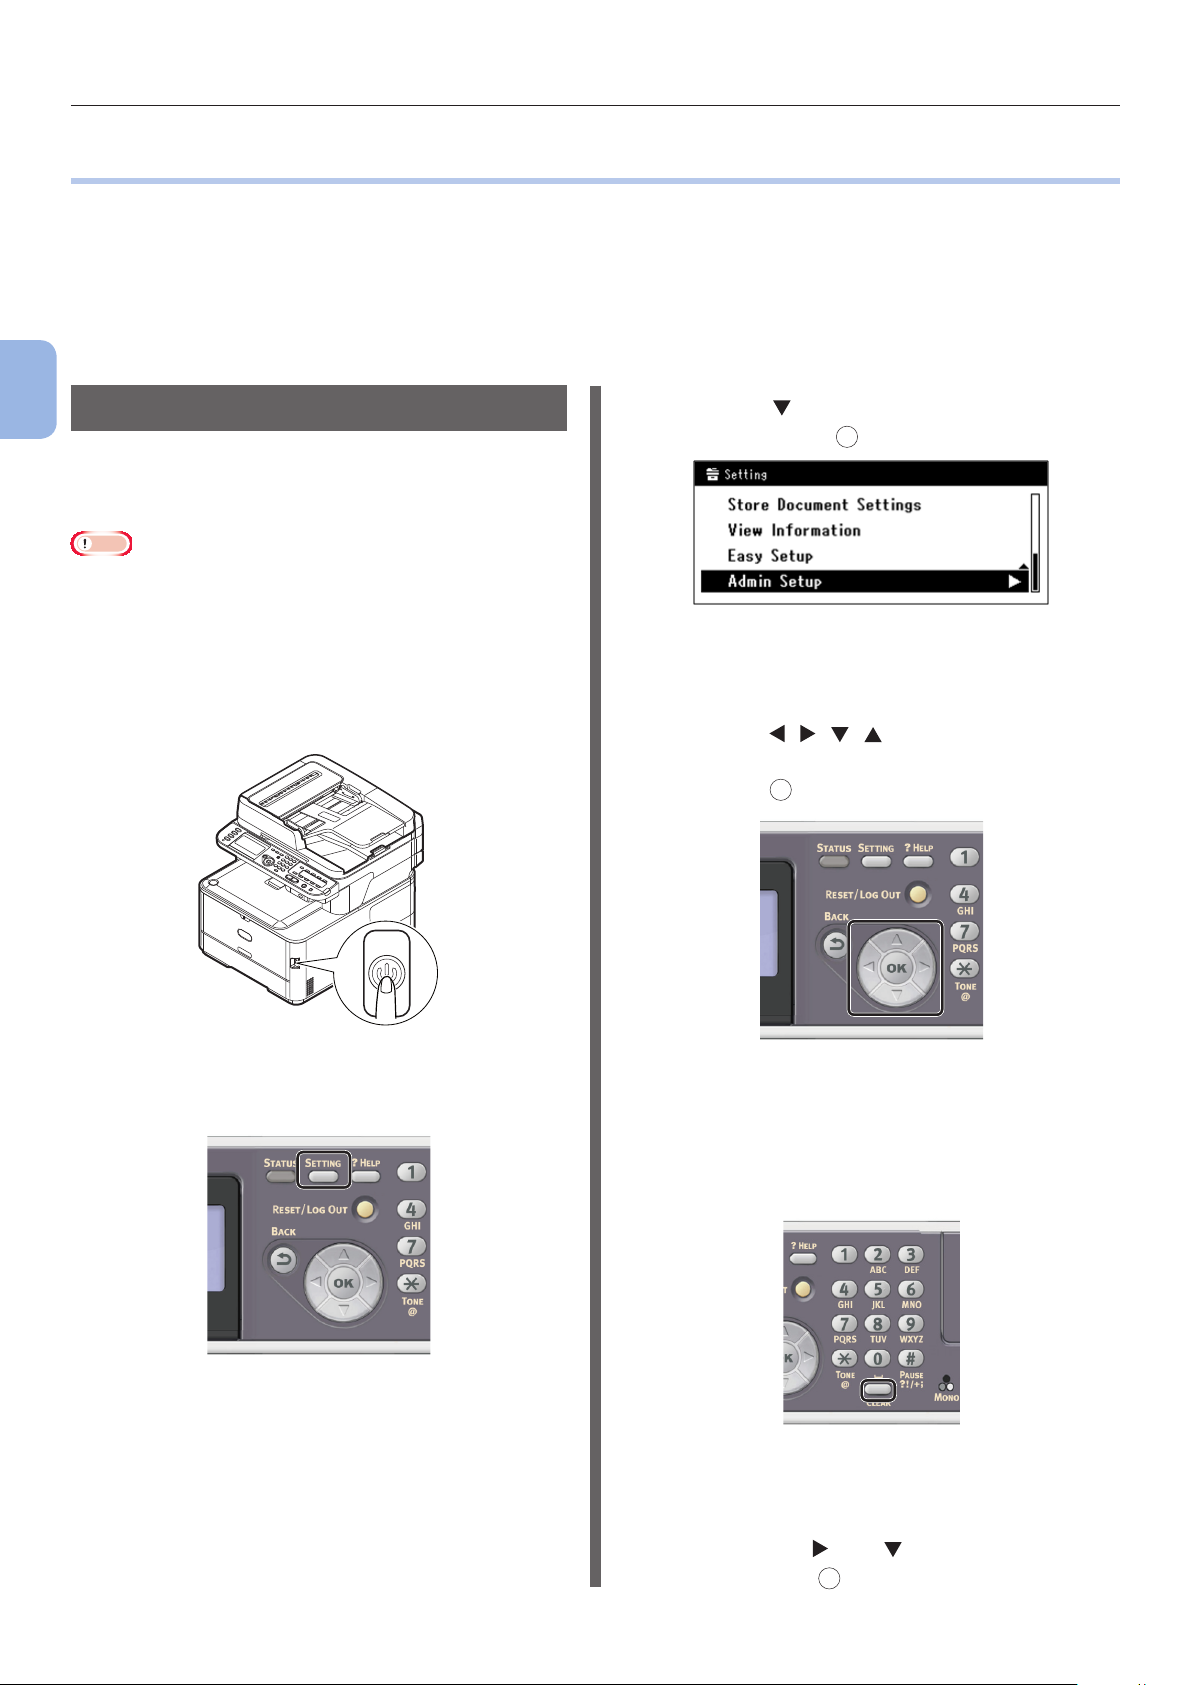
1 Hold down the power switch for
approximately one second to turn on the
power.
3 Press the to select [Admin Setup]
and then press OK.
4 Enter the administrator password.
The factory default password is “aaaaaa”.
a Press , , , to select the
character you want, and then
press OK.
2 Press the <SETTING> key on the
operator panel.
- The selected character is entered as “*” in
the text led.
- If you have entered an incorrect value,
press the <CLEAR> key and then enter
the correct value.
b Repeat step a until all characters
required are entered.
c Press the and to select [Enter]
and press OK.
- 26 -
Page 27
Initial Setup for Faxing
5 Press the to select [Fax Setup] and
then press OK.
6 Press the to select [Fax Setting] and
then press OK.
7 Press the to select [Country Code]
OK
and then press
.
8 Press the or to select your country
name and then press
If your country name is not displayed, select the
following value.
- If your country is the Czech Republic or
Slovakia, select [Czech/Slovakia].
- If your country is Canada, select [U.S.A].
- If the region of your country is Latin
America, select [Latin America].
- If the region of your country is Europe or
the Middle East, select [International].
Settable Country Codes:
U.S.A. International United Kingdom
Ireland Norway Sweden Finland
Denmark Germany Hungary
Czech/Slovakia Poland Switzerland
Austria Belgium Netherlands France
Portugal Spain Italy Greece
Australia New Zealand Singapore
Hong Kong Latin America Mexico
China Russia Taiwan Japan Korea
Thailand Malaysia Jordan Argentina
Brazil South Africa Belarus Moldova
Turkey Ukraine
OK
.
9 For the conrmation message, check
that [Yes] is selected and press OK.
The machine restarts automatically, and the
default screen is displayed a few minutes later.
Memo
● If the [Country Code] is changed, the value of [PBX
Line] and [MF (Tone)/DP (Pulse)] are changed to the
default values for each country code.
Step 2 Connecting a Telephone Line
This section explains how to connect a telephone
line for faxing. Be sure to connect the telephone
line depending on your environment before you
transmit or receive faxes.
The method of connecting a telephone line
differs depending on your environment. Based
on the following gures, connect the line for
your environment.
Note
● Do not connect with USB cable or LAN cable at this point.
● Be sure to set the appropriate country code before
connecting the telephone line.
● You cannot connect to an ISDN line directly. To connect to
an ISDN line, use the terminal adopter (TA) and connect
to the LINE connection of the machine.
● A telephone cable is supplied with your machine except in
certain countries.
Reference
● To check the reception mode according to the machine
environment, refer to “Step 3-6 Specifying Reception
Mode” P.37.
● To check the dial type settings, refer to “Step 3-1 Settings
for Each Dialing Type” P.31.
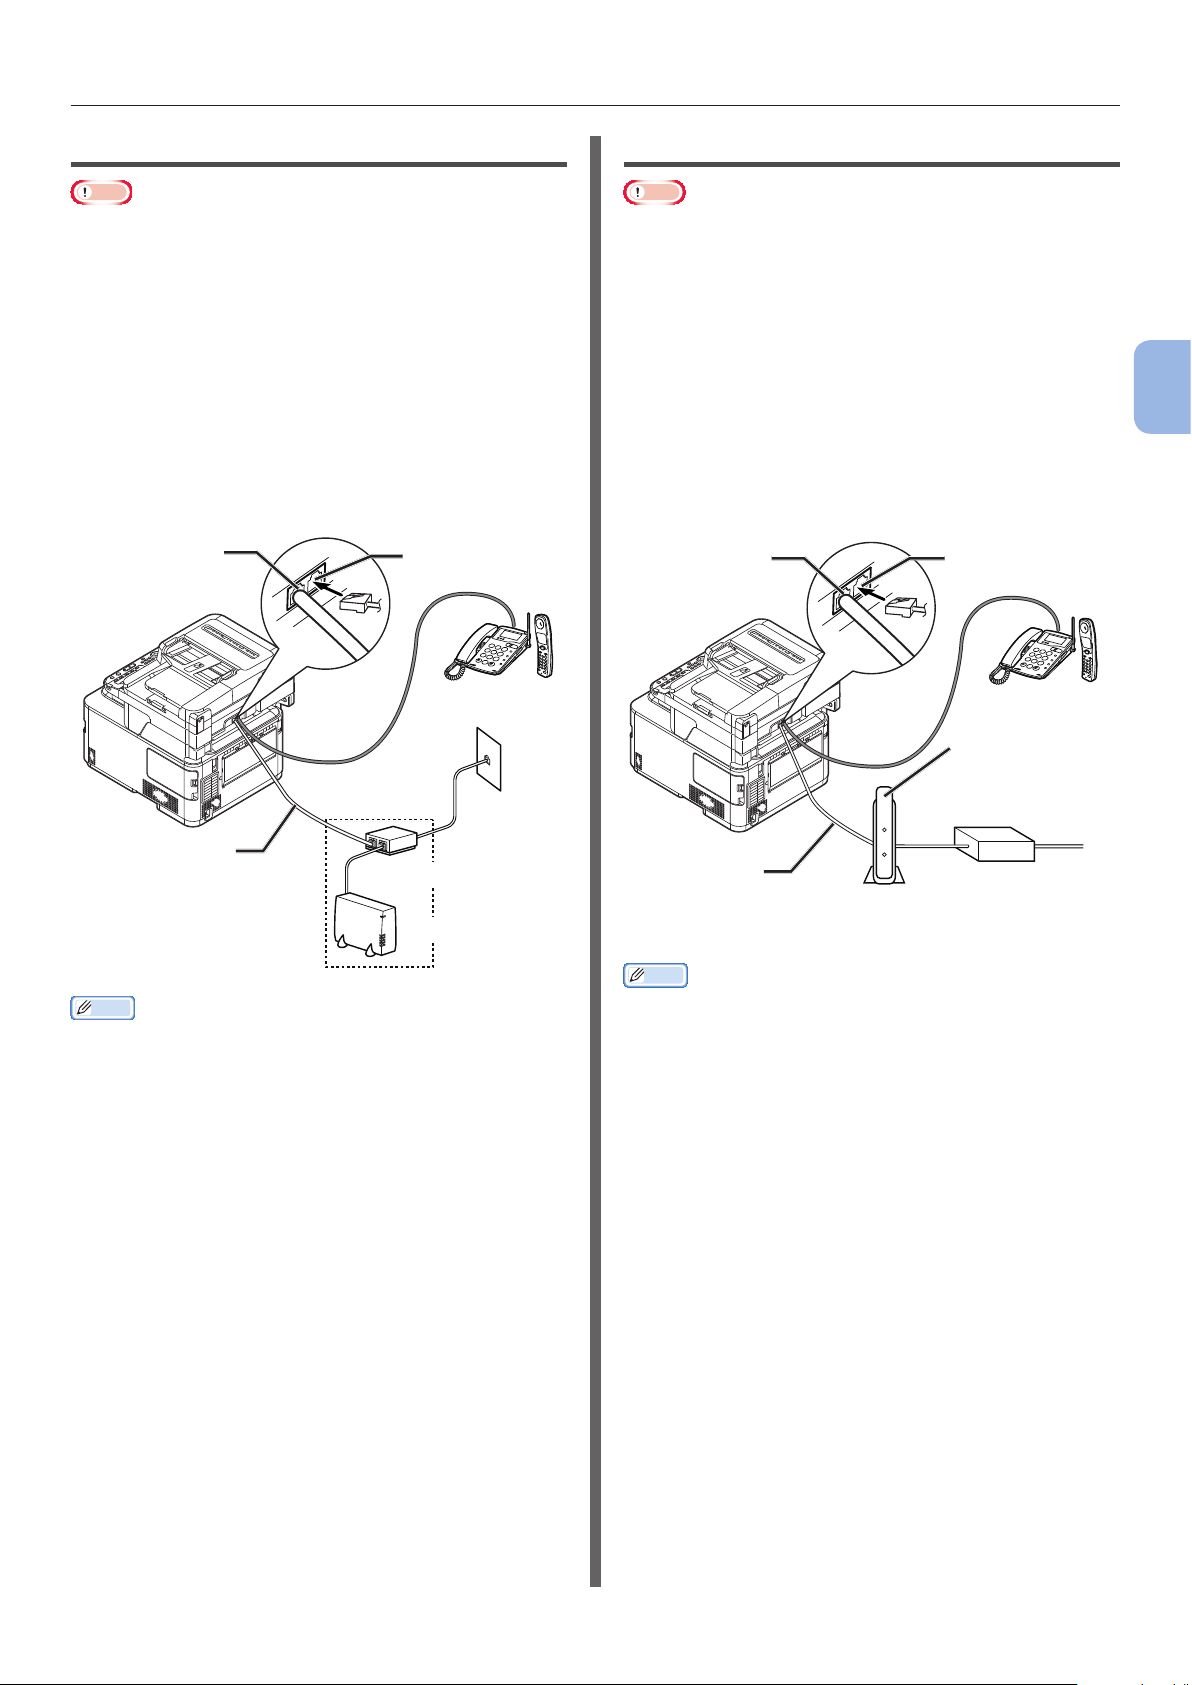
Connecting to a Public Line (Connecting for Fax Only)
Note
● Do not connect with USB cable or LAN cable at this point.
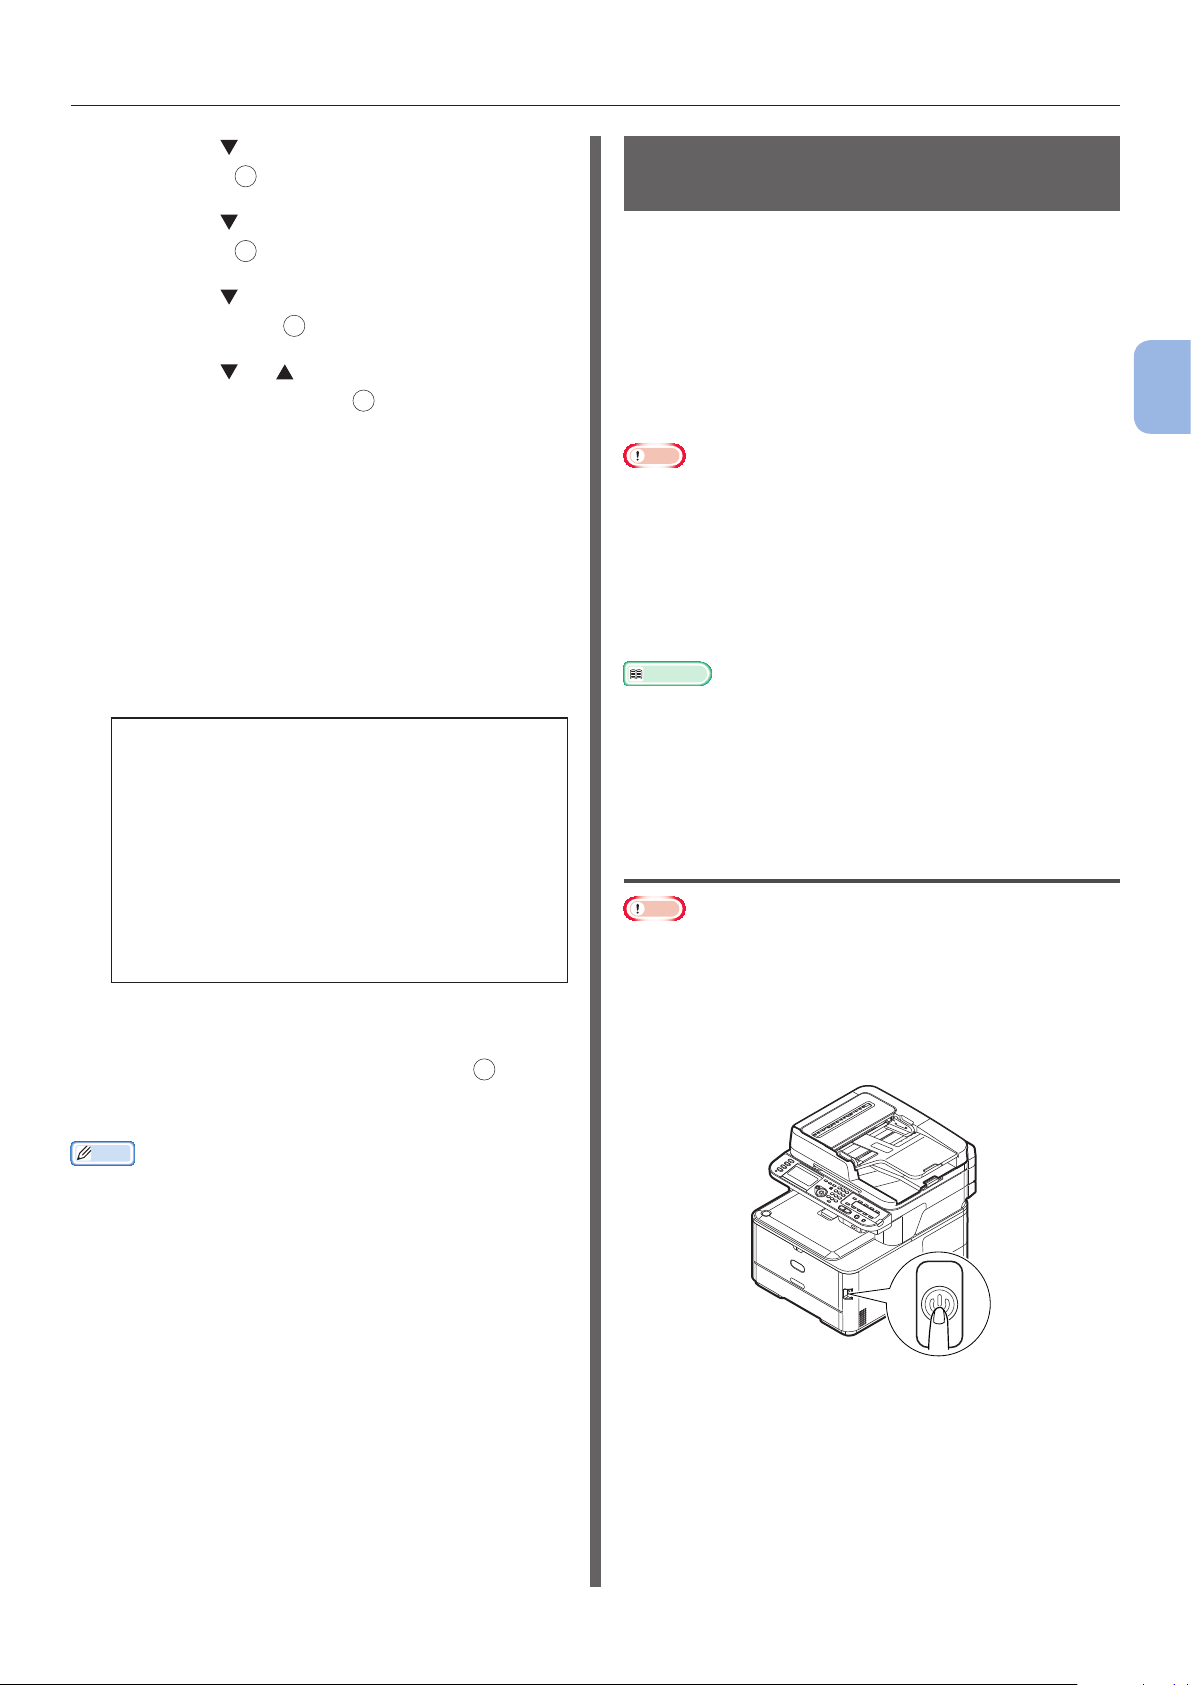
1 Check that the machine is turned off.
If the machine is turned on, hold down the power
switch for approximately one second to turn off
the power.
3
Faxing (For MC342dn, MC342dw, MC362dn, MC362w, MC562dn,
MC562w, MC562dw, ES5462 MFP, ES5462dw MFP, MPS2731mc only)
- 27 -
Page 28
Initial Setup for Faxing
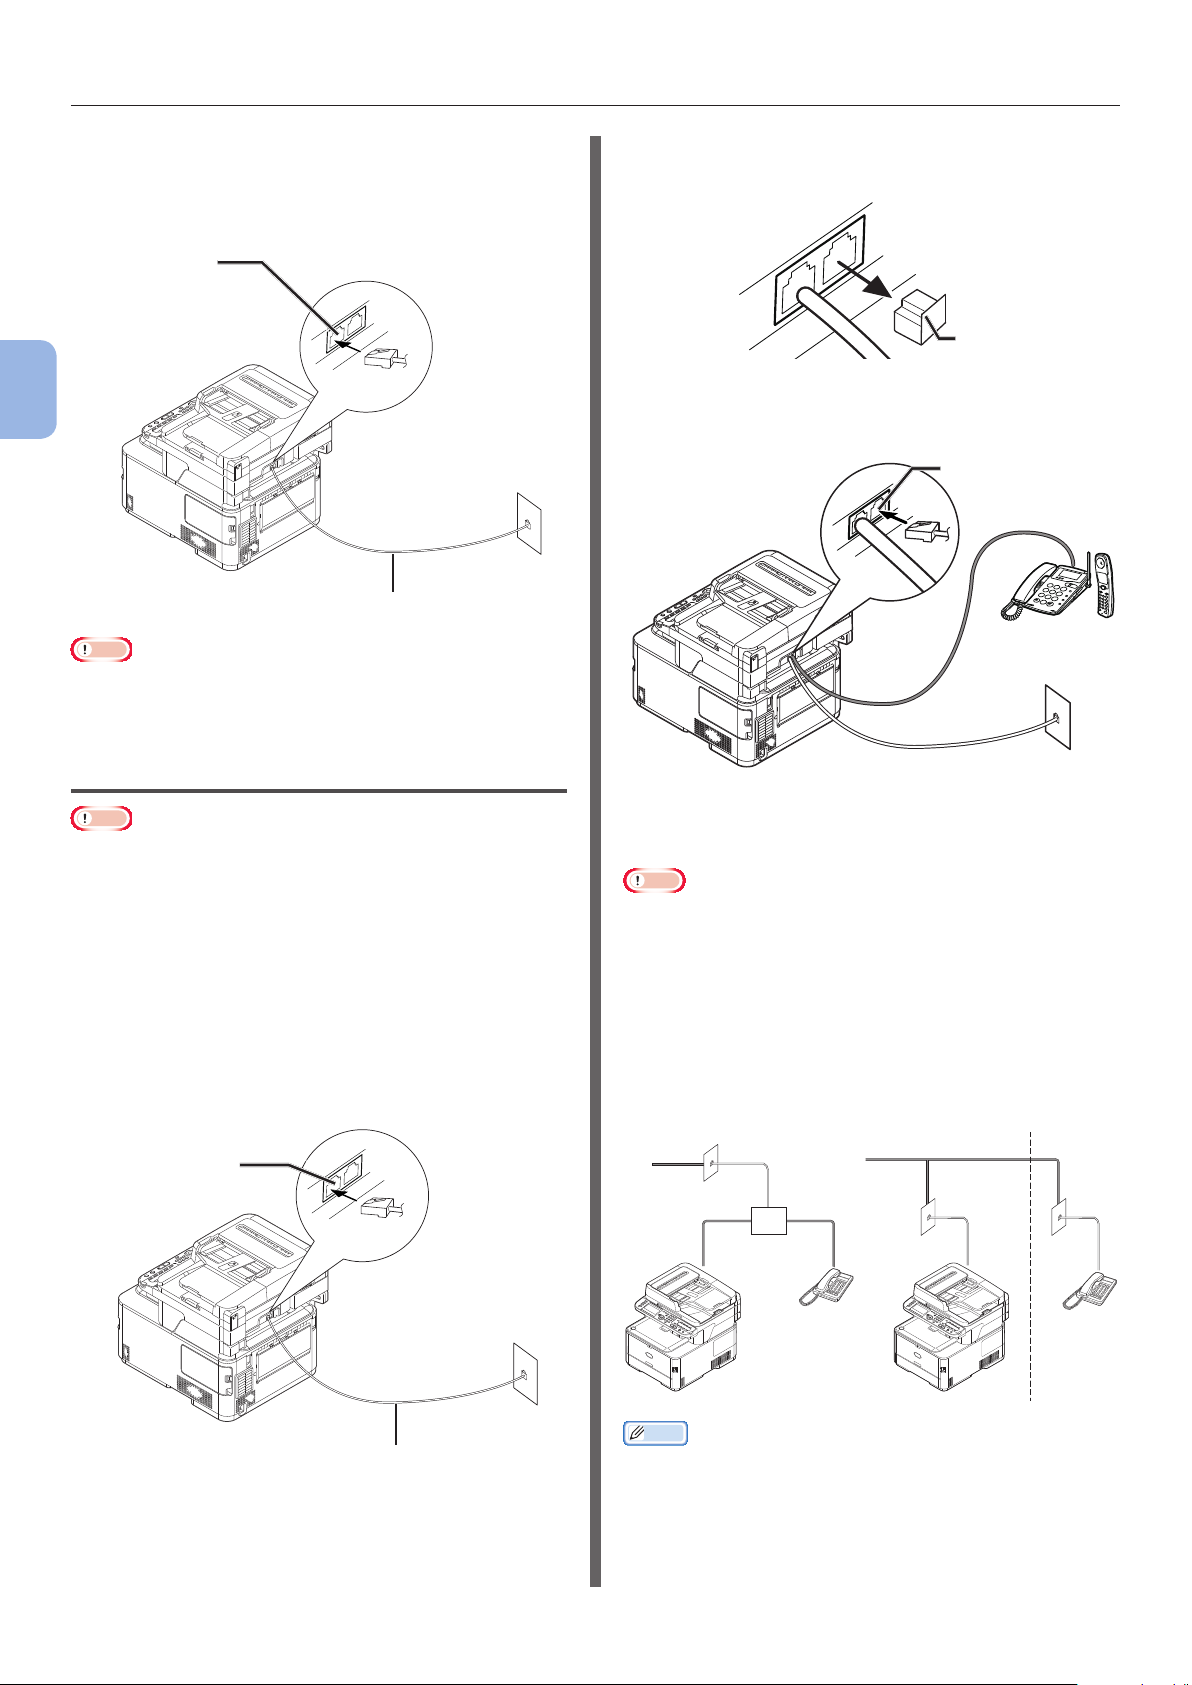
2 Plug one end of the [Telephone cable]
into the [LINE connection] of your
machine and the other end into the
[Public Line (Analog)].
LINE connection
3
Faxing (For MC342dn, MC342dw, MC362dn, MC362w, MC562dn,
MC562w, MC562dw, ES5462 MFP, ES5462dw MFP, MPS2731mc only)
Telephone cable
Note
● Be certain to connect the telephone cable to [LINE
connection]. Never connect it to [TEL connection].
Public Line
(Analog)
3 Remove the [Telephone connector
cover].
TEL
LINE
Telephone connector cover
4 Plug the external telephone’s cable into
the [TEL connection] of your machine.
TEL connection
Connecting to a Public Line (Connecting for Fax and Telephone)
Note
● Do not connect with USB cable or LAN cable at this point.
1 Check that the machine is turned off.
If the machine is turned on, hold down the power
switch for approximately one second to turn off
the power.
2 Plug one end of the [Telephone cable]
into the [LINE connection] of your
machine and the other end into the
[Public Line (Analog)].
LINE connection
Public Line
(Analog)
The telephone that is connected to the machine
is called an external telephone.
Note
● Only one telephone can be connected to the machine.
● Do not connect the telephone to the machine in parallel.
If you connect the telephone to the machine in parallel,
the following problems will occur and the machine will not
work correctly.
- When you send or receive a fax, the fax picture may
be broken or a communication error may occur by
picking up the telephone.
- The fax transfer function is not able to work from the
external telephone.
Public Line (Analog) Public Line (Analog) rst oor second oor
Telephone cable
Memo
● In the case of direct interconnection, separate
construction is necessary. Please contact the telephone
company that you use.
- 28 -
Page 29
Initial Setup for Faxing
Connecting to an ADSL Environment
Note
● Do not connect with USB cable or LAN cable at this point.
First, check that the machine is turned off. If
the machine is turned on, hold down the power
switch for approximately one second to turn off
the power.
Plug the [Telephone cable] connected to the
ADSL modem into the [LINE connection] of
your machine.
Remove the telephone connector cover.
Plug the external telephone’s cable into the [TEL
connection] of your machine.
LINE connection
Telephone cable
TEL connection
Public Line
(Analog)
Splitter
ADSL modem
Connecting to an IP Telephone
Note
● Do not connect with USB cable or LAN cable at this point.
First, check that the machine is turned off. If
the machine is turned on, hold down the power
switch for approximately one second to turn off
the power.
Plug the
IP telephone into the [LINE connection] of
your machine.
Remove the telephone connector cover.
Plug the external telephone’s cable into the
[TEL connection] of your machine.
LINE connection
Telephone cable
[Telephone cable] connected to the
TEL connection
Optical IP telephone
Corresponding
telephone
Optical Network
Unit (ONU)
LAN
cable
*Insert into the
telephone cable jack.
Optical cable
3
Faxing (For MC342dn, MC342dw, MC362dn, MC362w, MC562dn,
MC562w, MC562dw, ES5462 MFP, ES5462dw MFP, MPS2731mc only)
Memo
● Check the dial tone detection if it is unable to dial. Refer to
the Conguration Guide > “Appendix A - menu system” >
“Admin Setup” > “User Install”.
● If you cannot send or receive faxes very well, set [Super
G3] to [OFF]. Refer to “Step 3-5 Setting for Super G3”
P.36 in detail.
Memo
● Check the dial tone detection if it is unable to dial.
the Conguration Guide > “Appendix A - menu system” >
“Admin Setup” > “User Install”.
● If you cannot send or receive faxes very well, set [Super
G3] to [OFF]. Refer to “Step 3-5 Setting for Super G3”
P.36 in detail.
Refer to
- 29 -
Page 30
Initial Setup for Faxing
Connecting to a CS Tuner or Digital Television
Note
● Do not connect with USB cable or LAN cable at this point.
First, check that the machine is turned off. If
the machine is turned on, hold down the power
switch for approximately one second to turn off
the power.
Plug the
3
the [Public Line (Analog)] into the [LINE
connection] of your machine.
Faxing (For MC342dn, MC342dw, MC362dn, MC362w, MC562dn,
MC562w, MC562dw, ES5462 MFP, ES5462dw MFP, MPS2731mc only)
Remove the telephone connector cover.
Plug the telephone cable connected to the
CS tuner or digital television into the [TEL
connection] of your machine.
LINE connection
[Telephone cable] connected to
TEL connection
Connecting to a PBX, Home Telephone or Business Phone
Note
● Do not connect with USB cable or LAN cable at this point.
First, check that the machine is turned off. If
the machine is turned on, hold down the power
switch for approximately one second to turn off
the power.
Plug the [Telephone cable] connected to
the [Public Line (Analog)] into the [LINE
connection] of your machine.
Remove the telephone connector cover.
Plug the telephone cable connected to a
control device including PBX, etc. into the [TEL
connection] of your machine.
LINE connection TEL connection
Telephone cable
CS tuner or digital
television
Public Line
(Analog)
Control device
including PBX, etc.
Telephone cable
Public Line
(Analog)
● Home Telephone
In general, many telephones are connected
with one or two telephone lines, and internal
communication and door phone are possible.
This is simple switching equipment for
household.
● Business Phone
In general, it can accommodate more than
two telephone lines, these telephone lines can
be shared with other telephones, and internal
communication is possible. This is simple
switching equipment.
- 30 -
Page 31

Initial Setup for Faxing
Connecting as an Internal Telephone
Note
● Do not connect with USB cable or LAN cable at this point.
First, check that the machine is turned off. If
the machine is turned on, hold down the power
switch for approximately one second to turn off
the power.
Plug the [Telephone cable] connected to a
control device including PBX, etc. into the [LINE
connection] of your machine.
LINE connection
Telephone
cable
Public Line
(Analog)
Control device
including PBX, etc.
Step 3 Conguring Basic
Settings
This section explains how to congure the basic
settings on the machine for the fax function.
Follow the 6 sub steps below:
● “Step 3-1 Settings for Each Dialing Type”
P.31
● “Step 3-2 Setup of Date/Time” P.32
● “Step 3-3 Specifying Sender Information”
P.34
● “Step 3-4 PBX Connecting” P.35
● “Step 3-5 Setting for Super G3” P.36
● “Step 3-6 Specifying Reception Mode” P.37
Note
● You need to complete the country code setting and
connect the telephone line according to your environment
before this procedure.
Memo
● You can skip the steps 3-4 and 3-5 depending on your
environment. For details, refer to each description.
3
Faxing (For MC342dn, MC342dw, MC362dn, MC362w, MC562dn,
MC562w, MC562dw, ES5462 MFP, ES5462dw MFP, MPS2731mc only)
Memo
● Set [PBX Line] to [ON]. Refer to “Step 3-4 PBX
Connecting” P.35 in detail.
Step 3-1 Settings for Each Dialing Type
Specify the dialing type for transmission
according to your environment. The factory
default for [MF (Tone)/DP (Pulse)] is set to
[Tone].
● For push-button phones, if you hear a “Beep,
boop, beep” sound, leave [MF (Tone)/
DP (Pulse)] as [Tone].
● For push-button type phones, if you do not
hear a “Beep, boop, beep” sound, set
[MF (Tone)/DP (Pulse)] to [Pulse].
● For rotary-dial type phones, set [MF (Tone)/
DP (Pulse)] to [Pulse].
1 Press the <SETTING> key on the
operator panel.
- 31 -
Page 32

Initial Setup for Faxing
2 Press the to select [Admin Setup],
and press OK.
3
3 Enter the administrator password.
Faxing (For MC342dn, MC342dw, MC362dn, MC362w, MC562dn,
MC562w, MC562dw, ES5462 MFP, ES5462dw MFP, MPS2731mc only)
The factory default password is “aaaaaa”.
a Press , , , to select the
character you want, and then
press OK.
7 Press the until the top screen is
displayed.
Step 3-2 Setup of Date/Time
Set up Date/Time of your region.
1 Press the <SETTING> key on the
operator panel.
2 Press the to select [Easy Setup] and
then press OK.
- The selected character is entered as “*” in
the text eld.
- If you have entered an incorrect value,
press the <CLEAR> key and then enter
the correct value.
b Repeat step a until all characters
required are entered.
c Press the and to select [Enter]
and press OK.
4 Press the to select [User Install],
and press OK.
3 Enter the administrator password.
The factory default password is “aaaaaa”.
5 Press the to select [MF (Tone)/DP
(Pulse)], and then press OK.
6 Press the to select a dial type, and
then press OK.
- 32 -
Page 33

Initial Setup for Faxing
a Press , , , to select the
character you want, and then
press OK.
- The selected character is entered as “*” in
the text eld.
- If you have entered an incorrect value,
press the <CLEAR> key and then enter
the correct value.
8 Press the or to select the current
date and then press OK.
To move to the next box, press the .
9 Press the or to select the current
time and then press OK.
To move to the next box, press the .
OK
When you press
Date/Time setting is complete appears.
, a message showing that
10 When the setup menu screen is
displayed, press to complete the
setup.
3
Faxing (For MC342dn, MC342dw, MC362dn, MC362w, MC562dn,
MC562w, MC562dw, ES5462 MFP, ES5462dw MFP, MPS2731mc only)
b Repeat step a until all characters
required are entered.
c Press the and to select [Enter]
and press OK.
4 Check that [Date/Time Setting] is
selected and then press the .
5 Press the to select the appropriate
OK
time zone and then press
.
6 Press the to select whether summer
time is applied or not and then press OK.
7 Check that [Manual] is selected and
then press OK.
11 For the conrmation message, check
OK
that [Yes] is selected and press
.
- 33 -
Page 34

Initial Setup for Faxing
Step 3-3 Specifying Sender Information
Specify the fax number and sender name for
your machine. The information specied here is
printed on the top of the faxes you sent from the
machine.
1 Press the <SETTING> key on the
operator panel.
3
Faxing (For MC342dn, MC342dw, MC362dn, MC362w, MC562dn,
MC562w, MC562dw, ES5462 MFP, ES5462dw MFP, MPS2731mc only)
2 Press the to select [Easy Setup] and
press OK.
a Press , , , to select the
character you want, and then
press OK.
- The selected character is entered as “*” in
the text eld.
- If you have entered an incorrect value,
press the <CLEAR> key and then enter
the correct value.
3 Enter the administrator password.
The factory default password is “aaaaaa”.
b Repeat step a until all characters
required are entered.
c Press the and to select [Enter]
and press OK.
4 Press the to select [Fax Setting] and
then press the .
5 Press to select the [Fax Number]
entry box.
- 34 -
Page 35

Initial Setup for Faxing
6 Enter the fax number of your machine
with the ten-key pad.
7 Check that [Enter] is selected and then
press OK.
8 Press to select the [Sender ID] entry
box.
Step 3-4 PBX Connecting
When connecting to PBX (internal exchange), set
[PBX Line] to [ON].
1 Press the <SETTING> key on the
operator panel.
2 Press the to select [Admin Setup]
and then press OK.
3
Faxing (For MC342dn, MC342dw, MC362dn, MC362w, MC562dn,
MC562w, MC562dw, ES5462 MFP, ES5462dw MFP, MPS2731mc only)
9 Enter an arbitrary sender name up to 22
characters allowed.
10 Press the and to select [Enter] and
then press OK.
The message showing that fax setting is complete
appears.
11 When the setup menu screen is
displayed, press to complete the
setup.
12 For the conrmation message, check
that [Yes] is selected and press OK.
3 Enter the administrator password.
The default password is “aaaaaa”.
a Press , , , to select the
character you want, and then
press OK.
- 35 -
Page 36

Initial Setup for Faxing
- The selected character is entered as “*” in
the text eld.
- If you have entered an incorrect value,
press the <CLEAR> key and then enter
the correct value.
3
Faxing (For MC342dn, MC342dw, MC362dn, MC362w, MC562dn,
MC562w, MC562dw, ES5462 MFP, ES5462dw MFP, MPS2731mc only)
b Repeat step a until all characters
required are entered.
c Press the and to select [Enter]
and press
4 Press the to select [Fax Setup] and
then press
OK
.
OK
.
Step 3-5 Setting for Super G3
If you cannot send or receive faxes correctly
when the machine is connected to the ADSL
environment or an IP telephone, set [Super G3]
to [OFF].
1 Press the <SETTING> key on the
operator panel.
2 Press the to select [Admin Setup]
and then press OK.
5 Press the to select [Fax Setting] and
then press OK.
6 Press the to select [PBX Line] and
then press
OK
.
7 Press the to select [ON] and then
press
OK
.
8 Press the until the top screen is
displayed.
3 Enter the administrator password.
The default password is “aaaaaa”.
a Press , , , to select the
character you want, and then
press OK.
- 36 -
Page 37

Initial Setup for Faxing
- The selected character is entered as “*” in
the text eld.
- If you have entered an incorrect value,
press the <CLEAR> key and then enter
the correct value.
b Repeat step a until all characters
required are entered.
c Press the and to select [Enter]
and press
OK
.
4 Press the to select [User Install] and
OK
then press
.
Step 3-6 Specifying Reception Mode
The optimal reception mode differs depending
on your machine’s environment. Check with the
following description.
● Fax Ready Mode
This mode is recommended when you use the
machine as a fax machine.
● Tel/Fax Ready Mode
This mode is recommended when you connect an
external phone to the machine.
● Ans/Fax Ready Mode
This mode is recommended when you connect an
external answering machine to the machine.
● Tel Ready Mode
This mode is recommended when you mainly use
an external phone connected to the machine.
● DRD
This mode is recommended when you use the
distinctive ring detection (DRD) function provided
by a telephone company.
3
Faxing (For MC342dn, MC342dw, MC362dn, MC362w, MC562dn,
MC562w, MC562dw, ES5462 MFP, ES5462dw MFP, MPS2731mc only)
5 Press the to select [Super G3] and
then press OK.
6 Press the to select [OFF] and then
press
OK
.
7 Press the until the top screen is
dislpayed.
1 Press the <SETTING> key on the
operator panel.
2 Press the to select [Admin Setup]
and press OK.
3 Enter the administrator password.
The factory default password is “aaaaaa”.
- 37 -
Page 38

Initial Setup for Faxing
a Press , , , to select the
character you want, and then
press OK.
3
Faxing (For MC342dn, MC342dw, MC362dn, MC362w, MC562dn,
MC562w, MC562dw, ES5462 MFP, ES5462dw MFP, MPS2731mc only)
- The selected character is entered as “*” in
the text eld.
- If you have entered an incorrect value,
press the <CLEAR> key and then enter
the correct value.
b Repeat step a until all characters
required are entered.
c Press the and to select [Enter]
and press OK.
4 Press the to select [User Install] and
press OK.
5 Press the to select [Reception Mode]
and press OK.
6 Press the to specify a reception mode
and press OK.
Settable Reception Mode:
Fax Ready Mode* Tel/Fax Ready Mode
Ans/Fax Ready Mode Tel Ready Mode DRD
*indicates the factory default.
7 Press the until the top screen is
displayed.
- 38 -
Page 39

●● Faxing
This section explains the basic procedure for the Fax function.
The Fax function enables you to scan documents and transmit them as faxes or receive faxes via a
telephone line.
Be sure to nish the initial setup before using this function.
Faxing
Procedure for Fax
This section explains how to transmit faxes. The
following procedure uses the direct input method
for specifying a destination.
You need to congure the initial settings before
using the Fax function.
Note
● Up to 40 digits can be entered for the destination fax
number.
Memo
● You can load only A4, letter, or legal size documents in
the ADF, and A4 or letter size documents on the document
glass.
● You cannot load mixed size documents for faxing.
● The following procedure uses the factory default settings.
1 Press the <FAX> key on the operator
panel.
● Document Glass
Place the document face down and align its top
edge to the upper-left corner of the glass.
Close the document glass cover gently.
Note
● Do not apply an excessive load to the document
glass.
3
Faxing (For MC342dn, MC342dw, MC362dn, MC362w, MC562dn,
MC562w, MC562dw, ES5462 MFP, ES5462dw MFP, MPS2731mc only)
2 Place your document in the ADF or on
the document glass as below:
● ADF
Load documents face up with the top edge of the
documents in rst.
Adjust the document guides to the width of your
documents.
Memo
● The machine prioritizes the ADF when scanning
documents. Be sure not to place documents on the
ADF when you use the document glass.
Note
● If Carriage Error <02> is displayed, press Power
OFF/ON.
3 Check that [Fax] is selected and
press OK to open the fax start screen.
- 39 -
Page 40

Faxing
4 Check that [Add Destination] is
selected on the start screen and then
press
OK
.
3
5 Press the to select [Direct Input] and
Faxing (For MC342dn, MC342dw, MC362dn, MC362w, MC562dn,
MC562w, MC562dw, ES5462 MFP, ES5462dw MFP, MPS2731mc only)
then press OK.
6 Enter a destination fax number up to
40 digits using the ten-key pad on the
operator panel.
Reference
● For dialing functions such as hyphen, prex and
ash, refer to the User’s Guide > “Faxing - MC342dn,
MC342dw, MC362dn, MC362w, MC562dn, MC562w,
MC562dw, ES5462 MFP, ES5462dw MFP and
MPS2731mc only” > “Sending a fax from the MFP” >
“Advanced operation”.
7 Check that [Enter] is selected and then
press OK.
8 Press
Reference
● In addition to inputting the destination directly, you can
use the speed dial list, group list, transmission histories,
reception histories, or One-Touch key pad to specify the
destination. For details, refer to the User’s Guide >
“Faxing - MC342dn, MC342dw, MC362dn, MC362w,
MC562dn, MC562w, MC562dw, ES5462 MFP, ES5462dw
MFP and MPS2731mc only” > “Managing the phone book”.
● To load a landscape document, refer to the User’s Guide >
“Operation” > “Loading document(s)”.
● You can change the fax settings such as document size
and resolution as necessary. For details, refer to the
User’s Guide > “Faxing - MC342dn, MC342dw, MC362dn,
MC362w, MC562dn, MC562w, MC562dw, ES5462 MFP,
ES5462dw MFP and MPS2731mc only” > “Sending a fax
from the MFP” > “Advanced operation”.
● When you want to specify multiple destinations, refer
to the User’s Guide > “Faxing - MC342dn, MC342dw,
MC362dn, MC362w, MC562dn, MC562w, MC562dw,
ES5462 MFP, ES5462dw MFP and MPS2731mc only” >
“Sending a fax from the MFP” > “Advanced operation”.
MONO
Note
● You cannot use the
● If the <STATUS> key is pressed and
twice, the information is displayed on the display
screen.
Memo
● When you want to cancel the operation during the
transmission, press the <STOP> key on the operator
panel.
to start transmission.
button.
COLOR
is pressed
- 40 -
Page 41

Faxing
Receiving a Fax
This section explains how your machine behaves
when the machine whose reception mode is set
to [Fax Ready Mode] is receiving and printing
faxes.
Reference
● For the machine behavior when the reception mode is
set to other than [Fax Ready Mode], refer to the User’s
Guide > “Faxing - MC342dn, MC342dw, MC362dn, MC362w,
MC562dn, MC562w, MC562dw, ES5462 MFP, ES5462dw MFP
and MPS2731mc only” >
“Fax receiving”.
Reception Behavior
Your machine is set by factory default to [Fax
Ready Mode] so that it automatically receives
faxes.
When the machine is receiving faxes, the
<DATA IN MEMORY> indicator is lit. If the
<STATUS> key is pressed and
twice, the information is displayed on the display
screen. Even if the reception is nished, the
indicator remains lit while the data is stored in
memory.
“Sending a fax from the MFP” >
is pressed
Printing Received Faxes
The machine automatically prints out the
received fax. By factory default, tray 1 is set to
be used.
Note
● Do not pull out the paper trays when the machine is
printing.
Memo
● Use only standard or recycled paper.
● Available paper sizes are A4, letter, or legal.
Reference
● Images larger than the specied paper are reduced,
discarded, or printed onto multiple sheets of paper
depending on the reception print settings. For details,
refer to the User’s Guide > “Faxing - MC342dn, MC342dw,
MC362dn, MC362w, MC562dn, MC562w, MC562dw,
ES5462 MFP, ES5462dw MFP and MPS2731mc only” >
“Sending a fax from the MFP” > “Fax receiving” >
“Printing received faxes”.
● If you want to use another paper tray to print received
faxes, refer to the User’s Guide > “Appendix A - menu
system” > “Paper setup” > “Select Tray”.
3
Faxing (For MC342dn, MC342dw, MC362dn, MC362w, MC562dn,
MC562w, MC562dw, ES5462 MFP, ES5462dw MFP, MPS2731mc only)
Memo
● If the memory is exceeded while the machine is receiving
data, the reception is cancelled. If this happens, print the
data stored in memory or wait until the stored sending/
receiving job nishes, and then ask the sender to resend
the fax.
- 41 -
Page 42

Faxing from a Computer (For Windows)
●● Faxing from a Computer (For Windows)
This section explains how to install a fax driver and the basic procedure of sending a fax from a
computer. The fax driver allows you to send faxes directly from your computer to a destination via the
machine without printing the document.
Be sure to install the fax driver for MC342dn, MC342dw, MC362dn, MC362w, MC562dn, MC562w,
MC562dw, ES5462 MFP, ES5462dw MFP or MPS2731mc before faxing from a computer.
Note
● You need to nish the initial setup before using this function.
3
Installing a Fax Driver
Faxing (For MC342dn, MC342dw, MC362dn, MC362w, MC562dn,
MC562w, MC562dw, ES5462 MFP, ES5462dw MFP, MPS2731mc only)
This section explains how to install a fax driver
on your computer as the initial setup for Fax
from Computer function.
Overview
Connecting Methods
You can select either of the following connection methods:
● “For Network Connection” P.42
● “For USB Connection” P.48
Product Requirements
Your machine supports the following Windows
operating systems:
● Windows 8/Windows 8 (64bit Version)
● Windows Server 2012
● Windows 7/Windows 7 (64bit Version)
● Windows Vista/Windows Vista (64bit Version)
● Windows Server 2008 R2
● Windows Server 2008/Windows Server 2008
(x64 Version)
● Windows XP/Windows XP (x64 Version)
● Windows Server 2003/Windows Server 2003
(x64 Version)
For Network Connection
To install a fax driver on your computer via the
network connection, follow the 2 steps below:
● “Step 1 Conguring the Network Settings of
Your Machine” P.42
● “Step 2 Installing a Fax Driver” P.46
Note
● You need to complete the network setting of the computer
before this procedure.
Memo
● You can skip the step 1 if the IP address is already set on
your machine.
● You can skip the step 2 if the fax driver is already installed
on your computer.
Step 1 Conguring the Network
Settings of Your Machine
Connect your machine to a network with an
Ethernet cable or Wireless LAN connection
(MC342dw, MC362w, MC562w, MC562dw,
ES5462dw MFP, MPS2731mc only), and then
congure the machine’s IP address and other
network information from the operator panel.
You can set the IP address either manually or
automatically.
If there is no DHCP server or BOOTP server on
the network, you need to manually congure the
IP address on the computer or machine.
If your network administrator or internet
service provider species a unique IP address
for the computer and your machine, set the IP
addresses manually.
Note
● When setting an IP address manually, ask the network
administrator or your internet service provider which IP
address to use. If the IP address is set incorrectly, the
network may go down or Internet access may be disabled.
● Conform the IP version of the machine to that of your
computer.
● Set [TCP/IP] setting to [Enable] on your machine. (By
factory default, it is set to [Enable].)
Memo
● If conguring a small network consisting of only your
machine and a computer, set IP addresses as shown
below (according to RFC1918).
For the computer
IP address : 192.168.0.1~254
Subnet mask : 255.255.255.0
Default gateway : not used
DNS server : not used
For the machine
IP Address Set : Manual
IPv4 Address : 192.168.0.1~254
(select a different value
from the computer)
Subnet Mask : 255.255.255.0
Gateway Address : 0.0.0.0
Network Scale : Small
● To set [Network Scale], press the <SETTING> key
and then select [Admin Setup] > [Network Menu] >
[Network Setup] > [Network Scale].
- 42 -
Page 43

Faxing from a Computer (For Windows)
Connecting using wired LAN:
1 Prepare an Ethernet cable and a hub.
Prepare an Ethernet cable (category 5, twisted
pair, straight) and a hub separately.
2 Hold down the power switch for
approximately one second to turn off the
power. And turn off your computer.
4 Plug the other end of the Ethernet cable
into the hub.
5 Hold down the power switch for
approximately one second to turn on the
power.
3
Faxing (For MC342dn, MC342dw, MC362dn, MC362w, MC562dn,
MC562w, MC562dw, ES5462 MFP, ES5462dw MFP, MPS2731mc only)
3 Plug one end of the Ethernet cable into
the network interface connection on the
back of the machine.
Connecting using wireless LAN
(MC342dw, MC362w, MC562w,
MC562dw, ES5462dw MFP, MPS2731mc
only):
Use the WPS (push button) function to set the
wireless LAN. For details on other methods
for setting the wireless LAN, refer to the
Conguration Guide.
1 Press the <SETTING> key on the operator
panel.
2 Press the to select [Wireless Setting],
and then press the
.
- 43 -
Page 44

Faxing from a Computer (For Windows)
3 Log in by entering administrator password
of the device.
Use , , , key to select letter and then
OK
press
Default administrator password is “aaaaaa”.
.
3
Faxing (For MC342dn, MC342dw, MC362dn, MC362w, MC562dn,
MC562w, MC562dw, ES5462 MFP, ES5462dw MFP, MPS2731mc only)
The message below will be displayed for
about 5 seconds.
4 Check that [Automatic setup (WPS)]
is selected, and then press the .
7 If [Yes] is selected in step 6, [Running
pushbutton method...] is displayed in
the screen.
Note
● Panel operations cannot be performed during WPS
execution.
● When [WPS connection successful] is displayed,
this equipment is connected to the wireless LAN.
Memo
● If [Connection failed Timeout] is displayed, it
is possible that the wireless AP of the connection
destination could not be found within the time limit.
Select [Yes] again in step 6 within 2 minutes of
starting WPS push button for wireless AP.
5 Press the to select [WPS-PBC], and
OK
then press
.
6 Press the to select [Yes], and then
press OK.
Memo
● Start the WPS push button for wireless AP after clicking
[Yes] in the conrmation screen. Alternatively, if WPS
push button for wireless AP is started rst, start the
WPS push button on this equipment.
● If [No] is selected, the screen returns to that from
step 5.
● If [Overlap] is displayed, WPS-push button is being
executed on 2 or more wireless AP. Please wait for a
short time and then retry.
Setting the IP address:
1 Press the <SETTING> key on the
operator panel.
- 44 -
Page 45

Faxing from a Computer (For Windows)
2 Press the to select [Easy Setup], and
press OK.
3 Enter the administrator password.
The factory default password is “aaaaaa”.
a Press , , , to select the
character you want, and then
press OK.
4 Press the to select [Network
Setting], and then press the .
5 If setting the IP address manually, check
that [Manual] is selected, and press OK.
If obtaining the IP address automatically, press
to select [Auto], and press OK. Proceed to
the
step 10.
6 Enter the IP address using the ten-key
pad, and press OK.
3
Faxing (For MC342dn, MC342dw, MC362dn, MC362w, MC562dn,
MC562w, MC562dw, ES5462 MFP, ES5462dw MFP, MPS2731mc only)
- The selected character is entered as “*” in
the text eld.
- If you have entered an incorrect value,
press the <CLEAR> key and then enter
the correct value.
b Repeat step a until all characters
required are entered.
c Press the and to select [Enter]
and press OK.
To move to the next box, press the .
7 Enter the subnet mask using the ten-key
pad, and press OK.
To move to the next box, press the .
8 Enter the default gateway address using
the ten-key pad, and press OK.
To move to the next box, press the .
- 45 -
9 Enter the DNS server and WINS server if
needed.
If it is not necessary to connect the DNS server
or WINS server to the network, press OK until the
pop-up message showing setting completion is
displayed.
Page 46

Faxing from a Computer (For Windows)
10 When the setup menu screen is
displayed, press to complete the
setup.
3
11 For the conrmation message, check
Faxing (For MC342dn, MC342dw, MC362dn, MC362w, MC562dn,
MC562w, MC562dw, ES5462 MFP, ES5462dw MFP, MPS2731mc only)
that [Yes] is selected and press OK.
◆ Print the Network Information to check that
the IP address and other network information
are set properly.
1 Press the <SETTING> key on the
operator panel.
2 Click [Run Setup.exe] after [AutoPlay]
is displayed.
If the [User Account Control] dialog box is
displayed, click [Yes].
3 Select the language.
4 Select the device of your machine, and
then click [Next].
2 Check that [Reports] is selected and
press OK.
3 Press the to select [System] and
press OK.
4 Press the to select [Network
Information] and press OK.
5 For the conrmation message, check
that [Yes] is selected and press OK.
The Network Information is printed.
Step 2 Installing a Fax Driver
Note
● To complete this procedure, you must be logged in as an
administrator.
5 Read the license agreement and then
click [I Agree].
6 Read the “Environmental advice for
Users” and click [Next].
7 Click the Install button on the [FAX
driver] row.
1 Check that your machine and the
computer are turned on and connected,
and then insert the “Software DVD-ROM”
into the computer.
- 46 -
Page 47

Faxing from a Computer (For Windows)
8 On the [Pre-Installation Check] dialog
box, click [Next].
9 Click the [Easy Installation
(Network)] button.
The device search starts.
- If the machine is detected, it is
automatically installed. Proceed to step
12.
- If the machine is not detected, the
[Review your installation settings.]
screen is displayed. Proceed to step 10.
10 Click [Restart search] to restart the
device search.
11 If the [Windows Security] dialog box
is displayed, click [Install this driver
software anyway].
12 Click the [Finish] button.
13 Click [Exit] on the [Setup] window.
14 Click [Start] > [Devices and Printers].
15 Check that the OKI MC562(FAX) icon is
displayed.
If a printer driver for the machine is already
installed, the OKI MC562 icon may represent
these drivers. In this case, right-click the OKI
MC562 icon and select one of the menu items,
and then check that the fax driver is displayed in
the submenu.
3
Faxing (For MC342dn, MC342dw, MC362dn, MC362w, MC562dn,
MC562w, MC562dw, ES5462 MFP, ES5462dw MFP, MPS2731mc only)
After the machine is displayed, select the machine
and click [Next].
Memo
● If the machine is not displayed by clicking [Restart
search], select [Printer name/IP Address] and
enter the IP address assigned to your machine, and
then click [Next].
16 Remove the “Software DVD-ROM” from
the computer.
The installation is complete.
- 47 -
Page 48

Faxing from a Computer (For Windows)
For USB Connection
Follow the procedure below to connect a USB
cable and install a fax driver on your computer.
Note
● You must be logged in as an administrator to complete
this procedure.
Memo
● You can skip this procedure if the fax driver is already
installed on your computer.
3
1 Prepare a USB cable.
Faxing (For MC342dn, MC342dw, MC362dn, MC362w, MC562dn,
MC562w, MC562dw, ES5462 MFP, ES5462dw MFP, MPS2731mc only)
A USB cable is not supplied with your machine.
Prepare a USB 2.0 cable separately.
Memo
● Use a USB 2.0 Hi-Speed cable for a USB 2.0 Hi-
Speed connection.
2 Hold down the power switch for
approximately one second to turn off the
power.
6 Click [Run Setup.exe] after [AutoPlay]
is displayed.
If the [User Account Control] dialog box is
displayed, click [Yes].
7 Select the language.
8 Select the device of your machine, and
then click [Next].
9 Read the license agreement and then
click [I Agree].
3 Plug one end of the USB cable into the
USB interface connector on the back of
the machine.
10 Read the “Environmental advice for
Users” and click [Next].
11 Click the Install button on the [FAX
driver] row.
4 Turn on the computer.
5 Insert “Software DVD-ROM” into the
computer.
- 48 -
Page 49

Faxing from a Computer (For Windows)
12 On the [Pre-Installation Check] dialog
box, click [Next].
13 Click [Easy Installation (Local)]
button.
14 If the [Windows Security] dialog box
is displayed, click [Install this driver
software anyway].
15 When the instruction to connect the
machine to the computer and turn on
the machine is displayed, plug the other
end of the USB cable into the computer’s
USB interface connector and hold down
the power switch for approximately one
second to turn on the power.
3
Faxing (For MC342dn, MC342dw, MC362dn, MC362w, MC562dn,
MC562w, MC562dw, ES5462 MFP, ES5462dw MFP, MPS2731mc only)
- 49 -
Note
● Do not plug the USB cable into the network interface
connection. Doing so may damage your machine.
16 Click the [Finish] button.
17 Click [Exit] on the [Setup] window.
18 Click [Start] > [Devices and Printers].
Page 50

Faxing from a Computer (For Windows)
19 Check that the OKI MC562(FAX) icon is
displayed.
If a printer driver for the machine is already
installed, the OKI MC562 icon may represent
these drivers. In this case, right-click the OKI
MC562 icon and select one of the menu items,
and then check that the fax driver is displayed in
the submenu.
20 Remove “Software DVD-ROM” from the
3
Faxing (For MC342dn, MC342dw, MC362dn, MC362w, MC562dn,
MC562w, MC562dw, ES5462 MFP, ES5462dw MFP, MPS2731mc only)
computer.
The installation is complete.
Procedure for Fax from a Computer
This section explains how to send fax data from
your computer.
You need to install the fax driver for your
machine on the computer before using the Fax
from Computer function.
Memo
● This section uses NotePad as example. The menu items
and procedure may differ according to the application and
the version of the fax driver you are using.
● For additional information on the setting items on the fax
driver, refer to the driver’s help.
1 Open the le you want to fax.
2 From the [File] menu, select [Print].
3 From [Select Printer], select [OKI
MC562 (FAX)] and then click [Print].
The [Settings] dialog box is displayed.
4 On the [Recipient] tab, enter the
destination name in [Name] on the
[Specifying numbers] sheet.
5 Enter the destination fax number in
[FAX number].
6 Click [Add<-].
7 Repeat steps 4 to 6 to specify all the
destinations.
8 Click the [Sender] tab, and enter the
[Sender’s name] and the [Sender’s
number].
9 Click [OK] to start transmitting.
Memo
● When you want to cancel a job while the data is
being transmitted to the machine, double-click the
printer icon in the toolbar, select the job to cancel,
and then select [Cancel] from the [Document]
menu.
Reference
● Once the data is stored in the machine, you cannot cancel
the job from your computer. For details on how to cancel a
fax job stored in the machine memory, refer to the User’s
Guide > “Faxing - MC342dn, MC342dw, MC362dn, MC362w,
MC562dn, MC562w, MC562dw, ES5462 MFP, ES5462dw MFP
and MPS2731mc only” >
“Advanced operation” > “Fax job view/cancel
“Sending a fax from the MFP” >
”.
- 50 -
Page 51

4 Scanning
This chapter explains the initial setup and basic procedure for the Scan to E-mail, Scan to Shared
Folder and Scan to Computer functions.
Your machine supports the following scan functions.
Function Overview
“Scanning to E-mail” Scans documents and sends the scanned images as an attached le of an E-mail to the
specied E-mail address on the network.
“Scanning to Shared
Folder”
Scanning to USB
Memory
“Scanning to Computer” Scans documents to the computer via network or USB and manipulates the scanned
Scanning from Remote
Computer
Scans documents and saves the scanned images to the “shared folder” of a computer
on the network.
Scans documents and saves the scanned images directly to a USB memory.
For the procedure for the function, refer to the User’s Guide > “Scanning” > “Scan to
USB Memory”.
images as necessary by operating on the operator panel.
Scans documents to the computer via network or USB and manipulates the scanned
images as necessary by operating on the computer.
For the initial setup for the function, refer to the User’s Guide > “Scanning” >
“Installing Scanner Drivers (TWAIN/WIA/ICA Driver)”.
For the procedure for the function, refer to the User’s Guide > “Scanning” > “Remote
Scan”.
4
Scanning
●● Scanning to E-mail
This section explains the initial setup and basic procedure for the Scan to E-mail function.
This function enables you to scan documents and send the scanned images as an attached le of an
E-mail to the specied E-mail address on the network.
Be sure to nish the initial setup before using this function.
Initial Setup for Scan to E-mail
This section explains how to congure the initial
setup for the Scan to E-mail function. Follow the
2 steps below:
● “Step 1 Conguring the Network Settings of
Your Machine” P.51
● “Step 2 Conguring the E-mail Settings of
Your Machine” P.56
Note
● You need to complete the network setting of the computer
before this procedure.
Memo
● You can skip step 1 if the IP address is already set on your
machine.
Step 1 Conguring the Network
Settings of Your Machine
Connect your machine to a network with an Ethernet
cable or Wireless LAN connection (MC342dw,
MC362w, MC562w, MC562dw, ES5462dw MFP,
MPS2731mc only), and then congure the machine’s
IP address and other network information from the
operator panel. You can set the IP address either
manually or automatically.
If there is no DHCP server or BOOTP server on
the network, you need to manually congure the
IP address on the computer or machine.
If your network administrator or internet
service provider species a unique IP address
for the computer and your machine, set the IP
addresses manually.
Note
● When setting an IP address manually, ask the network
administrator or your internet service provider which IP
address to use. If the IP address is set incorrectly, the
network may go down or Internet access may be disabled.
● Conform the IP version of the machine to that of your
computer.
● Set [TCP/IP] setting to [Enable] on your machine. (By
factory default, it is set to [Enable].)
- 51 -
Page 52

Scanning to E-mail
Memo
● If conguring a small network consisting of only your
machine and a computer, set IP addresses as shown
below (according to RFC1918).
For the computer
IP address : 192.168.0.1~254
Subnet mask : 255.255.255.0
Default gateway : not used
DNS server : not used
For the machine
IP Address Set : Manual
IPv4 Address : 192.168.0.1~254
Subnet Mask : 255.255.255.0
4
Scanning
Gateway Address : 0.0.0.0
Network Scale : Small
● To set [Network Scale], press the <SETTING> key
and then select [Admin Setup] > [Network Menu] >
[Network Setup] > [Network Scale].
(select a different value
from the computer)
Connecting using wired LAN
Prepare an Ethernet cable and a hub.
1
Prepare an Ethernet cable (category 5, twisted
pair, straight) and a hub separately.
3 Plug one end of the Ethernet cable into
the network interface connection on the
back of the machine.
4 Plug the other end of the Ethernet cable
into the hub.
2 Hold down the power switch for
approximately one second to turn off the
power.
5 Hold down the power switch for
approximately one second to turn on the
power.
- 52 -
Page 53

Scanning to E-mail
Connecting using wireless LAN
(MC342dw, MC362w, MC562w, MC562dw,
ES5462dw MFP, MPS2731mc only)
Use the WPS (push button) function to set the
wireless LAN. For details on other methods
for setting the wireless LAN, refer to the
Conguration Guide.
1 Press the <SETTING> key on the operator
panel.
2 Press the to select [Wireless Setting],
and then press the
.
3 Log in by entering administrator password
of the device.
Use , , , key to select letter and then
Default administrator password is “aaaaaa”.
press
OK
.
6 Press the to select [Yes], and then
press
● Start the WPS push button for wireless AP after clicking
● If [No] is selected, the screen returns to that from
OK
.
Memo
[Yes] in the conrmation screen. Alternatively, if WPS
push button for wireless AP is started rst, start the
WPS push button on this equipment.
step 5.
7 If [Yes] is selected in step 6, [Running
pushbutton method...] is displayed in
the screen.
4
Scanning
The message below will be displayed for
about 5 seconds.
4 Check that [Automatic setup (WPS)]
is selected, and then press the
.
Note
● Panel operations cannot be performed during WPS
execution.
● When [WPS connection successful] is displayed,
this equipment is connected to the wireless LAN.
Memo
● If [Connection failed Timeout] is displayed, it
is possible that the wireless AP of the connection
destination could not be found within the time limit.
Select [Yes] again in step 6 within 2 minutes of
starting WPS push button for wireless AP.
5 Press the to select [WPS-PBC], and
then press OK.
● If [Overlap] is displayed, WPS-push button is being
executed on 2 or more wireless AP. Please wait for a
short time and then retry.
- 53 -
Page 54

Scanning to E-mail
Setting the IP address
Press the <SETTING> key on the
1
operator panel.
4
2 Press the to select [Easy Setup], and
Scanning
press
OK
.
b Repeat step a until all characters
required are entered.
c Press the and to select [Enter]
and press
OK
.
4 Press the to select [Network
Setting], and then press the .
5 If setting the IP address manually, check
that [Manual] is selected, and press OK.
3 Enter the administrator password.
The factory default password is “aaaaaa”.
a Press , , , to select the
character you want, and then
press
- The selected character is entered as “*” in
the text eld.
- If you have entered an incorrect value,
press the <CLEAR> key and then enter
the correct value.
OK
.
If obtaining the IP address automatically, press
the to select [Auto], and press OK. Proceed to
step 10.
6 Enter the IP address using the ten-key
pad, and press OK.
To move to the next box, press the .
- 54 -
7 Enter the subnet mask using the ten-key
pad, and press OK.
To move to the next box, press the .
8 Enter the default gateway address using
the ten-key pad, and press OK.
To move to the next box, press the .
Page 55

Scanning to E-mail
9 Enter the DNS server and WINS server if
needed.
If it is not necessary to connect the DNS server
or WINS server to the network, press
pop-up message showing setting completion is
displayed.
OK
until the
10 When the setup menu screen is
displayed, press
setup.
to complete the
11 For the conrmation message, check
that [Yes] is selected and press OK.
◆ Print the Network Information to check that
the IP address and other network information
are properly set.
1 Press the <SETTING> key on the
operator panel.
2 Check that [Reports] is selected and
OK
press
.
3 Press the to select [System] and
press OK.
4 Press the to select [Network
Information] and press OK.
4
Scanning
5 For the conrmation message, check
OK
that [Yes] is selected and press
The Network Information is printed.
.
- 55 -
Page 56

Scanning to E-mail
Step 2 Conguring the E-mail Settings of Your Machine
To congure the E-mail Settings of your machine, follow the 3 sub steps below:
● “Step 2-1 Checking the E-mail Settings of the Computer” P.56
● “Step 2-2 Setting the E-mail Address for Your Machine” P.57
● “Step 2-3 Conguring Your Machine’s E-mail Settings” P.57
Check the values for each item in the Setup Information Form through the above steps.
Setup Information Form
No. Item Outline Introduction Example
4
B-1 E-mail address for
Scanning
your machine
B-2 SMTP server address The address of the server used
B-3 POP3 server address The address of the server used
B-4 Authentication
method
B-5 SMTP user ID Sending mail server account name OKIMC562
B-6 SMTP password Sending mail server password okimc562
B-7 POP user ID Receiving mail server account name user
B-8 POP password Receiving mail server password okimc562
B-9 Name of the E-mail
destination
B-10
E-mail address of the
E-mail destination
The E-mail address used when
sending E-mails from the machine
when sending e-mails
when receiving e-mails
Sending mail server authentication SMTP
The name of the recipient to whom
you are sending a scan-to-mail from
the machine
The E-mail address of the recipient
to whom you are sending a scan-tomail from the machine
mc362@test.
com
smtp.test.com
pop3.test.com
User
user@test.com
User Value
* You can look at the following pages
and make notes on the details you
have checked or the settings you
have congured.
(Up to 80 characters)
Step 2-1 Checking the E-mail
Settings of the Computer
Note
● If a network administrator species values such as mail
server account, password and E-mail address for your
machine, enter them in the Setup Information Form.
Memo
● The procedure below uses Windows Live Mail on Windows
7. If you are using different mail software, refer to the
manual for the E-mail software.
1 Click [Start] and select [Windows Live
Mail].
2 Select the [Tools] menu > [Accounts].
If the menu bar is not displayed, click the
[Menus] icon and then select [Show menu
bar].
3 Select the mail account and then click
[Properties].
- 56 -
Page 57

Scanning to E-mail
4 On the [General] tab, enter the
contents of [Name] and [E-mail
address] in B-9 and B-10 of the Setup
Information Form.
B-9
B-10
5 Click the [Servers] tab, and then
note each setting in the corresponding
columns of the Setup Information Form.
B-3
B-2
B-7
B-8
7 Check the login information on the
[Outgoing Mail Server] dialog box.
- If [Use same settings as my incoming
mail server] is selected, enter the same
values as B-7 and B-8 on B-5 and B-6.
- If [Log on using] is selected, note
the content of [Account name] and
[Password] in B-5 and B-6, respectively.
Step 2-2 Setting the E-mail
Address for Your Machine
When sending data scanned from the
machine by an E-mail, the E-mail address for
the machine is necessary. According to the
following procedure, set the E-mail address for
the machine and enter it in B-1 of the Setup
Information Form.
● If the E-mail address for your machine is
specied by the network administrator, enter
the E-mail address in B-1.
● If you are using an internet service provider,
obtain an E-mail address for your machine
from the provider and then enter the E-mail
address in B-1.
4
Scanning
- If there is a check in the [My server
requires authentication] checkbox,
enter “SMTP” into B-4 and follow
procedure 6.
- If there is no check in the [My server
requires authentication] checkbox,
enter [POP or not yet authenticated]
in B-4. At this point the conrmation of
E-mail settings is complete.
Note
● If using an internet service provider, enter [POP].
6 Click [Settings].
● If the E-mail address for your machine is
neither specied nor obtained, determine the
E-mail address according to the value you
entered in B-4 (authentication method):
- If B-4 is “SMTP”, determine an E-mail
address and enter it in B-1.
- If B-4 is “POP”, enter the same E-mail
address as B-10 in B-1.
Note
● If you want your machine to receive E-mail, you must
obtain an E-mail address for your machine from a network
administrator or your internet service provider.
Step 2-3 Conguring Your
Machine’s E-mail Settings
Set up your machine’s E-mail settings using the
information in the Setup Information Form.
- 57 -
Page 58

Scanning to E-mail
1 Press the <SETTING> key on the
operator panel.
2 Press the to select [Easy Setup] and
press OK.
4
Scanning
3 Enter the administrator password.
The factory default password is “aaaaaa”.
a Press , , , to select the
character you want, and then
press OK.
c Press the and to select [Enter]
and press
OK
.
4 Press the to select [E-mail Setting]
and then press the .
5 Press the and then enter the
information in B-2.
6 Select [Enter] and then press
OK
.
7 Press the and then enter the
information in B-1.
8 Select [Enter] and then press
OK
.
9 Press the and then select a protocol
for receiving E-mail for the machine, and
then press OK.
- If you want your machine to receive
E-mail from the POP3 server, select
[POP3]. Proceed to step 10.
- The selected character is entered as “*” in
the text eld.
- If you have entered an incorrect value,
press the <CLEAR> key and then enter
the correct value.
- If you want your machine to receive
E-mail without using a mail server, select
[SMTP]. Proceed to step 12.
- If you do not want your machine to
receive E-mail, select [Disable]. Proceed
to step 12.
10 Press the and then enter the
information in B-3.
11 Select [Enter] and then press
12 Press the and then select an
authentication method based on the
information in B-4. Then, press OK.
- If B-4 is “Do not authenticate”, select [No
Authentication]. Proceed to step 21.
- If B-4 is “SMTP”, select [SMTP Auth].
Proceed to step 13.
- If B-4 is “POP”, select [POP Before
SMTP]. Proceed to step 17.
OK
.
b Repeat step a until all characters
required are entered.
- 58 -
13 Press the and then enter the
information in B-5.
14 Select [Enter] and then press
OK
.
Page 59

Scanning to E-mail
15 Press the and then enter the
information in B-6.
16 Select [Enter] and then press
Proceed to step 21.
17 Press the and then enter the
information in B-7.
18 Select [Enter] and then press
19 Press the and then enter the
information in B-8.
20 Select [Enter] and then press
21 When the setup menu screen is
displayed, press .
Procedure of Scan to E-mail
OK
.
OK
.
OK
.
This section explains how to start Scan to
E-mail. The following procedure uses the direct
input method for specifying a destination.
You need to congure the initial network and
E-mail settings before using the Scan to E-mail
function.
Memo
● The following procedure uses the factory default settings.
1 Press the <SCAN> key on the operator
panel.
4
Scanning
22 For the conrmation message, check
that [Yes] is selected and press OK.
The setup for Scan to E-mail is complete.
2 Place your document in the ADF or on
the document glass as below:
● ADF
Load documents face up with the top edge of the
documents in rst.
Adjust the document guides to the width of your
documents.
- 59 -
Page 60

Scanning to E-mail
4
Scanning
● Document Glass
Place a document face down and align its top
edge to the upper-left corner of the glass.
Close the document glass cover gently.
Note
● Do not apply an excessive load to the document
glass.
7 Enter a destination E-mail address up to
80 characters.
a Press , , , to select the
character you want, and then
press OK.
The selected character is entered in the text
eld.
Memo
● The machine prioritizes the ADF when scanning
documents. Be sure not to place documents on the
ADF when you use the document glass.
Note
● If Carriage Error <02> is displayed, press Power
OFF/ON.
3 Check that [E-mail] is selected and then
press OK.
4 Check that [Add Destination] is
selected and then press OK.
If you have entered an incorrect value, press
the <CLEAR> key and then enter the correct
value.
b Repeat step a until all characters
required are entered.
c Press the and to select [Enter]
and press OK.
8 If necessary, select [Cc] or [Bcc] and
repeat steps 6 and 7.
9 Press the to return to start screen.
10 Press
Reference
● In addition to inputting the destination directly, you can
use the address book, group list, E-mail histories, LDAP
search, or One-Touch key pad to specify the destination.
For details, refer to the User’s Guide > “Scanning” >
“Scan to E-mail”.
● To load a landscape document, refer to the User’s Guide >
“Operation” > “Loading document(s)”.
MONO
or
COLOR
.
5 Check that [To] is selected and then
press OK.
6 Press the to select [Direct Input] and
then press OK.
- 60 -
Page 61

Scanning to Shared Folder
●● Scanning to Shared Folder
This section explains the initial setup and basic procedure for the Scan to Shared Folder function.
This function enables you to scan documents and save the scanned images to the “shared folder” of a
computer on the network.
Be sure to nish the initial setup before using this function.
Initial Setup for Scan to Shared Folder
This section explains how to congure the initial
setup for the Scan to Shared Folder function.
Follow the 2 steps below:
● “Step 1 Conguring the Network Settings of
Your Machine” P.61
● “Step 2 Setting Up Your Computer and
Machine for Scan to Shared Folder” P.65
Note
● You need to congure the network setting of the computer
before this procedure.
Memo
● You can skip step 1 if the IP address is already set on your
machine.
Step 1 Conguring the Network
Settings of Your Machine
Connect your machine to a network with an
Ethernet cable or Wireless LAN connection
(MC342dw, MC362w, MC562w, MC562dw,
ES5462dw MFP, MPS2731mc only), and then
congure the machine’s IP address and other
network information from the operator panel.
You can set the IP address either manually or
automatically.
Memo
● If conguring a small network consisting of only your
machine and a computer, set IP addresses as shown
below (according to RFC1918).
For the computer
IP address : 192.168.0.1~254
Subnet mask : 255.255.255.0
Default gateway : not used
DNS server : not used
For the machine
IP Address Set : Manual
IPv4 Address : 192.168.0.1~254
Subnet Mask : 255.255.255.0
Gateway Address : 0.0.0.0
Network Scale : Small
● To set [Network Scale], press the <SETTING> key
and then select [Admin Setup] > [Network Menu] >
[Network Setup] > [Network Scale].
(select a different value
from the computer)
Connecting using wired LAN
Prepare an Ethernet cable and a hub.
1
Prepare an Ethernet cable (category 5, twisted
pair, straight) and a hub separately.
4
Scanning
If there is no DHCP server or BOOTP server on
the network, you need to manually congure the
IP address on the computer or machine.
If your network administrator or internet
service provider species a unique IP address
for the computer and your machine, set the IP
addresses manually.
Note
● When setting an IP address manually, ask the network
administrator or your internet service provider which IP
address to use. If the IP address is set incorrectly, the
network may go down or Internet access may be disabled.
● Conform the IP version of the machine to that of your
computer.
● Set [TCP/IP] setting to [Enable] on your machine. (By
factory default, it is set to [Enable].)
2 Hold down the power switch for
approximately one second to turn off the
power.
- 61 -
Page 62

Scanning to Shared Folder
3 Plug one end of the Ethernet cable into
the network interface connection on the
back of the machine.
4
Scanning
4 Plug the other end of the Ethernet cable
into the hub.
Connecting using wireless LAN
(MC342dw, MC362w, MC562w, MC562dw,
ES5462dw MFP, MPS2731mc only)
Use the WPS (push button) function to set the
wireless LAN. For details on other methods
for setting the wireless LAN, refer to the
Conguration Guide.
1 Press the <SETTING> key on the operator
panel.
2 Press the to select [Wireless Setting],
and then press the
.
3 Log in by entering administrator password
of the device.
Use , , , key to select letter and then
Default administrator password is “aaaaaa”.
press
OK
.
5 Hold down the power switch for
approximately one second to turn on the
power.
The message below will be displayed for
about 5 seconds.
4 Check that [Automatic setup (WPS)]
is selected, and then press the
.
5 Press the to select [WPS-PBC], and
OK
then press
.
- 62 -
Page 63

Scanning to Shared Folder
6 Press the to select [Yes], and then
press
● Start the WPS push button for wireless AP after clicking
● If [No] is selected, the screen returns to that from
OK
.
Memo
[Yes] in the conrmation screen. Alternatively, if WPS
push button for wireless AP is started rst, start the
WPS push button on this equipment.
step 5.
7 If [Yes] is selected in step 6, [Running
pushbutton method...] is displayed in
the screen.
Setting the IP address
Press the <SETTING> key on the
1
operator panel.
2 Press the to select [Easy Setup], and
press
OK
.
4
Scanning
Note
● Panel operations cannot be performed during WPS
execution.
● When [WPS connection successful] is displayed,
this equipment is connected to the wireless LAN.
Memo
● If [Connection failed Timeout] is displayed, it
is possible that the wireless AP of the connection
destination could not be found within the time limit.
Select [Yes] again in step 6 within 2 minutes of
starting WPS push button for wireless AP.
3 Enter the administrator password.
The factory default password is “aaaaaa”.
a Press , , , to select the
character you want, and then
press OK.
- The selected character is entered as “*” in
the text eld.
- If you have entered an incorrect value,
press the <CLEAR> key and then enter
the correct value.
● If [Overlap] is displayed, WPS-push button is being
executed on 2 or more wireless AP. Please wait for a
short time and then retry.
- 63 -
Page 64

Scanning to Shared Folder
b Repeat step a until all characters
required are entered.
c Press the and to select [Enter]
and press
OK
.
4 Press the to select [Network
Setting], and then press the .
4
5 If setting the IP address manually, check
Scanning
that [Manual] is selected, and press OK.
9 Enter the DNS server and WINS server if
needed.
If it is not necessary to connect the DNS server
or WINS server to the network, press
pop-up message showing setting completion is
displayed.
OK
until the
10 When the setup menu screen is
displayed, press
setup.
to complete the
11 For the conrmation message, check
that [Yes] is selected and press OK.
◆ Print the Network Information to check that
the IP address and other network information
are properly set.
If obtaining the IP address automatically, press
the to select [Auto], and press OK. Proceed to
step 10.
6 Enter the IP address using the ten-key
pad, and press OK.
To move to the next box, press the .
7 Enter the subnet mask using the ten-key
pad, and press OK.
To move to the next box, press the .
1 Press the <SETTING> key on the
operator panel.
2 Check that [Reports] is selected and
press OK.
3 Press the to select [System] and
press OK.
4 Press the to select [Network
Information] and press OK.
5 For the conrmation message, check
that [Yes] is selected and press OK.
The Network Information is printed.
8 Enter the default gateway address using
the ten-key pad, and press OK.
To move to the next box, press the .
- 64 -
Page 65

Scanning to Shared Folder
Step 2 Setting Up Your Computer and Machine for Scan to Shared Folder
To setup your computer and machine for Scan to Shared Folder, follow the 4 sub steps below:
● “Step 2-1 Checking the Name of the Computer” P.65
● “Step 2-2 Determining the Names of the Items Required for Scan to Shared Folder” P.66
● “Step 2-3 Conguring the Computer for Scan to Shared Folder” P.67
● “Step 2-4 Creating a Prole for Scan to Shared Folder” P.74
Check the values for each item in the Setup Information Form through the above steps.
Setup Information Form
User Value
No. Item Outline Introduction Example
C-1 Name of the
destination computer
C-2 User name to log
into the destination
computer
C-3 Password to log
into the destination
computer
C-4 Prole name to
register the settings
C-5 Shared folder name
on the destination
computer
C-6 File name of the
scanned data
The name of the computer to which
you are forwarding scanned data
User name to log in to the computer
to which you are forwarding scanned
data
Password to log in to the computer
to which you are forwarding scanned
data
Name when registering a prole on
the machine
Folder name of the computer to
which you are forwarding scanned
data
Scanned data le name ScanData (Up to 64 characters)
PC1
mc562 (Up to 32 characters)
mc562 (Up to 32 characters)
Sales (Up to 16 characters)
SalesDev (Up to 64 characters)
* You can look at the following pages
and make notes on the details you
have checked or the settings you
have congured.
4
Scanning
Note
● Before starting the setup, obtain permission from the network administrator to create a shared folder on the computer by
following the procedure below.
Memo
● The CIFS protocol is used in this procedure.
Step 2-1 Checking the Name of
the Computer
Check the name of the computer following the
procedure below, and ll in C-1 of the Setup
Information Form.
3 Select [See the name of this
computer] under [System].
4 Enter the name in [Computer name] in
C-1 of the Setup Information Form.
For Windows 8, Windows Server
2012, Windows 7, Windows Server
2008 R2, Windows Server 2008 and
Windows Vista
1 Click [Start] and select [Control
Panel].
C-1
2 Select [System and Security].
For Windows Server 2008 and Windows Vista,
select [System and Maintenance].
5 Close the window.
- 65 -
Page 66

Scanning to Shared Folder
For Windows Server 2003 and
Windows XP
1 Click [start] > [Control Panel] >
[Performance and Maintenance] >
[System].
For Windows Server 2003, click [Start] >
[Operator panel] > [System].
2 Select the [Computer Name] tab and
then click [Change].
3 Enter the name in [Computer Name] in
C-1 of the Setup Information Form.
4
4 Click [Cancel] to close the window.
Scanning
For Mac OS X
1 From the Apple menu, select [System
Preferences].
2 Click [Sharing].
3 Enter the name in [Computer Name] in
C-1 of the Setup Information Form.
Step 2-2 Determining the Names
of the Items Required for Scan to
Shared Folder
Determine the names of the following items and
ll in C-2 to C-6 on the Setup Information Form.
● User name to log into the destination computer (C-2)
Note
● If the username is managed on the domain,
enter “Username@Domainname” in C-2. To check
the domain name, click on [Change] within the
[Computer Name] tab in the [System Properties]
dialog box.
● Password to log into the destination computer
(C-3)
● Prole name to register the settings on your
machine (C-4)
● Shared folder name on the destination
computer (C-5)
● File name of the scanned data (C-6)
“#n” or #d” can be specied for the le name.
- When specifying “#n”: 5-digit serial
number between 00000 to 99999
- When specifying “#d”: Date and time
when a le is created. 12 digits of
yymmddhhmmss.
Memo
● If the computer name is over 16 characters, for
Mac OS X 10.4.11 enter the rst 15 characters in
C-1. For Mac OS X 10.5-10.7, select the network
service you are using from [System Preferences] >
[Network], and click [Advanced]. Click the [WINS]
tab, and enter the name in [NetBIOS Name] into
C-1.
4 Close [Sharing].
C-1
yy: Year created (the last 2 digits of the
Christian Era)
mm: Month created (01 to 12)
dd: Date created (01 to 31)
hh: Hours created (00 to 23)
mm: Minute created (00 to 59)
ss: Second created (00 to 59)
* A date and time when a le is created are values of the
timer of the machine.
Example of le name specication (when the le
format is PDF)
- When specifying “Data#n”: Saved as
le names such as “Data00000.pdf” and
“Data00001.pdf”,etc.
- When specifying “File#d”: saved as le
names “File090715185045.pdf”, etc.
- When specifying “Scan”: “Scan.pdf” is
created rst, and then, data is saved with
the name of ”Scan#d.pdf”.
For “#d”, refer to the above.
- When nothing is specied: “Image.pdf” is
created rst and then, data is saved with
the name of “Image#d.pdf”.
For “#d”, refer to the above.
- 66 -
Page 67

Scanning to Shared Folder
Step 2-3 Conguring the
Computer for Scan to Shared
Folder
With the Setup Information Form, create an
account and shared folder for the machine in the
computer.
Memo
● If the computer is in a domain, the procedure for adding a
user account may differ from the procedure below. Refer
to the Microsoft Windows manual.
For Windows 8, Windows Server
2012, Windows 7, Windows Server
2008 R2, Windows 2008 and
Windows Vista
1 Click [Start] > [Control Panel].
2 Select [Add or remove user
accounts].
3 Select [Create a new account].
4 Enter the information in C-2 in the text
box.
8 Enter the information in C-3 in [New
password] and [Conrm new
password], and then click [Create
password].
4
Scanning
9 Close the Control Panel.
10 Create a new folder on the computer
with the name entered in C-5.
Memo
● It is recommended that the folder be created in the
local drive (C drive or D drive), not on the desktop,
[Documents], or network drive.
5 Ensure that [Standard user] is
selected, and then click [Create
Account].
6 Click the icon of the user account
created in step 5.
7 Select [Create a password].
11 Right-click the folder created in step 10
and select [Properties].
12 Select the [Sharing] tab and then click
[Share].
- 67 -
Page 68

Scanning to Shared Folder
13 Select the user account created in step 5
from the drop down box, and then click
[Add].
4
14 Check that the user added in step 13 is
Scanning
displayed and then click [Share].
18 Click [Add].
19 Enter the value in C-2 in the entry eld
and then click [OK].
After the [Network discovery and le sharing]
dialog box is displayed, click [No, make the
network that I am connected to a private
network].
15 Click [Done].
16 Click [Advanced Sharing] on the
[Sharing] tab.
17 Click [Permissions].
20 Select the user added in step 13 and
select the [Allow] checkbox for [Full
Control], and then click [OK].
21 Click [OK].
22 Click [Close].
Proceed to “Step 2-4 Creating a Prole for Scan
to Shared Folder” P.74.
For Windows XP
For Windows Vista/Windows Server 2008,
proceed to step 20.
1 Click [start] > [Control Panel].
2 Double-click [User Accounts].
3 Select [Create a new account].
- 68 -
Page 69

Scanning to Shared Folder
4 Enter the value of C-2 in the text box
and click [Next].
5 Select [Limited] and click [Create
Account].
11 Right-click the folder created in step
10, and then select [Sharing and
Security].
12 Click [If you understand the security
risks but want to share les without
running the wizard, click here.].
4
Scanning
If the screen below is displayed, select [Share
this folder] and click [Permissions]. Proceed to
step 15.
6 Click the icon of the user account
created in step 5.
7 Select [Create a password].
8 Enter the value of C-3 in [Type a
new password] and [Type the new
password again to conrm], and then
click [Create Password].
13 Select [Just enable le sharing] in
Windows Firewall, and then click [OK].
9 Close the Control Panel.
10 Create a new folder on the computer
with the name entered in C-5.
Memo
● It is recommended that the folder be created in the
local drive (C drive or D drive), not on the desktop,
[My Documents], or network drive.
- 69 -
Page 70

Scanning to Shared Folder
14 Select the [Share this folder on the
network] and [Allow network users
to change my les] checkbox, and
then click [OK].
4
Proceed to “Step 2-4 Creating a Prole for Scan
Scanning
to Shared Folder” P.74.
15 Click [Add].
17 Select the [Allow] checkbox for [Full
Control], and then click [OK].
Proceed to “Step 2-4 Creating a Prole for Scan
to Shared Folder” P.74.
For Windows Server 2003
Memo
● The items here may differ depending on the edition you
are using.
1
Click [Start] > [Administrative Tools] >
[Computer Management].
16 Enter the value in C-2 in the entry eld
and click [OK].
2 In the right window, double-click
[System Tools] > [Local Users and
Groups], and then right-click [Users]
and select [New User].
3 Enter the value of C-2 in [User name]
and the value of C-3 in [Password] and
[Conrm password].
- 70 -
Page 71

Scanning to Shared Folder
4 Select [User can not change
password] and [Password never
expires], and then click [Create].
Memo
● If [User must change password at next logon]
is selected, deselect so that you can select [User
can not change password] and [Password never
expires].
5 Click [Close].
6 Double-click [User] and check that the
user created in step 4 is displayed.
7 Close the window.
8 Create a new folder on the computer
with the name entered in C-5.
Memo
● It is recommended that the folder be created in the
local drive (C drive or D drive), not on the desktop,
[My Documents], or network drive.
9 Right-click the folder created in step 8
and then select [Sharing].
10 Select [Share this folder] and then
click [Permissions].
12 Enter the value in C-2 in the entry eld
and click [OK].
13 Select the [Allow] checkbox for [Full
Control], and then click [OK].
4
Scanning
14 Ensure that the icon of the shared folder
created in step 8 changes into the icon
with a hand, and then close the window.
Proceed to “Step 2-4 Creating a Prole for Scan
to Shared Folder” P.74.
11 Click [Add].
For Mac OS X 10.5 to 10.7
1 From the Apple menu, select [System
Preferences].
2 Click [Users & Groups] (for Mac OS X
10.5 and 10.6: [Accounts]).
3 Click [Click the lock to make
changes.] at the bottom left of the
screen and enter the administrator’s
password. Then, click [Unlock] (for Mac
OS X 10.5 and 10.6: [OK]).
4 Click [+].
- 71 -
Page 72

Scanning to Shared Folder
5 Select [Standard] from [New
Account].
6 Enter the value of C-2 in [Full Name].
For Mac OS X 10.5, enter the value of C-2 in
[Name].
4
7 Enter the value in C-3 in both
Scanning
[Password] and [Verify].
8 Click [Create User] (for Mac OS X 10.5
and 10.6: [Create Account]).
Memo
● After the dialog box for auto login, disable the auto
login.
13 Select the checkbox for [File Sharing].
14 Click [+] under [Shared Folders].
15 Select the folder created in step 10 and
click [Add].
16 Select the folder added in step 15 and
click [+] under [Users].
9 Check that an account is added to
[Other Users] (for Mac OS X 10.5 and
10.6: [Other Accounts]) with the name
of C-2, and close [Users & Groups] (for
Mac OS X 10.5 and 10.6: [Accounts]) .
10 Create a new folder on the computer
with the name entered in C-5.
11 From the Apple menu, select [System
Preferences].
17 Select the account created in step 8 and
click [Select].
12 Click [Sharing].
- 72 -
Page 73

Scanning to Shared Folder
18 Click the triangle button at the right side
of the user added in step 17 and select
[Read & Write].
19 Click [Options].
20 Select the checkbox for [Share les
and folders using SMB (Windows)].
For Mac OS X 10.5, select the checkbox for
[Share les and folders using SMB].
For Mac OS X 10.3.9 to 10.4.11
Memo
● The following procedure uses Mac OS X 10.4.11 as an
example. The description may differ depending on the OS.
1 From the Apple menu, select [System
Preferences].
2 Click [Accounts].
3 Click [Click the lock to make
changes.] at the bottom left of the
screen and enter the administrator’s
password. Then, click [OK].
4 Click [+].
4
Scanning
21 Select the checkbox for the account
added in the step 16.
22 Enter the value of C-3 in [Password]
and click [OK].
23 Click [Done].
24 Close [Sharing].
Proceed to “Step 2-4 Creating a Prole for Scan
to Shared Folder” P.74.
5 Enter the value of C-2 in [Name].
6 Enter the value in C-3 in both
[Password] and [Verify].
7 Click [Create Account].
Memo
● After the dialog box for auto login, disable the auto
login.
- 73 -
Page 74

Scanning to Shared Folder
8 Check that an account is added to
[Other Accounts] with the name of
C-2, and close [Accounts].
4
Scanning
9 Create a new folder on the computer
with the name entered in C-5.
10 From the Apple menu, select [System
Preferences].
15 Enter the value in C-3 in [Password]
and click [OK].
16 Click [Done].
17 Close [Sharing].
Proceed to “Step 2-4 Creating a Prole for Scan
to Shared Folder” P.74.
Step 2-4 Creating a Prole for
Scan to Shared Folder
Register the information on the Setup
Information Form on the machine as a prole. It
is necessary to specify the prole to send data
when you perform Scan to Shared Folder with
the computer.
11 Click [Sharing].
12 Select the checkbox of [Windows
Sharing].
13 Click [Accounts...].
14 Select the checkbox for the account
created in the step 7.
1 Press the <SETTING> key on the
operator panel.
2 Press the to select [Prole] and then
press OK.
3 Press the to select the prole number
you want to register and then press OK.
- 74 -
4 Check that [Register] is selected and
then press
OK
.
5 Check that [Prole Name] is selected
and then press the .
6 Enter the information in C-4.
Page 75

Scanning to Shared Folder
a Press , , , to select the
character you want, and then
press OK.
- The selected character is entered in the
text eld.
- If you have entered an incorrect value,
press the <CLEAR> key and then enter
the correct value.
11 Enter the information in C-2.
Note
● If domain management is done, enter “C-2@domain
name”.
● When carrying out domain management, if
you cannot connect even after entering “C-2@
Domainname”, delete “@Domainname”.
Access the machine’s website again, and set the
NetBIOS domain name in [Workgroup Name]
within [Admin Setup] > [Network] > [NBT/
NetBEUI].
*For the domain name, please check with the
network manager.
12 Select [Enter] and then press
OK
.
13 Press the to select [Password] and
then press .
14 Enter the value of C-3.
15 Select [Enter] and then press
OK
.
16 Press the to select [File Name] and
then press .
4
Scanning
b Repeat step a until all characters
required are entered.
c Press the and to select [Enter]
and press OK.
7 Press the to select [Target URL] and
then press .
8 Enter the value of C-1 and C-5 as
“\\C- 1\C-5”.
Example: \\PC1\SalesDev
Note
● If there is no DNS server on the network, you cannot
specify the computer by using the computer name
(C-1). In such a case, you can congure the settings
by using the computer’s IP address.
17 Enter the information in C-6.
18 Select [Enter] and then press
OK
.
19 Congure other items if necessary.
20 Press
The setup for Scan to Shared Folder is complete.
OK
to register the settings.
Example: \\192.168.0.3\SalesDev
Memo
● In order to enter the “\” sign while using a QWERTY
keyboard, press <CTRL> and then press <\>.
9 Select [Enter] and then press
OK
.
10 Press the to select [User Name] and
then press .
- 75 -
Page 76

Scanning to Shared Folder
Procedure for Scan to Shared Folder
This section explains how to start Scan to
Shared Folder.
You need to congure the initial settings before
using the Scan to Shared Folder function.
Memo
● The following procedure uses the factory default settings.
1 Press the <SCAN> key on the operator
panel.
4
Scanning
Note
● Do not apply an excessive load to the document
glass.
Memo
● The machine prioritizes the ADF when scanning
documents. Be sure not to place documents on the
ADF when you use the document glass.
Note
● If Carriage Error <02> is displayed, press Power
OFF/ON.
3 Press the to select [Shared Folder]
and then press OK.
2 Place your document in the ADF or on
the document glass as below:
● ADF
Load documents face up with the top edge of the
documents in rst.
Adjust the document guides to the width of your
documents.
● Document Glass
Place the document face down and align its top
edge to the upper-left corner of the glass.
4 Check that [Select Prole] is selected
and then press OK.
5 Press the to select a prole and then
press OK.
6 Press
Reference
● To load a landscape document, refer to the User’s Guide >
“Operation” > “Loading document(s)”.
MONO
or
COLOR
.
Close the document glass cover gently.
- 76 -
Page 77

Scanning to Computer
●● Scanning to Computer
This section explains the initial setup and basic procedure for the Scan to Computer function.
This function enables you to scan documents to the computer via network or USB, and manipulate the
scanned images as necessary. You can start a scan job from the operator panel.
● For Windows
When you press the
the scanner driver. You can send the scanned document to a specied application, save it in a specied
folder, or send it by fax.
For the WSD Scan connection, you can specify the application to start and where to send and save the
scanned document for each destination.
● For Mac OS X
When you press the
the ICA driver. You can select a folder and save the scanned documents in it.
The machine can be connected to USB interface or network, but only a computer can be recognized at
the same time.
Be sure to nish the initial setup before using this function.
or
MONO
or
MONO
, the ActKey utility starts, and the scan job starts automatically using
COLOR
, Image Capture starts, and the scan job starts automatically using
COLOR
4
Scanning
Initial Setup for Scan to Computer
This section explains how to congure the initial
setup for the Scan to Computer function.
Refer to the procedure for the OS you are using.
● “For Windows” P.77
● “For Mac OS X” P.90
For Windows
Overview
Connecting Methods
You can select one of the following connection
methods:
● “For Network Connection” P.78
● “For USB Connection” P.83
● “For WSD Scan Connection” P.85
Product Requirements
Your machine supports the following Windows
operating systems.
For Network/USB Connection:
● Windows 8/Windows 8 (64bit Version)
● Windows Server 2012
● Windows 7/Windows 7 (64bit Version)
● Windows Vista/Windows Vista (64bit Version)
● Windows Server 2008 R2
● Windows Server 2008/Windows Server 2008
(x64 Version)
● Windows XP/Windows XP (x64 Version)
● Windows Server 2003/Windows Server 2003
(x64 Version)
For WSD Scan Connection:
● Windows 8/Windows 8 (64bit Version)
● Windows Server 2012
- 77 -
● Windows 7/Windows 7 (64bit Version)
● Windows Vista/Windows Vista (64bit Version)
● Windows Server 2008 R2
● Windows Server 2008/Windows Server 2008
(x64 Version)
Page 78

Scanning to Computer
For Network Connection
To congure the Scan to Computer function
via the network connection, follow the 2 steps
below:
● “Step 1 Conguring the Network Settings of
Your Machine” P.78
● “Step 2 Installing Driver and Software” P.82
Note
● You need to congure the network setting of the computer
before this procedure.
Memo
● You can skip step 1 if the IP address is already set on your
machine.
● You can skip step 2 if the scanner driver and ActKey are
4
Scanning
already installed on your computer.
Step 1 Conguring the Network
Settings of Your Machine
Connect your machine to a network with an
Ethernet cable or Wireless LAN connection
(MC342dw, MC362w, MC562w, MC562dw,
ES5462dw MFP, MPS2731mc only), and then
congure the machine’s IP address and other
network information from the operator panel.
You can set the IP address either manually or
automatically.
Memo
● If conguring a small network consisting of only your
machine and a computer, set IP addresses as shown
below (according to RFC1918).
For the computer
IP address : 192.168.0.1~254
Subnet mask : 255.255.255.0
Default gateway : not used
DNS server : not used
For the machine
IP Address Set : Manual
IPv4 Address : 192.168.0.1~254
(select a different value
from the computer)
Subnet Mask : 255.255.255.0
Gateway Address : 0.0.0.0
Network Scale : Small
● To set [Network Scale], press the <SETTING> key
and then select [Admin Setup] > [Network Menu] >
[Network Setup] > [Network Scale].
Connecting using wired LAN:
1 Prepare an Ethernet cable and a hub.
Prepare an Ethernet cable (category 5, twisted
pair, straight) and a hub separately.
If there is no DHCP server or BOOTP server on
the network, you need to manually congure the
IP address on the computer or machine.
If your network administrator or internet
service provider species a unique IP address
for the computer and your machine, set the IP
addresses manually.
Note
● When setting an IP address manually, ask the network
administrator or your internet service provider which IP
address to use. If the IP address is set incorrectly, the
network may go down or Internet access may be disabled.
● To congure the Scan to Computer function via the
network connection, follow these instructions.
- Conform the IP version of the machine to that of your
computer.
- Set [TCP/IP] setting to [Enable] on your machine.
(By factory default, it is set to [Enable].)
- Set [Network TWAIN] setting to [ON] on your
machine. (By factory default, it is set to [ON]. If
it has been disabled, enable it by referring to the
Conguration Guide > “Conguring the Scan to
Computer and Remote Scan” > “Using Functions for
Scan to Computer and Remote Scan” > “Enabling the
Network TWAIN Setting”.)
2 Hold down the power switch for
approximately one second to turn off the
power.
- 78 -
Page 79

Scanning to Computer
3 Plug one end of the Ethernet cable into
the network interface connection on the
back of the machine.
4 Plug the other end of the Ethernet cable
into the hub.
Connecting using wireless LAN
(MC342dw, MC362w, MC562w, MC562dw,
ES5462dw MFP, MPS2731mc only):
Use the WPS (push button) function to set the
wireless LAN. For details on other methods
for setting the wireless LAN, refer to the
Conguration Guide.
1 Press the <SETTING> key on the operator
panel.
2 Press the to select [Wireless Setting],
and then press the
.
3 Log in by entering administrator password
of the device.
Use , , , key to select letter and then
Default administrator password is “aaaaaa”.
press
OK
.
4
Scanning
5 Hold down the power switch for
approximately one second to turn on the
power.
The message below will be displayed for
about 5 seconds.
4 Check that [Automatic setup (WPS)]
is selected, and then press the
.
5 Press the to select [WPS-PBC], and
then press OK.
- 79 -
Page 80

Scanning to Computer
6 Press the to select [Yes], and then
press OK.
Memo
● Start the WPS push button for wireless AP after clicking
[Yes] in the conrmation screen. Alternatively, if WPS
push button for wireless AP is started rst, start the
WPS push button on this equipment.
● If [No] is selected, the screen returns to that from
4
7 If [Yes] is selected in step 6, [Running
Scanning
step 5.
pushbutton method...] is displayed in
the screen.
Setting the IP address:
1 Press the <SETTING> key on the
operator panel.
2 Press the to select [Easy Setup], and
press OK.
Note
● Panel operations cannot be performed during WPS
execution.
● When [WPS connection successful] is displayed,
this equipment is connected to the wireless LAN.
Memo
● If [Connection failed Timeout] is displayed, it
is possible that the wireless AP of the connection
destination could not be found within the time limit.
Select [Yes] again in step 6 within 2 minutes of
starting WPS push button for wireless AP.
3 Enter the administrator password.
The factory default password is “aaaaaa”.
a Press , , , to select the
character you want, and then
OK
press
- The selected character is entered as “*” in
the text eld.
- If you have entered an incorrect value,
press the <CLEAR> key and then enter
the correct value.
.
● If [Overlap] is displayed, WPS-push button is being
executed on 2 or more wireless AP. Please wait for a
short time and then retry.
- 80 -
Page 81

Scanning to Computer
b Repeat step a until all characters
required are entered.
c Press the and to select [Enter]
and press
OK
.
4 Press the to select [Network
Setting], and then press the .
5 If setting the IP address manually, check
that [Manual] is selected, and press OK.
9 Enter the DNS server and WINS server if
needed.
If it is not necessary to connect the DNS server
or WINS server to the network, press
pop-up message showing setting completion is
displayed.
OK
until the
10 When the setup menu screen is
displayed, press
setup.
to complete the
11 For the conrmation message, check
that [Yes] is selected and press OK.
◆ Print the Network Information to check that
the IP address and other network information
are properly set.
4
Scanning
If obtaining the IP address automatically, press
the to select [Auto], and press OK. Proceed to
step 10.
6 Enter the IP address using the ten-key
pad, and press OK.
To move to the next box, press the .
7 Enter the subnet mask using the ten-key
pad, and press OK.
To move to the next box, press the .
1 Press the <SETTING> key on the
operator panel.
2 Check that [Reports] is selected and
press OK.
3 Press the to select [System] and
press OK.
4 Press the to select [Network
Information] and press OK.
5 For the conrmation message, check
that [Yes] is selected and press OK.
The Network Information is printed.
8 Enter the default gateway address using
the ten-key pad, and press OK.
To move to the next box, press the .
- 81 -
Page 82

Scanning to Computer
Step 2 Installing Driver and Software
The following procedure installs a scanner driver
and ActKey at once.
1 Check that your machine and the
computer are turned on and connected,
and then insert the”Software DVD-ROM”
into the computer.
2 Click [Run Setup.exe] after [AutoPlay]
is displayed.
If the [User Account Control] dialog box is
displayed, click [Yes].
3 Select the language.
4
4 Select the device of your machine, and
Scanning
then click [Next].
7 Check that [Scanner driver] and
[ActKey] are selected, and then click
the Install bunch button.
Memo
● By default, [PCL driver], [Scanner driver], and
[ActKey] are selected. Deselect [PCL driver] if it is
unnecessary or has been installed on the computer
already.
8 If the [Windows Security] dialog box
is displayed, click [Install this driver
software anyway].
5 Read the license agreement and then
click [I Agree].
6 Read “Environmental advice for Users”
and click [Next].
9 Click the [Network] button.
The device search starts.
- If the machine is detected, it is
automatically installed. Proceed to step
11.
- If the machine is not detected, the
[Review your installation settings.]
screen is displayed. Proceed to step 10.
- 82 -
Page 83

Scanning to Computer
10 Click [Restart search] to restart the
device search.
After the machine is displayed, select the machine
and click [Next].
Memo
● If the machine is not displayed by clicking [Restart
search], select [Printer name/IP Address] and
enter the IP address assigned to your machine, and
then click [Next].
13 Remove the “Software DVD-ROM” from
the computer.
The installation is complete.
Reference
● When installing ActKey, Network Conguration is
also installed simultaneously. Network Conguration
automatically acquires the IP address of your machine
and network information (IP address, computer name,
port number) of the computer. If the IP address or other
settings of the machine or computer is changed, you
need to change the settings. For details, refer to the
Conguration Guide > “Conguring the Scan to Computer
and Remote Scan” > “Using Drivers and Software” >
“Using ActKey Software” > “Using Network Conguration”.
For USB Connection
To congure the Scan to Computer function via
the USB connection, install a scanner driver and
ActKey on the computer.
Memo
● You can skip this procedure if the scanner driver and
ActKey are already installed on your computer.
1 Prepare a USB cable.
A USB cable is not supplied with your machine.
Prepare a USB 2.0 cable separately.
4
Scanning
11 If the [Windows Security] dialog box
is displayed, click [Install this driver
software anyway].
12 Click the [Exit] button.
Memo
● Use a USB 2.0 Hi-Speed cable for a USB 2.0 Hi-
Speed connection.
2 Hold down the power switch for
approximately one second to turn off the
power.
- 83 -
Page 84

Scanning to Computer
3 Plug one end of the USB cable into the
USB interface connector on the back of
the machine.
4
4 Turn on the computer.
Scanning
5 Insert “Software DVD-ROM” into the
computer.
6 Click [Run Setup.exe] after [AutoPlay]
is displayed.
If the [User Account Control] dialog box is
displayed, click [Yes].
10 Read the “Environmental advice for
Users” and click [Next].
11 Check that [Scanner driver] and
[ActKey] are selected, and then click
the Install bunch button.
Memo
● By default, [PCL driver], [Scanner driver], and
[ActKey] are selected. Deselect [PCL driver] if it is
unnecessary or has been installed on the computer
already.
7 Select the language.
8 Select the device of your machine, and
then click [Next].
9 Read the license agreement and then
click [I Agree].
12 If the [Windows Security] dialog box
is displayed, click [Install this driver
software anyway].
- 84 -
Page 85

Scanning to Computer
13 When the instruction to connect the
machine to the computer and turn on
the machine is displayed, plug the other
end of the USB cable into the computer’s
USB interface connector and hold down
the power switch for approximately one
second to turn on the power.
For WSD Scan Connection
To congure the Scan to Computer via the WSD
Scan connection, follow the 2 steps below:
● “Step 1 Conguring the Network Settings of
Your Machine” P.85
● “Step 2 Installing Your Machine to the
Computer” P.89
Note
● You need to congure the network setting of the computer
before this procedure.
Memo
● You can skip the step 1 if the IP address is already set on
your machine.
Step 1 Conguring the Network
Settings of Your Machine
Connect your machine to a network with an
Ethernet cable or Wireless LAN connection
(MC342dw, MC362w, MC562w, MC562dw,
ES5462dw MFP, MPS2731mc only), and then
congure the machine’s IP address and other
network information from the operator panel.
You can set the IP address either manually or
automatically.
4
Scanning
Note
● Do not plug the USB cable into the network interface
connection. Doing so may damage your machine.
14 Click the [Exit] button.
15 Remove “Software DVD-ROM” from the
computer.
The installation is complete.
If there is no DHCP server or BOOTP server on
the network, you need to manually congure the
IP address on the computer or machine.
If your network administrator or internet
service provider species a unique IP address
for the computer and your machine, set the IP
addresses manually.
Note
● When setting an IP address manually, ask the network
administrator or your internet service provider which
IP address to use. If the IP address is set wrong, the
network may go down or Internet access may be disabled.
● To congure the Scan to Computer function via the WSD
Scan connection, follow these instructions.
- Conform the IP version of the machine to that of your
computer.
- Set [TCP/IP] setting to [Enable] on your machine.
(By factory default, it is set to [Enable].)
- Set [WSD Scan] setting to [Enable] on your
machine. (By factory default, it is [Enable]. If it
has been disabled, enable it by referring to the
Conguration Guide > “Conguring the Scan to
Computer and Remote Scan” > “Using Functions for
Scan to Computer and Remote Scan” > “Enabling the
WSD Scan”.)
- 85 -
Page 86

Scanning to Computer
Memo
● If conguring a small network consisting of only your
machine and a computer, set IP addresses as shown
below (according to RFC1918).
For the computer
IP address : 192.168.0.1~254
Subnet mask : 255.255.255.0
Default gateway : not used
DNS server : not used
For the machine
IP Address Set : Manual
IPv4 Address : 192.168.0.1~254
Subnet Mask : 255.255.255.0
4
Scanning
Gateway Address : 0.0.0.0
Network Scale : Small
● To set [Network Scale], press the <SETTING> key
and then select [Admin Setup] > [Network Menu] >
[Network Setup] > [Network Scale].
(select a different value
from the computer)
Connecting using wired LAN:
3 Plug one end of the Ethernet cable into
the network interface connection on the
back of the machine.
4 Plug the other end of the Ethernet cable
into the hub.
1 Prepare an Ethernet cable and a hub.
Prepare an Ethernet cable (category 5, twisted
pair, straight) and a hub separately.
2 Hold down the power switch for
approximately one second to turn off the
power.
5 Hold down the power switch for
approximately one second to turn on the
power.
- 86 -
Page 87

Scanning to Computer
Connecting using wireless LAN
(MC342dw, MC362w, MC562w, MC562dw,
ES5462dw MFP, MPS2731mc only):
Use the WPS (push button) function to set the
wireless LAN. For details on other methods
for setting the wireless LAN, refer to the
Conguration Guide.
1 Press the <SETTING> key on the operator
panel.
2 Press the to select [Wireless Setting],
and then press the
.
3 Log in by entering administrator password
of the device.
Use , , , key to select letter and then
Default administrator password is “aaaaaa”.
press
OK
.
6 Press the to select [Yes], and then
press OK.
Memo
● Start the WPS push button for wireless AP after clicking
[Yes] in the conrmation screen. Alternatively, if WPS
push button for wireless AP is started rst, start the
WPS push button on this equipment.
● If [No] is selected, the screen returns to that from
step 5.
7 If [Yes] is selected in step 6, [Running
pushbutton method...] is displayed in
the screen.
4
Scanning
The message below will be displayed for
about 5 seconds.
4 Check that [Automatic setup (WPS)]
is selected, and then press the
.
5 Press the to select [WPS-PBC], and
then press OK.
Note
● Panel operations cannot be performed during WPS
execution.
● When [WPS connection successful] is displayed,
this equipment is connected to the wireless LAN.
Memo
● If [Connection failed Timeout] is displayed, it
is possible that the wireless AP of the connection
destination could not be found within the time limit.
Select [Yes] again in step 6 within 2 minutes of
starting WPS push button for wireless AP.
● If [Overlap] is displayed, WPS-push button is being
executed on 2 or more wireless AP. Please wait for a
short time and then retry.
- 87 -
Page 88

Scanning to Computer
Setting the IP address:
1 Press the <SETTING> key on the
operator panel.
4
2 Press the to select [Easy Setup], and
Scanning
press
OK
.
b Repeat step a until all characters
required are entered.
c Press the and to select [Enter]
and press
OK
.
4 Press the to select [Network
Setting], and then press the .
5 If setting the IP address manually, check
that [Manual] is selected, and press OK.
3 Enter the administrator password.
The factory default password is “aaaaaa”.
a Press , , , to select the
character you want, and then
press OK.
- The selected character is entered as “*” in
the text eld.
- If you have entered an incorrect value,
press the <CLEAR> key and then enter
the correct value.
If obtaining the IP address automatically, press
the to select [Auto], and press OK. Proceed to
step 10.
6 Enter the IP address using the ten-key
pad, and press OK.
To move to the next box, press the .
- 88 -
7 Enter the subnet mask using the ten-key
pad, and press OK.
To move to the next box, press the .
8 Enter the default gateway address using
the ten-key pad, and press OK.
To move to the next box, press the .
Page 89

Scanning to Computer
9 Enter the DNS server and WINS server if
needed.
If it is not necessary to connect the DNS server
or WINS server to the network, press
pop-up message showing setting completion is
displayed.
OK
until the
10 When the setup menu screen is
displayed, press
setup.
to complete the
11 For the conrmation message, check
that [Yes] is selected and press OK.
◆ Print the Network Information to check that
the IP address and other network information
are properly set.
Step 2 Installing Your Machine to the
Computer
Memo
● The following procedure installs the WIA driver as a
scanner driver automatically.
1 Click [Start] and select [Control
Panel].
2 Select [Network and Internet] >
[Network and Sharing Center].
3 Select [Change advanced sharing
settings].
4 Check that [Turn on network
discovery] is selected.
4
Scanning
1 Press the <SETTING> key on the
operator panel.
2 Check that [Reports] is selected and
press OK.
3 Press the to select [System] and
press OK.
4 Press the to select [Network
Information] and press OK.
5 For the conrmation message, check
that [Yes] is selected and press OK.
The Network Information is printed.
5 Close the Control Panel.
6 Click [Start] and select [Network].
The devices connected to the network are
displayed.
7 Right-click the MC362 icon under
[Multifunction Devices] and select
[Install].
If the [User Account Control] dialog box is
displayed, click [Yes].
- 89 -
Page 90

Scanning to Computer
8 When the balloon message saying that
the installation is complete is displayed
on the task bar, click the balloon to
check the details, and click [Close].
4
9 Press the <SCAN> key on the operator
Scanning
panel.
For Mac OS X
Overview
Connecting Methods
You can select either of the following connection
methods:
● Network Connection
● USB Connection
Product Requirements
Your machine supports Mac OS X 10.6 to 10.8.
Steps to Go
To congure the Scan to Computer function with
Mac OS X, follow the 3 steps below:
● “Step 1 Connecting Your Machine and
Computer” P.91
● “Step 2 Installing a Scanner Driver” P.95
10 Press the to select [Computer] and
then press OK.
11 Check that [Select A Connecting PC]
is selected, and press OK.
12 Press the to select [From WSD
Scan], and press OK.
13 Check that the computer on which your
machine has been installed is displayed
as the destination PC.
Note
● If the machine’s IP address is changed after the
installation, uninstall the machine from the computer by
following the same procedure as in “Step 2 Installing Your
Machine to the Computer” P.89, and then reinstall it.
● “Step 3 Registering Your Computer in Network
Scanner Setup Tool” P.96
Memo
● For the network connection, you can skip step 1 if the IP
address is already set on your machine.
● You can skip step 2 if the scanner driver is already
installed on your computer.
● For the USB connection, skip step 3.
- 90 -
Page 91

Scanning to Computer
Step 1 Connecting Your Machine
and Computer
Select the connection method and follow each
procedure.
● “For Network Connection” P.91
● “For USB Connection” P.95
For Network Connection
Connect your machine to a network with an
Ethernet cable or Wireless LAN connection
(MC342dw, MC362w, MC562w, MC562dw,
ES5462dw MFP, MPS2731mc only), and then
congure the machine’s IP address and other
network information from the operator panel.
You can set the IP address either manually or
automatically.
If there is no DHCP server or BOOTP server on
the network, you need to manually congure the
IP address on the computer or machine.
If your network administrator or internet
service provider species a unique IP address
for the computer and your machine, set the IP
addresses manually.
Note
● You need to congure the network setting of the computer
before this procedure.
● When setting an IP address manually, ask the network
administrator or your internet service provider which IP
address to use. If the IP address is set incorrectly, the
network may go down or Internet access may be disabled.
● To congure the Scan to Computer function via the
network connection, follow these instructions.
- Conform the IP version of the machine to that of your
computer.
- Set [TCP/IP] setting to [Enable] on your machine.
(By factory default, it is set to [Enable].)
- Set [Network TWAIN] setting to [ON] on your
machine. (By factory default, it is set to [ON]. If
it has been disabled, enable it by referring to the
Conguration Guide > “Conguring the Scan to
Computer and Remote Scan” > “Using Functions for
Scan to Computer and Remote Scan” > “Enabling the
Network TWAIN Setting”.)
Memo
● If conguring a small network consisting of only your
machine and a computer, set IP addresses as shown
below (according to RFC1918).
For the computer
IP address : 192.168.0.1~254
Subnet mask : 255.255.255.0
Default gateway : not used
DNS server : not used
For the machine
IP Address Set : Manual
IPv4 Address : 192.168.0.1~254
(select a different value
from the computer)
Subnet Mask : 255.255.255.0
Gateway Address : 0.0.0.0
Network Scale : Small
● To set [Network Scale], press the <SETTING> key
and then select [Admin Setup] > [Network Menu] >
[Network Setup] > [Network Scale].
Connecting using wired LAN
1 Prepare an Ethernet cable and a hub.
Prepare an Ethernet cable (category 5, twisted
pair, straight) and a hub separately.
2 Hold down the power switch for
approximately one second to turn off the
power.
4
Scanning
- 91 -
Page 92

Scanning to Computer
3 Plug one end of the Ethernet cable into
the network interface connection on the
back of the machine.
4
Scanning
4 Plug the other end of the Ethernet cable
into the hub.
Connecting using wireless LAN
(MC342dw, MC362w, MC562w, MC562dw,
ES5462dw MFP, MPS2731mc only)
Use the WPS (push button) function to set the
wireless LAN. For details on other methods
for setting the wireless LAN, refer to the
Conguration Guide.
1 Press the <SETTING> key on the operator
panel.
2 Press the to select [Wireless Setting],
and then press the
.
3 Log in by entering administrator password
of the device.
Use , , , key to select letter and then
Default administrator password is “aaaaaa”.
press
OK
.
5 Hold down the power switch for
approximately one second to turn on the
power.
The message below will be displayed for
about 5 seconds.
4 Check that [Automatic setup (WPS)]
is selected, and then press the
.
5 Press the to select [WPS-PBC], and
then press OK.
- 92 -
Page 93

Scanning to Computer
6 Press the to select [Yes], and then
press OK.
Memo
● Start the WPS push button for wireless AP after clicking
[Yes] in the conrmation screen. Alternatively, if WPS
push button for wireless AP is started rst, start the
WPS push button on this equipment.
● If [No] is selected, the screen returns to that from
step 5.
7 If [Yes] is selected in step 6, [Running
pushbutton method...] is displayed in
the screen.
Setting the IP address
1 Press the <SETTING> key on the
operator panel.
2 Press the to select [Easy Setup], and
press OK.
4
Scanning
Note
● Panel operations cannot be performed during WPS
execution.
● When [WPS connection successful] is displayed,
this equipment is connected to the wireless LAN.
Memo
● If [Connection failed Timeout] is displayed, it
is possible that the wireless AP of the connection
destination could not be found within the time limit.
Select [Yes] again in step 6 within 2 minutes of
starting WPS push button for wireless AP.
3 Enter the administrator password.
The factory default password is “aaaaaa”.
a Press , , , to select the
character you want, and then
press
- The selected character is entered as “*” in
the text eld.
- If you have entered an incorrect value,
press the <CLEAR> key and then enter
the correct value.
OK
.
● If [Overlap] is displayed, WPS-push button is being
executed on 2 or more wireless AP. Please wait for a
short time and then retry.
- 93 -
Page 94

Scanning to Computer
b Repeat step a until all characters
required are entered.
c Press the and to select [Enter]
and press
OK
.
4 Press the to select [Network
Setting], and then press the .
4
5 If setting the IP address manually, check
Scanning
that [Manual] is selected, and press OK.
9 Enter the DNS server and WINS server if
needed.
If it is not necessary to connect the DNS server
or WINS server to the network, press
the pop-up message of showing the setting
completion is displayed.
OK
until
10 When the setup menu screen is
displayed, press
setup.
to complete the
11 For the conrmation message, check
that [Yes] is selected and press OK.
◆ Print the Network Information to check that
the IP address and other network information
are properly set.
If obtaining the IP address automatically, press
the to select [Auto], and press OK. Proceed to
step 10.
6 Enter the IP address using the ten-key
pad, and press OK.
To move to the next box, press the .
7 Enter the subnet mask using the ten-key
pad, and press OK.
To move to the next box, press the .
1 Press the <SETTING> key on the
operator panel.
2 Check that [Reports] is selected and
press OK.
3 Press the to select [System] and
press OK.
4 Press the to select [Network
Information] and press OK.
5 For the conrmation message, check
that [Yes] is selected and press OK.
The Network Information is printed.
8 Enter the default gateway address using
the ten-key pad, and press OK.
To move to the next box, press the .
- 94 -
Page 95

Scanning to Computer
For USB Connection
1 Prepare a USB cable.
A USB cable is not supplied with your machine.
Prepare a USB 2.0 cable separately.
Memo
● Use a USB 2.0 Hi-Speed cable for a USB 2.0 Hi-
Speed connection.
2 Hold down the power switch for
approximately one second to turn off the
power. And turn off the computer.
4 Plug the other end of the USB cable into
the computer’s USB interface connector.
Note
● Do not plug the USB cable into the network interface
connection. Doing so may damage your machine.
Step 2 Installing a Scanner Driver
1
Check that the machine is connected to
the computer and the machine is turned
on. Then, load the “Software DVD-ROM”
on the drive of the computer.
4
Scanning
3 Plug one end of the USB cable into the
USB interface connector on the back of
the machine.
2 Double-click [OKI] on the desktop.
3 Double-click [Drivers] > [Scanner] >
[Installer for OS X 10.8] (for Mac OS
X 10.8) or [Installer for OS X 10.3-
10.7] (for Mac OS X 10.3.9 to 10.7).
4 Click [Continue].
5 Click [Continue].
- 95 -
Page 96

Scanning to Computer
6 Check the display and click [Continue]
if OK.
4
7 Read the license agreement and click
Scanning
[Continue].
11 Click [Continue Installation].
12 Click [Restart].
Step 3 Registering Your Computer
in Network Scanner Setup Tool
8 Click [Agree] if you agree.
9 Click [Install].
To change the installation location of the driver,
click [Change Install Location].
To use the Scan to Computer function via the
network connection, be sure to register your
computer as a destination in Network Scanner
Setup Tool before starting a scan job.
Memo
● Network Scanner Setup Tool is installed simultaneously
when installing the scanner driver.
1 From the [Go] menu, select
[Applications] > [OKIDATA] >
[Scanner] > [Network Scanner Setup
Tool].
2 Select your machine from [Device List]
and click [Register].
3 Edit [Name] which is displayed as
a destination on your machine if
necessary, and click [Register].
4 For the conrmation message, click
[OK].
10 Enter the administrator’s name and
password and then click [Install
Software].
5 Click [OK] to close the Network Scanner
Setup Tool.
- 96 -
Page 97

Scanning to Computer
Procedure for Scan to Computer
This section explains how to start Scan to
Computer. The following procedure is common
for Windows and Mac OS X.
You need to congure the initial settings before
using the Scan to Computer function.
Select the connection method and follow each
procedure.
● “For Network Connection” P.97
● “For USB Connection” P.98
● “For WSD Scan Connection (Windows only)”
P.100
Note
● If the Mac OS X is running, you can scan a document in
the xed A4 size only on the document glass.
● If the Mac OS X is running, you can save a le only as
JPEG.
For Network Connection
2 Place your document in the ADF or on
the document glass as below:
● ADF
Load documents face up with the top edge of the
documents in rst.
Adjust the document guides to the width of your
documents.
● Document Glass
Place the document face down and align its top
edge to the upper-left corner of the glass.
4
Scanning
Note
● For Mac OS X 10.7 to 10.8, if you scan documents
through network connection, you need to start the Image
Capture rst. Then, you need to select the machine from
the list displayed at the left of Image Capture screen.
1 Press the <SCAN> key on the operator
panel.
Close the document glass cover gently.
Note
● Do not apply an excessive load to the document
glass.
- 97 -
Memo
● The machine prioritizes the ADF when scanning
documents. Be sure not to place documents on the
ADF when you use the document glass.
Note
● If Carriage Error <02> is displayed, press Power
OFF/ON.
Page 98

Scanning to Computer
3 Press the to select [Computer] and
then press OK.
4 Check that [Select A Connecting PC]
is selected and then press OK.
5 Check that [From Network] is selected
and then press OK.
4
6 Press the to select the computer you
Scanning
want and then press OK.
7 Press the to select [Select An
Application] and then press OK.
8 Press the to select where to send the
scanned document and then press OK.
For USB Connection
1
Press the <SCAN> key on the operator
panel.
Selectable location Values to send:
Application Folder PC-FAX
Note
● For Mac OS X, you can select [Folder] only.
9 Press
ActKey (for Windows) or Image Capture (for
Mac OS X) starts, and the scan job starts
automatically on the computer. When scanning is
done, the scanned image is processed as below:
MONO
or
COLOR
.
- If you select [Application], the specied
application starts and the scanned image
is displayed on the application.
- If you select [Folder], the scanned image
is saved in the specied folder.
- If you select [PC-FAX], the application for
fax transmission starts. After sending the
scanned image, send a fax with the fax
transmission software on your computer.
Reference
● To load a landscape document, refer to the User’s Guide >
“Operation” > “Loading document(s)”.
● You can customize the scan button settings of ActKey. For
details, refer to the Conguration Guide > “Conguring
the Scan to Computer and Remote Scan” > “Using Drivers
and Software” > “Using ActKey Software” > “Setting the
Scan Button”.
- 98 -
Page 99

Scanning to Computer
2 Place your document in the ADF or on
the document glass as below:
● ADF
Load documents face up with the top edge of the
documents in rst.
Adjust the document guides to the width of your
documents.
● Document Glass
Place the document face down and align its top
edge to the upper-left corner of the glass.
3 Press the to select [Computer] and
then press OK.
4 Check that [Select A Connecting PC]
is selected and then press OK.
5 Press the to select [From USB
Interface] and then press OK.
6 Press the to select [Select An
Application] and then press OK.
7 Press the to select where to send the
scanned document and then press OK.
Selectable location Values to send:
Application Folder PC-FAX
4
Scanning
Close the document glass cover gently.
Note
● Do not apply an excessive load to the document
glass.
Memo
● The machine prioritizes the ADF when scanning
documents. Be sure not to place documents on the
ADF when you use the document glass.
Note
● If Carriage Error <02> is displayed, press Power
OFF/ON.
Note
● For Mac OS X, you can select [Folder] only.
8 Press
ActKey (for Windows) or Image Capture (for
Mac OS X) starts, and the scan job starts
automatically on the computer. When scanning is
done, the scanned image is processed as below:
MONO
or
COLOR
.
- If you select [Application], the specied
application starts and the scanned image
is displayed on the application.
- If you select [Folder], the scanned image
is saved in the specied folder.
- If you select [PC-FAX], the application for
fax transmission starts. After sending the
scanned image, send a fax with the fax
transmission software on your computer.
Reference
● To load a landscape document, refer to the User’s Guide >
“Operation” > “Loading document(s)”.
● You can customize the scan button settings of ActKey. For
details, refer to the Conguration Guide > “Conguring
the Scan to Computer and Remote Scan” > “Using Drivers
and Software” > “Using ActKey Software” > “Setting the
Scan Button”.
- 99 -
Page 100

Scanning to Computer
For WSD Scan Connection
(Windows only)
1
Press the <SCAN> key on the operator
panel.
4
2 Place your document in the ADF or on
Scanning
the document glass as below:
● ADF
Load documents face up with the top edge of the
documents in rst.
Note
● Do not apply an excessive load to the document
glass.
Memo
● The machine prioritizes the ADF when scanning
documents. Be sure not to place documents on the
ADF when you use the document glass.
Note
● If Carriage Error <02> is displayed, press Power
OFF/ON.
3 Press the to select [Computer] and
then press OK.
Adjust the document guides to the width of your
documents.
● Document Glass
Place the document face down and align its top
edge to the upper-left corner of the glass.
Close the document glass cover gently.
4 Check that [Select A Connecting PC]
is selected and then press OK.
5 Press the to select [From WSD Scan]
and then press OK.
6 Press the to select the event for the
destination computer and then press OK.
Selectable events:
Scan for E-mail to XXX
Scan for Fax to XXX
Scan for OCR to XXX
Scan for Print to XXX
Scan to XXX
XXX indicates the name of the destination computer.
You can set an action for each event in Windows
scan properties.
- 100 -
 Loading...