

Page 1

User’s Guide:
Windows
59356001
Page 2

Every effort has been made to ensure that the information in this
document is complete, accurate, and up-to-date. The manufacturer
assumes no responsibility for the results of errors beyond its control.
The manufacturer also cannot guarantee that changes in software
and equipment made by other manufacturers and referred to in this
Guide will not affect the applicability of the information in it. Mention
of software products manufactured by other companies does not
necessarily constitute endorsement by the manufacturer.
While all reasonable efforts have been made to make this document
as accurate and helpful as possible, we make no warranty of any
kind, expressed or implied, as to the accuracy or completeness of
the information contained herein.
Copyright © 2003. All rights reserved.
As an E
NERGY STAR
®
Program Participant, the
manufacturer has determined that this product meets
the E
NERGY STAR guidelines for energy efficiency.
This product complies with the requirements of the Council Directives
89/336/EEC (EMC) and 73/23/EEC (LVD) as amended where
applicable on the approximation of the laws of the member states
relating to electromagnetic compatibility and low voltage.
Oki is a registered trademark of Oki Electric Industry Company, Ltd. Executive Series
is a trademark of Oki Data Americas, Inc.
ENERGY STAR is a registered trademark of the United States Environmental
Protection Agency.
Hewlett-Packard, HP, and LaserJet are registered trademarks of Hewlett-Packard
Company.
Microsoft, MS-DOS and Windows are registered trademarks of Microsoft Corporation.
Apple, Macintosh and Mac OS are registered trademarks of Apple Computors Inc.
Other product names and brand names are registered trademarks or trademarks of
their proprietors.
Page 3

Contents
Introduction . . . . . . . . . . . . . . . . . . . . . . . . . . . . . . . . . . . . . . . . .6
Printer Overview . . . . . . . . . . . . . . . . . . . . . . . . . . . . . . . . . . . . . . . . .7
Front View. . . . . . . . . . . . . . . . . . . . . . . . . . . . . . . . . . . . . . . . . . . .7
Rear View . . . . . . . . . . . . . . . . . . . . . . . . . . . . . . . . . . . . . . . . . . . .8
Changing the display language. . . . . . . . . . . . . . . . . . . . . . . . . . . . . .10
Media Recommendations . . . . . . . . . . . . . . . . . . . . . . . . . . . . .11
Media Weight Designations . . . . . . . . . . . . . . . . . . . . . . . . . . . . . . . .11
Media Types . . . . . . . . . . . . . . . . . . . . . . . . . . . . . . . . . . . . . . . . . . . .12
Paper . . . . . . . . . . . . . . . . . . . . . . . . . . . . . . . . . . . . . . . . . . . . . . .12
Envelopes. . . . . . . . . . . . . . . . . . . . . . . . . . . . . . . . . . . . . . . . . . . .13
Transparencies . . . . . . . . . . . . . . . . . . . . . . . . . . . . . . . . . . . . . . . .14
Labels. . . . . . . . . . . . . . . . . . . . . . . . . . . . . . . . . . . . . . . . . . . . . . .14
Media: Tray 1 and Optional Tray 2 . . . . . . . . . . . . . . . . . . . . . . . . . .15
Media Sizes: Trays 1 & 2 . . . . . . . . . . . . . . . . . . . . . . . . . . . . . . .15
Auto Switching . . . . . . . . . . . . . . . . . . . . . . . . . . . . . . . . . . . . . . .16
Media: Multi-Purpose Tray . . . . . . . . . . . . . . . . . . . . . . . . . . . . . . . .16
Media Sizes: Multi-Purpose Tray . . . . . . . . . . . . . . . . . . . . . . . . .17
Top Exit (Face Down Stacker) . . . . . . . . . . . . . . . . . . . . . . . . . . . . . .18
Rear Exit (Face Up Stacker). . . . . . . . . . . . . . . . . . . . . . . . . . . . . . . .18
Optional Duplex Unit . . . . . . . . . . . . . . . . . . . . . . . . . . . . . . . . . . . . .18
Loading Paper . . . . . . . . . . . . . . . . . . . . . . . . . . . . . . . . . . . . . . 19
Trays 1 and 2 . . . . . . . . . . . . . . . . . . . . . . . . . . . . . . . . . . . . . . . . . . .19
Multi-Purpose (MP) Tray. . . . . . . . . . . . . . . . . . . . . . . . . . . . . . . . . .22
Postscript Emulation Driver . . . . . . . . . . . . . . . . . . . . . . . . . . .26
Windows 98/Me. . . . . . . . . . . . . . . . . . . . . . . . . . . . . . . . . . . . . . . . .26
Windows 2000 and XP. . . . . . . . . . . . . . . . . . . . . . . . . . . . . . . . . . . .45
Windows NT 4.0 . . . . . . . . . . . . . . . . . . . . . . . . . . . . . . . . . . . . . . . .72
PCL Emulation Driver . . . . . . . . . . . . . . . . . . . . . . . . . . . . . . . .97
Windows 98/Me / XP/ NT 4.0. . . . . . . . . . . . . . . . . . . . . . . . . . . . . . .97
Windows 2000 . . . . . . . . . . . . . . . . . . . . . . . . . . . . . . . . . . . . . . . . .127
Color Printing . . . . . . . . . . . . . . . . . . . . . . . . . . . . . . . . . . . . . . 156
General Information . . . . . . . . . . . . . . . . . . . . . . . . . . . . . . . . . . . . .156
Factors That Affect the Appearance of Printed Documents . . . .156
Differences between the Range of Colors a Monitor or Printer Can
Reproduce. . . . . . . . . . . . . . . . . . . . . . . . . . . . . . . . . . . . . . . . . .156
How Your Software Application Displays Color . . . . . . . . . . . .158
Choosing a Color Matching Method . . . . . . . . . . . . . . . . . . . . . . . .159
RGB or CMYK? . . . . . . . . . . . . . . . . . . . . . . . . . . . . . . . . . . . . .159
Matching Photographic Images . . . . . . . . . . . . . . . . . . . . . . . . . .159
Matching Specific Colors (e.g., a Company logo): RGB only . .160
Printing Vivid Colors: RGB Only . . . . . . . . . . . . . . . . . . . . . . . .160
ES 1220n Contents • 3
Page 4

Color matching: Postscript emulation driver . . . . . . . . . . . . . . . . . .161
Color Matching Options: Windows Me and 98. . . . . . . . . . . . . .163
Color Matching Options: Windows 2000, XP and NT 4.0 . . . . .164
Color Matching: PCL Driver . . . . . . . . . . . . . . . . . . . . . . . . . . . . . .168
Color Matching Options . . . . . . . . . . . . . . . . . . . . . . . . . . . . . . .168
The Print Color Swatch Utility . . . . . . . . . . . . . . . . . . . . . . . . . .171
Menu Functions . . . . . . . . . . . . . . . . . . . . . . . . . . . . . . . . . . . . 172
How To Make Changes in The Menus. . . . . . . . . . . . . . . . . . . . . . .172
Summary of Menu Defaults . . . . . . . . . . . . . . . . . . . . . . . . . . . . . . .175
Printer Menus . . . . . . . . . . . . . . . . . . . . . . . . . . . . . . . . . . . . . . . . . .183
Setting Color Tuning from The Front Panel. . . . . . . . . . . . . . . . . . .214
Replacing Consumables . . . . . . . . . . . . . . . . . . . . . . . . . . . . . 218
Toner Cartridge Replacement. . . . . . . . . . . . . . . . . . . . . . . . . . . . . .219
Image Drum Replacement . . . . . . . . . . . . . . . . . . . . . . . . . . . . . . . .226
Belt Unit Replacement . . . . . . . . . . . . . . . . . . . . . . . . . . . . . . . . . . .235
Fuser Replacement . . . . . . . . . . . . . . . . . . . . . . . . . . . . . . . . . . . . . .240
Options . . . . . . . . . . . . . . . . . . . . . . . . . . . . . . . . . . . . . . . . . . .245
RAM Memory . . . . . . . . . . . . . . . . . . . . . . . . . . . . . . . . . . . . . . . . .245
Second Paper Tray . . . . . . . . . . . . . . . . . . . . . . . . . . . . . . . . . . . . . .246
Duplex Unit . . . . . . . . . . . . . . . . . . . . . . . . . . . . . . . . . . . . . . . . . . .247
Hard Disk Drive . . . . . . . . . . . . . . . . . . . . . . . . . . . . . . . . . . . . . . . .248
Clearing Paper Jams . . . . . . . . . . . . . . . . . . . . . . . . . . . . . . . .249
Jam 382. . . . . . . . . . . . . . . . . . . . . . . . . . . . . . . . . . . . . . . . . . . . . . .250
Jam 381. . . . . . . . . . . . . . . . . . . . . . . . . . . . . . . . . . . . . . . . . . . . . . .253
Jam 372 and 380. . . . . . . . . . . . . . . . . . . . . . . . . . . . . . . . . . . . . . . .259
Jam 370, 373 and 383. . . . . . . . . . . . . . . . . . . . . . . . . . . . . . . . . . . .261
Jam 371. . . . . . . . . . . . . . . . . . . . . . . . . . . . . . . . . . . . . . . . . . . . . . .263
Jam 391 and 392. . . . . . . . . . . . . . . . . . . . . . . . . . . . . . . . . . . . . . . .266
Jam 390. . . . . . . . . . . . . . . . . . . . . . . . . . . . . . . . . . . . . . . . . . . . . . .268
Troubleshooting. . . . . . . . . . . . . . . . . . . . . . . . . . . . . . . . . . . .270
LCD messages . . . . . . . . . . . . . . . . . . . . . . . . . . . . . . . . . . . . . . . . .270
Parallel Transmission Mode. . . . . . . . . . . . . . . . . . . . . . . . . . . . . . .276
Problem Solving . . . . . . . . . . . . . . . . . . . . . . . . . . . . . . . . . . . . . . . .277
Problems Printing . . . . . . . . . . . . . . . . . . . . . . . . . . . . . . . . . . . .277
Computer Interface Problems . . . . . . . . . . . . . . . . . . . . . . . . . . .280
Print Quality Problems . . . . . . . . . . . . . . . . . . . . . . . . . . . . . . . .283
Miscellaneous Problems . . . . . . . . . . . . . . . . . . . . . . . . . . . . . . .286
Specifications. . . . . . . . . . . . . . . . . . . . . . . . . . . . . . . . . . . . . .287
ES 1220n Contents • 4
Page 5

Software Utilities . . . . . . . . . . . . . . . . . . . . . . . . . . . . . . . . . . .289
Overview . . . . . . . . . . . . . . . . . . . . . . . . . . . . . . . . . . . . . . . . . . . . .289
Color Swatch Utility. . . . . . . . . . . . . . . . . . . . . . . . . . . . . . . . . . . . .290
General Information. . . . . . . . . . . . . . . . . . . . . . . . . . . . . . . . . . .290
Installing the Color Swatch Utility . . . . . . . . . . . . . . . . . . . . . . .290
Opening the Color Swatch utility . . . . . . . . . . . . . . . . . . . . . . . .290
Using the Color Swatch Utility . . . . . . . . . . . . . . . . . . . . . . . . . .291
Storage Device Manager Utility for Windows . . . . . . . . . . . . . . . . .293
General Information. . . . . . . . . . . . . . . . . . . . . . . . . . . . . . . . . . .293
Installing Storage Device Manager . . . . . . . . . . . . . . . . . . . . . . .295
Opening Storage Device Manager. . . . . . . . . . . . . . . . . . . . . . . .295
Using Storage Device Manager. . . . . . . . . . . . . . . . . . . . . . . . . .296
PrintSuperVision Utility. . . . . . . . . . . . . . . . . . . . . . . . . . . . . . . . . .320
General Information. . . . . . . . . . . . . . . . . . . . . . . . . . . . . . . . . . .320
Installing PrintSuperVision. . . . . . . . . . . . . . . . . . . . . . . . . . . . .320
Features . . . . . . . . . . . . . . . . . . . . . . . . . . . . . . . . . . . . . . . . . . . .320
Additional Information . . . . . . . . . . . . . . . . . . . . . . . . . . . . . . . .321
Network Printer Status Utility . . . . . . . . . . . . . . . . . . . . . . . . . . . . .321
Installing The Network Printer Status Utility . . . . . . . . . . . . . . .321
To Open The Network Printer Status Utility. . . . . . . . . . . . . . . .321
Oki LPR Utility . . . . . . . . . . . . . . . . . . . . . . . . . . . . . . . . . . . . . . . .323
How to Install . . . . . . . . . . . . . . . . . . . . . . . . . . . . . . . . . . . . . . .323
LPR Status box . . . . . . . . . . . . . . . . . . . . . . . . . . . . . . . . . . . . . .323
Additional Information . . . . . . . . . . . . . . . . . . . . . . . . . . . . . . . .323
Print Job Accounting Utility (optional software) . . . . . . . . . . . . . . .324
Introduction . . . . . . . . . . . . . . . . . . . . . . . . . . . . . . . . . . . . . . . . .324
Installation . . . . . . . . . . . . . . . . . . . . . . . . . . . . . . . . . . . . . . . . . .327
User Name Versus Account ID . . . . . . . . . . . . . . . . . . . . . . . . . .330
Using the Server Software . . . . . . . . . . . . . . . . . . . . . . . . . . . . . .332
Using the Client Software . . . . . . . . . . . . . . . . . . . . . . . . . . . . . .346
Troubleshooting. . . . . . . . . . . . . . . . . . . . . . . . . . . . . . . . . . . . . .350
Known Problems/Solutions . . . . . . . . . . . . . . . . . . . . . . . . . . . . .351
Uninstalling the Job Accounting Software . . . . . . . . . . . . . . . . .352
Checking the Printer Status . . . . . . . . . . . . . . . . . . . . . . . . . . . . .353
ES 1220n Contents • 5
Page 6

Introduction
Your new printer is designed with advanced features to give you
clear, vibrant color printing and crisp black and white pages at high
speed on a range of print media.
Features:
• Up to 12 pages per minute in full color.
• Up to 20 pages per minute in black and white.
• 600 dpi (dots per inch) print resolution.
• Single Pass Color Digital LED technology.
• Postscript emulation; PCL 5C and Epson FX emulations.
• 10 Base-T and 100 Base-TX network connection.
• Secure Print feature for printing confidential documents over the
network
• Proof and Print feature which allows you to proof out one copy of
your document before printing multiple copies. If the proof is okay,
you can print the balance of the copies immediately without
having to reprocess the document.
Options:
• Duplex Unit for automatic two-sided printing: P/N 42158401—see
page 247.
• Additional Memory—see page 245.
– 64 MB (P/N 70043001)
– 128 MB (P/N 70043101)
– 256 MB (P/N 70043201).
• Internal 10 GB Hard Disk Drive for storage of overlays, macros
and downloadable fonts, etc.: P/N 70043501—see page 248.
• Second Paper Tray, capacity 530 sheets 20-lb. paper:P/N
42158501—see page 246.
ES 1220n Introduction • 6
Page 7

Printer Overview
Front View
Output Stacker, face down
Standard printed copy delivery point. Holds up to 250 sheets of
20-lb. US Bond (75 g/m²) paper.
Operator Panel
Menu driven operator controls and LCD display panel (can be
changed to show different languages: see page 10).
PaperTray
Standard blank paper tray. Holds up to 300 sheets of 20-lb. US
Bond (75 g/m²) paper.
Multi-Purpose Tray
Used for feeding heavier paper stocks, envelopes and other
special media. Also for manual feeding of single sheets when
required.
ES 1220n Introduction • 7
Page 8
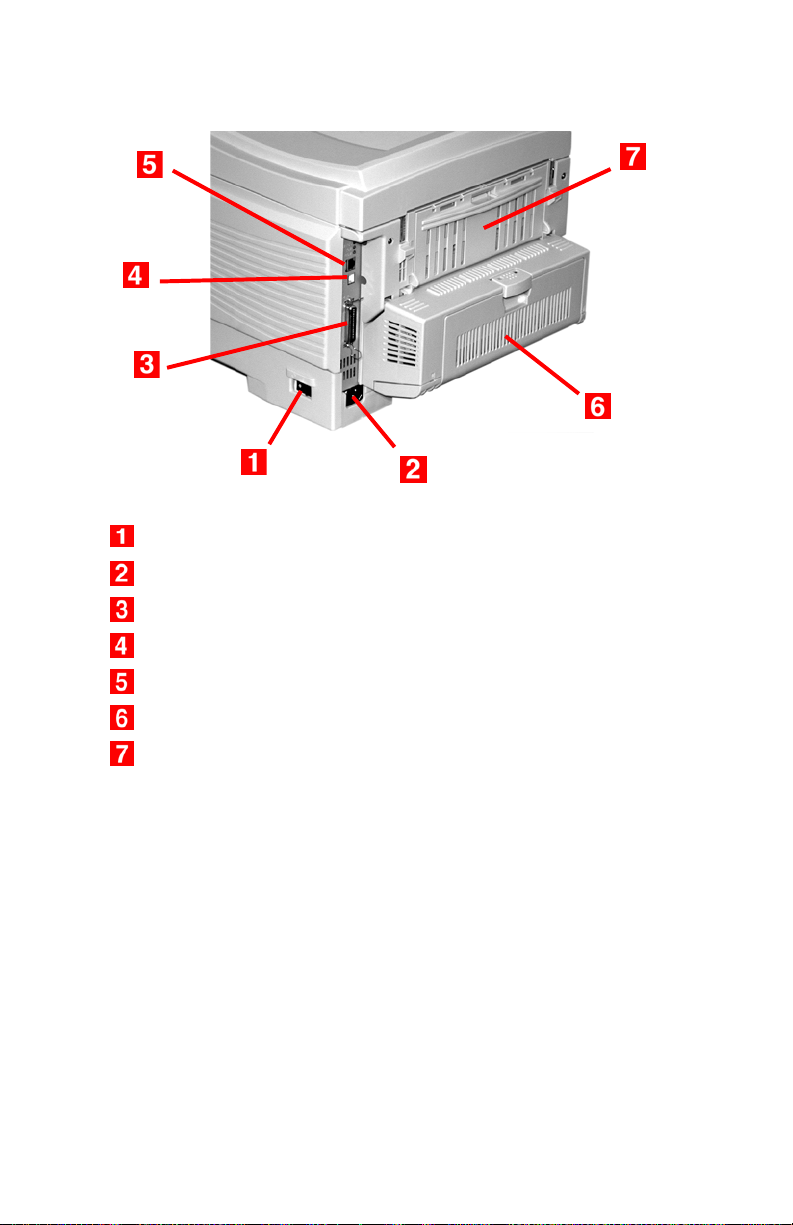
Rear View
On/Off Switch
Socket for Power Cord
Parallel Interface
USB Interface
Network Interface
Optional Duplex Unit
Rear Stacker (face up), Capacity100 sheets 20-lb. US Bond (75
g/m²) paper
When the rear paper stacker is folded down, paper exits the printer
through the rear of the printer and is stacked here face up. This is
mainly used for heavy print media. When used in conjunction with the
Multi-Purpose Tray, the paper path through the printer is essentially
straight. This avoids bending the paper around curves in the paper
path and makes paper feeding more reliable.
ES 1220n Introduction • 8
Page 9

Notes, Cautions, etc.
NOTE
A note appears like this. A note provides additional
information to supplement the main text which helps you to
use and understand the product.
CAUTION!
A caution appears like this. A caution provides additional
information which, if ignored, may result in equipment
malfunction or damage.
WARNING!
A warning appears like this. A warning provides additional
information which, if ignored, may result in a risk of
personal injury.
Important!
An important message appears like this. An important message
provides supplemental information which can prevent potential
problems.
ES 1220n Introduction • 9
Page 10

Changing the display language
READY
ATTENTION
BACK ENTER
1. Press MENU + repeatedly until you see
SYSTEM CONFIG MENU
POWER SAVE DELAY TIME
2. Press ENTER.
3. Press MENU
+ repeatedly until you see
SYSTEM CONFIG MENU
LANGUAGE
4. Press ENTER.
5. Press MENU
+ and/or MENU – repeatedly until you see the
language you wish to select.
6. Press ENTER to select this language.
MENU
OLN INE
CANCEL
7. Press ON LINE to exit the menu and return the printer to standby.
ES 1220n Introduction • 10
Page 11

Media Recommendations
Your printer can handle a variety of print media, including a range of
paper weights and sizes, transparencies, labels and envelopes. This
section provides general advice on choice and use of media.
CAUTION!
Print media must be able to withstand 446°F (230°C) for 0.2
second.
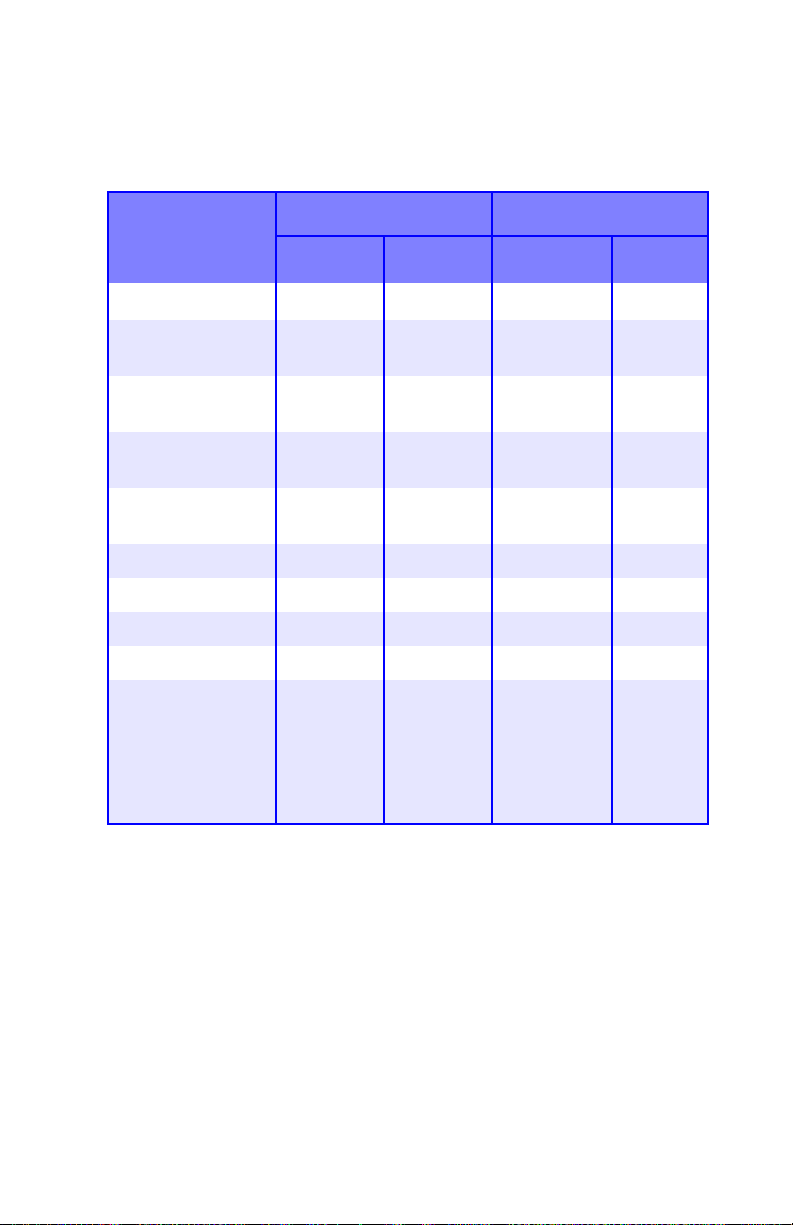
Media Weight Designations
Weight
Designation
Weight Feed Tray Duplexer? Exit Tray
Light
Medium
Heavy
Ultra Heavy
a. Face Down Stacker
b. Face Up Stacker
c. 47 lb. (177 g/m²) maximum for Tray 2
16-19 lb. US Bond
(60-71 g/m²)
20-27 lb. US Bond
(75-101 g/m²)
28-32 lb. US Bond
(105-120 g/m²)
33-54 lb. US Bond
(124-203 g/m²)
Tray 1
Tray 2
Tray 1
Tray 2
MP Tray
Tray 1
Tray 2
MP Tray
c
Tray 2
MP Tray
No
Yes
Yes (restricted
to 28 lb.
maximum)
No
To p
Rear
To p
Rear
Rear
Only
Rear
Only
a
b
ES 1220n Media Recommendations • 11
Page 12

Media Types
Paper
The best performance is obtained when using paper designed for
use in copiers and laser printers. Suitable types include:
• Hammermill
g/m²)
• Xerox
®
• Oki
52206101 Bright White Proofing Paper, 32 lb. US Bond
(120 g/m
Recommendations
• Check http://my.okidata.com for the latest information on
recommended papers for your printer.
• Paper should be stored flat, away from moisture, direct sunlight
and heat sources.
• The use of heavily laid or textured paper will seriously affect
the life of the image drum and give poor print quality. Print
quality can be improved by changing the media setting to ‘Ultra
Heavy.’ However, this will reduce the output speed and prevent
the use of the duplex option.
®
Laser Printer Radiant White, 24 lb. US Bond (90
®
4024, 20 lb.US Bond (75 g/m²)
2
)
• Avoid:
– Damp, damaged or curled paper.
– Very smooth, shiny or glossy paper.
– Heavily embossed letterhead paper, very rough paper or paper
that has a large grain difference between the two sides.
– Paper with perforations, cut-outs or ragged edges.
– Carbon paper, recycled paper, NCR paper, photosensitive
paper, pressure sensitive paper or thermal transfer paper.
ES 1220n Media Recommendations • 12
Page 13

Envelopes
Yes No
• Use only recommended envelopes (Oki 52206301 and 52206302:
see “Selecting/Using OKI Print Media” in your Handy Reference
Guide for more information).
• Envelopes should be stored flat and away from moisture, direct
sunlight and heat sources.
• Don’t use envelopes with windows or metal clasps.
• Don’t use damp, damaged or curled envelopes.
CAUTION
Print media must be able to withstand 446°F (230°C) for 0.2
second.
ES 1220n Media Recommendations • 13
Page 14

Transparencies
• Use only recommended transparencies (3M CG3720, Oki
52205701).
• Avoid office transparencies designed for use by hand with marker
pens. These will melt in the fuser and cause damage.
Labels
• Avery 5161 White Laser Labels (letter size) work well with your
printer. Check http://my.okidata.com for the latest information on
media for your printer.
• Use only labels designed for use in color laser printers and
photocopiers.
CAUTION!
• Labels should cover the entire carrier sheet.
• Carrier sheet or adhesive must not be exposed to any
part of the printer
ES 1220n Media Recommendations • 14
Page 15
Media: Tray 1 and Optional Tray 2
Media Sizes: Trays 1 & 2
Feed Exit
Paper size Tray 1 Tray 2
Letter (8½ x 11'')
Legal-14
(8½ x 14'')
Legal-13.5
(8½ x 13.5'')
Legal-13
(8½ x 13'')
Executive
(7¼ x 10½'')
S, D
c
S, D S, D S, D
S, D S, D S, D S, D
S, DS, DS, D S, D
S, D S, D S, D S, D
S, DS, DS, D S, D
Topa
Rearb
A4 (210 x 297 mm) S, D S, D S, D S, D
A5 (145 x 210 mm) S, D S, D S, D S, D
A6 (105 x 148 mm) S Not Usable. Not Usable. S
B5 (182 x 257 mm) S, D S, D S, D S, D
Custom
S: min. 3.94
x 5.83'' [100
x 148 mm],
max. 8.5 x
14'' [215.9 x
355.6 mm]
S: min. 3.94
x 8.27'' [100
x 210 mm],
max. 8.5 x
14'' [215.9 x
355.6 mm]
S
Not
Usable.
a. Use the Top Exit (Face Down Stacker) only for paper up to 47 lb. US Bond
(98 lb. Index, 177 g/m
b. Switch to the Rear Exit (Face Up Stacker) when you are printing paper
heavier than 47 lb. US Bond (98 lb. Index, 177 g/m
c. S = Simplex; D = Duplex (printing on both sides)
ES 1220n Media Recommendations • 15
2
).
2
).
Page 16

Auto Switching
If you have identical paper stock loaded in the Multi-Purpose Tray or
the optional Second Paper Tray, you can have the printer
automatically switch to the other tray when the current tray runs out
of paper. This function is enabled in the Print Menu (see the “Menu
Functions” section of this manual).
Media: Multi-Purpose Tray
Use the Multi-Purpose (MP) Tray for printing card stock, labels,
envelopes and transparencies. Or load a stack of letterhead
stationery to switch to as needed.
• A stack of media about 3/8'' (10 mm) high can be loaded into the
MP Tray, equivalent to about 10 envelopes or 50 transparencies.
• Media should be loaded print side up, top edge facing into the
printer.
• Generally, the rear exit (Face Up Stacker) is used with the MP
Tray.
Important!
The duplex unit can be used for paper only, at weights up to 28
lb. US Bond (105 g/m
duplex (two-sided printing) function for labels, envelopes,
transparencies, or paper heavier than 28 lb. US Bond.
2
metric, 58 lb. Index). Do not use the
ES 1220n Media Recommendations • 16
Page 17

Media Sizes: Multi-Purpose Tray
Feed Exit
Paper size MP Tray
Reara
Topb
Letter (8½ x 11'') Yes Yes Yes
Legal-14 (8½ x 14'') Yes Yes Yes
Legal-13.5
(8½ x 13.5'')
Yes Yes Yes
Legal-13 (8½ x 13'') Ye s Ye s Ye s
Executive
(7¼ x 10½'')
Yes Yes Yes
A4 (210 x 297 mm) Yes Yes Yes
A5 (145 x 210 mm) Yes Yes Yes
B5 (182 x 257 mm) Yes Yes Yes
Envelopes
(COM-10)
Yes Yes No
Custom: min.
3.94 to 5.83'' [100 x
148 mm]; max. 8½ x
Yes Yes No
14'' [216 x 356 mm],
or banner
c
a. Use the Rear Exit (Face Up Stacker) for heavy paper, transparencies,
envelopes, and labels.
b. Use the Top Exit (Face Down Stacker) only for paper up to 47 lb. US
Bond (98 lb. Index, 177 g/m
c. Banner specifications:
– Length: up to 47¼'' (1.2 m)
– Width Range = 8¼ to 8½'' (210 to 215.9 mm)
– Weight Range = 28 to 34 lb. US Bond (105 to 128 g/m
– Path = Rear Exit (Face Up Stacker) only
– Feed one sheet at a time.
2
).
2
)
ES 1220n Media Recommendations • 17
Page 18

Top Exit (Face Down Stacker)
• Holds up to 250 sheets of 20-lb. US Bond (42 lb. Index, 75 g/m²
metric) standard paper.
• Handles paper stocks up to 47 lb. US Bond (98 lb. Index, 176 g/m²
metric).
• Pages are printed in reading order (page 1 first; last page on top,
facing down).
Rear Exit (Face Up Stacker)
The face up stacker at the rear of the printer should be opened and
the tray extension pulled out when required for use. In this condition
paper will exit via this path, regardless of driver settings.
• The face up stacker can hold up to 100 sheets of 20-lb. US Bond
(42 lb. Index, 75 g/m²) standard paper.
• Handles stocks up to 54 lb. US Bond (113 lb. Index, 113 lb. Index,
203 g/m² metric).
• Papers are printed face up: for multi-page documents, select
reverse order printing in your application Print dialog box so that
the stack is in correct order.
NOTE
Always use this stacker and the Multi-Purpose Tray for
paper stocks heavier than 47 lb. US Bond (98 lb. Index, 176
g/m² metric).
Optional Duplex Unit
This option provides automatic two-sided printing on the same range
of paper sizes as optional Tray 2 (i.e. all Tray 1 sizes except A6),
using paper from 20 to 28-lb. US Bond (42 to 58 lb. Index, 75 to 105
g/m² metric).
ES 1220n Media Recommendations • 18
Page 19

Loading Paper
Trays 1 and 2
NOTE
If you have the optional second paper tray installed:
• If you are printing from the 1st (upper) tray, you can pull
out the 2nd (lower) tray and reload it while the printer is
printing.
• If you are printing from the 2nd (lower) tray, do not pull
out the 1st (upper) tray while printing. This will cause a
paper jam.
1. Remove the paper tray from the printer.
ES 1220n Loading Paper • 19
Page 20

2.
Fan the paper to be loaded at the edges (1) and in the middle (2),
then tap the edges of the stack on a flat surface to make it flush
again (
3
).
123
3. Load paper print side down, making sure the rear stopper (1) and
paper guides (2) are snug against the paper.
ES 1220n Loading Paper • 20
Page 21

NOTE
Load letterhead paper face down, with the top edge aimed
towards the front of the printer.
4. Gently close the paper tray.
ES 1220n Loading Paper • 21
Page 22

NOTE
To prevent paper jams:
• Do not leave space between the paper and the guides
and rear stopper.
• Do not overfill the paper tray. Capacity depends on the
type of paper stock.
• Do not load damaged paper.
• Do not load paper of different sizes or types at the same
time.
• Do not pull the paper tray out during printing (except as
described above for the 2nd tray).
Multi-Purpose (MP) Tray
NOTE
The MP Tray will take a stack of media about 3/8'' (10 mm)
high, equivalent to about 10 envelopes or 50 transparencies.
Do not exceed the 3/8'' (10 mm) media stack height.
ES 1220n Loading Paper • 22
Page 23

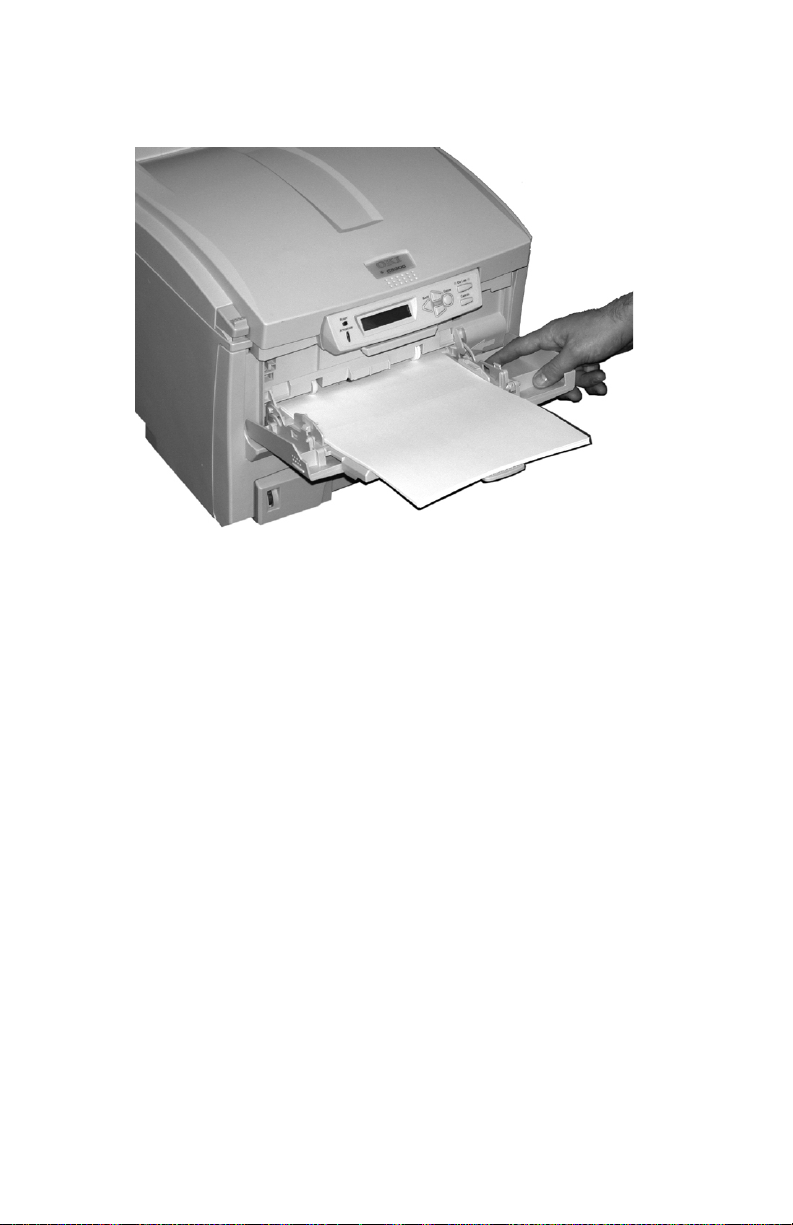
1. Open the MP Tray.
ES 1220n Loading Paper • 23
Page 24

2. Press down on the loading platform.
3. Load the print media and adjust the guides (1) to the size media
being used.
• Letterhead stationery:
– For single-sided printing, load with pre-printed side up and
the top edge into the printer.
– For two-sided (duplex) printing, load with pre-printed side
down and top edge away from the printer. (Optional duplex
unit must be installed.)
• Envelopes: load print side up (flap down) with top edge to the
left and short edge into the printer. Do not select duplex printing on envelopes.
ES 1220n Loading Paper • 24
Page 25

4. Press the blue tray latch (1) toward the paper stack to lift the
paper platform into the feed position.
ES 1220n Loading Paper • 25
Page 26

Postscript Emulation Driver
The Windows Postscript emulation printer driver contains settings for
many of the same items as are found in the operator panel menus.
Where items in the printer driver are the same as those in the
operator panel menus, and you print documents from Windows, the
settings in the Windows printer driver will override those items in the
operator panel menus.
Windows 98/Me
NOTE
The illustrations in this section show the Windows Me
Operating System. The Windows 98 operating system may
appear slightly different, but the principles are the same.
• N-Up Printing: multiple pages on one sheet (see page 27)
• Custom Page Sizes (see page 28)
• Selecting Print Resolution (see page 32)
• Duplex Printing (see page 34)
• Collating (see page 36)
• Secure Print: printing confidential documents (see page 37)
• Storing Print Fles to the Hard Disk Drive (see page 41)
NOTE
Most applications allow the printer properties to be
accessed from within the document print dialog box.
ES 1220n Postscript Emulation Driver • 26
Page 27

N-Up Printing (Printing Multiple Pages on One Sheet)
Me and 98
You can print either 2 or 4 pages on one sheet of paper.
1. Open the file in your application and select File → Print.
2. In the Print dialog box, click the Postscript emulation printer, then
click Properties.
3. On the Paper tab, under Layout, select 2 up or 4 up printing.
4. Click OK to return to the Print dialog box.
5. Click OK to print the document.
ES 1220n Postscript Emulation Driver • 27
Page 28

Printing Custom Page Sizes
Me and 98
Custom page sizes can be printed from Tray 1, Tray 2 or the
Multi-Purpose (MP) Tray, one-sided printing only, rear exit only.
Tray 1 and Tray 2 Custom Size Range
• minimum 3.94'' x 5.83'' [100 x 148 mm]
• maximum 8½'' x 14'' [215.9 x 355.6 mm].
MP Tray Custom Size Range
• minimum 3.94'' to 5.83'' [100 x 148 mm]
• maximum 8½'' x 14'' [216 x 356 mm]
• or banners from 8¼'' to 8½'' (210 to 215.9 mm) wide by up to 47¼''
(1.2 m) long. Banners must be fed one sheet at a time. Resolution
must be set to Fast (see page 32).
NOTE
Three custom paper sizes can be defined in the Postscript
emulation driver.
The printer media size must be manually set in the driver to the
custom paper size before use:
1. Open the rear exit path.
ES 1220n Postscript Emulation Driver • 28
Page 29
2. Load the custom size paper in the tray you will be using. For
example, the MP Tray:
3. Open the file in your application and select File → Print.
4. In the Print dialog box, select the Postscript emulation printer,
then click Properties.
ES 1220n Postscript Emulation Driver • 29
Page 30

5. On the Paper tab and select the tray you are using in the Paper
source drop-down list.
6. Under Paper Size (1), scroll across and click one of the three
Custom icons, then click Custom (2). Name and define your
ES 1220n Postscript Emulation Driver • 30
Page 31

custom size in the dialog box which appears, then click OK twice
to go back to the Print dialog box.
7. Click OK to print the document.
ES 1220n Postscript Emulation Driver • 31
Page 32

Changing The Resolution for a Print Job
Me and 98
NOTE
These instructions explain how to change the settings as
you are printing a job. If you wish to change the settings to
apply to all jobs (default settings):
•Click Start → Settings → Printers.
• Right click the Postscript emulation printer, then select
Properties.
• Follow steps 3, etc., below. Note that the Properties
screen for setting defaults will have more tabs.
1. Open the file in your application and select File → Print.
2. In the Print dialog box, click the Postscript emulation printer, then
click Properties.
ES 1220n Postscript Emulation Driver • 32
Page 33

3. On the Graphics tab, select the required printing resolution in the
Resolution drop-down list, then click OK:
• Fine = high resolution, slower speed: the default. Provides
optimum results when printing graphics.
• Normal = medium resolution, medium speed: choose this set-
ting for documents with lower resolution graphics, line art, or
text only.
• Fast = low resolution, fast speed: choose this one for quick
proofing of drafts.
4. Click OK to print the document.
ES 1220n Postscript Emulation Driver • 33
Page 34

Duplex Printing (Printing on Both Sides of The Paper)
Me and 98
NOTE
The optional duplex unit must be installed in the printer and
enabled before duplex printing can be carried out.
• Standard paper sizes only.
• Paper weight range 20 to 28 lb. US Bond (75 to 105 g/m
• Paper must be loaded print side up.
• Any tray (Tray 1, optional Tray 2, MP tray) can be used for duplex
printing.
²
).
NOTE
These instructions explain how to change the settings as
you are printing a job. If you wish to change the settings to
apply to all jobs:
•Click Start → Settings → Printers.
• Right click the Postscript emulation printer, then select
Properties.
• Follow steps 3, etc., below. Note that the Properties
screen for setting defaults will have more tabs.
1. Open the file in your application and select File → Print.
2. In the Print dialog box, click the Postscript emulation driver, then
click Properties.
ES 1220n Postscript Emulation Driver • 34
Page 35

3. On the Paper tab, click More Options…. Select Flip on Long
Edge or Flip on Short Edge, then click OK twice.
4. Click OK to print the document.
ES 1220n Postscript Emulation Driver • 35
Page 36

Collating
Me and 98
Collating can be carried out with or without a hard disk drive installed.
However, printers with a hard disk drive will provide greater
performance.
1. Open the file in your application and select File → Print.
2. In the Print dialog box, click the Postscript emulation printer, then
click Properties.
3. On the Paper tab, enter the number of Copies you wish to print.
4. Click the Device Options tab. In the Printer features list box (1),
click Collate, then click Yes in the Change setting drop-down list
(2).
5. Click OK to return to the Print dialog box, then click OK to print
the document.
ES 1220n Postscript Emulation Driver • 36
Page 37

Secure Print (Printing Confidential Documents)
Me and 98
Secure printing or printing with passwords allows the printing of
confidential documents on printers that are shared with other users.
Once the document is printed, it is deleted from the Hard Disk Drive.
If you wish to retain the document on the Hard Disk Drive after
printing it, use the Store to Hard Disk feature (see page 41).
NOTE
• The internal hard disk must be installed in the printer and
enabled to allow for spooling of the print job before final
printing.
• If the hard disk memory is insufficient for the spooled
data,
DISK FULL is displayed and only one copy is printed.
• If the software application being used has a collate print
option, this must be turned OFF
operate correctly.
• Secure printing may not be available in some software
applications.
1. Open the file in your application and select File → Print.
for secure printing to
2. In the Print dialog box, click the Postscript printer, then click
Properties.
3. On the Paper tab, enter the number of copies you wish to print.
ES 1220n Postscript Emulation Driver • 37
Page 38

4. Click the Device Options tab. In the Printer features list, click
Job Type (1), then select Secure print under Change setting
(2).
5. Enter your 4-digit password (0000 to 9999): In the Printer
features list, click PASSWORD1, then select the value of your
choice for that digit under Change setting. Repeat the process
for each digit of the password, making note of the number you
entered.
6. For collated printing, scroll down under Printer features and
change the setting for Collate to Yes.
7. Click OK.
8. Click OK.
The document is processed to a print file and stored on the
printer’s hard disk drive.
9. Go to the printer and print out the document using the front panel
(see below).
ES 1220n Postscript Emulation Driver • 38
Page 39

Printing a Confidential Document from The Front Panel
1. Press + to enter the menu mode.
PRINT JOBS MENU
2. Press ENTER.
ENTER PASSWORD
****
3. Use
4. Repeat step 3 for each of the remaining digits in the password.
5. To print all jobs stored under your password, press ENTER. To
Deleting the Confidential Document Before Printing It
1. Press + to enter the menu mode.
+/ – to set the number for the first digit of the password, then
press ENTER to engage the number and move to the next digit:
ENTER PASSWORD
5***
SELECT JOB
ALL JOBS
print a specific job, press
appears on the second line of the display, then press ENTER.
The document prints and is deleted from the hard disk drive.
PRINT JOBS MENU
+/– until the job you wish to print
ES 1220n Postscript Emulation Driver • 39
Page 40

2. Press ENTER.
ENTER PASSWORD
****
3. Use
4. Repeat step 3 for each of the remaining digits in the password.
5. Press CANCEL.
6. Press ENTER to delete the job, then press ON LINE.
+/ – to set the number for the first digit of the password, then
press ENTER to engage the number and move to the next digit:
ENTER PASSWORD
5***
SELECT JOB
ALL JOBS
DELETE THE JOB
Y=ENTER/N=CANCEL
NOTE
An alternative method of printing or deleting the document
is to use the Storage Device Manager. Please refer to the
On-line help for Storage Device Manager.
ES 1220n Postscript Emulation Driver • 40
Page 41

Store to Hard Disk
Me and 98
Store to hard disk (job spooling) allows print jobs to be prepared and
stored on the hard disk for printing on demand. This is good for forms,
generic memos, letterhead stationery, etc.
NOTE
• The internal hard disk must be installed in the printer and
enabled.
• If the hard disk memory is insufficient for the spooled
data, DISK FULL is displayed and only one copy printed.
• If the software application being used has a collate print
option, this must be turned OFF
operate correctly.
• Store to Hard Disk may not be available in some software
applications.
1. Open the file in your application and select File → Print.
2. In the Print dialog box, click the Postscript emulation printer, then
click Properties.
for Store to Hard Disk to
3. On the Paper tab, enter the number of copies you wish to print.
ES 1220n Postscript Emulation Driver • 41
Page 42

4. Click the Device Options tab. In the Printer features list (1),
click Job Type, then select Store to HDD under Change
settings (2).
5. Enter your 4-digit password (0000 to 9999): In the Printer
features list, click PASSWORD1, then select the value of your
choice for that digit under Change setting. Repeat the process
for each digit of the password, making note of the number you
entered.
6. For collated printing, scroll down under Printer features and
change the setting for Collate to Yes.
7. Click OK.
8. Click OK.
The document is processed to a print file and stored on the
printer’s hard disk drive.
9. Go to the printer and print out the document using the front panel
(see below).
ES 1220n Postscript Emulation Driver • 42
Page 43

Printing a Stored Document from The Front Panel
BACK ENTER
MENU
OLN INE
CANCEL
1. Press + to enter the menu mode.
PRINT JOBS MENU
2. Press ENTER.
ENTER PASSWORD
****
3. Use
+/ – to set the number for the first digit of the password, then
press ENTER to engage the number and move to the next digit:
ENTER PASSWORD
5***
4. Repeat step 3 for each of the remaining digits in the password.
SELECT JOB
ALL JOBS
5. To print all jobs stored under your password, press ENTER. To
print a specific job, press
+/– until the job you wish to print
appears on the second line of the display, then press ENTER.
The document prints.
ES 1220n Postscript Emulation Driver • 43
Page 44

Deleting The Stored Document
1. Press + to enter the menu mode.
PRINT JOBS MENU
2. Press ENTER.
ENTER PASSWORD
****
3. Use
4. Repeat step 3 for each of the remaining digits in the password.
5. Press CANCEL.
6. Press ENTER to delete the job, then press ON LINE.
+/ – to set the number for the first digit of the password, then
press ENTER to engage the number and move to the next digit:
ENTER PASSWORD
5***
SELECT JOB
ALL JOBS
DELETE THE JOB
Y=ENTER/N=CANCEL
NOTE
An alternative method of printing or deleting a stored
document is to use the Storage Device Manager. Please
refer to the On-line help for Storage Device Manager.
ES 1220n Postscript Emulation Driver • 44
Page 45

Windows 2000 and XP
NOTE
The illustrations in this section show the Windows 2000
operating system. The Windows XP operating system dialog
boxes appear slightly different, but the principles are the
same.
• N-up Printing: multiple pages on one sheet (see page 46)
• Booklets (see page 47)
• Custom Page Sizes (see page 49)
• Selecting Print Resolution (see page 51)
• Duplex Printing (see page 53)
• Watermarks (see page 55)
• Collating (see page 56)
• Secure Print: printing confidential documents (see page 57)
• Storing Print Files to the Hard Disk Drive (see page 65)
NOTE
Most applications allow the printer properties to be
accessed from within the document print dialog box.
ES 1220n Postscript Emulation Driver • 45
Page 46

N-Up Printing (Printing Multiple Pages on One Sheet)
2000 and XP
1. Open the file in your application and select File → Print.
2. In the Print dialog box, select the Postscript emulation printer.
3. Windows XP only
4. On the Layout tab, under Pages Per Sheet, select the required
number of pages.
: click Preferences.
5. Windows XP only
6. Click Print.
ES 1220n Postscript Emulation Driver • 46
: click OK to return to the Print dialog box.
Page 47

Printing Booklets
2000 and XP
Booklets are restricted to two pages per sheet, i.e., you can print a
5½'' x 8½'' booklet on 8½'' x 11'' paper.
NOTE
• You must have the duplex unit installed and enabled in
order to print booklets.
• Not available on some network connections: see the
Help file.
• Some software applications may not support booklet
printing.
• The right-to-left setting allows a booklet to be printed for
right to left reading, as used in some languages.
1. Open the file in your application and select File → Print.
2. In the Print dialog box, select the Postscript emulation printer.
3. Windows XP only
ES 1220n Postscript Emulation Driver • 47
: click Preferences.
Page 48

4. On the Layout tab, under Pages Per Sheet, select Booklet.
5. Select Portrait or Landscape under Orientation.
6. Make sure Flip on Long Edge is selected under Print on Both
Sides(Duplex).
7. Select the desired Page Order.
8. Windows XP only
: click OK to return to the Print dialog box.
9. Click Print.
ES 1220n Postscript Emulation Driver • 48
Page 49

Printing Custom Page Sizes
2000 and XP
Custom page sizes can only be printed from the Multi-Purpose Tray.
The printer media size for the Multi-Purpose Tray must be manually
set in the driver to the custom paper size before use (range 3½'' to
8½'' [89 to 216 mm] wide x 5'' to 14'' [127 to 356 mm] long).
Resolution must be set to Fast (see page 51)
NOTE
One custom paper size can be defined in the Windows 2000
and XP Postscript emulation driver.
1. Make sure the rear exit path is open:
2. Load the custom paper in the tray of your choice.
3. Open the file in your application and select File → Print.
4. In the Print dialog box, select the Postscript emulation printer.
5. Windows XP only
: click Preferences.
ES 1220n Postscript Emulation Driver • 49
Page 50

6. On the Layout tab., click Advanced.
7. In the Paper Size drop-down list, select Postscript Custom
Page Size.
8. Define your custom size in the dialog box which appears, then
click OK twice.
9. Click the Paper/Quality tab and select the feed tray you are
using for the custom size paper from the Paper Source
drop-down list.
10. Windows XP only
: click OK to return to the Print dialog box.
11. Click Print.
ES 1220n Postscript Emulation Driver • 50
Page 51

Changing The Resolution for A Print Job
2000 and XP
NOTE
These instructions explain how to change the settings as
you are printing a job. If you wish to change the settings to
apply to all jobs (default settings):
•Click Start → Settings → Printers [for XP, Printers and
Faxes].
• Right click the appropriate printer name, then select
Properties.
•Click Printing Preferences.
• Follow steps 3, etc., below. Note that the Properties
screen for setting defaults will have more tabs.
1. Open the file in your application and select File → Print.
2. In the Print dialog box, select the Postscript emulation printer.
3. Windows XP only
ES 1220n Postscript Emulation Driver • 51
: click Preferences.
Page 52

4. On the Job Options tab, select the required printing resolution,
then click OK:
• Fine = high resolution, slower speed: the default. Provides
optimum results when printing graphics.
• Normal = medium resolution, medium speed: choose this set-
ting for documents with lower resolution graphics, line art, or
text only.
• Fast = low resolution, fast speed: choose this one for quick
proofing of drafts.
5. Select Toner Saving if appropriate.
6. Windows XP only
: click OK to return to the Print dialog box.
7. Click Print.
ES 1220n Postscript Emulation Driver • 52
Page 53

Duplex Printing (Printing on Both Sides of The Paper)
2000 and XP
NOTE
The optional duplex unit must be installed in the printer and
enabled before duplex printing can be carried out.
• Standard paper sizes only.
• Paper weight range 20 to 28 lb. US Bond (75 to 105 g/m²).
• Paper must be loaded print side up.
• Any tray (Tray 1, optional Tray 2, MP tray) can be used for duplex
printing.
NOTE
These instructions explain how to change the settings as
you are printing a job. If you wish to change the settings to
apply to all jobs:
•Click Start → Settings → Printers [for XP, Printers and
Faxes].
• Right click the appropriate printer name, then select
Properties.
•Click Printing Preferences.
• Follow steps 3, etc., below. Note that the Properties
screen for setting defaults will have more tabs.
1. Open the file in your application and select File → Print.
2. In the Print dialog box, select the Postscript emulation printer.
3. Windows XP only
: click Preferences.
ES 1220n Postscript Emulation Driver • 53
Page 54

4. On the Layout tab, under Print on Both Sides (Duplex), select
Flip on Long Edge or Flip on Short Edge.
5. Windows XP only
6. Click Print.
ES 1220n Postscript Emulation Driver • 54
: click OK to return to the Print dialog box.
Page 55

Printing Watermarks
2000 and XP
1. Open the file in your application and select File → Print.
2. In the Print dialog box, select the Postscript emulation printer.
3. Windows XP only
4. On the Job Options tab, click Watermark.
5. In the dialog box which appears, click New to define a watermark
or select a predefined watermark from the list box, then click OK.
: click Preferences.
6. Windows XP only
7. Click Print.
ES 1220n Postscript Emulation Driver • 55
: click OK to return to the Print dialog box.
Page 56

Collating
2000 and XP
Collating can be carried out with or without the optional hard disk
drive installed. However, printers with a hard disk drive will provide
greater performance.
1. Open the file in your application and select File → Print.
2. In the Print dialog box, select the Postscript emulation printer.
3. Windows XP only
4. On the Job Options tab, enter the number of Copies you wish to
print, then select Collate.
5. Windows XP only
6. Click Print.
: click Preferences.
: click OK to return to the Print dialog box.
ES 1220n Postscript Emulation Driver • 56
Page 57

Secure Printing (Printing Confidential Documents)
2000 and XP
Secure printing allows the printing of confidential documents on
printers that are shared with other users. First the document is
assigned a password and processed to a print file which is saved on
the hard disk drive. Then it is printed on demand by entering the
password through the printer’s front panel.
Once the document is printed, it is deleted from the hard drive. If you
wish to retain the document on the hard disk drive after printing it, use
the Store to Hard Disk feature (see page 65).
NOTE
• The internal hard disk must be installed in the printer and
enabled to allow for spooling of the print job before final
printing.
• If the hard disk memory is insufficient for the spooled
data,
DISK FULL is displayed and only one copy printed.
• If the software application being used has a collate print
option, this must be turned OFF
operate correctly.
• Secure printing may not be available in some software
applications.
for secure printing to
1. Open the file in your application and select File → Print.
2. In the Print dialog box, select the Postscript emulation printer.
3. Windows XP only
: click Preferences.
ES 1220n Postscript Emulation Driver • 57
Page 58

4. On the Job Options tab, select Secure Print.
5. In the dialog box which appears, enter a Job Name and 4-digit
password (PIN) of your choice (0000 to 9999), then click OK. (If
no dialog box appears, click PIN.)
6. Enter the number of copies to be printed, then select Collate if
applicable.
7. Windows XP only
: click OK to return to the Print dialog box.
8. Click Print.
The document is processed to a print file and stored on the
printer’s hard disk drive.
9. Go to the printer and print out the document using the front panel
(see below).
Printing a Confidential Document from The Front Panel
1. Press + to enter the menu mode.
PRINT JOBS MENU
ES 1220n Postscript Emulation Driver • 58
Page 59

2. Press ENTER.
ENTER PASSWORD
****
3. Use
4. Repeat step 3 for each of the remaining digits in the password.
5. Press
Deleting the Confidential Document Before Printing It
1. Press + to enter the menu mode.
+/ – to set the number for the first digit of the password, then
press ENTER to engage the number and move to the next digit:
ENTER PASSWORD
5***
SELECT JOB
ALL JOBS
+/– until the name of the job you wish to print appears on
the second line of the display, then press ENTER.
The document prints and is deleted from the hard disk drive.
PRINT JOBS MENU
2. Press ENTER.
ENTER PASSWORD
****
ES 1220n Postscript Emulation Driver • 59
Page 60

3. Use +/ – to set the number for the first digit of the password, then
press ENTER to engage the number and move to the next digit:
ENTER PASSWORD
5***
4. Repeat step 3 for each of the remaining digits in the password.
SELECT JOB
ALL JOBS
5. Press CANCEL.
DELETE THE JOB
Y=ENTER/N=CANCEL
6. Press ENTER to delete the job, then press ON LINE.
NOTE
An alternative method of printing or deleting a confidential
document is to use the Storage Device Manager. Please
refer to the On-line help for Storage Device Manager.
ES 1220n Postscript Emulation Driver • 60
Page 61

Proof and Print
2000 and XP
Proof and Print lets you print a proof of a document for review and
approval before printing the document in quantity. First the document
is assigned a password and processed to a print file. The file is saved
on the hard disk drive and one copy prints. If the document is okay
for printing, the remaining copies are printed on demand by entering
the password through the printer’s front panel.
Once the document is printed, it is deleted from the hard drive. If you
wish to retain the document on the hard disk drive after printing it, use
the Store to Hard Disk feature (see page 65).
NOTE
• The internal hard disk must be installed in the printer and
enabled to allow for spooling of the print job before final
printing.
• If the hard disk memory is insufficient for the spooled
data,
DISK FULL is displayed and only one copy printed.
• If the software application being used has a collate print
option, this must be turned OFF
operate correctly.
• Proof and Print may not be available in some software
applications.
for secure printing to
1. Open the file in your application and select File → Print.
2. In the Print dialog box, select the Postscript emulation printer.
3. Windows XP only
: click Preferences.
ES 1220n Postscript Emulation Driver • 61
Page 62

4. On the Job Options tab, select Proof and Print.
5. In the dialog box which appears, enter a Job Name and 4-digit
password (PIN) of your choice (0000 to 9999), then click OK. (If
no dialog box appears, click PIN.)
6. Enter the number of copies to be printed, then select Collate if
applicable.
7. Windows XP only
: click OK to return to the Print dialog box.
8. Click Print.
The document is processed to a print file and stored on the
printer’s hard disk drive. One copy prints for proofing.
9. Once the proof is approved, print out the document using the
front panel (see below).
ES 1220n Postscript Emulation Driver • 62
Page 63

Printing The Proofed Document from The Front Panel
1. Press + to enter the menu mode.
PRINT JOBS MENU
2. Press ENTER.
ENTER PASSWORD
****
3. Use
4. Repeat step 3 for each of the remaining digits in the password.
5. Press
Deleting The Document Before Printing Multiple Copies
If the proof is not ready for printing, the job must be deleted from the
printer:
1. Press
+/ – to set the number for the first digit of the password, then
press ENTER to engage the number and move to the next digit:
ENTER PASSWORD
5***
SELECT JOB
ALL JOBS
+/– until the name of the job you wish to print appears on
the second line of the display, then press ENTER.
The document prints and is deleted from the hard disk drive.
+ to enter the menu mode.
PRINT JOBS MENU
ES 1220n Postscript Emulation Driver • 63
Page 64

2. Press ENTER.
ENTER PASSWORD
****
3. Use
4. Repeat step 3 for each of the remaining digits in the password.
5. Press CANCEL.
6. Press ENTER to delete the job, then press ON LINE.
+/ – to set the number for the first digit of the password, then
press ENTER to engage the number and move to the next digit:
ENTER PASSWORD
5***
SELECT JOB
ALL JOBS
DELETE THE JOB
Y=ENTER/N=CANCEL
NOTE
An alternative method of printing or deleting the remaining
copies of the document is to use the Storage Device
Manager. Please refer to the On-line help for Storage Device
Manager.
ES 1220n Postscript Emulation Driver • 64
Page 65

Store to Hard Disk
2000 and XP
Store to hard disk (job spooling) allows print jobs to be prepared and
stored on the hard disk for printing on demand. This is good for forms,
generic memos, letterhead stationery, etc.
NOTE
• The internal hard disk must be installed in the printer and
enabled.
• If the hard disk memory is insufficient for the spooled
data, DISK FULL is displayed and only one copy printed.
• If the software application being used has a collate print
option, this must be turned OFF
operate correctly.
• Store to Hard Disk may not be available in some software
applications.
1. Open the file in your application and select File → Print.
2. In the Print dialog box, select the Postscript emulation printer.
for Store to Hard Disk to
3. Windows XP only
ES 1220n Postscript Emulation Driver • 65
: click Preferences.
Page 66

4. On the Job Options tab, select Store to HDD.
5. In the dialog box which appears, enter a Job Name and 4-digit
password (PIN) of your choice (0000 to 9999), then click OK. (If
no dialog box appears, click PIN.)
6. Enter the number of copies to be printed, then select Collate if
applicable.
7. Windows XP only
: click OK to return to the Print dialog box.
8. Click Print.
The document is processed to a print file and stored on the
printer’s hard disk drive.
9. Print out the document using the front panel (see below).
Printing The Stored Document from The Front Panel
1. Press + to enter the menu mode.
PRINT JOBS MENU
ES 1220n Postscript Emulation Driver • 66
Page 67

2. Press ENTER.
ENTER PASSWORD
****
3. Use
4. Repeat step 3 for each of the remaining digits in the password.
5. Press
Deleting the Stored Document
To delete a document stored on the Hard Disk Drive:
1. Press
+/ – to set the number for the first digit of the password, then
press ENTER to engage the number and move to the next digit:
ENTER PASSWORD
5***
SELECT JOB
ALL JOBS
+/– until the name of the job you wish to print appears on
the second line of the display, then press ENTER.
The document prints.
+ to enter the menu mode.
PRINT JOBS MENU
2. Press ENTER.
ENTER PASSWORD
****
ES 1220n Postscript Emulation Driver • 67
Page 68

3. Use +/ – to set the number for the first digit of the password, then
press ENTER to engage the number and move to the next digit:
ENTER PASSWORD
5***
4. Repeat step 3 for each of the remaining digits in the password.
SELECT JOB
ALL JOBS
5. Press CANCEL.
DELETE THE JOB
Y=ENTER/N=CANCEL
6. Press ENTER to delete the job, then press ON LINE.
NOTE
An alternative method of printing or deleting documents
stored on the Hard Disk Drive is to use the Storage Device
Manager. Please refer to the On-line help for Storage Device
Manager.
ES 1220n Postscript Emulation Driver • 68
Page 69

Printing Overlays
2000 and XP
What are Overlays?
An Overlay can be a combination of graphics, fonts, or text that is
stored in the printer's flash memory or on the optional hard disk drive,
and printed whenever required. The result is similar to the Watermark
feature, but with the ability to be much more elaborate.
Overlays can be useful for tasks such as printing letterheads, forms,
or invoices, and should reduce the need for pre-printed stationery.
An Example of Using Overlays:
Suppose that you have created and stored three files in the printer
using the Storage Device Manager:
• the company logo
• the company address
• the company mission statement.
The Overlay feature allows these files to be incorporated into your
document in various combinations, depending on your requirements.
To Create Overlays:
1. Create the document that you wish to use for Overlay printing
(e.g. a letterhead) and generate a PRN file (print file) using the
printer driver.
2. Use the Storage Device Manager utility to convert this PRN file
(print file) to a storable file format, and download it to the printer.
ES 1220n Postscript Emulation Driver • 69
Page 70

Once someone has set up all the necessary overlay files on the
printer, other users only have to switch on the required settings in the
printer driver to use the overlays.
NOTE
• The internal hard disk must be installed in the printer to
allow for spooling of the print job before final printing.
• If the hard disk memory is insufficient for the spooled
data,
DISK FULL is displayed and only one copy printed.
• If the software application being used has a collate print
option, this must be turned OFF
correctly.
• An overlay may consist of more than one component
files.
Creating Documents To Use As Overlays
An overlay can be created in any software application that can
handle logos, letterheads, forms, etc. and can print to a file.
1. With the file to be stored as an overlay open in your application
program, choose File then Print.
for overlay to operate
2. Ensure that the Print To File option is switched on in your
application's Print dialog box.
3. Depending on the application, you may need to select your
printer model, and then click Properties… This should open the
printer driver settings.
ES 1220n Postscript Emulation Driver • 70
Page 71

4. Select the Overlay tab.
5. Choose Create Form from the drop-down list, then make your
selections in the dialog box which appears and click OK.
6. Windows XP only
: click OK to return to the Print dialog box.
7. Click Print.
Instead of sending the print job to the printer, this prompts you to
save the print job on your PC's hard disk. Give the file a meaningful
name.
Downloading The Print File To Use as An Overlay
Use the Storage Device Manager utility to download the file for use
as an overlay. Follow the instructions in the Utility Software section
(see page 293), or use the Storage Device Manager Help.
ES 1220n Postscript Emulation Driver • 71
Page 72

Windows NT 4.0
• N-up Printing: multiple pages on one sheet (see page 73)
• Custom Page Sizes (see page 74)
• Selecting Print Resolution (see page 76)
• Duplex Printing (see page 78)
• Watermarks (see page 80)
• Collating (see page 81)
• Secure Print: printing confidential documents (see page 82)
• Proof and Print (see page 86)
• Storing Print Files to the Hard Disk Drive (see page 90)
NOTE
Most applications allow the printer properties to be
accessed from within the document print dialog box.
ES 1220n Postscript Emulation Driver • 72
Page 73

N-Up Printing (Printing Multiple Pages on One Sheet)
NT 4.0
1. Open the file in your application and select File → Print.
2. In the Print dialog box, select the Postscript emulation printer,
then click Properties.
3. On the Advanced tab, double click Document Options.
4. Click Page Layout (N-UP) Option. In the dialog box which
appears, select the desired number of pages to print per sheet.
5. Click OK to return to the Print dialog box.
6. Click Print.
ES 1220n Postscript Emulation Driver • 73
Page 74

Printing Custom Page Sizes
NT 4.0
Custom page sizes can only be printed from the Multi-Purpose Tray.
The printer media size for the Multi-Purpose Tray must be manually
set in the driver to the custom paper size before use (range 3½'' to
8½'' [89 to 216 mm] wide x 5'' to 14'' [127 to 356 mm] long).
NOTE
One custom paper size can be defined in the Windows NT
4.0 Postscript emulation driver.
1. Make sure the rear exit path is open:
2. Load the custom paper in the tray of your choice.
3. Open the file in your application and select File → Print.
4. In the Print dialog box, select the Postscript emulation printer,
then click Properties.
ES 1220n Postscript Emulation Driver • 74
Page 75

5. On the Page Setup tab, select Postscript Custom Page Size at
the bottom of the Paper Size drop-down list, then define the
custom size in the dialog box which appears and click OK.
6. Select the tray you are using in the Paper Source drop-down
box, then click OK.
7. Click OK to print the document
ES 1220n Postscript Emulation Driver • 75
Page 76

Changing The Resolution for A Print Job
NT 4.0
NOTE
These instructions explain how to change the settings as
you are printing a job. If you wish to change the settings to
apply to all jobs (default settings):
•Click Start → Settings → Printers [for XP, Printers and
Faxes].
• Right click the appropriate printer name, then select
Properties.
•Click Printing Preferences.
• Follow steps 3, etc., below. Note that the Properties
screen for setting defaults will have more tabs.
1. Open the file in your application and select File → Print.
2. In the Print dialog box, select the Postscript emulation printer,
then click Properties.
ES 1220n Postscript Emulation Driver • 76
Page 77

3. On the Job Options tab, select the required print resolution
under Quality, then click OK:
• Fine = high resolution, slower speed: the default. Provides
optimum results when printing graphics.
• Normal = medium resolution, medium speed: choose this set-
ting for documents with lower resolution graphics, line art, or
text only.
• Fast = low resolution, fast speed: choose this one for quick
proofing of drafts.
4. Select Toner Saving if appropriate.
5. Click OK.
6. Click OK to print the document.
ES 1220n Postscript Emulation Driver • 77
Page 78

Duplex Printing (Printing on Both Sides of The Paper)
NT 4.0
NOTE
The optional duplex unit must be installed in the printer and
enabled before duplex printing can be carried out.
• Standard paper sizes only.
• Paper weight range 20 to 28 lb. US Bond (75 to 105 g/m²).
• Paper must be loaded print side up.
• Any tray (Tray 1, optional Tray 2, MP tray) can be used for duplex
printing.
NOTE
These instructions explain how to change the settings as
you are printing a job. If you wish to change the settings to
apply to all jobs:
•Click Start → Settings → Printers [for XP, Printers and
Faxes].
• Right click the appropriate printer name, then select
Properties.
•Click Printing Preferences.
• Follow steps 3, etc., below. Note that the Properties
screen for setting defaults will have more tabs.
1. Open the file in your application and select File → Print.
2. In the Print dialog box, select the Postscript emulation printer,
then click Properties.
ES 1220n Postscript Emulation Driver • 78
Page 79

3. On the Page Setup tab, under Print on Both Sides(Duplex),
select Long Side or Short Side.
4. Click OK to print the document.
ES 1220n Postscript Emulation Driver • 79
Page 80

Printing Watermarks
NT 4.0
1. Open the file in your application and select File → Print.
2. In the Print dialog box, select the Postscript emulation printer,
then click Properties.
3. On the Job Options tab, click Watermark.
4. In the dialog box which appears, click New to define a watermark
or select a predefined watermark from the list box, then click OK.
5. Click OK to return to the Print dialog box.
6. Click OK.
ES 1220n Postscript Emulation Driver • 80
Page 81

Collating
NT 4.0
Collating can be carried out with or without the optional hard disk
drive installed. However, printers with a hard disk drive will provide
greater performance.
1. Open the file in your application and select File → Print.
2. In the Print dialog box, select the Postscript emulation printer,
then click Properties.
3. On the Job Options tab, enter the number of Copies you wish to
print, then select Collate.
4. Click OK to return to the Print dialog box.
5. Click OK.
ES 1220n Postscript Emulation Driver • 81
Page 82

Secure Printing (Printing Confidential Documents)
NT 4.0
Secure printing allows the printing of confidential documents on
printers that are shared with other users. First the document is
assigned a password and processed to a print file which is saved on
the hard disk drive. Then it is printed on demand by entering the
password through the printer’s front panel.
Once the document is printed, it is deleted from the hard drive. If you
wish to retain the document on the hard disk drive after printing it, use
the Store to Hard Disk feature (see page 90).
NOTE
• The internal hard disk must be installed in the printer and
enabled to allow for spooling of the print job before final
printing.
• If the hard disk memory is insufficient for the spooled
data,
DISK FULL is displayed and only one copy printed.
• If the software application being used has a collate print
option, this must be turned OFF
operate correctly.
• Secure printing may not be available in some software
applications.
for secure printing to
1. Open the file in your application and select File → Print.
2. In the Print dialog box, select the Postscript emulation printer,
then click Properties.
ES 1220n Postscript Emulation Driver • 82
Page 83

3. On the Job Options tab, select Secure Print.
4. In the dialog box which appears, enter a Job Name and 4-digit
password (PIN) of your choice (0000 to 9999), then click OK. (If
no dialog box appears, click PIN.)
5. Enter the number of copies to be printed, then select Collate if
applicable.
6. Click OK to return to the Print dialog box.
7. Click Print.
The document is processed to a print file and stored on the
printer’s hard disk drive.
8. Go to the printer and print out the document using the front panel
(see below).
Printing a Confidential Document from The Front Panel
1. Press + to enter the menu mode.
PRINT JOBS MENU
ES 1220n Postscript Emulation Driver • 83
Page 84

2. Press ENTER.
ENTER PASSWORD
****
3. Use
4. Repeat step 3 for each of the remaining digits in the password.
5. Press
Deleting the Confidential Document Before Printing It
1. Press + to enter the menu mode.
+/ – to set the number for the first digit of the password, then
press ENTER to engage the number and move to the next digit:
ENTER PASSWORD
5***
SELECT JOB
ALL JOBS
+/– until the name of the job you wish to print appears on
the second line of the display, then press ENTER.
The document prints and is deleted from the hard disk drive.
PRINT JOBS MENU
2. Press ENTER.
ENTER PASSWORD
****
ES 1220n Postscript Emulation Driver • 84
Page 85

3. Use +/ – to set the number for the first digit of the password, then
press ENTER to engage the number and move to the next digit:
ENTER PASSWORD
5***
4. Repeat step 3 for each of the remaining digits in the password.
SELECT JOB
ALL JOBS
5. Press CANCEL.
DELETE THE JOB
Y=ENTER/N=CANCEL
6. Press ENTER to delete the job, then press ON LINE.
NOTE
An alternative method of printing or deleting the document
is to use the Storage Device Manager. Please refer to the Online help for Storage Device Manager.
ES 1220n Postscript Emulation Driver • 85
Page 86

Proof and Print
NT 4.0
Proof and Print lets you print a proof of a document for review and
approval before printing the document in quantity. First the document
is assigned a password and processed to a print file. The file is saved
on the hard disk drive and one copy prints. If the document is okay
for printing, the remaining copies are printed on demand by entering
the password through the printer’s front panel.
Once the document is printed, it is deleted from the hard drive. If you
wish to retain the document on the hard disk drive after printing it, use
the Store to Hard Disk feature (see page 90).
NOTE
• The internal hard disk must be installed in the printer and
enabled to allow for spooling of the print job before final
printing.
• If the hard disk memory is insufficient for the spooled
data,
DISK FULL is displayed and only one copy printed.
• If the software application being used has a collate print
option, this must be turned OFF
operate correctly.
• Secure printing may not be available in some software
applications.
for secure printing to
1. Open the file in your application and select File → Print.
2. In the Print dialog box, select the Postscript emulation printer,
then click Properties.
ES 1220n Postscript Emulation Driver • 86
Page 87

3. On the Job Options tab, select Proof and Print.
4. In the dialog box which appears, enter a Job Name and 4-digit
password (PIN) of your choice (0000 to 9999), then click OK. (If
no dialog box appears, click PIN.)
5. Enter the number of copies to be printed, then select Collate if
applicable.
6. Click OK to return to the Print dialog box.
7. Click Print.
The document is processed to a print file and stored on the
printer’s hard disk drive. One copy prints for proofing.
8. Once the proof is approved, print the additional copies of the
document using the front panel (see below).
Printing The Approved Document from The Front Panel
1. Press + to enter the menu mode.
PRINT JOBS MENU
ES 1220n Postscript Emulation Driver • 87
Page 88

2. Press ENTER.
ENTER PASSWORD
****
3. Use
4. Repeat step 3 for each of the remaining digits in the password.
5. Press
Deleting the Document Before Printing Multiple Copies
If the proof is not ready for printing, the job must be deleted from the
printer:
1. Press
+/ – to set the number for the first digit of the password, then
press ENTER to engage the number and move to the next digit:
ENTER PASSWORD
5***
SELECT JOB
ALL JOBS
+/– until the name of the job you wish to print appears on
the second line of the display, then press ENTER.
The document prints and is deleted from the hard disk drive.
+ to enter the menu mode.
PRINT JOBS MENU
2. Press ENTER.
ENTER PASSWORD
****
ES 1220n Postscript Emulation Driver • 88
Page 89

3. Use +/ – to set the number for the first digit of the password, then
press ENTER to engage the number and move to the next digit:
ENTER PASSWORD
5***
4. Repeat step 3 for each of the remaining digits in the password.
SELECT JOB
ALL JOBS
5. Press CANCEL.
DELETE THE JOB
Y=ENTER/N=CANCEL
6. Press ENTER to delete the job, then press ON LINE.
NOTE
An alternative method of printing or deleting the remaining
copies of the document is to use the Storage Device
Manager. Please refer to the On-line help for Storage Device
Manager.
ES 1220n Postscript Emulation Driver • 89
Page 90

Store to Hard Disk
NT 4.0
Store to hard disk (job spooling) allows print jobs to be prepared and
stored on the hard disk for printing on demand. The job is password
protected.
NOTE
• The internal hard disk must be installed in the printer and
enabled.
• If the hard disk memory is insufficient for the spooled
data, DISK FULL is displayed and only one copy printed.
• If the software application being used has a collate print
option, this must be turned OFF for Store to Hard Disk to
operate correctly.
• Store to Hard Disk may not be available in some software
applications.
1. Open the file in your application and select File → Print.
2. In the Print dialog box, select the Postscript emulation printer,
then click Properties.
ES 1220n Postscript Emulation Driver • 90
Page 91

3. On the Job Options tab, select Store to HDD.
4. In the dialog box which appears, enter a Job Name and 4-digit
password (PIN) of your choice (0000 to 9999), then click OK. (If
no dialog box appears, click PIN.)
5. Enter the number of copies to be printed, then select Collate if
applicable.
6. Click OK to return to the Print dialog box.
7. Click Print.
The document is processed to a print file and stored on the
printer’s hard disk drive.
8. Go to the printer and print out the document using the front panel
(see below).
Printing The Stored Document from The Front Panel
1. Press + to enter the menu mode.
PRINT JOBS MENU
ES 1220n Postscript Emulation Driver • 91
Page 92

2. Press ENTER.
ENTER PASSWORD
****
3. Use
4. Repeat step 3 for each of the remaining digits in the password.
5. Press
Deleting a Stored Document
To delete a document stored on the Hard Disk Drive:
1. Press
+/ – to set the number for the first digit of the password, then
press ENTER to engage the number and move to the next digit:
ENTER PASSWORD
5***
SELECT JOB
ALL JOBS
+/– until the name of the job you wish to print appears on
the second line of the display, then press ENTER.
The document prints.
+ to enter the menu mode.
PRINT JOBS MENU
2. Press ENTER.
ENTER PASSWORD
****
ES 1220n Postscript Emulation Driver • 92
Page 93

3. Use +/ – to set the number for the first digit of the password, then
press ENTER to engage the number and move to the next digit:
ENTER PASSWORD
5***
4. Repeat step 3 for each of the remaining digits in the password.
SELECT JOB
ALL JOBS
5. Press CANCEL.
DELETE THE JOB
Y=ENTER/N=CANCEL
6. Press ENTER to delete the job, then press ON LINE.
NOTE
An alternative method of printing or deleting a stored
document is to use the Storage Device Manager. Please
refer to the On-line help for Storage Device Manager.
ES 1220n Postscript Emulation Driver • 93
Page 94

Printing Overlays
NT 4.0
What are Overlays?
An Overlay can be a combination of graphics, fonts, or text that is
stored in the printer's flash memory or on the optional hard disk drive,
and printed whenever required. The result is similar to the Watermark
feature, but with the ability to be much more elaborate.
Overlays can be useful for tasks such as printing letterheads, forms,
or invoices, and should reduce the need for pre-printed stationery.
An Example of Using Overlays:
Suppose that you have created and stored three files in the printer
using the Storage Device Manager:
• the company logo
• the company address
• the company mission statement.
The Overlay feature allows these files to be incorporated into your
document in various combinations, depending on your requirements.
To Create Overlays:
1. Create the document that you wish to use for Overlay printing
(e.g. a letterhead) and generate a PRN file (print file) using the
printer driver.
2. Use the Storage Device Manager utility to convert this PRN file
(print file) to a storable file format, and download it to the printer.
ES 1220n Postscript Emulation Driver • 94
Page 95

Once someone has set up all the necessary overlay files on the
printer, other users only have to switch on the required settings in the
printer driver to use the overlays.
NOTE
• The internal hard disk must be installed in the printer to
allow for spooling of the print job before final printing.
• If the hard disk memory is insufficient for the spooled
data,
DISK FULL is displayed and only one copy printed.
• If the software application being used has a collate print
option, this must be turned OFF for overlay to operate
correctly.
• An overlay may consist of more than one component
files.
Creating Documents To Use As Overlays
An overlay can be created in any software application that can
handle logos, letterheads, forms, etc. and can print to a file.
1. With the file to be stored as an overlay open in your application
program, choose File then Print.
2. Ensure that the Print To File option is switched on in your
application's Print dialog box.
3. Depending on the application, you may need to select your
printer model, and then click Properties… This should open the
printer driver settings.
4. Select the Overlay tab.
5. Choose Create Form from the drop-down list, then make your
selections in the dialog box which appears and click OK.
6. Click Print.
Instead of sending the print job to the printer, this prompts you to
save the print job on your PC's hard disk. Give the file a meaningful
name.
ES 1220n Postscript Emulation Driver • 95
Page 96

Downloading The Print File To Use as An Overlay
Use the Storage Device Manager utility to download the file for use
as an overlay. Follow the instructions in the Utility Software section
(see page 293), or use the Storage Device Manager Help.
ES 1220n Postscript Emulation Driver • 96
Page 97

PCL Emulation Driver
The Windows PCL emulation printer driver contains settings for
many of the same items as are found in the operator panel menus.
Where items in the printer driver are the same as those in the
operator panel menus, and you print documents from Windows, the
settings in the Windows printer driver will override those items in the
operator panel menus.
Windows 98/Me/XP/NT 4.0
NOTE
The illustrations in this section show the Windows Me
Operating System. The other Windows operating systems
may appear slightly different, but the principles are the
same.
• N-up Printing: multiple pages on one sheet (see page 98)
• Custom Page Sizes (see page 99)
• Selecting Print Resolution (see page 102)
• Duplex Printing (see page 104)
• Watermarks (see page 108)
• Collating (see page 110)
• Proof and Print (see page 111)
• Secure Print: printing confidential documents (see page 116)
• Storing Print Files to the Hard Disk Drive (see page 121)
• Printing Posters (see page 126)
NOTE
Most applications allow the printer properties to be
accessed from within the document print dialog box.
ES 1220n PCL Emulation Driver • 97
Page 98

N-Up Printing (Printing Multiple Pages on One Sheet)
98 / Me / XP / NT 4.0
1. Open the file in your application and select File → Print.
2. In the Print dialog box, select the PCL printer, then:
a. Windows 98/ Me / NT4.0: click Properties.
b. Windows XP: click Preferences.
3. On the Setup tab, under Finishing Mode (1), select the required
number of pages per sheet in the drop-down list. To set additional
parameters, click Options (2), then make your selections and
click OK.
4. Click OK.
5. Windows 98/ Me / NT4.0: click OK.
Windows XP: click Print.
ES 1220n PCL Emulation Driver • 98
Page 99

Printing User Defined Sizes
98 / Me / XP / NT 4.0
User defined (custom) page sizes can only be printed from the
Multi-Purpose Tray. The printer media size for the Multi-Purpose
Tray must be manually set in the driver to the custom paper size
before use.
MP Tray Custom Size Range
• minimum 3.94'' to 5.83'' [100 x 148 mm]
• maximum 8½'' x 14'' [216 x 356 mm]
• or banners from 8¼'' to 8½'' (210 to 215.9 mm) wide by up to 47¼''
(1.2 m) long. Banners must be fed one sheet at a time. Resolution
must be set to Fast (see page 102).
NOTE
Up to 32 custom page sizes can be defined in the PCL driver.
1. Make sure the rear exit path is open:
2. Load the custom size paper in the tray of your choice.
3. Open the file in your application and select File → Print.
4. In the Print dialog box, select the PCL printer, then:
a. Windows 98/ Me / NT4.0: click Properties.
b. Windows XP: click Preferences.
ES 1220n PCL Emulation Driver • 99
Page 100

5. On the Setup tab, under Media, select User Defined Size in the
Size drop-down list. Define the custom size in the dialog box
which appears, then click OK.
NOTE
You may see a Warning dialog box indicating a conflict. If
you do, click OK and the driver will automatically make the
needed changes to correct for the conflict.
ES 1220n PCL Emulation Driver • 100
 Loading...