

Page 1

Instruction manual
U10000187102
Printer controller
CP_Manager
for E-series
Page 2

U10000187101 2016 Septemb er
U10000187102 2017 January
Copyright© 2016 OKI Data Infotech Corporation.
All rights reserved.
The contents of this manual may be changed without prior notice.
Page 3

Introduction
Thank you for purchasing a ColorPainter series ink jet printer.
The CP_Manager™ software controls the ColorPainter series printers. Its functions include displaying the printer status,
changing the settings, test printing, and maintenance.
The CP_Manager for E-Series software is CP_Manager software dedicated to the ColorPainter E series (IP-5630/IP-5530).
Unless otherwise specied, the CP_Manager for E-Series software will be referred to as CP_Manager in this manual.
Before using the software and printer, carefully read the software instruction manual (this document) and the printer
user’s guide.
After reading these manuals, carefully store them so they can be accessed when needed.
Windows® is a registered trademark or trademark of Microsoft® Corporation in the United States and other countries.
Adobe® Reader® is a registered trademark or trademark of Adobe Systems in the United States and other countries.
Other company and product names are trademarks or registered trademarks of their respective companies.
Page 4

Table of Contents
Chapter 1. Overview of CP_Manager
◆Basic operations ………………………………………………………………………………… 1-2
◆System requirements ………………………………………………………………………… 1-2
Chapter 2. Basics of CP_Manager
◆Installation procedure …………………………………………………………………………2-2
◆CP_Manager operating conditions ……………………………………………………………2-4
◆Starting CP_Manager ……………………………………………………………………………2-4
◆Screen layout ……………………………………………………………………………………2-5
Chapter 3. Printer status display area
◆Printer status display area ………………………………………………………………………3-2
Chapter 4. Printer setting area
◆Icon explanation ………………………………………………………………………………… 4-2
◆Printer operations …………………………………………………………………………… 4-4
◆Printer maintenance ……………………………………………………………………………4-5
◆Media adjustment …………………………………………………………………………… 4-6
◆Media preset ………………………………………………………………………………… 4-8
◆Heater settings ……………………………………………………………………………… 4-10
◆Maintenance ………………………………………………………………………………… 4 -11
◆Mechanical adjustment ……………………………………………………………………… 4 -12
◆Useful tool …………………………………………………………………………………… 4 -13
◆Notication and remote operation ………………………………………………………… 4-14
◆Settings ……………………………………………………………………………………… 4-22
◆Printer information ………………………………………………………………………… 4-23
Page 5
What is CP_Manager? (Useful Functions)
The CP_Manager software is used to display the printer status, congure the printer settings and perform
maintenance operations without using the printer operation panel.
The printer settings are displayed in a user-friendly manner to facilitate conguration, even for users who operate the
printer for the rst time.
An electronic version of the maintenance manual is also available.
Moreover, CP_Manager can warn and notify you of the printer status through sounds and messages sent by e-mails
or via twitter.
CP_Manager for E-series is compatible with the following printers.
- ColorPainter E series (IP-5630/IP-5530)
An enhanced interface to facilitate entry of value and detailed settings
Entering values and modifying the settings are simple.
CP_Manager Instruction manual
v
Page 6
The status of the printer can be displayed on a computer to allow the
user to stay away from the printer.
Checking the printer status
The status of the printer can be checked from a computer.
The virtual panel makes it possible to control the printer remotely
Operations on a computer can be performed the same way as on the printer operation panel.
vi
CP_Manager Instruction manual
Page 7
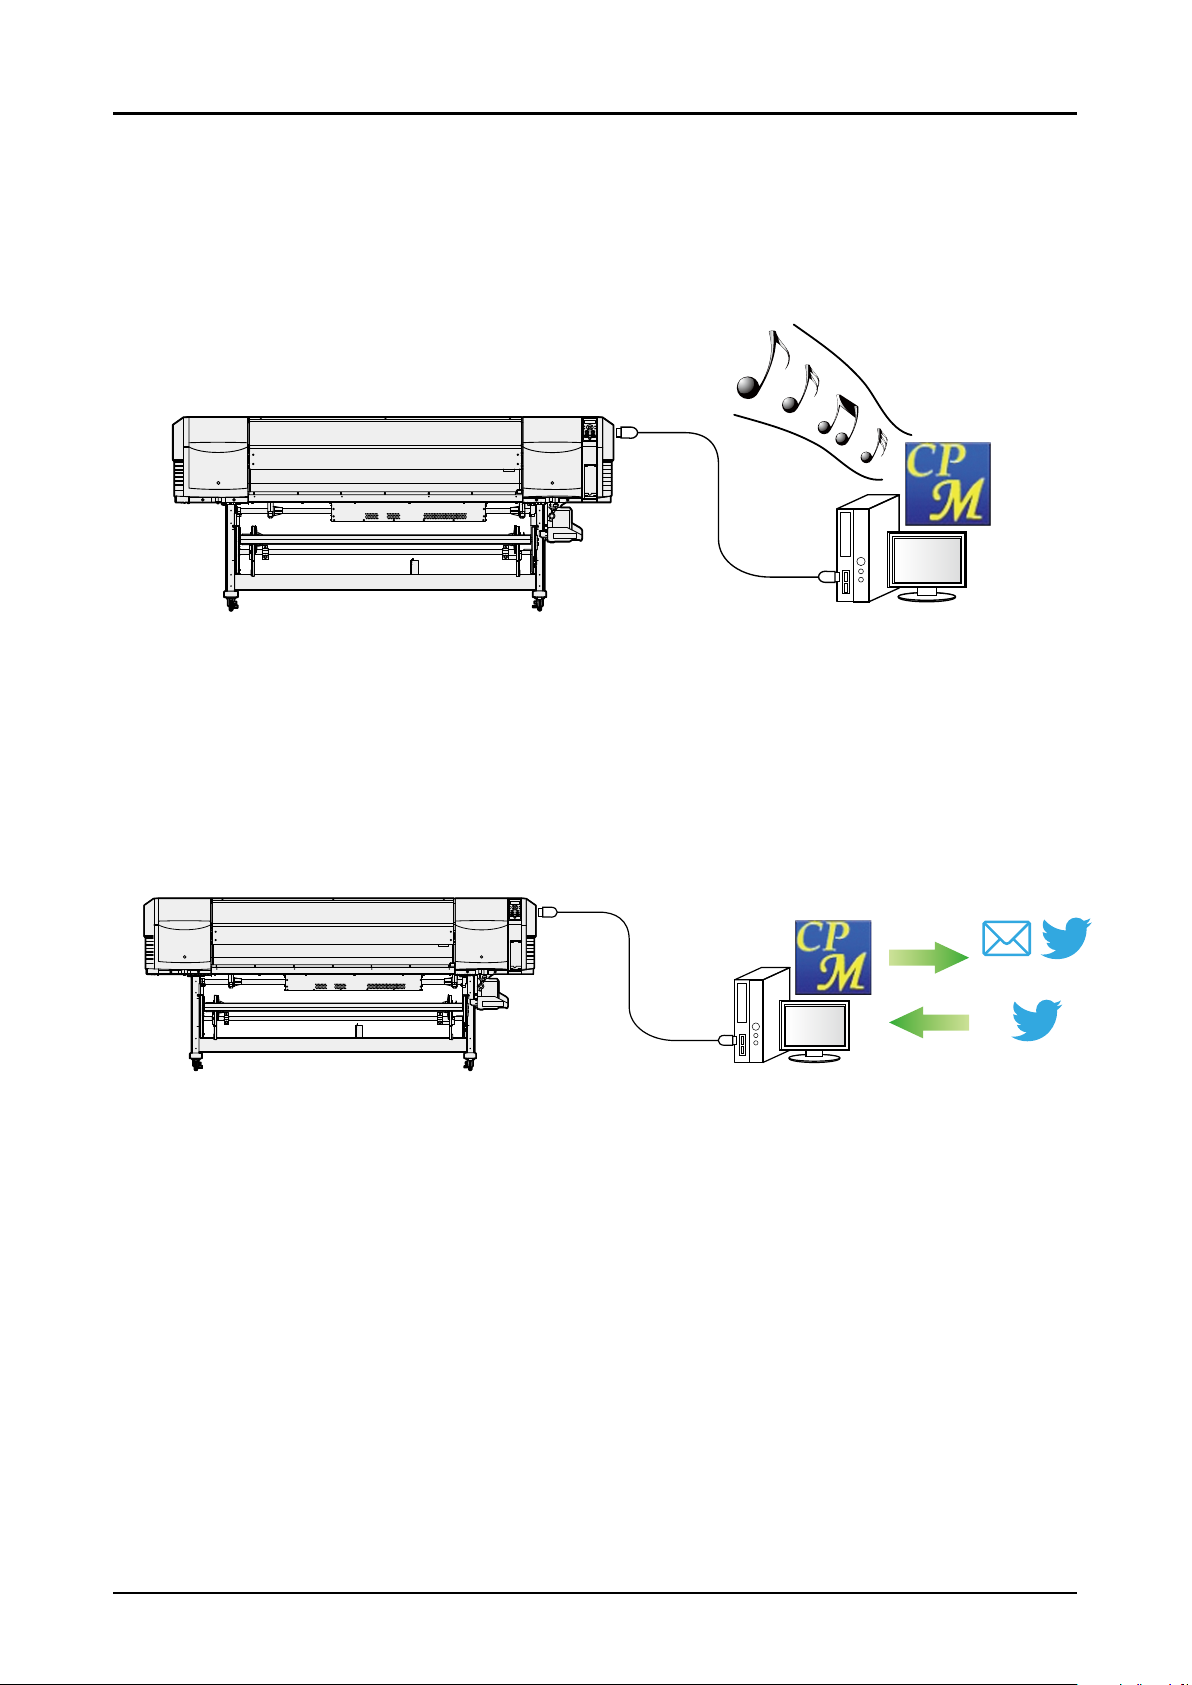
The sound warning function noties you when the print has nished or
when an error occurs
Congure the warning sound to be notied when the print has nished or when an error has occurred.
twitter support and e-mail function to control the printer and its status
remotely
Notications on the printer status are sent to you by e-mail or via twitter.
The printer can also be operated remotely.
* Only some operations can be performed remotely.
Notification
Remote Operation
E-mail/twitter
twitter
CP_Manager Instruction manual
vii
Page 8

Page 9

Chapter 1
Overview of CP_Manager
▽Basic operations ………………………………………………………………………1-2
▽System requirements …………………………………………………………………1-2
CP_Manager Instruction manual
1-1
Page 10

Chapter 1. Overview of CP_Manager
Chapter 1. Overview of CP_Manager
Basic operations
CP_Manager can perform the following operations.
Display printer status - Printer status
- Media information
- Amount of ink remaining
- Heater information
- Ambient temperature
- Information about the connected printer, etc.
Change settings - Media preset
- Heater status
- Media adjustment
- Mechanical adjustment
- Nozzle map
Maintenance operations - Regular maintenance
- Other maintenance items
- Replacement of consumables, etc.
Test printing - Nozzle printing
- Adjustment pattern printing
Printer operations - Explanations on each maintenance operation
- Explanations about troubleshooting
- Display of manuals
Acquire log information Acquire printer log information and save it as a le
Panel operation Operate the printer panel keys (virtual panel function)
Notify printer status Notify the status via Twitter or e-mail function
Remote operation Operate the printer remotely using the Twitter function
System requirements
The CP_Manager software is designed to control ColorPainter series printers and runs on Microsoft Windows®.
Operating System
Windows 7 (x86) 32-bit/64-bit version (runs as a 32-bit application on the 64-bit version)
1-2
Windows 8 (x86)
Windows 10 (x86)
CP_Manager Instruction manual
32-bit/64-bit version (runs as a 32-bit application on the 64-bit version)
32-bit/64-bit version (runs as a 32-bit application on the 64-bit version)
Page 11

Chapter 2
Basics of CP_Manager
▽Installation procedure ……………………………………………………………… 2-2
▽CP_Manager operating conditions ………………………………………………… 2-4
▽Starting CP_Manager ……………………………………………………………… 2-4
▽Screen layout ……………………………………………………………………… 2-5
CP_Manager Instruction manual
2-1
Page 12

Chapter 2. Basics of CP_Manager
Chapter 2. Basics of CP_Manager
Installation procedure
Warning
- Close all programs before installing the sof tware.
- Log in as a user with administrative privileges to install the software and driver software.
- Be sure to refer to all the instruction manuals included in the Document folder on the CD-ROM.
Install CP_Manager for E-Series
1-1. Start the setup screen
Insert the included setup CD-ROM into the CD-ROM drive of the computer
and run OKI CP_Manager for E-Series_VX.XX.exe in the CP_Manager
for E-Series folder.
1-2. Start the installer
The Welcome to the CP_Manager for E-Series Setup Wizard screen appears.
Click Next.
1-3. Agree to the software license agreement
The software license agreement screen appears.
To agree to the software license agreement, check I accept the agreement
and then click Next.
1-4. Enter user information
The user information input screen appears. Enter the required information
and click Next to continue.
2-2
1-5. Specify the installation location
The installation location selection screen appears. Specif y an installation
location and click Next to continue.
(Note: To change the installation location, click Browse and then select a
folder.)
CP_Manager Instruction manual
Page 13
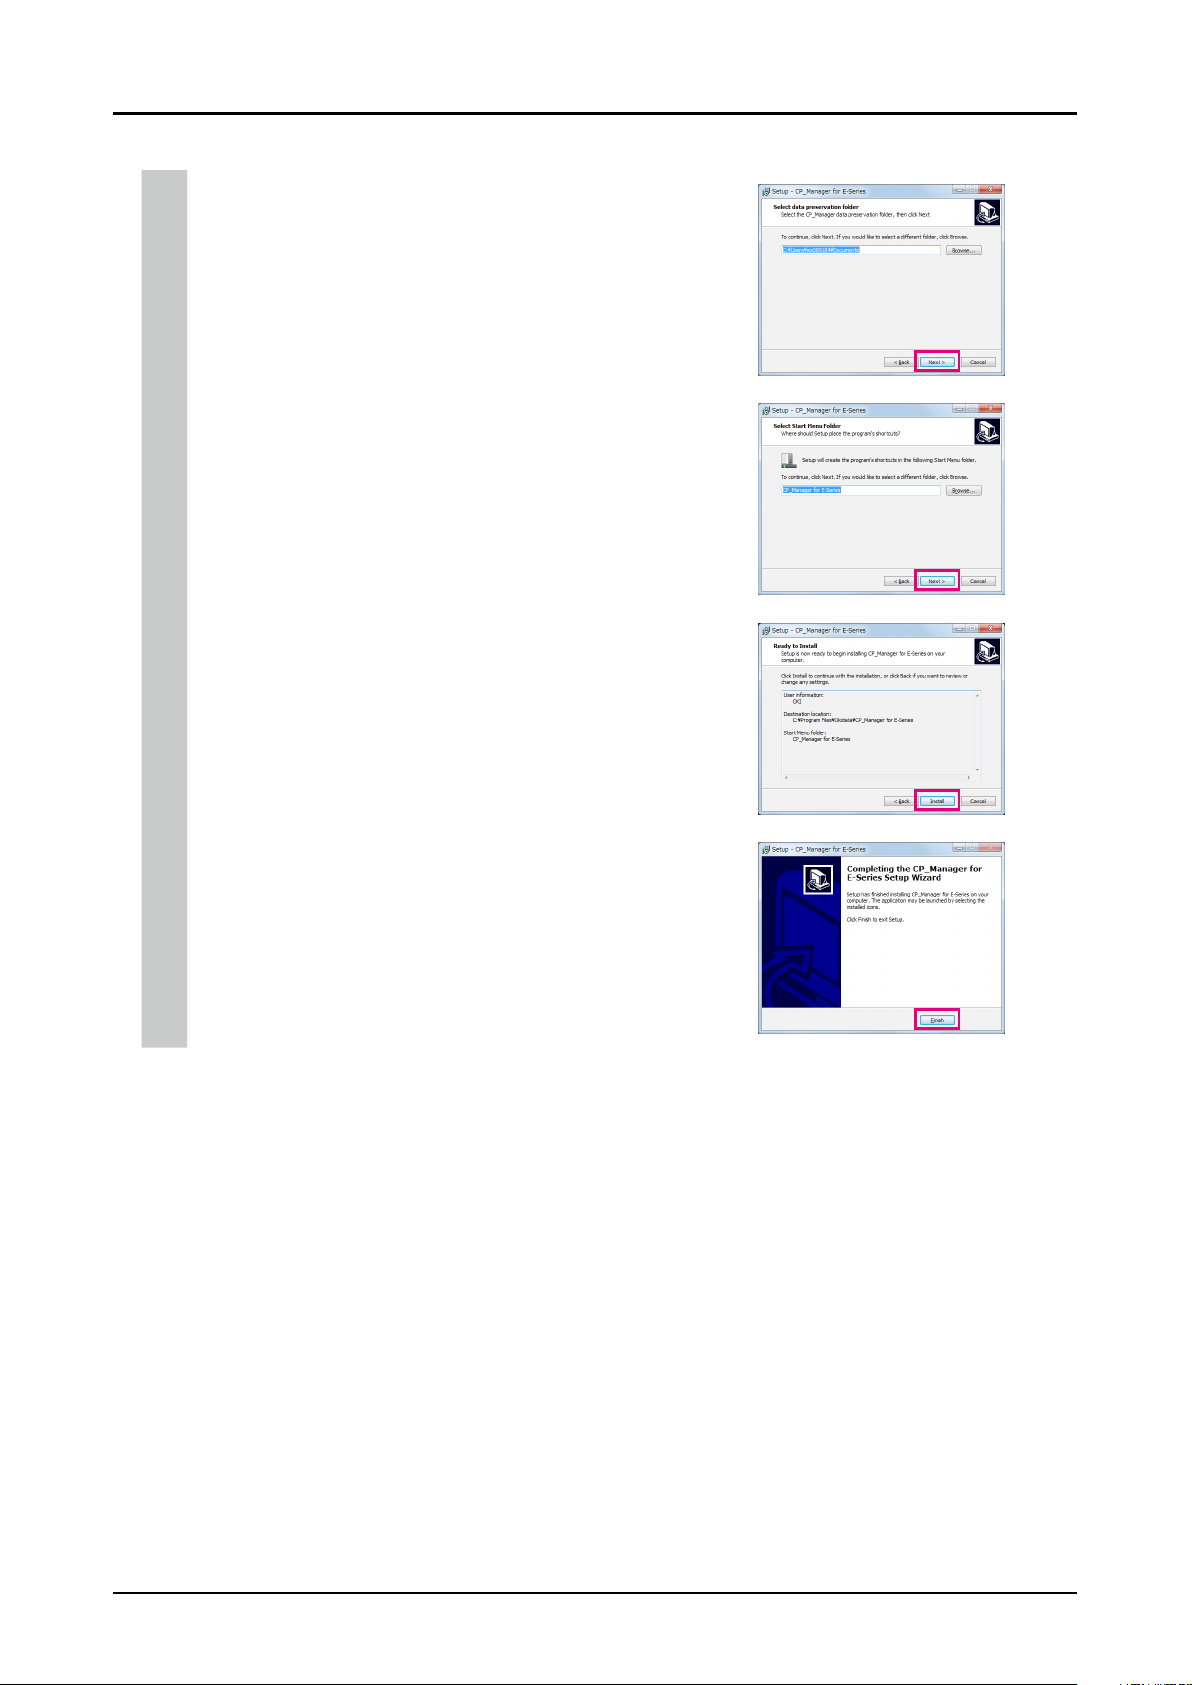
1-6. Specify the folder to save the data
The saved data folder selection screen appears. Select a folder to save the data
and click Next to continue.
(Note: To change the location to save the data, click Browse and then select a
folder.)
1-7. Specify the program group
The program group creation screen appears. Specif y a location to create the
program group and click Next to continue. (Note: To create the program
group in a different location, click Browse and then select a folder.)
1-8. Start the installation
The installation preparation is finished. Click Install to start the installation.
Wait until the installation finishes.
Chapter 2. Basics of CP_Manager
1-9. Complete the installation
When the installation has finished, click Finish to complete the procedure.
Important points about starting CP_Manager
- Switch on the power of the printer and let the printer start before launching CP_Manager.
- If the printer has not yet started or the connection to the printer cannot be found, CP_Manager enters demonstration mode.
- The units (length and temperature) displayed in CP_Manager match those registered with the printer. Therefore, it is not necessary
to set the units in CP_Manager.
Note that the printer settings are only checked when CP_Manager starts. If you change the printer settings, restart CP_Manager.
- The default language displayed in CP_Manager matches the printer setting. However, you can change the CP_Manager language
to a setting dierent from the printer. CP_Manager must be restarted after changing the language setting.
CP_Manager Instruction manual
2-3
Page 14

CP_Manager operating conditions
CP_Manager operations Printer status
Displaying the printer status Always possible
Changing the settings Possible only when online (idle mode)
Performing maintenance Possible only when online (idle mode)
Testing printing Possible only when online (idle mode)
Troubleshooting Always possible
Acquire log information Possible only when online or oine (idle mode)
Panel key operations Always possible
Starting CP_Manager
Chapter 2. Basics of CP_Manager
From the computer desktop, double-click the CP_Manager for E-Series shortcut icon. Alternatively, click Start, point
to All Programs, CP_Manager for E-Series, and then click CP_Manager for E-Series.
2-4
CP_Manager Instruction manual
Page 15

Screen layout
CP_Manager is composed of two display areas.
(1)
Chapter 2. Basics of CP_Manager
(2)
(1) Printer status display area This area displays information regarding the printer status, such as the panel
information, the remaining ink, and the temperatures. This area also displays the
virtual panel used to operate the printer panel in CP_Manager.
(2) Printer setting area In this area you can change the printer settings, such as media presets and adjustment
values, and execute cleaning and other maintenance operations.
CP_Manager Instruction manual
2-5
Page 16

Page 17

Chapter 3
Printer status display area
▽Printer status display area …………………………………………………………… 3-2
CP_Manager Instruction manual
3 -1
Page 18

Chapter 3. Printer status display area
Chapter 3. Printer status display area
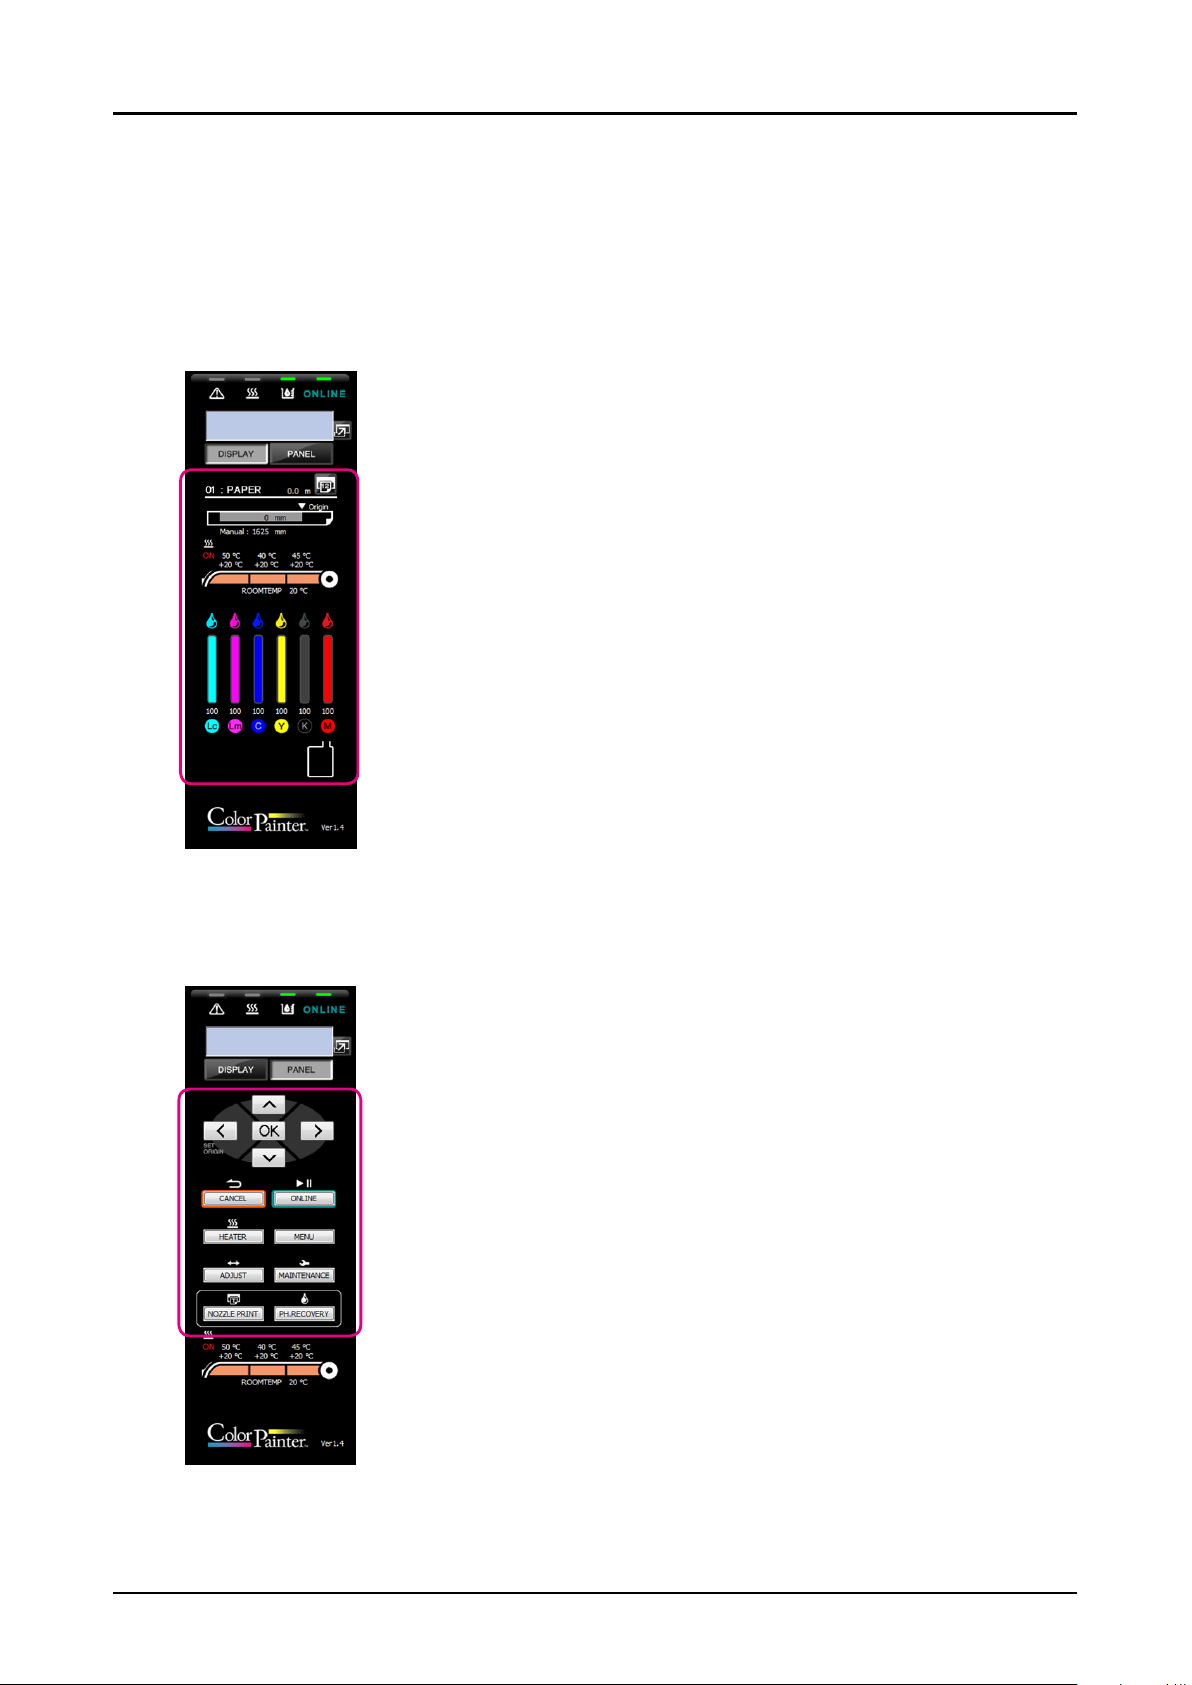
Printer status display area
<Printer information display> <Panel operation display>
Printer status
Printer panel display
Enlarge Printer Panel button
Display switch buttons
Print Remaining Media Amount button
Media information
Heater status
Ambient temperature
Ink information
Waste ink bottle information
Multiple printers connection button
Panel operation buttons
Heater status
Ambient temperature
3-2
CP_Manager Instruction manual
Page 19

Chapter 3. Printer status display area
<Printer information display>
Description
Printer Status Online indicator
On: Online, Off: Offline
Flashing (fast): Receiving data, Flashing (slowly): In pause
Ink indicator
On: Normal, Flashing: Ink warning, Off: Ink error
Heater indicator
On: All media heaters reached the set temperatures, Flashing: Media heaters currently heating
Off: All media heaters are turned off
Error indicator
Off: No error, Flashing: Warning, On: Error
Printer panel display Displays the printer panel.
*This can be used as a virtual panel if the area is switched to panel operation display.
Enlarge Printer Panel button Button used to enlarge the printer panel.
Display switch buttons Buttons used to switch between the printer information display and the panel operation display.
Display: Printer information display
Panel: Panel operation display
Print Remaining Media Button used to print the remaining amount of the currently installed media.
Amount button
Media information Displays information about the currently used media
Preset number: Media name Remaining length
Printable area width
When the media width detection mode is set to AUTO: Media width
When the media width detection mode is set to MANUAL: Manual: Media width
Heater status Upper: Set temperature
Lower: Current temperature (the “+” mark indicates the heater is currently heating)
All heaters ON indicator
Indicates that all heaters are on when displayed.
Ambient temperature Ambient temperature
Ink information
Waste ink bottle information Indicates the waste ink bottle status (5 levels)
Multiple printers connection Button used to launch an additional instance of CP_Manager when more than one printer is connected.
button *Displayed only when multiple printers are connected.
During cleaning, a mark ( ) indicating that the ink is currently used is displayed above the corresponding ink color.
Amount remaining for each ink color (%)
Origin setting
<Panel operation display>
Panel operation buttons Same buttons as on the printer panel
Heater status Upper: Set temperature
Ambient temperature Ambient temperature
Description
Lower: Current temperature (the “+” mark indicates the heater is currently heating)
All heaters ON indicator
Indicates that all heaters are on when displayed.
CP_Manager Instruction manual
3-3
Page 20

Page 21

Chapter 4
Printer setting area
▽Icon explanation …………………………………………………………………… 4 -2
▽Printer operations …………………………………………………………………… 4-4
▽Printer maintenance ………………………………………………………………… 4-5
▽Media adjustment …………………………………………………………………… 4-6
▽Media preset ………………………………………………………………………… 4-8
▽Heater settings ……………………………………………………………………… 4-10
▽Maintenance ………………………………………………………………………… 4 -11
▽Mechanical adjustment …………………………………………………………… 4-12
▽Useful tool …………………………………………………………………………… 4 -13
▽Notication and remote operation ………………………………………………… 4-14
▽Settings …………………………………………………………………………… 4-22
▽Printer information ………………………………………………………………… 4-23
CP_Manager Instruction manual
4 -1
Page 22

Chapter 4. Printer setting area
Chapter 4. Printer setting area
Icon explanation
The CP_Manager software includes 11 main screens.
You can switch between the dierent screens by selecting one of the icons displayed at the top of the screen.
The icons and the screens that are displayed are described below.
Icon Description of the corresponding screen
Screen used to perform cap cleaning, cleaning, nozzle print, nozzle maps, consumable replacement and
Printer Maintenance
Media Adjustment
Media Settings
Heater Settings
Maintenance
Mech Adjustment
other daily maintenance operations required to use the printer.
Screen used to adjust the settings, such as media advance adjustment and bidirectional adjustment
(automatic or manual) to match the media when a new type of media is installed.
Screen used to congure settings for each type of media.
Screen used to congure settings, such as temperature and timer, related to the heaters.
Screen used to perform printer maintenance operations, such as lling ink system with ink and head wash.
Screen used to adjust the printer characteristics.
4-2
CP_Manager Instruction manual
Page 23

Icon Description of the corresponding screen
Screen used to calculate print times.
Useful tool
Screen used to congure the notication function and remote operations.
End of printer operations or change in printer status (such as errors or alarms) can be notied using sounds
Notica tion and Remote
Operation
or by e-mail. The printer can also be operated remotely using tweets.
Screen used to congure CP_Manager and printer settings.
Settings
Screen used to display printer information as a list.
Printer Info
Screen displaying explanations on dierent operations, troubleshooting and links to open instruction
manuals.
Printer Operations
*A separate pop-up window is displayed when this button is pressed.
Chapter 4. Printer setting area
CP_Manager Instruction manual
4-3
Page 24

Printer operations
The following operations can be performed in this mode.
- Display of explanations on printer operations
- Display of explanations on troubleshooting methods
- Display of manuals
Chapter 4. Printer setting area
4-4
CP_Manager Instruction manual
Page 25

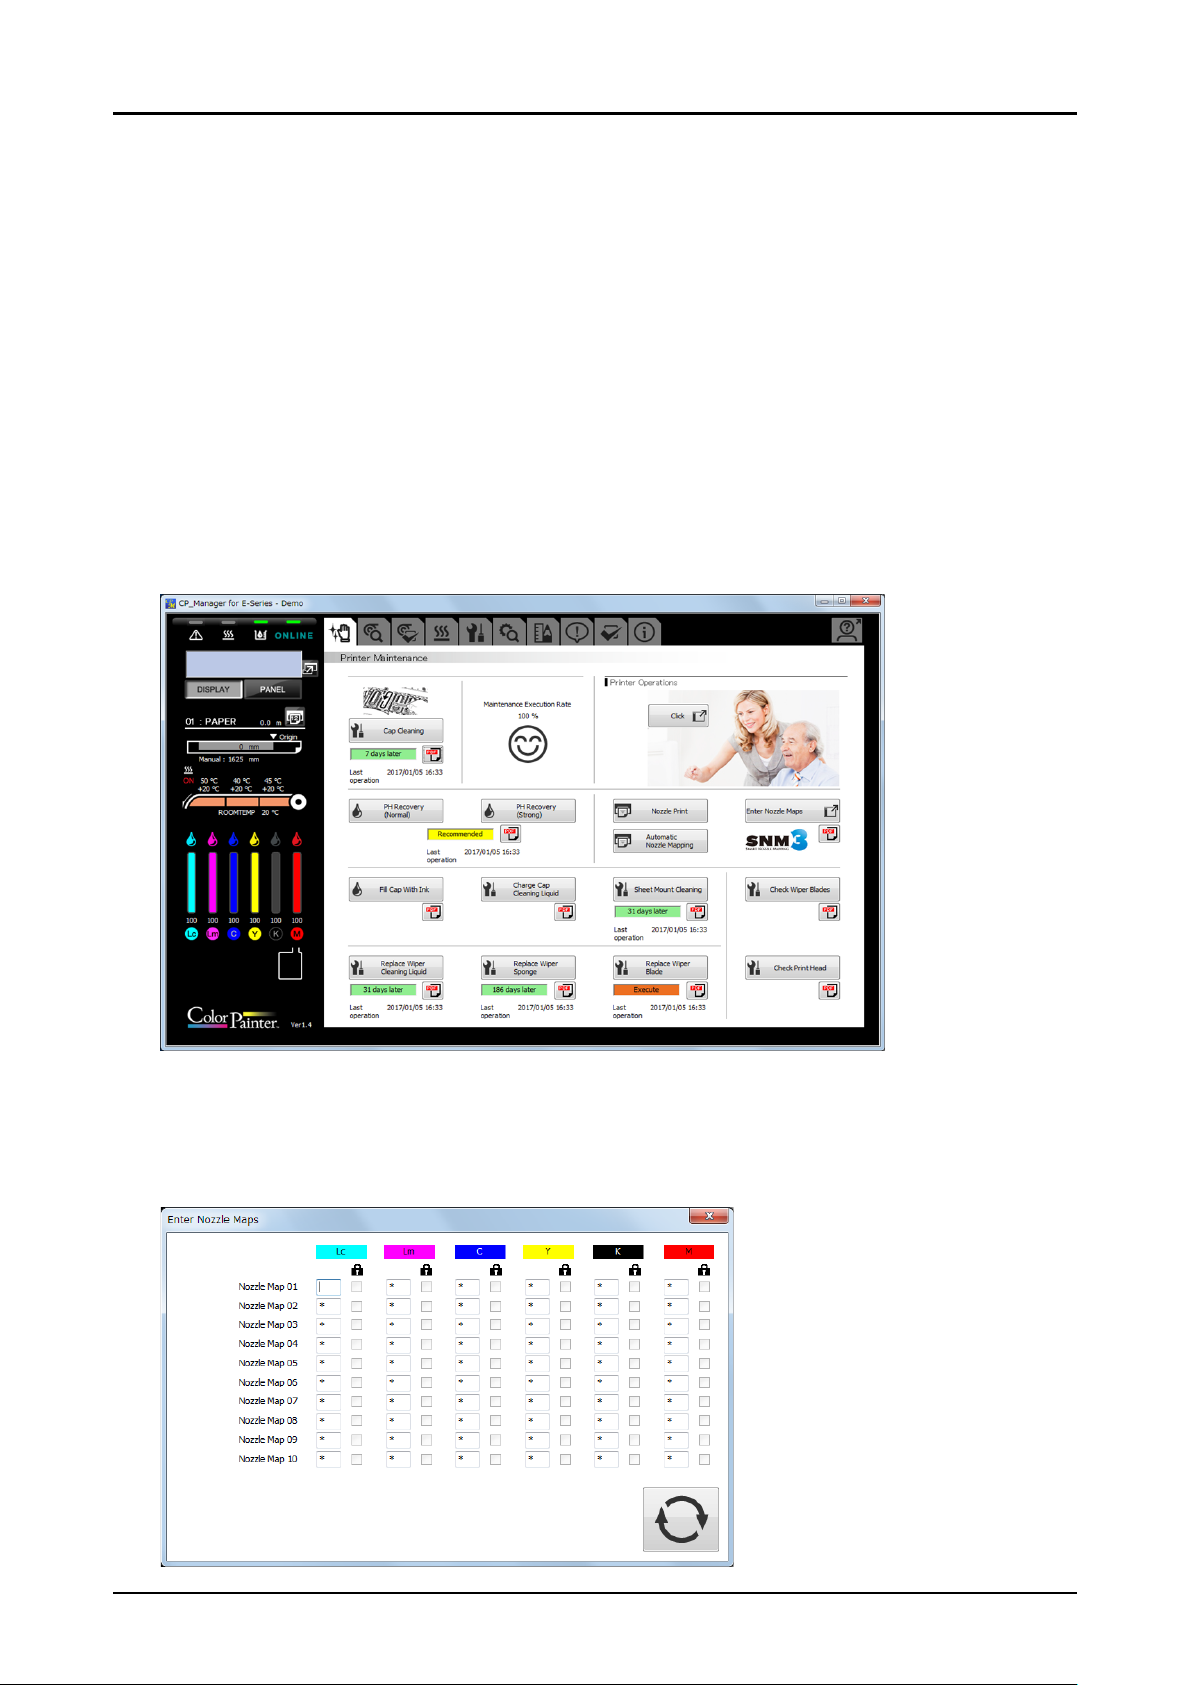
Printer maintenance
The following operations can be performed in this mode.
- Maintenance operations
- Display of cap cleaning execution rate
- Display of printer operations
- Setting of nozzle maps
- Replacement of consumables, etc.
(4)
Chapter 4. Printer setting area
(1)
(2)
(3)
(6)
(2)
(3)
(10)
(13)
(2)
(3)
(5)
(7) (8)
(9)
(11)
(2)
(3)
(12)
(1) Cap Cleaning button: Execute cap cleaning.
(2) Time until next maintenance: Click to display the time until next maintenance.
(3) Last operation: Displays the date and time of the last maintenance operations.
(4) Execution rate: Displays the execution rate of cap cleaning.
(5) Printer Operations button: Displays explanations on printer operations.
(6) PH Recovery buttons: Execute PH recovery (cleaning of the print heads).
(7) Nozzle Print button: Execute nozzle print.
(8) Enter Nozzle Maps button: Button used to enter nozzle maps.
(9) Automatic Nozzle Mapping button: Execute automatic nozzle map.
(10) Clogged nozzles recovery buttons: Buttons used to recover the clogged nozzles.
(11) Sheet mount cleaning execution button: Click to execute sheet mount cleaning.
(12) Daily maintenance buttons: Buttons used to perform daily printer checks or printer cleaning.
(13) Consumable replacement buttons: Buttons used when replacing consumable parts of the wiper.
CP_Manager Instruction manual
4-5
Page 26

Media adjustment
Adjustment can be made for each media used.
Chapter 4. Printer setting area
(1)
(2)
(3)
(6)
(7)
(11)
(12)
(13)
(12)
(13)
(19)
(4)
(5)
(8)
(10)
(9)
(14)
(15)
(14)
(15)
(17)
(17)
(16)
(18)
(18)
(20)
(1) Preset No., Media name: Number and name of the media for which adjustment is performed.
(2) PH Height: Menu used when changing the height of the print heads.
(3) Notication eld for print head height
change:
You are notied of the need to change the height of the print heads in this eld
when the print head height congured in the media preset does not match the
print head height congured in the printer.
(4) Change Print Head Height button: Button used to change the height of the print heads.
(5) Information on print head height setting: Displays the height setting for the print heads in the preset of the media that is being
adjusted.
(6) Media Advance: Menu used to perform media advance adjustment.
(7) Notication eld for media advance
You are notied of the need to perform media advance adjustment in this eld.
adjustment:
(8) Automatic Adjustment button: Button used to execute automatic media advance adjustment.
With automatic media advance adjustment, the adjustment value is set
automatically.
(9) Print buttons for manual media advance
adjustment patterns:
Buttons used to print media advance adjustment patterns.
The patterns are printed based on the adjustment value set in (10).
Check the print results visually. If the print output is still misaligned, change the
adjustment value and print the adjustment patterns again.
*After changing the adjustment value in (10), you must apply the setting with the
update settings button (20) before printing the patterns.
(10) Input eld for media advance adjustment
value:
Field used to input the media advance adjustment value.
After changing the adjustment value, apply the setting with the update settings
button (20).
(11) Bidirectional Adj: Menu used to perform bidirectional adjustment.
(12) Carriage speeds: Menus used to congure bidirectional adjustment with normal and slow carriage
speeds.
(13) Notication elds for bidirectional
adjustment:
You are notied of the need to perform bidirectional adjustment in these elds.
The need to perform adjustment is displayed for each carriage speed.
(14) Automatic Adjustment buttons: Buttons used to perform automatic bidirectional adjustment.
With automatic bidirectional adjustment, the adjustment value is set automatically.
4-6
CP_Manager Instruction manual
Page 27

Chapter 4. Printer setting area
(15) Manual adjustment buttons: Buttons used to print bidirectional adjustment patterns.
(16) Information on carriage speed:
(17) Enter Adjustment Value buttons: Buttons used to enter bidirectional adjustment values.
(18) Print buttons for bidirectional check
patterns:
(19) Detailed Settings button: Button used to perform adjustment under every print condition using a detailed
(20) Update settings button: Button used to send and set the media advance adjustment and bidirectional
Check the print results visually and choose an adjustment value. Then enter the
adjustment value using the Enter Adjustment Value button (18).
Displays carriage speed setting in the preset of the media being adjusted
Clicking these buttons opens a window where you can enter adjustment values for
each color.
After entering the adjustment values, apply the settings with the update settings
button (20).
*The entered values are not set if you do not click the update button (20).
Buttons used to print bidirectional adjustment check patterns.
After you have performed bidirectional adjustment, print and check visually the
check pattern to conrm that the adjustment results are correct.
setting menu when print output is still misaligned after performing automatic and
manual bidirectional adjustment.
adjustment values to the printer.
Detailed settings for bidirectional adjustment
Detailed settings are used to perform bidirectional adjustment with specic print conditions (print mode and carriage speed).
Automatic and manual adjustment methods are available.
(21)
(22)
(23)
(24)
(25)
(26)
(27)
(28)
(29)
(30)
(21) Setting Number: Number of the detailed setting (1 to 4).
(22) Print mode: Field used to specify the print mode for detailed setting adjustment.
(23) Carriage speed: Field used to specify the carriage speed for detailed setting adjustment.
(24) Automatic Adjustment button: Button used to execute automatic adjustment.
(25) Manual Adjustment button: Button used to print the bidirectional adjustment pattern.
(26) Enter Adjustment Value button: Button used to enter bidirectional adjustment values.
(27) Print button for bidirectional check
patterns:
(28) Remove Setting button: Button used to remove the settings in the currently selected detailed setting.
(29) Current setting eld:
(30) Print condition eld: Displays the print conditions specied for each detail setting.
Detailed settings are disabled when Undened is selected.
With automatic bidirectional adjustment, the adjustment value is set automatically.
Check the print results visually and choose an adjustment value. Then enter the
adjustment value using the Enter Adjustment Value button (27).
Clicking this button opens a window where you can enter adjustment values for each color.
After entering the adjustment values, apply the settings with the update settings button.
*The entered values are not set if you do not click the update button.
Button used to print bidirectional adjustment check patterns.
After you have performed bidirectional adjustment with detailed settings, print and
check visually the check pattern to conrm that the adjustment results are correct.
Clicking this button disables the detailed setting.
Displays the bidirectional adjustment values currently set for the selected detailed setting.
CP_Manager Instruction manual
4-7
Page 28

Media preset
The following operations can be performed in this mode.
- Congure a media preset
- Write media preset settings to a le
(1)
(2)
(4)
(3)
Chapter 4. Printer setting area
(6)
(5)
(7)
(3)
(3)
(3)
(8)
(3)
(8)
(3)
(9)
(1) Currently used media: Displays information (preset number and media name) about the currently used media.
(2) Change for Media Set Below button: Button used to replace the settings of the media currently installed with the settings
displayed in CP_Manager.
(3) Pull-down lists: Used to select a parameter from a list.
(4) Tex t box: Used to enter a character string using the keyboard.
(5) Activate check box: Used to activate the preset currently being displayed.
(6) Media Adjustment button: Button used to go to the media adjustment screen (see Media adjustment).
(7) Setting Management button: Button used to manage media settings.
(8) Numeric Up/Down boxes: Used to enter numerical values directly or using the Up/Down buttons.
(9) Update settings button: Button used to send the media preset settings to the printer and set the setting values.
4-8
CP_Manager Instruction manual
Page 29

Media setting management
The following operations related to media presets can be performed in this mode.
- Copy of media preset
- Saving of media preset settings on a computer
- Loading of media preset settings from a computer
(2)
(1)
(3)
Chapter 4. Printer setting area
(1) Copy Media Preset button: Button used to copy the settings of the media preset whose number has been specied
(2) Save Media Preset Settings buttons: Buttons used to save the media preset settings to a specied le.
(3) Import Media Preset Settings buttons: Buttons used to import the media preset settings from a specied le.
to the media preset currently being updated.
CP_Manager Instruction manual
4-9
Page 30

Heater settings
The heater settings can be changed in this mode.
(1)
(2)
Chapter 4. Printer setting area
(3)
(4)
(1) Heater on check boxes: Check a box to select the operation mode for the heaters.
(2) Heater set temperatures: Set the temperatures by entering a value or using the up and down buttons.
(3) Heater Operation Settings eld: Set the Heater Delay Time and the Heater Standby Time.
(4) Heater Timer Settings eld: Congure heater operations during the day. Check the Activate timer box to activate the heater
tim er.
*Deactivate the heater timer if you want to control the timer manually.
(When the heater timer is activated, the heaters turn on and o following a xed interval
based on the on/o setting congured with the function. The heater timer setting is
prioritized.)
(5) Update settings button: Send the heater settings to the printer and update the printer settings.
(5)
4 -10
CP_Manager Instruction manual
Page 31

Chapter 4. Printer setting area
Maintenance
This mode is used to perform maintenance operations such as lling ink system with ink and head wash.
(1)
(2)
(1) Part Replacement: Field displaying the necessity of replacing parts.
(2) Storage Liquid Ink System button: Button used to execute service cleaning, i.e. to ll the ink system with storage liquid.
(3) Clean PH and Ink System button: Button used to execute head wash, i.e. to clean the print head and ink system.
(4) Prime Ink System button: Button used to ll the ink system with ink.
(5) Check Print Head Quality button: Button used to print a pattern to check that print head replacement has been
(3) (4) (5)
performed correctly.
CP_Manager Instruction manual
4 - 11
Page 32

Chapter 4. Printer setting area
Mechanical adjustment
Printer characteristics can be adjusted in this mode.
Caution
- You are recommended not to change the settings on the Mech Adjustment tab. All the settings were already adjusted during
the printer installation. So usually they do not need to be adjusted any more.
Exceptionally, the settings may be adjusted to reduce color misalignment, but only if the problem is not solved with
media advance adjustment and bidirectional print position adjustment. However, note that this adjustment may cause
misalignment for the other colors or a printer malfunction.
(1)
(2)
(1)
(1)
(3)
(1) Test printing button: Click to print various adjustment patterns.
(2) Entry box: Enter a value using the keyboard or the up and down buttons.
(3) Take-up Reel Unit Adjustment button: Button used to print adjustment pattern for the take-up reel unit.
(4) Update settings button: Send the print heads position adjustment values, the nozzles position adjustment
values, and the edge sensors position adjustment values to the printer and update the
printer settings.
(3)
(2)
(4)
4 -12
CP_Manager Instruction manual
Page 33

Useful tool
This mode is used calculate print times.
Chapter 4. Printer setting area
(1)
(1) Print Time Estimation eld: Field used to calculate an estimation of the print time and productivity by entering the
width and length of the image to print.
CP_Manager Instruction manual
4 -13
Page 34

Chapter 4. Printer setting area
Notication and remote operation
This mode is used to congure the following CP_Manager notication functions and remote operations.
- Notication sound, e-mail, and tweet settings
- Notication via sound, e-mails, and tweets
- Remote operation via tweets
(1) (3)
(2) (4)
(7)
(1) Sound settings button: Congure the sound settings.
(2) Select the events to be notied with sounds.
(3) E-mail settings button: Congure the e-mail settings.
(4) Select the events to be notied by e-mails.
(5) Tweet settings button: Congure the tweet settings.
(6) Select the events to be notied by tweets.
(7) Remote operation via tweets: Select the operations that can be remotely performed via tweets.
(5)
(6)
4 -14
CP_Manager Instruction manual
Page 35

Sound settings
You can change the sounds to your favorite one in the WAVE format.
(1) Click the Select Sound button (1) of the sound you want to change.
(2) Select a sound in the WAVE format.
(3) Click the button (2) of the sound you want to listen to.
Chapter 4. Printer setting area
(1)(2)
CP_Manager Instruction manual
4 -15
Page 36

Chapter 4. Printer setting area
About the e-mail and tweet functions
Information about a print job progress and the printer status can be notied to a computer or a mobile device via e-mail
or using Twitter.
Via Twitter, you can also remotely operate the printer from a computer or a mobile device.
E-mail addresses and accounts on Twitter must be available to use these functions.
To use the e-mail function the following two addresses (accounts) are necessary.
- An address to be used by CP_Manager
- An address that will receive the e-mail notications
To use the tweet function the following two Twitter usernames (accounts) are necessary.
- A username to be used by CP_Manager
- A username to receive the notications and to remotely operate the printer
Note
Moreover, to be able to receive the notications on Twitter, the account that will receive them must be set in
advance on Twitter as a follower of the account used by CP_Manager. (To follow the other account, the settings
must be made on CP_Manager.)
E-mail address for
CP_Manager
mail: yyyy@gmail.com
Notification by direct message
Twitter: @bbbb
Username of the account
used for CP_Manager
Notification
Remote operation
Username of the account used to receive
the notifications and for remote operation
E-mail address that receives
the notifications
mail: xxxx@gmail.com
Twitter: @aaaa
* To use the tweet and e-mail functions, the computer running CP_Manager must be connected to the Internet. You will not be
able to use these functions without a connection to the Internet or if the access to the e-mail server or Twitter is restricted by a
rewall on the network.
* For CP_Manager, use one of the following types of e-mail address.
(1) A Google mail address
(2) An e-mail address on a server supporting SMTP.
The e-mail service provider must provide SMTP server information. Conrm with your e-mail service provider.
* The notification and remote operation functions cannot be used when the computer running CP_Manager is sleeping or
hibernating.
4 -16
CP_Manager Instruction manual
Page 37

Chapter 4. Printer setting area
E-mail settings
To congure the settings, click the E-mail settings button (3) under Notication and Remote Operation.
(1) Set the e-mail account used by CP_Manager to send e-mails.
Normally use a Google mail account.
- Google mail: Set the e-mail account information here.
Follow the steps (1) to (3) to congure the settings.
- SMTP server: Set the SMTP server information when you use an e-mail service provider other than Google.
(2) Enter the e-mail address that will receive the notications.
Click the Send Test E-mail button to send a test e-mail to the specied address.
CP_Manager Instruction manual
4 -17
Page 38

Chapter 4. Printer setting area
Tweet function settings
To congure the settings, click the Tweet settings button (5) under Notication and Remote Operation.
Authenticate CP_Manager on Twitter
* Important
- If a proxy server is set on your local network, rst conrm
with the system administrator that the proxy settings are
adequate before starting the procedure.
- When performing the procedure below, execute all the
steps in a row. The PIN code issued by the Twitter website
is valid only during a specic period of time. After this
period the PIN becomes invalid so complete all the steps
until the authentication in a row.
(1) Click the Display URL to Anthenticate Application button 1.
(2) The URL displayed in the eld 2 is copied to the clipboard. Paste the URL in a web browser and open the web page
(access the Twitter web site).
(2-A) When you have not signed in Twitter
(a)
Username for CP_Manager
(b)
(c)
Enter the username (a) used for CP_Manager and the password (b), and click Authorize app (c).
4 -18
CP_Manager Instruction manual
Page 39

Chapter 4. Printer setting area
(2-B) When you have already signed in Twitter with the username used for CP_Manager
(d)
(e)
Conrm that the username in (d) is the one used for CP_Manager and click Authorize app (e).
(2-C) When you have signed in Twitter with a username dierent from the one used for CP_Manager
(f)
(g)
Username for CP_Manager
(j)
(h)
(i)
Click the p mark (f) next the username, and select Sign out (g) that is displayed.
Enter the username (h) used for CP_Manager and the password (i), and click Authorize app (j).
(3) Note the PIN down.
(4) Enter the PIN you have previously noted down in the PIN eld 4.
(5) Click the Complete Authentication button to complete the setting.
CP_Manager Instruction manual
4 -19
Page 40

Chapter 4. Printer setting area
Set the account that will receive the notications
To be able to receive the notications on Twitter, the account that will receive them must be set in advance on Twitter as a
follower of the account used by CP_Manager.
(1) Enter the username of the account that will receive the notications in the ID eld 5 (after the @ mark).
(2) Click the Send Test Message button to send a test message to the user you have set.
Set the account that will operate the printer remotely
(1) Enter the username of the account that will operate the printer remotely via CP_Manager in the ID eld 6 (after the
@ mark).
(2) Click the CP_Manager follows remote operation users button to follow the user set here with the account used
for CP_Manager.
* Normally set the same username here that the one used to receive the notications.
* Do not set the username used for CP_Manager here.
About notications
Direct messages are sent for the items selected in (4) and (6) under Notication and Remote Operation.
Examples of notication messages (common for e-mails and tweets)
Notication Message
Printing Complete The print job XXXXXXX ended with 100% completed.
Print Progress 50% of the print job XXXXXXX has been completed.
Cleaning complete PH recovery has been completed.
Error during printing The printing ended because of an error.
Warning during printing A warning has been issued.
About remote operation
You can operate the printer remotely by sending commands through direct messages from the account for remote
operation to the account used for CP_Manager.
* The direct messages can be seen only by the sender and the receiver.
Examples of remote operation commands
Operation Command
Heater control
PH Recovery
Pinter status report* <<CP_ M >>p r inter s tat u s
*Information about error status, heater status, remaining ink, and operating state will be returned.
After a remote operation command has been sent, a message saying that the command has been received is sent from
CP_Manager.
An error message is returned if an undened command is sent. In such cases, check the command and try again with the
correct command.
ON <<C P_ M>>h e a t e r o n
OFF <<CP_ M>>he a te r o ff
NORMAL
STRONG <<CP_M>>strong PH recovery start
<<CP_M>>normal PH recovery start or
<<CP_M>>cleaning start
4-20
CP_Manager Instruction manual
Page 41

Chapter 4. Printer setting area
Note:
Due to Twitter characteristics, messages with exactly the same content cannot be sent consecutively. To send the same
command a second time consecutively, rst send any message (the content does not matter), then send the command
again.
Example of remote operation via Twitter
The printer status command is sent and the report is
received from CP_Manager.
The heater on command is sent and a message is
returned from CP_Manager.
The heater on command is sent, but an error
occurred and a message explaining the error is
returned from CP_Manager.
Note:
Due to Twitter characteristics, messages with exactly
the same content cannot be sent consecutively.
To send the same command a second time
consecutively, rst send any message (the content
is only H in the example), then send the command
again.
The content of the messages may be changed without prior notice due to change in the
specications.
CP_Manager Instruction manual
4-21
Page 42

Settings
The following CP_Manager settings can be displayed and changed in this mode.
- CP_Manager language
- Printer nickname setting
- Date display
The following printer settings can be displayed and changed in this mode.
- Warning Sound Settings
Chapter 4. Printer setting area
(1)
(2)
(4)
(7)
(1) CP_Manager language setting: Change the language displayed in CP_Manager. CP_Manager must be
(2) Nickname setting: A dierent nickname can be set for each printer.
(3) Date display: Set the display format for the date.
(4) Save folder path display: Displays the paths of the media information and log information save folders.
(5) Change save folder button: Click to change the media information and log information save folders.
(6) Open save folder buttons: Click to open the media information and log information save folders.
Warning sound settings: Set the warning sounds of the printer.
(7)
Update settings button: Button used to send the warning sound settings to the printer and set the
(8)
(3)
(5)
(6)
(8)
restarted to apply the setting.
setting values.
4-22
CP_Manager Instruction manual
Page 43

Printer information
The following operations can be performed in this mode.
- Display printer information
- Display ink cartridge information
- Display print head information
- Acquire log information
Chapter 4. Printer setting area
(4)
(1)
(2)
(3)
Printer Status eld: Displays information such as rmware and hardware versions, and the accumulated
(1)
Ink Cartridge Info eld: Displays information related to the ink cartridges.
(2)
Print Head Info eld: Displays information related to the print heads.
(3)
Display Results of Maintenance Log
(4)
Analysis checkbox:
(5) Acquire log information button: Acquire printer log information.
print length.
Check the box to display the results of maintenance log analysis when log information
is acquired.
Check the Open Folder box to open the folder where the log le is saved when log
information is acquired.
(5)
CP_Manager Instruction manual
4-23
 Loading...