

Page 1
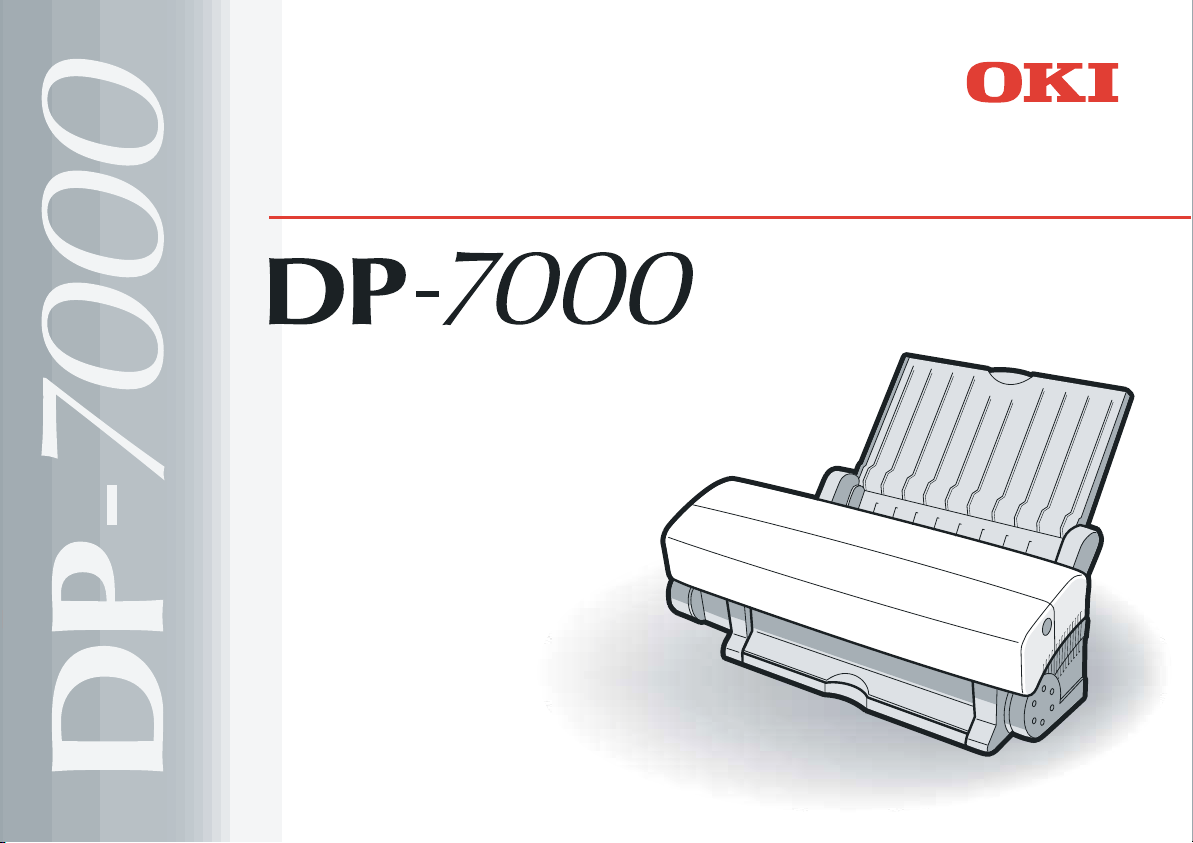
Thermal A3+ Colour Desktop Printer
User's Guide
Page 2

Preface
EEC compatibility
Every effort has been made to ensure that the
information in this document is complete, accurate, and
up-to-date. Oki assumes no responsibility for the results
of errors beyond its control. Oki also cannot guarantee
that changes in software and equipment made by other
manufacturers and referred to in this guide will not
affect the applicability of the information in it. Mention
of software products manufactured by other companies
does not necessarily constitute endorsement by Oki.
Copyright 2000 by Oki. All rights reserved.
Oki is a registered trademark of Oki Electric Industry
Co., Ltd.
E
NERGY STAR is a U.S. registered mark.
Apple, Macintosh, Mac, Mac OS and TrueType are
registered trademarks of Apple Computer, Inc.
This product complies with the
requirements of the Council Directives
89/336/EEC and 73/23/EEC amended
by 93/68/EEC (EMC) and 73/23/EEC
(LVD), as amended where applicable,
on the approximation of the laws of the
members states relating to
Electromagnetic Compatibility and
Low voltage.
Energy Star
As an ENERGY STAR® Partner,
Oki has determined that this product
meets the ENERGY STAR
guidelines for energy efficiency.
Universal Serial Bus
This printer is fitted with an
industry Standard Universal
Serial Bus (USB) data interface.
®
ii User’s Guide
Page 3

Safety instructions
English
This printer has been carefully designed to give years of
safe, reliable performance. As with all electrical
equipment, however, there are a few basic precautions
that should be taken to avoid personal injury or
damaging the printer:
• Read this setup guide carefully and save it for
future reference.
• Read and follow all warning and instruction
labels on the printer itself.
• Disconnect the printer before cleaning. Use only
a damp cloth. Do not use liquid or aerosol
cleaners to clean the printer.
• Place the printer on a firm, solid surface. If the
printer is placed on something unsteady, it may
fall and become damaged or injure someone. If
the printer is placed on a soft surface, such as a
rug, sofa, or bed, the vents may become blocked
causing the printer to overheat.
• Do not put the printer on or near a heat source,
such as a radiator or heat register. Keep it out of
direct sunlight. Allow enough room around the
printer for adequate ventilation and easy access.
• Do not use the printer near water, or spill liquid of
any kind into it.
• Make sure that the power source matches the
rating listed on the back of the printer. If you are
not sure, check with your dealer or with your
local power company.
• This printer has an earthed plug as a safety
feature and will only connect to an earthed outlet.
If this plug cannot be connected to a power outlet,
then it is possible that the power outlet is of the
older, non-earthed type. Contact an electrician to
have the power outlet replaced. Do not use an
adapter to defeat the earthing.
• To avoid damaging the power cable, do not put
anything on it or place it where it will be walked
on. If the cable becomes damaged or frayed,
replace it immediately.
• If an extension cable or power strip is being used
with the printer, make sure that the total of the
amperage rating required by all the equipment is
less than the rating of the extension cable or
power strip. The total ratings of all equipment
Preface iii
Page 4

plugged into the outlet should not exceed 13
amperes.
• The power outlet into which the printer is
connected must remain accessible at all times.
• Opening any cover may expose hot surfaces.
These are clearly labelled. Do NOT touch them.
• Do not insert anything into the ventilation slots
on the printer; you could get a shock or cause a
fire.
If anything happens that indicates that the printer is not
working properly or has been damaged, disconnect the
printer from the power source and contact your dealer.
These are some of the things to look for:
• The power cable or plug is frayed or damaged.
• Liquid has been spilled into the printer, or it has
been exposed to water.
• The printer has been dropped, or the cabinet is
damaged.
• Aside from the routine maintenance described in
the user’s guide, do not try to service the printer
• The printer does not function normally when
following the operating instructions.
yourself. Opening a cover may expose you to
shocks or other hazards.
• Do not make any adjustments other than those
outlined in the user’s guide as damage may be
caused to the printer.
iv User’s Guide
Page 5

Table of contents
English
Preface . . . . . . . . . . . . . . . . . . . . . . . . . . . . . . . . . . . . . ii
EEC compatibility . . . . . . . . . . . . . . . . . . . . . . . . . . . . ii
Energy Star . . . . . . . . . . . . . . . . . . . . . . . . . . . . . . . . . ii
Universal Serial Bus . . . . . . . . . . . . . . . . . . . . . . . . . . ii
Safety instructions . . . . . . . . . . . . . . . . . . . . . . . . . . . iii
Table of contents . . . . . . . . . . . . . . . . . . . . . . . . . . . . . v
Chapter 1 - Introduction
Introduction . . . . . . . . . . . . . . . . . . . . . . . . . . . . . . . . . 1
Features . . . . . . . . . . . . . . . . . . . . . . . . . . . . . . . . . . . . 2
Preparing your printer . . . . . . . . . . . . . . . . . . . . . . . . . 3
Removing package contents . . . . . . . . . . . . . . . . . 3
Opening front cover . . . . . . . . . . . . . . . . . . . . . 4
Closing front cover . . . . . . . . . . . . . . . . . . . . . . 5
Locating printer . . . . . . . . . . . . . . . . . . . . . . . . . . . 5
Fitting Paper Support . . . . . . . . . . . . . . . . . . . . . . . 5
Fitting Dust Cover . . . . . . . . . . . . . . . . . . . . . . . . . 6
Using Output Paper Tray . . . . . . . . . . . . . . . . . 7
Transporting the printer . . . . . . . . . . . . . . . . . . 7
Printer functions . . . . . . . . . . . . . . . . . . . . . . . . . . . . . 8
Front view of printer . . . . . . . . . . . . . . . . . . . . . . . 8
Rear view of printer . . . . . . . . . . . . . . . . . . . . . . . . 9
Rear view of printer with
SCSI interface module . . . . . . . . . . . . . . . . . . 10
Inside the printer . . . . . . . . . . . . . . . . . . . . . . . . . 10
Paper feed switch . . . . . . . . . . . . . . . . . . . . . . . . 12
Control panel . . . . . . . . . . . . . . . . . . . . . . . . . . . . 13
Indicator lights summary . . . . . . . . . . . . . . . . . . 14
Chapter 2 - Initial Setup
Computer connection . . . . . . . . . . . . . . . . . . . . . 15
Macintosh USB connection . . . . . . . . . . . . . . 15
Macintosh SCSI connection . . . . . . . . . . . . . 15
Fitting the SCSI adapter . . . . . . . . . . . . . . . . 16
Connecting the printer to a computer . . . . . . 16
How to uninstall SCSI adapter . . . . . . . . . . . 17
Connecting Power Cord . . . . . . . . . . . . . . . . . . . 18
Ink cartridges . . . . . . . . . . . . . . . . . . . . . . . . . . . . . . 19
Identifying ink cartridge and paper types . . . . . . 19
Installing ink cartridges . . . . . . . . . . . . . . . . . . . . 20
Replacing or changing ink cartridges . . . . . . . . . 22
Loading paper . . . . . . . . . . . . . . . . . . . . . . . . . . . . . . 24
Paper types and available feeding modes . . . . . . 24
Notes and precautions about paper . . . . . . . . 24
Loading paper in automatic feed mode . . . . . . . . 25
Loading high grade/laser paper
and Press Papers . . . . . . . . . . . . . . . . . . . 25
Loading paper in manual feed mode . . . . . . . . . . 27
Preface v
Page 6

Chapter 3 - Installation and Operation, Macintosh
Installing the printer driver . . . . . . . . . . . . . . . . . . . . . 29
Purpose of the printer driver . . . . . . . . . . . . . . . . . 29
Preparing for installation . . . . . . . . . . . . . . . . . . . . 29
Turn on the power . . . . . . . . . . . . . . . . . . . . . . . . . 29
SCSI Connection . . . . . . . . . . . . . . . . . . . . . . . . . . . . 30
System requirements . . . . . . . . . . . . . . . . . . . . . . . 30
Contents of the installation disk . . . . . . . . . . . . . . 30
Installing the printer driver software . . . . . . . . . . . 30
Using balloon help . . . . . . . . . . . . . . . . . . . . . . . . 31
Selecting the correct driver . . . . . . . . . . . . . . . . . . 31
Testing the printer . . . . . . . . . . . . . . . . . . . . . . . . . 32
Page setup dialogue box . . . . . . . . . . . . . . . . . 32
Print dialogue box . . . . . . . . . . . . . . . . . . . . . . 32
Print preview . . . . . . . . . . . . . . . . . . . . . . . . . . 32
USB Connection . . . . . . . . . . . . . . . . . . . . . . . . . . . . . 33
System Requirements . . . . . . . . . . . . . . . . . . . . . . 33
Installing printer software . . . . . . . . . . . . . . . . . . . 33
Using the OKI USB printer . . . . . . . . . . . . . . . . . . 33
Printing operations . . . . . . . . . . . . . . . . . . . . . . . . . . . 34
Printing in monochrome . . . . . . . . . . . . . . . . . . . . 34
Requirements . . . . . . . . . . . . . . . . . . . . . . . . . . 34
Placing an ink cartridge in your printer . . . . . . 34
Setting up the printer driver
for Monochrome printing . . . . . . . . . . . . . 35
Printing in colour . . . . . . . . . . . . . . . . . . . . . . . . . 35
Requirements . . . . . . . . . . . . . . . . . . . . . . . . . . 35
Placing ink cartridges in your printer . . . . . . . 36
Setting up the printer driver
for colour printing . . . . . . . . . . . . . . . . . . . 36
Setting up colour matching option . . . . . . . . . 36
Printing on reverse side . . . . . . . . . . . . . . . . . . . . 38
Setting up the printer driver
for printing on reverse side . . . . . . . . . . . . 38
Chapter 4 - Specialised Printing Operations
VPhoto colour printing . . . . . . . . . . . . . . . . . . . . . . . 41
Colour printing on Press Paper and VPhoto film . 41
Requirements . . . . . . . . . . . . . . . . . . . . . . . . . 41
Prepare the image to be printed . . . . . . . . . . . 41
Install ink cartridges . . . . . . . . . . . . . . . . . . . . 41
Load VPhoto film in your printer . . . . . . . . . . 42
Setting up the printer driver for printing . . . . 42
Colour printing on High Grade Paper . . . . . . . . . . . . 43
Requirement . . . . . . . . . . . . . . . . . . . . . . . . . . 43
Prepare the image to be printed . . . . . . . . . . . 43
Install ink cartridges . . . . . . . . . . . . . . . . . . . . 43
Load the paper in your printer . . . . . . . . . . . . 43
Setting up the printer driver for printing . . . . 43
Printing in Metallic Colour . . . . . . . . . . . . . . . . . . . . 45
Single metallic colour printing . . . . . . . . . . . . . . . 45
Requirements . . . . . . . . . . . . . . . . . . . . . . . . . 45
Prepare the image to be printed . . . . . . . . . . . 46
Install ink cartridges . . . . . . . . . . . . . . . . . . . . 46
Load the paper in your printer . . . . . . . . . . . . 46
Setting up the printer driver for printing . . . . 46
vi User’s Guide
Page 7

Multi metallic colour printings . . . . . . . . . . . . . . 47
Requirements . . . . . . . . . . . . . . . . . . . . . . . . . 47
Prepare the image to be printed . . . . . . . . . . . 47
Install ink cartridges . . . . . . . . . . . . . . . . . . . . 48
Load the paper in your printer . . . . . . . . . . . . 48
Setting up the printer driver for printing . . . . 49
Simultaneous full colour and
metallic colour printing . . . . . . . . . . . . . . . . . 49
Requirements . . . . . . . . . . . . . . . . . . . . . . . . . 50
Prepare the image to be printed . . . . . . . . . . . 50
Install ink cartridges . . . . . . . . . . . . . . . . . . . . 51
Load the paper in your printer . . . . . . . . . . . . 51
Setting up the printer driver for printing . . . . 52
Printing in foil colour . . . . . . . . . . . . . . . . . . . . . . . . 53
Single foil colour printing . . . . . . . . . . . . . . . . . . 53
Requirements . . . . . . . . . . . . . . . . . . . . . . . . . 54
Prepare the image to be printed . . . . . . . . . . . 54
Install ink cartridges . . . . . . . . . . . . . . . . . . . . 54
Load the paper in your printer . . . . . . . . . . . . 54
Setting up the printer driver for printing . . . . 54
Multi foil colour printings . . . . . . . . . . . . . . . . . . 55
Requirements . . . . . . . . . . . . . . . . . . . . . . . . . 55
Prepare the image to be printed . . . . . . . . . . . 55
Install ink cartridges . . . . . . . . . . . . . . . . . . . . 56
Load the paper in your printer . . . . . . . . . . . . 56
Setting up the printer driver for printing . . . . 57
Simultaneous full colour and
foil colour printing . . . . . . . . . . . . . . . . . . . . . 57
English
Requirements . . . . . . . . . . . . . . . . . . . . . . . . . 58
Prepare the image to be printed . . . . . . . . . . . 58
Install ink cartridges . . . . . . . . . . . . . . . . . . . 59
Load the paper in your printer . . . . . . . . . . . . 59
Setting up the printer driver for printing . . . . 59
Printing on transparencies or transfer film . . . . . . . . 61
Requirements . . . . . . . . . . . . . . . . . . . . . . . . . . . 61
Prepare the image to be printed . . . . . . . . . . . . . . 61
Install ink cartridges . . . . . . . . . . . . . . . . . . . . . . 61
Load the transparency film or transfer film . . . . 62
Setting up the printer driver for printing . . . . . . . 62
Printing on transparencies
with opaque white ink or transfer film . . . . . . . . 63
Requirements . . . . . . . . . . . . . . . . . . . . . . . . . . . 63
Prepare the image to be printed . . . . . . . . . . . . . . 63
Install ink cartridges . . . . . . . . . . . . . . . . . . . . . . 63
Load the transparency film or transfer film . . . . 64
Setting up the printer driver for printing . . . . . . . 64
Setting up the film support . . . . . . . . . . . . . . . . . . . . 65
RGB Printing . . . . . . . . . . . . . . . . . . . . . . . . . . . . . . 67
Requirements . . . . . . . . . . . . . . . . . . . . . . . . . . . 67
Prepare the image to be printed . . . . . . . . . . . . . . 67
Install ink cartridge . . . . . . . . . . . . . . . . . . . . . . . 67
Load the paper in your printer . . . . . . . . . . . . . . . 67
Setting up the printer driver for printing . . . . . . . 67
Preface vii
Page 8

Chapter 5 - Maintenance
Cleaning the printer . . . . . . . . . . . . . . . . . . . . . . . . . . 69
Cleaning the main unit . . . . . . . . . . . . . . . . . . . . . 69
Cleaning the print head . . . . . . . . . . . . . . . . . . . . . 70
Cleaning the platen . . . . . . . . . . . . . . . . . . . . . . . . 70
Cleaning the feed roller . . . . . . . . . . . . . . . . . . . . . 71
Cleaning the paper transport rollers . . . . . . . . . . . 72
Chapter 6 - Troubleshooting
Troubleshooting - general . . . . . . . . . . . . . . . . . . . . . . 75
Printer errors . . . . . . . . . . . . . . . . . . . . . . . . . . . . . 75
Ready/insert button functions . . . . . . . . . . . . . . . . 75
Paper feed . . . . . . . . . . . . . . . . . . . . . . . . . . . . 75
Paper eject . . . . . . . . . . . . . . . . . . . . . . . . . . . . 75
Cancelling an alarm . . . . . . . . . . . . . . . . . . . . . 76
Forced printing and clearing data . . . . . . . . . . 76
Clearing paper jams . . . . . . . . . . . . . . . . . . . . . . . 76
Troubleshooting - Macintosh . . . . . . . . . . . . . . . . . . . 77
Troubleshooting for USB . . . . . . . . . . . . . . . . . . . . . . 88
The USB printer cannot be selected
in the Chooser . . . . . . . . . . . . . . . . . . . . . . . . . 88
Chapter 7 - Specifications & Settings
DIP switches . . . . . . . . . . . . . . . . . . . . . . . . . . . . . 90
Printable area . . . . . . . . . . . . . . . . . . . . . . . . . . . . 91
Using cardboard or thick paper . . . . . . . . . . . . 91
Available supplies . . . . . . . . . . . . . . . . . . . . . . . . . 92
Ink cartridges . . . . . . . . . . . . . . . . . . . . . . . . . . 92
Print media . . . . . . . . . . . . . . . . . . . . . . . . . . . 92
Appendix A
SCSI Interface module . . . . . . . . . . . . . . . . . . . . . . . . 93
Index
viii User’s Guide
Page 9

Chapter 1 - Introduction
Introduction
Thank you for your purchase of the OKI DP-7000
Colour A3+ desktop printer. This printer represents the
most recent advances in printing quality and
technology. Whether you need a printer for your
Macintosh or the new iMac computer, this printer is the
solution you have been looking for.
English
Chapter 1 - Introduction 1
Page 10

Features
The following is a summarised list of the many standard
features offered by your new printer:
• Variable-dot 2400 dots-per-inch printing
resolution.
• Nine-colour ink capacity, the most challenging
printing tasks are easily accomplished.
• Fully compatible with all of the standard inks and
foil colours.
• Fade-proof, smear-proof, and waterproof
printing.
• Reversable finish cartridge enabling the cartridge
to have a more extended life.
• USB Serial Interface allows a direct interface to
your Macintosh without an expensive converter
cable.
2 User’s Guide
Page 11
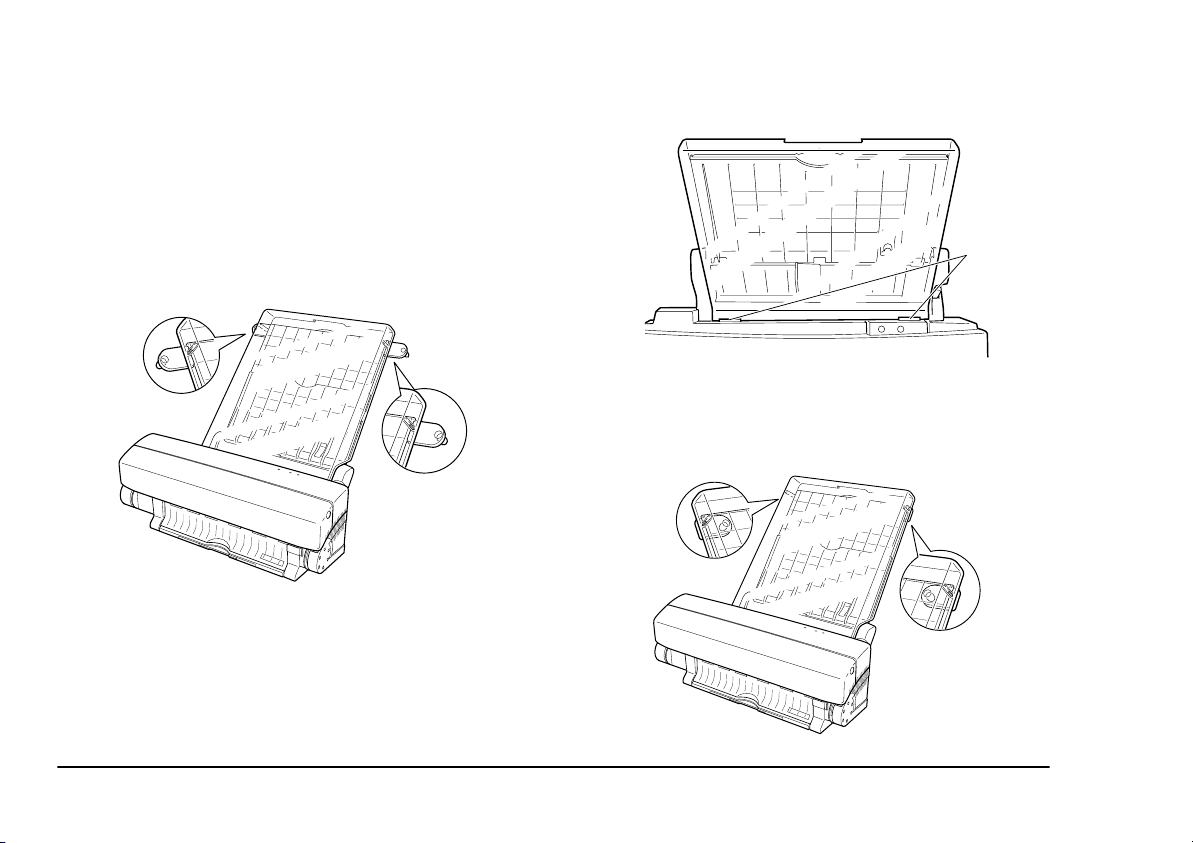
Preparing your printer
English
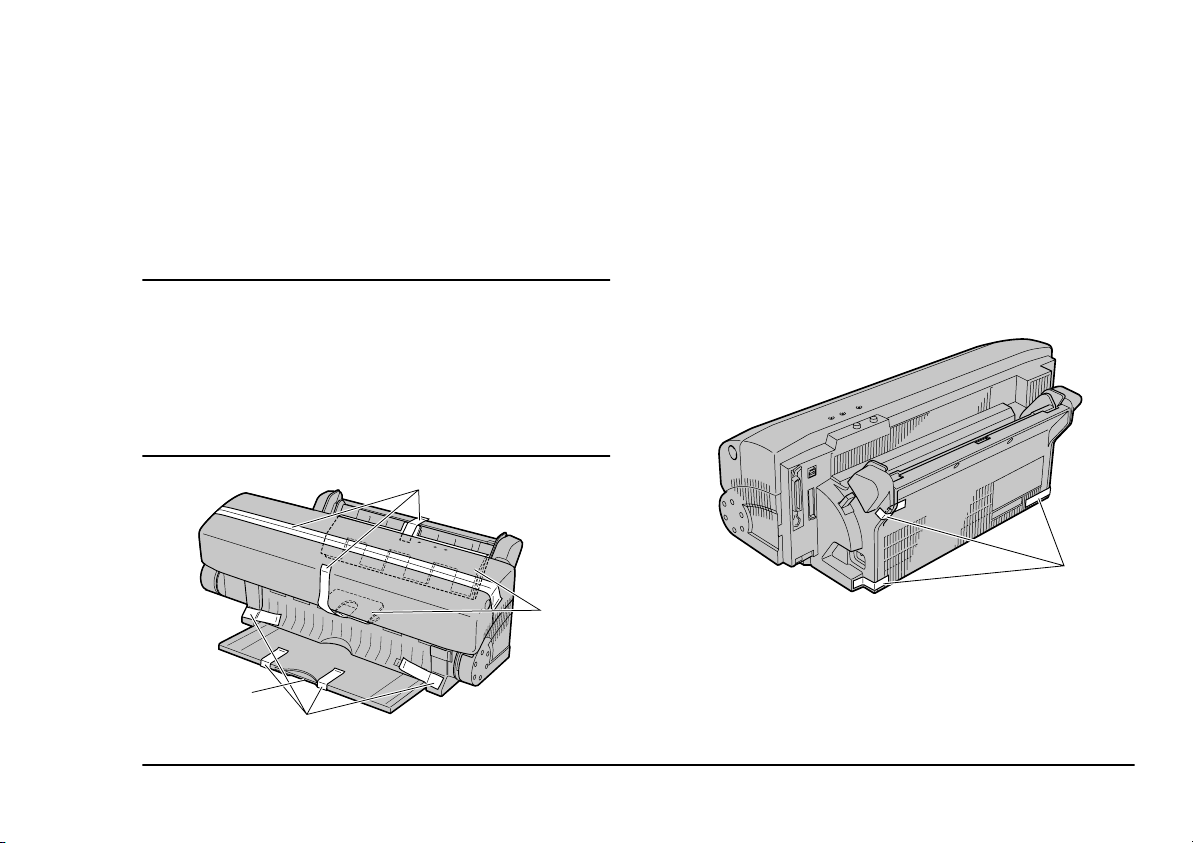
Removing package contents
1. Lift the printer out of its container box. Remove
the packing materials from inside and outside the
printer.
Caution
The printer is shipped with tape, spacers, and other
packing materials to prevent delicate parts from being
damaged while in transit. Remove these packing materials
before using the printer. Damage to the printer or
malfunction may occur if the printer is used while these
packing materials are still present.
1
2
3
1
2. Remove the seven pieces of tape (1) and two
pieces of corrugated cardboard (2) at the front of
the printer. Remove the pieces of tape in the
output paper tray by taking hold of the handle and
pulling the output paper tray out.
3. Remove the three pieces of tape (1) at the back of
the printer.
1
Chapter 1 - Introduction 3
Page 12
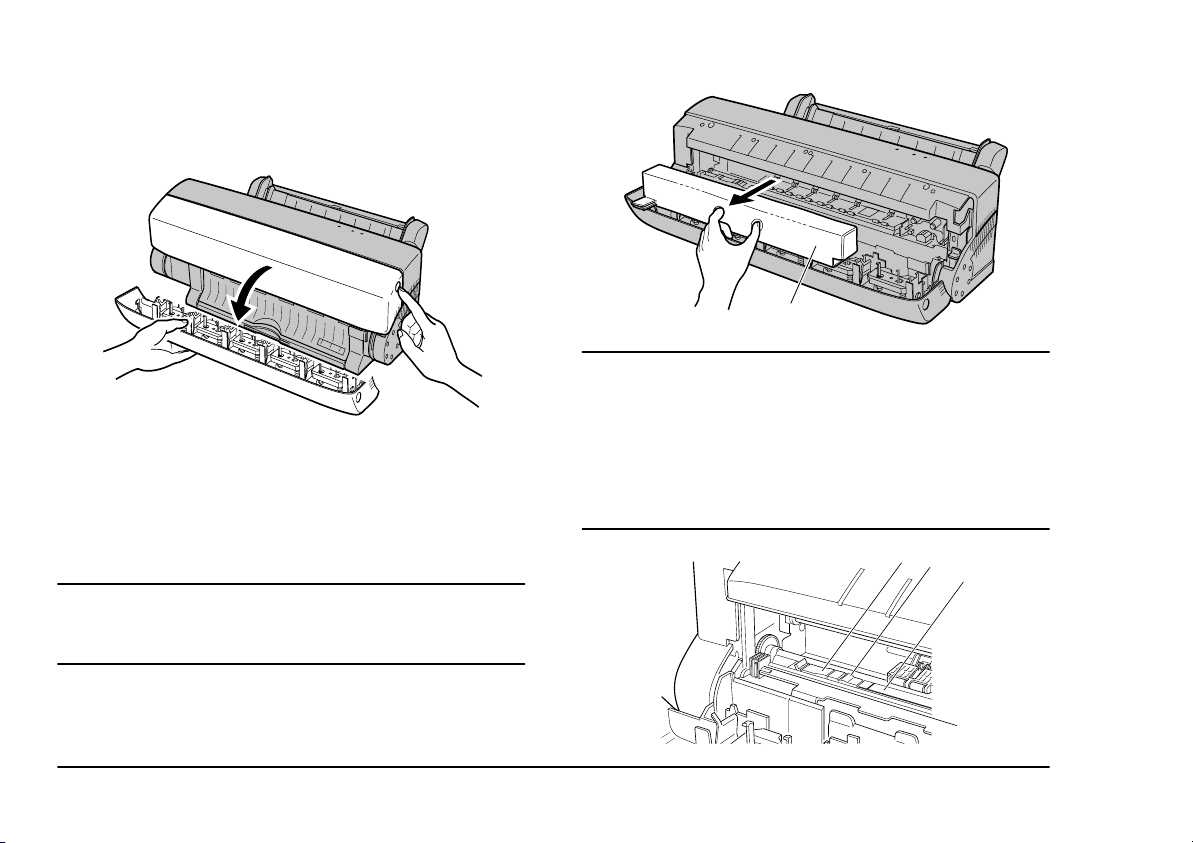
Opening front cover
1. Open the front cover to remove the inside
packing material.
2. To open the front cover (1), push the front cover
release button (2) to release the internal lock.
Gently lower the front cover with your hand.
3. Remove the piece of carriage packing material
(1) from inside the printer.
Caution:
Operating the printer without first removing the packing
materials may damage the printer.
1
Caution:
Do not remove the white pad (1) or the orange pad (2) at
the left end of the platen (3). They are there to clean the
print head. Removing them can cause the printer to
malfunction. The cleaning pad can be replaced when it
gets dirty. Do not touch the cover open sensor (4), which is
located on the left side of the printer.
6
2
1
3
4
4 User’s Guide
Page 13
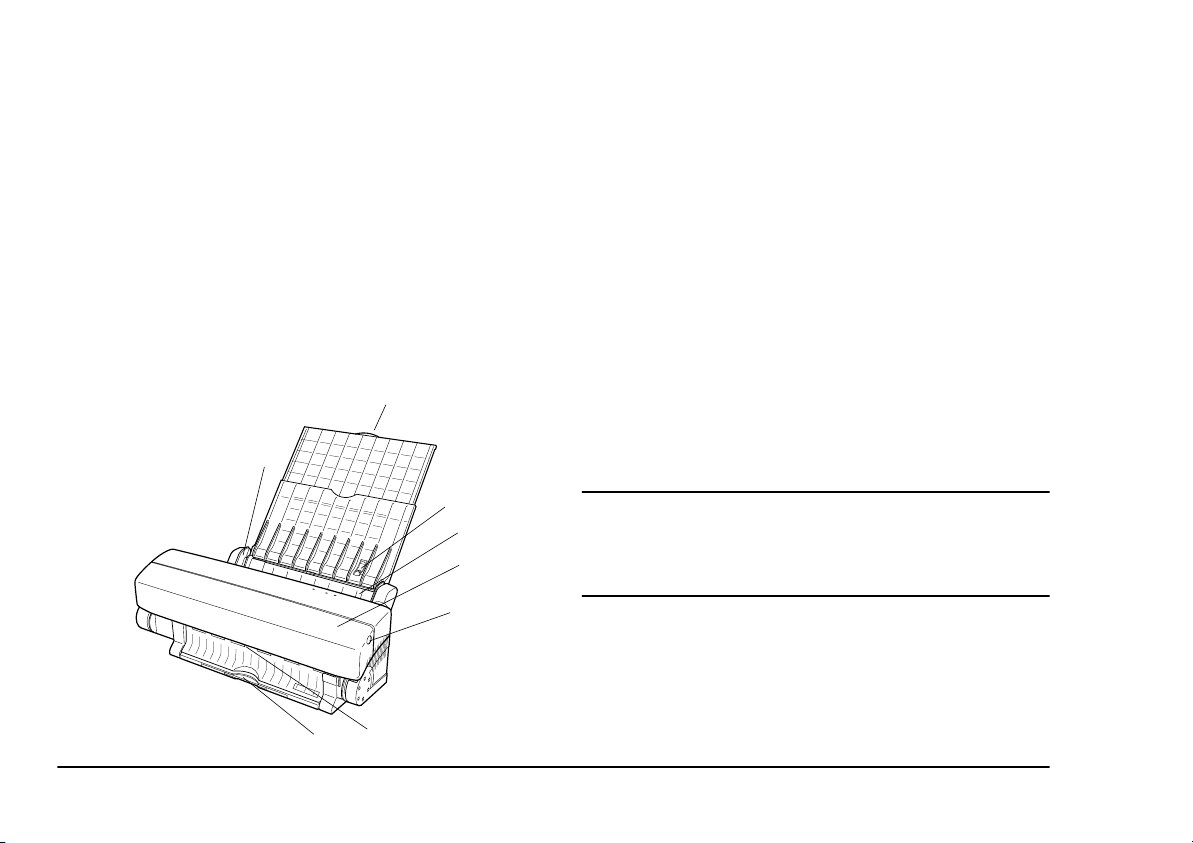
Closing front cover
English
Fitting Paper Support
Close the front cover after removing the carriage
packing material.
Caution:
When closing the front cover, never slam it shut. The ink
cartridges can become dislodged and damage to the
printer may result.
Locating printer
After removing the packing material and reading the
safety precautions (see page iii), choose a location
which offers a stable, firm surface for your printer. Try
to avoid places which are subject to extremes of heat,
cold, sunlight and damp. Also, choose a location from
which you can run the power cables safely to suitable
nearby connection points. Ensure that there is sufficient
space around the printer to allow the output paper tray
and the paper support to be pulled out when necessary.
Caution:
Do not allow the output paper tray hang over the edge
of a table or to protrude from the location of the printer
in any way.
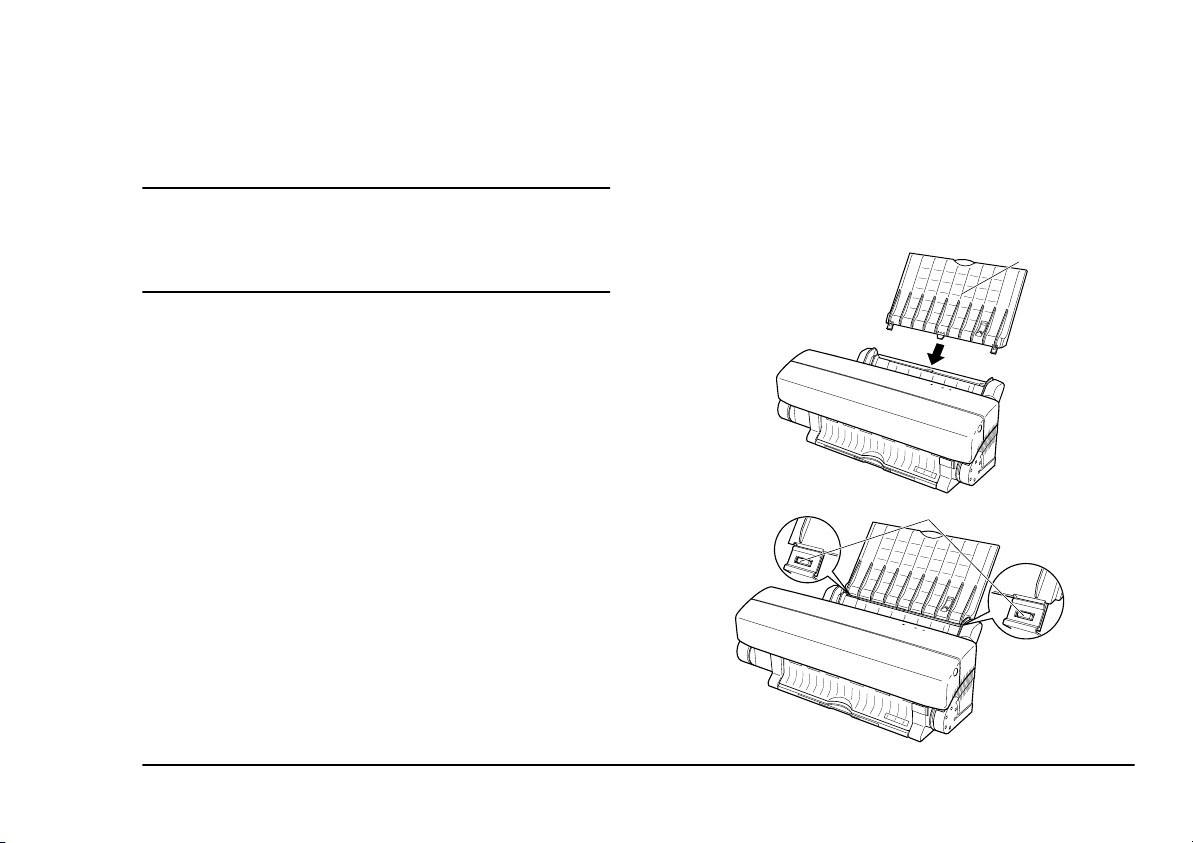
Fit the paper support (1) so that the paper inserted in the
printer does not bend backwards. When fitting the
paper support (1), please make sure that the convex part
of the paper support fits into the hollow section of the
printer as shown in the drawing.
1
2
Chapter 1 - Introduction 5
Page 14
Fitting Dust Cover
The dust cover is used when the printer is not used or is
printing. The dust cover prevents the paper inserted in
the printer, as well as the inside of the printer, from
getting dusty. Dust can cause not only poor printing
quality but also various other problems.
1. Fit the dust cover on the printer with the two
wings pulled out.
At this time, hook the dust cover onto the convex
part of the printer.
1
2. Fit the dust cover on the paper support by
pushing the two wings of the dust cover in and
insert the paper support between the dust cover
and the wings.
6 User’s Guide
Page 15

Using Output Paper Tray
English
Transporting the printer
To use the output paper tray when printing, take hold of
the handle and pull the tray gently all the way out.
When you have finished printing, push it gently back in
again using the handle.
It is important to retain the packaging material to
protect the printer during transit if the printer has to be
moved.
To repack the printer for transportation:
1. Remove all ink cartridges.
2. Replace packing inserts that were removed when
the machine was first unpacked (see ‘Removing
Package Contents’ earlier in this guide).
3. Repack in original box with original packing
materials.
Chapter 1 - Introduction 7
Page 16
Printer functions
The following paragraphs explain the name and
function of each part of the printer.
Front view of printer
1. Sheet feeder - Paper can fed into the printer either
automatically or manually. Place a stack of not
more than 100 sheets (plain laser paper) for
automatic feed. In manual feed, insert a single
sheet at a time.
7
8
6
4
5
2. Front cover release button - Pressing this button
opens the front cover. The front cover will need to
be opened when there is a paper jam or when
changing ink cartridges. Open the front cover
gently, using both hands.
3. Front cover - The front cover protects the internal
mechanisms of the printer. The cover is always
closed during printing.
4. Paper output slot - Paper exits the printer through
this slot.
5. Output paper tray - The output paper tray
receives printed paper.
Caution:
1
3
Never reach inside the printer while it is operating. Injury
may result. Do not open the front cover while the printer is
running.
2
6. Paper stopper - This stopper prevents the paper
from rising when the small size media is set
vertically for printing.
8 User’s Guide
Page 17
7. Paper support - The paper support holds the
loaded paper upright. To extend the paper
support, pull up on the top edge.
8. Paper feed guide - This guide feeds the paper into
the printer. Set the adjustable guide on the left to
match the paper size being used.
9. Paper transport rollers - The paper transport
rollers for feeding sheets of paper loaded on the
sheet feeder (at 5 places which are enclosed in a
wavy line box).
Rear view of printer
1. Parallel interface connector - The printer cable is
connected to the parallel interface connector.
2
1
4
5
3
English
9
2. USB Interface Connector - The USB Interface
Connector connects to the USB cable.
3. Accessory connector - This connector is used to
connect Macintosh interface module to the
printer. Make sure you remove the rectangular
plastic connector cover before connecting either
of these options.
4. Paper feed switch - This switch sets the paper
feeding method to automatic feed mode or
manual feed mode.
5. Power socket - The power cable connects to the
power socket.
Chapter 1 - Introduction 9
Page 18
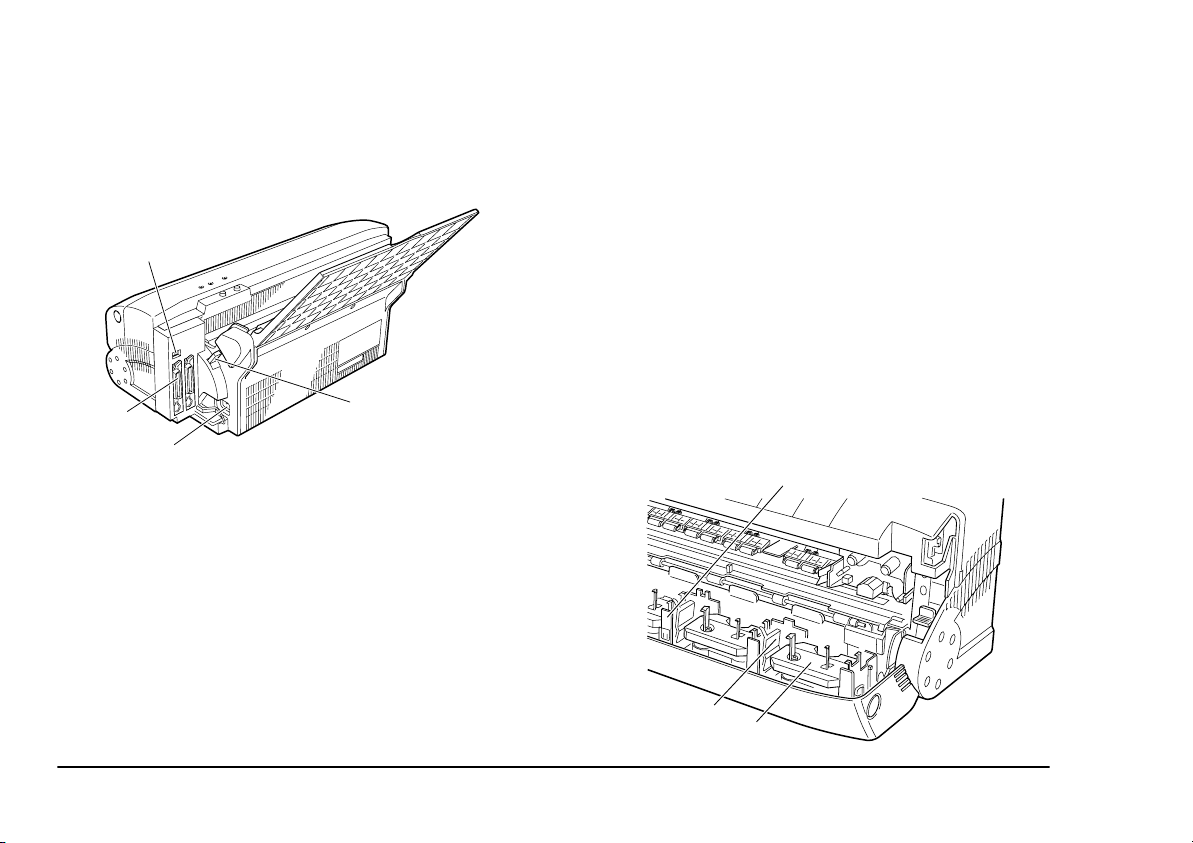
Rear view of printer with SCSI interface module
1. DIP switches - The DIP switches are used to set
the SCSI device number for the printer.
1
2
4
2. SCSI connector - The SCSI connectors are used
for connecting to the Macintosh computer and/or
other SCSI devices.
3. Paper feed switch - This switch sets the paper
feeding method to automatic feed mode or
manual feed mode.
4. Power socket - The power cable connects to the
power socket.
3
Inside the printer
1. Marking sticker (Black and Silver sticker)
The marking sticker confirms that the carriage is
in the standard position. Try not to smear the
sticker. If the sticker gets dirty, please clean it
with a dry cotton swab gently so as not to peel it
off.
2. Latch (the blue part)
This latch fixes the ink cartridge into the ink
cartridge holder.
3. Ink cartridge holder plate
There are five holder plates which hold two ink
cartridges. A maximum of nine ink cartridges is
allowed.
1
2
3
10 User’s Guide
Page 19
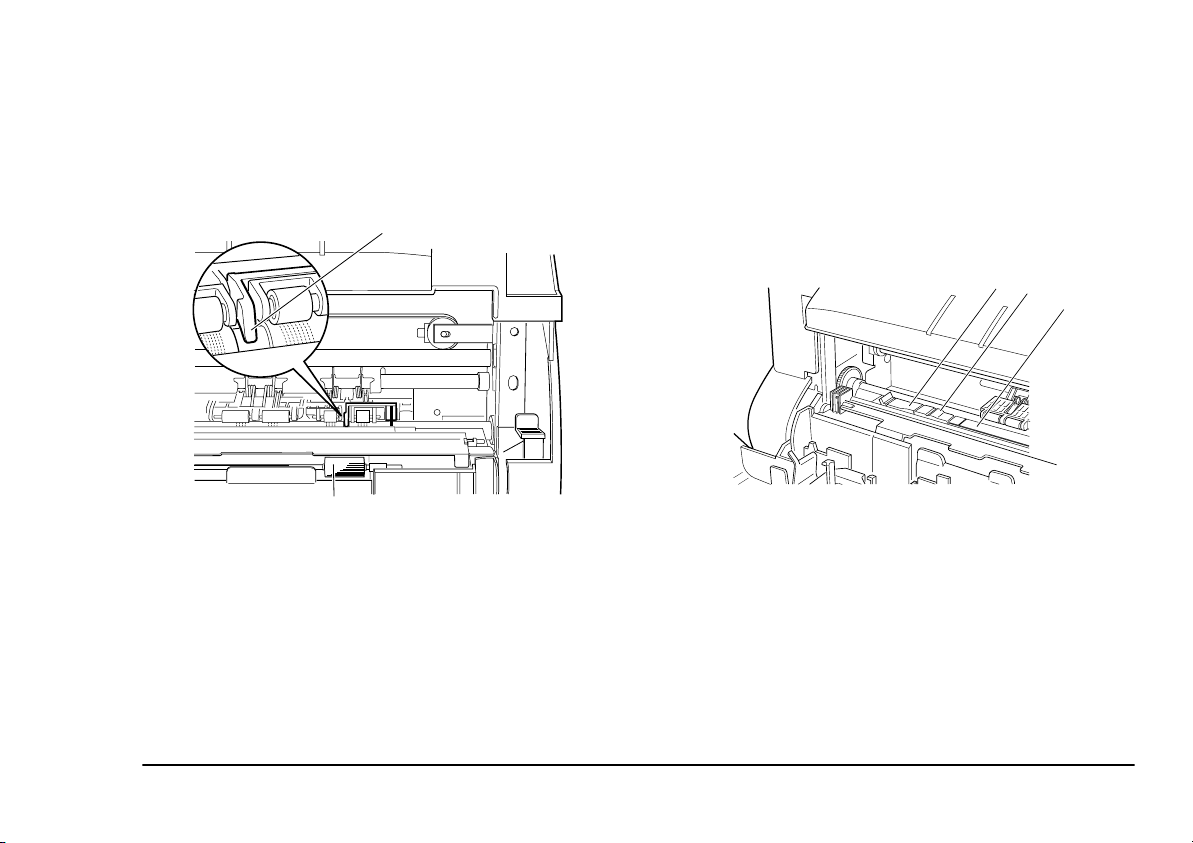
4. PE lever
This lever detects whether or not there is any
paper left.
5. Paper eject roller
The paper eject roller discharge paper sheets.
4
9. Platen
This is a rubber plate which is pressed by the
print head while printing. Dust on the platen may
result in poor printing quality.
10. Cover open sensor
The cover open sensor detects whether or not the
front cover is open.
6
2
1
English
3
4
5
6. Feed roller (metal roller)
The feed roller feeds loaded sheets.
7. Cleaning Pad (Orange)
This pad is used for cleaning the print head. Do
not remove this pad.
8. Cleaning Pad (White)
This pad is used for cleaning the print head. Do
11. Carriage
The carriage automatically selects and picks up
the necessary ink cartridges from any ink
cartridge holders. The carriage is usually
positioned more to the left than is shown in the
drawing.
12. Release lever (Blue lever)
The release lever is used to clear paper jams.
Press the lever down to remove the jammed
not remove this pad.
Chapter 1 - Introduction 11
Page 20

paper. When the front cover is closed, the lever
will automatically go back to its original position.
13. Print head
The print head is on the carriage and prints the
characters. Please take care not to touch the print
head except when cleaning.
11
14
15
16
12
Caution:
Mishandling the print head or carriage can cause damage
to the printer. Also, never load an ink cartridge directly
into the carriage. Malfunction or damage to the printer
may result.
13
Paper feed switch
14. RE sensor (at the Black part)
The RE sensor detects used-up ink cartridges.
15. HP sensor (two at the Black parts)
The HP sensor detects the type and standard
position of an ink cartridge.
16. Bobbin axis
Caution:
Do not move the paper feed switch while paper is being
fed, otherwise the paper may feed in incorrectly. Move the
paper feed switch until it clicks into position “M” or “A”.
Paper will not feed properly unless the switch is correctly
set to either “M” or “A”.
Winds the ink cartridge around.
12 User’s Guide
Page 21
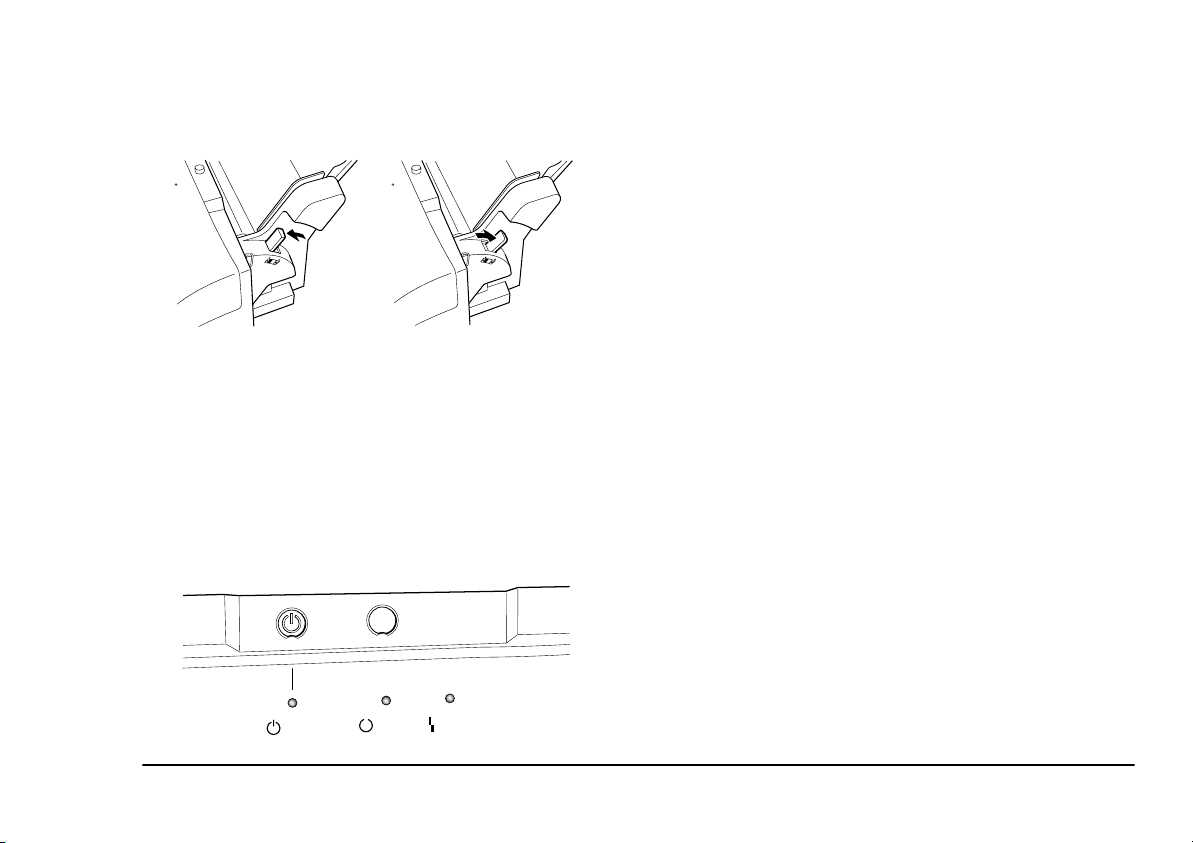
For continuous printing using automatic feeding, set the
paper feed switch to position “A”. To manually feed
paper, set the paper feed switch to position “M”.
Paper feed switch
set to position “A”
Paper feed switch
set to position “M”
Control panel
The top area of the printer has two buttons and three
LED indicator lights. This area of the printer is called
the control panel.
1. Power button - Use the
printer on and off.
power
power
ready/ insert
button to turn the
English
2. Ready / Insert button - Use the
ready / insert
button to load and eject paper. When the paper
feed switch is set in position “M”, this button is
used to feed or eject paper. The button is not
functional when the paper feed switch is in
position “A”. Pressing the
ready / insert
button
for three seconds or more causes the printer to
print a sample page.
3. Error light - This light blinks when a printer error
has occurred.
4. Ready light - This light illuminates when the
printer is ready to print. The light blinks slowly
while printing and goes out when printing has
paused or stopped.
5. Power light - Indicates whether the printer is on
or off. The light illuminates when the printer is
on. When the light is off, the internal functions of
the printer still retain power. To completely shut
off power to the printer, unplug the power cable
from the socket.
For a full description of the indicator lights refer to
‘Indicator Lights Summary’
power
Chapter 1 - Introduction 13
ready error
Page 22
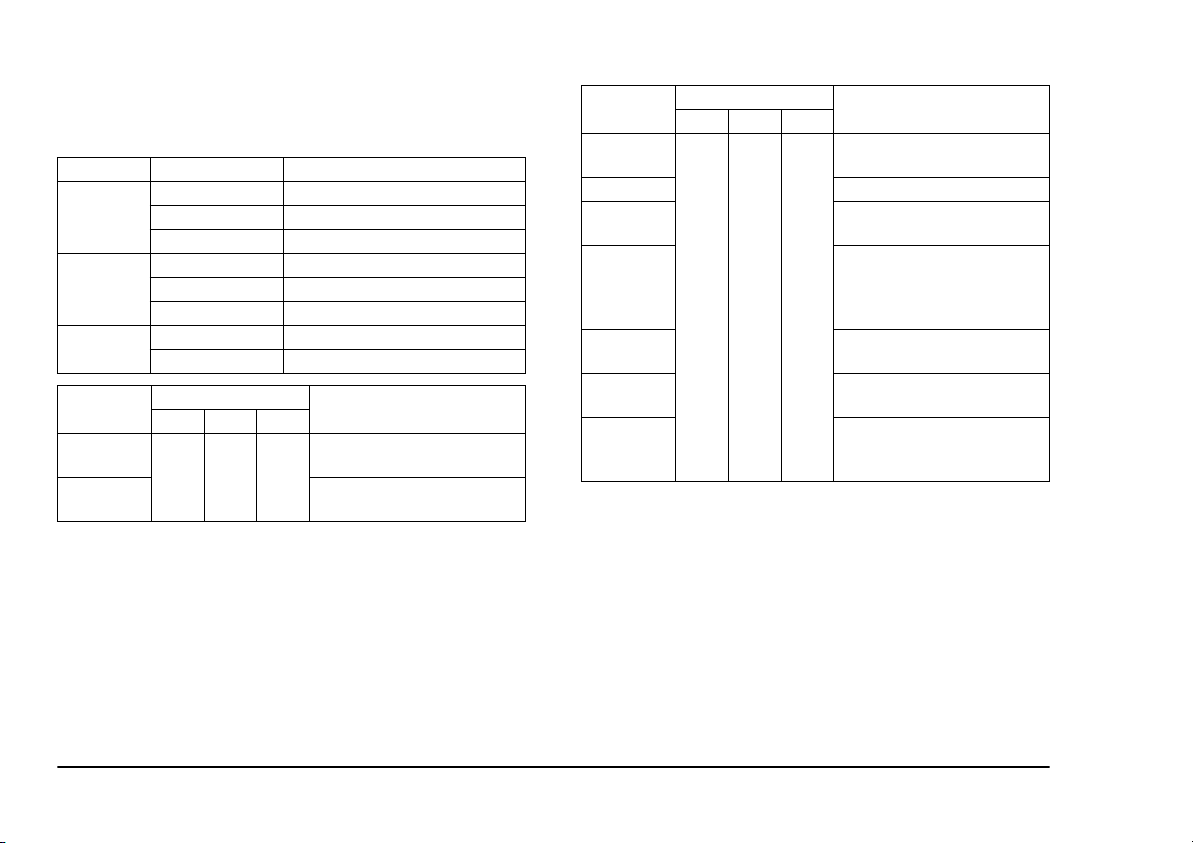
Indicator lights summary
Light Light status Printer status
On Ready for operation
power
ready
error
Error Status
Hardware
error
Nonvolatile
error
Fast blinking Printing sample page
Off Printer not ready
On Select mode (ready to print)
Fast blinking Deselect mode (not ready)
Slow blinking Receiving or processing data
Fast blinking Printer error detected
Off Normal
Light Status
power ready error
Blink Blink Blink
An electrical circuit error has
occurred.
Contents of printer memory
have been lost.
Description
Error Status
Out of paper
Paper jam Paper jam detected.
Ribbon end
Cartridge
change error
Mechanism
error
Front cover
open
Necessary
ribbon not
installed.
Light Status
power ready error
On Off Blink
Description
Printer is out of paper or deselected during paper feed
Ink cartridge ribbon needs
replacement.
Error detected during ink
cartridge change, or eight
cartridges installed plus one on
carriage.
Printer mechanical error.
Front cover left open.
Necessary ink cartidge not
installed or used up. Forced
printing still possible.
14 User’s Guide
Page 23
Chapter 2 - Initial Setup
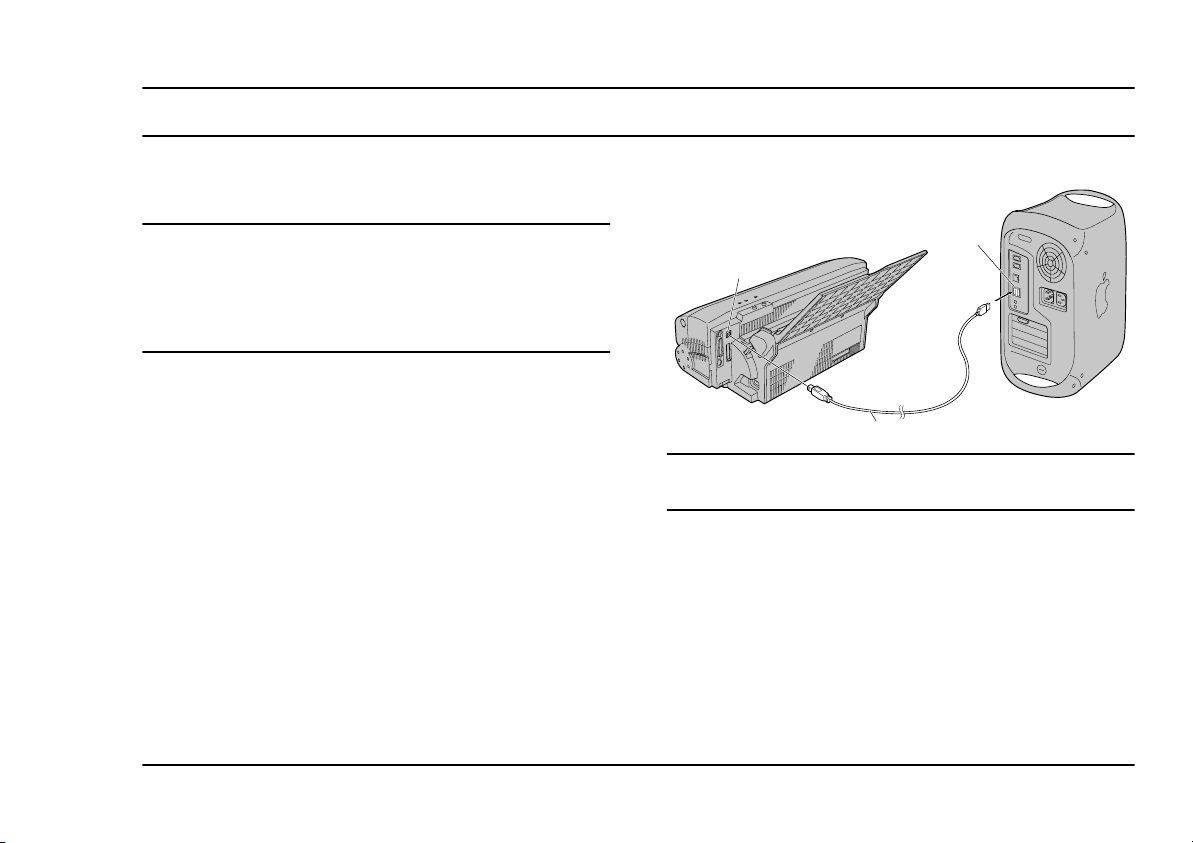
Computer connection
English
Caution:
Power to the printer and computer must be turned off and
2
3
the power cables unplugged before connecting or
disconnecting the printer cable to prevent any damage or
malfunction from occurring.
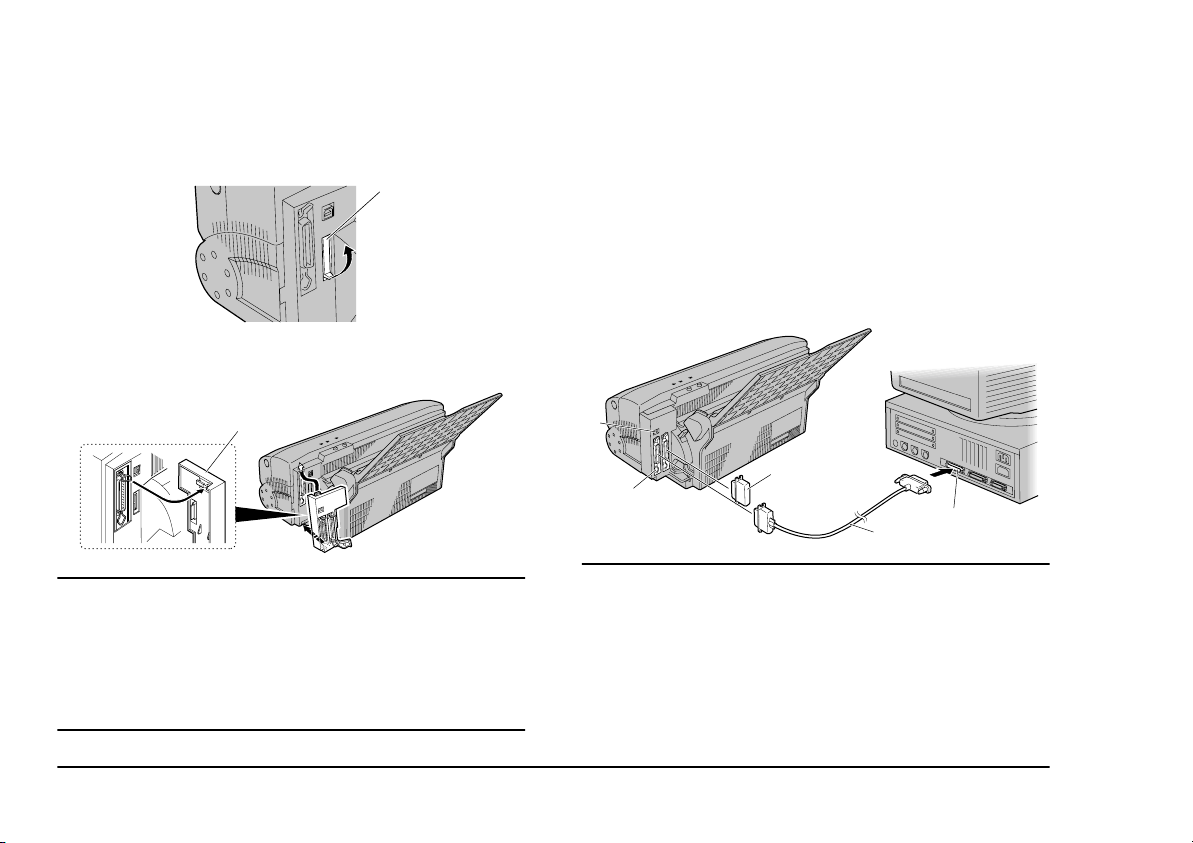
Macintosh USB connection
1. Please make sure that the power is turned off. If
the computer has started, please shut down the
computer again and turn the power off.
Caution:
Using extension cables can cause printing problems.
2. Connect the printer (2) to the computer (3) using
the USB cable (1).
Macintosh SCSI connection
When using Macintosh SCSI connection, the SCSI
adapter must be fitted.
Chapter 2 - Initial Setup 15
1
Page 24
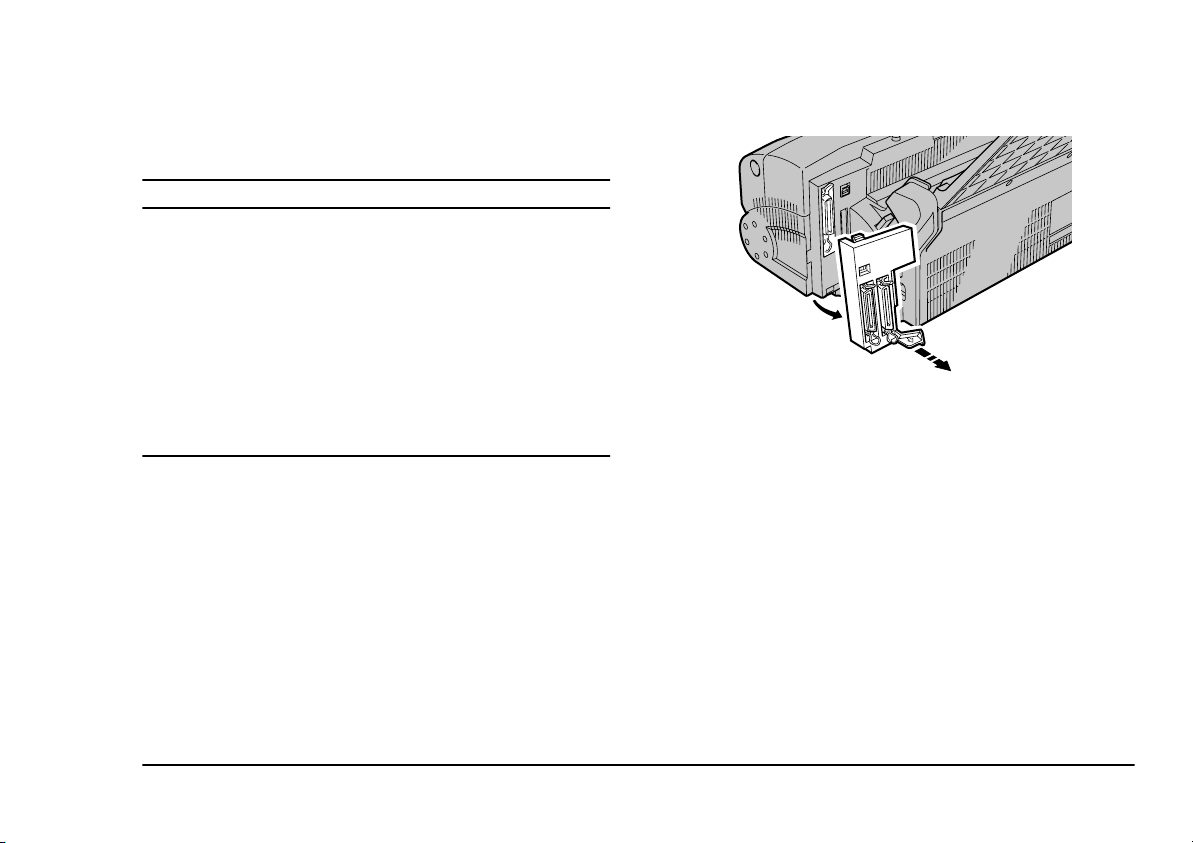
Fitting the SCSI adapter
Connecting the printer to a computer
1. Remove the cover (1) from the SCSI adapter
socket.
1
2. Fit the adapter by fitting the connector of the
SCSI adapter (1) into the SCSI connector socket.
1
Caution:
Please connect the SCSI cable and the terminator after
installing the SCSI adapter.
Please install the SCSI adapter before the power cable is
plugged in to prevent any damage or malfunction from
occurring.
1. Please make sure that the power is turned off. If
the computer has started, please shut down the
computer again and turn off the power.
2. Connect the printer (2) to the computer (3) using
the SCSI cable (1), then fasten them tightly with
screws and adjustment catches. If the printer is at
the end position of a SCSI chain, you should fit a
SCSI terminator (4).
5
4
2
3
1
Caution:
Power to the computer, the printer and all peripheral
devices connected using SCSI must be turned off (the
power cord plug should be unplugged from a wall socket).
Before connecting or disconnecting the SCSI cable and the
terminator to prevent any damage or malfunction from
occurring.
16 User’s Guide
Page 25
A high impedance cable is recommended for use as the
SCSI cable. With other cables, unstable working can be
expected. An active terminator is recommended as the
terminator.
Caution SCSI ID:
The initial SCSI ID of the SCSI adapter has been set as 6.
To change the ID, set the ID by using the dip switch (5).
Regarding details, refer to [Dip Switch Setting (Macintosh
SCSI Connection)] in [Chapter 7 Specification & Setting].
If any SCSI peripheral devices other than this printer are
connected to the computer, and if the SCSI ID of this
printer and other peripheral devices are the same, it is
possible that this printer and other SCSI peripheral devices
will not work properly.
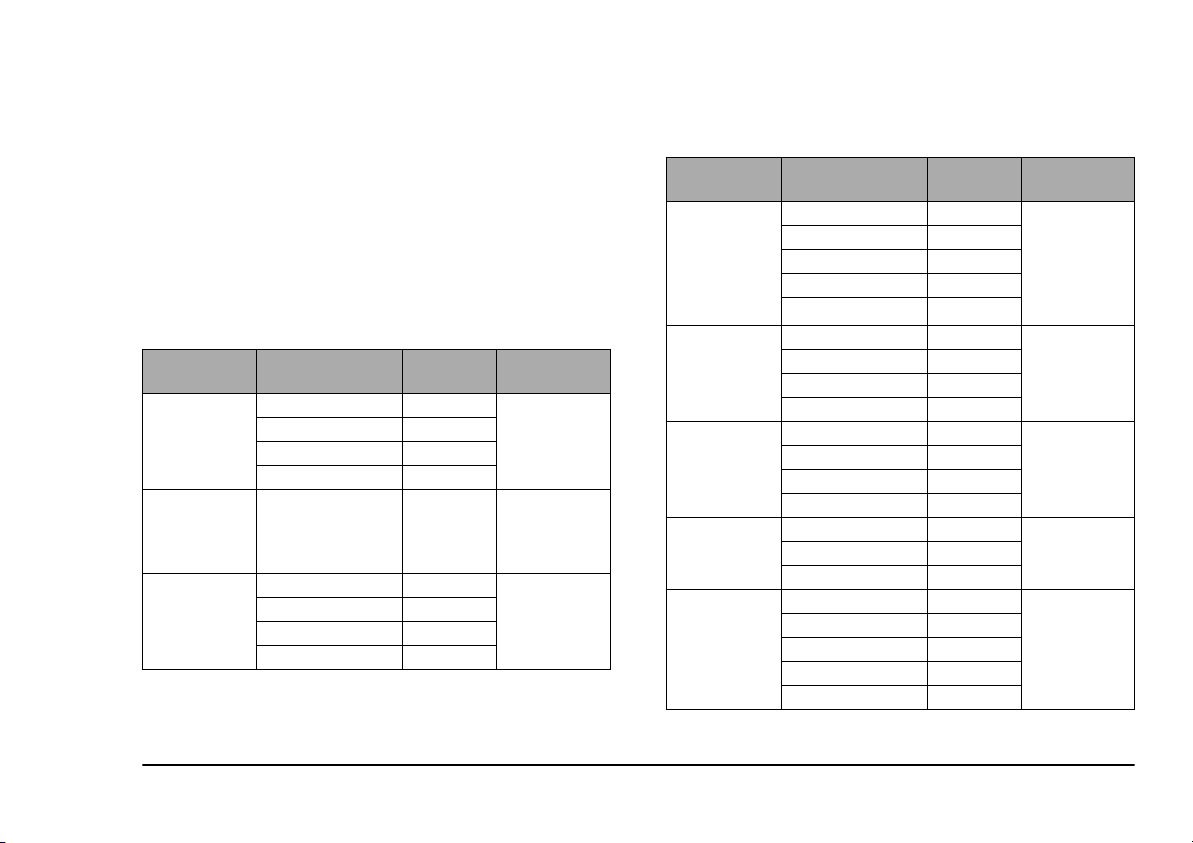
How to uninstall SCSI adapter
1. Turn off the computer, the printer and all
peripheral devices connected using SCSI.
2. Unplug the power cord from the printer.
3. Disconnect the SCSI cable and the terminator
from the SCSI adapter.
English
adapter by taking hold of the part shown by the
arrows.
4. Uninstall SCSI adapter.
As shown in the drawing, pull out the SCSI
Chapter 2 - Initial Setup 17
Page 26

Connecting Power Cord
1. Plug the optional power cord completely into the
power cord socket of the printer hard.
2. Next, plug the plug of the power cord into a
power source. Three lamps on the control panel
will light up. If the lamps do not light up, make
sure that the power cable is connected properly.
After the lamps have been lit up for a few seconds
they will all go out.
Caution 1:
Ensure that the power cord is pushed home completely
into the socket on the printer. If it is not, the printer will
not function.
Caution 2:
Power to the printer is completely cut off only when the
power cord is unplugged.
Caution 3:
Ensure that the printer is located in a position where the
plug and power cord are easily accessible.
Caution 4:
When unplugging the power cord from the power source,
pull on the plug, not on the cord.
Caution 5:
The printer should be connected to the power supply using
a three-pin earthed plug, preferrably the one supplied with
the machine.
18 User’s Guide
Page 27
Ink cartridges
English
The following describes how to identify the different
types of ink cartridge and how to install and remove the
cartridges from the printer.
Identifying ink cartridge and paper types
The ink cartridge type is indicated on the surface of
each cartridge.
Printing Mode
Standard colour
printing
600 dpi
Standard
grayscale
printing
1200 dpi
VPhoto printing
on
VPhoto Film
2400 dpi
Ink cartridge
Process Black 41644606
Process Yellow 41644609
Process Magenta 41644608
Process Cyan 41644607
Process Black 41644606 Press Paper
Process Black 41644606
Process Yellow 41644609
Process Magenta 41644608
Process Cyan 41644607
Part
number
Matching
paper type
High Grade
Paper
VPhoto Film
Printing Mode
VPhoto printing
on Press Paper
2400 dpi
RGB printing
Spot Color
Printing
Foil Color
Printing
Transparency
Printing
*1 Option
Ink cartridge
Process Black 41644606
Process Yellow 41644609
Process Magenta 41644608
Process Cyan 41644607
Finish II*
Red Spot 41644602
Green Spot 41644603
Blue Spot 41644604
Black Spot 41644605
Metallic Magenta 41067617
Metallic Cyan 41067618
Metallic Gold 41067615
Metallic Silver 41067616
Gold Foil 41067608 Press Paper
Silver Foil 41067609
Black Spot 41644605
Process Black 41644606
Process Yellow 41644609
Process Magenta 41644608
Process Cyan 41644607
Opaque White 41644601
1
Part
number
41067607
Matching
paper type
Press Paper
Press Paper
High Grade
Paper
Press Paper
High Grade
Paper
High Grade
Paper
Transfer Film
Transparency
Film
Chapter 2 - Initial Setup 19
Page 28
Caution 1
The manufacturer only recommends printing with the
cartridge-paper combinations listed in Table 1.
Caution 2
Printing with an inappropriate ink cartridge-paper
combination can damage the cartridge ribbon.
Caution 3
Printing outside the printable paper area can damage the
cartridge ribbon. Always print within the printable area.
See ‘Printable Area’ in Specifications and Settings.
Installing ink cartridges
Install ink cartridges by following the steps below.
Caution
Dropping an ink cartridge could damage the cartridge and
result in lower quality printing. If you drop a cartridge you
should replace it with a new cartridge.
1. The cartridge has a stopper (1) to prevent slack in
the ribbon (see below). Remove this stopper from
the ink cartridge.
1
2. Insert a pencil from the side marked “B” and turn
the pencil slowly to take up any slack in the
ribbon (1).
D
N
I
W
3. Open the front cover by pushing the front cover
release button to release the internal lock. Gently
lower the front cover with your hand.
4. Hold the ink cartridge with your thumb and index
finger so that the side with the letter “B” and the
manufacturer’s logo faces upward.
20 User’s Guide
Page 29
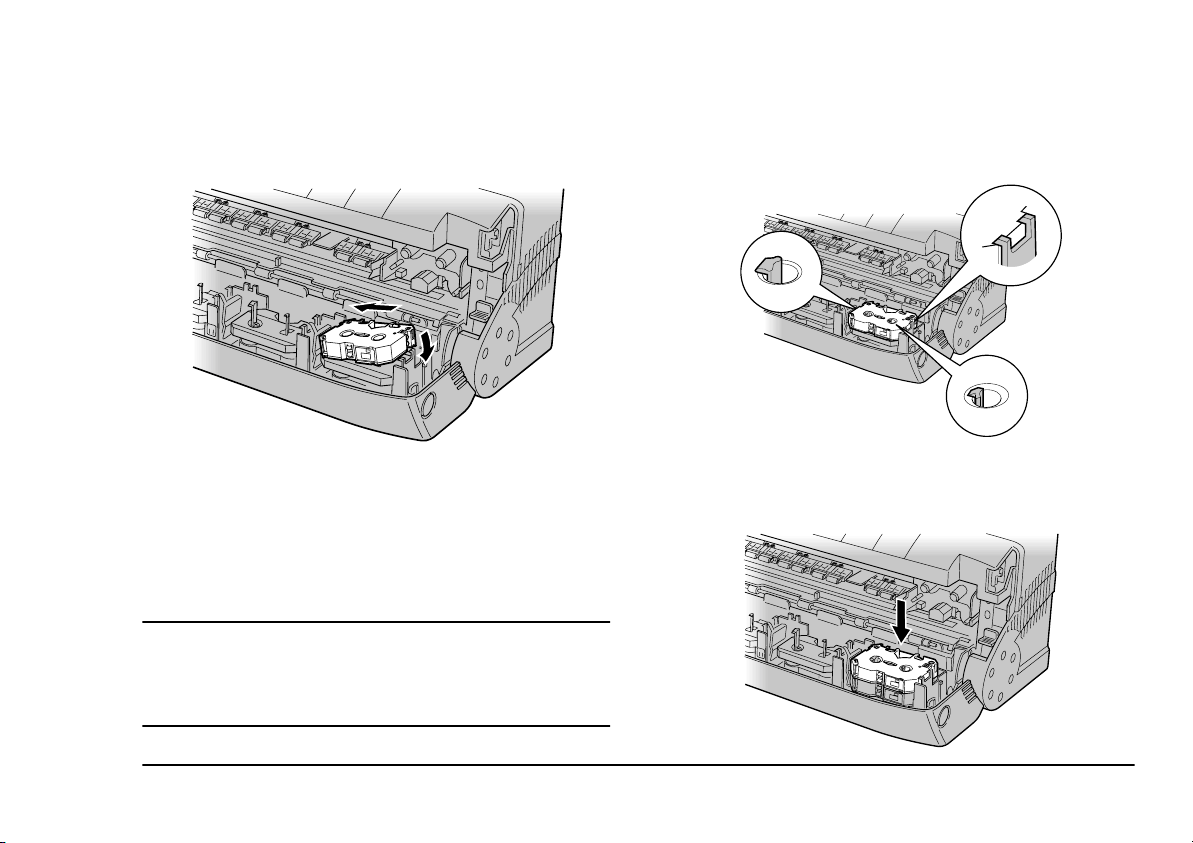
5. Insert the left end of the ink cartridge into the ink
cartridge holder, while pushing the left side latch
of the holder slightly to the left along with the
cartridge.
English
6. Push down the right side of the ink cartridge.
Make sure that the ink cartridge is securely
locked into the holder, and that there is no slack
in the ribbon.
Note
The printer carriage located inside the printer can
select and pick up the necessary ink cartridge from any
7. Place the second ink cartridge on top of the ink
cartridge already installed. Gently push down the
centre of the ink cartridges.
holder. You can place up to 9 cartridges of the same
colour in the holders to reduce the need to change ink
cartridges.
Caution
The ink cartridges may be put in any holder but DO NOT
put ink cartridges directly into the carriage. Doing so may
result in damage to the printer.
Chapter 2 - Initial Setup 21
Page 30
Caution 1:
Place the side marked “B” face up. Finish Cartridges are
reversible.
Caution 2:
You must leave at least one cartridge holder empty for the
printer to operate properly. Do not install more than 9 ink
cartridges.
Caution 3:
Locate the first and second cartridge by facing their bar
codes towards the printer and aligning them vertically.
Not doing so may result in a cartridge change error.
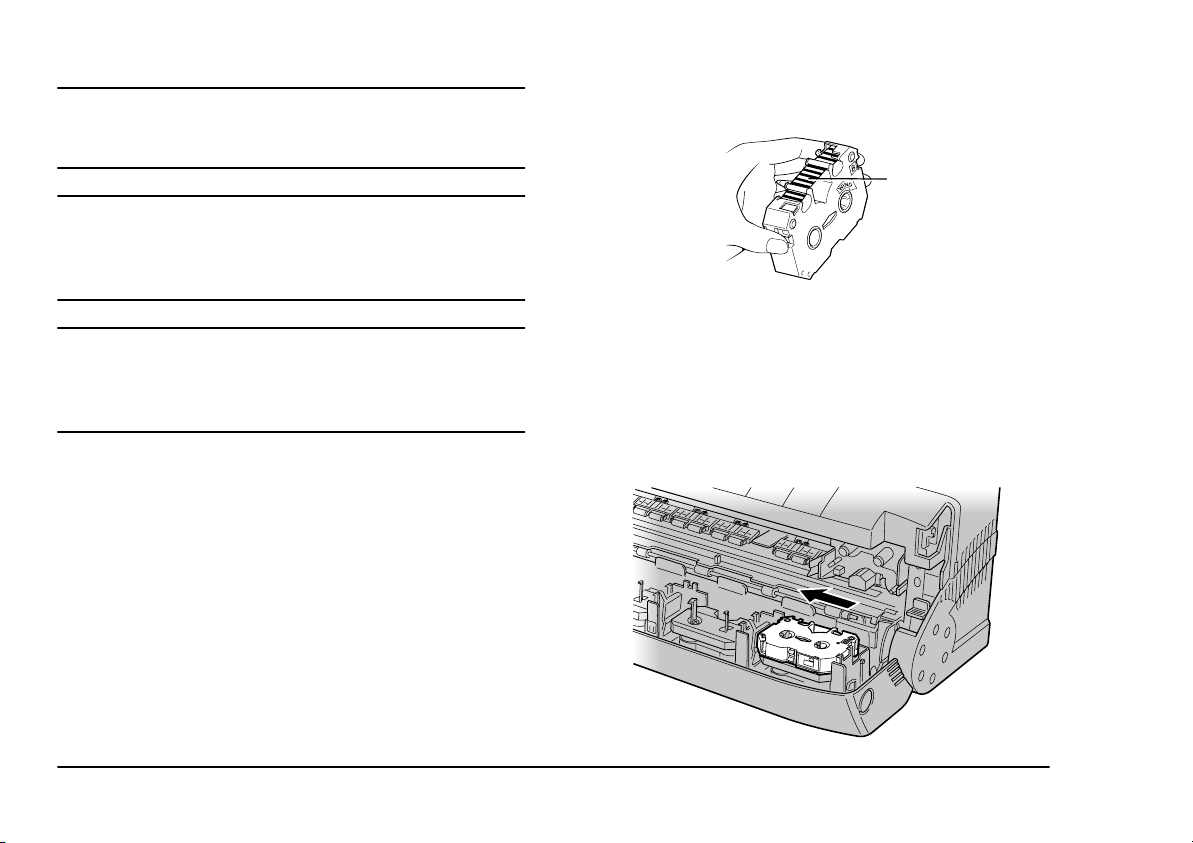
Replacing or changing ink cartridges
When you want to change ink cartridges or replace a
cartridge whose ribbon has been used up, remove the
cartridges by the following steps.
Note 1:
When an ink cartridge has been used up, black and
silver stripes will be visible on the ribbon.
over and manually advance the ribbon until the black
and silver stripes (1) disappear.
1
1. Open the front cover by pushing the front cover
release button.
2. Removing an ink cartridge is similar to installing
it. Hold the centre of the cartridge with your
thumb and index finger. Push the left latch on the
ink cartridge holder slightly to the left with the
cartridge.
Note 2:
To reverse a Finish II ink cartridge, flip the cartridge
22 User’s Guide
Page 31

3. Lift up the right side of the cartridge, and then
remove the entire ink cartridge. Insert a new ink
cartridge by following the steps described earlier.
English
Chapter 2 - Initial Setup 23
Page 32

Loading paper
The following paragraphs explain how to load paper
into the printer.
Paper types and available feeding modes
The table below shows information on switching
between automatic and manual feeds, and on setting the
paper feed switch (“A” or “M”).
Media type
Press Paper-Matte and Art A M
High Grade Paper A M
VPhoto Film
Transparency Film/Transfer Film x M
Other media (thick paper, etc.) A M
Automatic feed
mode
1
A*
*1 For VPhoto Film, use single sheet and manual feed.
Caution:
Do not print on the following; thermal paper, paper
exclusively for use in ink jet printers, glossy paper (paper
whose surface has been specially treated), and envelopes.
Doing so may damage the printer.
Manual feed
mode
M
Note 1:
Loading too many sheets into the sheet feeder may
cause paper jams or misfeeding.
Note 2:
Be aware that when using automatic feed mode, the
last sheet will occasionally feed incorrectly depending
on the paper type.
Notes and precautions about paper
The printer’s sheet feeder can feed paper to the printer
automatically, which is the most convenient method of
printing. The sheet feeder holds up to 100 sheets of
plain paper at once.
Thick paper and other kinds of special printing media
should be used in manual feed mode. The approximate
thicknesses of paper that can be used in manual feed
mode or automatic feed mode are as follows:
Feed Mode Min. Max.
Automatic 0.07mm (0.003") 0.10mm (0.004")
Manual 0.07mm (0.003") 0.23mm (0.01")
24 User’s Guide
Page 33

Caution:
Never use paper in the sheet feeder with thickness outside
the range 0.07 mm - 0.10 mm (0.003" - 0.004") in
automatic feed mode. In manual feed mode, never use
paper whose thickness is outside the range 0.07 mm - 0.23
mm (0.003" - 0.01"). Doing so may cause paper jams or
damage to the printer.
Paper jams can be caused by feeding in paper that is
extremely smooth or shiny, too rough, or paper that
easily picks up static electricity. Paper jams and other
paper feed problems can tear the ribbons in ink
cartridges.
To avoid such problems, please note the following
precautions:
• Always use the recommended paper types, and
be sure to set the printer’s paper options properly.
Settings that are not appropriate for the paper
being used can cause paper jams.
• When printing on a thick sheet, or an irregular
postcard-size sheet allow a 1/2 inch (12 mm)
margin on the left and right side to prevent
printing over the paper edge, this could result in
tearing the ink cartridge ribbon.
English
• When printing on used sheets (already printed on
the same side), use manual feed only. Automatic
feed may not feed used sheets properly. When
using manual feed, avoid repeatedly inserting and
removing the same sheet.
Loading paper in automatic feed mode
Use automatic feed mode for continuous printing.
There are two methods for loading paper, depending on
the media.
Loading high grade/laser paper and Press Papers
1. Pull the paper support upwards.
Chapter 2 - Initial Setup 25
Page 34

2. Set the paper feed switch to position “A”.
3. Place the paper in the sheet feeder.
4. Adjust the paper feed guide to the paper size.
Note 1:
Do not use creased or curled paper, this can cause the
paper to misfeed.
Note 2:
Fan the paper once before placing it in the sheet
feeder. This will prevent the paper sticking and printer
feeding a number of sheets together.
Note 3:
Use only one type of paper at a time.
Note 4:
Pushing the paper feed guide too hard against the
paper can bend the paper. Adjust the position of the
paper feed guide so that it just touches the paper.
26 User’s Guide
Page 35

Loading paper in manual feed mode
Use manual feed mode when printing on thick paper,
cards and other kinds of special printing media. In
manual feed mode you should load only one sheet at a
time.
1. Set paper feed switch to position “M”.
English
2. Remove any paper from the sheet feeder.
3. Make sure that the paper stopper is not lifted.
Chapter 2 - Initial Setup 27
Page 36

4. Insert the sheet of paper straight into the sheet feeder.
Note 1:
Paper that is creased or curled may print incorrectly.
Note 2:
Make sure that you insert the paper straight. Inserting
it at a slant can cause a paper jam.
5. Adjust the paper feed guide to the paper size.
6. Press the ready/insert button with supporting the
paper by hand. The paper will be automatically
pulled into the printer.
28 User’s Guide
Page 37

Chapter 3 - Installation and Operation, Macintosh
Installing the printer driver
English
Before you can use your printer, you need to install the
correct printer driver software so that your computer
can work with the printer.
This chapter describes how to install the supplied
printer driver for an Apple Macintosh. These directions
assume that you are familiar with normal Macintosh
operations, such as using the mouse and menus. Please
refer to the User’s Guide that came with your
Macintosh if you need information about general
Macintosh operations.
Preparing for installation
Before installing the printer driver, check your hard
disk with the Disk First Aid utility to make sure that it
has no serious problems. Refer to the Macintosh User
Guide for information about using Disk First Aid.
Turn on the power
Turn your printer and computer on or off in the
following order;
• Push the power button on the printer to turn it on.
Purpose of the printer driver
• Turn on your computer.
The printer driver is software that enables your
computer to control the printer. When printing from any
application, you must select a printer driver that
matches the printer being used in order to ensure
accurate printing results. To take advantage of the many
features of this printer, select the correct printer driver
before creating your documents.
Chapter 3 - Installation and Operation, Macintosh 29
Page 38

SCSI Connection
System requirements
The system and disk space requirements for the DP7000 printer driver are as follows:
Computer: Apple Macintosh computer or compatible
Operating System: System7.6.1 to system 9
Installed RAM: 32 MB or more (64 MB or more is recommended)
Monochrome image Colour image
VPhoto Printing 20MB 80MB
Note 1:
The figures in Table 2 are approximations of the total
disk space required when printing at VPhoto Colour
mode.
Note 2:
The working disk space needed during printing is
automatically erased after printing is completed.
Contents of the installation disk
The files shown below are contained on the Installation
Disc CD-ROM. The installer will install the following
files:
• Printer Driver
• ColorSync
• USB Class Driver
*1
System 8.1 ~ 8.5.1
*1
Installing the printer driver software
The CD-ROM includes the printer driver software. To
install the printer driver software onto your Macintosh,
follow these steps:
1. Insert the OKI DP-7000 installation Disc CD into
your CD-ROM drive.
2. Locate
it.
3. Open the ‘UK English’ folder, and then double-
click on the Install OKI DP-7000 icon to start
installation.
4. Follow the instructions on-screen to complete the
installation.
DP-7000 Printer Driver folder and open
30 User’s Guide
Page 39

Using balloon help
Balloon Help works on all versions of MacOS from 7.1
upwards. By displaying Balloon Help, you can get a
simple explanation of each function. Follow the steps
below to use Balloon Help.
1. Select Show Balloons from the Help menu
(found on the menu bar, at the upper right corner
of the screen).
2. Move the cursor over the button or box to be
explained.
3. To hide Balloon Help, select Hide Balloons from
the Help menu.
Selecting the correct driver
Before creating any documents in your application you
should select the DP-7000 printer driver which you
installed from the CD-ROM. If you want to print
documents created when this printer driver was not
selected, first select the DP-7000 printer in the
Chooser menu, then choose Page Setup from your
application’s File menu. Finally change the
application’s page format and other settings if needed.
Follow the steps below to select the correct printer
driver.
English
1. From the Apple menu, select the Chooser.
2. Click on the DP-7000 printer driver icon on the
left side of the screen. The box on the right
displays the SCSI device number of the printer.
Note:
Make sure the device number in the Select a SCSI port
box is highlighted. If it is not, your printer is not being
recognised. Click on the device number a few times. If
it is still not highlighted, it is possible that the
Finder
has insufficient memory. In this case, close the
Chooser, run any one of your application programs,
and select the printer from the Chooser again.
3. If you have several identical printers connected,
click on the SCSI device number of the printer
you will use. The factory device setting is #6. To
change SCSI device numbers, see ‘Specifications
and Settings’ in Chapter 7.
Note 1:
If you have more than one SCSI bus in your Macintosh,
“SCSI #6 BUS #1” or similar will be displayed.
Note 2:
Immediately following installation, background
printing is turned off. Click on the On button to enable
background printing. Background printing will not be
available if you did not install the Queue Kit software.
Chapter 3 - Installation and Operation, Macintosh 31
Page 40

4. Click on the Close box to close the Chooser.
3. Close the Page Setup box by clicking OK.
5. When the selected printer driver is changed from
a previous printer driver, a dialogue box will
appear to inform you that a different printer has
been selected. Click on the OK button to close the
dialogue box.
Testing the printer
To make sure the printer is functioning correctly, use
Print Desktop command in the Finder. Before
the
using Print Desktop check the following:
1. The printer is connected to the computer and is
turned on.
2. The system folder window is open (if not,
double-click the folder on the startup disk).
3. There is paper in the printer.
Page setup dialogue box
1. Select Page Setup from the File menu. The Page
Setup
dialogue box opens.
2. Make sure the paper type and size settings match
the paper loaded in the printer, (factory settings
are Press Paper-Matte, A4). If the paper type does
not match, select the appropriate settings.
Print dialogue box
1. Select Print Desktop from the File menu. The
Print dialog box opens.
2. Select required settings and click Print to begin
printing.
Print preview
You can preview your printed job by clicking the
Preview button in the Print dialogue box, the desktop
will appear on screen. To print the desktop, click Print
Page
. Printing begins.
When you finished printing, turn off your printing
devices in the following order;
1. Shut down (and, if needed) turn off your
computer.
2. Push the power button on the printer to turn it off.
32 User’s Guide
Page 41

USB Connection
English
System Requirements
The system and disk space requirements for the DP7000 printer driver are as follows:
Computer:
Operating System: System8.1 with iMac update 1.0 or later
Apple Macintosh computer or compatible with
USB port
Installing printer software
1. Open the OKI DP-7000 Printer Driver folder.
2. Open the ‘UK English’ folder, and then double-
click on the Install OKI DP-7000 icon.
3. Follow the instructions on-screen to complete the
installation.
Using the OKI USB printer
Make sure that the USB interface cable is properly
connected and your printer is turned on.
1. Select Chooser from the menu and click the DP-
7000
icon.
2. Go to Select a USB printer and select printer
required.
Note:
When more than one OKI printer is connected to the
USB port, each printer will be assigned a separate
USB port number (USB #1, USB #2, and so on).
3. You can use Background Printing. Select the On
button to enable Background Printing.
4. Close the Chooser. Click OK to confirm you have
changed your current printer.
5. Now you are ready for printing. Refer to your
User’s Guide on the OKI Installation Disc for the
printer driver settings.
Chapter 3 - Installation and Operation, Macintosh 33
Page 42

Printing operations
When you have connected the cables to your printer and
have installed the printer driver, you are ready to use
your printer. The following describes step by step
operations for monochrome and colour printing.
Printing in monochrome
The following paragraphs explain how to perform
monochrome printing on plain paper.
Requirements
You need the following items for monochrome
printing:
1. Ink cartridge
a Process Black ink cartridge.
2. Media
a High Grade Paper
b Press Paper
c VPhoto Film
3. Printing data
a Printing data consisting of text and/or
graphics created in your application.
Placing an ink cartridge in your printer
Make sure at least one black ink cartridge is installed in
the ink cartridge holders.
Caution:
Do not place an ink cartridge directly into the carriage.
Doing so may damage the printer.
Note 1:
If at least one of the ink cartridges in the five ink
cartridge holders can be used in the selected printing
mode, the carriage will automatically pick up that ink
cartridge.
Note 2:
Refer to ‘Installing Ink Cartridges in Chapter 2 for
directions on installing ink cartridges.
Note 3:
Installing multiple ink cartridges of the same colour
allows you to print more pages without stopping to
replace spent ink cartridges.
34 User’s Guide
Page 43

Load the paper into your printer, for reference see
Chapter 2, ‘Loading Paper.
English
7. After completing your changes, click Print to
start printing.
Setting up the printer driver for Monochrome printing
1. In the application you want to print from, select
Page Setup from the File menu to open the Page
Setup
dialogue box.
2. Make any necessary changes to the settings in the
Page Setup dialogue box.
3. Set the Media to High Grade Paper and the Size
to A4. When using a different type or size of
paper, change the setup accordingly.
4. Click OK to close the Page Setup dialogue box.
5. Select Print from the File menu.
6. Make any necessary changes to the settings in the
Print dialogue box.
a Select either Greyscale or Black & White
from the Type menu.
b When you install a black ink cartridge,
select Standard Colour from the Mode
menu.
Printing in colour
The following paragraphs describe how to print
standard colour images on plain paper.
Requirements
You need the following items for standard colour
printing:
1. Ink cartridges
a Process Black ink cartridge
b Process Cyan ink cartridge
c Process Magenta ink cartridge
d Process Yellow ink cartridge
2. Media
a High grade paper
b Press Paper
c VPhoto Film
3. Printing data
Chapter 3 - Installation and Operation, Macintosh 35
Page 44

a Printing data consisting of text and/or
graphics created in your application.
Placing ink cartridges in your printer
Make sure the ink cartridges listed above installed. The
ink cartridges may be installed in any order.
Caution:
Do not place an ink cartridge directly into the carriage.
Doing so may damage the printer.
Load the paper into your printer, for reference see
Chapter 2, ‘Loading Paper.
Setting up the printer driver for colour printing
1. Follow steps 1 to 4 in ‘Setting up the printer
driver for monochrome printing’.
2. In the Print dialogue box select either Automatic,
Photographs,
menu.
Note 1:
When you select Photographs from the Type menu,
Darker Black is automatically selected in the Colour
Matching
section of the Image Settings dialogue.
or Graphics & Text from the Type
Note 2:
If the Type menu is set to Greyscale or Black & White
the coloured image will be printed in monochrome or
in greyscale.
3. Click the Image button in the Print dialogue box.
4. Make colour matching selections as required. For
selection information see “Setting up colour
matching option”.
5. After the settings have been completed, click
6. When you have completed your settings, click
Print in the Print dialogue box. The printer prints
cyan, magenta, yellow, and black in that order as
the print head moves back and forth over the
paper.
Note 1:
If the four ink cartridges (cyan, magenta, yellow, and
black) are not installed, the error light will flash, and
the printer will not print.
Note 2:
See Chapter 2, ‘Initial Setup’, for information on
installing ink cartridges.
Setting up colour matching option
The printer has the following colour-matching options:
OK.
36 User’s Guide
Page 45

1. OKI DP-7000 Driver mode - This mode provides
unique OKI colour matching. It is the default
mode for colour printing.
2. ColorSync mode - When ColorSync is selected,
the printer performs colour management using
ColorSync™, which is part of the Macintosh
system software.
Note:
A printer cannot exactly reproduce the colours shown
on a monitor because the printer uses inks to create
colours while the monitor uses light. However, the
printer will try to match the monitor colours as closely
as possible.
3. No Colour Matching - The colour information for
print data is output directly to the printer.
To use ColorSync, follow these steps.
English
colour temperature of D50 (5000K) as a reference for
colour reproduction based on the human colour sense
under a standard light source. The ColorSync™ profile
of this printer conforms to this standard.
3. Set the Monitor’s Colour Temperature. Since the
ColorSync profile is set to DP-7000 Monitor-D50,
the printer and monitor colours will not match
unless the colour temperature of your monitor is
set at D50. To set the monitor’s colour
temperature see your computer’s reference
manual for details.
Note 1:
Some monitors do not allow the colour temperature to
be changed. In this case, open Monitor & Sound in
Control Panels and set the Gamma option to Page-
White Gamma,
which provides a colour temperature
similar to D50.
1. Open the ColorSync™ System Profile in the
Apple Control Panels and click Set Profile...
2. Select DP-7000 Monitor-D50 from the list
displayed, and then click Select.
Note:
The D50 in the profile indicates the colour temperature
of the monitor. Most monitors are set to a colour
temperature of D93 (9300K). However, CIE sets a
Chapter 3 - Installation and Operation, Macintosh 37
Note 2:
Once you have completed steps 1 through 3, you
should not need to repeat them unless you wish to
change the settings.
4. Prepare print data and set up the paper for
printing. Select Print from the File menu.
Note:
The contents of the Print dialogue box depend on the
Page 46

application software. If the colour setting options
RGB, CMYK, or others are available in the dialogue
box, select the RGB option. If you select the CMY
option, the printed output will differ from the colours
displayed on the monitor.
5. To enable the ColorSync function during
printing. Click the Image.. button in the Print
dialogue box to display the Colours dialogue box.
Select ColorSync from the Colour Matching
options. After the settings have been completed,
click OK.
Note:
When printing a photograph, it is advisable to turn on
the Darker Black option. The darkness graduation will
then be smoothed because black will be expressed by
all four colours .
6. After returning to the Print dialogue box, click
Print to start printing.
Printing on reverse side
The DP-7000 printer has a special option for printing on
the reverse side of paper. The Print On Reverse option
skips the paper curl reforming process for best printing
results.
Setting up the printer driver for printing on reverse side
1. In the application you want to print with, select
Page Setup from the File menu to open the Page
Setup dialogue box.
2. Make any necessary changes to the settings in the
Page Setup dialogue box.
3. Set the Media to High Grade Paper, and the Size
to A4. When using a different type or size of
paper, change the setup accordingly.
4. After making any changes required, click OK to
close the Page Setup dialogue box.
5. Select Print from the File menu to display the
Print dialogue box.
6. Select either Automatic, Photographs or
Graphics & Text from the Type: menu.
Note 1:
When you select Photographs or Graphics & Text from
the Type menu, Darker Black is automatically selected
in the Colour Matching section of the Image... settings
dialogue.
Note 2:
If the Type menu is set to Greyscale or Black & White
38 User’s Guide
Page 47

the coloured image will be printed in monochrome or
in greyscale.
7. Click Image... in the Print dialogue box.
8. Make colour matching selections as required.
After the settings have been completed, click OK.
9. In the Print dialogue box select Print On Reverse
option.
Caution:
When printing on the reverse side of paper, the printer
needs periodic maintenance for cleaning to ensure best
results. See ‘Cleaning the Feed Roller’ and ‘Cleaning the
Platen’ in Chapter 4
Note:
When you select certain media types this option will
not be available.
10. Click Print in the Print dialogue box to start
printing.
English
Chapter 3 - Installation and Operation, Macintosh 39
Page 48

40 User’s Guide
Page 49

Chapter 4 - Specialised Printing Operations
VPhoto colour printing
English
Colour printing on Press Paper and
VPhoto film
The following describes how to print colour images on
VPhoto print media. Photographic-like quality can be
achieved by printing images on VPhoto print media
with standard inks. This is very effective when printing
multicolored images such as computer graphics.
b Process Magenta ink cartridge
c Process Yellow ink cartridge
d Process Black ink cartridge
e Finish II ink cartridge (This is an optional
cartridge that you can use for your printing.)
Prepare the image to be printed
Requirements
You need the following items for colour printing on
VPhoto print film.
1. Media
a Press Paper-Matte, Press Paper-Art or
VPhoto film
2. Ink Cartridges
a Process Cyan ink cartridge
Chapter 4 - Specialised Printing Operations 41
Create the image or document you want to print by
arranging text, graphic objects, photographs, etc. in
your application.
Install ink cartridges
Install the five ink cartridges listed above into the ink
cartridge holders. The ink cartridges may be installed in
any order. For details on installation refer to ‘Installing
Ink Cartridges’ in Chapter 2.
Page 50

Load VPhoto film in your printer
You may use either automatic feed mode (position ‘A’)
or manual feed mode (position ‘M’) when loading the
film into your printer.
Note:
VPhoto Film is very adhesive. When loading the
multiple sheets, fan them thoroughly before loading to
make sure that they do not adhere to one another. Store
unused sheets in the package. For best results, use
single sheet and manual feed.
Setting up the printer driver for printing
1. In the application you want to print from, select
Page Setup from the File menu to open the Page
Setup
dialogue box.
2. Make any necessary changes to the settings in the
Page Setup dialogue box
3. Set the Media to Press Paper-Matte/Art or
VPhoto Film and the Size to match the paper
loaded in the printer. When using a different type
or size of paper, change the setup accordingly.
5. In the Print dialogue box select Automatic,
Photographs, Graphics & Text , or Grayscale
from the Type menu.
6. Click the Image button in the Print dialogue box.
7. Make colour matching selections as required. For
selection information see “Setting up colour
matching option”.
8. If you want obtain glossy finish, check the
Glossy Finish check box.
9. After the settings have been completed, click OK.
10. When you have completed your settings, click
Print in the Print dialogue box to start printing.
Note:
We recommend that Glossy Finish is not normally set.
If you do not want this setting, click the More Settings
button, then check the Glossy Finish check box.
11. Click Print in the Print dialog box to start
printing.
4. Click OK to close the Page Setup dialogue box.
42 User’s Guide
Page 51

Colour printing on High Grade Paper
English
The following describes how to print colour images on
High Grade Paper.
Requirement
You need the following items for colour printing on
High Grade Paper.
1. Media
a High Grade Paper
2. Ink Cartridges
a Process Cyan ink cartridge
b Process Magenta ink cartridge
c Process Yellow ink cartridge
d Process Black ink cartridge
e Finish II ink cartridge (This is an optional
cartridge that you can use for your printing.)
Prepare the image to be printed
Create the image or document you want to print by
arranging text, graphic objects, photographs, etc. in
your application.
Install ink cartridges
Install the ink cartridges listed above into the ink
cartridge holders. The ink cartridges may be installed in
any order. For details on installation refer to ‘Installing
Ink Cartridges’ in Chapter 2.
Load the paper in your printer
You may use either automatic feed mode (position “A”)
or manual feed mode (position “M”) when loading the
film into your printer.
Setting up the printer driver for printing
1. In the application you want to print from, select
Page Setup from the File menu to open the Page
Setup
dialogue box.
Chapter 4 - Specialised Printing Operations 43
Page 52

2. Make any necessary changes to the settings in the
Page Setup dialogue box
3. Set the Media to High Grade Paper and the Size
to match the paper loaded in the printer. When
using a different type or size of paper, change the
setup accordingly.
4. Click OK to close the Page Setup dialogue box.
5. In the Print dialogue box select Automatic,
Photographs, Graphics & Text , or Grayscale
from the Type menu.
6. Click the Image button in the Print dialogue box.
7. Make colour matching selections as required. For
selection information see “Setting up colour
matching option”.
8. After the settings have been completed, click OK.
9. When you have completed your settings, click
Print in the Print dialogue box to start printing.
Note 1:
If you do not want this setting, click the More Settings
button, then check the Glossy Finish check box.
12. Click Print in the Print dialog box to start
printing.
10. Make any other necessary changes to the settings.
11. When you complete the setup, click OK to close
the dialog box.
44 User’s Guide
Page 53

Printing in Metallic Colour
English
Metallic colour printing is one of the unique features of
the OKI DP-7000 printer. The printer driver allows you
to select specific colours or colour components that will
be replaced by foil colours and black ink when printing.
You can print with up to one metallic colour, (or four
metallic colours plus black) from most applications that
allow colour specification. Moreover, because metallic
inks are opaque, metallic colour printing is unaffected
by the colour of the underlying paper.
Note 1:
Depending on the font type, size or paper type, metallic
colour ink may not always be well applied.
The following types of metallic colour printing are
possible depending on the number of ink cartridges
used.
• Single metallic colour printing Metallic colour
printing using a single colour (Magenta, Cyan,
gold or silver).
• Multi metallic colour printing - Metallic colour
printing using four colours (Magenta, Cyan, gold
and silver).
• Full colour plus metallic colour printing Simultaneous full colour and metallic colour
printing.
Single metallic colour printing
Single metallic colour printing uses just one metallic
colour. Only the metallic colour to be used is installed
in the printer. This method of printing is used when an
entire image (including grayscale images) or document
is going to be printed in a single metallic colour. Single
metallic colour printing can be used even when the
application you are using does not allow designation of
colour components.
Requirements
For single metallic colour printing you will need the
following.
1. Media
a Press Paper, High Grade Paper, etc. can be
used as with normal colour printing.
2. Ink cartridges
Chapter 4 - Specialised Printing Operations 45
Page 54

Use either one of the following ink cartridges.
a Metallic Magenta ink cartridge
b Metallic Cyan ink cartridge
c Metallic Gold ink cartridge
d Metallic Silver ink cartridge
Prepare the image to be printed
Use any application to create the image or document
you want to print, and prepare it as you would for
normal printing.
Note:
It is not necessary to select a colour in the application
that matches the colour of the ink cartridge in the
printer. Leaving the characters and images in black is
acceptable.
Install ink cartridges
Install the desired metallic colour (Magenta, Cyan, gold
or silver) into the ink cartridge holders. The ink
cartridges may be installed in any order.
Load the paper in your printer
The method used for loading paper depends on the
paper type. Use manual feed mode for cardboard (thick
paper) and greeting cards. For Press Paper or High
Grade Paper, you may also use automatic feed mode.
Setting up the printer driver for printing
1. In the application you want to print from, select
Page Setup from the File menu to open the Page
Setup
dialogue box.
2. Make any necessary changes to the settings in the
Page Setup dialogue box
3. Set the Media to Press Paper-Matte/Art, High
Grade Paper
Grade Paper
loaded in the printer. When using a different type
or size of paper, change the setup accordingly.
4. Click OK to close the Page Setup dialogue box.
5. In the Print dialogue box click the Use Spot
Colours
6. In the Spot Colours Setting dialogue box click
the Use Spot Colour(s) radio button.
, or Cardboard (Thick Paper) High
and the Size to match the paper
check box.
46 User’s Guide
Page 55

7. Select Single Ink (No Halftone) or Single Ink
(Halftone)
8. After the settings have been completed, click OK.
from the Print Using pop-up menu.
English
metallic colours or four metallic colours plus black.
You can use this method with most applications that
support colour.
9. In the Print dialogue box click OK.
10. In Select Ink Cartridge(s) enabled ink cartridges
among those installed in the printer are displayed.
Click the radio button(s) of the ink cartridge(s) to
be used.
11. When the correct ink cartridge is selected, click
OK to start printing.
Note:
If bidirectional communication is not possible, all the
usable ink cartridges are displayed.
12. When you complete the setup, click OK to close
the dialog box.
13. Click Print in the Print dialog box to start
printing.
Multi metallic colour printings
Use the steps outlined below for foil colour printing
using four metallic colour ink cartridges. By
associating each foil colour with a colour (or colour
component) in your application, you can print with four
Requirements
The media and ink cartridge requirements for multi
metallic colour printing are the same as in the single
metallic colour printing.
Prepare the image to be printed
Use any application to create the image or document
you want to print. Then set the colours corresponding to
each metallic colour you want to use. For example, set
the parts of the image that you want to print in gold foil
to yellow and those of the image that you want to print
in silver foil to grey. When you want to print metallic
colours and black simultaneously, you must also
specify the area you want to print in black.
Note 1:
Since all of the colour and grayscale data is binarized
in multi colour printing, gradation cannot be
represented.
Note 2:
White portions of data (R=G=B=100%) are not
printed.
Chapter 4 - Specialised Printing Operations 47
Page 56

In multi metallic colour printing, indicate metallic
colours by selecting colours in the application that most
closely resemble the metallic colours. Try to select
colours that resemble the colours listed in the tables
below. In applications that do not have many colour
choices, such as word processors, closely related
colours can be used.
Metallic Colour
Metallic Gold Yellow (or yellow/orange)
Metallic Silver Grey
Metallic Magenta Magenta, Red (a red close to magenta)
Metallic Cyan Cyan, Blue (a blue close to cyan)
Black (normal) Normal black (R=G=B=0 or C=M=Y=0, K=100)
Application colour used to indicate the metallic
colour
• Colour compositions using RGB settings (n/255)
Metallic Colour R G B
Metallic Gold 225 160 0
Metallic Silver 189 193 197
Metallic Magenta 163 36 115
Metallic Cyan 0 176 201
• Colour compositions using RGB settings (n/
100%)
Metallic Colour R G B
Metallic Gold 88 63 0
Metallic Silver 74 76 77
Metallic Colour R G B
Metallic Magenta 64 14 45
Metallic Cyan 0 69 79
Note:
For instructions on changing colour component
settings within an application, refer to your software
application User manual. Depending on the
application, a metallic colour may not print correctly
even though the colour settings were properly set in the
application. Check the Preview window before
printing, and try increasing or decreasing the setting to
get the correct foil colour to print.
Install ink cartridges
Install the gold and silver foil colour ink cartridges. The
ink cartridges can be installed in any order.
Load the paper in your printer
Use manual feed mode for cardboard (thick paper). For
Press Paper or High Grade Paper, you can use
automatic feed mode.
48 User’s Guide
Page 57

Setting up the printer driver for printing
1. In the application you want to print from, select
Page Setup from the File menu to open the Page
Setup
dialogue box.
2. Make any necessary changes to the settings in the
Page Setup dialogue box
3. Set the Media to Press Paper-Matte/Art, High
Grade Paper
Grade Paper
loaded in the printer. When using a different type
or size of paper, change the setup accordingly.
4. Click OK to close the Page Setup dialogue box.
5. In the Print dialogue box click the Use Spot
Colours
6. In the Spot Colours Setting dialogue box click
the Use Spot Colour(s) radio button.
, or Cardboard (Thick Paper) High
and the Size to match the paper
check box.
English
Click the radio button(s) of the ink cartridge(s) to
be used.
11. When the correct ink cartridge is selected, click
OK to start printing.
Note 1:
If bidirectional communication is not possible, all the
usable cartridges are displayed.
Note 2:
Even though you have set the colour of an area to a
desired colour in your application, the area will not be
printed if the corresponding ink cartridge has not
selected.
12. When you complete the setup, click OK to close
the dialog box.
13. Click Print in the Print dialog box to start
printing.
7. Select Multiple Inks from the Print Using pop-up
menu.
8. After the settings have been completed, click OK.
9. In the Print dialogue box click OK.
10. In Select Ink Cartridge(s) enabled ink cartridges
among those installed in the printer are displayed.
Chapter 4 - Specialised Printing Operations 49
Simultaneous full colour and metallic colour printing
The following paragraphs describe how to print full
colour and metallic colour simultaneously . This
printing method differentiates between metallic colour
and full colour areas depending on their colour
component. For this reason, it is necessary to assign the
Page 58

correct colour to each area. This printing method is
used with applications that allow the user to accurately
specify colour components.
Requirements
For simultaneous full colour and metallic colour
printing you will need the following.
i Finish II ink cartridge
Note:
Only a maximum of nine ink cartridges can be
installed in the printer at any one time. Cyan,
Magenta, Yellow and Black cartridges must always be
installed. The Foil and Finish II cartridges are
optional.
1. Media
a Press Paper or High Grade Paper, etc. can be
used as with normal colour printing.
2. Ink cartridges
The following ink cartridges can be used for
simultaneous full colour and foil colour printing.
a Metallic Magenta ink cartridge
b Metallic Cyan ink cartridge
c Metallic Gold ink cartridge
d Metallic Silver ink cartridge
e Process Cyan ink cartridge
f Process Magenta ink cartridge
g Process Yellow ink cartridge
h Process Black ink cartridge
50 User’s Guide
Prepare the image to be printed
Create the data you want to print, then set the image
areas to be printed in metallic colours to colours that
correspond to the metallic colours you want to use. For
the colours (and colour components) that correspond to
each metallic colour, refer to the table below.
Note:
There are a small range of colour component values
that will be interpreted by the printer as indicating
metallic colours. Because of this, photographs and
other data with many different colours may have areas
that match the metallic colour designations and print
only partially in foil colour. When printing images that
contain data such as photographs, it is best to print full
colour plus metallic colour using Overlay mode
In simultaneous full colour plus metallic colour
printing, indicate the Red, Blue, gold and silver metallic
Page 59

colours by selecting the corresponding colour
component. For characters of 32 points or more, select
the following approximate colours.
Metallic Colour
Metallic Gold Yellow (or yellow/orange)
Metallic Silver Grey
Metallic Magenta Magenta, Red (a red close to magenta)
Metallic Cyan Cyan, Blue (a blue close to cyan)
Black (normal) Normal black (R=G=B=0 or C=M=Y=0, K=100)
Application colour used to indicate the metallic
colour
• Colour compositions using RGB settings (n/255)
Metallic Colour R G B
Metallic Gold 225 160 0
Metallic Silver 189 193 197
Metallic Magenta 163 36 115
Metallic Cyan 0 176 201
• Colour compositions using RGB settings (n/
100%)
Metallic Colour R G B
Metallic Gold 88 63 0
Metallic Silver 74 76 77
Metallic Magenta 64 14 45
Metallic Cyan 0 69 79
English
Note 1:
Some applications make internal adjustment to
produce the displayed colour components. In such
cases, the colour components cannot be restricted and
therefore metallic colours cannot be used. When using
such an application, use the Overlay mode.
Note 2:
There are a small range of colour component values
which are close to a metallic colour. These colours will
be interpreted by the printer as indicating metallic
colours and will be printed in the respective metallic
colour.
Install ink cartridges
Install all the ink cartridges specified in Requirements
into the ink cartridge holders. Simultaneous full colour
plus metallic colour printing is possible by exchanging
ink cartridges when the corresponding message is
displayed.
Load the paper in your printer
The method used for loading paper depends on the
paper type used.
Chapter 4 - Specialised Printing Operations 51
Page 60

Setting up the printer driver for printing
1. In the application you want to print from, select
Page Setup from the File menu to open the Page
Setup
dialogue box.
2. Make any necessary changes to the settings in the
Page Setup dialogue box
3. Set the Media to Press Paper-Matte/Art, High
Grade Paper
Grade Paper
loaded in the printer. When using a different type
or size of paper, change the setup accordingly.
4. Click OK to close the Page Setup dialogue box.
5. In the Print dialogue box click the Use Spot
Colours
6. In the Spot Colours Setting dialogue box click
the Use Spot Colour(s) radio button.
7. Select Metallics & CMYK Inks from the Print
Using
8. After the settings have been completed, click OK.
9. In the Print dialogue box click OK.
, or Cardboard (Thick Paper) High
and the Size to match the paper
check box.
pop-up menu.
Click the radio button(s) of the ink cartridge(s) to
be used.
11. When the correct ink cartridge is selected, click
OK to start printing.
Note 1:
Even though you have set the colour of an area to your
desired colour in your application, the area will not be
printed if the corresponding ink cartridge has not been
selected.
Note 2:
If a selected foil colour ink cartridge is not installed, a
warning message will be displayed. In this case,
exchange ink cartridges as indicated in the message.
12. When you complete the setup, click
OK to close
the dialog box.
13. Click Print in the Print dialog box to start
printing.
10. In Select Ink Cartridge(s) enabled ink cartridges
among those installed in the printer are displayed.
52 User’s Guide
Page 61

Printing in foil colour
English
Foil colour printing is one of the unique features of the
OKI DP-7000 printer. The printer driver allows you to
select specific colours or colour components that will
be replaced by foil colours and black ink when printing.
You can print with up to two foil colours, (or two foil
colours plus black) from most applications that allow
colour specification. Moreover, because foil inks are
opaque, foil colour printing is unaffected by the colour
of the underlying paper.
Note 1:
Black Spot ink is used for foil colour printing.
Therefore, undercoat must be applied using Black Spot
ink before printing foil colour.
Note 2:
Depending on the font type, size or paper type, foil
colour ink may not always be well applied.
The following types of foil colour printing are possible
depending on the number of ink cartridges used.
• Single foil colour printing (without halftone) Foil colour printing using a single colour (gold or
silver).
• Multi foil colour printing - Foil colour printing
using two colours (gold and silver).
• Full colour plus foil colour printing Simultaneous full colour and foil colour printing.
Single foil colour printing
Single foil colour printing uses just one foil colour.
Only the foil colour to be used is installed in the printer.
This method of printing is used when an entire image
(including grayscale images) or document is going to
be printed in a single foil colour. Single foil colour
printing can be used even when the application you are
using does not allow designation of colour components.
Chapter 4 - Specialised Printing Operations 53
Page 62

Requirements
For single foil colour printing you will need the
following.
1. Media
a Press Paper, High Grade Paper, etc. can be
used as with normal colour printing.
2. Ink cartridges
printer. Leaving the characters and images in black is
acceptable.
Install ink cartridges
Install the desired foil colour (gold or silver) plus the
undercoat inks, cyan, magenta, yellow, and black into
the ink cartridge holders. The ink cartridges may be
installed in any order.
Use either one of the following ink cartridges.
a Gold Foil ink cartridge
b Silver Foil ink cartridge
The following ink cartridges are also necessary
for undercoating.
a Black Spot ink cartridge
Prepare the image to be printed
Use any application to create the image or document
you want to print, and prepare it as you would for
normal printing.
Note:
It is not necessary to select a colour in the application
that matches the colour of the ink cartridge in the
54 User’s Guide
Load the paper in your printer
The method used for loading paper depends on the
paper type. Use manual feed mode for cardboard (thick
paper) and greeting cards. For Press Paper or High
Grade Paper, you may also use automatic feed mode.
Setting up the printer driver for printing
1. In the application you want to print from, select
Page Setup from the File menu to open the Page
Setup
dialogue box.
2. Make any necessary changes to the settings in the
Page Setup dialogue box
3. Set the Media to Press Paper-Matte/Art, High
Grade Paper
the Size to match the paper loaded in the printer.
, or Cardboard(Thick Paper) and
Page 63

When using a different type or size of paper,
change the setup accordingly.
English
13. Click Print in the Print dialog box to start
printing.
4. Click OK to close the Page Setup dialogue box.
5. In the Print dialogue box click the Use Spot
Colours
6. In the Spot Colours Setting dialogue box click
the Use Foil Colour(s) radio button.
7. Select Single Ink (No Halftone) from the Print
Using
8. After the settings have been completed, click OK.
9. In the Print dialogue box click Ok.
10. In Select Ink Cartridge(s) enabled ink cartridges
among those installed in the printer are displayed.
Click the radio button(s) of the ink cartridge(s) to
be used.
11. When the correct ink cartridge is selected, click
OK to start printing.
Note:
If bidirectional communication is not possible, all the
usable ink cartridges are displayed.
12. When you complete the setup, click OK to close
the dialog box.
check box.
pop-up menu.
Multi foil colour printings
Use the steps outlined below for foil colour printing
using two foil colour ink cartridges. By associating
each foil colour with a colour (or colour component) in
your application, you can print with two foil colours or
two foil colours plus black. You can use this method
with most applications that support colour.
Requirements
The media and ink cartridge requirements for multi foil
colour printing are the same as in the single foil colour
printing. The only difference being that both gold and
silver foil ink cartridges must be used.
Prepare the image to be printed
Use any application to create the image or document
you want to print. Then set the colours corresponding to
each foil colour you want to use. For example, set the
parts of the image that you want to print in gold foil to
yellow and those of the image that you want to print in
silver foil to grey. When you want to print foil colours
and black simultaneously, you must also specify the
area you want to print in black.
Chapter 4 - Specialised Printing Operations 55
Page 64

Note 1:
Since all of the colour and grayscale data is binarized
in multi colour printing, gradation cannot be
represented.
Note 2:
White portions of data (R=G=B=100%) are not
printed.
In multi foil colour printing, indicate foil colours by
selecting colours in the application that most closely
resemble the foil colours. Try to select colours that
resemble the colours listed in the tables below. In
applications that do not have many colour choices, such
as word processors, closely related colours can be used.
Foil Colour
Gold Foil Yellow (or yellow/orange)
Silver Foil Grey
Black (normal) Normal black (R=G=B=0 or C=M=Y=0, K=100)
Application colour used to indicate the foil
colour
• Colour compositions using RGB settings (n/255)
Foil Colour R G B
Gold Foil 225 160 0
Silver Foil 189 193 197
• Colour compositions using RGB settings (n/
100%)
Foil Colour R G B
Gold Foil 88 63 0
Silver Foil 74 76 77
Note:
For instructions on changing colour component
settings within an application, refer to your software
application User manual. Depending on the
application, a foil colour may not print correctly even
though the colour settings were properly set in the
application. Check the Preview window before
printing, and try increasing or decreasing the setting to
get the correct foil colour to print.
Install ink cartridges
Install the gold and silver foil colour ink cartridges plus
the undercoat ink cartridges listed in Requirements.
The ink cartridges can be installed in any order.
Load the paper in your printer
Use manual feed mode for cardboard (thick paper). For
Press Paper or High Grade Paper, you can use
automatic feed mode.
56 User’s Guide
Page 65

Setting up the printer driver for printing
1. In the application you want to print from, select
Page Setup from the File menu to open the Page
Setup
dialogue box.
2. Make any necessary changes to the settings in the
Page Setup dialogue box
3. Set the Media to Press Paper-Matte/Art, High
Grade Paper
Grade Paper
loaded in the printer. When using a different type
or size of paper, change the setup accordingly.
4. Click OK to close the Page Setup dialogue box.
5. In the Print dialogue box click the Use Spot
Colours
6. In the Spot Colours Setting dialogue box click
the Use Foil Colour(s) radio button.
, or Cardboard (Thick Paper) High
and the Size to match the paper
check box.
English
Click the radio button(s) of the ink cartridge(s) to
be used.
11. When the correct ink cartridge is selected, click
OK to start printing.
Note 1:
If bidirectional communication is not possible, all the
usable cartridges are displayed.
Note 2:
Even though you have set the colour of an area to a
desired colour in your application, the area will not be
printed if the corresponding ink cartridge has not
selected.
12. When you complete the setup, click OK to close
the dialog box.
13. Click Print in the Print dialog box to start
printing.
7. Select Multiple Inks from the Print Using pop-up
menu.
8. After the settings have been completed, click OK.
9. In the Print dialogue box click OK.
10. In Select Ink Cartridge(s) enabled ink cartridges
among those installed in the printer are displayed.
Chapter 4 - Specialised Printing Operations 57
Simultaneous full colour and foil colour printing
The following paragraphs describe how to print full
colour and foil colour simultaneously . This printing
method differentiates between foil colour and full
colour areas depending on their colour component. For
this reason, it is necessary to assign the correct colour
Page 66

to each area. This printing method is used with
applications that allow the user to accurately specify
colour components.
Requirements
For simultaneous full colour and foil colour printing
you will need the following.
1. Media
a Press Paper or High Grade Paper, etc. can be
used as with normal colour printing.
2. Ink cartridges
The following ink cartridges can be used for
simultaneous full colour and foil colour printing.
a Gold Foil ink cartridge
b Silver Foil ink cartridge
c Process Cyan ink cartridge
d Process Magenta ink cartridge
e Process Yellow ink cartridge
f Process Black ink cartridge
g Finish II ink cartridge
Note:
Only a maximum of nine ink cartridges can be
installed in the printer at any one time. Cyan,
Magenta, Yellow and Black cartridges must always be
installed. The Foil and Finish II cartridges are
optional.
Prepare the image to be printed
Create the data you want to print, then set the image
areas to be printed in foil colours to colours that
correspond to the foil colours you want to use. For the
colours (and colour components) that correspond to
each foil colour, refer to the tables on page 5-12.
Note:
There are a small range of colour component values
that will be interpreted by the printer as indicating foil
colours. Because of this, photographs and other data
with many different colours may have areas that match
the foil colour designations and print only partially in
foil colour. When printing images that contain data
such as photographs, it is best to print full colour plus
foil colour using Overlay mode
In simultaneous full colour plus foil colour printing,
indicate the gold and silver foil colours by selecting the
corresponding colour component. For characters of 32
58 User’s Guide
Page 67

points or more, select the following approximate
colours.
Foil Colour
Gold Foil Yellow (or yellow/orange)
Silver Foil Grey
Application colour used to indicate the foil
colour
• Colour compositions using RGB settings (n/255)
Foil Colour R G B
Gold Foil 225 160 0
Silver Foil 189 193 197
• Colour compositions using RGB settings (n/
100%)
Foil Colour R G B
Gold Foil 88 63 0
Silver Foil 74 76 77
Note 1:
Some applications make internal adjustment to
produce the displayed colour components. In such
cases, the colour components cannot be restricted and
therefore foil colours cannot be used. When using such
an application, use the Overlay mode.
Note 2:
There are a small range of colour component values
which are close to a foil colour. These colours will be
interpreted by the printer as indicating foil colours and
will be printed in the respective foil colour.
Install ink cartridges
Install all the ink cartridges specified in Requirements
into the ink cartridge holders. Simultaneous full colour
plus foil colour printing is possible by exchanging ink
cartridges when the corresponding message is
displayed.
Load the paper in your printer
The method used for loading paper depends on the
paper type used.
Setting up the printer driver for printing
1. In the application you want to print from, select
Page Setup from the File menu to open the Page
Setup
dialogue box.
2. Make any necessary changes to the settings in the
Page Setup dialogue box
3. Set the Media to Press Paper-Matte/Art, High
Grade Paper
Grade Paper
loaded in the printer. When using a different type
or size of paper, change the setup accordingly.
, or Cardboard (Thick Paper) High
and the Size to match the paper
English
Chapter 4 - Specialised Printing Operations 59
Page 68

4. Click OK to close the Page Setup dialogue box.
5. In the Print dialogue box click the Use Spot
Colours
check box.
6. In the Spot Colours Setting dialogue box click
the Use Foil Colour(s) radio button.
7. Select Metallics & CMYK Inks from the Print
Using
pop-up menu.
8. After the settings have been completed, click OK.
9. In the Print dialogue box click OK.
10. In Select Ink Cartridge(s) enabled ink cartridges
among those installed in the printer are displayed.
Click the radio button(s) of the ink cartridge(s) to
be used.
11. When the correct ink cartridge is selected, click
OK to start printing.
Note 1:
Even though you have set the colour of an area to your
desired colour in your application, the area will not be
printed if the corresponding ink cartridge has not been
selected.
warning message will be displayed. In this case,
exchange ink cartridges as indicated in the message.
12. When you complete the setup, click OK to close
the dialog box.
13. Click Print in the Print dialog box to start
printing.
Note 2:
If a selected foil colour ink cartridge is not installed, a
60 User’s Guide
Page 69

Printing on transparencies or transfer film
English
The following paragraphs describe how to print full
colour graphic images and text on transparencies.
The OKI transparency film has an additional benefit in
that it shrinks when heat is applied - ideal for creative
package design. Transfer film may be used when a print
is required on a material that will not pass through the
printer either because it is too big or too thick. An iron
is used to transfer the image.
Requirements
For printing on transparencies or transfer film, you will
need the following.
1. Media
a DP-7000 Transfer film and Transparency
Film.
2. Ink cartridges
The following ink cartridges can be used.
a Process Cyan ink cartridge
b Process Magenta ink cartridge
c Process Yellow ink cartridge
d Process Black ink cartridge
3. Others
a Dryer For Transparency films
b Iron For Transfer films
c Transcription papers For Transfer films
Caution:
When printing on transparencies, use only OKI DP-7000
transparency film. Using other transparency films may
cause damage to the printer.
Prepare the image to be printed
Create the text and graphics to be printed in your
application. Take care to lay them out within the
printing area of the transparency film or transfer film.
Install ink cartridges
Install the ink cartridges listed above into the ink
cartridge holders. The ink cartridges may be installed in
any order.
Chapter 4 - Specialised Printing Operations 61
Page 70

Load the transparency film or transfer
film
1. Fan the sheets before loading them into the
printer to ensure they do not stick together.
2. Load the sheets into the manual feed slot in the
correct orientation. The cut corner at the end of
the sheet should be first located into the left side
of the printer (when viewed from the front).
3. To prevent jams remove the sheets immediately
after printing.
Setting up the printer driver for printing
1. In the application you want to print from, select
Page Setup from the File menu to open the Page
Setup
dialogue box.
2. Make any necessary changes to the settings in the
Page Setup dialogue box
4. Click OK to close the Page Setup dialogue box.
5. In the Print dialogue box select Automatic,
Photographs, or Graphics & Text from the Type
menu.
6. Click the Image button in the Print dialogue box.
7. Make colour matching selections as required. For
selection information see “Setting up colour
matching option”.
8. After the settings have been completed, click OK.
9. When you have completed your settings, click
Print in the Print dialogue box to start printing.
Note 1:
Shrinking transparency film
When printing is complete, use a heater/hairdryer to
shrink the film.
Please read the detailed explanation in the notes that
come with the transparency film.
3. Set the Media to Transparency Film or Transfer
Film
and the Size to match the paper loaded in
the printer. When using a different type or size of
paper, change the setup accordingly.
Note:
Note 2 :
Using the transfer film
When printing is complete use an iron to transter the
image to the media. For additional information please
read the instructions that come with the transfer film.
When Transparency Film is selected from Media pop-
up Menu, A3+ is automatically set.
62 User’s Guide
Page 71

English
Printing on transparencies with opaque white ink or transfer film
The following paragraphs describe how to print full
colour graphic images and text on transparencies.
After graphic images and text are printed in full-colour
on transparency film or transfer film, an opaque white
layer is printed on the back of the image. This means
that the image print-out is unaffected by the colour of
the background material.
Requirements
For printing on transparencies or transfer film, you will
need the following.
1. Media
a DP-7000 Transfer film and Transparency
Film.
2. Ink cartridges
The following ink cartridges can be used.
a Process Cyan ink cartridge
b Process Magenta ink cartridge
c Process Yellow ink cartridge
d Process Black ink cartridge
e Opaque White ink cartridge
3. Others
a Dryer For Transparency films
b Iron For Transfer films
c Transcription papers For Transfer films
Caution:
When printing on transparencies, use only OKI DP-7000
transparency film. Using other transparency films may
cause damage to the printer.
Prepare the image to be printed
Create the text and graphics to be printed in your
application. Take care to lay them out within the
printing area of the transparency film or transfer film.
Install ink cartridges
Install the ink cartridges listed above into the ink cartridge
holders. The ink cartridges may be installed in any order.
Chapter 4 - Specialised Printing Operations 63
Page 72

Load the transparency film or transfer
film
1. Fan the sheets before loading them into the
printer to ensure they do not stick together.
2. Load the sheets into the manual feed slot in the
correct orientation. The cut corner at the end of
the sheet should be first located into the left side
of the printer (when viewed from the front).
3. To prevent jams remove the sheets immediately
after printing.
4. Click OK to close the Page Setup dialogue box.
5. In the Print dialogue box select Automatic,
Photographs, or Graphics & Text from the Type
menu.
6. Click the Image button in the Print dialogue box.
7. Make colour matching selections as required. For
selection information see “Setting up colour
matching option”.
8. If you want overprint a coat of opaque white,
check the Opaque White(overprint) check box.
Setting up the printer driver for printing
1. In the application you want to print from, select
Page Setup from the File menu to open the Page
Setup
dialogue box.
2. Make any necessary changes to the settings in the
Page Setup dialogue box
3. Set the Media to Transparency Film or Transfer
Film
and the Size to match the paper loaded in
the printer. When using a different type or size of
9. After the settings have been completed, click OK.
10. When you have completed your settings, click
Print in the Print dialogue box to start printing.
Caution
When Automatic is selected, opaque white printing is only
applied to the picture data area, it is not applied to the text
area.
If you wish to apply opaque white printing to the text area,
you will need to set the printing area in Manual Preview.
paper, change the setup accordingly.
Note:
When Transparency Film is selected from Media pop-
up Menu, A3+ is automatically set.
64 User’s Guide
Page 73

Setting up the film support
English
Occasionally electrostatic build-up may cause sheets of
transparency film to stick to each other. To prevent this
happening, assemble the film support and install it in
the output paper tray. To set up the film support:
1. Push up the Supporting parts (1) from the
basecard.
2. Fold out the joint parts (2).
2
1
3. Attach together as shown (3).
3
Chapter 4 - Specialised Printing Operations 65
Page 74

4. Place the film support (4) on the output paper tray
so that it supports transparencies that are fed out
from the paper output slot.
4
5. When the transparencies are printing they will
ride over the top of the support, preventing them
from sticking to any completed transparencies
lying below.
66 User’s Guide
Page 75

RGB Printing
English
RGB printing ink cartridges are for two-colour printing.
It is possible to check a print such as a flyer in 2 colours.
Note:
You cannot carry out full colour or spot colour
printing, but only monochrome or multicolour printing.
Requirements
For RGB Printing, you will need the following.
1. Media
Press Paper or High Grade Paper.
2. Ink cartridges
Red Spot ink cartridge
Green Spot ink cartridge
Blue Spot ink cartridge
Black Spot ink cartridge
Prepare the image to be printed
Use any application to create the image or document.
Prepare the image or the document in two colours from
among the three different colours in the RGB ink and
Black.
Install ink cartridge
Make sure at least one RGB ink (Red Spot, Green Spot,
Blue Spot) cartridge is installed in the ink cartridge
holders. The ink cartridge can be installed in any
holder.
Load the paper in your printer
Load the paper into your printer and set up the feed
mode to either automatic or manual.
Setting up the printer driver for printing
1. In the application you want to print from, select
Page Setup from the File menu to open the Page
Setup
dialogue box.
2. Make any necessary changes to the settings in the
Page Setup dialogue box
3. Set the Media to Press Paper-Matte/Art, High
Grade Paper
the Size to match the paper loaded in the printer.
, or Cardboard (Thick Paper) and
Chapter 4 - Specialised Printing Operations 67
Page 76

When using a different type or size of paper,
change the setup accordingly.
4. Click OK to close the Page Setup dialogue box.
5. In the Print dialogue box click the Use Spot
Colours
check box.
6. In the Spot Colours Setting dialogue box click
the Use RGB Colour(s) radio button.
7. Select Single Ink (No Halftone), or Single Ink
(Halftone)
Using
, or Multiple Inks from the Print
pop-up menu.
8. After the settings have been completed, click OK.
9. In the Print dialogue box click Print.
10. In Select Ink Cartridge(s) enabled ink cartridges
among those installed in the printer are displayed.
Click the radio button(s) of the ink cartridge(s) to
be used.
11. When the correct ink cartridge is selected, click
OK to start printing.
68 User’s Guide
Page 77

Chapter 5 - Maintenance
Cleaning the printer
English
We recommend that this printer be cleaned periodically
to ensure satisfactory long term operation.
WARNING
Make sure you unplug the printer before cleaning it.
2. Push the front cover release button and gently
lower the front cover.
Cleaning the main unit
Follow the cleaning steps described below.
1. Use a soft cloth to wipe the outside of the printer
to avoid dust and dirt build-up.
Chapter 5 - Maintenance 69
3. Clean the inside of the printer using a soft brush
to brush away dirt and dust.
Page 78

Caution:
Brush very gently around electrical components, and be
careful not to leave any brush hairs on or near these
components.
Cleaning the print head
Follow the steps below, using isopropyl alcohol and a
cotton swab.
Caution 1:
Do not use benzene, thinner, or other volatile materials, as
they may damage the printer components.
Caution 2:
Do not get the inside of the printer wet.
1. Push the front cover release button and gently
lower the front cover.
2. Wipe the print head (1) with a cotton swab dipped
in isopropyl alcohol. The print head may not
come clean in one wipe so repeat several times.
Caution:
Avoid getting alcohol on the platen (2). Wait until the
alcohol dries before printing.
Cleaning the platen
Use cellophane tape to clean the platen as described
below.
70 User’s Guide
Page 79

1. Press the front cover release button and gently
lower the front cover.
2. Gently apply the tape (1) to dirty spots on the
platen (2), and rub your finger over the tape.
English
3. Slowly peel off the tape.
4. Repeat as necessary to remove dirt from the
platen.
Cleaning the feed roller
Use isopropyl alcohol and a cotton swab to clean the
feed roller as described below.
Caution 1:
Do not use benzene, thinner, or other volatile materials, as
they may damage the printer components.
Caution 2:
Do not get the inside of the printer wet.
1. The printer must be initialised for cleaning the
feed roller. To initialise turn off the printer first,
then press the power button to turn the printer on
again.
2. Push the front cover eject button and gently lower
the front cover.
Caution:
Do not touch or remove the white pad (3) on the left side of
the platen. Doing so may damage the printer.
Chapter 5 - Maintenance 71
3. Press the ready/insert button to move the
carriage to a safe position.
Page 80

4. Wipe the feed roller (metal shaft roller) with a
cotton swab dipped in isopropyl alcohol. The feed
roller may not come clean in one wipe, so repeat
several times.
Caution:
Avoid getting alcohol on the platen. Wait until the alcohol
dries before printing.
5. Press the ready/insert button to turn the feed
roller and wipe the roller with a cotton swab until
clean.
6. Close the front cover after you have finished
cleaning the feed roller.
7. The printer will be ready for printing.
Cleaning the paper transport rollers
When the printer has been used for a lengthy period,
paper may start to feed incorrectly due to dust on the
paper transport rollers. If incorrect feeding occurs,
clean the paper transport rollers with water and a cotton
swab as follows:
Caution:
Do not use benzene, thinner, or any other volatile
materials, as they may damage the printer components.
Do not get the inside of the printer wet.
1. Turn off the printer.
When cleaning the feed rollers, turn off the
printer to initialize.
2. Remove any paper in the sheet feeder.
If there is paper on the sheet feeder, please
remove it.
3. Set the printer to the initial mode.
Turn on printer power and check that the power
lamp and ready lamp light up.
4. Open the front cover.
Press the front cover release button and lower the
front cover gently. The error lamp will blink.
72 User’s Guide
Page 81

5. Set the printer to the cleaning mode.
Press the ready/insert button to move the carriage
to the left.
WARNING:
Do not put your hands inside the printer when printer
parts are moving.
3
1
2
English
7. Press and release the ready/insert button to
partially rotate the feed rollers. Continue cleaning
in this way until the feed rollers are completely
clean.
Caution:
Never press the ready/insert button when putting a cotton
swab or your hand inside the printer. Doing so may result
in an injury and malfunction as the cotton swab or your
hand may be pulled inside the sheet feeder.
8. Close the front cover.
6. Press the plate (1) to wipe the 5 paper transport
rollers (2) with a moist cotton swab, using a left
right motion along the gutter (3).
Chapter 5 - Maintenance 73
Page 82

74 User’s Guide
Page 83

Chapter 6 - Troubleshooting
Troubleshooting - general
English
Printer errors
When a printer error occurs, the error light flashes and
the error message dialogue box appears on your
computer's screen. To rectify printer errors;
1. Check the error message on your computer's
screen. For a list of Error messages see Indicator
Lights Summary in Chapter 1 - Introduction.
Caution:
The error message dialogue box cannot be displayed if
your computer is not capable of bi-directional printing.
2. Fix the error to continue printing, or terminate
printing. For more information on fixing printer
errors see the rest of this Chapter.
Chapter 6 - Troubleshooting 75
Ready/insert button functions
The ready/insert button is used for a number of
functions, depending on the printer status. The
functions during normal printing are described below.
Paper feed
To feed a single sheet, set the paper feed switch to
position “M” while no data is being received from the
computer (i.e. ready light is on), load one sheet of paper
into the sheet feeder, and then press the ready/insert
button.
Paper eject
If paper is already in the printer and no data is being
received (ready light is on), press the ready/insert
button to eject the paper.
Page 84

Cancelling an alarm
To cancel an alarm for anything other than a hardware
or mechanism error, press the ready/insert button after
the removing the cause of the alarm.
Forced printing and clearing data
When the data transfer from the computer stops for
more than about 30 seconds, and the ready light is
blinking quickly, press the ready/insert button to force
the printer to print the data it has received so far.
Clearing paper jams
Follow these steps to clear a paper jam.
1. First, press the power button to shut off the
power.
2. Press the front cover release button and gently
open the front cover.
3. Press down on the release lever (1) and gently
pull out the jammed paper.
Paper jams can be caused by a dirty platen. For
information on cleaning see ‘Cleaning the Platen’
in Chapter 5 - Maintaining the Printer.
4. Close the front cover.
5. Press the power button to turn on the power.
76 User’s Guide
Page 85

Troubleshooting - Macintosh
English
When problems occur during printer operation, please
check the following troubleshooting tips before
returning the printer for repair.
Power does not come on
1 Is the power cord disconnected?
Make sure the power cord is plugged into an
outlet as well as connected to the printer. After
checking the power cable, push the power button
to turn on the printer.
2 Is the printer plugged into an extension block or
power strip?
After turning on the extension block or power
strip, press the power button on the printer.
During installation a “File not found” error occurs
or the installer is not found
1 Is At Ease installed?
If you are using At Ease when you place the
Installation Disc in the CD-ROM drive, (some of
the Performa series start up in At Ease), the
following things may happen.
a The alert dialogue box appears.
b The installer is not displayed.
In these cases the following methods can be used
to install the printer driver:
a From the Special menu, select Switch To
Finder.
install the printer driver.
b If the Switch To Finder function is not
available on the Special menu, select
Switch To At Ease and check the Off
checkbox in At Ease settings. Restart your
computer and install the printer driver.
The icon does not appear in the Chooser
1 Is QuickDraw GX enabled?
If QuickDraw GX is installed, disable it by
following these steps:
a Select “Control Panel” from the Apple
menu.
b Open the Extensions Manager.
Double-click on the installer icon to
Chapter 6 - Troubleshooting 77
Page 86

c Deselect QuickDraw GX in the list of items.
d Close the Extensions Manager, and restart
your Macintosh.
2 Is the printer driver installed?
Install the DP-7000 printer driver from the
Installation Disc (CD-ROM).
device must have a unique device number. (If the
computer has more than one SCSI bus, then the
device number must only be unique for the bus
that the printer is attached to.)
4 Are you using a high impedance cable?
Use a high impedance cable for each device in the
SCSI chain.
The DP-7000 printer cannot be selected in
Chooser
1 Are the SCSI cable and terminator correctly
connected?
Correctly connect the SCSI cable and terminator.
Make sure that the cable is not bent excessively.
Excessive bending of the cable may break the
wires inside.
2 Is the SCSI cable loose?
Make sure the SCSI cable connectors are firmly
attached at both ends using the fastening screws
or clasps.
3 Is the SCSI device number set correctly?
Make sure the SCSI device number for the printer
5 Is the cable too long?
Do not use a cable that is longer than you need.
The signals become more unstable as the cable
gets longer.
6 Is the printer turned on?
Make sure the printer is turned on before using
the Chooser to select the printer.
7 Were the printer and computer turned on in the
wrong order?
Turn the printer on before turning on the
computer.
8 Is the front cover closed correctly?
Make sure that the front cover is closed correctly.
is not the same as that used by any other SCSI
device attached to the computer. Each SCSI
78 User’s Guide
Page 87

9 Is the ready light off?
Press the ready/insert button and make sure that
the ready light comes on.
10 Are you using the wrong cartridges?
Use only OKI recommended cartridges in the
DP-7000 printer. Do not use cartridges from other
manufacturers.
English
14 Is the device number set correctly?
Make sure the SCSI device number of the printer
is not the same as that used by any other SCSI
device attached to the computer. Each SCSI
device must have a unique device number. (If the
computer has more than one SCSI bus, then the
device number must only be unique for the bus
that the printer is attached to.)
11 Are the cartridges installed correctly?
Insert the cartridges in the holders with the
identification markings (B side) face up.
15 Is the terminator connected?
Make sure there is a terminator connected to the
last peripheral in the SCSI chain. If you are using
a device with an internal terminator, make it the
12 Is the ribbon in one of the cartridges used up?
last peripheral in the SCSI chain.
When the ribbon in a cartridge has been used up,
black and silver stripes will be visible on the
ribbon. Install a new cartridge. After replacing the
16 Is the USB cable is connected correctly?
Connect the USB cable correctly.
cartridge printing will continue from where it left
off.
17 Is there a paper jam?
Remove the paper. If the paper is caught in the
13 Is the SCSI cable correctly connected?
Make sure the cable is not bent excessively, and
secure it firmly at both ends with the fastening
screws or clasps.
rollers, open the front cover, push down on the
release lever, and gently remove the paper. Make
sure there are no pieces of paper left in the
printer.
18 Are the settings in the application correct?
Recheck the printer settings in the application.
Chapter 6 - Troubleshooting 79
Page 88

19 Is the printer driver correctly installed?
Install the DP-7000 printer driver from the
Installation Disc (CD-ROM).
20 Has the printer been selected using the Chooser?
From the Apple menu, select the Chooser and
make sure the printer and device number appear
correctly. Click on the printer name and SCSI#.
(The printer may not be selected correctly if you
do not click on the printer name.)
21 Do you have enough hard drive space?
The DP-7000 requires work space on the hard
disk when it prints. Keep enough space open on
the disk for the printer to operate. (After printing,
the work space is released.)
22 Does the hard disk have areas where reading or
writing are unreliable?
If there are areas on the hard disk where reading
or writing are unreliable, sometimes a printing
error will occur and printing will stop.
Periodically use the Disk First Aid utility that
comes with your system software (or other
commercial disk checking utility) to prevent
these problems.
Colour printing is not working or is extremely
slow
1 Are the ink cartridges for colour printing
installed?
The following ink cartridges are required for
colour printing:
a Yellow, cyan, magenta, and black ink
cartridges
b Yellow, cyan, magenta, black and Finish II
ink cartridges
2 Are the print settings correct?
In the Print dialogue box, select Automatic,
Photographs
or Graphics & Text from the Type
menu.
3 Is the free space on the hard disk fragmented?
The time required for printing can increase
dramatically if the free space on the disk is
extremely fragmented. Clean up your files and
defragment the disk by periodically using a
defragment utility.
80 User’s Guide
Page 89

4 Is enough memory allocated?
Colour printing may not be possible if the
memory allocated to the application is
insufficient. Allocate more memory to the
application.
5 Are you using memory management tools or virtual
memory?
When you are using memory management tools
such as RAM Doubler or virtual memory,
memory may not be correctly recognised for
colour printing.
If colour printing is not working, try disabling
these utilities and try again.
6 Do you have enough disk space?
Make sure there is enough empty space on your
hard disk. (The working space is released once
printing is finished.)
When there is just barely enough working space
left on the disk, printing may take much longer
than normal.
7 Is the application set for colour printing? Does the
application support colour printing?
Some applications have colour printing enable/
disable settings. Some applications do not
English
support colour printing. Read the manual for the
application and check the colour settings.
8 Are you using many applications at one time?
When very little memory is available for print
processing, printing may take a long time or fail.
Close as many applications as possible and try
again.
Printing is light, distorted, or has gaps
1 Has one of the ribbons separated from the
head?
Stop the printing and reinstall all the cartridges.
Take up any slack in the ribbons. If a particular
cartridge repeatedly causes problems, try a
different cartridge.
2 Is the head dirty or is there an obstruction on the
print head?
Clean the head by following the directions in
Chapter 5. If anything is stuck to the print head,
remove it, being careful not to damage the head.
The platen often gets dirty at the same time as the
head, so it is recommended that you clean the
platen after cleaning the head.
Chapter 6 - Troubleshooting 81
Page 90

3 Is the platen dirty or is there an obstruction on the
platen?
Clean the platen by following the directions in
Chapter 5. If anything is stuck to the platen,
remove it, being careful not to damage the platen.
If cleaning the head and the platen does not work,
contact the supplier from where you purchased
the printer.
4 Are you using the correct cartridges for the chosen
printing media?
Use only OKI cartridges for the DP-7000 printer.
When printing transparencies, use only
recommended Transparency Film and Transfer
Film (A3+).
5 Are you printing on envelopes, thermal paper, or
picture postcards?
Printing is unreliable on envelopes and other
surfaces which have a non-uniform thickness.
Printing and feeding of thermal paper is
unreliable. The back side of picture postcards
may be printed on if the surface is smooth and the
card thickness is 0.23 mm (0.01") or less, but
printing on the photo side is unreliable.
6 Are you printing in colour on the glossy side of a
greeting card?
The glossy side of a greeting card can only be
printed on using metallic cartridges.
7 Are you printing on the wrong side of the paper?
With VPhoto Film, printing should take place on
the glossy side. The ribbons in the cartridges may
break.
Paper is not feeding or ejecting correctly from the
sheet feeder
1 Are you using paper which is thicker or thinner
than recommended?
Use paper within the range 0.07 mm - 0.23 mm
(0.003" - 0.01"). For auto feeding use paper in the
range 0.07 mm - 0.1 mm (0.003" - 0.004").
2 Are you using poor quality paper?
Paper that is folded, ripped or has holes, such as
loose leaf binder or refill paper, can cause paper
jams and should not be used.
3 Are you using curled paper?
This will cause paper jams. The paper should be
curled the opposite way to flatten it out before it
is used.
82 User’s Guide
Page 91

4 Are you using paper with folded or cut corners?
This can cause problems since the paper position
sensor and paper length sensor do not work
properly. Sheets with corner cuts, such as
transparencies and back print film, will work fine
if the corner cut end is placed at the top of the
paper guide.
5 Is the cut corner in the correct position?
When these sheets are inserted with the cut
corner incorrectly positioned, they may not feed
correctly.
6 Is the paper feed guide too narrow for the paper?
The paper feed guide should hold the paper
loosely enough so that it can feed easily.
7 Is there too much paper in the sheet feeder?
The sheet feeder can hold up to 100 sheets of
High Grade Paper, or 30 transparencies, any more
than this may cause a paper jam.
8 Is the paper feed switch positioned correctly for the
paper feed method?
To print on High Grade Paper using automatic
feed mode, set the paper feed switch to position
English
“A”; to print in manual feed mode, set it to
position “M”.
9 Are you printing on envelopes, thermal paper, or
picture postcards?
Correct printing and feeding of envelopes and
thermal paper cannot be guaranteed. The back
side of picture postcards can be used if the card is
less than 0.23 mm (0.01") thick and manual feed
mode is used. Printing on the photo side is
unreliable.
10 Are you using home-made cards or thick cards?
Cards with thickness within the range of 0.07 mm
- 0.23 mm (0.003" - 0.01") can be used in manual
feed mode.
11 Are there pages piled up near the output slot or in
the output paper tray?
When printed material obstructs the paper output
slot, the paper feed and paper output may not
work correctly.
12 Have you loosened the paper sufficiently prior to
loading it into the sheet feeder?
Paper must be riffled several times prior to being
loaded into the sheet feeder. If not, sheets of
paper may stick to one another and cause
Chapter 6 - Troubleshooting 83
Page 92

multiple sheets to feed into the printer at the same
time, or other forms of misfeed.
a thick piece of paper to remove the small piece
of paper.
The printer emits unusual noises when the power
is turned on, and the error lights blink
1 Has the carriage packing material been
removed?
Refer to Chapter 1, Introduction for details on
removing packing material.
2 Has the packing tape been removed?
There are two pieces of tape on the front of the
printer that help protect the printer during
shipping. Gently remove the tape before using the
printer.
3 Has a cartridge become dislodged from the cartridge
holder?
Open the front cover and make sure the cartridges
are correctly installed.
4 Is there a paper jam?
Clear a paper jam by refering to ‘Clearing Paper
Jams’ in this Chapter. Occasionally a small piece
of paper will tear off and remain in the printer. If
this happens, hold the release lever down and use
A mechanism or cartridge change error occurred
1 Are the cartridges installed correctly?
If a cartridge has become dislodged from its
holder, a cartridge change error will occur. Open
the front cover and reinstall the cartridge.
2 Are you using the printer on a level surface?
The printer will not operate correctly on a slanted
surface. Place it on a level, stable surface.
3 Is the printer in a place where it is subject to
movement?
Various movements such as bumps and vibrations
can cause mechanical problems. Place the printer
in an environment where it will not be subject to
movement.
4 Is the front cover properly closed?
The printer will not operate correctly if the front
cover is not closed properly. Close the front cover
all the way.
84 User’s Guide
Page 93

5 Are items stacked on top of the printer?
The printer may malfunction if items are stacked
on top or to the side of the printer. Remove any
obstruction on top or to the side of the printer.
6 Is there an obstruction in front of the paper output
slot?
If the paper output slot is obstructed, paper
ejected from the printer can fold or bend and
cause the printer to malfunction. When printing,
make sure that the paper output slot is
unobstructed and that there is room for paper to
be ejected.
Ink cartridges are not correctly recognised
1 Is the bar code on the cartridge dirty?
Clean the bar code.
2 Is the cartridge installed in the holder with the (A)
side up?
Make sure the cartridges are placed in the holder
with the identification markings (B side) facing
up.
3 Has an ink cartridge for a different printer been
installed?
Cartridges made by other manufacturers will not
work. Use only OKI recommended cartridges.
Printing quality, hue, and resolution queries
1 Can all four colours of the colour inks be
combined for black and white printing?
If Darker Black is set in colour printing or if the
brightness and contrast settings are correct, 4-
colour black is possible. To print only with black,
turn off
Darker Black, and return the Image
setting under Image Settings to default.
For monochrome printing, select Greyscale
under Document Type.
2 Black is printed with black ink, but grey portions
are printed using four colours.
In colour printing, greyscale intermediate colours
(such as grey) are printed using four colours. If
you want to print only in black ink, set the Type
setting in the Print dialogue box to Greyscale.
3 When coloured paper is used for full colour printing,
the colours are not reproduced correctly.
Colour printing is based upon the ink being
printed on a white background, so correct colours
cannot be reproduced on coloured paper.
English
Chapter 6 - Troubleshooting 85
Page 94

Ink and paper
1 How should I use opaque white ink?
Opaque white ink can be used as follows:
Opaque white ink can be used for white base
printing. It is possible to do a white base print
which is necessary for the dummy design for film
packaging.
2 Is it OK to print using the opaque white ink on top
of a full colour image?
Print with Opaque white ink for full-colour
printing.
3 For full colour printing and glossy finishing, may I
use any type of paper?
We suggest using High Grade Paper, Press Paper
or VPhoto Film for full colour printing. Using
other types of paper can produce a poor image.
Connection method
1 Can I connect multiple DP printers to a single
computer?
If different SCSI device numbers are used,
multiple printers can be connected to a single
Macintosh. Of course, simultaneous printing is
not possible.
2 Can I connect a single DP printer to multiple
computers?
No, the printer is not designed for this.
Other operational problems
1 Is this printer compatible with PostScript?
The DP-7000 printer uses QuickDraw. It is not
compatible with PostScript.
However, it is possible to use DP-7000 printer for
PostScript printing by using the DP-7000 RIP
(software RIP).
2 EPS files cannot be output clearly.
Since EPS files are data files for PostScript
printers, images at 72 dpi may be output from
QuickDraw depending on the application.
3 Are enlargements and reductions possible?
Set either the enlargement or the reduction rate in
the Reduce or Enlarge setting in the Page Setup
dialogue box. This value may be specified
between 25 and 400.
4 The preview doesn’t change even though I change
the reduction or enlargement in the Page Setup
dialogue box.
86 User’s Guide
Page 95

The preview will not change size with different
reduction or enlargement settings. Check the size
after printing to see that the changes took effect.
5 How do I uninstall the printer driver?
Remove the DP-7000 printer driver from the
Extensions folder in the System Folder, and
remove the DP-7000 Preferences file from the
Preferences folder.
6 Why can I not print correctly with page layout
settings?
There are application programs that allow you to
format a document correspond of both
orientations of portrait and landscape. When
printing such document with layout (move than 2
pages per sheet), it may not print properly.
English
Chapter 6 - Troubleshooting 87
Page 96

Troubleshooting for USB
The USB printer cannot be selected in the Chooser
Please check the following:
1. Make sure that the USB interface cable is
properly connected to the printer and computer,
and the printer is turned on. Then restart your
computer.
2. Make sure that you have installed the iMac
Update 1.0, if your iMac was running Mac OS
8.1.
88 User’s Guide
Page 97

Chapter 7 - Specifications & Settings
English
The table below details the general specifications for
the OKI DP-7000 printer.
Name OKI DP-7000 Photo Quality Colour Printer
Print head 240 dot
Printing speed
Resolution Photo-Quality: 2400 dpi colour and greyscale
Printing area 330mm x 681mm (13” x 27”) maximum
Paper feed
method
Paper width 98mm - 330mm (3.9” - 13.0”)
Paper length 98mm - 681mm (3.9” - 26.8”)
Paper
thickness
Print media
Dimensions
Weight 9.5 kg (20lbs. 15 oz.)
High Grade Paper: Equivalent to 235 cps (When
printing 10-cpi text)
1200 dpi greyscale / black & white;
Standard:
Friction feed
0.07mm - 0.23mm (0.003” - 0.01”)
Photo-Quality:
Standard:
56.8cm (width) x 27.5cm (depth) x 20cm (height)
22.4" x 10.8" x 7.9" (approximate dimensions)
600 dpi colour / black & white /
greyscale
VPhoto film and Press paper (2400
dpi)
High Grade Paper transparencies,
(600 dpi)
Name OKI DP-7000 Photo Quality Colour Printer
Power supply 220-240 Vac 50/60Hz
Interface Parallel, SCSI (optional), USB
Head life 250 million pulses/dots
Machine life printing; 10,000 cycles
Noise 51 dB Maximum
Agency
approvals
Operating
environment
Storage
environment
FCC Class B, UL, CSA and CE
Temperature: 15˚C to 30˚C. (59˚ to 86˚F).
Humidity:
Temperature: 0˚C to 35˚C (32˚ to 95˚)
Humidity:
30% to 70% (without condensation or
freezing)
50% to 70% (without condensation or
freezing)
Chapter 7 - Specifications & Settings 89
Page 98

DIP switches
DIP switches are used to set the SCSI ID number.
ON
OFF
4
3
12
The following summarises the settings for each SCSI
device number.
1 2 3 4 SCSI No.
OFF OFF OFF OFF No. 0 (note 2)
ON OFF OFF OFF No. 1
OFF ON OFF OFF No. 2
ON ON OFF OFF No. 3 (note 1)
OFF OFF ON OFF No. 4
ON OFF ON OFF No. 5
OFF ON ON OFF No. 6 (note 1)
ON ON ON OFF No. 7 (note 2)
Note 1:
Factory default setting is No.6.
Note 2:
SCSI device number 7 is reserved for the Macintosh
itself. Device number 0 is normally assigned to the
internal hard disk drive, if there is one. Device number
3 is normally assigned to the internal hard disk drive,
if there is one.
Please refer to the user manual that came with your
Macintosh to find an empty and usable SCSI device
number.
90 User’s Guide
Page 99

Printable area
B
English
A
A4
F
A3
A3+
A B C D E F
210mm
(8.5")
297mm
(11")
329.2mm
(13")
297mm
(11")
420mm
(16.5")
483mm
(19")
*1
3.5mm
(0.134")
3.5mm
(0.134")
3.5mm
(0.134")
3.5mm
(0.134")
3.5mm
(0.134")
3.5mm
(0.134")
15.2mm
(0.6”min)
15.2mm
(0.6”min)
15.2mm
(0.6”min)
12mm
(0.47”min)
12mm
(0.47”min)
12mm
(0.47”min)
*1 475mm (18.7") in the case of transparent film.
Using cardboard or thick paper
Print within the recommended range shown below.
Depending on the printing media, printing outside the
recommended area may cause malfunctions such as the
ink cartridge ribbon getting caught and breaking.
C D E F
12mm (0.47") 12mm (0.47") 15.2mm (0.6”min) 12mm (0.47")
E
C
Chapter 7 - Specifications & Settings 91
D
Page 100

Available supplies
Print media
Ink cartridges
Ink Cartridges Part Number
Process Cyan
Process Magenta
Process Yellow
Process Black
Black Spot
Blue Spot
Red Spot
Green Spot
Gold Foil
Silver Foil
Metallic Gold
Metallic Silver
Metallic Cyan
Metallic Magenta
Finish II
Opaque White
41644607
41644608
41644609
41644606
41644605
41644604
41644602
41644603
41067608
41067609
41067615
41067616
41067618
41067617
41067607
41644601
Press Paper – Matte
Press Paper – Art
High Grade Paper
VPhoto Film
Transparency Film
Transfer Film
Print media Part Number
41644404
41644405
41644407
41644403
41644401
41644412
92 User’s Guide
 Loading...