

Page 1
Page 2
Introduction
Thank you very much for purchasing OKI DP-7000 RIP. OKI DP-7000 RIP is a software RIP for
making the OKI DP-7000 PostScript printer. The information provided in this manual is intended to
enable the user to take full advantage of various features of the OKI DP-7000 RIP.
How to use this operation manual
Symbols
Trademarks
The caution symbol alerts the user to restrictions governing RIP operation. Read carefully to avoid mistakes
in operation.
The memo symbol alerts the user to helpful hints and information useful when using the RIP.
Adobe, PostScript, PostScript 3, and PostScript logos are trademarks or registered trademarks
of Adobe Systems Incorporated.
Apple, Macintosh, Performa, Power Macintosh, and Mac OS are trademarks or registered
trademarks of Apple Computer, Inc.
Other brand names and product names are trademarks or registered trademarks of their
respective companies.
Software copyright
© 2000 Amiable Technologies, Inc. All Rights Reserved.
© 2000 Adobe Systems Incorporated. All rights reserved.
© 2000 ALPS ELECTRIC CO., LTD.
Regarding this manual
1. Reproduction of any part of this operation manual without prior permission is prohibited.
2. The contents of this operation manual are subject to change without notice.
3. Great care was taken in making this manual. Howe ver, should you f ind any inconsistencies, errors
or omissions, please do not hesitate to notify the shop where you purchased this product.
4. OKI DATA CO., LTD, ALPS ELECTRIC CO., LTD, Adobe Systems Incorporated and Amiable
Technologies, Inc shall not be liable to the user for an y damage incurred through direct, indirect,
exceptional, or accidental operation using the information contained in this manual, regardless of
the stipulations in Clause 3.
1
Page 3

Manual copyright
© 2000 Amiable Technologies, Inc. All rights reserved.
© 2000 ALPS ELECTRIC CO., LTD.
DIC standard color
1. This printer has been “DIC standard color” certified by Dainippon Ink and Chemicals, Inc.
2. DIC standard color satisfies print standards determined by Dainippon Ink and Chemicals, Inc.
This standard is applicable to the colour range used for offset/ process printing on art paper and
conforms to “Japan Color”.
3. This printer conforms to the “thermal transfer” reference level of the “DIC standard color” under
a D50 light source, allowing approximate simulation of colours printed by the standard offset/
process printing method.
4. To operate printer:
Select “DIC Standard Color SFC” for CMYK-Lab conversion.
Select “VPhoto_PressPaper_Matte.icm”, “VPhoto_PressPaper_Art.icm”,or
“VPhoto_VPhotoFilm.icm” profile for Lab - CMYK conversion.
5. Although this printer has been “DIC standard color” certified, printed colours might not match
samples displayed in the “DIC Color Guide/Process Color Note”
Chemicals, Inc.
6. Characteristics of printed colours may vary due to aging, environmental changes or other reasons.
7. Characteristics of printed colours may vary due to differences in the characteristics of indi vidual
products or consumable items.
*1
issued by Dainippon Ink and
*1. The “DIC Color Guide/ Process Color Note” is a process colour book that approximately reproduces
dot percentage combinations of process colours (i.e. yellow, magenta, cyan and black) on art
paper from the spot color books (“DIC Color Guide ®” and “DIC Color Guide ®, Part 2”), using
DIC spot ink.
TOYO INK standard colors
1. This printer has been certified compliant to “TOYO INK standard colors” certified by TOYO
INK MFG. CO., LTD.
2. TOYO INK standard colors are colors that satisfy the standards for colors of prints as prescribed
by TOYO INK MFG. CO., LTD.
These standard colors apply to the color range known as “Japan Color” for process printing on art
quality paper.
2
Page 4

Contents
Contents
Introduction ......................................................................................................................1
How to use this operation manual .............................................................................. 1
Symbols .................................................................................................................................................................1
Trademarks ..........................................................................................................................................................1
Software copyright...............................................................................................................................................1
Regarding this manual ........................................................................................................................................1
Manual copyright.................................................................................................................................................2
DIC standard color ..............................................................................................................................................2
TOYO INK standard colors ................................................................................................................................2
Chapter 1. Set Up.............................................................................................................6
System Requirements ..................................................................................................6
To install program........................................................................................................6
To install Roman screen fonts ................................................................................... 10
To connect the DP-7000 to your computer .............................................................. 12
To set up the printer .................................................................................................. 13
To uninstall RIP .........................................................................................................16
Chapter 2. Functions of the RIP....................................................................................17
Print Monitor ............................................................................................................. 17
Function of each button.....................................................................................................................................17
Information display ...........................................................................................................................................18
Menu ...................................................................................................................................................................19
Setup Properties.........................................................................................................20
General tab .........................................................................................................................................................20
Port tab ...............................................................................................................................................................20
Print tab ..............................................................................................................................................................21
Colour Adjust tab...............................................................................................................................................29
Density Curve Adjustment ........................................................................................30
Function of each button.....................................................................................................................................30
Create and Edit Density curve..........................................................................................................................31
Preferences..................................................................................................................32
3
Page 5

Contents
Chapter 3. Printing Procedures.....................................................................................33
Printing without running the application in which the data was made................33
Printing with the application in which the data was made. ................................... 35
To set up SpotColorLibrary ..............................................................................................................................37
To set up Color Palette in FreeHand 8 .............................................................................................................38
To set up Color Palette in Illustrator 8.0 .........................................................................................................40
To set up Color Palette in PageMaker 6.5........................................................................................................41
To set up Color Palette in QuarkXPress 4.1 ....................................................................................................43
To print from each application. ................................................................................45
To print from FreeHand 8 .................................................................................................................................45
To print from Illustrator8. 0 .............................................................................................................................48
To print from PageMaker6. 5 ...........................................................................................................................51
To print from QuarkXPress4. 1 ........................................................................................................................54
Regarding 2-Colour Press ......................................................................................... 58
To create image data for colour separations....................................................................................................58
2- Colour Press in FreeHand8.0 .......................................................................................................................60
2-Colour Press in Illustrator8.0 ........................................................................................................................64
2-Colour Press in PageMaker6.5 ......................................................................................................................68
2-Colour Press in QuarkXPress4.1 ..................................................................................................................71
Printing in Opaque White.........................................................................................75
4
Page 6

Chapter 1. Set Up
5
Page 7
Chapter 1. Set Up
System Requirements
The minimum and recommended system requirements for using the OKI DP-7000 RIP are listed below .
Processor Power PC 601 90 MHz Power Macintosh G3 233MHz
Installed RAM 64MB More than 128MB
Disk installation space 90MB 90MB
Disk available space More than 1GB More than 2GB
Operating System Mac OS 8.1 or later Mac OS 8.1 or later
Video system 14 inch monitor, 256 colours 17 inch monitor,
Chapter 1. Set Up
Minimum system Recommended system
(virtual memory=128MB) (virtual memory=256MB)
(for saving data)
more than Thousands colours
Peripheral devices CD-ROM drive CD-ROM drive
Interface SCSI or SCSI or
USB (Mac OS 8.5 or later) USB (Mac OS 8.5 or later)
To install program
To install the program from the OKI DP-7000 Installation Disc CD-ROM,follow these steps.
1. Insert the OKI DP-7000 Installation Disc into your CD-ROM drive.
2. Double-click the ‘DP-7000 RIP’ folder.
3. Double-click the OKI DP-7000 RIP Installer icon.
6
Page 8
Chapter 1. Set Up
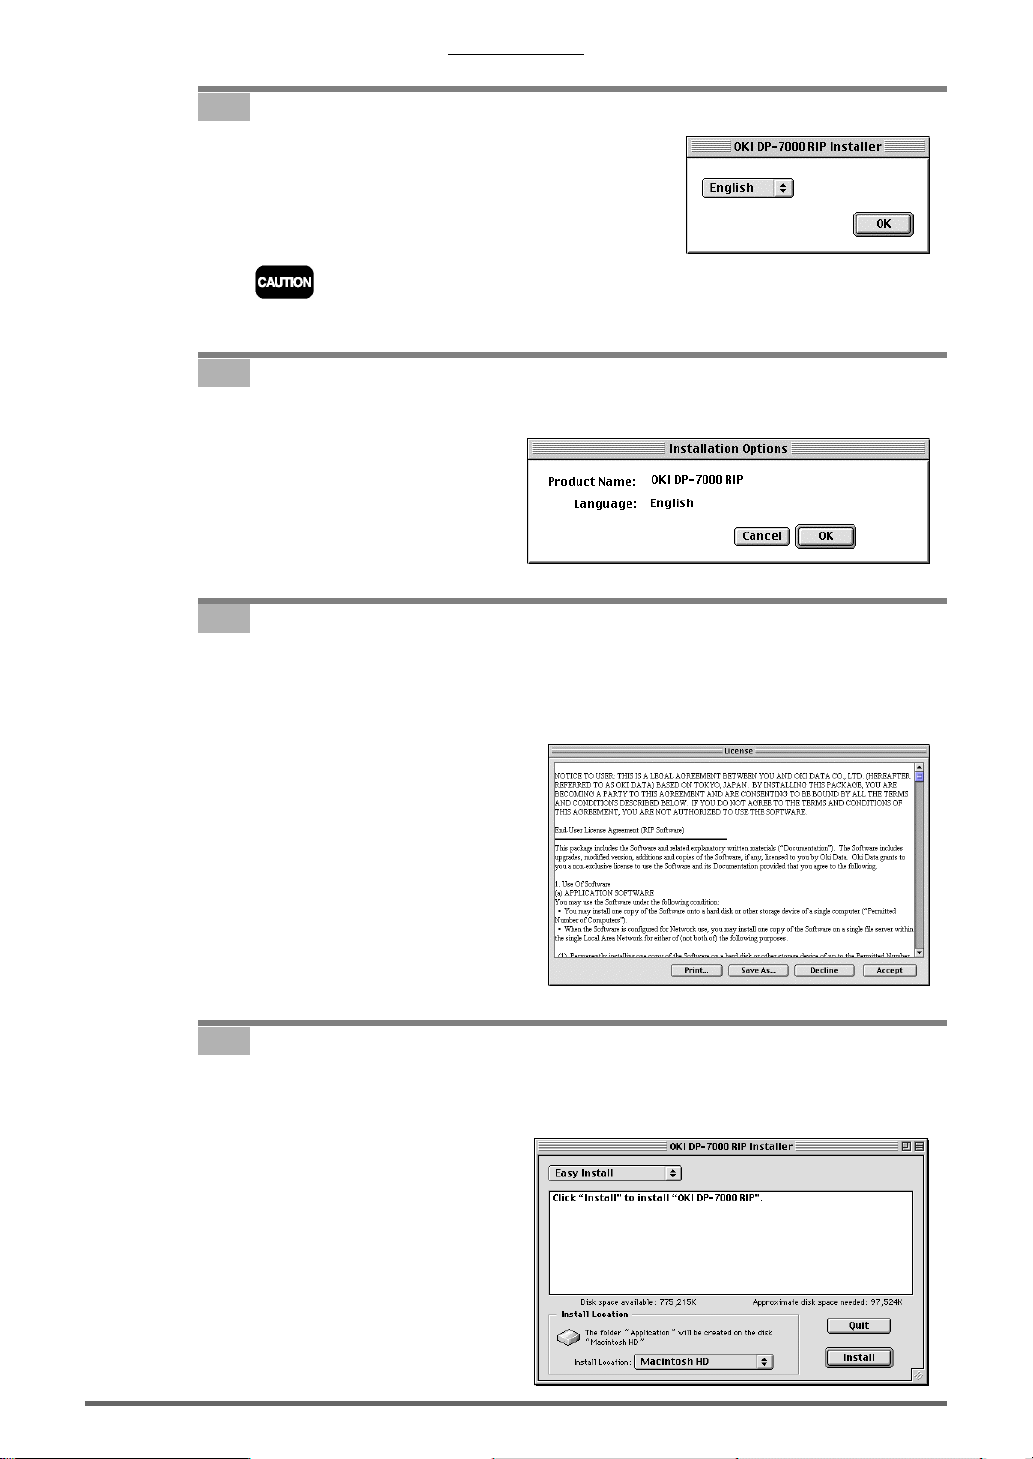
4. Select the language.
The language selection here is for the language the installer will use to display install process messages. It
is not a program
5. Confirm the product name.
The Installation Options dialogue appears. Click OK.
6. Read license agreement.
Follow the instructions on the screen and click OK. This will display the End User License
Agreement. Read through the terms of the License Agreement; then click Accept to accept
the agreement.
7. Select location to install.
Select the location where you wish to install the software from the OKI DP-7000 RIP Installer
dialogue box and click Install.
7
Page 9
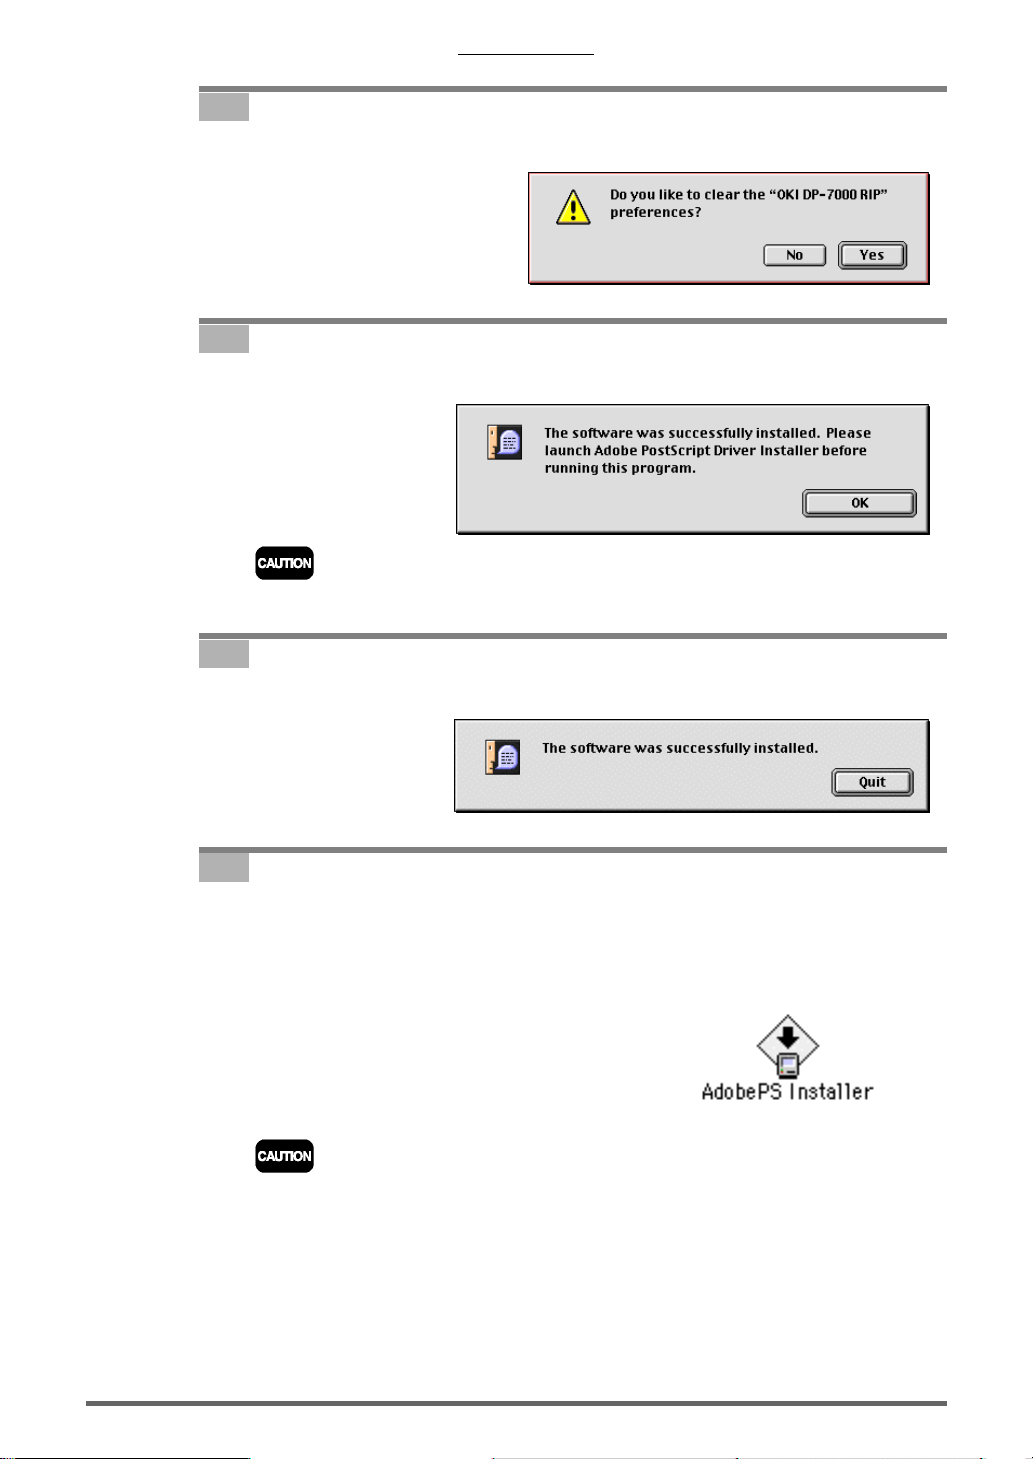
8. Clear preferences.
A prompting you to clear the ‘OKI DP-7000 RIP’ preferences appears. Click Yes.
9. Confirm message.
A message prompting you to install the Adobe PostScript Driver appears. Click OK.
If the message prompting you to restart appears, do not click Quit to restart. Restart only after installation
of Adobe PostScript Driver finishes.
Chapter 1. Set Up
10. Finish installation.
A message informing you that the installation has been completed appears. Click Quit.
11. Install Adobe PostScript Driver.
Open the ‘AdobePS Installers’ folder. Among the five language folders select the folder of the
language you wish to use. (Language folders are Deutsche, English, Español, Français and
Italiano) Double-click the AdobePS Installer icon.
The name of the Adobe PostScript Driv er is AdobePS8.6. If this has already been installed, it is not necessary
to install it again.
8
Page 10
Chapter 1. Set Up
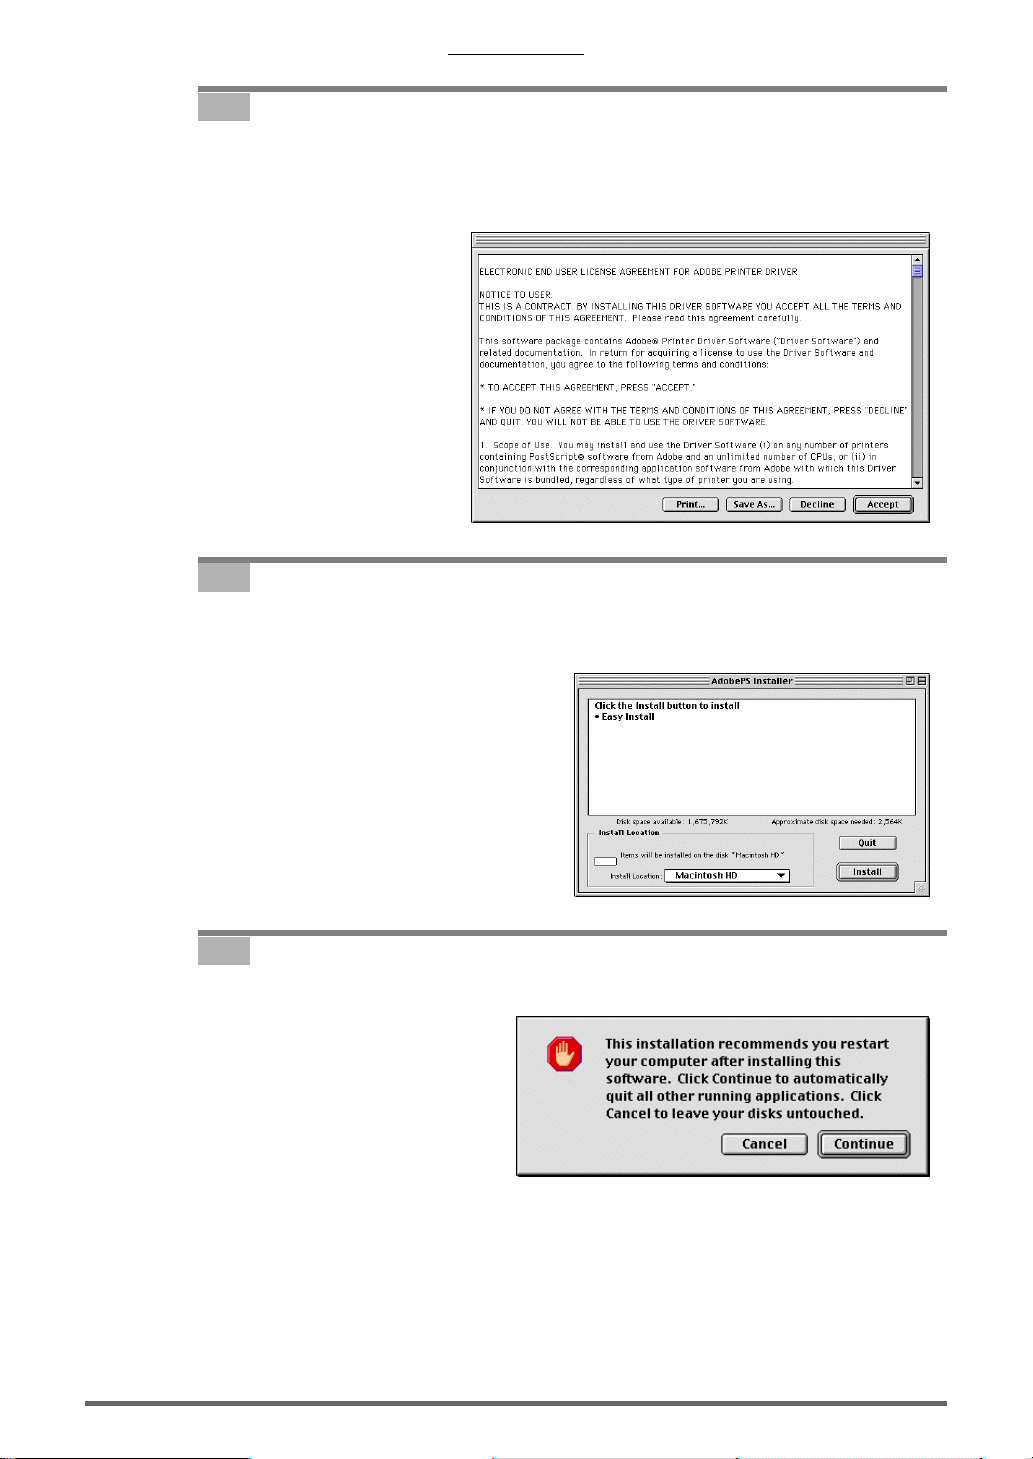
12. Read license agreement.
Following the instructions on the screen and click Continue. This displays the ELECTRONIC
END USER LICENSE AGREEMENT FOR ADOBE PRINTER DRIVER. Read through
the terms of the License Agreement; then click Accept to accept the agreement.
13. Select location to install.
Select the location to which install the Adobe Postscript driver in the AdobePS Installer
dialogue and click Install.
14. Confirm message.
Confirm the message and click Continue.
9
Page 11
Chapter 1. Set Up
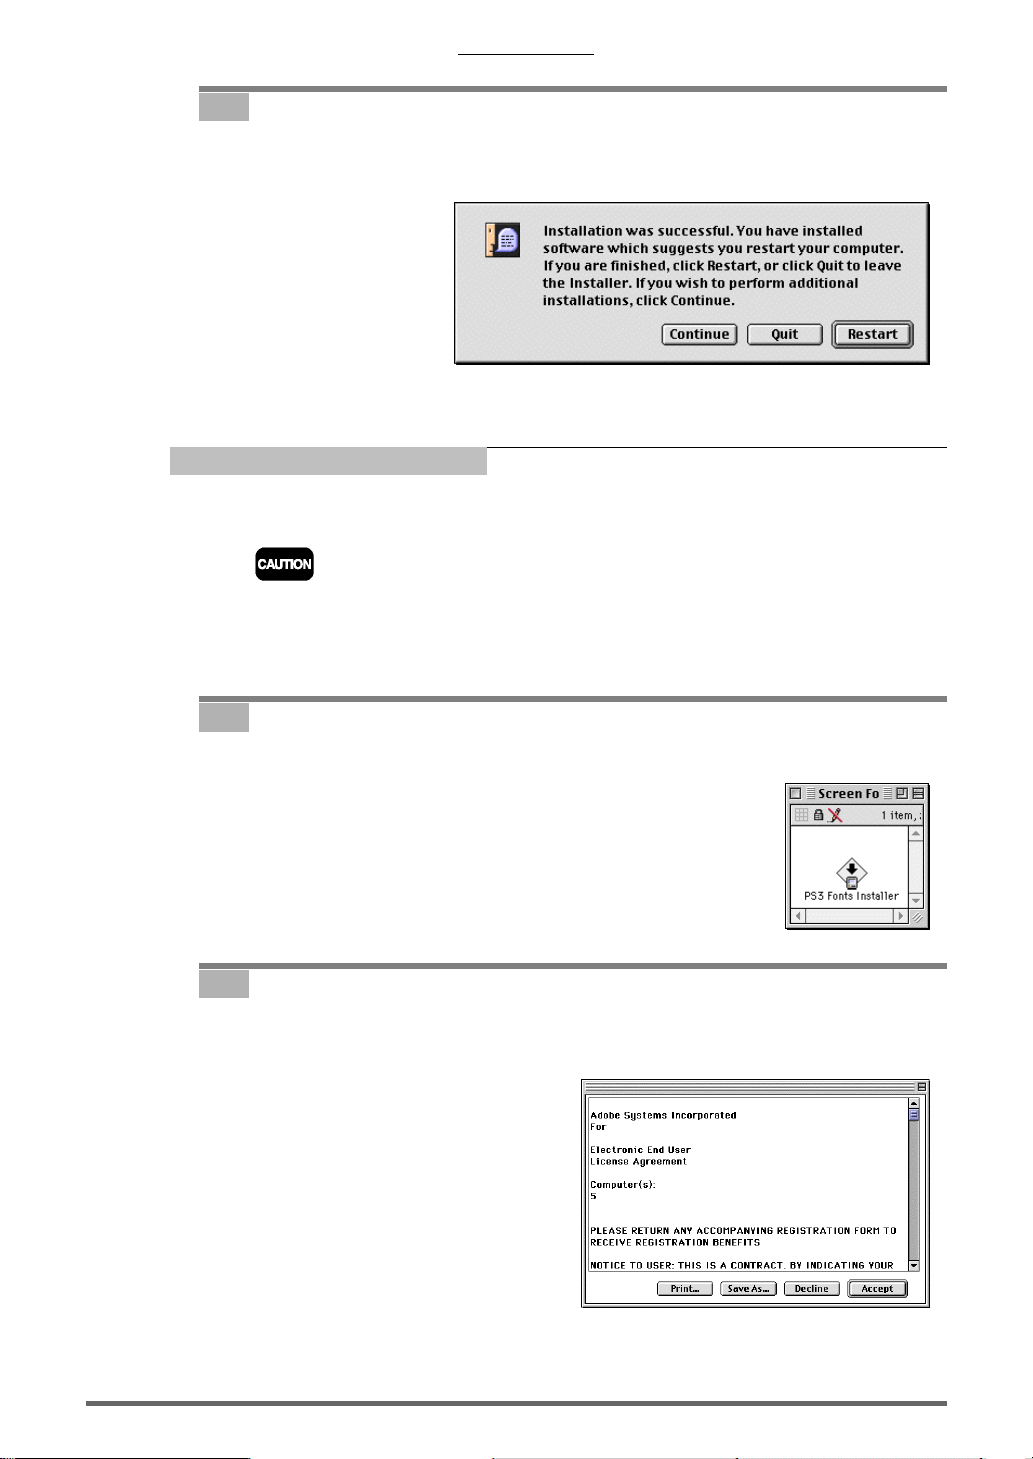
15. Finish installation and restart
A message informing you that the installation has completed appears. Click Restart to restart
your Macintosh computer.
The next step is the installation of the Roman Screen Font.
To install Roman screen f onts
The OKI DP-7000 RIP comes with the Roman fonts , ‘T ype 1 font (117 typestyles)’ and ‘TrueType font
(19 typestyles)’.
• If your Macintosh system uses the TrueType style screen fonts for Times, Helvetica, Courier, Symbol,
replace these with the Type 1 style font.
• By default, the program will replace NewYork with Times, Genev a with Helv etica and Monaco with
Courier. To print without replacing any of the fonts, uncheck Substitute Fonts box selected by the
PostScript Options tab in the Page Setup for the Adobe PostScript Driver.
1. Install Roman screen fonts.
Open the ‘Screen Fonts’ folder and double-click the PS3 Fonts Installer icon.
2. Read license agreement.
The Electronic End User License Agreement appears. Read through the terms of the
License Agreement; then click Accept to accept the agreement.
10
Page 12
Chapter 1. Set Up
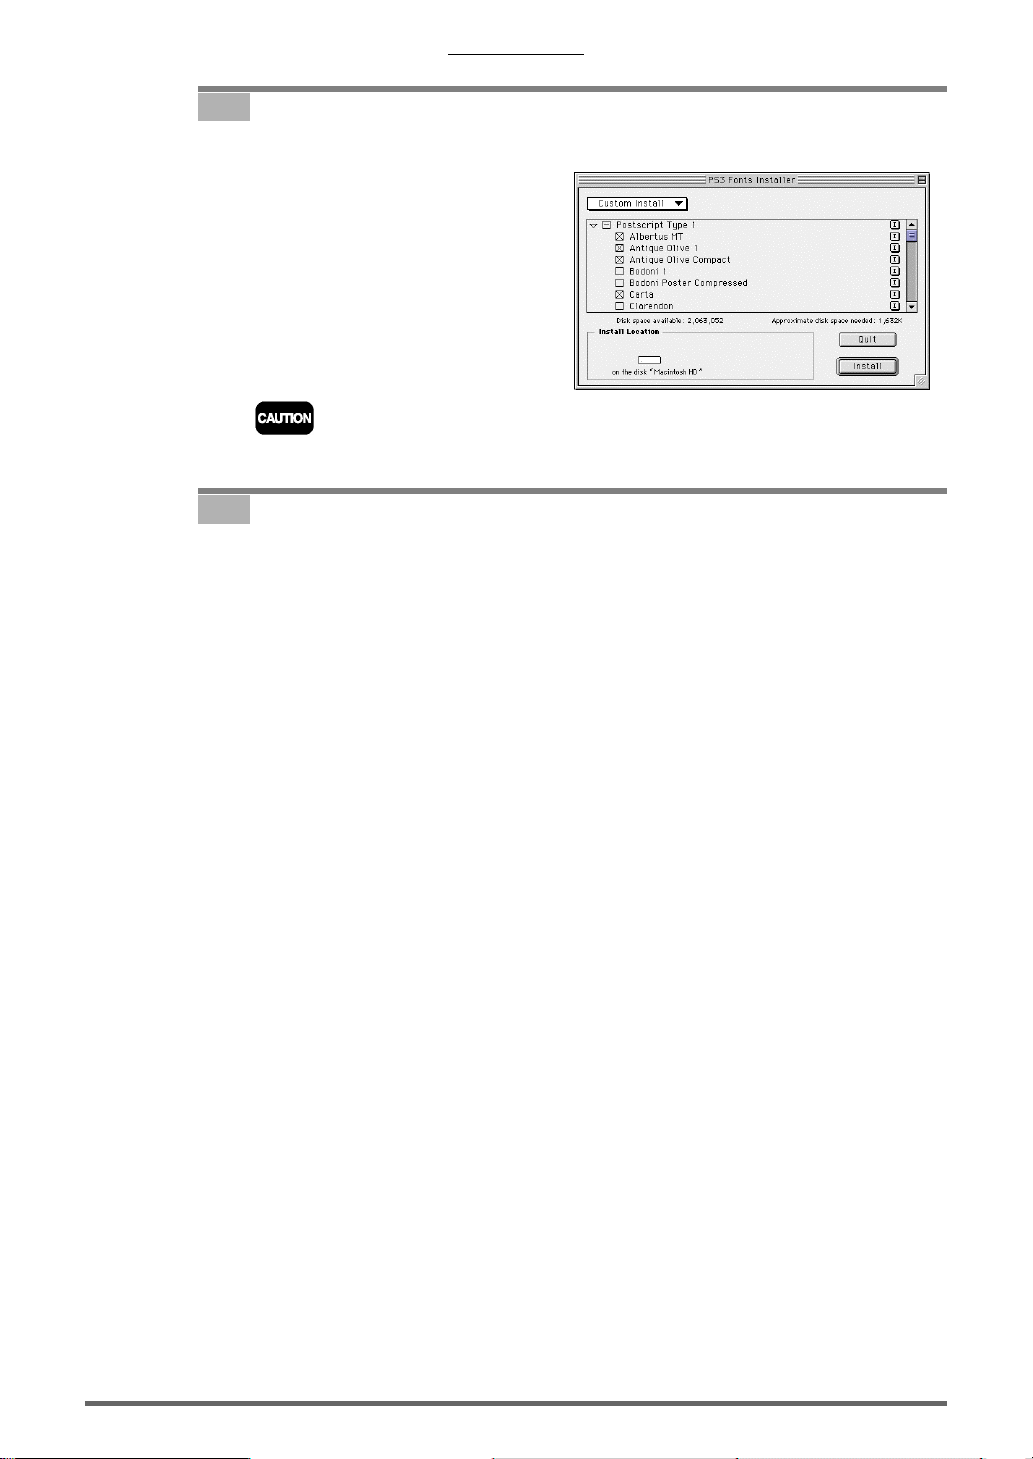
3. Select font to add.
Select Custom Install to confirm which fonts to add; then click Install.
Selecting Easy Install will install all fonts. Use Custom Install when you wish to specify which fonts to
install.
4. Restart.
Click Restart to restart your Macintosh computer.
This completes the software installation. The next step is to connect the printer and enter the various
RIP settings.
11
Page 13

Chapter 1. Set Up
To connect the DP-7000 to your computer
Connect the DP-7000 to your computer using the procedures described in Chapter 2 ‘Computer
connection’ in the Printer User's Guide DP-7000.
USB connection
USB interface connector
SCSI connection
Connect after the optional SCSI adapter has been installed.
SCSI adapter
USB port
USB cable
Dip switch
SCSI interface connector
Terminator
SCSI cable
12
Page 14
To set up the printer
Set up the printer by starting up RIP.
In addition to enabling the computer on which it is installed to print directly from the printer, the OKI DP7000 RIP also enables the computer to function as a print server. This makes it possible to print from
individual client computers connected to a network.
1. Start up RIP.
Double-click the OKI DP-7000 RIP icon.
An OKI DP-7000 RIP icon is placed on the desktop when he installation of OKI DP-7000 RIP completes.
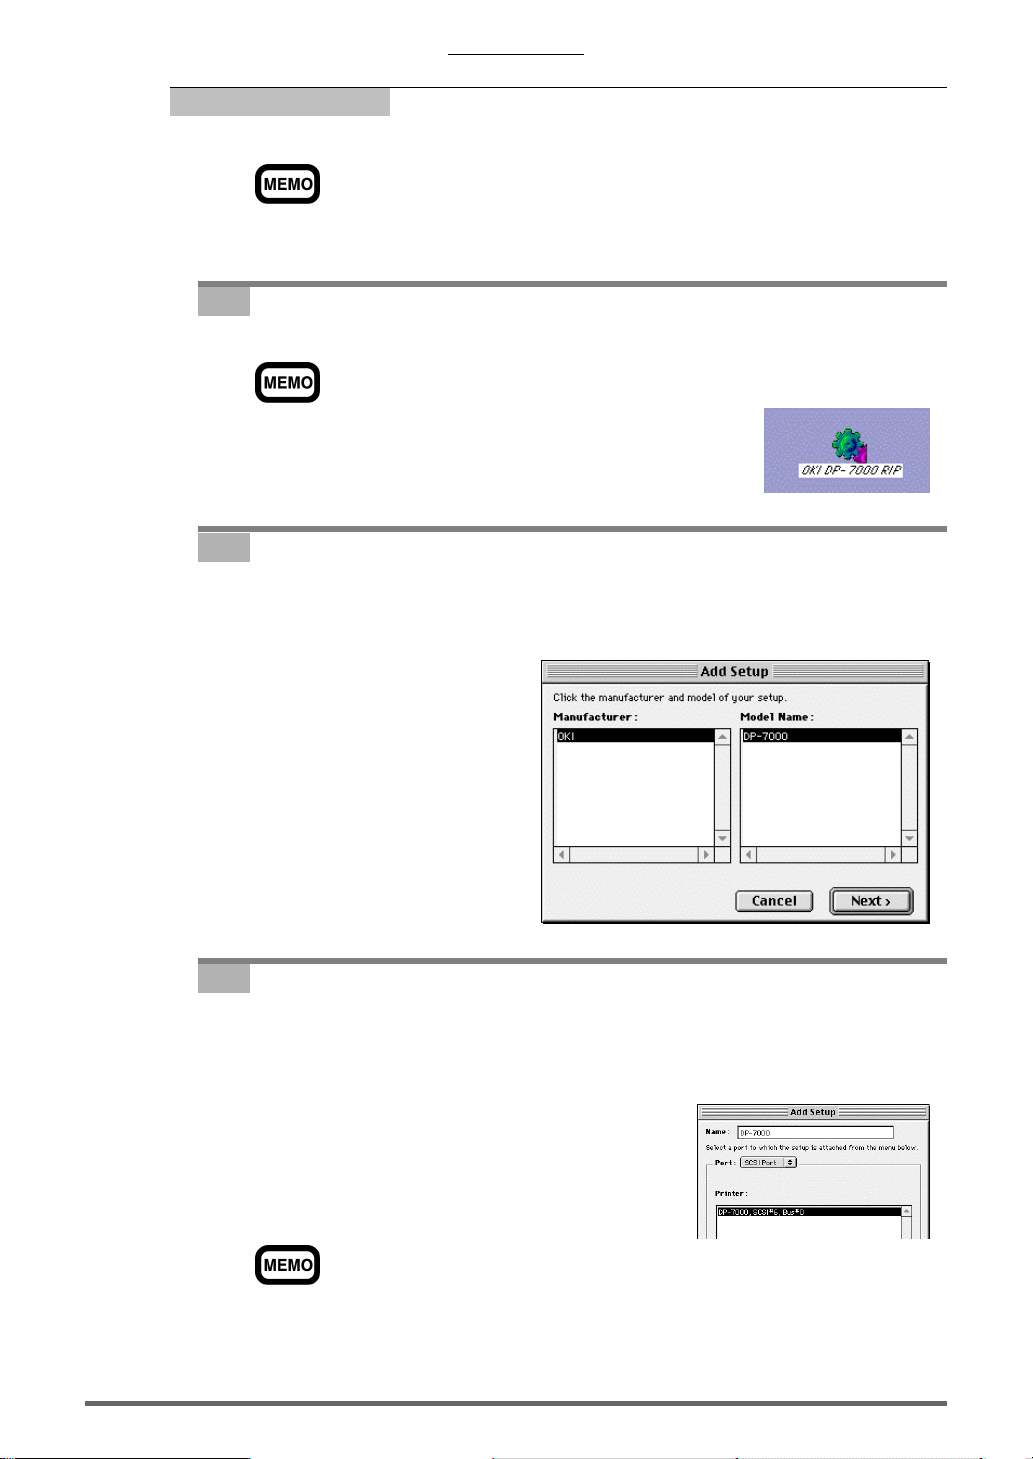
2. Confirm Add Setup.
Confirm the Add Setup box and click Next.
Chapter 1. Set Up
3. Choose port.
Select the port (SCSI port or USB port) to which the printer is currently connected from the
Add Setup dialogue box. This displays the name of the connected printer. Select the name of
the printer to use from the list and click OK.
Use the standard settings for names displayed in the Add Setup dialogue box. When you change a name,
make sure that the new name has no more than 28 characters in length.
13
Page 15
Chapter 1. Set Up
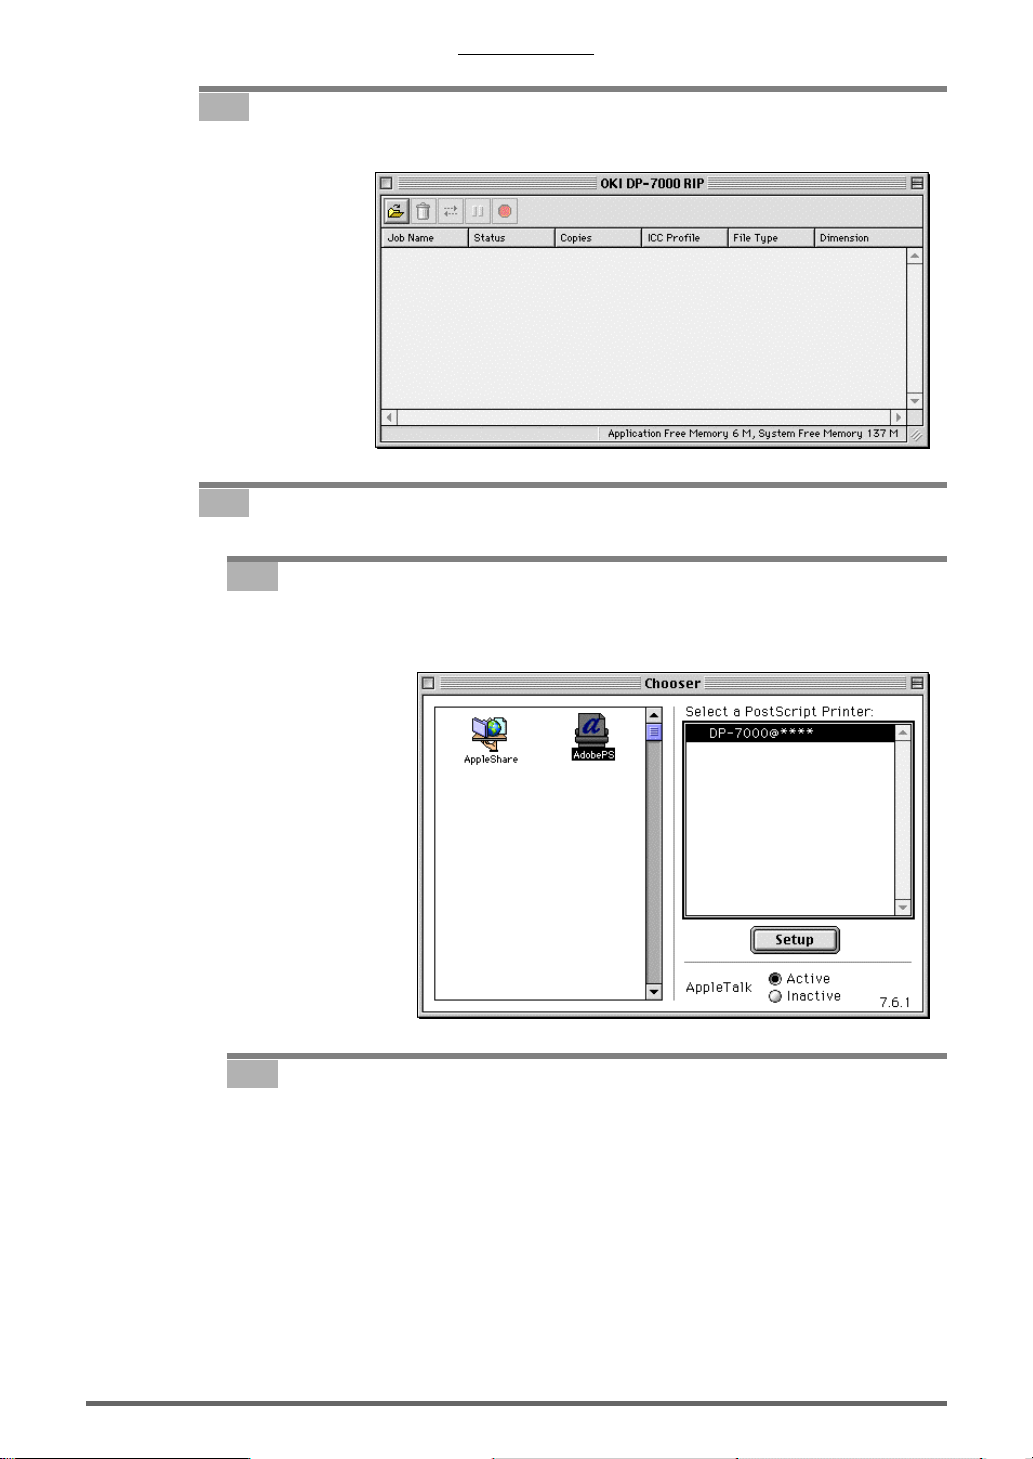
4. Confirm RIP start up.
Confirm that the Print Monitor has been displayed.
5. Select AdobePS.
5-1 Printing from the computer in which RIP is installed.
Open Chooser from the Apple Menu and select AdobePS. Choose DP-7000@**** (****
will show your computer’s name) from the Select a PostScript Printer list and click Setup.
5-2 Printing from a Client Computer.
Copy the PPD file ‘AmOKIDP7000.PPD’ in the ‘DP-7000 RIP>Printer Descriptions’ folder
on the DP-7000 Installation Disc CD-ROM to ‘System Folder > Extensions > Printer
Descriptions’ folder of the client computer.
Open Chooser from the Apple Menu and select AdobePS. Select DP-7000@**** (****
will show your computer’s name) from the Select a PostScript Printer list and click Create.
14
Page 16
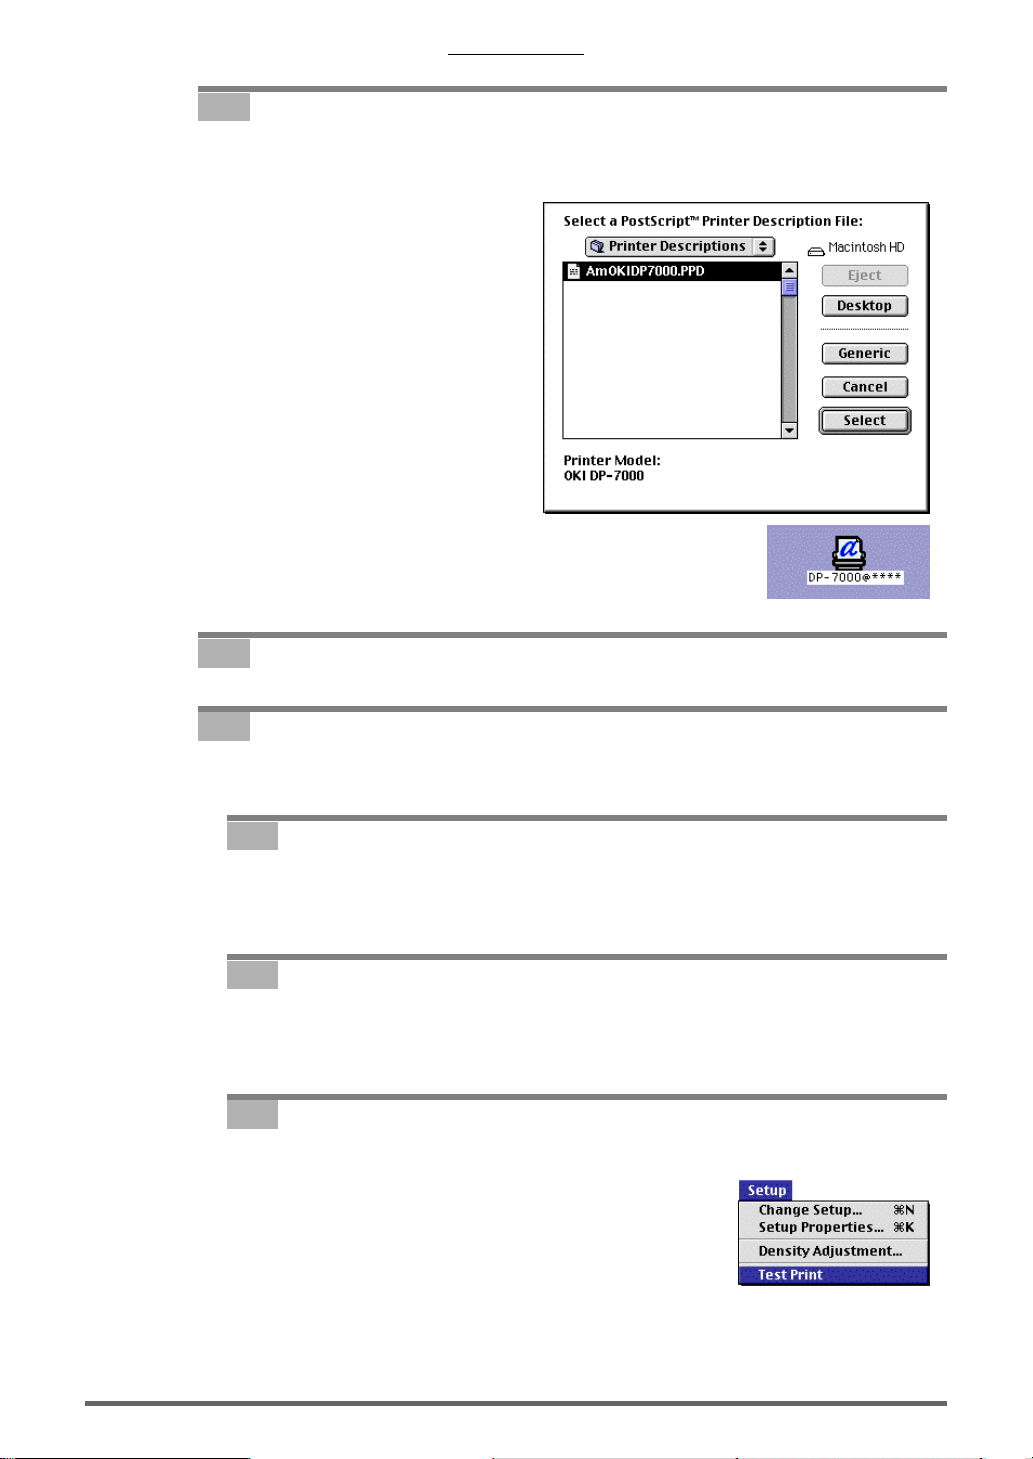
6. Select the PPD file.
Select AmOKIDP7000.PPD and click Select. This sa ves the PPD f ile in the ‘System F older
> Extensions > Printer Descriptions’ folder and displays the DP-7000@**** desktop icon.
Chapter 1. Set Up
7. Close Chooser.
8. Test print.
Test print a page to confirm that the printer is properly connected.
8-1 Install the ink cartridge.
Select Process Cyan, Process Magenta, Process Yellow and Process Black as described in
Chapter 2 ‘Installing ink cartridge’ in the Printer User's Guide DP-7000.
8-2 Load Press Paper-Matte.
Select Press P aper-Matte as described in Chapter 2 ‘Loading paper’ in the Printer User's
Guide DP-7000. Note that the paper size for the test pattern is A4.
8-3 Perform test print.
Test print a page by selecting Test Print from Setup.
15
Page 17

Chapter 1. Set Up
To uninstall RIP
Use the procedures described below to uninstall the RIP.
1. Close the Print Monitor.
The Print Monitor should be closed while the RIP is starting.
2. Drag the OKI DP-7000 RIP icon to the Trash.
Drag and drop the OKI DP-7000 RIP icon on the desktop to the Trash.
3. Drag and drop the ‘OKI DP-7000 RIP’ folder to the Trash.
4. Open the ‘System Folder’.
5. Open the ‘Preferences’ folder.
Drag and drop ‘OKI DP-7000 RIP Preferences’ and ‘OKI DP-7000 RIP Prefs’ to the Trash.
6. Open the ‘Extensions’ folder.
Drag and drop ‘Am_DP-7000’ to the Trash.
7. Open ‘Extensions>Printer Descriptions’.
Drag and drop ‘AmOKIDP7000.PPD’ to the Trash.
8. Restart computer.
9. Empty Trash by holding down the option key.
16
Page 18
Chapter 2. Functions of the RIP
Chapter 2. Functions of the RIP
This chapter describes the various functions provided with the Raster Image Processor (RIP).
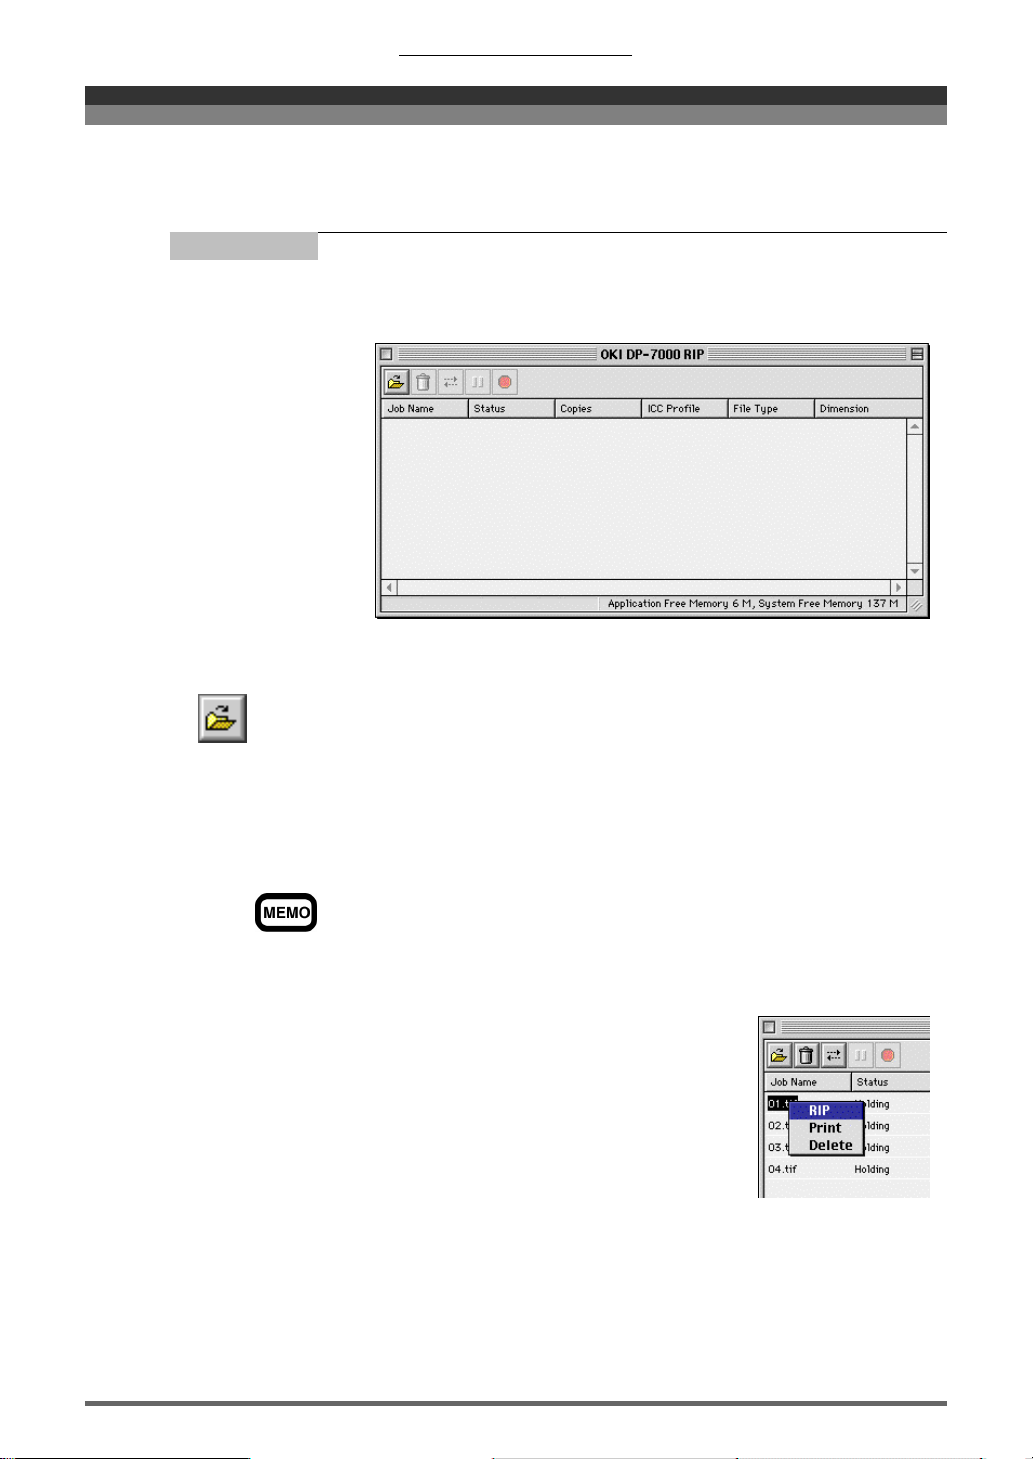
Print Monitor
The Print Monitor is displayed when the RIP is started (double-click the OKI DP-7000 RIP icon). The
Print Monitor manages the queue containing the various jobs to be printed.
Function of each button
Add Job
To add jobs to the Print Monitor. Select the file to be added, and click Open. Compliant formats
are JPEG, PDF, PostScript and EPS. The added job names will appear in the Print Monitor.
Except for PostScript file, the status of added job will be Holding. To carry out printing, select
job files (it is possible to select a few) and click Print. RIP processing will be started. After RIP
processing has finished, printing will commence.
RIP stands for Raster Image Processor, and is a process that converts data for output into a series of dots
that are used to reproduce the data on paper. RIP processing is complex, which means that processing time
is greatly influenced by your computer' s processing capacity and the size of a file.
Clicking on a job and holding down the mouse button displays the following pop-up menu.
RIP: applies RIP processing to a job.
Print: prints the job.
Delete: deletes the job.
1717
Page 19
Chapter 2. Functions of the RIP
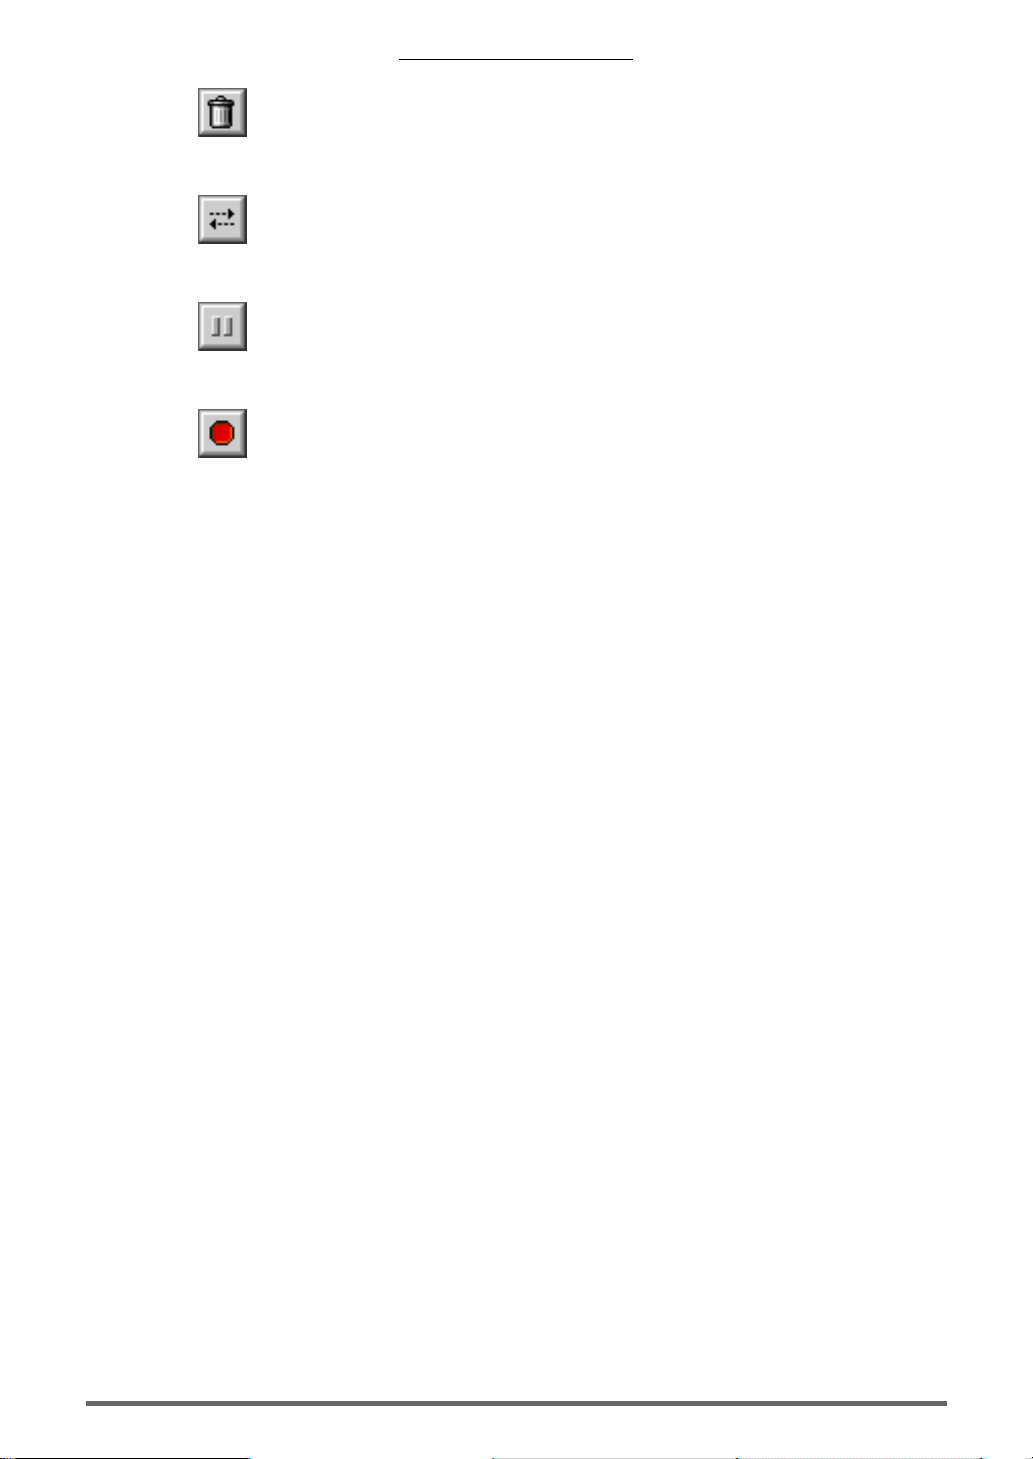
Delete
To delete jobs, select the job file or files you wish to delete and click Delete in the Print Monitor
window.
Print
To print jobs, select the job file or files you wish to print and click Print in the Print Monitor
window.
Pause
To pause during printing, select the job file or files on which to pause from the Print Monitor
window by clicking on the file name and then clicking P ause. Click Pause again to restart printing.
Abort
T o abort jobs, select the job file or files you wish to abort and click Abor t in the Print Monitor
window.
Information display
Jobs to be printed are queued in the order that the y are sent. The following information is displayed for
each job on the Print Monitor.
Job Name: name of the file.
Status: current status of the job (i.e. Holding, Riping or Printing)
Copies: number of copies to be printed.
ICC Profile: displayed here is the name of the media for the profile entered in the Output profile
described in the Print tab window on Setup Properties. Although the name of the
media is displayed even when the Perform Colour Correction box is unchecked it
will not affect print output.
File Type: file type for the selected job.
Dimension: displays the size of the rectangular area that encloses the entire image of the job file
when using the JPEG, TIFF, and EPS formats. The size of the rectangular area and the
size of the media to be printed may differ depending on the application. 8.500 x 11.000
in. is displayed when the sizes differ, ho we ver , the job is printed to the size specif ied in
the Page Information section of the file.
18
Page 20
Chapter 2. Functions of the RIP
Menu This section describes the Menu that may appear after the RIP has started.
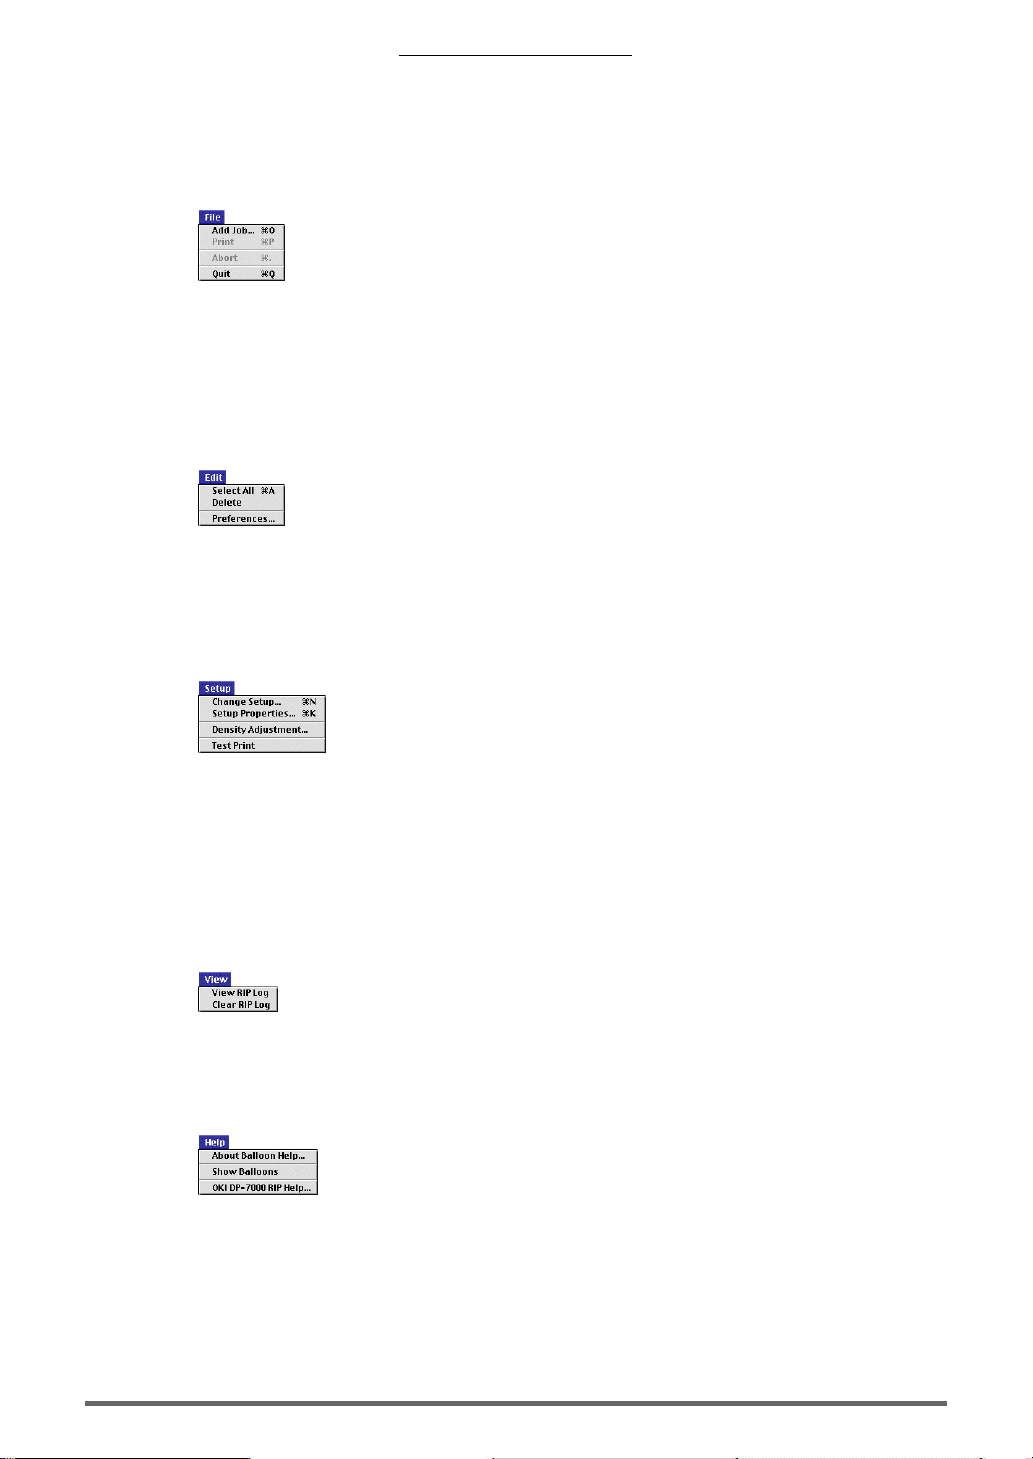
File
Add job: performs the same function as the Add job button.
Print: performs the same function as the Print button.
Abort: performs the same function as the Abort button.
Quit: quit the RIP program.
Edit
Select All: select all jobs added to the Print Monitor.
Delete: performs the same function as the Delete button.
Preferences: refer to the page entitled Preferences.
Setup
Change Setup: changes the device setting. When selected, items entered in Setup Properties are
initialised as default.
Setup Properties: refer to the next page.
Density Adjustment: refer to the page entitled Density Curve Adjustment.
Test Print: runs a test print in an A4 pattern.
View
View RIP log: displays the internal current status and error information internal to the RIP operation.
Clear RIP log: clears the RIP log.
Help
Displays the content of the user’s guide for the OKI DP-7000 RIP as a PDF file.
Adobe Acrobat Reader is required to display PDF format files. The Adobe Acrobat Reader
can be installed by clicking on the ‘Reader Installer’ in the ‘Acrobat Reader’ folder on the
CD-ROM.
1919
Page 21

Chapter 2. Functions of the RIP
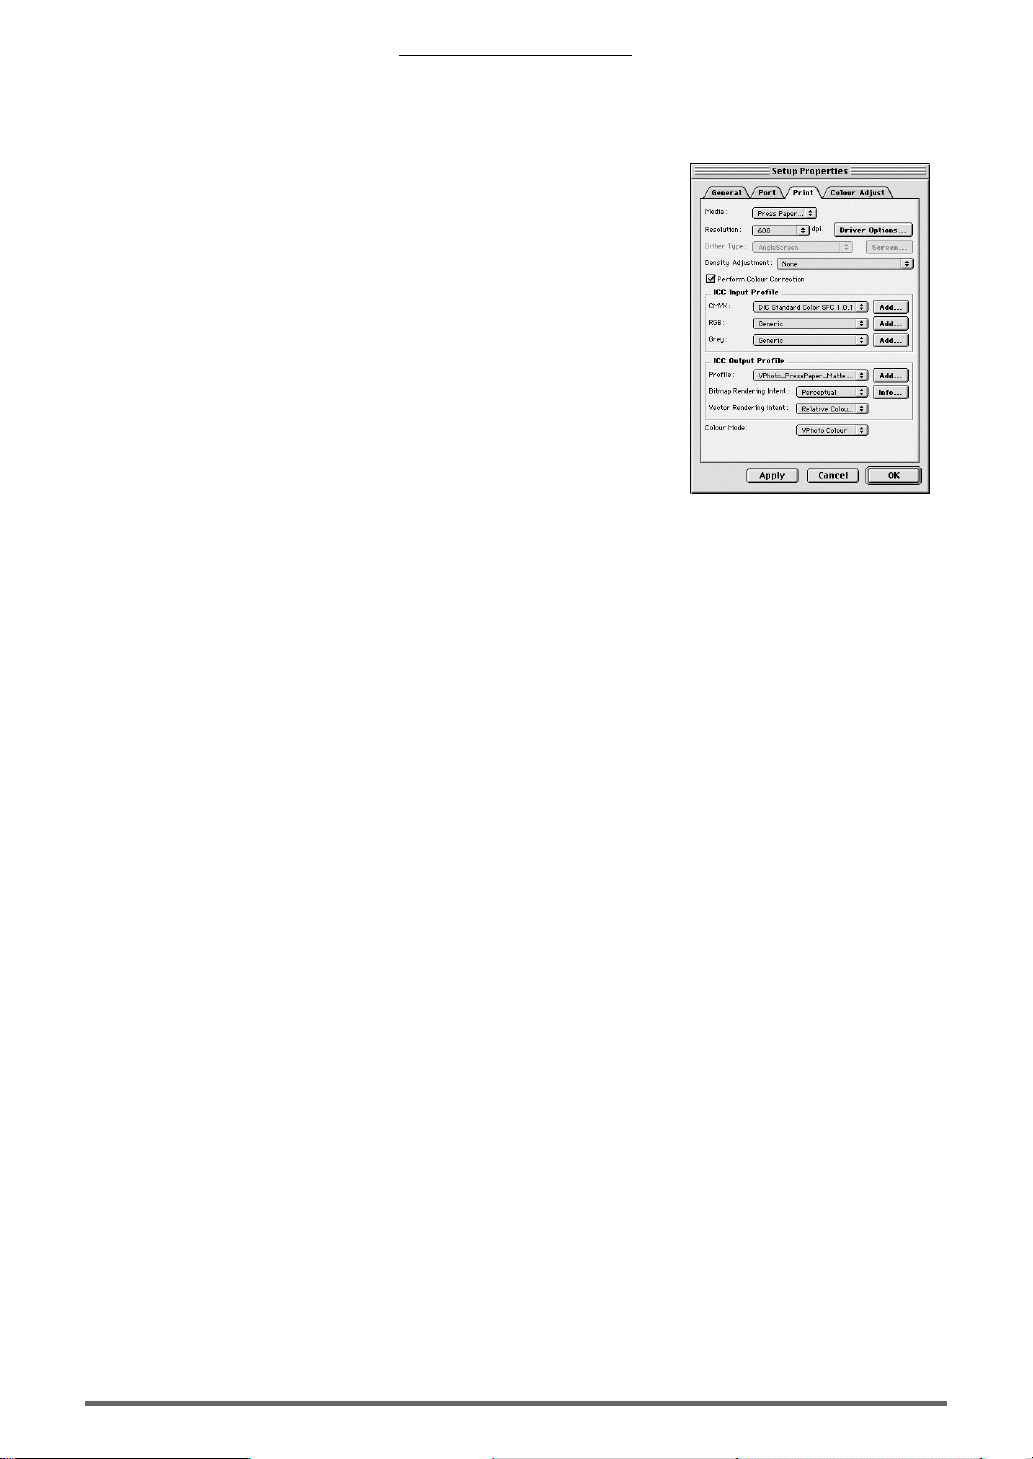
Setup Properties
The various printer settings are entered in Setup Properties. To display the Setup Properties,
operate Setup > Setup Properties from the menu bar.
General tab
This selects the media size. If you wish to specify custom media size, select Other from the media size
menu and specify each parameters you wish.
The minimum is (width) 98.0 mm - (length) 148.0 mm, and the maximum is (width) 330.2 mm - (length)
681.0 mm. After setting, click Apply.
Make sure that the media size in the General Tab is the same as the media size in the Adobe PostScript
Driver and the actual media to be printed.
Port tab
This selects the port (SCSI port or USB port) to which the printer is currently connected. The connected
printer name is displayed when the port is selected.
20
Page 22
Chapter 2. Functions of the RIP
Print tab The various processing settings for the file to be printed are entered from the Print tab
Media
This specifies the media type. The seven media types include Press Paper-Matte, Press
Paper-Art, High Grade Paper, Cardboard (Thick Paper), VPhoto Film, Transfer
Film and Transparency Film.
Some of the Resolution, Driver Options and Colour Mode items are not available with
certain media types.
Resolution
This specifies the media type. The seven media types include Press Paper-Matte, Press
Paper-Art, High Grade Paper, Cardboard (Thick Paper), VPhoto Film, Transfer
Film and Transparency Film.
Some of the Resolution, Driver Options and Colour Mode items are not available with
certain media types.
Dither Type
This specifies the dither type to be used when printing. AngleScreen is the only setting
provided here. AngleScreen can only be enabled when either Media to Press Paper-
Matte or Press Paper-Art have been selected and CMYK (AngleScreen), CMYK
(AngleScreen)+Spot, Greyscale (AngleScreen), or Greyscale (AngleScreen)+Spot
have been entered in the Colour Mode. The AngleScreen dialogue box is displayed by
clicking the Screen button.
The type of dither used depends on the Colour Mode. There are two types of dither; the
dither specifically optimized to printer type and the PostScript unique dot dither. When CMYK
(AngleScreen), CMYK (AngleScreen)+Spot, Greyscale (AngleScreen) or
Greyscale (AngleScreen)+Spot is selected as the Colour Mode, the image will be printed
using the PostScript unique dot dither. For colour modes other than these, the dither specif ically
optimized to printer type is used.
2121
Page 23
Chapter 2. Functions of the RIP
Screen
This displays the dialogue box for entering dot Shape, Frequency and Angle settings. The
parameters can be set for all colours used for printing.
Dot Shape, Frequency and Angle determine the colour when AngleScreen is selected
for dither type. Therefore, the image may not be printed in colours best suited to the printer.
Density Adjustment
This selects the profile (Density Curve) on which density adjustment has been perform.
Refer to the section entitled ‘Density Curve Adjustment’.
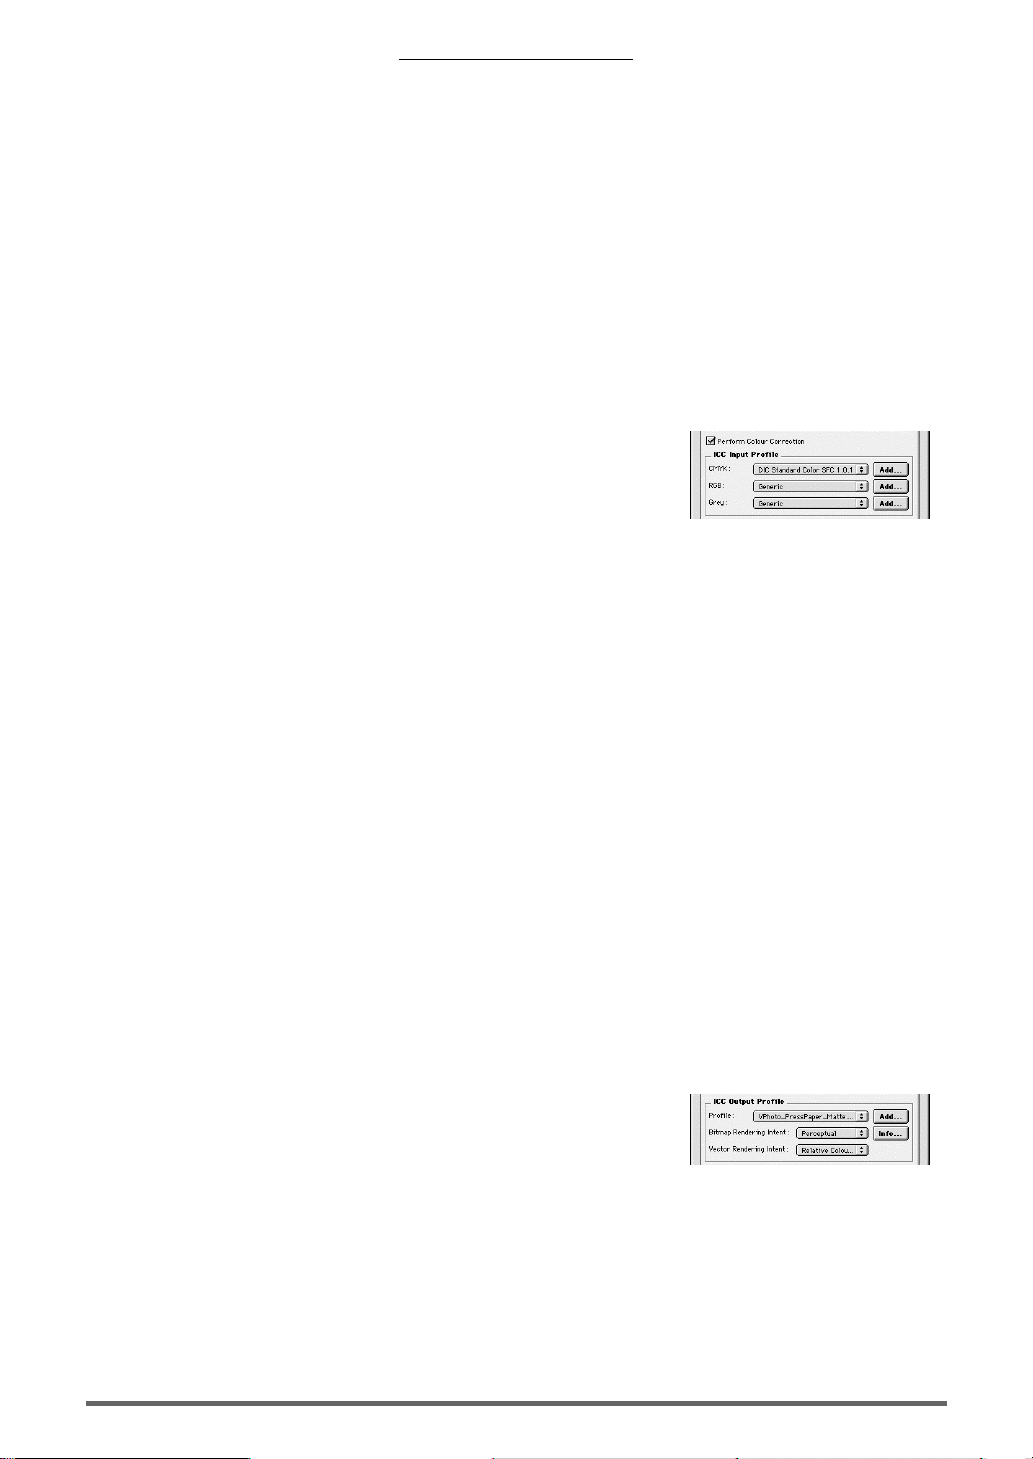
Perform Colour Correction
This selects Colour correction based on ICC Input Profile and ICC Output Profile.
ICC Input profile
Three types of input profiles are provided. The ICC profiles are used to define each colour
space to be input to the RIP . Only users with a good understanding of ICC profiles should use
settings other than the default settings.
CMYK
DIC Standard Color SFC 1.0.1 is the default. Other profiles can be specified using the
Add button.
RGB
RGB corresponds to monitor profiles. Other profiles can be specified using the Add button.
Grey
This specifies the ICC profile for the grey component. Other profiles can be specified using
the Add button.
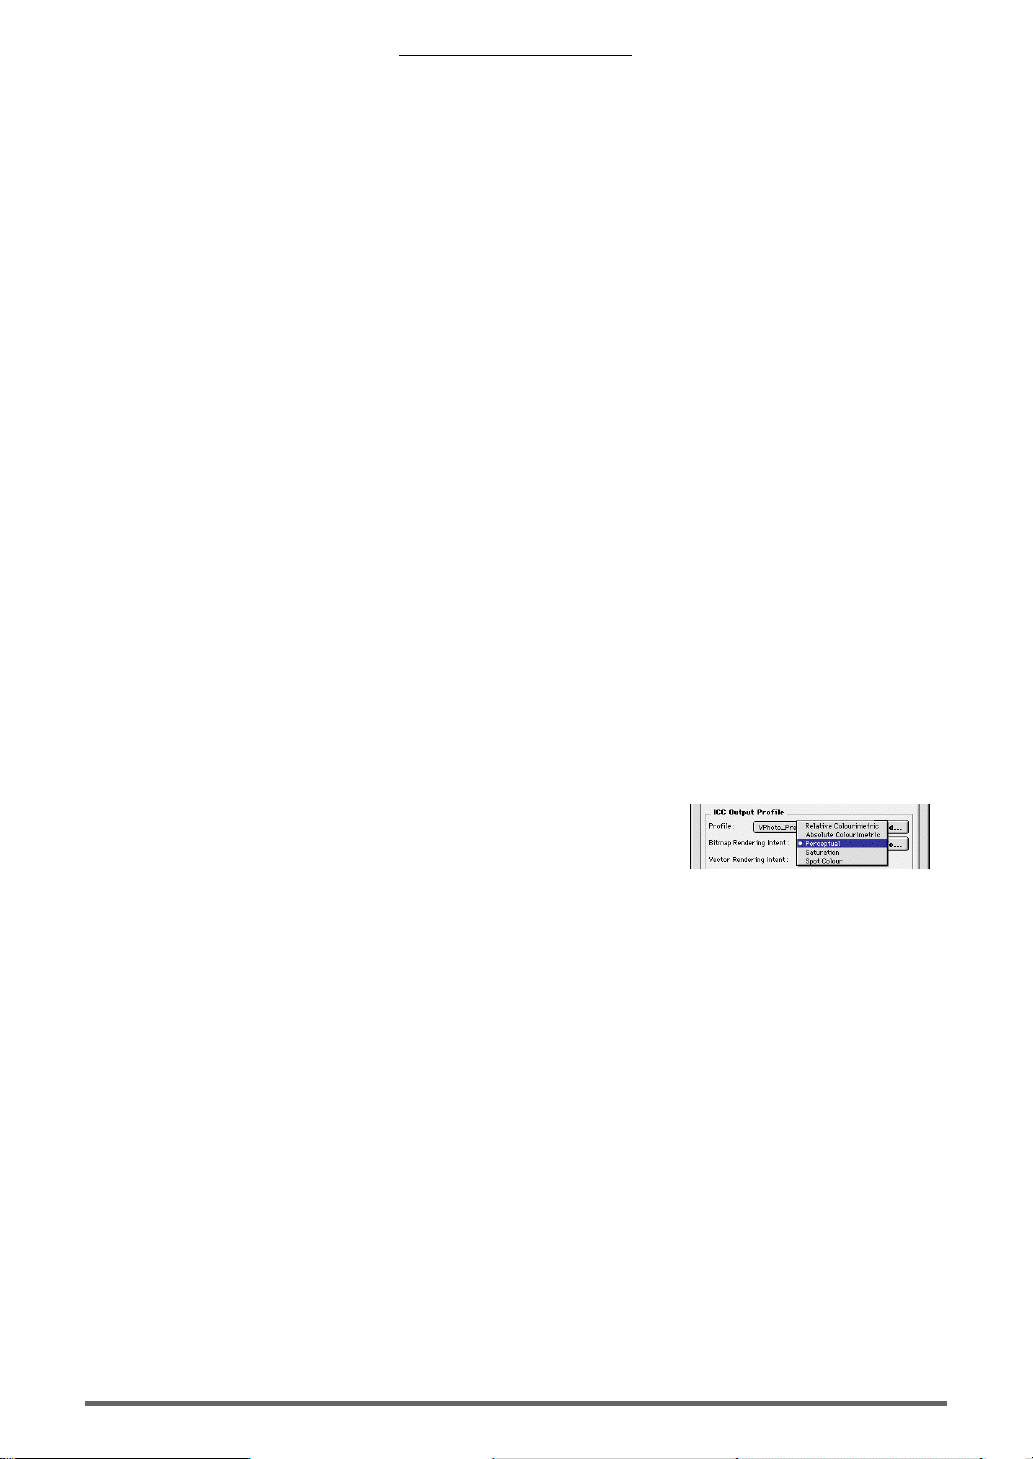
ICC Output profile
This specifies the output profile corresponding to the combination of Media and Colour
Mode. When the Perform Colour Correction box is unchecked, any selected settings will
not be enabled for the print output.
22
Page 24
Chapter 2. Functions of the RIP
Profile
This defines the characteristics of the user’s printer. Eight types of ICC profiles based on the
combinations of Media and Colour Mode that can be printed have been installed. Select the
desired profile from the pop-up menu. The media corresponding to the selected profile is
displayed in the Media field in the Print Monitor.
Profile Colour Mode Media
VPhoto_PressPaper_Matte.icm VPhoto Colour Press Paper-Matte
VPhoto_PressPaper_Art.icm VPhoto Colour Press Paper-Art
VPhoto_VPhotoFilm.icm VPhoto Colour VPhoto Film
VPhoto_VPhotoFilm_TOYO.icm VPhoto Colour VPhoto Film
VPhoto_TransferFilm.icm VPhoto Colour Transfer Film
VPhoto_TransparencyFilm.icm VPhoto Colour Transparency Film
CMYK_HighGradePaper.icm CMYK High Grade Paper
CMYK_PressPaper_Matte.icm CMYK(AngleScreen) Press Paper-Matte
CMYK_PressPaper_Art.icm CMYK(AngleScreen) Press Paper-Art
Bitmap Rendering Intent / Vector Rendering Intent
Rendering Intent is used to specify the procedure for matching the colour value of the input
image or input vector for the colour gamut of the printer. The colour gamut refers to the colour
range the device is capable of generating. Before RIP starts processing to the file, an ICC
Profile is converted to a CRD (Colour Rendering Dictionary). This RIP allows the Rendering
Intent to be set independently for the vector object and the image object. The Image Rendering
Intent is only applicable to bitmap object. The Vector Rendering Intent is applicable to line,
rectangle and text objects other than bitmap data.
Relative Colourimetric
This option is selected when working with logos and other design elements, where exact
matching is important, even when working with fewer colours. With this method, the colour
match is adjusted without changing the colours within each device’s gamut. Because colours
outside the gamut are compressed to colours with similar tone within the limits of the gamut
range, variation in gradation may be lost.
2323
Page 25

Chapter 2. Functions of the RIP
Absolute Colourimetric
This Rendering Intent produces the same effect as Relative Colourimetric with the exception
that is does no apply white point matching. The result is that the input white object is reproduced
with no colour (paper white).
Perceptual
Perceptual is best suited to photographic images. Colours in the input data are scaled to fit the
output device’s colour gamut while preserving the relationships between colours.
Saturation
This method is selected when the colour itself is not as important as the definition of colour
contrast. This matching technique preserves the saturation characteristics for individual colours
within the gamut. Colours outside of the gamut are converted to colours with the same saturation
up to the limits of the colour gamut but with different brightness.
Spot Colour
Spot Colour is suited to use with vector data (text). This option, which applies the maximum
available saturation, should only be used with non-photographic images. When performing
Colour Correction on documents that combine text with photographic images, Image Rendering
Intent for the images should be set to Perceptual (Image). In addition, Vector Rendering Intent
should be set to Spot Colour when printing with only Black for text sections.
Spot Colour is an intent designed for reproducing pure colours and should not be used for standard colour
correction. When documents contain a combination of vector objects that require colour correction, as well
as 100% black text objects, be sure to use one of the following techniques.
Overlay Mode
Go to Driver Options, enable Overlay Mode; then print only the 100% black text layer without colour
correction. Next, disable the Overlay Mode, determine the setting of colour correction as desired and
print the remaing objects that are reiquired colour correction.
Using Black Spot
Specify “Black Spot” for the 100% black text, specify the desired colour correction for the other objects
and print.
* When the objects to be applide colour correction are in both bitmap and vector format, specify the desired
intent for bitmap and vector objects individually.
* “Spot Colour” described here as an intent is different from “ spot colour” that is used ingeneral such as “
Green Spot” ink.
24
Page 26

Information
his displays the ICC Profile Properties dialogue box for use in confirming the Output
profile details entered in Profile.
General tab
This tab is used to display basic profile information.
GCR tab
The following information that has been entered in the Output profile can be modified.
Each output profile attached to this RIP is optimized based on the print properties. Changes made to individual
items of information are reflected in the attached profile. Users should have a good understanding of each
characteristic feature and make a copy of the profile before modifying any information.
Black Generation
This specifies the ratio for using Black ink in Grey components created using combinations of
the four colours, CMY and K.
Total Ink Limit
This specifies the total ink quantity. 400% (no limit) has been set as the default in the profile.
For normal operation, it is not necessary to change this value.
Black Ink Start
This specifies the starting point for adding the Black ink to be used for representing Grey
components.
Black Ink Limit
This specifies the maximum limit for Black ink with the highest density.
2525
Page 27

Colour Mode
This selects the Print Method. The available Colour Modes vary according to the Media
being used. The colours are listed below.
Chapter 2. Functions of the RIP
*1 Supported spot colours in this mode are all spot colour inks supported by your printer except
Opaque White.
*2 Supported spot colours in this mode is only Opaque White.
When the crop or registration mark is drawn with the Registration colour in a Postscript application document
and a composite output is made to OKI DP-7000 RIP, if the setting of the RIP Colour Mode pop-up menu
is set to [+ Spot], the crop or registration mark is printed out using all supported inks (including spot colour
ink). During composite output of an object such as a crop registration mark to a document containing spot
colour, print out the object using only K100% for the colour. Furthermore, during monochromatic colour
separation output or two colour printing, printing may be performed without problem even if the register or
crop mark colour designation is set to Registration colour.
VPhoto Colour and VPhoto Greyscale perform printing by using 16 greyscale variable dot control at
a resolution of 600 dpi. This makes it possible to obtain high-definition prints. In other colour modes
(colour modes not containing the words “VPhoto”), two grey scale printing is performed without using
variable dot control.
26
Page 28

Chapter 2. Functions of the RIP
Driver Options
Display the Driver Option.
2-Colour Press
Test printing of combinations of the two types of inks used for the flyers is possible when
High Grade Paper is selected for the Media and 2-Colour Press is selected for the Colour
Mode.
2-Colour Combination
This specifies the ink combinations that will be supported by 2-Colour Press. Users can
choose from the five following combinations. The ink on the left side of the combination is
the used for the first print and the ink on the right for the second.
Green_Spot & Red_Spot
Blue_Spot & Red_Spot
Red_Spot & Black_Spot
Green_Spot & Black_Spot
Blue_Spot & Black_Spot
Change Separation Order
The separation output colours for each application are Cyan, Magenta, Yellow, Black and
Spot colour inks (in alphabetical order). This checkbox should be checked when the order is
different from the order of the supporting ink combination.
When Red_Spot & Black_Spot, Green_Spot & Black_Spot or Blue_Spot & Black_Spot are
selected as the 2-colour combination, the checkbox is checked as the default. This means that
when the Red_Spot & Black_Spot combination is selected, for example, Red_Spot will be
used for the second print and Black_Spot for the first. This checkbox is unchecked by default
when the other combinations are selected,
The SpotColorLibrary, which defines spot colour inks for FreeHand 8.0, Illustrator 8.0, P ageMaker 6.5 and
QuarkXPress 4.1, is contained on the CD. Refer to the section on Chapter 3 ‘To set up SpotColorLibrary’
for further information on the set up procedure for each application. Furthermore, since the SpotColorLibrary
does not support the spot colour inks for Photoshop, please manually enter the spot colour inks name of the
colour channel when creating image data for two colour printing (DCS2.0 format).
2727
Page 29

Glossy Finish
Select this function to produce printouts with photograph-like Glossy Finish.
None
Whole Page
Ribbon Replace
Checking this checkbox displays the Ribbon Replace dialogue box prior to printing. This
specifies the colour to be substituted for color (Cyan, Magenta, Yellow or Black) selected in
the document to be printed.
This function is effective when printing with spot colour inks supported by this printer with applications,
such as Word and Excel, which do not support Spot colour inks.
Foil Undercoating
Checking this checkbox prints the foil colours on the foundation processing ( Black Spot
printing) when using Gold Foil and Silver Foil as spot colour inks.
Chapter 2. Functions of the RIP
To disable Glossy Finish.
Selecting this coats the whole surface of a rectangular area that includes letters, images
and vector objects to be printed on the page.
Foil inks provide the feel of gold or silver foils. Foil printing requires foundation processing because
special inks are used. The checkbox should be checked normally. It is possible to print foil inks on an
already printed surface using the Overlay Mode function by putting this checkbox off.
Overlay Mode
Checking this checkbox ensures that paper is not output after printing but is positioned at the
start location ready for the next printing.
This function works well when double printing with multiple pages using spot colour inks supported by
this printer on the media that have already been printed once with applications, such as Word and Excel,
which do not support spot colour inks.
Curl Correction
Checking this checkbox enables the printer’s curl correction (to prevent media from curling)
function.
Depending on selected media type, the checkbox is checked by default. Unchecking this checkbox will
prevent printed surfaces from being damaged by the Curl Correction function when printing on the back of
media that has already been printed once.
28
Page 30
Adjustment
Clicking the Adjustment button displays the Adjustment dialogue box.
Micro Feed
Intensity
Colour Adjust tab
Chapter 2. Functions of the RIP
The pitch at which to send to output media can be adjusted according to specified
media type. It is possible to adjust by moving the slider to the left or right to narrow
or expand the pitch, respectively.
Ink density can be adjusted for the specified paper type by moving the slider to the
left or right to darken or lighten density, respectively.
The gamma and contrast can be adjusted for each colour.
2929
Page 31

Chapter 2. Functions of the RIP
Density Curve Adjustment
By adjusting the Density curve, it is possible to compensate for dispersion and loss due to individual
differences. Adjusting the density curve is efficient in cases where the printer is linearized or when
output with as smooth a gradation as possible is desired. T o adjust density curves, select Setup>Density
Adjustment from the Menu.
Function of each button
New Profile
Use this button to create new profiles (density curves). The created profile will be added into
Density Adjustment in the Print tab from the Setup Properties.
Import Profile
Profiles (density curves) can be imported using this button. Click the Import Profile button and
then select the file to import it.
Export Profile
Use this button to export profiles (density curves). Select the prof ile and click the Export Profile
button to export it.
Profile Properties
Use this button to edit profiles (density curves). Select the profile and click the Profile
Properties button to display the Density Curve Adjustment dialogue and to edit the
density curve.
Delete Profile
Use this button to delete density files selected. Select the profile and click the Delete Profile
button to delete.
Refresh List
It is possible to update the list of Density Curve Adjustment files.
30
Page 32

Chapter 2. Functions of the RIP
Create and Edit Density curve
Click the New Profile button to create a new profile. When the Density Adjustment dialogue appears,
select CMYK/CMY from Colour T ype to adjust the density curve for the CMYK, or select the Greyscale
to adjust the density curve for only K.
Click Next button to edit the density curve, the Density Curve Adjustment dialogue appears.
The vertical axis represents the output density for the input value on the horizontal axis. If you use the
default setting, the density curve is a straight line and a 50% density input value read from the file will
print at 50 % coverage. Drag the curve line to the ne w location using the mouse. After editing, input the
file name and click OK.
3131
Page 33

Chapter 2. Functions of the RIP
Preferences
This specifies what to do with files after printing and the units for display on the Print Monitor. Select
Preferences from Edit menu.
Browse: Locate the RIP scratch folder necessary for creating temporary files during file
processing. For systems with multiple hard disks, select the hard disk with the most
available storage space. A shortage of disk space can result in memory errors when
processing larger files.
After Printing: Specify what to do after printing by selecting Delete Job or Hold.
Units: Select display units (in millimetres, centimeters, metres, inches or feet) for cases
when the media size is set to Other on the General tab and for the Dimension
setting of the Print Monitor.
32
Page 34

Chapter 3. Printing Procedures
Chapter 3. Printing Procedures
There are two ways to print. One is to print without running the application in which the data was
created and the other is to print by running the application.
Please do not use (do not select from Chooser) the standard driver (the print driver provided with the OKI
DP-7000) while performing RIP processing. Doing so can cause faults.
Printing without running the application in which the data was made
The following file format data can be printed without running the application in which the data was
created. Supported file formats include JPEG, TIFF, PDF, PostScript and EPS.
• The PDF file format is supported by Ver1.2 and the TIFF file format is supported by versions through
to V er 5. 0. If unable to print normally, run the application in which the data was created.
• A JPEG file saved in the CMYK Colour Mode can be printed in larger sizes than a JPEG file saved
in the original application. The print sizes are as follows:
Horizontal: Horizontal pixels / 72 [inches]
Vertical: Vertical pixels / 72 [inches]
• Since page information is not included as data in JPEG, TIFF and EPS formats, images are printed
justified to the left top corner.
• Please use paper sizes larger than the values displayed under Size for the Print Monitor for JPEG,
TIFF and EPS formats.
1. Start up RIP.
Double-click the OKI DP-7000 RIP icon.
2. Click Add job.
Click Add job from the Print Monitor.
3. Select the file to be printed.
Select file to be printed and click Open.
33
Page 35
4. Click Print.
When using the job file other than PostScript file, the Status for the added job will be Holding.
When using PostScript files, the job is printed according to the file settings. Select the job file or
files and click Print to print. This starts RIP processing after which the file is printed.
Jobs can be added using drag and drop directly to the Print Monitor window.
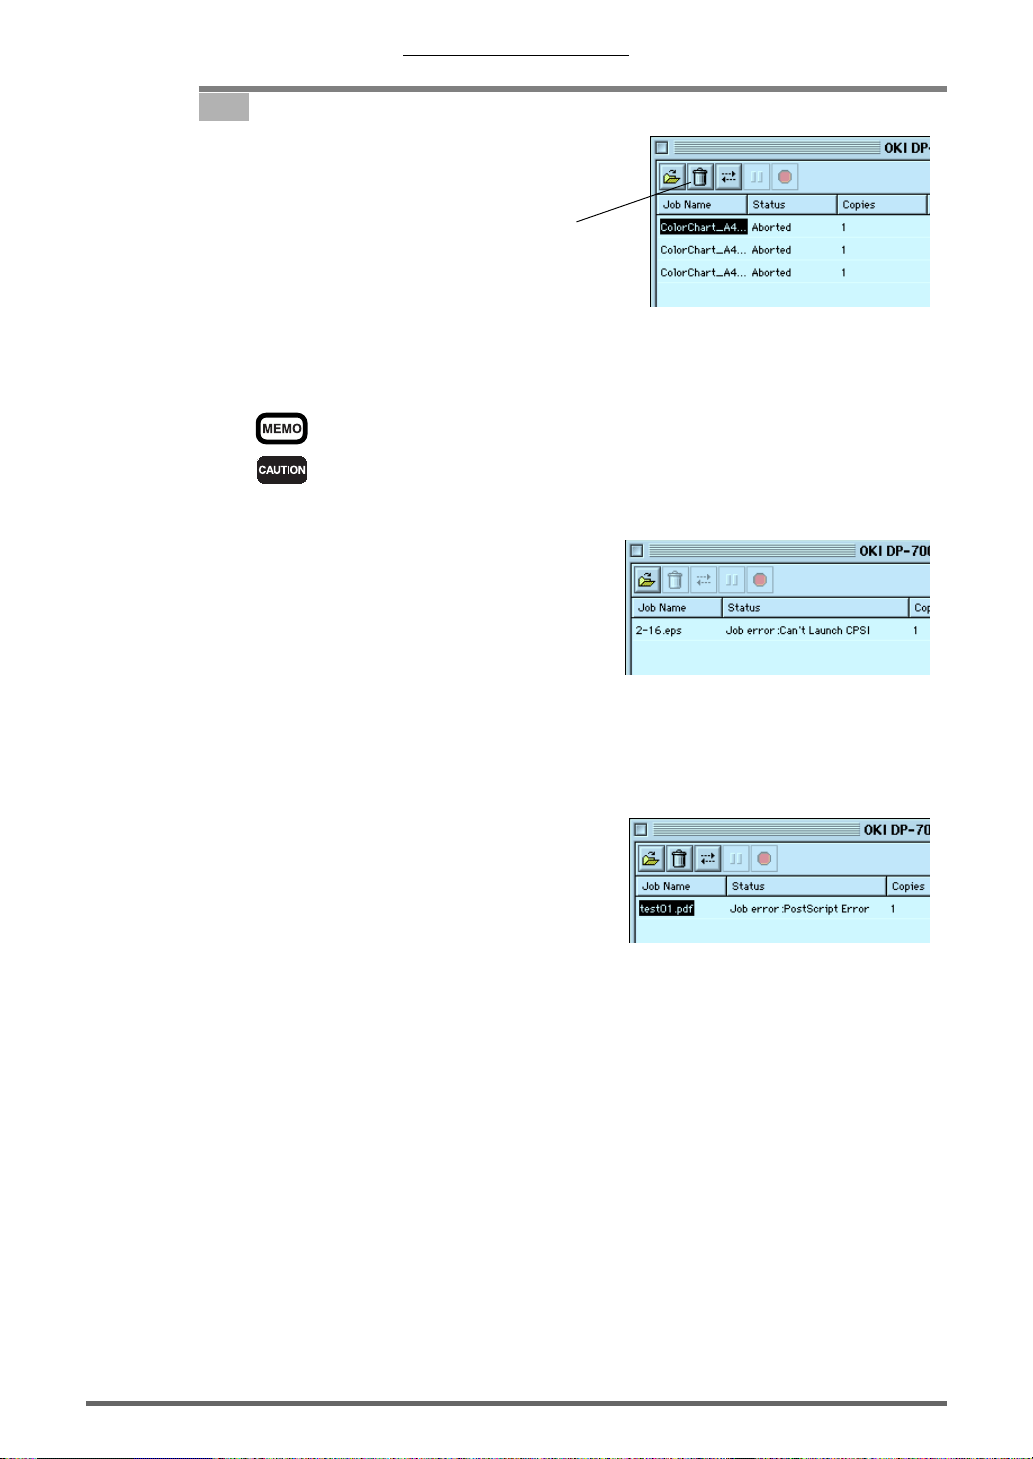
• When the Status of the Print Monitor displays the following messages when adding jobs, terminate
the RIP. Then select About This Computer from the Apple menu to confirm the current status of
the memory. Free up memory by closing any applications not being used.
Chapter 3. Printing Procedures
Select the job and click Print.
• When the following message appears during processing RIP after jobs have been added, check to
see if the View RIP log is being displayed in the View menu.
%%[ Error: VMerror; OffendingCommand: ]]%%
When this message appears in the log file, repeat the RIP processing after allocating more memory
to the ‘RIP Engine’ in the ‘Program’ folder.
34
Page 36

Chapter 3. Printing Procedures
Printing with the application in which the data was made.
1. Create data with the specified application.
2. Set OKI DP-7000 RIP.
Check the settings for each tab.
General : Media Size
Port : confirm that the printer name is displayed in the Printer list.
Print :
Media: specify a media for use.
Perform Colour Correction: On
ICC Input profile: select an appropriate profile.
ICC Output profile: select an appropriate profile and rendering intent
Colour Mode: select an appropriate colour mode.
3. Confirm DP-7000@xxxx in Chooser.
Open Chooser from the Apple Menu and select AdobePS. Choose DP-7000@xxxx (xxxx
will show your computer’s name) from Select PostScript Printer.
4. Select Page Setup from the File menu.
Specify the media size and orientation to be used and click OK after completing settings for
Page Setup.
• The selected function, Invert Image, in the pop-up menu PostScript Options will be disabled.
To print in reverse, select Negative Print from the pop-up menu Printer Specific Options in
the Print dialogue box.
• When wishing to print on Transparency Film and Transfer Film, check the Flip Horizontal
checkbox under Visual Effects in the pop-up menu PostScript Options.
35
Page 37

Chapter 3. Printing Procedures
5. Go to File>Print
In the application, go to File>Print in the application to display the Print dialogue box.
Confirm the following item
Printer: DP-7000@xxxx,
Destination: Printer
The settings can also be edited by selecting Printer Specific Options from the pop-up menu.
Select Printer Specific Options
from the pop-up menu.
After Spooling Selects what to do with the job after adding it into the Print Monitor.
When the job is set to Hold, RIP processing will not commence.
When the job is set to Print, printing is performed after RIP processing.
After printing Selects what to do with the job after printing.
Pause and Delete can be selected.
Negative Print: Either True or False can be selected for this function. If True is selected, the printing
will be in Negative Print (reversed Black and White).
6. Click Print.
Click Print in the Print dialogue box to start printing.
36
Page 38

Chapter 3. Printing Procedures
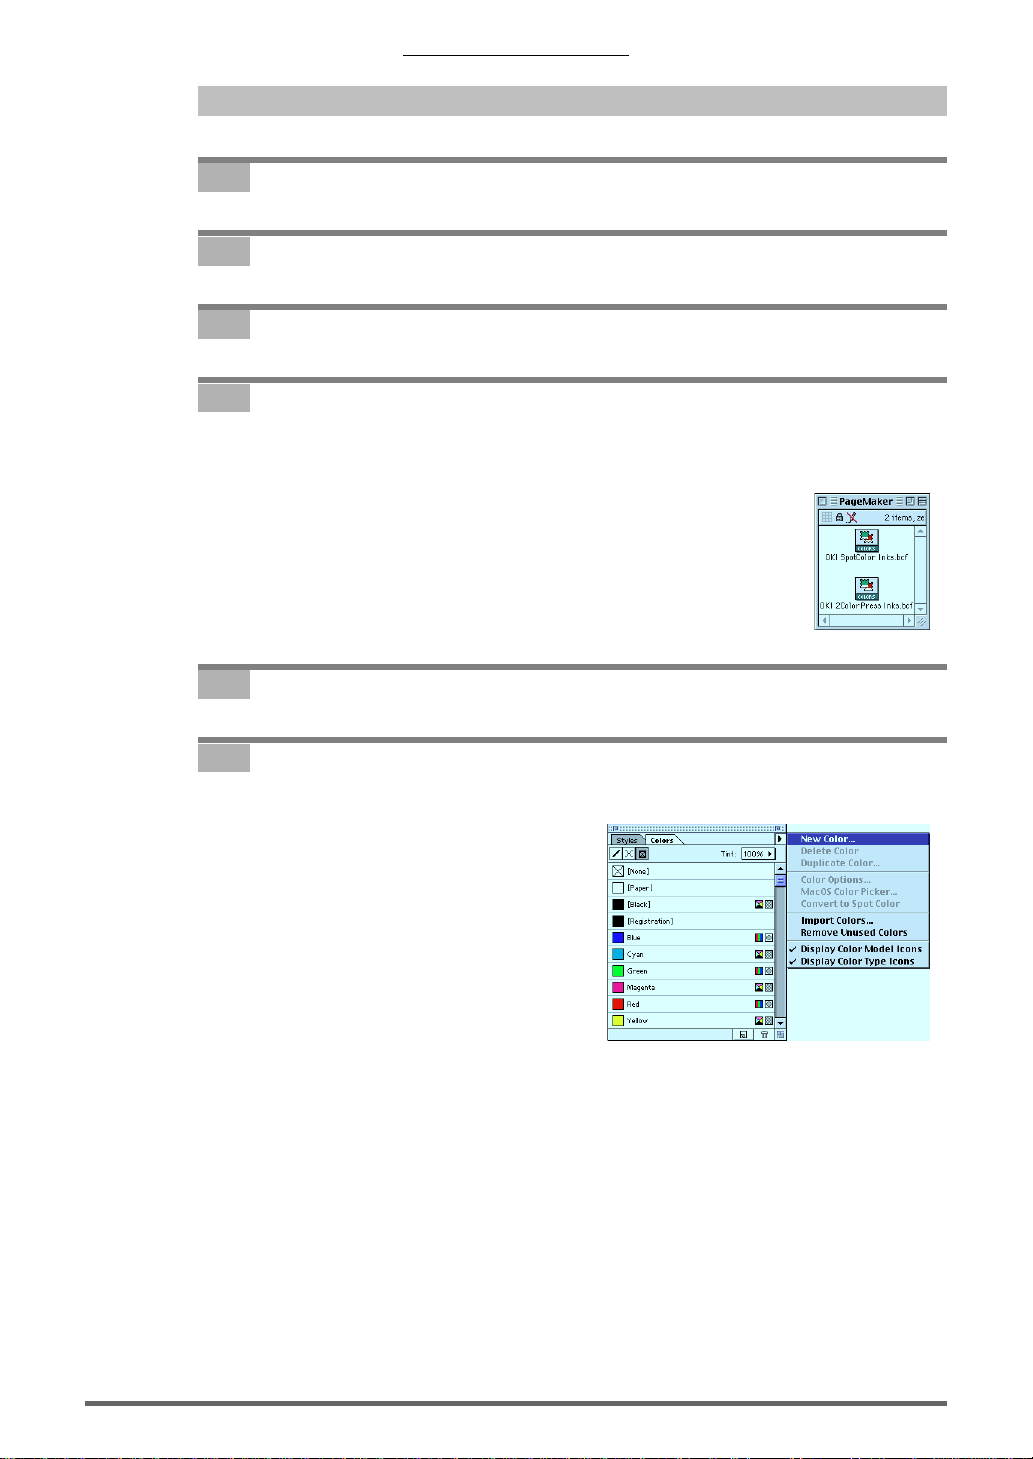
To set up SpotColorLibr ary
It is easy to specify colours when printing by using Metallic Gold, Metallic Silver, Metallic Cyan,
Metallic Magenta, Gold Foil, Silver Foil, Finish II, Opaque White, Blue Spot, Red Spot,
Green Spot and Black Spot, if the ‘SpotColorLibrary’ provided with this RIP is used. The steps for
setting up ‘SpotColorLibrary’ are described here. The ‘SpotColorLibrary’ is supported by the following
software applications:
FreeHand 8.0, Illustrator 8.0, PageMaker 6.5, QuarkXPress 4.1.
There are two types of ‘SpotColorLibrary’ files (‘OKI SpotColor Inks’ and ‘OKI 2ColorPress Inks’)
that can be added. The description provided here is for use of the ‘OKI SpotColor Inks’ file. The color
palettes that can be added to files compatible with the ink cassette name are listed below:
‘OKI SpotColor Inks’
Ink Cassette Name Addable Color Palette
Gold Foil → Gold_Foil
Silver Foil → Silver_Foil
Metallic Gold → Metallic_Gold
Metallic Silver → Metallic_Silver
Metallic Cyan → Metallic_Cyan
Metallic Magenta → Metallic_Magenta
Finish II → Finish_II
Opaque White → Opaque_White
• When using Glossy Finish, specify Finish II to overprint the area where the Glossy Finish will
be printed. Be sure to specify the Overprint option.
• When using Opaque White, specify Opaque White to overprint the area where Opaque White
will be printed. Be sure to specify the Overprint option.
‘OKI 2ColorPress Inks’
Ink Cassette Name Addable Color Palette
Black Spot → Black_Spot
Blue Spot → Blue_Spot
Red Spot → Red_Spot
Green Spot → Green_Spot
37
Page 39

Chapter 3. Printing Procedures
To set up Color P alette in FreeHand 8
1. Insert the OKI DP-7000 Installation Disc into your computer.
2. Open the ‘DP-7000 RIP’ folder.
3. Open the ‘SpotColorLibrary’ folder.
4. Copy the file.
Open the ‘FreeHand’ folder and drag and drop the ‘OKI 2ColorPress Inks. BCF’ file and the
‘OKI SpotColor Inks. BCF’ file to the ‘Color’ folder in the ‘FreeHand 8’ folder .
5. Start up FreeHand.
6. Go to Window>Panels>Color List.
7. Select ‘OKI SpotColor Inks’.
Select ‘OKI SpotColor Inks’ which has now been added to the list in the Option pop-up
menu.
38
Page 40

Chapter 3. Printing Procedures
8. Add to Color List.
Select the spot colour to be used from Library, then click OK to add into the colour list.
39
Page 41

Chapter 3. Printing Procedures
To set up Color P alette in Illustr ator 8.0
1. Insert the OKI DP-7000 Installation Disc into your computer.
2. Open the ‘DP-7000 RIP’ folder.
3. Open the ‘SpotColorLibrary’ folder.
4. Copy the file.
Open the ‘Illustrator’ folder and drag and drop the ‘OKI SpotColor Inks’ file and the ‘OKI
2ColorPress Inks’ file to the ‘Swatch Libraries’ folder in the ‘Adobe Illustrator 8.0’ folder .
5. Start up Illustrator.
6. Go to Window>Swatch Libraries.
If you go to Window>Swatch Libraries>OKI SpotColor Inks, the colour palette will
appear.
40
Page 42
Chapter 3. Printing Procedures
To set up Color P alette in PageMaker 6.5
1. Insert the OKI DP-7000 Installation Disc into your computer.
2. Open the ‘DP-7000 RIP’ folder.
3. Open the ‘SpotColorLibrary’ folder.
4. Copy the file.
Open the ‘PageMaker 6.5’ folder and drag and drop the ‘OKI SpotColor Inks.bcf’ file and the
‘OKI 2ColorPress Inks.bcf’ file to the ‘Adobe PageMaker 6.5>RSRC>Color’ folder.
5. Start up PageMaker.
6. Go to Window>Show Colors>New Color.
Select New Color from the Colors palette menu.
41
Page 43

Chapter 3. Printing Procedures
7. Select OKI SpotColor Inks.
Select OKI SpotColor Inks from the Libraries menu in the Color Options dialogue box.
8 Select spot colours.
Select the spot colours to be used from Color Picker and click OK.
9. Click OK in the Color Options dialogue box.
10. The selected colours will be added into the Colors palette.
42
Page 44
Chapter 3. Printing Procedures
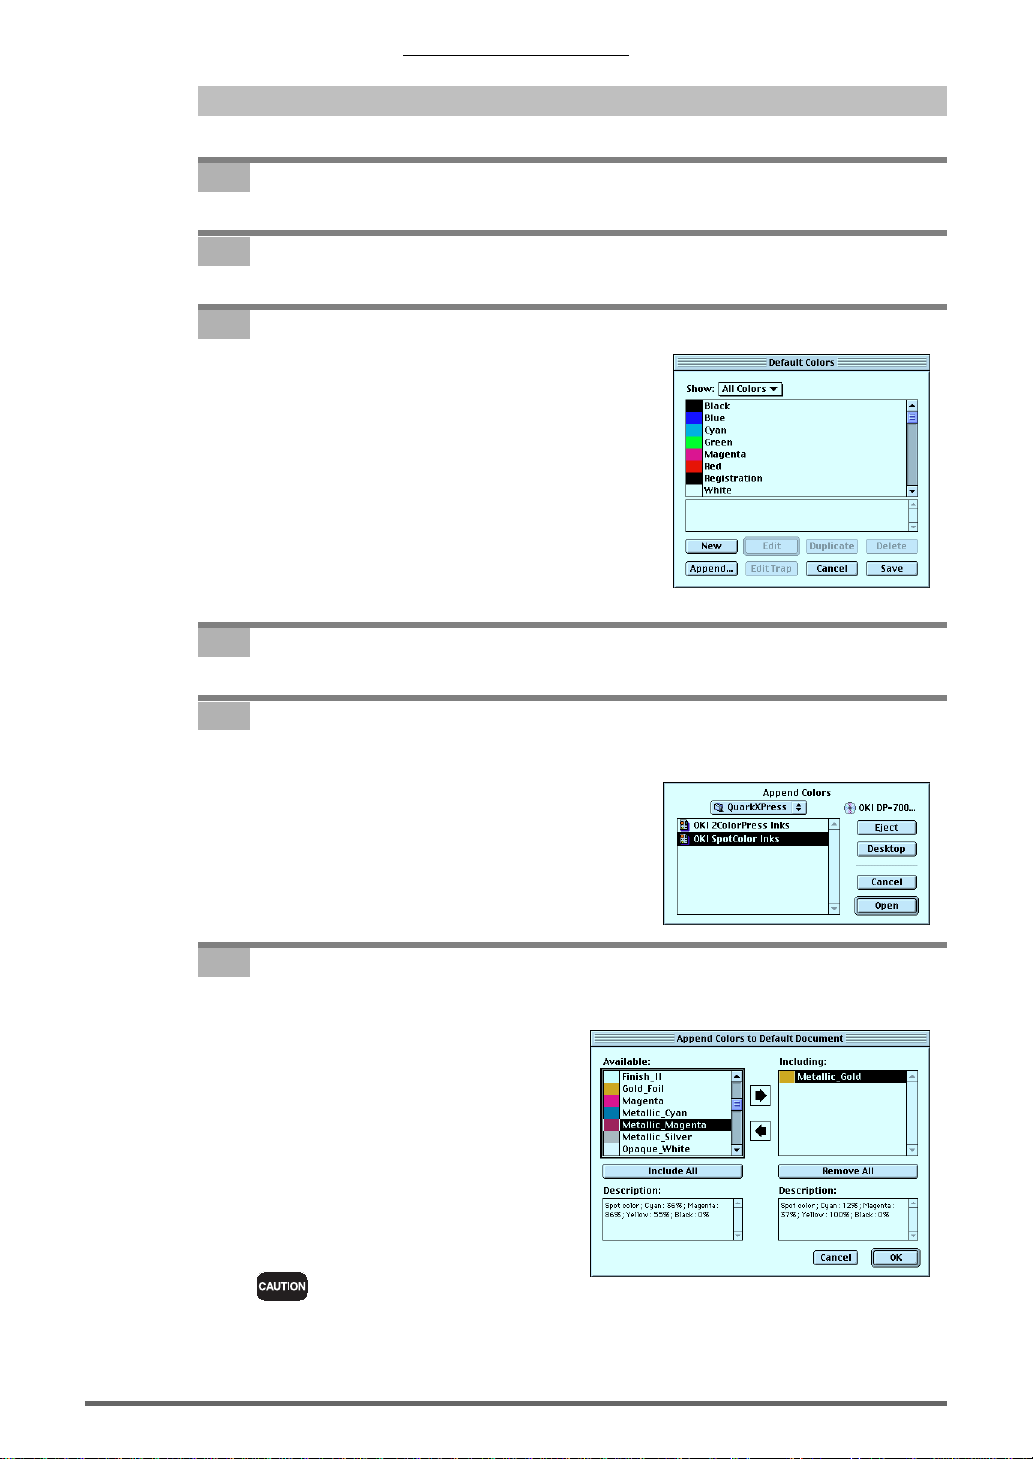
To set up Color P alette in QuarkXPress 4.1
1. Insert the OKI DP-7000 Installation Disc into your computer.
2. Start up QuarkXPress.
3. Go to Edit>Colors to display the Default Colors dialogue box.
4. Click the Append.
5. Select ‘OKI SpotColor Inks’.
Select ‘OKI SpotColor Inks’ from ‘OKI DP-7000 RIP Installation Disc>DP-7000
RIP>SpotColorLibrary>QuarkXPress’.
6. Select from the Available list in the Append Colors To dialogue box.
Specify the spot colours to be used from the Available list in the Append Colors To
dialogue box.
When setting up ‘SpotColorLibrary’ in QuarkXPress, register using the same order used when printing
colour separations (output order). Be sure to register ‘SpotColorLibrary’ in alphabetical order so that it
will be in the same order as colour separations when printing in FreeHand, Illustrator and PageMaker.
43
Page 45

Chapter 3. Printing Procedures
7. Click Save.
8. The specified colours will be added into the Colors palette.
44
Page 46

Chapter 3. Printing Procedures
To print from each application.
To print from FreeHand 8
1. Set OKI DP-7000 RIP.
Check the settings for each tab.
General : Media Size
Port : confirm that the printer name is displayed in the Printer list.
Print :
Media: specify a media for use.
Perform Colour Correction: On
ICC Input profile: select an appropriate profile.
ICC Output profile: select an appropriate profile and rendering intent
Colour Mode: select an appropriate colour mode.
When using spot inks, set the Colour Mode pop-up menu to . . . . . +spot inks.
After confirming the information for each tab, click OK. Open Chooser from the Apple
Menu and select AdobePS. Choose DP-7000@xxxx (xxxx will sho w your computer’s name)
from Select PostScript Printer.
2. Select Page Setup from the File menu.
Specify the media size and orientation to be used and click OK after completing settings for
Page Setup.
• The selected function, Invert Image, in the pop-up menu PostScript Options will be disabled.
To print in reverse, select Negative Print from the pop-up menu Printer Specific Options in
the Print dialogue box.
• When wishing to print on Transparency Film and Transfer Film, check the Flip Horizontal
checkbox under Visual Effects in the pop-up menu PostScript Options.
45
Page 47

Chapter 3. Printing Procedures
3. Select Print from the File menu.
4. Select FreeHand 8 from the pop-up menu.
Check the Use PPD checkbox on.
Click [...] to select ‘ AmOKIDP7000.PPD’ (PPD file name of OKI DP-7000) from ‘System
Folder >Extensions>Printer Descriptions’ folder .
Set Output to Composite.
5. Select Color Matching from the pop-up menu.
Set Print Color item to Color/Grayscale.
46
Page 48

Chapter 3. Printing Procedures
6. Select Printer Specific Options from the pop-up menu.
Select Print for After Spooling in order to automatically perform RIP processing when the
OKI DP-7000 RIP receives the data. Select Hold for After Printing in order to keep the
output file in the OKI DP-7000 RIP. Set Negative Print to T rue if you want to print the image
in reverse printed.
7. Click OK after settings have been completed.
47
Page 49
Chapter 3. Printing Procedures
To print from Illustrator8. 0
1. Set OKI DP-7000 RIP.
Check the settings for each tab.
General : Media Size
Port : confirm that the printer name is displayed in the Printer list.
Print :
Media: specify a media for use.
Perform Colour Correction: On
ICC Input profile: select an appropriate profile.
ICC Output profile: select an appropriate profile and rendering intent
Colour Mode: select an appropriate colour mode.
When using spot inks, set the Colour Mode pop-up menu to . . . . . +spot inks.
After confirming the information for each tab, click OK. Open Chooser from the Apple
Menu to select AdobePS. Choose DP-7000@xxxx (xxxx will show your computer’s name)
from Select PostScript Printer.
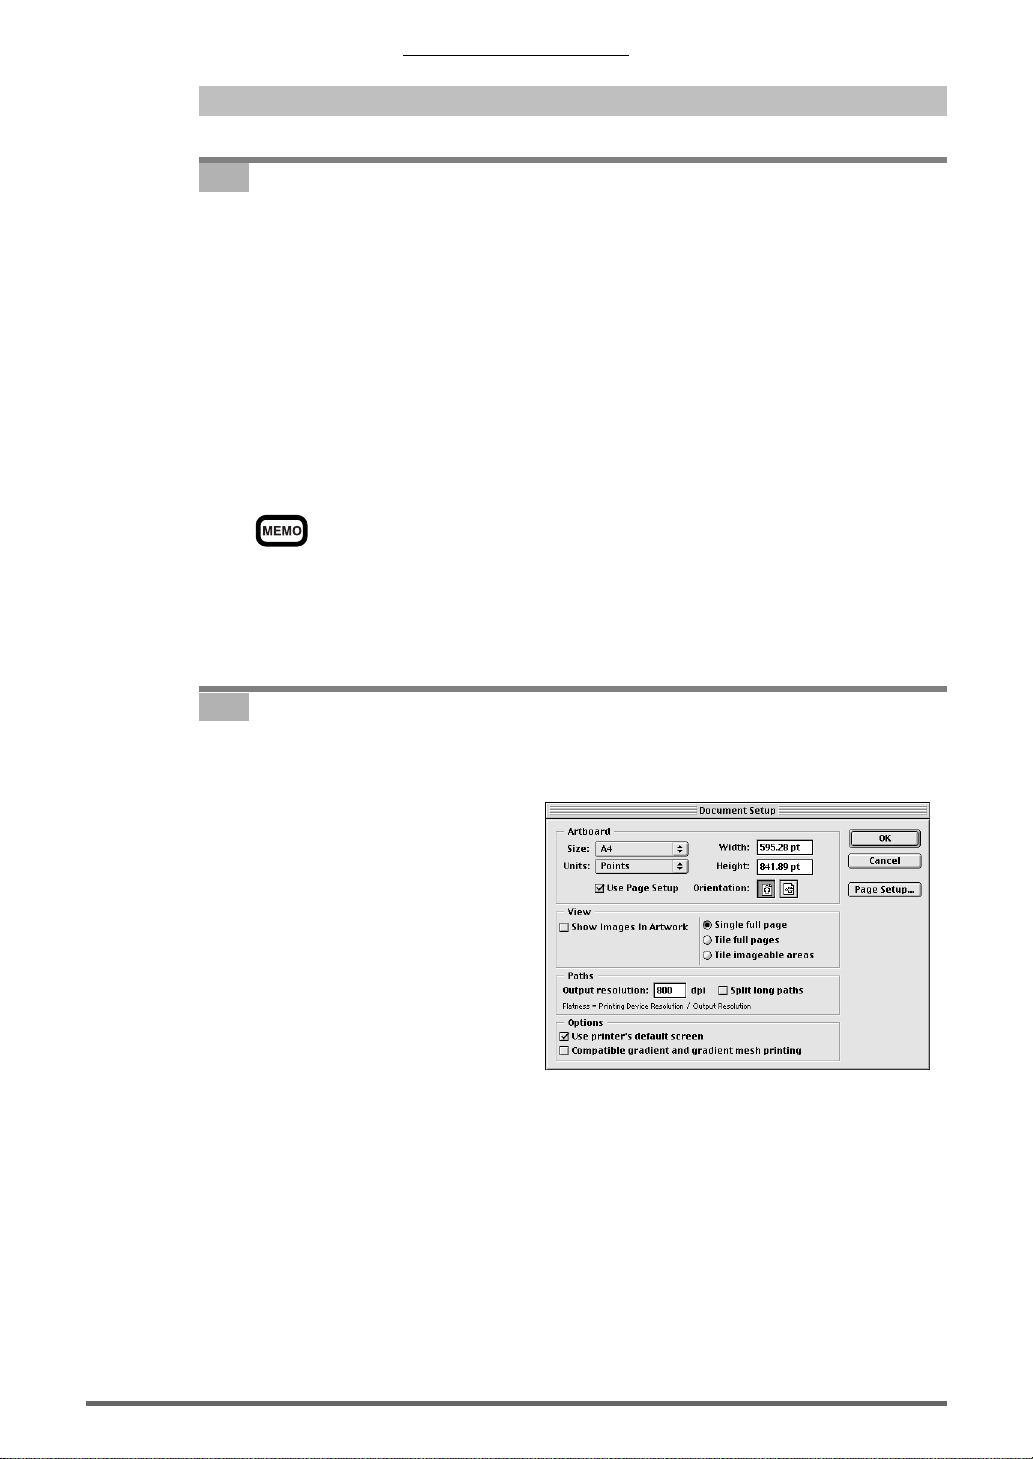
2. Select Document Setup from the File menu.
Check the Use Page Setup setting in Artboard and check the Use printer’ s default setting
under Option, then click Page Setup.
48
Page 50

Chapter 3. Printing Procedures
3. Select Page Setup from the File menu.
Specify the media size and orientation to be used and click OK after completing settings for
Page Setup.
• The selected function, Invert Image, in the pop-up menu PostScript Options will be disabled.
To print in reverse, select Negative Print from the pop-up menu Printer Specific Options in
the Print dialogue box.
• When wishing to print on Transparency Film and Transfer Film, check the Flip Horizontal
checkbox under Visual Effects in the pop-up menu PostScript Options.
4. Select Print from the File menu.
Input the Pages specified and the Copies, and conf irm that the printer to be used is selected in
the Printer field.
5. Select Adobe Illustrator®8. 0 from the pop-up menu.
Set Output to Composite, PostScript to Level 3 and Data to Binary. To print the fonts
which are not supported in RIP, check Force Fonts to Download checkbox.
49
Page 51

Chapter 3. Printing Procedures
6. Select Color Matching from the pop-up menu.
Set Print Color item to Color/Grayscale.
7. Select Printer Specific Options from the pop-up menu.
Select Print for After Spooling in order to automatically perform RIP processing when the
OKI DP-7000 RIP receives the data. Select Hold for After Printing in order to keep the
output file in the OKI DP-7000 RIP. Set Negative Print to True if you want to print the image
in reverse printed.
8. Click Print after the settings have been completed.
50
Page 52

Chapter 3. Printing Procedures
To print from P ageMaker6. 5
1. Set OKI DP-7000 RIP.
Check the settings for each tab.
General : Media Size
Port : confirm that the printer name is displayed in the Printer list.
Print :
Media: specify a media for use.
Perform Colour Correction: On
ICC Input profile: select an appropriate profile.
ICC Output profile: select an appropriate profile and rendering intent
Colour Mode: select an appropriate colour mode.
When using spot inks, set the Colour Mode pop-up menu to . . . . . +spot inks.
After confirming the information for each tab, click OK. Open Chooser from the Apple
Menu and select AdobePS. Choose DP-7000@xxxx (xxxx will show your computer’ s name)
from Select PostScript Printer.
2. Select Print from the File menu.
Confirm that the format is ‘AmOKIDP7000.PPD’.
3. Select Paper.
Set the media size for using.
51
Page 53

Chapter 3. Printing Procedures
4. Select Options.
Check the box for Write PostScript to file.
5. Select Save as.
5-1 Printing from the computer in which RIP is installed.
Click Save as to set ‘OKIDP-7000 RIP>Jobs>DP-7000’. Click OK.
5-2 Printing from a Client Computer.
Click the Save as button and select the desired folder or the desktop as location, then click
OK.
6. Select Color.
• Designating the Negative function is inv alid. Please set Negative Print to True in the Features to print in
reverse printed.
• Check the box for Mirror when you want to print on Transparency Film and Transfer Film.
52
Page 54

Chapter 3. Printing Procedures
7. Select Features.
Select Print for After Spooling in order to automatically perform RIP processing when the
OKI DP-7000 RIP receives the data. Select Hold for After Printing in order to keep the
output file in the OKI DP-7000 RIP. Set Negative Print to T rue if you want to print the image
in reverse printed.
8. Start printing.
8-1 Printing from the computer in which RIP is installed.
Click Save after the settings have been completed.
8-2 Printing from a Client Computer.
Drag and drop the PostScript file to the desktop icon DP-7000@xxxx (xxxx will show
your computer’s name.)
53
Page 55

Chapter 3. Printing Procedures
To print from QuarkXPress4. 1
1. Set OKI DP-7000 RIP.
Check the settings for each tab.
General : Media Size
Port : confirm that the printer name is displayed in the Printer list.
Print :
Media: specify a media for use.
Perform Colour Correction: On
ICC Input profile: select an appropriate profile.
ICC Output profile: select an appropriate profile and rendering intent
Colour Mode: select an appropriate colour mode.
When using spot inks, set the Colour Mode pop-up menu to . . . . . +spot inks.
After confirming the information for each tab, click OK. Open Chooser from the Apple
Menu to select AdobePS. Choose DP-7000@xxxx (xxxx will show your computer’s name)
from Select PostScript Printer.
2. Select Print from the File menu.
54
Page 56

Chapter 3. Printing Procedures
3. Select Page Setup from the File menu.
Specify the media size and orientation to be used and click OK after completing settings for
Page Setup.
• The selected function, Invert Image, in the pop-up menu PostScript Options will be disabled.
To print in reverse, select Negative Print from the pop-up menu Printer Specific Options in
the Print dialogue box.
• When wishing to print on Transparency Film and Transfer Film, check the Flip Horizontal
checkbox under Visual Effects in the pop-up menu PostScript Options.
4. Select the Setup tab.
Set the media size and orientation for using after setting the Printer Description pop-up
menu to OKI DP-7000.
5. Select the Output tab.
Set Print Colors to Composite Color, and set Halftone to the pop-up menu Printer.
55
Page 57

Chapter 3. Printing Procedures
6. Select the Options tab.
Set each pop-up menu in the Pictures setup as follows:
Output to Normal, Data to Binary and OPI to include images.
7. Click Printer after completing settings.
8. Select Color Matching from the pop-up menu.
Set Print Color item to Color/Grayscale.
56
Page 58

Chapter 3. Printing Procedures
9. Select Printer Specific Options from the pop-up menu.
Select Print for After Spooling in order to automatically perform RIP processing when the
OKI DP-7000 RIP receives the data. Select Hold for After Printing in order to keep the output
file in the OKI DP-7000 RIP. Set Negative Print to True if you want to print the image in
reverse printed.
10. Click Print after completing settings.
11. Click Print.
57
Page 59

Chapter 3. Printing Procedures
Regarding 2-Colour Press
Test printing can be performed for the two colour Printing used for flyers.
High Grade Paper and the following spot ink cassettes will be required;
Ink Cassette Name colour palette selection
Black Spot → Black_Spot
Blue Spot → Blue_Spot
Red Spot → Red_Spot
Green Spot → Green_Spot
To create image data for colour separ ations
1. Open the data in Photoshop5.0 or later.
Ready the image data to be used in Two Colour Print and open the data in Photoshop5.0 or later.
2. Create an image for only two channels.
Create an image in only 2 channels with Cyan and Magenta components.
58
Page 60
Chapter 3. Printing Procedures
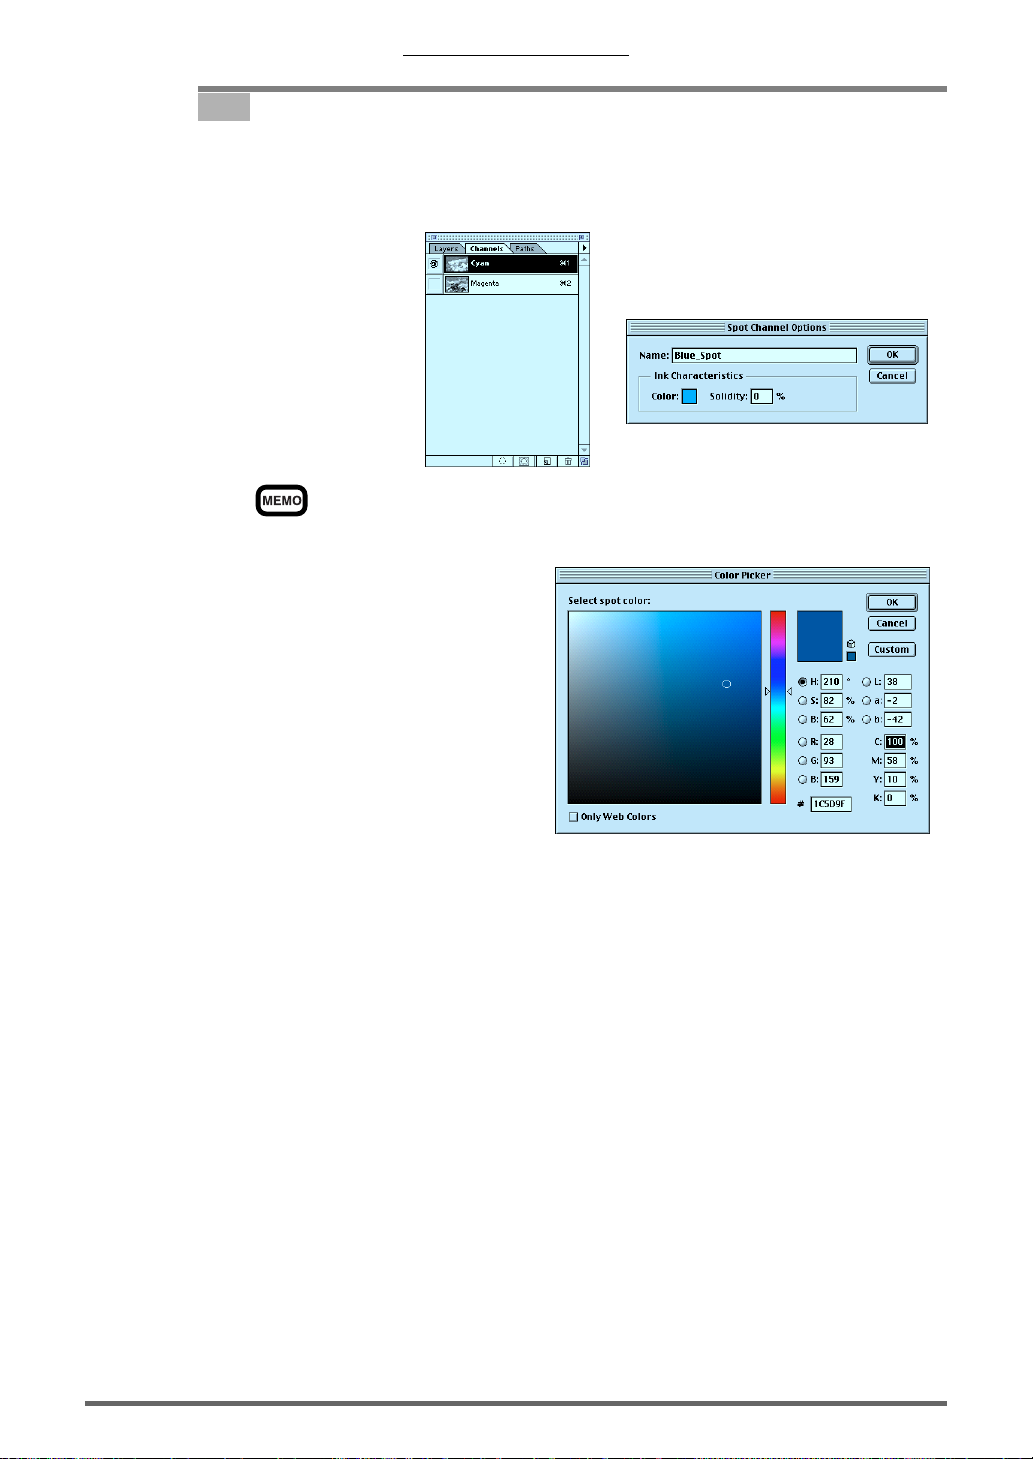
3. Change the colour component names into spot colour names.
Change Cyan into Blue_Spot and Magenta to Red_Spot. Double-click the colour component
to be changed in the Channels dialogue box to display the Spot Channel Options dialogue
box, then change the component names.
To perform a test print for the shade of spot colours created on the screen, enter the v alues of the colours to be
displayed. To enter display colours, click Color in the Spot Channel Options dialogue box to display the
Color Picker dialogue box.
Input the following values in the input box of CMYK here.
C M Y K
Red_Spot 0% 84% 86% 0%
Green_Spot 90% 4% 84% 0%
Blue_Spot 100% 58% 10% 0%
59
Page 61
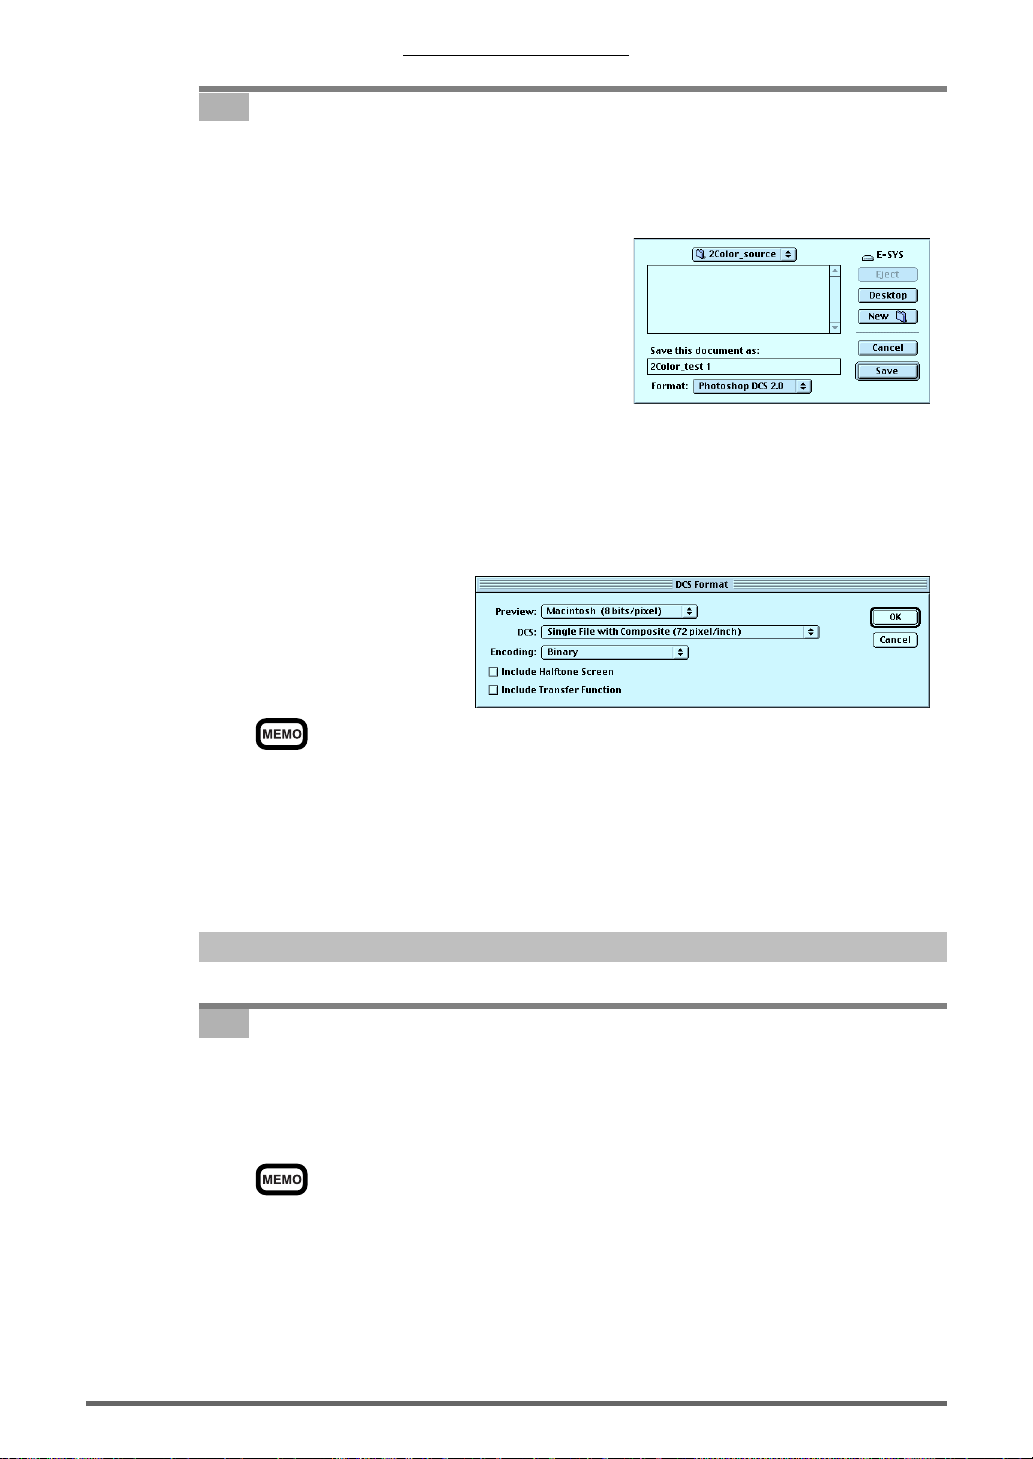
4. Save the file.
Save the file in DCS2.0 format in order to be able to use the image in other applications.
Go to ‘File>Save As…’, select Photoshop DCS 2.0 from the File Format field, and click
Save.
When the dialogue box for selecting the save format appears, enter the following settings;
Preview: Macintosh (8 bit/pixel)
DCS: Single File with Composite (72 pixel/inch)
Encoding: Binary
Click OK with the two checkboxes below off to save the file.
Chapter 3. Printing Procedures
It is possible to preview images on the screen before assigning them to other applications by including
Color Preview.
The procedures used to prepare for printing with DP-7000 are described in this chapter. Applications
capable of fetching (assigning) data in DCS2.0 format and printing spot colour separations will be
required. Illustrator 8.0, PageMaker 6.5, QuarkXPress 4.1 and FreeHand 8.0 are capable of colour
separation printing.
2- Colour Press in FreeHand8.0
1. Read out two colours separation image data.
Reading the image data for two-colour separations by going to File and selecting Read will
add the spot colours being used to the Color list. Enter colour settings for the data generated
using these colours.
Select Overprint to overprint two spot colours.
60
Page 62

Chapter 3. Printing Procedures
2. Set OKI DP-7000 RIP.
Check the settings for each tab.
General : Media Size
Port : confirm that the printer name is displayed in the Printer list.
Print :
Media: High Grade Paper
Perform Colour Correction: Off
If Perform Colour Correction is on, printing will not work properly.
Colour Mode: 2-Colour Press
Driver Option dialogue box: select the combination of ink cassettes to be used in 2-
After confirming the information in each tab, click OK. Open Chooser from the Apple Men u
and select AdobePS. Choose DP-7000@xxxx (xxxx will show your computer’ s name) from
Select PostScript Printer.
Colour Press from the pop-up menu of 2-Colour
Combination.
3. Select Page Setup from the File menu.
Specify the size and orientation for the media to be used and click OK after completing settings
for Page Setup.
4. Select Print from the File menu.
61
Page 63

Chapter 3. Printing Procedures
5. Select FreeHand 8 from the pop-up menu.
Check the box for Use PPD.
Click [...] to select ‘AmOKIDP7000.PPD’ (PPD file name of OKI DP-7000) from
‘System>ExtensionS>Printer Descriptions’ folder.
Click the radio button for Output to Separations.
Click Setup... after the settings have been completed.
6. Select the Separations tab.
When the Print Setup dialogue box is displayed, select the Separations tab. Select the name
of the spot ink for two colour Print displayed in the Separation list and check the P checkbox.
Uncheck the P section for names of ink that will not be used.
62
Page 64

Chapter 3. Printing Procedures
7. Select the Paper Setup tab.
Select the size and orientation for the media to be used and click OK.
8. Select Color Matching from the pop-up menu.
Set Print Color item to Color/Grayscale.
9. Select Printer Specific Options from the pop-up menu.
Select Print for After Spooling in order to automatically perform RIP processing when the
OKI DP-7000 RIP receives the data. Select Hold for After Printing in order to keep the
output file in the OKI DP-7000 RIP.
Do not set Negative Print to True. The printing will not work properly.
10. Click OK after completing settings.
63
Page 65

Chapter 3. Printing Procedures
2-Colour Press in Illustrator8.0
1. Read out the image data for two colours separations.
Placing the image data for two colour separations by going to File >Place will add the spot
colours being used to the Color list. Enter colour settings for the data generated using these
colours.
• Set Overprint if you want to overlap two spot colours.
• Check Link to Place.
2. Set OKI DP-7000 RIP.
Check the settings for each tab.
General : Media Size
Port : confirm that the printer name is displayed in the Printer list.
Print :
Media: High Grade Paper
Perform Colour Correction: Off
If Perform Colour Correction is on, printing will not work properly.
Colour Mode: 2-Colour Press
Driver Option dialogue box: select the combination of ink cassettes to be used in 2-
Colour Press from the pop-up menu of 2-Colour
Combination.
After confirming the information for each tab, click OK. Open Chooser from the Apple Menu
and select AdobePS. Choose DP-7000@xxxx (xxxx will show your computer’s name) from
Select PostScript Printer.
3. Select Page Setup from the File menu.
Select Use printer's default screen from Option and check Use Page Setup and click
the Page Setup.
64
Page 66

Chapter 3. Printing Procedures
4. Click Page Setup.
Specify the media size and orientation to be used and click OK after completing settings for
Page Setup.
5. Select Print from the File menu.
Input the Pages and number of Copies and confirm that the printer to be used is selected in
the Printer field.
6. Select Adobe Illustrator®8.0 from the pop-up menu.
Set Output to Composite, PostScript to Level 3 and Data to Binary. To print the fonts
which are not supported in RIP, check Force Fonts to Download box..
65
Page 67

Chapter 3. Printing Procedures
7. Click Separations Setup.
Follow these settings in the dialogue box.
Click Open PPD to select AmOKIDP7000.PPD.
Emulsion : Up (Right Reading)
Halftone: Default Halftone
Image: Positive
Convert to Process box: uncheck
Confirm that the printer symbol is displayed on the selected spot inks in the scroll list. Enter
any other settings required by the document that has been created.
Uncheck the Print checkbox for names of ink that will not be used.
8. Select Color Matching from the pop-up menu.
Set Print Color item to Color/Grayscale.
66
Page 68

Chapter 3. Printing Procedures
9. Select Printer Specific Options from the pop-up menu.
Select Print for After Spooling in order to automatically perform RIP processing when the
OKI DP-7000 RIP receives the data. Select Hold for After Printing in order to keep the
output file in the OKI DP-7000 RIP.
Do not set Negative Print to True. The printing will not work properly.
10. Click OK after completing settings.
67
Page 69

Chapter 3. Printing Procedures
2-Colour Press in PageMaker6.5
1. Read out the image data for two colour separations.
Reading the image data for two-colour separations by going to File>Place will add the spot
colours being used to the Color list. Enter colour settings for the data generated using these
colours.
Set Overprint if you want to overlap two spot colours.
2. Set OKI DP-7000 RIP.
Check the settings for each tab.
General : Media Size
Port : confirm that the printer name is displayed in the Printer list.
Print :
Media: High Grade Paper
Perform Colour Correction: Off
If Perform Colour Correction is on, printing will not work properly.
Colour Mode: 2-Colour Press
Driver Option dialogue box: select the combination of ink cassettes to be used in 2-
After confirming the information for each tab, click OK. Open Chooser from the Apple
Menu and select AdobePS. Choose DP-7000@xxxx (xxxx will show your computer’ s name)
from Select PostScript Printer.
3. Select Print the File menu.
Confirm that the format is ‘AmOKIDP7000.PPD’.
Colour Press from the pop-up menu of 2-Colour
Combination.
68
Page 70

Chapter 3. Printing Procedures
4. Select Paper.
Set the size of the media to be used.
5. Select Options.
Check the box for Write PostScript to file.
6. Select Save as.
6-1 Printing from the computer in which RIP is installed.
Click Save as to set ‘OKIDP-7000 RIP>Jobs>DP-7000’. Click OK.
6-2 Printing from a Client Computer.
Click the Save as button and select the desired folder or the desktop as location, then click
OK.
69
Page 71

Chapter 3. Printing Procedures
7. Select Color.
Set as follows;
Separations: On
Select the ink to be used and check the Print this ink checkbox.
Uncheck the Print checkbox for names of ink that will not be used.
8. Features.
Select Print for After Spooling in order to automatically perform RIP processing when the
OKI DP-7000 RIP receives the data. Select Hold for After Printing in order to keep the
output file in the OKI DP-7000 RIP.
Do not set Negative Print to True. The printing will not work properly.
9. Start printing.
9-1 Printing from the computer in which RIP is installed.
Click Save after the settings have been completed.
9-2 Printing from a Client Computer.
Drag and drop the PosrScript file to the desktop icon DP-7000@xxxx (xxxx will show
your computer’s name.)
70
Page 72

Chapter 3. Printing Procedures
2-Colour Press in QuarkXPress4.1
1. Read out the image data for two colour separations.
Reading the image data for two-colour separations by going to File>Get Picture will add
the spot colours being used to the Color list. Enter colour settings for the data generated
using these colours.
Set Overprint if you want to overlap two spot colours.
2. Set OKI DP-7000 RIP.
Check the settings for each tab.
General : Media Size
Port : confirm that the printer name is displayed in the Printer list.
Print :
Media: High Grade Paper
Perform Colour Correction: Off
If Perform Colour Correction is on, printing will not work properly.
Colour Mode: 2-Colour Press
Driver Option dialogue box: select the combination of ink cassettes to be used in 2-
Press from the pop-up menu for 2-Color Combination.
After confirming the information for each tab, click OK. Open Chooser from the Apple
Menu and select AdobePS. Choose DP-7000@xxxx (xxxx will show your computer’ s name)
from Select PostScript Printer.
3. Select Print from the File menu.
Colour Press from the pop-up menu of 2-Colour
Combination.
71
Page 73

Chapter 3. Printing Procedures
4. Click Page Setup.
Specify the size and orientation for the media to be used and click OK after completing settings
for Page Setup.
5. Select Setup tab.
Select the size and orientation for the media to be used after setting the Printer Description
pop-up menu to OKI DP-7000.
6. Select Document tab.
Set the checkbox for Separations on.
72
Page 74

Chapter 3. Printing Procedures
7. Select the Output tab.
Set the Plates pop-up menu to Process & Spot.
Select the ink to be used from the Separation list and check the Print section.
Uncheck the Print checkbox for names of ink that will not be used.
With two colour Printing, all halftone, number of lines, angle and dot style settings are disabled and the
printer defaults are used.
8. Select the Options tab.
Set each pop-up menu in the Pictures setup as follows:
Output to Normal, Data to Binary and OPI to include images.
9. Click Printer after completing settings.
73
Page 75

Chapter 3. Printing Procedures
10. Select Color Matching from the pop-up menu.
Set Print Color item to Color/Grayscale.
11. Select Printer Specific Options from the pop-up menu.
Select Print for After Spooling in order to automatically perform RIP processing when the
OKI DP-7000 RIP receives the data. Select Hold for After Printing in order to keep the
output file in the OKI DP-7000 RIP.
Do not set Negative Print to True. The printing will not work properly.
12. Click Print after completing settings.
13. Click Print.
74
Page 76

Chapter 3. Printing Procedures
Printing in Opaque White
Transparency Film and Transfer Film are used to simulate package design and PET bottle package
design with Opaque White.
Description here is based on an example using Illustrator 8.0. The settings used here are basically the
same as those used for other applications.
1. Opening data items for setting Opaque White.
Start Illustrator 8.0 and open the data for making Opaque White settings.
2. Creating Opaque White Layer.
Be sure to check the Print box in the Layer Options dialogue box. If the box is left unchecked, the white
undercoat object created in this layer will not be printed. And always place the object at the top of the layer
list.
75
Page 77

Chapter 3. Printing Procedures
3. Specifying Opaque_White.
Create objects in such a way that they cover the design data positioned on the opaque white
layer; then paint them in using Opaque_White (100%) as a spot colour.
It is better to make the opaque white objects slightly larger than the design data. Creating them in the same or
smaller sizes can result in discoloration around the edges of opaque white objects. Therefore, be sure to use
thicker lines and make the opaque white objects slightly larger than the design data.
When using Opaque_White as a spot colour, select the ‘OKI SpotColor Inks’ file from the Spot Color
Library. The SpotColorLibrary, which defines spot colour inks for FreeHand 8.0, Illustrator 8.0, PageMaker
6.5 and QuarkXPress 4.1, is contained on the CD. Refer to the section on Chapter 3 ‘To set up SpotColorLibrary’
for further information on the set up procedure for each application.
76
Page 78

Chapter 3. Printing Procedures
4. Setting the Overprint File option to On.
With the object already selected, go to the Overprint Fill option on the Attribute Palette to On.
It is not possible to preview the overprint paint effect. To reconfirm the comp design on the rectangular
background painted in Opaque White, first click to release the eye-shaped icon located on the left side of the
opaque white layer. It is important to remember, however, that this icon must be displayed when printing the
work.
5. Checking OKI DP-7000 RIP Settings.
5-1 For Transparency Film.
Check the settings for each tab.
General : Media Size : A3 Plus (330 x 475mm)
Port : confirm that the printer name is displayed in the Printer list.
Print :
Media: Trao77ô¤ ency Film
Perform Colour Correction: On
ICC Input profile: select appropriate profile
Output profile: VPhoto_TransparencyFilm.icm
Colour Mode: VPhoto Colour + Spot
After confirming the information for each tab, click OK. Open Chooser from the Apple
Menu to select AdobePS. Choose DP-7000@xxxx (xxxx will show your computer’s name)
from Select PostScript Printer.
77
Page 79
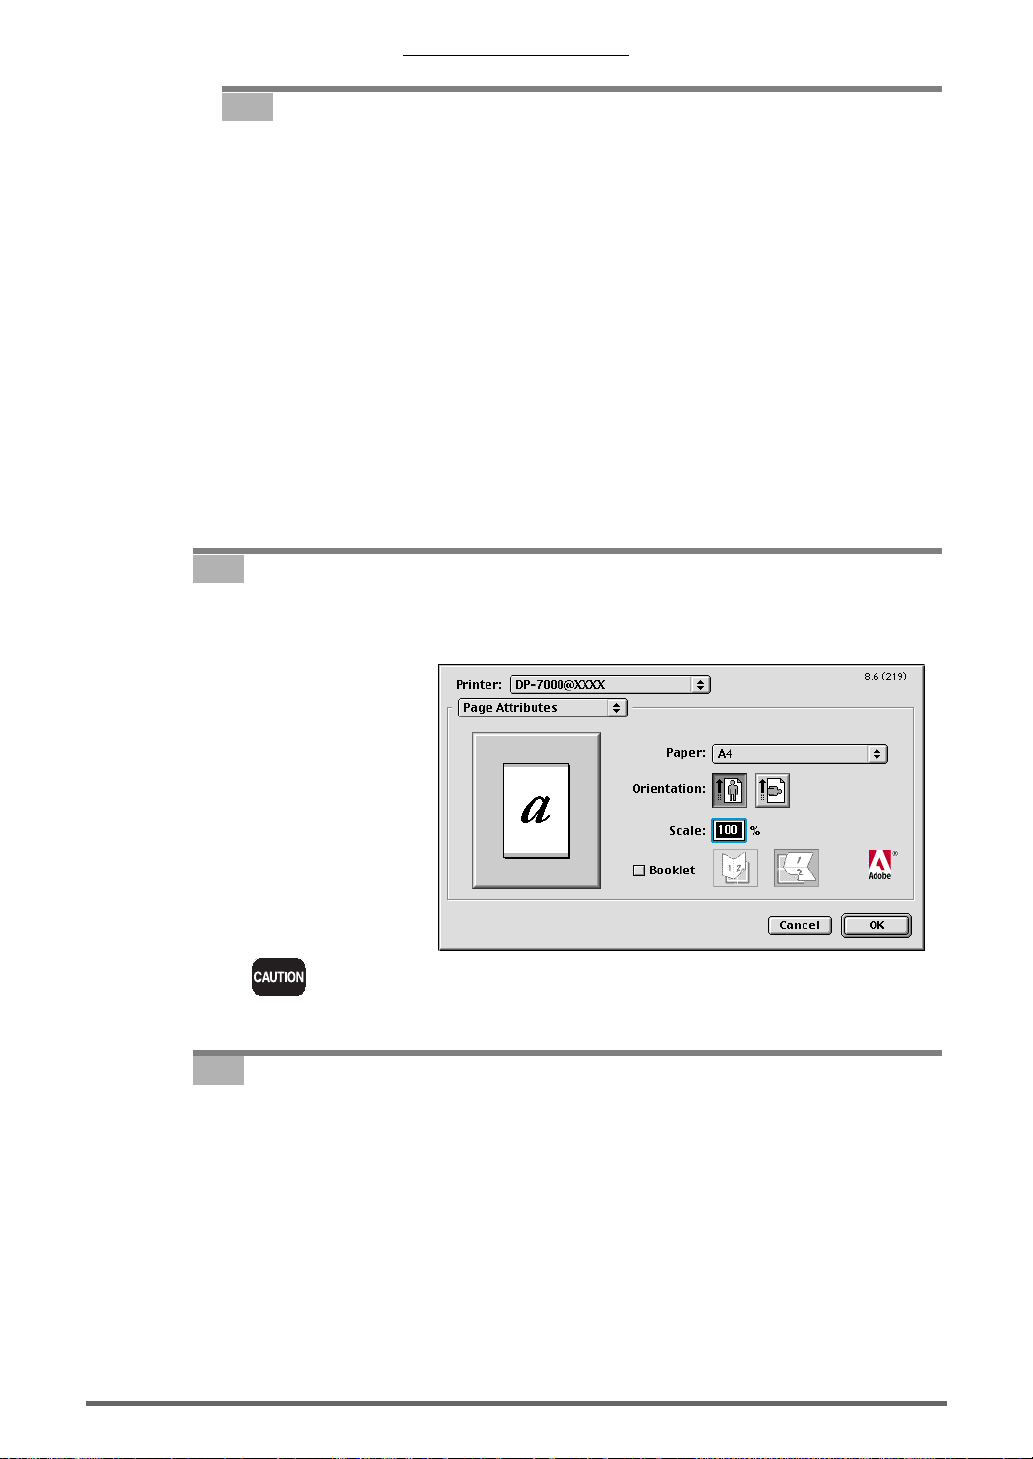
Chapter 3. Printing Procedures
5-2 For Transfer Film.
Check the settings for each tab.
General : Media Size (A4)
Port : confirm that the printer name is displayed in the Printer list.
Print :
Media: Transfer Film
Perform Colour Correction: On
ICC Input profile: select appropriate profile
Output profile: VPhoto_TransferFilm.icm
Colour Mode: VPhoto Colour + Spot
After confirming the information for each tab, cli¸˚ OK. Open Chooser from the Apple
Menu and select AdobePS. Choose DP-7000@xxxx (xxxx will show your computer’s name)
from Select PostScript Printer.
6. Selecting Paper Type.
Go to File menu and select Dcument Setup. From Options, choose Use printer’s default
screen check the Use Page Setup box; then click Page Setup.
Set the Flip Horizontal checkbox in Visual Effects in the pop-up menu PostScript Options when you
want to print on Transparency Film and Transfer Film.
7. Printing.
Go to the File menu, select Print, enter the desired settings and print..
78
 Loading...