

Page 1
DP-5000 Metallic and Colour Desktop Printer
User’s Guide
Page 2

Preface
EEC compatibility
Every effort has been made to ensure that the information in this document is complete, accurate, and up-todate. Oki assumes no responsibility for the results of errors beyond its control. Oki also cannot guarantee that
changes in software and eq uipment made by other manufacturers and referred to in this gui de will not affect
the applicability of the information in it. Mention of
software products manufactured by other companies
does not necessarily constitute endorsement by Oki.
Copyright 1999 by Oki. All rights reserved.
Oki is a registered trademark of Oki Electric Industry
Company Ltd.
Energy Star is a trademark of the United States Envi-
ronmental Protection Agency.
Microsoft, MS-DOS and Windows are registered trade-
marks of Mi crosoft Corporation.
Apple, Macintosh, Mac, MacOS and True Type are reg-
istered trademarks of Apple Computer Corporation.
This product complies with the requirements of the Council Directives
89/336/E EC and 73 /23/EEC a mended by 93/68/EEC on the approximation of the laws relating to
electromagnetic compatibility and
low voltage.
Energy Star
As an Energy Star Partner, Oki
has determined that this product
meets the Energy Star guidelines
for energy efficiency.
ii User’s Guide
Page 3

Safety instructions
English
This printer has been carefully designed to give years of
safe, reliable performance. As with all electrical equipment, however, there are a few basic precautions t hat
should be taken to avoid personal injury or damaging
the printer:
• Read this setup guide carefully and save it for
future reference.
• Read and follow all warning and instruction
labels on the printer itself.
• Disconnect the printer before cleaning. Use only
a damp cloth. Do not use liquid or aerosol cleaners to clean the printer.
• Place the printer on a firm, solid surface. If the
printer is placed on something unsteady, it may
fall and become damaged or injure someone. If
the printer is placed on a soft surface, such as a
rug, sofa, or bed, the vents may become blocked
causing the printer to overheat.
• Do not put the printer on or near a heat source,
such as a radiator or heat register. Keep it out of
direct sunlight. Allow enough room around the
printer for adequate ventilation and easy access.
• Do not use the printer near water, or spill liquid
of any kind into it.
• Make sure that the power source matches the rating listed on the back of the printer. If you are not
sure, check with your dealer or with your local
power company.
• This printer has an earthed plug as a safety feature and will only connect to an earthed outlet. If
this plug cannot be connected to a power outlet,
then it is possible that the power outlet is of the
older, non-earthed type. Contact an electrician to
have the power outlet replaced. Do not use an
adapter to defeat the earthing.
• To avoid damaging the power cable, do not put
anything on it or place it where it will be walked
on. If the cable becomes damaged or frayed,
replace it immediately.
• If an extension cable or power strip is being used
with the printer, make sure that the total of the
amperage rating required by all the equipment is
less than the rating of the extension cable or
power strip. The total ratings of all equipment
Preface iii
Page 4

plugged into the outlet should not exceed 13
amperes.
• The power outlet into which the printer is connected must remain accessible at all times.
• Opening any cover may expose hot surfaces.
These are clearly labelled. Do NOT touch them.
• Do not insert anything into the ventilation s lots
on the printer; you could get a shock or cause a
fire.
If anything happens that indicates that the printer is not
working properly or has been damaged, disconnect the
printer from the power source and contact your dealer.
These are some of the things to look for:
• The power cable or plug is frayed or damaged.
• Liquid has been spilled in to the printer, or it has
been exposed to water.
• The printer has been dropped, or the cabinet is
damaged.
• Aside from the routine maintenance described in
the user’s guide, do not try to service the printer
• The printer does not function normally when following the operating instructions.
yourself. Opening a cover may expose you to
shocks or other hazards.
• Do not make any adjustments other than those
outlined in the user’s guide as damage may be
caused to the printer.
iv User’s Guide
Page 5

Table of contents
English
Preface . . . . . . . . . . . . . . . . . . . . . . . . . . . . . . . . . . . . . ii
EEC compatibility . . . . . . . . . . . . . . . . . . . . . . . . . . . . ii
Energy Star. . . . . . . . . . . . . . . . . . . . . . . . . . . . . . . . . . ii
Safety instructions . . . . . . . . . . . . . . . . . . . . . . . . . . . .iii
Table of contents . . . . . . . . . . . . . . . . . . . . . . . . . . . . . .v
Chapter 1 - In troduction
Introduction . . . . . . . . . . . . . . . . . . . . . . . . . . . . . . . . . .1
Features. . . . . . . . . . . . . . . . . . . . . . . . . . . . . . . . . . . . . .2
Preparing your printer. . . . . . . . . . . . . . . . . . . . . . . . . . .3
Removing package contents. . . . . . . . . . . . . . . . . . .3
Opening front cover . . . . . . . . . . . . . . . . . . . . . .3
Closing front cover . . . . . . . . . . . . . . . . . . . . . . .4
Locating printer. . . . . . . . . . . . . . . . . . . . . . . . . . . . .4
Installing output paper tray. . . . . . . . . . . . . . . . . . . .5
Printer functions . . . . . . . . . . . . . . . . . . . . . . . . . . . . . . .6
Front view of printer. . . . . . . . . . . . . . . . . . . . . . . . .6
Rear view of printer . . . . . . . . . . . . . . . . . . . . . . . . .7
Rear view of printer with Macintosh interface
module . . . . . . . . . . . . . . . . . . . . . . . . . . . . . . . . . . .7
Inside the printer. . . . . . . . . . . . . . . . . . . . . . . . . . . .8
Paper feed switch . . . . . . . . . . . . . . . . . . . . . . . . . . .9
Control panel. . . . . . . . . . . . . . . . . . . . . . . . . . . . . . .9
Indicator lights summary . . . . . . . . . . . . . . . . . . . .10
Chapter 2 - Initial Setup
Connecting cables for Windows . . . . . . . . . . . . . . . . . 11
Connecting the printer to your computer. . . . . . . . 11
Connecting the printer to a power supply . . . . . . . 11
Ink cartridges. . . . . . . . . . . . . . . . . . . . . . . . . . . . . . . . 13
Identifying ink cartridge and paper types . . . . . . . 13
Installing ink cartridges . . . . . . . . . . . . . . . . . . . . . 14
Replacing or changing ink cartridges . . . . . . . . . . 16
Loading paper . . . . . . . . . . . . . . . . . . . . . . . . . . . . . . . 17
Paper types and available feeding modes . . . . . . . 17
Notes and precautions about paper. . . . . . . . . . 17
Loading paper in automatic feed mode . . . . . . . . . 18
Loading high grade/plain/laser paper and
transparencies. . . . . . . . . . . . . . . . . . . . . . . . . . 19
Loading paper in manual feed mode . . . . . . . . . . . 20
Chapter 3 - Installation and Operation, Windows
Installing the printer driver . . . . . . . . . . . . . . . . . . . . . 23
Purpose of the printer driver . . . . . . . . . . . . . . . . . 23
Turning on the power. . . . . . . . . . . . . . . . . . . . . . . 23
System requirements . . . . . . . . . . . . . . . . . . . . . . . 23
Installing printer software from CD. . . . . . . . . . . . 24
Installing printer software using Plug & Play . . . . 24
Preface v
Page 6

Port monitor setup . . . . . . . . . . . . . . . . . . . . . . . . . 24
Select the I/O port speed . . . . . . . . . . . . . . . . . 25
Port speed error . . . . . . . . . . . . . . . . . . . . . . . . 25
Configure LPT port . . . . . . . . . . . . . . . . . . . . . 25
Printing operations. . . . . . . . . . . . . . . . . . . . . . . . . . . . 26
Printing in monochrome . . . . . . . . . . . . . . . . . . . . 26
Requirements . . . . . . . . . . . . . . . . . . . . . . . . . . 26
Placing an ink cartridge in your printer . . . . . . 26
Setting up the printer driver for monochrome
printing. . . . . . . . . . . . . . . . . . . . . . . . . . . . . . . 27
Printing in colour. . . . . . . . . . . . . . . . . . . . . . . . . . 28
Requirements . . . . . . . . . . . . . . . . . . . . . . . . . . 28
Placing ink cartridges in your printer. . . . . . . . 28
Setting up the printer driver for colour printing29
Printing on reverse side . . . . . . . . . . . . . . . . . . . . . 29
Setting up the printer driver for printing on reverse
side . . . . . . . . . . . . . . . . . . . . . . . . . . . . . . . . . . 29
Turning off the power . . . . . . . . . . . . . . . . . . . . . . 30
Chapter 4 - Installation and Operation, Macintosh
Installing the printer driver . . . . . . . . . . . . . . . . . . . . . 31
Purpose of the printer driver . . . . . . . . . . . . . . . . . 31
Preparing for installation . . . . . . . . . . . . . . . . . . . . 31
Turn on the power . . . . . . . . . . . . . . . . . . . . . . . . . 31
System requirements . . . . . . . . . . . . . . . . . . . . . . . 31
Contents of the installation disk. . . . . . . . . . . . . . . 32
Installing the printer driver software . . . . . . . . . . . 32
Using balloon help. . . . . . . . . . . . . . . . . . . . . . . . . 32
Selecting the correct driver. . . . . . . . . . . . . . . . . . .33
Testing the printer. . . . . . . . . . . . . . . . . . . . . . . . . .33
Page setup dialogue box . . . . . . . . . . . . . . . . . .34
Print dialogue box . . . . . . . . . . . . . . . . . . . . . . .34
Print preview. . . . . . . . . . . . . . . . . . . . . . . . . . .34
Printing operations . . . . . . . . . . . . . . . . . . . . . . . . . . . .35
Printing in monochrome . . . . . . . . . . . . . . . . . . . . .35
Requirements. . . . . . . . . . . . . . . . . . . . . . . . . . .35
Placing an ink cartridge in your printer. . . . . . .35
Setting up the printer driver for monocrome
printing . . . . . . . . . . . . . . . . . . . . . . . . . . . . . . .36
Printing in colour . . . . . . . . . . . . . . . . . . . . . . . . . .36
Requirements. . . . . . . . . . . . . . . . . . . . . . . . . . .36
Placing ink cartridges in your printer . . . . . . . .37
Setting up the printer driver for colour printing37
Setting up colour matching option . . . . . . . . . .38
Printing on reverse side. . . . . . . . . . . . . . . . . . . . . .39
Setting up the printer driver for printing on reverse
side . . . . . . . . . . . . . . . . . . . . . . . . . . . . . . . . . .39
Chapter 5 - Specialised Printing Operations
VPhoto colour printing. . . . . . . . . . . . . . . . . . . . . . . . .41
Colour printing on VPhoto print film. . . . . . . . . . .41
Requirements. . . . . . . . . . . . . . . . . . . . . . . . . . .41
Prepare the image to be printed. . . . . . . . . . . . .41
Install ink cartridges . . . . . . . . . . . . . . . . . . . . .41
Load VPhoto print film in your printer. . . . . . .41
Set up the printer driver for printing. . . . . . . . .42
vi User’s Guide
Page 7

Colour printing on plain paper . . . . . . . . . . . . . . . .42
Requirement . . . . . . . . . . . . . . . . . . . . . . . . . . .42
Prepare the image to be printed. . . . . . . . . . . . .43
Install ink cartridges . . . . . . . . . . . . . . . . . . . . .43
Load the paper in your printer. . . . . . . . . . . . . .43
Set up the printer driver for printing. . . . . . . . .43
Printing in foil colour . . . . . . . . . . . . . . . . . . . . . . . . . .45
Single foil colour printing. . . . . . . . . . . . . . . . . . . .45
Requirements. . . . . . . . . . . . . . . . . . . . . . . . . . .46
Prepare the image to be printed. . . . . . . . . . . . .46
Install ink cartridges . . . . . . . . . . . . . . . . . . . . .46
Load the paper in your printer. . . . . . . . . . . . . .46
Set up the printer driver for printing. . . . . . . . .46
Multi foil colour printings. . . . . . . . . . . . . . . . . . . .47
Requirements. . . . . . . . . . . . . . . . . . . . . . . . . . .47
Prepare the image to be printed. . . . . . . . . . . . .47
Install ink cartridges . . . . . . . . . . . . . . . . . . . . .48
Load the paper in your printer. . . . . . . . . . . . . .48
Set up the printer driver for printing. . . . . . . . .48
Simultaneous full colour and foil colour printing. .4 9
Requirements. . . . . . . . . . . . . . . . . . . . . . . . . . .49
Prepare the image to be printed. . . . . . . . . . . . .50
Install ink cartridges . . . . . . . . . . . . . . . . . . . . .51
Load the paper in your printer. . . . . . . . . . . . . .51
Set up the printer driver for printing. . . . . . . . .51
Printing on overhead transparencies. . . . . . . . . . . . . . .53
Requirements . . . . . . . . . . . . . . . . . . . . . . . . . . . . .53
Prepare the image to be printed . . . . . . . . . . . . . . .53
English
Install ink cartridges. . . . . . . . . . . . . . . . . . . . . . . . 53
Load the overhead transparencies . . . . . . . . . . . . . 53
Setting up transparency separators. . . . . . . . . . . . . 54
Set up the printer driver for printing . . . . . . . . . . . 54
Undercoating with VPhoto primer ink cartridge. . . . . 56
Requirements . . . . . . . . . . . . . . . . . . . . . . . . . . . . . 56
Prepare the image to be undercoated. . . . . . . . . . . 56
Install ink cartridge . . . . . . . . . . . . . . . . . . . . . . . . 56
Load the paper in your printer. . . . . . . . . . . . . . . . 56
Set up the printer driver for printing . . . . . . . . . . . 56
Printing on undercoat . . . . . . . . . . . . . . . . . . . . . . . 57
Chapter 6 - Maintenance
Cleaning the printer. . . . . . . . . . . . . . . . . . . . . . . . . . . 59
Cleaning the main unit. . . . . . . . . . . . . . . . . . . . . . 59
Cleaning the print head . . . . . . . . . . . . . . . . . . . . . 60
Cleaning the platen . . . . . . . . . . . . . . . . . . . . . . . . 60
Cleaning the feed roller . . . . . . . . . . . . . . . . . . . . . 61
Changing dye sub cleaning pads . . . . . . . . . . . . . . 62
Chapter 7 - Troubleshooting
Troubleshooting - general . . . . . . . . . . . . . . . . . . . . . . 65
Power failure while printing . . . . . . . . . . . . . . . . . 65
Printer errors . . . . . . . . . . . . . . . . . . . . . . . . . . . . . 65
Ready/insert button functions . . . . . . . . . . . . . . . . 66
Paper feed. . . . . . . . . . . . . . . . . . . . . . . . . . . . . 66
Paper eject . . . . . . . . . . . . . . . . . . . . . . . . . . . . 66
Cancelling an alarm . . . . . . . . . . . . . . . . . . . . . 66
Preface vii
Page 8

Forced printing and clearing data. . . . . . . . . . . 66
Clearing paper jams. . . . . . . . . . . . . . . . . . . . . . . . 66
Troubleshooting - Windows . . . . . . . . . . . . . . . . . . . . 68
Troubleshooting - Macintosh . . . . . . . . . . . . . . . . . . . 80
Chapter 8 - Specifications & Settings
Options . . . . . . . . . . . . . . . . . . . . . . . . . . . . . . . . . . 94
DIP switches . . . . . . . . . . . . . . . . . . . . . . . . . . . . . 94
Printable area . . . . . . . . . . . . . . . . . . . . . . . . . . . . . 95
Using cardboard or thick paper . . . . . . . . . . . . 95
Available supplies . . . . . . . . . . . . . . . . . . . . . . . . . 96
Ink cartridges . . . . . . . . . . . . . . . . . . . . . . . . . . 96
Print media. . . . . . . . . . . . . . . . . . . . . . . . . . . . 96
Options. . . . . . . . . . . . . . . . . . . . . . . . . . . . . . . 96
Appendix A - Optional Devices
USB interface kit. . . . . . . . . . . . . . . . . . . . . . . . . . . . . 97
System requirements . . . . . . . . . . . . . . . . . . . . . . . 97
Installation for iMac. . . . . . . . . . . . . . . . . . . . . . . . 97
Using the OKI USB printer . . . . . . . . . . . . . . . 99
Installing for Windows 98. . . . . . . . . . . . . . . . . . 100
Deleting the OKI printer driver . . . . . . . . . . . 100
Installing the USB printer driver . . . . . . . . . . 100
Troubleshooting for USB interface kit . . . . . . . . 101
iMac . . . . . . . . . . . . . . . . . . . . . . . . . . . . . . . . 101
Windows 98 . . . . . . . . . . . . . . . . . . . . . . . . . . 102
Dye sublimation upgrade kit . . . . . . . . . . . . . . . . . . . 104
Installing the upgrade. . . . . . . . . . . . . . . . . . . . . . 104
Installing the printer software. . . . . . . . . . . . . . . .105
Installing the port monitor for Wi ndows 95/98 . .105
Installing the printer driver for Macintosh . . . . . .106
Connecting SCSI interface for Macintosh . . . . . . . . .107
Connecting the Macintosh SCSI interface module107
Removing the SCSI interface module. . . . . . . . . .108
Connecting the printer to your computer . . . . . . .108
Checking the SCSI device number. . . . . . . . . . . .109
Power supply connection . . . . . . . . . . . . . . . . . . .109
Index
viii User’s Guide
Page 9

Chapter 1 - Introduction
Introduction
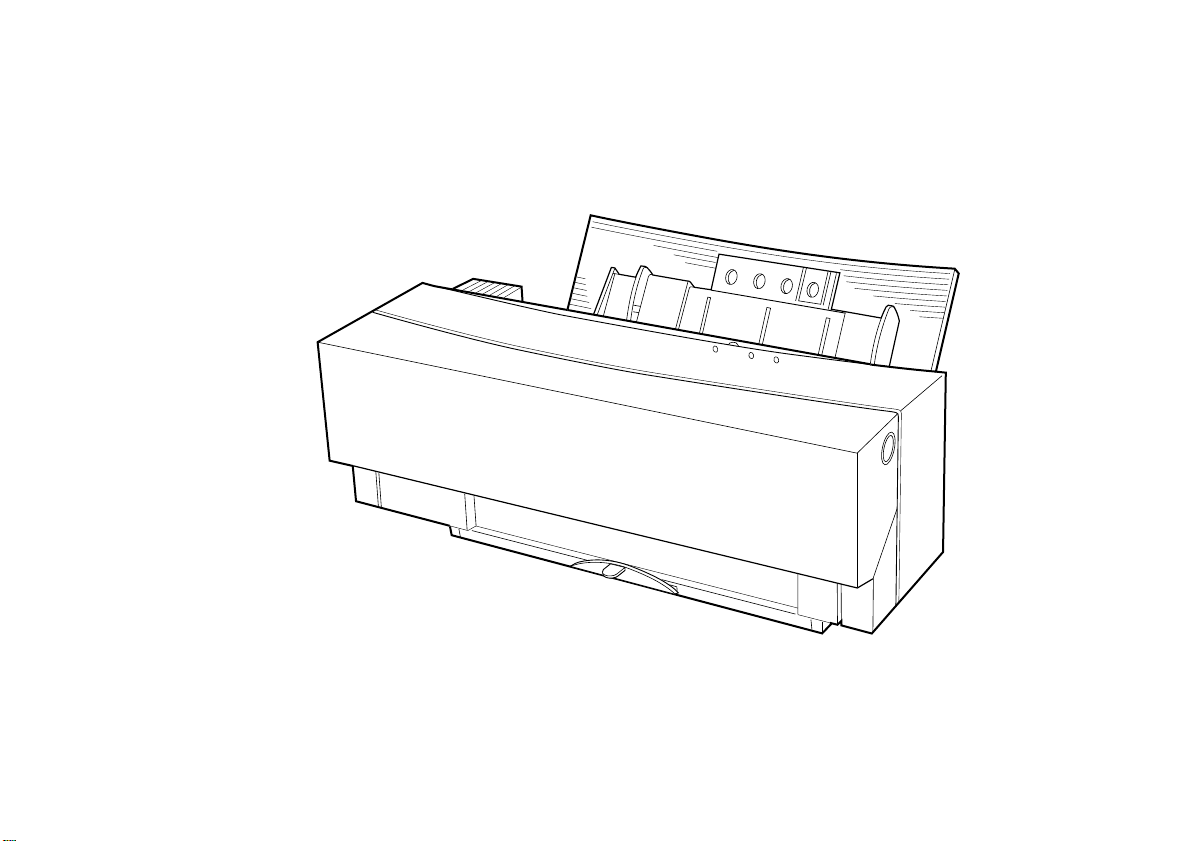
Thank you for your purcha se of th e OKI DP- 5000 P hoto Quality Colour Printer. This printer represents the
most recent advances in printing quality and technology. Whether you need a printer for your Windows PC,
your Macintosh or the new iMac computer, this printer
is the solution you h ave been look ing for . In addit ion to
the standard features listed in this Chapter we can offer
a number of optional devices which expand machine
functions and further sup port your communication
needs. The available options include:
• Macintosh SCSI Interface Module
• USB Interface Kit for iMac and PC with Windows 98
• Dye Sublimation Upgrade Kit ( for photographic
printing)
English
Chapter 1 - Introduction 1
Page 10

Features
The following is a summari sed list of the man y standard
features offered by your new printer:
• Variable-dot 2400 dots-per-inch printing resolution.
• Seven-colour ink capacity, the most challenging
printing tasks are easily accomplished.
• Fully compatible with all of the standard inks and
foil colours.
• Fade-proof, smear-proof, and waterproof printing.
• Ability to print on any paper using our VP hoto
Primer cartridge.
• Our Econo Black cartridge can be used again and
again, for the lowest-cost black and white printing.
• Reversable finish cartridge enabling the cartridge
to have a more extended life.
• Option to add dye sublimation printing. With a
simple upgrade kit, yo u can have true co nt inu ous tone photographic-quality printing at your fingertips.
2 User’s Guide
Page 11
Preparing your printer
1
2
English
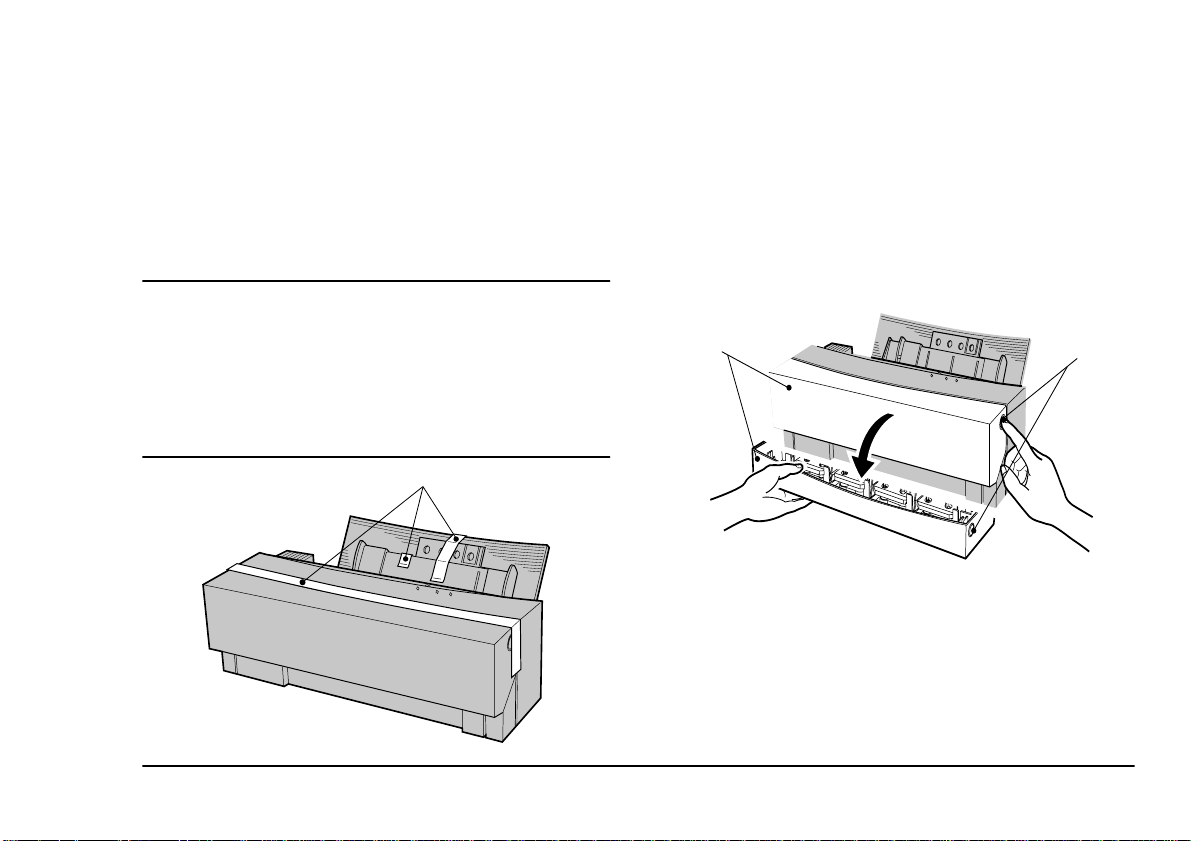
Removing package contents
2. Remove the three pieces of tape (1) from the outside of the printer before using.
1. Lift the prin ter out of it s container bo x. Remove
the packing materials from inside and outside the
printer.
Opening front cover
1. Open the front cover to remove the inside pack-
Caution
ing material.
The printer is shipped with tape, spacers, and other
packing materials to prevent delicate parts from being
damaged while in transit. Remove these packing materials
before using the printer. Damage to the printer or
malfunction may occur if the p rinter is used while these
packing materials are still present.
1
2. To open the front cover (1), push the front cover
release button (2) to release the internal lock.
Gently lower the front cover with your hand.
3. Remove the two pieces of carriage packing material (1) from inside the printer.
4. Press down on the release lever (2).
Chapter 1 - Introduction 3
Page 12
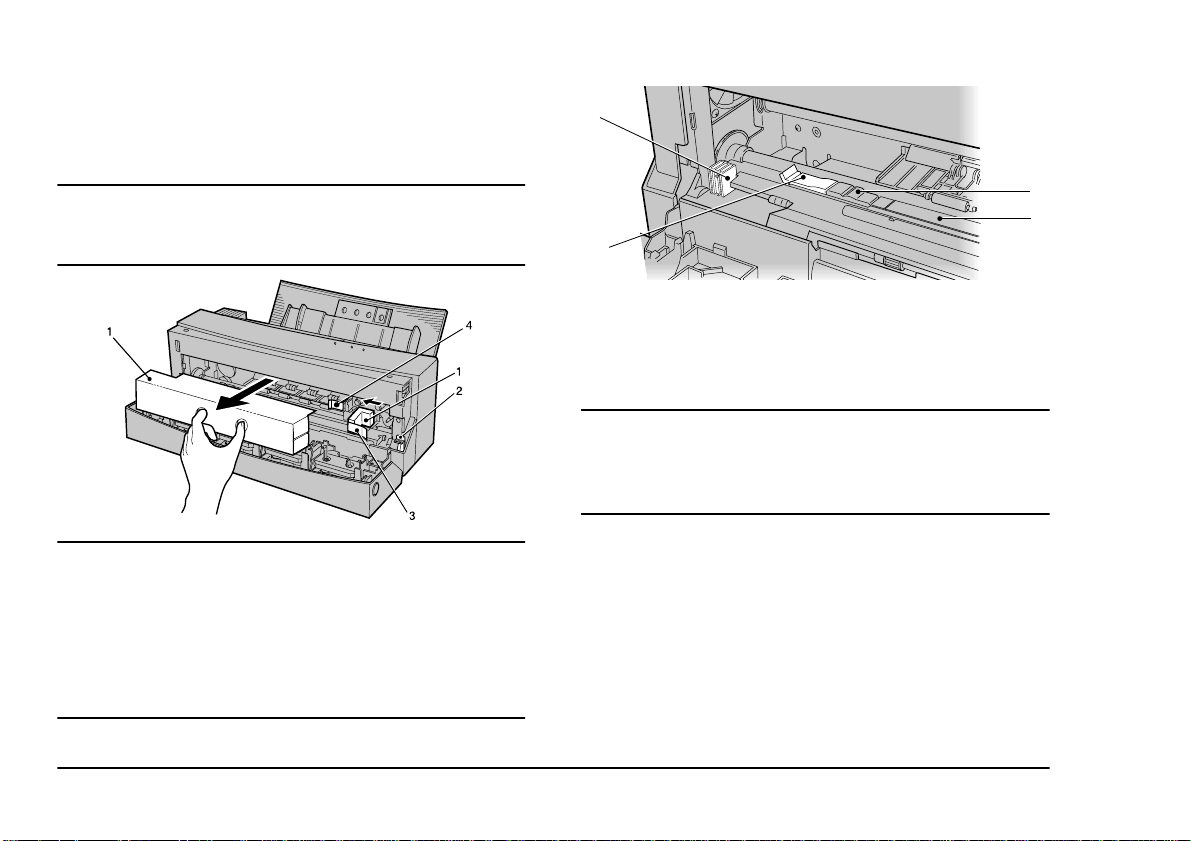
5. Remove the tape (3) from the metal frame, and
move the smaller packing piece (1) to the left.
6. Remove the other tape (3) from the carriage
4
Caution:
Operating the printer without first removing the packing
materials may damage the printer.
Caution:
Do not remo ve the whit e pad (1) or the cleani ng pa d (2) at
the left end of the platen (3). They are there to clean the
print head. Removing them can cause the printer to
malfunction. The cleaning pad can be replaced when it
gets dirty. Do not touch the cover open s ens or (4 ), which is
located on the left side of the printer.
1
3
2
Closing front cover
Close the front cover after removing the carriage packing material.
Caution:
When closing the front cover, never slam it shut. The ink
cartridges can become dislodged and damage to the
printer may result.
Locating printer
After removing the packing material and reading the
safety precautions (see page iii), choose a location
which offers a stable, firm surface for your printer. Try
to avoid places which are subject to extremes of heat,
cold, sunlight and damp. Also, choose a location from
4 User’s Guide
Page 13
which you can run the power cables safely to su itable
nearby connection points.
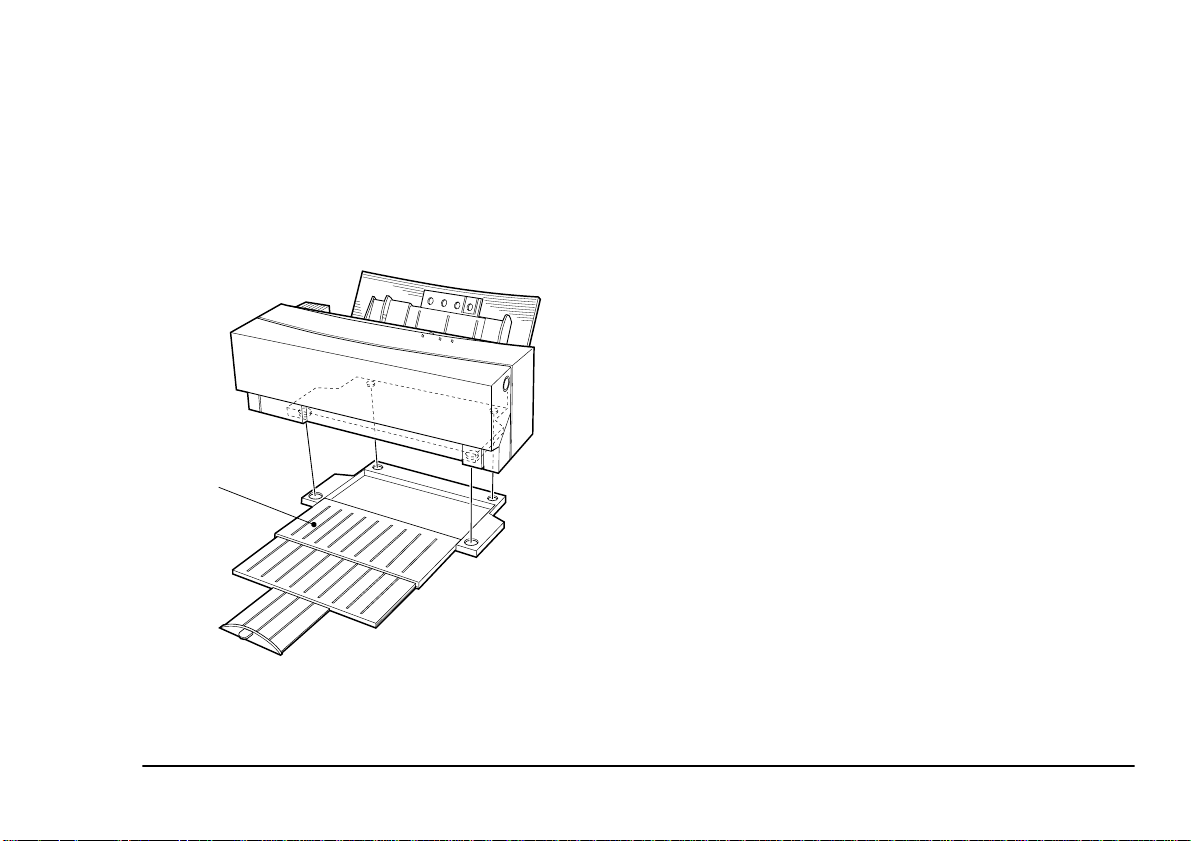
Installing output paper tray
Place the printer on the output paper tray (1) as shown
below. During printing, extend the paper tray. The output paper tray will hold up to 100 sheets of paper.
1
English
Chapter 1 - Introduction 5
Page 14

Printer functions
The following paragraphs explain the name and function of each part of the printer.
Front view of printer
1. Sheet feeder - P aper can fed into the printer either
automatically or manually. Place a stack of not
more than 100 sheets (plain laser pap er) for automatic feed. In manual feed, insert a single sheet at
a time.
1
4
2. Front cover release button - Pressing this button
opens the front cover. The front cover will need to
be opened when there is a paper jam or when
changing ink cartridges. Open the front cover
gently, using both hands.
3. Front cover - The front cover protects the internal
mechanisms of the printer. The cover is always
closed during printing.
4. Paper output slot - Paper exits the printer through
this slot.
Caution:
Never reach inside the printer while it is operating. Injury
may result. Do not open the front cover while the printer is
running.
2
7
3
5
6
6 User’s Guide
Page 15

5. Paper stopper - This stopper prevents the paper
from rising when th e small size media is set vertically for printing.
6. Paper support - The paper support holds the
loaded paper upright. To extend the paper support, pull up on the top edge.
7. Paper feed guide - This guid e feeds the p aper in to
the printer. Set the adjustable guide on the left to
match the paper size being used.
Rear view of printer
1. Parallel interface connector - The printer cable is
connected to the parallel interface connector.
1
2
2. Accessory connector - This connector is used to
connect an optional dye sublimation key or Macintosh interface module to the printer. Make sure
you remove the rectangular plastic connector
cover before connecting either of these options.
3. Paper feed switch - This switch sets the paper
feeding method to automatic feed mode or manual feed mode.
4. Power socket - The power cable connects to the
power socket.
Rear view of printer with Macintosh interface module
1. DIP switches - The DIP switch es are used to set
the SCSI device number for the printer.
3
1
English
3
4
Chapter 1 - Introduction 7
2
4
Page 16
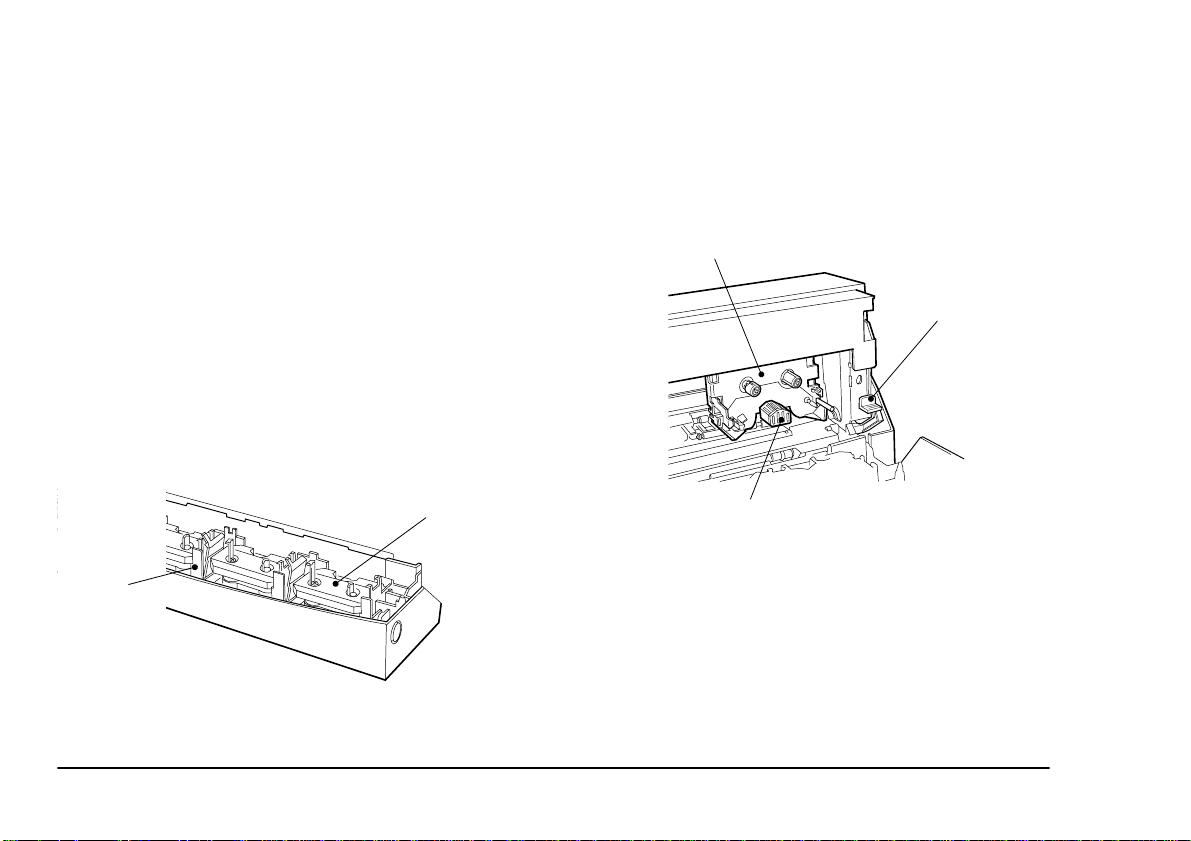
2. SCSI connector - The SCSI connectors are used
for connecting to the Macintosh computer and/or
other SCSI devices.
3. Paper feed switch - This switch sets the paper
feeding method to automatic feed mode or manual feed mode.
4. Power socket - The power cable connects to the
power socket.
Inside the printer
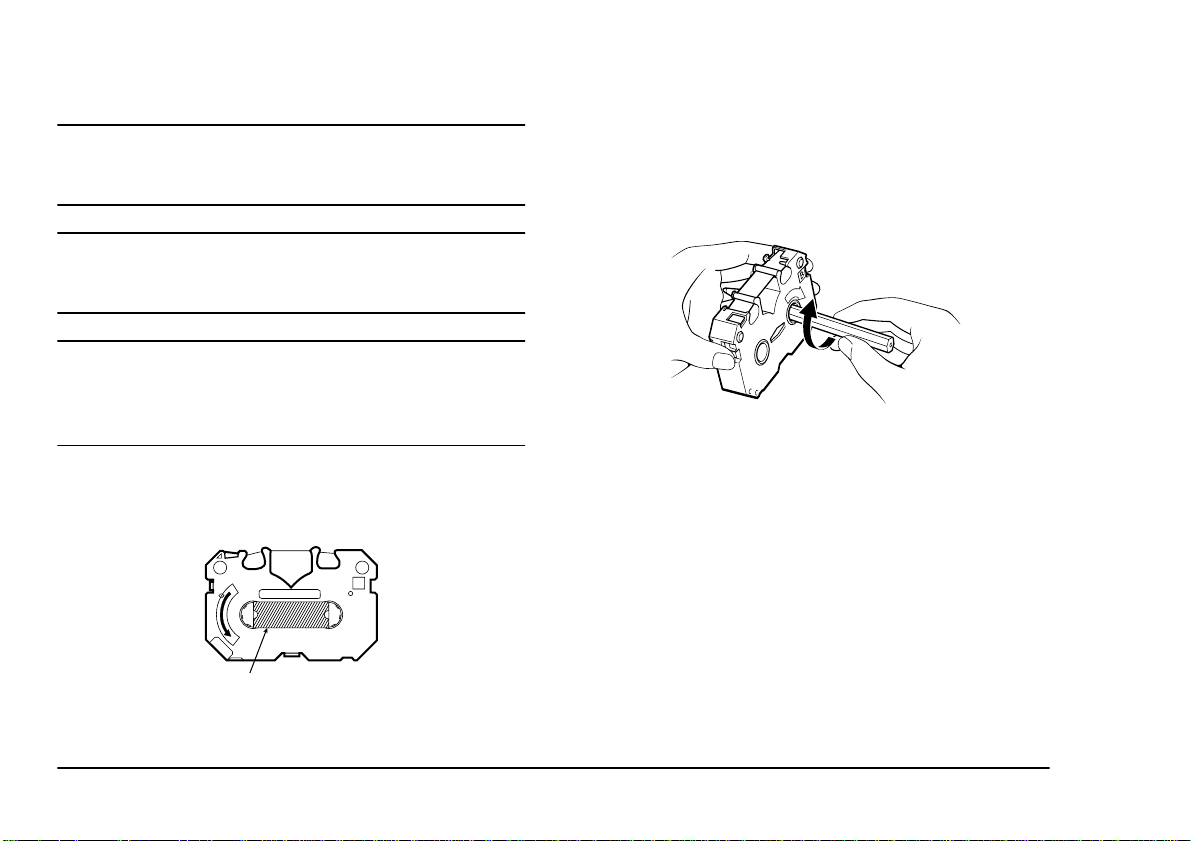
1. Marking sticker - The marking sticker confirms
that the carriage is i n the standard position. Try
not to smear the face of the sticker. If it gets dirty,
gently clean it with a dry cotton swab. As you do
so, be careful not to peel it off.
2
1
needed for a particular printing jo b. A maximum
of seven ink cartridges is allowed.
3. Carriage - The carriage automatically picks up
the specific ink cartridge needed for print ing and
moves it to the printi ng locatio n. The carria ge
also contains the print head.
3
4
5
4. Release lever - This lever, located to the right of
the carriage and platen, is used to clear paper
jams. Press the release lever down to remove the
jammed paper. When you close the front c over,
the lever will automatically go back to its original
position.
2. Ink cartridge holder plate - There are four holder
plates which hold the two ink cartridges each
8 User’s Guide
5. Print head - The print head prints the characters.
Take care not touch the underside of the head.
Page 17

Caution:
Mishandling the print head or carriage can cause damage
to the printer. Also, never load an ink cartridge directly
into the carriage. Malfunction or damage to the printer
may result.
Paper feed switch
Caution:
Do not move the paper feed switch while paper is being
fed, otherwise the paper may feed in incorrectly. Move the
paper feed switch until it clicks into position “M” or “A”.
Paper will not feed properly unless the switch is correctly
set to either “M” or “A”.
For continuous printing using automatic feeding, set the
paper feed switch to position “A”. To manually feed pa per, set the paper feed switch to position “M”.
Paper feed switch set to position “A”Paper feed switch
set to position “M”
Control panel
The top area of the printer has tw o buttons and three
LED indicator lights. This area of the printer is cal led
the control panel.
1. Power button - Use the
printer on and off.
2. Ready / Insert button - Use the
ton to load and eject paper. When the paper feed
switch is set in position “M”, this button is used
to feed or eject paper. The button is not functional when the paper feed switch is in position
“A”. Pressing the
ready / insert
seconds or more causes the printer to print a sample page.
button to turn the
power
ready / insert
button for three
English
but-
3. Error light - This light blinks when a printer error
has occurred.
Chapter 1 - Introduction 9
Page 18
4. Ready light - This light illuminates when the
printer is ready to print. The light blinks slowly
while printing and goes out when printing has
paused or stopped.
5. Power light - Indicates whether the printer is on
or off. The light illuminates when the printer is
on. When the light is off, the internal functions of
the printer still retain power. To completely shut
off power to the printer, unplug the power cable
from the socket.
For a full description of the indicat or lights refer to ‘Indicator Lights Summary’
Indicator lights summary
Light Light status Printer status
On Ready for operation
power
ready
error
Fast blinking Printing sample page
Off Printer not ready
On Select mode (ready to pr int)
Fast blinking Deselect mode (not ready)
Slow blinking Receiving or processing data
Fast blinking Printer error detected
Off Normal
Error Status
Hardware
error
Nonvolatile
error
Out of paper
Paper jam Paper jam detected.
Ribbon end
Cartridge
change error
Mechanism
error
Front cover
open
Necessary
ribbon not
installed.
Light Status
power ready error
Blink Blink Blink
On Off Blink
Description
An electrical circuit error has
occurred.
Contents of printer me mory
have been lost.
Printer is out of paper or deselected during paper feed
Ink cartridge ribbon needs
replacement.
Error detected during ink cartridge change, or eight cartridges installed plus one on
carriage.
Printer mechanical error.
Front cover left open.
Necessary ink cart idge not
installed or used up. Forced
printing still possible.
10 User’s Guide
Page 19
Chapter 2 - Initial Setup
1
3
2
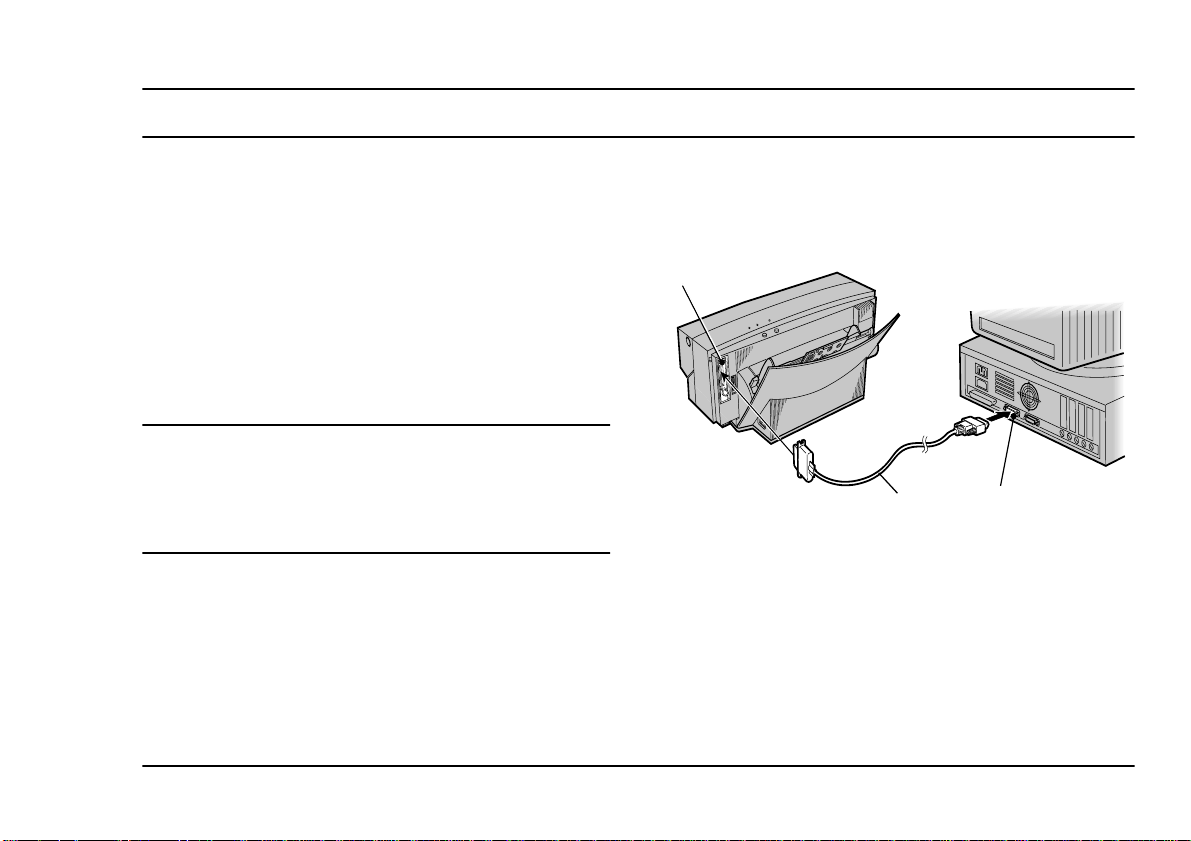
Connecting cables for Windows
When your printer has been positioned in a suitable location, you can connect it to your Windows PC with a
printer cable and to a suitable AC power source with the
power cable.
Connecting the printer to your computer
Caution
Power to the printer and computer must be turned off and
the power cables unplugged before connecting or
disconnecting the printer cable. Otherwise damage or
malfunction may result.
English
interface module, see ‘Connecting SCSI interface for
Macintosh’ i n Appendix A.
Connect the printer to the computer with a bi-directional printer cable. Secure the printer cable (1) to the connectors on the printer (2) and on the computer (3).
Note
When using y our printer with a Macint osh computer,
connect the printer to the Macintosh using a SCSI
Chapter 2 - Initial Setup 11
Connecting the printer to a power supply
1. Plug the power cable into the power socket on th e
printer. Make sure that the power cable is
securely seated in the socket.
Page 20
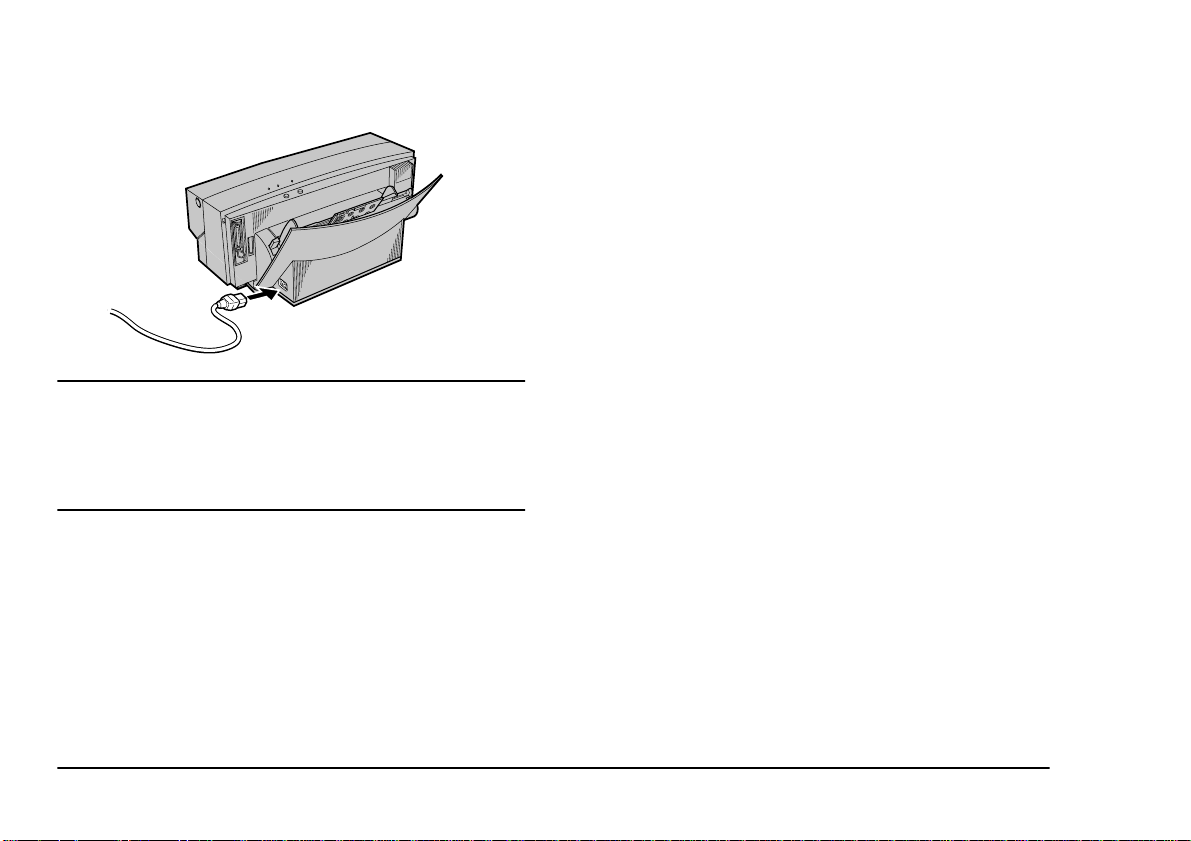
2. Plug the free end of the power cable into a suitable AC power source (such as a wall socket).
Caution:
Power to the printer is completely cut off only when the
cable is unplugged. Place the printer where you can easily
unplug it from the wall socket. Also, pull the plug and not
the cable when unplugging the printer.
12 User’s Guide
Page 21

Ink cartridges
English
The following describes how to ident ify the different
types of ink cartridge and how to install and r emove the
cartridges from the printer.
Identifying ink cartridge and paper types
The ink cartridge type is indicated on t he surface of
each cartridge.
Printing type
Black text Econo Black 41067605
Standard
colour printing
600 dpi
Ink cartridge
type
Black 41067604 Plain paper
Yellow 41067603
Magenta 41067602
Cyan 41067601
Part number
Matching paper
type
Plain paper
Laser paper
High grade paper
Overhead
projector
transparency film
Laser paper
High grade paper
Printing type
VPhoto
printing (fine)
on plain paper
2400 dpi
VPhoto
printing on
VPhoto film
2400 dpi
Spot colour
printing
Dye
sublimation
Ink cartridge
type
Black 41067604
Yellow 41067603
Magenta 41067602
VPhoto primer
1
*
Cyan 41067601
Finish II 4106 7607
Black 41067604
Yellow 41067603
Magenta 41067602
Cyan 41067601
Finish II 4106 7607
Gold foil 41067608 Plain paper
Silver foil 41067609
White 41067610
Photo cyan 41067612
Photo magenta 41067613
Photo yellow 41067614
Photo overcoat 41067611
Part number
41067606
Matching paper
type
Plain paper
Laser paper
High grade paper
VPhoto print film
Laser paper
High grade paper
Overhead
projector
transparenc y film
Dye Sub paper
(A4)
Chapter 2 - Initial Setup 13
Page 22
*1 Use VPhoto primer for any plain papers.
Caution 1
The manufacturer only recommends printing with the
cartridge-paper combinations listed in Table 1.
Caution 2
Printing with an inappropriate ink cartridge-paper
combination can damage the cartridge ribbon.
Caution 3
Printing outside the printable paper area can damage the
cartridge ribbon. Always print within the pr intable area.
See ‘Printable Area’ in Specifications and Settings.
Installing ink cartridges
Install ink cartridges by following the steps below.
1
1. The cartridge has a stopper (1) to prevent slack in
the ribbon (see below). Remove this stopper from
the ink cartridge.
2. Insert a pencil from the side marked “B” and turn
the pencil slowly to take up any slack in the ribbon (1).
D
N
I
W
3. Open the fr ont cover by pushing the fron t cover
release button to release the intern al lock. Gen tly
lower the front cover with your hand.
4. Hold the ink cartrid ge w ith you r t hum b and in dex
finger so that the side wi th the letter “B” and t he
manufacturer’s logo faces upward.
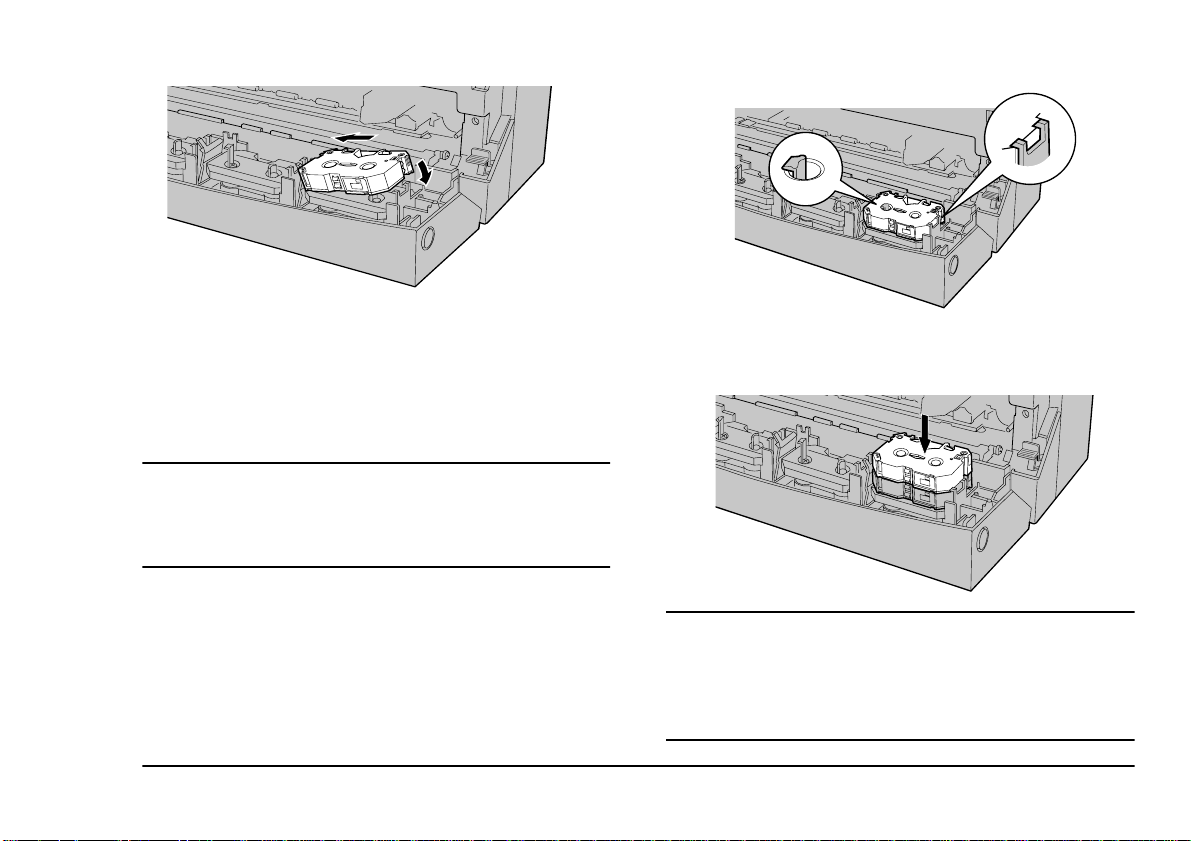
5. Insert the left end of the ink cartridge in to the ink
cartridge holder, while pushing the left side latch
of the holder slightly to the left along with the
cartridge.
14 User’s Guide
Page 23
Note
The printer carriage located inside the printer can
select and pick up the necessary ink cartridge from any
holder. You can place up to 7 cartridges of the same
colour in the holders to reduce the need to change ink
cartridges.
Caution
The ink cartridges may be put in any holder but DO NOT
put ink cartridges directly into the carriage. Doing so may
result in damage to the printer.
6. Push down the right side of the ink cartridge.
Make sure that the ink cartridge is securely
locked into the holder, and that there is no slack
in the ribbon.
English
7. Place the second ink cartridge on top of the ink
cartridge already installed. Gently push do wn the
centre of the ink cartridges.
Caution 1:
Place the side marked “B” face up. If the ink cartridge is
installed upside down, the printer will not know it has
been installed. Only the Econo Black and Finish
Cartridges are reversible.
Chapter 2 - Initial Setup 15
Page 24
Caution 2:
You must leave at least one cartridge holder empty for the
printer to operate properly. Do not install more than 7 ink
cartridges.
Replacing or changing ink cartridges
When you want to change ink cartridg es or replace a
cartridge whose ribbon has been used up, remove the
cartridges by the following steps.
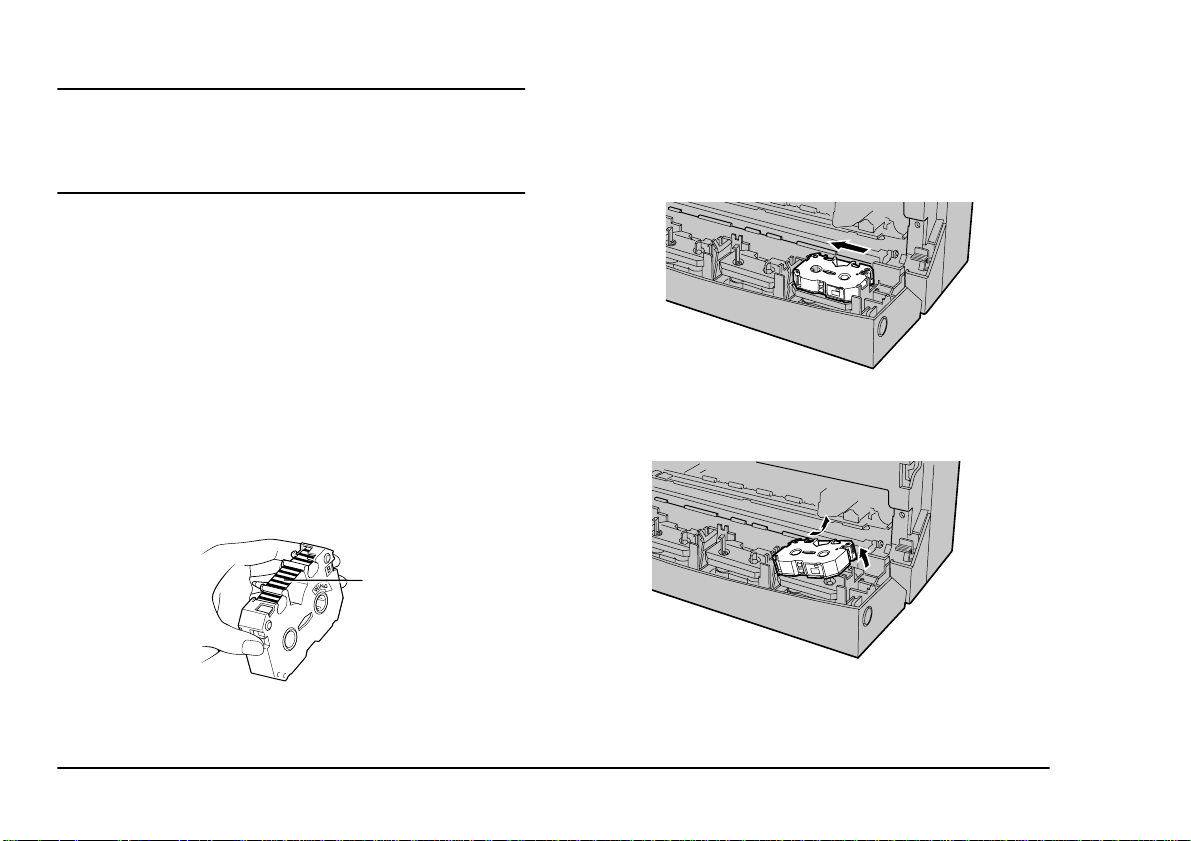
Note 1:
When an ink cartridge has been used up, black and silver stripes will be visible on the ribbon.
Note 2:
To re verse a Finish II or Econo Black ink cartridge, flip
the cartridge over and manually advance the ribbon
until the black and silver stripes (1) disappear.
1
2. Removing an ink cartridge is similar to installing
it. Hold the centre of the cartridge with your
thumb and index finger. Push the left latch on the
ink cartridge holder slightly to the left with the
cartridge.
3. Lift up the right side of the cartridge, and then
remove the entire ink cartridge. Insert a new ink
cartridge by following the steps described earlier.
1. Open the front cover by pushing the front cover
release button.
16 User’s Guide
Page 25

Loading paper
English
The following paragraphs explain how to load paper
into the printer.
Paper types and available feeding modes
The table below shows information on switching between automatic and manual feeds, and on setting the
paper feed switch (“A” or “M”).
Media type
Plain paper (for plain paper
copiers)
Laser paper / High Grade Paper A M
VPhoto Pr int Film (A4)
Overhead Projector
Transparency Film
Other media (thick paper, etc.) x M
Dye Sub Paper (A4)
Automatic feed
mode
AM
1
A*
AM
2
A*
*1 For VPhoto Print Film, use single sheet and
manual feed.
*2 To continuously print Dye Sub Paper, always
use the guide sheet (included in the supplies).
Manual feed
mode
M
M
Caution:
Do not print on the following; thermal paper, paper
exclusively for use in ink jet printers, glossy paper (paper
whose surface has been specially treated), and envelopes.
Doing so may damage the printer.
Note 1:
Loading too many sheets into the sheet feeder may
cause paper jams or misfeeding.
Note 2:
Be aware that when using automatic feed mode, the
last sheet will occasionally feed incorrectly depending
on the paper type.
Notes and precautions about paper
The printer’s sheet feeder can feed paper to the printer
automatically, which is the most convenient method of
printing. The sheet feede r holds up to 100 sheets o f
plain paper (or 30 transparencies) at once.
Chapter 2 - Initial Setup 17
Page 26

Thick paper and other kinds of special printing media
should be used in manual feed mode. The approximate
thicknesses of paper that can be used in manual feed
mode or automatic feed mode are as follows:
Feed Mode Min. Max.
Automatic 0.07mm (0.003") 0.10mm (0.004")
Manual 0.07mm (0.003") 0.23mm (0.01")
Caution:
Never use paper in the sheet feeder with thickness outside
the range 0.07 mm - 0.10 mm (0.003" - 0.004") in
automatic feed mode. In manual feed mode, never use
paper whose thickness is outside the range 0.07 mm - 0.23
mm (0.003" - 0.01"). Doing so may cause paper jams or
damage to the printer.
• When printing on Dye Sublimation Paper, use
only Dye Sublimation ink cartridges. Be sure to
confine your printing to the glossy printable area
only. If you print outside this area, you may damage the ink cartridge.
• When printing on a thick sheet, or an irregular
postcard-size sheet allow a 1/2 inch (12 mm)
margin on the left and right side to prevent printing over the paper edge, this could result in tearing the ink cartridge ribbon.
• When printing on used sheets (already printed on
the same side), use manual feed only. Automatic
feed may not feed used sheets properly. When
using manual feed, avoid repeatedly inserting and
removing the same sheet.
Paper jams can be caused by feeding in paper that is extremely smooth or shiny, too roug h, or paper that easil y
picks up static electricity. Paper jams and other paper
feed problems can tear the ribbons in ink cartridges.
To avoid such problems, please note the fo llo wing pre-
Loading paper in automatic feed mode
Use automatic feed mode for continuous printing.
There are two methods for loading p aper, dependi ng on
the media.
cautions:
• Always use the recommended paper types, and
be sure to set the printer’s paper options properly.
Settings that are not appropriate for the paper
being used can cause paper jams.
18 User’s Guide
Page 27
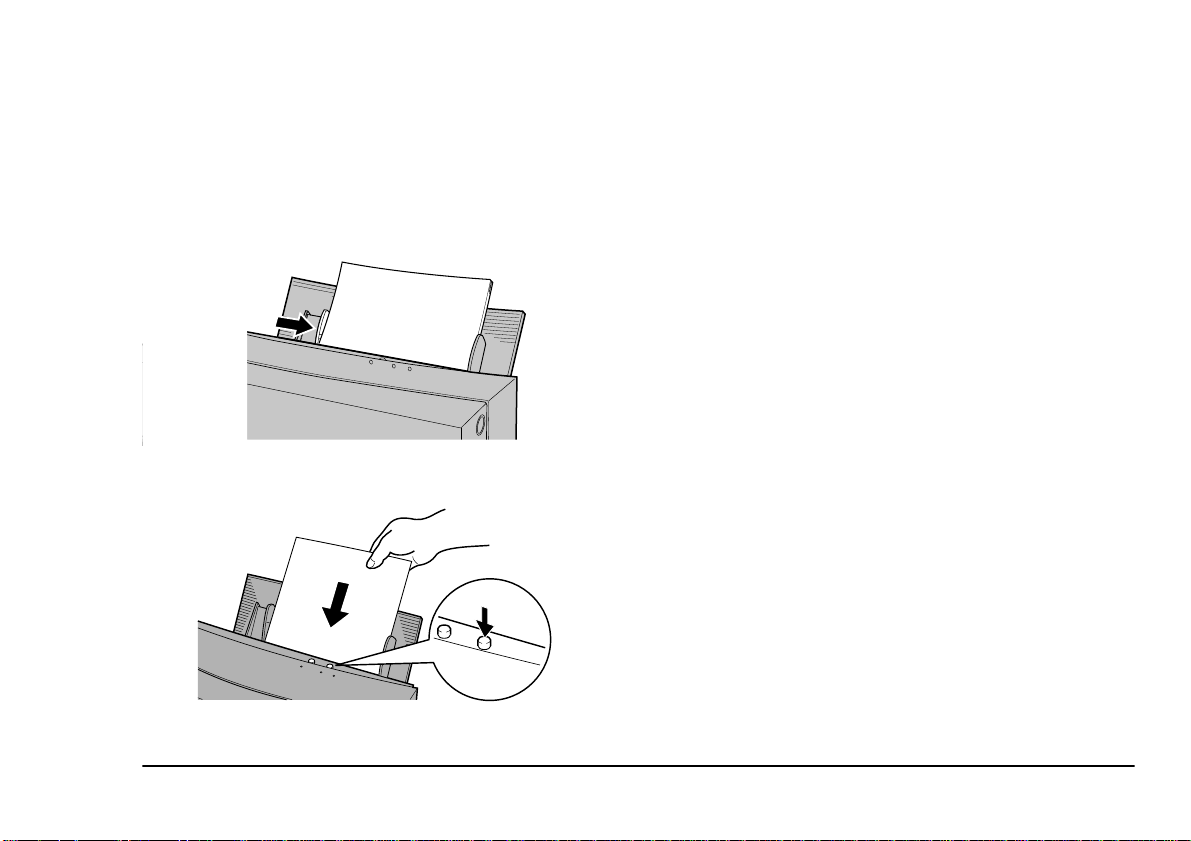
Loading high grade/plain/laser paper and transparencies
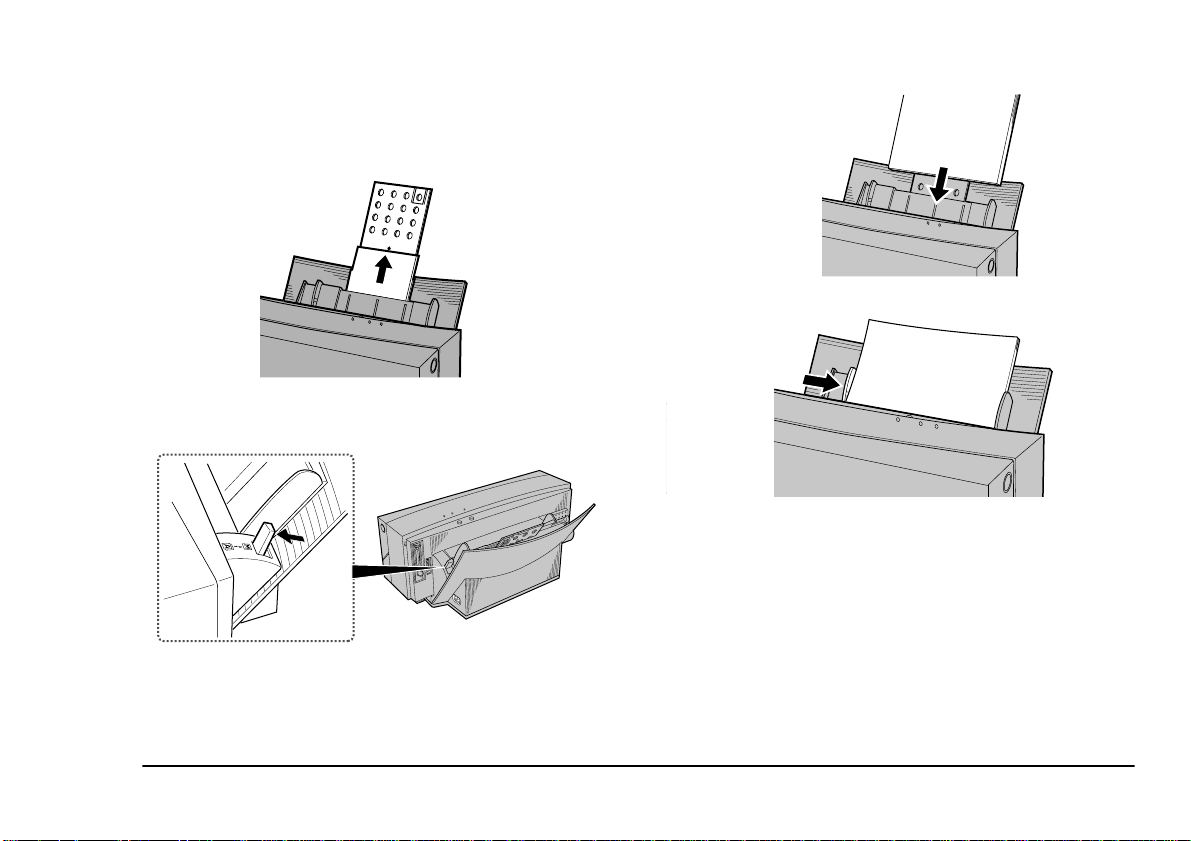
1. Pull the paper support upwards.
2. Select the paper feed mode by switching the
paper feed switch to position “A”.
3. Place the paper in the sheet feeder.
English
4. Adjust the paper feed guide to the paper size.
Note 1:
Do not use creased or curled paper, this can cause the
paper to misfeed.
Note 2:
F a n the paper once before placing it in the sheet feeder .
This will prevent the paper sticking and printer feeding
a number of sheets together.
Chapter 2 - Initial Setup 19
Page 28

Note 3:
Use only one type of paper at a time.
Note 4:
Pushing the paper feed guide too hard against the
paper can bend the paper. Adjust the position of the
paper feed guide so that it just touches the paper.
Loading paper in manual feed mode
Use manual feed mode when pri nting on thick paper,
cards and other kinds of special pr inting media. In ma nual feed mode you should load only on e sheet at a time.
1. Switch the paper feed switch to position “M”.
2. Remove any paper from the sheet feeder.
3. Make sure that the paper stopper is not lifted.
4. Insert the sheet of paper straigh t into the sheet feeder.
20 User’s Guide
Page 29
Note 1:
Paper that is creased or curled may print incorrectly.
Note 2:
Make sure that you insert the paper straight. Inserting
it at a slant can cause a paper jam.
5. Adjust the paper feed guide to the paper size.
6. Press the ready/ insert button. The paper is automatically pulled into the printer .
ready / insert
English
Chapter 2 - Initial Setup 21
Page 30

22 User’s Guide
Page 31

Chapter 3 - Installation and Operation, Windows
Installing the printer driver
English
Before you can use your printer, you need to install the
correct printer driver software into your computer so
that it can operate with the printer. The following paragraphs describe how to install the printer driver.
Purpose of the printer driver
The printer driver software helps to control the printing
process, so the driver you select must match the printer
you are using. When printing from an application in
Windows, always use the printer drive r specif ically designed for your printer model.
To take full advantage of t he many features of your
printer, always create your documents after you h ave
selected the correct printer driver. If you have a different printer driver selected when you print a document,
then only the print settings that match functions of your
printer will be valid.
Chapter 3 - Installation and Operation, Windows 23
Turning on the power
Turn your printer and co mputer on or off in the fol lo wing order;
• Push the power button on the printer to turn it on.
• Turn on your computer.
System requirements
The system requirements for the supplied printer driver
are as follows:
Computer: IBM PC-AT or compatible
Windows: Microsoft Windows 95/98
Total RAM: 16 MB or more (32 MB or more is recomme nded)
Disk space required during printing is as follows:
Monochrome image Colour image
VPhoto Colour Printing 20MB 80MB
Page 32

Note 1:
The figures in Table 2 are approximations of the total
disc space required when printing at VPhoto Colour
mode.
Note 2:
The working disk space needed during print ing is automatically erased after printing is completed.
Installing printer software from CD
The printer driver is included on the suppli ed installation disc. To install the printer driver software for Windows 95/98
1. Insert the OKI DP-5000 installation disk into
2. In the window that appears, choose
3. Choose the language of the printer driver that you
4. Follow the instructions on-screen to complete the
®
follow these steps.
your CD-ROM drive. If a window does not
appear automatically, double-click the OKI
installation disc to open it, and then double-click
the
‘setup.exe’
file.
Install Driver
wish to install.
installation
Installing printer software using Plug & Play
When you are installing the printer driver software using Plug & Play or the
Add Printer Wizard
, Windows
will ask you to choose the printer driver to install. When
prompted, insert the installation disc into your CDROM drive and click
. Follow the instructions on the
OK
screen to complete the installation.
Port monitor setup
The Port Monitor provides DMA/ECP and ECP parallel
port settings that allow you to print at higher speed.
Your computer must meet the following system requirements to use the high speed printing function.
DMA Access ECP capable parallel port a nd D MA supported
Faster ECP capable parallel port
Standard Any IBM compatible computer
.
Note:
The Installer will automatically s et the I/O Port Speed
Faster
to
, if your computer has the ECP capable parallel port. Refer to your computer's reference manual for
details.
24 User’s Guide
Page 33

Select the I/O port speed
English
Port speed error
1. Choose
select
Settings
Printers
from the
menu, and then
Start
. In the Printers window that
appears, right-click the DP-5000 printer icon.
Then select
2. Click the
tings…
3. In the
Properties
Details
button.
Configure LPT Port
select an option. Then click
.
tab, and then click the
window that appears,
OK.
Port Set-
Note 1:
To use DMA access your computer must b e able to s upport this, and you must ensure that your parallel port is
set to use DMA in the computer’s BIOS settings. Refer
to your computer's reference manual for details.
Note 2:
To use the “Faster” option your computer must be able
and set to support ECP mode in the BIOS settings.
Refer to your computer's reference manual for details.
4. Click
to close the
OK
Properties
window
If the
‘I/O Port Speed Error
’ message appears, you
must set the parallel port configuration to ECP mode in
the BIOS settings for the parallel port to use the DMA.
Refer to your computer's reference manual for details.
Configure LPT port
If your computer has additional parallel p orts, you can
use the Resources dialogue box to select the
Channel.
DMA
Please ensure that there is no conflict in the address assignments. The PC can suppo rt up to three parallel port s
as long as there are no conflicts for each port.
IRQ
and
Chapter 3 - Installation and Operation, Windows 25
Page 34

Printing operations
When you have connected the cables to you r printer and
have installed the printer driver, you are ready to use
your printer. This section describes step by step operations for monochrome and colour printing.
Printing in monochrome
The following paragraphs explain how to perform monochrome printing on plain paper.
Requirements
You need the following items for monochrome printing;
1. Ink cartridge
a Black ink cartridge or Econo Black ink car-
tridge.
2. Media
a High Grade Paper
b Laser paper or plain paper
c VPhoto Print Film.
Note:
Our VPhoto Primer will help make many plain papers
suitable for printing. See Chapter 5, ‘Specialized
Printing Operations’ for details.
3. Printing data for monochrome printing
a Printing data consisting of text and/or
graphics created by an application.
Placing an ink cartridge in your printer
Make sure at least one black or Ec ono Black ink cartridge is installed in the ink cartridge holders.
Caution:
Do not place an ink cartridge directly into the carriage.
Doing so may damage the printer.
Note 1:
If at least one of the ink cartridges in the four ink cartridge holders can be used in the selected printing
mode, the carriage will automatically pick up that ink
cartridge.
26 User’s Guide
Page 35

Note 2:
Refer to Installing Ink Cartridges’ in Chapter 2 for
directions on installing ink cartridges.
Note 3:
Installing multiple ink cartridges of the same colour
allows you to print more pages without stopping to
replace spent ink cartridges.
Note 4:
Econo Black cartridges can be reversed up to 20 times .
Load the paper into your printer.
Setting up the printer driver for monochrome printing
1. In the application you want to print from, select
from the
Print
logue box.
Note:
Please note that the procedure for opening the dialogue box of the driver may differ slightly from one
application to another.
2. In the Print dialogue box click
3. In the
Document Quali ty
or
cale
Type
Monochrome Text
menu.
menu to open the Print dia-
File
Properties.
tab click either
from the
Greys-
Document
English
4. Select a paper type from the
5. Select either
from the
Black
Standard Colour
Print Mode
Media T y pe
menu.
or
menu.
Economy
a If you have installed a black ink cartridge,
select
Standard Colour
.
b If you have installed an Econo Black ink
cartridge, select
6. Click the
Quality
tab. If you selected
More Settings
Economy Black
button on
Standard Colour
the Print Mode, you can now select either
Standard
in the
Print Quality
menu.
.
Document
for
or
Fine
Note 1:
To print black in
chrome Text
Paper
Document/Quality
Settings
from the
Laser Paper
or
dialogue box.
tab. Then set to
Fine
, select
Document Type
from the
Grayscale
menu and
Media Type
Fine
Mono-
or
Plain
menu in the
in the
More
Note 2:
Checking the
Eject Paper Quicker
in the Printing
Option setting shortens the printing time. This option is
only available when you have selected to print in either
Monochrome or Greyscale.
7. In the
box select
Properties
Paper
window of the Print dialogue
tab.
Chapter 3 - Installation and Operation, Windows 27
Page 36

8. Set the
Copies
9. When you have completed all the setup, click
to close the printer driver Properties dialogue
box.
10. Click
ing.
Paper Size, Orientation,
as required.
in the Print dialogue box to s tart print-
OK
and number of
Printing in colour
The following paragraphs describe how to print standard colour images on plain paper.
OK
b Laser paper or plain paper
c VPhoto Print Film
3. Printing data for colour printing
a Printing data consisting of text and/or
graphics created by an application.
Note:
Using our VPhoto Primer will help make many plain
papers suitable for full-colour pri ntin g. See Chapter 5,
‘Specialized Printing Operations’ for details.
Placing ink cartridges in your printer
Requirements
You need the foll owing items for standard col our p rinting;
1. Ink cartridges
a Black ink cartridge
b Cyan ink cartridge
c Magenta ink cartridge
d Yellow ink cartridge
2. Media
a High grade paper
28 User’s Guide
Make sure the ink cartridges listed above are installed.
The ink cartridges may be installed in any order.
Caution:
Do not place an ink cartridge directly into the carriage.
Doing so may damage the printer.
Load the paper into your printer.
Page 37

Setting up the printer driver for colour printing
1. In the application you want to print from, select
from the
Print
logue box.
menu to open the Print dia-
File
English
7. When you have completed all the setup, click
to close the printer driver Properties dialogue
box.
8. Click
in the Print dialogue box to start p rint-
OK
ing.
OK
Note:
Printing on reverse side
Please note that the procedure for opening the dialogue box of the DP-5000 driver may differ slightly
from one application to anot her.
2. In the Print dialogue box click
3. Select
Automatic, Photographs
from the
Text
ument/Quali t y
Document type
tab. When you select
Properties.
or
Graphics/
menu on the
Automatic
Doc-
The DP-5000 printer has a special option for printing on
the reverse side of paper. The
Print On Reverse Side
option skips the paper curl reforming process for best
printing results.
Setting up the printer driver for printing on reverse side
in the Document Type, the black printing data
will be printed in black, and the colour printing
data will be printed in full colour.
1. In the application you want to print from, select
Print
from the
menu to open the Print dia-
File
logue box.
4. Select a paper type from the
5. Select
VPhoto Colour
6. Click the
Quality
Print Quality
Chapter 3 - Installation and Operation, Windows 29
Standard Colour, Glossy Finish
from the
More Settings
tab. Select the desired quality from the
menu.
Media Type
Print Mode
button on
menu.
or
menu.
Document
2. In the Print dialogue box click
Properties.
3. In the application you want to print with, select
Print
from the
menu to open the Print dia-
File
logue box.
4. Click
Properties
. The printer Properties dialogue
box appears.
Page 38

5. In the
Reverse Side
Document/Quality
option.
tab click
Print On
Note:
Note that when you select certain media types the
on Reverse Side
6. Select
Text
select
option will not be available.
Automatic, Photographs,
from the
Automatic
Document Type
here, the black & white printing
or
Graphics/
menu. When you
data will be printed in black & white, and the colour printing data will be printed in full colour.
Print
Turning off the power
When you finished printing, turn off your printing devices in the following order;
• Quit Windows, and then turn off your computer.
• Push the power button on the printer to turn it off.
7. Select a paper type from the
8. Select
VPhoto Colour
Standard Colour, Glossy Finish,
from the
Media Type
Print Mode
9. When you complete the setup, click
menu.
menu.
to close
OK
or
the printer driver Properties dialogue box.
10. Click
in the Print dialogue box to s tart print-
OK
ing.
Caution:
When printing on the reverse side of paper, the printer
needs periodic maintenance for cleaning. See ‘Cleaning
the F eed Roller’ and ‘Cleaning the Platen’ in Chapter 6 to
ensure best results when printing.
30 User’s Guide
Page 39

Chapter 4 - Installation and Operation, Macintosh
Installing the printer driver
English
Before you can use your printer, you need to install the
correct printer driver software so that your computer
can work with the printer.
This chapter describes how to install the supplied printer driver for an Apple Macintosh. These directions assume that you are familiar with normal Macintosh
operations, such as using the mouse and menus. Please
refer to the User’s Guide that came with your Macintosh if you need information about general Macintosh
operations.
Preparing for installation
Before installing the printer driver, chec k your hard
disk with the Disk First Aid utility to ma ke sure that it
has no serious problems. Refer to the Macintosh User
Guide for information about using Disk First Aid.
Turn on the power
Turn your printer and co mputer on or off in the fol lo wing order;
• Push the power button on the printer to turn it o n.
Purpose of the printer driver
The printer driver is software that enables your computer to control the printer. When printing from any application, you must select a printer driver that matches the
printer being used in order to ensure accurate printing
results. To take advantage of the many features of this
printer, select the correct printer driver before creating
your documents.
Chapter 4 - Installation and Operation, Macintosh 31
• Turn on your computer.
System requirements
The system and disk space requirements for the DP5000 printer driver are as follows:
Page 40

Computer: Apple Macintosh computer or compatibl e
Operating sy s tem: System 7.1 or later
Total RAM: 16 MB or more (32 MB or more is recommen de d)
Monochrome image Colour image
VPhoto Printing 20MB 80MB
Note 1:
The figures in Table 2 are approximations of the total
disk space required when printing at VPhoto Colour
mode.
Note 2:
The working disk space needed during print ing is automatically erased after printing is completed.
Contents of the installation disk
The files shown below are contained on the supplied
CD-ROM installation disc. The installer will install the
following files:
• Printer Driver
• Queue Monitor (background printin g applicati on)
• Queue Watcher (background printing extension)
• ColorSync
Installing the printer driver software
The CD-ROM includes the printer driver software. To
install the printer driver software onto your Macintosh,
follow these steps:
1. Insert the OKI DP-5000 installation disk into
your CD-ROM drive.
2. Open the
on the
Install OKI DP-5000
‘English’
folder, and then double-click
icon.
3. Follow the instructions on-screen to complete the
installation.
Using balloon help
Balloon Help works on all versions of MacOS from 7.1
upwards. By displaying Balloon Help, you can get a
simple explanation of each function. Follow the steps
below to use Balloon Help.
1. Select
Show Balloons
(found on the menu bar, at the upper right corner
of the screen).
2. Move the cursor over the button or box to be
explained.
3. To hide Balloon Help, select
the
Help
menu.
from the
Hide Balloons
Help
menu
from
32 User’s Guide
Page 41

Selecting the correct driver
Before creating any documents in your appli catio n you
should select the DP-5000 printer driver which you installed from the CD-ROM. If you want to print documents created when this printer driver was not selected,
first select the DP-5000 printer in the
then choose
Page Setup
from your application’s
menu. Finally change the application’s pag e format and
other settings if needed.
Follow the steps below to select the correct printer driver.
1. From the Apple menu, select the
2. Click on the DP-5000 printer driver icon on the
left side of the screen. The box on the right displays the SCSI device number of the pr i nter.
Note:
Make sure the device number in the
box is highlighted. If it is not, your p rinter is not b eing
recognised. Click on the device number a few times. If
it is still not highlighted, it is pos sible that the
has insufficient memory. In this case, close the
Chooser,
and select the printer from the
run any one of your application programs,
Chooser
Chooser
Chooser
Select a SCSI port
again.
menu,
.
Finder
File
3. If you have several identical printers connected,
click on the SCSI device number of the printer
you will use. The factory device setting is #6. To
change SCSI device numbers, see ‘Specif ications
and Settings’ in Chapter 8.
Note 1:
If you have more than one SCSI b u s in yo ur Macinto sh,
“SCSI #6 BUS #1” or similar will be displayed.
Note 2:
Immediately following installation, background printing is turned off. Click on the
On
button to enable
background printing. Backgro und printing will not be
available if you did not install the Queue Kit software.
4. Click on the
box to close the
Close
Chooser.
5. When the selected printer driver is changed from
a previous printer driver, a dialogue box will
appear to inform you that a different printer has
been selected. Click on the
button to close the
OK
dialogue box.
Testing the printer
To make sure the printer is functioning corre ctly, use
the
Print Desktop
ing
Print Desktop
command in the
Finder.
check the following:
Before us-
English
Chapter 4 - Installation and Operation, Macintosh 33
Page 42

1. The printer is connected to the computer and is
turned on.
2. The system folder window is open (if not, dou bleclick the folder on the startup disk).
3. There is paper in the printer.
Page setup dialogue box
Print preview
You can preview your printed job by clicking the
button in the Print d ialogue box, th e desktop w ill
view
appear on screen. To print the desktop, click
. Printing be gins.
Page
When you finished printing, turn off your printing devices in the following order;
Pre-
Print
1. Select
Setup
Page Setup
dialogue box opens.
from the
menu. The
File
Page
2. Make sure the paper type and size s ettings match
1. Shut down (and, if needed) turn off your computer.
2. Push the power button on the printer to turn it off.
the paper loaded in the printer, (factory settings
are Laser Paper, A4). If the paper type does not
match, select the appropriate settings.
3. Close the
Page Setup
box by clicking
OK.
Print dialog ue box
1. Select
Print Desktop
Print dialog box opens.
2. Select required settings and click
printing.
34 User’s Guide
from the
File
Print
menu. The
to begin
Page 43

Printing operations
English
When you have connected the cables to your printer and
have installed the print er driver, you are re ady to use
your printer. The followi ng describ es step by st ep operations for monochrome and colour printing.
Printing in monochrome
The following paragraphs explain ho w to perform monochrome printing on plain paper.
Requirements
You need the following items for monochrome printing:
1. Ink cartridge
a Black ink cartridge or Econo Black ink car-
tridge.
2. Media
a High Grade Paper
b Laser paper or pl ain paper
c VPhoto Prin t Film.
Note:
Our VPhoto P rime r will he lp make many pl ain pa pers
suitable for printing. See Chapter 5, ‘Specialized
Printing Operations’ for details.
3. Printing data
a Printing data consisting of text and/or
graphics created in your application.
Placing an ink cartridge in your printe r
Make sure at least one black or Econo Black ink cartridge is installed in the ink cartridge holders.
Caution:
Do not place an ink cartridge directly into the carriage.
Doing so may damage the printer.
Note 1:
If at least one of the ink cartridges in the four ink cartridge holders can be used in the selected printing
mode, the carriage will automatically pick up that ink
cartridge.
Chapter 4 - Installation and Operation, Macintosh 35
Page 44

Note 2:
Refer to ‘Installing Ink Cartridges in Chapter 2 for
directions on installing ink cartridges.
Note 3:
Installing multiple ink cartridges of the same colour
allows you to print more pages without stopping to
replace spent ink cartridges.
Note 4:
Econo Black cartrid g es can b e reversed up to 20 times.
Load the paper into your printer, for reference see
Chapter 2, ‘Loading Paper.
5. Select
Print
from the
File
menu.
6. Make any necessary changes to the settings in the
dialogue box.
Print
a Select either
from the
Type
Greyscale
menu.
or
Black & White
b When you install a black ink cartridge,
select
Standard Colour
from the
Mode
menu.
c When you install an Econo Black ink car-
tridge, select
menu.
Mode
Economy Black
from the
Setting up the printer driver for monocrome printing
1. In the application you want to print from, select
Page Setup
Setup
from the
dialogue box.
2. Make any necessary changes to the settings in the
Page Setup
3. Set the
the
Size
dialogue box.
to
Media
to
A4.
Plain Paper
When using a different type or
size of paper, change the setup accordingly.
4. Click
to close the
OK
menu to open the
File
or
Laser Paper
Page Setup
Page
and
dialogue box.
7. After completing your changes, click
start printing.
Printing in colour
The following paragraphs describe how to print standard colour images on plain paper.
Requirements
You need the followi ng it ems fo r st andard colour pri nting:
1. Ink cartridges
Print
to
a Black ink cartridge
36 User’s Guide
Page 45

b Cyan ink cartridge
c Magenta ink cartridge
English
Load the paper into your printer, for referenc e see
Chapter 2, ‘Loading Paper.
d Yellow ink cartridge
2. Media
a High grade paper
b Laser paper or pl ain paper
c VPhoto Prin t Film
3. Printing data
a Printing data consisting of text and/or
graphics created in your applica tion.
Note:
Using our VPhoto Primer will help make many plain
papers suitable for full-colour printing. See Chapter 5,
‘Specialized Printing Operations’ for details.
Placing ink cartridges in your printer
Make sure the ink cartridges listed above installed. The
ink cartridges may be installed in any order.
Caution:
Do not place an ink cartridge directly into the carriage.
Doing so may damage the printer.
Setting up the printer driver for colour printing
1. Follow steps 1 to 4 in ‘Setting up the printer
driver for monochrome printing’.
2. In the Print dialogue box select either
Photographs,
or
Graphics & T e xt
menu.
Note 1:
When you select
Darker Black
Matching
is automatically selected in the
section of the Image Settings dialogue.
Photographs
from the
Note 2:
If the Type menu is set to
Greyscale
the coloured image will be printed in monochrome or
in greyscale.
3. Click th e
Image
button in the
Print
4. Make colo ur m at ch ing se l ec tio ns as re qu ir ed. For
selection information see “Setting up colour
matching option”.
5. After the settings have been completed, click
Automatic,
from the
Type
Black & White
or
dialogue box.
Type
menu,
Colour
OK
.
Chapter 4 - Installation and Operation, Macintosh 37
Page 46

6. When you have completed your settings, click
in the Print dialogue box. The printer p rints
Print
cyan, magenta, yellow, and black in that order as
the print head moves back and forth over the
paper.
Note 1:
If the four ink cartridges (cyan, magenta, yellow, and
black) are not installed, the error light will flash, and
the printer will not print.
Note 2:
See Chapter 2, ‘Initial Setup’, for information on
installing ink cartridges.
on a monitor because the printer uses inks to create
colours while the monitor uses light. However, the
printer will try to match the monitor colours as closely
as possible.
3. No Colour Matching - The colour information for
print data is output directly to the printer.
To use ColorSync, follow these steps.
1. Open the
ColorSync™ System Profile
Apple Control Panels and click
2. Select
DP-5000 Monitor-D50
played, and then click
Set Profile...
from the list dis-
Select.
in the
Setting up colour matching option
The printer has the following colour-matching options:
1. OKI DP-5000 Driver mode - This mode provides
unique O KI colour matchi ng. It is the defaul t
mode for colour printi ng.
2. ColorSync mode - When ColorSync is selected,
the printer performs colour management using
ColorSync™, which is part of the Macintosh system software.
Note:
A printer cannot exactly reproduce the colours shown
38 User’s Guide
Note:
The D50 in the profile in dicates the colour temperature
of the monitor. Most monitors are set to a colour temperature of D93 (9300K). However, CIE sets a colour
temperature of D50 (5000K) as a reference for colour
reproduction based on the human colour sense under a
standard light source. The ColorSync™ profile of this
printer conforms to this standard.
3. Set the Monitor’s Colour Temperature. Since the
ColorSync profile is set to
, the printer and monitor colours will not
D50
DP-5000 Monitor-
match unless the colour temperature of your monitor is set at D50. To set the monitor’ s colour tem-
Page 47

perature see your computer’s reference manual
for details.
English
ColorSync
from the
Colour Matching
options.
After the settings have been completed, click
OK.
Note 1:
Some monitors do not allow the colour temperature to
be changed. In this case, open
Control Panels and set the
White Gamma,
which provides a colour temperature
Monitor & Sound
Gamma
option to
Page-
similar to D50.
Note 2:
Once you have completed steps 1 through 3, you
should not need to repeat them unless you wish to
change the settings.
4. Prepare print data and set up the paper for printing. Select
Print
from the
File
menu.
Note:
The contents of the Print dialogue box depend on the
application software. If the colour setting options
RGB, CMYK, or others are available in the dialogue
box, select the RGB option. If you select the CMY
option, the printed output will di ffer from the colours
displayed on the monitor.
5. To enable the ColorSync function during printing.
Click the
Image..
button in the Print dial og ue box
to display the Colours dialogue box. Select
Note:
When printing a photograph, it is advisable to turn on
in
Darker Black
the
option. The darkness graduation will
then be smoothed because black will be expressed by
all four colours .
6. After returning to the Print dialogue box, click
to start printing.
Print
Printing on reverse side
The DP-5000 printer has a special option for printing on
the reverse side of paper. The
Print On Reverse Side
option skips the paper curl reforming process for best
printing results.
Setting up the printer driver for printing on reverse side
1. In the application you want to print with, select
Page Setup
from the
Setup dialogue box.
2. Make any necessary changes to the settings in the
Page Setup dialogue box.
menu to open the Page
File
Chapter 4 - Installation and Operation, Macintosh 39
Page 48

3. Set the
and the
to
Media
Size
Plain Paper
to A4. When using a different type
or
Laser Paper,
or size of paper, change the setup accordingly.
4. After making any changes required, click
close the Page Setup dialogue box.
OK
to
Caution:
When printing on the reverse side of paper, the printer
needs periodic maintenance for cleaning to ensure best
results. See ‘Cleaning the Feed Roller’ and ‘Cleaning the
Platen’ in Chapter 5
5. Select
Print dialogue box.
6. Select either
ics & Text
Note 1:
When you select
Darker Black
Matching
section of the
from the
Print
Automatic, Photographs
from the
Photographs
menu to display the
File
menu.
Type:
from the
or
Type
is automatically selected in the
Image...
settings dialogue.
Graph-
menu,
Colour
Note:
When you select certain media types this option will
not be available.
10. Click
in the Print dialogue box to s tart print-
OK
ing.
Note 2:
If the Type menu is set to
Greyscale
Black & White
or
the coloured image will be printed in monochrome or
in greysca le.
7. Click
Image...
in the Print dialogue box.
8. Make colour matching selections as required.
After the settings have been completed, click
9. In the Print dialogue box sel ect
option.
Side
40 User’s Guide
Print On Reverse
OK
.
Page 49

Chapter 5 - Specialised Printing Operations
VPhoto colour printing
English
Colour printing on VPhoto print film
The following describes how to print colour images on
VPhoto print f ilm. Photographic-li ke quality can be
achieved by printing images on VPhoto print film with
standard inks. This is very effective when printing multicolored images such as computer graphics.
Prepare the image to be prin te d
Requirements
You need the following items for colour printing on
VPhoto print film.
1. Media
a VPhoto Print Film (A4)
2. Ink Cartridges
a Cyan ink cartridge
b Magenta ink cartridge
c Yellow ink cartridge
Chapter 5 - Specialised Printing Operations 41
Install ink cartridges
Load VPhoto print film in your printer
d Black ink cartridge
e Finish II ink cartridge
Create the image or document you want to print by arranging text, graphic objects, photographs, etc. in your
application.
Install the five ink cartridges lis ted above into the ink
cartridge holders. The ink cartridges may be installed in
any order. For details on installation refer to ‘Installing
Ink Cartridges’ in Chapter 2.
You may use either automatic feed mode (position ‘M’)
or manual feed mode (position ‘A’) when loading the
film into your printer.
Page 50

Note:
VPhoto Print Film is very adhesive. When loading the
multiple sheets, fan them thoroughly before loading to
make sure that they do not adhere to one another. Store
unused sheets in the package. For best results, use single sheet and manual feed.
Set up the printer driver for printing
1. Select
dialog box, then click
from the File menu to open the Print
Print
Properties
.
want this setting, click the
uncheck the
7. Click
Glossy Finish
in the Print dialog box to start printing.
OK
More Settings
check box.
button, then
Colour printing on plain paper
The following describes how to print colour images on
plain paper. As with VPhoto print film, photogravurelike quality can be achieved by printing colour images
on plain paper.
2. Click the
Document/Quality
front.
3. Select
Automatic, Photographs
rom the
Text f
Document Type
document to be printed.
4. Select
VPhoto Print Film
setting.
5. Make any other necessary changes to the settings.
6. When you complete the setup, click
the dialog box.
Note:
VPhoto Print Film
When
Type, Glossy Finish
mend that
42 User’s Guide
Glossy Finish
is selected from the
is automatically set. We recom-
is normally set. If you do not
tab to bring to the
or
Graphics/
depending on the
from the
Media Type
to close
OK
Media
Requirement
You need the following items for colour printing on
plain paper.
1. Media
a High Grade Paper or Plain Paper (A4)
2. Ink Car tridges
a Cyan ink cartridge
b Magenta ink cartridge
c Yellow ink cartridge
d Black ink cartridge
e Finish II ink cartridge
Page 51

f VPhoto Primer ink car tr idge
Note:
To print the photo quality images on plain paper, use
VPhoto Primer ink. VPhoto Primer ink fills any unevenness on the paper surface, so that a similar print
quality as on VPhoto Print Film can be achieved.
Prepare the image to be pri nte d
Create the image or document you want to print by arranging text, graphic objects, photographs, etc. in your
application.
Set up the printer driver for printing
1. Select
dialog box , then click
2. Click the
front.
3. Select
Text
document to be printed.
4. Select
paper from the
from the File menu to open th e Print
Print
Properties
Document/Quality
Automatic, Photographs
from the
Plain Paper
Document Type
or
Laser Paper
Media Type
.
tab to bring to the
, or
depending on the
setting.
for high grade
English
Graphics/
Install ink cartridges
Install the ink cartridges lis ted above into the ink car tridge holders. The ink cartridge s may be installed in
any order. For details on installation refer to ‘Installing
Ink Cartridges’ in Chapter 2.
5. Set
Note 1:
When
from the
Glossy Finish
Glossy Finish
Print Mode
Laser Paper
Media Type
setting, click the
Load the paper in your printer
You may use either automatic feed mode (position ‘M’)
or manual feed mode (position ‘A’) when loading the
film into your printer.
Chapter 5 - Specialised Printing Operations 43
Glossy Finish
the
Note 2:
Plain Paper
When
Media Type
the
Primer (Un-dercoat)
cally set.
VPhoto Pri mer (U nderc oat)
to
VPhoto Colour
VPhoto Colour
and
Print Mode
and
.
are selected
, respectively,
is automatically set. We recommend that
is normally set. If you do not want this
More Settings
button, then uncheck
check box.
VPhoto Colour
and
and
Print Mode
Glossy Finish
and
are selected from
, respectively,
are automati-
is set when
VPhoto
Auto-
Page 52

matic, Photographs
Document Type
.
Graphics/Text
, or
is selected from
6. Make any other necessary changes to the settings.
7. When you complete the setup, click
the dialog box.
8. Click
in the Print dialog box to start printing.
OK
to close
OK
44 User’s Guide
Page 53

Printing in foil colour
English
Foil colour printing is one of the unique features of the
OKI DP-5000 printer. The printer driver allows you to
select specific colours or colour components that will
be replaced by foil colours and black ink when printing.
You can print with up to two foil colours, (or two foil
colours plus black) from most applications that allow
colour specification. Moreover, because foil inks are
opaque, foil colour printing is unaffected by the colour
of the underlying paper. As a result, you can print on
coloured plain paper.
Note 1:
Special colour ink is used for foil colour printing.
Therefore, undercoat must be applied using cyan,
magenta, yellow, and black inks before printing Foil
Colour.
Note 2:
Depending on the font type, size or paper type , fo il co l our ink may not always be well applied.
The following types of foil colour printing are possible
depending on the number of ink cartridges used.
• Single foil colour printing (without halftone) Foil colour printing using a single colour (gold or
silver).
• Multi foil colour printing - Foil colour printing
using two colours (gold and silver).
• Full colour plus foil colou r printing - Simultaneous full colour and foil colour printing.
Single foil colour printing
Single foil colour prin ting uses just one foil c olour.
Only the foil colour to be used is installed in the printer.
This method of printing is used when an entire image
(including grayscale images) or document i s going to
be printed in a single foil colour. Single foil colour
printing can be used even when the application you are
using does not all ow designatio n of colour com ponents.
Chapter 5 - Specialised Printing Operations 45
Page 54

Requirements
For single foil colour printing you will need the following.
1. Media
Note:
It is not necessary to select a colour in the appl ication
that matches the colour of the ink cartridge in the
printer. L eaving the characters and images in black is
acceptable.
a Plain paper, laser paper, postcards, etc. can
be used as with normal colour printing.
2. Ink cartridges
Use either one of the following ink cartridges.
a Gold Foil ink cartridge
b Silver Foil ink cartridge
The following ink cartridges are also necessary
for undercoating.
a Cyan ink cartridge
b Magenta ink cartridge
c Yellow ink cartridge
d Black ink cartridge
Prepare the image to be printed
Use any application to create the image or document
you want to print, and prepare it as you would for normal printing.
46 User’s Guide
Install ink cartridges
Install the desired foil colour (gold or silver) plus the
undercoat inks, cyan, magenta, yellow, and black into
the ink cartridge holders. The ink cartridges may be installed in any order.
Load the paper in your printer
The method us ed fo r loa din g pap er de pend s on the paper type. Use manual feed mode for cardboard (thick
paper) and greeting cards. For plain paper or laser paper, you may also use automatic feed mode.
Set up the printer driver for printing
1. Select
dialog box, then click
2. Click the
front.
3. Set
Document Type
the document to be printed.
from the File menu to open the Print
Print
Properties
Document/Quality
to an option appropriate to
.
tab to bring to th e
Page 55

4. Set
Media Type
depending on the paper to be
used.
5. In
Print Settings
check box so that the
click the
Spot Colours
Use Spot Colours
dialog box is
displayed.
6. In the
Colour(s)
7. Set
Print Using
Spot Colour Settings
radio button.
to
Single Ink
click the
.
Use Foil
8. Enabled ink cartridges among those installed in
the printer are displayed in
tridge(s)
. Click the radio button(s) of the ink car-
Select Ink Car-
tridge(s) to be used.
Note:
If bidirectional communication is not possible, all the
usable ink cartridges are displayed.
9. When you complete the setup, click
OK
the dialog box.
10. Click
Multi foil colour pri nting
in the Print dialog box to start printing.
OK
s
Use the steps outlined below for foil colour printing using two foil colour ink cartridges. By associating each
foil colour with a colour (or colour component) in your
to close
English
application, you can print with two f oil colours o r two
foil colours plus black. You can use this method with
most applications that support colour.
Requirements
The media and ink cartridge requirements for multi foil
colour printing are the same as in the single foil colour
printing. The only difference being that both gold and
silver foil ink cartridges must be used.
Prepare the image to be prin te d
Use any application to create the image or document
you want to pri nt. Then set the colours corres ponding to
each foil colour you want to use. For example, set the
parts of the image that you want to print in gold foil to
yellow and those of the image that you want to print in
silver foil to grey. When you want to print foil colours
and black simultaneously, you must also specify the
area you want to print in black.
Note 1:
Since all of the colour and grayscale data is binarized
in multi colour printing, gradation cannot be represented.
Chapter 5 - Specialised Printing Operations 47
Page 56

Note 2:
White portions of data (R=G=B=100%) are not
printed.
In multi foil colour printing, indicate foil colours by selecting colours in the application that most closely resemble the foil colours. Try to select colours that
resemble the colours listed in the tables below. In applications that do not have many colour choices, such as
word processors, closely related colours can be used.
Foil Colour
Gold Foil Yellow (or yellow/orange)
Silver Foil Grey
Black (normal) Normal black (R=G= B=0 or C=M=Y=0, K=100)
Application colour used to indicate the foil
colour
Note:
For instructions on changing colour component settings within an application, refer to your software
application User manual. Depending on the application, a foil colour may not print correctly even though
the colour settings were pro perly set in the application.
Check the Preview window before printing, and try
increasing or decreasing the setting to get the correct
foil colour to print.
Install ink cartridges
Install the gold and silver foil colour ink cartridges plus
the undercoat ink cartridges listed in Requirements.
The ink cartridges can be installed in any order.
• Colour compositions using RGB settings (n/255)
Foil Colour R G B
Gold Foil 225 160 0
Silver Foil 189 193 197
Load the paper in your printer
Use manual feed mode for cardboard (thick paper). For
plain paper or laser paper, you can use automatic feed
mode.
• Colour compositions using RGB settings (n/
100%)
Foil Colour R G B
Gold Foil 88 63 0
Silver Foil 74 76 77
Set up the printer driver for printing
1. Select
dialog box, then click
2. Click the
from the File menu to open the Print
Print
Properties
Document/Quality
.
tab to bring to th e
front.
48 User’s Guide
Page 57

3. Set
Document Type
to an option appropriate to
the document to be printed.
4. Set
5. In
Print Settings
box so that the
Media Type
depending on the paper used.
click
Use Spot Colours
Spot Colours
dialog box is dis-
check
played.
6. In the
Colour(s)
7. Set
Print Using
Spot Colour Settings
radio button.
to
Multiple Inks.
click the
Use Foil
8. Enabled ink cartridges among those installed in
the printer are displayed in
tridge(s).
Click the radio button(s) of the ink car-
Select Ink Car-
tridge(s) to be used.
Note 1:
If bidirectional communication is not possible, all the
usable cartridges are displayed.
English
10. Click
in the Print dialog box to start printing.
OK
Simultaneous full colour and foil colour printing
The following paragraphs describe how to print full
colour and foil colour simultaneously . This printing
method differentiates between foil colour and full colour areas depending on their colou r component. For this
reason, it is necessary to assign the correct colour to
each area. This printing method is used with applications that allow the user to accurately specify colour
components.
Requirements
For simultaneous full colour and foil colour printing
you will need the following.
1. Media
Note 2:
Even though you have set the colour of an area to a
desired colour in your application, the area will not be
printed if the corresponding ink cartridge has not
selected.
9. When you complete the setup, click
to close
OK
the dialog box.
Chapter 5 - Specialised Printing Operations 49
a Plain paper, laser paper, postcards, etc. can
be used as with normal colour printing.
2. Ink cartridges
The following ink cartridges can be used for
simultaneous full colour and foil colour printing.
a Gold Foil ink cartridge
Page 58

b Silver Foil ink cartridge
c Cyan ink cartridge
d Magenta ink cartridge
e Yellow ink cartridge
f Black ink cartridge
g Finish II ink cartridge
h VPhoto Primer ink cartridge
Note:
Only a maximum of seven ink cartridges can be
installed in the printer at any one time. Cyan,
Magenta, Yellow and Black cartridges must always be
installed. The Foil, Finish II and VPhoto Primer cartridges are optional.
Prepare the image to be printed
Create the data you want to print, then set the image areas to be printed in foil colours to colours that correspond to the foil colours you want to use. For the
colours (and colour components) that correspond to
each foil colour, refer to the tables on page 5-12.
Note:
There are a small range of colour component values
that will be interpreted by the printer as indicating foil
colours. Because of this, photographs and other data
with many different colours may have areas that match
the foil colour designations and print only partially in
foil colour. When printing images that contain data
such as photographs, it is best to print full colour plus
foil colour using Overlay mode
In simultaneous full colour plus f oil colour printin g, indicate the gold and silver foil colours by selectin g the
corresponding colour component. For characters of 32
points or more, select the following approximate colours.
Foil Colour
Gold Foil Yellow (or yellow/orange)
Silver Foil Grey
Application colour used to indicate the foil
colour
• Colour compositions using RGB settings (n/255)
Foil Colour R G B
Gold Foil 225 160 0
Silver Foil 189 193 197
• Colour compositions using RGB settings (n/
100%)
Foil Colour R G B
Gold Foil 88 63 0
Silver Foil 74 76 77
50 User’s Guide
Page 59

Note 1:
Some applications make internal adjustment to produce the displayed colour components. In such cases,
the colour components cannot be restricted and therefore foil colours cannot be used. When using such an
application, use the Overlay mode.
Note 2:
There are a small range of colour component values
which are close to a foil colour. These colo urs will be
interpreted by the printer as indicating foil colours and
will be printed in the respective foil colour.
Set up the printer driver for printing
1. Select
dialog box , then click
2. Click the
front.
3. Select
from the
Text
4. Set
Media Type
5. Make any other necess ary ch anges to the s etti n gs.
from the File menu to open th e Print
Print
Properties
Document/Quality
Automatic, Photographs
Document T y pe
.
tab to bring to the
, or
.
depending on the paper used.
Graphics/
English
Install ink cartridges
Install all the ink cartridges specified in Requirements
into the ink cartridge holders, including VPhoto Primer
ink for undercoating. Simultan eous ful l colou r plus foil
colour printing is p ossible by exchangin g ink cartrid ges
when the corresponding message is displayed.
Load the paper in your printer
The method used for loading paper depends on the paper type used.
6. In
Print Settings
box so that the
played.
7. In
8. Set
Spot Colour Settings
radio button.
our(s)
Print Using
9. Enabled ink cartridges among those installed in
the printer are displayed in
tridge(s).
tridge(s) to be used.
click
Use Spot Colours
Spot Colours
dialog box is dis-
click the
to
Metallics & CMYK Inks.
Select Ink Car-
check
Use Foil Col-
Click the radio button(s) of the ink car-
Note 1:
Even though you have set the colour of an area to your
desired colour in your application, the area will not be
Chapter 5 - Specialised Printing Operations 51
Page 60

printed if the corresponding ink cartridge has not been
selected.
Note 2:
If a selected foil colour ink cartridge is not installed, a
warning message will be displayed. In this case,
exchange ink cartridges as indicated in the message.
10. When you complete the setup, click
to close
OK
the dialog box.
11. Click
52 User’s Guide
in the Print dialog box to start printing.
OK
Page 61

Printing on overhead transparencies
English
The following paragraphs desc ribe how to print full
colour graphic images and text on overh ead transparencies for presentations.
Requirements
For printing on overhead transparencies, you will need
the following.
1. Media
a DP-5000 Overhead Projector Transparency
Film (A4)
2. Ink cartridges
The following ink cartridges can be used.
a Cyan ink cartridge
b Magenta ink cartridge
c Yellow ink cartridge
d Black ink cartridge
e White ink cartridge
.
Caution:
When printing on overhead transparencies, use only OKI
DP-5000 transparency film. Using other transparency
films may cause damage to the printer.
Prepare the image to be printed
Create the text and graphics to be printed in your application. Take care to lay them out within the printing
area of an overhead transparency film.
Install ink cartridges
Install the ink cartridges listed above into the ink cartridge holders. The ink cartridges may be installed i n
any order.
Load the overhead transparencies
1. Fan the sheets before loading them into the
printer to ensure they do not stick together.
2. Load the sheets into the auto sheet feeder or manual feed slot in the correct orientation. The cut
corner at the end of the sheet should be first
Chapter 5 - Specialised Printing Operations 53
Page 62

located into the left side of the printer (when
viewed from the front).
3. To prevent jams remove the sheets immediately
after printing.
4. If the last sheet of film will not feed from the auto
sheet feeder, place a sheet of paper underneath it.
Setting up transparency separato rs
Occasionally electrostatic build up may cause a sheet of
transparency film to attach itself to another. To pr event
this separator cards must be placed inside the transparency film box. To set up the transparency separators:
1. Cut along the two inner dotted lines (see Figure 1,
number 1) on the separator card. Discard the middle portion of the card.
2. Fold the two cards along the dotted line (2). The
folded angle should be less than 90 degrees.
3. Take the inner box of the transparency film and
insert it into the box cover (3).
4. Insert the separators into each side of the box
between outer cover and inner box (4). Make su re
the folded angle remains at less than 90 degrees.
5. Place the box with the installed separators into
the printer paper tray and align the edge of the
box with the centre cover (5) on the printer.
6. When the transparencies are printing they will
ride on top of the sep arators, preventing them
from picking up any completed transparencies
lying below. When a transparency is completed it
will drop through the separators by the time the
next sheet begins printing.
Set up the printer driver for printing
1. Select
tion. When the dialog box appears, click
.
ties
2. Click the
front.
3. Set the
option.
4. Set the
5. In
Print Mode
6. When you complete the setup, click
the dialog box.
from the File menu of your applica-
Print
Document/Quality
Document Type
Media T y pe
to
tab to bring to th e
to the appropriate
Transparency Fi lm
select the required colour option.
OK
Proper-
.
to close
7. Click
54 User’s Guide
in the Print dialog box to start printing.
OK
Page 63

English
2
2
1
5
3
4
Chapter 5 - Specialised Printing Operations 55
Page 64

Undercoating with VPhoto primer ink cartridge
The VPhoto Primer ink cartridge is used to print an undercoat on paper prior to the main printing pr ocess. Undercoat fills any uneveness on the paper surface making
plain paper suitable for high quality colour printing.
Requirements
For undercoating, you will need the following.
1. Media
Any plain photocopier paper can be used.
2. Ink cartridges
VPhoto Primer ink cartridge
Caution:
Overhead projector transparencies cannot be undercoated
with VPhoto Primer ink.
Prepare the image to be undercoated
Use any application to create the image or document.
Highlight the area to be undercoated in grayscale.
White portions of data (R=G=B=100%) are not undercoated.
Install ink cartridge
Make sure at least one VPhoto Primer ink cartridge is
installed in the ink cartridge holders. The ink cartridge
can be installed in any holder.
Load the paper in your printer
Load the paper into your printer and set up the feed
mode to either automatic or manual.
Set up the printer driver for printing
1. Select
dialog box, then click
2. Click the
front.
3. Set
4. Set
5. In
Document Type
used.
Print Settings
box so that the Spot Colours dialog box is displayed.
from the File menu to open the Print
Print
Document/Quality
Media Type
Properties
to an appropriate option.
depending on the paper being
click
Use Spot Colours
.
tab to bring to th e
check
56 User’s Guide
Page 65

6. In
our(s)
Spot Colour Settings
radio button.
click the
English
Use Spot Col-
7. Set
Print Using
to
VPhoto Primer (Undercoat).
8. Click OK to close the dialog box.
9. Click the
tab to bring to the front, make all
Paper
necessary adjustments then click the
check box.
10. When you complete the setu p, click
OK
the dialog box.
11. Click
in the Print dialog box to start printing.
OK
Your d ocument will be pr inted using VPhot o
Primer ink.
Note:
The
Overlay
function lets you leave a sheet in the
printer after a printing pass is complete, allowing you
can change cartridges and print addittonal colours on
the same page.
Printing on undercoat
After the printing process is complete, you can then
print your document onto the undercoated paper.
Overlay
to close
Chapter 5 - Specialised Printing Operations 57
Page 66

58 User’s Guide
Page 67

Chapter 6 - Maintenance
Cleaning the printer
English
We recommend that this printer be cleaned periodically
to ensure satisfactory long term operation.
WARNING
Make sure you unplug the printer before cleaning it.
2. Push the front cover release button and gently
lower the front cover.
Cleaning the main unit
Follow the cleaning steps described below.
1. Use a soft cloth to wipe the outside of the printer
to avoid dust and dirt build-up.
Chapter 6 - Maintenance 59
3. Clean the inside of the printer using a soft brush
to brush away d irt and dus t.
Page 68

Caution:
Brush very gently around electrical components, and be
careful not to leave any brush hairs on or near these
components.
1. Push the front cover release button and gently
lower the front cover.
2. Wipe the print head (1) with a cotton swab dipp ed
in isopropyl alcohol. Th e print head may not
come clean in one wipe so repeat several times.
Cleaning the print head
1
Follow the steps below, using isopropyl alcohol and a
cotton swab.
Caution 1:
Do not use benzene, thinner, or other volatile materials, as
they may damage the printer components.
Caution 2:
Do not get the inside of the printer wet.
Caution:
2
Avoid getting alcohol on the platen (2). Wait until the
alcohol dries before printing.
Cleaning the platen
Use cellophane tape to clean the platen as described below.
60 User’s Guide
Page 69

1. Press the front cover release button and gently
lower the front cover.
2. Gently apply the tape (1) to dirty spots on the
platen (2), and rub your finger over the tape.
3
2
1
English
3. Slowly peel off the tape.
4. Repeat as necessary to remove dirt from the
platen.
Cleaning the feed roller
Use isopropyl alcohol and a cotton sw ab to clean the
feed roller as described below.
Caution 1:
Do not use benzene, thinner, or other volati le mater ial s , as
they may damage the printer components.
Caution 2:
Do not get the inside of the printer wet.
1. The printer must be initialised for cleaning the
feed roller. To initialise turn off the printer first,
then press the
again.
2. Push the front cover eject button and gently lower
the front cover.
button to turn the printer on
power
Caution:
Do not touch or remove the white pad (3) on the left side of
3. Press the
to a safe position.
ready/insert
button to move the carriage
the platen. Doing so may damage the printer.
Chapter 6 - Maintenance 61
Page 70

4. Wipe the feed roller (metal shaft roller) with a
cotton swab dipped in isopropyl alcohol. The
feed roller may not come clean in one wipe, so
repeat several times.
Caution:
Avoid getting alcohol on the platen. Wait until the alcohol
dries before printing.
Changing dye sub cleaning pads
In order to maintain good print quality, replace the orange-coloured cleaning pad after printing 20 sheets of
paper. A cleaning pad is enclosed in each new package
of Dye Sub paper.
1. To remove the cleaning pad, open the front cover,
and pull on the left end of the cleaning pad while
holding the right side of the pad, as shown in the
figure.
5. P ress the
ready/insert
and wipe the roller with a cotton swab un til clean.
button to turn the feed roller
Caution:
The white pad (next to the cleaning pad) is not removable.
6. Close the front cover after you have finished
cleaning the feed roller.
7. The printer will be ready for printing.
62 User’s Guide
Page 71

2. To fit a new cleaning pad, mount the pad on the
platen by locating the two lugs on the underside
of the pad into the holes on th e platen. Push the
pad onto the platen to make sure it sits flat.
Caution:
Always fit a cleaning pad in the printer. Failure to do so
can cause the printer to malfunction.
English
Chapter 6 - Maintenance 63
Page 72

64 User’s Guide
Page 73

Chapter 7 - Troubleshooting
Troubleshooting - general
English
Power failure while printing
With the front cover closed, turn the printer on. The
printer will initia lise and eject the partially printed
page.
When the front cover has been opened before the printer is turned back on, perform the following.
1
2
A
1. If an ink cartridge (1) is on the carriage (2), press
on the middle of the cartridge, as shown belo w, to
ensure it is properly seated. Also, check that the
cartridges in the holders are correctly installed.
Chapter 7 - Troubleshooting 65
Printer errors
Caution:
The error message dialogue box cannot be displayed if
your computer is not capable of bi-directional printing.
See ‘Installing Ink Cartridges’ in Chapter 2 - Initial Setup.
2. Close the front cover. The printer will now be
able to resume operation.
When a printer error occurs, the error light flashes and
the error message dialogue box appears o n your computer's screen. To rectify printer errors;
1. Check the error message on your computer's
screen. For a list of Error messages see Indicator
Lights Summary in Chapter 1 - Introduction.
Page 74

2. Fix the error to continue printing, or terminate
printing. For more information on fixing printer
errors see the rest of this Chapter.
Ready/insert button functions
The
ready/insert
tions, depending on the printer status. The functions
during normal printing are described below.
button is used for a number of func-
Forced printing and clearing data
When the data transfer from the computer stops for
more than about 30 seconds, and the
blinking quickly, press the
the printer to print the data it has received so far.
ready/insert
ready
button to force
Clearing paper jams
Follow these steps to clear a paper jam.
light is
Paper feed
To feed a single sheet, set the paper feed switch to position “M” while no data is be ing received from the
computer (i.e.
into the sheet feeder, and then press the
button.
light is on), load one sheet of paper
ready
ready/insert
1. First, press the
power.
2. Press the front cover release button and gently
open the front cover.
button to shut off the
power
Paper eject
If paper is already in the printer and no data is being received (
to eject the paper.
light is on), press the
ready
ready/insert
Cancelling an alarm
To cancel an alarm for anything other than a hardware
or mechanism error, press the
the removing the cause of the alarm.
66 User’s Guide
ready/insert
button
3. Press down on the release lever (1) and gently
pull out the jammed paper.
button after
Page 75

1
Paper jams can be caused by a dirty platen. For
information on cleaning see ‘Cleaning the Platen’
in Chapter 6 - Maintaining the Printer.
4. Close the front cover.
English
5. Press the
Chapter 7 - Troubleshooting 67
button to turn on the power.
power
Page 76

Troubleshooting - Windows
When problems occur during operation of the printer,
please check the following troubleshooting tips before
returning the printer for repair.
Power does not come on
1 Is the power cable disconnected?
Make sure the power cable is plugged int o an outlet as well as connected to the printer. After
checking the power cable, press the
power
to turn on the printer.
2 Is the printer plugged into an extension block or
power strip?
After turning on the extension block or power
strip, press the
power
button to turn on the
printer.
Check computer and printer communications
1 Are you using the proper printer cable?
To fully take advantage of the features of your
DP-5000 printer, you will need a bi-directional
printer port and a bi-directional printer cable.
button
With AT compatible computers, most typical
cables will work.
It is possible to use a one-way interface with the
printer if the spooler is set for one-way interfacing.
2 Does your computer have a bi-directional port? Is
the cable bi-directional?
Windows 95/98 Plug & Play installation and bidirectional interfacing with the printer are only
possible if your computer supports bi-directional
parallel ports and you are using a bi-directional
cable.
3 Is your computer a DOS machine?
All DOS machines (AT compatibles) can use the
bi-directional communication used with this
printer.
4 What are the limitations of using one-way
communication with this printer?
a Printer errors cannot be detected by the
printer driver.
68 User’s Guide
Page 77

b The printer driver cannot tell which ink car-
tridge is in which holder.
c To store all the print output, an enormous
amount of spool data (held in a temporary
file for printing) is generated during colour
multipage printing. As a result, the number
of sheets of paper that can be continuously
printed will be limited if there is insufficient
free space on the hard disk.
English
5 Is there a paper jam?
Remove the paper. If the paper is caught in the
rollers, open the front cover, push down on the
release lever, and gently remove the paper. Make
sure there are no pieces of the paper left in the
printer.
6 Are the settings in the application correct?
Recheck the printer settings in the application.
Printer does not print or stops while printing
7 Is the printer driver correctly installed?
Install the DP-5000 printer driver from the Instal-
1 Is the printer turned on?
Before printing make sure the printer is turned
on.
lation Disc.
8 Is the cable dis connected ?
When one of the followings occurs, it is possible
2 Is the front cover closed properly?
Make sure that the front cover is firmly closed.
3 Is the ‘
4 Is the interface cable correctly connected?
ready’
Press the
light comes on.
ready
light off?
ready/insert
button and ma ke sure the
that the cable is broken or disconnected.
a The gauge in the Print dialogue box does
not progress.
b The “Out of Paper” message appear s repeat-
edly.
c Replace the cable with a new one.
After connecting the cable tighten the fastening
screws and clamps to secure the cable, and make
sure no pressure is on the cable.
Chapter 7 - Troubleshooting 69
Page 78

9 Are you using a printer sele ct io n swi t ch or a pr in ter
buffer?
With bi-directional interfaces, operation is sometimes unreliable when using printer switching
boxes or printer buffers. If you are using a printer
selection switching box or pri nter buffer, use oneway communication.
10 Is your cable too long?
Do not use a cable that is longer than you need.
The signals become more unstable as the cable
gets longer.
11 Are you using the wrong ink cartridges?
Use only the recommended ink cartridges. Do not
use ink cartridges from other manufacturer s.
12 Are the ink cartridges correctly installed?
Insert ink cartridges in the carriage with the identification markings (B side) face up. This applies
to all ink cartridges except the reversible types :
Econo Black and Finish II.
13 Is the ribbon on an ink cartridges used up?
When the ribbon in an ink cartridge has been
used up, black and silver stripes will be visible on
the ribbon. When these appear install a new ink
cartridge. After replacing the ink cartridge, printing will continue from where it left off.
14 Do you have enough hard disk space?
The DP-5000 requires work space on the hard
disk when it prints. Keep enough space open on
the disk for the printer to operate (after printing,
the work space is released.)
15 Does the hard disk have areas where reading or
writing are unreliable?
If there are areas on the hard disk where reading
or writing are unreliable, sometimes a printing
error will occur and printing will stop. Periodically use a utility like SCANDISK that comes
with MS-DOS 6.0 (or later) or Windows 95/98 to
prevent these problems.
Printing is light, distorted, or has gaps
1 Has one of ribbons separated from the head?
Stop the printing and reinstall all the ink cartridges. Take up any slack in the ribbons. If a particular ink cartridge repeatedly causes problems,
try a different ink cartridge.
70 User’s Guide
Page 79

2 Is the ink cartridge head dirty?
Clean the cartridge head by refering to Chapter 5,
Maintaining the Printer. The platen often gets
dirty at the same time as the head, so it is recommended to also clean the platen.
3 Is the platen dirty?
Clean the platen by refering to Chapter 5, Maintaining the Printer. If cleaning the head and the
platen does not work, contact the supplier from
where you pu rchased the printer.
4 Are you using the correct ink cartridge for the
chosen printing medium?
Use only OKI ink cartridges for the DP-5000
printer. When printing in colour on the glossy
side of a greeting card, use only metallic ink cartridges.
5 Are you printing on a rough or special surface (such
as overhead transparency film)?
Rough or specially treated surfaces may not allow
the ink to adhere well, resulting in gaps or disto rtions. In such a case, use a halftone setting appropriate for the image.
English
6 Are you printing images with sudden colour
variations or very bright colours?
In these situations, the overlap of different colours of ink can degrade the quality of the image.
Reducing the amount of halftoning can reduce
this effect. Use a halftone option appropriate for
the image.
7 Are you printing on envelopes, thermal paper, or
picture ca rds?
Printing is unreliable on envelopes and other surfaces which have a non-uniform thickness. Printing and feeding of thermal paper is unreliable.
The paper side of picture cards may be printed on
if the surface is smooth and the card thickness is
0.23 mm (0.01") or less, but pri n tin g on t he photo
side is unreliable.
8 Are you printing on the wrong side of the paper?
With both VPhoto Print Film and Dye Sublimation Paper, printing should take place on the
glossy side. Take care not to print on back of the
paper, particularly with Dye Sublimation paper,
while using the Dye Sub ink cartridges as the ribbons in the cartridges may break.
Chapter 7 - Troubleshooting 71
Page 80

Colour printing is not working or is extremely
slow
manual for information and check the colour settings.
1 Are the ink cartridges for colour printing
installed?
Only the following ink cartridges are suitable for
colour printing:
a Yellow, cyan, magenta, and black ink car-
tridges
b Yellow, cyan, magenta, black, VPhoto
Primer and Finish II ink cartridges
2 Are the settings correct?
Colour printing is selected if
, or
graphs
Graphics/Text
Automatic, Photo-
is selected in Docu-
ment Ty pe.
3 Do you have enough disk space?
Make sure there is enough space on your hard
disk, (the working space is released once printing
is finished.)
4 Is the application set for colour printing? Does the
application support colour printing?
Some applications have colour printing enable/
disable settings. Some applications do not support colour printing. Refer to your computer User
5 Are you using many applications at one time?
When little memory is available for print processing, printing may take a long time or fail. Close as
many applications as possible and try again.
6 Do you have enough memory?
Handling colour images requires a lot of memory
for the application and for the data. Sometimes
there is insufficient memory left for printing.
Make sure your computer has enough memory to
print the size of images you are using.
7 General protection fault err ors occur.
These errors can occur when there is insufficient
memory for colour printing or when part of the
hard disk has become corrupted. After decreasing
the size of the print data or scanning the hard
disk, try printing again.
8 Is the free space on the hard disk fragmented?
The time required for printing can increase dramatically if the free space on the disk drive is
extremely fragmented. Clean up your files and
defragment the disk by periodically running a
72 User’s Guide
Page 81

utility like DEFRAG that comes with MS-DOS
6.0 (or later) or Windows 95/98.
English
corner cut end is placed at the top of the paper
guide.
Paper is not feeding correctly or not ejecting
correctly from the sheet feeder
1 Are you using paper which is thicker or thinner
than recommended?
Use paper within the range 0.07 mm - 0.23 mm
(0.003" - 0.01"). For auto feeding use paper in
the range 0.07 mm - 0.1 mm (0.003" - 0.004").
2 Are you using poor quality paper?
Paper that is folded, ripped or has holes, such as
loose leaf binder or refill paper, can cause paper
jams and should not be used.
3 Are you using curled paper?
This will cause paper jams. The paper should be
curled the opposite way to flatten it out before it
is used.
4 Are you using paper with folded or cut corn ers?
This can cause problems since the paper position
sensor and paper length sensor do not work properly. Sheets with corner cuts, such as transparencies and back print film, will work fine if the
5 Is there a paper jam?
Clear the paper jam. Sometimes a small piece of
the jammed page will tear off and remain in the
printer so that sheets will continue to jam after
the page is removed. Remove any small remaining pieces of paper.
6 Is the paper feed guide too narrow for the paper?
The paper feed guide should hold the paper
loosely enough so that it can feed easily.
7 Is there too much paper in the sheet feeder?
The sheet feeder can hold up to 100 sheets of
plain paper, an y more than this ma y caus e a paper
jam.
8 Is the paper feed switch posi tioned correc tly for the
paper feed method?
To print on plain paper using automatic feed
mode, set the paper feed switch to position “A”;
to print in manual feed mode, set it to position
“M”.
Chapter 7 - Troubleshooting 73
Page 82

9 Is the cut corner in the correct position (for
transparencies and back print film)?
When these sheets are inserted with the cut corner
incorrectly positioned, they may not feed correctly. Follow the instructions and insert the
sheets correctly.
10 Are you printing on envelopes, thermal paper, or
picture cards?
Correct printing and feeding of envelopes and
thermal paper cannot be guaranteed. The paper
side of picture cards can be used if the card is less
than 0.23 mm (0.01") thick and manual feed
mode is used. Printing on the photo side is unreliable.
13 Have you loosened the paper sufficiently prior to
loading it into the sheet feeder?
Paper must be riffled several times prior to being
loaded into the sheet feeder. If not, sheets of
paper may stick to one another and cause multiple
sheets to feed into the printer at the same time, or
other forms of misfeed.
Printer emits unusual noises when the power is
turned on, and the error lights blink
1 Has the carriage packing material been
removed?
Refer to Chapter 1, Introduction for details on
removing packing material.
11 Are you using home-made cards or thic k cards?
Cards with thickness within the range of 0.07 mm
- 0.23 mm (0.003" - 0.01") can only be used in
manual feed mode.
2 Has the packing tape on the case been removed?
There are two pieces of tape on the front of the
printer that help protect the printer during shipping. These must be removed before using the
printer.
12 Is there anything blocking the paper output slot
(such as a large pile of printed sheets)?
This can cause ejection or feed problems, remove
the blocking paper.
3 Has an ink cartridge become dislodged from the
carriage?
Open the front cover and make sure the ink cartridges are correctly installed.
74 User’s Guide
Page 83

4 Is there paper caught between the platen and the
print head?
Remove the paper (for reference see ‘Cleaning
the Printer’, Chapter 5) .
5 “Missing ink cartridges ” message appears. Are all
the necessary colours of ink cartridge installed in the
printer?
Colour printing requires that fo ur colours of ink
cartridge (yellow, magenta, cyan, and black) are
installed with the OKI logo (B side) facing up.
6 Are you generating monochrome printing in
Automatic mode?
If
Automatic
is selected in Document Type, colour ink cartridges must be installed even when
printing monochrome. If you want to print using
only black ink, select
chrome Text.
Greyscale
or
Mechanism or cartridge change error
1 Are the ink cartridges correctly installed?
If an ink cartridge ha s b ecome d isl od ged f rom the
holder, an ink cartridge change error will occur.
Open the front cover and reinstall the ink cartridge.
Mono-
English
2 Are you using the prin ter on a level surface?
The printer will not operate correctly on a slanted
surface. Place it on a level, stable surface.
3 Is the printer in a place where it is subject to
movement?
Various movements such as bumps and vibrations
can cause mechanical problems. Place the printer
in an environment where it will not be subject to
movement.
4 Is the front cover properl y closed?
The printer will not operate correctly if the fro nt
cover is not closed properly. Close the front cover
correctly.
5 Are items stacked on top of the printer?
The printer may malfunction if items are stacked
on top or to the side of th e printer. Remove any
obstruction on top or to the side of the printer.
Ink cartridges are not correctly recognised
1 Is the bar code on the ink cartridge dirty?
Clean the bar code.
Chapter 7 - Troubleshooting 75
Page 84

2 Is the ink cartridge installed in the holder with the
(A) side up?
Make sure the ink cartridges are placed in the
holder with the identification markings (B side)
facing up.
3 Has an ink cartridge for a different printer been
installed?
Ink cartridges made by other manufacturers will
not work. Use only ink cartridges recommended
by OKI.
Printing quality, hue, and resolution queries
1 Can all four colours of the colour inks be
combined for black and white printing?
If
Darker Black
is set in colour printing or if the
brightness and contrast settings are correct, 4-colour black is possible. To print only with black,
turn off
Darker Black
, and return the
Image
ting under Image Settings to default.
For monochrome printing, select
under
Document Type
.
Greyscale
set-
2 Black is printed with black ink, but grey portions
are printed using four colours.
In colour printing, greyscale intermediate colours
(such as grey) are printed using four colours. If
you want to print only in black ink, set the
ment Type
in the Print dialogue box to
3 I would like to adjust the image quality of
photographs without reducing character resolution.
setting in the
Document/Quality
Greyscale
Docu-
tab
.
Characters always print at the currently selected
resolution (if an outline font is used). The image
quality of photographs can be adjusted independently using the
dialogue box.
tings
4 There seems to be no difference between
photographic output using monochrome printing at
‘Fine’ and images obtained by monochrome
printing at ‘Standard’.
Halftone
When monochrome printing in
setting in the
Fine
More Set-
, only the
characters can be printed at 1200 dpi. This is
done by smoothing the 600 dpi images. The quality of photographs, however, differs little from
that of images obtained by monochrome printing
at
Standard.
76 User’s Guide
Page 85

5 When plain or other coarse-surfaced paper is
printed in colour, ink is missing from a number of
points on the image.
When paper with a coarse surface is used for full
colour printing, ink will be missing from certain
points where it was difficult to deposit. To correct
this, you can attempt the following.
a Set the Halftone setting in the
dialogue box to
tings
Standard Dither
More Set-
for
printing. The image will be coarse, but the
ink will transfer to the paper more reliably.
b If you have VPhoto Primer ink, the image
quality may be improved by providing an
undercoat.
6 When coloured paper is used for full colour
printing, the colours are not reproduced correctly.
Colour printing is based on the colours reproduced when ink is printed on white paper, so correct colours cannot be reproduced on coloured
paper. DP printers, however, can provide the following forms of printing even on coloured paper:
a On light-coloured paper, DP printers pro-
vide a white undercoat prior to colour printing. This allows colours to be reproduced in
English
tones clos e to those obtained by pr inting o n
white paper.
b On dark-coloured paper, impressive finish-
ing may be obta ined by using mon ochrome
printing with white ink.
7 Colour images in the same docu ment look different.
Make sure that you select the same media type
and print mode. The media type presets the most
suitable settings for your document. If you
change the media type or print mode, it will affect
the printed results.
Ink and paper
1 How should I use white ink?
White ink can be used as follows:
a As with foil ink, white ink is effective for
spot colour printing on dark-coloured paper.
b White ink can provide an undercoat for full
colour printing on light-coloured or coarsesurfaced paper. The white undercoat will
improve image quality and colour reproduction.
Chapter 7 - Troubleshooting 77
Page 86

2 How should I use VPhoto Primer ink?
The VPhoto Primer ink prints an und ercoat and
improves the print quality on most plain papers
by allowing you to print photo quality images at
2400 dpi using variable dots.
3 Is it OK to print using white ink on top of a full
colour image?
This can cause unsatisfactory results. Print the
white ink before using other ink colours.
7 Can I use the Photo Overc oat cartridge for photo
realistic finishing?
No. Always use the Finish II cartridge.
Connection method
1 I would like to use a printer switcher.
Since your printer switcher may not support bidirectional communication, use a uni-directional
interface setting.
4 For full col ou r pr in ti ng a nd glo s sy fi ni sh , ma y I us e
any type of paper?
We suggest using High Grade Paper for full colour printing and glossy finish. Using other types
of paper can produce a poor image. Although
using our VPhoto Primer can help make many
plain papers suitable for full-colour printing.
2 I would like to use multiple printer ports for
connections.
If the computer is AT-compatible, up to three
ports (LPT1 to LPT3) can be us ed, as long as the y
are parallel ports.
3 Can I use the printer on a network?
Yes, the printer can be used on a network, but
5 Must I use the special sheets when printing
transparencies?
only with a unidirectional interface and when set
for unidirectional communication.
Yes, OKI recommended inks do not adhere well
to normal transparency sheets.
6 Can I print on regular greeting cards?
Yes, using manual feed mode.
Other operational queries
1 How do I delete the printer driver?
For Windows 95/98, refer to ‘Installing the
Printer Driver’ in Chapter 3 for details.
78 User’s Guide
Page 87

2 When my display is set for 64,000 or 16,700,000
colours, I run out of memory when printing.
Windows runs out of memory when there are too
many display colours. Change to 256 colours
when printing. Changing the display mode does
not change the print results.
3 When I print from Notepad in Windows, the left
edge does not print.
This happe ns whenever you print from N otepad
at 600 dpi or mo re. Sw it ch t o 30 0 d pi o r u se a di f ferent application.
4 When I print many sheets continuously, small
vertical lines ap pear on the right side of the page.
When printing for long periods of time, the print
head retains heat, and ink can attach to the paper
in places other than just the printing area. After
printing 30 sheets of Letter/A4 sized pages in
monochrome or 8 Letter/A4 sheets in colour, let
the printer cool down before continuing printing.
5 How can I reduce or enlarge my d ocument?
The printer driver software allows you to scale
printing. Specify your scaling factor (25 - 400%)
in the
Reduce
or
Enlarge
option of your printer
driver software.
English
6 Why can I not print correctly with page layout
settings?
There are application programs that allow you to
format a document composed of both orientatio ns
of portrait and landscape. When printing such
document with layout (more than 2 pages per
sheet), it may not print properly.
7 Why can I not print spot colour using the Metallics
& CMYK option?
You cannot prin t text larger than 32pt in spot col our. In some application programs, you cannot
print in spot colour if the text is rotated or
reshaped.
Chapter 7 - Troubleshooting 79
Page 88

Troubleshooting - Macintosh
When problems occur during printer operation, please
check the following troubleshooting tips before returning the printer for repair.
Power does not come on
1 Is the power cord disconnected?
Make sure the power cord is plugged into an outlet as well as connected to the printer. After
checking the power cable, push the
power
to turn on the printer.
2 Is the printer plugged into an extension block or
power strip?
After turning on the extension block or power
strip, press the
button on the printer.
power
During installation a “File not found” error
occurs or the installer is not found
1 Is At Ease installed?
If you are using
At Ease
when you place the
Installation Disc in the CD-ROM drive, (some of
the Performa series start up in
At Ease
), the fol-
lowing things may happen.
butto n
a The alert dialogue box appears.
b The installer is not displayed.
In these cases the following methods can be used
to install the printer driver:
aFrom the
Finder.
Double-click on the
Special
menu, select
installer
install the printer driver.
bIf the
Switch To Finder
available on the
Switch To At Ease
checkbox in
Special
At Ease
function is not
menu, select
and check the
settings. Restart your
computer and install the printer driver.
The icon does not appear in the Chooser
1Is
QuickDraw GX
If
QuickDraw GX
enabled?
is installed, disable it by fol-
lowing these steps:
a Select “Control Panel” from the Apple
menu.
bOpen the
Extensions Manager.
Switch To
icon to
Off
80 User’s Guide
Page 89

c Deselect
d Close the
QuickDraw GX
Extensions Manager,
in the list of items.
your Macintosh.
2 Is the printer driver installed?
Install the DP-5000 printer driver from the Installation Disc (CD-ROM).
and restart
English
device must have a unique device number. (If the
computer has more than one SCSI bus, then the
device number must only be unique for the bus
that the printer is attached to.)
4 Are you using a high impedance cable?
Use a high impedance cable for each device in th e
SCSI chain.
The DP-5000 printer cannot be selected in
Chooser
1 Are the SCSI cable and terminator correctly
connected?
Correctly connect the SCSI cable and terminator.
Make sure that the cable is not bent excessively.
Excessive bending of the cable may break the
wires inside.
2 Is the SCSI cable loose?
Make sure the SCSI cable connectors are firmly
attached at both ends using the fastening screws
or clasps.
3 Is the SCSI device number set correctly?
Make sure the SCSI device numb er fo r the prin te r
5 Is the cable to o lo n g ?
Do not use a cable that is longer than you need.
The signals become more unstable as the cable
gets longer.
6 Is the printer turned on?
Make sure the printer is turned on before using
the
Chooser
7 Were the printer and computer turned on in the
wrong order?
to select the printer.
Turn the printer on before turning on the computer.
8 Is the front cover closed correctly?
Make sure that the front cover is closed correctly.
is not the same as that used by any other SCSI
device attached to the computer. Each SCSI
Chapter 7 - Troubleshooting 81
Page 90

9 Is the ready light off?
Press the
the
10 Are you using the wrong cartridges?
ready/insert
ready
light comes on.
button and make sure that
Use only OKI recommended cartridges in the
DP-5000 printer. Do not use cartridges from other
manufacturers.
14 Is the device number set correctly?
Make sure the SCSI device number of the printer
is not the same as that used by any other SCSI
device attached to the computer. Each SCSI
device must have a unique device num ber. (If the
computer has more than one SCSI bus, then the
device number must only be unique for the bus
that the printer is attached to.)
11 Are the cartridges installed correctly?
Insert the cartridges in the holders with the identification markings (B side) face up.
15 Is the terminator connected?
Make sure there is a terminator connected to the
last peripheral in the SCSI chain. If you are using
a device with an internal terminator, make it the
12 Is the ribbon in one of the cartridges used up?
last peripheral in the SCSI chain.
When the ribbon in a cartridge has been used up,
black and silver stripes will be visible on the ribbon. Install a new cartridge. After replacing the
cartridge printing will continue from where it left
off.
16 Is there a paper jam?
Remove the paper. If the paper is caught in the
rollers, open the front cover, push down on the
release lever, and gently remove the paper. Make
sure there are no pieces of paper left in the
13 Is the SCSI cable correctly connected?
printer.
Make sure the cable is not bent excessively, and
secure it firmly at both ends with the fastening
screws or clasps.
82 User’s Guide
17 Are the settings in the application correct?
Recheck the printer settings in the application.
Page 91

18 Is the printer driver correctly installed?
Install the DP-5000 printer driver from the Installation Disc (CD-ROM).
19 Has the printer been selected using the Choo ser?
From the
menu, select the
Apple
Chooser
and
make sure the printer and device number appear
correctly. Click on the printer name and SCSI#.
(The printer may not be selected correctly if you
do not click on the printer name.)
20 Do you have enough hard dri ve space?
The DP-5000 requires work space on the hard
disk when it prints. Keep enough space open on
the disk for the printer to operate. (After printing,
the work space is released.)
21 Does the hard disk have areas where reading or
writing are unreliable?
If there are areas on the hard disk where reading
or writing are unreliable, sometimes a printing
error will occur and printing will stop. Periodically use the
Disk First Aid
utility that comes
with your system software (or other commercial
disk checking utility) to prevent these problems.
English
Colour printing is not working or is extremely
slow
1 Are the ink cartridges for colour printing
installed?
The following ink cartridges are required for colour printing:
a Yellow, cyan, magenta, and black ink car-
tridges
b Yellow, cyan, magenta, black, VPhoto
Primer, and Finish II ink cartridges
2 Are the print settings correct?
In the Print dialogue box, select
tographs
or
Graphics & Text
Automatic, Pho-
from the
menu.
3 Is the free space on the hard disk fragmented?
The time required for printing can increase dramatically if the free space on the disk is
extremely fragmented. Clean up your files and
defragment the disk by periodically using a
defragment utility.
Type
Chapter 7 - Troubleshooting 83
Page 92

4 Is enough memory allocated?
Colour printing may not be pos sible if the memory allocated to the application is insufficient.
Allocate more memory to the application.
5 Are you using memory managemen t tools or virtual
memory?
When you are using memory managem ent tools
such as RA M Doubler or v irtual memo ry, memory may not be correctly recognised for colour
printing.
If colour printing is not working, try disabling
these utilities and try again.
6 Do you have enough disk space?
Make sure there is enough empty space on your
hard disk. (The working space is released once
printing is finished.)
When there is just barely enough working space
left on the disk, printing may take much longer
than normal.
7 Is the application set for colour printing? Does the
application support colour printing?
Some applications have colour printing enable/
disable settings. Some applications do not sup-
port colour printing. Read the manual for the
application and check the colour settings.
8 Are you using many applications at one time?
When very little memory is available for print
processing, printing may take a long time or fail.
Close as many applications as possible and try
again.
Printing is light, distorted, or has gaps
1 Has one of the ribbons separated from the
head?
Stop the printing and reinstall all the cartridges.
Take up any slack in the ribbons. If a particular
cartridge repeatedly causes problems, try a different cartridge.
2 Is the head dirty or is there an obstruction on the
print head?
Clean the head by following the directions in
Chapter 5. If anything is stuck to the print head,
remove it, being careful not to damage the head.
The platen often gets dirty at the same time as the
head, so it is recommended that you clean the
platen after cleaning the head.
84 User’s Guide
Page 93

3 Is the platen dirty or is there an obstruction on the
platen?
Clean the platen by following the directions in
Chapter 5. If anything is stuck to the platen,
remove it, being careful not to damage the platen.
If cleaning the head and the platen does not work,
contact the supplier from where you purchased
the printer.
4 Are you using the correct cartridges for the chose n
printing medium?
Use only OKI cartridges for the DP-5000 printer.
When printing transparencies, use only recommended Overhead Projector Transparency Film
(A4).
5 Are you printing images with many sudden colour
variations or very bright colours?
In these situations, the overlap of different colours of ink can degrade the quality of the image.
Try changing the Halftone option in the
Settings dialogue box from
Fine
to
Image
Standard
Use a Blends option appropriate for the image.
English
6 Are you printing on envelopes, thermal paper, or
picture postcards?
Printing is unreliable on envelopes and other surfaces which have a non-uniform thickness. Printing and feeding of thermal paper is unreliable.
The back side of picture postcards may b e printed
on if the surface is smooth and the card thickness
is 0.23 mm (0.01") or less, but printing on the
photo side is unreliable.
7 Are you printi ng in colour on the glossy side of a
greeting card?
The glossy side of a greeting card can only be
printed on using metallic cartridges.
8 Are you printing on the wrong side of the paper?
With both VPhoto Print Film and Dye Sub Paper,
printing should take place on the glossy side. Particularly with Dye Sub Paper, take care not to
print on back of the sheet while using Dye Sub
ink cartridges. The ribbons in the cartridges may
.
break.
Chapter 7 - Troubleshooting 85
Page 94

Paper is not feeding or ejecting correctly from
the sheet feeder
1 Are you using paper which is thicker or thinner
than recommended?
Use paper within the range 0.07 mm - 0.23 mm
(0.003" - 0.01"). For auto feeding use paper in the
range 0.07 mm - 0.1 mm (0.003" - 0.004").
2 Are you using poor quality paper?
Paper that is folded, ripped or has holes, such as
loose leaf binder or refill paper, can cause paper
jams and should not be used.
3 Are you using curled paper?
This will cause paper jams. The paper should be
curled the opposite way to flatten it out before it
is used.
4 Are you using p a p e r w i th f ol ded or cut corne rs?
This can cause problems since the paper position
sensor and paper length sensor do not work properly. Sheets with corner cuts, such as transparencies and back print film, will work fine if the
corner cut end is placed at the top of the paper
guide.
5 Is the cut corner in the correct posi tion?
When these sheets are inserted with the cut corner
incorrectly positioned, they may not feed correctly.
6 Is the paper feed guide too narrow for the paper?
The paper feed guide should hold the paper
loosely enough so that it can feed easily.
7 Is there too much paper in the sheet feeder?
The sheet feeder can hold up to 100 sheets of
plain paper, or 30 transparencies, any more than
this may cause a paper jam.
8 Is the paper feed switch posi tioned correctl y for th e
paper feed method?
To print on plain paper using automatic feed
mode, set the paper feed switch to position “A”;
to print in manual feed mode, set it to position
“M”.
9 Are you printing on envelopes, thermal paper, or
picture postcards?
Correct printing and feeding of envelopes and
thermal paper cannot be guaranteed. The back
side of picture postcards can be used if the card is
less than 0.23 mm (0.01") thick and manual feed
86 User’s Guide
Page 95

mode is used. Printing on the pho t o side i s un rel iable.
English
The printer emits unusual noises when the power
is turned on, and the error lights blink
10 Are you using home-made cards or thick cards?
Cards with thickness within the range of 0.07 mm
- 0.23 mm (0.003" - 0.01") can be used in manual
feed mode.
11 Are there pages piled up near the output slot or in
the output paper tray?
When printed material obstructs the paper output
slot, the paper feed and paper output may not
work correctly.
12 Have you loosened the paper sufficiently prior to
loading it into the sheet feeder?
Paper must be riffled several times prior to being
loaded into the sheet feeder. If not, sheets of
paper may stick to one another and cause multiple
sheets to feed into the printer at the same time, or
other forms of misfeed.
1 Has the carriage packing material been
removed?
Refer to Chapter 1, Introduction for details on
removing packing material.
2 Has the packing tap e been removed?
There are two pieces of tape on the front of the
printer that help protect the printer during shipping. Gently remove the tape before using the
printer.
3 Has a cartridge become dislodged from the
cartridge holder?
Open the front cover and mak e sure the cartrid ges
are correctly installed.
4 Is there a paper jam?
Clear a paper jam by refering to ‘Clearing Paper
Jams’ in this Chapter. Occasionally a small piece
of paper will tear off and remain in the printer. If
this happens, hold the release lever down and use
a thick piece of paper to remove the small piece
of paper.
Chapter 7 - Troubleshooting 87
Page 96

A mechanism or cartridge change error occurred
1 Are the cartridges installed correctly?
If a cartridge has become dislodged from its
holder, a cartridge change error will occur. Open
the front cover and reinstall the cartridge.
2 Are you using the printer on a level surface?
The printer will not operate correctly on a slanted
surface. Place it on a level, stable surface.
3 Is the printer in a place where it is subject to
movement?
Various movements such as bumps and vibrations
can cause mechanical problems. Place the printer
in an environment where it will not be subject to
movement.
4 Is the front cover properly cl osed?
The printer will not operate correctly if the front
cover is not closed properly. Close the front cover
all the wa y.
5 Are items stacked on top of the printer?
The printer may malfunction if items are stacked
on top or to the side of the printer. Remove any
obstruction on top or to the side of the printer.
6 Is there an obstruction in fr ont of the paper output
slot?
If the paper output slot is obstructed, paper
ejected from the printer can fold or bend and
cause the printer to malfunction. When printing,
make sure that the paper output slot is unobstructed and that there is room for paper to be
ejected.
Ink cartridges are not correctly recognised
1 Is the bar code on the cartridge dirty?
Clean the bar code.
2 Is the cartridge installed in the holder with the (A)
side up?
Make sure the cartridges are placed in the holder
with the identification markings (B side) facing
up.
3 Has an ink cartridge for a different printer been
installed?
Cartridges made by other manufacturers will not
work. Use only OKI recommended cartridges.
88 User’s Guide
Page 97

Printing quality, hue, and resolution queries
1 Can all four colours of the colour inks be
combined for black and white printing?
In colour printing mode, greyscale portions are
printed using a four- c olou r greyscale. Black characters are also printed using a mixture of the four
colours, if brightness is adjusted. To print monochrome portions in black only, adjust the brightness to 0%. To subject the overall image to
monochrome printing, set the Type Settings to
Black & White.
2 Black is printed with black ink, but grey portions
are printed using four colours.
In colour printing, greyscale intermediate colours
(such as grey) are printed using four colours. If
you want to print only in black ink, set the Type
setting in the Print dialogue box to Greyscale.
3 I would like to adjust the image quality of
photographs without reducing character resol ution.
Characters always print at the currently selected
resolution (if an outline font is used). The image
quality of photographs can be adjusted independently using the
Halftone
setting in the
Image
ting dialogue box.
Set-
English
4 There seems to be no difference between
photographic output using monochrome printing set
Fine
to
printing set to
With monochrome printing set to
characters can be printed at
and images obtained by monochrome
Standard
.
, only the
Fine
. This is done by
Fine
smoothing the Standard images. The quality of
photographs, however, differs little from that of
images obtained by monochrome printing set to
Standard.
5 When plain or other coarse-surfaced paper is
printed in colour, ink is missing from a number of
points on the image.
When paper with a coarse surface is used for full
colour printing, ink will be missing from certain
points where it was difficult to deposit. To correct
this, you can attempt the following:
a Set the Halftone setting in the
dialogue to
Standard
for printing. The
Image
Setting
image will be coarse, but the ink will transfer to the paper more reliably.
b If you have VPhoto Primer ink, the image
quality may be improved by providing an
undercoat.
Chapter 7 - Troubleshooting 89
Page 98

6 When coloured paper is used for full colour
printing, the colours are not reproduced cor rectly.
Colour printing is based upon the ink being
printed on a white background, so correct colours
cannot be reproduced on coloured paper. DP
printers, however, can provide the following
forms of printing even on coloured paper.
improve image quality and colour reproduction.
2 Can I print on overhea d transparencies using foil
cartridges?
Printing is possible, but the foil ink is not transparent.
a On light-coloured paper, DP printers pro-
vide a white undercoat prior to colour printing. This allows colours to be reproduced in
3 Can I use the Dye Sub Overcoat cartridge for Glossy
finishing?
No. Always use the Finish II cartridge.
tones close to those obtained by printing on
white paper.
b On dark-coloured paper, impressive finish-
ing may be obtained by using monochrome
printing with white ink.
Ink and paper
1 How should I use white ink?
White ink can be used as follows:
a As with foil ink, white ink is effective for
spot colour printing on dark-coloured paper.
4 Is it OK to print using the white ink on top of a full
colour image?
This can cause unsatisfactory results. Print the
white ink before using other ink colours.
5 For full colour printing and glossy finishing, may I
use any type of paper?
We suggest using High Grade Paper for full colour printing. Using other types of paper can produce a poor image. Using our VPhoto Primer will
help make many plain pap ers suita ble for fu ll-col our printing.
b White ink can provide an undercoat for full
colour printing on light-coloured or coarsesurfaced paper. The white undercoat will
90 User’s Guide
Page 99

Connection method
1 Can I connect multiple DP printers to a single
computer?
If different SCSI device numbers are used, multiple printers can be connected to a single Macintosh. Of course, simultaneous printing is not
possible.
2 Can I connect a single DP printer to multiple
computers?
No, the printer is not designed for this.
Other operational problems
1 Is this printer compatible with PostScript?
The DP-5000 printer uses QuickDraw. It is not
compatible with PostScript.
2 EPS files cannot be output clearly.
Since EPS files are data files for PostScript printers, images at 72 dpi may be output from QuickDraw depending on the application.
3 Are enlargements and reduction s pos sible?
Set either the enlargement or the reduction rate in
the
Reduce
or
Enlarge
setting in the
Page Setup
English
dialogue box. This value may be specified
between 25 and 400.
4 The preview doesn’t change even though I change
the reduction or enlargement in the
dialogue box.
Page Setup
The preview will not change size with different
reduction or enlargement settings. Check the size
after printing to see that the changes took effect.
5 How do I uninstall the printer driver?
Remove the DP-5000 printer driver from the
Extensions
remove the
Preferences
Queue Kit
folder in the
DP-5000 Preferences
System Folder,
file from the
folder. If you have installed the
software, and you are not going to use
it with other applications, remove the
Monitor
Extensions
6 Can this printer be connected to Windows and
Macintosh computers simult aneously?
and
Queue Watcher
folder. Restart your computer.
files from the
and
Queue
No, the parallel port and the SCSI port cannot be
used at the same time. Connect a Macintosh computer to the printer using the Macintosh interface
module, and connect a Windows computer without the module.
Chapter 7 - Troubleshooting 91
Page 100

7 Why can I not print correctly with page layout
settings?
There are application programs that allow you to
format a document composed of both o rientation s
of portrait and landscape. When printing such
document with layout (more than 2 pages per
sheet), it may not print properly.
92 User’s Guide
 Loading...