


PrintSuperVision 4.0
Enterprise and Professional Editions
Installation, Configuration
and Users Guide
V. 1.0 1 January 2014

Contents
Introduction ........................................................................................................ 6
What’s New in Version 4.0 ................................................................................... 7
Installing the Software ........................................................................................ 8
Setup and Configuration: Using the Setup Tool ................................................. 10
Selecting a Location/Language ............................................................................. 10
Selecting a PSV Edition: Features Tab .................................................................. 11
Entering a Software License Key: Enterprise Edition Only ....................................... 12
Selecting a Database: Database Tab .................................................................... 12
Assigning server memory limits to SQL server: Database Tab: ................................ 15
Database Housekeeping Features: Database Tab: ................................................... 16
Selecting a Web Server: Web Config Tab .............................................................. 17
Configuring an Internal Web Site: Web Config Tab ................................................. 18
Configuring a Public Web Site: Web Config Tab ..................................................... 19
Assigning Admin Username and Password: Administrator Tab ................................. 20
Configuring your E-mail server: Alerts Tab ............................................................ 21
Data Synchronization: Data Synch Tab .................................................................. 22
Software Registration: Registration Tab ................................................................ 24
Identifying PSV Version Numbers: Program Tab .................................................... 25
Getting Started .................................................................................................. 26
Context Sensitive Help ........................................................................................ 26
User Access ....................................................................................................... 26
Adding a User / Assigning Individual User rights: .................................................... 27
Importing a List of Users ..................................................................................... 27
Creating User Groups: ......................................................................................... 28
Changing Your Password: .................................................................................... 28
Creating / Editing Groups of Devices: .................................................................... 28
Adding/Removing a Device to/from a Group: ......................................................... 30
Adding Maps and Floor Plans to a Group ................................................................ 32
Discovering Devices ........................................................................................... 35
Configuring Timeouts .......................................................................................... 43
SNMP Discovery Delay ........................................................................................ 43
Status Icon Timeout............................................................................................ 43
Retry Interval / Retry Maximum Wait .................................................................... 43
Use DNS Addresses ............................................................................................ 43
Importing IP Addresses from a text file: Making Discovery Easier ............................ 44
Discovering Network Devices: Easy Configuration .................................................. 46
My Printers ........................................................................................................ 46
Near Me ............................................................................................................ 47
Computers with Agents ....................................................................................... 48
Status of Print Devices ........................................................................................ 49
Configuring Email Alerts .................................................................................... 52
Usage-based Alerts ............................................................................................. 53
Status-based Alerts: ........................................................................................... 54
Configuring an Email Server for Alerts: ................................................................. 56
Testing The Email Alert Configuration: .................................................................. 58
Configuring Status Events: .................................................................................. 58
Customizing Status Codes: .................................................................................. 60
Processing Alerts /Generating Alert Logs: .............................................................. 61
2

Processing Alerts: Setting the Data Collection Interval ........................................... 63
Configuring Print Devices Remotely .................................................................. 64
Configuration: Behind the Scenes: ....................................................................... 64
Configuring Individual devices:............................................................................. 65
Configuration Requirement: Device Web Password................................................. 66
Obtaining Current Configuration Values from each Device: ...................................... 67
Configuring Several Devices at Once: .................................................................... 69
Saving Attributes to the PSV Database: ................................................................. 69
Set Values from Attributes ................................................................................... 71
SNMP Test Connection Checkbox: ......................................................................... 72
Exporting / Importing Configuration Data: ............................................................. 73
Sample Configuration Exercise: ............................................................................ 75
Configuring Email Address Book and Fax Phone Book .............................................. 76
Exporting / Importing Email Address Book and Fax Phone Book values...................... 77
Configuring Scan Profiles: .................................................................................... 78
Getting and Setting a Scan Profile to one MFP device: ............................................. 80
Configuring Scan profiles to several devices:.......................................................... 81
Editing Common Scan Profiles and Attributes ......................................................... 84
Exporting / Importing Scan Profiles from CSV: ....................................................... 85
Configuring MFP Devices ................................................................................... 89
Scan Profiles: ..................................................................................................... 89
Using PSV to Configure MFP Devices: .................................................................... 91
Interactive Configuring of Scan Profiles ................................................................. 91
Adding a Scan Profile .......................................................................................... 91
Editing and Deleting a Scan Profile........................................................................ 92
Scan Destination: Share Folder or a Server: .......................................................... 92
Using Scan Templates: ........................................................................................ 93
Adding a New Scan Template: .............................................................................. 93
Editing Scan Templates: ...................................................................................... 93
Applying Scan Templates ..................................................................................... 94
Hierarchy of Group Templates .............................................................................. 94
Using PSV “Attributes” to Customize Scan Templates: ............................................. 95
Date/Time and Document Number in Filename: ..................................................... 96
Show State: ....................................................................................................... 96
Show Logs ......................................................................................................... 97
Using a Scan Profile from the MFP device’s Control Panel ......................................... 97
Group Configuration .......................................................................................... 99
Configuring Static IP Address .......................................................................... 100
Configure Static IP Address: .............................................................................. 100
Getting Prepared: ............................................................................................. 102
Preparing the CSV file: ...................................................................................... 102
Importing a CSV file to create Subnets in PSV: ..................................................... 103
Discover printers in the subnets: ........................................................................ 104
Configuring PSV for IP Address Configuration ....................................................... 104
Configure Supported Printers from all subnets in database: ................................... 105
Discover single subnet: ..................................................................................... 107
Configure Dynamic IP ....................................................................................... 109
Configuring Static IP Addresses: ......................................................................... 110
Enabling “Configure Static IP Address” in Public Web Site using PSV Setup tool:....... 111
Configure One: Gateway, Subnet ....................................................................... 112
3

Fix Many: Gateway, Subnet ............................................................................... 114
Supplies Ordering ............................................................................................ 116
Searching for a supply item ............................................................................... 117
Items for Local Printers: .................................................................................... 117
Customizing Supplies Orders .............................................................................. 117
Configuring the Supplies List .............................................................................. 119
Enabling / Disabling Online Supplies Ordering: ..................................................... 119
Editing the Supplies List: ................................................................................... 119
Selecting an Alternative Supplies List .................................................................. 121
Disabling Supplies Ordering: .............................................................................. 121
Supplies Ordering Calendar: .............................................................................. 122
Reporting ........................................................................................................ 123
Available Reports: ............................................................................................ 123
Configuring Report Properties: ........................................................................... 124
Printing Report: ................................................................................................ 125
Low Supplies Report ......................................................................................... 128
Toner Changes Report ....................................................................................... 130
Supplies Usage Report ...................................................................................... 132
Printed Pages Report ......................................................................................... 137
Exporting Device Properties and Attributes Report ................................................ 138
Usage Report ................................................................................................... 139
Windows Print Job Logs ..................................................................................... 141
Printers Log Report ........................................................................................... 142
Device Job Logs Report ..................................................................................... 145
Meter Reading Report ....................................................................................... 147
Print Accounting .............................................................................................. 149
Main Elements of the System ............................................................................. 149
Workflow ......................................................................................................... 150
Configuring PSV Server Accounting ..................................................................... 150
Options => Users ............................................................................................. 151
Accounting => Accounting Options ..................................................................... 151
Accounting => Directory Users .......................................................................... 152
Adding new Directory Users ............................................................................... 153
Sync with Active Directory ................................................................................. 153
Import from a CSV File ...................................................................................... 154
Manually Adding Users ...................................................................................... 154
Accounting => Managed Print Devices ................................................................ 155
Accounting => Device Job Accounting Logs ......................................................... 160
Accounting => Directory Printers ....................................................................... 162
Accounting => Print Usage Report ...................................................................... 163
Services => Data Synchronization ...................................................................... 163
Managed Device Data Synchronization ................................................................ 163
User Info from Active Directory .......................................................................... 165
Services => Print Agents ................................................................................... 166
Options => Features Access Rights ..................................................................... 167
Adding Device Attribute Data .......................................................................... 168
Monitoring Locally Connected Devices ............................................................. 170
Introduction to PSV Agent ................................................................................. 170
Main Features .................................................................................................. 170
PSV USB Agent Installation ................................................................................ 170
4

Configuring PSV USB Agent ............................................................................... 172
Options Tab ..................................................................................................... 172
Service Tab...................................................................................................... 173
About Tab ........................................................................................................ 174
Installing PSV USB Agent From a Command Line .................................................. 174
Uninstalling PSV USB Agent ............................................................................... 175
Installing the PSV Agent Using PSV Director: Option 2 ......................................... 175
PSV Assistant ................................................................................................... 178
Performing Day to Day Tasks ........................................................................... 182
Viewing Device Status ....................................................................................... 182
Quick Search ................................................................................................... 183
Changing the Device Properties Displayed ........................................................... 183
Additional Configuration Settings ........................................................................ 185
Changing Languages ......................................................................................... 187
Downloading Oki Drivers ................................................................................... 187
Sending Files / Updating Firmware from PSV .................................................. 188
Firmware Upload .............................................................................................. 190
Configure Options ............................................................................................. 190
Firmware Upgrade ............................................................................................ 192
Multi File Printing Log ........................................................................................ 192
Creating a Maintenance Log / Managing Supplies Inventory ........................... 195
Public Web Services ........................................................................................ 197
5

Introduction
PrintSuperVision (referred to as PSV throughout this document) is a Windows server
application designed for managing and monitoring printing and copying devices. The core
application is server–based and is accessible from any browser enabled device connected
to a network. Popular browsers supported include Internet Explorer, Firefox, Chrome and
Safari.
The application is available in two editions: Professional Edition and Enterprise Edition.
The Professional Edition is a subset of the Enterprise edition and shares the same menu
structure and many of the same features. Notations will be made throughout this
document to indicate differences between the Enterprise and Professional Editions.
One notable feature in the Professional Edition that does not exist in the Enterprise Edition
is the Single-user “Easy Configuration” option. The Single-user option can be installed in
a non-server configuration on network-connected laptops and desktops.
The Single-user Easy Configuration option allows users to check status of supply levels,
monitor consumable life remaining and collect printed page counts while providing the
ability to order supplies on line. The easy configuration option is designed for very small
offices and does not support the automatic delivery of device Alerts through email.
Some of the common features of both PSV Professional and PSV Enterprise Editions
include:
Discovers and configures devices
Helps pinpoint devices on the network
Assists in remote trouble shooting
Automatically identifies device status and emails alerts
Produces reports and automatically delivers them via email
On-line supplies and consumable ordering (configurable by region)
Manage devices including detailed job accounting reports
Monitor locally connected OKI devices with PSV Agent, PSV Assistant
6

What’s New in Version 4.0
Perhaps the most important enhancement in version 4.0 Enterprise Edition is the
accounting features that help manage Oki devices. When configured, this feature collects
detailed user and device job accounting data and provides reports. Using this feature,
print quotas can be set for users and enforced on the device. Users can now be managed
by synchronizing the list of users with Active Directory.
Several other noteworthy enhancements have been made to both PSV Pro and PSV
Enterprise Editions in version 4.0 and include:
Windows 8 and Windows Server 2012 support added
Support for SQL Server 2008 Express R2 and SQL Server 2012 Express has been
added, allowing up to 10 GB of database storage.
“Device Job Logs” enhanced to show print job data for selected devices
Enhanced the file download feature to support remote firmware installation in
Enterprise Edition
“Configure Print Devices” feature in Enterprise Edition allows remote configuration
of a fleet of similar printing devices. The desired printer properties can be
configured in a CSV file and imported to PSV and the changes applied to the devices.
“Configure MFP Devices” feature in Enterprise Edition allows automation of scan
profiles, scan templates for select OKI printing devices
“Low Supplies Report” helps in replenishing the consumables of devices that are
running low
“Printing Report” in Enterprise Edition provides the number of color and mono
pages printed, and shows daily/monthly usage
Supplies Forecast Report added to provide a summary of projected consumables
replenishment within 90 days
SNMP Community Name supported for discovering devices. SNMP delay option is
added to allow discovering all devices in a slow network.
Enhancements to the User Interface to support better access from iPhone, iPad
browsers – changes made for easier navigation in those devices
7
Installing the Software
PSV Professional and Enterprise Editions are available from www.okidata.com at
http://www.okidata.com/printsupervision-downloads-and-faq.
Both Enterprise and Professional editions downloaded from the web include the PSV
Server application. PSV Enterprise also includes the PSV Director application described
later. The PSV Agent and PSV Assistant applications are available as separate downloads
from the web and operates only with PSV Enterprise.
During installation, PSV checks the target server to see if .NET 2.0 (or above) is installed.
If the .NET platform is not detected, PSV will link the user to the Microsoft website to
download and install the .NET software. PSV also provides the option to download and
install Microsoft’s free versions of SQL databases such as the Express Edition and Compact
Edition.
To install PrintSuperVision, locate the executable file that was downloaded from the Oki
website, and click on it. A standard licensing agreement is displayed. If you agree with
the license agreement, click Next.
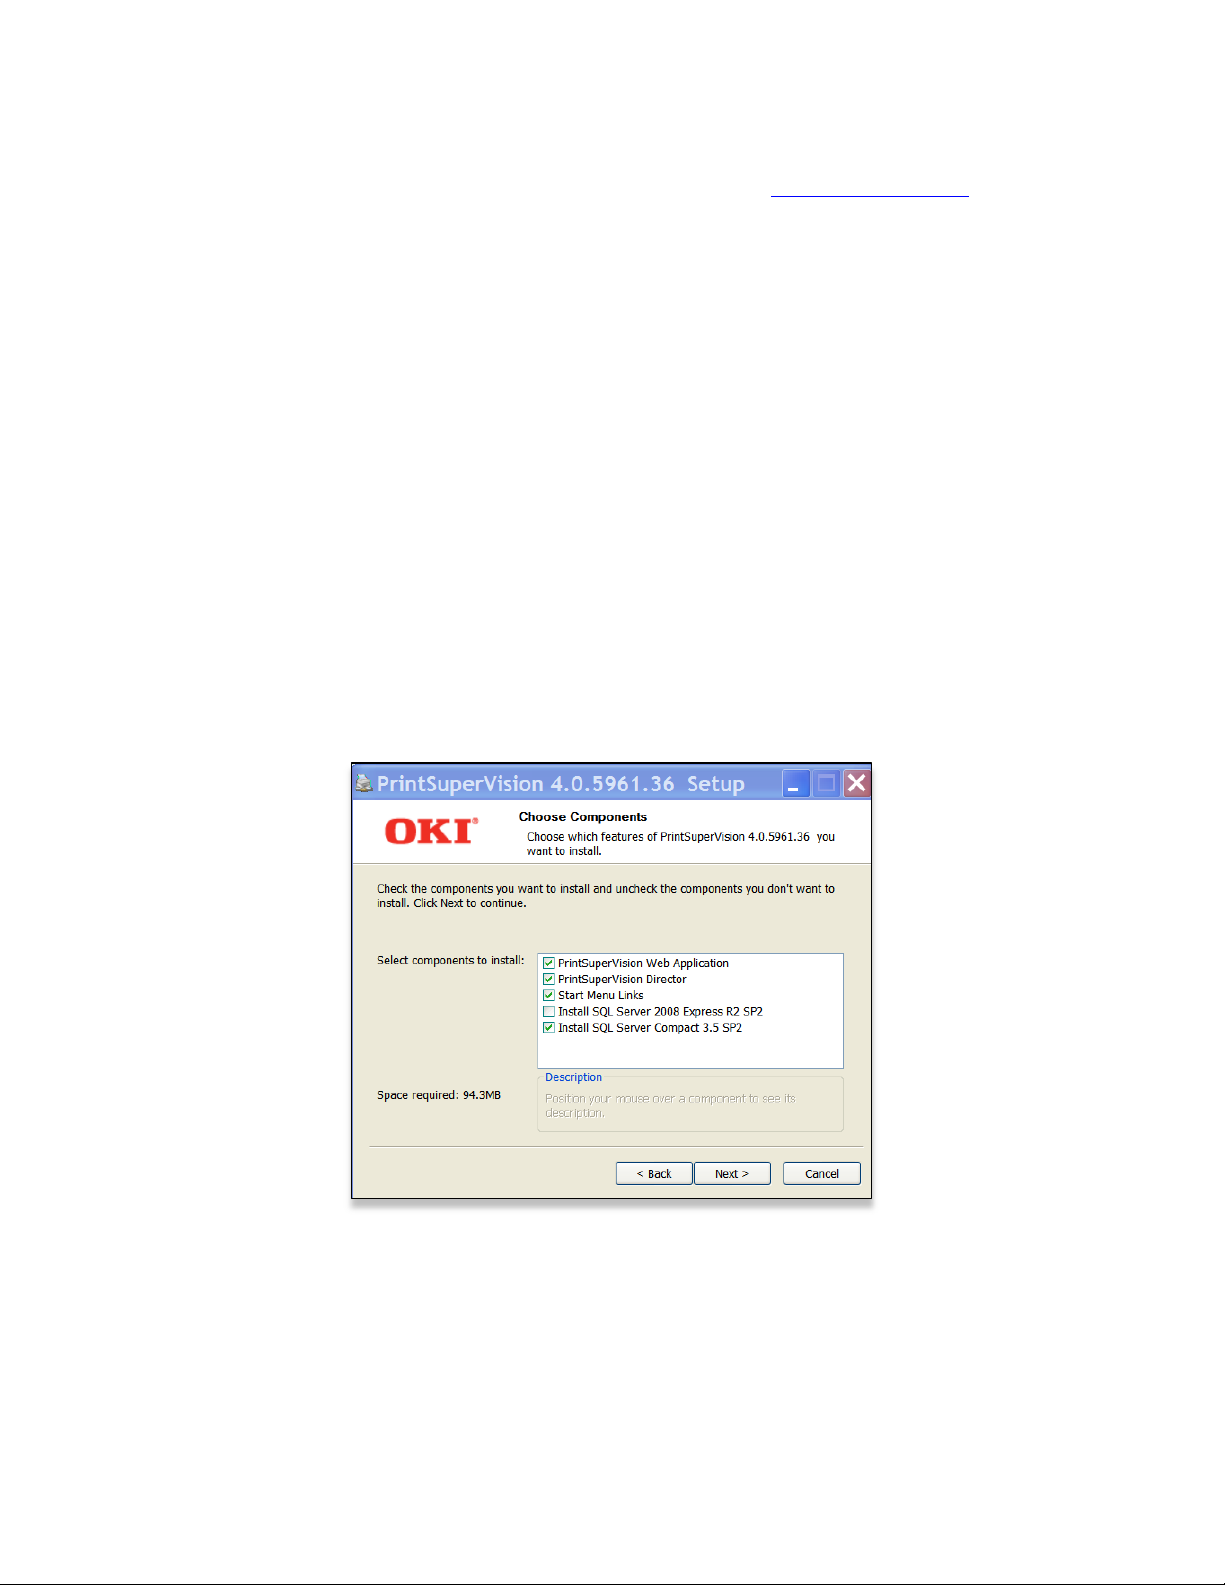
Both editions allow you to select the desired components to install. The following dialog
box displays the options that can be installed in the Enterprise Edition. Fewer choices are
available from the same dialog box when installing the Professional edition.
An application called PSV Director can be installed along with the core server (web)
application and other options. PSV Director provides Windows domain administrators the
ability to remotely install, upgrade, uninstall, monitor, and configure the PSV Agent (which
is a separate download).
The Director can also collect information about printer queues, drivers, and ports on either
a single computer or all computers in a domain. PSV Director will be discussed in more
8

detail in the Monitoring Locally Connected Devices section. Click the PSV Director
check box if you wish to install that module.
Note: When PSV Director is installed, you can find it later by clicking Start /All
Programs /PrintSuperVision. It is not accessible from the setup wizard discussed in
the following section.
You also have the option to install free versions of SQL Express or SQL Compact Editions
which PSV uses to collect device information and subsequently to run reports.
If you do not install SQL Express or SQL Compact edition you will still be able to use PSV’s
built-in Microsoft Access database but it is limited in storage capacity, so if you are
monitoring a large fleet we suggest using SQL Compact, SQL Express or a purchased
version of SQL.
9
Setup and Configuration: Using the Setup Tool
Immediately following installation, the PSV setup tool (wizard) is launched. Follow the
step by step process to configure PrintSuperVision. Keep in mind that many of the
configuration options are also available from within the PSV server application so it is not
imperative to complete all configuration settings during the initial setup process.
You may also return to the PSV Setup Tool at any time. It is available from the Windows
Start menu by clicking All Programs / PrintSuperVision / PrintSuperVision Setup.
Note: Certain changes using the PSV setup tool can only be made when the web
application and PSV Engine services are not running. For example, in order to change the
web server component from “embedded” to “IIS”, the web service application must not
be running.
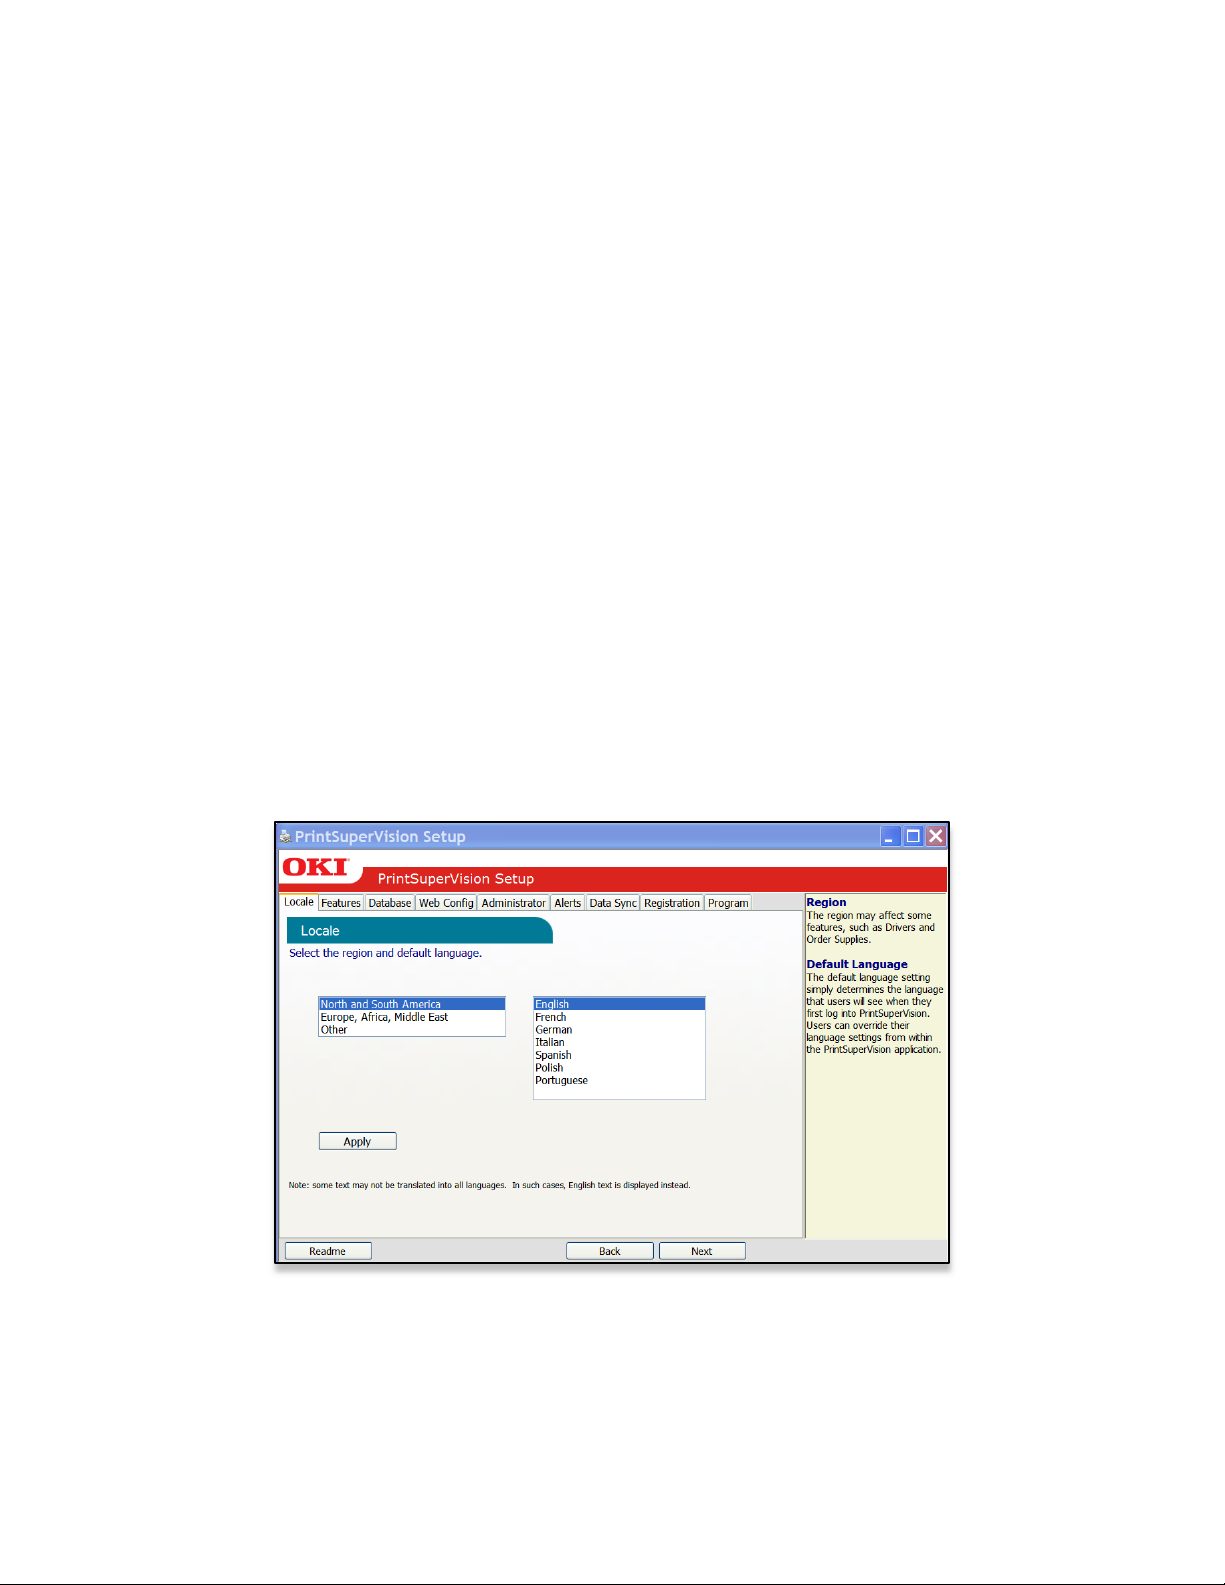
Selecting a Location/Language
The PSV setup tool launches directly into the Locale tab and displays the Region/
Language selection screen first.
1. Select a default region / language for all users
2. Click Apply and Next
Each user can later change his/her language preference directly from the application. Use
caution however when selecting the desired language since it is changed as soon as the
user clicks “Apply”.
Note: The region/language selected effects enabling or disabling the On-Line supplies
ordering feature in PSV. Selecting “North and South America” region will enable the OnLine ordering feature. Selecting any other region disables the ability to order supplies online from links that appear within the application.
10
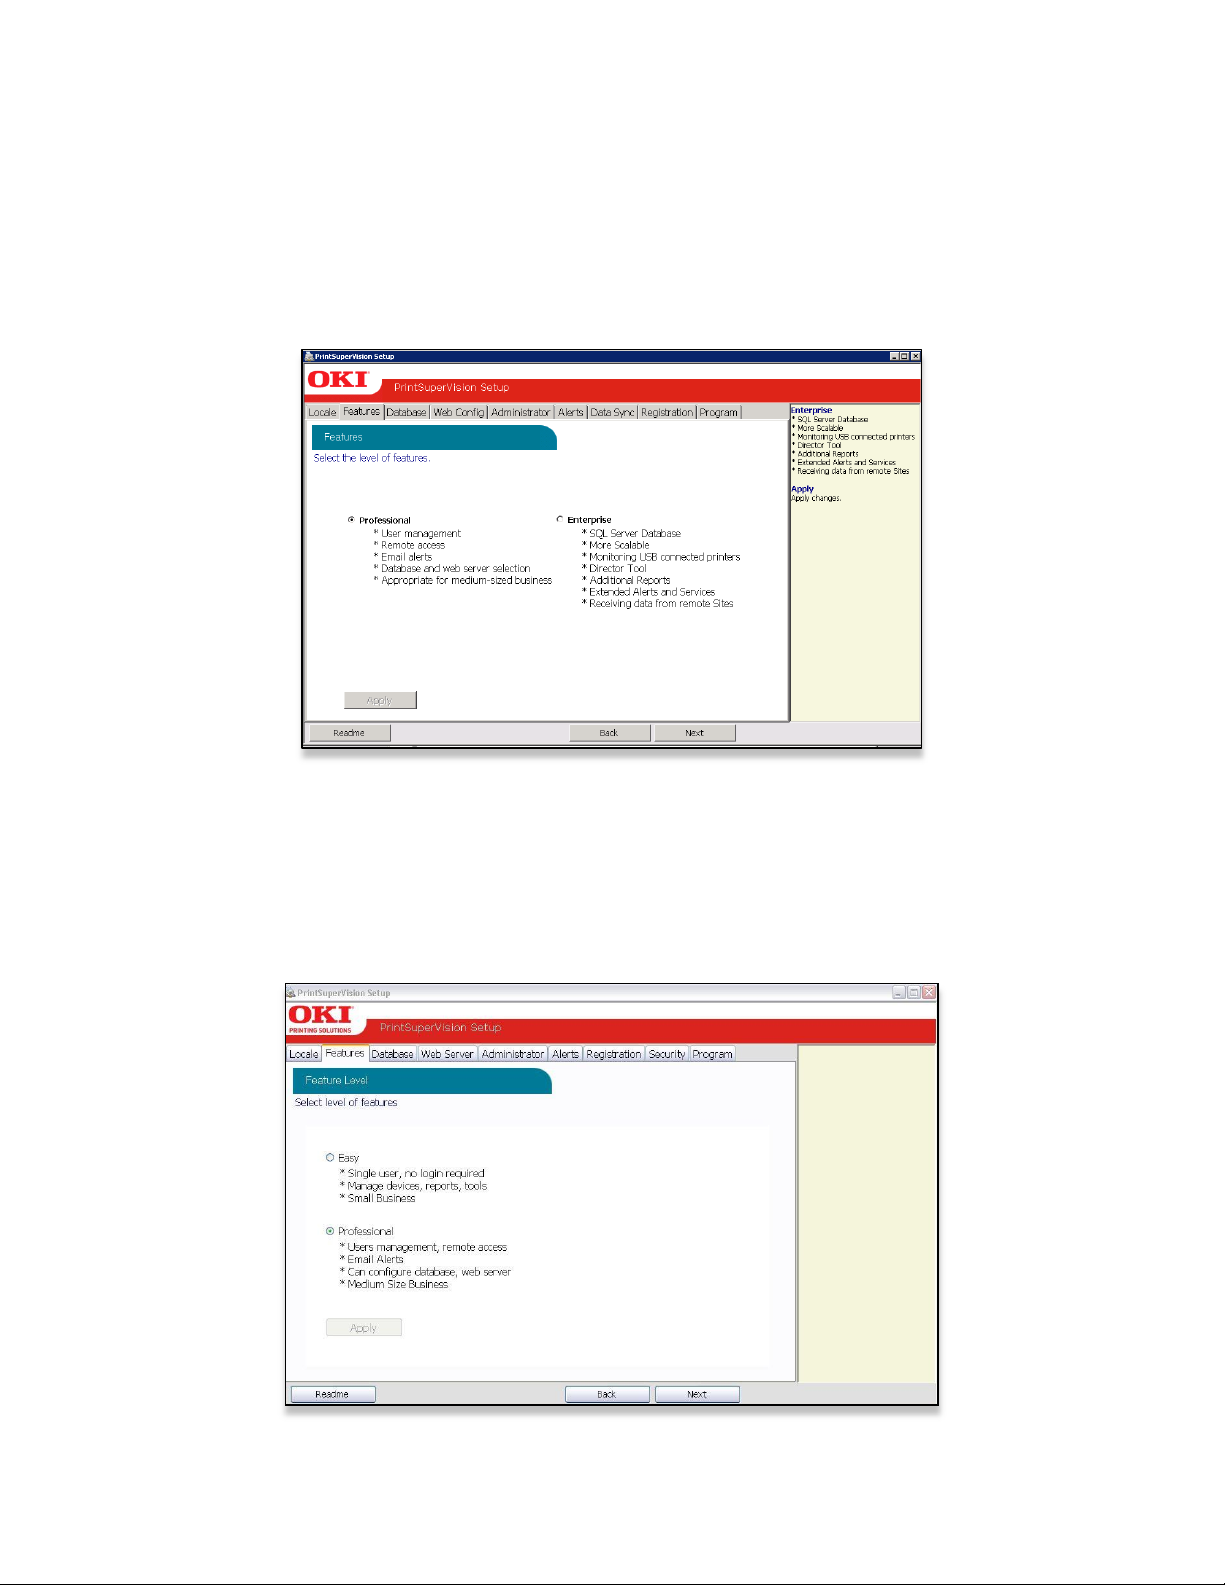
Selecting a PSV Edition: Features Tab
After choosing a language and clicking Next you will be prompted to select the PSV
edition that you would like to use.
If you installed the Enterprise Edition you are offered the choice to install either the
Enterprise or Professional Edition (but not the single-user Easy edition).
Select the desired PSV configuration, Click Apply and Next.
If you installed the Professional edition you have the choice of selecting the Single-user
“Easy” edition or the standard server-based Professional edition. Select the appropriate
configuration and click Apply and then Next.
11
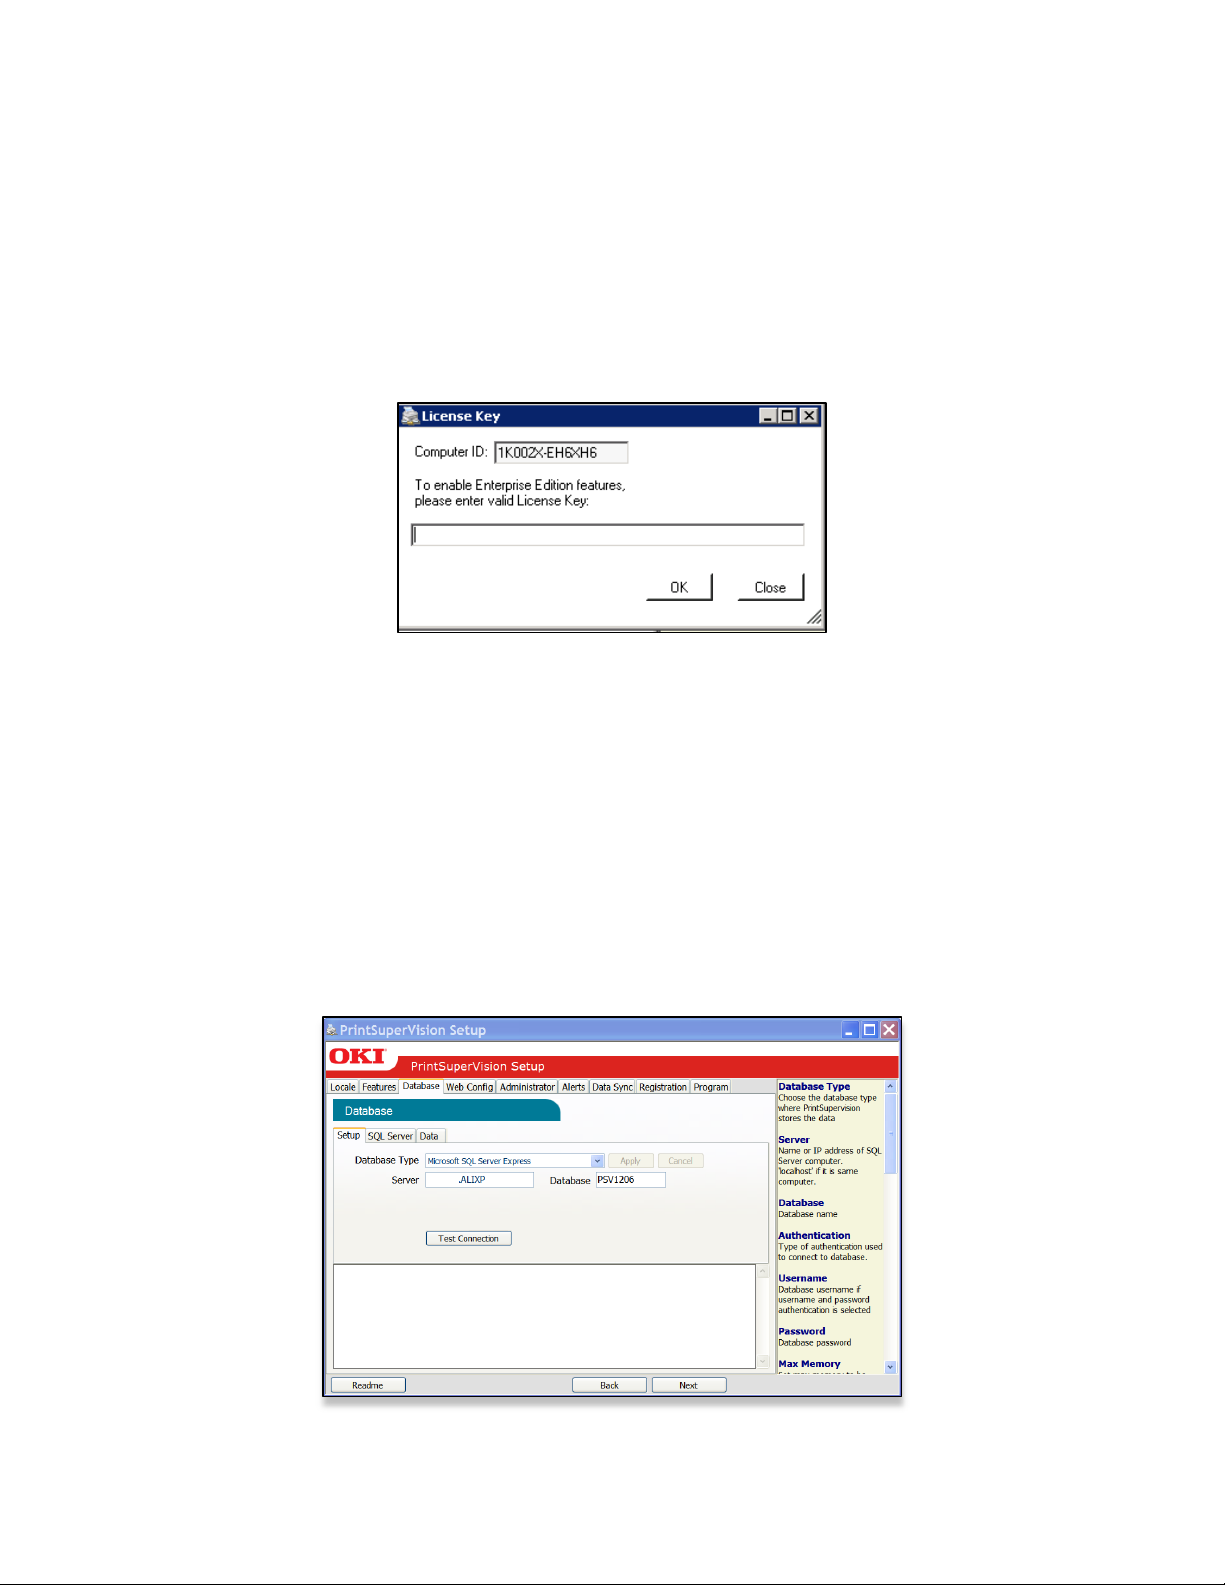
Entering a Software License Key: Enterprise Edition Only
If you selected the Enterprise Edition you will be prompted to enter a valid license key.
Keys can be requested from Oki Data Customer Support via email at
psvlicensekey@okidata.com or by calling 800-okidata.
Enter a valid license key and Click OK
Selecting a Database: Database Tab
The next step is to select the type of database you would like to use with PrintSupervision.
As mentioned previously, both editions of PrintSuperVision utilize a built-in Microsoft
Access database, but you may choose other options as well.
If you do not wish to use the built-in Access database, PSV allows you to select SQL
Compact Edition (in the Pro edition) as well as SQL Server Express in the Enterprise
edition. Both versions of SQL were provided as optional choices when installing PSV
Enterprise.
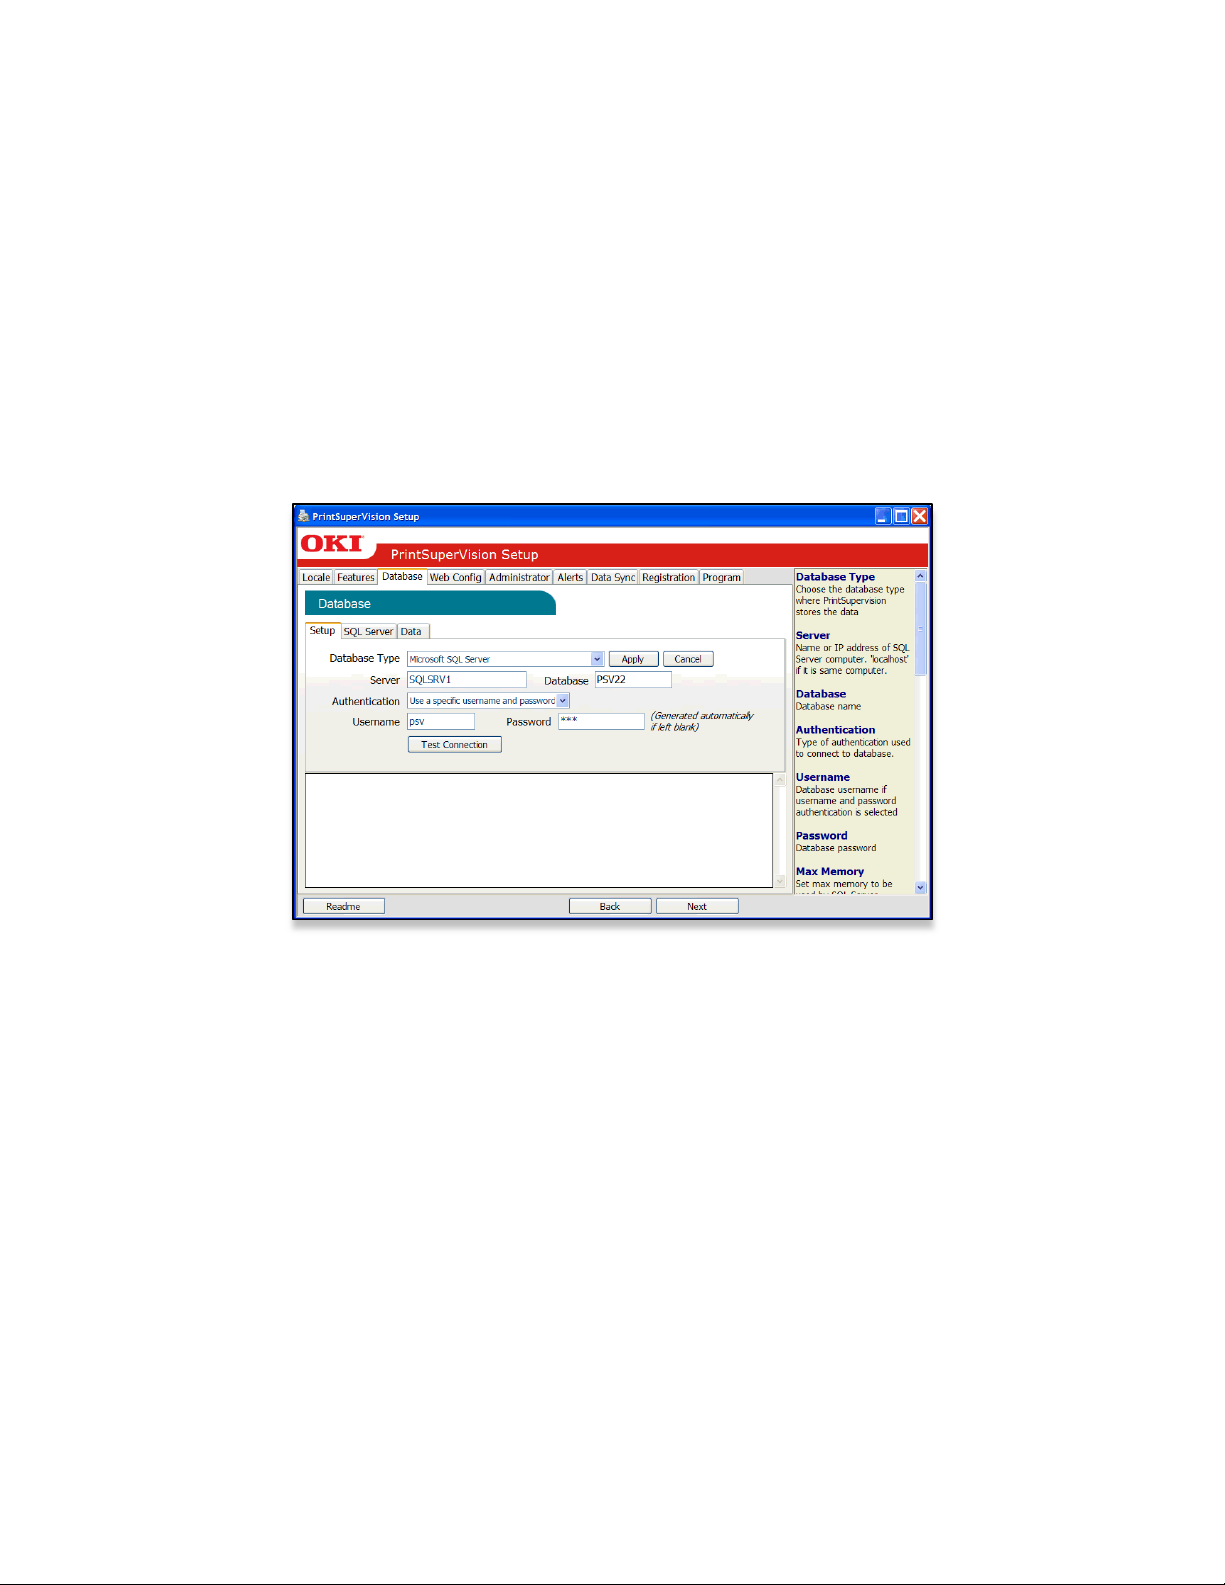
While in the Database tab, Click the Setup tab and select the desired database from the
dropdown menu.
12
Note: The previous Screen shot is from PSV Enterprise. PSV Professional does not
provide the option to enter a name for the server or database.
Also note that the SQL Server Tab is dynamic and will only appear if you have a full
version or express version of SQL server installed on the server/computer.
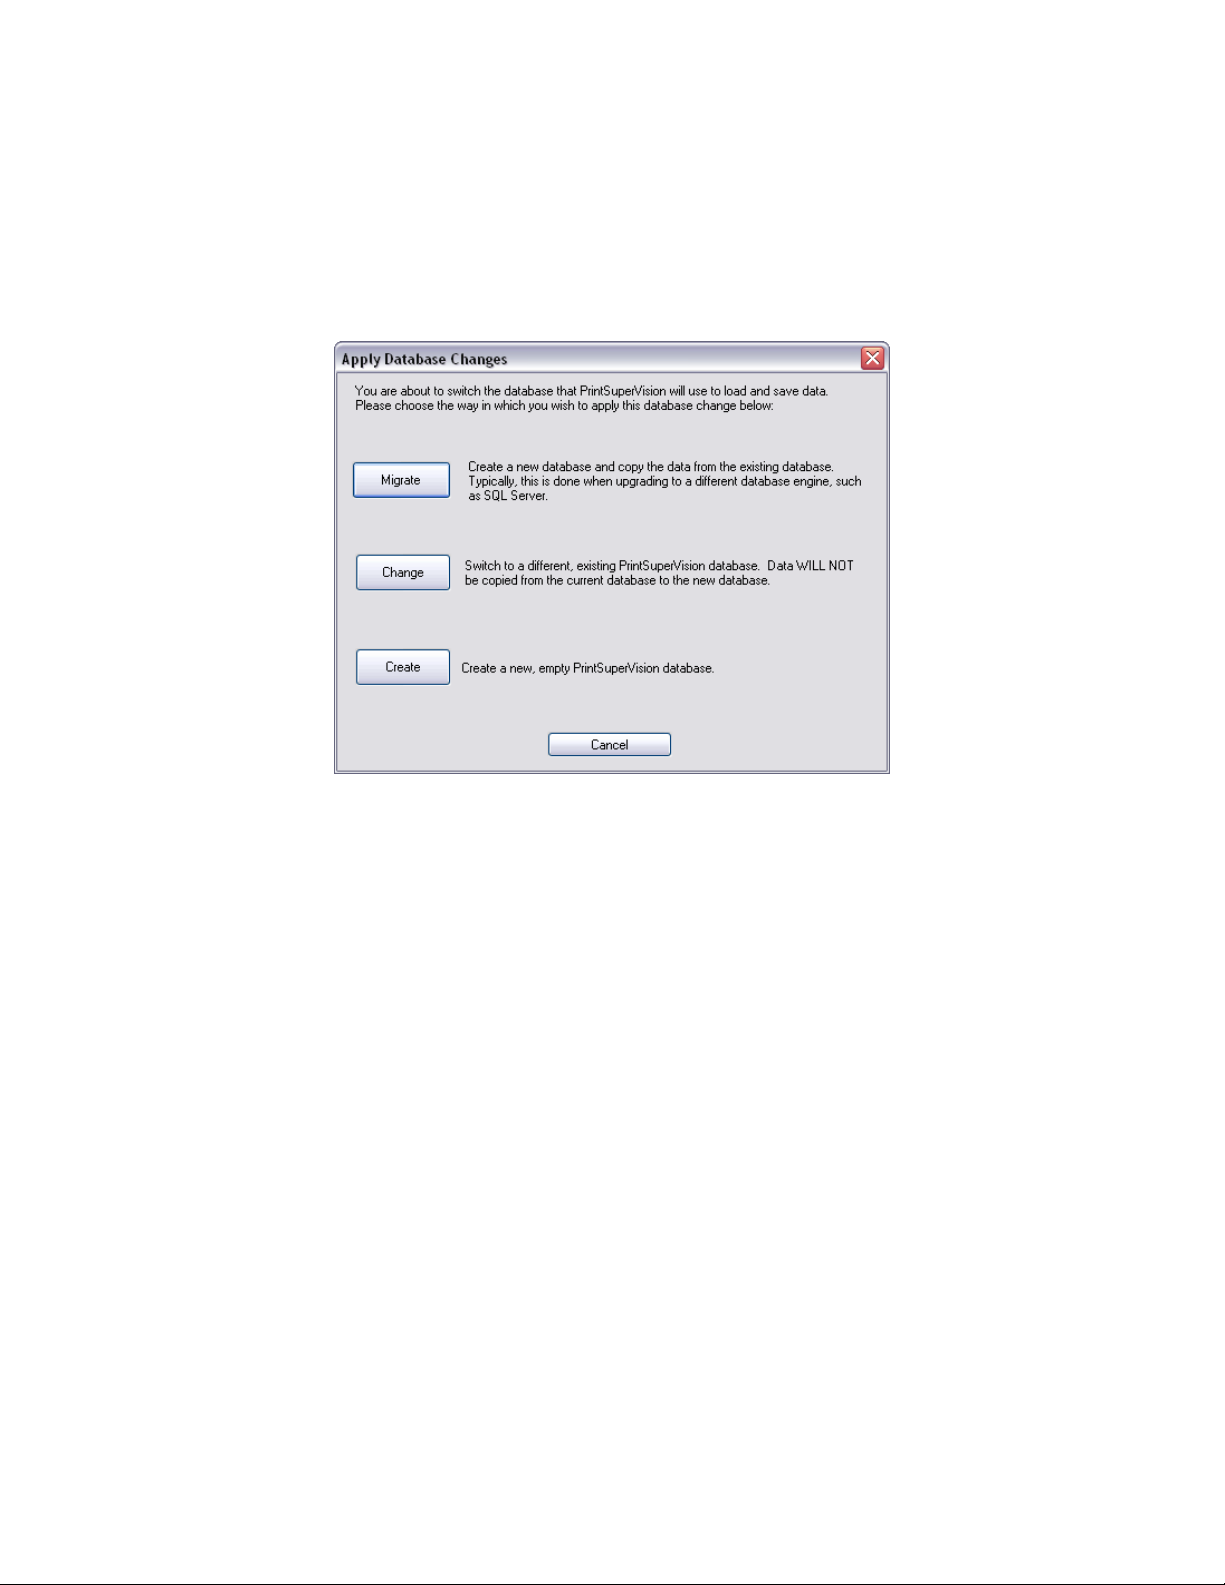
Click Apply, and the following options are presented:
Please note that even if you already have a compatible database such as SQL Compact
Edition installed on your server, you still must complete the following steps to “create” it
so that PSV knows where to save data.
Click one of the following options:
Migrate: Migrates your current database to a new one
Change: Switches to an existing database
Create: Creates a new database
For new PSV Installations click Create which creates a new (empty) database.
To switch to an existing database without saving any previous data click Change.
To create a new database and copy existing data to the new database click Migrate.
Click Start to process the database selection and click OK when the operation is complete.
To restore PSV database generated by another instance of PSV, use the Restore option if
the database is SQL Express.
13
If the requirement is to switch to a SQL server from SQL Express – when the database
size exceeds the SQL Express limit – the following steps are recommended:
Copy the SQL database to the SQL server
Ensure that SQL authentication is used and not Windows authentication if the
database is located in another computer
Run PSV Setup utility, and in the database tab, enter the name of the SQL server
and the database name
Click Apply to save the changes
The pop up screen with the 3 options – Create, Change, Migrate – will appear.
Select Change.
Note that if SQL server is used, to backup and restore the PSV database, use the
SQL management tools such as SQL Server Management Studio.
Notice in the Enterprise Edition (not available in Pro) that you may also test the
connection to the server and enter a new name for the server if you selected SQL Server
Express or another SQL database such SQL 2000, 2005, 2008, 2012 that have already
been installed on the server.
14
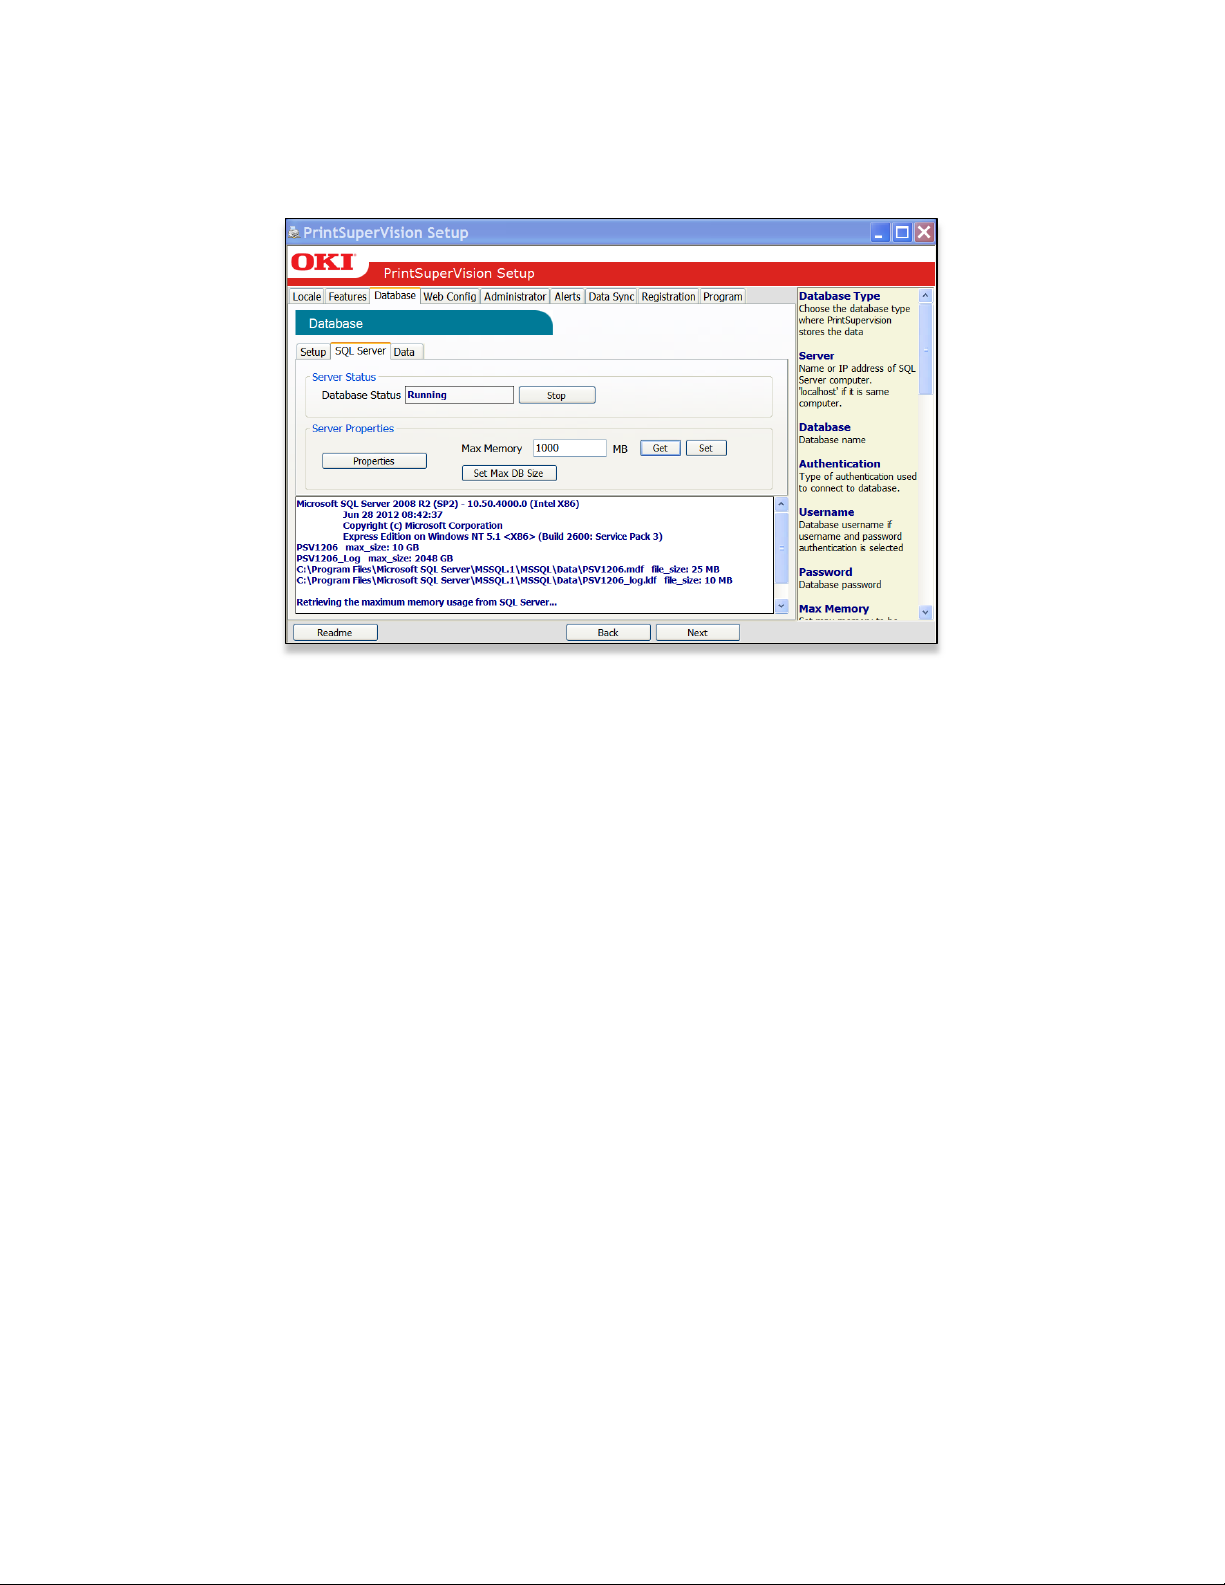
Assigning server memory limits to SQL server: Database Tab:
If the server you are installing PSV on already has a full version (or express version) of
SQL installed, the SQL Server tab will appear in the Database section.
This tab allows you to assign a maximum amount of memory that SQL can use and may
prevent SQL from consuming a significant part of your server’s memory.
To check the amount of memory (RAM) that SQL is currently using, click the Get button.
A numeric value will be displayed. To allocate a larger or smaller amount of RAM to the
database application, type in an amount (in megabytes) in the Max Memory field and
click the Set button.
You may also click the Properties button to see the accumulated size of your database
files.
Note: The SQL Server tab is not available in the PSV Pro edition
15
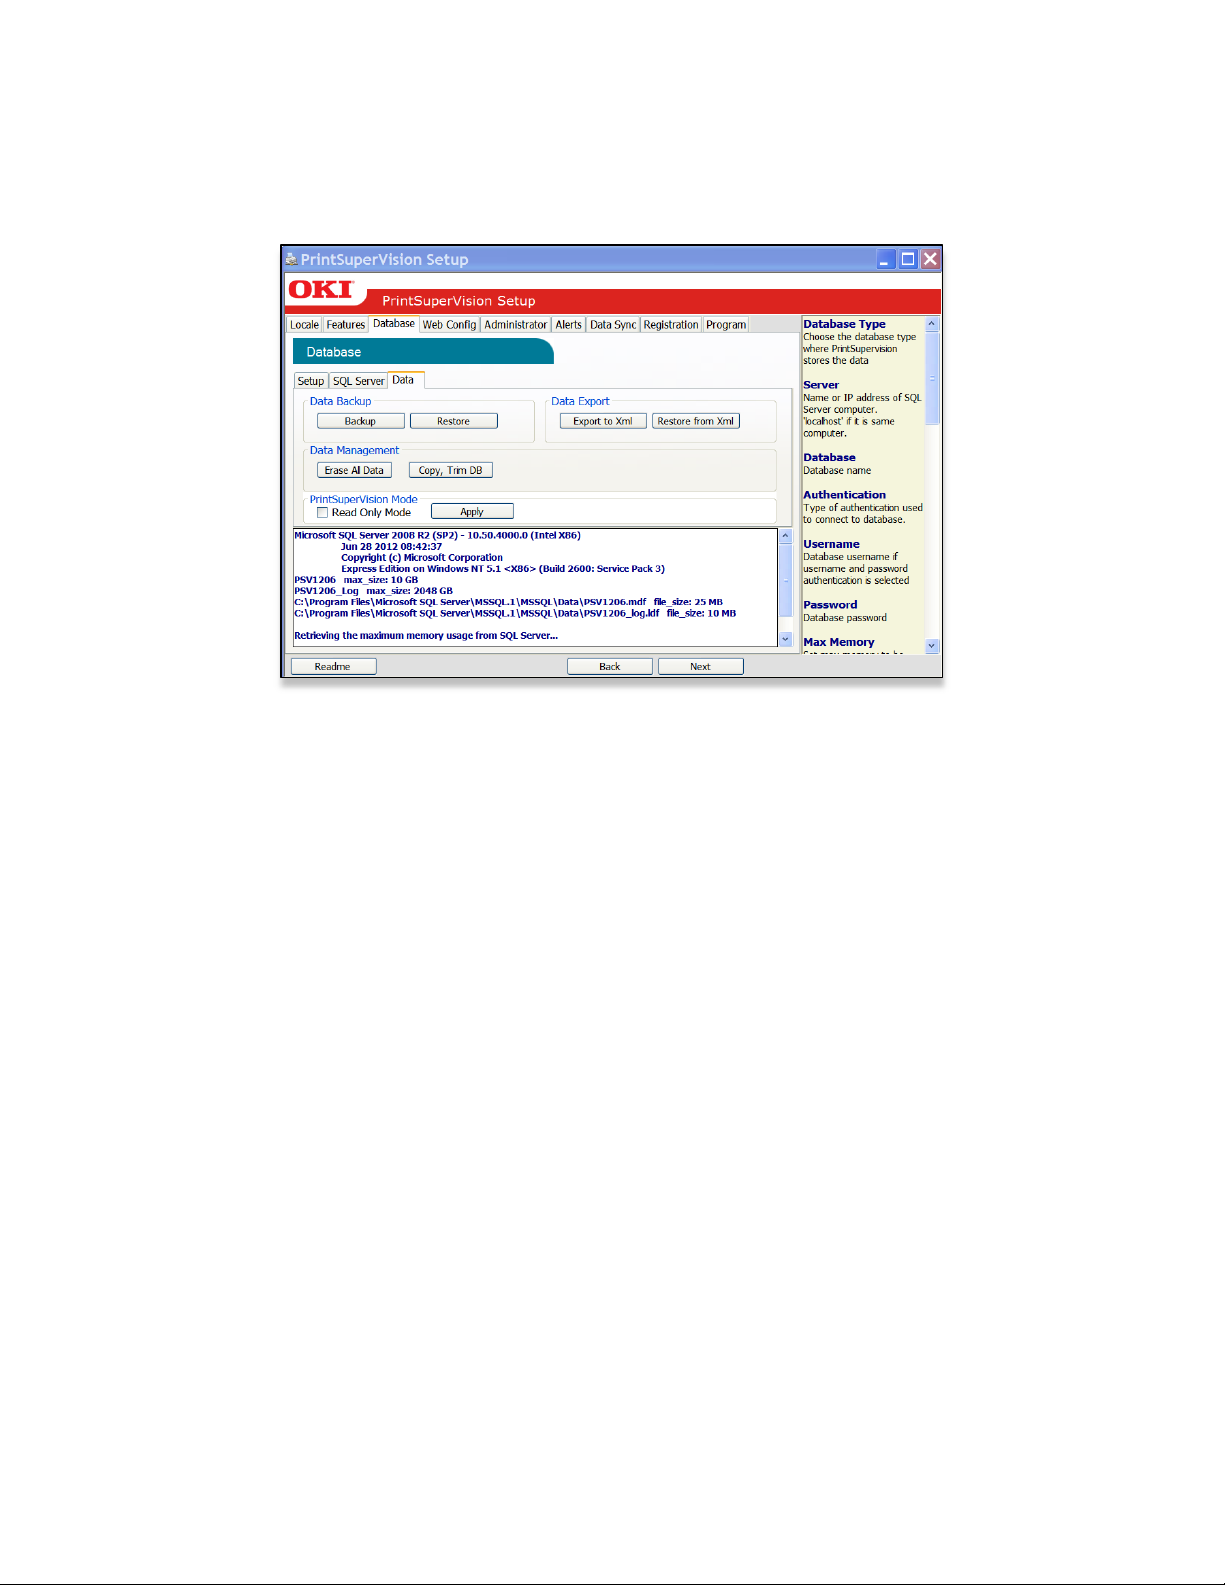
Database Housekeeping Features: Database Tab:
While in the database section, you may also click the Data Tab for several other database
“housekeeping” options such as backing up and restoring a database, exporting data,
erasing, copying, and trimming data from an existing database.
A noteworthy feature in the Data section is the Read Only Mode.
By checking the Read Only Mode box it prevents PSV from discovering devices. This is
particularly useful when a device database has been imported for diagnostic purposes and
you do not want PSV to discover those devices. But use caution and do not check the
Read Only Mode box for normal operation.
Perform the desired functions and click Next to move to the next setup module.
16
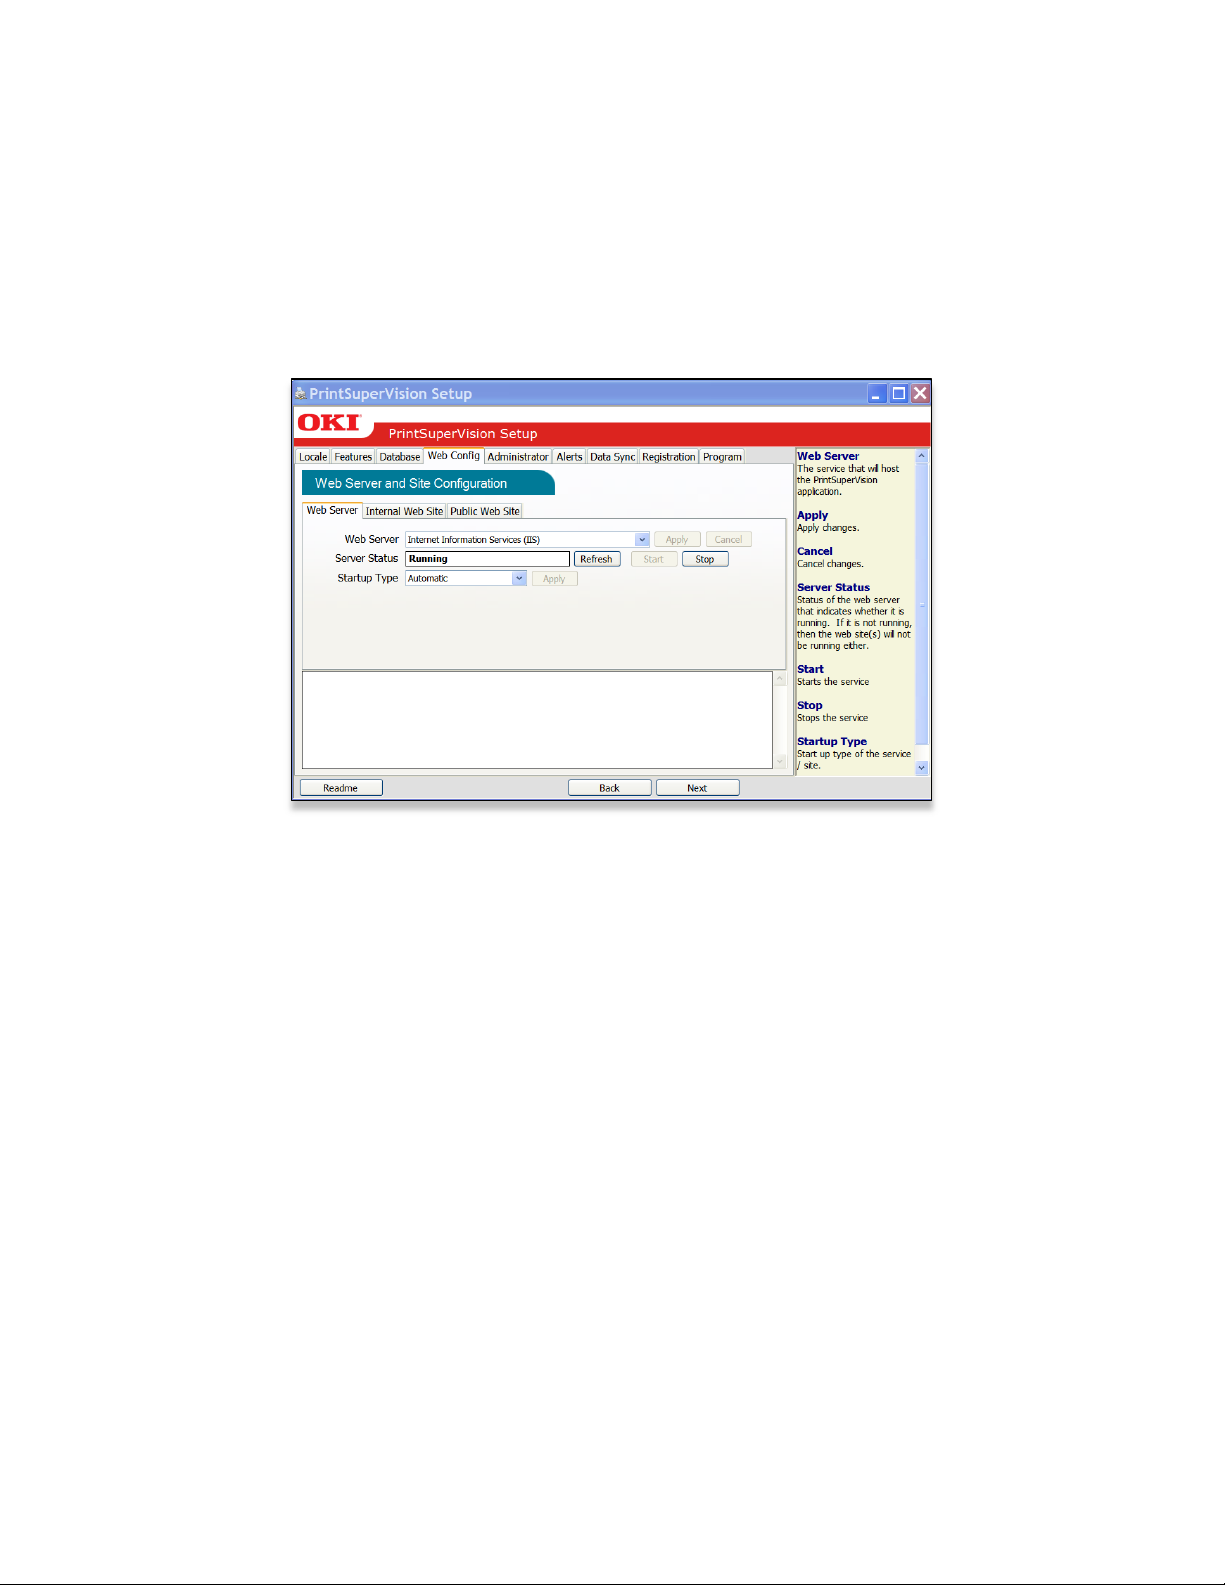
Selecting a Web Server: Web Config Tab
PSV supports both Microsoft IIS web server and/or an Embedded Web Server that is
packaged with the PSV application. It is strongly recommended to use IIS if you will be
monitoring large networks with hundreds or thousands of devices. The embedded server
provides the same functionality as IIS but performance can be affected when using it in
large network installations.
If IIS is not installed on the target server/computer, it will not be visible in the Web
Server drop down box displayed below.
Select the desired web server from the drop down box and click Apply.
The server status box indicates whether the service is running, you also have the ability to
start it or stop it. Additionally there is an option to select how the web server should start:
automatically, manually or disabled. Make the desired settings and click Apply.
17
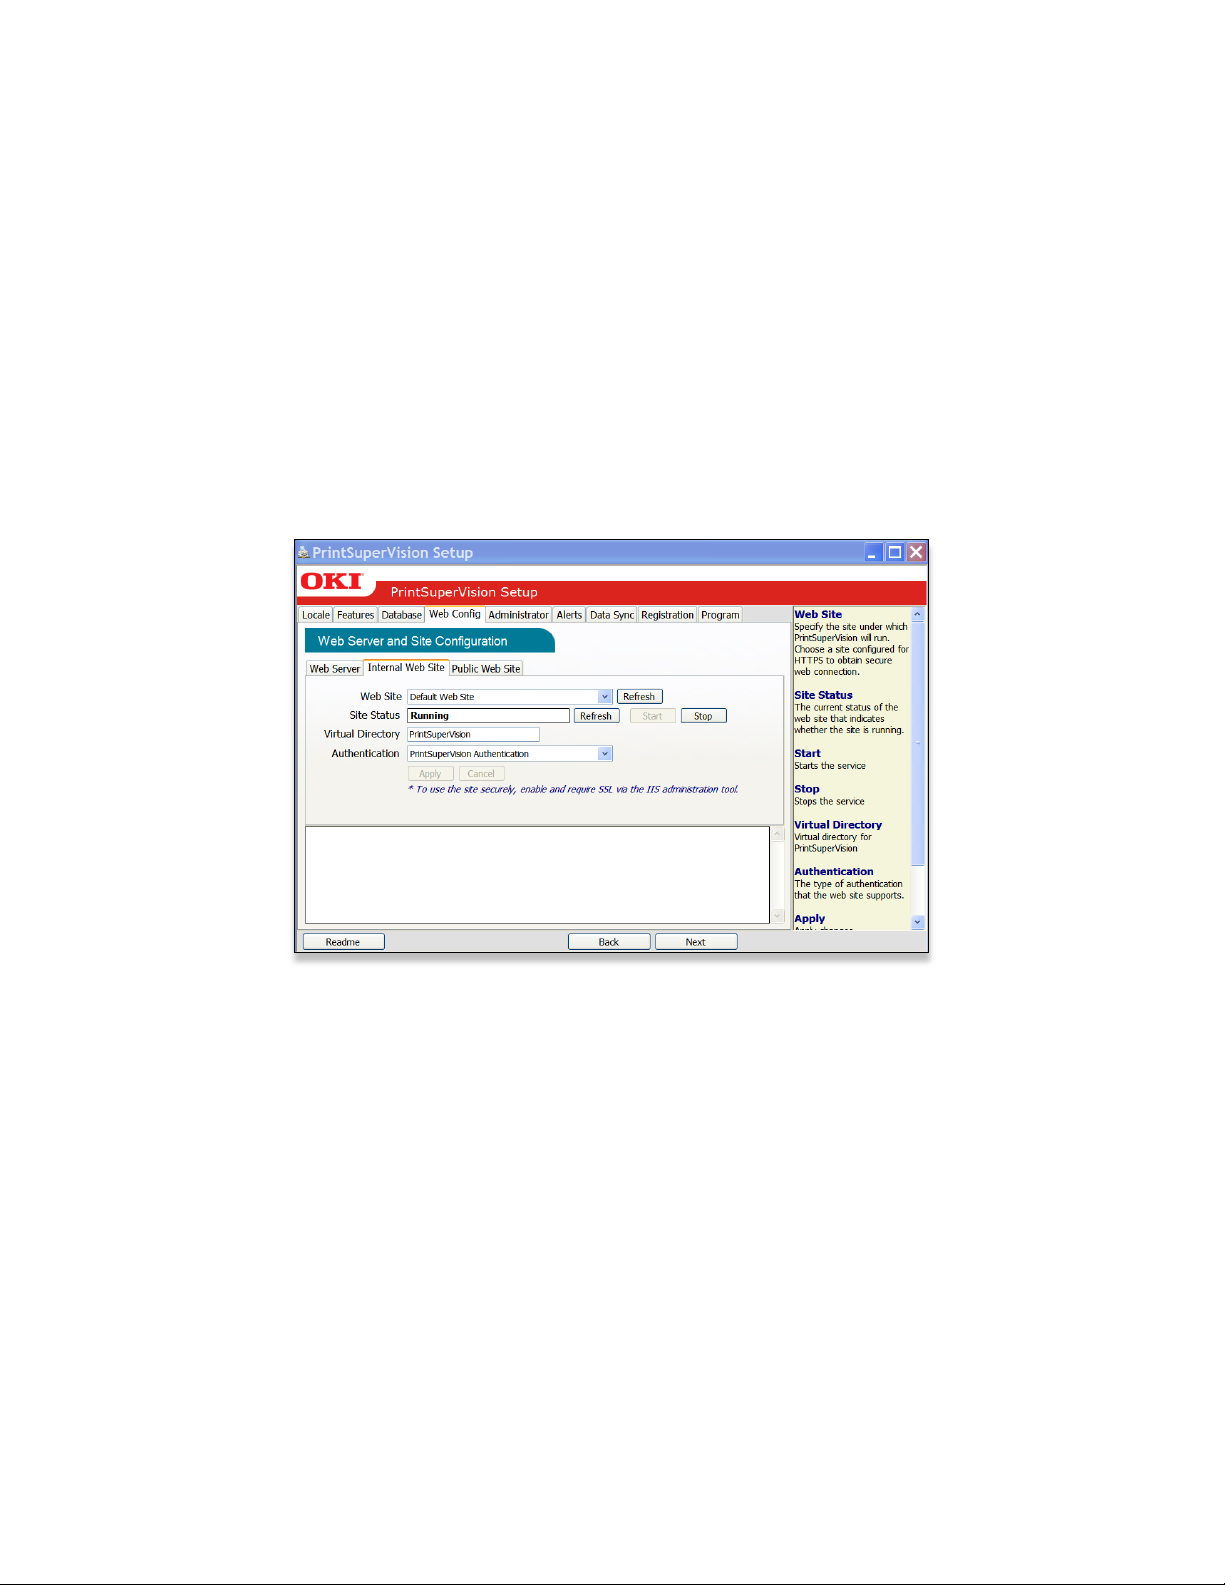
Configuring an Internal Web Site: Web Config Tab
PSV provides an option to select a pre-defined web site rather than using the default web
site. When multiple web sites are created and configured in IIS, the website names will
appear in the website selection drop down box. Select the appropriate web site or use the
default if no web sites have been previously configured.
PSV also provides the option to use a unique virtual directory name or use the default
name, which is configured as "PrintSuperVision".
The Authentication option eliminates the need for an Admin to log in to PSV if they have
previously been authenticated on their domain. Select Windows Integrated
Authentication to take advantage of this time saving feature.
To require Admin log-in every time, keep the default setting which is PrintSupervision
Authentication.
Click Apply to save changes.
18
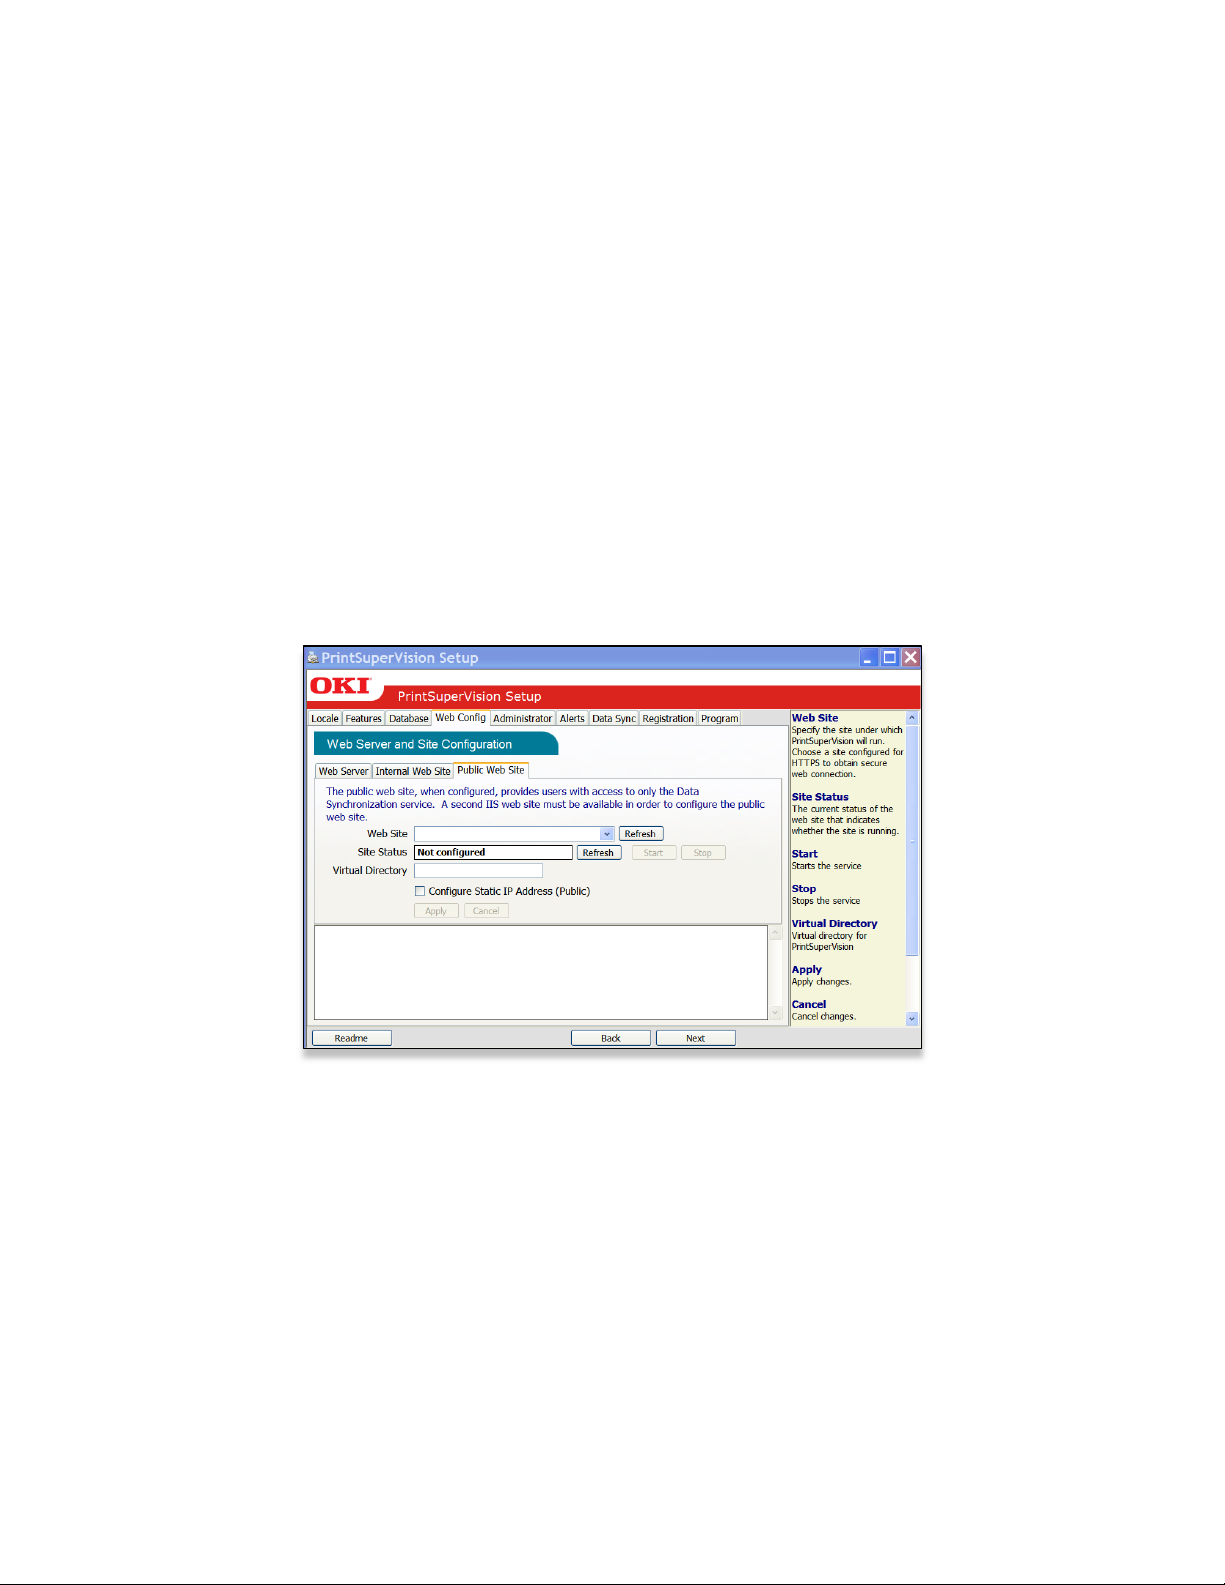
Configuring a Public Web Site: Web Config Tab
The Public Web Site tab is only supported in PSV Enterprise edition and will appear only if
IIS is selected as the web server.
The Public Web Site feature allows you to create an intranet or internet site that can
receive data from multiple PSV server sites or from multiple PSV Agents. This can be
particularly helpful in retrieving device page counts and other supply status information
from one designated site rather than requiring users to access multiple PSV server sites.
An additional feature in PSV v4.0 allows you to change IP address configurations (on Oki
Devices only) from dynamic to static by using an intranet web page without the need to
access the core PSV server application. In this scenario, a technician, who does not have
PSV Admin rights can simply access an intranet web page rather than having to run a
standalone utility.
You must create the intranet web page by adding a Virtual Directory prior to entering
the virtual directory name and/or selecting the Configure Static IP Address check box
in the setup routine. A new virtual directory can be created from the IIS section in your
OS.
Note: This feature is intended for Intranet usage only, so if the PSV public website is
configured for public internet, the check box should not be selected.
19
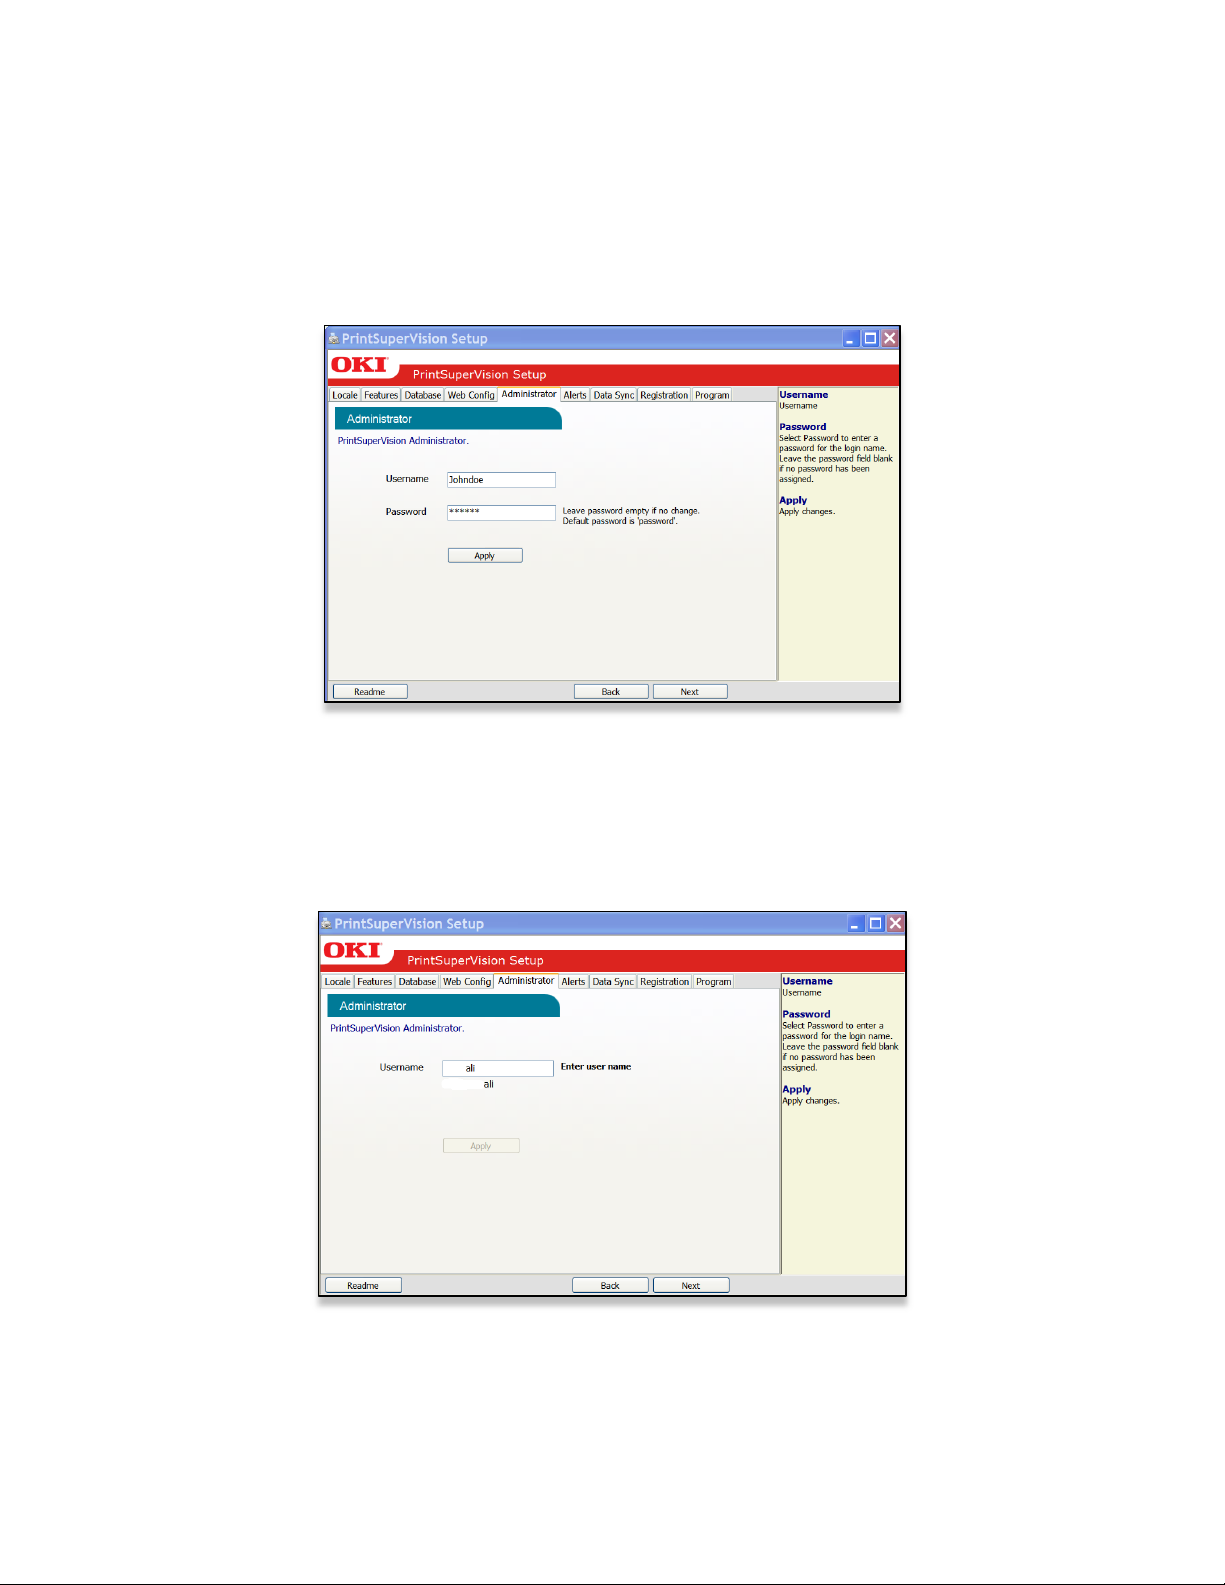
Assigning Admin Username and Password: Administrator Tab
Newly installed versions of PSV come with a single user account called “Admin” which has
all Administrator Access rights. It is strongly recommended to enter a new Username and
Password for the global Administrator.
The Global Administrator can later add other administrators or standard users from within
the application.
Click Apply after a new username and password have been created.
The Global administrator can reset the login password using the Setup utility.
If you selected Windows Integrated Authentication mode described in the last section,
the following screen will be displayed just for verification.
Click Next to go to the next setup module.
20

Configuring your E-mail server: Alerts Tab
In order for PSV to send out device related alerts via email, you must first enter the
necessary information such as the address of your email server, username, password, the
email address of the recipient, etc.
Enter the desired Email Server Address and SMTP server port (default port number is 25
and 456 or 587 if using SSL/ TLS).
Select the appropriate email sending method. PSV provides 4 methods that define how
the email message is sent:
Method 1 – This is the Default setting. It uses a SMTP library from IP Works
Method 2 – Permits streaming. Emails are sent without buffering once the
connection is established
Method 3 – Uses Webmail library from .NET 1.1
Method 4 – Content of email is saved as a file attached to an email message
Method 1 is recommended, but you may try methods 2, 3 and 4 if emails are not
successfully sent using the default setting.
If your email server requires authentication, indicate the appropriate username and
password in the fields provided. Click the TLS / SSL checkbox if your organization uses
these communication protocols.
Enter the email address of the recipient in the Admin Email field.
As an added convenience, PSV allows you customize the header and subject line of all
email messages sent. Add the desired words to the “Email From” and “Email Subject”
fields or keep the defaults which are PrintSuperVision and Alerts.
21

Indicate the interval time (in minutes) for PSV to wait to obtain device status. Set to a
larger number if network traffic is a concern. Set to a smaller number if you would like
more frequent updates reported from your print/copy devices.
Finally, another added convenience allows you to start and stop the PrintSuperVision
Service from the set up menu and select whether the PSV Services should start
automatically, manually or are disabled.
You can test the email connection by clicking the Test button (located next to the Admin
Email field). PSV will attempt to send an email message to the address you specified.
If an email is received successfully, click Apply to save your settings and click Next to go
to the next setup module.
Data Synchronization: Data Synch Tab
Making configuration settings in the Data Sync section are only required when multiple
PSV servers are installed and are configured to communicate with each other.
Disregard this section and click Next if you have a single PSV server /site that does not
communicate with any other PSV server.
Note: PSV Enterprise Edition can receive and send data while PSV Professional Edition can
only send data, therefore an Enterprise Edition must be designated as a receiving site.
Each PSV Enterprise server (site) can send and receive data which can help streamline the
reporting process by collecting and saving data in one central location. Thus an admin
may run reports from other PSV sites while being logged into one server designated as
the “receiving site”.
To receive data from other PSV sites, simply enter the name of the receiving PSV site in
the “Local Site Name” field. If no data will be sent from the receiving hub PSV site, leave
the Send Data to URL field blank.
22

It is important that the Local Site Name is specified. If a name is not entered, data will
not be sent during data synchronization.
Each remote PSV site must also be configured to send data to the central hub PSV
receiving site. To do that, you must log into each remote PSV site, assign a local site
name as we just did, and indicate the address / URL of the receiving PSV site in the Send
Data to URL field.
The data synch feature also allows you to specify a proxy server should one be required to
connect to the PSV receiver site.
Keep the default setting checked “Use IE Connection Settings” if you would like the
proxy configuration to be fetched from the current user’s Internet Explorer configuration.
Otherwise, check the Use Proxy Server box and enter the appropriate proxy address and
port number.
Click Apply to save changes.
To schedule how often data synchronization should take place among PSV sites, click the
Schedule tab and enter the appropriate time and interval.
If no interval values are entered, PSV assigns a default value of 1 hour. The minimum
value is 1 hour and the maximum interval value is 24 hours.
Click Apply to save changes and click Next to proceed to the next section
Note: The ability to configure the Data Synchronization feature is also available from
within the PSV application and will be discussed later in this guide.
23
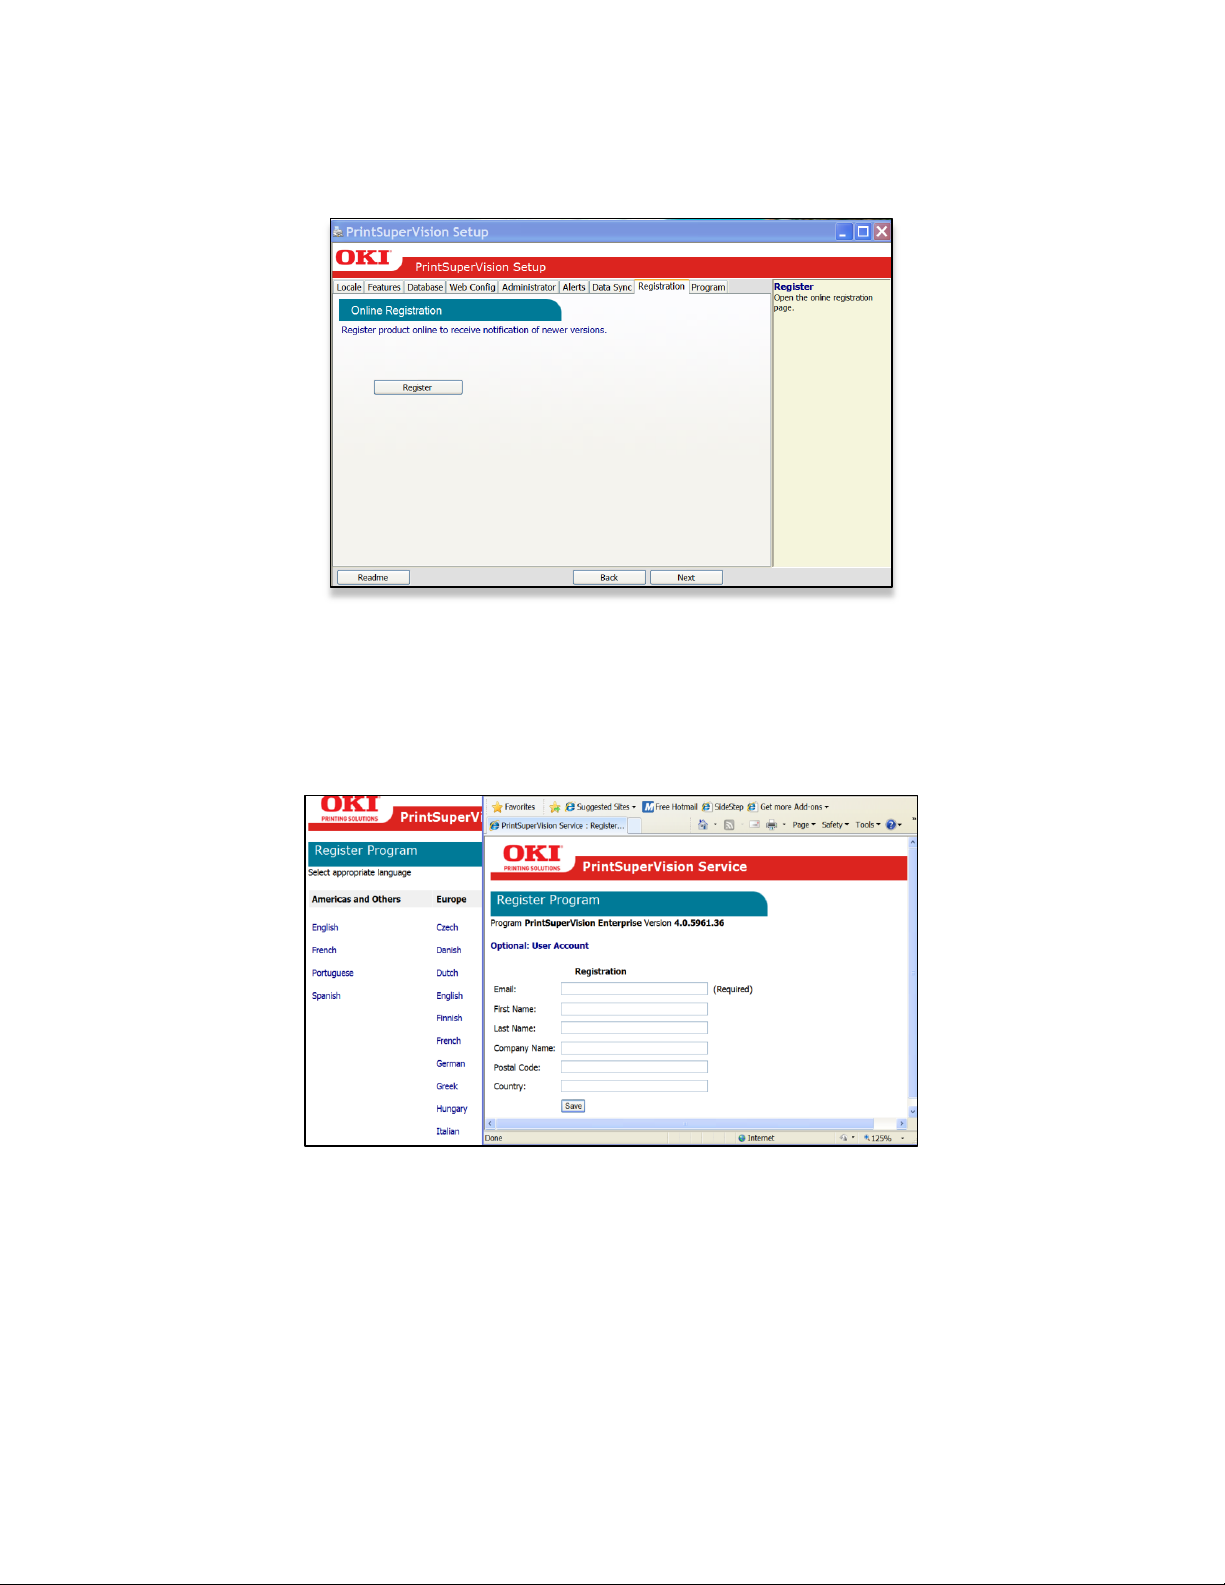
Software Registration: Registration Tab
You can register your new PrintSuperVision software with Oki Data Americas on-line by
clicking the Register button.
Registering your name and email address with Oki Data will help us keep you informed of
new product releases and PSV related information. All registration information supplied is
kept in strict confidence.
Select the appropriate language / location to register. Enter your user information
including your email address and click Save.
A validation email will be sent to the email address indicated. Click the validation link in
the email message when you receive it and your information will be registered.
Back to the registration Process: If the PSV Setup tool is still running, click on the PSV
Setup tool icon in the tool bar to return to the Setup process. Click Next to go to the
next setup module.
24
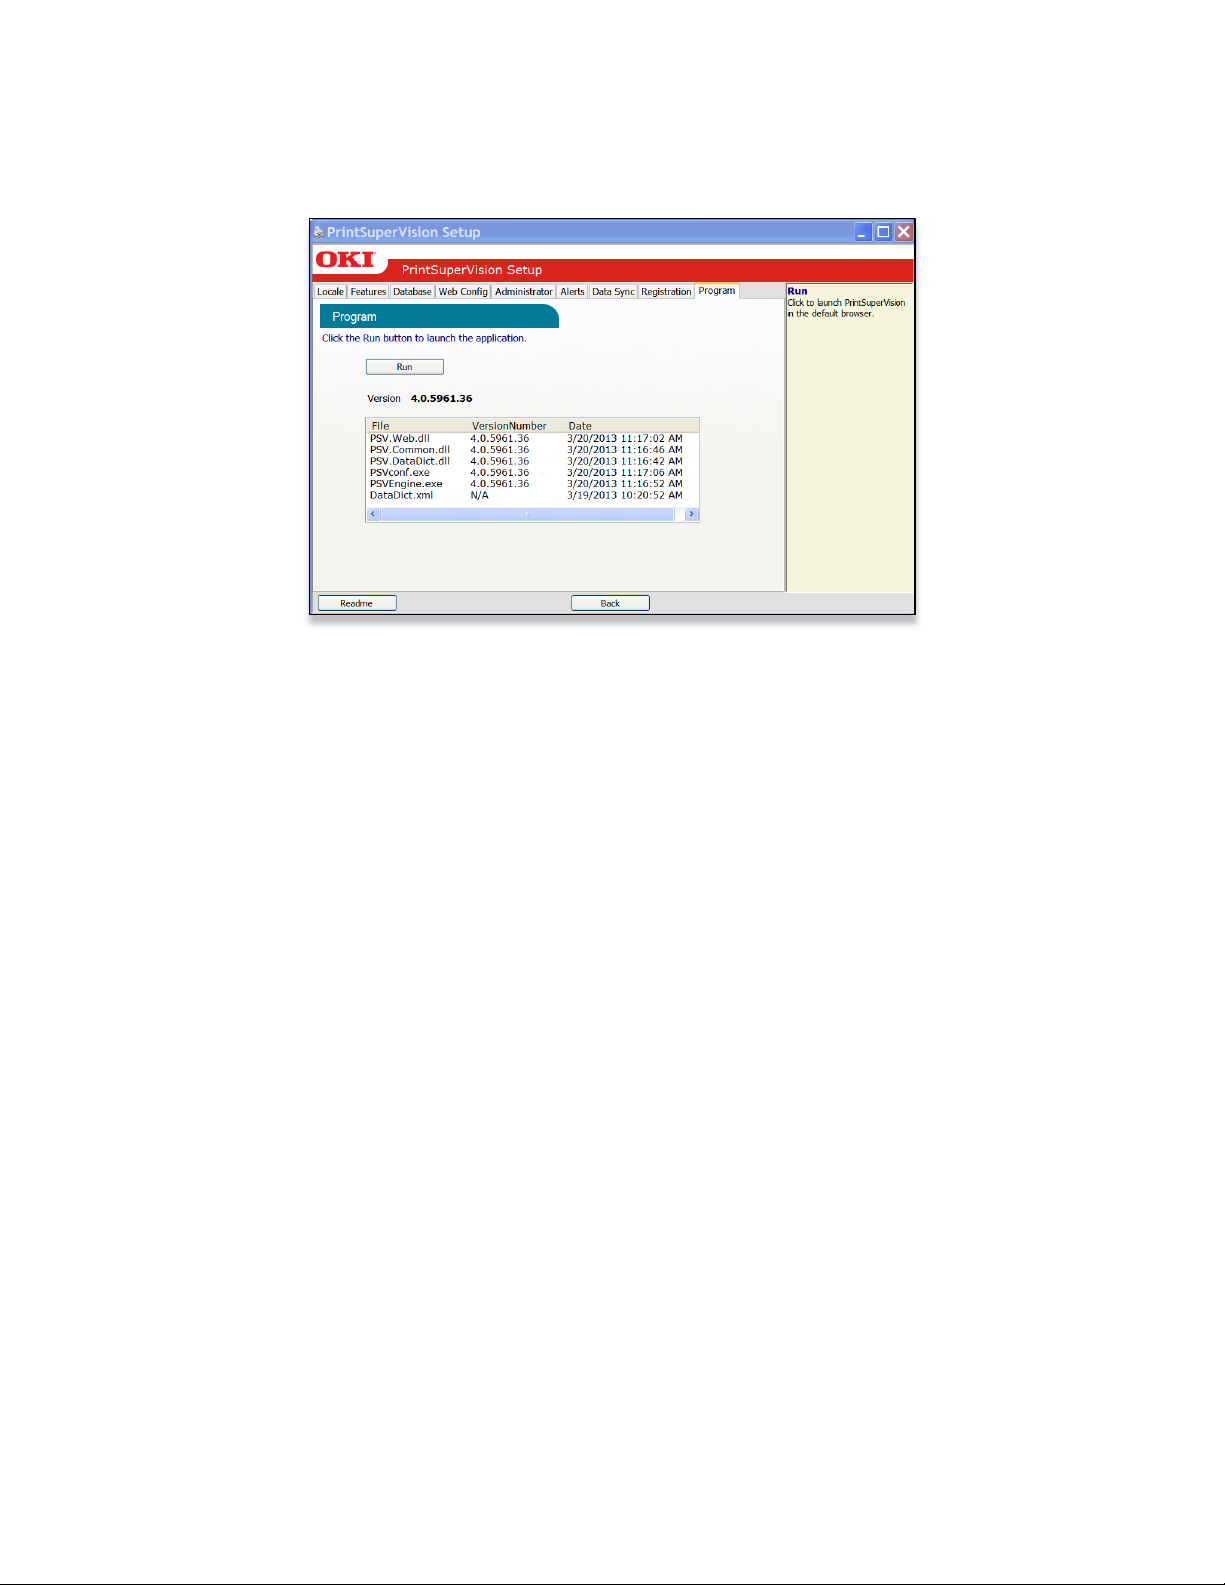
Identifying PSV Version Numbers: Program Tab
The Program tab is provided as a means to quickly identify the version numbers of each
major component in PrintSuperVision.
Click the Readme button to view the PSV Readme file, or
Click Back to return to a previous section, or
Click Run to complete the setup process and begin using the PSV application.
25

Getting Started
Now that you have installed and initially configured PrintSuperVision, you may use any
browser-enabled computer or device connected to your network to access the PSV
application.
Open your browser and type the IP address of the PSV server followed by
/printsupervision. For example: http://12.34.56.78/printsupervision
If you are the Global Administrator or have Admin rights, click Login, and type your user
name and password. If you have not changed the login username and password, the
default is admin and password.
Context Sensitive Help
Throughout the PrintSuperVision application, help is just a click away. For context
sensitive help, click the icon located in the upper right corner (next to the printer icon)
on every page.
User Access
One of the first things to determine is the level of access rights to assign to each user.
There are 3 ways a user can access the PSV application from any browser:
Without Logging into PSV
Logging in as a User
Logging in as an Administrator
Be aware that certain menu options are only available to users with Admin rights that
have logged into PSV. For example, in the following screenshot the user is not logged in:
In this example a user is logged in as an Administrator
26

If a user does not log in, the areas that are not accessible are Services, Reports, and
Accounting and the following functionality will not be available
Cannot view, add, or configure Alerts
Cannot generate any type of report or configure email sending
Cannot add or delete devices or users
Cannot access accounting options including setting quota, obtaining device job logs
Adding a User / Assigning Individual User rights:
To add an individual user to the system:
1. Select Options from the main menu
2. Click Users from the drop down box
3. Click the Add User button and fill in the user’s information. Make sure that you
include a password that contains at least 6 digits.
4. Before clicking Save, assign the appropriate user rights by Selecting
Administrator from the Add to Group drop-down box or leave it blank for
Standard User rights.
5. Click Save
A list of users will be displayed. Notice that individuals with Admin rights are displayed
with a red line under the icon while those with Standard User rights are displayed with a
blue line under the icon.
Note: User attributes can be changed at any time by clicking the icon in the Edit column
and entering new information.
Importing a List of Users
It may also be helpful to take advantage of the Import Users feature to save time. You
can import users into the application from a text file using a comma separated format.
The fields available for data import are the same fields listed in the Add User section.
Fields cannot be left empty with the exception of Password. If passwords are not
supplied in the text file, PSV will set it to the word “password” by default.
To import a list of users:
1. From the main menu click Options
2. Select Users
3. Select the Import Users button
4. Specify the text file location or click Browse to locate the file
5. Click the Import Users button.
PSV will add users one by one into the application. When complete, the number of users
imported successfully will be displayed as well as details of any errors that may have
occurred.
27

Creating User Groups:
In large organizations it may be helpful to organize users into groups based on admin
status, user status or by any number of criteria. This feature should not be confused with
creating groups of print devices which is also possible in PSV and described in the next
section.
To create a group of users:
1. Click your browser’s back button or select Options from the main menu
2. Select User from the drop down box.
3. Click the User Groups button
4. Click the Add User Group button
5. Enter a name for the user group
6. Click Save. A list of groups will be displayed.
You will notice that the new group name is automatically added to the Add to Group drop
down menu when adding an individual user.
For convenience, the All Users button has been provided in the User Groups area to
help identify if an individual has been assigned to a group.
Changing Your Password:
1. Select Options from the main menu
2. Click Change Password
3. Enter your current password, then enter your new password and confirm the new
password by typing it again
4. Click Change to save new password
Creating / Editing Groups of Devices:
Before discovering the devices on your network, it may be beneficial to organize them into
logical groups in order to monitor and manage them in an efficient manner.
A Group can have attributes assigned to it such as location, contact person, SNMP
community and even images of maps and floor plans which are used to quickly
locate individual devices
Groups can be arranged in a hierarchy where a “parent group” can contain sub
groups. A device can also be a member of more than one group
You can assign a subnet or a range of IP addresses (for discovery purposes) to a
group, and as an added convenience, a link to the discovery screen is provided
when groups are displayed.
To create or edit a Group:
1. Click Printers from the main menu and Printer Groups, Maps from the drop down
menu to view a list of groups already created.
28
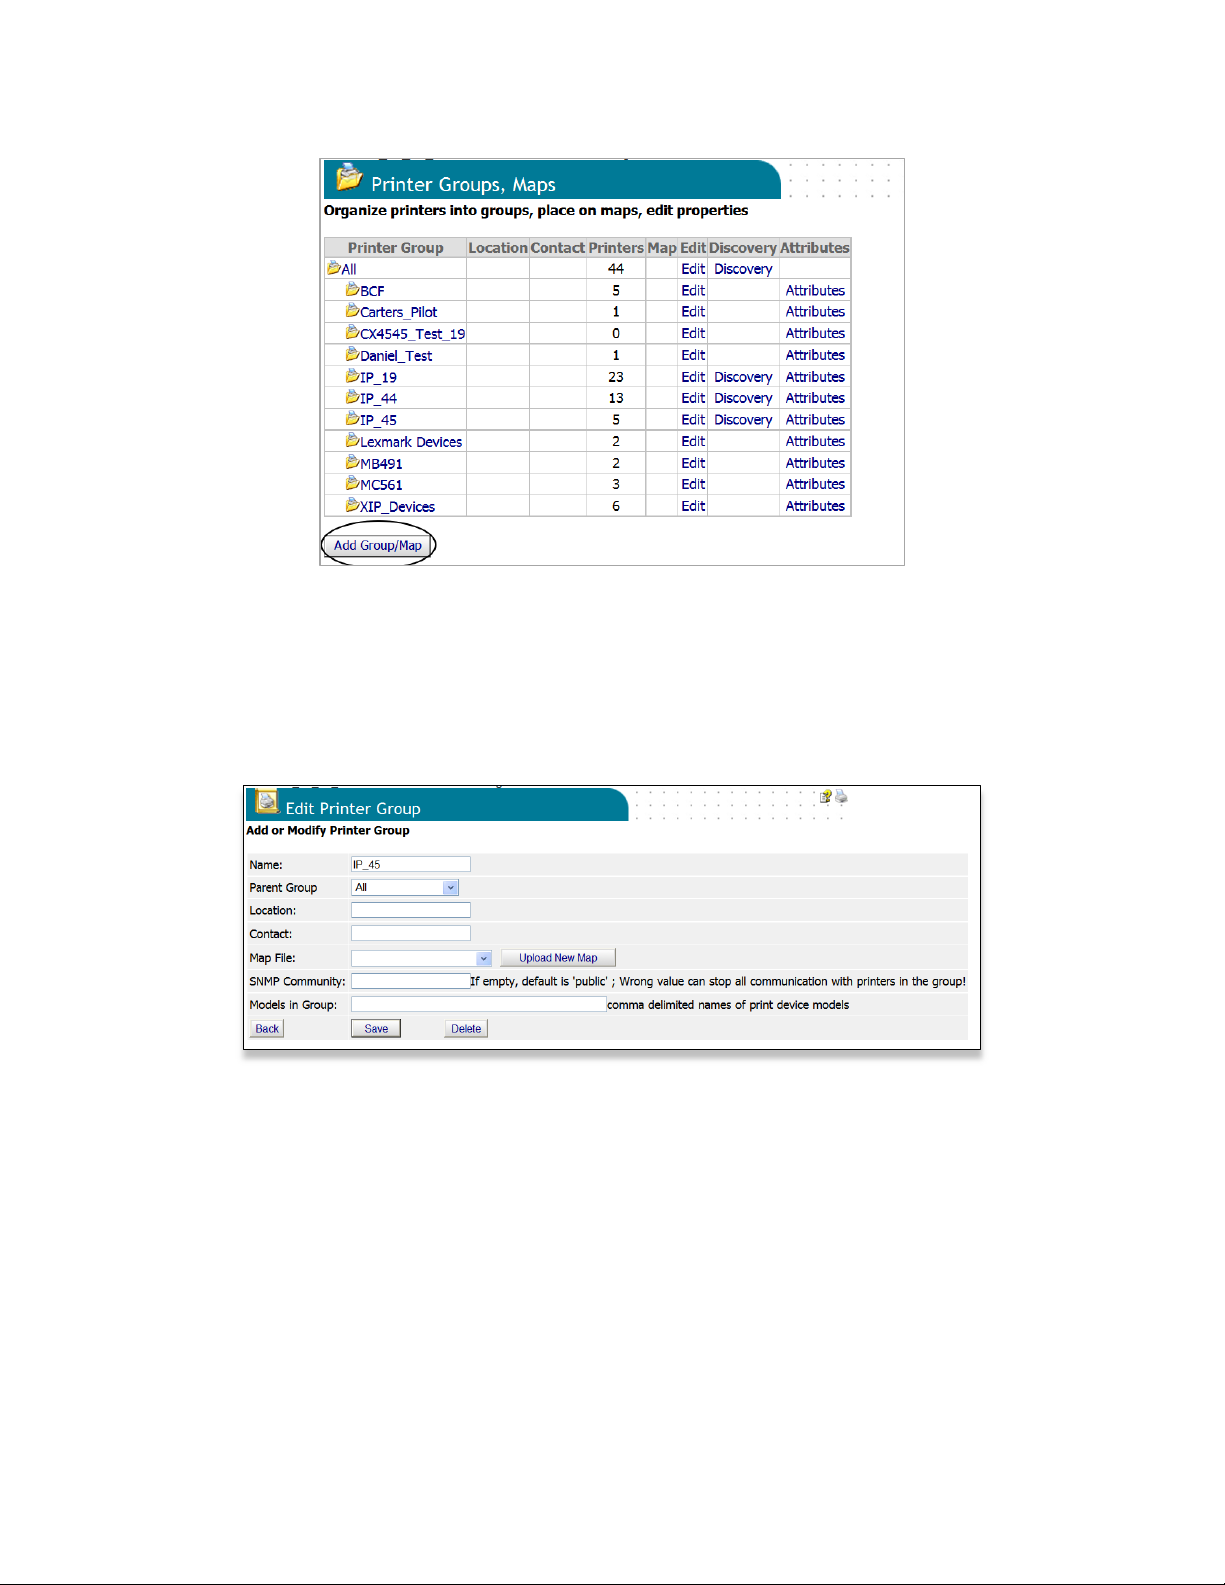
2. Click the Add Group/Map button to create a new group of devices
3. Assign a Parent group, a group name, location, contact person responsible for the
group, a map or floor plan and the SNMP community name. If Model Names are
entered in the Models in Group field, the group will be populated with the model
names that match. Whenever a new device is discovered or added to PSV that
matches the model name, that device will be added to the group.
4. Click the Save button
29
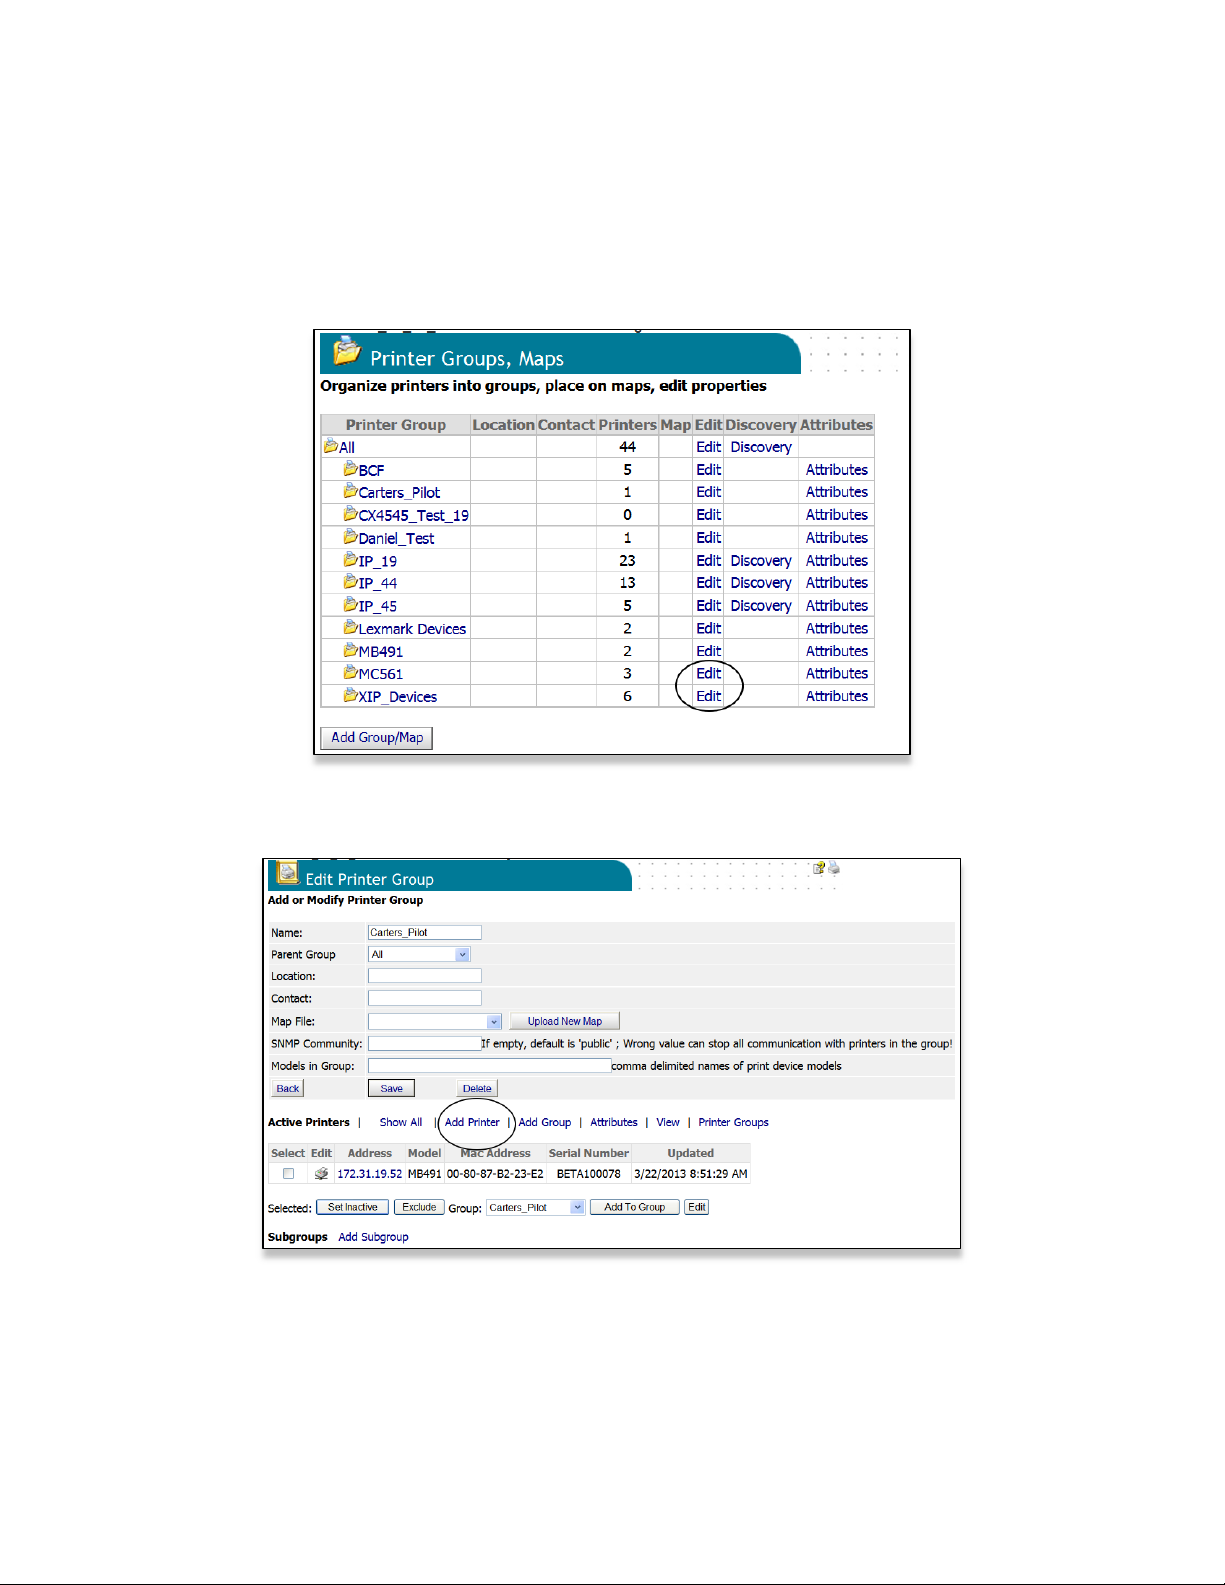
Adding/Removing a Device to/from a Group:
To add a device to an existing Group
1. Click Printers from the main menu and Printer Groups, Maps from the drop down
menu view a list of groups already created
2. Click Edit in the Edit Column of the group you wish to modify.
3. Click Add Printer
4. Select the appropriate device from the Printer drop down menu and click Save
30

If the group was initially empty, you will see the added device listed after clicking save. If
the group already contained devices you will see an updated list of all devices in that
group.
To remove a device from an existing group
1. Click Printers from the main menu and Printer Groups, Maps from the drop-down
menu to view a list of groups already created
2. Click Edit in the Edit Column
3. Select the devices from the list of grouped devices displayed on the Edit Printer
Group screen and click Exclude. The devices will be deleted from the selected group.
You can also add the selected devices to another group by selecting the devices and a
different group name and click Add to Group.
31

Adding Maps and Floor Plans to a Group
Groups can also have images of maps, floor plans, etc. assigned to them, which in turn
allows PSV to display the location of a device icon on an associated map or floor plan.
Several popular image file formats for maps and floor plans are supported, such
as .gif, .jpg, .bmp, or .png.
You can assign a map or floor plan image to a new group as soon as you create the group
or you can add a map / floor plan image to an existing group at any time.
To add the image while creating the group:
1. Select Printers from the main menu and click Printer Groups, Maps.
2. Select a saved image file from the drop down menu and click Save or click Upload
New Map to browse for your desired image. Once an image has been located, click
Upload.
3. Place a device icon on the map or floor plan
Note: Remember the individual device must be a member of a group before it can be
placed on the map.
4. From the main menu select Printers and Printer Groups from the drop down box. If
you have successfully linked an image with a group, you will see an icon in the map
column.
5. Click the map icon and the image will be displayed.
32

6. Click Place on Map, and select a device from the drop down menu.
7. Click on the image and the device icon will be placed where your mouse pointer is
positioned
To move the device icons at any time, click the Place on Map button and drag and drop
the icon to the desired location on the map. Left click once more to activate.
Remember, when viewing the map or floor plan, the interactive icons can be clicked at
any time to go directly to the device’s status page (displayed below).
33

While on the Device Status Page, you can link back to the map or floor plan by clicking
the On Map button.
Note: If you return to the map or floor plan from the Device Status Page by clicking
the On Map button you will only see that device’s icon displayed on the image. To see all
devices on the map or floor plan, click Printers from the main menu and select Printer
Groups, Maps from the drop down box. Click the map icon associated with a particular
group.
34

Discovering Devices
To discover devices on your network, click Printers from the main menu and select
Discovery from the drop down menu. PSV is capable of discovering any device that is
compliant with Public MIB Specification RFC 3805.
Click Start Discovery if you want to discover all of the compatible devices on your
network. For large organizations, see Importing IP Addresses from a Text File:
Making Discovery Easier: section before starting the discovery process.
For Enterprises with several hundred or even several thousand devices, it may be time
consuming to discover all devices at once.
PSV provides the flexibility to selectively discover individual subnets or ranges of IP
Addresses by simply selecting the appropriate check box and clicking Start Discovery.
Discovery: Add Button
Click the Add button to selectively discover devices.
The Add button allows you to:
Add an IP address of a device to the discovery database
Create a discovery list based on IP subnet entered
Create a discovery list based on a range of IP addresses indicated
Click the IP Address radio button and click Next.
35

When adding a specific IP address to the discovery database, PSV provides an option to
assign the device to a specific group of devices and associate the group to a specific SNMP
community.
Enter an IP address, select a group name from the Printer Group drop down menu and
type the desired SNMP community. Click Add to save your changes.
Similar to adding a single IP Address to a database, click the IP Subnet or IP Range
radio buttons to create a discovery list for a specific IP Subnet or Range of IP addresses.
PSV also provides the option to assign a group name to the subnet or the IP address
range by selecting a predefined name from the group drop down menu or by clicking on
the map/group button if you would like to create a new group name.
Enter the appropriate information and click Save.
36

Discovery: Exclude Button
Use the Exclude button to exclude a specific IP address or IP address range from the
discovery process.
1. Click the Exclude button and select either Exclude IP address or Exclude IP range
and Click Next
Notice that PSV displays all IP Addresses and IP Address Ranges that have been excluded
previously.
2. Enter desired IP address to exclude and click Save, or for IP Range, enter the range
of IP addresses to exclude and click Save.
37

3. To include an IP address that was previously excluded, return to the Discovery section,
click the Exclude button, Click on one of the IP addresses listed as previously
excluded and click the Delete button.
Discovery: Windows Button
From the Discovery screen, click the Windows button.
The Windows button provides a list of devices that have been saved in the local system’s
Windows Print Queue. The local system is defined as the desktop or server that PSV is
running on. Each device listed can be selectively saved to the discovery database.
1. Click the check boxes to select the devices to add to the discovery database
2. Click the Start Discovery button.
38

Discovery: Schedule Button
Discoveries can be scheduled to occur on a regular basis by clicking the Schedule button.
Click the Add Discovery Schedule button
Indicate the appropriate date, time and a recurring interval that you desire for the
discovery to take place. PSV can also send you an email each time discovery takes place.
Enter the appropriate email address if desired. Click Save to save the discovery schedule.
39

Discovery: Logs Button
PSV records a log of all discoveries performed (and several other system activities) and
indicates whether the discovery was successful or not.
Click the Logs button to view the system activity log.
To obtain just a Discovery log, select Discovery from the Type drop down box, indicate
time frame by entering desired dates and click Show to display the log.
Note: This feature creates activity logs for all other activities supported in the drop down
box.
Caution: Clicking Clear Log will delete all discovery log entries permanently.
40

Discovery: Show Addresses check box
Selecting Show Addresses displays a list of all IP addresses that PSV attempts to
discover when a Discovery is performed.
Discovery: Start Discovery Button
Clicking the Start Discovery button begins the discovery process for all subnets and IP
address ranges selected.
After the discovery process is complete, clicking the Printers button at the bottom of the
screen will display a list of the devices that were previously discovered with refreshed
status.
Clicking the Discovery button takes you back to the main discovery screen.
Clicking the Collect Data Now button collects more printing device data from and saves
in PSV database.
41

Discovery: Settings Button
By clicking the Settings button you are linked to a universal page that is not specific to
just Discovery options.
Settings specific to Discovery are circled in the screen shot below:
42

Configuring Timeouts
The SNMP Get timeout value controls the length of time PSV will wait for a response from
the device before timing out. Keep in mind the greater the SNMP Get timeout value, the
longer the overall discovery will take.
SNMP Discovery Delay
The SNMP Discovery Delay value can also be configured. This value sets the delay
between each discovery request. This value may have to be tuned to suit the network
configuration considering the number of devices being discovered.
Status Icon Timeout
The status icon timeout value sets the time interval that PSV waits for a response from a
device before turning the status icon gray (status icon is displayed in the Printers List).
Notice that after clicking Refresh, the status icons are returned to an active state. Enter
a desired value for each option and click Save.
Retry Interval / Retry Maximum Wait
The Retry Interval / Retry Maximum Wait values can be configured, and may have to be
tuned to suit the network configuration.
Use DNS Addresses
Use DNS Addresses translates IP addresses to DNS names if possible, and saves them in
the PSV database. When a list of devices is displayed in other areas of PSV, you will see
the DNS address name displayed instead of the IP address. This is particularly helpful
when an organization uses DHCP.
43

Importing IP Addresses from a text file: Making Discovery Easier
As an alternative to running discovery, you may also import a list of devices using a CSV
file.
In some organizations, IT departments may keep track of the IP addresses of their print
and copy devices in a text file. If such a file exists, you can use PSV’s “Import” feature to
speed the discovery process. This is done by simply importing the text file:
1. From the main menu click Printers and select Import Printers & Attributes
2. Click Browse to locate the desired file. The text file should be formatted so that one
device address is on each line of the file. For more detailed instructions click the
Instructions button.
3. Select an appropriate group name from the Printer Group dropdown box (or leave
blank).
4. Select the way the file is delimited by selecting comma, semi colon or tab
5. Select the format of the text file: UTF-8 is the normal format. Select the format out of
the list shown in the drop down list.
6. To add only new devices added to the CSV file since the last discovery, select Skip
addresses that are already in the database checkbox.
You may click Preview to view the data before importing it or Click Import to add the
devices immediately. The import process can also be automated and scheduled to occur
on a regular basis.
To schedule an import:
44

1. Click the Scheduled Import button
2. Enter the location of the file to be imported in the Import File Path field
3. Enter a printer group if you want the imported devices to be placed in a specific group
4. Select the way the file is delimited by selecting comma, semi colon or tab
5. Select the text file format
6. To add only the new devices added, check Skip addresses that are already in the
database checkbox
7. Click Save
8. Click the Import Schedule link to indicate when the file should be imported
9. Click the Add Import Schedule button
10.Enter date, time, recurring interval and who should receive the confirming email, click
Save
45

Discovering Network Devices: Easy Configuration
If you have installed the single-user “Easy Configuration” option from PSV Professional
Edition you will notice there are fewer discovery options.
Click Printers from the main menu and select Discovery from the drop down box. The
two options available are: Add Subnet and Exclude. Both features are included in PSV
Enterprise. See previous discussion for a complete description of these features.
My Printers
An alternative way to group devices together is to use the My Printers feature. It’s an
easy way to view device status with minimal mouse clicks.
1. From the main menu select Printers and My Printers from the drop down box. You
will see a list of devices that have been added to the My Printers group.
2. To add a device to the My Printers group, simply click the Add Printer button, choose
the desired device and click Save.
3. To delete a device, click the trash can icon / Delete button listed in the right column.
46

Near Me
Another time saving, grouping feature available in PrintSuperVision is called Near Me.
From the main menu select Printers and Near Me from the drop down menu. Device
status in the Near Me group will be displayed
Near Me allows a user to quickly view the status of devices that are conceptually located
near the PC being used, without the need to configure or group devices.
PSV detects and locates devices that have similar network addresses to the client
computer (or browser enabled device) being used to access the PSV application and
automatically includes those devices in the Near Me group.
Note: Devices cannot be added or deleted from the Near Me group.
47

Computers with Agents
If you have installed the PSV Agent on desktops or laptops within your organization to
monitor USB-connected Oki print devices, you have the ability to search for and view
those client computers from PSV.
Click Printers from the main menu and Computers with Agents from the drop down
menu.
You can search for the computers on your network that are running the PSV agent by
using Site, Search, and whether the Agent is Active or not. Click Show to perform the
search.
When the search results are returned, you can view all of the print queues and print
drivers that an individual user has installed on their computer and can even obtain
consumable status and printed page counts from Oki print devices that are connected via
USB.
To view individual print queues, click the Printer Queues link.
48

To view the status page that contains page counts, supplies status and the current
operational status for a device, Click the Printer link.
To view Windows Job Logs return to the Computers with Agents screen and click the
Windows Job Logs link. This will display a list of jobs printed and provides many filtering
options.
Status of Print Devices
For a quick view of current status of all devices being monitored, click Printers from the
main menu and select Status of Print Devices from the drop down menu.
Select a status category from the list on the left. Devices matching that status will be
displayed on the right.
49

To obtain more detailed status of an individual device, select the word “Log”. Historic
data collected by PSV will be displayed for that device.
PSV normally uses SNMP to communicate with Print Devices, but from time to time you
may want to know if a device is responding by doing a simple Ping. The Ping feature is
available from the Status of Print Devices screen.
Click the word Ping in the list of devices or Click the PingDB button or PingCSV button
which will indicate whether the device is responding or not.
50

The Ping DB button only pings device addresses that are saved in the PSV database,
while Ping CSV will only ping the devices saved in the CSV file used to import your
devices.
The SNMP DB button provides status of all devices saved in the PSV database by using
SNMP while the SNMP CSV button provides status of only those devices listed in the CSV
file used for device import.
The Optimize button for both Ping and SNMP queries, only targets the devices that did
not respond to the earlier request, thus streamlining the process.
51

Configuring Email Alerts
PSV can notify a helpdesk or network admin that a device has generated an alert.
Alert notifications are available in the Enterprise Edition and the server configuration of
the Professional Edition. Alerts are not available in the single-user Easy Configuration
option in the Professional Edition.
Note: Only users with Admin rights can edit email alert configurations or set alerts for
other users or user groups. A non-Admin user however, may configure and view Alerts
just for themselves.
PSV uses email to deliver alert conditions. The email message can be sent to an
individual user or a group of users.
An Alert can also be saved in a “log file” or processed by another software application (if
you choose to perform the integration).
Each alert can be configured to be processed immediately upon receiving updated status
from the device, or processed at specified time intervals.
To add an email Alert:
1. Select Services from the main menu and Alerts from the drop down box
2. Click the Add Alert button.
52

Adding an alert requires the following information and steps
3. Identify the device or a group of devices to monitor and select it from the Printer:
drop down box
4. Select how often you would like the Alert to be sent from the interval drop down box
5. Next, you have the option to select Usage or Status from the “Based On” drop down
menu. Some explanation may be required before proceeding:
A Status based alert instructs PSV to act upon events that are generated directly by the
print device and generally describe a device state such as “cover open” or “paper out”.
A Usage based alert is used for monitoring supplies and maintenance items such as toner,
drums, transfer belts and fusers. A greater level of detail can be applied to Usage based
Alerts since you can set life remaining thresholds for each item.
Usage-based Alerts
6. Select Usage from the drop down menu
Notice in the screenshot above that you have the ability to choose all supply and
maintenance items or just the items that are most important to you.
You also have the ability to set the life remaining threshold that triggers the alert. So in
the example above PSV will send an alert email whenever toner or drum exceeds 20% life
remaining.
53

In order to assign different life remaining threshold values to each individual supply or
maintenance item you must create separate Alerts for each item.
7. Select the supply items that you wish to create an Alert for
8. Enter a % life remaining threshold in the Value field that applies to each supply item
checked
9. Select the appropriate action from the drop down menu that will occur when an Alert
condition is met. Select Send Email to have the Alert message delivered by email.
Note that there are 2 additional options in the drop down box: Run Program and Log
Alert Only. Both will be discussed later.
10.Select the user or group of users the Alert message will be sent to
11.Select the format of the email message (text or html) to be sent. To avoid duplicate
alerts, select the Email format option: Individual Email for each Event.
Note that while this option may reduce duplicate alerts, the number of email alerts will
multiply since one alert will be sent for each device and each condition.
10. Click Save after the information has been entered
Status-based Alerts:
To select a Status based Alert, return to step 5 above by clicking the Back button or by
clicking the Add Alerts button from the main Alerts screen.
1. Select the Event group that will trigger the Alert. For example, select “Error” if you
only want to be notified when the device reports an error condition. Individual status
conditions have been grouped in this list for convenience.
Keep in mind that if you have previously added events manually they will automatically be
displayed in this drop down box
2. Select the appropriate action from the drop down menu that will occur when an Alert
condition is met. Select Send Email to have the Alert message delivered by email.
Note: As mentioned previously, there are 2 additional options in the Event drop down
box: Run Program and Log Alert Only.
Run Program allows PSV to call another windows based application that can be installed
on the same PSV server. Using Run Program requires custom integration not included in
PSV.
54

Run Program Action, available in Enterprise Edition only, requires providing full file-path
(on the computer where PSV server is running) or the program to be called when the Alert
match is found.
The program is called by the PSV server with a standard set of arguments.
For example: .BAT file:
1:date 2:time 3:address 4:model 5:supplies_type 6:supplies_level 7:supplies_sku
Log Alert Only adds the Alert into a running log file.
3. Select the user or group of users the Alert message will be sent to
4. Select the format of the email message (text or html) to be sent. To avoid duplicate
alerts further, select the Email format option: Individual Email for each Event.
5. Click Save after the information has been entered.
Note: For some OKI models, such as the B6500 and some B700 series models,
configuring Status Alerts requires the creation of custom events. Usage Alerts are not
affected and can be configured as described previously.
To create a custom event and corresponding Status Alert, Click the Add link located next
to the Event drop down menu. You will be directed to the Add Alert page.
Create a name for the event and type it in the Name field. Select the severity of the
event and describe the status of the event as it appears on the operator panel of the
device. Click the Add Event button.
See the Configuring Status Events section on page xx for more detail
55

Configuring an Email Server for Alerts:
1. To set the parameters for sending alerts in email, click the Configure Email button
from the Alerts page. If you already configured email settings using PSV Setup utility,
those settings will be displayed.
2. Enter the following information and click Save:
The address of your email server
The Administrator’s email address
The Sender’s name that will be placed in the “From” field in the email
The email method
The Username and Password for authentication if required
The SMTP Port
TLS or SSL Encryption
The Subject of email message
The maximum number of message attempts
Note: To test whether the email configuration is correct, click the Send Test Email to
Admin button. PSV will attempt to send an email to the address specified.
3. To select the Print device properties to be included in the email alert message, click
the Email Properties Button.
56

4. Highlight the desired properties to be included in the email alert message and click
the Add button. It will appear in the Selected Properties column. To remove it,
simply highlight it and click the Remove button.
For convenience, four pre-populated lists of properties are available by clicking the Load
From button. The choices are: Standard, Long List, Toners and Toner Details.
Once selected, you will notice that the properties associated with a pre-populated list are
already entered into the “Selected Properties” column. Don’t forget to click Save to save
your settings.
57

Testing The Email Alert Configuration:
For convenience, you can click the Process Alerts Now button to make sure everything
is configured properly. PSV will process the alert and send an email message to the
assigned recipient.
Note: the “Process Alerts Now” function is system wide and not tied to a particular device
or group. Therefore, if you have a large number of devices in your network, it may take
an extended period of time to scan your entire fleet of devices and send the alert email.
Configuring Status Events:
PrintSuperVision allows you to customize certain events that trigger notification emails.
An “Event” is different than a standard Alert condition where the print device generates
the Alert and PSV delivers the Alert in an email.
A customized Event can be created where a single condition or several conditions are
assigned to one Event. This can be useful if you only want to be notified when a critical
condition is met or when several conditions are met.
1. To add or modify an event, go back to the Alerts page and click the Status Events
button.
A list of default events is displayed. You can add an event by clicking the Add Event
button, or review the conditions of each existing event.
58

2. Click the name of the Event to see a list of conditions that are assigned to that event
category. Click “Toner Low” for example
This Event is configured to send an email alert when toner is less than or equal to 15%
remaining.
Notice also that PrintSuperVision translates difficult to understand proprietary error codes
displayed by the device into meaningful descriptions.
Click your browsers back button
3. Click the Add Event button
4. Enter a unique name for the customized event
5. Assign a severity level to the event by selecting one of the options from the drop
down box
Note: It is not necessary to fill in the Status Messages field. Entering a description in
that field instructs PSV to try and match a similar description of a message that is
displayed on the device’s Control Panel. This is an alternative method to adding Alerts by
entering a name and severity level described above.
59

Keep in mind that the description displayed on the device operator panel must match the
description you entered in the Status Messages field exactly in order for PSV to
recognize the condition and act upon it.
6. Select one or more conditions to assign to the event by selecting the check boxes in
the left margin.
7. Click the Add Event button to save the customized Event.
Customizing Status Codes:
PSV also allows you to customize the severity level of any of the status code conditions.
By default, PSV has assigned a predefined severity level to each status code, but you may
decide that a code is too critical or not critical enough for the default code so you have the
option to change the status code displayed in PSV.
To modify status codes:
1. Return to the Alerts main page and click the Status Codes button.
2. Scroll through the list of conditions or type in a search word to narrow your choices.
3. Click on the severity level icon listed in the Edit Severity column.
60

4. Select the new severity level from the drop down menu and click Save
The default severity level and the new severity level will both be displayed in the Status
Codes page. You may go back and change the severity level at any time.
Processing Alerts /Generating Alert Logs:
This section discusses the functionality of the Users button, the Process Alerts Now
button and the Alerts Action Log button.
Click your browsers back button to return to the Alerts main page.
The Users button is provided for navigation convenience and links to the All Users page.
The Process Alerts Now button processes all outstanding Alert conditions immediately.
As mentioned previously, it is a system wide command and will scan every device in the
network and process outstanding Alerts. If you are monitoring several thousand devices
on the network, this process may take an extended period of time to complete.
61

The Alert Action Log button takes you to the following screen where you can selectively
generate a list of all Alerts that have been processed for a single device or group of
devices.
This page provides a history of the alert logs that were sent by PSV. The alert logs can
be filtered by alert ID, date range, and alert status (active, cleared, deleted).
The Update Time option indicates the amount of time an Alert has been in an Active
state (it is calculated by subtracting detected time from updated time).
The Update Time format is displayed in days followed by hours. This feature is
particularly helpful in determining response times by viewing the amount of time the Alert
was in an Active state, or in other words, the time it took to clear the Alert.
The Working Hours option displays the amount of time (adjusted for work hours) that an
Alert has been in an active state, and can also be used to estimate response times.
To change the status of an Alert Log from Active or Cleared to Deleted, click the checkbox
in the Delete column of the appropriate row(s). Once selected, click the Delete Selected
button to make the change.
Any rows that have their status changed to Deleted will still be shown on the current page
even if the Deleted checkbox is unchecked. This will continue until a different set of Alert
Log entries is selected or the user moves to a different page in the results.
If you need to change the status of a specific Alert Log or a large number of entries at the
same time, from Active or Cleared to Deleted, the following suggestions could make this
task easier:
a. If you have a large number of entries, use the Alert ID drop-down list to search
for and work on a single alert
b. Use the From and To dates. For example, you may want to look only at entries
that have not been updated in over one year.
62

c. Uncheck the Deleted checkbox. If you are not interested in Cleared items, then
uncheck the Cleared checkbox as well
d. Select ‘All Alerts’ from the ‘Number of alerts per page’ drop-down list. All of the
Alert Log entries that match the specified conditions will be shown on a single
page.
e. Use the ‘Select All’ button to select all of the entries shown on the current page.
Individual rows can be unselected by clicking the Delete check box of that row.
f. Click the ‘Delete Selected’ button. All of the records with a check in the Delete
column will have their status changed to Deleted.
Processing Alerts: Setting the Data Collection Interval
PSV periodically collects data from print devices and saves it into a database, thereby
enabling PSV to create reports or generate Alerts. Users with Admin rights can configure
the data collection interval time in hours for basic usage information and in minutes for
processing Alerts.
To set the data collection interval:
1. Click Services from the main menu and select Data Collection Services from the
drop down box.
2. Indicate the desired data collection interval times and click Save.
To display a log of previous data collection activity for a selected date range, enter the
appropriate date and click Show. PSV will list all data collection activity from the date
indicated to the present date.
For added convenience, click the Collect Data Now button and specify options. Click the
Start button to begin processing.
63

Configuring Print Devices Remotely
In addition to monitoring and managing print devices, PSV Enterprise includes tools for
automating the configuration of print devices in the field. This is helpful when you are
configuring a large fleet of multi-function devices that may require several configuration
settings such as populating Email Address Books or Fax Phone Books on each device.
The configuration tool makes it possible to configure all compatible devices with the same
parameters, as well as the ability to configure individual devices with desired values.
The configuration values can be saved in the PSV database and later used to re-configure
(i.e. clone) all devices to desired default values with one mouse click.
Examples of how the configuration tool can be used are:
Common configuration values such as “system contact” can be imported into PSV
and then applied to multiple devices.
Email and fax address books used in MFP devices can be imported and quickly
applied to multiple MFPs. PSV allows an address book to be configured with a
combination of shared addresses that are common to all devices and local
addresses that apply only to a single device.
Scan profiles for MB4xx MFP devices can be imported and quickly applied to
multiple MFPs. PSV allows the scan profile to be configured with a combination of
shared values that are common to all devices and local values that apply only to a
single device.
Once a device is fully configured, that configuration can be saved and used to
configure similar devices as they are brought online or to restore a device to a
previous configuration.
Configuration: Behind the Scenes:
PSV uses HTTP (web) protocol to do most of the configuration of print devices. This means
the PSV program helps automate what can also be done manually from a print device’s
embedded web page. With large networks, this automation can save a tremendous
amount of time and ensure all devices are configured consistently and quickly.
The Configuration tool in PSV can be used in three ways:
Configuration settings can be applied selectively to one device at a time
Configuration parameters for individual devices can be saved as attributes which
can be used to configure one or more devices.
Configuration parameters that are the same for all devices can be saved as
common attributes. Once saved to the PSV database, any compatible device can
be configured with these values. “Common” attributes have preference over
individual attributes.
To help populate the PSV database with attributes, there is an “Export/Import” feature
that can import both individual and common attributes from a CSV file. Attribute values
can also be exported to a CSV file. This can be used to obtain the required attribute
names that need to be in the first line of CSV files.
64

Configuration settings can be made on a device by device basis or by cloning a selected
configuration and sending it to a fleet of devices at one time.
Note: There are two areas within PSV where remote device configurations can be made:
Tools / Configure Print Devices and Tools / Configure MFP Devices. Even though the OKI
MB460/70/80 are MFPs, you must use the Configure Print Device area to configure those
MFP models. For all others, remote configuration is performed from the Configure MFP
Device page.
Configuring Individual devices:
PSV uses the devices’ embedded web page to change configuration values, therefore,
when settings are made using this module, it is the same end result as making a
configuration change from the device’s embedded web page.
Select Tools from the main menu and Configure Print Devices
Note: The “Configure Print Devices” page is available only to Admins
65

Configuration Requirement: Device Web Password
Since PSV uses the print devices embedded web page to make configuration changes, it
requires the embedded web page password in order to make those changes.
PSV uses the factory-default password unless an alternative value is entered when using
the Edit feature. Click the Edit button next to the Print Device drop down menu.
In the Web Password field, enter the password that your organization uses for each
device’s embedded web page.
Note: This setting is only needed if the web passwords have been changed from factory
default. For most devices, the factory default password is “aaaaaa” or the last six digits of
the device’s MAC address.
You can click the verify button to see if the web password was correct. Don’t forget to
click the Save button after verification.
66

Obtaining Current Configuration Values from each Device:
Before making configuration changes on an individual device you may wish to view
current configuration settings for that device.
Select the print device model you wish to make configuration changes on.
The Device Model drop down displays a list of models that are compatible with the
automated configuration feature. Only print devices in the PSV database matching the
selected models in the drop down menu are able to have their configuration settings
retrieved. “All Models” can be selected to read all compatible devices. Click the Select
button after choosing a new model from the list.
The Print Device list shows the individual devices in the PSV database that match the
Device Model selection. You can use this to restrict configuration to a particular printer.
The All compatible selection in the print device drop down menu extends the selection to
all printers that match the selected model type.
Config Form is a group of configuration values that are similar in purpose. The Config
Form selection controls which configuration values are retrieved from the device.
Select All Forms from the drop down menu to retrieve all available configuration values
from the device. Click the Get Values from Devices button after you have made your
selections for Device Model, Print Device, and Config Form. PSV will then connect to the
appropriate devices and obtain the form values indicated.
67

From the list of configuration settings you can make changes to the current values by
selecting a new value from a drop down menus.
Click the Set to Device button to send and save all configuration changes to the device.
Note: When certain networking options are changed, the device may auto restart. This is
necessary for the changes to become active. A device restart will normally complete in
about 30 seconds.
If the print devices are configured for “dynamic” network address (DHCP), and network
servers do not reserve IP addresses, the IP address of the print device could change after
the device restarts, and effectively it could become unreachable from PSV until the new
address is found using the Discovery feature. Most of the time this is not an issue since
DHCP servers typically re-assign the same IP address to a device.
68

Configuring Several Devices at Once:
As mentioned previously, configuration data from each print device can be saved in PSV’s
database to be reused later for multi-device configuration and set up. The saved
configuration settings are called attributes and each has a unique pre-defined name
recognized by PSV, i.e. “SNMPv3_Username”.
Distinct attribute values can be saved for each compatible printer. Attributes can also be
saved and shared by all compatible devices. Attributes shared in this way are called
common attributes.
The steps to configure several devices at one time are summarized below:
1. Check the Show Attributes & Common box
2. Click the Get Values from Devices button
3. Edit the Current Value fields and select the desired attributes to save into the PSV
database by checking boxes
4. Click the Save as Attribute or Save as Common buttons
Saving Attributes to the PSV Database:
To save Attributes to the PSV database, enter the desired value in the Current Value
fields or select the desired value from a drop down list.
Select the values to be saved by clicking the desired check boxes in the Attribute Name
column. Click the Save as Attributes button.
Note: Clicking the Save as Common button saves the data as a common attribute shared
by all devices.
Any attribute values or common attribute values that have been saved are shown in the
“Attribute Value” column. A “*” next to the attribute name indicates it is a common
attribute.
69

To delete a value from the PSV database, click on the “X” next to the value in the
Attribute Value column.
Note that common attributes have preference over individual attributes. If both common
and individual attributes are defined in the database, the common attribute will be
displayed and used.
70

Set Values from Attributes
When the print device’s configured value is different from the saved attribute or common
attribute value, the database attribute value is shown in red.
When a print device’s configured value is the same as the saved value in the PSV
database, the value is shown in green.
Click the Set Devices from Attributes button to apply the attribute values in the PSV
database to the selected device. The changes are applied to all devices selected in the
“Print Device” list. By selecting “All Compatible”, PSV will apply all attributes from the
database to all devices that support the selected form.
If “All Forms” is selected for Config Form, the program will apply changes to all forms that
match. If “All” is selected for both Print Device and Config Form, the program will make
sure that all devices are in-sync with desired values stored in the PSV database when Set
Devices from Attributes is clicked.
To avoid unnecessary delays, PSV first tests if the print device(s) are on the network by
using SNMP protocol and provides a list with checkboxes next to addresses of matching
devices. Those who respond to SNMP v1 have the checkbox checked.
71

Click the Set Selected Devices from Attributes button and PSV will apply changes only
to the devices that have the checkbox checked next to the IP address.
To verify that the new values have been configured in the device, click the Get Values
from Devices button. The attribute values should be listed in green.
Note that “Common” attributes will be visible with all devices, not just with the device
selected when saved to the database.
SNMP Test Connection Checkbox:
The “Configure Print Devices” feature uses SNMP v1 to determine if the device is available
on the selected network and verifies that it is the same device in the PSV database.
If the print device is configured to respond only to SNMP v3, uncheck the SNMP test
connection checkbox, to make sure PSV is able to communicate with the print device.
72

Exporting / Importing Configuration Data:
Populating the PSV database with attributes can also be accomplished by clicking the
Export / Import Config Data link. It may be easier to first “Export Attributes” to
create a template file containing the names of the attributes. Such a file can be edited in
Excel or a similar tool, and then “imported” back into PSV.
Select Export Attributes from the drop down. Click Select. Choose the appropriate
Config form and Click Export. Click the Export CSV button.
Note: The first line of the CSV file is comprised of the PSV attributes contained in the file.
The first column must be the address of the print devices (IP or DNS). Import Attributes
supports a number of encoding formats.
73

To import a CSV file that contains a list of devices and their attributes select Import
Attributes from the drop down and click Select.
74

Sample Configuration Exercise:
In this example the goal is to set all network protocols that are not used to disabled, and
to set SNMP v3 enabled along with SNMP v1 and v2.
The first step is to select a print device. The attributes we are interested in are part of the
“Network -> Basic Setup” form.
Select this form from the “Config Form” list. Make sure the “Show Attributes and Common”
checkbox is checked then click “Get Values from Devices”.
Next, modify the values that we want to be the same for all devices. For example, set
“Netware” to Disable. Check the checkbox next to it (“B7x0_Netware”) and click the Save
as Common button.
Finally, click Set Devices from Attributes to apply the changes to the selected device.
Common attributes apply to all compatible devices, so by selecting “All compatible” for
“Print Device” and clicking Set Devices from Attributes the selected common values will
be applied to all compatible devices found in the database. This feature can be used to
reset device settings to desired values that have been saved to database.
75

Configuring Email Address Book and Fax Phone Book
For MFP devices that support scan-to-email and fax transmission, you can remotely
configure the device to add or change email addresses and fax phone numbers. The
configuration process to add or change email addresses or fax phone numbers is similar to
the way other device properties are remotely configured.
Caution: When adding or editing email addresses and fax numbers to a device the
values must be entered in a specific format, i.e. a specific syntax must be followed (see
screen shot below). The syntax may differ between models so check with an OKI
technical resource before attempting to add or edit these values.
Note: If the values are not entered correctly, the device will not accept the configuration
changes. The top line of data is designated as the header followed by individual email
addresses. In this case, the values are comma delimited.
Step 1: Set new values directly to the device through the embedded web page
Step 2: Read the current values from the device clicking the Get Values from Device
button
Step 3: Save the attributes as regular attributes or common attributes by clicking the
appropriate button
Step 4: Save the attributes to each device by clicking set the device
76

Exporting / Importing Email Address Book and Fax Phone Book values
Like other forms, the values in the email address book form and fax phone book form can
be exported to and imported from CSV files. However, there is one important difference
specific to Email Address Books and Fax Phone Books: their forms can have records that
are “shared” (common) among multiple devices.
For example, there may be situations where a common set of fax phone numbers need to
be configured in every MFP device, and in addition, some devices require unique numbers
aside from the common set of numbers. This is achieved by “merging” records that have
a “*” in the address column to all devices in the CSV file. Such a merged list is saved to
PSV’s database to be applied to individual devices.
77

Configuring Scan Profiles:
Many OKI MFPs have the ability to use “scan profiles” which instruct the device to send
scanned documents to shared folders, FTP and HTTP resources.
Scan Profiles can be created and configured from the device’s embedded web page one
device at a time or by using PSV to configure many devices at one time.
Configuring Scan profiles are performed in much the same way in PSV as configuring
other device properties.
There are 2 different methods available to configure Scan Profiles using PSV:
1) The “Common Attributes Template” method
A simple configuration starts by configuring a target MFP device with the desired
configuration through its embedded web page. PSV can then be used to obtain the
configuration from the target device by reading it and saving it to the PSV database.
The configuration template can then be modified as needed and applied to another MFP
device, a group of devices, or all compatible devices.
This method is practical when all devices need to have the same set of profiles and only
requires optional destination folders for each device or a different destination share server
address.
2) “Exporting / Importing Scan Profiles” from CSV
In some cases, MFP devices need to share the same scan profiles but also need unique
profiles specific to each individual device. In such cases PSV can “Export” Scan Profiles
from one or multiple MFP devices, allow the user to edit the profile in another
application such as Excel, import it back into the PSV database and apply to all
compatible MFP devices.
78

Method 1: The “Common Attributes Template” method
The first step to method 1 is to configure a Scan Profile on a target device by accessing
and using the devices embedded web page. Login to the device web page with username:
root and default password: aaaaaa.
Select Scanner Menu, click Scan to Network PC, click Profile Manager, click New or
Modify (New to create a new profile, Modify to edit an existing one).
Make appropriate changes to the profile setting page (displayed on the right side of the
split screen above) and click Submit.
It’s useful to try using a scan profile after creating or editing it to make sure it works as
expected before applying the same or similar configuration to many other MFP devices
using PSV.
79

Getting and Setting a Scan Profile to one MFP device:
The second step is to acquire the scan profile configuration values from the target
machine using PSV. In this example the scan profile values will be applied to one device.
The next section will describe applying the values to many devices.
Return to the Configure Print Devices page: Click Tools, click Configure Print
Devices, and select an MFP model type from the device model drop down.
Select an individual device from the Print Device drop down. From the Config Form
drop down, select the Scan-> Scan Profiles form. Click the Get Values from Devices
button.
If any changes to the profile are required, make them now. After making changes, click
the Set to Device button to send the configuration values to the device selected.
Note: The first row of text includes names of fields. Each profile starts with number: #nn
80

Configuring Scan profiles to several devices:
Before describing how to apply a scan profile to many devices, a short discussion on
common attributes is needed.
Common Attributes for MFP Scan Profiles
When multiple devices are sending scan files to the same (FTP or CIFS) share server, it is
usually required to have those files saved in separate folders: first to make sure files with
potentially same names do not override other files and second to be able to know which
MFP devices have sent the file to the server.
A very simple method to achieve this “unique folder for each MFP device” is to:
Get current Scan Profiles from an already configured MFP device
Modify the profiles to add template {Markers} in the CSV text and save it as a
Common Attribute
Then select a group of devices or all compatible devices and click Set Devices
from Attributes.
Return to the Configure Print Devices page by clicking Tools / Configure Print Devices.
Obtain the Scan Profile values from the target MFP device that you previously configured
using its embedded web page.
Select an MFP model type from the device model drop down. Select an individual device
from the Print Device drop down. From the Config Form drop down, select the Scan->
Scan Profiles form. Check the Show Attributes and Common checkbox and click the
Get Values from Devices button.
81

The original Scan Profile values will look like this (trimmed for clarity):
EntryNumber,Name,Protocol,TargetURL,PortNumber,…
#01,HR_01,FTP,//172.31.44.195/scan/HT_01/172.31.19.95,21…
#02,IT_02,FTP,//172.31.44.195/scan/IT_02/172.31.19.95,21,…
#07,SALES_07,FTP,//172.31.44.195/scan/Sales_07/172.31.19.95,21,…
Please observe “TargetURL” field starts with address of server (172.31.44.195), and the
destination folder includes address of MFP device (172.31.19.95). The goal is to make this
URL unique for each device, so we modify the CSV text to:
EntryNumber,Name,Protocol,TargetURL,PortNumber,…
#01,HR_01,FTP,//172.31.44.195/scan/HT_01/{ADDRESS},21…
#02,IT_02,FTP,//172.31.44.195/scan/IT_02/{ADDRESS},21,…
#07,SALES_07,FTP,//172.31.44.195/scan/Sales_07/{ADDRESS},21,…
Make sure the Scan Profiles checkbox is checked and click the Save as Common button.
This will save data to PSV’s database as a generic template, where {ADDRESS} marker
will be replaced with the actual address of each MFP device.
82

Select another device from the list, and click the Set Devices from Attributes button
This will obtain a “Common” template from the PSV database, replace {ADDRESS} marker
with actual address of selected MFP device (in this case ‘172.31.19.57’), and apply a new
value to the selected device.
Select “All Compatible” devices and apply, and they will all be configured.
Besides {ADDRESS}, the system supports {NAME} and {LOCATION} properties, and any
other attribute that can be assigned to print devices as described in previous sections of
this document.
83

Editing Common Scan Profiles and Attributes
To modify a Common Scan Profile template, click on Edit Common link.
Expand text box next to “Scan_Profiles”, edit CSV text, and click Save.
Note: that “Common Attributes” can include any name-value pair. You can add at the
bottom of the form both new name and value and save. In this case we have added
“FTP_SERVER” attribute, with value “172.31.44.195”. Now, we can make our Common *
Scan profiles even better, replacing the address of server with {FTP_SERVER} marker in
the CSV text.
EntryNumber,Name,Protocol,TargetURL,PortNumber,…
#01,HR_01,FTP,//{FTP_SERVER}/scan/HT_01/{ADDRESS},21…
#02,IT_02,FTP,//{FTP_SERVER}/scan/IT_02/{ADDRESS},21,…
#07,SALES_07,FTP,//{FTP_SERVER}/scan/Sales_07/{ADDRESS},21,…
The first benefit is that we can now change the address of the FTP server in only one place.
The second is that we can have the FTP_SERVER individually assigned as an attribute for
each print device, and imported to the PSV database as described in previous sections of
this document.
84

Exporting / Importing Scan Profiles from CSV:
The second method to configure scan profiles for a fleet of similar devices is by creating a
CSV file with the configuration parameters and importing it to CSV and applying the
changes to the devices.
In some cases there is a need to have different Scan Profiles for each devices, not only
different folder, server, or scan option. There could be some common scan profiles that
should be applied to all MFP devices, and then individual scan profiles for each MFP device
as desired. This can be done by using “Export / Import Data” tool, “Export Scan Profiles”
and “Import Scan Profiles” options.
This technique provides complete control, flexibility and efficiency, but it does require
some additional effort to prepare and manage CSV text files with Scan Profiles.
As in a previous example, the first step is to manually configure Scan Profiles on one or
more template MFP devices by using the embedded web app on those devices. Then
select
Tools => Export / Import Data
-> [Export MFP Scan Profile], [Select]
-> [Device Properties\], [Printer or Group\], [Export]
-> [Export CSV], and [Save]
The resulting CSV file can be edited by any text editor, or by Excel or similar tool.
85

The rows that have a ‘*’ in the ‘Address’ column will apply to all devices that do not have
Scan Profiles with same ‘EntryNumber’ already defined.
Please observe that rows are trimmed for clarity:
Address,EntryNumber,Name,Protocol,TargetURL,PortNumber,…
*,#01,ftp_01,FTP,//{FTP_SERVER}/scan/01/{ADDRESS},21,…
*,#02,ftp_02,FTP,//{FTP_SERVER}/scan/02/{ADDRESS},21,…
172.31.19.57,#00,ScanToRonsW7PC,0,\\172.31.45.63\SWE_Shared,445,…
172.31.19.57,#01,ScanToJCDsW7PC,0,\\172.31.19.58\SWE_shared,445,…
172.31.19.57,#06,Ubuntu,CIFS,\\172.31.19.134\smbuser,445,…
172.31.19.95,#00,DraganScanMB460,CIFS,\\172.31.44.195\scan\MB460,21,…
172.31.19.95,#03,eng_ftp,FTP,//172.31.1.41/incoming,21,…
In this case Scan Profile #02 for device ‘172.31.19.57’ will be
*,#02,ftp_02,FTP,//172.31.44.195/scan/02/172.31.19.57,21,…
The profile #01 will be as defined for specific device, not from Common, as well as #00
and #06.
In this case Scan Profile #02 for device ‘172.31.19.95’ will be
*,#01,ftp_01,FTP,//172.31.44.195/scan/01/172.31.19.95,21,…
*,#02,ftp_02,FTP,//172.31.44.195/scan/02/172.31.19.95,21,…
86

Data can now be imported from CSV text file to the PrintSuperVision database
87

Now that the values are stored in the PSV database, you can use the “Configure Print
Devices” feature as previously described and use Set Devices from Attributes to save
to individual devices, to a group of devices or all compatible devices.
88

Configuring MFP Devices
MFP devices, such as the OKI MC561 and MB491 provide many options when scanning
documents. One option is the use of “Scan Profiles”. For a user of MFP device, Scan
Profiles appear as list of names on LCD menu after pressing “Scan” button and selecting
“Network PC” menu option. After pressing “Start” button MFP scans a document with pre-
configured options, and sends it to a (file) server on pre-configured location, and with preconfigured filename.
Since files can be sent to the same file server from multiple MFP devices, with multiple
“Scan Profiles”, it is important to be able to recognize the purpose and origin of the
scanned file by its filename.
In an Enterprise network there could be many MFP devices that need to be configured and
managed. This is where the PrintSuperVision “Configure MFP Devices” tool is useful, since
it provides an efficient way to configure Scan Profiles on a large number of compatible OKI
MFP devices by a “one button click”.
To make filenames from devices different, Scan Profiles in each device can be configured
to indicate location of the MFP device. PSV admin can configure a “Template” for Scan
Profiles that is the same for all managed MFP devices, and it gets adjusted for each device
based on data from the database. For example, a new employee may be required to sign
and send an “HR-Form1”. Resulting filename can be “HR-Form1_Store-
123_052912133702.pdf”, where “HR-Form1” is for profile, “Store-123” is for location
of MFP, and date-time makes filename unique: 052912 is May 29, 2012, 133702 is
1:37:02 PM.
How to use the PSV tool to automate the process is described in this section.
Scan Profiles:
Scan Profiles are a collection of settings that the device uses when one or more
documents are scanned. The settings define things such as the resolution and format of
the scanned image and the location where the scanned file will be copied to. A user can
then select a Scan Profile from the device’s control panel, and the settings defined for that
profile are used when scanning. A user can enter the desired scan options each time he
or she uses the scan function, but this would be a slow process. It is better to configure
the device with Scan Profiles and let the user select from the available choices.
89

PSV’s Enterprise Edition provides a tool for configuring Scan Profiles.
This tool is most useful when profiles need to be established on a large number of MFP
devices connected to a network. PSV can be used to “push” Scan Profiles to a large
number of devices.
The system can have a ‘Scan Template’ that can be applied to all compatible devices with
a single button click.
Scan Profiles are configurations in MFP devices used for scanning and sending to
server.
Attributes are descriptions of print and MFP devices in the PSV database
Scan Templates are shared descriptions of scan profiles saved in the PSV
database. Scan Templates can include Attributes.
90

Using PSV to Configure MFP Devices:
The main reason for using the ‘Configure MFP Devices’ tool is to configure Scan Profiles in
a large number of network MFP devices. However, it can be used to configure individual
devices as well.
The tool is accessed by selecting Configure MFP Devices from the Tools menu.
Interactive Configuring of Scan Profiles
OKI MC561 and MB491 devices support up to 99 Scan Profiles. Each profile is numbered
from 01 to 99.
To set up Scan Profiles in a particular device, select the device from the dropdown list and
click the Get from Device(s) button.
The Scan Profile settings are displayed as a table. The settings displayed depend upon
the selection of the View dropdown list. “Simple” displays only the most important profile
settings. “Advanced” shows all of the settings associated with the profile.
Adding a Scan Profile
You can add a scan profile to a particular device by clicking the Add button when that
device is selected in the Device dropdown list. Provide the desired values for the various
settings. PSV automatically provides the next available Id. Click Apply To Device to add
the new profile to the device.
91

Editing and Deleting a Scan Profile
You can make changes to a scan profile by clicking in the Id column of the profile you
want to change. The settings shown depend upon the selection of the View dropdown list.
When working in the Advanced view, it is assumed the user has an understanding of what
each option represents. Not all combinations of profile values are acceptable. For
example, FTP encoding options are not applicable with the HTTP protocol. In some cases
the program will automatically adjust obvious mistakes. In other cases, the MFP device
may reject a wrong combination of options.
After making any changes, click the “Apply To Device” button. This will save the Scan
Profile back to the device. PSV does not save device scan profiles in its database. You
can delete a scan profile by clicking the “Delete From Device” button.
Scan Destination: Share Folder or a Server:
Scan Profiles may specify a server or shared folder that needs to be configured separately.
Please make sure to correctly configure security access rights, including username and
password as applicable. The available protocols are:
CIFS: Windows Sharing
FTP: Windows IIS (Internet Information Server) support it; In case of “anonymous”
access FTP server still expect username “ftp” and password that includes character
“@” like in email address.
HTTP: Be aware that IIS 7 or newer (Windows 2008 and Windows 7) do not support
“anonymous HTTP PUT” so Username and Password must be provided.
Make sure to enter correct port number for the selected protocol. Default choices are
provided next to “Port No.” field on the form.
92

Using Scan Templates:
Scan Templates can be used to save scan profile settings to the PSV database. A scan
template can be associated with a particular device or a group of devices. When the
template is a device template, it essentially provides a way to save an individual scan
profile to the database. It is when a template is a group template that it becomes more
useful from a configuration standpoint. When a group template is used it gets applied to
all compatible MFP devices in that group. This allows you to easily configure the same
scan profile to a number of devices.
Adding a New Scan Template:
To add a scan template, select an individual MFP device or printer group from the Device
dropdown list and click the “Add” button. If the “Add” button is not shown, click “Show
Templates”. If an individual device is selected, then the template created is a device
template for that particular device. If a printer group is selected, then the template
created is a group template for that group. Provide the desired values for each setting.
When you have made all of your changes, click the “Save Database Template” button
instead of the “Apply To Device” button.
Editing Scan Templates:
Editing Scan Templates is very similar to editing Scan Profiles. One visual difference is the
addition of the ‘Template From’ column shown before ‘Id’ column. This column indicates if
the template is a device or group template. Both device and group templates apply to
individual devices. This column distinguishes between the two. Only group templates will
be shown for a printer group.
In the following example, Scan Template with Id ‘04’ is assigned to this one individual MFP
devices, and other three templates (‘02’, ‘03’, ‘10’) are from ‘Group: All’. That is they
apply to the selected device and to all compatible MFP devices.
93

Applying Scan Templates
For the scan settings represented by a scan template to be used by a particular MFP
device, the scan template must be applied to that device. To do this:
1. Select the individual device or printer group where the template has been saved
from the Device dropdown list.
2. Click in the Id column of the template you want to apply.
3. Click the “Set with Templates” button. If a device template is selected, only that
device is updated. If a group template is selected, the template is applied to all
devices in that group.
Once the program has completed this, you should see a new profile for each device where
the template was applied. You can confirm this by selecting a device from the Device
dropdown and clicking the “Get from Device(s)” button.
Hierarchy of Group Templates
Besides the default group ‘Group: All’, devices can be organized into any number of
groups. This allows printers to be grouped by region or department for example. Scan
Templates can be assigned to those groups, and then applied to each printer in the group.
In next example, Scan Template ‘04’ is defined for ‘Group: Marketing MC561s’. It applies
to all compatible devices in that group. Care should be taken so that all templates have a
unique Id. When there are scan templates with same “Id” assigned to both group and
individual device, the template for the group is used. This is to make sure that common
templates are always visible on all devices in the group, and avoid accidental “hiding” of
common templates.
94

Using PSV “Attributes” to Customize Scan Templates:
Scan Templates allow you to establish the same scan profile in a number of MFP devices.
However, there may be cases when you want a part of the scan profile to be different for
each device. You could set up a different scan profile for each device, but this would be
time consuming to implement and configure. The “Configure MFP Devices” tool allows you
to use PSV “Attributes” as part of a scan profile.
PSV Attributes are named values that are assigned to individual print devices and saved in
the database. For example, each device can have an attribute named “StoreNumber” that
a company uses to identify individual store locations. PSV Attributes can be included in
interactive reports, email alerts, and in tools such as “Configure MFP Scan Profiles”.
Here’s how it works:
In a Scan Template, a special marker with attribute name inside of { } can be used.
When the program finds these characters, it tries to find an Attribute with the same name
for the device the template is being applied to. If such an attribute exists, then the
program replaces the attribute name with the attribute value. This new value is used
when setting up the profile for that device. The profile is customized to the device even
though the same scan template is used.
‘Address’, ‘Name’ and ‘Location’ are standard attributes. The values for these come
directly from the MFP device. They do not need to be entered by the user.
For example, a Scan Template can have a Filename set as:
“Order_{Address}_{Name}_#n”. When this template is applied to a device with Address
“192.168.1.100” and name “OKI-MC561-221037”, the Scan Profile created in the device
will have Filename setting “Order_192.168.1.100_OKI-MC561-221037_#n”. The Address
attribute has been replaced with the IP address of the device. The Name attribute has
been replaced with the actual name of the device. The “#n” is replaced by MFP device
with number of scan (to make filename unique) at the time of scanning.
Another example, stores may submit a daily sales summary. A scan template can be set
up so that all stores use the same FTP site. The Filename setting can use an attribute so
that the name of the file created indicates the store the report is from. The Filename field
in the template can have the value
“Sales_{StoreNumber}_#d”. When the template is applied to a device, the program
will try to use the attribute “StoreNumber” for that device. The names of the scan file
created by different MFP devices will all have the correct store number in the filename
making it easier to identify the source of the file.
Editing and viewing of Attributes can be accessed from “Configure MFP Devices” by
clicking the “Edit Attributes” button. Be sure any attribute name you use in a scan
template match exactly the actual attribute name.
95

Attributes can also be imported from a CSV file, from “Printers | Import Printers and
Attributes” tool.
Date/Time and Document Number in Filename:
To help make each scan file name unique, MFP device can insert current date/time and
scan number to each scan file. For example, ‘Filename’ can be defined in Scan Profile as
‘SalesSummary_100_#d_#n’
#d is replaced by current date/time by the MFP device when scanning.
#n is replaced by a number that increments for every scan, to form a unique filename.
Using the previous example, a scan document created by an MFP device would have a
filename like “SalesSummary_100_052912133702_00001.pdf”.
The date/time in the filename is encoded by MFP device as “MMDDYYhhmmss”.
The date in the example is “29-May-2012 01:37:02 PM”.
Show State:
The tool keeps track of all ‘Set with Templates’ actions, with date and status. By selecting
a device or group and clicking “Show State”, you get the current configuration state of
selected devices. “OK” indicates success. “Not Set” means the device was not responding
at the time configuration was tried. If configuration failed, the error is displayed in red.
The ‘address, name, location’ is a link to an individual device. It is a convenient way to
directly access a device to configure it again, view current configuration, or edit attributes.
96

Show Logs
Click on “Show Logs” button presents a list of attempts to configure devices in the
selected group.
Using a Scan Profile from the MFP device’s Control Panel
Press the “Scan” button.
Select “Network PC” using the up and down arrows on the control panel.
Press the “OK” button.
Use the up and down arrows on the control panel to select “Select Profile” from the
menu. Then, press the “OK” button.
The Profile List will be shown.
97

Use the up and down arrows to select the desired Scan Profile.
Press the “Start” button on the control panel to start scanning.
The scan file is sent to configured file server
98

Group Configuration
Only available in the PSV Enterprise edition, Group Configuration is a more advanced way
to configure devices remotely by using the parameters from one device to configure a
group of similar devices.
Group configuration uses an XML file as a “Template” to remotely set up groups of devices.
Currently there are 4 sample templates included with PSV.
To use Group Configuration: Click Tools from the main menu and click Printer Group
Config from the drop down box.
2. Select a template from the drop down menu.
3. Select the Target Group of devices that will receive the new configuration.
For a list of devices in each group click Show printers. Select the devices that will
receive the configuration by clicking the check boxes in the Select column.
The “paper source” configuration from the origin device can be modified before applying
the configuration to the group selected.
4. Make desired configuration changes and click Apply.
There are other sample Group Configuration templates provided that perform various
tasks.
99

Configuring Static IP Address
PSV Enterprise Edition includes a tool for automating the configuration of IP addresses. It
is accessible from the main Tools menu.
It is frequently requested to configure a print device to use a static IP address, by using
some “address scheme”. Typically, printers have “fixed last octet” inside of a subnet.
This tool helps find matching printers inside of selected subnets, detects current
configuration of IP address (static, dynamic), and allows changing from dynamic to static
and vice versa.
The tool makes it possible to configure all (compatible) devices with the parameters as
per policy, as well as to configure individual devices with desired values. The tool can be
used to re-configure all devices to desired default values with one mouse click. Specific
examples of how this feature can be used are:
Configure One: Gateway, Subnet - Change IP configuration parameters for one
device at a time. The parameters available are: Static or Dynamic IP Address
(DHCP disabled or enabled) selection, Gateway address and Subnet mask.
Fix many: Gateway, Subnet – Change Gateway address and Subnet mask to
desired value.
Configure Static IP Address:
This tool helps to automate the configuration of gateway address and subnet mask. These
options can be configured manually using a browser and the device’s embedded web
forms. PSV helps automate the configuration of such options.
The “Configure Static IP Address” page is available only to members of the PSV
“Administrators” group. It is accessed by selecting “Configure Static IP Address” from the
Tools menu.
100
 Loading...