

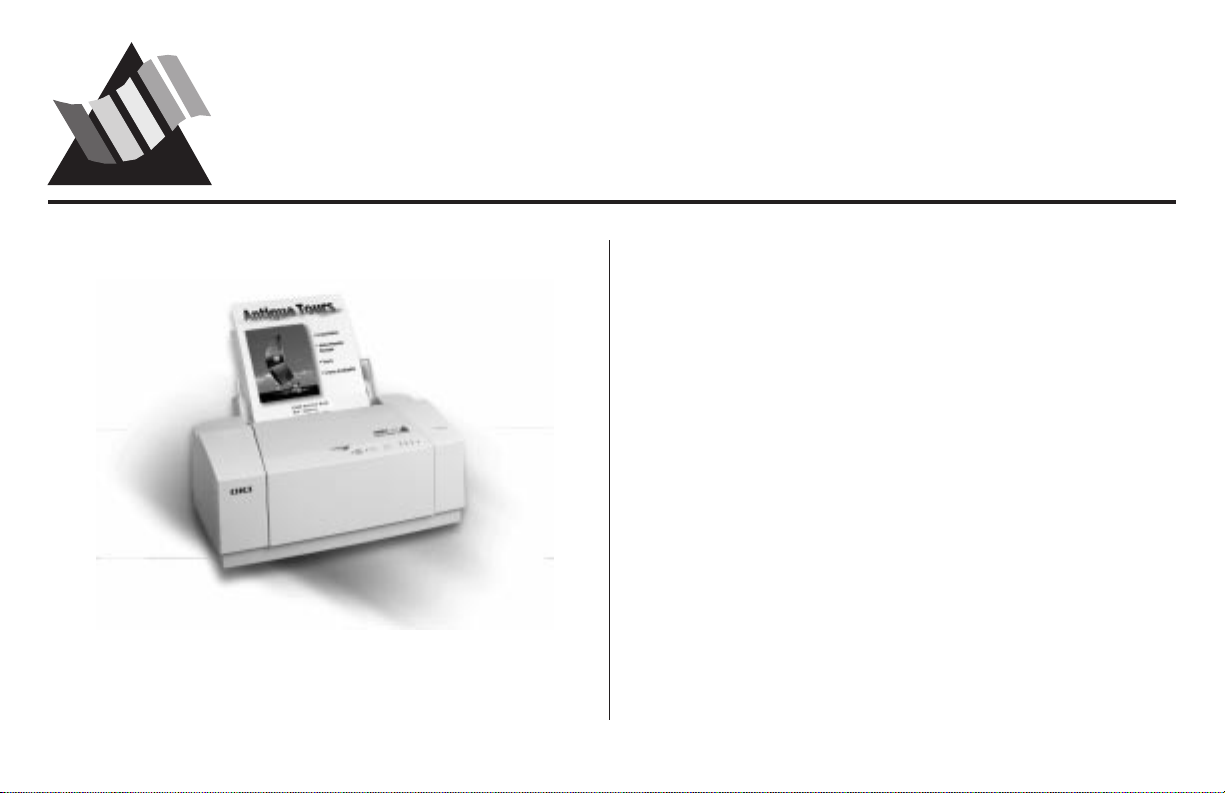
Page 1
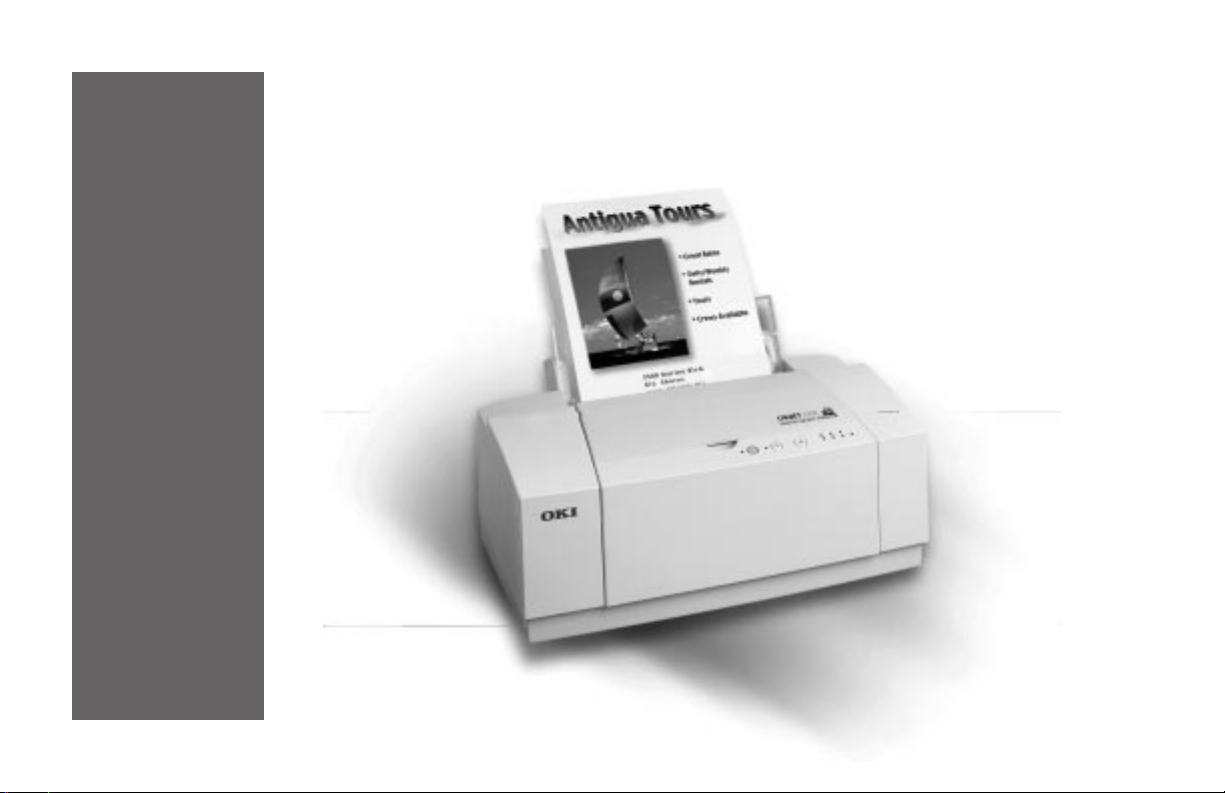
2500
®
OKIJET
User’s Guide
Page 2
Every effort has been made to ensure that the information in
this document is complete, accurate and up-to-date. Okidata
assumes no responsibility for the results of errors bey ond its
control Okidata also cannot guarantee that changes in
software and equipment made by other manufacturers, and
referred to in this handbook, will not affect the applicability
of the information in this manual. Mention of software
products manufactured by other companies does not necessarily constitute endoresment by Okidata.
© 1998 by Okidata
First Edition, June 1998
Written and produced by the Okidata Publications Ser-
vices Department. Please address any comments on this
publication to:
Publications Services Department
Okidata, Division of Oki America, Inc.
532 Fellowship Road
Mount Laurel, NJ 08054-3405
OKIDATA is a registered trademark/marque déposée/marca registrada,
and OKI and OKIJET are registered trademarks of OKI Electric Industry
Company, Ltd. DeskJet, Hewlett-Packard, HP and PCL are registered
trademarks of Hewlett-Pac kard Company. E
trademark of the US EPA. IBM is a registered trademark of International
Business Machines Corporation. Microsoft, MS-DOS and Windows are
either registered trademarks or trademarks in the United States and/or
other countries. Touch-Tone is a registered trademark of American
Telephone and Telegraph. Univers is a tr ademark of Linotype AB and/or
its subsidiaries.
NERGY STAR is a registered
Conventions Used in This Guide
Notes containing
general information.
Precautions against
!
actions which could
cause damage to the
printer (set in italic).
Precautions
against actions
which could
cause personal
injury (set in
bold italic).
Year 2000 Compliance
All products currently sold by Okidata are Year 2000
Compliant. Each product contains information technology
that accurately processes date and time data between the
years 1999 and 2000. These products, when used in
combination with products purchased from other manufacturers, whose products properly exchange date and time
information, will accurately process the date and time. All
future products are committed to meeting the same Year
2000 compliance.
ENERGY STAR
As an ENERGY STAR® Partner, Okidata
has determined that this product meets
the E
NERGY STAR guidelines for energy
efficiency.
Page 3

Contents
Important Safety Instructions.......................................ii i
Section 1: Setup................................................................ 1
OKIJET 2500 Features ...................................................... 1
Select a Location ............................................................... 2
Unpack the Printer............................................................. 2
Remove the Packing Material............................................ 2
Getting to Know Your Printer ............................................ 3
Connect to the Computer................................................... 4
Connect to Power............................................................... 4
Install the Printhead and Ink Cartridges............................ 5
Install the Printhead Storage Box...................................... 8
Usable Print Media............................................................ 9
Recommended Print Media............................................. 10
Load Paper....................................................................... 10
Print the Demo Page........................................................ 12
Section 2: Printing ......................................................... 13
Install the Printer Driver/Electronic Registration Utility 13
Installation on Windows 3.1x ........................................ 13
Installation on Windows 95 ........................................... 14
The Control Software ...................................................... 15
On-Line Help................................................................. 15
Printing from Windows 3.1 or Windows for
Workgroups 3.11 Applications.................................... 15
Printing from Windows 95 Applications .......................15
Checking Printer Settings.............................................. 16
To Open the OKIJET 2500 Printer Setup Dialog Box
From Windows 3.1x Control Panel ...................... 16
In Windows 95 ...................................................... 16
Canceling or Pausing a Print Job................................... 17
Windows 3.1x............................................................ 17
Windows 95 ............................................................... 17
Printing from DOS Applications ..................................... 17
The OKIJET 2500 DOS Control Panel ......................... 18
Installing the DOS Control Panel .............................18
Loading the DOS Control Panel for Use .................. 18
Printing on Special Media ............................................... 18
Envelopes.......................................................................18
Banners.......................................................................... 20
Other Media................................................................... 20
Section 3: Maintenance .................................................21
Replacing/Swapping the Printhead .................................21
Replacing the Ink Cartridges ...........................................23
Cleaning the Printhead Nozzles ...................................... 26
Aligning the Printhead..................................................... 26
In Windows 3.1 and Windows for W orkgroups 3.11.....26
In Windows 95...............................................................27
i
Page 4

Contents
Transporting the Printer................................................... 27
Cleaning the Printer......................................................... 29
Section 4: Control Panel................................................ 31
Control Panel................................................................... 31
Control Panel Buttons ................................................... 31
Power/Reset Button................................................... 31
Resume/FF Button .................................................... 32
Cartridge Change/Clean Button................................ 32
Control Panel Indicator Lights ...................................... 33
Section 5: Troubleshooting............................................ 35
Clearing Paper Misfeeds.................................................. 35
Clearing Paper Jams ........................................................ 36
If the Trailing Edge is Accessible.................................. 36
If the Trailing Edge is Not Accessible........................... 36
Clearing Multi-Page Paper jams ................................... 38
Problem Solving .............................................................. 40
Section 6: Specifications................................................ 47
Printer Specifications....................................................... 47
Paper Specifications ........................................................ 49
Envelope Specifications ................................................... 49
Label Specifications ........................................................ 50
Transparency Specifications............................................ 50
Card Specifications.......................................................... 50
Iron-on Transfer Media Specifications............................ 50
Section 7: Customer Support & Service...................... 51
Getting Support and Service............................................ 51
Your Dealer.................................................................... 51
Okidata Information System Automated Attendant ...... 51
Okidata Customer Support Professionals...................... 52
Okidata Faxable Facts ...................................................52
Okidata Service Locations ............................................ 53
Purchasing Replacement Parts & Accessories ................ 54
Wa ys to Purchase........................................................... 54
Accessories & Service Manual .................................54
Replacement Parts..................................................... 54
Appendix A: Transporting the Printer ........................ 55
Transporting the Printer under Special Conditions .........55
FCC, IC, CE Statements ...............................................58
Limited Wa rranty.......................................................... 59
Overnight Exchange ...................................................... 61
Glossary.......................................................................... 62
Material Safety Data Sheet: Black Ink........................ 63
Material Safety Data Sheet: Cyan Ink ........................ 65
Material Safety Data Sheet: Magenta Ink .................. 67
Material Safety Data Sheet: Yellow Ink....................... 69
Index ...............................................................................71
ii
Page 5

Important Safety Instructions
Your OKIDATA printer has been carefully designed to give
you years of safe, reliable performance. As with all electrical
equipment, however, there are a few basic precautions you
should take to avoid hurting yourself or damaging the unit:
• Read the setup and operating instructions in this manual
carefully. Be sure to save it for future reference.
• Read and follow all warning and instruction labels on the
printer.
• Unplug the printer before you clean it. Use only a damp
cloth; do not use liquid or aerosol cleaners.
• Place your printer on a firm, solid surface. If you put it on
something unsteady, it might fall and be damaged; if you
place it on a soft surface, such as a rug, sofa, or bed, the
vents may be blocked, causing it to overheat.
• To protect your printer from overheating, make sure no
openings on the printer are blocked. Do not put the printer
on or near a heat source, such as a radiator or heat register.
If you put the printer in any kind of enclosure, make sure it
is well ventilated.
• Do not use your printer near water, or spill liquid of any
kind into it.
• Be certain that your power source matches the rating listed
on the back of the printer. If you are not sure, check with
your dealer or with your local power company.
• Your printer has a grounded, 3-prong plug as a safety
feature, and it will only fit into a grounded outlet. If you
can not plug it in, chances are you have a non-grounded
outlet; contact an electrician to have it replaced with a
grounded outlet. Do not use an adapter to defeat the
grounding.
• The printer must be installed near a power outlet which
will remain easily accessible.
• To avoid damaging the power cord, do not put anything on
it or place it where it will be walked on. If the cord becomes damaged or frayed, replace it immediately.
• The use of an extension cord or power strip with this
printer is not recommended or authorized. Check building
codes and insurance requirements before using an extension cord or power strip. If you are using an extension cord
or power strip with the printer, make sure that the total of
the amperes required by all of the equipment on the
extension is less than the extension’s rating. Generally, the
iii
Page 6
Important Safety Information
total ratings of all equipment plugged into any one power
line should not exceed 15 amperes. Do not exceed this
unless you know that the power line your equipment is
plugged into has a rating above 15 amperes.
• Aside from the routine maintenance described in this
handbook, do not try to service the printer yourself;
opening the cover may expose you to shocks or other
hazards. Do not make any adjustments other than those
outlined in the manual—you might cause damage requiring extensive repair work. Section 7 explains how to get
your printer serviced by qualified OKIDATA technicians.
• If anything happens that indicates that your printer is not
working properly or has been damaged, unplug it immediately and follow the procedures in Section 7 for having
your printer serviced. These are some of the things to look
for:
- The power cord or plug is frayed or damaged.
- Liquid has been spilled into the housing, or the printer
has been exposed to water.
- The printer has been dropped or its cabinet has been
damaged.
- The printer does not function normally when you are
following the operating instructions.
Oki Exchange
• Available in the U.S. and Canada only.
of your Okidata printer and the problem can not be resolved
over the phone, you can get a replacement printer the next
business day — or no later than the second business day.
TM
You can extend your standard
2-year OKIJET 2500 printer
Overnight Exchange policy
(see page 61) by 1 or 2 years.
With Overnight Exchange, if
you experience a malfunction
For more information . . .
For pricing and more information on this program:
• call 1-800-OKIDATA (1-800-654-3282)
or
• visit our Web site: http://www.okidata.com
iv
Page 7
Setup
1
OKIJET 2500 Features
Superb Color Printing
• High quality 1200 x 600 dpi printing on glossy paper;
600 x 600 dpi on plain paper
• Automatic Color Control
Smarter Color System
• Individually replaceable ink cartridges
• True sensing of ink levels with both “Low Ink” and
“Cartridge Empty” indicators for each color
Easy to Use
• Compatible with Windo ws
• Easy printer control, right from your PC screen
Versatile
• Paper, Labels, Transparencies
• Cards, Envelopes
• Iron-on Transfer Media
Backed by a 2-Year Warranty, with Overnight Exchange*
• Full 2-year warranty with Overnight Exchange providing a
replacement unit shipped to reach you the next business
day — or no later than the second business day
(*U.S. and Canada only)
1
®
95, Windows 3.1x & MS-DOS
®
Page 8
1
Setup
Select a Location
Select a flat, stable surface with space above and in front of
the printer to provide adequate ventilation.
• Avoid direct sunlight
• Avoid air conditioners and heat sources
• Avoid areas with high vibra tion
• Avoid dusty/dirty environments
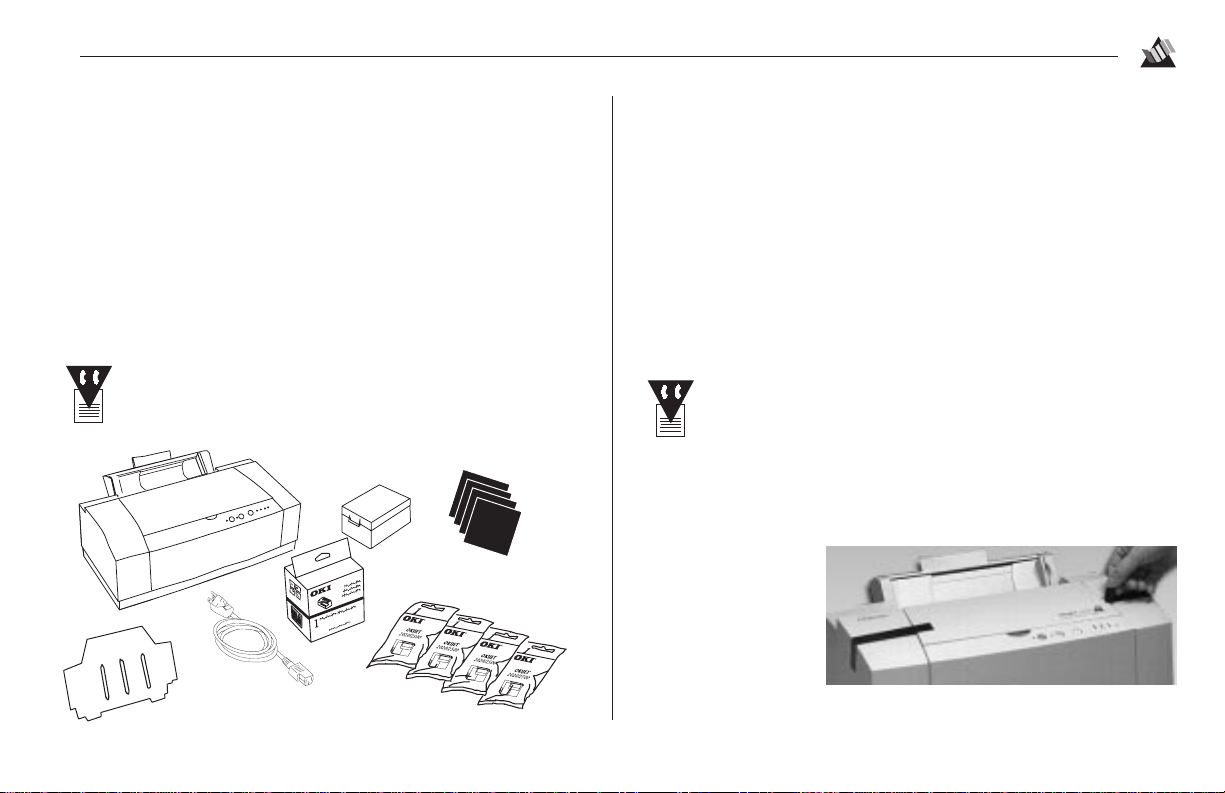
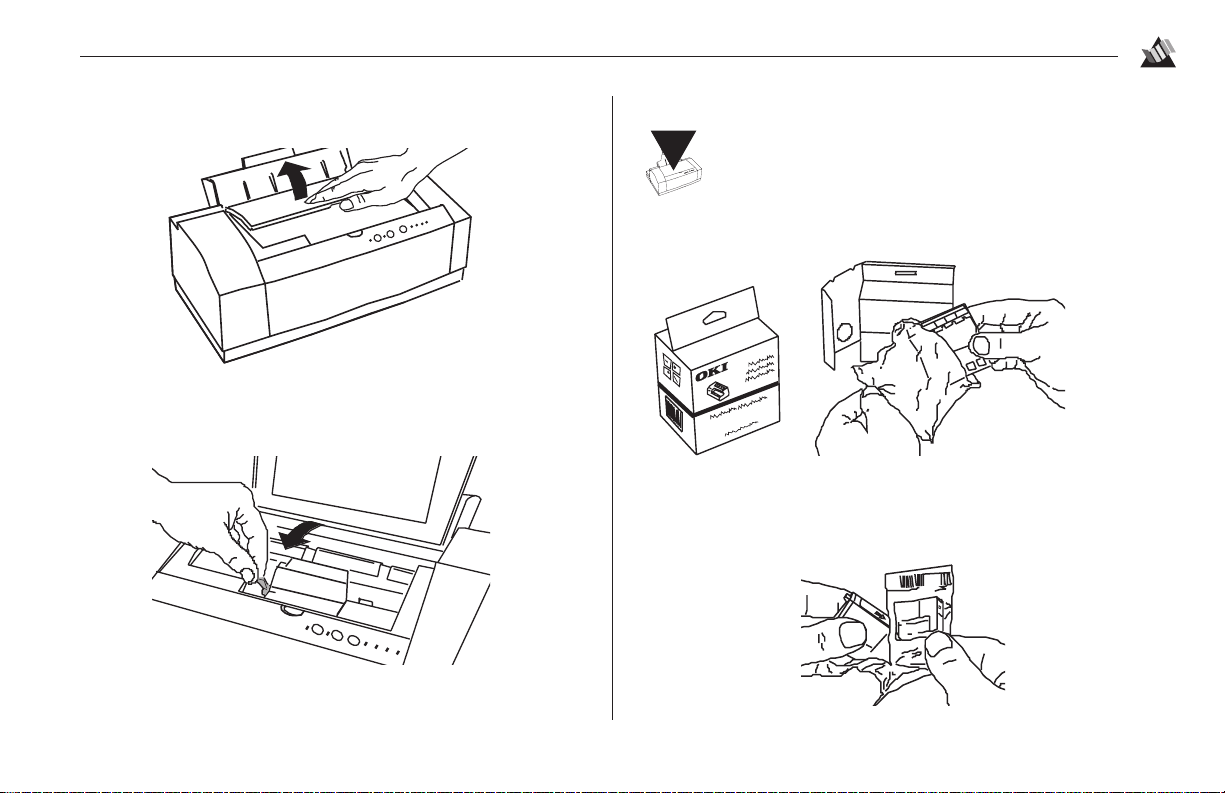
Unpack the Printer
Save the carton and packing materials in case you
ever need to ship the printer.
➐
➊
➋
➌
➏
➍
➎
Make sure you have:
➊ Printer
➋ Output Shelf
➌ Power Cord
➍ Color Printhead
➎ 4 Ink Cartridges (1 black, 1 cyan, 1 magenta, 1 yellow)
➏ Printhead Storage Box
➐ Diskette(s)
Anything missing or damaged? Contact your dealer.
A parallel printer cable is not supplied. To ensure
the best computer to printer communications, use
an IEEE-1284-compliant, parallel, bi-directional
interface cable, such as Okidata 70000803.
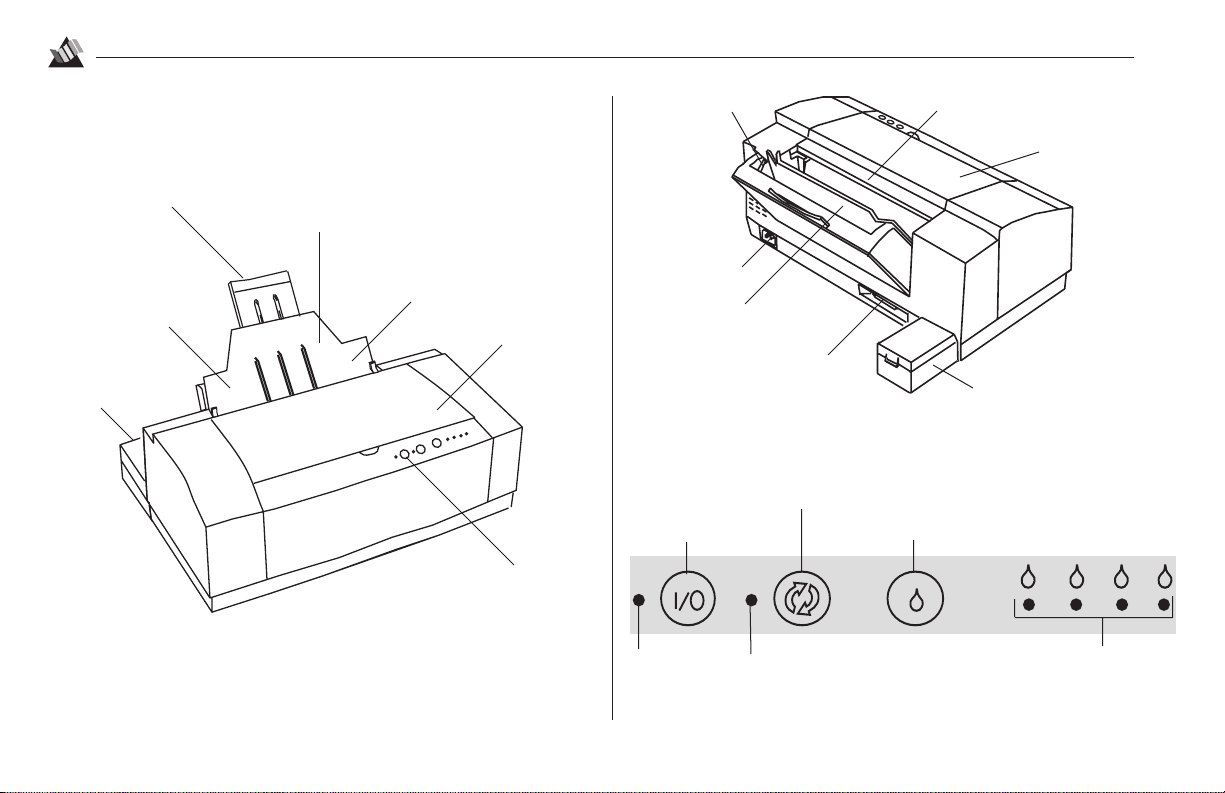
Remove the Packing Material
Remove the tape
securing the top
cover, then open the
cover and remove
the pieces of
packing tape inside.
2
Page 9
Setup
1
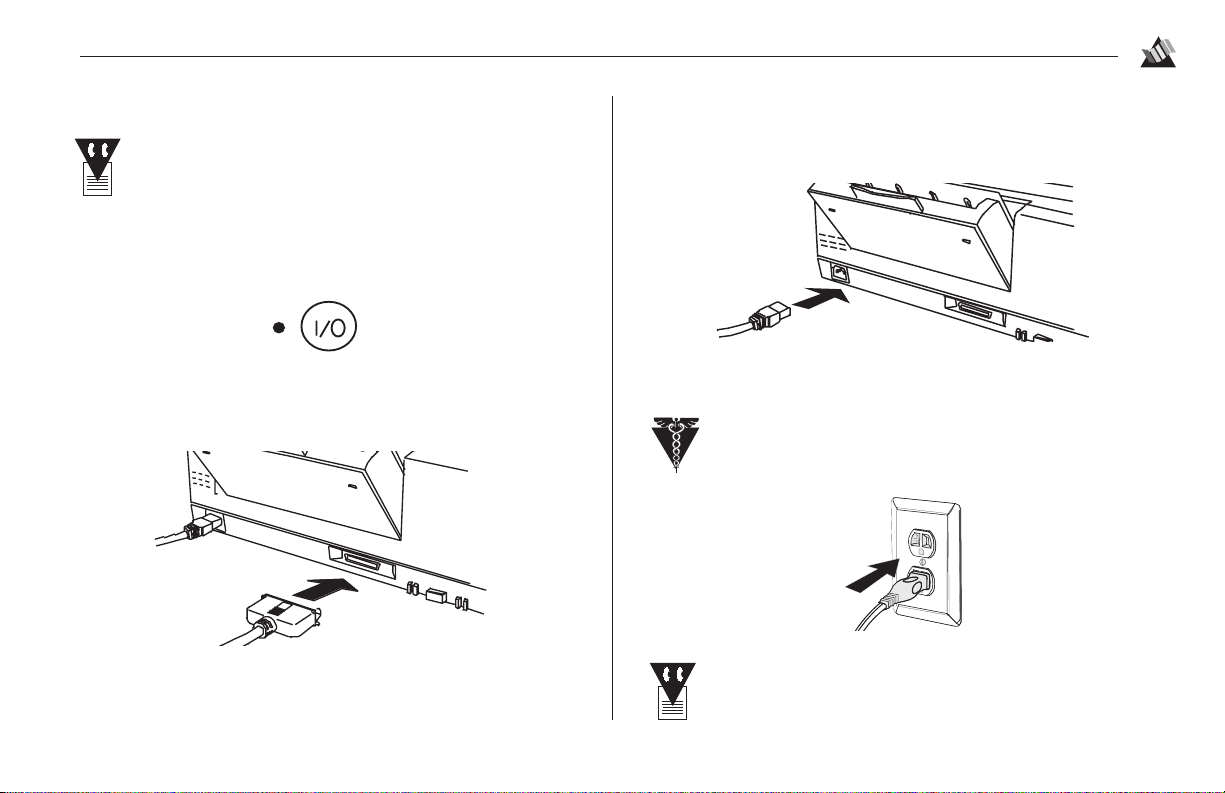
Getting to Know Your Printer
Paper Support
Envelope Feed Guide
(behind output shelf,
in paper tray)
Printhead
Storage Box
Output Shelf
Paper Guide Lever
(behind output shelf, on paper tray)
Front View
Top Cover
On/off Switch
Paper Guide Lever Output Shelf
Power Cord Socket
Paper Tray
Parallel Cable Connector
Printhead Storage Box
Back View
Resume/FF Button
Power/Reset Button
Power LED
Error LED
Cartridge Change/Clean Button
Top Cover
Low Ink Indicators
Control Panel
3
Page 10
1
Setup
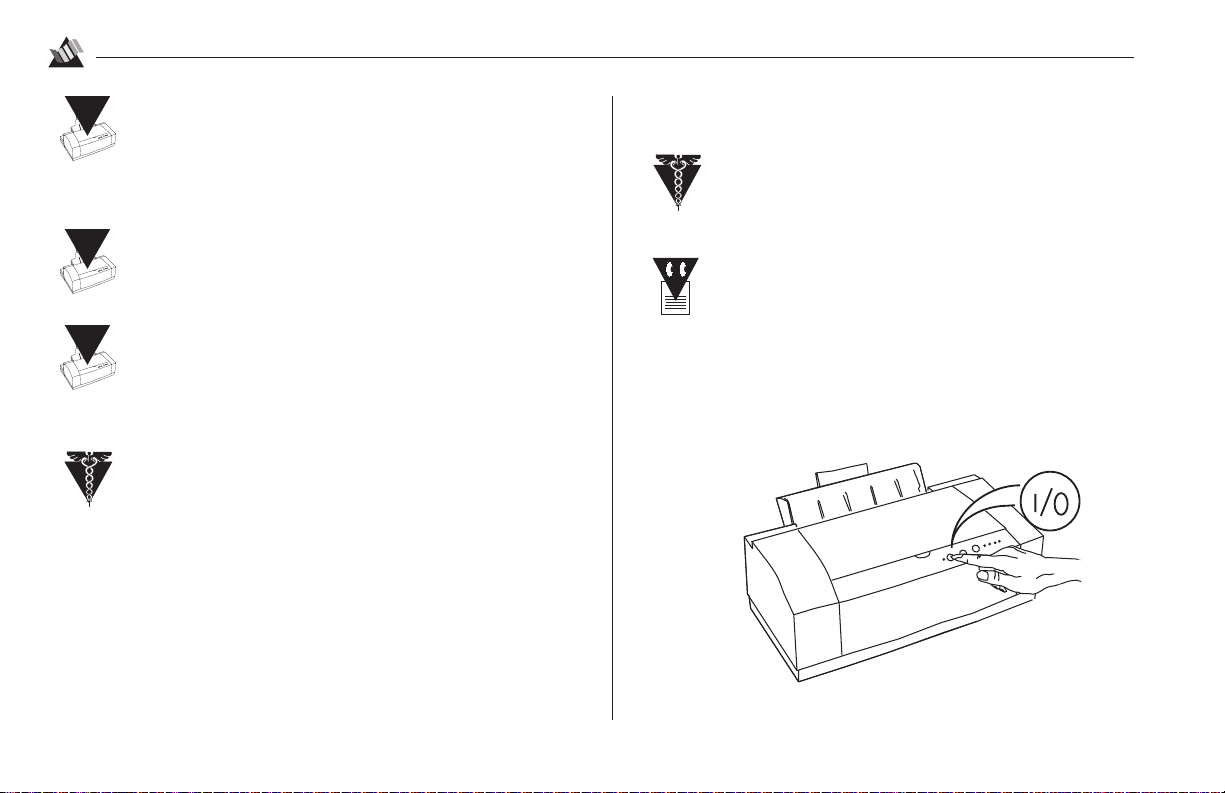
Connect to the Computer
You’ll need an IEEE-1284-compliant, parallel,
bi-directional interface cable.
1. Turn off the computer.
2. Turn off the printer (press and hold the Power/Reset button
for approximately 2 to 5 seconds).
3. Plug the parallel interface cable into the printer and secure
it with the wire clips.
4. Connect the other end of the cable to the parallel port on
the computer, and turn on the printer, then the computer.
Connect to Power
1. Insert power cord.
2. Connect to a grounded power outlet.
As a general safety precaution, do not use an
extension cord!
The lights on the control panel may flash once then
turn off.
4
Page 11
To protect against damage to the printhead, ensure
!
that the printer has stopped its operation completely (carriage at its left most “home” position)
before detaching the power cord.
Do not unplug the printer for long periods of time:
!
the printhead nozzles can dry out.
Do not use a power strip to control the power to the
!
printer. The printer requires a small amount of
power, even when off, in order to maintain the
printhead.
In order to comply with UL and CSA safety
regulations, you must use a UL-listed/CSA labelled detachable power cord with a
3-conductor, 18 AWG, SVT-type plug, having a
grounding-type parallel blade and an
IEC320-style cord connector, such as the one
supplied with the printer.
Setup
1
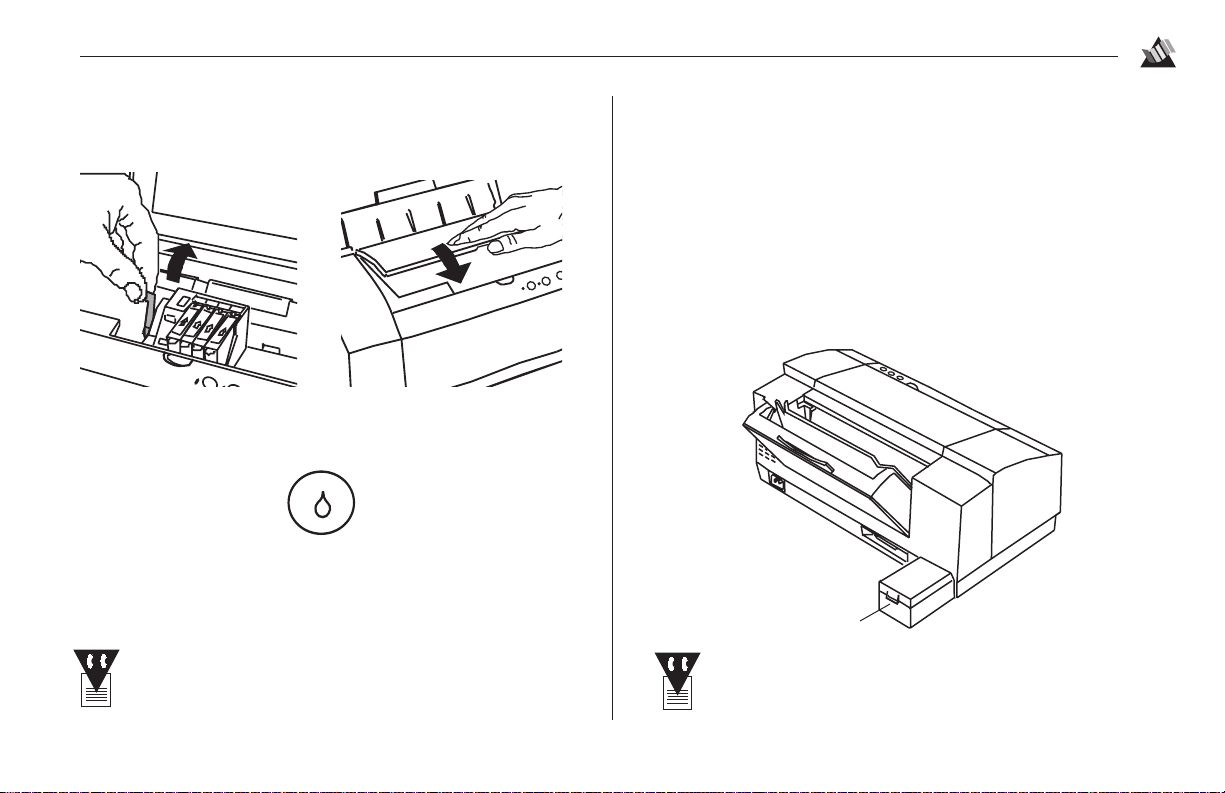
Install the Printhead and Ink Cartridges
Keep the printhead and ink cartridges out of the
reach of children. Do not get the ink near your
eyes or mouth.
Avoid contact of the uncovered ink nozzles with
hands and clothing. The ink is not easy to remove.
1. Turn on the printer: the Error LED lights, the Low Ink
indicators flash, and the printhead carriage moves to the
center (loading position).
5
Page 12
1
1
Setup
2. Open the top cover.
3. Make sure the green cartridge lock l ever is forward.
4. Unpack the printhead.
Be careful not to touch the printhead nozzles when
!
removing the printhead from the plastic bag. Ink
will get on your hands and the printhead can
become contaminated.
5. Holding the bag upside down as illustrated, remove the
black ink cartridge from its plastic bag.
6
Page 13

Setup
1
6. Carefully peel the plastic foil seal off the ink cartridge in
the direction of the arrows printed on the seal.
Do not force the ink cartridges into the
!
printhead!
7. Grasp the printhead, insert the black ink cartridge into
position 1 and snap it firmly down into place.
8. Repeat steps 5 to 7 for each color cartridge, matching the
color/number on the ink cartridges with the corresponding
color/number on the printhead.
9. Align the rectangular hole in the printhead (➊) with the
green post (➋) on the printer carriage, then gently lower
the printhead into position.
➋
➊
7
Page 14
1
Setup
10. Push the green cartridge lock lever back to secure the
printhead and close the cover.
11. Press and release the Cartridge Change/Clean button.
The printer prepares the printhead for printing. When the
process is complete (about 30 seconds), the Error LED and
the flashing Low Ink indicators turn off.
If the error LED remains lit after the Cartridge
Change/Clean button is pressed, try removing and
reinstalling the printhead assembly.
Install the Printhead Storage Box
For those who have both the optional high-capacity black
printhead and the standard color printhead, the printhead
storage box is designed to protect one while the other is in
use. It is also used to store the printhead when the printer is
being transported.
Attach the box (➊) included with your printer to the back of
the housing:
➊
If space limitations are a concern, you can store the
box in any cool location away from direct sunlight.
8
Page 15
Setup
1
Usable Print Media
Media Use Media Setting(s) Media Size Setting(s)
Cards Cards designated for inkjet printers. Plain Paper • US 4x6 OR US 5x8
• A6 (105 x 148 mm)
• Hagaki (100 x 148 mm)
Envelopes Only short-flap, side-seam type, Plain Paper • #10 (4.125 x 9.5 in)
designated for inkjet printers. • DL (110 x 220 mm)
• C6 (114 x 162 mm)
Labels Paper labels/full sheets only, Plain Paper • Letter (8.5 x 11 in)
designated for inkjet printers. • A4 (148 x 216 mm)
Banners 20 or 24-lb paper, designated for Plain Paper • Banner
inkjet printers. • Banner A4
Paper 20 or 24-lb paper, designated Plain Paper See “Selectable
for inkjet printers. Sizes” at right
Paper, Coa ted 24-lb, “Hi-Resolution” or “Premium • Premium coated paper See “Selectable
Coated,” designated for inkjet printers. • Photo quality matte paper Sizes” at right
Paper, Glossy Film-backed or paper-backed, Photo quality glossy paper See “Selectable
designated for inkjet printers. Sizes” at right
Iron-on Transfer Iron-on transfer media designated Iron-on Transfer • Letter 8.5 x 11 in
for ink jet printers. • A4 148 x 216 mm
Transparencies Transparencies designated for inkjet Transparency • Letter 8.5 x 11 in
printers. Do not use paper-backed • A4 148 x 216 mm
transparencies. Place rough side
against paper support!
Be sure to
select the
proper media in the
Main tab and
media size in the
Page tab of the OKI
OKIJET 2500
printer setup dialog
box (see page 15).
See Section 6 for
additional specifications on print
media.
Selectable Sizes
• Letter (8.5 x 11 in)
• Legal (8.5 x 14 in)
• A5 (148 x 216 mm)
• B5 (182 x 257 mm)
• A4 (210 x 297 mm)
• Executive
(7.25 x 10.5 in)
9
Page 16
1
Setup
Recommended Print Media
Note: To change the print quality settting, open the OKI
OKIJET 2500 printer setup dialog box and select the
desired print quality in the Main tab.
Media Recommended Print Quality
Plain Paper Hammermill Jet Print Normal or
Matte Coated HP Premium Ink Jet Pa per High Quality
Paper Hammermill Jet Print Ultra-Matte
Glossy Paper Kodak Photo Weight Glossy High Quality
Banners HP Banner Paper Normal or
Transparencies 3M CG3410 Transparency Film High Quality
Iron-on Transfer Xerox Ink Jet Fabric Transfer High Quality
Labels Xerox Ink Jet Labels Normal or
Envelopes Use short-flap, not v-flap: High Quality
Xerox 4024DP or Color Xpressions High Quality
HP Bright White
HP Greeting Card Paper
Xerox Ink Jet Photo Glossy
High Quality
High Quality
✔✔
✔
✔✔
x
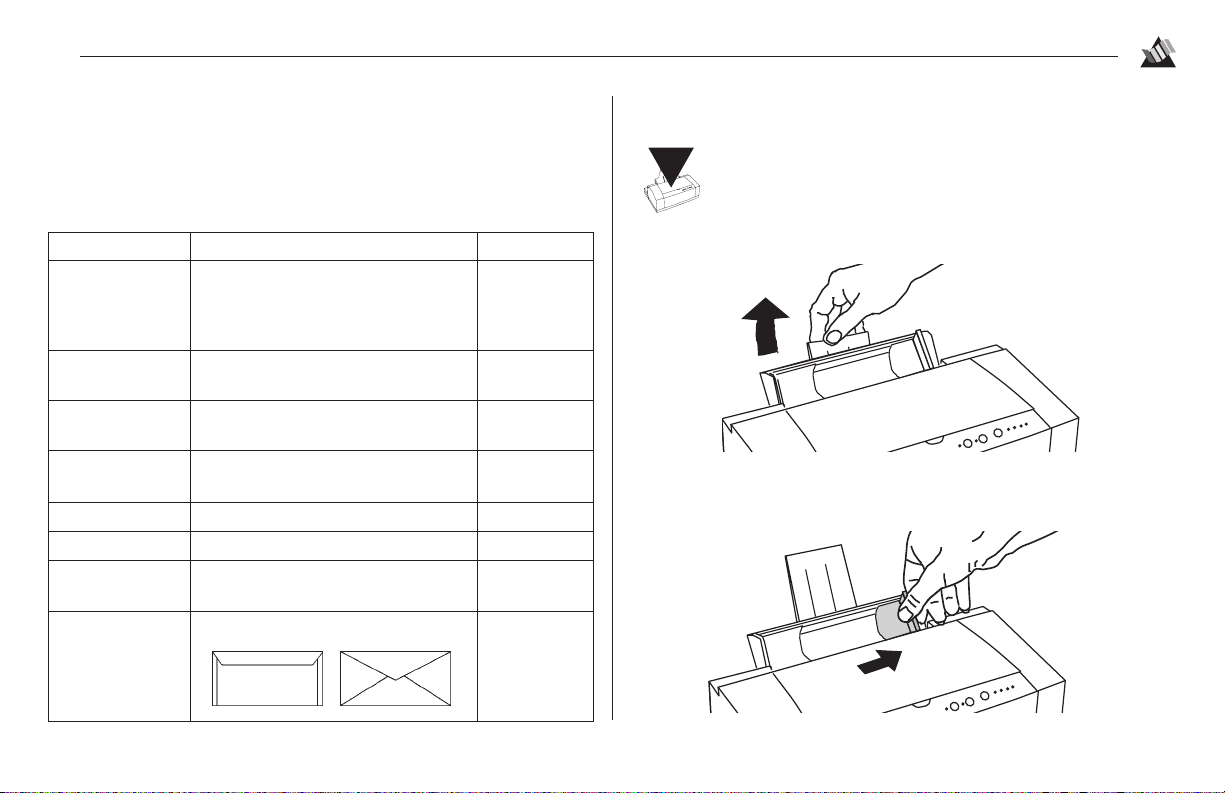
Load Paper
To avoid paper jams, always wait until the printer is
!
done printing before loading paper.
1. Pull up the paper support.
2. Slide the paper guide lever to the far right.
10
Page 17
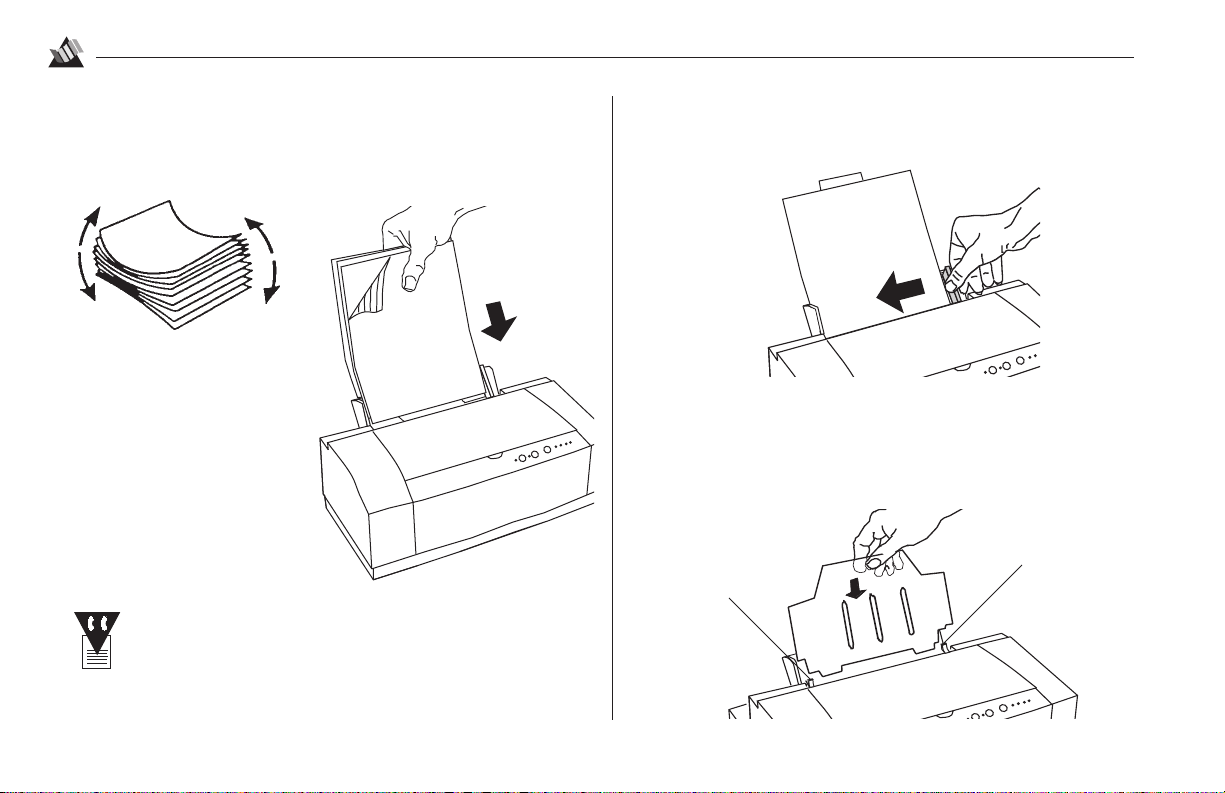
Setup
1
3.Fan a stack of paper and load it into the paper tray (max.
125 sheets 20-lb paper), with the side to be printed facing
the back.
To load envelopes, banners and other print media,
see page 18, ff.
4. Slide the paper guide lever to touch the right edge of the
paper stack.
5. Install the output shelf behind the green tabs(➊), with the
ribs facing forward. M a ke sure you insert the tabs on the
shelf into the cutouts in the feed area.
➊
➊
11
Page 18
1
Setup
Print the Demo Page
We recommend that you run a demo print whenever the
printer is moved or the ink cartridge is replaced.
The printer does not need to be attached to a host
computer to perform this demo.
1. Make sure that at least 4 sheets of paper are loaded and
that the printer is turned on (Power LED lit: if not, press
Power/Reset button).
2. Press and hold the Resume/FF button for approximately 2
to 5 seconds, until the green LED flashes. The demo
prints.
If the demo page shows streaks or missing colors,
press and hold the Cartridge Clean button to start
the cartridge cleaning process.
If the demo fails to print, repeat steps 1 and 2.
12
Page 19
Printing
2
Install the Printer Driver/Electronic
Registration Utility
Before you can begin printing,
you must first install the OKI
OKIJET 2500 printer driver in
your computer.
When you are installing the
driver, you will also be offered
the opportunity to install the
Electronic Registration utility.
This manual uses “d” to reference the CD ROM
drive. If your CD ROM drive is another letter,
substitute that letter wherever “ d ” appears in the
installation steps.
Installation on Windows 3.1x
For Windows 3.1 or Windows for Workgroups 3.11:
1. Start Windows on your computer (make sure all other
programs are closed before proceeding).
2. Insert the OKI OKIJET 2500 CD in your CD ROM drive.
3. From the Program Manager, choose File, then select
Run.
4. Type d:\setup, then click OK.
The Welcome dialog box appears.
5. Click Next.
The Software License Agreement appears.
6. Click Yes.
The Select Components dialog box appears with the
following components preselected:
µ OKIJET 2500 Windows Printer Driver
µ OKIJET 2500 Electronic Registration
13
Page 20
2
Printing
7. Clear any components you do not wish to install (see note
below regarding the various registration options available
to you), then click Next.
The Printer Port Selection dialog box appears.
8. Select the port you wish to use (normally LPT1:), then
click Next.
The Select Program Folder dialog box appears.
9. Click Next.
10. Click Next to start copying the files, then follow the
remaining steps of the installation program.
To run the Win 3.1x Electronic Registration utility:
You must have a modem installed in your PC in
order to use Electronic Registration. If you do not
have a modem, you can still use the Electronic
Registration utility to fill out the registration form,
then print out a copy and fax it or mail it in. Or, if
you prefer, you can register directly online at the
Okidata internet site http://www.okidata.com.
1. Double click the Electronic Registration icon in the OKI
OKIJET 2500 program group.
2. Select the appropriate location, then click Continue.
3. Follow the steps of the Electronic Registration utility.
Installation on Windows™ 95:
1. Start Windows 95 on your computer (make sure all other
programs are closed before proceeding).
2. Insert the OKI OKIJET 2500 CD in your CD ROM drive.
3. Click Start on the task bar.
4. Select Settings
5. Double-click the Add Printer icon and follow the steps
given in the A dd Printer Wizard dialog box.
When you are prompted for the manufacturer and
model of your printer, click Have Disk, then type d:\
and click OK. On the next screen, you will see OKI
OKIJET 2500 highlighted. Click Next, then follow
the remaining steps of the Add Printer Wizard.
7. When the Software License dialog box appears, click Yes.
The Reboot dialog b ox appears.
8. Click Yes.
The system reboots
Your OKI OKIJET 2500 printer driver is now installed.
To load the Electronic Registration utility:
1. Click Start on the task bar, then click Run.
2. Type d:\setup and press the Enter key.
3. Follow the instructions given.
→→
→ Printers.
→→
14
Page 21
Printing
2
To run the Win 95 Electronic Registration utility:
You must have a modem installed in your PC in
order to use Electronic Registration. If you do not
have a modem, you can still use the Electronic
Registration utility to fill out the registration form,
then print out a copy and fax it or mail it in. Or, if
you prefer, you can register directly online at the
Okidata internet site http://www.okidata.com.
1. Clict Start on the task bar.
2. Select Programs
Registration.
3. Select the appropriate location, then click Continue.
4. Follow the steps of the Electronic Registration utility.
→→
→ OKI OKIJET 2500
→→
→→
→ Electronic
→→
The Control Software
Use the OKIJET 2500 control software to
• Print from W indows applications
• Manage print jobs
• Monitor print jobs and print cartridge ink levels
• Change printer settings and print queue
• Test the printer
On-Line Help
The printer control software has extensive on-line Help,
accessible from any dialog box. Click the Help button or
press the F1 function key.
Printing from Windows 3.1 or Windows for
Workgroups 3.11 Applications
1. Double click the Windows Control Panel icon to open it:
2. Double click the Printers icon.
3. Select OKIJET 2500 as your default printer.
4. Print as you normally would from your Windows 3.1x
application.
Printing from Windows 95 Applications
1. Click Start, Settings, Printers.
2. Use the right mouse button to
click the OKIJET 2500 icon:
3. Click Set As Default.
4. Close the Printers dialog box.
5. Print as you normally would from your Windows 95
application.
15
Page 22
2
Printing
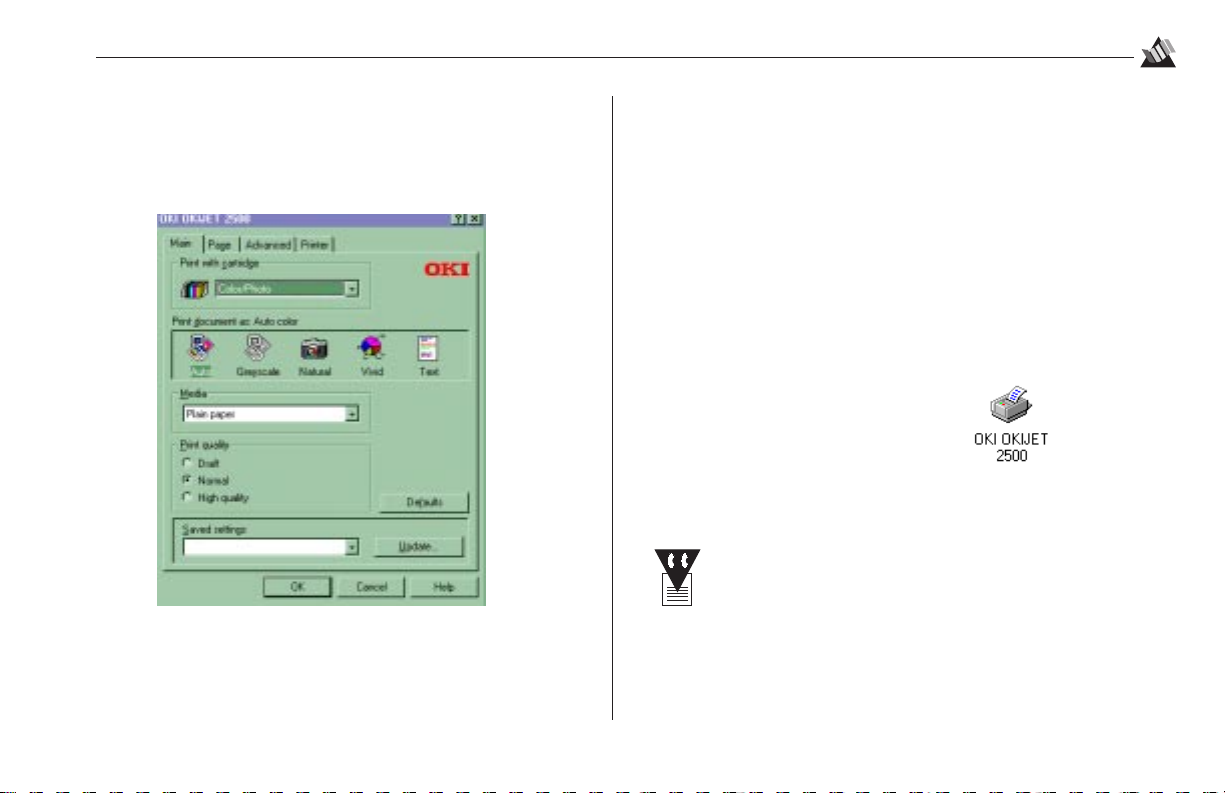
Checking Printer Settings
You can check the printer settings by opening the OKI
OKIJET 2500 printer setup dialog box:
Scan through the setting options on the Main, Page and
Advanced tabs: for more information, then click the Help
button or press the F1 key.
To Open the OKI OKIJET 2500 Printer Setup Dialog Box
From Windows 3.1x Control Panel
1. Double click the Printers icon.
2. Set OKIJET 2500 as the default printer.
3. Click Setup.
The settings you make will apply to all print jobs and all
Windows 3.1x-based applications.
In Windows 95
1. Click Start, Settings, Printers.
2. Use the right mouse button
to click the OKIJET 2500 icon:
3. Click Properties.
4. Make setting changes in the Main, Page and Advanced
tabs.
To save your settings for future print jobs, click
Update in the Main tab. Type the setting name you
wish to use under Setting:, then click Save, Close.
5. Click OK.
The settings you make will apply to all print jobs and all
Windows 95-based applications.
16
Page 23
Printing
2
Canceling or Pausing a Print Job
Windows 3.1x
1. Click the Print Manager icon from the Main group.
2. Click the document name.
• To cancel the print job, click Delete.
• To pause the print job, click Pause. When you are ready
to resume printing, click Resume.
3. Close the Print Manager window.
Windows 95
1. Click Start, Settings, Printers.
2. Double click the OKI OKIJET 2500 icon.
3. Click the document name.
• To cancel the print job, click Cancel Printing from the
Document menu.
• To pause the print job, click Pause Printing from the
Document menu. When you are ready to resume
printing, click Resume Printing from the Document
menu.
4. Close the OKI OKIJET 2500 window.
Printing from DOS Applications
To print from DOS applications which have the capability of
selecting a printer driver:
1. Enter your application and set the printer driver to a
Hewlett-Packard
550C (for color printing) or HP 500 (black only).
See your software documentation for
information on selecting printer drivers.
2. Make any necessary changes in printer settings (see “To
Open the OKI OKIJET 2500 Printer Setup Dialog Box” on
page 15).
To print from DOS applications which do not have a printer
driver selection or to print files directly from DOS, you need
to use the OKIJET 2500 DOS Control Panel.
The OKIJET 2500 does not support color printing
of landscape documents from DOS applications: if
you send a color landscape document to the printer
from a DOS application, it will print in monochrome black.
®
PCL® 3c emulation printer such as HP
®
17
Page 24
2
Printing
The OKIJET 2500 DOS Control Panel
Installing the DOS Control Panel
To install the DOS Control Panel on your computer:
1. Insert the DOS Control Panel diskette supplied with the
printer in your 3-1/2" floppy disk drive.
2. At the MS-DOS prompt, type a:install (or b:\install, if b
is your 3-1/2" drive) and press Enter.
The DOS Control Panel Installer menu appears, showing
the factory default settings:
OKIJET2500 Printer
DOS Control Panel Installer
Install Directory C:\OKIDATA\InkJet
Exit Start Install
3. Make any necessary changes in the install directory.
Use the tab key to highlight the directory, press Enter,
type in your new choice, and press Enter again.
4. Use the tab key to highlight Start Install, then press
Enter.
If an ERROR message appears, check the install
directory specified to be sure that it is a valid path ,
then try again.
Loading the DOS Control Panel for Use
When you wish to use the DOS Control Panel:
1. Go to the DOS command prompt.
2. Make sure you are in the directory you specified as the
Install Directory when you loaded the DOS Control Panel
Utility.
3. Type OJCONPNL.
4. Press the Enter key.
Printing on Special Media
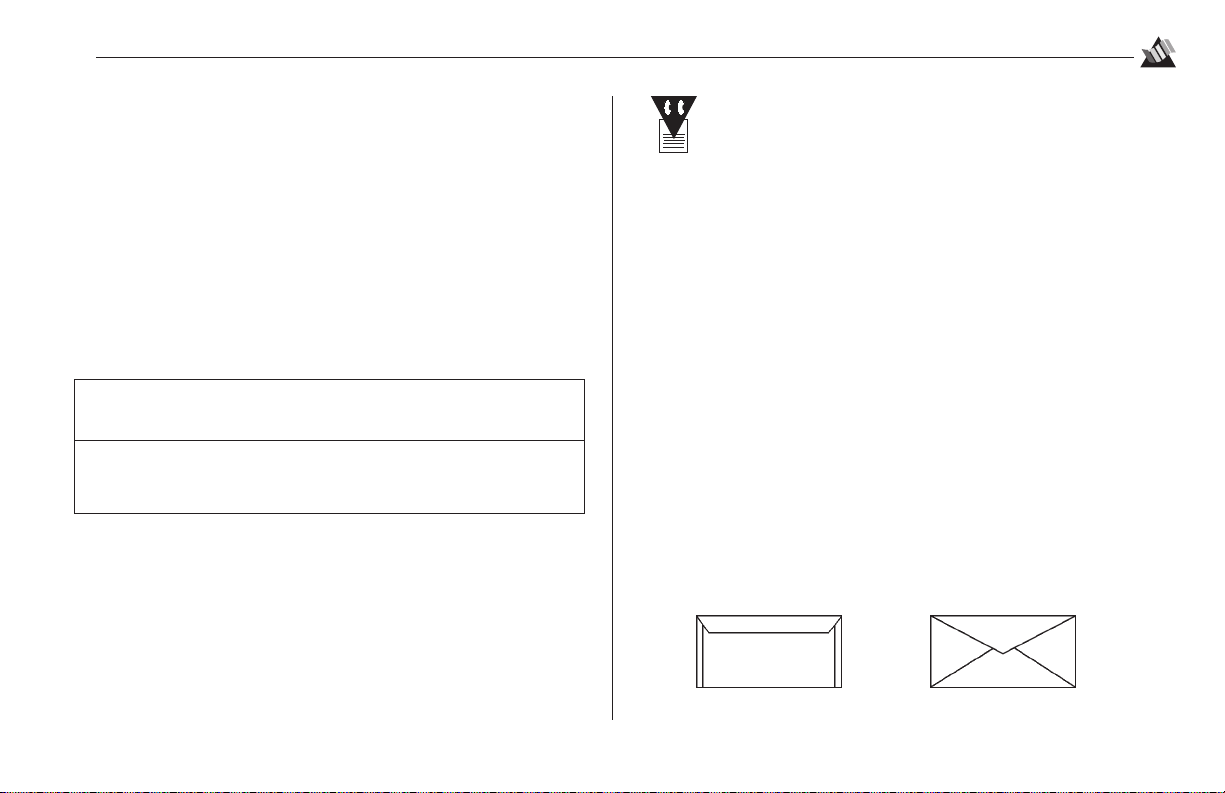
Envelopes
Envelopes should be loaded with the flap facing the front of
the printer (side to be printed facing the paper tray). For best
results, use short-flap, side-seam envelopes rather than vflap envelopes:
The DOS Control Panel Utility will be installed in the
directory you specified.
Short-Flap Type V-Flap T ype (Do not use)
18
Page 25

Printing
2
To load envelopes:
1. Remove any print media from the paper tray.
2. Remove the output shelf and flip up the envelope feed
guide (➊).
➊
3. Place the envelopes against the feed guide, address side
against the paper tray—flap to the left, then move the
paper guide lever over to touch the right edge of the
envelopes and replace the output shelf.
5. Make sure you have envelopes selected as the print media
in your software and in the printer driver (open the OKI
OKIJET 2500 printer setup dialog box — see page 15 —
and click the appropriate envelope size [#10, DL or C6] in
the Media size listbox of the Page tab).
19
Page 26

2
Printing
Banners
Printing on fan-fold banner paper can only be done
using a software package which fully supports this
feature, such as Corel Draw
packages may allow you to select “banner” printing,
but only work if you feed in single sheets of paper
then tape them together to form the banner.
To load fan-fold type banner paper:
1. Place the stack of paper behind the printer.
2. Push the paper support back down into the paper tray.
®
. Some software
3. Adjust the paper guides for the width of the banner paper,
then carefully insert the leading edge of the banner into the
paper tray.
Other Media
Transparencies, sheets of labels, iron-on transfer media, et c.
are loaded in the same way you load paper (side to be printed
facing the paper tray): see page 10, ff.
For print media specifications, see Section 6.
Before printing, make sure you have the appropriate print
media and media size selected (see page 9): to select the
media, go to the Main tab of the OKI OKIJET 2500 printer
setup dialog box; to select the media size, go to the Page tab
of the OKI OKIJET 2500 printer setup dialog box (see page
15).
20
Page 27

Maintenance
3
Replacing/Swapping the Printhead
Keep the printhead and ink cartridges out of the
reach of children. Do not get the ink near your
eyes or mouth.
Do not touch the ink nozzles when removing the
!
printhead! The printhead can become contaminated, and ink, which is not easily re moved, will get
on your hands and/or clothing.
1. Make sure the printer is turned on.
2. Press and release the Cartridge Change/Clean button.
3. Open the top cover.
4. Once the carriage moves to the center and stops, pull the
green cartridge lock lever to the forward position and
remove the printhead.
The Low Ink indicators will flash, indicating that the
printhead is removed.
21
Page 28

Maintenance
3
5. Install the new/swapped printhead: align the rectangular
hole in the printhead with the green post (➊) on the printer
carriage, then gently lower the printhead into position.
When installing a new color cartridge, insert the
four color ink cartridges into the printhead before
installing the printhead in the printer.
➊
6. Push the green cartridge lock lever back to secure the
printhead.
7. Close the top cover.
To avoid premature failure of the printhead, the
!
printhead must be stored in the storage box when
not installed in the printer.
8. If you are swapping printheads, place the printhead you
removed in the storage box and firmly latch the cover.
To maintain the stor ed printhead
at peak performance, remove it
from the storage box once a
month and use it to print a few
demo pages before returning it to
the storage box.
22
Page 29

Maintenance
3
9. Press and release the Cartridge Change/Clean button.
The printer will prepare the cartridge for printing.
If the carriage does not return home after the
Cartridge Change/Clean button is pressed, try
removing and reinstalling the printhead.
Replacing the Ink Cartridges
Keep the ink cartridges out of the reach of
children. Do not get the ink near your eyes or
mouth.
Be careful not to touch the ink nozzles when han-
!
dling the printhead. Ink will get on your hands and
the printhead can become contaminated.
1. Press and release the Cartridge Change/Clean button.
23
Page 30

Maintenance
3
2. Open the top cover.
3. Pull the green lock lever forward and remove the
printhead.
The Low Ink lights will all flash, indicating that the
printhead is removed.
Do not remove the ink cartridge until you have a
!
replacement cartridge to install!
4. Remove the empty ink cartridge from the printhead.
5. Holding the bag upside down as illustrated, remove the ink
cartridge from its plastic bag.
24
Page 31

Maintenance
3
6. Carefully peel the plastic foil seal off the cartridge in the
direction of the arrows printed on the seal.
!
Do not force the ink cartridge into the printhead!
7. Insert the ink cartridge into the printhead and snap it
firmly down into position.
8. Reinstall the printhead and push the green lock lever back.
9. Close the top cover.
25
Page 32

Maintenance
3
10. Press and release the Cartridge Change/Clean button.
The printer prepares the printhead for printing.
Cleaning the Printhead Nozzles
To clean the printhead nozzles
1. Make sure the printer is turned on and paper is loaded.
2. Press and hold the Cartridge Change/Clean button for
two seconds.
3. Print the Test page (turn the printer off, then press the
Resume/FF button
page shows nozzles not firing, repeat steps 1 and 2.
while turning it back on). If the Test
Aligning the Printhead
In Windows 3.1 or Windows for Workgroups 3.11:
1. Open the Control Panel.
2. Click the Printers icon, then click Setup.
3. Click the Printer tab.
4. Click Align, then Yes.
The test page prints.
5. Click the number which corresponds to the straightest set
of vertical lines on the test page.
6. Click Align.
The test page prints.
7. Repeat steps 5 and 6 until the straightest set of lines
corresponds to 0.
8. Click Done and exit back out.
26
Page 33

Maintenance
3
In Windows 95:
1. Click Start, Settings, Printers.
2. Click the OKIJET 2500 icon with the right mouse button.
3. Click the Printer tab.
4. Click Align, then Yes.
The test page prints.
5. Click the number which corresponds to the straightest set
of vertical lines on the test page.
6. Click Align.
The test page prints.
7. Repeat steps 5 and 6 until the straightest set of lines
corresponds to 0.
8. Click Done and exit back out.
Transporting the Printer
Significant changes in temperature and/or pressure
!
can cause leakage in the ink cartridges and the
color printhead. If such changes will occur as you
transport the printer (e.g., from a cooled or heated
interior environment to a hot or cold exterior
environment, or by airplane), please turn to
Appendix A for transport instructions.
When moving the printer from one location to another
without any significant changes in temperature or pressure:
1. Open the cover, pull the lock lever forward and lift out the
color printhead.
27
Page 34

Maintenance
3
2. Place the color printhead in the printhead storage box.
If you have a high-capacity bl a ck printhead stored
in the box, remove it and install it in the printer
(because it is sealed, the optional high-capacity
black printhead can be left in the printer during
transportation).
As soon as possible after the move:
1. Remove the color printhead from the storage box and
reinstall it in the printer.
If you swapped the color and black printheads, you
will need to remove the black printhead from the
printer before reinstalling the color printhead.
2. Make sure paper is loaded, then press the Power/Reset
button to power up.
4. Press and hold the Resume/FF button for 2 to 5 seconds to
run a demo print.
28
Page 35

Maintenance
3
Cleaning the Printer
To avoid damage to the printer:
!
• Do not pour or spray any liquid directly on the printer.
• Use only water to moisten the cleaning cloth: do
not use detergent, alcohol, etc.
1. Press and hold the Power/Reset button for 2 to 5 seconds
to stop the printer’s opera tion.
2. Unplug the power cord from the outlet.
3. Slightly dampen a soft, clean cloth with water and wipe
the printer cover.
4. Dry the printer cover with a clean cloth.
5. Plug the power cord back into the outlet.
6. Press the Power/Reset button to turn the printer back on.
29
Page 36

Maintenance
3
30
Page 37

Control Panel
4
Control Panel
Each button and LED on the control panel has multiple
functions.
Resume/FF Button
Power/Reset Button
Power LED
Error LED
Cartridge Change/Clean Button
Low Ink Indicators
Control Panel Buttons
Power/Reset Button
Function Action
Turn the printer on. Press and release.
Turn the printer off. Press and hold for 2 to 5 seconds.
Reset the printer. With the printer on, p ress and release. The
data remaining in the buffer is cleared.
Settings permanently stored in the printer
memory are retained.
If the Power/Reset button is pressed during the print
cycle, the printer will complete the current line
before it stops printing.
31
Page 38

Control panel
4
Resume/FF Button
Function Action
Resume printing. If the printing has paused, press and
release.
Form Feed. Press and release.
Eject paper. Press and hold for 2 to 5 seconds.
Clear error (Error LED lit). Press and release.
Print Demo page. Make sure:
1. Paper is loaded.
2. There are no print jobs in progress.
3. There is no paper in the print path.
Then press and hold the Resume/FF
button for 2 to 5 seconds.
Print Test page. 1. Turn off the printer.
2. Press and hold the Resume/FF
button while turning the printer
back on.
The test page prints and the printer
returns to the on-line state.
Cartridge Change/Clean Button
Function Action
Change ink cartridge(s). With the power on, press and release.
(See the label inside the printer cover,
or the instructions under “Replacing the
Ink Cartridges” in Section 3 of this
manual for instructions on changing ink
cartridges).
You can change cartridges during
printing by pressing the Cartridge
Change/Clean button, but doing
so may affect the print quality.
Clean the ink jet nozzles. With the power on, press and hold the
button for 2 to 5 seconds.
You can clean cartridges during
printing by pressing the Change
Cartridge/Clean button. When
the printer finishes printing the
current line, it ejects the sheet, and
cleans the cartridge, then inserts a new
sheet of paper and resumes printing
where it left off.
32
Page 39

Control Panel
4
Control Panel Indicator Lights
Power LED
Condition Meaning
On Printer is on-line and ready to print.
Blinking Printer is processing data.
Error LED
Condition Meaning
On Recoverable error. To correct this, press and release the
Resume/FF button.
Blinking Non-recoverable error: contact your service dealer (see
Section 7 for information on getting service).
Low Ink Indicators
Condition Meaning
Off Ink cartridge contains sufficient ink.
On Cartridge is getting low on ink (about 10 to 15% left):
make sure you have a replacement cartridge on hand.
Blinking Ink cartridge is empty and must be replaced.
Ink cartridge is installed incorrectly
Wrong brand of ink cartridge is installed.
Printhead is not installed in printer.
33
Page 40

Control panel
4
34
Page 41

Troubleshooting
5
Clearing Paper Misfeeds
The Error LED will be lit to indicate a misfeed. To clear a
paper misfeed:
1. Remove all paper from the paper tray.
2. Fan the paper and reinstall it in the paper tray.
3. Press and release the Resume/FF
button to continue the print job.
If the misfeeds continue, flip the paper stack over
(keeping the print side facing the paper support) and
press and release the Resume/FF button to continue
the print job.
35
Page 42

Troubleshooting
5
Clearing Paper Jams
If the Trailing Edge is Accessible
If the trailing edge of the paper is accessible in the paper tray,
grasp it, then press the Resume/FF button for 2 to 5 seconds.
This frees up the paper so that you can pull it out.
To continue the print job, press the Resume/FF button.
If the Trailing Edge is Not Accessible
1. If you cannot get to the trailing edge of the paper in the
paper tray, remove the unused paper from the tray.
2. Remove the output shelf.
36
Page 43

Troubleshooting
5
3. Press back firmly on the
green plastic tabs at either
side of the paper tray until
they unsnap, then remove
the paper tray, observing
carefully how the tray is
installed.
4. Remove the jammed sheet of paper from the printer.
5. Press in on the feed
plate (➊) and insert
the tray into the
back of the printer at
the bottom of the
tray opening, then
pivot the tray toward
you and release the
feed plate.
6. Take hold of the green
tabs and push down until
they snap in place.
➊
7. Reinstall the output shelf.
8. Fan the paper and reinstall it in the paper tray.
9. Press and release the
Resume/FF button to
continue the print job.
37
Page 44

Troubleshooting
5
Clearing Multi-Page Paper Jams
If a clump of 10 or more pages has jammed in the printer,
removing the paper tray will not allow sufficient clearance to
extract it. To correct such a paper jam:
1. Follow steps 1 through 4 under “If the Trailing Edge is Not
Accessible” (see pages 36-37).
2. Remove the top cover:
a. Open the cover about half way, then press against the
side to disengage the pin from the hole.
b. Slide the pin at the other end out of its hole and lift the
cover off.
3. Make sure that the printhead is in the left-most position. If
not, press the Cartridge Change/Clean button (
).
4. Remove the Star Wheel bar:
a. Press in firmly at either end to disengage the latch tabs.
b. Pivot the bar back and lift it out.
38
Page 45

Troubleshooting
5
5. While pressing down on the green dot
inside the printer, remove the
jammed paper.
6. Reinstall the Star Wheel bar:
a. Insert the pins (➊) in the cradles (➋) at either end and
push the bar firmly down into place.
➊
➋
b. Pivot the bar forward and press in at either end to
reengage the latch tabs.
7. Reinstall the top cover (insert pin in the hole on one side,
then press against the opposite side to slip its pin into the
corresponding hole).
8. Follow steps 5 through 8 under “If the Trailing Edge is Not
Accessible” (see page 37).
39
Page 46

Troubleshooting
5
Problem Solving
Problem
Printer Power LED does not turn
on.
Printer output does not reflect the
options selected.
Blank print
Possible Meaning(s) Solution(s)
No power from outlet
Power cord is not securely inserted into the
power outlet and/or the printer.
Power cord is damaged.
The options selected with the print driver
are being overridden by the application.
Printhead, cable or PC
Connect the power cord to a different power outlet.
Remove the power cord from the wall outlet, then remove
it from the printer and reinsert it. Plug the power cord back
into the wall outlet.
Check the power cord and replace if damaged.
The application may override any options that are selected
using the printer driver. Choose the desired options through
your application.
Print Demo page (See “Print the Demo Page” in Section 1).
1. Demo page is OK: check cable and PC.
2. Demo page is blank:
a. Remove/reinstall printhead; print demo page.
b. Demo page still blank: press Cartridge
Change/Clean button for 2 to 5 seconds to clean the
printhead. Repeat if necessary.
c. Demo page still blank: replace printhead.
d. Demo page still blank: contact your local service
dealer (see Section 7).
40
Page 47

Troubleshooting
5
Possible Meaning(s) Solution(s)Problem
Data is sent, but not printed.
Data is sent, but not printed and the
Error LED is blinking.
Printer is not set for local port.
Interface cable is not connected properly.
Interface cable is damaged. Check the interface cable and replace if damaged.
The type of interface is incorrect. Verify that the computer is using the parallel interface.
Interface cable is incorrect.
Printer has paused.
Check the port setting (usually lpt1) for your printer to be
sure that it is not being directed either to a remote printer or
to print to file. (See the Details tab of the OKI OKIJET
2500 printer setup dialog box.)
Press and release the Power on/Reset button to make the
printer stop its operation. Then properly reconnect the
interface cable to the printer and host computer.
Check your software manual to make sure that your
software communicates to the interface port to which your
printer is connected.
You must use an IEEE 1284-compliant, parallel,
bi-directional interface cable.
Press and release the Resume/FF button to continue
printing.
41
Page 48

Troubleshooting
5
Possible Meaning(s) Solution(s)Problem
Error LED is on. Printer is out of paper. Add paper to the paper tray and press the Resume /FF
Printhead has not been correctly installed. Remove and reinstall the printhead.
Carriage position error has occurred. 1. Press the Resume /FF button to clear the error and eject
Paper feed error has occurred. If paper has misfed, remove the jammed pape r. (Refer to
The optional high-capacity black printhead
is installed and color print is selected in the
Printer Driver Setup.
Error LED is blinking. An internal printer fault has occurred. Turn the printer off, then back on.
button.
the paper.
2. Ensure that all packing material is removed.
“Clearing Paper Misfeeds” earlier in this Section).
• For black only print, press and release the Resume/FF
button.
• For color printing, replace the high-capacity black
printhead with the color printhead.
If the problem persists, unplug the printer from the outlet,
then plug it back in and turn it on.
If the problem still persists, contact your local service
dealer (see Section 7).
42
Page 49

White horizontal lines and streaks
appear in the printing.
Possible Meaning(s) Solution(s)Problem
The printhead nozzles are blocked.
The ink cartridge is empty. Replace the ink cartridge.
1. Press the Cartridge Change/Clean button for 2 to 5
seconds to clean and restore the printhead.
2. Print the Test page (hold Resume/FF button while
turning printer on). If the Test page shows nozzles not
firing, repeat the above process up to 5 times. If the
problem continues, replace the printhead.
Troubleshooting
5
Print is faint or missing.
The printer is connected to a power strip
which has been turned off.
The printhead has been left in the storage
box for a long time.
The paper being used is not one of the
recommended types.
The ink cartridge is empty.
Print quality is set to Draft. Use the printer driver to select a different print quality.
The printer requires a continuous, small amount of power
to maintain the printhead. If you use a power strip with the
printer, you must leave it turned on at all times.
To maintain a stored prinhtead, you need to remove it from
the storage box once an month and use it to print several
pages before returning it to the storage box.
Try pressing the Cartridge Change/Clean button for 2 to 5
seconds to clean and restore the printhead.
Refer to Section 6 for paper recommendations.
Replace the ink cartridge.
43
Page 50

Troubleshooting
5
Possible Meaning(s) Solution(s)Problem
Print is faint or missing
(continued).
Blurry, or jagged vertical
lines
Poor print quality when
printing on transparencies.
The printhead nozzles are blocked. 1. Press the Cartridge Change/Clean button for 2 to 5 seconds to
The ink cartridge is clogg ed, defective, or
empty.
Paper problem
Printhead out of alignment
“Transparency” is not selected as the
Media.
The document was printed on the wrong
side of the transparency.
Transparencies in the output shelf are not
yet dry and new transparencies being
printed are causing smearing as they enter
the output shelf.
clean and restore the printhead.
2. Print the Test page (hold Resume/FF button while turning
printer on). If the Test page still shows nozzles not firing,
repeat step 1 two more times. If the problem is still not
corrected, replace the printhead.
Press the Cartridge Change/Clean button for 2 to 5 seconds, then
print the Test page (hold Resume/FF button while turning printer
on). If necessary, repeat the process up to 5 more times. If the
problem is still not corrected, replace the ink cartridge.
Turn the paper over to print on the other side.
• Perform the printhead alignment procedure (see page 26).
• Switch to High Quality print mode in the printer driver.
In the Printer Setup dialog box (see page 15), select Transpar-
ency as the Media in the Main tab.
Remove the transparencies from the printer, turn them over, and
reinsert them: the rough side should face the paper tray.
Remove transparencies from the output shelf as soon as they are
printed.
44
Page 51

Troubleshooting
5
Possible Meaning(s) Solution(s)Problem
Print image is clipped or off the
edge of the print media.
Printing on one page of the
document suddenly gets much
larger and that page flows onto
several pages.
Paper is not feeding properly. The paper is not correctly positioned
The selected document margins exceed the
printer margins.
Incorrect settings for media size and/or type
in the printer driver setup.
The Reset button was accidentally pressed
during a printer error recovery process.
between the paper guides.
The paper is not loaded properly.
More than one type of print media is loaded
in the paper tray or the paper loaded is not
recommended.
Adjust the margins in the application as necessary.
Ensure correct selection of media size and type in the
printer driver setup.
When the document has finished printing, resend the
affected page.
Make sure the left edge of the paper is aligned with the left
paper guide and that the paper guide lever is against the
right edges of the paper.
• Remove the paper, fan the stack, reload.
• Ensure th at paper tray is not overloaded.
• Use new paper.
• Make s u re that on ly one type of paper is loaded in the
tray: mixing different types of paper in tray will cause
paper jams.
• Verify use of recommended media (see Section 6).
45
Page 52

Troubleshooting
5
Possible Meaning(s) Solution(s)Problem
Paper does not stack neatly in the
output tray.
Low Ink Indicator on. Low ink in corresponding cartridge . Make sure you have a replacement ink cartridge on hand.
Low Ink indicator blinking.
The Star Wheel bar is not properly engaged.
The star wheels in the Star Wheel bar are
jammed or askew.
The corresponding ink cart ridge is empty.
The ink cartridge is not installed correctly. Press down on the cartridge to ensure that it is fully seated.
The printhead is not installed
The cartridge lock lever is not in the locked
position.
The wrong type of ink cartridge is installed. Replace the ink cartridge with a genuine Okidata ink
Remove the top cover (see page 38, ff.) and make sure that
the Star Wheel bar is firmly engaged, then replace the top
cover.
Remove the Star Wheel bar (see page 38) and make sure all
the star wheels can rotate freely, then reinstall the Star
Wheel bar.
Replace the ink cartridge.
Install the printhead (see steps 9 through 11 on page 7).
Open the top cover and make sure the lock lever is pushed
back all the way (see page 7).
cartridge.
46
Page 53

Specifications
Printer Specifications
6
Print Method: Four-color thermal, drop-on-demand
ink jet
Print Speed: Color Printhead (standard):
Black printing: up to 5 ppm
Color printing: up to 2.5 ppm
High-Capacity Black Printhead
(option): up to 7 ppm
Printhead Nozzles: Color Printhead (standard): 120
nozzles—24 cyan, 24 magenta,
24 yellow, 48 black
High-Capacity Black Printhead
(option): 128 nozzles
Print resolution: 1200 x 600 dpi on glossy paper; 600 x 600
dpi on plain paper (addressable dots per
inch)
Compatibility: Microsoft Windows 3.1x, Windows 95
PCL3C emulation for DOS applications
80286 or faster IBM
Interface: Parallel, bi-directional. Cable must be
IEEE 1284 compliant.
Emulation: HP PCL3C
HP DeskJet
Paper capacity: 125 sheets, 20-lb. (80 g/m
Print media: Plain paper, transparencies, envelopes,
card stock, paper-faced labels, high
resolution paper, photo glossy paper and
fabric transfer sheets
47
®
550C
®
-compatible PC
2
) bond paper
Page 54

Specifications
6
Resident: Courier, CG Times, Univers
typefaces
Symbol Sets: HP PC-8, HP ROMAN-8, PC-8 Dan/Nor
(ISO 21), PC-850, ECMA-94 Latin 1 (ISO
8859/1), German (ISO 21), French (ISO 69),
Italian (ISO 15), Spain (ISO 17), Swedish
Names (ISO 11), Swedish (ISO 10), Norwegian 1 (ISO 60), Norwegian 2 (ISO 61),
Portuguese (ISO 16), UK (ISO 4), ANSI
ASCII (ISO 6), HP-Legal, ISO IRV (ISO 2),
HP-PC-852, Latin 2 (ISO 8859/2), Latin 5
(ISO 8859/9), HP-PC-8 Turkish, Russian
(Cyrillic, 3R), and Russian (Cyrillic, 10N)
character sets.
Consumable Life, @ 5% Coverage:
Color Printhead: 3,000 pages
High-Capacity Black Printhead (Option): 1,460 pages
Color Ink Cartridges: 295 pages
Black Ink Cartridge: 275 pages
Printable area: Left, Right, Top Margins: 0.20-inch (5 mm)
Bottom Margin: 0.5 to 0.71-inch
(12.7 to 18 mm)
Output T ray: 50 sheets 20 lb. (80 g/m
Operating
Temperature: 60 to 85°F (15 to 30°C)
Operating
Humidity: 20% to 80% RH (No condensation)
Sound level: Printing less than 46 db (A) average
Electrical: 90 to 260 volts AC, 50/60 Hz
110V/60 HZ: 0.1A idle, 0.5A operating
230V/50 Hz: 0.08A idle, 0.3A operating
Dimensions: 16-3/8" W x 11-3/4" D x 7-5/8" H
(416 x 299 x 193 mm)
Weight: 10.1 lbs. (4.6 kg )
Specifications are subject to to change without notice.
2
) paper
48
Page 55

Specifications
6
Paper Specifications
Most types of paper will work well in your printer, although
some variables in paper composition may affect print quality.
Most high-grade photocopying papers produce good results.
The majority of cotton bond papers also yield excellent
results. Paper should be tested fully before large quantities
are purchased.
Avoid extremely thin paper, thick paper, or
chemically processed paper, such as thermal fax
paper, as frequent paper misfeeds may occur.
Sheet Feeder up to 125 sheets
Capacity
Weight 16-36 lb. (60-135 g/m
Common USA: Letter (8½" x 11")
Sizes Legal (8½" x 14")
Executive (7¼" x 10½")
International: A4 (210 x 297 mm),
Minimum Size 3.9" x 3.9" (100 x 100 mm)
Maximum Size 9" x 14" (229 x 356 mm)
2
)
B5 (182 x 257 mm)
Envelope Specifications
Most types of envelopes will work well in your printer. Some
variables in paper composition may affect the quality of the
printing. Envelopes should be tested before large quantities
are purchased.
For best results, use short-flap, side-seam envelopes rather
than v-flap envelopes:
Short-Flap Type V-Flap T ype
Sheet Feeder up to 10 envelopes, 20-lb (75 g/m2) weight
Capacity
Usable T ypes USA: #10 (4-1/8" x 9½")
International: C6 (114 x 162 mm)
Weight 20-24 lb. (75 to 90 g/m
Minimum Size 3.9" x 3.9" (100 x 100 mm)
Maximum Size 9" x 14" (229 x 356 mm)
DL (110 x 220 mm)
2
)
49
Page 56

Specifications
6
Label Specifications
Always use labels designed specifically for ink jet
!
printers. Use only paper face label stock. Ink will
not dry on vinyl, plastic, or clear label stock.
Use only full sheets of labels: partial sheets can jam
the printer! Do not use any label material which is
partially used, folded, curled, or wrinkled.
Sheet Feeder Up to 50 sheets
Capacity
Sheet Size USA: Letter (8½" x 11")
International: A4 (210 x 297 mm)
Transparency Specifications
Important! Do not use paper-backed transparencies!
Always use transparencies designed specifically for ink jet printers.
Sheet Feeder up to 10 transparencies
Size USA: Letter (8½" x 11")
International: A4 (210 x 297 mm)
Card Specifications
Sheet Feeder Up to 10 cards
Capacity
Weight 90 lb. (163 g/m
Minimum Size 3.9" x 3.9" (99 x 99 mm)
Maximum Size 9" x 14" (229 x 356 mm)
2
) max.
Iron-on Transfer Specifications
Iron-on transfer media is used for copying images to T-shirts,
canvas or similar material. Please see the instructions supplied with your iron-on transfer media for the actual transfer
instructions.
Important! Purchase iron-on transfer media specifically
designated for ink jet printers. Be sure to test the
media with your printer before buying large
quantities.
Sheet Fe ed One Sheet
Capacity
Size Letter (8½" x 11")
A4 (210 x 297 mm)
50
Page 57

Customer Support & Service
7
Getting Support and Service
This information is valid for the United States and
Canada only.
Your Dealer
Consult the store where you purchased your printer, or call
1-800-OKIDATA (1-800-654-3282) for the location of the
nearest Authorized Okidata Service Dealer. Have your ZIP
code ready.
• Prices and minimum charges may vary.
• Proof of purchase is required for warranty work. Be sur e
to retain your purchase documents.
Okidata Information System Automated Attendant
For automated customer support information, call
1-800-OKIDATA (1-800-654-3282): available 24 hours a day,
7 days a week, providing immediate assistance with:
• Sales and Service Referrals
• Parts and Consumable Referrals
• Product Information
This service also provides access to Okidata’s Faxable Facts
document retrieval system and to our Okidata Customer
Support Professionals.
51
Page 58

Customer Support & Service
7
Okidata Customer Support Professionals
Agents are available 24 hours a day, seven days a week. Call
1-800-OKIDATA (1-800-654-3282). Please call from a
telephone close to your printer, so you can refer to it directly
as needed during the conversation.
Our Customer Support Representatives are trained on all
current Okidata products. They can answer your questions
regarding
• Locations of Sales and Service Dealers
• Installation of your OKI printer
• Usage and normal maintenance of your pinrter
• Availability and installation of printer drivers
Customer Support Representatives are not
trained to provide assistance with the use of
commercial software packages. Please consult
your software user’s manual for times and
availability of their support .
• Error message interpretation and solutions
• Parts identification
• Consumer relations
Okidata Faxable Facts
Call 1-800-654-6651 and follow the recorded message
(English only) to have information faxed to you automatically through Okidata’s Faxable Facts on-line document
retrieval system:
• Pricing and information on OKIJET Print Cartridges and
Accessories
• OKIJET Support Bulletins
• Okidata Product Information
52
Page 59

Customer Support & Service
7
Okidata Service Locations
For the latest list of Okidata Service Centers, see the Okidata
We b site at http://www.okidata.com.
• Allow 3½ business days for repair.
• Carry-in repairs must be called in first to schedule service.
• Before shipping your printer, you must call and obtain a
return authorization number.
USA USA
Okidata Okidata
57 Carnegie Plaza 851 Feehanville Drive
Cherry Hill, NJ 08003 Mt. Prospect, IL 60056
Attn.: Field Service Dept. Attn.: Field Service Dept.
Phone: 1-800-654-3282 Phone: 1-800-654-3282
Fax: 1-609-222-5247 Fax: 1-609-222-5247
Argentina Brazil
Megatech Oki Data do Brasil, Ltda
Lavalle 1524 Av. Leonardo da Vinci, 1178/1182
1048 Buenos Aires, Argentina Jabaquara
Phone/Fax: (541) 371-4123 Phone: (5511) 5589-1518
[Touch-Tone
required]
®
Sao Paulo, Brazil
Fax: (5511) 5584-0267
Canada Chile
Okidata Teknos Comunicaciones
2735 Matheson Blvd. East, Unit 1 Santa Elena 2222
Mississauga, Ontario Santiago, Chile
Canada L4W 4M8 Phone: 56 (2) 555 5530
Attn.: Field Service Dept. Fax: 56 (2) 550 2390
Phone: 1-800-654-3282
Fax: 905-238-4427
Colombia Mexico
Soluciones Tecnologicas Oki Data de Mexico, S.A. de C.V.
C/93 #14-17, OF 308 Av. Insurgentes 1700-7 Piso
Centro 93 Col. Florida 01030
Bogota, Colombia Phone: 525-661-6860
Phone: (571) 218-2380 Fax: 525-661-5861
Fax: (571) 622-1280
Venezuela
MAI de Venezuela S.A.
Torre Lincoln, Piso 8
Sabana Grande
Caracas, V enezuela
Phone: 782.78.11
F ax: (02) 781.9390
53
Page 60

Customer Support & Service
7
Purchasing Replacement Parts & Accessories
Before you order, know your printer model number (see the
front of the printer) and have the correct part number and
description of the item.
Ways to Purchase
• Consult the dealer where your purchased your printer.
• Consult an Okidata Authori zed Sales or Service Dealer.
Call 1-800-OKIDATA (1-800-654-3282) for the nearest
Authorized Sales and Service location: have your ZIP code
and telephone area code ready.
• Check office supply catalogs or your local stationery store.
Be sure to ask for genuine Okidata ink cartridges!
• In the US, order toll-free by phone at 1-800-OKIDATA
(1-800-654-3282), using VISA, MasterCard, or American
Express.
— $10.00 minimum purchase required
— Orders shipped within 24 hours.
• In Canada, call 905-602-6400 to order parts: VISA and
American Express are accepted.
Accessories & Service Manual
Item Order No.
Black Printhead (➊).............. 52110101
Service Manual..................... 59272601
➊
Replacement Parts
Part Order No.
Ink Cartridges (➋)
Black.................................................................... 52110001
Cyan..................................................................... 52110002
Magenta ............................................................... 52110003
Yellow .................................................................. 52110004
Color Printhead (➌) ................................................. 52110102
Printhead Storage Box (➍) ...................................... 53591201
➋
1
➍
➌
54
Page 61

Transporting the Printer
A
Transporting the Printer under Special
Conditions
If you will be transporting the printer under either or both of
the following conditions:
• Elevation Changes greater than 1,000 feet
• Temperature Changes greater than 20ºF (10ºC)
you will need to remove the color printhead and the individual ink cartridges before transport.
Because it is sealed, the high-capacity black printhead can be left in the printer during transport. If
you have the color printhead stored in the storage
box, you must remove the ink cartridges before
transporting it under the above conditions (see steps
2 through 5).
1. Open the cover, pull the lock lever forward and lift out the
color printhead.
55
Page 62

Transporting the Printer
A
2. One at a time:
a. Remove each ink cartridge, and wipe the area around
the ink port dry with a tissue.
b. Wrap the cartridge in plastic wrap (keep ink port up to
minimize ink spillage), and tape the wrap securely.
3. Place the ink cartridges ink port up in a plastic bag with a
zipper-type top seal, then squeeze out as much air as
possible and seal the bag.
4. Place the empty color printhead in the printhead storage
box.
If you have a high-capacity bl a ck printhead stored
in the box, remove it and place it in the printer
during transportation.
5. Place the storage box in a plastic bag with a zip-type
sealable top and seal the top.
As soon as possible after the move:
1. Remove the color printhead from the storage box.
2. Unpack and wipe off the ink cartridges, then snap each ink
cartridge into the corresponding color/number slot in the
printhead.
3. Reinstall the printhead.
56
Page 63

2. Make sure paper is loaded, then press the Power/Reset
button to power up.
4. Press and hold the Resume/FF button for 2 to 5 seconds to
run a demo print.
Transporting the Printer
A
57
Page 64

FCC, IC, CE Statements
Federal Communications Commission
Radio Frequency Interference Statement
WARNING: This equipment has been tested and found to
comply with the limits for a Class B digital device, pursuant to
Part 15 of the FCC rules. These limits are designed to provide
reasonable protection against harmful interference in a residential installation. This equipment generates, uses and can radiate
radio frequency energy and, if not installed and used in accordance with the instructions, may cause harmful interference to
radio communications. However, there is no guarantee that
interference will not occur in a particular installation. If this
equipment does cause harmful interference to radio or television reception, which can be determined by turning the equipment off and on, the user is encouraged t o try to correct the
interference by one or more of the following measures:
• Reorient or relocate the receiving antenna.
• Increase the separation between the equipment and the
receiver.
• Plug the unit into an outlet on a circuit different from that to
which the receiver is connected.
• Consult the dealer or an experienced radio/television tec hnician for help.
It is the responsibility of the user to obtain the
required shielded cable in order to ensure compliance
of this equipment with FCC regulations.
Changes or modifications not expressly approved by OKIDATA
may void your authority to operate this device.
Industry Canada Radio Interference Statement
This OKIDATA apparatus complies with the Class B limits for
radio interference as specified in the Industry Canada Radio
Interference Regulations.
European Union Council of the European Communities
(CE) Statement of Electromagnetic Conformance
This product complies with the requirements of the Council
Directive 89/336/EEC on the approximation of the laws of
the member states relating to electromagnetic compatibility.
58
Page 65

Limited Warranty
Okidata, division of Oki America, Inc. (Okidata) warrants
this printer to be free from defects in material and workmanship and will remedy any such defect according to the terms
of this Limited Warranty. This Limited Warranty does not
extend to consumable items, including but not limited to print
cartridges, etc.
Okidata warrants that this machine is manufactured from new
parts, or new and serviceable used parts which perform like
new parts, and that it is in good working order.
Okidata will repair (or at its option, replace) at no charge, any
defective OKIJET 2500 printer for two (2) years from the
date of purchase. This Limited Warranty extends to the
original purchaser only.
When warranty service involves the exchange of a machine
or part, the item replaced becomes the property of Okidata.
The replacement may be a new or a repaired item. The
replacement item assumes the remaining warranty period of
the original machine.
To make request or claim for service under this Limited
Warranty the original purchaser must return the Okidata
product, shipping prepaid, in the original shipping container
or equivalent, to Okidata or an authorized Okidata service
center and assume the risk of loss or damage in transit.
BEFORE YOU SEND THE UNIT FOR WARRANTY
SERVICE, REMOVE THE INK CARTRIDGES TO PREVENT DAMAGE TO THE PRINTER DURING SHIPMENT: failure to do so may result in your being charged a
fee for cleaning/repairs. A written receipt for the product,
showing the date of purchase, dealer’s name, and both the
model and serial numbers of the Okidataprinter must accompany any request or claim for work to be performed under
this Limited Warranty.
This Limited Warranty shall not apply if the product has been
damaged due to abuse, misuse, misapplication, accident, or
as a result of service or modification by any other than an
authorized Okidata service center.
THERE ARE NO EXPRESS OR IMPLIED WARRANTIES
OTHER THAN THOSE ON THE FACE HEREOF AND
DESCRIBED ABO VE. NO WARRANTIES WHETHER
EXPRESS OR IMPLIED, INCLUDING, BUT NOT LIMITED TO, ANY IMPLIED WARRANTIES OF MERCHANTABILITY OR FITNESS FOR A PARTICULAR
PURPOSE, SHALL EXTEND BEYOND THE WARRANTY
PERIOD DESCRIBED ABOVE OF TWO (2) YEARS. Some
states do not allow limitations on how long an implied
warranty lasts, so the above limitation may not apply to you.
59
Page 66

Limited Warranty
Additional information on obtaining service under this
Limited Warranty is available by contacting the Okidata
dealer from whom the product was purchased, by contacting
Okidata directly at 1-800-OKIDATA (1-800-654-3282), or by
contacting one of the service depots listed under “Okidata
Service Locations” on pages 52 and 53.
This Limited Warranty applies to all OKIJET 2500 printers.
The procedure for obtaining service may vary outside the
continental United States and Canada. Contact your Okidata
dealer for such warranty service information.
This warranty gives you specific legal rights, and you may
also have other rights which vary from state to state and from
province to province.
60
Page 67

Overnight Exchange
Available in the United States and Canada only.
If you choose to use our Overnight Exchange service, call
1-800-OKIDATA (1-800-654-3282): our trained personnel
will try to solve your problem over the phone. If they determine that your printer hardware is defective, an exchange
machine will be shipped to you via air express. You will
receive the exchange machine the next business day — or no
later than the second business day.
You must return the failing machine to Okidata by packing it
in the materials from the exchange machine, and making it
available for pickup by Okidata’s representative within 2
business days from your receipt of the exchange machine:
failure to do so will result in your being charged the full price
of the exchange machine. BEFORE YOU SHIP THE MACHINE, REMOVE THE INK CARTRIDGES TO PREVENT
DAMAGE TO THE PRINTER DURING SHIPMENT :
failure to do so may result in your being charged a fee for
cleaning/repairs.
Overnight Exchange is not available for machines that h ave
been defaced, altered, or damaged beyond repair. When
Overnight Exchange is used, the returned machine becomes
the property of Okidata.
Exchange machines may be new or repaired, at the option of
Okidata: the exchange machine becomes the property of the
customer when the returned machine has been picked up by
Okidata’s designated carrier and it assumes the remainder of
the warranty period from the returned machine. The returned
machine must not be encumbered.
Overnight Exchange is not a guarantee of uninterrupted or
error-free functioning of a machine. Overnight Exchange
does not include repair of failures caused by: misuse, neglect,
accident, modification, operation outside the operating
environment described in this User’s Guide, improper
maintenance by you, failure caused by service of the machine
by non-authorized servicers, or failure caused by a p roduct,
including supply products for which Okidata is not responsible.
61
Page 68

Glossary
Acronyms
CMYK. Cyan/Magenta/Yellow/Black: K is used for bl a ck
because B is used to represent blue in RGB.
cpi. Characters per inch.
cpl. Characters per line.
dpi. Dots per inch (printer resolution).
DOS. Disk Operating System.
LED. Light Emitting Diode.
PCL3C. Hewlett Packard Printer Command Language.
RGB. Red/Green/Blue.
RH. Relative humidity.
Terms
Cotton bond paper. Paper with a high proportion of cotton
fiber. Usually this is a high-quality paper.
Dither. A method by which dots are combined on a page to
produce a wide spectrum of colors or gray tones.
Font. A character or set of characters having the same
typeface, size and style: e.g., 12-point, Univers, bold.
Ink Jet. One nozzle of an ink jet printer head.
Ink Jet Printer. A type printer that heats the ink to a boiling
point in a nozzle to form a bubble. When the ink expands,
the ink is projected onto the paper.
Internal Fonts. Fonts which are resident in the printer.
Parallel Interface. An interface that transmits multiple bits
simultaneously.
Parallel Port. A parallel interface port (generally designated
LPT1:, LPT2:, etc.) on the back of a PC system or unit, most
often used to connect a printer.
Print Drivers. Software which interfaces between the printer
and computer and controls the printer’s att ributes.
Printhead Nozzles. The orifices in an ink jet printhead from
which the ink is expelled.
Resident Fonts. Fonts residing in the printer: same as
internal fonts.
Resolution. The degree of fine detail in printing, expressed
in dots per inch (dpi). The higher the dpi, the greater the
detailed fineness of the printed image. The lower the dpi, the
coarser the printed image will appear.
62
Page 69

Material Safety Data Sheet (MSDS)
MSDS No. 58321301
for OKIJET 2500 Black Ink Cartridge (P/N 52110001)
For more information, contact
OKIDATA
532 Fellowship Road,
Mt. Laurel, NJ 08054-3405.
For emergency information, contact Okidata’s agent, the
Xerox Customer Safety hotline, 24 hours a day, at
1-800-828-6571.
Emergency First Aid Procedures
Emergency Procedure
Contact occurs Wash affected area with soap and water.
with skin.
Contact occurs Flush eyes with large quantities of water for 15
with eyes. minutes, keeping eyelids open with fingers. Seek
medical attention.
Ink is ingested. If person is conscious, dilute stomach contents
with several glasses of water. Seek medical
attention.
Ink is inhaled. Remove person from area of exposure to fresh air.
Preparation Date: June 1, 1998
Ingredients
Water: 50-60% Dipropylene glycol: 10-15%
CAS # 7732-18-5 CAS # 110-98-5
OSHA PEL N/E* OSHA PEL N/E*
ACGIH TLV N/E* ACGIH TLV N/E*
Trade Secret Ingredient: 15-20% Trade Secret Ingredient: <5%
New Jersey T rade Secret New Jersey Trade Secret
Registration # 489 909-5060P CH Registration #
TPM: 10-15%
CAS # 20324-33-8
OSHA PEL N/E*
ACGIH TLV N/E*
5859800-5002
Physical Data
Melting Point: N/D*
Boiling Point: N/D*
Vapor Pressure: N/D*
Evaporation Rate (Butyl Acetate=1): N/D*
Specific Gravity (H
pH: 7.0 to 7.7
Solubility in Water: Soluble.
Appearance and Odor: Black liquid with slight odor.
*N/A = Not applicable, N/D = Not determined, N/E = None established.
63
O=1): N/D*
2
Page 70

MSDS: Black Ink
Fire and Explosion Hazard Data
Flash Point: Non-flammable
Autoignition Point: N/A*
Flammability Limits, LEL, UEL: N/A*
Extinguishing Media: N/A*
Special Fire and Explosion Procedures: None
Unusual Fire and Explosion Hazards: None.
Health Hazard Data:
Routes of Entry: Skin, eyes, ingestion, inhalation
Health Hazards:
Oral LD
Dermal LD
Inhalation LC
extremely low given the physical nature of the product.
Skin Irritation: Non-irritating, non-sensitizing.
Eye Irritation: Not an irritant (rabbits).
Ingestion: May cause gastro-intestinal discomfort with ingestion of
large quantities.
Mutagenicity: No mutagenicity detected.
Carcinogens: None present.
: Not determined.
50
: Not determined.
50
: Not determined. Potential inhalation exposure is
50
Reactivity Data
Stability: Stable.
Polymerization: Will not occur.
Hazardous Decomposition or Byproduct: None.
Incompatibility: Acids.
Spill Cleanup and Disposal
Spill Cleanup: Use absorbent towel to wipe up the ink. Rinse area with
water.
Waste Disposal: Not a hazardous waste according to Federal Regulation
40 CFR 261. Dispose of in accordance with all applicable Federal, State
and Local laws.
Safe Handling and Use
Respiratory Protection: None required when used as intended.
Protective Gloves and/or Eye P rotection: W ater-proof gloves in
unusual handling. Goggles or safety glasses recommended.
Ventilation: Not normally required.
Other Protective Equipment and/or Hygienic Practices: None
required when used as intended.
Special Precautions
Precautions for Handling or Storage: Keep out of reach of children.
Other Precautions: None.
The information contained in this Material Safety Data Sheet (MSDS) is
based on data considered accurate; however, no warranty is expressed or
implied regarding the accuracy of these data or the results to be obtained
from the use thereof. V endor assumes no responsibility for injury to vendee
or third person party proximately caused by the product if reasonable
safety procedures are not adhered to as stipulated in the MSDS. Furthermore, vendor assumes no responsibility for injury to vendee or third person party proximately caused by abnormal use of the product even if reasonable safety procedures are followed. Additionally, vendee assumes the
risk of their use of the product.
64
Page 71

Material Safety Data Sheet (MSDS)
MSDS No. 58321401
for OKIJET 2500 Cyan Ink Cartridge (P/N 52110002)
For more information, contact
OKIDATA
532 Fellowship Road,
Mt. Laurel, NJ 08054-3405.
For emergency information, contact Okidata’s agent, the
Xerox Customer Safety hotline, 24 hours a day, at
1-800-828-6571.
Emergency First Aid Procedures
Emergency Procedure
Contact occurs Wash affected area with soap and water.
with skin.
Contact occurs Flush eyes with large quantities of water for 15
with eyes. minutes, keeping eyelids open with fingers. Seek
medical attention.
Ink is ingested. If person is conscious, dilute stomach contents
with several glasses of water. Seek medical
attention.
Ink is inhaled. Remove person from area of exposure to fresh air.
Preparation Date: June 1, 1998
Ingredients
Water: 40-45% TPM: 10-15%
CAS # 7732-18-5 CAS # 20324-33-8
OSHA PEL N/E* OSHA PEL N/E*
ACGIH TLV N/E* ACGIH TLV N/E*
Trade Secret Ingredient: 30-40% Dipropylene glycol: 10-15%
New Jersey Trade Secret CAS # 110-98-5
Registration #
15859800-5005 OSHA PEL N/E*
ACGIH TLV N/E*
Physical Data
Melting Point: N/D*
Boiling Point: N/D*
Vapor Pressure: N/D*
Evaporation Rate (Butyl Acetate=1): N/D*
Specific Gravity (H
pH: 7.5 to 8.0
Solubility in Water: Soluble.
Appearance and Odor: Cyan (blue) liquid with slight odor.
*N/A = Not applicable, N/D = Not determined, N/E = None established.
65
O=1): N/D*
2
Page 72

MSDS: Cyan Ink
Fire and Explosion Hazard Data
Flash Point: Non-flammable
Autoignition Point: N/D*
Flammability Limits, LEL, UEL: N/A*
Extinguishing Media: N/A*
Special Fire and Explosion Procedures: None
Unusual Fire and Explosion Hazards: None.
Health Hazard Data:
Routes of Entry: Skin, eyes, ingestion, inhalation
Health Hazards:
Oral LD
Dermal LD
Inhalation LC
extremely low given the physical nature of the product.
Skin Irritation: Non-irritating, non-sensitizing.
Eye Irritation: Not an irritant (rabbits).
Ingestion: May cause gastro-intestinal discomfort with ingestion of
large quantities.
Mutagenicity: No mutagenicity detected.
Carcinogens: None present.
: Not determined.
50
: Not determined.
50
: Not determined. Potential inhalation exposure is
50
Reactivity Data
Stability: Stable.
Polymerization: Will not occur.
Hazardous Decomposition or Byproduct: None.
Incompatibility: Acids.
Spill Cleanup and Disposal
Spill Cleanup: Use absorbent towel to wipe up the ink. Rinse area with
water.
Waste Disposal: Not a hazardous waste according to Federal Regulation
40 CFR 261. Dispose of in accordance with all applicable Federal, State
and Local laws.
Safe Handling and Use
Respiratory Protection: None required when used as intended.
Protective Gloves and/or Eye P rotection: W ater-proof gloves in
unusual handling. Goggles or safety glasses recommended.
Ventilation: Not normally required.
Other Protective Equipment and/or Hygienic Practices: None
required when used as intended.
Special Precautions
Precautions for Handling or Storage: Keep out of reach of children.
Other Precautions: None.
The information contained in this Material Safety Data Sheet (MSDS) is
based on data considered accurate; however, no warranty is expressed or
implied regarding the accuracy of these data or the results to be obtained
from the use thereof. V endor assumes no responsibility for injury to vendee
or third person party proximately caused by the product if reasonable
safety procedures are not adhered to as stipulated in the MSDS. Furthermore, vendor assumes no responsibility for injury to vendee or third person party proximately caused by abnormal use of the product even if reasonable safety procedures are followed. Additionally, vendee assumes the
risk of their use of the product.
66
Page 73

Material Safety Data Sheet (MSDS)
MSDS No. 58321501
for OKIJET 2500 Magenta Ink Cartridge (P/N 52110004)
For more information, contact
OKIDATA
532 Fellowship Road,
Mt. Laurel, NJ 08054-3405.
For emergency information, contact Okidata’s agent, the
Xerox Customer Safety hotline, 24 hours a day, at
1-800-828-6571.
Emergency First Aid Procedures
Emergency Procedure
Contact occurs Wash affected area with soap and water.
with skin.
Contact occurs Flush eyes with large quantities of water for 15
with eyes. minutes, keeping eyelids open with fingers. Seek
medical attention.
Ink is ingested. If person is conscious, dilute stomach contents
with several glasses of water. Seek medical
attention.
Ink is inhaled. Remove person from area of exposure to fresh air.
Preparation Date: June 1, 1998
Ingredients
Water: 40-45% Dipropylene glycol: 10-15%
CAS # 7732-18-5 CAS # 110-98-5
OSHA PEL N/E* OSHA PEL N/E*
ACGIH TLV N/E* ACGIH TLV N/E*
Trade Secret Ingredient: 20-30% Trade Secret Ingredient: <6%
New Jersey Trade Secret Registra’n New Jersey Trade Secret
# 1664900-5015P/5742P/5695P Registration # 15859800-5004
TPM: 10-15%
CAS # 20324-33-8
OSHA PEL N/E*
ACGIH TLV N/E*
Physical Data
Melting Point: N/D*
Boiling Point: N/D*
Vapor Pressure: N/D*
Evaporation Rate (Butyl Acetate=1): N/D*
Specific Gravity (H
pH: 7.0 to 7.5
Solubility in Water: Soluble.
Appearance and Odor: Magenta liquid with slight odor.
*N/A = Not applicable, N/D = Not determined, N/E = None established.
67
O=1): N/D*
2
Page 74

MSDS: Magenta Ink
Fire and Explosion Hazard Data
Flash Point: Non-flammable
Autoignition Point: N/D*
Flammability Limits, LEL, UEL: N/A*
Extinguishing Media: N/A*
Special Fire and Explosion Procedures: None
Unusual Fire and Explosion Hazards: None.
Health Hazard Data:
Routes of Entry: Skin, eyes, ingestion, inhalation
Health Hazards:
Oral LD
Dermal LD
Inhalation LC
extremely low given the physical nature of the product.
Skin Irritation: Non-irritating, non-sensitizing.
Eye Irritation: Not an irritant (rabbits).
Ingestion: May cause gastro-intestinal discomfort with ingestion of
large quantities.
Mutagenicity: No mutagenicity detected.
Carcinogens: None present.
: Not determined.
50
: Not determined.
50
: Not determined. Potential inhalation exposure is
50
Reactivity Data
Stability: Stable.
Polymerization: Will not occur.
Hazardous Decomposition or Byproduct: None.
Incompatibility: Acids.
Spill Cleanup and Disposal
Spill Cleanup: Use absorbent towel to wipe up the ink. Rinse area with
water.
Waste Disposal: Not a hazardous waste according to Federal Regulation
40 CFR 261. Dispose of in accordance with all applicable Federal, State
and Local laws.
Safe Handling and Use
Respiratory Protection: None required when used as intended.
Protective Gloves and/or Eye P rotection: W ater-proof gloves in
unusual handling. Goggles or safety glasses recommended.
Ventilation: Not normally required.
Other Protective Equipment and/or Hygienic Practices: None
required when used as intended.
Special Precautions
Precautions for Handling or Storage: Keep out of reach of children.
Other Precautions: None.
The information contained in this Material Safety Data Sheet (MSDS) is
based on data considered accurate; however, no warranty is expressed or
implied regarding the accuracy of these data or the results to be obtained
from the use thereof. V endor assumes no responsibility for injury to vendee
or third person party proximately caused by the product if reasonable
safety procedures are not adhered to as stipulated in the MSDS. Furthermore, vendor assumes no responsibility for injury to vendee or third person party proximately caused by abnormal use of the product even if reasonable safety procedures are followed. Additionally, vendee assumes the
risk of their use of the product.
68
Page 75

Material Safety Data Sheet (MSDS)
MSDS No. 58321601
for OKIJET 2500 Yellow Ink Cartridge (P/N 52110003)
For more information, contact
OKIDATA
532 Fellowship Road,
Mt. Laurel, NJ 08054-3405.
For emergency information, contact Okidata’s agent, the
Xerox Customer Safety hotline, 24 hours a day, at
1-800-828-6571.
Emergency First Aid Procedures
Emergency Procedure
Contact occurs Wash affected area with soap and water.
with skin.
Contact occurs Flush eyes with large quantities of water for 15
with eyes. minutes, keeping eyelids open with fingers. Seek
medical attention.
Ink is ingested. If person is conscious, dilute stomach contents
with several glasses of water. Seek medical
attention.
Ink is inhaled. Remove person from area of exposure to fresh air.
Ingredients
Water: 40-45% TPM: 10-15%
CAS # 7732-18-5 CAS # 20324-33-8
OSHA PEL N/E* OSHA PEL N/E*
ACGIH TLV N/E* ACGIH TLV N/E*
Trade Secret Ingredient: 25-35% Dipropylene glycol: 10-15%
New Jersey Trade Secret CAS # 110-98-5
Registration # 15859800-5003 OSHA PEL N/E*
ACGIH TLV N/E*
Physical Data
Melting Point: N/D*
Boiling Point: N/D*
Vapor Pressure: N/D*
Evaporation Rate (Butyl Acetate=1): N/D*
Specific Gravity (H
pH: 7.0 to 7.5
Solubility in Water: Soluble.
Appearance and Odor: Yellow liquid with slight odor.
*N/A = Not applicable, N/D = Not determined, N/E = None established.
O=1): N/D*
2
Preparation Date: June 1, 1998
69
Page 76

MSDS: Yellow Ink
Fire and Explosion Hazard Data
Flash Point: Non-flammable
Autoignition Point: N/D*
Flammability Limits, LEL, UEL: N/A*
Extinguishing Media: N/A*
Special Fire and Explosion Procedures: None
Unusual Fire and Explosion Hazards: None.
Health Hazard Data:
Routes of Entry: Skin, eyes, ingestion, inhalation
Health Hazards:
Oral LD
Dermal LD
Inhalation LC
extremely low given the physical nature of the product.
Skin Irritation: Non-irritating, non-sensitizing.
Eye Irritation: Not an irritant (rabbits).
Ingestion: May cause gastro-intestinal discomfort with ingestion of
large quantities.
Mutagenicity: No mutagenicity detected.
Carcinogens: None present.
: Not determined.
50
: Not determined.
50
: Not determined. Potential inhalation exposure is
50
Reactivity Data
Stability: Stable.
Polymerization: Will not occur.
Hazardous Decomposition or Byproduct: None.
Incompatibility: Acids.
Spill Cleanup and Disposal
Spill Cleanup: Use absorbent towel to wipe up the ink. Rinse area with
water.
Waste Disposal: Not a hazardous waste according to Federal Regulation
40 CFR 261. Dispose of in accordance with all applicable Federal, State
and Local laws.
Safe Handling and Use
Respiratory Protection: None required when used as intended.
Protective Gloves and/or Eye P rotection: W ater-proof gloves in
unusual handling. Goggles or safety glasses recommended.
Ventilation: Not normally required.
Other Protective Equipment and/or Hygienic Practices: None
required when used as intended.
Special Precautions
Precautions for Handling or Storage: Keep out of reach of children.
Other Precautions: None.
The information contained in this Material Safety Data Sheet (MSDS) is
based on data considered accurate; however, no warranty is expressed or
implied regarding the accuracy of these data or the results to be obtained
from the use thereof. V endor assumes no responsibility for injury to vendee
or third person party proximately caused by the product if reasonable
safety procedures are not adhered to as stipulated in the MSDS. Furthermore, vendor assumes no responsibility for injury to vendee or third person party proximately caused by abnormal use of the product even if reasonable safety procedures are followed. Additionally, vendee assumes the
risk of their use of the product.
70
Page 77

Index
A
A4
label sheets........................ 50
paper ................................. 48
transfer media ................... 50
transparencies ................... 49
Accessories ............................ 54
Acronyms ..............................62
Add printer wizard................. 14
Alignment, printhead....... 26-27
B
B5 paper ................................48
Bar, Star Wheel ................ 38-39
Bi-directional interface
cable ...........................2, 11, 47
Black ink cartridge ................ 54
Black printhead...................... 54
Blank printing problems ........ 40
Box, printhead
storage ...................... 2, 3, 8, 22
Buttons
Cartridge change/clean ..... 32
Power/Reset ...................... 31
Resume/FF ........................ 32
C
Cable, interface .................. 2, 11
Canceling a print job ............. 17
Card specific ations ................ 50
Cartridge
change/clean button .......... 32
lock lever............. 5, 7, 21, 22
Cartridges, ink
installing .........................5–7
replacement, listings ......... 54
replacing ..................... 23–26
Cleaning
printer................................ 26
printhead nozzles .............. 26
Color printhead...................... 54
Compatibility ......................... 47
Computer connection ............11
Connections
computer ........................... 11
power .................................. 4
Control panel ...................31–33
Control software .................... 15
Customer support ............ 51-52
Cyan ink cartridge ................. 54
D
Demo page............................. 11
Dimensions ............................ 48
DL envelopes......................... 49
DOS applications................... 17
DOS control panel ................. 17
installer .............................17
DOS printer panel.................. 17
E
Electrical requirements .......... 48
Electronic registration ..... 13-15
Emulation ........................ 17, 47
Envelope specifications ......... 49
Envelopes, loading........... 18-19
Error LED ........................ 33, 42
Exchange, overnight.............. 61
Executive paper ..................... 48
F
Faint print, solving................. 43
Faxable Facts ......................... 52
FCC statements...................... 58
Features.................................... 1
G
Glossary ................................. 62
H
Help
button ................................ 15
on-line ............................... 15
Hewlett-Packard PCL3c
emulation ........................ 17, 47
Humidity, operating ............... 48
I
Indicator lights....................... 33
Indicators
low ink ........................ 33, 46
Industry Canada
statements ............................. 58
Ink cartridges
installation........................5-7
replacement, listings ......... 54
replacing ..................... 23–26
Installation error message...... 18
Interface................................. 47
Interface cable ................... 2, 11
71
Page 78

Index
J
Jams, paper ...................... 36-39
L
Label specifications ............... 50
LEDs
error ............................33, 42
low ink ........................ 33, 46
power ................................ 33
Legal paper ............................48
Lights, indicator..................... 33
Loading envelopes........... 18-19
Loading paper.................... 8–10
Location ................................... 1
Lock lever,
cartridge.................. 5, 7, 21, 22
Low ink indicators ........... 33, 46
M
Magenta ink cartridge............ 54
Making connections
computer ........................... 11
power .................................. 4
Material safety data
sheets .............................. 63-70
Misfeeds, paper .....................35
Moving the
printer .................. 27-28, 55-57
N
Nozzles
alignment .................... 26-27
ink jet, cleaning................. 26
printhead ........................... 47
O
Okidata
customer support......... 51-54
Faxable Facts .................... 52
service locations ......... 52-53
On-Line help.......................... 15
Overnight exchange
statement............................... 61
P
Packing, removing................... 2
Paper
feed problem solving ........ 45
guide lever ............... 3, 8, 10
jams, clearing .............. 36-39
Paper (cont.)
loading .......................... 8–10
misfeeds ............................ 35
output shelf .................. 3, 10
specifications ....................48
support ......................... 3, 10
Paper capacity........................ 47
Parallel bi-directional
interface cable .................. 2, 11
Parallel cable...................... 2, 11
connector ......................3, 11
Parallel interface cable....... 2, 11
Parallel port .......................2, 11
Parts, replacement.................. 54
Pausing print jobs ..................17
Power LED ............................ 33
Power/Reset button ................ 31
Print
cancel ................................ 17
method .............................. 47
pause ................................. 17
speed ................................. 47
Print from DOS
applications..................... 17-18
Print image clipping
problem solving.................... 44
Print media................... 9, 47-50
Printable area ......................... 48
Printer cleaning...................... 26
Printer moving...... 27-28, 55-57
Printer cable....................... 2, 11
Printer driver.................... 17, 47
Printer setup dialog box......... 16
Printhead
alignment .................... 26-27
installation........................5-7
lock
lever ...................5, 7, 21, 22
nozzles, cleaning............... 26
replacement, listings ......... 54
replacing ..................... 21-23
storage box............ 2, 3, 8, 22
swapping ..................... 21-23
Printheads, replacement......... 54
Printing from DOS
applications..................... 17-18
Problem solving............... 40-46
R
Registration, electronic.... 13-15
Replacement parts .................54
Replacing
ink cartridges .............. 23–26
the printhead ............... 21–23
72
Page 79

Index
Resident typefaces ................. 47
Resolution.............................. 47
Resume/FF button.................. 32
S
Service information ......... 51-54
Service locations.............. 52-53
Service manual ...................... 54
Specifications...................47–50
cards .................................. 50
envelope............................ 49
label................................... 50
paper ................................. 48
transfer media ................... 50
transparency ...................... 49
Star Wheel bar ................. 38-39
Storage box.............. 2, 3, 8, 22
Streaks, problem solving ....... 43
Support, paper ................... 3, 10
Swapping printheads ...... 21-23
T
T-shirt transfer media............. 50
Temperature, operating.......... 48
Test page ....................26, 27, 32
Transfer media
specifications ........................ 50
Transparency
specifications ........................ 49
Transporting the
printer .................. 27-28, 55-57
Troubleshooting ............... 35-46
Typefaces, resident ................ 47
U
Unpacking ...............................2
W
Warranty statement .......... 59-60
Weight .................................... 48
Windows
3.1 ......................... 13, 14, 26
95 .......................... 14-15, 27
for W orkgroups
3.11 ......................13, 14, 26
Wire clips, cable
connector .............................. 11
Y
Yellow ink cartridge ..............54
73
Page 80

Index
74
 Loading...