

Ohsung Electronics URCTKP7600 User Manual

Order Number
: GETEC-C1-16-250
FCC Part 15 Certification
Test Report Number
: GETEC-E3-16-027 Page 1 / 1
APPENDIX G
: USER’S MANUAL
EUT Type: Network Keypad
FCC ID.: OZ5URCTKP7600

TKP-7600
Network Keypad
Introducing the TKP-7600
Thank you for purchasing URC’s TKP-7600 In-Wall Network Color Touch-screen keypad. Its easy
intuitive use helps to simplify your life while adding control of more things than you thought
possible.
Enjoy some key features like:
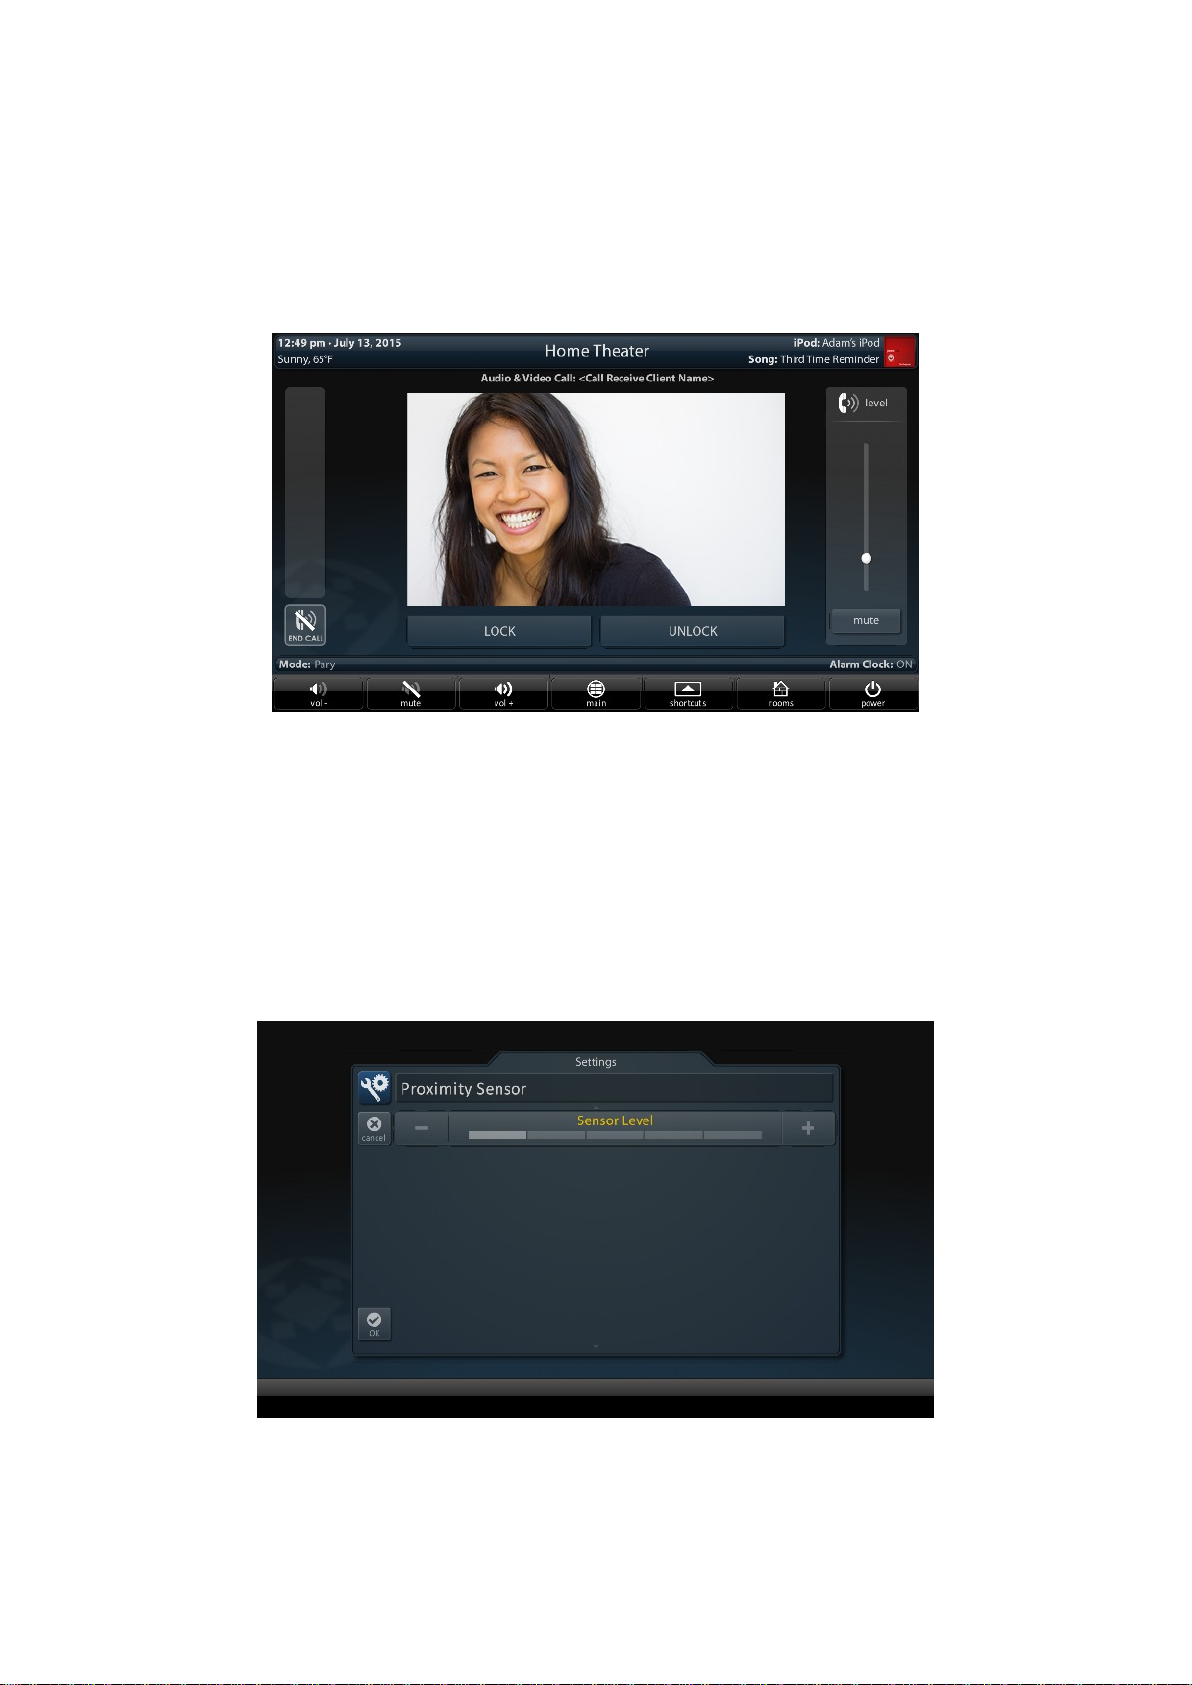
Audio Video Intercom
Easily communicate throughout your home using the Audio Video Intercom feature with multiple
TKP-7600 clients and/or URC Mobile app clients. You can also make sure the baby is safe and
sound by viewing the baby monitor right on the TKP-7600.
Flexible Orientation
The TKP-7600 offers the ability to display the keypad in either portrait or landscape modes making
it the perfect keypad for virtually any room. This feature can only be programmed from within the
URC software. Speak to your custom home professional prior to installation.
Proximity Sensor
A remote that knows where you are, the TKP-7600 has a built in sensor that can detect the
distance you are from it. As you approach the keypad illuminates and is ready to control the home.
The sensitivity of this sensor is adjustable by your custom home professional.
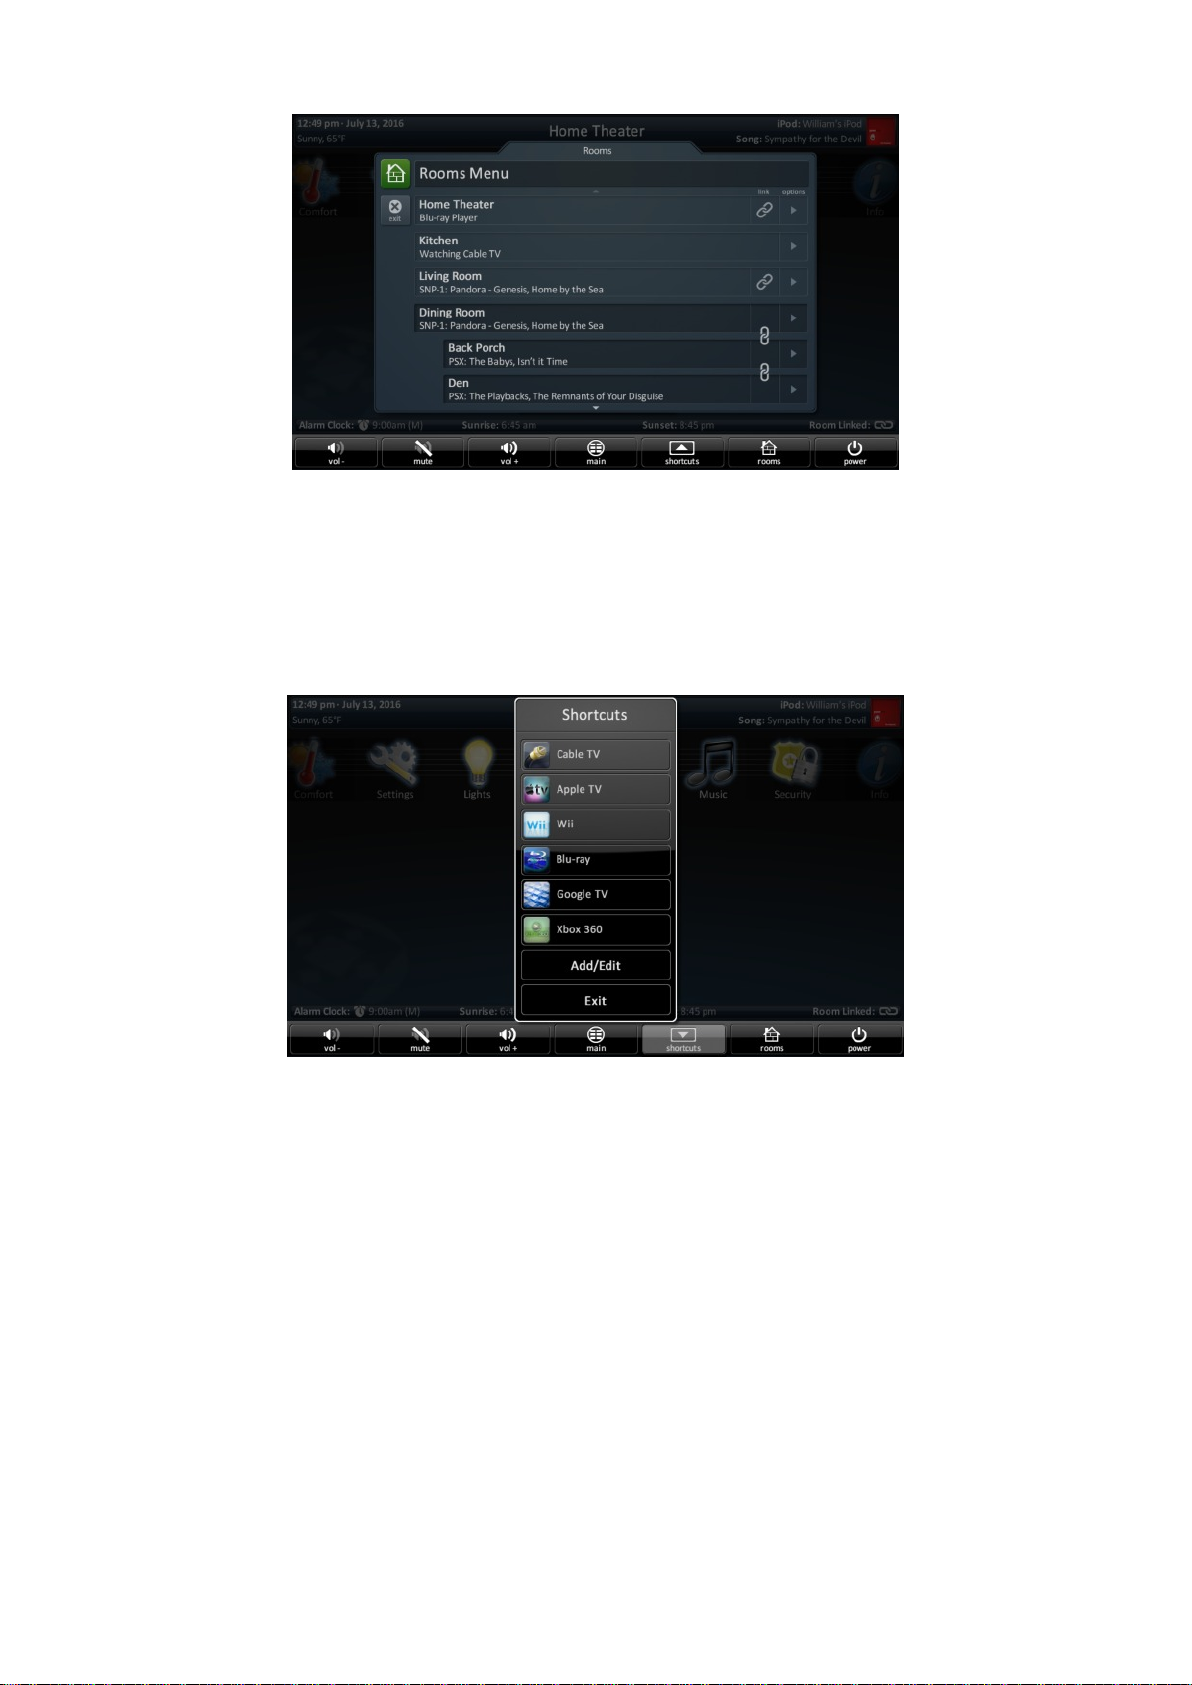
Rooms Menu
With the touch of a single button, take control of your domain. Besides the ability to temporarily
link the different rooms/areas of your system for music listening, the Rooms Menu offers a
snapshot of “what’s going on” in every room of your Total Control system. Better yet, tapping on a
room converts your keypad into a controller for THAT room. See how easy it is to keep track of
what’s happening in your world…and control it!
Shortcuts Pop-Up
With all the different options to choose from, the Shortcut Pop-Up allows you to save some of
the most common devices/activities for easy selection. Keep up to six different activities at your
fingertips with the Shortcuts Pop-Up menu.
Parts List
The TKP-7600 Network Keypad includes:
1 - TKP-7600 4 - Mounting Screws
1 - Mounting Ring
Installing the TKP-7600
The TKP-7600 is wall-mountable and fits into a standard dual gang (J-box or Mud Ring) opening.
Prior to installation, make sure power is available at the preferred location.
Power can be supplied to the TKP-7600 through an Ethernet ( ) cable connected to a PoE
( ) or in either of the following ways:
● Router/Switch
● PoE injector
Power over Ethernet or PoE technology describes a system to pass electrical power safely, along
with data, on Ethernet cabling. A shielded Ethernet cable is preferred. The IEEE standard for PoE
requires a Category 5 or higher for high power levels.
Installation
Follow the diagram below for installation:
1. Make sure the dual-gang opening is fitted with a standard two-gang trim box (available
from the local electrical supplier/store)
2. Connect the Ethernet cable to the rear of the supplied TKP-7600 wall-plate
3. Mount the wall-plate to the two-gang retro-box
4. The TKP-7600 easily snaps into the wall-plate
Note:
Main Menu Navigation
Although specific screen design and certain options are dictated by the custom integrator that
programmed the Total Control system, the general layout remains the same. Actual navigation is
performed through screen swipes ( ) while selecting any item is as simple as
pressing the icon/text to be selected.
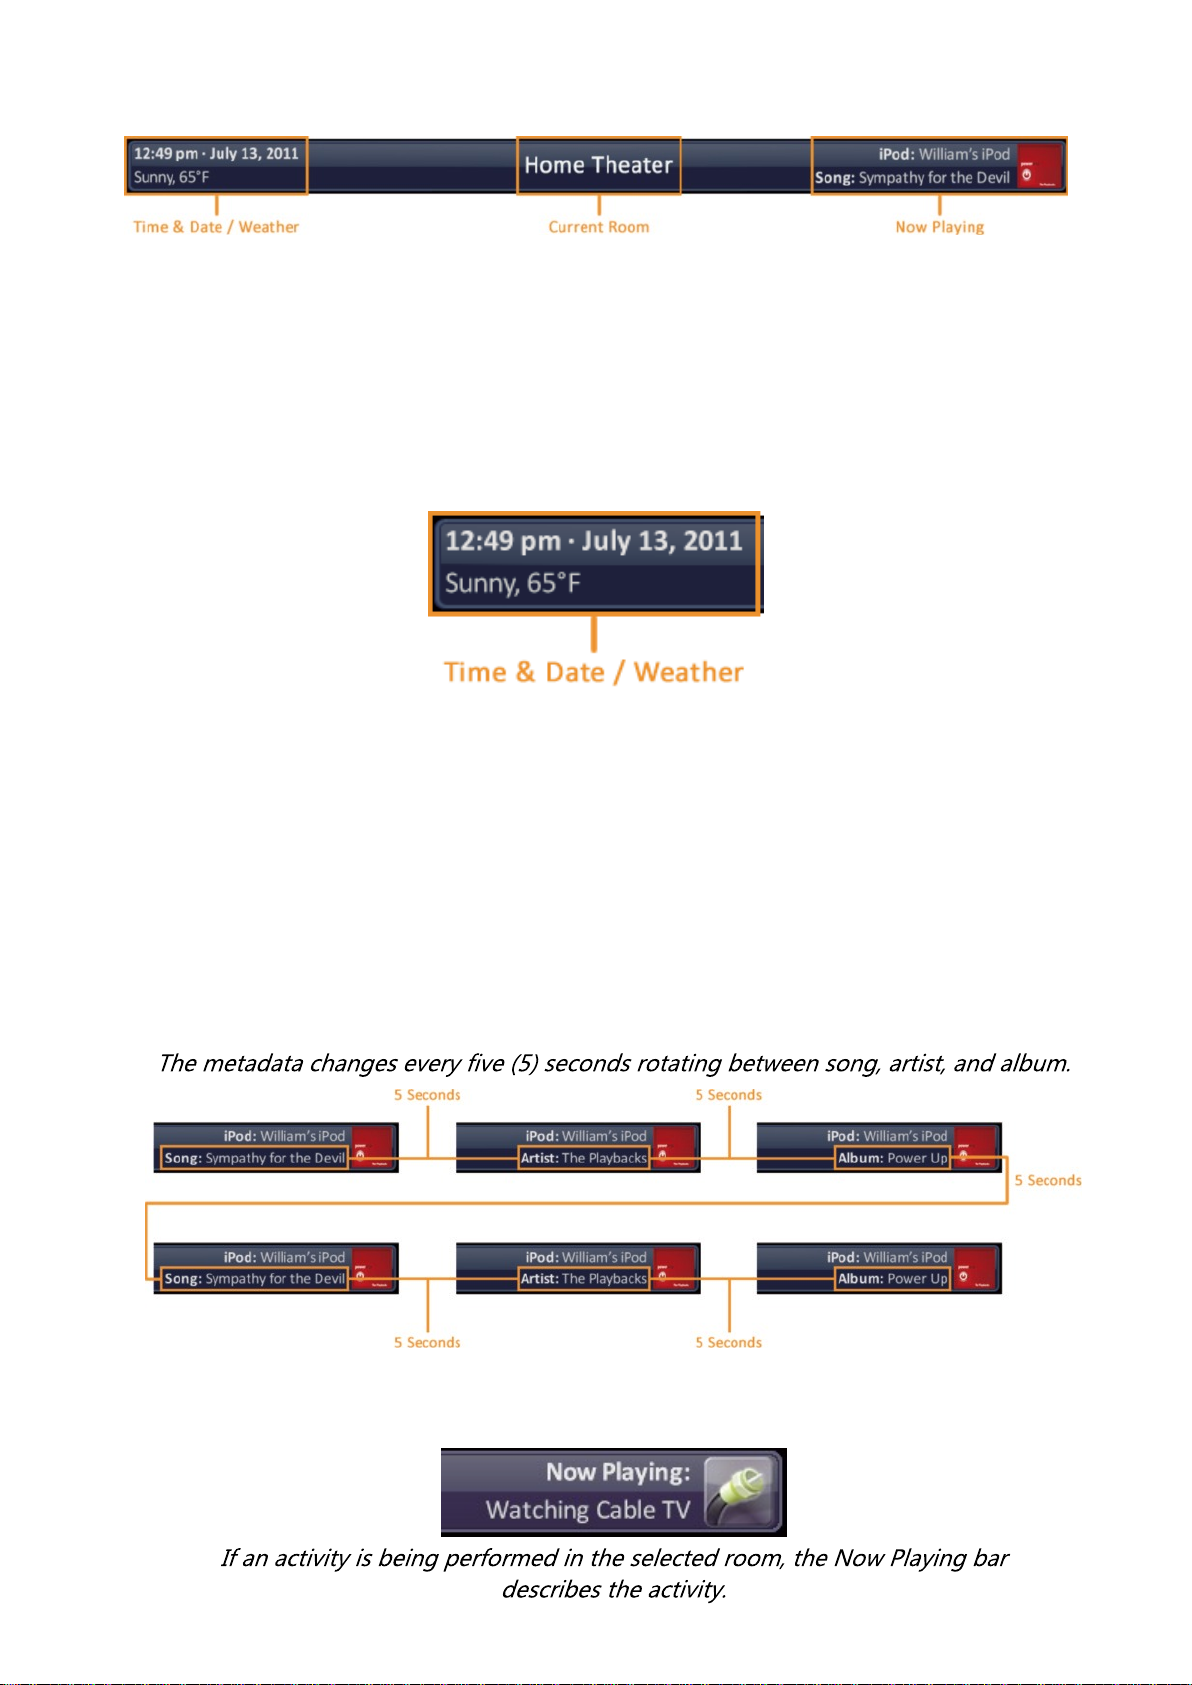
Title Bar
The Title Bar is present on all TKP-7600 screens and contains valuable information during normal
use. Easily find out the time, weather, now playing and the room that the keypad is controlling.
Time & Weather
This data, found on the left-hand side of the Title bar shows the current time, date, and weather
information. Pressing this area of the Title Bar opens the Time & Weather Module. For
information about this module, refer to the Time & Weather Module section, later in this manual.
Current Room
The current room portion of the Title Bar shows the room that the TKP-7600 is controlling.
Remember, in a Total Control system, although each room’s keypad defaults to control the room
in which is is placed, using the Rooms Menu allows it to control any other room in the system.
Now Playing
Appearing on the right-hand side of the Title Bar, this displays the source that is currently being
used in the room that the keypad is controlling.
● The Now Playing display shows the device that is being used (in this case, William’s iPod),
associated artwork, and metadata information is displayed since it is a URC media device.
● If an activity is being performed (like DVD or cable) in the selected room, the Now Playing
section displays the activity:
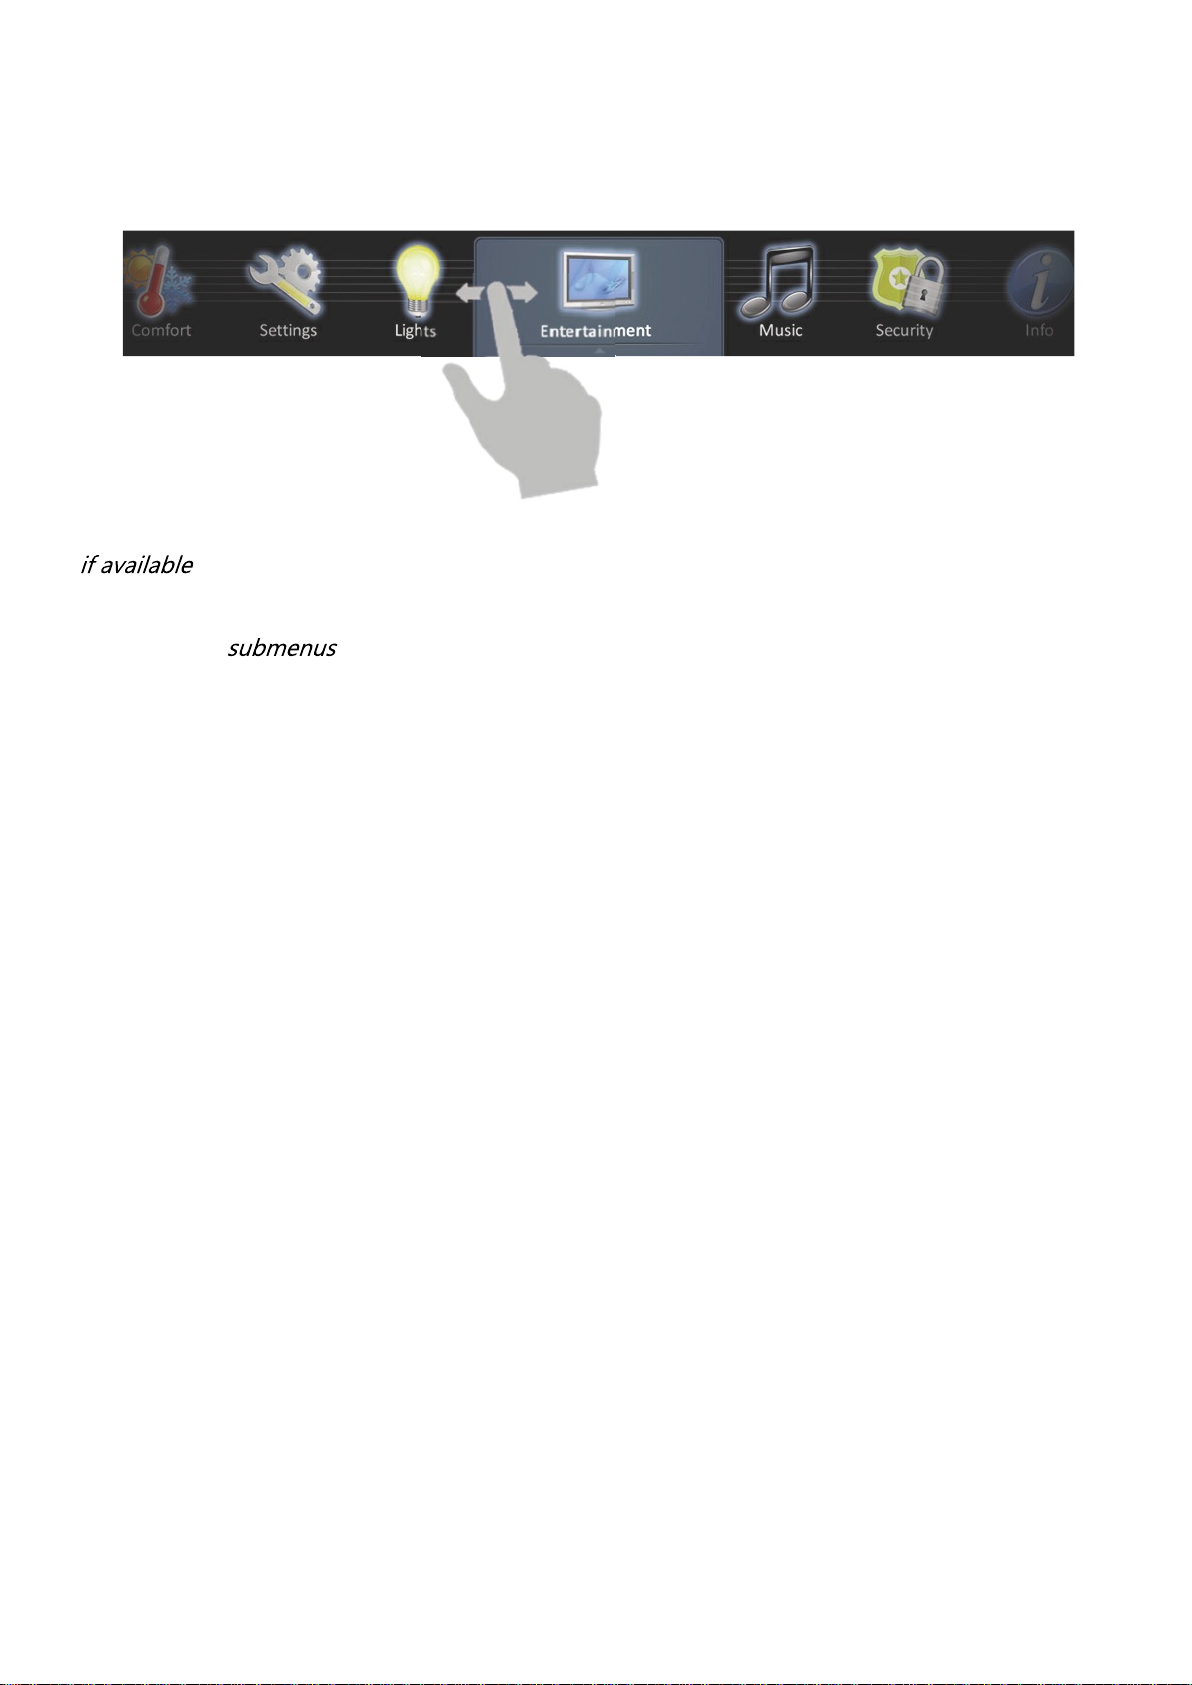
Category/Device Ribbon
This ribbon shows the various categories of control that are available to the selected room. The
quantity of categories is determined by the system setup and can vary from one to however many
categories were programmed by the system designer.
Although only seven categories can fit on the screen at any moment, navigate to other categories
( ) by swiping left or right.
Select a category by pressing the appropriate icon; this reveals the devices/activities available for
that category ( ).
Device List
Submenus contain the devices/activities that were placed in the chosen category by the system
programmer.
Scroll up or down through the list by swiping upwards or downwards, select a device/activity by
pressing its icon.
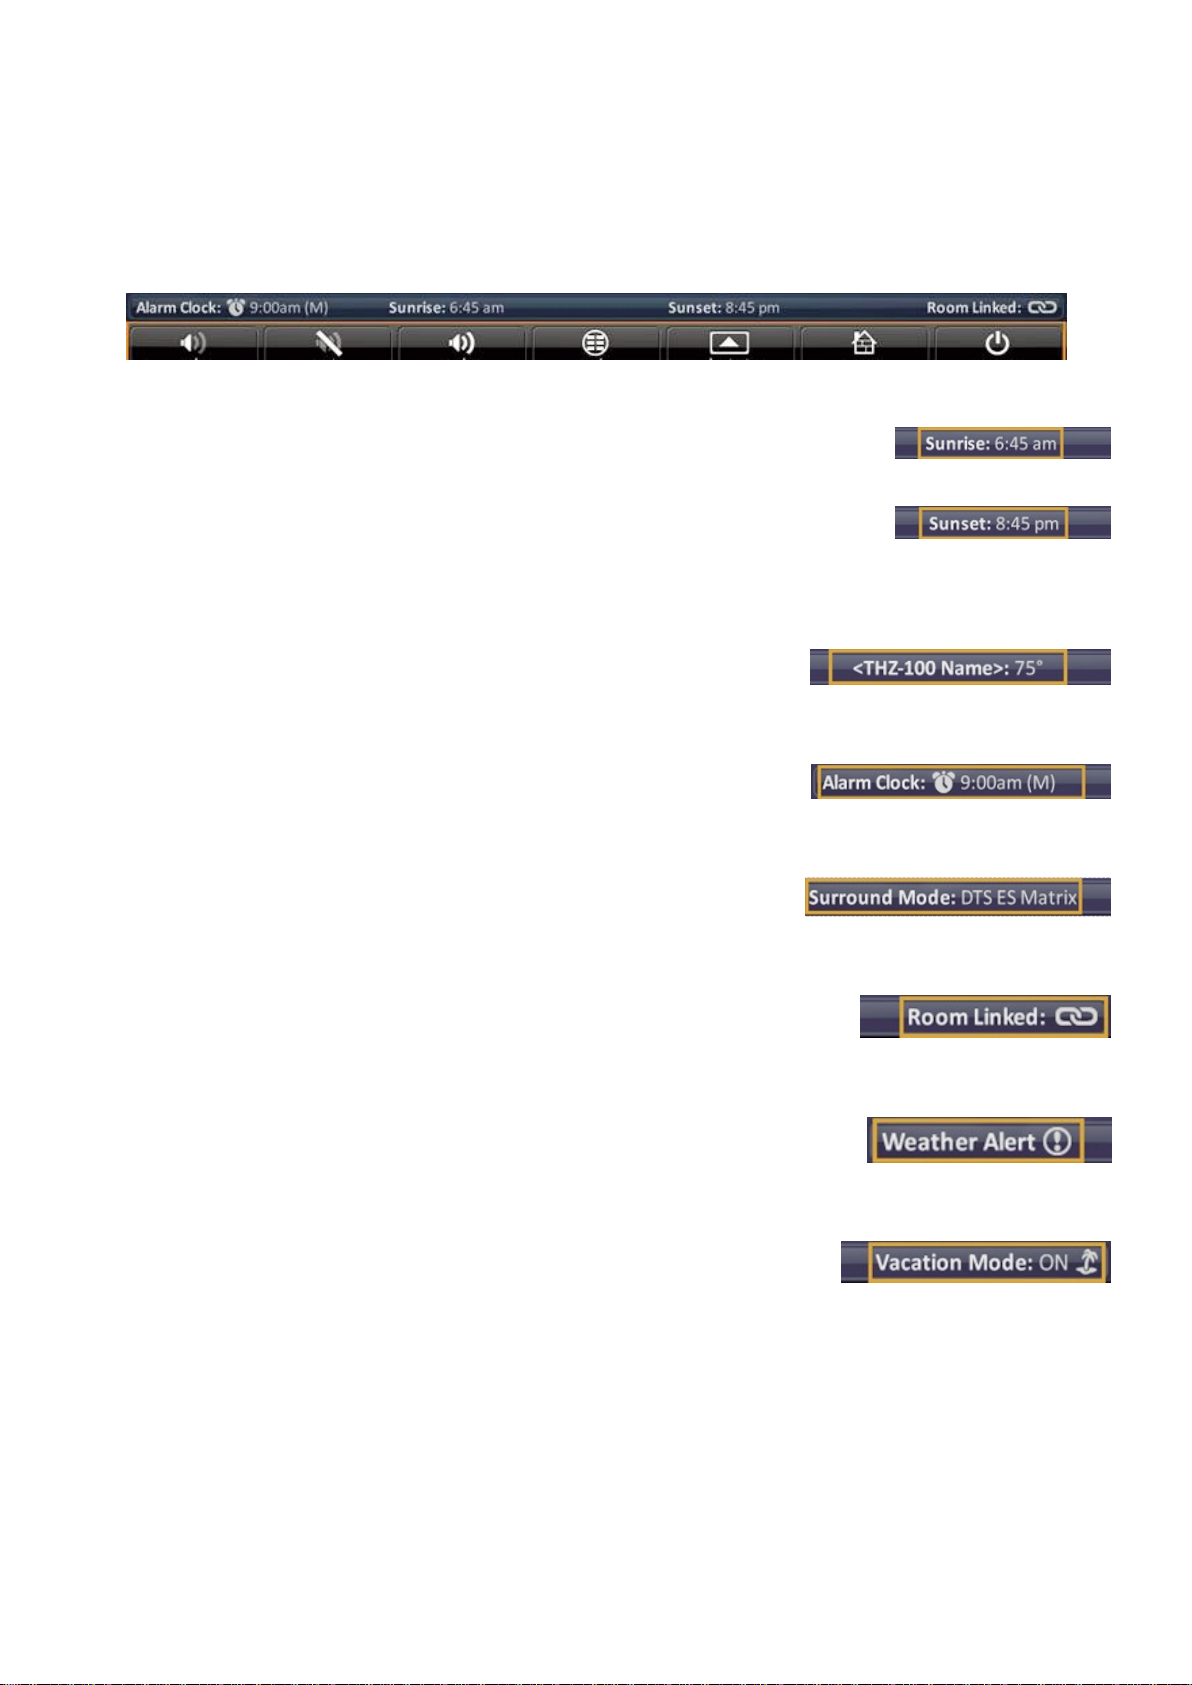
Status Bar
The Status Bar, located directly above the Core Buttons, provides valuable status and feedback of
the Total Control System. The four sections of the Status Bar are determined by the system
programmer and are customizable per keypad. It is not possible to explain how your keypad looks;
however, after reviewing the following possibilities, there should be no need for further
explanation.
Sunrise Time: Updated at midnight every day, this shows the sunrise time for the next day.
Sunset Time: Updated at midnight every day, this shows the sunset time for the next day.
URC Thermostat Temperature: If a THZ-100 (URC’s thermostat) is included in the home, this
shows the current temperature status based upon the internal sensor, additional sensor, or the
mean temperature of both.
Alarm Clock: If the room being controlled has an Alarm that is set to activate for that room, the
status bar displays an alarm clock icon and the next scheduled time/day.
Surround Mode: When used with URC’s DMS-AV Surround Processor, this displays the current
surround mode of the processor.
Room Linked Status: Whenever the chosen room/area is “linked” to other rooms, this shows a
link acknowledgement and icon.
Weather Alerts: Based on the current location entered by the system programmer, the words
“weather alert” appear if an automatic alert is received via Internet.
Vacation Mode: Whenever the Vacation Mode is activated for the Total Control system, the status
bar displays “Vacation Mode: ON”.
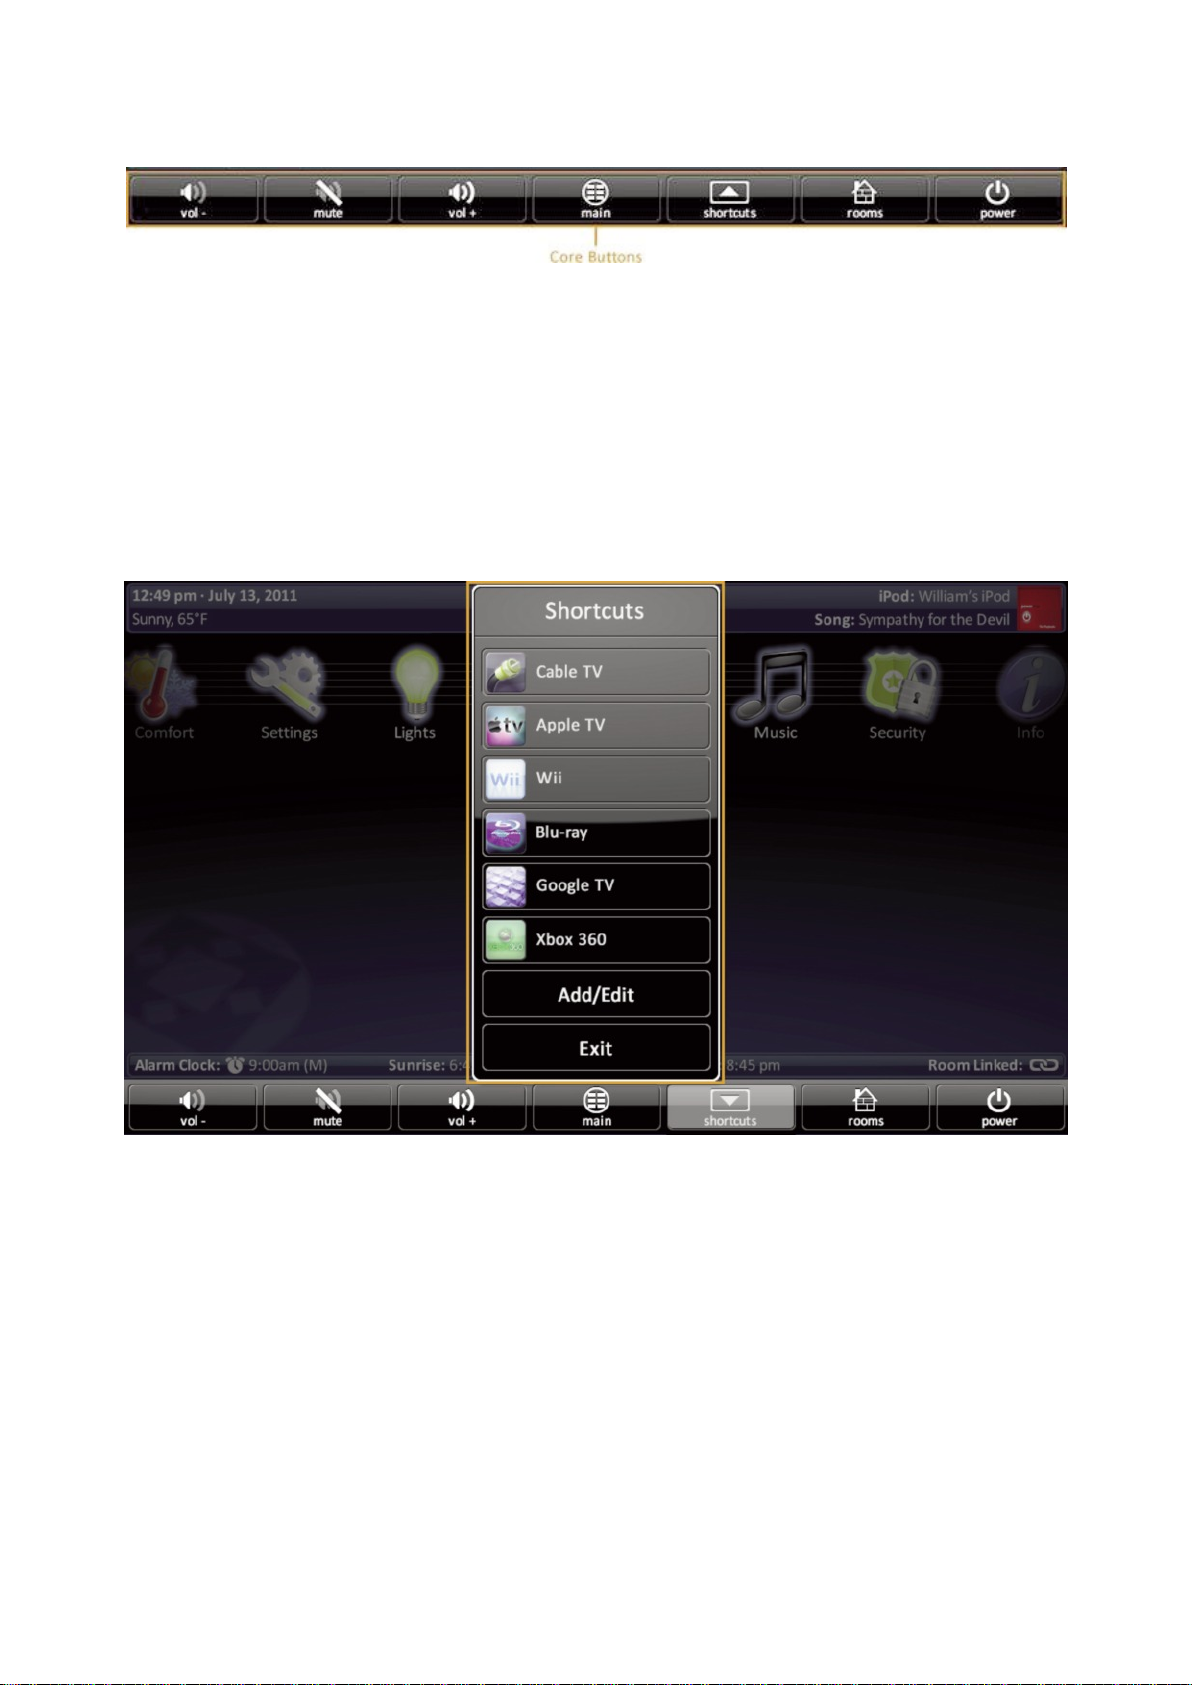
Core Buttons
These key system navigation buttons always are present at the bottom of the screen.
Vol-, Vol+, & Mute
These audio controls affect the volume for the room to which the TKP-7600 is assigned. See the
Rooms Menu section of this manual for more details.
Main
Selecting this button always returns the user to the Main screen.
Shortcuts
These user-configurable shortcuts allow the end-user to store up to six (6) favorite activities. For
more information about using short cuts, refer to the Using Shortcuts section of this manual.
Rooms
This selection opens the Rooms Menu and allows for monitoring and/or control of other rooms in
the project. See the Rooms Menu section of this manual for more details.

Power
When pressed, this performs the Room Off function programmed by the Custom Integrator.
If this button is pressed for greater than three (3) seconds, the Power Menu appears.
In this menu, it is possible to:
● Turn Off the ROOM ( ).
● Issue the House Off command, as programmed by the custom integrator.
● Custom commands, programmed by the custom integrator, may also appear in this menu.
Audio Video Intercom Menu
The Intercom module communicates with other installed TKP-7600’s via audio, audio & video, or a
baby monitor. In order to use the intercom it must first be enabled within the Settings screen.
Using the Intercom
1. Touch the screen and navigate through the Category ribbon (scroll left or right) to locate
the Intercom icon.
2. Press the Intercom icon.
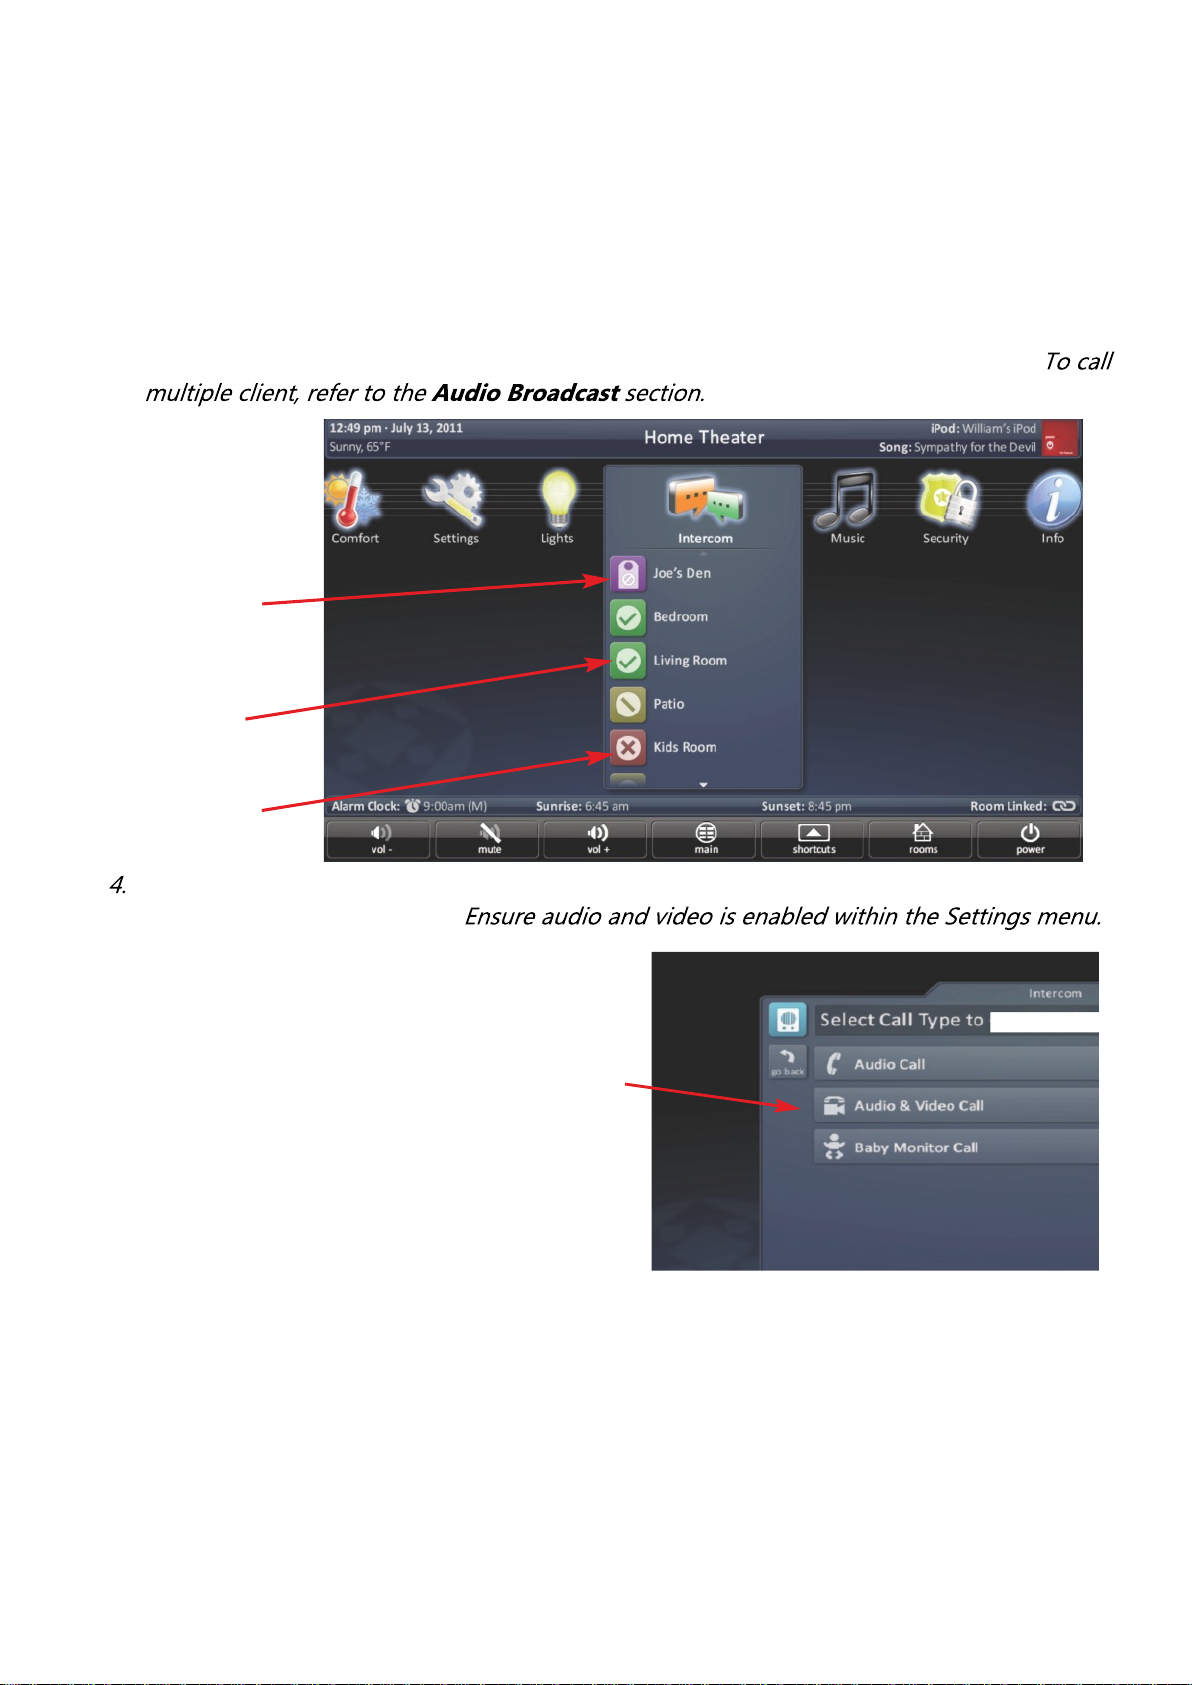
3. A list of available client (other TKP-7600 clients) are shown. Select an available client.
Unavailable
client set to
do not
disturb.
Available
client
Busy client
on call
When an available client is selected, you have the option to select from audio only, audio
and video, or a baby monitor.
● Audio: Two-way communication between
clients and via audio only.
● Audio and Video: Two-way communication
between clients via audio and video.
● Baby Monitor: One-way communication to
view and listen to a room where the secondary
client cannot hear or see you.
 Loading...