


Order Number
: GETEC-C1-18-469
FCC Part 15 subpart C & FCC Part 15 subpart E
Test Report Number
: GETEC-E3-18-025 Page 1 / 1
APPENDIX H
: USER’S MANUAL
EUT Type: Table top networking keypad
FCC ID.: OZ5URCTDC9100
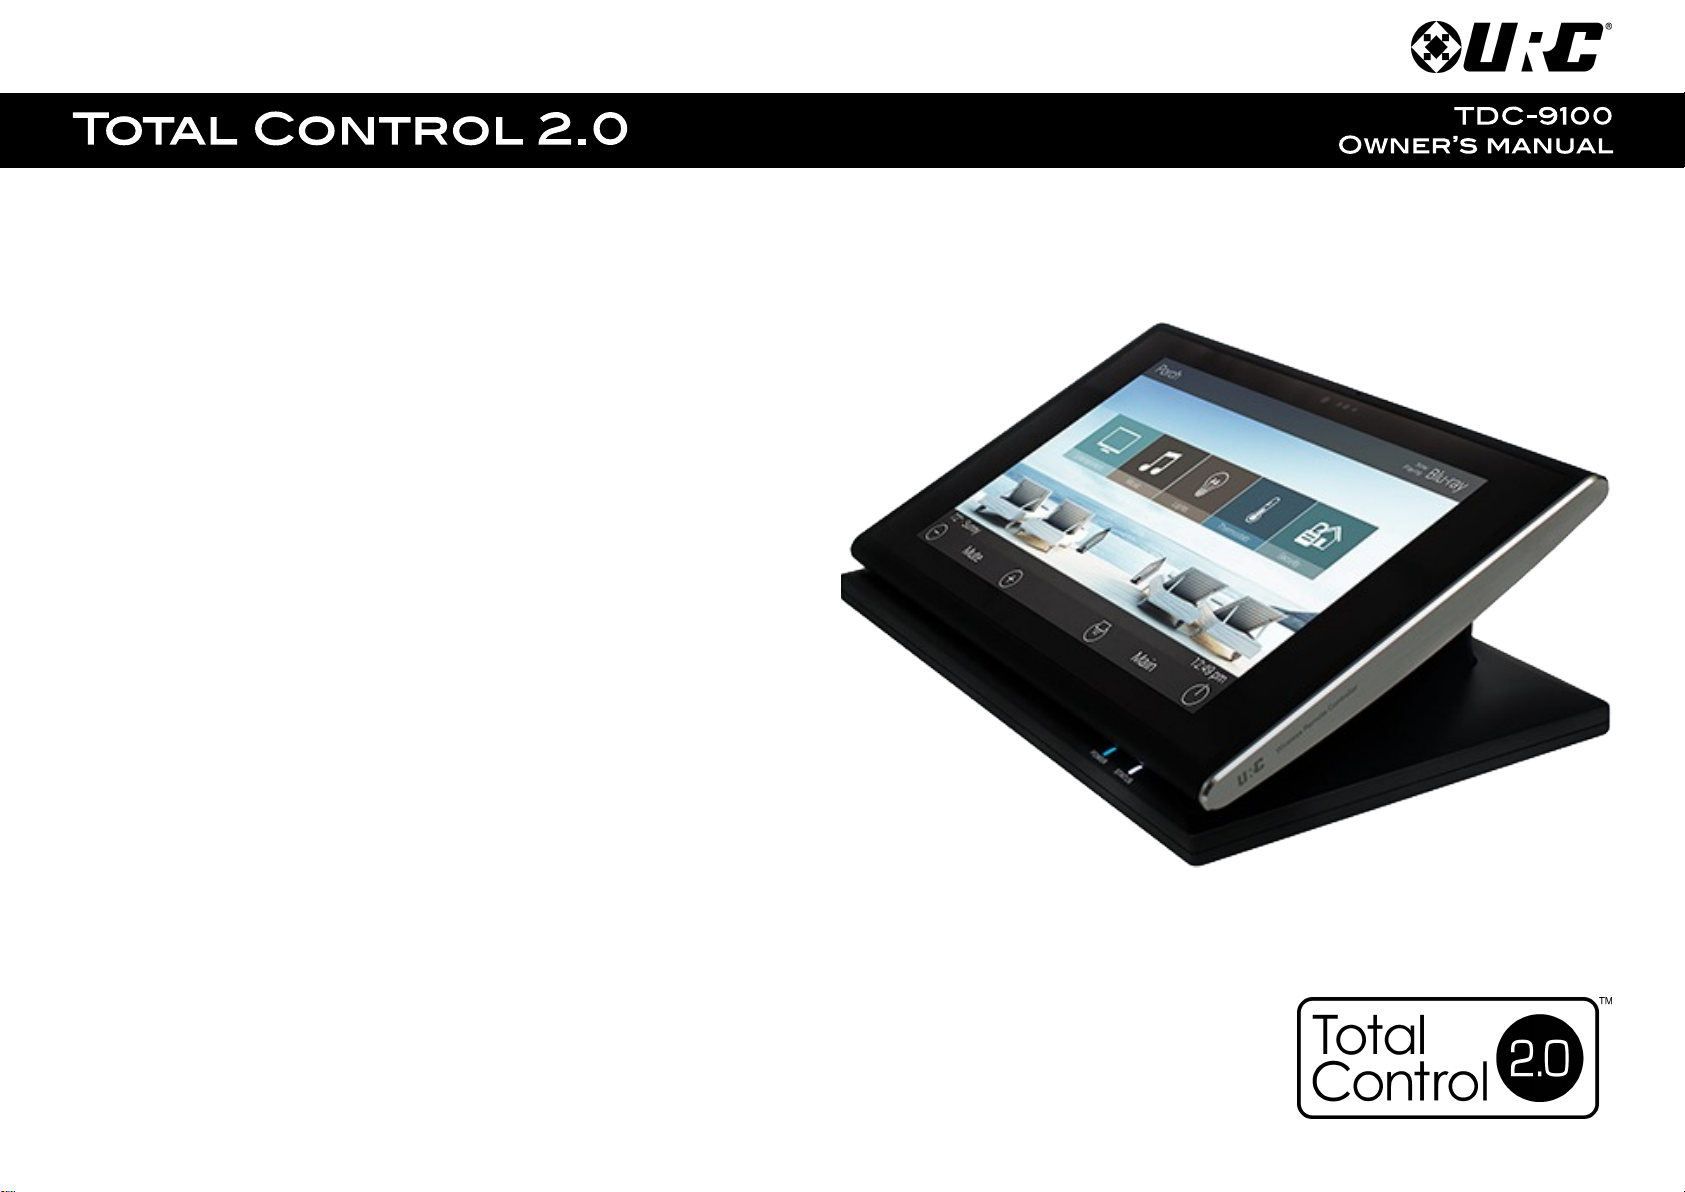
TDC-9100
Owner’s Manual
Introducing the TDC-9100
Thank you for purchasing URC’s TDC-9100 10-inch Tabletop Controller. Its easy and
intuitive design helps to simplify your life while adding control of more things than
thought possible.
Online Help:
Visit the URC Home Page for downloads, training materials, and frequently asked
questions.
Contact Support:
Total Control is a URC product sold direct or through distribution. For questions or
assistance contact your Custom Installer/Programmer.
My Installer/Programmer:
or URC Technical Support at: techsupport@universalremote.com
(914) 835-4484
Universal Remote Control, Inc.
Table of Contents
Features and Benefits.......................................................................................................1
Parts List.............................................................................................................................3
Main Menu: Navigation...................................................................................................4
Title Bar...............................................................................................................................6
Room’s Menu...............................................................................................................7
Room Linking...............................................................................................................8
Now Playing................................................................................................................9
Core Buttons.....................................................................................................................10
Shortcut Popup Menu..............................................................................................11
Status Bar...................................................................................................................13
Intercom............................................................................................................................15
Navigating the Intercom Menu..............................................................................17
Making Calls: Audio-Video.....................................................................................18
Making Calls: Audio Calls......................................................................................20
Making Calls: Baby Monitor...................................................................................22
Making Calls: Audio Broadcast.............................................................................24
Do Not Disturb Mode...............................................................................................26
500 Mamaroneck Ave
Harrison, New York 10528
Toll Free: (800) 901-0800
Scenes Menu...................................................................................................................27
Charging the TDC-9100...................................................................................................28
Wi-Fi Setup.......................................................................................................................29
Settings Menu..................................................................................................................30
Specifications..................................................................................................................40
Limited Warranty Statement.........................................................................................40
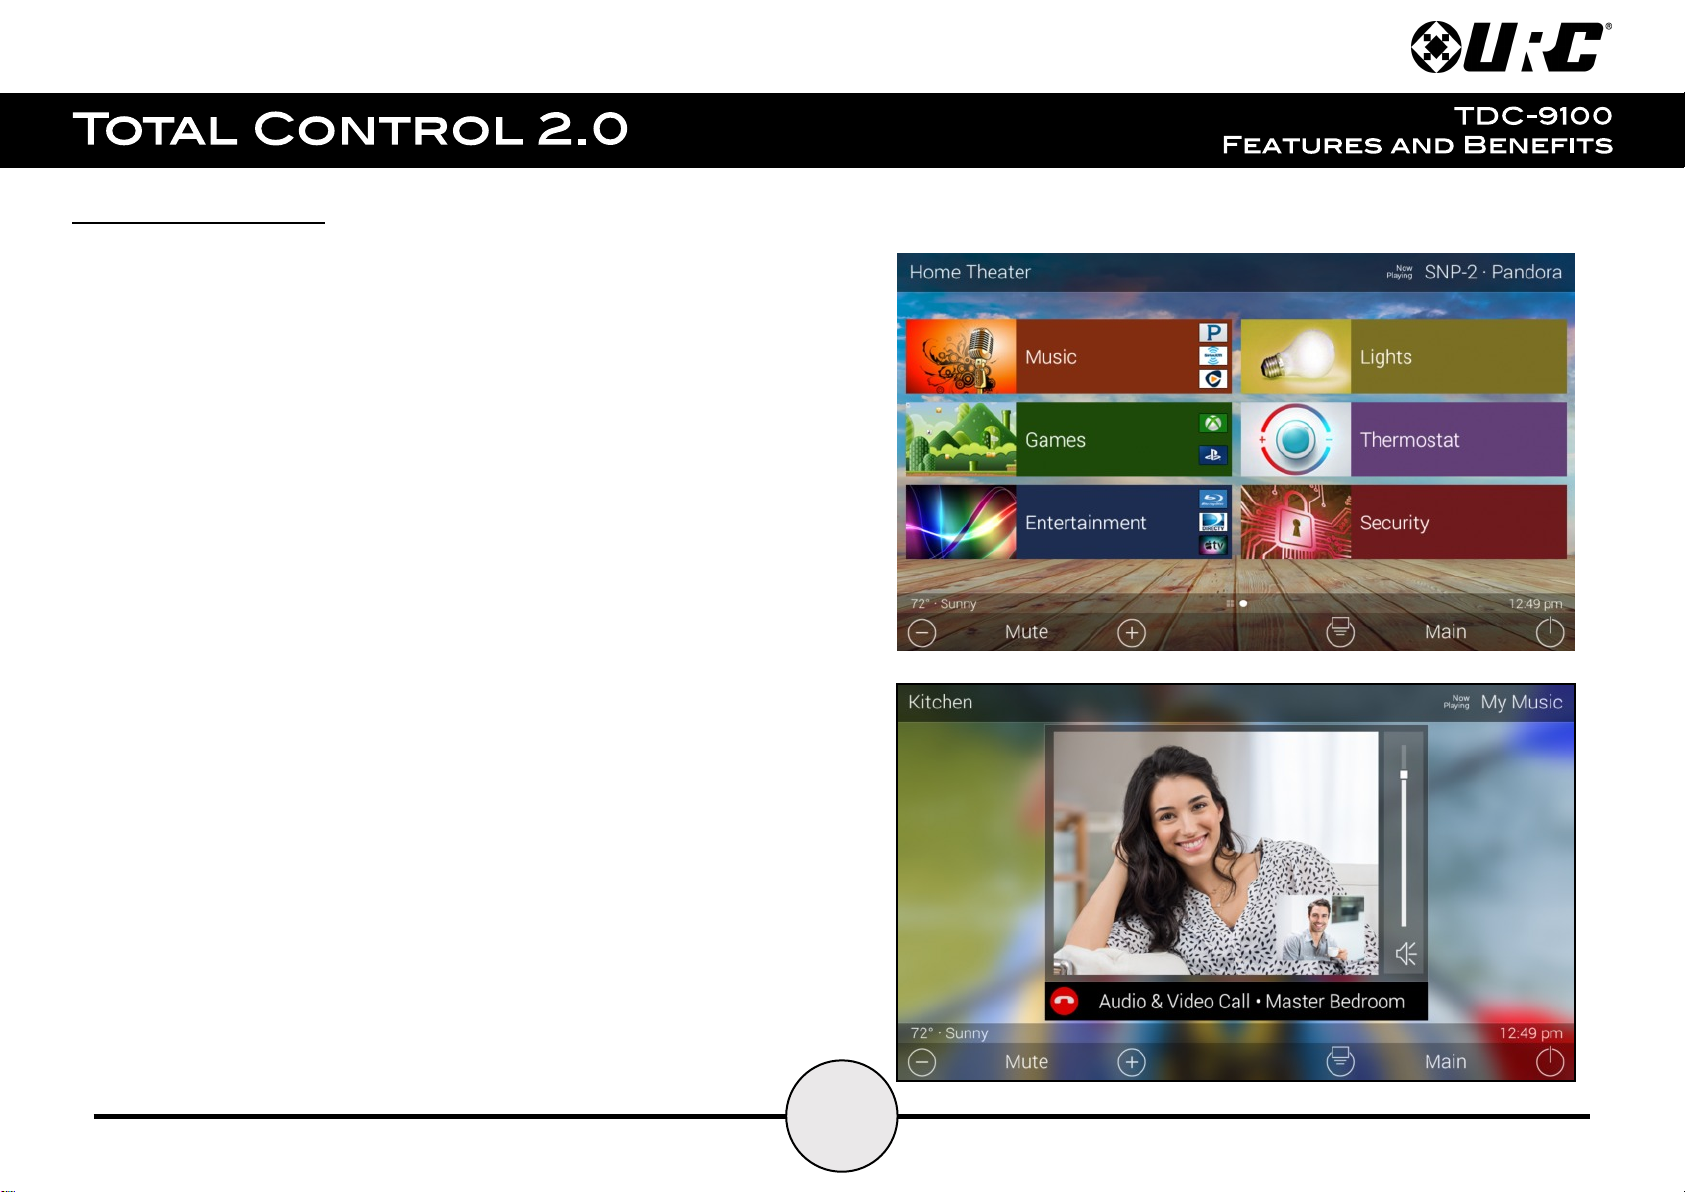
Features and Benefits:
The TDC-9100 Tabletop Controller is one of URC’s most advanced user interfaces that is
optimized for usage with Total Control 2.0 and Flex 2.0.
Enjoy these key features:
Updated User Experience:
This device has the capability of using URC’s Total Control 2.0 software suite. Using
this software provides this device with a modern “look and feel” giving the end-user
an improved user experience in terms of graphics, performance, and features.
Audio-Video Interface:
Communicate with any other URC Intercom-Enabled device in the system.
Make Audio-Video, Audio, or Baby Monitor calls directly from the TDC-9100.
1
2
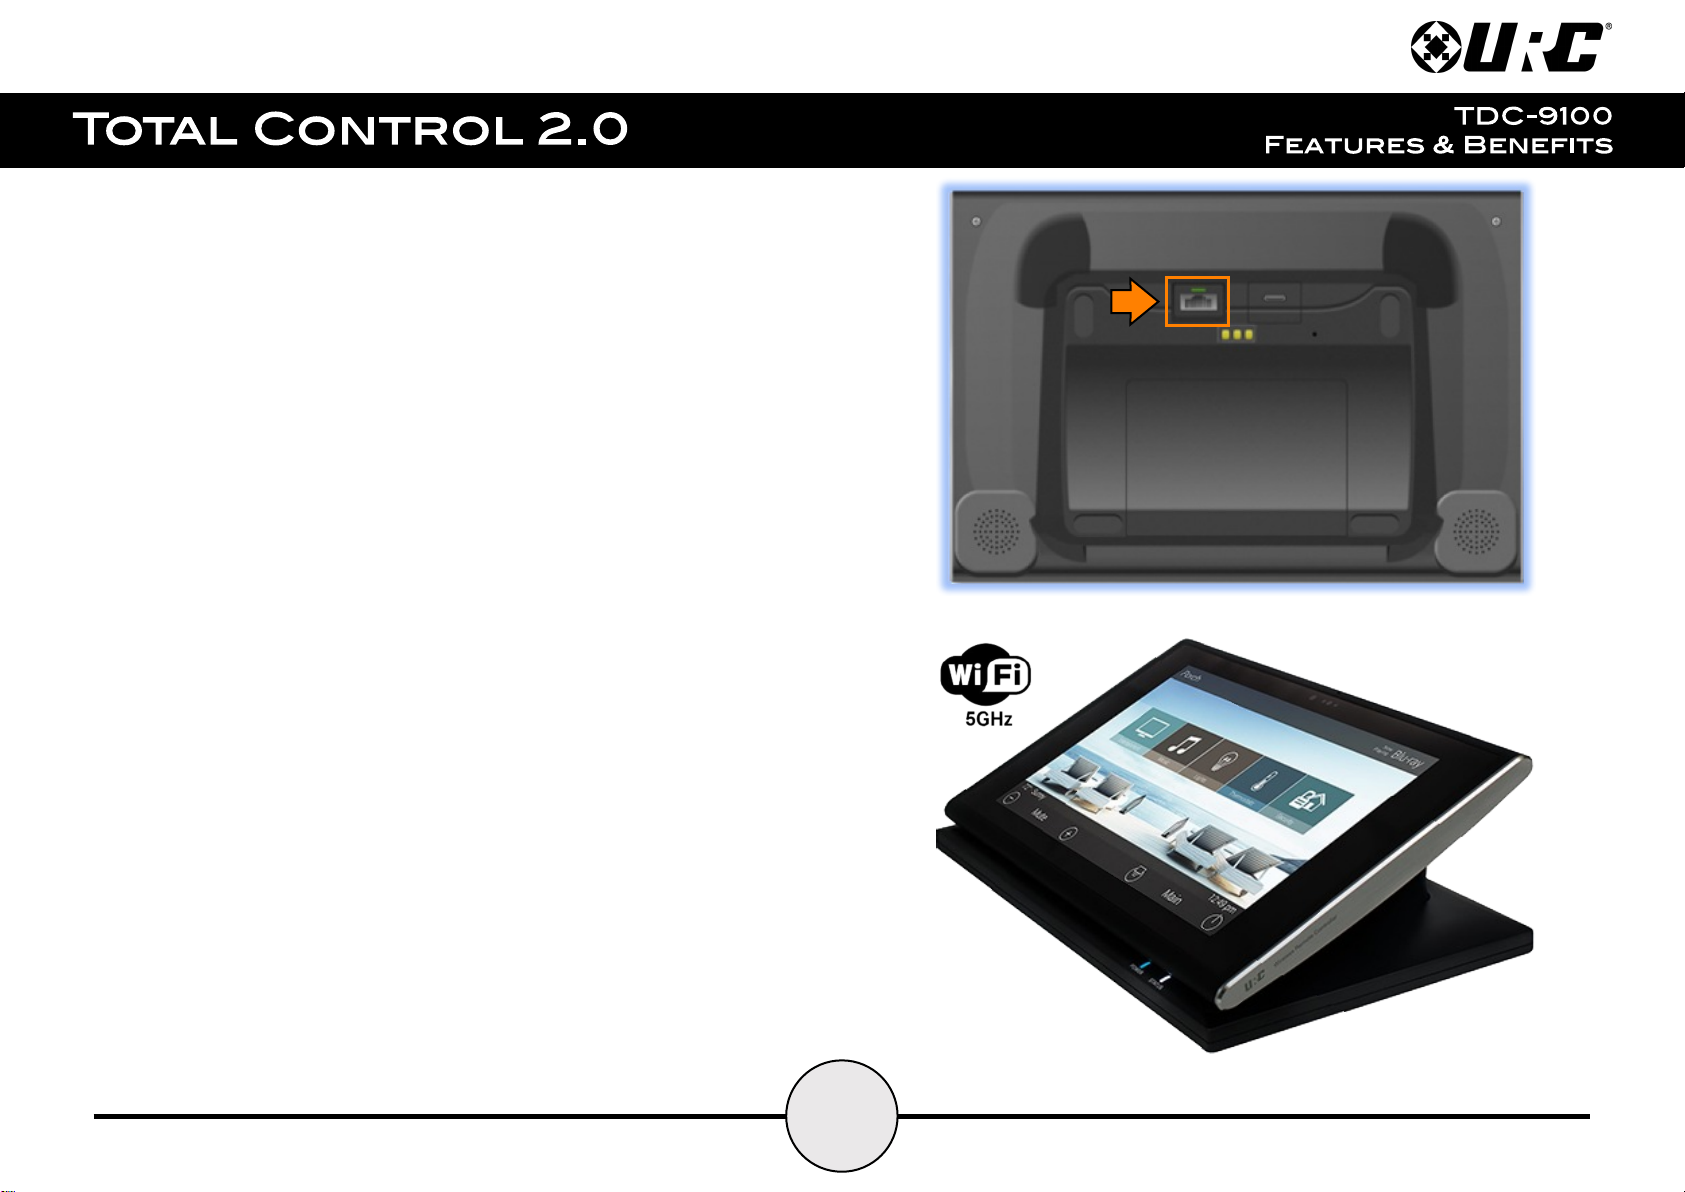
Gigabit Ethernet:
The TDC-9100 supports a Gigabit wired Ethernet connection providing faster speeds
and improved reliability.
5GHz Wi-Fi
5GHz functions at a higher frequency providing faster data speeds. This feature
allows the TDC-9100 to operate seamlessly on a wireless connection.
3
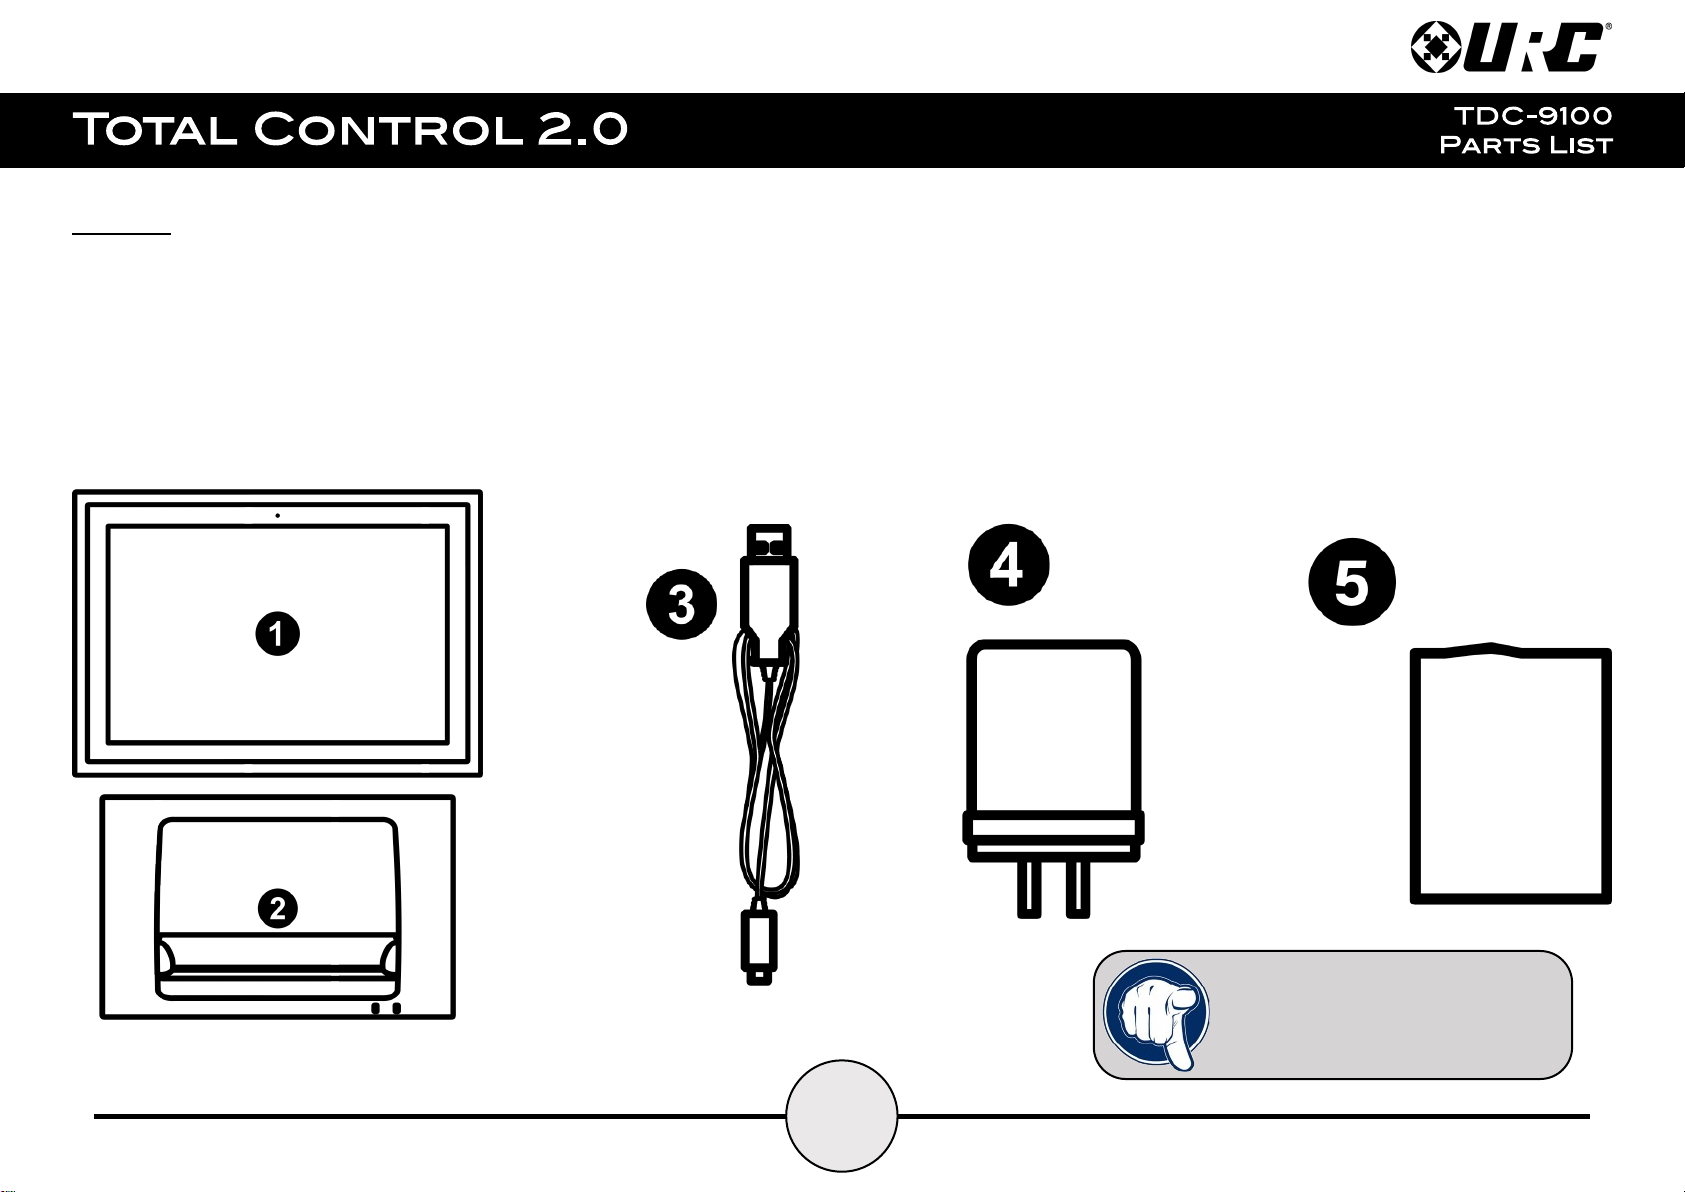
Part List:
Included with the TDC-9100:
1. TDC-9100 Tabletop Controller
2. Charging Dock
3. USB Cable Type C
4. Power Adapter
5. Battery
The Power Adapter provided with
the TDC-9100 is REQUIRED for
fast charging .

4
Main Menu Navigation:
1234567
Although specific screen design and certain options are dictated by the
custom integrator that programmed the Total Control 2.0 system, the general
layout remains the same.
Navigation is performed via various screen swipes:
● Left Swipe: Swipe left to reveal additional Main Menu pages. The
amount of pages available on the Main Menu is dictated by the
custom integrator.
● Right Swipe: Swipe right to reveal the Scenes Menu. The Scenes
Menu contains URC Scenes that are created by the custom
integrator. Return to the Main Menu by swiping left from the
Scenes Menu.
● Button Tapping: On the Main Menu selecting each of these areas
provide the end-user with control:
1. Category/Device Ribbon: Select a Category button to reveal
the associated submenu OR select a Device located here to
access that devices menu. This is dictated by the
custom integrator.
5. Main: Select to return to the Main Menu regardless of what page the device is currently
on. This can be changed to display the Scenes Menu, speak with the custom integrator to
program the TDC-9100 in this way.
2. Rooms Menu: Displays the Room’s Menu which provides
access to any available room in the system.
3. Volume Control: Tap the minus (Vol-) to lower the volume, plus
(Vol+) to increase the volume, and Mute to mute the volume.
4. Shortcuts: Reveals the Shortcuts Popup menu. The end-user
can add up to six (6) items on this menu.
6. Room Power Off: Select to turn off all the devices in the current room.
7. Now Playing: Select the Now Playing button at the top to instantly jump into that
device/activity’s menu pages.
5
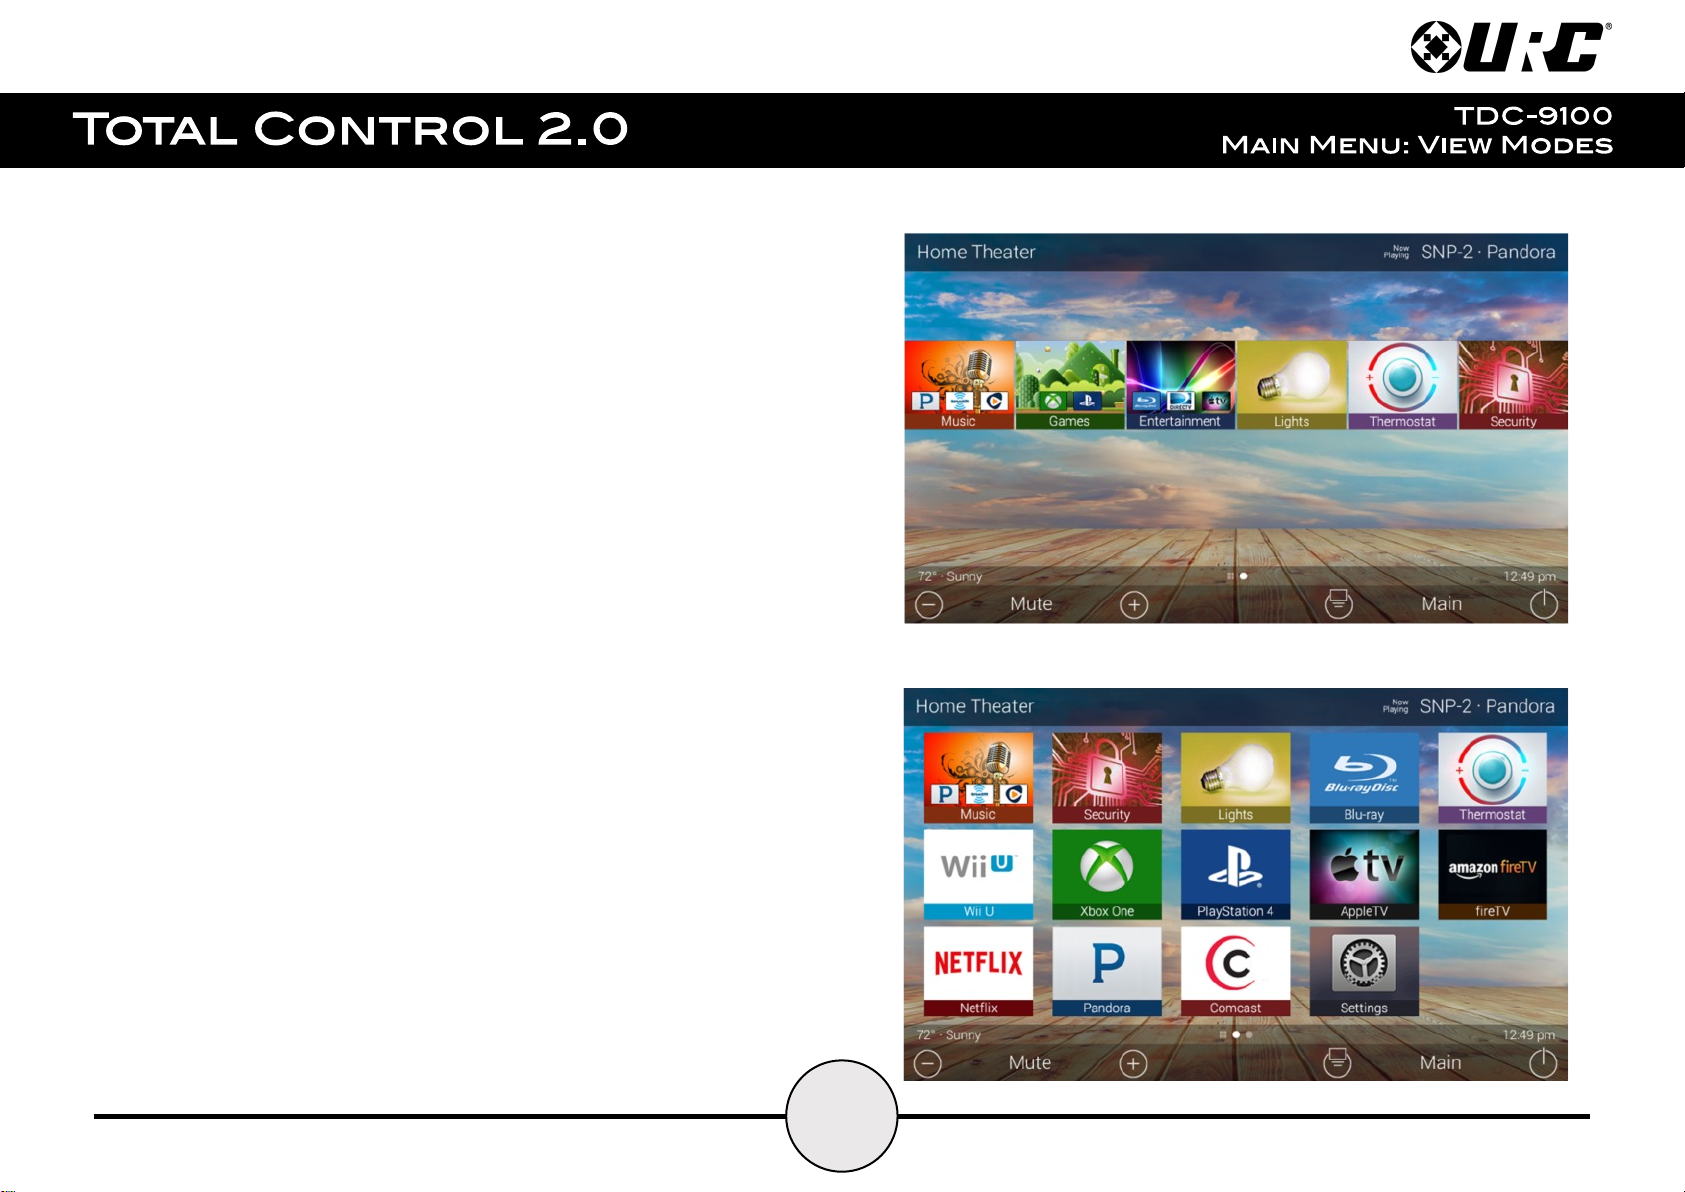
Main Menu: View Modes
Total Control 2.0 features two different view modes for the TDC-9100. Each view
mode has its own unique properties that compliment the user experience.
The view mode must be programmed from within the Accelerator 2.0 software,
speak to a custom home integrator for more details.
1. Ribbon View: This is the default view mode and it contains up to six (6)
items per page.
2. Grid View: This view mode contains up to fifteen (15) items per page.
Ribbon View:
Grid View:
6
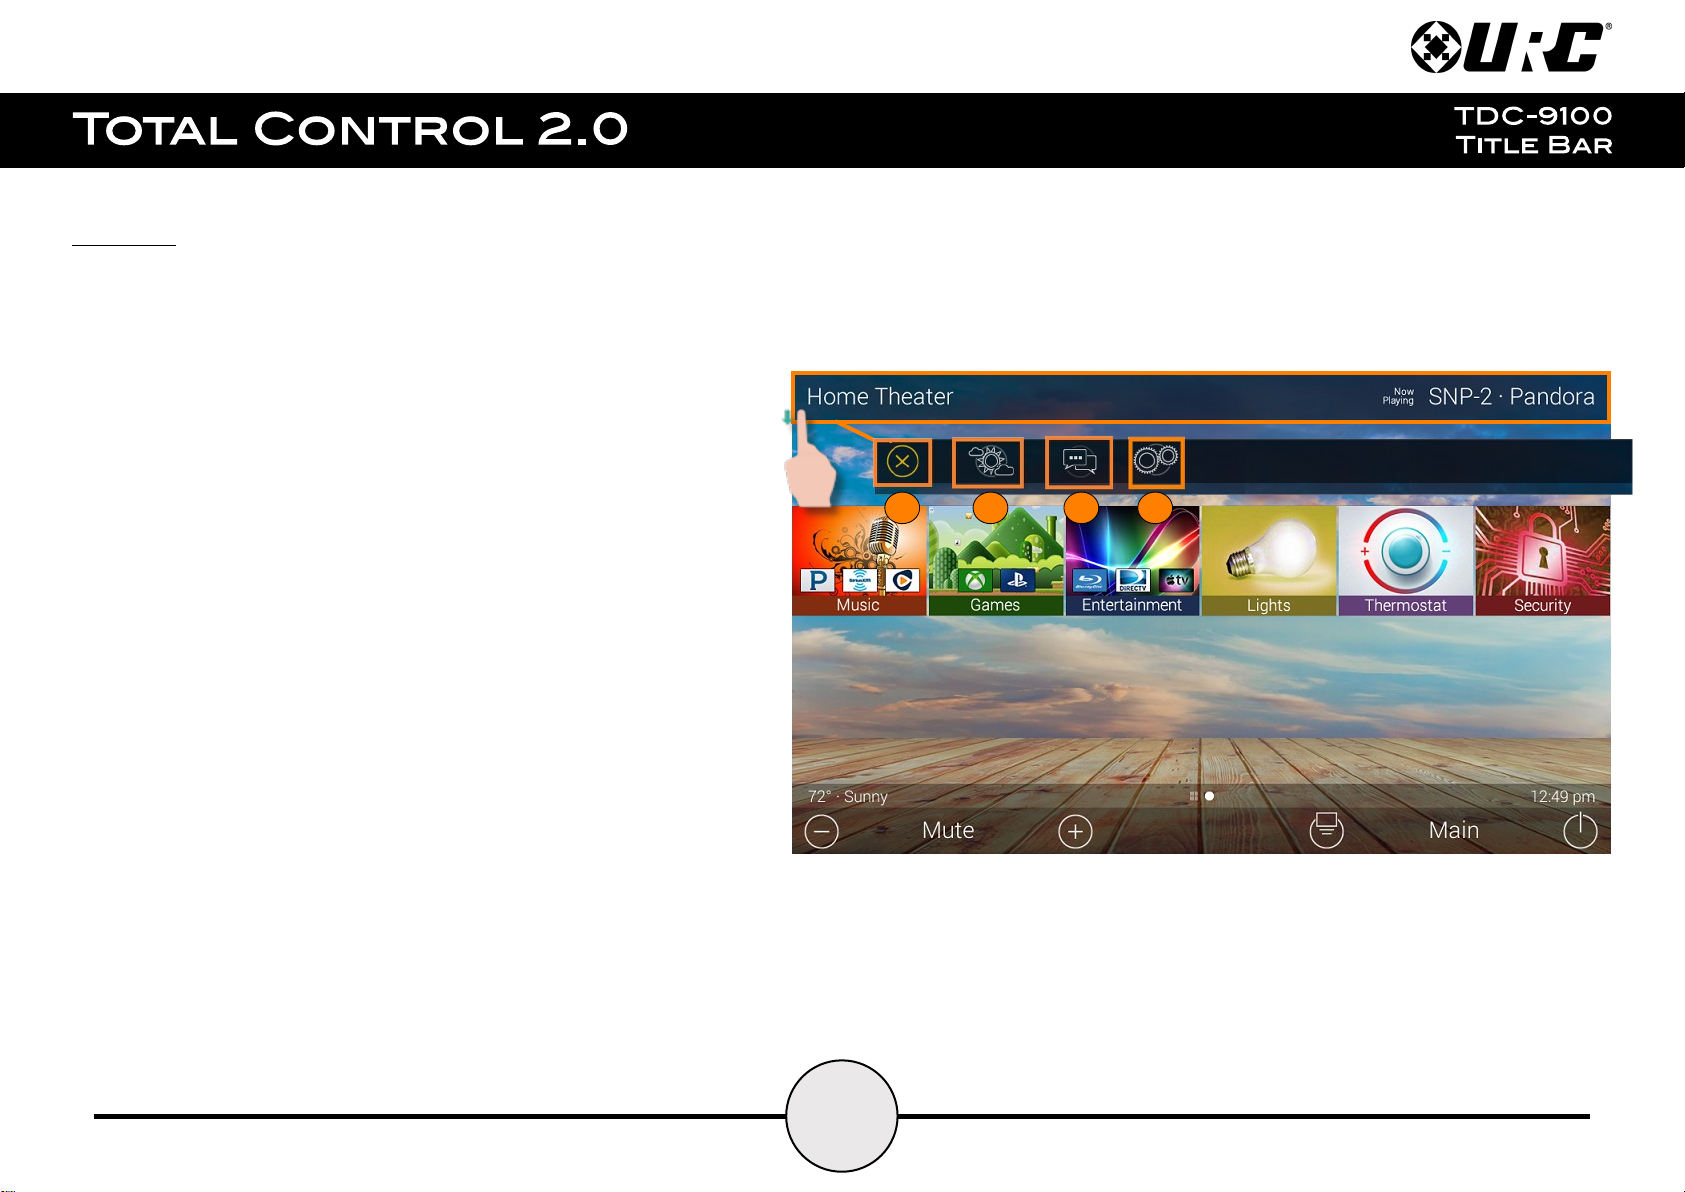
Title Bar:
Current Room
Now Playing
123
4
The Title Bar is always present regardless of what menu and/or room the
TDC-9100 is currently operating.
On the left of the Title Bar, the current room the TDC-9100 is controlling is
displayed. Selecting it reveals the Rooms Menu.
At the right of the Title Bar is the Now Playing area, which displays the
device/activity currently active. Selecting it returns the interface to that
device/activity’s menu for control.
The Title Bar is located at the very top of the display. To access its menu,
swipe down as depicted on the image to the right. There are three (3)
selectable options:
1. Close: Select this to hide the Title Bar Menu.
2. Weather Module: Displays the Time and Weather Module, this
feature requires an Internet connection and is configured by the
custom home integrator.
3. Intercom: Select this button to display the Intercom Menu. This
menu displays all available Intercom-Enabled device (clients). Please
see this documents Audio-Video Intercom section for more details.
4. Settings: Select this button to access the TDC-9100’s
Settings Menu. The various parts of the Settings Menu are
explained in detail in a later section of this document.
7
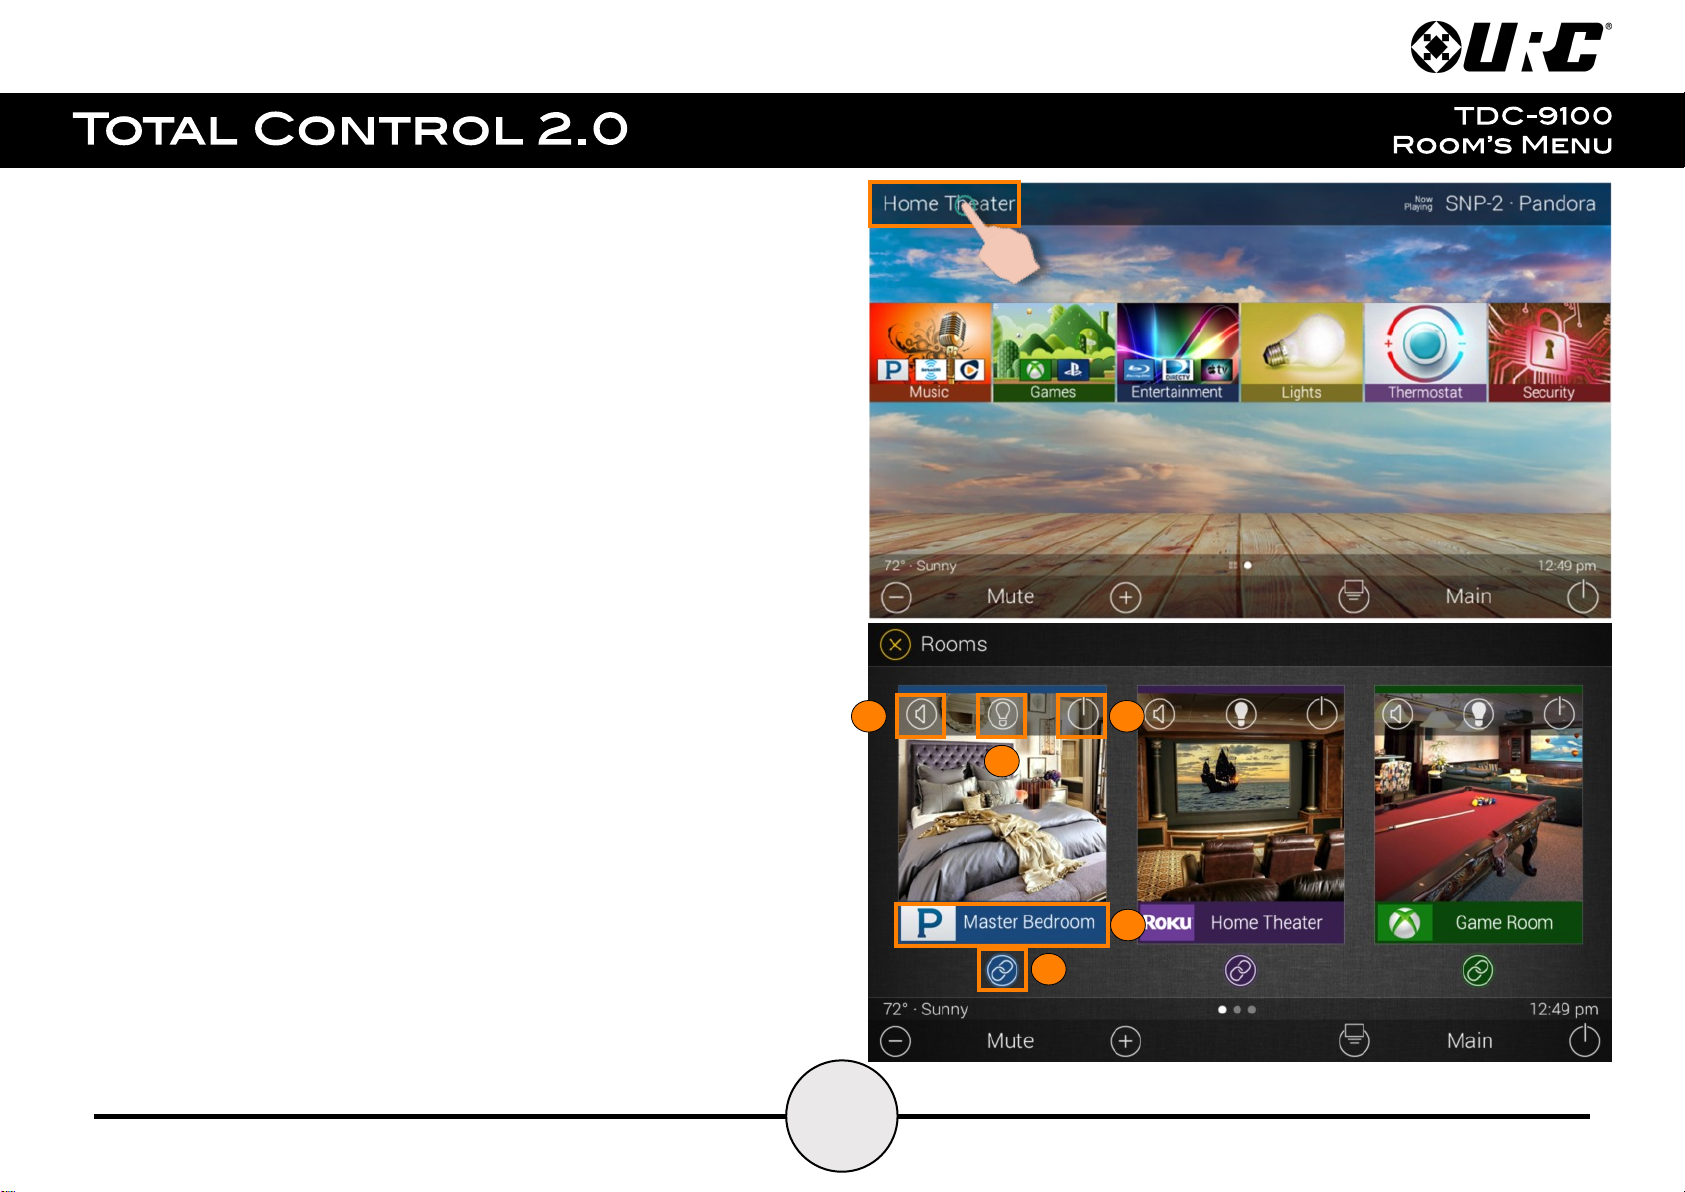
Room’s Menu:
12345
Tap on the Room Name located on the left in the Title Bar to display the
Room’s Menu.
The Room’s Menu contains every room programmed into the system. Specific
rooms may be hidden from certain interfaces, speak to the custom home
integrator for that option.
Each room is given a Room Name and customized image to represent that
room. Additionally, the Room’s Menu can be used for controlling volume,
turning off the lights, or completely powering off a specific room.
Here are the selectable buttons in the Room’s Menu:
1. Volume Control: Select this button to reveal the Vol +, Vol -, and
Mute icons. This button is available on rooms with audio sources.
2. Lights Off Action Command: This button is programmed by the
custom integrator and can be set to turn off all the lights in a
particular room.
3. Room Off: Select this button to turn off all the devices in that
particular room. This button can only be used to turn off a room.
4. Now Playing: This section displays what device/activity is currently
active in that room. Selecting this jumps the TDC-9100 to that
device/activity’s menu for control.
5. Room Linking: This feature is only available on DMS Audio device.
It is used to link DMS Zones/Areas. This means having one menu
that controls volume for multiple zones simultaneously or individually.
8
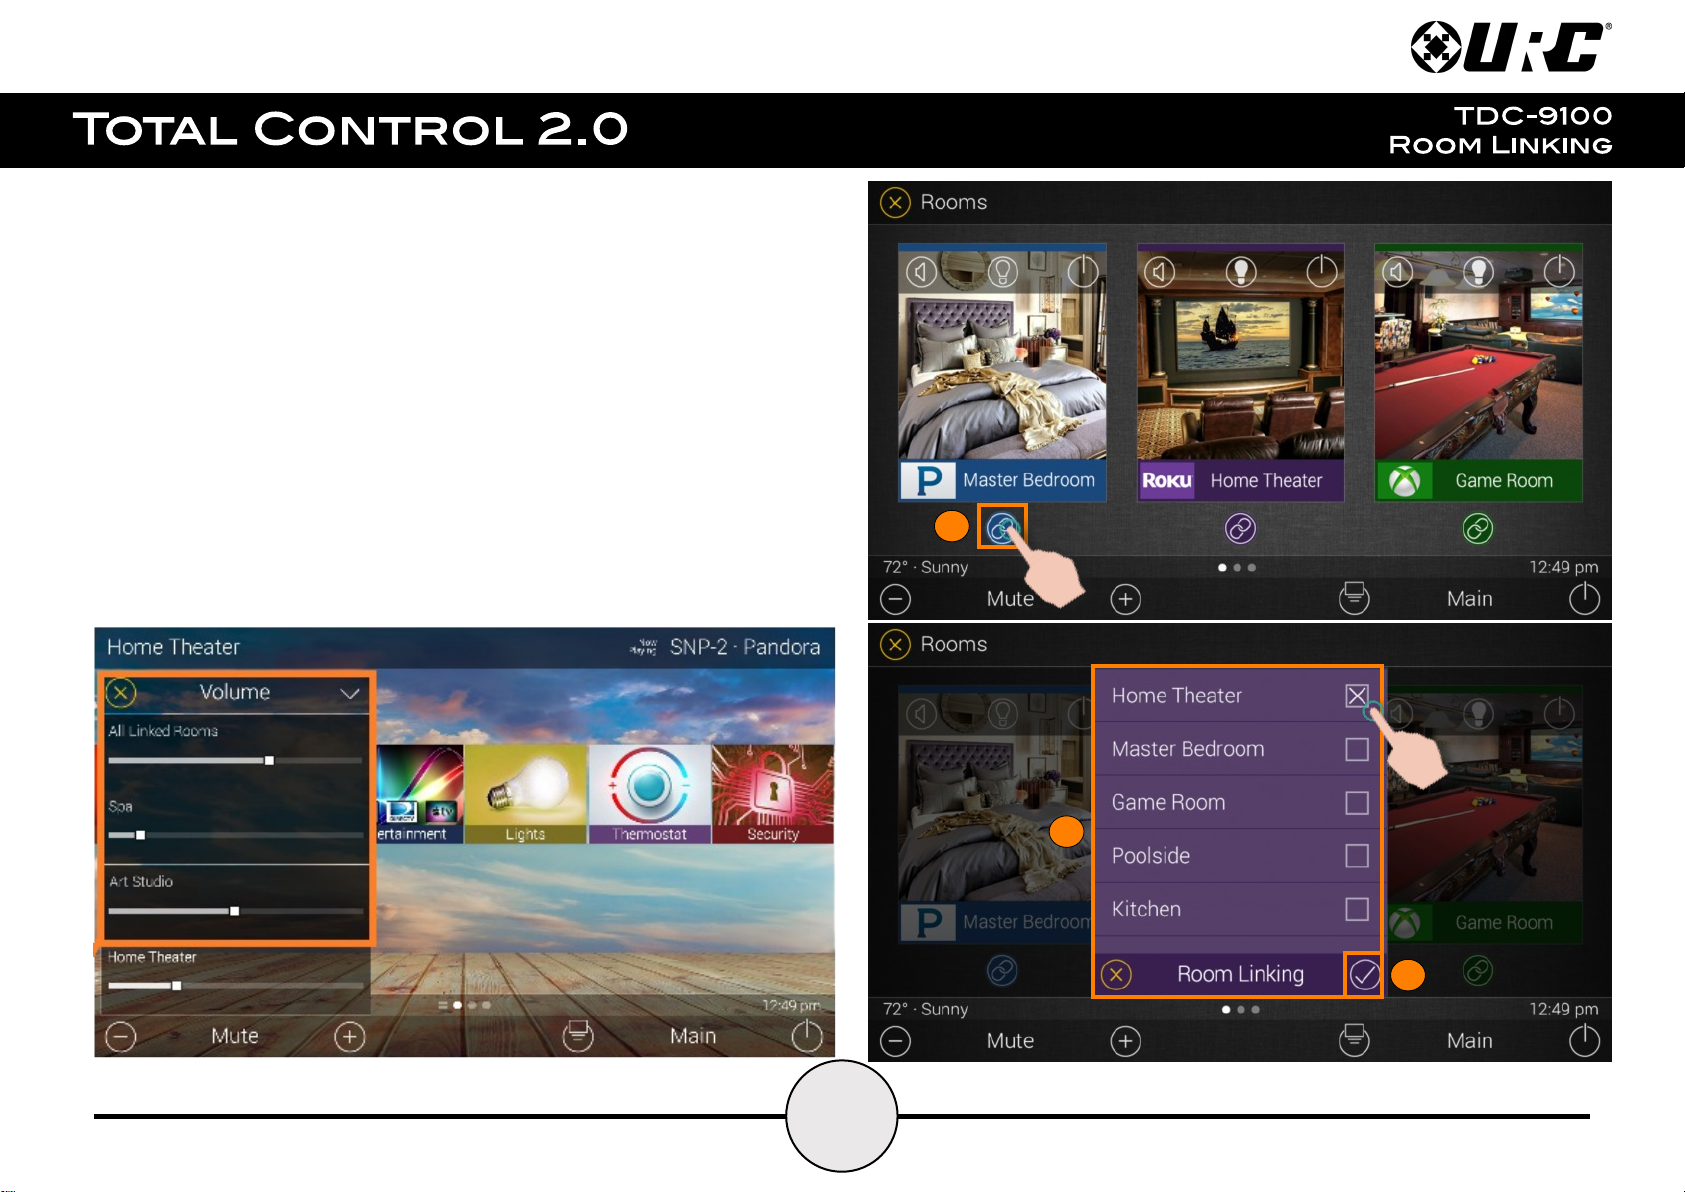
Room Linking:
123
Remember, Room Linking can only be used by DMS Zones/Areas. The
following steps take place from within the Room’s Menu:
1. Select the Room Link button, this displays the Room Linking Menu.
2. Select which rooms in the system to link. Only rooms that are
DMS Zones/Areas appear on the Room Linking Menu.
3. Select the Check to confirm.
These rooms are now linked. It is possible to control volume on all of
these rooms from one menu (see below). Control the volume of each
Linked Zone/Area individually or simultaneously using the
All Linked Rooms volume slider.
9
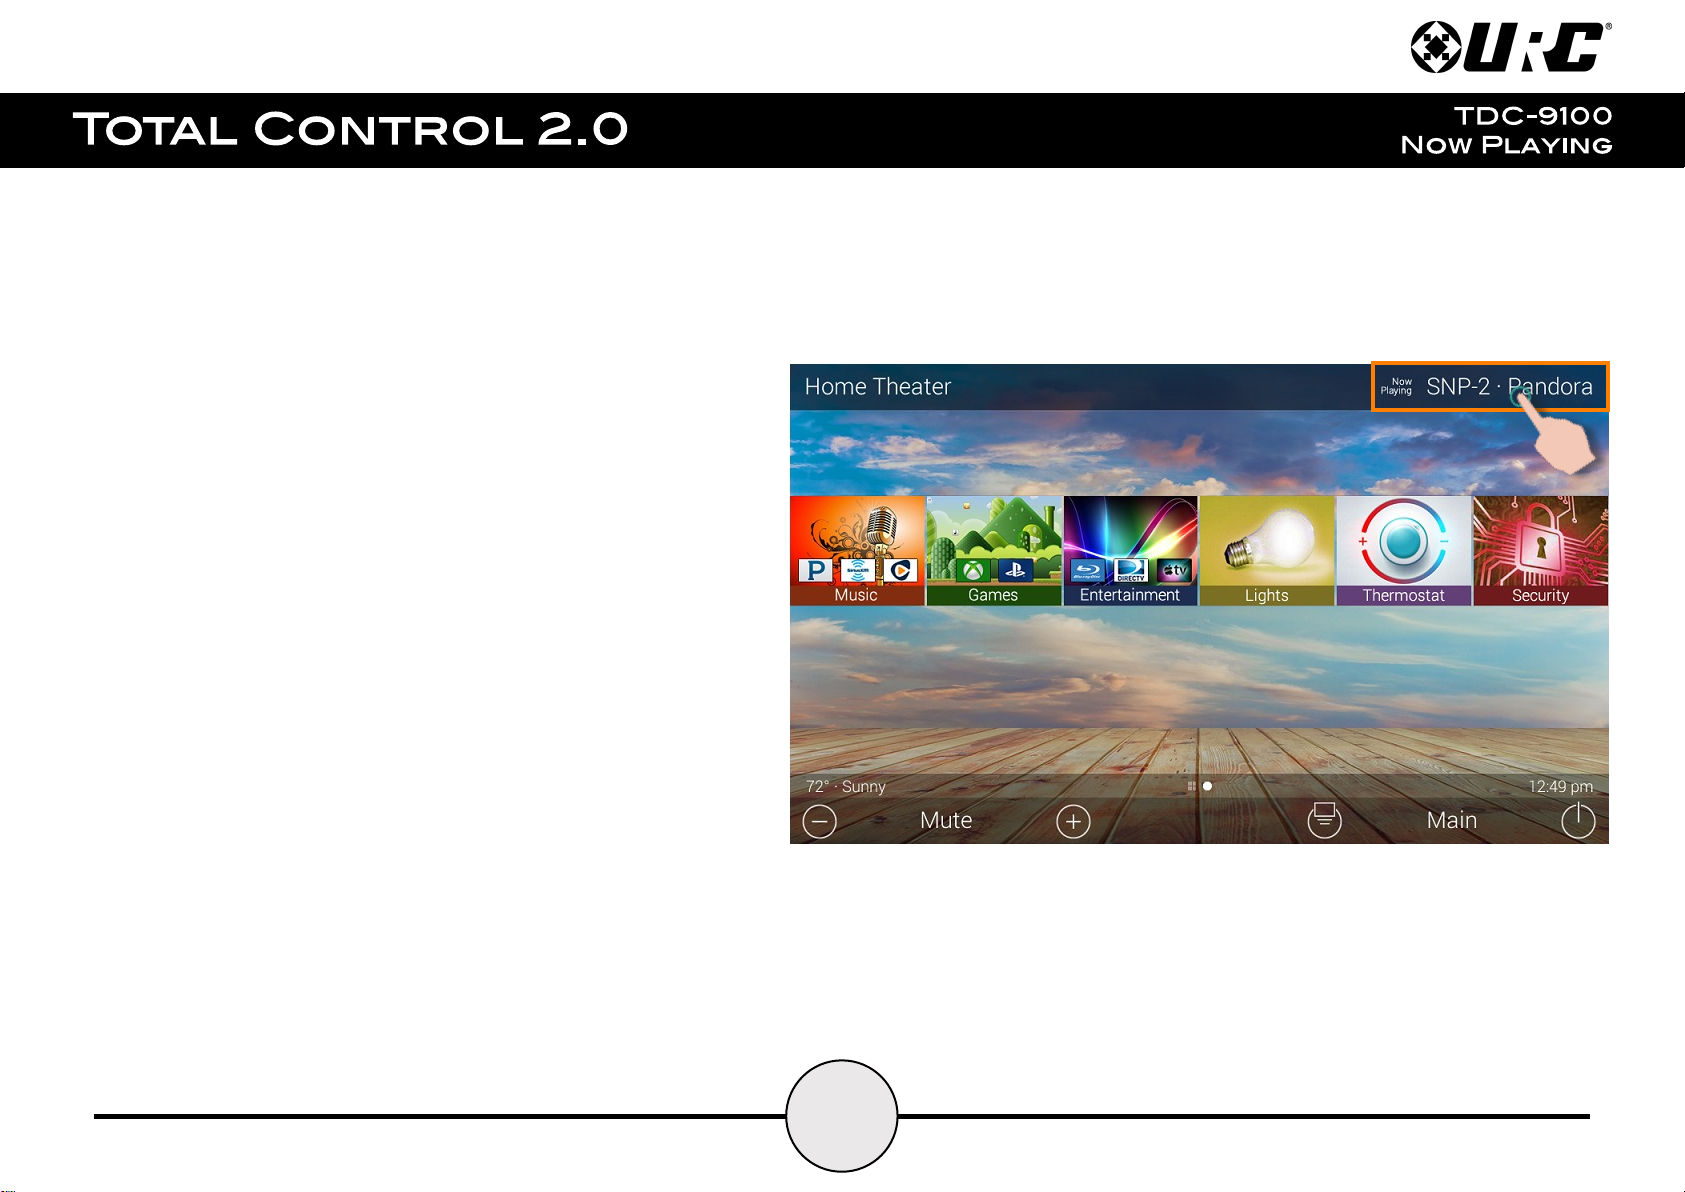
Now Playing:
On the right hand side of the Title Bar is the Now Playing area. The
Now Playing area always displays what activity is currently playing in
the room.
In the example at the right, Now Playing reads “SNP-2 Pandora”.
This means that in the Home Theater the SNP-2 is using
Pandora currently.
Tapping the Now Playing area jumps the TDC-9100 to the menu for
the device in that section. In the example, this means that once
Now Playing is tapped, the interface jumps to the SNP-2 device
menu for control.
10
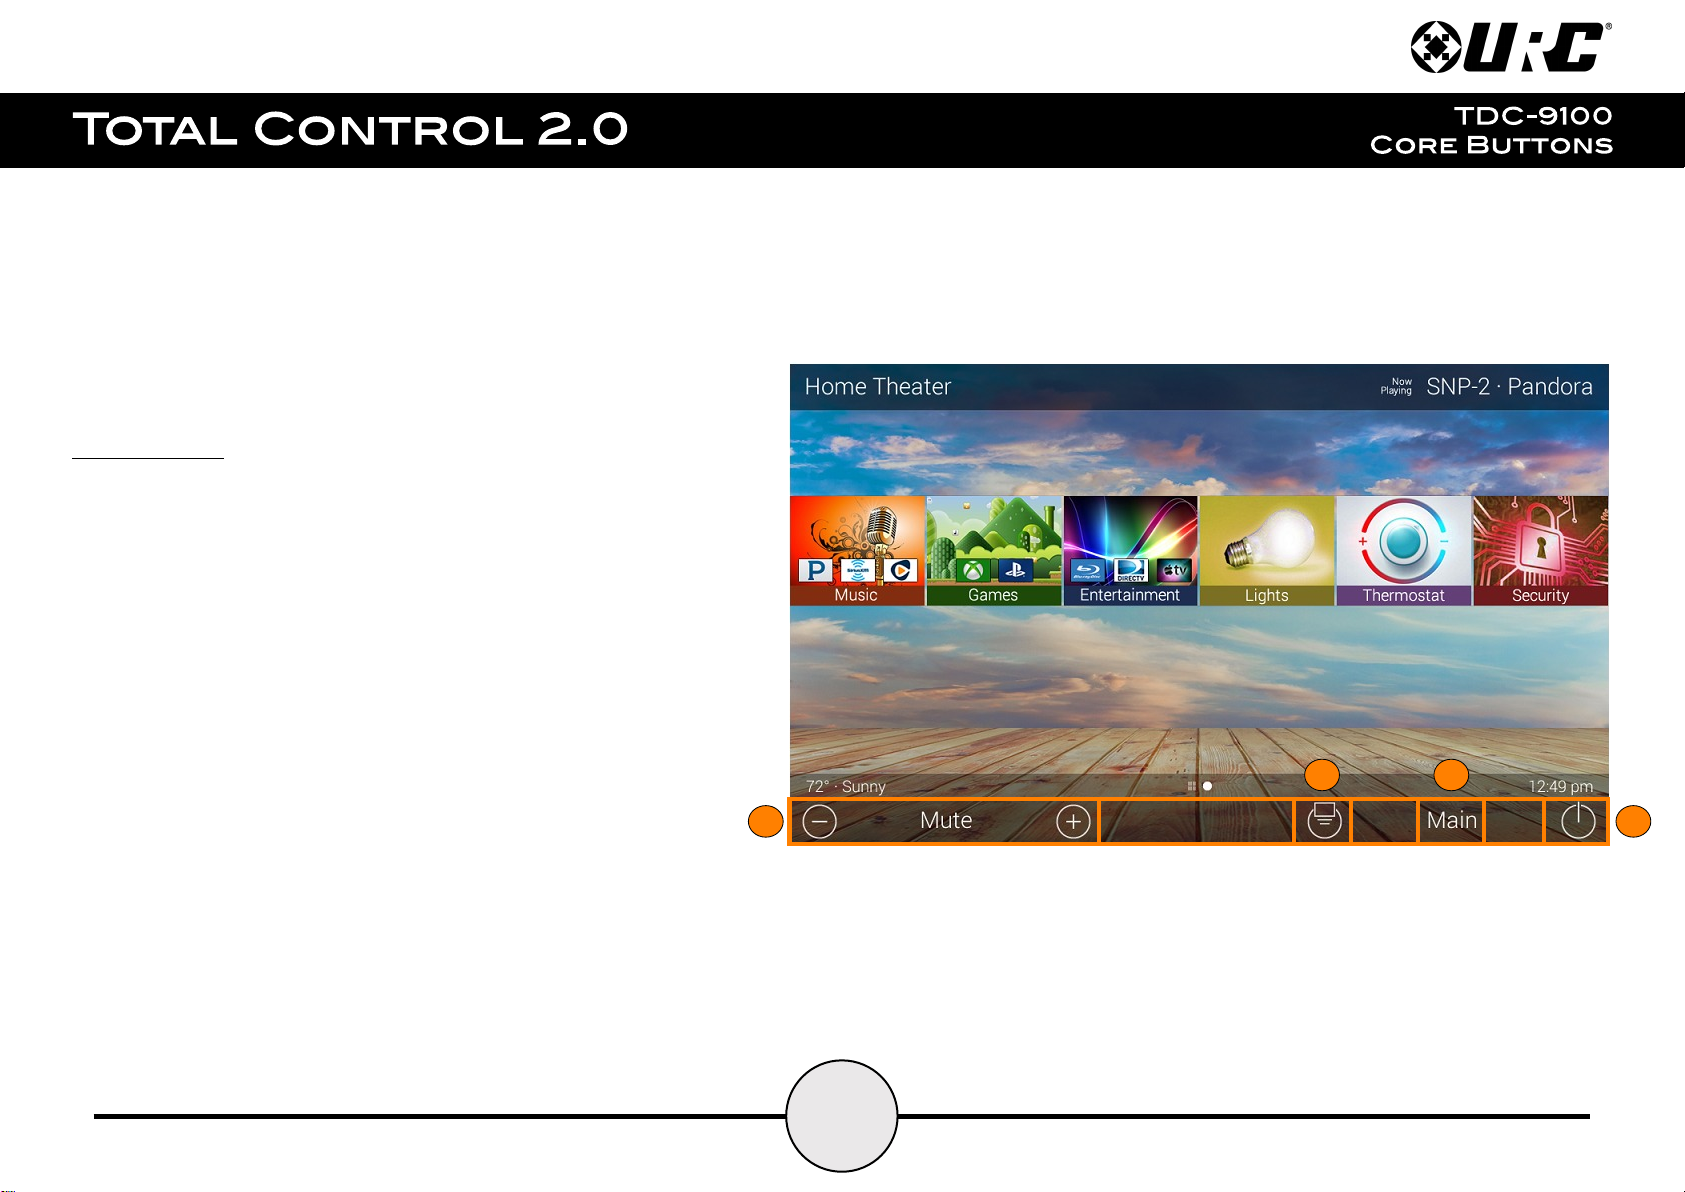
Core Buttons:
1
Vol-
Mute
Vol+
234
Shortcut Popup
Room Off
These buttons are almost always on display. Each one of these buttons has a
specific function:
1. Volume: Used to control an active audio device.
2. Shortcut Popup: Displays the Shortcut Popup Menu. This menu
contains up to six (6) current room activities.
3. Main: Return the display to the Main Menu regardless of what screen
the TDC-9100 is currently displaying.
4. Room Off: Use this button to turn off the current room.

11
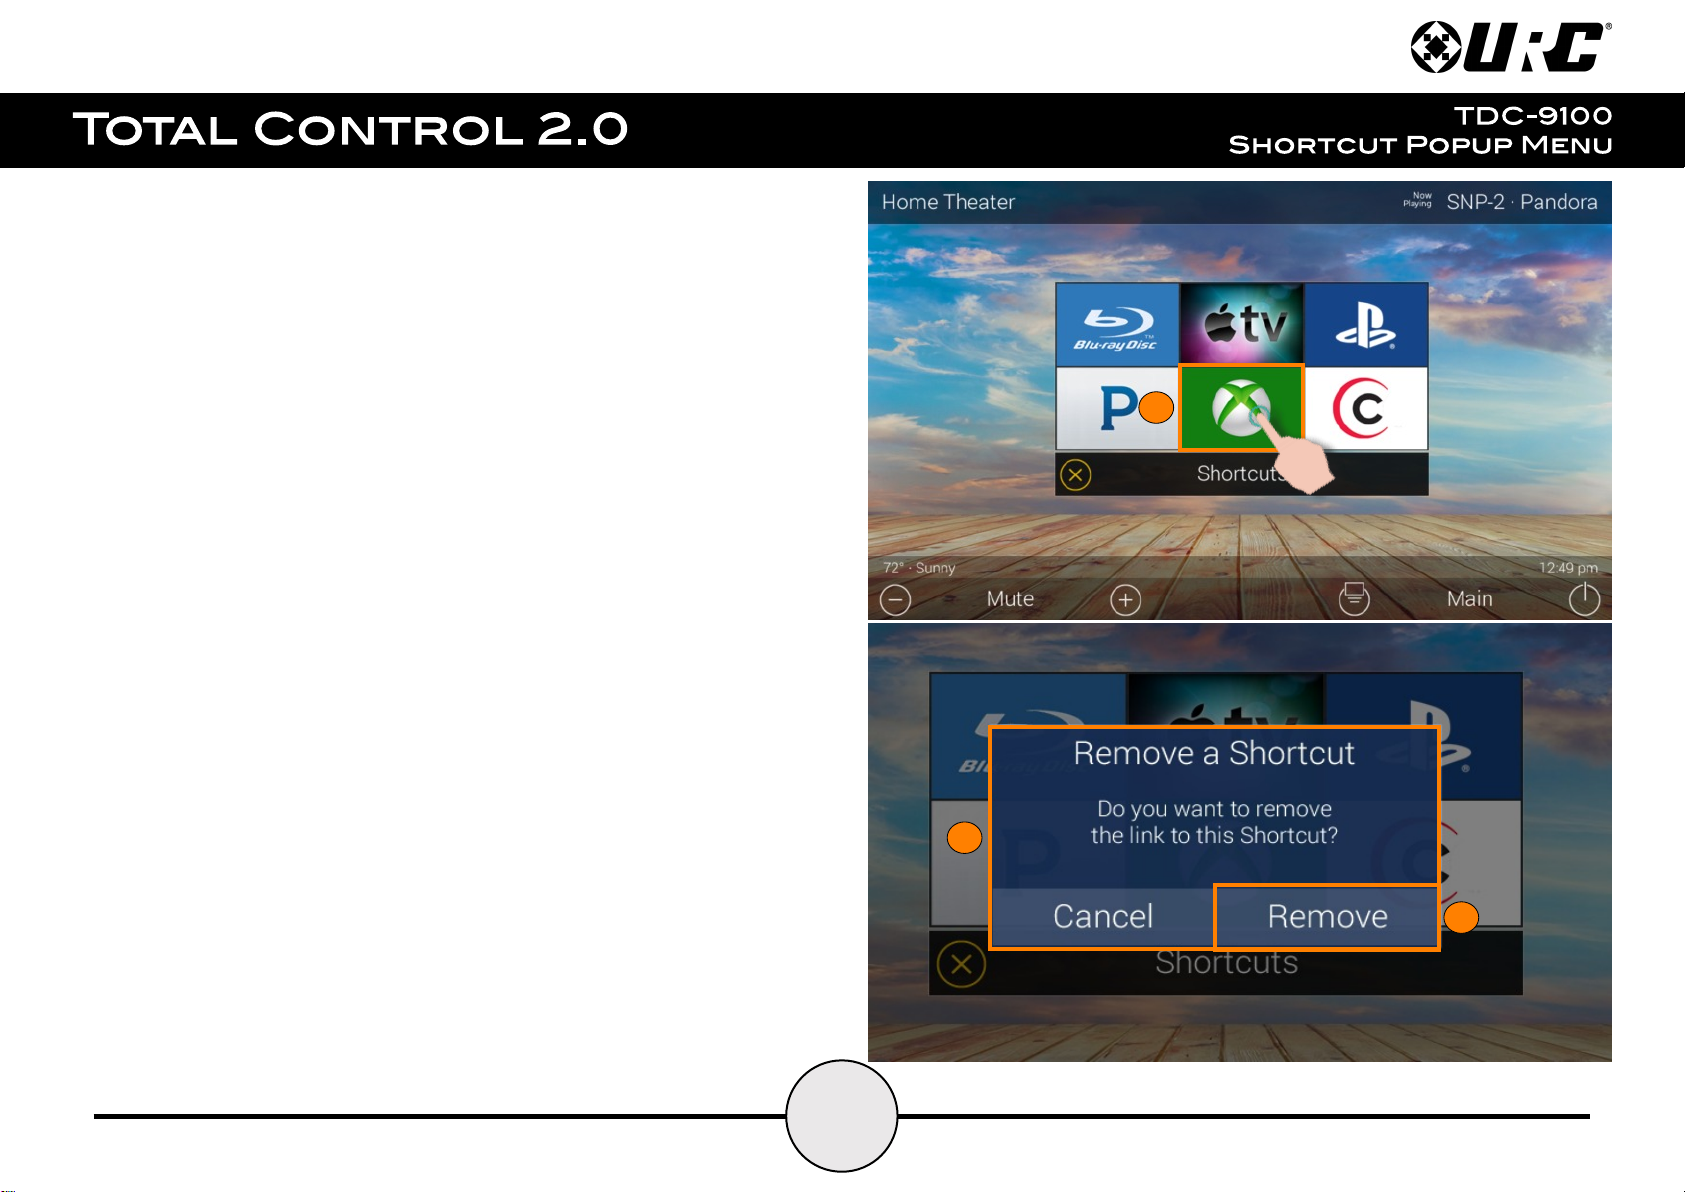
Shortcut Popup Menu:
1
2
The Shortcut Popup Menu holds the end-user’s favorites or most
frequently used devices/activities and places them into one easy to
access location.
Adding Shortcuts:
Follow these steps to add a Shortcut:
1. Locate an available button and hold it down until the
status bar on the top of the display fills.
As stated on the bottom of the interface “Press and Hold
to Add or Remove”.
A list of device/activities for that room a presented in
the Add a Shortcut Menu.
2. Select a device/activity. This adds that item to the
Shortcut Popup Menu.
12
Just tap on a Shortcut button to launch that device/activity. Remember, this menu
123
can only hold up to six (6) items and each item must already be a device/activity
programmed into that current room.
Removing Shortcuts:
Follow these steps to remove a Shortcut:
1. From the Shortcut Popup Menu, press and hold the Shortcut that
needs to be deleted.
2. Hold the button until the Remote a Shortcut window displays.
3. Select Remove.
 Loading...