


 Loading...
Ohmicide Reference Manual
Ohmicide Manual v1.10
THIS MANUAL IS COPYRIGHT c OHM FORCE 2000-2007. ALL RIGHTS RESERVED.
NO PART MAY BE REPRODUCED WITHOUT WRITTEN PERMISSION.
VST TECHNOLOGY BY STEINBERG MEDIA TECHNOLOGIES AG. ALL TRADEMARKS ACKNOWLEDGED.
CHAPTER 1 Introduction
Thank you for purchasing Ohmicide, your new huge-sounding, feature-rich, audiomangling tool!
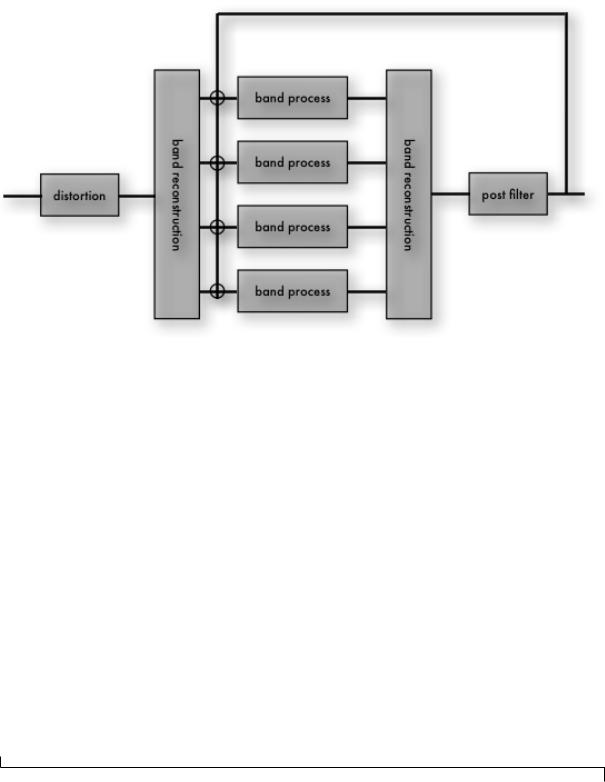
So, how does it work? Basically, the plugin splits an input audio signal into userde ned frequency bands and processes them individually through dynamic and then distortion stages.
All the processing is in stereo, and you'll discover that Ohmicide can create wide sounds, through the use of the very stereo per-band feedbacks, pans, and optional mid-side processing(see pages 16 and 18).
Ohmicide is designed to help you quickly shape any sound according to your needs. It can be used in a subtle way to help it t better in the mix, in a more direct
On the top of this, feedback sections and other deviously designed goodies are included for you to mess up your sounds even more, and a post-e ect low-pass lter can come in handy to tame any unwanted high frequencies induced by all this madness.
way to give it more width and punch, or it can even be used to radically change the color. It works very well with drums, voices, basses, guitars and synthesizers, in fact anything you can throw at it!
As usual for Ohmforce products, we put a great deal of e ort into this one, and we hope you'll enjoy using it as much as we enjoyed making it.
2
Copyright c 2000-2007 Ohm Force Ohmicide Manual v1.10

CHAPTER 2 Getting Started
Contents
1. |
Structure of this Manual . . . . . |
3 |
|
2. |
Requirements . . . . . . . . . . . |
3 |
|
3. |
Installation . . . . . . . . . . . . . |
3 |
|
|
3.1. |
Installing on Windows . . |
3 |
|
3.2. |
Installing on MacOS X . . |
3 |
|
3.3. |
Installing AudioUnit Presets |
4 |
4. |
First Use . . . . . . . . . . . . . . . |
4 |
|
1. Structure of this Manual
This manual is divided into 8 chapters:
I Introduction brie y describes the design of the plug-in and it's usage,
I Getting Started explains how to install Ohmicide and get it working,
I User Interface Features rounds up the user interface features of Ohmicide and covers Automation and MIDI topics,
I Using Ohmicide, shows you how to operate the e ect
I Settings File Reference explains the syntax and use of a Settings File,
I Ohmicide Default MIDI Mapping gives the information necessary to control Ohmicide using MIDI,
I Version Notes summarize the di erence from one version of Ohmicide to another,
I FAQ gives you some helpful information on how to troubleshoot your plugin.
2. Requirements
The minimum requirements to run Ohmicide are:
I PC 64 Mbytes RAM, 25 Mbytes hard disk space, Pentium III compatible CPU, and Windows 98.
IMAC - 64 Mbytes RAM, 25 Mbytes hard disk space, G5 compatible CPU, and OS 10.1, but OS 10.2 is strongly recommended.
It is available on VST for Windows, and VST/AU/RTAS for MacOS X.
3. Installation
3.1. Installing on Windows 


Run the installer, an .exe le whose exact name depends on the version you received. Follow the on-screen instructions carefully.
You will be prompted to enter both your
User Name and Key Code. They have been sent to you by e-mail or can be found within your printed manual if you bought a boxed version. Please enter the two codes carefully, preferably using copy/paste to avoid typos. Then you will be prompted to choose one or more installation path, depending on the plug-in version you are installing.
3.2. Installing on MacOS X 


Almost every internet browser will open the le automatically, presenting a disk image on your desktop. If not, please locate the .dmg le and double click it.
The disk image contains:
IThis manual,
IThe installer named Ohmicide Installer,
IA folder containing a collection of Presets in AudioUnit format for the AudioUnit installer only.
To install Ohmicide, double click the installer icon. Before the installer can copy its le to your disc, it needs to have permission from your system to do it.
The rst window will ask for your admin password:
3
Copyright c 2000-2007 Ohm Force Ohmicide Manual v1.10

If you don't know the admin password please contact the system administrator, generally the owner of the computer, who should know it.
The next screen is the plug-in installer. Please follow the on-screen instructions carefully. You will have to choose between
Classic Skin and Funky Skin (they cannot be both installed), and you will be prompted to enter your User Name and
Key Code.
They have either been sent to you by e- mail, or can be found within your printed manual if you bought a boxed version. Please enter those two codes carefully, preferably using copy/paste to avoid typos.
3.3. Installing AudioUnit Presets
You will nd a folder containing a collection of Presets in the AudioUnit format. Installing them depends upon the host you use. Please refer to your host manual and install them manually.
4. First Use
Open your favorite audio host and put Ohmicide as an insert e ect on an audio track. A good way of getting a feel for Ohmicide is to try the factory Presets. You will nd a frame with buttons in it, either numbered or laid out like a keyboard octave. Click on each button to audition a factory Preset.
Turn the knobs by clicking on them and dragging the mouse vertically.
If your mouse suddenly goes mad, don't call the cat, stay calm and locate the Setup button. Click on it to open the menu and deselect Enhanced Mouse Mode. This behaviour may happen with some mice, graphic tablets or trackball devices.
4
Copyright c 2000-2007 Ohm Force Ohmicide Manual v1.10
CHAPTER 3 User Interface Features
Contents |
|
|
Neither the preset nor the Meta- |
||
1. |
Preset and Melohman Panel . . |
5 |
patch is stored on the disk at this |
||
|
1.1. |
Presets / Memorise . . . . |
5 |
point. See next section. |
|
|
1.2. Load / Save Metapatch . |
5 |
|||
|
|
||||
2. |
Using Knobs and Faders . . . . . |
5 |
|
||
|
2.1. |
Direct action . . . . . . . . |
5 |
|
|
|
2.2. |
Side-clicks . . . . . . . . . |
6 |
1.2. Load / Save Metapatch |
|
|
2.3. |
Linked Knobs . . . . . . . |
6 |
||
3. |
Tempo Control . . . . . . . . . . . |
6 |
|
||
4. |
Automation . . . . . . . . . . . . |
6 |
Use these two buttons to load and save |
||
|
4.1. |
Support |
6 |
||
|
your Metapatches from and to the hard |
||||
|
4.2. VST and AU Limitations |
6 |
|||
|
disk. Note that loading a Metapatch will |
||||
5. |
MIDI Support |
7 |
|||
not modify the current settings until you |
|||||
|
5.1. |
Selecting MIDI Ports . . . |
8 |
||
5.2.Binding Parameters to either select a new Preset on the GUI, or
|
MIDI Controls . . . . . . . |
8 |
morph to a preset using Melohman (see |
5.3. |
Saving and Loading MIDI |
|
page 10). There are many Presets bundled |
|
Configuration . . . . . . . |
8 |
|
|
with your plug-in. Feel free to use the Pre- |
||
5.4. |
About Control Change |
|
|
|
sets as the basis from which to create your |
||
|
(CC) Messages . . . . . . |
9 |
|
5.5. |
Unbind . . . . . . . . . . . |
9 |
desired sound. |
2. Using Knobs and Faders
1. Preset and Melohman Panel
Each bank, or Metapatch, contains twelve preset allocations. Metapatches can be saved to your hard disk, and are multi-platform,
thus enabling you to load them into any sequencer on any computer.
1.1. Presets / Memorise
To activate a Preset simply click on any of the twelve Preset buttons. The Preset will be applied immediately.
After editing the on-screen parameters, you may wish to memorise your new settings. To do so, click once on the Store (or M) button; it will light-up. Then click on the Preset button in which you wish to store your new settings in the Metapatch. The Store M button will turn o automatically and you'll be returned to Preset Mode.
All the knobs and the faders work the same way. There are two modes: direct action and side-clicks.
2.1. Direct action
You can move a Knob or Fader by clicking directly on it and moving the mouse while keeping the button pressed down. Each button has a preferred direction for mouse movement: vertical for Knobs and, for the Faders, parallel to their layout.
If you move the mouse in the preferred direction, the Knob will turn quickly. However, if you move your mouse in the perpendicular direction i.e. horizontally for Knobs, the movement will be slow and very accurate. Some Knobs have notches which lock to certain values. It is possible, however, to set the Knob position between two notches by moving the mouse in the perpendicular direction, as mentioned above.
If you double click the control, it will be reset at its default position.
5
Copyright c 2000-2007 Ohm Force Ohmicide Manual v1.10

2.2. Side-clicks
When selected, a Knob or Fader display a blue shape with lobes. If you click on a lobe, the control will start to move
toward the lobe's value. This enables you to make very small adjustments with ease.
If you click on this zone, then move the mouse without releasing it, the control will move automatically and keep moving even after you have released it. The further you move the mouse, the faster the Knob will move. To stop the movement, just click on the Knob again.
The movement will stop by itself at the end of the course or the lobe value. This is especially useful during live sessions, as you can have many parameters shifting at the same time without having to use the Melohman morphing feature.
If you double click the lobe, you will set the control to the lobe's value directly.
2.3. Linked Knobs
You can link similar parameters of di erent bands. This means that you can alter a parameter in the four bands at the same time | with a single click.
To do so, you have to click on the parameter with the right mouse-button (click while holding the Control key on Mac systems with a single-button mouse). The Knobs of the four bands will now move in unison.
If you hold the Shift key and click on the right mouse-button, the four Knobs move at the same time but retain their relative distance. For instance, if the original value of the rst Knob is 10% and the second Knob is at 50%, when you increase the value of the rst Knob to 30%, you will also increase the second knob to 70%.
You can undo the movement of the slave Knob(s) by performing a right mouse click while holding the Control key (the Command key on Macintosh).
6
3. Tempo Control
Because many plug-in applications are related to music and
therefore rhythm, it is necessary to be able to synchronise to the tempo of the host application. Some host programs can automatically synchronise the plug-in's internal tempo with their own tempo. Alternatively, you can change the tempo by clicking on the buttons to the right of the numeric display. You can also type into the numeric display itself. On the Ohmicide, the tempo only a ects morphing times.
 When the host controls the tempo, you won't be able to manually set the plug-in tempo
4. Automation
4.1. Support
Every parameter is potentially automatable on RTAS, VST and AudioUnit platforms. However, depending on your host's capabilities, you may be restricted to axed number of parameters, or even have no automation capability at all. Check your host's reference manual for details about parameter automation.
ProTools display the automated parameters on the plug-in interface itself. A green triangle on a Knob indicates that automation is playing, and a red disc shows automation data being recorded.
4.2. VST and AU Limitations
Some host applications, such as Ableton Live and earlier versions of Steinberg Cubase VST, have several limitations regarding plug-in automation. They can handle only a few parameters, which is unfortunate as some Ohm Force plug-ins have hundreds! As a consequence, some important parameters cannot be automated. However, it is possible to get around this limitation by using MIDI commands, or changing the order that parameters are displayed in the host.
Copyright c 2000-2007 Ohm Force Ohmicide Manual v1.10

To change the order, you need to edit the plug-in's con guration le, by following the steps below. We should warn you that this section is rather technical!
Before editing the con gurationle, please save any changes you have made to the plug-in to a preset as described in the Preset section above. Note also that if you have used the host's preset system you should rst save those presets using the plug-ins internal preset procedure, as the reordering of the parameters may make those presets act di erently to what you expect!
You have two ways to proceed: you can either use the provided le or make your own from scratch.
To |
load the provided con guration |
|||
le, |
activate |
the Settings/Load |
item |
|
in |
the Setup |
menu. |
Locate the |
le |
easy vst automation.cfg.txt in your effect's installation folder and open it. The con guration le is designed so that you can manually move the parameters, that you want to be automated, to the top of the list, thus allowing them to be recognized by the host.
Now to change the provided con g- uration le. First save the current plug-in con guration using Settings/Save (eg. my settings.cfg.txt). Then load it into a text editor, along with easy vst automation.cfg.txt so you have a reference to work with. If you examine the le, you can see that it consists of a number of keys. Each key has a name and a value (which might consist of other keys, a recursive structure known as a tree in scienti c circles). Key names are separated from their values by an equals sign (=), and complex key values are enclosed by brackets.
The provided con guration le will be a lot smaller than your own one. This is because it is a partial con guration, whereas yours is a complete one. You can suppress some irrelevant subkeys (like the MIDI section, for example) in order to make the twoles look more alike, however yours will inevitably remain longer.
Now let's look at parameter reorder mapkey. You'll see many parameter names as thele you have just saved will contain all possible plug-in parameters. To change the parameter order, simply move the parameters you want to automate to the top
of the list. You can specify a particular order for the other parameters if you want to, or you can simply suppress them (Suppressing them does not mean that they will not appear any more, or become unavailable for automation, because when loading the con guration le, the plug-in will automatically nd the best available mapping for the suppressed parameters). Once you have nished sorting the parameters to your liking, save your work and load your con guration le into the plugin. The newly ordered paramters should appear in the host's automation lists as you set them.
Finally, activate Settings/Autoload to automatically load your new le each time the plug-in is opened.
5. MIDI Support
You can also use MIDI commands to control the plug-in parameters. MIDI can even replace automation, because not only can the plug-ins receive MIDI commands, they can also transmit them. The e ects are set in \Omni"mode, meaning they can receive MIDI commands from any channel. However, all commands are sent via Channel 1. Commands can be regular CC (Continuous Controllers), or RPN and NRPN (NonRegistered Parameter Numbers). The decision as to whether to use CC or NRPN will depend upon the capabilities of your MIDI device. CC is commonly used by
7
Copyright c 2000-2007 Ohm Force Ohmicide Manual v1.10

hardware devices, but NRPN has a higher resolution, so is recommended if available to you. The factory MIDI settings use NRPN, but it is possible to change the mapping at any time. The default mapping for Ohmicide is listed in the Ohmicide default MIDI mapping chapter of this manual.
Some hosts, such as Mackie Tracktion or Ableton Live auto connect the MIDI ports of audioconnected plug-ins. This can result of strange behaviour. However you can disable the MIDI ports in the plug-in Setup Menu.
5.1. Selecting MIDI Ports
Depending on your host, your MIDI devices and your system settings, you may have more than one MIDI port available for MIDI input and output. If so, you may want to select which `virtual' port you wish to use for receiving and sending MIDI events.
To choose the input port | the one from which MIDI data is received by the plugin | click on the Setup button, go to the
MIDI/Input device menu and select the one you want. Do the same thing to select the output port, except, of course, you will need to click MIDI/Output device. The selected MIDI port will be ticked in the menu. You can only use one input and one output port at a time.
 Only one MIDI Input device is available for AudioUnit plug-ins. No MIDI output device is available for AudioUnit plug-ins.
If the connection fails, it is usually because the port you selected is already in use by another application | most likely the host itself. In this case, check your host's operating manual to see if it is possible to free up the port.
8
5.2. Binding Parameters to MIDI Controls
The easiest way to bind a parameter with a speci c MIDI controller knob or fader (or any MIDI Control Change) is to use the Auto-bind feature. First, activate Autobind mode by checking MIDI/Auto-bind in the Setup menu.
If you have already selected a parameter its name will be displayed in brackets in the menu, like this:
Auto-bind [target: Volume]
If not, click on the Knob you want to bind to a MIDI control message. Only the last one selected will be taken into account for binding.
Once you have chosen the parameter, send a MIDI event to the plug-in (for example, turn a knob on your external MIDI controller). It can be a simple CC, an RPN or an NRPN command. As soon as the event is received, the connection is created automatically, and the MIDI command will remain associated with this parameter. Only one parameter can be bound to each MIDI command, and visa versa. If you want to Bind more parameters, repeat the procedure: select another parameter, and send another MIDI event. Do not forget to exit the Auto-bind mode, by un-checking the corresponding entry in the Setup menu, when you have nished.
5.3. Saving and Loading MIDI Configuration
If you have numerous parameters to bind each time you want to use the plug-in, you can save the con guration for later use. Currently selected ports will also be saved.
To do so, select Settings/Save in the Setup menu. You can restore the settings at any time by selecting Settings/Load.
Copyright c 2000-2007 Ohm Force Ohmicide Manual v1.10

The MIDI con guration is not stored with the Presets, and therefore is not saved with the host song. You will have to load the settings manually after loading a song on your host application. The true tech freaks among you will notice one can open the saved le in a text editor and tweak the con guration from there. It is also possible to build partial con gurations by only keeping a couple of the `keys'. The content syntax is covered in the Settings File Reference chapter of this manual.
5.4. About Control Change (CC) Messages
Although you can assign most of the CC numbers to plug-in parameters, there are some things to consider:
IYou cannot use certain CC numbers like Data Entry (6 and 38), Data Button Increment (96), Data Button Decrement (97), nor you can use RPN and NRPN Parameters 98, 99, 100 and 101, because
they are used for RPN and NRPN coding.
IIt is possible, but not advisable, to use the ne tuned section at the lower end of the controller range (32 to 63). This will work, but if plug-in parameters are assigned to coarse parts of the low controller range (0 to 31), the plug-in will also output the ne commands, resulting in possible interference. For example, if you assigned Knob A to CC 20 and Knob B to CC 52 (= 20 + 32), twisting Knob B would output CC 52 messages, whereas twisting Knob A would output both CC 20 and 52! Trying to record automation in this manner could result in a host of unnecessary complications.
5.5.Unbind
Select the parameter you want to unbind. Open the Setup menu. You can see that the Un-bind menu item shows which MIDI control the parameter is bound to. To unbind it, simply click on the Un-bind menu item.
 The Un-bind menu item is handy to know which MIDI control is currently bound to the selected parameter.
9
Copyright c 2000-2007 Ohm Force Ohmicide Manual v1.10

CHAPTER 4 Melohman
Contents
1. Overview . . . . . . . . . . . . . . 10 2. Using Melohman . . . . . . . . . 10 3. Parameters on the GUI . . . . . . 10
3.1.Melohman Mode . . . . . 10
3.2. Time . . . . . . . . . . . . . 10
4.Parameters in the Setup Menu . 11
4.1. Mapping . . . . . . . . . . 11
to another, simply play the MIDI key that corresponds to the target preset in the de-ned Melohman octave.
The time taken to morph from one preset to another is determined by either the Time parameter (default), or the velocity you play the MIDI key (optional). The lights on the preset buttons indicate the
4.2.Sensitivity . . . . . . . . . . 11 state of the morph; getting brighter on the
4.3.Density . . . . . . . . . . . 11
4.4.MIDI Channel . . . . . . . 11
5. Modes . . . . . . . . . . . . . . . |
11 |
5.1.Preset Morphing . . . . . . 11
5.2. Morphing Back & Forth . 12
5.3.Morphing triggered . . . . 12
5.4.Morphing sequence . . . 12
5.5.Mutation . . . . . . . . . . 13
1.Overview
This is probably the most innovative part of Ohmicide. With Melohman, you can assign an octave of your MIDI keyboard to control the settings of the e ect. There areve modes available :
IPreset Morphing
IPreset Morphing back and forth
IPreset Morphing triggered
IPreset Morphing sequence
IMutation
IPartial mutation
The Morphing modes let you morph between the 12 presets of the bank (or Metapatch). The mutation modes modify a reference preset and morph toward it.
2. Using Melohman
If you look at the preset layout on the e ect,
you'll see a remarkable simularity to a piano keyboard. To morph from one preset
target preset as the morph is closer to completion.
You can assign the Melohman octave to a particular MIDI channel, and can also set the octave to 'All Octaves', so that any key on the keyboard will activate the Melohman functions.
Note that you can still press the 12 presets buttons on the GUI to change presets, but the sound will change abruptly, with no morphing.
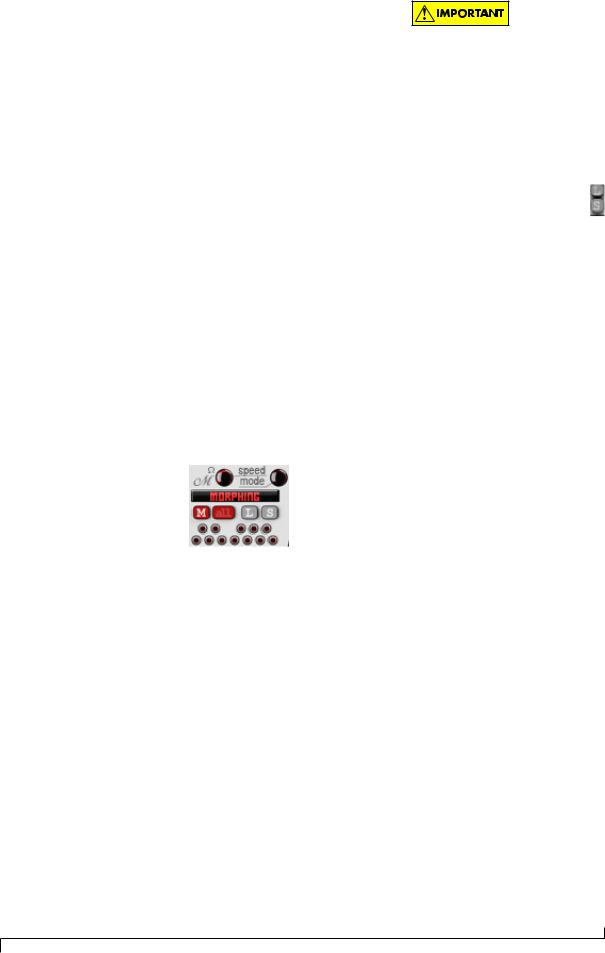
3. Parameters on the GUI
Below is an explanation of the Melohman controls.
3.1. Melohman Mode
This big knob allows you to choose the current Melohman mode. We will explain later the functionality of each Mode.
3.2. Time
This is the time parameter for the Melohman functions. Its e ect may vary from one mode to another, but generally it sets the maximum time it takes to morph between di erent settings.
 When you click on a preset button, the sound changes immediately.
10
Copyright c 2000-2007 Ohm Force Ohmicide Manual v1.10
4. Parameters in the Setup Menu
4.1. Mapping
This parameter selects the Melohman octave. Choose 'No MIDI control' to deactivate control via the keyboard, and 'All octaves' to make the Melohman octave loop over the whole keyboard (so that, for example, playing any A key will always choose Preset #10)
4.2. Sensitivity
This parameter sets the sensitivity of the Melohman keys to note velocity. If set to 'None', the morphing time will be determined by the Time parameter, whereas if set to 'Full', the morphing time is dependant on how hard you press the key. It will be instantaneous at maximum velocity, and progressively longer the lighter you press the key. The minimum time to complete a morph increases with lower Sensitivity settings.
4.3. Density
This parameter sets the smoothness of the morph. A high value will result in smoother morphs but can be very CPU intensive, particularly if there are a lot of parameters changing.
Be careful when you change a Melohman parameter while playing notes to control Melohman as occasionally a note may become stuck. If this happens, you'll need to either send a MIDI reset message or replay the stuck key to unstick it.
4.4. MIDI Channel
This parameter sets the MIDI channel for Melohman control.
5. Modes
5.1. Preset Morphing
When you play a key, the sound starts to morph toward the preset corresponding to the key you press. If you then play a second key, the synthesiser morphs from its current position to the newly selected preset, but will morph back to the intitial one if you release this second key while keeping the rst one pressed.
For example, your current preset is C (#1). You play E and the sound begins to morph to preset #5. While keeping E pressed you then play an A and the sound morphs to preset #10. Releasing the A key will bring the sound back to preset #5, and releasing the E will stop the morph at its current position.
Following the lights on the preset buttons give you a visual clue as to the current state of the morph.
There are many ways to use preset morphing. For example, you can:
IPress and hold a key to morph smoothly to another preset,
IRapidly hit a key which will slow morphing down as the current settings approach the destination Preset,
IStart a morph then interrupt it and morph to another Preset, circulating between Presets without actually reaching their full target parameter values.
Some parameters cannot be morphed (and also cannot be saved with the presets, although they are saved with a song). They are the band Solo and Mute buttons, and the Trim, Dry/Wet and Output knobs. If you want to even out the overall gain between the presets, adjust the band Volumes in each preset.
11
Copyright c 2000-2007 Ohm Force Ohmicide Manual v1.10
Loading...