

Page 1

Ohmicide Reference Manual
THIS MANUAL IS COPYRIGHTc OHM FORCE 2000-2007. ALL RIGHTS RESERVED.
NO PART MAY BE REPRODUCED WITHOUT WRITTEN PERMISSION.
VST TECHNOLOGY BY STEINBERG MEDIA TECHNOLOGIES AG. ALL TRADEMARKS ACKNOWLEDGED.
Ohmicide Manual v1.10
Page 2
CHAPTER 1 Introduction
Thank you for purchasing Ohmicide, your
new huge-sounding, feature-rich, audiomangling tool!
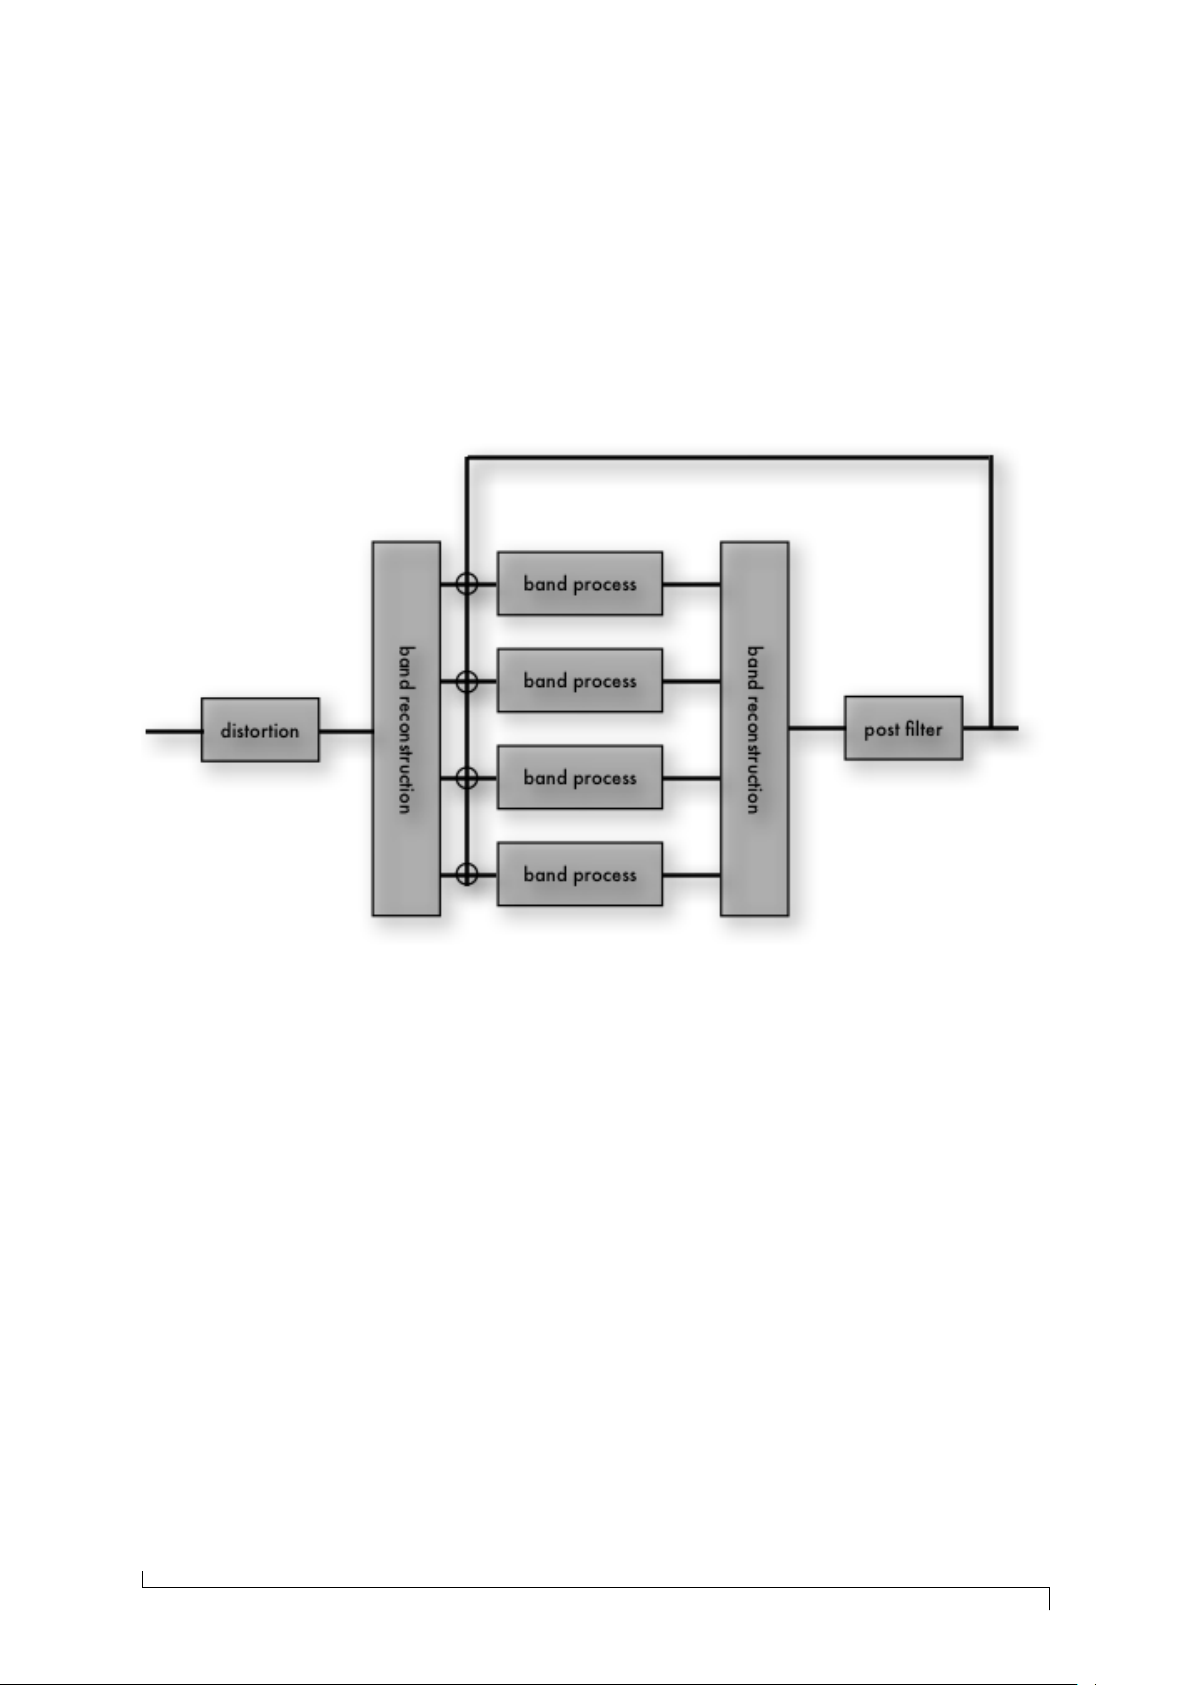
So, how does it work? Basically, the plugin splits an input audio signal into userdefined frequency bands and processes
them individually through dynamic and
then distortion stages.
On the top of this, feedback sections and
other deviously designed goodies are included for you to mess up your sounds
even more, and a post-effect low-pass filter
can come in handy to tame any unwanted
high frequencies induced by all this madness.
All the processing is in stereo, and you’ll
discover that Ohmicide can create wide
sounds, through the use of the very stereo
per-band feedbacks, pans, and optional
mid-side processing(see pages 16 and 18).
Ohmicide is designed to help you quickly
shape any sound according to your needs.
It can be used in a subtle way to help
it fit better in the mix, in a more direct
way to give it more width and punch, or
it can even be used to radically change
the color. It works very well with drums,
voices, basses, guitars and synthesizers, in
fact anything you can throw at it!
As usual for Ohmforce products, we put a
great deal of effort into this one, and we
hope you’ll enjoy using it as much as we
enjoyed making it.
2
Copyrightc 2000-2007 Ohm Force Ohmicide Manual v1.10
Page 3

CHAPTER 2 Getting Started
Contents
1. Structure of this Manual . . . . . 3
2. Requirements . . . . . . . . . . . 3
3. Installation . . . . . . . . . . . . . 3
3.1. Installing on Windows . . 3
3.2. Installing on MacOS X . . 3
3.3. Installing AudioUnit Presets 4
4. First Use . . . . . . . . . . . . . . . 4
1. Structure of this Manual
This manual is divided into 8 chapters:
I
Introduction briefly describes the design
of the plug-in and it’s usage,
I
Getting Started explains how to install
Ohmicide and get it working,
I
User Interface Features rounds up the user
interface features of Ohmicide and covers Automation and MIDI topics,
I
Using Ohmicide, shows you how to oper-
ate the effect
I
Settings File Reference explains the syn-
tax and use of a Settings File,
I
Ohmicide Default MIDI Mapping gives the
information necessary to control Ohmicide using MIDI,
I
MAC - 64 Mbytes RAM, 25 Mbytes hard
disk space, G5 compatible CPU, and
OS 10.1, but OS 10.2 is strongly recommended.
It is available on VST for Windows, and
VST/AU/RTAS for MacOS X.
3. Installation
3.1. Installing on Windows
Run the installer, an .exe file whose exact
name depends on the version you received.
Follow the on-screen instructions carefully.
You will be prompted to enter both your
User Name and Key Code. They have
been sent to you by e-mail or can be found
within your printed manual if you bought a
boxed version. Please enter the two codes
carefully, preferably using copy/paste to
avoid typos. Then you will be prompted
to choose one or more installation path,
depending on the plug-in version you are
installing.
3.2. Installing on MacOS X
Almost every internet browser will open
the file automatically, presenting a disk image on your desktop. If not, please locate
the .dmg file and double click it.
The disk image contains:
I
Version Notes summarize the difference
from one version of Ohmicide to another,
I
FAQ gives you some helpful information
on how to troubleshoot your plugin.
2. Requirements
The minimum requirements to run Ohmicide are:
I
PC 64 Mbytes RAM, 25 Mbytes
hard disk space, Pentium III compatible
CPU, and Windows 98.
Copyrightc 2000-2007 Ohm Force Ohmicide Manual v1.10
I
This manual,
I
The installer named Ohmicide Installer,
I
A folder containing a collection of Presets in AudioUnit format for the AudioUnit installer only.
To install Ohmicide, double click the installer icon. Before the installer can copy
its file to your disc, it needs to have permission from your system to do it.
The first window will ask for your admin
password:
3
Page 4

If you don’t know the admin password
please contact the system administrator,
generally the owner of the computer, who
should know it.
3.3. Installing AudioUnit Presets
You will find a folder containing a collection of Presets in the AudioUnit format.
Installing them depends upon the host you
use. Please refer to your host manual and
install them manually.
4. First Use
Open your favorite audio host and put
Ohmicide as an insert effect on an audio
track. A good way of getting a feel for
Ohmicide is to try the factory Presets. You
will find a frame with buttons in it, either
numbered or laid out like a keyboard octave. Click on each button to audition a
factory Preset.
The next screen is the plug-in installer.
Please follow the on-screen instructions
carefully. You will have to choose between
Classic Skin and Funky Skin (they cannot be both installed), and you will be
prompted to enter your User Name and
Key Code.
Turn the knobs by clicking on them and
dragging the mouse vertically.
If your mouse suddenly goes mad, don’t
call the cat, stay calm and locate the Setup
button. Click on it to open the menu
and deselect Enhanced Mouse Mode. This
behaviour may happen with some mice,
graphic tablets or trackball devices.
They have either been sent to you by email, or can be found within your printed
manual if you bought a boxed version.
Please enter those two codes carefully,
preferably using copy/paste to avoid typos.
4
Copyrightc 2000-2007 Ohm Force Ohmicide Manual v1.10
Page 5
CHAPTER 3 User Interface Features
Contents
1. Preset and Melohman Panel . . 5
1.1. Presets / Memorise . . . . 5
1.2. Load / Save Metapatch . 5
2. Using Knobs and Faders . . . . . 5
2.1. Direct action . . . . . . . . 5
2.2. Side-clicks . . . . . . . . . 6
2.3. Linked Knobs . . . . . . . 6
3. Tempo Control . . . . . . . . . . . 6
4. Automation . . . . . . . . . . . . 6
4.1. Support . . . . . . . . . . . 6
4.2. VST and AU Limitations . . 6
5. MIDI Support . . . . . . . . . . . . 7
5.1. Selecting MIDI Ports . . . 8
5.2. Binding Parameters to
MIDI Controls . . . . . . . 8
5.3. Saving and Loading MIDI
Configuration . . . . . . . 8
5.4. About Control Change
(CC) Messages . . . . . . 9
5.5. Unbind . . . . . . . . . . . 9
Neither the preset nor the Metapatch is stored on the disk at this
point. See next section.
1.2. Load / Save Metapatch
Use these two buttons to load and save
your Metapatches from and to the hard
disk. Note that loading a Metapatch will
not modify the current settings until you
either select a new Preset on the GUI, or
morph to a preset using Melohman (see
page 10). There are many Presets bundled
with your plug-in. Feel free to use the Presets as the basis from which to create your
desired sound.
2. Using Knobs and Faders
1. Preset and Melohman Panel
Each bank, or Metapatch,
contains twelve preset allocations. Metapatches can
be saved to your hard disk,
and are multi-platform,
thus enabling you to load them into any
sequencer on any computer.
1.1. Presets / Memorise
To activate a Preset simply click on any of
the twelve Preset buttons. The Preset will
be applied immediately.
After editing the on-screen parameters,
you may wish to memorise your new settings. To do so, click once on the Store
(or M) button; it will light-up. Then click
on the Preset button in which you wish
to store your new settings in the Metapatch. The Store M button will turn off automatically and you’ll be returned to Preset Mode.
All the knobs and the faders work the same way. There are two modes: direct action and side-clicks.
2.1. Direct action
You can move a Knob or Fader by clicking
directly on it and moving the mouse while
keeping the button pressed down. Each
button has a preferred direction for mouse
movement: vertical for Knobs and, for the
Faders, parallel to their layout.
If you move the mouse in the preferred direction, the Knob will turn quickly. However, if you move your mouse in the perpendicular direction i.e. horizontally for
Knobs, the movement will be slow and very
accurate. Some Knobs have notches which
lock to certain values. It is possible, however, to set the Knob position between two
notches by moving the mouse in the perpendicular direction, as mentioned above.
If you double click the control, it will be
reset at its default position.
Copyrightc 2000-2007 Ohm Force Ohmicide Manual v1.10
5
Page 6

2.2. Side-clicks
3. Tempo Control
When selected, a Knob or
Fader display a blue shape with
lobes. If you click on a lobe,
the control will start to move
toward the lobe’s value. This enables you
to make very small adjustments with ease.
If you click on this zone, then move the
mouse without releasing it, the control will
move automatically and keep moving even
after you have released it. The further you
move the mouse, the faster the Knob will
move. To stop the movement, just click on
the Knob again.
The movement will stop by itself at the
end of the course or the lobe value. This
is especially useful during live sessions, as
you can have many parameters shifting at
the same time without having to use the
Melohman morphing feature.
If you double click the lobe, you will set
the control to the lobe’s value directly.
2.3. Linked Knobs
You can link similar parameters of different bands. This means that you can alter
a parameter in the four bands at the same
time — with a single click.
To do so, you have to click on the parameter with the right mouse-button (click
while holding the Control key on Mac systems with a single-button mouse). The
Knobs of the four bands will now move in
unison.
If you hold the Shift key and click on the
right mouse-button, the four Knobs move
at the same time but retain their relative
distance. For instance, if the original value
of the first Knob is 10% and the second
Knob is at 50%, when you increase the
value of the first Knob to 30%, you will
also increase the second knob to 70%.
You can undo the movement of the slave
Knob(s) by performing a right mouse
click while holding the Control key (the
Command key on Macintosh).
Because many plug-in applications are related to music and
therefore rhythm, it is necessary to be able
to synchronise to the tempo of the host
application. Some host programs can automatically synchronise the plug-in’s internal tempo with their own tempo. Alternatively, you can change the tempo by clicking on the buttons to the right of the numeric display. You can also type into the
numeric display itself. On the Ohmicide,
the tempo only affects morphing times.
When the host controls the
tempo, you won’t be able to manually set the plug-in tempo
4. Automation
4.1. Support
Every parameter is potentially automatable on RTAS, VST and AudioUnit platforms. However, depending on your host’s
capabilities, you may be restricted to a
fixed number of parameters, or even have
no automation capability at all. Check
your host’s reference manual for details
about parameter automation.
ProTools display the automated parameters on the plug-in interface itself. A green
triangle on a Knob indicates that automation is playing, and a red disc shows automation data being recorded.
4.2. VST and AU Limitations
Some host applications, such as Ableton Live and earlier versions of Steinberg
Cubase VST, have several limitations regarding plug-in automation. They can
handle only a few parameters, which is unfortunate as some Ohm Force plug-ins have
hundreds! As a consequence, some important parameters cannot be automated.
However, it is possible to get around this
limitation by using MIDI commands, or
changing the order that parameters are displayed in the host.
6
Copyrightc 2000-2007 Ohm Force Ohmicide Manual v1.10
Page 7

To change the order, you need to edit the
plug-in’s configuration file, by following the
steps below. We should warn you that this
section is rather technical!
Before editing the configuration
file, please save any changes you
have made to the plug-in to a preset as described in the Preset section above. Note also that if you
have used the host’s preset system you should first save those
presets using the plug-ins internal preset procedure, as the reordering of the parameters may
make those presets act differently
to what you expect!
You have two ways to proceed: you can either use the provided file or make your own
from scratch.
To load the provided configuration
file, activate the Settings/Load item
in the Setup menu. Locate the file
easy vst automation.cfg.txt in your effect’s installation folder and open it. The
configuration file is designed so that you
can manually move the parameters, that
you want to be automated, to the top of
the list, thus allowing them to be recognized by the host.
Now to change the provided configuration file. First save the current plug-in configuration using Set-
tings/Save (eg. my settings.cfg.txt).
Then load it into a text editor, along
with easy vst automation.cfg.txt so
you have a reference to work with. If you
examine the file, you can see that it consists
of a number of keys. Each key has a name
and a value (which might consist of other
keys, a recursive structure known as a tree
in scientific circles). Key names are separated from their values by an equals sign
(=), and complex key values are enclosed
by brackets.
The provided configuration file will be a
lot smaller than your own one. This is because it is a partial configuration, whereas
yours is a complete one. You can suppress
some irrelevant subkeys (like the MIDI section, for example) in order to make the two
files look more alike, however yours will inevitably remain longer.
Now let’s look at parameter reorder mapkey.
You’ll see many parameter names as the
file you have just saved will contain all
possible plug-in parameters. To change
the parameter order, simply move the parameters you want to automate to the top
of the list. You can specify a particular
order for the other parameters if you want
to, or you can simply suppress them (Suppressing them does not mean that they
will not appear any more, or become unavailable for automation, because when
loading the configuration file, the plug-in
will automatically find the best available
mapping for the suppressed parameters).
Once you have finished sorting the parameters to your liking, save your work and
load your configuration file into the plugin. The newly ordered paramters should
appear in the host’s automation lists as
you set them.
Finally, activate Settings/Autoload to automatically load your new file each time
the plug-in is opened.
5. MIDI Support
You can also use MIDI commands to control the plug-in parameters. MIDI can even
replace automation, because not only can
the plug-ins receive MIDI commands, they
can also transmit them. The effects are set
in “Omni”mode, meaning they can receive
MIDI commands from any channel. However, all commands are sent via Channel 1.
Commands can be regular CC (Continuous Controllers), or RPN and NRPN (NonRegistered Parameter Numbers). The decision as to whether to use CC or NRPN
will depend upon the capabilities of your
MIDI device. CC is commonly used by
Copyrightc 2000-2007 Ohm Force Ohmicide Manual v1.10
7
Page 8

hardware devices, but NRPN has a higher
resolution, so is recommended if available
to you. The factory MIDI settings use
NRPN, but it is possible to change the
mapping at any time. The default mapping for Ohmicide is listed in the Ohmi-
cide default MIDI mapping chapter of this
manual.
Some hosts, such as Mackie
Tracktion or Ableton Live auto
connect the MIDI ports of audioconnected plug-ins. This can result of strange behaviour. However you can disable the MIDI
ports in the plug-in Setup Menu.
5.1. Selecting MIDI Ports
Depending on your host, your MIDI devices and your system settings, you may
have more than one MIDI port available
for MIDI input and output. If so, you
may want to select which ‘virtual’ port you
wish to use for receiving and sending MIDI
events.
To choose the input port — the one from
which MIDI data is received by the plugin — click on the Setup button, go to the
MIDI/Input device menu and select the
one you want. Do the same thing to select the output port, except, of course, you
will need to click MIDI/Output device. The
selected MIDI port will be ticked in the
menu. You can only use one input and one
output port at a time.
5.2. Binding Parameters to MIDI Controls
The easiest way to bind a parameter with a
specific MIDI controller knob or fader (or
any MIDI Control Change) is to use the
Auto-bind feature. First, activate Autobind mode by checking MIDI/Auto-bind in
the Setup menu.
If you have already selected a parameter
its name will be displayed in brackets in
the menu, like this:
Auto-bind [target: Volume]
If not, click on the Knob you want to bind
to a MIDI control message. Only the last
one selected will be taken into account for
binding.
Once you have chosen the parameter, send
a MIDI event to the plug-in (for example,
turn a knob on your external MIDI controller). It can be a simple CC, an RPN or
an NRPN command. As soon as the event
is received, the connection is created automatically, and the MIDI command will remain associated with this parameter. Only
one parameter can be bound to each MIDI
command, and visa versa. If you want to
Bind more parameters, repeat the procedure: select another parameter, and send
another MIDI event. Do not forget to exit
the Auto-bind mode, by un-checking the
corresponding entry in the Setup menu,
when you have finished.
Only one MIDI Input device is
available for AudioUnit plug-ins.
No MIDI output device is available for AudioUnit plug-ins.
If the connection fails, it is usually because
the port you selected is already in use by
another application — most likely the host
itself. In this case, check your host’s operating manual to see if it is possible to free
up the port.
8
5.3. Saving and Loading MIDI Configuration
If you have numerous parameters to bind
each time you want to use the plug-in, you
can save the configuration for later use.
Currently selected ports will also be saved.
To do so, select Settings/Save in the Setup
menu. You can restore the settings at any
time by selecting Settings/Load.
Copyrightc 2000-2007 Ohm Force Ohmicide Manual v1.10
Page 9

The MIDI configuration is not
stored with the Presets, and
therefore is not saved with the
host song. You will have to
load the settings manually after
loading a song on your host application. The true tech freaks
among you will notice one can
open the saved file in a text editor and tweak the configuration
from there. It is also possible to build partial configurations
by only keeping a couple of the
‘keys’. The content syntax is covered in the Settings File Reference
chapter of this manual.
they are used for RPN and NRPN coding.
I
It is possible, but not advisable, to use
the fine tuned section at the lower end
of the controller range (32 to 63). This
will work, but if plug-in parameters are
assigned to coarse parts of the low controller range (0 to 31), the plug-in will
also output the fine commands, resulting
in possible interference. For example, if
you assigned Knob A to CC 20 and Knob
B to CC 52 (= 20 + 32), twisting Knob B
would output CC 52 messages, whereas
twisting Knob A would output both CC
20 and 52! Trying to record automation
in this manner could result in a host of
unnecessary complications.
5.4. About Control Change (CC) Messages
Although you can assign most of the CC
numbers to plug-in parameters, there are
some things to consider:
I
You cannot use certain CC numbers like
Data Entry (6 and 38), Data Button Increment (96), Data Button Decrement
(97), nor you can use RPN and NRPN
Parameters 98, 99, 100 and 101, because
5.5. Unbind
Select the parameter you want to unbind.
Open the Setup menu. You can see that
the Un-bind menu item shows which MIDI
control the parameter is bound to. To unbind it, simply click on the Un-bind menu
item.
The Un-bind menu item is handy
to know which MIDI control is
currently bound to the selected
parameter.
Copyrightc 2000-2007 Ohm Force Ohmicide Manual v1.10
9
Page 10
CHAPTER 4 Melohman
Contents
1. Overview . . . . . . . . . . . . . . 10
2. Using Melohman . . . . . . . . . 10
3. Parameters on the GUI . . . . . . 10
3.1. Melohman Mode . . . . . 10
3.2. Time . . . . . . . . . . . . . 10
4. Parameters in the Setup Menu . 11
4.1. Mapping . . . . . . . . . . 11
4.2. Sensitivity . . . . . . . . . . 11
4.3. Density . . . . . . . . . . . 11
4.4. MIDI Channel . . . . . . . 11
5. Modes . . . . . . . . . . . . . . . 11
5.1. Preset Morphing . . . . . . 11
5.2. Morphing Back & Forth . 12
5.3. Morphing triggered . . . . 12
5.4. Morphing sequence . . . 12
5.5. Mutation . . . . . . . . . . 13
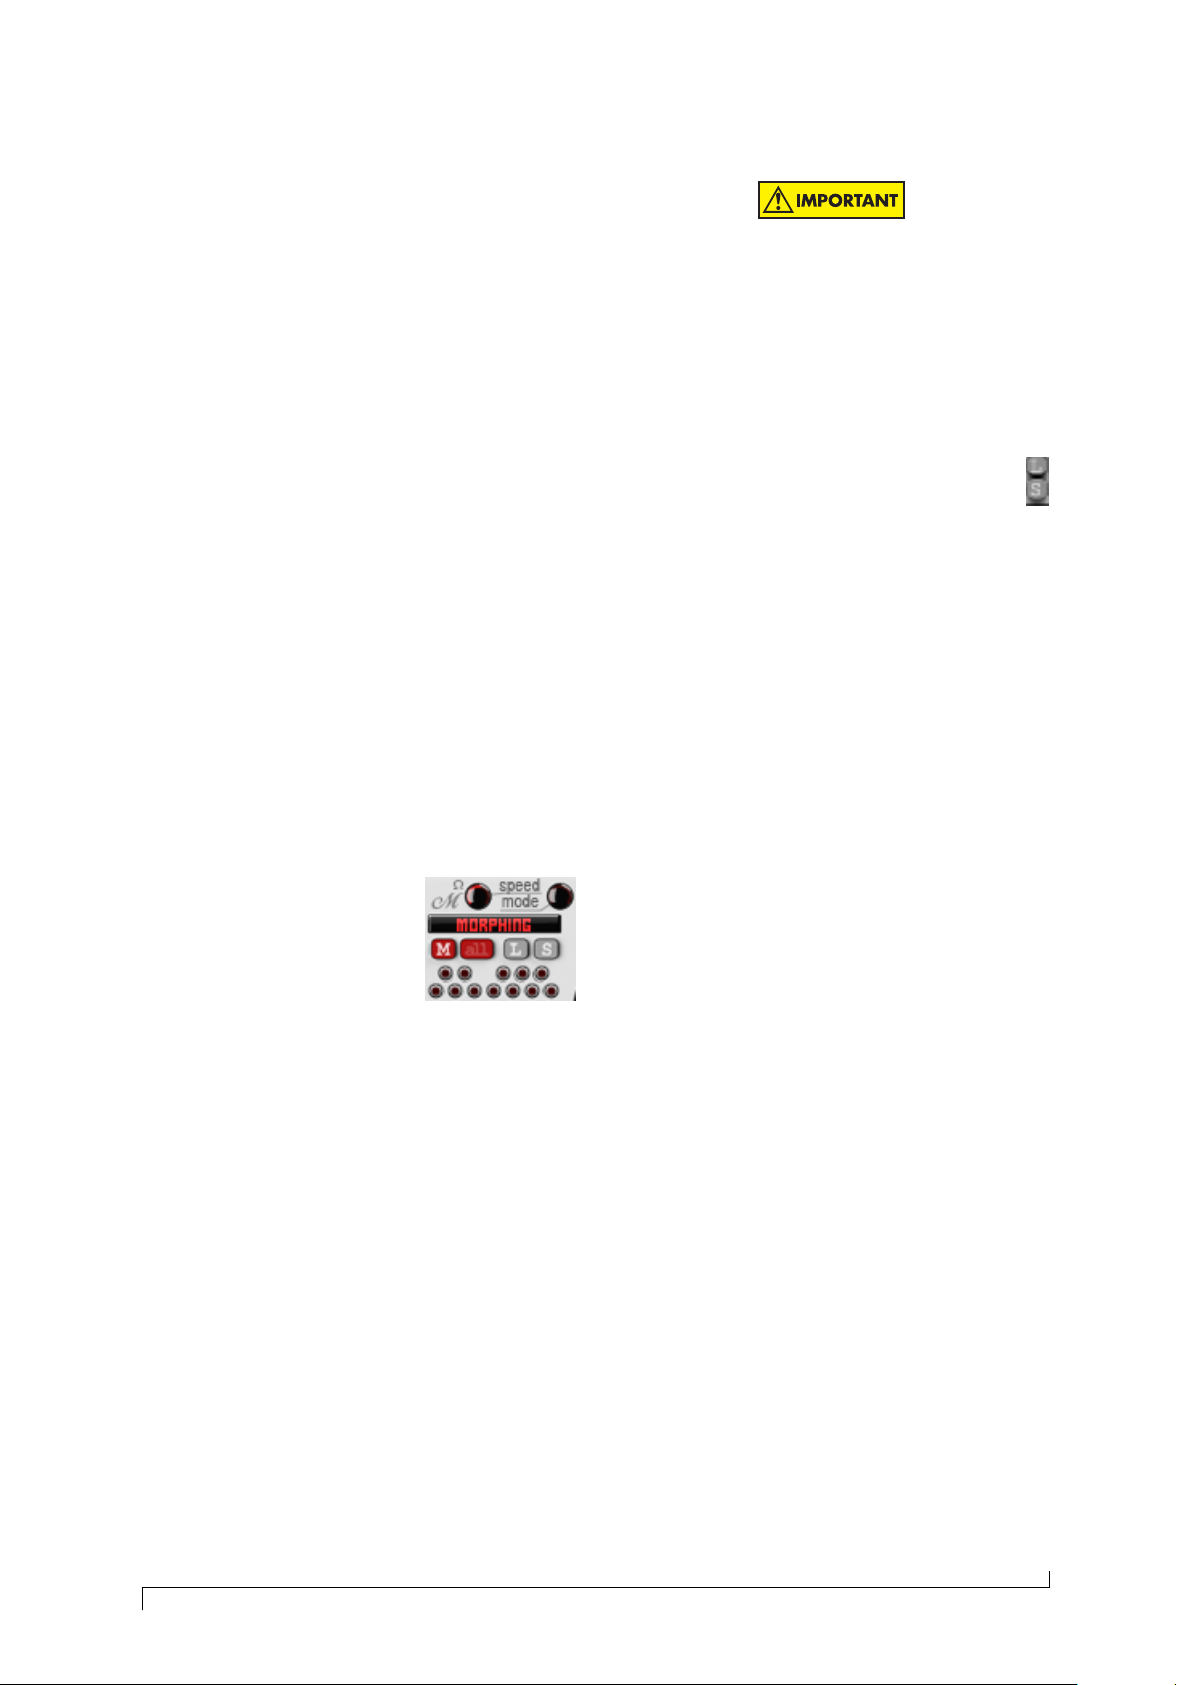
1. Overview
This is probably the most innovative part
of Ohmicide. With Melohman, you can assign an octave of your MIDI keyboard to
control the settings of the effect. There are
five modes available :
I
Preset Morphing
to another, simply play the MIDI key that
corresponds to the target preset in the defined Melohman octave.
The time taken to morph from one preset to another is determined by either the Time parameter (default), or the velocity you play the MIDI key (optional). The lights on the preset buttons indicate the state of the morph; getting brighter on the target preset as the morph is closer to completion.
You can assign the Melohman octave to
a particular MIDI channel, and can also
set the octave to ’All Octaves’, so that
any key on the keyboard will activate the
Melohman functions.
Note that you can still press the 12 presets buttons on the GUI to change presets,
but the sound will change abruptly, with
no morphing.
3. Parameters on the GUI
Below is an explanation of
the Melohman controls.
I
Preset Morphing back and forth
I
Preset Morphing triggered
I
Preset Morphing sequence
I
Mutation
I
Partial mutation
The Morphing modes let you morph between the 12 presets of the bank (or Metapatch). The mutation modes modify a reference preset and morph toward it.
2. Using Melohman
If you look at the preset layout on the effect,
you’ll see a remarkable simularity to a piano keyboard. To morph from one preset
3.1. Melohman Mode
This big knob allows you to choose the
current Melohman mode. We will explain
later the functionality of each Mode.
3.2. Time
This is the time parameter for the
Melohman functions. Its effect may vary
from one mode to another, but generally it
sets the maximum time it takes to morph
between different settings.
When you click on a preset button, the sound changes immediately.
10
Copyrightc 2000-2007 Ohm Force Ohmicide Manual v1.10
Page 11

4. Parameters in the Setup Menu
5. Modes
4.1. Mapping
This parameter selects the Melohman octave. Choose ’No MIDI control’ to deactivate control via the keyboard, and ’All octaves’ to make the Melohman octave loop
over the whole keyboard (so that, for example, playing any A key will always choose
Preset #10)
4.2. Sensitivity
This parameter sets the sensitivity of the
Melohman keys to note velocity. If set to
’None’, the morphing time will be determined by the Time parameter, whereas if
set to ’Full’, the morphing time is dependant on how hard you press the key. It
will be instantaneous at maximum velocity, and progressively longer the lighter you
press the key. The minimum time to complete a morph increases with lower Sensi-
tivity settings.
4.3. Density
This parameter sets the smoothness of
the morph. A high value will result in
smoother morphs but can be very CPU intensive, particularly if there are a lot of parameters changing.
Be careful when you change a
Melohman parameter while playing notes to control Melohman as
occasionally a note may become
stuck. If this happens, you’ll need
to either send a MIDI reset message or replay the stuck key to unstick it.
4.4. MIDI Channel
This parameter sets the MIDI channel for
Melohman control.
5.1. Preset Morphing
When you play a key, the sound starts to
morph toward the preset corresponding to
the key you press. If you then play a second key, the synthesiser morphs from its
current position to the newly selected preset, but will morph back to the intitial one
if you release this second key while keeping
the first one pressed.
For example, your current preset is C (#1).
You play E and the sound begins to morph
to preset #5. While keeping E pressed you
then play an A and the sound morphs to
preset #10. Releasing the A key will bring
the sound back to preset #5, and releasing
the E will stop the morph at its current
position.
Following the lights on the preset buttons
give you a visual clue as to the current state
of the morph.
There are many ways to use preset morphing. For example, you can:
I
Press and hold a key to morph smoothly
to another preset,
I
Rapidly hit a key which will slow morphing down as the current settings approach the destination Preset,
I
Start a morph then interrupt it and
morph to another Preset, circulating between Presets without actually reaching
their full target parameter values.
Some parameters cannot be morphed (and also cannot be saved
with the presets, although they
are saved with a song). They are
the band Solo and Mute buttons,
and the Trim, Dry/Wet and Out-
put knobs. If you want to even
out the overall gain between the
presets, adjust the band Volumes
in each preset.
Copyrightc 2000-2007 Ohm Force Ohmicide Manual v1.10
11
Page 12

5.2. Morphing Back & Forth
This mode is quite similar to Preset Morphing, except that the effect will morph back
to the state it was in before the first key
was pressed. This means you will not play
this mode in exactly the same way: releasing all the keys will result in a morph back
to the preset’s original state, and not leave
it in its current morph state.
For example, if you click on preset #12 on
the GUI and then play and hold the C key,
the effect will morph to preset #1. Release
the key and the preset will morph back to
preset #12.
When all the keys are released, the plugin morphs to the orginal state. If a key
is pressed while the morph occurs, the current state of the morph is set as the original
preset to morph back to. A consequence
of this feature is that tapping a key twice
whilst morphing will overwrite your original preset for that key with the current
state of the morph, so be sure that you do
not want to keep the original preset values!
mined sequence of morphs, the duration
between each morph being controlled by
the Melohman Time Knob setting.
The sequence for each key press is listed
below with the notes indicating the corresponding Preset slots:
I
Key Pressed
P resetSequence
I
C:
C, D
I
C#:
C, D, E
I
D:
C, D, E, F
I
D#:
C, D, E, F, G, A
I
E:
C, C#, D, D#, E, F, F#, G
Note that you can also change the source
preset at any time by tweaking the controls
on the GUI or selecting a new preset (while
not playing a MIDI note).
5.3. Morphing triggered
This mode, as with the previous ones, allows you to morph between the 12 presets.
However, the notes off MIDI events are ignored, meaning that the morph will continue after you release your key. To stop
the morph you will need to press the same
key again.
This was originally designed to help drummers controll morphing via MIDI pads, as
they can’t send sustained notes. After
thorough testing, it also appears to be very
handy for keyboardists!
5.4. Morphing sequence
This mode is all about morphing your
presets, but in a different way : playing a Melohman key plays a predeter-
I
F:
C, C#, D, D#, E, F, F#, G, G#, A, A#, B
I
F#:
C, C, D, D, C, C, E, D, C, E
I
G: Random (presets C and D only)
I
G#: Random (all presets)
The three remaining keys are used to
change the sequence key. They do not
change the morphing time though.
I
A: Slows down the sequence by a factor
of 2
I
A#: Resets the morphing time to that
indicated on the Time display.
I
B: Speeds up the sequence by a factor of
2
12
Copyrightc 2000-2007 Ohm Force Ohmicide Manual v1.10
Page 13

5.5. Mutation
Consider this mode as a type of preset randomisation that centres around the current
Preset. This means that newly generated
presets are variations of the original one to
a greater or lesser degree, depending on the
MIDI key played.
Mutations are intelligently managed. If a
parameter is set to 0, its chances of being
mutated is smaller.
The mutation keys are as follows:
I
C-G#: Mutates the preset. The amount
of mutation ranges from small changes
(C key) to large changes (G# key). Additionally, more parameters will change
pressing keys higher in the Melohman
octave, whereas some parameters may
never be changed when playing lower in
the octave.
I
A: Morphs to last saved mutation
I
A#: Saves the current mutation state
I
B: Morphs to the original reference preset
Note that, as with Preset Morphing:
I
the time to mutate a preset is governed
by the Time knob and Sensitivity settings,
I
releasing a key will stop the mutation
process in its current state,
I
the GUI Preset buttons are still useable
to activate and store presets.
Be careful when using large parameter changes (higher range
keys), as they may result in high
feedback levels which could result
in screeching and high output levels
Copyrightc 2000-2007 Ohm Force Ohmicide Manual v1.10
13
Page 14

CHAPTER 5 Using the effect
2. Input Signal Trim
Contents
1. The Main Display . . . . . . . . . 14
2. Input Signal Trim . . . . . . . . . . 14
3. Output stage . . . . . . . . . . . . 15
4. Pre-distortion . . . . . . . . . . . . 15
5. Stereo Link . . . . . . . . . . . . . 15
6. Per Band Processing . . . . . . . 15
6.1. Setting the Frequency
Ranges of each Band . . 16
6.2. Mid/Side . . . . . . . . . . 16
6.3. Gate . . . . . . . . . . . . 16
6.4. Dynamics . . . . . . . . . 17
6.5. Distortion . . . . . . . . . . 18
6.6. Gain and Stereo Control . 18
7. Feedback . . . . . . . . . . . . . 19
8. Overall Tone Setting . . . . . . . 20
9. Miscellaneous . . . . . . . . . . . 20
9.1. Parameters and Preset
morphing . . . . . . . . . . 20
9.2. Oversampling . . . . . . . 20
1. The Main Display
The display shows you at a glance all you
need to know regarding the current preset
parameter settings, as well as the audio signal being shaped by Ohmicide.
As the distortion process is nonlinear and its resulting behaviour
unpredictable, we needed a way to
help tame its wild nature, without
you having to make fine and fiddly adjustments, on a multitude of
paramters, just to balance out the overall
output.
So we introduced input signal trimming
to attenuate the incoming signal, before it
gets to the main stages of Ohmicide.
With a correctly trimmed input signal:
I
you’ll be able to adjust the distortion
without having to make drastic changes
to the band gains, thus allowing you to
shape your sound faster and in a more
intuitive way,
I
the overall perceived volume, when
changing parameters, will be closer to
the level of the input signal (unless you
change the main output gain),
I
presets will sound more like their designers’ original intentions,
If the In/Out buttons in the top right of
the display are activated, you can see the
audio signal represented by frequency on
the X axis and amplitude on the Y axis.
You can choose to display just the input or
output signals, both signals superimposed,
or neither signal if you need to free up a bit
of CPU. The line across the middle represents the active bands, and their parameter settings. The currently active parameter name and its setting is displayed at the
top of the screen.
To see how to fully interpret the information in the display screen, please go to page
21.
I
morphs will be more consistent in their
overall volume.
To calibrate Ohmicide to your input audio,
adjust the Trim knob so that the left light
is on constantly, the center light flickers,
and the rightmost light does not flicker at
all.
The signal is now roughly calibrated, and
that may be all you need to do. However,
you might want to run the following simple
test, to see whether you need to fine-tune
the Trim to match the output levels:
I
While still playing the audio, right click
a Distortion Gain knob, and raise it to
3 o’clock.
I
If the overall volume remains constant as
the distortion gain increased, then you’re
set to go!
14
Copyrightc 2000-2007 Ohm Force Ohmicide Manual v1.10
Page 15

I
If the output volume rises, then increase
the Trim.
I
If the output volume lowers, then decrease the Trim.
That’s it! You’re now in the optimal operation range for Ohmicide.
3. Output stage
If you followed the calibration steps
above, the input and output signals
are now matched in volume. However, if you need to cut or boost
the main output level, just adjust
the Out knob to suit. You can also
modify the wet/dry of the effect here.
reaching the main effect stages, and without affecting its original dynamic quality.
5. Stereo Link
Some sections of Ohmicide are
triggered by the levels in the signal and the Stereo Link button affects the
way the signal levels are detected.
When active, the two stereo signals are
merged prior to level detection, so that
both channels will behave the same dynamically.
When inactive, the level detection is done
separately on both channels. In both cases,
the signal processing remains in stereo.
Stereo Link has an impact on the following:
Double-clicking the Out knob will
automatically set it to 0db.
It is important to note that the wet signal
goes through a limiter after its level has
been changed, which means a stronger level
will attack much more the limiter. So playing with the main volume will affect the
sound much more than a standard transparent gain. If you need a higher volume
without over limiting the signal, then use
a gain before or after the Ohmicide. If you
use a gain before the Ohmicide, you’ll need
to adjust the trim accordingly.
Since the release of v1.1, the main
output level also affect the dry
signal, when it used to affect only
the wet signal.
The main dry/wet may phase depending
on the bands frequencies. It’s due to a
slight delay which is delicate to compensate. If you don’t want this phasing, then
use the bands wet/dry instead, as the dry
signal of the bands is phase corrected.
I
the dynamic section : you’ll have a more
faithful stereo image if active.
I
the gate section : left and right channels
are gated synchronously if active.
I
feedback : behaves the same on both
channels if active.
6. Per Band Processing
One of the main features of Ohmicide is
that you can split up your audio into frequency bands and apply the main effects
sections to each band separately. For example, assume you have a drum loop playing and you want to apply distortion to
everything except the kick drum.
By simply setting up two bands, you can
get a drum loop that sounds like its just
gone through an overdriven blender and
yet still retain a clean and powerful kick!
When you consider that each band also has
dynamic and feedback sections, you can see
that the possibilities are endless.
4. Pre-distortion
The Pre-distortion knob allows you to add some colour and distortion to the audio signal, prior to it
Copyrightc 2000-2007 Ohm Force Ohmicide Manual v1.10
You can set a parameter on all
four bands at once by rightclicking instead of left-clicking on
the parameter.
15
Page 16

Let’s get into the details of what you can
do with each band:
6.1. Setting the Frequency Ranges of
each Band
You can have up to four active bands,
which are stacked on top of each other
in such a way that the ceiling cutoff frequency of one band acts as the floor cutoff frequency of the next band (hence the
need for only three frequency cutoff knobs).
The floor of Band One is fixed at 20hz, and
the ceiling of Band Four at 20khz. Note
that if your sample rate is less than 42106
Hz then your range will be smaller, and
you can calculate the maximum range of
the band as 0.475 times the sampling frequency.
The per-band processing is divided into six steps:
I
Mid/Size
I
Gate
I
Dynamics
I
Distortion
I
Gain and Stereo Field
I
Feedback
The controls are the same for each of Ohmicide’s bands.
6.2. Mid/Side
An unusual feature of Ohmicide
is it’s ability to process a band
in Mid/side mode, which you activate by
clicking the Side button in the band’s
Stereo Control section (see page 18).
This works as follows: instead of processing normal stereo left/right channels, the
stereo image is split up into middle and
side channels, with the mid signal sent to
the left channel for processing and the side
signals sent to the right channel.
Also, any band that has its floor set to any
value between 20000 and 20480 Hz (the
upper limit of the operating range) is effectively disabled, which means that if all
knobs are set to 20khz (far right), then only
Band One is active and processing audio.
Finally, to maintain the frequency band design of Ohmicide, the frequency knobs may
move automatically. To see this in action,
set all the band frequency knobs to 20khz
and then move Band Four’s knob to the
left. You will see that all the bands will
lower their knobs to keep the stacked relationship.
For you DSP freaks: the filters,
as with any filter, introduce frequency dependent phase shifts.
These shifts are cancelled by the
reconstructing filters post band.
Switching to and from Mid/Side mode may produce a click. As such, you will probably want to keep the same setting across all presets in a Metapatch.
See page 23 for more info and tips.
6.3. Gate
Mainly, Noise Gates are used to remove
unwanted sound in an audio track, for
example removing any extraneous noise
on the silent sections of a vocal track.
They work by only allowing audio to pass
through when it exceeds a user defined
decibel threshold.
But a gate can also be used creatively, such
as when a guitarist uses a gate before a distortion pedal to get sharp and well defined
chords.
16
Copyrightc 2000-2007 Ohm Force Ohmicide Manual v1.10
Page 17

Some more advanced gates have two inputs, one to process the audio, and one to
trigger the gate, known as a side-chain, by
comparing its signal to the threshold.
Generally, the audio to be processed is also
the side-chain, but you can come up with
useful results by using a different audio signal to trigger the gate, such as a kick drum
on a bass guitar track to tighten up both
instruments.
For Ohmicide, the side chain is the main,
pre-split signal. This means that each
band’s gate threshold comparison is made
using the same signal, and if they all have
the same threshold value, then they’ll open
and close at the same time.
The gate is nice to add a snap to a sound,
such as making shorter drum hits. Additionally, by inverting the gate on a band
you can have, for example, one band’s gate
opening while the others are closing.
The gate works best with sounds
having a lot of dynamic movement in them. A pad won’t gate
so well, as it’s usually a sound
with very slow attack and decay
envelopes.
6.4. Dynamics
This stage changes the shape
of the attack transients and
sustains of the input audio,
though its effectiveness depends upon the dynamic energy in the
signal. It’s a complex process but only
needs two parameters to tune:
You control the gate by using the following
knobs :
I
Threshold
I
Attack
I
Release
I
Amount
The Threshold lets you define the decibel
level to open the gate. There’s a fixed hysteresis on the gate, which means that the
close-gate threshold is lower than the opengate threshold, so that the gate does not
chatter while the signal level is around the
threshold setting.
The Attack and Decay settings allow you to
control how fast the gate opens and closes.
The Amount lets you set how much the
gate closes, so that it will totally close when
set to 100%, and barely close when set
to 0%. With a negative setting, the gate
shape is inverted, which means it will open
below the threshold, and close above it.
I
Shape
I
Body
The Shape parameter determines how the
audio dynamics will be changed, as follows:
I
In the neutral position (center), the audio is unmodified.
I
In the Phat zone (left), the audio is ’compressed’: dynamics are reduced, but the
overall sound is perceived to be louder
and sustaining longer. This is not a compressor in the traditional sense, as it will
usually just increase low volume levels,
leaving higher levels untouched.
I
In the Sharp zone (right), the audio
is ’expanded’: dynamics are increased
and attacks emphasized, producing percussive and generally faster decaying
sounds.
Use the Body parameter to adjust the
amount that Shape affects the audio. In
addition, Body also progressively adds a
Copyrightc 2000-2007 Ohm Force Ohmicide Manual v1.10
17
Page 18

limiter to the end of the band processing,
which means that even if Shape is set to the
central, neutral position, Body may still
have an affect on the audio.
The vu-meter next to the dynamic section gives you a visual
feedback of how much the section
is affecting the audio gain. It also
lights up in red when the limiter
kicks in.
6.5. Distortion
The family controls on the top of
the distortion selector can be used to
quickly change the variation groups. Clicking again on the family icon will set the
distortion to None.
The Gain knob is adjustable in a range
from −20 dB to +60 dB. The higher the
gain, the more distortion applied to the
sound. However, the overall perceived
volume should not deviate by too much
(though this is somewhat dependant on
the level you’re listening at), provided the
Trim has been correctly set.
After the dynamic stage, the
band signal can be optionally distorted.
The parameters for this stage are:
I
Type
I
Gain
I
Bias
I
Alt
Ohmicide provides three variations, Standard, Xxx, and Odd, of
37 distortion algorithms for a total of 111
distortion types.
For an explanation of the differing distortions read the accompanying reference
sheet, page 25.
Refer to the Trim section for more
information on balancing the input level.
The following two controls, Bias and Alt,
can be used to further colour the chosen
distortion type, though bear in mind that
for some algorithms the controls are irrelevant and so are inactive.
The Bias slider emulates malfunctioning
hardware circuitry and adds a DC offset
before the distortion is applied. The control is very sensitive, so even very small
changes can make dramatic changes to the
sound. To break up the sound completely,
move the slider all the way over.
Alt varies the chosen distortion algorithm.
What is varied depends on the distortion
type (see page 25).
To select a distortion you can either :
I
click (or right click) on the arrows to
change the distortion type to the previous/next one,
I
click (or right click) on the central circle and move your mouse (just like you
would do on a knob) to change the distortion without clicking,
I
click in the Type display and choose one
from a pop-up menu.
18
The loudness of the postdistortion output is determined
by the nature of the original
audio, the bias offset, and the
trim you applied to the input
audio.
6.6. Gain and Stereo Control
The output volume of
each band can be set
by moving the respective faders below the bands in a range of
Copyrightc 2000-2007 Ohm Force Ohmicide Manual v1.10
Page 19

−∞ dB to +20 dB.
The gain stage is before the limiter and you
can see on the band’s dynamic vu-meter
that increasing the band’s volume fader activates the limiter.
Directly above the volume fader is the
Pan control, which can use in conjunction
with the other bands’ pans to create wider
sounds.
When the Mid/Side mode is active (see
page 16), the Pan control behaves differently : turning the pan to the left will attenuate the side channel, and turning it to
the right will attenuate the mid channel.
As all Ohmicide processing is
done in stereo, if the original audio is mono, it will be converted
to stereo first.
A consequence of that is that
you won’t have interesting results
using Mid/Side processing on a
mono signal, as the ’side’ area of
the signal contains, well, nothing.
So, if you turn the Pan knob to
the right, you might end up with
no output, particularly if no feedback is being used.
For Ohmicide, turning on feedback will
take the wet signal, after the signal reconstruction, and loop it back, with a slight
delay, into the signal path before the Gate
section.
The feedback works on each band independently, so that you can use different configurations of the parameters on any band.
Note, however, that the feedback frequency
content will probably exceed the boundaries of the current band, and so will leak
onto the other bands!
Be careful when using feedback.
Big Amount values can make it
very loud and present, particularly if the band has its dynamic
processing set to a ‘Phat’ mode.
Don’t forget to lower your speaker
or headphone levels before experimenting!
The Feedback parameters are :
The remaining controls are the Mix knob
and the Mute and Solo buttons. The Solo
control takes precedence over the Mute
control, which means that a soloed band
will be heard regardless of its mute state.
The Solo state is ignored if the band is
turned off using the Band Split knobs.
When a band is inactive, the dynamic vumeter will light up, which means either it is
muted, other bands are soloed, or its lower
cutoff frequency is over 20kHz.
7. Feedback
The Feedback section simulates a micro-
phone recording the signal coming out of
loudspeakers and then amplified back into
the signal chain.
Copyrightc 2000-2007 Ohm Force Ohmicide Manual v1.10
I
Feedback Amount
I
Feedback Frequency
I
Feedback Spread
The Amount control determines the simulated microphone sensitivity.
Frequency sets the feedback frequency from
16 Hz to 1024 Hz and simulates the distance separating the microphone from the
loudspeaker. The further away the microphone, the lower is the resultant pitch.
The fact you can set this parameter per
band goes beyond reality, and does not reflect a real world phenomenon. It’s however sonically interesting and that’s what
matters!
19
Page 20

The Spread control changes the stereo field
of the feedback. At mid position, the feedback is mono, while on the right, the feedback is stereo. In the left position, the feedback will cross channels (left channel feeds
the right channel and vice versa).
The feedback behaviour changes
when the Stereo Link parame-
ter is activated, as the signal detection used during the feedback
process will be mono. The feedback will then tend to appear
much more in the center of the
stereo image and will be totally
mono when the Spread control is
in the mid position).
Also, because, the feedback enters
the signal path before the gate, if
the gate is on the feedback will
be cut off when the gate is closed.
However, it’s not re-injected in
the gate side-chain signal, which
means it won’t trigger the gate
(see page 16).
increases the slope, effectively making it a
48 dB/octave low pass filter. Turning it
further right adds resonance to the signal.
The PF Freq knob sets the filter cutoff fre-
quency from 2 KHz to 8 KHz.
9. Miscellaneous
9.1. Parameters and Preset morphing
Some parameters are not saved in the presets. These are :
I
Input Trim
I
Main output level
I
Band Solo and Mute
I
Master Bypass
They are also not morphed when using the
Melohman functions. However, they can
be automated using MIDI or, if supported,
host automation.
9.2. Oversampling
8. Overall Tone Setting
After the per-band processing,
the signals are mixed together
and a low pass filter can optionally be applied to attenuate any hyperbright frequencies.
The control is located under the Melohman
section and has two parameters:
I
PF Shape
I
PF Freq
The PF Shape knob determines the ‘color’
of the filter. Turned to the far left, the filter
is disabled. Raising it to the mid position
Oversampling is an optional Ohmicide feature which reduces unwanted aliasing artifacts produced by the distortion process. You turn on Oversampling by selecting the High Quality mode in the setup menu.
Oversampling can add a hefty increase to the CPU load! Generally, we recommend that you
turn it on only on mixdowns, but,
if the aliasing effect is too noticeable and irritating, then we
suggest that you turn it on and
bounce (or freeze if your host supports it) the track
20
Copyrightc 2000-2007 Ohm Force Ohmicide Manual v1.10
Page 21

CHAPTER 6 Tips
Contents
1. Dissecting A Preset . . . . . . . . 21
2. Creating portable Metapatches 22
3. Notes on the factory Metapatches 22
4. On the Mid-Side mode . . . . . . 23
4.1. What is Mid-Side anyway? 23
4.2. Using dynamics . . . . . . 23
5. Main volume and wet/dry . . . . 23
1. Dissecting A Preset
With nearly all Ohmicide’s parameters being shown visually in the large display
screen, you can quite easily see at a glance
what a preset is doing to your sound, without having to check each individual parameter’s setting.
In this section, we will go through a factory preset to show you how to use those
visual clues, so you can quickly narrow in
on areas that may need tweaking to match
your input audio.
To start with, load Ohmicide into an audio
track in your host and add a frequency rich
drum loop to the track. Then open the factory preset called DrumOutOfPhase, press
the C key on the Melohman to get the first
preset of the bank, loop the drum loop, and
press play.
The display should now look something like
the one shown below.
Ok. Let’s get the trim adjusted first. Turn
the Trim first to the left and then to the
right until you get the middle light flicking
regularily. As you move the knob you will
see your audio frequency spectrum (FS)
move up and down in the display.
While we’re up here, turn the PF Shape
knob to the right. You’ll see the high
frequency cutoff slope of your audio get
sharper as you raise the knob to 50%, and
a peak form as resonance is added beyond
50%. Leaving the Shape knob at 100%,
turn the PF Cutoff knob to the left. You’ll
see the resonance peak shift to the left in
the display as the cutoff frequency changes.
Now to move onto the bands.
Note that we will always be using Band One here and that’s represented by the leftmost central
line in the display, so please bear
that in mind when we talk about
bands and lines.
Click on the Melohmnan C# then C to get
back to the original preset settings, and
then move the Band’s volume fader up and
down. You’ll see the line in the display
move up and down as well as the bass in
the FS. The Mute and Solo buttons will
also visually fade the corresponding band
lines and affect the FS in the display.
The width of the line also shows you the
band’s upper and lower boundaries.
Next open up the band’s Distortion Gain
fully and note the line gets wider the more
gain applied (there’s no difference in the
sound as there’s no distortion type chosen).
Turn Body full right and then Shape full
left. The line gets both brighter and fatter. Turn Shape fully right and the line
splits into two. Back off the Body and the
lines fades and merge into one again.
Now turn the band’s Gate Threshold to the
right. The central line begins to break up,
with fewer breaks the higher the threshold
setting. The Attack and Release settings
will increase the distance of the breaks and
the Amount will invert the colours of the
breaks and non-breaks.
Finally, Raise the band’s Feedback Level
(this should be quite safe within this frequency range, but raise it slowly just in
case to prevent possible damage to your
ears). A ball will begin to glow in the line’s
display. Turn the pan to the far left and the
Copyrightc 2000-2007 Ohm Force Ohmicide Manual v1.10
21
Page 22

line will turn into a triangle, the hi-side indicating the pan direction. Note also that
the feedback ball moves to the correct panning side of the line as well.
And that’s it! You should now be able to
quickly determine what the other band’s
rough settings are, and to test yourself,
choose some other presets and banks included with Ohmicide. Have fun!
2. Creating portable Metapatches
So you’ve spent some time honing parameters and saving several versions in presets
to create your ideal Metapatch. But then
you load up the patch on a different track
and suddenly find all your carefully set parameters and balances are all off for the
new audio! Ouch!
This section will provide you with some
guidelines, which should help you design
presets and metapatches that you can port
between different tracks and projects.
Firstly, setup the trim correctly (see page
14), and set the main output level to 0.
Now, start working (or load the metapatch
you want to work on).
When bypassing/unbypassing the effect,
the perceived volume should be roughly the
same. If not, change the bands volumes
(and not the main volume) to compensate
(Remember, shift right-clicking clicking on
one of the bands volume fader will let you
move the four fader relatively, which is
equivalent to change the main output volume).
Then try and match the presets to roughly
the same levels across the whole metapatch
(unless the effect you want is to have large
dynamic differences between presets), using, once again, the bands gain.
The operation would consist in :
I
selecting a preset (via the GUI or your
MIDI keyboard,
I
shift-right clicking on a band volume, adjust all the bands at once,
I
store the preset in its slot,
I
compare with the other presets and the
dry sound, and start the operations
again if needed.
When morphing from one preset to another, bear in mind that the Mid/Side
and Distortion Type parameters change
abruptly at the start of the morphing process, which may result in clicks in extreme
cases or effects that you didn’t have in
mind in less extreme cases.
As a general practice, it is better to leave
these parameters at the same settings
across the whole Metapatch, though by
all means experiment, as the result may be
exactly what you are looking for!
3. Notes on the factory Metapatches
The factory Metapatches were created to
be as portable as possible. They have been
named to reflect which kind of sounds they
were tested with or designed for. This is
only a hint, feel free to try the Metapatches
on any sound!
I
BassXxxxx metapatches were tested on
an electric Bass.
I
DrumBassXxxxx metapatches were tested
on a Bass+Drums mix.
I
DrumXxxxx metapatches were tested on
a drums track.
I
GuitXxxxx metapatches were designed for
a guitar track.
I
GuitAmpXxxxx metapatches were de-
signed to sound like a guitar amplifier.
I
MiscXxxx metapatches are rather general
purpose.
I
PercXxxx metapatches were designed to
work on a solo percussion track (one element of a drum kit for example. They
can be further named if the patch was
designed with a specific percussive sound
in mind, such as PercKickXxxx or Perc-
SnareXxxx.
22
Copyrightc 2000-2007 Ohm Force Ohmicide Manual v1.10
Page 23

I
SynthXxxx metapatches are rather gen-
eral purpose Metapatches to apply on
synthesizers, particularly software synthesizers with a low noise floor, as some
of them use very high ”Phat” dynamics.
I
VocalsXxxx metapatches were designed
for voice processing.
Don’t forget to trim correctly the signal.
You might for instance have no sound at all
using a factory Metapatch because it uses
a gate and the input sound level is too low.
4. On the Mid-Side mode
4.1. What is Mid-Side anyway?
A stereo signal is commonly viewed as being a pair of Left and Right signals, probably because it’s intuitive (we have one left
and one right ear) and also because the
common today restitution system is composed of a pair of left/right monitors. However, the very basic reason we’re using two
channels for listening and recording music
is because two is the minimum number of
channels we need to convey the sensation
of space.
When recording a sound source, it’s imperative to use at least two microphones to be
able to restitute the sound source and its
localisation in its environment relatively to
the recording position. A traditional way
of recording is called the M/S technique1,
which roughly consists in using one microphone facing the source (the Mid microphone) and one perpendicular to the sound
source (the Side microphone).
It’s possible to reconstruct a Left/Right
representation by summing and subtracting the Mid and Side signals.
The Ohmicide uses a similar process : by
summation/substration, the Left/Right
stereo signal is converted to a Mid/Side
representation before entering the band,
and converted back to Left/Right afterward. This transformation in itself does
1
See Wikipedia on stereophonic recording techniques.
not modify the stereo signal in term of
information, but the action of the band
processing will be totally different.
For example, the pan acquires a totally different meaning when in Mid/Side mode, as
it represent a balance of volume between
the Mid and the Side channels instead of
Left/Right.
4.2. Using dynamics
Let say we record a sound source using a
pair of coupled microphones so that the
sound appears to be in the center of the
stereo image. The left and right channels will be similar in term of amount of
energy they convey, but once encoded in
Mid/Side, the situation will be very different : the Mid channel will usually convey
the most part of the signal, and the Side
channel will be rather weak.
When using the Phat shape (see p.17),
the Side channel will be heavily boosted
and the sound will sound much more large
in the stereo field because the ”room” or
localisation information will be boosted.
Note however that it’s very likely that the
signal will be less mono compatible.
When using the Sharp shape, the Side
channel will tend to lower a lot, and the
result will appear more in the center of the
stereo field.
Now, if we use a mono signal (left and right
channels are equals), the Side channel will
contain nothing. If this mono signal was
panned before entering the Ohmicide, then
the Mid and Side channel will contain a
combination of in and out of phase signals.
All in all, the Mid/Side encoding used on
Mono signals is moderately interesting.
5. Main volume and wet/dry
It is important to understand there is a limiter after the main volume, so that if you
increase the main volume, the wet sound
will be heavily limited. However, the dry
volume is not limited which means at high
Copyrightc 2000-2007 Ohm Force Ohmicide Manual v1.10
23
Page 24

gain it might sound much louder than the
limited wet signal.
If you prefer to process the peaks by yourself, lower the main gain and put a limiter (or whatever you need). If you need
to increase the output gain without limiting, lower the main volume and use a gain
plug-in after the Ohmicide.
Here is a nice trick to give a whole new use
to your existing metapatches: configure the
Ohmicide so that it has a high master volume (and eventually lower the gain of your
track). You’ll attack the limiter strongly,
and get a whole new range of sounds.
24
Copyrightc 2000-2007 Ohm Force Ohmicide Manual v1.10
Page 25

CHAPTER A Ohmicide Distortion reference
The following table will give you more information on the various base distortion algorithms.
Distortion Bias Alt. Comment
Porridge • • It has a nice analog feel. The brightness of the distortion is
controllable.
Soft Clip • Waveshaper, symmetrical and soft.
Harder • Waveshaper, symmetrical and harder.
Stronger • Waveshaper, symmetrical and stronger.
Crest • Waveshaper, symmetrical, and not bijective.
Hollowed • Waveshaper asymmetrical.
Lopsided • Waveshaper asymmetrical.
Attractor • • Multiple states distortion.
SmartE • • Varying waveshape. Use Alteration to change the wave-
shape. 0.8 is very bright.
Sastrugi • Waveshape with ripples.
Puncher • Cyclic waveshaper. High gain will produce ”tuned” noise.
NoizE • Cyclic distortion. High gain will produce white noise.
Antipole • • Crest mangler. Alteration to 50% will be similar to a hardclip.
More than 50% will reverse the crest.
Rotten Luck • • Same as antipole, with an additional waveshaper on the
crests.
Vacuum • Waveshaper that affects the low portion of the signal.
Cubic • Waveshaper. Will ‘dry’ the signal.
Rectifier • Will tend to produce a higher pitched sound.
Squared • Waveshaped rectifier. Will tend to dry the signal much more
than Rectifier.
Slew 1 • Slew rate limiter. This is an extreme version of a physical limita-
tion that exists on any amplifier. Alteration will change the slew
rate limit, raising it will give more highs.
Slew 2 • • Waveshaped slew rate distortion.
Random Walk • Random walk.
Angry Mouse • • Waveshaper followed by a resonator low pass filter. The higher
the distortion gain, the higher the resonance. Alteration will
change the cutoff frequency.
Decimator • • Emulates an analogue sample & hold. Alteration will change
the hold time.
Bitcrush • • Crushes the bit resolution of the signal. May oscillate when
used in the Xxx mode.
Jellyfish • • text
Fractal • • Uses a chaotic feedback equation to to distort the sound. This
is the only distortion whose sound depends on the sample rate.
A bit experimental, pretty weird and analogue sounding. Al-
teration will change the recursivity depth, and raising it will
take more CPU. Use some Bias to make it unstable.
Accumulator • A distortion that can add low frequencies! It behaves a bit like
a modulator, but it’s not. Experimental, nice on drums particu-
larly.
Freezer • • Freezes portions of the audio signal depending on the Bias,
Alteration and Gain.
... continued next page ...
Copyrightc 2000-2007 Ohm Force Ohmicide Manual v1.10
25
Page 26

Distortion Bias Alt. Comment
Clicks • • Adds Vinyl clicks, with a click density depending on the Alter-
ation parameter.
Chastity belt • • A floating point mantissa distortion.
Suspender belt • • A floating point exponent distortion.
Hole • • Variable asymmetrical waveshaper.
Hip • Features RIAA filters1, used in vinyl signal encoding/decoding,
and an emulation of stylus degradation.
Hop • • Based on the same principles as Hop.
Bounce • • Emulate the behaviour of a ball in a cylinder where the top
and bottom move accordingly to the sound. The Alteration
varies the ball inertia.
Zippy • • Distortion using a chaotic oscillator. The Alteration varies the
oscillator frequency.
Valve • • Asymmetrical soft distortion. Produces even order harmon-
ics which reduce when Alteration rises, resulting in a brighter
sound.
The following table will give you more information on the various distortion families.
Distortion Familly Bias Alt. Comment
Std family • ◦ The raw algorithms!
Xxx family • ◦ This is a variation on the standard familly. The bias behaves
”better” than on the normal distortions. Used with waveshaper
distortions, it will emulate amp guitars. It’s more experimental
with other distortions. Nice for guitars.
Odd familly • ◦ Use the bias to tune the distortion harmonics. There is one ex-
ception : the Odd Fractal distortion uses the Alteration parameter to tune the harmonics, and the Bias to set a DC offset in
the base distortion.
◦ : same as the base distortion.
26
1
See Wikipedia on RIAA filters
Copyrightc 2000-2007 Ohm Force Ohmicide Manual v1.10
Page 27

CHAPTER B Settings File Reference
2. Practical Use: Reordering Parame-
Contents
1. Syntax . . . . . . . . . . . . . . . 27
2. Practical Use: Reordering Pa-
rameters . . . . . . . . . . . . . . 27
This chapter is very technical. For now,
settings files only contains MIDI parameter mapping, if available.
To create a settings file, select Save Set-
tings from the Setup menu. Locate the file
on your system and open it using a regular
text editor, such as NotePad on Windows,
or TextEdit on MacOS X.
1. Syntax
Its modular structure allows you to suppress, add or move the ‘keys’ making up
the file. Each key represents a particular
property of the plug-in. Just respect the
syntax (key names are case sensitive) and
the structure, and you’ll be fine. The keys
work with a simple syntax:
KeyName1 = key value
KeyName2 = key value
...
Or
ters
You may want to reorder parameters so to
be able to automate them within host that
can only automate a limited numbers of
parameters.
Settings file for the parameter reorder map
look likes:
parameter_reorder_map = {
0_Stereo_Boost
1_Fdbk_Freq
2_Fdbk_Amnt
3_Tone_Freq
4_Tone_Shape
5_Master_Vol
...
}
You may reorder the parameters to change
the way they are exposed to the host. Suppose that in the last example the host
would only be able to automate 4 parameters.
Then 4 Tone Shape and 5 Master Vol
would not be automable. If you want to
make them automable to the detriment of,
let’s say, 2 Fdbk Amnt and 3 Tone Freq,
you would produce the following file:
KeyName3 =
{
KeyName4 = key value
// Some comment after the "//"
KeyName5 = key value
...
}
The second example shows a hierarchy,
where a key contains other keys. Thus, it is
possible to load partial configurations and
to merge it with the current one. Only the
keys in the file will be taken into account.
However, saving will store all the keys into
the file.
Copyrightc 2000-2007 Ohm Force Ohmicide Manual v1.10
parameter_reorder_map = {
0_Stereo_Boost
4_Tone_Shape
5_Master_Vol
1_Fdbk_Freq
2_Fdbk_Amnt
3_Tone_Freq
...
}
Simply cutting and pasting the lines will
permit you to reorder the parameters. But
do not change the numbers, as they are
actually identifying the parameters (the
name is just indicative), please keep each
whole line intact.
27
Page 28

CHAPTER C Ohmicide Default MIDI Mapping
Use following table to help you to match effect parameters to NRPN numbers.
1. Generic parameters
NRPN Parameter Remark
9 Reserved
10 Reserved
11 Reserved
12 Reserved
2. Band parameters
NRPN For Band Parameter Remark
1 2 3 4
28
Copyrightc 2000-2007 Ohm Force Ohmicide Manual v1.10
Page 29

CHAPTER D Version Notes
Contents
v1.10 (2007.10.10) . . . . . . . . . . . . 29
v1.02 (2007.05.11) . . . . . . . . . . . . 29
v1.01 (2007.04.17) . . . . . . . . . . . . 29
v1.00 (2007.04.13) . . . . . . . . . . . . 29
v1.10 (2007.10.10)
I
Added new distortion algorithms
I
Main volume also applies on the dry signal
I
Band-vu lits up when the band is inactive
I
Changing the dynamics is less prone to
click
I
Removed zippering noise when changing
bands frequencies using 7 bit MIDI control
I
Output spectrum gain compensated
I
Redesigned selection of the Disto Alt.
and Gate knobs.
I
Added a short morph when switching
preset via the GUI.
I
The Melohman textbox now display
something on startup.
I
Some crash possibilities in case of host
misconduct removed.
I
Bug correction : the odd family distortion gain was slowly increasing or decreasing over time depending on the bias
setting.
I
Wet/dry levels can now correctly be set
via the key- board.
I
Some crash possibilities in case of host
misconduct removed.
I
Mac: Corrected GUI problems on VST.
I
Mac: VST support improved.
I
Bug fix : Ohmicide mono clicks when
changing the main volume.
I
Bug fix : automation problem with Ableton Live on Windows
I
Bug fix : some parameters initialized
with wrong values when reloading a song
I
Bug fix : removed denormal (high cpu
usage) in some case
v1.02 (2007.05.11)
I
Added the possibility to deselect the active parameter by clicking in the background.
I
Spectrum display correction and improvement.
v1.01 (2007.04.17)
I
Corrected memory leak in standalone pc
I
Melohman deactivated by default (excepted on the standalone)
I
GUI bug : mouse misplacement when using the distortion selector
I
Mac : VST and RTAS version release
I
Mac: installers work on PPC platforms.
I
Mac : demo now has MIDI
I
Mac : default preset location was broken
I
PC : removed an unwanted log
v1.00 (2007.04.13)
I
Added an animation on metapatch load.
Copyrightc 2000-2007 Ohm Force Ohmicide Manual v1.10
I
Initial release
29
Page 30

CHAPTER E FAQ
Contents
1. Website . . . . . . . . . . . . . . . . . . . . . . . . . . . . . . . . . . . . . . . . . . . . . . 31
I’ve lost my password. . . . . . . . . . . . . . . . . . . . . . . . . . . . . . . . . . . . . . 31
How can I update my plug-ins? . . . . . . . . . . . . . . . . . . . . . . . . . . . . . . . 31
How can I register my plug-ins? . . . . . . . . . . . . . . . . . . . . . . . . . . . . . . . 31
I’ve lost my plug-in registration key. . . . . . . . . . . . . . . . . . . . . . . . . . . . . . 31
2. Plug-in installation . . . . . . . . . . . . . . . . . . . . . . . . . . . . . . . . . . . . . . . 31
When I try to install the plug-in, the installer tells me that my key is invalid. . . . . . 31
The installer reports an error while installing. . . . . . . . . . . . . . . . . . . . . . . . . 31
When I double click the installer .bin file, it opens Toast. . . . . . . . . . . . . . . . . . 31
3. Product . . . . . . . . . . . . . . . . . . . . . . . . . . . . . . . . . . . . . . . . . . . . . . 31
My host does not let me automate some parameters. What can I do? . . . . . . . . 31
My plug-in does not seem to receive MIDI. . . . . . . . . . . . . . . . . . . . . . . . . 31
When I load a Preset from the Load button, the sound does not change. . . . . . . 31
What’s the best way to save my Presets? . . . . . . . . . . . . . . . . . . . . . . . . . . 31
I’m finding that the VST-AU wrapped versions (using FXpansion’s VST-AU wrapper)
of the plug-ins seem to change Presets when I save in Logic 7.1 and Logic
6.4.3 — usually to some extreme setting that creates a horrible noise and
endangers my speakers and ears! . . . . . . . . . . . . . . . . . . . . . . . . . 32
Can I share my Presets with the other customers? . . . . . . . . . . . . . . . . . . . . 32
How can I get the Muse Receptor version of the plug-ins? . . . . . . . . . . . . . . . 32
4. Macintosh Specific . . . . . . . . . . . . . . . . . . . . . . . . . . . . . . . . . . . . . . . 32
Will the plug-in work in MacOS X Tiger? . . . . . . . . . . . . . . . . . . . . . . . . . . . 32
The plug-in will fail validation ! - I have a line in the report which states: ”ERROR:
Parameter’s min value is greater than max value” . . . . . . . . . . . . . . . . 32
The plug-in does not pass AU validation. . . . . . . . . . . . . . . . . . . . . . . . . . . 32
The plug-in crashes validation. . . . . . . . . . . . . . . . . . . . . . . . . . . . . . . . . 32
The plug-in crashes my host. . . . . . . . . . . . . . . . . . . . . . . . . . . . . . . . . . 32
I bought the Ohm Force Experience boxed version, and the AU plug-ins won’t work. 32
The plug-ins make Digital Performer crash while using them in mono to stereo mode. 32
5. Hosts Related . . . . . . . . . . . . . . . . . . . . . . . . . . . . . . . . . . . . . . . . . . 33
Under Logic, the plug-in will not receive MIDI commands. . . . . . . . . . . . . . . . 33
Under Tracktion, the plug-in settings change when I save my project! . . . . . . . . 33
My plug-in installed fine, but Cubase SL3/SX3 does not recognise it (the plug-in is
not in the plug-ins list). . . . . . . . . . . . . . . . . . . . . . . . . . . . . . . . . . 33
My Plug-ins do not follow Cubase 4 tempo. . . . . . . . . . . . . . . . . . . . . . . . . 33
Touch automation doesn’t work in Cubase 4. . . . . . . . . . . . . . . . . . . . . . . . 33
I experience clicks in EnergyXT while morphing Presets. . . . . . . . . . . . . . . . . 33
6. OhmBoyz . . . . . . . . . . . . . . . . . . . . . . . . . . . . . . . . . . . . . . . . . . . . . 33
Can I synchronise one of the LFOs to my song? . . . . . . . . . . . . . . . . . . . . . . 33
7. QuadFrohmage . . . . . . . . . . . . . . . . . . . . . . . . . . . . . . . . . . . . . . . . . 33
I experience clicks in EnergyXT while morphing Presets. . . . . . . . . . . . . . . . . 33
8. Ohmygod . . . . . . . . . . . . . . . . . . . . . . . . . . . . . . . . . . . . . . . . . . . . 33
The plug-in makes no sound. . . . . . . . . . . . . . . . . . . . . . . . . . . . . . . . . . 33
9. Melohman Synthesisers . . . . . . . . . . . . . . . . . . . . . . . . . . . . . . . . . . . . 33
The plug-in uses too much CPU when morphing using the Melohman octave. . . . 33
30
Copyrightc 2000-2007 Ohm Force Ohmicide Manual v1.10
Page 31

1. Website
I’ve lost my password.
Click on the Login button at the top right
of the web-site main page, leaving the
name and password fields blank, and follow the instructions. Alternatively, click
here.
How can I update my plug-ins?
Open the plug-in you want to update, and
select Update in the Setup menu. You will
be directed to the update page, where the
new versions will be highlighted. Alternatively, you can log on the site and go to the
My Software section, Download Files.
Please drag’n’drop the installer .bin file on
Stuffit Expander.
3. Product
My host does not let me automate some parameters. What can I do?
Some hosts limit the number of automatable parameters but you can reorder them
so that the most important to you are
shown. Please read the section about reordering parameters in the plug-in manual.
Also the file easy vst automation.cfg.txt is
an example of basic configuration (and
most likely the one you’ll need). This file
will work on VST, AU and RTAS.
How can I register my plug-ins?
Open the plug-in you wish to register, and
select Register in the Setup menu of the
plug-in.
I’ve lost my plug-in registration key.
Log on the site, go to the My Software section, and click on the Mail Personal Key
button.
2. Plug-in installation
When I try to install the plug-in, the installer tells me that my key is invalid.
Be sure to enter Username and Keycode
as they were sent to you. If you received
authorisation by e-mail, please copy/paste
the two codes. If you are using a boxed version, check for letter ‘O’ and number ‘0’, as
well as letter ‘I’ and number ‘1’.
The installer reports an error while installing.
Please find the installer log for the plugin located in your ∼/Library/Logs/ folder.
Then send this log here.
When I double click the installer .bin
file, it opens Toast.
My plug-in does not seem to receive MIDI.
In the plug-in Setup menu, check the MIDI
input device. It should be set to VST (or
AU) MIDI in if you want to receive MIDI
from the host. You can choose any other
MIDI device as long as it’s not used by another application (or the host).
When I load a Preset from the Load button, the sound does not change.
Our Preset files are in fact Presets Bank
files and you will need to click on a Preset
button to activate a Preset
What’s the best way to save my Presets?
Using the Ohm Force system to save your
Presets will allow you to:
I
Save them by banks (so that you can
then morph between related Presets)
I
Use them on any other platform (be it
AU, VST, DirectX, Mac, PC. . . )
I
If you reorder your parameters in the
configuration file, then you can be sure
that previously saved Presets will still be
correctly configured
Copyrightc 2000-2007 Ohm Force Ohmicide Manual v1.10
31
Page 32

I’m finding that the VST-AU wrapped
versions (using FXpansion’s VST-AU
wrapper) of the plug-ins seem to
change Presets when I save in Logic
7.1 and Logic 6.4.3 — usually to some
extreme setting that creates a horrible noise and endangers my speakers and ears!
Use the native AU versions.
old one (mainly for backward compatibility with your older projects), you can put
this option back on from the setup menu
after validation.
As stated in our manuals, new users of
Ohm Force plug-ins are strongly recommended not to use this option (that is leave
the Linear Automation not checked in the
setup menu)
Can I share my Presets with the other customers?
Yes, simply write us a mail along with
the Presets (under the Ohm Force format).
We’ll add them to the Presets section of the
site.
How can I get the Muse Receptor version of the plug-ins?
You can buy Receptor versions on the Plu-
gorama web-site. In case you already own a
’Pack’ version of some plug-ins, or a bundle
with multiple platform support, you can
get those for free, also on the Plugorama
web-site.
4. Macintosh Specific
Will the plug-in work in MacOS X Tiger?
Please download the demos. That way you
can easily check that everything will work
correctly with your audio environment.
The plug-in will fail validation ! - I have
a line in the report which states: ”ERROR: Parameter’s min value is greater
than max value”
Please go to your home folder, then Library/, then /Preferences/ then locate the
Ohm Force/ folder and finally the folder
which is named after the plug-in name.
Trash the latter folder.
This error is caused when the plug-in is
put in the old incorrect linear automation
mode. If you need this mode to be the
The plug-in does not pass AU validation.
Please download the latest version of the
plug-in. If it still does not pass validation,
please send us the validation report here.
The plug-in crashes validation.
Please download the latest version of the
plug-in. If it still crashes validation, please
send the validation report and the crash
log here. The crash log can be found
in your ∼/Library/Logs/Crash Reporter/
folder. The file you need to send us contains a reference to “auval” in its name.
The plug-in crashes my host.
Please download the latest version of
the plug-in. If it still crashes your
host, please send us the crash log here.
The crash log can be found in your
∼/Library/Logs/Crash Reporter/ folder.
The file you need to send us contains the
host name in its name.
I bought the Ohm Force Experience
boxed version, and the AU plug-ins
won’t work.
Please download the latest version
of the plug-ins. You will have
to create an account on our site
(http://www.ohmforce.com), and then
register your OFE on our site here.
The plug-ins make Digital Performer crash while using them in mono to stereo mode.
Please download the latest version of the
plug-in which will resolve this issue.
32
Copyrightc 2000-2007 Ohm Force Ohmicide Manual v1.10
Page 33

5. Hosts Related
Under Logic, the plug-in will not receive MIDI commands.
Some hosts, such as Apple Logic, requires that the Plug-in is instantiated as a
Midified-FX in order to receive MIDI commands. For example in Logic, you need to
instantiate the Plug-in on a MIDI track as
an input, choosing the Midified-FX version
of the Plug-in. Then you have to sidechain
the audio from the plug-in window toolbar.
Touch automation doesn’t work in
Cubase 4.
Please update to the latest plug-in version.
I experience clicks in EnergyXT while morphing Presets.
Disable the plug-in’s MIDI output in the
plug-in Setup menu (select none instead
of VST). This happens only with Quad
Frohmage as far as we know.
6. OhmBoyz
Under Tracktion, the plug-in settings change when I save my project!
This may happen when two Ohm Force
plug-ins are following each others in a
track. This is because Tracktion connects
the two plug-ins via MIDI. When you save
your project, the upstream plug-in sends
MIDI controls to the downstream plug-in,
changing it’s setting! So, what can you do?
Disable the MIDI output of the plug-in by
default. First select None as MIDI out device in the set-up menu, then save your
configuration (Settings → Save), and set
this file to Auto-load.
My plug-in installed fine, but Cubase
SL3/SX3 does not recognise it (the
plug-in is not in the plug-ins list).
It seems that Cubase does not always
properly scan the VST plug-in folder, and
‘misses’ some plug-ins. Re-install the plugin in a new folder (for example ‘tempVSTPlugin’), and in Cubase register this directory as a VST plug-ins directory. This is
done in the Device → Plug-in information
menu of Cubase. Then restart Cubase and
check the plug-in is correctly listed. Otherwise, contact us.
My Plug-ins do not follow Cubase 4 tempo.
Update to the latest plug-in version.
Can I synchronise one of the LFOs to my song?
Yes, this is possible by sending a specific
MIDI NRPN to the plug-in. It’s also possible to change the MIDI mapping, and assign a Control Change message for this.
Refer to the documentation for more information.
7. QuadFrohmage
I experience clicks in EnergyXT while morphing Presets.
Disable the plug-in MIDI output in the QF
Setup menu (select none instead of VST).
8. Ohmygod
The plug-in makes no sound.
Check the playing mode of the filter. If
it’s set to ‘MIDI poly’, it will only output
something if you send it MIDI notes. Set it
to ‘Classic’ or ‘MIDI mono’ to hear something without playing.
9. Melohman Synthesisers
The plug-in uses too much CPU when
morphing using the Melohman octave.
Lower the Melohman density in the Setup
menu of the plug-in.
Copyrightc 2000-2007 Ohm Force Ohmicide Manual v1.10
33
Page 34

34
Copyrightc 2000-2007 Ohm Force Ohmicide Manual v1.10
Page 35

CHAPTER F Credits & Thanks
1. Credits
I
Product design: Laurent de Soras, Gregory Makles, J´erˆome No¨el
I
GUI design: Rapha¨el Ding´e, Gregory Makles
I
Code: Laurent de Soras, Rapha¨el Ding´e, J´erˆome No¨el
I
Team managment: Franck Bacquet
I
Support: Vincent Birebent and all the crew
I
Web: Franck Bacquet, Vincent Birebent, Eric Cestari, Vincent Frison
I
Web graphics: Gregory Makles
I
Documentation: J´erˆome No¨el, Steve Trigger
2. Thanks
Ohm Force would like to thank all the following people for their involvement in betatesting, advices, help and ideas, without any particular order:
I
Nicolas Lacoumette
I
Steve Duda
I
Kasper T. Toepliz
I
Ian Finney
I
Dave Spiers
I
Chris Macleod
I
Eric Gougaud
I
H´el`ene Zanni
I
Fr´ed´erique Boeuf
I
Bill Hamel
I
Barry Wood
I
Flemming Bloch
I
Hugo Mercier
I
Joeri Vankeirsbilck
I
Laurent Dailleau
I
Luke Slater
I
David Roberts
I
Alan Branch
I
Mike McGrath
I
Mathias Standaert
I
Michael Weeks
I
Nymo
I
Renaud Bordes
I
Brian Desmond
I
James Kirby
I
Felix Petrescu
I
Robert Mouyren
I
Remy Muller
I
V¨ain¨o Ala-H¨ark¨onen
I
Chris Farell
I
Derick White
I
Ian Ditchburn
I
Allen Somerlot
I
Guillaume Calfati
I
Cliff Douse
I
David Korn
I
Fred Hahn
I
Robert Monn
I
Rory Dow
. . .all those forgotten and everyone who knows us.
Copyrightc 2000-2007 Ohm Force Ohmicide Manual v1.10
I
Niklas Silen
I
Justin Kirton
I
Our lovely cats
35
 Loading...