


42SWP22
22 cu ft LAWN SWEEPER
U.S. Patent No. 7,610,646
READ AND FOLLOW ALL SAFETY RULES AND OPERATING
INSTRUCTIONS BEFORE USING THIS EQUIPMENT
6003311 - REV A 11/14

Safety Rules
This is the safety alert symbol. It is used to alert you to
potential personal injury hazards. Obey all safety messages
that follow this symbol to avoid possible injury or death.
Read and understand all safety rules and operating instructions before using this
tractor attachment.
Follow all safety rules and operating instructions provided by your tractor's
manufacturer when using attachment.
Never allow children or untrained persons to operate tractor or attachment.
Reduce tractor speed to slowest setting when towing or operating on slopes.
Operate up and down slopes, never across the face of slopes.
Do not carry passengers on tractor or attachment.
Avoid sudden turns or maneuvers.
Use caution when backing up to prevent damaging attachment.
Do not tow attachment on public roadways.
Do not remove warning decals from product.
Check product for worn, loose, or damaged parts before each use. If any damage
is present, repair the product before using.
Check product for loose or missing fasteners before each use. Tighten or replace
fasteners as needed before using.
Do not fasten rope to any part of your body or clothing.
Do not hold rope while tractor and Lawn Sweeper are in motion.
Do not use Lawn Sweeper near fire or smoldering debris.
Always fasten rope to tractor to avoid contact with wheels and brushes.
Always empty hopper before storing to avoid spontaneous combustion of contents.
Do not exceed tractor speed of 6 miles per hour when towing or operating Lawn
Sweeper.
1
42
(x2)
44
(x2)
(x1)
40
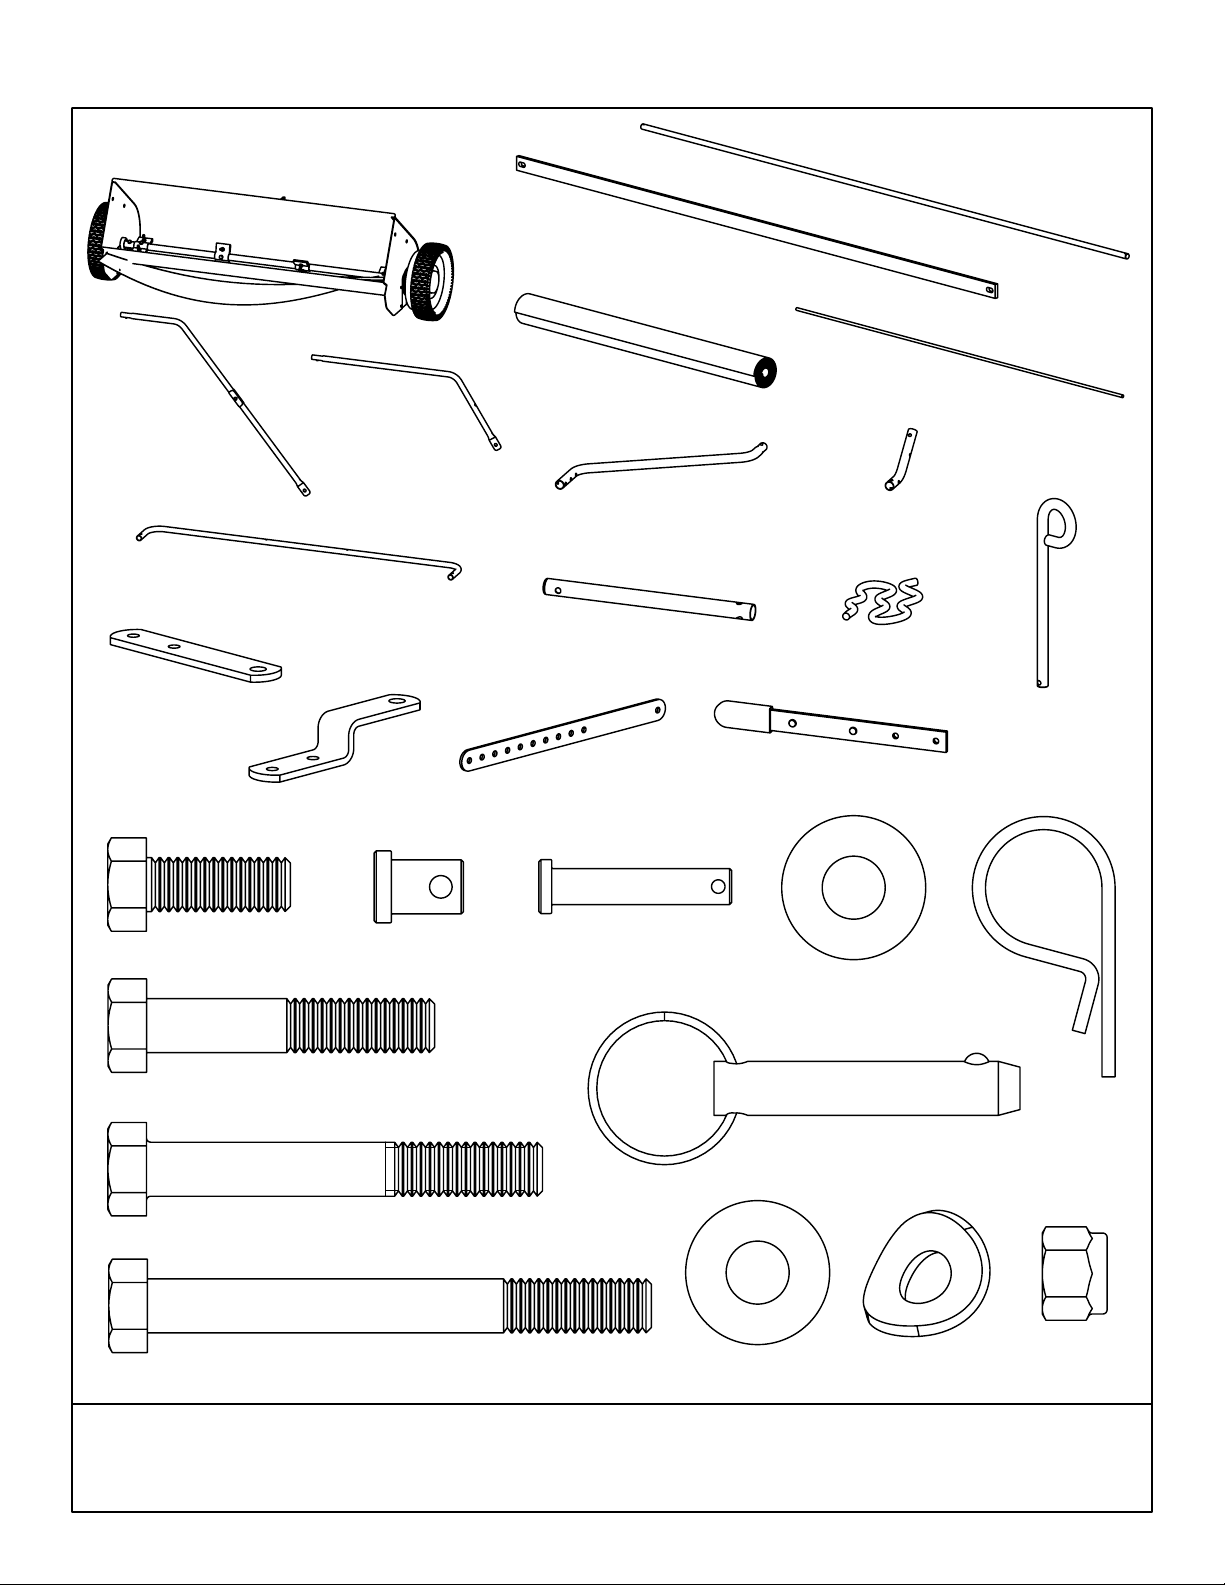
Carton Contents
45
(x1)
39
(x1)
(x2)
25
(x2)
55
(x2)
57
47
26
(x1)
46
(x2)
(x2)
(x1)
5
(x2)
31
27
(x2)
(x4)
30
(x2)
6
(x2)
49
(x2)
4
(x1)
50
(x2)
3
(x1)
53
54
(x2)
(x2)
38
17
(x1)
(x8)
32
(x3)
TOOLS REQUIRED FOR ASSEMBLY:
9/16" Wrench and Socket
•
29
28
60
(x4)
2
(x10)
(x11)

Assembly Instructions
1
Attach Short Hitch Tubes to Sweeper Assembly and tighten hardware.
DO NOT OVERTIGHTEN.
2
Attach Handle to Height Adjustment and tighten hardware.
29
29
60
26
28
27
3
31
3
Insert Long Hitch Tubes into Short Hitch Tubes and snap into position.
25
3

Assembly Instructions
4
5
Install hardware through front two holes of Long Hitch Tubes as shown.
Hold Adjustment Lever in position and install third bolt as shown.
Pin Adjustment Lever to Handle.
DO NOT TIGHTEN
AT THIS TIME.
Install Clevis Bars as shown; Clevis bolts pass between Hitch Tube bolts.
Tighten Hitch Tube hardware first, then tighten Clevis hardware.
29
28
4
38
28
32
6
30
6
5
5
6
29
Insert Bottom Frame Tubes into Rear Frame Tube and snap into position.
44
40
40
4

Assembly Instructions
7
8
Slide Hopper Bar into pocket of Hopper Bag as shown.
39
45
Place bottom frame assembly into Hopper Bag.
Install Clevis Pins through Hopper Bag, Hopper Bar, and Bottom Frame Tubes
and secure with Hairpins.
9
38
50
5038
Insert Top Frame Tubes into Rear Frame Tube and snap into position.
44
42
42
5

Assembly Instructions
10
11
Place top frame assembly into Hopper Bag.
Install Clevis Pins through Top Frame Tubes and Bottom Frame Tubes
and secure with Hairpins.
38
49
49
38
Slide Pivot Rod through Top Frame Tube and Connecting Tube, then through
pocket of Hopper Bag, then through Connecting Tube and Top Frame Tube.
Secure both ends with Washer and Hairpin.
12
55
38
46
53
55
Hold Hopper Bag open and carefully insert Tension Rods into holes in
Rear Frame Tubes.
Secure Hopper Bag around Top Frame Tubes with velcro tabs.
Velcro Tab
38
53
47
6

Assembly Instructions
13
Insert Connecting Tubes into Short Hitch Tubes and secure with
Quick-Release Pins. Install Hitch Pin and secure with Hairpin.
54
14
17
54
38
Tie Dump Rope securely around exposed section of Rear Frame Tube.
57
7

Operating Instructions
Before Using Lawn Sweeper:
Read all Safety Rules found on page 1.
1.
How to Sweep Lawn:
Remove large debris from lawn.
1.
Do not sweep if conditions are too wet or muddy.
2.
Attach Lawn Sweeper to tractor using supplied hitch pin. The multi-pronged
3.
hitch allows the Lawn Sweeper to accomodate varying tractor hitch heights;
choose the appropriate setting so that Lawn Sweeper hitch tubes are
roughly level with the ground.
Attach dump rope to tractor so that it cannot contact the brushes or wheels.
4.
Start tractor engine and tow Lawn Sweeper to lawn.
5.
Adjust brush height so that brushes extend roughly 1/2" below the tips of the
6.
grass. For best performance, always set the brushes as high as possible to
minimize resistance on brushes and wheels.
Engage tractor drive at its slowest speed and begin sweeping. Increase
7.
tractor speed as required to throw material to the back of the hopper bag.
Sweep in straight lines whenever possible and avoid sharp turns.
8.
Periodically check the sweeper while operating to ensure that wheels and
9.
brushes are rotating smoothly and that nothing is wrapped around the
brushes or brush shaft.
When filled, the hopper bag can be emptied by pulling the dump rope
10.
forward.
How to Adjust Brush Height:
Remove hairpin and detach adjustment lever from handle.
1.
Move handle downwards to raise the brush height or upwards to lower the
2.
brush height.
Align the handle pin with the nearest hole in the adjustment lever. Use the
3.
top or bottom pin on the handle, whichever provides the best alignment.
Secure adjustment lever to handle with hairpin.
4.
8

Operating Instructions
Storing Lawn Sweeper:
Empty hopper bag and thoroughly clean Lawn Sweeper before storing.
1.
Store Lawn Sweeper away from excessive heat to prevent damage.
2.
Brushes must not contact ground during storage to prevent damage.
3.
Remove quick-release pins to separate hopper bag from Lawn Sweeper.
4.
Carefully remove tension rods and collapse hopper bag for compact storage.
5.
Detach adjustment lever from handle and depress snap buttons to remove
6.
hitch tubes from Lawn Sweeper for compact storage.
Periodic Maintenance:
Tighten fasteners as needed before each use
•
Empty hopper and thoroughly clean Lawn Sweeper after each use
•
Remove any materials that have wrapped around brushes or brush shaft
•
after each use
Lubricate wheel bearings and gears annually with a light coating of grease
•
9

Warranty
If this product fails due to a defect in material or workmanship within THREE
YEARS from the date of purchase, we will at our option repair or replace it free of
charge. This warranty excludes tires, wheels, brushes and bag, which are
expendable and become worn during normal use.
This warranty does not cover:
Repairs necessary because of operator abuse or negligence.
•
Equipment used for commercial or rental purposes.
•
Paint that is worn or faded due to normal use or exposure.
•
To arrange for product repair call 1-800-652-2321, or return this product to place
of purchase for replacement.
This warranty gives you specific legal rights, and you may also have other rights
which may vary from state to state. This warranty applies only while this product
is in use in the United States.
In the space below record the purchase date of your Lawn Sweeper.
Model Number
Purchase Date
Keep this Owner's Manual and your receipt in a safe place for future reference.
After the three year warranty period all replacement parts may be ordered by
calling
When ordering replacement parts, always give the following information:
•
•
1-800-652-2321
Product
Model Number
42SWP22
.
22 cu ft LAWN SWEEPER
42SWP22
Part Number
•
Part Description
•
10

Repair Parts
59
29 30
17
1
29
28
22
5
6
38
2
24
13
29
3
31
345934
4
2424
5922
29
60
25
23
88
26
62
28
27
21
37
7
12
38
3228
10
15
24
22
14
16 24
REPLACEMENT PARTS ORDERING OHIO STEEL INDUSTRIES 1-800-652-2321
11

46
Repair Parts
57
39
63
67
50
54
55
45
38
67
67
47
61
67 61
38
53
49
66
64
65
REPLACEMENT PARTS ORDERING OHIO STEEL INDUSTRIES 1-800-652-2321
12

Designed And Tested In Columbus, Ohio
Assembled In Vietnam From U.S.A.
And Asia Components
MODEL # 42SWP22
2575 Ferris Road Columbus, OH 43224
(800) 652-2321
www.OHIOSTEEL.com
(800) 652-2321
 Loading...