

Page 1

Instruction Manual
Vortex Mixer, Mini Fix Speed, VXMNFS
Vortex Mixer, Mini Analog, VXMNAL
Vortex Mixer, Mini Digital, VXMNDG
Vortex Mixer, Mini Pulsing, VXMNPS
EN - English ......... 1
FR - Français ......... 11
ES - Español ......... 22
IT - Italiano ......... 33
DE - Deutsch ......... 44
PT - Português ......... 55
NL - Nederlands ......... 66
NO - Norsk ......... 70
DA - Dansk ......... 74
SV - Svenska ......... 78
FI - Suomi ......... 82
HU - Magyar ......... 86
PL - Polski ......... 90
CZ - Czech ......... 94
KR - Korean ......... 98
Revision 5
28/09/17
Page 2

table of contentS
Package Contents . . . . . . . . . . . . . . . 1
Service Information . . . . . . . . . . . . . . . 1
Installation . . . . . . . . . . . . . . . 2
Maintenance & Servicing . . . . . . . . . . . . . . . 2
Environmental Conditions . . . . . . . . . . . . . . . 2
Safety Instructions . . . . . . . . . . . . . . . 3
Standards & Regulations . . . . . . . . . . . . . . . 3
Specifications . . . . . . . . . . . . . . . 4
Digital & Pulsing Mini Vortex Mixer Control Panel . . . . . . . . . . . . . . . 5
Operating Instructions . . . . . . . . . . . . . . . 6-7
Head/Accessory Installation Instructions . . . . . . . . . . . . . . . 8-9
Troubleshooting . . . . . . . . . . . . . . . 10
EN
Package contentS
Fixed Speed, Analog, Digital or Pulsing Mini Vortex Mixer
Power Cord
* (1) cup head
* (1) 3” (7.6cm) head
* (1) 3” (7.6cm) rubber head cover
Instruction manual
* These accessories come with all units except the Pulsing Mini Vortex Mixer which is
also supplied with a 1.5 to 2mL Micro-Tube Holder with built-in cup head.
1
1
Service information
If the troubleshooting section does not resolve or describe your problem, contact your
authorized OHAUS service agent. For service assistance or technical support in the
United States call toll-free 1-800-672-7722 ext. 7852 between 8:00 AM and 5:00 PM EST.
An OHAUS product service specialist will be available to provide assistance. Outside the
USA, please visit our web site, www.ohaus.com to locate the Ohaus office nearest you.
Serial Number: _______________________________________________________
Date of Purchase: ____________________________________________________
Supplier: ___________________________________________________________
Page 3
inStallation environmental conDitionS
Upon receiving the Ohaus Mini Vortex Mixer, check to ensure that no damage has
occurred during shipment. It is important that any damage that occurred in transport
is detected at the time of unpacking. If you do find such damage the carrier must be
notified immediately.
After unpacking, place the Mini Vortex Mixer on a level bench or table, away from
explosive vapors. Ensure that the surface on which the unit is placed will withstand
typical heat produced by the unit. Always place the unit on a sturdy work surface.
The Mini Vortex Mixer is supplied with a power cord that should be plugged into a
properly grounded outlet. If the supplied power cord does not meet your needs, please
use an approved power cord that suits local codes and electric supply. Replacement
of the plug must be made by a qualified electrician.
maintenance & Servicing
The Mini Vortex Mixer is built for long, trouble-free, dependable service. No lubrication
or other technical user maintenance is required.
The unit should be given the care normally required for any electrical appliance. Avoid
wetting or unnecessary exposure to fumes. Spills should be removed promptly. DO
NOT use a cleaning agent or solvent on the front panel which is abrasive or harmful to
plastics, nor one which is flammable. Always ensure the power is disconnected from
the unit prior to any cleaning. If the unit ever requires service, contact your Ohaus
representative.
Operating Conditions: Indoor use only.
Temperature: 4 to 40°C (39.2 to 104°F)
Humidity: 20% to 85% relative humidity, non-condensing
Altitude: 0 to 6,562 ft. (2000 M) above sea level
Non-Operating Storage:
Temperature: -20 to 65°C (-4 to 149°F)
Humidity: 20% to 85% relative humidity, non-condensing
Installation Category II and Pollution Degree 2 in accordance with IEC 664.
equiPment DiSPoSal
This equipment must not be disposed of with unsorted waste. It is your responsibility
to correctly dispose of the equipment at life-cycle-end by handing it
over to an authorized facility for separate collection and recycling. It is also
your responsibility to decontaminate the equipment in case of biological,
chemical and/or radiological contamination, so as to protect the persons
involved in the disposal and recycling of the equipment from health
hazards.
For more information about where you can drop off your waste of equipment, please
contact your local dealer from whom you originally purchased this equipment. By doing
so, you will help to conserve natural and environmental resources and you will ensure
that your equipment is recycled in a manner that protects human health.
intenDeD uSe
The Ohaus Mini Vortex Mixers are intended for general laboratory use. Safety can not
be guaranteed if used outside of the intended use.
EN
2
2
Page 4
Safety inStructionS StanDarDS & regulationS
Please read the entire instruction manual before operating the Mini Vortex Mixer.
WARNING! DO NOT use the Mini Vortex Mixer in a hazardous atmosphere
or with hazardous materials for which the unit was not designed. Also, the
user should be aware that the protection provided by the equipment may
be impaired if used with accessories not provided or recommended by the
manufacturer, or used in a manner not specified by the manufacturer.
Always operate unit on a level surface for best performance and maximum
safety.
DO NOT lift the Mini Vortex Mixer by the head. All heads, including cup head,
are removable. They can pop off if lifted by them.
CAUTION! To avoid electrical shock, completely cut off power to the unit by
disconnecting the power cord from the wall outlet. Disconnect unit from the
power supply prior to maintenance and servicing.
Spills should be removed promptly. DO NOT immerse the unit for cleaning.
DO NOT operate the unit if it shows signs of electrical or mechanical damage.
Earth Ground - Protective Conductor Terminal
Alternating Current
3
3
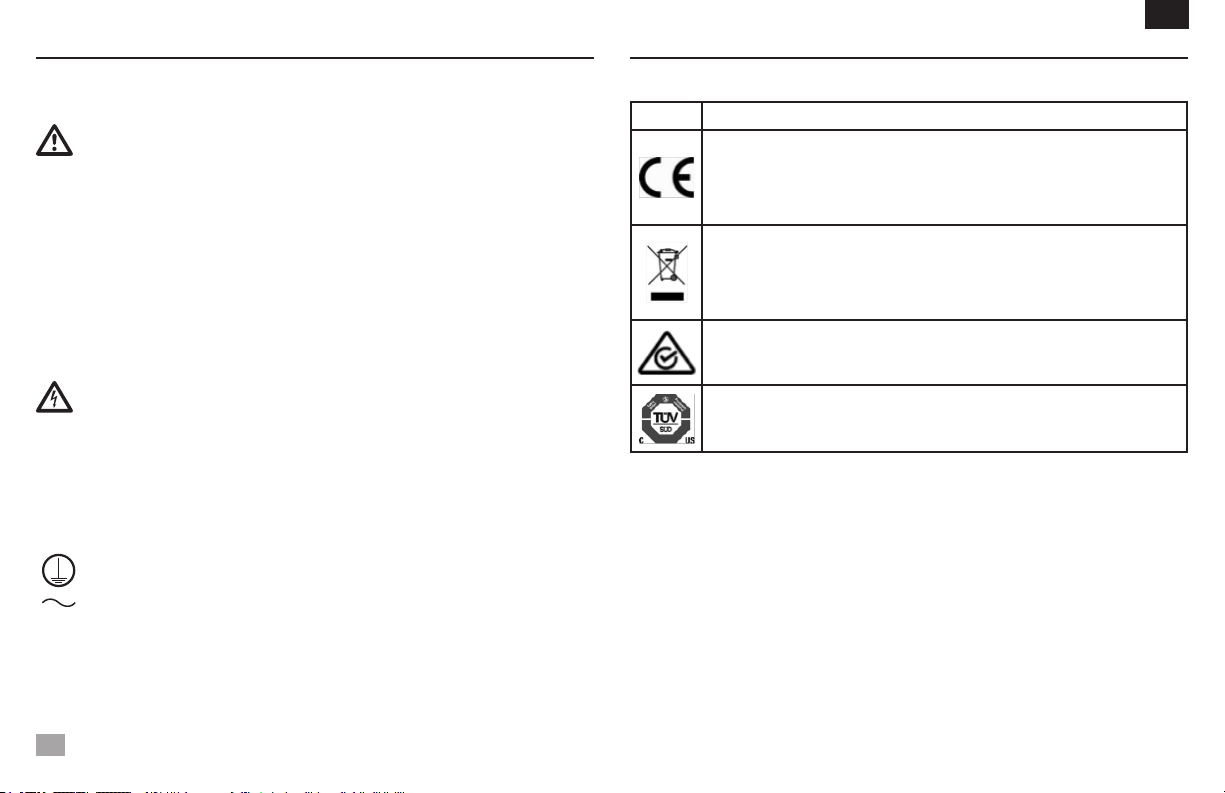
Compliance to the following standards and regulations is indicated by the corresponding mark
on the product.
Mark Standards and Regulations
OHAUS Corporation declares that the VXMN series mixers comply with directives
2011/63/EU, 2014/30/EU, 2014/35/EU and standards EN 50581, EN 61010-1, EN
61010-2-051, EN 61326-1.
The full text of the EU declaration of conformity is available at the following internet
address: www.ohaus.com/ce.
This product complies with directive 2012/19/EU. Please dispose of this product in
accordance with local regulations at the collecting point specified for electrical and
electronic equipment.
For disposal instructions in Europe, refer to www.ohaus.com/weee.
EN 61326-1
CAN/CSA C22.2 61010-1, CAN/CSA C22.2 61010-2-051
UL 61010-1, UL 61010-2-051
Global Notice
Warning: This is a Class A product. In a domestic environment this product may cause radio interference in which case the user may be required to take adequate measures.
Canada Notice
This Class A digital apparatus complies with Canadian ICES-003.
FCC Notice
NOTE: This equipment has been tested and found to comply with the limits for a Class A digital
device, pursuant to Part 15 of the FCC Rules. These limits are designed to provide reasonable
protection against harmful interference when the equipment is operated in a commercial environment. This equipment generates, uses, and can radiate radio frequency energy and, if not
installed and used in accordance with the instruction manual, may cause harmful interference to
radio communications. Operation of this equipment in a residential area is likely to cause harmful
interference in which case the user will be required to correct the interference at his own expense.
Changes or modifications not expressly approved by Ohaus Corporation could void the user’s authority
to operate the equipment.
EN
Page 5

fixeD SPeeD vortexer mixer SPecificationS Digital vortexer mixer SPecificationS
Overall dimensions (L x W x H): 8.3 x 4.8 x 6.5” (21.0 x 12.3 x 16.5 cm)
Electrical (50/60 Hz): 120V: 1.2 amps, 135 watts
230V: 0.6 amps, 135 watts
Speed range: 120V: 3200rpm
230V: 2500rpm
Orbit: 4.9mm (0.194”)
Duty rating: intermittent duty
Controls: none
Ship weight: 10lbs (4.5kg)
Overall dimensions (L x W x H): 8.3 x 4.8 x 6.5” (21.0 x 12.3 x 16.5 cm)
Electrical (50/60 Hz): 120V: 1.2 amps, 135 watts
230V: 0.6 amps, 135 watts
Speed range*: 120V: 500 to 3000rpm
230V: 500 to 2500rpm
Timer: 1 second to 9999 minutes
Orbit: 4.9mm (0.194”)
Duty rating: intermittent duty
Controls: see page 5
Ship weight: 10lbs (4.5kg)
EN
analog vortexer mixer SPecificationS
Overall dimensions (L x W x H): 8.3 x 4.8 x 6.5” (21.0 x 12.3 x 16.5 cm)
Electrical (50/60 Hz): 120V: 1.2 amps, 135 watts
230V: 0.6 amps, 135 watts
Speed range*: 120V: 300 to 3200rpm
230V: 300 to 2500rpm
Orbit: 4.9mm (0.194”)
Duty rating: intermittent duty
Controls: auto/off/on rocker switch,
speed knob: variable 1 to 10 dial marks
Ship weight: 10lbs (4.5kg)
* Maximum speed will vary depending on accessory being used.
PulSing vortexer mixer SPecificationS
Overall dimensions (L x W x H): 8.3 x 4.8 x 6.5” (21.0 x 12.3 x 16.5 cm)
Electrical (50/60 Hz): 120V: 1.2 amps, 135 watts
230V: 0.6 amps, 135 watts
Speed range*: 120V: 500 to 3000rpm
230V: 500 to 2500rpm
Timer: 1 second to 9999 minutes
Orbit: 2.5mm (0.098”)
Duty rating: intermittent duty
Controls: see page 5
Ship weight: 10lbs (4.5kg)
44
Page 6
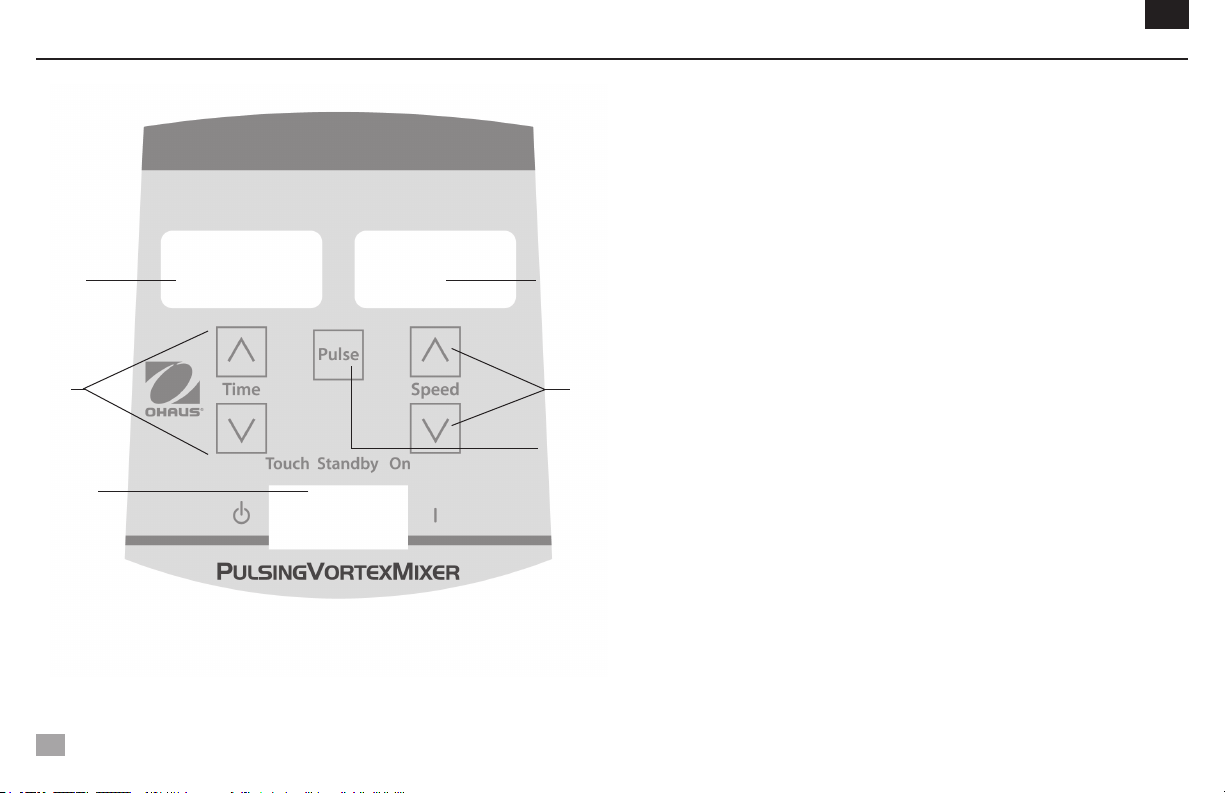
Digital & PulSing mini vortex mixer control Panel
B
C
A
EN
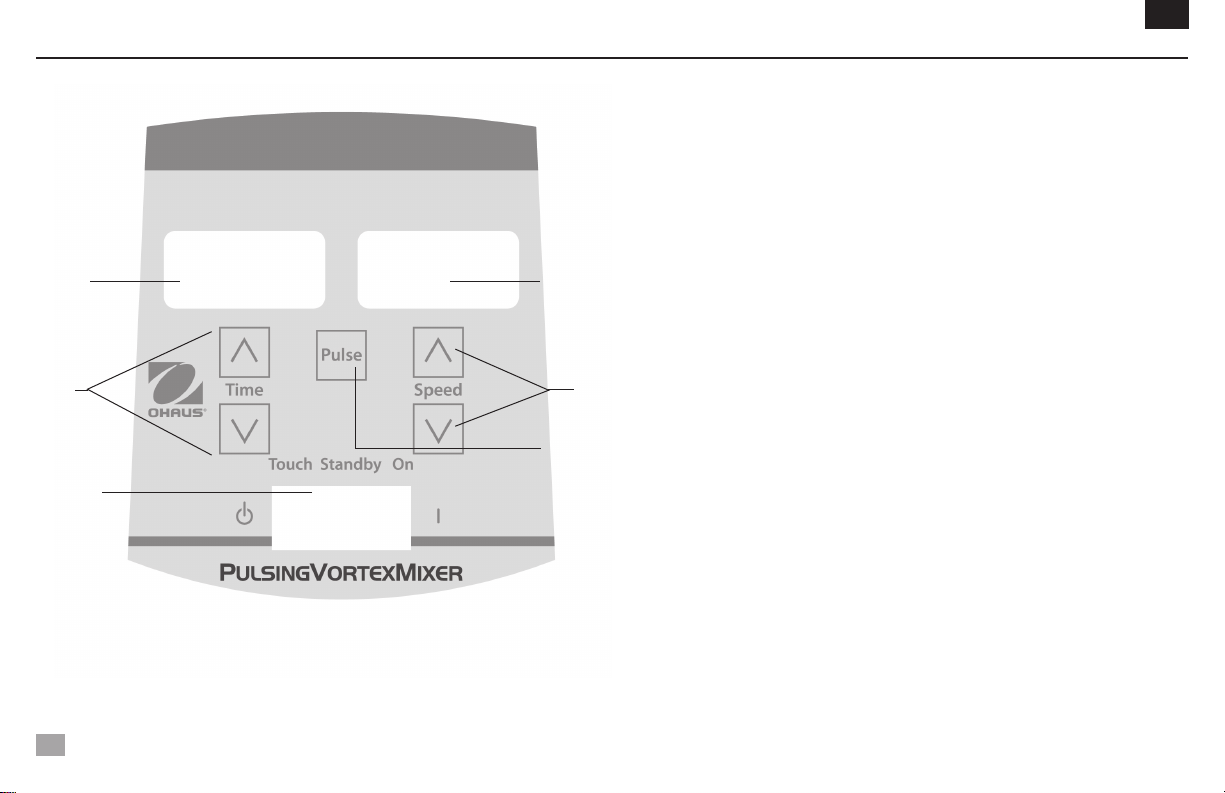
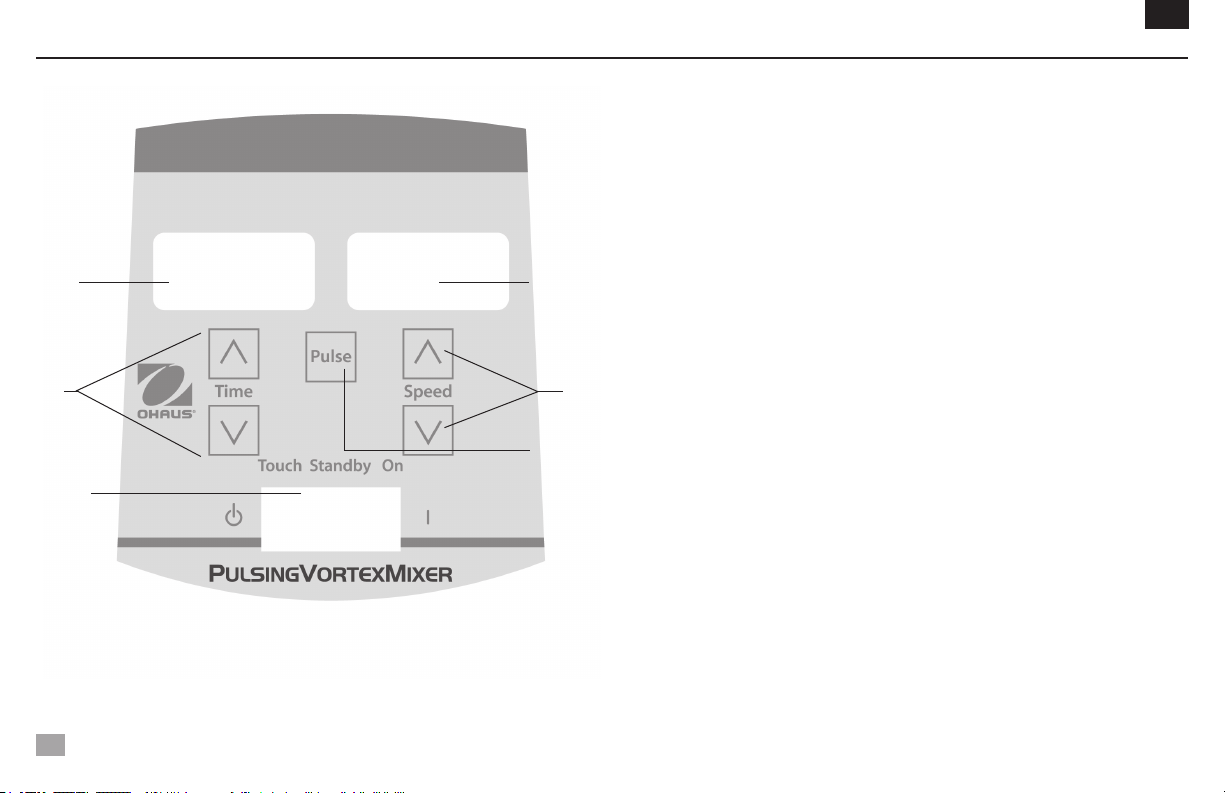
The front panel of the Digital/Pulsing Mini Vortex Mixer contains all the switches,
controls and displays needed to operate the unit.
A. 3-way rocker switch: Auto/standby/on rocker switch starts/stops the vortexing
function.
B. Time display: Displays accumulated time (continuous mode) or how much time is
remaining (timed mode). The display range is from 0 to 9,999 minutes in one (1)
second increments. The display will indicate minutes and seconds until the timer
reaches 99 minutes and 59 seconds (99:59), then the display will automatically
display minutes up to 9,999.
D
F
C. Up/down arrows for set-point control.
D. Speed display: Displays the speed of the Mini Vortex Mixer.
E. Up/down arrows for set-point control.
F. Pulse button: Starts the pulsing mode.
E
* Same controls for the Digital Mini Vortex Mixer but without the ‘pulse’ button.
5
5
Page 7

mini vortex mixer introDuction analog mini vortex mixer oPerating inStructionS
Your Mini Vortex Mixer is ready for most one-handed applications. The Mini Vortex
Mixer operates by mixing tubes just prior to testing.
oPerating tiPS
These units are not intended for continuous use over extended periods of time. A
built-in temperature sensor will prevent the unit from overheating by shutting the motor
down. If this occurs, allow the motor to cool down and the unit will be able to resume
normal operation. Decrease the duration of the time unit is used between rest periods.
See page 8-9 for ‘Head/Accessory Installation Instructions’.
fixeD SPeeD mini vortex mixer oPerating inStructionS
The Fixed Speed Mini Vortex Mixer runs only at 3200rpm (2500rpm for 230V).
1. Plug the power cord into a properly grounded outlet. The unit is now on and in a
standby mode.
2. The vessel you are using must be pushed down on the head attachment to achieve
motion. To get the desired mix, vary the angle of contact and pressure against the
head.
3. The mixer will return to standby mode when the vessel is lifted off the head.
4. The unit can become warm to the touch with constant use. There is nothing wrong
with it. At high performance settings the motor (UL recognized component) simply
puts out more heat. IMPORTANT: DO NOT use large accessories on the Fixed
Speed Mini Vortex Mixer. This unit is designed for use with cup head or 3” (7.6cm)
head with 3” (7.6cm) rubber head cover only.
5. To completely cut off power to the unit, disconnect the power cord from the wall
outlet.
1. Make sure the 3-way rocker switch is in the center, off position. Plug the power
cord into a properly grounded outlet.
2. For continuous operation, push the rocker switch to the right, on position. For
intermittent/touch operation, push the rocker switch to the left, auto position.
3. In either case, turn the speed knob to 1. In the on position, you will see the head in
motion immediately. In the auto position, the vessel you are using must be pushed
down on the head attachment to achieve motion. To get the desired mix, vary
the speed, using the speed knob, and/or vary the angle of contact and pressure
against the head.
4. When finished with either continuous or intermittent operation, return rocker switch
to the center, off position.
5. The continuous, on mode is for the larger accessories. In continuous on mode,
DO NOT run the unit above 900rpm (analog speed setting of approximately 5).
6. The intermittent, auto mode is intended for short mixing times of one (1) minute
or less at full speed. A rest period of two (2) minutes is recommended to minimize
the possibility of overheating the motor. The unit can become warm to the touch
with constant use. There is nothing wrong with it. At high performance settings
the motor (UL recognized component) simply puts out more heat. IMPORTANT:
When using larger accessories (Insert Retainer with foam inserts or Ampule
Tube Holders), DO NOT run the unit above 900rpm, (analog speed setting of
approximately 5). UNIT DAMAGE WILL OCCUR.
7. To completely cut off power to the unit, disconnect the power cord from the wall
outlet.
EN
6
6
Page 8

Digital & PulSing mini vortex mixer oPerating inStructionS
1. Make sure the 3-way rocker switch is in the center, standby position. Plug the
power cord into a properly grounded outlet. The unit is now on and in a standby
mode.
2. For continuous operation, push the rocker switch to the right, on position. For
intermittent/touch operation, push the rocker switch to the left, auto position.
3. In either case, set the speed. In the on position, you will see the head in motion
immediately. In the auto position, the vessel you are using must be pushed down
on the head attachment to achieve motion. To get the desired mix, vary the speed,
using the speed up/down arrows, and/or vary the angle of contact and pressure
against the head.
Setting speed:
To set the speed press the up/down arrows below the speed display until you reach
the desired speed.
• Speedwhilerunningintheonpositionis500to3000rpm(500to2500rpm
for 230V).
• Speed while running in the auto position is 1000 to 3000rpm (1000 to
2500rpm for 230V).
• Speedwhilerunninginthepulsemodeis3000rpm,runningfor30seconds,
resting 10 seconds (2500rpm for 230V).
Setting time:
Time operation works in both auto and on positions.
• Torunintimedmode(programmedtime),startbypressingtherockerswitch
to the left, auto position. Press the up/down arrows below the time display
until you reach the desired time. While running unit in timed mode, the time
display will show time remaining, counting down to zero (0:00).
• Torunincontinuousmode(accumulatedtime),resetthetimertozero(0:00)
before running. Time display will show the accumulated time and run until
you press the rocker switch to the center, standby position.
EN
Pulse operation: (for Pulsing Mini Vortex Mixer only)
• Setthetimeifdesired.
• Movetherockerswitchtotheright,onposition.Pressthepulse button, in
the center of the front panel. The speed display will show “PULSE”. The unit
will run at 3000rpm, cycling a run time of 30 seconds, followed by a resting
time of 10 seconds. The unit will continue vortexing until the timer reaches
zero (0:00) or you stop the unit by moving the rocker switch to the center,
standby position.
4. When finished with either continuous, intermittent or pulse operation, return rocker
switch to the center, standby position.
5. The continuous, on mode is for the larger accessories. In continuous on mode, DO
NOT run the unit above 900rpm.
6. The intermittent, auto mode is intended for short mixing times of one (1) minute
or less at full speed. A rest period of two (2) minutes is recommended to minimize
the possibility of overheating the motor. The unit can become warm to the touch
with constant use. There is nothing wrong with it. At high performance settings
the motor (UL recognized component) simply puts out more heat. IMPORTANT:
When using larger accessories (Insert Retainer with foam inserts or Ampule Tube
Holders), DO NOT run the unit above 900rpm. UNIT DAMAGE WILL OCCUR.
7. To completely cut off power to the unit, disconnect the power cord from the wall
outlet.
NOTE: In the event of a power outage or hazard that will interrupt unit operation, the
unit will restart at set speed and/or temperature when a power outage or hazard is
restored.
7
7
Page 9
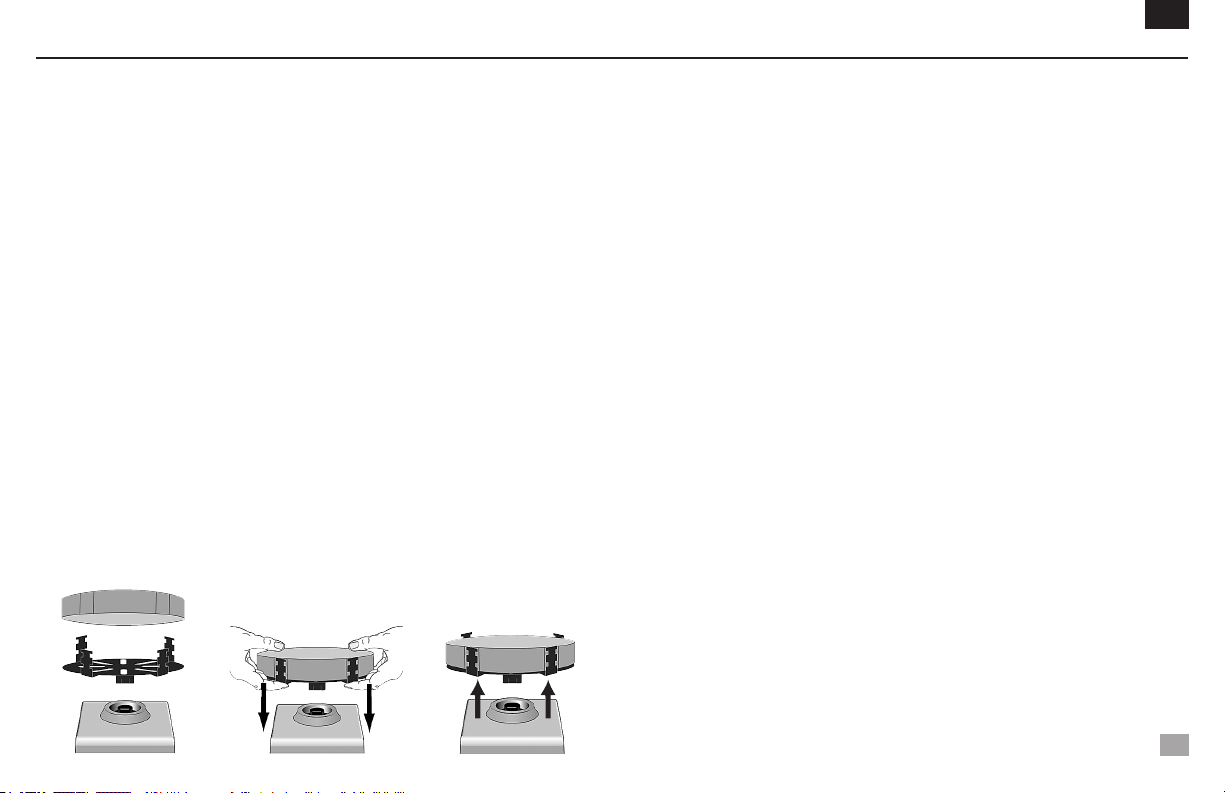
HeaD/acceSSory inStallation inStructionS
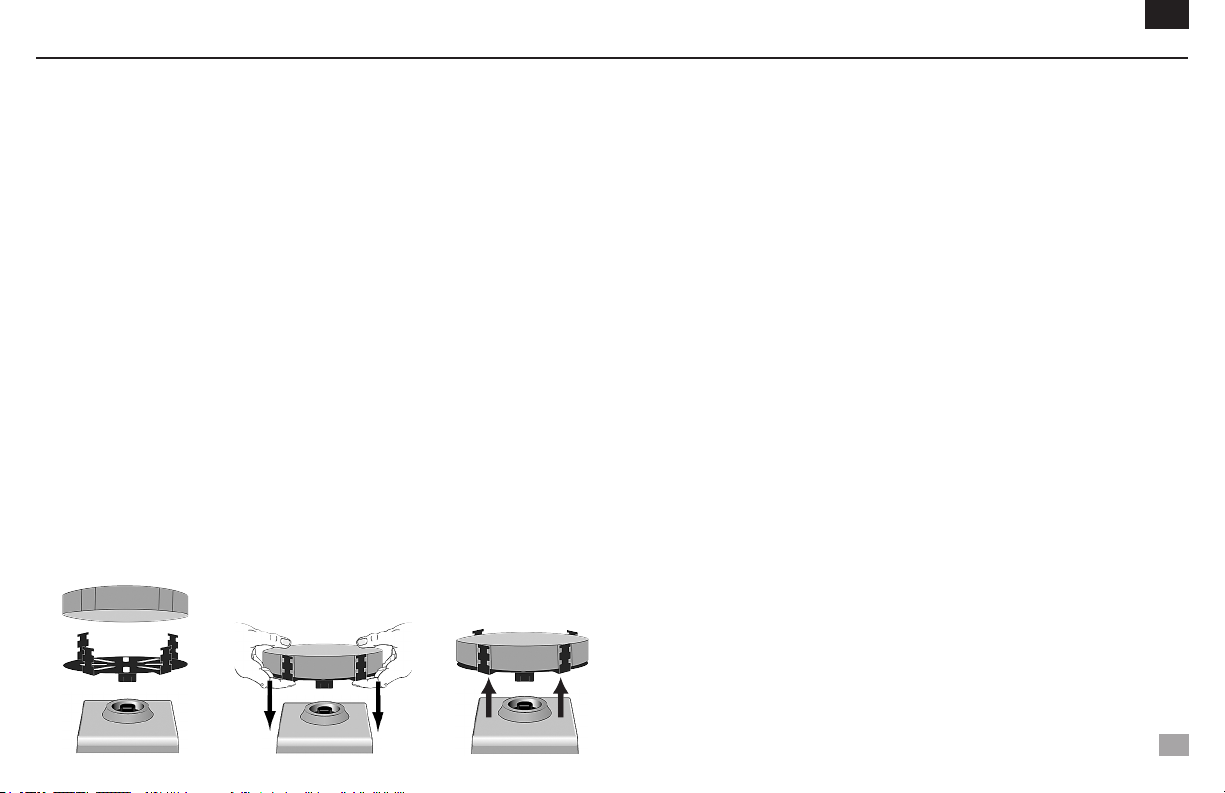
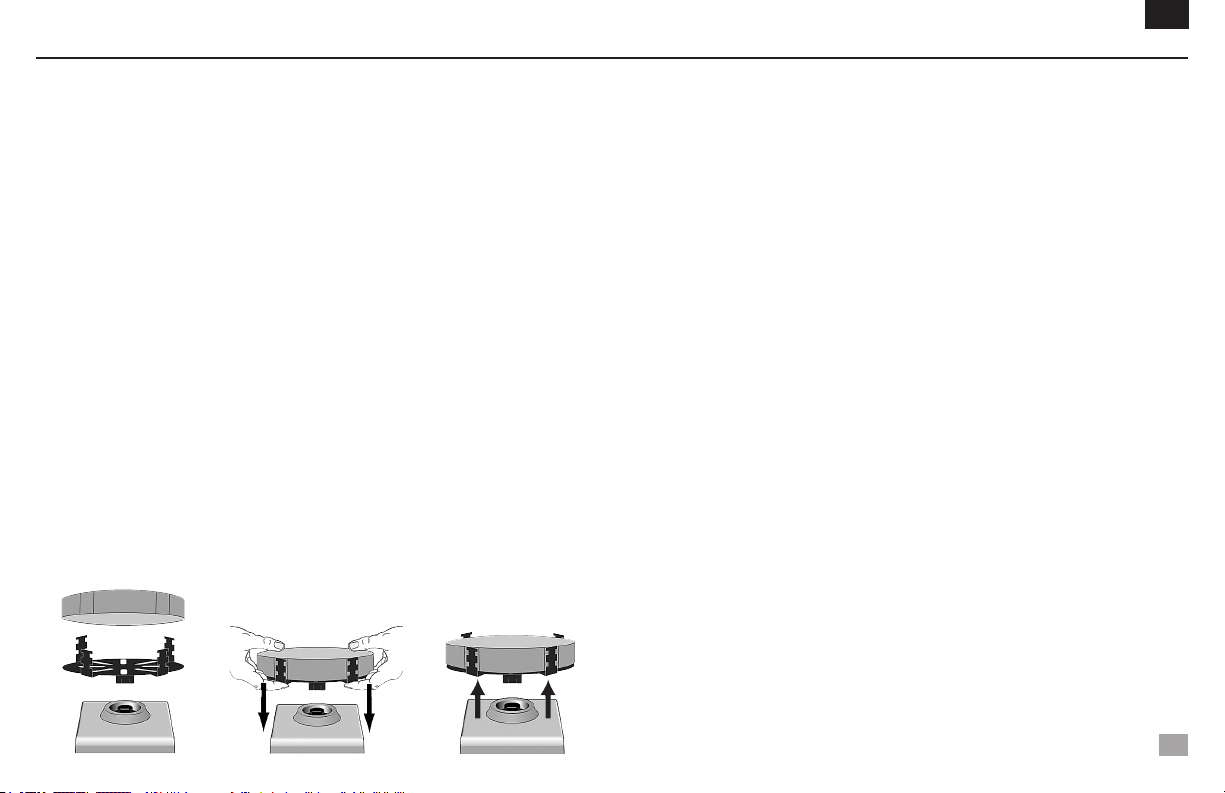
Installing the cup head, 3” head or other head attachments:
1. Move the 3-way rocker switch to the center, off/standby position. For the Fixed
Speed Mini Vortex Mixer disconnect the power cord from the wall outlet.
2. If using an Insert Retainer with tube holder, insert foam tube holder into Insert
Retainer by lining up the recessed notches of the foam with the fingers of the
retainer. Push foam to the bottom of the retainer.
3. Place head on post of the unit, aligning the flat “alignment mark” inside of the head
mounting hole with the flat “alignment mark” on the post.
4. Press center of head down firmly until it snaps into place. DO NOT use a 3” head
without the 3” rubber head cover. Add samples to attachments after the head is
secured onto the Mini Vortex Mixer. Be sure samples are secure before turning unit
on.
5. To remove an installed head, hold the Mini Vortex Mixer housing with one hand
and firmly pull the head straight up. Larger heads may require using both hands to
force head off post. Remove samples before removing attachments.
EN
Installing Vessel Harness:
1. Install Insert Retainer without foam tube holder onto Mini Vortex Mixer.
2. Stretch vessel harness elastic bands over opposite fingers of the Insert Retainer.
Place bands on either upper or lower notches of the retainer.
3. Place sample in center of the harness bands. Be sure sample is secure before
turning unit on.
2.
3.
4.
5.
8
8
Page 10
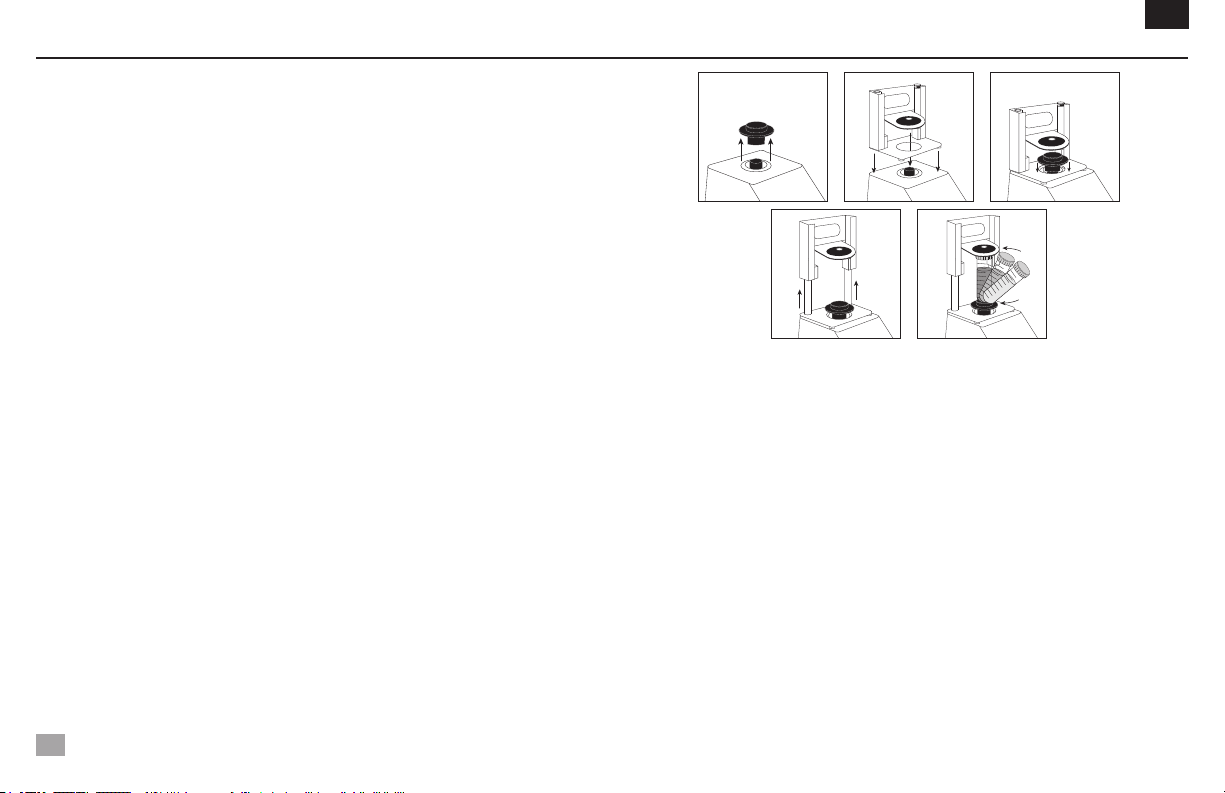
HeaD/acceSSory inStallation inStructionS
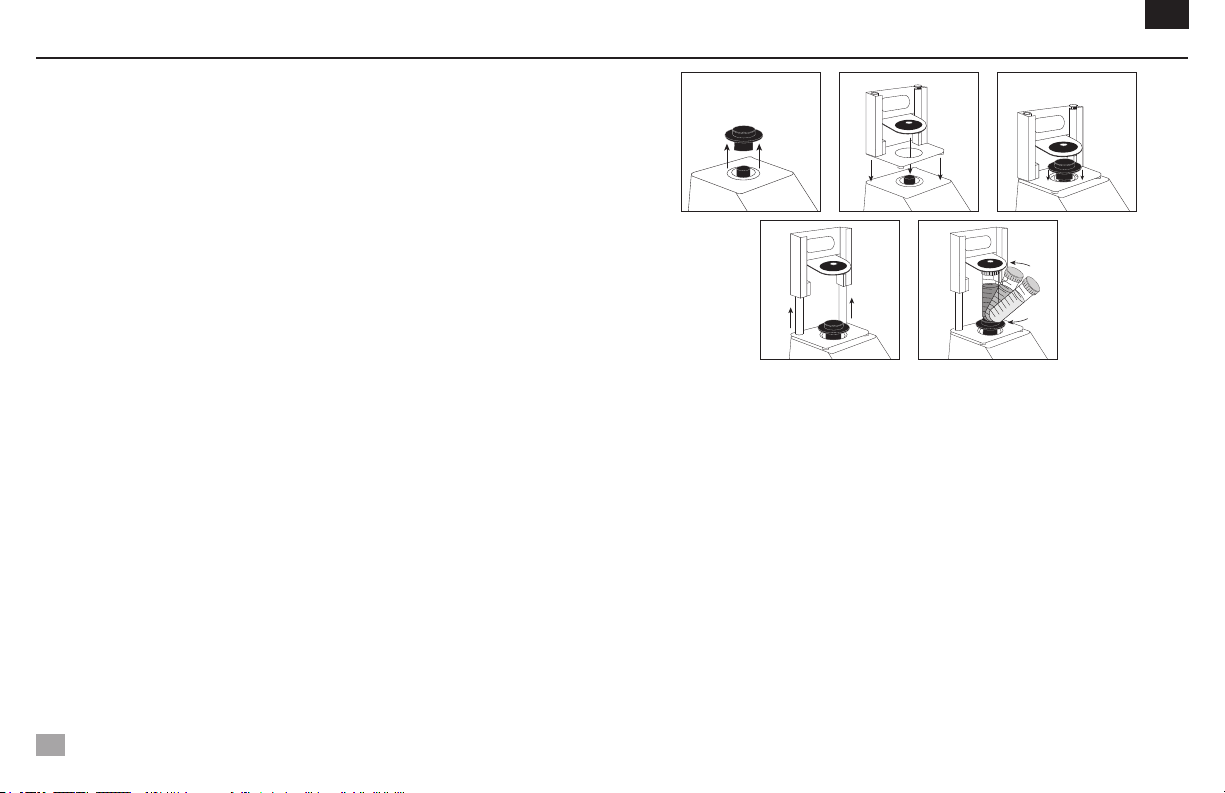
Installing Single Tube Holder:
1. Move the 3-way rocker switch to the center, off/standby position. Single Tube
Holder should NOT be used on the Fixed Speed Mini Vortex Mixer.
2. Remove cup head, or any other accessory from the Mini Vortex Mixer.
3. Remove the adhesive backing from adapter plate and line up the opening of the
adapter plate over the opening of the housing. Press down firmly to ensure a
proper bond between the adaptor and the unit. Align the base plate of the Single
Tube Holder with the adaptor plate from the previous step. Keep the center
openings of the plates concentric to avoid mechanical interference. The magnets
will hold the Single Tube Holder in place. To realign this attachment, pull up from
the handle until the magnets release, check the alignment and place again.
4. Align the base plate of the Single Tube Holder over the post of the Mini Vortex
Mixer with the two Single Tube Holder alignment posts at the back of the unit.
Lower Single Tube Holder onto the adapter plate, the magnets will hold the Single
Tube Holder in place. To realign this attachment, pull up from the handle until the
magnets release, check the alignment and place again.
5. Now that the Single Tube Holder is in place, attach the cup head on the post of the
unit, aligning the orientation arrow towards the rear of the unit.
6. Lift up on the spring loaded upper portion of the Single Tube Holder and slide a
2.5 to 4.5” (6.4 to 11.4cm) long tube on the cup head so that the tube is aligned
in the middle. The 0.5mL Micro-Tube Holder or the 1.5 to 2mL Micro-Tube Holder
will also fit into the Single Tube Holder. You are now ready to mix your sample.
EN
2.
5.5.
4.3.
9
Page 11
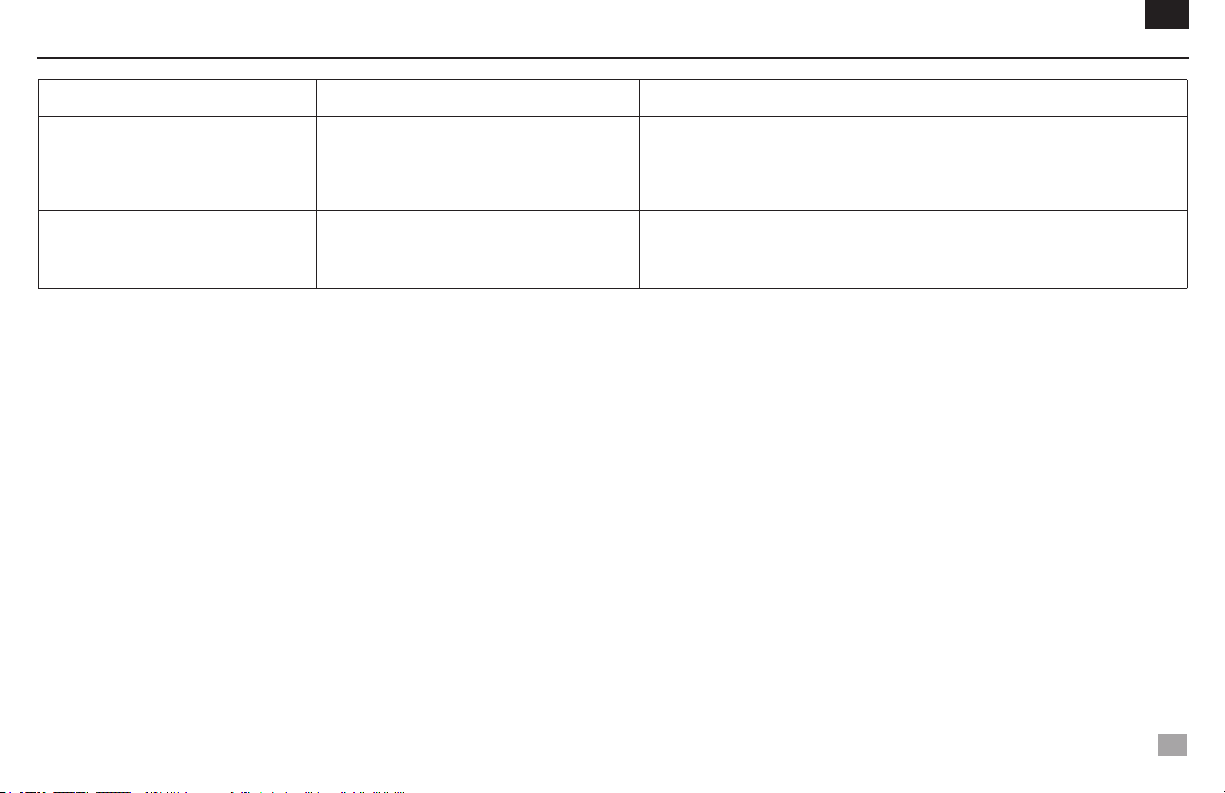
troubleSHooting
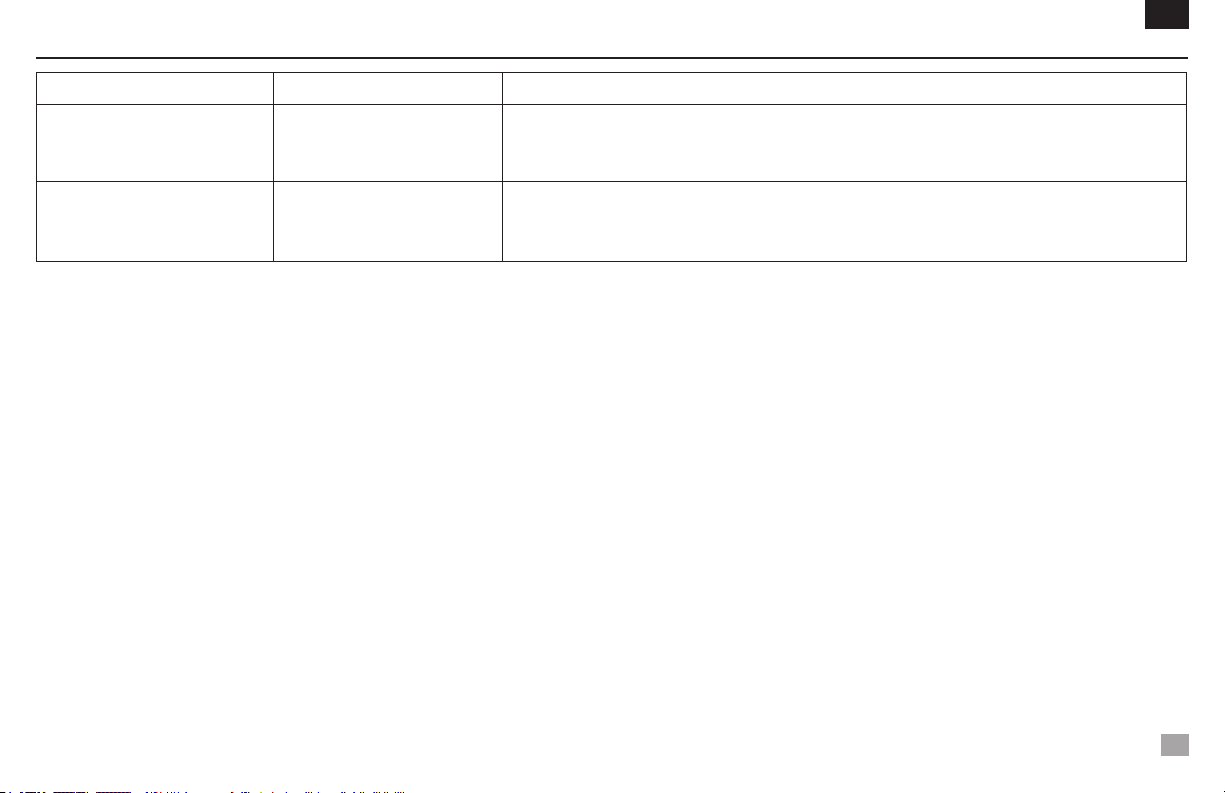
Problem Cause Solution
EN
Unit will not run
Unit is excessively noisy
Mechanical obstruction
or Motor obstruction
Sensor fan misaligned
or Motor misaligned
Removeobstructionand pressdownoncup headseveraltimes toconrmnoobstruction exists.If
problem persists, please contact your Ohaus representative for repair.
Thiserrorcannotbexedbytheenduser.PleasecontactyourOhausrepresentativeforrepair.
10
Page 12

Manuel d’Instruction
Mélangeur Vortex, Mini vitesse réglable, VXMNFS
Mélangeur Vortex, Mini Analogique, VXMNAL
Mélangeur Vortex, Mini Numérique, VXMNDG
Mélangeur Vortex, Mini Pulsation, VXMNPS
EN - English ......... 1
FR - Français ......... 11
ES - Español ......... 22
IT - Italiano ......... 33
DE - Deutsch ......... 44
PT - Português ......... 55
NL - Nederlands ......... 66
NO - Norsk ......... 70
DA - Dansk ......... 74
SV - Svenska ......... 78
FI - Suomi ......... 82
HU - Magyar ......... 86
PL - Polski ......... 90
CZ - Czech ......... 94
KR - Korean ......... 98
Page 13

table DeS matiéreS
Contenu de l’emballage . . . . . . . . . . . . 12
Des informations de service . . . . . . . . . . . . 12
Installation . . . . . . . . . . . . 13
Maintenance et réparation . . . . . . . . . . . . 13
Conditions environnementales . . . . . . . . . . . . 13
Consignes de sécurité . . . . . . . . . . . . 14
Normes et réglementations . . . . . . . . . . . . 14
Spécifications . . . . . . . . . . . . 15
Digital & Pulsing Panneau de commande Mini Vortex Mixer . . . . . . 16
Mode d’emploi . . . . . . . . . . . . 17-18
Instructions d’installation de tête / accessoire . . . . . . . . . . . . 19-20
Dépannage . . . . . . . . . . . . 21
FR
contenu De l’emballage
Mélangeur Vortex à vitesse fixe, analogique, numérique ou à mini pulsation
Cordon d’alimentation
*(1) tête à godet
*(1) tête de 7,6 cm
*(1) couvercle de tête en caoutchouc de 7,6 cm
Manuel d’instruction
* Ces accessoires sont livrés avec tous les appareils sauf le mélangeur vortex à impul-
sions qui est muni d’un support de microtubes de 1,5 à 2 ml avec une tête à godet
intégrée.
12
DeS informationS De Service
Si la section de dépannage ne permet pas de résoudre ou ne décrit pas le problème,
contacter l’agent d’entretien agréé OHAUS. Pour un service d’assistance ou une prise en
charge technique aux États-Unis, composer le numéro gratuit 1-800-672-7722, poste 7852
entre 8h00 et 17h00 (GMT - 5). Un spécialiste du service produit OHAUS est disponible pour
apporter son aide. En dehors des États-Unis, bien vouloir se rendre sur notre site web, www.
ohaus.com pour rechercher la filiale OHAUS la plus proche.
Numéro de série: __________________________________________________________
Date d’achat: _____________________________________________________________
Fournisseur: ______________________________________________________________
Page 14
inStallation
Dès réception du mélangeur vortex Ohaus, vérifiez l’absence de dommages
survenus pendant le transport. Il est important que tout dommage résultant du transport soit détecté lors du déballage. Informez immédiatement le transporteur en cas
de dommage.
Après le déballage, placez le mélangeur vortex sur un plan de travail ou une table de
niveau, à l’écart de toute vapeur explosive. Assurez-vous que la surface sur laquelle le
système est placé résiste à la chaleur généralement produite par le système. Placez
toujours l’appareil sur un plan de travail solide.
Le mélangeur vortex est fourni avec un cordon d’alimentation qui doit être branché
dans une prise correctement mise à la terre. Si le cordon d’alimentation fourni ne
répond pas à vos besoins, veuillez utiliser un cordon d’alimentation homologué
respectant les normes et l’alimentation électrique locales. La prise doit être remplacée
par un électricien qualifié.
maintenance et réParation
L’agitateur vortex a été conçu pour un service de longue durée, sans problème
et stable. Aucune lubrification ni autre forme de maintenance par l’utilisateur n’est
nécessaire. Le dispositif doit être entretenu comme un appareil électrique normal
: il ne doit pas être mouillé ou exposé à des fumées. Si vous renversez du liquide
dessus, retirez-le rapidement. N’utilisez sur le panneau avant que des décapants
ou solvants non inflammables, non abrasifs et non réactifs aux matières plastiques.
Avant tout nettoyage, assurez-vous que le dispositif est hors tension. Si le dispositif
nécessite une maintenance, contactez votre représentant Ohaus.
FR
conDitionS ambianteS
Conditions de fonctionnement : utilisation en intérieur uniquement.
Température : 4 à 40°C (39.2 à 104°F)
Humidité : 20% à 85% d’humidité relative, sans condensation.
Altitude : 0 à 6,562 ft. (2000 M) au dessus du niveau de la mer.
Stockage non fonctionnel :
Température : -20 à 65°C (-4 à 149°F)
Humidité : 20% à 85% d’humidité relative, sans condensation.
Catégorie d’installation II et Niveau de pollution 2 selon la norme IEC 664.
élimination Du matériel
Cet appareil ne peut pas être mis au rebut avec les déchets non triés.
Il vous incombe de le mettre correctement au rebut à la fin de sa vie
utile en le confiant à une entreprise agréée pour sa collecte et son
recyclage. Il vous incombe également de le décontaminer en cas
de contamination biologique, chimique et/ou radiologique, de façon
à protéger la santé des personnes impliquées dans la mise au rebut
et le recyclage de l’appareil.
Pour plus de renseignements sur les endroits où vous pouvez
déposer votre appareil usagé, veuillez contacter le concessionnaire auprès duquel
vous avez effectué l’achat. De cette façon, vous contribuerez à protéger les ressources naturelles et environnementales et assurerez que votre appareil est recyclé
de façon sanitaire.
utiliSation Prévue
Les Mini Vortex Mélangeurs Ohaus sont destinés à une utilisation générale en laboratoire. La sécurité ne saurait en cas d’utilisation non prévue.
13
Page 15
conSigneS De Sécurité
Avant d’utiliser l’agitateur vortex, veuillez lire le manuel d’instructions dans
son intégralité.
AVERTISSEMENT! N’utilisez pas l’agitateur vortex dans une atmosphère
dangereuse ou avec des matériaux dangereux pour lesquels le dispositif n’a pas été conçu. En outre, nous vous informons que le matériel de
protection fourni avec l’agitateur peut s’avérer inefficace si vous utilisez
des accessoires non fournis ou non recommandés par le fournisseur ou
i vous utilisez anormalement le matériel.
Placez toujours le dispositif sur une surface plane pour des
performances et une sécurité optimales.
Ne soulevez pas le dispositif par la tête. Toutes les têtes, y compris la tête
support, sont démontables. Elles peuvent donc se détacher si vous saisissez
le dispositif par l’une d’elles.
ATTENTION ! Pour éviter tout choc électrique, mettez le dispositif
hors tension en débranchant le câble d’alimentation de la prise murale. Avant
toute opération de nettoyage ou d’entretien mettez le dispositif hors tension.
Si vous renversez du liquide dessus, retirez-le rapidement. Pour le nettoyer,
n’immergez pas le dispositif.
Si le dispositif est électriquement ou mécaniquement endommagé, ne l’utilisez
pas.
Prise de terre - Revêtement conducteur protecteur
Courant alternatif
14
FR
normeS et réglementationS
La conformité aux normes et réglementations suivantes est indiquée par la marque correspondante sur le produit.
Marque Normes et réglementations
OHAUS Corporation déclare que le série VXMN mélangeurs est conforme aux directives 2011/63/UE, 2014/30/UE, 2014/35/UE et aux normes EN 50581, EN 61010-1,
EN 61010-2-051, EN 61326-1.
Le texte complet de la déclaration UE de conformité est disponible à l’adresse internet
suivante: www.ohaus.com/ce.
Ce produit est conforme à la directive 2012/19/UE. Veuillez jeter ce produit conformément à la réglementation locale au point de collecte spécifié pour les équipements
électriques et électroniques.
Pour obtenir des instructions d’élimination en Europe, consultez www.ohaus.com/
weee.
EN 61326-1
CAN/CSA C22.2 61010-1, CAN/CSA C22.2 61010-2-051
UL 61010-1, UL 61010-2-051
Avis Global
Avertissement: Il s’agit d’un produit de classe A. Dans un environnement domestique, ce produit
peut causer des interférences radio, auquel cas l’utilisateur peut être amené à prendre des mesures
adéquates.
Canada Avis
Cet appareil numérique de classe A est conforme à la norme ICES-003 du Canada.
Avis de la FCC
REMARQUE: Cet équipement a été testé et déclaré conforme aux limites d’un appareil numérique de
classe A, conformément à la partie 15 des règles de la FCC. Ces limites sont conçues pour fournir
une protection raisonnable contre les interférences nuisibles lorsque l’équipement est utilisé dans un
environnement commercial. Cet équipement génère, utilise et peut émettre de l’énergie radiofréquence
et, s’il n’est pas installé et utilisé conformément au manuel d’instructions, peut causer des interférences
nuisibles aux communications radio. Le fonctionnement de cet équipement dans une zone résidentielle est susceptible de causer des interférences nuisibles, auquel cas l’utilisateur devra corriger
l’interférence à ses propres frais.
Les modifications ou modifications non expressément approuvées par Ohaus Corporation peuvent
annuler l’autorisation de l’utilisateur d’utiliser l’équipement.
Page 16

SPécificationS Pour l’agitateur vortex viteSSe réglable
Dimensions totales (L x W x H): 8.3 x 4.8 x 6.5” (21.0 x 12.3 x 16.5 cm)
Électricité (50/60 Hz): 120V: 1.2 ampères, 135 watts
230V: 0.6 ampères, 135 watts
Plage de vitesses*: 120V: 3200rpm
230V: 2500rpm
Orbite: 4.9mm (0.194”)
Devoir Évaluation: service intermittent
Contrôles: aucun
Poids du colis: 10lbs (4.5kg)
FR
SPécificationS Pour l’agitateur vortex numérique
Dimensions totales (L x W x H): 8.3 x 4.8 x 6.5” (21.0 x 12.3 x 16.5 cm)
Électricité (50/60 Hz): 120V: 1.2 ampères, 135 watts
230V: 0.6 ampères, 135 watts
Plage de vitesses*: 120V: 500 à 3000rpm
230V: 500 à 2500rpm
Minuteur: 1 seconde à 9999 minutes
Orbite: 4.9mm (0.194”)
Devoir Évaluation: Service intermittent
Contrôles: Voir page 5
Poids du colis : 10lbs (4.5kg)
SPécificationS Pour l’agitateur vortex analogique
Dimensions totales (L x W x H): 8.3 x 4.8 x 6.5” (21.0 x 12.3 x 16.5 cm)
Électricité (50/60 Hz): 120V: 1.2 ampères, 135 watts
230V: 0.6 ampères, 135 watts
Plage de vitesses*: 120V: 300 à 3200rpm
230V: 300 à 2500rpm
Orbite: 4.9mm (0.194”)
Devoir Évaluation: service intermittent
Contrôles interrupteur à bascule automatique/dés
activé/activé, bouton de vitesse : variable
marques de numérotation de
Poids du colis: 10lbs (4.5kg)
PulSation vortexer mixer SPécificationS
Dimensions totales (L x W x H): 8.3 x 4.8 x 6.5” (21.0 x 12.3 x 16.5 cm)
Électricité (50/60 Hz): 120V: 1.2 ampères, 135 watts
230V: 0.6 ampères, 135 watts
Plage de vitesses*: 120V: 500 à 3000rpm
230V: 500 à 2500rpm
Minuteur: 1 seconde à 9999 minutes
Orbite: 2.5mm (0.098”)
Devoir Évaluation: Service intermittent
Contrôles: Voir page 5
Poids du colis : 10lbs (4.5kg)
*La vitesse maximale varie en fonction de l’accessoire utilisé.
15
Page 17
Panneau De commanDe - l’agitateur vortex numérique à PulSation
B
C
A
D
F
Le panneau avant du mélangeur vortex à impulsions/Pulsation réunit toutes les
touches, commandes et affichages nécessaires au fonctionnement
de l’appareil.
A. Interrupteur à bascule à trois positions : L’interrupteur à bascule «
marche/attente/auto » active et désactive la fonction vortex.
B. Affichage Time (durée) : Indique la durée accumulée (mode continu) ou le temps
restant (mode temporisé). La plage d’affichage est de 0 à 9999 minutes par incréments d’une (1) seconde. L’affichage indique les minutes et les se ondes jusqu’à
ce que la minuterie atteigne 99 minutes et 59 secondes (99:59), puis il affiche
automatiquement les minutes, jusqu’à 9999.
C. Touches fléchées vers le haut/vers le bas pour le contrôle des valeurs de consigne.
D. Affichage Speed (vitesse) : Indique la vitesse du mélangeur vortex.
E. Touches fléchées vers le haut/vers le bas pour le contrôle des valeurs de consigne.
E
F. Touche Pulse (impulsions) : Active le mode « impulsions ».
FR
* Mêmes contrôles pour le mini mélangeur Vortex numérique mais sans le bouton de
« pulsation ».
16
Page 18

introDuction Du mélangeur vortex
Le mélangeur vortex est prêt pour la plupart des applications à une main.
Il permet de mélanger des tubes juste avant un essai.
CONSEILS D’UTILISATION
Ces appareils ne sont pas prévus pour une utilisation continue pendant longtemps.
Un capteur de température intégré empêche la surchauffe de l’appareil en arrêtant le
moteur. Si cette situation survient, laissez le moteur refroidir et l’appareil pourra reprendre son fonctionnement normal. Diminuez la durée d’utilisation de l’appareil entre les
périodes de repos.
Consultez les « Instructions d’installation de la tête/accessoire » aux page
21 et 22.
inStructionS D’oPération Du mini mélangeur vortex à viteSSe fixe
Le mini mélangeur Vortex à vitesse fixe fonctionne uniquement à 3200tpm (2500tpm
pour 230V).
1. Brancher le cordon d’alimentation dans une prise correctement mise à la terre.
L’unité est présentement en marche et en mode de veille.
2. Le récipient que vous utilisez doit être poussé vers le bas sur la fixation de la tête
pour réaliser le mouvement. Pour obtenir le mélange désiré, varier l’angle de contact
et la pression contre la tête.
3. Le mélangeur va retourner en mode de veille lorsque le récipient est retiré de la
tête.
4. En cas d’utilisation fréquente, l’unité pourrait devenir chaude en cas de contact.
Le couvercle n’a aucun problème. Lors des réglages de performance élevée du
moteur (composante UL reconnue), simplement augmenter la chaleur. IMPORTANT:
EVITEZ d’utiliser de larges accessoires sur le mini mélangeur Vortex à vitesse fixe.
Cet appareil est conçu pour être uniquement utilisé avec une tête noyée ou i,e tête de
3” (7,6cm) et un couvercle de tête en caoutchouc de 3” (7,6cm).
5. Pour couper complètement l’alimentation de l’unité, déconnecter le cordon
d’alimentation de la prise murale.
FR
conSigneS D’utiliSation Du mélangeur vortex numérique et à imPulSionS
1. Assurez-vous que l’interrupteur à bascule à trois positions se trouve bien au
centre, en position « attente ». Branchez le cordon d’alimentation dans une prise
correctement mise à la terre. L’appareil est alors sous tension, en mode « attente
».
2. Pour un fonctionnement continu, mettez l’interrupteur à bascule à droite, en
position « marche ». Pour un fonctionnement intermittent,mettez l’interrupteur à
bascule à gauche, en position « auto ».
3. Dans les deux cas, réglez la vitesse. Lorsque l’interrupteur est en position «
marche », la tête se met immédiatement en mouvement. En position « auto », il
vous faut appuyer sur le vase utilisé sur la tête pour déclencher le mouvement.
Pour obtenir le mélange désiré, ajustez la vitesse à l’aide des touches fléchées
vers le haut/bas et/ou faites varier l’angle de contact et la pression contre la tête.
Réglage de la vitesse :
Réglez la vitesse à la valeur souhaitée en appuyant sur les flèches se trouvant
sous l’affichage de la vitesse.
• Enposition«marche»,lavitesseestde500à2500tr/min.
• Enposition«auto»,lavitesseestde1000à2500tr/min.
• Enmode«impulsions»,lavitesseestde2500tr/minpendant30secondes
avec une pause de 10 secondes.
Réglage de la durée :
Le fonctionnement temporisé est possible dans les positions « auto » et « marche ».
• Pour utiliser le mode temporisé (durée programmée), commencez par
mettre l’interrupteur à bascule à gauche, en position « auto ». Appuyez
sur les touches fléchées vers le haut/bas situées sous l’affichage de la
durée jusqu’à ce que la durée souhaitée soit obtenue. En mode temporisé,
l’affichage de la durée affiche le temps restant en décomptant jusqu’à zéro
(0:00).
• Pourunfonctionnementcontinu(durée cumulée),remettezla minuterieà
zéro (0 :00) avant de commencer. L’affichage de la durée affiche la durée
de fonctionnement accumulée jusqu’à ce que vous mettiez l’interrupteur à
bascule au centre, en position « attente ».
17
Page 19

conSigneS D’utiliSation Du mélangeur vortex numérique et à imPulSionS
Fonctionnement des impulsions:
(pour mélangeur vortex à impulsions uniquement)
• Réglezladuréesidésiré.
• Placezl’interrupteuràbasculeàdroite,enposition«marche».Appuyez
sur la touche « pulse » au centre du panneau avant. L’affichage de vitesse
indique « PULSE ». L’appareil fonctionne à 2500 tr/min pendant des périodes de 30 secondes suivies d’une pause de 10 secondes. L’appareil continue le vor jusqu’à ce que la minuterie revienne à zéro (0 :00) ou que vous
arrêtiez l’appareil en mettant l’interrupteur à bascule au centre, en position
« attente ».
4. Une fois le mélange continu, intermittent ou par impulsions terminé, remettez
l’interrupteur à bascule au centre, en position « attente ».
5. Le mode continu « marche » est destiné aux accessoires de grande taille. En mode
continu « marche », NE faites PAS fonctionner l’ap pareil à plus de 900 tr/min.
6. Le mode intermittent « auto » est prévu pour les mélanges de courte durée, d’une
(1) minute ou moins, à plein régime. Une période de repos de deux (2) minutes
est recommandée afin de minimiser les risques de surchauffe du moteur. En cas
d’utilisation prolongée, le mélangeur vortex peut devenir chaud au toucher. Cela
ne signale pas un dysfonctionnement. À des réglages de performance élevés, le
moteur (composant reconnu UL) dégage simplement plus de chaleur. IMPORTANT
: Avec les accessoires de grande taille (retenue d’insert avec inserts en mousse
ou supports d’ampoules), NE faites PAS fonctionner l’appareil à plus de 900 tr/min.
CELA ENDOMMAGERAIT L’APPAREIL.
7. Pour mettre l’appareil hors tension, débranchez le cordon d’alimentation de la prise
murale.
REMARQUE: En cas d’interruption d’alimentation ou de risque provoquant
l’interruption de l’appareil, il va redémarrer à la vitesse et/ou température réglée
lorsque l’alimentation est rétablie ou le risque restauré.
FR
18
Page 20
conSigneS D’inStallation De la tête/DeS acceSSoireS
Installation de la tête à godet, la tête de 7,6 cm ou tout autre accessoire de tête :
1. Placez l’interrupteur à bascule à trois positions au centre, en position « attente
/ arrêt ». Pour le mini mélangeur Vortex à vitesse fixe, déconnecter le cordon
d’alimentation de la prise murale.
2. Si vous utilisez une retenue d’insert avec le support de tubes, insérez le support de
tubes en mousse dans la retenue d’insert en alignant les découpes de la mousse
sur les doigts de la retenue. Poussez la mousse jusqu’au fond de la retenue.
3. Placez la tête sur la tige de l’appareil, en alignant le « repère d’alignement » plat
de l’intérieur du trou de montage de la tête avec celui de la tige.
4. Appuyez fermement sur le centre de la tête jusqu’à ce qu’elle s’emboîte. N’utilisez
PAS une tête de 7,6 cm sans le couvercle de tête en caoutchouc de 7,6 cm. Placez
les échantillons sur les accessoires dès que la tête est fixée au mélangeur vortex.
Assurez-vous que les échantillons sont bien fixés avant de mettre l’appareil en
marche.
5. Pour retirer une tête installée, maintenez le boîtier du mélangeur vortex d’une main
et tirez fermement et verticalement sur la tête. Pour les têtes de grande taille, il
peut être nécessaire d’utiliser les deux mains pour forcer la tête et la séparer de la
tige. Retirez les échantillons avant de retirer les accessoires.
FR
Installation du harnais pour vase :
1. Placez la retenue d’insert sans le support de tubes en mousse sur le mélangeur
vortex.
2. Tirez sur les bandes élastiques du harnais et accrochez-les sur les doigts opposés
de la retenue d’insert. Accrochez les bandes élastiques dans la fente supérieure ou
la fente inférieure de la retenue.
3. Placez l’échantillon au centre des bandes élastiques. Assurez-vous que
l’échantillon est bien fixé avant de mettre l’appareil en marche.
2.
3.
4.
5.
19
Page 21
conSigneS D’inStallation De la tête/DeS acceSSoireS
Installation du Support de Tube Unique:
1. Déplacez l’interrupteur à bascule à 3 positions vers la position centrale, arrêt /
veille. Le support de tube unique NE doit PAS être utilisé sur le mini mélangeur à
vitesse fixe.
2. Retirez la tête de coupe, ou tout autre accessoire du Mini Vortex Mixer.
3. Retirer le support adhésif sur la plaque de l’adaptateur et aligner l’ouverture de la plaque
de l’adaptateur avec l’ouverture du boîtier. Appuyer fermement pour assurer une bonne
liaison entre l’adaptateur et l’unité. Aligner la plaque de base du support de tube unique
avec la plaque d’adaptateur à partir de l’étape précédente. Maintenir concentrique les
ouverture du centre des plaques pour éviter toute interférence mécanique. Les aimants
maintiendront le support du tube unique en place. Pour réaligner, tirer la poignée
jusqu’à ce que l’aimant relâcher, vérifier l’alignement une fois de plus.
4. Aligner la plaque de base du support du tube unique sur le poste du mini mélangeur
Vortex avec les deux postes d’alignement du support du tube unique à l’arrière de
l’unité. Abaisser le support de tube unique sur la plaque de l’adaptateur, les aimants
maintiendront le support de tube unique en place. Pour réaligner, tirer la poignée
jusqu’à ce que l’aimant relâcher, vérifier l’alignement une fois de plus.
5. Une fois le support de tube unique en place, monter la tête du verre sur le poste de
l’unité, alignant les flèches d’orientation vers l’arrière de l’unité.
6. Soulevez la partie supérieure chargée par ressort du porte-tube simple et faites
glisser un tube de 2,5 à 4,5 po (6,4 à 11,4 cm) de longueur sur la tête de coupe de
telle sorte que le tube soit aligné au milieu. Le support de micro-tube de 0,5mL ou le
support de micro-tube de 1,5 à 2mL s’insérera également dans le porte-tube simple.
Vous êtes maintenant prêt à mélanger votre échantillon.
FR
2.
5.5.
4.3.
20
Page 22
DéPannage
Problème Cause Solution
Retirer l’obstruction et appuyer plusieurs fois sur la ventouse afin de confirmer le
retrait de l’obstruction.
Si le problème persiste, contacter le représentant Ohaus pour programmer une
réparation.
L’utilisateur final ne peut pas réparer cette erreur.
Si le problème persiste, contacter le représentant Ohaus pour programmer une
réparation.
L’unité ne fonctionne pas
L’unité est excessivement bruyante
Obstruction mécanique
ou
Obstruction du moteur
Mauvais alignement du capteur de ventilateur
ou
Mauvais alignement du moteur
FR
21
Page 23

Manual de Instrucciones
Mezclador vórtex, Mini Velocidad fija, VXMNFS
Mezclador vórtex, Mini Analógico, VXMNAL
Mezclador vórtex, Mini Digital, VXMNDG
Mezclador vórtex, Mini Impulsos, VXMNPS
22
EN - English ......... 1
FR - Français ......... 11
ES - Español ......... 22
IT - Italiano ......... 33
DE - Deutsch ......... 44
PT - Português ......... 55
NL - Nederlands ......... 66
NO - Norsk ......... 70
DA - Dansk ......... 74
SV - Svenska ......... 78
FI - Suomi ......... 82
HU - Magyar ......... 86
PL - Polski ......... 90
CZ - Czech ......... 94
KR - Korean ......... 98
Page 24

ÍnDice
Contenidos del paquete . . . . . . . . . . . . 23
Servicio de Información . . . . . . . . . . . . 23
Instalación . . . . . . . . . . . . 24
Mantenimiento y servicio . . . . . . . . . . . . 24
Condiciones ambientales . . . . . . . . . . . . 24
Instrucciones de seguridad . . . . . . . . . . . . 25
Estándares y normativas . . . . . . . . . . . . 25
Especificaciones . . . . . . . . . . . . 26
Panel de control digital y pulsador Mini Vortex Mixer . . . . . . . . . 27
Instrucciones de operación . . . . . . . . . . . . 28-29
Instrucciones de instalación de la cabeza / accesorios . . . . . . . . 30-31
Solución de problemas . . . . . . . . . . . 32
ES
conteniDoS Del Paquete
Mezclador Mini vórtex de Velocidad fija, Analógico, Digital o Impulsos
Cable de alimentación
* (1) cabezal de copa
* (1) cabezal de 7,6 cm
* (1) cubierta de caucho del cabezal de 7,6 cm
Manual de instrucciones
* Todas las unidades incluyen estos accesorios, excepto el Mezclador vorticial de
impulsos, que incluye un sujetador de microtubos de 1,5 a 2 ml con cabezal de
copa integrado.
23
Servicio De información
Si el apartado de resolución de problemas no le resulta útil para resolver un problema,
puede ponerse en contacto con su agente autorizado OHAUS. Para servicio o soporte
técnico en los Estados Unidos puede llamar al servicio de atención al cliente al número
gratuito :1-800-672-7722 ext. 7852entre las 8:00 AM y las 5:00 PM EST. Un especialista
en los productos OHAUSse hallará disponible para brindarle la asistencia técnica necesaria. Si reside fiera de la Estados Unidos, por favor, visite nuestra web :www.ohaus.com
o localice las oficinas de OHAUSmás cercanas.
Número de serie: _______________________________________________________
Fecha de compra: ______________________________________________________
Proveedor: ____________________________________________________________
Page 25
inStalación
Cuando reciba el mezclador vorticial Ohaus, compruebe que no haya
sufrido daños durante el transporte. Es importante que cualquier daño que
la unidad haya sufrido durante el transporte sea detectado al momento de desempacarla. Si encontrara algún daño, deberá notificarlo de inmediato a la empresa
transportista.
Cuando haya terminado de desempacar el mezclador vorticial, colóquelo
sobre una repisa o una mesa de trabajo nivelada, alejado de vapores
explosivos. Cerciórese de que la superficie sobre la que coloca la unidad
esté en condiciones de soportar el calor normal producido por esta unidad. Siempre
coloque la unidad sobre una superficie de trabajo sólida y resistente.
El Mezclador vorticial incluye un cable de alimentación que deberá ser
enchufado a un tomacorriente con conexión a tierra adecuada. Si el cable de
alimentación suministrado no se ajusta a sus necesidades, utilice un cable de alimentación homologado que satisfaga las normas locales y de suministro eléctrico. La
sustitución del enchufe deberá realizarla un electricista certificado.
mantenimiento y Servicio
La mezcladora Vortex está construida para brindar un servicio de larga duración, sin
problemas y confiable. No requiere lubricación ni ningún otro mantenimiento técnico
por parte del usuario. La unidad deberá recibir el cuidado que normalmente requiere
cualquier artefacto eléctrico. Evite mojar o la exposición innecesaria a gases. Los derrames deben recogerse inmediatamente. No utilice un agente limpiador ni disolvente
en el panel frontal que sean abrasivos o dañen los plásticos, ni tampoco que sean
inflamables. Siempre asegúrese de que la alimentación eléctrica esté desconectada
de la unidad antes de limpiar. Si la unidad requiere servicio, comuníquese con su
representante de Ohaus.
ES
conDicioneS ambientaleS
Condiciones de operación: Para uso en interiores solamente
Temperatura: 4 a 40°C (39.2 a 104°F)
Humedad: 20% a 85% humedad relativa, sin condensación
Altitud: 0 a 6,562 ft. (2000 M) por encima del nivel del mar
Almacenamiento cuando no está en operación:
Temperatura: -20 a 65°C (-4 a 149°F)
Humedad: 20% a 85% humedad relativa, sin condensación
Categoría de instalación II y Grado de polución 2 de acuerdo con la norma IEC 664.
eliminación Del equiPo
Este equipo no debe ser desechado con desperdicios no clasificados. Usted es
responsable de desechar correctamente la unidad al final de su vida
útil, llevándolo a un establecimiento autorizado para recolección y
reciclaje diferenciado. Además usted es responsable de descontaminarlo en caso que esté contaminado con agentes biológicos,
químicos y/o radiológicos, para proteger a las personas involucradas
en la disposición y reciclaje de equipos contra peligros a la salud.
Si desea obtener más información en cuanto a dónde entregar su
equipo desechado, póngase en contacto con su distribuidor local donde
lo compró originalmente. Al cerciorarse de que su equipo es reciclado de forma tal que
proteja la salud humana, usted contribuye a la conservación de los recursos naturales
y ambientales.
uSo PreviSto
Las mezcladoras de torbellino están indicadas para uso general de laboratorio. No se
garantiza la seguridad si se utiliza fuera del uso previsto.
24
Page 26
inStruccioneS De SeguriDaD
Por favor, lea todo el manual antes de operar la mezcladora Vortex.
¡ADVERTENCIA! No use la mezcladora Vortex en una atmósfera
peligrosa ni con materiales peligrosos para los cuales no ha sido
diseñada la unidad. Además, el usuario debe tener presente que la
protección proporcionada para el equipo puede comprometerse si se usa con
accesorios no proporcionados ni recomendados por el fabricante, o si se usa
de manera no especificada por el fabricante.
Siempre opera la unidad sobre una superficie plana para lograr el mejor
rendimiento y la seguridad máxima..
No levante la mezcladora Vortex del cabezal. Todos los cabezales,
incluso el cabezal de la copa, son desmontables. Pueden salirse si
se levantan.
¡PRECAUCIÓN! Para evitar el choque eléctrico, corte completamente
la alimentación eléctrica de la unidad desconectando el cordón de
alimentación eléctrica del tomacorriente. Desconecte la unidad de
la fuente de alimentación eléctrica antes de hacer el mantenimiento y
servicio.
Los derrames deben recogerse inmediatamente. No sumerja la unidad
durante la limpieza.
No opere la unidad si muestra señales de daño eléctrico o mecánico.
Conexión a tierra – Terminal conductor de protección
Corriente alterna
ES
eStánDareS y regulacioneS
La conformidad a los estándares y regulaciones siguientes es indicada por la marca correspondiente en el producto.
Marca Estándares y regulaciones
OHAUS Corporation declara que el Serie VXMN mezcladores cumple con las directivas 2011/63/UE, 2014/30/UE, 2014/35/UE y las normas EN 50581, EN 61010-1, EN
61010-2-051, EN 61326-1.
El texto completo de la declaración de conformidad de la UE está disponible en la
dirección Internet siguiente: www.ohaus.com/ce.
Este producto cumple con la directiva 2012/19/UE. Elimine este producto, según las
disposiciones locales, mediante el sistema de recogida selectiva de aparatos eléctricos y electrónicos.
Para obtener instrucciones de eliminación en Europa, consulte www.ohaus.com/weee.
EN 61326-1
CAN/CSA C22.2 61010-1, CAN/CSA C22.2 61010-2-051
UL 61010-1, UL 61010-2-051
Aviso Global
Advertencia: Este es un producto de Clase A. En un entorno doméstico, este producto puede causar
interferencias de radio, en cuyo caso el usuario puede ser obligado a tomar las medidas adecuadas.
Canadá Aviso
Este aparato digital de Clase A cumple con la norma canadiense ICES-003.
Aviso de la FCC
NOTA: Este equipo ha sido probado y cumple con los límites para un dispositivo digital de Clase A, de
acuerdo con la Parte 15 de las Reglas de la FCC. Estos límites están diseñados para proporcionar una
protección razonable contra interferencias dañinas cuando el equipo se opera en un entorno comercial.
Este equipo genera, utiliza y puede irradiar energía de radiofrecuencia y, si no se instala y utiliza de
acuerdo con el manual de instrucciones, puede causar interferencia perjudicial a las comunicaciones
de radio. El funcionamiento de este equipo en una zona residencial es probable que cause interferencia
perjudicial en cuyo caso el usuario deberá corregir la interferencia a su propio costo.
25
Los cambios o modificaciones no aprobados expresamente por Ohaus Corporation pueden anular la
autoridad del usuario para operar el equipo.
Page 27

eSPecificacioneS De la mezclaDora vortexer velociDaD fija
Dimensiones generales (Largo x Ancho x Altura): 8.3 x 4.8 x 6.5”
(21.0 x 12.3 x 16.5 cm)
Eléctricas (50/60 Hz): 120V: 1.2 amperios, 135 vatios
230V: 0.6 amperios, 135 vatios
Rango de velocidad*: 120V: 3200rpm
230V: 2500rpm
Órbita: 4.9mm (0.194”)
Capacidad nominal de servicio: servicio intermitente
Controles: nada
Peso de transporte: 10lbs (4.5kg)
eSPecificacioneS De la mezclaDora vortexer analógico
Dimensiones generales (Largo x Ancho x Altura): 8.3 x 4.8 x 6.5”
(21.0 x 12.3 x 16.5 cm)
Eléctricas (50/60 Hz): 120V: 1.2 amperios, 135 vatios
230V: 0.6 amperios, 135 vatios
Rango de velocidad*: 120V: 300 a 3200rpm
230V: 300 a 2500rpm
Órbita: 4.9mm (0.194”)
Capacidad nominal de servicio: servicio intermitente
Controles: interruptor oscilador
auto/off/on (autom./apagado
/ encendido), perilla de
velocidad: variable 1 a 10
marcas de dial
Peso de transporte: 10lbs (4.5kg)
ES
mezclaDor De vórtice Digital eSPecificacioneS
Dimensiones generales (Largo x Ancho x Altura): 8.3 x 4.8 x 6.5”
(21.0 x 12.3 x 16.5 cm)
Eléctricas (50/60 Hz): 120V: 1.2 amperios, 135 vatios
230V: 0.6 amperios, 135 vatios
Rango de velocidad*: 120V: 500 a 3000rpm
230V: 500 a 2500rpm
Reloj Automático: 1 segundo a 9999 minutos
Órbita: 4.9mm (0.194”)
Capacidad nominal de servicio: servicio intermitente
Controles: Ver página 5
Peso de transporte: 10lbs (4.5kg)
mezclaDor De vórtice imPulSoS eSPecificacioneS
Dimensiones generales (Largo x Ancho x Altura): 8.3 x 4.8 x 6.5”
(21.0 x 12.3 x 16.5 cm)
Eléctricas (50/60 Hz): 120V: 1.2 amperios, 135 vatios
230V: 0.6 amperios, 135 vatios
Rango de velocidad*: 120V: 500 a 3000rpm
230V: 500 a 2500rpm
Reloj Automático: 1 segundo a 9999 minutos
Órbita: 2.5mm (0.098”)
Capacidad nominal de servicio: servicio intermitente
Controles: Ver página 5
Peso de transporte: 10lbs (4.5kg)
*La velocidad máxima varía dependiendo del accesorio que se utilice.
26
Page 28
Panel De control - mezclaDora vortexer Digital y imPulSoS
B
C
A
ES
El panel frontal del mezclador vorticial digital/impulsos contiene todos los
controles y pantallas necesarios para operar la unidad.
A. Interruptor basculante de 3 posiciones: El interruptor basculante en automát co/
espera/encendido activa/desactiva la función de vórtice.
B. Pantalla de tiempo: Indica el tiempo acumulado (modo continuo) o el tiempo
restante (modo cronometrado). El rango de visualización es de 0 a 9999 minutos
con incrementos de un (1) segundo. En la pantalla van a aparecer los minutos y
segundos hasta que el temporizador llegue a 99 minutos y 59 segundos (99:59) y
D
E
F
después presentará automáticamente minutos, hasta 9999.
C. Flechas de aumento/disminución para control del punto de ajuste.
D. Pantalla de velocidad: Indica la velocidad del mezclador vorticial.
E. Flechas de aumento/disminución para control del punto de ajuste.
F. Botón de impulsos: Activa el modo de impulsos.
*Los mismos controles que en el Mezclador Mini vórtex digital pero sin el botón
«pulso».
27
Page 29

introDucción Del mezclaDor vorticial
El mezclador vorticial está listo para la mayoría de las aplicaciones que se
realizan con una sola mano. El mezclador vorticial funciona mezclando los tubos justo
antes de realizar la prueba.
CONSEJOS PARA LA UTILIZACIÓN
Estas unidades no son aptas para usarse continuamente durante largos períodos de
tiempo. Un sensor de temperatura integrado evitará que la unidad se sobrecaliente
apagando el motor. Si esto sucede, deje enfriar el motor para que la unidad pueda
reanudar el funcionamiento normal. Disminuya el tiempo que se utilice la unidad entre
períodos de descanso.
Consulte páginas 34 a 35 para conocer las ‘Instrucciones de instalación del cabezal
y los accesorios’.
inStruccioneS De uSo Del mezclaDor mini vórtex De velociDaD fija
El Mezclador Mini vórtex de velocidad fija funciona solo a 3200 rpm (2500 rpm para
230V).
1. Enchufe el cable de alimentación a una toma de corriente conectada a tierra. La
unidad está ahora encendida y en modo de espera.
2. El recipiente utilizado debe presionar en la sujeción del cabezal para lograr movimiento. Para obtener la mezcla deseada, varíe el ángulo de contacto y presión contra
el cabezal.
3. El mezclador volverá al modo de espera cuando se retire el recipiente del cabezal.
4. Con el uso constante la unidad puede estar caliente al tacto. Esto es normal. En
configuraciones de alto rendimiento el motor (componente UL reconocido) produce
más calor. IMPORTANTE: NO utilice accesorios de gran tamaño en el Mezclador Mini
vórtex de velocidad fija. Esta unidad está diseñada para su uso solo con cabezales
de copa o cabezales de 3” (7,6 cm) con cubierta de cabezal de goma de 3” (7,6 cm).
5. Para cortar completamente el suministro a la unidad, desconecte el cable de alimentación de la toma de corriente.
ES
mezclaDor vorticial Digital y De imPulSoS – inStruccioneS De
funcionamiento
1. Asegúrese de que el interruptor basculante de 3 posiciones esté en el centro,
posición “off” (apagado). Conecte el cable de alimentación en un tomacorriente
con conexión a tierra adecuada. La unidad se encuentra conectada y en modo en
espera.
2. Para activar el funcionamiento continuo, empuje el interruptor basculante hacia
la derecha, posición “on” (encendido). Para activar el funcionamiento intermitente/
por contacto, empuje el interruptor basculante hacia la izquierda, posición “auto”
(automática).
3. En cualquier caso, ajuste la velocidad En la posición “on”, el cabezal comenzará a
moverse de inmediato. En la posición “auto”, debe presionar hacia abajo el recipiente que está utilizando sobre el accesorio del cabezal para que haya movimiento.
Para lograr la mezcla deseada, cambie la velocidad utilizando las flechas arriba/
abajo y/o cambie el ángulo de contacto y la presión sobre el cabezal.
Ajuste de velocidad: :
Para ajustar la velocidad, presione las flechas arriba/abajo que se encuentran
debajo de la pantalla de velocidad hasta alcanzar la velocidad deseada.
• Mientraslaunidadfuncioneenposición“on”(encendido),lavelocidadesde
500 a 2500 rpm.
• Mientraslaunidadfuncioneenposición“auto”(automática),lavelocidades
de 1000 a 2500 rpm.
• Mientraslaunidadfuncioneenmododeimpulsos,lavelocidadesde2500
rpm, funcionando durante 30 segundos y descansan do 10 segundos.
Ajuste del tiempo:
El temporizador funciona en las posiciones “auto” y “on”.
• Para trabajar en modo temporizado (tiempo programado), comience
empujando el interruptor basculante hacia la izquier da, posición “auto”
(automática). Presione las flechas aumen-to/disminución que se encuentran
debajo de la pantalla del temporizador hasta alcanzar el valor deseado.
Mientras la unidad funcione en modo temporizado, la pantalla del tempo-
28
Page 30

mezclaDor vorticial Digital y De imPulSoS – inStruccioneS De funcionamiento
rizador indicará el tiempo restante, la cuenta regresiva contin uará hasta
llegar a cero (0:00).
• Paratrabajarenmodocontinuo(tiempoacumulado),vuelvaa ajustar el
temporizador en cero (0:00) antes de poner en fun cionamiento la unidad.
La pantalla del temporizador indicará el tiempo acumulado y funcionará
hasta que coloque el interrup-tor basculante en la posición central, “standby” (en espera).
Funcionamiento por impulsos: (Sólo para el Mezclador vorticial de impulsos)
• Ajusteeltiemposiasílodesea.
• Muevaelinterruptorbasculante hacialaderecha, posición“on”(encendido).
Presione el botón de impulsos, en el centro-del panel frontal. En la pantalla de
velocidad aparecerá la pal abra “PULSE”. La unidad funcionará a 2500 rpm, en
ciclos de 30 segundos, seguidos de períodos de descanso de 10 segun dos. La
unidad continuará funcionando hasta que el temporizador llegue a cero (0:00) o
el usuario la detenga al colocar el interruptor basculante en la posición central
“standby” (en espera).
4. Al finalizar el funcionamiento ya sea en modo continuo, intermitente o de impulsos,
vuelva a colocar el interruptor basculante en la posición central, posición “standby”
(en espera).
5. El modo continuo, “on”, es para los accesorios de mayor tamaño. En el modo
continuo, NO utilice la unidad a más de 900 rpm.
6. El modo intermitente, “auto”, está diseñado para tiempos cortos de mezclado
de un (1) minuto o menos a máxima velocidad. Se recomienda un período de
descanso de dos (2) minutos para reducir la posibilidad de recalentar el motor.
La unidad puede calentarse con el uso constante. Esto no tiene nada de malo.
Con configuraciones de alto rendimiento, el motor (componente reconocido por
UL) simplemente libera más calor. IMPORTANTE: Al usar accesorios de mayor
tamaño (retenedor de inserción con piezas de espuma o sujetadores para ampolletas), NO util ice el mezclador analógico a más de 900 rpm. SE PRODUCIRÁN
29
ES
DA—OS EN LA UNIDAD.
7. Para desconectar completamente el suministro de energía eléctrica a la unidad,
retire el cable de alimentación eléctrica del tomacorriente de la pared.
NOTA: En caso de corte eléctrico o cualquier riesgo que interrumpa el funcionamiento
de la unidad, esta se reiniciará a la velocidad y/o temperatura programada una vez
restaurado el servicio.
Page 31
inStruccioneS De inStalación Del cabezal y loS acceSorioS
Cómo instalar el cabezal de copa, el cabezal de 7,6cm u otros accesorios del
cabezal:
1. Mueva el interruptor basculante de 3 posiciones hacia el centro, posición apagado/
en espera. Para el Mezclador Mini vórtex de velocidad fija desconecte el cable de
alimentación de la toma de corriente.
2. Si usa un Retenedor de inserción con el sujetador de tubo, introduzca el sujetador
de tubo de espuma en el retenedor de inserción alineando las ranuras de la pieza
de espuma con los dedos del retenedor. Empuje la espuma hacia el fondo del
retenedor.
3. Coloque el cabezal sobre el soporte de la unidad, alineando la “marca de alineación” plana del interior del orificio de montaje del cabezal con la “marca de
alineación” plana del soporte.
4. Presione el centro del cabezal firmemente hacia abajo hasta que calce en la
posición adecuada. NO utilice el cabezal de 7,6cm sin la cubierta de hule del
cabezal de 7,6cm. Agregue muestras a los accesorios después de sujetar el
cabezal en el mezclador vorticial. Asegúrese de que las muestras estén bien
sujetas antes de activar la unidad.
5. Para quitar un cabezal instalado, sujete la carcasa del mezclador vorticial con una
mano y jale firmemente el cabezal hacia arriba. Los cabezales demayor tamaño
podrían requerir el uso de ambas manos para poder sacarlos del soporte. Retire
las muestras antes de quitar los accesorios.
ES
Cómo instalar los arneses del recipiente:
1. Instale el retenedor de inserción sin el sujetador de tubo de espuma en el
Mezclador vorticial.
2. Estire las bandas elásticas del arnés y colóquelas en las lengüetas opuestas del
retenedor de inserción. Coloque las bandas en las ranuras superiores o inferiores
del retenedor.
3. Ponga la muestra en el centro de las bandas del arnés. Asegúrese de que la
muestra esté bien sujeta antes de activar la unidad.
2.
3.
4.
5.
30
Page 32
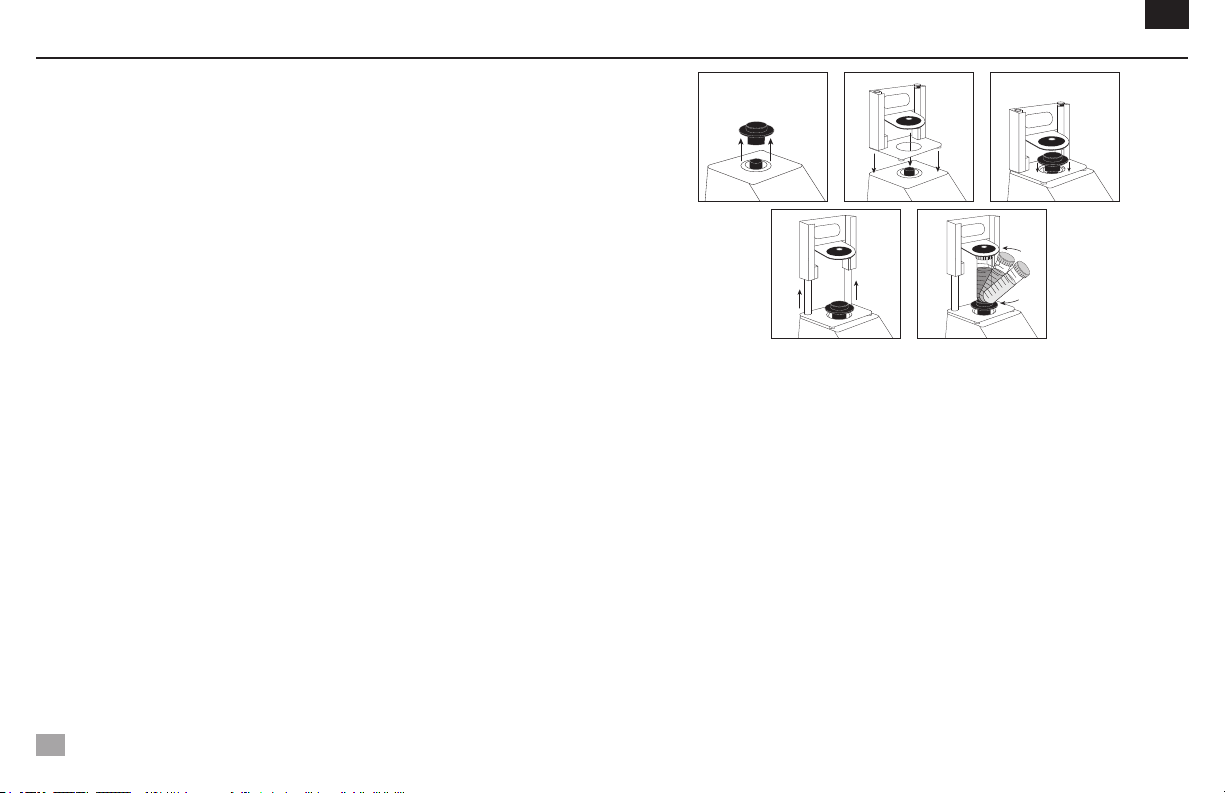
inStruccioneS De inStalación Del cabezal y loS acceSorioS
Cómo Instalar el Sujetador Para un Solo Tubo:
1. Mueva el interruptor basculante de 3 vías a la posición central, apagado / en
espera. El soporte de tubo individual NO debe utilizarse con el Mezclador Mini
vórtex de velocidad fija.
2. Retire la cabeza de copa, o cualquier otro accesorio de la Mezcladora Mini Vortex.
3. Retire el adhesivo de la placa adaptadora y alinee su abertura con la abertura de la
carcasa. Presione firmemente para garantizar una unión adecuada entre el adap
tador y la unidad. Alinee la placa base del soporte de tubo individual con la placa
del adaptador del paso anterior. Mantenga las aberturas centrales de las placas
en posición concéntrica para evitar interferencias mecánicas. Los imanes sosten
drán el soporte de tubo individual en su lugar. Para volver a alinear este accesorio,
tire de la manilla hasta que se liberen los imanes, compruebe la alineación y
vuelva a colocarlos.
4. Alinee la placa base del soporte de tubo individual del Mezclador Mini vórtex con
los dos puntos de alineación del soporte de tubo individual en la parte posterior de
la unidad. Coloque el soporte de tubo individual en la placa adaptadora, los imanes
sostendrán el soporte de tubo individual en su lugar. Para volver a alinear este
accesorio, tire de la manilla hasta que se liberen los imanes, compruebe la alin
eación y vuelva a colocarlos.
5. Ahora que el soporte de tubo individual está en su lugar, conecte el cabezal de
copa en la unidad, alineando la flecha de orientación hacia la parte posterior de la
unidad.
6. Levante la parte superior cargada de resorte del Soporte de Tubo Único y
deslice un tubo de 2,5 a 4,5 “(6,4 a 11,4 cm) de largo sobre el cabezal de la
copa para que el tubo esté alineado en el centro. El titular de Micro-Tubo de
0.5mL o el titular de Micro-Tubo de 1.5 a 2mL. También caben en el sostenedor
de tubo simple. Ahora está listo para mezclar su muestra.
ES
2.
5.5.
4.3.
31
Page 33
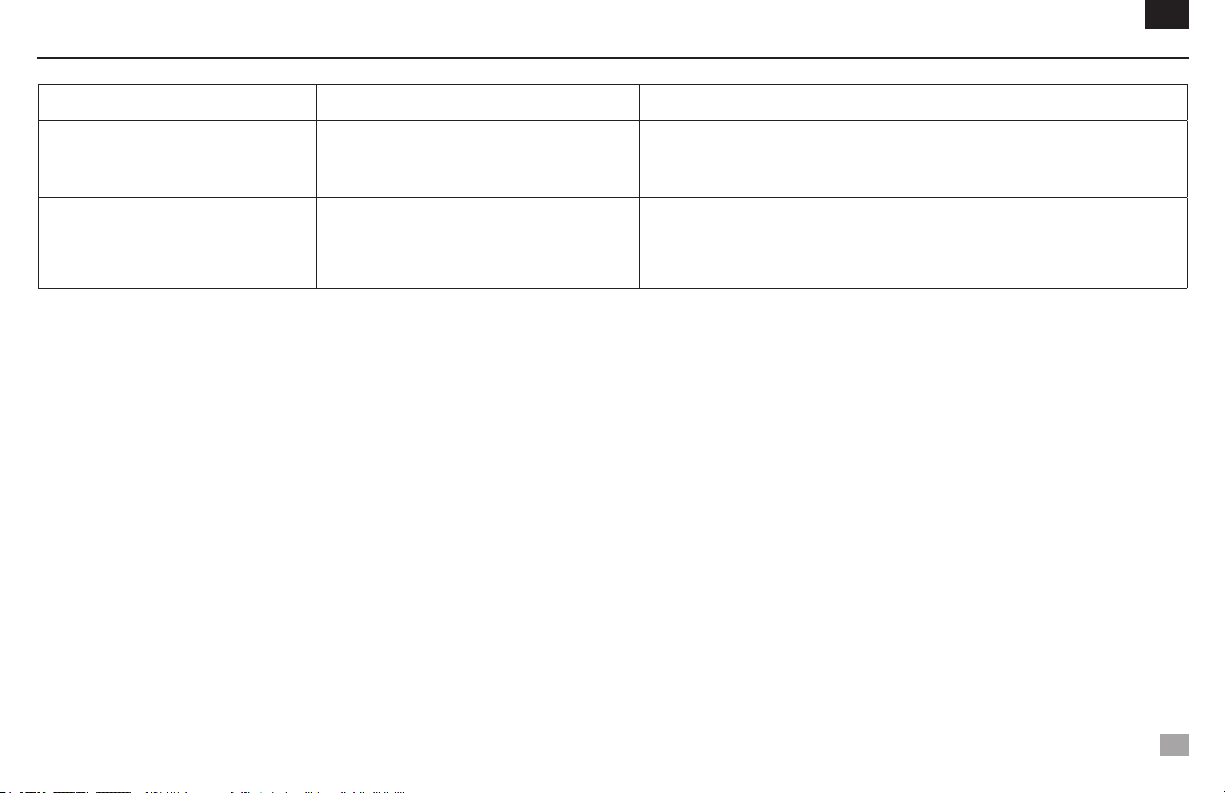
reSolución De ProblemaS
Problema Causa Solución
ES
La unidad no funciona
La unidad es excesivamente ruidosa
Obstrucción mecánica
o
Obstrucción del motor
Ventilador del sensor mal alineado
o
Motor mal alineado
Elimine la obstrucción y presione varias veces el portatubos para confirmar que no
haya obstrucción.
Si persiste el problema, contacte con su representante de Ohaus para repararlo.
Este error no puede solucionarlo el usuario final.
Si persiste el problema, contacte con su representante de Ohaus para repararlo.
32
Page 34

Manuale di istruzioni
Vortex mixer, mini, velocità fissa, VXMNFS
Vortex mixer, mini, analogico, VXMNAL
Vortex mixer, mini, digitale, VXMNDG
Vortex mixer, mini, a impulsi, VXMNPS
33
EN - English ......... 1
FR - Français ......... 11
ES - Español ......... 22
IT - Italiano ......... 33
DE - Deutsch ......... 44
PT - Português ......... 55
NL - Nederlands ......... 66
NO - Norsk ......... 70
DA - Dansk ......... 74
SV - Svenska ......... 78
FI - Suomi ......... 82
HU - Magyar ......... 86
PL - Polski ......... 90
CZ - Czech ......... 94
KR - Korean ......... 98
Page 35

inDice Dei contenuti
Contenuti Della Confezione . . . . . . . . . . . . 34
Informazioni di Servizio . . . . . . . . . . . . 34
Installazione . . . . . . . . . . . . 35
Manutenzione e Assistenza . . . . . . . . . . . . 35
Condizioni Ambientali . . . . . . . . . . . . 35
Istruzioni di Sicurezza . . . . . . . . . . . . 36
Norme e Regolamenti . . . . . . . . . . . . 36
Specificazioni . . . . . . . . . . . . 37
Digitale e Pulsare Mini Vortice Pannello di Controllo Mixer . . . . . . . 38
Istruzioni Per L’uso . . . . . . . . . . . . 39-40
Testina / Accessori Istruzioni Per L’installazione . . . . . . . . . . . . 41-42
Risoluzione dei Problemi . . . . . . . . . . . . 43
IT
contenuti Della confezione
Vortex mixer mini a velocità fissa, analogico, digitale o a impulsi
Cavo di alimentazione
* (1) Coppetta
* (1) Testina di 7,6 cm
* (1) Coperchio di gomma per la testina di 7,6 cm
Manuale di istruzioni
* Questi accessori sono forniti con tutte le unità eccetto che con l’agitatore a vortice con
vibrazione che é provvisto di un contenitore di micro-provette da 1,5 a 2 ml con coppetta
incorporata.
34
informazioni Di Servizio
Se la Sezione Risoluzione dei Problemi non solve o descrive il vostro problema, contattare il
vostro agente di servizio autorizzato OHAUS. Per assistenza di servizio o appoggio tecnico negli
Stati Uniti telefonare con chiamata a carico del destinatario il numero 1-800-672-7722 est. 7852
tra le 08:00 AM and e le 05:00 PM EST. Un addetto specialista al servizio dei prodotti OHAUS
sarà disponibile per darvi assistenza. Al di fuori degli USA, si prega di visitare il nostro sito web
www.ohaus.com per localizzare l’Ufficio OHAUS più vicino a Voi.
Numero di serie: _________________________________________________________
Data di acquisto: _________________________________________________________
Fornitore: _______________________________________________________________
Page 36
inStallazione
Dopo aver ricevuto l’agitatore a vortice Ohaus, controllare per assicurarsi che non si
siano verificati danni durante la spedizione. È importante che qualsiasi danno verificatosi durante il trasporto venga individuato al momento del disimballaggio. Se si trova
un simile danno il corriere deve essere immediatamente notificato.
Dopo averlo disimballato, posizionare l’agitatore a vortice su un banco o tavolo di
lavoro piano, lontano da vapori esplosivi. Assicurarsi che la superficie su cui l’unità
viene posizionata resista al calore tipicamente prodotto dall’unità. Posizionare sempre
l’unità su una superficie di lavoro resistente.
L’agitatore a vortice è provvisto di un cavo di alimentazione che dovrebbe essere
inserito in una presa a terra. Se il cavo di alimentazione fornito non corrisponde alle
vostre necessità, si prega di usare un cavo di alimentazione approvato che soddisfa i
codici locali e le attrezzature elettriche. La sostituzione della spina deve essere effettuata da un elettricista qualificato.
manutenzione e Servizio tecnico
L’agitatore a vortice è costruito per un servizio prolungato, senza problemi, affidabile.
Non è richiesta lubrificazione nè altra manutenzione tecnica dell’utente.
L’unità deve venire trattata con l’attenzione normalmente riservata a ogni apparecchio
elettrico. Evitare di bagnarla o di esporla inutilmente alle esalazioni. Le fuoriuscite
dovrebbero essere rimosse prontamente. NON usare sul pannello frontale un detergente o un solvente abrasivo o dannoso per le materie plastiche, nè uno infiammabile.
Assicurarsi sempre che la corrente sia staccata dall’unità prima di qualsiasi pulizia. Se
l’unità richiedesse servizio tecnico, contattate il vostro rappresentante Ohaus.
IT
conDizioni ambientali
Condizioni operativi: Solo uso interno.
Temperatura: Da 4º a 40ºC (39.2 a 104°F)
Umidità: Da 20% a 85% di umidità relativa, non-condensing
Altitudine: Da 0 a 6.562 piedi (2000 m) sopra il livello del mare
Immagazzinamento non operativo:
Temperatura: Da -20º a 65ºC (-4 ta149°F)
Umidità: Da 20% a 85% di umidità relativa, non-condensing
Installazioni di Categoria II e Grado di Inquinamento 2 in conformità con la IEC 664.
eliminazione Dell’aPPareccHiatura
Questo apparecchio non deve essere smaltito fra i rifiuti indifferenziati.
Il corretto smaltimento della strumentazione al termine della sua vita
utile è responsabilità dell’utente, che dovrà provvedere ad inoltrarla ad
un centro autorizzato di raccolta e recupero. È inoltre responsabilità
dell’utente decontaminare l’apparecchio nell’eventualità che sia avvenuta una contaminazione biologica, chimica e/o radiologica, in modo
da proteggere da rischi sanitari il personale addetto allo smaltimento e
al riciclaggio della strumentazione.
Per ulteriori informazioni su dove consegnare eventuali apparecchiature dismesse,
contattare il rappresentante locale presso il quale era stato originariamente effettuato l’acquisto della strumentazione. La vostra collaborazione contribuirà a proteggere
l’ambiente e assicurerà il riciclaggio dell’apparecchio secondo modalità che non mettono
a rischio la salute umana.
ambito D’uSo
Questi agitatori a vortice sono predisposti per l’uso comune in laboratorio. Non si
garantisce la sicurezza per l’utente in caso di utilizzo diverso da quello specificato.
35
Page 37
iStruzioni Di Sicurezza
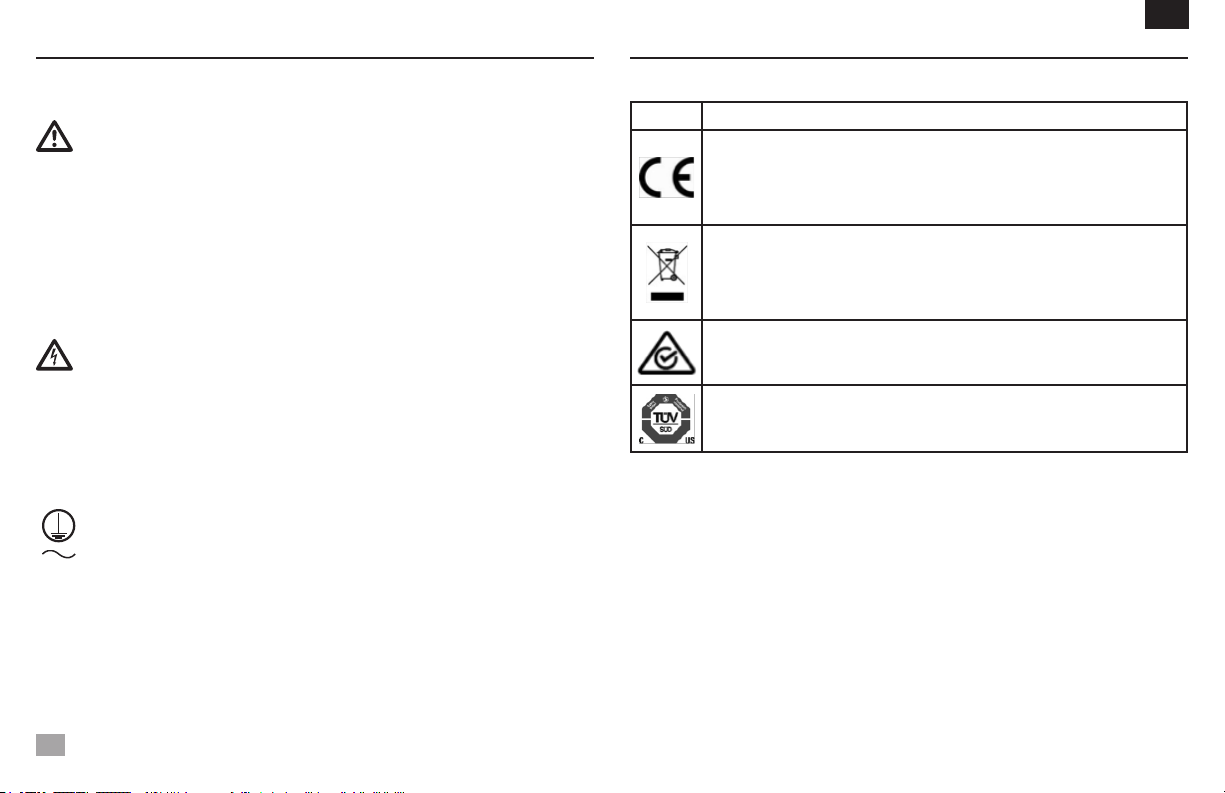
Si prega di leggere il manuale di istruzioni per intero prima di azionare l’agitatore a
vortice.
AVVERTIMENTO! NON usare l’agitatore a vortice in un’atmosfera pericolosa
o con materiali nocivi per cui l’unità non è stata progettata. Inoltre, l’utente
dovrebbe essere consapevole che la protezione provvista dall’apparecchiatura
può venire ridotta se usata con accessori non forniti o raccomandati dal fabbricante, o se usata in una maniera non specificata dal fabbricante.
Azionare sempre l’unità su una superficie di lavoro piana per ottenere le
migliori prestazioni e la massima sicurezza.
NON sollevare l’agitatore a vortice per la testina. Tutte le testine, incluse le
coppette, sono rimovibili. Possono saltare se sollevate.
ATTENZIONE! Per evitare scosse elettriche, togliere completamente la corrente all’unità staccando il cavo di alimentazione dalla presa a muro. Staccare
l’unità dalla fonte di corrente prima di eseguire la manutenzione o il servizio
tecnico.
Le fuoriuscite devono essere rimosse prontamente. NON immergere l’unità
per la pulizia.
NON azionare l’unità se mostra segni di danni elettrici o meccanici.
Presa a terra - Terminale conduttore protettivo
Corrente alternata
36
IT
norme e regolamenti
La conformità agli norme e regolamenti seguenti viene indicata dalla presenza del marchio corrispondente sul prodotto.
Marchio Norme e regolamenti
OHAUS Corporation dichiara che il VXMN serie miscelatori conforme alle direttive
2011/63/UE, 2014/30/UE, 2014/35/UE e le norme EN 50581, EN 61010-1, EN 610102-051, EN 61326-1.
Il testo completo della dichiarazione di conformità UE è disponibile al seguente indirizzo Internet: www.ohaus.com/ce.
Questo prodotto è conforme alla direttiva 2012/19/UE. Si prega di smaltire questo
prodotto in conformità alla normativa vigente presso il punto di raccolta indicato per le
apparecchiature elettriche ed elettroniche.
Per le norme di smaltimento vigenti in Europa, fare riferimento a www.ohaus.com/
weee.
EN 61326-1
CAN/CSA C22.2 61010-1, CAN/CSA C22.2 61010-2-051
UL 61010-1, UL 61010-2-051
Avviso globale
Attenzione: Questo è un prodotto di classe A. In un ambiente domestico, questo prodotto può causare
interferenze za della radio, nel qual caso l’utente è tenuto a prendere misure adeguate.
Canada Avviso
Questo apparecchio digitale di classe A è conforme alla norma canadese ICES-003.
Avviso FCC
NOTA: Questo apparecchio è stato testato ed è risultato conforme ai limiti per una classe di dispositivi
digitali, ai sensi dell’articolo 15 delle norme FCC. Questi limiti sono progettati per fornire una protezione
ragionevole contro le interferenze dannose quando l’apparecchiatura viene utilizzata in un ambiente
commerciale. Questa apparecchiatura genera, utilizza e può emettere energia a radiofrequenza e, se
non installato e utilizzato in conformità con il manuale di istruzioni, può causare interferenze dannose
alle comunicazioni radio. Il funzionamento di questa apparecchiatura in un’area residenziale può causare interferenze dannose, nel qual caso l’utente è tenuto a correggere l’interferenza a proprie spese.
Cambiamenti o modifiche non espressamente approvate da Ohaus Corporation potrebbero invalidare
il diritto dell’utente ad utilizzare l’apparecchiatura.
Page 38

SPecificHe - agitatore a vortice velocità fiSSa
Dimensioni totali (Lu x La x A): 8.3 x 4.8 x 6.5” (21.0 x 12.3 x 16.5 cm)
Potenza elettrica (50/60 Hz): 120V: 1.2 ampere, 135 watt
230V: 0,6 ampere, 135 watt
Gamma di velocitá*: 120V: 3200rpm
230V: 2500rpm
Orbita: 4.9mm (0.194”)
Servizio continuo: servizio intermittente
Controlli: niente
Peso di spedizione: 10lbs (4.5kg)
IT
Digitale vortexer mixer SPecificHe
Dimensioni totali (Lu x La x A): 8.3 x 4.8 x 6.5” (21.0 x 12.3 x 16.5 cm)
Potenza elettrica (50/60 Hz): 120V: 1.2 ampere, 135 watt
230V: 0,6 ampere, 135 watt
Gamma di velocitá*: 120V: 500 a 3000rpm
230V: 500 a 2500rpm
Orbita: 4.9mm (0.194”)
Servizio continuo: servizio intermittente
Controlli: vedere a pagina 5
Peso di spedizione: 10lbs (4.5kg)
SPecificHe - agitatore a vortice analogico
Dimensioni totali (Lu x La x A): 8.3 x 4.8 x 6.5” (21.0 x 12.3 x 16.5 cm)
Potenza elettrica (50/60 Hz): 120V: 1.2 ampere, 135 watt
230V: 0,6 ampere, 135 watt
Gamma di velocitá*: 120V: 300 a 3200rpm
230V: 300 a 2500rpm
Orbita: 4.9mm (0.194”)
Servizio continuo: servizio intermittente
Controlli: interruttore AUTO/OFF/ON.
Manopola di velocità: variabile dal segno
1 a 10 del quadrante.
Peso di spedizione: 10lbs (4.5kg)
imPulSi vortexer mixer SPecificHe
Dimensioni totali (Lu x La x A): 8.3 x 4.8 x 6.5” (21.0 x 12.3 x 16.5 cm)
Potenza elettrica (50/60 Hz): 120V: 1.2 ampere, 135 watt
230V: 0,6 ampere, 135 watt
Gamma di velocitá*: 120V: 500 a 3000rpm
230V: 500 a 2500rpm
Orbita: 2.5mm (0.098”)
Servizio continuo: servizio intermittente
Controlli: vedere a pagina 5
Peso di spedizione: 10lbs (4.5kg)
* Velocità massima varia a seconda accessorio utilizzato.
37
Page 39
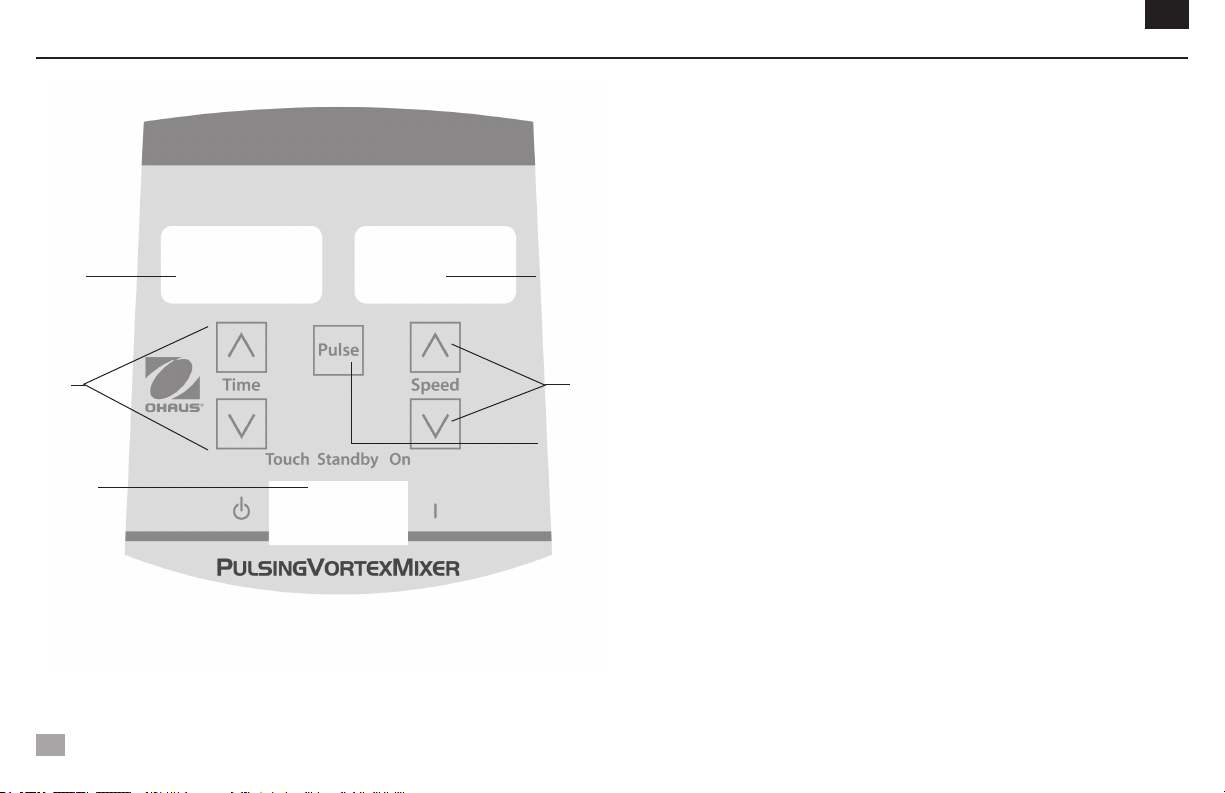
Pennello Di controllo - agitatore a vortice Digitale e a imPulSi
B
C
A
D
F
Il pannello frontale dell’agitatore a vortice digitale/ impulsi contiene tutti i pulsanti, i
comandi e i display necessari per azionare l’unità.
A. Interruttore a tre vie: L’interruttore auto/standby/on fa partire/ ferma la funzione di
vortice. “Auto” si usa per la modalità di funzionamento “Touch” e on si usa per la
modalità di funzionamento continua.
B. Display del tempo: Mostra il tempo trascorso (modalità continua) o quanto tempo
rimane (modalità di regolazione del tempo). La portata del display va da 0 a 9,999
minuti in un (1) secondo di incremento. Il display indicherà minuti e secondi fino
a che il timer raggiunge 99 minuti e 59 secondi (99:59), poi il display mostrerà
automaticamente i minuti fino a 9,999.
C. Frecce verso l’alto/verso il basso per il comando dei valori di riferimento.
D. Display della velocità: Mostra la velocità dell’agitatore a vortice.
E. Frecce verso l’alto/verso il basso per il comando dei valori di riferimento.
E
F. Pulsante ‘pulse’: Fa partire la modalità di vibrazione.
IT
* Stessi controlli del Vortex mixer mini digitale ma senza il pulsante ’impulso’.
38
Page 40

introDuzione Dell’agitatore a vortice
L’agitatore a vortice è pronto per la maggior parte delle applicazioni semplici.
L’agitatore a vortice opera mescolando provette appena prima dei test.
CONSIGLI PER L’USO
Queste unità non sono progettate per l’uso continuato durante estesi periodi di tempo.
Un sensore della temperatura incorporato impedirà all’unità di surriscaldarsi spegnendo
il motore. Se questo succede, lasciare che il motore si raffreddi e l’unità potrà riprendere le normali operazioni. Diminuire la durata di tempo in cui l’unità viene usata tra
le soste.
Vedi le pagine 47-48 per ‘Istruzioni per l’installazione di testina/accessori’.
iStruzioni Per l’uSo Del vortex mixer mini a velocità fiSSa
Il Vortex mixer mini a velocità fissa funziona solo a 3200 giri/min (2500 giri/min per
230 V).
1. Collegare il cavo di alimentazione a una presa correttamente messa a terra. A
questo punto l’apparecchio è acceso e in modalità standby.
2. Il recipiente in uso deve essere spinto verso il basso sul fissaggio della testa
per rendere possibile il movimento. Per ottenere la miscelazione desiderata variare
l’angolo di contatto e di pressione contro la testa.
3. Il mixer tornerà in modalità standby quando il recipiente viene staccato dalla testa.
4. L’apparecchio può diventare caldo al tatto con l’uso constante. Non è una situazione insolita. Nel funzionamento ad alta potenza il motore (componente certificato UL)
sviluppa semplicemente più calore. IMPORTANTE: NON usare accessori voluminosi
sul Vortex mixer mini a velocità fissa. L’apparecchio è progettato per essere usato
con testa a coppa o testa da 3” (7,6 cm) esclusivamente con copertura per la testa in
gomma da 3” (7,6 cm).
5. Per escludere completamente l’apparecchio dall’alimentazione disconnettere il
cavo di alimentazione dalla presa a muro.
IT
inStruzione Per l’uSo Dell’agitatore a vortice Digitale e a imPulSi
1. Assicurarsi che l’interruttore a tre vie sia in posizione centrale, di standby. Inserire
il cavo di alimentazione in una presa a terra appropriata. L’unità è ora accesa e in
modalità di standby.
2. Per funzionamento continuo, premere l’interruttore sulla destra, in posizione “on”.
Per funzionamento intermittente/ “touch”, premere l’interruttore sulla sinistra, in
posizione “auto”.
3. In entrambi i casi, fissare la velocità. Nella posizione “on” vedrete la testina mettersi in movimento immediatamente. Nella posizione “auto”, il recipiente in uso si
deve premere sull’attaccatura della testina per mettere in moto. Per ottenere la
miscela desiderata, variare la velocità usando le frecce verso l’alto/verso il basso,
e/o variare l’angolo di contatto e di pressione contro la testina.
Configurazione della velocità:
Per configurare la velocità premere le frecce verso l’alto/verso il basso al di sotto
del display della velocità fino a quando si raggiunge la velocità desiderata.
• Lavelocitàoperandoinposizione“on”èda500a2500rpm
• Lavelocitàoperandoinposizione“auto”èda1000a2500rpm
• Lavelocitàoperandoinmodalitàdivibrazioneèdi2500rpm,operandoper
30 secondi, fermandosi per 10 secondi.
39
Page 41

inStruzione Per l’uSo Dell’agitatore a vortice Digitale e a imPulSi
Configurazione del tempo:
Il funzionamento del tempo si aziona in entrambe le posizioni “auto” e “on.”
• Per funzionare in modalità cronometrata (tempo programmato), iniziare
premendo l’interruttore sulla sinistra, in posizione “auto”. Premere le frecce
verso l’alto/verso il basso al di sotto del display del tempo fino a raggiungere
la durata desiderata. Operando l’unità in modalità cronometrata, il display
del tempo mostrerà il tempo rimanente, facendo il conto alla rovescia fino a
zero (0:00).
• Perfunzionareinmodalitàcontinuata(tempotrascorso),riportareiltimera
zero (0:00) prima di azionare. Il display del tempo mostrerà il tempo trascorso e opererà fino a quando si preme l’interruttore in posizione centrale,
di standby.
Utilizzo in vibrazione: (solo per l’agitatore a vortice con vibrazione)
• Fissareladuratasesidesidera.
• Muoverel’interruttoresulladestra,inposizione“on.”Premereil pulsante
‘pulse’, al centro del pannello frontale. Il display della velocità mostrerà
“PULSE”. L’unità opererà a 2500rpm, alternando una durata di operazione
di 30 secondi, seguita da una pausa di 10 secondi. L’unità continuerà a
centrifugare fino a quando il timer raggiunge lo zero (0:00) o si ferma l’unità
muovendo l’interruttore in posizione centrale, di standby.
4. Terminato il funzionamento continuato, intermittente o a vibrazione, riportare
l’interruttore in posizione centrale, di standby.
5. La modalità continuata, “on”, è per gli accessori di maggiori dimensioni. In modalità
continuata, “on”, NON operare l’unità al di sopra dei 900rpm.
6. La modalità intermittente, “auto”, è progettata per brevi tempi di miscela di un (1)
minuto o meno a piena velocità. Si raccomanda una pausa di due (2) minuti per
minimizzare la possibilità di surriscaldare il motore. L’unità può diventare calda
al tatto con l’uso costante. Non c’è niente di sbagliato. A configurazioni di alto
IT
rendimento il motore (componente riconosciuto UL) semplicemente consuma più
calore. IMPORTANTE: quando si usano accessori di maggiori dimensioni (vite
di ritenzione con inserti di poliestere o contenitori di tubi per fiale), NON operare
l’unità al di sopra dei 900rpm. SI VERIFICHERANNO DANNI ALL’UNITÀ.
7. Per togliere completamente corrente all’unità, staccare il cavo di alimentazione
dalla presa a muro.
NOTA: In caso di mancanza di alimentazione o di un rischio che interrompa il funzionamento, l’apparecchio riparte alla velocità e/o temperatura impostata una volta
ripristinata l’alimentazione o cessato il rischio.
40
Page 42
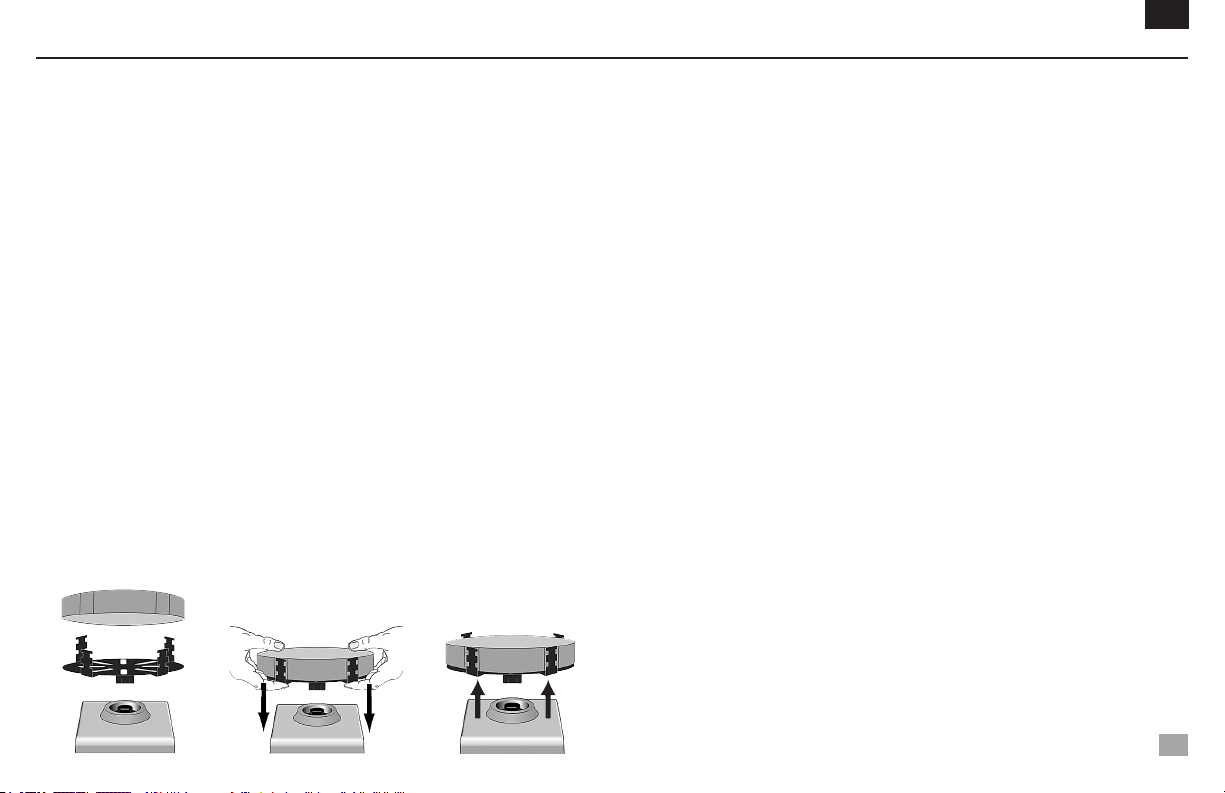
inStruzioni Per l’inStallazione Della teStina/acceSSori
Installazione della coppetta, della testina da 7,6cm o di altre attaccature della
testina:
1. Muovere l’interruttore a tre vie in posizione centrale, di off/standby. Per il Vortex
mixer mini a velocità fissa disconnettere il cavo di alimentazione dalla presa a muro.
2. Usando una vite di ritenzione con un contenitore di provette, inserire un contenitore
di provette di poliestere nella vite di ritenzione allineando le tacche incassate del
poliestere con le “dita” della vite di ritenzione. Spingere il poliestere fino in fondo
alla vite di ritenzione.
3. Posizionare la testina sull’unità, allineando il “segno di allineamento” piatto
all’interno della montatura del foro della testina con il “segno di allineamento” piatto
sull’unità.
4. Premere fermamente il centro della testina fino a farla scattare al suo posto. NON
usare una testina da 3’’ senza il copritestina di gomma da 3’’. Aggiungere campioni alle attaccature dopo che le testine sono assicurate all’agitatore a vortice.
Accertarsi che i campioni siano assicurati prima di accendere l’unità.
5. Per rimuovere una testina installata, tenere l’apparecchio dell’agitatore a vortice
con una mano e tirare fermamente la testina verso l’alto. Testine di maggiori
dimensioni possono richiedere l’uso di entrambe le mani per forzare la testina fuori
dall’unità. Rimuovere i campioni prima di rimuovere le attaccature.
IT
Installazione dell’imbracatura per recipienti:
1. Installare una vite di ritenzione senza contenitore di provette di poliestere
nell’agitatore a vortice.
2. Tendere le fasce elastiche dell’imbracatura per recipienti sulle “dita” opposte della
vite di ritenzione. Posizione le fasce in corrispondenza delle tacche superiori o
inferiori della vite di ritenzione.
3. Posizionare il campione al centro delle fasce dell’imbracatura. Accertarsi che il
campione sia assicurato prima di accendere l’unità.
2.
3.
4.
5.
41
Page 43
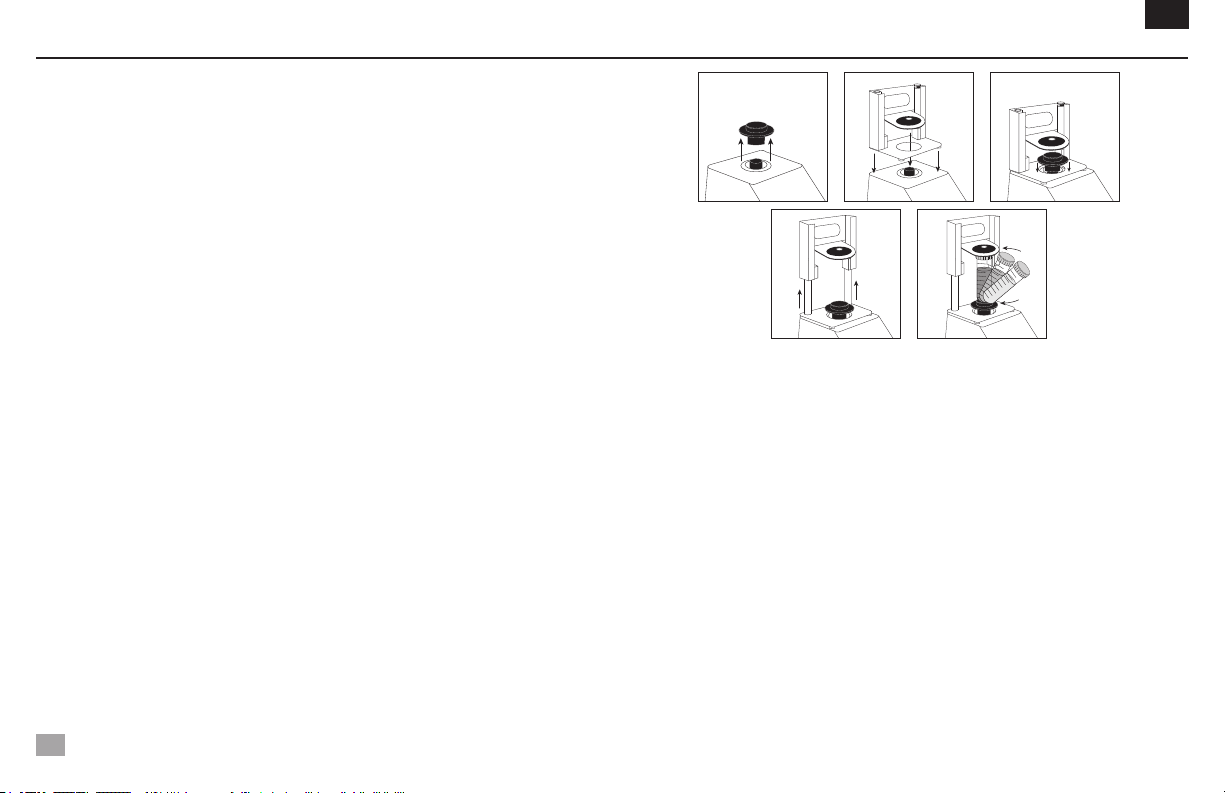
inStruzioni Per l’inStallazione Della teStina/acceSSori
Installazione del contenitore per provetta unica:
1. Spostare l’interruttore a 3 vie per il centro, off / posizione di attesa. NON usare
supporti per singola provetta sul Vortex mixer mini a velocità fissa.
2. Togliere la testa tazza, o di qualsiasi altro accessorio dal mini Vortex Mixer.
3. Rimuovere la protezione adesiva dalla piastra dell’adattatore e allineare l’apertura
della piastra dell’adattatore con l’apertura della scatola. Premere con decisione
verso il basso per assicurare un fissaggio corretto tra l’adattatore e l’apparecchio.
Allineare la piastra di base del supporto per singola provetta con la piastra
dell’adattatore dalla fase precedente. Mantenere concentriche le aperture di cen
tratura delle piastre per evitare interferenze meccaniche. I magneti terranno al loro
posto il supporto per singola provetta. Per riallineare questa connessione tirare la
maniglia verso l’alto fino a sbloccare il magnete, controllare l’allineamento e col
locare di nuovo.
4. Allineare la piastra di base del supporto per singola provetta sopra il perno del
Vortex mixer mini con i due perni di allineamento per supporti a singola provetta
sul retro dell’apparecchio. Calare il supporto per singola provetta sulla piastra
dell’adattatore; i magneti manterranno al loro posto il supporto per singola provet
ta. Per riallineare questa connessione tirare la maniglia verso l’alto fino a sbloccare
il magnete, controllare l’allineamento e collocare di nuovo.
5. Una volta sistemato il supporto per singola provetta fissare la testa della coppa
sul perno dell’apparecchio allineando la freccia di orientamento verso il retro
dell’apparecchio.
6. Sollevare la parte superiore caricato a molla del titolare SINGOLA valvola e far
scorrere un 2,5 a 4,5 “(6,4 a 11,4 centimetri) lungo tubo sulla testa tazza in
modo che il tubo sia allineata al centro. Il titolare Micro-Tube 0,5 ml o da 1,5
a 2 ml Holder Micro-Tube anche adattarsi al Titolare tubo singolo. Ora sei pronto
a mescolare il campione.
IT
2.
5.5.
4.3.
42
Page 44
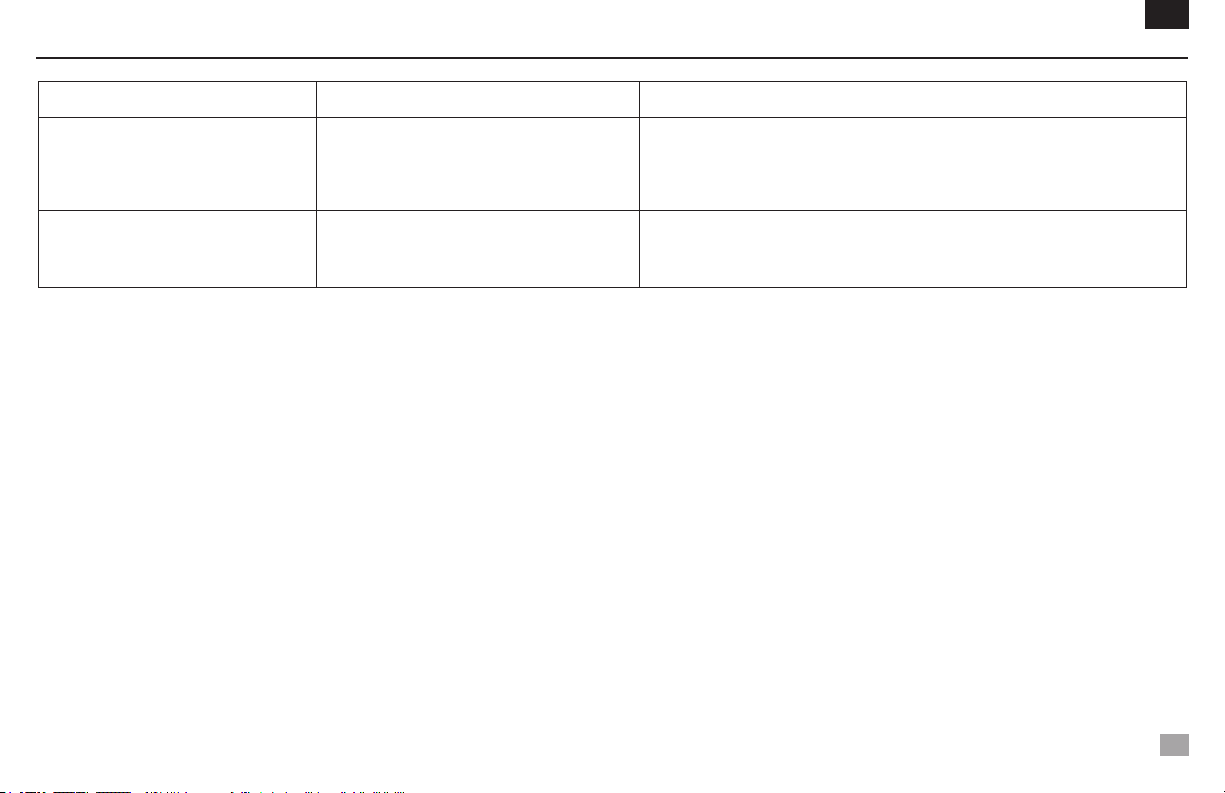
riSoluzione Dei Problemi
Problema Causa Soluzione
Rimuovere l’ostruzione e premere sulla coppetta diverse volte per confermare che
L’unità non funziona
L’unità è eccessivamente rumorosa
Ostruzione meccanica
o Ostruzione del motore
Sensore della ventola disallineato
o Motore disallineato
non esiste ostruzione.
Se il problema persiste, si prega di contattare il rappresentante Ohaus per la
riparazione.
Questo errore non può essere risolto dall’utente finale.
Se il problema persiste, si prega di contattare il rappresentante Ohaus per la
riparazione.
IT
43
Page 45

Bedienungsanleitung
Wirbelmischer, Mini Feste Drehzahl, VXMNFS
Wirbelmischer, Mini Analog, VXMNAL
Wirbelmischer, Mini Digital, VXMNDG
Wirbelmischer, Mini Pulsierend, VXMNPS
44
EN - English ......... 1
FR - Français ......... 11
ES - Español ......... 22
IT - Italiano ......... 33
DE - Deutsch ......... 44
PT - Português ......... 55
NL - Nederlands ......... 66
NO - Norsk ......... 70
DA - Dansk ......... 74
SV - Svenska ......... 78
FI - Suomi ......... 82
HU - Magyar ......... 86
PL - Polski ......... 90
CZ - Czech ......... 94
KR - Korean ......... 98
Page 46

inHaltSverzeicHniS
Packungsinhalt . . . . . . . . . . . . 45
Service Information . . . . . . . . . . . . 45
Aufstellung . . . . . . . . . . . . 46
Wartung und reparatur . . . . . . . . . . . . 46
Umweltbedingungen . . . . . . . . . . . . 46
Sicherheitshinweise . . . . . . . . . . . . 47
Normen und vorschriften . . . . . . . . . . . . 47
Technische Daten . . . . . . . . . . . . 48
Digitales und pulsierendes Mini Vortex Mischer Bedienfeld . . . . . 49
Bedienungsanleitung . . . . . . . . . . . . 50-51
Kopf / Zubehör Montageanleitung . . . . . . . . . . . 52-53
Fehlerbehebung . . . . . . . . . . . . 54
DE
PackungSinHalt
Mini-Wirbelmischer mit fester Drehzahl, Analog, Digital oder Pulsierend
* (1) Becheraufsatz
* (1) 7,6-cm-Aufsatz
* (1) 7,6-cm-Gummiaufsatzdeckel
Bedienungsanleitung
* Dieses Zubehör ist (mit Ausnahme des Wirbelmischers mit Pulsierfunktion, der mit
einem 1,5-ml- bis 2-ml-Mikroröhrchenhalter mit integriertem Becheraufsatz geliefert
wird) im Lieferumfang aller Geräte enthalten.
45
Service information
Wenn der Abschnitt zur Fehlerbehebung Ihr Problem nicht löst oder beschreibt, kontaktieren Sie Ihren autorisierten OHAUS Service-Agent. Für Hilfe oder um den technischen
Support in den USA zu erreichen, rufen Sie von 8.00 bis 17.00 Uhr EST. gebührenfrei
1-800-672-7722 ext. 7852 an. Ein OHAUS Produktservice-Spezialist wird Ihnen zur
Verfügung stehen, um Hilfe zu leisten. Außerhalb der USA besuchen Sie bitte unsere
Website, www.ohaus.com, um eine OHAUS Niederlassung in Ihrer Nähe zu finden.
Ordnungsnummer: ___________________________________________________
Kaufdatum: _________________________________________________________
Lieferant: ___________________________________________________________
Page 47
aufStellung
Prüfen Sie Ihren Ohaus Wirbelmischer nach Erhalt bitte sofort auf etwaige
Transportschäden. Es ist wichtig, während des Transports erfolgten Schäden
zum Zeitpunkt des Auspackens zu erfassen. Bei sichtbarer Beschädigung ist das
Transportunternehmen sofort davon in Kenntnis zu setzen.
Stellen Sie den Wirbelmischer auf einen ebenen Untergrund (Bank oder Tisch) fern
von explosiven Dämpfen. Vergewissern Sie sich, dass die Oberfläche, auf der Sie
das Gerät platzieren, für die vom Gerät produzierte Wärme hitzebeständig ist. Dieses
Gerät ist grundsätzlich auf einer stabilen Arbeitsfläche aufzustellen.
Der Wirbelmischer wird mit einem Netzkabel geliefert, das an eine ordnungsgemäß
geerdete Steckdose angeschlossen werden sollte. Sollte das mitgelieferte Netzkabel
nicht Ihren Anforderungen entsprechen, verwenden Sie bitte ein Netzkabel, das den
örtlichen Vorschriften und der Netzspannung entspricht. Der Austausch des Steckers
muss von einem qualifizierten Elektriker vorgenommen werden.
Wartung unD reParatur
Der Vortex-Mischer ist für einen langjährigen, störungsfreien und zuverlässigen Betrieb
konzipiert. Es ist keine Schmierung oder sonstige Wartung seitens des Bedieners
erforderlich. Achten Sie auf die Durchführung der für elektrische Geräte üblichen
Wartung. Vermeiden Sie Befeuchtung oder unnötige Rauchaussetzung. Flecken
sollten umgehend entfernt werden. Verwenden Sie weder scheuernde noch schädigende oder entzündbare Reinigungs- oder Lösungsmittel, die die Kunststoffoberfläche
beschädigen könnten. Vergewissern Sie sich vor jeder Reinigung, dass das Gerät von
der Stromzufuhr getrennt ist. Falls eine Wartung des Geräts erforderlich ist, wenden
Sie sich an Ihren Ohaus-Vertreter.
DE
umgebungSbeDingungen
Betriebsbedingungen: Nur für den Innengebrauch.
Temperatur: 4 bis 40°C (39.2 bis 104°F)
Feuchtigkeit: 20% bis 85% relative Feuchte, nicht kondensierend
Höhe: 0 bis 6,562 ft. (2000 M) über dem Meeresspiegel
Lagerung bei Nichtgebrauch:
Temperatur: -20 bis 65°C (-4 bis 149°F)
Feuchtigkeit: 20% bis 85% relative Feuchte, nicht kondensierend
Installationskategorie II und Verschmutzungsgrad 2 in Übereinstimmung mit IEC 664.
geräteentSorgung
Dieses Gerät muss als Sondermüll entsorgt werden. Der
Betreiber ist dafür verantwortlich, das Gerät am Ende seines
Lebenszyklus vorschriftsmäßig bei einer befugten RecyclingStelle zu entsorgen. Außerdem ist das Gerät im Fall von Kontakt
mit biologischen, chemischen und/oder radioaktiven Stoffen zum
Schutz der an der Entsorgung und Wiederverwertung des Geräts
beteiligten Personen zu dekontaminieren.
Informationen über Entsorgungs- und Recycling-Stellen erhalten
Sie bei Ihrem Händler, von dem Sie das Gerät ursprünglich bezogen haben. Mit
der vorschriftsmäßigen Entsorgung Ihrer Geräte leisten Sie Ihren Beitrag zum
Umweltschutz und stellen sicher, dass das Gerät dem Gesundheitsschutz entsprechend recycelt wird.
beabSicHtigter gebraucH
Die Ohaus Mini Vortex Mischer sind für den allgemeinen Laboreinsatz bestimmt.
Die Sicherheit kann nicht garantiert werden, wenn er außerhalb der beabsichtigten
Verwendung benutzt wird.
46
Page 48
SicHerHeitSanWeiSungen
Bitte lesen Sie die Betriebsanleitung vollständig durch, bevor Sie den Vortex-Mischer
in Betrieb nehmen.
WARNUNG! Verwenden Sie den Vortex-Mischer nicht bei gefährlicher
Atmosphäre oder mit gefährlichen Materialien, für die das Gerät nicht
konzipiert wurde. Ebenso sollte der Bediener beachten, dass der durch
das Gerät gegebene Schutz beeinträchtigt sein kann, wenn Zubehörteile
verwendet werden, die nicht vom Hersteller bereitgestellt oder empfohlen wurden, oder wenn das Gerät nicht gemäß den Herstellervorgaben betrieben wird.
Für beste Leistung und maximale Sicherheit das Gerät stets auf
ebenem Untergrund bedienen.
Heben Sie den Vortex-Mischer nicht am Kopf. Alle Köpfe einschließlich
Aufstellteller sind austauschbar. Sie können herausspringen, wenn sie herausgezogen werden.
VORSICHT! Um Elektroschocks zu vermeiden, trennen Sie das Gerät vollständig von der Stromzufuhr, indem Sie das Netzkabel aus der Steckdose
ziehen. Trennen Sie das Gerät vor einer Wartung oder Reparatur von der
Stromzufuhr.
Flecken sollten umgehend entfernt werden. Tauchen Sie das Gerät bei der
Reinigung nicht unter.
Nehmen Sie das Gerät nicht in Betrieb, wenn Anzeichen von elektronischen oder
mechanischen Schäden zu sehen sind.
Erdung – Schutzleiterklemme
Wechselstrom
47
DE
normen unD vorScHriften
Die Einhaltung der folgenden Normen und Vorschriften ist durch die entsprechende Markierung
am Produkt gekennzeichnet.
Markierung Normen und Vorschriften
OHAUS Corporation erklärt, dass die VXMN-Serie Mischern den Richtlinien
2011/63/EU 2014/30/EU 2014/35/EU und den Normen EN 50581, EN 61010-1,
EN 61010-2-051, EN 61326-1 entsprechen.
Der vollständige Text der EU-Konformitätserklärung ist unter der folgenden
Internetadresse verfügbar: www.ohaus.com/ce.
Dieses Produkt entspricht der Richtlinie 2012/19/EU. Entsorgen Sie das Produkt
gemäß den lokalen Bestimmungen in einer angegebenen Sammelstelle für
elektrische und elektronische Geräte.
Hinweise zur Entsorgung in Europa finden Sie unter www.ohaus.com/weee.
EN 61326-1
CAN/CSA C22.2 61010-1, CAN/CSA C22.2 61010-2-051
UL 61010-1, UL 61010-2-051
Globale Mitteilung
Warnung: Dies ist ein Produkt der Klasse A. In einer häuslichen Umgebung kann dieses Produkt
Funkstörungen verursachen. In diesem Fall kann der Benutzer entsprechende Maßnahmen ergreifen.
Kanada Hinweis
Dieses digitale Gerät der Klasse A entspricht dem kanadischen ICES-003.
FCC Hinweis
HINWEIS: Dieses Gerät wurde getestet und entspricht den Grenzwerten für ein digitales Gerät der
Klasse A gemäß Teil 15 der FCC-Bestimmungen. Diese Grenzwerte sollen einen vernünftigen Schutz
gegen schädliche Störungen bieten, wenn das Gerät in einer gewerblichen Umgebung betrieben
wird. Dieses Gerät erzeugt und verwendet Hochfrequenzenergie und kann diese ausstrahlen, und
wenn es nicht in Übereinstimmung mit der Bedienungsanleitung installiert und verwendet wird, kann
es zu schädlichen Störungen der Funkkommunikation kommen. Der Betrieb dieses Gerätes in einem
Wohngebiet kann schädliche Störungen verursachen, in welchem Fall der Benutzer die Störungen auf
eigene Kosten beheben muss.
Änderungen oder Modifikationen, die nicht ausdrücklich von der Ohaus Corporation genehmigt wurden,
können zum Erlöschen der Betriebserlaubnis des Benutzers führen.
Page 49

feSte geScHWinDigkeit vortexer miScHer tecHniScHe Daten
Gesamtabmessungen (L x W x H): 8.3 x 4.8 x 6.5” (21.0 x 12.3 x 16.5 cm)
Anschluss(50/60 Hz): 120V: 1,2 Amps, 135 Watt
230V: 0,6 Amps, 135 Watt
Geschwindigkeitsbereich*: 120V: 3200rpm
230V: 2500rpm
Bahn: 4.9mm (0.194”)
Bemessungsdaten der Betriebsart: Aussetzbetrieb
Bedienelemente: keiner
Gewicht: 10lbs (4.5kg)
DE
Digitale vortexer miScHer tecHniScHe Daten
Gesamtabmessungen (L x W x H): 8.3 x 4.8 x 6.5” (21.0 x 12.3 x 16.5 cm)
Anschluss(50/60 Hz): 120V: 1,2 Amps, 135 Watt
230V: 0,6 Amps, 135 Watt
Geschwindigkeitsbereich*: 120V: 500 bis 3000rpm
230V: 500 bis 2500rpm
Bahn: 4.9mm (0.194”)
Bemessungsdaten der Betriebsart: Aussetzbetrieb
Bedienelemente: Siehe Seite 5
Gewicht: 10lbs (4.5kg)
analog-vortexer-miScHer tecHniScHe Daten
Gesamtabmessungen (L x W x H): 8.3 x 4.8 x 6.5” (21.0 x 12.3 x 16.5 cm)
Anschluss(50/60 Hz): 120V: 1,2 Amps, 135 Watt
230V: 0,6 Amps, 135 Watt
Geschwindigkeitsbereich*: 120V: 300 bis 3200rpm
230V: 300 bis 2500rpm
Bahn: 4.9mm (0.194”)
Bemessungsdaten der Betriebsart: Aussetzbetrieb
Bedienelemente: Kippschalter Auto/Aus/Ein,
Geschwindigkeitseinstellknopf:
verstellbar 1 to 10 Einstellmarkierung
Gewicht: 10lbs (4.5kg)
Digitale vortexer miScHer tecHniScHe Daten
Gesamtabmessungen (L x W x H): 8.3 x 4.8 x 6.5” (21.0 x 12.3 x 16.5 cm)
Anschluss(50/60 Hz): 120V: 1,2 Amps, 135 Watt
230V: 0,6 Amps, 135 Watt
Geschwindigkeitsbereich*: 120V: 500 bis 3000rpm
230V: 500 bis 2500rpm
Bahn: 2.5mm (0.098”)
Bemessungsdaten der Betriebsart: Aussetzbetrieb
Bedienelemente: Siehe Seite 5
Gewicht: 10lbs (4.5kg)
*Die Höchstdrehzahl richtet sich nach dem verwendeten Zubehör.
48
Page 50
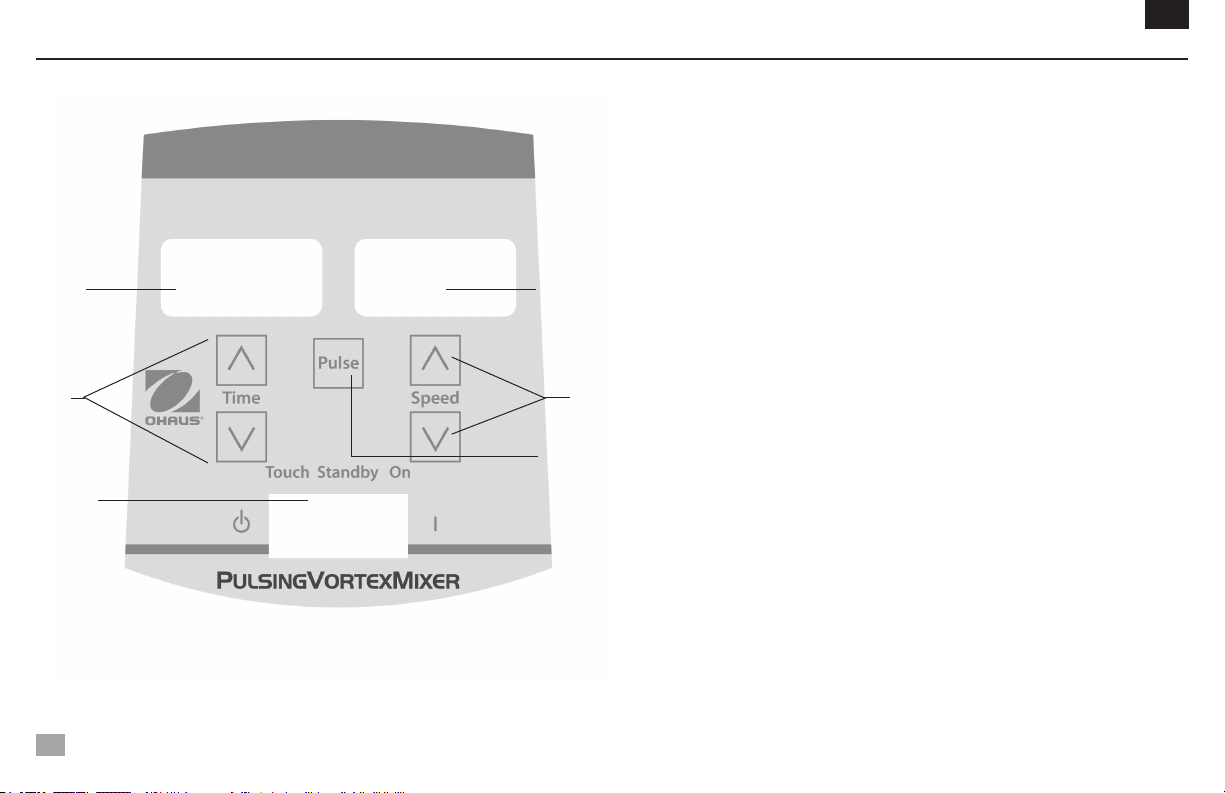
beDienfelD - Digital- unD imPulS-vortexer-miScHer
B
C
A
DE
Auf der Frontplatte des digitalen Wirbelmischers bzw. des Wirbelmischers
mit Pulsierfunktion befinden sich alle für den Betrieb des Geräts
erforderlichen Schalter, Regler und Anzeigen.
A. 3-Wege-Wippschalter: Automatik-/Standby-/Ein-Wippschalter startet/stoppt die
Wirbelfunktion.
B. Zeitanzeige: Zeigt die abgelaufene Zeit (Dauermodus) oder die verbleibende Zeit
(zeitgesteuerter Modus) an. Auf der Anzeige werden Zeitwerte von 0 bis 9999
Minuten in Schritten von einer Sekunde angezeigt. Die Anzeige gibt Minuten und
Sekunden an, bis der Timer 99 Minuten und 59 Sekunden (99:59) erreicht. Danach
D
E
F
werden Minuten bis 9999 angezeigt.
C. Pfeiltasten für die Sollwerteinstellung.
D. Geschwindigkeitsanzeige: Zeigt die Geschwindigkeit des Wirbelmischers an.
E. Pfeiltasten für die Sollwerteinstellung.
F. Pulsiertaste: Startet den Pulsiermodus.
* Die gleichn Kontrollen für den Digital Mini Vortex Mixer, aber ohne die
‘Impuls’-Taste.
49
Page 51

WirbelmiScHer – einfüHrung
Der Wirbelmischer ist für die meisten einhändigen Applikationen betriebsbereit. Der
Wirbelmischer mischt die Probenröhrchen kurz vor dem Testen.
BETRIEBSHINWEISE
Dieses Gerät ist nicht für den Dauerbetrieb über längere Zeit vorgesehen. Ein
integrierter Temperatursensor schützt das Gerät vor dem Überhitzen, indem er
den Motor ausschaltet. In diesem Fall muss sich der Motor abkühlen, bevor das
Gerät den normalen Betrieb wieder aufnehmen kann. Die Einsatzzeit des Geräts
zwischen den Ruheperioden sollte verringert werden.
Siehe Seite 60-61 unter Installationsanweisungen für Aufsätze/Zubehör.
fixeD SPeeD mini vortex mixer-beDienungSanleitung
Der Fixed Speed Mini Vortex Mixer läuft nur bei 3200 U/min (2500 U/min für 230V).
1. Stecken Sie das Netzkabel in eine ordnungsgemäß geerdete Steckdose. Das Gerät
ist nun eingeschaltet und befindet sich im Standby-Modus.
2. Das Gefäß, das Sie benutzen, muss auf die Kopfbefestigung gedrückt werden, um
eine Bewegung zu erreichen. Um die gewünschte Mischung zu erhalten, ändern Sie
den Kontaktwinkel und den Druck gegen den Kopf.
3. Der Mixer kehrt in den Standby-Modus zurück, wenn das Gefäß vom Kopf abgehoben wird.
4. Das Gerät kann sich bei konstantem Gebrauch aufheizen. Es ist nichts falsch mit
ihm. Bei hohen Leistungsstufen erzeugt der Motor (UL erkannte Komponente) einfach
mehr Wärme. WICHTIG: Verwenden Sie auf dem Fixed Speed Mini Vortex Mixer kein
großes Zubehör. Dieses Gerät ist nur für den Einsatz mit Cup-Head oder 3 “(7,6cm)
Kopf mit 3” (7,6cm) Gummikopf-Abdeckung konzipiert.
5. Um das Gerät vollständig abzuschalten, ziehen Sie das Netzkabel aus der
Steckdose.
DE
betriebSanWeiSungen – Digitaler WirbelmiScHer bzW. WirbelmiScHer mit
PulSierfunktion
1. Der 3-Wege-Kippschalter muss sich in der mittleren Position (Standby) befinden.
Schließen Sie das Netzkabel an eine ordnungsgemäß geerdete Steckdose an.
Damit ist das Gerät eingeschaltet und im Bereitschaftsmodus (Standby).
2. Für den Dauerbetrieb wird der Kippschalter in die rechte Position geschoben (on).
Für den Aussetzbetrieb wird der Kippschalter in die linke Position geschoben
(auto).
3. In beiden Fällen wird die Drehzahl eingestellt. Wenn das Gerät auf on“ steht,
setzt sich der Aufsatz sofort in Bewegung. Im auto“-Modus muss das Gerät durch
Herunterdrücken des Aufsatzes in Bewegung gesetzt werden. Für die gewünschte
Mischung kann die Geschwindigkeit über die Pfeiltasten geändert und/oder der
Kontaktwinkel und -druck gegen den Aufsatz variiert werden.
Einstellen der Geschwindigkeit:
Stellen Sie die Geschwindigkeit durch Drücken der Pfeiltasten unter
halb der Drehzahlanzeige ein.
• DieDrehzahlsollteimDauermodus(on)zwischen500und2500rpmliegen.
• DieDrehzahlsollteimAutomatikmoduszwischen1000und2500rpmliegen.
• DieDrehzahlsollte imPulsiermodus30 Sekundenlangbei2500minliegen,
gefolgt von einer 10 Sekunden langen Ruheperiode.
Einstellen der Zeit:
Zeitgesteuerte Vorgänge können sowohl im auto“- als auch im on“-Modus ausge-
führt werden.
• Der zeitgesteuerte Modus (einprogrammierte Zeit) wird durch Schieben des
Kippschalters nach links (auto) gestartet. Drücken Sie auf die Pfeiltasten
unterhalb der Zeitanzeige, bis Sie die gewünschte Zeiteinstellung erhalten. Im
zeitgesteuerten Modus erscheint die verbleibende Zeit (Countdown auf Null,
0:00) auf der Anzeige.
• Im Dauermodus(abgelaufeneZeit)wirdder Timer vor dem BetriebaufNull
(0:00) zurückgesetzt. Die Zeitanzeige zeigt die abgelaufene Zeit an und zählt
50
Page 52

betriebSanWeiSungen – Digitaler WirbelmiScHer bzW. WirbelmiScHer mit PulSierfunktion
weiter, bis der Kippschalter auf die mittlere Position (Standby) geschoben wird.
Pulsiermodus: (nur bei Wirbelmischern mit Pulsierfunktion)
• DieZeitwirdnachBedarfeingestellt.
• Schieben Sie den Kippschalter in die rechte Position (on). Drücken Sie in
der Mitte des Bedienfelds auf die Pulsiertaste. Auf der Drehzahlanzeige wird
„PULSE“ angezeigt. Das Gerät läuft 30 Sekunden lang mit einer Drehzahl
von 3000 min-1 und ruht dann 10 Sekunden lang. Das Gerät behält den
Schüttelbetrieb bei, bis der Timer Null (0:00) erreicht oder Sie den Betrieb
beenden, indem Sie den Kippschalter auf die mittlere Position (Standby)
schieben.
4. Bei Abschluss des Aussetz- bzw. Dauer- oder Pulsierbetriebs wird
der Kippschalter in die mittlere Position (Standby) gebracht
5. Der Dauerbetrieb (on) ist für größeres Zubehör gedacht. Im Dauerbetrieb (on) darf
eine Drehzahl von 900 min-1 NICHT übeschrit ten werden.
6. Der Aussetzmodus (auto) ist für kurze Mischzeiten von höchstens einer (1) Minute
bei voller Geschwindigkeit ausgerichtet. Eine zweiminütige Ruhephase wird empfohlen, um eine Überhitzung des Motors zu verhindern. Das Gerät wärmt sich bei
dauerhaftem Betrieb leicht auf. Dabei handelt es sich nicht um eine Fehlfunktion. Bei
Hochleistungseinstellungen erzeugt der Motor (von UL anerkannte Komponente)
lediglich mehr Wärme. WICHTIG: Bei der Verwendung von größerem Zubehör
(Aufsatzhalterung mit Schaumstoffeinsätzen oder Ampullenröhrchenaufsätzen)
sollte eine Drehzahl von 900 min NICHT überschritten werden. DAS GERÄT
WIRD SONST BESCHÄDIGT.
7. Um die Stromzufuhr zum Gerät vollständig zu unterbrechen, muss das Netzkabel
aus der Steckdose gezogen werden.
HINWEIS: Im Falle eines Stromausfalls oder einer Gefahr, die den Betrieb der Anlage
unterbricht, startet das Gerät bei festgelegter Geschwindigkeit und/oder Temperatur
erneut, wenn ein Stromausfall oder eine Gefährdung wiederhergestellt wird.
DE
51
Page 53
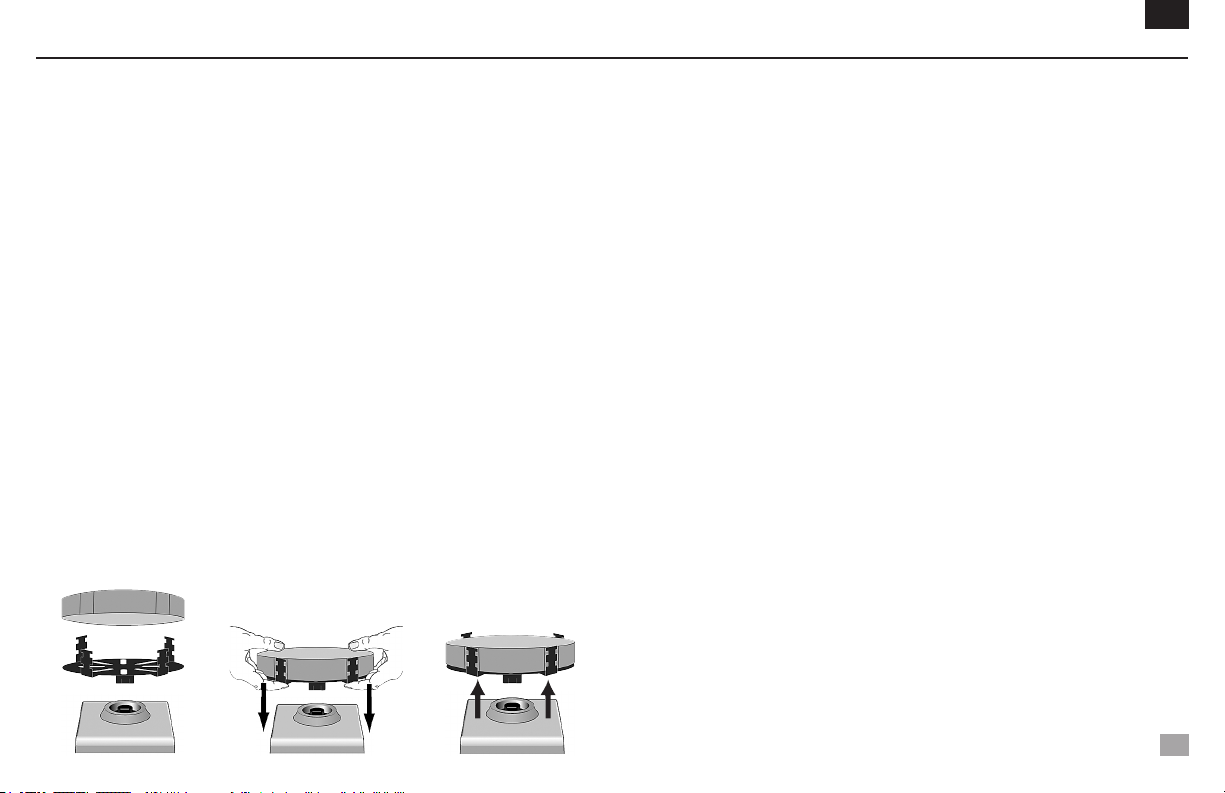
inStallationSanWeiSungen für koPf/zubeHörteile
Installieren des Becheraufsatzes, des 7,6-cm-Aufsatzes oder anderer Aufsätze:
1. Schieben Sie den 3-Wege-Kippschalter in die mittlere Position (off/Standby).
Trennen Sie für den Fixed Speed Mini Vortex Mixer das Stromkabel aus der
Wandsteckdose.
2. Bei Verwendung einer Aufsatzhalterung mit dem Röhrchenhalter wer den die
Schaumstoffröhrchenhalter in die Aufsatzhalterung einge führt, indem Sie die
eingelassenen Kerben des Schaumstoffs mit der Halterung greifen. Schaumstoff
in der Halterung nach unten schieben.
3. Legen Sie den Aufsatz auf den Gerätezapfen und richten Sie die flache Innenseite
der Befestigungsöffnung mit der flachen Seite des Zapfens aus.
4. Drücken Sie fest auf die Mitte des Aufsatzes, bis dieser einrastet. Verwenden Sie
den 7,6-cm-Aufsatz NICHT ohne den passenden Deckel. Wenn der Aufsatz sicher
auf dem Wirbelmischer befestigt ist, werden die Proben zugegeben. Vergewissern
Sie sich, dass die Proben ausreichend gesichert sind, bevor Sie das Gerät einschalten.
5. Zur Abnahme eines installierten Aufsatzes halten Sie den Wirbelmischer mit
einer Hand fest, und ziehen den Aufsatz mit der anderen nach oben ab. Größere
Aufsätze müssen ggf. mit beiden Händen vom Aufsatzzapfen abgezogen werden.
Vor Entfernen des Zubehörs werden die Proben entnommen.
DE
Installieren einer Gefäßfixierung:
1. Die Aufsatzhalterung wird ohne Schaumstoffröhrchenhalter auf dem Wirbelmischer
installiert
2. Dehnen Sie die Gummibänder der Gefäßfixierung über die gegenüber liegenden
Greifer der Aufsatzhalterung. Sichern Sie die Gummibänder in den oberen oder
unteren Kerben der Aufsatzhalterung.
3. Stellen Sie die Probe in die Mitte der Fixierungsbänder. Vergewissern Sie sich,
dass die Probe ausreichend gesichert ist, bevor Sie das Gerät einschalten.
2.
3.
4.
5.
52
Page 54
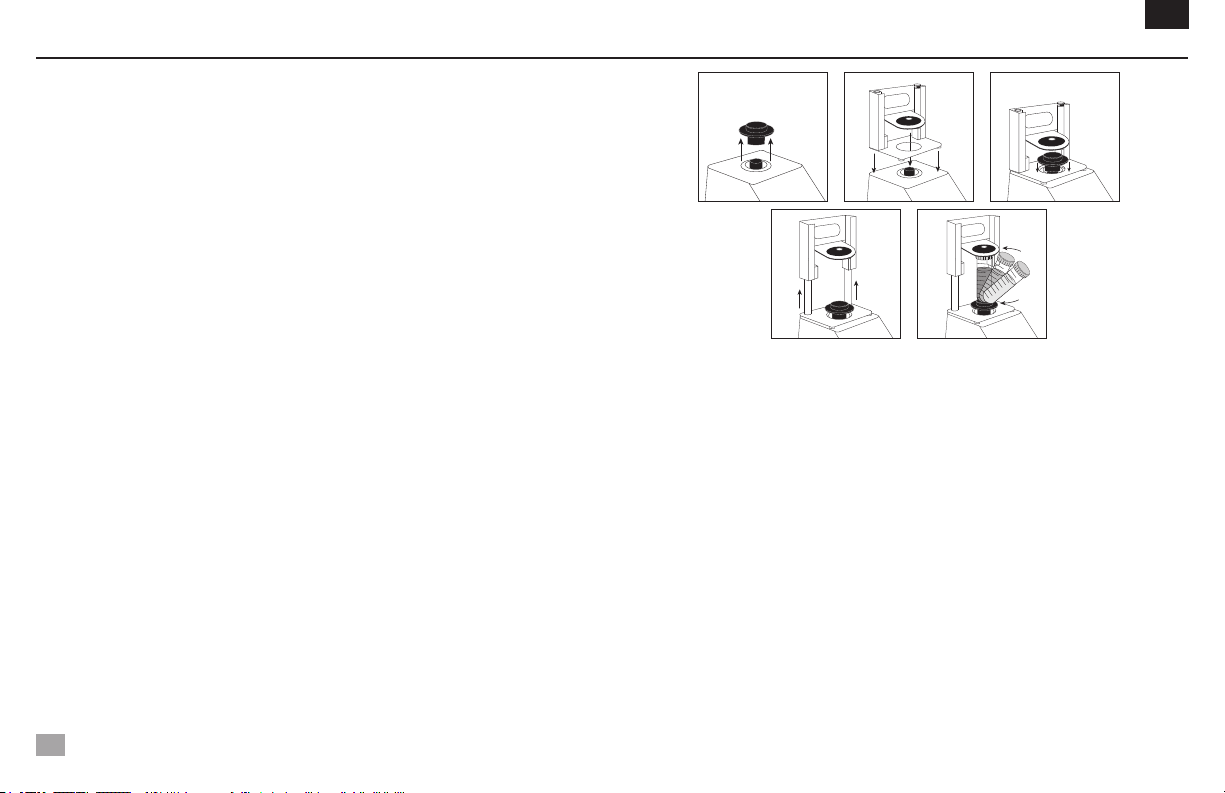
inStallationSanWeiSungen für koPf/zubeHörteile
Installieren eines Einzelröhrchenaufsatzes:
1. Bewegen Sie den 3-Wege-Wippschalter in die Mitte, aus / Standby-Position.
Auf dem Fixed Speed Mini Vortex Mixer sollte KEIN Einzelröhrchenhalter
verwendet werden.
2. Entfernen Sie den Becherkopf oder ein anderes Zubehör vom Mini Vortex Mixer.
3. Entfernen Sie die Klebstoffrückseite von der Adapterplatte und richten Sie die
Öffnung der Adapterplatte an der Öffnung des Gehäuses aus. Drücken Sie sie fest
nach unten, um eine ordnungsgemäße Verbindung zwischen dem Adapter und
dem Gerät zu gewährleisten. Richten Sie die Grundplatte des Einzelröhrchenhalters
mit der Adapterplatte aus dem vorherigen Schritt aus. Halten Sie die Mittelöffnungen
der Platten konzentrisch, um mechanische Störungen zu vermeiden. Die Magneten
halten den Einzelröhrchenhalter an Ort und Stelle. Um diese Befestigung neu
auszurichten, ziehen Sie den Griff hoch, bis die Magnete loslassen, überprüfen Sie
die Ausrichtung und platzieren Sie sie wieder.
4. Gleichen Sie die Basisplatte des Einzelröhrchenhalters über den Pfosten des
Mini Vortex Mixers mit zwei Einzelröhrchenhalter-Angleichungspfosten auf der
Rückseite der Einheit an. Senken Sie den Einzelröhrchenhalter auf die
Adapterplatte, die Magnete werden den Einzelröhrchenhalter an seinem Platz
halten. Um diesen Anhang anzugleichen, ziehen Sie ihn am Griff hoch, bis die
Magnete freigeben, prüfen Sie die Angleichung erneut und platzieren Sie sie
erneut.
5. Jetzt da der Einzelröhrchenhalter angebracht ist, bringen Sie den Cup-Head an
der Spitze des Pfostens unter Angleichung des Ausrichtungspfeils in Richtung der
Rückseite der Einheit an.
6. Heben Sie den federbelasteten oberen Teil des Einzelröhrchenhalters an und
schieben Sie ein 2,5 bis 4,5 “(6,4 bis 11,4 cm) langes Rohr auf den Becherkopf,
so dass das Rohr in der Mitte ausgerichtet ist. Der 0,5 mL Micro-Tube Halter
oder der 1,5 bis 2 mL Micro-Tube Halter passt auch in den Single Tube Halter.
Sie sind jetzt bereit, Ihre Probe zu mischen.
DE
2.
5.5.
4.3.
53
Page 55
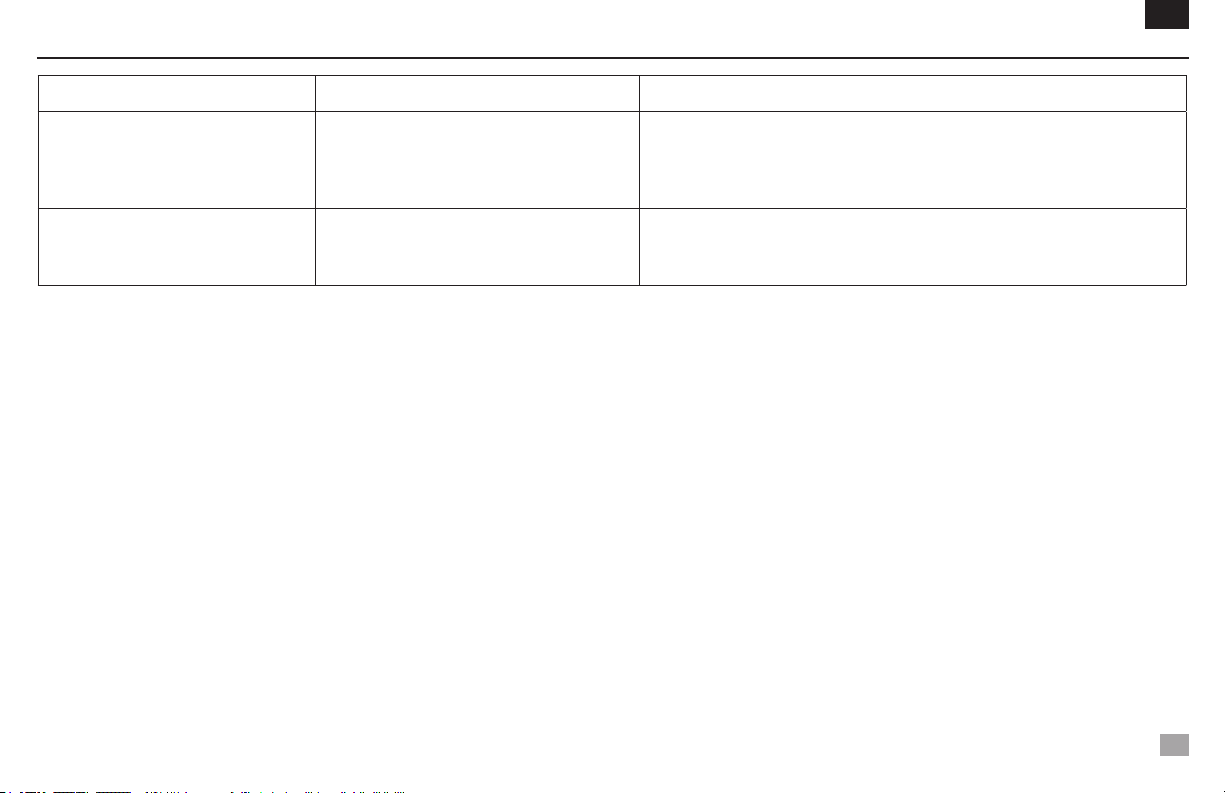
StörungSSucHe
Problem Ursache Lösung
Beheben Sie die Blockierung und drücken Sie den Napfkopf mehrere Male, um zu
Einheit läuft nicht
Einheit ist übermäßig laut
Mechanische Blockierung
oder Motorblockierung
Sensorlüftung falsch ausgerichtet
oder Motor falsch ausgerichtet
bestätigen, dass keine Blockierung besteht.
Falls das Problem weiter besteht, wenden Sie sich bitte zwecks Reparatur an Ihren
Ohaus Vertreter.
Dieser Fehler kann nicht durch den Endnutzer behoben werden.
Falls das Problem weiter besteht, wenden Sie sich bitte zwecks Reparatur an
Ihren Ohaus Vertreter.
DE
54
Page 56

Manual de Instrução
Agitador vórtex, velocidade fixa mini, VXMNFS
Agitador vórtex, analógico mini, VXMNAL
Agitador vórtex, digital mini, VXMNDG
Agitador vórtex, impulso mini, VXMNPS
55
EN - English ......... 1
FR - Français ......... 11
ES - Español ......... 22
IT - Italiano ......... 33
DE - Deutsch ......... 44
PT - Português ......... 55
NL - Nederlands ......... 66
NO - Norsk ......... 70
DA - Dansk ......... 74
SV - Svenska ......... 78
FI - Suomi ......... 82
HU - Magyar ......... 86
PL - Polski ......... 90
CZ - Czech ......... 94
KR - Korean ......... 98
Page 57

inDice
Conteúdo da Caixa . . . . . . . . . . . . 56
Serviço de informação . . . . . . . . . . . . 56
Instalação . . . . . . . . . . . . 57
Manutenção e Serviço . . . . . . . . . . . . 57
Condições Ambientais . . . . . . . . . . . . 57
Instruções de Segurança . . . . . . . . . . . . 58
Normas e Regulamentos . . . . . . . . . . . . 58
Especificações . . . . . . . . . . . . 59
Mixer Vortex Digital & Pulsante Mini Painel De Controle. . . . . . . 60
Instruções de Operação . . . . . . . . . . . . 61-62
Instruções de Instalação Cabeça/Acessório . . . . . . . . . . . . 63-64
Solução de Problemas . . . . . . . . . . . . 65
PT
contenúDo Da caixa
Agitador vórtex mini de impulso ou velocidade, analógico, digital fixo
* (1) concha da cabeça
* (1) 7.6cm cabeça
* (1) 7.6cm capa da cabeça de borracha
Manual de instrução
* Estes acessórios vêm com todas as unidades exceto o Agitador vórtex impulso
que é fornecido com um Suporte de Micro-Tubo 1,5 à 2mL com concha da cabeça
embutida.
56
Serviço De informação
Se a seção de solução de problemas não resolver ou descrever o problema, entre em
contato com o agente de serviço autorizado OHAUS. Para assistência técnica ou suporte
técnico nos Estados Unidos, ligue gratuitamente para 1-800-672-7722 ext. 7852 entre
8:00 AM e 5:00 PM EST. Um especialista do serviço de produtos da OHAUS estará
disponível para prestar assistência. Fora dos EUA, visite nosso site, www.ohaus.com
para localizar o escritório OHAUS mais próximo de você.
Número de série: _______________________________________________________
Data da compra: _______________________________________________________
Fornecedor: ___________________________________________________________
Page 58
inStalação
Assim que receber o Agitador vórtex de Ohaus, verificar para que nenhum dano tenha
ocorrido durante o envio. É importante que qualquer dano ocorrido no transporte seja
detectado durante o desenpacotar. Se você encontrar esse tipo de dano, é importante
que a transportadora seja notificada imediatamente.
Depois de desenpacotar, coloque o Agitador vórtex numa área, mesa plana, longe de
vapores explosivos. Se assegure que a superfície onde o equipamento funcionará,
resistirá ao calor típico produzido pelo equipamento. Sempre coloque o Misturador
numa área firme para funcionamento.
O Agitador vórtex é fornecido com uma extensão que deve ser conectado à uma
tomada com fio terra apropriado. Se a extensão fornecida não estiver de acordo
com o que você necessita, por favor use uma extensão que seja aprovada pelos
códigos locais e eletricidade fornecida. A substituição da tomada deve ser feita por
um eletricista qualificado.
manutenção e Serviçio
O Agitador vórtex é construído para serviço longo, confiável e sem problemas.
Nenhuma lubrificação nem outra manutenção técnica para operação é necessária. A
unidade deve ter o cuidado normal necessário como qualquer equipamento elétrico.
Evite molhar ou expor desnecessariamente à fumaças. Os derramamentos devem ser
limpos imediatamente. NÃO USE produto de limpeza, no painel da frente, nem solvente que seja abrasivo ou que provoque danos em plásticos ou que seja inflamável.
Sempre se assegure de que a tomada está desconectada do equipamento antes de
limpá-la. Se a unidade precisar de manutenção ou serviço, contate seu representante
de Ohaus.
PT
conDiçõeS ambientaiS
Condições Operacionais: Use somente dentro de algum local fechado.
Temperatura: 4 à 40°C (39.2 à 104°F)
Humidade: 20% à 85% humidade relativa, não-condensando
Altitude: 0 à 6,562 ft. (2000 M) acima do nível do mar
Não-operacional de armazenamento:
Temperatura: -20 à 65°C (-4 à 149°F)
Humidade: 20% à 85% humidade relativa, não-condensando
Categoria de Instalação II e Grau de Poluição 2 de acordo com IEC 664.
eliminação De equiPamento
Esse equipamento não poder ser colocado em lixo que não seja
separado. É sua responsabilidade de entregar esse equipamento
para uma compania autorizada de separação e reciclagem de lixo
para que seja corretamente destruído ou reciclado. É também
sua responsabilidade descontaminar o equipamento em caso de
qualquer contaminação biológica, química e/ou radiológica, a fim
de proteger as pessoas involvidas na eliminação e reciclagem do
equipamento contra riscos de saúde.
Para mais informações sobre onde você pode entregar o seu equipamento para ser
eliminado, por favor entre em contato com representante local onde você originalmente comprou o seu equipamento. Ao fazer assim, você estará ajudando a conservar recursos naturais e ambientais e você assegurará que seu equipamento será
reciclado de forma que protege a saúde humana.
finaliDaDe De uSo
Esses Misturadores Vórtice são intencionados para uso geral em laboratórios.
57
Page 59
inStruçõeS De Segurança
Por favor, leia o Manual de Instruções antes de operar o Agitador vórtex.
ADVERTÊNCIA! NÃO use o Agitador vórtex numa atmosfera arriscada nem
com materiais perigosos para os quais o equipamento não foi programado. O
operador também deve estar consciente que a proteção fornecida pelo equipamento pode ser comprometida se utilizado com acessórios não fornecidos
e nem recomendados pelo fabricante, nem se for utilizado de alguma maneira
não especificada pelo fabricante.
Sempre opere esse equipamento em uma superfície plana para melhor desempenho e segurança máxima.
NÃO levante o Agitador vórtex pela cabeça. Todas as cabeças, inclusive a
concha da cabeça são removíveis. Elas podem estourar se forem levantadas
por elas.
CUIDADO! Para evitar choque elétrico, se assegure que não há corrente
elétrica nenhuma indo para o equipamento tendo certeza de disconectar a
tomada da eletricidade. Disconecte o equipamento da energia elétrica antes
de fazer manutenção e algum serviço.
Os derramamentos devem ser retirados imediatamente. NÃO afunde em
líquido o Agitador vórtex para limpeza.
NÃO opere o equipamento se tiver sinais aparente de problemas elétricos ou
mecânicos.
Fio terra – Terminal Condutor Protetor
Corrente Alternante
58
PT
normaS e regulamentoS
A conformidade com as seguintes normas e regulamentos está indicada pela marca correspondente no produto.
Marca Normas e regulamentos
A OHAUS Corporation declara que o Série VXMN misturadores cumpre as directivas
2011/63/EU, 2014/30/EU, 2014/35/EU e as normas EN 50581, EN 61010-1, EN
61010-2-051, EN 61326-1.
O texto integral da declaração de conformidade está disponível no seguinte endereço
de Internet: www.ohaus.com/ce.
Este produto cumpre com a Diretiva 2012/19/EU. Elimine este produto de acordo com
os regulamentos locais no ponto de recolha especificado para o equipamento elétrico
e eletrónico.
Para instruções de eliminação na Europa, consulte www.ohaus.com/weee.
EN 61326-1
CAN/CSA C22.2 61010-1, CAN/CSA C22.2 61010-2-051
UL 61010-1, UL 61010-2-051
Aviso Global
Aviso: Este é um produto de Classe A. Em um ambiente doméstico, este produto pode causar interferência de rádio, caso em que o usuário pode ser obrigado a tomar medidas adequadas.
Canadá Aviso
Este aparelho digital Classe A está em conformidade com a norma canadense ICES-003.
Aviso da FCC
NOTA: Este equipamento foi testado e está em conformidade com os limites para um dispositivo
digital de Classe A, de acordo com a Parte 15 das Regras da FCC. Esses limites são projetados para
fornecer proteção razoável contra interferência prejudicial quando o equipamento é operado em um
ambiente comercial. Este equipamento gera, usa e pode irradiar energia de freqüência de rádio e, se
não for instalado e usado de acordo com o manual de instruções, pode causar interferência prejudicial
às comunicações de rádio. A operação deste equipamento em uma área residencial é susceptível
de causar interferência prejudicial, caso em que o usuário será obrigado a corrigir a interferência por
conta própria.
Alterações ou modificações não expressamente aprovadas pela Ohaus Corporation podem anular a
autoridade do usuário para operar o equipamento.
Page 60

eSPecificaçõeS técnicaS Do agitaDor vórtex velociDaDe fixa
Dimensões totais (C x L x A): 8.3 x 4.8 x 6.5” (21.0 x 12.3 x 16.5 cm)
Elétrico (50/60 Hz): 120V: 1,2 ampères, 135 watts
230V: 0,6 amperes, 135 watts
Velocidade média*: 120V: 3200rpm
230V: 2500rpm
Órbita: 4.9mm (0.194”)
Classificação de funcionamento: intermitente
Controles: nenhum
Peso de embalagem: 10lbs (4.5kg)
PT
Digital vortexer mixer eSPecificaçõeS
Dimensões totais (C x L x A): 8.3 x 4.8 x 6.5” (21.0 x 12.3 x 16.5 cm)
Elétrico (50/60 Hz): 120V: 1,2 ampères, 135 watts
230V: 0,6 amperes, 135 watts
Velocidade média*: 120V: 500 a 3000rpm
230V: 500 to 2500rpm
Cronômetro: 1 segundo para 9999 minutos
Órbita: 4.9mm (0.194”)
Classificação de funcionamento: intermitente
Controles: Consulte a página 5
Peso de embalagem: 10lbs (4.5kg)
eSPecificaçõeS técnicaS Do agitaDor vórtex analógico
Dimensões totais (C x L x A): 8.3 x 4.8 x 6.5” (21.0 x 12.3 x 16.5 cm)
Elétrico (50/60 Hz): 120V: 1,2 ampères, 135 watts
230V: 0,6 amperes, 135 watts
Velocidade média*: 120V: 300 a 3200rpm
230V: 300 a 2500rpm
Órbita: 4.9mm (0.194”)
Classificação de funcionamento: intermitente
Controles: Botão para posições auto/off/on
(auto/desligado/ligado)
Botão de velocidade: para aumentar e
diminuir a velocidade entre 1 e 10
Peso de embalagem: 10lbs (4.5kg)
imPulSo vortexer mixer eSPecificaçõeS
Dimensões totais (C x L x A): 8.3 x 4.8 x 6.5” (21.0 x 12.3 x 16.5 cm)
Elétrico (50/60 Hz): 120V: 1,2 ampères, 135 watts
230V: 0,6 amperes, 135 watts
Velocidade média*: 120V: 500 a 3000rpm
230V: 500 to 2500rpm
Cronômetro: 1 segundo para 9999 minutos
Órbita: 2.5mm (0.098”)
Classificação de funcionamento: intermitente
Controles: Consulte a página 5
Peso de embalagem: 10lbs (4.5kg)
* Velocidade Máxima varia dependendo do acessório sendo utilizado.
59
Page 61
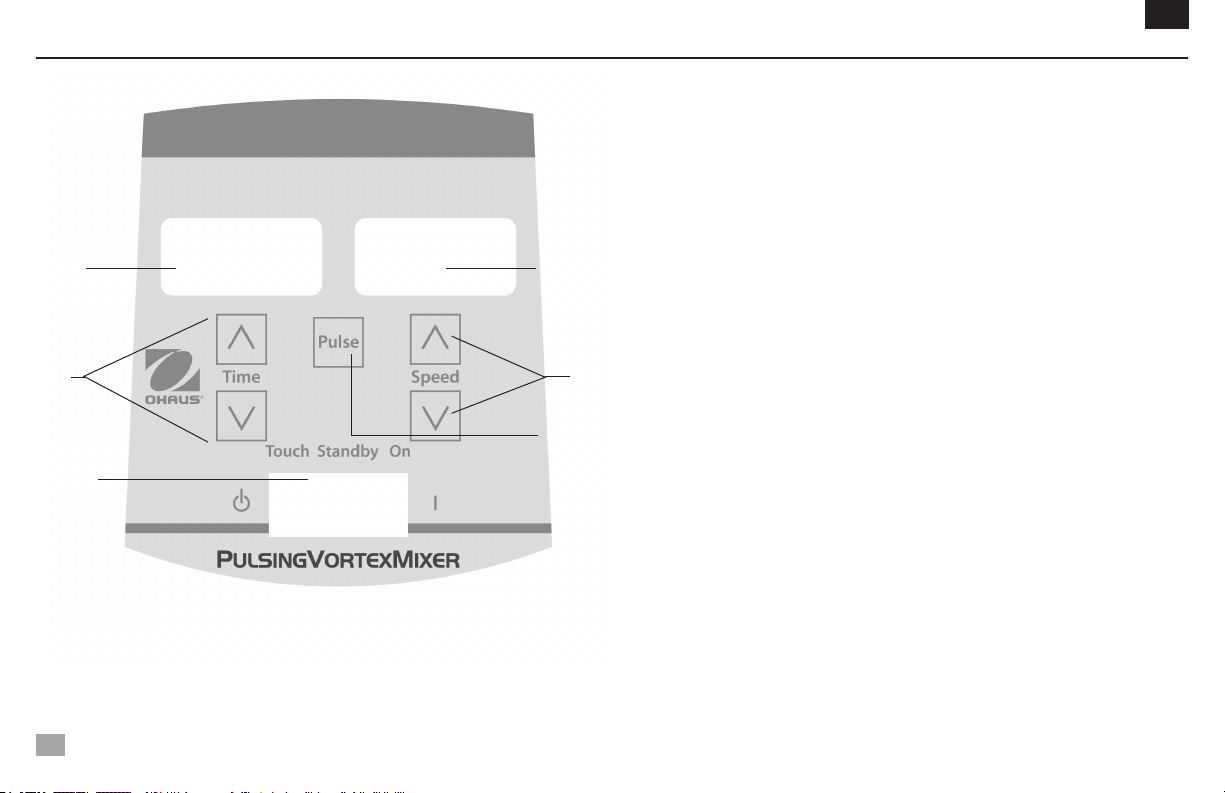
Painel De controle - agitaDor vórtex Digital e imPulSo
B
C
A
PT
O painel da frente do Agitador vórtex Digital e Impulso contém todos os interruptores,
controles e telas necessárias para a operação do equipamento.
A. O botão de 3-posições: : Botão com posições Auto/standby/on (Automático/
Espera/Ligado) do interruptor para iniciar/parar a função de misturador. O
Automático é usado para o modo de operação de Toque e Ligado é usado para o
mode de operação Contínua.
B. Marcador de Tempo: Exibe o tempo acumulado (modo contínuo), ou quanto
tempo ainda há disponível (modo marcado). O marcador varia de 0 à 9.999
D
E
F
minutos em incrementos de um (1) segundo. O marcador vai indicar os minutos e
segundos até que o cronômetro alcance 99 minutos e 59 segundos (99:59), a partir
daí, o marcador passa a marcar automaticamente os minutos até 9.999.
C. As flexas para cima/baixo indicam para o ponto de ajuste marcado.
D. Marcador de velocidade: Marca a velocidade do Agitador vórtex.
E. As flexas para cima/baixo indicam para o ponto de ajuste marcado.
F. Botão de Pulsação: Inicia o modo pulsante de operação.
* Os mesmos controles para o Agitador vórtex digital mini, mas sem o botão ‘pulse’
(impulso).
60
Page 62

introDução ao agitaDor vórtex
Seu Agitador vórtex está pronto para a maioria das aplicações singulares. O Agitador
vórtex opera misturando tubos imediatamente antes de testar.
DICAS OPERACIONAIS
Estes equipamentos não foram intencionados para uso contínuo por longo períodos de
tempo. Um sensor embutido de temperatura prevenirá a unidade do superaquecimento
desligando o motor. Se isto ocorrer, permita que o motor esfrie e o equipamento
voltará a operação normal. Diminua a duração de tempo de funcionamento usado
entre os períodos de descanso. Veja páginas 8-9 com ‘Instruções de Instalação de
Cabeça/Acessório.
Veja páginas 73-74 com ‘Instruções de Instalação de Cabeça/Acessório.
inStruçõeS De funcionamento Do agitaDor vórtex mini De velociDaDe
fixa
O Agitador vórtex mini de velocidade fixa funciona apenas a 3200rpm (2500rpm
para 230V).
1. Ligue o cabo de alimentação a uma tomada devidamente ligada à terra. A
unidade está ligada e no modo de espera.
2. O recipiente que está a utilizar deve ser empurrado para baixo no acessório
da cabeça para obter o movimento. Para obter a mistura desejada, pode variar o
ângulo de contacto e pressão contra a cabeça.
3. O agitador volta para o modo de espera, quando o recipiente é retirado da
cabeça.
4. A unidade pode ficar quente ao toque com o uso constante. Não há nada de
errado nesta situação. Em definições de alto desempenho do motor (componentes reconhecidos por UL) coloca simplesmente mais calor. IMPORTANTE:
NÃO utilize acessórios grandes no Agitador vórtex de velocidade fixa mini. Esta
unidade é concebida para ser utilizada com a cabeça do copo ou uma cabeça
de 3” (7,6 cm) apenas com uma tampa de borracha da cabeça de 3” (7,6 cm).
PT
5. Para cortar completamente a energia da unidade, desligue o cabo de alimen-
tação da tomada de parede.
inStruçõeS Para oPeração Do agitaDor vórtex Digital e imPulSo
1. Se assegure que o botão 3-posições está no centro, standby (Espera). Conecte a
extensão na tomada com fio terra. O equipamento agora está em posição standby
(Espera).
2. Para operação continua, empurre o botão para a direita, on (Ligado). Para operação intermitente/toque, empurre o botão para a esquerda, auto (Automático).
3. Nos dois casos, escolha a velocidade. Na posição on (Ligado), você verá que a
cabeça começará o movimento imediatamente. Na posição auto (Automático), o
recipiente precisa ser empurrado para baixo para iniciar o movimento. Para a
mistura desejável, varie a velocidade, use as flechas para cima/baixo, e/ou varie
o ângulo de contato e pressão contra a cabeça.
Definindo velocidade
Para marcar a velocidade aperte as flechas para cima/baixo posicionadas abaixo
da tela de velocidade até que alcance a desejada.
• Velocidadeenquantonaposiçãoon(Ligado)variade500à2500rpm
• Velocidade enquanto na posição auto (Automático) varia de 1000 à
2500rpm
61
Page 63

inStruçõeS Para oPeração Do agitaDor vórtex Digital e imPulSo
• VelocidadeenquantonaposiçãoPulse(Pulso)é2500rpm,funcionandopor
30 segundos, descansando por 10 segundos.
Definindo tempo:
Operação com tempo definido funciona nos modos auto (Automático) e on
(Ligado).
• Parafuncionarcomtempoprogramado,empurreobotãoparaaesquerda,
posição auto (Automático). Empurre as flechas para cima/baixo abaixo
do marcador de tempo na tela até que você alcance o tempo desejado.
Enquanto o equipamento estiver operando em tempo programado, a tela
vai marcar o tempo restante, contando para baixo até chegar a zero (0.00).
• Para funcionar em modo contínuo (tempo acumulado), remarqueopro-
gramador para zero (0.00) antes de começar a operação. O marcador de
tempo vai mostrar o tempo acumulado e vai operar até que você empurre o
botão para o centro, posição standby (Espera).
Operação Pulsante: (Para o Agitador vórtex Pulsante apenas)
• Marqueotempodesejado
• Empurreobotãoparaadireita,on(Ligado).Aperteobotãodepulsação,
no centro do painel da frente. A velocidade vai marcar “PULSE”. O equipamento vai funcionar em 2500rpm, ciclando um tempo de operação de 30
segundos, seguido 10 segundos de descanso. O equipamento misturará
até que o marcador chegue a zero (0.00) ou você pare o equipamento
empurrando o botão para o centro, posição standby (Espera).
4. Quando acabado com a função contínua ou intermitente ou pulsante, empurre o
botão para a posição do centro, posição standaby (Espera).
5. O modo contínuo, é para acessórios grandes. No modo contínuo, NÃO use o
equipamento acima de 900rpm.
6. O modo intermitente, automático é intencionado para misturas de um (1) minuto
ou menos a toda a velocidade. Um período de descanso de dois (2) minutos é
PT
recomendado para minimizar a possibilidade de superaquecimento do motor.
A unidade pode parecer quente ao toque com uso constante. Não há nada de
errado com o equipamento. Durante esses desempenhos alto, o motor (componente reconhecido UL) simplesmente emite mais calor. IMPORTANTE: Ao usar
acessórios maiores (Insira a Placa com espuma ou Suportes de Tubo de Ampola),
NÃO opere o equipamento acima de 900 rpm, (velocidade analógica aproximada
5). CAUSARÁ DANO AO EQUIPAMENTO.
7. Para desligar completamente o equipamento, disconecte a extensão da tomada
elétrica.
NOTA: Em caso de falta de energia ou risco que interrompa a operação da unidade,
a unidade reinicia à velocidade e/ou temperatura definida quando um corte de energia
ou perigo é corrigido.
62
Page 64
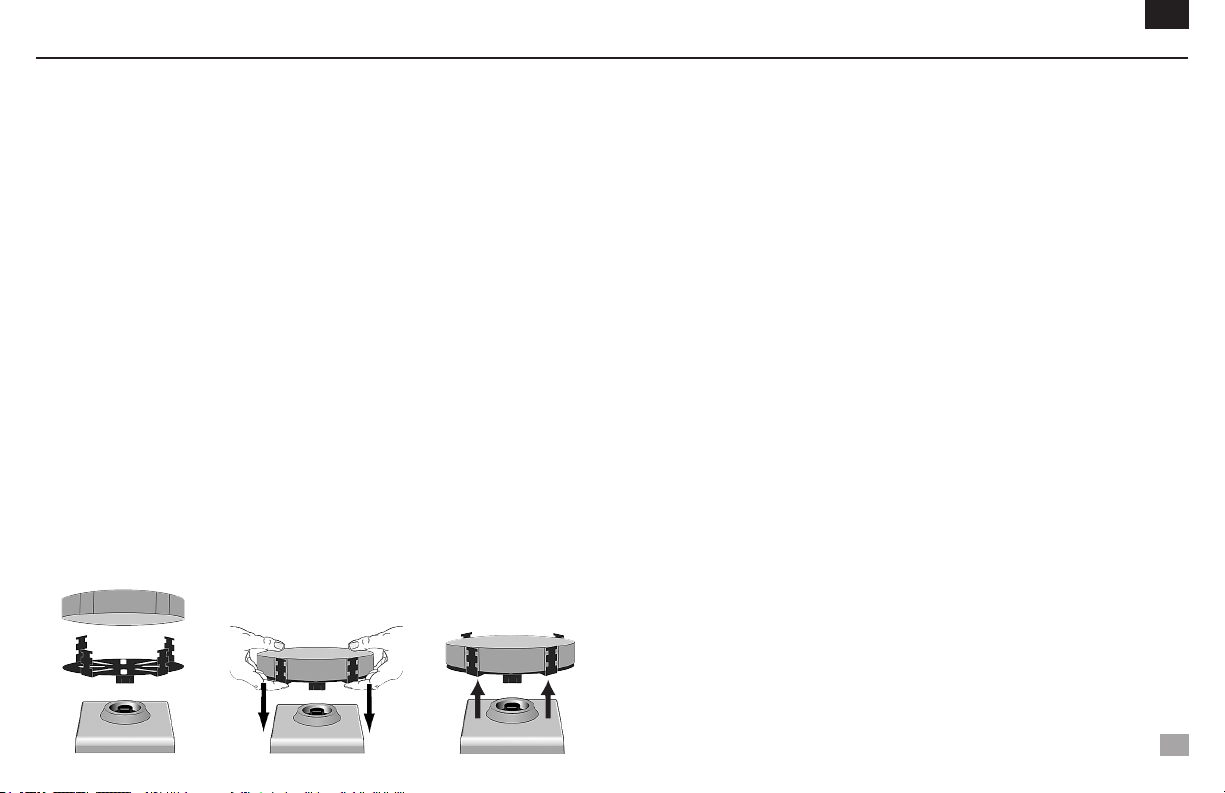
cabeça / aceSSório - inStruçõeS De inStalação
Instalar a concha da cabeça, a cabeça de 7,6cm ou outros acessórios da cabeça:
1. Mova o botão de 3-posições para o centro, posição de ESPERA. Para o Agitador
vórtex de velocidade fixa mini desligue o cabo de alimentação da tomada.
2. Se usando um Uma Placa com o suporte de tubo, insira a espuma com os dedos
na Placa. Empurre a espuma até o fundo da Placa.
3. Coloque cabeça no poste do equipamento, alinhando o lado plano com a “marca
de alinhamento” dentro de do buraco da cabeça para montagem com o lado plano
com a “marca de alinhamento” no poste.
4. Aperte o centro da cabeça firme até que clique no lugar. NÃO USE a cabeça de 3”
sem a capa de borracha da cabeça. Adicione amostras aos anexos depois que a
cabeça esteja assegurada no Agitador vórtex. Se assegure que as amostras estão
seguras antes de ligar o equipamento.
5. Para retirar a cabeça instalada, segure o alojamento do Agitador vórtex com uma
mão e firmemente puxe a cabeça diretamente para cima. Para as cabeças maiores talvez seja preciso usar as duas mãos para forçar a cabeça a sair do poste.
Retire as amostras antes de retirar os acessórios.
PT
Instalação da Corda do Recipiente:
1. Instale a Placa sem espuma do suporte de tubo no Agitador vórtex.
2. Estique as cordas do recipiente sobre dedos opostos da Placa. Coloque os elásticos na parte de cima ou de baixo dos entalhes da Placa.
3. Coloque uma amostra no centro das cordas de elástico. Tenha certeza de que a
amostra está bem segura antes de ligar o Misturador.
2.
3.
4.
5.
63
Page 65
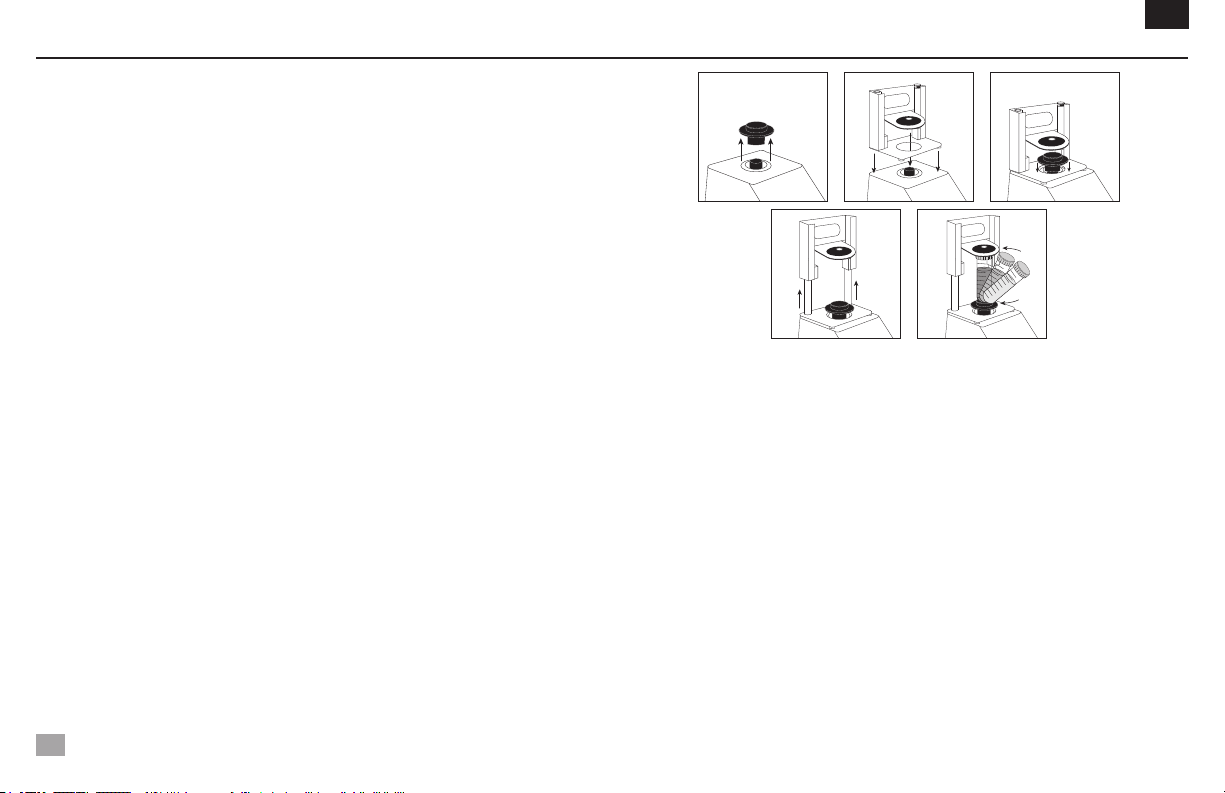
cabeça / aceSSório - inStruçõeS De inStalação
Instalação de Suporte de Tubo Singular:
1. Mova o interruptor basculante de 3 vias para a posição central, desligado / em
espera. O Suporte de tubo individual não deve ser utilizado na no Agitador vórtex
de velocidade fixa mini.
2. Retire a cabeça do copo ou qualquer outro acessório do Mini Vortex Mixer.
3. Remova a parte de trás do adesivo da placa adaptadora e alinhe a abertura da
placa adaptadora sobre a abertura do compartimento. Pressione com firmeza para
garantir uma ligação adequada entre o adaptador e a unidade. Alinhe a placa
de base do suporte do tubo individual com a placa adaptadora do passo anterior.
Mantenha as aberturas centrais do concêntrico das placas para evitar interfer
ência mecânica. Os imãs irão fixar o suporte do tubo individual. Para realinhar
este acessório, puxe para cima através da pega até os imãs soltarem, verifique o
alinhamento e coloque novamente.
4. Alinhe a placa de base do suporte do tubo individual sobre o pino do Agitador vór
tex mini com os dois pinos de alinhamento do suporte de tubos individuais na
parte de trás da unidade. Baixe o suporte do tubo individual para a placa adap
tadora, os imãs irão fixar o suporte do tubo individual. Para realinhar este
acessório, puxe para cima através da pega até os imãs soltarem, verifique o alin
hamento e coloque novamente.
5. Agora que o suporte de tubo individual está instalado, coloque a cabeça do copo
no pino da unidade, alinhando a seta de orientação para a parte traseira da uni
dade.
6. Levante a parte superior carregada por mola do Suporte de Tubo Único e
deslize um tubo longo de 6,5 a 10,4 cm (6,4 a 11,4 cm) na cabeça do copo de
forma que o tubo fique alinhado no meio. O Titular de Micro-Tubo de 0,5mL ou o
Titular de Micro-Tubo de 1,5 a 2mL também cabem no Suporte de Tubo Único.
Agora você está pronto para misturar sua amostra.
PT
2.
5.5.
4.3.
64
Page 66
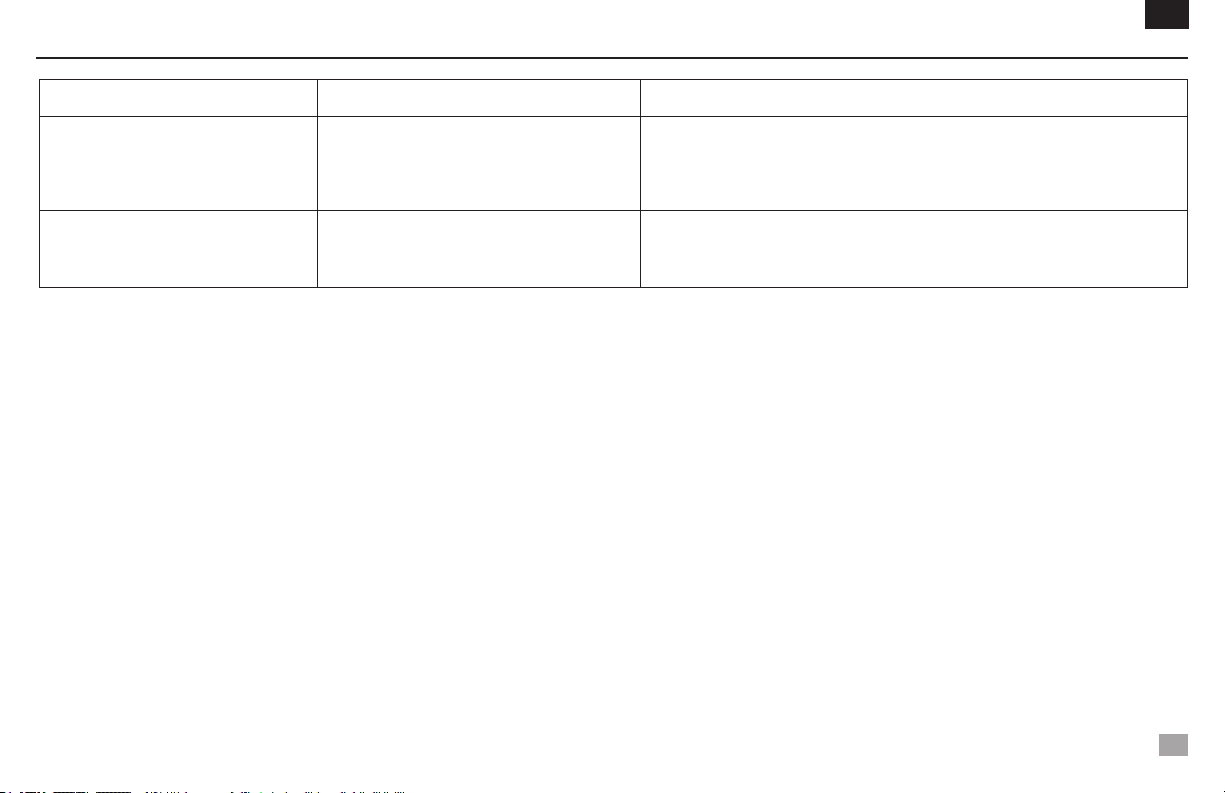
Solução De ProblemaS
Problema Causa Solucao
Retire a obstrução e empurre para baixo a concha da cabeça várias vezes para
confirmar que não há nenhuma outra obstrução.
Se o problema continuar, por favor contate seu representante de Ohaus para
conserto.
Esse erro não poder consertador pelo operador.
Se o problema continuar, por favor contate seu representante de Ohaus para
conserto.
O equipamento não funciona
O equipamento está exessivamente
barulhento
Obstrução mecânica
Ou Obstrução no motor
O sensor do ventilador está disalinhado
Ou O motor está disalinhado
PT
65
Page 67

Gebruiksaanwijzing
Vortex mixer, Mini vaste snelheid, VXMNFS
Vortex mixer, Mini analoog, VXMNAL
Vortex mixer, Mini digitaal, VXMNDG
Vortex mixer, Mini puls, VXMNPS
66
EN - English ......... 1
FR - Français ......... 11
ES - Español ......... 22
IT - Italiano ......... 33
DE - Deutsch ......... 44
PT - Português ......... 55
NL - Nederlands ......... 66
NO - Norsk ......... 70
DA - Dansk ......... 74
SV - Svenska ......... 78
FI - Suomi ......... 82
HU - Magyar ......... 86
PL - Polski ......... 90
CZ - Czech ......... 94
KR - Korean ......... 98
Page 68
veiligHeiDSinStructieS
Lees voor gebruik a.u.b. de volledige instructie van de Vortex mixer.
WAARSCHUWING! Gebruik de Vortex mixer NIET in een onveilige omgeving,
en werk NIET met onveilige materialen die niet geschikt/ontworpen zijn voor
dit apparaat. Tevens, moet de gebruiker zich er van bewust zijn dat de van
bescherming voorziene installatie wellicht wordt verzwakt als er accessoires
gebruikt worden die niet geleverd zijn door, aanbevolen zijn door de fabrikant,
of wordt gebruikt op een manier die niet door de fabrikant omschreven wordt.
Gebruik het apparaat altijd op een vlakke ondergrond(waterpas) voor de best
mogelijke uitvoering en maximale veiligheid.
Til de Vortex Mixer niet op aan de kop/boven/voorkant. Alle koppen, inclusief
de hoofd kop, zijn verwijderbaar. Zij kunnen los raken(eraf schieten) als je
eraan trekt.
PAS OP! Schakel het apparaat uit voordat er onderhoud of service plaats
vind. Haal de stekker uit het stopcontact om een elektrische schok te vermijden.
Vlekken moeten direct verwijderd worden. Dompel het apparaat niet onder
water om het schoon te maken.
GEBRUIK het apparaat NIET als er tekenen zijn van elektrische of mechanische
schade.
Geaard – Beschermd Gebruikers Werkstation
Wisselstroom
67
NL
normen en voorScHriften
Naleving van de volgende normen en voorschriften wordt aangegeven door de corresponderende markering op het product.
Mark Normen en voorschriften
OHAUS Corporation verklaart dat de VXMN-serie mixer voldoen aan de richtlijnen
2011/63/EU, 2014/30/EU, 2014/35/EU en de normen EN 50581, EN 61010-1, EN
61010-2-051, EN 61326-1.
De volledige tekst van de EU-conformiteitsverklaring kan worden geraadpleegd op het
volgende internetadres: www.ohaus.com/ce.
Dit product voldoet aan de richtlijn 2012/19/EU. Gooi dit product in overeenstemming
met de plaatselijke regelgeving op het verzamelpunt opgegeven voor elektrische en
elektronische apparatuur.
Voor de afvalverwerking in Europa, zie www.ohaus.com/weee.
EN 61326-1
CAN/CSA C22.2 61010-1, CAN/CSA C22.2 61010-2-051
UL 61010-1, UL 61010-2-051
Global Kennisgeving
Waarschuwing: Dit is een klasse A product. In een huiselijke omgeving kan dit product radio-interferentie, in welk geval de gebruiker kan worden verplicht om passende maatregelen te nemen.
Canada Kennisgeving
Dit Klasse A digitale apparaat voldoet aan de Canadese ICES-003.
FCC-kennisgeving
OPMERKING: Deze apparatuur is getest en voldoet aan de limieten voor een klasse A digitaal apparaat, conform Deel 15 van de FCC-regels. Deze beperkingen zijn bedoeld om een redelijke bescherming te bieden tegen schadelijke interferentie wanneer de apparatuur wordt gebruikt in een commerciële
milieu. Dit apparaat genereert, gebruikt en kan radiofrequentie-energie uitstralen en kan, indien niet
geïnstalleerd en gebruikt in overeenstemming met de instructies, schadelijke storing aan radiocommunicatie veroorzaken. Gebruik van deze apparatuur in een woonwijk zal waarschijnlijk schadelijke
storing, in welk geval de gebruiker verplicht om de storing op eigen kosten te verhelpen.
Wijzigingen die niet uitdrukkelijk door Ohaus Corporation zijn goedgekeurd, kunnen de bevoegdheid
van de gebruiker om het apparaat te gebruiken.
Page 69
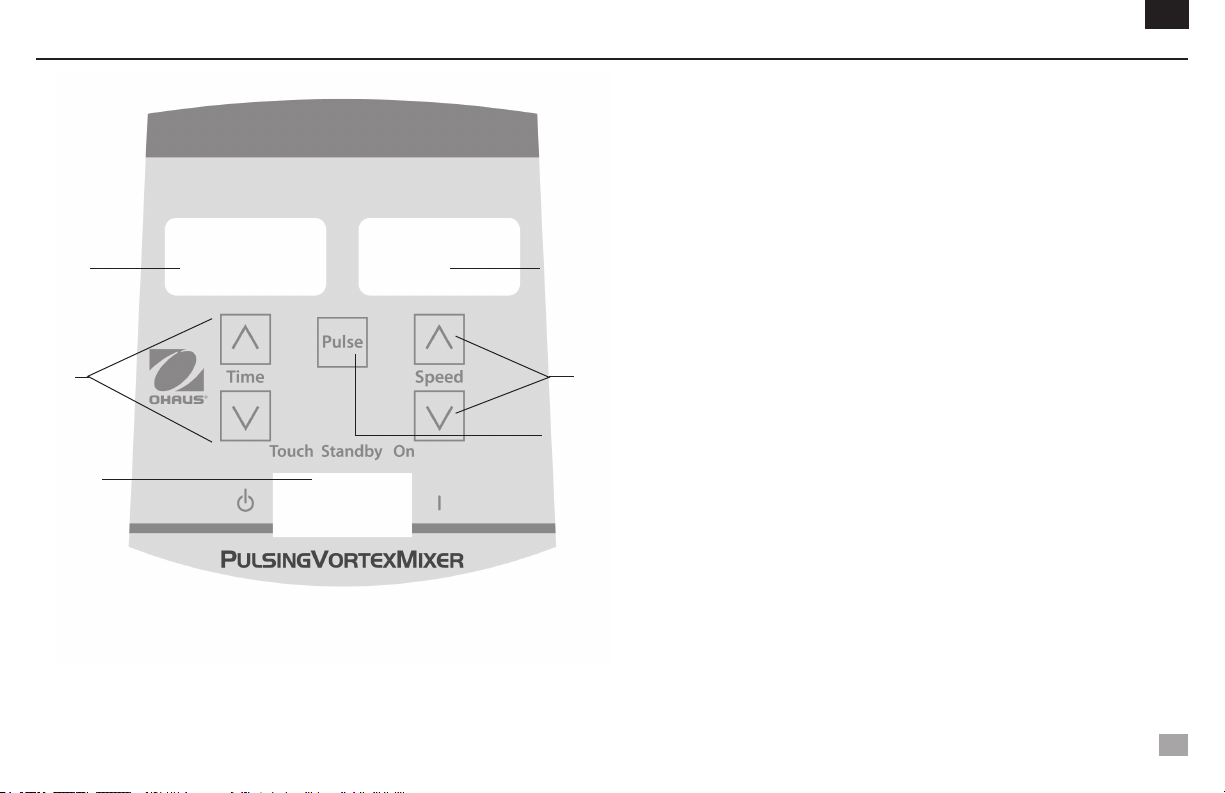
beDieningSPaneel - Digitaal & PulS vortex mixer
B
C
A
NL
De voorkant van de Digitaal/Puls Vortex Mixer bevat al de knoppen, controles en
displays die nodig zijn om het apparaat re bedienen.
A. 3-weg schakelaar: Auto/stand-by/AAN schakelaar start/stopt de vortex(mix)
functie. Auto wordt gebruikt voor handmatige instelling en AAN wordt gebruikt voor
Continue stand gebruik.
B. Tijd display: Toont de opgetelde tijd( continue stand) of hoeveel tijd er nog over
is(tijd stand). Het getoonde verloop loopt van 0 tot 9999 minuten met een (1)
seconde vermeerderd . De display toont minuten en seconden tot de timer 99
D
E
F
minuten en 59 seconden (99:59)toont, daarna zal de timer automatisch minuten
tonen tot 9999.
C. Op/neer pijlen voor tijds instelling.
D. Snelheid display: Toont de snelheid van de Vortex Mixer.
E. Op/neer pijlen voor snelheids instelling.
F. Pulseren knop: Start de pulserende stand.
* Zelfde bedieningselementen voor de Digital Mini Vortex Mixer, maar zonder
de ‘puls’-knop.
68
Page 70
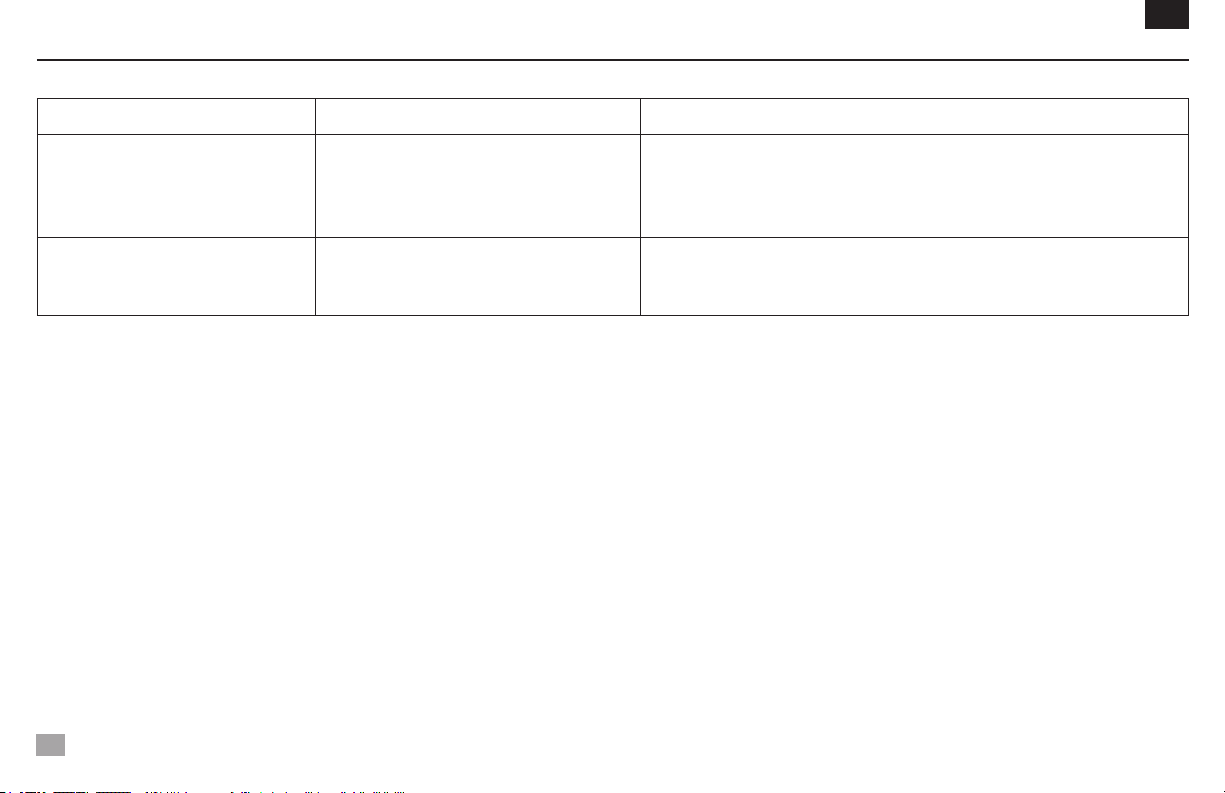
Problemen oPloSSen
Probleem Oorzaak Oplossing
Verwijder de obstructie en druk meerdere keren op de kop om te controleren of de
Apparaat doet het niet
Mechanische obstructie
of Motor Obstructie
obstructie weg is.
Als het probleem blijft, neem dan contact op met Uw Ohaus vertegenwoordiger voor
reparatie.
NL
Apparaat maakt extreem
veel geluid
69
Sensor fan misaligned
or Motor misaligned
Dit probleem kan niet door de gebruiker worden opgelost.
Neem contact op met U Ohaus vertegenwoordiger voor reparatie.
Page 71

Bruksanvisning
Vortexmikser, mini fikset hastighet, VXMNFS
Vortexmikser, mini analog, VXMNAL
Vortexmikser, mini digital, VXMNDG
Vortexmikser, mini pulsering, VXMNPS
70
EN - English ......... 1
FR - Français ......... 11
ES - Español ......... 22
IT - Italiano ......... 33
DE - Deutsch ......... 44
PT - Português ......... 55
NL - Nederlands ......... 66
NO - Norsk ......... 70
DA - Dansk ......... 74
SV - Svenska ......... 78
FI - Suomi ......... 82
HU - Magyar ......... 86
PL - Polski ......... 90
CZ - Czech ......... 94
KR - Korean ......... 98
Page 72
SikkerHetSinStrukSjoner
Les gjennom hele bruksanvisningen før du bruker vortexblanderen.
ADVARSEL! IKKE bruk vortexblanderen i farlige omgivelser eller sammen med
farlige materialer som ikke er beregnet for enheten. Brukeren må også være
oppmerksom på at beskyttelsen som leveres med utstyret, kan bli skadet dersom den brukes med tilbehør som ikke er levert eller anbefalt av produsenten,
eller hvis den brukes på en måte som ikke er spesifisert av produsenten.
Bruk alltid enheten på en flat overflate for best ytelse og maksimal sikkerhet.
IKKE løft vortexblanderen i hodet. Alle hoder, inkludert kopphodet, er avtak-
bare. De kan falle av hvis man løfter i dem.
FORSIKTIG! Koble strømforsyningen fra enheten ved å trekke ut ledningen
fra stikkontakten i veggen for å unngå elektrisk støt. Koble enheten fra strømforsyningen før vedlikehold og reparasjoner.
Søl skal tørkes opp umiddelbart. IKKE senk enheten ned i væske under
rengjøring.
IKKE bruk enheten dersom den viser tegn på elektrisk eller mekanisk skade.
Jordet – verneledertilkobling
Vekselstrøm
71
NO
StanDarDer og forSkrifter
Samsvar av følgende standarder og forskrifter er angitt med tilsvarende merket på produktet.
Merking Standarder og forskrifter
OHAUS Corporation erklærer at VXMN-serien miksere i samsvar med direktivene
2011/63/EU 2014/30/EU 2014/35/EU og standardene EN 50581, EN 61010-1, EN
61010-2-051, EN 61326-1.
Den fullstendige teksten i EU-erklæring er tilgjengelig på følgende internettadresse:
www.ohaus.com/ce.
Dette produktet er i samsvar med direktiv 2012/19/EU. Vennligst kast dette produktet
i henhold til lokale regler på samlepunkt spesifisert for elektrisk og elektronisk utstyr.
For deponering i Europa, se www.ohaus.com/weee.
EN 61326-1
CAN/CSA C22.2 61010-1, CAN/CSA C22.2 61010-2-051
UL 61010-1, UL 61010-2-051
Global Notice
Advarsel: Dette er et klasse A-produkt. I et hjemmemiljø kan dette produktet forårsake radioforstyrrelse
i så fall må brukeren ta nødvendige tiltak.
Canada Notice
Dette klasse A digitale apparatet er i samsvar med den kanadiske ICES-003.
FCC merknad
MERK: Dette utstyret er testet og funnet i samsvar med grensene for en klasse A digital enhet i henhold til del 15 av FCC-reglene. Disse grensene er utformet for å gi rimelig beskyttelse mot skadelig
interferens når utstyret brukes i et kommersielt miljø. Dette utstyret genererer, bruker og kan utstråle
radiofrekvensenergi, og hvis det ikke installeres og brukes i henhold til bruksanvisningen, kan det
forårsake skadelig interferens på radiokommunikasjon. Bruk av dette utstyret i et boligområde vil
sannsynligvis forårsake skadelig interferens i så fall vil brukeren bli bedt om å korrigere interferensen
på egen bekostning.
Endringer eller modifikasjoner som ikke er uttrykkelig godkjent av Ohaus Corporation, kan frata brukeren retten til å bruke utstyret.
Page 73
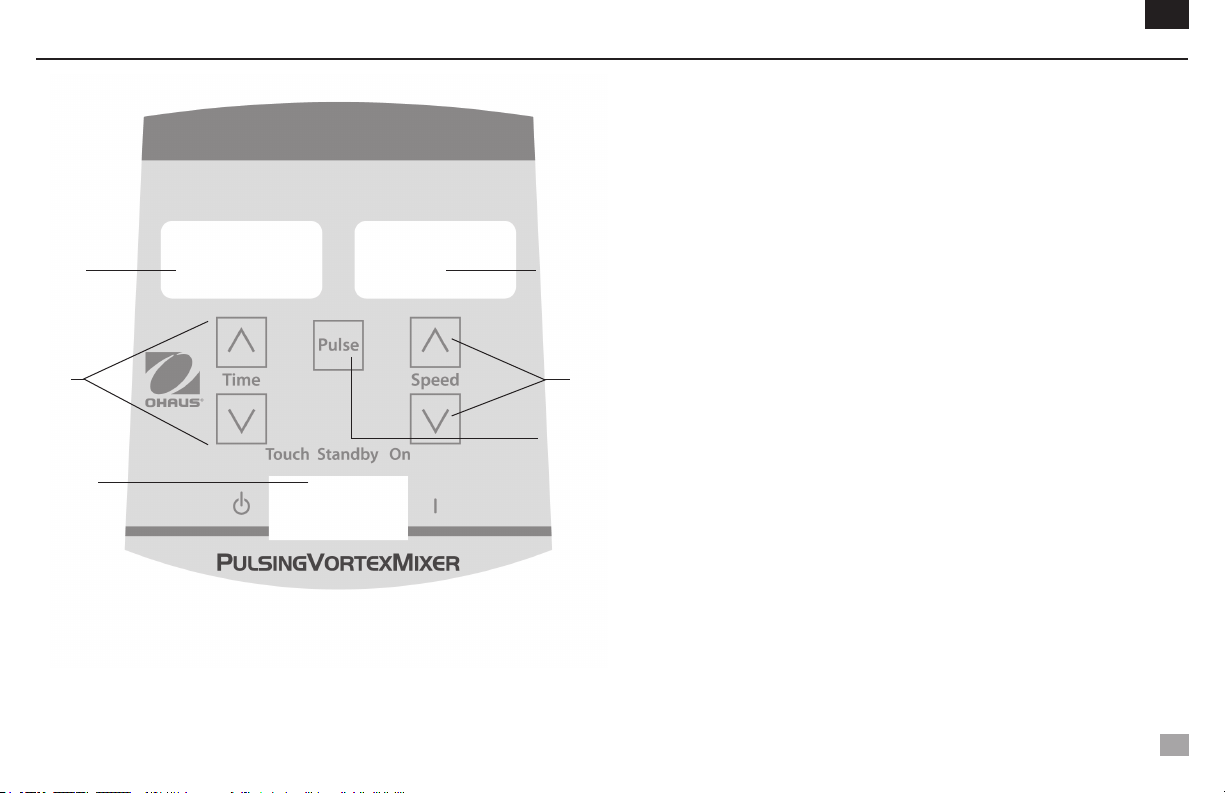
kontrollPanel – Digital og PulSering vortexmikSer
B
C
A
NO
Frontpanelet til den digital/pulsering Vortexmikser inneholder alle de brytere, kontroller
og displayer som er nødvendig for å betjene enheten.
A. 3-veis vippebryter: Auto-/standby-/på-vippebryter starter/stopper vortexfunk-
sjonen. Auto brukes til betjening i berøringsmodus og På brukes til betjening i
kontinuerlig modus.
B. Tidsdisplay: Viser akkumulert tid (kontinuerlig modus) eller hvor mye tid som
gjenstår (tidsbestemt modus). Displayområdet er fra 0 til 9999 minutter i trinn på
D
E
F
ett (1) sekund. Displayet viser minutter og sekunder til timeren når 99 minutter og
59 sekunder (99:59), så viser det automatisk minutter opptil 9999.
C. Opp-/nedpiler for innstilling av verdi.
D. Hastighetsdisplay: Viser hastigheten til Vortexmikser.
E. Opp-/nedpiler for innstilling av verdi.
F. Pulseringsknapp: Starter pulseringsmodus.
* Samme kontroller som for digital mini vortexmikser men uten pulsknappen.
72
Page 74
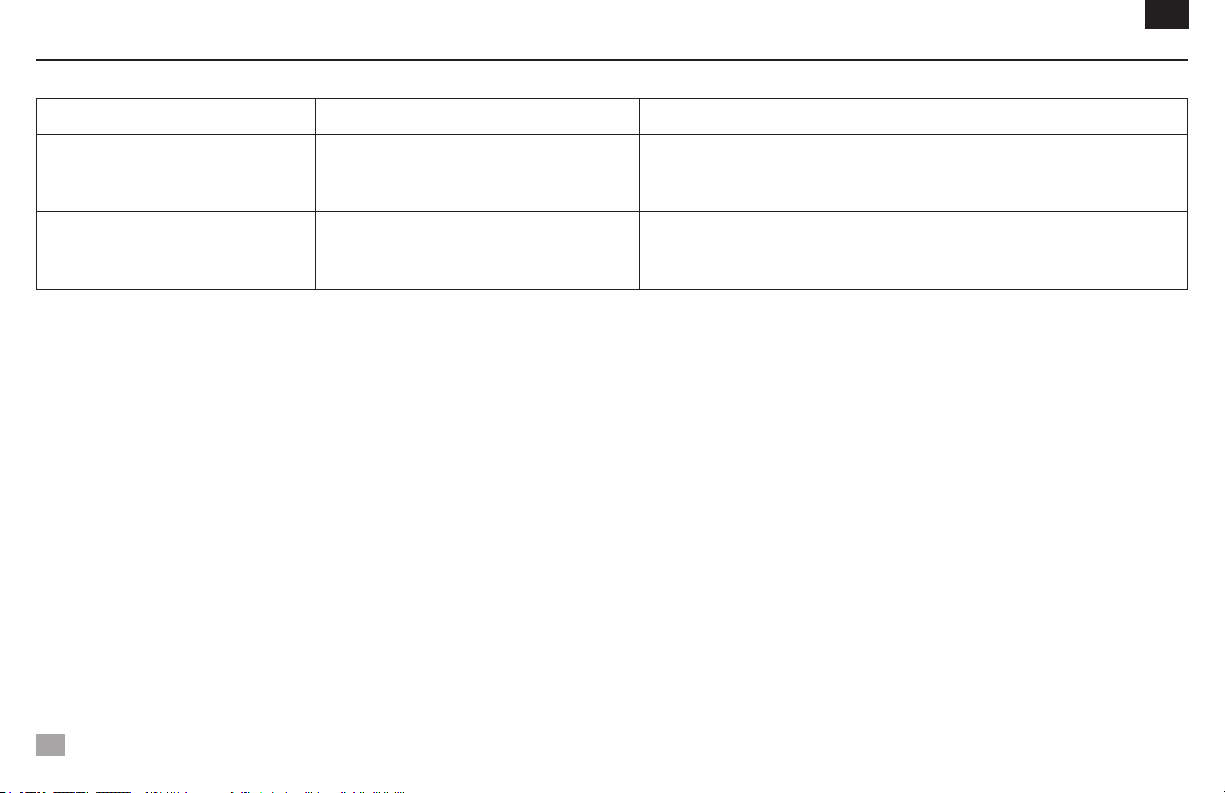
feilSøking
Problem Årsak Løsning
NO
Enheten kjører ikke.
Enheten lager unormalt mye støy.
Mekanisk hindring.
eller
Motorhindring
Sensorviften er skjev
eller
Motoren er skjev
Fjern hindringen og trykk ned kopphodet flere ganger for å kontrollere at det ikke
finnes flere hindringer.
Hvis problemet vedvarer, kontakt din Ohaus-representant for reparasjon.
Denne feilen kan ikke fikses av sluttbruker.
Kontakt din Ohaus-representant for reparasjon.
73
Page 75

Brugsanvisning
Vortex-mikser, Mini Fix Speed, VXMNFS
Vortex-mikser, Mini Analog, VXMNAL
Vortex-mikser, Mini Digital, VXMNDG
Vortex-mikser, Mini Pulsing, VXMNPS
74
EN - English ......... 1
FR - Français ......... 11
ES - Español ......... 22
IT - Italiano ......... 33
DE - Deutsch ......... 44
PT - Português ......... 55
NL - Nederlands ......... 66
NO - Norsk ......... 70
DA - Dansk ......... 74
SV - Svenska ......... 78
FI - Suomi ......... 82
HU - Magyar ......... 86
PL - Polski ......... 90
CZ - Czech ......... 94
KR - Korean ......... 98
Page 76
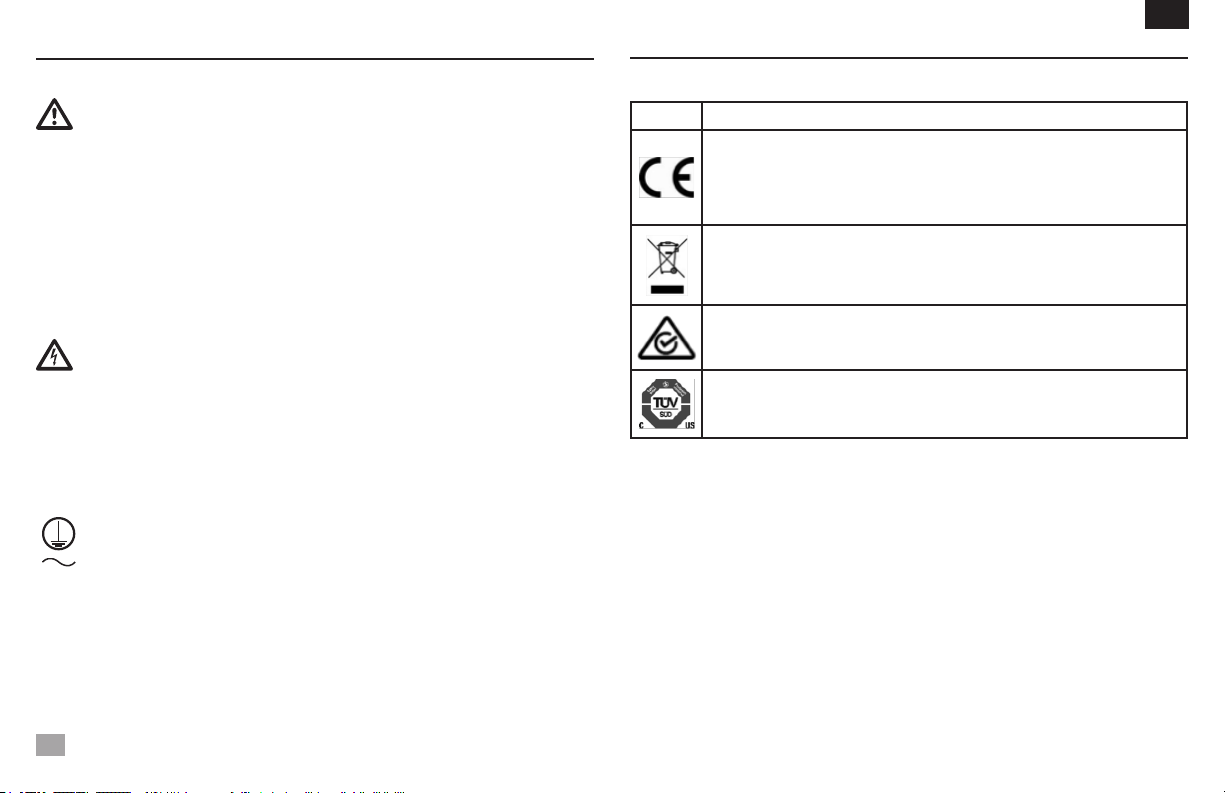
SikkerHeDSforSkrifter
Læs venligst hele brugsanvisningen inden Vortex Mikseren tages i brug.
WARNING! BRUG IKKE Vortex Mikseren varmeplade i en farlig omgivelse
eller med farlige materialer, som apparatet ikke er designet til. Brugeren bør
også være opmærksom på, at de sikkerhedsforanstaltninger, som apparatet
er udstyret med, kan forringes, hvis der anvendes tilbehør, der ikke er leveret
eller anbefalet af fabrikanten, eller hvis det anvendes på en anden måde end
fabrikanten har angivet.
Anvend kun apparatet på en plan overflade for at sikre den bedste ydeevne
og den maksimale sikkerhed.
LØFT IKKE Vortex Mikseren op i hovedet. Alle hoveder, inklusive kophoved,
er aftagelige. De kan springe af, hvis man løfter i dem.
FORSIGTIG! For at undgå elektrisk stød skal strømmen afbrydes ved at
frakoble ledningen fra apparatet eller trække stikket ud af stikkontakten.
Afbryd strømforsyningen til apparatet inden der foretages vedligeholdelse
eller service.
Spild bør fjernes omgående. NEDSÆNK IKKE apparatet i vand ved rengøring.
ANVEND IKKE apparatet, hvis det viser tegn på elektrisk eller mekanisk beska-
digelse.
Jordklemme til beskyttelsesledere
Vekselstrøm
75
DA
StanDarDer og regler
Overensstemmelse med følgende standarder og regler er angivet med det tilsvarende mærke
på produktet.
Mark Standarder og regler
OHAUS Corporation erklærer, at VXMN-serien mixere overholde direktiverne 2011/63/
EU, 2014/30/EU, 2014/35/EU og standarderne EN 50581, EN 61010-1, EN 61010-2051, EN 61326-1.
EU-overensstemmelseserklæringens fulde tekst kan findes på følgende internetadresse: www.ohaus.com/ce.
Dette produkt er i overensstemmelse med EU-direktiv 2012/19/EU. Bortskaf dette
produkt i overensstemmelse med lokale regler på samlingspunktet angivet for elektrisk
og elektronisk udstyr.
For instruktioner bortskaffelse i Europa, se www.ohaus.com/weee.
EN 61326-1
CAN/CSA C22.2 61010-1, CAN/CSA C22.2 61010-2-051
UL 61010-1, UL 61010-2-051
Global Notice
Advarsel: Dette er et klasse A-produkt. I private hjem kan dette produkt forårsage radio forstyrrelse i
hvilket tilfælde brugeren kan være nødvendigt at træffe passende foranstaltninger.
Canada Notice
Dette klasse A digitale apparat overholder den canadiske ICES-003.
Notice FCC
BEMÆRK: Dette udstyr er blevet testet og fundet i overensstemmelse med grænserne for en Klasse
A digital enhed i henhold til afsnit 15 i FCC-reglerne. Disse grænser er designet til at give en rimelig
beskyttelse mod skadelig interferens, når udstyret betjenes i et kommercielt miljø. Dette udstyr genererer, bruger og kan udstråle radiofrekvensenergi, og hvis det ikke installeres og bruges i overensstemmelse med brugsanvisningen, forårsage skadelig interferens med radiokommunikation. Brug af dette
udstyr i et boligområde vil sandsynligvis forårsage skadelig interferens, i hvilket tilfælde brugeren vil
være forpligtet til at afhjælpe interferensen for egen regning.
Ændringer eller modifikationer, der ikke udtrykkeligt er godkendt af Ohaus Corporation, kan ophæve
brugerens ret til at betjene udstyret.
Page 77
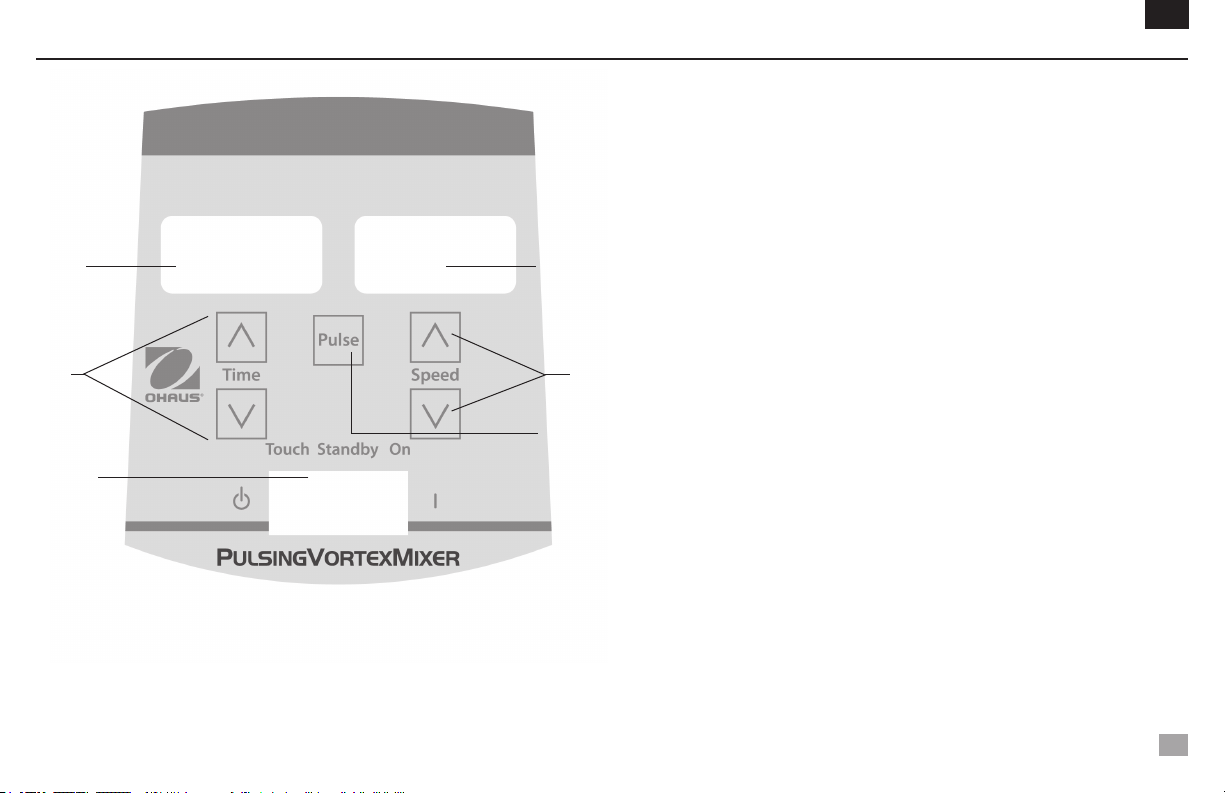
betjeningS Panel - Digital & PulSing vortex-mikSer
B
C
A
DA
Betjeningspanelet på den Digitale/Pulsing Vortex-Mikser er udstyret med alle kontakter, knapper og displays, der er nødvendige for at betjene apparatet.
A. 3-vejs vippekontakt: Auto/standby/tænd vippekontakt starter/stopper vortex
rystefunktionen. Auto bruges til manuel indstilling og tænd bruges til kontinuerlig
funktion.
B. Timer: Viser akkumuleret tid (kontinuerlig funktion) eller resterende tid (tidsind-
stillet funktion). Programmerbar fra 0 til 9999 minutter med et (1) sekund interval.
Displayet viser minutter og sekunder indtil tælleren når til 99 minutter og 59
D
E
F
sekunder (99:59), derefter vil displayet automatisk vise minutter frem til 9999.
C. Pile op/ned til tidsindstilling.
D. Hastigheds display: Viser Vortex-Mikserens hastighed.
E. Pile op/ned til hastighedsindstilling.
F. Pulserings knap: Starter pulseringsfunktionen.
* Samme betjening på Digital Mini Vortex-mikseren, bare uden ‘puls’-knappen.
76
Page 78
ProblemløSning
Problem Årsag Løsning
DA
Apparatet vil ikke fungere
Apparatet støjer overdrevent
Mekanisk blokering
eller Motor fejl
Sensor ventilator ude af position
eller Motor ude af position
Fjern blokeringen og tryk kophovedet ned flere gange for at sikre, at blokeringen er
væk.
Kontakt venligst din Ohaus repræsentant for reparation, hvis problemet varer ved.
Dette problem kan ikke løses af brugeren.
Kontakt venligst en Ohaus repræsentant for reparation.
77
Page 79

Bruksanvisning
Virvelblandare, mini fast hastighet, VXMNFS
Virvelblandare, mini analog, VXMNAL
Virvelblandare, mini digital, VXMNDG
Virvelblandare, mini vibrering, VXMNPS
78
EN - English ......... 1
FR - Français ......... 11
ES - Español ......... 22
IT - Italiano ......... 33
DE - Deutsch ......... 44
PT - Português ......... 55
NL - Nederlands ......... 66
NO - Norsk ......... 70
DA - Dansk ......... 74
SV - Svenska ......... 78
FI - Suomi ......... 82
HU - Magyar ......... 86
PL - Polski ......... 90
CZ - Czech ......... 94
KR - Korean ......... 98
Page 80
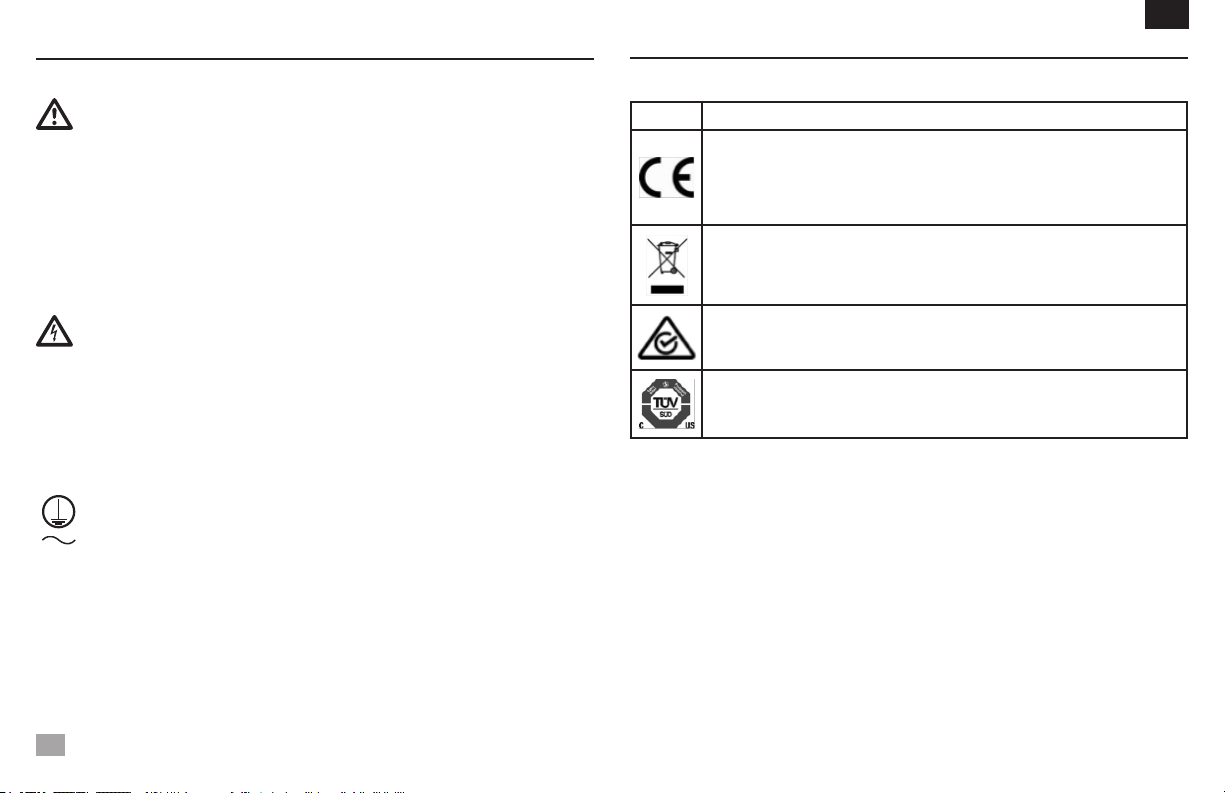
SäkerHetSföreSkrifter
Läs igenom hela bruksanvisningen innan du börjar använda vortexblandaren.
VARNING! Använd inte vortexblandaren i skadliga miljöer eller tillsammans
med skadliga ämnen för vilka produkten inte är avsedd. Notera även att utrustningens inbyggda säkerhetsfunktioner kan påverkas negativt om andra tillbehör
än de medföljande eller de av tillverkaren rekommenderade används, eller om
godkända tillbehör används på annat sätt än vad tillverkaren föreskriver.
Placera alltid produkten på jämnt underlag för att få bästa prestanda och
högsta möjliga säkerhet.
Lyft inte vortexblandaren i hållaren. Alla hållare, inklusive skålfästet, är löstagbara. De kan lossna om de används som handtag.
VARNING! Bryt strömförsörjningen fullständigt genom att dra ur nätsladden
ur vägguttaget. För att undvika elstötar ska strömförsörjningen alltid brytas
fullständigt före underhåll och reparation.
Avlägsna eventuellt spill omedelbart. Produkten får inte doppas i vätska vid
rengöring.
Använd INTE produkten om den uppvisar tecken på elektrisk eller mekanisk
skada.
Jordning – skyddsledaruttag
Växelström
79
SV
StanDarDer ocH föreSkrifter
Överensstämmelse med följande standarder och föreskrifter anges med motsvarande markering
på produkten.
Märke Standarder och föreskrifter
OHAUS Corporation förklarar att VXMN-serien blandaren överensstämmer med
direktiven 2011/63/EU, 2014/30/EU, 2014/35/EU och de standarder EN 50581, EN
61010-1, EN 61010-2-051, EN 61326-1.
Den fullständiga texten till EU-försäkran om överensstämmelse finns på följande webbadress: www.ohaus.com/ce.
Denna produkt överensstämmer med EU Direktiv 2012/19/EU. Vänligen kassera
denna produkt i enlighet med lokala föreskrifter vid uppsamlingspunkten angiven för
elektrisk och elektronisk utrustning.
För kasserings instruktioner i Europa referera till www.ohaus.com/weee.
EN 61326-1
CAN/CSA C22.2 61010-1, CAN/CSA C22.2 61010-2-051
UL 61010-1, UL 61010-2-051
global Observera
Varning: Detta är en klass A-produkt. I hemmiljö kan denna produkt orsaka radio störningar i vilket fall
användaren kan behöva vidta lämpliga åtgärder.
Kanada Observera
Denna klass A digitala apparat överensstämmer med kanadensiska ICES-003.
FCC-meddelande
OBS: Denna utrustning har testats och befunnits uppfylla gränserna för en klass A digital enhet, i
enlighet med del 15 av FCC-reglerna. Dessa gränser är utformade för att ge rimligt skydd mot skadliga
störningar när utrustningen används i en kommersiell miljö. Denna utrustning genererar, använder
och kan utstråla radiofrekvent energi och om den inte installeras och används i enlighet med bruksanvisningen, kan den orsaka störningar på radiokommunikation. Användning av denna utrustning i ett
bostadsområde kommer sannolikt att orsaka störningar i vilket fall användaren kommer att krävas för
att korrigera störningen på egen bekostnad.
Ändringar eller modifieringar som inte uttryckligen har godkänts av Ohaus Corporation kan upphäva
användarens rätt att använda utrustningen.
Page 81
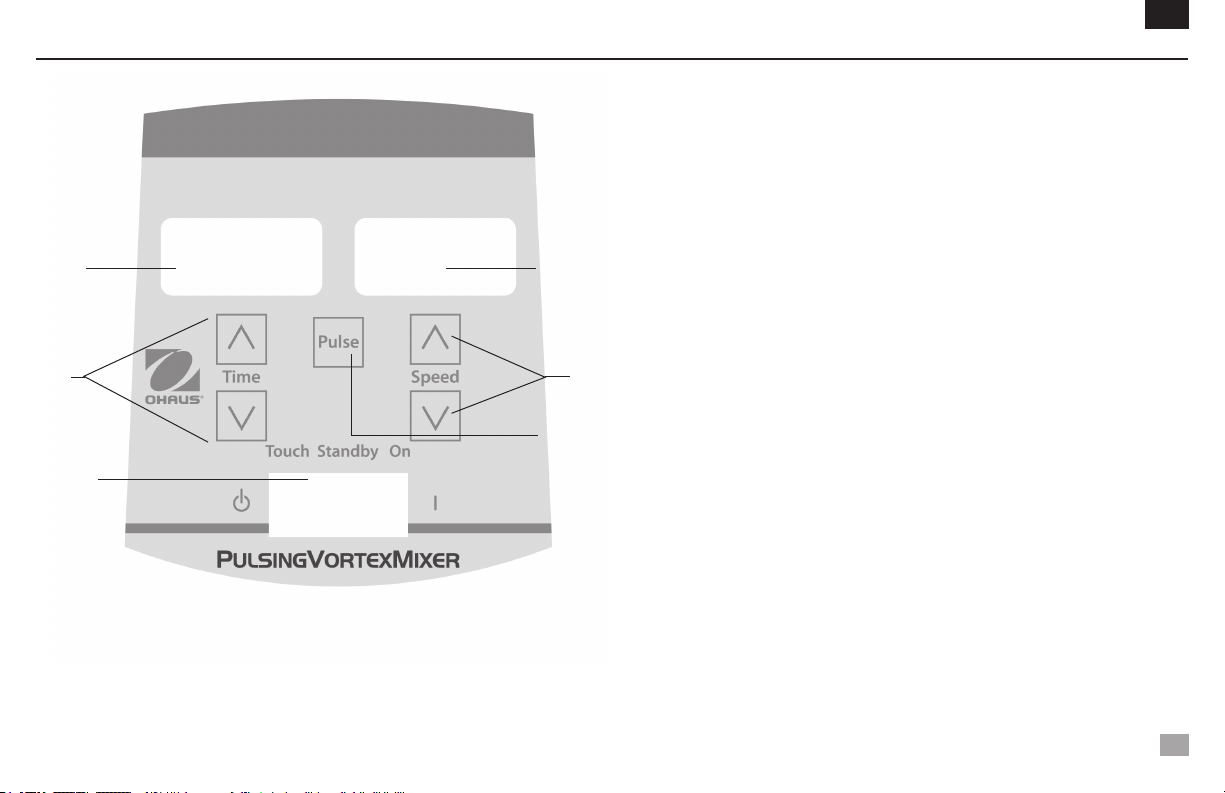
kontrollPanel – Digital ocH vibrering virvelblanDare
B
C
A
SV
På den digitala/vibrering Virvelblandare frontpanel sitter alla de brytare, kontroller och
teckenfönster som behövs för att använda utrustningen.
A. Strömbrytare med tre lägen: Strömbrytaren sätter på respektive stänger av
vortexblandaren samt aktiverar autoläge och standbyläge. Autoläget används vid
manuell drift och standardläget används vid kontinuerlig drift.
B. Teckenfönster för tidsangivelse: Visar sammanlagd tid (kontinuerligt läge) eller
återstående tid (tidsinställt läge). Tillgängligt intervall är från 0 till 9999 minuter,
med en (1) sekunds noggrannhet. Teckenfönstret visar minuter och sekunder upp
D
E
F
till 99 minuter och 59 sekunder (99:59), varpå det automatiskt övergår till att visa
minuter upp till 9999.
C. Piltangenter för inställning av önskad temperatur.
D. Teckenfönster för hastighet: Visar Virvelblandare hastighet.
E. Piltangenter upp/ned för inställning av önskat värde.
F. Pulsknapp: Aktiverar pulsläget.
* Samma kontroller för digital mini virvelblandare men utan “vibrerings”knappen.
80
Page 82
felSökning
Problem Orsak Åtgärd
SV
Utrustningen startar inte
Utrustningen låter ovanligt mycket
Mekaniskt hinder
eller
Motorfel
Felriktad sensorfläkt
eller
Felriktad motor
Avlägsna hindret och tryck upprepade gånger på hållaren för att försäkra dig om att
alla hinder är borta.
Kontakta din Ohaus-representant om problemet kvarstår och reparation krävs.
Det här felet kan inte åtgärdas av användaren.
Kontakta din Ohaus-representant för att begära reparation.
81
Page 83

Käyttöohje
Vortex-sekoitin, mini vakionopeuksellinen, VXMNFS
Vortex-sekoitin, mini analoginen, VXMNAL
Vortex-sekoitin, mini digitaalinen, VXMNDG
Vortex-sekoitin, mini sykäyksellinen, VXMNPS
82
EN - English ......... 1
FR - Français ......... 11
ES - Español ......... 22
IT - Italiano ......... 33
DE - Deutsch ......... 44
PT - Português ......... 55
NL - Nederlands ......... 66
NO - Norsk ......... 70
DA - Dansk ......... 74
SV - Svenska ......... 78
FI - Suomi ......... 82
HU - Magyar ......... 86
PL - Polski ......... 90
CZ - Czech ......... 94
KR - Korean ......... 98
Page 84
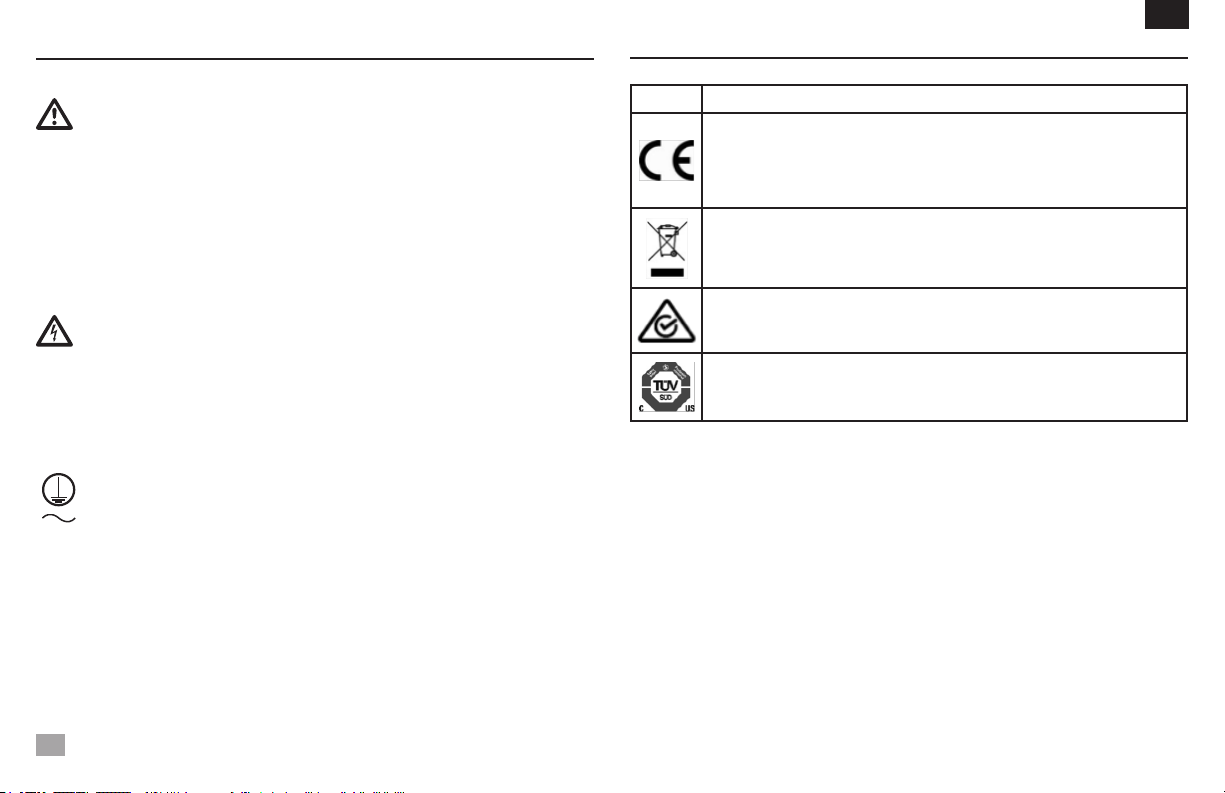
turvalliSuuSoHjeet
Luote koko ohjekirja ennen Vortex-sekoittimen käyttöä.
VAROITUS! ÄLÄ käytä Vortex-sekoitinta vaarallisissa ympäristöissä tai vaarallisten materiaalien kanssa,joille laitetta ei ole suunniteltu. Käyttäjän tulee myös
huomata, että laitteiston tarjoama suojaus saattaa vikaantua, jos sitä käytetään
lisälaitteilla, jotka eivät ole valmistajan tarjoamia tai suosittelemia, tai jos laitetta
käytetään laitteen valmistajan ohjeiden vastaisesti.
Käytä laitetta tasaisella pinnalla saadaksesi parhaan suorituskyvyn ja maksimoidaksesi turvallisuuden.
Älä nosta Vortex-sekoittajaa yläosasta. Kaikki päät, myös kupin pää ovat
irrotettavia. Ne voivat irrota, jos laitetta nostetaan niistä.
HUOMAUTUS! Välttääksesi sähköiskun vaaran, sammuta laitteen virta kokonaan irrottamalla virtajohto laitteesta tai irrota laite pistorasiasta. Irrota laite
virtalähteestä ennen ylläpitotoimia ja huoltoa.
Roiskeet tulee poistaa välittömästi. Älä upota laitetta veteen puhdistamista
varten.
ÄLÄ käytä laitetta jos siinä vaikuttaa olevan sähköisiä tai mekaanisia vikoja.
Suojamaa - rasialiitin
Vaihtovirta
83
FI
StanDarDien ja määräySten
Noudattaminen seuraavien standardien ja määräysten osoitetaan vastaava merkintä tuotteen.
Merkki Standardien ja määräysten
OHAUS Corporation vakuuttaa, että VXMN sarja sekoittimet noudatettava direktiivien 2011/63/EU 2014/30/EU 2014/35/EU ja standardien EN 50581, EN 61010-1, EN
61010-2-051, EN 61326-1.
EU-vaatimustenmukaisuusvakuutuksen täysimittainen teksti on saatavilla seuraavassa
internetosoitteessa: www.ohaus.com/ce.
Tämä tuote täyttää direktiivin 2012/19/EU. Hävitä tuote paikallisten määräysten
mukaisesti on keruupisteeseen määritelty sähkö- ja elektroniikkalaitteissa.
Hävitysohjeet Euroopassa, katso www.ohaus.com/weee.
EN 61326-1
CAN/CSA C22.2 61010-1, CAN/CSA C22.2 61010-2-051
UL 61010-1, UL 61010-2-051
Global Notice
Varoitus: Tämä on luokan A tuote. Kotikäytössä tämä tuote saattaa häiritä radiolaitteita jolloin käyttäjä
voi ryhtyä tarvittaviin toimenpiteisiin.
Kanadassa Huomio
Tämä luokan A digitaalinen laite on kanadalaisen ICES-003.
FCC
HUOMAUTUS: Tämä laite on testattu ja todettu noudattavan luokan A digitaalisille laitteille kohdan 15
FCC Rules. Nämä rajat on suunniteltu antamaan kohtuullinen suoja haitallisia häiriöitä vastaan, kun
laitetta käytetään kaupallisessa ympäristöön. Tämä laite tuottaa, käyttää ja voi säteillä radiotaajuista
energiaa ja jos sitä ei asenneta ja käytetä ohjeiden mukaisesti manuaalinen, se voi aiheuttaa häiriöitä
radioliikenteelle. Tämän laitteen käyttö asuinalueella aiheuttaa todennäköisesti haitallisia häiriöitä, jolloin käyttäjän on korjattava häiriö omalla kustannuksellaan.
Laitteen muuttaminen ei ole nimenomaisesti hyväksynyt Ohaus Corporation voivat mitätöidä käyttäjän
oikeuden käyttää laitetta.
Page 85
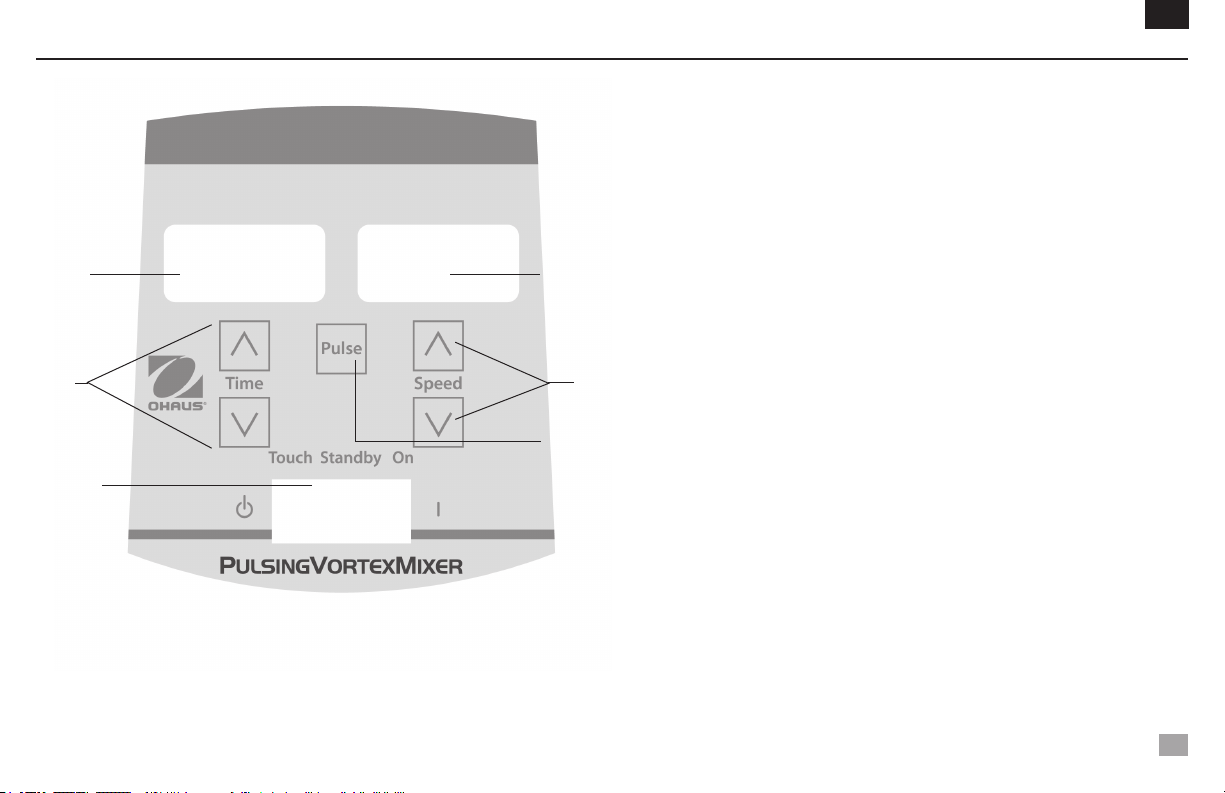
HallintaPaneeli - Digitaalinen & SykäykSellinen vortex-Sekoittaja
B
C
A
D
E
F
FI
Digitaalisen/sykäyksellinen Vortex-sekoitin etupaneelissa ovat kaikki kytkimet,
ohjai´met ja näytöt, joita laitteen käyttämiseen tarvitaan.
A. 3-suuntainen keinukytkin: Auto/valmiustila/päällä keinukytkin käynnistää/sam-
muttaa laitteen toiminnon. “Auto”-toimintoa käytetään kosketustilan käyttöön ja
“päällä” -toimintoa käytteätän jatkuvaan käyttöön.
B. Aikanäyttö: Näyttää kuluneen ajan (jatkuvassa tilassa) tai kuinka paljon aikaa on
jäljellä (ajastettu tila). Näyttöalue on 0-9999 minuutin alueella yhden (1) sekunnin
osissa. Näyttö osoittaa minuutit ja skunnit, kunnes ajastin näyttää 99 minuuttia ja
59 sekuntia (99:59), sitten näyttö näyttää minuutit automaattisesti 9999 asti.
C. Nuolet ylös/alas asetusarvon hallitsemiseksi.
D. Nopeusnäyttö: Näyttää Vortex-sekoitin nopeuden.
E. Nuolet ylös/alas asetusarvon hallitsemiseksi.
F. Sykäyspainike: Käynnistää sykkivän tilan.
* Digitaalisella mini vortex-sekoittimella on samat ohjaintoiminnot ilman
pulssipainiketta.
84
Page 86
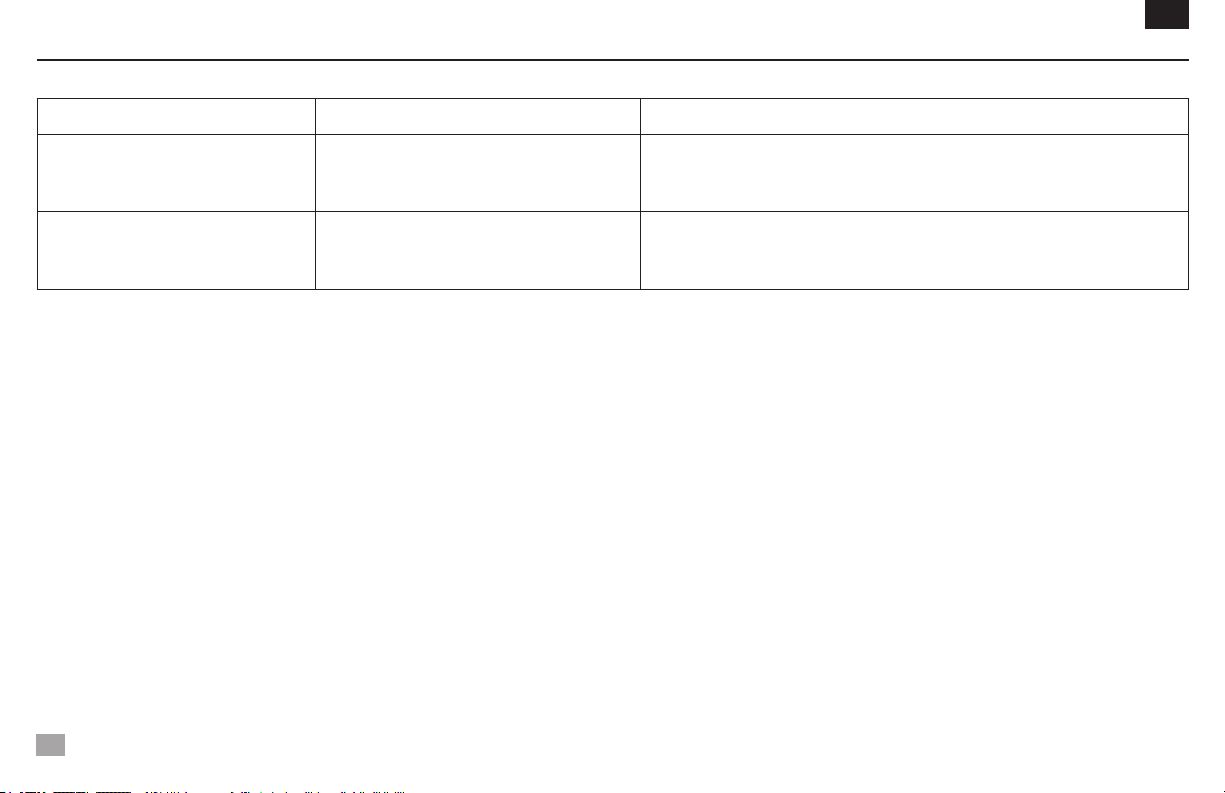
vianetSintä
Ongelma Syy Ratkaisu
Poista este ja paina kupin päätä alas useamman kerran vahvistaaksesi, ettei estettä
Laite ei käynnisty Mekaaninen tai este
Anturin tuuletin väärin suunnattu tai moottori
Laite on liian äänekäs
väärin suunnattu
enää ole.
Jos ongelma jatkuu, ota yhteyttä Ohaus-edustajaan korjauksen järjestämiseksi.
Käyttäjä ei voi korjata tätä vikaa.
Ota yhteyttä Ohaus-edustajaan korjauksen järjestämiseksi.
FI
85
Page 87

Használati utasítás
Vortexkeverő,mini,fixsebességű,VXMNFS
Vortexkeverő,mini,analóg,VXMNAL
Vortexkeverő,mini,digitális,VXMNDG
Vortexkeverő,mini,pulzáló,VXMNPS
86
EN - English ......... 1
FR - Français ......... 11
ES - Español ......... 22
IT - Italiano ......... 33
DE - Deutsch ......... 44
PT - Português ......... 55
NL - Nederlands ......... 66
NO - Norsk ......... 70
DA - Dansk ......... 74
SV - Svenska ......... 78
FI - Suomi ......... 82
HU - Magyar ......... 86
PL - Polski ......... 90
CZ - Czech ......... 94
KR - Korean ......... 98
Page 88
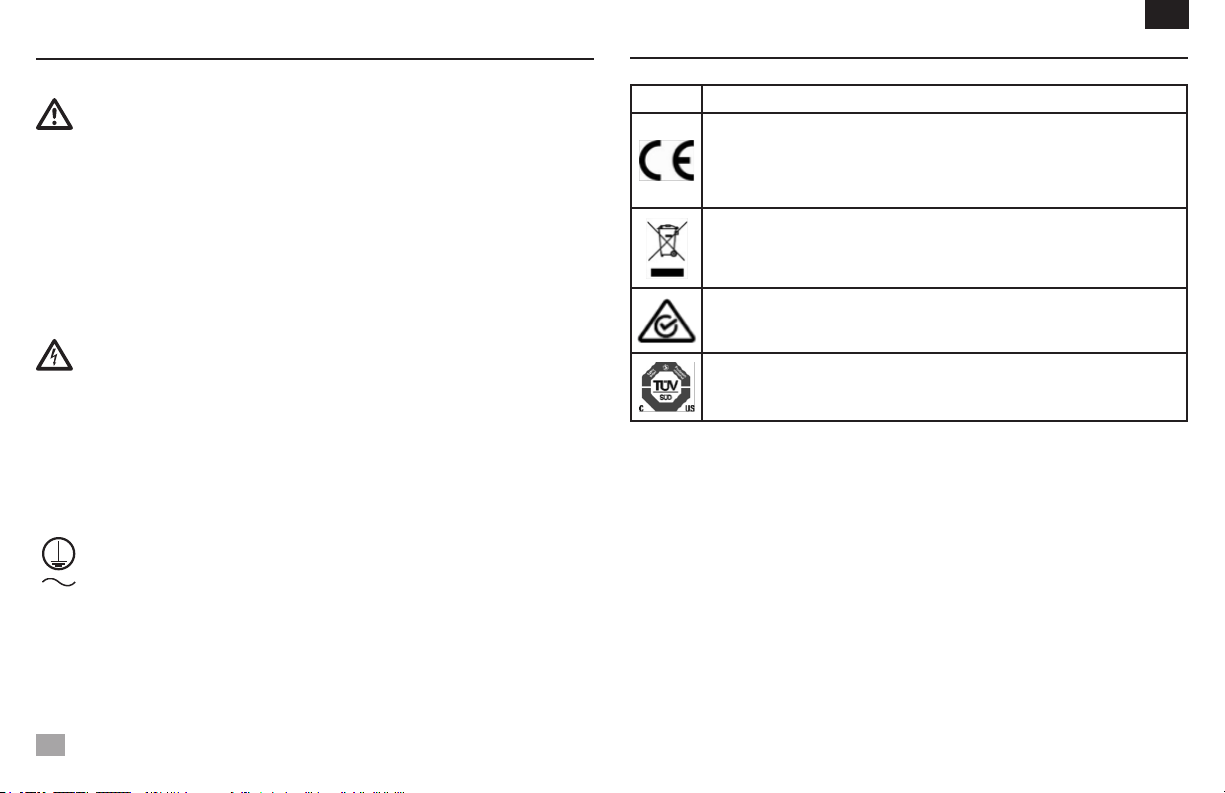
biztonSági utaSÍtáSok
Kérjük, a vortex keverő működtetés előtt olvassa végig a használati utasítást.
FIGYELMEZTETÉS! Ne használja a vortex keverőt veszélyes környezetben,
vagy olyan veszélyes anyagokkal, amelyek nem felelnek meg a készülék
rendeltetésének. A felhasználónak tisztában kell lennie azzal is, hogy a berendezés biztonságosságát hátrányosan befolyásolhatja a gyártó által nem javasolt
tartozékok használata, vagy ha az alkalmazás nem a gyártó előírásai szerint
történik.
A legjobb teljesítmény és a maximális biztonság érdekében a készüléket
mindig vízszintes felületen működtesse.
A vortex keverőt ne a fejnél fogva emelje fel. Az összes fej eltávolítható, a
félgömbfejet is beleértve. Kijöhetnek, ha azoknál fogva emeli fel a készüléket.
VIGYÁZAT! Az áramütések elkerülése érdekében, kapcsolja le teljesen a
készülékhez vezető áramot úgy, hogy a hálózati kábelt kihúzza a fali konnektorból. Karbantartási vagy szervizelési munkák végzése előtt kapcsolja
ki a készülék áramellátását.
A kiömlött anyagokat azonnal el kell távolítani. Tisztításhoz a készüléket ne
merítse bele a vízbe.
NE működtesse a készüléket, ha azon elektromos vagy mechanikai sérülésekre
utaló jelek láthatók.
Földelt – védővezető csatlakozó
Váltakozó áram
87
HU
Szabványok éS SzabályozáSok
Megfelelésazalábbiszabványoknakésszabályozásokjelziamegfelelőjeletaterméken.
Jelölés Szabványok és szabályozások
OHAUSCorporationigazolja, hogy aVXMNsorozat keverők megfelelnekazirányelvek 2011/63/EU, 2014/30/EU, 2014/35/EU és a szabványok EN 50581, EN 61010-1,
EN 61010-2-051, EN 61326-1.
AzEU-megfelelőséginyilatkozatteljesszövegeelérhetőakövetkezőinternetescímen:
www.ohaus.com/ce.
Ez a termék megfelel a 2012/19/EU irányelv. Kérjük, hogy ezt a terméket a helyi
előírásoknak megfelelően a kijelölt gyűjtőhelyen az elektromos és elektronikus
berendezések.
Az ártalmatlanításra vonatkozó utasításokat Európában, lásd www.ohaus.com/weee.
EN 61326-1
CAN/CSA C22.2 61010-1, CAN/CSA C22.2 61010-2-051
UL 61010-1, UL 61010-2-051
globális közlemény
Figyelem: Ez egy A osztályú termék. Otthoni környezetben a termék okozhat rádiófrekvenciás interfer-
enciát,amelyesetbenafelhasználónakmegkelltennieamegfelelőintézkedéseket.
Kanada közlemény
Ez az A osztályú digitális berendezés megfelel a kanadai ICES-003 szabványnak.
FCC-nyilatkozat
Megjegyzés: Ez a berendezés a vizsgálata során köteles betartani az A osztályú digitális eszközökre
15.részeszerintazFCCszabályok.Ezeketahatárértékeketúgytervezték,hogymegfelelővédelmet
nyújtsanak a káros interferencia ellen, ha a berendezést üzemeltetni kereskedelmi környezetben.
Ez a berendezés generál, használ és sugározhat rádió frekvenciás energiát, és ha nincs telepítve,
és megfelelően használják fel a használati utasítás, káros interferenciát okozhat a rádió kommunikációban.Aberendezésműködtetéselakott területenvalószínűlegkárosinterferenciátokoz,amely
esetben a felhasználónak kell elhárítani az interferenciát a saját költségén.
Változtatások vagy módosítások által nem kifejezetten jóváhagyott Ohaus Corporation érvénytelení-
thetiafelhasználójogosultságátaberendezésműködtetésére.
Page 89
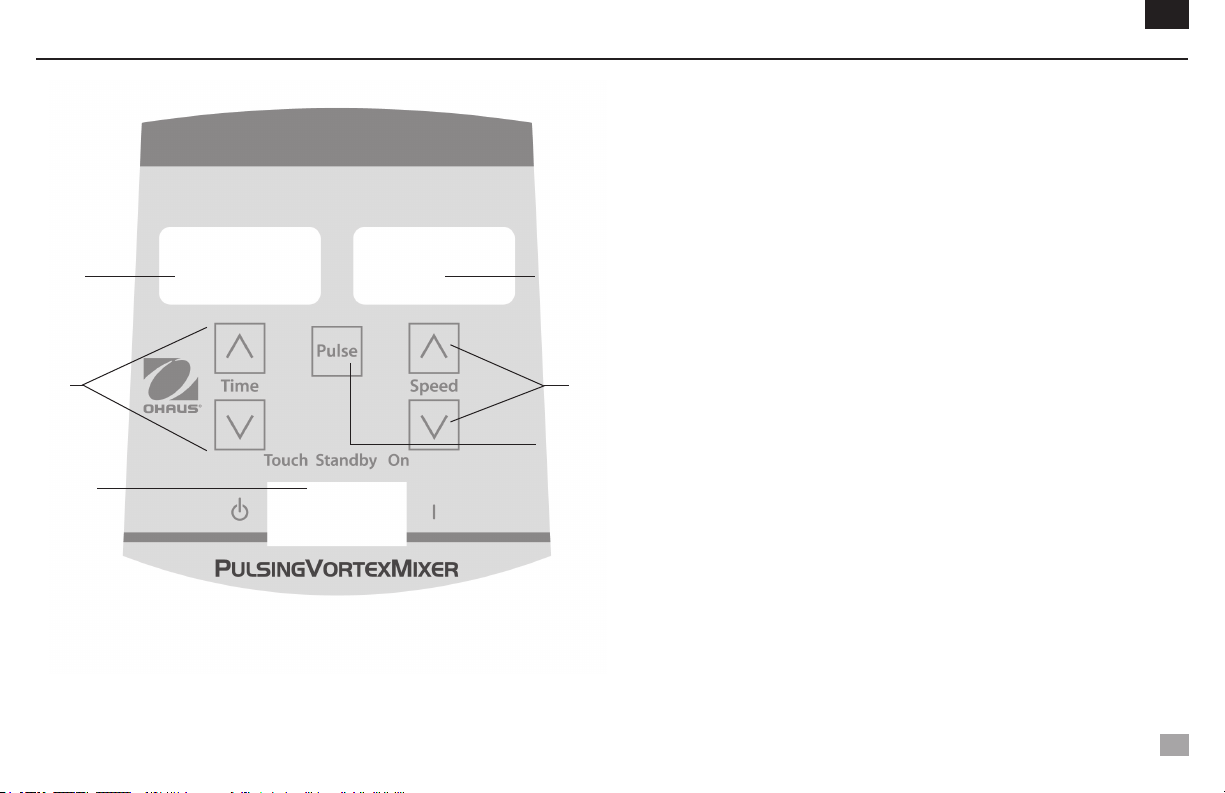
Vezérlőpanel – Digitális és pulzáló Vortex keVerő
B
C
A
HU
A digitális/ pulzáló Vortex keverő előlapja magában foglalja az összes kapcsolót,
vezérlőt és kijelzőt, amely a készülék működtetéséhez szükséges.
A. 3-utas billenőkapcsoló: Az auto/ standby/ be billenőkapcsoló beindítja/ leál-
lítja az örvénylő funkciót. Az „Auto” pozíció használható az érintő üzemmódú
működéshez, és a “Be” a folyamatos üzemmódú működéshez.
B. Idő kijelző: Kijelzi az eltelt időt (folyamatos üzemmód) vagy a még hátralévő
időt (időzítési üzemmód). A kijelzési tartomány 0 és 9999 perc között van, egy
D
E
F
(1) másodperces növekedéssel. A kijelző perceket és másodperceket jelenít
meg, amíg az időzítő el nem éri a 99 perc és 59 másodperc (99:59) pontot, ezt
követően a kijelző automatikusan perceket fog megjeleníteni a 9999 értékig.
C. Fel/le nyilak a megadott értékek beállításához.
D. Sebesség kijelző: Kijelzi a Vortexkeverőgép sebességét.
E. Fel/le nyilak a megadott értékek beállításához.
F. Impulzus gomb: Beindítja a pulzáló üzemmódot.
* A digitális mini vortex keverővel azonos vezérlés, a „pulzáló” gomb nélkül.
88
Page 90
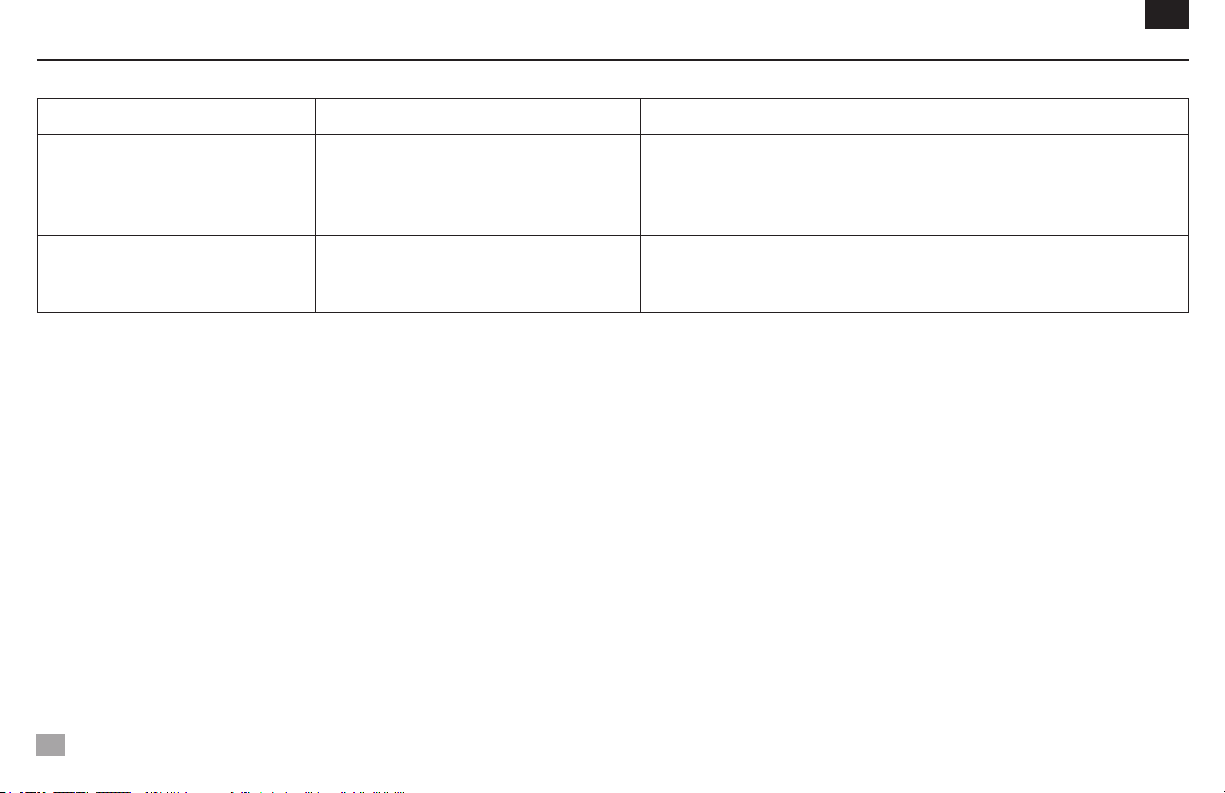
HibaelHárÍtáS
Probléma Ok Megoldás
Távolítsa el az akadályt, és nyomja le néhányszor a annak megerősítésére, hogy
már nincsen akadály.
Ha a probléma továbbra is fennáll, lépjen kapcsolatba Ohaus képviselőjével a javítás
ügyében
Készülék nem működik
Mechanikai akadály félgömbfejet
Motor akadályoztatása
HU
Készülék túlzottan zajos
89
Szenzor ventilátor illesztése hibás vagy
Motor illesztése hibás
A végső felhasználó nem tudja elhárítani ezt a hibát.
Kérjük, lépjen kapcsolatba Ohaus képviselőjével a javítás ügyében.
Page 91

Instrukcja obsługi
Mieszadłowirowe,Miniostałejprędkości,VXMNFS
Mieszadłowirowe,Minianalogowe,VXMNAL
Mieszadłowirowe,Minicyfrowe,VXMNDG
Mieszadłowirowe,Miniimpulsowe,VXMNPS
90
EN - English ......... 1
FR - Français ......... 11
ES - Español ......... 22
IT - Italiano ......... 33
DE - Deutsch ......... 44
PT - Português ......... 55
NL - Nederlands ......... 66
NO - Norsk ......... 70
DA - Dansk ......... 74
SV - Svenska ......... 78
FI - Suomi ......... 82
HU - Magyar ......... 86
PL - Polski ......... 90
CZ - Czech ......... 94
KR - Korean ......... 98
Page 92
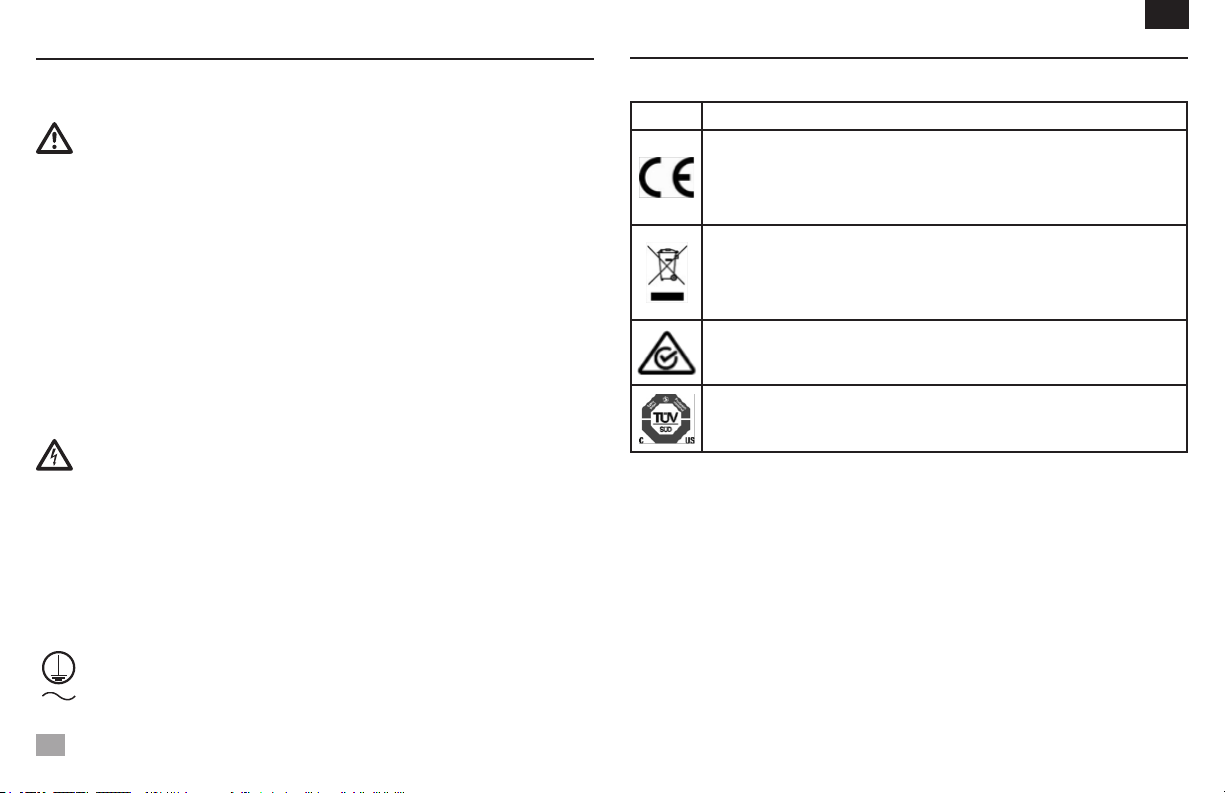
zalecenia bezpieczeństwa
Przed przystąpieniem do obsługi mieszarek Vortex prosimy uważnie przeczytać całą
instrukcję obsługi.
OSTRZEŻENIE Mieszarek Vortex nie wolno stosować w atmosferze niebezpiec-
znej ani nie wolno w urządzeniu tym stosować materiałów niebezpiecznych, do
mieszania których nie jest ono przeznaczone. Należy także mieć świadomość
faktu, że ochrona zapewniana przez urządzenie może ulec pogorszeniu w
przypadku, jeżeli urządzenie to będzie stosowane wraz z akcesoriami, które nie
są dostarczane lub zalecane do stosowania przez producenta urządzenia lub
jeżeli urządzenie to będzie stosowane w sposób nie wyspecyfikowany przez
producenta.
W celu zapewnienia jak najlepszej jakości pracy oraz najwyższego poziomu
bezpieczeństwa, urządzenie to należy w czasie użytkowania zawsze ustawiać
na wypoziomowanej powierzchni.
Mieszarki Vortex nie wolno podnosić za głowicę. Wszystkie głowice, włącznie
z przyssawkowymi, są zdejmowane. Jeżeli urządzenie będzie trzymane za
głowicę, wówczas w czasie podnoszenia może się ona wysunąć z zaczepów.
OSTROŻNIE! W celu uniknięcia porażenia elektrycznego należy całkowicie
odciąć napięcie zasilania poprzez odłączenie elektrycznego kabla zasilającego
od gniazdka ściennego. Przed przystąpieniem do wykonywania czynności
konserwacyjnych lub serwisowych należy wpierw odłączyć urządzenie od
zasilania elektrycznego.
Wszelkie rozlewy należy bezzwłocznie usuwać. Urządzenia nie wolno zanurzać
w celu czyszczenia w żadnej cieczy.
Jeżeli urządzenie będzie wykazywać jakiekolwiek oznaki uszkodzenia mechanicz-
nego lub elektrycznego NIE WOLNO przystępować do jego użytkowania.
Zacisk uziemiający – zacisk przewodu ochronnego
Prąd zmienny
91
PL
normy i PrzePiSy
Wymienione niżej oznaczeniawskazująnazgodnośćurządzeniaz wymienionymi normami i
przepisy.
Znak Normy i przepisy
OHAUS Corporation deklaruje, że Seria VXMN miksery zgodne z dyrektywami
2011/63/UE, 2014/30/UE, 2014/35/UE oraz normy EN 50581, EN 61010-1, EN 610102-051, EN 61326-1.
Pełnytekst deklaracjizgodności UEjest dostępnypodnastępującymadreseminternetowym: www.ohaus.com/ce.
Ten produkt spełnia wymagania dyrektywy 2012/19/UE. Prosimy o przekazywanie
zużytego sprzętu zgodnie z lokalnymi przepisami do punktów zbierających zużyty
sprzętelektrycznyielektroniczny.
Informacje dotyczące utylizacjizużytegosprzętuelektrycznegoi elektronicznego w
Europieznajdująsięnastronieinternetowejwww.ohaus.com/weee.
EN 61326-1
CAN/CSA C22.2 61010-1, CAN/CSA C22.2 61010-2-051
UL 61010-1, UL 61010-2-051
Globalny Wskazówki
Ostrzeżenie: Jest to produkt klasy A. W środowisku domowym produkt ten może powodować
zakłóceniaradiowe,wktórymtoprzypadkuużytkownikmożebyćzmuszonydopodjęciaodpowiednich
działań.
kanada Wskazówki
TourządzeniecyfroweklasyAjestzgodnezkanadyjskąnormąICES-003.
FCC
UWAGA:Tourządzenie zostałoprzetestowanei uznanezazgodne zograniczeniamidla urządzeń
cyfrowychklasyA,zgodniez częścią15przepisówFCC.Ograniczeniatemająnaceluzapewnienie
odpowiedniejochrony przedszkodliwymi zakłóceniami,gdy sprzętjest eksploatowanywśrodowisku
komercyjnym.Urządzenietogeneruje,wykorzystujeimożeemitowaćenergięo częstotliwościradiowej,ajeślinie jest zainstalowaneiużywane zgodnie z instrukcją,możepowodować zakłócenia w
łączności radiowej. Działanie tegosprzętuwobszarzemieszkalnymmożespowodować szkodliwe
zakłócenia, w którym to przypadkuużytkownikbędziezobowiązanydoskorygowaniazakłóceńna
własnykoszt.
Zmiany lub modyfikacje, które nie zostały wyraźnie zatwierdzone przez Ohaus Corporation mogą
unieważnićprawoużytkownikadokorzystaniazurządzenia.
Page 93
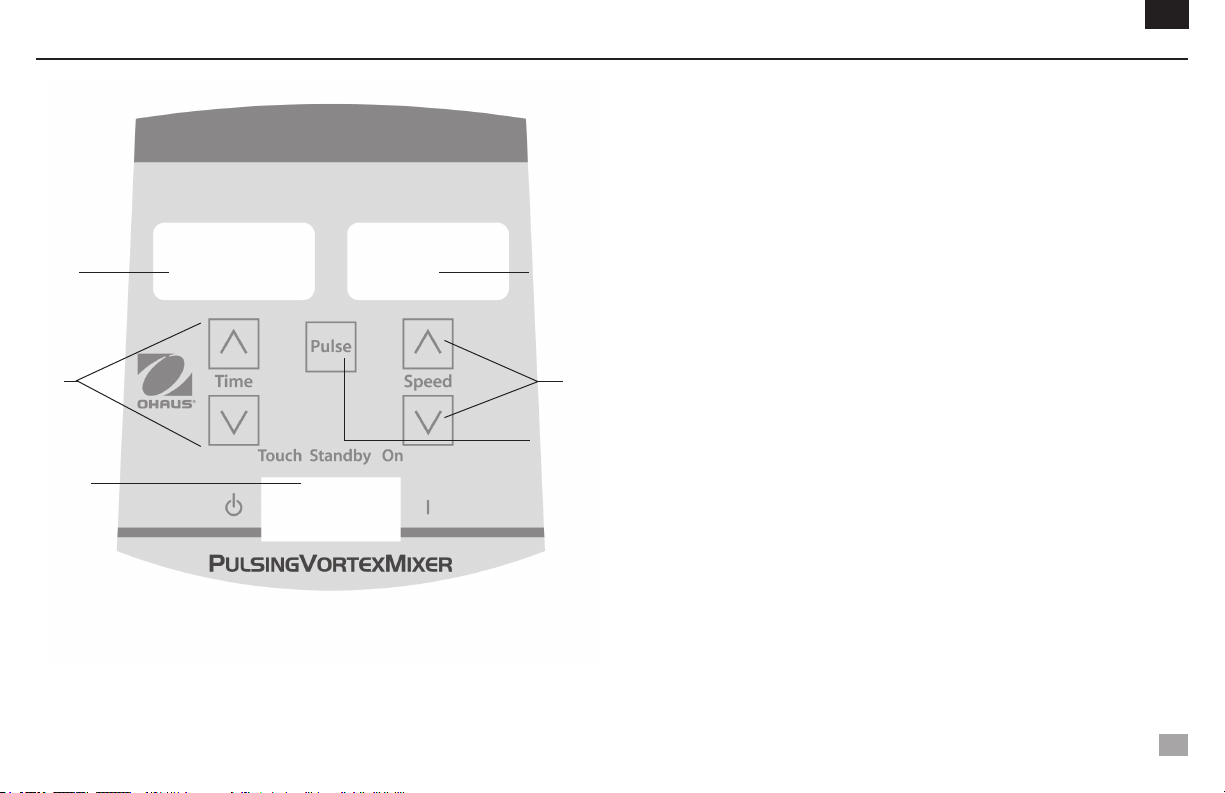
panel sterujący cyfrowe i impulsowe mieszaDło wirowe
B
C
A
PL
Panel przedni cyfrowe/impulsowe Mieszadłowirowe zawiera wszystkie przełączniki,
regulatory oraz wyświetlacze niezbędne do obsługi urządzenia.
A. 3-pozycjny prze�ącznik ko�yskowy: Pracę mieszania uruchamia/zatrzymu-
je 3-pozycyjny przełącznik kołyskowy: praca automatyczna (Auto)/Czuwanie
(Standby)/Włączenie (On). Tryb pracy automatycznej (Auto) jest wykorzystywany
podczas sterowania dotykowego, a tryb On (Wł. ) jest wykorzystywany podczas
pracy ciągłej.
B. Wyświetlacz prędkości: Wyświetla czas sumacyjny (w trybie pracy ciągłej) lub
D
E
F
wskazanie informujące ile czasu pozostało (tryb sterowania czasowego). Zakres
wyświetlanych wskazań waha się od 0 do 9999 minut w jednosekundowych (1 s)
przyrostach. Wyświetlacz wskazuje minuty i sekundy do momentu, aż sterownik
czasowy osiągnie wartość 99 minut i 59 sekund (99:59), następnie przejdzie on
w sposób automatyczny na wyświetlanie minut, aż do osiągnięcia stanu 9999.
C. Strzałki w górę / w dół umożliwiające nastawę wartości zadanych.
D. Wyświetlacz czasu: Wyświetla prędkość roboczą Mieszadłowirowe.
E. Strzałki w górę / w dół umożliwiające nastawę wartości zadanych.
F. Przycisk pracy impulsowej: Przycisk ten uruchamia tryb pracy impulsowej.
* Niektóre panele sterowania dotyczącą Mieszadła wirowego, mini cyfrowe, ale
bez przycisku “pulse”.
92
Page 94
rozwiązywanie problemów
Problem Przyczyna Rozwiązanie
Należy usunąć przeszkodę i wcisnąć głowicę przyssawkową kilka razy, aby
Urządzenie nie pracuje
Przeszkoda natury mechanicznej
lub Utknięcie silnika
upewni się, że żadna dalsza przeszkoda nie występuje.
Jeżeli problem będzie się utrzymywał, w celu dokonania naprawy prosimy
skontaktować się z lokalnym przedstawicielem firmy Ohaus.
PL
Urządzenie nadmiernie hałasuje
93
Bicie wirnika wentylatora czujnika
lub Bicie wirnika silnika
Ta usterka nie może zostać usunięta przez użytkownika końcowego.
W celu dokonania naprawy prosimy skontaktować się z lokalnym przedstawicielem firmy Ohaus..
Page 95

Návod k obsluze
Spirálový mixér, mini, fixní rychlost, VXMNFS
spirálový mixér, mini analog, VXMNAL
spirálový mixér, mini digitální, VXMNDG
spirálovýmixér,minipulzační,VXMNPS
EN - English ......... 1
FR - Français ......... 11
ES - Español ......... 22
IT - Italiano ......... 33
DE - Deutsch ......... 44
PT - Português ......... 55
NL - Nederlands ......... 66
NO - Norsk ......... 70
DA - Dansk ......... 74
SV - Svenska ......... 78
FI - Suomi ......... 82
HU - Magyar ......... 86
PL - Polski ......... 90
CZ - Czech ......... 94
KR - Korean ......... 98
Page 96
bezpečnostní pokyny stanDarDy & směrnice
Předpoužitímminispirálovéhomixérusipřečtětecelýnávodkobsluze,prosím.
VAROVÁNÍ! NEPOUŽÍVEJTEminispirálovýmixérvnebezpečnéatmosféře
nebo s nebezpečnými materiály, pro které nebylo zařízení navrženo.
Uživatelsimusíbýtrovněžvědomtoho,žeochranaposkytovanázařízením
může být narušena v případě použití s příslušenstvím nedodaným nebo
nedoporučeným výrobce nebo v případě použití způsobem, který nebyl
výrobcem specifikován.
Zařízení vždy používejte na rovném povrchu, abyste zajistili co nejlepší
výkonnostamaximálníbezpečnost.
Mini spirálový mixér NEZDVIHEJTE za přední část. Všechny přední části
jsouvyjímatelné.Vpřípadě,žejepoužijetekezdvihnutí,mohouvyklouznout.
UPOZORNĚNÍ! Abyste předešli úrazu elektrickým proudem, napájení
zařízení přerušte odpojením napájecího kabelu ze zástrčky. Zařízení od
napájeníodpojteještě,nežprovedeteúdržbuaservis.
Rozlitou kapalinu je třeba okamžitě odstranit. Zařízení při čištění
NEPONOŘUJTE do vody.
ZAŘÍZENÍ NEPOUŽÍVEJTE pokud prokazuje známky elektrického nebo
mechanickéhopoškození.
Uzemnění–Ochrannýterminálvodiče
Střídavýproud
Souladsnásledujícínormamiasměrnicemijeoznačenodpovídajícíznačkounaproduktu.
Značka Standardyasměrnice
OHAUSCorporationprohlašuje,žesériemixérůVXMNjevsouladusesměrnicemi.
2011/63/EU, 2014/30/EU, 2014/35/EU a normami EN 50581, EN 61010-1, EN
61010-2-051,EN61326-1.ÚplnýtextsměrniceEUosouladujekdispozicinanásledující adrese: www.ohaus.com/ce.
Tentoproduktjevsouladusezněnímsměrnice2012/19/EU.Tentoproduktzlikvidujte
v souladusmístními předpisy na sběrnémmístěurčenémpro sběr elektrického a
elektronickéhozařízení.
PokynyklikvidacivEvropěnaleznetenawww.ohaus.com/weee.
EN 61326-1
CAN/CSA C22.2 61010-1, CAN/CSA C22.2 61010-2-051
UL 61010-1, UL 61010-2-051
Globální oznámení
Varování: Toto je výrobek třídy A. V domácím prostředí může tento produkt způsobovat rušení
rádiovýchfrekvencí,avtakovémpřípadějetřebapoužítodpovídajícíopatření.
Kanada–upozornění
TentodigitálnípřístrojtřídyAjeveshoděskanadskouvyhláškouICES-003.
Oznámení FCC
POZNÁMKA: Toto zařízení bylo testováno avyhovujelimitůmprodigitálnízařízenítřídyA,podle
části 15PravidelFCC. Tato omezení poskytujípřiměřenouochranupřed škodlivým rušením, je-li
systémpoužívánvkomerčnímprostředí.Tentosystémvytváří,využíváamůževyzařovatenergiena
rádiovýchfrekvencíchanení-linainstalovánoapoužívánovsouladuspokyny,můžezpůsobitškodlivé
rušenírádiovýchkomunikací. Provoztohotozařízenív obytnýchoblastechmůže způsobitškodlivé
interference,vtakovémpřípaděbudeuživatelnucenopravitinterferencenasvévlastnínáklady.
CZ
Změnyneboúpravytohotozařízení,kterénebylyvýslovněschválenyOhausCorporation,mohouvést
95
keztrátěoprávněníuživatelekprovozovánízařízení.
Page 97
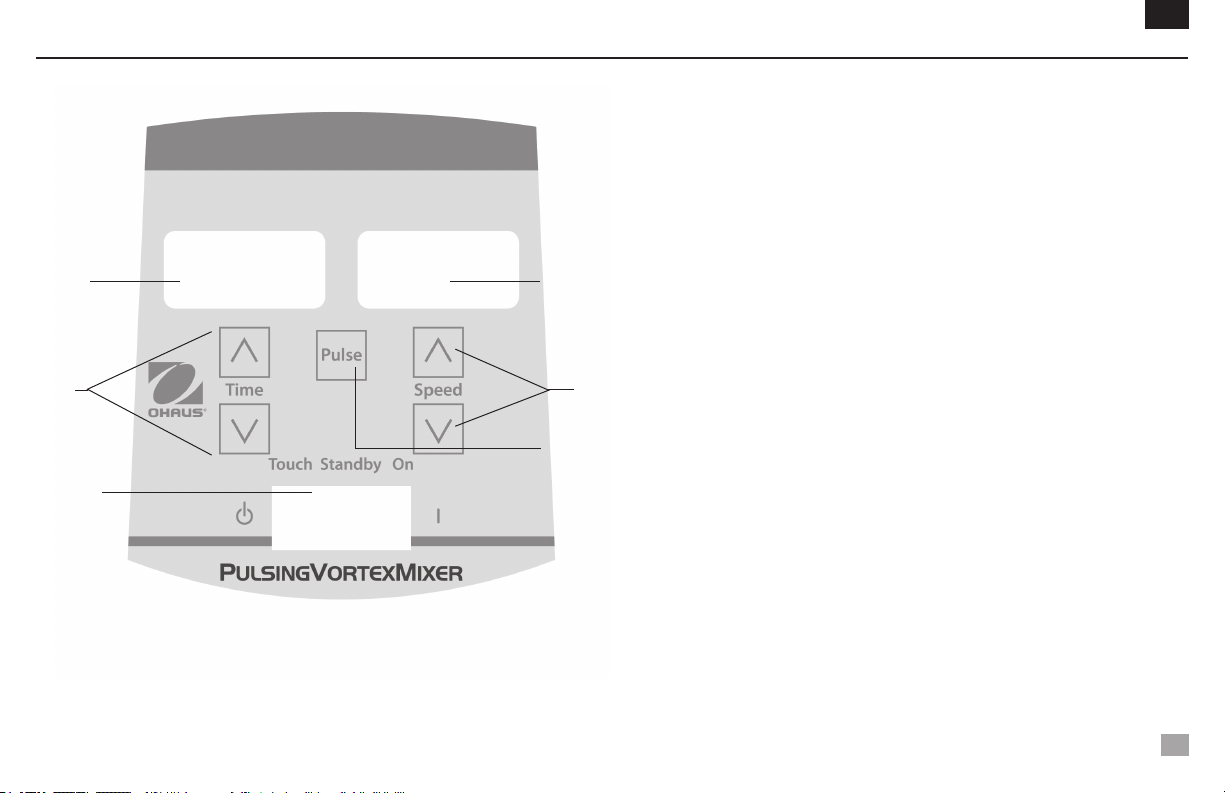
Digitální pulzační mini spiráloVý mixér – oVláDací panel
B
C
A
CZ
Přední panel mini spirálového mixéru obsahu ovládací prvky a displeje nutné k
provozuzařízení.
A. Spínač se 3 pozicemi: Spínač Automatický/Pohotovostní/Zap. spustí/zastaví
funkci mixování.
B. Displej – Čas: Zobrazícelkovýčas (průběžnýrežim)nebo to,kolikčasu zbývá
(načasovaný režim). Rozsah displeje je 0 až 9999 minut, v krocích po jedné (1)
sekundě. Na displeji se zobrazí minuty a sekundy, dokud časovač nedosáhne99
minuta59sekund(99:59), potomsenadisplejizobrazí pouzeminuty,aždo9999
minut.
D
F
C. Tlačítkanahoru/dolůknastaveníhodnoty.
D. Displej – Rychlost: Zobrazí rychlost mini spirálového mixéru.
E. Tlačítkanahoru/dolůknastaveníhodnoty.
F. Spouštěcí tlačítko:Spuštěnípulzačníhorežimu.
E
96
Page 98
oDstraňoVání problémů
Problém Příčina Řešení
CZ
Zařízenísenespustí:
Zařízeníjenadměrněhlučné
Mechanickápřekážkanebo
překážkavmotoru
Vychýlený senzor ventilátoru
nebo vychýlený motor
Odstraňtepřekážkuaněkolikrátstisknětehlavuzařízení, abysteseujistilionepřítomnostipřekážky.
Pokudproblémpřetrvává,kontaktujtezástupcespolečnostiOhausadomluvtesenaopravě.
Opravutétozávadynemůžeprovéstkoncovýuživatel.Ohledněopravykontaktujtezástupcespolečnosti
Ohaus, prosím.
97
Page 99

사용 설명서
볼텍스 믹서, 미니 고정 스피드, VXMNFS
볼텍스 믹서, 미니 아날로그, VXMNAL
볼텍스 믹서, 미니 디지털, VXMNDG
볼텍스 믹서, 미니 펄싱, VXMNPS
EN - English ......... 1
FR - Français ......... 11
ES - Español ......... 22
IT - Italiano ......... 33
DE - Deutsch ......... 44
PT - Português ......... 55
NL - Nederlands ......... 66
NO - Norsk ......... 70
DA - Dansk ......... 74
SV - Svenska ......... 78
FI - Suomi ......... 82
HU - Magyar ......... 86
PL - Polski ......... 90
CZ - Czech ......... 94
KR - Korean ......... 98
Page 100

목차
내용물 . . . . . . . . . . . . . . . 99
서비스 정보 . . . . . . . . . . . . . . . 99
설치법 . . . . . . . . . . . . . . . 100
관리 및 서비스 . . . . . . . . . . . . . . . 100
환경 조건 . . . . . . . . . . . . . . . 100
안전 지시서 . . . . . . . . . . . . . . . 101
기준 및 규정 . . . . . . . . . . . . . . . 101
사양 . . . . . . . . . . . . . . . 102
디지털 및 펄싱 미니 볼텍스 믹서 컨트롤 패널 . . . . . . . . . . 103
작동법 . . . . . . . . . . . . . . 104-105
머리받침/부품 설치법 . . . . . . . . 106-107
문제해결 . . . . . . . . . . . . . . . 108
KR
내용물
고정 스피드, 아날로그, 디지털 또는 펄싱 미니 볼텍스 믹서
전원코드
* (1) 컵 머리받침
* (1) 3” (7.6cm) 머리받침
* (1) 3” (7.6cm) 고무 머리받침 커버
사용 설명서
보증서
* 이 부품들은 펄싱 미니 볼텍스 믹서를 제외한 모든 기계에 포함되어 있고
펄싱 미니 볼텍서 믹서는 컵 머리받침이 내장된 1.5에서 2mL 마이크로 튜브
홀더가 함께 제공됩니다.
99
서비스 정보
문제 해결 섹션에서 해결되지 않거나 설명되지 않은 문제는 공인된 OHAUS 서비
스 담당자에게 문의하십시오. 미국에서 서비스 또는 기술 지원을 받으려면 오전
8 시부터 오후 5 시까지 수신자 부담 번호 1-800-672-7722 및 내선 번호 7852
로 전화하십시오. OHAUS 제품 서비스 전문가가 지원을 제공할 것입니다. 미국
이외의 지역에서는 당사의 웹 사이트를 (www.ohaus.com) 방문하여 가장 가까
운 OHAUS 사무소를 찾으십시오.
일련번호:
구매일:
공급자:
 Loading...