


Navigator® Balances
Instruction Manual
Balanzas Navigator®
Manual de instrucciones
Balances Navigator®
Manuel d’instructions
Navigator® Waagen
Bedienungsanleitung
Bilance Navigator®
Manuale di istruzioni

Navigator® EN-1
1. INTRODUCTION
This manual contains installation, operation and maintenance instructions for the Navigator® Series.
Please read the manual completely before using the balance.
1.1 Safety Precautions
Please follow these safety precautions:
• Verify that the AC Adapter input voltage matches the local AC power supply.
• Only use the balance in dry locations.
• Do not operate the balance in hostile environments.
• Do not drop loads on the platform.
• Service should be performed only by authorized personnel.
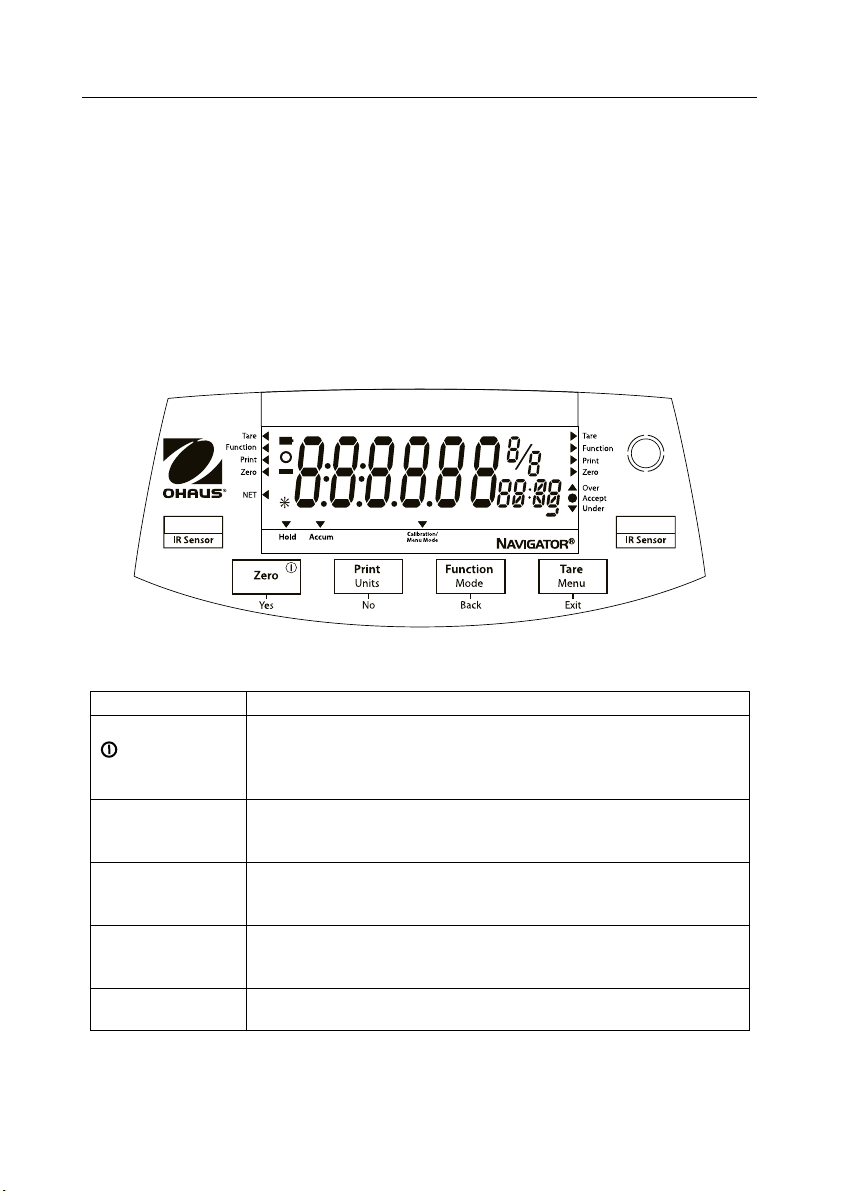
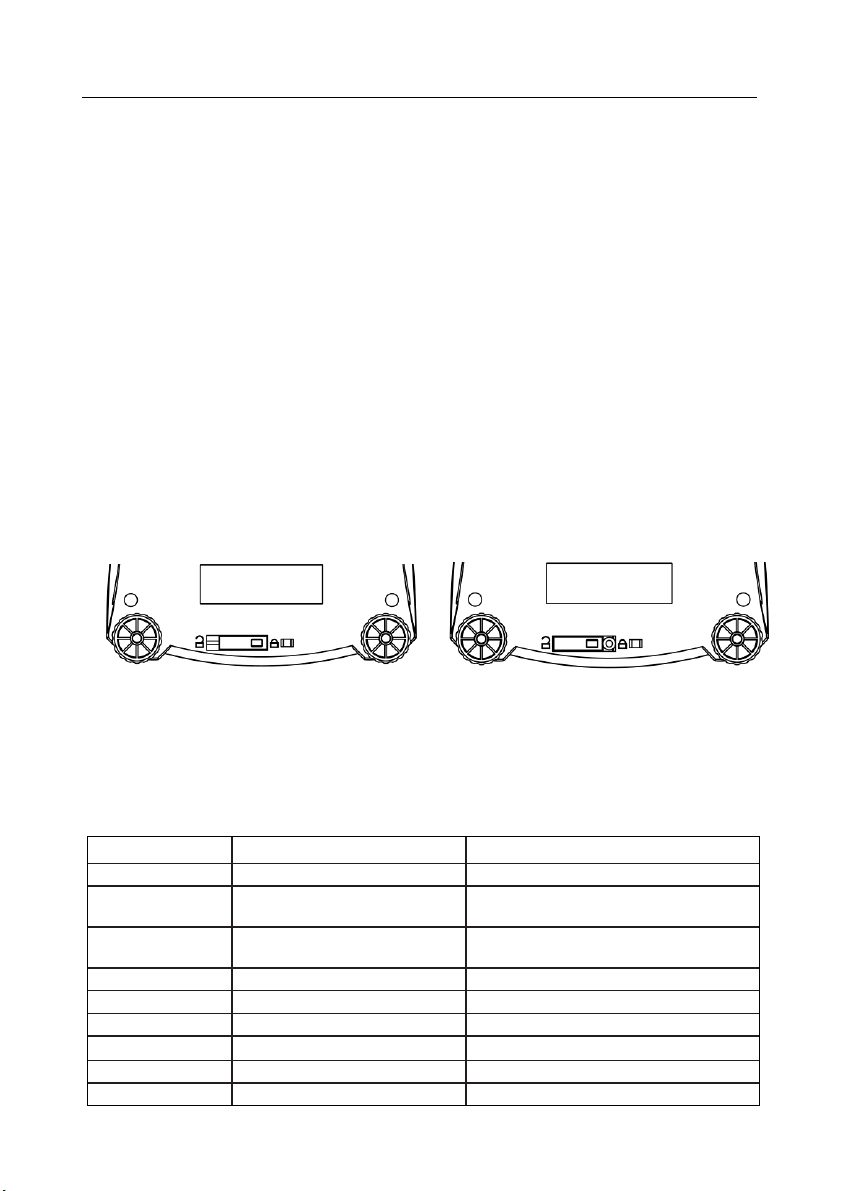
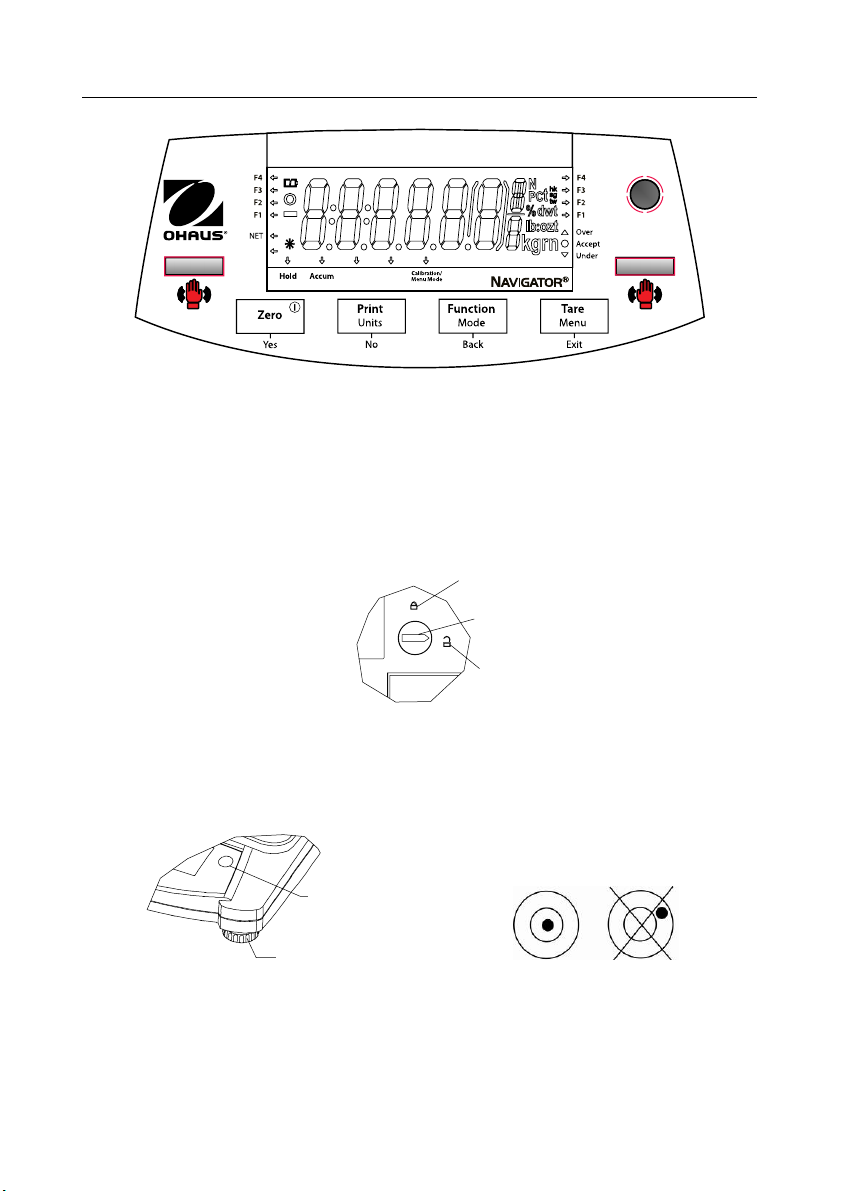
1.2. Controls
Standard (non-approved) models – shown with LED display.
Button Functions
Zero
Yes
Print
Units
No
Function
Mode
Back
Tare
Menu
Exit
IR Sensor-Left
IR Sensor-Right
The IR Sensors can be activated by a hand or other object that is placed about 12mm (½ inch)
above the sensor locations. The sensor activation distance will vary based on the reflective nature
of the object. If unwanted activations occur due to unique situations the sensors can be turned off.
Short Press (when on): Sets display to zero
(when off): Turns balance on
Long Press (when on): Turns the balance off
Short Press (in Menu): Selects/accepts displayed setting
Short Press: See Interface Manual for operation description.
Long Press: Toggles through active units
Short Press (in Menu): Toggles through available settings
Short Press: Selects function setting
Long Press: Selects active Mode
Short Press (in Menu): returns to previous settings
Short Press: Enter / clear a Tare value
Long Press: Enters User Menu
Short Press (in Menu): Quickly exit User Menu
IR Sensors can be programmed to act as “touchless” buttons. See the
User Menu section 4.3 for the available settings.
EN-2 Navigator®
F1
F2
F3
F4
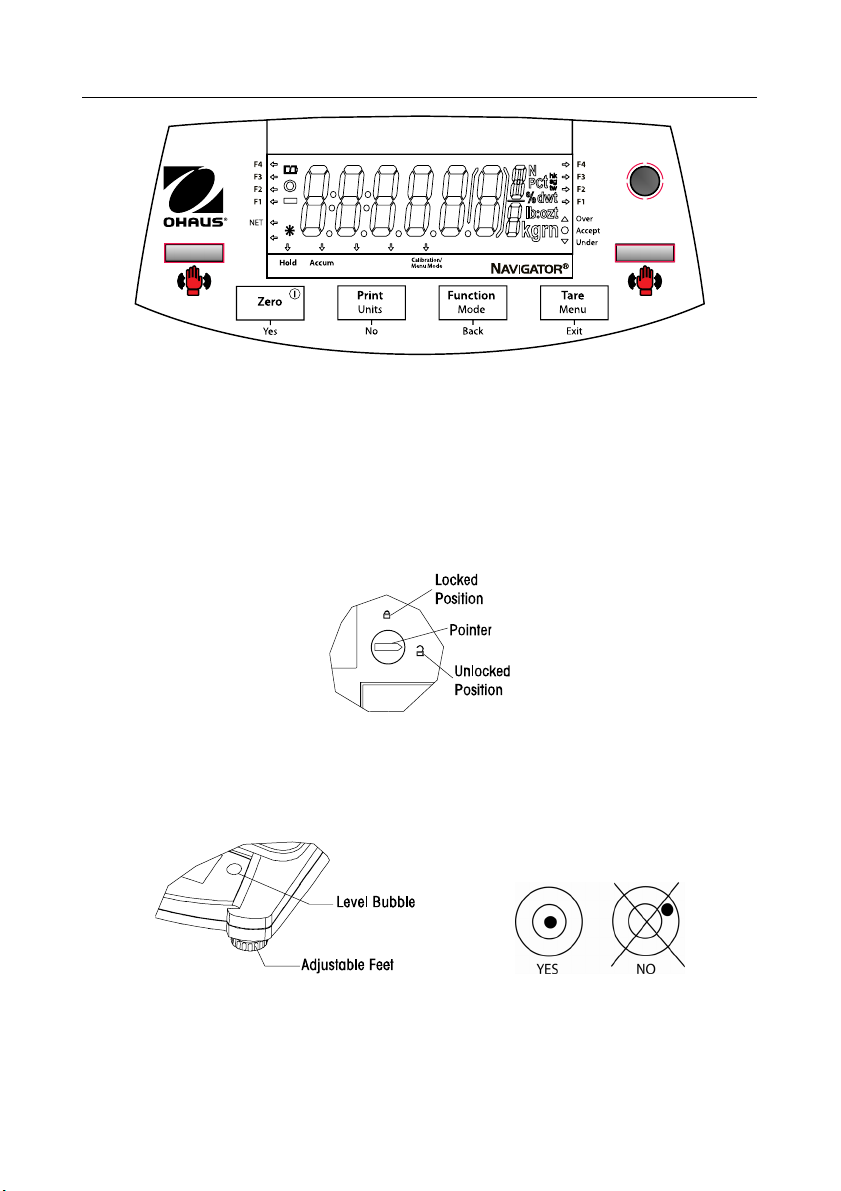
Approved models – shown with LCD display.
2. INSTALLATION
2.1 Package Contents
• Balance
• Pan
2.2 Transportation Lock
The Transportation Lock is located under the balance. Rotate the pointer to the unlocked position.
2.3 Location
Use the balance on a firm, steady surface. Avoid locations with excessive air current, vibrations, heat
sources, or rapid temperature changes.
Adjust the leveling feet so the bubble is centered in the circle.
• Power Adapter
• Instruction Manual
• Warranty Card
Note: No shipping lock on Approved models.
Navigator® EN-3
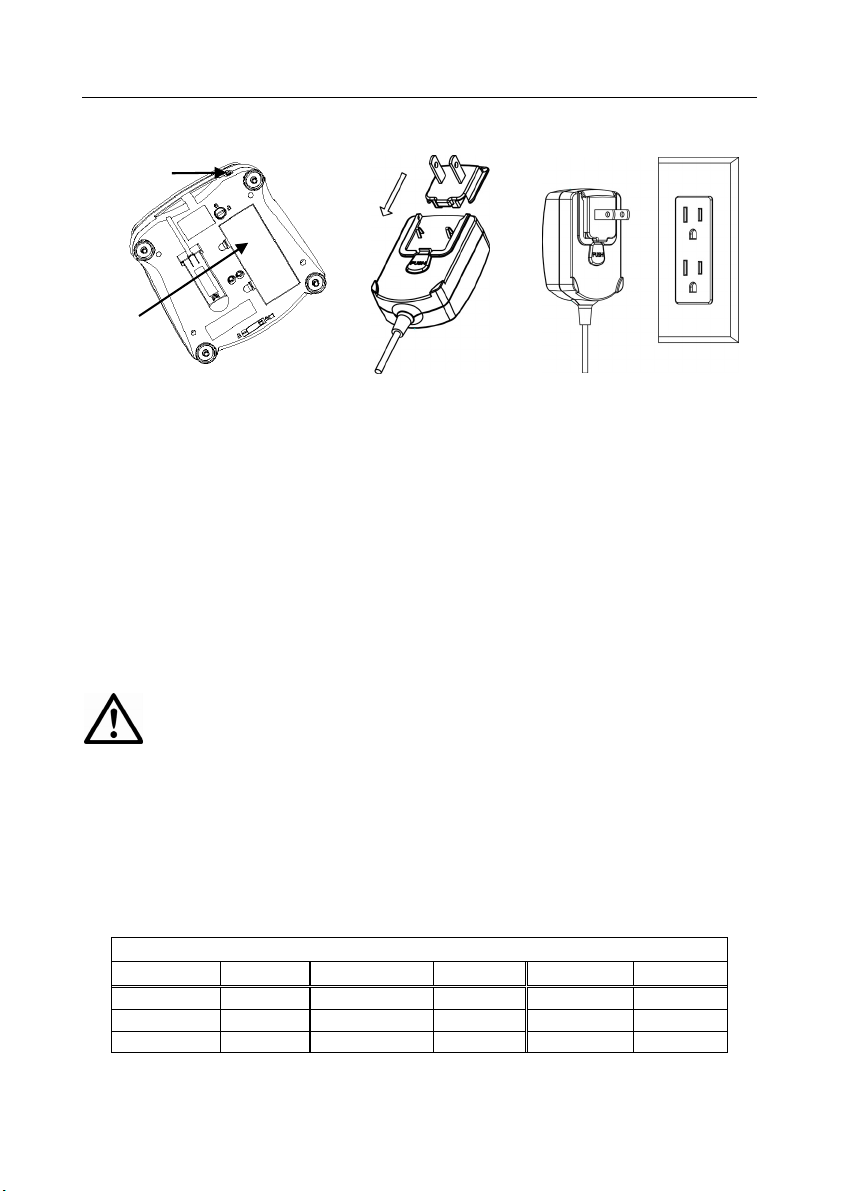
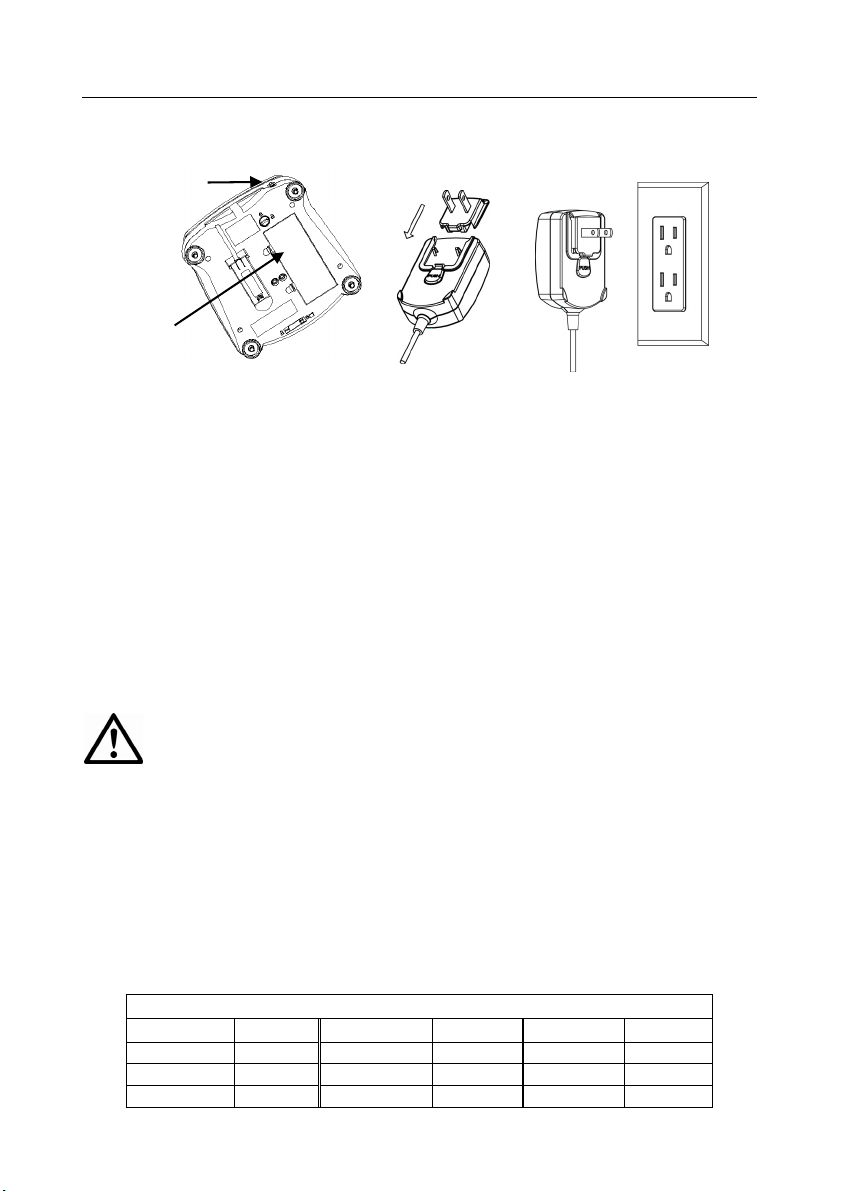
2.4 Power
The AC Adapter is used to power the balance when battery power is not needed.
Input Jack
Battery
Cover
Connect the AC Adapter plug to the
input jack.
Battery installation (without optional internal battery):
Remove battery cover and install 4 batteries using the polarity indications as shown in the
compartment.
Optional rechargeable battery (NVL and NVT models only):
Balances with the optional rechargeable battery will need to be charged for 12 hours before the
balance can be operated on battery power for the first time. The battery is protected from
overcharging so the balance can remain connected to the AC power. When the battery is fully
charged the battery indicator on the display will stop blinking.
To remove the rechargeable battery option and install C cell batteries, reference the Recharging
Battery Option instruction manual for step by step instructions as well as disposal instructions.
Caution: Risk of explosion can occur if the rechargeable battery is replaced with the
wrong type or if it is not properly connected.
Connect AC Adapter to the
proper AC supply.
2.5 Initial Calibration
When the balance is first installed it should be calibrated to ensure accurate results.
Press and hold Menu until [mMeNU] (Menu) is displayed. When the button is released, the display will
display [.C.A.L.]. Press Yes to accept, [SpaN] will then be shown. Press Yes again to begin the span
calibration. [--C--] blinks while zero reading is stored. Next, the display shows the calibration weight
value. Place the specified calibration mass on the pan. [--C--] blinks while the reading is stored. The
balance returns to the previous application mode and is ready for use.
Required Span Calibration Mass (sold separately)
*
Capacity Mass
210g 200g 1600g - 2100g 1kg / 2lb 6400g - 10kg 5kg / 10lb
310g - 510g 300g 3100g - 4100g 2kg / 5lb 16kg - 20kg 10kg / 20lb
1100g 500g / 1lb 5100g 3kg / 5lb
*
Pound masses are used when calibrating in the lb unit.
Capacity Mass
*
Capacity Mass
*

EN-4 Navigator®
3. OPERATION
All modes except for weighing must be activated in the User Menu before they are available, see
Section 4.
3.1 Weigh Mode
1. Press and hold Mode until [wJeIGH] (Weigh) is displayed.
2. If required, place an empty container on the pan and press Tare.
material to the container. The display shows the weight of the material.
3. Add
3.2 Parts Counting Mode
This mode counts large numbers of items based on the weight of a reference count.
1. Place an empty container on the pan and press Tare.
2. Press and hold Mode until [Count] (Count) is displayed. [CLr.APU] (Clear Average Piece
Weight) will then display.
3. Press No to use the stored APW. Proceed to step 6.
4. Press Yes to establish an APW. The balance will then display the stored sample size, i.e. [Put
10]. Press No or Back to toggle the choices (5, 10, 20, 50 or 100).
5. Put the indicated number of pieces on the pan then press Yes to calculate the APW. The
display shows the piece count. Note: Press Function to view the current APW.
6. Add additional pieces until the desired count is reached.
7. To clear the stored APW press and hold Mode until [Count] is displayed. Press Yes when
[Clr.APU] is displayed.
3.3 Percent Mode
This mode measures the weight of a sample as a percentage of a reference weight.
1. Place an empty container on the pan and press Tare.
2. Press and hold Mode until [Percnt] is displayed. [Clr.ref] (clear reference) will then display.
3. Press No to use the stored reference weight and proceed to step 6.
4. Press Yes to establish a new reference. Balance will now display [Put.ref].
5. Add the desired reference material to the container. Press Yes to store the reference weight.
The display shows 100%.
Note: Press Function to view the current reference weight.
6. Replace the reference material with the sample material. The display shows the percentage of
the sample compared to reference weight.
7. To clear the stored reference press and hold Mode until [Percnt] is displayed. Press Yes
when [Clr.ref] is displayed.

Navigator® EN-5
3.4 Display Hold Mode
This mode holds the highest stable weight value for easy reference.
1. Press and hold Mode until [Hold] is displayed.
2. Place samples to be weighed on the pan. When the balance detects the highest stable weight
the “Hold Indicator” will blink and the displayed weight will not change.
3. Press Function to release the held weight value.
3.5 Accumulation Mode
This mode allows the user to store the total of a series of weight measurements. With an Interface
Option the component weights and the total weight can be transmitted.
1. Press and hold Mode until [ACCUmM] (Accumulate) is displayed. [Clr.Acc] (clear accumulate)
will then display.
2. Press Yes to clear the stored value or No to continue adding to the stored total.
3. If required, place an empty container on the pan and press Tare.
4. Add first item, its weight is displayed. Press Function to store the weight, the “Accum” indicator
will flash and the display will show the total weight.
5. Remove the first item and add the next item. The balance will display its weight. Press
Function to store its weight. The “Accum” indicator will flash and the new total weight will be
displayed.
6. Repeat step 5 for all of the items to be added. Note: While the display indicates zero, press
Function to view the current total number of samples and the total weight.
7. To clear the stored total press and hold Mode until [ACCUmM] is displayed. Press Yes when
[Clr.Acc] is displayed.
3.6 Checkweigh Mode
This mode sets low and high weight limits for portion control processes.
1. Press and hold Mode until [CHeCk] (Check) is displayed. [CLr.ref] (clear references) will then
display.
2. Press No to use the stored reference weight limits and proceed to step 5.
Note: Press Function to view the low and high reference weight limits.
3. Press Yes to establish new reference values. The balance will then display [Set. Lo]. Press
Yes to view the “Low” limit value. Press Yes to accept or No to edit the “Low” limit value. The
stored value then displays with the first digit highlighted [000.000 kg]. Repeatedly press No
until the desired number appears. Press Yes to accept and highlight the next digit. Repeat until
all the digits are correct. Press Yes to accept the “low” limit value, [Set. Hi] will be displayed.
4. Repeat the same procedure to accept or edit the “high” value.
5. Place sample material on the Pan. The “Accept” indicator will now show that the sample weight
is within the acceptable range.
6. To clear the stored reference values press and hold Mode until [CHeCk] is displayed. Press Yes
when [Clr.ref] is displayed.
EN-6 Navigator®
4. SETTINGS
The User Menu allows the customizing of balance settings.
Note: Additional Sub-Menus may be available if Interface Options are installed. See Interface User
Manual for the additional setting information.
4.1 Menu Navigation
User Menu:
Sub-Menus:
Menu Items:
Press and hold Menu until [mMeNU] (Menu) is displayed. When released the first sub-menu [.C.a.l.]
(Cal) will be shown.
Press Yes to enter the displayed sub-menu or press No to advance to the next.
Selecting a sub-menu will display the first menu item. Press Yes to view the menu item setting or
press No to move to the next menu item. When viewing the setting, press Yes to accept the setting, or
press No to change the setting. When [End] is displayed, press Yes to return to the sub-menu
selections or No to return to the first item in the current menu.
4.2 Cal Sub-Menu
• Span [SpaN] (yes, no) - Initiates a span calibration procedure (zero and span). A span
calibration is important when initially setting up the balance.
• Lin [Lin] (yes, no) - Initiates a linearity calibration procedure (zero, mid-point and span).
4.3 Setup Sub-Menu
The backlit LCD and (red) LED displays will have different menu items or settings based on the
functionality.
• Auto Off [A-Off] (on, off) - When Auto Off is set to “on” the balance will turn off automatically
after 5 minutes of inactivity. Auto off is used to save battery power.
• Display [disply] (on, auto, dim (LED), off (LCD)) - This setting controls the LCD backlight or
the LED digits; constant on, automatic turn off after 5 seconds of balance inactivity, dimming of
the LED after 60 seconds of balance inactivity or LCD backlight always off.
• Bright [Bright] (hi, mid, low) - This setting controls the brightness of the LED display. LCD
models will not see this menu item.
• IR Sensor Left [Ir.LEFt] / Right [Ir.rght] (Off, Tare, Function, Print, Zero, Display) - These
settings determine the role of the IR Sensors. “Zero”, “Print”, “Function” or “Tare” allows the IR
sensor to act the same as the related button. “Display” activates the display if Display-Auto is
set. “O
• ff” disables the sensor.
.C.a.l. .S.e.t.u.p. .M.o.d.e. .U.n.i.t. .E.n.d.
Span
Lin
End
A-off
Disply
Bright
IR.LEFT
IR.RGHT
End
Count
Percnt
Hold
Accum
Check
End
ct, g, kg, grn,
lb, oz, lb:oz,
ozt, N, dwt,
thk, tsg, ttw,
tola, tical
End
Navigator® EN-7
4.4 Mode Menu
This sub-menu activates modes so they will be available for use with the Mode button. Weigh mode is
always active.
• Parts Count [Count] (on, off) - Set on for the mode to be active.
• Percent [Percnt] (on, off) - Set on for the mode to be active.
• Hold [Hold] (on, off) - Set on for the mode to be active.
• Accumulate [ACCUmM] (on, off) - Set on for the mode to be active.
• Check Weigh [CHECk] (on, off) - Set on for the mode to be active.
4.5 Units Menu
This sub-menu activates units so they will be accessible with the Units button. The units in the menu
must be turned “on” to be active. The ounce (oz) and pound:ounce (lb:oz) units include the option of
decimal [dec] or fractional [frac] readouts. Due to different agency requirements the grain unit has
two icon display options, gr or grn.
Note: Available units and modes vary by model and local regulations.
4.6 Sealing access to balance settings
The Menu Lock switch limits changes to the Cal, Setup, Mode and Unit menus. The switch in type
approved models may set some balance settings as required by the approval agency. The switch may
be secured using paper seals, wire seals or plastic ties.
Locked Unlocked
5. MAINTENANCE
5.1 Troubleshooting
The following table lists common problems and possible causes and remedies.
If the problem persists, contact OHAUS or your authorized dealer.
Symptom Possible Cause Remedy
Cannot turn on No power to balance Verify connections and voltage
Poor accuracy
Cannot calibrate
Cannot access mode Mode not enabled Enter menu and enable mode
Cannot access unit Unit not enabled Enter menu and enable unit
Lo ref
ref err
Err 3.0 Cal
Err 4.4 full
Improper calibration
Unstable environment
Unstable environment
Incorrect calibration weight
Reference weight is too low Increase reference weight.
Parts counting– sample weight <1d.
Incorrect calibration weight See section 2.5 for correct weights
RS232 buffer is full Set Handshake on, see Interface User Manual.
Perform calibration
Move balance to suitable location
Move the balance to suitable location
Use correct calibration weight
Shows error - exits mode or goes to [Clr.ApU].

EN-8 Navigator®
Err 8.1 ¯Load¯
Err 8.2 _Load_
Err 8.3 ¯Load¯
Err 8.4 _Load_
Err 8.6 999999
Err 9 Data
Err 13 mMEmM
Err 53 CSumM
Power on zero range exceeded Clear pan, check Shipping Lock setting
Power on zero under range Install pan, check Shipping Lock setting
Overload (>cap+9e) Load exceeds balance maximum capacity
Under load Reading below min. range - Re-install pan.
Displayed value >999999 Result exceeds display capability.
Internal data error. Contact an authorized service agent
Fail to write EEPROM. Contact an authorized service agent
Invalid checksum data Contact an authorized service agent
5.2 Service Information
If the troubleshooting section does not resolve or describe your problem, contact your authorized
OHAUS service agent. For service assistance or technical support in the United States call toll-free 1800-526-0659 between 8:00 AM and 5:00 PM EST. An OHAUS product service specialist will be
available to provide assistance. Outside the USA, please visit our web site, www.ohaus.com to locate
the OHAUS office nearest you.
5.3 Accessories
Rechargeable Battery Kit 83032106 (NVL, NVT)
RS232 Interface Kit 83032107 (NV, NVL, NVT)
USB Interface Kit 83032108 (NV, NVL, NVT)
Ethernet Interface Kit 83032109 (NV, NVL, NVT)
In-Use Cover Kit 83032223 (NV) 83032222 (NVL) 83032221 (NVT)
Carrying Case Kit 83032226 (NV) 83032225 (NVL) 83032224 (NVT)
Printers and Cables Contact OHAUS
6. TECHNICAL DATA
The technical data is valid under the following ambient conditions:
Ambient temperature: 10°C to 40°C, Approved models (M) 0°C to 40°C
Relative humidity: 20% to 85% relative humidity, non-condensing
Height above sea level: Up to 4000 m
Operability: assured at ambient temperatures between 0°C and 40°C
Power: AC Adapter – 12VDC 420mA output, 4 batteries or rechargeable battery
Protection: dust and water
Pollution degree: 2
Installation category: Class III
EMC: See Declaration of Conformity
Navigator® EN-9
6.1 Specifications
Typical specifications:
Stabilization Time
Tare range To capacity by subtraction
Application Modes1 weigh, percent, parts count, check weigh, accumulate, hold
Weighing Units
Non-Approved: ct, g, kg, grn, lb, oz, lb:oz, ozt, N, dwt, tael (3), tola, tical
M models: g, kg, ct N models: g, kg, ct, lb, oz, ozt, dwt, grn
AC Power AC Adapter (supplied)- 12 VDC or 12VAC, 420 mA
Battery Power
NV: 4 AA (LR6) batteries (not supplied)
NVL, NVT: 4 C (LR14) batteries (not supplied) or rechargeable battery option
Calibration Digital with external weight
LCD Display 6-digit 7-segment LCD with white LED backlight
LED Display 6-digit 7-segment LED
Display Size 20 mm / 0.78” digits
Keypad 4-button overlay plus two programmable IR sensors
Ingress Protection IP43 (NVT and NVL models)
Pan Size (W x D)
NV: 190 mm x 138 mm NV212: Ø120mm
NVL: 194 mm x 203 mm NVT: 230 mm x 174 mm
Net Weight2 NV: 0.9 kg / 2.2 lb NVL: 1.5 kg / 3.3 lb NVT: 1.5 kg / 3.3 lb
Shipping Weight2 NV: 1.4 kg / 3.1 lb NVL: 2.3 kg / 5.1 lb NVT: 2.3 kg / 5.1 lb
Note 1: Some application modes are restricted in Approved models.
Note 2: /1 and /3 models add 0.5kg / 1lb
Non-Approved Models:
1
Capacity Readability (d) Repeatability Linearity Span Cal. Wt. Lin. Cal. Wts.
Model
NV212 210g 0.01g 1d ±2d 200g 100g, 200g
NV511 510g 0.1g 1d ±2d 300g 300g, 500g
NV1101 1100g 0.1g 1d ±2d 500g 500g, 1000g
NV2101 2100g 0.1g 1d ±2d 1kg 1kg, 2kg
NV4101 4100g 0.2g 1d ±2d 2kg 2kg, 4kg
NV5101 5100g 0.5g 1d ±2d 3kg 3kg, 5kg
NVL511 510g 0.1g 1d ±2d 300g 300g, 500g
NVL1101 1100g 0.1g 1d ±2d 500g 500g, 1000g
NVL2101 2100g 0.1g 1d ±2d 1kg 1kg, 2kg
NVL5101 5100g 0.5g 1d ±2d 3kg 3kg, 5kg
NVL10000 10000g 1g 1d ±2d 5kg 5kg, 10kg
NVL20000 20000g 1g 1d ±2d 10kg 10kg, 20kg
NVT1601 1600g 0.1g 1d ±2d 1kg 1kg,1.5kg
NVT3201 3200g 0.2g 1d ±2d 2kg 2kg, 3kg
NVT6401 6400g 0.5g 1d ±2d 5kg 3kg, 6kg
NVT10001 10000g 0.5g 1d ±2d 5kg 5kg, 10kg
NVT16000 16000g 1g 1d ±2d 10kg 10kg, 15kg
≤1 seconds
EN-10 Navigator®
Note 1: /1 = Factory installed rechargeable battery option
/2 = LED display
/3 = LED display with factory installed rechargeable battery option
Approved Models:
1,2
Max= e= Approval Class Span Cal. Wt. Lin. Cal. Wts.
Model
NV311 310g 0.1g III 200g 200g, 300g
NV3100 3100g 1g III 2kg 2kg, 3kg
NVT1601 1600g 0.5g III 1kg 1kg,1.5kg
NVT3200 3200g 1g III 2kg 2kg, 3kg
NVT6400 6400g 2g III 5kg 3kg, 6kg
NVT16000 16000g 5g III 10kg 10kg, 15kg
Note 1: M = EC Type approved
N = NTEP and Measurement Canada approved
Note 2: /1 = Factory installed rechargeable battery option
/2 = LED display
/3 = LED display with factory installed rechargeable battery option
Example: NVT3200M/3
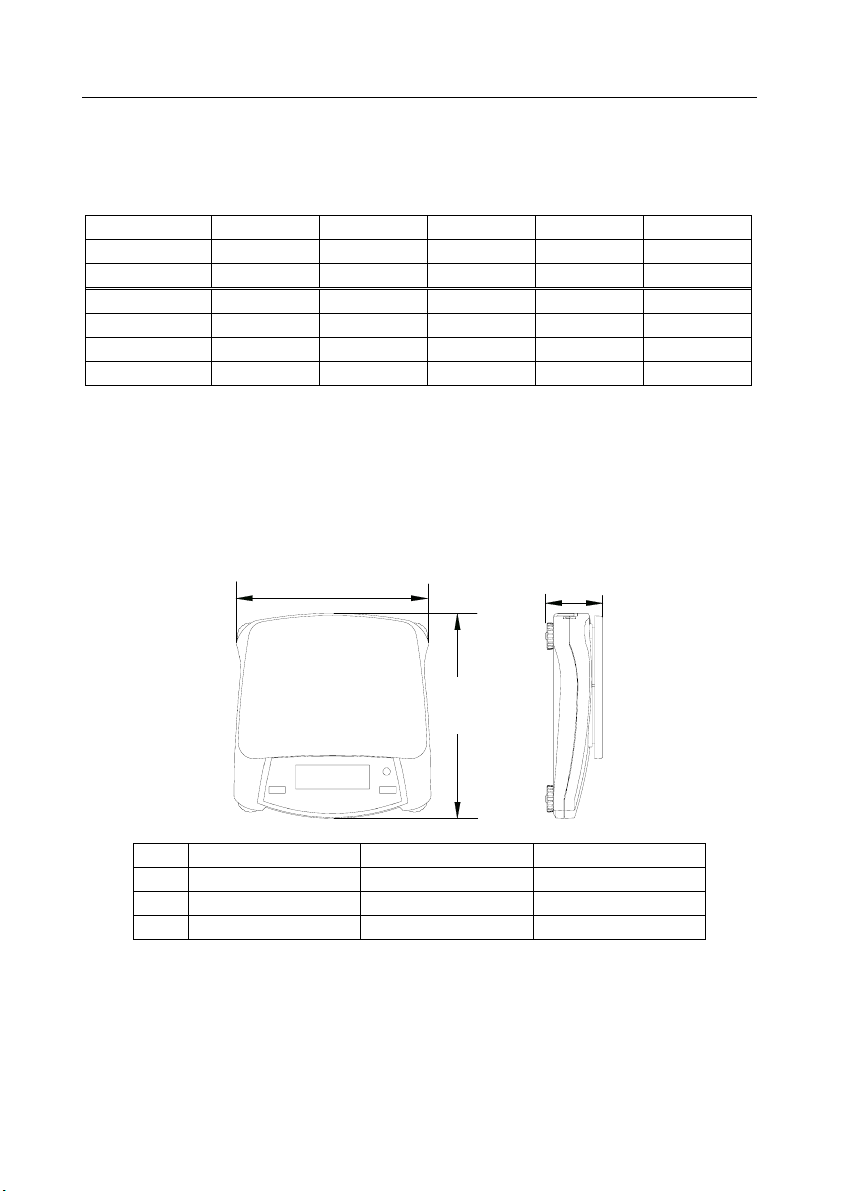
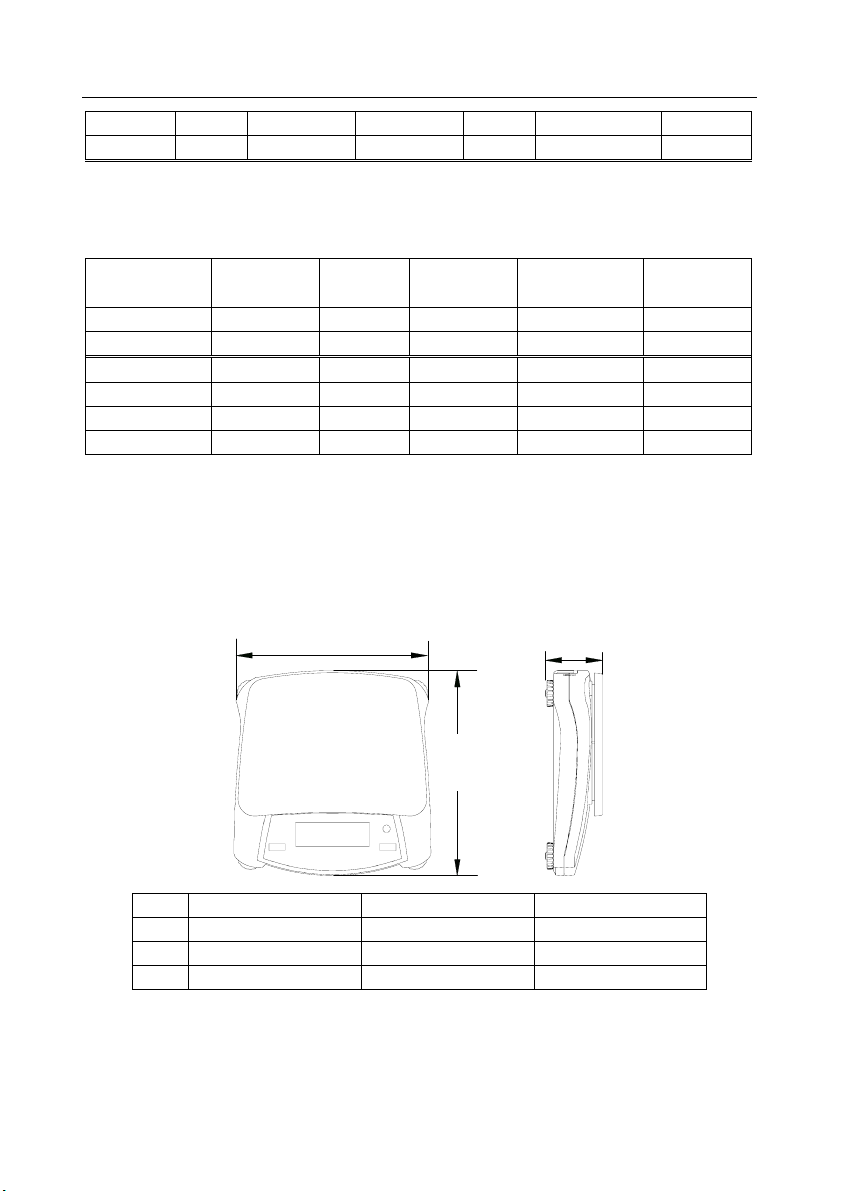
6.2 Drawings
A
B
NV
NVL
NVT
A B C
204 mm / 8 in. 212 mm / 8.4 in. 58 mm / 2.3 in.
204 mm / 8 in. 282 mm / 11.1 in. 74 mm / 2.9 in.
240 mm / 9.5 in. 250 mm / 9.8 in. 74 mm / 2.9 in.
Navigator® EN-11
6.3 Compliance
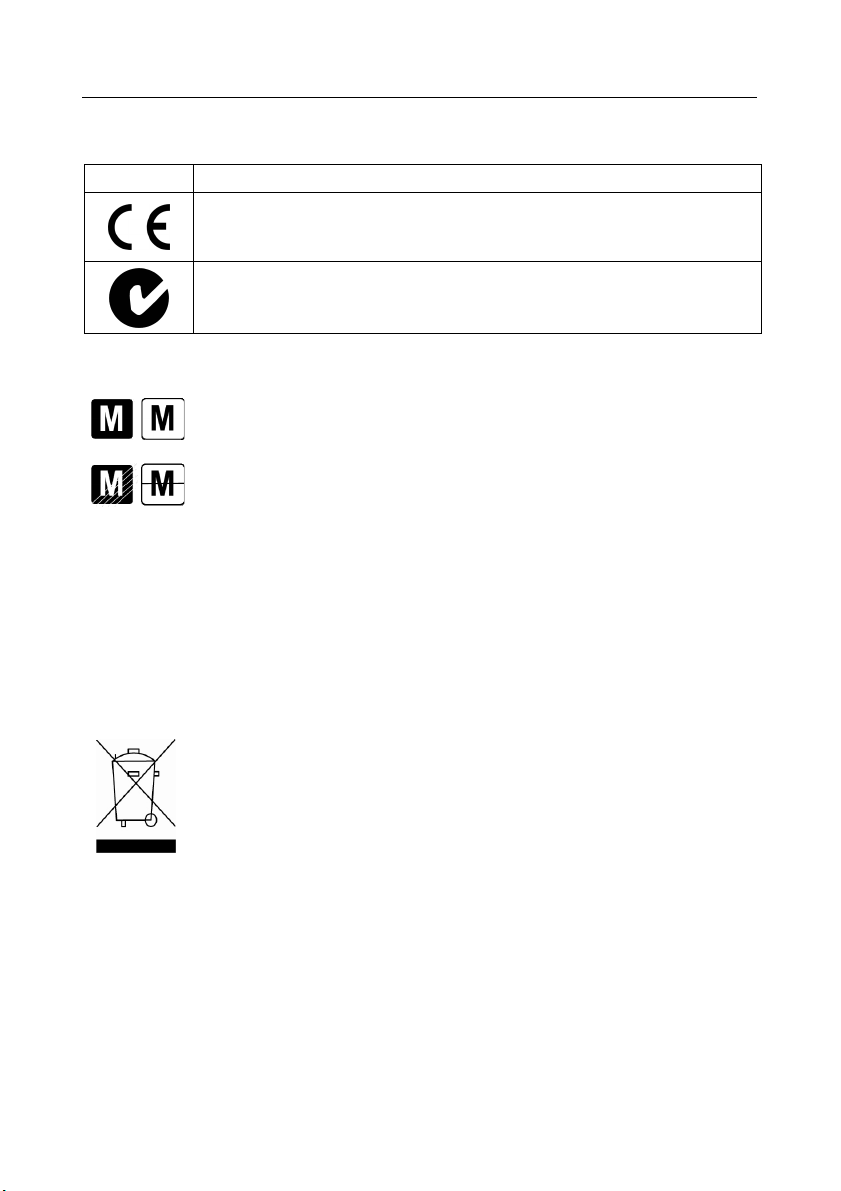
Compliance to the following standards is indicated by the corresponding mark on the product.
Mark Standard
This product conforms to the EMC directive 2004/108/EC, the Low Voltage Directive
2006/95/EC and the Non-automatic Weighing Instrument Directive 2009/23/EC. The
Declaration of Conformity is available online at www.OHAUS.com.
AS/NZS4251.1 Emission; AS/NZS4252.1 Immunity
Important notice for verified weighing instruments
Weighing Instruments verified at the place of manufacture bear one of the preceding
marks on the packing label and the green ‘M’ (metrology) sticker on the descriptive
The first stage of the initial verification has been carried out at the manufacturers work. It comprises
all tests according to the adopted European standard EN 45501:1992, paragraph 8.2.2.
If national regulations limit the validity period of the verification, the user of the weighing instrument
must strictly observe the re-verification period and inform the respective weights and measures
authorities.
Disposal
Please dispose of this product in accordance with local regulations at the collecting point specified
for electrical and electronic equipment. If you have any questions, please contact the responsible
authority or the distributor from which you purchased this device.
Should this device be passed on to other parties (for private or professional use), the content of this
regulation must also be related.
Disposal instructions in Europe are available online at www.ohaus.com. Choose your country,
then search for “WEEE.”
Thank you for your contribution to environmental protection.
data plate. They may be put into service immediately.
Weighing Instruments to be verified in two stages have no green ‘M’ (metrology) on
the descriptive data plate and bear one of the preceding identification marks on the
packing label. The second stage of the initial verification must be carried out by an
authorized and certified service organization established within the European
Community or by the National Notified Body.
In conformance with the European Directive 2002/96/EC on Waste Electrical and
Electronic Equipment (WEEE) this device may not be disposed of in domestic waste.
This also applies to countries outside the EU, per their specific requirements.
The Batteries Directive 2006/66/EC introduces new requirements from September
2008 on removability of batteries from waste equipment in EU Member States. To
comply with this Directive, this device has been designed for safe removal of the
batteries at end-of-life by a waste treatment facility.

EN-12 Navigator®
FCC Note
This equipment has been tested and found to comply with the limits for a Class B digital device,
pursuant to Part 15 of the FCC Rules. These limits are designed to provide reasonable protection
against harmful interference when the equipment is operated in a commercial environment. This
equipment generates, uses, and can radiate radio frequency energy and, if not installed and used in
accordance with the instruction manual, may cause harmful interference to radio communications.
Operation of this equipment in a residential area is likely to cause harmful interference in which case
the user will be required to correct the interference at his own expense.
Industry Canada Note
This Class B digital apparatus complies with Canadian ICES-003.
ISO 9001 Registration
In 1994, OHAUS Corporation, USA, was awarded a certificate of registration to ISO 9001 by Bureau
Veritus Quality International (BVQI), confirming that the OHAUS quality management system is
compliant with the ISO 9001 standard’s requirements. On May 15, 2003, OHAUS Corporation, USA,
was re-registered to the ISO 9001:2000 standard.
Limited Warranty
OHAUS products are warranted against defects in materials and workmanship from the date of
delivery through the duration of the warranty period. During the warranty period OHAUS will repair, or,
at its option, replace any component(s) that proves to be defective at no charge, provided that the
product is returned, freight prepaid, to OHAUS. This warranty does not apply if the product has been
damaged by accident or misuse, exposed to radioactive or corrosive materials, has foreign material
penetrating to the inside of the product, or as a result of service or modification by other than OHAUS.
In lieu of a properly returned warranty registration card, the warranty period shall begin on the date of
shipment to the authorized dealer. No other express or implied warranty is given by OHAUS
Corporation. OHAUS Corporation shall not be liable for any consequential damages.
As warranty legislation differs from state to state and country to country, please contact OHAUS or
your local OHAUS dealer for further details.
Product Registration
Protect your investment. Register your product with your local OHAUS dealer. In the US and Canada
register online at www.ohaus.com.

Navigator® ES-1
1. INTRODUCCIÓN
Este manual contiene instrucciones de instalación, operación y mantenimiento para las serie
Navigator
1.1 Precauciones de seguridad
Siga estas precauciones de seguridad:
1.2. Controles
®
. Lea el manual completamente antes de usar la balanza.
• Verifique que el voltaje del adaptador de corriente alterna coincida con la alimentación eléctrica
local.
• Use la balanza sólo en lugares secos.
• No opere la balanza en ambientes adversos.
• No deje caer cargas sobre la plataforma de pesaje.
• El servicio debe proporcionarse solamente por personal autorizado.
Modelos Estándares (no aprobados) – mostrado con pantalla LED.
Botón Funciones
Zero
Yes
Print
Units
No
Function
Mode
Back
Tare
Menu
Exit
IR Sensor (Izquierdo)
IR Sensor - Derecho
Los sensores de infrarrojos se pueden activar con una mano u otro objeto que se coloca alrededor de 12 mm por
encima de la ubicación de los sensores. La distancia de activación del sensor puede variar en función de la
naturaleza reflexiva del objeto. Si se producen activaciones no deseadas debido a situaciones excepcionales, los
sensores se pueden desactivar.
Presión corta (estando encendida): establece la pantalla en cero
(estando apagada): enciende la balanza
Presión larga (estando encendida): apaga la balanza
Presión corta (en Menú): selecciona o acepta la configuración mostrada
Presión corta: vea en el Manual de interfase la descripción de la operación.
Presión larga: navega a través de las unidades activas
Presión corta (en Menú): navega a través de las configuraciones disponibles
Presión corta: selecciona la configuración de la función
Presión larga: selecciona el modo activo
Presión corta (en Menú): regresa a la configuración anterior
Presión corta: introduce o borra un valor de tara
Presión larga: ingresa al menú de usuario
Presión corta (en Menú): sale rápido del menú de usuario
Los sensores pueden programarse para actuar como botones “sin tocarlos”.
Vea en menú del usuario la sección 4.3 de las configuraciones disponibles.
ES-2 Navigator®
F1
F2
F3
F4
Modelos aprobados – mostrado con pantalla LCD.
2. INSTALACIÓN
2.1 Contenido del paquete
• Balanza
• Bandeja de pesaje
2.2 Seguro para transporte
El seguro para transporte se encuentra en la parte inferior de la balanza. Gire el indicador hacia la
posición desbloqueada.
2.3 Ubicación
Coloque la balanza sobre una superficie firme y estable. Evite lugares con exceso de corrientes de
aire, vibraciones, fuentes de calor y cambios rápidos de temperatura.
Ajuste las patas de nivelación de manera que la burbuja quede centrada en el círculo.
• Adaptador de corriente
• Manual de instrucciones
Nota: No hay bloqueo de transporte en los modelos aprobados.
Burbuja de nivel
• Tarjeta de garantía
Posición bloqueada
Indicador
Posición desbloqueada
Patas ajustables
SÍ NO
Navigator® ES-3
2.4 Energía
El adaptador de corriente alterna se usa para alimentar la balanza cuando no se necesitan baterías.
Conector de
entrada del
adaptador de
corriente
Tapa del
compartimiento
de la batería
Conecte el adaptador de corriente
alterna en el conector de entrada.
Instalación de la batería (sin batería interna opcional):
Retire la tapa de la batería e instale cuatro baterías siguiendo las indicaciones de polaridad que
se muestran en el compartimiento.
Batería recargable opcional (sólo los modelos NVL y NVT):
Las balanzas con la opción de batería interna necesitarán cargarse durante 12 horas antes de
operar la balanza con la energía de la batería por primera vez. La batería está protegida contra
sobrecarga para que la balanza pueda permanecer conectada a la corriente alterna. Cuando la
batería está totalmente cargada, el indicador de batería en la pantalla dejará de destellar.
Para quitar la opción de batería recargable e instalar baterías C., la referencia de la instrucción
de recarga de la batería Opción manual de instrucciones paso a paso, así como instrucciones
para su eliminación
.
Precaución: Puede haber riesgo de explosión si la batería recargable se reemplaza
por una de tipo erróneo o si no está correctamente conectada.
2.5 Calibración inicial
Cuando se instala la balanza por primera vez, debe calibrarse para asegurar resultados exactos.
Presione Menu hasta que aparezca [mMeNU] (Menú) en la pantalla. Cuando suelte el botón, la
pantalla mostrará [.C.A.L.]. Presione Yes para aceptar, y se mostrará [SpaN]. Presione Yes
nuevamente para iniciar la calibración de extensión (Span). [--C--] destella mientras se guarda la
lectura de cero. Enseguida la pantalla muestra el valor del peso de calibración. Coloque sobre la
bandeja de pesaje el masa de calibración especificado.
[--C--] destella mientras se guarda la lectura. La balanza regresa al modo de aplicación previo y
está lista para usarse.
Conecte el adaptador de
corriente alterna en una toma
de corriente adecuada.
Masas de calibración requerido (se vende aparte)
Capacidad Masa Capacidad Masa Capacdad Masa
210g 200g 1600g - 2100g 1kg 6400g - 10kg 5kg
310g - 510g 300g 3100g - 4100g 2kg 16kg - 20kg 10kg
1100g 500g 5100g 3kg

ES-4 Navigator®
3. OPERACIÓN
Todos los modelos excepto para pesaje deben activarse en el Menú de usuario antes de que estén
disponibles; vea la sección 4.
3.1 Modo de pesaje
1. Mantenga presionado Mode hasta que aparezca [wJeIGH] (Pesaje).
2. Si se requiere, coloque un recipiente vacío sobre la bandeja de pesaje y presione Tare.
3. Agregue material al recipiente. La pantalla muestra el peso del material.
3.2 Modo de conteo de piezas
Este modo cuenta cantidades grandes de artículos con base en el peso de un conteo de referencia.
1. Coloque un recipiente vacío sobre la bandeja de pesaje y presione Tare.
2. Mantenga presionado Mode hasta que aparezca [Count] (Conteo). Entonces aparecerá
[CLr.APU] (Borrar peso de pieza promedio o APW, por sus siglas en inglés).
3. Presione No para usar el peso de pieza promedio (APW) guardado. Continúe con el paso 6.
4. Presione Yes para establecer un nuevo APW. La balanza mostrará el tamaño de la muestra
almacenada, por ejemplo, [Put 10]. Presione No o Back para alternar las opciones (5, 10, 20,
50 ó 100).
5. Coloque la cantidad de piezas indicadas sobre la bandeja y presione Yes para calcular el APW.
La pantalla muestra el conteo de piezas. Nota: presione Function para ver el APW actual.
6. Agregue piezas hasta que llegue al conteo que desea.
7. Para borrar el APW guardado, mantenga presionado Mode hasta que aparezca [Count]
(Conteo). Presione Yes cuando aparezca [Clr.APU].
3.3 Modo de porcentaje
Este método mide el peso de una muestra como porcentaje de un peso de referencia.
1. Coloque un recipiente vacío sobre la bandeja de pesaje y presione Tare.
2. Presione Mode hasta que aparezca [Percnt] (Porcentaje). Aparecerá [Clr.ref] (Borrar
referencia).
3. Presione No para usar el peso de referencia guardado y proceda con el paso 6.
4. Presione Yes para establecer una nueva referencia. La balanza mostrará ahora [Put.ref].
5. Agregue el material de referencia que desee al recipiente. Presione Yes para ver el peso de
referencia, y luego presione Yes otra vez para guardar el peso de referencia. La pantalla
muestra 100%.
Nota: presione Function para ver el peso de referencia actual.
6. Reemplace el material de referencia con material de la muestra. La pantalla muestra el
porcentaje de la muestra comparado con el peso de referencia.
7. Para borrar la referencia guardada, mantenga presionado Mode hasta que aparezca [Percnt]
(Porcentaje). Presione Yes cuando aparezca [Clr.ref].

Navigator® ES-5
3.4 Modo mantener pantalla
Este modo mantiene el valor del peso estable más alto para fácil referencia.
1. Mantenga presionado Mode hasta que aparezca [Hold] (Mantener).
2. Coloque muestras que va a pesar sobre la bandeja. Cuando la balanza detecte el peso estable
más alto, destellará “Hold Indicator” (Mantener indicador) y el peso mostrado no cambiará.
3. Presione Function para liberar el valor del peso mantenido.
3.5 Modo acumular
Este modo permite al usuario almacenar el total de una serie de mediciones de peso. Con una opción
de interfase se pueden transmitir los pesos de los componentes y el peso total.
1. Mantenga presionado Mode hasta que aparezca [ACCUmM] (Acumular). Aparecerá [Clr.Acc]
(Borrar acumular).
2. Presione Yes para borrar el valor guardado, o No para continuar sumando al total guardado.
3. Si se requiere, coloque un recipiente vacío sobre la bandeja de pesaje y presione Tare.
4. Agregue el primer artículo; se muestra su peso. Presione Function para guardar el peso; el
indicador “Accum” destellará y la pantalla mostrará el peso total.
5. Retire el primer artículo y coloque el siguiente. La balanza mostrará su peso. Presione
Function para guardar su peso. El indicador “Accum” destellará y se mostrará el nuevo peso
total.
6. Repita el paso 5 para todos los artículos que va a agregar.
Nota: Mientras la balanza muestra cero, presione Function para ver la cantidad total actual de
muestras y el peso total.
7. Para borrar el total guardado, mantenga presionado Mode hasta que aparezca [ACCUmM]
(Acumular). Presione Yes cuando aparezca [Clr.Acc].
3.6 Modo de peso de comprobación
Este modo establece límites bajos y altos para procesos de control de porciones.
1. Mantenga presionado Mode hasta que aparezca [CHeCk] (Verificar). Aparecerá [Clr.ref]
(Borrar referencias).
2. Presione No para usar los límites de los pesos de referencia guardados y proceda con el paso
5. Presione Function para ver los límites de los pesos de referencia bajo y alto.
3. Presione Yes para establecer nuevos valores de referencia. La balanza mostrará [Set. Lo]
(Establecer bajo). Presione Yes para ver el valor del límite “Low” (Bajo). Presione Yes para
aceptar, o No para modificar el valor del límite “Low”. Aparece entonces el valor guardado con
el primer dígito resaltado [000.000 kg]. Presione No varias veces hasta que aparezca el
número que desee. Presione Yes para aceptar y resaltar el siguiente dígito. Repita hasta que
todos los dígitos sean correctos. Presione Yes para aceptar el valor del límite “Low”; entonces
aparecerá [Set. Hi] (Establecer alto).
4. Repita el mismo procedimiento para aceptar o modificar el valor “High”.
5. Coloque material de muestra sobre la bandeja. El indicador “Accept” (Aceptable) mostrará
ahora que el peso de la muestra está dentro del rango aceptable.
6. Para borrar los valores de referencia guardados, mantenga presionado Mode hasta que
aparezca [CHeCk] (Verificar). Presione Yes cuando aparezca [Clr.ref].
ES-6 Navigator®
4. CONFIGURACIONES
El Menú de usuario permite personalizar las configuraciones de la balanza.
Nota: puede haber submenús adicionales si se instalan opciones de interfase. Vea el Manual de
usuario de interfase para más información de configuración.
4.1 Menú de navegación
Menú de usuario:
Submenús: .C.a.l. .S.e.t.u.p. .M.o.d.e. .U.n.i.t. .E.n.d.
Elementos
del menú:
Mantenga presionado Menu hasta que aparezca [mMeNU] (Menú) en la pantalla. Al soltarlo,
aparecerá el primer submenú [.C.a.l.] (Calibración).
Presione Yes para ingresar al submenú mostrado, o presione No para avanzar al siguiente.
Al seleccionar un submenú se muestra el primer elemento del menú. Presione Yes para ver la
configuración del elemento del menú, o presione No para avanzar al siguiente elemento del menú.
Cuando vea la configuración, presione Yes para aceptarla, o presione No para cambiar dicha
configuración. Cuando aparezca [End] (Finalizar), presione Yes para regresar a las opciones del
submenú, o No para regresar al primer elemento del menú actual.
4.2 Submenú Cal (Calibración)
• Extensión [SpaN] (yes, no): inicia un procedimiento de calibración de extensión (cero y
extensión). La calibración de extensión es importante cuando se configura inicialmente la
balanza.
• Linealidad [Lin] (yes, no): inicia un procedimiento de calibración de linealidad (cero, punto
medio y extensión).
4.3 Submenú Setup (Configuración)
Las pantallas LCD de luz de fondo y LED (rojo) tendrán diferentes elementos de menú o
configuraciones con base en su funcionalidad.
• Apagado automático [A-Off] (on, off): cuando Auto Off se configura en “on” (encendido), la
balanza se apaga automáticamente después de cinco minutos de inactividad. Auto off se usa
para ahorrar energía de la batería.
• Pantalla [disply] (on, auto, dim (LED), off (LCD)): esta configuración controla la luz de fondo
LCD o los dígitos LED; constantemente encendida, apagado automático después de cinco
segundos de inactividad de la balanza, atenuación de la luz LED después de 60 segundos de
inactividad de la balanza, o luz de fondo LCD siempre apagada.
• Brillo [Bright] (hi, mid, low): esta configuración controla el brillo de la pantalla LED. Los
modelos con LCD no verán este elemento de menú.
• Sensor infrarrojo izquierdo [Ir.LEFt] o derecho [Ir.rght] (Off, Tare, Function, Print, Zero,
Display): estas configuraciones determinan el papel de los sensores infrarrojos. “Zero” (Cero),
“Print” (Imprimir), “Function” (Función) o “Tare” (Tara) permiten que el sensor infrarrojo actúe
igual que el botón relacionado. “Display” (Pantalla) activa la pantalla si está configurada como
Display-Auto (Pantalla-automática). “Off” (Apagado) inhabilita al sensor.
Span
Lin
End
A-off
Disply
Bright
IR.LEFT
IR.RGHT
End
Count
Percnt
Hold
Accum
Check
End
ct, g, kg, grn,
lb, oz, lb:oz,
ozt, N, dwt,
thk, tsg, ttw,
tola, tical
End

Navigator® ES-7
4.4 Menú modo
Este submenú activa modos para que estén disponibles para usarse con el botón Mode. El modo de
pesaje siempre está activo.
• Conteo de piezas [Count] (on, off); configure como “on” (encendido) para que el modo esté
activo.
• Porcentaje [Percnt] (on, off): configure como “on” (encendido) para que el modo esté activo.
• Mantener [Hold] (on, off): configure como “on” (encendido) para que el modo esté activo.
• Acumular [ACCUmM] (on, off): configure como “on” (encendido) para que el modo esté activo.
• Comprobar peso [CHECk] (on, off): configure como “on” (encendido) para que el modo esté
activo.
4.5 Menú unidades
Este submenú activa unidades para que sean accesibles con el botón Units. Las unidades en el
menú deben encenderse (on) para que estén activas. Las unidades onza (oz) y libra:onza (lb:oz)
incluyen la opción de lectura decimal [dec] o fraccional [frac]. Debido a los diferentes requerimientos
de las agencias, la unidad de grano tiene dos opciones de presentación de íconos: gr o grn.
Nota: Las unidades y modalidades disponibles pueden varían en función de los modelos y la
legislación de cada país o región.
4.6 Sellado del acceso a las configuraciones de la balance
El interruptor de bloqueo del menú limita los cambios en los menús CAL, SETUP, MODE y UNIT. En
el de los modelos aprobados tipo CE, el interruptor puede establecer algunos ajustes de la balanza
específicamente requerido por el organismo de aprobación. El interruptor puede sellarse con sellos de
papel/etiqueta, sellos de plomo o cintas de plástico.
Bloqueado Desbloqueado
5. MANTENIMIENTO
5.1 Identificación y solución de problemas
La siguiente tabla describe los problemas comunes y las posibles causas y soluciones.
Si persiste algún problema, comuníquese con OHAUS o con su distribuidor autorizado.
Síntoma Causa posible Solución
No enciende No hay energía hacia la balanza Verifique las conexiones y el voltaje
Falta de precisión
No puede calibrarse
No puede ingresar al
modo
No puede ingresar en
la unidad de medida
Calibración incorrecta
Ambiente inestable
Ambiente inestable
Peso de calibración incorrecto
Modo no habilitado Ingrese al menú y habilite el modo
Unidad no habilitada Ingrese al menú y habilite la unidad
Calibre
Cambie la balanza a un lugar apropiado
Cambie la balanza a un lugar adecuado
Use pesos de calibración correctos
ES-8 Navigator®
Lo ref
ref err
Err 3.0 Cal
Err 4.4 full
Err 8.1 ¯Load¯
Err 8.2 _Load_
Err 8.3 ¯Load¯
Err 8.4 _Load_
Err 8.6 999999
Err 9 Data
Err 13 mMEmM
Err 53 CSumM
5.2 Información de servicio
Si la sección de identificación y solución de problemas no resuelve o describe su problema,
comuníquese con su agente autorizado de servicio de OHAUS. Para asistencia de servicio o ayuda
técnica en Estados Unidos, llame gratis al 1-800-526-0659 entre las 8:00 a.m. y las 5:00 p.m. hora del
este. Un especialista de servicio para productos OHAUS estará disponible para brindarle asistencia.
Fuera de los Estados Unidos, visite nuestra página web, www.OHAUS.com, para encontrar la oficina
de OHAUS más cercana a usted.
5.3 Accesorios
Kit de recargable bateria 83032106 (NVL, NVT)
Kit de interfase RS232 83032107 (NV, NVL, NVT)
Kit de interfase USB 83032108 (NV, NVL, NVT)
Kit de interfase Ethernet 83032109 (NV, NVL, NVT)
Kit de protección y cubrimiento 83032223 (NV) 83032222 (NVL) 83032221 (NVT)
Maletín de transporte 83032226 (NV) 83032225 (NVL) 83032224 (NVT)
Impresoras y cables Póngase en contacto con OHAUS
El peso de referencia es demasiado bajo Aumente el peso de referencia
Conteo de piezas– peso de muestra <1d.
Peso de calibración incorrecto Vea la sección 2.5 para los pesos correctos
Memoria intermedia RS232 llena
Rango de cero en encendido excedido
Cero en encendido debajo del rango
Sobrecarga (>cap+9e)
Carga deficiente
Valor mostrado >999999
Error de datos internos
Error al escribir EEPROM.
Datos de suma de comprobación no
válidos
Muestra error –sale del modo o va a
[Clr.ApU].
Establezca comunicación amiga encendida;
vea el Manual de usuario
Retire la bandeja; revise la posición del seguro
de transporte
Instale la bandeja; revise la posición del
seguro de transporte
La carga excede la capacidad máxima de la
balanza
Lectura por debajo del rango mínimo –
Reinstale la bandeja.
El resultado excede la capacidad de la
pantalla.
Comuníquese con OHAUS o con un agente de
servicio autorizado
Comuníquese con OHAUS o con un agente de
servicio autorizado
Comuníquese con OHAUS o con un agente de
servicio autorizado
Navigator® ES-9
6. DATOS TÉCNICOS
Los datos técnicos son válidos en las siguientes condiciones ambientales:
Temperatura ambiente: 10 a 40 °C, modelos aprobados (M) 0 a 40 °C
Humedad relativa: humedad relativa de 20% a 85%, no condensante
Altura sobre el nivel del mar: hasta 4000 m
Viabilidad de operación: se garantiza a temperaturas ambiente entre 0 y 40 °C
Energía: adaptador de corriente alterna; salida de 12 VCD, 420 mA, 4 baterías o batería recargable
Protección: contra polvo y agua
Grado de contaminación: 2
Categoría de instalación: Clase III
EMC: vea la Declaración de Conformidad
6.1 Especificaciones
Especificaciones típicas:
Tiempo de estabilización
Rango de tara A la capacidad mediante sustracción
Modos de aplicación
Unidades de pesaje
Energía de CA Adaptador (se incluye) - 12 VCD o 12 VCA, 420 mA
Energía de la batería
Calibración Digital con peso externo
Pantalla LCD LCD de 6 dígitos y 7 segmentos con luz de fondo blanca LED
Pantalla LED LED de 6 dígitos y 7 segmentos
Tamaño de la pantalla Dígitos de 20 mm
Teclado numérico Membrana de 4 botones más dos sensores infrarrojos programables
Protección contra ingreso IP43 (modelos NVL y NVT sólo)
Tamaño de la bandeja
(A x P)
Peso neto1 NV: 1,0 kg / 2,2 lb NVL: 1,5 kg / 3,3 lb NVT: 1,5 kg / 3,3 lb
Peso de transporte1 NV: 1,4 kg / 3,1 lb NVL: 2,3 kg / 5,1 lb NVT: 2,3 kg / 5,1 lb
Nota 1: /1 y /3 modelos añadir 0,5 kg
Modelos no aprobados:
Modelo1 Capacidad
NV212 210g 0,01g 1d ±2d 200g 100g, 200g
NV511 510g 0,1g 1d ±2d 300g 300g, 500g
NV1101 1100g 0,1g 1d ±2d 500g 500g, 1000g
NV2101 2100g 0,1g 1d ±2d 1kg 1kg, 2kg
NV4101 4100g 0,2g 1d ±2d 2kg 2kg, 4kg
peso, porcentaje, conteo de piezas, comprobación de peso, acumular,
no aprobados: ct, g, kg, grn, lb, oz, lb:oz, ozt, N, dwt, tael (3), tola, tical
M modelos: g, kg, ct N modelos: g, kg, ct, lb, oz, ozt, dwt, grn
NV: 4 baterías AA (LR6) (no se incluyen), NVL, NVT: 4 baterías C
(LR14) (no se incluyen) u opción de batería recargable
NV: 190 mm x 138 mm NV212: Ø120mm
NVL: 194 mm x 203 mm NVT: 230 mm x 174 mm
Capacidad de
lectura (d)
Repetibilidad Linealidad
≤1 segundo
mantener
Masa de
calibración
de extensión
Masa de
calibración
de linealidad

ES-10 Navigator®
B
MV5101 5100g 0,5g 1d ±2d 3kg 3kg, 5kg
NVL511 510g 0,1g 1d ±2d 300g 300g, 500g
NVL1101 1100g 0,1g 1d ±2d 500g 500g, 1000g
NVL2101 2100g 0,1g 1d ±2d 1kg 1kg, 2kg
NVL5101 5100g 0,5g 1d ±2d 3kg 3kg, 5kg
NVL10000 10000g 1g 1d ±2d 5kg 5kg, 10kg
NVL20000 20000g 1g 1d ±2d 10kg 10kg, 20kg
NVT1601 1600g 0,1g 1d ±2d 1kg 1kg,1.5kg
NVT3201 3200g 0,2g 1d ±2d 2kg 2kg, 3kg
NVT6401 6400g 0,5g 1d ±2d 5kg 3kg, 6kg
NVT10001 10000g 0,5g 1d ±2d 10kg 5kg, 10kg
NVT16000 16000g 1g 1d ±2d 10kg 10kg, 15kg
Nota 1: /1 = Opción de batería recargable instalada en fábrica
/2 = Pantalla LED
Modelos aprobados:
Modelo
NV311 310g 0,1g III 200g 200g, 300g
NV3100 3100g 1g III 2kg 2kg, 3kg
NVT1601 1600g 0,5g III 1kg 1kg, 1,5g
NVT3200 3200g 1g III 2kg 2kg, 3kg
NVT6400 6400g 2g III 5kg 3kg, 6kg
NVT16000 16000g 5g III 10kg 10kg, 15kg
Nota 1: M = Tipo aprobado por la EC
N = Certificación NTEP y aprobación de Measurement Canada
Nota 2: /1 = Opción de batería recargable instalada en fábrica
Ejemplo: NVT3200M/3
/3 = Pantalla LED con opción de batería recargable instalada en fábrica
1,2
Max= e=
/2 = Pantalla LED
/3 = Pantalla LED con opción de batería recargable instalada en fábrica
Clase
aprobada
Masa de calibración
de extensión
Masa de calibración
de linealidad
6.2 Dibujos
A
A B C
204 mm 212 mm 58 mm
NV
204 mm 282 mm 74 mm
NVL
240 mm 250 mm 74 mm
NVT

Navigator® ES-11
6.3 Conformidad
La conformidad a los estándares siguientes es indicada por la marca correspondiente en el producto.
Marca Estándar
Este producto se conforma con la Directiva EMC 2004/108/EC. con la Directiva para
Voltaje Bajo 2006/95/EC y con la Directiva para Instrumentos de Pesaje no Automát
cos 2009/23/EC. La Declaración de Conformidad está disponible en internet a través
de www.OHAUS.com.
AS/NZS4251.1; AS/NZS4252.1
Notificación importante para instrumentos de pesaje verificados.
Los instrumentos de pesaje verificados en el sitio de fabricación llevan una de las
marcas precedentes en el rótulo del empaque y la etiqueta de la ‘M’ verde
(metrología) en la placa descriptiva. Estos instrumentos se pueden poner en
funcionamiento inmediatamente.
Los instrumentos de pesaje a ser verificados en dos etapas no tienen ninguna ‘M’
verde (metrología) en la placa descriptiva, y presentan una de las marcas de
identificación precedentes sobre el rótulo del empaque. La segunda etapa de la
verificación inicial debe ser llevada a cabo por la organización de servicio aprobada
del representante autorizado dentro de la CE o por las autoridades nacionales de
pesos y medidas.
La primera etapa de la verificación inicial ha sido llevada a cabo en el sitio de fabricación. Ésta
comprende todas las pruebas estipuladas por el estándar europeo adoptado: EN 45501:1992,
párrafo 8.2.2.
Si las normas nacionales limitan el periodo de validez de la verificación, el usuario del instrumento de
pesaje debe seguir estrictamente el periodo de re-verificación e informar a las correspondientes
autoridades de pesos y medidas.

ES-12 Navigator®
Eliminación
de residuos
Elimine este producto, según las disposiciones locales, mediante el sistema de recogida selectiva
de aparatos eléctricos y electrónicos.
Si tiene alguna pregunta al respecto, diríjase a las autoridades responsables o al distribuidor que le
proporcionó el equipo.
Si transfiere este equipo (por ejemplo, para la continuación de su uso con fines privados,
comerciales o industriales), deberá transferir con él esta disposición.
Las instrucciones de eliminación para Europa están disponibles a través de Internet en
www.ohaus.com
electrónicos (WEEE).
Muchas gracias por su contribución a la conservación medioambiental.
De conformidad con las exigencias de la directiva europea 2002/96/CE sobre
residuos de aparatos eléctricos y electrónicos (RAEE), este equipo no puede
eliminarse como basura doméstica. Esta prohibición es asimismo válida para los
países que no pertenecen a la UE cuyas normativas nacionales en vigor así lo
reflejan.
La Directiva para baterías 2006/66/EC introduce nuevos requisitos a partir de
septiembre de 2008 acerca de la remoción de las baterías de equipos de desecho
en los países miembros de la Unión Europea. Para cumplir con esta Directiva, este
dispositivo ha sido designado para remoción segura de baterías al final de su vida
útil a través de un centro de tratamiento de desechos.
. Elija su país, realice la búsqueda sobre residuos de aparatos eléctricos y
Registro ISO 9001
En 1994, Bureau Veritus Quality International (BVQI) le otorgó a OHAUS Corporation, EE.UU., un
certificado de registro ISO 9001 el cual confirma que el sistema administrativo de calidad de OHAUS
cumple con los requerimientos del estándar ISO 9001. En mayo 15 del 2003, OHAUS Corporation,
EE.UU., fue registrada nuevamente al estándar ISO 9001:2000.
GARANTÍA LIMITADA
Los productos de OHAUS están garantizados contra defectos en los materiales y la mano de obra
desde la fecha de entrega hasta que se termine el periodo de garantía. Durante el periodo de
garantía, OHAUS reemplazará o reparará, por cuenta propia, sin costo alguno, el o los componentes
comprobados como defectuosos, siempre y cuando el producto sea enviado a OHAUS con los gastos
de envío pagados por anticipado.
Esta garantía no se aplica si el producto ha sido dañado por accidente o mal uso, expuesto a
materiales radioactivos o corrosivos, se ha penetrado con objetos extraños en su interior, o como
resultado de haberle prestado servicio o haber realizado una modificación personas ajenas a OHAUS.
Además del envío apropiado de la tarjeta de garantía, el periodo de garantía comienza en la fecha del
envío al distribuidor autorizado. No existe ninguna otra garantía expresa o implícita ofrecida por
OHAUS Corporation. OHAUS Corporation no puede ser demandada por daños consecuentes.
Ya que las legislaciones de garantías difieren de estado a estado y de país a país, por favor contacte
a su representante de OHAUS para mayores detalles.
Registro de productos
Proteja su inversion. Registre su producto con su distribuidor local de OHAUS. En los EE.UU. y
registro en linea de Canadá en www.ohaus.com.

Navigator® FR-1
1. INTRODUCTION
Ce manuel contient des instructions d'installation, de fonctionnement et d'entretien de la série
Navigator
1.1 Consignes de sécurité
Veuillez respecter ces consignes de sécurité.
• Assurez-vous que la tension d'entrée de l’adaptateur CA correspond à l'alimentation secteur locale.
• Utilisez seulement la balance dans des lieux secs.
• N'utilisez pas la balance dans des environnements difficiles.
• Ne laissez pas tomber les charges sur la plate-forme.
• L'entretien doit être exclusivement exécuté par un personnel agréé.
1.2. Contrôles
®
. Veuillez lire toutes ces instructions avant d’utiliser la balance.
Modèles Standard (non approuvés) – montre avec affichage LED.
Bouton Fonctions
Zero
Yes
Print
Units
No
Function
Mode
Back
Tare
Menu
Exit
IR Sensor - gauche
IR Sensor - droit
Les capteurs IR peuvent être activés par une main ou un autre objet qui est placé environ 12 mm audessus de leur position. La distance d' activation du capteur varie en fonction de la nature réfléchissante de l'objet. Le capteur peut également être désactivé afin de prévenir un déclenchement involontaire.
Courte pression (si en marche) Définit l'affichage à zéro
(si à l'arrêt) : Met la balance sous tension
Longue pression (si en marche) Met la balance à l'arrêt
Courte pression (dans le menu) Sélectionne/accepte le réglage affiché
Courte pression : Reportez-vous au Manuel de l'interface pour une description
du fonctionnement.
Longue pression : Navigue parmi les unités actives
Courte pression (dans le menu) Navigue parmi les réglages disponibles
Courte pression : Sélectionne le réglage de fonctionnement
Longue pression : Sélectionne le mode actif
Courte pression (dans le menu) : revient aux réglages précédents
Courte pression : Introduction/Effacement d'une valeur de tare
Longue pression : Permet d'entrer dans le menu Utilisateur
Courte pression (dans le menu) : Sortie rapide du menu Utilisateur
Les capteurs IR peuvent être programmés pour agir en tant que boutons « sans
effleurement ». Reportez-vous à la section du menu Utilisateur pour les réglages
disponibles.

FR-2 Navigator®
F1
F2
F3
F4
Modèles approuvés – montre avec affichage LCD.
2. INSTALLATION
2.1 Contenu de l’emballage
• Balance
• Plate-forme
2.2 Verrouillage de transport
Le verrouillage de transport se trouve sous la balance. Faites tourner le pointeur vers la position
déverrouillée.
2.3 Emplacement
Utilisez la balance sur une surface solide et stable. Évitez les emplacements avec des courants d'air,
des vibrations, des sources de chaleur excessive ou avec des changements brusques de
température.
Réglez les pieds de mise à niveau pour que la bulle soit centrée dans le cercle.
• Adaptateur d'alimentation
• Manuel d’instructions
Position verrouillée
Pointeur
Position déverrouillée
Note: Aucun dispositif de sécurité sur les modèles approuvés.
• Carte de garantie
Niveau à bulle
OUI NON
Pied réglable

Navigator® FR-3
2.4 Alimentation
L'adaptateur CA est utilisé pour alimenter la balance lorsque l'alimentation par piles n'est pas
nécessaire.
Prise d'entrée
de l'adaptateur
d'alimentation
Couvercle du
compartiment
des piles
Connectez la fiche de l'adaptateur
d'alimentation CA sur la prise d'entrée.
Connectez l'adaptateur CA sur
l'alimentation secteur adéquate.
Installation des piles (sans l'option de batterie interne):
Démontez le couvercle des piles et installez 4 piles en respectant les indications de polarité
indiquées dans le compartiment.
Batteries rechargeables en option (modèles NVL et NVT seulement):
Les balances avec l'option de batterie interne devront être chargées pendant 12 heures avant
de pouvoir les faire fonctionner sur batterie pour la première fois. La batterie est protégée contre
les surcharges, elle peut donc rester connectée sur la prise secteur. Lorsque la batterie est
complètement chargée, le témoin sur l'affichage s'arrêtera de clignoter.
Pour supprimer l'option batterie rechargeable et d'installer les piles C, référence de l'instruction
Option Recharge Batterie manuel pour des instructions étape par étape, ainsi que les
instructions d'élimination.
Attention: Un risque d'explosion peut se produire si la pile rechargeable est
remplacée par un mauvais type ou si elle n'est pas correctement connectée.
2.5 Étalonnage initial
Lorsque la balance est installée pour la première fois, elle doit être étalonnée afin d'assurer des
résultats précis.
Maintenez appuyé Menu jusqu'à ce que [mMeNU] (Menu) s'affiche. Lorsque le bouton est relâché,
[.C.A.L.] s'inscrit sur l'afficheur. Appuyez sur Yes pour accepter, [SpaN] s'affichera alors. Appuyez sur
Yes à nouveau pour commencer l'étalonnage général.
[--C--] clignote pendant que la mesure du zéro est mémorisée. Ensuite, l'affichage présente la
valeur de la pesée d'étalonnage. Placez la masse d'étalonnage spécifié sur la plate-forme. [--C--]
clignote pendant que la mesure est mémorisée. La balance revient au mode de l'application
précédente et est prête à être utilisée.
Masses d'étalonnage nécessaires (vendus séparément)
Capacité Masse Capacité Masse Capacité Masse
210g 200g 1600g - 2100g 1kg 6400g - 10kg 5kg
310g - 510g 300g 3100g - 4100g 2kg 16kg - 20kg 10kg
1100g 500g 5100g 3kg

FR-4 Navigator®
3. FONCTIONNEMENT
Tous les modes, à l'exception de la pesée, doivent être activés dans le menu Utilisateur avant de
pouvoir être disponibles, reportez-vous à la section 4.
3.1 Mode Pesée
1. Maintenez appuyé Mode jusqu'à ce que [wJeIGH] (Poids) s'affiche.
2. Au besoin, placez un récipient vide sur la plate-forme et appuyez sur Tare.
3. Introduisez un objet à peser dans le récipient. L'affichage présentera le poids de l'objet.
3.2 Mode Comptage des pièces
Ce mode permet de compter un plus grand nombre d'éléments en se basant sur le poids d'un
comptage de référence.
1. Au besoin, placez un récipient vide sur la plate-forme et appuyez sur Tare.
2. Maintenez appuyé Mode jusqu'à ce que [Count] (Comptage) s'affiche. [CLr.APU] (Effacement
du poids moyen de la pièce) s'affichera alors.
3. Appuyez sur No pour utiliser APW en mémoire. Passez à l'étape 6.
4. Appuyez sur Yes pour établir APW. La balance affichera alors la taille enregistrée de
l'échantillon, par exemple [Put 10]. Appuyez sur No ou Back pour naviguer parmi les choix (5,
10, 20, 50 ou 100).
5. Introduisez le nombre indiqué de pièces sur la plate-forme et appuyez sur Yes pour calculer
l'APW. L'affichage présente le nombre de pièces. Remarque: Appuyez sur Function pour
visualiser l'APW en cours.
6. Ajoutez des pièces supplémentaires jusqu'à ce que le nombre désiré soit atteint.
7. Pour effacer APW en mémoire, maintenez appuyé Mode jusqu'à ce que [Count] (comptage)
soit affiché. Appuyez sur Yes lorsque [Clr.APU] s'affiche.
3.3 Mode Pourcentage
Ce mode mesure le poids d'un échantillon en tant que pourcentage d'un poids de référence.
1. Placez un récipient vide sur la plate-forme et appuyez sur Tare.
2. Maintenez appuyé Mode jusqu'à ce que [Percnt] s'affiche. [Clr.ref] (effacer référence)
s'affichera alors.
3. Appuyez sur No pour utiliser le poids de référence en mémoire et passez à l'étape 6.
4. Appuyez sur Yes pour établir une nouvelle référence. La balance affichera alors [Put.ref].
5. Ajoutez l'objet de référence retenu au récipient. Appuyez sur Yes à nouveau pour mettre en
mémoire le poids de référence. L’écran affiche 100 %.
Remarque : Appuyez sur Function pour visualiser le poids de référence en cours.
6. L'affichage présente le pourcentage de l'échantillon comparé au poids de référence.
7. Pour effacer la référence en mémoire, maintenez appuyé Mode jusqu'à ce que [Percnt] soit
affiché. Appuyez sur Yes lorsque [Clr.ref] s'affiche.

Navigator® FR-5
3.4 Mode Maintien de l’affichage
Ce mode maintient la valeur de la pesée stable la plus élevée à titre de référence facile
1. Maintenez appuyé Mode jusqu'à ce que [Hold] s'affiche.
2. Placez les échantillons à peser sur la plate-forme. Lorsque la balance détecte le poids stable le
plus élevé, le Témoin de maintien clignotera et le poids affiché ne changera pas.
3. Appuyez sur Function pour libérer la valeur maintenue du poids.
3.5 Mode Accumulation
Utilisez ce mode pour mémoriser le total d’une série de mesures de poids. Avec une option
d'interface, le composant pèse et le total de la pesée peut être transmis.
1. Maintenez appuyé Mode jusqu'à ce que [ACCUmM] (accumulation) s'affiche. [Clr.Acc] (effacer
accumulation) s'affichera alors.
2. Appuyez sur Yes pour effacer la valeur mémorisée ou sur No pour continuer à ajouter au total
en mémoire.
3. Au besoin, placez un récipient vide sur la plate-forme et appuyez sur Tare.
4. Ajoutez le premier élément, son poids s'affiche. Appuyez sur Function pour mémoriser le
poids, le témoin « Accum » clignotera et l'affichage présentera le poids total.
5. Retirez le premier élément et ajoutez l'élément suivant. La balance affiche son poids. Appuyez
sur Function pour mémoriser ce poids. Le témoin « Accum » clignotera et l'affichage
présentera le nouveau poids total.
6. Répétez l'étape 5 pour tous les autres éléments à ajouter.
Remarque : Pendant que l'affichage indique zéro, appuyez sur Function pour visualiser le total
actuel d'échantillons et le poids total.
7. Pour effacer le total en mémoire, maintenez appuyé Mode jusqu'à ce que [ACCUmM] soit affiché.
Appuyez sur Yes lorsque [Clr.Acc] s'affiche.
3.6 Mode Pesage de contrôle
Ce mode définit les limites de poids inférieures et supérieures pour les processus de contrôle des
portions.
1. Maintenez appuyé Mode jusqu'à ce que [CHeCk] (vérification) s'affiche. [CLr.ref] (effacer
références) s'affichera alors.
2. Appuyez sur No pour utiliser les limites de poids de référence en mémoire et passez à l'étape
5. Remarque : Appuyez sur Function pour visualiser les limites inférieures et supérieures des
poids de référence.
3. Appuyez sur yes pour établir de nouvelles valeurs de référence. La balance affichera alors
[Set. Lo]. Appuyez sur Yes pour visualiser la valeur limite inférieure. Appuyez sur Yes pour
accepter ou sur No pour modifier la valeur limite inférieure. La valeur mémorisée s'affiche alors
avec le premier chiffre en surbrillance [000.000 kg]. Appuyez plusieurs fois sur No jusqu'à ce
que le chiffre désiré apparaisse. Appuyez sur Yes pour accepter et mettre en surbrillance le
chiffre suivant. Répétez jusqu'à ce que tous les chiffres soient corrects. Appuyez sur Yes pour
accepter la valeur de limite inférieure, [Set. Hi] s'affichera.
4. Répétez la même procédure pour accepter ou modifier la valeur supérieure.
5. Placez un échantillon sur la plate-forme. Le témoin Acceptation affichera maintenant que le
poids de l'échantillon se trouve dans une plage acceptable.
6. Pour effacer les valeurs de référence en mémoire, maintenez appuyé Mode jusqu'à ce que
[CHeCk] soit affiché. Appuyez sur Yes lorsque [Clr.ref] s'affiche.
FR-6 Navigator®
4. RÉGLAGES
Le menu Utilisateur permet de personnaliser les réglages de la balance.
Remarque: Des sous-menus supplémentaires peuvent être disponibles si les options d'interface sont
installées. Reportez-vous au Manuel de l'utilisateur de l'interface pour des informations
complémentaires de réglage.
4.1 Menu Navigation
Menu Utilisateur:
Sous-menus : .C.a.l. .S.e.t.u.p. .M.o.d.e. .U.n.i.t. .E.n.d.
Éléments de
menus :
Maintenez appuyé Menu jusqu'à ce que [mMeNU] (Menu) s'affiche. Une fois libéré, le premier sousmenu [.C.a.l.] (étalonnage) s'affichera
Appuyez sur Yes pour entrer dans le sous-menu affiché ou appuyez sur No pour avancer jusqu'au
suivant.
La sélection d'un sous-menu affichera le premier élément du menu. Appuyez sur Yes pour visualiser
le réglage de l'élément du menu ou sur No pour passer à l'élément de menu suivant. Lorsque vous
visualisez le réglage, appuyez sur Yes pour l'accepter ou sur No pour le modifier. Lorsque [End]
s'affiche, appuyez sur Yes pour revenir aux sélections du sous-menu ou sur No pour revenir au
premier élément du menu en cours.
4.2 Sous-Menu Cal (étalonnage)
• [SpaN] général (Yes, No) - Initialise une procédure d'étalonnage général (zéro et générale). Un
étalonnage général est important lors du premier réglage de la balance.
• Linéaire [Lin] (Yes, No) - Initialise une procédure d'étalonnage linéaire (zéro, point milieu et
générale).
4.3 Sous-Menu Configuration
Les affichages à rétroéclairage ACL et à DEL (rouges) présenteront des éléments de menus ou des
réglages différents basés sur la fonctionnalité.
• Arrêt automatique [A-Off] (on, off) - Lorsque Arrêt automatique est réglé sur « on », la balance
s'éteindra automatiquement après 5 minutes d'inactivité. L'arrêt automatique est utilisé pour
économiser la batterie.
• Affichage [disply] (on, auto, dim (LED), off (LCD)) - Ce réglage contrôle le rétroéclairage ACL
ou les chiffres DEL ; constamment sur marche, arrêt automatique se produisant après 5
secondes d'inactivité de la balance, assombrissant la DEL après 60 secondes d'inactivité de la
balance ou rétroéclairage DEL toujours à l'arrêt.
• Luminosité [Bright] (hi, mid, low) - Ce réglage contrôle la luminosité de l'affichage à DEL. Les
modèles ACL ne présenteront pas cet élément de menu.
• Capteur IR gauche [Ir.LEFt] / droit [Ir.rght] (Off, Tare, Function, Print, Zero, Display) - Ces
réglages déterminent le rôle des capteurs IR. Zéro, Impression, Fonction ou Tare permettent au
capteur IR d'agir de la même manière que le bouton correspondant. Affichage active l'écran si
Auto-affichage est défini. Arrêt désactive le capteur.
Span
Lin
End
A-off
Disply
Bright
IR.LEFT
IR.RGHT
End
Count
Percnt
Hold
Accum
Check
End
ct, g, kg, grn,
lb, oz, lb:oz,
ozt, N, dwt,
thk, tsg, ttw,
tola, tical
End

Navigator® FR-7
4.4 Menu Mode
Ce sous-menu active des modes pour qu'ils soient disponibles avec le bouton Mode. Le mode Pesée
est toujours actif.
• Comptage des pièces [Count] (on, off) - Sur marche (on) pour que le mode soit actif.
• Pourcentage [Percnt] (on, off) - Sur marche (on) pour que le mode soit actif.
• Maintien [Hold] (on, off) - Sur marche (on) pour que le mode soit actif.
• Accumulation [ACCUmM] (on, off) - Sur marche (on) pour que le mode soit actif.
• Vérification du poids [CHECk] (on, off) - Sur marche (on) pour que le mode soit actif.
4.5 Menu Unités
Ce sous-menu active les unités pour qu'elles soient accessibles avec le bouton Units. Les unités dans
ce menu doivent être sur marche (on) pour être actives. Les onces (oz) et les livres:once (lb:oz)
comprennent l'option de lecture décimale [dec] ou fractionnelle [frac]. En raison des impératifs des
différents bureaux, le « grain » possède deux options d'affichage d’icônes, gr ou grn.
Note: Les unités disponibles et les modes varient selon les réglementations locales.
4.6 Protection des paramètres de la balance par apposition d’un sceau
Le commutateur de verrouillage de menu limite les changements à Cal, Setup, Mode et Unit menus.
Le commutateur, dans les modèles approuvés, peut configurer certains paramètres tel que requis par
l'organisme d'approbation. Le commutateur doit être sécurisé à l'aide de scellements approuvés.
Verrouillé Déverrouillé
5. MAINTENANCE
5.1 Dépannage
Le tableau suivant présente les problèmes communs, les causes possibles et les solutions.
Si le problème persiste, contactez OHAUS ou votre revendeur agréé.
Symptôme Cause possible Solution
Mise en marche impossible La balance n’est pas alimentée Vérifier la connexion et la tension
Précision de qualité
médiocre
Étalonnage impossible
Impossible d'accéder au
mode
Impossible d'accéder aux
unités
Lo ref
ref err
Étalonnage défectueux
Environnement instable
Environnement instable
Poids d'étalonnage incorrect
Mode n'est pas activé Entrer dans le menu et activer Mode
Les unités ne sont pas activées Entrer dans le menu et activer les unités
Le poids de référence n'est pas
assez élevé
Comptage des pièces - poids de
l'échantillon <1d
Réaliser un étalonnage
Déplacer la balance sur un emplacement stable
Déplacer la balance sur un emplacement stable
Utiliser un poids d'étalonnage correct
Augmenter le poids de référence.
Affichage d'une erreur - quitte le mode et passe
sur [Clr.ApU].

FR-8 Navigator®
Err 3.0 Cal
Err 4.4 full
Err 8.1 ¯Load¯
Err 8.2 _Load_
Err 8.3 ¯Load¯
Err 8.4 _Load_
Err 8.6 999999
Err 9 Data
Err 13 mMEmM
Err 53 CSumM
Poids d'étalonnage incorrect
Le tampon RS232 est plein
Puissance sur la gamme zéro
dépassée
Puissance sur le zéro sous la
gamme
Surcharge (>cap+9e)
Charge insuffisante
Valeur affichée >999999 Le résultat dépasse la capacité d'affichage.
Erreur de données internes Contacter OHAUS ou un agent d'entretien agréé
Impossible d'écrire sur l'EEPROM
Données de somme de contrôle
invalides
Reportez-vous à la section 2.5 pour des poids
corrects.
Activer l'établissement d'une liaison, se reporter
au manuel de l'utilisateur de l'interface.
Vider la plate-forme, vérifier le réglage du
verrouillage d'expédition
Installer la plate-forme, vérifier le réglage du
verrouillage d'expédition
La charge dépasse la capacité maximum de la
balance
Mesures inférieures à la plage minimum à nouveau la plate-forme.
Contacter OHAUS ou un agent d'entretien agréé
Contacter OHAUS ou un agent d'entretien agréé
Installer
5.2 Informations sur les services
Si la section de dépannage ne vous aide pas à résoudre votre problème ou ne le décrit pas, contactez
un technicien agréé OHAUS. Pour de l'aide relative aux services ou pour de l'assistance technique
aux États-Unis, appelez gratuitement le 1-800-526-0659 entre 8h00 et 17h00 (heure de l'est). Un
spécialiste des produits OHAUS se tient à votre disposition pour vous fournir de l'aide. En dehors des
États-Unis, visitez notre site Web sur www.OHAUS.com pour localiser le bureau OHAUS le plus
proche de chez vous.
5.3 Accessoires
Kit Batterie rechargeable 83032106 (NVL, NVT)
Kit d’interface RS232 83032107 (NV, NVL, NVT)
Kit d’interface USB 83032108 (NV, NVL, NVT)
Kit d’interface Ethernet 83032109 (NV, NVL, NVT)
Housse de protection pendant utilisation 83032223 (NV) 83032222 (NVL) 83032221 (NVT)
Malette de transport 83032226 (NV) 83032225 (NVL) 83032224 (NVT)
Imprimantes et câbles Contact OHAUS
6. DONNÉES TECHNIQUES
Les données techniques sont valides dans les conditions ambiantes suivantes:
Température ambiante: 10°C à 40°C, Modèles approuvés (M) 0 C à 40°C
Humidité relative: humidité relative entre 20 et 85 %, sans condensation
Altitude au-dessus du niveau de la mer: Jusqu'à 4 000 m
Fonctionnement : assuré à température ambiante entre 0°C et 40°C
Alimentation : Adaptateur CA - 12 V CC, 420 mA en sortie, 4 piles ou batteries rechargeables
Protection : poussière et eau
Degrés de pollution : 2
Catégorie d'installation : Classe III
CEM : Reportez-vous à la Déclaration de conformité
Navigator® FR-9
6.1 Spécifications
Spécifications générales:
Durée de stabilisation
Plage de tare À capacité par soustraction
Modes d’application
Unités de pesage
poids, pourcentage, comptage des pièces, vérification du poids,
non approuvés: ct, g, kg, grn, lb, oz, lb:oz, ozt, N, dwt, tael (3), tola, tical
M modèles: g, kg, ct N modèles: g, kg, ct, lb, oz, ozt, dwt, grn
Alimentation CA Adaptateur CA (fourni) - 12 V CC ou 12 V CA, 420 mA
NVT: 4 piles (LR6) (non fournies)
Alimentation pile
NVL, NVT: 4 piles (LR14) (non fournies) ou option de batteries
rechargeables
Étalonnage Numérique avec poids externe
Affichage ACL ACL 6 chiffres 7 segments avec rétroéclairage à DEL blanches
Affichage DEL DEL 6 chiffres 7 segments
Dimensions de l'affichage 20 mm chiffres
Clavier 4 boutons avec recouvrement plus deux capteurs IR programmables
Protection contre
pénétration
Dimensions plate-forme
(LxP)
NV: 190 mm x 138 mm NV212: Ø120mm
NVL: 194 mm x 203 mm NVT: 230 mm x 174 mm
Poids net1 NV: 1,0 kg / 2,2 lb NVL: 1,5 kg / 3,3 lb NVT: 1,5 kg / 3,3 lb
Poids à l'expédition1 NV: 1,4 kg / 3,1 lb NVL: 2,3 kg / 5,1 lb NVT: 2,3 kg / 5,1 lb
Remarque 1 : /1 et / 3 modèles ajouter 0,5 kg
Modèles non approuvés:
1
Capacité
Modèle
Précision
d'affichage (d)
Répététabilité Linéarité
NV212 210g 0,01g 1d ±2d 200g 100g, 200g
NV511 510g 0,1g 1d ±2d 300g 300g, 500g
NV1101 1100g 0,1g 1d ±2d 500g 500g, 1000g
NV2101 2100g 0,1g 1d ±2d 1kg 1kg, 2kg
NV4101 4100g 0,2g 1d ±2d 2kg 2kg, 4kg
MV5101 5100g 0,5g 1d ±2d 3kg 3kg, 5kg
NVL511 510g 0,1g 1d ±2d 300g 300g, 500g
NVL1101 1100g 0,1g 1d ±2d 500g 500g, 1000g
NVL2101 2100g 0,1g 1d ±2d 1kg 1kg, 2kg
NVL5101 5100g 0,5g 1d ±2d 3kg 3kg, 5kg
NVL10000 10000g 1g 1d ±2d 5kg 5kg, 10kg
NVL20000 20000g 1g 1d ±2d 10kg 10kg, 20kg
NVT1601 1600g 0,1g 1d ±2d 1kg 1kg, 1,5kg
NVT3201 3200g 0,2g 1d ±2d 2kg 2kg, 3kg
NVT6401 6400g 0,5g 1d ±2d 5kg 3kg, 6kg
≤1 seconde
accumulation, maintien
IP43 (Modèles NVL et NVT)
Masse calibrage
portée
Masses
cal. lin.
FR-10 Navigator®
NVT10001 10000g 0,5g 1d ±2d 10kg 5kg, 10kg
NVT16000 16000g 1g 1d ±2d 10kg 10kg, 15kg
Remarque 1 : /1 = Option batteries rechargeables installées en usine
/2 = Affichage DEL
/3 = Affichage DEL avec option batteries rechargeables installées en usine
Modèles approuvés:
Modèle
NV311 310g 0.1g III 200g 200g, 300g
NV3100 3100g 1g III 2kg 2kg, 3kg
NVT1601 1600g 0.5g III 1kg 1000g,1500g
NVT3200 3200g 1g III 2kg 2kg, 3kg
NVT6400 6400g 2g III 5kg 3kg, 6kg
NVT16000 16000g 5g III 10kg 10kg, 15kg
Remarque 1 : M = Type EC approuvé
N = certifié NTEP et approuvé Mesure Canada
Remarque 2 : /1 = Option batteries rechargeables installées en usine
Exemple : NVT3200M/3
1,2
Max= e=
/2 = Affichage DEL
/3 = Affichage DEL avec option batteries rechargeables installées en usine
d'approbation
Classe
Masse calibrage
portée
Masses
cal. lin.
6.2 Schémas
A
B
NV
NVL
NVT
A B C
204 mm 212 mm 58 mm
204 mm 282 mm 74 mm
240 mm 250 mm 74 mm
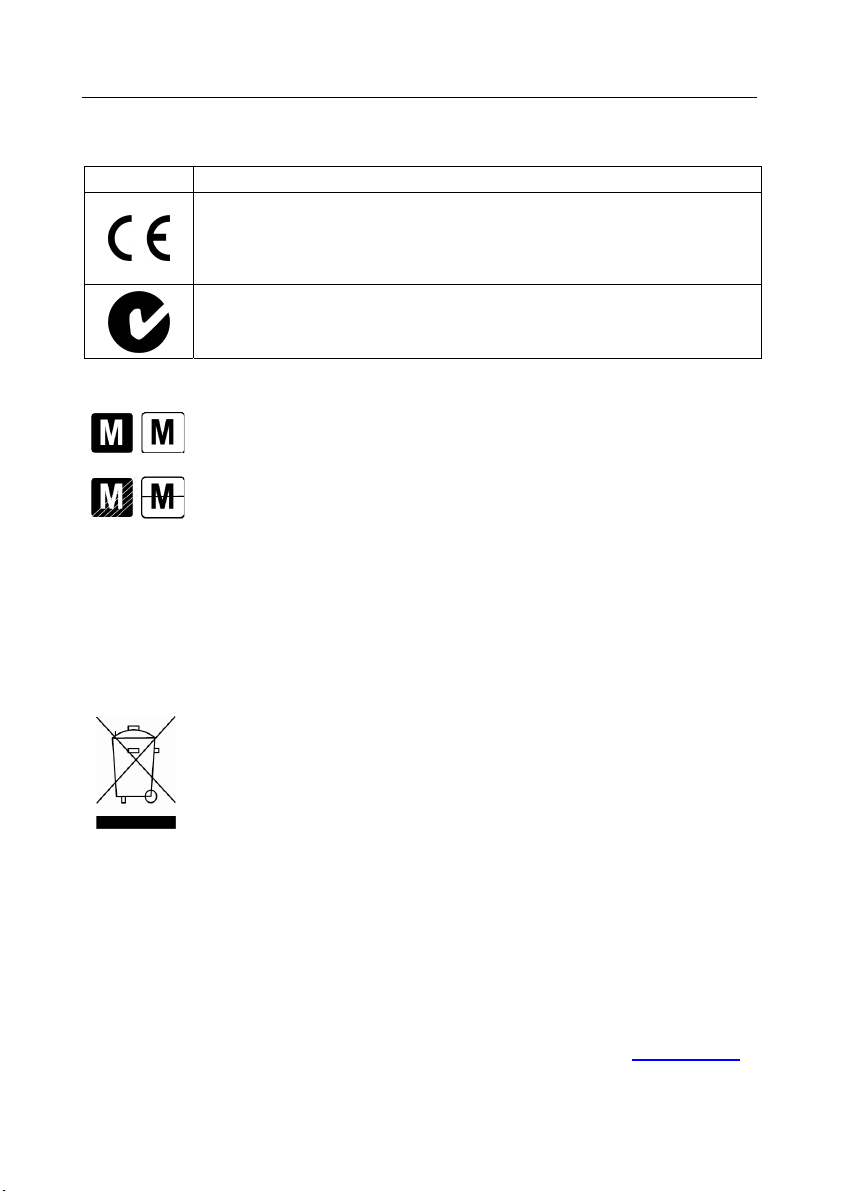
Navigator® FR-11
6.3 Conformité
La conformité aux normes suivantes est indiquée par la marque correspondante sur le produit.
Marquage Norme
Ce produit est conforme à la directive EMC 2004/108/CE et à la directive de basse
tension 2006/95/CE et à la directive sur les instruments de pesage à fonctionnement
non automatique 2009/23/CE. La déclaration de conformité est disponible en ligne à
www.OHAUS.com.
AS/NZS4251.1; AS/NZS4252.1
.
Remarque importante pour les instruments de pesage vérifiés dans les pays de l’UE
Les instruments de pesage vérifiés en usine portent l’identification ci-contre sur leur
emballage et un autocollant “M“ vert sur la plaque d'identification. Ils peuvent êtres
La première étape de la vérification a été effectuée en usine. Cela comprend tous les essais selon la
norme EN45501-8.2.2.
Si la durée de la vérification est limitée selon les prescriptions nationales dans les différents pays,
I' utilisateur d’une telle balance est lui-même responsable de la vérification ultérieure dans les délais
prévus.
Elimination
Veuillez éliminer cet appareil conformément aux prescriptions locales dans un conteneur séparé
pour appareils électriques et électroniques.
Pour toute question, adressez-vous aux autorités compétentes ou au revendeur chez qui vous avez
acheté cet appareil.
En cas de remise de cet appareil (p. ex. pour une utilisation privée ou artisanale/industrielle), cette
prescription doit être transmise en substance.
Des directives concernant la mise au rebut en Europe sont disponibles en ligne à www.ohaus.com
Choissez votre pays, puis cherchez « WEEE ».
Merci pour votre contribution à la protection de l’environnement.
utilisés après leur installation.
Les instruments de pesage vérifiés en deux étapes portent l’identification ci-contre sur
leur emballage et n'ont pas d'autocollant “M“ vert sur la plaque d'identification. La
seconde étape de la vérification doit être effectuée par le service technique ou l’agent
de vérification autorisée.
En conformité avec les exigences de la directive européenne 2002/96/CE relative
aux déchets d‘équipements électriques et électroniques (DEEE), cet appareil ne doit
pas être éliminé avec les déchets ménagers. Logiquement, ceci est aussi valable
pour les pays en dehors de l’UE conformément aux règlementations nationales en
vigueur.
La directive 2006/66/CE sur les batteries introduit de nouveaux impératifs à partir de
septembre 2008 sur le retrait des batteries d'un équipement destiné au rebut dans
tous les États membres de l'Union européenne. Pour être conforme à cette directive,
cet appareil a été conçu pour un retrait sans danger des batteries usagées par une
installation de traitement des déchets.
.

FR-12 Navigator®
Remarque d’Industrie Canada
Cet appareil numérique de la classe A est conforme à la norme NMB-003 du Canada.
Enregistrement ISO 9001
En 1994, le Bureau Veritus Quality International (BVQI) a octroyé la certification d’enregistrement ISO
9001 à OHAUS Corporation, États-Unis d’Amérique, confirmant que le système de gestion de la
qualité OHAUS était conforme aux conditions normalisées de l’ISO 9001. Le 15 mai 2003, OHAUS
Corporation, États-Unis d’Amérique, a été ré-enregistrée à la norme ISO 9001:2000.
GARANTIE LIMITEE
Les produits OHAUS sont garantis contre tous défauts de pièces et de main d’œuvre pour une
période de garantie prenant effet le jour de la livraison. Pendant la période de garantie, OHAUS
réparera ou, à sa discrétion, remplacera le(les) composant(s) défectueux gratuitement, à condition
que le produit ait été retourné à OHAUS, tous frais de port à charge de l’expéditeur.
Cette garantie ne s’applique pas si le produit a été endommagé accidentellement ou par une
mauvaise utilisation, s’il a été exposé à des matériaux radio-actifs ou corrosifs, si des corps étrangers
y ont pénétré ou si des modifications ont été apportées au produit autres que celles effectuées par
OHAUS. En l’absence de retour de la carte d’enregistrement de garantie, la période de garantie prend
effet à la date de livraison au revendeur agréé. OHAUS Corporation ne concède pas d’autre garantie,
expresse ou implicite. OHAUS Corporation ne pourra être tenue responsable pour les dommages
résultants.
Compte tenu que la législation diffère d’un Etat à l’autre et d’un pays à l’autre, veuillez contacter
OHAUS ou votre revendeur local OHAUS pour plus d’informations.
Enregistrement du produit
Protégez votre investissement. Enregistrer votre produit auprès de votre revendeur OHAUS. Aux
Etats-Unis et le Canada inscrire en ligne à www.ohaus.com.
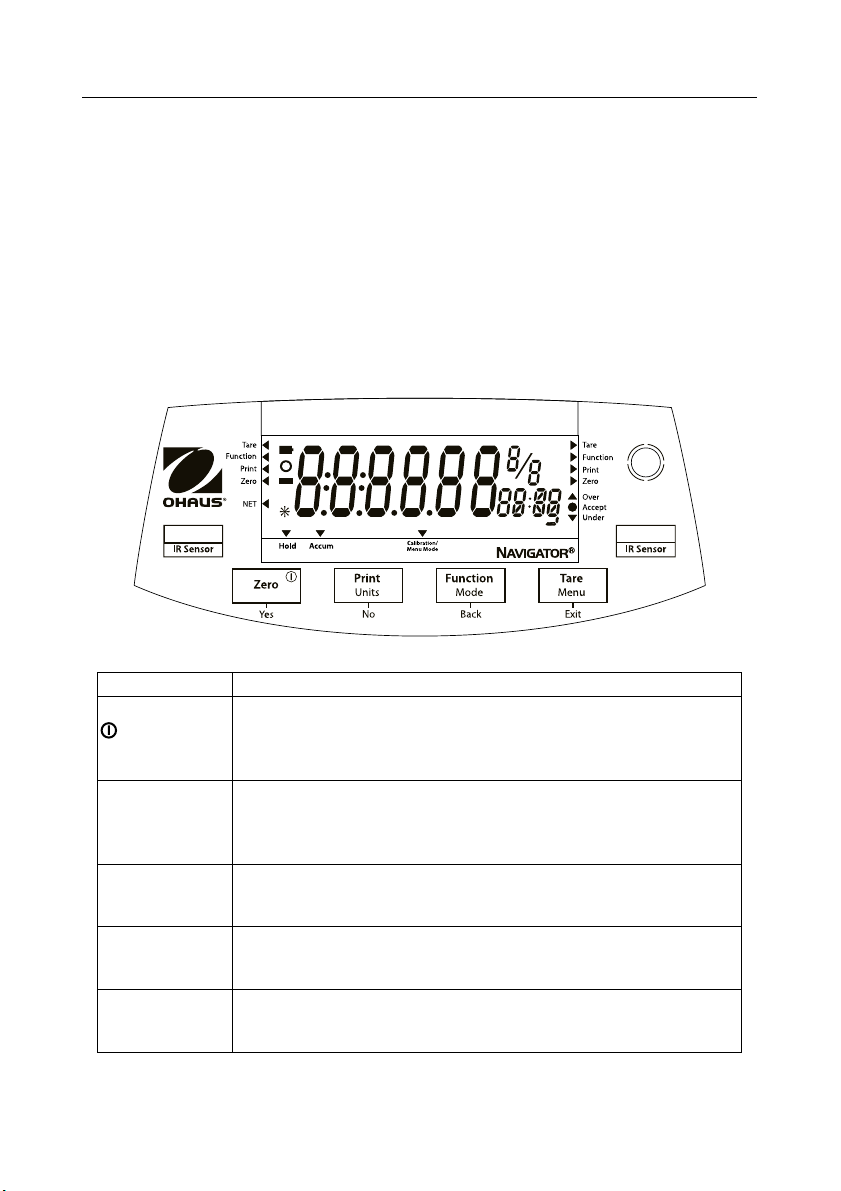
Navigator® DE-1
1. EINLEITUNG
Dieses Handbuch enthält Anweisungen zur Installation, zum Betrieb und zur Wartung der Navigator®Serie. Bitte lesen Sie das Handbuch ganz durch, bevor Sie die Waage in Betrieb nehmen.
1.1 Sicherheitsvorkehrungen
Bitte befolgen Sie die folgenden Sicherheitsmaßnahmen:
• Sicherstellen, dass die Eingangsspannung des Netzadapters der örtlichen Netzspannung
entspricht.
• Die Waage nur an trockenen Orten verwenden.
• Die Waage nicht unter widrigen Umgebungsbedingungen betreiben.
• Keine Lasten auf die Plattform fallen lassen.
• Reparaturen sollten nur von dazu befugtem Personal durchgeführt werden.
1.2. Steuerungen
Standard (nicht zugelassene) Modelle -- abgebildet mit LED-Anzeige.
Taste Funktionen
Zero
Yes
Print
Units
No
Function
Mode
Back
Tare
Menu
Exit
IR Sensor – links
IR Sensor – rechts
Die IR-Sensoren können durch Handbewegung, ca 12mm über den Sensoren, aktiviert werden.
Der Abstand zur Aktivierung der Sensoren kann, je nach Umgebungsbedingungen, unterschiedlich
sein. Die Sensoren können auch deaktiviert werden, um ungewolltes Aktivieren zu verhindern.
Kurzes Drücken (wenn eingeschaltet): Stellt das Display auf Null
(wenn ausgeschaltet): Schaltet Waage ein
Langes Drücken (wenn eingeschaltet): Schaltet die Waage aus
Kurzes Drücken (in Menü): Wählt/akzeptiert angezeigte Einstellung
Kurzes Drücken: Die Beschreibung des Betriebs finden Sie im
Schnittstellenhandbuch.
Langes Drücken: Durchläuft aktive Einheiten
Kurzes Drücken (in Menü): Durchläuft die verfügbaren Einstellungen
Kurzes Drücken: Wählt die Funktionseinstellung
Langes Drücken: Wählt den aktiven Modus
Kurzes Drücken (in Menü): Kehrt zu den vorherigen Einstellungen zurück
Kurzes Drücken: Gibt einen Tarawert ein bzw. löscht ihn
Langes Drücken: Ruft das Benutzermenü auf
Kurzes Drücken (in Menü): Beendet schnell das Benutzermenü
Die IR-Sensoren können so programmiert werden, dass sie als
„berührungslose“ Tasten fungieren. Die verfügbaren Einstellungen
entnehmen Sie dem Abschnitt „Benutzermenü“.
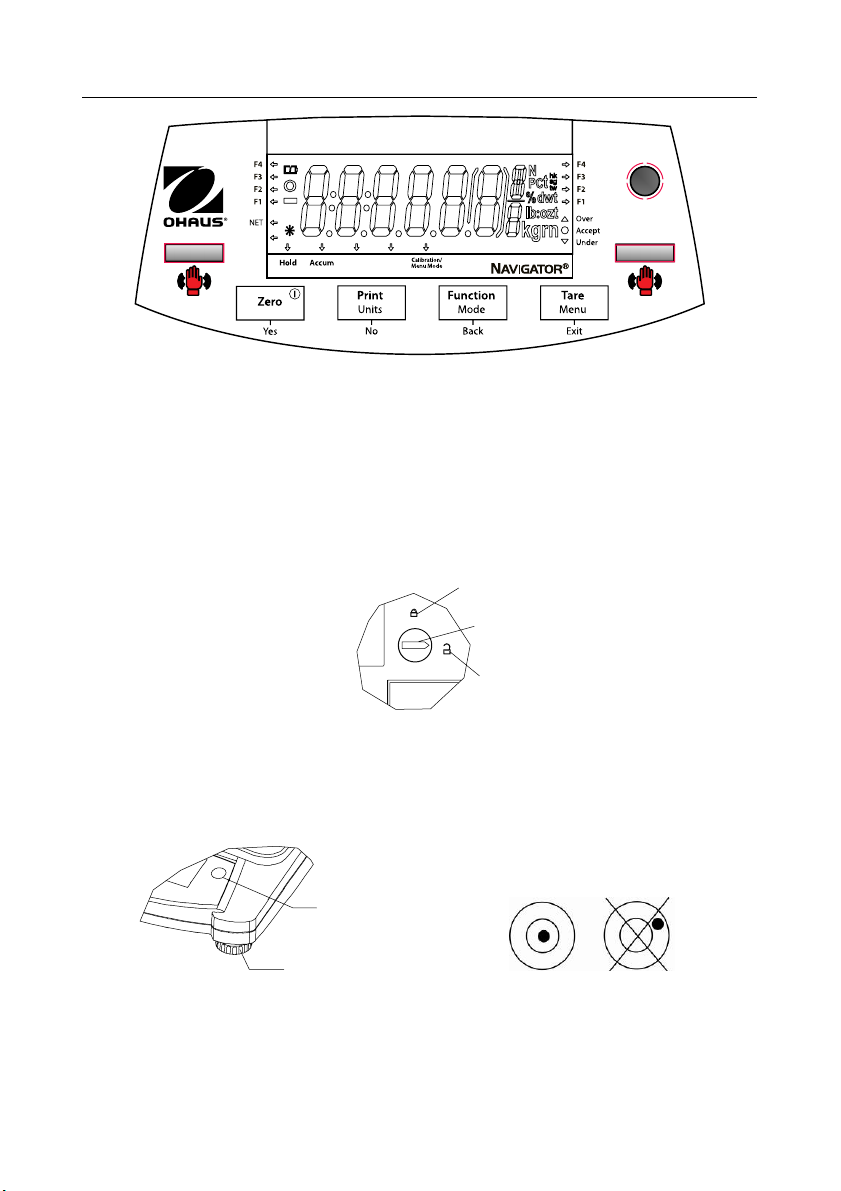
DE-2 Navigator®
F1
F2
F3
F4
Genehmigt Modelle -- abgebildet mit LCD-Anzeige.
2. INSTALLATION
2.1 Packungsinhalt
• Waage
• Schale
2.2 Transportsperre
Die Transportsperre befindet sich unter der Waage. Den Zeiger auf die entriegelte Position drehen.
2.3 Standort
Verwenden Sie die Waage auf einer festen, stabilen Oberfläche. Vermeiden Sie Standorte mit zu
starken Luftströmungen, Vibrationen, Wärmequellen oder schnellen Temperaturschwankungen.
Stellen Sie die Nivellierfüße so ein, dass sich die Blase genau in der Kreismitte befindet.
• Netzadapter
• Bedienungsanleitung
Verriegelte Position
Hinweis: Kein Versand Sperre auf Genehmigt Modelle.
• Garantiekarte
Zeiger
Unverriegelte Position
Wasserwaage
Ja Nein
Verstellbare Füße
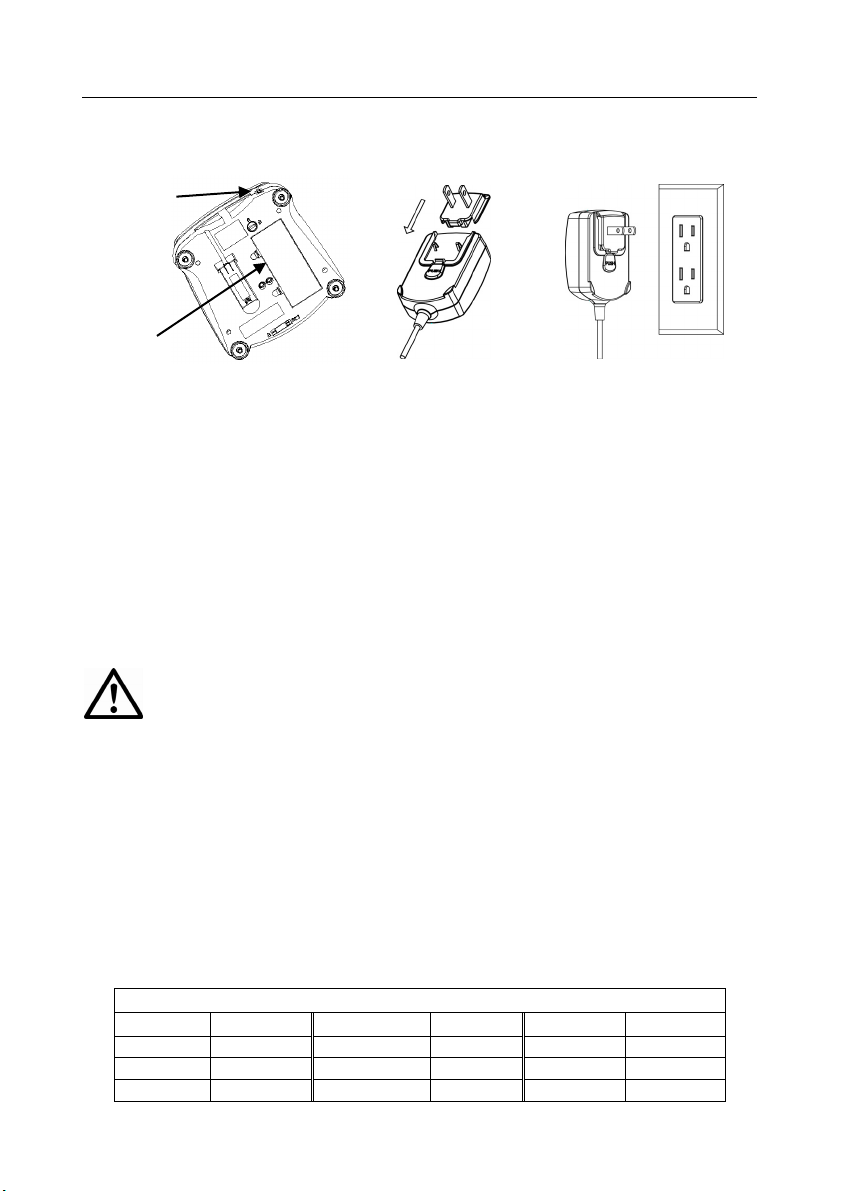
Navigator® DE-3
2.4 Stromversorgung
Der Netzadapter wird zur Stromversorgung der Waage verwendet, wenn kein Batteriestrom benötigt
wird.
NetzadapterEingangsbuchse
Batteriefachdeckel
Den Netzadapterstecker an die
Eingangsbuchse anschließen.
Den Netzadapter an eine
geeignete Netzversorgung
anschließen.
Einlegen der Batterien (ohne optionales internes Akku):
Die Batterieabdeckung entfernen und 4 Batterien einlegen. Die Polarität muss der im Fach
angezeigten Polarität entsprechen.
Optionaler aufladbarer Akku (nur NVL- und NVT-Modelle):
Waagen mit der optionalen internen Akku-Option müssen 12 Stunden lang aufgeladen werden, bevor
die Waage zum ersten Mal mit Akkustrom betrieben werden kann. Der Akku ist gegen eine
Überladung geschützt, sodass die Waage weiterhin am Netzstrom angeschlossen bleiben kann.
Wenn der Akku vollständig aufgeladen ist, hört die Akku-Anzeige auf dem Display auf zu blinken.
So entfernen Sie den Akku-Option und installieren C Batterien, bitte die Option Aufladen des
Akkus Bedienungsanleitung Schritt für Schritt-Anleitung sowie Hinweise zur Entsorgung.
Vorsicht : Explosionsgefahr kann auftreten, wenn der Akku mit einem falschen Typ
ersetzt wird oder wenn der Akku nicht richtig angeschlossen ist.
2.5 Anfängliche Kalibrierung
Wenn die Waage zum ersten Mal installiert wird, sollte sie kalibriert werden, um genaue Ergebnisse
sicherzustellen.
Menu drücken und gedrückt halten, bis [mMeNU] (Menü) eingeblendet wird. Wenn die Taste
losgelassen wird, erscheint auf dem Display [.C.A.L.]. Auf YES drücken, um dies zu akzeptieren.
Daraufhin wird [SpaN] (Messspanne) eingeblendet. Erneut auf Yes drücken, um mit der
Messspannenkalibrierung zu beginnen. [--C--] blinkt, während der Null-Messwert gespeichert wird.
Als Nächstes erscheint auf dem Display der Kalibrierungsgewichtswert. Das vorgegebene
Kalibriergewicht auf die Schale platzieren.
[--C--] blinkt, während der Messwert gespeichert wird. Die Waage kehrt zum vorherigen
Anwendungsmodus zurück und ist betriebsbereit.
Erforderliches Kalibriergewicht (separat erhältlich)
Kapazität Gewicht Kapazität Gewicht Kapazität Gewicht
210g 200g 1600g - 2100g 1kg 6400g - 10kg 5kg
310g - 510g 300g 3100g - 4100g 2kg 16kg - 20kg 10kg
1100g 500g 5100g 3kg

DE-4 Navigator®
3. BETRIEB
Alle Modi mit Ausnahme des Wägemodus müssen im Benutzermenü aktiviert werden, bevor sie zur
Verfügung stehen (siehe Abschnitt 4).
3.1 Wägemodus
1. Die Taste Mode drücken und gedrückt halten, bis [wJeIGH] (Wägen) angezeigt wird.
2. Nach Bedarf einen leeren Behälter auf die Schale stellen und Tare drücken.
3. Dem Behälter Material hinzufügen. Auf dem Display erscheint das Gewicht des Materials.
3.2 Stückzählmodus
In diesem Modus werden große Anzahlen von Artikeln gezählt, und zwar basierend auf dem Gewicht
einer Bezugszählung.
1. Einen leeren Behälter auf die Schale stellen und Tare drücken.
2. Die Taste Mode drücken und gedrückt halten, bis [Count] (Zählung) eingeblendet wird.
Anschließend wird [CLr.APU] (Durchschnittliches Stückgewicht löschen) angezeigt.
3. Auf No drücken, um das zuvor gespeicherte APW (durchschnittliche Stückgewicht) zu
verwenden. Mit Schritt 6 fortfahren.
4. Auf Yes drücken, um ein APW festzulegen. Die Waage zeigt anschließend den gespeicherten
Probenumfang an, d. h. [Put 10] (10 auflegen). Auf No oder Back drücken, um die Optionen
zu durchlaufen (5, 10, 20, 50 oder 100).
5. Die angezeigte Stückzahl auf die Schale legen und anschließend auf Yes drücken, um das
APW zu berechnen. Auf dem Display erscheint die Stückzahl. Hinweis: Auf Function drücken,
um den aktuellen APW-Wert aufzurufen.
6. Weitere Stücke auflegen, bis die gewünschte Zahl erreicht ist.
7. Zum Löschen des gespeicherten APW-Wertes Mode drücken und gedrückt halten, bis [Count]
(Zählung) eingeblendet wird. Auf Yes drücken, wenn [Clr.APU] (APW löschen) angezeigt wird.
3.3 Prozentmodus
In diesem Modus wird das Gewicht einer Probe als Prozentsatz eines Bezugsgewichts gemessen.
1. Einen leeren Behälter auf die Schale stellen und Tare drücken.
2. Die Taste Mode drücken und gedrückt halten, bis [Percnt] (Prozent) eingeblendet wird.
Anschließend wird [Clr.ref] (Bezug löschen) angezeigt.
3. Auf No drücken, um das gespeicherte Bezugsgewicht zu verwenden, und mit Schritt 6
fortfahren.
4. Auf Yes drücken, um einen neuen Bezugswert festzulegen. Auf der Waage erscheint jetzt
[Put.ref] (Bezugsgewicht auflegen).
5. Das gewünschte Bezugsmaterial dem Behälter hinzufügen. Auf Yes drücken, um das
Bezugsgewicht zu speichern. Auf dem Display erscheint 100 %.
Hinweis: Auf Function drücken, um das aktuelle Bezugsgewicht aufzurufen.
6. Das Bezugsmaterial durch das Probenmaterial ersetzen. Auf dem Display erscheint der
Prozentsatz der Probe im Vergleich zum Bezugsgewicht.
7. Zum Löschen des gespeicherten Bezugsgewichts Mode drücken und gedrückt halten, bis
[Percnt] (Prozent) eingeblendet wird. Auf Yes drücken, wenn [Clr.ref] (Bezug löschen)
angezeigt wird.

Navigator® DE-5
3.4 Display-Speichermodus
In diesem Modus wird der höchste stabile Gewichtswert für eine leichte Bezugnahme auf dem Display
gespeichert.
1. Die Taste Mode drücken und gedrückt halten, bis [Hold] eingeblendet wird.
2. Die zu wiegenden Proben auf die Schale legen. Wenn die Waage den höchsten stabilen Gewichtswert
erkennt, blinkt der „Hold“-Anzeiger und das angezeigte Gewicht ändert sich nicht mehr.
3. Auf Function drücken, um den gespeicherten Gewichtswert wieder freizugeben.
3.5 Akkumulationsmodus
In diesem Modus kann der Benutzer den Gesamtwert einer Reihe von Gewichtsmessungen
speichern. Mit einer Schnittstellenoption können die einzelnen Gewichte sowie das Gesamtgewicht
übertragen werden.
1. Die Taste Mode drücken und gedrückt halten, bis [ACCUmM] (Akkumulieren) eingeblendet wird.
Anschließend wird [Clr.Acc] (Akkumulation löschen) angezeigt.
2. Auf Yes drücken, um den gespeicherten Wert zu löschen, bzw. auf No, um dem gespeicherten
Gesamtwert weitere Werte hinzuzufügen.
3. Nach Bedarf einen leeren Behälter auf die Schale stellen und Tare drücken.
4. Nach Auflegen des ersten Artikels wird das entsprechende Gewicht angezeigt. Auf Function
drücken, um das Gewicht zu speichern. Der Anzeiger „Accum“ blinkt, und auf dem Display
erscheint das Gesamtgewicht.
5. Den ersten Artikel entfernen und dann den nächsten Artikel auflegen. Auf der Waage wird das
entsprechende Gewicht angezeigt. Auf Function drücken, um das Gewicht zu speichern. Der
Anzeiger „Accum“ blinkt, und das neue Gesamtgewicht wird angezeigt.
6. Schritt 5 für alle Artikel wiederholen, die hinzugefügt werden.
Hinweis: Während auf dem Display Null angezeigt wird, auf Function drücken, um die aktuelle
Gesamtzahl der Proben und das Gesamtgewicht anzuzeigen.
7. Zum Löschen des gespeicherten Gesamtgewichts Mode drücken und gedrückt halten, bis
[ACCUmM] eingeblendet wird. Auf Yes drücken, wenn [Clr.Acc] angezeigt wird.
3.6 Kontrollwägemodus
In diesem Modus werden die unteren und oberen Gewichtsgrenzwerte für die
Portionierungssteuerung eingestellt.
1. Die Taste Mode drücken und gedrückt halten, bis [CHeCk] (Kontrollwägen) eingeblendet wird.
Anschließend wird [CLr.ref] (Bezüge löschen) angezeigt.
2. Auf No drücken, um die gespeicherten Gewichtsgrenzwerte zu verwenden, und mit Schritt 5
fortfahren. Hinweis: Auf Function drücken, um die unteren und oberen
Bezugsgewichtsgrenzwerte anzuzeigen.
3. Auf Yes drücken, um neue Bezugswerte festzulegen. Auf der Waage wird dann [Set. Lo]
angezeigt. Auf Yes drücken, um den „niedrigen“ Grenzwert anzuzeigen. Zum Akzeptieren uf
Yes drücken bzw. auf No, um den „niedrigen“ Grenzwert zu bearbeiten. Der gespeicherte Wert
wird dann so angezeigt, dass die erste Ziffer hervorgehoben erscheint [000.000 kg].
Wiederholt auf No drücken, bis die gewünschte Zahl erscheint. Auf Yes drücken, um den Wert
zu akzeptieren und die nächste Ziffer hervorzuheben. Wiederholen, bis alle Ziffern korrekt sind.
Auf Yes drücken, um den „niedrigen“ Grenzwert zu akzeptieren. Daraufhin wird [Set.Hi]
angezeigt.
4. Dasselbe Verfahren wiederholen, um den „hohen“ Wert zu akzeptieren oder zu bearbeiten.
5. Probenmaterial auf die Schale legen. Der Anzeiger „Accept“ zeigt jetzt, dass das
Probengewicht innerhalb des akzeptablen Bereichs liegt.
6. Zum Löschen der gespeicherten Bezugswerte Mode drücken und gedrückt halten, bis
[CHeCk] eingeblendet wird. Auf Yes drücken, wenn [Clr.ref] angezeigt wird.
DE-6 Navigator®
4. EINSTELLUNGEN
Im Benutzermenü können die Waageneinstellungen benutzerspezifisch angepasst werden.
Hinweis: Wenn Schnittstellenoptionen installiert sind, stehen eventuell zusätzliche Untermenüs zur
Verfügung. Weitere Informationen über Einstellungen finden Sie im Schnittstellen-Benutzerhandbuch.
4.1 Menünavigation
Benutzermenü:
Untermenüs: .C.a.l. .S.e.t.u.p. .M.o.d.e. .U.n.i.t. .E.n.d.
Menüelemente:
Span
Lin
End
A-off
Disply
Bright
IR.LEFT
IR.RGHT
End
Count
Percnt
Hold
Accum
Check
End
ct, g, kg, grn,
lb, oz, lb:oz,
ozt, N, dwt,
thk, tsg, ttw,
tola, tical
End
„Menu“ drücken und gedrückt halten, bis [mMeNU] (Menü) eingeblendet wird. Bei Loslassen der Taste
wird das erste Untermenü [.C.a.l.] (Kal) angezeigt.
Auf Yes drücken, um das angezeigte Untermenü aufzurufen, bzw. auf No drücken, um zum nächsten
Untermenü vorzurücken.
Durch Auswahl eines Untermenüs wird das erste Menüelement angezeigt. Auf Yes drücken, um die
Menüelementeinstellung anzuzeigen, bzw. auf No drücken, um zum nächsten Menüelement
vorzurücken. Beim Betrachten der Einstellung Yes drücken, um die Einstellung zu akzeptieren, bzw.
auf No, um die Einstellung zu ändern. Wenn [End] (Ende) angezeigt wird, auf Yes drücken, um zu den
Untermenüoptionen zurückzukehren, bzw. auf No, um zum ersten Element im aktuellen Menü
zurückzukehren.
4.2 Untermenü Cal (Kalibrierung)
• Messspanne [SpaN] (yes [ja], no [nein]) – Leitet eine Messspannenkalibrierung ein (Null und
Messspanne). Eine Messspannenkalibrierung ist für die anfängliche Einrichtung der Waage
wichtig.
• Lin [Lin] (yes, no) – Leitet eine Linearitätskalibrierung ein (Null, Mittelpunkt und Messspanne).
4.3 Untermenü Setup
Die LCD mit Hinterleuchtung und die (rote) LED haben je nach Funktionalität unterschiedliche
Menüelemente oder Einstellungen.
• Automatisches Ausschalten [A-Off] (on [ein], off [aus]) – Wenn das automatische Ausschalten
auf „on“ (ein) steht, schaltet sich die Waage nach 5 Minuten ohne Aktivität automatisch aus.
Das automatische Ausschalten wird verwendet, um Batteriestrom zu sparen.
• Display [disply] (on, auto, dim (LED), off (LCD)) – Mit dieser Einstellung werden die LCD-
Hinterleuchtung bzw. die LED-Ziffern gesteuert; sie sind entweder konstant eingeschaltet oder
werden automatisch nach 5 Sekunden ohne Waagenaktivität ausgeschaltet oder die LED wird
nach 60 Sekunden ohne Waagenaktivität gedimmt oder die LCD-Hinterleuchtung ist immer
ausgeschaltet.
• Hell [Bright] (hi [hoch], mid [mittel], low [niedrig]) – Diese Einstellung steuert die Helligkeit des
LED-Displays. Bei LCD-Modellen ist dieses Menüelement nicht vorhanden.
• IR-Sensor links [Ir.LEFt] / rechts [Ir.rght] (Off, Tare, Function, Print, Zero, Display) – Mit
diesen Einstellungen wird die Rolle der IR-Sensoren festgelegt. Über „Zero“ (Null), „Print“
(Drucken), „Function“ (Funktion) oder „Tare“ (Tara) kann der IR-Sensor die jeweilige Funktion

Navigator® DE-7
der entsprechenden Taste ausführen. Mit „Display“ wird das Display aktiviert wenn „DisplayAuto“ eingestellt ist. Mit „Off“ wird der Sensor deaktiviert.
4.4 Menü Mode (Modus)
Mit diesem Untermenü werden die Modi aktiviert, damit sie zur Verwendung mit der Mode-Taste zur
Verfügung stehen. Der Wägemodus ist immer aktiv.
• Stückzählung [Count] (on [ein], off [aus]) – Zur Aktivierung des Modus auf „ein“ stellen.
• Prozent [Percnt] (on, off) - Zur Aktivierung des Modus auf „ein“ stellen.
• Display-Speicher [Hold] (on, off) - Zur Aktivierung des Modus auf „ein“ stellen.
• Akkumulieren [ACCUmM] (on, off) - Zur Aktivierung des Modus auf „ein“ stellen.
• Kontrollwägen [CHECk] (on, off) – Zur Aktivierung des Modus auf „ein“ stellen.
4.5 Menü Units (Einheiten)
Mit diesem Untermenü werden die Einheiten aktiviert, sodas sie über die Taste „Units“ aufgerufen
werden können. Die Einheiten im Menü müssen auf „ein“ gestellt werden, damit sie aktiv sind. Die
Einheiten Unze (oz) und Pfund:Unze (lb:oz) beinhalten die Optionen für die Anzeige von Dezimalwert
[dec] oder Bruchzahl [frac]. Wegen unterschiedlicher behördlicher Anforderungen hat die Einheit
„Grain“ zwei unterschiedliche Symbolanzeigeoptionen, gr oder grn.
Hinweis: Einheiten und Anwendungen variieren je nach Modell und lokalen Vorschriften.
4.6 Zugriff auf die Waageneinstellungen versiegein
Der Menü-Sperr-Schlater schränkt die Eingabemöglichkeiten im Cal-, Setup-, Mode- und Unit-Menü
ein. Bei geeichten Modellen, sind manche Einstellungen durch das europäische Eichrecht
vorgegeben. Der Schalter kann mit Klebesiegel, Drahtplomben und Kabelbinder gesichert werden.
Gesperrt Entriegelt
5. WARTUNG
5.1 Fehlersuche
In der folgenden Tabelle sind häufig vorkommende Probleme, ihre möglichen Ursachen und
Abhilfemaßnahmen aufgeführt.
Falls das Problem weiterhin auftritt, wenden Sie sich an OHAUS oder Ihren Vertragshändler.
Symptom Mögliche Ursache Abhilfemaßnahme
Kann nicht
eingeschaltet werden
Schlechte Genauigkeit
Lässt sich nicht
kalibrieren
Modus kann nicht
aufgerufen werden
Einheit kann nicht
aufgerufen werden
Keine Stromzufuhr zur Waage Anschlüsse und Spannung überprüfen
Falsche Kalibrierung
Instabile Umgebung
Instabile Umgebung
Falsches Kalibriergewicht
Modus nicht aktiviert Menü aufrufen und Modus aktivieren
Einheit nicht aktiviert Menü aufrufen und Einheit aktivieren
Kalibrierung durchführen
Waage an geeigneten Standort bringen
Waage an einen geeigneten Standort verlegen
Richtiges Kalibriergewicht verwenden

DE-8 Navigator®
Symptom Mögliche Ursache Abhilfemaßnahme
Lo ref
ref err
Err 3.0 Cal
Err 4.4 full
Err 8.1 ¯Load¯
Err 8.2 _Load_
Err 8.3 ¯Load¯
Err 8.4 _Load_
Err 8.6 999999
Err 9 Data
Err 13 mMEmM
Err 53 CSumM
Bezugsgewicht ist zu niedrig Bezugsgewicht erhöhen
Stückzählung – Probengewicht <1 d.
Falsches Kalibriergewicht Die richtigen Gewichte finden Sie in Abschnitt 2.5.
RS232-Puffer ist voll.
Bereich für Nullwert beim Einschalten
überschritten
Nullwert beim Einschalten unter
Bereich
Überlast (>Kap+9e) Last überschreitet maximale Waagenkapazität.
Unterlast
Anzeigewert >999999 Ergebnis überschreitet Anzeigefähigkeit.
Interner Datenfehler.
Fehler beim Schreiben in EEPROM.
Ungültige Prüfsummendaten
Fehler wird angezeigt – beendet Modus oder ruft
[Clr.ApU] auf.
Handshake auf „ein“ stellen, siehe
Schnittstellenbenutzerhandbuch.
Last von der Schale abnehmen,
Versandverriegelungseinstellung prüfen
Schale einbauen,
Versandverriegelungseinstellung prüfen
Messwert unter Mindestbereich – Schale erneut
einbauen.
OHAUS oder einen zugelassenen ServiceVertreter verständigen.
OHAUS oder einen zugelassenen ServiceVertreter verständigen.
OHAUS oder einen zugelassenen ServiceVertreter verständigen.
5.2 Wartungsinformationen
Wenn Ihr Problem im Abschnitt „Fehlersuche“ nicht gelöst oder beschrieben wird, wenden Sie sich
bitte an Ihren zugelassenen OHAUS-Servicevertreter. Wenn Sie in den Vereinigten Staaten Hilfe oder
technischen Support benötigen, rufen Sie bitte zwischen 8.00 und 17.00 Uhr US-Ostküstenzeit (EST)
die (in den USA) gebührenfreie Nummer 1-800-526-0659 an. Ein Produktservice-Spezialist von
OHAUS wird Ihnen dann weiterhelfen. Außerhalb der USA besuchen Sie unsere Website
www.OHAUS.com, um die für Sie am nächsten gelegene OHAUS-Geschäftsstelle zu finden.
5.3 Zubehör
Wiederaufladbare Akkusatz 83032106 (NVL, NVT)
RS232-Schnittstellensatz-Set 83032107 (NV, NVL, NVT)
USB-Schnittstellensatz-Set 83032108 (NV, NVL, NVT)
Ethernet-Schnittstellensatz-Set 83032109 (NV, NVL, NVT)
Arbeitsschutzabdeckung 83032223 (NV) 83032222 (NVL) 83032221 (NVT)
Transportkoffer 83032226 (NV) 83032225 (NVL) 83032224 (NVT)
Drucker und Kabel Kontakt OHAUS

Navigator® DE-9
6. TECHNISCHE DATEN
Die technischen Daten gelten bei folgenden Umgebungsbedingungen:
Umgebungstemperatur: 10 °C bis 40 °C, zugelassene Modelle (M) 0 °C bis 40 °C
Relative Feuchte: 20% bis 85% relative Feuchtigkeit, nicht kondensierend
Höhe über dem Meeresspiegel: bis zu 4000 m
Betriebsfähigkeit: gewährleistet bei Umgebungstemperaturen zwischen 0 °C und 40 °C
Leistung: Netzadapter – 12 V DC 420 mA Ausgang, 4 Batterien oder wiederaufladbarer Akku
Schutzklasse: Staub und Wasser Verschmutzungsgrad: 2
Installationskategorie: Klasse III EMC: Siehe Konformitätserklärung
6.1 Spezifikationen (Typische Spezifikationen:
Stabilisierungszeit
Tarierbereich Auf Kapazität durch Subtraktion
Anwendungsmodi
Wägeeinheiten
Wägen, Prozent, Stückzählung, Kontrollwägen, Akkumulieren, Display-
Nicht zugelassene: ct, g, kg, grn, lb, oz, lb:oz, ozt, N, dwt, tael (3), tola, tical
M modell: g, kg, ct N modell: g, kg, ct, lb, oz, ozt, dwt, grn
Netzstrom Netzadapter (im Lieferumfang enthalten)- 12 V DC oder 12 V AC, 420 mA
NV: 4 AA- (LR6-) Batterien (nicht im Lieferumfang enthalten)
Batteriestrom
NVL, NVT: 4 C- (LR14-) Batterien (nicht im Lieferumfang enthalten) oder
wiederaufladbare Akku-Option
Kalibrierung Digital mit externem Gewicht
LCD-Display 6-stelliges LCD mit 7 Segmenten und weißer LED-Hinterleuchtung
LED-Display 6-stelliges LCD mit 7 Segmenten
Display-Größe Ziffern 20 mm
Tastenfeld 4-Tasten-Folie sowie zwei programmierbare IR-Sensoren
Schutzart IP43
Schalengröße (B x T)
Nettogewicht
1
NV: 1,0 kg / 2,2 lb NVL: 1,5 kg / 3,3 lb NVT: 1,5 kg / 3,3 lb
Versandgewicht
Anmerkung 1: /1 und / 3 Modelle fügen 0.5kg
NV: 190 mm x 138 mm NV212: Ø120mm
NVL: 194 mm x 203 mm NVT: 230 mm x 174 mm
1
NV: 1,4 kg / 3,1 lb NVL: 2,3 kg / 5,1 lb NVT: 2,3 kg / 5,1 lb
Nicht zugelassene Modelle:
Modell1 Kapazität
Ablesbarkeit
(d)
Wiederholbarkeit
NV212 210g 0,01g 1d ±2d 200g 100g, 200g
NV511 510g 0,1g 1d ±2d 300g 300g, 500g
NV1101 1100g 0,1g 1d ±2d 500g 500g, 1000g
NV2101 2100g 0,1g 1d ±2d 1kg 1kg, 2kg
NV4101 4100g 0,2g 1d ±2d 2kg 2kg, 4kg
MV5101 5100g 0,5g 1d ±2d 3kg 3kg, 5kg
NVL511 510g 0,1g 1d ±2d 300g 300g, 500g
NVL1101 1100g 0,1g 1d ±2d 500g 500g, 1000g
≤1 Sekunde
Speicher
Linearität
Messspannen
Kalibriergewicht
Linearitäts
Kalibriergewicht
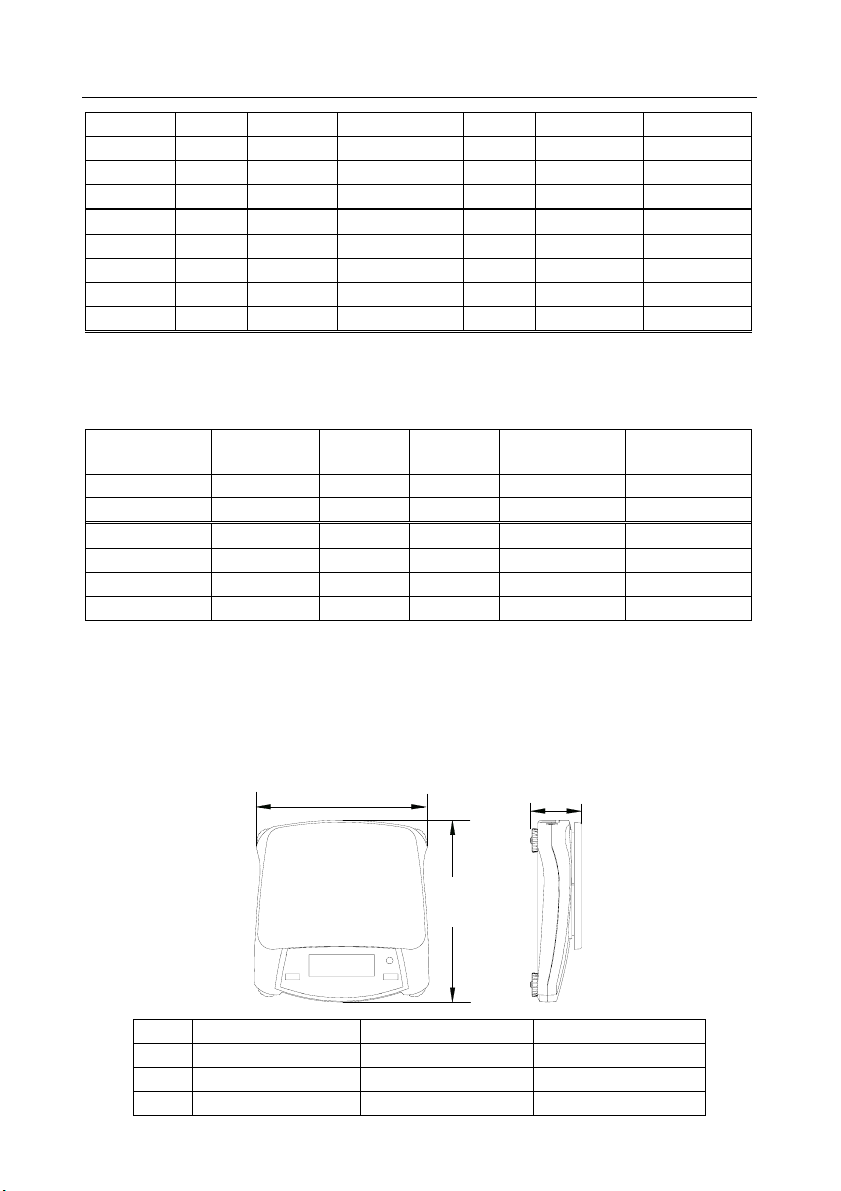
DE-10 Navigator®
B
NVL2101 2100g 0,1g 1d ±2d 1kg 1kg, 2kg
NVL5101 5100g 0,5g 1d ±2d 3kg 3kg, 5kg
NVL10000 10000g 1g 1d ±2d 5kg 5kg, 10kg
NVL20000 20000g 1g 1d ±2d 10kg 10kg, 20kg
NVT1601 1600g 0,1g 1d ±2d 1kg 1kg,1.5kg
NVT3201 3200g 0,2g 1d ±2d 2kg 2kg, 3kg
NVT6401 6400g 0,5g 1d ±2d 5kg 3kg, 6kg
NVT10001 10000g 0,5g 1d ±2d 10kg 5kg, 10kg
NVT16000 16000g 1g 1d ±2d 10kg 10kg, 15kg
Anmerkung 1: /1 = Ab Werk installierte wiederaufladbare Akku-Option
/2 = LED-Display
/3 = LED-Display mit ab Werk installierter wiederaufladbarer Akku-Option
Zugelassene Modelle:
1,2
Max= e=
Modell
Zulassungs-
klasse
Messspannen
Kalibriergewicht
Linearitäts
Kalibriergewicht
NV311 310g 0,1g III 200g 200g, 300g
NV3100 3100g 1g III 2kg 2kg, 3kg
NVT1601 1600g 0,5g III 1kg 1kg, 1,5g
NVT3200 3200g 1g III 2kg 2kg, 3kg
NVT6400 6400g 2g III 5kg 3kg, 6kg
NVT16000 16000g 5g III 10kg 10kg, 15kg
Anmerkung 1: M= Mit EC-Typenzulassung
N = nach NTEP zertifiziert und nach Measurement Canada zugelassen
Anmerkung 2: /1 = Ab Werk installierte wiederaufladbare Akku-Option
/2 = LED-Display
/3 = LED-Display mit ab Werk installierter wiederaufladbarer Akku-Option
Beispiel: NVT3200M/3
6.2 Zeichnungen
A
NV
NVL
NVT
A B C
204 mm 212 mm 58 mm
204 mm 282 mm 74 mm
240 mm 250 mm 74 mm

Navigator® DE-11
6.3 Befolgung
Befolgung zu den folgenden Standards wird durch die entsprechende Markierung auf dem Produkt
angezeigt.
Markierung Standard
Dieses Produkt entspricht der EMC-Richtlinie 2004/108/EG, der Niederspannungsrichtlinie
2006/95/EG und der Richtlinie 2009/23/EG für nicht selbsttätige Waagen. Die
Konformitätserklärung ist online unter www.ohaus.com
AS/NZS4251.1; AS/NZS4252.1
erhältlich.
Wichtiger Vermerk für geeichte Waagen in EU-Ländern
Werksgeeichte Waagen tragen vorstehendes Kennzeichen auf dem Packetikett und
einen grünen „M“ Kleber auf dem Eichschild. Sie dürfen sofort in Betrieb genommen
Der erste Schritt der Eichung wurde im Herstellerwerk durchgeführt. Er umfasst alle Prüfungen
gemäss EN45501-8.2.2.
Sofern gemäss den nationalen Vorschriften in den einzelnen Staaten die Gültigkeitsdauer der Eichung
beschränkt ist, ist der Betreiber einer solchen Waage für die rechtzeitige Nacheichung Selbst
verantwortlich.
Entsorgung
Bitte entsorgen Sie dieses Produkt gemäss den örtlichen Bestimmungen in einer getrennten
Sammlung für Elektro- und Elektronikgeräte.
Bei allfälligen Fragen wenden Sie sich bitte an die zuständige Behörde oder den Händler, bei dem
Sie dieses Gerät erworben haben.
Bei Weitergabe dieses Gerätes (z.B. für private oder gewerbliche/industrielle Weiternutzung) ist
diese Bestimmung sinngemäss weiterzugeben.
Anweisungen zur Entsorgung in Europa sind online unter www.ohaus.com
lhr Land und suchen Sie nach ,,WEEE’’.
Vielen Dank für Ihren Beitrag zum Schutz der Umwelt.
werden.
Waagen, die in zwei Schritten geeicht werden und kein grünes “M” auf dem
Eichschild haben, tragen vorstehendes Kennzeichen auf dem Packetikett. Der zweite
Schritt der Eichung ist durch die behördlich anerkannte Serviceorganisation oder
durch den Eichbeamten durchzuführen.
In Übereinstimmung mit den Anforderungen der Europäischen Richtlinie
2002/96/EG über Elektro- und Elektronik-Altgeräte (WEEE) darf dieses Gerät nicht
mit dem Hausmüll entsorgt werden. Sinngemäss gilt dies auch für Länder
ausserhalb der EU entsprechend den geltenden nationalen Regelungen.
Die EU-Richtlinie für Batterien 2006/66/EG führte im September 2008 neue
Anforderungen an die Entfernbarkeit von Batterien aus Altgeräten in EUMitgliedstaaten ein. Um dieser Richtlinie zu entsprechen, wurde dieses Gerät für ein
sicheres Entfernen der Batterien durch eine Abfallbehandlungsanlage am Ende
seiner Lebensdauer konzipiert.
verfügbar. Wählen Sie

DE-12 Navigator®
Registrierung nach ISO 9001
Im Jahr 1994 wurde der OHAUS Corporation, USA, ein Zertifikat der Registrierung nach ISO 9001
vom Bureau Veritus Quality International (BVQI) verliehen, in dem bestätigt wird, dass das OHAUSQualitätsmanagementsystem den Anforderungen der Norm ISO 9001 entspricht. Am 15. Mai 2003
wurde die OHAUS Corporation, USA, gemäß der Norm ISO 9001:2000 neu registriert.
BESCHRÄNKTE GARANTIE
Auf OHAUS-Produkte wird ab Datum der Auslieferung über die Dauer des Garantiezeitraums hinweg
eine Garantie gegen Material- und Herstellungsmängel gegeben. Während des Garantiezeitraums
wird OHAUS kostenlos jegliche Komponente(n), die sich als defekt erweist (erweisen), reparieren oder
nach eigenem Ermessen ersetzen, wenn das Produkt bei Vorauszahlung der Versandkosten an
OHAUS zurückgeschickt wird.
Die Garantie gilt nicht, wenn das Produkt durch einen Unfall oder durch Missbrauch beschädigt wurde,
wenn es radioaktiven oder korrodierenden Materialien ausgesetzt wurde, wenn Fremdkörper das
Innere des Produkts durchdrungen haben oder wenn es auf Grund einer Reparatur oder Modifikation
beschädigt wurde, die nicht von OHAUS durchgeführt wurde. Wenn keine ordnungsgemäß
zurückgeschickte Garantieregistrierungskarte vorliegt, beginnt der Garantiezeitraum am Datum der
Lieferung an den befugten Händler. OHAUS Corporation gibt keine sonstige ausdrückliche oder
stillschweigende Garantie. OHAUS Corporation ist nicht haftbar für irgendwelche Folgeschäden.
Da die Gesetzgebung in Bezug auf Garantien von Bundesstaat zu Bundesstaat und von Land zu Land
anders ist, wenden Sie sich bitte an OHAUS oder Ihren örtlichen OHAUS-Händler, wenn Sie weitere
Einzelheiten erfahren wollen.
Produkt Registrierung
Schützen Sie Ihre Investitionen. Registrieren Sie Ihr Produkt mit Ihrem OHAUS-Händler. In den USA
und Kanada Online-Registrierung unter www.ohaus.com

Navigator® IT-1
1. INTRODUZIONE
Questo manuale illustra l'installazione, il funzionamento e la manutenzione della serie Navigator®.
Leggere il manuale interamente, prima di utilizzare la bilancia.
1.1 Precauzioni di sicurezza
Seguire le precauzioni di sicurezza riportate di seguito:
• Verificare che la tensione d'ingresso dell’adattatore CA corrisponda alla tensione di rete.
• Utilizzare la bilancia solo in luoghi asciutti.
• Non utilizzare la bilancia in ambienti difficili.
• Non far cadere pesi sulla piattaforma.
• Fare eseguire la manutenzione solo da personale autorizzato.
1.2. Comandi
Standard (non approvato) modelli –mostrato con display a LED.
Pulsante Funzioni
Zero
Yes
Print
Units
No
Function
Mode
Back
Tare
Menu
Exit
IR Sensor (sinistro)
IR Sensor (destro)
I sensori a infrarossi si possono attivare con la mano o con un oggetto posto a circa 12mm di distanza
dal sensore stesso. La distanza dal sensore varia a seconda della natura riflettente dell'oggetto. In
caso di attivazioni anomale, i sensori possono essere disattivati.
Pressione breve (quando accesa): azzera il display
(quando spenta): accende la bilancia
Pressione lunga (quando accesa): spegne la bilancia
Pressione breve (in Menu): seleziona/accetta l'impostazione visualizzata
Pressione breve: per la descrizione operativa consultare il manuale
dell'interfaccia.
Pressione lunga: passa tra le unità attive
Pressione breve (in Menu): passa tra le impostazioni disponibili
Pressione breve: seleziona l'impostazione della funzione
Pressione lunga: seleziona la modalità attiva
Pressione breve (in Menu): ritorna alle impostazioni precedenti
Pressione breve: immette/elimina un valore di tara
Pressione lunga: accede al menu User (Utente)
Pressione breve (in Menu): esce rapidamente dal menu User (Utente)
È possibile programmare i sensori IR come pulsanti "touchless". Per le
impostazioni disponibili, consultare la sezione del menu User (Utente).
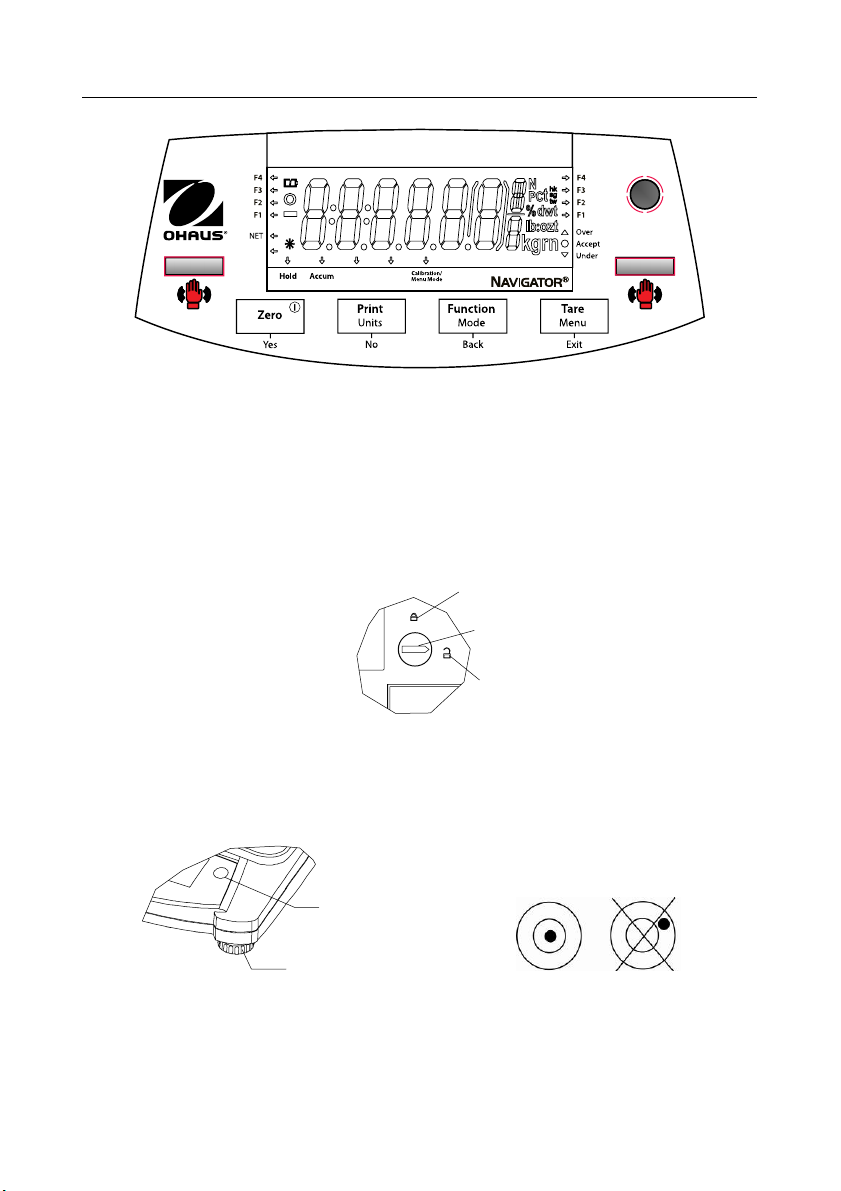
IT-2 Navigator®
F1
F2
F3
F4
Approvati i modelli –mostrato con display a LCD.
2. INSTALLAZIONE
2.1 Contenuto della confezione
• Bilancia
• Piatto
2.2 Blocco di trasporto
Il blocco di trasporto si trova sotto la bilancia. Ruotare l'indicatore fino alla posizione di sblocco.
2.3 Ubicazione
Utilizzare la bilancia su una superficie solida e ferma. Evitare luoghi in cui siano presenti correnti d'aria,
vibrazioni, fonti di calore eccessive o brusche variazioni di temperatura.
Regolare i piedini fino a quando la bolla di livello non si trova al centro del cerchio.
• Alimentatore di rete
• Manuale di istruzioni
Nota: Nessun blocco di trasporto sui modelli approvati.
• Scheda di garanzia
Posizione bloccata
Indicatore
Posizione sbloccata
Bolla di livello
SÌ NO
Piedini regolabili

Navigator® IT-3
2.4 Alimentazione
Quando l'alimentazione a batteria non è necessaria, per avviare la bilancia è possibile utilizzare
l'alimentatore di rete.
Jack di ingresso
alimentazione
Coperchio del
vano della batteria
Collegare la presa dell’alimentatore
di rete allo spinotto di ingresso.
Installazione della batteria (senza batteria interna opzionale):
Rimuovere il coperchio della batteria e installare quattro batterie nel compartimento, rispettando
la polarità.
Batteria ricaricabile opzionale (solo modelli NVL e NVT):
Prima di utilizzare per la prima volta una bilancia dotata della batteria interna opzionale occorre
ricaricare quest'ultima per 12 ore. La batteria è protetta da sovraccarichi e la bilancia può
rimanere collegata alla linea dell'alimentazione di rete. Quando la batteria è completamente
carica, la spia sul display non lampeggia più.
Per rimuovere l'opzione di batteria ricaricabile e installare batterie C, riferimento l'opzione di
ricarica della batteria manuale di istruzioni per le istruzioni passo passo e le istruzioni per lo
smaltimento.
Attenzione: se la batteria ricaricabile viene collegata in maniera non corretta o viene
sostituita con un modello errato, esiste il rischio di Esplosione !
2.5 Regolazione iniziale
Per ottenere risultati precisi, è necessario regolare la bilancia al primo utilizzo.
Tenere premuto Menu fino a quando non viene visualizzato [mMeNU] (Menu). Quando si rilascia il
pulsante, sul display viene visualizzato [.C.A.L.]. Premere Yes (Sì) per accettare, viene quindi
visualizzato [SpaN]. Premere nuovamente Yes (Sì) per avviare la regolazione a intervallo. [--C--]
lampeggia mentre viene memorizzata la lettura dello zero. Quindi sul display viene visualizzato il
valore del peso della regolazione. Disporre il massa di taratura specificato sul vassoio. [--C--]
lampeggia mentre viene memorizzata la lettura. La bilancia ritorna alla modalità di applicazione
precedente ed è pronta per l’uso.
Collegare l'alimentatore alla
rete CA.
Peso di regolazione richiesto (venduto separatamente)
Capacità Massa* Capacità Massa* Capacità Massa*
210g 200g 1600g - 2100g 1kg 6400g - 10kg 5kg
310g - 510g 300g 3100g - 4100g 2kg 16kg - 20kg 10kg
1100g 500g 5100g 3kg

IT-4 Navigator®
3. FUNZIONAMENTO
Affinché siano disponibili occorre attivare tutte le modalità, a eccezione di quella di pesatura, nel menu
User (Utente), fare riferimento alla sezione 4.
3.1 Modalità di pesatura
1. Tenere premuto Mode fino a quando non viene visualizzato [wJeIGH].
2. Se necessario, disporre un contenitore vuoto sul piatto e premere Tare.
3. Aggiungere il materiale nel contenitore. Sul display viene visualizzato il peso del materiale.
3.2 Modalità conteggio parti
In questa modalità è possibile contare grandi quantità di articoli in base al peso di un conteggio di
riferimento.
1. Collocare un contenitore vuoto sul piatto della bilancia e premere Tare.
2. Tenere premuto Mode fino a quando non viene visualizzato [Count] (Conteggio). Viene quindi
visualizzato [CLr.APU] (Eliminare peso medio per pezzo).
3. Premere No per utilizzare il peso medio per pezzo (APW) memorizzato. Passare alla fase 6.
4. Premere Yes per stabilire peso medio per pezzo (APW). La bilancia visualizza quindi le
dimensioni del campione memorizzato, ovvero [Put 10]. Premere No o Back (Indietro) per
passare tra le scelte (5, 10, 20, 50 or 100).
5. Sistemare il numero di pezzi indicato sul piatto e premere Yes per calcolare il peso medio per
pezzo. Sul display viene visualizzato il conteggio dei pezzi. Nota: premere Function per
visualizzare il peso medio per pezzo corrente.
6. Aggiungere altri pezzi fino a raggiungere il conteggio desiderato.
7. Per eliminare il peso medio per pezzo memorizzato, tenere premuto Mode fino a quando non
viene visualizzato [Count]. Premere Yes quando viene visualizzato [Clr.APU].
3.3 Modalità Percentuale
Questa modalità misura il peso di un campione come percentuale di un peso di riferimento.
1. Collocare un contenitore vuoto sul piatto della bilancia e premere Tare.
2. Tenere premuto Mode fino a quando non viene visualizzato [Percnt] (Percentuale). Viene
quindi visualizzato [Clr.ref] (eliminare riferimento).
3. Premere No per utilizzare il peso di riferimento memorizzato e passare alla fase 6.
4. Premere Yes per stabilire un nuovo riferimento. Sulla bilancia viene visualizzato [Put.ref].
5. Aggiungere il materiale di riferimento desiderato nel contenitore. Premere Yes per
memorizzarlo il peso di riferimento. Sul display viene visualizzato 100%.
Nota: premere Function per visualizzare il peso di riferimento corrente.
6. Sostituire il materiale di riferimento con il materiale campione. Sul display viene visualizzata la
percentuale del campione confrontata con il peso di riferimento
7. Per eliminare il riferimento memorizzato, tenere premuto Mode fino a quando non viene
visualizzato [Percnt]. Premere Yes quando viene visualizzato [Clr.ref].

Navigator® IT-5
3.4 Modalità Display Hold
Questa modalità memorizza il valore del peso più stabile per un semplice riferimento.
1. Tenere premuto Mode (Modalità) fino a quando non viene visualizzato [Hold].
2. Disporre i campioni da pesare sul piatto. Quando la bilancia rileva il peso più stabile la "spia
Hold" lampeggia e il peso visualizzato non cambia.
3. Premere Function (Funzione) per rilasciare il valore del peso memorizzato.
3.5 Modalità Accumulazione
Questa modalità consente all'utente di memorizzare il totale di una serie di misurazioni d peso. Grazie
a un'opzione di interfaccia è possibile trasmettere i pesi dei componenti e il peso totale.
1. Tenere premuto Mode fino a quando non viene visualizzato [ACCUmM] (Accumula). Viene quindi
visualizzato [Clr.Acc] (eliminare accumulazione).
2. Premere Yes per eliminare il valore memorizzato o No per continuare ad aggiungere al totale
memorizzato.
3. Se necessario, disporre un contenitore vuoto sul piatto e premere Tare.
4. Aggiungere il primo articolo, viene visualizzato il suo peso. Premere Function per memorizzare
il peso, la spia "Accum" lampeggia e sul display viene visualizzato il peso totale.
5. Rimuovere il primo articolo e aggiungere il successivo. La bilancia visualizzerà il suo peso.
Premere Function per memorizzare il peso. La spia "Accum" lampeggia e verrà visualizzato il
nuovo peso totale.
6. Ripetere la fase 5 per tutti gli articoli da aggiungere. Nota: mentre il display indica zero, premere
Function per visualizzare il numero corrente totale di campioni e il peso totale.
7. Per eliminare il totale memorizzato, tenere premuto Mode fino a quando non viene visualizzato
[ACCUmM] . Premere Yes quando viene visualizzato [Clr.Acc].
3.6 Modalità di controllo peso
Questa modalità stabilisce i limiti superiore e inferiore di peso per le procedure di controllo porzione.
1. Tenere premuto Mode fino a quando non viene visualizzato [CHeCk] (Controllo). Viene quindi
visualizzato [Clr.ref] (eliminare riferimenti).
2. Premere No per utilizzare limiti del peso di riferimento memorizzati e passare alla fase 5.
Nota: premere Function per visualizzare i limiti superiore e inferiore del peso di riferimento.
3. Premere Yes per stabilire nuovi valori di riferimento. Sulla bilancia viene visualizzato [Set. Lo].
Premere Yes per visualizzare il valore del limite "Inferiore". Premere Yes per accettare o No
per modificare il valore del limite "Inferiore". Viene quindi visualizzato il valore memorizzato con
la prima cifra evidenziata [000.000 kg]. Premere ripetutamente No fino a quando non viene
visualizzato il numero desiderato. Premere Yes per accettare ed evidenziare la cifra successiva.
Ripetere fino a quando tutte le cifre non sono corrette. Premere Yes per accettare il valore del
limite "Inferiore", viene visualizzato [Set. Hi].
4. Ripetere la stessa procedura per accettare o modificare il valore "superiore".
5. Sistemare il materiale campione sul piatto. La spia "Accept" (Accetta) indica che il peso
campione rientra nella gamma accettabile.
6. Per eliminare i valori di riferimento memorizzati, tenere premuto Mode fino a quando non viene
visualizzato [CHeCk]. Premere Yes quando viene visualizzato [Clr.ref].
IT-6 Navigator®
4. IMPOSTAZIONI
Il menu User (Utente) consente di personalizzare le impostazioni della bilancia.
Nota: se sono installate le opzioni di interfaccia possono essere disponibili altri sottomenu. Per
informazioni relative alle altre impostazioni, consultare il manuale dell'interfaccia utente.
4.1 Navigazione nei menu
Menu User (Utente):
Sottomenu: .C.a.l. .S.e.t.u.p. .M.o.d.e. .U.n.i.t. .E.n.d.
Voci del
menu:
Tenere premuto Menu fino a quando non viene visualizzato [mMeNU] (Menu). Quando viene rilasciato,
verrà visualizzato il primo sottomenu, [.C.a.l.] (Cal).
Premere Yes per accedere al menu visualizzato, oppure No per avanzare al successivo.
Se si seleziona un sottomenu viene visualizzata la prima voce del menu. Premere Yes per
visualizzare l'impostazione della voce del menu o No per avanzare alla voce successiva del menu.
Durante la visualizzazione delle impostazioni, premere Yes per accettarle o No per modificarle.
Quando viene visualizzato [End], premere Yes per tornare al sottomenu successivo o No per tornare
alla prima voce del menu corrente.
4.2 Sottomenu Cal (Regolazione)
•
Intervallo [SpaN] (yes, no) - Avvia la procedura di regolazione a intervallo (zero e intervallo). La
regolazione a intervallo è importante alla prima configurazione della bilancia.
• Lin [Lin] (yes, no) - Avvia la procedura di regolazione lineare (zero, a punto centrale e a
intervallo).
4.3 Sottomenu Setup (Configurazione)
I display LCD retroilluminato e LED (rosso) prevedono diverse voci di menu o impostazioni, a seconda
delle funzionalità.
• Spegnimento automatico [A-Off] (on, off) - Quando Auto Off (Spegnimento automatico) è
impostato a "on" la bilancia si spegne automaticamente se rimane inattiva per 5 minuti. Lo
spegnimento automatico è utilizzato per il risparmio energetico della batteria.
• Display [disply] (on, auto, dim (LED), off (LCD)) - Questa impostazione controlla la
retroilluminazione dell'LCD o le cifre del LED; acceso costante, spegnimenti automatico dopo 5
secondi di inattività della bilancia, diminuzione della luminosità del LED dopo 60 di inattività
della bilancia o retroilluminazione dell'LCD sempre spenta.
• Luminosità [Bright] (hi, mid, low) - Questa impostazione controlla la luminosità del display
LED. Nei modelli LCD questa voce non è presente.
• Sensore IR sinistro [Ir.LEFt] / destra [Ir.rght] (Off, Tare, Function, Print, Zero, Display) -
Queste impostazioni determinano il ruolo dei sensori IR. "Zero", "Print", "Function" o "Tare"
consentono al sensore IR di agire come il tasto pertinente. "Display" attiva il display se è
impostato Display-Auto. "Off" disabilita il sensore.
Span
Lin
End
A-off
Disply
Bright
IR.LEFT
IR.RGHT
End
Count
Percnt
Hold
Accum
Check
End
ct, g, kg, grn,
lb, oz, lb:oz,
ozt, N, dwt,
thk, tsg, ttw,
tola, tical
End
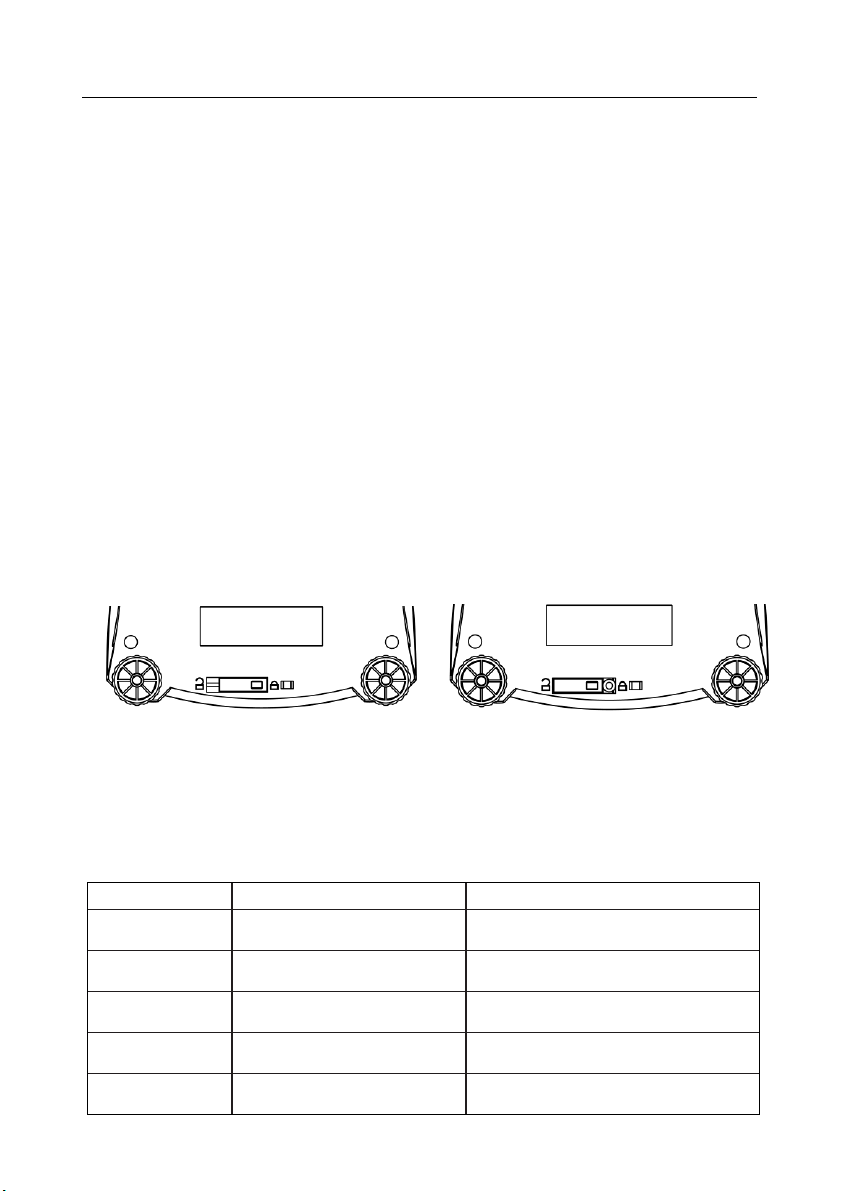
Navigator® IT-7
4.4 Menu Mode (Modalità)
Questo sottomenu attiva le modalità, che saranno disponibili tramite il pulsante Mode. La modalità di
peso è sempre attiva.
• Conteggio parti [Count] (on, off) - Impostare su on affinché la modalità sia attiva.
• Percentuale [Percnt] (on, off) - Impostare su on affinché la modalità sia attiva.
• Hold [Hold] (on, off) - Impostare su on affinché la modalità sia attiva.
• Accumulazione [ACCUmM] (on, off) - Impostare su on affinché la modalità sia attiva.
• Check Weigh [CHECk] (on, off) - Impostare su on affinché la modalità sia attiva.
4.5 Menu Unit (Unità di misura)
Questo sottomenu attiva le unità di misura, che saranno disponibili tramite il pulsante Units. Le unità di
misura nel menu vanno impostate a "on" affinché siano attive. Le unità oncia (oz) e libbra:oncia (lb:oz)
prevedono l'opzione dei risultati decimali [dec] o in frazione [frac]. A causa dei requisiti diversi delle
agenzie l'unità grano ha due icone opzionali per la visualizzazione, gr o grn.
Nota: Le unità di misura e le applicazioni disponibili variano in base al modello e ai regolamenti locali.
4.6 Sigillare l’accesso aile impostazioni della bilancia
L'interruttore di blocco Menu, limita le modifiche ai seguenti menu: CAL, SETUP, MODE e UNIT.
L'interruttore di blocco, per i modelli Approvati CE, può impostare alcune funzioni della bilancia, così
come previsto dalla normativa. L’interruttore può essere bloccato tramite sigilli in adesivo
autodistruggente, sigilli a filo o fermi in plastica.
Bloccato Sblocatto
5. MANUTENZIONE
5.1 Individuazione guasti
La tabella seguente elenca alcuni problemi comuni, le loro cause possibili e le varie soluzioni.
Se il problema persiste, contattare OHAUS o un rivenditore autorizzato.
Sintomo Causa possibile Soluzione
Impossibile accendere
la bilancia
Scarsa precisione
Impossibile regolare
Impossibile accedere
alla modalità
Impossibile accedere
all’unità
Bilancia non alimentata Verificare connessioni e tensione
Taratura impropria
Ambiente non stabile
Ambiente non stabile
Pesi di regolazione non corretti
Modalità non attivata Accedere al menu e attivare la modalità
Unità non abilitata Accedere al menu e abilitare l’unità
Eseguire taratura
Spostare la bilancia in una posizione adatta
Spostare la bilancia in una posizione adatta
Utilizzare un peso di regolazione corretto

IT-8 Navigator®
Lo ref
ref err
Err 3.0 Cal
Err 4.4 full
Err 8.1 ¯Load¯
Err 8.2 _Load_
Err 8.3 ¯Load¯
Err 8.4 _Load_
Err 8.6 999999
Err 9 Data
Err 13 mMEmM
Err 53 CSumM
5.2 Informazioni relative all'assistenza
Se la sezione Individuazione guasti non risolve o non descrive il problema incontrato, contattare
l’assistenza tecnica autorizzata OHAUS. Per l'assistenza negli Stati Uniti, chiamare il numero verde
800-526-0659 tra le 8.00 e le 17.00 EST (Eastern Standard Time, ora della costa orientale degli Stati
Uniti). Il personale specializzato addetto alla manutenzione sarà disponibile per l'assistenza. Fuori
dagli Stati Uniti, consultare il nostro sito Web, www.OHAUS.com, per individuare l'ufficio OHAUS più
vicino.
5.3 Accessori
Kit batteria ricaricabile 83032106 (NVL, NVT)
Kit interfaccia RS232 83032107 (NV, NVL, NVT)
Kit interfaccia USB 83032108 (NV, NVL, NVT)
Kit interfaccia Ethernet 83032109 (NV, NVL, NVT)
Capottina di protezione 83032223 (NV) 83032222 (NVL) 83032221 (NVT)
Valigetta rigida per il trasporto 83032226 (NV) 83032225 (NVL) 83032224 (NVT)
Stampanti e Cavi Contatta OHAUS
Peso di riferimento troppo basso Aumentare il peso di riferimento.
Conteggio parti- peso campione < 1d.
Peso di regolazione non corretto Per i pesi corretti, consultare la sezione 2.2.5.
Il buffer RS232 è pieno
Intervallo zero all'accensione superato
Intervallo zero all'accensione non
raggiunto
Sovraccarico (>cap+9e)
Sottocarico
Valore visualizzato >999999 Il risultato supera la capacità del display
Errore dati interno. Contattare la OHAUS o un assistente autorizzato
Scrittura su EEPROM non riuscita. Contattare la OHAUS o un assistente autorizzato
Dati checksum non validi Contattare la OHAUS o un assistente autorizzato
Visualizza l'errore - esce dalla modalità o accede
a [Clr.ApU].
Attivare la sincronizzazione, consultare il
manuale dell'interfaccia utente.
Togliere gli articoli dal piatto, verificare
l'impostazione del blocco di spedizione
Installare il piatto, verificare l'impostazione del
blocco di spedizione
Il carico supera la capacità massima della
bilancia
Lettura inferiore all'intervallo minimo,
riposizionare il piatto.

Navigator® IT-9
6. DATI TECNICI
I dati tecnici sono validi per le seguenti condizioni ambientali:
Temperatura ambiente: 10-40 °C, modelli approvati (M) 0-40 °C.
Umidità relativa: 20-85% di umidità relativa, senza condensa
Altitudine s.l.m.: fino a 4.000 m
Operabilità: viene assicurata a temperature ambiente comprese tra 0 e 40 °C
Alimentazione elettrica: Adattatore CA da 12 VCC 420 mA, 4 batterie o batteria ricaricabile
Protezione: polvere e acqua
Grado di inquinamento: 2
Categoria d'installazione: Classe III
EMC: fare riferimento alla dichiarazione di conformità
6.1 Specifiche tecniche
Specifiche tipiche:
Tempo di stabilizzazione
Campo di tara A capacità per sottrazione
Modalità di applicazione peso, percentuale, conteggio parti, check weigh, accumulazione, hold
Unità di pesatura
Non approvati: ct, g, kg, grn, lb, oz, lb:oz, ozt, N, dwt, tael (3), tola, tical
M modellos: g, kg, ct N modellos: g, kg, ct, lb, oz, ozt, dwt, grn
Alimentazione di rete Adattatore CA (in dotazione)- 12 VCC o 12 VCA, 420 mA
Alimentazione a batteria
NV: 4 batterie "AA" (LR6) (non fornite)
NVL, NVT: 4 batterie "C" (LR14)
Regolazione Digitale con peso esterno
Display LCD LCD con LED bianco retroilluminato, a sei cifre, sette segmenti
Display LED LED a 6 cifre, 7 segmenti
Dimensioni del display cifre da 20 mm
Tastierino Mascherina a 4 pulsanti più due sensori IR programmabili
Grado di protezione IP43 (NVL e NVT modelli)
Dimensioni del piatto
(L x P)
NV: 190 mm x 138 mm NV212: Ø120mm
NVL: 194 mm x 203 mm NVT: 230 mm x 174 mm
Peso netto NV: 1,0 kg / 2,2 lb NVL: 1,5 kg / 3,3 lb NVT: 1,5 kg / 3,3 lb
Peso di spedizione NV: 1,4 kg / 3,1 lb NVL: 2,3 kg / 5,1 lb NVT: 2,3 kg / 5,1 lb
Nota 1: /1 e /3 modelli aggiungere 0.5kg
Modelli non approvati
1
Capacità
Modello
Leggibilità
(d)
Ripetibilità Linearità
NV212 210g 0,01g 1d ±2d 200g 100g, 200g
NV511 510g 0,1g 1d ±2d 300g 300g, 500g
NV1101 1100g 0,1g 1d ±2d 500g 500g, 1000g
NV2101 2100g 0,1g 1d ±2d 1kg 1kg, 2kg
NV4101 4100g 0,2g 1d ±2d 2kg 2kg, 4kg
MV5101 5100g 0,5g 1d ±2d 3kg 3kg, 5kg
≤1 secondi
(non fornite), o batteria ricaricabile opzionale
Massa di taratura
dell’intervallo di
Massa di taratura
di linearità
misura richiesto

IT-10 Navigator®
B
NVL511 510g 0,1g 1d ±2d 300g 300g, 500g
NVL1101 1100g 0,1g 1d ±2d 500g 500g, 1000g
NVL2101 2100g 0,1g 1d ±2d 1kg 1kg, 2kg
NVL5101 5100g 0,5g 1d ±2d 3kg 3kg, 5kg
NVL10000 10000g 1g 1d ±2d 5kg 5kg, 10kg
NVL20000 20000g 1g 1d ±2d 10kg 10kg, 20kg
NVT1601 1600g 0,1g 1d ±2d 1kg 1kg,1,5kg
NVT3201 3200g 0,2g 1d ±2d 2kg 2kg, 3kg
NVT6401 6400g 0,5g 1d ±2d 5kg 3kg, 6kg
NVT100011 10000g 0,5g 1d ±2d 10kg 5kg, 10kg
NVT160001 16000g 1g 1d ±2d 10kg 10kg, 15kg
Nota 1: /1 = Batteria opzionale ricaricabile installata in fabbrica
/2 = Display LED
Modelli approvati
Modello
NV311 310g 0,1g III 200g 200g, 300g
NV3100 3100g 1g III 2kg 2kg, 3kg
NVT1601 1600g 0,5g III 1kg 1kg, 1,5kg
NVT3200 3200g 1g III 2kg 2kg, 3kg
NVT6400 6400g 2g III 5kg 3kg, 6kg
NVT16000 16000g 5g III 10kg 10kg, 15kg
Nota 1: M = Omologazione CE
N = certificazione NTEP e approvazione standard di misurazione canadesi
Nota 2: /1 = Batteria opzionale ricaricabile installata in fabbrica
Esempio: NVT3200M/3
/3 = Display LED con batteria opzionale ricaricabile installata in fabbrica
1,2
Max= e=
/2 = Display LED
/3 = Display LED con batteria opzionale ricaricabile installata in fabbrica
Classe di
approvazione
Massa di taratura
dell’intervallo di
misura richiesto
Massa di taratura
di linearità
6.2 Disegni tecnici
A
A B C
204 mm 212 mm 58 mm
NV
204 mm 282 mm 74 mm
NVL
240 mm 250 mm 74 mm
NVT

Navigator® IT-11
6.3 Conformità
La conformità ai seguenti campioni è indicata dal contrassegno corrispondente sul prodotto
Marchio Standard
Il prodotto è conforme alla Direttiva Compatibilità Elettromagnetica (EMC) 2004/108/CE,
alla Direttiva Bassa Tensione 2006/95/CE e alla Direttiva per gli strumenti di pesa non
automatici 2009/23/CE. La Dichiarazione di Conformità completa è disponibile online sul
sito Web www.OHAUS.com.
AS/NZS4251.1, AS/NZS4252.1
Nota importante per bilance approvate nei paesi UE
Le bilance verificate in fabbrica portano questo contrassegno sull’etichetta dell’imballo
e con il sigillo ‘M’ su stando verde sulla targhetta metrological possono essere messe
La prima fase della verifica è stata eseguirla dal produttore e comprende lotte le prove previste dalla
norma EN 45501-8.2.2.
Se la durata di validità della verifica è limitata in accordo con le prescrizioni nazionali vigenti nei singoli
paesi, I'utilizzatore stesso di una bilancia di tale tipa sarà responsabile dell'esecuzione, entro le date di
scadenza previste, delle verifiche periodiche.
Smaltimento
Si prega quindi di smaltire questo prodotto separatamente e in modo specifico secondo le
disposizioni locali relative alle apparecchiature elettriche ed elettroniche.
Per qualsiasi chiarimento, rivolgersi agli enti preposti o al rivenditore dell‘apparecchiatura stessa.
In caso di cessione dello strumento (per es. per ulteriore utilizzo privato o aziendale/industriale), si
prega di comunicare anche questa disposizione.
Le istruzioni relative allo smaltimento in Europa sono disponibili online sul sito Web
www.ohaus.com
Si ringrazia per il contributo alla tutela dell‘ambiente.
in uso immediatamente.
Le bilance che sono verificate in due fasi, portano questo contrassegno sull'etichetta
dell'imballo e non portano il sigillo “M” sulla targhetta metrological. La seconda fase
delia verifica devo essere eseguita dal servizio assistenza Dini Argeo s.r.l. autorizzato,
oppure dalla autorità competente.
In conformità a quanto stabilito dalla Direttiva Europea 2002/96/CE in materia di
apparecchi elettrici ed elettronici (RAEE), questo strumento non può essere
smaltito come i normali rifiuti. Tale presupposto resta valido anche per i Paesi al di
fuori dei confini della UE, conformemente alle norme nazionali in vigore.
La direttiva sulle batterie 2006/66/EC introduce nuovi requisiti, a partire da
settembre 2008, sulla rimozione delle batterie da apparecchiature in disuso nei
paesi membri dell’Unione europea. Per conformità alla direttiva, l’apparecchio è
stato progettato per una rimozione sicura delle batterie al termine della vita utile da
effettuarsi presso una struttura specializzata nel trattamento di rifiuti.
. Selezionare el paese per eseguire la ricerca per “WEEE”.

IT-12 Navigator®
Registrazione ISO 9001
Nel 1994, OHAUS Corporation, USA, ha ricevuto il certificato di registrazione ISO 9001 da Bureau
Veritus Quality International (BVQI), come conferma che il sistema di gestione della qualità OHAUS
risponde alle caratteristiche standard di ISO 9001. Il 15 Maggio 2003, OHAUS Corporation, USA, è
stata riregistrata per la normativa ISO 9001:2000.
GARANZIA LIMITATA
I prodotti OHAUS sono garantiti da difetti nel materiale e nell’esecuzione a partire dalla data di
consegna per tutta la durata del periodo di garanzia. Durante il periodo di garanzia, la OHAUS
riparerà o, a suo giudizio, sostituirà ogni componente che risulterà essere difettoso gratuitamente,
purché il prodotto venga restituito, nolo anticipato, alla OHAUS.
Tale garanzia non si applica nel caso in cui il prodotto sia stato danneggiato accidentalmente o per
cattivo utilizzo, esposto a materiale radioattivo o corrosivo, abbia del materiale estraneo al suo interno,
o sia danneggiato come conseguenza dell’assistenza o di un intervento di modifica da parte di
personale diverso da quello della OHAUS. Dietro debito invio della scheda di garanzia, il periodo di
garanzia decorrerà a partire dalla data di spedizione al rivenditore autorizzato. Non viene data altra
garanzia espressa o implicita da parte della OHAUS Corporation. La OHAUS Corporation non sarà
ritenuta responsabile di qualsiasi danno conseguente.
Poiché la legislazione di garanzia è diversa da stato a stato e da paese a paese, si prega di contattare
la OHAUS o il vostro rivenditore autorizzato OHAUS per ulteriori dettagli.
Registrazione del prododotto
Proteggi il tuo investimento. Registra il tuo prodotto con il vostro rivenditore locale OHAUS. Negli Stati
Uniti e Canada a registarsi online www.ohaus.com.


OHAUS Corporation
7 Campus Drive
Suite 310
Parsippany, NJ 07054 USA
Tel: +1 973 377 9000
With offices worldwide / Con oficinas alrededor del mundo / Avec des bureaux dans le
monde entier / Weltweite Geshäftsstellen / Con uffici in tutto il mondo.
www.ohaus.com
*80252448*
P/N 80252448 B © 2011 OHAUS Corporation, all rights reserved / todos los derechos
reservados / tous droits réservés / Alle Rechte vorbehalten / tutti i diritti riservati.
Printed in China / Impreso en la China / Imprimé en Chine / Gedruckt in China / Stampato in Cina
 Loading...