Ohaus I150-S User Manual

Ohaus CorporationOhaus Corporation
Ohaus Corporation
Ohaus CorporationOhaus Corporation
29 Hanover Road
Florham Park NJ
07932-0900
I150 Electronic Indicator
Models I150-P and I150-S
Instruction Manual

NOTE:NOTE:
NOTE: THIS EQUIPMENT HAS BEEN TESTED AND FOUND TO
NOTE:NOTE:
COMPLY WITH THE LIMITS FOR A CLASS A DIGITAL DEVICE, PURSUANT TO PART 15 OF THE FCC RULES.
THESE LIMITS ARE DESIGNED TO PROVIDE REASONABLE PROTECTION AGAINST HARMFUL INTERFERENCE WHEN THE EQUIPMENT IS OPERATED IN A COMMERCIAL ENVIRONMENT. THIS
EQUIPMENT GENERATES, USES, AND CAN RADIATE RADIO FREQUENCY ENERGY AND, IF NOT INSTALLED AND USED IN ACCORDANCE WITH THE INSTRUCTION MANUAL, MAY CAUSE HARMFUL
INTERFERENCE TO RADIO COMMUNICATIONS. OPERATION OF
THIS EQUIPMENT IN A RESIDENTIAL AREA IS LIKELY TO CAUSE
HARMFUL INTERFERENCE IN WHICH CASE THE USER WILL BE
REQUIRED TO CORRECT THE INTERFERENCE AT HIS OWN EXPENSE.
THIS DIGITAL APPARATUS DOES NOT EXCEED THE CLASS A LIMITS FOR RADIO NOISE EMISSIONS FROM DIGITAL APPARATUS AS
SET OUT IN THE INTERFERENCE-CAUSING EQUIPMENT STANDARD
ENTITLED "DIGITAL APPARATUS", ICES-003 OF THE DEPARTMENT
OF COMMUNICATIONS.
CET APPAREIL NUMÉRIQUE RESPECTE LES LIMITES DE BRUITS
RADIOÉLECTRIQUES APPLICABLES AUX APPAREILS NUMÉRIQUES
DE CLASSE A PRESCRITES DANS LA NORMA SUR LE MATÉRIAL
BROUILLEUR : "APPAREILS NUMÉRIQUES", NMB-003 ÉDICTÉE PAR
LE MINISTRE DES COMMUNICATIONS.
This apparatus has been designed and tested according to DIN 57 411
Pt. 1/VDE 0411 Pt. 1, Safety Requirements for Electronic Measuring
Apparatus, and has been supplied in a safe condition. This instruction
manual contains information and warnings which must be followed by
the user to ensure safe operation and to retain the apparatus in safe
condition.
Unauthorized changes or modifications to this equipment are not
permitted.
The exclamation
point within the triangle is a warning
sign alerting you of
important instructions accompanying the product.
2

PREFACEPREFACE
PREFACE
PREFACEPREFACE
The I150 Electronic Indicator is a highly versatile device which is designed for a variety
of applications. It can be used with virtually any load receiver which provides a
compatible output signal. This instruction manual contains the information needed to
install, configure and operate the I150. Read it before attempting to operate the
indicator.
The I150 is a software controlled indicator with a host of user-programmable features.
Calibrating and setting up operating parameters are easily accomplished using the
front panel keypad and display. These are a few of the standard features included with
the indicator:
RS-232 Interface: RS-232 Interface:
RS-232 Interface: The bi-directional RS-232 interface enables the indicator to
RS-232 Interface: RS-232 Interface:
communicate with printers and computers. Instructions on connecting and using the
interface are included in this manual.
Parts Counting: Parts Counting:
Parts Counting: The parts counting feature allows you to count parts in a number of
Parts Counting: Parts Counting:
ways. You can enter the average piece weight and start counting, or let the indicator
perform averaging and display the count.
Single/Dual Platform Operation: Single/Dual Platform Operation:
Single/Dual Platform Operation: The I150 is a two-channel indicator which permits
Single/Dual Platform Operation: Single/Dual Platform Operation:
you to monitor two load receivers. Switch to either load receiver by pressing a single
button.
Checkweighing and Filling: Checkweighing and Filling:
Checkweighing and Filling: Set point indicators and digital outputs are provided for
Checkweighing and Filling: Checkweighing and Filling:
these applications. In checkweighing, the indicators and digital outputs correspond to
OVER, UNDER and ACCEPT values. In filling processes, they can be used to activate
preset feedrates and cutoff points of filling devices.
ClassificationsClassifications
Classifications
ClassificationsClassifications
Both models I150-P and I150-S have been tested and certified to comply with the
following regulations:
Weights and MeasuresWeights and Measures
Weights and Measures
Weights and MeasuresWeights and Measures
• National Institute of Standards and Technology Handbook 44 Class III and IIIL
• Consumer and Corporate Affairs Canada Weights and Measures Act and Regula-
tions general class.
SafetySafety
Safety
SafetySafety
• Underwriters Laboratory 114 and 466
• Canadian Standards Association C22.2 No. 151-m1986
• National Electrical Manufacturers Association Standard 250 Type 4 (NEMA 4)
• International Electrotechnical Commission Pub. 529 Index of Protection 65-(IP65)
• DIN VDE 0411
LEGAL FOR TRADE NOTELEGAL FOR TRADE NOTE
LEGAL FOR TRADE NOTE
LEGAL FOR TRADE NOTELEGAL FOR TRADE NOTE
Throughout this manual, the abbreviation “LFT” represents “Legal For Trade”.
3

TABLE OF CONTENTSTABLE OF CONTENTS
TABLE OF CONTENTS
TABLE OF CONTENTSTABLE OF CONTENTS
PAGE
UNPACKING ........................................................................................................ 6
INSTALLATION.................................................................................................... 7
Power Connections....................................................................................... 7
Load Receiver Connections.......................................................................... 8
Installing “Gain Setting” Shorting Jumpers................................................... 9
RS-232 Connections................................................................................... 10
RS-232 Shorting Jumpers .......................................................................... 10
Digital Output Connections ......................................................................... 11
Turning the I150 ON ................................................................................... 12
Display Indicator Functions......................................................................... 1 2
Key Functions ............................................................................................. 13
USING MENUS TO CONFIGURE THE I150 .................................................... 14
SETUP SUBMENU ..................................................................................... 18
Legal For Trade....................................................................................... 19
Sense ...................................................................................................... 19
Number of Load Reeceivers ................................................................... 20
Zero ......................................................................................................... 20
Calibration Unit ........................................................................................ 21
Full Scale Point........................................................................................ 21
Graduations............................................................................................. 22
Calibration Point ...................................................................................... 22
Linearization Point ................................................................................... 23
End .......................................................................................................... 23
SCALE SUBMENU ..................................................................................... 24
Reset to Factory Defaults ....................................................................... 25
Averaging Level....................................................................................... 25
Stability Range ........................................................................................ 26
Unit Selection .......................................................................................... 27
Auto-Zero Tracking .................................................................................. 28
Custom Unit Conversion Factor.............................................................. 28
Average Display Cycle ............................................................................ 31
Parts Count Error Level .......................................................................... 3 1
Set Point .................................................................................................. 3 2
Set ........................................................................................................... 32
Store ........................................................................................................ 34
Retain Zero Data ..................................................................................... 3 5
End .......................................................................................................... 35
CALIBRATION SUBMENU ......................................................................... 36
Dead Load ............................................................................................... 3 6
Zero Adjustment .................................................................................. 37
Calibration ............................................................................................... 37
End .......................................................................................................... 39
4

PAGE
RS-232 SUBMENU ..................................................................................... 40
Baud Rate ............................................................................................... 4 1
Number of Data Bits................................................................................ 41
Number of Stop Bits ................................................................................ 4 1
Parity ....................................................................................................... 41
Sample Size (APW) (for Auxiliary Sample Scale)................................... 4 2
Auto Print Feature ................................................................................... 42
Non Printing Weight Values and Auto Print Time Interval...................... 43
Print Stable Data Only............................................................................. 4 4
Print Block or Display Data ..................................................................... 44
Print Numeric Display Data Only ............................................................ 4 5
Time......................................................................................................... 45
Date ......................................................................................................... 45
End .......................................................................................................... 46
Exit All Menus ............................................................................................. 46
Disabling Menu Changes for Legal For Trade Installations .............................. 47
Closing the Cover............................................................................................... 4 8
LFT SEALING .................................................................................................... 48
OPERATION ...................................................................................................... 48
Selecting a Weighing Unit........................................................................... 48
Weighing ..................................................................................................... 49
Taring .......................................................................................................... 49
View/Enter Time and Date.......................................................................... 51
Parts Counting ............................................................................................ 5 2
Parts Counting With An Auxiliary Sample Scale ........................................ 55
Checkweighing............................................................................................ 57
Filling and Emptying Processes.................................................................. 5 8
Animal Weighing ......................................................................................... 61
Using ID Codes........................................................................................... 61
RS-232 INTERFACE.......................................................................................... 65
TROUBLESHOOTING ....................................................................................... 70
Error Codes ................................................................................................. 7 2
SPECIFICATIONS ............................................................................................. 73
REPLACEMENT PARTS ................................................................................... 74
ACCESSORIES ................................................................................................. 74
CARE AND MAINTENANCE ............................................................................. 75
SERVICE INFORMATION ................................................................................. 75
LIMITED WARRANTY ....................................................................................... 75
5
UNPACKINGUNPACKING
UNPACKING
UNPACKINGUNPACKING
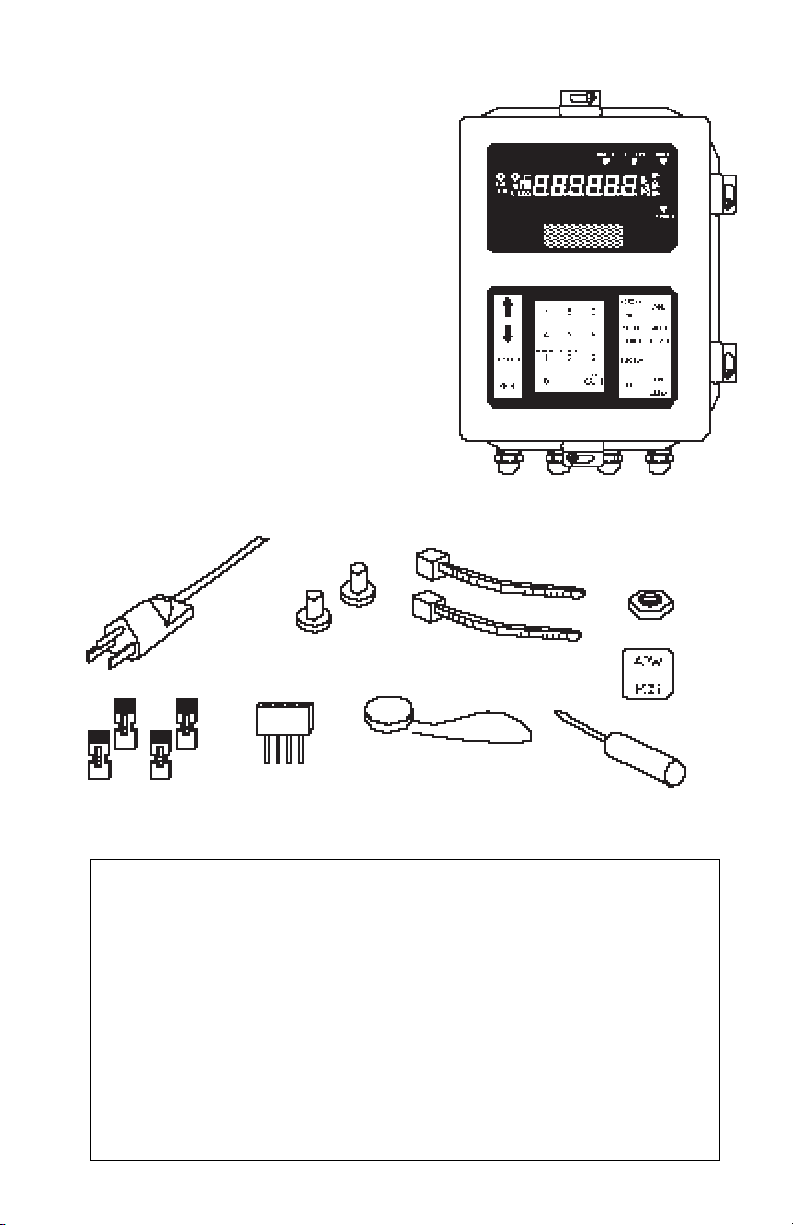
Verify that your indicator was shipped
with the following items:
• I150-P or I150-S indicator
• power cord
• instruction manual
• warranty card
• an accessory kit including:
- two hole plugs
- one calibration seal
- one capacity label sheet
- one screwdriver
- one 5/16" #6-32 hex nut
- two cable ties
- four shorting jumpers
- one press-on “APW/PCS” label
- one setpoint connector
I150 Indicator
Power
Cord
Hole Plugs
Calibration Seal
Shorting Jumpers
• To avoid shock hazards, always be certain that the power cord is
disconnected from the wall outlet BEFORE opening the enclosure.
• Even though the I150 may have been switched OFF, high voltage is
present inside the enclosure as long as power cord is connected to a power
source.
• DO NOT use any other type of power cord other than the one that was
furnished with the indicator.
• DO NOT create a safety hazard by defeating the grounding feature.
Setpoint
Connector
WARNINGWARNING
WARNING
WARNINGWARNING
Cable Ties
Screw Driver
Hex Nut
Label
6
INSTALLATIONINSTALLATION
INSTALLATION
INSTALLATIONINSTALLATION
Power ConnectionsPower Connections
Power Connections
Power ConnectionsPower Connections
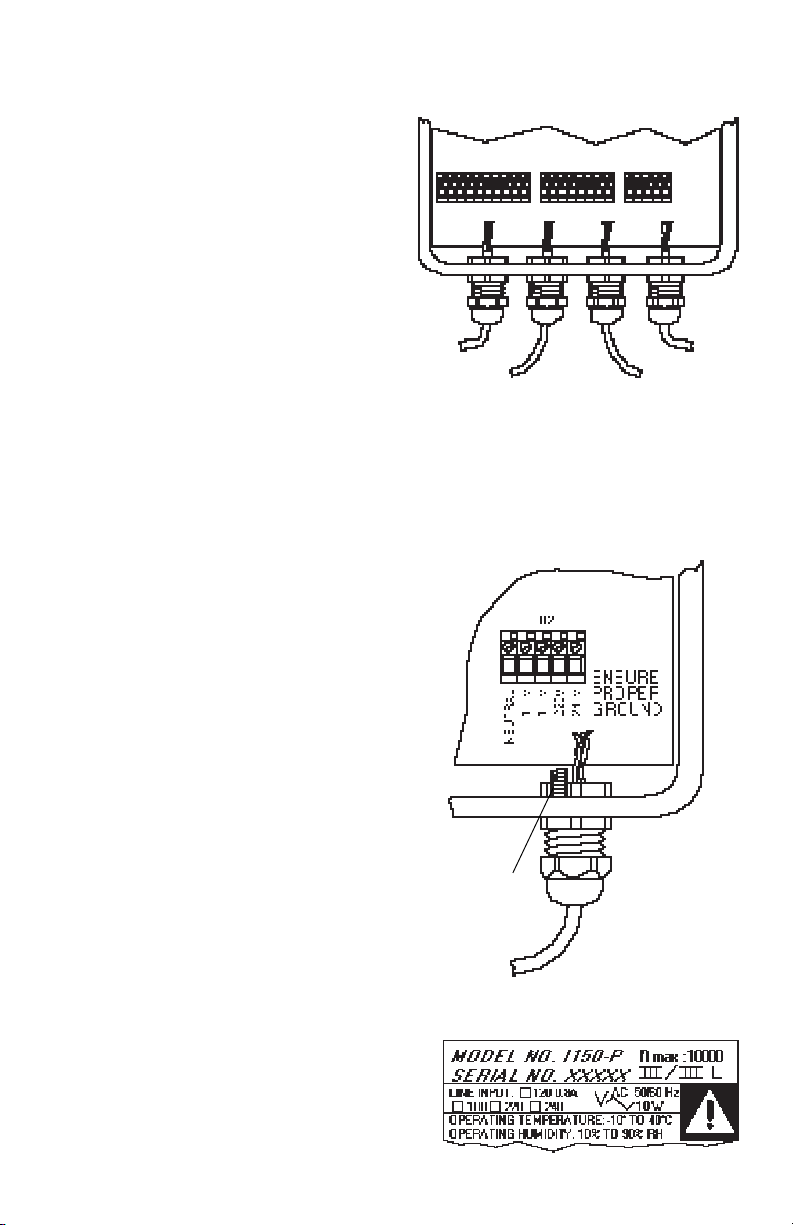
Using a small screwdriver, connect the
power cord to TB2 located on the main
circuit board inside the enclosure as follows (see diagram):
1. Pass the power cord through the seal
bushing of the liquid tight connector
on the lower right of the enclosure.
2. Connect the ground wire (green or
green/yellow) to the case ground
screw located inside the enclosure,
just above the seal bushing. Secure
the wire to the screw using the #6-32
hex nut provided in the accessory kit.
TB1
Load
Receiver #2
Cable
TB3
Load
Receiver #1
Cable
TB2
RS232
Cable
Power
Cord
Tighten nut to minimum torque of 10
inch-pounds to ensure ground continuity.
3. Connect the NEUTRAL wire (WHITE
or BLUE) to the terminal labeled NEUTRAL.
4. Connect the BLACK or BROWN wire
to the terminal labeled with the appropriate line voltage (100V, 120V,
220V or 240V).
CAUTION: Indicator may be damaged if operated at incorrect voltage.
5. Permanently mark the appropriate
line voltage box on the serial number
label located on the side of the enclosure.
Case
Ground
Screw
Power
Cord
7
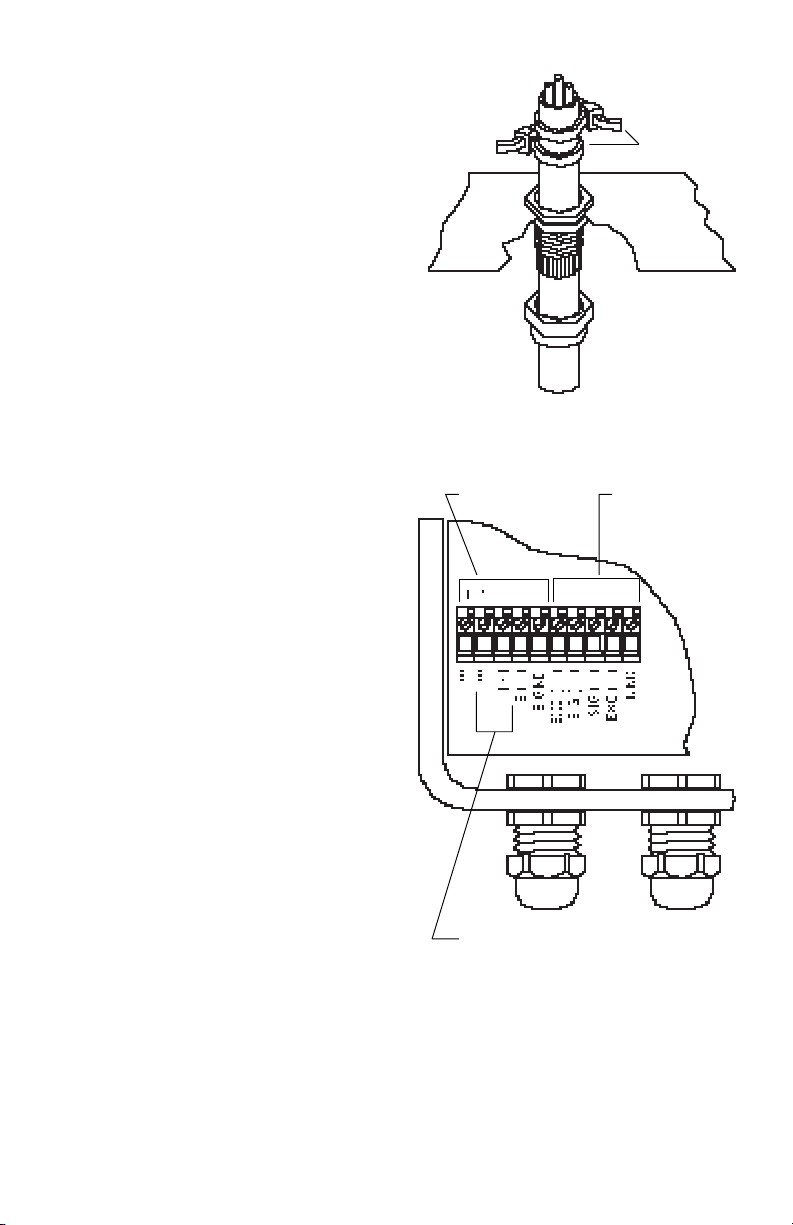
6. After the connections have been
made, fasten two cable ties (included
in the accessory kit) around the power
cord as shown in the diagram. The
cable ties secure the power cord so it
cannot be pulled out of the enclosure.
7. Tighten the seal bushing until resistance is felt against the cable. Turn
the cap nut an additional full turn to
secure the cable.
Load Receiver ConnectionsLoad Receiver Connections
Load Receiver Connections
Load Receiver ConnectionsLoad Receiver Connections
Using a small screwdriver, connect the
load cell cable to TB1 located on the main
circuit board inside the enclosure as follows (see diagram):
1. Pass the cable from the load
receiver(s) through one of the two
liquid tight connector(s) seal bushings on the lower left of the enclosure.
Load Receiver
#2
Cable Ties
Load Receiver
#1
2. Make the connections according to
the markings on the circuit board.
3. After the connections have been
made, tighten the seal bushing until
resistance is felt against the cable.
Turn the cap nut an additional full
turn to secure the cable.
NOTE: Remote sensing is available only
on load receiver #1. Load receiver #2 may
not be used.
For Ohaus LB, PL and WB platforms,
leads are color coded as follows:
Black: EXC (-) Green: EXC (+)
White: SIGNAL (-) Red: SIGNAL (+)
Yellow: SENSE (-) Blue: SENSE (+)
For Ohaus WBS platforms:
Black: EXC (-) Red: EXC (+)
White: SIGNAL (-) Green: SIGNAL (+)
SENSE connections from Load
Receiver #1. (Load Receiver #2 IS
NOT USED)
8
Installing “Gain Setting”Installing “Gain Setting”
Installing “Gain Setting”
Installing “Gain Setting”Installing “Gain Setting”
Shorting JumpersShorting Jumpers
Shorting Jumpers
Shorting JumpersShorting Jumpers
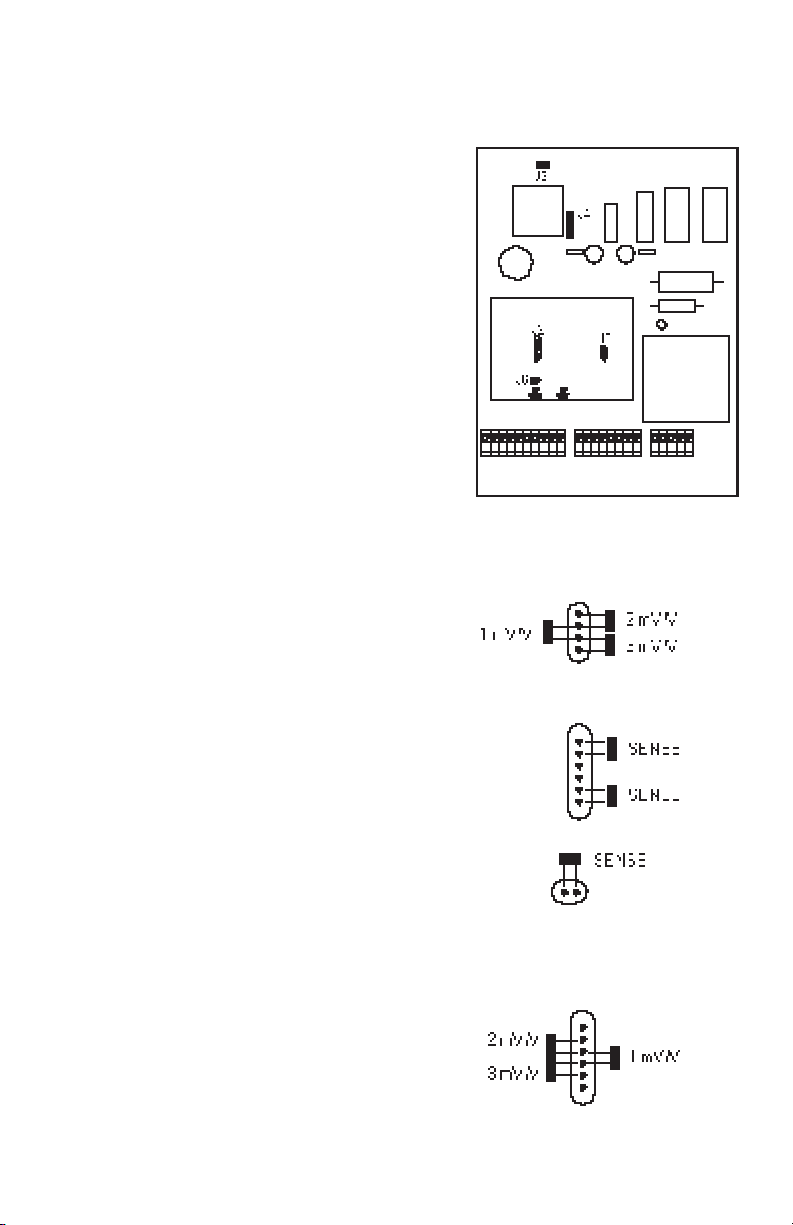
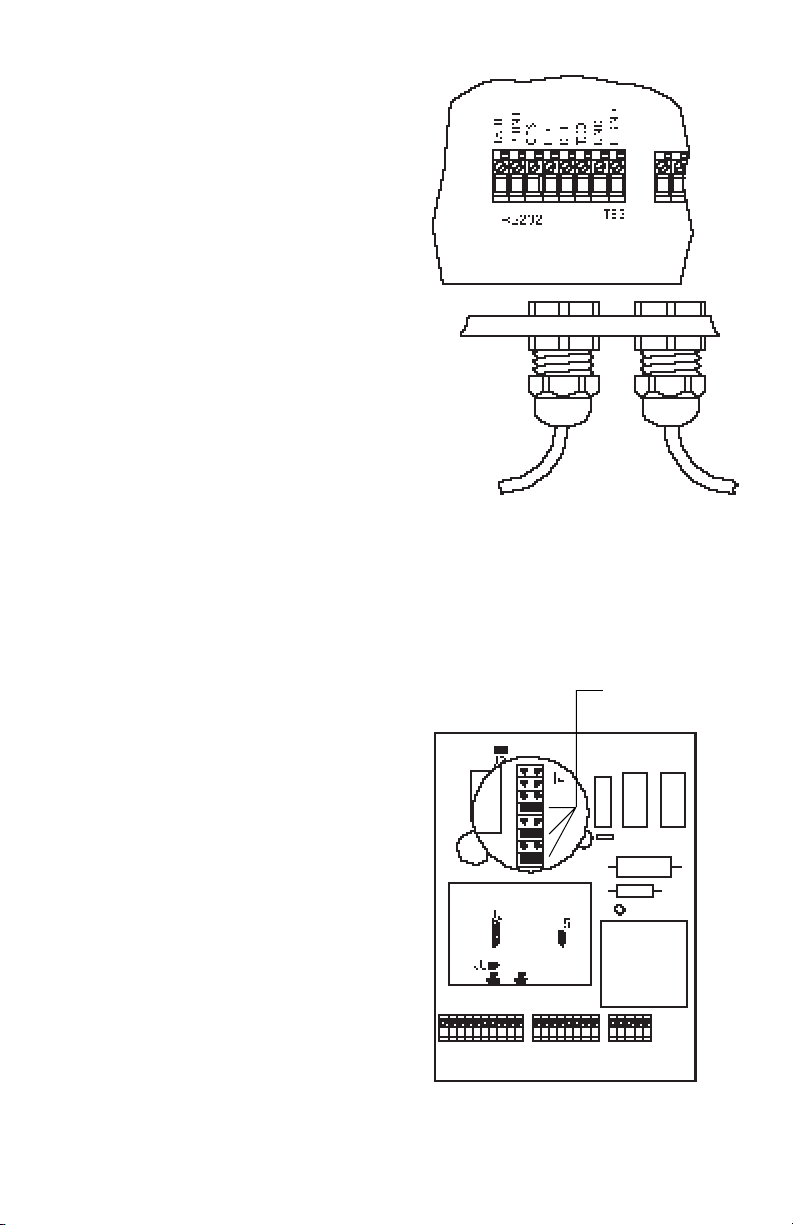
The gain setting for the I150 must be set
to match the output signal of the load
receiver(s) being used. There are three
possible configurations:
1. Single load receiver without SENSE.
2. Single load receiver with SENSE.
3. Dual load receivers.
The gain setting is selected by installing
shorting jumpers on connectors “J6”, “J5”
and “J2” of the main circuit board as
necessary. Refer to the diagrams and use
the following as a guide.
The factory default gain setting has been
set to single load receiver, at 2mV/V,
without SENSE.
For Single Load Receiver Operation:For Single Load Receiver Operation:
For Single Load Receiver Operation:
For Single Load Receiver Operation:For Single Load Receiver Operation:
Install one shorting jumper on connector
“J5” in the position labeled with the gain
that matches the output of the load receiver in use: 1, 2 or 3 mV/V.
If the SENSE connection is being used,
install two shorting jumpers on “J2”, and
one on “J6” as shown in the diagram.
For Dual Load Receiver Operation:For Dual Load Receiver Operation:
For Dual Load Receiver Operation:
For Dual Load Receiver Operation:For Dual Load Receiver Operation:
Install one shorting jumper on “J5” as for
one cell operation. Install one shorting
jumper on “J2” in the position labeled with
the gain matching the output of the second load receiver: 1, 2 or 3 mV/V.
NOTE: During dual receiver operation,
SENSE jumpers must be removed.
J5
J2
J6
J2
9
RS-232 ConnectionsRS-232 Connections
RS-232 Connections
RS-232 ConnectionsRS-232 Connections
Using a small screwdriver, connect the
RS-232 interface cable to TB3 located
between TB1 and TB2 on the main circuit
board as follows:
1. Pass the RS-232 cable through the
seal bushing of the liquid tight connector next to the one used for the
power cord.
2. Make the connections according to
the markings on the circuit board.
3. After the connections have been
made, tighten the seal bushing until
resistance is felt against the cable.
Turn the cap nut an additional full
turn to secure the cable.
RS-232 Connections For AuxiliaryRS-232 Connections For Auxiliary
RS-232 Connections For Auxiliary
RS-232 Connections For AuxiliaryRS-232 Connections For Auxiliary
Sample Scale (Parts Counting Option)Sample Scale (Parts Counting Option)
Sample Scale (Parts Counting Option)
Sample Scale (Parts Counting Option)Sample Scale (Parts Counting Option)
If an auxiliary sample scale will be used
for parts counting, refer to “Parts Counting With An Auxiliary Sample Scale” in the
OPERATION section for RS-232 wiring.
RS232
Cable
Power
Cord
Shorting
Jumpers
RS-232 Shorting JumpersRS-232 Shorting Jumpers
RS-232 Shorting Jumpers
RS-232 Shorting JumpersRS-232 Shorting Jumpers
Three shorting jumpers are factory installed on connector J4 of the main circuit
board to enable the RS-232 feature.
10
Digital Output ConnectionsDigital Output Connections
Digital Output Connections
Digital Output ConnectionsDigital Output Connections
Digital outputs are provided for checkweighing and filling applications where
the I150 will be used to control other
devices. Refer to “Checkweighing” and
“Filling and Emptying Processes” in the
OPERATION section of this manual for
instructions on using these features.
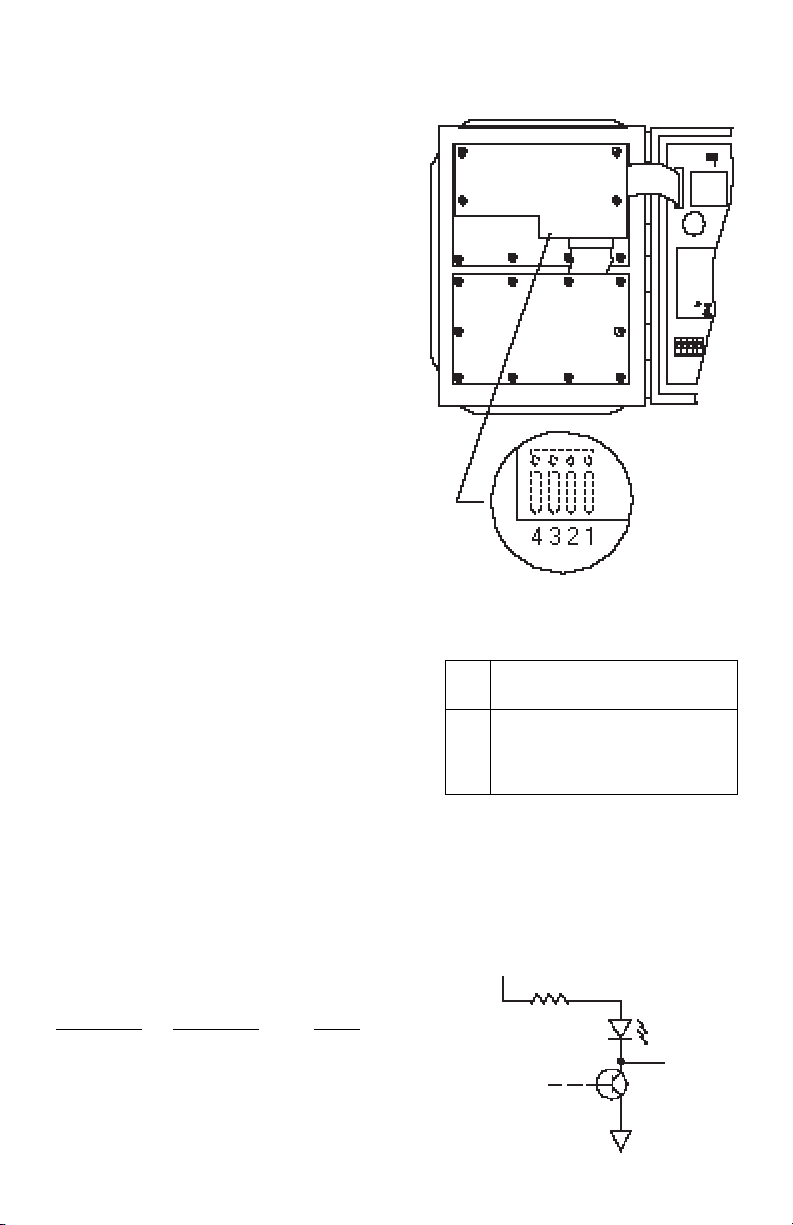
The digital outputs are accessed via a 4pin header which is located on the component side of the display circuit board (see
diagram).
Use the setpoint connector provided in
the accessory kit, and a suitable cable for
connecting to the header. The cable must
be round to fit properly through one of the
liquid tight connectors.
1. Locate the 4-pin header on the display circuit board.
2. Pass the cable through any free liquid tight connector.
3. Connect the cable wires to the socket
connector according to the pin connections shown in the table.
4. Plug the setpoint connector into the
4-pin header on the display circuit
board. Make sure the connector is
properly oriented.
Display
Circuit
Board
Header is on
component
side of circuit
board.
PIN CONNECTIONS
APPLICATION
Pin Checkweighing Filling/Emptying
1 UNDER DRIBBLE
2 GND GND
3 OVER PREACT
4 ACCEPT TARGET
5. Tighten the seal bushing until resistance is felt against the cable.
Output SpecificationsOutput Specifications
Output Specifications
Output SpecificationsOutput Specifications
Test
Parameter Conditions Value
V
V
OH
OL
IOH = -2mA max. 2.4 V min.
IOL = 16mA max. 0.5 V max.
Outputs are ACTIVE LOW: LED is ON,
when output is LOW (V
)
OL
11
+5V
475 ohms
LED
DIGITAL
OUTPUT
PIN
Turning the I150 ONTurning the I150 ON
Turning the I150 ON
Turning the I150 ONTurning the I150 ON
After all connections have been made, plug in the power cord; the Power ON LED will
ONON
ON
light. Press ZERO on the front panel. All display segments and indicators will light
ONON
ZEROZERO
ZERO
ZEROZERO
briefly, and then clear.
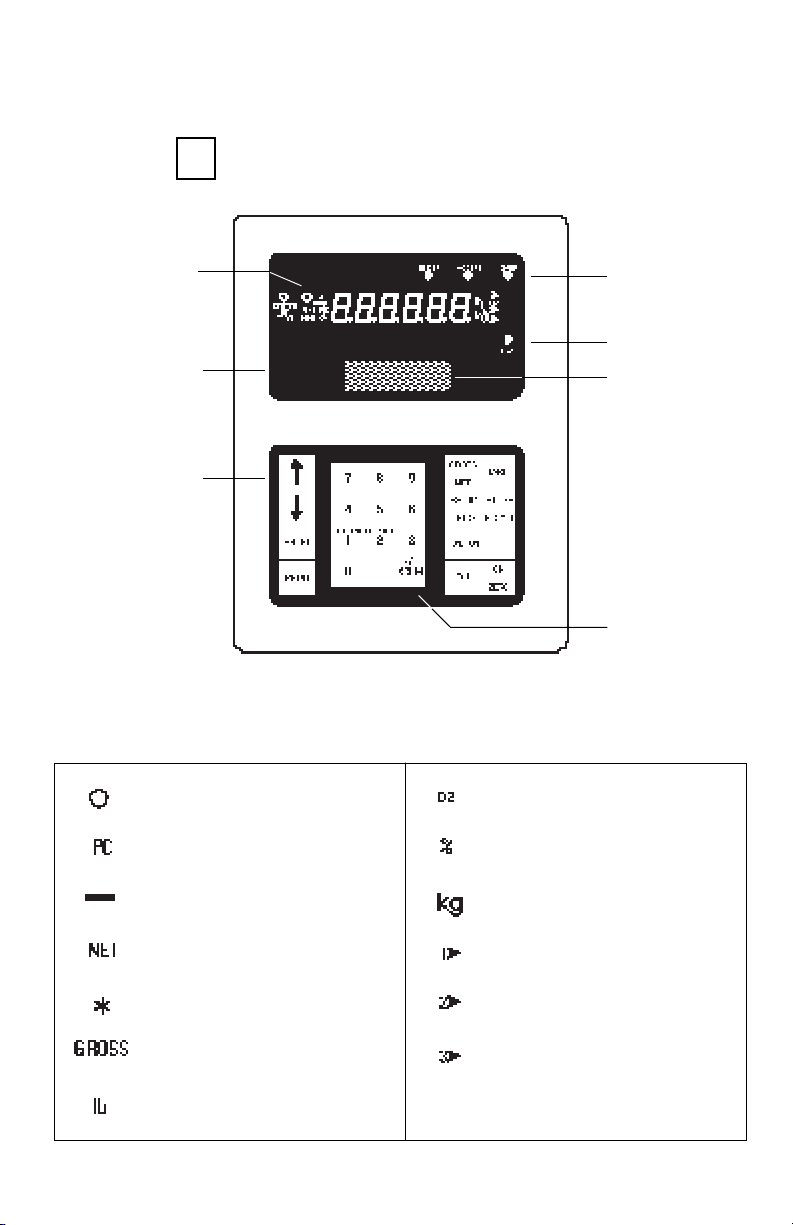
Display Indicators
Display Window
Keypad
Display Indicator FunctionsDisplay Indicator Functions
Display Indicator Functions
Display Indicator FunctionsDisplay Indicator Functions
Lights when scale is at center
of zero.
Indicates the I150 is in parts
counting mode.
Indicates that the currently displayed value is negative.
Indicates currently displayed
weight is net weight.
Lights when displayed weight
is stable (non LFT only).
Indicates currently displayed
weight is gross weight.
Lights when current weighing
unit is pounds.
Setpoint LEDs
Power ON LED
Capacity Label
Window
Numeric Keypad
Lights when current weighing
unit is ounces (non LFT only).
Indicates displayed value is a
percentage.
Lights when current weighing
unit is kilograms .
Indicates load receiver #1 is
displayed (non LFT only).
Indicates load receiver #2 is
displayed (non LFT only).
Lights when current weighing
unit is custom unit (non LFT
only).
12
Key FunctionsKey Functions
Key Functions
Key FunctionsKey Functions
ENTERENTER
ENTER
ENTERENTER
PRINTPRINT
PRINT
PRINTPRINT
SETPOINTSETPOINT
SETPOINT
SETPOINTSETPOINT
11
1
11
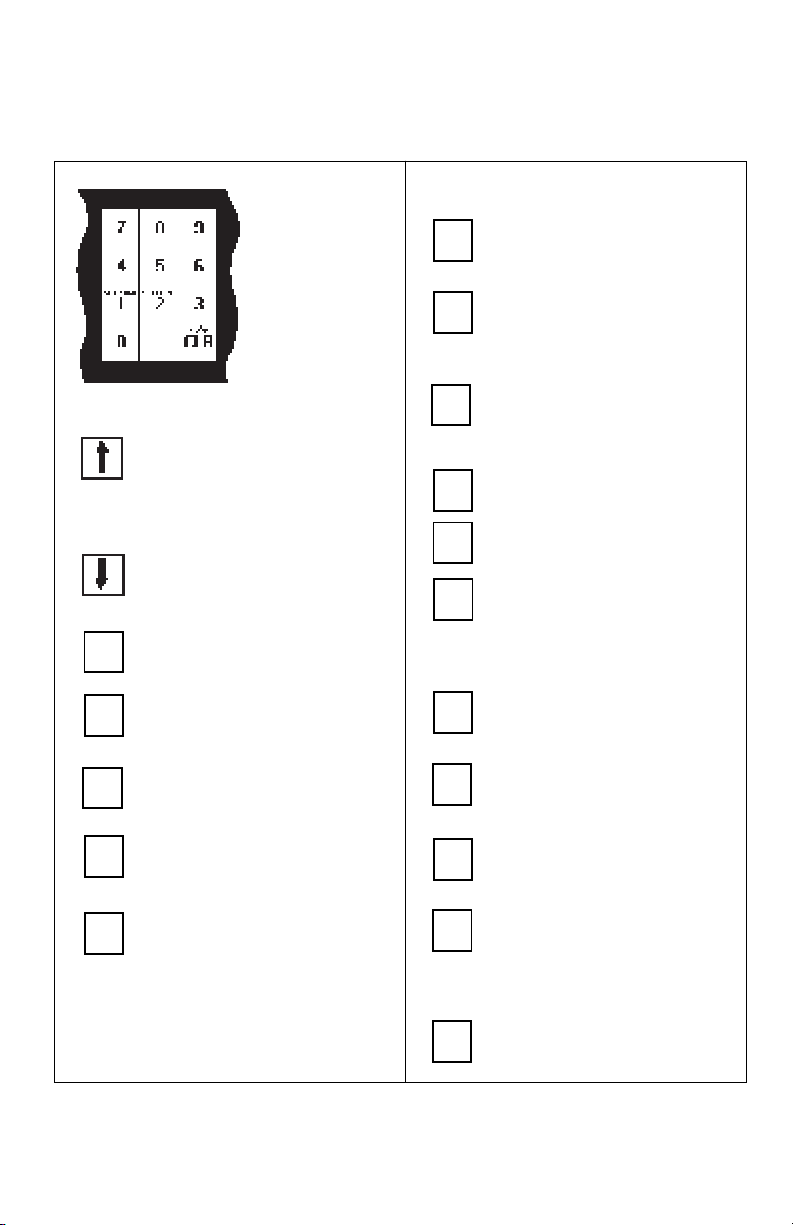
Numeric Keypad;
used to enter
numeric values
when applicable.
Switches display from one load
receiver to another. Steps
backward through menu selections.
Switches display from one load
receiver to another. Steps forward through menu selections.
Used during configuration.
Outputs data via the RS232
interface.
Used with FUNCTION key to
view/enter setpoint 1.
GROSSGROSS
GROSS
GROSSGROSS
NETNET
NET
NETNET
SETUPSETUP
SETUP
SETUPSETUP
UNITSUNITS
UNITS
UNITSUNITS
FUNCTIONFUNCTION
FUNCTION
FUNCTIONFUNCTION
OFFOFF
OFF
OFFOFF
TARETARE
TARE
TARETARE
STORESTORE
STORE
STORESTORE
RECALLRECALL
RECALL
RECALLRECALL
44
4
44
55
5
55
Switches display between
gross and net weights.
Changes current weighing
unit. Used with FUNCTION
key to access menus.
Used in conjunction with other
keys to provide alternate function.
Turns I150 off.
Enters tare values.
Used alone to retrieve ID
Codes and data, or with FUNCTION key to store ID codes
and data.
Used with FUNCTION key to
start/stop filling processes.
Used with FUNCTION key to
view/enter time.
SETPOINTSETPOINT
SETPOINT
SETPOINTSETPOINT
22
2
22
- / +- / +
- / +
- / +- / +
CLRCLR
CLR
CLRCLR
Used with FUNCTION key to
view/enter setpoint 2.
Clears numeric entries. Aborts
calibration. Clears memory location when used with ID
Codes. Aborts average display cycle. Used with FUNCTION key to change polarity of
numeric entries (+ or -).
13
ONON
ON
ONON
ZEROZERO
ZERO
ZEROZERO
Used with FUNCTION key to
66
6
66
view/enter date.
Blank key used for parts counting with APW/PCS label. Inactive in Legal for Trade applications.
Turns I150 ON. Zeroes display.
USING MENUS TOUSING MENUS TO
USING MENUS TO
USING MENUS TOUSING MENUS TO
CONFIGURE THE I150CONFIGURE THE I150
CONFIGURE THE I150
CONFIGURE THE I150CONFIGURE THE I150
Configuring the I150 for your specific
requirements is accomplished through a
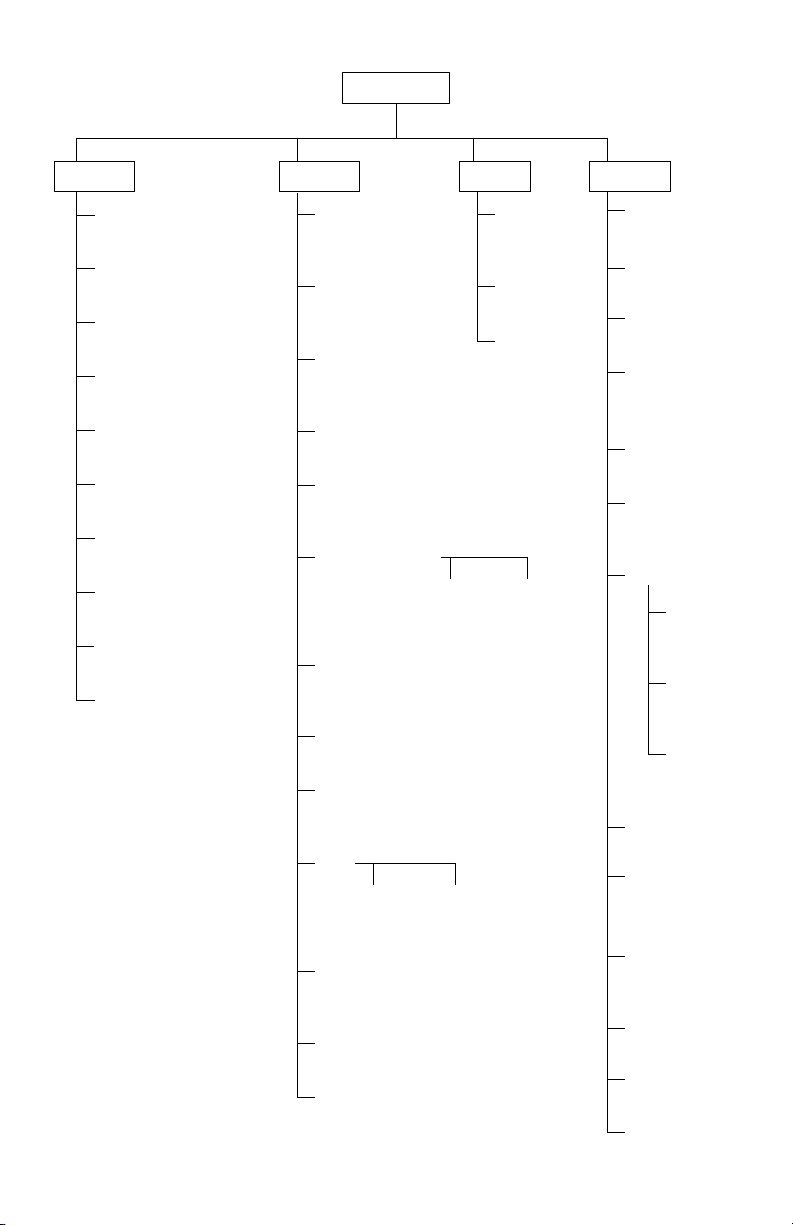
series of “menus”. There is one “main”
menu which includes four “submenus”.
The submenus contain the parameters to
be programmed.
The menus are accessed using the front
panel buttons and viewed on the display.
Using these menus, you will program
parameters such as display resolution,
load receiver capacity, the number of load
receivers used, and others. The menus
are also used to calibrate the indicator.
TO ACCESS THE MAIN MENU:TO ACCESS THE MAIN MENU:
TO ACCESS THE MAIN MENU:
TO ACCESS THE MAIN MENU:TO ACCESS THE MAIN MENU:
SETUPSETUP
SETUP
FUNCTIONFUNCTION
FUNCTION
FUNCTIONFUNCTION
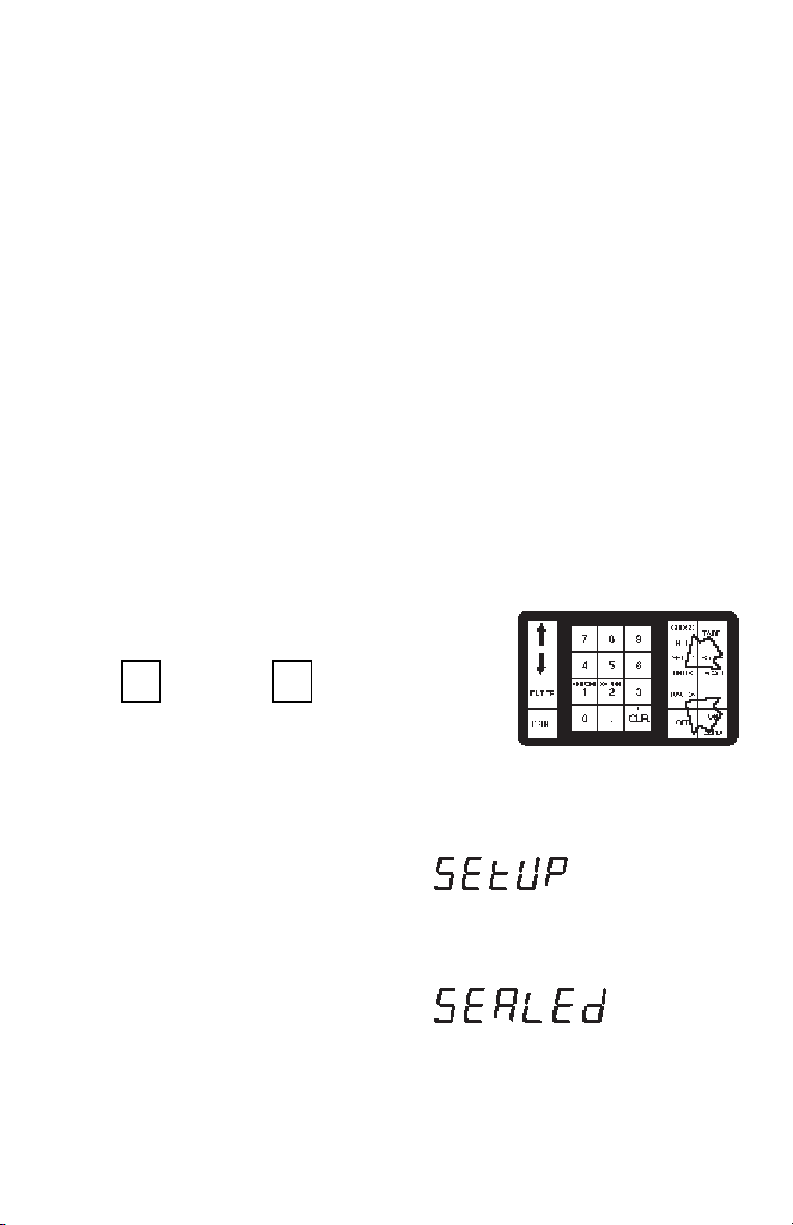
Press FNCT, then press SETP.
SETUPSETUP
UNITSUNITS
UNITS
UNITSUNITS
The word “SEtUP” will be displayed which
is the first item on the main menu. The
following table shows the sequence in
which the submenus will appear on the
main menu.
If the word “SEALEd” is displayed, it indicates that the I150 has been configured
and sealed for Legal For Trade use. Setup
parameters may not be changed. They
may only be viewed. See “Disabling Menu
Changes For Legal For Trade Installations”.
14
MAIN MENU
SETUP
LFT
ON or OFF
Sense
ON or OFF
Platform
Single or Dual
Zero
Enter % value
Cal. Unit
lb or kg
Full Scale Capacity Pt.
Enter value
Graduation Size
Enter value
Cal Pt.
Enter value
Linearity Pt.
1/2 Cal Pt. or none
End
SCALE CAL RS-232
Reset
to factory
defaults
d Load
adjust
0-5%
Baud
Data
AL
Enter value
0, 1, 2 or 3
Calib
perform
Stop
End
Stb
Enter value
0.5, 1 or 3
Parity
Select
active units
APW
AT
0.5, 1, 3 or
OFF
Auto P
Custom Units
Init
Exp. Mantissa
Enter Enter
value value
AD
Enter value
1 - 255
PC Err
Enter % value
Set Pt.
chec, fill, unfill
or OFF
Stable
Set
Print
Dribble Preact
Enter Enter
value value
nu (numeric
Store
tare, in-out
or apw
data only)
time
Retain
ON or OFF
date
End
Enter value
Enter value
Enter value
none, odd
or even
Enter value
select
parameter
nonP Lo
Enter
value
nonP Hi
Enter
value
Interval
Enter
value
ON or OFF
display or
block data
ON or OFF
ON or OFF
ON or OFF
15
End
MAIN MENUMAIN MENU
MAIN MENU
MAIN MENUMAIN MENU
Displayed SubmenuDisplayed Submenu
Displayed Submenu
Displayed SubmenuDisplayed Submenu
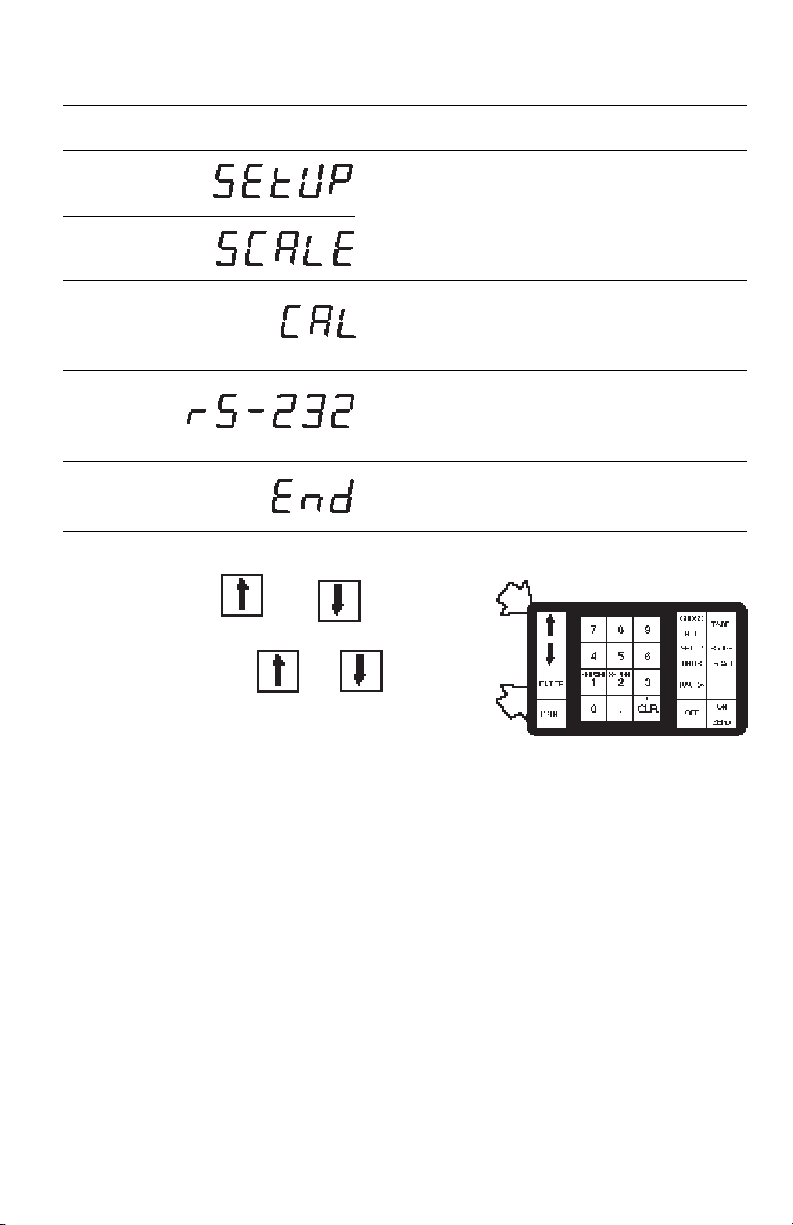
Only one menu selection will be displayed
at a time. Use the UPUP and DOWN keys
to step through the menu selections. By
repeatedly pressing UPUP or DOWN,
you can view all of the selections on the
DescriptionDescription
Description
DescriptionDescription
Setup and scale submenus are used to
configure the I150 software for the load
receiver(s) being used and to display
weight measurements according to your
requirements.
Calibration submenu is used to adjust
load receiver zero potentiometers and
to calibrate the I150.
RS-232 submenu is used to configure
the interface communication parameters.
End is used to exit the menus and
SAVE CHANGES .
menu.
When you select one of the submenus,
you gain access to a specific group of
operating parameters.
How To Use MenusHow To Use Menus
How To Use Menus
How To Use MenusHow To Use Menus
When initially setting up the I150, it is
recommended to view all of the parameters. Once configured, you can view or
change a particular parameter while bypassing others. The following procedures
apply whenever you use menus.
16
To select an item from a menu:To select an item from a menu:
To select an item from a menu:
To select an item from a menu:To select an item from a menu:
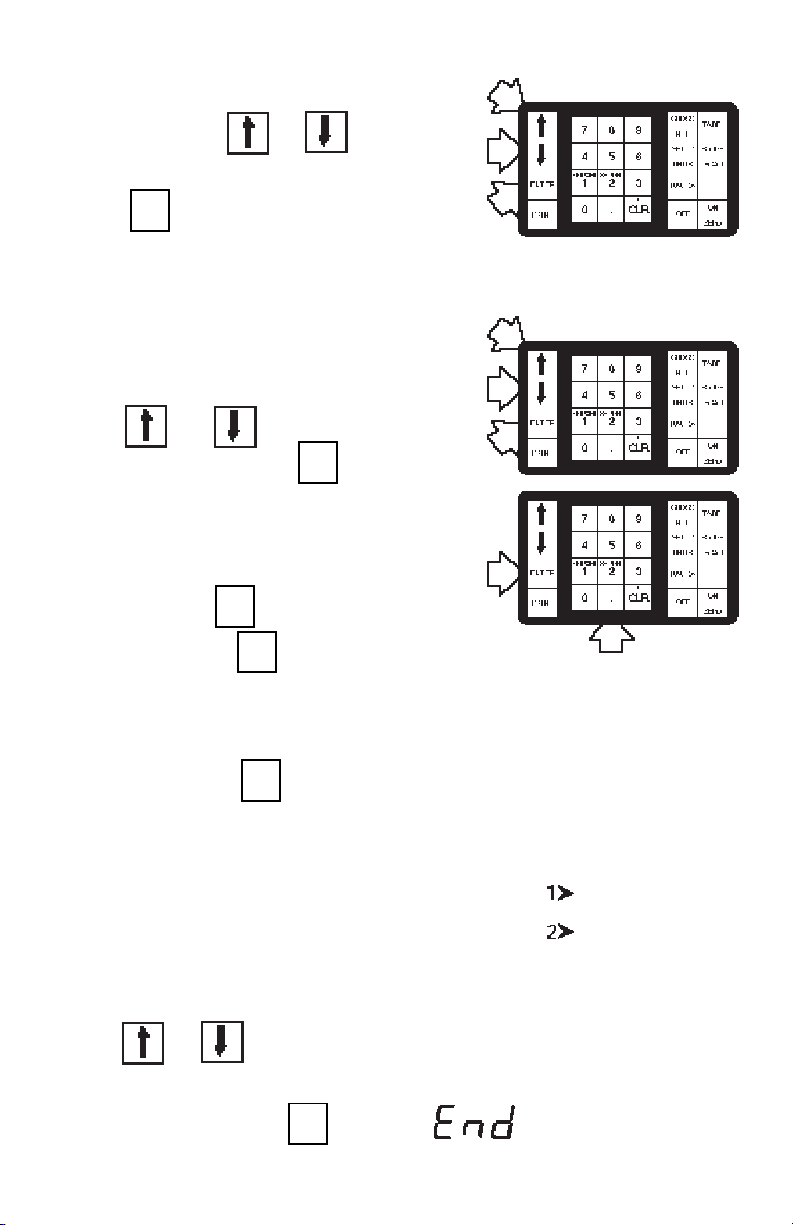
Repeatedly press UPUP or DOWN until
the desired selection is displayed, then
ENTERENTER
ENTER
press ENTER to select it.
Selections and Numeric Entries:Selections and Numeric Entries:
Selections and Numeric Entries:
Selections and Numeric Entries:Selections and Numeric Entries:
ENTERENTER
Some parameters offer you selections to
make while others require you to enter a
numeric value.
To make a selection:To make a selection:
To make a selection:
To make a selection:To make a selection:
Press UPUP or DOWN to display the
ENTERENTER
ENTER
desired setting, then press ENTER.
To enter a numeric value:To enter a numeric value:
To enter a numeric value:
To enter a numeric value:To enter a numeric value:
ENTERENTER
Enter the number using the numeric key-
ENTERENTER
ENTER
pad, then press ENTER. Errors can be
ENTERENTER
cleared by pressing CLER.
- / +- / +
- / +
- / +- / +
CLRCLR
CLR
CLRCLR
If an invalid number is entered, an acceptable number will automatically be substituted.
ENTERENTER
ENTER
If this occurs, press ENTR to accept the
ENTERENTER
new entry.
Dual Load Receivers:Dual Load Receivers:
Dual Load Receivers:
Dual Load Receivers:Dual Load Receivers:
If the I150 is configured for operation with
two load receivers, some parameters must
be entered separately. The load receiver
indicators in the display will show which
one is currently active. To change from
one load receiver to the other,
press UPUP or DOWN.
To exit from any menu:To exit from any menu:
To exit from any menu:
To exit from any menu:To exit from any menu:
ENTERENTER
ENTER
Select “End” , then press ENTER to exit.
ENTERENTER
Load Receiver #1
Load Receiver #2
17
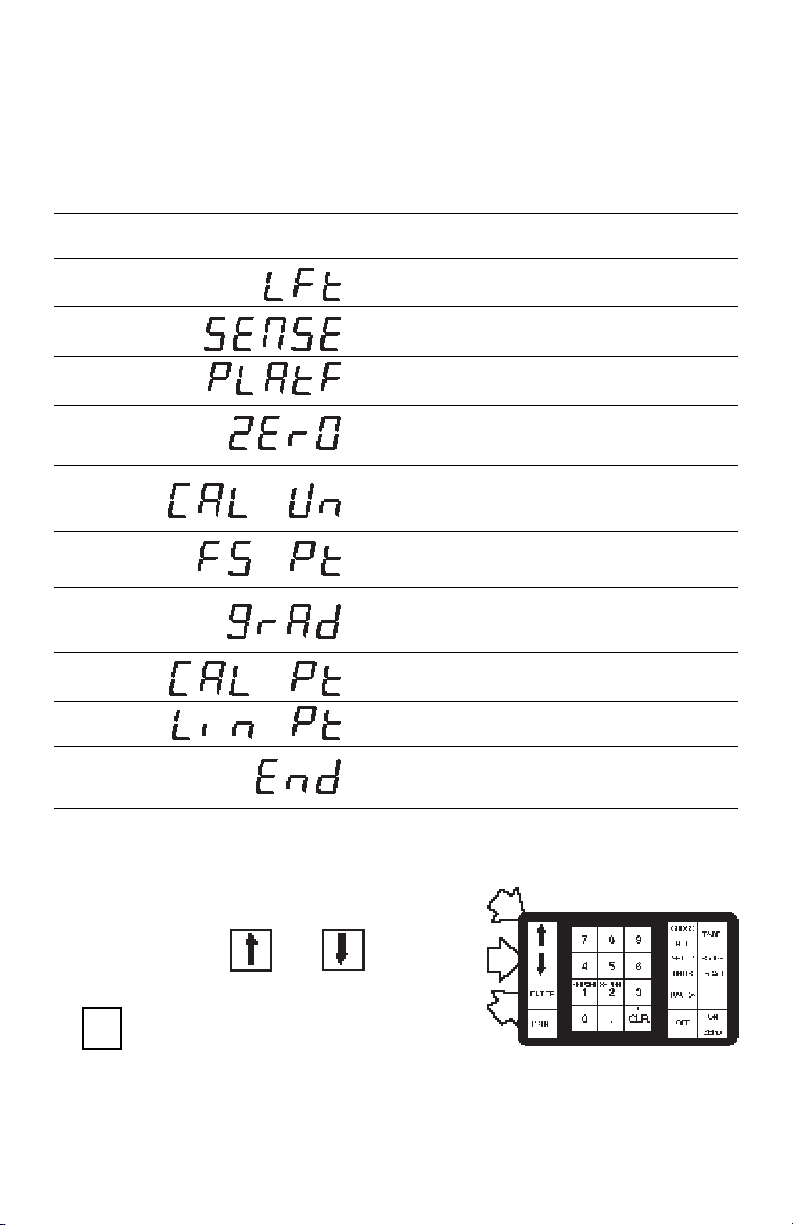
SETUP SUBMENUSETUP SUBMENU
SETUP SUBMENU
SETUP SUBMENUSETUP SUBMENU
The Setup submenu is used to view or change the parameters outlined in the following
table. The table shows the sequence in which the parameters appear on the display.
SETUP SUBMENUSETUP SUBMENU
SETUP SUBMENU
SETUP SUBMENUSETUP SUBMENU
Displayed ParameterDisplayed Parameter
Displayed Parameter
Displayed ParameterDisplayed Parameter
DescriptionDescription
Description
DescriptionDescription
sets I150 for Legal for Trade operation
enables/disables load cell sensing
configures I150 for 1 or 2 load receivers
specifies allowable percentage of max
load that can be zeroed out
specifies the weighing unit that will be
used for calibration
specifies full scale capacity
specifies increment of calibration unit in
which indicator will display weight
specifies the span calibration point
specifies the linearization point
used to exit the Setup menu
To select a parameter,
Repeatedly press UPUP or DOWN to
display the desired parameter, then press
ENTERENTER
ENTER
ENTERENTER
ENTER.
18
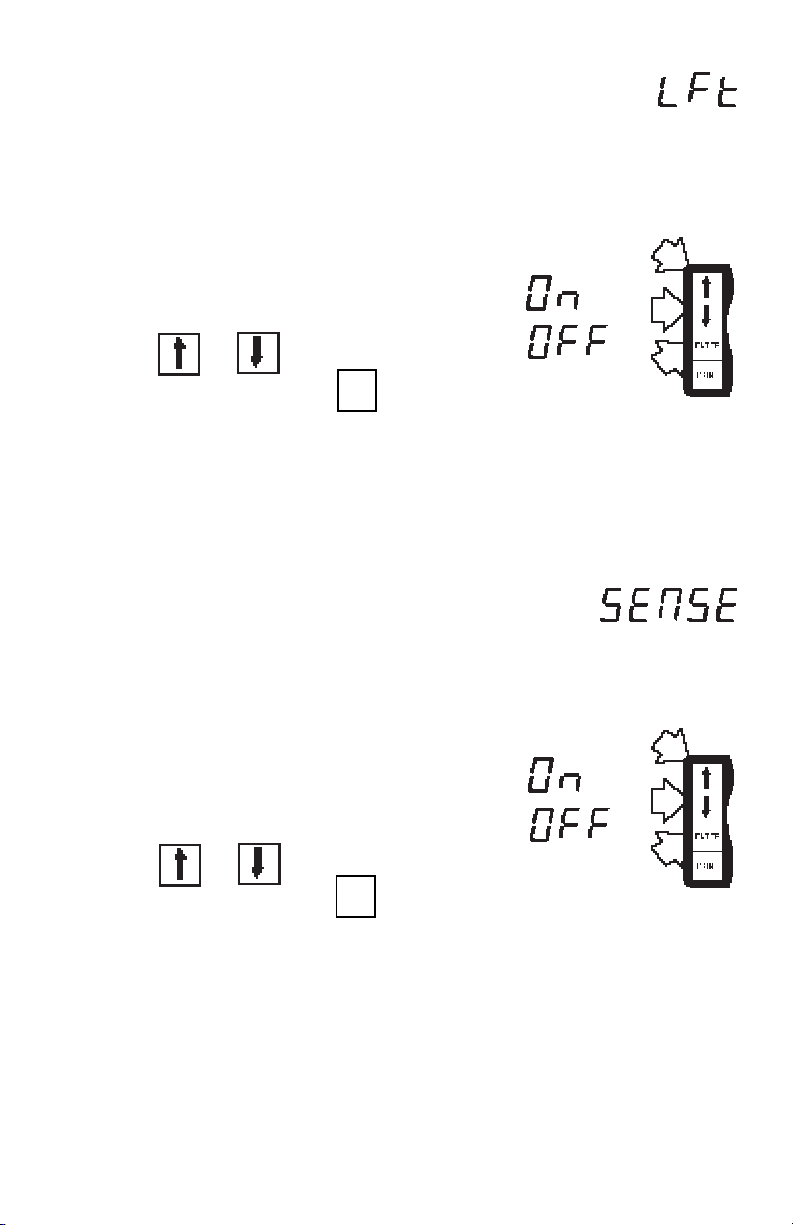
Legal For TradeLegal For Trade
Legal For Trade
Legal For TradeLegal For Trade
This parameter can be set to ON or OFF.
Selecting ON automatically sets certain
parameters for legal for trade requirements, disables others, and limits the
overall display resolution to 1:10,000.
When this parameter is set to ON, only
load receiver #1 may be used.
To set this parameter ON or OFF:
Press UPUP or DOWN to display the
ENTERENTER
ENTER
desired setting, then press ENTER
ENTERENTER
to return to the setup submenu.
RECALIBRATION IS REQUIREDRECALIBRATION IS REQUIRED
RECALIBRATION IS REQUIRED if LFT
RECALIBRATION IS REQUIREDRECALIBRATION IS REQUIRED
is switched from OFF to ON and greater
than 1:10,000 resolution exists.
SenseSense
Sense
SenseSense
Sense is used to compensate for signal
losses when load receivers are located
long distances from the indicator. When
this feature is used, only load receiver #1
may be connected to the indicator. If two
load receivers are used, OFF must be
selected for this parameter.
To set the Sense parameter ON or OFF:
Press UPUP or DOWN to display the
ENTERENTER
ENTER
desired setting, then press ENTER
ENTERENTER
to return to the setup submenu.
RECALIBRATION IS REQUIREDRECALIBRATION IS REQUIRED
RECALIBRATION IS REQUIRED if
RECALIBRATION IS REQUIREDRECALIBRATION IS REQUIRED
SENSE parameter is changed.
19
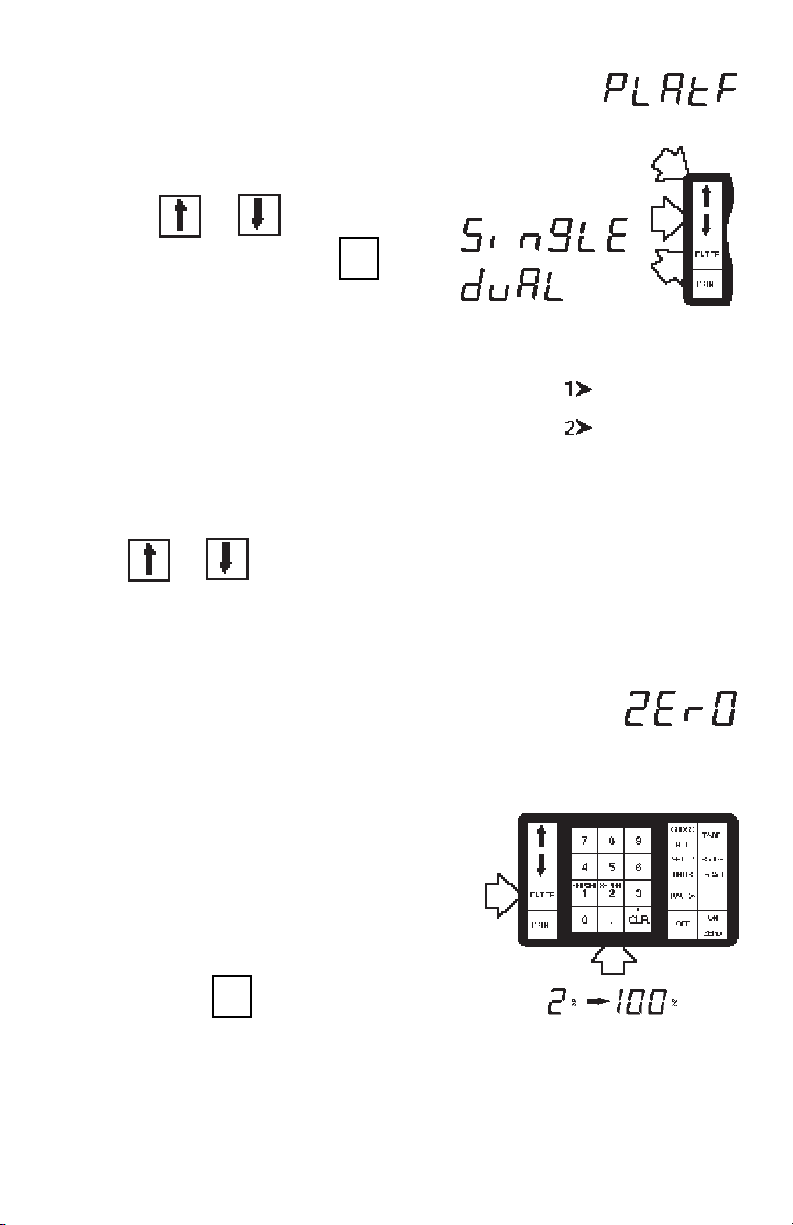
Number of Load ReceiversNumber of Load Receivers
Number of Load Receivers
Number of Load ReceiversNumber of Load Receivers
The I150 is configured for operation with
one (single) or two (dual) load receivers
using this parameter:
Press UPUP or DOWN to display the
ENTERENTER
ENTER
desired setting, then press ENTER
ENTERENTER
to return to the setup submenu.
If Dual is selected:If Dual is selected:
If Dual is selected:
If Dual is selected:If Dual is selected:
If dual is selected, the load receiver indicators on the display will light to show
which load receiver is currently being
displayed. Some parameters can be set
separately for load receiver 1 and 2.
To switch from one to the other,
press UPUP or DOWN.
LFT NOTE:LFT NOTE:
LFT NOTE: “SingLE” is automatically se-
LFT NOTE:LFT NOTE:
lected when LFT is set to ON.
Load Receiver #1
Load Receiver #2
ZeroZero
Zero
ZeroZero
This parameter specifies the percentage
of full capacity load that may be cleared
by pressing ZERO. Zero limits may be
required in certain applications. The value
can be set to any number from 2% to
100%.
To set the allowable Zero:
Enter the desired percentage (from 2
to 100) using the numeric keypad,
ENTERENTER
ENTER
then press ENTER to return to the
ENTERENTER
setup submenu.
LFT NOTE:LFT NOTE:
LFT NOTE: Must be set to ≤4% zero for
LFT NOTE:LFT NOTE:
Canadian Legal for Trade installations.
20
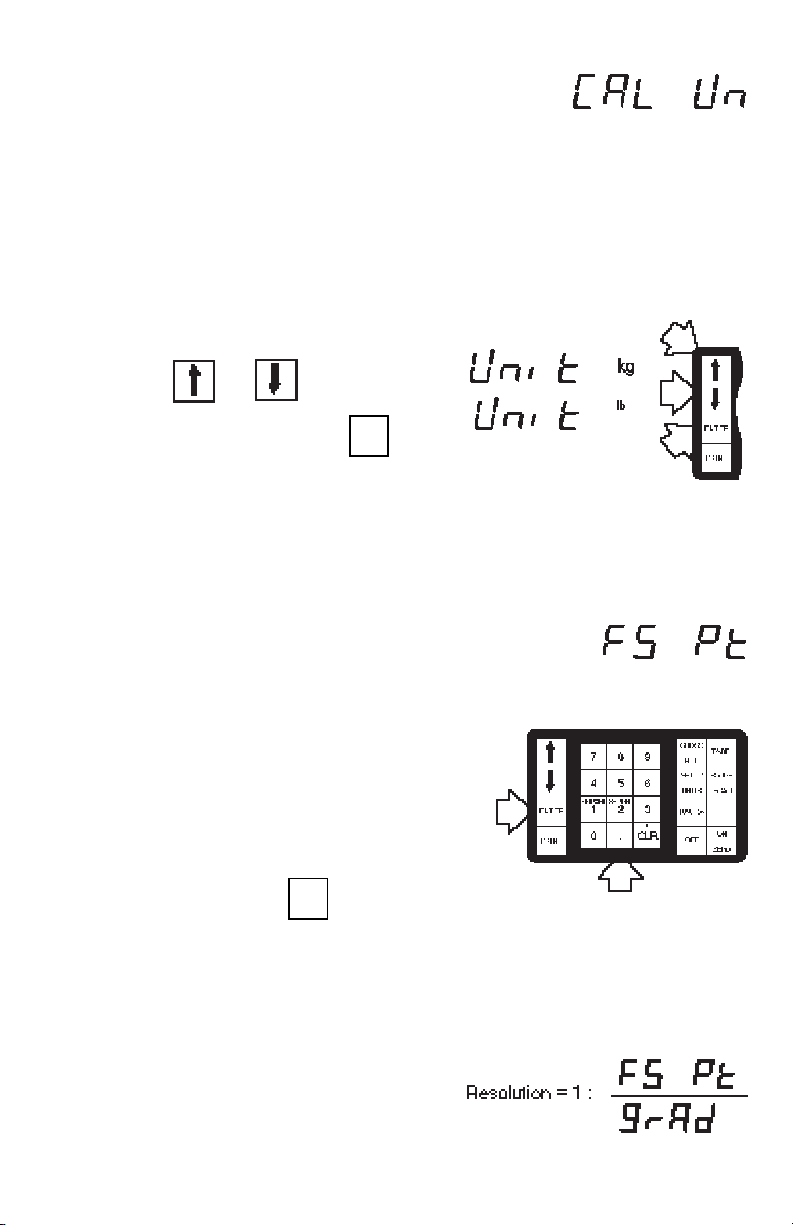
Calibration UnitCalibration Unit
Calibration Unit
Calibration UnitCalibration Unit
The indicator can be calibrated using
pounds or kilograms; no other units are
acceptable. If dual load receivers are
used, the same calibration unit applies to
both.
When you access this parameter, the
display will show the word “Unit” and the
current calibration unit indicator.
To change the calibration unit:
Press UPUP or DOWN to switch to
ENTERENTER
ENTER
the desired unit, then press ENTER
ENTERENTER
to return to the setup submenu
RECALIBRATION IS REQUIREDRECALIBRATION IS REQUIRED
RECALIBRATION IS REQUIRED if the
RECALIBRATION IS REQUIREDRECALIBRATION IS REQUIRED
calibration unit is changed. Setup submenu changes are not saved if you exit
menus without recalibrating.
Full Scale PointFull Scale Point
Full Scale Point
Full Scale PointFull Scale Point
The maximum capacity of the load receiver is entered in this parameter using
the same weighing unit selected for the
calibration unit.
To enter the full scale point:
Enter the number using the numeric
ENTERENTER
ENTER
keypad, then press ENTER to return
ENTERENTER
to the setup submenu.
RECALIBRATION IS REQUIREDRECALIBRATION IS REQUIRED
RECALIBRATION IS REQUIRED if the
RECALIBRATION IS REQUIREDRECALIBRATION IS REQUIRED
full scale point is changed. Setup submenu changes are not saved if you exit
menus without recalibrating.
LFT NOTE:LFT NOTE:
LFT NOTE: Resolution is limited to
LFT NOTE:LFT NOTE:
1:10,000 for Legal for Trade installations.
Enter Full Scale Point
21
GraduationsGraduations
Graduations
GraduationsGraduations
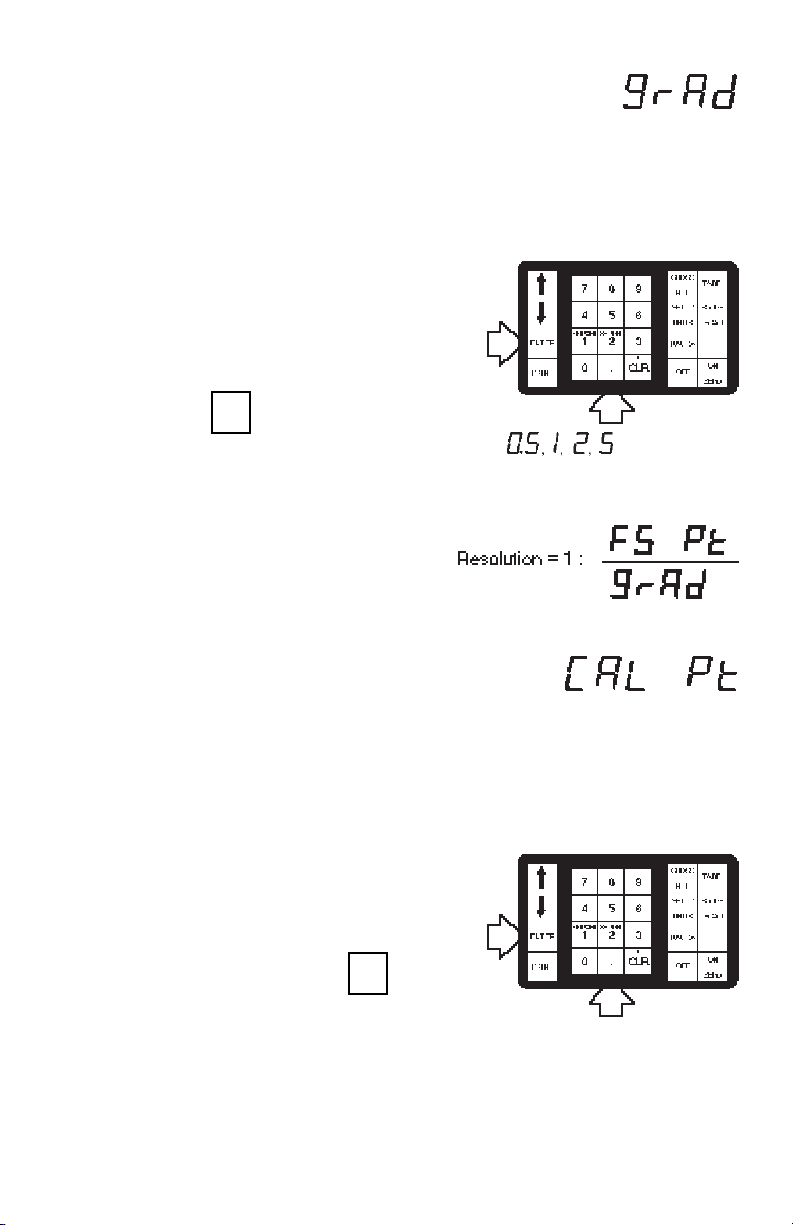
This parameter specifies the increments
in which the last digit of the display will
count, and sets the decimal point position. Graduations can be set to a decimal
multiple of 1, 2, or 5 (i.e. .02, .2, 2, 20,
etc.).
To set graduations:
Enter the desired number (with decimal point) using the numeric keypad,
ENTERENTER
ENTER
then press ENTER to return to the
ENTERENTER
setup submenu.
RECALIBRATION IS REQUIREDRECALIBRATION IS REQUIRED
RECALIBRATION IS REQUIRED if the
RECALIBRATION IS REQUIREDRECALIBRATION IS REQUIRED
graduations setting is changed. Setup
submenu changes are not saved if you
exit menus without recalibrating.
LFT NOTE:LFT NOTE:
LFT NOTE: Resolution is limited to
LFT NOTE:LFT NOTE:
1:10,000 for Legal for Trade installations.
Calibration PointCalibration Point
Calibration Point
Calibration PointCalibration Point
The calibration point is the weight value
that will be used to calibrate the indicator.
It can be any value from 10% to 100% of
the Full Scale Point and must be entered
in the same weighing unit selected for the
calibration unit.
To enter the calibration point:
Enter the desired value using the
numeric keypad, then press ENTER
to return to the setup submenu.
ENTERENTER
ENTER
ENTERENTER
or .1, .2, .5, Etc.
RECALIBRATION IS REQUIREDRECALIBRATION IS REQUIRED
RECALIBRATION IS REQUIRED if the
RECALIBRATION IS REQUIREDRECALIBRATION IS REQUIRED
calibration point is changed. Setup submenu changes are not saved if you exit
menus without recalibrating.
22
Linearization PointLinearization Point
Linearization Point
Linearization PointLinearization Point
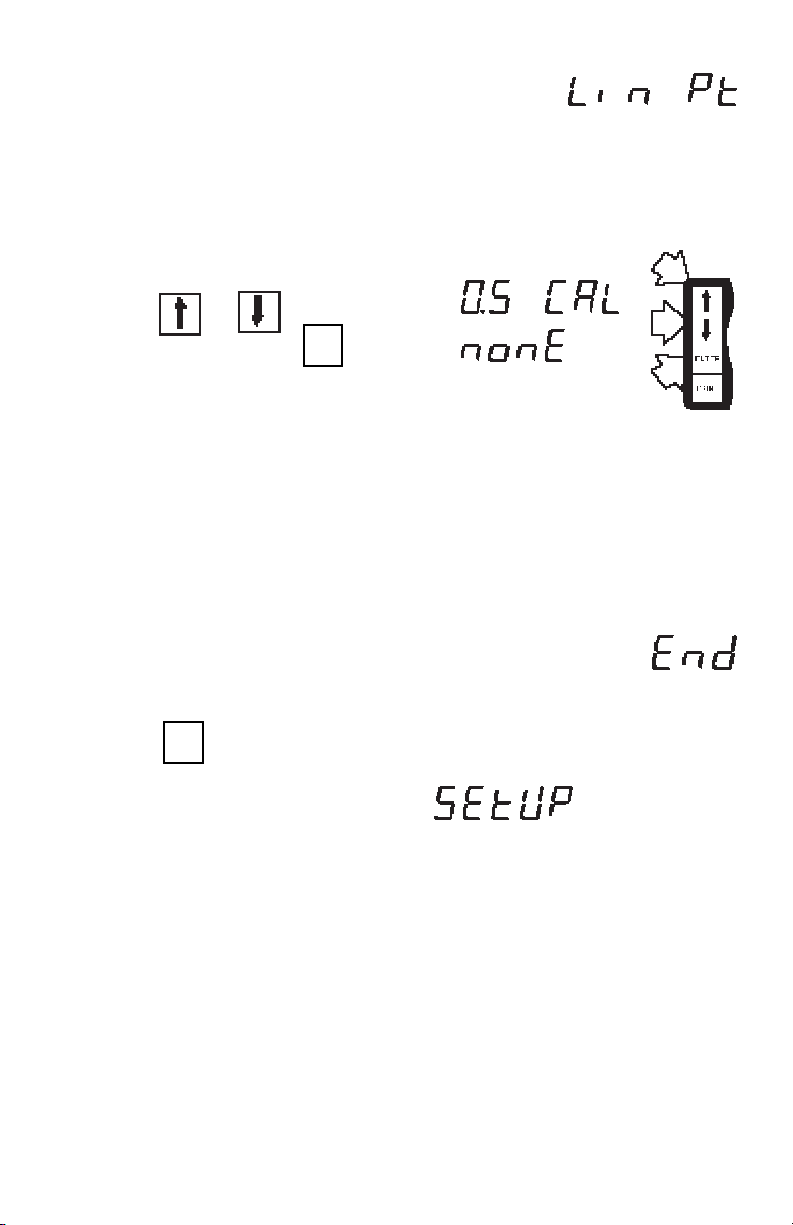
This parameter is used when 3-point linearization is required. The linearization
point can be set to either 1/2 of the
Calibration point, or “NONE” to disable 3point linearization.
To set the linearization point:
Press UPUP or DOWN to display the
ENTERENTER
ENTER
desired setting, press ENTER to re-
ENTERENTER
turn to the setup submenu.
LFT NOTE:LFT NOTE:
LFT NOTE: Parameter does not appear
LFT NOTE:LFT NOTE:
on menu when LFT is set to ON.
RECALIBRATION IS REQUIREDRECALIBRATION IS REQUIRED
RECALIBRATION IS REQUIRED if the
RECALIBRATION IS REQUIREDRECALIBRATION IS REQUIRED
linearization point is changed. Setup submenu changes are not saved if you exit
menus without recalibrating.
EndEnd
End
EndEnd
You must select “End” to exit the Setup
submenu. To exit the setup submenu:
ENTERENTER
ENTER
1. Press ENTEwhen “End” is displayed.
ENTERENTER
2. “SEtUP” will be displayed and the
main menu will be returned.
NOTE: Parameter settings are permanently stored in memory when you use
“End” to exit from the Main menu, or when
the OFF key is pressed. However, Setup
submenu parameter changes require recalibration in order to be saved.
23
 Loading...