Ohaus AP250E, AP310E, AP210E, AP110E, AP250D Service Manual
...
ANALYTICAL
Menu
Menu
Electronic Balances
Models
AP1 10, AP210, AP310, AP250D,
AP1 10E, AP210E, AP310E and
AP250E
Plus
Instruction Manual

NOTE: THIS EQUIPMENT HAS BEEN TESTED AND FOUND TO COMPLY WITH THE LIMITS FOR
Menu
Menu
A CLASS A DIGITAL DEVICE, PURSUANT TO PART 15 OF THE FCC RULES.
THESE LIMITS ARE DESIGNED TO PROVIDE REASONABLE PROTECTION AGAINST HARMFUL
INTERFERENCE WHEN THE EQUIPMENT IS OPERATED IN A COMMERCIAL ENVIRONMENT.
THIS EQUIPMENT GENERATES, USES, AND CAN RADIATE RADIO FREQUENCY ENERGY AND,
IF NOT INSTALLED AND USED IN ACCORDANCE WITH THE INSTRUCTION MANUAL, MAY
CAUSE HARMFUL INTERFERENCE TO RADIO COMMUNICATIONS. OPERATION OF THIS EQUIPMENT IN A RESIDENTIAL AREA IS LIKELY TO CAUSE HARMFUL INTERFERENCE IN WHICH
CASE THE USER WILL BE REQUIRED TO CORRECT THE INTERFERENCE AT HIS OWN EXPENSE.
THIS DIGITAL APPARATUS DOES NOT EXCEED THE CLASS A LIMITS FOR RADIO NOISE
EMISSIONS FROM DIGITAL APPARATUS AS SET OUT IN THE INTERFERENCE-CAUSING EQUIPMENT STANDARD ENTITLED “DIGITAL APPARATUS”, ICES-003 OF THE DEPARTMENT OF
COMMUNICATIONS.
CET APPAREIL NUMERIQUE RESPECTE LES LIMITES DE BRUITS RADIOELECTRIQUES
APPLICABLES AUX APPAREILS NUMERIQUES DE CLASSE A PRESCRITES DANS LA NORME
SUR LE MATERIEL BROUILLEUR: “APPAREILS NUMERIQUES”, NMB-003 EDICTEE PAR LE
MINISTRE DES COMMUNICATIONS.
Unauthorized changes or modifications to this equipment are not permitted.
The exclamation
point within the triangle is a warning
sign alerting you of
important instructions accompanying the product.

TABLE OF CONTENTS
Menu
Menu
INTRODUCTION ............................................................................................................. 1
DESCRIPTION ................................................................................................................ 1
FEATURES ..................................................................................................................... 1
UNPACKING ................................................................................................................... 2
INSTALLATION ............................................................................................................... 3
Environment ............................................................................................................. 3
Weigh Below Hook ................................................................................................... 3
Leveling the Balance ................................................................................................ 4
Installing the Pan Assembly ..................................................................................... 4
In-Service Cover....................................................................................................... 4
RS232 Interface ....................................................................................................... 5
Hardware .............................................................................................................. 5
Output Formats..................................................................................................... 5
RS232 Commands ................................................................................................... 5
Connecting Power .................................................................................................... 8
Spare Fuse............................................................................................................... 8
Self Test ................................................................................................................... 8
OPERATION ................................................................................................................... 9
Switch Functions ...................................................................................................... 9
Symbols Used for Operation of the Balance .......................................................... 10
Navigating the Menus............................................................................................. 11
Operational Guide/Index ........................................................................................ 12
Turning the Balance On ......................................................................................... 13
Display Indications ................................................................................................. 13
Stabilization ............................................................................................................ 14
Auto Range (AP250D and E Only)......................................................................... 14
Weighing ................................................................................................................ 14
Taring ..................................................................................................................... 14
Percent Weighing ................................................................................................... 15
Parts Counting........................................................................................................ 16
Check Weighing ..................................................................................................... 17
Animal Weighing .................................................................................................... 18
Fill Guide ................................................................................................................ 19
Reference Weight ............................................................................................... 19
i

Reference Number ............................................................................................. 20
Menu
Menu
High Point............................................................................................................... 20
Printing Data........................................................................................................... 21
Time and Date .................................................................................................... 21
List ...................................................................................................................... 22
Automatic Calibration Printout ............................................................................ 23
User Calibration Printout .................................................................................... 23
Calibration Test Printout ..................................................................................... 23
Statistics Printout ................................................................................................ 24
Sampling............................................................................................................. 24
Percent Weighing ............................................................................................... 25
Parts Counting .................................................................................................... 25
Check Weighing ................................................................................................. 26
FillGuide
MENUS.......................................................................................................................... 27
MENU LOCK-OUT PROTECTION................................................................................ 28
CALIBRATION MENU ................................................................................................... 29
Calibration Menu Protection ................................................................................... 29
Auto Calibration...................................................................................................... 29
User Calibration...................................................................................................... 30
Cal Test .................................................................................................................. 31
Cal End................................................................................................................... 31
TM
........................................................................................................... 26
USER MENU ................................................................................................................. 32
User Menu Protection............................................................................................. 32
Reset ...................................................................................................................... 32
Averaging Level...................................................................................................... 33
Stability Range ....................................................................................................... 33
Auto-Zero ............................................................................................................... 34
Dual Range Function.............................................................................................. 34
Exiting User Menu .................................................................................................. 34
ii

SETUP MENU ............................................................................................................... 35
Menu
Menu
Setup Menu Protection........................................................................................... 36
Reset ...................................................................................................................... 36
Type Approved/LFT................................................................................................ 37
Unit Selection ......................................................................................................... 37
Functions................................................................................................................ 38
Statistics ................................................................................................................. 39
Net.......................................................................................................................... 40
Custom Unit or Volume Selection .......................................................................... 40
Good Laboratory Practices..................................................................................... 42
Parts Counting Error............................................................................................... 43
Check Weighing Options........................................................................................ 43
Sample Displays..................................................................................................... 44
Animal Weighing Options ....................................................................................... 46
Fill Option ............................................................................................................... 46
Time ....................................................................................................................... 47
Adjust ..................................................................................................................... 48
Date........................................................................................................................ 49
Lockswitch.............................................................................................................. 50
List.......................................................................................................................... 50
Exit Setup Menu ..................................................................................................... 50
PRINT MENU ................................................................................................................ 51
Print Menu Protection............................................................................................. 51
Reset ...................................................................................................................... 52
Communication ...................................................................................................... 52
Baud Rate........................................................................................................... 53
Data Bits ............................................................................................................. 53
Parity................................................................................................................... 54
Stop Bits ............................................................................................................. 54
Good Laboratory Practices (GLP) .......................................................................... 54
Print Options........................................................................................................... 55
Auto Print Feature .............................................................................................. 55
Initialize............................................................................................................... 56
iii

Print Stable Data Only ........................................................................................ 57
Menu
Menu
Print Numeric Data Only ..................................................................................... 57
Time.................................................................................................................... 58
Date .................................................................................................................... 58
Reference ........................................................................................................... 58
Difference ........................................................................................................... 59
List ...................................................................................................................... 59
CARE AND MAINTENANCE......................................................................................... 60
TROUBLESHOOTING .................................................................................................. 60
Error Codes List ..................................................................................................... 61
SERVICE INFORMATION............................................................................................. 63
REPLACEMENT PARTS............................................................................................... 63
ACCESSORIES............................................................................................................. 63
SPECIFICATIONS......................................................................................................... 64
DECLARATION OF CONFORMITY.............................................................................. 65
LIMITED WARRANTY................................................................................................... 69
iv

INTRODUCTION
Menu
Menu
INTRODUCTION
This manual covers Installation, Operation and Troubleshooting for the Ohaus ANALYTICAL Plus Series of Electronic balances, Models AP110, AP210, AP310, AP250D, AP110E,
AP210E, AP310E and AP250E. Suffixes after the basic model number are: D = Moveable
FineRange
Min, Class, etc.) on a serial number plate located on the side of the balance. To ensure proper
operation of the balance, please read this manual completely.
TM
and E= Type Approved with CE conformance and bear official markings (Max,
DESCRIPTION
The Ohaus ANALYTICAL Plus Series balances are high precision weighing instruments,
designed to be versatile, accurate, easy to operate and will provide years of service with
virtually no maintenance. The Analytical Plus series is constructed using a die-cast
aluminum base finished with a durable corrosion resistant epoxy powder paint. The weighing
area is protected from air currents by a draft shield. It contains solid-state precision
electronics PC boards, and a seven and a half, 0.5 inch digit, Vacuum Fluorescent display.
Each balance operates through a series of menus which enhances operation. A built in
lockswitch prevents preset settings from being changed.
FEATURES
Analytical Plus balances contain four main display menus which enable you to calibrate and
configure the balance for specific operating requirements. MENU When
pressed and released with MENU displayed, allows access to the calibration, user, setup
and print menus.
ON
TARE
switch is
CALIBRATION Menu - Allows the balance to be calibrated by using either Auto, User or
Test calibration methods. The test function is used to verify the last calibration.
USER Menu - Allows the balance to be set for environmental conditions. Reset,
averaging level, stability range and auto-zero functions can be set.
SETUP Menu - Allows the balance to be customized for specific weighing functions.
PRINT Menu - Allows the selection of parameters under which the balance will interface
to a computer or a printer.
Each of these menus contain selectable parameters which can be entered via the front panel
switches. Storing of the parameters is accomplished by selecting at the completion of all
selections in a particular menu. For a detailed description of each feature, refer to the
individual menus in this manual.
1
INSTALLATION
Menu
Menu
UNPACKING
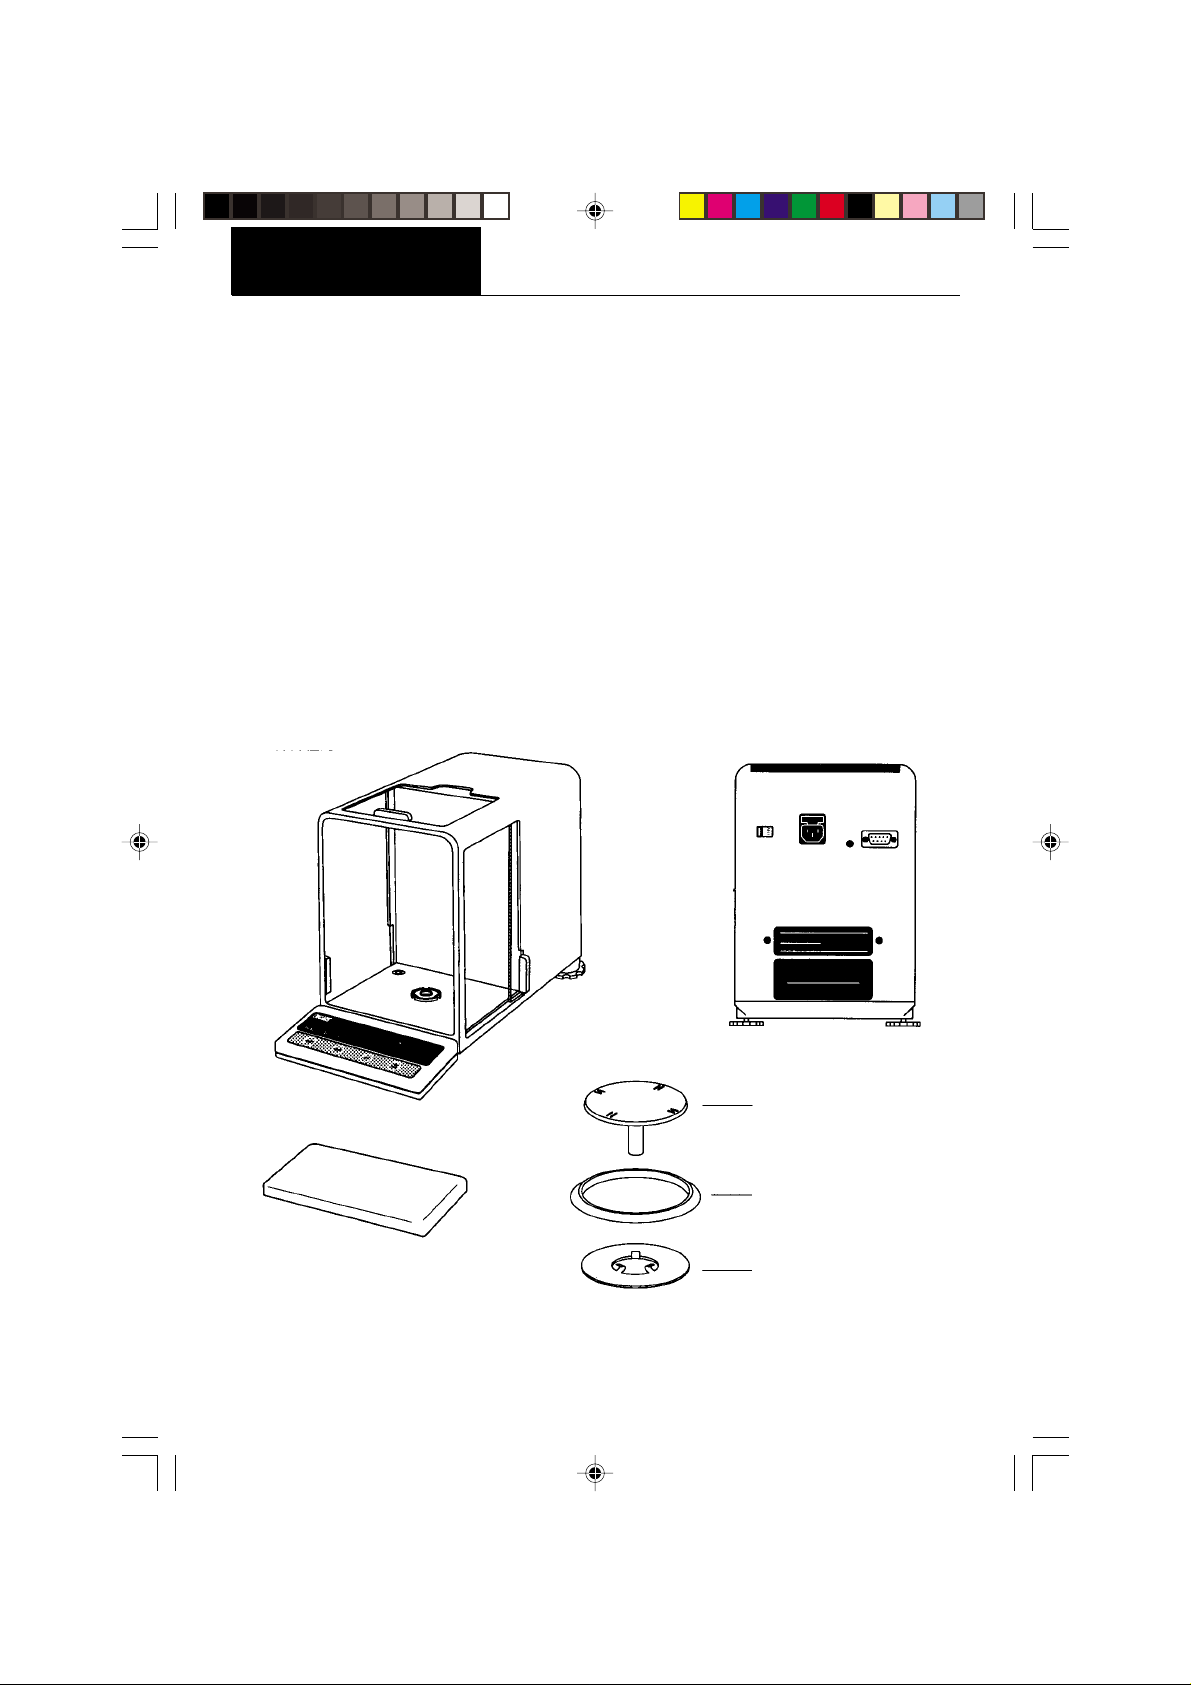
Your ANALYTICAL Plus balance was shipped with the following items:
• Pan assembly (including pan, shield, ring and assembly instructions)
• In-service cover
• AC power cord
• Spare fuse
• Instruction manual
• Warranty card
Remove the contents from the carton and carefully remove all packing material. It is
recommended to save the carton and packing material for storing and/or transporting the
balance. Verify that all of the components have been included and there has been no
damage during shipment.
ANALYTICAL
BALANCE
In-Service Cover
Plus
REAR VIEW
Pan
Ring
Shield
2
INSTALLATION
Menu
Menu
INSTALLATION
Environment
The balance should always be used in an environment which is free from excessive air
currents, corrosives, vibration, and temperature or humidity extremes. These factors will
affect displayed weight readings.
DO NOT install the balance:
• next to open windows or doors causing drafts or rapid temperature changes.
• near air conditioning or heat vents.
• near vibrating, rotating or reciprocating equipment.
• near magnetic fields or devices that may generate magnetic fields (i.e. motors, alterna-
tors, etc.)
• on an unlevel work surface.
Install the balance in the location where it will be used before proceeding.
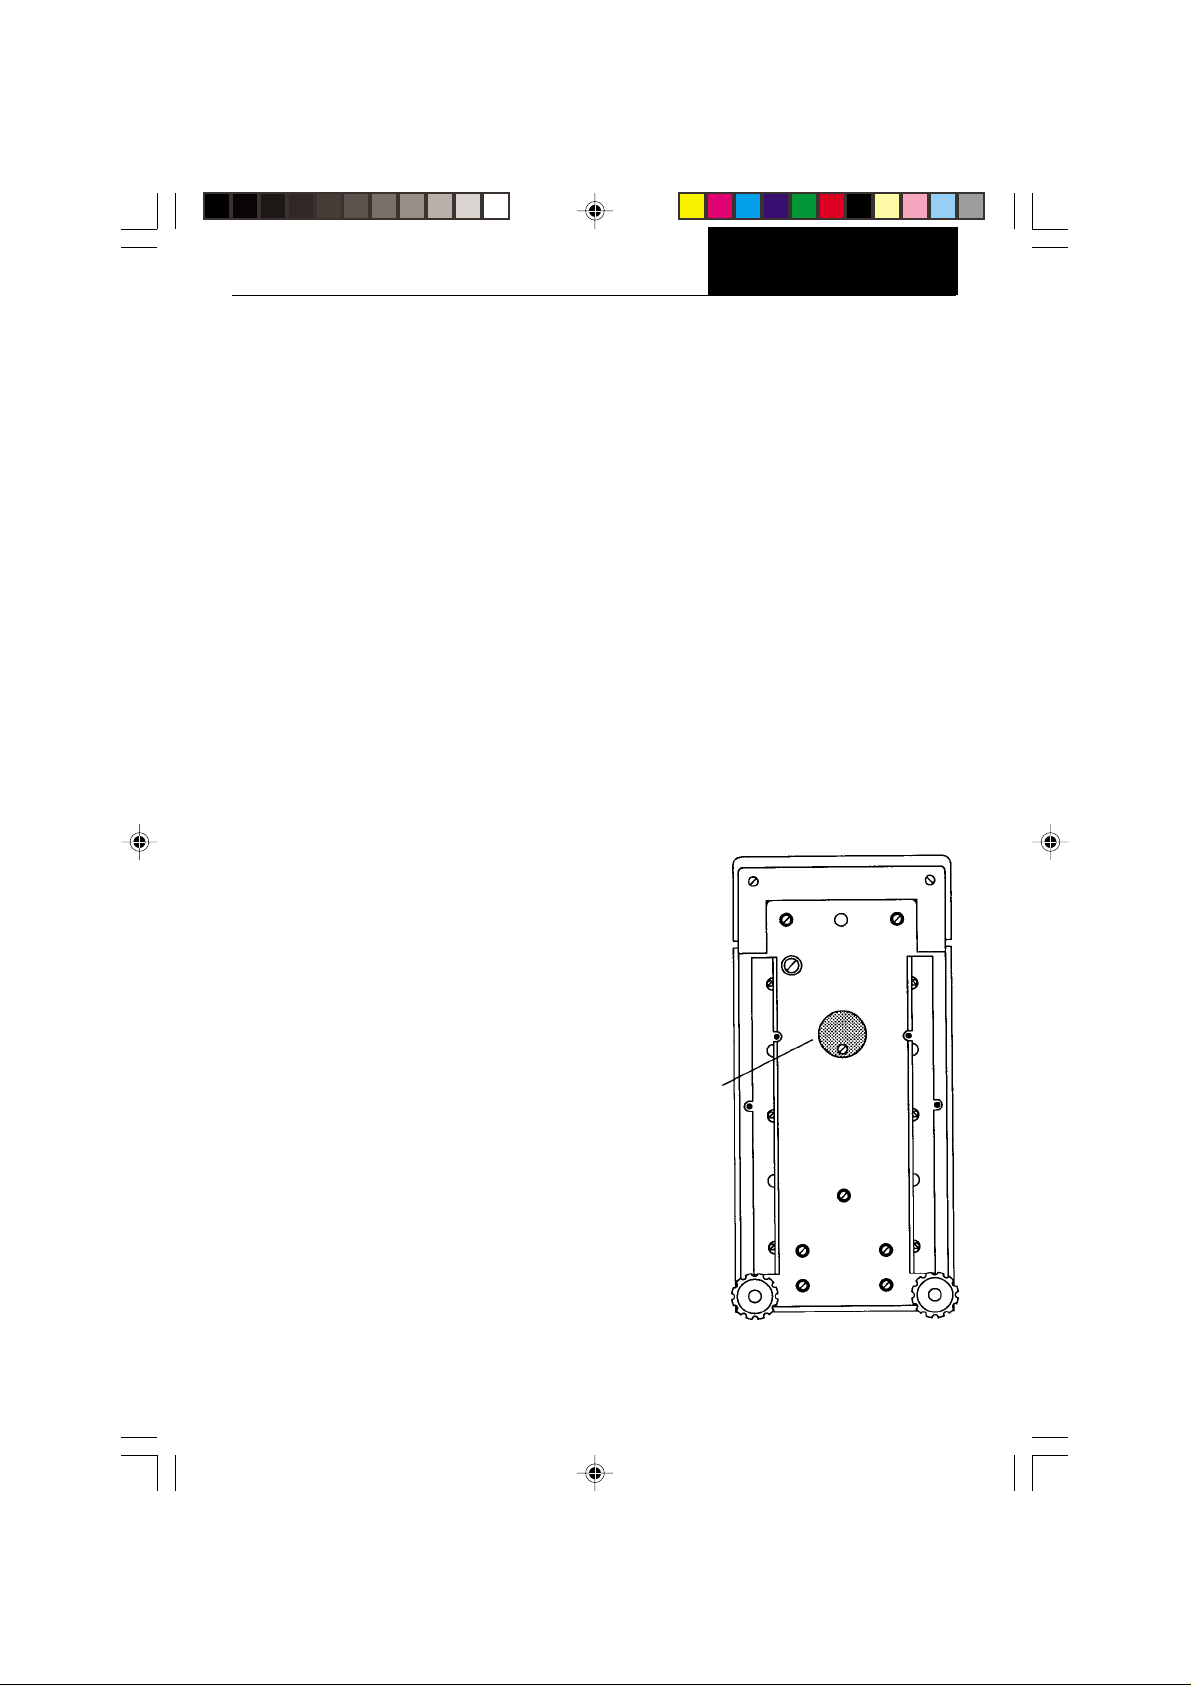
Weigh Below Hook
A weigh below hook is provided inside the
bottom cover under the protective plate
shown in the illustration.
To access the weigh below hook, carefully turn the balance on it's side, loosen
the screw which secures the cover plate,
rotate the plate to clear the hole, then
secure the plate in that position. Return
the balance to an upright position. Mount
the balance on a stable, level elevated
platform and install a hook.
Weigh Below
Hook Cover
Plate
3
INSTALLATION
Menu
Menu
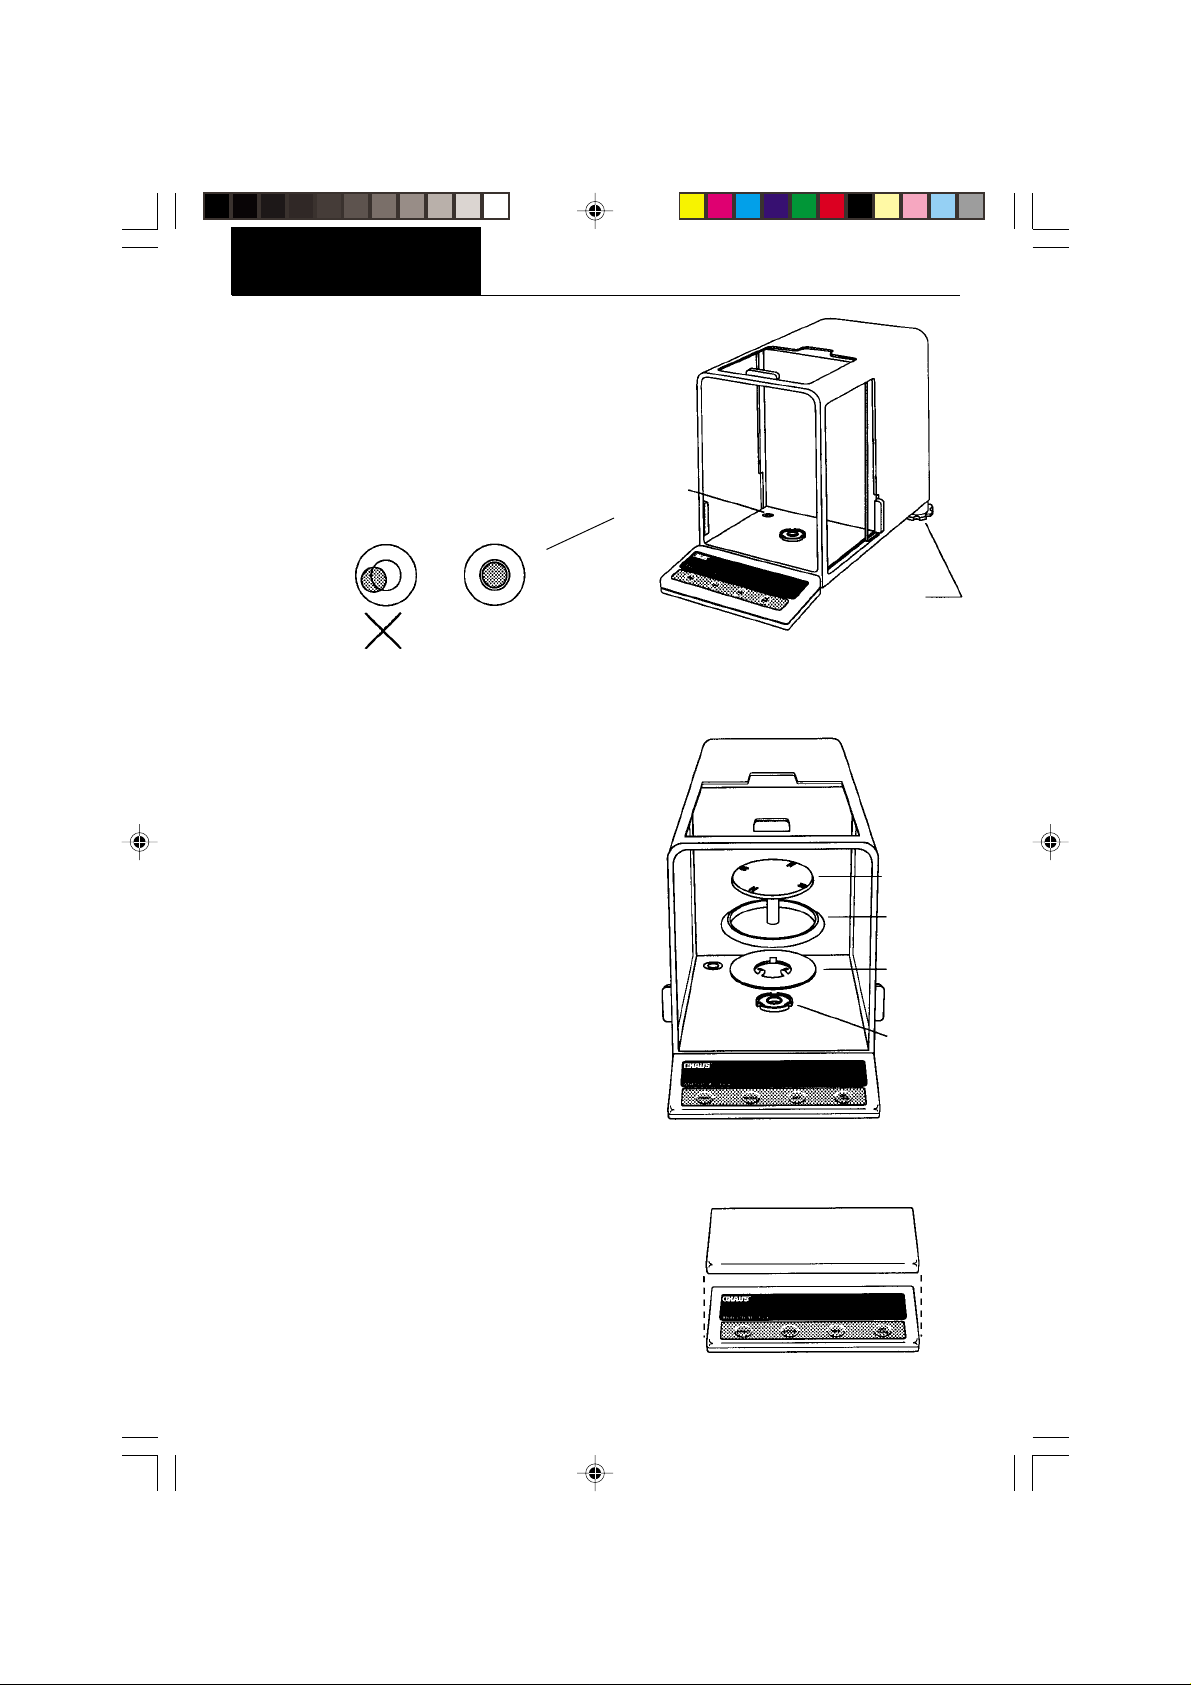
Leveling the Balance
The balance is equipped with a level indicator on
the floor of the weighing chamber and two
adjustable leveling feet at the rear. Adjust the
leveling feet until the bubble appears in the
center circle of the level indicator.
Installing the Pan Assembly
1. Place the shield onto the keyed bushing
and press it down into place. The bent tabs
must be facing upward and the shield should
be flat against the chamber floor.
Level
Indicator
Leveling
Feet
2. Place the ring over the shield. The lip on the
bottom of the ring should fit against the
shield to keep it from moving.
3. Insert the pan in the load receiver hole,
matching the key on the pan shaft with the
slot in the hole. Gently press the pan down
into place.
In-Service Cover
Place the cover snugly over the display unit.
Pan
Ring
Shield
Keyed
Bushing
4
INSTALLATION
Menu
Menu
RS232 INTERFACE
ANALYTICAL Plus balances are equipped with a bi-directional RS232 compatible interface
for communication with printers and computers. When the balance is connected directly to
a printer, displayed data can be output at any time by simply pressing PRINT, or by using
the Auto Print feature.
Connecting the balance to a computer enables you to operate the balance from the
computer, as well as receive data such as displayed weight, weighing mode, stability status,
etc.
The following sections describe the hardware and software provided with the balance.
Hardware
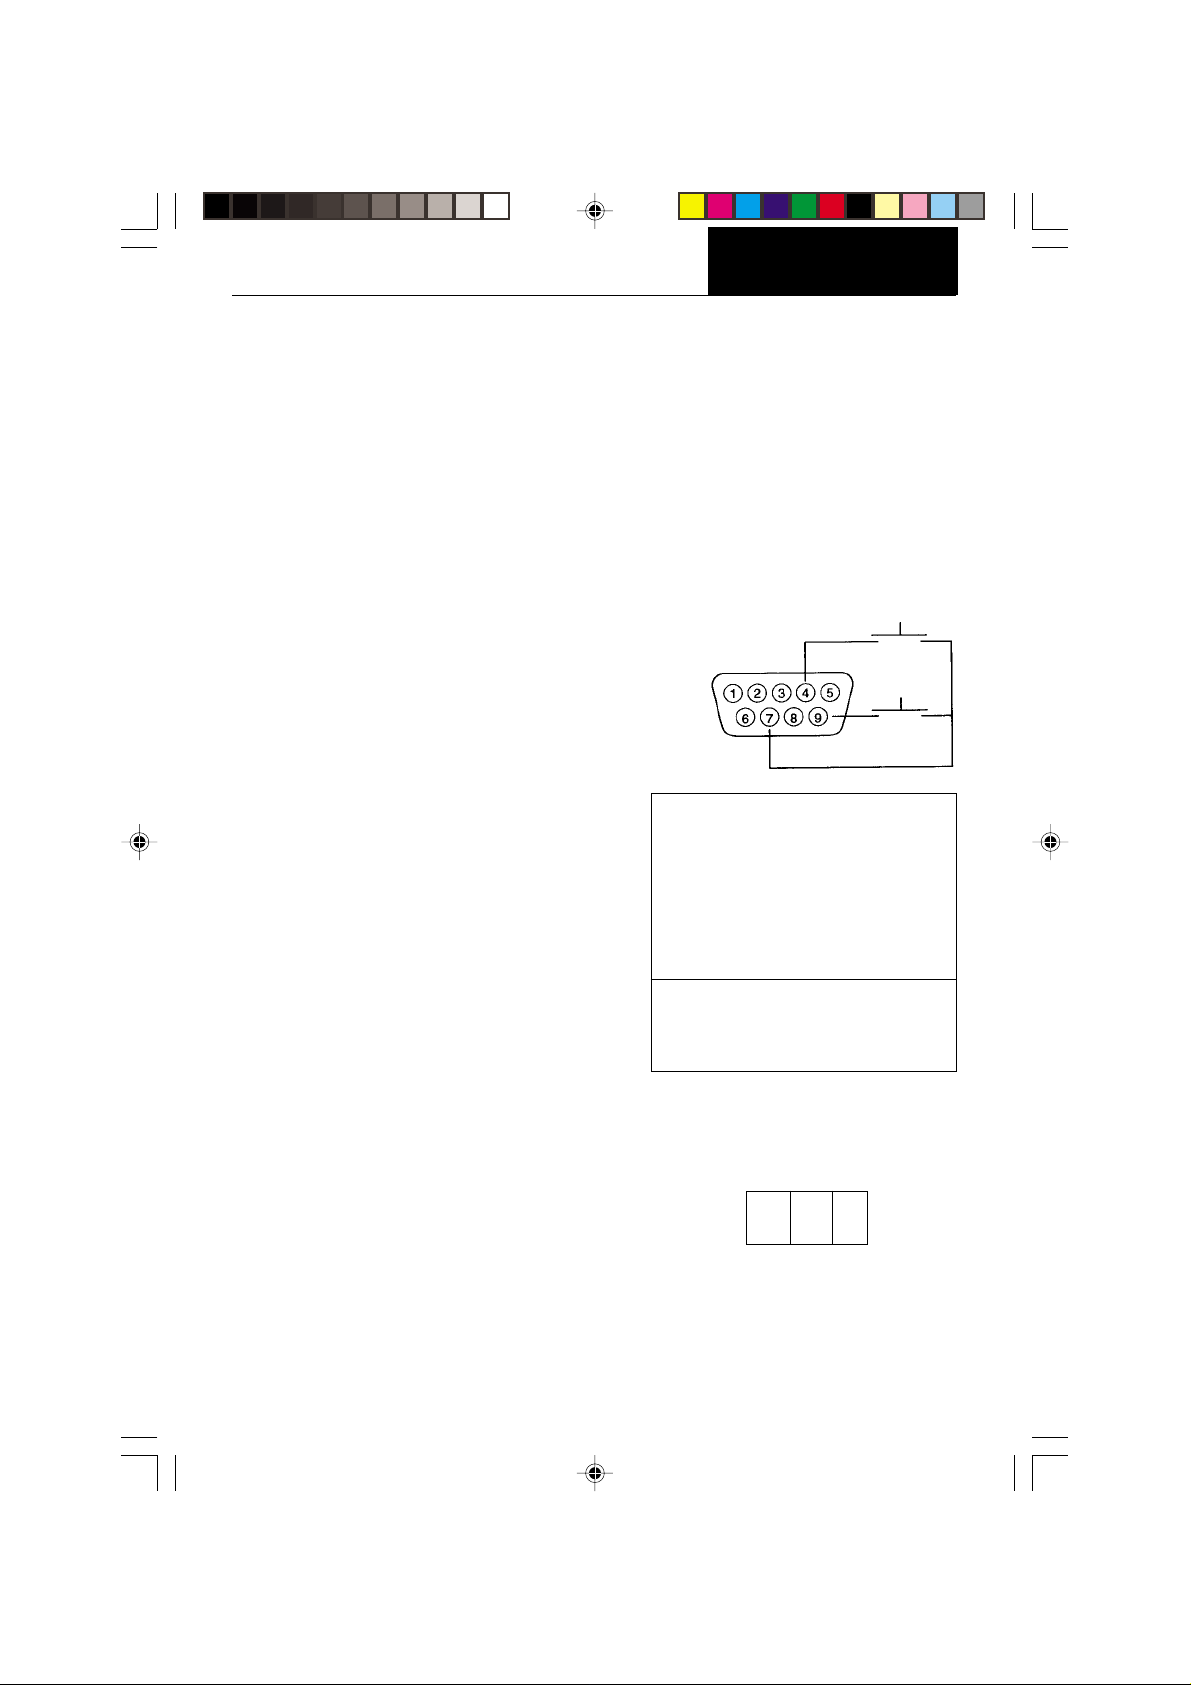
On the rear of the balance, a 9-pin subminiature “D” connector is provided for interfacing to
other devices. The pinout and pin connections
are shown in the adjacent illustration.
The balance will not output any data unless pin
5 (CTS) is held in an ON state (+3 to +15 V dc).
Interfaces not utilizing the CTS handshake
may tie pin 5 to pin 6 to defeat it.
Output Formats
Data output can be initiated in one of three
ways: 1) By pressing PRINT; 2) Using the Auto
Print feature; 3) Sending a print command
(“P”) from a computer.
The output format is illustrated in the RS232
command table which follows.
RS232 Commands
All communication is accomplished using standard ASCII format. Only the characters shown
in the following table are acknowledged by the
balance. Any other commands, control characters or spaces are ignored. Commands sent
to the balance must be terminated with a
carriage return (CR) or carriage return-line line
feed (CRLF). For example, a tare command
should appear as shown in the adjacent diagram. Data output by the balance is always
terminated with a carriage return - line feed
(CRLF).
TARE *
PRINT *
1 5 V dc (5 mA max.)
2 Data Out (TXD)
3 Data In (RXD)
4* Tare (External signal)
5 Clear To Send (CTS)
6 Data Terminal Ready (DTR)
7 Ground
8 Request To Send (RTS)
9* Print (External signal)
* External PRINT and/or TARE
switches may be installed as
shown in the diagram. Momentary
contact switches must be used.
TARE COMMAND
Field: T CR LF
Length: 1 1 1
5
INSTALLATION
Menu
Menu
Command
Character Description
RS232 COMMAND TABLE
? Print current unit.
Grams, Dwt, Carat, Oz Av, Oz t, Grain, Tael 1,
Tael 2, Tael 3, Momme, Custom Unit
xI Set averaging level to “x”, where x = 0, 1, 2
xM Places balance in mode “x”, where x = 1 to 11
(see table).
If unit is not already enabled,
command will be ignored.
P Print display data
When “numeric only” displaydata is
selected for output in the RS232 menu,
the Mode field is not output.
hhmmss TIME Set current time to “hh: mm: ss”, hh is between 0 - 23.
TIME Print current time.
mmddyy DATE Set current date “mmddyy”.
DATE Print current date.
% Print current % ref.
# Print current ref., any function.
AC Abort calibration /Test.
C Start an auto calibration.
E Go to initial state of current function.
F Print current function.
M Same as mode button.
xD Set 1 second print delay (set x = 0 for OFF, or x = 1 for ON).
ID Print current ID string.
xxxxID Enter ID string (xxxx limit to 8 characters).
Field: Mode Stab CR LF
Length: 5 1 1 1
0 = minimum level
1=
2 = maximum level
1 = grams
2 = pennyweight
3 = carats
4 = avoidupois ounces
5 = troy ounces
6 = grains
7 = taels
8 = mommes
11 = custom unit
Field: Weight Mode Stab CR LF
Length: 10 1 5 1 1 1
Displayed weight sent right justified
w/lead zero blanking.
Nine characters include:
decimal point (1)
weight (7 max))
polarity (1): blank if positive
6
blank if stable
“ ? ” if unstable
Same as ?
command
“ - ” if negative
Command
Menu
Menu
Character Description
xS Set stable data only printing (set x = 0 for OFF, or x = 1 for ON.
T Same effect as pressing on tare button.
V Print EPROM version
Field: Model # 1 EPROM # CR LF
Length: 6 16 1 1
INSTALLATION
Balance Model
x# Set current ref., any function, CW takes two reference separated by a space.
x% Doanloads reference weight “x” for percent mode. “x” must be in grams. Command is
ignored if percent mode is disabled. If percent mode is enabled, balance will automatically
switch to percent mode display.
xF Set current function to “x”. x = 0 to 6. Setup menu must be unlocked.
xZ Set Auto Zero to “x”. x = 0 for OFF, x = 1 for ON
xSL Set stability level. User menu must be unlocked. x = 0 to 3
Z Zero request (Gross tare) if Net/Gross enabled.
nnnA Set Auto Print feature to “nnn” (see table).
nnn = 0 Turns feature OFF
nnn = S Output on stability
nnn = C Output is continuous
nnn = 1-256 Sets Auto Print interval
Esc L Prints listing of Setup and Print menu settings.
Esc R Resets Setup and Print menus to factory defaults.
CAUTION: This will reset RS232 configuration.
Esc S Save current settings.
“98101-xx Sr#x.xx”
0 = None
1 = Percent
2 = Parts Counting
3 = Check Weighing
4 = Animal Weighing
5 = Fill Guide
6 = High Point
7
INSTALLATION
Menu
Menu
Connecting Power
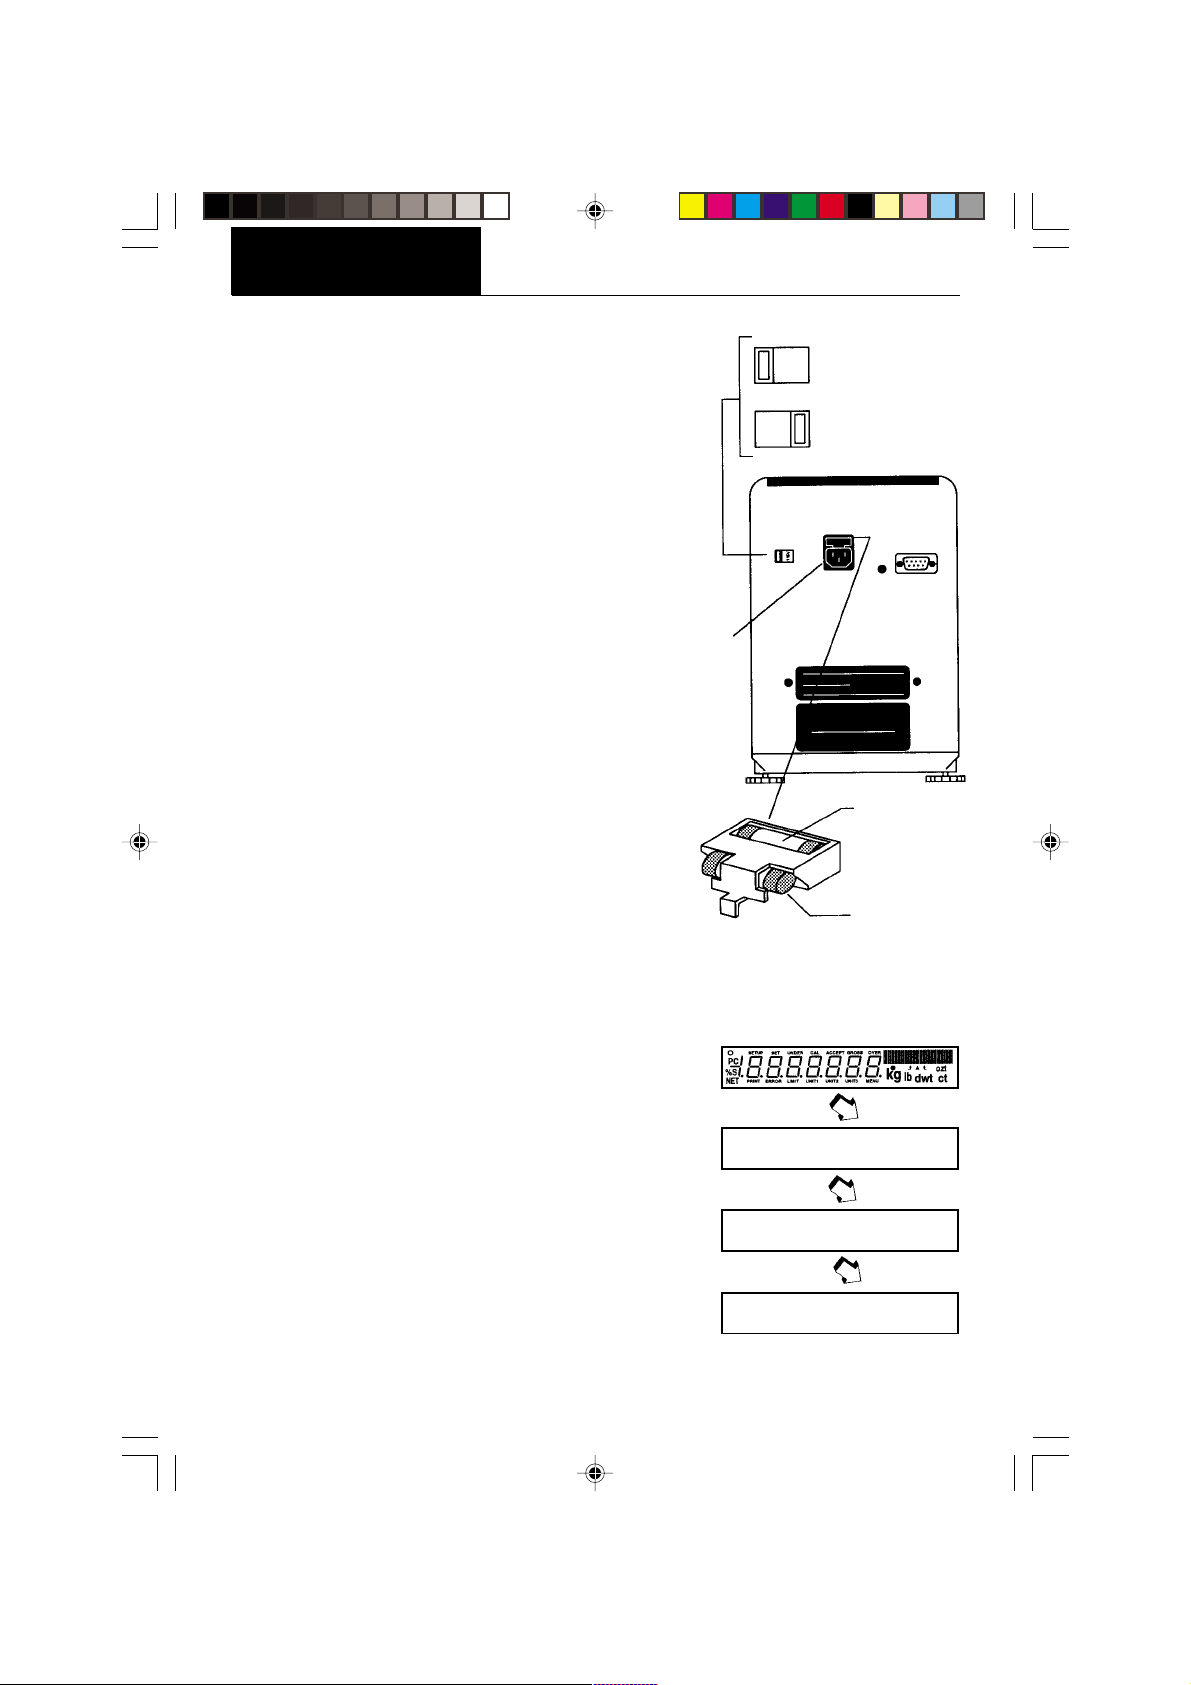
1. Before connecting the power cord, check
that the line voltage switch located at the
rear of the balance is set correctly for your
location. If not, use a small screwdriver to
set the switch correctly.
2. Make sure the doors to the weighing chamber are closed.
2. Connect the power cord receptacle to the
plug on the rear of the balance.
3. Plug the power cord only into a convenient
grounded AC outlet. The balance signals
one long beep to indicate power has been
applied.
Spare Fuse
A spare fuse is provided in the fuse holder as
shown in the diagram. All models use a
T 160 mA/250 V fuse.
Power
Connection
Fuse Holder
115V
230V
Line
Voltage
Switch
For 100-120 V∼
For 220 240 V∼
Active Fuse
Spare Fuse
Self Test
When power is applied to the balance, it begins
a self test cycle. During this time, the display
cycles as shown.
NOTE: Sr shown in the display is the software
revision and may be different in your balance.
After the self test is completed, the display turns
off. Allow the balance to stabilize for about 2
hours before using it.
s R 3.1
c h e c · ·
8
OPERATION
Menu
Menu
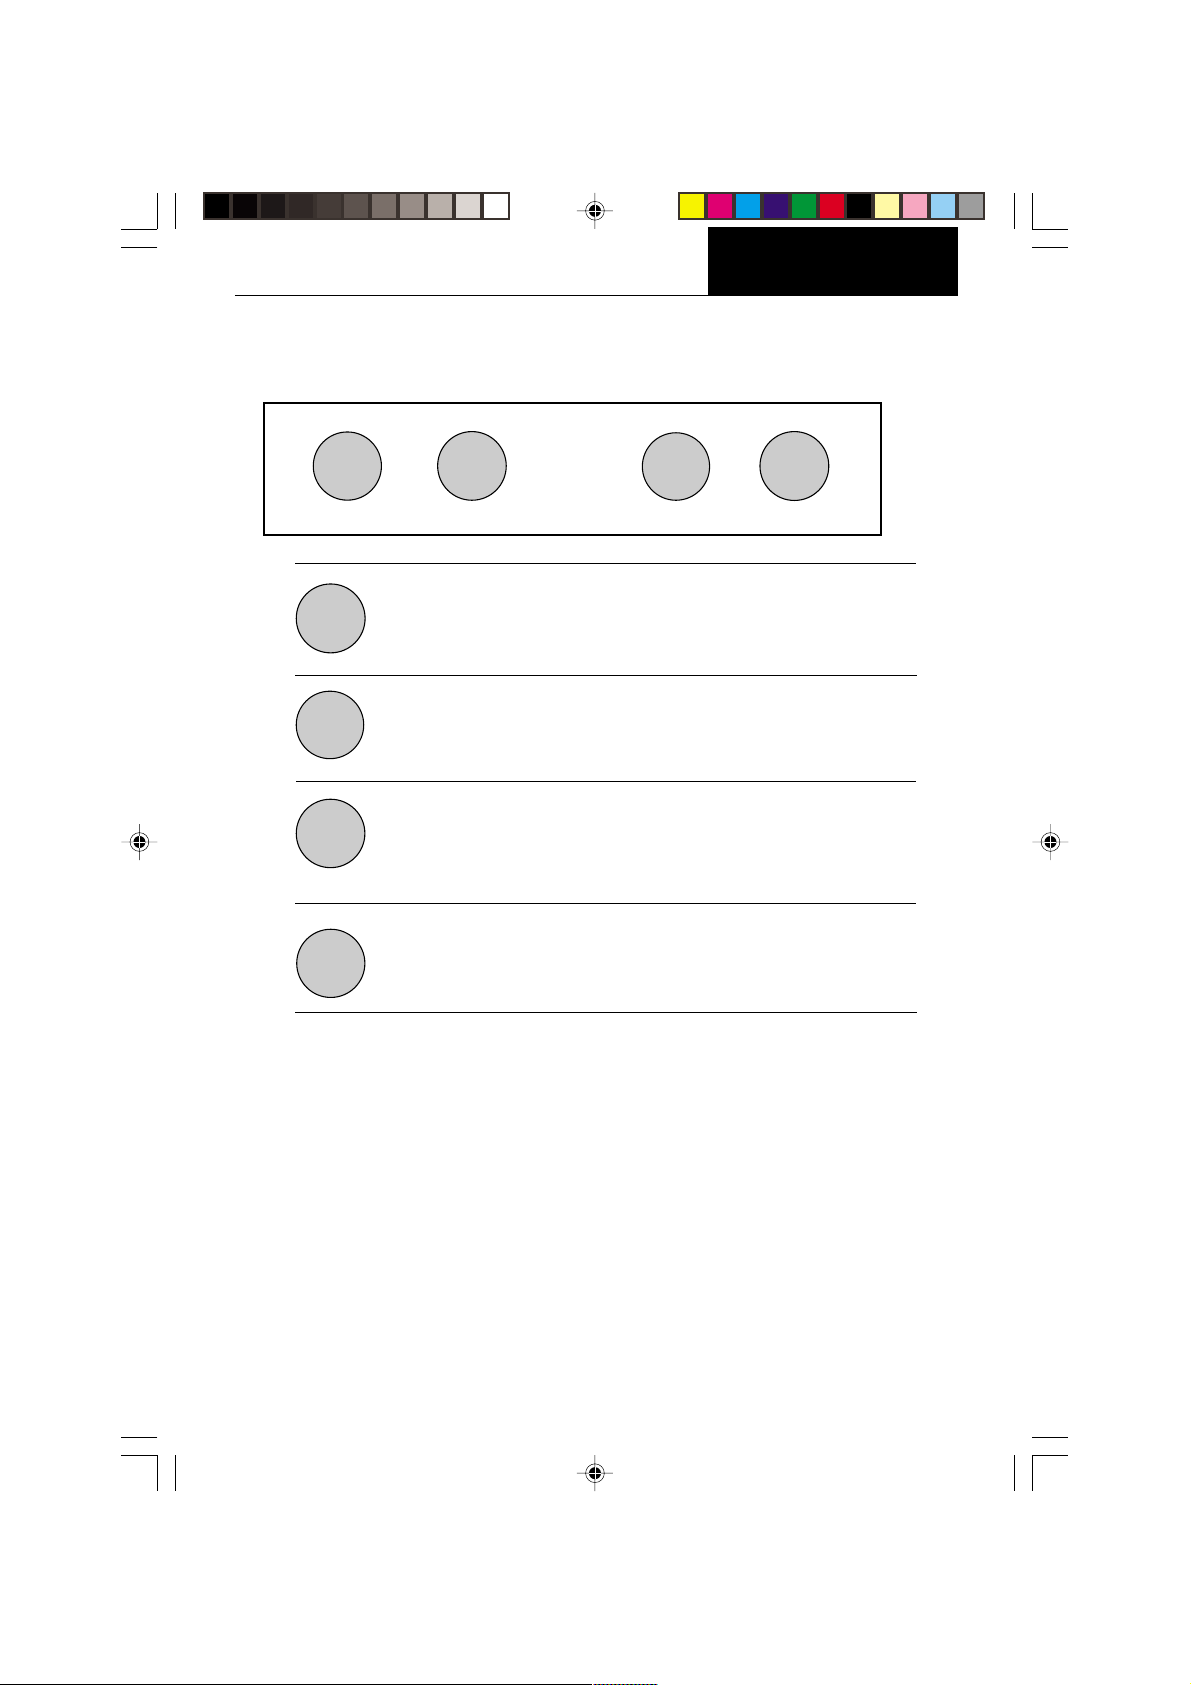
Switch Functions
OPERATION
PRINT
ON
TARE
OFF
MODE
PRINT
MODE
Press and Release:
Turns on the balance if it is off, zeros the balance. In the menu
system, this button is used to accept a choice or enter a submenu.
Press and Release:
Turns the balance off.
Press and Release:
Selects weighing units functions or options. In menus, changes to
next step or value.
Press and Release:
Sends weight data, statistical data, GLP data to computer/printer. In
menus, allows returning to a previous menu step.
OFF
ON
TARE
Before using the balance, carefully review the Symbols Used for Operation of the Balance
shown on page 10, Navigating the Menus on page 11and Operational Guide/Index on page
12.
Please read the entire manual as there are many features which can be enabled. The
balance is shipped from the factory ready to operate with default settings as shown in the
menus.
The balance is a high precision instrument and will give you years of service if kept clean
and handled carefully. If you have any problems operating the instrument or require
additional information, please feel free to contact our Customer Service Department at
(800) 526-0659.
9
OPERATION
Menu
Menu
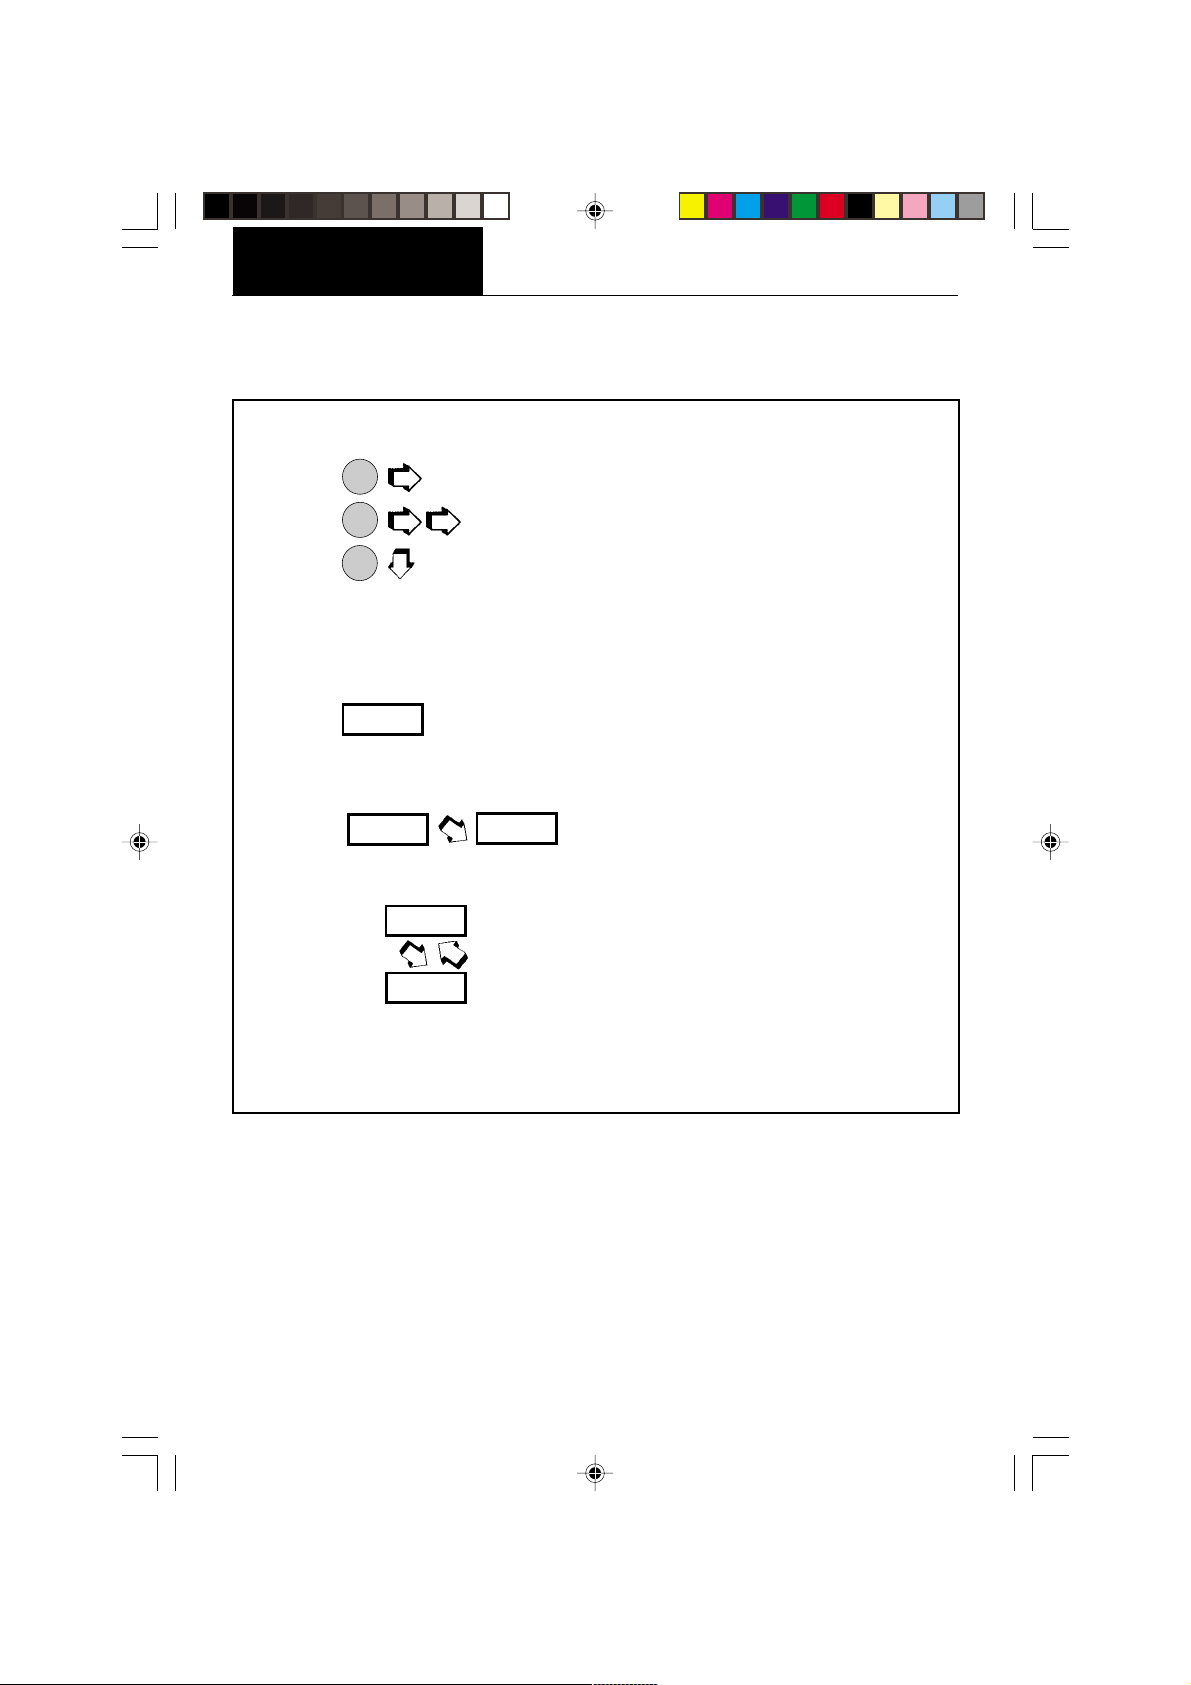
Symbols Used for Operation of the Balance
This instruction manual uses certain symbols to explain various operational procedures and
actions that occur. Examples of the symbols used are shown as follows:
Pushbutton Switches:
ON
= NORMAL PRESS AND RELEASE
TARE
ON
= MULTIPLE PRESS
TARE
ON
Display Area:
= PRESS AND HOLD FOR DESIRED DISPLAY
TARE
DISPLAY AREA - AS A RESULT OF USER ACTION
DISPLAY AREA - AUTO CHANGE OCCURS
DISPLAY AREA -SWITCHES BACK AND FORTH
10
OPERATION
Menu
Menu
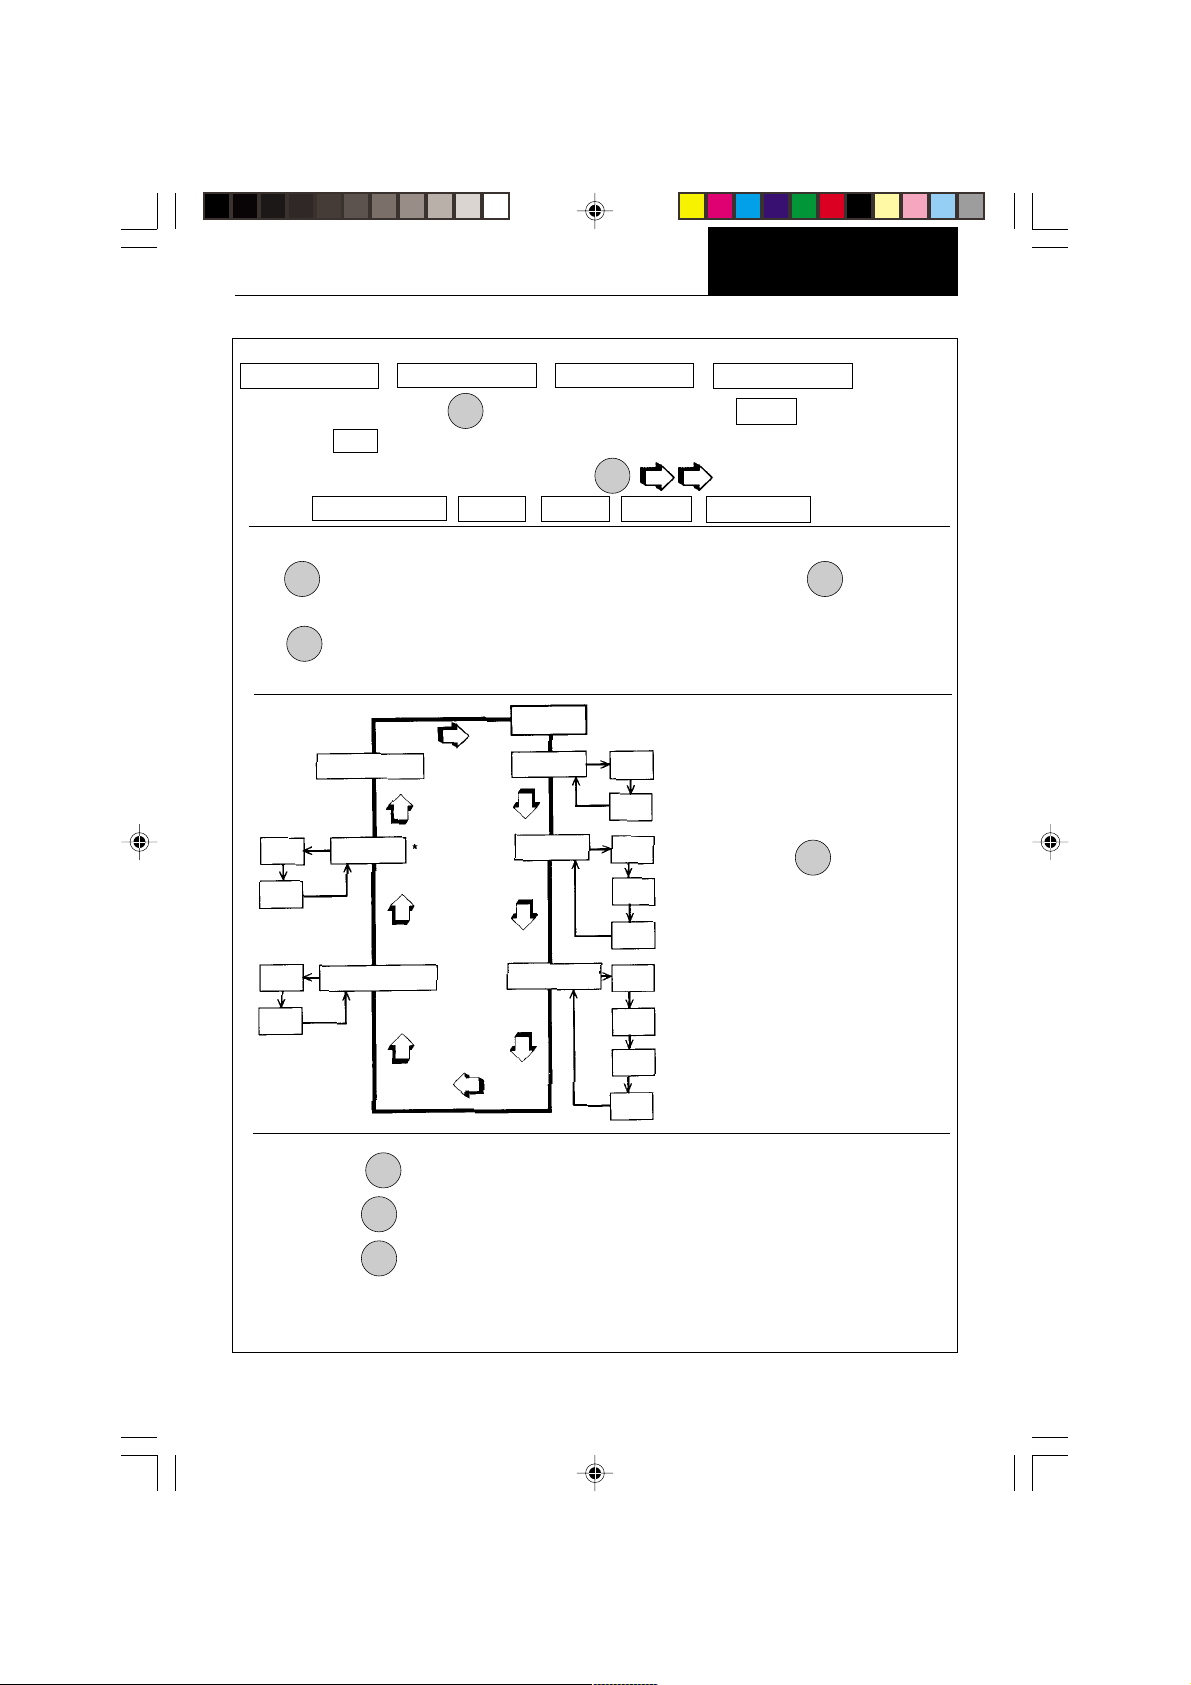
Navigating the Menus
There are four menus used in the balance:
CALIBRATION USER SETUP PRINT
To enter the menus, the
released, CAL is displayed which is the Calibration menu.
When in the menus, repeated pressing of
menus. CALIBRATION USER SETUP PRINT END
Each menu contains selections (submenus) which can be set for specific operations.
MODE
The
button is used to advance though the submenu selections. The
or accepts the submenu selection and returns to the beginning of the submenu selection.
PRINT
The
button is used to backup in the submenu if a change is desired.
The following sample illustrates the USER menu and submenu items
ON
button is pressed and held until MENU is displayed. When
TARE
MODE
advances through the
MENU
ON
button enters
TARE
END USER
ON
DUAL
OFF
AUTO ZERO
ON
OFF
RULES: Use
Use
Use
After selections are made, always exit menus through END
store settings.
USER
RESET
YES
NO
AL
STABILTY
MODE
button to advance.
ON
button to enter or accept submenu.
TARE
PRINT
button to backup.
NOTE:
Each menu is constructed
in the form of a loop.
Advancing from one
submenu item to the next
0
1
by using the
will eventually return to
the beginning of the menu
2
* Only on AP250D Models.
0
1
2
3
MODE
button
to
MENU
11

OPERATION
Menu
Menu
Operational Guide/Index
The Operational Guide/Index lists the pages for all balance operations and options. After
settings are made, exit menus to save settings.
FUNCTION TO OPERATE SETUP
(See pages) (See pages)
1. Turning the Balance ON 13 ----
2. Weighing (grams) 14 ----
3. Taring 14 ----
4. Percent Weighing 15 38
5. Parts Counting 16 38, 43
6. Check weighing 17 38, 43
7. Animal Weighing 18 38, 46
8. Fill Guide 19 38, 46
9. High Point 20 38
10. Printing Data 21 to 26 50, 51, 55 to 59
11. List 22 50, 59
12. Menu Lockout 28 ----
13. Calibration 29 to 31 ----
14. Net/Gross Weighing ---- 40
15. Custom Units ---- 40
16. GLP ---- 42, 54
17. Time ---- 47, 48
18. Date ---- 49
19. Lockswitch ---- 50
20. Legal for Trade ---- 35, 37
21. Changing Units ---- 37
22. Statistics ---- 39
23. Averaging Level ---- 32, 33
24. Stability ---- 32, 33
25. Auto Zero ---- 32, 34
26. Dual Range (AP250D) ---- 32, 34
27. Reset User ---- 32
28. Reset Setup ---- 36
29. Reset Print ---- 52
30. Communications ---- 52 to 54
12
OPERATION
Menu
Menu
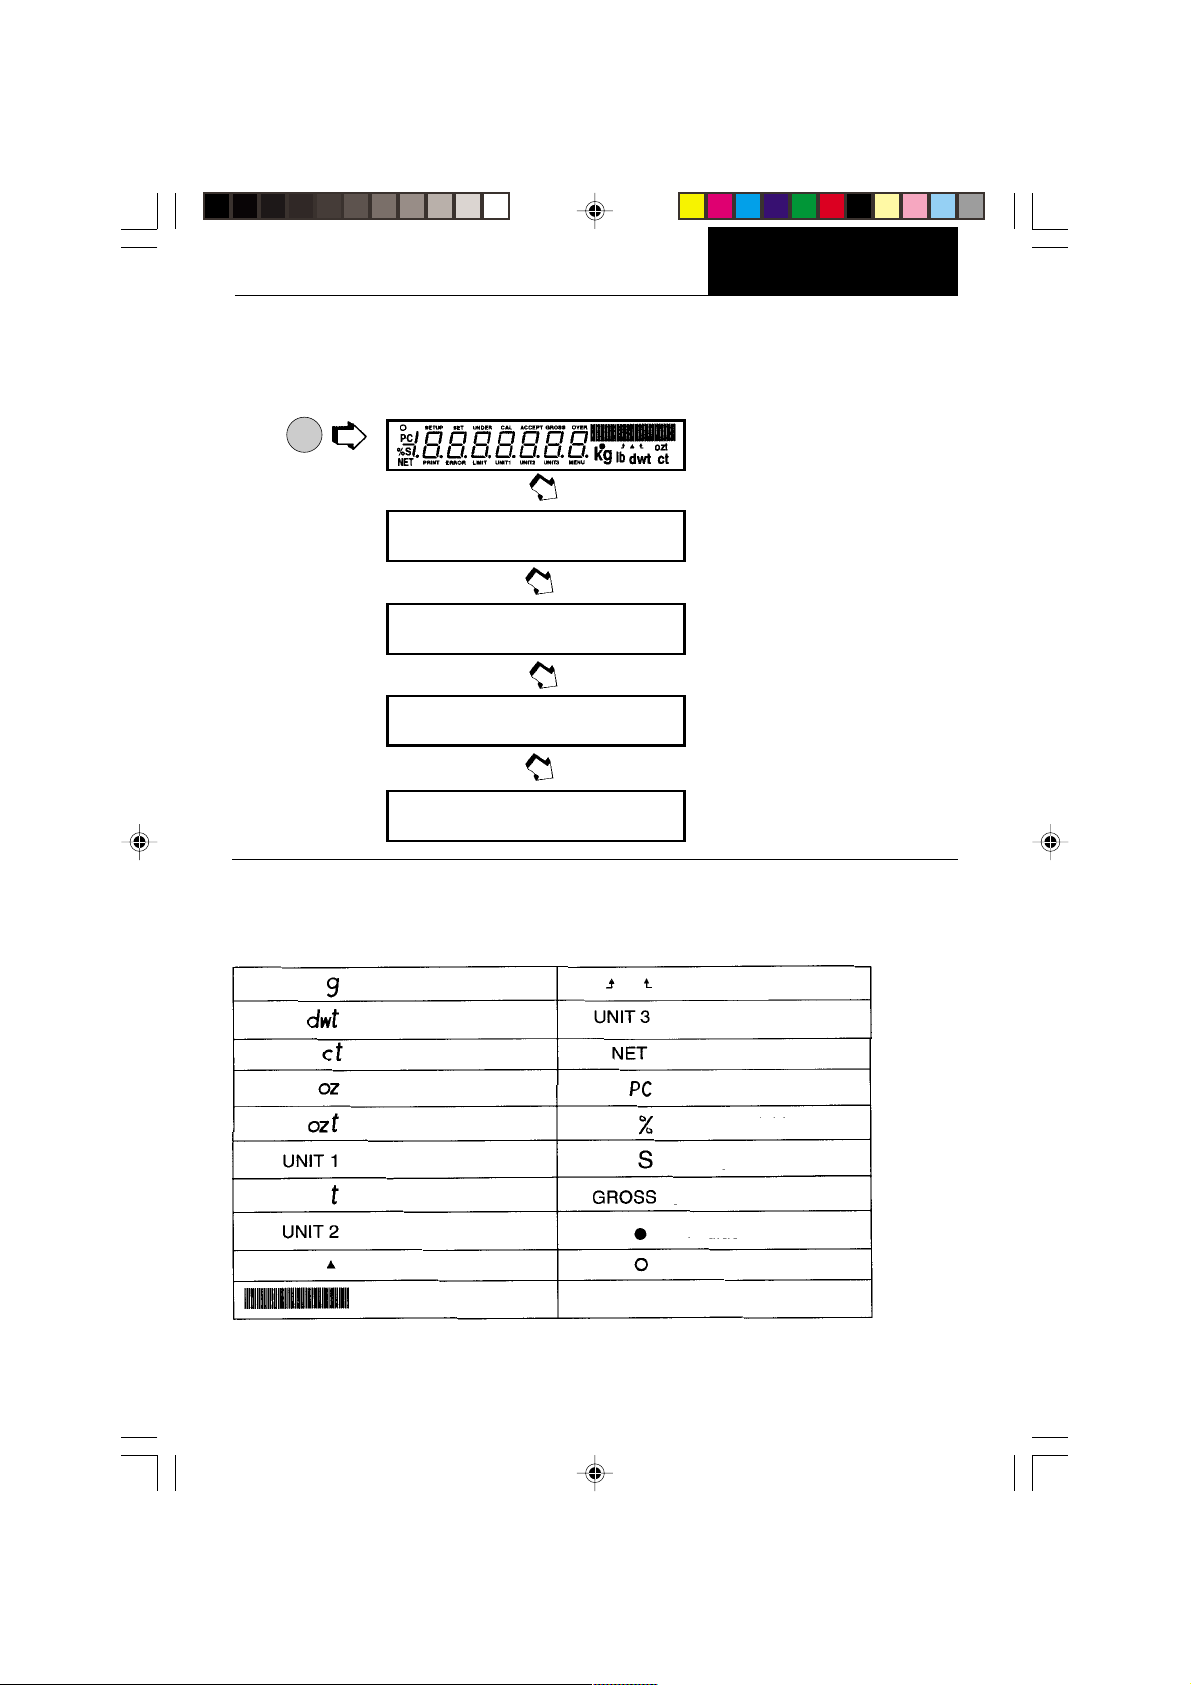
Turning the Balance ON
1. After the Self Test in the Installation Section is completed (power applied to the
balance), make sure the pan on the balance is clear, then, close the chamber doors.
ON
TARE
ap25FD
sR3.1
2.
˛
0.00000
s
g
g
Display Indications
The following table describes each of the display indicators.
DISPLAY INDICATORS
grams check weighing limits
pennyweight custom unit/volume
carats net indicator
ounces parts counting
troy ounces percent weighing
grains stability indicator
taels gross (total) indicator
mommes fill guide
user calibration indicator center of zero
I
capacity guide
13
OPERATION
Menu
Menu
Stabilization
Before initally using the balance, allow time for it to adjust to its new environment. The
balance only requires to be plugged in to warm up. Recommended warm up period is twenty
(20) minutes. The balance is powered whenever it is plugged into a power source.
Auto Range (AP250D and E Only)
Modes AP250D and E offer both a fine range (0.01 mg readability from 0 to 52 g) and a coarse
range (0.1 mg over 52 g). When first turned on, the balance is in the fine range. It remains
in this range until the weight on the pan exceeds 52 g. When weight on the pan is greater
than 52 g, the balance switches to the coarse range.
If weight on the pan falls below 52 g, it automatically switches back to the fine range.
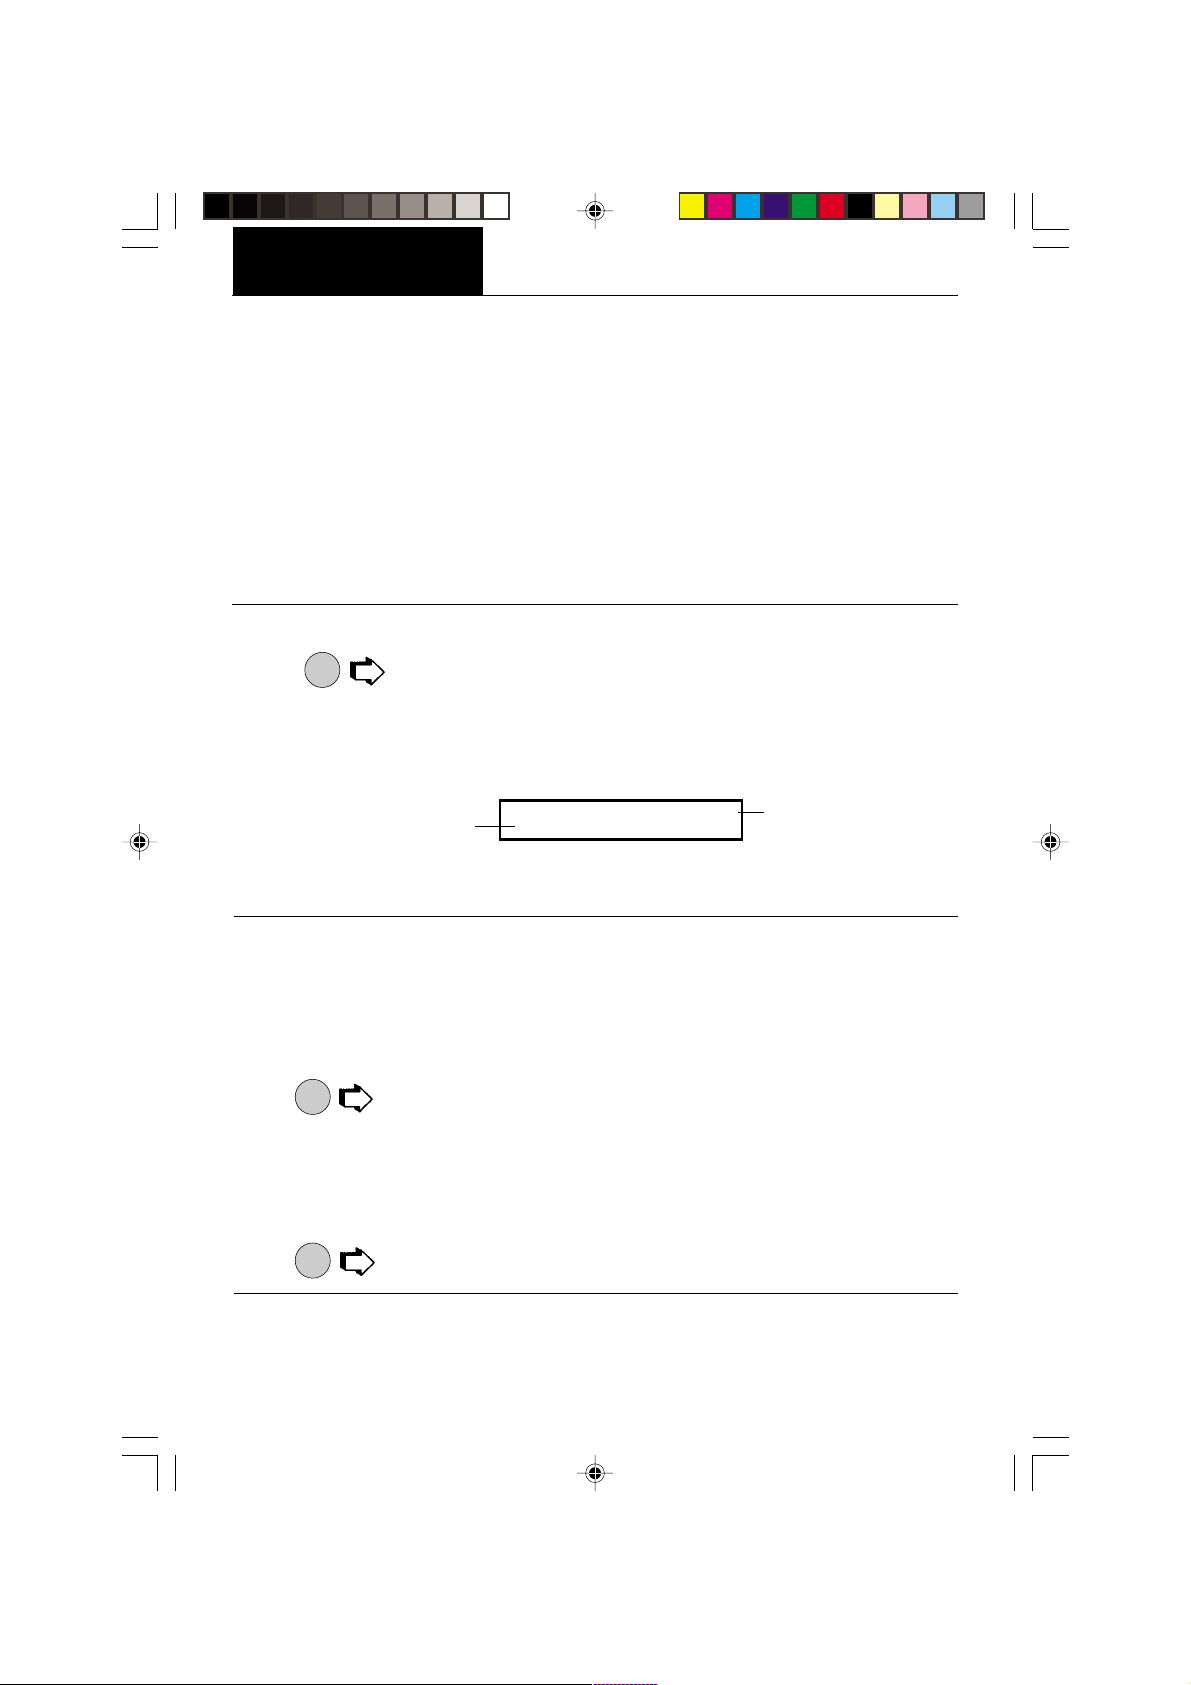
Weighing
ON
1.
to rezero the display.
TARE
2. Place the object(s) or material to be weighed on the pan.
3. Wait for the stability indicator to appear before reading the weight.
STABILITY INDICATOR
200.0000
s
IIIIIIIIIIIIIIIIIIIIIIIIIIIIIIIIIIIIIIII I
g
NOTE: The capacity guide (bars) indicates the percentage of the current weight to the
balance capacity. The example above illustrates a 200 gram weight, (balance full capacity
210 grams).
CAPACITY GUIDE
Taring
When weighing material or objects that must be held in a container, taring stores the
container weight in the balance’s memory, separate from the weight of the material in the
container.
1. Place an empty container on the pan. Its weight is displayed.
ON
2.
3. Add material to the container. As material is added, its net weight is displayed.
4. Removing the container and material from the pan will cause the balance to display the
5.
, the display blanks until stable weight readings are received, then indicates
TARE
zero. The container’s weight is stored in memory.
container’s weight as a negative number.
ON
resets the balance to zero.
TARE
14

Percent Weighing
Menu
Menu
OPERATION
Percent Weighing is
Percent Function is selected under the Setup
menu. Refer to page 38. Percent weighing
permits you to place a reference load on the
balance, then view other loads as a percentage of the reference. The load you place on the
platform as a reference may be displayed as
any percentage you select from 5% to 100%
enabled only
when the
EXAMPLE
A 10g reference load is set for 20%:
• A subsequent load of 100 g will be
displayed as 200%.
• A subsequent load of 200 g will be
displayed as 400%.
(in 1% increments). One hundred percent does
not necessarily have to represent the reference load. Subsequent loads, displayed as a
percentage of the reference are limited only by the capacity of the balance. The default
setting is Reference 100%.
To perform percent weighing when in a weighing mode, use the following procedure:
ON
1.
TARE
pCT cON
.
%
IIIIIIIIIIIIIIIIIIIIIIIIIIIIIIIIIIIIIIII I
2. Place an empty container on the pan (if one will be used).
ON
3.
. This is the current reference percentage.
TARE
seT 100
%
IIIIIIIIIIIIIIIIIIIIIIIIIIIIIIIIIIIIIIII I
NOTE: The reference percentage can be changed to any value from 5 to 100.
MODE
4.
NOTE:
seT 5
increments to .
%
PRINT
does not return to a lower number. Instead, it sends Set x%
IIIIIIIIIIIIIIIIIIIIIIIIIIIIIIIIIIIIIIII I
seT 100
%
IIIIIIIIIIIIIIIIIIIIIIIIIIIIIIIIIIIIIIII I
command through the RS232 Interface, where x = 5 to 100.
5. When the selected reference value appears on the display, place the reference load
in the container (or directly on the pan if no container is used).
ON
8.
, display indicates the reference load as the percent-
TARE
100.0
%s
IIIIIIIIIIIIIIIIIIIIIIIIIIIIII II I
age entered. The bar graph indicates the load relative to the capacity of the balance.
9. Remove the reference load from the balance and replace it with another load. The
second load is displayed as a percentage of the reference.
10.
MODE
to view alternate display in units.
100.0000
%s
11.To restart percent weighing at any time,
ON
12.
to exit to a weighing mode.
TARE
IIIIIIIIIIIIIIIIIIIIIIIIIIII I
g
ON
TARE
pCT cON
.
%
IIIIIIIIIIIIIIIIIIIIIIIIIIIIIIIIIIIIIIII I
15

OPERATION
Menu
Menu
Parts Counting
Parts Counting is
menu. Refer to page 38. In the parts counting mode, the balance displays the quantity of
parts you place on the pan. Since the balance determines the quantity based on the average
weight of a single part, all parts must be reasonably uniform in weight. The accuracy of parts
counting results is determined by the error level entered in PC Err of the Setup Options
submenu. Refer to page 43. The default setting for PC Err is off.
To perform parts counting when in a weighing mode, use the following procedure:
enabled only
when the Parts Counting Function is selected in the Setup
ON
1.
TARE
ON
2.
TARE
PC
.
. The balance requires a sample of the parts to use
pc cON
PC
aDD 5
IIIIIIIIIIIIIIIIIIIIIIIIIIIIIIIIIIIIIIII I
IIIIIIIIIIIIIIIIIIIIIIIIIIIIIIIIIIIIIIII I
as a reference for counting. The default for the sample size is 5 parts, but this can be
changed to 10, 20, 30, 40, 50, or 100 parts by
MODE
(Larger samples yield
more accurate results). Add the required number of sample pieces to the pan.
ON
3.
TARE
PC
(indicates 5 pieces).
5
5
IIIIIIIIIIIIIIIIIIIIIIIIIIIIIIIIIIIIIIII I
4. If Add X is displayed, the sample is too small to provide results within the selected error
level (PC Error of the Setup Options submenu).
NOTE:X represents the number of additional parts needed to provide a sufficient sample.
5. Add the required number of parts, then
ON
again.
TARE
6. To count additional pieces, add them to the pan. The display indicates the actual
number of pieces based on their sample size. Tolerance will be within whatever was
selected under the Parts Counting Error Level.
NOTE:If the balance controls are not touched, the sample size is stored in memory. You
can continue to use the balance to measure quantities as long as the samples to be
measured are of the same weight.
MODE
7.
to display the weight of the pieces on the pan.
MODE
8.
again to display the number of pieces.
9. To restart parts counting,
MODE
10.
, the balance returns to a weighing mode.
ON
TARE
PC
pc cON
.
16
IIIIIIIIIIIIIIIIIIIIIIIIIIIIIIIIIIIIIIII I
Check Weighing
Menu
Menu
OPERATION
Check Weighing is
enabled only
when the Check Weighing Function is selected in the
Setup menu. Refer to page 38. Refer to page 43, Check Weighing Options under the Setup
menu to set the Reference Type and Display Type options. In the check weighing mode, a
reference weight can be set into the balance either as a reference weight on the pan or as
a user entered number. The balance display shows either under, accept or over as each
sample is weighed.
If reference weight was selected under CW Options submenu:
1. With the balance in the weighing mode,
ON
.
TARE
seT Ref
IIIIIIIIIIIIIIIIIIIIIIIIIIIIIIIIIIIIIIII I
NOTE:If reference number was selected, go to step 7.
2. Place a sample weight on the pan which is considered to be the under limit for check
weighing.
ON
3.
.
TARE
seT Ref
IIIIIIIIIIIIIIIIIIIIIIIIIIIIIIIIIIIIIIII I
4. Place a sample weight on the pan which is considered to be the over weight limit for
check weighing.
ON
. The display blanks until a stable reading is achieved, then it goes to either
5.
TARE
the (Normal, None or Sign) display type previously selected in CW Options submenu
to indicate under, over or acceptacle limits of the objects being weighed.
6. Check weighing can now be made by removing a sample and placing a new sample
on the pan.
If reference number was selected under the CW Options submenu:
7. With the balance in the weighing mode,
ON
.
TARE
seT Ref
IIIIIIIIIIIIIIIIIIIIIIIIIIIIIIIIIIIIIIII I
MODE
8.
9.
10.
11.
to return to weighing.
ON
TARE
MODE
until the first digit (under weight) is correctly displayed.
ON
to accept the value.
TARE
UNDER
000.0000
indicates under value with first digit flashing.
g
12.Repeat steps 10 and 11and set all digits to the desired value. When the last digit is
entered, display changes to an over value to be entered with the first digit flashing
000.0000
NOTE:
PRINT
OVER
.
g
allows going back.
17
 Loading...