

Page 1
DE
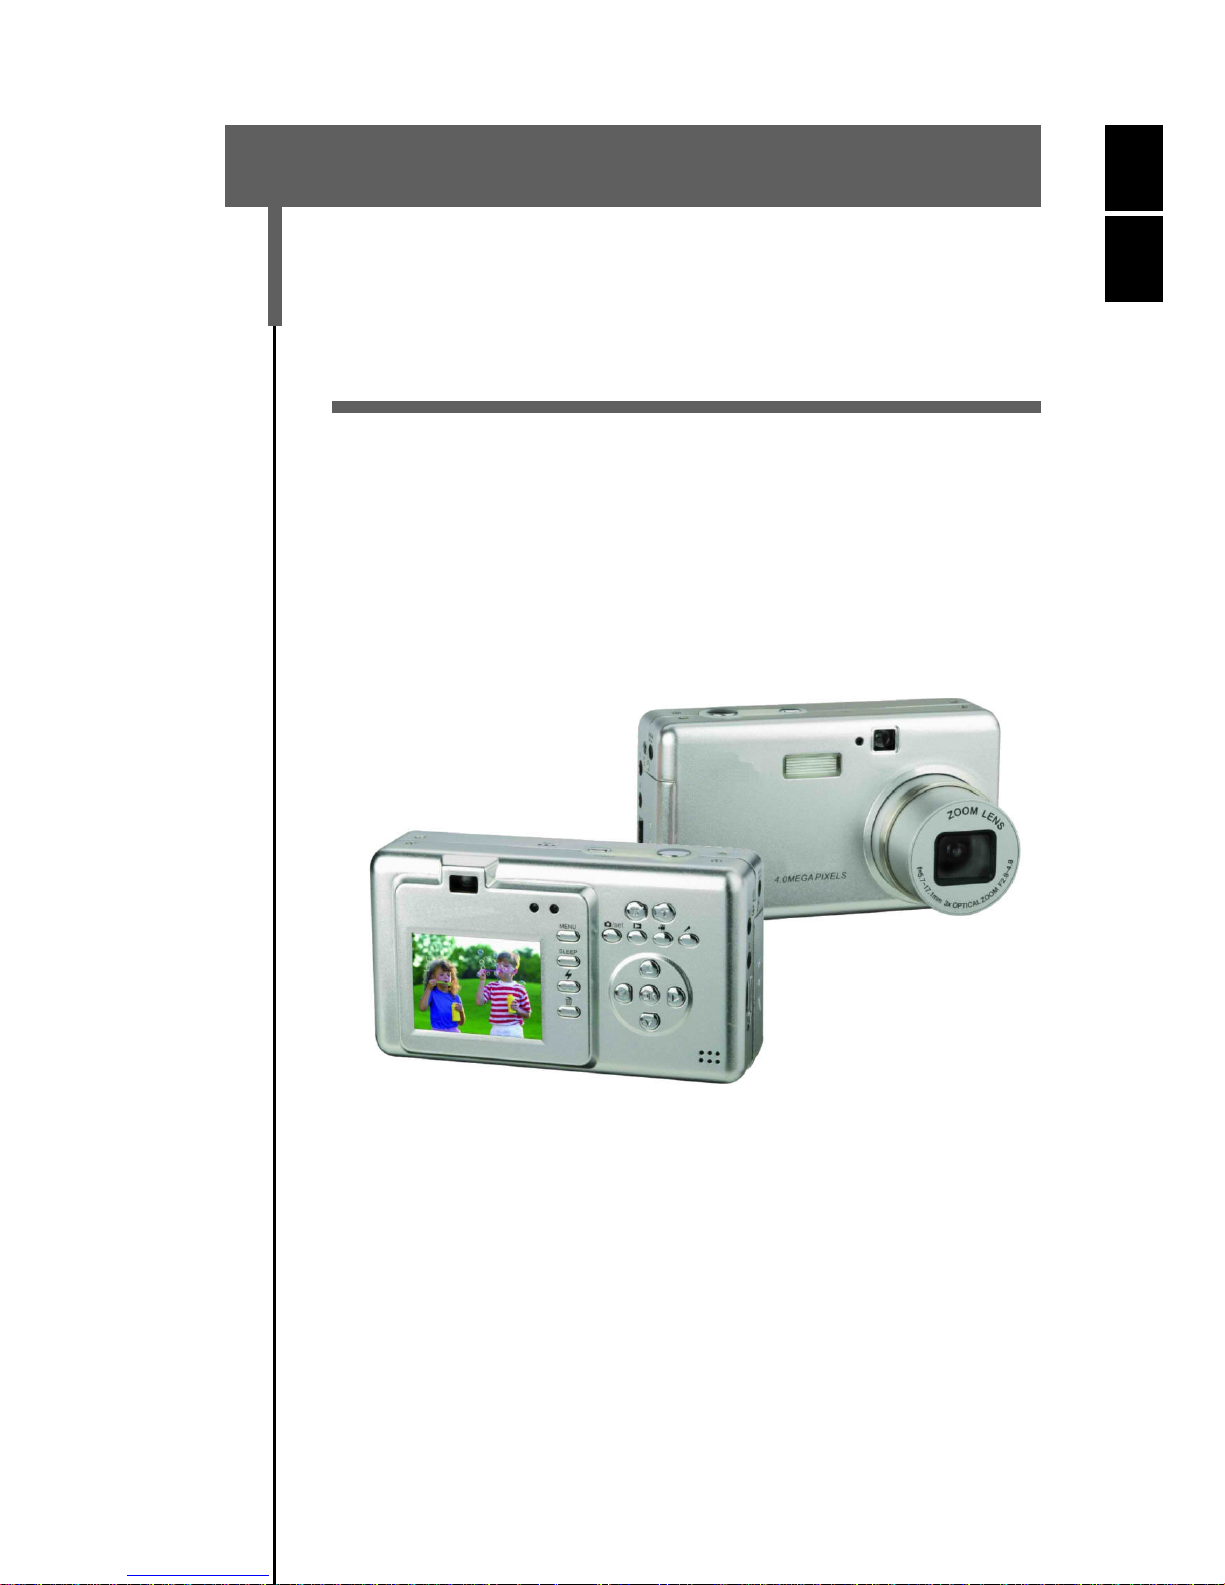
Digitalkamera Mpix5
GB
Mpix5 Digital Camera
BENUTZERHANDBUCH
USER MANUAL
Page 2

DE
Inhaltsverzeichnis
Danke, dass Sie sich für unser Produkt entschieden haben. Bitte lesen
Sie die Anleitung sorgfältig, um alle Funktionen des Produkts nutzen zu
können und um eine lange Lebensdauer zu gewährleisten. Bitte bewahren Sie die Anleitung für späteres Nachschlagen gut auf.
Lieferumfang............................................................................4
Einleitung.................................................................................5
Inbetriebnahme........................................................................6
1. Kamerakomponenten...................................................................6
2. Einlegen der Batterie....................................................................7
3. Verwenden des Netzteils..............................................................8
4. Einstecken und Entfernen der SD/MMC-Karte .............................9
5. Anbringen des Trageriemens.....................................................10
Grundbedienung ...................................................................11
1. Ein- und Ausschalten.................................................................11
2. Verwenden der Modustasten .....................................................12
3. Aufnehmen von Bildern..............................................................13
1 Beschreibungen der LCD-Anzeige...........................................13
2 Fotos machen..........................................................................14
4. Aufnehmen von Audio................................................................16
5. Aufnehmen von Videoclips.........................................................17
1 Beschreibungen der LCD-Anzeige...........................................17
2 Aufzeichnen eines Videoclips...................................................17
6. Wiedergabe von Bildern, Audio und Videos ...............................18
1 Beschreibungen der LCD-Anzeige...........................................18
2 Anschauen der Bilder, Videos und Töne ..................................18
3 Anzeige vergrößerter Bilder (Zoom).........................................19
7. Fotos löschen ............................................................................20
2
Page 3

Erweiterte Bedienung........................................................... 21
1. Aufnahmen mit Blitzlicht.............................................................21
2. Menüoptionen ändern ................................................................22
3. Schnelltasten verwenden ...........................................................22
4. Liste der Menüoptionen..............................................................24
5. Belichtungskorrektur ..................................................................26
6. Sprache wählen.........................................................................27
7. Bildauflösung einstellen .............................................................27
8. Bildqualität einstellen .................................................................28
9. Bildeffekte einstellen..................................................................28
10. Fotos vor dem versehentlichen Löschen schützen....................29
11. Bilder auf dem Fernseher betrachten ........................................30
12. Einstellen von Datum und Zeit...................................................30
13. LOGO einstellen .......................................................................31
DE
14. Treiber einstellen ......................................................................31
Software-Installation............................................................. 33
1. Unterstützte Betriebssysteme ....................................................33
2. Treiberinstallation.......................................................................33
1 Treiberinstallation im MASS-Modus .........................................33
2 Installation im TWAIN-Modus...................................................35
Dateiübertragung zum PC.................................................... 37
Technische Daten ................................................................. 38
Fehlerbehebung.................................................................... 40
Weitere Informationen.......................................................... 42
1. Sicherheitshinweise ...................................................................42
2. Wartung und Pflege ...................................................................43
3. Fototipps....................................................................................43
4. Batteriehinweis...........................................................................44
5. Hinweise zur Benutzung von Speicherkarten .............................45
6. Hinweise zum Netzteil................................................................45
3
Page 4

DE
Lieferumfang
Bitte überprüfen Sie den Karton auf folgenden Inhalt:
1 x Digitalkamera ODYS-Mpix5
1 x Benutzerhandbuch
1 x Li-Batterie (wiederaufladbar)
1 x USB-Kabel
1 x TV-Kabel
1 x Audio-Kabel
1 x CD-ROM (Treiber + Anwendungssoftware)
1 x Tragetasche
1 x Handriemen
1 x Netzteil
4
Page 5

Einleitung
Dieses Produkt ist ein digitales Bildgerät mit integrierter Digitalkamera,
digitalem Videorecorder, digitaler Tonaufzeichnung und PC-Kamera.
Es wird Ihnen in allen Lebenslagen zur Seite stehen. Mit diesem Gerät
können Sie digitale Fotos schießen, Videos aufnehmen, Sprache aufzeichnen oder es als Web-Kamera verwenden.
Produkteigenschaften
• Aufnahmen mit hoher Pixelzahl, verschiedene Auflösungen wählbar,
interpolierte Ausgabe
• Interne oder externe Speicherung möglich
• Hochempfindlicher Weitwinkelblitz, drei Blitzmodi wählbar
• Farbiger TFT LCD-Monitor für Menü- und Bildbetrachtung
• Drei Bildaufnahmemodi: Einzelbild, Selbstauslöser und Serienbild
DE
• TV-Ausgabe: NTSC oder PAL
• Unbeschränkte Tonfilm-Funktion, AVI Format (640 x 480 Pixel)
• Kristallklare digitale Tonaufzeichnung
• Einfache Menüführung
• Individuelles Start Interface für angenehme Bedienung
• Spezielle Bildeffekte wie Umwandlung in Schwarzweißbild oder
Nostalgiebild
• Hohe Datenübertragung dank Mini-USB-Buchse
• Batterieschonend durch automatische Abschaltung
Fünf Anwendungsmodi
• Bild-Modus – für die Aufnahme digitaler Bilder/Fotos
• Video-Modus – für die Aufnahme hochwertiger Tonfilme
• Aufnahme-Modus – für kristallklare Tonaufnahmen
• Wiedergabe-Modus – zum Betrachten/Hören aller Aufnahmen
• Einstellungsmodus – zur Bestimmung der Betriebsparameter
5
Page 6
DE
Inbetriebnahme
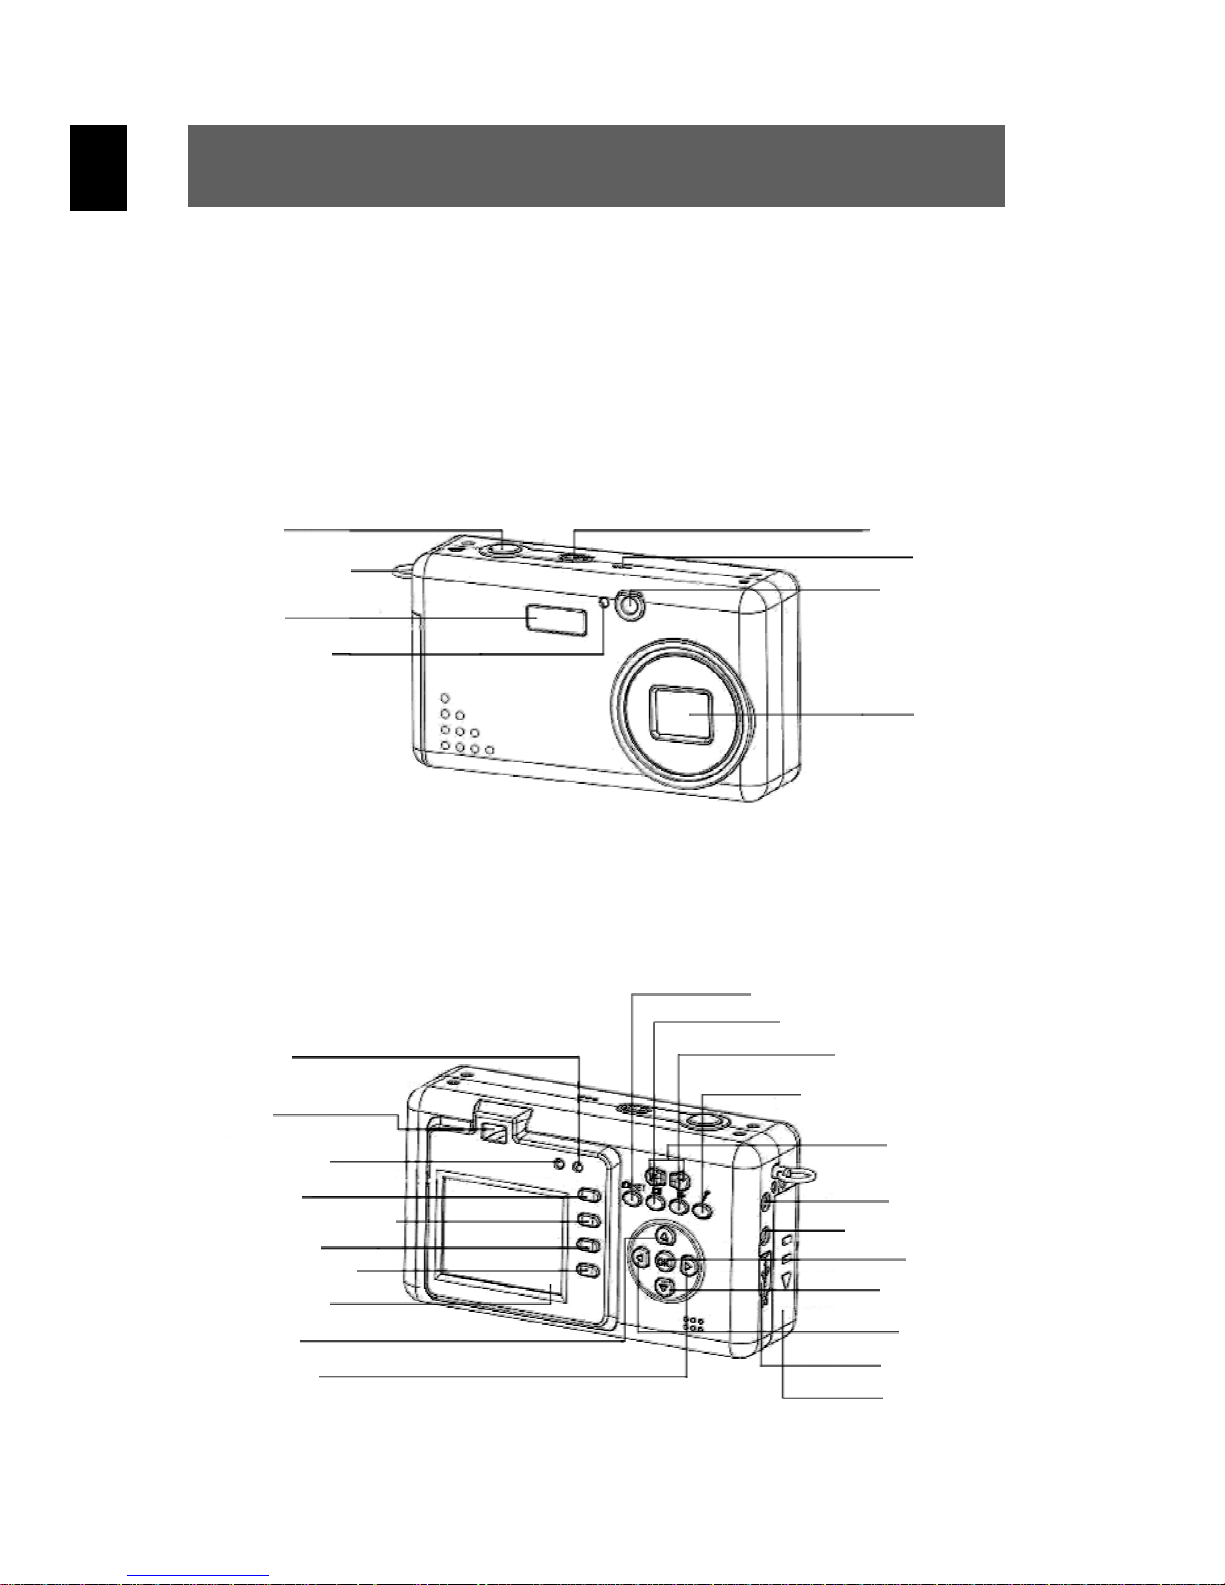
1. Kamerakomponenten
Lernen Sie bitte vor Gebrauch Ihre Kamerakomponenten kennen.
Dies erleichtert die Bedienung der Kamera.
Auslöser
Riemenhalterung
Blitzlicht
Anzeige für
Selbstauslöser
Ein/Aus-Taste
Mikrofon
Sucherfenster
Objektiv
Anzeige
Ladestatus
Sucher
Anzeige Blitz-/
Betriebsstatus
Menütaste
Ein/Aus LCD-Anzeige
Blitzlichttaste
Löschschnelltaste
LCD-Anzeige
Taste Hoch
Taste Rechts
Modustaste Bild/Einstellung
Modustaste Wiedergabe
Modustaste Video
Modustaste Aufnahme
Zoomtasten
TV-Ausgang
Ohrhörer-Buchse
OK-Taste
Taste Runter
Taste Links
USB-Buchse
Batterie- und
Kartenfach
6
Page 7
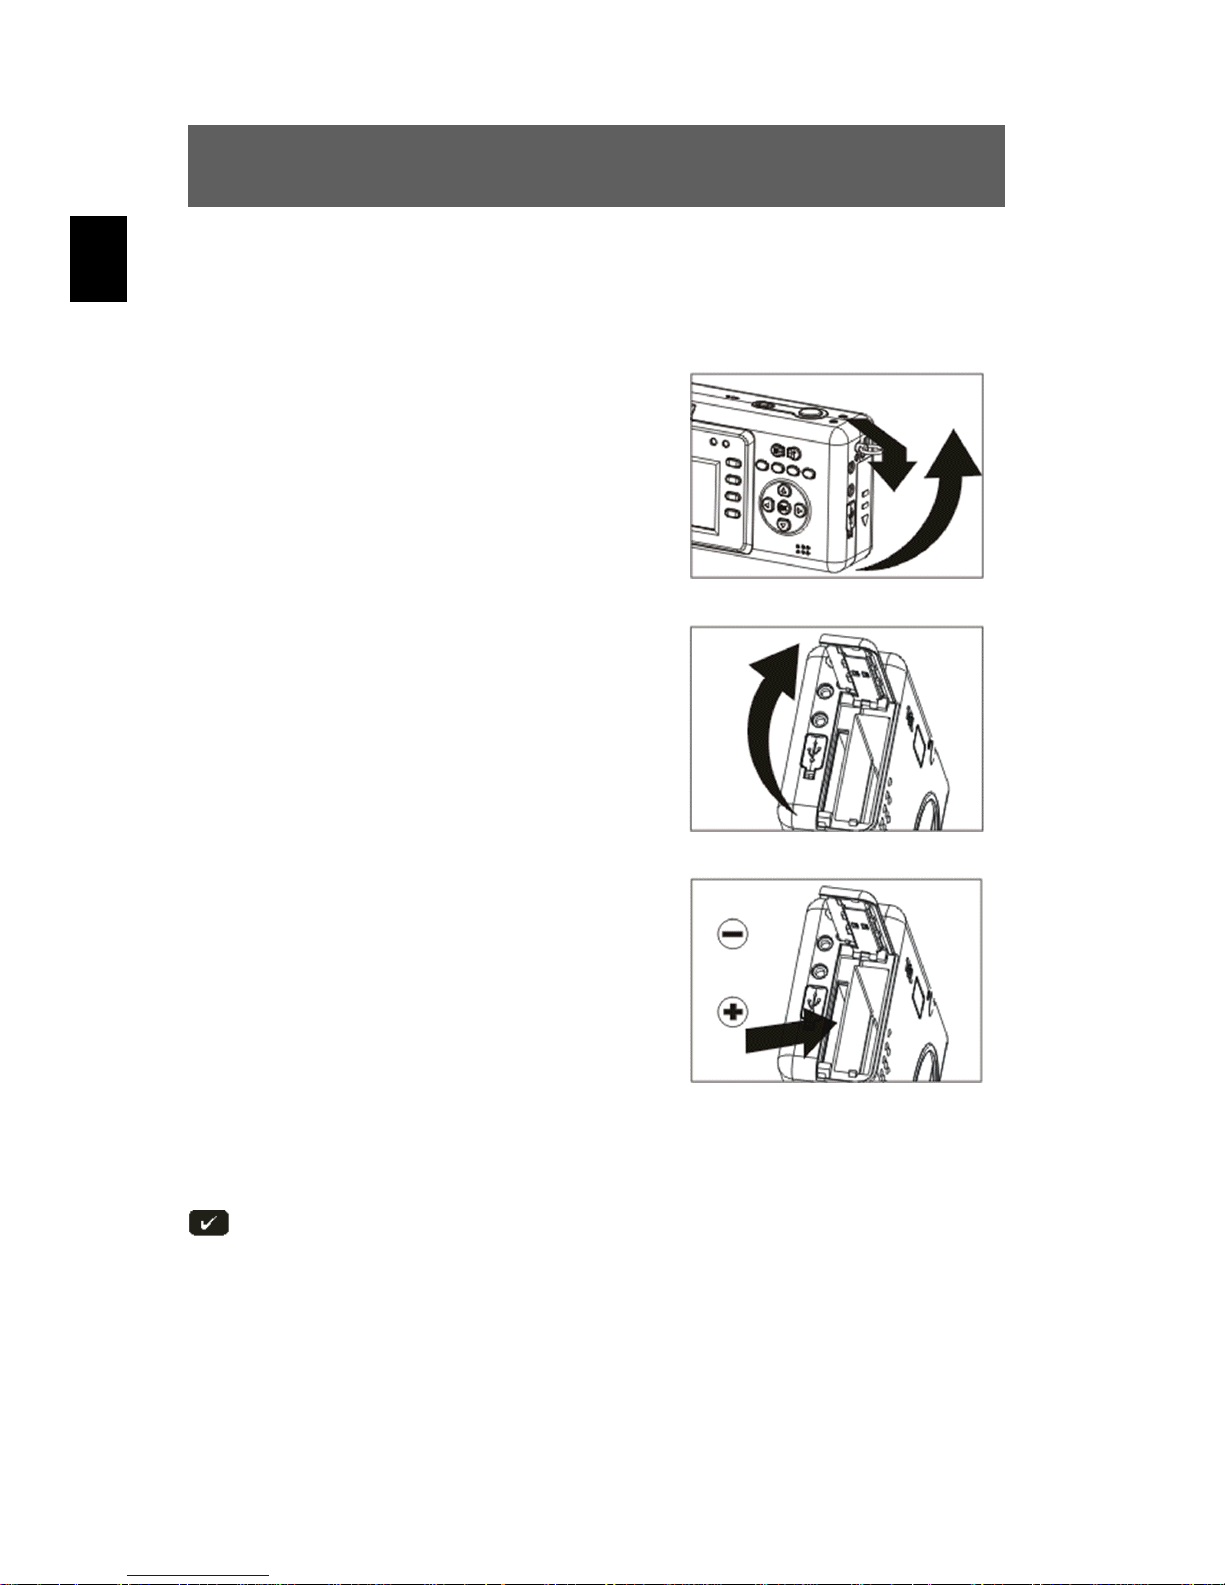
2. Einlegen der Batterie
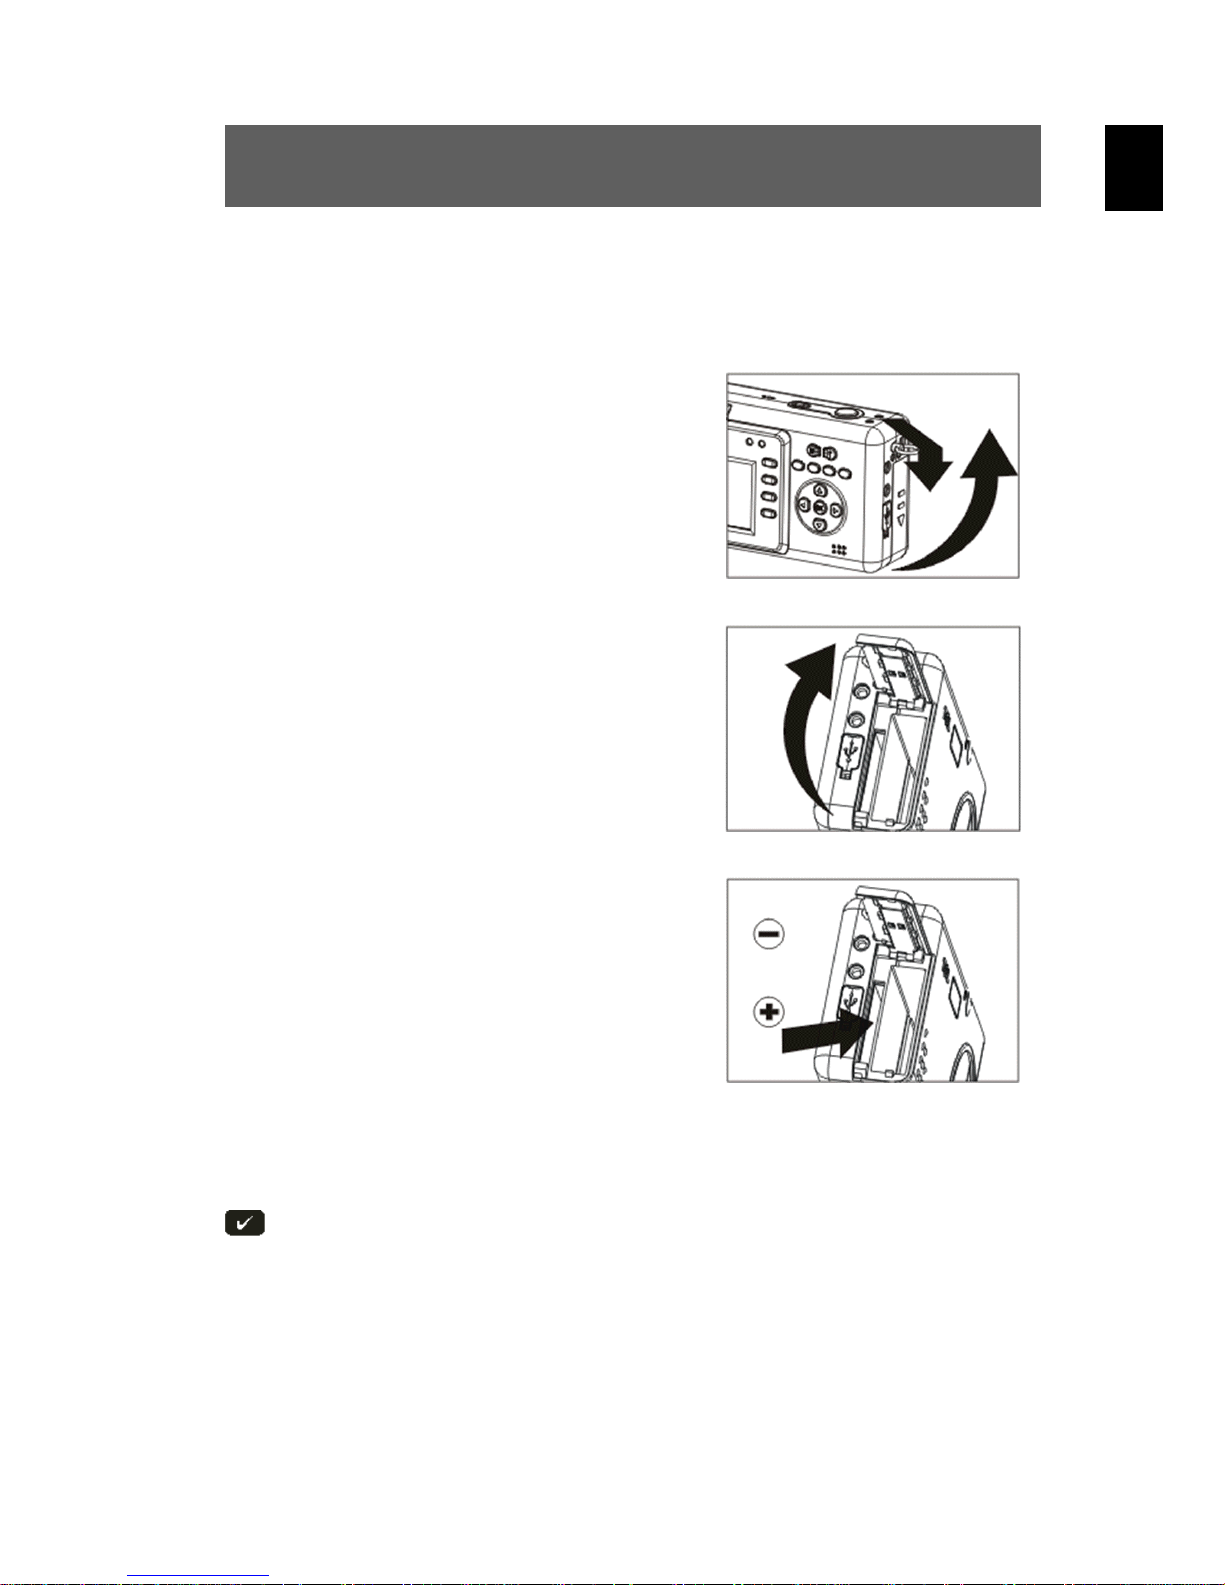
Verwenden Sie die beigefügte Lithium-Batterie.
Schieben Sie den Batterie-
1
2
fachdeckel in die angezeigte
Richtung, um das Fach zu öffnen.
Öffnen Sie den Batteriefachdeckel.
DE
Legen Sie die Li-Batterie in das
3
Batteriefach ein und achten Sie
dabei auf deren Polarität.
Schließen Sie den Batteriefachdeckel, indem Sie ihn
zuklappen und zurückschieben.
Informationen zu der Batterielebensdauer finden Sie im Abschnitt
”Batteriehinweise” auf Seite 44.
7
Page 8
DE
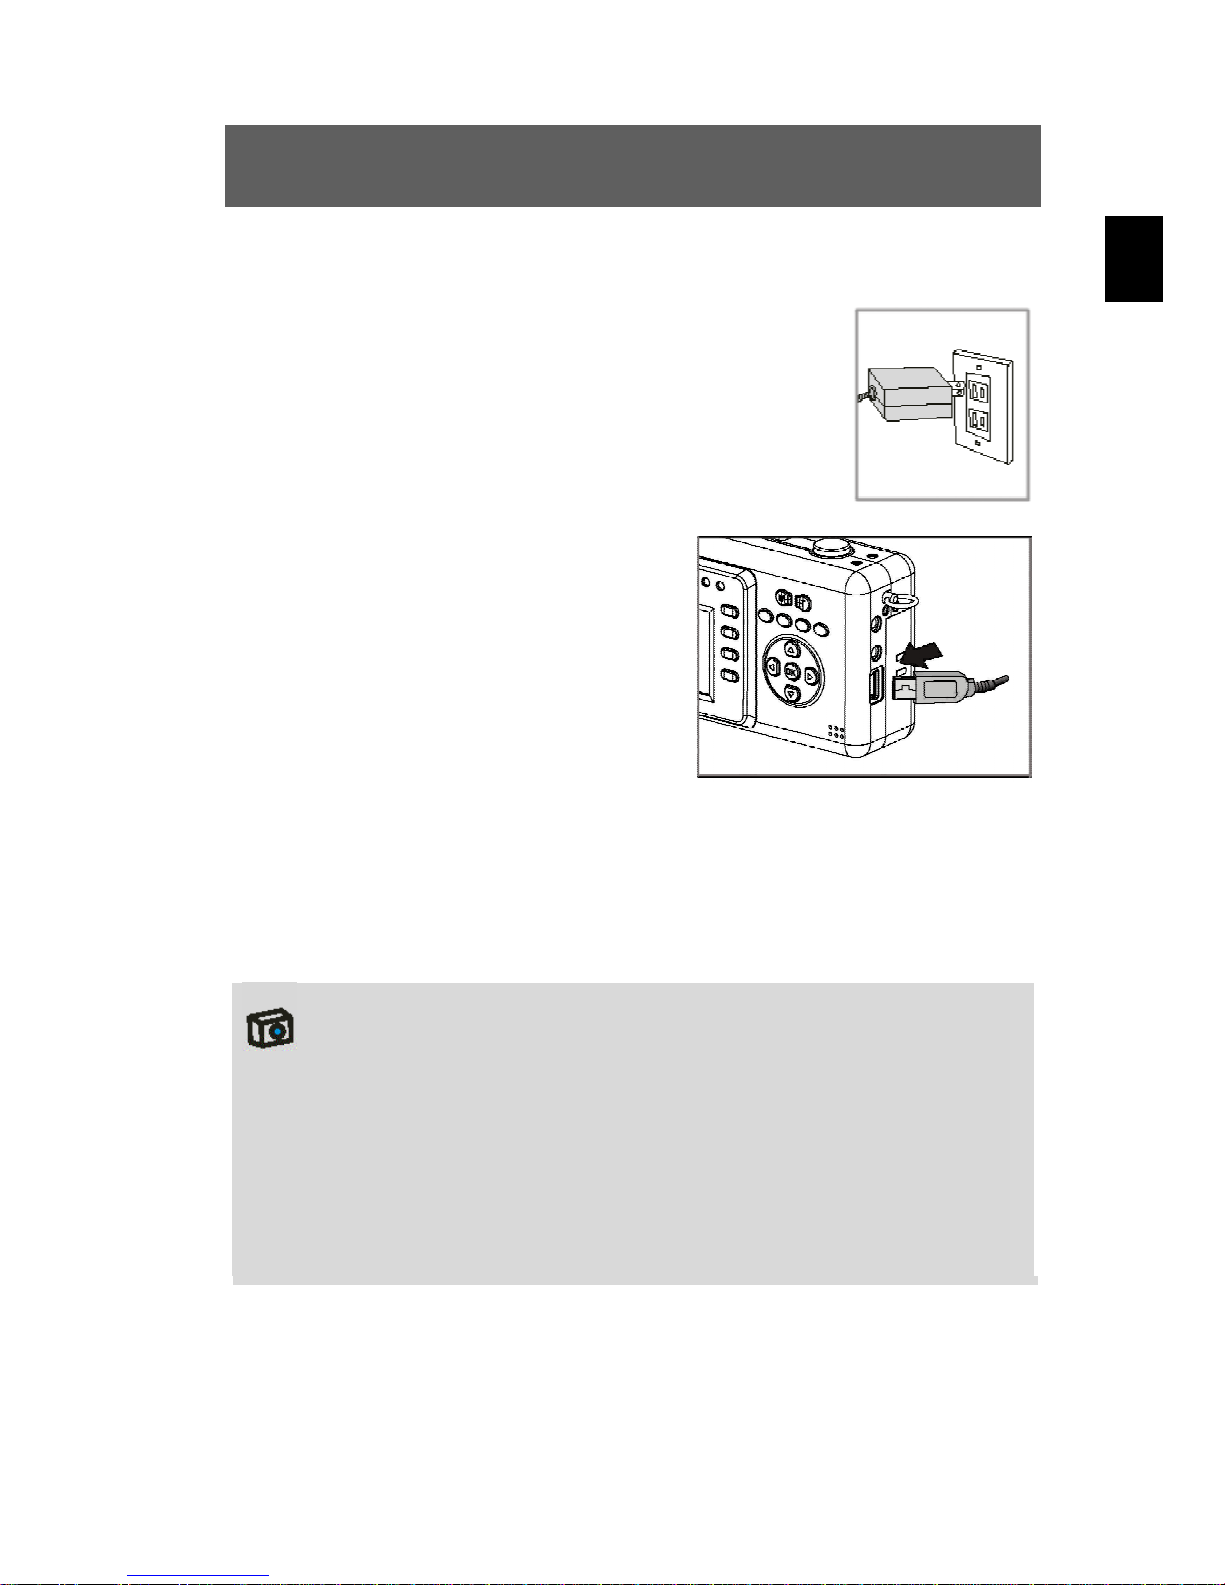
3. Verwenden des Netzteils
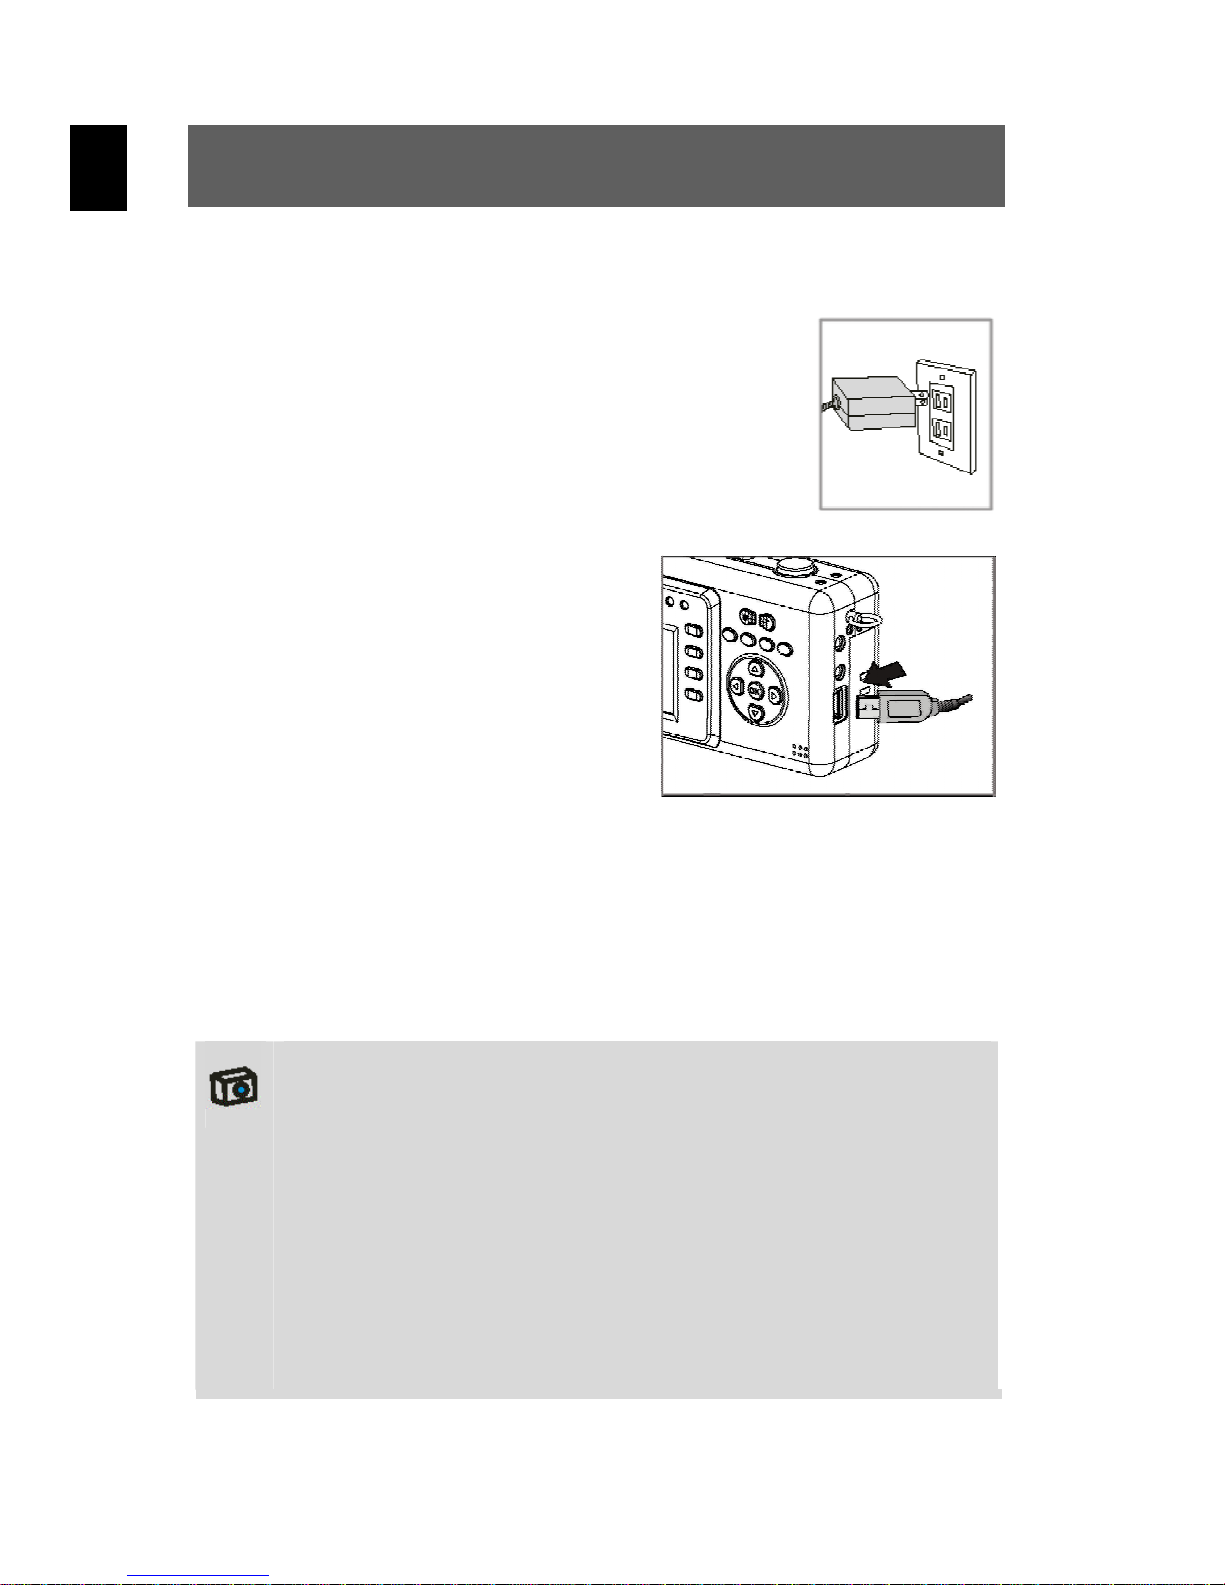
Schließen Sie den Stecker des
1
2
Netzgerätes an eine Netzsteckdose an. (Hinweis: Beachten
Sie die länderspezifischen
Standards für den
Netzgerätestecker.)
Vergewissern Sie sich, dass
die Kamera ausgeschaltet ist
und die zu ladende Batterie
korrekt eingelegt ist. Schließen
Sie dann den USB-Stecker des
Netzgerätes an die USBBuchse der Kamera an.
Die Anzeige für den Ladestatus leuchtet nun in den meisten
Fällen auf und zeigt an, dass die Batterie aufgeladen wird.
Wenn die Batterie vollständig aufgeladen ist, schaltet sich die
Anzeige wieder aus.
Hinweise
1. Bei ausgeschalteter Kamera können Sie die Batterie laden,
indem Sie die Kamera mit dem USB-Kabel an einen freien
USB-Anschluß des Computers anschließen.
2. Für diese Kamera wird nur eine wiederaufladbare LithiumBatterie verwendet. Die neue Batterie ist am leistungsfähigsten, wenn sie zwei oder drei Mal vollständig geladen und
entladen wird. Eine Überbeanspruchung verkürzt die
Lebensdauer der Batterie.
Bitte lesen Sie auch die Zusatzinformationen auf Seite 45.
8
Page 9
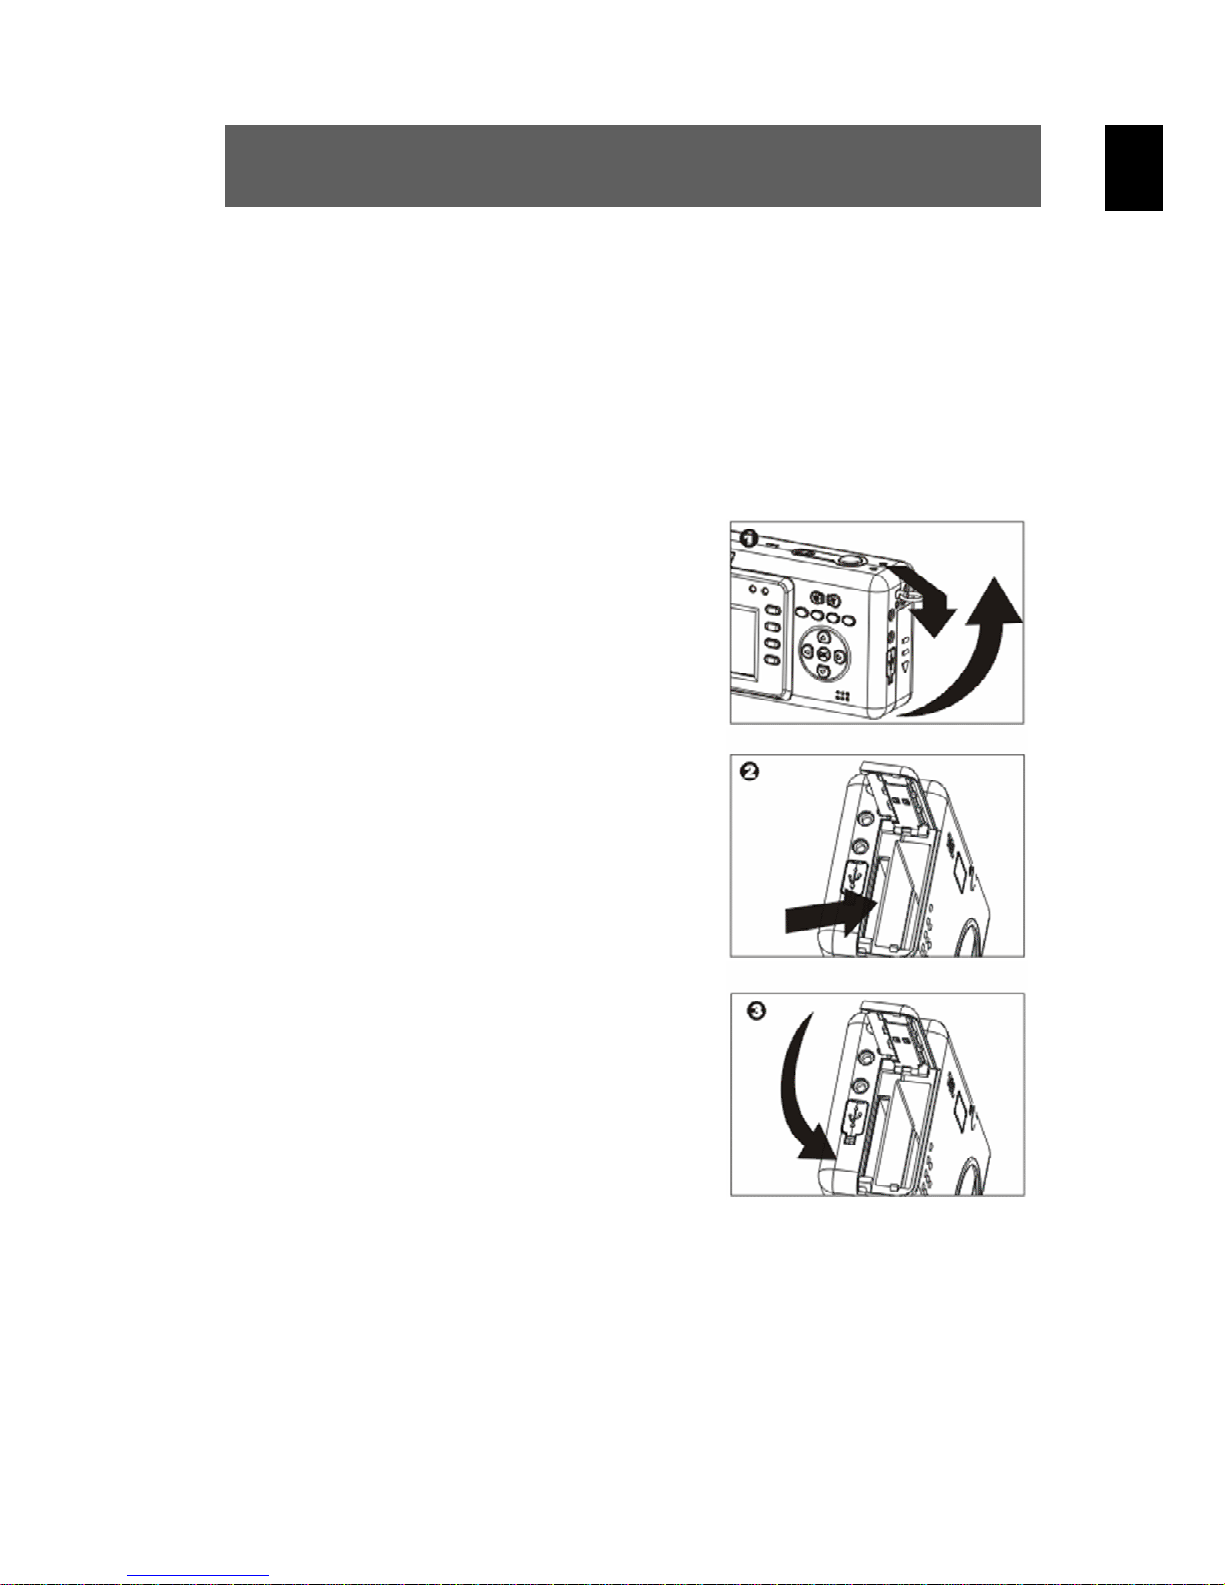
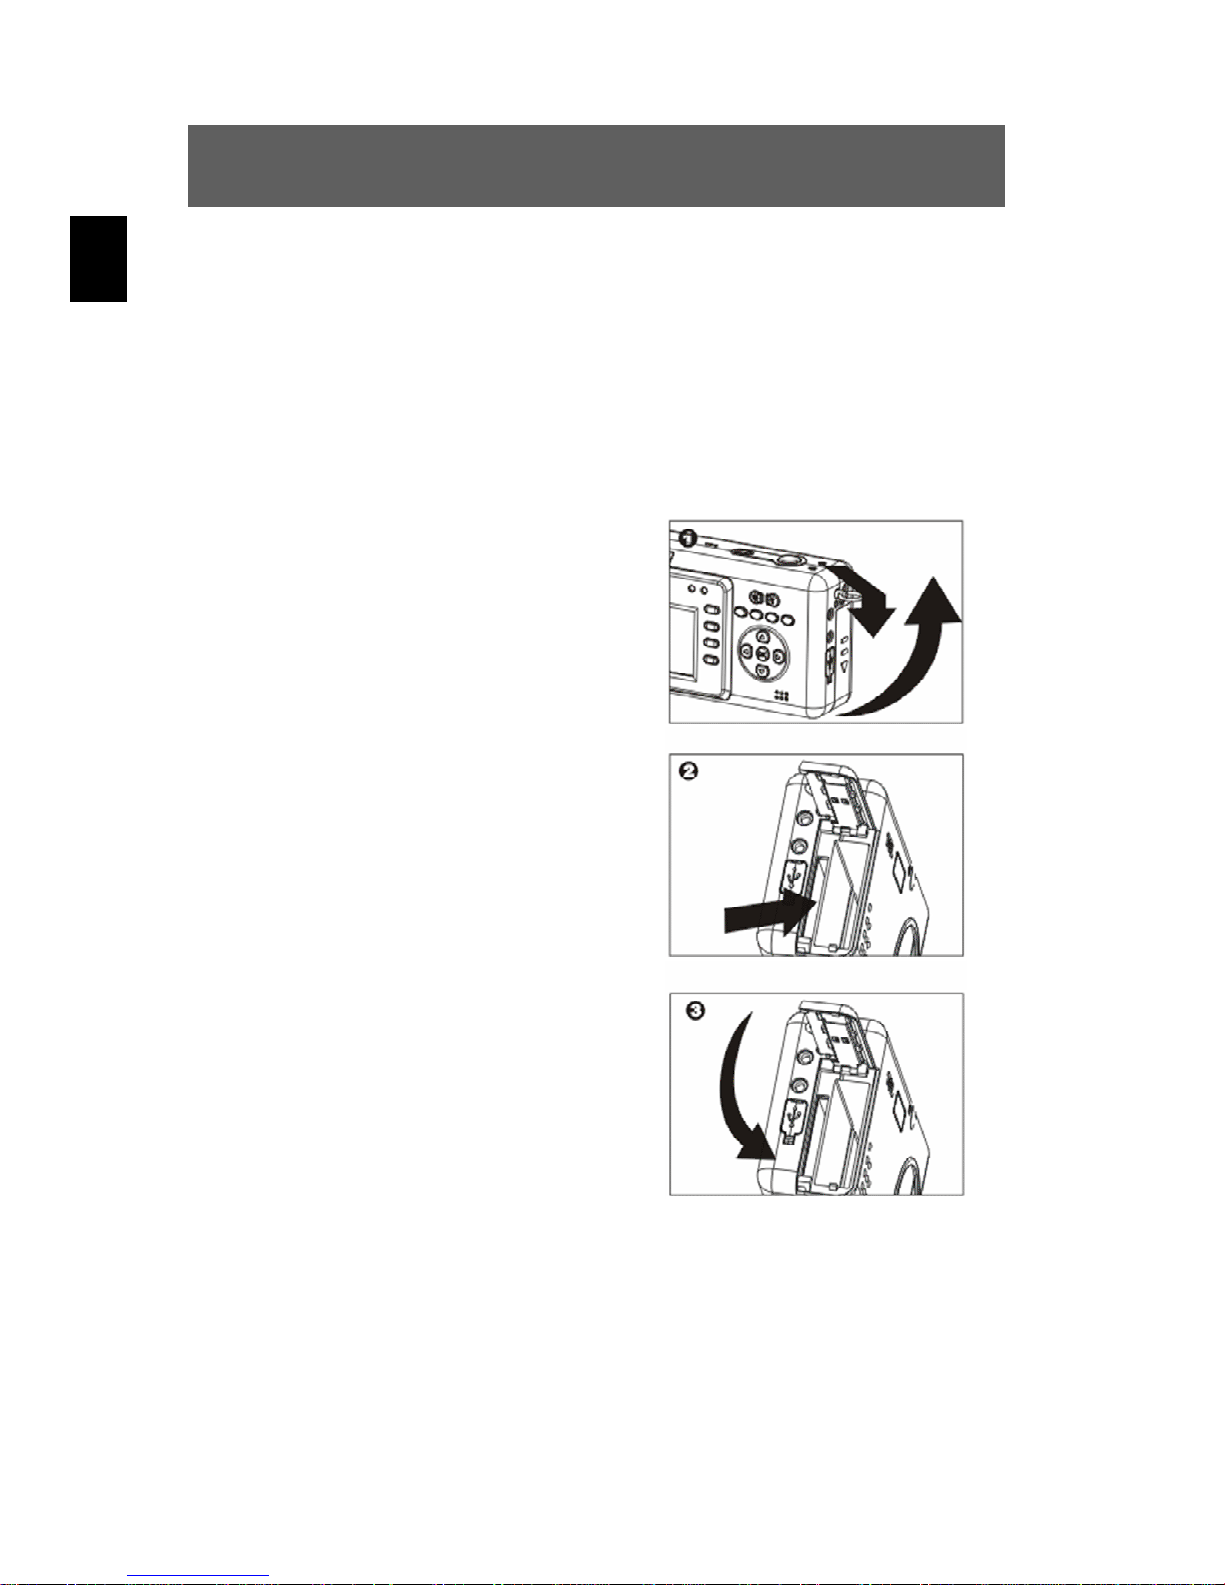
4. Einstecken und Entfernen der SD/MMC-Karte
Zur Erhöhung der Speicherkapazität können Sie SD- oder MMC-Karten
verwenden. Schalten Sie die Kamera ab, bevor Sie eine Karte einlegen.
Legen Sie die Karte, wie in folgender Zeichnung beschrieben, ein (die
Bilder, Töne und Videos werden dann auf der Karte gespeichert).
Einstecken der Karte
Öffnen Sie den
1
Kartenfachdeckel.
DE
Stecken Sie die Karte
2
3
Entfernen der Karte
entsprechend der angezeigten
Richtung ein und drücken Sie
sie bis zum Anschlag des
Kartenfaches.
Schließen Sie den
Kartenfachdeckel.
Öffnen Sie den Kartenfachdeckel. Drücken Sie die Karte kurz einmal
nach unten, um sie zu entriegeln. Entfernen oder wechseln Sie die
Karte und schließen Sie wieder den Kartenfachdeckel.
9
Page 10
DE
Hinweise zum Umgang mit SD/MMC-Karten
Bitte lesen Sie die Zusatzinformationen auf Seite 45.
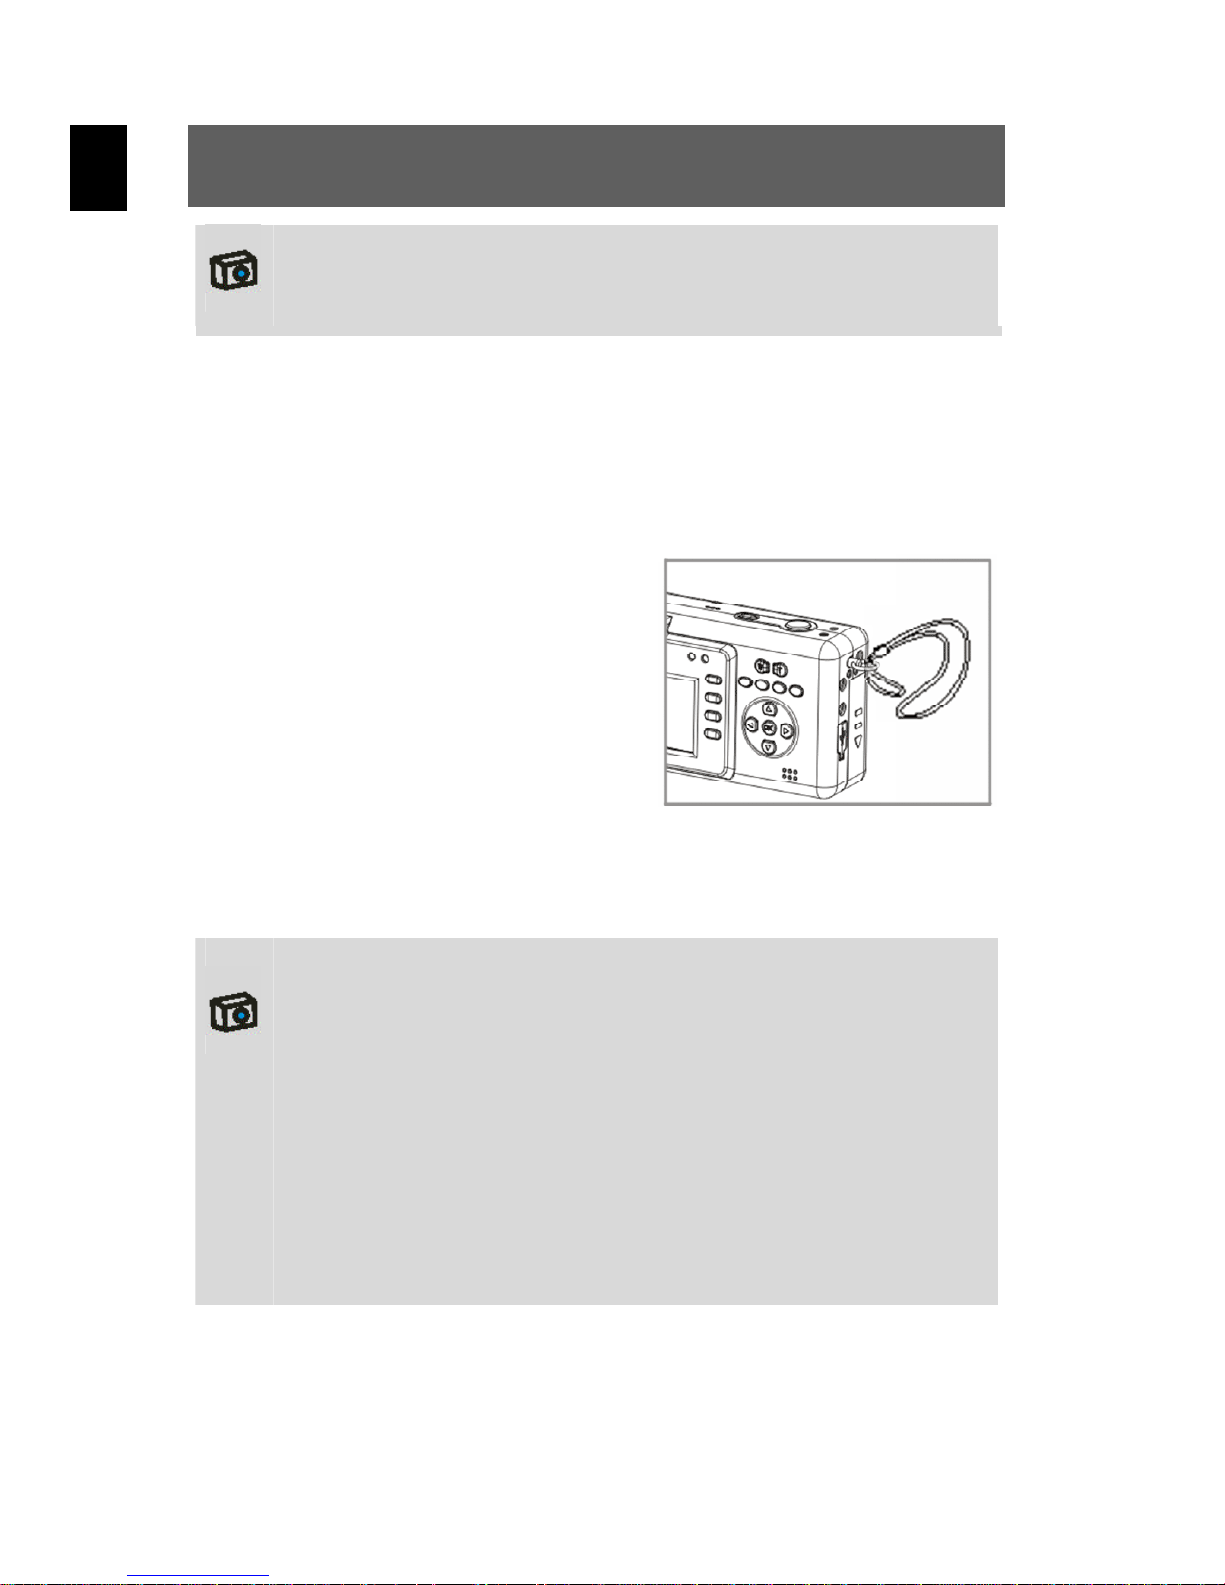
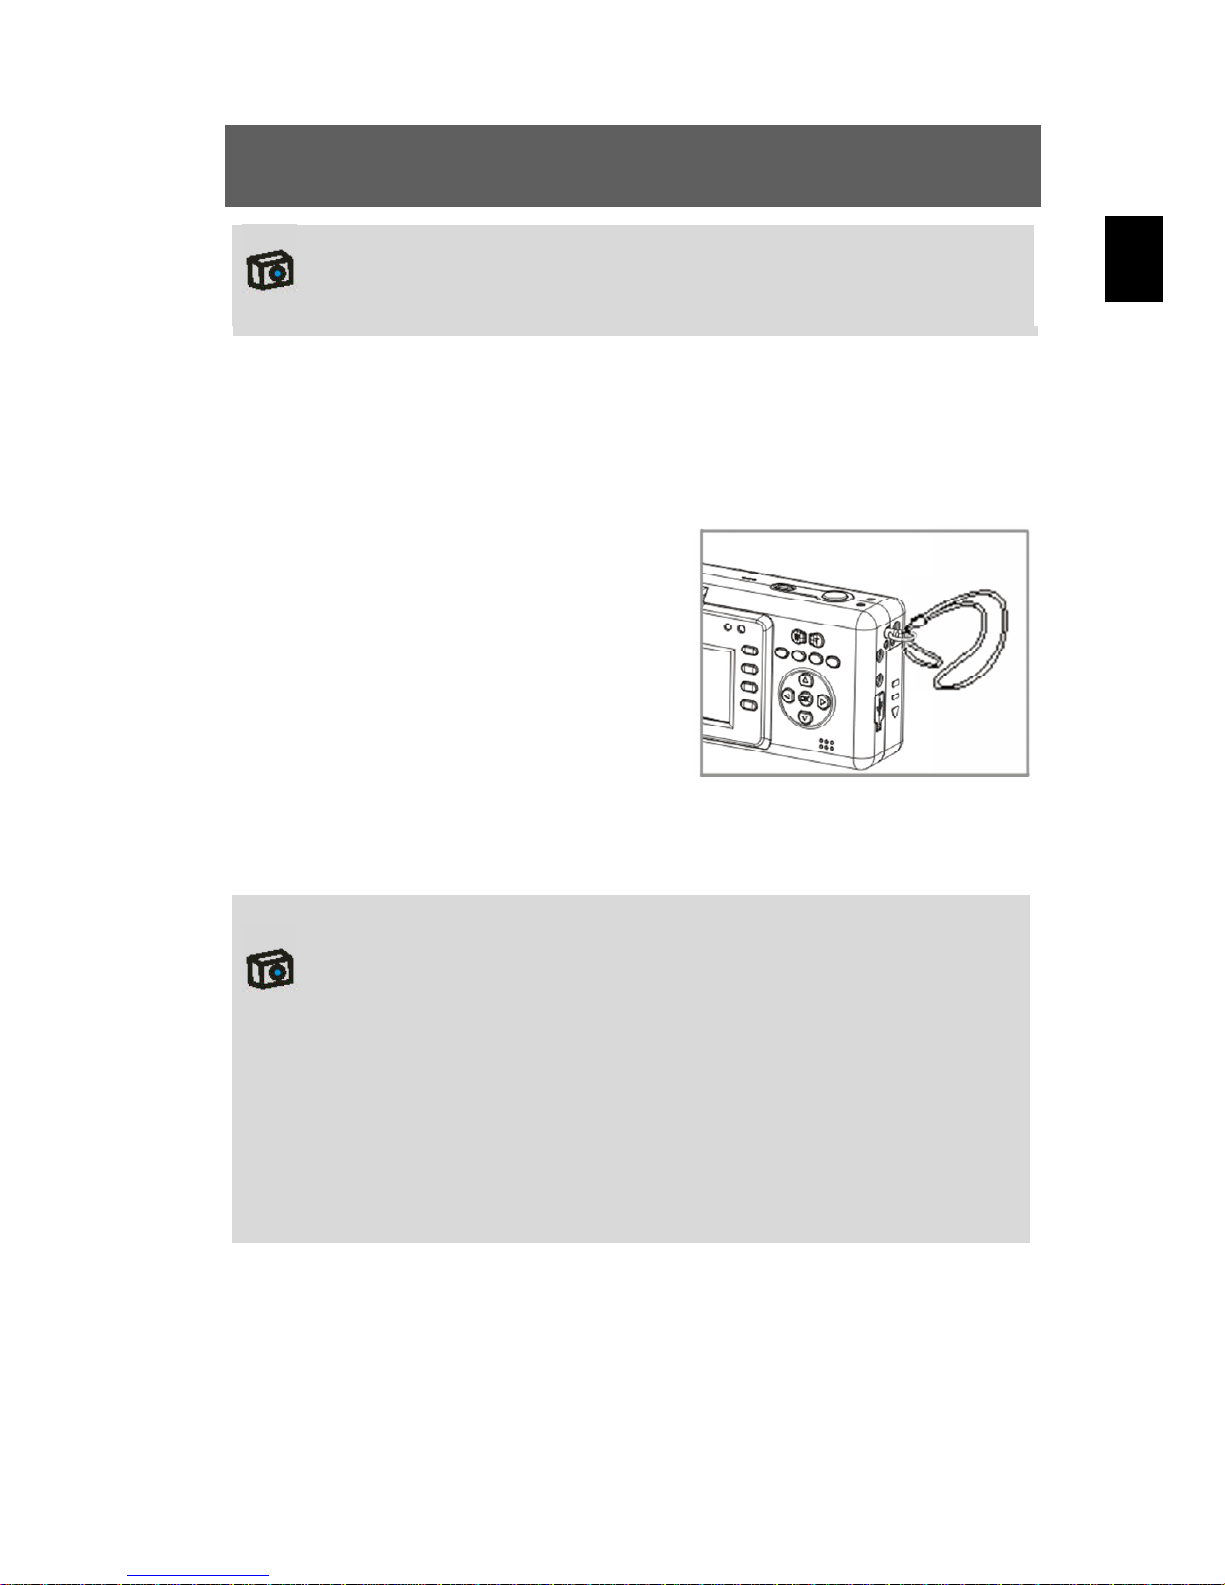
5. Anbringen des Trageriemens
Bringen Sie bitte für Ihre Bequemlichkeit und aus Sicherheitsgründen
den Trageriemen an.
Führen Sie die Trageriemen-
1
2
schleife durch die Halterung,
wie in der Abbildung angezeigt.
Ziehen Sie das andere Ende
des Trageriemens durch
die Schlaufe der dünnen
Riemenschnur und ziehen
Sie den Trageriemen fest.
10
Achtung
1. Die Kamera mit dem Trageriemen nicht um den Hals hängen,
besonders nicht bei Kindern, um Gefahren auszuschließen.
2. Wenn Sie die Kamera am Riemen baumelnd tragen, achten
Sie darauf, nicht irgendwo anzuschlagen.
3. Benutzen Sie den Trageriemen, wenn Sie die Kamera hochkant halten.
4. Beim Anbringen des Trageriemens sollte die Kamera auf einer
stabilen Fläche stehen, damit sie nicht herunterfallen und
beschädigt werden kann.
Page 11
Grundbedienung
1. Ein- und Ausschalten
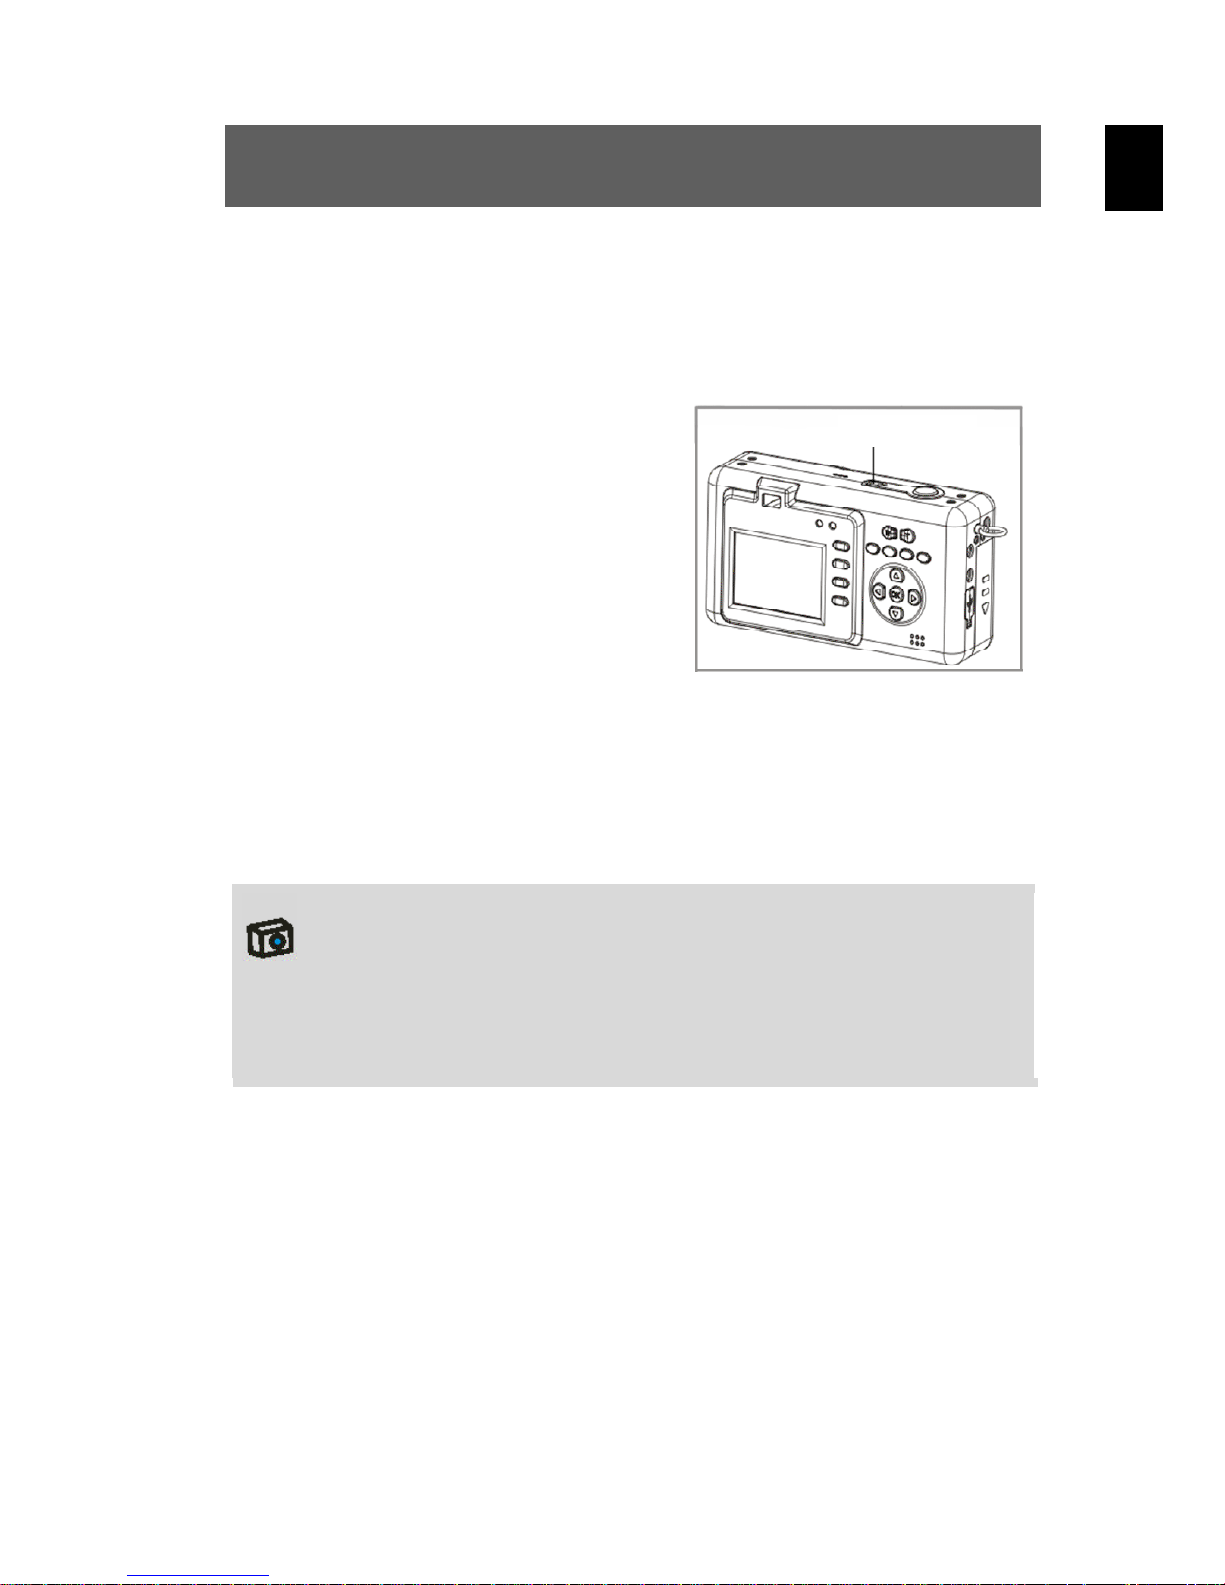
Einschalten
Drücken Sie die Ein/Aus-Taste für
1-2 Sekunden, um die Kamera
einzuschalten. Falls das Gerät nicht
einschaltet, prüfen Sie bitte die
Batterie auf Füllung und Polarität.
Ausschalten
Drücken Sie mehrere Sekunden
den Hauptschalter, um die Kamera
abzuschalten. Die LCD-Anzeige
erlischt.
DE
Ein/Aus-Taste
Wenn die Kamera über eine Minute nicht bedient wurde, wird die
Kamera automatisch ausgeschaltet, um Batteriestrom zu sparen.
Um die Kamera wieder einzuschalten, drücken Sie die Ein/AusTaste für 1-2 Sekunden.
Im USB- oder Aufzeichnungsmodus arbeitet die automatische
Abschaltung nicht.
11
Page 12
DE
2. Verwenden der Modustasten
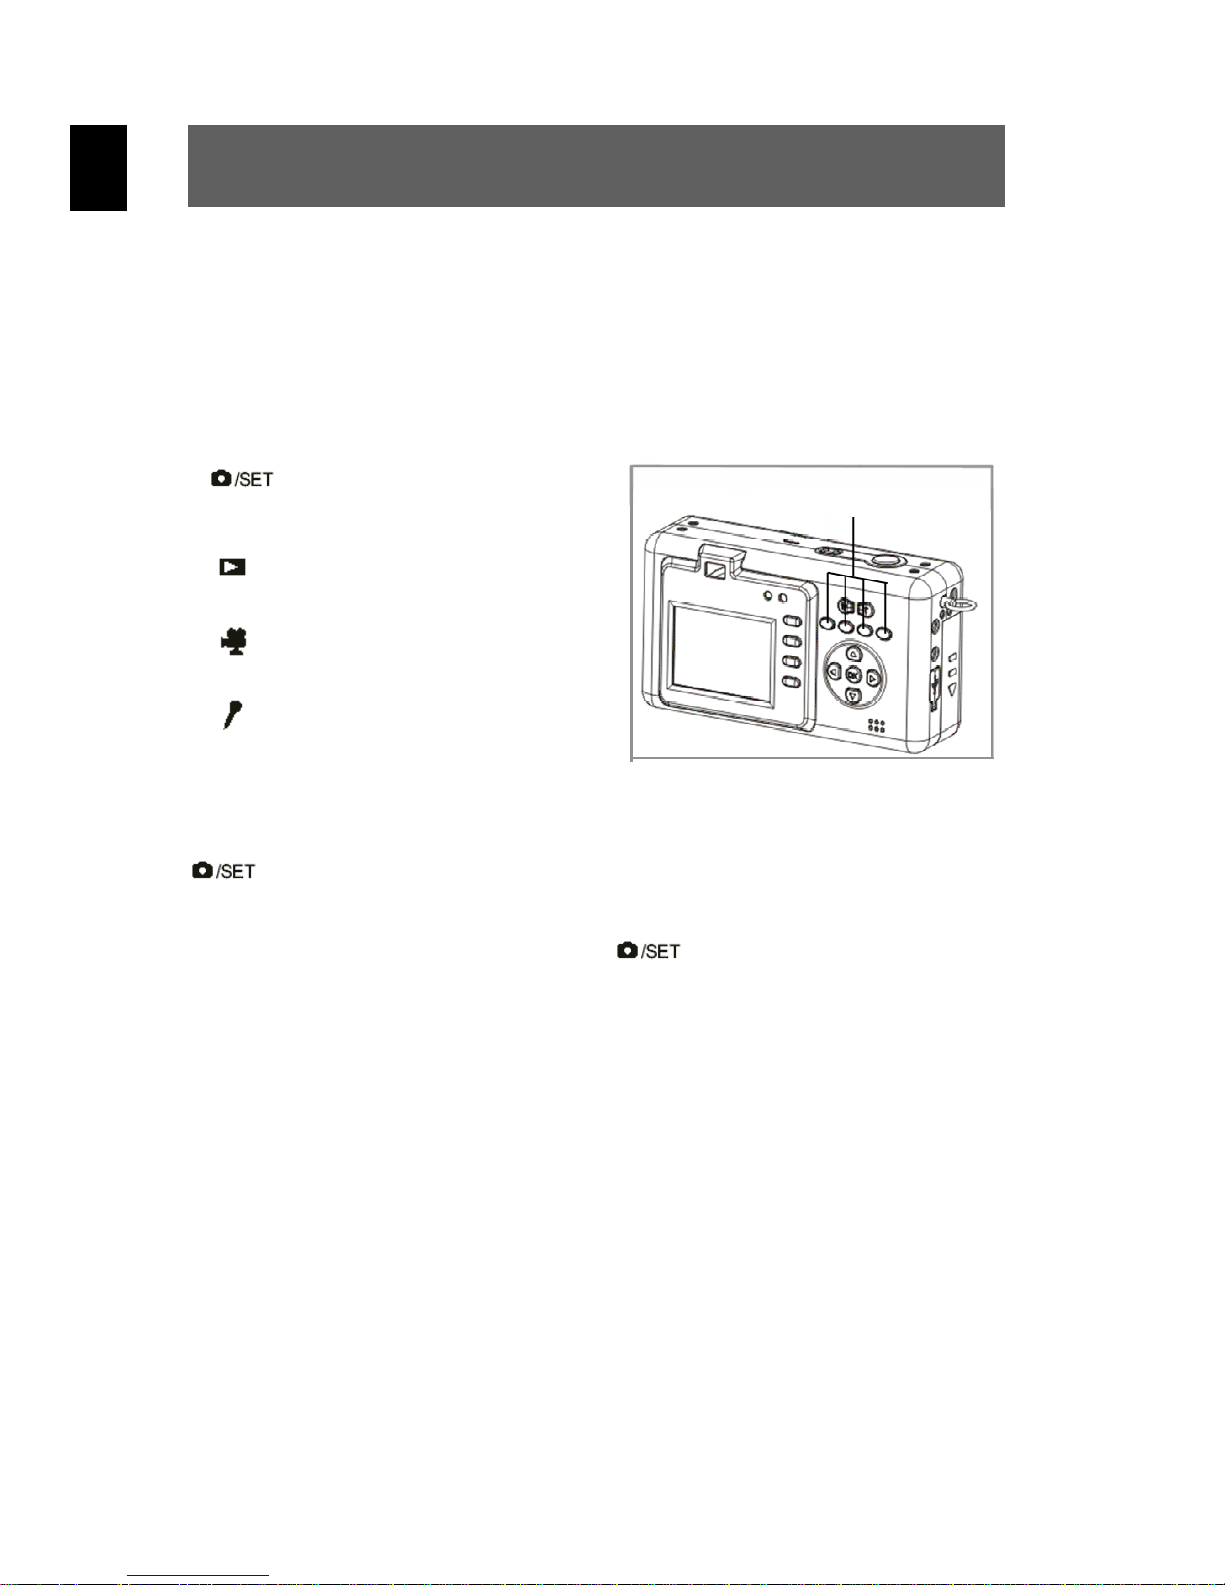
Diese Kamera bietet fünf Verwendungsmodi an. Nach dem Einschalten
der Kamera wird der Bild-Modus automatisch gewählt. Drücken Sie die
folgenden Modustasten, um den gewünschten Modus zu wählen.
Wahl des Bild-Modus und
des Einstellungsmodus
Wiedergabe-Modus
Video-Modus
Aufnahme-Modus
Modustasten
Wenn sich die Kamera im Bild-Modus befindet, drücken Sie die Taste
, um in den Einstellungsmodus zu gelangen.
Wenn sich die Kamera im Einstellungsmodus oder einem der anderen
Modi befindet, drücken Sie die Taste
Bild-Modus zu gelangen.
, um wieder zurück in den
12
Page 13
3. Aufnehmen von Bildern
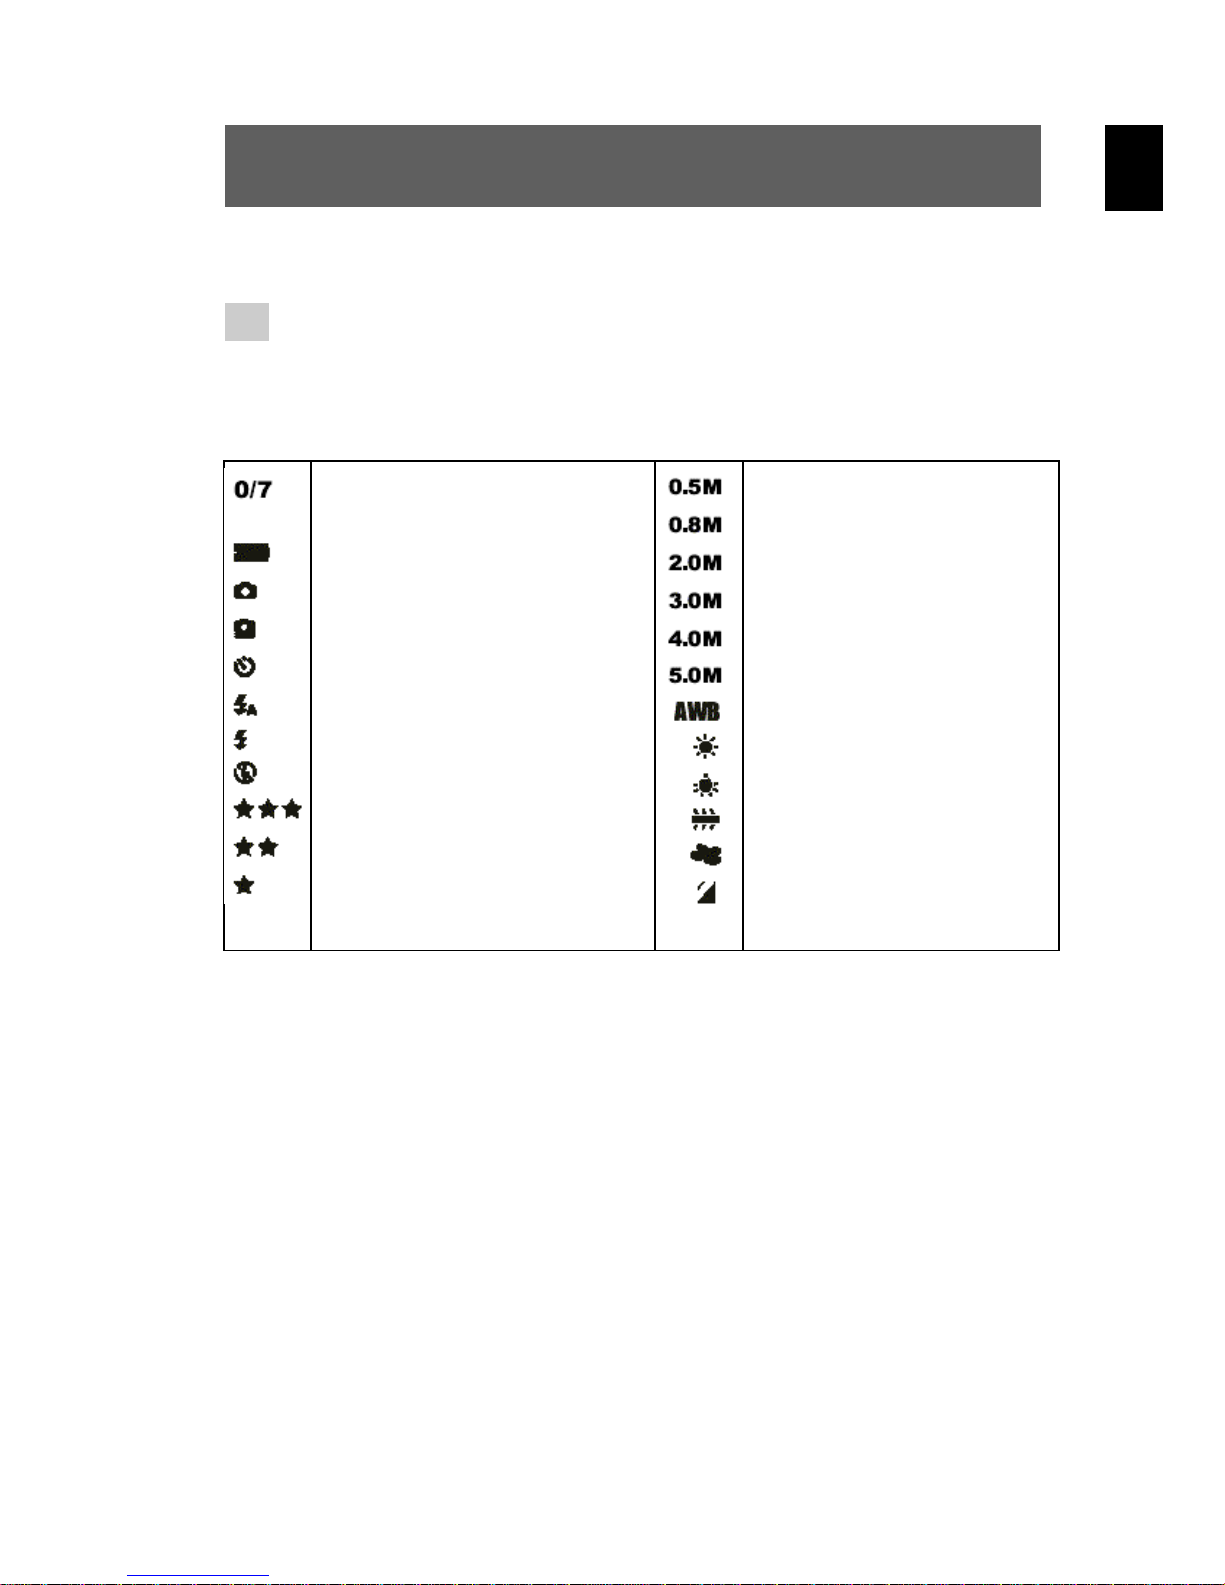
1 Beschreibungen der LCD-Anzeige
Status-Symbole im Bild-Modus
Anzahl aufgenommener Bilder
Anzahl verfügbarer Bilder
Batteriestatus
Einzelbildmodus
Serienbildmodus
Selbstauslösermodus
Automatischer Blitz
Permanenter Blitz
Blitz aus
Höchste Bildqualität
Mittlere Bildqualität
Standard-Bildqualität
0,5 Megapixel Bild-Modus
0,8 Megapixel Bild-Modus
2,0 Megapixel Bild-Modus
3,0 Megapixel Bild-Modus
4,0 Megapixel Bild-Modus
5,0 Megapixel Bild-Modus
Automatischer Weißabgleich
Weißabgleich Tageslicht
Weißabgleich Tungsten
Weißabgleich Fluoreszenz
Weißabgleich bewölkt
externe Speicherkarte in
Betrieb
DE
13
Page 14
DE
2 Fotos machen
Schalten Sie Ihre Kamera ein, indem Sie für 1-2 Sekunden auf die
Ein/Aus-Taste drücken.
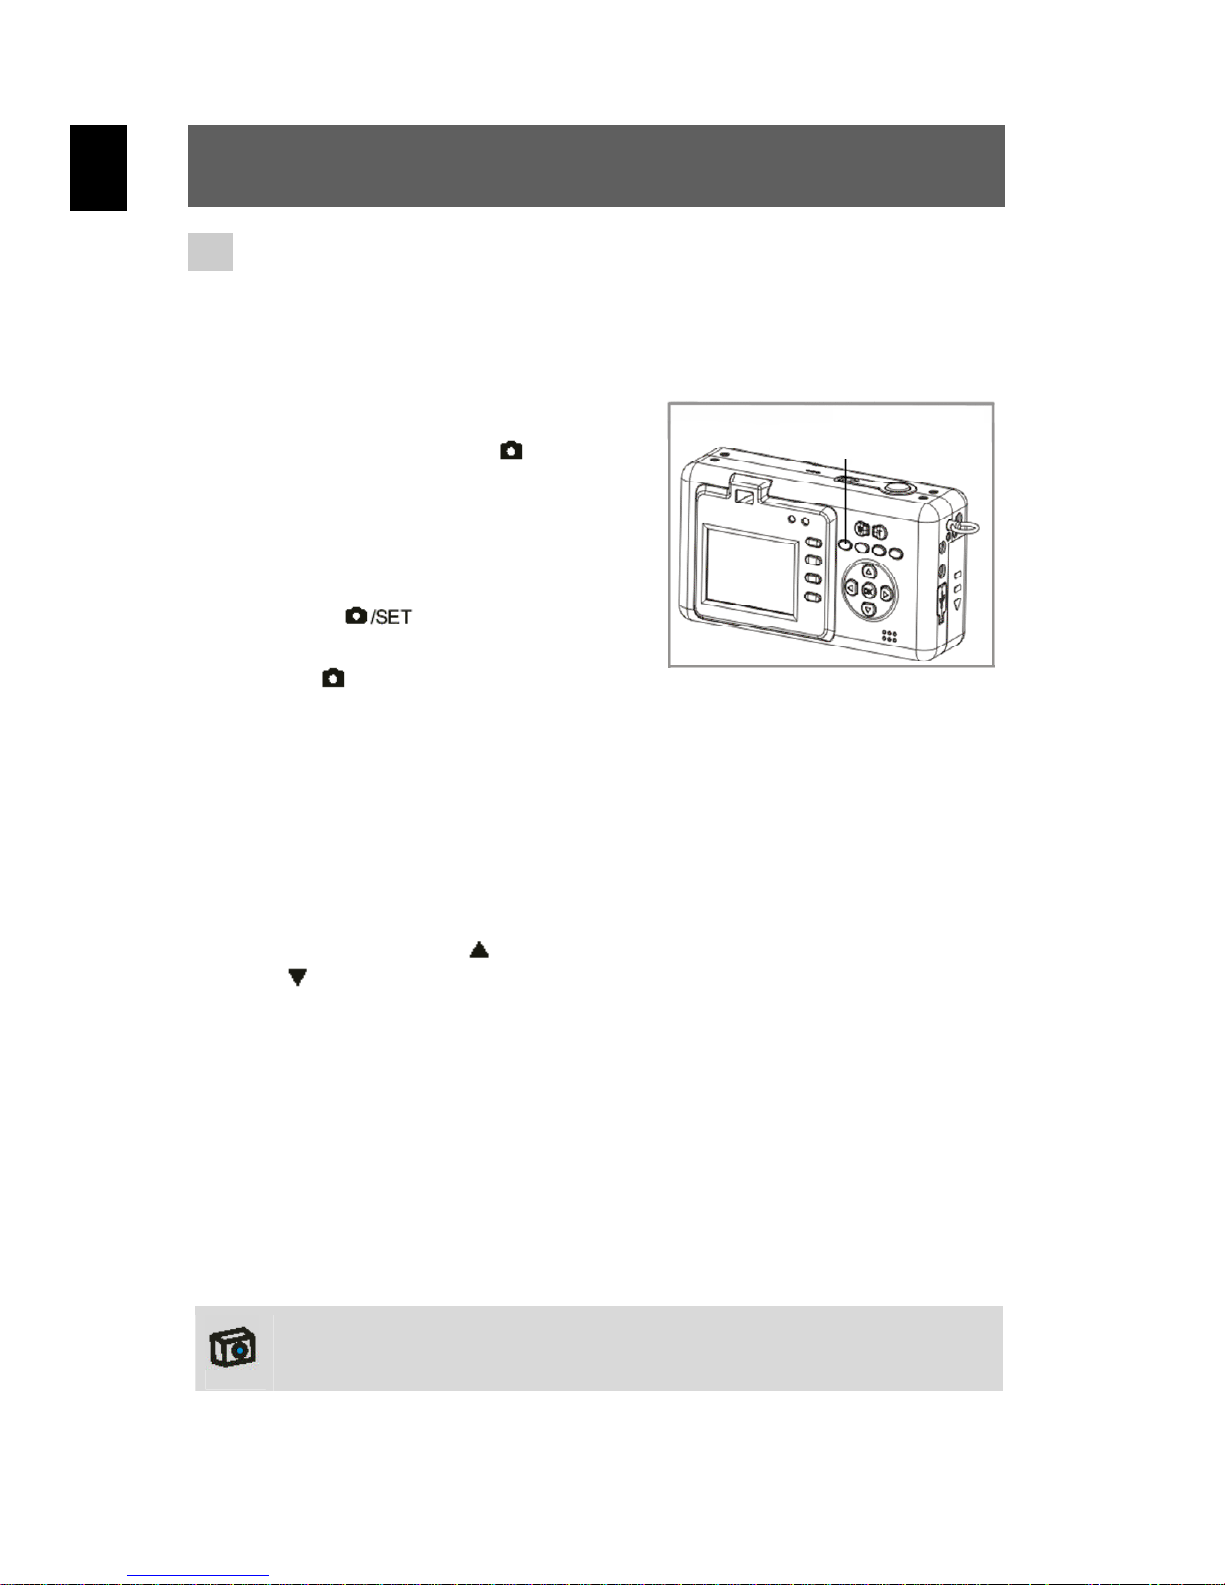
Modustaste
Bild/Einstellung
1
Wählen Sie den
Einzelbildmodus
Nach dem Einschalten der
Kamera wird der Bild-Modus
automatisch gewählt. Wenn
nicht, drücken Sie die Modus-
taste
dus zu wählen. Wenn das Symbol
der LCD-Anzeige erscheint, ist
der Bild-Modus aktiv.
in der linken oberen Ecke
, um den Bild-Mo-
Optisches und digitales Ein- oder Auszoomen
2
Wählen Sie das Bild-Motiv mit der LCD-Anzeige. Drücken
Sie zum optischen Einzoomen die T-Taste und zum Auszoomen die W-Taste. Drücken Sie zum digitalen Einzoomen
die Hoch-Taste (
).
(
Autofokus fixieren / Bild aufnehmen
) und zum Auszoomen die Runter-Taste
3
Drücken Sie den Auslöser halb nieder. Die automatische Fokussierung ist abgeschlossen, wenn das Bild in der LCD-Anzeige
klar erscheint. Drücken Sie danach den Auslöser ganz nach
unten, um ein Bild aufzunehmen. Wenn ein Signalton ertönt, ist
das Bild aufgenommen.
Die mit der Kamera aufgenommenen Bilder werden im Format
JPEG gespeichert.
14
Page 15
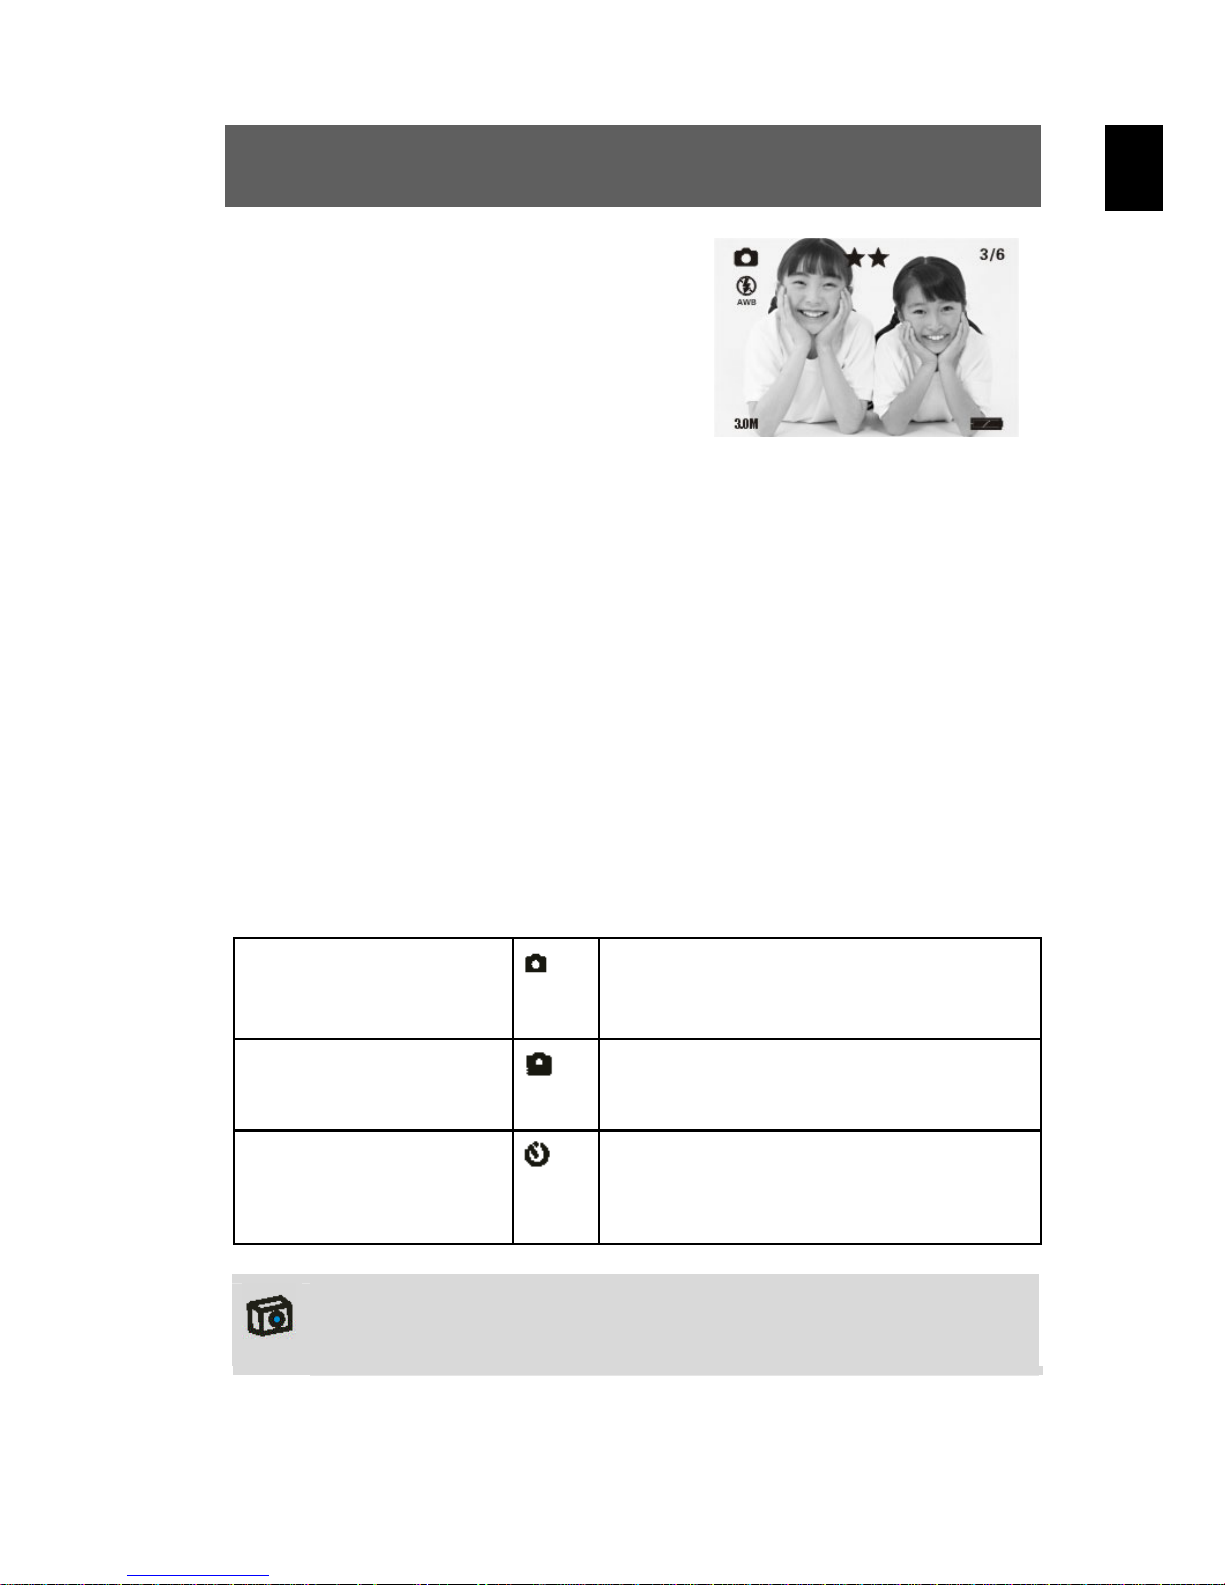
In der LCD-Anzeige können Sie nun
das aufgenommene Bild betrachten.
Die Bedeutung der in der LCDAnzeige sichtbaren Status-Symbole
ist in der Tabelle auf Seite 13 erklärt.
Wenn Sie im Bild-Modus die Menütaste drücken, können Sie folgende
Menü-Funktionen auswählen:
• Capture Mode (Betriebsart des Bild-Modus)
• Strobe (Blitz-Einstellung)
• Resolution (Auflösung)
• Photo Quality (Bildqualität)
• Photo Effect (Bildspezialeffekte)
DE
• WB (Weißabgleich)
• EV (Belichtungskorrektur)
Innerhalb der Menü-Funktion „Capture Mode“ (Betriebsart des BildModus) können Sie drei verschiedene Bild-Modi auswählen:
Single
(Einzelbildmodus)
Sequence
(Serienbildmodus)
SelfTimer
(Selbstauslösermodus)
Aufnahme eines einzigen Bildes beim
Drücken des Auslösers
Aufnahme einer Serie von drei Bildern
beim Drücken des Auslösers
Aktivierung des Verschlusses
10 Sekunden nach dem Drücken
des Auslösers
Der Bild-Modus ist auf Einzelbild voreingestellt.
Mit der Sleep-Taste (Ein/Aus LCD-Anzeige) kann die LCDAnzeige ausgeschaltet werden, um Energie zu sparen.
15
Page 16
DE
4. Aufnehmen von Audio
1
2
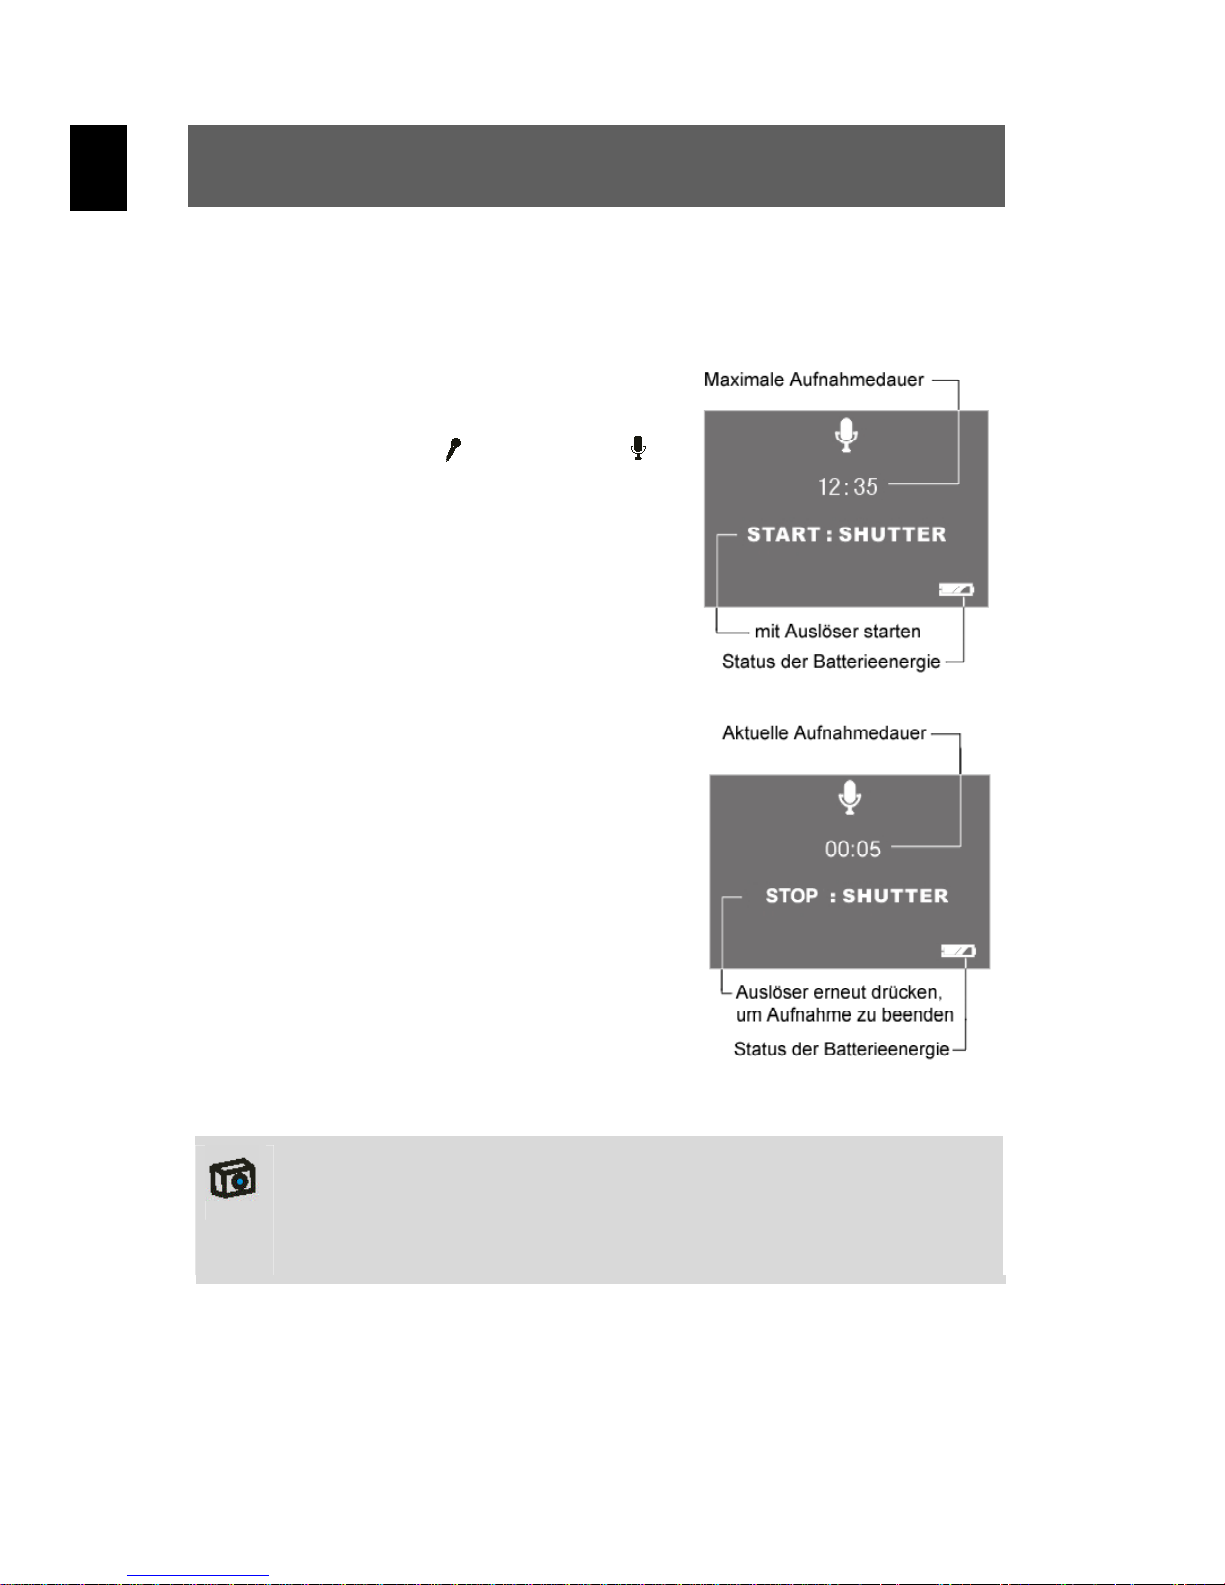
Die Funktion „Digital Recording“
(Digitale Aufnahme) aktivieren Sie
mit der Taste
erscheint nun auf der LCDAnzeige. Vor der Aufnahme
sehen Sie die rechts abgebildete
Information. Zum Start der Tonaufnahme drücken Sie einmal auf
den Auslöser.
Wurde die Aufnahme mit dem
Auslöser gestartet, erscheint die
nebenstehende Information.
Zum Beenden der Tonaufnahme
drücken Sie den Auslöser erneut.
. Das Symbol
16
Der Ton wird im WAV-Format aufgezeichnet. Die Länge hängt von
der Speichergröße ab.
Mit der Sleep-Taste (Ein/Aus LCD-Anzeige) kann die LCDAnzeige ausgeschaltet werden, um Energie zu sparen.
Page 17
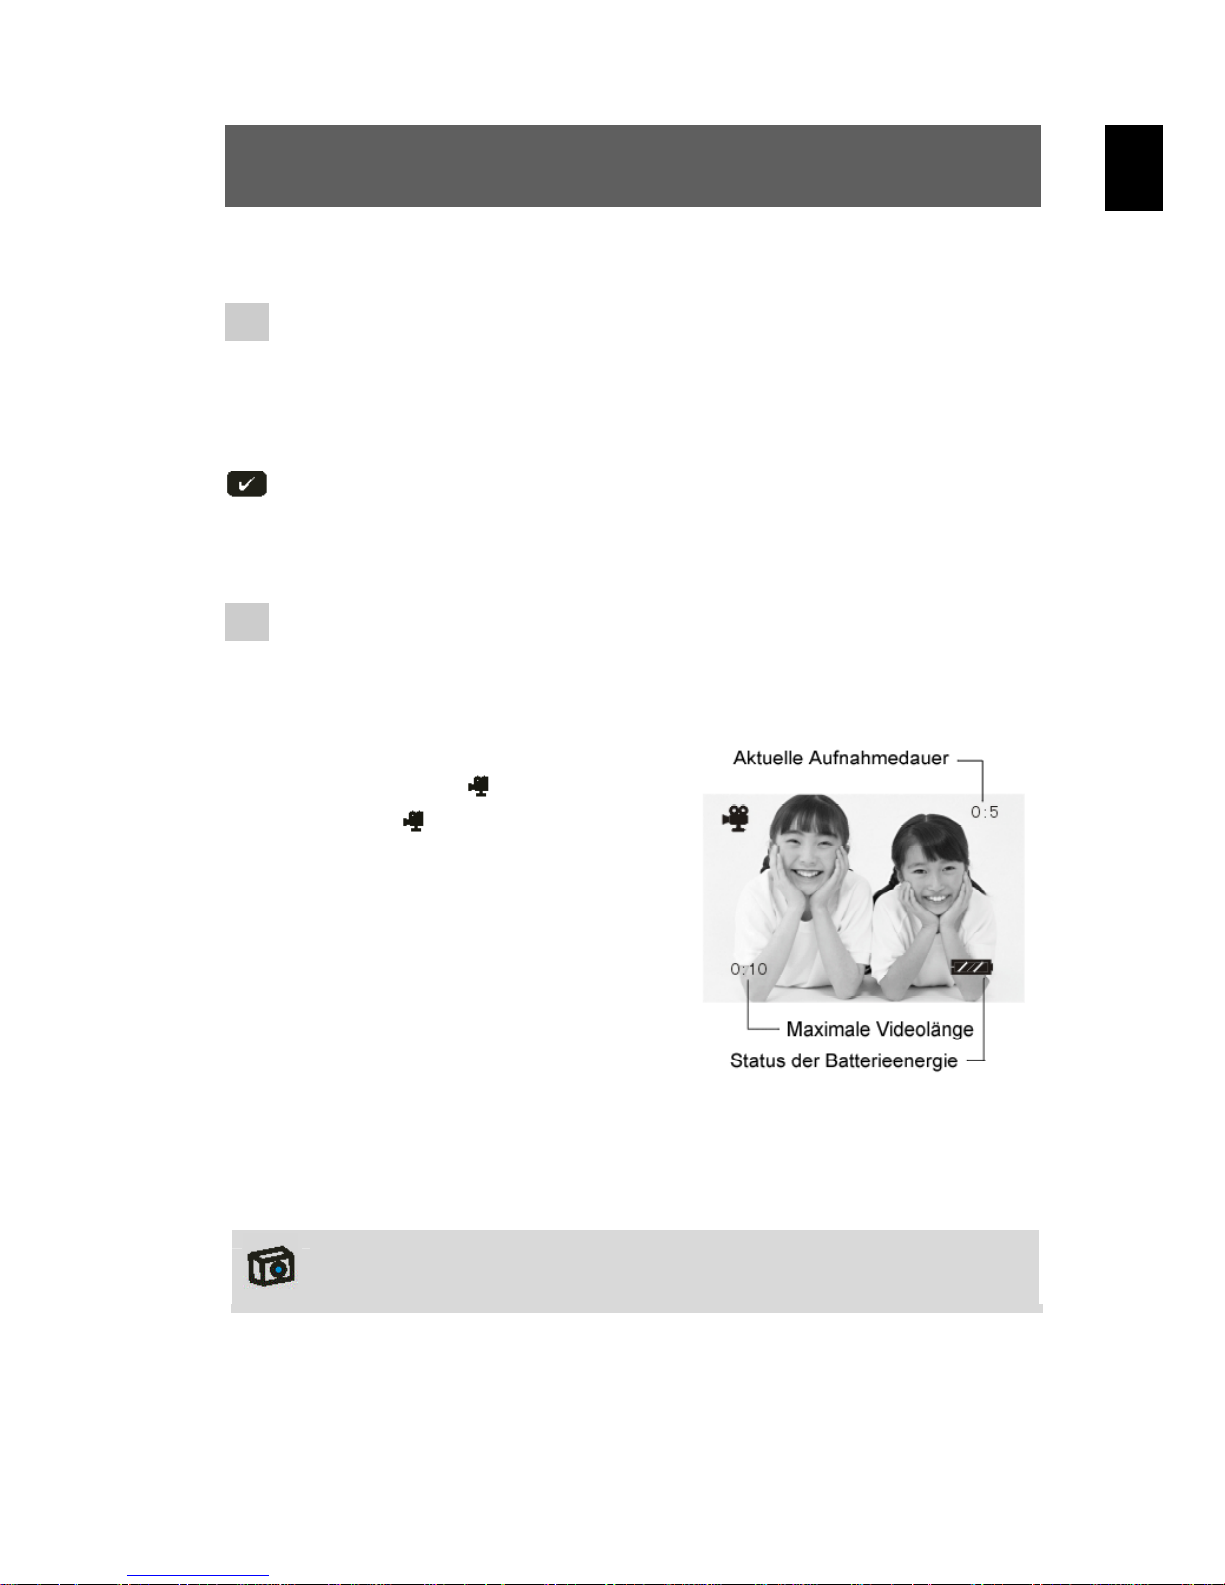
5. Aufnehmen von Videoclips
1 Beschreibungen der LCD-Anzeige
Rechts oben wird die abgelaufene Zeit angezeigt. Links unten wird die
verbleibende Zeit angezeigt.
Die Information ändert sich während der Aufnahme nicht. Erst nach
deren Ende wird sie aktualisiert.
2 Aufzeichnen eines Videoclips
Schalten Sie Ihre Kamera ein.
Drücken Sie die Taste für den
1
Video-Modus
. Wenn das
DE
Symbol
Ecke der LCD-Anzeige erscheint,
ist der Video-Modus aktiv.
Drücken Sie den Auslöser, um
2
die Videoaufnahme zu starten.
Ein erneutes Drücken des
Auslösers stoppt die Aufnahme.
Während der Videoaufzeichnung
erscheint die rechts abgebildete
Information auf der LCD-Anzeige.
Das Video wird im AVI-Format aufgezeichnet (mit Ton). Die Länge
hängt von der Speichergröße ab.
in der linken oberen
17
Page 18

DE
6. Wiedergabe von Bildern, Audio und Videos
1 Beschreibungen der LCD-Anzeige
Status-Symbole im Wiedergabe-Modus
2004:02:11
12:02:47
01/10
Aktuelle Systemzeit: 11.02.2004, 12:02:47
Anzahl vorhandener Bilder / Anzahl aller Bilder
Foto ist geschützt
Foto ist ungeschützt
Aktuelle Datei ist ein Bild (jpg)
Aktuelle Datei ist ein Video (avi)
Aktuelle Datei ist eine Tonaufzeichnung (wav)
2 Anschauen der Bilder, Videos und Töne
Aktivieren Sie den Wiedergabe-Modus durch die Taste .
1
2
Fotos, Filme und Tonaufzeichnungen können nun wiedergegeben werden. Auf der LCD-Anzeige erscheint das Symbol
Im Abspielmodus durchsuchen Sie die Aufnahmen mit
folgenden Tasten:
zeigt letztes Foto, Video oder letzte Tonaufzeichnung
zeigt nächstes Foto, Video nächste Tonaufzeichnung
OK Miniaturansicht aufrufen/beenden.
Videos oder Tonaufzeichnungen werden von der Miniaturansicht aus mit dem Auslöser gestartet. Ein erneutes Drücken
des Auslösers beendet das Abspielen.
.
18
Page 19
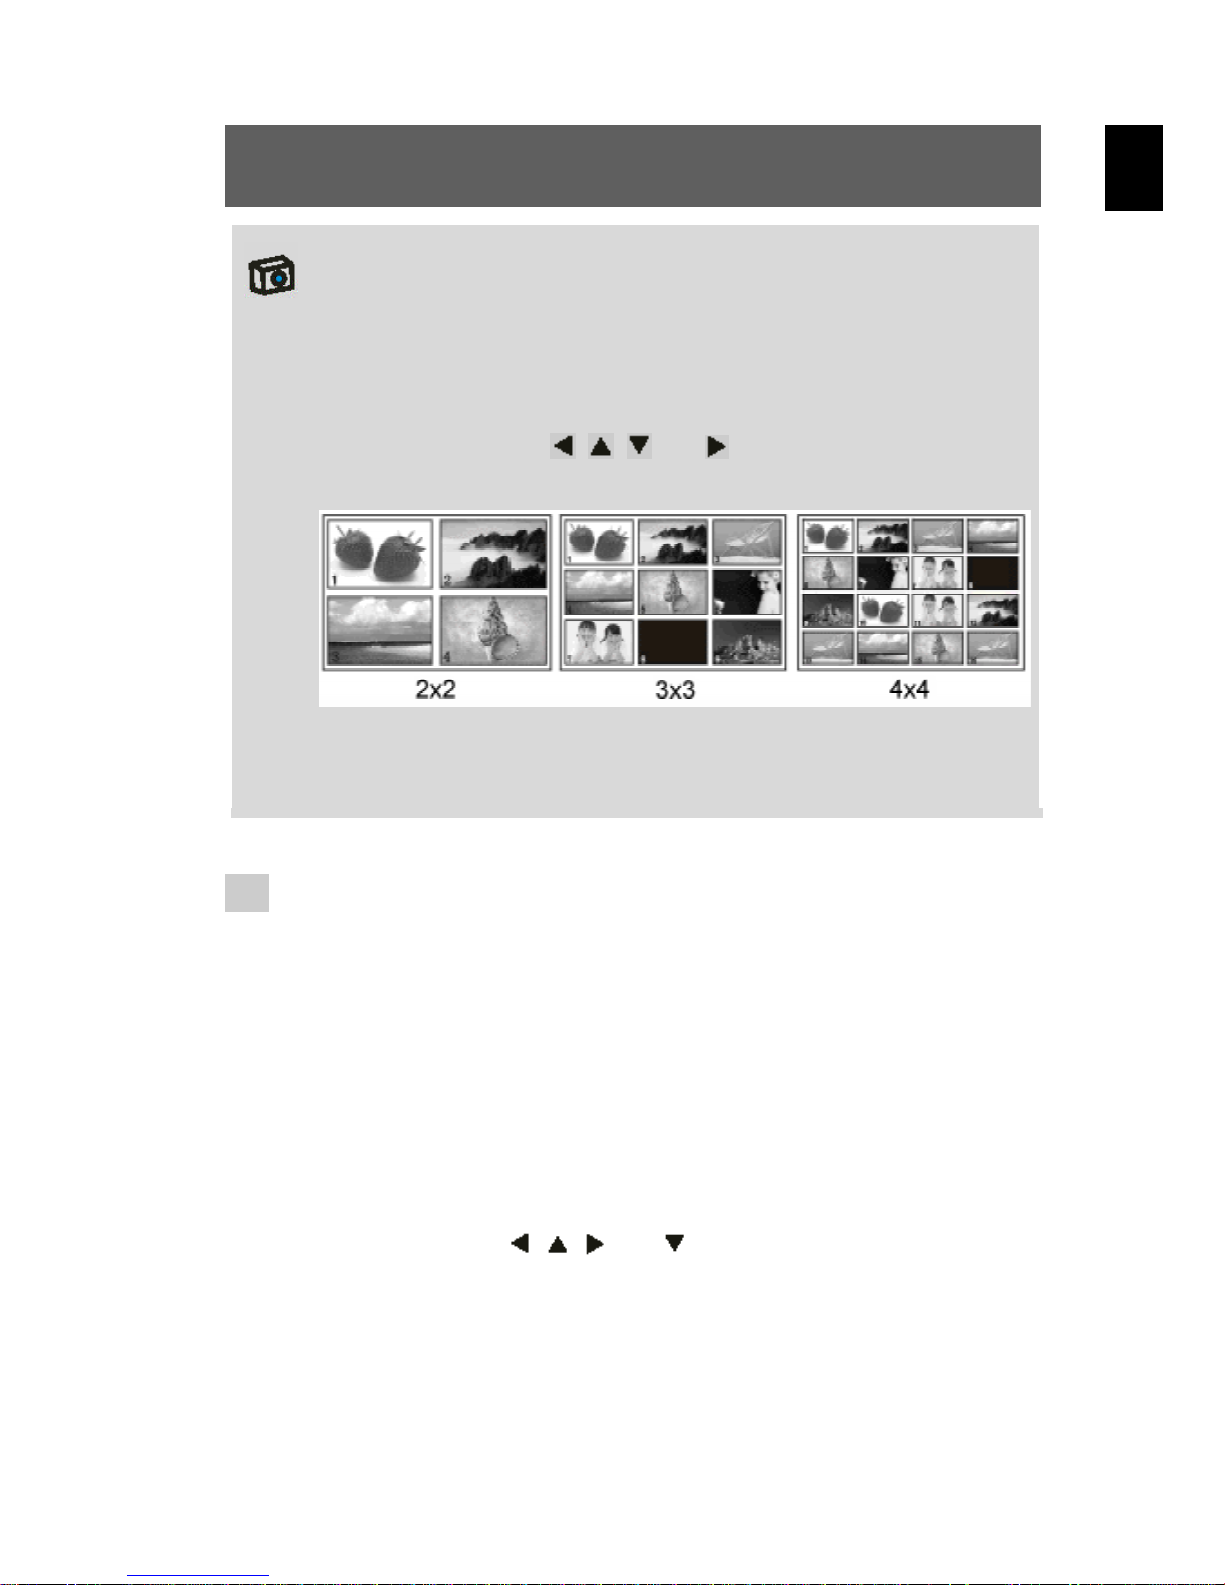
Miniaturansicht
Während des Abspielens von Fotos, Videos und Tonaufzeichnungen können Sie die Miniaturansicht mit der Bestätigungstaste
(OK-Taste) aufrufen. In diesem Modus können mehrere Fotos,
Videos oder Tonaufzeichnungen gleichzeitig aufgelistet werden.
Mit den Steuertasten , , und kann nun eine Datei
gewählt und mit OK wiedergegeben werden.
Es gibt drei Miniaturmodi: 2x2, 3x3 und 4x4, so dass gleichzeitig
vier, neun oder sechzehn Miniaturen auf dem LCD-Monitor
angezeigt werden können.
DE
3 Anzeige vergrößerter Bilder (Zoom)
Bei der Wiedergabe von Bildern können Sie die Zoom-Tasten T und W
verwenden, um ein Bild heranzuzoomen bzw. um es wieder in die
Ausgangsgröße zu bringen.
Drücken Sie die T-Taste, um das Bild heranzuzoomen.
1
2
Drücken Sie die W-Taste, um das Bild wieder normal
anzuzeigen.
Nachdem Sie Ihr Bild herangezoomt haben, drücken Sie
die Steuertasten
Bildbereiche anzusehen.
, , und , um sich unterschiedliche
19
Page 20
DE
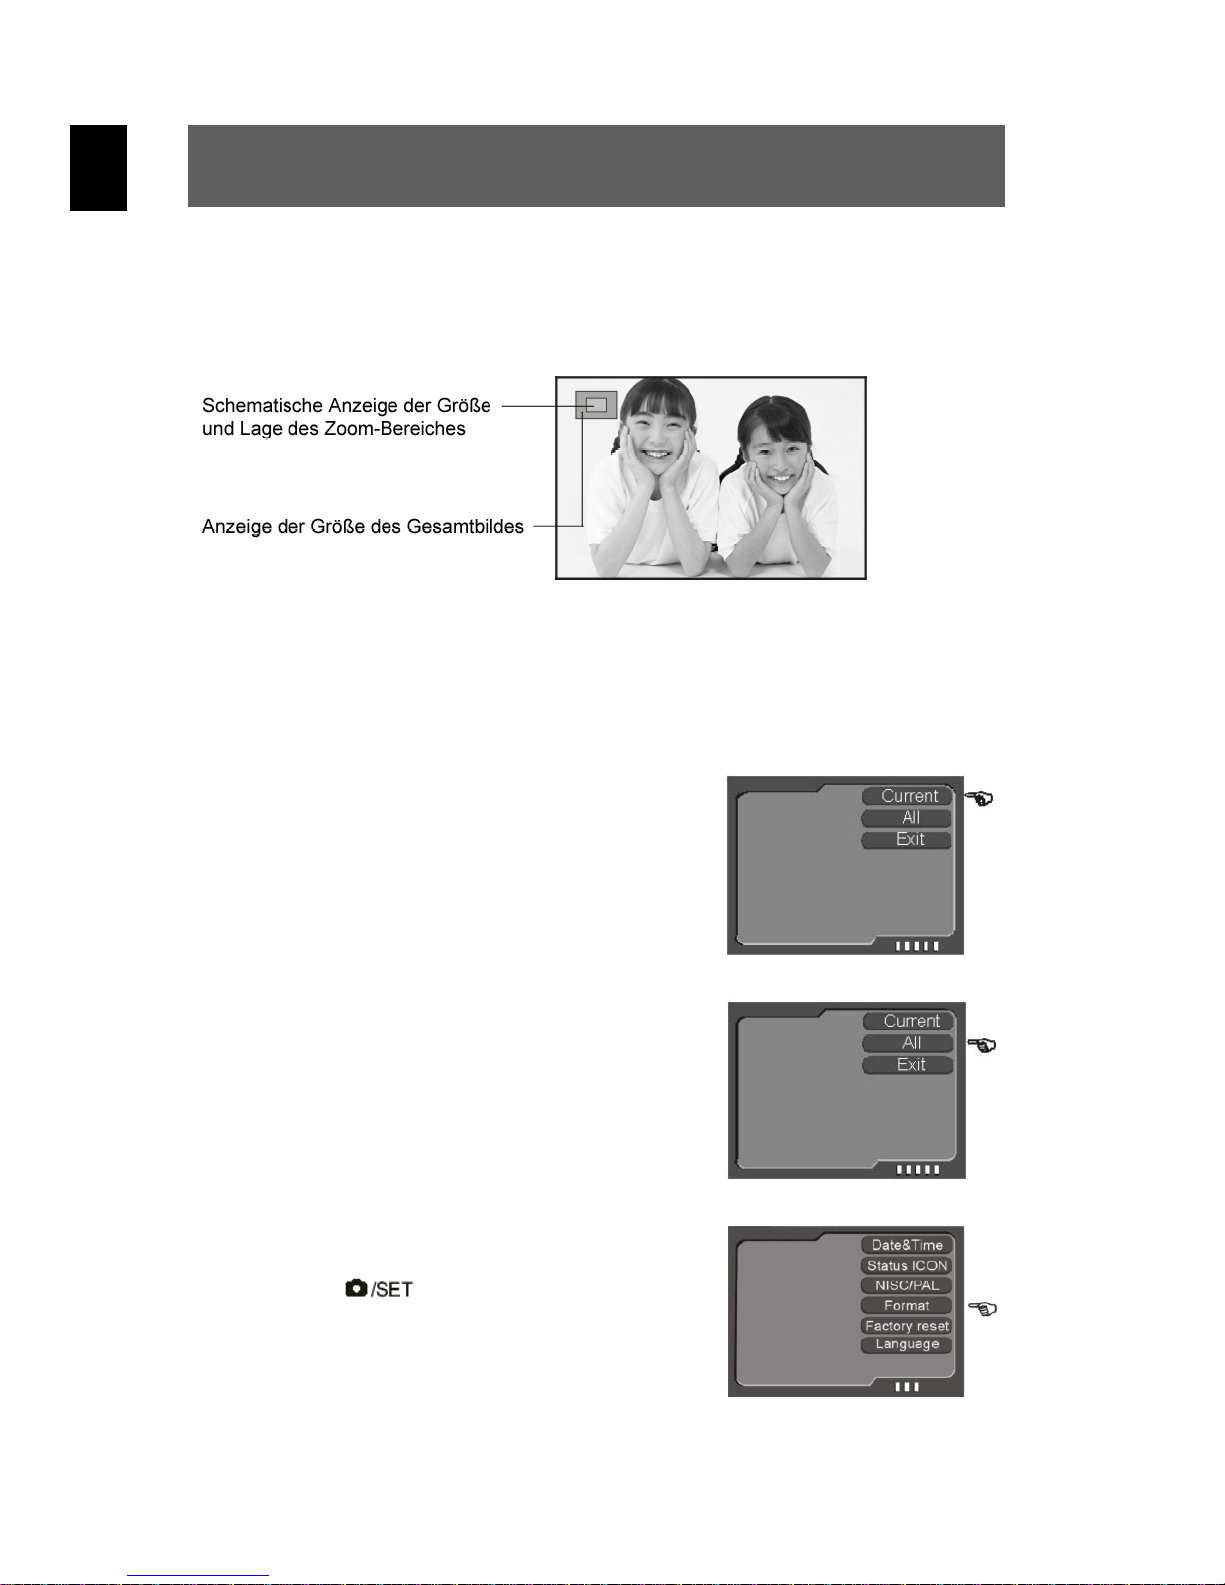
In der oberen linken Ecke der LCD-Anzeige sollte während der ZoomAnzeige ein kleines Fenster erscheinen, das die Größe und Lage des
aktuell angezeigten Bildausschnittes innerhalb des Gesamtbildes
anzeigt (siehe folgende Abbildung).
7. Fotos löschen
Unerwünschte Fotos können gelöscht werden. Sie können einzelne
oder alle Fotos löschen. Dazu muss der Wiedergabe-Modus aktiv sein.
Ein einzelnes Foto löschen
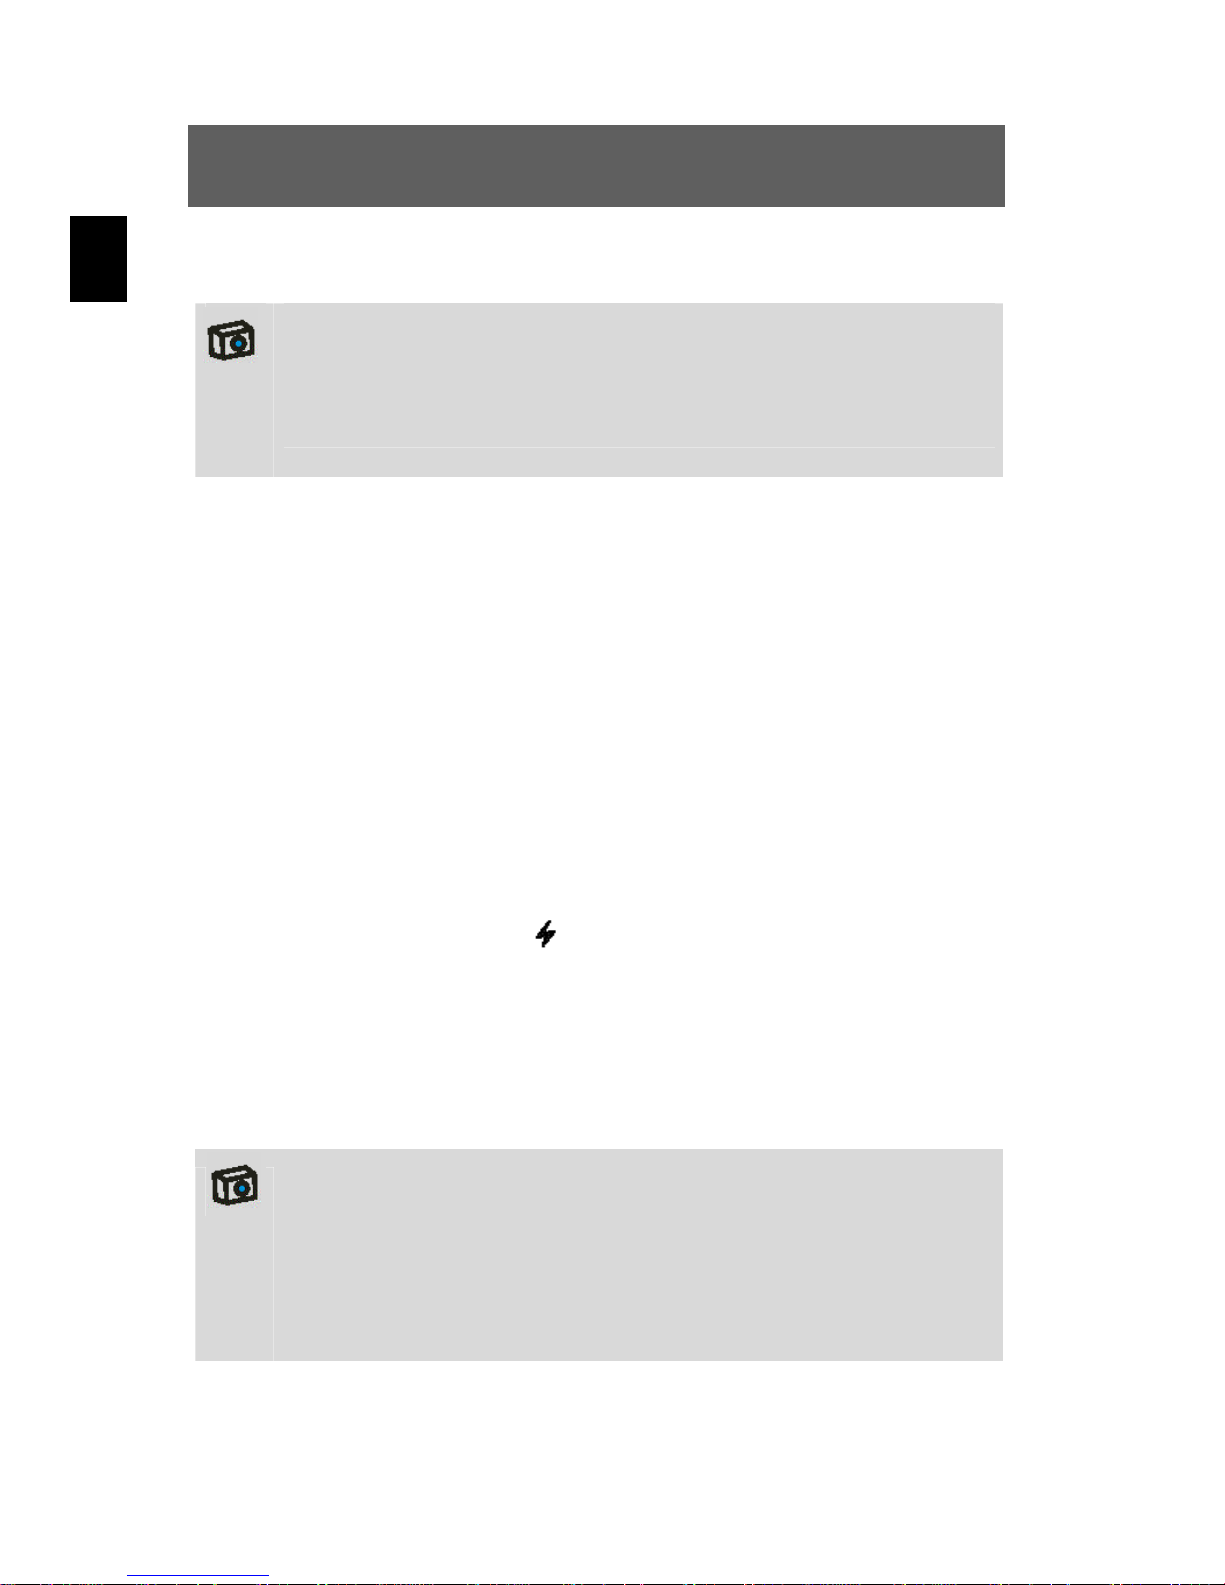
Im Wiedergabe-Modus wählen Sie zunächst
das zu löschende Foto. Dann drücken Sie die
Menütaste und wählen „DELETE“ (LÖSCHEN)
und „Current“ (Aktuelles Bild), um das Foto zu
entfernen.
Alle Fotos löschen
Um alle Fotos zu löschen, drücken Sie die
Menütaste, wählen „DELETE“ (LÖSCHEN) und
dann „All“ (Alle Bilder). Nun werden alle Fotos
entfernt.
Speicher formatieren
Mit der Taste rufen Sie den Einstellungsmodus auf. Wählen Sie „Format“ (Formatieren),
drücken Sie die OK-Taste und wählen Sie „YES“
(JA), um die Formatierung zu starten. Nach der
Formatierung erscheint wieder das Menü.
20
Page 21

Mit der oben erwähnten Methode können Sie auch Videoclips und
Tonaufnahmen löschen.
Achtung
Die Formatierung löscht alle nicht geschützten Daten.
Geschützte Daten werden nicht gelöscht, können aber formatiert
werden. Bitte lesen Sie auf Seite 29, wie Daten gesichert und
entsichert werden.
Erweiterte Bedienung
1. Aufnahmen mit Blitzlicht
Wenn das Umgebungslicht für die Aufnahme Ihres Bildes nicht
ausreicht, kann der Blitz das benötigte zusätzliche Licht geben.
DE
Schalten Sie die Kamera ein und wählen Sie den Bild-Modus
1
2
(Einzelbild oder Selbstauslösermodus).
Drücken Sie einmal oder mehrmals auf die Blitzlichttaste
Bei jedem Drücken wechselt die Blitzbetriebsart von „Auto“
zu „Permanent“ zu „Aus“. Dabei erscheint gleichzeitig das
entsprechende Status-Symbol der Blitzbetriebsart in der
linken oberen Ecke der LCD-Anzeige.
Wenn es dunkel ist, wird der Blitz bei „Auto“ automatisch aktiviert.
Bei „Permanent“ wird bei jedem Bild der Blitz benutzt. Mit „Aus“
wird der Blitz deaktiviert. Der Blitz arbeitet nur bei Einzelbildern
und bei Selbstauslöser. Bei Serienbild und im Videomodus
funktioniert er nicht.
Berücksichtigen Sie, dass das Verwenden des Blitzes einen
höheren Stromverbrauch der Batterien verursacht.
, um eine von drei Blitzbetriebsarten einzustellen.
21
Page 22
DE
2. Menüoptionen ändern
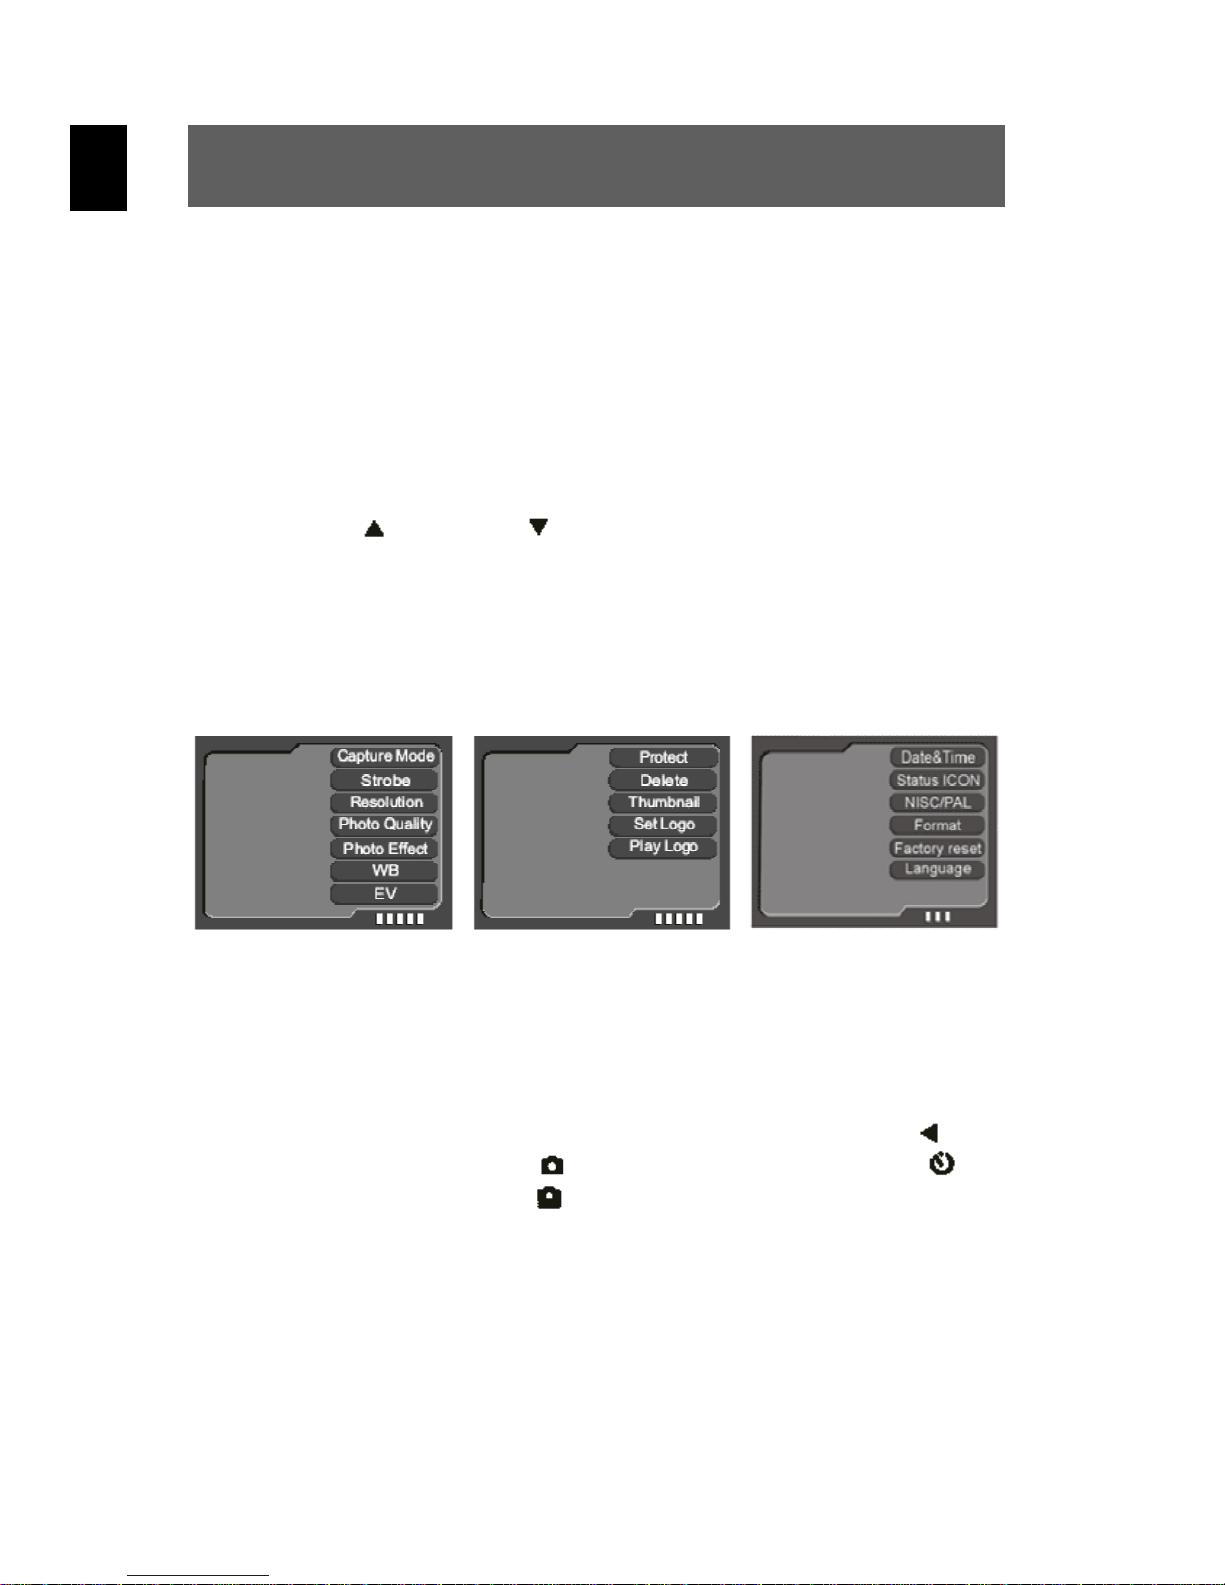
Die Kamera besitzt ein Bild-, Wiedergabe- und Einstellungsmenü.
Wählen Sie diese Menüs innerhalb des Bild-, Wiedergabe-
1
2
Die jeweilige gewählte Option wird farblich hervorgehoben.
Menü Bild-Modus Menü Wiedergabe-Modus Menü Einstellungsmodus
oder Einstellungsmodus aus, indem Sie auf die Menütaste
drücken.
In den Menüs wählen Sie die entsprechende Option mit den
Tasten
Bestätigungstaste (OK).
(Hoch) und (Runter) und bestätigen mit der
3. Schnelltasten verwenden
Schnellwahl des Bildmodus
Im Bild-Modus kann durch wiederholtes Drücken der Linkstaste
die Modi „Single“ („Einzelbild“)
und „Sequence“ („Serienbild“)
chende Symbol erscheint gleichzeitig links oben auf der LCD-Anzeige.
Schnellwahl der Auflösung
Im Bild-Modus kann mit der OK-Taste die Auflösung sequenziell
gewählt werden. Die aktuelle Auflösung erscheint gleichzeitig links
oben auf der LCD-Anzeige.
, „SelfTimer“ („Selbstauslöser“)
zugegriffen werden. Das entspre-
auf
22
Page 23
Ö
Schnellwahl der Bildqualität
Im Bild-Modus kann durch wiederholtes Drücken der Rechtstaste
die verschiedenen Bildqualitäten
Das entsprechende Symbol erscheint gleichzeitig links oben auf der
LCD-Anzeige.
Schnellwahl der Blitzbetriebsart
Bei Einzelbild und Selbstauslöser kann der Blitz mit der Taste
„Auto“
sprechende Symbol erscheint gleichzeitig auf der LCD-Anzeige.
Schnelles Löschen von Bildern
Die Löschschnelltaste
aufgenommene Bild zu löschen.
, „Permanent“ oder „Aus“ eingestellt werden. Das ent-
kann verwendet werden, um das zuletzt
, und zugegriffen werden.
auf
DE
auf
Drücken Sie im Bild-Modus die
1
Löschschnelltaste
aufgenommene Bild erscheint nun
in der LCD-Anzeige.
Wählen Sie mit der Hoch-Taste die
2
Option „DELETE" (L
drücken Sie die OK-Taste, um das
Bild zu löschen. Danach kehrt das
System zurück in den Bild-Modus.
1. Die Löschschnelltaste kann nur das letzte Bild löschen.
Videoclips und Tonaufnahmen können damit nicht gelöscht
werden.
2. Die Löschschnelltaste funktioniert nur im Bild-Modus.
. Das zuletzt
SCHEN) und
23
Page 24
DE
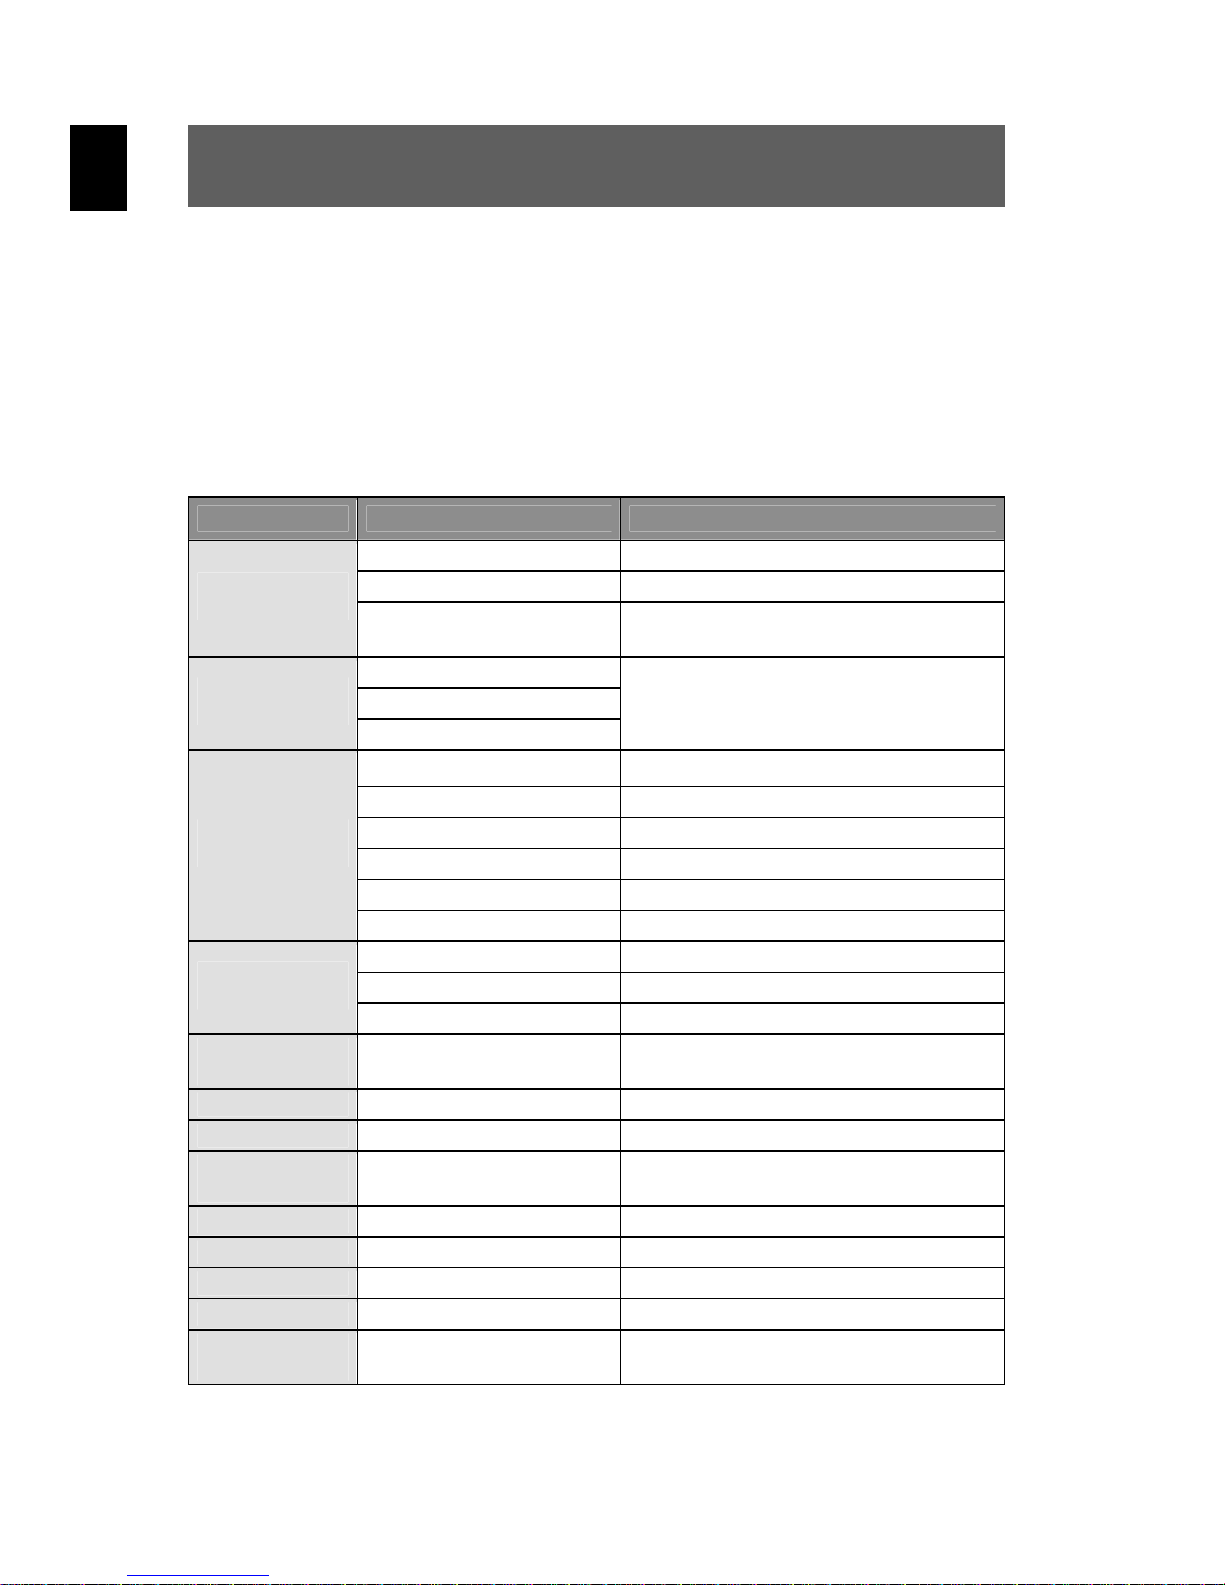
4. Liste der Menüoptionen
Je nach Betriebsmodus unterscheiden sich die Menüinhalte.
Der Menüinhalt kann je nach Kameramodell leicht variieren.
Näheres unter „Technische Daten“ auf Seite 38.
Bild-Modus
Menü Einstellung Beschreibung
Single (Einzel) Einzelbildaufnahme
Shoot Mode
(Bild-Modus)
Strobe
(Blitz)
Sequence (Serie) Drei Fotos in Reihe
SelfTimer
(Selbstauslöser)
AUTO
Force (Permanent)
Forbidden (AUS)
2560 x 1920 5 Millionen Bildpunkte
10 Sekunden Selbstauslöser
Näheres zur Einstellung finden Sie auf
Seite 21.
2304 x 1728 4 Millionen Bildpunkte
Resolution
(Auflösung)
Photo Quality
(Fotoqualität)
Photo Effect
(Fotoeffekt)
B/W (Schwarzweiß) Schwarzweiß Fotodarstellung
Sepia Fotos mit nostalgischem Braunton
WB
(Weißabgleich)
Daylight (Tageslicht) Weißabgleich für Tageslichtmodus
Tungsten Weißabgleich für Tungstenmodus
Fluorescent (Fluoreszent) Weißabgleich für Fluoreszenzmodus
Cloudy (Bewölkt) Weißabgleich für bewölkten Modus
EV
(Belichtung)
2048 x 1536 3 Millionen Bildpunkte
1600 x 1200 2 Millionen Bildpunkte
1024 x 768 0,8 Millionen Bildpunkte
800 x 600 0,5 Millionen Bildpunkte
Superfine (Superfein) Optimale Bildqualität
Fine (Fein) Mitllere Bildqualität
Economy (Standard) Normale Bildqualität
Normal Normale Fotodarstellung
Auto Automatischer Weißabgleich
−2.0 EV bis +2.0 EV Sechsstufige Einstellungsmöglichkeit
24
Page 25
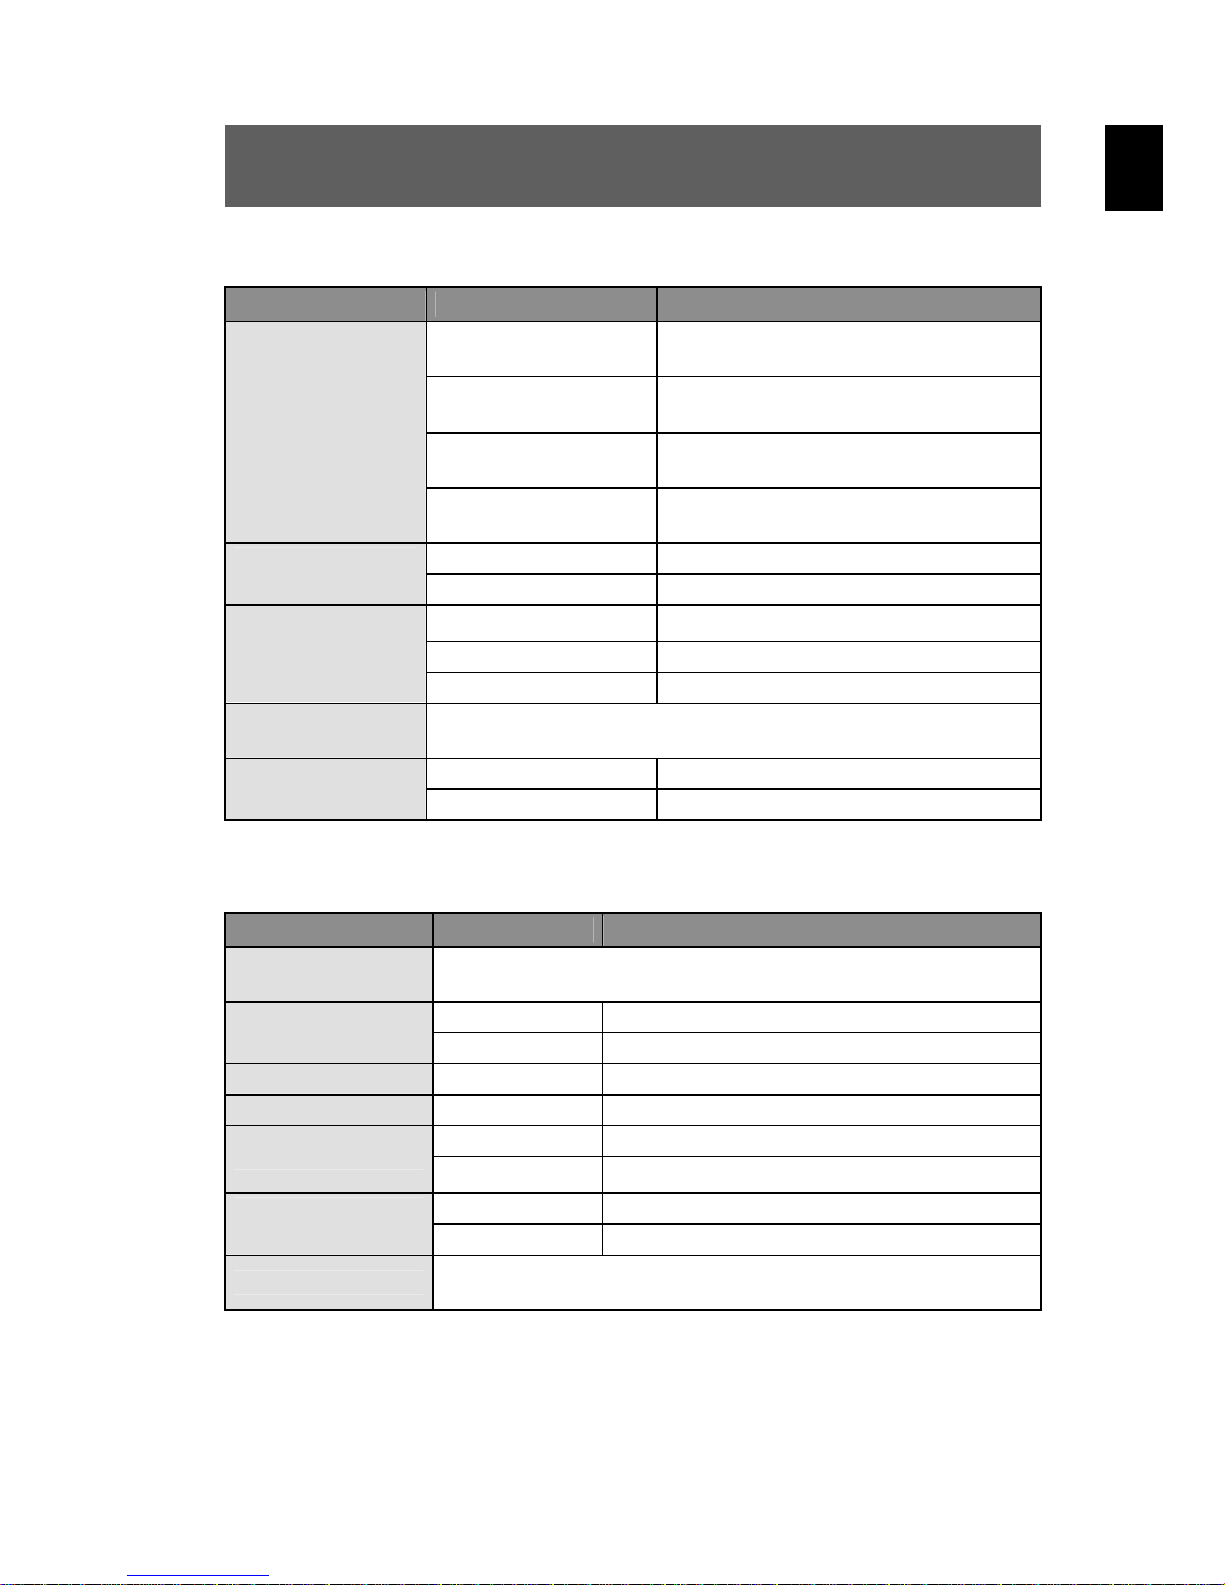
Wiedergabe-Modus
Menü Einstellung Beschreibung
Lock Current
(Aktuelles sichern)
Unlock Current
Protect
(Schützen)
Delete
(Löschen)
Thumbnail
(Miniatur)
Set Logo
(Logo setzen)
Play Logo
(Logo abspielen)
(Aktuelles entsichern)
Lock All
(Alle sichern)
Unlock All
(Alle entsichern)
Current (Aktuelles) Aktuelles Foto löschen
All (Alle) Alle Fotos löschen
2 x 2 4 Miniaturen gleichzeitig anzeigen
3 x 3 9 Miniaturen gleichzeitig anzeigen
4 x 4 16 Miniaturen gleichzeitig anzeigen
Das aktuelle Foto als Startbild verwenden
Enable (Aktivieren) Aktuelles Foto als Startbild nehmen
Disable (Deaktivieren) Vorgegebenes Bild als Startbild
DE
Aktuelles Foto gegen versehentliches
Löschen schützen
Sicherung für aktuelles Foto aufheben
Alle Fotos gegen versehentliches
Löschen schützen
Alle Fotos entsichern
Einstellungsmodus
Menü Einstellung Beschreibung
Date&Time
(Datum/Uhrzeit)
Status ICON
(Statussymbol)
NTSC/PAL NTSC TV-Ausgang auf NTSC setzen
PAL Ausgang auf PAL setzen
Format
Factory Reset
(Werkeinstellung)
Language (Sprache)
Datum und Uhrzeit für aktuelles Foto einstellen
On (An) Symbol des aktuellen Status einblenden
Off (Aus) Symbol des aktuellen Status ausblenden
Yes (Ja) Formatiert internen / externen Speicher
No (Nein) Formatierung abbrechen
Yes (Ja) Werte auf Werkeinstellung zurücksetzen
No (Nein) Werkeinstellung abbrechen
Die Menüsprache wählen (Menüinhalt kann bei verschiedenen
Modellen variieren).
25
Page 26

DE
5. Belichtungskorrektur
Mit der Korrektur des Belichtungswertes (EV – Exposure Value) können
zu hell oder zu dunkel erscheinende Bilder korrigiert werden.
Bild-Modus wählen
1
Drücken Sie im Bild-Modus auf die Menütaste.
EV-Eintrag wählen
2
Wählen Sie im Menü den Eintrag „EV“ und drücken Sie die OKTaste, um die Belichtungsoption aufzurufen.
EV-Wert wählen
3
Wählen Sie mit den Tasten
tungskorrektur und bestätigen Sie mit der OK-Taste. Der Wert
kann in sechs Schritten zwischen −2.0 EV und +2.0 EV
eingestellt werden.
und eine geeignete Belich-
Achtung
Die Belichtungskorrektur kann sehr nützlich sein. Bei dunklerer
Umgebung setzen Sie den Wert in Richtung Plusbereich und bei
hellerer Umgebung in den Minusbereich.
Befindet sich das Zielobjekt in sehr heller oder dunkler Umgebung
oder wird der Blitz benutzt, sollte die Korrektur nicht verwendet
werden.
26
Page 27

6. Sprache wählen
Wenn Sie die Kamera zum ersten Mal benutzen, werden die Texte auf
der LCD-Anzeige wahrscheinlich nicht in Ihrer Sprache angezeigt.
Sie können die LCD-Anzeigesprache jedoch leicht ändern.
Rufen Sie mit der Taste das Einstellungsmenü auf.
1
Wählen Sie den Menüpunkt „Language“ (Sprache) und
2
bestätigen Sie mit der OK-Taste.
Wählen Sie die gewünschte Sprache aus.
3
DE
7. Bildauflösung einstellen
Die Grundeinstellung für die Bildauflösung beträgt 4,0 Megapixel.
Drücken Sie im Bild-Modus auf die Menütaste.
1
Wählen Sie mit den Tasten und die Option „Resolution“
2
(Auflösung) und bestätigen Sie mit der OK-Taste.
Nun können Sie zwischen sechs Auflösungen wählen:
3
5,0 Megapixel, 4,0 Megapixel, 3,0 Megapixel, 2,0 Megapixel,
0,8 Megapixel und 0,5 Megapixel. Bei 5,0 Megapixel werden
die Bildpunkte interpoliert.
Hinweis: Wenn Sie die 5,0 Megapixel-Auflösung wählen,
unterstützt die Kamera den Serienbildmodus nicht.
27
Page 28

DE
8. Bildqualität einstellen
Die Grundeinstellung der Bildqualität beim Einschalten der Kamera ist
„Fine“ (Fein).
Drücken Sie im Bild-Modus auf die Menütaste.
1
Wählen Sie im Menü den Eintrag „Photo Quality“ (Fotoqualität)
2
3
• „Superfine“ (Superfein): höchste Qualität mit dem höchsten
und bestätigen Sie mit der OK-Taste.
Wählen Sie mit den Tasten „Hoch“ bzw. „Runter“ die Qualität
und bestätigen Sie mit OK.
Speicherbedarf
• „Fine“ (Fein): mittlere Qualität mit einem mittleren Speicherbedarf
• „Economy“ (Standard): normale Qualität mit geringem Speicherbedarf
9. Bildeffekte einstellen
Die Grundeinstellung für die Bildeffekte beim Einschalten der Kamera
ist „Normal“.
Aktivieren Sie mit der Taste den Bild-Modus und
1
2
drücken Sie auf die Menütaste.
Wählen Sie im Menü den Eintrag „Photo Effect“ (Fotoeffekt)
und bestätigen Sie mit der OK-Taste.
28
Page 29

Wählen Sie mit den Tasten „Hoch“ bzw. „Runter“ den
3
• „Normal“: Fotos werden normal dargestellt.
• „B/W“ (Schwarzweiß): Bilder werden in Schwarzweiß dargestellt.
• „Sepia“: Bilder werden in nostalgischem Braun dargestellt.
Fotoeffekt und bestätigen Sie mit OK.
Achtung
Sepia: Braun/Amber simuliert den Braunstich alter Fotos, der
durch Oxidation der chemischen Komponenten des Bildes
entsteht. Sepia verschiebt die Brauntöne des digitalen Fotos in
den dunkelbraunen Bereich, um den Eindruck von einem „Alten
Foto“ zu erwecken.
DE
10. Fotos vor dem versehentlichen Löschen
schützen
Diese Kamera bietet eine Schutzfunktion, damit ausgewählte Bilder
nicht versehentlich gelöscht werden.
Rufen Sie mit der Taste den Wiedergabe-Modus und
1
2
Die Liste besteht aus vier Optionen: „Lock Current“ (Aktuelles sichern),
„Unlock Current“ (Aktuelles entsichern), „Lock All“ (Alle sichern), „Unlock
All“ (Alle entsichern) (siehe auch Liste der Menü-Optionen Seite 25).
danach das zu schützende Foto auf. Drücken Sie die Menütaste und wählen Sie den Eintrag „Protect“ (Schützen).
Wählen Sie aus der nun angezeigten Liste die gewünschte
Option.
29
Page 30

DE
Das Symbol erscheint auf dem Bild in der LCD-Anzeige, wenn das
Foto gegen versehentliches Löschen geschützt ist. Das Symbol
erscheint, wenn das Foto wieder freigegeben wird.
Achtung
Die geschützten Fotos können zwar nicht gelöscht, aber formatiert
werden.
11. Bilder auf dem Fernseher betrachten
Schließen Sie den TV-Ausgang der Kamera mit dem
1
2
beiliegenden Kabel am Videoeingang des Fernsehers an.
Verbinden Sie den Audioeingang des TVs mit der
Kopfhörerbuchse der Kamera. Die Kamera erkennt den
Fernseher automatisch und schaltet auf TV um.
Achtung
Werden auf dem TV Standbilder abgespielt, können schwarze
Bildpunkte um das Bild herum entstehen.
12. Einstellen von Datum und Zeit
Ihre Digitalkamera kann für jedes Bild das Datum und die Zeit der
Aufnahme abspeichern und im Wiedergabe-Modus anzeigen.
Zuvor müssen Sie jedoch das Datum und die Zeit für die Kamera
einstellen.
Aktivieren Sie mit der Taste das Einstellungsmenü und
1
drücken Sie auf die Menütaste.
30
Page 31
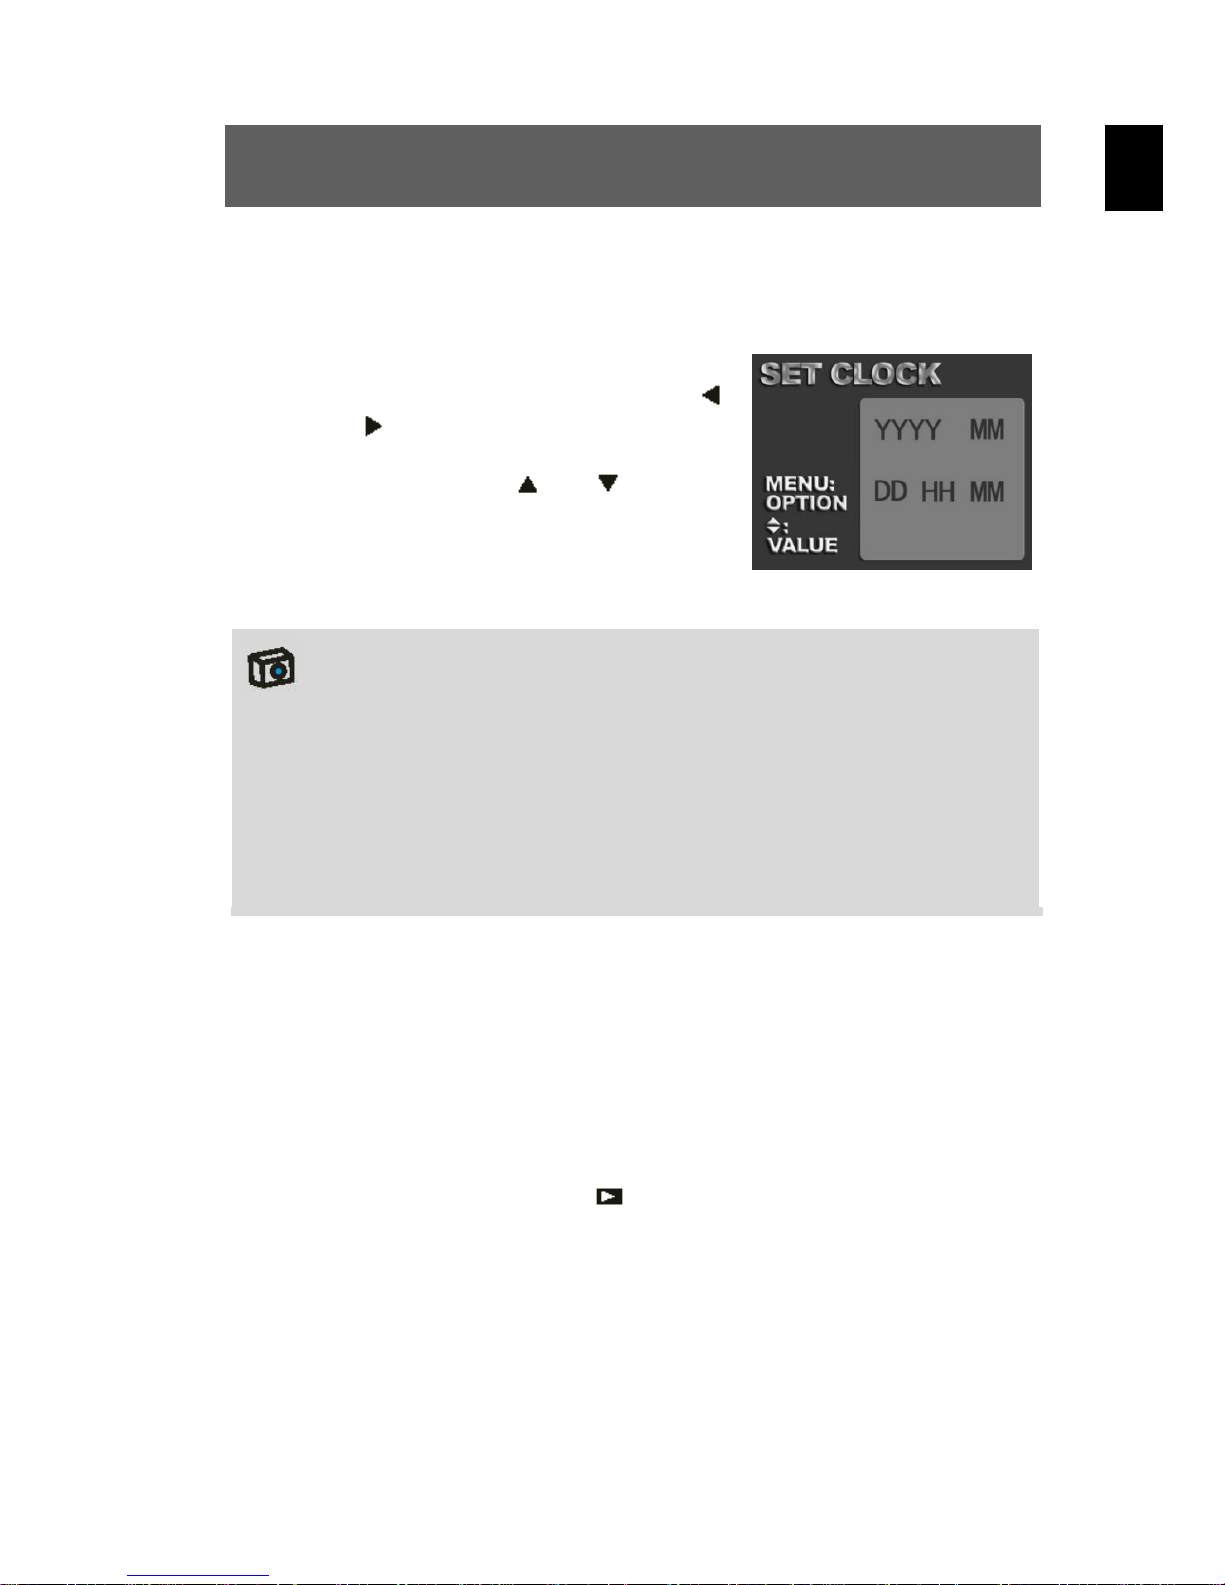
Wählen Sie im Menü den Eintrag „Date&Time“ (Datum/Uhrzeit)
2
3
und bestätigen Sie mit der OK-Taste.
Ändern Sie nun die Zeiteinstellung.
Wählen Sie mit den Steuertasten
und
und ändern Sie dann den Wert mit
den Steuertasten
Bestätigen Sie nach Abschluss der
Einstellungen mit der OK-Taste.
Achtung
Das Datum und die Uhrzeit kann durch die Kamera nur im
Wiedergabe-Modus angezeigt werden. Eine Druckausgabe ist
nicht möglich.
die gewünschte Einstellung
und .
DE
Die Zeiteinstellungen werden durch eine interne Backup-Batterie
gespeichert. Beim Wechsel der austauschbaren Li-Batterie gehen
die Zeiteinstellungen daher nicht verloren. Nur wenn die interne
Backup-Batterie verbraucht ist, sind die Einstellungen verloren.
13. LOGO einstellen
Mit LOGO ist das Startbild gemeint, welches beim Einschalten der
Kamera auf dem Monitor erscheint. So kann der Nutzer sein individuelles Bild definieren.
Gehen Sie dabei wie folgt vor:
Rufen Sie mit der Taste den Wiedergabe-Modus und
1
2
danach das gewünschte Foto auf. Drücken Sie die Menütaste
und wählen Sie den Eintrag „Set Logo“ (Logo einstellen).
Nach dem Einstellen des Logos wählen Sie die Option „Play
Logo“ (Logo zeigen) im Menü des Wiedergabe-Modus.
Dabei gibt es zwei Wahlmöglichkeiten:
31
Page 32
DE
• Aktivieren: das vom Nutzer gewählte Bild wird Startbild.
• Deaktivieren: das vorgegebene Bild wird Startbild.
Achtung
Das Startbild wird beim Löschen oder Formatieren nicht entfernt.
Um ein anderes Startbild zu definieren, muss der oben beschriebene Vorgang erneut ausgeführt werden.
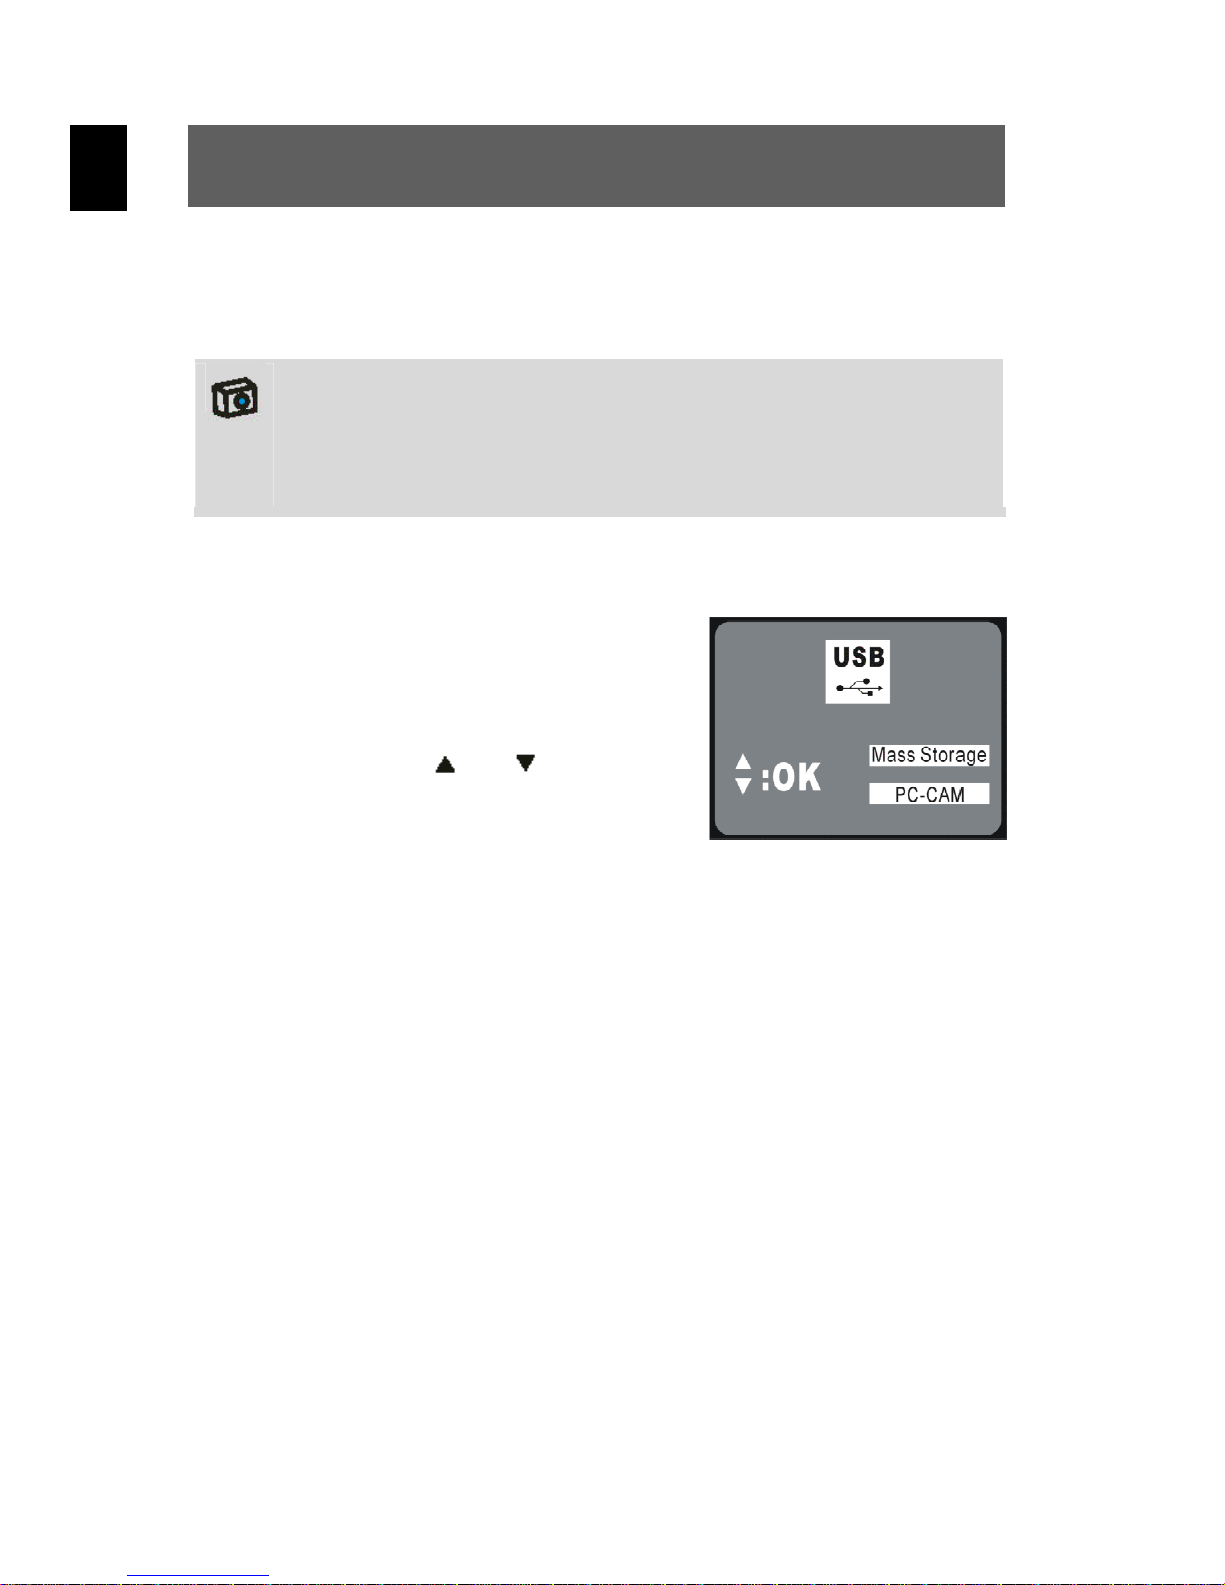
14. Treiber einstellen
Wenn Sie die Digitalkamera korrekt mit
dem USB-Anschluss des PC verbinden,
wechselt die LCD-Anzeige automatisch
zur USB-Modusanzeige. Wählen Sie hier
mit den Steuertasten
tigten Treibertyp aus und bestätigen Sie
mit der OK-Taste.
und den benö-
Wählen Sie „Mass Storage“ aus, wenn der PC die Kamera als Wechseldatenträger erkennen soll. Sie können die Kamera in diesem Fall am
PC wie ein Laufwerk behandeln, die PC-Befehle „Kopieren“, „Einfügen“
und „Löschen“ ausführen und Bilder, Videos und Tonaufnahmen von
der Kamera auf den PC downloaden.
Wählen Sie „PC-CAM“ aus, wenn Sie die Digitalkamera für PC-gesteuerte Videoaufnahmen (WebCam), Videoüberwachung oder für Videokonferenzen (NetMeeting) einsetzen möchten.
32
Page 33

Software-Installation
1. Unterstützte Betriebssysteme
• Windows 98 (inklusive Second Edition)
• Windows Me
• Windows 2000
• Windows XP
Microsoft Windows 98, Windows 98 SE, Windows 2000 Professional,
Windows Me oder Windows XP Systeme sind vorinstalliert.
2. Treiberinstallation
Die Treiberinstallation ähnelt sich bei den verschiedenen WindowsSystemen. Bei der Pfadangabe muss lediglich auf den Treiber im
CD-ROM-Laufwerk verwiesen werden.
DE
Wählen Sie, wie oben beschrieben, einen der beiden Treibertypen aus
(„Mass Storage“ oder „PC-CAM“). Die Kamera wechselt dabei in den
MASS-Modus bzw. in den TWAIN-Modus. Führen Sie die nachfolgend
beschriebene Treiberinstallation für jeden der beiden Treibertypen
durch.
1 Treiberinstallation im MASS-Modus
Achtung
Befindet sich die Kamera im MASS-Modus, erkennen Windows Me,
2000 und XP die Kamera automatisch und es muss kein Treiber
installiert werden. Die Beschreibung der Treiberinstallation bezieht
sich also auf Windows 98.
33
Page 34
DE
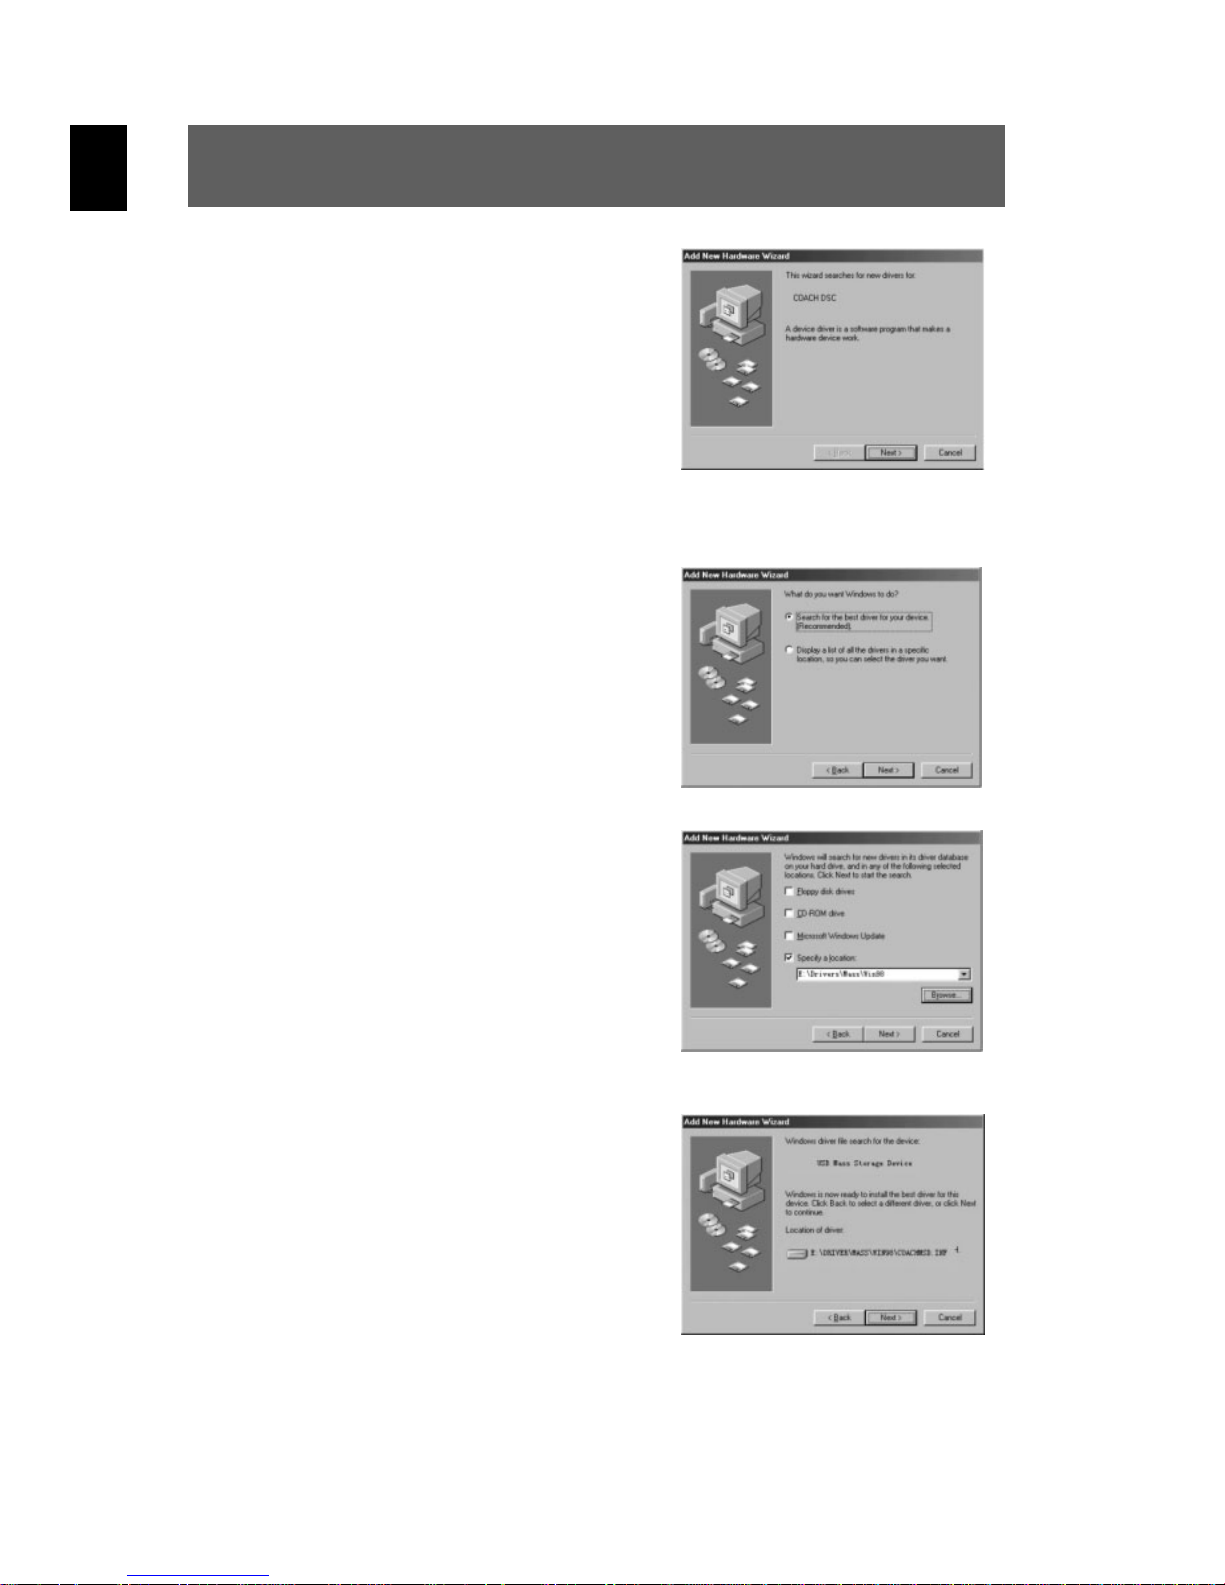
1.
Befindet sich die Kamera im MASSModus und ist sie mit dem Computer
verbunden, erscheint die Meldung „New
hardware found“ (Neue Hardware
gefunden) auf dem PC-Monitor.
Klicken Sie auf „Next“ (Weiter), um das
nächste Fenster aufzurufen.
2.
Wählen Sie „Search for the best driver
for your device“ (Nach dem besten
verfügbaren Treiber suchen) und
klicken Sie auf „Next“ (Weiter).
3.
Wählen Sie „Browse“ (Durchsuchen),
und markieren Sie den Punkt „Specify a
location“ (Geben Sie eine Position an).
Verweisen Sie auf die Treiber-CD im
Laufwerk.
4.
Klicken Sie nun auf „Next“ (Weiter).
Das System installiert den Treiber und
folgendes Fenster erscheint:
34
Page 35
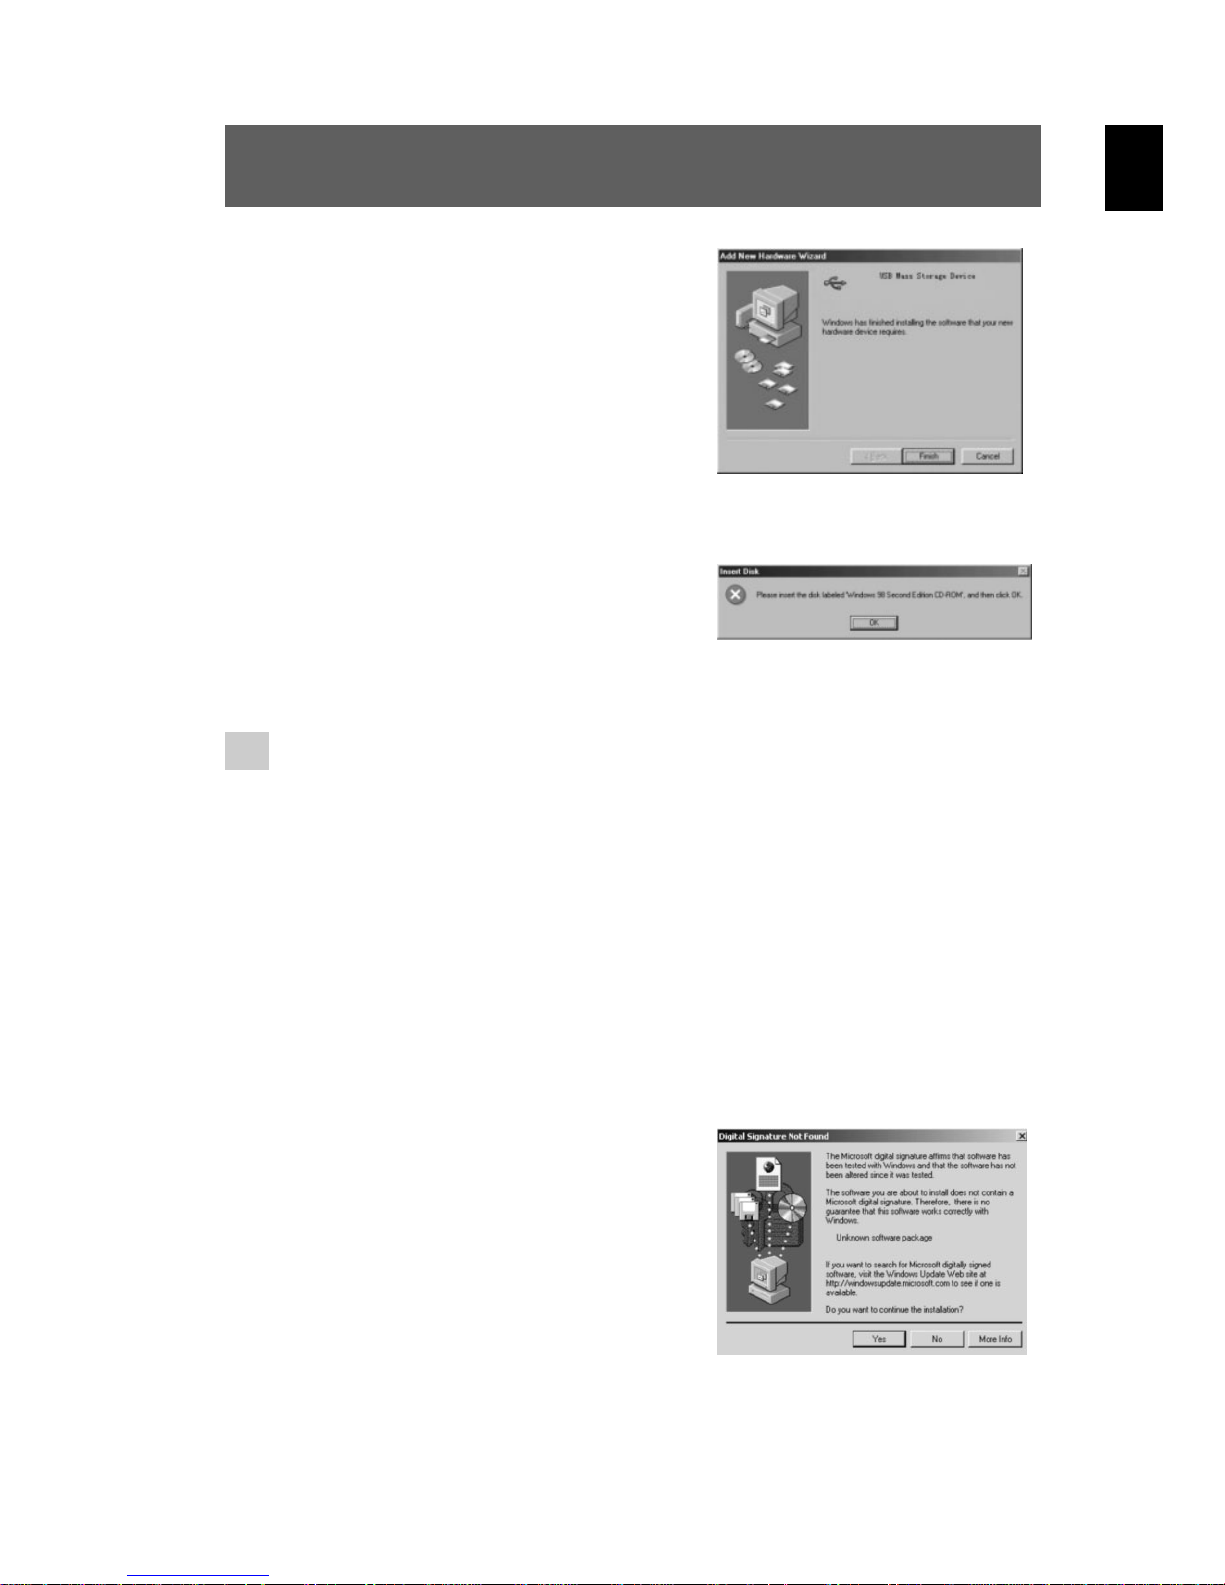
5.
Klicken Sie auf „Finish“ (Fertig stellen),
um die Installation abzuschließen.
6.
Während der Installation kann es auch
vorkommen, dass der Rechner die
Windows 98-CD verlangt:
2 Installation im TWAIN-Modus
DE
1.
Verbinden Sie die Kamera mit dem Rechner. Das System sollte
automatisch erkennen, dass ein neues Gerät angeschlossen wurde.
2.
Im TWAIN Modus muss der Treiber bei allen Systemen installiert
werden. Der Vorgang läuft, wie im Mass-Modus beschrieben, ab.
3.
Bei Windows 2000 kann eine Anfrage
wegen der digitalen Signatur des
Treibers erscheinen. Klicken Sie
auf „Yes“ (Ja), um den Treiber zu
installieren.
35
Page 36
DE
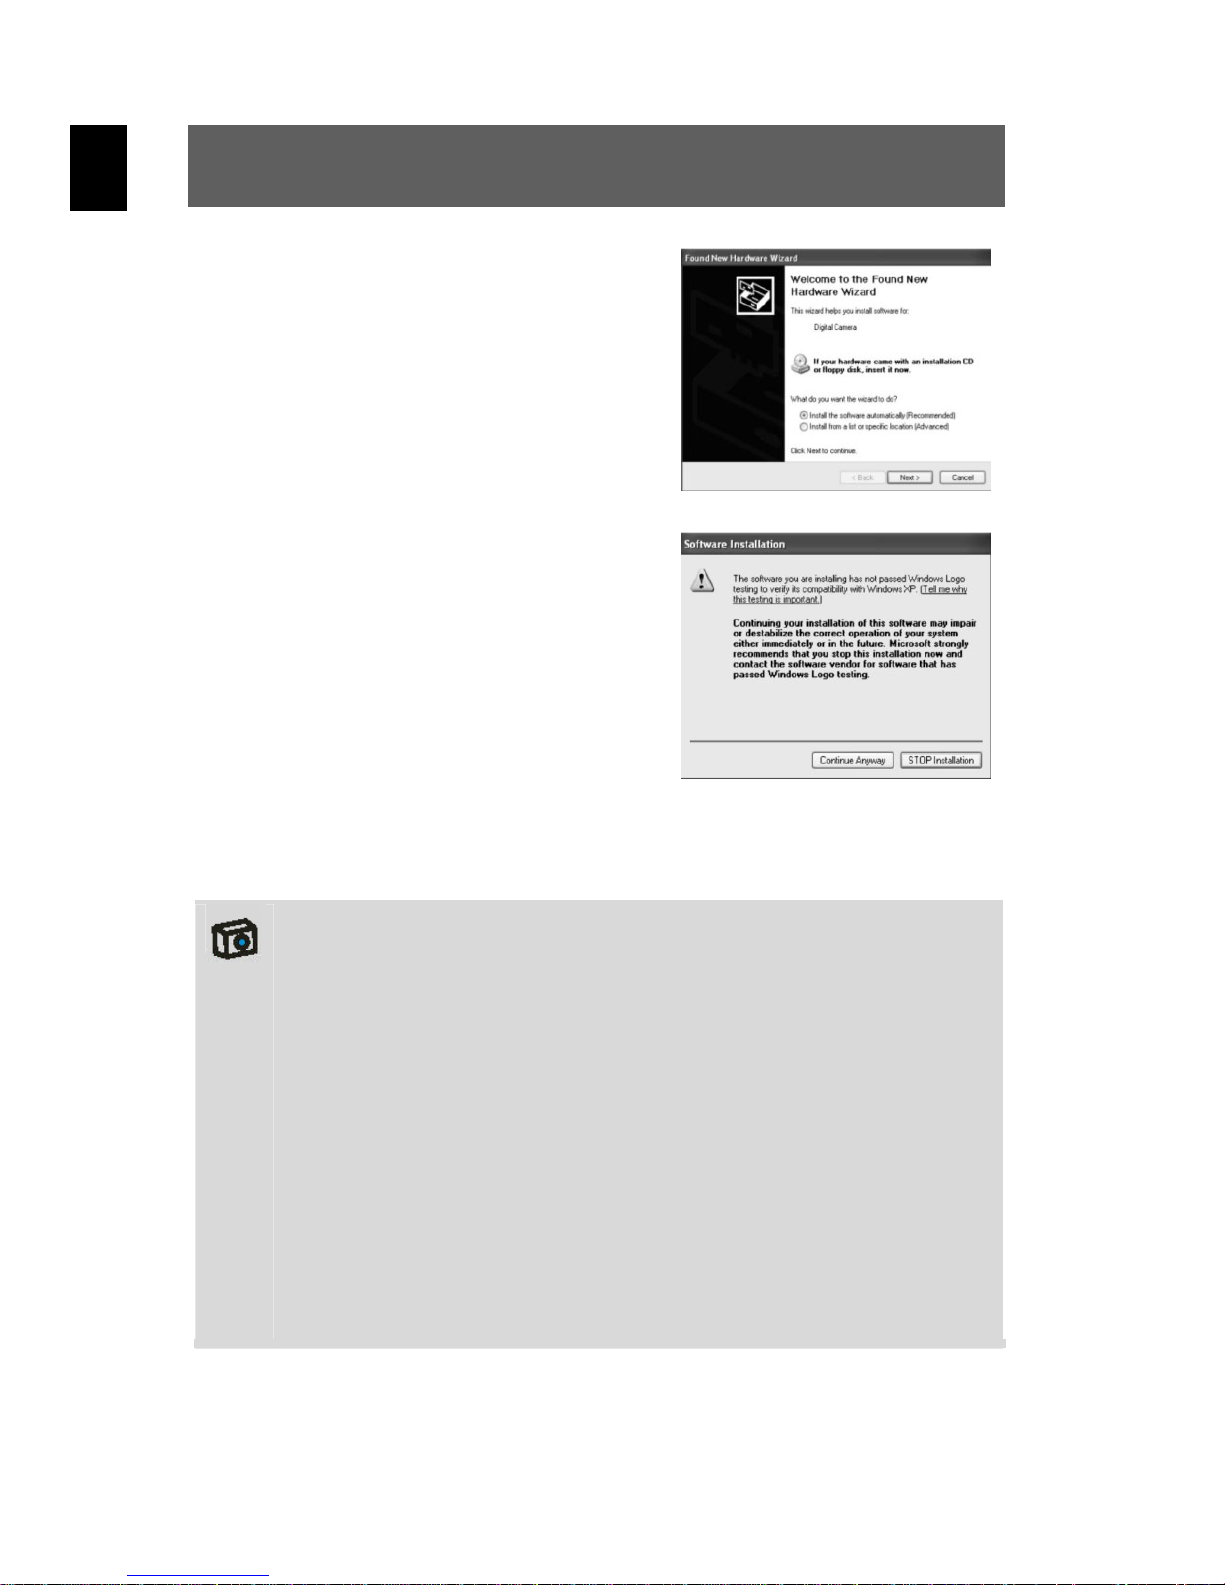
4.
Bei der Treiberinstallation unter
Windows XP erscheint „New hardware
found“ (Neue Hardware gefunden).
Wählen Sie dann „Auto install software
(recommendatory)“ (Treiber automatisch installieren (empfohlen)).
Es kann auch folgendes „Logo Test“Fenster erscheinen. Klicken Sie auf
„Still go on“ (Fortfahren), und warten
Sie das Ende der Installation ab.
5. Die Installation unter Windows Me läuft ähnlich ab.
Achtung
Es können zwei Treibermodi bei der Kamera gewählt werden.
Der TWAIN-Modus nutzt die Videokomponenten beim PC.
Im MASS-Modus wird der interne Speicher als mobiler Speicher
verwendet. Er kann wie eine Festplatte behandelt werden.
Kopieren, Löschen, Ausschneiden und das Laden von Fotos/
Filmen von der Kamera sind möglich.
Der Ort der Treiber auf der CD:
(Beispiel: „F:\ “ als CD-ROM-Laufwerk)
F:\Driver\mass-storage\Win98: MASS-Treiber für Win 98
F:\Driver\Twain\win98_2k: TWAIN-Treiber für Win 98 / 2000
F:\Driver\Twain\WinMe_XP: TWAIN-Treiber für Win Me / XP
Das Herunterladen von Fotos sollte direkt im MASS-Modus durchgeführt werden.
36
Page 37

Dateiübertragung zum PC
Nachdem Sie die Treiber installiert haben, können Sie Ihre Fotos, Filme
und Tonaufzeichnungen mit Hilfe des USB-Kabels zum PC übertragen
und am PC betrachten, wiedergeben und bearbeiten. Dabei schaltet
sich die Kamera in den USB-Modus.
Schalten Sie Ihren PC ein.
1
Verbinden Sie die Digitalkamera mit Ihrem PC, indem Sie das eine
2
3
Ende des beigefügten USB-Kabels in den USB-Anschluss am PC
und das andere Ende des USB-Kabels in die USB-Buchse der
Kamera einstecken.
Setzen Sie den Treibermodus Ihrer Kamera auf MASS. Wurde der
Treiber korrekt installiert, wird die Kamera vom Computer als
Massenspeichergerät (Wechseldatenträger) erkannt. Unter
Windows XP können Sie nun sofort auf den Speicherinhalt der
Kamera zugreifen. Unter den anderen Windows-Versionen öffnen
Sie den Windows-Explorer oder doppelklicken auf den Arbeitsplatz.
Doppelklicken Sie auf das Datenträgersymbol der Kamera und auf
einen eventuell vorhandenen Unterordner, um die Dateien sichtbar
zu machen.
DE
Ziehen Sie nun mit der linken Maustaste die gewünschten Dateien
4
Damit sind die Dateien auf Ihren PC übertragen und gesichert. Sie
können nun die Dateien anzeigen, wiedergeben und nach Ihren
Wünschen mit der Anwendungssoftware bearbeiten.
(Bild, Ton oder Video) zu einem geeigneten Ordner auf Ihren PC,
z.B. in den Ordner „Eigene Dateien“. Sie können dazu auch die
Dateien markieren und danach die Windows-Befehle „Kopieren“
und „Einfügen“ verwenden.
37
Page 38
DE
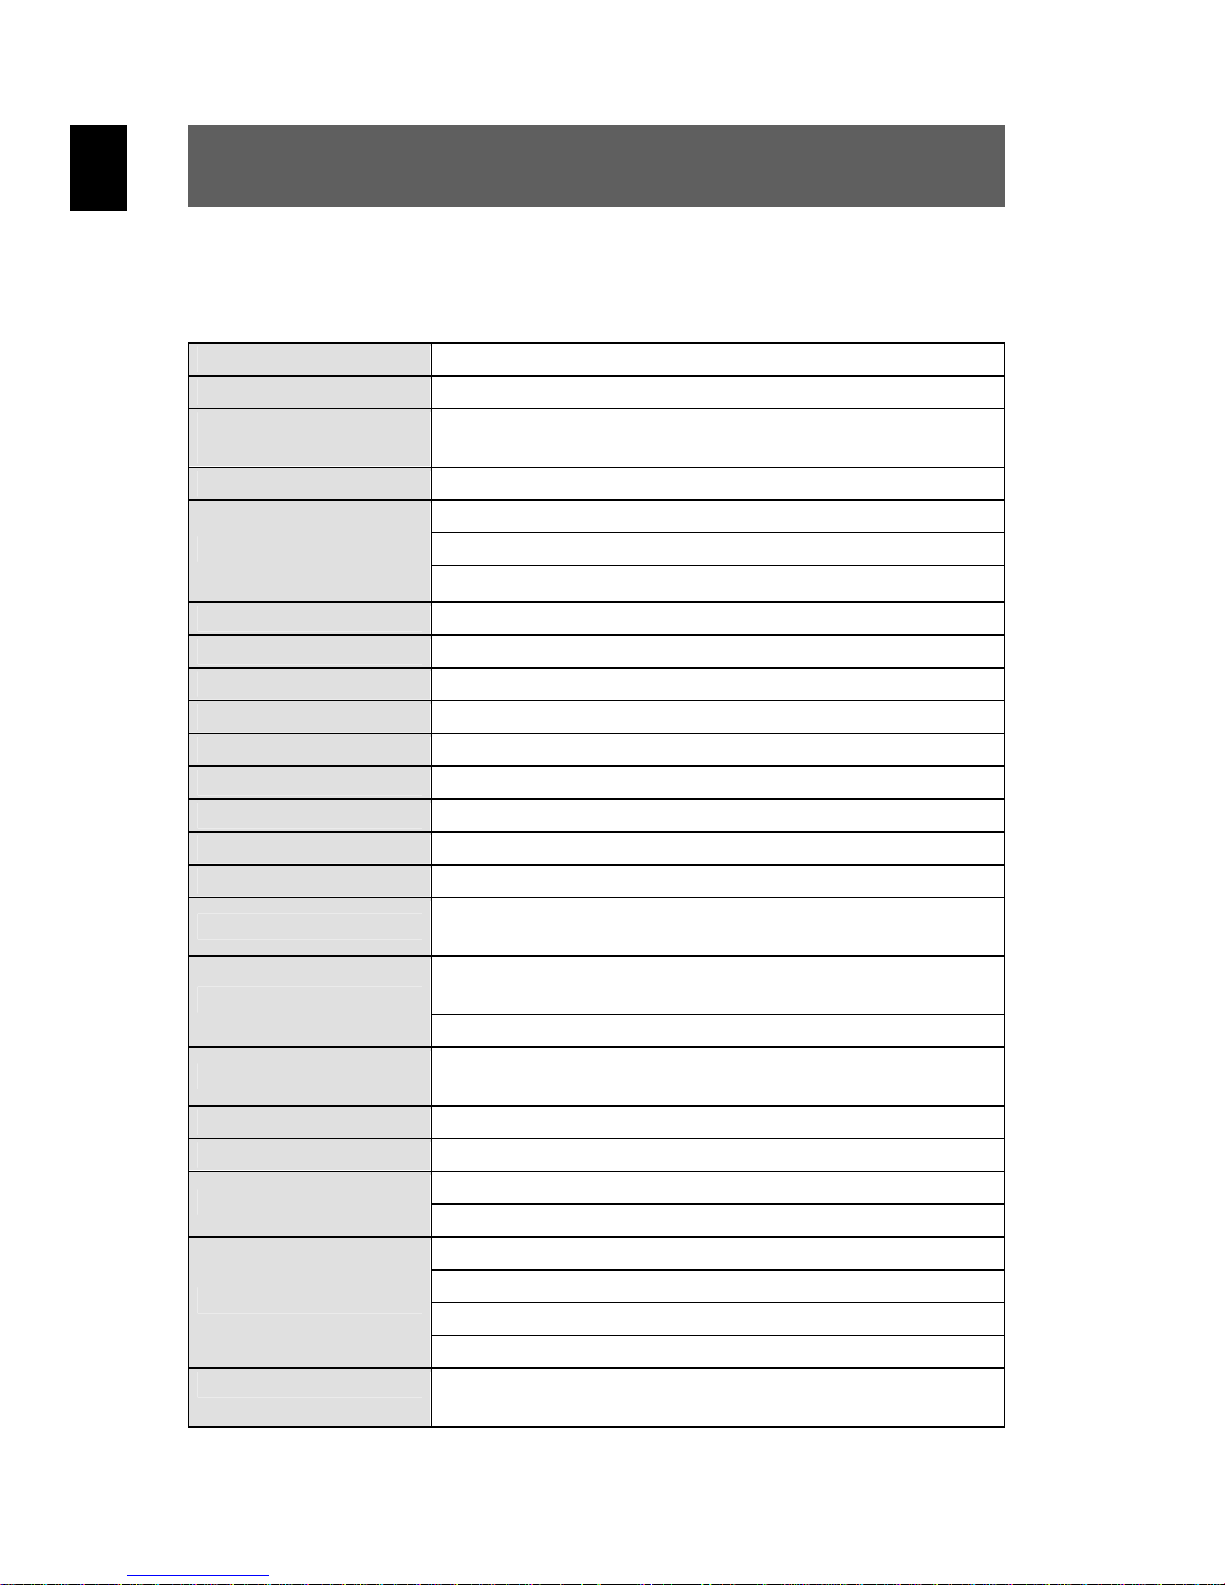
Technische Daten
Sensor 1/2,5" CCD-Sensor
Pixel 4,0 Millionen
Effektive
Bildauflösung
Interpolierte Auflösung 2560x1920
Spezialeffekte Standard-Modus, Schwarzweiß-Modus, Sepia-Modus
Zoomfaktor 3 x optisches Zoom, 8 x digitales Zoom
LCD-Monitor 1,5 Zoll 130.000 Pixel TFT-Monitor
Kompatible Systeme Windows 98/2000/Me/XP
Brennweite F = 5,7 mm – 17,1 mm
Blende F2,8 – F4,8
Brennweitenbereich 0,04 m ~ unendlich
Belichtung Auto und manuell
Belichtungskorrektur -2.0 EV bis +2.0 EV in sechs Schritten
Datenbuchse
Blitz
Weißabgleich
Serienbild drei Fotos in Reihe
Selbstauslöser 10 Sekunden
Videoausgang
Weitere Funktionen
Speichermedium 16 MB intern (inklusive Systemspeicher), SD- oder
2304x1728, 2048x1536, 1600x1200, 1024x768,
800x600
Foto: JPEG (Version EX1F2.1)
Video: AVI/Motion JPEG 640x480 Dateiformate
Ton: WAV-Format
Mini USB-Buchse, zwei Treibermodi
(MASS und TWAIN)
integrierter Weitwinkelblitz mit drei Modi:
Auto, Permanent und Aus
Blitzreichweite 1 m
automatischer Weißabgleich und vier manuelle Modi:
Tageslicht, Tungsten, Fluoreszenz, Bewölkt
NTSC- und PAL-System wählbar
TV-Ausgangssignal
kristallklare Tonaufnahme
erweiterbarer Speicher
PC-Kamera für Internet-Chat und -Konferenz
frei wählbares Startbild
MMC-Karte
38
Page 39

Speicher Qualität 8MB 16MB 32MB 64MB 128MB
Superfine 4 8 16 32 64
2560x1920
2048x1536
1024x768
Fine 5 10 20 40 80
Economy 6 12 24 48 96
Superfine 5 10 20 40 80
Fine 7 14 28 56 112 2304x1728
Economy 8 16 32 64 128
Superfine 6 12 24 48 96
Fine 8 16 32 64 128
Economy 10 20 40 80 160
Superfine 10 20 40 80 160
Fine 14 28 56 112 224 1600x1200
Economy 17 34 68 136 272
Superfine 26 52 104 208 416
Fine 34 68 136 272 544
Economy 43 86 172 344 688
Superfine 42 84 168 336 672
Fine 54 108 216 432 864 800x600
Economy 68 136 272 544 1088
DE
Video --- ~10 sec ~30 sec ~70 sec ~150 sec ~3 min
Die tatsächliche Anzahl der gespeicherten Bilder kann in Abhängigkeit von der
Auflösung und Farbsättigung bis zu ± 30% variieren.
39
Page 40
DE
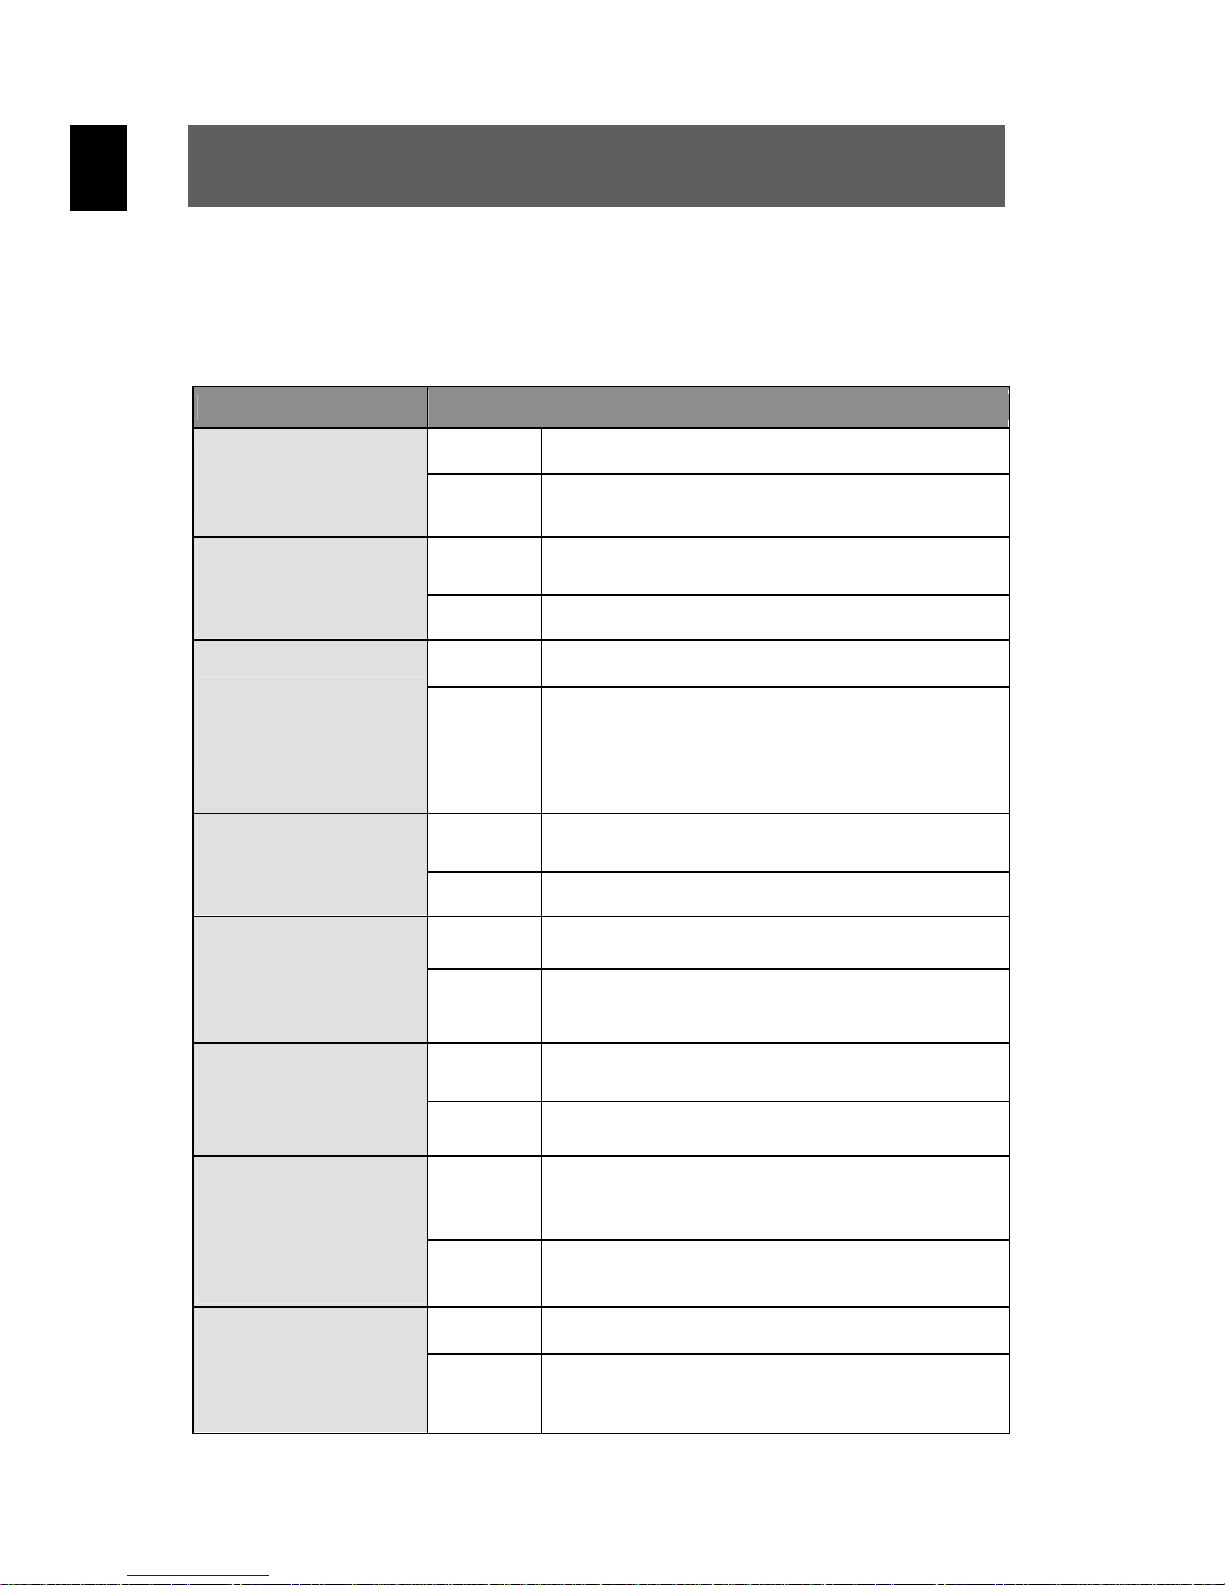
Fehlerbehebung
Falls Ihre Kamera nicht korrekt funktioniert, überprüfen Sie bitte die folgenden Punkte. Falls das Problem danach immer noch besteht, wenden Sie
sich bitte an Ihren Händler.
Symptome Ursache und Lösung
Fehler A
Kamera macht
keine Fotos
Fehler B
Nach einiger Zeit
verschwinden Fotos von
der LCD-Anzeige
Fehler C
Nicht alle Bilder
können auf den
PC geladen werden
Fehler D
Kamera geht nach
5 Minuten aus.
LCD schaltet ab.
Fehler E
Beim ersten Anschluss
der Kamera an den
PC wird keine neue
Hardware gefunden.
Fehler F
Die Bildabfolge bei
Aufnahmen ist
im Dunkeln langsamer.
Fehler G
Kamera startet nicht
nach dem Anschluss an
PC. Kameraanzeige
leuchtet und LCD zeigt
alle Symbole.
Fehler H
Rote, blaue, schwarze
Punkte auf der LCDAnzeige unter kalten Bedingungen
Ursache: Die Lichtstärke ist nicht ausreichend.
Lösung:
Ursache: schwache Batterien
Lösung: Setzen Sie zwei frische Batterien ein.
Ursache: Der PC hat nicht genug Arbeitsspeicher frei.
Lösung:
Ursache: Kamera schaltet automatisch ab.
Lösung: Kamera neu starten.
Ursache: USB-Port des PCs ist im BIOS deaktiviert.
Lösung: Aktivieren Sie den Port im BIOS des PCs.
Ursache:
Lösung:
Ursache:
Lösung:
Ursache: LCD-typische Erscheinung
Lösung:
Blickwinkel der Kamera ändern, um mehr Licht
aufzufangen oder automatischen Blitz verwenden.
Vor dem Herunterladen alle anderen Anwendungen schließen. Falls das Problem weiterbesteht, laden Sie die Bilder einzeln auf den PC
und speichern Sie sie dort, bevor das nächste Bild
übertragen wird.
Es ist normal, das die Geschwindigkeit des
Kameraverschlusses im Dunkeln langsamer wird.
Kamerawinkel ändern oder Lichtverhältnisse
verbessern.
PC oder Kamera sind ausgelastet und die
Verbindung zwischen beiden besteht nicht.
USB-Kabel vom PC trennen, PC auf Überlastung
überprüfen und Kabel neu einstecken.
Kann nicht verhindert werden. Auf den aufgenommenen Bildern sind diese Fehler nicht zu sehen.
40
Page 41
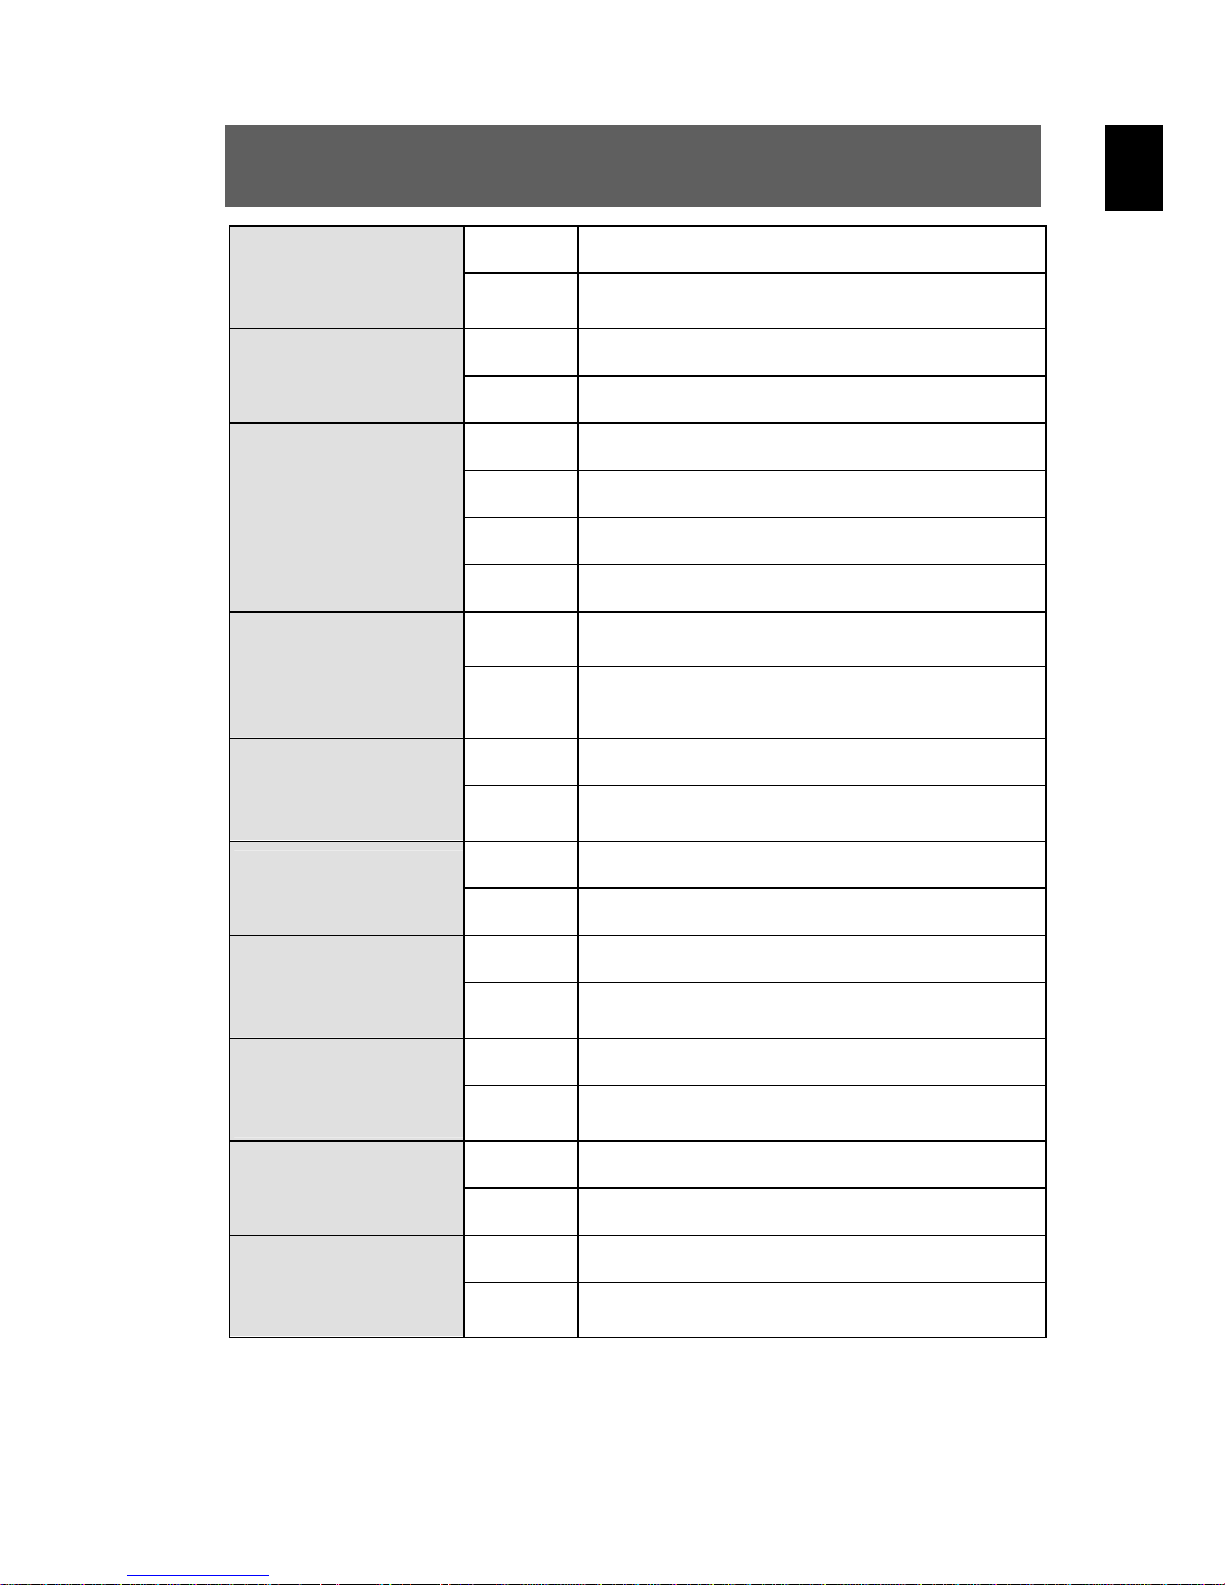
Fehler I
Kamera lässt sich unter
kalten Bedingungen
nicht einschalten.
Fehler J
Die Batterie wird nicht
vollständig aufgeladen.
Fehler K
Kamera zoomt nicht
richtig / Bild ist unscharf
Fehler L
Das aufgenommene Bild
unterscheidet sich bei
Nahaufnahmen vom
Sucherbild.
Fehler M
Fotos auf der Speicherkarte können nicht
gelesen werden
Ursache: Kapazitätsverringerung bei niedriger Temperatur
Lösung:
Ursache: Die Lebensdauer der Batterie ist überschritten.
Lösung: alte Batterie gegen neue austauschen
Ursache 1: Autofokussieren wurde nicht beendet
Lösung 1: Auslöser nur halb nieder drücken, dann auslösen
Ursache 2: Abstand zwischen Kamera und Objekt ist zu klein.
Lösung 2: Wählen Sie einen zulässigen Zoomabstand.
Ursache:
Lösung:
Ursache: Speicherkarte ist fehlerhaft
Lösung:
Bewahren Sie die Kamera in einer warmen
Tasche auf.
Parallaxenfehler (Sucher und Objektiv nehmen
verschiedene Positionen ein)
Machen Sie Nahaufnahmen immer über die LCDAnzeige.
Speicherkarte austauschen, Empfehlungen für
den Umgang mit Speicherkarten beachten
DE
Fehler N
Kein Bild auf dem angeschlossenen TV-Monitor
Fehler O
Geräusche aus TV und
Radio während des
Ladens der Batterien
Fehler P
Tasten der Kamera
lassen sich nicht mehr
bedienen
Fehler Q
Fotos sind zu dunkel
Fehler R
Fotos sind zu hell
Ursache: Kabel nicht korrekt angeschlossen
Lösung: korrekter Anschluss (TV auf „Video“ stellen)
Ursache: elektromagnetische Wellen des Ladegerätes
Lösung:
Ursache: temporärer interner Systemfehler
Lösung:
Ursache: Der Blitz ist mit der Hand verdeckt.
Lösung: Kamera korrekt halten, den Blitz nicht verdecken
Ursache: Die Helligkeit der Umgebung ist zu stark.
Lösung:
Abstand zwischen Ladegerät und TV bzw. Radio
vergrößern
Batterie kurz aus der Kamera nehmen, wieder
einlegen und Kamera wieder einschalten.
Nehmen Sie eine Belichtungskorrekur an Ihrer
Kamera vor (EV – Belichtungswert verringern).
Hinweis: In dieser Tabelle sind mögliche Fehlerquellen aufgeführt. Einige davon treten
als natürliche Phänomene auf.
41
Page 42

DE
Weitere Informationen
1. Sicherheitshinweise
Obwohl es sich um ein sicheres Produkt handelt, sollten Sie folgende
Hinweise und Warnungen beachten.
Warnung
1. Kamera nicht verändern oder zerlegen.
2. Bei Reparaturen und Überprüfungen den Händler kontaktieren.
3. Kamera nicht schütteln oder harten Stößen aussetzen.
Falls sie herunterfällt, kann es zu Verletzungen kommen.
4. Lassen Sie kein Wasser und keine Feuchtigkeit in die Kamera
eindringen. Das kann zu Kurzschlüssen und auch zu Unfällen
führen.
5. Um Verkehrsunfälle zu vermeiden, benutzen Sie die Kamera
nicht während des Autofahrens oder während der Teilnahme
am Straßenverkehr. Bewahren Sie die Kamera während des
Fahrens an einem gesicherten, stabilen Platz auf.
6. Benutzen Sie die Kamera nicht in Flugzeugen oder anderen
verbotenen Stellen.
7. Achten Sie auf Ihre eigene Sicherheit und auf Ihre Umgebung,
wenn Sie die Kamera im Gehen benutzen.
8. Benutzen Sie die Kamera nicht in einer Umgebung, die explosionsgefährdet, staubig oder sehr heiß ist.
9. Bewahren Sie die Kamera an einem für Kinder unerreichbaren
Platz auf. Kinder könnten sonst sich mit dem Trageriemen verletzen, Kamerateile verschlucken oder mit dem Blitzlicht Augenschmerzen erleiden.
10. Sehen Sie durch den Kamerasucher nicht direkt in die Sonne.
Achtung
Bei Verwendung des Blitzlichtes nicht direkt in den Blitz schauen,
da dies die Augen schädigen kann.
42
Page 43

2. Wartung und Pflege
Bitte reinigen Sie Gehäuse, Objektiv und LCD-Anzeige wie folgt:
• Keine Verdünner oder Reiniger verwenden, die Benzin enthalten.
Das kann die Kamera beschädigen.
• Kameragehäuse mit einem weichen Tuch reinigen.
• Objektiv: zunächst mit einem Objektivpinsel den Staub entfernen.
Dann mit einem weichen Tuch reinigen.
• Keine starken Reiniger für Gehäuse und Objektiv verwenden
(Händler kontaktieren, falls sich der Schmutz nicht entfernen lässt).
• LCD-Anzeige keinem Druck aussetzen und nicht mit harten Gegen-
ständen bearbeiten.
• Ihre Digitalkamera ist ein Präzisionsgerät. Vermeiden Sie deshalb
während der Benutzung und Aufbewahrung der Kamera folgende
Umgebungsbedingungen: volles Sonnenlicht, Feuchtigkeit und Hitze,
Klimaanlagen, starke Erschütterungen, Schmutz und Staub.
DE
3. Fototipps
Für hochwertige Fotos beachten Sie bitte folgende Hinweise:
• Benutzer, die zum ersten Mal eine Digitalkamera verwenden und noch
nicht alle Kameraparameter kennen, sollten zunächst mit den fabrikmäßigen Voreinstellungen der Kamera arbeiten.
• Kamera nicht schnell bewegen, um Unschärfen zu vermeiden.
Beim Auslösen die Kamera ruhig halten. Nicht sofort bewegen, wenn
der Auslöser gedrückt wurde. Warten Sie nach dem Auslösen auf den
Signalton, bevor Sie die Kamera bewegen.
• Das Objektiv hat zwei Einstellungen: Makroaufnahme und normale
Aufnahme. Makro wird bei Nahaufnahmen eingesetzt. Gehen Sie mit
der Kamera vor und zurück, bis das Objekt der Nahaufnahme scharf
abgebildet wird.
• Betrachten Sie das Motiv durch den Sucher, bevor Sie den Auslöser
drücken.
• Achten Sie auf den Blickwinkel, wenn das Motiv im Gegenlicht fotografiert
wird. Gehen Sie etwas zur Seite, um das Gegenlicht abzumildern.
• Bei dunkler Umgebung sollte der Blitz oder die manuelle Belichtungseinstellung verwendet werden.
43
Page 44

DE
4. Batteriehinweis
Falsche Handhabung der Batterien kann sie lecken, heiß werden oder
platzen lassen.
Beachten Sie folgende Sicherheitshinweise:
• Batterien nicht erhitzen oder ins Feuer werfen.
• Batterien nicht zusammen mit Metallobjekten transportieren, da diese mit
den Batteriepolen in Berührung kommen und Schäden auftreten können.
• Batterien keiner Feuchtigkeit aussetzen. Sie sollten immer trocken
gelagert werden.
• Batterien nicht zerlegen, deformieren oder modifizieren.
• Die Hülle der Batterie niemals entfernen.
• Batterien keinen harten Stößen aussetzen.
• Keine leckenden, beschädigten Batterien verwenden.
• Batterien von Kindern fernhalten.
• Beim Einlegen in die Kamera auf die korrekte Polarität achten.
• In kalter Umgebung (−10 °C oder kälter) lassen Leistung und
Lebensdauer der Batterien nach.
• In kalter Umgebung die Batterien vor dem Einsatz aufwärmen (z. B. in der
Tasche).
• Bei Verwendung einer Heizquelle Batterien nicht mit ihr in Kontakt
kommen lassen.
Entsorgungshinweis
Bitte werfen Sie defekte und entladene Batterien nicht in
den normalen Hausmüll. Bringen Sie verbrauchte Batterien
zu Ihrem Fachhändler oder zu einer entsprechenden Sammelstelle.
Damit ermöglichen Sie eine umweltgerechte Entsorgung. Entladen
sind Batterien in der Regel dann, wenn das Gerät abschaltet und
„Batterie leer“ signalisiert oder nach längerer Gebrauchsdauer der
Batterien „nicht mehr einwandfrei funktioniert“.
44
Page 45

5. Hinweise zur Benutzung von Speicherkarten
Folgende Speicherkarten-Typen können für die Digitalkamera verwendet werden:
SD-Speicherkarte (Secure Digital)
MMC-Speicherkarte (MultiMedia Card)
• Schalten Sie die Kamera aus, bevor Sie die Speicherkarte einlegen oder
entnehmen.
• Während des Kamerabetriebs (Aufzeichnen, Wiedergabe, Dateiübertragung usw.) entfernen Sie niemals die Karte oder schalten die Kamera
aus. Die Karte könnte dadurch beschädigt werden.
• Setzen Sie die Karte keiner elektrostatischen Entladung aus.
• Nehmen Sie die Karte nicht auseinander und bearbeiten Sie diese nicht.
Verbiegen Sie die Karte nicht, setzen Sie die Karte keiner hohen
Luftfeuchtigkeit aus und lassen Sie sie nicht fallen.
• Berühren Sie mit der Hand nicht den Kontaktbereich der Karte.
DE
• Vermeiden Sie volles Sonnenlicht oder große Hitze.
• Verwenden und lagern Sie die Karte nicht in einer nassen, staubigen oder
korrodierenden Umgebung.
6. Hinweise zum Netzteil
Die Daten des Netzteiles sind: 5 V DC Ausgang mit 1000 mA oder
höher (umschaltbar).
Beachten Sie folgende Sicherheitshinweise:
• Verbinden Sie das Kabel mit der USB-Buchse der Digitalkamera.
• Achten Sie auf eine sichere Verbindung und behandeln Sie die Stecker
behutsam.
• Während des Betriebs wird das Netzteil etwas warm. Das ist jedoch ein
normaler Betriebszustand.
• Das Netzteil nicht zerlegen. Dies kann zu Unfällen führen.
• Gerät nicht bei sehr hohen Temperaturen und hoher Luftfeuchtigkeit
verwenden.
• Gerät keinen harten Stößen aussetzen.
45
Page 46

DE
46
Page 47

Table of contents
Thank you for choosing our product. Please read the manual carefully
to make best use of all functions of the product and to guarantee a long
service life. Please store the manual in a safe place for later reference.
Table of contents .................................................................... 1
Contents of package............................................................... 3
Introduction............................................................................. 4
Getting started ........................................................................ 5
1. Parts of your camera....................................................................5
2. Inserting the batteries...................................................................6
3. Using the power supply unit .........................................................7
4. Inserting and removing the SD/MMC card....................................8
5. Attaching the carrying strap..........................................................9
Basic operation..................................................................... 10
GB
1. Switching the camera on and off ................................................10
2. Using the mode buttons .............................................................11
3. Taking photographs ...................................................................12
1 LCD descriptions display..........................................................12
2 Snapshot .................................................................................13
4. Recording audio.........................................................................15
5. Making video clips......................................................................16
1 LCD descriptions .....................................................................16
2 Making a video clip ..................................................................16
6. Playing images, audio and videos..............................................17
1 LCD descriptions .....................................................................17
2 Viewing photos, videos and listening to sound recordings........17
3 Viewing enlarged images (zoom) .............................................18
7. Deleting photos..........................................................................19
1
Page 48

GB
Advanced operation..............................................................20
1. Using the flash...........................................................................20
2. Changing menu options .............................................................21
3. Using direct access buttons .......................................................21
4. List of menu options...................................................................23
5. Exposure compensation.............................................................25
6. Selecting a language..................................................................26
7. Setting the image resolution.......................................................26
8. Setting image quality..................................................................27
9. Setting image effects..................................................................27
10. Protecting photos against accidental deletion.............................28
11. Viewing images on a television set............................................29
12. Setting the date and time .......................................................... 29
13. Setting the LOGO .....................................................................30
Setting the driver.......................................................................31
14.
Installing the software...........................................................32
1. Supported operating systems.....................................................32
2. Installing the driver.....................................................................32
1 Installing the driver in MASS mode ..........................................32
2. Installing the driver in TWAIN mode........................................34
Transferring files to your PC ................................................ 36
Specifications........................................................................37
Troubleshooting .................................................................... 39
Further information ............................................................... 41
1. Safety instructions......................................................................41
2. Maintenance and care................................................................42
3. Photo tips...................................................................................42
4. Battery tips.................................................................................43
5. Notes on using memory cards....................................................44
6. Notes on the power supply.........................................................44
2
Page 49

Contents of package
Please ensure that the following items are included in the box:
1x ODYS-Mpix5 digital camera
1x user manual
1 x Li battery (rechargeable)
1x USB cable
1x TV cable
1x audio cable
1x CD-ROM (driver and application software)
1x carrying case
1x wrist strap
1 x power supply unit
GB
3
Page 50

GB
Introduction
This product is a digital imaging device with an integrated digital
camera, digital video recorder, digital audio recorder and PC camera.
It allows you to take digital photographs and videos, make voice
recordings or use it as a webcam.
Product properties
• High resolution photographs, various resolutions can be selected,
interpolated output.
• Images can be saved internally or externally.
• High-sensitivity wide-angle flash, three flash modes can be selected.
• Colour TFT LCD monitor for viewing menus and images.
• Three photography modes: single image, self-timer and burst
• TV output: NTS C or PAL
• Unlimited video function with sound recording, AVI format
(640 x 480 pixel)
• Crystal-clear digital sound recording
• Simple user interface
• Individual start interface for convenient operation
• Special picture effects such as conversion to black and white or nostalgic
images
• Fast data transfer thanks to mini-USB connector
• Automatic shutdown conserves batteries
Five operating modes
• Still image mode – for taking digital images/photographs
• Video mode – for taking high-quality videos with sound
• Recording mode – for crystal clear sound recordings
• Play mode – for watching/listening to all recordings
• Configuration mode – for setting the operating parameters
4
Page 51
w
Getting started
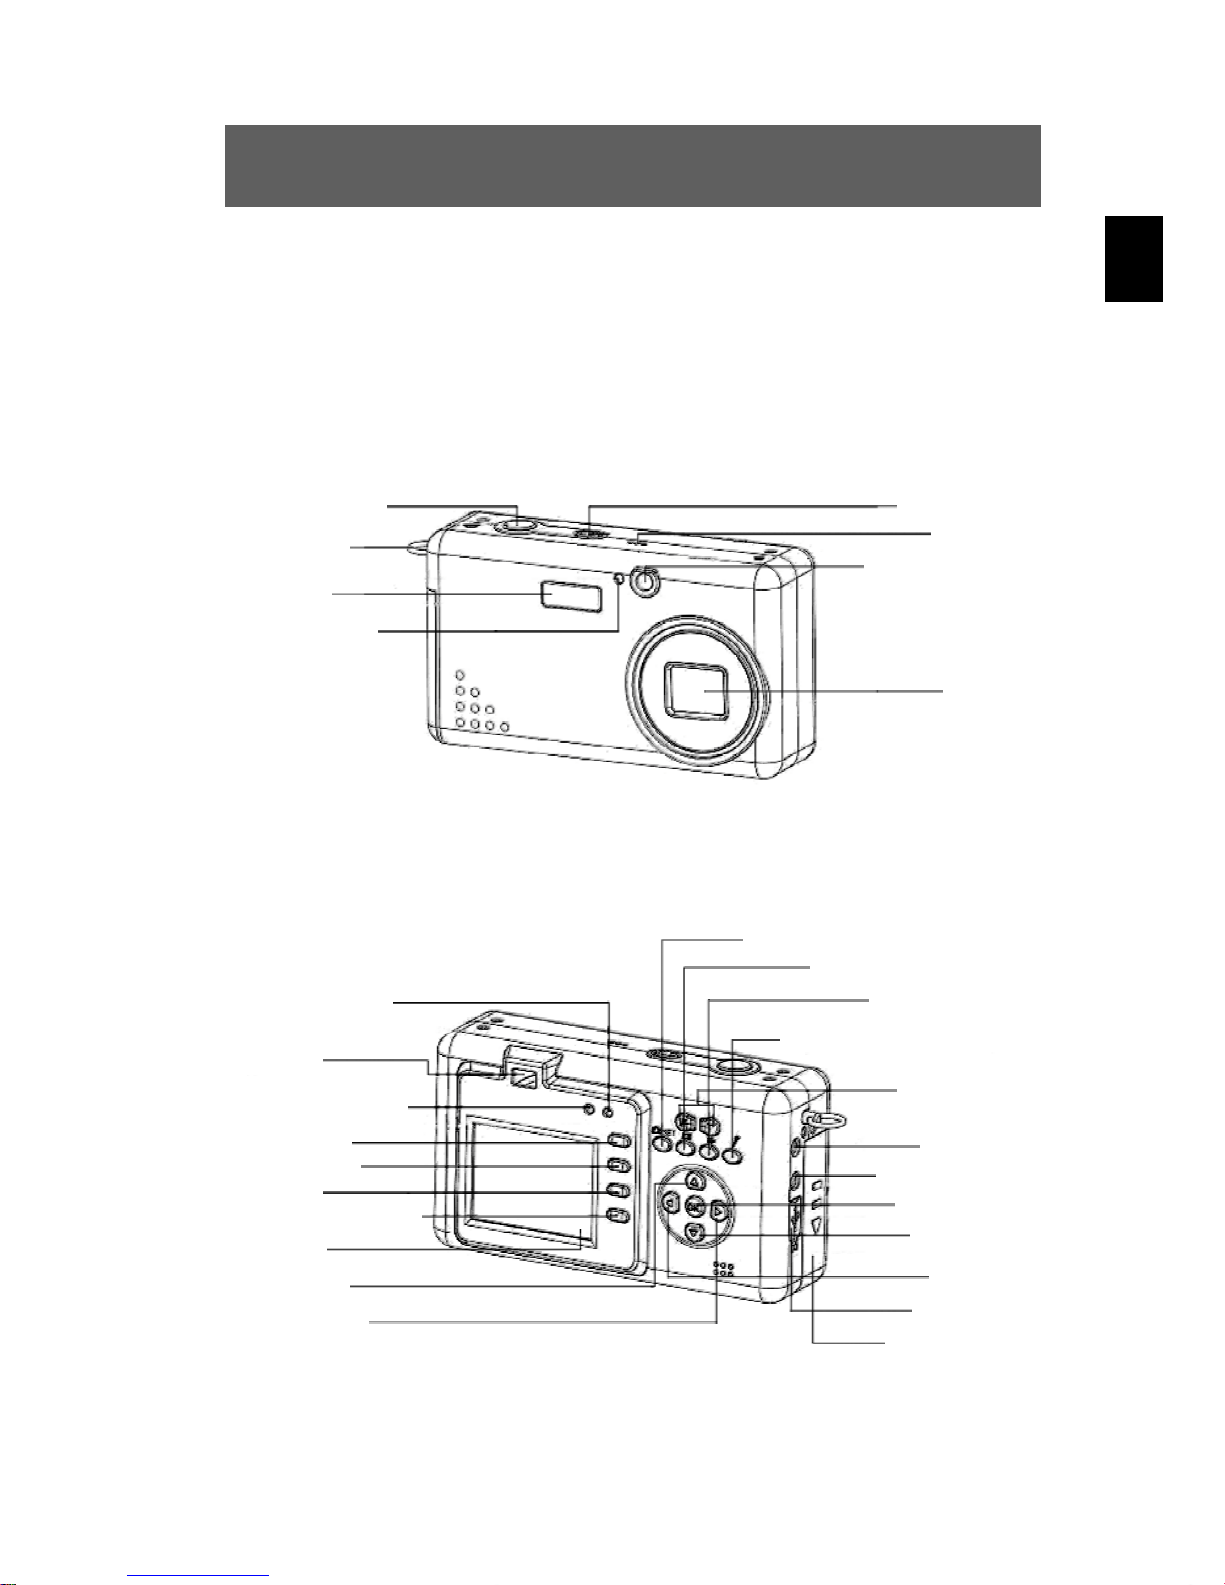
1. Parts of your camera
Familiarise yourself with the parts of your camera before use.
That makes it easier to operate the camera.
Shutter release
Strap eye
Viewfinder windo
Flash
Indicator for
self-timer
GB
On/off button
Microphon
Lens
Charging status
indicator
Viewfind
Flash / operating
status indicator
Menu button
LCD on/off
Flash
Direct delete button
LCD
Up button
Right button
Photo/configuration mode button
Play mode button
Video mode button
Sound recording mode button
Zoom buttons
TV output
Earphone terminal
Confirm button
Down button
Left button
USB terminal
Battery and card
compartment
5
Page 52
GB
2. Inserting the batteries
Use the included lithium battery.
Push the cover of the battery
1
2
compartment in the direction
indicated to open the compartment.
Open the cover of the battery
compartment.
Insert the battery into the battery
3
compartment and ensure that the
polarity is correct. Close the cover
of the battery compartment by
closing it over and pushing it back
into place.
See the “Battery tips” section on page 43 for details on the battery life.
6
Page 53
3. Using the power supply unit
Connect the power supply unit
1
2
plug to a mains socket. (Note:
Observe the country-specific
standards for mains plugs.)
Ensure that the camera is
switched off and the battery to
be charged is inserted
correctly. Connect the USB
connector of the power supply
unit to the USB terminal of the
camera.
GB
The charging status indicator should now light in most cases to
indicate that the battery is charging. The indicator light goes
out when the battery is fully charged.
Notes:
1. When the camera is switched off, you can charge the battery by
connecting the USB cable to a free USB port on a computer.
2. Only a rechargeable lithium battery may be used for this
camera. The new battery does not reach full capacity until it has
been fully charged and discharged several times. Completely
discharging the battery shortens its service life.
Please also read the additional information on page 44.
7
Page 54
GB
4. Inserting and removing the SD/MMC card
You can use SD or MMC cards to increase the memory capacity.
Switch off the camera before inserting the card. Insert the card as
shown in the drawing below (photographs, sound and video are then
stored on the card).
Inserting the card
Open the cover of the card slot.
1
Insert the card in the direction
2
shown in the drawing and push
it fully into the card slot.
Close the cover of the card slot.
3
Removing the card
Open the cover of the card slot. Press the card downwards briefly to
unlock it. Remove or change the card and close the card slot cover
again.
8
Page 55
Notes on using SD/MMC cards
Please see page 44 for additional information on this.
5. Attaching the carrying strap
Attach the carrying strap for your convenience and for safety reasons.
Pass the loop of the carrying
1
2
strap through the eye as shown
in the illustration.
Pull the other end of the
carrying strap through the
loop of the thin cord and pull
the carrying strap tight.
GB
Caution
1. Do not hang the camera around your neck using the carrying
strap to avoid danger. This applies to children in particular.
2. When carrying the camera on the strap, ensure that you
do not hit the camera against anything.
3. Use the carrying strap when holding the camera vertically.
4. When attaching the carrying strap, place the camera on a solid
surface to ensure that it cannot fall down and be damaged.
9
Page 56
GB
Basic operation
1. Switching the camera on and off
Switching the camera on
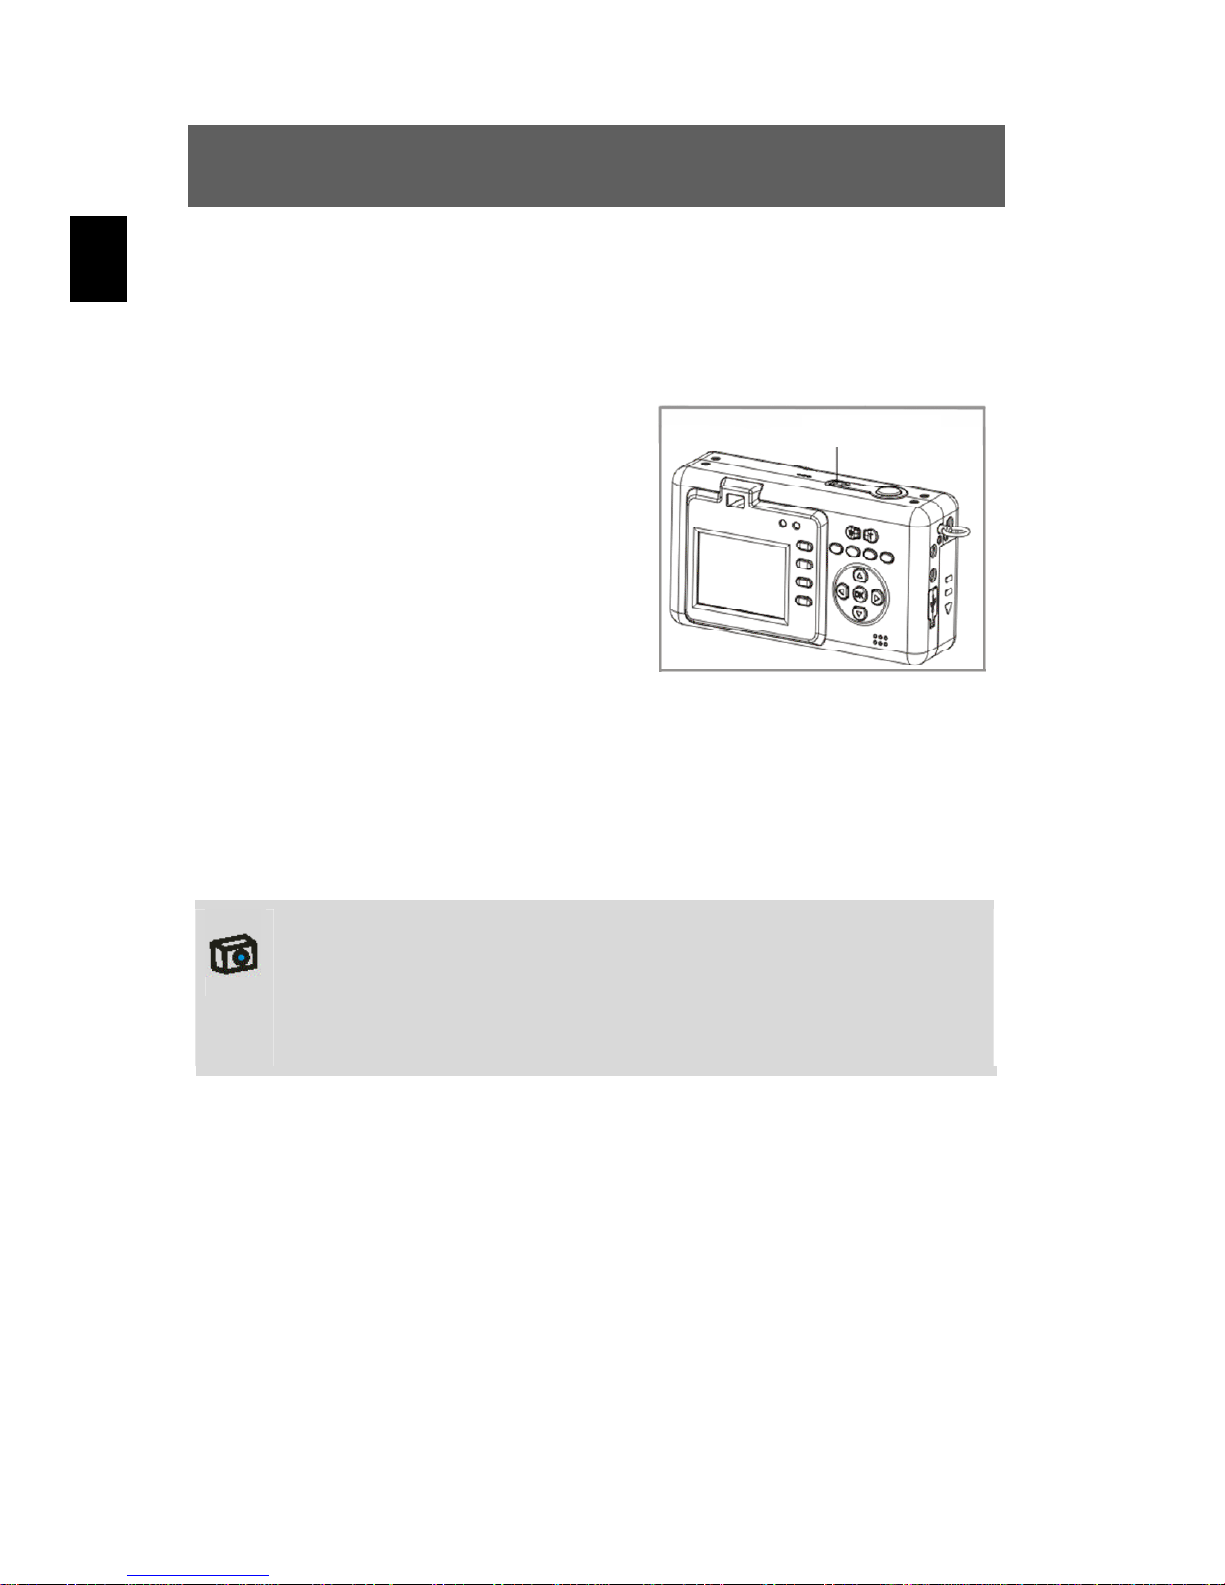
Press the On/Off button for 1-2 seconds to switch the camera on. If the
camera is not switched on, check the
polarity of the battery and ensure that it
is charged.
Switching the camera off
Press and hold the main switch for
several seconds to switch the cameral
off. The LCD goes blank.
On/off button
In order to conserve the battery, the camera is deactivated
automatically after it has been idle for more than one minute.
Press the On/Off button for 1-2 seconds to switch the camera on
again.
Automatic deactivation is not active in USB or record mode.
10
Page 57
2. Using the mode buttons
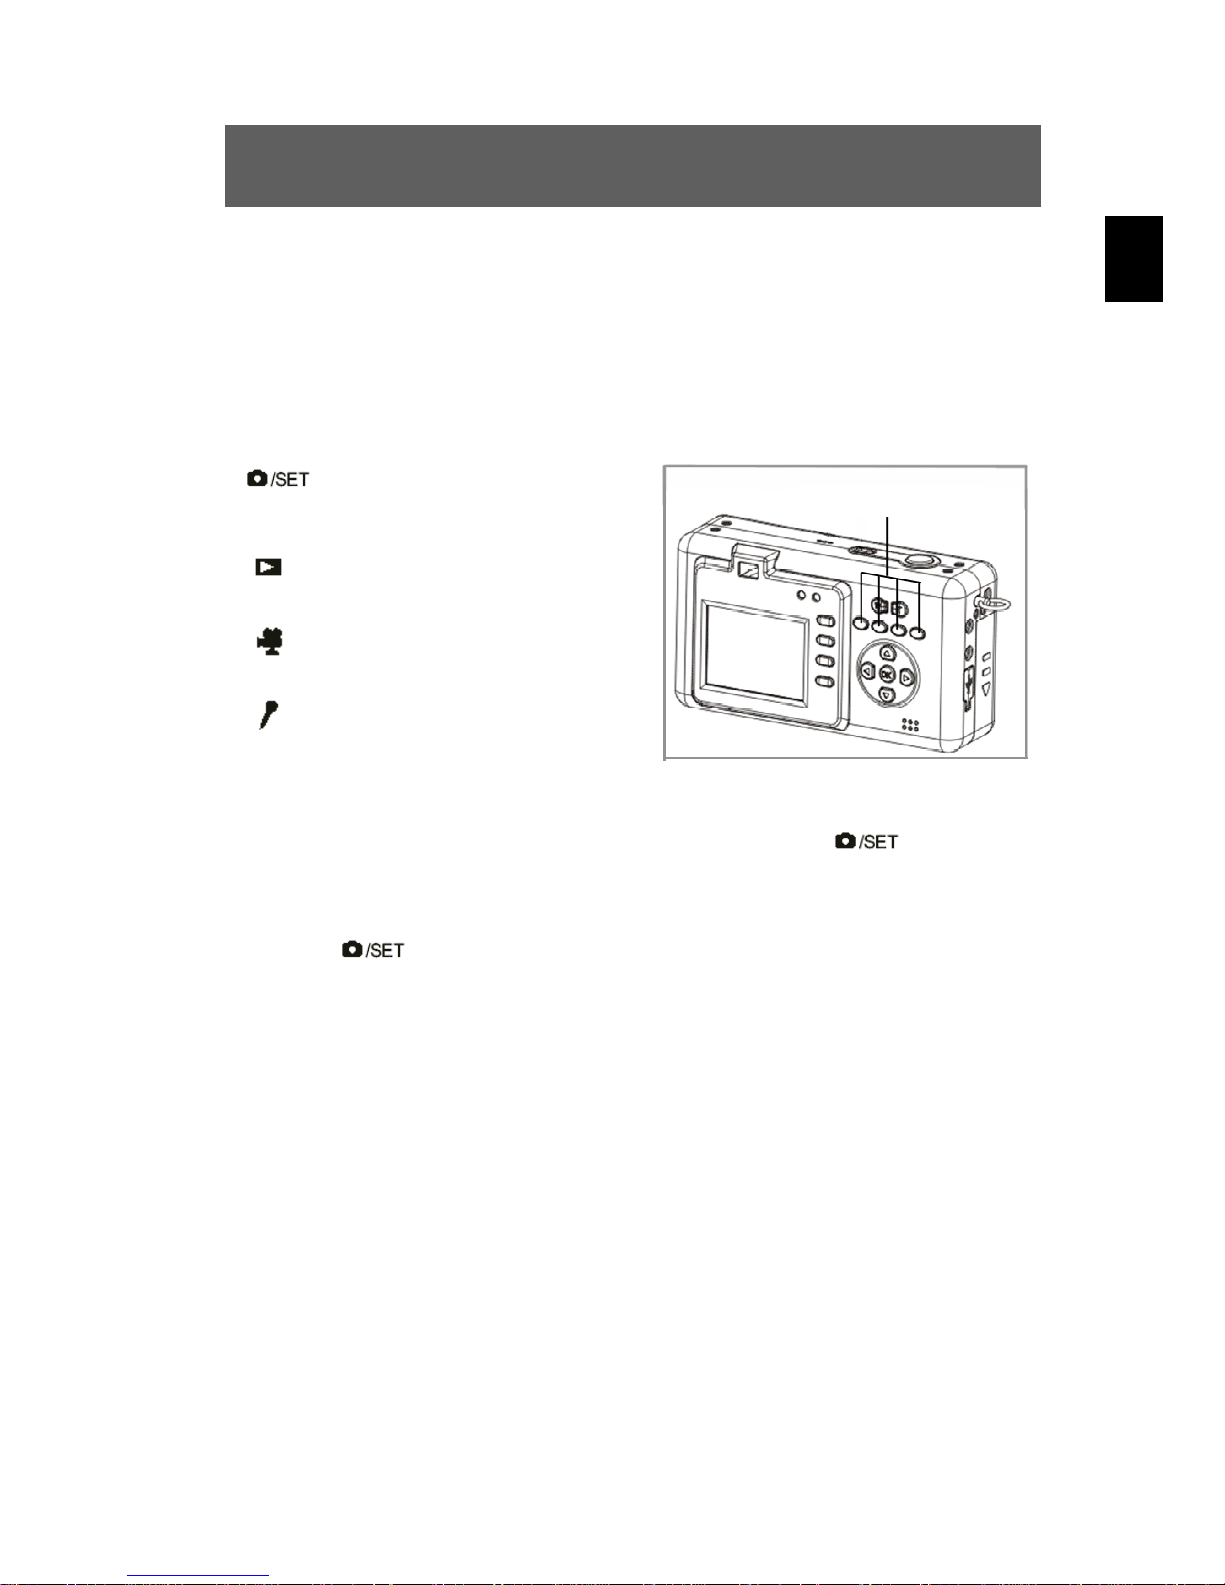
The camera features five operating modes. When the camera is
switched on, it is automatically in still photograph mode. Press the
following mode buttons to select the required mode.
Selects the photography
mode and setting mode
Play mode
Video mode
Sound recording mode
Video mode button
GB
When the camera is in photography mode, press the
access the setting mode.
When the camera is in the setting mode or one of the other modes,
press the
button to return to the photography mode.
button to
11
Page 58
GB
3. Taking photographs
1 LCD descriptions display
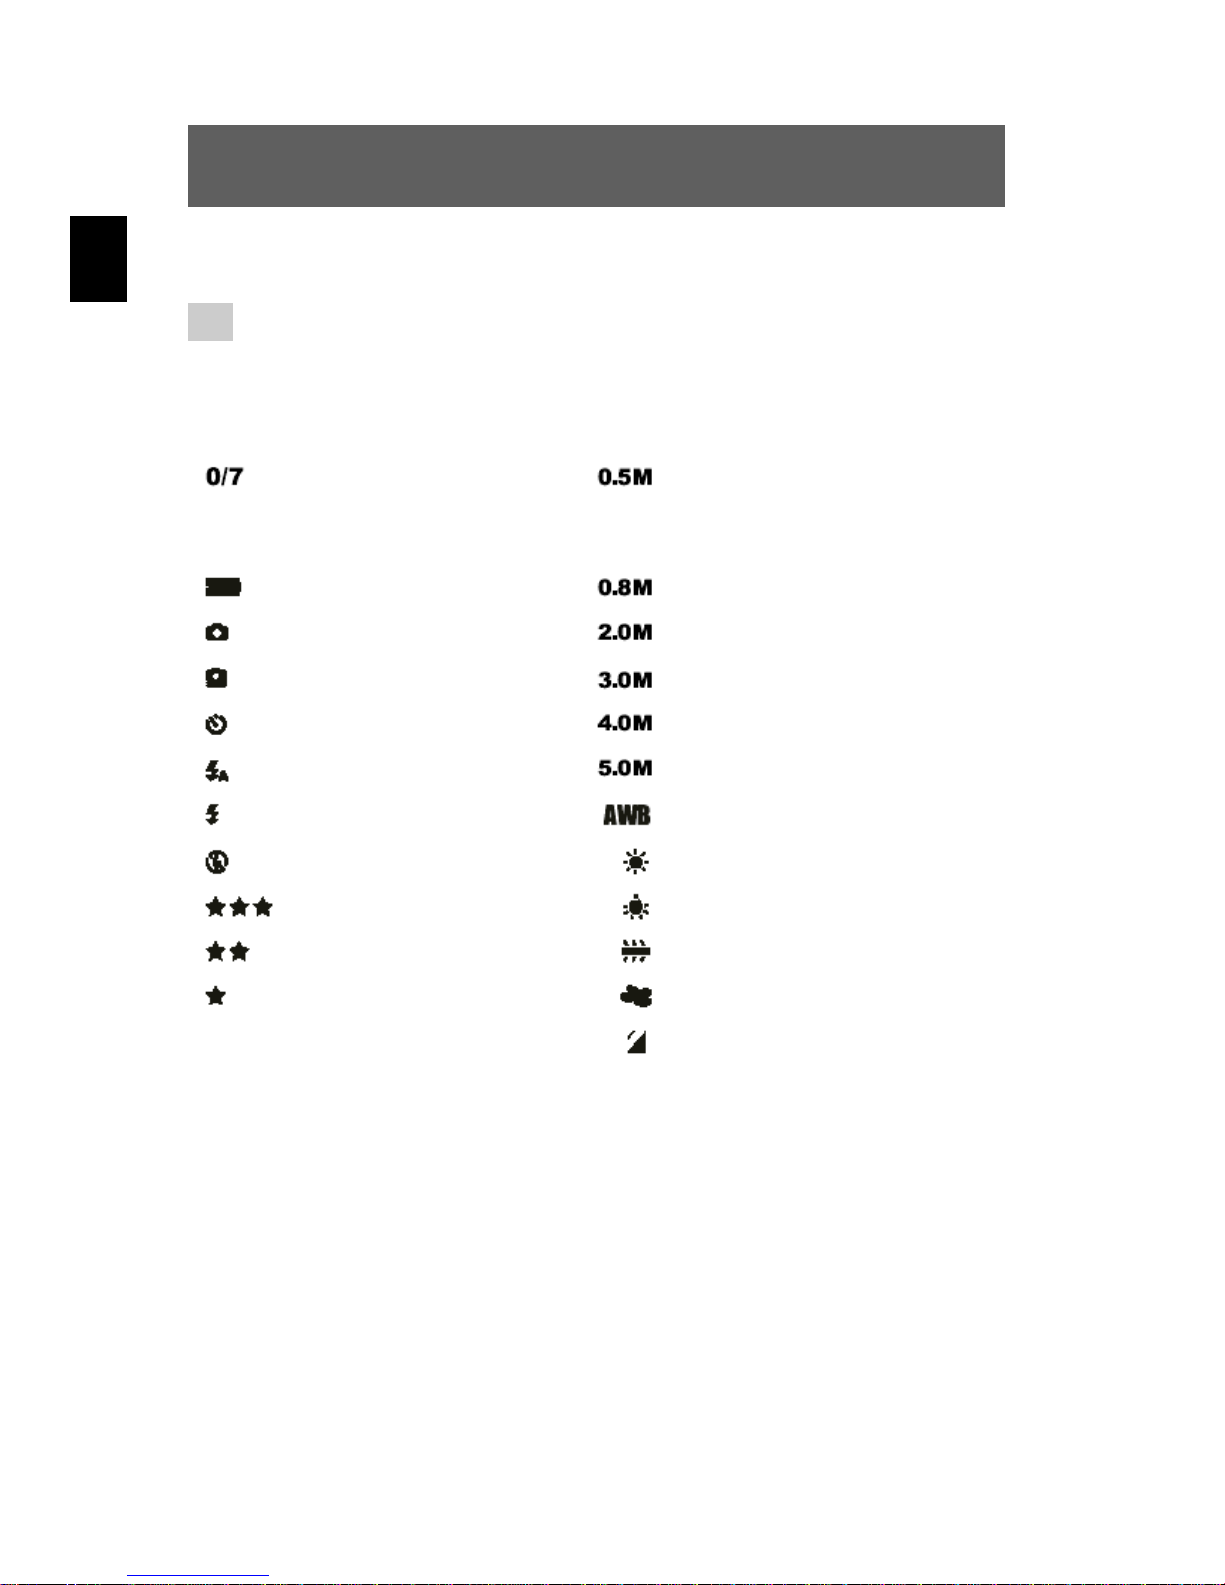
Status symbols in the photography mode
Number of photographs
taken
Number of photographs
available
Battery status 0.8 megapixel image mode
Single shot mode 2.0 megapixel image mode
Burst mode 3.0 megapixel image mode
Self-timer mode 4.0 megapixel image mode
Automatic flash 5.0 megapixel image mode
Flash always on Automatic white balance
0.5 megapixel image mode
Flash off Daylight white balance
Best image quality Tungsten white balance
Medium image quality Fluorescent white balance
Standard image quality Cloudy white balance
Using external memory card
12
Page 59
2 Snapshot
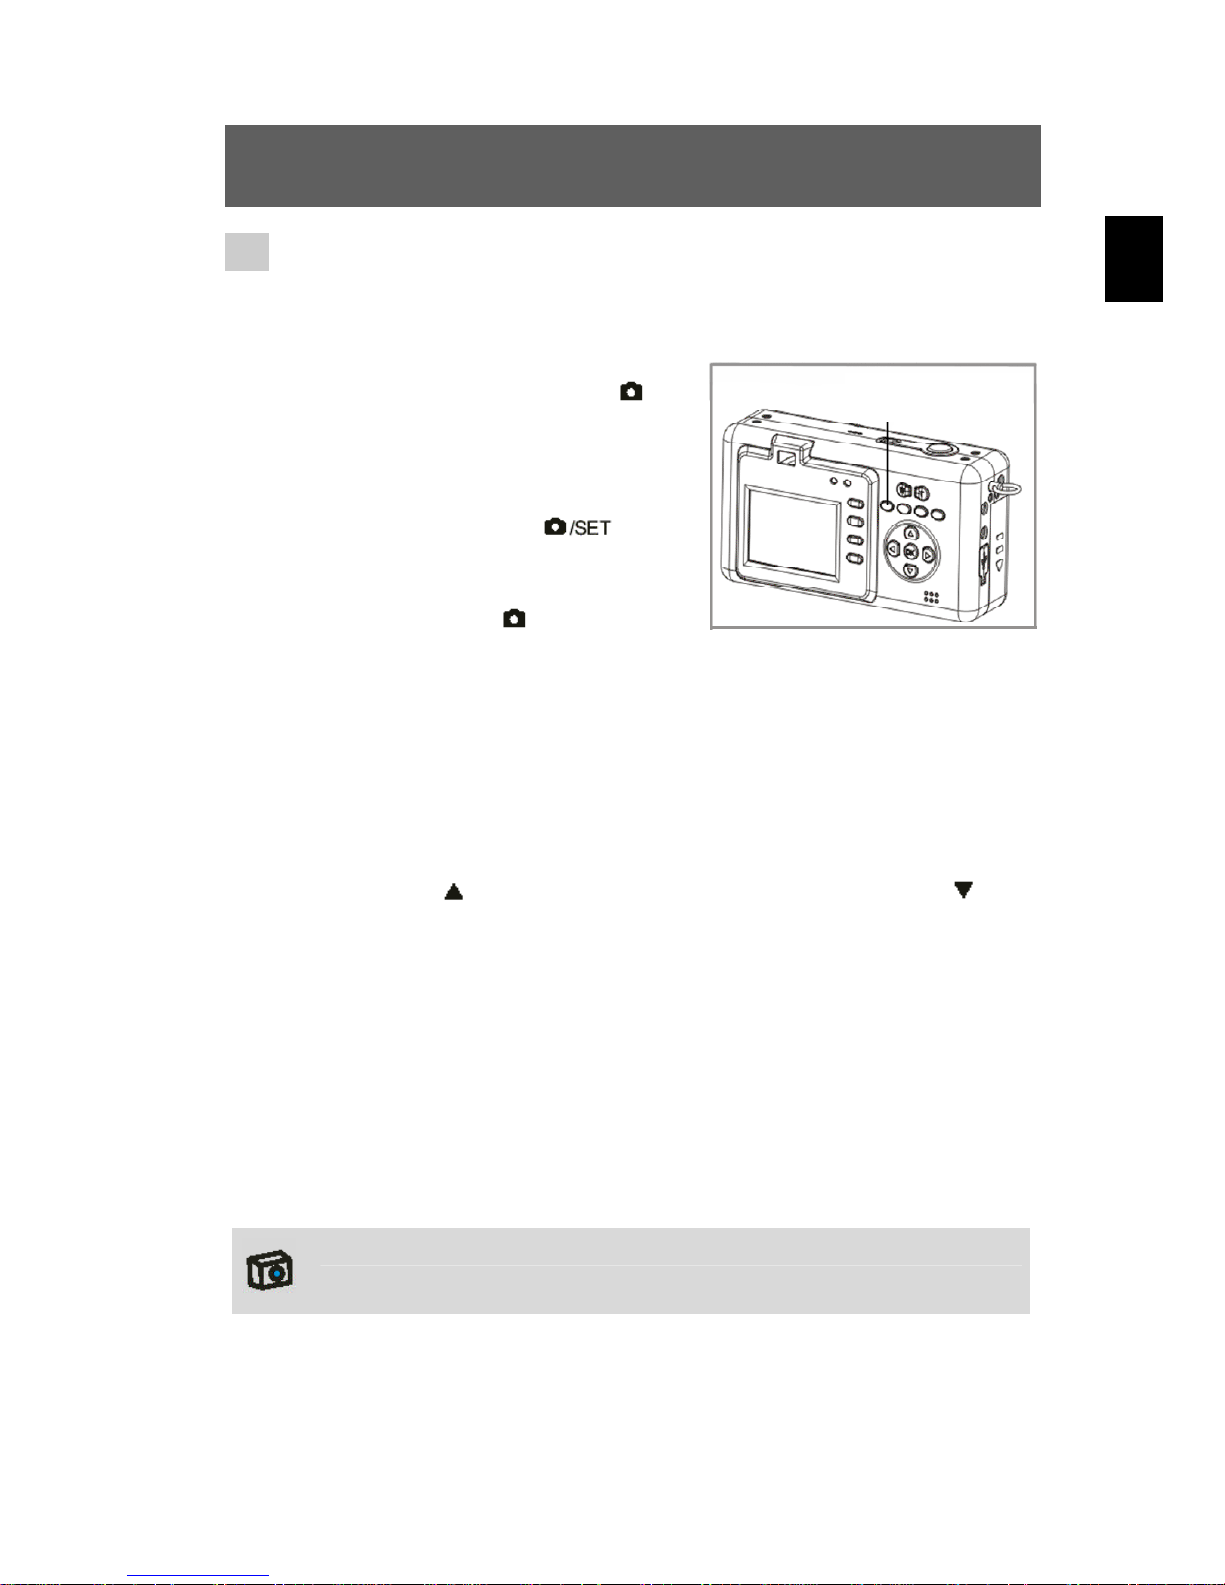
Press the On/Off button to switch the camera on.
Select single shot mode
1
When the camera is switched
on, it is automatically in still
photograph mode. If this is not
the case, press the
button to select the photography
mode. Photography mode is
active when the
appears in the upper corner of
the LCD display.
Zooming in and out optically and digitally
symbol
mode
2
Use the LCD to frame the subject. Press the T button to zoom
in optically and the W button to zoom out optically. Press the
Up button (
zoom out digitally.
) to zoom in digitally and the Down button ( ) to
GB
Photo/configuration
mode button
Locking autofocus/taking a picture
3
Press the shutter release halfway. Autofocus is complete when
the image appears in focus on the LCD. Press the shutter
release all the way to take a picture. A signal sounds to
indicate when the picture has been taken.
Photographs taken with the camera are saved as JPEG files.
13
Page 60
GB
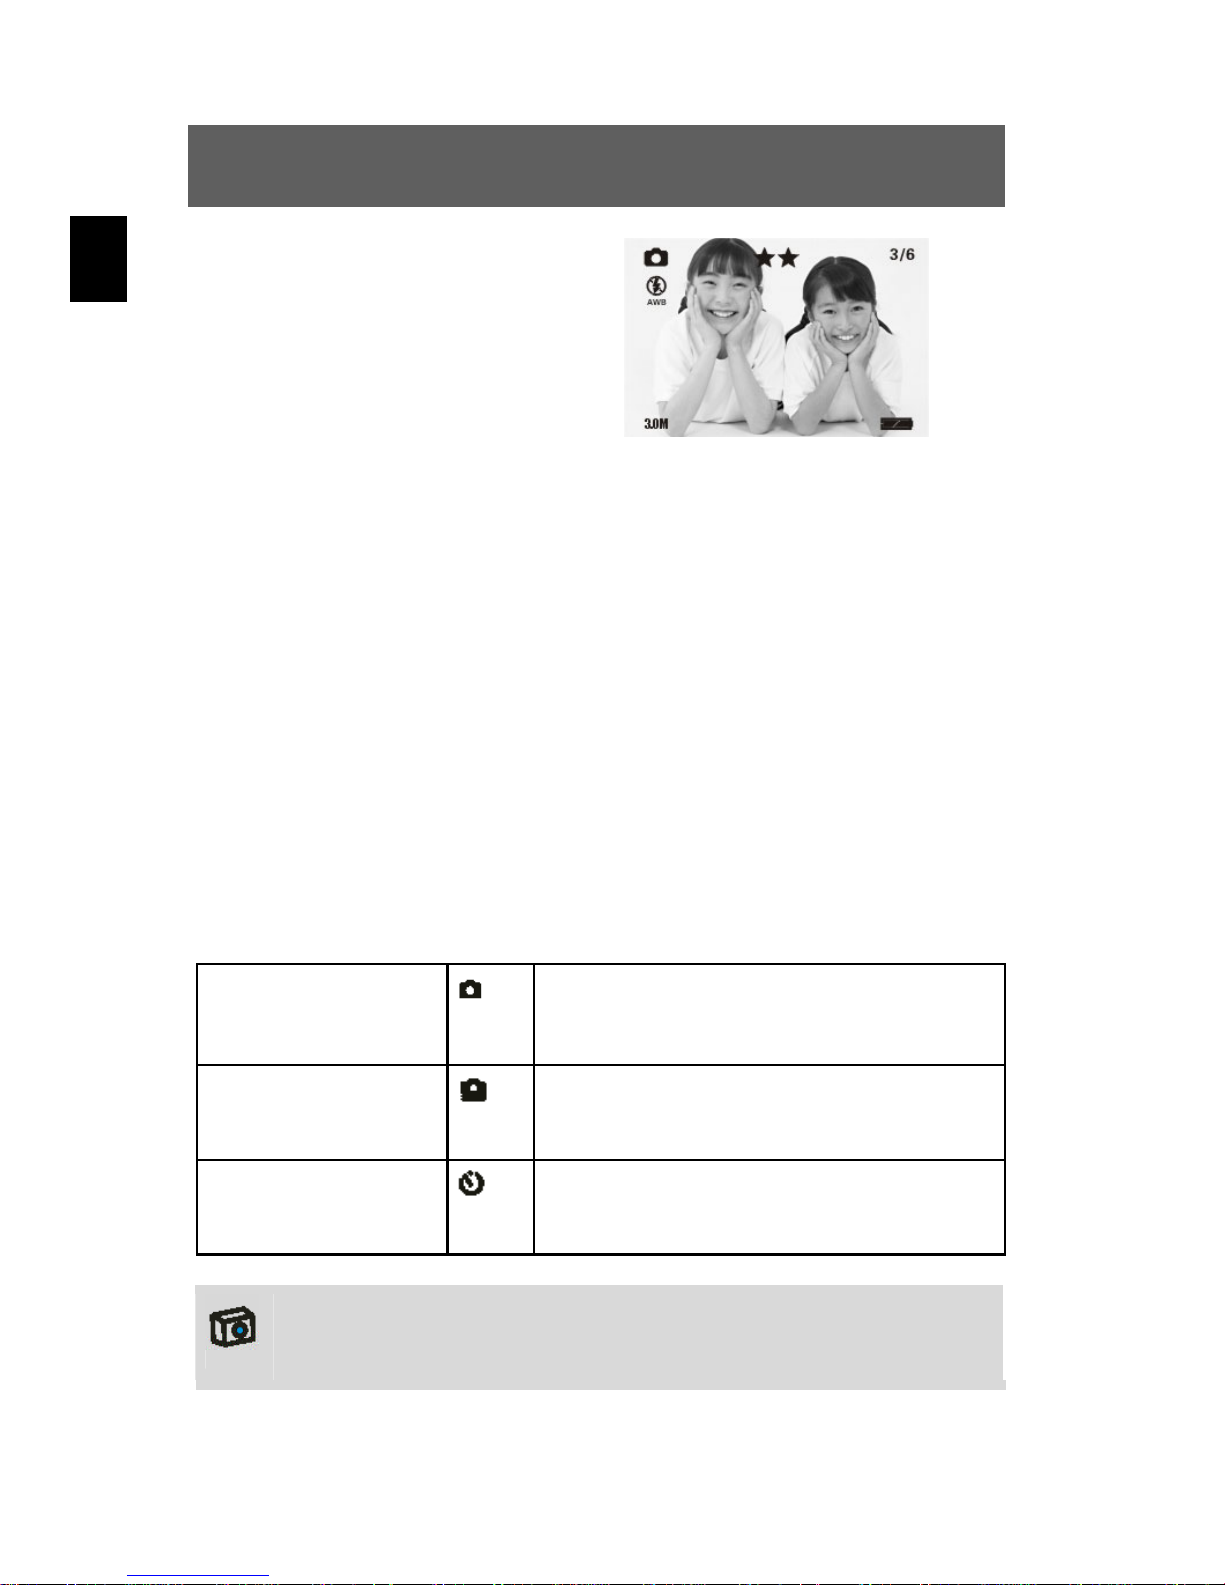
You can now view the image on the
LCD. The meaning of the status
symbols shown on the LCD is
explained in the table on page 12.
When you press the menu button in photography mode, the following
menu functions are available for selection:
• Capture Mode
• Strobe
• Resolution
• Photo Quality
• Photo Effect
• WB
• EV
You can choose between three different image modes in the “Capture
Mode” menu function:
Single
Sequence
SelfTimer
The photography mode is preset to single-shot.
The LCD can be switched off using the sleep button
(LCD on/off) to save power.
14
When the shutter release is pressed, a
single photograph is taken.
When the shutter release is pressed, a
series of three photographs is taken.
The photograph is taken 10 seconds after
the release is pressed.
Page 61
4. Recording audio
1
2
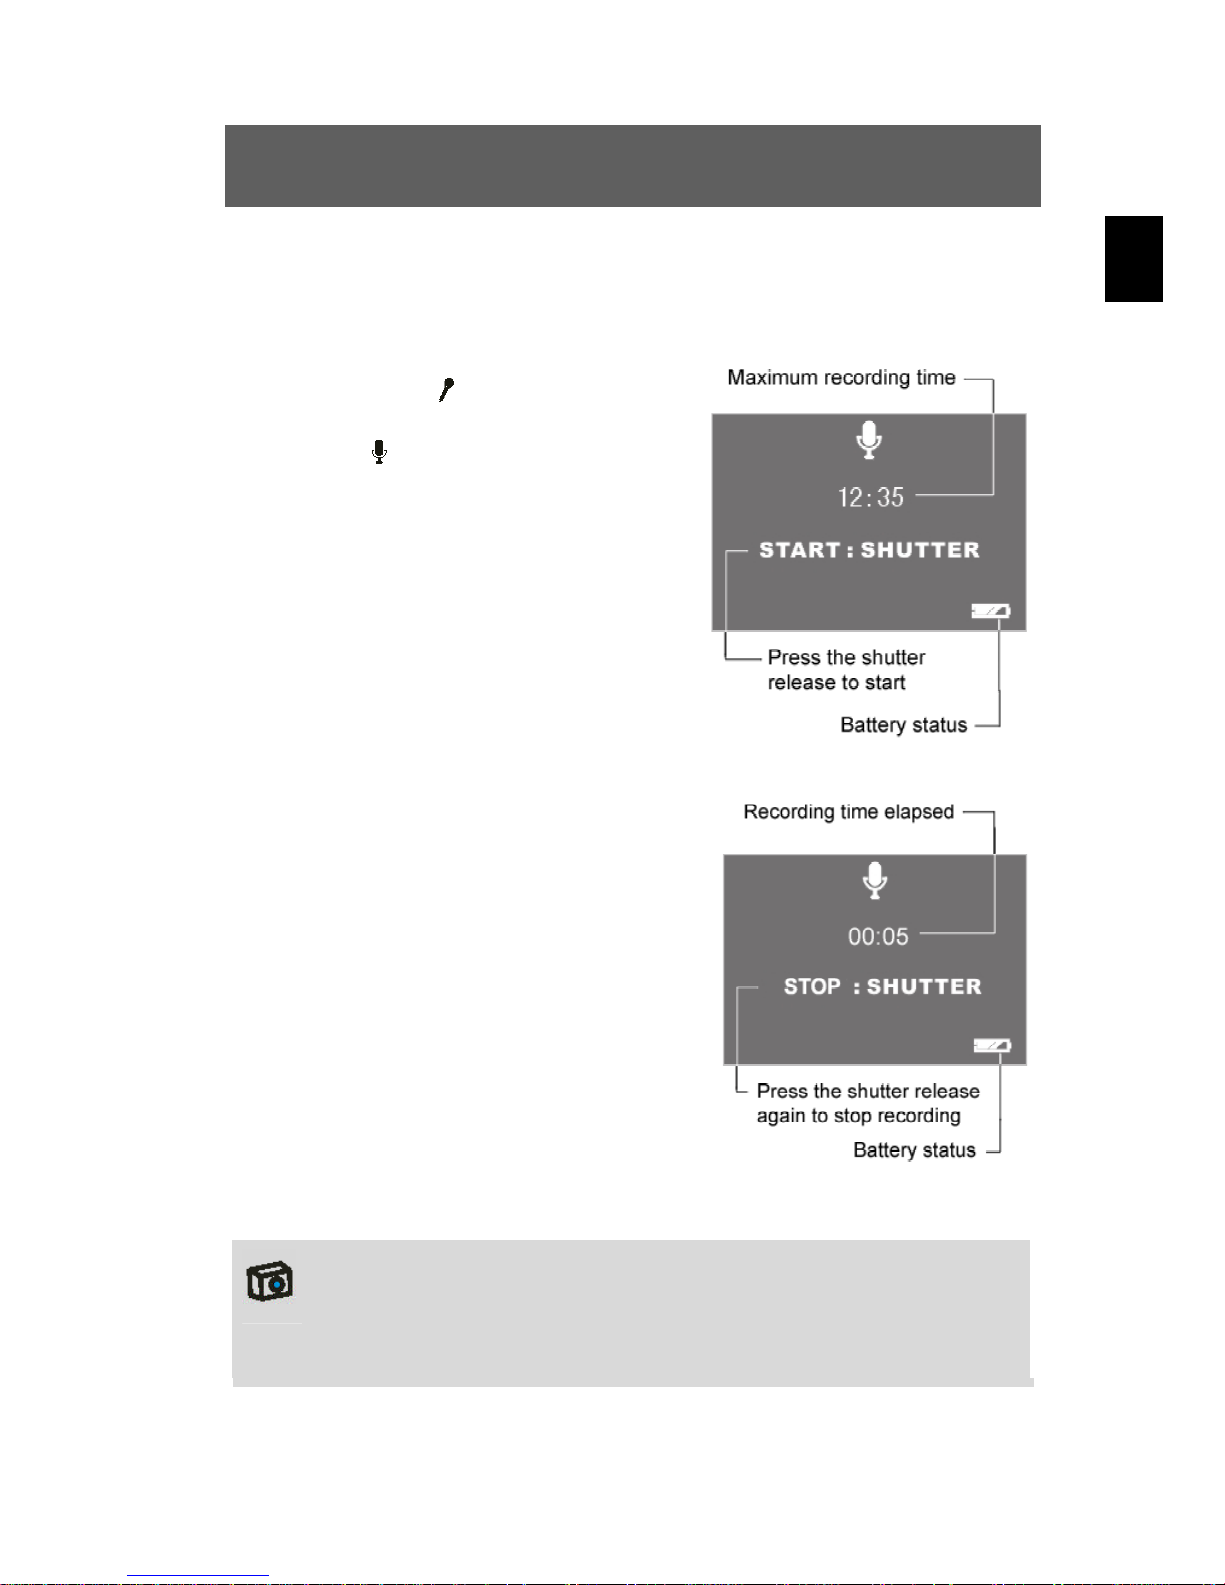
Press the button to activate
the digital recording function.
The
LCD. Before recording, the
information shown at right is
displayed. Press the shutter
release once to start sound
recording.
The information shown here
is displayed when recording
was started using the shutter
release. Press the shutter
release again to stop sound
recording.
symbol is shown on the
GB
The sound is recorded as a WAV file. The length available
depends on the size of the memory.
The LCD display can be switched off using the sleep button
(LCD on/off) to save power.
15
Page 62
GB
5. Making video clips
1 LCD descriptions
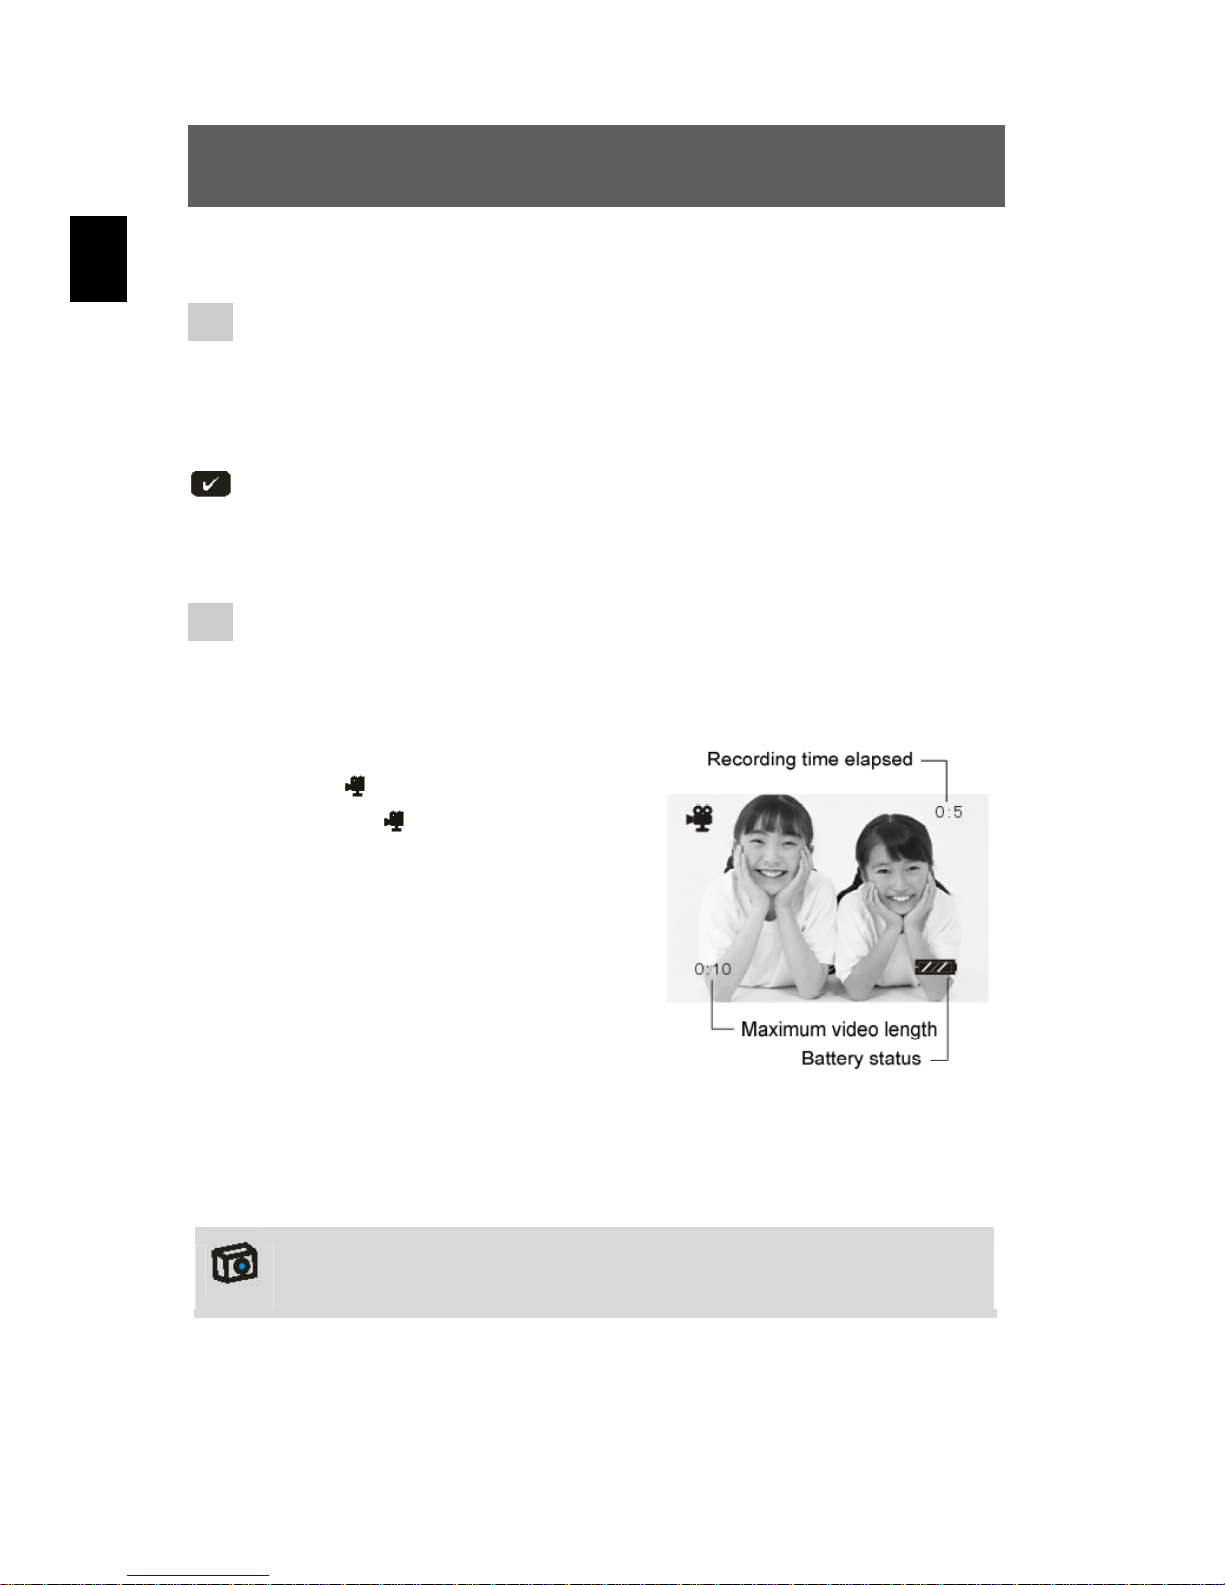
The elapsed time is shown at the top right. The remaining time is shown at
the bottom left.
The display is not changed during recording and is not updated until
recording is complete.
2 Making a video clip
Switch the camera on.
Press the button for the video
1
mode
when the
the upper corner of the LCD
display.
. Video mode is active
symbol appears in
2
16
Press the shutter release to start
recording a video. Press the
shutter release again to stop
recording. The information shown
at right is displayed on the LCD
during video recording.
The video is recorded as an AVI file (with sound). The length
depends on the memory capacity.
Page 63

6. Playing images, audio and videos
1 LCD descriptions
Status symbols in play mode
2004:02:11
12:02:47
01/10
2 Viewing photos, videos and listening to sound
recordings
Current system time: 11.02.2004, 12:02:47
Number of photographs taken / total photographs
Photo is protected
Photo is not protected
Current file is a photograph (jpg)
Current file is a video (avi)
Current file is a sound recording (wav)
GB
Press the button to activate play mode. You can now play
1
2
photographs, videos and sound recordings. The
shown on the LCD.
The following buttons are used to browse the
photos/videos/sound recordings in play mode:
Goes to the previous photo, video or sound recording
Goes to the next photo, video or sound recording
OK Start/close thumbnail view.
Press the shutter release to start videos or sound recordings
from the thumbnail view. Press the shutter release again to
stop playing.
symbol is
17
Page 64
GB
Thumbnail view
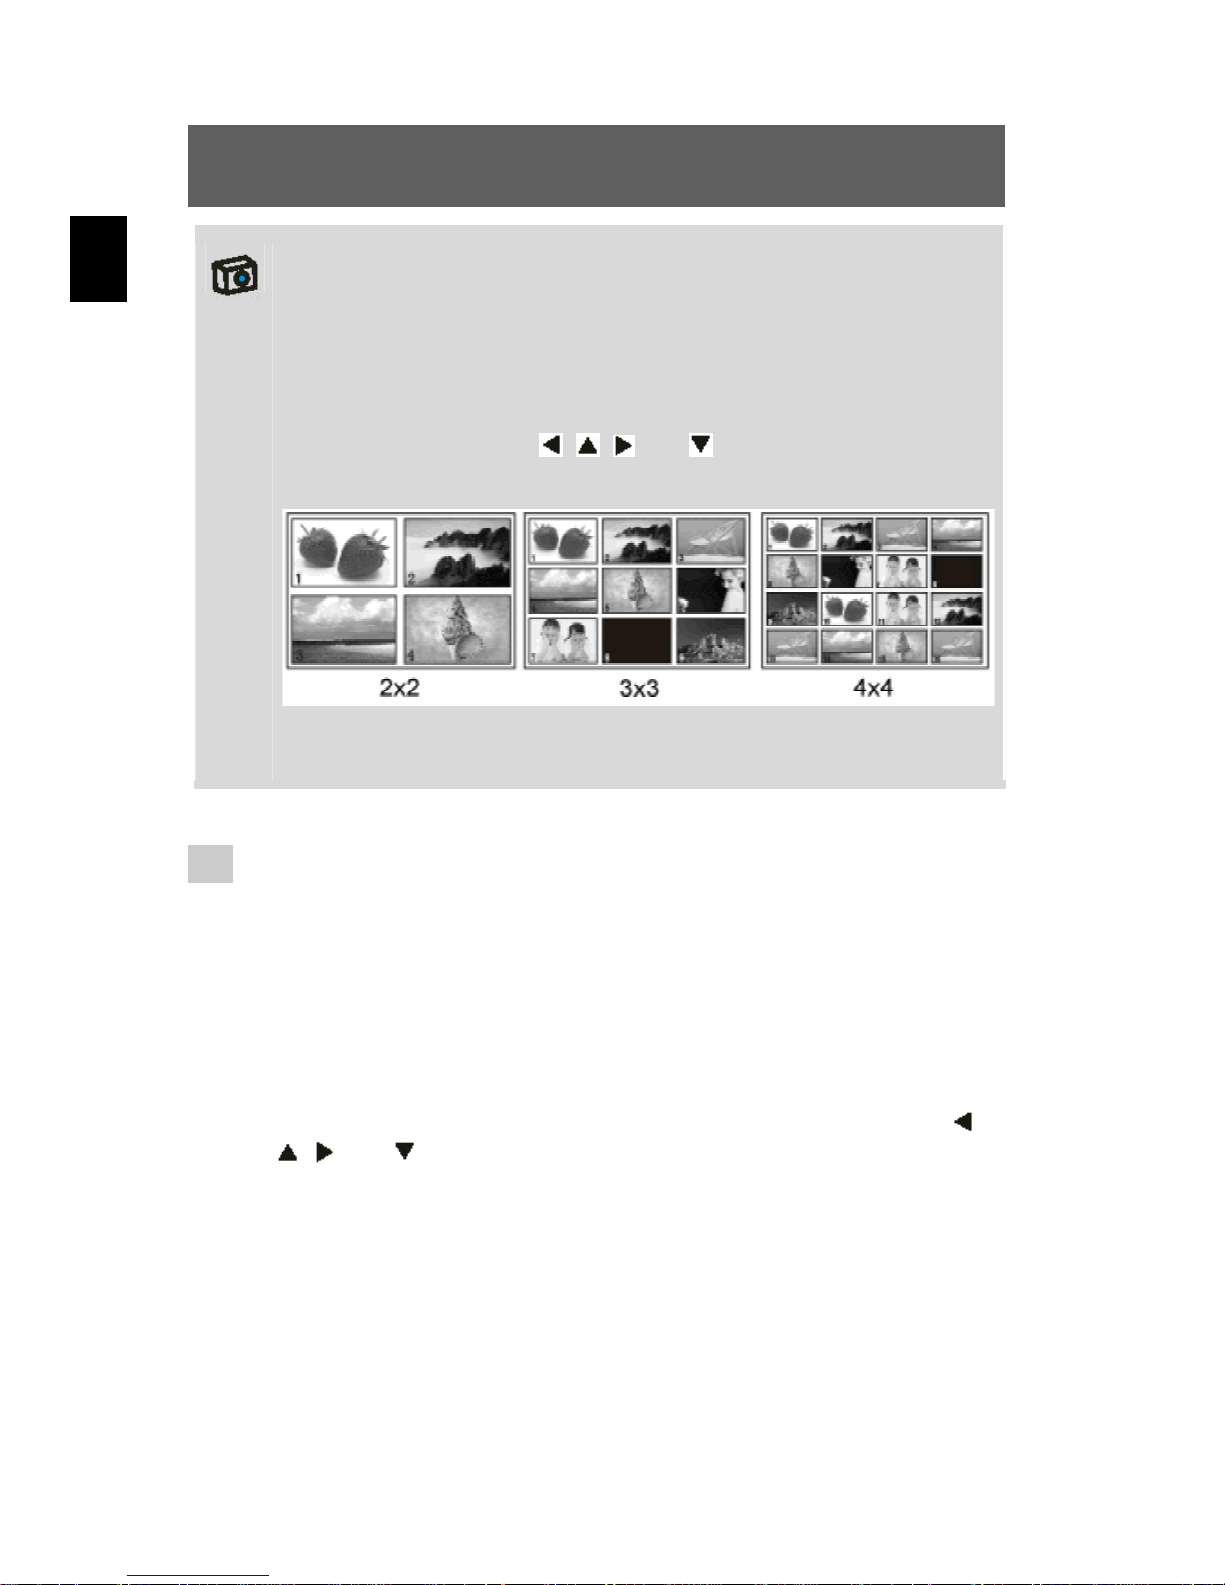
While playing photos, videos and sound recordings, you can open
the thumbnail view by pressing the confirm button (OK button).
This mode allows you to view several photos, videos or sound
recordings at once.
Use the control buttons , , and to select a file and press
OK to play the file.
There are three thumbnail modes: 2x2, 3x3 and 4x4, so that four,
nine or sixteen thumbnails can be shown on the LCD.
3 Viewing enlarged images (zoom)
When viewing images, you can use the T and W zoom buttons to zoom
in on an image or return to the original size.
Press the T button to zoom in on the image.
1
2
Press the W button to return to the original size.
When you zoom in on the image, press the control buttons ,
, and to view various parts of the image.
18
Page 65
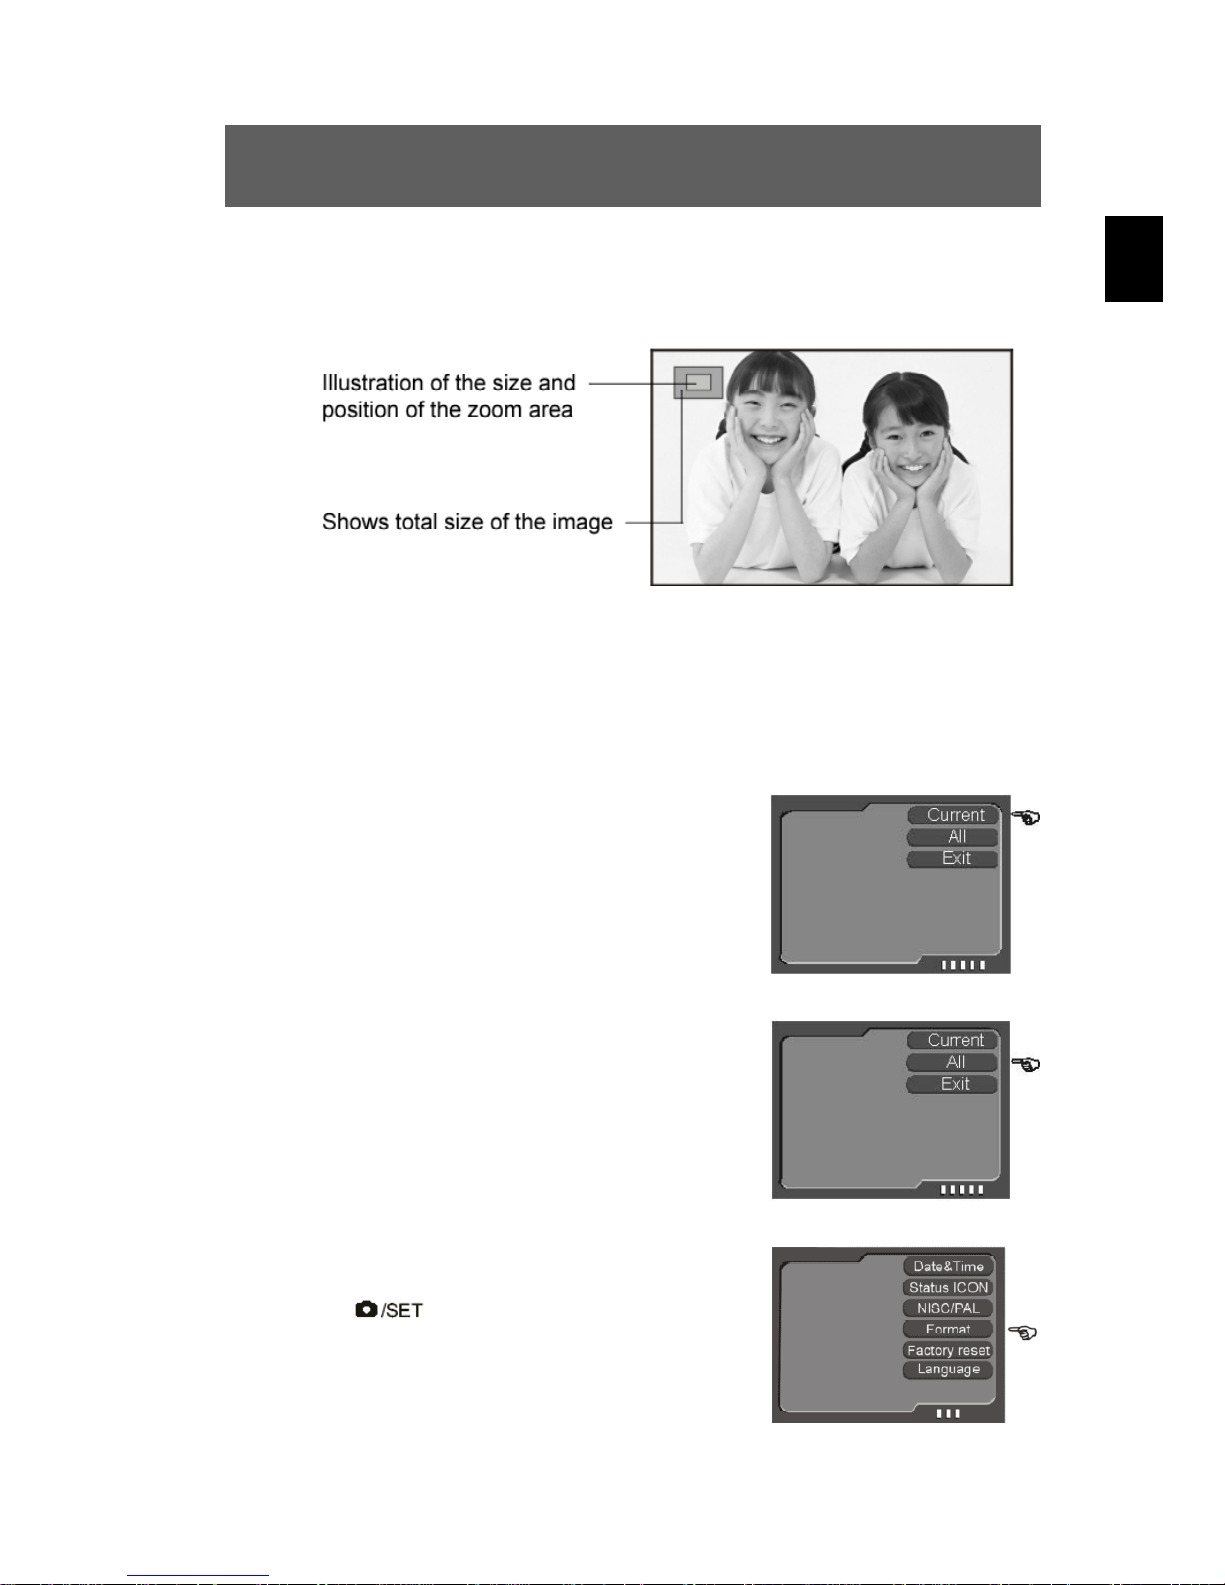
When you use the zoom function, a small window appears in the upper
left corner of the LCD showing the size and position of the image area
currently displayed within the total image (see illustration below).
7. Deleting photos
GB
You can delete unrequired photos. Either single photos or all photos
can be deleted. To do so, you must be in playback mode.
Deleting a single photo
Select the photo to be deleted in playback
mode. Then press the menu button and select
“Delete” and “Current” to erase the photo.
Deleting all photos
To delete all photos, press the menu button and
select “Delete” and “All”. All photos are now
deleted.
Formatting the memory
Press the button to open the
configuration mode. Select “Format”, press the
OK button and select “YES” to start formatting.
The menu is displayed again after formatting.
19
Page 66
GB
The method described above can also be used to delete video clips and
sound recordings.
Caution
Formatting deletes all unprotected data.
Protected data is not deleted but can be formatted. See page 28
for instructions on protecting and unprotecting data.
Advanced operation
1. Using the flash
If there is not enough available light for your photo, the built-in flash can
provide the additional light required.
Switch the camera on and select the photo mode (single shot
1
or self-timer mode).
2
20
Press the flash button once or repeatedly to set one of three
flash modes. The flash mode changes from “Auto” to “Always
on” to “Off” each time you press the button. The corresponding
status symbol for the flash mode is shown in the upper left
corner of the LCD.
The flash is activated automatically when the light level is too low if
the flash is set to “Auto”. When “Always on” is set the flash is used
for every shot. When “Off” is selected, the flash is deactivated.
The flash only works in single shot mode and self-timer mode.
It does not work in burst and video mode.
Please note that using the flash increases battery consumption.
Page 67
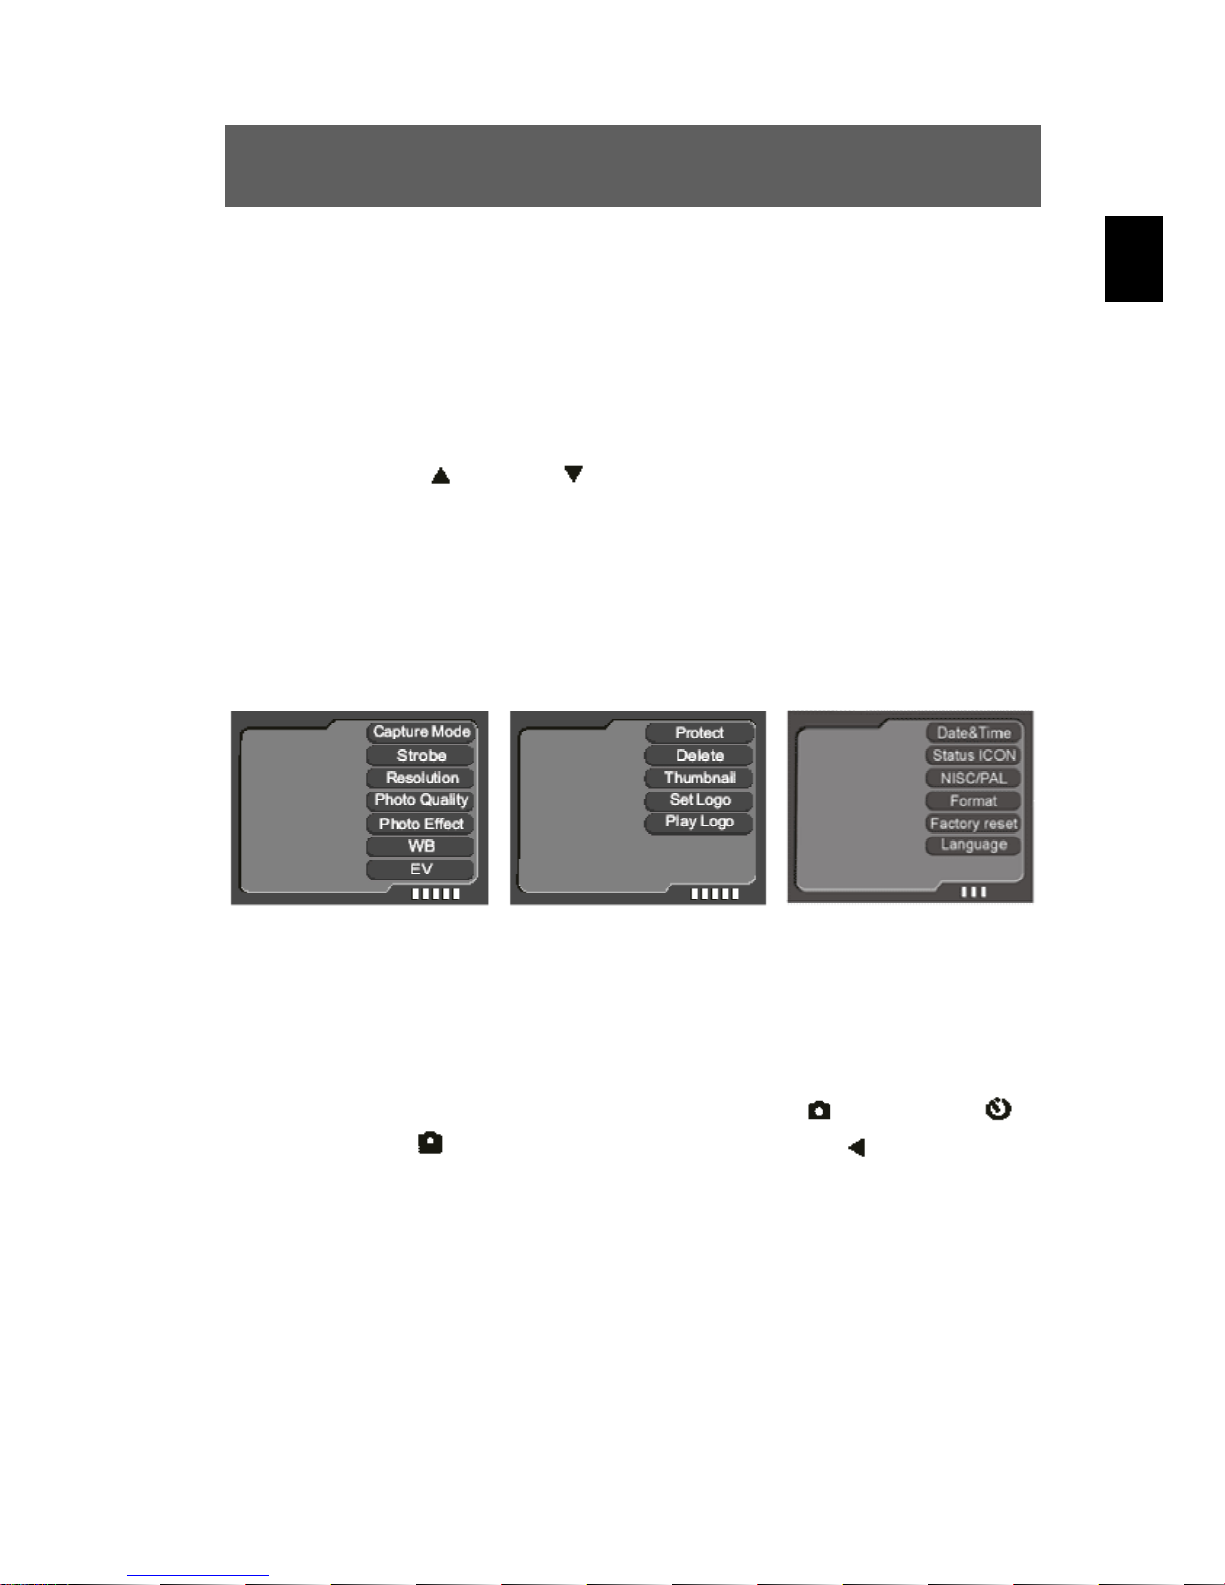
2. Changing menu options
The camera features image, playback and configuration menus.
Press the menu button to select these menus from the
1
2
The respective option selected is highlighted in colour.
Photography mode menu Playback mode menu Configuration mode menu
photography, playback or configuration mode.
Press the (up) and (down) buttons to select the
corresponding option and press the OK button to confirm.
GB
3. Using direct access buttons
Selecting photography mode directly
In photography mode, you can access the “Single”
and “Sequence”
The corresponding symbol is displayed at the top left of the LCD.
Selecting the resolution directly
In photography mode, the OK button can be used to select the
resolution progressively. The current resolution is displayed at the
top left of the LCD.
modes by pressing the left button repeatedly.
, “SelfTimer”
21
Page 68
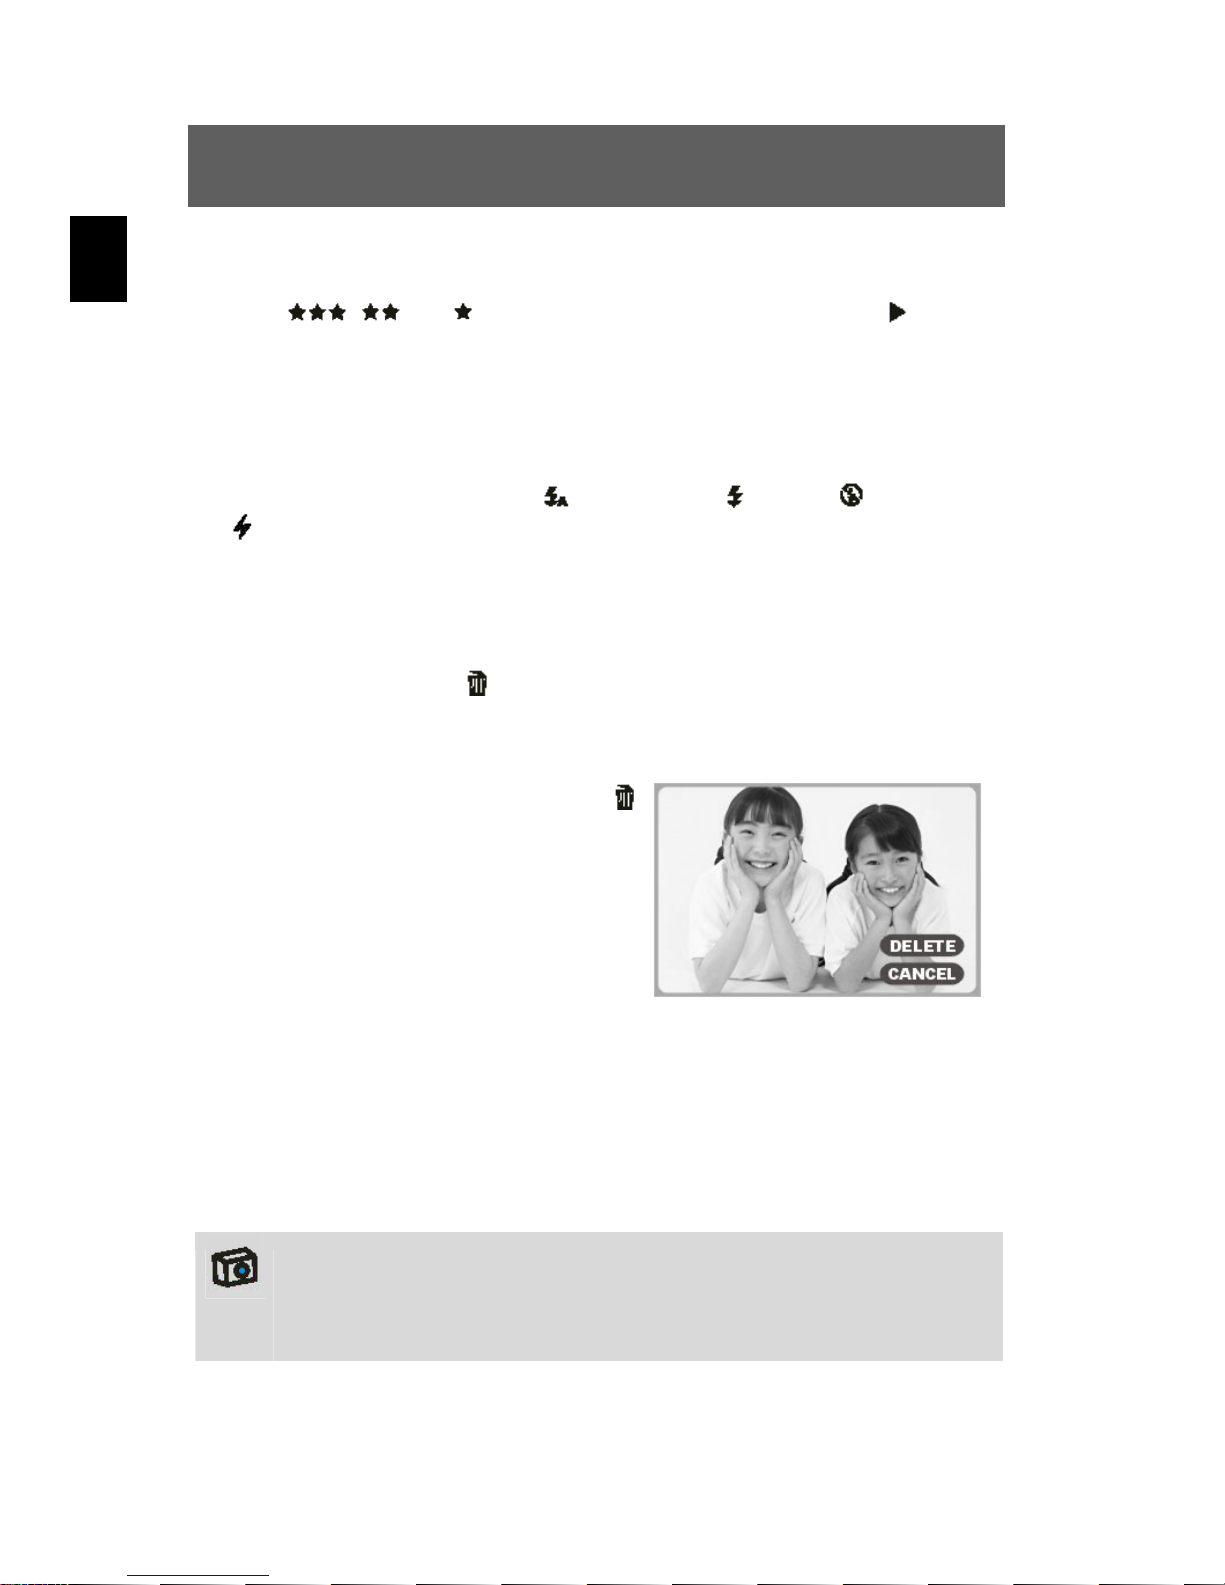
Selecting the image quality directly
GB
In photography mode, you can access the various image quality
settings
repeatedly. The corresponding symbol is displayed at the top left of
the LCD.
Accessing the flash mode directly
You can set the flash to “Auto”
the
symbol is displayed on the LCD.
Deleting photographs directly
The direct delete button
taken.
button in single shot and self-timer modes. The corresponding
Press the direct delete button
1
in photography mode. The last
photograph taken appears on
the LCD.
, and directly by pressing the right button
, “Always on” or “Off” by pressing
can be used to delete the last photograph
Press the up button to select the
2
“DELETE” option, then press OK
to delete the image. The system
then returns to photography
mode.
1. The direct delete button can only delete the last image. It cannot
be used to delete video clips and sound recordings.
2. The direct delete button only functions in photography mode.
22
Page 69
4. List of menu options
The menu contents vary in accordance with the operating mode.
The menu contents may vary in accordance with the camera model.
See “Specifications” on page 37 for further details.
Photography mode
Menu Setting Description
Single Take a single photograph
Shoot Mode
Strobe
Resolution
Photo Quality
Photo Effect Normal Normal photo mode
B/W Black and white
Sepia Photos with a nostalgic brown tone
WB Auto Automatic white balance
Daylight White balance for daylight mode
Tungsten White balance for tungsten mode
Fluorescent White balance for fluorescent mode
Cloudy White balance for cloudy mode
EV −2.0 EV to +2.0 EV Six-step exposure compensation
Sequence Takes a series of three photos
SelfTimer 10 seconds self-timer
AUTO
Force
Forbidden
2560 x 1920
2304 x 1728
2048 x 1536
1600 x 1200
1024 x 768
800 x 600
Superfine Best image quality
Fine Medium image quality
Economy Normal image quality
See page 20 for further details on the
setting.
5 million pixels
4 million pixels
3 million pixels
2 million pixels
0.8 million pixels
0.5 million pixels
GB
23
Page 70
Playback mode
GB
Menu Setting Description
Lock Current Protect current photo to prevent
accidental deletion
Protect
Delete
Thumbnail
Set Logo Use the current photo as the start-up image
Play Logo
Unlock Current Cancel protection for current photo
Lock All Protect all photos to prevent accidental
deletion
Unlock All Cancel protection for all photos
Current Delete current photo
All Delete all photos
2 x 2 Show 4 thumbnails simultaneously
3 x 3 Show 9 thumbnails simultaneously
4 x 4 Show 16 thumbnails simultaneously
Enable Select current photo as the start-up
image
Disable Use the preset image as the start-up
image
Configuration mode
Menu Setting Description
Date&Time Set date and time for current photo
Status ICON
NTSC/PAL NTSC Set TV output to NTSC
PAL Set TV output to PAL
Format
Factory Reset
Language
On Display symbol for current status
Off Hide symbol for current status
Yes Format internal/external memory
No Cancel format
Yes Reset values to factory settings
No Cancel factory reset
Select the menu language (menu contents may vary in
various models).
24
Page 71

5. Exposure compensation
By correcting the exposure value (EV), you can adjust images which
appear too light or too dark.
Selecting the image mode
1
Press the menu button in photography mode.
Selecting EV
2
Select the EV item in the menu and press OK to open the
exposure option.
GB
Selecting an EV value
3
Press
press OK to confirm. The value can be set in six steps between
-2.0 EV and +2.0 EV.
Note
Exposure compensation can be very useful. In dark conditions
set the value to a positive number and in bright conditions to a
negative value.
Do not use exposure compensation if the subject is in a very bright
or very dark area, or if the flash is used.
or to select a suitable exposure compensation and
25
Page 72

GB
6. Selecting a language
When you use the camera for the first time, the texts on the LCD may
not be displayed in your language. However, the LCD language can be
changed easily.
Press the button to open the configuration menu.
1
Select the “Language” menu item and press OK to confirm.
2
Select the required language.
3
7. Setting the image resolution
The basic setting for the image resolution is 4.0 megapixels.
Press the menu button in photography mode.
1
Press or to select the “Resolution” option and press OK to
2
confirm.
You can select one of six resolution settings:
3
5.0 megapixels, 4.0 megapixels, 3.0 megapixels,
2.0 megapixels, 0.8 megapixels and 0.5 megapixels.
At the 5.0 megapixel setting, pixels are interpolated.
Note: The camera does not support burst mode when the
resolution is set to 5.0 megapixels.
26
Page 73

8. Setting image quality
The default image quality setting when the camera is switched on is
“Fine”.
Press the menu button in photography mode.
1
Select the “Photo quality” item in the menu and press OK to
2
3
confirm.
Press “up” or "down” to select the “Exposure” option and press
OK to confirm.
GB
The following applies:
• “Super fine” is the best quality which requires most memory,
• “Fine” is medium quality with a medium memory requirement and
• “Economy” is normal quality with a low memory requirement.
9. Setting image effects
The standard image effect setting when the camera is switched on is
“Normal”.
Press the button to activate photography mode and
1
2
press the menu button.
Select the “Photo Effect” item in the menu and press OK to
confirm.
27
Page 74

GB
Press “up” or “down” to select the photo effect option and press
3
• “Normal”: No special photo effect.
• “Black and white”: Images are recorded in black and white.
• “Sepia”: Images are recorded in a nostalgic brown tone.
OK to confirm.
Note
Sepia: Brown/amber simulates the brown tone of old photos
caused by oxidation of the chemical components of the photograph. Sepia shifts the brown tones of the digital image to the
dark brown range to give the impression of an old photo.
10. Protecting photos against accidental
deletion
This camera offers a protect function to prevent selected images being
accidentally deleted.
Press the button to start the playback mode. Open the
1
photo to be protected. Press the menu button and select the
“Protect” item.
Select the required option from the list displayed.
2
The list contains four options: “Lock Current”, “Unlock Current”, “Lock
All”, “Unlock All” (see also list of menu options on page 24).
28
Page 75
The symbol appears on the image in the LCD if the image is protected against accidental deletion. The
protection option is cancelled for the photo.
symbol appears when the
GB
Note
Protected photos cannot be deleted but can be formatted.
11. Viewing images on a television set
Connect the TV output of the camera to the video input of the
1
2
television set using the cable supplied.
Connect the audio input of the TV to the headphone jack of the
camera. The camera automatically recognises the television
set and switches to TV.
Note
When still images are played on a TV, black pixels may appear
around the image.
12. Setting the date and time
Your digital camera can save the date and time each photo was taken
and display this information in playback mode.
However, you must first set the date and the time for the camera.
Press the button to activate the configuration menu and
1
press the menu button.
29
Page 76
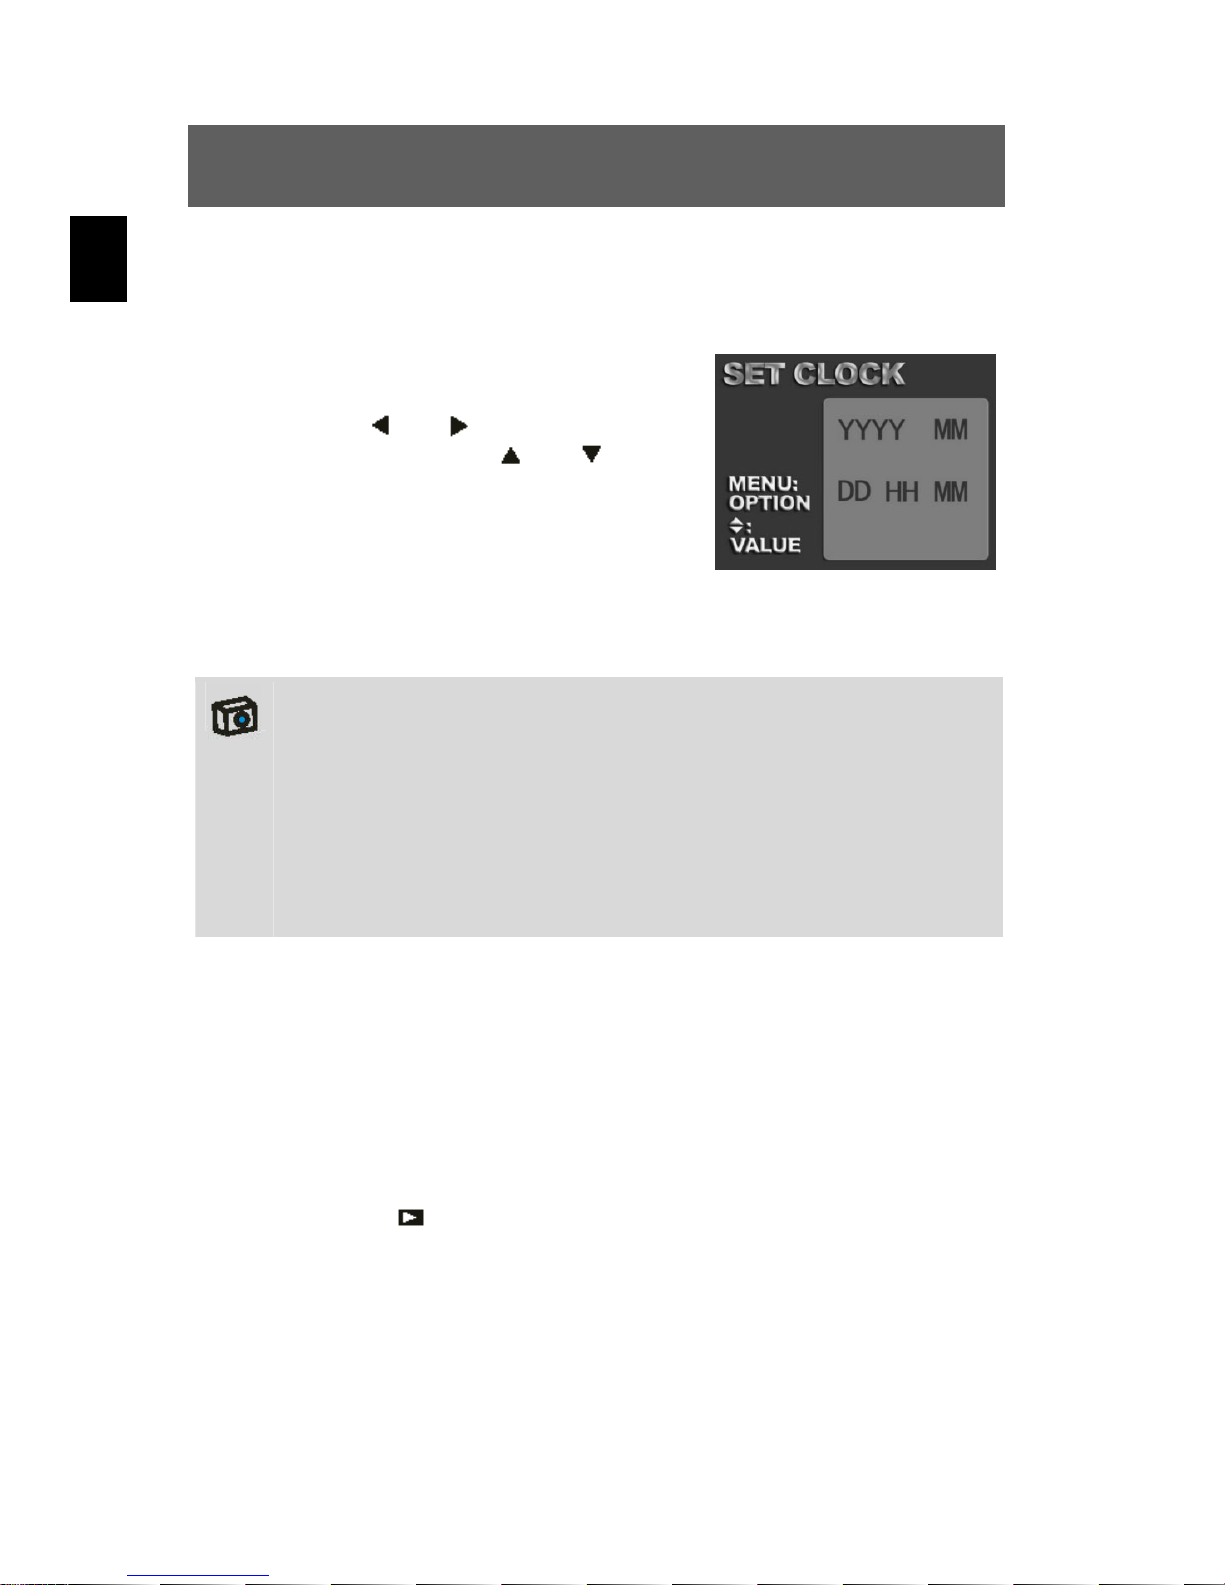
GB
Select the “Date&Time” item in the menu and press OK to
2
3
confirm.
Now change the time setting. Select
the setting required using the control
buttons
the value using the
buttons.
Press OK to confirm the values
after you have finished making the
settings.
Note
The date and time can only be displayed by the camera in
playback mode. They cannot be printed.
The time settings are saved by an internal backup battery.
Therefore, the time settings are not lost when Li battery is
removed. The settings are not lost until the internal backup battery
is flat.
and , and then change
and control
13. Setting the LOGO
The LOGO is the startup image which is shown on the display when the
camera is activated. This allows the user to define individual images.
To do so, proceed as follows:
Press the button to start playback mode. Open the required
1
2
photo Press the menu button and select the “Set Logo” item.
After setting the logo, select the option “Play Logo” in the
playback mode menu. There are two options:
• Activate: The image selected by the user is used as the startup
image.
30
Page 77
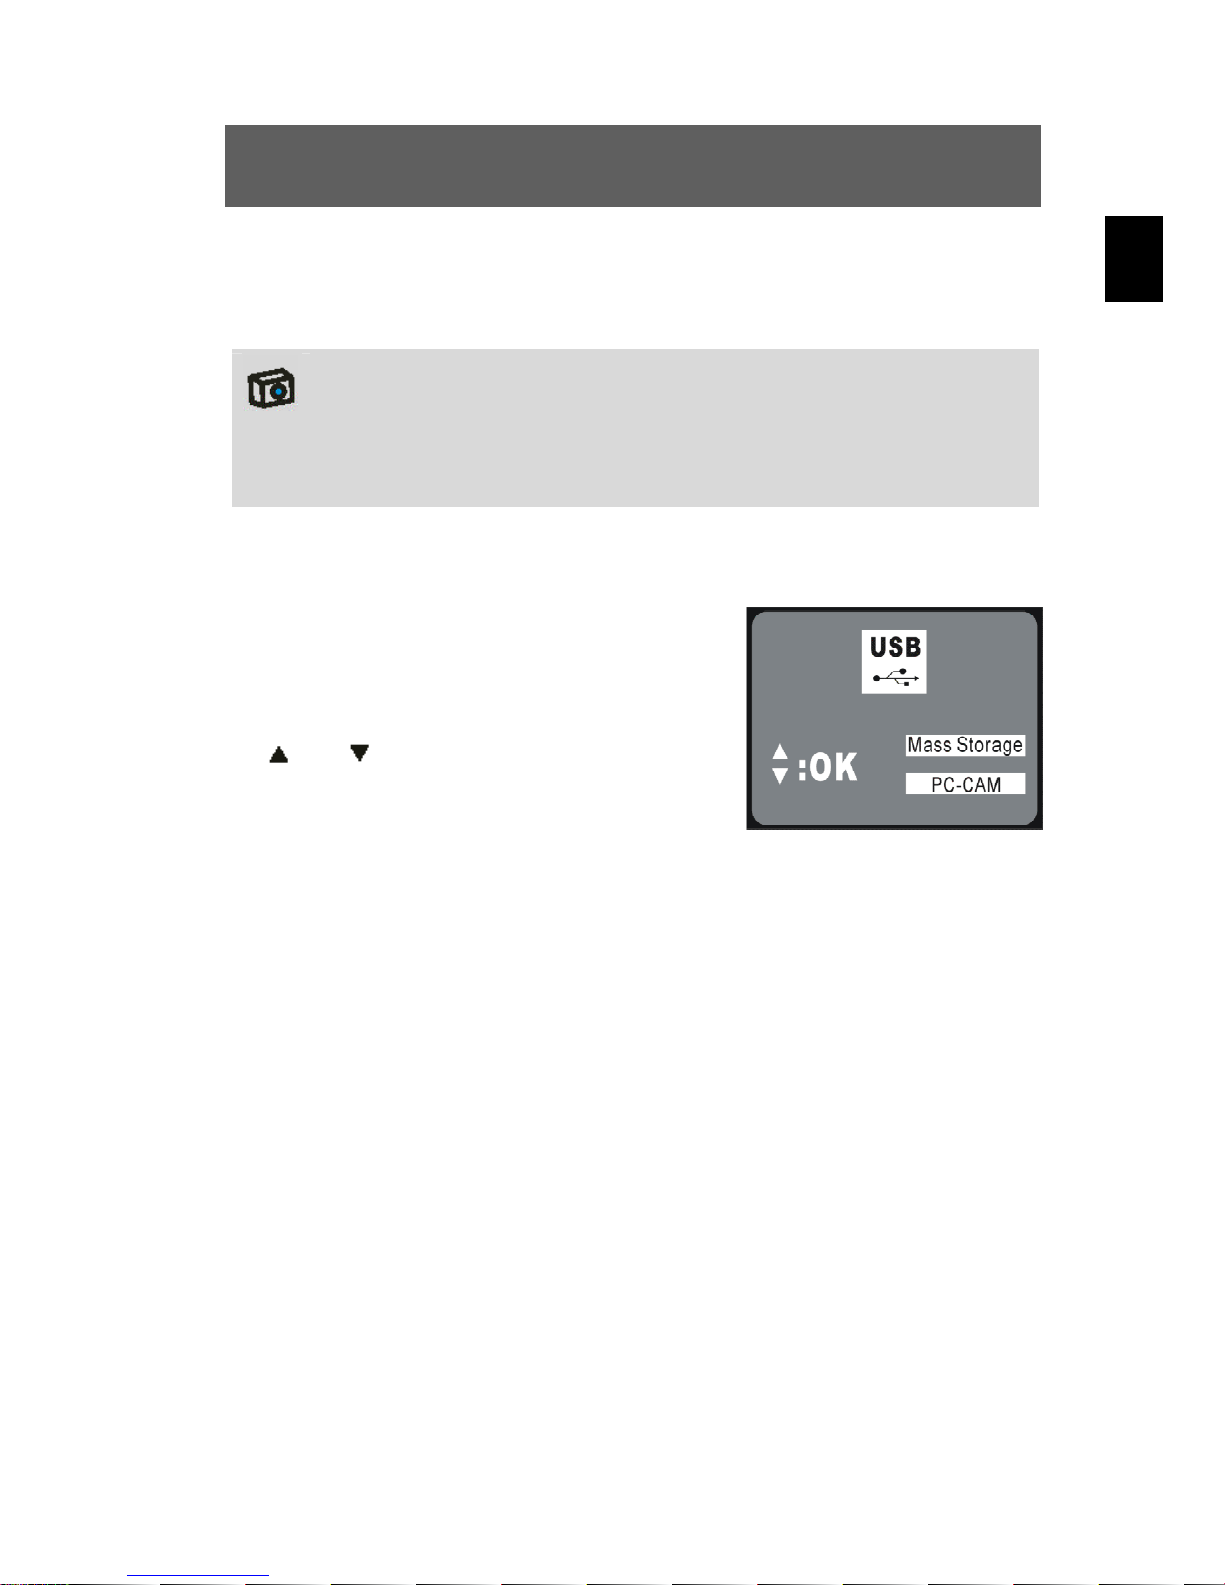
• Deactivate: The preset image is the startup image.
GB
Note
The startup image is not deleted when images are deleted or the
memory is formatted. To set another startup image, you must
repeat the procedure described above.
14. Setting the driver
When the digital camera is correctly
connected to the PC’s USB port, the LCD
automatically switches to USB mode
display. Select the required driver using
the
OK to confirm.
Select 'Mass Storage’ if the PC is to identify the camera as a removable
medium. This allows you to treat the camera like a drive on the PC and
use PC commands such as ‘Copy’, ‘Paste’ and ‘Delete’ as well as to
download images, videos and sound recordings from the camera to the
PC.
and control buttons and press
Select ‘PC-CAM’ if you want to use the digital camera for PC-controlled
video recording (webcam), video monitoring or video conferences
(NetMeeting).
31
Page 78

GB
Installing the software
1. Supported operating systems
• Windows 98 (including Second Edition)
• Windows Me
• Windows 2000
• Windows XP
Microsoft Windows 98, Windows 98 SE, Windows 2000 Professional,
Windows Me or Windows XP systems are pre-installed.
2. Installing the driver
Driver installation is similar for the various Windows systems. When
specifying the path, you must simply select the driver in the CD-ROM
drive.
Select one of the two driver types as described above (‘Mass Storage’
or ‘PC-CAM’). The camera switches to MASS mode or TWAIN mode.
Install each driver type as described below.
1 Installing the driver in MASS mode
Note
When the camera is in MASS mode, Windows Me, 2000 and
XP automatically recognise the camera and no driver must be
installed. The description of the driver installation procedure
refers to Windows 98.
32
Page 79
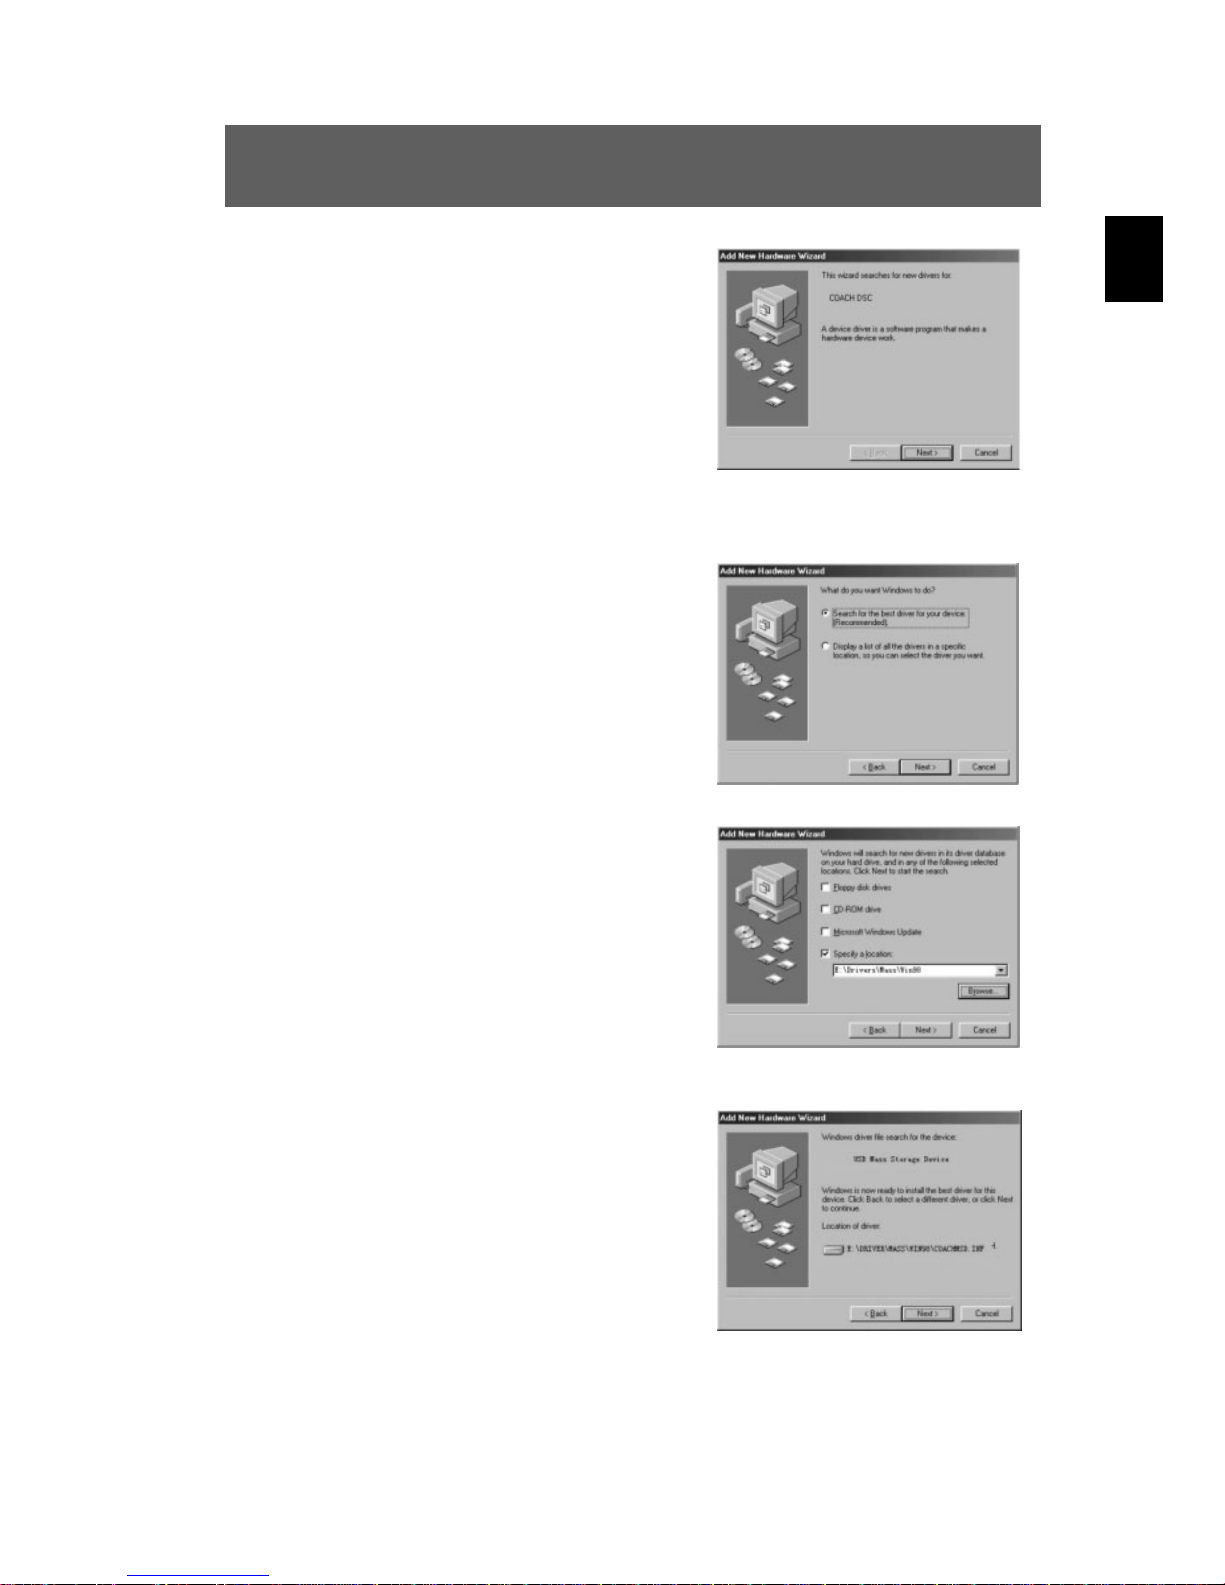
1.
When the camera is connected to the
computer in MASS mode, the Found
New Hardware Wizard appears on your
PC monitor.
Click “Next” to open the next window
2.
Select “Search for the best driver for
your device” and click “Next”.
3.
GB
Select “Specify a location” and click
“Browse”. Specify the driver CD in your
drive.
4.
Now click “Next”. The system installs
the driver and the following window
appears:
33
Page 80
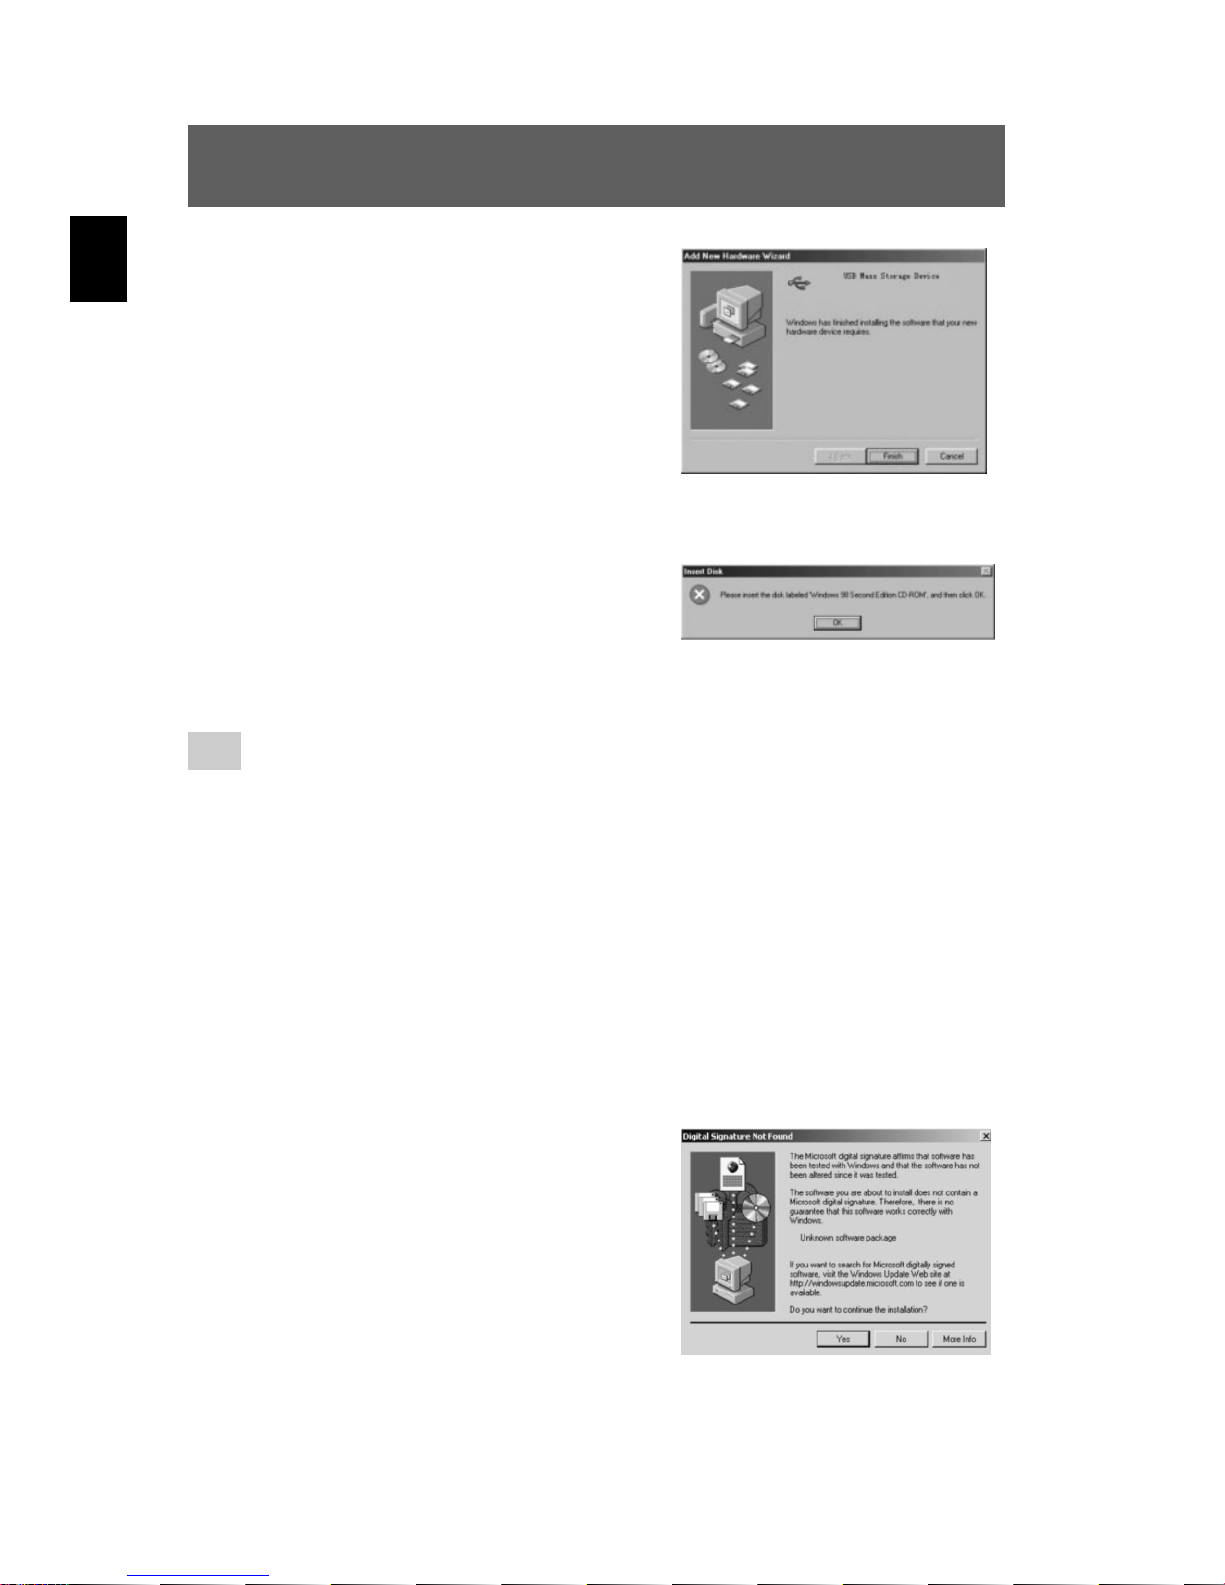
GB
5.
Click “Finish” to complete installation.
6.
You may be prompted to insert the
Windows 98 CD during the installation
process:
2. Installing the driver in TWAIN mode
1.
Connect the camera to the computer. The system should
automatically recognise that a new device has been connected.
2.
In TWAIN mode, the driver must be installed for all systems.
The procedure is similar to that described for Mass mode.
3.
Under Windows 2000, you may be
asked about the digital signature of the
driver. Click “Yes” to install the driver.
34
Page 81
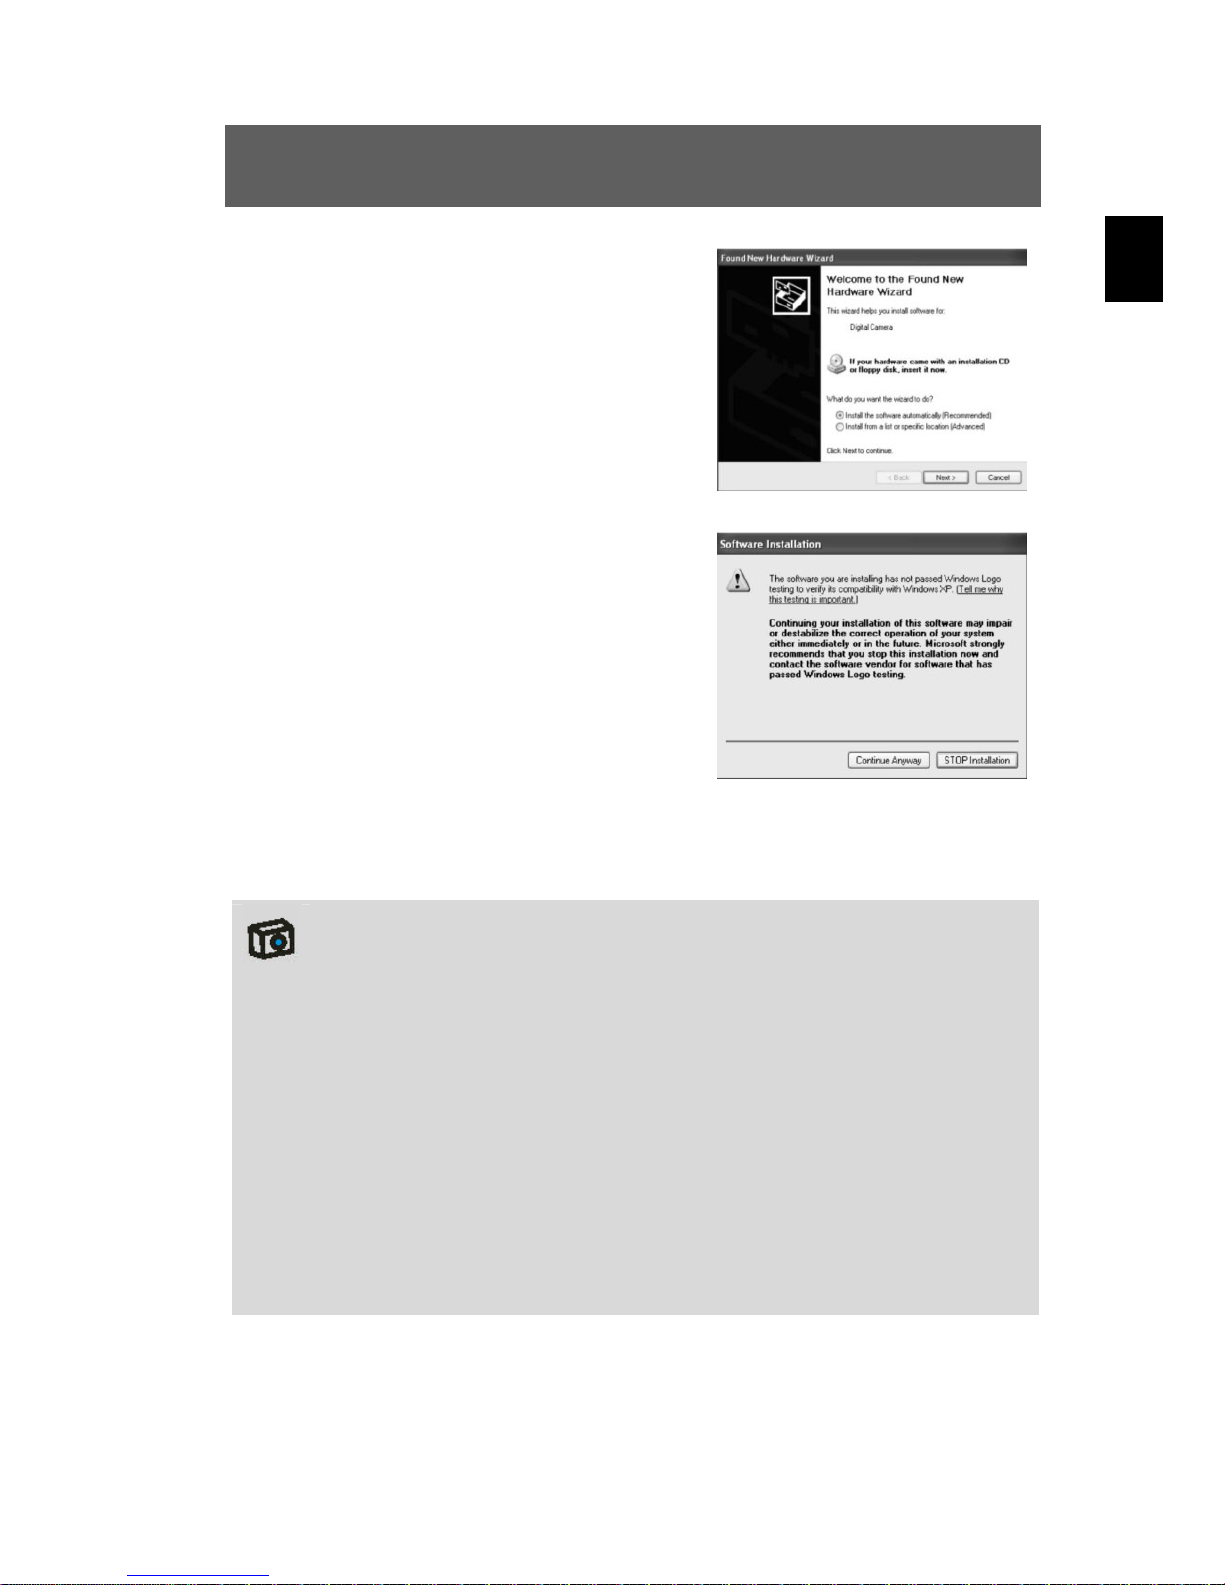
4.
When installing the driver on Windows
XP the Found New Hardware Wizard
appears. Select “Install the software
automatically” (recommended).
The following window may appear. Click
“Continue” and wait until the installation
is complete.
5. The installation procedure under Windows ME is similar.
GB
Note
Either of two driver modes can be selected for the camera.
TWAIN mode uses the video components for the PC.
In MASS mode, the internal memory is used as mobile memory.
It can be treated like a hard drive. You can copy, delete, cut and
download photos and videos from the camera.
Location of the drivers on the CD:
(Example: “F:\ ” as the CD-ROM drive)
F:\Driver\mass-storage\Win98: MASS driver for Win 98
F:\Driver\Twain\win98_2k: TWAIN driver for Win 98 / 2000
F:\Driver\Twain\WinMe_XP: TWAIN driver for Win Me / XP
Photos should be downloaded directly in MASS mode.
35
Page 82

GB
Transferring files to your PC
After you install the drivers, you can transfer your photos, videos and
sound recordings to the PC using the USB cable, and view, play and
edit them on your PC. The camera switches to USB mode.
Switch your PC on.
1
Connect the digital camera to your PC by inserting the end of the
2
3
supplied USB cable into the USB port of your PC and connecting
the other end of the USB cable to the USB terminal of your camera.
Set your camera’s driver mode to MASS. If the driver was installed
correctly, the camera is identified by the computer as a mass
storage device (removable media). If you use Windows XP, you
can access the contents of the camera memory immediately. In
other Windows versions, open the Windows Explorer or doubleclick My Computer. Double-click the media symbol for the camera
and, where applicable, the folders within it to view the files.
Now press and hold the left mouse button to drag the required files
4
The files have now been transferred and saved to your PC. You can
now view, play and edit the files using the application software.
(images, sound or video) to a suitable folder on your PC, e.g. the
“My Files” folder. You can also select the files and use the “Copy”
and “Paste” Windows commands.
36
Page 83
Specifications
Sensor 1/2.5" CCD sensor
Pixels 4.0 million
Effective resolution 2304x1728, 2048x1536, 1600x1200, 1024x768, 800x600
Interpolated resolution 2560x1920
Photo: JPEG (EXIF 2.1 Version)
Video: AVI/Motion JPEG 640*480 File formats
Sound: WAV format
Special effects Standard, black and white, sepia modes
Zoom factor 3x optical zoom, 8x digital zoom
LCD monitor 1.5 inch 130,000 pixel TFT monitor
Compatible systems Windows 98/2000/Me/XP
Focal length F = 5.7mm – 17.1mm
Aperture F2.8 – F4.8
Focus range 0.04m ~ infinity
Exposure Auto and manual
Exposure
compensation
Date terminal
Flash
White balance
Burst Series of three photos
Self-timer 10 seconds
Video output
Other functions
Memory medium 16MB internal (including system memory), SD or MMC
-2.0 EV to +2.0 EV in six steps
Mini USB terminal, two driver modes: MASS and
TWAIN
Integrated wide angle flash with three modes:
Auto, always on and off
Flash range 1m
Automatic white balance and four manual modes:
Daylight, tungsten, fluorescent, cloudy
NTSC and PAL system available
TV output signal
Crystal clear sound recordings
Memory can be expanded
Webcam for internet chat and conference
Customisable startup image
card
GB
37
Page 84

GB
Memory Quality 8MB 16MB 32MB 64MB 128MB
Superfine 4 8 16 32 64
2560x1920
2048x1536
1024x768
Fine 5 10 20 40 80
Economy 6 12 24 48 96
Superfine 5 10 20 40 80
Fine 7 14 28 56 112 2304x1728
Economy 8 16 32 64 128
Superfine 6 12 24 48 96
Fine 8 16 32 64 128
Economy 10 20 40 80 160
Superfine 10 20 40 80 160
Fine 14 28 56 112 224 1600x1200
Economy 17 34 68 136 272
Superfine 26 52 104 208 416
Fine 34 68 136 272 544
Economy 43 86 172 344 688
Superfine 42 84 168 336 672
Fine 54 108 216 432 864 800x600
Economy 68 136 272 544 1088
Movies --- ~10 sec ~30 sec ~70 sec ~150 sec ~3 min
The actual number of pictures stored may vary (up to ± 30%) depending on the
resolution and color saturation.
38
Page 85
Troubleshooting
If your camera does not work properly, please check the following items.
If the problem still exists please contact your dealer.
Symptoms Cause and solution
Error A
Camera does not take
photos
Error B
Photos disappear from
the LCD after a period
Error C
Not all images can be
downloaded to the PC
Error D
Camera switches off after
5 minutes. LCD switches
off.
Error E
When the camera is
connected to the PC for
the first time, no new
hardware is found.
Error F
The shot to shot time
is longer when taking
pictures in dark
conditions.
Error G
The camera does not
start after connection to
the PC. The camera
display lights up and LCD
shows all symbols.
Cause: Not enough light
Solution:
Cause: Weak batteries
Solution: Insert two fresh batteries.
Cause: The PC does not have enough free RAM.
Solution:
Cause: Camera shuts down automatically.
Solution: Restart camera.
Cause: The PC’s USB port is deactivated in the BIOS.
Solution: Activate the port in the PC’s BIOS.
Cause:
Solution:
Cause:
Solution:
Change angle of camera to include more light
or use automatic flash.
Close all other applications before downloading.
If the problem persists, download the images
one at a time to the PC and save them there
before transferring the next image.
It is normal for the shutter speed to be slower in
dark conditions.
Change the camera angle or improve the light
conditions.
PC or camera is busy and there is no
connection between the two.
Disconnect the USB cable from the PC, check
why the PC is busy and insert the cable again.
GB
Error H
Red, blue or black dots on
the LCD in cold conditions
Cause: Typical feature of LCDs
Solution:
Cannot be prevented. This error does not affect
images taken.
39
Page 86
GB
Error I
Camera does not switch
on in cold conditions
Cause: Battery capacity drop at low temperature
Solution: Keep the camera in a warm pocket
Error J
The battery does not
charge fully
Error K
Camera does not zoom
properly / Image is out of
focus
Error L
In macro photos, the
image framing is different
to that in the viewfinder
Error M
Images on the memory
card cannot be read
Error N
No image on the
connected TV screen
Cause: The battery service life is expired
Solution: Replace old battery with a new one
Cause 1: Autofocus process not complete
Solution 1:
Cause 2: Camera is too close to the subject
Solution 2:
Cause: Parallax error (viewfinder and lens not aligned)
Solution: Always use the LCD when taking macro photos
Cause: Memory card is faulty
Solution:
Cause: Cable not connected correctly
Solution: Connect correctly (set TV to “Video”)
Press shutter release halfway, then take the
picture
Move to a distance within the camera’s
focussing range
Replace memory card. Observe
recommendations for handling memory cards
Error O
TV and radio make
noises when the battery
is charging
Error P
Buttons on the camera
can no longer be
operated
Error Q
Photos are too dark
Error R
Photos are too bright
Note: This table contains possible causes of error. Some of these are normal
phenomena.
Cause: Electromagnetic waves from the charger
Solution: Move the charger away from the TV or radio
Cause: Temporary internal system error
Solution:
Cause: Flash in being blocked by a hand.
Solution: Hold the camera correctly, do not block the flash
Cause: The surrounding area is too bright
Solution:
Remove the battery briefly, then re-insert it and
switch on the camera
Adjust the exposure on your camera (reduce the
EV exposure value)
40
Page 87

Further information
1. Safety instructions
Although this product is safe, please observe the following information
and warnings.
Caution
1. Do not modify or dismantle the camera.
2. Contact your dealer for repairs and inspections.
3. Do not shake the camera or subject it to hard knocks.
The camera may be damaged if it falls.
4. Ensure that no water or moisture enters the camera. This can
cause short circuits and accidents.
5. In order to avoid traffic accidents, do not use your camera while
driving or while participating in traffic. Store the camera in a
secure stable place while driving.
GB
6. Do not use the camera in aeroplanes or other places where
photography is prohibited.
7. Be aware of your own safety and of what is going on around
you when using the camera while walking.
8. Do not use the camera in dusty or very hot areas, or where
there is a risk of explosion.
9. Keep the camera out of reach of children. Children could injure
themselves with the strap, swallow parts of the camera, or
damage their eyes with the flash.
10. Do not look directly at the sun through the camera’s viewfinder
Note
When using the flash, do not look directly into it, as this can
damage the eyes.
41
Page 88

GB
2. Maintenance and care
Please clean the body, lens and LCD as follows:
• Do not use thinning or cleaning agents which contain petrol. This could
damage the camera.
• Clean the camera body with a soft cloth.
• Lens: First remove dust with a lens brush. Then clean with a soft cloth.
• Do not use powerful cleaning agents on the body and lens (contact your
dealer if dirt cannot be removed).
• Do not apply pressure to the LCD or use hard objects to clean it.
• Your digital camera is a precision device. You should therefore avoid the
following surrounding conditions when using and storing the camera: full
sunlight, moisture and heat, air conditioning systems, heavy shocks, dirt
and dust.
3. Photo tips
For excellent photographs, please observe the following tips:
• First-time digital camera users who are not familiar with all the camera
settings should use the factory settings on the camera at first.
• Do not move the camera quickly to prevent the photos being out of focus.
Hold the camera steady when pressing the shutter release. Do not move
the camera immediately after pressing the shutter release. Wait until you
hear the sound signal before moving the camera.
• The lens has two settings. Macro and normal focus. The macro setting is
used for close-ups. Move the camera back and forth until the subject of
the close-up is in focus.
• Look at the subject through the viewfinder before pressing the shutter
release.
• Check the angle if the subject is backlit. Move to the side to reduce the
backlighting.
• In dark conditions, the flash or manual exposure setting should be used.
42
Page 89

4. Battery tips
Incorrect handling of the batteries can cause them to leak, become hot
or explode.
Observe the following safety instructions:
• Do not heat batteries or dispose of them in fires.
• Do not transport batteries with metallic objects, as they can come into
contact with the battery poles and cause damage.
• Do not expose batteries to moisture. Always store them in a dry area.
• Do not dismantle, deform or modify batteries.
• Never remove the cover of the battery.
• Do not subject the battery to hard knocks.
• Never use leaking or damaged batteries.
GB
• Keep batteries out of reach of children.
• Ensure that the polarity is correct when inserting the batteries into the
camera.
• Battery power is reduced in cold environments (−10 °C or colder, applies
to alkaline batteries in particular).
• Warm up batteries before use in cold environments (e.g. in your pocket).
• When using a heat source, do not allow batteries to come into contact
with it.
43
Page 90

GB
5. Notes on using memory cards
The following memory card types can be used with the digital camera:
SD memory card (Secure Digital)
MMC memory card (MultiMedia Card)
• Switch off the camera before inserting or removing the memory card.
• Never remove the card or never switch off the camera while operating the
camera (file transfer, recording, playback, deleting images etc.). This
could damage the card.
• Do not subject the card to discharges of static electricity.
• Do not dismantle the card or alter it. Do not bend the card, subject it to
high humidity or let it drop.
• Do not touch the contact area of the card with your hand.
• Avoid direct sunlight or great heat.
• Do not use or store the card in a damp, dusty or rusting environment.
6. Notes on the power supply
The specifications of the power supply are: 5V DC output at 1000mA or
more (switchable).
Observe the following safety instructions:
• Connect the cable to the USB terminal of the digital camera.
• Ensure that it is securely connected and handle the connector with care.
• During operation, the power supply unit becomes warm. This is normal.
• Do not dismantle the power supply unit. This can lead to accidents.
• Do not use the device in very hot and humid conditions.
• Do not subject the device to hard knocks.
44
 Loading...