

Page 1
Retractable Screen
Replacement Screen
Instructions
Patent Pending
For “RTS”, “RET”, & “RTM” Products
Retractable screens are not intended to provide
security or provide for the retention of objects,
animals or persons within the interior.
ATTENTION!
Page 2
These instructions outline the step-by-step
process to replace your Retractable Screen.
Before beginning, please review the entire
instructions and familiarize yourself with the
component parts. A large clean carpeted floor
area is suggested as a workspace. The only
tool needed is a phillips head screwdriver.
A friend might be helpful but is not necessary
to replace your screen.
First...
Identify your screen type and the screen parts.
Screen Type:
Y ou have an “R TS” screen if your screen closes
with a latch and catch. You have an “RET”
screen if your screen closes by the handle
dropping down. You have an “RTM” screen
if your screen closes with a magnet. The
instructions for replacing your screen are
the same, however, you will notice some
slight differences.
Replacement Screen Instructions
for ODL “R TS”, “RET”, and “RTM”
Retractable Screen Units.
ODL ® Retractable Screen Replacement Screen Instructions
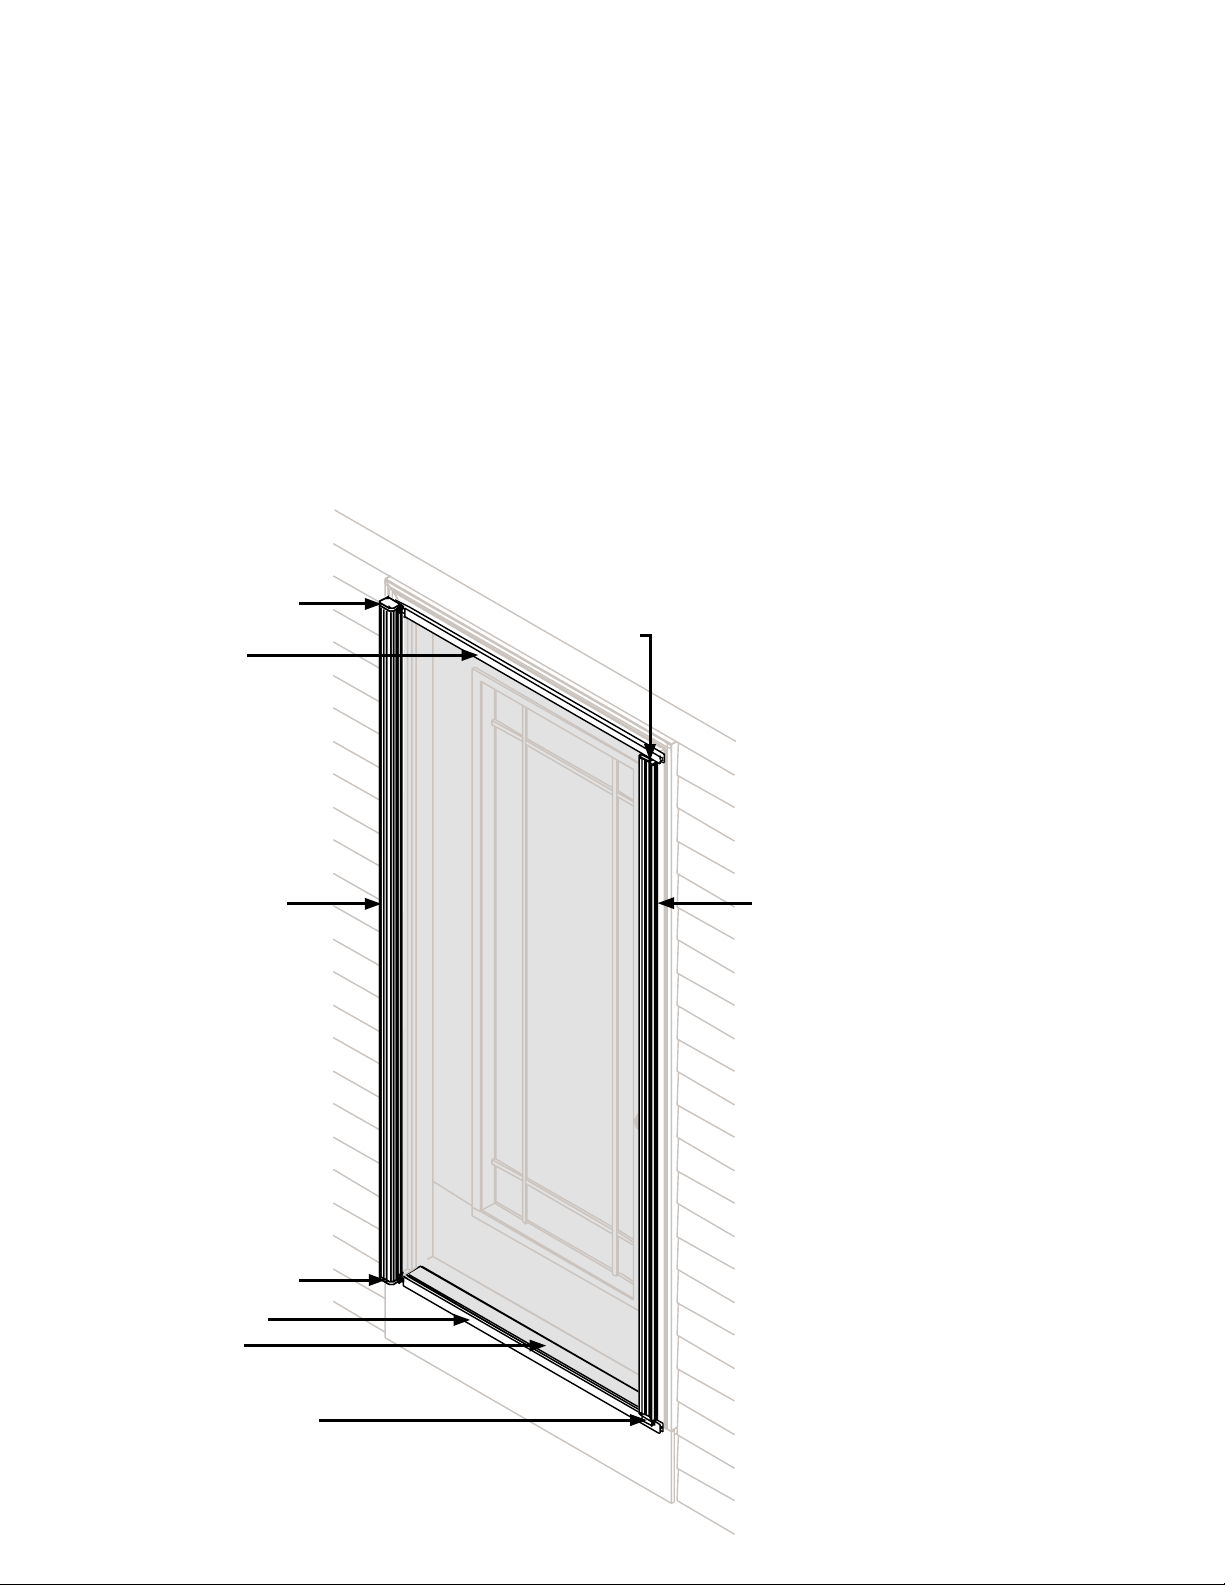
Top Track
Pull Handle
End Cap
Screen Housing
Pull Handle
Housing End Cap
Housing End Cap
Bottom Track
Sill Cover
Pull Handle End Cap
Screen Parts:
Page 3
Step
1
Step
2
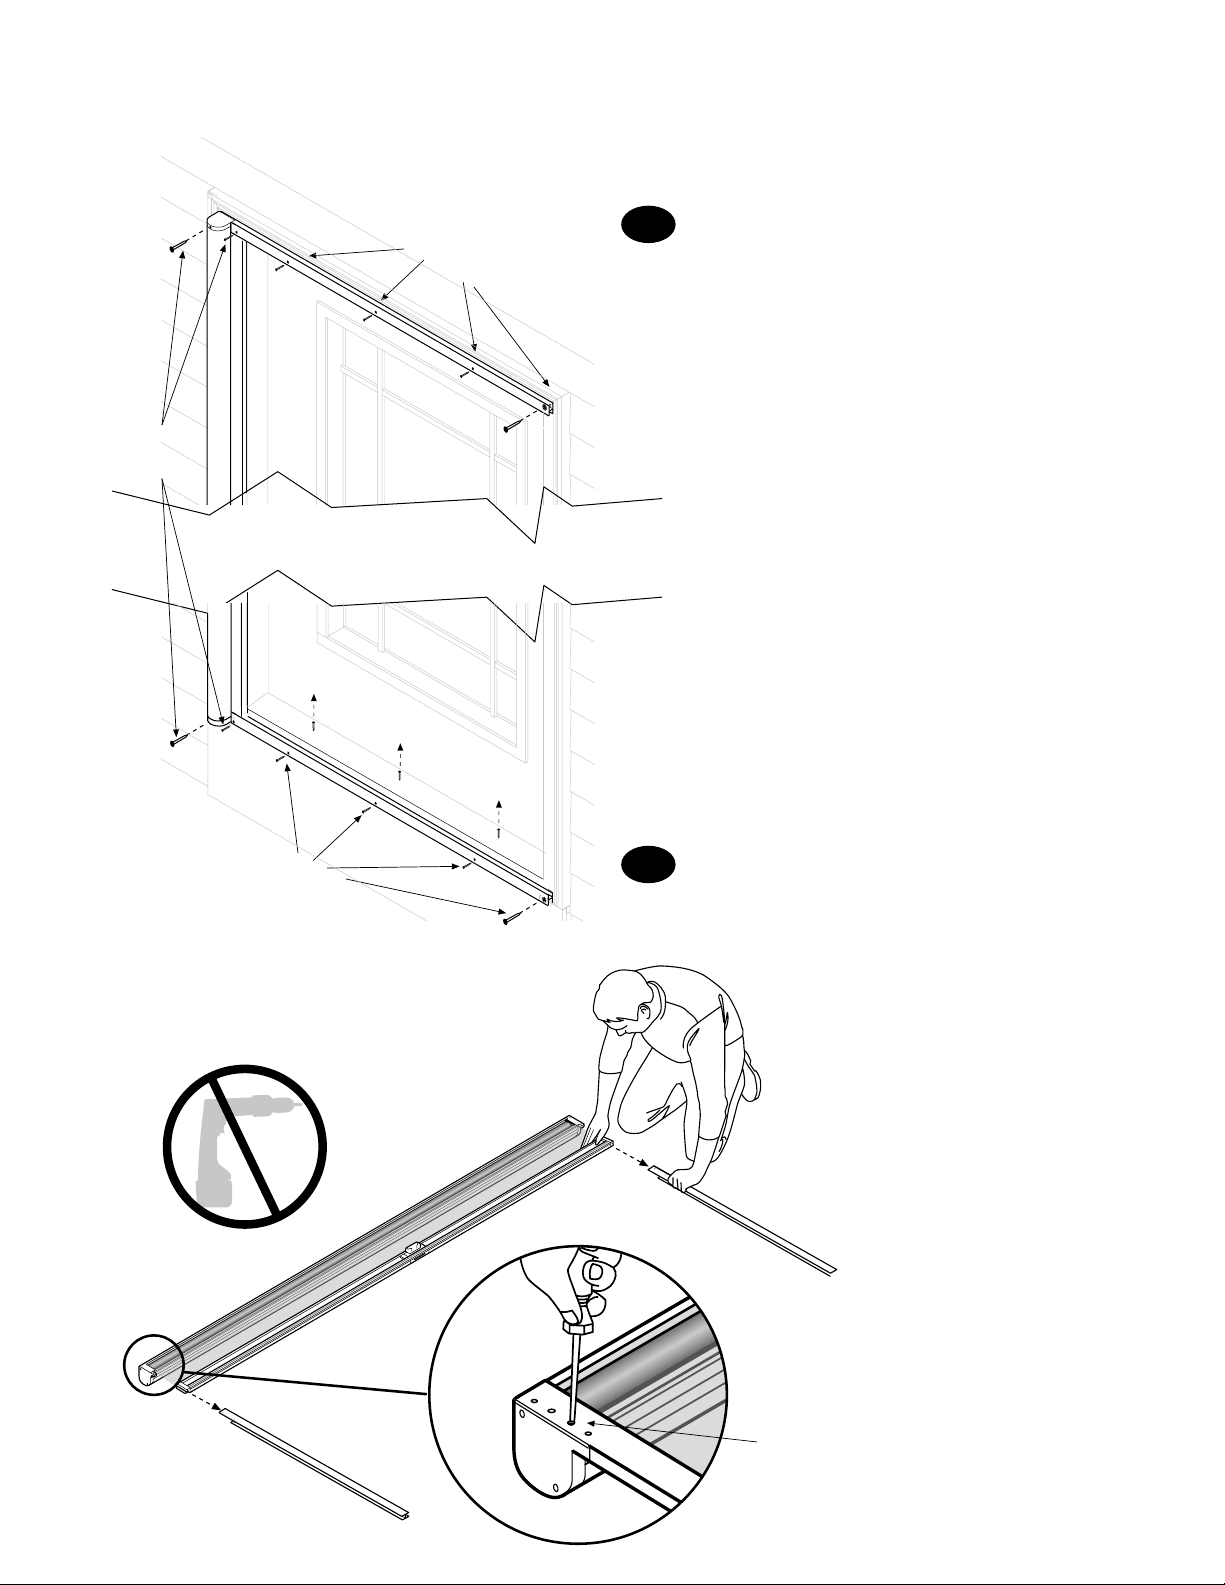
Remove for “RTS”
Remove Screws on RTS
Take your screen housing down
Remove the screws used to hold your retractabale
screen housing to your entry door.
Be sure to keep screws in safe place. When you have
removed the screws, lay your housing on a soft
surface (a large carpeted floor area is suggested
as a workplace).
IMPORTANT: For the “RTS” product, you will have
to take your tracks down as well.
Remove tracks from housing (”RTS” Only)
For the “RTS” product, you’ll have to remove the 1/2”
screws that connect the track to the back of housing,
and pull tracks off from housing.
ODL ® Retractable Screen Replacement Screen Instructions
Remove
for “RTS”
Remove
for all
screen types
Page 4

Locate the end cap marked R
Remove the screws that secure the end cap marked R.
The end cap can then be removed from the housing.
You may hear the release of the spring tension which is normal.
Remove the pull handle end cap
Locate the pull handle end cap on the opposite end from the housing
end cap you just removed. Remove screw/s that hold the pull handle
end cap in place and remove the cap. You can now withdraw the
pull handle from the damaged screen.
Remove the damaged screen
You can now remove the entire damaged screen roll & discard.
If you have an “R TM” screen you will need to remove the ball bearing
from your damaged screen and insert it in your new screen.
You will need to remove the damper (has a plastic gear on it)
from the new screen in order to do this.
Install the new screen roll.
Remove the new screen from it’s packaging - leave the tape holding
the screen roll in place. Identify the tension pin end of the new
screen - this is the end with the flat metal pin protruding. Carefully
insert the metal tension pin into the slot on the end cap that is still
secured to the housing. Make sure it is seated properly and kept
there for the next few steps.
Pull Handle
Screen Housing
Lay the unit down on a
flat carpeted surface.
Remove Pull Handle end
cap from opposite end
of housing end cap “R”.
Pull Handle
End Cap
Remove 2 screws
Remove pull handle
end cap and slide
pull handle off.
Insert flat metal tension
pin of new screen into
end cap on housing.
Step
3
Step
4
Step
5
Step
6
ODL® Retractable Screen Replacement Screen Instructions
Picture shown is “RTS”.
Follow same instructions
for “RET” and “RTM”.
End Cap marked “R”
Remove 2-3 screws
then remove cap.
Page 5

Tension the screen roll
While holding the screen roll in place, move
to the opposite end where the housing end cap
is still uninstalled. Rotate the screen roll 9
revolutions clockwise to build spring tension
while making sure the secured end of the
screen roll stays in place. Positioning the end
cap against a wall will help. Keep holding the
screen roll securely and install the end cap in
place. Make sure the plastic gear or ball bearing
on the screen roll end fits into the end cap you
are installing. Secure it with one screw r ight now.
Continue to hold tension on the screen roll at
this point.
NOTE: For “RTS”, if the screen you are replacing
did not have a plastic gear at one end, you will need
to remove the gear from the new screen you are
installing. This can be done simply by pinching the
gear with wire cutters or pliers and pulling it off from
the plastic pin. The plastic pin will now fit snuggly into
your existing screen housing end cap.
Secure the Screen Tension
Remove the tape holding the screen and pull out the
tensioned screen approximately 18”. Carefully wrap
the screen around the housing once or twice and lay
the housing flat to hold the screen securely. You can
now release your hold on the screen tension and the
wrapped screen should hold it securely for the next
step. You can now install the second screw to hold
the end cap to the housing.
If for any reason you lost tension on the screen during
these steps, just wind 8 rolls clockwise again and
repeat the steps.
Install the pull handle
Carefully slide the pull handle onto the new screen
spline. It should slide easily into place. When it is
inserted fully, you can install the pull handle end cap
with the same screw/s you used to remove it. Check
each of the pull handle end caps carefully before
tightening the screws. The screen actually seats
Step
8
Step
7
Step
9
Pull Handle
Screen Spline
Slide onto new
screen spline
Maintain tension on the
screen until the housing end
cap is secured with one
screw and the screen is
wrapped around the
housing.
Install the pull handle
Carefully slide the pull handle
spline. It should slide easily i
inserted fully, you can install
with the same screw/s you u
each of the pull handle end
tightening the screws. Th
Step
9
Screen Spline
Rotate screen roll 9
revolutions clockwise while
making sure the tension pin
end stays in place. Do not
let go of the tensioned roll.
Positioning the tension
pin end against a wall
will help.
Make sure the
plastic gear on
the screen roll
end fits into the
end cap center
hole.
Slight pressure keeps
tension pin in place.
R
Wrap screen around
housing to hold tension.
ODL® Retractable Screen Replacement Screen Instructions
Pictures shown are “RTS”.
(If you have an “RTM”
your ball bearing will be here.)
Page 6

Screen should be located
to travel between end cap
flange and housing.
ODL® Retractable Screen Replacement Screen Instructions
Step
10
Step
13
Check for operation on door
With all screws securely installed you can now test the
operation of the installed unit. It should open and close
smoothly with no binding. If binding occurs , first chec k that
the screws securing the housing are not over tightened.
If binding still occurs, check the helpful tips on the
next page.
Install the screen tracks (For “RTS” Only)
A) Thread bead on track through hole in screen end
cap. Flat end of track lies flush with back of screen
housing.
B) With the screen track properly threaded through
the screen end cap, install your 1/2” flat head
screws, as shown.
Step
11
Install screen housing / tracks to door
Take your screen housing / track assembly to the door.
Use the existing holes as a guide for correct position.
Once the correct position is obtained, install your track,
sill cover and housing screws. Be sure you don’t
overtighten your track screws, for that could cause
binding of the screen.
Step
12
(A)
(B)
Pictures shown are “RTS”.
Check screen path and test operation
Unwrap the screen from around the housing. The
screen itself should follow the path through the end
cap channels as shown in the detailed illustration. If
it doesn’t, carefully manuever the screen into position.
You can now test the screen for proper operation by
extending it and letting it retract. It should operate
smoothly and not retract with excessive force.
Page 7

ODL ® Retractable Screen Replacement Screen Instructions
Maintenance and Helpful Tips
• Check for loose screws and proper operation.
• Clean debris from tracks and screen.
• Retract screen into housing during below freezing
temperatures - do not operate - damage may occur.
Regular seasonal maintenance
• Check for squareness where track and housing meet.
• Check for proper fit between track and housing.
• Check that top and bottom tracks are parallel
• Check that tracks are mounted to flat vertical surfaces
• Check tracks for debris - leaves, twigs, etc.
• Check for screws that may be ov ertightened causing the
pull handle to bind on the track.
If screen binds during extension/retraction:
For questions or additional information
call ODL at 800-253-3900
Warranty Coverage
Subject to the conditions, exclusions and limitations herein, ODL
Incorporated (“ODL”) warrants that its Retractable Screen Product
(“Product”) is free from defects in material and workmanship that would
render the Product unfit for its normal and recommended use.
THIS W ARRANTY APPLIES AND EXTENDS ONLY TO THE ORIGINAL
CONSUMER PURCHASING THIS PRODUCT. THE DURATION OF THIS
WARRANTY BEGINS ON THE DATE OF PURCHASE BY THE
CONSUMER AND EXTENDS FOR PERIOD OF ONE YEAR.
Exclusions from Coverage
This warranty does not cover:
• Damage to the screen mesh component of the product.
• A Product that is not installed on a steel, wood or fiberglass entry door.
• Defects or damages resulting in failure to install or operate the Product
in accordance with ODL’s installation instructions.
• Defects or damages resulting from use of the Product for purposes
other than those for which it was designed.
• Defects or damages resulting from modifications or attachments to
the Product.
• Damage to the entry door.
• Defects or damages arising out of improper handling, cleaning,
maintenance, operation, defective or improper installation, (including
installation not in accordance with ODL’s installation instructions),
improper storage, normal wear and tear, accident, act of God, intentional
human acts, misuse, abuses, or any circumstances be yond the control
of ODL.
• Defects or damages resulting from shipment by common carriers,
private transportation or other means of transportation.
Inspection and Discovery of Defect
It is the Consumer’s responsibility to inspect the Product immediately
upon receipt of the Product. If a defect covered under this warranty is
discovered upon inspection, the customer must follo w the Warranty Claim
Procedure set forth below.
ODL shall have no obligation under this warranty with respect to any
defect reasonably discoverable upon immediate inspection once the
product has been installed.
If a defect occurs after installation within the warranty period, then the
consumer must follow the Warranty Claim Procedure set forth below.
Warranty Claim Procedure
The Consumer must follow the following procedure to make a claim
under this warranty:
1. The Consumer must present a written claim to ODL within 30 days
after discovering the defect. The Consumer must submit its claim to the
following address: ODL Incorporated, Customer Service, 215 East
Roosevelt Avenue, Zeeland, Michigan, 49464. ODL must receive this
written claim within the warranty period.
2. The Consumer must use reasonable diligence to include all of the
following in the written claim:
a. An adequate description of the claimed defect(s); b. The date of the
Consumer’s purchase, the place of purchase, and the purchase price.
3. The Consumer must, if requested by ODL, permit ODL or its
representative to inspect the Product.
Remedies
After receiving a valid claim, ODL will, at ODL’s option either (a) repair
the Product or provide a replacement Product of like kind and design,
or (b) upon the return of the Product to ODL, refund the Consumer the
purchase price of the Product paid by the Consumer.
If ODL elects to provide a replacement Product, the limited warranty for
the replacement product will last for the balance of the warranty of the
original Product.
ODL’S LIABILITY UNDER THIS WARRANTY IS LIMITED TO EITHER
(A) OR (B) ABOVE, AND ODL WILL IN NO EVENT BE RESPONSIBLE
FOR SHIPPING, LABOR, REMOVAL OF ORIGINAL PRODUCT,
INSTALLATION OF REPLACEMENT PRODUCT, FINISHING
EXPENSES, OR OTHER CHARGES, COSTS OR CLAIMS INCURRED
BY THE CONSUMER.
Disclaimer of Warranty
NO IMPLIED WARRANTY, INCLUDING WARRANTY OF
MERCHANT ABILITY OR OF FITNESS FOR A PARTICULAR PURPOSE,
SHALL APPLY TO THE PR ODUCT (OR ANY REPLA CEMENT) BEYOND
THE DURATION OF THIS WRITTEN WARRANTY. (Some states do not
allow limitations on how long an implied warranty lasts, so the above
limitation may not apply to you.)
Limitation of Remedies
THE REMEDIES SET FORTH ABOVE ARE THE CONSUMER’S
EXCLUSIVE REMEDIES FOR BREACH OF WARRANTY OR
NEGLIGENCE, IN NO CASE SHALL ODL BE LIABLE TO THE
CONSUMER OR ANY OTHER PERSON FOR ANY GENERAL,
SPECIAL, INCIDENTAL OR CONSEQUENTIAL DAMAGES. (Some
states do not allow the exclusion or limitation of incidental or consequential
damages, so the above limitations or exclusions may not apply to you.)
Unless modified in a later writing signed by both ODL and Consumer,
this warranty is the complete and exclusive warranty related to the
Product, and it supersedes all earlier agreements and other
communications relating to the Product. No employee of ODL or any
other party is authorized to make any warranty in addition to this warranty.
Invalidation of any one or more of the other provisions of this warranty
shall not invalidate or affect one of the other provisions. This warranty
is not transferable.
This warranty gives the Consumer specific legal rights, and the Consumer
may also have other legal rights which may vary from state to state.
Effective August 2000
Limited Warranty for ODL Retractable Screen
Page 8

16593-608 (1/03)©2001 ODL Inc.
 Loading...