

Page 1
BRISA
Retractable Screen Door
Single Door Installation Instructions
© 2014 ODL Inc. 16593900 BRISA STD/TL DOOR INSTALLATION INSTRUCTIONS
Page 2
A fresh approach to fresh air
Thank you for purchasing a Brisa Retractable Screen Door from ODL. Make sure
the retractable screen door you purchased is the correct size to fit your door.
This retractable screen door fits a single inswing or single outswing door.
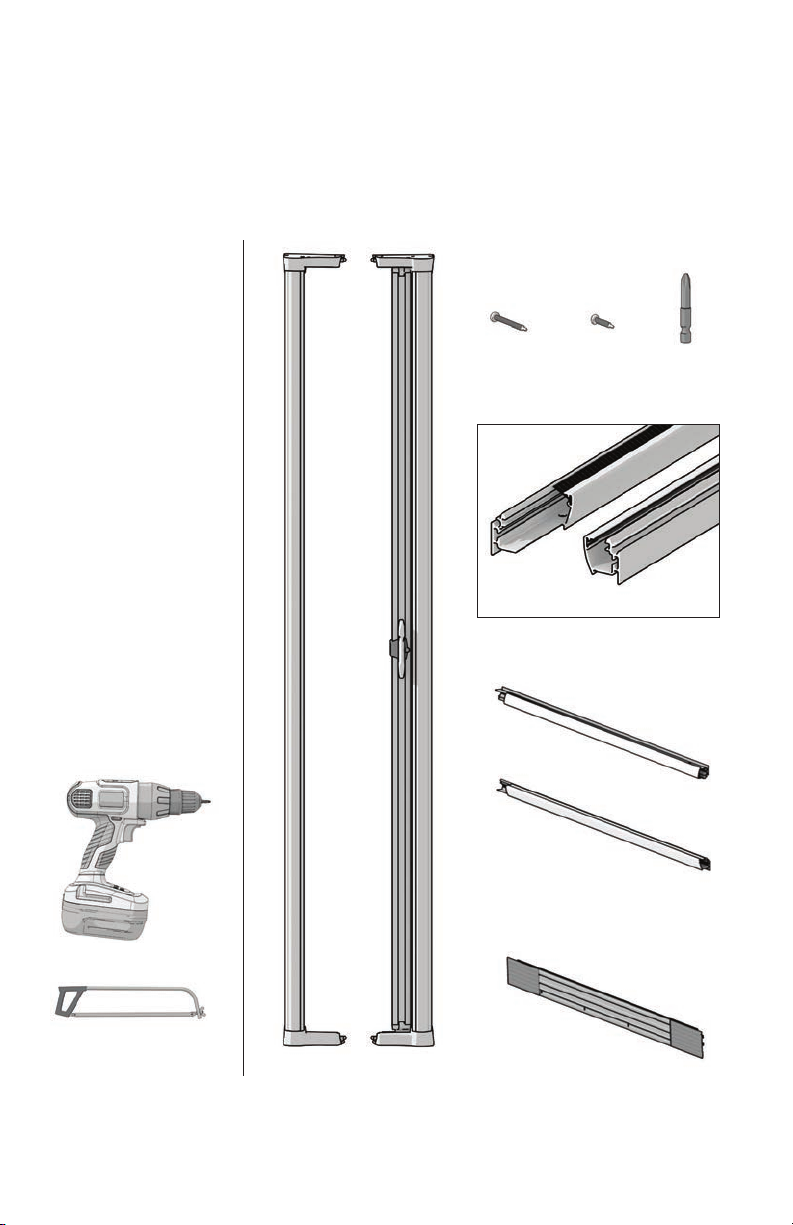
PAR TS
CALL US FIRST
Do not return to the store.
For assistance with your
installation, or for additional
product information, call our
customer service department
at 1-866-635-4968, or visit
www.odl.com.
Important
Be sure to first read through
and then follow completely
all step-by-step instructions.
This will help to insure proper
installation and functionality.
Expect installation to take less
than 30 minutes.
To view a product installation
video, visit odl.com/videos_
brisa_installation.htm
Attention
Retractable screen doors
are not intended to provide
security or provide for the
retention of objects, animals,
or persons within the interior.
Slider
Bar
(5) 1-1/4"
Housing Screws
Notch End
Each track has two distinctly different ends
(5) 3/4"
Sill Screws
Flat End
Phillips Head
No. 2
Driver Bit
TOOLS
Power Drill/Screwdriver
OPTIONAL TOOL
A hack saw is required if your
door width is less than 32" wide.
1
Decorative
Housing
Screen
Housing
Tracks
Sill Plate Assembly
Page 3
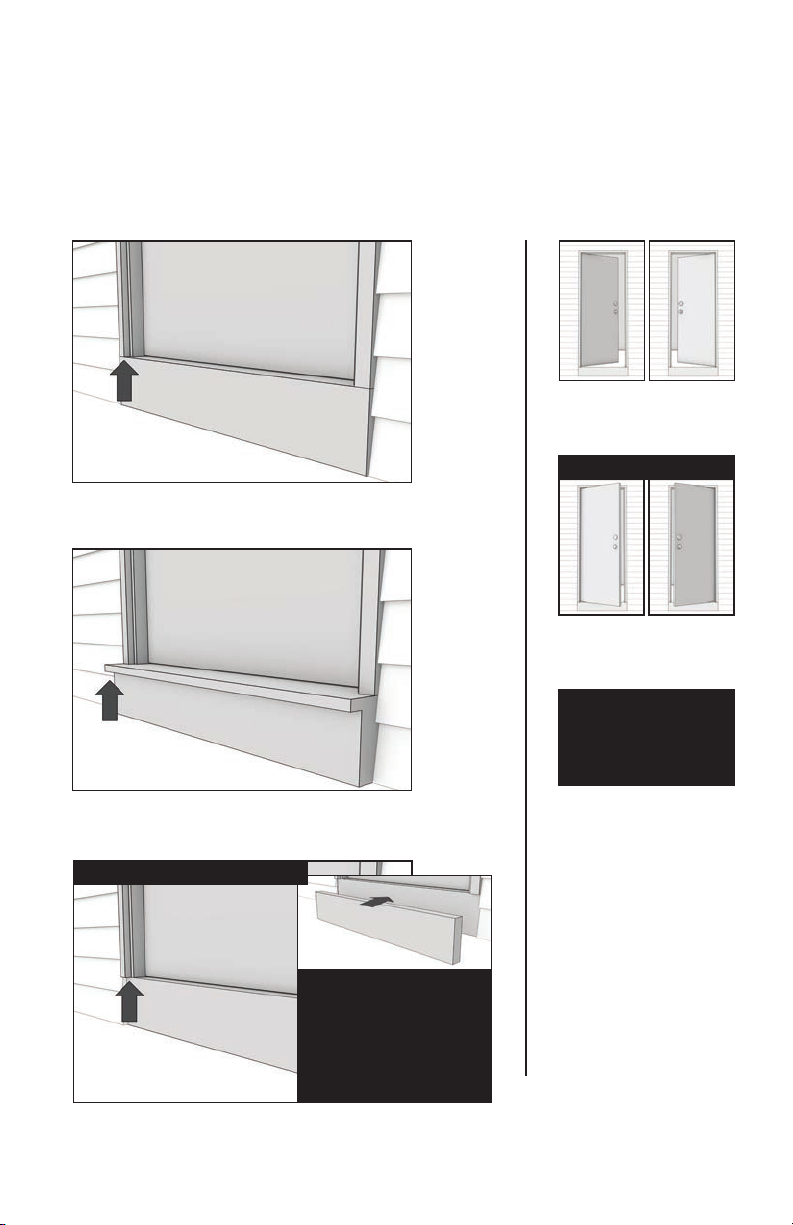
Identify your door type
Before you begin installing your new retractable screen door, it is important to
identify your sill and door type. If you have a short sill or an outswing door, you
may need to make some modifications before proceeding to the installation steps.
SILL TYPE DOOR TYPE
Right/Left Inswing
Screen assembly will mount
on outside of the home.
Additional steps required
Sill is flush with the exterior trim.
Flush Sill
Right/Left Outswing*
Screen assembly will mount
on inside of the home.
Long/Extended Sill
Sill extends past the exterior trim.
Additional steps may be required
Short Sill
Sill stops short of the exterior trim.
Filler Board
• A filler board is not needed
when short sills have ground
directly underneath sill.
• A filler board is needed when
short sill sits on top of a step.
• Cut the filler board and place
under the trim so the top of the
filler board is even with the sill.
*
NOTE: Prior to following
the standard assembly
process, you must first
reconfigure the lock/latch.
Go to page 7 to complete
this modification first.
2
Page 4
Assembly process
These instructions outline the step-by-step process to install a retractable
screen door. Before starting, review all instructions and become familiar
with the parts included.
MEASURE YOUR
DOOR TRIM OPENING
This screen door is designed to fit door
trim openings between 32" and 36"
without modifications. If your door trim
opening measures less than 32" wide,
the top and bottom tracks will require
cutting. Go to page 7 to complete this
modification first.
STEP 1
ASSEMBLE COMPONENTS
Determine assembly configuration.
The screen housing should be oriented
to the hinge side of the door.
TIP: Place housings face down on
a soft surface to protect the finish
during assembly.
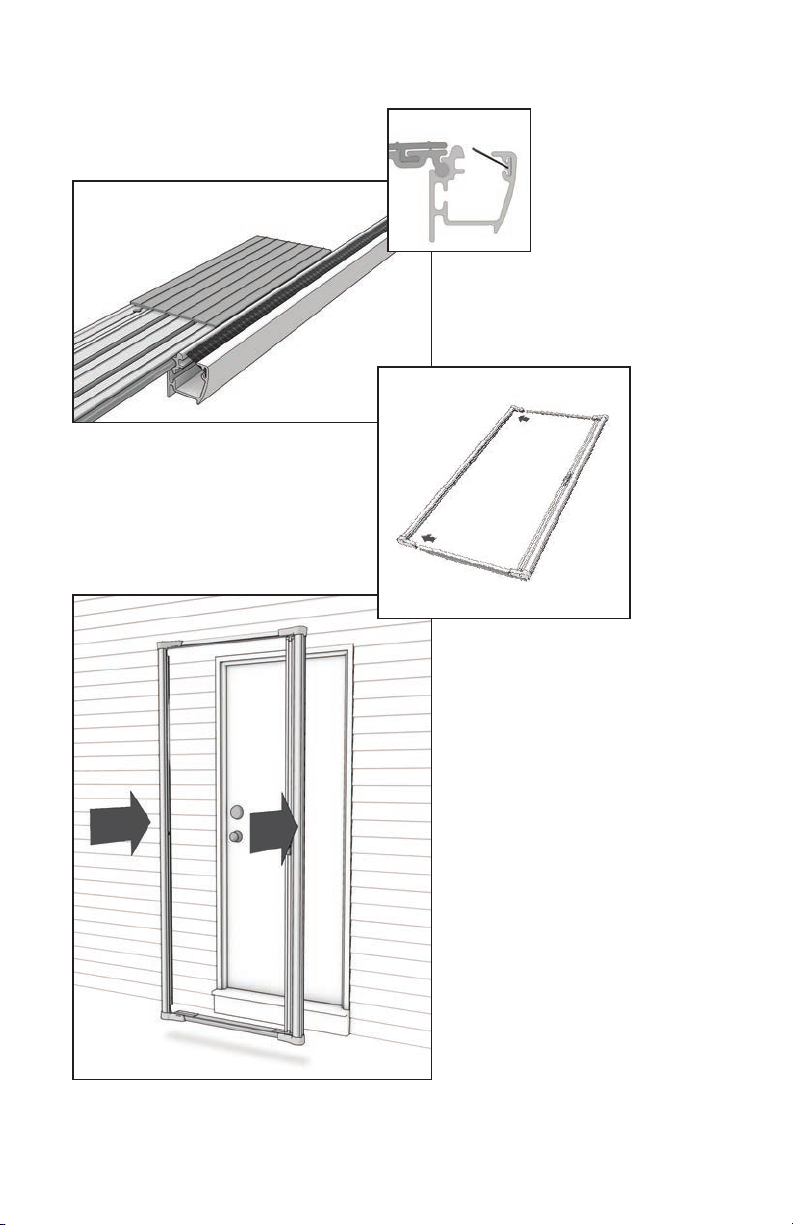
Insert the notch ends
of the tracks into the
screen housing.
Make sure the
screen threads
through the tracks.
3
Slider
Bar
Bottom
Track
Page 5
Sill Plate
Assembly
Bottom Track
Slide sill plate assembly
onto bottom track.
Insert the flat ends of the
top and bottom tracks into
the decorative housing.
STEP 2
INSERT SCREEN
Place screen assembly onto
door sill and lift into place.
Flush and short sill – Assembly
rests in a position where top of
track is flush with bottom edge
of sill.
Long sill – Assembly rests in a
position on top of sill.
4
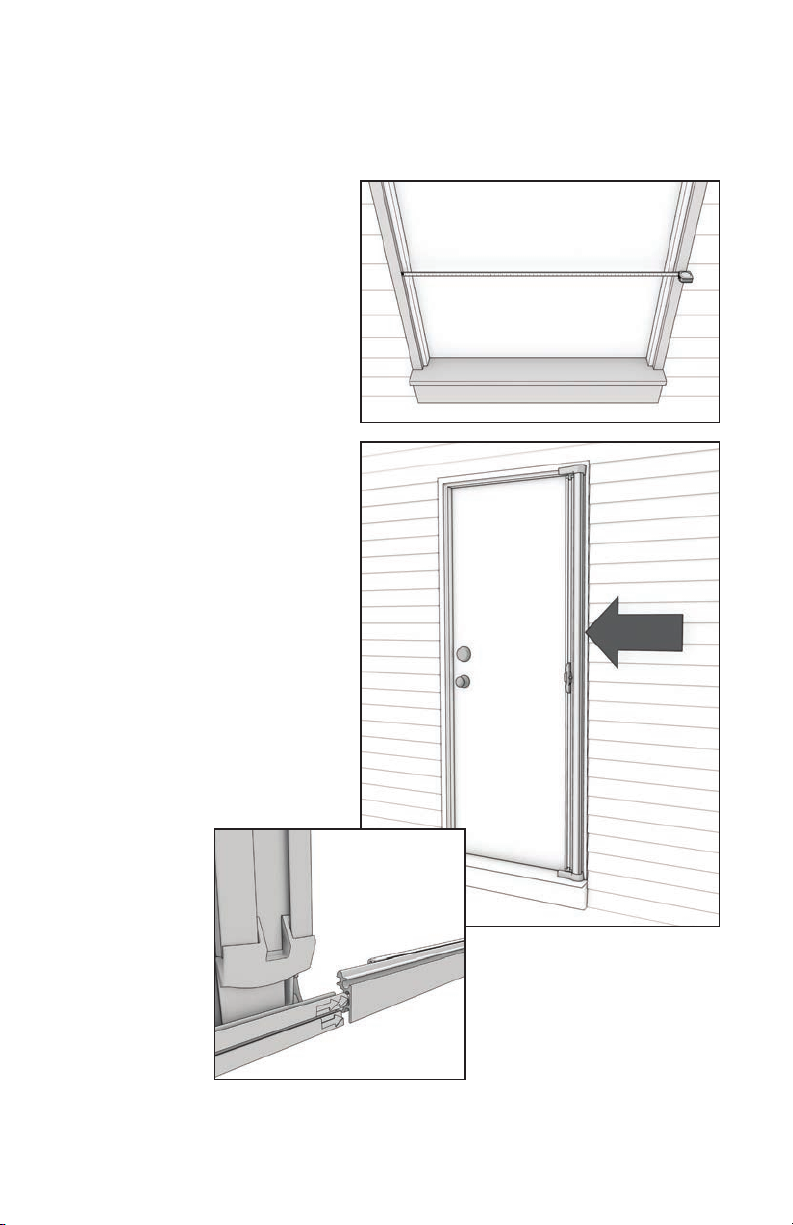
Page 6
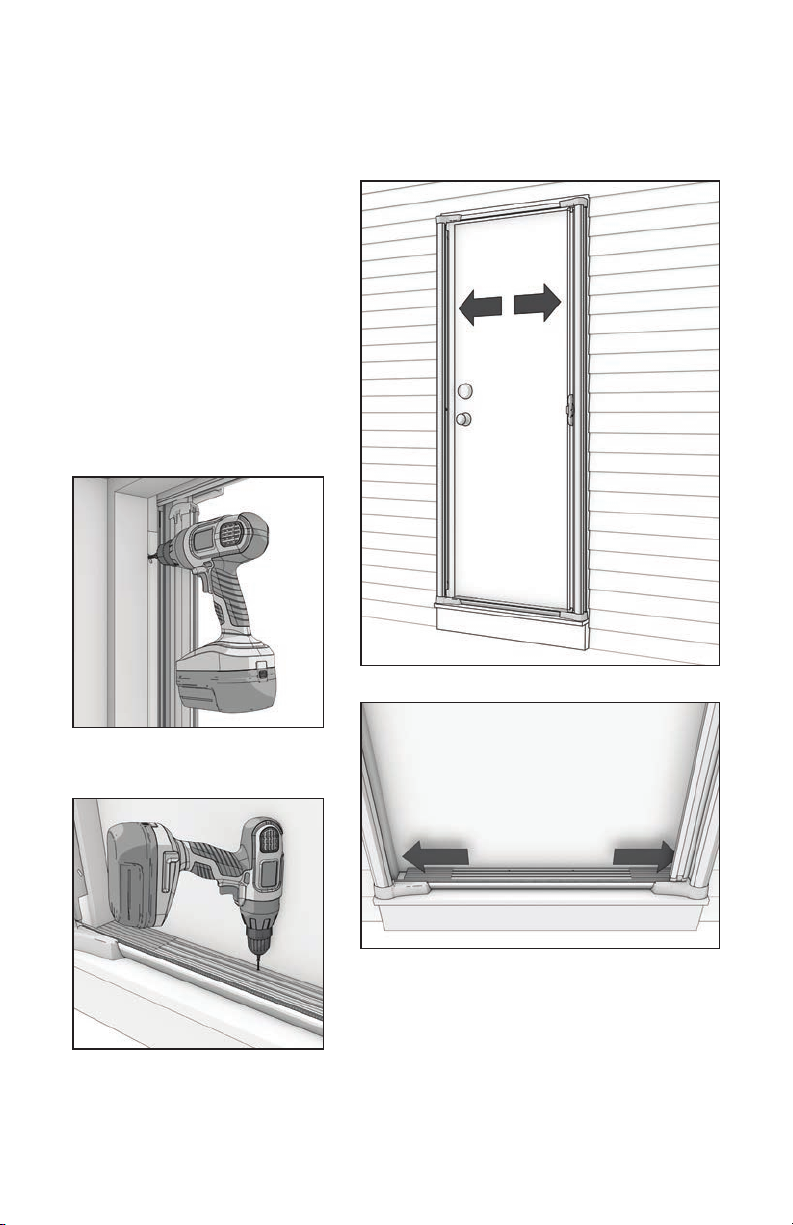
Extend housings to the left and
right evenly until snug to the door
inside trim.
STEP 3
SECURE SCREEN
Insert a housing screw into the predrilled screw hole at the top of screen
housing flange to hold frame in place.
Do not tighten completely.
Interior View
Drive self-drilling screws into sill
through all visible pre-drilled holes.
5
Center sill plate assembly on the door sill.
Slide sill plate assembly extenders to each
side to fill gaps.
Page 7

Insert housing screws into all remaining
pre-drilled holes on each vertical housing
flange (2 total per side). Tighten all screws.
Pull the slider bar closed to verify the
latch and latch hook align properly.
Latch hook can be adjusted as needed
with a hand screwdriver.
TIP: Latch hook can be oriented either
hook up or down to connect with latch.
TIP: For a tailored fit around door
moldings, notch each plastic sill
plate extender using a utility knife.
6
Page 8

Product modification
There are two seperate scenarios that will require modifications before proceeding
to the installation steps. Door trim openings that measure less than 32" will require
track cutting to fit the door width. Outswing door installations require a change to
the handle/lock assembly to move the lock mechanism to the inside of the home.
NARROW DOOR
TRACK MODIFICATION
Measure your door trim opening and
follow the example below to make
your modifications.
EXAMPLE
32" standard door width
- 30" existing door width
= 2" total amount to be cut from
the FLAT ends of the top and
bottom tracks
(Do not cut the notch end of the track)
OUTSWING DOOR
HANDLE MODIFICATION
Remove the two screws on the
handle assembly.
Remove the slider bar end cap and
slide the handle assembly all the way
to the open end of the slider bar.
Slide the handle off completely and
flip the handle end-to-end
Re-insert the handle assembly,
making sure the handle tabs slide
into the tracks of the slider bar.
TIP: Locking latch and housings
should be on the inside of the
home when installed.
7
Locking
Latch
Page 9

Slide the handle assembly back
to the middle of the slider bar and
align the screw holes of the handle
over the slider bar screw holes.
Insert and tighten the screws on
the handle assembly.
Re-insert the slider bar end cap.
Insert the slider bar in the
screen housing.
After completing the handle
change steps, please return
to the standard assembly
process on page 3.
8
Page 10

Limited Lifetime Warranty
Your purchase of an ODL Brisa Retractable Screen Door includes a Limited
Lifetime Warranty. Visit www.odl.com/warranty_brisa.htm to register your
product and to view a complete description of the warranty terms, conditions
and exclusions (e.g. screen mesh damage). Your product must be registered
within 30 days after purchase to receive the full benefits of the warranty.
9
Page 11

BRISA
Retractable Screen Door
Instrucciones para la instalación de la puerta simple
Instructions d’installation pour une porte simple
Page 12

Una propuesta innovadora para tomar aire fresco
Gracias por comprar una puerta de malla retráctil Brisa de ODL. Asegúrese de que la puerta
de malla retráctil que compró sea del tamaño adecuado para su puerta. Esta puerta de malla
retráctil se adapta a puertas simples que abren hacia adentro o hacia afuera.
Une nouvelle façon de sentir l’air frais
Merci d’avoir fait l’acquisition d’une porte-moustiquaire rétractable Brisa de ODL. Assurezvous que les dimensions de la porte-moustiquaire que vous avez achetée correspondent aux
dimensions de votre porte. Cette porte-moustiquaire rétractable peut être utilisée pour une
porte simple qui s’ouvre vers l’intérieur ou une porte simple qui s’ouvre vers l’extérieur.
PRIMERO LLÁMENOS
No devuelva el producto a
la tienda. Si necesita ayuda
con la instalación de su malla
retráctil o si desea información
adicional sobre el producto,
llame a nuestro departamento
de atención al cliente al 1-866-
635-4968, o visite nuestro sitio
en Internet en www.odl.com.
Importante
Asegúrese de leer
detenidamente y de seguir
paso a paso todas las
instrucciones. Esto garantizará
la correcta instalación y
funcionalidad. El tiempo
estimado de instalación es de
menos de 30 minutos. Para
ver un video de instalación
del producto, visite odl.com/
videos_brisa_installation.htm
Atención
Las puertas de malla retráctiles
no están diseñadas para
proporcionar seguridad ni para
retener objetos, animales o
personas en el interior.
APPELEZ-NOUS D’ABORD
Ne retournez pas en magasin.
Pour obtenir de l’aide
pour l’installation ou des
informations supplémentaires
sur le produit, appelez notre
département de service à la
clientèle au 1-866-635-4968
ou visitez notre site web au
www.odl.com
Important
Assurez-vous de lire d’abord
et de suivre à la lettre les
instructions étape par étape.
Cela permettra une installation
appropriée et vous aurez
une porte fonctionnelle.
L’installation vous prendra
moins de 30 minutes.
Vous pouvez visionner un vidéo
de l’installation du produit
au odl.com/videos_brisa_
installation.htm
Attention
Les portes-moustiquaires
rétractables ne sont pas
conçues pour offrir une sécurité
ni pour empêcher des objets,
des animaux ou des personnes
de sortir à l’extérieur.
1
PAR TES
PIÈCES
Barra
corrediza
Barre
coulissante
(5) 1-1/4"
Tornillos de
montante
(5) 1-1/4"
Housing
Vis pour boîtier
d’encastrement
Extremo
con muesca
Extrémité
à encoche
Cada riel tiene dos extremos bien diferentes
Les deux extrémités de chacun
(5) 3/4"
Tornillos
para solera
(5) 3/4"
Sill Vis
pour seuil
Extremo plano
Extrémité plate
des rails sont différentes
destornillador
Mèche Phillips
Punta de
Phillips N. º 2
No 2
Philips Head
Rieles
Rails
Montaje de umbral
Seuil de porte en métal
HERRAMIENTAS
Montante
decorativo
Cadre
décoratif
Montante
de la malla
Cadre de la
moustiquaire
OUTILS
Taladro eléctrico/
Destornillador
Perceuse mécanique/
Tournevis
HERRAMIENTA
OPCIONAL
Se necesita una
segueta si el ancho de
su puerta tiene menos
de 32" (81,28 cm).
OUTILS
FACULTATIFS
Une scie à métaux
est nécessaire si votre
porte fait moins de
32" de large.
Page 13

Antes de comenzar a instalar la nueva puerta de malla retráctil, es importante que identifique
Determinar el tipo de puerta
el tipo de solera y de puerta. Si tiene una solera corta o una puerta que abre hacia afuera, es
posible que deba hacer algunas modificaciones antes de continuar con la instalación.
Avant de commencer à installer votre nouvelle porte-moustiquaire rétractable, il
est important d’identifier le type de seuil et le type de porte que vous avez. Si vous
avez un seuil court ou une porte qui ouvre vers l’extérieur, vous devrez peut-être
effectuer quelques modifications avant de procéder aux étapes d’installation.
TIPO DE SOLERA TIPO DE PUERTA
TYPE DE SEUIL TYPE DE PORTE
Solera al ras: La solera está al ras del borde exterior.
Seuil égal au cadre – Le seuil est égal au cadre extérieur
Solera larga o extendida: La solera se extiende
más allá del borde exterior.
Seuil long/avancé – Le seuil dépasse le cadre extérieur
Se pueden requerir pasos adicionales
Des étapes supplémentaires peuvent être requises
Identifier votre type de porte
Giro hacia adentro derecha/izquierda
La estructura de la malla se montará
del lado de afuera de la casa.
Porte qui ouvre vers l’intérieur,
droite/gauche
La moustiquaire se montera à
l’extérieur de la maison
Pasos adicionales requeridos
Étapes supplémentaires requises
Giro hacia afuera derecha/izquierda*
La estructura de la malla se montará
del lado de adentro de la casa.
Porte qui ouvre vers l’extérieur
droite/gauche*
La moustiquaire se montera à
l’intérieur de la maison.
*NOTA : Antes de seguir con el proceso de
montaje estándar, primero debe reconfigurar
el cerrojo/pestillo. Diríjase a la página 7 para
completar primero esta modificación.
NOTE*: Avant de suivre la procédure
d’assemblage standard, vous devez
reconfigurer le verrou et/ou le loquet.
Pour ce faire, référez-vous à la page 7.
Solera corta: La solera corta llega justo
hasta donde comienza el borde exterior.
Seuil court – Le seuil s’arrête avant le
cadre extérieur
Plancha de relleno
• No se necesita una plancha de
relleno cuando las soleras cortas se
instalan directamente debajo de la
placa de umbral.
• La plancha de relleno es necesaria
cuando la solera corta se coloca
en la parte superior de un peldaño.
• Corte la plancha de relleno y
colóquela debajo del reborde de
la solera de manera que la plancha
de relleno quede al nivel de la solera.
Planche à ajouter
• La planche à ajouter n’est pas
nécessaire si un seuil court est
fixé directement sous le seuil.
• La planche à ajouter est
nécessaire si le seuil court est
placé sur le dessus d’une marche.
• Coupez la planche à ajouter et
placez-la sous le cadre de façon
à ce que le haut de la planche
soit égal avec le seuil.
2
Page 14

Proceso de montaje
Estas instrucciones describen paso por paso el proceso para instalar una puerta de malla retráctil.
Antes de comenzar, vuelva a leer todas las instrucciones y familiarícese con las mismas.
Procédure d’assemblage
Ces instructions constituent la procédure à suivre étape par étape pour installer une
porte-moustiquaire rétractable. Avant de commencer, revoyez toutes les instructions et
familiarisez-vous avec les pièces incluses.
MIDA LA ABERTURA DEL
BORDE DE SU PUERTA
Esta puerta de malla está diseñada para
anchos de entre 32" (81,28 cm) y 36"
(91,44 cm), sin hacer modificaciones. Si
la puerta mide menos de 32" de ancho,
los rieles superior e inferior requerirán
un corte para adecuarse al ancho de
la puerta. Diríjase a la página 7 para
completar esta modificación primero.
MESUREZ L’OUVERTURE DU
CADRE DE PORTE EXTÉRIEUR
Cette porte est conçue pour s’adapter
aux cadres de porte extérieurs mesurant
entre 32" et 36" de large sans que des
modifications soient nécessaires. Si le
cadre de porte extérieur mesure moins
de 32" de large, le rail du haut et le rail
du bas devront être coupés. Référezvous à la page 7 pour effectuer cette
modification en premier lieu.
PASO 1
COMPONENTES DE MONTAJE
Determine la configuración de montaje.
El montante de la malla debería estar
orientado hacia la bisagra de la puerta.
ÉTAPE 1
ASSEMBLEZ LES PIÈCES
Déterminez la configuration d’assemblage.
Le cadre de la moustiquaire doit être orienté
vers le côté des charnières de la porte.
CONSEJO: Apoye los montantes hacia
abajo sobre una superficie blanda para
proteger el acabado durante el montaje.
CONSEIL: Placez
la moustiquaire
vers le bas sur une
surface souple pour
protéger la finition
durant l’assemblage.
3
corrediza
coulissante
Barra
Barre
Riel
Inferior
Rail
Du Bas
Inserte los extremos de muesca de
los rieles en el montante de la malla.
Asegúrese de que la malla pase por
los rieles.
Insérez l’extrémité du rail avec
l’encoche dans le cadre de la
moustiquaire
Assurez-vous que la moustiquaire
s’enfile dans les rails.
Page 15

Inserte los extremos planos
de los rieles superior e inferior
en el montante decorativo.
Insérez les extrémités plates
des rails du bas et du haut
dans le cadre décoratif.
Montaje de umbral
Seuil de porte en métal
Riel inferior
Rail du bas
Deslice el montaje de
umbral sobre el riel inferior
Glissez le seuil de porte
en métal sur le rail du bas
PASO 2
INSERTE LA MALLA
Coloque el montante de la malla
sobre la solera de la puerta y levante
hasta que quede en posición.
Solera corta y al ras: El montaje
se apoya en una posición donde la
parte superior del riel está al ras del
borde inferior de la solera.
Solera larga: El montaje se apoya
en la parte superior de la solera.
ÉTAPE 2
INSÉREZ LA MOUSTIQUAIRE
Placez la moustiquaire assemblée sur
le seuil de porte et levez-là en place.
Seuil égal au cadre et seuil court —
Assemblez le reste dans une position
où le dessus du rail est égal avec le
rebord du bas du seuil.
Seuil long – Assemblez le reste dans
une position sur le dessus du seuil.
4
Page 16

Extienda los montantes en forma pareja
a la izquierda y a la derecha hasta que se
ajusten en el borde interno de la puerta.
Étirez la moustiquaire de façon égale vers la
gauche et la droite jusqu’à ce qu’elle se soit
bien ajustée au cadre intérieur de la porte.
PASO 3
ASEGURE LA MALLA
Inserte un tornillo de montante en el orificio
perforado previamente en la parte superior
de la brida del montante de la malla para
que el cuadro quede firme en el lugar.
No ajuste los tornillos completamente.
ÉTAPE 3
SOLIDIFIEZ LA MOUSTIQUAIRE
Insérez une housing vis pour boîtier
d’encastrement dans les trous prépercés
dans le haut du rebord du cadre de la
moustiquaire pour maintenir le cadre en
place. Ne serrez pas complètement.
Vista interior
Vue de l’intérieur
Coloque los tornillos en el umbral, en los
orificios visibles perforados previamente.
Vissez les vis de perçage dans le seuil
dans tous les trous prépercés.
5
Centre el montaje de umbral en el umbral de la
puerta. Deslice los extensores del montaje de
umbral a cada lado para llenar los espacios libres.
Centrez le seuil de porte en métal sur le seuil de
votre porte. Glissez les rallonges du seuil de porte
en métal de chaque côté pour combler les espaces.
Page 17

Inserte los tornillos del montante en los
demás orificios de cada brida del montante
vertical (2 por lado en total). Ajuste todos
los tornillos.
Insérez les housing vis de boîtier
d’encastrement dans tous les trous
prépercés restants dans chaque barre
verticale du cadre (2 de chaque côté).
Serrez les vis.
Verifique que el pestillo y el gancho del
pestillo estén alineados correctamente.
El gancho del pestillo se puede ajustar
con un destornillador de mano, si es
necesario.
CONSEJO: Para conectar el pestillo,
el gancho del pestillo puede estar
orientado con el gancho hacia arriba
o hacia abajo.
Fermez la barre coulissante pour vérifier
que le verrou et le crochet du verrou
sont alignés. Le crochet du verrou peut
être ajusté au besoin avec un tournevis.
CONSEIL: Le crochet du verrou peut
être orienté vers le haut ou vers le bas
pour être connecté avec le verrou.
CONSEJO: Para lograr el montaje
deseado alrededor de las molduras
de la puerta, muesque cada
extensor del umbral con un cuchillo
de uso general.
CONSEIL: Pour un bon ajustement
avec la moulure de porte, coupez
chaque rallonge en plastique du
seuil de porte en métal avec un
couteau tout usage.
6
Page 18

Puerta que abre hacia afuera – modificación del producto
Hay dos escenarios individuales que requerirán modificaciones antes de comenzar con los
pasos de instalación. Las aberturas de borde de la puerta que midan menos de 32" requerirán
un corte de los rieles para adecuarse al ancho de la puerta. Las instalaciones de puertas que
abren hacia afuera necesitan un cambio en el montaje de la manija/cerrojo antes de realizar la
instalación completa para cambiar el mecanismo de cierre hacia el interior de la casa.
Modification du produit
Il y a deux cas différents qui nécessiteront des modifications avant de procéder aux étapes
de l’installation. Pour les cadres de porte qui mesurent moins de 32", les rails devront être
coupés afin de correspondre à la largeur de la porte. Les portes qui ouvrent vers l’extérieur
nécessiteront un changement à l’assemblage de la poignée/verrou pour positionner le
mécanisme de verrouillage à l’intérieur de la maison.
PUERTA ANGOSTA
MODIFICACIÓN DE RIELES
Mida la abertura del borde de la puerta
y siga el siguiente ejemplo para hacer
las modificaciones.
EJEMPLO
32" ancho de puerta estándar
- 30" ancho de puerta actual
= 2" cantidad total a cortar de los
extremos PLANOS de la parte
superior y los rieles inferiores
(No corte el extremo de muesca del riel)
MODIFICATION DU RAIL
POUR UNE PORTE ÉTROITE
Mesurez votre cadre de porte et suivez
les exemples ci-dessous afin de faire les
modifications.
EXEMPLE
32" largeur de porte standard
- 30" largeur de votre porte
= 2" Longueur totale qui doit être
coupée de l’extrémité plate du
rail du haut et du rail du bas
(Ne coupez pas les extrémités avec encoche)
PUERTA QUE ABRE HACIA
AFUERA MODIFICACIÓN DE
LA MANIJA
Retire los dos tornillos del montaje de
la manija.
Retire la tapa del extremo de la barra
corrediza y deslice el montaje de la
manija hasta el extremo abierto de la
barra corrediza.
MODIFICATION DE LA
POIGNÉE POUR UNE PORTE
QUI OUVRE VERS L’EXTÉRIEUR
Retirez les deux vis qui sont sur la poignée.
Retirez un embout de la barre coulissante
et glissez la poignée jusqu’à l’extrémité
ouverte de la barre coulissante.
7
Page 19

Deslice la manija hacia afuera
completamente y gírela de
extremo a extremo.
Vuelva a insertar el montaje de la
manija y asegúrese de que las bridas
de la manija se deslicen por los rieles
de la barra corrediza.
CONSEJO: El cerrojo/pestillo y los
montantes se deben instalar del lado
de adentro de la casa.
Cerrojo/pestillo
Crochet du verrou
Enlevez complètement la poignée et
retournez-là de 180 degrés (l’extrémité
du haut devient l’extrémité du bas)
Réinsérez la poignée en vous assurant
qu’elle glisse bien dans le rail de la barre
coulissante
CONSEIL: Le crochet du verrou et la
moustiquaire devraient être à l’intérieur
de la maison une fois installés.
Deslice el montaje de la manija hacia
atrás al medio de la barra corrediza
y alinee los orificios de los tornillos
de la manija con los orificios de los
tornillos de la barra corrediza.
Inserte y ajuste los tornillos en la
manija.
Glissez la poignée jusqu’au milieu
de la barre coulissante et alignez
les trous des vis de la poignée avec
ceux de la barre coulissante.
Insérez et serrez les vis dans la
poignée.
Vuelva a insertar la tapa del extremo
de la barra corrediza
Replacez l’embout de la barre
coulissante.
Inserte la barra corrediza en el
montante de la malla.
Luego de completar los
pasos para cambiar la manija,
regrese al proceso de montaje
estándar en la página 3.
Insérez la barre coulissante dans
le cadre de la moustiquaire.
Après avoir complété les
étapes pour le changement
de la poignée, retournez
à la procédure standard
d’assemblage à la page 3.
8
Page 20

Garantía limitada de por vida
Su compra de una puerta de malla retráctil Brisa de ODL tiene garantía limitada de por
vida. Visite www.odl.com/warranty_brisa.htm para registrar su producto y ver la descripción
completa de los términos, condiciones y exclusiones de la garantía (por ejemplo, daños en la
malla). Su producto se debe registrar dentro de los 30 días posteriores a la compra para
obtener todos los beneficios de la garantía.
Garantie à vie limitée
L’achat de votre porte-moustiquaire rétractable ODL comprend une garantie à vie limitée.
Visitez le www.odl.com/warranty_brisa.htm pour enregistrer votre produit et obtenir une
description complète des conditions, des termes et des exclusions de la garantie (p. ex. :
endommagement des mailles de la moustiquaire). Votre produit doit être enregistré dans
les 30 jours suivant l’achat pour bénéficier de tous les avantages de la garantie.
9
 Loading...