

Page 1

Océ Repro Desk
User Manual
Page 2

Océ-Technologies B.V.
This manual contains a description of the Océ Repro Desk software
version 4.30.5.
Trademarks
Products in this manual are referred to by their trade names.
In most, if not all cases, these designations are claimed as
trademarks or registered trademarks of their respective companies.
Copyright
© 2002 Océ-Technologies B.V. Venlo, The Netherlands
All rights reserved. No part of this work may be reproduced, copied, adapted,
or transmitted in any form or by any means without written permission from
Océ.
Océ-Technologies B.V. makes no representation or warranties with respect to
the contents hereof and specifically disclaims any implied warranties of
merchantability or fitness for any particular purpose.
Further, Océ-Technologies B.V. reserves the right to revise this publication and
to make changes from time to time in the content hereof without obligation to
notify any person of such revision or changes.
Edition 2002-09
US
Page 3

Table of Contents
Table of Contents 3
Chapter 1
Introduction
What is Océ Repro Desk 16
Océ Repro Desk Server 16
Océ Repro Desk Remote Client 16
The concept, Remote version 18
The concept, LAN version 19
The concept, Facilities Management 20
Resumé of the Océ Repro Desk products 21
Some definitions 22
Getting help 23
On-line help 23
Tool tips 23
About this manual 24
Chapter 2
Installation
Introduction to installation 26
At the reprographic shop 26
Installation procedure at the reprographic shop 26
At the client site 26
Installation procedure at the client site 26
Install Océ Repro Desk Server 28
Install Repro Desk Remote at a Client Site (ApModem) 36
Create customized files 36
Install Océ Repro Desk Remote 38
Configure communications 46
Install Repro Desk Remote at a Client Site (ApFtp) 48
Create Customized Files 49
Customize the work order defaults 50
Install Océ Repro Desk Remote 52
Uninstallation of Océ Repro Desk 59
Table of Contents 3
Page 4

Chapter 3
Chapter 4
Configuration
What is the Configuration Manager 62
Access the Configuration Manager 62
What the settings mean 64
Locate specific settings 65
Reuse a previous search 66
Configure the software 67
General 68
Communications 69
Job default settings 70
Directories 71
PostScript tab 72
AutoCAD tab 74
Paper sizes 74
The software interface
Starting Océ Repro Desk 78
The user interface 79
Menu bar 80
Button bar and Quick menus 80
Information bar 81
Pen overview 82
Window 82
Logo 83
View tool bar 83
Title bar 83
Status bar 83
How to access the menus and options 84
Set preferences 85
Quit Océ Repro Desk 86
Chapter 5
A Quick Tour through
Océ Repro Desk
Purpose of this quick tour 88
Start Océ Repro Desk and add files to a job 89
View, check and print files 91
4Océ Repro Desk User Manual
Page 5

Chapter 6
Handling jobs
What is a job 94
Create a new job 94
Add files to a job 95
Add drawings from ProjectPoint™ sites 95
Insert a drawing into a job 96
Add files from a text file 97
Save a job 97
Close a job 98
Open an existing job 98
Merge a job with another job 98
Remove a drawing from a job 99
Delete a drawing 99
Rename a job 100
Organize drawings within a job 101
Skip drawings within a job 101
Move drawings within a job 101
Copy drawings within a job 102
Job settings 103
Change settings for one drawing 103
Change settings for several drawing 104
File 105
Copies 105
Drawing size 106
Zoom 106
Paper size 106
Media type 107
Fold 107
Pen set 108
Alignment 108
Rotation and mirror 108
Border removal 109
Color 109
Chapter 7
Check and process drawings
To process files 112
Raster files 112
Vector files 112
Supported vector formats 113
Supported raster formats 113
To check vector files 114
5
Page 6

Chapter 8
To control drawing properties 115
AutoCAD DWG properties 116
General tab 116
Plot by/Scale tab 117
AutoCAD R14 batch plot utility 119
Advanced tab 120
Directories tab 121
Solving AutoCAD scale problems 122
Configure AutoCAD processing 123
How to process AutoCAD files 123
HP-GL, HP-GL/2 and HP-RTL 125
CalComp 906/907 PCI 126
Process and unprocess drawing files 128
To unprocess 128
Unprocess a single drawing file 129
Process raster files 130
Cals 130
TIFF, NIFF 131
View drawings
Viewer 134
View toolbar 135
Zoom tools 136
View fold 138
Move drawing 138
Border removal 139
Crop drawing 139
Enlarge detail 140
Edit pen 141
Center drawing 141
Align title block 142
Mirror and Rotate 142
Negative paper 143
Rasterization 144
Color patterns 144
Outline polygons 145
Status bar 146
Previous/Next drawing 146
Ruler 146
Drawing size 147
Zoom status 147
Paper size 148
6Océ Repro Desk User Manual
Page 7

Chapter 9
Chapter 10
Locator 148
Second locator 148
Viewer menu bar 149
Viewer troubleshooting 150
Imaging properties
Imaging properties 152
Paper size 153
Drawing size 154
Alignment 155
Border removal 156
Margins 157
Zoom 158
Orientation 159
Folder 160
Set pen parameters
Pen settings 164
Pen patterns 166
Pen width 167
Pen shape 168
Effect 168
All pens 169
Edit pen pattern 170
HP-GL/2 pen controls 172
Other pen features 174
Chapter 11
Define Stamps and Overlays
Electronic stamps 178
Stamp options 179
Position options 181
Adding a stamp to a drawing 182
Adding a stamp to all drawings 183
Overlay files 184
View and position a drawing 185
7
Page 8

Chapter 12
Chapter 13
Send jobs
Send jobs 188
Send a job to a network queue 188
Send a job by modem 189
Send a job via FTP 190
Send a job to be stored on disk 192
Send a job by e-mail 193
Send files to a ProjectPoint™ sites 194
Fill out a work order 195
The work order 195
To use the order receipt 199
Queues
About queues 202
Create an incoming queue 203
Queue options 207
Queue information 208
Use queues 209
Open a queue 209
Save queue 209
Receive new jobs in a queue 209
Work with queues 210
Print from a queue 212
Organize jobs in the queue 212
Chapter 14
Printing
Introduction 216
Print from a queue 218
Print on a Windows printer 220
Scaling 220
Color inkjet printers 221
Print preview 222
Print a job on a windows printer 226
View and print work orders 228
HP-GL/2 HP-RTL output 233
Output (HP-GL/2/HP-RTL) 235
Resolution (HP-GL/2/HP-RTL) 237
Collation (HP-GL/2/HP-RTL) 238
8Océ Repro Desk User Manual
Page 9

Chapter 15
Chapter 16
Options (HP-GL/2/HP-RTL) 239
Banner page (HP-GL/2/HP-RTL) 241
HPGL pass-through 242
Print on an Océ 9400
Océ 9400 printer (CALS/TIFF file) 246
Output (Océ 9400) 248
Resolution (Océ 9400) 250
Collation (Océ 9400) 251
Options (Océ 9400) 251
Banner page (Océ 9400) 253
Print on an Océ 9600
Océ 9600 printer 256
Start up the Océ 9600 print manager 256
Make settings in the print manager 258
Adapt the leading edge position of the roll drawers 259
Modify the roll drawer width positions 260
Adapt the leading edge position of the sheet feeders 261
Modify the sheet feeder width positions 261
Modify the static deviation 262
Other adjustments 263
Key operator settings 263
Print on the Océ 9600 printer 264
Rolls and Sets (Océ 9600) 266
Collation (Océ 9600) 267
Folder (Océ 9600) 268
Delivery (Océ 9600) 270
Banner page (Océ 9600) 271
Chapter 17
Print on Océ 9700 or Océ 9800
Océ 9700/9800 printer 274
Starting up the Océ 9700/9800 print manager 274
Printing on the Océ 9700/9800 printer 276
Rolls and Sets (Océ 9700/9800) 278
Collation (Océ 9700/9800) 279
Printer stamp (Océ 9700/9800) 280
Folder (Océ 9700/9800) 281
9
Page 10

Chapter 18
Chapter 19
Stacker (Océ 9700/9800) 283
Delivery (Océ 9700/9800) 285
Banner page (Océ 9700/9800) 286
Print on Océ 3165
Océ 3165 PostScript printer 290
Output (Océ 3165) 292
Resolution (Océ 3165) 294
Collation (Océ 3165) 295
Options (Océ 3165) 296
Banner page (Océ 3165) 298
Unattended printing
Introduction 300
About print settings 301
Direct printing 304
Automatic printing 305
Native printing 306
To prepare direct, automatic and native printing 307
To create a polling queue 312
Enable/Disable printing at Repro Desk Server 315
Send to a polling queue 318
Configure printer for broadcasted print queue 321
Queue administration for broadcasted print queue 323
Queue administration for automatic print queue 326
Banner page for broadcasted print queue 327
Automatic printing from Repro Desk Remote 328
Using direct printing 333
Enable/Disable direct printing at Repro Desk Server 333
Direct printing from Repro Desk Remote 335
Chapter 20
Multiple machine support
Introduction 338
Control center 340
Prepare multiple machine support 341
Configure printer for broadcasted print queue 344
Queue administration for broadcasted print queue 346
Banner page for broadcasted print queue 349
10 Océ Repro Desk User Manual
Page 11

Chapter 21
Chapter 22
Using multiple machine support 351
Enable/Disable printing at unattended Repro Desk Server 351
Print from the main Repro Desk Server 353
Accounting
What is accounting? 358
Accounting information 358
The accounting process 358
To prepare Repro Desk for accounting 359
Standard accounting 359
ODBC accounting 359
ODBC set accounting 359
ODBC sheet accounting 359
ODBC Set and Sheet Accounting 361
Export accounting information 362
To use Accounting login 364
Query accounting information 365
Report accounting information 372
Understanding logs 373
Scan
Scanning 380
Preparation 381
Scan 382
Scan with the Océ 9600 383
Name and save scanned files 383
Scanner settings on the Océ 9600 388
Brightness 388
Scan to file mode 390
File size optimization 390
Scan resolution 391
File type 392
Zoom settings 393
Scanner settings on the Océ 9700 394
Modifying the exposure 394
File size optimization 396
Scanning non-standard size originals 397
Using the zoom settings 398
Scanning originals with filing strip 399
Scanner settings on the Océ 9800 402
11
Page 12

Chapter 23
Chapter 24
Modifying the exposure 402
File size optimization 404
Scanning non-standard size originals 405
Using the zoom settings 406
Scanning originals with filing strip 407
Work order customizer
Introduction 412
To use the work order customizer 413
Order receipt header 413
Work order fields 415
Work order colors and fonts 417
Preview the work order changes 417
Send the work order form to the customer 418
Restore the default work order 418
ApHost: Server
Introduction 420
Installation 420
Migration from Hyperaccess 420
Start ApHost 422
To stop ApHost 423
Preparations 424
Preferences 424
Phone lines 426
Create queues 429
Users 433
Use ApHost 437
De-activate a phone line 437
Get information about a specific phone line 439
Get information about all phone lines 440
To hang up a phone line 442
Broadcast a message to remote users 444
Read messages from remote users 444
Chapter 25
ApModem: Remote Client
Introduction 448
Overview 448
12 Océ Repro Desk User Manual
Page 13

Chapter 26
Menu selections 450
File 450
Communications 450
Windows 3.x configuration 451
Windows 95/NT configuration 454
Script 456
Help 457
Script file 458
Script commands 459
Create script files 461
JOBCOMM.INI file keys 463
Command line options 464
Troubleshooting / FAQ 465
Tips 465
General information 466
My modem won't connect 466
I can't log in 467
I get errors when transferring 468
ApFTP: Remote Client
Introduction 470
Menu selections 472
File 472
Communications 472
Server setup 476
Create customized diskettes 477
Command line options 478
Chapter 27
Supported RCF commands
Introduction 480
RCF commands 480
Appldata 001 Pen attributes 480
Appldata 002 Job parameters 480
Appldata 003 Transformations 481
Appldata 020 Stamp 482
Appldata 021 Media selection 482
Appldata 022 Finishing 483
Appldata 023 Delivery 483
Appldata 025 Framing 483
Appldata 029 Image alignment 484
13
Page 14

Chapter 28
Chapter 29
Appendix A
Appldata 056 ASCII parameters 484
Special remarks 485
Auto rotate and auto paper detect settings 485
Optional RCF override 485
Priority of RCF versus other settings 485
Supported OJT commands
Introduction 488
Océ Job Ticket commands 488
Autorotate and autopaper detect settings 489
Key Operator Settings
Introduction 492
Key operator settings in the Configuration Manager 493
System Configuration 494
Printer KOS settings 495
Scanner KOS Settings 498
Configuration Manager settings 500
Miscellaneous
How to read this manual 502
User survey 503
Addresses of local Océ organizations 505
Index 507
14 Océ Repro Desk User Manual
Page 15

Océ Repro Desk
User Manual
Chapter 1 Introduction
■ ‘What is Océ Repro Desk’ on page 16
■ ‘The concept, Remote version’ on page 18
■ ‘The concept, LAN version’ on page 19
■ ‘The concept, Facilities Management’ on page 20
■ ‘Resumé of the Océ Repro Desk products’ on page 21
■ ‘Some definitions’ on page 22
■ ‘Getting help’ on page 23
■ ‘About this manual’ on page 24.
15
Page 16

What is Océ Repro Desk
Océ Repro Desk is a software application that is used for high speed digital
printing. The complete Océ Repro Desk system consists of two major software
applications: Océ Repro Desk Server and Océ Repro Desk Remote Client.
Océ Repro Desk Server
Océ Repro Desk Server is a application for printing or archiving digital files.
Océ Repro Desk Server contains software for receiving jobs from remote
clients by modem, network, FTP or disks, as well as tools for organizing,
preparing and printing digital files.
Received jobs can be modified, using the same facilities as offered by the
Remote Client application to create the job.
Océ Repro Desk Scan-to-file is an optional software application, used to scan
paper originals and store them as digital files.
Océ Repro Desk Remote Client
The Océ Repro Desk Remote Client application is the client version of the Océ
Repro Desk system.
There are three versions:
■ Océ Repro Desk Remote Client, which enables you to create a job, process,
preview and submit drawings for printing via LAN, modem and FTP
communication. You can print check prints on an A3/A4 (A or B) size
Windows printer. When you are satisfied with the appearance of the drawing,
you can print to an Océ 9400, 9600, 9700 or 9800 server on a local network
or via modem / ISDN or internet FTP connections.
■ Océ Repro Desk Remote Client LAN, permits you to create a print job,
process, preview and submit drawings for printing via LAN communication.
16 Océ Repro Desk User Manual
Page 17

You can print check prints on an A3/A4 (A or B) size Windows printer or
print to an Océ 9400, 9600, 9700 or 9800 server on a local network
■ Océ Repro Desk FM Remote (Facilities Management), which enables you to
create a print job, process, preview and submit drawings via LAN
communication (only), without the facility to create queues.
Océ Repro Desk Remote Client enables you (the customer) to take
responsibility for the actual output and not the reprographer or print room
operator. As you are the best person to verify and approve the proposed output,
Repro Desk Remote Client provides all the tools needed to do so.
Thus, Repro Desk Remote Client permits you to define job settings,
pre-process and view the proposed output on a WYSIWYG basis.
Additionally, Repro Desk Remote Client provides the you with intuitive,
meaningful feedback and pre-emptive warnings before a print job is actually
sent to the server.
Some users may already be using (Océ) applications that produce RCF
commands. For this purpose, Repro Desk includes support for RCF output (see
‘Supported RCF commands’ on page 479).
Introduction 17
Page 18
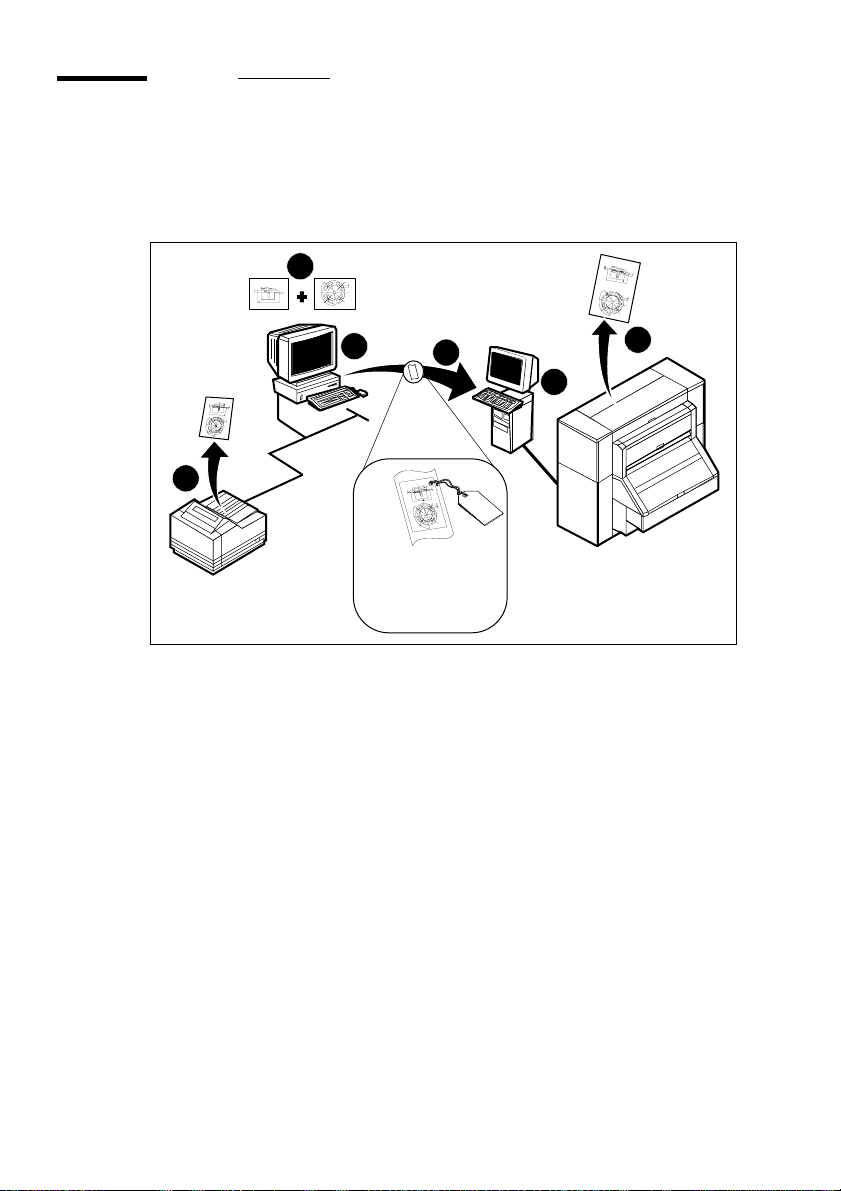
The concept, Remote version
The complete concept of the Océ Repro Desk Remote Client version can be
summarized in the following illustration:
1
Océ Server
Remote
Client
2
& ApHost
4
Océ
Printer
6
5
3
s
e
pi
o
c
es
l
i
5
f
r
t
e
e
t
n
i
s
s
r
d
e
P
he
d
y
t
l
a
f
o
o
p
e
nt
nd
t
n
e
a
a
r
o
d
m
ur
il
d
c
f
an
he
t
e
m
i
t
Via:
- LAN
A3/A4 Size
Windows printer
- Diskette
- own FTP-site
- modem / ISDN
[1] Concept Repro Desk
1 You prepare your job at your local Repro Desk Remote Client.
2 Repro Desk processes the files into vector image compressed format (VIC
file).
3 You check your job on a local Windows printer.
4 Depending on the version of the Repro Desk Remote Client:
You save your job on a diskette which is sent to the print server
or
You send your job via a modem/ISDN to the print server
or
You send your job via your own FTP site to the job printer.
5 Your job is loaded on the Repro Desk Server.
6 The job is printed on the Océ printer (Océ 9400, 9600, 9700 or 9800) or on a
Windows printer.
18 Océ Repro Desk User Manual
Page 19

The concept, LAN version
The complete concept of the Océ Repro Desk Remote Client LAN version can
be summarized in the following illustration:
1
Remote
Client
Océ Server
& ApHost
2
4
6
Océ
Printer
5
3
Via:
A3/A4 Size
Windows printer
[2] Concept Repro Desk Remote Client LAN
- LAN
- Diskette
s
e
pi
o
c
es
l
i
5
f
r
t
e
e
t
n
i
s
s
r
d
e
P
he
d
y
t
l
a
f
o
o
p
e
nt
nd
t
n
e
a
a
r
o
d
ur
lm
i
d
c
f
an
he
t
e
m
i
t
1 You prepare your job at your local Repro Desk Remote Client LAN.
2 Repro Desk processes the file(s) into Vector Image Compressed format (VIC
file).
3 You check your job on a local A3/A4 size Windows printer.
4 You save your job on a diskette which is sent to the print server.
or
You send your job via local area network directly to the queue of the job
printer.
or
You send your job via your own LAN to the job printer.
5 Your job is loaded on the Repro Desk Server.
6 The job is printed on an Océ printer (Océ 9400, Océ 9600, Océ 9700 or Océ
9800).
Introduction 19
Page 20

The concept, Facilities Management
Facilities Management describes the placement of reprographer-owned
large-format printers and controllers at a customer's site so they can perform
local printing. The reprographer charges the customer for use of the
equipment, as determined by a meter on each device or accounting information
software that keeps track of printing.
In those Facilities Management installations, the customer's personnel don't
need all the functions of ReproDesk Remote. Using FM Remote the customer
can process files and send them via LAN to Océ Repro Desk Server, also
installed at the customer site. Repro Desk Server is a workstation that hosts the
software; it is not an operating system server. The FM Remote users cannot
print to Océ equipment, send files via modem or FTP, or create/configure
queues. They can print to a local Windows printer and send files to the
server-based Repro Desk installation at their site.
Default is set to off for all forms of accounting in FM Remote. Because you
cannot print to the Océ equipment with FM Remote, accounting is irrelevant.
JOB.INI set to FM configuration. The installation of Repro Desk Remote and
FM Remote put exactly the same files in the exact same locations. The
computer knows the difference though, because the installation process inserts
a value in the registry letting job.exe know that the FM Remote button (and
therefore the FM Remote settings) was chosen in the Major Product dialog
box. All of this happens behind the scenes; no additional steps are required
beyond those in the regular installation procedure.
Reprographers can customize the work order if they wish and save the
customized work order to a disk, according to the instructions in chapter 23,
‘Work order customizer’ on page 411. They can then install this customized
version at the FM remote site, using the instructions in the same chapter.
20 Océ Repro Desk User Manual
Page 21

Resumé of the Océ Repro Desk products
Océ Repro Desk Remote Used to set up remote communications from
customer to Reprographer.
Océ Repro Desk FM Remote Used to set up client / server systems within a
customer's organization. Print and Queue buttons are disabled, along with the
Communications function in ‘Send job to’. Windows printing is available.
Océ Repro Desk Remote LAN Unlimited use of Océ Repro Desk within an
organization with the ability to set up queues and communications.
Introduction 21
Page 22

Some definitions
ODBC Open Database Connectivity
Sheet accounting Also known as ODBC sheet accounting, which tracks
information based on drawings rather than jobs. Information about each
drawing is logged in one record.
JOB.INI The initialization file that contains default settings for such things as
paper sizes and directories. In Repro Desk 4.25, a similar file, job.xml has been
added, which is affiliated with the new graphical interface: Configuration
Manager. We urge customers not to attempt to modify job.ini or job. xml files.
Instead, you can go to the ‘Configure’ menu and choose ‘Defaults’ to get the
‘Configuration’ dialog box with many tabs, or ‘Advanced’ to get the
‘Configuration Manager’.
FM Configuration The group of default settings for FM Remote contained in
the job.ini.
WOC Work Order Customizer (see page 411).
22 Océ Repro Desk User Manual
Page 23

Getting help
In addition to the User Manual, Océ Repro Desk software version 4.30 has
Windows on-line help.
On-line help
If you need help while using the Océ Repro Desk software, the on-line help
provides a quick explanation of options and procedures.
▼ Accessing the on-line help
1
From the Help menu, choose Index.
The help dialogue box appears.
2 Select the index tab and follow the instructions.
Tool tips
Tool Tips provide a short explanation of the button your mouse is pointing at.
Point at a button with the mouse, and wait a second or two. A box appears with
a short explanation of the function of the button.
Introduction 23
Page 24

About this manual
This manual is part of a user documentation set consisting of two manuals:
■ Océ Repro Desk User Manual, (this manual)
■ Océ 9600 Repro Desk System Hardware User Manual.
The User Manual covers all software related aspects of Océ Repro Desk. The
Hardware User Manual contains a description of all hardware elements of the
Océ Repro Desk printer.
24 Océ Repro Desk User Manual
Page 25

Océ Repro Desk
User Manual
Chapter 2 Installation
■ ‘Introduction to installation’ on page 26
■ ‘Install Océ Repro Desk Server’ on page 28
■ ‘Install Repro Desk Remote at a Client Site (ApModem)’ on page 36
■ ‘Install Repro Desk Remote at a Client Site (ApFtp)’ on page 48
■ ‘Uninstallation of Océ Repro Desk’ on page 59.
25
Page 26

Introduction to installation
At the reprographic shop
The server PC software includes:
■ Repro Desk Server
■ ApHost (communications software).
Installation procedure at the reprographic shop
Install Repro Desk Server.
During the installation,you have the opportunity to install ApHost as well. (If
you wish, ApHost can be installed later).
Prior to installing at a client site, a user ID is created on the Repro Desk Server
PC in ApHost for each remote site.
After you install Repro Desk, you must customize the work order for your
Remote Client users.
At the client site
The remote PC software includes:
■ Repro Desk Remote
■ ApModem (communications software).
Installation procedure at the client site
The ‘Diskette Customizer’ is run to setup a script file and cutomize a .ini file
to make it possible for the remote PC to dial in to the server PC.
Repro Desk Remote is then installed.
During the installation,you have the opportunity to install ApModem as well.
(If you wish, ApModem can be installed later).
26 Océ Repro Desk User Manual
Page 27

After ApModem is installed, you are prompted to configure the modem,
connection, etc.
Installation 27
Page 28
Install Océ Repro Desk Server
Prior to installing the software, be sure to have the CD key available as well as
the Authorization code that enables the print capability.
■ Read and follow the instructions on the Welcome screen.
■ Carefully read the Software Licence Agreement screen.
▼ Install Océ Repro Desk Server
1
Place the CD in the CD-ROM drive.
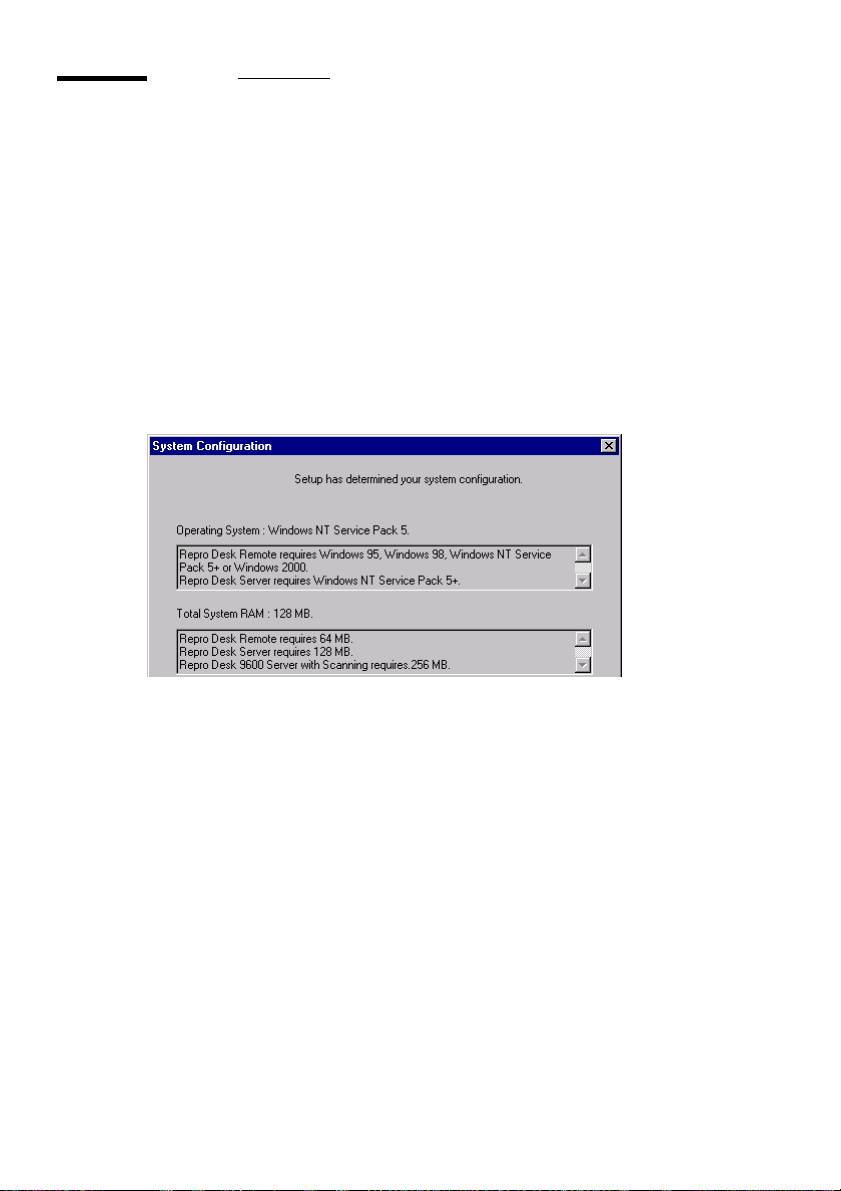
A message appears ‘Setup will now determine your system configuration’.
2 Click ‘OK’.
Setup displays a System configuration.
[3] Partial System configuration window
This screen informs you about your system configuration, hardware and
software.
It also informs you about the Repro Desk requiremens to ensure a correct
installation, before you continue to install.
3 Read this dialog box carefully.
Note: If some areas are incorrect, make a screen capture of the dialog (For
example, press ALT and PRINT SCREEN key) then save the file. Thiswill
help correct the system requirements.
4 If all areas of the ‘System Configuration’ dialog allow a correct installation,
press ‘Continue’.
28 Océ Repro Desk User Manual
Page 29
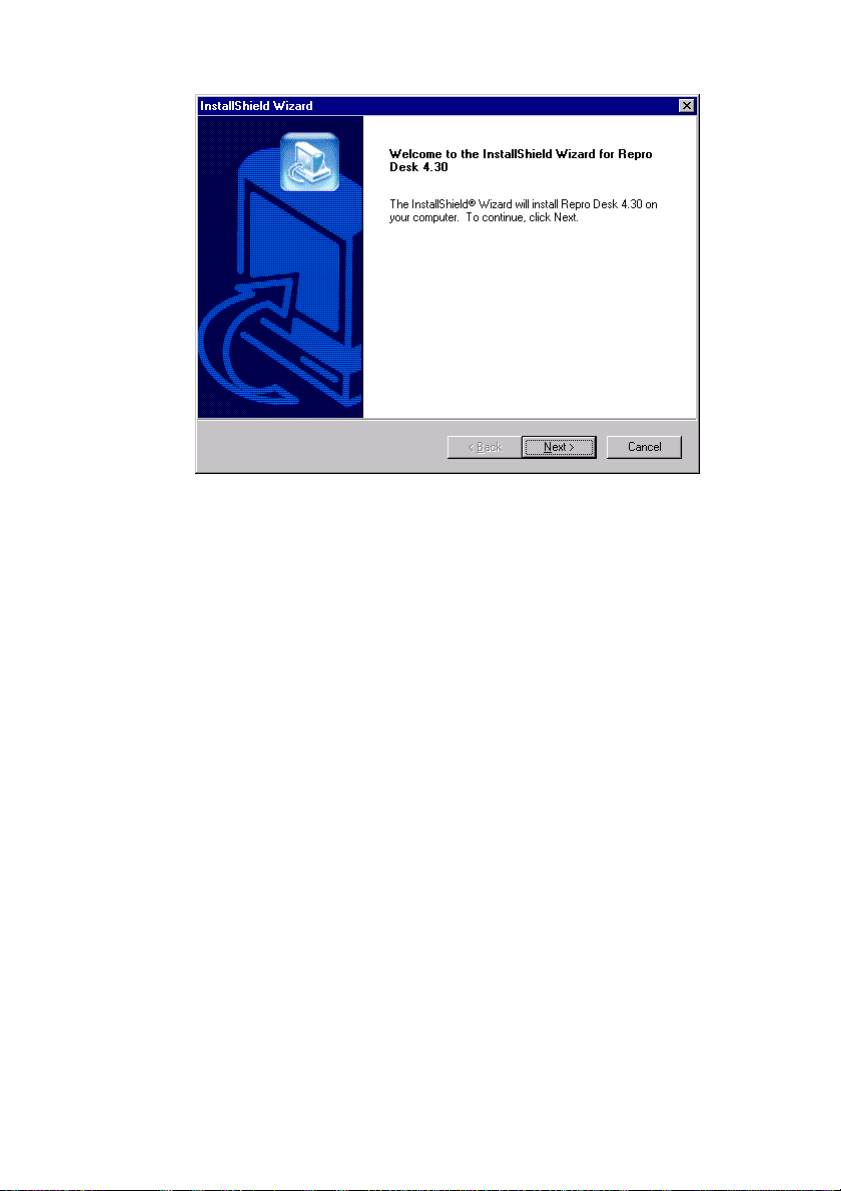
The following dialog box appears.
R DS5001.tif
5 Click the ‘Next>’ button to continue.
The ‘Software License Agreement’ dialog box appears.
6 Click the ‘Yes ’ button to continue.
The ‘User Information’ dialog box appears.
7 Enter the appropriate user name and company information.
8 Click the ‘Next>’ button to continue.
Installation 29
Page 30
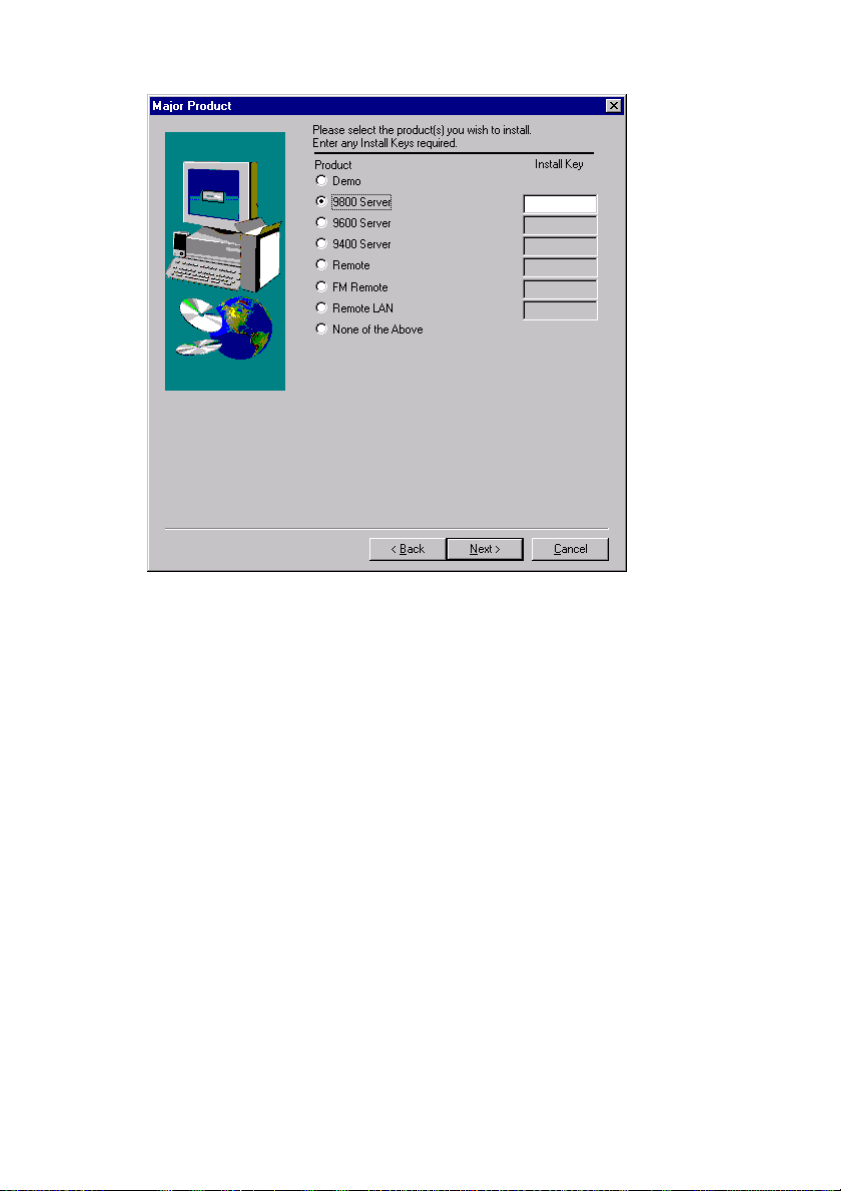
The ‘Major Products’dialog box appears.
[4] Select major products
9 Select the desired Server.
10 Enter the appropriate Install Key in the ‘Install Key’ text box.
11 Click the ‘Next>’ button to continue.
30 Océ Repro Desk User Manual
Page 31

The ‘Minor Products’ dialog box appears.
[5] Select minor products
12 Select the desired products.
13 Enter the Install Key in the appropriate ‘Install Key’ text boxes.
14 Click the ‘Next>’ button to continue.
Installation 31
Page 32

The ‘Folder Locations’ dialog box appears.
[6] Folder Locations
15 If you wish to change the location, click the ‘Browse’ button and select a
different location.
16 Click the ‘Next’ button.
32 Océ Repro Desk User Manual
Page 33

The ‘Other Configurations’ dialog box appears.
[7] Other Configurations
17 Select one radio button in each of the three sections.
18 If necessary, select either or both of the check boxes.
19 Click the ‘Next>’ button to continue.
Installation 33
Page 34

The ‘Select Program Folder’ dialog box appears.
[8] Select Program Folder
20 Accept the defaults or choose another location.
21 Click the ‘Next>’ button.
The file copy process begins.
Based on the minor products and communications software installed,
additional message boxes appear, asking if you wish to install these items.
22 Respond as appropriate to these message boxes.
23 Near the end of the copy process, you are prompted for the location of the
custom files. Enter the path and press ‘OK’.
If you have no custom files, press ‘Cancel’.
34 Océ Repro Desk User Manual
Page 35

24 When the copy process completes, the ‘Setup Complete’ dialog box appears.
RDR5007.TIF
[9] Select Restart
25 Select the desired option.
26 Click the Finish button.
At this point you may be prompted to configure your communications
software.
Note: Please remember that you must restart the computer prior to using
the software.
Installation 35
Page 36

Install Repro Desk Remote at a Client Site (ApModem)
Prior to installation be sure that the following items are available:
■ Install key for Remote
■ User entry in ApHost
■ ApModem script file
The remote installation requires preparatory work to be done prior to visiting
the client site and installing the software.
▼ Set up ApHost for the New User
1
Decide on a First Name, Last Name, and Password for your new user.
2 Add that user to your ApHost user list. (See ‘Users’ on page 433).
3 Write these down for step 6 in the next procedure: ‘Create an ApModem
customized script file’.
Create customized files
The ‘Diskette Customizer’ utility is included with Repro Desk. The
reprographer can use it to create an ApModem script file and copy it to a
diskette, CD or network drive.
The Diskette Customizer also contains a section that allows the reprographer
to set default Work Order values for Remote customers.
▼ Create an ApModem customized script file
1
Go to the ‘Configure’ menu
2 Select ‘Diskette Customizer’.
The Diskette Customizer dialog box appears:
36 Océ Repro Desk User Manual
Page 37

[10] Diskette customizer dialog
3 Select the ‘ApModem’ check box.
4 Enter the appropriate company name.
5 Enter the phone number for the modem.
6 Type in the user name and password exactly as you entered them into ApHost
(see step 3 on page 36), being especially careful of spaces before or after. They
will be accepted by ApHost as part of the name or password.
7 If you don’t want anyone to be able to read the script after it is created, click
the ‘Encrypt Script’ check box. The downside to this is that you won’t be able
to edit it in Notepad if needed.
8 Change the Work Order Defaults as needed. See ‘Customize the work order
defaults’ on page 50.
9 Click ‘Submit’ at the bottom of the Diskette Customizer dialog box.
A preview of the Work Order information appears.
10 Click ‘Back’ to make more changes in the Diskette Customizer dialog box, or
click ‘Save Changes’ to continue.
11 A ‘Select Directory’ dialog box appears.
12 Navigate to the appropriate directory and click OK.
The Diskette Customizer creates the following directories and files:
■ apmodem.scri
■ formoptions.dat
■ reproinfo.dat
■ winnt (containing jobcomm.ini)
■ wopics (containing logobitmap.gif and logobitmap2.gif).
Installation 37
Page 38

Install Océ Repro Desk Remote
Prior to installing the software, be sure to have the Install Key available as well
as the Activation Key that enables the print capability.
■ Read and follow the instructions on the Welcome screen.
■ Carefully read the Software Licence Agreement screen.
▼ Install Océ Repro Desk Remote Serve
Place the CD in the CD-ROM drive.
1
A message appears ‘Setup will now determine your system configuration’.
2 Click ‘OK’.
Setup displays a System configuration.
[11] Partial System configuration window
This screen informs you about your system configuration, hardware and
software.
It also informs you about the Repro Desk requiremens to ensure a correct
installation, before you continue to install.
3 Read this dialog box carefully.
Note: If some areas are incorrect, make a screen capture of the dialog (For
example, press ALT and PRINT SCREEN key) then save the file. Thiswill
help correct the system requirements.
4 If all areas of the ‘System Configuration’ dialog allow a correct installation,
press ‘Continue’.
5 Select a language.
38 Océ Repro Desk User Manual
Page 39

The following dialog box appears.
6 Click the Next> button to continue.
The Software License Agreement dialog box appears.
7 Click the Yes button to continue.
The User Information dialog box appears.
8 Enter the appropriate user name and company information.
Installation 39
Page 40

9 Click the ‘Next>’ button to continue.
The ‘Major Products’ dialog box appears.
[12] Select major products
10 Select the desired Remote products.
11 Enter the install key in the appropriate ‘Install Key’ text box.
12 Click the ‘Next>’ button to continue.
40 Océ Repro Desk User Manual
Page 41

The ‘Minor Product’s dialog box appears.
[13] Select minor products
13 Select the options required.
14 Select the appropriate ApModem option.
15 Enter the Install Key in the appropriate ‘Install Key’ text boxes.
16 Click the Next> button to continue.
Installation 41
Page 42

The ‘Folders Locations’ dialog box appears.
[14] Folder Locations
If you wish to change the location, click the ‘Browse’ button and select a
different location.
17 Click the Next> button.
42 Océ Repro Desk User Manual
Page 43

The ‘Other Configurations’ dialog box appears.
[15] Other Configurations
18 Select one radio button in each of the three sections.
19 If necessary, select either or both of the check boxes.
20 Click the Next> button.
The ‘Select Program Folder’ dialog box appears.
[16] Select Program Folder
Installation 43
Page 44

21 Accept the defaults or choose another location.
22 Click the ‘Next>’ button.
The file copy process begins.
23 Near the end of the copy process, you are prompted for the location of the
custom files. Enter the path and press ‘OK’.
If you have no custom files, press ‘Cancel’.
When the copy process completes, you will be prompted to configure
ApModem.
24 Click the ‘Ye s’ button.
A dialog box appears allowing you to select the appropriate modem and
various other settings.
One of the following dialog boxes appear, based on which APModem option
you selected earlier in the installation process.
■ Either:
RDR5030.TIF
[17] Configure ApModem
44 Océ Repro Desk User Manual
Page 45

■ or:
RDR5031.TIF
[18] Configure ApModem 32
See ‘ApModem: Remote Client’ on page 447 for a more detailed look at how
to best configure ApModem.
25 When finished, click the ‘OK’ button.
The ‘Installation Complete’ dialog box appears.
26 Click the ‘Finish’ button.
Note: Please remember that you must restart the computer prior to using
the software.
Installation 45
Page 46

Configure communications
See also ‘Configure the software’ on page 67.
Note: For Repro Desk LAN, the Communications settings are not used.
▼ Configure communications
1
Start Océ Repro Desk.
2 Go to the ‘Configure’ menu.
[19] Configure menu
3 Select ‘Defaults’.
The ‘Configuration’ dialog box appears.
[20] Configure the software: General tab
4 Click the ‘Communications’ tab.
46 Océ Repro Desk User Manual
Page 47

The following options appear.
RDR3741.tif
[21] Communications tab
5 Select the ‘ApModem’ entry.
6 Click the ‘Configure’ button.
The ‘Configure Communications Method’ dialog box appears.
RDR5032.tif
[22] Configure Communications Method
Note: Script refers to the file you created with the Diskette
Customizer,called ‘
page 36).
7 Be sure that the entries in the boxes are pointing to the correct files.
8 In the script field, click ‘Browse’ to navigate to the file you created with
Diskette Customizer. See ‘Create Customized Files’ on page 49.
9 Click the ‘OK’ button.
10 Click the ‘OK’ button in the ‘Configuration’ dialog box.
Installation 47
apmodem.scr’. (See ‘Create customized files’ on
Page 48

Install Repro Desk Remote at a Client Site (ApFtp)
Before you install ApFtp at a remote site be sure that the following settings are
in place on the server PC.
■ FTP Server Information
Third party FTP server software needs to be installed prior to setting up remote
clients with ApFtp. The software should be configured to handle multiple
users, simultaneous transfers and provide the functions required to meet the
remote clients’ needs.
■ User Rights
▼ Establish user rights
1
If your users are sending files directly to a queue via FTP, the following rights
and settings need to be in place:
- Read
- Write
- Delete
- Make Directory
- Change Directory
- Subdirectories (sometimes referred to as “Inherit subdirectories”).
Note: Directory Listing is NOT required for this to work.
- The ‘FTP to Queue’ check box needs to be enabled in ApFTP.
- The 'home directory' for each user should be the queue folder
(For example, D:\incoming).
Note: If FTP is setup without the ‘FTP To Queue’ feature enabled for remote
customers to be able to send jobs, the home directory can be any folder, but
it should NOT be a queue folder.
2 If your customers are not sending files directly to a queue via FTP the
following rights and setting must be in place:
- Read
- Write
- The ‘FTP to Queue’ check box needs to be disabled in ApFTP.
The ‘FTP to Queue’ feature allows the incoming FTP jobs to be automatically
put into an existing queue. If this is checked, then all jobs sent via this method
will be extracted and added to the queue automatically. If this feature is not
48 Océ Repro Desk User Manual
Page 49

checked, then the file will arrive as a zip file in the users home directory,
named after the time (24 hour) which it was submitted. (for example,
102413.zip means it came in at 10:24:13 am)
Prior to installation at a remote client site, be sure that the following list of
items is available:
■ Install Key for Remote
■ User Entry in FTP Server Program
The remote installation requires preparatory work to be done prior to visiting
the client site and installing the software.
Create Customized Files
The ‘Diskette Customizer’ utility is included with Repro Desk Server.
Reprographers can use it to generate an ApFTP configuration file and save it
to a client’s Repro Desk Remote diskette, CD or network drive.
▼ Create an ApFTP customized script file
To generate a set of remote files for an ApFTP installation, follow these steps:
1 Go to the ‘Configure’ menu
2 Select ‘Diskette Customizer’.
The ‘Diskette Customizer’ dialog box appears:
[23] Diskette Customizer dialog box
Installation 49
Page 50

3 Select the ‘ApFTP’ check box and enter the following information:
■ The domain name of your FTP server (For example, ftp.reprographer.com)
or your IP address.
■ Your client’s login ID.
■ Your client’s password.
4 Make changes to the ‘Work Order Defaults’ as needed.
See ‘Customize the work order defaults’, below.
5 Click ‘Submit’ at the bottom of the form.
A preview of the Work Order information appears.
6 Click ‘Back’ to make more changes.
7 Click ‘Save Changes’ to continue.
The ‘Select Directory’ dialog box appears.
Navigate to the directory where you wish to save the file and click ‘OK’.
The Diskette Customizer saves the following directories and files:
■ formoptions.dat
■ reproinfo.dat
■ winnt (containing jobcomm.ini)
■ wopics (containing logobitmap.gif and logobitmap2.gif).
Customize the work order defaults
Instructions for the work order default section of the Diskette Customizer are
the same for reprographers who wish to install either ApModem or ApFTP for
their clients.
▼ To use the Work Order Defaults section
1
Go to the ‘Configure’ menu
2 Select ‘Diskette Customizer’.
The ‘Diskette Customizer’ dialog box appears.
50 Océ Repro Desk User Manual
Page 51

If necessary, scroll down slightly to see the Work Order Defaults section:
[24] Diskette Customizer
3 Choose one of the following for each field:
■ To set up default values that will appear each time the customer accesses the
work order, type the appropriate information in the text boxes.
■ To get the fields to show up as blank each time the customer accesses the
work order, select the ‘Always Blank’ check box.
■ To get the fields to retain the last value the customer used, deselect the
‘Always Blank’ check box and leave the ‘Default Value’ text box blank.
4 Click ‘Submit’ at the bottom of the form.
5 A preview of the information appears.
6 Click ‘Submit’ at the bottom of the Diskette Customizer dialog box.
A preview of the Work Order information appears.
7 Click ‘Back’ to make more changes in the Diskette Customizer dialog.
8 Click ‘Save Changes’ to continue.
Installation 51
Page 52

Install Océ Repro Desk Remote
Before you install the software, be sure to have the Install Key available as well
Sas the Activation Key that enables the print capability.
■ Read and follow the instructions on the Welcome screen.
■ Carefully read the Software Licence Agreement screen.
▼ Install Océ Repro Desk Remote
Place the CD in the CD-ROM drive.
1
A message appears ‘Setup will now determine your system configuration’.
2 Click ‘OK’.
Setup displays a System configuration.
[25] Partial System configuration window
This screen informs you about your system configuration, hardware and
software.
It also informs you about the Repro Desk requiremens to ensure a correct
installation, before you continue to install.
3 Read this dialog box carefully.
Note: If some areas are incorrect, make a screen capture of the dialog (For
example, press ALT and PRINT SCREEN key) then save the file. Thiswill
help correct the system requirements.
4 If all areas of the ‘System Configuration’ dialog allow a correct installation,
press ‘Continue’.
5 Select a language.
52 Océ Repro Desk User Manual
Page 53

The following dialog box appears.
6 Click the ‘Next>’ button to continue.
The ‘Software License Agreement’ dialog box appears.
7 Click the ‘Yes ’ button to continue.
The ‘User Information’ dialog box appears.
8 Enter the appropriate user name and company information.
Installation 53
Page 54

9 Click the ‘Next>’ button to continue.
The Major Products dialog box appears.
[26] Select major products
10 Select the desired Remote products.
11 Enter the install key in the appropriate ‘Install Key’ text box.
54 Océ Repro Desk User Manual
Page 55

12 Click the ‘Next>’ button to continue.
The Minor Products dialog box appears.
[27] Select minor products
13 Select the ‘ApFTP’ check box.
14 Select any other options required.
15 Enter the Install Key in the corresponding text box.
16 Click the ‘Next>’ button.
Installation 55
Page 56

The ‘Folders Locations’ dialog box appears.
[28] Folder Locations
If you wish to change the location, click the ‘Browse’ button and select a
different location.
17 Click the ‘Next>’ button.
56 Océ Repro Desk User Manual
Page 57

The ‘Other Configurations’ dialog box appears.
[29] Other Configurations
18 Select one radio button in each of the three sections.
19 If necessary, select either or both of the check boxes.
20 Click the ‘Next>’ button.
The ‘Select Program Folder’ dialog box appears.
[30] Select Program Folder
Installation 57
Page 58

21 Accept the defaults or choose another location.
Click the ‘Next>’ button.
When the copy process completes, you will be prompted to configure ApFTP.
22 Click the ‘Ye s’ button.
A dialog box appears allowing you to configure FTPs.
[31] Configure ApFTP communications
23 Enter the appropriate information.
See ‘ApFTP: Remote Client’ on page 469 for a more detailed look at how to
best configure ApFTP.
24 When finished, click the ‘OK’ button.
The ‘Installation Complete’ dialog box appears.
25 Click the ‘Finish’ button.
26 After installing, the configuration is automatically entered in Repro Desk and
is ready for use.
27 The master ‘Install’ dialog box reappears, allowing you to install additional
components of the software, such as the DWG interpreter.
58 Océ Repro Desk User Manual
Page 59

Uninstallation of Océ Repro Desk
Before you uninstall Océ Repro Desk software, close the Océ Repro Desk
application.
▼ To uninstall the Océ Repro Desk software
1
Open the ‘Program Group’.
2 Locate the uninstall icon in the’ Océ Repro Desk’ group.
RDS2360.tif
3 Double click the ‘Uninstall’ icon.
A window pops up asking you to confirm the file deletion.
4 Click ‘OK’.
The program and the .INI files are removed.
Installation 59
Page 60

60 Océ Repro Desk User Manual
Page 61

Océ Repro Desk
User Manual
Chapter 3 Configuration
This chapter describes the Configuration Manager
application. This section is intended for system
administrators or advanced users.
61
Page 62

What is the Configuration Manager
The CONFIG.XML file stores all of the configuration settings for the Repro
Desk program. The Configuration Manager is a user-friendly interface which
allows you to view and modify the settings stored within the CONFIG.XML
file. Due to the complexity of the CONFIG.XML file, it is strongly
recommended that all modifications be managed through the Configuration
Manager.
Access the Configuration Manager
The Configuration Manager is opened from the Configuration menu of the
Repro Desk application window.
▼ Access the Configuration Manager
1
Go to the Configure menu.
RDS5008A.TIF
2 Select Advanced.
62 Océ Repro Desk User Manual
Page 63

The Configuration Manager appears.
RDS5008.TIF
[32] Configuration manager
Note: Please note that the program settings displayed in this window are
dependent on the version of Repro Desk installed on your system.
3 Select the desired setting.
4 Double click the setting as necessary to display the available options as shown
below.
RDS5011.TIF
5 Select the desired option.
6 Make other changes as necessary.
7 Click the OK button to accept the changes and close the Configuration
Manager window.
Configuration 63
Page 64

What the settings mean
Listed below is a brief description of the settings displayed in the
Configuration Manager window.
File Processing Controls how each supported file type (ASCII, AutoCAD,
CalComp, HP-GL, PostScript and VIC) is processed in the Repro Desk
program.
Default Directories Controls the default storage location for drawing files as
well as program related files such as labels, pen sets, scans, and VIC files.
General Controls standard program settings such as the measurement units
and maximum paper size.
Job Controls default settings for job files and work orders (job tickets).
Accounting Controls the default system used for logging accounting
information.
Pen Controls the default settings for any newly created pens.
Print Controls default print settings for a specified printer such as banner page,
collation, delivery, folding, roll selection, stamping and stapling.
Queue Controls the default settings for queue administration and reporting.
Scan Controls scan resolution, viewing, and template settings.
Security Displays the CD keys and print secure codes used for installing the
Repro Desk program and printing to one of the supported printers.
Image Viewer Controls the properties of the Viewer window such as
background color
Communications Controls the communication methods used for transferring
jobs between the Repro Desk Server and Repro Desk Remote applications.
64 Océ Repro Desk User Manual
Page 65

Locate specific settings
Since there are so many settings that can be modified, a find feature is
incorporated into the Configuration Manager. By entering a text string into the
‘Enter Settings to Search for:’ text box, it is possible to locate all settings
containing that string.
▼ Locate specific settings
1
Enter a text string resembling the desired setting as closely as possible.
2 Click the Find Next button.
3 The first setting containing the text string appears.
[33] An example of Find next
4 Click the Find Next button again to locate the next setting.
Configuration 65
Page 66

Reuse a previous search
The text strings used to locate settings are saved in a list attached to the text
box where you entered the text string originally.
▼ Access the search list
Click the arrow at the right end of the text box.
1
RDS5014.TIF
[34] Search drop down list
2 Select the desired text string from the drop down list.
3 Click the Find Next button.
66 Océ Repro Desk User Manual
Page 67

Configure the software
At installation, Océ Repro Desk modem software is installed in a default
directory. The default pen set, log files and job files are also saved in this
directory. It may be, however, that you want to check or change any of the
configuration items.
▼ Configure the software
1
Select ‘Defaults’ in the ‘Configure’ menu
RDS5999.TIF
[35] Select Defaults in the Configure menu
2 The following window will appear:
[36] Configure the software - General tab
Configuration 67
Page 68

General
3 Make the necessary changes (see following pages).
4 Click OK to save the changes and close the window.
In the General tab you can check and change:
Viewer has black background Check this box so that you will always have a
black background when you open the viewer.
Use Large Font for Windows Report Printing Check this box so that when you
print out an electronic work order, large fonts will be used for easier reading.
Allow Folding Column in Job Allows you to select a folding method from the
Jobs window
Banded Memory Size This is the amount of banded memory that will be used
when printing a file to a Windows printer. If you increase the amount of
memory, performance will improve.
Global Units The default units of measurement.
Accounting
■ Standard: Accounting information will be written and read from binary files
■ ODBC Set: Uses Set accounting table
■ ODBC Sheet: Uses Accounting information table.
You can select:
See ‘Accounting’ on page 357 for more information.
Note: You need to start a new job for certain options to take effect.
68 Océ Repro Desk User Manual
Page 69

Communications
Usually, the communication methods are already filled in during installation of
the software. You can use this window to make changes or add new
communication methods. See also ‘Configure communications’ on page 46.
In the Communications tab you can specify the following communication
settings:
RDS3741.TIF
[37] Specify Communication settings
Add To add communications methods.
Configure To configure the selected communication method.
Delete To configure the selected communication method.
Note: For communication details, see also ‘ApModem: Remote Client’ on
page 447, ‘ApHost: Server’ on page 419 and ‘ApFTP: Remote Client’ on
page 469.
Configuration 69
Page 70

Job default settings
In the Job Default Settings tab you can check and change the following
settings:
[38] Specify job default settings
Copies The default number of copies that will be applied for each file added
to the job.
RDSS6000.TIF
Zoom The default zoom ratio when printing a job. Choose between 25% and
400%. You can also select ‘Fit Page’.
Paper size The paper size that will be applied by default to a drawing each
time it is added to a Job.
Media The default media to be used. Choose between Bond (paper),
Transparent or Film (polyester).
Pen set The name and path of the default pen set that must be applied each
time a drawing is added to a Job.
Make paper size same as drawing size This means that the printer will print to
the appropriate size roll whenever possible.
Alignment The alignment to be used by default.
70 Océ Repro Desk User Manual
Page 71

Rotation The required rotation (in degrees) and whether you want the drawing
to be mirrored.
Border Removal The required default border removal: choose ‘None’ or:
■ 0.05” (1.3 mm)
■ 0.10” (2.5 mm)
■ 0.25” (6.3 mm)
■ 0.50” (12.7 mm).
Directories
In the Directories tab you can check and change:
RDS6001.TIF
[39] Specify directories
Default path for Job Files The default path and directory where Job files will
be stored.
Default path for VIC Files The default path and directory where VIC files will
be stored (Vector image compressed format).
Default path for Pen Files The default path and directory where Pen Files will
be stored.
Default path for Label Files The default path and directory where label files
will be stored.
Configuration 71
Page 72

Default Path for Drawings The default path and directory where Drawings to
be added to a job should be searched for.
Default path for Scans The default path and directory where Scans to be
added to a job should be searched for.
Remember last Path for drawings Retains the last directory used in Add Files.
PostScript tab
This tab has settings for using PostScript files if you are using a supported third
party application which converts PostScript to TIFF.
RDS6003.TIF
[40] Configuration: PostScript
PostScript output directory The default path and directory where the
converted TIFF files will be stored. The default is C:\VIC or D:\VIC.
72 Océ Repro Desk User Manual
Page 73

PostScript processing software These settings must be defined if you install
an optional third-party converter. They are described in the installation
instructions for the converters.
You can choose among third-party converters:
Jaws If Jaws is installed on your system, this option will be available.
You can choose the resolution from the list or type a number between 200 and
1200.
Ghostscript If Ghostscript is installed on your system, this option will be
available.
Type the location of the executable file in the text box or use the Browse button
to navigate to the desired location.
Choose a resolution from the list or type a number between 200 and 1200.
Other Software Reserved for future use.
Note: If you use a third-party converter, you should also check Configure
menu\Advanced\Configuration Manager\File Processing\PostScript for
additional options.
[41] Configuration manager - PostScript
▼ PostScript settings
1
If available, choose Jaws or Ghostscript.
2 Type the location of the executable or click Browse and navigate to the desired
location.
Configuration 73
Page 74

Note: You can include command line parameters if you include a space
after the executable name.
3 Choose a resolution from the list, or type a resolution between 200 and 1200.
4 Click ‘Apply’.
5 Click ‘OK’.
Note: Apprentice 4.25’s internal interpreter cannot read PDF files created
in Acrobat 4.0. Use the third-party interpreter to read such files.
AutoCAD tab
See ‘How to process AutoCAD files’ on page 123.
Paper sizes
In the Paper Sizes tab you can specify what paper sizes will appear in menus.
For example, you can specify only ISO-A settings in this window. In that case,
when you want to specify the paper size for a certain drawing in a Job window,
you can only choose from the ISO-A sizes.
RDS3746.TIF
[42] Specify what paper sizes will appear in menus
Standard Sizes You can select one or more ranges of standard sizes: ISO-A,
ISO-B, ANSI and Architecture.
74 Océ Repro Desk User Manual
Page 75

Custom Sizes You can specify your own paper sizes, and add them to the list
of available sizes.
▼ Add a new custom size to the list
1
Click the ‘Add’ button.
A new size will be added to the list
2 Specify the name of the new custom size.
3 If needed, double-click on the specified unit for the new drawing size, to
switch from inches to mm and visa versa.
RDS6004.TIF
[43] Custom paper size - Units
Note: If you change the unit afterwards, the specified width and height will
change automatically to correspond to the new unit.
4 Double click on a value to specify the width of the new drawing size.
5 Double click on a value to specify the height of the new drawing size.
6 Click ‘Apply’.
▼ Change an existing custom size
1
Double click on any field of the custom size you want to change, and specify
new settings.
2 Click ‘Apply’.
▼ Delete an existing custom size
1
Select the custom size you want to delete.
2 Click ‘Delete’.
The selected custom size will be deleted.
3 Click ‘Apply’.
Configuration 75
Page 76

76 Océ Repro Desk User Manual
Page 77

Océ Repro Desk
User Manual
Chapter 4 The software interface
This chapter describes the different parts of the user
interface. It also explains the different ways in which
options can be accessed.
77
Page 78

Starting Océ Repro Desk
You ca n s t ar t O cé Repro Desk in several ways just like any other Windows
program. Follow the procedure below. Quitting Océ Repro Desk is explained
later in this chapter (see ‘Quit Océ Repro Desk’ on page 86).
In general, the server software will be pre-installed, and starts automatically.
However, if problems occur contact your job printer to re-install the software,
or contact Océ service if this software was provided by Océ.
▼ Starting Océ Repro Desk
1
Double click the Océ Repro Desk icon in the Windows screen.
[44] Océ Repro Desk Icon
78 Océ Repro Desk User Manual
Page 79

The user interface
When you start the Océ Repro Desk software the main window is displayed.
1
2
3
6
4
5
[45] Main Window
The main window can be divided in eight parts:
1 the title bar
2 the menu bar
3 the button bar
4 the information bar
5 the window
6 the logo
7 the view toolbar
8 the status bar
7
8
The software interface 79
Page 80

Menu bar
The menus available on the menu bar depend on the mode you are using: job
mode, queue mode or view mode.
This illustrations is an example of the menu bar in job mode.
3748-144
[46] The menu bar in job mode
The menu bar in job mode contains six menus: File, Edit, View, Options,
Window and Help. When you click with the left mouse button on one of these
options a pull-down menu appears. The menus and the options in the pull down
menu depend on the mode you are in.
Button bar and Quick menus
[47] The Button bar
The Button bar exists of two parts:
■ Buttons with an icon. When you click on an Icon button the option of the
button is activated. The Icon buttons contain the most used option of the
menu.
■ Quick menus. When you click on the arrow, a pull-down menu will appear
with menu options.
RDSKL030.TIF
Note: You may not always be able to use all the buttons. This depends on the
mode you are in.
80 Océ Repro Desk User Manual
Page 81

Information bar
The Information bar is on the left side of the Main window (see next figure).
When a file is selected in a job, the information displayed is related to the
selected file.
[48] Closed Information barOpen Information bar
When you move your mouse over the Information bar, it highlights.
When you click the Information bar it opens.
If a drawing is selected this bar provides information on the drawing settings.
The software interface 81
Page 82

Pen overview
If you are viewing a drawing, Océ Repro Desk shows the used pens below the
Information bar. Selecting one of these pens opens the Pen settings window
(see ‘Pen settings’ on page 164). If the drawing uses more Pens than fit on the
current screen, you can hold down the left mouse button and move to the top
or bottom to browse through the whole list.
[49] Used pens in the left border of the window
Window
How the main window looks depends on the mode you are using. Each mode
uses a different window. There are 5 different modes:
■ job
■ viewer
■ pen
■ log
■ empty
82 Océ Repro Desk User Manual
Page 83

More than one window type may be open at a time, but only one mode can be
active. The options available in the menus and toolbars depend on the mode
which is being used.
Logo
The logo indicates the following:
1 When the logo turns into a moving sheet of paper, the program is processing.
2 When the logo turns into a moving press/stamp, the program is printing.
Note: When you click on the logo, the open job will be saved.
View tool bar
The View toolbar is visible in every mode. But you can only use the buttons
when you are using the View mode.
The View toolbar contains two different tools. Both make changes in the
viewing mode. But some tools do not affect the drawing and other do. The
functionality of the different tools on the View toolbar is explained in
chapter 8, ‘View drawings’ on page 133.
3753-144
Title bar
Status bar
The title bar is at the top of the window Status bar
There is a status bar at the bottom of the window, showing extra information
about selected windows or functions:
The software interface 83
Page 84

How to access the menus and options
Most of the time you have several ways to open or use an option in Océ Repro
Desk:
Menu bar When you click on a menu of the Menu bar, a pull-down menu
appears. You can select an option from the menu.
Button bar When you click on the icon button the selected option opens.
When you click on an arrow on the Quick menu bar a pull-down menu appears.
You can select an option from the pull-down menu.
Right mouse click When you click with the right mouse button in the main
window, a pop-up menu appears. This pop-up menu contains the most used
options and settings. You will not have access to all the available options with
this method. This is a quick way of accessing the most common option.
Double left mouse click If you double click on a setting in the job or pen
window, a list box appears. You can choose an option from the list box.
Note: To maximize a window double click the title bar.
84 Océ Repro Desk User Manual
Page 85

Set preferences
In job mode, you can set preferences in the Options menu. A check mark next
to an option indicates that it is ‘On’, while an icon or no check mark indicates
that it is ‘Off’.
Ignore prompting mode If you check this option, the prompt windows will
not be displayed when problems occur.
Note: This option is recommended only for unattended printing.
Pre-processing mode Select this option to store VIC files in the VIC directory
for reuse. The drawback is that this takes up space on your hard disk.
Ignore RCF Headers Select this option to ignore the print information created
by an Océ driver.
Windows printer uses colors Check this option if you want to print to a
Windows color printer.
Windows printer scale 100% Check this option if you want to print to a
wide-format Windows printer.
Invert paper image The image is inverted so that black pixels are turned to
white, and white pixels to black.
Note: This option uses a lot of printer toner.
Auto detect paper size If this option is checked, the best fitting paper size will
be selected when the file is processed.
Auto paper rotate If this option is checked, the drawing will be rotated, if
necessary, in order to fit onto the selected paper size.
In addition to these options, the menu contains the following functions:
Save job default settings now Selecting this option will change the Default
Job Settings to the most recently-changed settings in the job window.
Clean VIC directory Deletes existing files from the VIC directory.
The software interface 85
Page 86

Quit Océ Repro Desk
If you have finished working with Océ Repro Desk, quit the application. Do
not quit Océ Repro Desk while jobs are still being printed. It is good practice
to make sure that jobs sent to the printer have been completed before quitting
Océ Repro Desk.
▼ Quit Océ Repro Desk
1
Wait until the active job has been sent to the printer completely.
2 From the ‘Fil’e menu, choose ‘Exit’.
The Océ Repro Desk software is closed.
86 Océ Repro Desk User Manual
Page 87

Océ Repro Desk
User Manual
Chapter 5 A Quick Tour through Océ Repro Desk
This quick tour gives you an impression of what you can do
with Océ Repro Desk. It leads you along the most important
features of Océ Repro Desk in no longer than 5 minutes.
87
Page 88

Purpose of this quick tour
This quick tour is meant to introduce you to the very basics of Océ Repro Desk
in a more or less active way.
Once you have achieved this exercise you can go to the other sections in this
manual for more details.
This Quick Tour consists of the following parts:
■ ‘Start Océ Repro Desk and add files to a job’ on page 89
■ ‘View, check and print files’ on page 91.
88 Océ Repro Desk User Manual
Page 89

Start Océ Repro Desk and add files to a job
1 Start Océ Repro Desk by double clicking on the Océ Repro Desk icon.
The main screen appears with the first job description ready to fill in:
2 Click the ‘Add files’ button.
A Quick Tour through Océ Repro Desk 89
Page 90

Two windows are displayed; the second one is shown below:
3 Select the files you wish to add to the job and press OK
.
The job window pops up. It lists the drawings you wish to print
4 Select ‘Save Job’ from the ‘File’ menu.
5 Fill in the file name of the new job, using the default extension and file type
(.JOB).
90 Océ Repro Desk User Manual
Page 91

View, check and print files
1 Double click any of the files to view it.
You are now able to fine tune the selected files for printing, but this kind of
editing is beyond the scope of this quick tour.
A Quick Tour through Océ Repro Desk 91
Page 92

2 Alternatively, you may want to have Océ Repro Desk check the files for you.
To do so, select ‘Check All Drawings’ from the ‘Process’ menu.
3838-144
Océ Repro Desk will issue a warning whenever it sees a drawing that is likely
to be printed incorrectly.
3 Answer ‘Yes ’ to each warning until you see the message:
‘All plot files checked’.
4 Press the print button to print the selected files to your local printer.
5 Your job is now ready to be forwarded to a local or remote printer.
This concludes our quick tour through Océ Repro Desk.
Refer to ‘Handling jobs’ on page 93 for detailed information on how to further
handle jobs.
92 Océ Repro Desk User Manual
Page 93

Océ Repro Desk
User Manual
Chapter 6 Handling jobs
This chapter describes what a job is, how to manage a job
and how to change drawing settings within a job.
93
Page 94

What is a job
A job is a folder for holding a drawing or set of drawings. A job also has the
controls that allow you to customise each drawing in a set. You can change the
order of the drawings within a job, set the number of copies, set the size of each
drawing, select a scale, create reductions or enlargements, set a paper size,
select media, apply a pen set, set an alignment, define the degrees of rotation,
and enable border removal.
A Job file keeps track of the drawings you want to print and the settings that
affect how theese drawings will appear on paper. When a Job file is created, it
includes several pieces of vital information. In addition to the drawings and
their settings, the job will include the selected pen set(s) for the drawings, and
an electronic work order in which the sender is specified along with delivery
information and special instructions. If none of this information has been set,
Océ Repro Desk will apply a default pen set and a blank work order. This
information is stored on all jobs prepared in Océ Repro Desk, whether stored
on diskette or sent by modem. Job files are stored with the extension Job. Océ
Repro Desk allows you to have multiple jobs open during one session.
Create a new job
When Repro Desk is started a job window, called Job 1, will appear. Creating
another new job can be done as shown below.
▼ Create a new job
1
From the File menu, choose New.
2 Select Job
3 Click OK.
4 A Job window opens. You have created a new job.
94 Océ Repro Desk User Manual
Page 95

Add files to a job
A new job does not contain any files. Drawings to be printed must be placed in
a job.
▼ Add a new file to a job
Click Add Files in the Button bar.
1
2 The Add or Insert Drawings dialogue appears.
3 Select the drive and the directories that contain drawings to be added.
4 Select the file name(s) of the drawing you want to add.
Note: You can select more than one file name by holding the Ctrl button or
the Shift button (for a range of files) while selecting the file name.
5 Click OK. The drawing files are added to the job.
Add drawings from ProjectPoint™ sites
Buzzsaw.com and Repro Desk are integrated so that you can send and receive
between them. You must have a ProjectPoint account set up to use this
function.
▼ Add files from ProjectPoint sites
1
With the job window active, click the Add Files quick menu.
A submenu appears.
2 Click ‘Add Files from ProjectPoint’.
3 The ProjectPoint login appears:
4 Type your Username and Password if necessary, and choose a site from the list.
5 Click OK.
Handling jobs 95
Page 96

The ‘Open’ dialog box displays ProjectPoint sites to which you have access:
6 Navigate to the desired files and click OK.
The files are added to the top of your job.
Insert a drawing into a job
You can insert a drawing into a certain position in a job, rather than adding it
to the bottom of the job.
▼ Inserting a new file in a job
1
Select the drawing that is below the point where you want to insert a drawing.
The selected drawing is highlighted.
2 From the ‘Add Files’ quick menu, choose ‘Insert Drawing’.
3 The ‘Insert Drawing Files’ dialogue appears.
4 Select the drive and the directories that contain drawings to be added.
5 Select the file name of the drawing you want to add.
Note: You can select more than one file name by holding the Ctrl button or
the Shift button (for a range of files) while selecting the file name.
6 Click OK.
7 The drawing files are inserted above the highlighted drawing in the job.
96 Océ Repro Desk User Manual
Page 97

Add files from a text file
In addition to adding separate files to a job, you can use a special text file to
add several drawings at once. This file should be formatted as a number of
lines, each specifying the path and filename of the drawing to add.
▼ Add new files from file list
1
Open your favourite text editor.
2 Type the path and file name of every drawing on a separate line.
3 Save and close the text file.
4 Go to Océ Repro Desk and select ‘Add Drawings’ from the ‘Add Files’ quick
menu.
5 Select the file which you saved with the text editor.
Every file specified in the file list is added to the current job now.
Note: An extra blank line must be added at the end of the file list..
Save a job
When you have defined all the settings in a job for each drawing, save the job
to keep these settings.
▼ Save a job
1
From the ‘File’ menu, choose ‘Save Job’.
The ‘Save As’ dialogue box opens.
Note: If you have opened a job and want to save it with a different name,
use the Save Job As command instead of Save.
2 Select the drive and directory where you want to save the job.
3 Define a descriptive file name for this job.
4 Click OK.
The job is saved.
Note: Once you have saved a job the ‘Save Job’ option will no longer ask
for a file name.
Handling jobs 97
Page 98

Close a job
You can close a job also without saving it. Use this option if you made a
mistake in handling a job. If you made any changes to the job (like adding or
deleting drawings or change any settings) Océ Repro Desk will ask you to
confirm that you wish to close without saving.
▼ Close a job
1
Make sure the job you wish to close is active.
2 From the File menu, choose Close.
If you have made any changes, Océ Repro Desk will ask you if you want to
close without saving, otherwise the job closes.
Open an existing job
You can use Job files that have been saved on the print server, a network
workstation, or on diskette.
▼ To open apreviously saved job
1
From the ‘File’ menu, choose ‘Open’.
The ‘Open’ dialogue box appears.
2 Select the drive and directory where the job to be opened is located.
3 Select the job you wish to open
4 Click OK.
The selected job opens.
Merge a job with another job
You can add the contents of one job to another. Drawings will be placed in the
order they are merged.
▼ Merge jobs
1
Open the first job to be merged.
2 From the ‘File’ menu, choose ‘Merge Job File’.
The ‘Merge Job File’ dialogue box opens.
3 Select the next job to be merged.
The two jobs are merged.
Note: The drawings of Job 2 will be attached to the drawings of Job 1.
98 Océ Repro Desk User Manual
Page 99

Remove a drawing from a job
A drawing can be removed from a job.
▼ Remove a drawing from a job
1
Select the file you want to remove. The selected drawing name is highlighted.
2 From the ‘Add Files’ quick menu, choose ‘Delete Drawing File’.
The ‘Job’ window appears and informs you that the reference of the selected
file will be deleted.
3 Click ‘OK’.
The selected drawing is removed from this job.
Delete a drawing
A drawing file can also be deleted from the disk. Once deleted, a drawing
cannot be restored. When erasing a drawing from the disk it will of course also
be removed from the job.
▼ Delete a drawing from the disk
1
Select the file you want to delete permanently. The selected drawing name is
highlighted.
2 Press the ‘F7’ function key.
A dialogue box asks whether you want to delete the file and the reference from
the job.
3 Verify that this what you want to do.
4 When you are sure, click the ‘OK’ button.
The file is erased from the disk.
Handling jobs 99
Page 100

Rename a job
Give your job files a descriptive name so they can be found easily.
▼ Rename a job
1
Select the desired job.
2 From the ‘File’ menu, choose ‘Save Job As’.
3 Define a new name for the job file.
The job is saved with the new name.
100 Océ Repro Desk User Manual
 Loading...