


 Loading...
Operation guide
Océ PlotWave 345/365

Copyright and Trademarks
Copyright
Copyright 2016 Océ.
Illustrations and specifications do not necessarily apply to products and services offered in each local market. No part of this publication may be reproduced, copied, adapted or transmitted, transcribed, stored in a retrieval system, or translated into any language or computer language in any form or by any means, electronic, mechanical, optical, chemical, manual, or otherwise, without the prior written permission of Océ.
OCÉ MAKES NO WARRANTY OF ANY KIND WITH REGARD TO THE CONTENTS OF THIS PUBLICATION, EITHER EXPRESS OR IMPLIED, EXCEPT AS PROVIDED HEREIN, INCLUDING WITHOUT LIMITATION, THEREOF, WARRANTIES AS TO MARKETABILITY, MERCHANTABILITY, FITNESS FOR A PARTICULAR PURPOSE OF USE OR NON-INFRINGEMENT. OCÉ SHALL NOT BE LIABLE FOR ANY DIRECT, INCIDENTAL, OR CONSEQUENTIAL DAMAGES OF ANY NATURE, OR LOSSES OR EXPENSES RESULTING FROM THE USE OF THE CONTENTS OF THIS PUBLICATION.
Océ reserves the right to revise this publication and to make changes from time to time in the content hereof without obligation to notify any person of such revision or changes.
Trademarks
Océ, Océ PlotWave are registered trademarks of Océ-Technologies B.V. Océ is a Canon company.
Adobe, Acrobat, PostScript, and the Adobe logos are both registered trademarks or trademarks of Adobe Systems Incorporated in the United States and/or other countries.
Microsoft, Windows, Internet Explorer are trademarks or registered trademarks of Microsoft Corp. incorporated in the United States and/or other countries.
All other trademarks are the property of their respective owners.
Edition 2016-11 |
|
Software version 2.1 |
US |

Contents
Contents
Chapter 1 |
|
Introduction......................................................................................................................... |
9 |
Notes for the reader....................................................................................................................................... |
10 |
Available documentation............................................................................................................................... |
12 |
Chapter 2 |
|
Get to Know the Printing System................................................................................... |
15 |
The Océ PlotWave 345/365............................................................................................................................ |
16 |
Connect your Printing System...................................................................................................................... |
17 |
Working area [Footprint]......................................................................................................................... |
17 |
Connect the mains supply cable and the network cable...................................................................... |
18 |
Switch on the printing system................................................................................................................ |
19 |
The Hardware................................................................................................................................................. |
20 |
The components of the printer (front).................................................................................................... |
20 |
The components of the printer (left side).............................................................................................. |
21 |
The components of the printer (back).................................................................................................... |
22 |
The media drawer.................................................................................................................................... |
23 |
The user panel: Océ ClearConnect......................................................................................................... |
24 |
The components of the scanner (optional)............................................................................................ |
25 |
The delivery destination.......................................................................................................................... |
27 |
The front original tray (optional)............................................................................................................ |
28 |
The folder (optional)................................................................................................................................ |
29 |
Workflow of the Océ ClearConnect user panel............................................................................................ |
30 |
The home screen...................................................................................................................................... |
30 |
The job queue and the system menu..................................................................................................... |
32 |
Presets, templates and advanced settings............................................................................................. |
34 |
Job preview.............................................................................................................................................. |
35 |
The cloud.................................................................................................................................................. |
36 |
Chapter 3 |
|
Define your Workflow with Océ Express WebTools..................................................... |
39 |
Getting Started............................................................................................................................................... |
40 |
Océ Express WebTools............................................................................................................................ |
40 |
Set another language for Océ Express WebTools................................................................................ |
41 |
User roles and authorizations................................................................................................................. |
42 |
Log in as an authorized user................................................................................................................... |
43 |
Log out after your session....................................................................................................................... |
44 |
Change the password for authorized users........................................................................................... |
45 |
The system monitor................................................................................................................................. |
46 |
Shut down or restart the system............................................................................................................ |
48 |
Define the defaults......................................................................................................................................... |
49 |
About the default settings in Océ Express WebTools........................................................................... |
49 |
How to edit a setting................................................................................................................................ |
50 |
View and check the settings ................................................................................................................... |
51 |
Save the settings in a file ....................................................................................................................... |
52 |
Load the settings from a file .................................................................................................................. |
53 |
Restore the factory defaults ................................................................................................................... |
54 |
Set the print job default settings............................................................................................................ |
55 |
Set the copy job default settings............................................................................................................ |
58 |
3

Contents |
|
Set the scan job default settings............................................................................................................. |
59 |
Configure the Smart Inbox settings.............................................................................................................. |
60 |
The Smart Inbox and the queue concept............................................................................................... |
60 |
The Smart Inbox in the Jobs tab............................................................................................................ |
61 |
Create and open a Smart Inbox.............................................................................................................. |
63 |
Close or delete a Smart Inbox................................................................................................................. |
66 |
The job states........................................................................................................................................... |
67 |
Configure the job management settings............................................................................................... |
68 |
Configure the network and security settings............................................................................................... |
69 |
Configure the network settings in Océ Express WebTools.................................................................. |
69 |
Set the security settings for Microsoft Internet Explorer ..................................................................... |
70 |
Set the security settings for Mozilla Firefox.......................................................................................... |
71 |
Set the link speed and duplex mode...................................................................................................... |
72 |
Enable user authentication...................................................................................................................... |
73 |
Enable Access control ............................................................................................................................. |
74 |
Access control and IPsec settings........................................................................................................... |
75 |
Enable or disable the e-shredding function........................................................................................... |
76 |
Select the e-shredding algorithm........................................................................................................... |
77 |
Specify the number of overwrite passes............................................................................................... |
78 |
Remote security....................................................................................................................................... |
79 |
Generate a new CA-signed certificate.................................................................................................... |
80 |
Import a CA-signed certificate: Import the root certificate .................................................................. |
82 |
Import a CA-signed certificate: Import the intermediate certificate.................................................... |
83 |
Import a CA-signed certificate................................................................................................................ |
84 |
Import a CA-signed certificate: Check and import the root certificate................................................ |
85 |
Configure the presets and stamping............................................................................................................ |
86 |
What you need to know about presets ................................................................................................. |
86 |
Set the default copy preset .................................................................................................................... |
87 |
Configure the custom copy preset ........................................................................................................ |
88 |
Set the default print preset ..................................................................................................................... |
89 |
Configure the custom print preset ......................................................................................................... |
90 |
Make a custom preset available on the user panel............................................................................... |
91 |
Create a stamp......................................................................................................................................... |
92 |
Configure the Templates............................................................................................................................... |
93 |
Scan templates ........................................................................................................................................ |
93 |
Create a new template............................................................................................................................. |
94 |
Delete all templates................................................................................................................................. |
95 |
Import templates...................................................................................................................................... |
96 |
Export templates...................................................................................................................................... |
97 |
Restore the factory defaults of the templates........................................................................................ |
98 |
Enable or disable scan templates........................................................................................................... |
99 |
Configure the locations................................................................................................................................ |
100 |
Configure your locations....................................................................................................................... |
100 |
Enable or disable USB........................................................................................................................... |
101 |
Enable and edit the Home folder.......................................................................................................... |
102 |
Enable PlanWell Collaborate (optional)............................................................................................... |
103 |
Create an external location................................................................................................................... |
104 |
Set a default external location ............................................................................................................. |
106 |
Set a default print destination............................................................................................................... |
107 |
Troubleshoot the creation of an FTP external location (after an error message)............................. |
108 |
Troubleshoot the creation of an SMB external location (after an error message)........................... |
111 |
Troubleshoot the creation of a WebDAV external location (after an error message)...................... |
113 |
Configure the printer settings..................................................................................................................... |
114 |
Configure the regional settings ........................................................................................................... |
114 |
Configure the user session time-out.................................................................................................... |
115 |
Configure the working hours................................................................................................................ |
116 |
Configure the sleep mode..................................................................................................................... |
117 |
Configure the media request time-out ................................................................................................ |
118 |
Configure the media types.................................................................................................................... |
119 |
Configure the media sizes..................................................................................................................... |
120 |
4

|
Contents |
Configure the pen settings.................................................................................................................... |
121 |
Optimise the print quality and print productivity...................................................................................... |
122 |
Set transparency flattening for PDF..................................................................................................... |
122 |
Set the wipeout correction for PDF...................................................................................................... |
123 |
Set the long plot mode.......................................................................................................................... |
124 |
Set the automatic roll switch................................................................................................................ |
125 |
Set the spool threshold......................................................................................................................... |
126 |
Set the rotation mode............................................................................................................................ |
127 |
Set the alignment mode ....................................................................................................................... |
128 |
Configure Mobile Printing and Scanning................................................................................................... |
129 |
Océ Mobile WebTools........................................................................................................................... |
129 |
Configure Océ Express WebTools settings for a mobile connection................................................ |
131 |
Generate the Quick Response Card...................................................................................................... |
132 |
Connect your mobile device to Océ Mobile WebTools ..................................................................... |
133 |
Chapter 4 |
|
Use the Printing System................................................................................................ |
135 |
How to feed an original................................................................................................................................ |
136 |
How to auto-feed an original....................................................................................................................... |
137 |
How to use the carrier sheet........................................................................................................................ |
138 |
Print Jobs - Job submission tools............................................................................................................... |
139 |
Use Océ Publisher Express to send a print job................................................................................... |
139 |
Use the Smart Inbox to send a print job.............................................................................................. |
141 |
Use Océ Publisher Select 2 to send a print job................................................................................... |
142 |
Use Océ Wide format Printer Driver 2 for Microsoft® Windows® to send a print job.................... |
144 |
Use the Océ PostScript® 3 Driver to send a print job......................................................................... |
146 |
Use Océ Publisher Mobile to send a print job..................................................................................... |
147 |
Print from your mobile device.............................................................................................................. |
149 |
Use FTP to send a print job................................................................................................................... |
150 |
Use LPR to send a print job................................................................................................................... |
151 |
Use the home folder to send a print job.............................................................................................. |
152 |
Use the cloud to send a print job.......................................................................................................... |
153 |
Troubleshoot print job submission...................................................................................................... |
154 |
Print Jobs...................................................................................................................................................... |
155 |
Do a default print job ............................................................................................................................ |
155 |
Direct print ............................................................................................................................................. |
157 |
Print from a USB key............................................................................................................................. |
158 |
Print presets on the user panel............................................................................................................. |
159 |
Advanced settings for print jobs........................................................................................................... |
160 |
Copy Jobs..................................................................................................................................................... |
164 |
Do a default copy job ............................................................................................................................ |
164 |
Copy presets on the user panel............................................................................................................ |
165 |
The Image preset for copy jobs............................................................................................................ |
166 |
Advanced settings for copy jobs.......................................................................................................... |
167 |
Recommended settings for copy jobs.................................................................................................. |
174 |
The original type.................................................................................................................................... |
175 |
Make a half size copy............................................................................................................................. |
176 |
Make a copy and add a strip................................................................................................................. |
177 |
Make a copy and remove a strip........................................................................................................... |
178 |
Make a copy of a specific area of an original...................................................................................... |
179 |
Make a copy and remove a specific area of an original..................................................................... |
180 |
Make a copy and scale to another size................................................................................................. |
181 |
Make a copy of a dark original (Diazo)................................................................................................. |
182 |
Make a copy of an original with highlighted colors............................................................................ |
183 |
Make a copy on a cut sheet................................................................................................................... |
184 |
Make a copy with a stamp..................................................................................................................... |
185 |
Copy by set............................................................................................................................................. |
186 |
Scan Jobs...................................................................................................................................................... |
187 |
Do a default scan job ............................................................................................................................ |
187 |
5

Contents |
|
Scan templates on the user panel........................................................................................................ |
188 |
Advanced settings for scan jobs........................................................................................................... |
189 |
Advised settings for scan jobs.............................................................................................................. |
195 |
The original type.................................................................................................................................... |
197 |
File type................................................................................................................................................... |
199 |
Scan to a USB key.................................................................................................................................. |
201 |
Scan to the home folder........................................................................................................................ |
202 |
Save a scanned document on your mobile device............................................................................. |
203 |
Pause, resume, or stop an active job.......................................................................................................... |
204 |
Clear the system........................................................................................................................................... |
205 |
Chapter 5 |
|
Maintain the Printing System........................................................................................ |
207 |
Update your System.................................................................................................................................... |
208 |
Update the system software on the user panel................................................................................... |
208 |
Update the system software in Océ Express WebTools..................................................................... |
209 |
Install the system security patches in Océ Express WebTools.......................................................... |
210 |
Move the Printing System........................................................................................................................... |
211 |
Turn off the printing system................................................................................................................. |
211 |
Disconnect the network cable and the mains supply cable............................................................... |
213 |
Move and re-adjust the printing system.............................................................................................. |
214 |
Connect the mains supply cable and the network cable.................................................................... |
220 |
Switch on the printing system.............................................................................................................. |
221 |
Replace the Media........................................................................................................................................ |
222 |
Remove a media roll.............................................................................................................................. |
222 |
Unpack the media roll............................................................................................................................ |
225 |
Load a media roll (position 1)............................................................................................................... |
227 |
Load a media roll (position 2)............................................................................................................... |
231 |
Media types............................................................................................................................................ |
235 |
Media sizes............................................................................................................................................. |
237 |
Refill the Toner............................................................................................................................................. |
239 |
Refill the toner........................................................................................................................................ |
239 |
Replace the residual toner container.................................................................................................... |
242 |
Maintain the Scanner................................................................................................................................... |
244 |
Clean the scanner................................................................................................................................... |
244 |
Calibrate the scanner............................................................................................................................. |
247 |
Chapter 6 |
|
License Management..................................................................................................... |
249 |
Introduction to license management.......................................................................................................... |
250 |
Check your licenses...................................................................................................................................... |
251 |
Save the currently active licenses .............................................................................................................. |
252 |
Get a new license file................................................................................................................................... |
253 |
Activate a new license.................................................................................................................................. |
254 |
Chapter 7 |
|
Account Management.................................................................................................... |
255 |
An overview of Océ Account Center........................................................................................................... |
256 |
Océ Account Console ®............................................................................................................................... |
257 |
Introduction to Océ Account Console.................................................................................................. |
257 |
Summary of Océ Account Console...................................................................................................... |
258 |
Enable account management in Océ Express WebTools................................................................... |
260 |
Accounting workflow............................................................................................................................. |
261 |
Workflow on the printer.................................................................................................................. |
261 |
Chapter 8 |
|
Solve Problems............................................................................................................... |
263 |
6

|
Contents |
How to solve problems with jobs............................................................................................................... |
264 |
Clear an original jam in the scanner........................................................................................................... |
265 |
Clear a media jam in the heater section..................................................................................................... |
266 |
Clear a media jam in the media bypass section........................................................................................ |
268 |
Clear a media jam in the roll feed section.................................................................................................. |
270 |
Event messages............................................................................................................................................ |
271 |
Print a demo print......................................................................................................................................... |
274 |
Print a test print............................................................................................................................................ |
275 |
Print the print density chart......................................................................................................................... |
276 |
Chapter 9 |
|
Support............................................................................................................................ |
277 |
Counter history............................................................................................................................................. |
278 |
Settings in case of errors............................................................................................................................. |
279 |
Audit log........................................................................................................................................................ |
280 |
Remote Service: configure the proxy......................................................................................................... |
281 |
Remote Service: check the connection....................................................................................................... |
282 |
Remote Service: allow remote assistance.................................................................................................. |
283 |
Remote Service: download log files........................................................................................................... |
284 |
Chapter 10 |
|
Contact............................................................................................................................. |
285 |
Downloads and support for your product.................................................................................................. |
286 |
Reader's comment sheet............................................................................................................................. |
287 |
Index................................................................................................................................. |
289 |
7

Contents
8
Chapter 1
Introduction

Notes for the reader
Notes for the reader
Typography
This manual uses the following typography to indicate elements that are part of the user interface.
Typography |
Indicates |
|
|
|
|
[Text between square brackets] |
Name of a button, tile, setting, value, or other |
|
|
option of the user interface |
|
|
|
|
< Text between angle brackets > |
Name of a key on a keyboard |
|
|
|
|
Text displayed in courier font |
• |
File path |
|
• |
Command Prompt comment |
|
|
|
[Text]→[displayed in]→[menucascade] |
Names of options to be used in a fixed order |
|
|
|
|
Safety symbols
Before using this product, make sure you have read and understood the safety information belonging to the product. Find the safety information on http://downloads.oce.com. Also be sure to follow all warnings and instructions marked on the product.
This manual uses the following safety symbols to indicate hazards and precautions.
Symbol |
Type of symbol |
Indicates |
|
|
|
|
|
|
WARNING |
Indicates a warning concerning operations that may lead to |
|
|
|
death or injury to persons if not performed correctly. To use |
|
|
|
the machine safely, always pay attention to these warnings. |
|
|
|
|
|
|
CAUTION |
Indicates a caution concerning operations that may lead to in- |
|
|
|
jury to persons if not performed correctly. To use the ma- |
|
|
|
chine safely, always pay attention to these cautions. |
|
|
|
This indication can concern hazards that have a specific CAU- |
|
|
|
TION symbol. The 'hot surface', 'electric shock', 'moving |
|
|
|
parts' and 'laser beam' cautions are listed below. |
|
|
|
|
|
|
CAUTION |
Hot surface |
|
|
|
Indicates a caution concerning operations that may lead to in- |
|
|
|
jury to persons if not performed correctly. To use the ma- |
|
|
|
chine safely, always pay attention to these cautions. |
|
|
|
|
|
|
CAUTION |
Electric shock |
|
|
|
Indicates a caution concerning operations that may lead to in- |
|
|
|
jury to persons if not performed correctly. To use the ma- |
|
|
|
chine safely, always pay attention to these cautions. |
|
|
|
|
|
|
CAUTION |
Moving parts |
|
|
|
Indicates a caution concerning operations that may lead to in- |
|
|
|
jury to persons if not performed correctly. To use the ma- |
|
|
|
chine safely, always pay attention to these cautions. |
|
|
|
|
|
|
CAUTION |
Laser beam |
|
|
|
Indicates a caution concerning operations that may lead to in- |
|
|
|
jury to persons if not performed correctly. To use the ma- |
|
|
|
chine safely, always pay attention to these cautions. |
4 |
|
|
|
|
10 Chapter 1 - Introduction
|
|
|
Notes for the reader |
|
|
|
|
|
|
|
|
|
Symbol |
Type of symbol |
Indicates |
|
|
|
|
|
|
IMPORTANT |
Indicates operational requirements and restrictions. Be sure |
|
|
|
to read these items carefully to operate the machine correctly |
|
|
|
and to avoid damaging the machine or property. |
|
|
|
|
|
|
NOTE |
Indicates a clarification of an operation or contains additional |
|
|
|
explanations for a procedure. Reading these notes is highly |
|
|
|
recommended. |
|
|
|
|
Body protection symbols
This manual uses the following body protection symbols to indicate that it is important to protect yourself before performing a specific task or action.
Symbol |
Type of symbol |
Indicates |
|
|
|
|
IMPORTANT |
Hand protection |
|
|
Wear the mentioned type of gloves when you perform this |
|
|
task or action. |
|
|
|
|
IMPORTANT |
Eye protection |
|
|
Use the mentioned type of eye protection when you perform |
|
|
this task or action. |
|
|
|
|
IMPORTANT |
Body protection |
|
|
Wear the mentioned type of body protection when you per- |
|
|
form this task or action. |
|
|
|
|
IMPORTANT |
Foot protection |
|
|
Wear the mentioned type of safety footwear when you per- |
|
|
form this task or action. |
|
|
|
Chapter 1 - Introduction |
11 |

Available documentation
Available documentation
Introduction
This manual is part of a complete documentation set. The following table shows a complete overview of the available documentation.
NOTE
For up-to-date documentation, visit the Océ downloads page on the Internet and find all the information for your printer.
Available documentation
Documentation |
Availability |
|
|
User Manual - Operation guide |
• On the download website under the product |
|
name ("http://downloads.oce.com"). |
|
Available as a PDF file in multiple languages. |
|
|
Online Help - Océ Express WebTools |
• Embedded in the application |
|
Available in multiple languages. |
|
|
User manual - Safety guide |
• On the download website under the product |
|
name ("http://downloads.oce.com"). |
|
Available as a PDF file in multiple languages. |
|
|
Quick Reference Guide for the use of Océ |
• On the download website under the product |
Mobile WebTools |
name ("http://downloads.oce.com"). |
|
Available as a PDF file. |
|
|
Océ Large Format Systems Connectivity - |
• On the download website under the product |
Administration guide |
name ("http://downloads.oce.com"). |
|
Available as a PDF file in English only. |
|
|
Océ PlotWave-ColorWave Systems Secur- |
• On the download website under the product |
ity - Administration guide |
name ("http://downloads.oce.com"). |
|
Available as a PDF file in English only. |
|
|
Available documentation Océ Wide format Printer Driver for Microsoft ® Windows®
Documentation |
Availability |
|
|
User guide |
• On the download website under the product |
|
name ("http://downloads.oce.com"). |
|
Available as a PDF file in multiple languages. |
|
|
Online Help |
• Embedded in the application |
|
Available in multiple languages. |
|
|
Available documentation Océ PostScript® 3 Driver
Documentation |
Availability |
|
|
|
|
Installation guide |
• On the download website under the product |
|
|
name ("http://downloads.oce.com"). |
|
|
Available as a PDF file in multiple languages. |
4 |
|
|
|
12 Chapter 1 - Introduction

Available documentation
Documentation |
Availability |
|
|
Online Help |
• Embedded in the application |
|
Available in multiple languages. |
|
|
Available documentation Océ Publisher Select
Documentation |
Availability |
|
|
User guide - Océ Publisher Select |
• On the download website under the product |
|
name ("http://downloads.oce.com"). |
|
Available as a PDF file in multiple languages. |
|
|
Online Help |
• Embedded in the application |
|
Available in multiple languages. |
|
|
Chapter 1 - Introduction |
13 |

Available documentation
14 Chapter 1 - Introduction
Chapter 2
Get to Know the Printing System
The Océ PlotWave 345/365
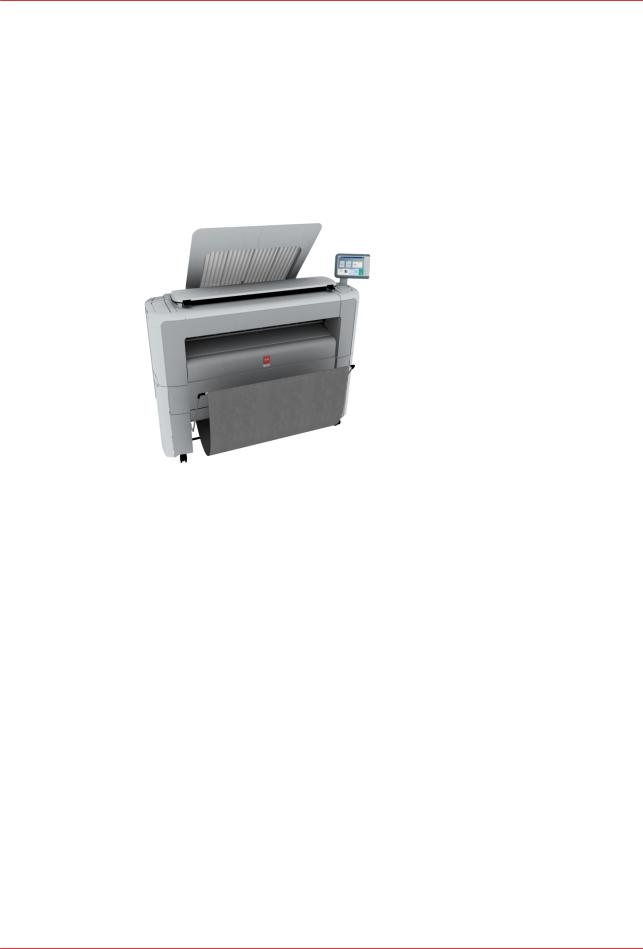
The Océ PlotWave 345/365
Introduction
The Océ PlotWave 345/365 is a black and white, all-in-one wide format print, copy and scan system with a multi-touch user panel and an optional color scanner.
Workflow of the Océ PlotWave 345/365
Process |
Actions |
Reference |
|
|
|
Before using the system |
Connect the printer |
Connect your Printing Sys- |
|
|
tem on page 17 |
|
|
|
|
Define and configure the settings |
Define your Workflow with |
|
|
Océ Express WebTools on |
|
|
page 39 |
|
|
|
Daily use |
Use the printer for copy, print, |
Print Jobs on page 155 |
|
and scan jobs |
Copy Jobs on page 164 |
|
|
Scan Jobs on page 187 |
|
|
|
Maintenance and support |
Maintain the system |
Maintain the Printing Sys- |
|
|
tem on page 207 |
|
|
|
|
Get support to solve problems |
Solve Problems on |
|
|
page 263 |
|
|
Support on page 277 |
|
|
|
16 Chapter 2 - Get to Know the Printing System
Connect your Printing System
Connect your Printing System
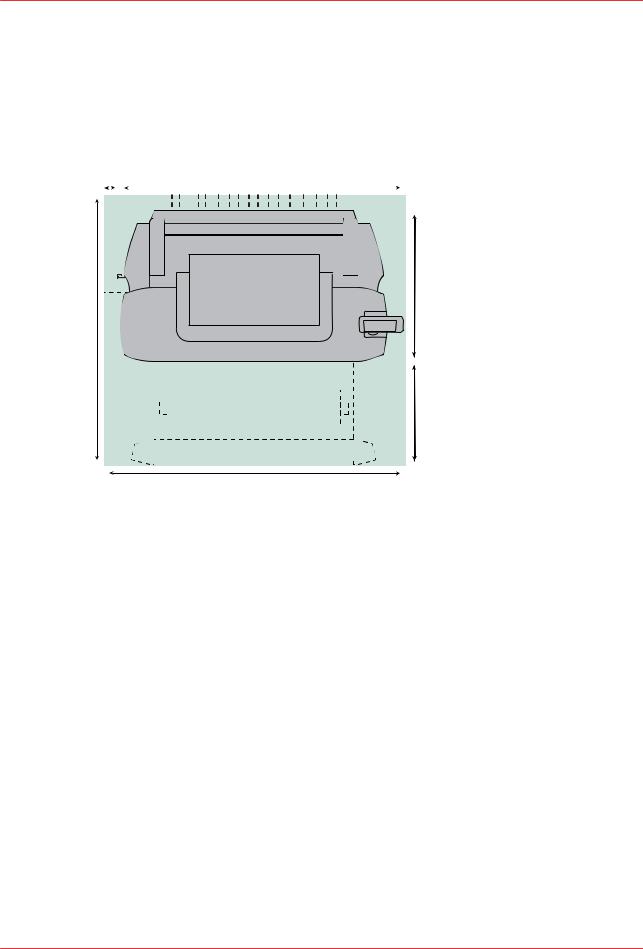
Working area [Footprint]
The printing system (with or without the optional [Océ Scanner Express]) requires a specific floor space / working area as indicated in the illustration below.
60MM |
|
|
|
|
|
|
1560MM |
|
|
|
|
|
|
||||||
2.4” |
|
|
|
|
|
|
61.4” |
|
|
|
|
|
|
||||||
|
|
|
|
|
|
|
|
|
|
|
|
|
|
|
|
|
|
|
|
|
|
|
|
|
|
|
|
|
|
|
|
|
|
|
|
|
|
|
|
|
|
|
|
|
|
|
|
|
|
|
|
|
|
|
|
|
|
|
|
803MM 31.6”
1403MM 55.2”
600MM 23.6”
1620MM 63.8”
Chapter 2 - Get to Know the Printing System |
17 |
Connect the mains supply cable and the network cable
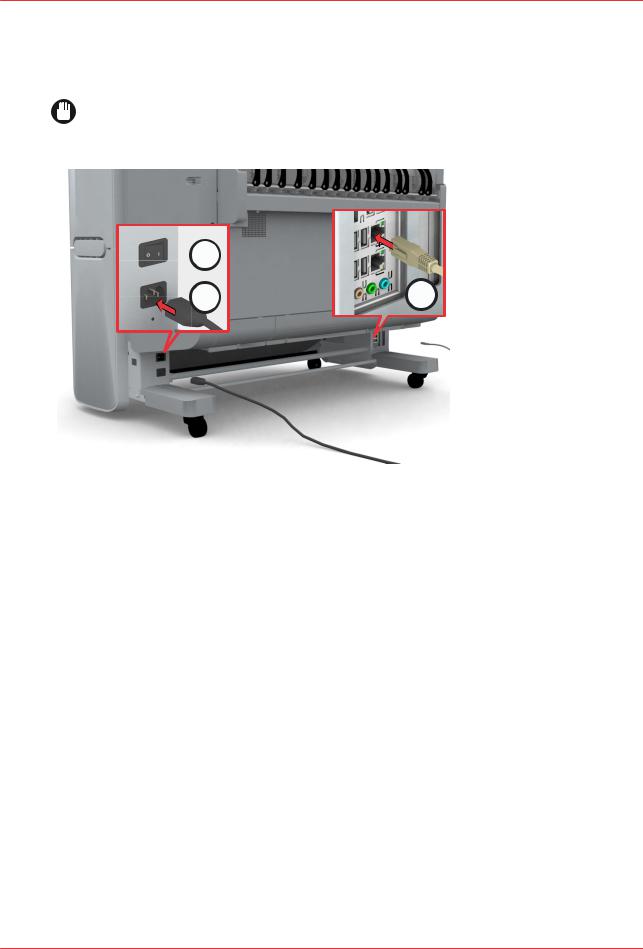
Connect the mains supply cable and the network cable
Procedure
IMPORTANT
Make sure the power switch (B) is in 'off' position.
1. Plug the mains supply cable into the power connection at the left back of the printer (A).
 B
B
A C
2.Plug the other side of the mains supply cable into the wall socket.
3.Plug the network cable into the upper (RJ45) connection port at the right back of the printer (C), to connect the printer to your company network.
18 Chapter 2 - Get to Know the Printing System
Switch on the printing system
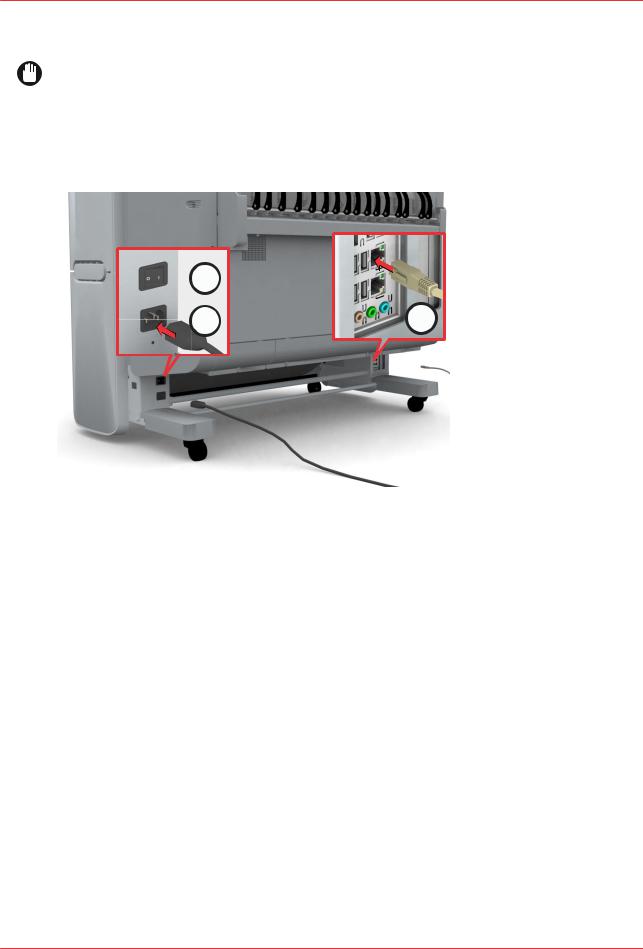
Switch on the printing system
IMPORTANT
•Make sure the mains supply cable (A) is plugged in.
•Make sure the network cable (C) is plugged in.
Procedure
1. Switch on the power switch at the left back of the printer (B).
 B
B
A C
Chapter 2 - Get to Know the Printing System |
19 |
The Hardware
The Hardware
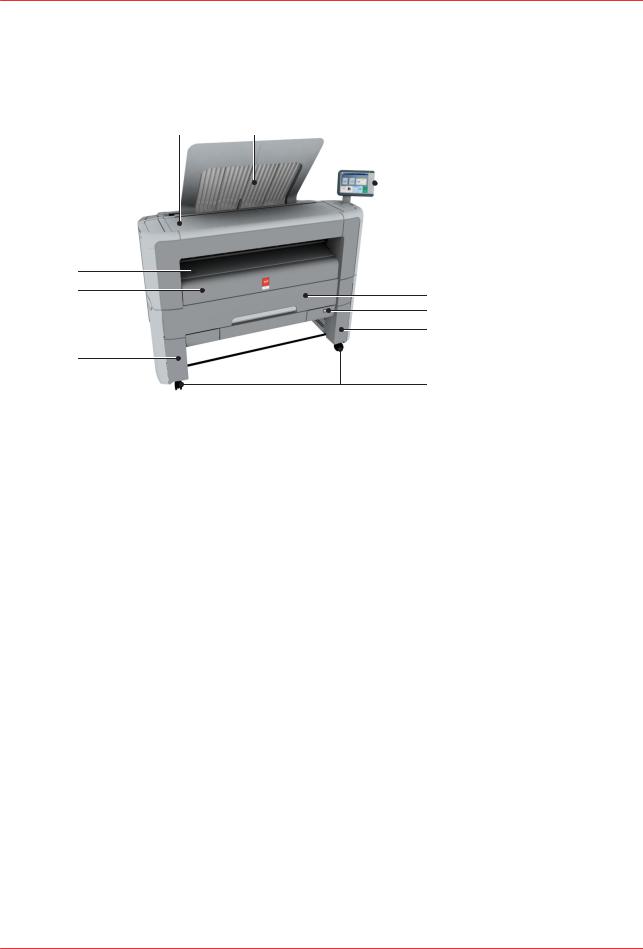
The components of the printer (front)
5 6
 7
7  8
8
4
3 |
|
2 |
9 |
|
|
|
10 |
|
11 |
1 |
|
|
12 |
Component - function table
No. |
Component |
Description / Function |
|
|
|
1 |
[lower left front cover] |
Remove this cover when you want to move the |
|
|
printer. |
|
|
|
2 |
[lower front cover] |
Located at the front, used for error recovery. |
|
|
|
3 |
[media bypass] |
To manually feed cut-sheets up to 36" width. |
|
|
|
4 |
[toner compartment] |
Compartment to refill toner. |
|
|
|
5 |
[printer top cover] |
Only available in printer-only version. |
|
|
|
6 |
[top delivery tray] |
Delivery tray that collects the printed sheets. |
|
|
|
7 |
USB port |
USB connector to use a USB mass storage de- |
|
|
vice to print from or to scan to. |
|
|
|
8 |
Océ ClearConnect: multi-touch [user |
The Océ ClearConnect user panel allows the user |
|
panel] |
to start copy, scan, or print jobs, and to monitor |
|
|
the system and the job status. |
|
|
|
9 |
[media drawer] |
Media drawer that contains the media roll 1 |
|
|
and/or 2. |
|
|
|
10 |
[on / off button] |
Button to start or shut down the printer. |
|
|
|
11 / B |
[lower right front cover] |
Located at the front, used to level the printer. |
|
|
|
12 |
[wheel] |
Swivel wheel with brakes. |
|
|
|
20 Chapter 2 - Get to Know the Printing System
The components of the printer (left side)
The components of the printer (left side)
Illustration
1
Component - function table
No. |
Component |
Description / Function |
|
|
|
1 |
[residual toner compartment] |
Gives access to the residual toner container. |
|
|
|
Chapter 2 - Get to Know the Printing System |
21 |

The components of the printer (back)
The components of the printer (back)
 3
3
2
1
Component - function table
No. |
Component |
Description / Function |
|
|
|
1 |
[power switch] |
Switch the main power supply on or off. |
|
|
You can find the serial number of the printer on |
|
|
the sticker above the power switch. |
|
|
|
2 |
[upper back cover] |
Open the [upper back cover] with the [media jam |
|
|
clearance handle], when you want to access the |
|
|
heater section in case of a media jam. |
|
|
|
3 |
[media jam clearance handle] |
Use this handle to access the paper in case of a |
|
|
paper jam in the heater section. |
|
|
|
22 Chapter 2 - Get to Know the Printing System
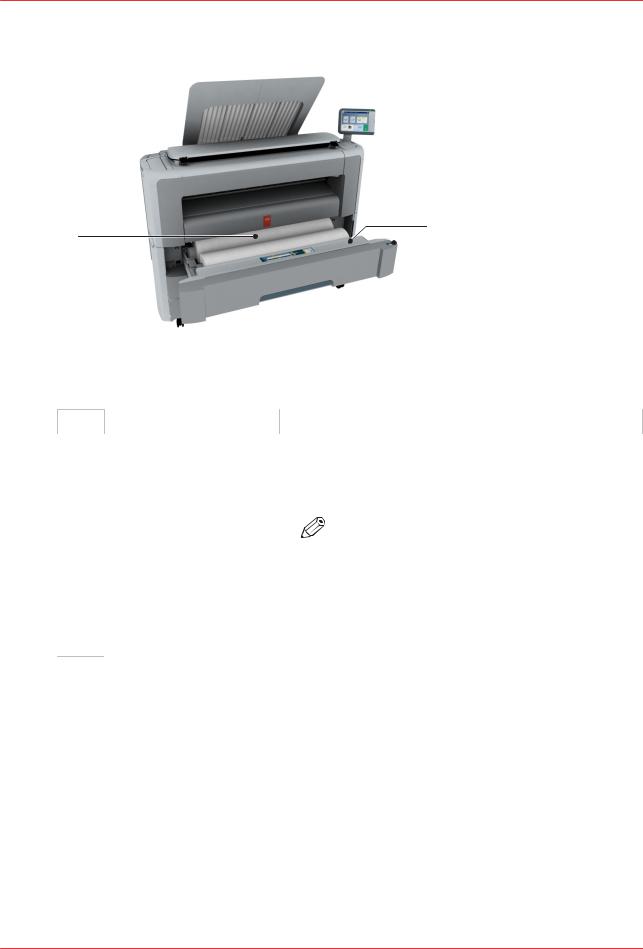
The media drawer
The media drawer
4
3
 5
5
2
1
Component - function table
No. |
Component |
Description / Function |
|
|
|
1 |
[roll holder] |
Carries the media roll |
|
|
|
2 |
[media roll] 1 |
Media placed on roll holder in first position. |
|
|
|
3 |
[media roll] 2 |
Media placed on roll holder in second position. |
|
|
NOTE |
|
|
The scanner calibration sheet is located at the |
|
|
back of roll 2. |
|
|
|
4 |
[roll loading station] |
Groove integrated behind the front cover of the media |
|
|
drawer, on which the media can be easily loaded. |
|
|
|
5 |
[clean cut button] |
Button used to trim a strip of a new or damaged media |
|
|
roll. |
Chapter 2 - Get to Know the Printing System |
23 |
The user panel: Océ ClearConnect
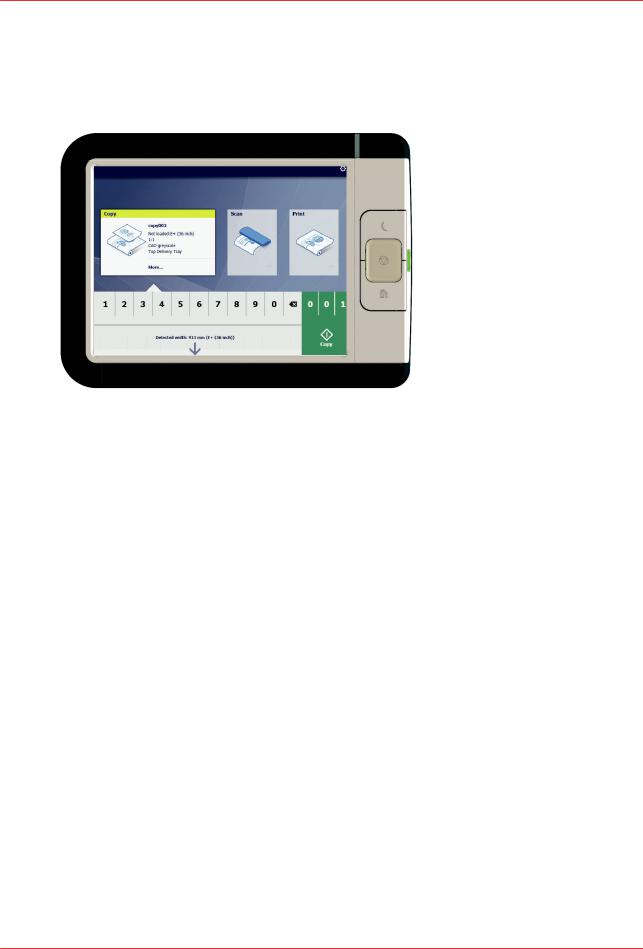
The user panel: Océ ClearConnect
Introduction
The Océ ClearConnect is the multi-touch user panel of the printer.
 1
1
 2
2
 3
3
 4
4
 5
5
 6
6
No. |
Component |
Function |
|
|
|
1. |
[status light] |
Light that gives feedback on the status of the printer. |
|
|
• A green light indicates that the printer is scanning or printing. |
|
|
• A green blinking light indicates that the printer is in a transition |
|
|
state (start-up, shut-down, pause). |
|
|
• A red light indicates that an error occurred or the print queue is |
|
|
paused. |
|
|
• When the light is off the system is ready or shutdown. |
|
|
|
2. |
[wake-up button] |
Button to: |
|
|
• Get the printer out of sleep mode. |
|
|
• Wake the printer up to full functionality. |
|
|
|
3. |
[USB port] |
Insert a USB key to: |
|
|
• Print a file directly from the USB key. |
|
|
• Save a scan file directly on the USB key. |
|
|
The port green light starts to blink during data transfer. |
|
|
|
4. |
[stop button] |
Button, with a red light, to: |
|
|
• Immediately interrupt a scan job. |
|
|
• Stop a print job after the page that is being printed. |
|
|
|
5. |
[home button] |
Button to: |
|
|
• Return to the user panel home screen. |
|
|
• Reset settings to default by pressing the button twice. |
|
|
|
6. |
[green button] |
Dynamic tile on the user panel display to: |
|
(touch) |
• Start a scan job, a print job or a copy job on the user panel. |
|
|
|
24 Chapter 2 - Get to Know the Printing System
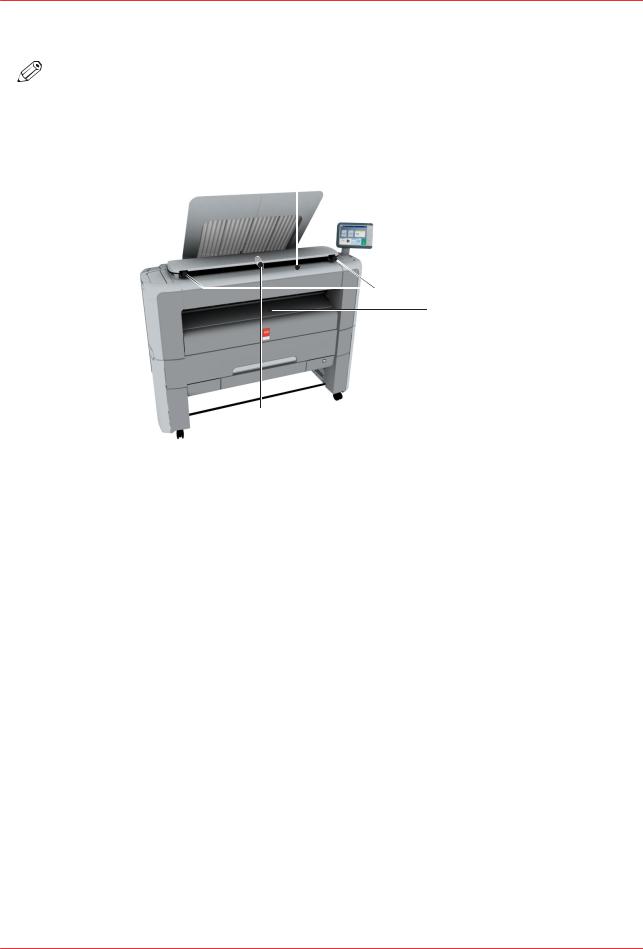
The components of the scanner (optional)
The components of the scanner (optional)
NOTE
The scanner calibration sheet for the [Océ Scanner Express] is located in the media drawer, at the back of roll 2.
The components of the scanner (top cover closed)
2
1
3
4
5
|
Component |
Description/Function |
|
|
|
1 |
[top cover] |
Closes off the scanner. |
|
|
|
2 |
[original feeding table] |
Use the [original feeding table] to feed the origi- |
|
|
nal into the scanner (face up). |
|
|
|
3 |
[open levers] |
Use the [open levers] to open the top cover. |
|
|
|
4 |
[originals exit] |
Exit for the scanned original. |
|
|
|
5 |
[output refeed protector] |
Prevents that your output is refed into the scan- |
|
|
ner. |
|
|
|
Chapter 2 - Get to Know the Printing System |
25 |
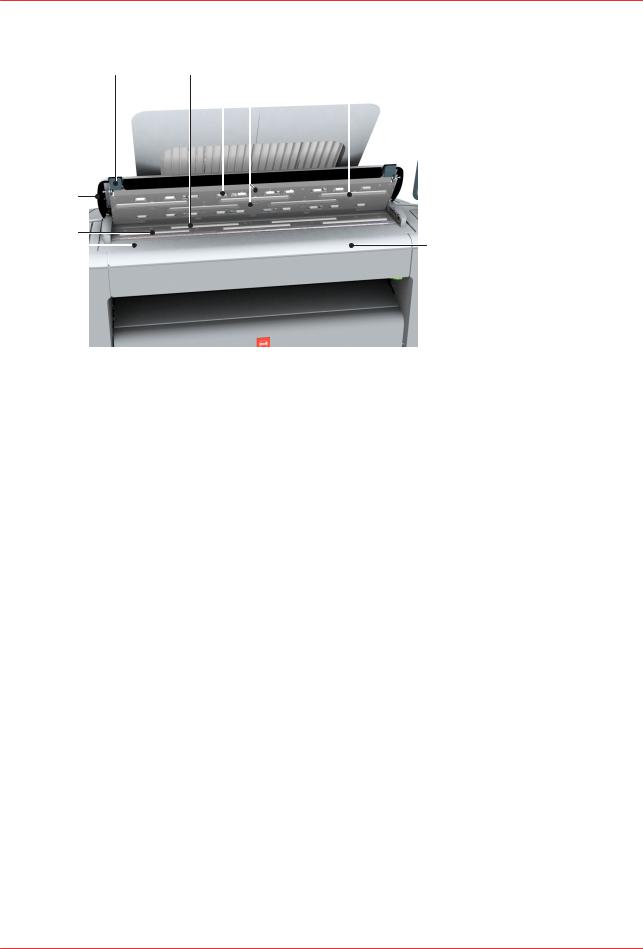
The components of the scanner (optional)
The components of the scanner (top cover opened)
5 |
6 |
7 |
8 |
9 |
4 |
|
3 |
|
2 |
10 |
1
|
Component |
Description/Function |
|
|
|
1 |
[originals exit] |
Exits originals for reception into the front origi- |
|
|
nal tray. |
|
|
|
2 |
[original size ruler] |
Use this ruler to measure the original. |
|
|
|
3 |
[original feed rollers] |
A set of rollers used to transport the original. |
|
|
|
4 |
[top cover] |
Closes off the scanner. |
|
|
|
5 |
[open levers] |
Use the open levers to open the top cover of the |
|
|
scanner. |
|
|
|
6 |
[original support rollers] |
A set of rollers to guide the original. |
|
|
|
7 |
[scanner top cover rollers] |
A set of rollers in the top cover to guide the orig- |
|
|
inal. |
|
|
|
8 |
[original sensors] |
Sensors to detect the original. |
|
|
|
9 |
[transparent contact plates] |
Cover of the image sensors. |
|
|
|
10 |
[original feeding table] |
Use the original feeding table to feed the original |
|
|
into the scanner (face up). |
|
|
|
26 Chapter 2 - Get to Know the Printing System
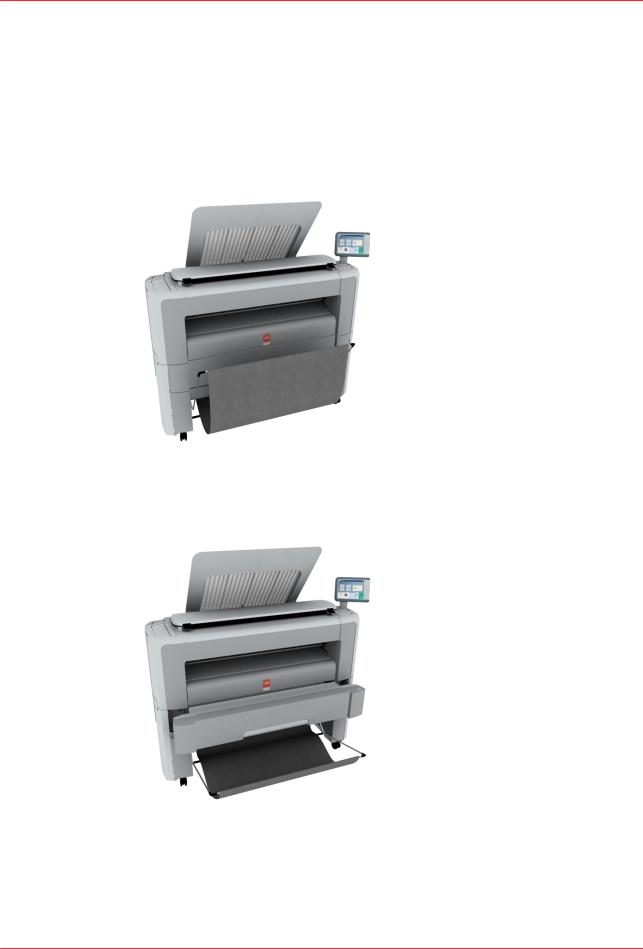
The delivery destination
The delivery destination
Introduction
The printer is equipped with a top delivery tray to collect your printed output.
The delivery destination
In Océ Express WebTools and under [Show all settings] on the user panel you can define the delivery destination for your printed output.
•When you select Top Delivery Tray and you use plain or transparent paper, your printed output is by default delivered face-down in the standard Top Delivery Tray. If you use a different media type, the printed output is always delivered at the back of the printer.
The Top Delivery Tray can collect up to 50 prints. When the sensor detects that the delivery tray is full, the printer will stop printing. The message [The Top Delivery Tray is full. Remove the printed output.] appears on the user panel. Remove the paper to continue printing.
•When you select [Back output] your printed output is by default delivered at the back of the printer. Your printed output is delivered face-up.
Chapter 2 - Get to Know the Printing System |
27 |
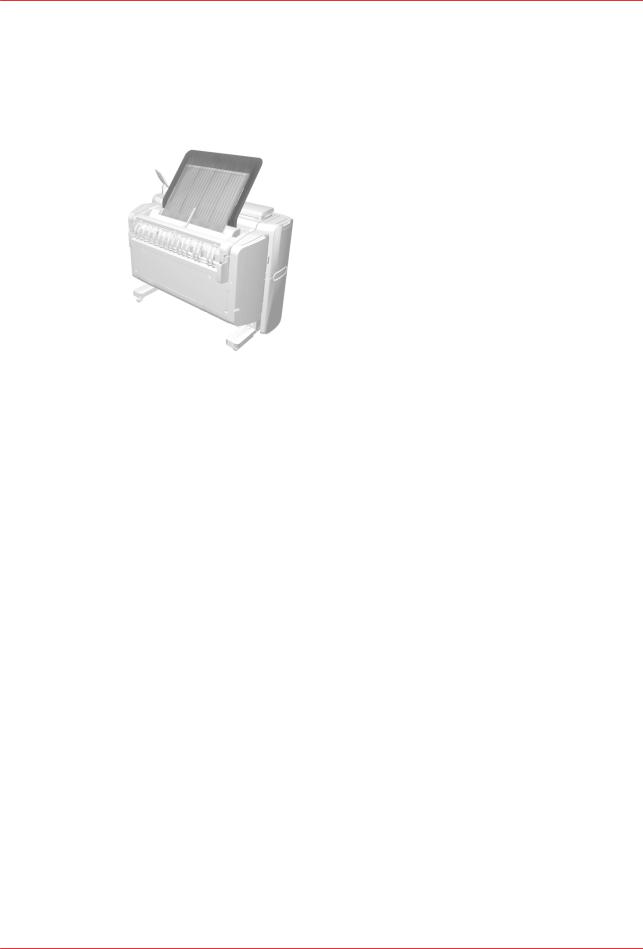
The front original tray (optional)
The front original tray (optional)
Introduction
The printer can be delivered with a front original tray to hold and collect your originals.
Illustration
[1] Position 1 - Holds and collects the originals
[2] Position 2 - Access the media drawer: lower the tray easily by pushing it down.
28 Chapter 2 - Get to Know the Printing System

The folder (optional)
The folder (optional)
Introduction
The printer can be delivered with an external folder. The Océ PlotWave 345 is compatible with the Océ 2400 fanfold. The Océ PlotWave 365 is compatible with the Océ 2400 fanfold and the Océ 4311 fullfold series.
NOTE
•A technician is required to install the folder and configure the system.
•For more information on folders, visit the Es-te company website and select your product.
Media compatibility with the folder
Media name |
Compatible with the folder |
|
|
Paper 60 g |
Yes |
|
|
[Bond 17 lb] |
Yes |
|
|
[Bond 20 lb] |
Yes |
|
|
[Bond 20 lb] |
Yes |
|
|
[Recycled bond 20 lb] |
Yes |
|
|
[Bond 24-28 lb] |
Yes |
|
|
NOTE
For folding speed reasons, the outputs longer than 1.2 m (47.2 in) must be printed one sheet at a time.
Chapter 2 - Get to Know the Printing System |
29 |
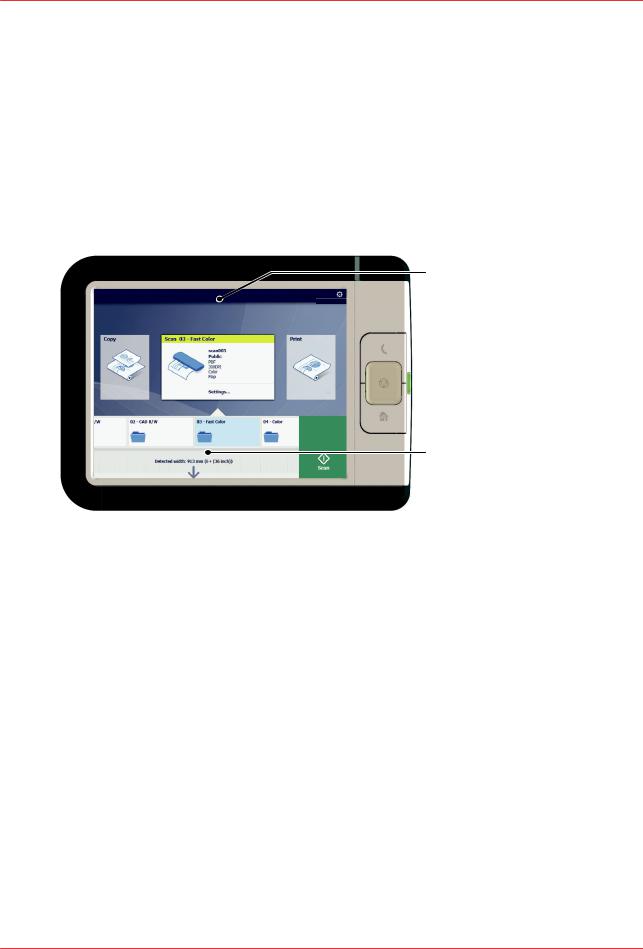
Workflow of the Océ ClearConnect user panel
Workflow of the Océ ClearConnect user panel
The home screen
Introduction
The default screen of the Océ ClearConnect user panel is the home screen.
From the home screen you can manage jobs and enter the system menu.
The home screen
1
 2
2
 3
3
 4
4
5  6
6
No. |
Component |
Function |
|
|
|
|
|
1. |
dynamic bar and |
In the dynamic bar you can see the system states (warming-up, |
|
|
[active job] |
cleaning etc.) and the active job when present. |
|
|
|
• When you tap the active job the job queue appears with the list |
|
|
|
of waiting jobs. |
|
|
|
• When you tap the active job the pause tile appears, with which |
|
|
|
you can pause the printing process. |
|
|
|
|
|
2. |
[system menu] |
In the dynamic bar you can access the system menu. |
|
|
|
• When you tap the system menu thumbnail, a new window |
|
|
|
opens with a dynamic view of the system and printer setup set- |
|
|
|
tings. |
|
|
|
|
|
3. |
[Copy tile] |
These dynamic tiles help you to perform copy, scan and print jobs. |
|
|
[Scan tile] |
Select the correct tile for your job: |
|
|
[Print tile] |
• When you tap one of the tiles and then use the Smart Access, |
|
|
|
you can start your job immediately. |
|
|
|
• As default the print tile is selected, but when you insert an origi- |
|
|
|
nal into the scanner the copy tile is selected. When you insert |
|
|
|
an original and a USB key the scan tile is selected. |
|
|
|
• When you want to make more settings you can tap the tile |
|
|
|
twice, and a new window with presets or settings opens. |
4 |
|
|
|
|
30 Chapter 2 - Get to Know the Printing System
Loading...