

Page 1

Océ | User Guide
Océ
Océ PRISMAoffice V3.0
Page 2

...and Training?
For this product we also offer seminars at
our Training Center in Poing.
Information:
Phone +49 8121 72-3940
Fax +49 8121 72-3950
Océ Printing Systems GmbH
Postfach 1260
85581 Poing
Germany
February 2003 Edition
A29247-X30-X-5-7670
Copyright Océ Printing Systems GmbH 2003
All rights reserved, including rights of translation, reprinting, reproduction by copying
or any other method.
Offenders will be liable for damages. All rights, including rights created by patent grant
or registration of a utility model or design, are reserverd.
Delivery subject to availability; right of technical modification reserved.
All hardware and software names used are trademarks of their respective owners.
Page 3

Introduction
Components, Functionalities
and Licenses
System Requirements
Installation
Print Manager Spool
Extended Line Printer Server
Windows Job Ticket
Enhancement
Web Job Submission
Appendix
Glossary
More Chapters ->
Page 4

A29247-X30-X-5-7670
Page 5

Related Publications
Index
Page 6

A29247-X30-X-5-7670
Page 7

Contents
1 Introduction................................................................................................................ 1
2 Components, Functionalities and Licenses ........................................................... 3
2.1 PRISMAoffice Components ......................................................................................... 3
2.2 PRISMAoffice Functionalities ...................................................................................... 4
2.3 PRISMAoffice Licenses .............................................................................................. 5
3 System Requirements ............................................................................................... 7
3.1 Hardware .....................................................................................................................7
3.2 Software ...................................................................................................................... 8
4 Installation.................................................................................................................. 9
4.1 Prerequisites................................................................................................................9
4.2 Types of Installation................................................................................................... 11
4.3 Installing PRISMAoffice ............................................................................................. 15
4.4 Installing the Data Encryption Plug-in........................................................................ 20
4.5 Installing the BarCode Support Plug-in ..................................................................... 24
4.6 Add/Remove Components ........................................................................................ 31
Contents
4.2.1 Custom ............................................................................................................ 11
4.2.2 Remote Admin................................................................................................. 12
4.4.1 Data Encryption ............................................................................................... 20
4.4.2 Installing the Plug-in ........................................................................................ 20
4.4.3 Activating the Plug-in....................................................................................... 21
4.4.4 How does the Interface Work? ........................................................................ 23
4.5.1 Printing the BarCode ....................................................................................... 24
4.5.2 Supported BarCodes ....................................................................................... 24
4.5.3 Installing the Plug-in ........................................................................................ 27
4.5.4 Activating the Plug-in....................................................................................... 28
4.5.5 How does the Interface Work? ........................................................................ 30
4.6.1 Extended Line Printer Server .......................................................................... 33
A29247-X30-X-5-7670
Page 8

Contents
5 Print Manager Spool................................................................................................ 35
5.1 Introduction ................................................................................................................ 35
5.2 Quick Start: Installing and Configuring Printers ......................................................... 40
5.2.1 Parallel Printers ............................................................................................... 40
5.2.2 SCSI Printers................................................................................................... 45
5.2.3 TCP/IP Printers................................................................................................ 50
5.2.4 Local NT Printers ............................................................................................. 56
5.2.5 Command Printers........................................................................................... 59
5.3 Advanced Configuration ............................................................................................ 63
5.3.1 Input Filter ....................................................................................................... 64
5.3.2 Filter Configuration File ................................................................................... 76
5.3.3 Parameters for the OSPPRINT.EXE ............................................................... 78
5.3.4 Print Job Generation with PJM Server ............................................................ 79
5.3.5 JEC Support for NPS File Systems ................................................................. 79
5.3.6 LIP Control File................................................................................................ 80
5.4 Spool Administration.................................................................................................. 84
5.4.1 Server Properties............................................................................................. 85
5.4.2 Security Settings ............................................................................................. 96
5.4.3 Forms .............................................................................................................. 98
5.4.4 Viewing Documents....................................................................................... 108
5.5 Print Manager Spool User Interface ........................................................................ 110
5.5.1 Customizing the Appearance of the User Interface ....................................... 111
5.5.2 Working with the In-Place Editable Dialog Boxes.......................................... 115
5.5.3 Toolbar and Menu Functions......................................................................... 116
5.5.4 Job Handling ................................................................................................. 119
5.5.5 Printer Handling............................................................................................. 131
6 Extended Line Printer Server ............................................................................... 135
6.1 Customizing Printcap File and lpd.ini....................................................................... 136
7 Windows Job Ticket Enhancement...................................................................... 139
7.1 Windows NT Print Extension ................................................................................... 139
7.2 Windows 95 Print Extension .................................................................................... 145
8 Web Job Submission ........................................................................................... 149
8.1 Web Service ............................................................................................................ 149
8.2 Configuration of Web Job Submission..................................................................... 156
8.2.1 Customizing HTML and Script Files .............................................................. 156
A29247-X30-X-5-7670
Page 9

Contents
8.2.2 Setting up Microsoft Personal Web Manager ................................................ 159
8.2.3 Setting up Apache ......................................................................................... 165
8.3 Submitting Files ....................................................................................................... 166
8.4 Getting Information .................................................................................................. 171
9 Appendix ................................................................................................................ 175
10 Glossary ................................................................................................................. 179
11 Related Publications ............................................................................................. 183
Index .............................................................................................................................. 185
A29247-X30-X-5-7670
Page 10

Contents
A29247-X30-X-5-7670
Page 11
Introduction
1 Introduction
This manual describes the functionality, installation, administration and usage of the
PRISMAoffice system for Windows NT 4.0 and Windows 2000.
PRISMAoffice is a powerful product family which offers scalable and efficient print solutions
for the professional office printing environment. PRISMAoffice supports all kinds of PCL
printers. It is designed to accommodate the demands of business with heavy print volumes
and to make work for operating personell as easy as possible.
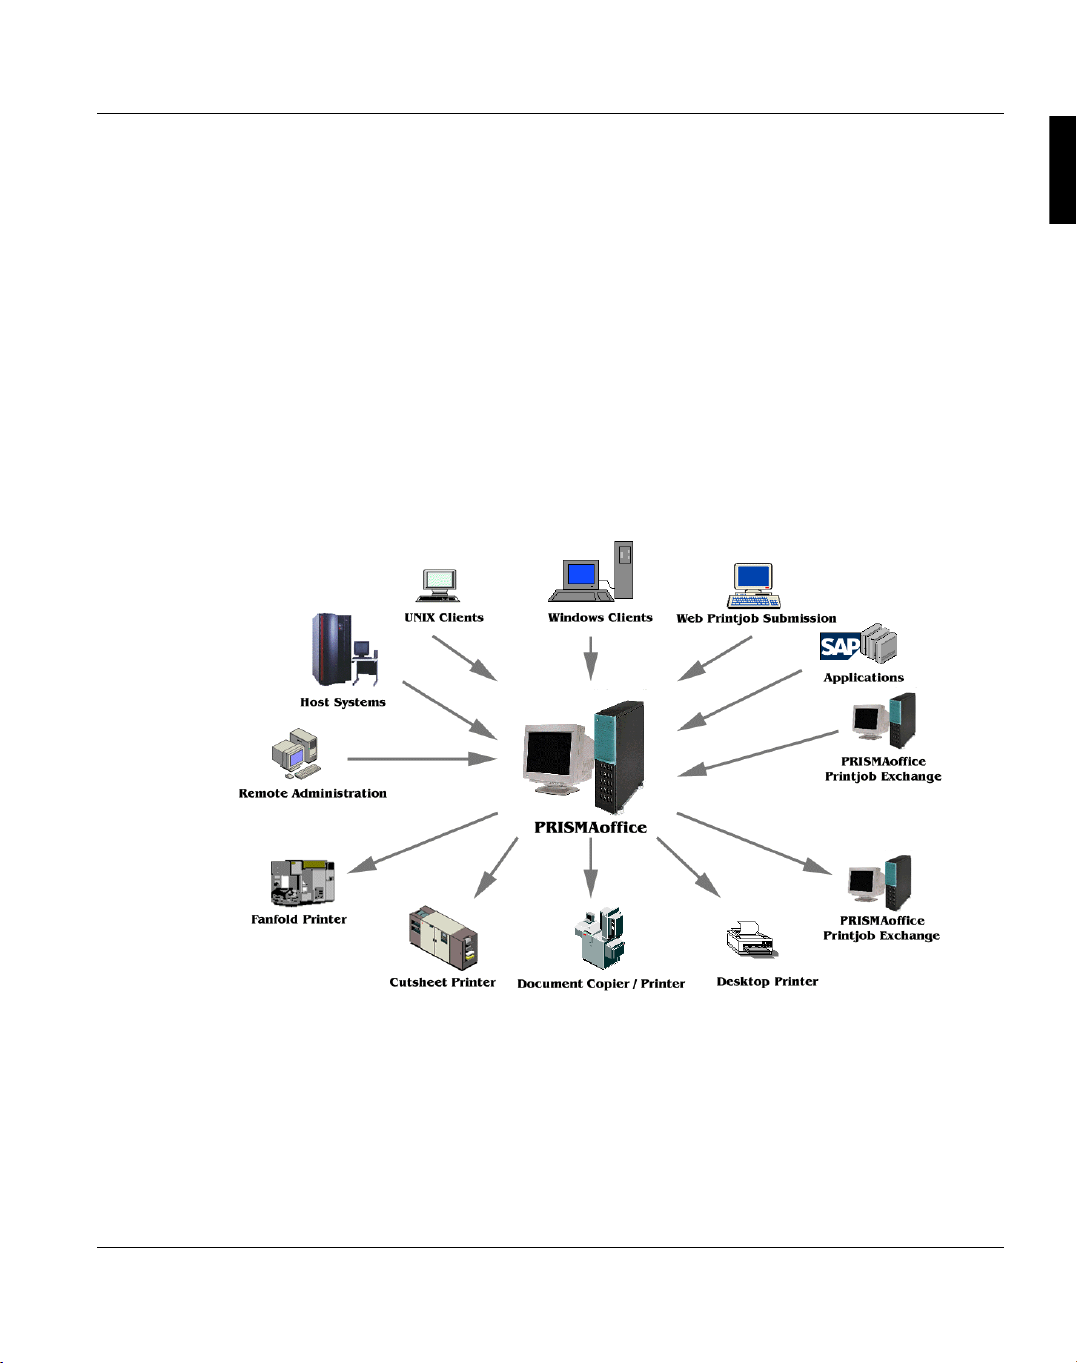
The PRISMAoffice systems environment
The operating system´s user interface makes the spool system easy to work with. Since
Windows NT/2000 supports many network protocols, the PRISMAoffice system integrates
into virtually every network environment and prints from every application.
A29247-X30-X-5-7670 1
Page 12

Introduction
PRISMAoffice enables easy installation and administration of all kind of printers via SCSI,
TCP/IP and more. You even can address printers that are connected to other servers in the
network. So you can distribute print jobs between several print servers and access all PCL
network printers which are supported by Windows NT/2000.
Covenient user interfaces of the different components make it easy to submit and control
print jobs. Tracking the print jobs is provided via job tickets.
An accounting function gives control of quantity of printing and makes cost calculation easy
and effective.
For the history of products and versions leading to PRISMAoffice see chapter 9, "Appendix"
on page 175.
2 A29247-X30-X-5-7670
Page 13
Components, Functionalities and Licenses PRISMAoffice Components
2 Components, Functionalities and Licenses
2.1 PRISMAoffice Components
The PRISMAoffice software component structure:
Software Components
PRISMAoffice V3.0 Basic Module
Professional Edition
Network Connection
Windows Job Ticket Enhancement
PCL BarCode Translation
Remote Administration
• The Basic Module contains the functionality of PRISMAoffice LE V2.02.
• The Professional Edition contains: SCSI connection, faster printers, security package
(data encryption, secure viewing)
• Network Connection: lpd deamon, web job submission
• Windows Job Ticket Enhancement: portmonitor extensions for job tickets
• PCL BarCode Translation: Input filter for replacement of PCL ESC sequences through
bitmaps
• Remote Administration: PRISMAoffice User Interface through network
A29247-X30-X-5-7670 3
Page 14

PRISMAoffice Functionalities Components, Functionalities and Licenses
2.2 PRISMAoffice Functionalities
• The Extended Line Printer Server contains a RFC 1179 compatible lp daemon which
accepts lpr generated print requests from the network. This gives you access to
PRISMAoffice from computers of the non-Windows world.
• The Windows NT Print Extension is an NT-conform port monitor which adds a job ticket
for advanced print job and output management to the print job.
• The Windows 95 Print Extension is similar to the Windows NT Print Extension but especially adapted to Windows 95.
• The PJM Interface allows to use the print manager spool from other tools via the PJM
server which can be installed with PRISMAoffice. The PJM server allows to generate
print jobs with a general PRISMA job generator and PRISMA job ticket.
The PJM Interface requires a Java Runtime Environment (Version 1.3.1_04). This JRE
is installed automatically when you install the component ’Pjm Server’ from
PRISMAoffice V3.0. Existing JRE versions will not be overwritten.
Note: When you uninstall the component ’Pjm Server’ from your computer the in-
stalled JRE Version 1.3.1_04 is also removed.
• The Web Job Submission enables users to submit print jobs, query spoolstatus information and general information via an usual web browser, i.e. without the installation of
a special client software. On a server (i.e. the machine, where the spool system is installed) a web server (e.g. Microsoft Internet Information Server) has to be installed. On
the clients only a common web browser need to be installed.
• The Remote Administration component enables users to handle and administer the
spool system completely from a Windows NT/2000 client. The Remote Administration
component has to be installed on the client.
4 A29247-X30-X-5-7670
Page 15

Components, Functionalities and Licenses PRISMAoffice Licenses
2.3 PRISMAoffice Licenses
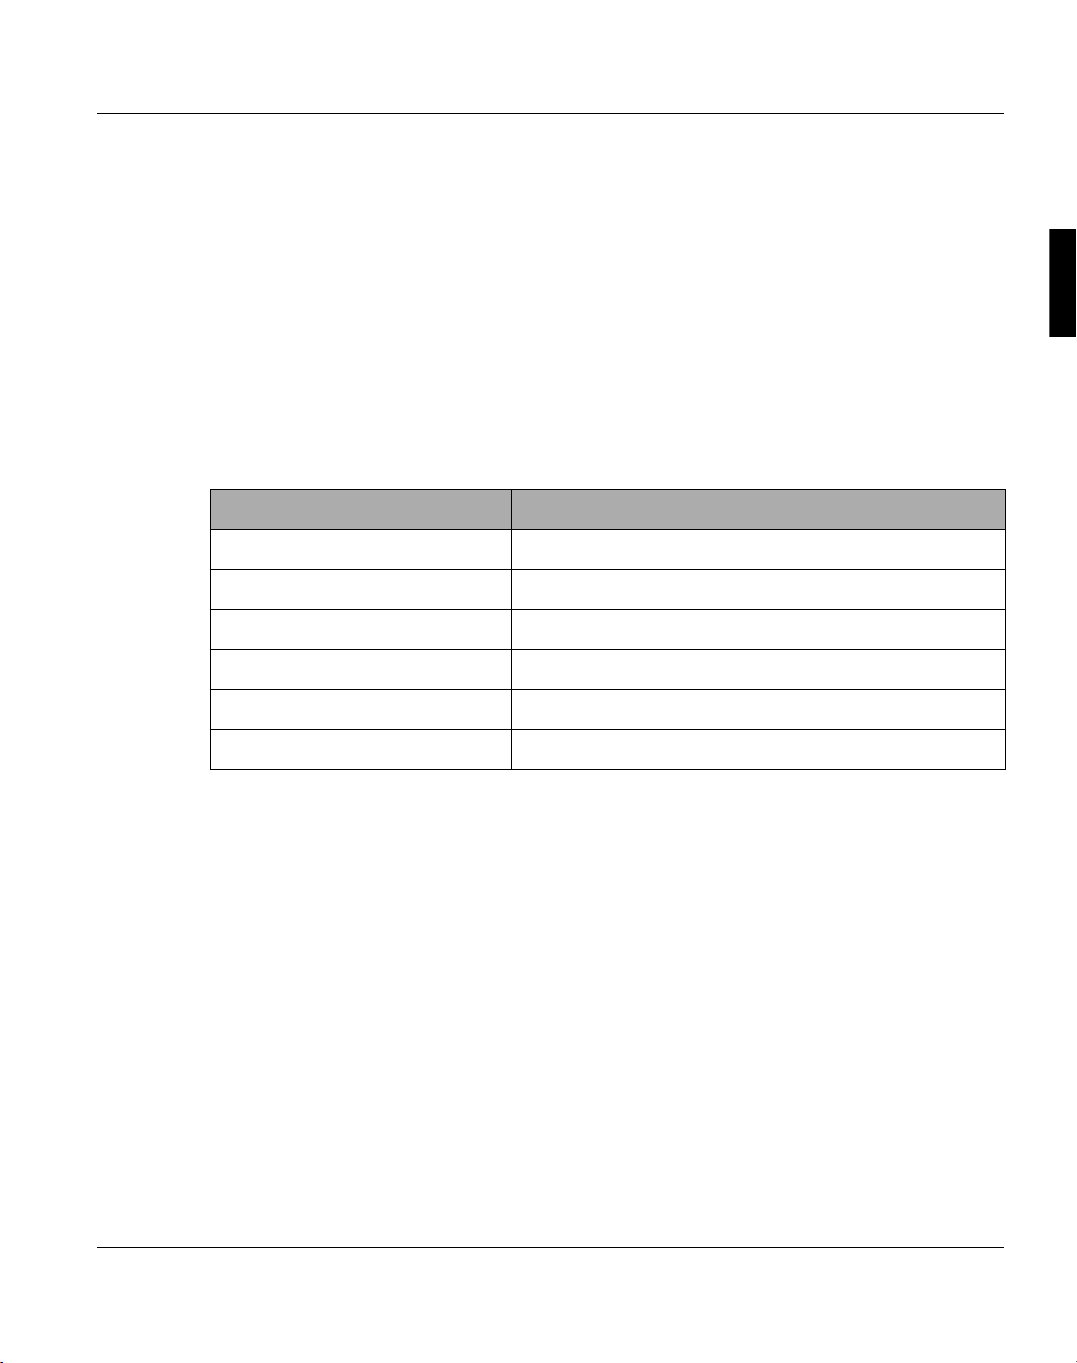
Software Components License Key (FLEXlm)
PRISMAoffice V3.0 Basic Module SPOOL_BASE 3.0
Professional Edition SPOOL_PROF 3.0
Network Connection SPOOL_NET_CONN 3.0
Windows Job Ticket
Enhancement
PCL BarCode Translation SPOOL_BARCODE_PCL 3.0
Remote Administration SPOOL_REM_ADMIN 3.0
SPOOL_TIC_ENH 3.0
A29247-X30-X-5-7670 5
Page 16
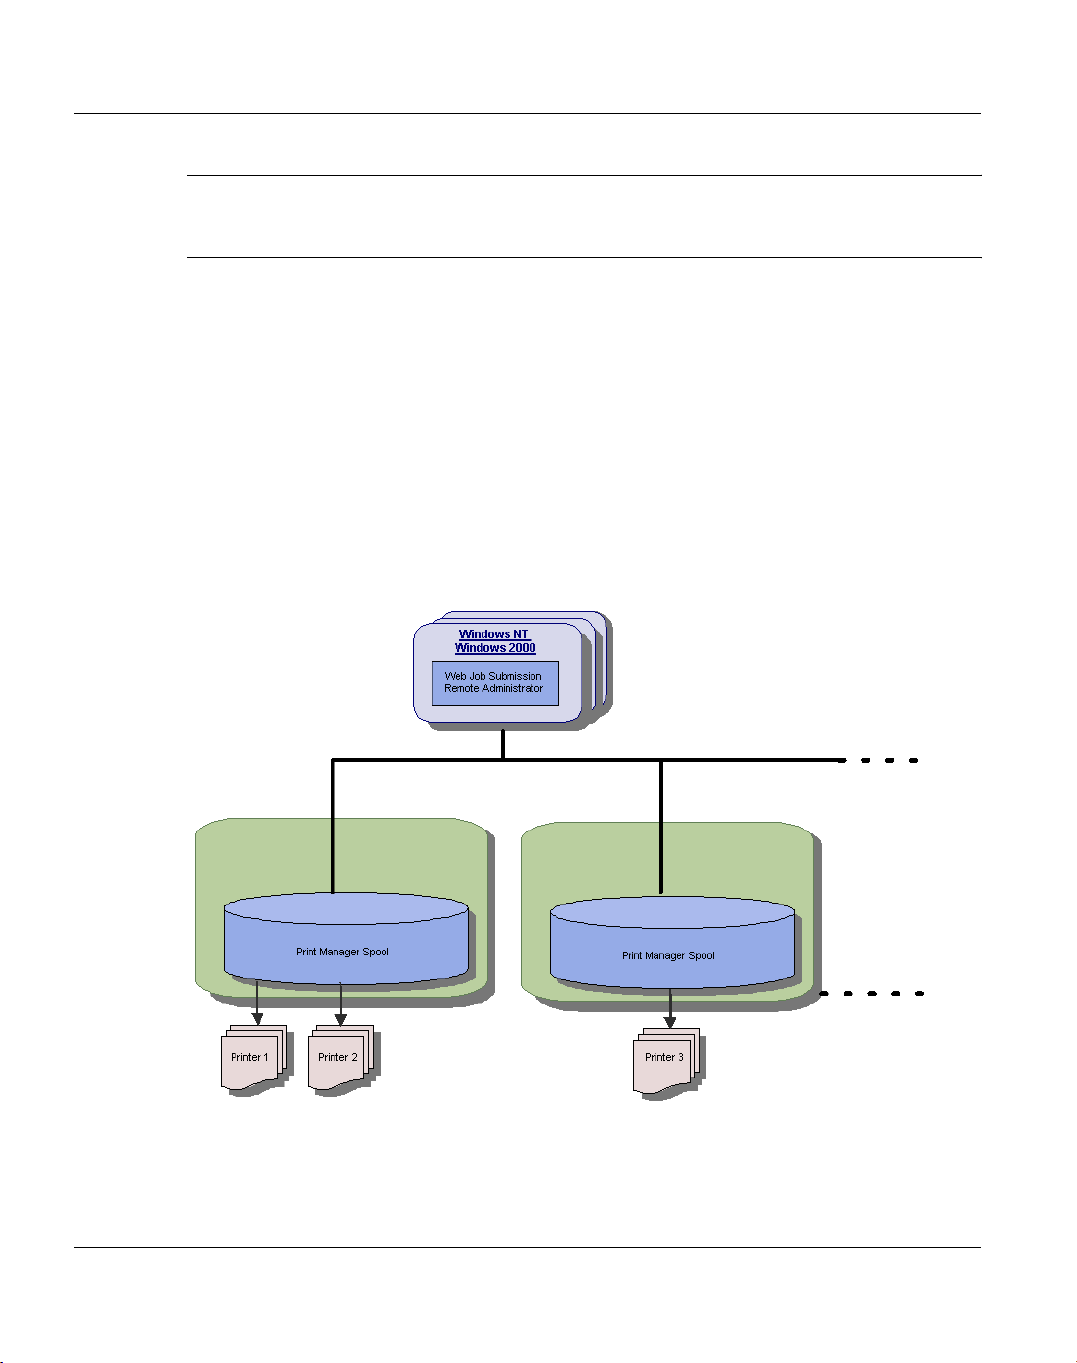
PRISMAoffice Licenses Components, Functionalities and Licenses
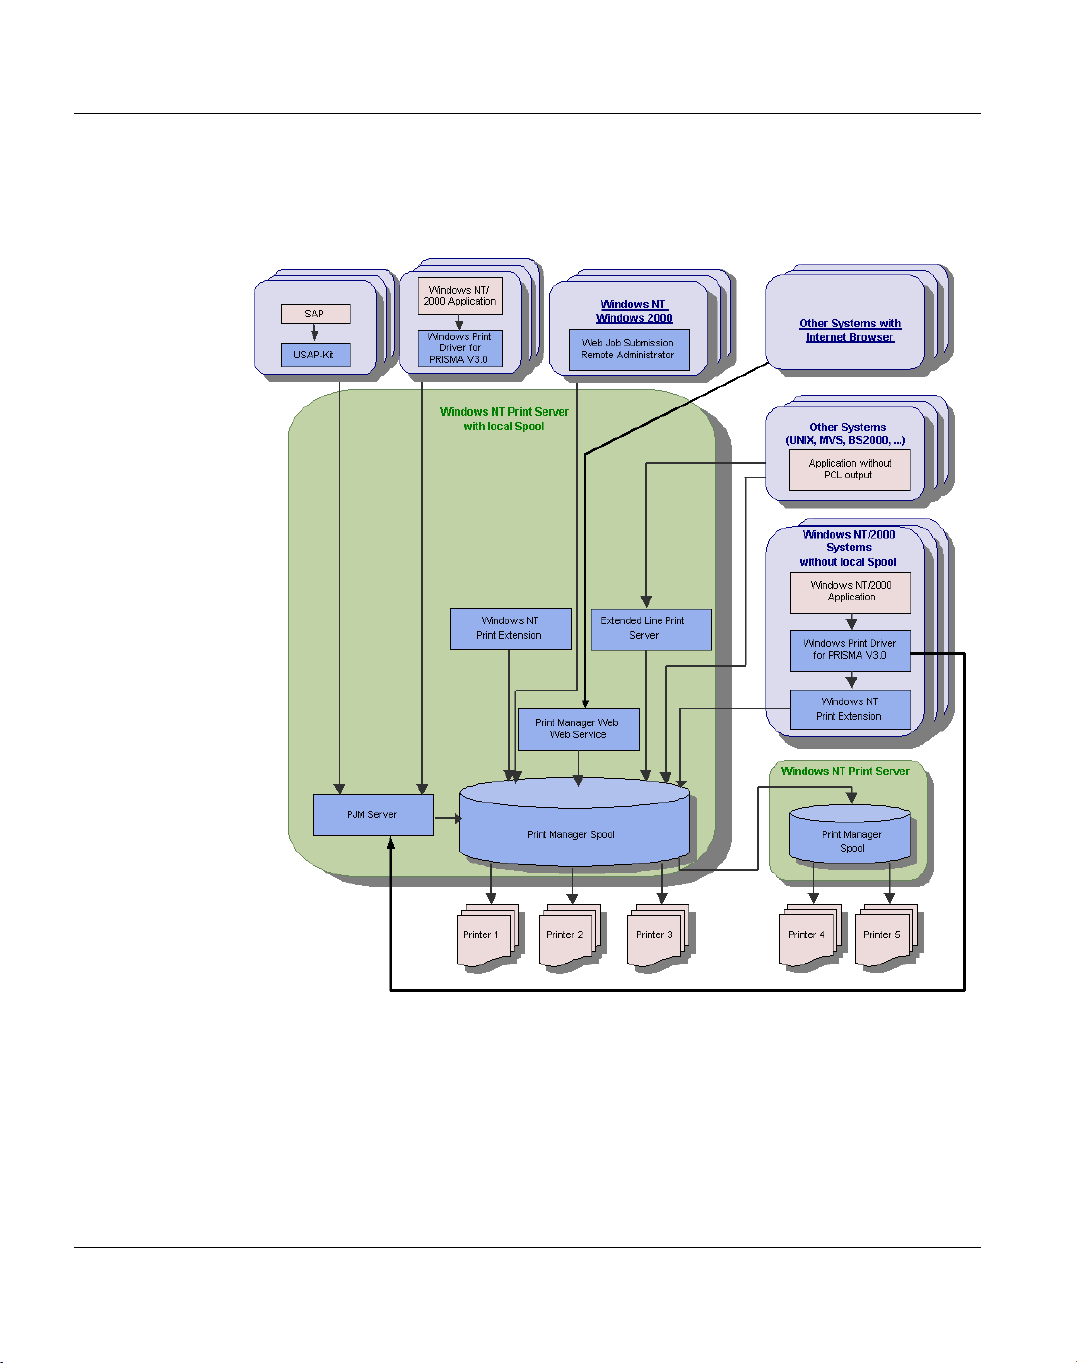
PRISMAoffice System Overview
6 A29247-X30-X-5-7670
Page 17

System Requirements Hardware
3 System Requirements
It is recommended to use the OPS Printer Servers PRISMA-Base 1 or PRISMA-Base 2 with
PRISMAoffice products.
Note: In various countries different hardware could be recommended.
3.1 Hardware
Minimum hardware requirements for PRISMAoffice:
• Pentium 1 GHz processor for very high volume printing
• 256 MB main memory for the base version. Additional 256 MB main memory for the
Professional Edition or if the PJM server is used.
• 10 GB free hard disk capacity
• SVGA screen with a resolution of 800x600 or higher
• SCSI adapter for SCSI printer: Adaptec 2940 (single ended) or Adaptec 2944 (differen-
tial). Printer cable D:20033-23 (20 meters)
Note: Ultra SCSI must be turned off when printing on a SCSI printer.
In various countries different hardware could be recommended.
• OPS printer: functional code with PCL mode V1.22 or higher has to be used
A29247-X30-X-5-7670 7
Page 18

Software System Requirements
3.2 Software
• Windows NT 4.0 Workstation with Service Pack 6a
Languages: International or German
Windows NT 4.0 Server is recommended for all customers who want to use the full connectivity of PRISMAoffice.
• Windows 2000 Professional Service Pack 2
Languages: English or German
• Windows SNMP Agent
Note: The Windows SNMP agent has to be installed before the PRISMAoffice instal-
lation.
• If you want to use Web Job Submission you need a web server.
The web server "Microsoft Peer Web Server" is on the Windows NT 4.0 Workstation
CD. You can also use Microsoft’s Personal Web Manager. But this is not on the Océ
delivered CDs for Windows NT 4.0 Workstation or Windows NT 4.0 Server.
On Microsoft’s Website you will find information about the copyright and the use of the
Internet Information Server (IIS) and Personal Web Server (PWS).
• If you use the SCSI Driver, you need:
Windows NT 4.0 or Windows 2000 SCSI Hostadapter Driver
Note: Printing with a SCSI connection to a printer is not possible with the original SCSI
driver from the EZ-SCSI CD from Adaptec, but only with the SCSI driver installed automatically from the Windows NT CD. If you use Windows NT as operating system, you need the SCSI mini driver from Windows NT Service Pack
6a.
8 A29247-X30-X-5-7670
Page 19

Installation Prerequisites
4 Installation
In this chapter you will find a description of the installation of PRISMAoffice, the necessary
preliminaries and the specialities.
4.1 Prerequisites
First of all, it is strongly recommended that you make a backup of your system, before you
install or update PRISMAoffice.
For this and for all other actions, you have to do on your Windows NT/2000, please refer to
the respective manuals from Microsoft or contact your system administration.
You will also need a Windows NT/2000-CD in some cases, so be sure that you have it
present when you start the installation of PRISMAoffice.
Note: Before installing PRISMAoffice you have to install the Microsoft SNMP service. If
this service is not installed before, it is not possible to install PRISMAoffice. You get
a corresponding message.
Next log in as a user with full administrator´s rights.
Close all other applications on your system.
Stop all active print jobs. During the installation a window will pop up reminding you to stop
all print jobs, but it is more useful to deactivate all print jobs before the installation.
If you intend to install an update of PRISMAoffice, first uninstall the previous version of any
PRISMAoffice components. For detailed information see chapter 4.6, "Add/Remove Components" on page 31.
Depending on which components you want to install or which printer you intend to use,
some further details have to be considered.
If you are using the parallel port the computer BIOS needs to be set to ECP mode. Follow
the instructions of your computer manual how to do this.
A29247-X30-X-5-7670 9
Page 20

Prerequisites Installation
If you want to install the ’Extended Line Printer Server’ from PRISMAoffice, you need to deactivate the service ’TCP/IP Print Server’ from Windows NT/2000. As both the Microsoft
’TCP/IP Print Server’ and the ’Extended Line Printer Server’ use the same lpd protocol and
port, they cannot be activated simultaneously. Instead, you need to activate the ’Simple
TCP/IP Services’, which are necessary for using ’Extended Line Printer Server’. After this,
you need to reinstall the Windows NT service pack. Refer to your Windows manual, to look
up how to work with services.
Now reboot your computer again to be ready for installation.
10 A29247-X30-X-5-7670
Page 21
Installation Types of Installation
4.2 Types of Installation
PRISMAoffice offers you two different types of installation:
•Custom
• Remote Admin
Choose ’Custom’ to install PRISMAoffice components on the print server. Select ’Remote
Admin’ if you want to install the Remote Administration Module on a client PC which is not
the print server.
4.2.1 Custom
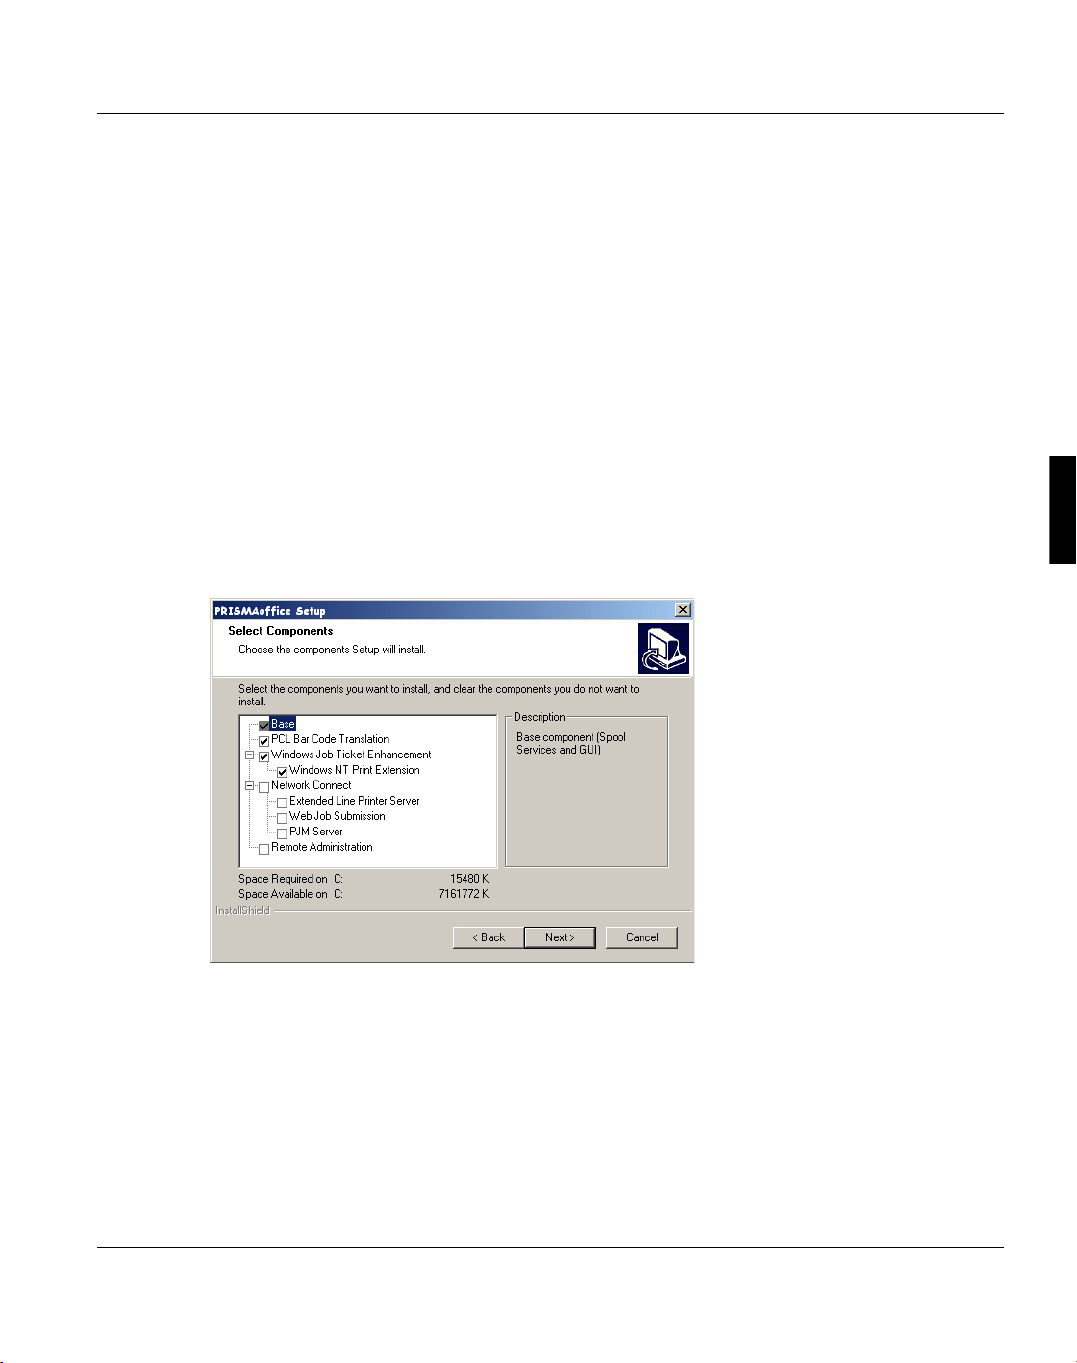
With setup type ’Custom’ you can select, which components of PRISMAoffice shall be installed.
When you select ’Custom’, a new window opens.
The following modules are selected by default:
–Base
– PCL Bar Code Translation
– Windows Job Ticket Enhancement
– Windows NT Print Extension
You can see the little boxes left of the product name. You have to select every module separately, if you want to install it. Click a module you want to select and it is marked.
A29247-X30-X-5-7670 11
Page 22
Types of Installation Installation
Note: There are certain correlations between the products.
If you select one item that has to be combined with certain others, these will be
marked automatically and have grayed out boxes you cannot deselect.
4.2.2 Remote Admin
To use the remote administration feature included on the PRISMAoffice CD, you have to
install the remote administration on a different Windows NT/2000 system. You can choose
any PRISMAoffice system in the network by selecting the IP address of PRISMAoffice
spooler. All of the spooler features work except file viewing. You must install a corresponding license on the PRISMAoffice systems you want to administer remotely.
The advantage of remote administration is that you can administer several PRISMAoffice
systems from one computer, you can centrally administer PRISMAoffice systems at different locations and you can administer PRISMAoffice systems that may not have physical access to the PC where the PRISMAoffice is installed.
12 A29247-X30-X-5-7670
Page 23
Installation Types of Installation
Installing the Remote Administration Feature
1. Install a corresponding license on the PRISMAoffice system (primary spooler) you want
to administer remotely.
2. Install a user with same name and password which is not user administrator (but which
may have administrator rights) on the PRISMAoffice system and on the remote administration system.
3. Make sure that on the remote administration system there are no PRISMAoffice components. If so remove them.
4. Install from the PRISMAoffice CD and choose ’Remote Admin’.
5. This will popup some windows. The last one, the license window, which you quit. (You
don’t need a license on the client machine; you need a license on each PRISMAoffice
system you want be administer remotely.)
6. After a reboot of the system log in as the user you have chosen for remote administration and start the ’Print Manager Spool’.
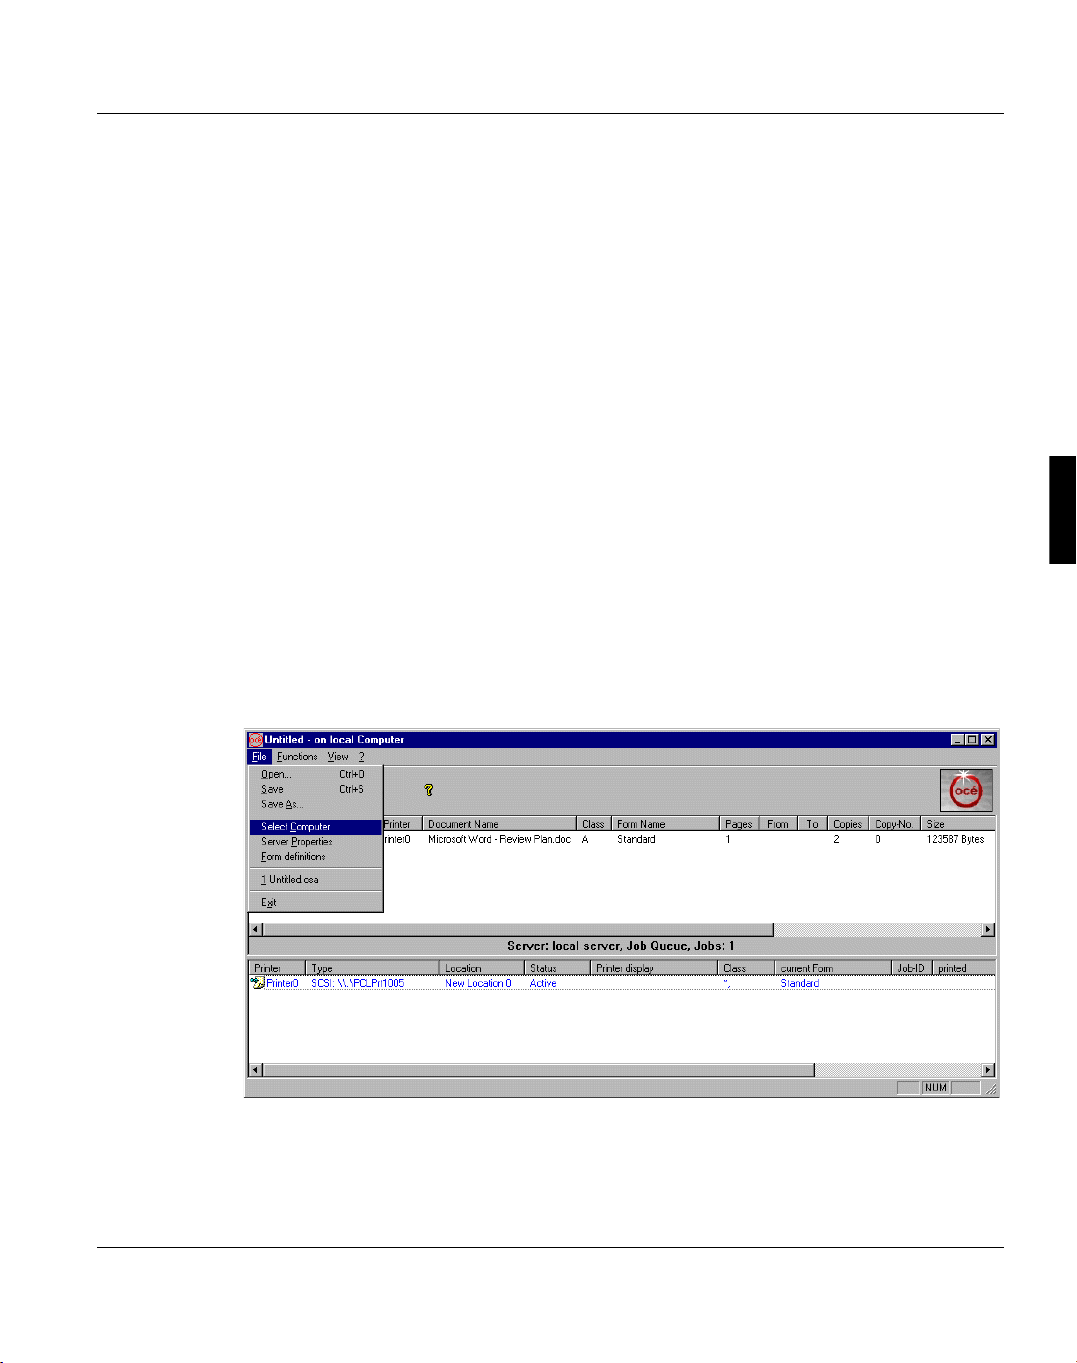
Using the Remote Administration
To use the remote administration feature of PRISMAoffice start the ’Print Manager Spool’.
1. Select ’Select Computer’ from the ’File’ menu.
2. The dialogbox ’New Computer’ appears. In this dialogbox enter the internet address of
the PRISMAoffice system you want to administer remotely.
A29247-X30-X-5-7670 13
Page 24

Types of Installation Installation
Note: A license for Web Job Submission Production Edition must be installed on that
system.
3. In the dialog box ’New Computer’ enter the internet address of the PRISMAoffice system you want to administer.
14 A29247-X30-X-5-7670
Page 25
Installation Installing PRISMAoffice
4.3 Installing PRISMAoffice
The following description of the PRISMAoffice installation is made with setup type ’Custom’.
1. Insert the PRISMAoffice CD in your CD drive and insert the license disk in your floppy
drive.
If the auto run option of your CD drive is activated, the setup procedure will start automatically, if not, open Windows NT/2000 explorer and select the letter of your CD drive.
Now double-click ’setup.exe’ and the installation routine will start automatically.
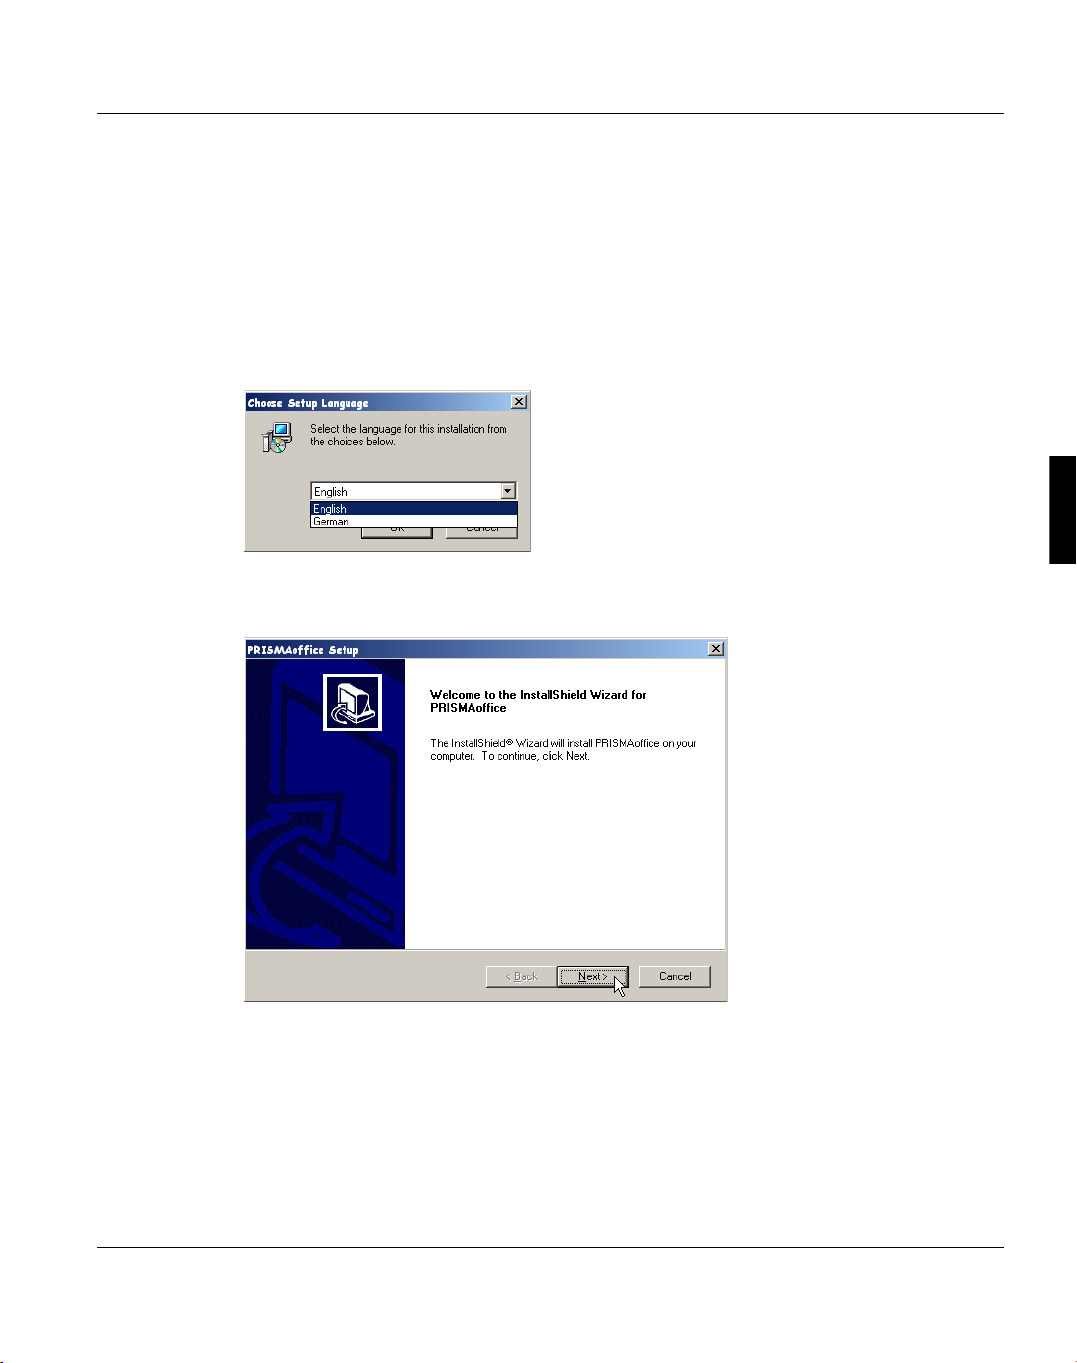
2. Select a setup language. The choice is between german and english. Click the ’OK’ button and then click ’Next’ in the following welcome screen to proceed with the installation.
A29247-X30-X-5-7670 15
Page 26
Installing PRISMAoffice Installation
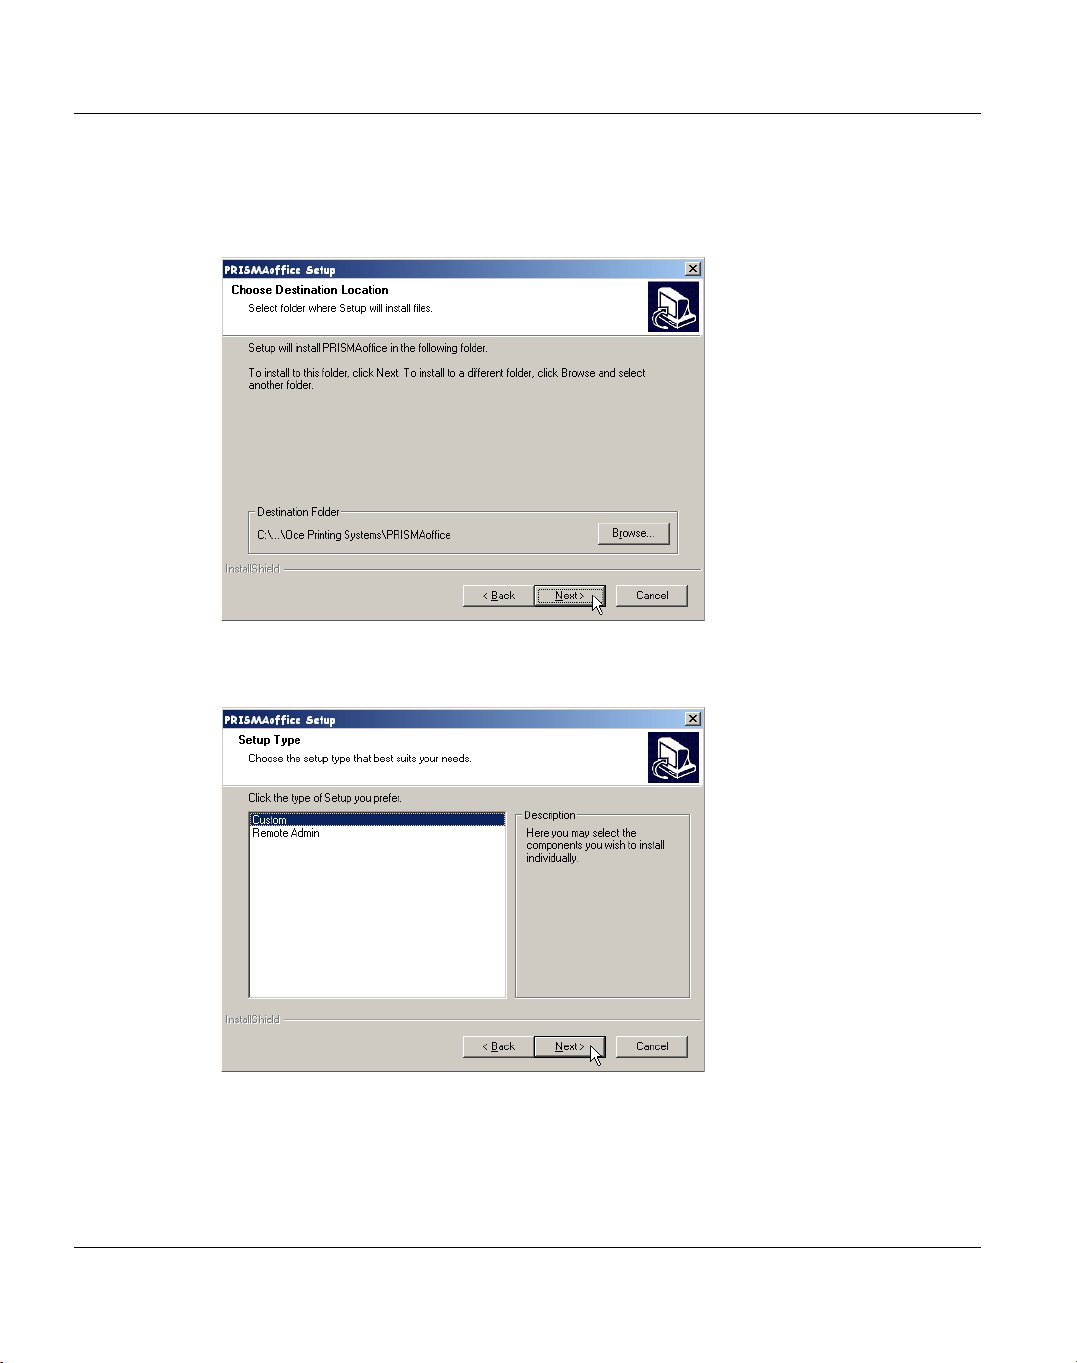
3. Then the installation routine proposes the path for the PRISMAoffice folder. You can
accept the default settings or you can click ’Browse’ to select a different path. When you
have entered the desired path, click ’Next’ to continue.
4. In the next window, you can select the setup type. Click on the desired option and then
click ’Next’ to proceed.
16 A29247-X30-X-5-7670
Page 27
Installation Installing PRISMAoffice
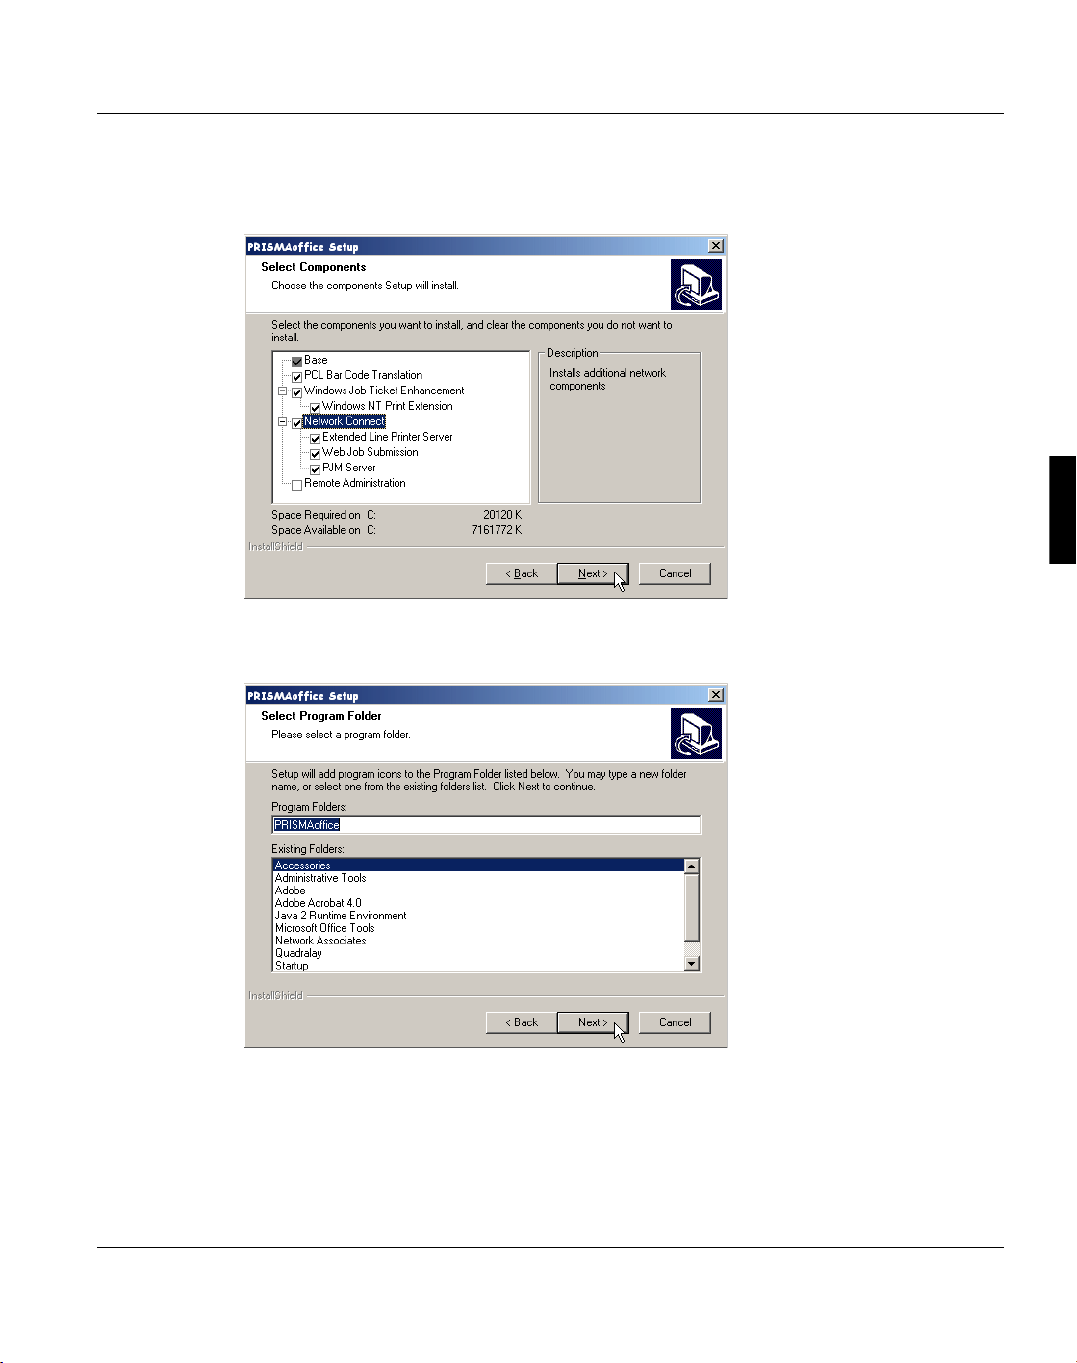
5. Now you are asked, which components of the PRISMAoffice package you want to install. Click the small check boxes in the dialog box to make your selection.
6. Now setup will ask you, where the PRISMAoffice program icon shall be installed. You
can either select an existing folder, type a new one or accept the default folder:
A29247-X30-X-5-7670 17
Page 28
Installing PRISMAoffice Installation
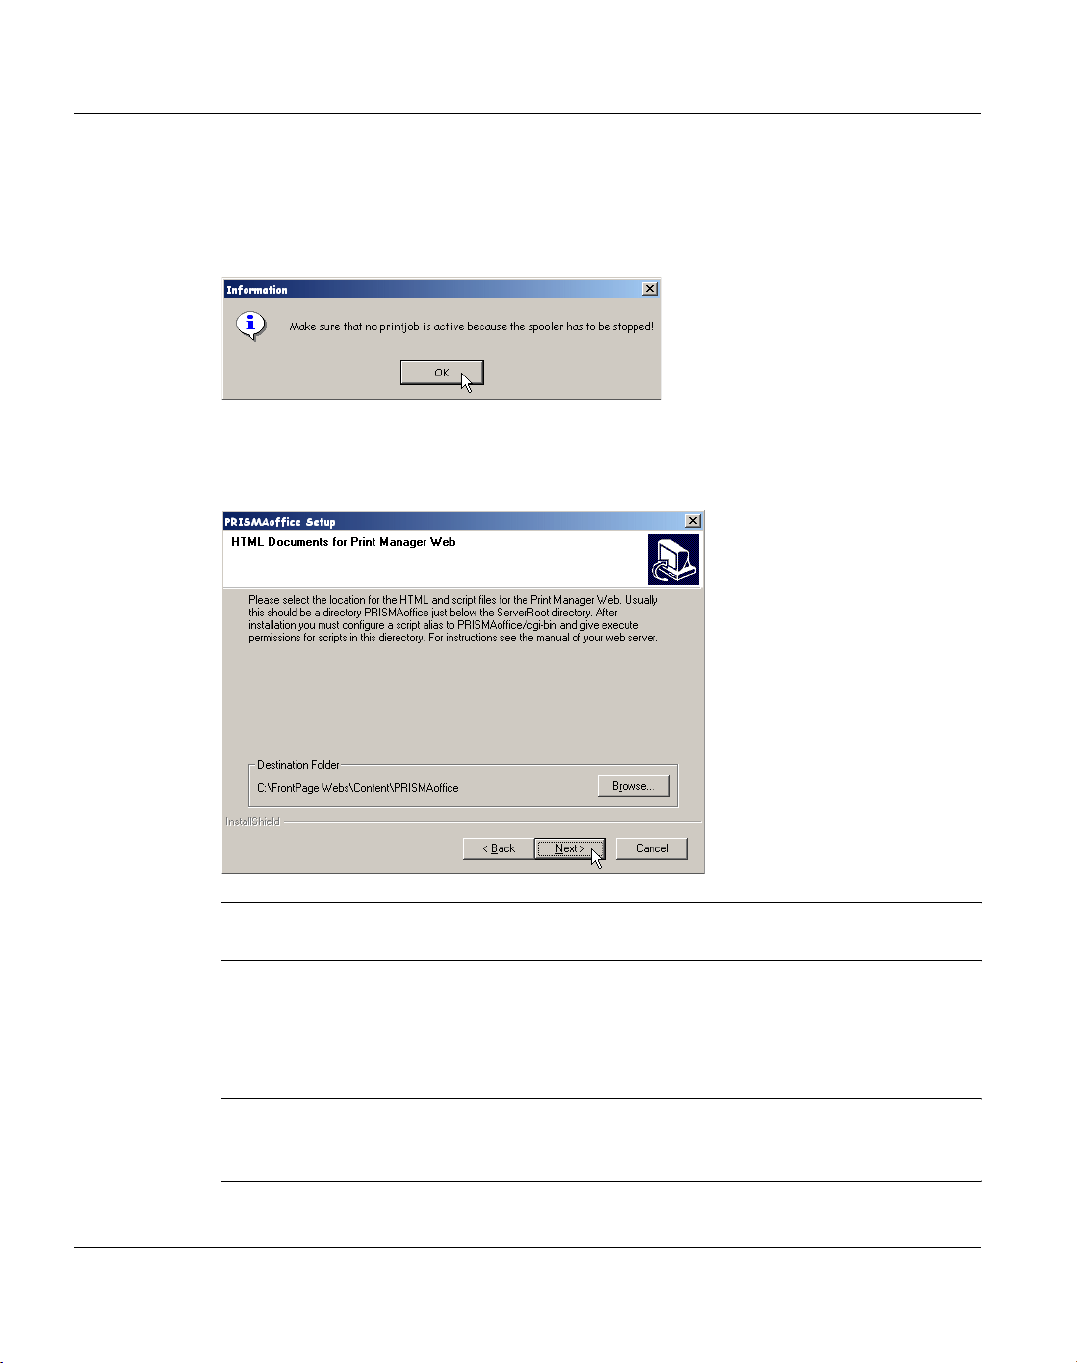
7. An information windows appears to tell you that no print job has to be active during installation. If you have followed the instructions in the chapter 4.1, "Prerequisites" on
page 9 you can click away the window with the ’OK’ button. Otherwise you first have to
stop all print jobs.
8. The installation now proposes the folder for the HTML and script files, necessary for the
’Web Job Submission’. If the default folder is not accepted for the HTML and script files
it will be necessary for the paths for ’Web Job Submission’ to be changed.
Note: After the installation you may still move the files to another location. You need
to modify the configuration of your web server.
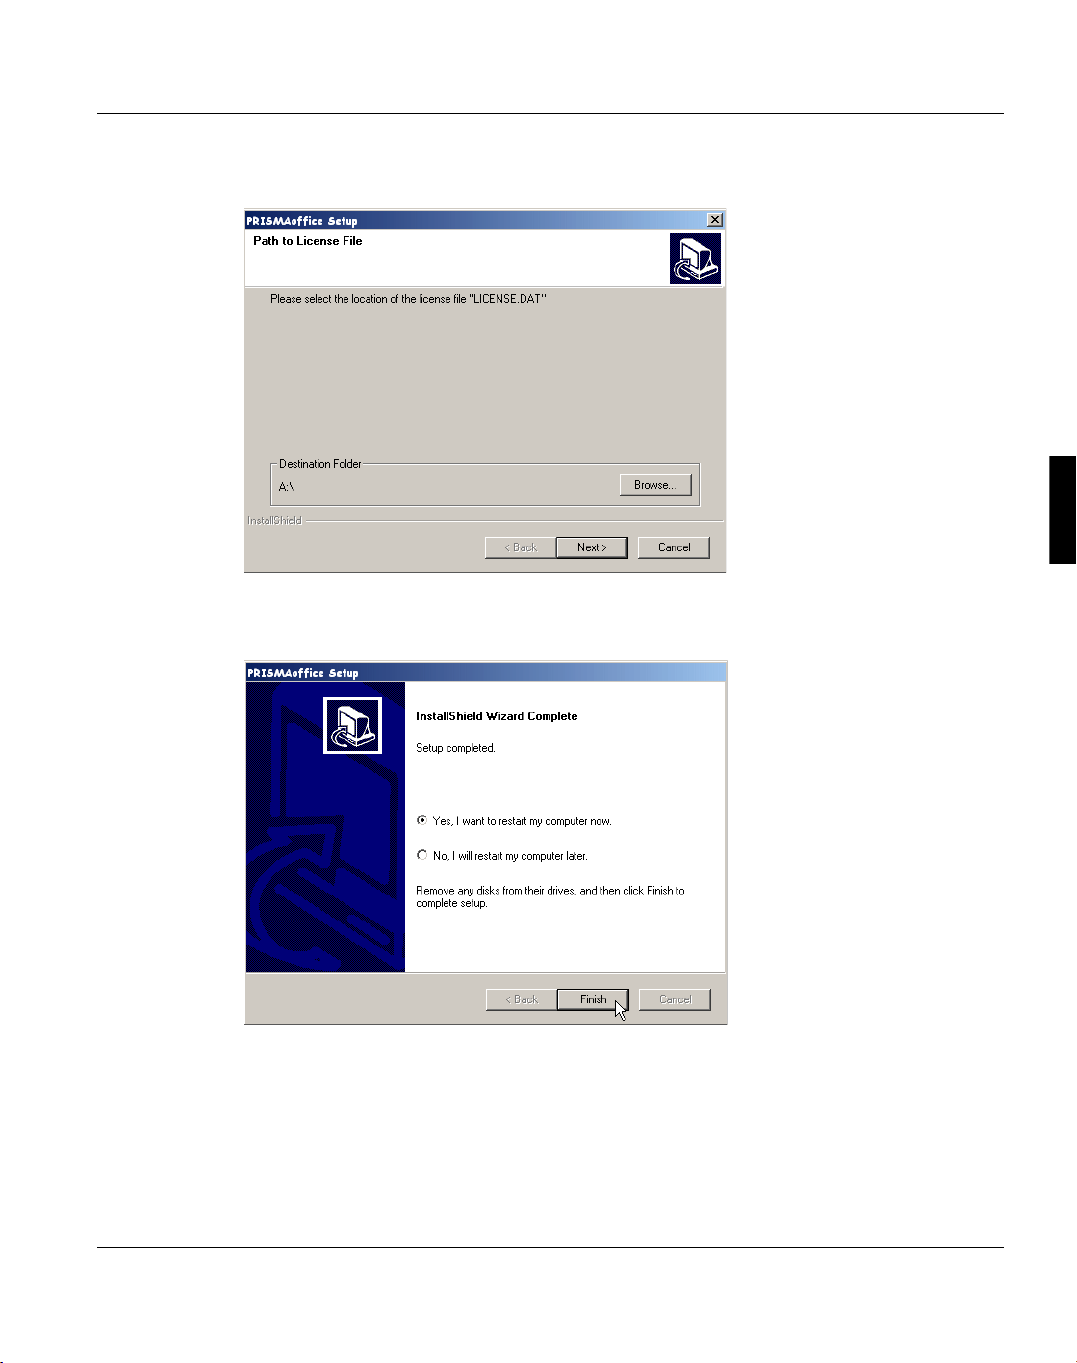
9. After that proceed with ’Next’ and the installation is nearly finished. In the next window
you have to select the path for the license file. If you receive your license file on a floppy
disk, you can accept the default settings. If you will receive the license file electronically,
you can click the ’Browse’ button to select a different path.
Note: Make sure that the license file is named "License.dat".
The licenses which you will install are written into an event log so you can check
later on which licenses are installed on your system.
18 A29247-X30-X-5-7670
Page 29
Installation Installing PRISMAoffice
When you have entered the desired path, click ’Next’ to continue..
10. The installation is completed now. Accept the settings by clicking the ’Finish’ button and
your computer will be rebooted.
After the reboot PRISMAoffice is ready for the installation and settings of your printer.
You will find the PRISMAoffice entry in the Windows NT/2000 start list and the respective program group.
A29247-X30-X-5-7670 19
Page 30

Installing the Data Encryption Plug-in Installation
4.4 Installing the Data Encryption Plug-in
4.4.1 Data Encryption
The encryption of print data with the data encryption plug-in allows to transfer data via LAN
to PRISMAoffice in an encrypted state. When the print job is sent from the client to the print
server the data will be encryted. In the spool of the print server the data will be converted
back to the original print format.
Note: Data encryption is only guaranteed during the data transfer via LAN.
If you want to use the data encryption plug-in, you need a license for the Professional Edition component of PRISMAoffice. Without the license for the Professional Edition component the data encryption plug-in will not encrypt and pass through the data.
4.4.2 Installing the Plug-in
The data encryption plug-in is a ’*.dll’ file which is added to the registry
(HKEY_LOCAL_MACHINE\SOFTWARE\OcePrintingSystems\Spooler\Plugins\IF_PRE)
during the installation of PRISMAoffice automatically.
20 A29247-X30-X-5-7670
Page 31

Installation Installing the Data Encryption Plug-in
The data encryption plug-in uses an interface which is installed in the registry during the
installation of PRISMAoffice too. The path to the data encryption plug-in is specified in the
registry (HKEY_LOCAL_MACHINE\SOFTWARE\OcePrintingSystems\Spooler) during the
PRISMAoffice installation.
4.4.3 Activating the Plug-in
After the installation of the data encryption plug-in (de_encrypt.dll) this module has the
name ’100’ in the registry.
To open the ’Registry Editor’ window select ’Run...’ from the ’Start’ menu. The ’Run’ dialog
box is opened. Type ’regedit’ in the ’Open’ text field and click the ’OK’ button. The ’Registry
Editor’ window is opened.
A29247-X30-X-5-7670 21
Page 32

Installing the Data Encryption Plug-in Installation
The following picture shows the corresponding registry entries after the installation.
The plug-in ’InputFilter.dll’ has the name ’0’ and the plug-in ’de_encrypt.dll’ has the name
’100’. To activate the data encryption plug-in in the ’Registry Editor’ you have to change the
name of the encryption plug-in to ’1’. To do this right-click to the name and select ’Rename’
from the displayed menu. Now you can change the name of the plug-in.
22 A29247-X30-X-5-7670
Page 33

Installation Installing the Data Encryption Plug-in
Note: If you recieve encrypted data, you have to name the ’de_encrypt.dll’ with ’0’ to de-
code the recieved data. Rename the plug-in ’InputFilter.dll’ with ’1’ to use the input
filter after decoding.
Reboot the computer to update your system. After the reboot you can use the data encryption plug-in.
4.4.4 How does the Interface Work?
When the print job is in the spool the registry is searched for entries in
’HKEY_LOCAL_MACHINE\SOFTWARE\OcePrintingSystems\Spooler\Plugins\IF_PRE’.
These entries have to be named ’0, 1, 2, ...’. The values of ’0, 1, 2, ...’ are the plug-in names
which are called in ascending order after the input filter. The functionality of the input filter
in PRISMAoffice V2.02 is now contained in a separate plug-in called ’InputFilter.dll’. This
plug-in is installed in ’HKEY_LOCAL_MACHINE\SOFTWARE\OcePrintingSystems\
Spooler\Plugins\IF_PRE’ and has the name ’0’.
A29247-X30-X-5-7670 23
Page 34

Installing the BarCode Support Plug-in Installation
4.5 Installing the BarCode Support Plug-in
4.5.1 Printing the BarCode
The HP-PCL data stream allows the creation of specific BarCodes via escape sequences.
This support can typically only be used with a limited range of desk top printers, mostly HP
printers, that require costly hardware modules called DIMM's.
The BarCode option for PRISMAoffice V3.0 removes the requirement for any hardware upgrades by converting the PCL escape sequences to standard PCL bitmaps that can be
printed on any PCL printer, including the Océ high speed printers. The conversion runs as
an automatic background task, and the updated print files are placed in the standard Spool.
4.5.2 Supported BarCodes
The BarCode plug-in of PRISMAoffice supports the following BarCodes:
BarCode ID BarCode Name
23591 USPS ZEBRA
24600 UPC-A
24601 UPC-A +2
24602 UPC-A +5
24610 UPC-E
24611 UPC-E +2
24612 UPC-E +5
24620 EAN/JAN-8
24621 EAN/JAN-8 +2
24622 EAN/JAN-8 +5
24630 EAN/JAN-13
24631 EAN/JAN-13 +2
24632 EAN/JAN-13 +5
24640 25 interleaved
24 A29247-X30-X-5-7670
Page 35

Installation Installing the BarCode Support Plug-in
BarCode ID BarCode Name
24641 25 interl + CHK
24642 German Postal 25 Leitcode 13
24643 German Postal 25 Identcode 11
24644 USPS 25, 11 digits Tray Label
24645 USPS 25, 8 digits Sack Label
24650 25 industrial
24651 25 indust + CHK
24660 25 matrix
24661 25 matrix + CHK
24670 39 (3of9)
24671 39 + CHK
24680 39 extended
24681 39 extended + CHK
24675 Danish PTT 39 barcode
24676 French Postal 39 A/R
24690 93
24691 93 extended
24700 128 autoswitch
24701 128 A
24702 128 B
24703 128 C
24704 128 C
24710 UCC-128
24720 EAN 128
24750 CODABAR
A29247-X30-X-5-7670 25
Page 36

Installing the BarCode Support Plug-in Installation
BarCode ID BarCode Name
24751 CODABAR +CHKmod16
24760 MSI
24761 MSI +CHK10
24762 MSI +CHK10+CHK10
24763 MSI +CHK11+CHK10
24770 ZIP+4 POSTNET 5
24771 ZIP+4 POSTNET 9
24772 ZIP+4 POSTNET 11
24780 Singapore 4 State
24785 Australia 4 State 37-CUST
24786 Australia 4 State 52-FF-MET
24787 Australia 4 State 67-FF-MET
24788 Australia 4 State FCC-45 REPLY
26 A29247-X30-X-5-7670
Page 37

Installation Installing the BarCode Support Plug-in
4.5.3 Installing the Plug-in
To install the BarCode Support plug-in you have to select the ’PCL Barcode Translation’
check box in the ’Select Components’ dialog box during the PRISMAoffice installation.
A29247-X30-X-5-7670 27
Page 38

Installing the BarCode Support Plug-in Installation
This plug-in uses an interface which is installed in the registry during the installation of
PRISMAoffice. The path to the BarCode Support plug-in is specified in the registry
(HKEY_LOCAL_MACHINE\SOFTWARE\OcePrintingSystems\Spooler) during the
PRISMAoffice installation.
4.5.4 Activating the Plug-in
After the installation of the BarCode Support plug-in (BcEscToBmpPlugin.dll) this plug-in
has the name ’101’ in the registry.
To open the ’Registry Editor’ window select ’Run...’ from the ’Start’ menu. The ’Run’ dialog
box is opened. Type ’regedit’ in the ’Open’ text field and click the ’OK’ button. The ’Registry
Editor’ window is opened.
28 A29247-X30-X-5-7670
Page 39

Installation Installing the BarCode Support Plug-in
The following picture shows the corresponding registry entries after the installation.
A29247-X30-X-5-7670 29
Page 40

Installing the BarCode Support Plug-in Installation
The plug-in ’InputFilter.dll’ has the name ’0’ and the plug-in ’BcEscToBmpPlugin.dll’ has the
name ’101’. To activate the BarCode Support plug-in in the ’Registry Editor’ you have to
change the name of the BarCode plug-in to ’1’. To do this right-click to the name and select
’Rename’ from the displayed menu. Now you can change the name of the plug-in.
Reboot the computer to update your system. After the reboot you can use the BarCode
Support plug-in.
4.5.5 How does the Interface Work?
When the print job is in the spool the registry is searched for entries in
’HKEY_LOCAL_MACHINE\SOFTWARE\OcePrintingSystems\Spooler\Plugins\IF_PRE’.
These entries have to be named ’0, 1, 2, ...’. The values of ’0, 1, 2, ...’ are the plug-in names
which are called in ascending order after the input filter. The functionality of the input filter
in PRISMAoffice V2.02 is now contained in a separate plug-in called ’InputFilter.dll’. This
plug-in is installed in ’HKEY_LOCAL_MACHINE\SOFTWARE\OcePrintingSystems\
Spooler\Plugins\IF_PRE’ and has the name ’0’.
30 A29247-X30-X-5-7670
Page 41

Installation Add/Remove Components
4.6 Add/Remove Components
If you want to add or remove components, PRISMAoffice offers a convenient function for
doing so.
In Windows NT/2000 click ’Start/Settings/Control Panel’. The ’Control Panel’ window
opens. Now double-click the ’Add/Remove Programs’ icon.
The ’Add/Remove Programs’ window appears.
In the left column of this window click the ’Change or Remove Programs’ icon. The currently
installed programs are listed in the right column. Select the entry ‘PRISMAoffice‘ from this
list and click the ’Change/Remove’ button.
A29247-X30-X-5-7670 31
Page 42

Add/Remove Components Installation
The ’PRISMAoffice Setup’ windows appears.
The window offers three options:
–’Modify’
–’Repair’
– ’Remove’
’Modify’
With ’Modify’ you can easily add or remove any components of PRISMAoffice. Click on the
option field and a new window opens.
32 A29247-X30-X-5-7670
Page 43

Installation Add/Remove Components
Select the module you want to install or uninstall by clicking to the respective box left of the
module name. Then click ’Next’ to proceed and the installation process will run as described
before in the ’Installing PRISMAoffice’ chapter.
’Repair’
With ’Repair’ you can reinstall your previous configuration of PRISMAoffice, e.g. after a system breakdown corrupting files or any other damage in PRISMAoffice. To have ’Repair’
work properly, the installation medium has to be accessible in the same way (i.e. drive letter
and path) as during the original installation. If this cannot be accomplished, you have to remove the whole installation via ’Remove’ and reinstall PRISMAoffice from scratch. Therefore you have to save all modified files (printcap file etc.) before you reinstall PRISMAoffice.
’Remove’
’Remove’ will uninstall PRISMAoffice from your system. Depending on the installed components, you may have to delete some files and entries manually. Please refer to the following
chapters.
4.6.1 Extended Line Printer Server
If you want to uninstall the ’Extended Line Printer Server’, it is recommended to save the
’printcap’ file prior to de-installation in case you will need it for some other programs.
A29247-X30-X-5-7670 33
Page 44

Add/Remove Components Installation
34 A29247-X30-X-5-7670
Page 45

Print Manager Spool Introduction
5 Print Manager Spool
5.1 Introduction
The Print Manager Spool is the central tool to manage print jobs. It receives print jobs through various print
job submission tools. (Ospprint, Windows Port Monitor, lpr, Web print).
When the print jobs are put into the
print queue, a job ticket will be assigned to them if they do not already
have one.
The input filter can be configured to
extract the parameters for the job
ticket from a header page of the print
job.
The Print Manager Spool processes
the printing of the jobs on the connected printers.
When the job is completely printed,
an accounting entry is generated and
the print job is deleted or is moved to
the reprint queue.
The ’Print Manager Spool’ is the basic module of PRISMAoffice. It consists of several Windows NT/2000 system services:
• ’Print Manager Spool Server’ (the main print service)
• ’Print Manager Spool Interface’ (for receiving jobs)
• ’Print Manager Spool Cleaner’ (manages the Reprint Queue)
A29247-X30-X-5-7670 35
End of Job
Page 46

Introduction Print Manager Spool
The user interface for this module is implemented as a separate Windows NT/2000 application program, ’OspAdmin.exe’.
The spool system supports local PCL printers (SCSI or Centronics) and communicates with
the printers via Windows NT/2000 device drivers.
It can also address printers that are configured in the local Windows NT/2000 standard
spool and printers connected to other servers in the network.
So you can distribute jobs between several print servers and access all PCL network printers which are supported by Windows NT/2000.
It is also possible to address a printer via TCP/IP.
Jobs are controlled and the printer status is queried by means of the Printer Job Language
(PJL).
A job ticket defines the properties of each job. The ticket stores various parameters, such
as the form name, the number of document copies requested, details about the sender and
information for the header page. The ticket is either created by a special Océ Printing Systems printer driver on the basis of information entered by the Windows Print Extension for
Windows NT or Windows 95 on basis of information entered by the user before printing,
generated by the OSPPRINT.EXE print command with parameters, or via the Input filter.
System messages may be written to the Windows NT Event Log Service.
With the integrated Océ PCL Viewer you can view jobs or header- and trailer pages.
The Océ spool system also supports JEC (printing systems of Océ NPS). For more details
please refer to chapter 5.3.5, "JEC Support for NPS File Systems" on page 79.
The functionality of the Océ spool system can be grouped in four main parts:
1. Job Control/Editing
• Display of a list of all jobs, together with their current status.
• Handle various data types, supported types are PCL, PCLXL, PostScript, Text, some
SEC_*, Text with form feeds included, AFPDS and IPDS but only to forward them to a
AFPDS/IPDS print server, and RAW for all unknown types.
• Form-controlled job processing. A job's form name determines, how it will be handled,
i.e. the system decides on the basis of the name which resources need to be loaded,
whether the paper has to be changed, or whether a data converter or filter has to be run.
• Job handling while printing is in progress: functions for halting, continuing, cancelling
and immediately deleting jobs.
• Display of job progress during printing: you can see at a glance how many pages have
been sent to the printer and how many have already been physically printed.
36 A29247-X30-X-5-7670
Page 47

Print Manager Spool Introduction
• Functions for reprinting: jobs can be restarted at any particular page. Via PJL, the printer then outputs the job beginning at this page, skipping the pages preceding this point.
If only part of the job is to be printed, the spooler stops transferring pages as soon as
the last page in the requested range has been printed. If a job is cancelled, the spooler
notes the last printed page in the job ticket – if you restart the job later, you have the
option of selecting the page after this one as the new start point.
• Other job functions – you can change the form name, move jobs to a different target
printer, and display the job ticket with the statistics of the last printout.
• Accounting: when a job is printed or cancelled, the spool is informed how many pages
have been printed physically. This data, plus the information from the job ticket, can be
stored in an accounting file.
• Data conversion: each form name can be assigned a converter or filter for processing
data. The system then runs the converter or filter before the data is printed.
• Input filter: this filter can extract information from a header page for use these information in a job ticket in the spooler. This enables the spool functionality to be accessed by
other system environments.
• Rearranging of job list: the sort order of jobs can be changed by simple point-and-click
functions. There are also multiple sort options for listing jobs by selected criteria.
• Changing the order of jobs in the print queue: each job can be moved to any position in
the list.
• Display filter: you can choose which jobs shall be displayed, e.g. just the jobs belonging
to a specific department.
2. Printer Control/Status
• The spool system supports multiple printers, enabling simultaneous printing on the devices.
• Each printer can be (logically) activated and deactivated, i.e. a printer is either enabled
or disabled for output.
• Each printer is assigned to a form. The assignment ”triggers” the output of the jobs
which have this form name. If a form has the ‘automatic form mounting’ property, the
spool changes to a different form automatically and then prints the jobs with the new
form. If a form does not have this property, it has to be assigned to the printer explicitly.
• Pending printer error messages are displayed.
• When a job is printing, the number of the most recently printed page is displayed; this
number is updated dynamically to inform you how many pages have been output on the
printer.
A29247-X30-X-5-7670 37
Page 48

Introduction Print Manager Spool
3. Form Properties
The properties of a form determine which actions the spool system is to execute when it
processes a job. The spool system can be instructed to:
• Print a header page at the start of a job. This page contains data from the job ticket.
• Print a trailer page at the end of a job.
• Automatically load a form. This determines, whether the form has to be assigned explicitly to the printer in order for jobs with this form name to be printed, or whether the
spool assigns the form name to the printer automatically.
• Turn job offsetting on or off. The system can also be instructed to take the job offsetting
commands from the print file itself.
• Turn job monitoring on and off (PJL capable printers only). This is the function that displays the number of pages printed while the job is being output.
• Load resources: PCL resources can be inserted preceding and following the job.
• Delete a job: you can specify, whether the job is to be deleted immediately after printing,
kept for a number of days and then deleted, or be deleted manually later.
• Run a data converter: a data filter can be run on the print data before output, e.g. to
insert special control commands for printing. Data filters provide the capabilities for customizing specific applications.
38 A29247-X30-X-5-7670
Page 49

Print Manager Spool Introduction
4. Input Filters
The input filter makes it possible for parameters such as the form name, user, etc. to be
transferred from other environments (e.g. UNIX or SAP).
The input filter (IPF.EXE) is now included in the Print Manager Interface Service. The filter
is started automatically by the Print Manager Interface Service when a job is received that
has no job ticket. From the print file (e.g. the header page), it retrieves the text that is to
serve as parameters. It can search for key words, read at fixed positions or suppress a
header page. This functionality is available for ASCII, EBCDIC and formatted PCL print
files.
Detecting of header pages will now be done during the transfer of the jobs from the standard
NT Spool to the PCL Spool. After the Print Manager Interface Service has tracked the parameters of the header page, it will inform the spooler with the parameters (form and so on).
Functionality in detail:
After the job has been transferred completely, the Print Manager Interface Service checks
the job ticket and starts the input filter if the ticket contains the form 'standard'.
The input filter reads the job file and looks for a known identification string. Then it reads
the parameters being configured for this string and saves them in the job ticket. This procedure allows to read any parameters, if the files can be detected by different identifiers.
The input filter contains a complete PCL parser and can therefore read preformed PCL files.
Only printable data in the files are interpreted. EBCDIC files can also be read.
For more information refer to chapter 5.3.1, "Input Filter" on page 64.
A29247-X30-X-5-7670 39
Page 50

Quick Start: Installing and Configuring Printers Print Manager Spool
5.2 Quick Start: Installing and Configuring Printers
In this chapter you will see, how different types of printers are to be installed with the ’Print
Manager Spool’.
5.2.1 Parallel Printers
The ’Print Manager Spool’ can only access a parallel printer if the corresponding parallel
port is not linked with a printer in the internal Windows NT/2000 spool.
Note: No printers can be defined as LPT1.
Open the Océ ’Print Manager Spool’ via ’Start/Programs/PRISMAoffice/Print Manager
Spool’. The user interface window opens.
The main window is divided into two panes. The upper one is the job view, which lists all
the current jobs in the spool, together with their properties. The lower window part is the
printer view, which lists all the printers you have configured, their current status plus various
other properties.
In the lower part of the window, the printer view, click right to open the context menu (click
anywhere in the white area).
40 A29247-X30-X-5-7670
Page 51

Print Manager Spool Quick Start: Installing and Configuring Printers
In the context menu click on ’Add Printer’. Now a new printer appears on the left side of the
printer view as Printer 0, the context menu closes.
Now mark this printer and click it with the right mouse button. A new context menu appears.
Click on the item ’Properties’. A new dialog window opens.
In this window you have to set the properties of the new printer.
First open the ’Connection Type’ drop down list and select ’Parallel’.
A29247-X30-X-5-7670 41
Page 52

Quick Start: Installing and Configuring Printers Print Manager Spool
Then open the ’Device-Link’ drop down and select ’\Device\Parallel0’. PRISMAoffice starts
counting the printers by 0. So if you install e.g. the third printer in the system, it would be
printer 2 for PRISMAoffice.
The settings in the list below can stay unchanged, they are already set on default.
Now confirm the settings by clicking ’OK’ and the window closes.
Mark the printer in the printer view again and click right to open the context menu. Now click
on the item ’Activate’ to activate the printer.
42 A29247-X30-X-5-7670
Page 53

Print Manager Spool Quick Start: Installing and Configuring Printers
A new window, ’Mount Form for Printer New Location 0’, opens.
In this window you can select the form you want to assign to the printer and the class. You
can accept the proposed default settings and confirm the window by clicking ’OK’.
Now a new window shows up that can be ignored, as you have already selected the standard form. Click ’OK’ and the window closes.
A29247-X30-X-5-7670 43
Page 54

Quick Start: Installing and Configuring Printers Print Manager Spool
In the printer view you can control now the settings you have just made.
You can see that ’Printer0’ is type ’Parallel’ with ’Active’ status, class ’*’ and form ’Standard’.
So now the printer is installed correctly.
44 A29247-X30-X-5-7670
Page 55

Print Manager Spool Quick Start: Installing and Configuring Printers
5.2.2 SCSI Printers
For security reasons each SCSI printer must be connected to a separate SCSI adapter.
Normally the printer runs on an Adaptec AHA 2944 board in differential mode. The cable
can be obtained from Océ.
Note: If you want to use the SCSI Driver, you need the Windows NT 4.0 or Windows 2000
SCSI Host adapter Driver.
In various countries different hardware could be recommended.
Always turn on the SCSI printer before you start the system. In addition, the printer´s SCSI
channel must be enabled and active.
Open the ’Océ Print Manager Spool’ via ’Start/Programs/PRISMAoffice/Print Manager
Spool’. The user interface window opens.
The main window is divided into two panes. The upper one is the job view, which lists all
the current jobs in the spool, together with their properties. The lower window part is the
printer view, which lists all the printers you have configured, their current status plus various
other properties.
In the lower part of the window, the printer view, click right to open the context menu.
A29247-X30-X-5-7670 45
Page 56

Quick Start: Installing and Configuring Printers Print Manager Spool
In the context menu click on ’Add Printer’. Now a new printer appears on the left side of the
printer pane as Printer 0.
Now mark this printer and click it with the right mouse button. A new context menu appears.
Click on the item ’Properties’. A new dialog window opens.
In this window you have to set the properties of the new printer.
Now change to the desktop and select ’My computer/Control Panel/SCSI adapters and
check the port assignment for your SCSI printer. Go back to the installation procedure.
Now open the ’Connection Type’ drop down list and select SCSI.
46 A29247-X30-X-5-7670
Page 57

Print Manager Spool Quick Start: Installing and Configuring Printers
Then open the ’Device-Link’ drop down and select ’\Device\ScsiPort0’ or what your port assignment is. PRISMAoffice starts counting the SCSI ports by ’0’. The counting corresponds
to the numbers of the host adapters.
Now click on the ’Address‘ button, to put in the printers SCSI address. A new window opens.
For ’Path-ID/Bus_No.’ put in 0. This is always the right value.
The ’Target-ID’ is the SCSI ID of the printer. This SCSI ID is configurable at the operator
panel of the OPS printers.
Finally put in 0 for the ’LUN’ value. 0 is always the correct value here. Then click ’OK’ to
confirm the settings, close this window and return to the properties window.
The settings in the list below can stay unchanged, they are already set on default.
Now confirm the settings by clicking ’OK’ and the window closes.
Mark the printer in the printer view again and click right to open the context menu. Now click
on the item ’Activate’ to activate the printer.
A29247-X30-X-5-7670 47
Page 58

Quick Start: Installing and Configuring Printers Print Manager Spool
A new window, ’Mount Form for Printer New Location 0’, opens.
In this window you can select the form you want to assign to the printer and the class. You
can accept the proposed default settings and confirm the window by clicking ’OK’.
Now a new window shows up that can be ignored, as you have already selected the standard form. Click ’OK’ and the window closes.
48 A29247-X30-X-5-7670
Page 59

Print Manager Spool Quick Start: Installing and Configuring Printers
In the printer view you can control now the settings you have just made.
You can see that ’Printer0’ is type ’SCSI’ with ’Active’ status, class ’*’ and form ’Standard’.
So now the printer is installed correctly. If the printer goes to a ’Waiting’ state check the print
job properties for the correct destination printer.
A29247-X30-X-5-7670 49
Page 60

Quick Start: Installing and Configuring Printers Print Manager Spool
5.2.3 TCP/IP Printers
Open the ’Océ Print Manager Spool’ via ’Start/Programs/PRISMAoffice/Print Manager
Spool’. The user interface window opens.
The main window is divided into two panes. The upper one is the job view, which lists all
the current jobs in the spool, together with their properties. The lower window part is the
printer view, which lists all the printers you have configured, their current status plus various
other properties.
In the lower part of the window, the printer view, click right to open the context menu.
In the context menu click on ’Add Printer’. Now a new printer appears on the left side of the
printer view as ’Printer0’. PRISMAoffice starts counting the printers by ’0’. So if you install
e.g. the third printer in the system, it would be ’Printer2’ for PRISMAoffice.
50 A29247-X30-X-5-7670
Page 61

Print Manager Spool Quick Start: Installing and Configuring Printers
Now mark this printer and click it with the right mouse button. A new context menu opens.
Click on the item ’Properties’. A new dialog window opens.
In this window you have to set the properties of the new printer.
First open the ’Connection Type’ drop down list and select ’TCP/IP’.
A29247-X30-X-5-7670 51
Page 62

Quick Start: Installing and Configuring Printers Print Manager Spool
In the ’TCP/IP Address’ field you put in the correct TCP/IP address of the printer. You find
the port number, you have to put in the field ’TCP/IP Port’, in the documentation of your
printer. The default TCP/IP port of OPS printers is ’5001’ and of HP printer usually ’9100’.
The settings in the list ’Parameter’ and ’Contents’ can stay unchanged, they are already set
on default.
Note: ’Check printer status’ is a setting for PJL capable TCP/IP printers.
If this setting is activated, PRISMAoffice will check the status of the printer before a
print job is sent to this printer. This setting prevents that jobs are sent to a printer
which is offline or reports an error. This printer check might cause a short delay for
starting printing the job.
This setting has no effect for printers which are non TCP/IP or non PJL capable
printers.
52 A29247-X30-X-5-7670
Page 63

Print Manager Spool Quick Start: Installing and Configuring Printers
Enabling the SNMP support for printers requires that the printers are connected through
TCP/IP, that all network components pass through SNMP packages and that the printer
supports SNMP. In the ’Parameter’ list you can make settings for the SNMP support.
Click the ’Query printer via SNMP’ check box to enable the SNMP requests for printers. The
check box is set to ’Yes’. The port number for SNMP must be ’161’ as the libraries of Windows NT 4.0 does not support other values. To configure the SNMP protocol enter the
’Community name for SNMP’ in the corresponding text box. This community name depends
from the device. Please refer the documentation of your printer for the community name.
Now confirm the settings by clicking ’OK’ and the window closes.
Mark the printer in the printer view again and click right to open the context menu. Now click
on the item ’Activate’ to activate the printer.
A29247-X30-X-5-7670 53
Page 64

Quick Start: Installing and Configuring Printers Print Manager Spool
A new window, ’Mount Form for Printer New Location 0’, opens.
In this window you can select the form you want to assign to the printer and the class. You
can accept the proposed default settings and confirm the window by clicking ’OK’.
Now a new window shows up that can be ignored, as you have already selected the standard form. Click ’OK’ and the window closes.
54 A29247-X30-X-5-7670
Page 65

Print Manager Spool Quick Start: Installing and Configuring Printers
In the printer view you can control now the settings you have just made.
You can see that ’Printer0’ is type ’TCP/IP’ with ’Active’ status, class ’*’ and form ’Standard’.
So now the printer is installed correctly.
A29247-X30-X-5-7670 55
Page 66

Quick Start: Installing and Configuring Printers Print Manager Spool
5.2.4 Local NT Printers
Open the ’Océ Print Manager Spool’ via ’Start/Programs/PRISMAoffice/Print Manager
Spool’. The user interface window opens.
The main window is divided into two panes. The upper one is the job view, which lists all
the current jobs in the spool, together with their properties. The lower window part is the
printer view, which lists all the printers you have configured, their current status plus various
other properties.
In the lower part of the window, the printer view, click right to open the context menu.
In the context menu click on ’Add Printer’. Now a new printer appears on the left side of the
printer view as ’Printer0’. PRISMAoffice starts counting the printers by ’0’. So if you install
e.g. the third printer in the system, it would be ’Printer2’ for PRISMAoffice.
56 A29247-X30-X-5-7670
Page 67

Print Manager Spool Quick Start: Installing and Configuring Printers
Now mark this printer and click it with the right mouse button. A new context menu opens.
Click on the item ’Properties’. A new dialog window opens. .
In this window you have to set the properties of the new printer.
First open the ’Connection Type’ drop down list and select ’LOCAL/SERVER’.
Then enter the name of the printer in the ‘Printer name’ field.
A29247-X30-X-5-7670 57
Page 68

Quick Start: Installing and Configuring Printers Print Manager Spool
Examples:
Local printer: HP LaserJet 4Si
Printer on a print server: \\Server name\Printer name
\\ST049018\2050
Click the ’User’ button to specify the User and the Password the Print Manager Spool Server should use to send jobs to the Windows NT/2000 Spooler.
The settings in the list ’Parameter’ and ’Contents’ can stay unchanged, they are already set
on default.
58 A29247-X30-X-5-7670
Page 69

Print Manager Spool Quick Start: Installing and Configuring Printers
5.2.5 Command Printers
Open the ’Océ Print Manager Spool’ via ’Start/Programs/PRISMAoffice/Print Manager
Spool’. The user interface window opens.
The main window is divided into two panes. The upper one is the job view, which lists all
the current jobs in the spool, together with their properties. The lower window part is the
printer view, which lists all the printers you have configured, their current status plus various
other properties.
In the lower part of the window, the printer view, click right to open the context menu.
In the context menu click on ’Add Printer’. Now a new printer appears on the left side of the
printer view as ’Printer0’. PRISMAoffice starts counting the printers by ’0’. So if you install
e.g. the third printer in the system, it would be ’Printer2’ for PRISMAoffice.
A29247-X30-X-5-7670 59
Page 70

Quick Start: Installing and Configuring Printers Print Manager Spool
Now mark this printer and click it with the right mouse button. A new context menu opens.
Click on the item ’Properties’. A new dialog window opens. .
In this window you have to set the properties of the new printer.
First open the ’Connection Type’ drop down list and select ’COMMAND’.
Enter the desired command in the corresponding text field.
60 A29247-X30-X-5-7670
Page 71

Print Manager Spool Quick Start: Installing and Configuring Printers
If you select the connection type 'command', a printer type can be configured, that creates
a job file and calls a command/program, for example to send print data via the LPR command or to PRISMAnet via the xpadd command.
Select the printer type ‚command‘. In the edit box, enter the command to call after the job
data has been created. To give job parameters to the command, the Print Manager Spool
uses parameters starting with a ‚%‘, for example ‚%Y‘ will be replaced by the path and file
name of the created job file. The following parameters are available:
Parameter Contents
%0 Name
%1 Department
%2 Account no
%3 Phone no
%4 Header page line 1
%5 Header page line 2
%6 Post Processing
%7 Document name
%8 Computer name
%9 IP-Address
%A Mail-Address
%B Form name
%C Document Copies
%D Date/Time of Job creation
%E Printing Date/Time
%F Counted Pages
%G First to be printed Page no
%H Last to be printed Page no
%I Job status as number
%J Current document copy no
%K User name in the NT-Network
A29247-X30-X-5-7670 61
Page 72

Quick Start: Installing and Configuring Printers Print Manager Spool
Parameter Contents
%L Printer name
%M Job Class
%N Current JobID
%O - %X Reserved
%Y File name of created job file
%Z Insert Dynamic Resource file
62 A29247-X30-X-5-7670
Page 73

Print Manager Spool Advanced Configuration
5.3 Advanced Configuration
Overview on generating, spooling and printing a job:
End of Job
A29247-X30-X-5-7670 63
Page 74

Advanced Configuration Print Manager Spool
5.3.1 Input Filter
The configuration of print files with parameters is performed by the program 'IPFCFG.EXE'.
After starting the program you can see a list of the actual configuration. If you have not configured a file yet, the list is empty:
Buttons:
Close: Terminates the program
New: A new 'type of file' is created
Modify: Configuring a 'type of file'
Delete: Deleting a 'type of file'
An Example:
Parameters from an SAP list should be assigned to a print job. SAP sends possibly a header page. An SAP list starts with some lines building up the word 'SAP' followed by different
spool parameters.
For the creation of a new 'type of file', a job should be in the spool, which has the format,
that is to be processed.
Click ’New’ to create a new 'type of file' ('type of file' is here used to identify the environment
from which a job comes, i.e. from SAP, PReS ...).
64 A29247-X30-X-5-7670
Page 75

Print Manager Spool Advanced Configuration
In the following dialog box enter a source name (i.e. SAP) and an identifier. The identifier
is a text which is placed before the parameters and identifies the type of file uniquely.
In SAP lists you can take i.e. one line from the large SAP lines:
--- SSSSSSSSSS --- AAAA ------ AAAA – PPPP --------- -
For this example the input is sufficient. Click ’OK’ and the configuration will be saved.
A29247-X30-X-5-7670 65
Page 76

Advanced Configuration Print Manager Spool
Other Parameters in the Dialog Box:
Source is EBCDIC: Check this box, if the text of the PCL file is EBCDIC
coded.
Read until current Page ends: The input filter only reads the file until the next form
feed is indicated.
EndString: You can insert a string which identifies the end of the
list of parameters.
Parameter List: Shows the parameters which you edit using the but-
tons ’New’, ’Modify’ and ’Delete’. Gives also information about the allocation to the job card destination
field.
The SAP job has Job Id '43'. If a type of file and an identifier is set, the input filter can be
started with an option to test the configuration. The filter then creates a text file which tells
you how the filter reads the job file. It is also possible to read parameters from absolute positions.
Now start the input filter with the test option:
C:\Program Files\Oce Printing Systems\PRISMAoffice\IPF -t C:\Program
Files\Oce Printing Systems\PRISMAoffice\Jobs\00000043.JOB
In the spool directory you will then find the file '00000043.JOB.txt' which tells you how the
input filter detects and reads the data.
To set up the parameter again start the program 'IPFCFG.EXE', mark 'SAP' and click <Modify>.
New Parameter Entry
Click ’New’ to get the 'New Parameter Entry' dialog box. Here you can enter the parameters
which should be read from the file and which should be transferred to the job ticket:
66 A29247-X30-X-5-7670
Page 77

Print Manager Spool Advanced Configuration
Options:
Search for Keyword: Enter a string to be searched for. Data behind this keyword
are detected as parameters.
Read from Line-No.: Use this option if the parameter is at an absolute position in
the file. You can read the number of the line and column in
the test file mentioned above.
Parameter Length: With absolute parameters enter here how many characters
should be read.
Read until End of Line: All characters until the end of line are read.
Store Parameter in
Job-Card field:
Choose a field in the job card where the detected parameters
should be saved.
In this example you want information on 'Documentname', 'Form' and 'Document-Copies'.
Enter these three expressions as 'Search for Keyword' and 'Job-Card Field' parameters.
Use the –t option to test the configuration again. Now you have a direct control whether the
parameters are assigned correctly.
Close all dialog boxes by clicking 'OK' and send the new print job to the spool.
Conditional Processing
If you want to change found parameters to different values activate the option 'Edit Conditional Processing Definition' by clicking the 'Edit Conditional Processing Definition' button.
Enter in the box under the 'Definition File:' text a valid filename for the configuration file. The
filename should be different for different input filter configurations.
A29247-X30-X-5-7670 67
Page 78

Advanced Configuration Print Manager Spool
In the list under the filename box you will see later all changes that will be made to job ticket
fields.
Let's try a sample. Every time we get the name '60B2' in the field ‘User’ we want to set the
following values:
User -> Paul Smith
Header page Line1 -> 60B2
Copies -> 2
Printer -> Printer3
We want to have always the form 'Invoice' for this input filter definition.
68 A29247-X30-X-5-7670
Page 79

Print Manager Spool Advanced Configuration
So create a new entry in the list with the button 'New'. In the following box we have the following setting:
Search field: the field of the job ticket that will be searched for a value.
Search for: the value that will be searched for in the field.
Field to set: the field where we want to store new information.
Value to set: the value to set in the field.
The 'Search field' and 'Search for' parameters may be empty what gives you the ability to
set a value as default (without a search for data).
The option 'Allow multiple changes when Search String found' is needed if you want to
change more than one destination field on a value found.
For our example we will make the following entries:
Note: Because we will change more than one field on the same user name, we have to
change the user last, because changes will be made immediate, and if we first
change '60B2' to 'Paul Smith' and look in the next entry for '60B2' again, the field
will not be changed, because its contents is then 'Paul Smith'.
A29247-X30-X-5-7670 69
Page 80

Advanced Configuration Print Manager Spool
Then click ’OK’ and again ’New’.
70 A29247-X30-X-5-7670
Page 81

Print Manager Spool Advanced Configuration
A29247-X30-X-5-7670 71
Page 82

Advanced Configuration Print Manager Spool
To change the form permanently to 'Invoice' for this configuration, we make the following
entry:
Finally you will get:
72 A29247-X30-X-5-7670
Page 83

Print Manager Spool Advanced Configuration
Changing the Destination Printer
The printer field in the PCL Spool always contains the Océ Spooler port where the job came
from. If you want to change the printer, you have to set this port in the printer field and not
the printer name. Use the following port names:
Printer0 --> OSP1:
Printer1 --> OSP2:
Printer2 --> OSP3:
...
...
...
Printer31 --> OSP32:
A29247-X30-X-5-7670 73
Page 84

Advanced Configuration Print Manager Spool
To route the job to a printer whose name is defined in the data, you can use the following
examples:
This will route jobs for printer L2 to the PCL Spool Printer2 and jobs for printer L3 to the PCL
Spool Printer3. Of course, you must have setup a parameter to read the printer name from
the print data in your input filter parameter list.
74 A29247-X30-X-5-7670
Page 85

Print Manager Spool Advanced Configuration
Setting a Default Printer if none of the values above was found:
String search is case sensitive, for numeric values (Pages or Document Copies field), you
can use the following characters:
= equal
! not equal
< lower than
> greater than
A29247-X30-X-5-7670 75
Page 86

Advanced Configuration Print Manager Spool
The following entry will send all jobs where the count of pages is greater than 1000 pages
to Printer2:
5.3.2 Filter Configuration File
The filter configuration file is a standard ASCII text file. Comment lines will start with a ‘*’ in
the first column.
To modify a
lowed by the value you want to change and the new value the command should be changed
to.
76 A29247-X30-X-5-7670
PCL Sequence, you have to specify the PCL command without parameter, fol-
Page 87

Print Manager Spool Advanced Configuration
Sample Filter Configuration File:
* PCL Spool system Filter File
*
* each line describes an PCL command to be replaced with another value
*
* value's MUST have same size (V2.02.00)
*
* Format : "<PCL Sequence>", "<oldvalue>" = "<newvalue>"
* the PCL Sequence MUST have 3 characters:
* 1. the Parameterized character
* 2. the Group character
* 3. the Termination character
* unused characters must be replace by a ' ' (space)
*
* Example: change <esc>*v0S to <esc>*v1S
"*vS" , "0" = "1"
"*vS" , "1" = "2"
* skip (remove) the next sequence
"*vS" , "6" = SKIP
* additional filter switches
* change 2 FF characters to only 1
-skip empty pages
* filtering JEC entries
* this sample will filter the flagsheet command in a jec header
JEC FLAGSHEET
* filter <esc>E, UEL command and all PJL
" E" , "" = SKIP
"% X" , "-12345" = SKIP
-SKIP PJL
A29247-X30-X-5-7670 77
Page 88

Advanced Configuration Print Manager Spool
5.3.3 Parameters for the OSPPRINT.EXE
With OSPPRINT.EXE, you can print a PCL file from the MS-DOS box via the Office Print
Manager. There are the following parameters:
-n <Name of the User>
-d <Department-Name>
-a <Account>
-p <Phone-No.>
-m <Mailing Address>
-v <PNV-Text>
-1 <Spoolheaderpage Line 1>
-2 <Spoolheaderpage Line 2>
-c <Number of Dataset Copies>
-f <Form-Name>
-C <Job-Class (0-9, A-Z)>
-P <Printername>
-j <Document Title>
-T <Ticket file>
Use this ticket as template
You can use a *.JIF file (get one from the spool directory) as template. The program will use the parameters from this JIF file for the newly created job.
Other command line parameters will override parameters from the JIF file.
-L <LIP file>
LIP Resource File from LIP2PCL
This parameter is used by the LIP2PCL Converter,
to tell the spool what resources and how the resources are to be loaded for this job. The LIP file
may also include some other parameters like the
user name and so on (see Specification of the LIP
control file). The Resources (fonts and macros)
must be copied first to the Resource directory of the
Spool system.
78 A29247-X30-X-5-7670
Page 89

Print Manager Spool Advanced Configuration
-t <table>
-y <type>
-J <job-id>
-D
Use this ticket as tamplate.
Specify the document type.
Use the predefined JobID.
Delete the <datafile> after printing.
Syntax for the usage of OSPPRINT.EXE:
ospprint [options] <printfile>
5.3.4 Print Job Generation with PJM Server
Note: Prerequisite for the print job generation with the PJM server it is required that the
PJM server is installed.
The PJM server will be installed during the PRISMAoffice installation, if you select
the corresponding check box during the installation process.
You can generate print jobs for PRISMAoffice by the command ’spjm’. After the installation
of PRISMAoffice the program ’spjm.exe’ is located in the following directory:
’\Program Files\Oce Printing Systems\PRISMAoffice’
The command ’spjm’ has the following syntax:
spjm -f <file>
-f <file> Specify the file which should be printed.
5.3.5 JEC Support for NPS File Systems
If you have a configuration with the name ‘JEC‘, where you read some parameters from the
JEC header, the input filter can read a second configuration after he has detected the End
String.
With this function, you can add another configuration, e.g. if you print PostScript, you can
use a filter definition to count the pages of the PostScript file (see next point). Use the following configuration for a JEC header:
Name: JEC
Identifier: *JEC BEGIN
End String:*JEC BODY
A29247-X30-X-5-7670 79
Page 90

Advanced Configuration Print Manager Spool
5.3.6 LIP Control File
The LIP control file is a standard text file. It describes the resources (fonts and macros) that
are needed for the print job. It can also describe some parameters for the job ticket (user,
account).
Fonts can be loaded using a CAT (Character Assignment Table) to describe the position of
characters.
A line starting with an asterisk (*) is a comment line and will be ignored.
A parameter line looks like the following:
KEYWORD = PARAMETER, KEYWORD = PARAMETER
Parameters for the Job Ticket:
FORM = <form name>
USER = <user name>
DEPT = <department of the user>
ACCOUNT = <account>
PHONE = <phone number>
MAIL = <mail address>
POSTP = <post processing>
LINE1 = <header page line 1>
LINE2 = <header page line 2>
CLASS = <job class (0-9, A-Z)>
DOCNAME = <document name>
COPIES = <document copies>
PAGES = <pages of the job>
80 A29247-X30-X-5-7670
Page 91

Print Manager Spool Advanced Configuration
Parameters for LIP Resource Loading
FONT NAME = <filename of the font>, ID = <font-id>
The FONT NAME command will load the font file <filename> and will set the font id to
<font-id>. If no previous CAT command was specified, the font loader will use a standard
cat with no conversions. The font file <filename> must exist in the Océ PCL Spool system
Resource directory.
MACRO NAME = <filename of the macro>, ID = <macro-id>
The MACRO NAME command will load the macro <filename> and will set the macro id to
<macro-id>. The macro loader will override the existing id of the stored macro. The macro
will be made permanent.
CAT = <2 Byte Hex numbers from 00 to FF>
The CAT command will set a character assignment table for the fonts that will be loaded
after this CAT command, until a new CAT will be set. The parameters of the CAT command
are 256 hex values, separated by a space, one value for each ASCII character setting the
address of this character.
A29247-X30-X-5-7670 81
Page 92

Advanced Configuration Print Manager Spool
Example LIP Control File:
*
* LIP Resource File
*
* Section 1: LIP Resources*
* the following 2 fonts will be unchanged (no cat used)
font name = SET09043.sfp,id = 9043
font name = SET10001.sfp,id = 10001
*
* we load now a cat, this example works like the
* standard cat, it changes nothing
*cat = 00 01 02 03 04 05 06 07 08 09 0A 0B 0C 0D 0E 0F
10 11 12 13 14 15 16 17 18 19 1A 1B 1C 1D 1E 1F
20 21 22 23 24 25 26 27 28 29 2A 2B 2C 2D 2E 2F
30 31 32 33 34 35 36 37 38 39 3A 3B 3C 3D 3E 3F
40 41 42 43 44 45 46 47 48 49 4A 4B 4C 4D 4E 4F
50 51 52 53 54 55 56 57 58 59 5A 5B 5C 5D 5E 5F
60 61 62 63 64 65 66 67 68 69 6A 6B 6C 6D 6E 6F
70 71 72 73 74 75 76 77 78 79 7A 7B 7C 7D 7E 7F
80 81 82 83 84 85 86 87 88 89 8A 8B 8C 8D 8E 8F
90 91 92 93 94 95 96 97 98 99 9A 9B 9C 9D 9E 9F
A0 A1 A2 A3 A4 A5 A6 A7 A8 A9 AA AB AC AD AE AF
B0 B1 B2 B3 B4 B5 B6 B7 B8 B9 BA BB BC BD BE BF
C0 C1 C2 C3 C4 C5 C6 C7 C8 C9 CA CB CC CD CE CF
D0 D1 D2 D3 D4 D5 D6 D7 D8 D9 DA DB DC DD DE DF
E0 E1 E2 E3 E4 E5 E6 E7 E8 E9 EA EB EC ED EE EF
F0 F1 F2 F3 F4 F5 F6 F7 F8 F9 FA FB FC FD FE FF
*
* the following 2 fonts will be loaded using the cat above
*
font name = SET10002.sfp, id = 10002
font name = SET11630.sfp, id = 11630
macro name = SET01560.mac, id = 1560
macro name = SET01561.mac, id = 1561
*
82 A29247-X30-X-5-7670
Page 93

Print Manager Spool Advanced Configuration
* setting some job ticket information
*
pages = 165
copies = 2user = smith
docname = :3:$TSOS.P.INFO
class = X
A29247-X30-X-5-7670 83
Page 94

Spool Administration Print Manager Spool
5.4 Spool Administration
A PRISMAoffice system can be administered
on the machine where the PRISMAoffice is installed or from any NT system in a network
which is allowed to do this.
If you want to administer a PRISMAoffice system remotely, you have to install the ’Remote
Admin’ component on the remote Windows NT/
2000 PC.
As an administrator you can manage the print
and reprint queues, configure the accounting of
the spool, set up header, separator and trailer
pages, configure and manage printers, create
and configure forms and setup and configure
input filters.
84 A29247-X30-X-5-7670
Page 95

Print Manager Spool Spool Administration
5.4.1 Server Properties
After installing the program, you have to make a number of basic settings. Start the spool
user interface by running OspAdmin.exe in the directory in which the software was installed, or select Print Manager Spool from the PRISMAoffice program group.
From the ‘File’ menu, select the option ‘Server Properties’ to open the general settings dialog box.
The settings for the Print Manager Spool Server has 5 categories, to select one of the following categories, use the drop down box to see only the parameters of the specific category:
Accounting settings to create account files of the printed jobs
Directories path settings
Separator Pages settings for the trailer pages
Reprint Queue settings for the reprint queue
Misc miscellaneous settings
A29247-X30-X-5-7670 85
Page 96

Spool Administration Print Manager Spool
Accounting
Choose ‘Accounting’ from the ‘Category’ box. You can then activate or deactivate the accounting function by clicking with the left mouse button in the column ‘Contents’ at the row
‘Accounting active’ and by selecting ‘Yes’ or ‘No’.
Click into the column ‘Contents’ at the row ‘Accounting file’ and enter a name for the file
where to store the accounting records. Accounting files may be created daily, monthly, per
year or only one file for all information. You specify the type of the accounting file by entering format parameters in the file name. The format parameters will be replaced by specific
date values, for example %d will be replaced by the day in numeric format. The following
format parameters are possible:
Format Parameter Replaced with
%a Abbreviated weekday name
%A Full weekday name
%b Abbreviated month name
%B Full month name
%d Day of month as decimal number (01 – 31)
%j Day of year as decimal number (001 – 366)
%m Month as decimal number (01 – 12)
86 A29247-X30-X-5-7670
Page 97

Print Manager Spool Spool Administration
Format Parameter Replaced with
%U Week of year as decimal number, with Sunday as first day of week (00 –
53)
%w Weekday as decimal number (0 – 6; Sunday is 0)
%W Week of year as decimal number, with Monday as first day of week
(00 – 53)
%y Year without century, as decimal number (00 – 99)
%Y Year with century, as decimal number
After a job is printed, the spool system queries the printer for the number of printed pages.
When accounting is turned on, the system saves a data record for every job to the accounting file you specify in this dialog box. If the accounting file does not exist, it is created by the
spool system. The record contains the job ID, data from the job ticket, the number of printed
pages and the final job status (canceled or printed).
The accounting file is an ASCII text file. The first line contains the field names, followed by
a line of data for each job. The fields are separated by '|' characters.
Directories
Use this category to specify the directories where the spool system can find the work files
(resources, jobs and fonts). The settings should be set during the installation process to the
correct path.
To change a file path, click into the column ‘Contents’ in the right row to enter the full paths
in the fields or click to choose from a dialog box list.
A29247-X30-X-5-7670 87
Page 98

Spool Administration Print Manager Spool
The following file paths are required:
Path Function
Program directory The basic directory containing the spool system. This is the direc-
tory you specified during installation.
Job directory The directory which stores incoming jobs. Two files are stored for
every job: <JOB ID>.JIF for the job ticket and <JOB ID>.JOB for the
print data.
Reprint Queue directory The directory which stores printed or deleted jobs if the required op-
tion is set in the category Reprint Queue in the Server Properties
dialog box.
Job archive directory The directory which stores jobs from the print and reprint queue.
Optimized fonts directory This directory stores the characters of optimized fonts. A large font
(m2.sfp) is supplied for the header page. Optimization can shorten
the time needed to load the header page, since the spool then only
loads the required characters into the printer. (see Settings/Header-Trailer Page).
Resource directory The directory for user resources such as macros and fonts. When
you configure form resources or header and trailer page resources,
the dialog boxes access this directory to display the available resource files.
Directory for filters The directory for data filters. All created data filters must be copied
to this directory so that they are visible from the corresponding setting in the form properties.
Directory for accounting The directory where the Print Manager Spool will save the account-
ing files, if enabled.
88 A29247-X30-X-5-7670
Page 99

Print Manager Spool Spool Administration
Reprint Queue
The Reprint Queue properties control the deletion of printed or manually deleted jobs. The
third Print Manager Service (Print Manager Spool Cleaner) will use these settings to delete
altered jobs from the Reprint Queue. The following parameters are possible:
Parameter Function
Move printed Jobs to the Reprint
Queue
Move deleted Jobs to the Reprint
Queue
Keep time of jobs in days The time in days, how long the jobs must be kept in the Reprint
Interval of job deletion in hours Defines the interval the Print Manager Spool Cleaner must
A29247-X30-X-5-7670 89
Controls if printed jobs should be moved to the Reprint Queue.
Controls if manually deleted jobs should be moved to the Reprint Queue.
Queue.
start the process of checking for altered jobs in hours.
NOTE: The print server must run this time without reboot.
Page 100

Spool Administration Print Manager Spool
Separator Pages
•A header or trailer page consists of several files from which the spool system gener-
ates one formatted page:
•A form file: a PCL file containing the basic layout of the page and the fixed texts.
•A data file: the positions and dummy parameters for variable texts are in this file. The
dummy parameters are each linked to a field in the job ticket. When the header and trailer pages are generated, the dummy parameters are replaced by values from the job
ticket. A dummy parameter has the format %<ID>, where <ID> is an alphanumeric value.
• Resources: a list of the files required for printing. Normally, these are just fonts.
Sample files and fonts are supplied for the header page. The files for trailer pages have to
be created separately.
To enter the file names in the fields for the form and variable files, click into the Contents
column in the corresponding row or click the button:
to select files from a dialog box.
90 A29247-X30-X-5-7670
 Loading...