


V80SE
Owner's Manual
English

3
INTRODUCTION
Congratulations and thank you for choosing OCTAVE!
V 80 SE
You are now the owner of one of the world's most innovative and reliable
amplifiers. Look after it, and it will provide you many years of listening pleasure.
You often hear people claim that tube amplifier design has not progressed for
years. The operating principles of tubes have indeed been documented
extensively and are well known to amplifier designers. The same can, of course,
be said for transistor amplifiers.
However, advances in both technologies are still possible thanks to the
development of innovative and improved components, our greater appreciation
of the fundamental principles and, of course, deeper and more advanced
insights into the interaction of amplifier and loudspeaker. With tube amplifiers in
particular, a general reluctance to depart from the classic circuit designs has not
done the technology any favours. Although today's loudspeakers and source
equipment provide better performance than ever before, they also make greater
demands on amplifiers. Modern sound reproduction equipment delivers a level
of performance at a price that simply would not have been possible 20 or even
10 years ago.
These advances have been achieved through the application of latest
technological developments as they become available and affordable.
We have specialized in tube amplification for the past 29 years, during which
time we have developed a number of innovative technologies that have earned
us a reputation as one of the leaders in the field.
Here's wishing you many happy hours of musical pleasure!
Andreas Hofmann

4
CONTENTS
Page
INTRODUCTION ......................................................................................................... 3
1. DESCRIPTION V 80 SE ................................................................................. 6
2. SAFETY INSTRUCTIONS
2.1. Before you begin ............................................................................................ 8
2.1.1. In case of emergency: disconnect the plug from the mains supply ...... 8
2.1.2. Do not open the case ........................................................................... 8
2.1.3. Service and maintenance ..................................................................... 8
2.1.4. Symbols and terms used in warnings ................................................... 8
2.1.5. Before connecting ................................................................................. 9
2.1.6. Grounding ............................................................................................. 9
2.2. Placement ....................................................................................................... 9
2.2.1. Location ................................................................................................ 9
2.2.2. Cover .................................................................................................... 9
2.2.3. Ventilation ............................................................................................. 9
2.3. Warranty ......................................................................................................... 9
3. SETTING UP
3.1. Unpacking, scope of delivery ......................................................................... 10
3.2. Removing the grille ......................................................................................... 11
3.3. Installing the power tubes ............................................................................... 12
3.4. Switching on for the first time: the soft-start feature ....................................... 13
3.5. Checking the power tubes – setting the bias ................................................. 14
3.6. Connecting other components to the V 80 SE ............................................... 14
3.7. Connection possibilities: overview ................................................................. 15
4. OPERATION
4.1. V 80 SE front panel ........................................................................................ 16
5. CONNECTIONS
5.1. V 80 SE rear panel ......................................................................................... 18
6. RECOMMENDED SETTINGS
6.1. Phono (MM) or optional MC playback ............................................................ 20
6.2. Line playback such as CD1, CD2, AUX, Tuner ............................................. 21
6.3. Tape playback and record .............................................................................. 22
6.4. Front Channel replay (multichannel) ..............................................................
23

5
CONTENTS
Page
7. ADVANCED FUNCTIONS AND CONNECTION OPTIONS
7.1. Linear mode ....................................................................................................... 24
7.2. "Extern"-function: Separating the pre- and power amplifier .............................. 24
7.2.1. Inserting an external equalizer ............................................................ 25
7.2.2. Using the V 80 SE as a 2-channel power amplifier
with an external preamp ....................................................................... 25
7.2.3. Using the V 80 SE in bi-amped systems – application 1
The V 80 SE as an independently adjustable power amplifier ............. 25
7.3. Adjustable preamplifier output: pre out .............................................................. 26
7.3.1 Using with a subwoofer ........................................................................ 26
7.3.2 Using the V 80 SE in bi-amped systems - application 2
The V 80 SE as a central control unit .................................................. 26
7.4 Ecomode: soft-start and reduced power consumption mode ............................ 27
7.5 Headphone/speaker operation .......................................................................... 28
7.6. Power Selector: alternative output tubes ........................................................... 30
8. TUBES
8.1 Removing the grille (see 3.2) ............................................................................. 31
8.2 Tube layout ........................................................................................................ 31
8.3 Bias measurement system ................................................................................ 32
8.4 Replacing tubes ................................................................................................. 34
8.5 Running in tubes ................................................................................................ 34
8.6 Tube service life ................................................................................................. 34
9. PROTECTION SYSTEM ................................................................................... 35
10. REMOTE CONTROL ........................................................................................ 36
11. OPTION PHONO MC/MM ................................................................................ 36
12. OPTION BLACK BOX AND SUPER BLACK BOX
12.1 The Black Box option ......................................................................................... 37
12.2 The Super Black Box option .............................................................................. 38
13. TROUBLESHOOTING
13.1. Faults caused by external issues ...................................................................... 39
13.1.1. Buzzing and hum in the speakers ........................................................ 39
13.1.2. Mains interference ................................................................................ 40
13.1.3. Channels are not balanced .................................................................. 40
13.2. Faults caused by tubes ...................................................................................... 41
13.2.1. Mechanical tube faults that do not trip the protection system .............. 41
13.2.2. Tube faults that trip the protection system ........................................... 42
14. TECHNICAL DATA
14.1. In- and outputs ................................................................................................... 43
14.2. Dimensions ........................................................................................................ 44
14.3. Diagrams ........................................................................................................... 45
15. FREQUENTLY ASKED QUESTIONS (FAQ) ................................................... 47

6
1. DESCRIPTION V 80 SE
The V 80 SE is a totally new design. It has been developed for music
lovers who do not have the space for large pre- and power amps. The
V 80 SE is guaranteed to provide the same sonic experience as
separates. Nevertheless, as a standalone unit, it is equipped with ever
y
feature you could need no matter how your hi-fi system is configured. We
have also included a number of forward-thinking features that are unique
in this amplifier class.
POWER AMPLIFIER +
BIAS
The power amplifier is a push-pull pentode system producing up to 130
W RMS each channel from 20 Hz to 80 kHz. The amplifier was designed
specifically for the V 80 SE, although its concept borrows heavily from
the MRE 220. This power amplifier enjoys excellent load stability, i.e.
neither the impedance nor the efficiency of the partnering loudspeakers
will affect the V 80 SE's sound.
The enhanced display functions of the bias measurement facilit
y
enable the owner to correctly set the bias current for the wide range o
f
output tubes that are compatible with the V 80 SE. Bias adjustment is
carried out using 3-turn precision regulators in conjunction with LEDs fo
r
each of the four output tubes.
POWER MANAGEMENT
The high voltage systems and the heaters for the power and preamp
tubes form part of a logic-control chain. The power management system
also controls the electronic protection and power saving functionalit
y
(Ecomode). The electronic protection continuously monitors th
e
current through the power tubes and the operating voltage of th
e
driver stage. This protects the unit from any overload situation including
power line surges (for example: speaker short circuit, faulty power tube,
lightning strike on the power line). The main purpose of the protection
system is to prevent damage to the amplifier; its secondary purpose it to
protect the power tubes from the harmful long-term effects of overload. At
the same time, it enhances user safety by preventing the occurrence o
f
critical conditions that could be harmful to the user.
DOUBLE SAFETY +
LONG SERVICE LIFE
Like other OCTAVE products, this amplifier is equipped with a double
safety system. This means that, if a component should fail and trigger the
electronic protection, a second, higher-level safety feature will always be
present. This technology has proven invaluable in recent years. It ha
s
enabled us to reduce our overall failure rate (excepting outpu
t
tubes, which we are unable to control 100 percent) to virtually zero.
OCTAVE equipment is desi
g
ned for achieve a service life of 10 to 1
5
years without needing to be serviced. This is particularly importan
t
feature for a tube-based amplifier, as many preconceptions still exist with
regard to the technology's durability and long-term stability.

7
1. DESCRIPTION V 80 SE
POWER CONSUMPTION
+
ECOMODE
Power consumption: The power supply is constructed using a high
performance, magnetically shielded transformer employing the lowes
t
loss material currently available. Internal stabilization is designed fo
r
maximum efficiency with the lowest possible losses. As a result, no-load
power consumption is approximately 180 W. The stabilization ensure
s
trouble-free operation of the power supply section between 210 to
250 V (or +/-10% Mains voltage tolerance). Within this ran
g
e, th
e
p
ower amplifier's operating point is stable.
The Ecomode function monitors the operational status of the V 80 SE
and automatically powers it down during extended breaks. This reduces
power consumption to less than 30 W compared with 180 W during
normal operation and improves passive safety. When it detects a
signal, the V 80 SE activates automatically and is ready for use again
within 30 seconds.
FEATURES
Adjustable pre-out for subwoofer, etc.
Pre and power amp can be used independently
Input for multichannel receiver, volume control bypass function
Tape playback and record; input and output monitor switching
True XLR input for balanced CD player
Optional phono MC or MM input
Separate headphone amplifier; speakers and headphones
electronically switchable
Ecomode: option of monitoring operational status to:
reduce power consumption to 30W at no load
Conveniently accessible true power switch
Bias measurement facility

8
2. SAFETY INSTRUCTIONS
2.1. Before you begin
2.1.1. In case of emergency: disconnect the plug from the mains supply
Never use an amplifier that is damaged or faulty. Make sure it has been labeled as defective and
that it cannot be used until it has been repaired by a qualified service engineer. Make sure that
there is easy access to the IEC socket and power cable.
2.1.2- Do not open the case
There are dangerously high voltages and hot tubes inside this equipment. To avoid a burn or the
risk of electric shock, never allow anyone except qualified personnel to open the case or remove
the grill.
2.1.3. Service and maintenance
For reasons of safety, please ensure that servicing, repairs and other modifications to OCTAVE
equipment are carried out only by a qualified technician. Defective fuses should also only be
replaced by a qualified technician. Always replace fuses with ones of the same type and rating. If
your amplifier requires servicing, please ship or take your equipment directly to OCTAVE or to one
of our authorized service centers.
2.1.4. Symbols and terms used in warnings
The following warnings, symbols and terms are used in this document in compliance with the
American National Standard ANSI Z535.6-2011:
The general danger symbol, in conjunction with the terms CAUTION,
WARNING, or DANGER, warns of the risk of severe injury.
The triangle symbol with the lightning bolt warns of non-isolated, dangerous
voltages inside the case and of hazards posed by electrical shocks. Follow all
subsequent instructions to avoid injury or death.
ATTENTION Indicates a danger that could lead to damage or destruction of the device.
CAUTION Indicates a danger that represents a low or medium risk of injury.
WARNING Indicates a danger that could lead to death or severe injury.
DANGER Indicates a danger that will result in death or severe injury.
Warning format
WARNING TERM
Type and source of danger
Consequences of ignoring the warning
► Action needed to avoid danger

9
2. SAFETY INSTRUCTIONS
2.1.5. Before connecting
Make sure that the voltage of your amplifier matches your local supply voltage.
2.1.6. Grounding
This amplifier is a protection class 2 device (without an earth conductor), while the power supply is
class 1. As a result, a three-pin power cable with a protective ground contact must be used (included in the scope of delivery).
2.2. Placement
2.2.1. Location
OCTAVE equipment is designed strictly for use in a dry domestic environment. Do not use it in
open air or in damp environments!
Never place plants or liquid-filled containers on your amplifier. Take care that objects do not
fall or liquids are not spilled into the enclosure. Should this happen, disconnect the mains plug
immediately and have your amplifier checked by a qualified service technician.
Condensation may form if the amplifier is taken from a cold environment into a warm one. In
this case, wait until the amplifier has reached room temperature and is dry before switching it
on.
Avoid installing the amplifier close to sources of heat, such as heaters, or anywhere that it may
be in direct sunlight.
Do not operate your OCTAVE amplifier near flammable materials, gases, or vapors. Avoid
areas where there may be heavy accumulations of dust or where the amplifier may be subject
to mechanical vibration.
Place your OCTAVE amplifier on a stable, even surface.
2.2.2. Cover
Never operate the amplifier without the cover.
2.2.3. Ventilation
Ensure sufficient air circulation around your amplifier. If you intend to install your equipment in
a cupboard or a shelf unit, ensure that there is at least a 10 centimeter gap between the ventilation slots and the walls all around the amplifier.
To prevent heat accumulation, the back of the cupboard should have ventilation holes.
Do not rest the equipment on a soft surface such as carpet or foam sheeting.
2.3. Warranty
OCTAVE can only guarantee the safety, reliability and performance of this unit if modifications and
repairs are carried out by specialized personnel and if the amplifier is operated in accordance with
the instructions contained in this manual.

10
3. GETTING STARTED
3.1. Unpack and check the contents of the box.
Scope of delivery
V 80 SE
4 power tubes with tube layout diagram
Power cord (3-core cable with 3-pin plug)
Remote control
2 screwdrivers:
1 x 3 mm flat-bladed screwdriver for adjusting the bias
1 x 2 mm Allen key for removing the cover
Owner's manual with warranty card

11
3. GETTING STARTED
3.2. Removing the grille
For your own safety, make sure that the amplifier is not connected to a wall outlet.
Completely remove the four hexagonal screws using the Allan key supplied. There are two
screws on each side.
Carefully pull the grille upward to remove.

12
3. GETTING STARTED
3.3. Installing the power tubes
Insert the power tubes into their sockets as shown on the tube layout. Ensure that you correctly
locate the anti-rotation lug on each of the tubes.
Anti-rotation recess on the tube
socket

13
3. GETTING STARTED
3.4. Switching on for the first time – the soft-start feature
Check that the headphone and Ecomode switches are in the "off" position and plug your amplifier
in. (On new units, both of these switches are set to "off" at the factory).
Now switch the V 80 SE on using the amplifier’s power on/off switch.
2 or 4 LEDs will illuminate, depending on the position of the switch. The soft-start LED will illuminate.
The soft-start LED will remain lit until the unit has powered up. It will extinguish about a minute later, at which point the amplifier is ready for use.

14
3. GETTING STARTED
3.5. Checking the power tubes – setting the bias
You do not need to have the speakers or any other partnering equipment to be connected to set
the bias. (For a more detailed explanation, see Chapter 8.3)
1. Turn the mode selector knob to BIAS. Four LEDs will now illuminate in the centre of the
display, one for each power tube. If the amplifier is still cold, the LEDs will initially illuminate "yellow". After about five minutes, the tubes will heat up and the LEDs will then
show a reading.
LED array:
Top row: red LEDs Setting is too high
Centre row: green LEDs Setting is OK
Bottom row: yellow LEDs Setting is too low
2. If the LEDs do not turned green after approximately five minutes, you can now use the
small screwdriver supplied to adjust them to "green". (Turn clockwise to increase the
current.)
3. When all four LEDS are "green", move the mode selector knob to the "Linear" setting if
you wish to listen to your system. (Or move the knob to "External" if you wish to connect
an equalizer)
3.6. Connecting other components to the V 80 SE
1. Be sure to switch the V 80 SE off again!
2.
Connect the other components in your system to the appropriate sockets on the rear of
the V 80 SE. (See Chapter 5 "Rear panel connections" and Chapter 6 "Recommended
settings". See also Chapter 3.7. "Connection options: overview")
3.
Check that the switch positions on the front and rear of the amplifier are in their
recommended settings.
4.
Switch the V 80 SE on using the on/off switch and wait until the soft-start LED extinguishes. You can now play some music.
15
3. GETTING STARTED
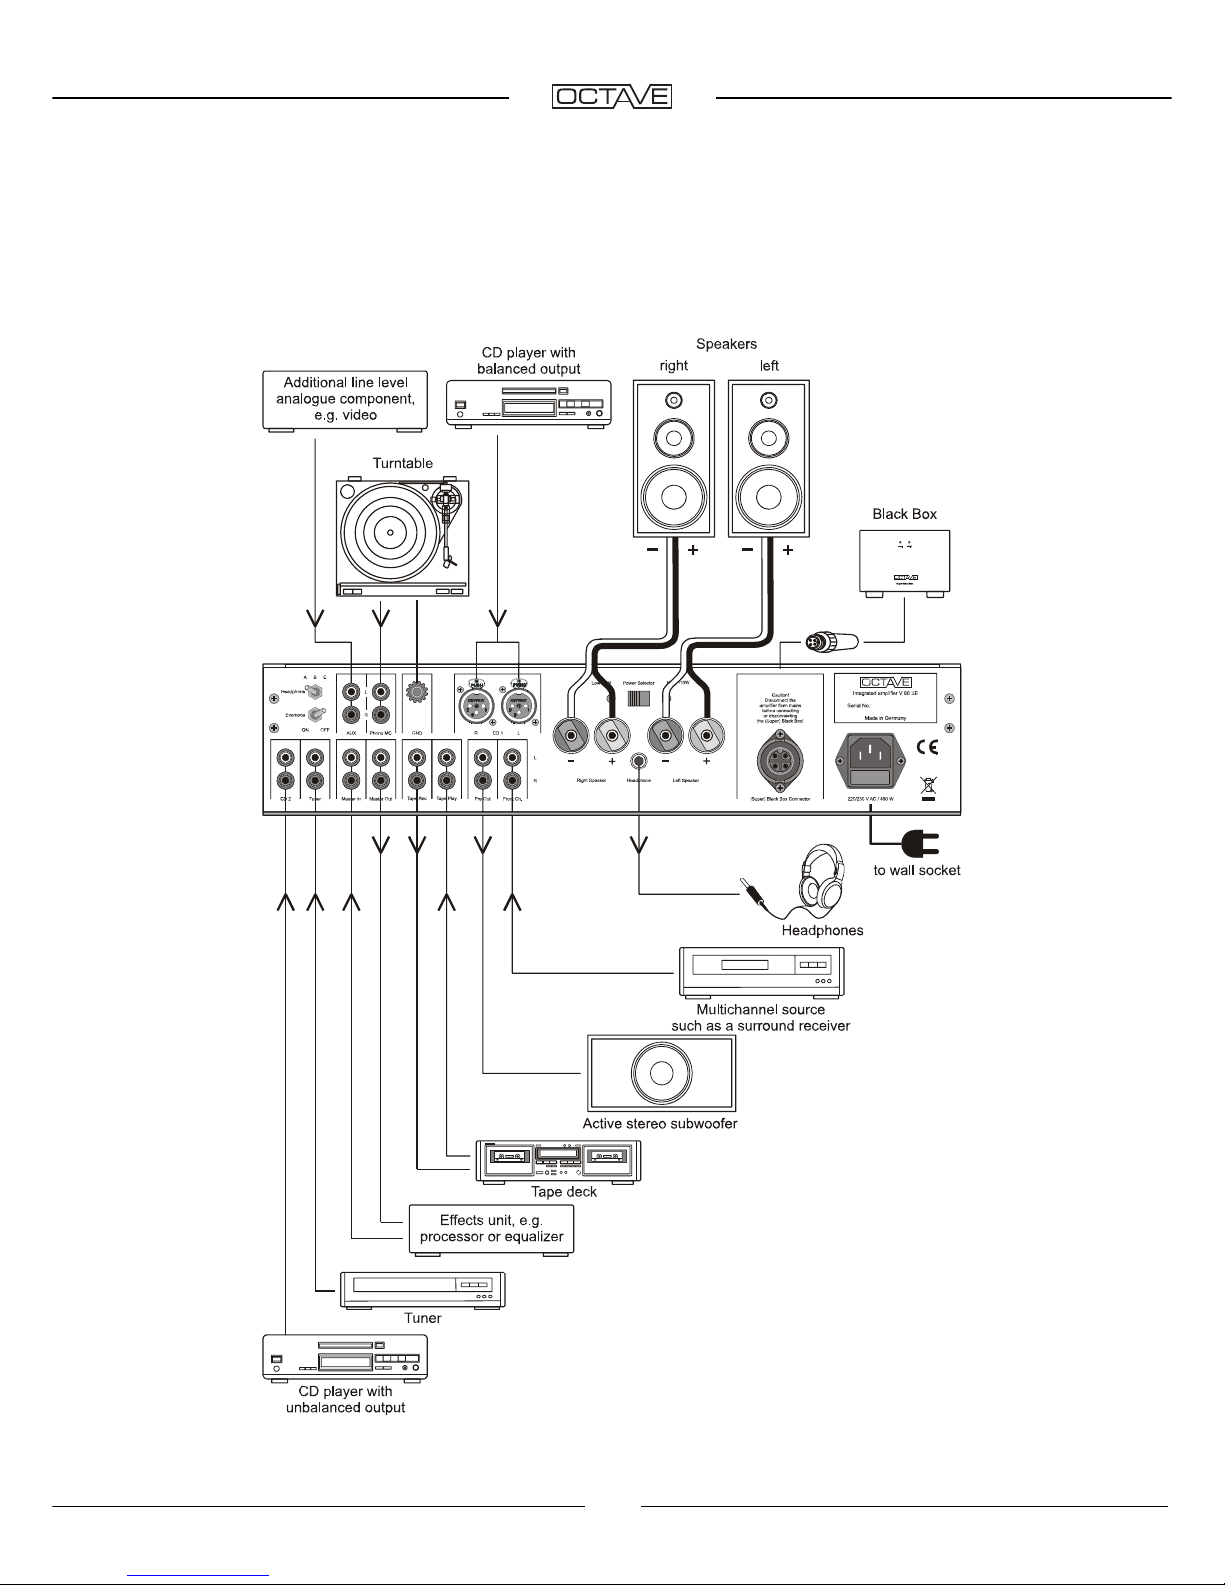
3.7. Connection possibilities: overview

16
4. OPERATION
4.1. V 80 SE front panel
Legend
Power switch
0 = off; 1 = on. Soft-start LED illuminates during start-up period
Input selector
This is used to select the desired input signal. A green LED illuminates in
the window to show which input you have selected.
Phono Line level or phono input (if phono has been selected as an
option)
CD1 XLR line level input for CD, SACD and similar
CD2 RCA line level input for CD, SACD and similar
Aux RCA line level input for video, etc.
Tuner RCA line level input for tuner, etc.
(Recommended settings, see Chapter 6.1 - 6.5)
Secondary input
selector
Source Playback of inputs selected with
Tape Playback of Tape or Tape/Monitor, when a recording
is being made of the source selected with (see Chap. 6.6.)
Front Ch. Multichannel bypass mode. Tape and inputs selected with
are switched off. In this mode, the V 80 SE functions as a two channel power amplifier.
The volume control is bypassed. (See Chapter 6.7)
LED indicators
For switch and switch
Bias adjustment
Bias adjustment and LED display for the power tubes.(See Chap. 8.3)
 Loading...