

Page 1

DAQ-700 PCMCIA A/D Converter
The DAQ-700 PCMCIA A/D CONVERTER is a 12-bit analog-to-digital converter card that connects our
spectrometers to notebook PCs. This 16-channel single-ended, 8-channel differential card -- also known by its
National Instruments DAQCard-700 designation -- fits into a slot in a notebook PC.
You must first configure your computer to properly detect and use the DAQ-700 and then follow several steps to
use it as an interface to your Ocean Optics spectrometer. Because A/D converter installation goes hand-in-hand
with software installation, directions for installing OOIBase32 Spectrometer Operating Software are included.
Install OOIBase32
Before installing OOIBase32, make sure that no other applications are running.
1. Execute Setup.exe. At the “Welcome” dialog box, click Next>.
2. At the “Destination Location” dialog box, accept the default or choose Browse to pick a directory. Click Next>.
3. At the “Backup Replaced Files” dialog box, select either Yes or No. We recommend selecting Yes. If you
select Yes, accept the default or choose Browse to pick a destination directory. Click Next>.
4. Select a Program Manager Group. Click Next>. At the “Start Installation” dialog box, click Next>.
5. Follow all prompts regarding the Spectrometer Configuration diskette that came with your system. For more on
the Spectrometer Configuration diskette, see the
Note below. (If you downloaded OOIBase32 from the Ocean
Optics web site, you will not have this diskette. Select No when first asked about the diskette.)
6. At the “Installation Complete” dialog box, choose Finish>.
7. When prompted to do so, restart your computer when the installation is complete.
8. Do not run OOIBase32 at this time. Your computer must be properly configured to use the DAQ-700 before
you can use OOIBase32.
Note:
In your spectrometer shipment box, you received a Wavelength Calibration Data Sheet wrapped around a
floppy diskette. The Wavelength Calibration Data Sheet and the spectrometer configuration file on the floppy
diskette contain the same information, which is unique to your spectrometer. When you install OOIBase32,
you are prompted to insert this diskette into your computer so that this data is installed with the software.
However, if the diskette is ever lost, or if you downloaded OOIBase32 from the our web site and did not
receive one, use the data on the Wavelength Calibration Data Sheet to enter into OOIBase32 fields.
Install NI-DAQ
1. Insert your NI-DAQ version 6 CD into your CD-ROM drive.
2. Aa setup program should automatically start. If it does not, run the Setup.exe program from the CD.
3. The installation program has an option called Install NI-DAQ. Select that option.
4. In the “Select Components” dialog box, make sure NI-DAQ Driver Files (Minimal Install) is checked.
Choose any of the other options you wish to install. Click Next>.
5. Accept the default destination directory and the default Program Group.
6. In the “Ready to Install” dialog box, click Next>. When prompted to do so,
RESTART YOUR COMPUTER.
Install the DAQ-700
1. After the computer restarts, wait until all disk drive activity stops -- that is, wait until your computer is
completely restarted. Connect the spectrometer cable between your DAQ-700 and your spectrometer.
2. Insert the DAQ-700 into any available PCMCIA slot.
Installation Instructions: DAQ-700 (for Windows 95/98 Users)
-1-
Page 2
3. You should hear two tones of increasing pitch. If you do not, and you do have internal speakers in your notebook
computer, try turning the speaker volume up and reinserting the DAQ-700. If you still do not hear the “happy”
sound, contact our Technical Support Department.
Configure the DAQ-700
1. If you hear the “happy” sound, click Start, and select Settings | Control Panel.
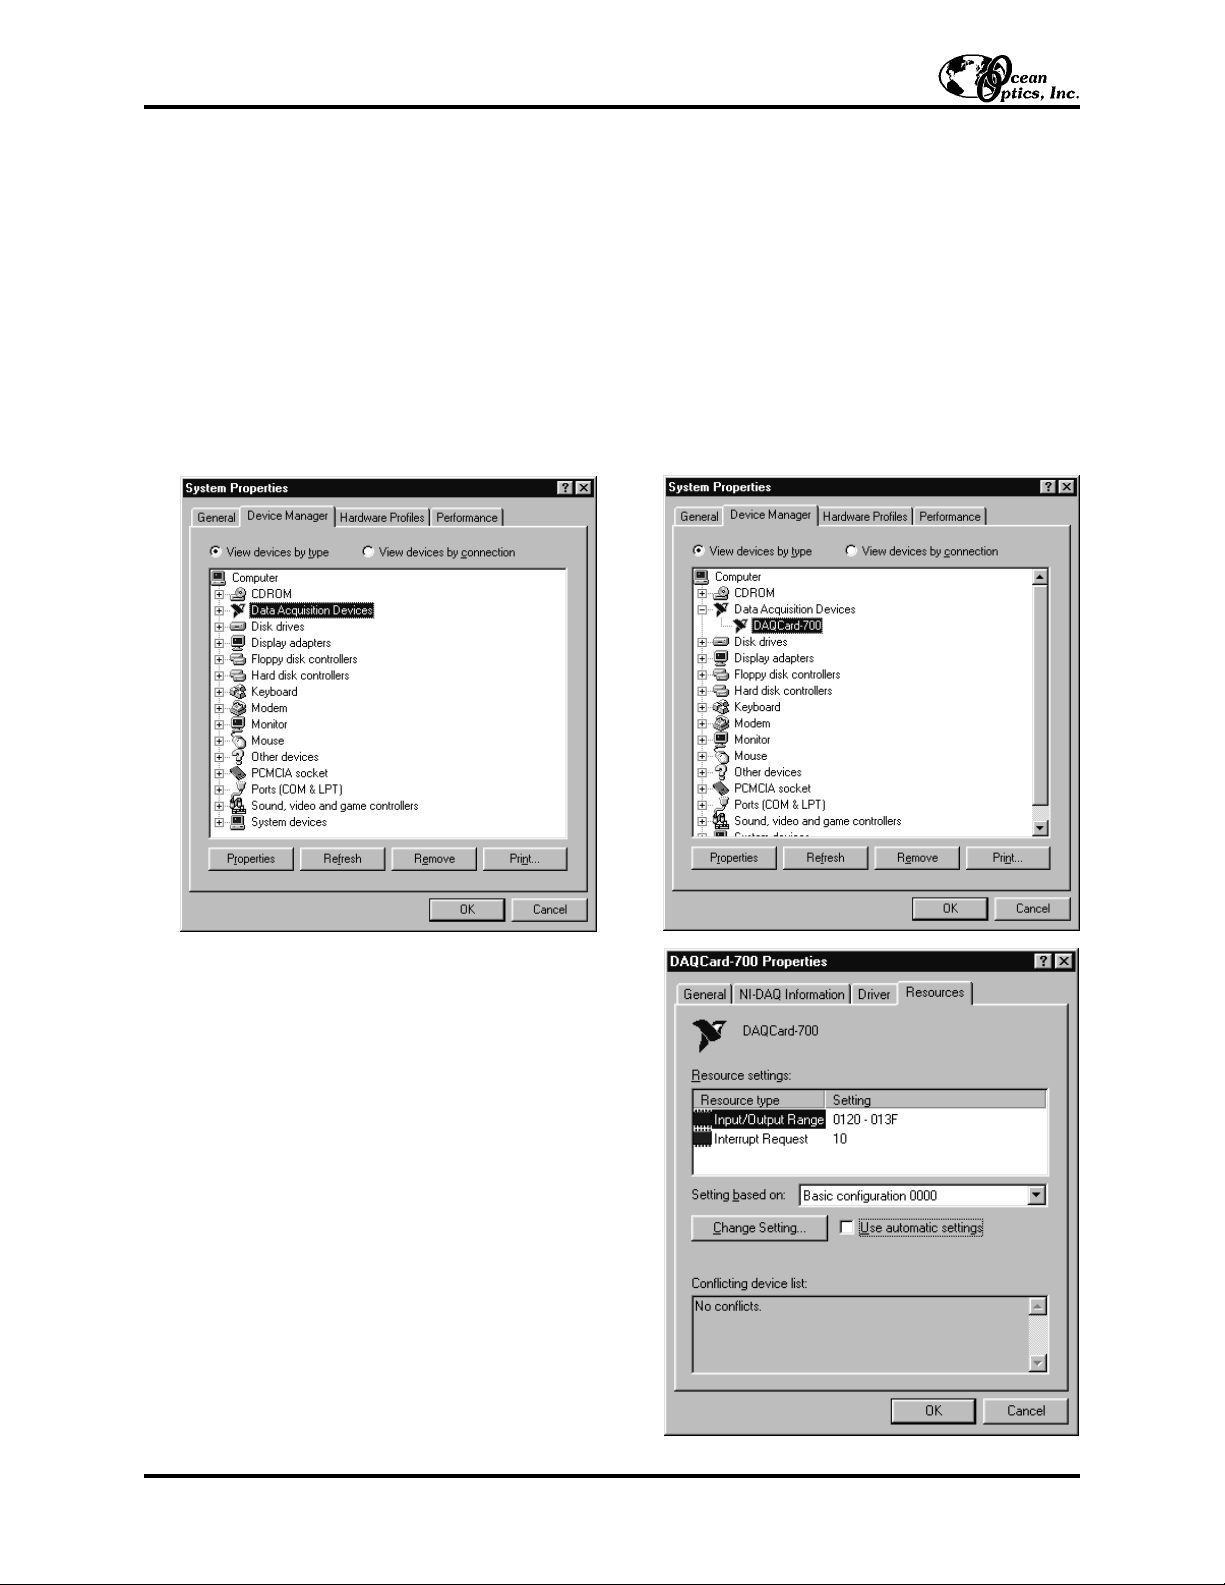
2. Double-click the System icon. Select the Device Manager tab.
3. In the “Device Manager” dialog box, find the hardware group named Data Acquisition Devices. Either
double-click the group or select the group and click Properties.
4. Under the Data Acquisition Devices group, find the entry for your DAQ-700. Either double-click DAQCard-700,
or select the entry and click Properties.
5. Once you have selected your DAQCard-700 from
the Device Manager, click the Resources tab.
The entries here control the hardware interface to
your DAQ-700.
6. In this dialog box, find the check box next to
Use automatic settings. Clear that check box
(deselect it).
7. In the same dialog box, you will see entries for
Input/Output Range and Interrupt Request. The
Input/Output Range corresponds to the Base
Address, and the Interrupt Request corresponds
to the IRQ in our software. By deselecting the
Use automatic settings box in the previous step,
you disabled Plug-and-Play for the DAQ-700.
But in order to fully disable Plug-and-Play, you
must also change the settings for either (or both)
the Input/Output Range or the Interrupt Request.
To make this change, double-click either
Input/Output Range or Interrupt Request.
Installation Instructions: DAQ-700 (for Windows 95/98 Users)
-2-
Page 3

A dialog box giving the current hardware setting appears. On the right side of the Value box are two small
arrows: one up and one down. You must use these arrows to change the hardware interface parameters of either
the Input/Output Range or the Interrupt Request.
8. While making this change, notice the Conflict information area at the bottom. Make sure you choose a value
that says No devices are conflicting. If it shows a conflict, you must select a different value. After selecting
values with no conflicts, click OK. You will then see the “Creating a Forced Configuration” message box.
Click Yes.
9. Note your values of both the Input/Output Range (Base Address) and the Interrupt Request (IRQ). When you
first run OOIBase32, you must enter these values in the “Configure Hardware” dialog box.
Run OOIBase32
After you restart your computer, navigate to the OOIBase32 icon and select it. The very first time you run
OOIBase32 after installation, you must follow several prompts before you can begin taking measurements.
Operator and Serial Number Dialog Box
First, a prompt to enter a user name and serial number appears. Certain data files will include this information in the
header. (If, at a later date, you wish to change the operator name and serial number, select Edit | Settings from the
menu and then choose the Registration tab.) Click OK.
Default Spectrometer Configuration File
Next, the following message appears:
This appears to be the first time OOIBase32 has been executed. Please select a spectrometer
configuration file from the following screen. This spectrometer configuration file will be used each
time OOIBase32 is started.
A file open dialog box then appears. Navigate to the OOIBase32 directory, and choose the default spectrometer
configuration file -- the file with .spec as the extension, preceded by the serial number of your spectrometer. (A
default spectrometer configuration file will be named something similar to
I2J613.spec.)
Installation Instructions: DAQ-700 (for Windows 95/98 Users)
-3-
Page 4

Configure Hardware Dialog Box
Next, the Configure Hardware dialog box opens. The parameters in this dialog box are usually set only once -when OOIBase32 is first installed and the software first opens.
1. Under Spectrometer Type, choose your
spectrometer.
2. Under A/D Converter Type, choose DAQ700.
3. Cchoose the same Base Address value selected in
steps 8 and 9 on page 3.
The I/O Range (Base Address) you selected was
expressed in hexadecimal. In this dialog box, the
Base Address is given in decimal, followed by the
hexadecimal equivalent in parenthesis. For
example, “768 (0x0300)” is 768 decimal, 300
hexadecimal.
4. Choose the same IRQ value selected in steps 8
and 9 on page 3.
5. For your setup, only these parameters apply to
your system. (Ignore the other settings; they apply
to other A/D converters.) Click OK. You can
always change these settings once OOIBase32 is
fully operational by selecting Spectrometer |
Configure | A/D Interface.
!!
If you do not see the “Configure Hardware” screen, exit the software. Then select Start | Run, and type
C:\windows\ooidrv.ini. Notepad will open. Edit this file for our device driver by finding the “Initialized”
entry and making sure this line reads
Initialized=0. Save the OOIDRV.INI file and exit Notepad. Restart
OOIBase32. You should now see the “Configure Hardware” dialog box.
Spectrometer Configuration Dialog Box
Now that OOIBase32 is running, you need to configure your system. Select Spectrometer | Configure from the
menu. Go through each page in the Spectrometer Configuration dialog box to set system parameters. (See the
OOIBase32 Spectrometer Operating Software Manual for details.)
" In the Wavelength Calibration page, the coefficients for each spectrometer channel in your system have
already been loaded as part of the spectrometer configuration file that came on a floppy diskette with your
spectrometer. (See the Note on page 1.)
If you did not receive this floppy
diskette, you can enter the wavelength
coefficients of your system from the
Wavelength Calibration Data Sheet that
came with your spectrometer. Check the
Enabled box for each spectrometer
channel in your system.
" In the A/D Interface page, enter the
same values as you did in the Configure
Hardware dialog box.
" The Detector Linearity page in this
dialog box allows you to enter
coefficients for an algorthim that
corrects for rare occurances of nonlinearity of the detector. Contact Ocean
Optics for more information.
Installation Instructions: DAQ-700 (for Windows 95/98 Users)
-4-
Page 5

Save the spectrometer configuration file by choosing Spectrometer | Save Configuration As from the OOIBase32
menu. You can rename the file or use the default file name ([your serial number].spec). You will then be asked if
you would like to make this file the default spectrometer configuration file. Choose Yes. The next time you run
OOIBase32, the software will use the file as the standard for your spectrometer configuration. When you exit
OOIBase32, any changes to the configuration file will be automatically saved to the default file.
OOIBase32 Settings Dialog Box
At this point, it is a good idea to configure several OOIBase32 operation parameters. Choose Edit | Settings from
the menu to open the OOIBase32 Settings dialog box. Go through each page of this dialog box to select options
for saving, opening, and printing data; to choose waveform sound files for various program events; to configure
default setting files; and to select other important options such as storing and copying data and choosing warning
messages. (See the OOIBase32 Spectrometer Operating Software Manual for details.)
Configure Data Acquisition Dialog Box
Finally, select Spectrum | Configure Data Acquisition from the menu to set your data acquisition parameters in
the Configure Data Acquisition dialog box. The Basic page allows you to set the integration time and choose
averaging and boxcar smoothing values. The External Trigger page allows you to specify the external trigger
mode. The Strobe page allows you to control external strobe events with the spectrometer. (See the OOIBase32
Spectrometer Operating Software Manual
for details.)
Specifications
Installation Instructions: DAQ-700 (for Windows 95/98 Users)
-5-
Type: PCMCIA Type II
Resolution: 12-bit
Sampling frequency: 100 kHz (maximum)
Channels: 16-c ha n n e l si n g le - e n d ed ; 8-chan nel differentia l
Interface cable: 50-pin connector to A/D card; 25-pin connector to spectrometer
Multiple-channel capability:
supports up to 4 spectrometer channels (number of supportable channels is
function of electrical current limitation s)
 Loading...