

Page 1

owner's guide
WARNING: This owner's guide contains important information,
warnings, and precautions. Do not attempt to use the Mako before
reading this manual in its entirety.
Page 2
®
INTRODUCTION
Congratulations! You have purchased the finest Dive Propulsion Vehicle available to today’s
recreational diver. A new dimension of freedom awaits you that cannot be experienced by
divers who rely solely on fins to move about underwater.
To obtain maximum enjoyment from your Mako, however, it is very important to first read the entire
contents of this manual before attempting to use it. Along with instructions to prepare your Mako for its
first use and future pre-operational checks, this manual also provides instructions for regular maintenance, correct use underwater, and general instructions for DPV diving.
You will find a maintenance log that you can use to record all chargings, inspections, and services performed. Don’t forget - your Mako requires a complete inspection on an annual basis by an Authorized
Oceanic Dealer, regardless of its warranty status. If you do not know the name or location of an Authorized Oceanic Dealer near you, contact Oceanic Customer Service at 510/562-0500 or email
service@oceanicusa.com, or visit our web site. http://www.oceanicusa.com
The Mako is manufactured with pride in the USA, using the finest materials and components available.
Given proper use and maintenance using the procedures outlined in this manual, it will provide you with
many years of reliable service.
As you embark on your excursions, remember that with the added freedom that the Mako can provide
comes added responsibility. You alone are responsible for your safety and the safety of those who dive
with you.
WARNING: Use of the Mako Diver Propulsion Vehicle (DPV) requires special instruction which is not available from another source besides this manual. Failure to read
these instructions in their entirety and to follow the procedures given for the correct
operation and maintenance of the Mako may likely result in serious damage to the
vehicle, and/or serious injury to the user, or death.
Be a RESPONSIBLE DIVER at all times!
R
E
S
P
O
R
E
V
I
D
N
E
S
L
I
B
COPYRIGHT NOTICE
This owner's guide is copyrighted, and all rights are reserved. It may not, in whole or in part, be copied,
photocopied, reproduced, translated, or reduced to any electronic medium or machine readable format
without prior, written consent from Oceanic / 2002 Design*.
© 2002 Design 1995
Mako Owner's Guide - Doc. No. 12-1827
TRADEMARK NOTICE
Oceanic, the Oceanic logo, and Mako are all registered and unregistered trademarks of Oceanic. All
rights are reserved.
*The Owner's Maintenance Log may be duplicated for personal use only - not for resale.
2
Page 3

Mako
OWNER'S GUIDE
CONTENTS
INTRODUCTION...................................................................................................... 2
NOTICES ................................................................................................................. 2
GETTING STARTED................................................................................................ 4
MAKING YOUR MAKO “DIVE READY”................................................................................... 5
• Initial Battery Installation....................................................................................................................................... 5
BATTERY CHARGING PROCEDURE ...................................................................................... 7
PRECAUTIONS AND WARNINGS............................................................................................ 9
REASSEMBLY PROCEDURES .............................................................................................. 10
PRE-OPERATIONAL CHECKS............................................................................. 12
PROPELLOR ADJUSTMENT ................................................................................................. 13
OPERATING THE MAKO UNDERWATER ........................................................... 14
OPERATING PRECAUTIONS & WARNINGS ........................................................................ 14
RECOMMENDED WATER ENTRY PROCEDURES............................................................... 15
HOW TO RIDE......................................................................................................................... 16
• Changing Direction ............................................................................................................................................. 17
• Selecting Optimum Propellor Pitch Underwater ................................................................................................. 17
• Monitoring the Battery Indicator.......................................................................................................................... 18
• What To Do If Your Vehicle Becomes Inoperative............................................................................................... 18
MAINTAINING YOUR MAKO ................................................................................ 19
BATTERY MAINTENANCE ..................................................................................................... 19
POST DIVE MAINTENANCE .................................................................................................. 19
STORAGE ............................................................................................................................... 19
ANNUAL DEALER INPSECTIONS......................................................................................... 19
DPV DIVING - A SPECIALTY ACTIVITY............................................................... 20
• Additional Rules For Dive Planning .................................................................................................................... 20
• Diving In Currents ............................................................................................................................................... 20
EQUIPMENT SUGGESTIONS .............................................................................. 21
• Exposure Protection ........................................................................................................................................... 21
• Mask ................................................................................................................................................................... 21
• Buoyancy Compensator ..................................................................................................................................... 21
• Instrument Consoler ........................................................................................................................................... 21
• Regulator ............................................................................................................................................................ 21
TECHNICAL SPECIFICATIONS............................................................................ 22
TROUBLESHOOTING GUIDE .............................................................................. 23
ADJUSTABLE CRUISE SEAT .............................................................................. 24
WARRANTY LIMITATIONS & CONDITIONS........................................................ 25
OPERATION, MAINTENANCE, SERVICE LOG................................................... 26
IMPORTANT: Have you registered your warranty card through the Authorized Dealer where you
purchased your Mako? If not, or if you did not receive a warranty card, contact your Authorized
Oceanic Dealer or Oceanic Customer Service (information on back cover).
3
Page 4
®
GETTING STARTED
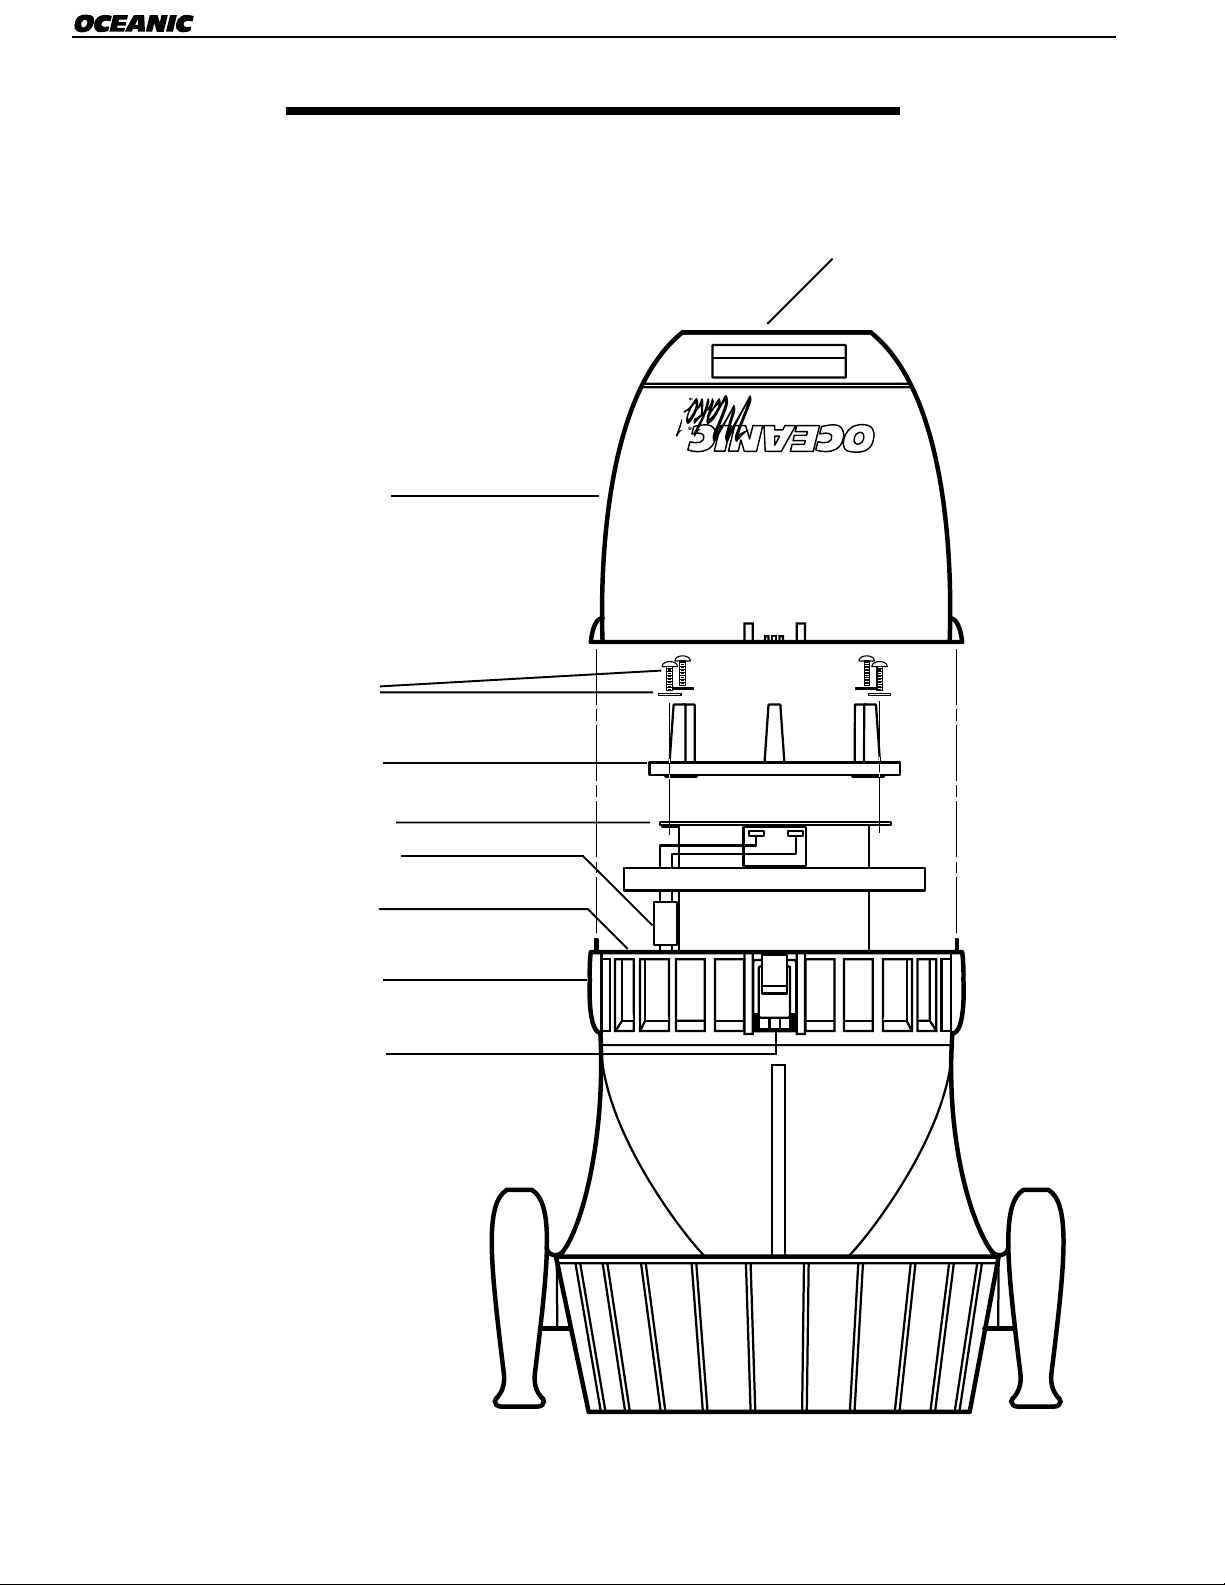
Before proceeding to the next section,
take the time to familiarize yourself
with the Mako’s various components,
as shown in Figure 1.
FORE SHELL
FOREWARD BULKHEAD
SCREWS & WASHERS (4)
FOREWARD BULKHEAD
BA TTERY COMP ARTMENT
CARRYING HANDLE
BA TTERY CONNECTION
BODY SEALS (2)
LA TCHING BUCKLES
BA TTERY LIFE INDICA T OR
FIG. 1 - Mako Diver Propulsion Vehicle Illustration
4
Page 5
Initial Battery Installation
Mako
OWNER'S GUIDE
MAKING YOUR MAKO “DIVE READY”
IMPORTANT: Be sure to save the original shipping carton, to
use for transporting the Mako to your Authorized Oceanic
Dealer or Oceanic Customer Service department whenever
service may be required in the future.
NOTE: All vehicles are delivered to
the Authorized Oceanic Dealer with
their batteries packaged separately.
The batteries must be properly
charged and installed according to the
following procedures before their first
use.
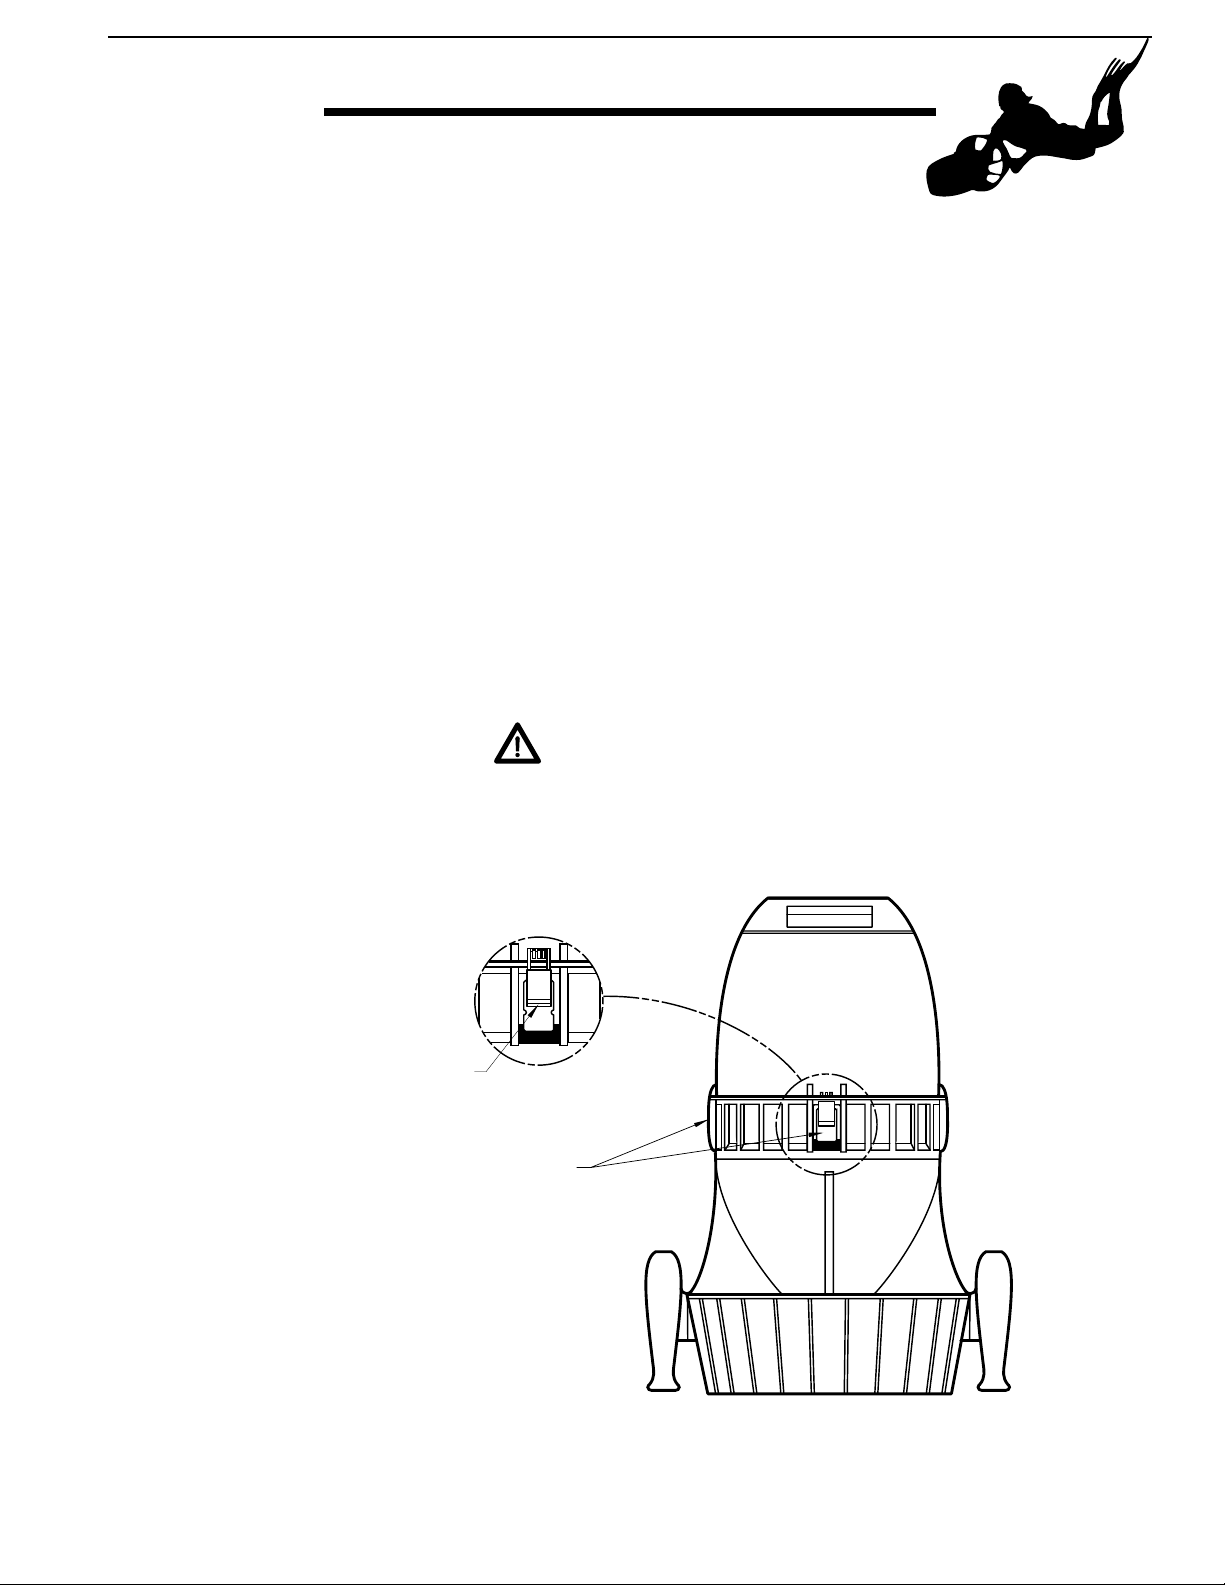
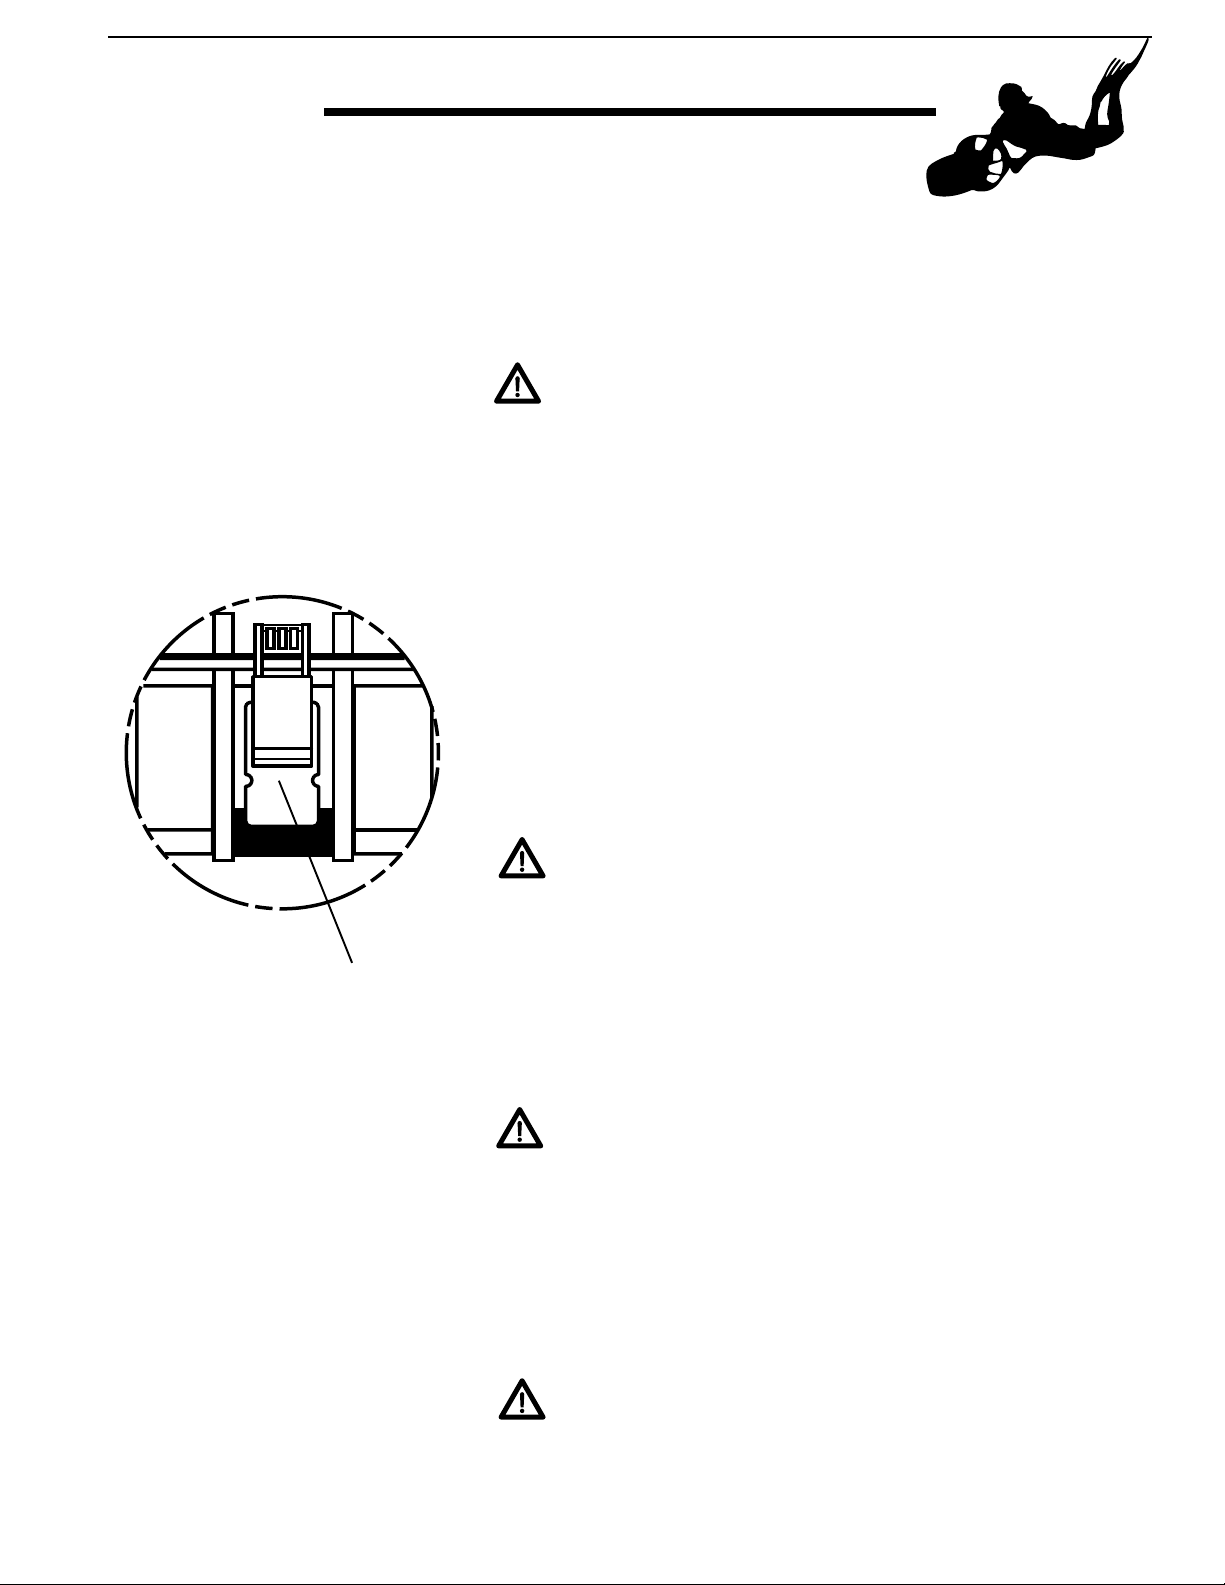
NOTE: To release each latching
buckle, it will be necessary to hold the
safety lock depressed, using your
thumb (Fig. 2).
1. To remove the vehicle from its packaging, remove the top piece of
protective foam and set aside. Grasp the vehicle by the carrying handle
at the end of the fore shell and lift the vehicle straight up and out of
the carton. Set down gently on the propellor shroud. DO NOT attempt to drop it out of the carton, or lift the carton off and away from
the vehicle.
2. To remove the fore shell from the main housing, stand the vehicle
upright on its shroud in a clean, dust free area, with the rubber bezel
and carrying handle facing up.
3. Release two of the four latching buckles which are opposite of each
other first, and then release the other two. Each pair should be opened
simultaneously to relieve pressure equally on both sides of the shell.
CAUTION: DO NOT open the vehicle in an environment
where sand, moisture, or salt air may be present. Doing
so may cause serious damage to the o-ring seals, electric
motor, and other components.
SAFETY LOCK
LA TCHING BUCKLES
FIG. 2 - Latching Buckle Mechanism
5
Page 6
®
GETTING STARTED
4. Using firm, steady force, lift the fore shell straight up and off the main
housing, while holding the main housing secure if necessary . DO NOT
use impact or rock the fore shell back and forth to loosen from the
main housing.
5. Place the fore shell on a clean, flat surface where it is not in danger of
falling over, standing up on its rubber bezel.
CAUTION: DO NOT place the fore shell on its side or
standing on its open end, which contains a delicate
seating surface for the main seal o-ring. Contamination
of or damage to this sealing surface will allow water to
enter the unit, which may cause irreparable damage to
the electric motor and other components.
6. Remove the four (4) screws (with washers) which hold the forward
bulkhead attached to the battery case. Lift the bulkhead straight up
and off, and set aside. (See Fig. 1.)
Lift Strap
FIG. 3 - Battery Position
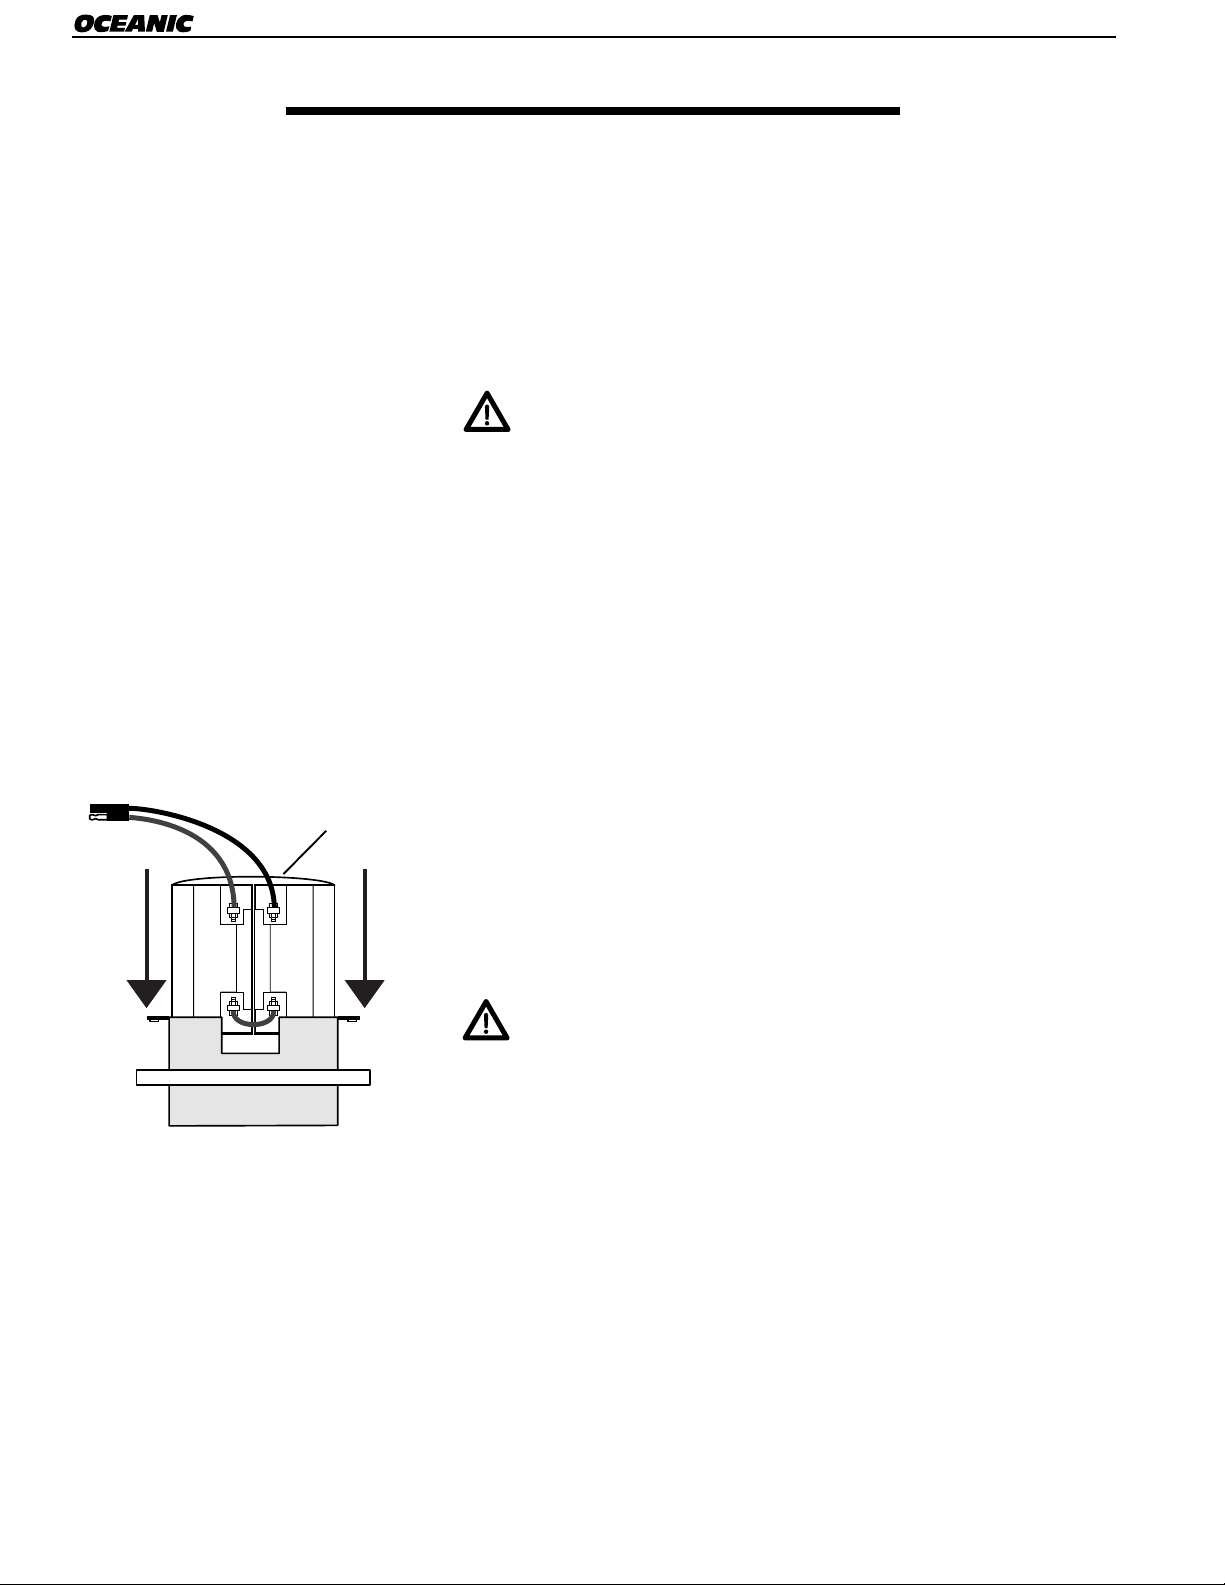
7. The batteries are held together by a nylon lift strap. To remove them
from their packaging, grasp the center of the strap and lift the batteries straight up and out.
8. If necessary, turn the batteries to position them directly above the
battery compartment with the terminals connected to the battery leads
facing up and aligned with the opening in the top center of the battery
compartment. The single wire that connects the two batteries must
be facing directly down (Fig. 3)
9. Carefully lower the batteries into place inside the metal compartment.
Guide the battery leads around the outside of the battery compartment and insert the connector through the opening in the middle bulkhead nearest to the connector of the motor leads.
CAUTION: DO NOT connect the battery leads to the
motor leads until the unit has first been fully charged.
Complete the reassembly of the forward bulkhead before
charging.
10. Place the forward bulkhead directly on top of the battery compartment, positioned with the openings for the four screws aligned exactly
with the battery compartment. Install each of the four screws with
washers, and rotate among each of them to tighten equally until snug.
You may now begin charging the vehicle, beginning with step
5 in the following procedure. If you will not be using the vehicle immediately, it is recommended that you fully charge
the batteries to 100% of their capacity , and store the unit with
the batteries disconnected. (See W arnings and Precautions.)
6
Page 7
OWNER'S GUIDE
BATTERY CHARGING PROCEDURE
Mako
Fore Shell Removal
NOTE: To release each latching
buckle, it will be necessary to hold
the safety lock depressed, using your
thumb (Fig. 4).
FIG. 4 - Safety Lock
1. If the fore shell has not been removed, stand the vehicle upright on its
shroud in a clean, dust free area, with the carrying handle of the fore
shell facing up (Fig. 4)
CAUTION: DO NOT open the vehicle in an environment
where sand, moisture, or salt air may be present. Doing
so may cause serious damage to the o-ring seals, electric
motor, and other components. If the vehicle is wet, be
certain to wipe completely dry before opening - particularly around the area of the housing seals and latching
mechanisms.
2. Release two of the four latching buckles which are opposite of each
other first, and then release the other two. Each pair should be opened
simultaneously to relieve pressure equally on both sides of the shell.
3. Using firm, steady force, lift the fore shell straight up and off the main
housing, while holding the main housing secure if necessary. DO NOT
use impact or rock the fore shell back and forth to loosen from the
main housing.
4. Place the fore shell on a clean, flat surface where it is not in danger of
falling over, standing vertically on its rubber bezel.
CAUTION: DO NOT place the fore shell on its side or
standing on its open end, which contains a delicate
seating surface for the main seal o-ring. Contamination
of or damage to this sealing surface will allow water to
enter the unit, which may cause irreparable damage to
the electric motor and other components.
5. Examine the internal cavities of the fore shell and main housing to
ensure that they are perfectly dry, and there is no evidence that moisture has entered the vehicle.
WARNING: If there is any evidence that moisture has
entered the vehicle, DO NOT attempt to reassemble or
operate it. Instead, take it directly to your nearest
Authorized Oceanic Dealer as soon as possible. DO NOT
store the vehicle reassembled until the unit has received
a factory authorized inspection and service.
6. Determine what the voltage supply is for the electrical outlet you will
be using to charge the unit (either 110 or 220 volts), and set the voltage switch of the charging unit to the appropriate setting.
CAUTION: Failure to properly set the voltage setting of
the charger to match the voltage of the electrical supply
will result in serious damage to the charger, and possibly
to the batteries as well.
7
Page 8

®
GETTING STARTED
7. After inspecting the electrical cord to ensure it is undamaged, plug it
into the outlet.
WARNING: DO NOT attempt to use the charger if the
cord appears to be spliced, altered, or damaged in any
way. Doing so may result in an electrical short, causing
damage to the vehicle, or electrical shock, causing
personal injury or death.
Battery Leads
FIG. 5 - Power Leads
Motor Leads
8. If the battery leads are connected to the motor leads, firmly grasp
both connectors and pull apart to disconnect. Lay the motor leads to
one side (Fig. 5).
9. Connect the battery leads to the charging connector.
CAUTION: DO NOT connect the charger to the motor
leads connector. Doing so may cause permanent damage
to the motor and the charger.
10. Depress the power switch to the “ON” position. This should cause
the “Power On” and “High Rate” indicator lights to appear.
11. After 4 hours of charging, the batteries will be charged to 90% of
their total capacity, and the “High Rate” indicator light will turn off.
24 hours of continuous charging is required to charge the batteries to
their full capacity, however.
CAUTION: The charger contains a built-in charge sensor which automatically reduces the charge rate when
the batteries are fully charged to prevent overcharging.
Once fully charged, however, the batteries and charger
should not be left plugged into an electrical source any
longer than necessary.
NOTE: Recommended ambient temperature for charging is
between 34° and 100°F (2° - 38°C). The charger case will get very
warm to the touch during the high rate phase of the charge
cycle. This is normal. As the batteries become more fully
charged, the case temperature will drop.
Responsible
8
Page 9

Mako
OWNER'S GUIDE
PRECAUTIONS AND WARNINGS:
1. DO NOT block the vents of the charger case, or charge the
vehicle in a closed area. This will cause an extreme buildup
of heat, which will result in damage to the charger and the
batteries.
2. A void exposing the vehicle to heat exceeding 100ºF, such as in
the trunk of a car, furnace rooms, engine rooms, etc. Prolonged exposure to heat will shorten the life of the batteries
and possibly damage them.
3. The battery life indicator should be continuously monitored
whenever the vehicle is in use or the batteries are being discharged. Immediately STOP operating the vehicle or discharging the batteries any further whenever the flashing red battery indicator light appears (Fig. 6). If the vehicle is in operation underwater when this light appears, abort the dive and
surface to re-charge the batteries as soon as possible. Swim
the vehicle to the surface, and DO NOT continue to operate.
FIG. 6 - Battery Indicator
4. DO NOT use any chargers other than a genuine Oceanic
charger to recharge your vehicle. Doing so may cause severe
damage to the batteries, and will void the warranty.
5. DO NOT expose the charger to moisture, salt air , sand, or dust.
Keep it clean and dry at all times.
6. DO NOT smoke or allow an open spark or flame near the batteries at any time.
7. DO NOT charge the batteries if they are frozen. Remove the
fore shell and allow the unit to warm to room temperature
(approximately 70°F or 21°C) for at least one hour.
8. DO NOT attempt to operate a unit which has been only partially charged to less than 90% capacity. Whenever possible,
the batteries should be charged to their total capacity for a
full 24 hours before using the vehicle.
9. DO NOT store the vehicle in a discharged state. Prior to storage, it is important to ensure that the batteries are charged
to 100% capacity, and that the unit has stood open for a full
hour afterwards to allow any hydrogen gas to vent completely .
10. DO NOT store the vehicle with the battery connected to the
motor. Prior to storage for any length of time, it is critical to
ensure that the power leads have been disconnected.
Disconnect power before storage!
11. If moisture has entered the vehicle, DO NOT attempt to operate or store it with the housing and fore shell assembled. Take
the vehicle to your Authorized Oceanic Dealer immediately,
where it should receive a factory authorized inspection and
service.
9
Page 10

®
GETTING STARTED
REASSEMBLY PROCEDURES
1. Depress the power switch of the charging unit to the “OFF” position.
2. Unplug the electrical cord from the outlet.
3. Disconnect the battery leads from the power leads of the charging
unit.
4. Reconnect the motor leads to the battery only if the vehicle is intended
to be used immediately .
CAUTION: ALWAYS store the vehicle with the battery
disconnected.
5. Wait at least 30 minutes before proceeding further, to allow the batteries to finish discharging the hydrogen gas which can be produced
during the charging cycle.
O-rings
6. Closely examine the o-ring sealing surfaces of both the fore shell and
the main housing, to ensure that they are perfectly clean, dry, and
free of any scratches, distortion, or other damage.
7. Remove both body seal o-rings from the main housing and dress them
with a very light film of silicone grease. Remove any visible excess by
running the o-ring between thumb and forefinger.
NOTE: It is very important that these o-rings remain clean and
free of any grit or debris prior to installation. Avoid applying
excessive amounts of silicone grease, as this will attract grit and
other debris that may interfere with the o-ring seal.
CAUTION: Aerosol spray silicone is to be strictly avoided. DO NOT attempt to use it as a substitute for silicone
grease, or use it anywhere else on or near the vehicle.
8. To install the larger diameter body seal o-ring onto the lower sealing
surface of the main housing, lay one side of the o-ring in place and
hold secure while gently stretching the rest of the o-ring over the main
housing and onto the sealing surface (Fig. 7).
CAUTION: DO NOT twist or roll the o-ring down onto
the housing, as this will cause improper seating.
FIG. 7 - Housing O-rings.
10
9. Use the same procedure to install the smaller diameter o-ring onto
the upper sealing surface of the main housing.
10. Look inside the fore shell and main housing to ensure that no moisture, dust, or other debris has entered. If found to be dry and clean,
hold the fore shell above the housing and turn if necessary to ensure
the carrying handle at the nose of the shell is facing up, even with the
top of the main housing.
Page 11

Mako
OWNER'S GUIDE
11. Align the latch ends of the fore shell with the buckles of the housing
and carefully lower the fore shell into place until it is resting evenly
over the top of the main housing. Fit the roller of each buckle into
each latch end before securing any of the buckles.
12. When every buckle is correctly positioned, press two latches on opposite sides of the housing shut. Check to ensure that the housing and
fore shell are mated evenly and the lower o-ring appears evenly seated
between them before shutting the remaining two latches. This is necessary to prevent crimping of the o-ring seal.
13. When all four buckles are secured, check the o-ring once again, which
should be visible through a thin gap between the fore shell and main
housing, to ensure that it is not crimped, and that it is evenly seated.
Your Mako should now be fully charged and reassembled. A PreOperational check must be performed as outlined in the next
section before it can be considered "Dive Ready."
R
E
S
P
O
R
E
V
I
D
N
E
S
L
I
B
Be a -
RESPONSIBLE DIVER
at all times.
11
Page 12

®
PRE-OPERATIONAL CHECKS
PRE-OPERATIONAL CHECKS
It is important to check the following each time before using
the Mako:
Batteries
Green Yellow Red
FIG. 8 - Battery Indicator
Housing
1. Batteries should be fully charged to at least 90% capacity before each
use. (Refer to the charging procedure for instructions.)
2. To check the battery life indicator on the vehicle, depress the activation trigger while the unit is standing on its shroud, and examine the
battery life indicator which is located at the top center of the main
housing, just below the seal. Release the trigger within ten seconds.
DO NOT attempt to use the vehicle if the indicator light does not
show a steady green (Fig. 8). Charge the vehicle according to the
procedures outlined in the section titled, Getting Started.
CAUTION: DO NOT allow the motor to run for more
than 10 seconds out of the water. Doing so may cause
damage to the propellor shaft seal. Keep hands, feet,
and other objects away from the moving propellor.
1. Check all areas of the main housing and fore shell - especially near
the seal - to ensure that they are clean and free of any signs of damage.
2. Examine the o-ring seal around its entire circumference, to ensure
that it is properly seated and does not appear to be crimped or extruding out between the fore shell and the main housing.
3. Check all four latching buckles to ensure they are securely fastened.
12
Trigger Mechanisms
1. Stand the vehicle on its shroud, with the nose facing up. Depress the
trigger in each handle and release.
CAUTION: DO NOT allow the motor to run for more
than 10 seconds out of the water. Doing so may cause
damage to the motor seal. Keep hands, feet, and other
objects away from the moving propellor.
2. Check to ensure that each trigger moves smoothly inside the handle,
and returns completely to the OFF position when released. If trigger
movement is not smooth, examine closely to check for any signs of
sand or other debris inside the handle which may be obstructing the
trigger’s movement.
3. If sand or debris is found, flush out with a pressurized stream of
water, or low pressure air. If necessary, you may use a blunt, nonmetallic instrument to dislodge the debris. Use water to flush out
the handle and trigger assembly again to remove any hidden debris
that might remain and repeat step 1.
Page 13

Propellor Adjustment
Mako
OWNER'S GUIDE
CAUTION: DO NOT attempt to operate the vehicle if any
abnormal noises are heard while the motor is running.
Return the vehicle to your nearest Authorized Oceanic
Dealer, where it should receive a factory authorized
inspection and service.
The Mako’s variable pitch propellor allows you to choose whether to run the vehicle at a slower speed that will provide a longer
running time, or at faster speeds that will shorten the running
time. Although the range of the vehicle will remain approximately the same, you may wish to consider other factors, such as
air consumption, No-Decompression bottom time, currents etc.
Unless you are really in a hurry with a lot of ground to cover,
you may find it more relaxing and less fatiguing to operate the
vehicle at a lower pitch setting. More on this will be covered in
the section titled, Operating the Mako Underwater.
5
Window
FIG. 9 - Prop Adjustment
1. Y ou select the desired pitch of the propellor by turning the adjustment
knob located at its center. First, sight through the grooved slot at the
outer edge of the knob to find the numbered pitch settings (1 through
9). You may need to rotate the propellor until the number comes into
view. (Fig. 9).
WARNING: DO NOT touch the activation triggers on
either of the side handles while adjusting the propellor
pitch, or allow them to otherwise be depressed. The
motor must not be activated while performing this procedure.
2. To set the knob more precisely, hold the propellor secure with one
hand while turning the knob with the other (Fig. 10). To select a
higher setting with increased pitch, turn the knob clockwise. Turn it
counter-clockwise to select a lower setting with less pitch.
Your Mako is now dive ready. Before using the vehicle, however,
you must first familiarize yourself with the following sections
which explain its operation, and special instructions for diving
with a Diver Propulsion Vehicle.
FIG. 10 - Precise Setting
Responsible
13
Page 14

®
OPERATING THE MAKO UNDERWATER
OPERATING PRECAUTIONS AND WARNINGS
WARNING: The Mako Diver Propulsion Vehicle is intended for use only by trained SCUBA divers who have received open water certification by a recognized training
agency, and have maintained proficiency in their diving
skills by remaining recently active in the sport. Knowledge of safe diving practices is therefore essential to safe
operation.
1. DO NOT descend faster than 75 feet (25 meters) per minute,
or exceed any rate of descent which allows you to clear your
ears and sinuses comfortably.
2. DO NOT operate the vehicle at a depth greater than 130 feet
(39 meters).
3. DO NOT operate the vehicle while ascending. When you are
ready to ascend, turn the vehicle off and swim it to the surface, being careful not to exceed a safe rate of ascent.
4. DO NOT allow straps, hoses, hair, hands, or other objects to
enter the propellor shroud.
5. DO NOT continue to operate the vehicle when the low battery indicator appears, flashing red. Cease operation immediately and swim the vehicle back to your exit point. Continued operation is very harmful to the batteries.
6. DO NOT operate the vehicle out of the water. Doing so will
damage the rotary propellor shaft seal, resulting in leakage.
7. DO NOT attempt to operate the vehicle before completing all
steps outlined in the section titled, Pre-Operational Checks.
8. DO NOT operate the vehicle while swimming through kelp,
sea grass, or other vegetation which may foul the propellor.
9. DO NOT leave the Mako unsupervised in the presence of children.
14
R
E
S
P
O
R
E
V
I
D
N
E
S
L
I
B
Page 15

Entering and Exiting the
Water From a Boat or Dock
Mako
OWNER'S GUIDE
RECOMMENDED WATER ENTRY PROCEDURES
It is very important to understand how to properly handle your
vehicle while entering and exiting the water. The preferred
method to enter the water from a boat or dock is as follows:
1. Before entering the water , arrange for a divemaster or someone else to
assist you by lowering the vehicle to you after you are already in the
water. If necessary , tie a tether line through the handle of the vehicle,
using a knot that will hold it secure without slipping, but which can
also be easily untied, such as a bowline.
2. Enter the water with your regulator in your mouth and wait for the
vehicle to be lowered to you. DO NOT remain directly below the vehicle while it is being lowered, but position yourself slightly off to one
side.
Entering and Exiting the
Water From Shore
3. When the vehicle has been lowered into the water , hold it by the carrying handle in the fore shell while untying the tether , if one is attached.
DO NOT take hold of the vehicle by the side handles, as the motor
may be accidentally activated.
4. When you are ready to begin your dive, turn the vehicle around so
that the prop shroud is directly in front of you. Hold handles securely
on both sides, below the activation triggers, until you are ready to
move forward.
5. When exiting the water, ask for assistance as before, and hold the vehicle secure by the carrying handle until the tether line is passed down,
if one is needed. Tie the vehicle on securely, or otherwise pass up
before exiting the water yourself. DO NOT remain directly below the
vehicle while it is being pulled from the water , but position yourself off
to one side.
CAUTION: Beach diving with the Mako is not recommended in conditions where entry or exit through moderate to heavy surf may be necessary. It is very important
to protect your Mako from coming in direct contact with
sand or gravel, which may cause damage to the propellor
shaft seal, the trigger mechanisms in the side handles,
and the o-ring seals.
1. When entering the water from shore, hold the vehicle securely by the
carrying handle in the fore shell, and carefully walk backwards. When
you are in water that is waist-deep, you may turn around and take
hold of the vehicle by the side handles and begin operation immediately, provided that vegetation such as kelp or sea grass is not present.
15
Page 16

®
OPERATING THE MAKO UNDERWATER
2. To exit the water, be sure to make your final ascent before reaching
the surf line. Cease operation of the vehicle and hold it securely by
the carrying handle. Walk carefully backwards out of the water and
continue carrying the vehicle until you are able to set it down on a
blanket or tarp where it will be protected from any contact with sand
or gravel. DO NOT attempt to swim the vehicle completely onto the
shore under power.
How to Ride
Side View
Top View
FIG. 11 - Cruising Position
To obtain maximum performance from your vehicle, it is essential
that you position yourself correctly in order to minimize drag and
fatigue and maximize comfort. The ideal cruising position is shown
in Figure 11.
1. The vehicle should be held so that it is parallel to and slightly below
your body. This allows the turbulence from the propellor to pass
freely beneath you.
2. Your arms should be slightly bent at the elbows so that the shroud is
below you as you look directly downward.
3. The side handles which contain the trigger mechanism should be held
firmly with both hands while operating the vehicle.
WARNING: DO NOT attempt to operate the vehicle with
only one hand. Doing so will result in a loss of control.
4. Keep your legs straight, your fins together, and your toes extended.
Remember, there will be very little benefit gained by kicking while
operating the vehicle, but fins should be worn in the event of a low
battery situation.
5. DO NOT hold the vehicle ahead of your body, which will cause excessive strain to your arms, and fatigue (Fig. 12).
FIG. 12 - Fatiguing Position
FIG. 13 - Prop Wash
16
6. DO NOT hold the vehicle directly in front of you, where you will feel
propellor turbulence. Y our body will block the thrust, reducing speed
and efficiency. This position will also cause fatigue to your arms, and
you will be chilled by the prop wash (Fig. 13).
Practice achieving and maintaining the correct position. You will
notice a pronounced increase in speed and comfort.
Page 17

OWNER'S GUIDE
Mako
Changing Direction
Selecting Optimum Propellor
Pitch Underwater
Turning is very easy to do - just point the vehicle in the direction you
would like it to go, and turn your body slightly to the same side to
allow it to follow. When you get the hang of it, try a barrel roll or two.
WARNING: DO NOT use the vehicle to ascend. Doing so
will invariably cause you to exceed the safe ascent rate.
Following bottom topography as you normally would
while swimming without the Mako is permissible, but be
very careful to monitor your depth gauge to avoid rapid
ascents of any duration.
WARNING: DO NOT continue descending if you experience discomfort in your ears or sinuses. If necessary,
ascend slightly to equalize first before continuing to
descend.
The pitch of the propellor can be adjusted at any time underwater as
described in the Pre-Operational Check procedures, provided that the
activation triggers in both side handles have been released, and the
motor is turned off.
The best combination of speed, run time, range, and comfort is usually achieved at a setting between 3 and 5, but this will vary depending on your size, weight, and the drag created by your equipment.
Presumably, you will be diving with a buddy who is also using a Dive
Propulsion Vehicle, to avoid diving alone. Unless your buddy is the
same weight and size as yourself, and wearing similar equipment with
the same amount of drag, you will probably need to adjust the pitch of
your vehicles accordingly to achieve the same cruising speed. This
can easily be done, using the Mako’s variable pitch feature.
NOTE: Higher settings may be
preferred if you are swimming
against a strong current, but always remember that this will
shorten the running time of the
batteries.
For example, a diver weighing 180 pounds with a large, high drag,
game bag attached to his or her BC may need to set his or her propellor
to a pitch setting of number 5 in order to match the speed of another
diver who weighs only 140 pounds, is wearing very low drag equipment, and is using a pitch setting of number 3. It is very important to
remember, however, that there will be a difference in the running
time provided by the batteries, and the dive should be planned according to the shorter battery life of the heavier diver.
17
Page 18

®
OPERATING THE MAKO UNDERWATER
Monitoring the
Battery Indicator
Flashing Red
FIG. 14 - STOP Operation
For easy viewing, the battery life indicator is located in the center of the
top surface of the main housing, and should be continuously monitored
whenever the vehicle is in use; no less often than you check your depth
and pressure gauges.
Each dive should be pre-planned according to no-decompression limits,
anticipated air consumption, and anticipated battery running time.
Whenever the yellow battery indicator light appears, however , you should
immediately begin your return to the boat or exit point, and discontinue
operation of the vehicle when the red low battery indicator appears.
WARNING: Immediately STOP operating the vehicle
whenever the flashing red battery indicator light appears
(Fig. 14). If the vehicle is in operation underwater when
this light appears, abort the dive and make a safe controlled ascent to the surface to re-charge the batteries as
soon as possible. Swim the vehicle to the surface, and DO
NOT continue to operate.
What To Do If Your Vehicle
Becomes Inoperative
If your vehicle becomes inoperative underwater for any reason, you must
safely return to the surface as soon as possible to examine the cause. DO
NOT attempt to operate the vehicle any further.
To exert the least amount of effort while swimming with an inoperative
vehicle, it is recommended to hold it in its normal use position, being
extremely careful to avoid depressing the activation triggers in either of
the side handles. While making your final ascent to surface, hold the
vehicle by the carrying handle in the top of the fore shell - especially
when it is necessary to hold onto a line or decompression bar with one
hand.
If the propellor has been fouled by an obstruction, the Mako’s safety
clutch will automatically disengage, and a loud clicking sound will be
heard while the motor remains activated. When the obstruction is removed, the clutch may be re-engaged by depressing the activation switch
briefly several times. When the clicking sound is no longer heard, the
clutch has been re-engaged.
CAUTION: If a loud clicking sound is heard, indicating
that the safety clutch has disengaged, immediately release the activation triggers in both of the side handles to
stop the motor, and safely return to the surface to remove
the obstruction. DO NOT attempt to remove the obstruction underwater.
18
WARNING: If air can be seen leaking from the Mako’s
housing, indicating that water has entered, the vehicle
should be considered inoperative and returned to the
surface immediately using the procedures described
above. As soon as possible, remove the fore shell to open
the housing and DO NOT re-seal until the vehicle has
received factory authorized service by an Authorized
Oceanic Dealer.
Page 19

OWNER'S GUIDE
MAINTAINING YOUR MAKO
Mako
Battery Maintenance
Post-Dive Maintenance
The Mako’s batteries should be fully charged within 24 hours following
each use, or immediately following use if the red (low) battery indicator
appears, following the procedures outlined in the section titled, Getting
Started. The charger should be kept in a waterproof container between
uses to prevent exposure to moisture or salt air.
If properly stored and maintained, the Mako’s batteries can be re-charged
up to 250 times before requiring replacement. After 250 charging cycles,
however, it becomes extremely important that the batteries are replaced
with new by your Authorized Oceanic Dealer before the vehicle is used
or stored, due to the higher levels of hydrogen gas that can be emitted by
an older, deteriorated battery. It is therefore important to maintain an
accurate log of all maintenance performed, including battery charge cycles,
storage intervals, and Annual Inspections and other services performed
by your Authorized Oceanic Dealer or the Oceanic factory.
NOTE: A Maintenance Log is provided in the back of this
manual for your convenience.
Like any other piece of diving equipment, your Mako should be rinsed
with fresh water after every dive, particularly in the areas of the side
handles, latching buckles, and the propellor hub. Ideally, it is recommended that you first immerse the vehicle in a large tub of fresh water
and allow it to soak for several hours before giving it a final rinse.
CAUTION: DO NOT expose any parts or components of
the Mako to petroleum based substances (such as gasoline or oil), alcohol, toluene, methyl-ethylketone, acetone, strong detergents, or fluorocarbons (aerosol
sprays). These substances are known to cause stress
cracks and crazing to the thermoplastic materials from
which many of the Mako’s components are made.
Storage
Annual Dealer Inspections
Prior to storage, it is important to ensure that the batteries are charged
to 100% capacity, and that the unit has stood open for a full hour afterwards to allow any hydrogen gas to vent completely. Before assembling
the fore shell onto the main housing, it is extremely important to disconnect the motor from the battery. The vehicle should be stored standing
upright on its propellor shroud.
WARNING: DO NOT store the vehicle in a discharged
state, or with the batteries connected to the motor.
Regardless of warranty status, it is also very important to bring
the Mako to your Authorized Oceanic Dealer on an annual basis
for a complete, factory authorized inspection to determine what
service may be needed, if any. Be sure to record the date of this
inspection in your Maintenance Log, along with the name of the
Authorized Oceanic Dealer where the inspection was performed.
19
Page 20

®
DPV DIVING - A SPECIALTY ACTIVITY
Additional Rules For
Dive Planning
The Mako was designed to broaden your enjoyment of the underwater environment, providing you with freedom you’ve only dreamed of before. With
it, you will be able to move with increased speed and cover up to two miles
underwater on a single dive, with very little exertion. Consequently, you’ll
also use less air - as much as 50% less! Like any accessory item, however,
using the Mako does not relieve you from your responsibility to remember
and obey the fundamental rules of safe diving.
“PLAN YOUR DIVE AND DIVE YOUR PLAN.” Sound familiar? It
was taught to you in your first open water class, and applies to every dive
you will ever make, regardless of what devices or accessories you bring
along with you. When you use a Diver Propulsion Vehicle, this rule becomes doubly important. A popular rule among cave divers, which also
applies to DPV diving, is to plan your dive using 1/3 of your air supply to
reach your destination, 1/3 to return, and keep 1/3 for reserve. Keep in
mind, though, that you will be using much less air than you have
grown accustomed to, and no-decompression limits will often become the more limiting factor for planning your dive while using
the Mako.
Diving In Currents
In addition to planning the depth and duration of your dive according to
the limitations of air consumption and nitrogen absorption, however, you
must now also pay attention to the limiting factors of battery life and running time. This becomes especially critical whenever you are diving in
conditions where currents may exist.
Picture yourself diving in a moderate current that is running slightly over
one knot. Ordinarily, you would know better than to start your dive swimming in the direction of the current, knowing what an ordeal returning
against it would be. But there’s something in that direction that you would
love to check out, and you have plenty of air to make it there and back.
Y ou’ve got the Mako with you, and it can tow you back against that current
with ease. That rule about starting your dive against the current and returning with it was only written for ordinary divers who can’t afford vehicles, so what the heck - why not go for it?
Before you take off, though, STOP and think about what a drag it would be
if your Mako’s low battery indicator appeared, flashing red, or if something
else disabled the vehicle while you were several hundred yards down-current from the boat or shore. In a current of any measurable speed, you
may find it impossible to swim back while holding onto the vehicle, and
your only choice will be to let it go before you drift any further down-current.
20
WARNING: ALWAYS begin your dive travelling against
the current, and immediately begin your return to the
boat or exit point whenever the yellow battery indicator
light appears.
Page 21

Mako
OWNER'S GUIDE
EQUIPMENT SUGGESTIONS
Because the Mako’s performance can be greatly affected by excessive drag,
it is important to streamline your diving equipment as much as possible.
The following suggestions may help you go a little faster , and farther, while
diving with your Mako:
Exposure Protection
Mask
Buoyancy Compensator
Instrument Console
Regulator
You will be moving much faster underwater and expending less energy,
and will therefore require additional exposure protection than you are currently using. Whenever water temperatures permit, however, a wet suit is
generally preferred over a dry suit, due to its snugger, more streamlined
fit. Of course, always be sure to tuck your boots under your wet suit, and
wear your gloves over the cuffs of your sleeves.
Select a smaller, low volume mask, but be sure that it provides a good seal
and fits your face comfortably. Avoid larger masks, which may feel less
comfortable and seat poorly when they are worn in strong currents.
Generally , a single bladder design is much more streamlined when deflated,
compared to most “double bag” designs. Most Oceanic BCs are of single
bladder construction. Newer models which are made with BioFlex®, a
revolutionary , expandable material, offer the maximum amount of lift when
inflated, and the minimum possible amount of drag when deflated.
If you use a gauge console that is attached to a high pressure hose, be sure
to keep it closely secured to your BC in such a way to prevent it from
dangling freely. This is also important to avoid fouling the propellor. If
you would to eliminate your high pressure hose, consider an Oceanic
DataTrans or DataTrans Plus integrated hoseless diving computer that
receives tank pressure information from a small radio frequency transmitter that is connected to your regulator first stage.
Like a gauge console, it is important to closely secure an octopus to your
BC in such a way to prevent it from dangling freely. If you would to eliminate your octopus hose, consider an Oceanic Air XS or In-Line SlimLine.
It is also important to use second stages which will not “self purge” in
strong currents, as some high performance designs have a tendency to do.
The side breathing Oceanic Omega II, for instance, is designed with a
control diaphragm that faces towards the diver , rather than straight ahead
towards an oncoming current. The very popular Delta may also be adjusted to maintain consistent performance when a strong current is encountered. Either of these top-rated models will perform excellently while
cruising at any speed with your Mako.
Be a RESPONSIBLE DIVER at all times!
R
E
S
P
O
R
E
V
I
D
N
E
S
L
I
B
21
Page 22

®
TECH SPECS AND TROUBLESHOOTING
TECHNICAL SPECIFICATIONS
LENGTH ................................................................................. 25 inches
WEIGHT.........................................................................................54 lbs
SPEED ................................................................................ 1.5-2.7 mph*
RUNNING TIME.................................................................... 40-120 min
CHARGING TIME ..................................4 hrs. = 90% or 16 hrs. = 100%
STATIC THRUST ......................................................................15-50 lbs
SERVICE INTERVAL .................................... Every 250 charging cycles
BATTERIES ............................... (2) 12 V, 17AH, Sealed, Rechargeable
RANGE ...............................................................Approximately 3 miles*
MAXIMUM OPERATING DEPTH ............................................... 180 fsw
MOTOR................................ Permanent Magnet Direct Drive, 750 RPM
BODY.................................................... Advanced High-Impact Xenoy®
*Based on average diver
Xenoy® is a registered trademark of General Electric Company.
22
Page 23

OWNER'S GUIDE
TROUBLESHOOTING GUIDE
PROBLEM POSSIBLE CAUSE TREA TMENT
Mako
MOTOR DOES NOT RUN
MOTOR RUNS, BUT
PROPELLOR DOES NOT
TURN
1. Batteries are discharged.
2. Batteries are not connected to motor.
3. Damaged reed switch.
4. Damaged Relay.
5. Loose Connection.
1. Propellor is obstructed.
1. Recharge batteries immediately.
1. Check battery connection.
1. Test other trigger.
2. Return to Authorized Oceanic Dealer for service.
1. Return to Authorized Oceanic Dealer for service.
1. Return to Authorized Oceanic Dealer for service.
1. Remove obstruction, and
briefly depress the activation trigger several times as
needed to engage the
clutch.
MOISTURE HAS ENTERED
THE VEHICLE
2. Safety clutch will not
engage.
1. Housing o-rings are worn
or damaged.
2. O-ring seating surface of
housing or fore shell is
1. Return to Authorized Oceanic Dealer for service.
1. Return to Authorized Oceanic Dealer for service.
1. Return to Authorized Oceanic Dealer for service.
damaged.
3. Rotary propellor shaft
seal is damaged.
WARNING: DO NOT attempt to disassemble or repair the internal components of your Mako.
Doing so will void the warranty, and may cause injury or death. Any service or repairs, other
than replacement of the main seal o-rings or recharging of the batteries, should be performed exclusively by an Authorized Oceanic Dealer, or by the Oceanic factory.
IMPORTANT: Be sure to save the original shipping carton, to use for transporting your Mako to an
Authorized Oceanic Dealer or to the factory whenever service may be required in the future.
1. Return to Authorized Oceanic Dealer for service.
23
Page 24

®
ADJUSTABLE CRUISE SEAT
The Mako adjustable cruise seat eliminates arm fatigue by automatically
positioning the diver for maximum efficiency and range, and allows one
handed operation.
Instructions
To attach the adjustable cruise seat to your Mako diver propulsion vehicle, clip each strap end onto the tow bar brackets.
The cruise seat length may be adjusted to accommodate divers of different
sizes. To shorten or lengthen the seat, loosen the 1” nylon webbing threaded through the 1” tri-glide and slide the tri-glide (toward the vehicle to
shorten; or away from the vehicle to lengthen) to the desired position.
Excess webbing should be looped back through the tri-glide for added security.
For optimal efficiency and comfort, the cruise seat should be adjusted to
attain proper diver positioning as shown on page 16. Arms should be slightly bent at the elbow and the diver’s head should be above and slightly
behind the shroud.
24
Page 25

OWNER'S GUIDE
WARRANTY LIMITATIONS & CONDITIONS
Mako
LIMITED ONE-YEAR WARRANTY
CORRESPONDENCE
Oceanic guarantees, to the original purchaser only, that the Mako purchased is
free of defects in material and/or workmanship under normal recreational scuba
use for a period of one (1) year from the date of consumer purchase from an
Authorized Oceanic Dealer, provided proper care and maintenance have been
performed as prescribed by the owner’s guide or instruction card included with
the equipment. Should this Mako prove to be defective for any reason (other
than those listed as limitations below) the Mako will be serviced or replaced at
Oceanic's sole discretion at no charge (excluding shipping and handling).
• This warranty shall be void if the registration card is not completed
and sent to Oceanic within 30 days of purchase.
• This warranty shall be void if the equipment has been tampered with
by a person (or persons) not authorized by Oceanic to perform service.
• This warranty is nontransferable and extends to the original purchaser only and is void if the equipment was purchased from anyone
other than an Authorized Oceanic Dealer.
• This warranty applies specifically to the fore shell, main housing,
trigger mechanisms, motor, clutch, drive unit, propellor, propellor
shroud, propellor shaft, rotary seal, and tail cone assembly.
• This warranty does not apply and may be rendered completely void in
the event of accidental damage, abuse, battery leakage, over-charging
of batteries, deep discharge of batteries and resulting damage, flooding due to neglect, tampering, lack of care and maintenance, improper
storage, or unauthorized service.
All correspondence regarding the Mako covered by this warranty agreement or
in direct reference to this warranty should be accompanied by a copy of the
original sales receipt and a copy of the owner’s portion of the warranty card.
LIMITATIONS
90-DAY WARRANTY FOR
BATTERIES & CHARGER
Warranty does not extend to cover damage from accident, abuse, tampering, lack
of maintenance, theft, or loss. Service or modifications by any person or persons
other than an Authorized Oceanic Dealership voids the warranty.
Oceanic will not be responsible for recovery or replacement of the product in the
event of loss or theft. Oceanic, its Authorized International Distributors, and
Authorized Dealers make no other warranties, either expressed or implied,
orally, or in writing, with respect to any other warranty coverage except those
expressly stated within the preceding paragraphs.
Oceanic will not be held responsible for any agreements orally or in writing with
the exception of those expressly included in this warranty statement. The
warranty registration card and the terms contained therein supersede all
statements contained in any and all owner’s guides, instruction cards, or other
equipment literature or catalogs.
In no event will Oceanic, its Authorized International Distributors, and Authorized Dealers be held responsible or liable for any personal injuries resulting
from the use of the Mako, or for any other damages, whether direct, indirect,
incidental, or consequential; even if Oceanic has been advised of such damages.
The Mako's batteries or charging unit, which are covered by a separate, 90-Day
warranty against defects. Warranty does not extend to damage to the MAKO
caused by battery leakage.
25
Page 26

®
OPERATION, MAINTENANCE, SERVICE LOG
Serial number _________________________________
Date of purchase _________________________________
Purchased from __________________________________________________________
DA TE
DESCRIPTION OF OPERATION OR MAINTENANCE
(Include operations, battery recharging, replacement of o-rings,
annual dealer inspections, and other services.)
AUTHORIZED OCEANIC FACILITY
(Where inspections and service was
performed.)
26
Page 27

OWNER'S GUIDE
Mako
DA TE
DESCRIPTION OF OPERATION OR MAINTENANCE
(Include operations, battery recharging, replacement of o-rings,
annual dealer inspections, and other services.)
AUTHORIZED OCEANIC FACILITY
(Where inspections and service was
performed.)
27
Page 28

OCEANIC USA
2002 Davis Street
San Leandro, Ca. 94577
USA
Phone: 510/562-0500
Fax: 510/569-5404
Web: http://www.oceanicusa.com
© 2002 Design 1995 Doc. No. 12-1827,R1 (4/99)
 Loading...